

User’s Manual
Important Safety Information. . . . . . . . . . . . . . . . . . .page 2
Part Names and Functions. . . . . . . . . . . . . . . . . . . . . .page 5
Setup. . . . . . . . . . . . . . . . . . . . . . . . . . . . . . . . . . . . . . . . . .page 8
Basic Operations . . . . . . . . . . . . . . . . . . . . . . . . . . . . . page 18
Installing/Replacing the Roll Paper . . . . . . . . . . . page 21
Cleaning. . . . . . . . . . . . . . . . . . . . . . . . . . . . . . . . . . . . . page 23
Troubleshooting . . . . . . . . . . . . . . . . . . . . . . . . . . . . . page 24
Specifications. . . . . . . . . . . . . . . . . . . . . . . . . . . . . . . . page 26
Appendix . . . . . . . . . . . . . . . . . . . . . . . . . . . . . . . . . . . . page 27
M00081003EN

English
Important Safety Information
This manual presents important information intended to ensure safe and effective use of this
product. Read this manual carefully and store it in an accessible location.
For information on development of a system with this product and setup, see also Technical
Reference Guide. You can access Technical Reference Guide from the included Manual CD.
If Windows Embedded POSReady7 or Windows Embedded POSReady 2009 is installed on your
model, be sure to read “MICROSOFT SOFTWARE LICENSE TERMS” at the end of this manual before you
start using the product. If you do not accept any one of the terms, do not use the product.
Key to Symbols
The symbols in this manual are identified by their level of importance, as defined below. Read the
following carefully before handling the product.
!WARNING:
Warnings must be observed carefully to avoid serious bodily injury.
!CAUTION:
Cautions must be observed to avoid minor injury to yourself, damage to your equipment, or loss of
data.
QNote:
Notes have important information and useful tips on the operation of your product.
Safety Precautions
!WARNING:
❏
If this product produces smoke, a strange odor, or unusual noise, immediately unplug the
AC cable, and then contact your dealer or an Epson service center for advice. Continued
use may lead to fire or electric shock.
❏
Do not use this product with any voltage other than the specified one. Doing so may lead
to fire or electric shock.
❏
Be sure to use the specified AC adapter [AC adapter, T (Model: M284A)]. Connection to an
improper power source may lead to equipment damage, fire, or electric shock.
❏
Do not connect the cables in ways other than those specified in the manuals. Different
connections may cause equipment damage or fire.
❏
Do not block the openings of this product. This may cause overheating inside the product
and lead to fire.
• Do not place the product in an unventilated narrow location, such as a bookshelf.
• Do not place the product on carpet.
• Do not cover the product with any fabric.
❏
Do not use this product where inflammable fumes of gasoline, benzine, thinner, or other
inflammable liquids may be in the air. Doing so may cause an explosion or fire.
2

English
❏
Do not use aerosol sprayers containing flammable gas inside or around this product.
Doing so may cause fire.
❏
If water or other liquid spills into this product, immediately unplug the AC cable, and then
contact your dealer or an Epson service center for advice. Continued use may lead to fire
or shock.
❏
Do not allow foreign objects to fall into this product. Penetration by foreign objects may
lead to fire or electric shock.
❏
Never attempt to repair this product yourself. Improper repair work can be dangerous.
❏
Never disassemble or modify this product. Tampering with this product may result in
injury, fire, or electric shock.
❏
Do not attempt to open or disassemble the internal lithium battery. This could result in
burns or release of hazardous chemicals.
❏
Do not leave the internal lithium battery in a hot place such as near a fire or a heater
because it could overheat and ignite.
!CAUTION:
❏
Do not use this product in locations subject to high humidity or dust levels. Excessive humidity
and dust may cause paper jams and other problems, such as fire, or electric shock.
❏
Be sure to set this product on a firm, stable, horizontal surface. The product may break or cause
injury if it falls.
❏
Do not stand on or place heavy objects on top of this product. Equipment may fall or collapse,
causing breakage and possible injury.
❏
Be sure to use this product with the connector cover attached. If it is not attached, foreign objects
may enter this product, causing fire or equipment damage.
❏
When you move this product, be sure to hold the main body. If you hold only the connector cover,
it may come off and the main body may break or cause injury if it falls.
❏
The print head can be very hot during and immediately after printing. If you need to touch it, such
as for cleaning, wait until it cools down. Touching it before that may cause burns.
❏
Be careful of the cutter blades of the printer unit.
❏
Make sure that the total power requirements of all devices receiving power from this product do
not exceed the power supplying capability of the product. Otherwise, the devices may be
damaged.
❏
Connecting an outdoor overhead LAN cable directly to this product may lead to lightning
damage. If you need to connect such a cable to the product, the cable must be protected against
an electrical surge between the cable and the product. You should avoid connecting the product
to a non-surge protected outdoor overhead LAN cable.
❏
Do not connect a telephone line to the drawer-kick connector of this product. The telephone line
or product may become damaged.
❏
To ensure safety, unplug this product before leaving it for an extended period.
3

English
Caution Labels
The caution label on the product indicates the following precautions.
!KCAUTION:
Do not touch the thermal head and the frame on its side because they can be very hot after printing.
4
English
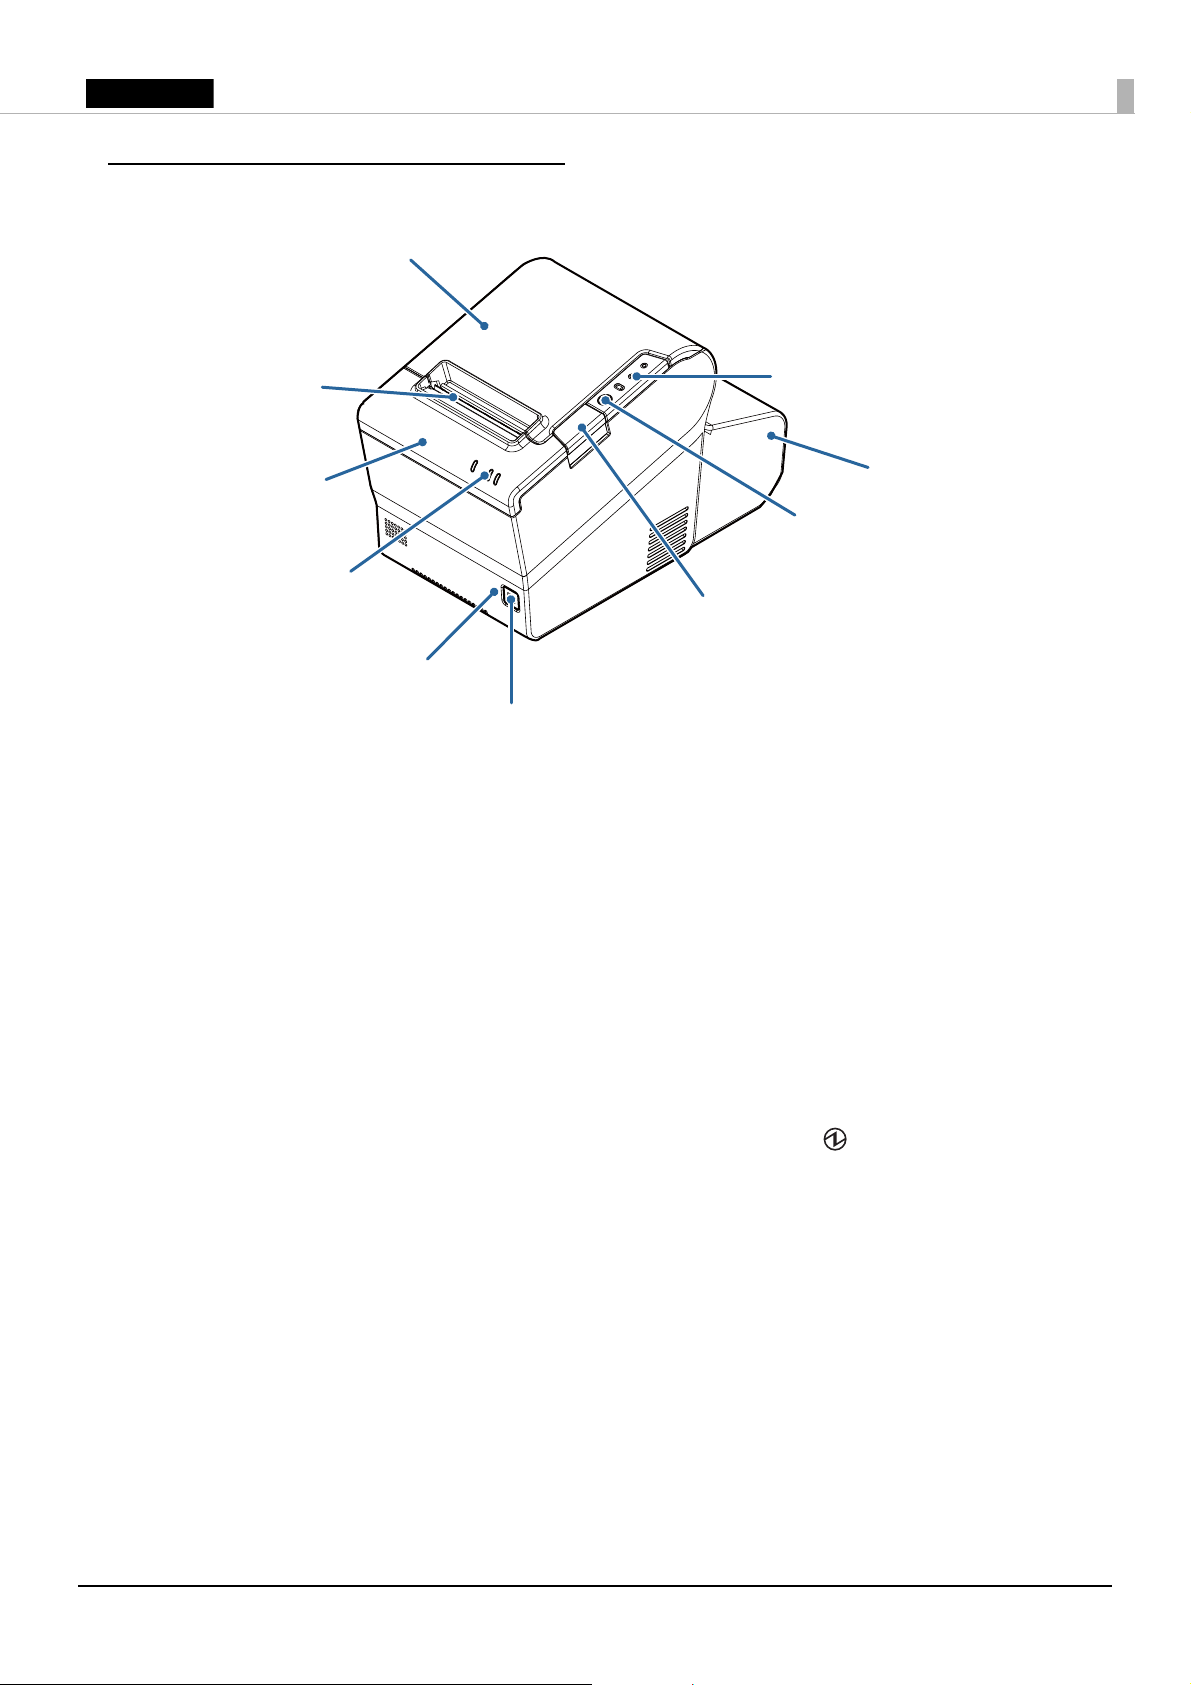
Part Names and Functions
Cutter cover
Controller LEDs
Connector cover
Roll paper cover
Printer reset
button
Feed button
Printer LEDs
Manual cutter
Cover open button
Power button
Roll paper cover
Open this cover to install/replace the roll paper.
Manual cutter
Use this cutter when you cut the roll paper manually.
Cutter cover
Open this cover to unlock the autocutter blade when the roll paper cover does not open due to a
paper jam. (U “The roll paper cover will not open” on page 25)
Printer reset button
Keep pressing this button with a pointed object (such as a pen) until the (Power) LED goes off to
reset the printer unit.
Power button
Press this button to turn on or shut down the product. Keep pressing the button to turn off the
product forcibly. (U “Forced Termination” on page 20)
Cover open button
Press this button to open the roll paper cover.
Feed button
Press this button to feed the roll paper.
5

English
Connector cover
Use the product with this cover attached to protect cables. (U “Attaching/Removing the Connector
Cover” on page 11
)
Controller LEDs
Indicates the controller unit status.
LED LED status Meaning
➀ Storage access LED (Green) On Accessing storage.
➁ Status LED (Orange) Flashing (with approx. 1
sec intervals)
Flashing (with approx.
160 msec intervals)
➂ Status LED (Green) On Power is on.
Flashing (with approx. 1
sec intervals)
Off Power is off.
Printer LEDs
Indicates the printer unit status.
LED LED status Meaning
➀ (Power) LED (Green) On Power is on.
Off Power is off.
Booting/Shutdown/Updating software.
CPU temperature is high.
Standby.
➁ Error LED (Orange) On Offline
Flashing An error has occurred.
Off In normal status.
➂ Paper LED (Orange) On Roll paper near-end.
Flashing Waiting for the self-test printing to be
continued.
Off There is a sufficient amount of roll paper
remaining.
6
English
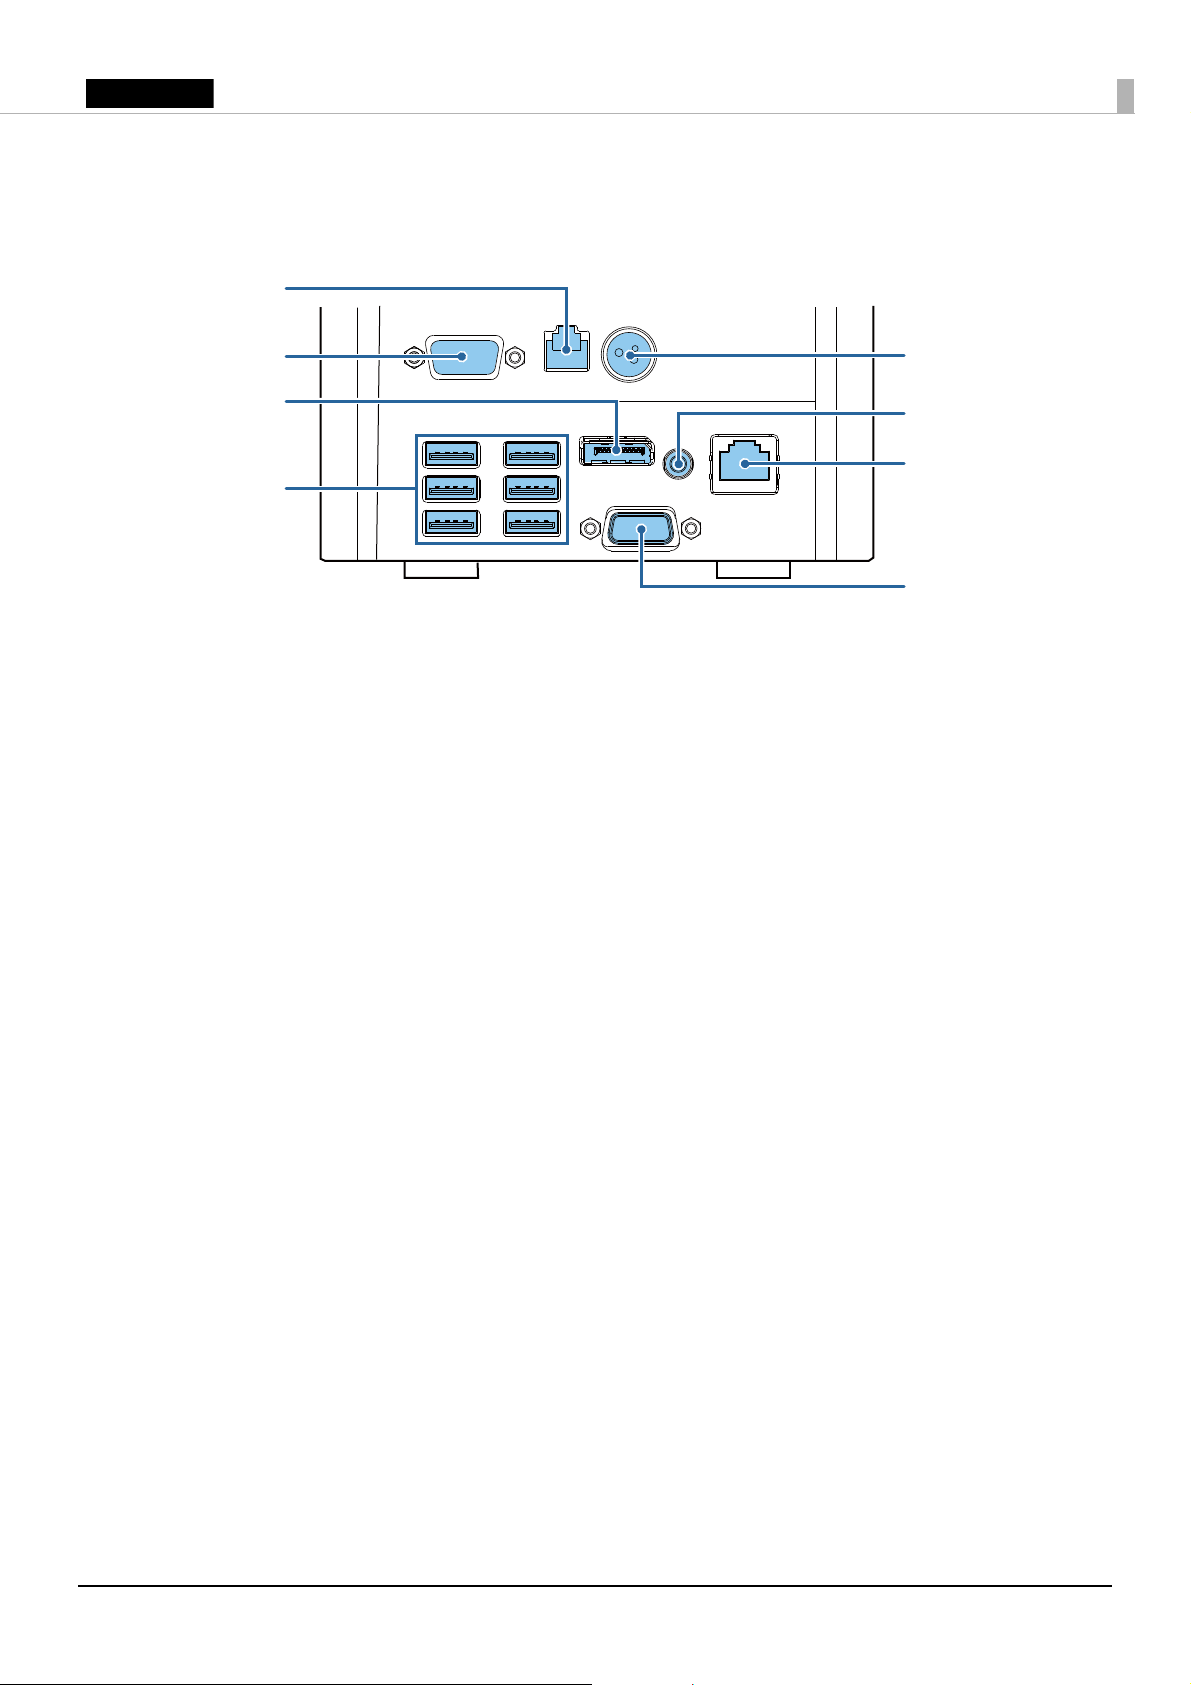
Interface
USB ports (× 6)
VGA port
Line-out port
Ethernet port
DC-in connector
Drawer kick
connector
Serial port
DisplayPort
All the ports and connectors are located on the back of the product
QNote:
If the connector cover is attached, detach it to access the ports or connectors. (U “Removing the
connector cover” on page 12
)
7
English
Setup
Security hook
Installing the Product
Install the product horizontally on a firm, stable surface.
QNote:
❏
The security hook on the back of the product allows you to attach a commercially available
antitheft wire.
❏
A tape for fixing the product (DF-10) is available as an option. (U “Securing the Product” on
page 17
)
8
English
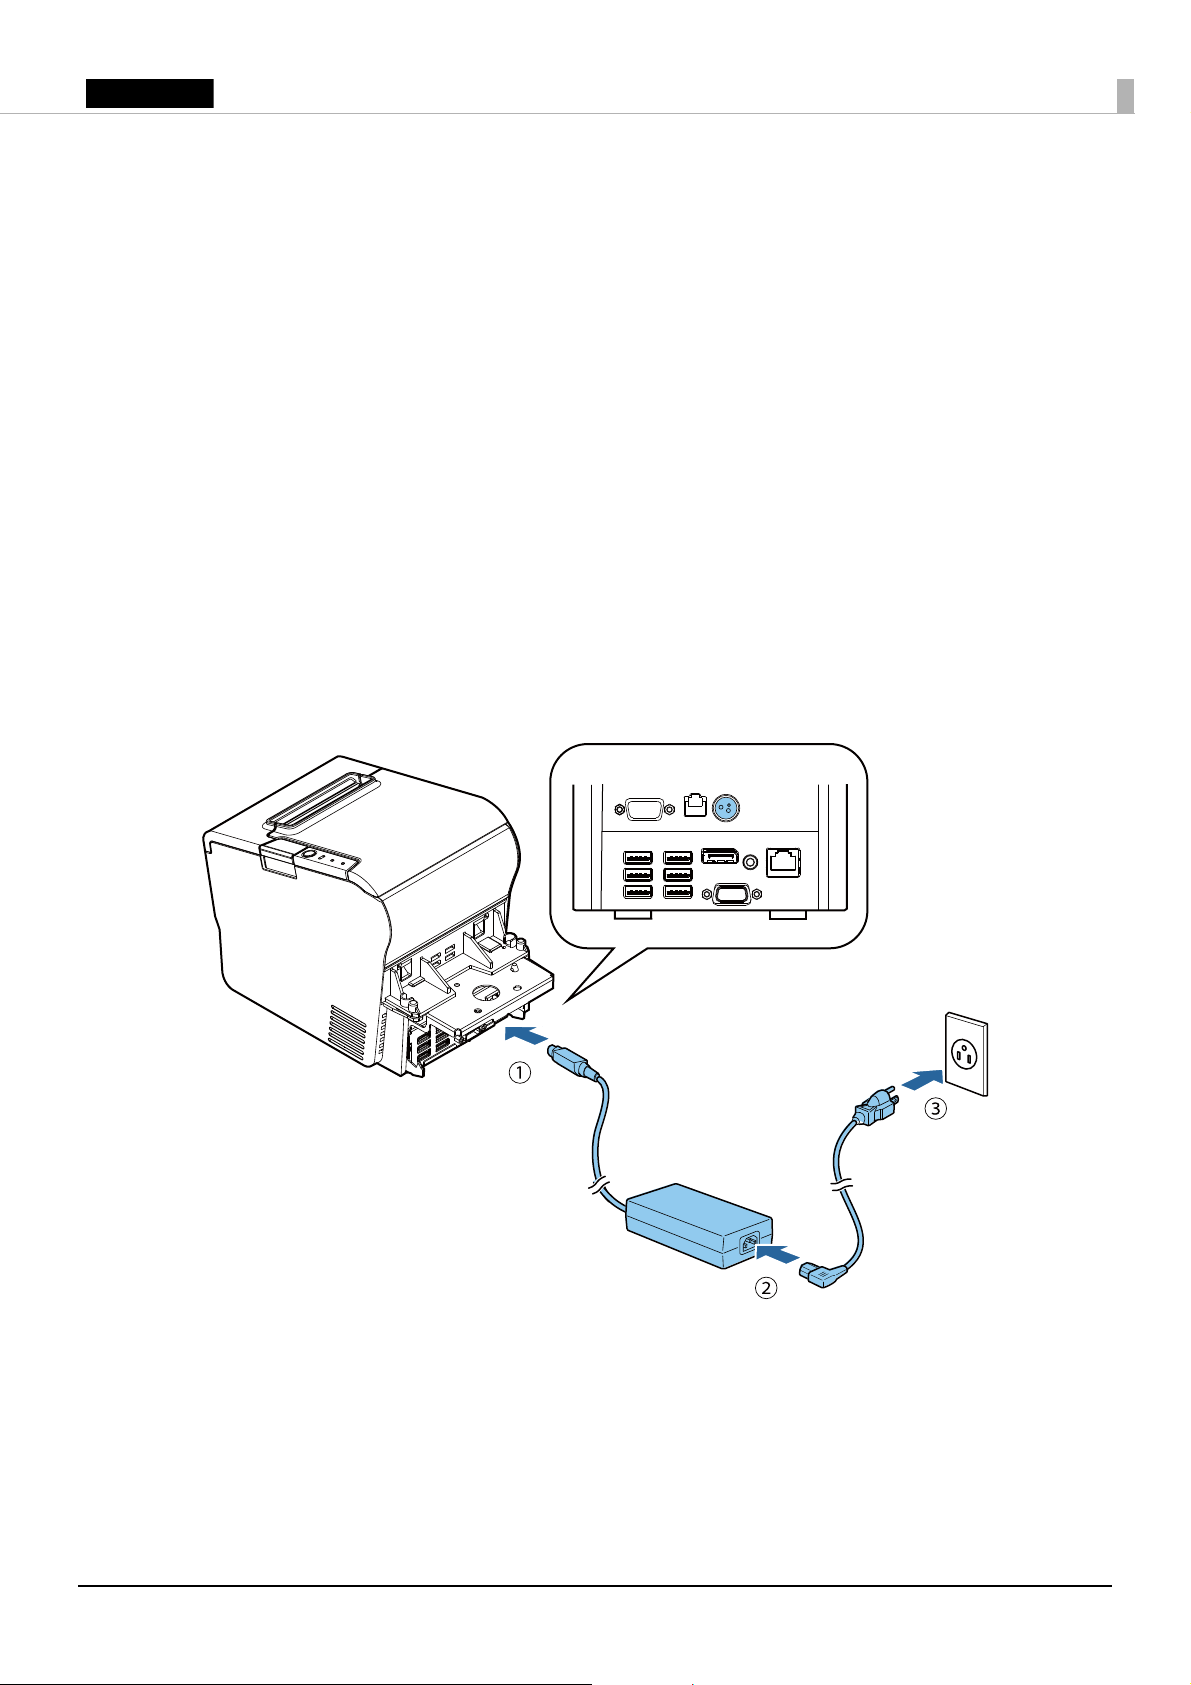
Connecting the AC Adapter
Follow the steps below to connect the AC adapter.
!WARNING:
Be sure to use the specified AC adapter [AC adapter, T (Model: M284A)]. Connection to an
improper power source may lead to equipment damage, fire, or electric shock.
!CAUTION:
Be sure to leave a space between the AC adapter and the main unit.
1. Firmly insert the DC connector of the AC adapter all the way into the DC-in connector on the
product. (➀ in the illustration)
2. Firmly insert the connector of the AC cable all the way into the AC inlet on the AC adapter. (➁
in the illustration)
3. Firmly insert the plug all the way into the grounded wall outlet. (➂ in the illustration)
4. Set the AC adapter so that its label side is facing down.
9
English
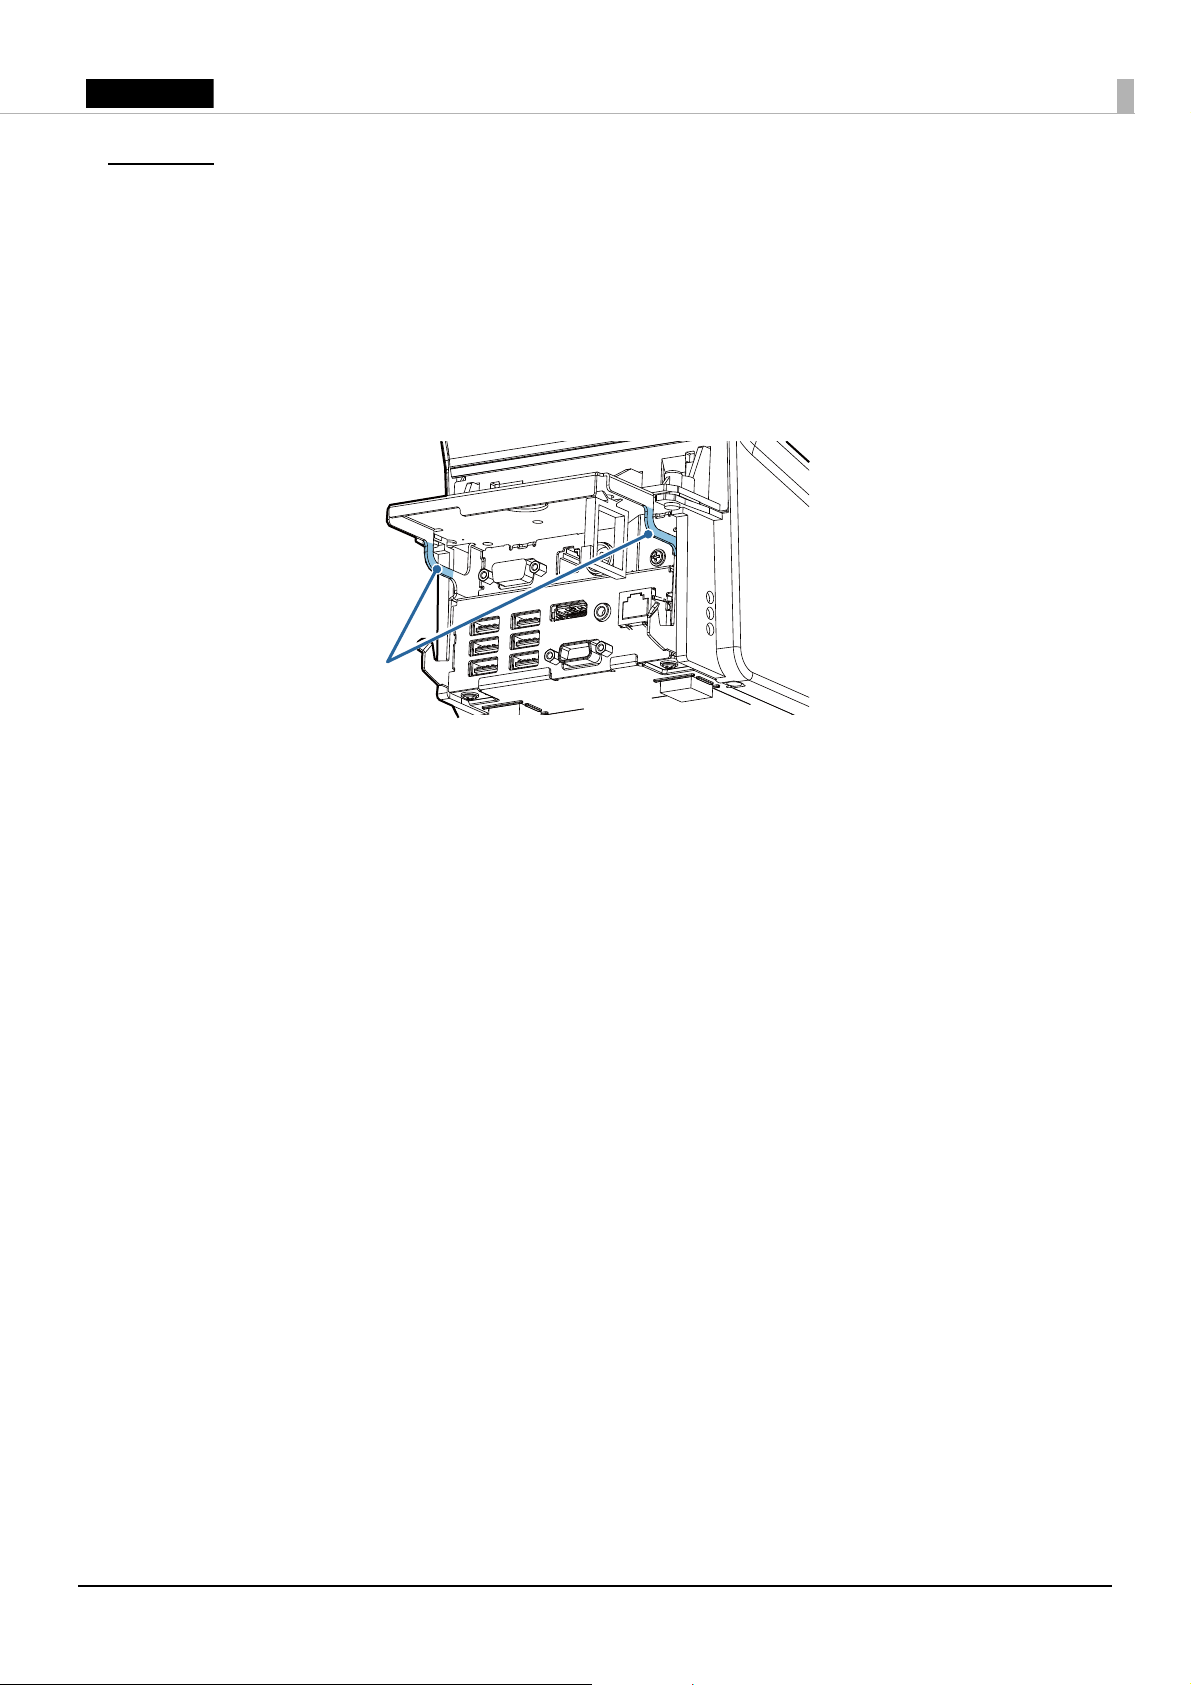
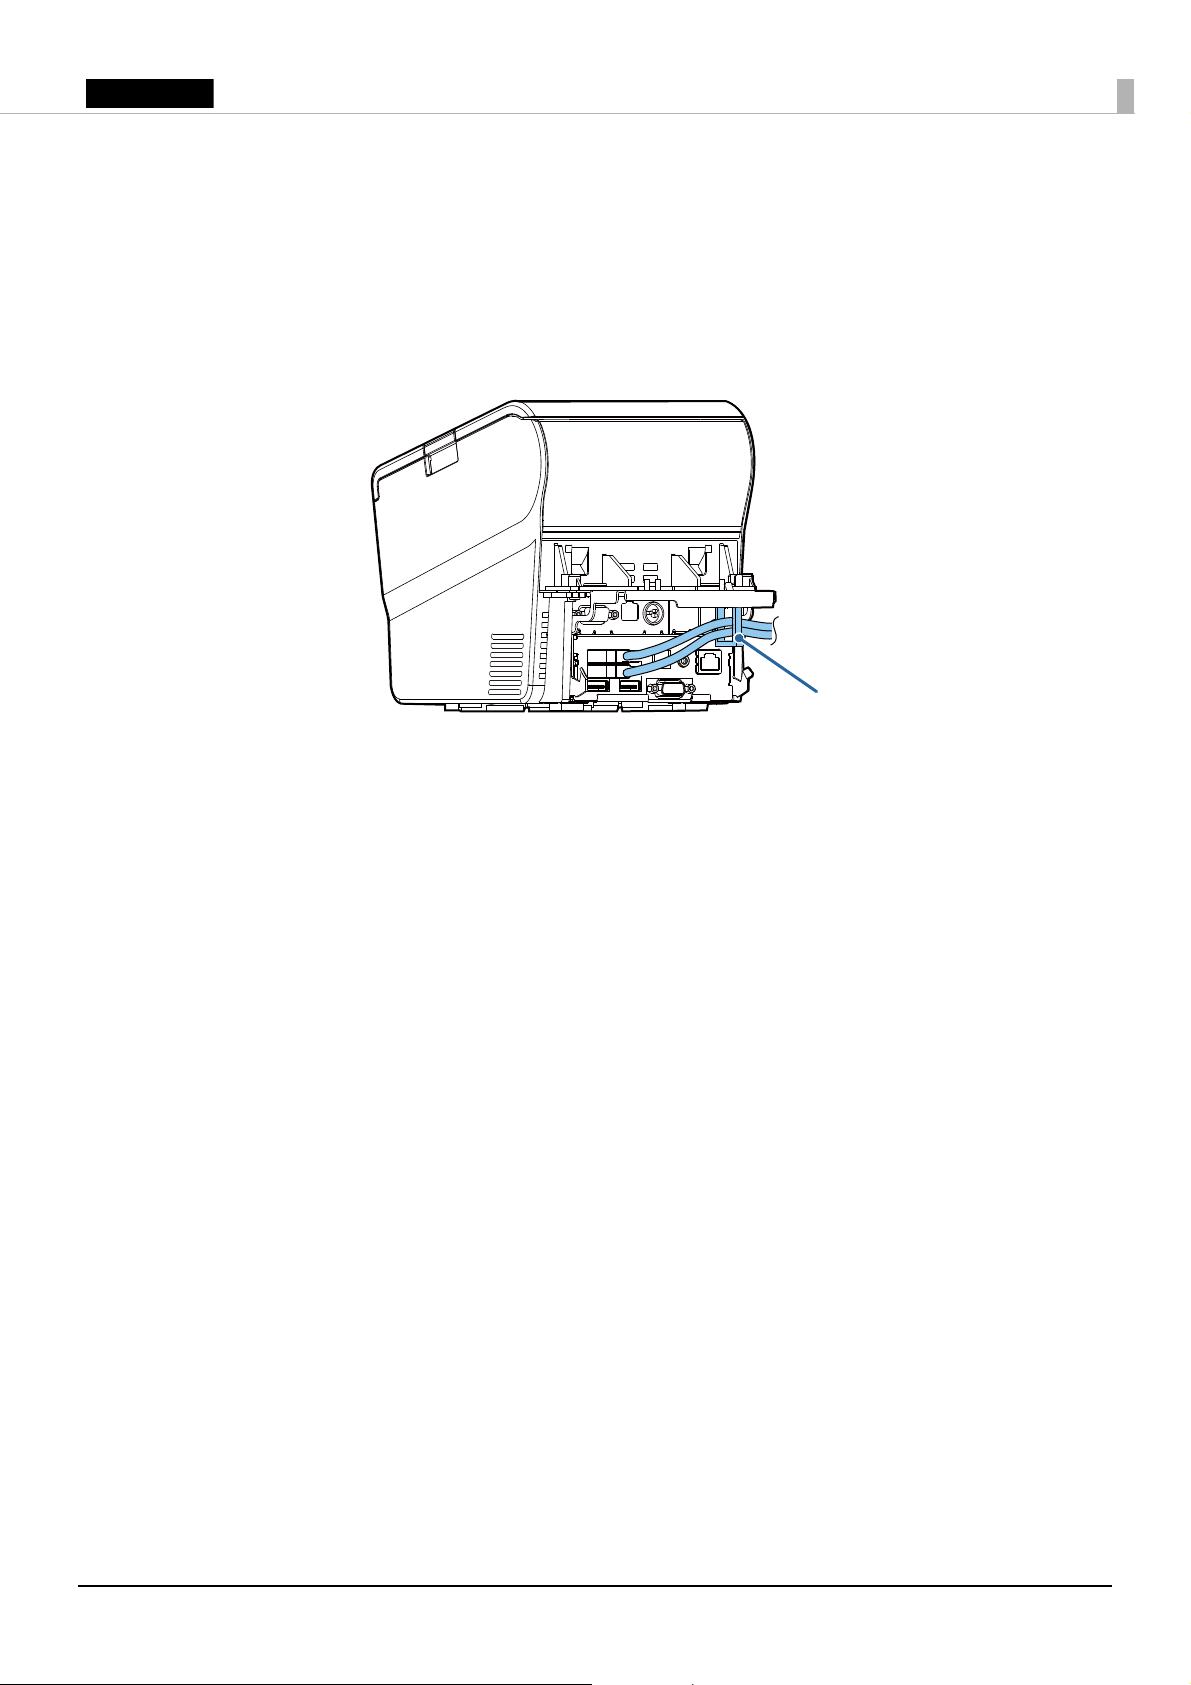
Connecting External Devices
Wire saddle
If you connect external devices, turn off the product and then connect each cable to the port/
connector on the back of the product. (U “Interface” on page 7)
QNote:
When connecting the cables whose connectors do not lock themselves (USB cables and line-out cable),
pass the cables through the wire saddle to prevent them from coming off.
10
English
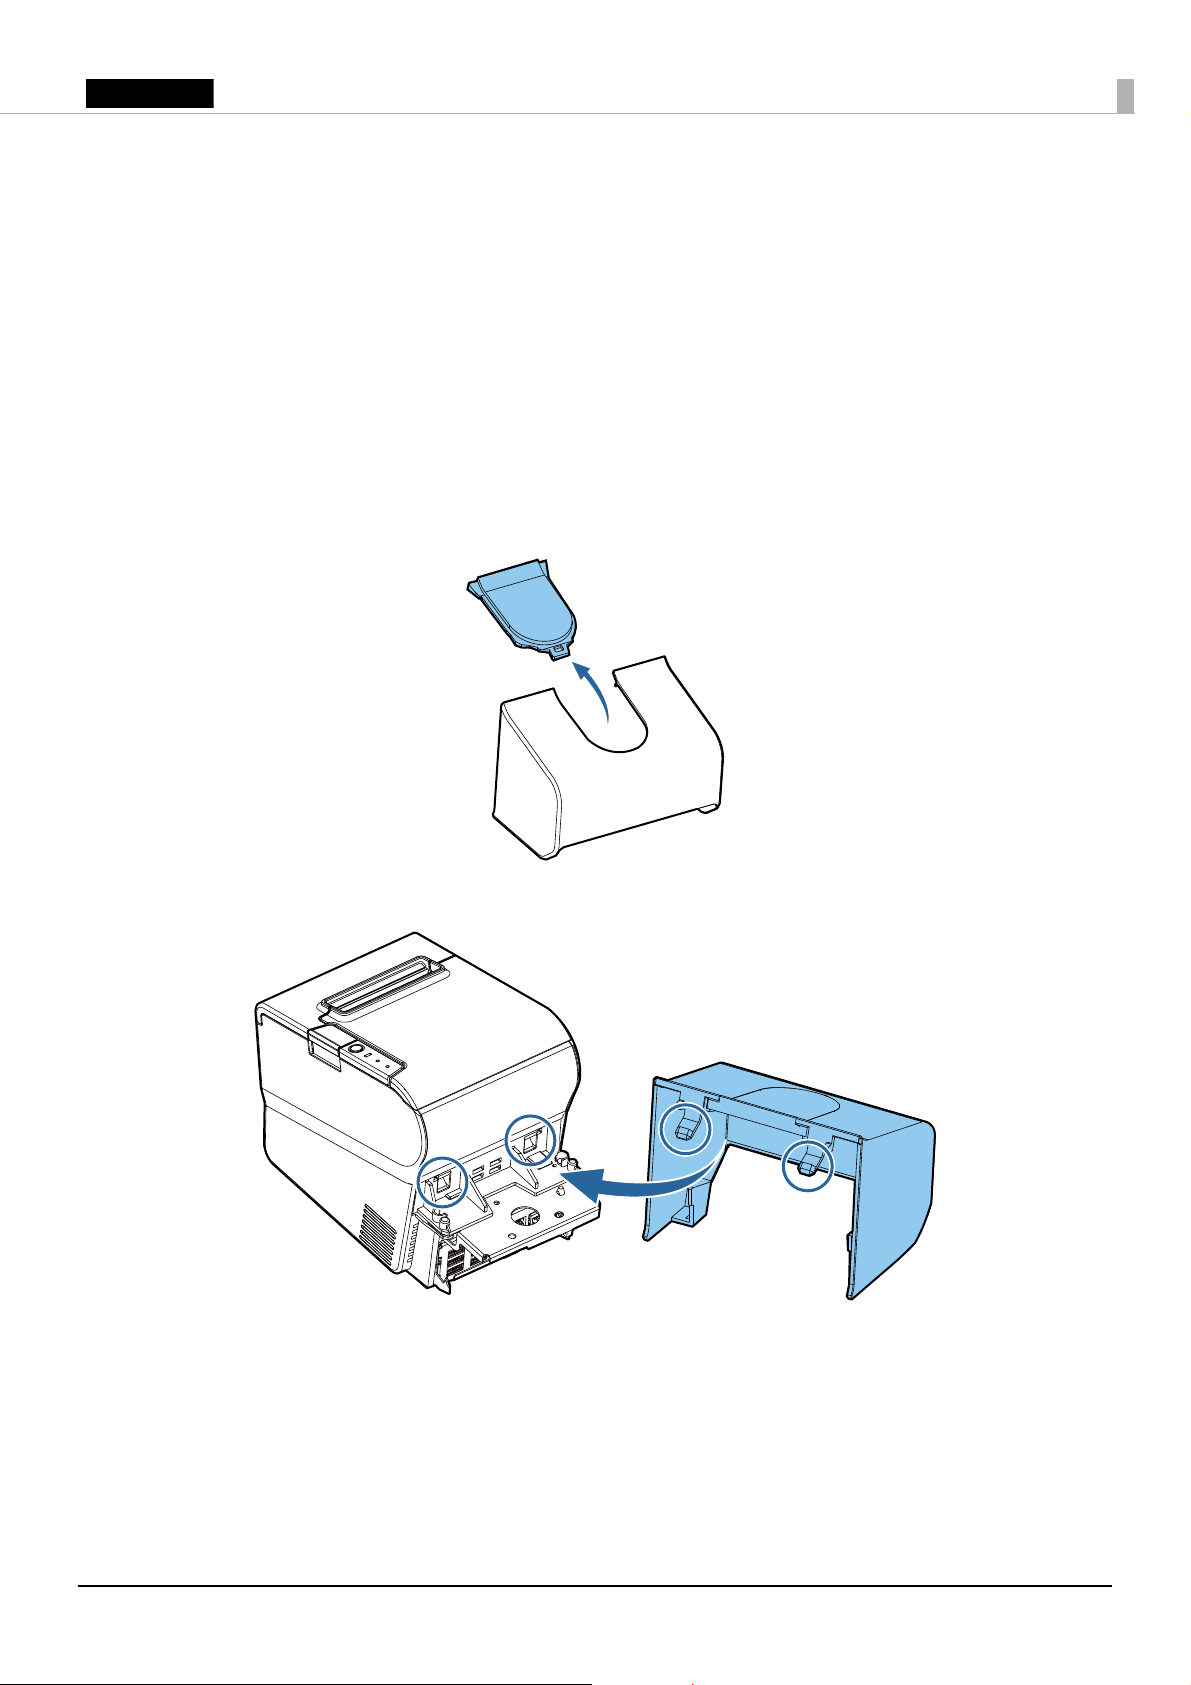
Attaching/Removing the Connector Cover
Attaching the connector cover
!CAUTION:
Be sure to hold both sides of the connector cover when attaching it, or it may become damaged.
Follow the steps below to attach the connector cover to protect cables.
Q
Note:
If you use the product with the optional customer display (Model: DM-D110), remove the U-shaped
part from the connector cover.
1. Align the hooks on the connector cover with the dents on the main body.
11

English
2. Push the connector cover to click onto the main body.
3. Make sure the cables are not pinched.
Removing the connector cover
Push the connector cover down while pushing the lower part of the both sides of it inward to
detach the hooks from the main body.
12

English
Attaching the Power Button Cover
Align the left edge of the
power button cover with
the right edge of the printer
reset button.
Align the inside edge of the
power button cover with the
upper edge of the power
button.
Printer reset button
Power button
Attaching the power button cover that comes with the product onto the power button prevents
accidental operation of the power button. Follow the steps below to attach the power button cover.
QNote:
It is recommended to clean any dirt around the power button before you attach the cover.
1. Open the power button cover.
2. Peel off the backing paper.
3. Attach the power button cover as shown in the illustration.
13

English
Installing the Customer Display
Customer display Base Screws
If you use the product with the optional exclusive customer display (Model: DM-D110), follow the
steps below to install it.
For models without a pole
Use the following items. The base and screws are included with the customer display.
1. Attach the base on the TM-T88V-DT with the three screws. (➀ in the illustration)
2. Pass the USB cable of the customer display through the base. (➁ in the illustration)
3. Align the dowel hole in the customer display and the dowel on the base to attach the customer
display on the base. (➂ in the illustration)
4. Connect the USB cable to the USB port. (U “Interface” on page 7)
14

English
For models with a pole
Customer display Pole Base Screws
1. Attach the base on the TM-T88V-DT with
the three screws. (➀ in the illustration)
2. With the end of the straight pole with a hole
pointing downward, pass the USB cable of
the customer display through the pole and
base. (➁ in the illustration)
3. Attach the pole with the customer display.
4. Align the dowel hole in the pole and the
dowel on the base to attach the pole on the
base. (➂ in the illustration)
5. Connect the USB cable to the USB port.
(U
“Interface” on page 7)
Use the following items. The pole, base, and screws are included with the customer display.
!CAUTION:
The pole does not come out of the customer display once it is attached to it. Be sure of its orientation
when attaching it to the customer display.
15

English
Changing the orientation of the display
48°
300°
270°
Hold the TM-T88V-DT with your hand and move the display or arm to change the direction or
angle.
!CAUTION:
Do not rotate the display with excessive force. Doing so may break it.
The mobile range of the display is as follows.
• Display tilt: Maximum angle of 48° (5 levels)
• Display rotation: Maximum angle of 300°
• Arm rotation: Maximum angle of 270° (only for models without a pole)
16

English
Securing the Product
Positioning lines
Using the optional affixing tape (Model: DF-10) secures the product to the installation surface.
Follow the steps below to use the affixing tape.
1. Turn over the product so that you can see its bottom.
2. With two pieces of the affixing tape combined, peel off the backing paper of a pair on one side,
and paste it to one of the specified positions on the bottom of the product.
3. In the same way, paste other three pairs of tape in the specified positions.
4. Peel off the backing paper of each pair on the other side of the affixing tape, turn over the
product back on its bottom, and place and secure it firmly to the installation surface.
17

English
Basic Operations
Turning Power On/Off
!CAUTION:
❏
If you turn the product off, wait more than 10 seconds before you turn it again.
❏
When the product is turned off or when it is in the standby mode, do not hold down the power
button longer than 4 seconds.
Press the power button to turn on/off the product.
18

English
Opening the Covers
Opening the roll paper cover
Press the cover open button to open the roll paper cover.
Opening the cutter cover
Slide the cutter cover toward front to open it.
19

English
Controlling the Speaker Volume
You can control the speaker volume through the operating system of the computer.
Forced Termination
!CAUTION:
When forced termination is executed, all unsaved data is lost and recovery of the operating system
may be required.
If you cannot turn the product off using applications or the operating system, you can execute
forced termination as a last resort by pressing the power button for approximately 4 seconds.
20

English
Installing/Replacing the Roll Paper
Follow the steps below to install/replace the roll paper.
1. Open the roll paper cover. (U “Opening the roll paper cover” on page 19)
2. Remove the used roll paper core if there is one.
3. Insert the roll paper in the correct direction.
4. Pull out some paper, and close the roll paper cover.
21

English
5. Tear off the paper.
22

English
Cleaning
Thermal head
Cleaning the Product Case
Be sure to turn off the product, and wipe the dirt off the product case with a dry cloth or a damp
cloth. For persistent dirt, use a cloth slightly moistened with mild neutral detergent.
!CAUTION:
Never clean the product with alcohol, benzine, thinner, or other such solvents. Doing so may
damage or break the parts made of plastic and rubber.
Cleaning the Thermal Head
To maintain print quality, Epson recommends cleaning the thermal head periodically (generally
every 3 months) by following the steps below.
!KCAUTION:
❏
The thermal head and the frame on its side can be very hot after printing. Be careful not to touch
them and to let them cool before you clean it.
❏
Do not damage the thermal head by touching it with your fingers or any hard object.
1. Turn off the product. (U “Turning Power On/Off” on page 18)
2. Open the roll paper cover. (U “Opening the roll paper cover” on page 19)
3. Clean the thermal elements of the thermal head with a cotton swab moistened with an alcohol
solvent (ethanol or IPA).
23

English
Troubleshooting
Thermal head
(Power) LED does not light
Check whether the AC adapter is correctly connected. (U “Connecting the AC Adapter” on page 9)
Error LED is on
❏ Check whether the roll paper cover is correctly closed.
❏ If the Paper LED is on, check whether the roll paper is correctly installed and any roll paper
remains. (U “Installing/Replacing the Roll Paper” on page 21)
Error LED is flashing
❏ Check whether paper is jammed. If it is jammed, remove it. (U “Paper is jammed” on page 24)
❏ Printing stops if the thermal head overheats and resumes automatically when it cools.
❏ For other cases, turn the product off, and after 10 seconds, turn it back on.
Paper is jammed
!KCAUTION:
Do not touch the thermal head and the frame on its side because they can be very hot after printing.
When paper is jammed, never pull out the paper forcibly. Open the roll paper cover (U “Opening
the roll paper cover” on page 19
), and then remove the jammed paper.
24

English
The roll paper cover will not open
Knob
When the autocutter blade is locked, the roll paper cover will not open. Follow the steps below to
return the autocutter blade to the normal position.
1. Turn off the product (U “Turning Power On/Off” on page 18)
2. Open the cutter cover. (U “Opening the cutter cover” on page 19)
3. Turn the knob in the direction of the arrow until you see a triangle in the opening of the frame.
4. Close the cutter cover.
5. Open the roll paper cover. (U “Opening the roll paper cover” on page 19)
25

English
Specifications
Item SATA HDD models SATA SSD models
CPU
Main memory
Backing storage
Interface
Ethernet 10BASE-T/100BASE-TX/1000BASE-T
USB (× 6) USB 2.0
Serial D-sub 9 pin male
VGA D-sub 15 pin female
DisplayPort DP1.1 female (16.1 mm × 4.76 mm)
Drawer kick RJ12 6 pin
Line-out φ 3.5 mm Mini-jack
RTC/CMOS Backup battery
Sound function
Print method
Print speed
Roll paper
Software
Paper width*
Diameter 83 mm {3.27"} at maximum
Roll paper core Inside diameter: 12 mm {0.47"}
Operating system Windows Embedded POSReady7
Device control
software
2
Power supply
Dedicated AC adapter
AC Power consumption
Te mp e ra t u re
Humidity
Operating*
Standby 15.8 W 14.9 W
Off 1.4 W 1.5 W
Operating 5 to 40°C {41 to 104°F}
Storage –10 to 50°C {14 to 122°F}
Operating 10 to 90 %RH (No condensation)
Storage 10 to 90 %RH (No condensation)
3
Overall dimensions
(including connector cover)
Mass
*1: The capacity differs depending on the model.
*2: 58 mm width paper (57.5 ± 0.5 mm) is also available. For information on how to change paper width, see Technical Reference
Guide.
*3: Based on Epson operating conditions.
Intel® Atom™ D2550 (1 MB Cache, 1.86 GHz)
4 GB DDR3, SO-DIMM slot
SATA HDD*
Power supply: DC 5 V, 500 mA (Peak: 1A/100ms)
Power supply: DC 24 V, 1 A
Lithium battery for RTC backup
Built-in monaural speaker
Thermal line printing
300 mm/s
79.5 mm ± 0.5 mm {3.13" ± 0.02"}
or 57.5 mm ± 0.5 mm {2.26" ± 0.02"}
Outside diameter: 18 mm {0.71"}
ePOS-Device
Dedicated AC adapter (AC adapter, T [Model: M284A])
DC 24 V, 4.2 A
AC adapter, T (Model: M284A)
Input: AC 100 V to AC 240 V, 50 Hz to 60 Hz, 2.4 A
Output: DC 24 V, 4.2 A
63.8 W 61.8 W
W × D × H: 145 mm × 279 mm × 183 mm {5.71"× 10.98" × 7.20"}
Approx. 2.9 kg {6.39 lb} Approx. 2.8 kg {6.17 lb}
1
SATA SSD*
1
26

English
Appendix
Restriction of Use
When this product is used for applications requiring high reliability/safety, such as transportation
devices related to aviation, rail, marine, automotive, etc.; disaster prevention devices; various safety
devices, etc.; or functional/precision devices, etc.; you should use this product only after giving
consideration to including fail-safes and redundancies into your design to maintain safety and total
system reliability. Because this product was not intended for use in applications requiring
extremely high reliability/safety, such as aerospace equipment, main communication equipment,
nuclear power control equipment, or medical equipment related to direct medical care, etc., please
make your own judgment on this product’s suitability after a full evaluation.
Trademarks
Intel and Intel Atom are trademarks of Intel Corporation in the U.S. and/or other countries.
Windows is a registered trademark of Microsoft Corporation in the United States and/or other
countries.
EPSON is a registered trademark of Seiko Epson Corporation. Exceed Your Vision is a registered
trademark or trademark of Seiko Epson Corporation.
All other trademarks are the property of their respective owners and used for identification
purpose only.
Caution
No part of this publication may be reproduced, stored in a retrieval system, or transmitted in any
form or by any means, electronic, mechanical, photocopying, recording, or otherwise, without the
prior written permission of Seiko Epson Corporation. No patent liability is assumed with respect to
the use of the information contained herein. While every precaution has been taken in the
preparation of this book, Seiko Epson Corporation assumes no responsibility for errors or
omissions. Neither is any liability assumed for damages resulting from the use of the information
contained herein.
Neither Seiko Epson Corporation nor its affiliates shall be liable to the purchaser of this product or
third parties for damages, losses, costs, or expenses incurred by purchaser or third parties as a
result of: accident, misuse, or abuse of this product or unauthorized modifications, repairs, or
alterations to this product, or (excluding the U.S.) failure to strictly comply with Seiko Epson
Corporation’s operating and maintenance instructions.
Seiko Epson Corporation shall not be liable against any damages or problems arising from the use
of any options or any consumable products other than those designated as Original Epson
Products or Epson Approved Products by Seiko Epson Corporation.
NOTICE: The contents of this manual are subject to change without notice.
©Seiko Epson Corporation 2014-2017. All rights reserved.
27

English
Open Source Software License
1 ) This printer product includes open source software programs listed in Section 5) according
to the license terms of each open source software program.
2 ) We provide the source code of the GPL Programs and LGPL Programs until five (5) years
after the discontinuation of same model of this printer product. If you desire to receive the
source code above, please contact the customer support for your region. You shall comply
with the license terms of each open source software program.
3 ) The open source software programs are WITHOUT ANY WARRANTY; without even the
implied warranty of MERCHANTABILITY AND FITNESS FOR A PARTICULAR
PURPOSE. See the license agreements of each open source software program for more
details.
4 ) OpenSSL toolkit
This printer product includes software developed by the OpenSSL project for use in the
OpenSSL Toolkit (http://www.openssl.org/).
This product includes cryptographic software written by Eric Young (eay@cryptsoft.com).
5 ) The list of open source software programs included with this printer product and the whole
license agreements of each license can be found in the following URL.
http://xxx.xxx.xxx.xxx/licenses/
* For the underlined part in the above URL, input each printer’s IP address.
28

English
MICROSOFT SOFTWARE LICENSE TERMS
MICROSOFT SOFTWARE LICENSE TERMS FOR:
Windows Embedded POSReady7
These license terms are an agreement between you and SEIKO EPSON CORPORATION. Please read them. They apply to
the software included on this device. The software also includes any separate media on which you received the
software.
The software on this device includes software licensed from Microsoft Corporation or its affiliate.
The terms also apply to any Microsoft
• updates,
• supplements,
• Internet-based services, and
• support services
for this software, unless other terms accompany those items. If so, those terms apply.
If you obtain updates or supplements directly from Microsoft, then Microsoft, and not SEIKO EPSON CORPORATION,
licenses those to you.
As described below, using the software also operates as your consent to the transmission of certain computer
information for Internet-based services.
By using the software, you accept these terms. If you do not accept them, do not use the software. Instead,
contact SEIKO EPSON CORPORATION to determine its return policy for a refund or credit.
If you comply with these license terms, you have the rights below.
1. USE RIGHTS
Use. The software license is permanently assigned to the device (physical hardware system) with which you
acquired the software. You may only use the software on that device.
2. ADDITIONAL LICENSING REQUIREMENTS AND/OR USE RIGHTS
a. Specific Use. You may use the software with a point of service "POS" application.
A POS System means an Embedded System that performs functions substantially similar to that of a point of
sale, kiosk (informational or transactional), digital signage, or similar types of devices; and is designed for use
solely with a POS Application.
A POS application is a software application which provides any of the following functions;
• process sales and service transactions
• scan and track inventory
• record or transmit customer information
• perform related management functions
• provide information directly and indirectly to customers about available products and services
b. Other Software. You may use other programs with the software as long as the other programs
• directly supports the manufacturer’s specific use for the device, or
• provide system utilities, resource management, or anti-virus or similar protection.
• Software that provides consumer or business tasks or processes may not be run on the device. This
includes email, word processing, spreadsheet, database, scheduling and personal finance software. The
device may use terminal services protocols to access such software running on a server.
c. Storage/Network Use. You may also store or install one (1) copy of the software on a storage device, such as
network server, used only to install or run the software on your other POS Systems over an internal network;
however, you must acquire and dedicate an additional license for each separate POS System on or from which
the software is installed, used, accessed, displayed or run. Except as otherwise permitted by Remote
Assistance features described above, a license for the software may not be shared or used concurrently on
different POS Systems.
d. Device Connections. You may use terminal services protocols to connect the device to a server running
business task or processes software such as email, word processing, scheduling or spreadsheets.
You may permit a maximum of twenty (20) computers or other electronic devices (each a "Device") to connect
via Server Message Bloc (SMB) to the POS System to utilize one or more of the following services of the
software: File Services, Print Services, Internet Information Services, Internet Connection Sharing and
telephony services. The twenty connection maximum includes any indirect connections made through
"multiplexing" or other software or hardware which pools or aggregates connections. Unlimited inbound
connections are allowed via TCP/IP (Transmission Control Protocol ("TCP") and the Internet Protocol ("IP").
e. Remote Desktop/Remote Assistance. The software may contain Remote Assistance and Remote Desktop
technologies that enable the software or other applications installed on the POS System to be used remotely
between two or more computing devices, even if the software or application is installed on only one POS
System. You may use Remote Assistance and Remote Desktop with all Microsoft products; provided however,
use of these technologies with certain Microsoft products may require an additional license. For both
29

English
Microsoft products and non-Microsoft products you should consult the license agreement accompanying the
applicable product or contact the applicable licensor to determine whether use of Remote Assistance or
Remote Desktop is permitted without an additional license.
f. Font Components. While the software is running, you may use its fonts to display and print content. You may
only
• embed fonts in content as permitted by the embedding restrictions in the fonts; and
• temporarily download them to a printer or other output device to print content.
g. Icons, images and sounds. While the software is running, you may use but not share its icons, images,
sounds, and media.
h. VHD BOOT. Additional copies of the software created using the software’s Virtual Hard Disk functionality
("VHD Image") may be pre-installed on the physical hard disk of the device. These VHD Images may only be
used for maintaining or updating the software installed on the physical hard disk or drive. If the VHD Image is
the only software on your device, it may be used as the primary operating system but all other copies of the
VHD Image may only be used for maintenance and updating.
i. Multiplexing. Hardware or software you use to
• pool connections,
• reroute information, or
• reduce the number of devices or users that directly access or use the software
(sometimes referred to as "multiplexing" or "pooling"), does not reduce the number of licenses of any type
that you need.
3. INTERNET-BASED SERVICES. Microsoft provides Internet-based services with the software. It may change or
cancel them at any time.
a. Consent for Internet-Based Services. The software features described below connect to Microsoft or service
provider computer systems over the Internet. In some cases, you will not receive a separate notice when they
connect. You may switch off these features or not use them. For more information about these features, see
http://windows.microsoft.com/en-US/windows7/windows-7-privacy-statement-highlights. By using these
features, you consent to the transmission of this information. Microsoft does not use the information to
identify or contact you.
Computer Information. The following features use Internet protocols, which send to the appropriate systems
computer information, such as your Internet protocol address, the type of operating system, browser and
name and version of the software you are using, and the language code of the device where you installed the
software. Microsoft uses this information to make the Internet-based services available to you.
• Auto Root Update.
switch off the Auto Root Update feature.
• Digital Certificates.
Internet users sending X.509 standard encrypted information. They also can be used to digitally sign files and
macros to verify the integrity and origin of the file contents. The software retrieves certificates and updates
certificate revocation lists using the Internet, when available.
• IPv6 Network Address Translation (NAT) Traversal service (Teredo).
gateway devices transition to IPv6. IPv6 is next generation Internet protocol. It helps enable end-to-end
connectivity often needed by peer-to-peer applications. To do so, each time you start up the software the
Teredo client service will attempt to locate a public Teredo Internet service. It does so by sending a query over
the Internet. This query only transfers standard Domain Name Service information to determine if your
computer is connected to the Internet and can locate a public Teredo service. If you
• use an application that needs IPv6 connectivity or
• configure your firewall to always enable IPv6 connectivity
by default standard Internet Protocol information will be sent to the Teredo service at Microsoft at regular
intervals. No other information is sent to Microsoft. You can change this default to use non-Microsoft servers.
You can also switch off this feature using a command line utility named "netsh."
• Information Rights Management.
cannot be printed, copied or sent to others without your permission. You may need to connect to Microsoft to
use this feature for the first time. Once a year, you may need to re-connect to Microsoft to update it. For more
information, go to
www.office.microsoft.com/en-us/assistance/HA010397891033.aspx. You may choose not to use this feature.
• Windows Media Digital Rights Management.
technology (WMDRM) to protect their intellectual property, including copyrights. This software and third
party software use WMDRM to play and copy WMDRM-protected content. If the software fails to protect the
content, content owners may ask Microsoft to revoke the software’s ability to use WMDRM to play or copy
protected content. Revocation does not affect other content. When you download licenses for protected
content, you agree that Microsoft may include a revocation list with the licenses. Content owners may require
you to upgrade WMDRM to access their content. Microsoft software that includes WMDRM will ask for your
consent prior to the upgrade. If you decline an upgrade, you will not be able to access content that requires
the upgrade. You may switch off WMDRM features that access the Internet. When these features are off, you
can still play content for which you have a valid license.
The Auto Root Update feature updates the list of trusted certificate authorities. You can
The software uses digital certificates. These digital certificates confirm the identity of
This feature helps existing home Internet
The software contains a feature that allows you to create content that
Content owners use Windows Media digital rights management
30

English
• Windows Media Player. When you use Windows Media Player, it checks with Microsoft for
• compatible online music services in your region;
• new versions of the player; and
• codecs if your computer does not have the correct ones for playing content.
You can switch off this last feature. For more information, go to go.microsoft.com/fwlink/?LinkId=51331.
• Windows (or Microsoft) Update Feature.
enable by selecting the "Opt In" dialogue box. Once enabled, this feature automatically connects to Microsoft
or service provider computer systems over the internet to provide updates from Microsoft to your software
and Runtime. In some cases, you will not receive a separate notice when they connect. Standard information
about your computer is sent each time the feature connects. Standard computer information may include
your Internet Protocol address, the type of operating system, browser and name and version of the software
you are using and the language code of the device where you installed the software. Microsoft uses this
information to make the Internet based service available to you. You may switch off this feature or not use it.
By using this feature, you consent to the transmission of this information.
information to identify or contact you.
4. BENCHMARK TESTING. You must obtain Microsoft's prior written approval to disclose to a third party the results
of any benchmark test of the software. However, this does not apply to the Microsoft .NET Framework (see below).
5. MICROSOFT .NET FRAMEWORK BENCHMARK TESTING. The software includes one or more components of the
.NET Framework (".NET Components"). You may conduct internal benchmark testing of those components. You
may disclose the results of any benchmark test of those components, provided that you comply with the
conditions set forth at
go.microsoft.com/fwlink/?LinkID=66406. Notwithstanding any other agreement you may have with Microsoft, if
you disclose such benchmark test results, Microsoft shall have the right to disclose the results of benchmark tests
it conducts of your products that compete with the applicable .NET Component, provided it complies with the
same conditions set forth at
go.microsoft.com/fwlink/?LinkID=66406.
6. SCOPE OF LICENSE. The software is licensed, not sold. This agreement only gives you some rights to use the
software. Microsoft reserves all other rights. Unless applicable law gives you more rights despite this limitation,
you may use the software only as expressly permitted in this agreement. In doing so, you must comply with any
technical limitations in the software that only allow you to use it in certain ways. For more information, see
www.microsoft.com/licensing/userights. You may not
• work around any technical limitations in the software;
• reverse engineer, decompile or disassemble the software, except and only to the extent that applicable law
expressly permits, despite this limitation;
• make more copies of the software than specified in this agreement or allowed by applicable law, despite this
limitation;
• publish the software for others to copy;
• rent, lease or lend the software; or
• use the software for commercial software hosting services.
7. BACKUP COPY. You may make one backup copy of the software. You may use it only to reinstall the software.
8. DOCUMENTATION. Any person that has valid access to your computer or internal network may copy and use the
documentation for your internal, reference purposes.
9. NOTICE ABOUT THE H.264/AVC VISUAL STANDARD, THE VC-1 VIDEO STANDARD, THE MPEG-4 VISUAL
STANDARD AND THE MPEG-2 VIDEO STANDARD. This software includes H.264/AVC, VC-1, MPEG-4 Part 2, and
MPEG-2 visual compression technology. MPEG LA, L.L.C. requires this notice:
THIS PRODUCT IS LICENSED UNDER THE AVC, THE VC-1, THE MPEG-4 PART 2 VISUAL, AND THE MPEG-2 VIDEO
PATENT PORTFOLIO LICENSES FOR THE PERSONAL AND NON-COMMERCIAL USE OF A CONSUMER TO DECODE
AVC, VC-1, MPEG-4 PART 2 AND MPEG-2 VIDEO THAT WAS ENCODED BY A CONSUMER ENGAGED IN A PERSONAL
AND NON-COMMERCIAL ACTIVITY OR WAS OBTAINED FROM A VIDEO PROVIDER LICENSED TO PROVIDE SUCH
VIDEO. NONE OF THE LICENSES EXTEND TO ANY OTHER PRODUCT REGARDLESS OF WHETHER SUCH PRODUCT IS
INCLUDED WITH THIS PRODUCT IN A SINGLE ARTICLE. NO LICENSE IS GRANTED OR SHALL BE IMPLIED FOR ANY
OTHER USE. ADDITIONAL INFORMATION MAY BE OBTAINED FROM MPEG LA, L.L.C. SEE WWW.MPEGLA.COM.
10. PRODUCT SUPPORT. Contact SEIKO EPSON CORPORATION for support options. Refer to the support number
provided with the device.
11. PROOF OF LICENSE. If you acquired the software on the device, or on a disc or other media, a genuine Certificate
of Authenticity label with a genuine copy of the software identifies licensed software. To be valid, this label must
be affixed to the device, or included on or in SEIKO EPSON CORPORATION’s software packaging. If you receive the
label separately, it is not valid. You should keep the label on the device or packaging to prove that you are
licensed to use the software. To identify genuine Microsoft software, see http://www.howtotell.com.
12. TRANSFER TO A THIRD PARTY. You may transfer the software only with the device, the Certificate of
Authenticity label, and these license terms directly to a third party. Before the transfer, that party must agree that
these license terms apply to the transfer and use of the software. You may not retain any copies of the software
including the backup copy.
Windows Update Feature. This is an optional feature that you can
Microsoft does not use the
31

English
13. NOT FAULT TOLERANT. The software is not fault tolerant. SEIKO EPSON CORPORATION installed the software on
the device and is responsible for how it operates on the device.
14. NO WARRANTIES FOR THE SOFTWARE. The software is provided "as is." You bear all risks of using it.
Microsoft gives no express warranties, guarantees or conditions. Any warranties you receive regarding the
device or the software do not originate from, and are not binding on, Microsoft or its affiliates. When
allowed by your local laws, SEIKO EPSON CORPORATION and Microsoft exclude implied warranties of
merchantability, fitness for a particular purpose and non-infringement.
15. LIABILITY LIMITATIONS. You can recover from Microsoft and its affiliates only direct damages up to two
hundred fifty U.S. Dollars (U.S. $250.00). You cannot recover any other damages, including consequential, lost
profits, special, indirect or incidental damages.
This limitation applies to:
• anything related to the software, services, content (including code) on third party internet sites, or third party
programs, and
• claims for breach of contract, breach of warranty, guarantee or condition, strict liability, negligence, or other
tort to the extent permitted by applicable law.
It also applies even if Microsoft should have been aware of the possibility of the damages. The above
limitation may not apply to you because your country may not allow the exclusion or limitation of incidental,
consequential or other damages.
16. EXPORT RESTRICTIONS. The software is subject to United States export laws and regulations. You must comply
with all domestic and international export laws and regulations that apply to the software. These laws include
restrictions on destinations, end users and end use. For additional information, see www.microsoft.com/
exporting.
17. ENTIRE AGREEMENT. This agreement, additional terms (including any printed-paper license terms that
accompany the software and may modify or replace some or all of these terms), and the terms for supplements,
updates, Internet-based services and support services that you use, are the entire agreement for the software and
support services.
18. APPLICABLE LAW
a. United States. If you acquired the software in the United States, Washington state law governs the
interpretation of this agreement and applies to claims for breach of it, regardless of conflict of laws principles.
The laws of the state where you live govern all other claims, including claims under state consumer protection
laws, unfair competition laws, and in tort.
b. Outside the United States. If you acquired the software in any other country, the laws of that country apply.
32

English
MICROSOFT SOFTWARE LICENSE TERMS FOR:
Windows® Embedded POSReady 2009
These license terms are an agreement between you and SEIKO EPSON CORPORATION. Please read them. They apply
to the software included on this device. The software also includes any separate media on which you received the
software.
The software on this device includes software licensed from Microsoft Corporation or its affiliate.
The terms also apply to any Microsoft
• Updates,
• Supplements,
• Internet-based services, and
• Support services
for this software, unless other terms accompany those items. If so, those terms apply. If you obtain updates or
supplements directly from Microsoft, then Microsoft, and not SEIKO EPSON CORPORATION, licenses those to you.
As described below, using some features also operates as your consent to the transmission of certain standard
computer information for Internet-based services.
By using the software, you accept these terms. If you do not accept them, do not use or copy the software.
Instead, contact SEIKO EPSON CORPORATION to determine its return policy for a refund or credit.
If you comply with these license terms, you have the rights below.
1.
Use Rights
You may use the software on the device with which you acquired the software.
2.
Additional Licensing Requirements and/or Use Rights
a. Specific Use. SEIKO EPSON CORPORATION designed this device for a Point Of Sale Application. You may only
use the software for that use.
“POS Application” means a software application which provides only the following functions to:
i. process sales and service transactions, scan and track inventory, record and/or transmit customer
information, and perform related management functions; and/or
ii. provide information directly and indirectly to customers about products and services available.
b.
Other Software. You may use other programs with the software as long as the other programs
i. directly support the manufacturer’s specific use for the device, or
ii. provide system utilities, resource management, or anti-virus or similar protection.
Software that provides consumer or business tasks or processes may not be run on the device. This includes
email, word processing, spreadsheet, database, networking/internet browsing, scheduling and personal finance
software. The device may use terminal services protocols to access such software running on a server.
WIN PE Component. You may use the Microsoft® Windows® Pre-installation Environment component (“WinPE
c.
Component”) only for your internal use and solely for purposes of installing the Software on point of service
device. During installation you may use the WinPE component and the set-up components included in the
Software to modify the Software to do the following:
i. install device drivers for known device classes that are not supported by the WinPE Component and/or
the set-up components included in the Software; and
ii. add unattended.xml and/or driverinstall.xml files to the setup folder of the Software and the files referred
to in unattended.xml and/or driverinstall.xml files to enable unattended mode set up of the Software.
d.
Device Connections
i. You may use terminal services protocols to connect the device to another device running business task or
processes software such as email, word processing, scheduling or spreadsheets.
ii. You may allow up to 10 other devices to access the software to use
•File Services,
•Print Services,
•Internet Information Services, and
•Remote access (including connection sharing).
The 10 connection limit applies to devices that access the software indirectly through “multiplexing” or
other software or hardware that pools connections. You may use unlimited inbound connections at
any time via TCP/IP.
e.
FBReseal
i. This Product includes tools known as FBReseal.
ii. Enterprise Customers are permitted to use FBReseal on the Image provided by SEIKO EPSON
CORPORATION or on the Embedded Application and to replicate the Image to match the number of
runtime licenses purchased by that Enterprise Customer. The Image created by FBReseal may only be
installed onto Embedded Systems that already bear the COA for that Licensed Product.
33

English
3. Scope of License. The software is licensed, not sold. This agreement only gives you some rights to use the
software. SEIKO EPSON CORPORATION and Microsoft reserve all other rights. Unless applicable law gives you
more rights despite this limitation, you may use the software only as expressly permitted in this agreement. In
doing so, you must comply with any technical limitations in the software that allow you to use it only in certain
ways. For more information, see the software documentation or contact SEIKO EPSON CORPORATION. Except
and only to the extent permitted by applicable law despite these limitations, you may not:
•Work around any technical limitations in the software;
•Reverse engineer, decompile or disassemble the software;
•Make more copies of the software than specified in this agreement;
•Publish the software for others to copy;
•Rent, lease or lend the software; or
•Use the software for commercial software hosting services.
Except as expressly provided in this agreement, rights to access the software on this device do not give you any
right to implement Microsoft patents or other Microsoft intellectual property in software or devices that access
this device.
You may use remote access technologies in the software such as Remote Desktop to access the software remotely
from another device. You are responsible for obtaining any licenses required for use of these protocols to access
other software.
a.
Remote Boot Feature. If SEIKO EPSON CORPORATION enabled the device Remote Boot feature of the
software, you may
• use the Remote Boot Installation Service (RBIS) tool only to install one copy of the software on your server and
to deploy the software on licensed devices as part of the Remote Boot process; and
• use the Remote Boot Installation Service only for deployment of the software to devices as part of the Remote
Boot process; and
• download the software to licensed devices and use it on them.
For more information, please refer to the device documentation or contact SEIKO EPSON CORPORATION.
b.
Internet-Based Services. Microsoft provides Internet-based services with the software. Microsoft may change
or cancel them at any time.
i. Consent for Internet-Based Services. The software features described below connect to Microsoft or service
provider computer systems over the Internet. In some cases, you will not receive a separate notice when
they connect. You may switch off these features or not use them. For more information about these
features, visit
http://www.microsoft.com/windowsxp/downloads/updates/sp2/docs/privacy.mspx.
By using these features, you consent to the transmission of this information. Microsoft does not use
the information to identify or contact you.
ii. Computer Information. The following features use Internet protocols, which send to the appropriate
systems computer information, such as your Internet protocol address, the type of operating system,
browser and name and version of the software you are using, and the language code of the device where
you installed the software. Microsoft uses this information to make the Internet-based services available
to you.
(1)
Windows Update Feature. You may connect new hardware to the device where you installed the
software. Your device may not have the drivers needed to communicate with that hardware. If so,
the update feature of the software can obtain the correct driver from Microsoft and install it on your
device. You can switch off this update feature.
(2)
Web Content Features. Features in the software can retrieve related content from Microsoft and
provide it to you. To provide the content, these features send to Microsoft the type of operating
system, name and version of the software you are using, type of browser and language code of the
device where the software was installed. Examples of these features are clip art, templates, online
training, online assistance and Appshelp. These features only operate when you activate them. You
may choose to switch them off or not use them.
(3)
Digital Certificates. The software uses digital certificates. These digital certificates confirm the
identity of Internet users sending X.509 standard encrypted information. The software retrieves
certificates and updates certificate revocation lists. These security features operate only when you
use the Internet.
(4)
Auto Root Update. The Auto Root Update feature updates the list of trusted certificate authorities.
You can switch off the Auto Root Update feature.
(5)
Windows Media Player. When you use Windows Media Player, it checks with Microsoft for
• compatible online music services in your region;
• new versions of the player; and
• codecs if your device does not have the correct ones for playing content.
You can switch off this feature. For more information, go to http://microsoft.com/windows/
windowsmedia/mp10/privacy.aspx.
34

English
(6) Windows Media Digital Rights Management. Content owners use Windows Media digital rights
management technology (WMDRM) to protect their intellectual property, including copyrights. This
software and third party software use WMDRM to play and copy WMDRM-protected content. If the
software fails to protect the content, content owners may ask Microsoft to revoke the software’s
ability to use WMDRM to play or copy protected content. Revocation does not affect other content.
When you download licenses for protected content, you agree that Microsoft may include a
revocation list with the licenses. Content owners may require you to upgrade WMDRM to access
their content. Microsoft software that includes WMDRM will ask for your consent prior to the
upgrade. If you decline an upgrade, you will not be able to access content that requires the upgrade.
You may switch off WMDRM features that access the Internet. When these features are off, you can
still play content for which you have a valid license.
iii. Misuse of Internet-based Services. You may not use these services in any way that could harm them or
impair anyone else’s use of them. You may not use the services to try to gain unauthorized access to any
service, data, account or network by any means.
4.
Windows Update Agent (also known as Software Update Services). The software on the device includes
Windows Update Agent (“WUA”) functionality that may enable your device to connect to and access updates
(“Windows Updates”) from a server installed with the required server component. Without limiting any other
disclaimer in this Micrososoft Software License Terms or any EULA accompanying a Windows Update, you
acknowledge and agree that no warranty is provided by MS, Microsoft Corporation or their affiliates with respect
to any Windows Update that you install or attempt to install on your device.
5.
Product Support. Contact SEIKO EPSON CORPORATION for support options. Refer to the support number
provided with the device.
6.
Backup Copy. You may make one backup copy of the software. You may use it only to reinstall the software on
the device.
7.
Proof of License. If you acquired the software on the device, or on a disc or other media, a genuine Certificate of
Authenticity label with a genuine copy of the software identifies licensed software. To be valid, this label must be
affixed to the device, or included on or in SEIKO EPSON CORPORATION’s software packaging. If you receive the
label separately, it is not valid. You should keep the label on the device or packaging to prove that you are
licensed to use the software. To identify genuine Microsoft software, see http://www.howtotell.com.
8.
Transfer to a Third Party
You may transfer the software only with the device, the Certificate of Authenticity label, and these license terms
directly to a third party. Before the transfer, that party must agree that these license terms apply to the transfer
and use of the software. You may not retain any copies of the software including the backup copy.
9.
Not Fault Tolerant. The software is not fault tolerant. SEIKO EPSON CORPORATION installed the software
on the device and is responsible for how it operates on the device.
10.
Restricted Use
The Microsoft software was designed for systems that do not require fail-safe performance. You may not use the
Microsoft software in any device or system in which a malfunction of the software would result in foreseeable risk
of injury or death to any person. This includes operation of nuclear facilities, aircraft navigation or communication
systems and air traffic control.
11.
No Warranties for the Software
The software is provided “as is”. You bear all risks of using it. Microsoft gives no express warranties, guarantees or
conditions. Any warranties you receive regarding the device or the software do not originate from, and are not
binding on, Microsoft or its affiliates. When allowed by your local laws, SEIKO EPSON CORPORATION and
Microsoft exclude implied warranties of merchantability, fitness for a particular purpose and non-infringement.
12.
Liability Limitations
You can recover from Microsoft and its affiliates only direct damages up to $250.00. You cannot recover any other
damages, including consequential, lost profits, special, indirect or incidental damages.
This limitation applies to:
• Anything related to the software, services, content (including code) on third party internet sites, or third party
programs, and
• Claims for breach of contract, breach of warranty, guarantee or condition, strict liability, negligence, or other
tort to the extent permitted by applicable law.
It also applies even if Microsoft should have been aware of the possibility of the damages. The above limitation
may not apply to you because your country may not allow the exclusion or limitation of incidental, consequential
or other damages.
13.
Export Restrictions
The software is subject to United States export laws and regulations. You must comply with all domestic and
international export laws and regulations that apply to the software. These laws include restrictions on
destinations, end users and end use. For additional information, see www.microsoft.com/exporting.
35
 Loading...