


English
User’s Manual / Petunjuk Penggunaan
Di Impor oleh:
PT. Epson Indonesia
Wisma Kyoei Prince Lt.16
Jalan Jenderal Sudirman Kav.3
Jakarta Pusat 10220, Indonesia
No. Reg: I.24.EI2.01605.0710
Tgl. 5 Juli 2010

English
2 TM-T88V User’s Manual

English
User’s Manual
English
All rights reserved. No part of this publication may be reproduced, stored in a retrieval system, or transmitted in
any form or by any means, electronic, mechanical, photocopying, recording, or otherwise, without the prior
written permission of Seiko Epson Corporation. No patent liability is assumed with respect to the use of the
information contained herein. While every precaution has been taken in the preparation of this book, Seiko Epson
Corporation assumes no responsibility for errors or omissions. Neither is any liability assumed for damages
resulting from the use of the information contained herein.
Neither Seiko Epson Corporation nor its affiliates shall be liab
for damages, losses, costs, or expenses incurred by purchaser or third parties as a result of: accident, misuse, or
abuse of this product or unauthorized modifications, repairs, or alterations to this product, or (excluding the U.S.)
failure to strictly comply with Seiko Epson Corporation’s operating and maintenance instructions.
Seiko Epson Corporation shall not be liable against any dam
or any consumable products other than those designated as Original Epson Products or Epson Approved
Products by Seiko Epson Corporation.
EPSON is a registered trademark of Seiko Epson Corporat
NOTICE: Th
Copyright © 2010 by Seiko Epson Corporation, Nagano, Japan.
e contents of this manual are subject to change without notice.
le
to the purchaser of this product or third parties
ges or problems arising from the use of any options
a
ion in Japan and other countries/regions.
TM-T88V User’s Manual 3

English
Important Safety Information
This section presents important information intended to ensure safe and effective
use of this product. Read this section carefully and store it in an accessible
location.
Key to Symbols
The symbols in this manual are identified by their level of importance, as defined
below. Read the following carefully before handling the product.
WARNING:
Warnings must be followed carefully to avoid serious bodily injury.
CAUTION:
Cautions must be observed to avoid minor injury to yourself, damage to your
equipment, or loss of data.
Safety Precautions
WARNING:
Shut down your equipment immediately if it produces smoke, a strange odor, or
unusual noise. Continued use may lead to fire. Immediately unplug the
equipment and contact your dealer or a Seiko Epson service center for advice.
. Improper repair work can be
Never attempt to repair this product your
dangerous.
Never disassemble or modify this product.
result in injury or fire.
Be sure to use the specified power source
source may cause fire.
Do not allow foreign matter to fall into t
objects may lead to fire.
If water or other liquid spills into this equipment, unplug
immediately, and then contact your dealer or a Seiko Epson service center for
advice. Continued usage may lead to fire.
If you open the DIP switch cover, be sure to close th
screw after adjusting the DIP switch. Using this product with the cover open
may cause fire or electric shock.
Do not use aerosol sprayers containing flammable
product. Doing so may cause fire.
Do not connect a telephone line to the drawer kick-out connector; otherw
the printer and the telephone line may be damaged.
self
Tamperin
. Conn
h
e equipment. Penetration by foreign
g with this product may
ection to an improper power
the
power cord
e cover and tighte
g
as inside or around this
n the
ise
CAUTION:
Do not connect cables in ways other than those mentioned in this manual.
Different connections may cause equipment damage and burning.
Be sure to set this equipment on a firm, stable, horizontal surface. The product
y b
reak or cause injury if it falls.
ma
Do not use in locations subject to high humidity or
and dust may cause equipment damage or fire.
dust levels. Excessive humidity
4 TM-T88V User’s Manual

Do not place heavy objects on top of this product. Never stand or lean on this
product. Equipment may fall or collapse, causing breakage and possible injury.
fin
Take care not to injure your
• When you remove printed paper
hen you perform other operations such as loading/replacing roll
• W
To ensure safety, unplug this product before
period.
paper
gers on the manual cutter
leaving it unused for an extended
Caution Labels
The caution labels on the product indicate the following precautions.
English
Do not touch the thermal head and the frame on its side because it can be
very hot after printing.
Touching the manual cutter may cause injury.
CAUTION:
CAUTION:
Restriction of Use
When this product is used for applications requiring high reliability/safety, such
as transportation devices related to aviation, rail, marine, automotive, etc.;
disaster prevention devices; various safety devices, etc.; or functional/precision
devices, etc.; you should use this product only after giving consideration to
including fail-safes and redundancies into your design to maintain safety and
total system reliability. Because this product was not intended for use in
applications requiring extremely high reliability/safety, such as aerospace
equipment, main communication equipment, nuclear power control equipment,
or medical equipment related to direct medical care, etc., please make your own
judgment on this product’s suitability after a full evaluation.
Unpacking
The following items are included with the standard specification printer.
If any item is damaged, contact your dealer.
❏ Printer ❑ Roll paper
❏ Connector cover ❑ Po
❏ Roll paper guide* ❑ Strips
❏ Screw* ❑ AC adapter*
❏ AC cabl
❏ User’s Manual (this manual)
* May not be included depending on the printer model.
e* ❑ TM-T88V Software & Documents Disc*
wer switch cover
for 58 mm paper width × 2*
TM-T88V User’s Manual 5
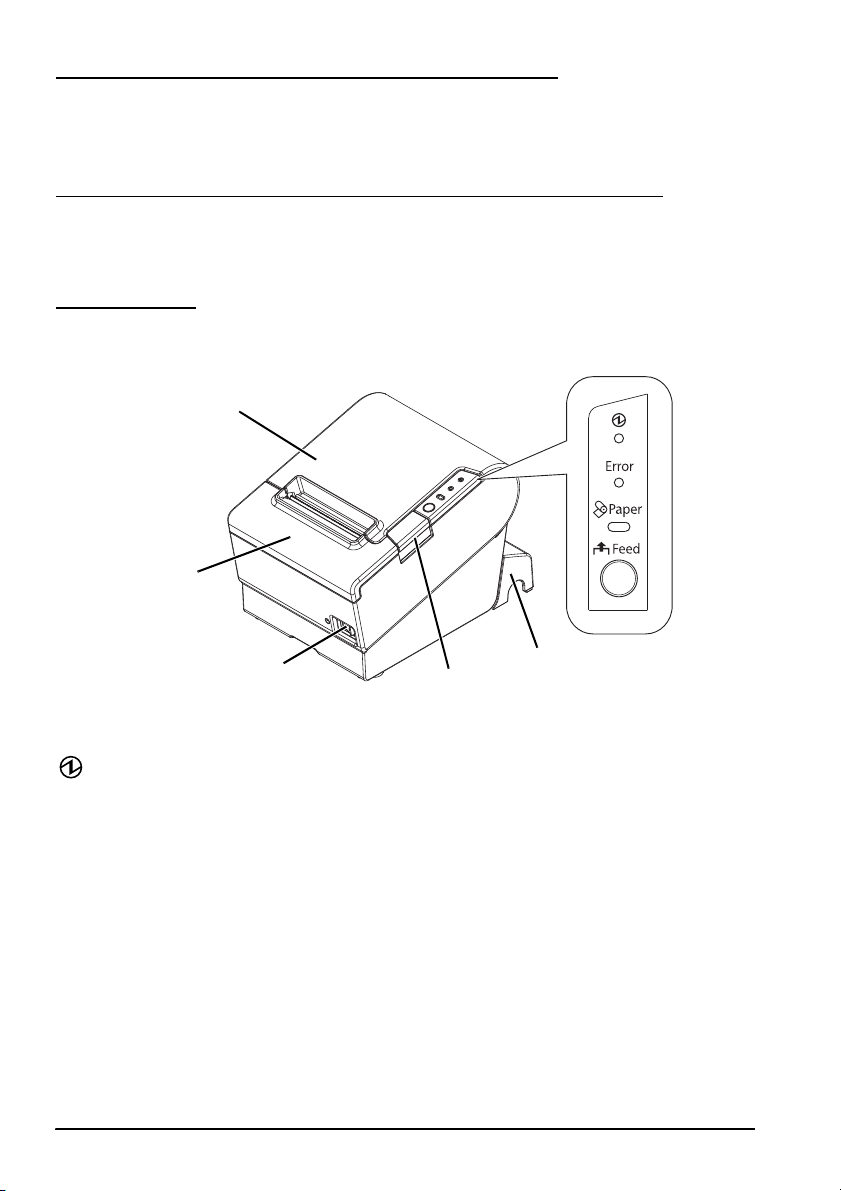
English
Roll paper cover
Cutter cover
Control panel
Connector cover
Power switch
Cover open button
Downloading Drivers, Utilities, and Manuals
The latest versions of drivers, utilities, and manuals can be downloaded from the
following URL.
http://www.epson-pos.com/
Precautions When Installing the Power Supply Cover
A description of EMI standards is on the bottom of the printer. When the optional
power supply cover (OT-BX88V) is installed, it is hard to check it. In such case,
uninstall the power supply cover if necessary.
Part Names
Control Panel
(Power) LED
This LED is on when the printer is on.
Error LED
This indicates an error.
Paper LED
On indicates a paper near end or out. Flashing indicates stand
Feed button
This button feeds paper.
6 TM-T88V User’s Manual
by.
Installing the Printer Horizontally or Vertically
RS-232
IEEE1284
10BASE-T/
100BASE-TX
DK
DC24V
USB
You can install the printer horizontally on a flat surface (with the paper exit on
top) or vertically (with the paper exit at the front) by hanging it on a wall, using
the optional WH-10 hanging bracket set.
WARNING:
When hanging the printer on the wall with the hanging bracket set, be sure to
attach a connector cover to the printer.
Setting Up the Printer
To set up the printer, follow the steps below.
1. Connect the cables.
2. Attach the connector cover.
3. Arrange the cables.
4. Install the roll paper.
Connecting the Cables
CAUTION:
For a serial interface, use a null modem cable.
For a parallel interface, use a
For a USB interface, do not turn on the printer b
1. Make sure the printer is turned off.
2. Connect the power cord and each interface cable to the connectors on the
printer back. For the shape of each connector, see the illustration below.
(Mounted interfaces vary by the printer model.)
n IEEE 1284 cable.
efore installing the printer driver.
English
3. Connect the interface cable to the computer.
4. Insert the power cord plug into a socket.
㩷
TM-T88V User’s Manual 7
English
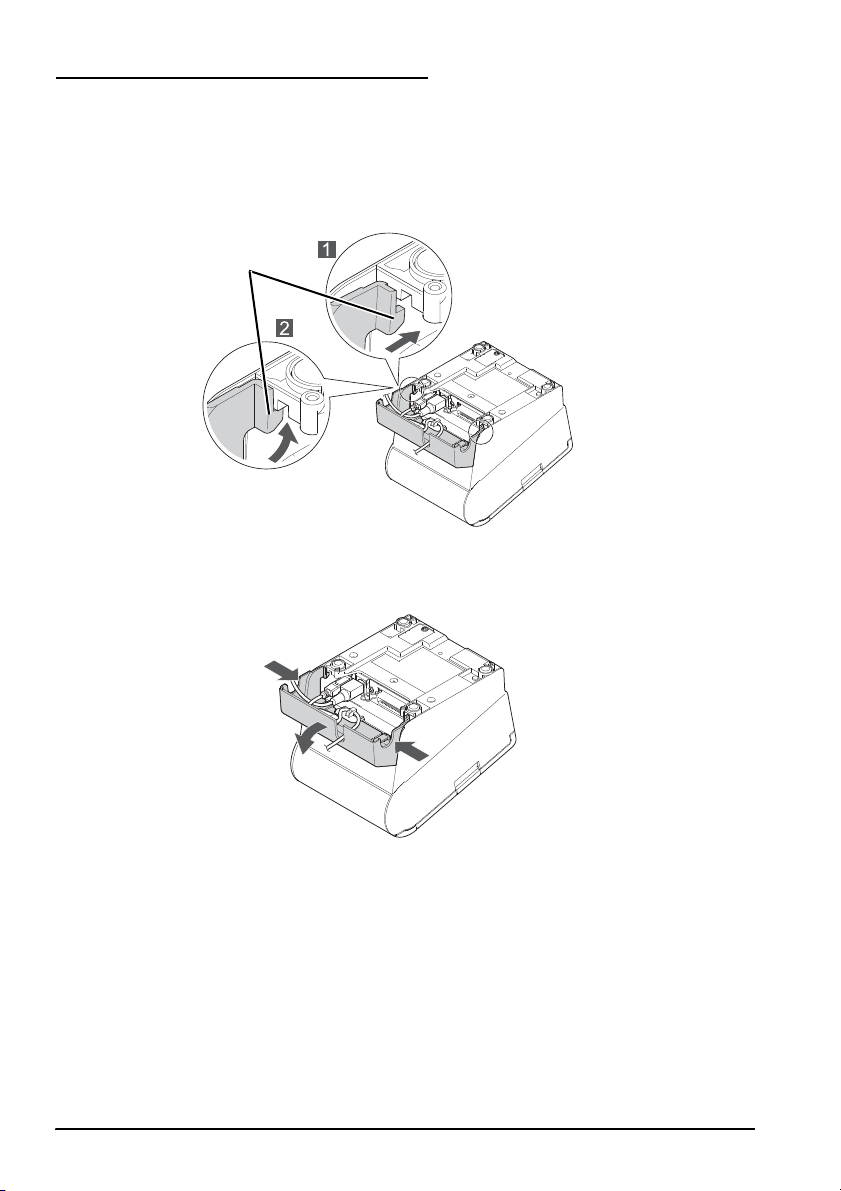
Hook
Attaching the Connector Cover
Follow the steps below to attach the connector cover to protect the cables.
1. Turn over the printer.
2. Position the two hooks on both sides of th
the printer case.
3. Push the connector cover down to click onto the printer case.
e connector cover so that they hook
To remove the connector cover, turn the
cover down while pushing both sides of the connector cover inward to detach the
hooks from the printer case.
r over, and push the connector
printe
8 TM-T88V User’s Manual
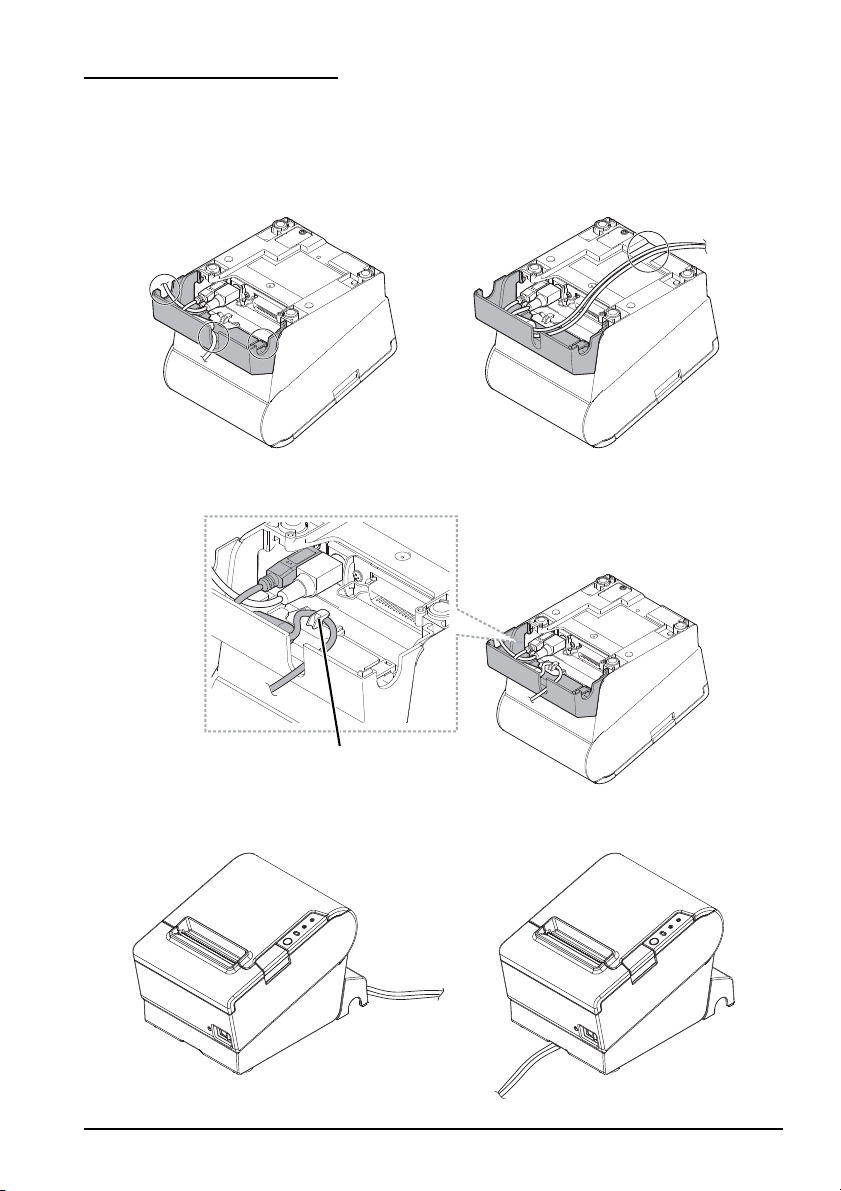
Arranging the Cables
Hook
Pass the cables through cable exits in the connector cover. The connector cover has
cable exits on the back and both sides.
You can also route the serial, USB, or power cable
through the notch in the printer bottom.
If you want to pass the USB cable through the cable exit on the back, fit the cable
under the hook on the printer to prevent the cable from coming off.
s out the front by passing them
English
After the cable arrangement, turn over the
not pinched.
printer, and make
TM-T88V User’s Manual 9
sure the cables are
English
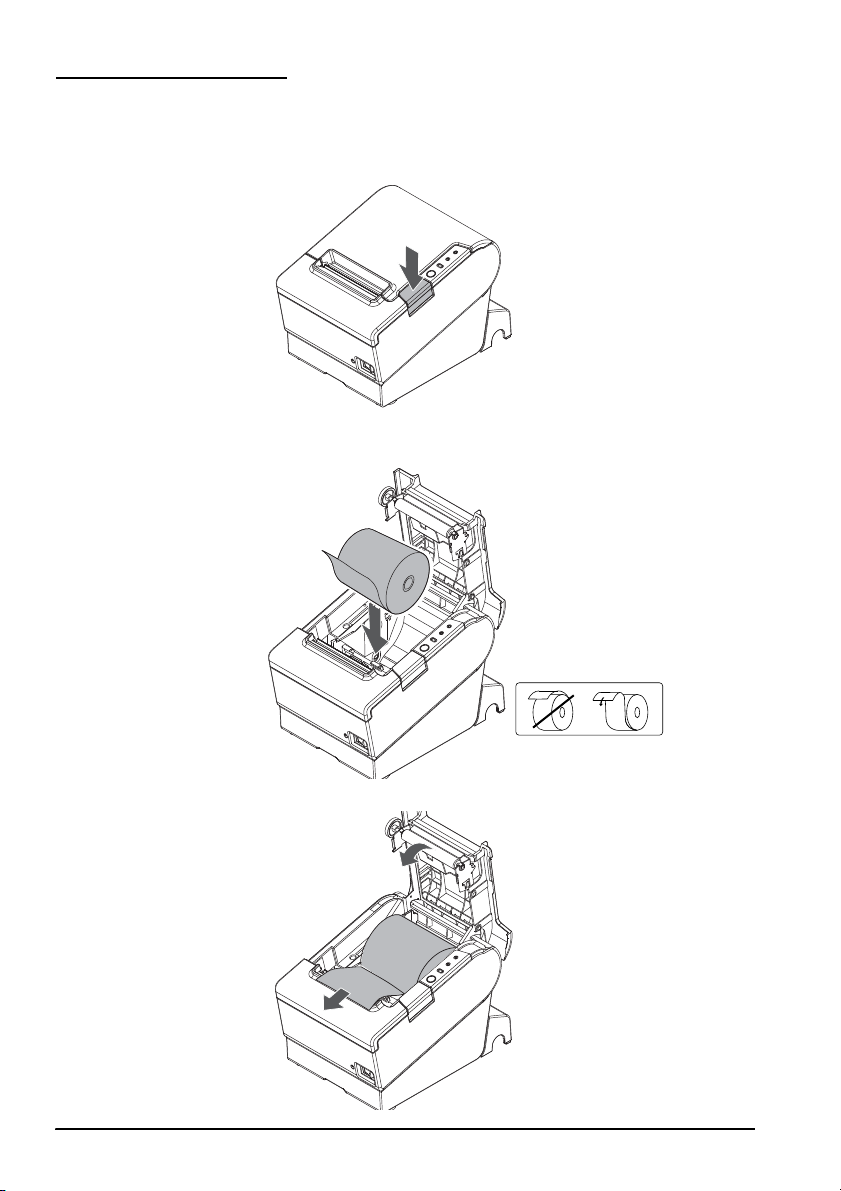
Installing Roll Paper
Follow the steps below to install the roll paper. If you want to change the paper
width by using the roll paper guide, see "Changing the Paper Width" on page 12.
1. Press the cover open button to open the
roll paper cover.
2. Remove the used roll paper core if any, and
direction of the paper is shown in the illustration below.
3. Pull out some paper, and close the roll paper cover.
insert the roll paper. The correct
10 TM-T88V User’s Manual
4. Tear off the paper.
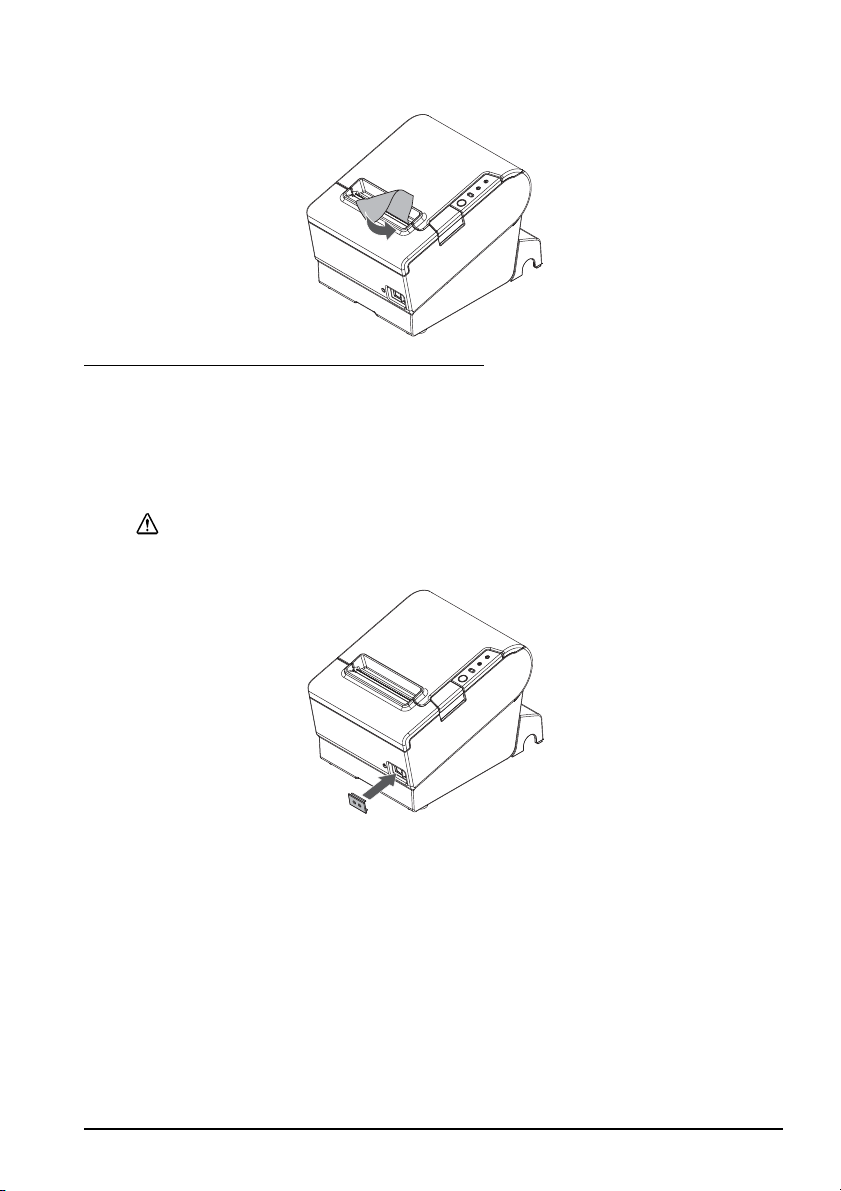
Attaching the Power Switch Cover
The enclosed power switch cover ensures that the power switch is not pressed
accidentally. You can turn on and off the power switch by inserting a sharppointed object in the holes in the power switch cover. To detach the cover, use a
sharp-pointed object.
To use this cover, install it as shown in the illustration below.
WARNING:
If an accident occurs with the power switch cover attached, unplug the power
cord immediately. Continued use may cause fire or shock.
English
TM-T88V User’s Manual 11
English
Hole
Changing the Paper Width
If a roll paper guide is included with your printer, you can change the paper
width from 80 mm to 58 mm by installing the roll paper guide. Follow the steps
below to change the paper width.
CAUTION:
If you once change the paper width from 80 mm to 58 mm, you cannot
change it back to 80 mm.
When changing the paper width, be sure to make the settin
width with utility software for the TM-T88V.
1. Open the roll paper cover.
2. Install the roll paper guide so that the proj
ection on its bottom is aligned with
the hole at the right of the roll paper holder.
g for the paper
3. Tighten the enclosed screw to fix th
12 TM-T88V User’s Manual
e roll paper guide.

4. Paste the enclosed 2 strips along the roll paper guide on the bottom of the roll
Strips for 58 mm
paper width
a
paper holder. Make sure the space between the top edge of strip and the line
of the groove in the roll paper guide (indicated as a in the illustration) is 0.5
mm or less.
5. Install the roll paper correctly.
6. Close the roll paper cover.
Troubleshooting
No lights on the control panel
Check whether the power supply cable is correctly connected to the printer and
the socket.
Error LED on with no printing
❏ Check whether the roll paper cover is closed. If it is open, close it.
❏ If the Paper LE
any roll paper remains.
Error LED flashing with no printing
❏ Check whether a paper jam has occurred. If paper is jammed, remove the
jammed paper referring to the description below and install the roll paper
correctly.
❏ Printing stops if the
❏ For other cases, turn the printer off, and after 10 seconds, back on.
D is on, check whether the roll paper is correctly installed and
head ov
erheats and resumes automatically when it cools.
English
TM-T88V User’s Manual 13

English
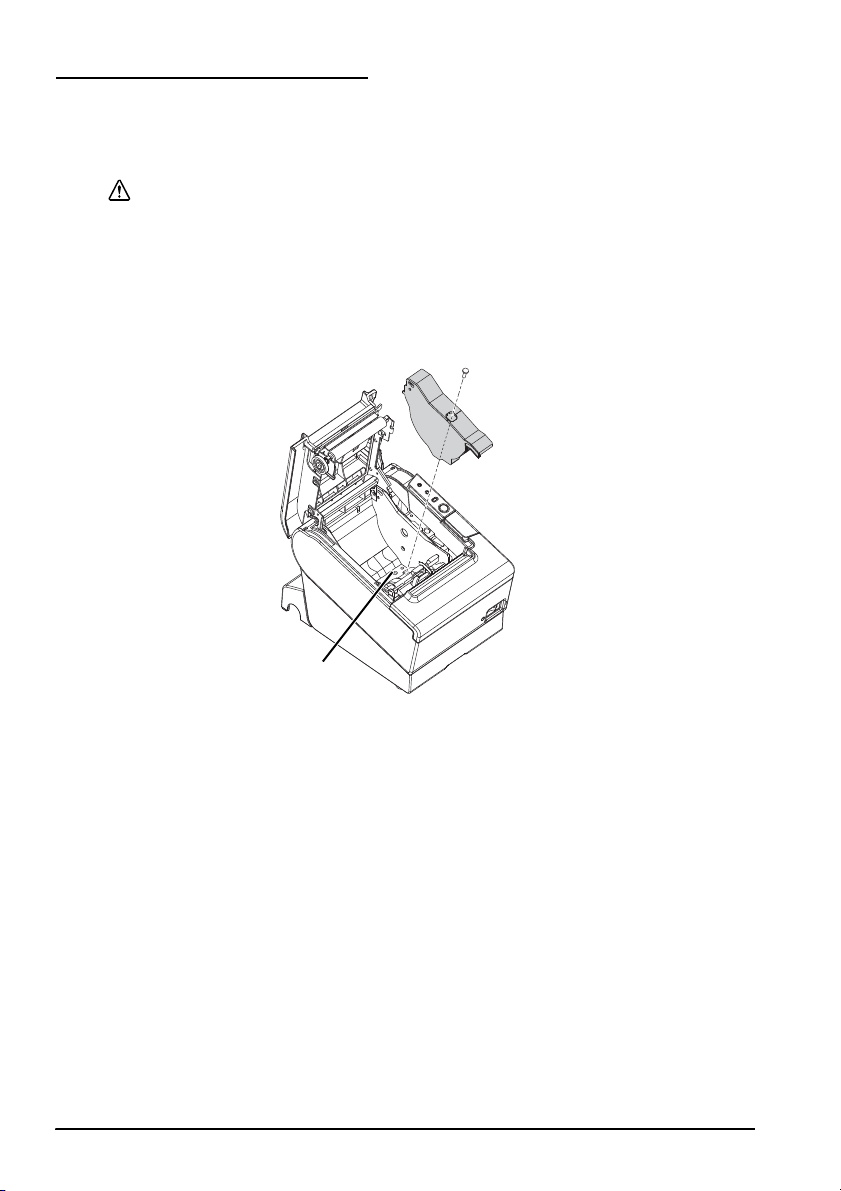
Removing Jammed Paper
When a paper jam occurs, never pull out the paper forcibly. Open the roll paper
cover and remove the jammed paper.
Do not touch the thermal head and the frame on its side (indicated in the circle
in the illustration below) because it can be very hot after printing.
If the roll paper cover does not open, follow the steps below.
1. Turn off the printer.
2. Slide the cutter cover toward the front to open it.
CAUTION:
3. Turn the knob until you see a triangle in the opening. This
blade to the normal position. There is a label near the cutter to assist you.
4. Close the cutter cover.
5. Open the roll paper cover and remove the jamm
14 TM-T88V User’s Manual
returns the cutter
ed paper.

Cleaning
Cleaning the Printer Case
Be sure to turn off the printer, and wipe the dirt off the printer case with a dry
cloth or a damp cloth.
CAUTION:
Never clean the product with alcohol, benzine, thinner, or other such solvents.
Doing so may damage or break the parts made of plastic and rubber.
Cleaning the Thermal Head
English
After printing, the thermal head and the frame on its side (indicated in the
circle in illustration below) can be very hot. Be careful not to touch it and to let
it cool before you clean it. Do not damage the thermal head by touching it
with your fingers or any hard object.
Turn off the printer, open the roll paper cover, and clean the thermal elements of
the thermal head with a cotton swab moistened with an alcohol solvent (ethanol
or IPA).
Epson recommends cleaning the thermal head period
3 months) to maintain rece
CAUTION:
ically (generally every
ipt print quality.
TM-T88V User’s Manual 15

English
DSW1
DSW2
Setting the DIP Switches
CAUTION:
Be sure to turn off the printer before removing the cover of the DIP switches.
Removing it while the printer is turned on may cause problems such as an
electric short, which leads to a malfunction of the printer.
1. Turn off the printer.
2. Turn over the printer.
3. Remove the DIP switch cover by removing the screw.
4. Set the DIP switches using a fine-tipped tool.
Replace the DIP switch cover, and fix it by installing the screw.
5.
The new setting becomes effective after the print
er is turned on.
16 TM-T88V User’s Manual

DIP Switch Tables
English
When using Serial Interface
DIP Switch Bank 1
SW Function ON OFF
1-1 Data receive error Ignored Prints “?”
1-2 Receive buffer
1-3 Handshaking XON/XOFF DTR/DSR
1-4 Data word length 7 bits 8 bits
1-5 Parity check Enabled Disabled
1-6 Parity selection Even Odd
1-7
1-8
ity
capac
Transmission speed (See table A.)
DIP Switch Bank 2
SW Function ON OFF
2-1 Handshaking
(BUSY condition)
2-
2 Do not change
settings
2-3
Print density See Table B
2-4
2-5 Release condition of
receive buffer BUSY
receive buffer
(If
capacity set to 4KB.)
2-6 Do not change
setting.
2-7 I/F pin 6 reset Enabled Disabled
2-8 I/F pin 25 reset Enabled Disabled
Table A
Transmission speed (bps) bits per second SW1-7 SW1-8
*1
38400
4800 OFF ON
9600 ON OFF
19200 OFF OFF
*1: When DIP switches 1-7 and 1-8 are on, the transmission
speed can be selected from one of seven speeds:
2400, 4800, 9600, 19200, 38400, 57600, and 115200 bps
by control commands.
45 bytes 4KB
Receive buffer
full
Fixed to OFF
Releases BUSY
when remaining
receive buffer
capacity
reaches
138 bytes.
Fixed to OFF
Offline or
Receive buffer
full
Releases BUSY
when remaining
receive buffer
capacity
reaches
256 bytes.
ON ON
When using Parallel Interface
DIP Switch Bank 1
SW Function ON OFF
1-1 Auto line feed Always
1-2 Receive buffer
capacity
1-3 Select paper sensors
to output paper-end
signals (default value
of a command) from
parallel I/F.
1-4 Error signal output
from parallel
1-5~
1-8
enabled
45 bytes 4KB
Disabled Roll paper end
Disabled Enabled
I/F
Undefined
DIP Switch Bank 2
SW Function ON OFF
2-1 Handshaking
(BUSY condition)
2-2 Do not change
settings
2-3
Print density See Table B
2-4
2-5 Release condition of
receive buffer BUSY
(If receive buffer
capacity set to 4KB.)
2-6
Do not change
2-7
setting.
2-8 I/F pin 31 reset
signal (Do not
change setting)
Receive buffer
fu
ll
Releases BUSY
when remaining
receive buffer
capacity
reaches
138 bytes.
Table B
Print density/low power SW2-3 SW2-4
Print density “Normal” OFF OFF
Print density “Medium” ON OFF
Print density “Dark” OFF ON
Do not set ON ON
Always disabled
sensor enabled,
Roll paper nearend sensor
enabled
Offline or
Receive buffer
l
ful
Fixed to OFF
Releases BUSY
when remaining
receive buffer
capacity
reaches
256 bytes.
Fixed to OFF
Fixed to ON
TM-T88V User’s Manual 17

English
When using USB/Ethernet/Wireless LAN Interface
DIP Switch Bank 1
SW Function ON OFF
1-1 Auto line feed Always
1-2 Receive buffer
capa
city
1-3~
*1
1-8
*1: When using the USB interface on a model with a serial
or parallel interface, the function of DIP switch 1-8 is as
follows.
SW Function ON OFF
1-8 Power saving function
for USB
enabled
45 bytes 4KB
Undefined
Disabled Enabled
Alwa
ys disabled
DIP Switch Bank 2
SW Function ON OFF
2-1 Handshaking
(BUSY condition)
2-2 Do not change
settings
2-3
Print density See Table B
2-4
2-5 Release condition of
receive buffer
(If receive buffer
capacity set to 4KB.)
2-6
Do not change
2-7
setting.
2-8 Do not change
setting.
*2: Whether DIP switch 2-8 is set to ON or OFF is
dependent on the printer model.
BUSY
Receive buffer
fu
ll
Fixed to OFF
Releases BUSY
when remaining
receive buffer
capacity
reaches
138 bytes.
Fixed to OFF
Offline or
Receive buffer
full
Releases BUSY
when remaining
receive buffer
capacity
reaches
256 bytes.
*
2
Table B
Print density/low power SW2-3 SW2-4
Print density “Normal” OFF OFF
Print density “Medium” ON OFF
Print density “Dark” OFF ON
Do not set ON ON
Specifications
80 mm paper width 58 mm paper width
Printing method Thermal line printing
Dot density 180 dpi ×180 dpi [dots per 25.4 mm {1"}]
Printing direction Unidirectional with friction feed
Printing width 72 mm {2.83"}, 512 dot positions 50.8 mm {2.0"}, 360 dot positions
Characters per line
Font A: 42; Font B: 56 Font A: 30; Font B: 40
(default)
Character spacing
Font A: 0.28 mm {.01"} (2 dots), Font
B: 0.28 mm {.01"} (2 dots)
(default)
Character size Standard/Double-height/Double-width/Double-width and Dou
Font A: 1.41 × 3.39/1.41 × 6.77/2.82 × 3.39/2.82 × 6.77 mm
Font B: 0.99 × 2.40/0.99 × 4.80/1.98 × 2.40/1.98 × 4.80 mm
Character structure Font A (default): 12 × 24; Font B: 9 × 17 (including 2-dot horizontal spacing)
Number of characters Alphanumeric characters: 95; International character sets: 18 sets
Extended graphics: 128 × 43 pages (including user-defined page)
Printing speed 300 mm/s {11.8"/s} max.; 70.9 lps (4.23 mm {1/6"} feed)
Ladder bar code and 2D code: 100 mm/s {2.4"/s}
The above speed values are approximate.
The values are when the printer prints with density “Normal” at 24 V and 25°C {77°F}
Speed is adjusted automatically depending on the voltage applied and head
temperature.
*1
ble-height
18 TM-T88V User’s Manual

English
80 mm paper width 58 mm paper width
*1
Paper feed speed Approx. 200 mm/s {approx. 7.9"/s}
(continuous paper feed with the Feed button.)
Line spacing (default) 4.23 mm {1/6"}
Roll paper
(single-ply)
Width 79.5 mm ± 0.5 mm {3.13" ± 0.02"} 57.5 mm ± 0.5 mm {2.26" ± 0.02"}
Diameter Maximum outside diameter: 83 mm {3.27"}
Spool Spool diameter: Inside: 12 mm {0.47"}; Outside: 18 mm {0.71"}
Thermal paper type NTP080-80 NTP058-80
Interface
ompatible)
(c
Serial (RS-232)/Parallel (IEEE1284)/Ethernet (10BASE-T/100BASE-TX)/
Wireless LAN (IEEE802.11b)/USB [Compliance: USB 2.0, Communication
speed: Full-speed (12 Mbps)]/USB Plus Power [Communication speed:
Full-speed (12 Mbps)]
Receive buffer 4KB/45 bytes
Cash drawer function 2 drives
Supply voltage*
2
DC + 24 V ± 7%
Current consumption Mean: Approx. 1.8A
Temperature Operating: 5 to 45°C {41 to 113°F}
Storage: –10 to 50°C {14 to 122°F}, except for paper
Humidity Operating: 10 to 90% RH
Storage: 10 to 90% RH, except for paper
Overall dimensions 148 × 145 × 195 mm {5.83 × 5.71 × 7.68"} (H × W × D)
Weight (mass) Approx. 1.6 kg {3.5 lb}
lps: lines per second dpi: dots per 25.4 mm (dots per inch)
*1: The values are those when the paper width is ch
and making the paper width setting with utility software for the TM-T88V. The roll paper guide may
not be included depending on the printer model.
*2: Be sure to use a safety-standards-applied power source that meets the following specifications.
Rated output: 24 V/2.0 A or more, Maximum output: 240 VA or less
anged to 58 mm by installing the roll paper guide
TM-T88V User’s Manual 19

English
20 TM-T88V User’s Manual

Bahasa Indonesia
Petunjuk Penggunaan
English
Semua hak cipta dilindungi. Dilarang mereproduksi bagian mana pun dari publikasi ini, atau menyimpannya
dalam sistem pengambilan atau mengirimkannya dalam bentuk apa pun atau cara apa pun, elektronik, mekanis,
memfotokopi, merekam, atau cara lainnya, tanpa izin tertulis sebelumnya dari Seiko Epson Corporation. Tidak
ada pertanggungjawaban hukum atas penggunaan informasi yang terdapat di dalam dokumen ini. Meskipun
persiapan buku ini telah dilakukan dengan sangat hati-hati, namun Seiko Epson Corporation tidak bertanggung
jawab atas kesalahan atau kelalaian. Juga tidak ada pertanggungjawaban apa pun yang ditanggung atas
kerusakan yang diakibatkan oleh penggunaan informasi yang terdapat di dalamnya.
Baik Seiko Epson Corporation maupun afiliasinya tidak akan bertangg
pihak ketiga atas kerusakan, kehilangan, biaya, atau pengeluaran yang dikenakan oleh pembeli atau pihak ketiga
sebagai akibat: kecelakaan, kesalahan penggunaan, atau penyalahgunaan produk ini atau modifikasi, perbaikan,
perubahan yang tidak resmi pada produk ini, atau (tidak termasuk A.S.) kegagalan dalam mematuhi instruksi
pengoperasian dan perawatan Seiko Epson Corporation.
Seiko Epson Corporation tidak akan bertanggung jawab terhadap kerus
penggunaan opsi apa pun atau produk habis pakai apa pun selain yang ditetapkan sebagai Produk Epson Asli
atau Produk yang Disetujui Epson oleh Seiko Epson Corporation.
EPSON adalah merek dagang terdaftar dari Seiko Epson
PEMBERITAHUAN: Isi manual in
Hak cipta © 2010 oleh Seiko Epson Corporation, Nagano, Jepang.
i dapat berubah tanpa pemberitahuan.
orporation di Jepang dan negara/wilayah lainnya.
C
u
ng jawab pada pembeli produk ini atau
a
kan atau masalah yang timbul dari
TM-T88V Petunjuk Penggunaan 21

Informasi Keselamatan Penting
Bagian ini menyajikan informasi penting yang dimaksudkan untuk memastikan
penggunaan produk ini dengan aman dan efektif. Baca bagian ini dengan
saksama dan simpanlah di lokasi yang mudah diakses.
Kunci untuk Simbol
Simbol dalam manual ini diidentifikasi menurut tingkat kepentingannya, seperti
didefinisikan di bawah. Baca peringatan berikut dengan saksama sebelum
menangani produk.
PERINGATAN:
Peringatan harus dipatuhi dengan saksama untuk menghindari cedera parah.
PERHATIAN:
Perhatian harus dipatuhi untuk menghindari cedera ringan pada diri Anda,
kerusakan pada peralatan, atau hilangnya data.
Tindakan Pencegahan Keselamatan
PERINGATAN:
Matikan peralatan Anda segera jika produk ini mengeluarkan asap, bau aneh,
atau suara bising yang tidak seperti biasanya. Jika produk terus digunakan,
dapat mengakibatkan kebakaran. Cabut stopkontak peralatan dengan
segera dan hubungi dealer Anda atau pusat layanan Seiko Epson untuk
meminta nasihat.
Jangan sekali-kali berusaha memperbaiki produk ini sendiri. Pekerjaan
perbaikan
Jangan sekali-kali membongkar atau memodifikasi produk ini. Dilarang
me
kebakaran.
Pastikan menggunakan sumber daya khusus. Koneksi ke sumber daya
tidak tepat bisa mengakibatkan kebakaran.
Jangan biarkan ada benda asing masuk
benda asing dapat mengakibatkan kebakaran.
Jika air atau cairan lainnya tumpah ke dalam peralatan ini, segera cabut
kab
mendapatkan nasihat. Jika produk terus digunakan, dapat mengakibatkan
kebakaran.
Jika Anda membuka penutup sakelar DIP, pastikan un
tersebut dan mengencangkan sekrup setelah menyesuaikan sakelar DIP.
Menggunakan produk ini dengan penutup masih terbuka bisa mengakibatkan
kebakaran atau kejutan listrik.
Jangan menggunakan penyemprot aerosol yang ber
terbakar di dalam atau di sekitar produk ini. Jika dilakukan dapat
mengakibatkan kebakaran.
Jangan menyambungkan kabel telepon ke konektor laci;
printer dan kabel telepon bisa rusak.
yang
tidak tepat dapat menjadi berbahaya.
ngo
tak-atik produk ini karena dapat menyebabkan cedera atau
ke dalam peralatan.
e
l daya, lalu hubungi dealer Anda atau pusat layanan Seiko Epson untuk
tuk men
si gas yang mudah
i
Masuknya
utup penutup
j
ika disambungkan,
yan
g
22 TM-T88V Petunjuk Penggunaan

PERHATIAN:
Jangan menyambung kabel dengan cara selain yang disebutkan dalam
manual ini. Sambungan dengan cara yang berbeda dapat mengakibatkan
peralatan rusak atau terbakar.
an ini pada permukaan datar, kokoh dan
Pastikan untuk menyetel pera
stabil. Produk bisa pecah atau mengakibatkan cedera jika jatuh.
Jangan gunakan produk ini di lokasi dengan tingkat kelembapan dan debu
nggi.
Kelembapan dan debu yang berlebihan bisa mengakibatkan peralatan
ti
rusak atau terbakar.
Jangan meletakkan benda berat di atas produk ini. Jangan sekali-kali berdiri
bersandar pada produk ini. Peralatan bisa jatuh atau roboh, peralatan
u
ata
bisa pecah atau kemungkinan menimbulkan cedera.
Berhati-hatilah agar jari Anda tidak
• Ketika Anda melepaskan kertas yang dicetak
etika Anda melakukan operasi lainnya seperti memasang/
• K
Untuk memastikan keselamatan, cabut stop
meninggalkannya dalam keadaan tidak terpakai untuk periode yang lama.
mengganti kertas kasir
lat
terluka terkena pemotong
k produk ini sebelum
konta
manual
Label Perhatian
Label perhatian pada produk ini mengindikasikan perhatian berikutnya.
Jangan sentuh kepala termal dan rangka di pinggirnya karena kepala termal
bisa menjadi sangat panas setelah pencetakan.
PERHATIAN:
PERHATIAN:
Menyentuh pemotong manual bisa mengakibatkan cedera.
Batasan Penggunaan
Apabila produk ini digunakan untuk aplikasi yang memerlukan keandalan/
keselamatan tinggi seperti alat transportasi yang terkait dengan penerbangan,
kereta api, laut, atau otomotif dll.; alat penanggulangan bencana; beragam alat
keselamatan dll.; atau alat fungsional/presisi dll., Anda harus menggunakan
produk ini hanya setelah memberi pertimbangan termasuk gagal-aman dan
redudansi ke dalam rancangan Anda untuk menjaga keselamatan dan keandalan
sistem secara keseluruhan. Karena produk ini tidak dimaksudkan untuk
penggunaan pada aplikasi yang memerlukan keandalan/keselamatan yang
sangat tinggi seperti peralatan ruang angkasa, peralatan komunikasi utama,
peralatan pengontrol tenaga nuklir, atau peralatan medis terkait dengan
perawatan medis dll., buatlah pertimbangan sendiri atas kesesuaian produk ini
setelah melakukan evaluasi menyeluruh.
TM-T88V Petunjuk Penggunaan 23

Membuka kemasan
Penutup kertas kasir
Penutup pemotong
Panel kontrol
Penutup konektor
Sakelar daya
Tombol buka penutup
Item berikut disertakan untuk printer dengan spesifikasi standar.
Jika ada item yang rusak, hubung
❏ Printer ❑ Kerta
❏ Penutup konektor ❑ Penu
❏ Pemandu kertas kasir* ❑ Pita untuk kertas dengan lebar 58 mm × 2*
❏ Sekrup* ❑ Adadpt
❏ Kabel AC* ❑ TM-T88V Software & Documents Disc*
❏ Petunjuk Penggunaan (manual ini)
* Mungkin tidak disertakan tergantu
i dealer Anda.
s kasir
tup sakelar daya
or AC*
ng pada model printer.
Mendownload Driver, Utilitas, dan Manual
Versi terbaru driver, utilitas, dan manual dapat didownload dari URL berikut.
http://www.epson-pos.com/
Tindakan Pencegahan Ketika Memasang Penutup Sumber Daya
Keterangan tentang standar EMI terdapat di bagian bawah printer. Jika penutup
sumber daya opsional (OT-BX88V) terpasang, sulit untuk memeriksanya. Jika
demikian, copotlah penutup sumber daya tersebut jika perlu.
Nama Komponen
24 TM-T88V Petunjuk Penggunaan

Panel Kontrol
LED (Daya)
LED ini menyala ketika printer hidup.
LED Error (Kesalahan)
Ini mengindikasikan kesalahan.
LED Paper (Kertas)
Menyala mengindikasikan kertas hampir
mengindikasikan siaga.
Tombol Feed (Umpan)
Tombol ini mengumpankan kertas.
is atau keluar. Berkedip
hab
Memasang Printer secara Horizontal dan Vertikal
Anda dapat memasang printer secara horizontal pada permukaan datar (dengan
posisi kertas keluar di atas) atau secara vertikal (dengan posisi kertas keluar di
depan) dengan menggantungnya di dinding, menggunakan perangkat braket
gantung WH-10.
PERINGATAN:
Apabila menggantung printer di dinding dengan perangkat braket gantung,
pastikan untuk memasang penutup konektor pada printer.
Menyiapkan Printer
Untuk menyiapkan printer, ikuti langkah-langkah di bawah.
1. Sambungkan kabel.
2. Pasang penutup konektor.
3. Atur kabel.
4. Pasang kertas kasir.
TM-T88V Petunjuk Penggunaan 25

Menyambungkan Kabel
㩷
RS-232
IEEE1284
10BASE-T/
100BASE-TX
DK
DC24V
USB
PERHATIAN:
Untuk antarmuka seri, gunakan kabel modem nol.
Untuk antarmuka paralel, gunakan kabel IEEE 1284.
Untuk antarmuka USB, jangan hidupkan printer sebelum menginstal driver
prin
ter.
1. Pastikan printer mati.s
2. Sambungkan kabel daya dan kabel masing-masin
pada bagian belakang printer. Untuk bentuk masing-masing konektor, lihat
ilustrasi di bawah. (Antarmuka dipasang berbeda menurut model printer.)
g antarmuka ke konektor
3. Sambungkan kabel antarmuk
a ke komputer.
4. Masukkan steker kabel daya ke dalam soket.
26 TM-T88V Petunjuk Penggunaan

Memasang Penutup Konektor
Pengait
Ikuti langkah-langkah di bawah untuk memasang penutup konektor guna
melindungi kabel.
1. Putar printer.
2. Atur posisi kedua pengait pada kedua sisi penutup konektor sehingga
pengait tersebut mengait kotak printer.
3. Tekan penutup konektor ke bawah agar masuk ke kotak printer.
Untuk melepaskan penutup konektor, balik printer,
ke bawah sambil menekan dua sisi penutup konektor ke dalam untuk melepaskan
pengait tersebut dari kotak printer.
dan tekan penutup konektor
TM-T88V Petunjuk Penggunaan 27

Mengatur Kabel
Pengait
Keluarkan kabel melalui keluaran kabel pada penutup konektor. Penutup
konektor mempunyai keluaran kabel pada bagian belakang dan kedua sisinya.
Anda juga dapat mengarahkan kabel seri, USB, atau daya keluar ke depan
mengeluarkannya melalui celah pada bagian bawah printer.
Jika Anda ingin mengeluarkan kabel USB melalui keluaran kabel di bagian
belakang printer, tempatkan kabel di bawah pengait pada printer untuk
mencegah kabel lepas.
dengan
Setelah pengaturan kabel, putar printer, dan pastikan kabel tidak terjepit.
28 TM-T88V Petunjuk Penggunaan

Memasang Kertas Kasir
Ikuti langkah-langkah di bawah untuk memasang kertas kasir. Jika Anda ingin
mengubah lebar kertas dengan menggunakan pemandu kertas kasir, lihat
"Mengubah Lebar Kertas" lihat di halaman 31.
1. Tekan tombol buka penutup untuk membuk
penutup kertas kasir.
a
2. Lepaskan bagian tengah kertas kasir beka
kasir. Arah kertas yang benar tampak pada ilustrasi di bawah.
3. Tarik sebagian kertas, dan tutuplah penutup kertas kasir.
s, jika ada, dan masukkan kertas
TM-T88V Petunjuk Penggunaan 29

4. Sobek kertas tersebut.
Memasang Penutup Sakelar Daya
Penutup sakelar daya yang disertakan memastikan agar sakelar daya tidak
ditekan dengan tidak sengaja. Anda dapat menghidupkan dan mematikan sakelar
daya dengan memasukkan benda lancip tajam di lubang pada penutup sakelar
daya. Untuk melepaskan penutup, gunakan benda runcing tajam.
Untuk menggunakan penutup ini, pasang seperti tampak dalam ilustrasi di
bawah.
PERINGATAN:
Jika terjadi kecelakaan pada saat penutup daya terpasang, cabut kabel
daya segera. Jika produk terus digunakan, bisa mengakibatkan kebakaran
atau kejutan listrik.
30 TM-T88V Petunjuk Penggunaan

Mengubah Lebar Kertas
Lubang
Jika pemandu kertas kasir disertakan dengan printer, Anda dapat mengubah
lebar kertas dari 80 mm ke 58 mm dengan memasang pemandu kertas kasir. Ikuti
langkah-langkah di bawah untuk mengubah lebar kertas.
PERHATIAN:
Jika Anda telah mengubah lebar kertas dari 80 mm ke 58 mm, Anda tidak
dapat mengubahnya kembali ke 80 mm.
Saat mengubah lebar kertas, pastikan untuk membuat pen
kertas dengan perangkat lunak utilitas untuk TM-T88V.
1. Buka penutup kertas kasir.
2. Pasang pemandu kertas kasir sehingga tonjolan pa
dengan lubang di sisi kiri penahan kertas kasir.
gaturan bagi lebar
da bagian bawahnya lurus
3. Kencangkan sekrup yang disertakan un
TM-T88V Petunjuk Penggunaan 31
tuk merapikan pemandu kertas kasir.

4. Rekatkan kedua pita di sepanjang pemandu kertas kasir di bagian bawah
Pita untuk lebar
kertas 58 mm
a
penahan kertas kasir. Pastikan jarak antara tepi atas pita dan garis lekuk
pemandu kertas kasir (ditandai dengan huruf a pada ilustrasi) adalah 0,5 mm
atau kurang.
5. Pasang kertas kasir dengan benar.
6. Tutuplah penutup kertas kasir.
Pemecahan Masalah
Kontrol panel tidak menyala
Periksa apakah kabel sumber daya tersambung dengan benar ke printer dan
soket.
LED Error (Kesalahan) menyala tetapi tidak ada pencetakan
❏ Periksa apakah penutup kertas kasir tertutup. Jika terbuka, tutuplah.
❏ Jika LED Paper (Kertas) me
dengan benar dan ada kertas kasir lainnya yang tersisa.
LED Error (Kesalahan) berkedip tetapi tidak ada pencetakan
❏ Periksa apakah ada kertas macet. Jika kertas macet, lepaskan kertas yang
macet dengan mengacu pada uraian di bawah dan pasang kertas kasir
dengan benar.
❏ P
encetakan berhenti jika kepala cetak terlalu panas dan melanjutkan kembali
secara otomati
❏ Untuk kasus lainnya, matika
s jika sudah dingin.
nyala, periksa apakah kertas kasir terpasang
n printer, dan setelah 10 detik, hidupkan lagi.
Melepaskan Kertas Yang Macet
Jika ada kertas macet, jangan sekali-kali menarik kertas dengan paksa. Buka
penutup kertas kasir dan buang kertas yang macet.
32 TM-T88V Petunjuk Penggunaan

Jangan sentuh kepala termal dan rangka di pinggirnya (ditandai dengan
lingkaran pada ilustrasi di bawah) karena kepala termal bisa sangat panas
setelah pencetakan.
Jika penutup kertas kasir tidak terbuka, ikuti langkah-langkah di bawah.
1. Matikan printer.
u
PERHATIAN:
2. Geser penutup pemotong ke depan
ntuk membukanya.
3. Putar tombol sampai Anda melihat tanda segi tiga pada lubang. Langkah ini
mengem
balikan pisau pemotong ke posisi normal. Terdapat label di dekat
pemotong untuk membantu Anda.
4. Tutuplah penutup pemotong.
5. Buka penutup kertas kasir dan buang kertas yang macet.
TM-T88V Petunjuk Penggunaan 33

Membersihkan
Membersihkan Kotak Printer
Pastikan untuk mematikan printer, dan mengelap kotoran pada kotak printer
dengan kain kering atau kain lembap.
PERHATIAN:
Jangan sekali-kali membersihkan produk ini dengan alkohol, bensin, tiner, atau
cairan pelarut lainnya. Membersihkan produk ini dengan cairan pelarut dapat
membuat komponen yang terbuat dari plastik atau karet rusak atau retak.
Membersihkan Kepala Termal
Setelah mencetak, kepala termal dan rangka di pinggirnya (ditandai dengan
lingkaran pada ilustrasi di bawah) bisa menjadi sangat panas. Hati-hatilah
jangan sampai menyentuhnya dan biarkan dingin sebelum Anda
membersihkannya. Jangan sampai membuat kepala termal rusak dengan
menyentuhnya dengan jari Anda atau benda keras lainnya.
Matikan printer, buka penutup kertas kasir, dan bersihkan elemen termal pada
kepala termal dengan kapas penyeka yang dibasahi dengan pelarut alkohol
(etanol atau IPA).
Epson merekomendasikan agar kepala termal dibersihk
(biasanya setiap 3 bulan) untuk menjaga kualitas cetakan kuitansi.
PERHATIAN:
n secara berkala
a
34 TM-T88V Petunjuk Penggunaan

Menyetel Sakelar DIP
DSW1
DSW2
PERHATIAN:
Pastikan untuk mematikan printer sebelum membuka penutup sakelar DIP.
Melepasnya ketika printer hidup bisa mengakibatkan masalah seperti
hubungan pendek, yang mengakibatkan malfungsi printer.
1. Matikan printer.
2. Putar printer.
3. Lepaskan penutup sakelar DIP dengan melepas baut.
4. Atur sakelar DIP dengan alat yang uju
5. Ganti penutup sakelar DIP, dan pasanglah dengan memasang baut.
Pengaturan baru akan berlaku setel
ngnya runcing.
ah printer dihidupkan.
TM-T88V Petunjuk Penggunaan 35

Tabel Sakelar DIP
Apabila menggunakan Antarmuka Seri
Sakelar DIP Bank 1
SW Fungsi HIDUP MATI
1-1 Kesalahan
penerimaan data
1-2 Kapasitas penyangga
penerima
1-3 Jabatan tangan XHIDUP/
1-4 Panjang kata data 7 bit 8 bit
1-5 Pemeriksaan paritas Aktif Nonaktif
1-6 Pemilihan paritas Genap Ganjil
1-7
Kecepatan transmisi (Lihat tabel A.)
1-8
Sakelar DIP Bank 2
SW Fungsi HIDUP MATI
2-1 Jabatan tangan
(Kondisi SIBUK)
2-2 Jangan ubah
pengaturan
2-3
Kepadatan cetak Lihat Tabel B
2-4
2-5 Kondisi rilis
penyangga
penerima SIBUK
(Jika kapasitas
penyangga
penerima disetel ke
4KB.)
2-6 Jangan ubah
pengaturan.
2-7 Reset I/F pin 6 Aktif Nonaktif
2-8 Reset I/F pin 25 Aktif Nonaktif
Tabel A
Kecepatan transmisi (bpd)-bit per detik SW1-7 SW1-8
*1
38400
4800 MATI HIDUP
9600 HIDUP MATI
19200 MATI MATI
*1: Kecepatan transmisi dapat dipilih mulai satu dari tujuh
kecepatan, apabila sakelar DIP 1-7 dan 1-8 hidup:
2400, 4800, 9600, 19200, 38400, 57600, dan 115200 bpd
menurut perintah kontrol.
Diabaikan Mencetak
45 bit 4KB
XMATI
Penyangga
penerima
penuh
Merilis SIBUK jika
sisa kapasitas
penyangga
penerima
mencapai
138 bit.
Putus jaringan
atau
Penyangga
penerima
penuh
Ditetapkan ke MATI
Merilis SIBUK jika
sisa kapasitas
penyangga
penerima
mencapai
256 bit.
Ditetapkan ke MATI
HIDUP HIDUP
“?”
DT
R/DSR
Apabila menggunakan Antarmuka Paralel
Sakelar DIP Bank 1
SW Fungsi HIDUP MATI
1-1 Umpan baris otomatis Selalu aktif Selalu nonaktif
1-2 Kapasitas
penyangga
penerima
1-3 Pilih sensor kertas
untuk menghasilkan
sinyal kertas habis
(nilai default
perintah) dari
antarmuka paralel.
1-4 Output sinyal
kesalahan dari
antarmuka paralel
~
1-5
1-8
Sakelar DIP Bank 2
SW Fungsi HIDUP MATI
2-1 Jabatan tangan
(Kondisi SIBUK)
2-2 Jangan ubah
pengaturan
2-3
Kepadatan cetak Lihat Tabel B
2-4
2-5 Kondisi rilis
penyangga
penerima SIBUK
(Jika kapasitas
penyangga
penerima disetel ke
4KB.)
2-6
Jangan ubah
2-7
pengaturan.
2-8 Sinyal reset pin I/F 31
(Jangan ubah
pengaturan)
Tabel B
Kepadatan cetak/daya rendah SW2-3 SW2-4
Kepadatan cetak “Normal” MATI MATI
Kepadatan cetak “Sedang” HIDUP MATI
Kepadatan cetak “Gelap” MATI HIDUP
Jangan atur HIDUP HIDUP
45 bit 4KB
Nonaktif Sensor Kertas
Nonaktif Aktif
Tidak ditetapkan
Penyangga
nerima
pe
penuh
Merilis SIBUK jika
sisa kapasitas
penyangga
penerima
mencapai
138 bit.
kasir habis aktif,
sensor Kertas
kasir hampir
habis aktif
Putus jaringan
atau
Penyangga
penerima
penuh
Ditetapkan ke MATI
Merilis SIBUK jika
sisa kapasitas
penyangga
penerima
mencapai
256 bit.
Ditetapkan ke MATI
Ditetapkan ke HIDUP
36 TM-T88V Petunjuk Penggunaan

Apabila menggunakan Antarmuka USB/Ethernet/LAN Nirkabel
Sakelar DIP Bank 1
SW Fungsi HIDUP MATI
1-1 Umpan baris otomatis Selalu aktif Selalu nonaktif
1-2 Kapasitas
penyangga
penerima
1-3~
*1
1-8
*1: Apabila menggunakan antarmuka USB pada model
dengan antarmuka seri atau paralel, fungsi sakelar
DIP 1-8 adalah sebagai berikut.
SW Fungsi HIDUP MATI
1-8 Fungsi hemat daya
untuk USB
45 bit 4KB
Tidak ditetapkan
Nonaktif Aktif
Sakelar DIP Bank 2
SW Fungsi HIDUP MATI
2-1 Jabatan tangan
(Kondisi SIBUK)
2-2 Jangan ubah
pengaturan
2-3
Kepadatan cetak Lihat Tabel B
2-4
2-5 Kondisi rilis
2-6
2-7
2-8 Jangan ubah
*2: Apakah sakelar DIP 2-8 diatur ke HIDUP atau MATI
gga
penyan
penerima SIBUK
(Jika kapasitas
penyangga
penerima disetel ke
4KB.)
Jangan ubah
pengaturan.
pengaturan.
g pada model printer.
tergantun
Penyangga
penerim
penuh
Merilis SIBUK jika
sisa kapasitas
penyangga
penerima
mencapai
138 bit.
Tabel B
Kepadatan cetak/daya rendah SW2-3 SW2-4
Kepadatan cetak “Normal” MATI MATI
Kepadatan cetak “Sedang” HIDUP MATI
Kepadatan cetak “Gelap” MATI HIDUP
Jangan atur HIDUP HIDUP
Putus jaringan
a
atau
Penyangga
penerima
penuh
Ditetapkan ke MATI
Merilis SIBUK jika
sisa kapasitas
penyangga
penerima
mencapai
256 bit.
Ditetapkan ke MATI
*
2
Spesifikasi
Lebar kertas 80 mm Lebar kertas 58 mm
Metode pencetakan Pencetakan baris termal
Kepadatan titik 180 dpi × 180 dpi [titik per 25,4 mm {1"}]
Arah pencetakan Searah dengan umpan geser
Lebar pencetakan posisi titik 72 mm {2,83"}, 512 posisi titik 50,8 mm {2,0"}, 360
Karakter per baris
Huruf cetak A: 42; Huruf cetak B: 56 Huruf cetak A: 30; Huruf cetak B: 40
(default)
Spasi karakter
Huruf cetak A: 0.28 mm {.01"} (2 titik), Huruf cetak B: 0,28 mm {.01"} (2 titik)
(default)
Ukuran karakter Standar/Tinggi-ganda/Lebar-ganda/Lebar-ganda dan Tinggi-ganda
Huruf cetak A: 1,41 × 3,39/1,41 × 6,77/2,82 × 3,39/2,82 × 6,77 mm
Huruf cetak B: 0,99 × 2,40/0,99 × 4,80/1,98 × 2,40/1,98 × 4,80 mm
Struktur karakter Huruf cetak A (default): 12 × 24; Huruf cetak B: 9 × 17 (termasuk spasi
horisoltal 2-titik)
Jumlah karakter Karakter Alfanumerik: 95; Set karakter Internasional: 18 set
Grafis diperluas: 128 × 43 halaman (termasuk halaman yang ditetapkan
pengguna)
TM-T88V Petunjuk Penggunaan 37
*1

*1
Kecepatan
pencetakan
Kecepatan umpan
kertas
Lebar kertas 80 mm Lebar kertas 58 mm
maks. 300 mm/s {11,8"/s}; 70,9 lps (umpan 4,23 mm {1/6"})
Kode bar vertikal dan kode 2D: 100 mm/s {2,4"/s}
Nilai kecepatan di atas adalah perkiraan.
Nilai ketika printer mencetak dengan kepadatan “Normal” pada 24 V dan 25°C
{77°F}
Kecepatan disesuaikan secara otomatis bergantung pada voltase yang
digunakan dan temperatur kepala cetak.
Kira-kira 200 mm/s {kira-kira 7,9"/s}
(umpan kertas bersambung dengan tombol Umpan.)
Spasi baris (default) 4,23 mm {1/6"}
Kertas kasir
(satu-lapis)
Lebar 79,5 mm ± 0,5 mm {3,13" ± 0,02"} 57,5 mm ± 0,5 mm {2,26" ± 0,02"}
Diameter Diameter luar maksimal: 83 mm {3,27"}
Kumparan
Diameter kumparan: Di dalam: 12 mm {0,47"}; Di luar: 18 mm {0,71"}
Jenis kertas termal NTP080-80 NTP058-80
Antarmuka
(kompatibel)
Seri (RS-232)/Paralel (IEEE1284)/Ethernet (10BASE-T/100BASE-TX)/
LAN Nirkabel (IEEE802.11b)/USB [Kesesuaian: USB 2,0, Kecepatan
Komunikasi: Kecepatan-penuh (12 Mbps)]/USB Plus Power [Kecepatan
komunikasi: Kecepatan-penuh (12 Mbps)]
Penyangga penerima 4KB/45 bit
Fungsi laci uang tunai 2 drive
Voltase pasokan*2DC + 24 V ± 7%
Konsumsi arus Rata-rata: Kira-kira 1,8A
Temperatur Pengoperasian: 5 hingga 45°C {41 hingga 113°F}
Penyimpanan: –10 hingga 50°C {14 hingga 122°F}, kecuali untuk kertas
Kelembapan Pengoperasian: 10 hingga 90% RH
Penyimpanan: 10 hingga 90% RH, kecuali untuk kertas
Dimensi keseluruhan 148 × 145 × 195 mm {5,83 × 5,71 × 7,68"} (T x L x P)
Berat (masa) Kira-kira 1,6 kg {3,5 pon}
lps: baris per detik dpi: titik per 25,4 mm (titik per inci)
*1: Nilai tersebut adalah apabila lebar kertas diubah ke 58 mm dengan memasang pemandu kertas
kasir da
n membuat pengaturan lebar kertas dengan perangkat lunak utilitas untuk TM-T88V.
Pemandu kertas kasir mungkin tidak disertakan tergantung pada model printer.
pka
*2: Pastikan untuk menggunakan sumber daya yang menera
spesifikasi berikut.
Nilai output: 24 V/2,0 A atau lebih, Output maksimum: 240 VA atau kurang
n standar keselamatan yang memenuhi
38 TM-T88V Petunjuk Penggunaan

Menghubungi Customer Support
Apabila printer tidak beroperasi dengan benar dan Anda tidak dapat
menyelesaikan permasalahan dengan menggunakan petunjuk perbaikan ini,
sebaiknya Anda menghubungi Layanan “Customer Support” kami.
PT. EPSON INDONESIA
Wisma Kyoei Prince Lt. 16
,
Jl. Jend Sudirman Kav 3
Help Desk : (021) 5724151, Fax : (021) 5724357
EPSON SUPPORT CENTER :
Jakarta : (021) 62301104, 62301103
Bandung : (022) 4207033
Surabaya : (031) 5355035
Yogyakarta : (0274) 581022, 7461560
Medan : (061) 4516173, 4516174
Makassar : (0411) 328212
Pontianak : (0561) 735507
Pekan Baru : (0761) 44270
Untuk informasi lebin lengkap, Anda dapat menghubungi website kami:
pson.co.id
w.e
ww
Jakarta 10220
TM-T88V Petunjuk Penggunaan 39

English
Printed in XXXXXX
 Loading...