


User’s Manual. . . . . . . . . . . . . . . . . . . . 1
Manuel de l’utilisateur . . . . . . . . . . . . . . . 7
Benutzerhandbuch . . . . . . . . . . . . . . . . 13
Gebruikershandleiding . . . . . . . . . . . . . 19
Manuale dell’utente . . . . . . . . . . . . . . . 25
Manual del usuario. . . . . . . . . . . . . . . . 31
Manual do utilizador . . . . . . . . . . . . . . . 37
Kullanıcı Kılavuzu . . . . . . . . . . . . . . . . . 43
Руководство по эксплуатации . . . . . . . . 49
Пайдаланушы нұсқаулығы . . . . . . . . . . . 57
M00089100
A
1
2
4
3
6
5
B
C
D
E
ii
FGH
J
8
I
7
DSW1
DSW2
L
K
iii
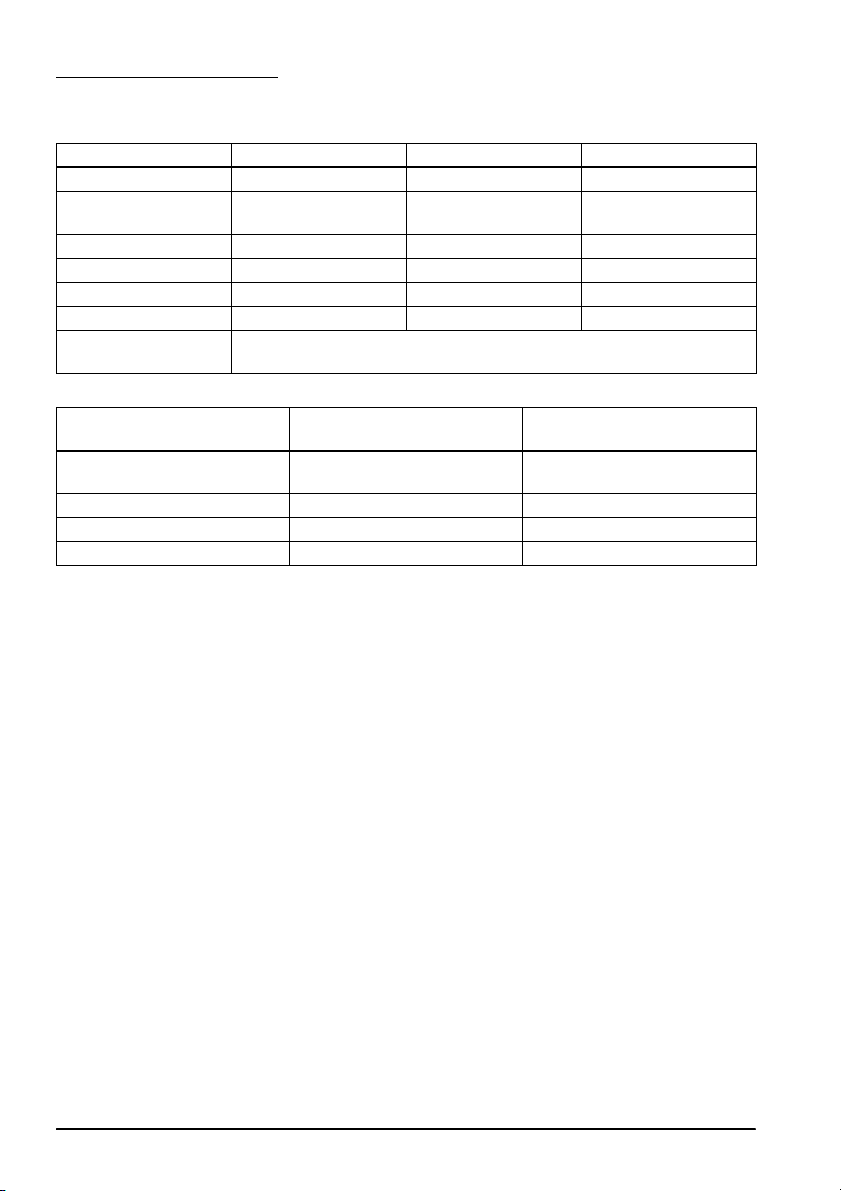
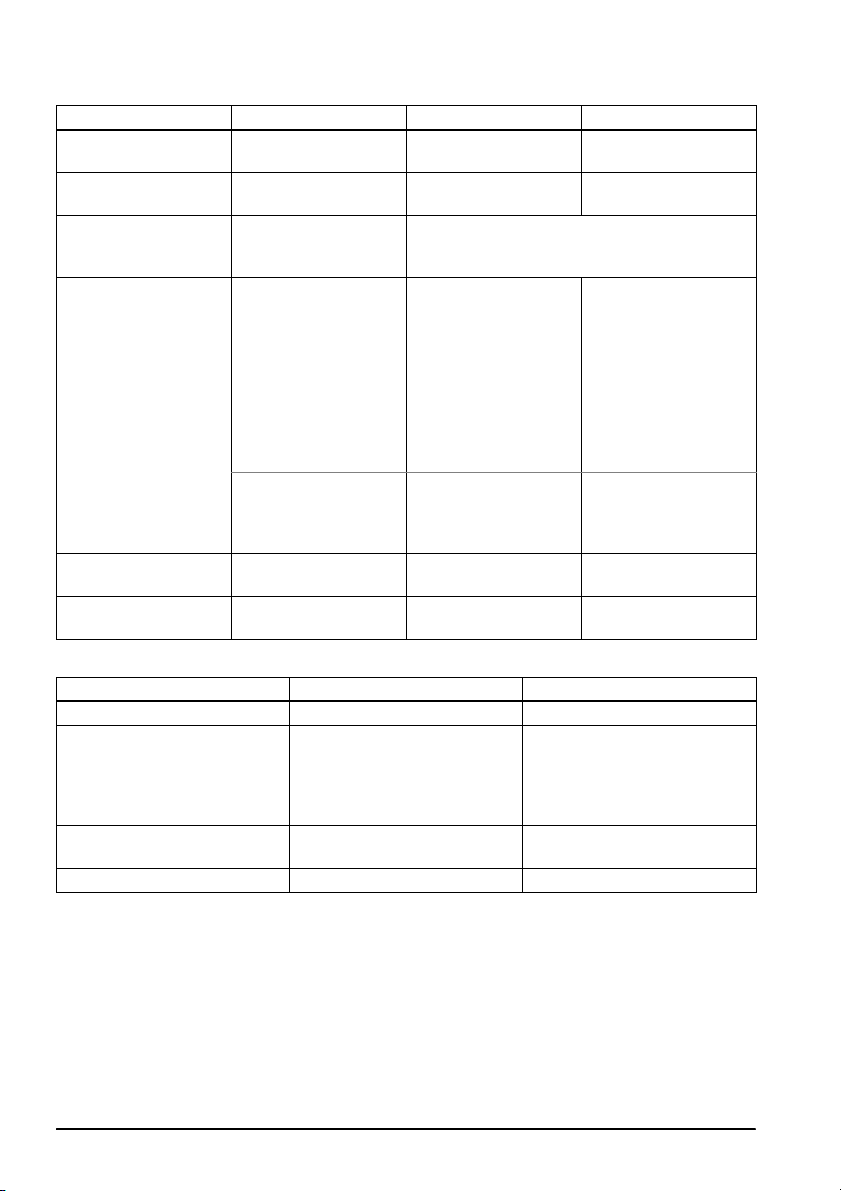
DIP Switch Tables
Serial Interface (DIP switch 1)
SW Function ON OFF
1-1 Data reception error Ignored Prints “?”
1-2 Receives buffer
1-3 Handshaking XON/XOFF DTR/DSR
1-4 Data word length 7 bits 8 bits
1-5 Parity check Enabled Disabled
1-6 Parity selection Even Odd
1-7
1-8
capacity
Selects transmission speed. (See table below.)
Transmission speed
Transmission speed (bps)-bits
Adjustable by control
commands *
4800 OFF ON
9600 ON OFF
19200 OFF OFF
*:When DIP Switches 1-7 and 1-8 are on, the transmission speed can be selected from one of seven
speeds: 2400, 4800, 9600, 19200, 38400, 57600, and 115200 bps by control commands.
per second
ON ON
45 bytes 4KB
1-7 1-8
iv
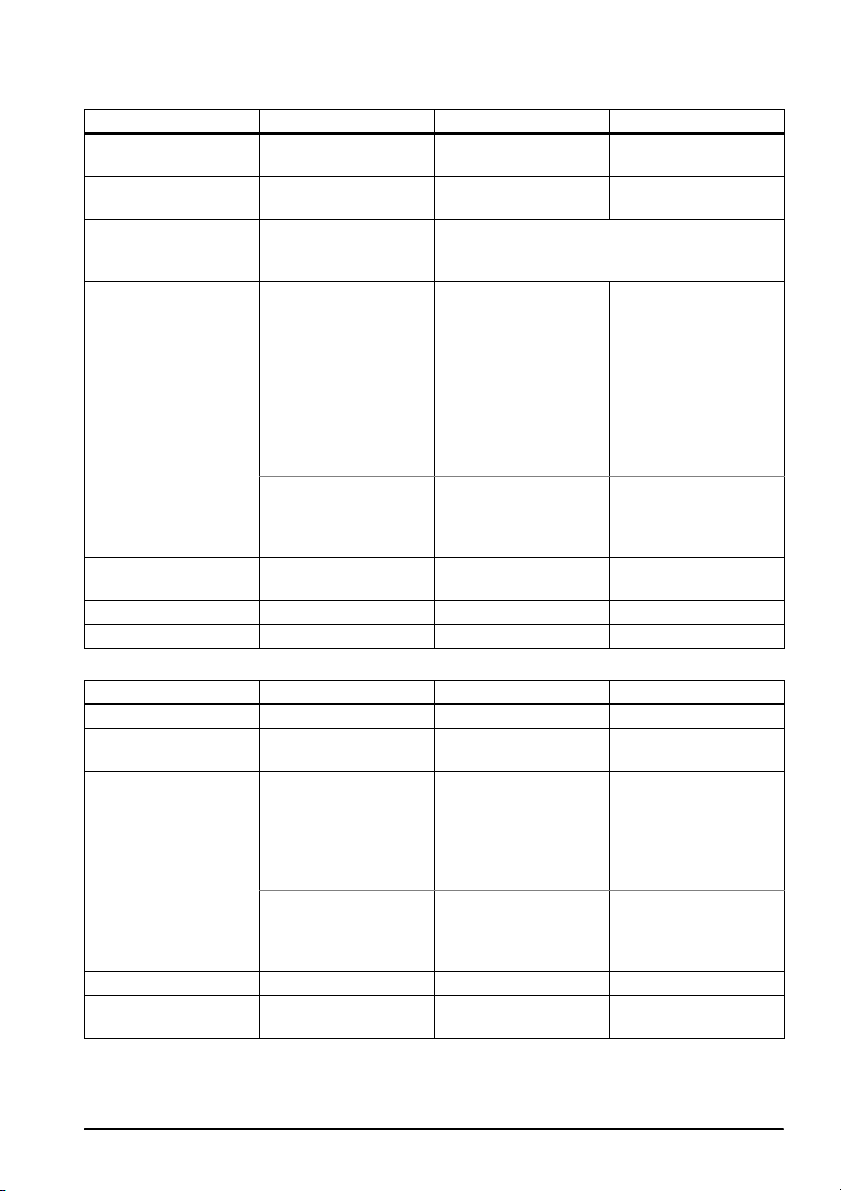
Serial Interface (DIP switch 2)
SW Function ON OFF
2-1 Handshaking
2-2 Reserved (Do not
2-3
2-4
2-5 [When TM-T88IV-
2-6 Reserved (Do not
2-7 I/F pin 6 reset signal Enabled Disabled
2-8 I/F pin 25 reset signal Enabled Disabled
(BUSY condition)
change)
Selects print density/
Low power
comsumption mode
compatible mode is
enabled]
Setting the conditions
that cancels the
receive buffer BUSY
state (This function is
effective when the
receive buffer
capacity is set to 4KB.
[When TM-T88IVcompatible mode is
disabled]
Reserved
change)
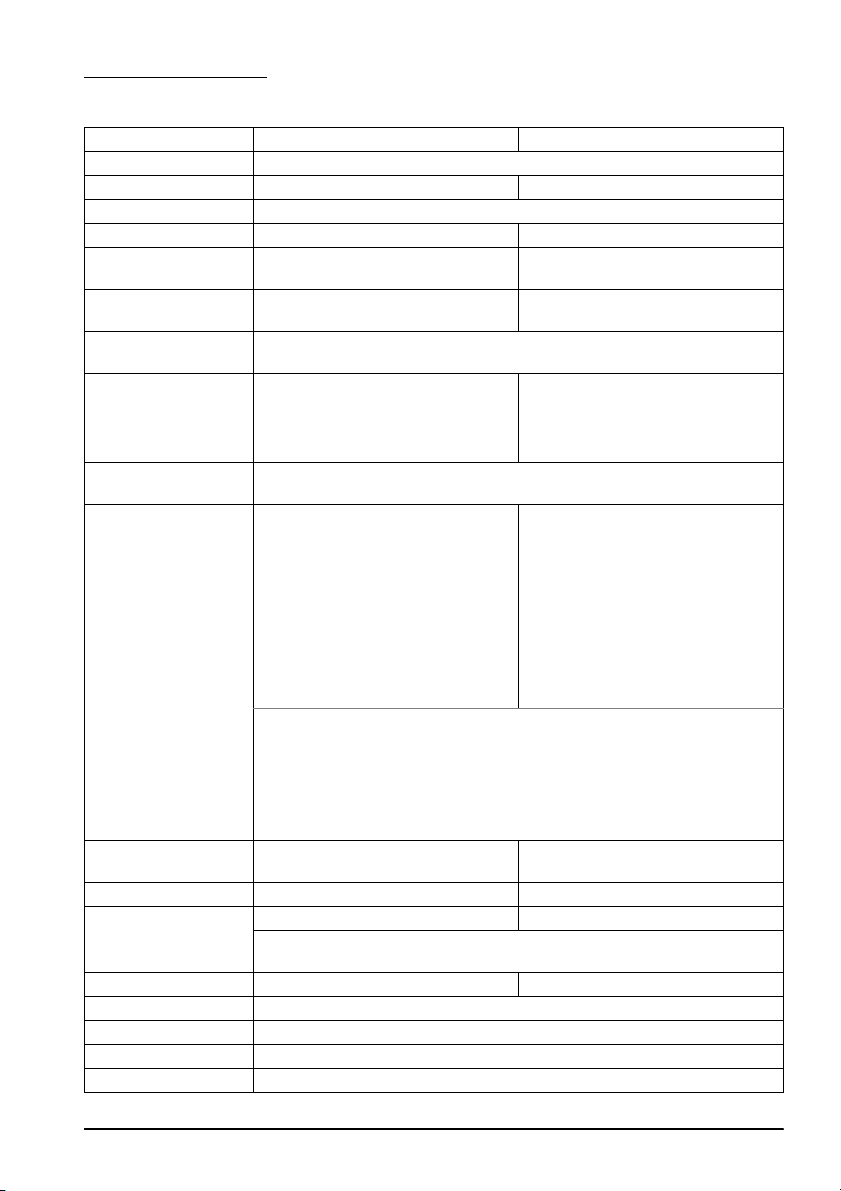
Interface other than Serial (DIP switch 1)
SW Function ON OFF
1-1 Auto line feed Always enabled Always disabled
1-2 Receives buffer
1-3 [When TM-T88IV-
1-4 Error signal output Disabled Enabled
1-5~
1-8
capacity
compatible mode is
enabled]
Selects paper sensor to
output paper-end
signal
[When TM-T88IVcompatible mode is
disabled]
Reserved
Reserved – –
Receive buffer full Offline or Receive
– Fix to OFF
See Table A.
Cancels the BUSY state
when the remaining
capacity of the receive
buffer reaches 138
bytes.
––
– Fix to OFF
45 bytes 4 KB
Disabled Roll paper end sensor
––
buffer full
Cancels the BUSY state
when the remaining
capacity of the receive
buffer reaches 256
bytes.
enabled
Roll paper near-end
sensor enabled
v
Interface other than Serial (DIP switch 2)
SW Function ON OFF
2-1 Handshaking
2-2 Reserved (Do not
2-3
2-4
2-5 [When TM-T88IV-
2-6 2-7 Reserved (Do not
2-8 I/F pin 31 reset
(BUSY condition)
change)
Selects print density/
Low power
comsumption mode
compatible mode is
enabled]
Setting the conditions
that cancels the
receive buffer BUSY
state (This function is
effective when the
receive buffer
capacity is set to 4KB.
[When TM-T88IVcompatible mode is
disabled]
Reserved
change)
(Do not change)
Receives buffer full Offline or receives
– Fixed to OFF
See Table A.
Cancels the BUSY state
when the remaining
capacity of the receive
buffer reaches 138
bytes.
––
– Fixed to OFF
Fixed to ON –
buffer full
Cancels the BUSY state
when the remaining
capacity of the receive
buffer reaches 256
bytes.
Table A
Print density/low power SW 3 SW 4
Print density (Standard) OFF OFF
58 mm paper width model:
Print density (Standard)
80 mm paper width model:
Low power consumption
mode
Print density (Darker than
standard)
Print density (Dark) OFF ON
ON ON
ON OFF
vi
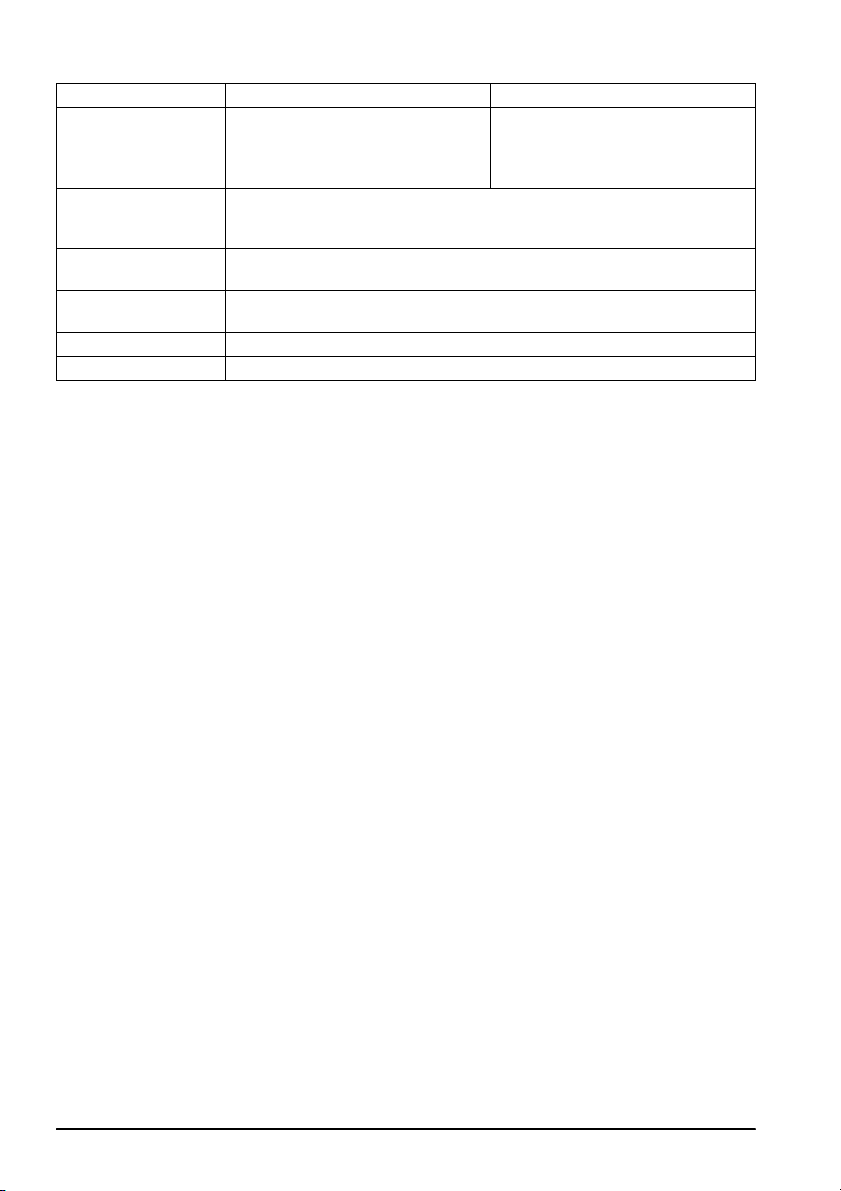
Specifications
80 mm paper width model 58 mm paper width model
Printing method Thermal line printing
Dot density 180 dpi × 180 dpi 203 dpi × 203 dpi
Printing direction Unidirectional with friction feed
Printing width 72.2 mm {2.84"}, 512 dot positions 52 mm {2.05"}, 416 dot positions
Characters per line
(default)
Character spacing
(default)
Character structure Font A: 12 × 24, Font B: 9 × 17
Character size
(Standard/Doubleheight/Double-width/
Double-width and
Double-height)
Number of characters Alphanumeric characters: 95; International characters: 48
Print speed High-speed mode:
Paper feed speed Approx. 170 mm/s {approx. 6.69"/s}
Line spacing (default) 4.23 mm {1/6"} 3.75 mm {30/203"}
Roll Paper (single-ply) Size: 79.5 mm ± 0.5 mm {3.13" ± 0.02"} Size: 57.5 mm ± 0.5 mm {2.26" ± 0.02"}
Thermal paper type Specified: NTP080-80 Specified: NTP058-80
Interface(compatible) Serial (RS-232/RS-485)/Parallel (IEEE1284)/USB/EPSON UB series
Receive buffer 4 KB/45 bytes
Cash drawer function 2 drives
Supplied voltage
Font A: 42, Font B: 56 Font A: 34, Font B: 46
Font A: 0.28 mm {0.01"} (2 dots)
Font B: 0.28 mm {0.01"} (2 dots)
Font A is the default.
Font A: 1.69 × 3.38/1.69 × 6.77/
3.38 × 3.38/3.38 × 6.77 mm
Font B: 1.27 × 2.40/1.27 × 4.79/
2.54 × 2.40/2.54 × 4.79 mm
Extended graphics: 128 × 11 pages (including user-defined page)
170 mm/s {6.69"/s} max. (4.23 mm
{1/6"} feed)
Ladder bar code and 2D code
printing: 100 mm/s {3.9"/s}
Low-power consumption mode:
150 mm/s {5.91"/s} max. (4.23 mm
feed {1/6"})
Bit image, Ladder bar code, 2D
code and Page mode: 60mm/s
{2.4"/s}
The above speed values are approximate.
The values are when the printer prints with the default print density level at
24 V and 25°C {77°F}. However, the print speed for the low power
consumption mode (for 80mm paper width models) is the value when the
printer prints at 34°C {93.2°F}.
Speed is adjusted automatically depending on the voltage applied and
head temperature.
continuous paper feed
Maximum outside diameter: 83 mm {3.27"}
Roll Paper spool diameter: Inside: 12 mm {0.47"}; Outside: 18 mm {0.71"}
*
DC+24 V ± 7%
Font A: 0.25 mm {0.01"} (2 dots)
Font B: 0.25 mm {0.01"} (2 dots)
Font A: 1.50 × 3.00/1.50 × 6.00/
3.00 × 3.00/3.00 × 6.00 mm
Font B: 1.13 × 2.13/1.13 × 4.25/
2.25 × 2.13/2.25 × 4.25
200 mm/s {7.87"/s} max. (4.23 mm {1/
6"} feed)
Ladder bar code and 2D code
printing: 100 mm/s {3.9"/s}
Approx. 200 mm/s {approx. 6.69"/s}
continuous paper feed
vii
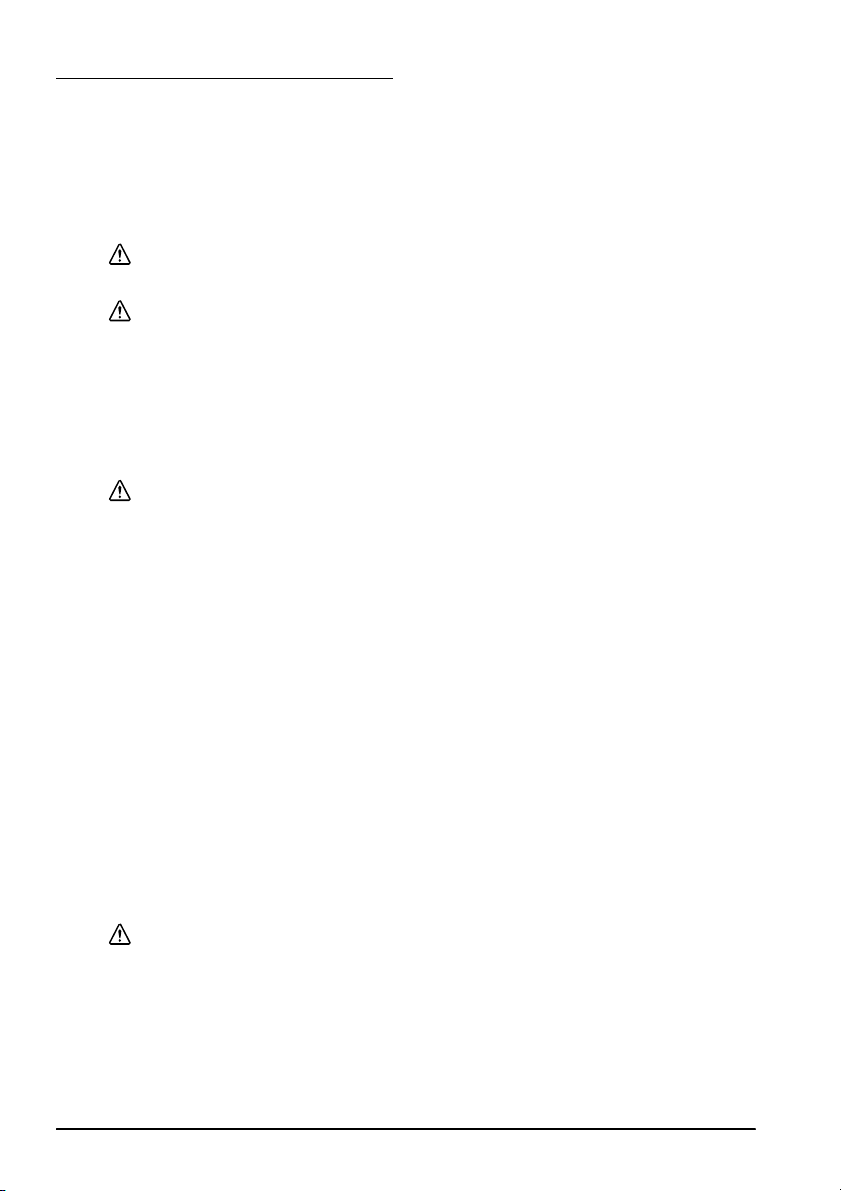
80 mm paper width model 58 mm paper width model
Current consumption
(at 24V)
Life Mechanism: 15,000,000 lines
Temperature Operating: 5 to 45°C {41 to 113°F}
Humidity Operating: 10 to 90% RH
Overall dimensions 114 × 125 × 194 mm {4.49 × 4.92 × 7.64"} (H × W × D)
Weight (mass) Approx. 1.8 kg {3.96 lb} (Roll paper exclosed)
*: Be sure to use a safety-standards-applied power source that meets the following specifications.
Rated output: 24 V/2.0 A or more, Maximum output: 240 VA or less
dpi: dots per 25.4 mm (dots per inch)
High-speed mode:
Mean: Approx. 1.8 A
Low-power consumption mode:
Mean: Approx. 1.2 A
Thermal head: 100 million pulses, 100 km
Autocutter: 1,500,000 cuts
Storage: –10 to 50°C {14 to 122°F}, except for paper
Storage: 10 to 90% RH, except for paper
Mean: Approx. 1.4 A
viii

English
User’s Manual
DIP Switch Tables and Specifications
The DIP switch tables and technical specifications are at the beginning of this manual.
Illustrations
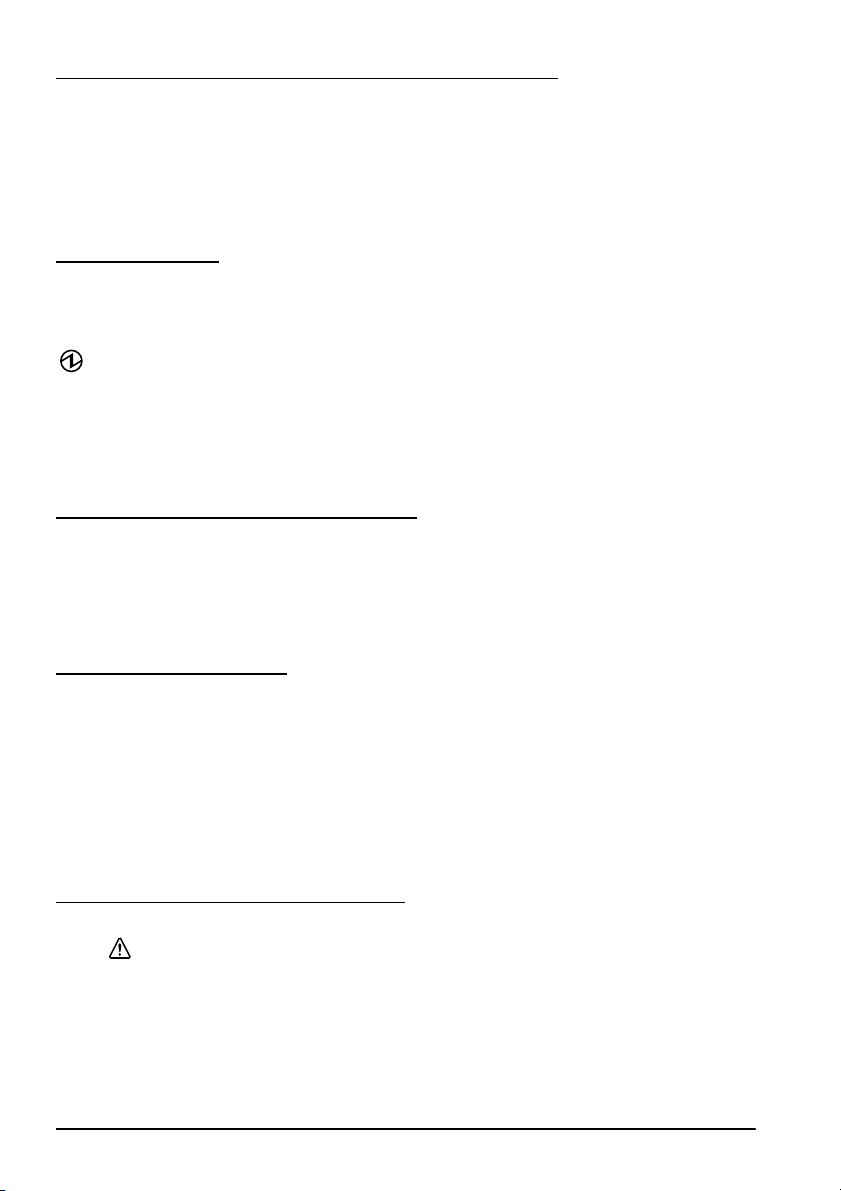
All of the illustrations are at the beginning of this manual. They are identified by letters (A, B, C . . .). Some
of the illustrations have numbers in them. See the list below for the meaning of the numbers.
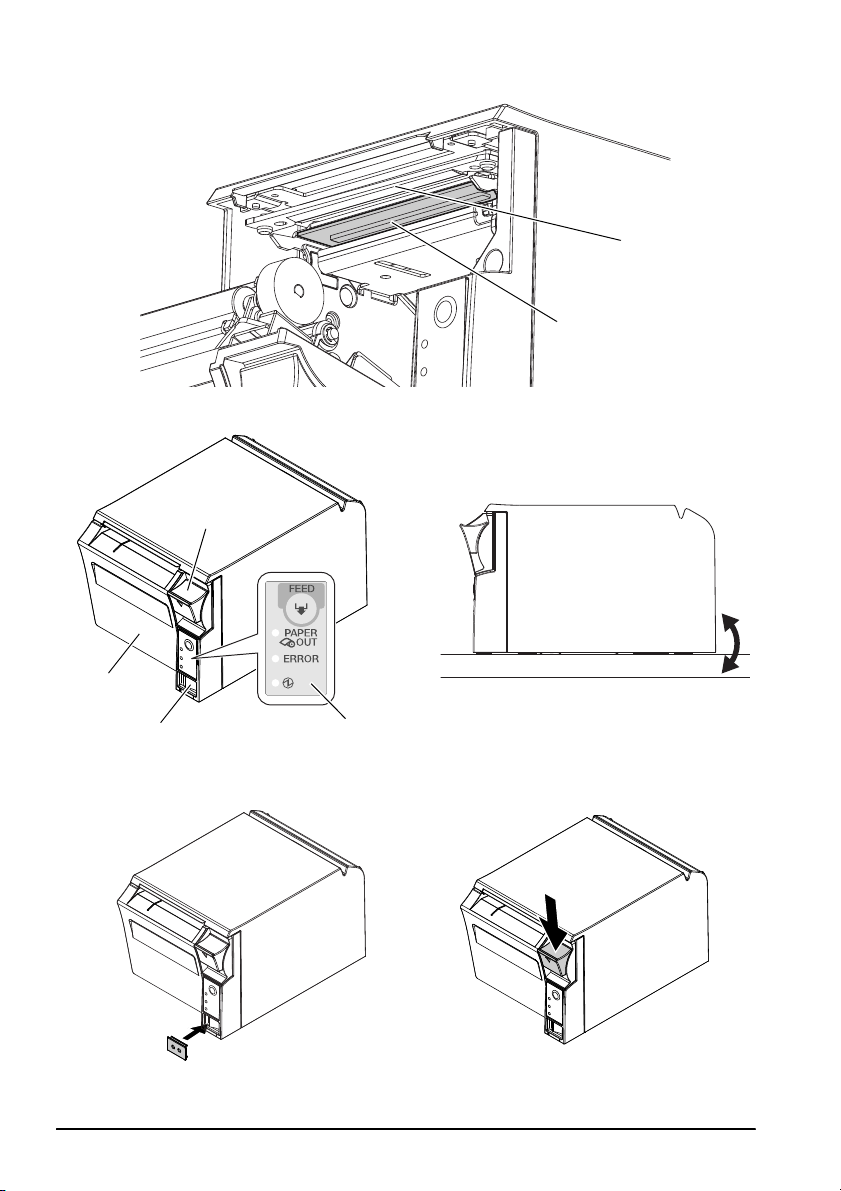
Illustration A Illustration H
1. Thermal head 7. Paper guides
2. Autocutter blade
Illustration B Illustration K
3. Cover open lever 8. Thermal head
4. Printer cover
5. Power switch
6. Control panel
All rights reserved. No part of this publication may be reproduced, stored in a retrieval system, or
transmitted in any form or by any means, electronic, mechanical, photocopying, recording, or otherwise,
without the prior written permission of Seiko Epson Corporation. No patent liability is assumed with
respect to the use of the information contained herein. While every precaution has been taken in the
preparation of this book, Seiko Epson Corporation assumes no responsibility for errors or omissions.
Neither is any liability assumed for damages resulting from the use of the information contained herein.
Neither Seiko Epson Corporation nor its affiliates shall be liable to the purchaser of this product or third
parties for damages, losses, costs, or expenses incurred by purchaser or third parties as a result of:
accident, misuse, or abuse of this product or unauthorized modifications, repairs, or alterations to this
product, or (excluding the U.S.) failure to strictly comply with Seiko Epson Corporation’s operating and
maintenance instructions.
Seiko Epson Corporation shall not be liable against any damages or problems arising from the use of any
options or any consumable products other than those designated as Original Epson Products or Epson
Approved Products by Seiko Epson Corporation.
EPSON is a registered trademark of Seiko Epson Corporation.
Exceed Your Vision is a registered trademark or trademark of Seiko Epson Corporation.
All other trademarks are the property of their respective owners and used for identification purpose only.
NOTICE: The contents of this manual are subject to change without notice.
© Seiko Epson Corporation 2015. All rights reserved.
TM-T70 User’s Manual 1
Important Safety Information
This section presents important information intended to ensure safe and effective
use of this product. Read this section carefully and store it in an accessible location.
Key to Symbols
The symbols in this manual are identified by their level of importance, as defined
below. Read the following carefully before handling the product.
WARNING:
Warnings must be observed carefully to avoid serious bodily injury.
CAUTION:
Cautions must be observed to avoid minor injury to yourself, damage to your
equipment, or loss of data.
Safety Precautions
This section describes the warnings and cautions intended to ensure safe and
effective use of the TM-T70. Other warnings and cautions on handling of this
product for its safe and effective use are described in other sections of the manual.
WARNING:
If the TM-T70 produces smoke, a strange odor, or unusual noise, shut down the
TM-T70, unplug the AC cable immediately, and then contact your dealer or an
Epson service center for advice. Continued use may lead to fire or electric
shock.
Never attempt to repair this product yourself. Improper repair work can be
dangerous.
Never disassemble or modify this product. Tampering with this product may
result in injury or fire.
Be sure to use the specified power source. Connection to an improper power
source may cause fire.
Do not allow foreign matter to fall into the equipment. Penetration by foreign
objects may lead to fire.
If water or other liquid spills into this equipment, shut down the TM-T70, unplug
the AC cable of the TM-T70 immediately, and then contact your dealer or an
Epson service center for advice. Continued use may lead to fire or shock.
If you open the DIP switch cover, be sure to close the cover and tighten the
screw after adjusting the DIP switch. Using this product with the cover open
may cause fire or electric shock.
Do not use aerosol sprayers containing flammable gas inside or around this
product. Doing so may cause fire.
CAUTION:
Do not connect cables in ways other than those mentioned in this manual.
Different connections may cause equipment damage or fire.
Be sure to set this equipment on a firm, stable, horizontal surface. The product
may break or cause injury if it falls.
Do not use this product in locations subject to high humidity or dust levels.
Excessive humidity and dust may cause equipment damage or fire.
2 TM-T70 User’s Manual

Do not place heavy objects on top of this product. Never stand or lean on this
product. Equipment may fall or collapse, causing breakage and possible injury.
Take care not to injure your fingers on the manual cutter
• When you remove printed paper
• When you perform other operations such as loading/replacing roll
paper
To ensure safety, unplug this product before leaving it unused for an extended
period.
Before moving this product, be sure to unplug it and all the cables connected
to it.
Caution Labels
The caution labels on the product indicate the following precautions.
The thermal head can be very hot during printing and immediately after
printing. Touching it may cause burns. Be sure to do cleaning and other work
after the thermal head cools down. Also, be careful of the autocutter blade
near the thermal head. See illustration A for the location of the thermal head
and the autocutter blade.
CAUTION:
Restriction of Use
When this product is used for applications requiring high reliability/safety, such
as transportation devices related to aviation, rail, marine, automotive, etc.;
disaster prevention devices; various safety devices, etc.; or functional/precision
devices, etc.; you should use this product only after giving consideration to
including fail-safes and redundancies into your design to maintain safety and
total system reliability. Because this product was not intended for use in
applications requiring extremely high reliability/safety, such as aerospace
equipment, main communication equipment, nuclear power control equipment,
or medical equipment related to direct medical care, etc., please make your own
judgment on this product’s suitability after a full evaluation.
Purpose of This Manual
This manual provides information to operators of the TM-T70 printer to describe
basic operations to enable safe and correct use of the printer.
Part Names
See illustration B.
Unpacking
The following items are included with the standard specification printer. If any
item is damaged, contact your dealer.
❏ Printer ❑ Roll Paper
❏ Power switch cover ❑ AC adapter *
❏ User’s Manual (this manual)
* May not be included with your printer.
TM-T70 User’s Manual 3
Downloading Drivers, Utilities, and Manuals
Drivers, utilities, and manuals can be downloaded from one of the following
URLs.
For customers in North America, go to the following web site:
http://www.epsonexpert.com/ and follow the on-screen instructions.
For customers in other countries, go to the following web site:
http://www.epson-pos.com/
Control Panel
FEED button
This button feeds paper.
(Power) LED
This LED is on when the printer is on.
ERROR LED
This indicates an error.
PAPER OUT LED
On indicates a paper near end or out. Flashing indicates standby.
Important Notes on Installation
❏ For a serial interface, you must use a null modem cable, also called a cross
cable.
❏ For a parallel interface, use a cable that meets the specifications for an IEEE
1284-compliant cable.
❏ For a USB interface, install the printer driver before connecting the printer.
Installing the Printer
You can install this printer only horizontally.
Fix the printer so that it does not move around when you open the printer cover
and cut roll paper. A tape for fixing the printer is available as an option.
As shown in the illustration C, install the printer with a maximum tilt of 3°.
Installing the printer with a tilt of more than 3° may cause the following problems.
• Roll paper near end cannot be detected.
• The printer cover will not close after installing roll paper.
• Roll paper cannot be taken out.
Using the Power Switch Cover
WARNING:
If an accident occurs with the power switch cover attached, unplug the AC
cable immediately. Continued use may cause fire or shock.
The enclosed power switch cover ensures that the power switch is not pressed
accidentally. To use this cover, install it as shown in illustration D.
4 TM-T70 User’s Manual
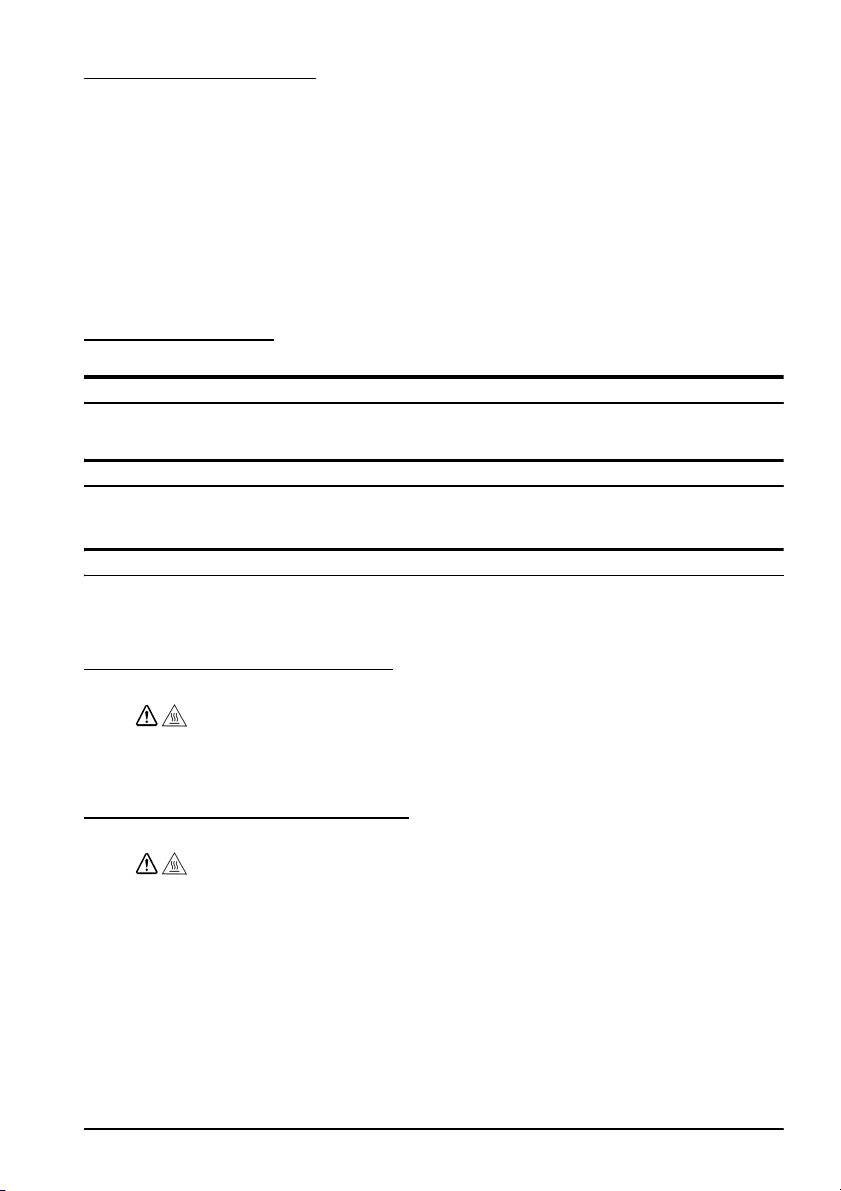
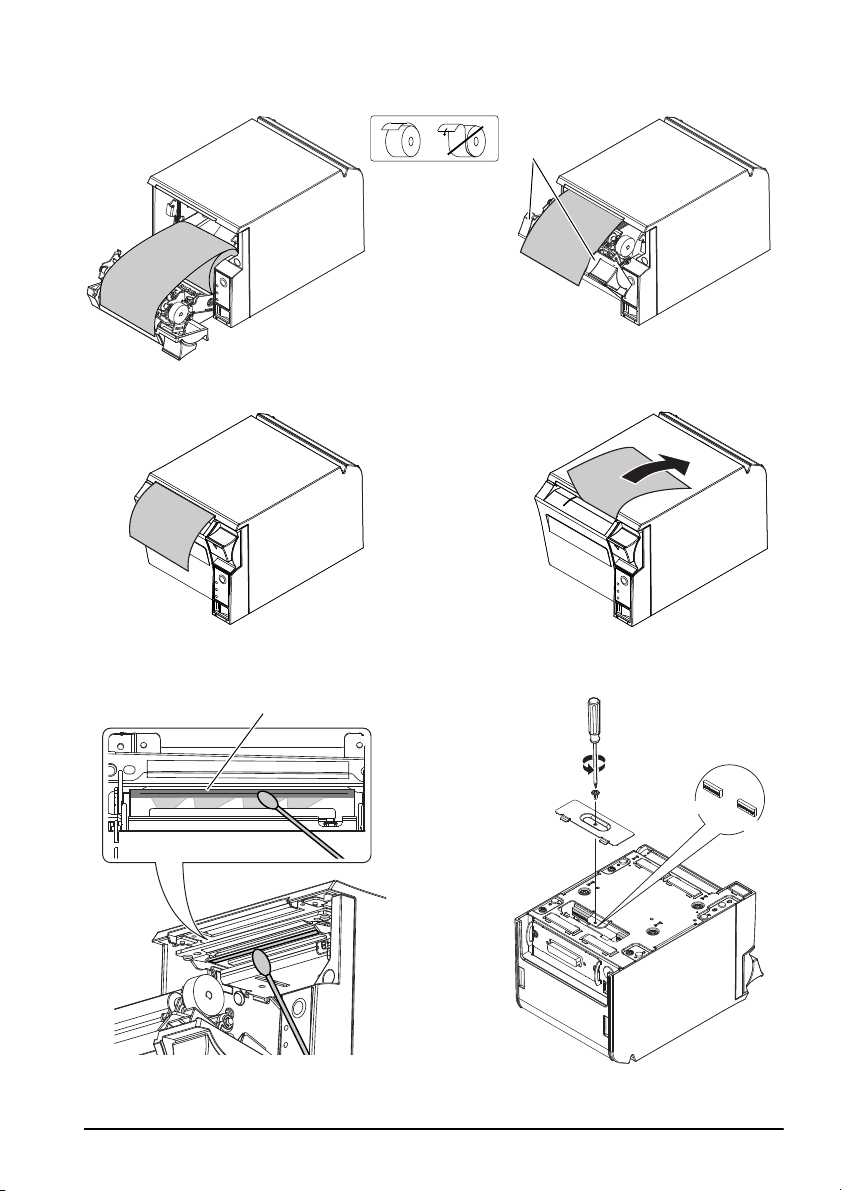
Installing Roll Paper
1. Press the lever indicated by the arrow in illustration E to open the printer
cover.
2. Remove the used roll paper core.
3. Install the roll paper as shown in illustration F. The correct direction of the
paper is shown in illustration G.
4. Pull out some roll paper as shown in illustration H so that the paper is set
between the paper guides.
5. Close the printer as shown in illustration I, and make sure that the roll paper
is properly installed between the paper guides.
6. Tear off the roll paper as shown in illustration J.
Troubleshooting
No lights on the control panel
Check whether the DC cable and AC cable are correctly connected to the printer
and the power outlet.
ERROR LED on (not flashing) with no printing
If PAPER OUT is on, the roll paper is not installed or is used up.
If PAPER OUT is off, the printer cover is not closed properly.
ERROR LED flashing with no printing (and no paper jam)
Printing stops if the thermal head overheats and resumes automatically when it
cools.
If overheating is not the cause, turn the printer off, and after 10 seconds, back on.
Removing Jammed Paper
Do not touch the thermal head because it can be very hot after printing.
1. Turn the printer off and press the cover open lever.
2. Remove jammed paper, reinstall the roll, and close the printer cover.
CAUTION:
Cleaning the Thermal Head
After printing, the thermal head can be very hot. Do not touch it and to let it
cool before you clean it. Do not damage the thermal head by touching it with
your fingers or any hard object.
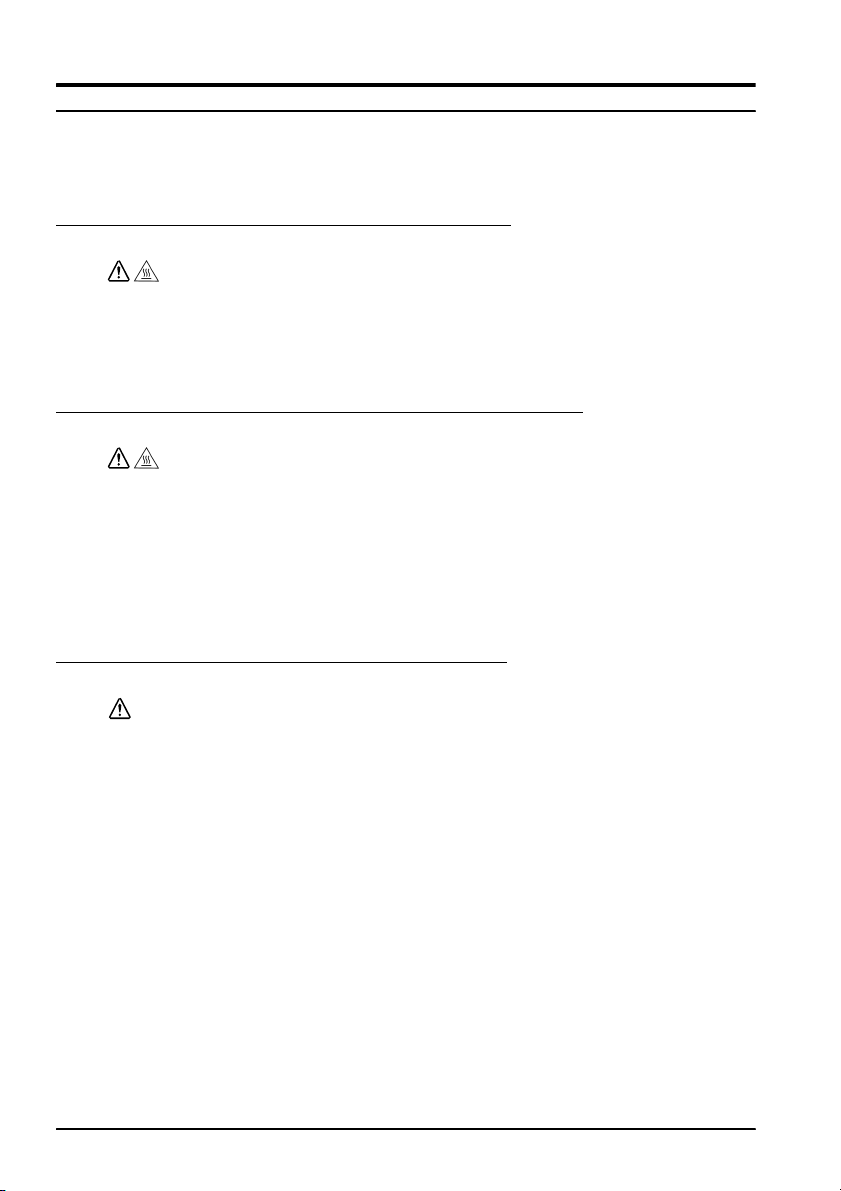
Turn off the printer and open the printer cover. As shown in illustration K, clean
the thermal elements of the thermal head with a cotton swab moistened with an
alcohol solvent (ethanol or IPA).
Epson recommends cleaning the thermal head periodically (generally every
3 months) to maintain receipt print quality.
CAUTION:
TM-T70 User’s Manual 5

Setting the DIP Switches
CAUTION:
Be sure to turn off the printer before removing the cover of the DIP switches.
Removing it while the printer is turned on may cause problems such as an
electric short, which leads to a malfunction of the printer.
1. Make sure the printer is turned off.
2. Turn over the printer.
3. As shown in illustration L, remove the cover of the DIP switches on the
printer bottom by removing a screw.
4. Set the DIP switches using a fine-tipped tool.
5. Replace the cover of the DIP switches, and fix it by installing the screw.
The new setting becomes effective after the printer is turned on.
6 TM-T70 User’s Manual

Français
Manuel de l’utilisateur
Tableaux et spécifications des DIP Switch
Les tableaux et spécifications techniques des DIP Switch figurent au début de ce manuel.
Illustrations
Toutes les illustrations se trouvent au début de ce manuel. Elles sont identifiées par des lettres (A, B, C . . .).
Certaines des illustrations comportent des chiffres. Voir la liste ci-dessous pour la signification de ces
chiffres.
Illustration A Illustration H
1. Tête thermique 7. Guide papier
2. Lame de disjoncteur
Illustration B Illustration K
3. Levier d’ouverture du capot 8. Tête thermique
4. Capot de l’imprimante
5. Interrupteur marche-arrêt
6. Panneau de commande
Tous droits réservés. Sauf autorisation écrite préalable de Seiko Epson Corporation, la reproduction, le stockage
dans un système de rappel de données et la transmission sous quelque forme ou par quelque moyen que ce soit
(électronique, mécanique, par photocopie, enregistrement, etc…) d’une partie quelconque de la présente
publication sont interdits. La société décline toute responsabilité relative à l’exploitation des informations
contenues dans le présent document. Cet ouvrage a été rédigé avec le plus grand soin ; toutefois, Seiko Epson
décline toute responsabilité pour les erreurs et omissions qu’il pourrait contenir, ainsi que pour tous dommages
résultant de l’exploitation des informations qu’il contient.
La responsabilité de Seiko Epson Corporation ou de ses filiales ne saurait être engagée envers l’acheteur de ce
produit ou envers des tiers pour dommages, pertes, frais ou débours encourus par ceux-ci par suite d’accident ou
d’utilisation erronée ou abusive de ce produit, de modification, réparation ou transformation non autorisé de
celui-ci, ou (à l’exclusion des Etats-Unis), de toute utilisation du produit qui n’est pas strictement conforme aux
instructions d’utilisation et de maintenance de Seiko Epson Corporation.
Seiko Epson Corporation décline toute responsabilité pour dommages ou problèmes découlant de l’utilisation de
tous articles en option ou de toutes fournitures consommables autres que celles désignée produit d’origine Epson
ou produit approuvé Epson par Seiko Epson Corporation.
EPSON est une marque déposée de Seiko Epson Corporation.
Exceed Your Vision est une marque déposée ou commerciale de Seiko Epson Corporation.
Toutes les autres marques appartiennent à leurs propriétaires respectifs et sont utilisées uniquement à des fins
d'identification.
REMARQUE : Les informations contenues dans ce manuel sont sujettes à modification sans préavis.
© Seiko Epson Corporation 2015. Tous droits réservés.
TM-T70 Manuel de l’utilisateur 7

Importantes précautions de sécurité
D'importantes informations destinées à assurer un emploi sans danger et efficace de
ce produit sont présentées dans cette section. Lisez-la attentivement et rangez-la
dans un endroit facile d'accès.
Signification des symboles
Dans ce manuel, les symboles sont identifiés par ordre d’importance de la manière
indiquée ci-après. Lisez attentivement ce qui suit avant de manipuler le produit.
AVERTISSEMENT :
Respectez strictement les avertissements afin d’éviter tout risque de blessure
grave.
ATTENTION :
Les mises en garde doivent être respectées afin d’éviter les risques de blessure
légère de l’utilisateur, d’endommagement du matériel ou de perte de données.
Consignes de sécurité
Cette section décrit les avertissements et mises en garde destinés à assurer une
utilisation sûre et efficace de l’imprimante TM-T70. D’autres avertissements et
mises en garde concernant une utilisation sûre et efficace de ce produit sont
décrits dans d’autres sections du manuel.
AVERTISSEMENT :
Mettre immédiatement l’imprimante TM-T70 hors tension si elle dégage de la
fumée ou une odeur étrange ou si elle produit des bruits inhabituels, et
débrancher immédiatement son cordon d’alimentation, puis contacter le
distributeur ou un centre de service Seiko Epson pour demander conseil. Il existe
sinon un danger d'incendie ou de choc électrique.
Ne jamais essayer de réparer ce produit soi-même. Toute réparation erronée
peut être dangereuse.
Ne jamais démonter ou modifier ce produit. Les interventions intempestives
peuvent provoquer des blessures ou des incendies.
Vérifier que la source d’alimentation électrique est conforme aux
spécifications. Toute connexion à une source d’alimentation non conforme
peut provoquer un incendie.
Ne pas laisser tomber de corps étrangers dans l’équipement. La pénétration de
corps étrangers peut provoquer un incendie.
En cas de renversement d’eau ou d’autre liquide sur l’équipement, mettre
immédiatement l’imprimante TM-T70 hors tension et débrancher son cordon
d’alimentation, puis contacter le distributeur ou un centre de service Seiko
Epson pour demander conseil. Il existe sinon un danger d'incendie ou de choc
électrique.
Si le cache du micro-interrupteur DIP est ouvert, s’assurer de le fermer et de
bien serrer la vis après avoir réglé le micro-interrupteur. L’utilisation de ce
produit avec le cache ouvert peut provoquer un incendie ou un choc
électrique.
Ne pas utiliser de bombes à aérosol contenant un gaz inflammable à l’intérieur
ou à proximité de ce produit. Cela pourrait entraîner un incendie.
8 TM-T70 Manuel de l’utilisateur

ATTENTION :
Ne pas connecter les câbles d’une manière autre que celle indiquée dans ce
manuel. Des connexions différentes pourraient endommager l’équipement et
causer un incendie.
Veiller à poser cette unité sur une surface horizontale ferme et stable. Toute
chute du produit peut casser celui-ci ou occasionner des blessures.
Ne pas utiliser ce produit dans un lieu exposé à un niveau élevé de poussières
ou à une forte humidité. Une humidité excessive ou des poussières excessives
pourrait endommager l’équipement ou entraîner un incendie.
Ne pas poser d’objets lourds sur ce produit. Ne jamais s’y appuyer ou monter
dessus. L’équipement pourrait tomber ou s’affaisser, et se casser ou causer des
blessures.
Prenez garde de ne pas vous couper les doigts au couteau manuel
• En retirant le papier imprimé
• Lors d’autres opérations somme le chargement/remplacement du
rouleau de papier
Pour plus de sécurité, débrancher ce produit lorsqu’il ne doit pas servir pendant
une période de temps prolongée.
Avant de déplacer ce produit, s’assurer de le débrancher et de débrancher
tous les câbles qui lui sont connectés.
Étiquettes de mise en garde
Les étiquettes de mise en garde sur le produit indiquent les précautions suivantes.
La tête thermique peut être très chaude pendant l’impression et immédiatement
après celle-ci. Son contact peut causer des brûlures. Veiller à laisser la tête
thermique refroidir avant d’effectuer tout nettoyage et autre entretien.
Egalement faire attention à la lame de disjoncteur proche de la tête
thermique. Voir l’illustration A pour les emplacements de la tête thermique et
de la lame de disjoncteur.
Restrictions d’emploi
En cas d’utilisation de ce produit pour des applications exigeant une grande
fiabilité/sécurité, telles qu’appareils employés en transport aérien, ferroviaire,
maritime, automobile, etc., appareils de prévention des catastrophes, divers
appareils de sécurité, etc., ou appareils de fonction/précision, vous devrez, avant
d’utiliser ce produit, considérer l’incorporation à votre système de dispositifs de
sécurité positive et de moyens redondants assurant la sécurité et la fiabilité de
l’ensemble du système. Étant donné que ce produit n’est pas destiné aux
applications exigeant une fiabilité/sécurité extrême, telles que matériel
aérospatial, matériel de communications principal, matériel de commande
nucléaire ou matériel de soins médicaux directs, etc., vous devrez, après totale
évaluation, décider si ce produit convient.
TM-T70 Manuel de l’utilisateur 9
ATTENTION :

Objectif de ce manuel
Ce manuel est destiné à fournir une description des opérations de base de la
TM-T70 aux utilisateurs afin de leur permettre de se servir sans danger et de
manière correcte de l’imprimante.
Nom des pièces
Voir l’illustration B.
Déballage
Les éléments suivants sont fournis avec l’imprimante standard. Contacter le
revendeur si l’un d’entre eux est endommagé.
❏ Imprimante ❑ Rouleau de papier
❏ Cache d’interrupteur ❑ Alimentation*
❏ Manuel de l’utilisateur (le présent manuel)
* Peut ne pas être compris avec l'imprimante.
Téléchargement des pilotes, utilitaires et manuels
Il est possible de télécharger les pilotes, utilitaires et manuels à partir de l’une des
URL suivantes.
En Amérique du Nord, accédez au site web suivant :
http://www.epsonexpert.com/ et suivez les instructions qui s’affichent à l’écran.
Dans les autres pays, accédez au site web suivant : http://www.epson-pos.com/
Panneau de commande
Bouton d'avance papier (FEED)
Ce bouton sert à faire avancer le papier.
Témoin d'alimentation
Ce voyant s’allume lorsque l’imprimante est en marche.
Témoin d'erreur (ERROR)
Ce voyant indique une erreur.
Témoin de papier épuisé (PAPER OUT)
Ce voyant s’allume quand le rouleau de papier arrive ou presque à la fin. Il
clignote pour indiquer que l’imprimante est en mode d’attente.
Remarques importantes concernant l’installation
❏ Dans le cas d'une interface série, il est nécessaire d'utiliser un câble de modem
nul, également appelé câble croisé ou simulateur de modem.
❏ Dans le cas d'une interface parallèle, il est nécessaire d'utiliser un câble
conforme aux spécifications de câble IEEE 1284.
❏ Dans le cas d’une interface USB, installez le pilote avant de connecter
l’imprimante.
10 TM-T70 Manuel de l’utilisateur

Installation de l’imprimante
Cette imprimante ne peut être installée qu’horizontalement.
Fixer l’imprimante de sorte qu’elle ne se déplace pas lorsque son capot est ouvert
ou lorsque le rouleau de papier est coupé. Un ruban adhésif invisible pour fixer
l’imprimante est offert en option.
Comme indiqué à l’illustration C, installer l’imprimante à un angle inférieur ou
égal à 3º. L’installation de l’imprimante à un angle supérieur à 3º peut entraîner les
problèmes suivants :
• Les rouleaux de papier presque finis ne peuvent pas être détectés.
• Le capot de l’imprimante ne se ferme pas après l’installation de papier.
• Le rouleau de papier ne peut pas être retiré.
Utilisation du cache d’interrupteur
AVERTISSEMENT :
En cas d’accident alors que le cache d’interrupteur est en place, débrancher
immédiatement le cordon d’alimentation. Il existe sinon des risques d’incendie
ou de choc électrique.
Le cache d’interrupteur fourni empêche tout actionnement accidentel de
l’interrupteur marche-arrêt. Pour l’utiliser, l’installer de la manière indiquée dans
l’illustration D.
Installation du rouleau de papier
1. Appuyer sur le levier indiqué par une flèche dans l’illustration E pour ouvrir
le capot de l’imprimante.
2. Si besoin, retirer le rouleau de papier usagé.
3. Installer le rouleau de papier comme indiqué dans l’illustration F. La
direction correcte d’alimentation du papier est indiquée dans l’illustration G.
4. Tirer une bande de papier comme indiqué dans l’illustration H de sorte que le
papier soit entre les guides du papier.
5. Fermer l'imprimant comme indiqué dans l'illustration I, et s'assurer que le
rouleau de papier est correctement installé entre les guides de papier.
6. Puis, déchirer le papier du rouleau comme indiqué dans l'illustration J.
Dépannage
Aucun témoin du panneau de commande ne s’allume
Vérifier que le câble d’alimentation est correctement connecté à l’imprimante et à
la prise murale.
Voyant d’erreur (ERROR) allumé (sans clignoter) en l’absence d’impression
Si le voyant de papier épuisé (PAPER OUT) est allumé, ceci indique que le rouleau
de papier est absent ou terminé.
Si le voyant de papier épuisé (PAPER OUT) est éteint, ceci indique que le capot de
l'imprimante est mal fermé.
TM-T70 Manuel de l’utilisateur 11
Voyant d’erreur (ERROR) clignotant en l’absence d’impression (et de bourrage de papier)
L’impression cesse si la tête thermique surchauffe et reprend une fois qu’elle s’est
refroidie.
Si une surchauffe n’est pas la cause de l’arrêt, éteindre l’imprimante, attendre
10 secondes, puis la rallumer.
Dégagement d’un bourrage de papier
Ne pas toucher la tête thermique d’impression car elle peut devenir très
chaude durant l’impression.
1. Éteindre l’imprimante et appuyer sur le levier d’ouverture du capot.
2. Enlever le papier qui a fait bourrage, réinstaller le rouleau et refermer le capot
ATTENTION :
de l’imprimante.
Nettoyage de la tête thermique d’impression
Après avoir imprimé, la tête d’impression peut être brûlante. Veiller à ne pas la
toucher et la laisser refroidir avant de la nettoyer. Prendre soin de ne pas
l’endommager en la touchant avec les doigts ou un objet dur.
Éteindre l’Imprimante et ouvrir le capot de l’imprimante. Comme indiqué à
l’illustration K, nettoyer les éléments thermiques de la tête d’impression avec un
coton-tige humecté d’un solvant à l’alcool (éthanol ou alcool isopropylique).
Epson recommande de nettoyer la tête thermique à intervalles réguliers (tous les
trois mois généralement) afin de maintenir la qualité d’impression des reçus.
ATTENTION :
Installation des micro-interrupteurs DIP
ATTENTION :
Veillez à mettre l’imprimante hors tension avant de retirer le cache des microinterrupteurs DIP. Si vous le retirez alors que l’imprimante est sous tension, des
problèmes tels qu’un court-circuit peuvent se produire, provoquant un
dysfonctionnement de l’imprimante.
1. Mettez l’imprimante hors tension.
2. Retournez l’imprimante.
3. Comme indiqué sur l’illustration L, retirer le cache des micro-interrupteurs
DIP sur le dessous de l’imprimante en déposant la vis.
4. Installez les micro-interrupteurs DIP à l’aide d’un outil à pointe fine.
5. Replacez le cache des micro-interrupteurs DIP et fixez-le à l’aide de la vis.
Cette installation sera prise en compte après une remise sous tension de
l’imprimante.
12 TM-T70 Manuel de l’utilisateur

Deutsch
Benutzerhandbuch
DIP-Schaltereinstellungen und Spezifikationen
Angaben über die Einstellungen der DIP-Schalter und Spezifikationen befinden sich am Anfang der
Bedienungsanleitung.
Abbildungen
Alle Abbildungen befinden sich am Anfang der Bedienungsanleitung und sind mit Buchstaben (A, B, C . . .)
gekennzeichnet. Einige Abbildungen enthalten Nummern. Die Bedeutung der Nummern ist wie folgt.
Abbildung A Abbildung H
1. Thermo-Druckkopf 7. Papierführung
2. Automatisches Schneidmesser
Abbildung B Abbildung K
3. Hebel zum Öffnen der Abdeckung 8. Thermo-Druckkopf
4. Druckerabdeckung
5. Einschalter
6. Bedienfeld
Alle Rechte vorbehalten. Diese Veröffentlichung darf ohne ausdrückliche schriftliche Genehmigung der Seiko
Epson Corporation nicht reproduziert, in einem Abrufsystem gespeichert oder in beliebiger Form und auf
jedwede Weise übermittelt werden, weder durch Fotokopieren, Aufzeichnen, noch auf elektronische,
mechanische oder sonstige Weise. Für die hierin enthaltenen Informationen wird keine Patenthaftung
übernommen. Obgleich bei der Zusammenstellung dieser Anleitung mit Sorgfalt vorgegangen wurde,
übernimmt die Seiko Epson Corporation keine Verantwortung für Fehler und Auslassungen. Zudem wird keine
Haftung übernommen für Schäden, die aus der Verwendung der hierin enthaltenen Informationen entstehen.
Weder die Seiko Epson Corporation noch ihre Tochtergesellschaften sind dem Käufer dieses Produkts oder
Drittparteien gegenüber für Schäden, Verluste, Kosten oder Ausgaben haftbar, die für den Käufer oder etwaige
Drittparteien aufgrund von Unfall, Mißbrauch oder Zweckentfremdung dieses Produkts, nicht autorisierten
Modifikationen, Reparaturen oder Produktumbauten sowie (mit Ausnahme USA) aufgrund des Versäumnisses
anfallen, die Bedienungs-und Wartungsanleitungen der Seiko Epson Corporation genau einzuhalten.
Die Seiko Epson Corporation ist nicht haftbar für Schäden oder Probleme, die bei Verwendung von Optionen
oder Verschleißteilen auftreten, die nicht als Original-Epson-Produkte oder von der Seiko Epson Corporation
zugelassene Epson Produkte gelten.
EPSON ist ein eingetragenes Warenzeichen der Seiko Epson Corporation.
Exceed Your Vision ist ein eingetragenes Warenzeichen oder Warenzeichen der Seiko Epson Corporation.
Alle anderen Warenzeichen sind das Eigentum ihrer jeweiligen Eigentümer und werden nur zu Identifikationszwecken
verwendet.
HINWEIS: Änderungen am Inhalt dieser Anleitung ohne Vorankündigung vorbehalten.
© Seiko Epson Corporation 2015. Alle Rechte vorbehalten.
TM-T70 Benutzerhandbuch 13

Wichtige Sicherheitshinweise
Dieser Abschnitt enthält wichtige Informationen für die sichere und effektive
Nutzung dieses Produkts. Bitte lesen Sie diesen Abschnitt sorgfältig durch und
bewahren Sie ihn leicht zugänglich auf.
Symbole
Die in diesem Handbuch verwendeten Symbole sind der untenstehenden
Wichtigkeit entsprechend definiert. Folgende Angaben vor der Benutzung des
Produkts sorgfältig durchlesen.
WARNUNG:
Warnungen müssen zur Vermeidung von möglicherweise schweren
Körperverletzungen genau beachtet werden.
VORSICHT:
Vorsichtshinweise müssen eingehalten werden, um leichte Verletzungen,
Geräteschäden oder Datenverluste zu vermeiden.
Sicherheitshinweise
Dieser Abschnitt enthält eine Beschreibung der Warn-und Vorsichtshinweise zur
sicheren und effektiven Anwendung des TM-T70. Zusätzliche Warn- und
Sicherheitshinweise für dieses Produkt und seine sichere und effektive
Anwendung befinden sich auch in anderen Abschnitten dieses Handbuchs.
WARNUNG:
Bei Rauchentwicklung oder ungewöhnlichen Gerüchen oder Geräuschen des
TM-T70, ziehen Sie sofort das Netzkabel und wenden Sie sich an Ihren Fachhändler
oder an ein Epson Service-Center, um weitere Schritte zu unternehmen. Bei
fortgesetztem Gebrauch besteht die Gefahr von Brandentwicklung und
elektrischem Stromschlag.
Versuchen Sie niemals, dieses Produkt eigenständig zu reparieren.
Unsachgemäße Reparaturarbeiten können gefährlich sein.
Zerlegen oder modifizieren Sie dieses Produkt nicht. Unsachgemäße Arbeiten
an diesem Produkt können zu Verletzungen oder einem Brand führen.
Stellen Sie sicher, dass Sie die für dieses Produkt geeignete Spannungsquelle
verwenden. Ein Anschluss an unpassende Spannungsquellen können zu einem
Brand führen.
Vermeiden Sie das Eindringen von Fremdobjekten in dieses Produkt. Das
Eindringen von Fremdobjekten kann zu einem Brand führen.
Sollten Wasser oder andere Flüssigkeiten in das Gerät gelangen, schalten Sie den
TM-T70 aus, ziehen Sie sofort den Netzstecker, und wenden Sie sich an Ihren
Fachhändler oder an ein Seiko Epson Service-Center. Bei fortgesetztem Gebrauch
besteht die Gefahr von Brandentwicklung und elektrischem Stromschlag.
Die Abdeckung der DIP-Schalter muss nach dem Öffnen und der Einstellung der
DIP-Schalter unbedingt geschlossen und fest verschraubt werden. Bei
Gebrauch dieses Gerätes mit offener Abdeckung besteht die Gefahr von
Brand oder elektrischem Schlag.
Verwenden Sie keine brennbaren Sprühmittel in und in der Nähe des Gerätes.
Brandgefahr!
14 TM-T70 Benutzerhandbuch

VORSICHT:
Die Kabel niemals anders anschließen als in diesem Handbuch beschrieben.
Unvorschriftsmäßige Anschlüsse können Geräteschäden und Brände verursachen.
Stellen Sie dieses Gerät unbedingt auf einer festen, stabilen, horizontalen
Fläche auf. Das Produkt kann beim Fallen beschädigt werden oder
Verletzungen verursachen.
Das Gerät nicht in stark feuchten oder staubigen Umgebungen installieren. Hohe
Luftfeuchtigkeit und Staub können Geräteschäden bzw. Brände verursachen.
Stellen Sie keine schweren Gegenstände auf dieses Produkt. Stellen Sie sich nie
auf das Produkt und lehnen Sie sich nicht dagegen. Das Gerät kann fallen oder
beschädigt werden und dabei Gegenstände beschädigen oder Personen
verletzen.
Handverletzungen durch die manuelle Schneidvorrichtung zuziehen:
• Beim Herausnehmen des bedruckten Dokuments
• Bei der Durchführung von anderen Arbeiten, wie zum Beispiel beim
Einlegen/Herausnehmen der Papierrolle.
Aus Sicherheitsgründen ziehen Sie bitte den Netzstecker aus der Netzsteckdose
wenn Sie beabsichtigen, das Gerät über einen längeren Zeitraum nicht zu
verwenden.
Vor dem Transport das Netzkabel und alle Anschlusskabel vom Gerät trennen.
Warnschilder
Die Warnschilder auf dem Produkt weisen auf die folgenden Sicherheitshinweise
hin:
Nach dem Drucken ist der Thermo-Druckkopf unter Umständen sehr heiß. Den
Kopf nicht berühren und vor dem Reinigen abkühlen lassen. Auf das
automatische Schneidmesser in Nähe des Thermo-Druckkopfs achten.
Abbildung A zeigt wo sich der Thermo-Druckkopf und das automatische
Schneidmesser befinden.
Verwendungshinweise
Wenn dieses Produkt für Anwendungen verwendet wird, bei denen es auf hohe
Zuverlässigkeit/Sicherheit ankommt, wie z.B. Transportvorrichtungen beim Flug, Zug-, Schiffs- und Kfz-Verkehr usw., Vorrichtungen zur
Katastrophenverhinderung, verschiedene Sicherheitsvorrichtungen oder
Funktions-/Präzisionsgerät usw., sollten Sie dieses Produkt erst verwenden,
wenn Sie Fail-Safe-Vorrichtungen und Redundanzsysteme in Ihr Design mit
einbezogen haben, um die Sicherheit und Zuverlässigkeit des gesamten Systems
zu gewährleisten. Da dieses Produkt nicht für den Einsatz bei Anwendungen
vorgesehen ist, bei denen es auf extrem hohe Zuverlässigkeit/Sicherheit
ankommt, wie beispielsweise in der Raumfahrt, bei primären
Kommunikationseinrichtungen, Kernenergiekontrollanlagen oder medizinischen
Vorrichtungen für die direkte medizinische Pflege usw., überlegen Sie bitte nach
umfassender Evaluierung genau, ob das Produkt für Ihre Zwecke geeignet ist.
TM-T70 Benutzerhandbuch 15
VORSICHT:

Zweck dieser Bedienungsanleitung
Diese Bedienungsanleitung enthält Informationen für die Benutzer des TM-T70Druckers und erläutert die Grundfunktionen für den sicheren und korrekten
Druckergebrauch.
Namen der Teile
Siehe Abbildung B.
Auspacken
Folgende Teile sind im Lieferumfang des Druckers mit Standardspezifikationen
enthalten. Falls eine der Systemkomponenten beschädigt ist, wenden Sie sich bitte
an Ihren Fachhändler.
❏ Drucker ❑ Rollenpapier
❏ Ein-/Ausschalterabdeckung ❑ Netzadapter*
❏ Bedienungsanleitung (diese Anleitung)
* Möglicherweise nicht im Lieferumfang des Druckers enthalten.
Herunterladen von Treibern, Dienstprogrammen und
Handbüchern
Treiber, Dienstprogramme und Handbücher können von folgenden Webadressen
heruntergeladen werden.
Für Kunden in Nordamerika: Besuchen Sie die Website
http://www.epsonexpert.com/ und befolgen Sie die auf dem Bildschirm
angezeigten Anweisungen.
Kunden in anderen Ländern besuchen die Website http://www.epson-pos.com/
Bedienfeld
Papiervorschubtaste (FEED)
Schiebt Papier vor.
Betriebsanzeige
Die Betriebsanzeige leuchtet grün, wenn der Drucker eingeschaltet ist.
Fehleranzeige (ERROR LED)
Dieses Lämpchen leuchtet rot, wenn am Gerät ein Fehler aufgetreten ist.
Papieranzeige (PAPER OUT LED)
Weist darauf hin, dass das Papier zu Ende geht bzw. gegangen ist. Wenn das rote
Lämpchen blinkt, befindetsichdas Gerät im Bereitschaftsmodus (Standby).
Wichtige Hinweise zur Installation
❏ An seriellen Anschlüssen ein Null-Modem-Kabel (Kreuzkabel) benutzen.
❏ An Parallelanschlüssen ein IEEE-1284-konformes Kabel benutzen.
❏ Bei Verwendung einer USB-Schnittstelle installieren Sie den Treiber, bevor
Sie den Drucker anschließen.
16 TM-T70 Benutzerhandbuch

Installation des Druckers
Der Drucker darf nur waagerecht installiert werden.
Befestigen Sie den Drucker so, dass er beim Öffnen der Druckerabdeckung und
dem Schneiden des Rollenpapiers nicht bewegt wird. Klebeband zur Fixierung
des Druckers ist als Option erhältlich.
Wie in Abbildung C gezeigt, darf der Neigungswinkel des Druckers nicht mehr
als 3° betragen. Bei einem Neigungswinkel von mehr als 3° können folgende
Probleme auftreten.
• Sensor für “Rollenpapier fast zu Ende” funktioniert nicht.
• Die Druckerabdeckung lässt sich nach Einlegen einer neuen Papierrolle
nicht schließen.
• Rollenpapier lässt sich nicht heraus nehmen.
Verwenden der Ein- / Ausschalterabdeckung
WARNUNG:
Wenn bei montierter Ein- / Ausschalterabdeckung ein Unfall auftritt, sofort den
Netzstecker ziehen. Bei Weiterverwendung des Geräts besteht Feuer- und
Stromschlaggefahr.
Die beiliegende Ein- / Ausschalterabdeckung verhindert, dass der Ein- /
Ausschalter versehentlich betätigt wird. Soll diese Abdeckung verwendet werden,
gehen Sie bei der Installation gemäß Abbildung D vor.
Einlegen des Rollenpapiers
1. Drücken Sie den auf Abbildung E mit einem Pfeil markierten Hebel, um die
Druckerabdeckung zu öffnen.
2. Nehmen Sie den leeren Rollenkern heraus (wenn vorhanden).
3. Legen Sie das neue Rollenpapier ein (Abbildung F). Die korrekte Ausrichtung
des Papiers ist in Abbildung G dargestellt.
4. Ziehen Sie etwas Papier wie in Abbildung H gezeigt heraus, so dass sich das
Papier zwischen den Papierführungen befindet.
5. Den Drucker wie auf Abbildung I gezeigt schließen, und dabei darauf achten,
dass das Rollenpapier richtig zwischen den Papierführungen liegt.
6. Reißen Sie dann das Papier ab, wie in Abbildung J gezeigt.
Fehlersuche
Auf dem Bedienfeld leuchten keine Lämpchen
Prüfen Sie, ob die Spannungsversorgung am Drucker und der Netzsteckdose
angeschlossen ist.
FEHLER-LED (ERROR) leuchtet (konstant-nicht blinkend); das Gerät druckt nicht
Wenn die Papieranzeige (PAPER OUT) leuchtet, ist das Rollenpapier fast zu Ende
oder es ist kein Papier vorhanden.
Wenn die Papieranzeige (PAPER OUT) nicht leuchtet, ist die Druckerabdeckung
nicht richtig geschlossen.
TM-T70 Benutzerhandbuch 17

FEHLER-LED (ERROR) blinkt und das Gerät druckt nicht (und es liegt kein
Papierstau vor)
Der Druckvorgang wird unterbrochen, wenn der Thermo-Druckkopf zu heiß
wird, und nach dem Abkühlen fortgesetzt.
Falls keine Überhitzung vorliegt, schalten Sie den Drucker aus und nach 10
Sekunden wieder ein.
Entfernen eines Papierstaus
Den Thermo-Druckkopf nicht berühren; er kann nach dem Drucken sehr heiß sein.
1. Schalten Sie den Drucker aus, und drücken Sie den Hebel zum Öffnen der
2. Entfernen Sie das gestaute Papier, legen Sie die Rolle wieder ein, und
VORSICHT:
Abdeckung.
schließen Sie die Abdeckung.
Reinigen des Thermo-Druckkopfes
Nach dem Drucken ist der Thermo-Druckkopf unter Umständen sehr heiß. Den
Kopf nicht berühren und vor dem Reinigen abkühlen lassen. Um eine
Beschädigung des Thermo-Druckkopfes zu vermeiden, berühren Sie ihn nicht
mit den Fingern oder harten Gegenständen.
Schalten Sie den Drucker aus, und öffnen Sie die Druckerabdeckung. Reinigen Sie
das Thermoelement des Thermo-Druckkopfes mit einem in Alkohollösung (Ethanol
oder IPA) getränkten Wattestäbchen, wie in Abbildung K dargestellt.
Epson empfiehlt, den Thermo-Druckkopf regelmäßig zu reinigen (im Allgemeinen
alle drei Monate), um die ursprüngliche Druckqualität beizubehalten.
VORSICHT:
Einstellung der DIP-Schalter
VORSICHT:
Schalten Sie den Drucker aus, bevor Sie die Abdeckung der DIP-Schalter
entfernen. Das Entfernen der Abdeckung bei eingeschaltetem Drucker kann zu
Problemen führen, wie z. B. ein Kurzschluss, der wiederum zu einer Fehlfunktion
des Druckers führt.
1. Schalten Sie den Drucker aus.
2. Drehen Sie den Drucker um.
3. Wie in Abbildung L gezeigt, die Abdeckung der DIP-Schalter durch
Entfernen der Schraube abnehmen.
4. Stellen Sie anhand eines feinspitzigen Werkzeugs die DIP-Schalter ein.
5. Bringen Sie die Abdeckung der DIP-Schalter wieder an und schrauben Sie sie
mittels der Schraube fest.
Die neue Einstellung wird nach dem Einschalten des Druckers aktiv.
18 TM-T70 Benutzerhandbuch

Nederlands
Gebruikershandleiding
Tabellen voor DIP-schakelaars en specificaties
De tabellen voor de DIP-schakelaars en de technische specificaties staan voor in deze handleiding.
Illustraties
Alle illustraties treft u voor in deze handleiding aan. Ze worden aangeduid door letters (A, B, C . . .).
Sommige illustraties bevatten cijfers. Zie de onderstaande lijst voor de betekenis van de cijfers.
Afbeelding A Afbeelding H
1. Thermische kop 7. Papiergeleiders
2. Automatisch snijmes
Afbeelding B Afbeelding K
3. Hendel voor openen deksel 8. Thermische kop
4. Printerdeksel
5. Stroomschakelaar
6. Bedieningspaneel
Alle rechten voorbehouden. Niets uit deze uitgave mag worden verveelvoudigd, opgeslagen in een
geautomatiseerd gegevensbestand of openbaar worden gemaakt in enige vorm of op enige wijze, hetzij
elektronisch, mechanisch, door fotokopiëren, opnamen of enige andere manier, zonder voorafgaande schriftelijke
toestemming van Seiko Epson Corporation. Er wordt geen aansprakelijkheid voor octrooien aanvaard in verband
met gebruik van de informatie in deze uitgave. Hoewel bij het samenstellen van deze uitgave de grootste
zorgvuldigheid is betracht, aanvaardt Seiko Epson Corporation geen aansprakelijkheid voor fouten of omissies.
Noch wordt aansprakelijkheid aanvaard voor schade die voortvloeit uit gebruik van de informatie in deze
uitgave.
Noch Seiko Epson Corporation noch een van haar dochterondernemingen kan aansprakelijk worden gesteld door
de koper of door derden voor schade, verliezen of kosten die door de koper of derden zijn gemaakt als gevolg van
ongelukken, onjuist gebruik of misbruik van dit product of door onbevoegden uitgevoerde modificaties,
reparaties of wijzigingen van dit product of (tevens in de VS) het niet in acht nemen van de aanwijzingen voor
gebruik en onderhoud van Seiko Epson Corporation.
Seiko Epson Corporation is niet aansprakelijk voor schade of problemen die voortvloeien uit gebruik van andere
optionele producten of verbruiksgoederen dan die welke door Seiko Epson Corporation zijn aangemerkt als
“originele Epson-producten” of als “door Epson goedgekeurde producten”.
EPSON is een gedeponeerd handelsmerk van Seiko Epson Corporation.
Exceed Your Vision is een gedeponeerd handelsmerk of handelsmerk van Seiko Epson Corporation.
Alle andere handelsmerken zijn eigendom van hun respectievelijke eigenaren en worden alleen gebruikt voor
identificatiedoeleinden.
BEKENDMAKING: Wijzigingen in de inhoud van deze handleiding onder voorbehoud.
© Seiko Epson Corporation 2015. Alle rechten voorbehouden.
TM-T70 Gebruikershandleiding 19

Belangrijke veiligheidsinformatie
Dit gedeelte bevat belangrijke informatie voor veilig en effectief gebruik van dit
product. Lees dit gedeelte zorgvuldig door en bewaar het op een goed toegankelijke
plaats.
Verklaring van symbolen
De symbolen in deze handleiding zijn onderverdeeld volgens hun mate van
belangrijkheid, zoals hieronder beschreven. Lees het onderstaande zorgvuldig
door voordat u het product gebruikt.
WAARSCHUWING:
Waarschuwingen moeten goed in acht genomen worden om ernstig
lichamelijk letsel te voorkomen.
LET OP:
Voorzorgsmaatregelen moeten in acht genomen worden om licht letsel,
apparatuurschade of dataverlies te voorkomen.
Veiligheidsmaatregelen
Dit gedeelte bevat waarschuwingen en voorzorgsmaatregelen voor veilig en effectief
gebruik van de TM-T70. Andere waarschuwingen en voorzorgsmaatregelen voor het
hanteren van dit product voor veilig en effectief gebruik treft u elders in de
handleiding aan.
WAARSCHUWING:
Als de TM-T70 rook, een vreemde geur of ongebruikelijk geluid produceert, moet
u de TM-T70 uitzetten, het snoer onmiddellijk uit het stopcontact trekken en voor
advies contact opnemen met de leverancier of een Epson servicecentrum.
Verder gebruik kan tot brand of elektrische schokken leiden.
Probeer niet zelf het product te repareren. Onjuist uitgevoerde reparaties
kunnen gevaar veroorzaken.
Dit product niet demonteren of wijzigen. Wijzigen van dit product kan letsel of
brand veroorzaken.
Ervoor zorgen dat u de juiste voedingsbron gebruikt. Aansluiten op een onjuiste
voedingsbron kan brand veroorzaken.
Voorkomen dat er voorwerpen in het apparaat vallen. Binnendringen van
vreemde voorwerpen kan brand veroorzaken.
Als er water of andere vloeistof in deze apparatuur wordt gemorst, moet u de
TM-T70 uitzetten, het snoer van de TM-T70 onmiddellijk uit het stopcontact trekken
en voor nader advies contact opnemen met de leverancier of een Seiko Epson
servicecentrum. Verder gebruik kan tot brand of elektrische schokken leiden.
Als u het deksel van de DIP-schakelaars opent, mag u niet vergeten dit weer te
sluiten en de schroef aan te draaien nadat u de DIP-schakelaar versteld hebt.
Gebruik van dit product terwijl dit deksel open is, kan brand of elektrische
schokken veroorzaken.
Geen spuitbussen met brandgevaarlijk gas in of bij dit product gebruiken.
Dat kan brand veroorzaken.
LET OP:
Sluit de snoeren niet anders aan dan beschreven in deze handleiding.
Verkeerde aansluitingen kunnen apparatuurschade of brand veroorzaken.
20 TM-T70 Gebruikershandleiding

Dit apparaat moet op een stevige, stabiele en horizontale ondergrond
geplaatst worden. Het product kan beschadigd raken of ongelukken
veroorzaken als het valt.
Dit product niet gebruiken op plaatsen met een hoge vochtigheidsgraad of
veel stof. Overmatig vocht en stof kunnen apparatuurschade of brand
veroorzaken.
Geen zware voorwerpen boven op dit product plaatsen. Nooit op dit product
gaan staan of leunen. De apparatuur kan defect raken of in elkaar klappen,
wat breuk en eventueel letsel kan veroorzaken.
Wees voorzichtig dat u uw vingers niet bezeert aan de handmatige snijder
• Wanneer u afgedrukt papier verwijdert
• Wanneer u andere handelingen uitvoert zoals het plaatsen/
vervangen van de papierrol
Om ongelukken te voorkomen altijd de stekker van dit product uit het
stopcontact trekken als u het langere tijd niet gebruikt.
Voordat u het product verplaatst, moet u de stekker uit het stopcontact
trekken en alle kabels die er op aangesloten zijn, loshalen.
Waarschuwingsetiketten
De waarschuwingsetiketten op het product geven de volgende
veiligheidsmaatregelen mee.
Tijdens het afdrukken en direct daarna kan de thermische kop zeer heet zijn.
Aanraken kan brandwonden veroorzaken. Wacht met schoonmaken en andere
werkzaamheden totdat de thermische kop is afgekoeld. Wees ook voorzichtig
met het automatische snijmes dat zich in de buurt van de thermische kop
bevindt. Zie afbeelding A voor de plaats van de thermische kop en het
automatische snijmes.
Gebruiksbeperkinge
LET OP:
Wanneer dit product gebruikt wordt voor toepassingen die een hoge mate van
betrouwbaarheid/veiligheid vereisen zoals bijv. transportapparatuur voor
vliegtuigen, treinen, schepen, auto's enz.; ramppreventievoorzieningen; diverse
soorten beveiligingsapparatuur enz.; of functionele/precisie-apparatuur, mag u
dit product alleen gebruiken indien uw ontwerp voorziet in redundantie en failsafes ten einde de veiligheid en betrouwbaarheid van het complete systeem te
waarborgen. Omdat dit product niet bestemd is voor toepassingen die een
uitermate hoge mate van betrouwbaarheid/veiligheid vereisen zoals
luchtvaartapparatuur, primaire communicatieapparatuur, regelapparatuur voor
kerninstallaties of medische apparatuur voor directe medische zorg, wordt u
geacht uw eigen oordeel te hanteren aangaande de geschiktheid van dit product,
op basis van grondige evaluatie.
Doel van deze handleiding
Deze handleiding bevat informatie over elementaire handelingen voor veilig en
correct gebruik van printer TM-T70.
TM-T70 Gebruikershandleiding 21

Naam van onderdelen
Zie afbeelding B.
Uitpakken
De printer met standaard specificaties omvat de volgende items. Neem contact op
met de leverancier als er onderdelen beschadigd zijn.
❏ Printer ❑ Rolpapier
❏ Deksel voor stroomschakelaar ❑ Netspanningsadapter*
❏ Gebruikershandleiding (deze handleiding)
* Soms niet met de printer meegeleverd.
Downloaden van stuur- en hulpprogramma’s en
gebruiksaanwijzingen
Stuur- en hulpprogramma’s en gebruiksaanwijzingen kunnen van een van de
volgende URL’s gedownload worden.
Klanten in Noord-Amerika kunnen gebruik maken van de volgende website:
http://www.epsonexpert.com/ en de instructies op het scherm volgen.
Klanten in andere landen kunnen gebruik maken van de volgende website:
http://www.epson-pos.com/
Bedieningspaneel
FEED-knop
Deze knop voert het papier in.
Aan/Uit-lampje
Dit lampje brandt als de printer aanstaat.
ERROR-lampje
Geeft aan dat er een fout is.
PAPER OUT-lampje
Geeft aan dat het papier bijna of helemaal op is. Knipperen geeft de stand-by
modus aan.
Belangrijke informatie over installatie
❏ Gebruik voor een seriële verbinding een null-modemkabel (ook wel
'kruiskabel' genoemd).
❏ Gebruik voor een parallelle verbinding een kabel die voldoet aan de
specificaties voor een IEEE 1284 kabel.
❏ Installeer voor een USB-verbinding het stuurprogramma voordat u de printer
aansluit.
Installeren van de printer
U kunt deze printer alleen horizontaal installeren.
Zet de printer vast zodat hij niet beweegt als u het printerdeksel opent en het
rolpapier afscheurt. Er is afzonderlijk plakband verkrijgbaar voor het vastzetten
van de printer.
22 TM-T70 Gebruikershandleiding

Zoals u ziet in afbeelding C, moet u de printer 3 graden gekanteld installeren Als
u de printer onder een hoek van meer dan 3 graden installeert, kan dat de
volgende problemen veroorzaken.
• Er kan niet vastgesteld worden dat het rolpapier bijna op is.
• Het printerdeksel kan niet gesloten worden na installatie van het rolpapier.
• Het rolpapier kan niet verwijderd worden.
Gebruik van het deksel voor de aan/uitknop
WAARSCHUWING:
Als er zich een ongeluk voordoet terwijl het deksel van de aan/uitknop is
aangebracht, moet u onmiddellijk het voedingssnoer uit het stopcontact
trekken. Verder gebruik kan brand of elektrische schokken veroorzaken.
U kunt het meegeleverde deksel voor de stroomschakelaar gebruiken om te
voorkomen dat er per ongeluk op de knop wordt gedrukt. Gebruik dit deksel
door het te installeren zoals afgebeeld in afb. D.
Installeren van rolpapier
1. Druk op de hendel die in afbeelding E met een pijltje is aangeduid om het
printerdeksel te openen.
2. Verwijder de lege papierrol.
3. Installeer het rolpapier zoals afgebeeld (zie afb. F). De juiste papierrichting
ziet u in afb. G.
4. Trek het rolpapier een stukje uit (zie afb. H) zodat het papier tussen de
papiergeleiders geplaatst is.
5. Sluit de printer (zie afb. I) en zorg dat het rolpapier goed tussen de
papiergeleiders geïnstalleerd is.
6. Scheur dan het rolpapier af (zie afb. J).
Probleemoplossing
Lichtjes op het bedieningspaneel branden niet
Controleer of de stekkers van de voedingskabel goed in de printer en het
stopcontact zijn gestoken.
ERROR-LED brandt (knippert niet) en er wordt niets afgedrukt
Als PAPER OUT brandt, is het rolpapier niet geïnstalleerd of is het op.
Als PAPER OUT niet brandt, is het printerdeksel niet goed gesloten.
ERROR-LED knippert en er wordt niets afgedrukt (en er is geen papier vastgelopen)
Het printen stopt als de thermische kop oververhit raakt en wordt automatisch
hervat nadat de kop is afgekoeld.
Zet de printer uit, wacht tien seconden en zet hem vervolgens weer aan als
oververhitting niet de oorzaak is.
TM-T70 Gebruikershandleiding 23

Verwijderen van vastgelopen papier
Raak de thermische kop niet aan, aangezien hij na het afdrukken zeer heet kan
zijn.
1. Zet de printer uit en druk op de hendel voor het openen van het printerdeksel.
2. Verwijder het vastgelopen papier, installeer de rol weer en sluit het
LET OP:
printerdeksel.
Reinigen van de thermische kop
Na het afdrukken kan de thermische kop zeer heet zijn. Raak hem niet aan en
wacht totdat hij is afgekoeld voordat u hem schoonmaakt. Beschadig de
thermische kop niet door hem met uw vingers of harde voorwerpen aan te raken.
Zet de printer uit en open het printerdeksel. Maak de verwarmingselementen van
de thermische kop schoon met een wattenstaafje dat in een alcoholoplosmiddel is
gedrenkt (ethanol of isopropanol), zoals aangegeven in afbeelding K.
Epson beveelt aan de thermische kop regelmatig (gewoonlijk om de drie
maanden) te reinigen om een goede afdrukkwaliteit te behouden.
LET OP:
De DIP-schakelaars instellen
LET OP:
Zorg ervoor dat de printer is uitgeschakeld voordat u de kap over de DIPschakelaars verwijdert. Als u deze verwijdert terwijl de printer is ingeschakeld,
kan dit problemen opleveren zoals kortsluiting, wat een defect in de printer kan
veroorzaken.
1. Schakel de printer uit.
2. Draai de printer om.
3. Verwijder de kap over de DIP-schakelaars op de printerbodem door de
schroef te verwijderen, zoals aangegeven in afbeelding L.
4. Stel de DIP-schakelaars in met een puntig voorwerp.
5. Plaats de kap over de DIP-schakelaars terug en zet hem vast door de schroef
aan te draaien.
De nieuwe instelling wordt gebruikt zodra de printer is ingeschakeld.
24 TM-T70 Gebruikershandleiding

Italiano
Manuale dell’utente
Tabelle degli interruttori DIP e specifiche tecniche
Le tabelle degli interruttori DIP e le specifiche tecniche si trovano all'inizio di questo manuale.
Figure
Tutte le figure si trovano all’inizio di questo manuale, e sono identificate da lettere (A, B, C...). Alcune
figure contengono anche numeri. Per il significato dei numeri vedere l'elenco qui sotto.
Figura A Figura H
1. Testina termica 7. Guide della carta
2. Lama taglierina automatica
Figura B Figura K
3. Levetta di apertura del coperchio 8. Testina termica
4. Coperchio della stampante
5. Copertura dell’interruttore
6. Pannello di controllo
Tutti i diritti riservati. Nessuna parte di questa pubblicazione può essere riprodotta, memorizzata in un sistema di
reperimento, né trasmessa in qualsiasi forma o con qualsiasi mezzo (elettronico, meccanico, fotocopia,
registrazione o altro) senza la preventiva autorizzazione scritta della Seiko Epson Corporation. Viene esclusa ogni
responsabilità di brevetto rispetto all’uso delle informazioni contenute in questa pubblicazione. Malgrado questo
manuale sia stato preparato con la massima cura, la Seiko Epson Corporation non si assume alcuna responsabilità
per eventuali errori o omissioni in esso contenuti, né per eventuali danni risultanti dall’uso delle informazioni
contenute in questo manuale.
Né la Seiko Epson Corporation, né alcuna delle sue affiliate, sarà ritenuta responsabile verso l’acquirente di
questo prodotto, o terze parti, di eventuali danni, perdite, costi o spese sostenuti dall’acquirente o terze parti
risultanti da: incidente, uso improprio o abuso di questo prodotto, o da modifiche non autorizzate, riparazioni,
alterazioni a questo prodotto, oppure (esclusi gli Stati Uniti d’America) dalla totale inosservanza delle istruzioni
per l’uso e la manutenzione impartite dalla Seiko Epson Corporation.
La Seiko Epson Corporation non sarà responsabile di alcun danno o problema insorto dall’uso di qualsiasi
accessorio opzionale o di prodotti consumabili diversi da quelli designati dalla Seiko Epson Corporation come
Prodotti originali Epson o Prodotti approvati dalla Epson.
EPSON è un marchio commerciale registrato di Seiko Epson Corporation.
Exceed Your Vision è un marchio commerciale registrato o un marchio commerciale di Seiko Epson Corporation.
Tutti gli altri marchi commerciali sono di proprietà dei rispettivi titolari e utilizzati solo a scopo identificativo.
AVVISO: il contenuto di questo manuale è soggetto a cambiamenti senza preavviso.
© Seiko Epson Corporation 2015. Tutti i diritti riservati.
TM-T70 Manuale dell’utente 25

Precauzioni di sicurezza
Questa sezione presenta informazioni importanti per l’uso efficiente e sicuro di
questo prodotto. Leggere attentamente questa sezione e conservare queste
informazioni in un posto accessibile.
Spiegazione dei simboli
I simboli usati in questo manuale sono identificati in base al loro grado di
importanza, come definito qui sotto. Prima di maneggiare il prodotto, leggere
attentamente questa sezione.
AVVERTENZA:
Seguire attentamente le note di avvertenza per evitare gravi infortuni alle persone.
ATTENZIONE:
Osservare le note di attenzione per evitare infortuni alla propria persona, danni
all’unità o perdita di dati.
Precauzioni di sicurezza
Questa sezione descrive le note di avvertenza e di attenzione per l’uso efficiente e
sicuro della stampante TM-T70. Altre note di avvertenza e di attenzione su come
maneggiare questo prodotto per usarlo in maniera efficiente e sicura sono
descritte in altre sezioni del manuale.
AVVERTENZA:
Se l’unità TM-T70 produce fumo, un odore strano o un rumore inconsueto,
spegnere l’unità TM-T70, staccare immediatamente la spina del cavo di
alimentazione e rivolgersi al rivenditore o ad un centro di servizio Epson per
assistenza in merito. L’uso continuato dell’unità potrebbe diventare causa
d’incendio o di scossa elettrica.
Non riparare mai da soli questa unità. La riparazione impropria potrebbe creare
un pericolo.
Non smontare né modificare mai questo prodotto. La manomissione del
prodotto potrebbe causare lesioni personali, incendio.
Accertarsi di usare la fonte di alimentazione specificata. Il collegamento del
prodotto ad una fonte di alimentazione impropria potrebbe causare incendio.
Evitare che nell’unità entrino corpi estranei. Questi potrebbero causare
incendio.
Se acqua o altro liquido cade accidentalmente nell’unità, spegnere l’unità
TM-T70, staccare immediatamente la spina del cavo di alimentazione
dell’unità TM-T70 e rivolgersi al rivenditore o ad un centro di servizio Epson per
assistenza in merito. L’uso continuato dell’unità potrebbe diventare causa
d’incendio o di scossa elettrica.
Se il coperchio degli interruttori DIP viene aperto, accertarsi di chiuderlo e
avvitare la vite dopo aver regolato l'interruttore DIP. L'uso della stampante con
il coperchio aperto può causare incendio o scossa elettrica.
Per evitare il pericolo d’incendio, non usare spruzzatori aerosol contenenti gas
infiammabili, all’interno del prodotto o vicino ad esso.
26 TM-T70 Manuale dell’utente

ATTENZIONE:
Non collegare i cavi in alcun modo diverso da quello indicato in questo manuale.
Collegamenti non corretti possono causare danni all’unità o incendio.
Posare questa unità su una superficie piana, solida e stabile. Se cade, questa
unità può rompersi o causare lesioni personali.
Non usare questa unità in ambienti soggetti ad un elevato tasso di umidità o
polvere. L’umidità o la polvere eccessiva può causare danni all’unità o incendio.
Non mettere oggetti pesanti sopra questa unità. Non porsi sopra questa unità
né appoggiarsi. L’unità potrebbe cadere e rompersi o causare lesioni personali.
Prestate attenzione a non ferirvi le dita sulla taglierina manuale
• Quando rimuovete la carta stampata
• Quando eseguite operazioni come carico/sostituzione del rotolo di
carta
Per motivi di sicurezza, staccare sempre la spina dell’unità prima di lasciarla
incustodita per un lungo periodo di tempo.
Prima di spostare questo prodotto, staccare il cavo di alimentazione e tutti i
cavi collegati al prodotto.
Etichette di avvertimento
Le etichette di avvertimento presenti sul prodotto indicano le seguenti
precauzioni.
Durante la stampa e immediatamente al termine della stampa, la testina di
stampa può essere molto calda. Per evitare ustioni, non toccare la testina
termica. Eseguire la pulizia ed ogni altro tipo di lavoro solo quando la testina
termica si è raffreddata. Fare attenzione anche alla lama della taglierina
automatica vicina alla testina termica. L’ubicazione della testina termica e
della lama della taglierina automatica sono mostrate nella figura A.
Limitazioni d’impiego
ATTENZIONE:
Quando questo prodotto viene impiegato in applicazioni che richiedono un alto
grado di affidabilità e sicurezza, come dispositivi relativi a trasporti aerei, per
treno, via mare, con motoveicoli, ecc., dispositivi per la prevenzione di disastri,
dispositivi di sicurezza vari ecc. o dispositivi di precisione/funzionali, lo si
dovrebbe usare solo dopo avere preso in considerazione l’inclusione nel progetto
di elementi di ridondanza e resistenza ai guasti aventi lo scopo di mantenere la
sicurezza e l’affidabilità dell’intero sistema. Poiché questo prodotto è stato
progettato per essere usato in applicazioni che richiedono un altissimo grado di
affidabilità e sicurezza, come in apparecchiature aerospaziali, reti di
comunicazione, controllo di impianti nucleari o apparecchi per l’assistenza
medica usate in cura diretta dei pazienti, ecc., si dovrà usare il proprio
discernimento nel valutare a fondo il prodotto e garantire che sia adatto all’uso.
Scopo di questo manuale
Questo manuale fornisce agli operatori le della stampante TM-T70 le informazioni
necessarie per l’uso corretto e sicuro della stampante.
TM-T70 Manuale dell’utente 27

Nomi della parti
Vedere la figura B.
Disimballaggio
Gli articoli seguenti sono inclusi con la stampante in configurazione standard. Se
un articolo risulta danneggiato, rivolgersi al rivenditore della stampante.
❏ Stampante ❑ Carta in rotolo
❏ Copertura dell'interruttore dell'alimentazione ❑ Adattatore CA *
❏ Manuale dell’utente (questo manuale)
* Può non essere incluso con la stampante acquistata.
Download dei driver, dei programmi di utility e dei manuali
I driver, i programmi di utility e i manuali possono essere scaricati dai siti ai
seguenti indirizzi URL.
Per clienti in Nord America, andare al seguente sito Web:
http://www.epsonexpert.com/ e seguire le istruzioni fornite sullo schermo.
Per clienti in altri Paesi, andare al seguente sito Web:
http://www.epson-pos.com/
Pannello di controllo
Pulsante FEED
Alimenta la carta nella stampante.
LED dell’alimentazione
Questo LED è acceso quando la stampante è accesa.
LED ERROR
Indica un errore.
LED PAPER OUT
Se acceso, indica che la carta è finita o sta per finire. Se lampeggia, indica lo stato
di attesa.
Importanti note per l’installazione
❏ Per il collegamento all'interfaccia seriale, utilizzare un cavo null modem,
chiamato anche cavo seriale incrociato.
❏ Per il collegamento all'interfaccia parallela, utilizzare un cavo parallelo
conforme alle specifiche IEEE 1284.
❏ Per il collegamento all’interfaccia USB, installare il driver prima di collegare
la stampante.
28 TM-T70 Manuale dell’utente

Installazione della stampante
La stampante può essere installata solo orizzontalmente.
Fissare la stampante in modo che non si muova quando viene aperto il coperchio
della stampante per tagliare la carta in rotolo. È disponibile, come opzione, un
nastro per fissare la stampante.
Come mostrato nella figura C, installare la stampante con un’inclinazione
massima di 3°. Un’inclinazione maggiore può causare i seguenti problemi.
• Il sensore di quasi fine carta potrebbe non rilevare che il rotolo di carta
sta per finire.
• Lo sportello della stampante non si chiuderà dopo aver installato il rotolo
di carta.
• Il rotolo di carta non potrà essere rimosso.
Uso della copertura dell’interruttore dell’alimentazione
AVVERTENZA:
Se la stampante subisce un incidente e la copertura dell’interruttore
dell’alimentazione è installata, staccare immediatamente il cavo di
alimentazione. L’uso continuato della stampante danneggiata può causare un
incendio o una scossa elettrica.
L’acclusa copertura dell’interruttore dell’alimentazione assicura che l’interruttore
dell’alimentazione non venga premuto accidentalmente. Per usare questa
copertura, installarla così come mostrato nella figura D.
Installazione della carta in rotolo
1. Premere la levetta indicata dalla freccia nella figura E per aprire il coperchio
della stampante.
2. Rimuovere il rocchetto della carta in rotolo esaurita.
3. Installare il rotolo di carta come mostrato nella figura F. La direzione corretta
della carta è mostrata nella figura G.
4. Svolgere un po’ di carta dal rotolo come mostrato nella figura H in modo da
posizionarla fra le guide della carta.
5. Chiudere la stampante come mostrato nella figura I, e verificare che la carta in
rotolo sia correttamente installata fra le guide della carta.
6. Quindi, strappare la carta in rotolo come mostrato nella figura J.
Risoluzione dei problemi
Sul pannello di controllo tutte le spie luminose sono spente
Verificare che il cavo di alimentazione sia collegato correttamente alla stampante e
alla presa di corrente elettrica.
La spia luminosa ERROR è accesa (non lampeggiante) e la stampante non stampa
Se PAPER OUT è acceso, la carta in rotolo non è installata o è finita.
Se PAPER OUT è spento, il coperchio della stampante non è chiusa correttamente.
TM-T70 Manuale dell’utente 29

La spia luminosa ERROR lampeggia e la stampante non stampa (senza inceppamento
della carta)
La stampa s’interrompe se la testina termica si surriscalda e riprende
automaticamente quando la testina termica si raffredda.
Se la causa non è il surriscaldamento, spegnere la stampante e riaccenderla dopo
10 secondi.
Rimozione della carta inceppata
Non toccare la testina termica perché può essere molto calda dopo la
stampa.
1. Spegnere la stampante e premere la levetta di apertura del coperchio.
2. Rimuovere la carta inceppata, installare di nuovo il rotolo e chiudere il
ATTENZIONE:
coperchio della stampante.
Pulizia della testina termica
Dopo la stampa, la testina termica può essere molto calda. Non toccarla e
lasciarla raffreddare prima di pulirla. Non danneggiare la testina termica
toccandola con le dita o con un qualsiasi altro oggetto duro.
Spegnere la stampante e aprire il coperchio della stampante. Come mostrato nella
figura K, pulire gli elementi termici della testina termica con un tamponcino di cotone
inumidito con solvente a base di alcool (etanolo o IPA).
La Epson raccomanda di pulire periodicamente la testina di stampa (in genere,
ogni tre mesi) per mantenere la buona qualità della stampa.
ATTENZIONE:
Impostazione degli interruttori DIP
ATTENZIONE:
Assicurarsi di spegnere la stampante prima di rimuovere la copertura degli
interruttori DIP. Se si rimuovono con la stampante accesa, si potrebbero
verificare problemi quali cortocircuiti, che potrebbero causare guasti alla
stampante.
1. Spegnere la stampante.
2. Capovolgere la stampante.
3. Come mostrato nella figura L, togliere la copertura degli interruttori DIP
rimuovendo la vite.
4. Impostare gli interruttori DIP con uno strumento a punta fine.
5. Reinstallare la copertura degli interruttori DIP e fissarla con le viti.
La nuova impostazione diventa efficace all’accensione della stampante.
30 TM-T70 Manuale dell’utente

Español
Manual del usuario
Tablas y especificaciones de los interruptores DIP
Las tablas de los interruptores DIP y las especificaciones técnicas se hallan al principio de este manual.
Ilustraciones
Todas las ilustraciones están al principio de este manual. Están identificadas por letras (A, B, C,…).
Algunas de las ilustraciones tienen números en ellas. Vea la lista que sigue para conocer el significado de
los números.
Ilustración A Ilustración H
1. Cabezal térmico 7. Guías del papel
2. Hoja del cortador automático
Ilustración B Ilustración K
3. Palanca para abrir la tapa 8. Cabezal térmico
4. Tapa de la impresora
5. Interruptor de alimentación
6. Panel de control
Se reservan todos los derechos. Ninguna porción de esta publicación podrá reproducirse, guardarse en un
sistema de recuperación de datos o transmitirse en forma o modo alguno, sea electrónico, mecánico, fotocopiado,
grabado o de otra forma, sin el permiso previo y por escrito de Seiko Epson Corporation. No se asume
responsabilidad de patente con respecto al uso de la información contenida aquí. Si bien se han tomado todas las
precauciones en la preparación de este libro, Seiko Epson Corporation no asume ninguna responsabilidad por
errores u omisiones. Tampoco asume responsabilidad alguna que surja por el uso de la información contenida
aquí.
Ni Seiko Epson Corporation ni sus compañías afiliadas serán responsables ante el comprador de este producto o
ante terceros por daños, pérdidas, costos, o gastos incurridos por el comprador o por terceros como resultado de:
accidente, uso indebido, o abuso de este producto o de modificaciones, reparaciones o alteraciones no autorizadas
de este producto, o (excluyendo a los EE.UU.) por no cumplir estrictamente con las instrucciones de operación y
mantenimiento de Seiko Epson Corporation.
Seiko Epson Corporation no será responsable de cualquier daño o problema que surja por el uso de cualquier
opción o producto de consumo que no esté designado como Producto Epson Original o Aprobado por Seiko
Epson Corporation.
EPSON es una marca comercial registrada de Seiko Epson Corporation.
Exceed Your Vision es una marca comercial registrada o una marca comercial de Seiko Epson Corporation.
Todas las demás marcas son propiedad de sus respectivos propietarios y se utilizan con fines meramente
identificativos.
AVISO: El contenido de este manual está sujeto a cambios sin previo aviso.
© Seiko Epson Corporation 2015. Reservados todos los derechos.
TM-T70 Manual del usuario 31

Información importante sobre la seguridad
En esta sección se ofrece información importante para asegurar el uso seguro y eficaz
de este producto. Lea esta sección atentamente y guárdela en un lugar accesible.
Clave de los símbolos
Los símbolos incluidos en este manual se identifican por su nivel de importancia,
como se define a continuación. Lea cuidadosamente lo siguiente antes de manejar
el producto.
ADVERTENCIA:
Hay que seguir cuidadosamente las advertencias para evitar daños físicos.
PRECAUCIÓN:
Se deben tener en cuenta las precauciones para evitar lesiones menores a su
persona, daños al equipo o pérdida de datos.
Precauciones de Seguridad
En esta sección se describen las advertencias y precauciones para cerciorarse del
uso seguro y efectivo de la impresora TM-T70. Hay otras advertencias y
precauciones sobre el funcionamiento de este producto y sobre su uso seguro y
efectivo en otras secciones del manual.
ADVERTENCIA:
Si la TM-T70 produce humo, un olor raro, o un ruido inusual, apáguela,
desenchufe el cable eléctrico de inmediato y comuníquese con su distribuidor
o con el servicio técnico Epson para que le asistan. Si sigue utilizándola podría
ocasionar un incendio o un cortocircuito.
Nunca trate de reparar este producto usted mismo. Una reparación incorrecta
puede ser peligrosa.
Nunca desmonte o modifique este producto. La manipulación de este
producto puede causar lesiones o un incendio.
Cerciórese de usar la fuente de alimentación eléctrica especificada. La
conexión a una fuente de alimentación eléctrica inadecuada puede causar
un incendio.
No deje que materiales extraños caigan dentro del equipo, ya que podría
provocar un incendio.
Si se derrama agua o algún otro líquido dentro de este equipo, apague la
TM-T70, desenchufe el cable eléctrico de la misma de inmediato, y después
póngase en contacto con su distribuidor o con el servicio técnico Epson. Si
sigue usándola podría causar un incendio o un cortocircuito.
Si abre la tapa de los interruptores DIP, cerciórese de cerrar la tapa y de
apretar el tornillo después de ajustar el interruptor DIP. Si este producto se usa
con la tapa abierta, puede causar un incendio o un cortocircuito.
No utilice aerosoles que contengan gases inflamables dentro o cerca de este
producto. Si lo hace, podría provocar un incendio.
PRECAUCIÓN:
No conecte los cables de forma que no sean las indicadas en este manual.
Las conexiones diferentes podrían ocasionar daños al equipo o incendios.
Cerciórese de poner este equipo sobre una superficie firme, estable, horizontal.
El producto se puede romper o causar lesiones si se cae.
32 TM-T70 Manual del usuario

No use este producto en lugares sujetos a altos niveles de humedad o de
polvo. El exceso de humedad o de polvo podría causar daños al equipo o
incendios.
No ponga objetos pesados encima de este producto. Nunca se apoye sobre
este producto. El equipo podría caerse, causando roturas y posibles lesiones.
Tenga cuidado para no lastimarse los dedos con el cortador manual
• Al retirar papeles impresos
• Cuando realice cualquier otra operación, tal como carga/reemplazo
de rollo de papel
Por razones de seguridad, por favor desenchufe este producto antes de
dejarlo sin usar por un largo periodo de tiempo.
Antes de mover este producto, cerciórese de desenchufarlo y de desenchufar
todos los cables que éste tenga conectados.
Etiquetas de Precaución
Las etiquetas de precaución de este producto indican las siguientes precauciones.
El cabezal térmico puede estar muy caliente durante la impresión e
inmediatamente después de ella. Si se toca, puede causar quemaduras. Antes
de limpiarlo o de hacerle otras cosas, cerciórese de que el cabezal térmico se
haya enfriado. Asimismo, tenga cuidado con la hoja del cortador automático
cerca del cabezal térmico. Vea la ilustración A para ubicar el lugar del
cabezal térmico y la hoja del cortador automático.
PRECAUCIÓN:
Restricción en el uso
Cuando este producto se usa en aplicaciones que requieren de alta fiabilidad/
seguridad tales como los dispositivos relacionados con la aviación, los
ferrocarriles, la marina, los automóviles, etc.; los dispositivos de prevención de
desastres; dispositivos varios de seguridad, etc.; o los dispositivos funcionales/de
precisión, etc., usted deberá tener en cuenta los posibles fallos, las redundancias
de su diseño para mantener la seguridad y la fiabilidad total de su sistema.
Debido a que este producto no tuvo el propósito de usarse en aplicaciones que
requieren de una fiabilidad/seguridad sumamente altas tales como los equipos
aeroespaciales, equipos principales de comunicación, equipos de control en
plantas nucleares, o en equipos médicos relacionados con los cuidados médicos
directos, etc., por favor decida usted mismo sobre la adecuación de este producto
después de una evaluación completa.
Propósito de este manual
Este manual proporciona información a los usuarios de la impresora TM-T70 que
describe las operaciones básicas que permiten un uso correcto y seguro de la
impresora.
Nombre de las piezas
Vea la ilustración B.
TM-T70 Manual del usuario 33

Desembalaje
Se incluyen los siguientes artículos con la versión estándar de la impresora. Si
algún artículo está dañado, contacte con su distribuidor.
❏ Impresora ❑ Papel de rollo
❏ Tapa del interruptor de alimentación ❑ Adaptador de C.A. *
❏ Manual del usuario (este manual)
* Podrían no venir incluidos con su impresora.
Cómo descargar programas gestores, utilerías y manuales
Los programas gestores, las utilerías y los manuales se pueden descargar en uno
de los siguientes URLs.
Para los clientes en América del Norte, visiten el siguiente sitio en la Internet:
http://www.epsonexpert.com/ y siga las instrucciones que aparecen en pantalla.
Para los clientes en otros países, visiten el siguiente sitio en la Internet:
http://www.epson-pos.com/
Panel de control
Botón de avance de papel (FEED)
Con este botón avanza el papel.
Indicador de alimentación eléctrica
Encendido cuando la impresora está encendida.
Indicador de ERROR
Se enciende cuando detecta un error.
Indicador de falta de papel (PAPER OUT)
Encendido indica que el papel se acabó o se está acabando. Parpadeando indica
que está en espera.
Notas importantes sobre la instalación
❏ Para una interface serie, se tiene que usar un cable de módem nulo, llamado
también cable trenzado (de par trenzado).
❏ Para un interface paralelo, use un cable que se ajuste a las especificaciones de
los cables que cumplen la norma 1284 de la IEEE.
❏ Para un interface USB, instale el driver antes de conectar la impresora.
Instalación de la impresora
Esta impresora sólo se puede instalar en forma horizontal.
Fije la impresora de tal forma que no se mueva cuando abra la tapa de la misma y
corte el papel del rollo. Hay disponible, como opción, cinta para fijar la impresora.
Como se muestra en la ilustración C, instale la impresora con una inclinación
máxima de 3°. Si la impresora se instala con una inclinación de más de 3° podrían
causarse los siguientes problemas.
• No se podrá detectar cuando el rollo de papel esté a punto de acabarse.
• La tapa de la impresora no cerrará después de instalar el rollo de papel.
• No se puede sacar el rollo de papel.
34 TM-T70 Manual del usuario

Uso de la tapa del interruptor de alimentación
ADVERTENCIA:
Si ocurre un accidente cuando esté puesta la tapa del interruptor de
alimentación, desenchufe el cable eléctrico de inmediato. Seguir usándola
podría causar un incendio o un cortocircuito.
La tapa del interruptor de alimentación, adjunta, evita que se presione
accidentalmente el interruptor de alimentación. Para usar esta tapa, instálela como
se muestra en la ilustración D.
Instalación del rollo de papel
1. Presione la palanca señalada por una flecha en la ilustración E para abrir la
tapa de la impresora.
2. Saque el núcleo ya usado del rollo de papel.
3. Instale el rollo de papel como se muestra en la ilustración F. La dirección
correcta del papel se muestra en la ilustración G.
4. Saque un poco de papel como se muestra en la ilustración H de tal manera
que el papel quede entre las guías del papel.
5. Cierre la impresora como se muestra en la ilustración I, cerciorándose de que
el papel de rollo quede instalado correctamente entre las guías del papel.
6. Después, corte el papel como se muestra en la ilustración J.
Localización de problemas
No se encienden las luces en el panel de control
Verifique que el cable de la alimentación eléctrica esté conectado correctamente en
la impresora y en la toma de corriente.
Luz de ERROR encendida (no parpadeando) y no hay impresión
Si PAPER OUT está encendido, el rollo de papel no está instalado o se se ha acabado.
Si PAPER OUT está apagado, la tapa de la impresora no está cerrada correctamente.
Indicador de ERROR parpadeando pero no hay impresión (ni tampoco un atasco de
papel)
La impresión se detiene si el cabezal impresor se sobrecalienta y se reanuda
automáticamente cuando se enfría.
Si la causa no es el sobrecalentamiento, apague la impresora, y después de 10
segundos, vuélvala a encender.
Solucionar un atasco de papel
No toque el cabezal térmico pues éste puede estar muy caliente después de
imprimir.
1. Apague la impresora y presione la palanca para abrir la tapa.
2. Saque el papel atascado, reinstale el rollo y cierre la tapa de la impresora.
PRECAUCIÓN:
TM-T70 Manual del usuario 35

Limpieza del cabezal térmico
Después de la impresión, el cabezal térmico puede estar muy caliente. No lo
toque y deje que se enfríe antes de limpiarlo. No lo dañe tocándolo con los
dedos o con algún objeto duro.
Apague la impresora, abra la tapa de la misma. Como se muestra en la ilustración K,
limpie los elementos térmicos del cabezal con un bastoncillo de algodón humedecido
con un solvente con base de alcohol (etanol o alcohol isopropílico).
Epson recomienda una limpieza periódica del cabezal térmico (en general, cada
tres meses) para mantener la calidad de impresión.
PRECAUCIÓN:
Configuración de los interruptores DIP
PRECAUCIÓN:
Asegúrese de apagar la impresora antes de retirar la tapa de los interruptores
DIP. Si se retira cuando la impresora está encendida, podría provocar
problemas como cortocircuitos, lo que daría lugar a una avería en la
impresora.
1. Apague la impresora.
2. Dé la vuelta a la impresora.
3. Como se muestra en la ilustración L, retire la cubierta de los interruptores DIP
de la parte inferior de la impresora quitando el tornillo.
4. Ajuste los interruptores DIP con una herramienta de punta fina.
5. Sustituya la tapa del interruptor DIP y fíjela colocando el tornillo.
La nueva configuración pasa a aplicarse después de encender la impresora.
36 TM-T70 Manual del usuario

Português
Manual do utilizador
Tabelas e especificações dos comutadores DIP
As tabelas e especificações técnicas dos comutadores DIP encontram-se na parte inicial deste manual.
Ilustrações
Todas as ilustrações encontram-se na parte inicial deste manual. Identificam-se com letras (A, B, C . . .).
Algumas contêm números. Consulte a relação abaixo para obter o significado dos números.
Ilustração A Ilustração H
1. Cabeça térmica 7. Guias do papel
2. Lâmina de corte automático
Ilustração B Ilustração K
3. Alavanca de tampa aberta 8. Cabeça térmica
4. Tampa da impressora
5. Interruptor de ligação
6. Painel de controlo
Todos os direitos reservados. Esta publicação não pode ser integral ou parcialmente reproduzida, arquivada nem
transmitida por meio de fotocópias, gravação ou qualquer outro sistema mecânico ou electrónico, sem a prévia
autorização por escrito da Seiko Epson Corporation, que não assume qualquer responsabilidade de patente no
que diz respeito ao uso das informações aqui contidas. Uma vez que foram tomadas todas as precauções na
elaboração deste manual, a Seiko Epson Corporation não se responsabiliza por erros ou omissões, nem por
quaisquer danos resultantes do uso das informações aqui contidas.
O comprador deste produto ou terceiros não podem responsabilizar a Seiko Epson Corporation, ou as suas filiais,
por quaisquer danos, perdas, custos ou despesas, incorridos por ele ou por terceiros, resultantes de acidentes,
abusos ou má utilização do produto, de modificações não autorizadas, reparações ou alterações do produto, ou
resultantes ainda da inobservância estrita das instruções de utilização e manutenção estabelecidas pela Seiko
Epson Corporation.
A Seiko Epson Corporation não se responsabiliza por quaisquer avarias ou problemas provocados pela utilização
de opções ou produtos não reconhecidos como sendo produtos genuínos Epson ou produtos aprovados pela
Epson.
"EPSON" é uma marca registada da Seiko Epson Corporation.
"Exceed Your Vision" é uma marca registada ou marca comercial da Seiko Epson Corporation.
Todas as outras marcas comerciais são propriedade dos respectivos proprietários e utilizadas apenas para fins de
identificação.
AVISO: O conteúdo deste manual está sujeito a alterações sem aviso prévio.
© Seiko Epson Corporation 2015. Todos os direitos reservados.
TM-T70 Manual do utilizador 37

Informações de segurança importantes
Esta secção apresenta informações importantes cuja finalidade é garantir uma
utilização segura e eficaz deste produto. Leia esta secção com atenção e guarde-a
num local de fácil acesso.
Significado dos símbolos
Os símbolos que aparecem neste manual são identificados pelo seu grau de
importância, como se explica abaixo. Leia esta secção com atenção antes de
manusear o produto.
ATENÇÃO:
Cuidados que deve ter para evitar lesões físicas graves.
IMPORTANTE:
Cuidados que deve ter para evitar lesões físicas secundárias, danos ao
equipamento ou perda de dados.
Instruções de segurança
Esta secção descreve as advertências e cuidados cuja finalidade é garantir uma
utilização segura e eficaz da TM-T70. Outras advertências e cuidados sobre como
lidar com este produto para que a sua utilização seja segura e eficaz encontram-se
descritos noutras secções deste manual.
ATENÇÃO:
Se a TM-T70 produzir fumo, um odor estranho ou ruído incomum, interrompa
imediatamente a alimentação para a impressora, desligue imediatamente o
cabo de alimentação e então entre em contacto com o seu revendedor ou
com um centro de atendimento da Epson para obter orientação. Continuar a
utilizá-la pode resultar em incêndio ou choque eléctrico.
Nunca tente reparar este produto; as reparações indevidas podem tornar-se
perigosas.
Nunca desmonte ou modifique este produto; caso contrário pode ferir-se,
provocar um incêndio ou um choque eléctrico.
Utilize a fonte de energia especificada; caso contrário, poderá provocar um
incêndio ou um choque eléctrico.
Não insira objectos estranhos no interior do equipamento; caso contrário,
poderá provocar um incêndio ou um choque eléctrico.
Se água ou outro líquido cair sobre este equipamento, interrompa a
alimentação para a TM-T70, desligue imediatamente o cabo de alimentação
da impressora e então entre em contacto com o seu revendedor ou com um
centro de atendimento da Seiko Epson para obter orientação. Continuar a
utilizá-lo pode resultar em incêndio ou choque.
Se abrir a tampa do comutador DIP, não se esqueça de fechá-la e de apertar
o parafuso depois de ajustar o comutador DIP. A utilização deste produto com
a tampa aberta pode resultar num incêndio ou choque eléctrico.
Não utilize aspersores aerossóis que contenham gás inflamável no interior ou
em torno deste produto, pois isto pode causar incêndio.
38 TM-T70 Manual do utilizador

IMPORTANTE:
Não ligue os cabos em formas diferentes daquelas indicadas neste manual.
Ligações diferentes podem causar danos ao equipamento ou incêndio.
Instale o equipamento numa superfície firme, plana e estável, para evitar que
o equipamento caia e fique danificado ou cause ferimentos.
Não utilize este produto em locais sujeitos a altos índices de humidade e
poeira. O excesso de humidade e poeira pode causar danos ao equipamento
ou incêndio.
Não coloque objectos pesados em cima deste produto. Não se sente nem se
apoie em cima do produto. O equipamento pode cair ou ceder e partir ou
provocar ferimentos.
Tome cuidado em não ferir os seus dedos no cortador manual quando Você:
• Remove papel impresso
• Executa outras atividades como carga / substituição de rolo de papel
Para maior segurança, desligue este produto se não o for utilizar durante um
longo período.
Antes de transportar este produto, não deixe de desligar a ficha e de desligar
todos os cabos ligados ao mesmo.
Etiquetas de aviso
As etiquetas de aviso no produto indicam as seguintes precauções.
Durante e imediatamente após a impressão, a cabeça térmica pode ficar
muito quente. Tocá-la pode resultar em queimaduras. Só realize a limpeza e
quaisquer outros trabalhos depois de arrefecida a cabeça térmica. Tambem,
tenha cuidado com a lâmina de corte automático perto da cabe ça térmica.
Veja na ilustração A a localização da cabeça térmica e da lâmina de corte
automático.
Restrições quanto à utilização
IMPORTANTE:
Quando este produto for utilizado em aplicações que requeiram alta fiabilidade/
segurança, como por exemplo dispositivos de transporte relacionados a aviação,
carris, por via marítima, automotiva, etc.; dispositivos para a prevenção de
desastres; vários dispositivos de segurança, etc.; ou dispositivos funcionais/de
precisão, etc., deve-se utilizá-lo apenas após considerar-se adequadamente a
inclusão de protecção contra falhas e de redundâncias no seu projecto de forma a
manterem-se a segurança e a total fiabilidade do sistema. Como este produto não
se destina à utilização em aplicações que requeiram fiabilidade/segurança
extremamente altas, como equipamentos aeroespaciais, equipamentos de base
para comunicações, equipamentos para o controlo de energia nuclear, ou
equipamentos médicos relacionados a cuidados médicos directos, etc., queira
tomar a sua própria decisão sobre a adequação deste produto após uma avaliação
completa.
Finalidade deste manual
Este manual fornece informações para os operadores da impressora TM-T70,
descrevendo as operações básicas a permitir o uso seguro e correcto da impressora.
TM-T70 Manual do utilizador 39

Nomes das peças
Veja a ilustração B.
Desembalagem
Os itens em baixo estão incluídos com a impressora de origem. Caso algum item
esteja danificado, contacte o seu revendedor.
❏ Impressora ❑ Papel em rolo
❏ Tampa do interruptor de alimentação ❑ Adaptador AC *
❏ Manual do Utilizador (este manual)
* Este item pode não estar incluso com a sua impressora.
Download de Drivers, Utilitários e Manuais
Pode-se fazer o download dos drivers, utilitários e manuais a partir de um dos
URL abaixo.
Para clientes na América do Norte, visitar o seguinte sítio da web:
http://www.epsonexpert.com/ e seguir as instruções no écran.
Para clientes noutros países, visitar o seguinte sítio da web:
http://www.epson-pos.com/
Painel de controlo
Tecla de alimentação (FEED)
Esta tecla alimenta o papel.
Indicador luminoso de ligação
Este indicador acende quando a impressora está ligada.
Indicador luminoso de erro (ERROR)
Este indicador assinala um erro.
Indicador luminoso de falta de papel (PAPER OUT)
Quando aceso, indica falta de papel ou que o papel está prestes a terminar.
Quando pisca, indica modo de espera.
Notas Importantes sobre a Instalação
❏ Para um interface serial, deve utilizar um cabo de modem nulo, também
chamado de cabo cruzado.
❏ Para um interface paralelo, utilize um cabo que satisfaça as especificações de
um cabo que cumpra a IEEE 1284.
❏ Para um interface USB, instale o driver antes de ligar a impressora.
40 TM-T70 Manual do utilizador

Instalação da impressora
A impressora só pode ser instalada horizontalmente.
Posicione-a de forma que não saia do lugar quando se abre a tampa da impressora
e se corta o rolo de papel. Há uma fita de fixação, fornecida em carácter opcional,
para se manter a impressora no lugar.
Como se mostra na ilustração C, instale a impressora com um inclinação de 3°.
Efectuar a instalação com uma inclinação superior a 3° pode acarretar os seguintes
problemas.
• Não se pode detectar quando o rolo de papel chega quase ao fim.
• A tampa da impressora não fecha depois da instalação do rolo de papel.
• Não se pode remover o rolo de papel.
Utilização da tampa do interruptor de ligação
ATENÇÃO:
Se ocorrer um acidente quando a tampa do interruptor de ligação estiver
instalada, desligue imediatamente o cabo de alimentação. Se não o fizer,
poderá provocar um incêndio ou um choque eléctrico.
A tampa protegida do interruptor de alimentação assegura que tal interruptor não
será premido acidentalmente. Para utilizar esta tampa, instale como mostra a
ilustração D.
Instalação do papel em rolo
1. Prima a alavanca indicada por uma seta na ilustração E para abrir a tampa da
impressora.
2. Retire o tubo central do papel de rolo esgotado.
3. Instale o papel em rolo, como se mostra na ilustração F. Pode-se ver a direcção
correcta do papel na ilustração G.
4. Puxe um pouco do papel em rolo, como se mostra na ilustração H, para que o
papel encaixe entre as guias.
5. Feche a impressora como se mostra na ilustração I e certifique-se de que o papel
em rolo esteja devidamente instalado entre as guias.
6. Corte o papel em rolo em seguida, como mostra a ilustração J.
Resolução de problemas
Os indicadores luminosos não acendem no painel de controlo
Verifique se o cabo da fonte de alimentação está correctamente ligado à
impressora e à tomada de energia.
LED DE ERRO iluminado (não intermitente) sem impressão
Se FINAL DO ROLO DE PAPEL estiver iluminado, o papel em rolo não está
instalado ou está esgotado.
Se FINAL DO ROLO DE PAPEL não estiver iluminado, a tampa da impressora
não está adequadamente fechada.
TM-T70 Manual do utilizador 41

LED DE ERRO intermitente, sem impressão (e sem papel encravado)
A impressão pára se a cabeça térmica sobreaquece e volta automaticamente
quando arrefece.
Se a causa não for o sobreaquecimento, desligue a impressora e ligue-a 10 minutos
depois.
Remoção do papel encravado
Não toque a cabeça térmica pois pode ficar muito quente após a impressão.
1. Desligue a impressora e prima a alavanca para a abertura da tampa.
2. Retire o papel encravado, reinstale o rolo e feche a tampa da impressora.
CUIDADO:
Limpeza da cabeça térmica
Após a impressão, a cabeça térmica pode ficar muito quente. Não a toque e
deixe-a arrefecer antes da limpeza. Não danifique a cabeça térmica
tocando-a com os dedos ou com um objecto duro.
Desligue a impressora e abra a tampa da impressora. Como mostra a ilustração K,
limpe os elementos térmicos da cabeça térmica com um bastonete de algodão
humedecido com um solvente à base de álcool (etanol ou IPA).
Para manter a boa qualidade impressão, a Epson aconselha a limpar
periodicamente a cabeça térmica (de três em três meses).
CUIDADO:
Configuração dos Comutadores DIP
IMPORTANTE:
Certifique-se de que desliga a impressora antes de remover a tampa dos
comutadores DIP. A remoção da mesma enquanto a impressora está ligada
pode causar problemas, como um curto-circuito, o que pode provocar um
mau funcionamento da impressora.
1. Desligue a impressora.
2. Vire a impressora ao contrário.
3. Como mostra a ilustração L, remova a tampa do comutador DIP ao remover o
parafuso.
4. Configure os comutadores DIP utilizando uma ferramenta de ponta afiada.
5. Substitua a tampa do comutador DIP e fixe-a ao instalar o parafuso.
A nova configuração torna-se efectiva após a ligação da impressora.
42 TM-T70 Manual do utilizador

Türkçe
Kullanıcı Kılavuzu
DIP Anahtar Tabloları ve Özellikler
DIP anahtar tabloları ve teknik özellikler bu kılavuzun başındadır.
Resimler
Tüm resimler bu kılavuzun başındadır. Harflerle tanımlanırlar (A, B, C . . .). Bazı resimlerin içinde numaralar
bulunur. Numaraların anlamı için aşağıdaki listeye bakın.
Resim A Resim H
1. Isıl yazıcı kafası 7. Kağıt kılavuzları
2. Otomatik kesici bıçağı
Resim B Resim K
3. Kapak açma kolu 8. Isıl yazıcı kafası
4. Yazıcı kapağı
5. Güç anahtarı
6. Kontrol paneli
Tüm hakları saklıdır. Bu yayının hiçbir bölümü Seiko Epson Corporation şirketinin önceden yazılı izni olmadan
çoğaltılamaz, herhangi bir bilgi saklama sisteminde saklanamaz veya hiçbir biçimde veya elektronik, mekanik,
fotokopi, kayıt ortamında ya da başka herhangi bir ortamda iletilemez. İşbu belgede bulunan bilgilerin kullanımına
ilişkin olarak patent hakkı sorumluluğu üstlenilmemektedir. Bu kitabın hazırlanmasında her türlü önlem alınmış
olmasına rağmen, Seiko Epson Corporation hata veya eksikliklerden dolayı sorumluluk kabul etmez. Yine bu
belgedeki bilgilerin kullanımından doğan zararlar için de sorumluluk kabul edilmemektedir.
Seiko Epson Corporation veya bağlı kuruluşlarının, bu ürünün satın alınması nedeniyle ne satın alana ne de üçüncü
taraflara karşı şunlardan kaynaklanan hasar, zarar, ziyan ve giderler için hiçbir sorumluluğu bulunmamaktadır: Kaza,
ürünün yanlış veya hatalı kullanımı veya üründe yapılan izinsiz değişiklikler, onarımlar veya (ABD hariç) Seiko
Epson Corporation tarafından yayınlanan işletme ve bakım talimatlarına tam olarak uyulmaması.
Seiko Epson Corporation, Seiko Epson Corporation tarafından Orijinal Epson Ürünleri veya Epson Onaylı Ürünler
olarak tanımlanmış ürünler dışındaki herhangi bir isteğe bağlı aygıtın veya sarf malzemesinin kullanılmasından
doğacak zararlardan ve sorunlardan sorumlu olmayacaktır.
EPSON, Seiko Epson Corporation'ın tescilli ticari markasıdır.
Exceed Your Vision, Seiko Epson Corporation'ın ticari markası veya tescilli ticari markasıdır.
Diğer tüm ticari markalar, ilgili sahiplerine aittir ve sadece tanımlama amacıyla kullanılır.
BİLDİRİM: Bu kılavuzun içeriği, önceden bildirilmeksizin değiştirilebilir.
© Seiko Epson Corporation 2015. Tüm hakları saklıdır.
TM-T70 Kullanıcı Kılavuzu 43

Önemli Güvenlik Bilgileri
Bu bölümde, ürünün güvenli ve etkili kullanımını sağlamak için gerekli önemli bilgiler
sunulmaktadır. Bu bölümü dikkatlice okuyun ve erişilebilir bir konumda saklayın.
Semboller için Anahtar
Aşağıda tanımlandığı gibi, bu kılavuzda yer alan semboller önem derecesine göre
tanımlanmıştır. Ürünü kullanmaya başlamadan önce aşağıdakileri dikkatlice okuyun.
UYARI:
Ciddi yaralanmaları önlemek için uyarılara dikkatli bir şekilde uyulmalıdır.
DİKKAT:
Kendinizde olabilecek küçük yaralanmaları, donanımlarınızda olabilecek hasarları ya da veri
kayıplarını önlemek için İkazlara dikkat edilmelidir.
Güvenlik Önlemleri
Bu bölümde güvenli ve etkili TM-T70 kullanımını sağlamak için gerekli uyarı ve ikazlar
açıklanmıştır. Bu ürünün güvenli ve etkili kullanımı için diğer uyarı ve ikazlar kılavuzun
diğer bölümlerinde açıklanmıştır.
UYARI:
TM-T70 duman, garip koku veya anormal ses çıkarırsa, TM-T70' i kapatın, AC kablosunu hemen
fişten çekin ve sonra danışmak için bayinize veya Seiko Epson servis merkezine başvurun.
Kullanıma devam edilmesi yangına veya elektrik çarpmasına yol açabilir.
Hiçbir zaman bu ürünü kendiniz tamir etmeye çalışmayın. Hatalı bir onarım tehlikeli olabilir.
Hiçbir zaman bu ürünü parçalarına ayırmayın veya üzerinde değişiklik yapmayın. Bu ürünün
kurcalanması yaralanma veya yangına neden olabilir.
Belirtilen güç kaynağını kullandığınızdan emin olun. Uygun olmayan bir güç kaynağına bağlantı
yangına neden olabilir.
Cihazın içine yabancı madde düşmesine izin vermeyin. Yabancı cisimlerin girmesi yangına neden
olabilir.
Cihazın içine su veya başka sıvı dökülürse, TM-T70'i kapatın, TM-T70'in AC kablosunu prizden
hemen çekin ve sonra danışmak için bayinize veya Seiko Epson servis merkezine başvurun.
Kullanıma devam edilmesi yangına veya elektrik çarpmasına yol açabilir.
DIP anahtar kapağını açarsanız, DIP anahtarını ayarladıktan sonra kapağı kapattığınızdan ve
vidayı sıktığınızdan emin olun. Bu ürünün kapak açık vaziyette kullanılması yangına veya elektrik
çarpmasına sebep olabilir.
Bu ürünün içinde veya çevresinde, yanıcı gaz içeren aerosol püskürtücüleri kullanmayın.
Kullanılması yangına neden olabilir.
DIKKAT:
Bu kılavuzda belirtilenler dışındaki yollarla kablolarını bağlamayın. Farklı bağlantılar cihazın
zarar görmesine veya yangına neden olabilir.
Cihazın sağlam, dengeli, yatay bir yüzey üzerine yerleştirildiğinden emin olun. Ürün düşerse
kırılabilir ya da yaralanmaya sebep olabilir.
Bu ürünü yüksek nem veya toza maruz kalan yerlerde kullanmayın. Aşırı nem ve toz cihazın hasar
görmesine veya yangına neden olabilir.
44 TM-T70 Kullanıcı Kılavuzu

Bu ürünün üzerine ağır nesneler koymayın. Hiçbir zaman bu ürünün üzerine basmayın ya da
yaslanmayın. Cihaz düşerek ya da çökerek kırılmaya ve olası bir yaralanmaya neden olabilir.
Manüel kesicide parmaklarınızı yaralamamaya dikkat edin.
• Yazdırılan kağıdı çıkarırken
• Rulo kağıt yükleme/değiştirme gibi diğer işlemleri gerçekleştirirken
Güvenliği sağlamak için uzun süreyle kullanım dışı bırakmadan önce ürünün fişini prizden çekin.
Bu ürünü taşımadan önce fişini çekip ürüne bağlı tüm kabloları ayırdığınızdan emin olun.
İkaz Etiketleri
Ürünün üzerindeki ikaz etiketleri aşağıdaki önlemleri gösterir.
Isıl yazıcı kafası yazdırma sırasında ve hemen sonrasında çok sıcak olabilir. Dokunulması
yanıklara neden olabilir. Temizlik ve diğer işlemlerin ısıl yazıcı kafası soğuduktan sonra
yapıldığından emin olun. Ayrıca, ısıl yazıcı kafasının yakınındaki otomatik kesici bıçağına da
dikkat edin. Isıll yazıcı kafası ve otomatik kesici bıçağının konumu için bkz. resim A.
DİKKAT:
Kullanım Kısıtlaması
Bu ürün havacılık, demiryolu, denizyolu, otomotiv, vb ile ilgili nakliye aygıtları; afet önleme
aygıtları; çeşitli güvenlik aygıtları, vb. ya da fonksiyonel/hassasiyet cihazları, vb. gibi yüksek
güvenilirlik/güvenlik gerektiren uygulamalar için kullanıldığı zaman, güvenlik ve toplam
sistem güvenilirliğini korumak için bu ürün yalnızca tasarımınızda arıza güvenceleri ve
yedeklilikler dahil düşünüldükten sonra kullanılmalıdır. Bu ürün havacılık ekipmanı, temel
haberleşme cihazları, nükleer güç kontrol cihazları veya doğrudan tıbbi bakım ile ilgili
medikal cihazlar, vb. gibi çok yüksek güvenilirlik/güvenlik gerektiren uygulamalarda
kullanım için tasarlanmadığı için lütfen ürünün uygunluğuna tam bir değerlendirmenin
ardından kendiniz karar verin.
Bu Kılavuzun Amacı
Bu kılavuz yazıcının güvenli ve doğru kullanımını sağlamak amacıyla TM-T70 yazıcı
kullanıcılarına temel işlemleri açıklayan bilgiler sunar.
Parça İsimleri
Bkz. resim B.
Ambalajından Çıkarma
Aşağıdaki öğeler standart özelliklere sahip yazıcıyla birlikte verilir. Herhangi bir öğe hasarlı
ise bayinize başvurun.
❏ Yazıcı ❑ Rulo Kağıt
❏ Güç anahtarı kapağı ❑ AC adaptörü *
❏ Kullanıcı Kılavuzu (bu kılavuz)
* Yazıcınız ile birilikte verilmeyebilir.
TM-T70 Kullanıcı Kılavuzu 45

Sürücüler, Yardımcı Programlar ve Kılavuzları İndirme
Sürücüler, yardımcı programlar ve kılavuzlar aşağıdaki URL adreslerinin birinden
indirilebilir.
Kuzey Amerika'daki müşteriler için aşağıdaki web sitesine gidin:
http://www.epsonexpert.com/ ve ekrandaki talimatları izleyin.
Diğer ülkelerdeki müşteriler için aşağıdaki web sitesine gidin:
http://www.epson-pos.com/
Kontrol Paneli
BESLEME düğmesi (FEED)
Bu düğme kağıt besler.
(Güç) LED'i
Bu LED yazıcı açık olduğunda yanar.
HATA LED'i (ERROR)
Bu bir hatayı gösterir.
KAĞIT YOK LED'i (PAPER OUT)
Yanması bir kağıdın sona yaklaştığını veya bitmiş olduğunu gösterir. Yanıp sönmesi bekleme
durumunu gösterir.
Kurulum Hakkında Önemli Notlar
❏ Seri arabirim için çapraz kablo olarak da adlandırılan kukla modem kablosu
kullanılmalıdır.
❏ Paralel arabirim için IEEE 1284 uyumlu kablo özelliklerini karşılayan bir kablo
kullanın.
❏ USB arabirim için yazıcıyı bağlamadan önce yazıcı sürücüsünü yükleyin.
Yazıcıyı Kurma
Bu yazıcı sadece yatay olarak kurulabilir.
Yazıcı kapağını açıp rulo kağıdı kestiğinizde hareket etmemesi için yazıcıyı sabitleyin.
Yazıcıyı sabitlemek için bir bant isteğe bağlı olarak mevcuttur.
Resim C'de gösterildiği gibi maksimum 3° eğimle yazıcıyı kurun. Yazıcının 3° eğimden
fazlası ile kurulması aşağıdaki sorunlara yol açabilir.
• Rulo kağıdın sona yaklaştığı algılanamaz.
• Rulo kağıt takıldıktan sonra yazıcı kapağı kapanmaz.
• Rulo kağıt çıkarılamaz.
Güç Anahtarı Kapağını Kullanma
UYARI:
Güç anahtarı kapağı takılı vaziyette bir kaza olursa, derhal AC kablosunu prizden çekin.
Kullanıma devam edilmesi yangına veya elektrik çarpmasına neden olabilir.
Birlikte verilen güç anahtarı kapağı güç anahtarına yanlışlıkla basılmamasını sağlar. Bu
kapağı kullanmak için resim D'de gösterildiği gibi takın.
46 TM-T70 Kullanıcı Kılavuzu

Rulo Kağıt Takma
1. Yazıcı kapağını açmak için resim E'deki okla gösterilen kola bastırın.
2. Kullanılmış rulo kağıt göbeğini çıkarın.
3. Rulo kağıdı resim F'de gösterildiği gibi takın. Doğru kağıt yönü resim G'de
gösterilmiştir.
4. Kağıdın kağıt kılavuzları arasında ayarlanması için resim H'de gösterildiği gibi bir
miktar rulo kağıt çekin.
5. Resim I'da gösterildiği gibi yazıcıyı kapatın ve rulo kağıdın kağıt kılavuzları arasına
düzgün bir şekilde takıldığından emin olun.
6. Resim J'de gösterildiği gibi rulo kağıdı yırtın.
Sorun Giderme
Kontrol panelinde hiç ışık yok
DC kablosu ve AC kablosunun yazıcıya ve elektrik prizine doğru takıldığını kontrol edin.
HATA LED'i (ERROR) yanıyor (yanıp sönmüyor) yazdırma yapılmıyor
KAĞIT YOK ışığı yanıyorsa, rulo kağıt takılmamış veya bitmiştir.
KAĞIT YOK ışığı yanmıyorsa, yazıcı kapağı düzgün kapatılmamıştır.
HATA LED'i (ERROR) yanıp sönüyor yazdırma yapılmıyor (ve kağıt sıkışması yok)
Isıl yazıcı kafası aşırı ısınırsa yazdırma durur ve soğuduğu zaman otomatik olarak kaldığı
yerden devam eder.
Nedeni aşırı ısınma değilse, yazıcıyı kapalı konuma getirim ve 10 saniye sonra tekrar açın.
Sıkışan Kağıdı Çıkarma
Yazdırma sonrasında çok sıcak olabileceği için ısıl yazıcı kafasına dokunmayın.
1. Yazıcıyı kapatın ve kapak açma koluna bastırın.
2. Sıkışan kağıdı çıkarın, ruloyu yeniden takın ve yazıcı kapağını kapatın.
DİKKAT:
Isıl Yazıcı Kafasını Temizleme
Yazdırma sonrasında ısıl yazıcı kafası çok sıcak olabilir. Buna dokunmayın ve temizlemeden önce
soğumasını bekleyin. Isıl yazıcı kafasına parmaklarınızla veya herhangi bir sert cisimle dokunarak
zarar vermeyin.
Yazıcıyı kapalı konuma getirin ve yazıcı kapağını açın. Resim K'de gösterildiği gibi, alkol
çözeltisi (etanol veya IPA) ile nemlendirilmiş bir pamuklu çubukla ısıl yazıcı kafasının ısıl
elemanlarını temizleyin.
Alındı yazdırma kalitesini korumak amacıyla Epson ısıl yazıcı kafasının periyodik olarak
(genelde her 3 ayda bir) temizlenmesini önerir.
DİKKAT:
TM-T70 Kullanıcı Kılavuzu 47

DIP Anahtarları Ayarlama
DIKKAT:
DIP anahtarların kapağını çıkarmadan önce yazıcıyı kapalı konuma getirdiğinizden emin olun.
Yazıcı açık konumdayken çıkarılması, yazıcının arızalanmasına yol açan bir elektrik kısa devresi
gibi sorunlara neden olabilir.
1. Güç anahtarının kapalı olduğundan emin olun.
2. Yazıcıyı ters çevirin.
3. Resim L'de gösterildiği gibi, vidasını sökerek yazıcının altındaki DIP anahtar kapağını
çıkarın.
4. DIP anahtarları ince uçlu bir alet kullanarak ayarlayın.
5. DIP anahtar kapağını yerine takın ve vidayı takarak tespit edin.
Yeni ayar yazıcı açık konuma getirildikten sonra etkili olur.
48 TM-T70 Kullanıcı Kılavuzu

Русский
Руководство по эксплуатации
DIP-переключатели в корпусах с двухрядным расположением выводов
(DIP): таблицы разводки выводов и технические характеристики
Таблицы разводки выводов и технические характеристики микропереключателей в плоских корпусах
с двухрядным расположением выводов (DIP) приводятся в начале этого руководства.
Иллюстрации
Все иллюстрации приводятся в начале руководства. Иллюстрации озаглавлены буквенными обозначениями
(A, B, C…). Кроме того, компоненты, изображенные на некоторых иллюстрациях, пронумерованы.
См. ниже перечень пронумерованных компонентов.
Иллюстрация A Иллюстрация H
1. Термопечатающая головка 7. Направляющие для бумаги
2. Авторезак
Иллюстрация B Иллюстрация K
3. Защелка, открывающая крышку 8. Термопечатающая головка
4. Крышка принтера
5. Переключатель питания
6. Панель управления
Все права защищены. Воспроизведение, хранение информации в системе поиска и передача какой-либо части настоящего
документа в какой-либо форме или с использованием каких-либо электронных, механических, фотокопировальных,
записывающих или иных средств без предварительного письменного разрешения корпорации Seiko Epson не допускаются.
Производитель не берет на себя никакой ответственности за нарушение патентных прав в
содержащейся в настоящем документе информации. Несмотря на то, что производитель принял все возможные меры
предосторожности при подготовке настоящего документа, корпорация Seiko Epson не несет никакой ответственности за
ошибки или упущения. Кроме того, производитель не несет никакой ответственности за убытки, причиненные
в результате использования содержащейся в настоящем документе информации.
корпорация Seiko Epson, ни какие-либо ее подразделения или филиалы не несут ответственности перед покупателем
Ни
описываемой в настоящем документе продукции или перед третьими сторонами за убытки, потери, издержки или расходы,
понесенные покупателем или третьими сторонами в результате несчастного случая, использования продукции не по
назначению, небрежного использования продукции или неразрешенных изготовителем изменения конструкции или
продукции, а также (за исключением продукции, используемой в США) в результате несоблюдения каких-либо инструкций
корпорации Seiko Epson по эксплуатации и техническому обслуживанию продукции.
Корпорация Seiko Epson не несет ответственности за какие-либо убытк и или проблемы, возникающие в связи с
использованием любых дополнительных устройств и компонентов или любых потребляемых материалов, кроме тех, котор ые
рекомендованы корпорацией Seiko Epson в качестве оригинальной продукции компании Epson или в качестве продукции,
одобренной компани ей Epson.
EPSON является зарегистрированным товарным знаком корпорации Seiko Epson Corporation.
Exceed Your Vision является зарегистрированным товарным знаком или товарным знаком корпорации Seiko Epson
Corporation.
Все остальные товарные знаки являются собственностью их соответствующих владельцев и используются только с целью
идентификации.
ВНИМАНИЕ! Содержание этого руководства может быть изменено без
© 2015 Seiko Epson Corporation. Все права защищены.
извещения.
связи с использованием
ремонта
TM-T70 Руководство по эксплуатации 49

Наименование изделия: TM-T70 (строчный термографический принтер)
Данная модель соответствует техническому регламенту Таможенного союза
«О безопасности низковольтного оборудования» (TP TC 004/2011); техническому
регламенту Таможенного союза «Об электромагнитной совместимости технических
средств» (TP TC 020/2011)
Изготовитель: SEIKO EPSON CORPORATION
Адрес: 3-5, Owa 3-темэ, Suwa-ши, Нагано-кен 392-8502 Япония
веб-сайт: http://www.epson.com/
Официальный представитель в странах СНГ:
ООО «EPSON CIS»
Адрес: Москва 129110, Москва, улица Щепкина 42, строение 2а, 3 этаж,
бизнес-центр «Чайка Плаза»
Телефон: +7 (495) 777-0355/56
веб-сайт: http://www.epson.ru/
эл. почта: info_CIS@epson.ru
Представительство компании в Москве «Эпсон Европа Б.В.»
Адрес: Москва 129110, Москва, улица Щепкина 42, строение 2а, 3 этаж,
бизнес-центр «Чайка Плаза»
Телефон: +7 (495) 777-0355/56
веб-сайт: http://www.epson.ru/
Месяц и год изготовления:
Маркирвана на продукте с помощью 6 чисел после MD.
(MD: ГГГГММ)
Наименование страны, где изготовлено:
Маркирована на продукте.
50 TM-T70 Руководство по эксплуатации

Важная информация об обеспечении безопасности
В этом разделе содержится важная информация, способствующая обеспечению
безопасного и эффективного использования описываемой продукции. Внимательно
прочтите этот раздел и храните инструкции по обеспечению безопасности рядом
с устройством.
Условные обозначения
Различными условными обозначениями тексте настоящего руководства
обозначается информация различной степени важности (см. приведенные ниже
определения). Внимательно читайте предупреждения и примечания перед
транспортировкой, подключением и использованием продукции.
ПРЕДУПРЕЖДЕНИЯ
Несоблюдение рекомендаций под заголовком «ПРЕДУПРЕЖДЕНИЕ» может
привести к нанесению тяжелой травмы.
ВНИМАНИЕ!
Несоблюдение рекомендаций под заголовком «ВНИМАНИЕ!» может привести
к травме, повреждению оборудования или потере данных.
Меры по обеспечению безопасности
В этом разделе содержится информация, призванная обеспечить безопасное
и эффективное использование принтера TM-T70. В других разделах руководства
содержатся дополнительные предупреждения, относящиеся к обращению
с продукцией, обеспечивающему ее безопасное и эффективное использование.
ПРЕДУПРЕЖДЕНИЯ
Если при использовании принтера TM-T70 будут замечены дым, непривычный
запах или необычный шум, выключите принтер TM-T70 и немедленно
отсоедините от сети кабель питания, после чего обратитесь за
рекомендациями к поставщику оборудования или в центр обслуживания
продукции компании Epson. Продолжение использования оборудования может
привести к пожару или к поражению электрическим током.
Никогда не пытайтесь самостоятельно
Неправильное выполнение ремонта может привести к возникновению опасной
ситуации.
Никогда не разбирайте оборудование и не изменяйте его конструкцию.
Неумелое обращение с оборудованием может привести к травме или пожару.
Пользуйтесь только указанным источником электропитания. Подсоединение
оборудования к неправильному источнику электропитания может привести
к пожару.
Не допускайте попадания посторонних
Попадание в оборудование постороннего предмета может привести к пожару.
В случае попадания внутрь оборудования воды или какой-либо другой жидкости
выключите принтер TM-T70, немедленно отсоедините от сети шнур
электропитания принтера TM-T70 и обратитесь за рекомендациями
к поставщику оборудования или в центр обслуживания оборудования компании
Seiko Epson. Продолжение использования оборудования может привести
к пожару или к поражению электрическим током.
ремонтировать это оборудование.
предметов внутрь оборудования.
TM-T70 Руководство по эксплуатации 51

После того, как вы откроете крышку переключателя в плоском корпусе
с двухрядным расположением выводов (DIP), чтобы отрегулировать
переключатель, не забудьте закрыть крышку и затянуть винт крышки.
Использование оборудования с открытой крышкой может привести к пожару
или к поражению электрическим током.
Не распыляйте аэрозоли, содержащие воспламеняющиеся газы, внутри этого
оборудования или около него
. Это может привести к пожару.
ВНИМАНИЕ!
Подключайте кабели только в соответствии с инструкциями, приведенными
в этом руководстве. Другое подключение кабелей может привести
к повреждению оборудования или пожару.
Устанавливайте оборудование только на устойчивой, твердой
горизонтальной поверхности. Падение оборудования может привести к его
поломке или к нанесению травм персоналу.
Не используйте оборудование на участках, где наблюдаются высокая
влажность или
запыленность могут привести к повреждению оборудования или пожару.
Не кладите на оборудование тяжелые предметы. Никогда не вставайте на
оборудование и не опирайтесь на него. Оборудование может упасть или
сломаться; в обоих случаях возможно нанесение травм персоналу.
Внимание! Нельзя ранить свой палец с ручным ножом,
• когда отрезать напечатанную бумагу, и/или
• когда сделать другую работу, напр. нагрузить и перегрузить рулон
В целях обеспечения безопасности отсоединяйте оборудование от сети в том
случае, если оно не будет использоваться в течение длительного времени.
Перед перемещением оборудования не забывайте отсоединять его от сети
и от всех подключенных к
высокий уровень запыленности. Чрезмерная влажность или
бумаги.
нему кабелей.
Предупреждающие таблички
На предупреждающих наклейках на изделии указаны следующие меры
предосторожности.
Термопечатающая головка может сильно нагреваться во время печати
и продолжает оставаться горячей сразу после печати. Прикосновение к головке
может привести к ожогам. Осуществляйте очистку термопечатающей
головки и другие работы только после того, как головка охладится. Будьте
также осторожны с авторезаком около термопечатающей головки.
Расположение термопечатающей головки и авторезака приведено на
иллюстрации
52 TM-T70 Руководство по эксплуатации
ВНИМАНИЕ!
A.

Ограниченное применение
Если эта продукция используется в условиях, требующих обеспечения высокого
уровня надежности и (или) безопасности — например, в сочетании с авиационными,
железнодорожными, судовыми, автомобильными и прочими транспортными
средствами, аварийными устройствами оповещения, различными
предохранительными устройствами или функциональными устройствами,
выполняющими прецизионные операции — применение этой продукции
рекомендуется только с учетом необходимых средств обеспечения
отказоустойчивости и резервирования
уровень безопасности и надежности всей проектируемой системы. В связи с тем, что
эта продукция не предназначена для использования в условиях, требующих
обеспечения очень высокого уровня надежности и (или) безопасности — например,
в сочетании с авиационно-космическим оборудованием, важнейшим
телекоммуникационным оборудованием, оборудованием систем управления
атомными электростанциями или медицинским оборудованием,
используемым в процессе медицинского обслуживания — пожалуйста, не забывайте
о том, что вы несете ответственность за всестороннюю оценку соответствия этой
продукции конкретным условиям эксплуатации и за ее применение в этих условиях.
, поддерживающих достаточно высокий
непосредственно
Для кого предназначено данное руководство
В этом руководстве, предназначенном для лиц, пользующихся принтером TM-T70,
описываются правильные методы безопасной эксплуатации принтера.
Названия деталей
См. рис. B.
Распаковка
В комплект стандартного принтера входят следующие компон ент ы
и материалы. Если какой-либо компонент или материал поврежден, обратитесь
к торговому агенту, у которого вы приобрели свой принтер.
❏ Принтер ❑ Рулон бумаги
❏ Крышка выключателя питания ❑ Адаптер для сети переменного тока*
❏ Руководство по эксплуатации (данное руководство)
* Может не входить в комплект вашего принтера.
Загрузка драйверов, утилит и руководств
Драйверы, утилиты и руководства можно загружать со следующих сайтов:
http://www.epson-pos.com/
http://support.epson.ru
TM-T70 Руководство по эксплуатации 53

Панель управления
Кнопка подачи бумаги FEED
Эта кнопка позволяет подавать бумагу.
Индикатор питания (POWER)
Этот индикатор загорается при включении питания принтера.
Индикатор ошибки (ERROR)
Этот индикатор загорается при возникновении ошибки.
Индикатор «КОНЧАЕТСЯ БУМАГА» (PAPER OUT)
Этот индикатор загорается, когд а запас бумаги подходит к концу или конч ает ся.
В режиме ожидания замены бумаги этот индикатор мигает.
Важные примечания, относящиеся к установке
❏ В случае последовательного интерфейса требуется применение нуль-
модемного кабеля (кабеля прямой цифровой связи).
❏ В случае параллельного инетрфейса используется кабель, соответствующий
требованиям стандарта IEEE 1284.
❏ Если требуется интерфейс универсальной последовательной шины (USB),
перед подключением принтера установите соответствующий драйвер.
Установка принтера
Принтер можно устанавливать только в горизонтальном положении.
Закрепите принтер таким образом, чтобы он не перемещался, когда вы открываете
крышку принтера и обрезаете рулонную бумагу. Дополнительно поставляется
липкая лента для закрепления принтера.
Как показано на иллюстрации C, устанавливайте принтер с наклоном не более 3°.
Уст а н о в к а принтера с наклоном более 3° может привести к возникновению
следующих проблем:
• принтер перестанет регистрировать окончание запаса рулонной бумаги;
• крышка принтера перестанет закрываться после установки рулона бумаги;
• вы не сможете вынимать рулон бумаги.
Использование крышки переключателя питания
ПРЕДУПРЕЖДЕНИЯ
Если в ходе эксплуатации оборудования с установленной крышкой
переключателя питания возникнет аварийная ситуация, немедленно
отсоедините провод питания от сети. Продолжение использования
оборудования может привести к пожару или к поражению электрическим током.
Закрытая крышка переключателя питания предотвращает случайное нажатие
переключателя. Эта крышка устанавливается так, как показано на иллюстрации D.
54 TM-T70 Руководство по эксплуатации

Установка рулона бумаги
1. Нажмите на защелку, указанную стрелкой на иллюстрации E, чтобы открыть
крышку принтера.
2. Уд а л и т е сердечник использованного рулона бумаги.
3. Вставьте новый рулон бумаги так, как показано на иллюстрации F. Правильная
ориентация рулона бумаги показана на иллюстрации G.
4. Вытяните полоску бумаги так, как показано на иллюстрации H, чтобы бумага
подавалась между направляющими для бумаги.
5. Закройте принтер так, как показано на иллюстрации I, и убедитесь в том, что
рулонная бумага правильно подается между направляющими для бумаги.
6. Nосле чего оторвите лишнюю рулонную бумагу так, как показано на
иллюстрации J.
Поиск и устранение причин неисправностей
На панели управления не горят индикаторы
Проверьте правильность соединения кабеля электропитания с принтером
и с розеткой электросети.
Горит (не мигая) индикатор ошибки (ERROR), принтер не печатает
Если индикатор «КОНЧАЕТСЯ БУМАГА» (PAPER OUT) горит, значит, рулон
бумаги не установлен или кончился.
Если индикатор «КОНЧАЕТСЯ БУМАГА» (PAPER OUT) не горит, значит,
недостаточно плотно закрыта крышка принтера.
Мигает индикатор ошибки (ERROR), принтер не печатает (бумага не застряла)
Печать прекращается при перегреве термопечатающей головки и автоматически
возобновляется после охлаждения головки.
Если прекращение печати не вызвано перегревом головки, выключите принтер на
10 секунд, после чего снова включите его.
Извлечение застрявшей бумаги
Не прикасайтесь к термопечатающей головке! Во время печати она может
нагреваться до очень высокой температуры.
1. Выключите принтер и нажмите на защелку, открывающую крышку принтера.
2. Извлеките застрявшую бумагу, заново установите рулон бумаги и закройте
ВНИМАНИЕ!
крышку принтера.
TM-T70 Руководство по эксплуатации 55

Очистка термопечатающей головки
После печати термопечатающая головка может быть очень горячей.
Не прикасайтесь к ней и дайте ей остыть перед началом очистки.
Прикосновение к термопечатающей головке пальцами или любым твердым
предметом может привести к ее повреждению.
Выключите принтер и откройте крышку принтера. Очистите термоэлементы
термопечатающей головки так, как показано на иллюстрации K, ватным тампоном,
увлажненным растворителем на основе спирта (этиловым или изопропиловым
спиртом).
Для того, чтобы обеспечивалось достаточно высокое качество печати чеков, фирма
Epson рекомендует производить очистку термопечатающей головки регулярно
(как правило, каждые 3 месяца).
ВНИМАНИЕ!
Установка DIP-переключателей
ВНИМАНИЕ!
Прежде чем снимать крышку DIP-переключателей, обязательно выключите
принтер. Снятие крышки при включенном принтере может привести к
электрическому разряду, который может вызвать неисправность принтера.
1. Выключите принтер.
2. Переверните принтер.
3. Снимите крышку DIP-переключателей, выкрутив винт в днище принтера, как
это показано на иллюстрации L.
4. Установите DIP-переключатели в нужное положение при помощи инструмента
с тонким острием.
5. Снова установите крышку DIP-переключателей и закрепите ее при помощи
винта.
Новые установки вступают в силу после включения принтера.
56 TM-T70 Руководство по эксплуатации

Қазақ тілі
Пайдаланушы нұсқаулығы
DIP қосқышының кестелері мен сипаттамалары осы нұсқаулықтың басында берілген.
Суреттер
Барлық суреттер осы нұсқаулықтың басында берілген. Олар әріптермен көрсетілген (A, B, C . . .).
Кейбір суреттерде сандар бар. Ол сандардың мағынасын төмендегі кестеден қараңыз.
Сурет A Сурет H
1. Жылу басы 7. Қағаз бағыттағыштар
2. Автокескіш пышағы
Сурет B Сурет K
3. Қақпақты ашу тұтқасы 8. Жылу басы
4. Принтер қақпағы
5. Қуат қосқышы
6. Басқару тақтасы
Барлық құқықтар сақталған. Seiko Epson корпорациясының алдын ала жазбаша рұқсатынсыз бұл
жарияланымның ешбір бөлігін көшірмелеуге, іздеу жүйесінде сақтауға немесе электрондық,
механикалық, ксерокс көшірмесі, жазу немесе өзге қандай болмасын үлгіде немесе қандай
болмасын құрал арқылы беруге болмайды. Осында қамтылған ақпаратты пайдалануға қатысты
ешбір патент міндеттемесі көзделмейді. Осы кітапты дайындауда кез келген сақтық шара
қолданғанымен, Seiko Epson корпорациясы жіберілген қателер немесе ағаттықтар үшін жауап
бермейді. Әрі осында қамтылған ақпаратты пайдалану нәтижесінде орын алған шығындар үшін
жауапкершілік көзделмейді.
Seiko Epson корпорациясы не еншілес бөлімшелері келеңсіз оқиға, осы өнімді дұрыс пайдаланбау
немесе теріс пайдалану немесе өнімге рұқсатсыз өзгерістер енгізу, оны жөндеу немесе өзгерту
немесе (АҚШ қоспағанда) Seiko Epson корпорациясының пайдалану және қызмет көрсету
нұсқауларын жіті орындамау нәтижесінде орын алған осы өнім сатып алушысының немесе үшінші
тараптардың шығындары немесе жоғалтуы үшін олар алдында жауап бермейді.
Seiko Epson корпорациясы Seiko Epson корпорациясының Түпнұсқа Epson өнімдерінен немесе Epson
мақұлданған өнімдерінен басқа мүмкіндіктерді немесе тұтынылатын өнімдерді пайдаланудан
туындаған шығындар немесе ақаулықтар үшін жауап бермейді.
DIP қосқышының кестелері мен сипаттамалары
EPSON — Seiko Epson Corporation компаниясының тіркелген сауда белгісі.
Exceed Your Vision -— Seiko Epson Corporation компаниясының тіркелген сауда белгісі немесе сауда
белгісі.
Барлық басқа сауда белгілері тиісті иелерінің меншігі болып табылады және тек айқындау
мақсатында пайдаланылады.
ЕСКЕРТПЕ: Осы нұсқаулықтың мазмұны ескертусіз өзгертілуі мүмкін.
© Seiko Epson корпорациясы 2015. Барлық құқықтар сақталған.
TM-T70 Пайдаланушы нұсқаулығы 57

Өнім атауы: TM-T70 (Желілік жылу принтері)
Үлгі Кеден Одағының “Кернеуі төмен жабдық қауіпсіздігі туралы”
Техникалық ережесіне (TP TC 004/2011) және Кеден Одағының
“Техникалық құрылғылардың электр магнитті үйлесімділігі туралы”
Техникалық ережесіне (TP TC 020/2011) жауап береді
Өнім жасаушысы: SEIKO EPSON КОРПОРАЦИЯСЫ
Мекенжайы: 3-5, Owa 3-chome, Suwa-shi, Nagano-ken 392-8502 Жапония
веб: http://www.epson.com/
ТМД елдеріндегі ресми өкіл:
“EPSON CIS” ЖШҚ
Мекенжайы: Мәскеу қ-сы, 129110, Щепкин к-сі, 42, 2a ғимараты, 3-пәтер,
“Чайка Плаза” бизнес орталығы
Телефоны: +7 (495) 777-0355/56
веб: http://www.epson.ru/
электрондық пошта
:info_CIS@epson.ru
EPSON EUROPE B.V. МӘСКЕУДЕГІ ӨКІЛЕТТІ КЕҢСЕСІ
Мекенжайы: Мәскеу қ-сы, 129110, Щепкин к-сі, 42, 2a ғимараты, 3-пәтер,
“Чайка Плаза” бизнес орталығы
Телефоны: +7 (495) 777-0355/56
веб: http://www.epson.ru/
Өнім жасалған ай мен жыл:
Өнімде MD кейінгі 6 санмен белгіленген. (MD: ЖЖЖЖАА)
Өнім жасалған ел: Өнімде белгіленген.
58 TM-T70 Пайдаланушы нұсқаулығы

Маңызды қауіпсіздік ақпараты
Бұл бөлім осы өнімді қауіпсіз және тиімді пайдалануды қамтамасыз етуге арналған
маңызды ақпаратты ұсынады. Бұл бөлімді мұқият оқыңыз және оны қол жетімді
орында сақтаңыз.
Нышандар кілті
Осы нұсқаулықтағы нышандар төменде белгіленген маңыздылық деңгейі арқылы
анықталады. Өнімді қолдану алдында мынаны мұқият оқыңыз.
ЕСКЕРТУ:
Ауыр дене жарақатының алдын алу үшін ескертулерді мұқият сақтау керек.
САҚТЫҚ ЕСКЕРТУ:
Жеңіл дене жарақатын, жабдық зақымын немесе деректердің жоғалуын болдырмау
үшін сақтық шараларды сақтау керек.
Қауіпсіздік сақтық шаралары
Бұл бөлімде TM-T70 принтерін қауіпсіз және тиімді пайдалануды қамтамасыз етуге
арналған ескертулер мен сақтық ескертулер сипатталған. Осы өнімді қауіпсіз және
тиімді пайдалану туралы басқа ескертулер мен сақтық ескертулер нұсқаулықтың
басқа бөлімдерінде сипатталған.
ЕСКЕРТУ:
Егер TM-T70 түтін, оғаш иіс немесе әдеттен тыс шу шығарса, TM-T70 принтерін
өшіріңіз, айнымалы ток кабелін розеткадан бірден суырыңыз, содан кейін кеңес алу
үшін дилерге немесе Epson сервистік орталығына хабарласыңыз. Пайдалануды
жалғастыру өртке немесе ток соғуына әкелуі мүмкін.
Бұл өнімді өз бетіңізбен жөндеуге мүлдем әрекеттенбеңіз. Дұрыс жөндемеу қауіпті
болуы мүмкін.
Бұл өнімді мүлдем бөлшектемеңіз
немесе өртке әкелуі мүмкін.
Көрсетілген қуат көзін пайдаланыңыз. Тиісті емес қуат көзіне қосу өрт тудыруы мүмкін.
Жабдық ішіне бөгде заттардың түсіп кетпеуін қадағалаңыз. Бөгде заттардың енуі өртке
әкелуі мүмкін.
Егер су немесе басқа сұйықтық осы жабдық ішіне төгіліп кетсе, TM-T70 принтерін
өшіріңіз, TM-T70 принтерінің қуат сымын
дилерге немесе Epson сервистік орталығына хабарласыңыз. Әрі қарай пайдалану өртке
немесе ток соғуына әкелуі мүмкін.
DIP қосқышының қақпағын ашсаңыз, DIP қосқышын реттеуден кейін қақпақты
жабыңыз және бұранданы бекемдеңіз. Бұл өнімді қақпағы ашық түрде пайдалану өртке
немесе ток соғуына әкелуі мүмкін.
Осы өнімнің ішіне немесе айналасына құрамында жанғыш
бүріккіштерін пайдаланбаңыз. Бұл әрекет өртке әкелуі мүмкін.
САҚТЫҚ ЕСКЕРТУ:
Кабельдерді осы нұсқаулықта аталғаннан өзге жолмен жалғамаңыз. Өзге жолмен
жалғау жабдық зақымына немесе өртке әкелуі мүмкін.
Осы жабдықты қатты, тұрақты, көлбеу бетке орнатыңыз. Өнім құласа сынып кетуі
немесе жарақатқа әкелуі мүмкін.
Бұл өнімді жоғары ылғалдылық немесе тозаң деңгейлері бар орындарда
пайдаланбаңыз. Артық ылғалдылық және тозаң жабдықтың зақымдалуына немесе
өртке әкелуі мүмкін
.
немесе өзгертпеңіз. Бұл өнімді шұқу жарақатқа
дереу ажыратыңыз және кеңес алу үшін
газ бар аэрозоль
TM-T70 Пайдаланушы нұсқаулығы 59

Осы өнімнің үстіне ауыр заттар қоймаңыз. Ешқашан осы өнімге тұрмаңыз немесе
сүйенбеңіз. Жабдық құлап немесе шашылып кетуі мүмкін және сынып, жарақаттауы
ықтимал.
Қолмен кескіште саусақтарыңызды жарақаттап алмаңыз
• Басылған қағазды алғанда
• Қағаз орамын жүктеу/ауыстыру сияқты басқа әрекеттерді орындағанда
Қауіпсіздікті қамтамасыз ету үшін осы өнімді ұзақ уақыт бойы пайдаланбайтын
болсаңыз, оны ажыратыңыз.
Осы өнімді жылжыту алдында розеткадан суырыңыз және оған қосылған барлық
кабельдерді ажыратыңыз.
Сақтық жапсырмалары
Өнімдегі сақтық жапсырмалары мына сақтық шараларды білдіреді.
САҚТЫҚ ЕСКЕРТУ:
Жылу басы басып шығару кезінде және басып шығарғаннан кейін бірден өте ыстық
болуы мүмкін. Оған тию күйіктерге әкелуі мүмкін. Тазалауды және басқа жұмысты
жылу басы суығаннан кейін орындаңыз. Сондай-ақ, жылу басының жанындағы
автокескіш пышағынан сақ болыңыз. Жылу басы мен автокескіш пышағының
орналасуын
A
суретінен қараңыз.
Пайдалану шектеуі
Бұл өнімді әуе, темір жол, теңіз, автокөлігіне, т.б. қатысты тасымал құрылғылары,
апаттың алдын алу құрылғылары; түрлі қауіпсіздік құрылғылары, т.б. немесе
мақсатты/дәлдік құрылғылары, т.б. сияқты жоғары сенімділікті/қауіпсіздікті талап
ететін қолдану үшін пайдаланған кезде қауіпсіздікті және жалпы жүйе сенімділігін
қамтамасыз ету үшін жасақтамаға ақаулықтарға қарсы және қосалқы шараларды
қосу мәселесін қарап шыққаннан кейін ғана осы өнімді пайдалану қажет. Бұл
өнімнің әуе-ғарыш жабдығы, негізгі байланыс жабдығы, атом қуатын басқару
жабдығы немесе тікелей медициналық көмекке қатысты медициналық жабдық
сияқты өте жоғары сенімділікті/қауіпсіздікті талап ететін қолдану түрлеріне
пайдалануға арналмағанын ескере отыра, осы өнімнің жарамдылығы жөніндегі
жеке пайымыңызды толық бағалағаннан
кейін жасаңыз.
Осы нұсқаулықтың мақсаты
Бұл нұсқаулық TM-T70 принтерінің пайдаланушыларына принтерді қауіпсіз және
дұрыс пайдалануға мүмкіндік беретін негізгі әрекеттерді сипаттайтын ақпаратты
қамтамасыз етеді.
Бөлшек атаулары
B суретін қараңыз.
Орамадан шығару
Стандартты техникалық сипаттамалары принтерде келесі заттар қамтылған. Егер
кез келген зат зақымдалған болса, дилерге хабарласыңыз
❏ Принтер ❑ Қағаз орамы
❏ Қуат қосқышының қақпағы ❑ Айнымалы ток адаптері *
❏ Пайдаланушы нұсқаулығы (осы нұсқаулық)
* Принтермен бірге қамтылмауы мүмкін.
60 TM-T70 Пайдаланушы нұсқаулығы

Драйверлерді, қызметтік бағдарламаларды және
нұсқаулықтарды жүктеу
Драйверлерді, қызметтік бағдарламаларды және нұсқаулықтарды келесі URL
мекенжайларының біреуінен жүктеуге болады:
Солтүстік Америка тұтынушылары үшін мына веб-торабына өтіңіз:
http://www.epsonexpert.com/ және экрандағы нұсқауларды орындаңыз.
Басқа елдер тұтынушылары үшін мына веб-торабына өтіңіз:
http://www.epson-pos.com/
Басқару тақтасы
ҚАҒАЗ БЕРУ түймесі (FEED)
Бұл түйме қағазды береді.
(Қуат) ЖШД
Бұл ЖШД принтер қосулы кезде қосулы болады.
ҚАТЕ ЖШД (ERROR)
Бұл қатені көрсетеді.
ҚАҒАЗ БІТТІ ЖШД (PAPER OUT)
Қосулы болуы қағаз бітуге жақын қалғанын немесе біткенін көрсетеді. Жыпылықтау
күту режимін көрсетеді.
Орнату туралы маңызды ескертпелер
❏ Сериялық интерфейс үшін нөл-модемдік кабельді (сондай-ақ, айқас кабель
деп аталады) пайдалану керек.
❏ Параллельді интерфейс үшін IEEE 1284 үйлесімді кабельдің техникалық
сипаттамаларына сай кабельді пайдаланыңыз.
❏ USB интерфейсі үшін принтерді жалғау алдында принтер драйверін
орнатыңыз.
Принтерді орнату
Бұл принтерді тек көлденеңінен орнатуға болады.
Принтер қақпағын ашқанда және орам қағазды кескенде жылжымауы үшін
принтерді бекітіңіз. Опция ретінде принтерді бекітуге арналған лента қол жетімді.
C суретінде көрсетілгендей, принтерді 3° ең үлкен еңкейтумен орнатыңыз.
Принтерді 3°-тан көбірек еңкейтумен орнату келесі мәселелерді тудыруы мүмкін.
• Орам қағаздың аяқталуға жақындауын анықтау мүмкін емес.
• Орам
• Орам қағазды шығару мүмкін емес.
қағазды орнатудан кейін принтер қақпағы жабылмайды.
Қуат қосқышының қақпағын пайдалану
ЕСКЕРТУ:
Егер қуат қосқышы қақпағы бекітілген күйде сәтсіз жағдай орын алса, айнымалы ток
кабелін бірден ажыратыңыз. Әрі қарай пайдалану өртке немесе ток соғуына себеп
болуы мүмкін.
Қамтылған қуат қосқышының қақпағы қуат қосқышының кездейсоқ басылмауын
қамтамасыз етеді. Бұл қақпақты пайдалану үшін D суретінде көрсетілгендей
орнатыңыз.
TM-T70 Пайдаланушы нұсқаулығы 61

Қағаз орамын орнату
1. Принтер қақпағын ашу үшін E суретінде көрсеткімен көрсетілген тұтқаны
басыңыз.
2. Пайдаланылған орам қағаз өзегін алыңыз.
3. Орам қағазды F суретінде көрсетілгендей орнатыңыз. Қағаздың дұрыс
бағыты G суретінде көрсетілген.
4. Қағаз H суретінде көрсетілгендей қағаз бағыттағыштары арасында
орнатылуы үшін біраз орам қағазды тартып шығарыңыз.
5. Принтерді I суретінде көрсетілгендей жабыңыз және орам
бағыттағыштар арасында дұрыс орнатылғанын тексеріңіз.
6. Орам қағазды J суретінде көрсетілгендей жыртып алыңыз.
қағаз
Ақаулықтарды жою
Басқару тақтасында шамдар жанбайды
Тұрақты ток кабелі және айнымалы ток кабелі принтерге және розеткаға дұрыс
қосылғанын тексеріңіз.
ҚАТЕ ЖШД (ERROR) қосулы (жыпылықтамайды) және басып шығармайды
Егер ҚАҒАЗ БІТТІ қосулы болса, орам қағаз орнатылмаған немесе біткен.
Егер ҚАҒАЗ БІТТІ өшірулі болса, принтер қақпағы дұрыс жабылмаған.
ҚАТЕ ЖШД (ERROR) жыпылықтайды және басып шығармайды (және қағаз
кептелісі жоқ)
Жылу басы қызып кеткен кезде тоқтайды және суыған кезде автоматты түрде
жалғасады.
Егер қызып кету себеп болмаса, принтерді өшіріңіз және 10 секундтан кейін қайта
қосыңыз.
Кептелген қағазды алу
Жылу басын ұстамаңыз, себебі басып шығарғаннан кейін ол өте ыстық болуы мүмкін.
1. Принтерді өшіріңіз және қақпақты ашу тұтқасын басыңыз.
2. Кептелген қағазды алыңыз, орамды қайта орнатыңыз және принтер қақпағын
САҚТЫҚ ЕСКЕРТУ:
жабыңыз.
Жылу басын тазалау
Басып шығарғаннан кейін жылу басы өте ыстық болуы мүмкін. Оны ұстамаңыз және
тазалау алдында оны суытыңыз. Жылу басын қолыңызбен немесе қатты затпен ұстап,
оны зақымдап алмаңыз.
Принтерді өшіріңіз және принтер қақпағын ашыңыз. K суретінде көрсетілгендей,
жылу басының жылу элементтерін алкоголь ерітіндісіне (этанол немесе изопропил
спирті) малынған мақта дәкесімен тазалаңыз.
Epson материалдарды басып шығару сапасын сақтау үшін жылу басын кезеңді
түрде (әдетте 3 ай сайын) тазалауды ұсынады.
62 TM-T70 Пайдаланушы нұсқаулығы
САҚТЫҚ ЕСКЕРТУ:

DIP қосқыштарын орнату
САҚТЫҚ ЕСКЕРТУ:
DIP қосқыштарының қақпағын алмай тұрып принтерді өшіріңіз. Оны принтер қосулы
кезде алу принтердің ақаулығына әкелетін қысқа тұйықталу сияқты мәселелерді
тудыруы мүмкін.
1. Принтер өшірулі екенін тексеріңіз.
2. Принтерді аударыңыз.
3. L суретінде көрсетілгендей, принтер түбіндегі DIP қосқыштарының қақпағын
бұранданы шығару арқылы алыңыз.
4. Үшкір құралды пайдаланып DIP қосқыштарын орнатыңыз.
5. DIP қосқышының қақпағын қайта орнатыңыз және бұранданы орнату арқылы
оны бекітіңіз.
Жаңа параметр принтер қосылғаннан кейін күшіне енеді.
TM-T70 Пайдаланушы нұсқаулығы 63
 Loading...