

Page 1

EPSON Stylus® Pro 7600/9600
PRINTER GUIDE
®
Page 2

All rights reserved. No part of this publication may be reproduced, stored in a retrieval system, or transmitted in
any form or by any means, electronic, mechanical, photocopying, recording, or otherwise, without the prior
written permission of SEIKO
EPSON CORPORATION. The information contained herein is designed only for
use with these EPSON printers. EPSON is not responsible for any use of this information as applied to other
printers.
Trademarks
EPSON, EPSON Stylus, EPSON ESC/P, MicroWeave, and Micro Piezo are registered trademarks of SEIKO
EPSON CORPORATION.
BorderFree, ColorLife, DX3, Photo Enhance, EPSON Photographic Dye , an d EPSON UltraChrome are
trademarks and EPSON Preferred and EPSON Store are service marks of Epson America, Inc.
General Notice: Other product names used herein are for identification purposes only and may be trademarks of
their respective owners. EPSON disclaims any and all rights in those marks.
The E
NERGY STAR emblem does not represent EPA endorsement of any product or service.
Legal Notices
Neither SEIKO EPSON CORPORATION nor its affiliates shall be liable to the purchaser of this product or third
parties for damages, losses, costs, or expenses incurred by purchaser or third parties as a result of: accident, misuse,
or abuse of this product or unauthorized modifications, repairs, or alterations to this product, or (excluding the
U.S.) failure to strictly comply with SEIKO EPSON CORPORATION’s operating and maintenance instructions.
SEIKO EPSON CORPORATION shall not be liable for any damages or problems arising from the use of any
options or any consumable products other than those designated as Original EPSON Products or EPSON
Approved Products by SEIKO EPSON CORPORATION.
Printed on recycled paper.
Copyright © 2003 by Epson America, Inc. 7/03 CPD-14021R1
2
Page 3

FCC Compliance Statement
For United States Users
This equipment has been tested and found to comply with the limits for a Class B digital device, pursuant to
Part 15 of the FCC Rules. These limits are designed to provide reasonable protection against harmful interference
in a residential installation. This equipment generates, uses, and can radiate radio frequency energy and, if not
installed and used in accordance with the instructions, may cause harmful interference to radio or television
reception. However, there is no guarantee that interference will not occur in a particular installation. If this
equipment does cause interference to radio and television reception, which can be determined by turning the
equipment off and on, the user is encouraged to try to correct the interference by one or more of the following
measures:
• Reorient or relocate the receiving antenna.
• Increase the separation between the equipment and receiver.
• Connect the equipment into an outlet on a circuit different from that to which the receiver is connected.
• Consult the dealer or an experienced radio/TV technician for help.
WARNING
The connection of a non-shielded equipment interface cable to this equipment will invalidate the FCC
Certification of this device and may cause interference levels which exceed the limits established by the FCC for
this equipment. It is the responsibility of the user to obtain and use a shielded equipment interface cable with this
device. If this equipment has more than one interface connector, do not leave cables connected to unused
interfaces. Changes or modifications not expressly approved by the manufacturer could void the user’s authority to
operate the equipment.
For Canadian Users
This Class B digital apparatus complies with Canadian ICES-003.
Cet appareil numérique de la classe B est conforme à la norme NMB-003 du Canada.
3
Page 4

4
Page 5

Contents | 5
Contents
Introduction
Options and Accessories . . . . . . . . . . . . . . . . . . . . . . . . . . . . . . . . . . 10
Where To Get Help . . . . . . . . . . . . . . . . . . . . . . . . . . . . . . . . . . . . . 11
Macintosh System Requirements . . . . . . . . . . . . . . . . . . . . . . . . . . . 12
Windows System Requirements . . . . . . . . . . . . . . . . . . . . . . . . . . . . 13
ENERGY STAR Compliance . . . . . . . . . . . . . . . . . . . . . . . . . . . . . . 14
Important Safety Instructions . . . . . . . . . . . . . . . . . . . . . . . . . . . . . . 14
1 Setting Up the Printer
Unpacking and Assembling the Stylus Pro 7600 . . . . . . . . . . . . . . . . 18
Unpacking and Assembling the Optional Stand . . . . . . . . . . . . . 18
Unpacking the Printer . . . . . . . . . . . . . . . . . . . . . . . . . . . . . . . . 21
Mounting the Printer on the Optional Stand . . . . . . . . . . . . . . . 23
Attaching the Paper Basket . . . . . . . . . . . . . . . . . . . . . . . . . . . . . 24
Unpacking and Assembling the Stylus Pro 9600 . . . . . . . . . . . . . . . . 27
Unpacking the Stand . . . . . . . . . . . . . . . . . . . . . . . . . . . . . . . . . 27
Assembling the Stand . . . . . . . . . . . . . . . . . . . . . . . . . . . . . . . . . 28
Unpacking the Printer . . . . . . . . . . . . . . . . . . . . . . . . . . . . . . . . 29
Mounting the Printer on the Stand . . . . . . . . . . . . . . . . . . . . . . 31
Attaching the Basket . . . . . . . . . . . . . . . . . . . . . . . . . . . . . . . . . . 34
Connecting the Power Cord . . . . . . . . . . . . . . . . . . . . . . . . . . . . . . . 37
Installing the Ink Cartridges . . . . . . . . . . . . . . . . . . . . . . . . . . . . . . . 38
Loading Roll Paper . . . . . . . . . . . . . . . . . . . . . . . . . . . . . . . . . . . . . . 42
Connecting the Printer to Your Computer . . . . . . . . . . . . . . . . . . . . 45
Connecting to the USB Port . . . . . . . . . . . . . . . . . . . . . . . . . . . 46
Connecting to the Parallel Port (Windows Only) . . . . . . . . . . . . 47
Installing and Connecting to an Optional Interface Card . . . . . . 48
Installing the Printer Software . . . . . . . . . . . . . . . . . . . . . . . . . . . . . . 50
Installing the Software for Macintosh OS 8.5 to 9.x . . . . . . . . . . 50
Installing Software for Windows . . . . . . . . . . . . . . . . . . . . . . . . 52
Running a Nozzle Check . . . . . . . . . . . . . . . . . . . . . . . . . . . . . . . . . 54
Cleaning the Print Head from the Control Panel . . . . . . . . . . . . 56
Aligning the Print Head . . . . . . . . . . . . . . . . . . . . . . . . . . . . . . . . . . 57
Examining the UNI-D ALL Alignment Pattern . . . . . . . . . . . . . 58
Examining the BI-D BLACK (K1) Alignment Pattern . . . . . . . . 59
Examining the BI-D ALL Alignment Pattern . . . . . . . . . . . . . . . 61
-5
Page 6

6 | Contents
2 Handling Paper and Other Media
Selecting Media For Your Printer . . . . . . . . . . . . . . . . . . . . . . . . . . . 63
Printing on EPSON Media . . . . . . . . . . . . . . . . . . . . . . . . . . . . . . . . 64
Guidelines for Using EPSON Papers . . . . . . . . . . . . . . . . . . . . . 69
Using Roll Paper . . . . . . . . . . . . . . . . . . . . . . . . . . . . . . . . . . . . . . . . 69
Guidelines for Using Roll Paper . . . . . . . . . . . . . . . . . . . . . . . . . 70
Loading the Paper onto the Spindle . . . . . . . . . . . . . . . . . . . . . . 70
Placing the Paper in the Printer . . . . . . . . . . . . . . . . . . . . . . . . . 71
Using the Roll Paper Belt . . . . . . . . . . . . . . . . . . . . . . . . . . . . . . 74
Removing Paper from the Spindle . . . . . . . . . . . . . . . . . . . . . . . 74
Switching Between 2-Inch and 3-Inch Roll Paper . . . . . . . . . . . 75
Cutting Paper Manually with the Built-in Cutter . . . . . . . . . . . . 76
Printing Trim Lines . . . . . . . . . . . . . . . . . . . . . . . . . . . . . . . . . . 76
Using Cut Sheet Paper . . . . . . . . . . . . . . . . . . . . . . . . . . . . . . . . . . . 77
Printing on Posterboard . . . . . . . . . . . . . . . . . . . . . . . . . . . . . . . 79
Adjusting the Platen Gap for Thick or Thin Paper . . . . . . . . . . . 81
Using the Paper Basket . . . . . . . . . . . . . . . . . . . . . . . . . . . . . . . . . . . 82
Catching Printouts in Front of the Printer . . . . . . . . . . . . . . . . . 82
Catching Printouts Under the Printer . . . . . . . . . . . . . . . . . . . . 83
Optimizing the Settings for Your Paper . . . . . . . . . . . . . . . . . . . . . . 84
Adjusting the Paper Settings . . . . . . . . . . . . . . . . . . . . . . . . . . . . 84
Creating and Selecting Paper Profiles . . . . . . . . . . . . . . . . . . . . . 85
3 Printing with EPSON Drivers for Macintosh
Choosing Page Setup Options . . . . . . . . . . . . . . . . . . . . . . . . . . . . . 90
Printing Without Borders . . . . . . . . . . . . . . . . . . . . . . . . . . . . . . 91
Choosing Basic Print Options . . . . . . . . . . . . . . . . . . . . . . . . . . . . . . 93
Selecting the Correct Media Type Setting . . . . . . . . . . . . . . . . . 96
Choosing Advanced Print Options . . . . . . . . . . . . . . . . . . . . . . . . . . 98
Color Management Settings . . . . . . . . . . . . . . . . . . . . . . . . . . . . 101
Paper Configuration Options . . . . . . . . . . . . . . . . . . . . . . . . . . . 102
Managing Print Jobs . . . . . . . . . . . . . . . . . . . . . . . . . . . . . . . . . . . . . 103
Setting Up Background Printing . . . . . . . . . . . . . . . . . . . . . . . . 103
Using Monitor3 . . . . . . . . . . . . . . . . . . . . . . . . . . . . . . . . . . . . . 104
Cancelling Printing . . . . . . . . . . . . . . . . . . . . . . . . . . . . . . . . . . 106
Checking Printer Status . . . . . . . . . . . . . . . . . . . . . . . . . . . . . . . . . . 106
Selecting Configuration Options . . . . . . . . . . . . . . . . . . . . . . . . 107
-6
Page 7

Contents | 7
4 Printing with EPSON Drivers for Windows
Choosing Basic Print Options . . . . . . . . . . . . . . . . . . . . . . . . . . . . . . 109
Selecting the Correct Media Type Setting . . . . . . . . . . . . . . . . . 112
Choosing Paper and Layout Options . . . . . . . . . . . . . . . . . . . . . . . . 114
Printing Without Borders . . . . . . . . . . . . . . . . . . . . . . . . . . . . . . 115
Choosing Advanced Print Options . . . . . . . . . . . . . . . . . . . . . . . . . . 117
Color Management Settings . . . . . . . . . . . . . . . . . . . . . . . . . . . . 119
Paper Configuration Settings . . . . . . . . . . . . . . . . . . . . . . . . . . . 120
Managing Print Jobs . . . . . . . . . . . . . . . . . . . . . . . . . . . . . . . . . . . . . 121
Using the Progress Meter . . . . . . . . . . . . . . . . . . . . . . . . . . . . . . 121
Using the Spool Manager . . . . . . . . . . . . . . . . . . . . . . . . . . . . . . 122
Using Status Monitor 3 . . . . . . . . . . . . . . . . . . . . . . . . . . . . . . . 122
Setting Monitoring Preferences . . . . . . . . . . . . . . . . . . . . . . . . . 124
Optimizing Print Speed . . . . . . . . . . . . . . . . . . . . . . . . . . . . . . . . . . 126
5 Maintaining and Transporting the Printer
Checking Printer Status and Part Life . . . . . . . . . . . . . . . . . . . . . . . . 130
Printing Status Information . . . . . . . . . . . . . . . . . . . . . . . . . . . . 130
Viewing Status Information . . . . . . . . . . . . . . . . . . . . . . . . . . . . 131
Running a Cleaning Cycle . . . . . . . . . . . . . . . . . . . . . . . . . . . . . . . . 132
Printing a Nozzle Check Pattern . . . . . . . . . . . . . . . . . . . . . . . . 132
Cleaning the Print Head from the Control Panel . . . . . . . . . . . . 133
Performing a Power Cleaning . . . . . . . . . . . . . . . . . . . . . . . . . . . 134
Aligning the Print Head . . . . . . . . . . . . . . . . . . . . . . . . . . . . . . . . . . 135
Examining the UNI-D ALL Alignment Pattern . . . . . . . . . . . . . 136
Examining the BI-D BLACK Alignment Pattern . . . . . . . . . . . . 137
Examining the BI-D ALL Alignment Pattern . . . . . . . . . . . . . . . 139
Replacing Ink Cartridges . . . . . . . . . . . . . . . . . . . . . . . . . . . . . . . . . . 141
Checking Ink Levels . . . . . . . . . . . . . . . . . . . . . . . . . . . . . . . . . . 141
Purchasing Ink Cartridges . . . . . . . . . . . . . . . . . . . . . . . . . . . . . 142
Installing an Ink Cartridge . . . . . . . . . . . . . . . . . . . . . . . . . . . . . 143
Switching Between Black Ink Modes . . . . . . . . . . . . . . . . . . . . . . . . 146
Preparing to Switch Black Ink Modes . . . . . . . . . . . . . . . . . . . . . 146
Selecting the Black Ink Cartridges . . . . . . . . . . . . . . . . . . . . . . . 148
Checking the Maintenance Tank . . . . . . . . . . . . . . . . . . . . . . . . 150
-7
Page 8

8 | Contents
Draining the Ink . . . . . . . . . . . . . . . . . . . . . . . . . . . . . . . . . . . . 150
Charging the Ink . . . . . . . . . . . . . . . . . . . . . . . . . . . . . . . . . . . . 151
Updating the Driver . . . . . . . . . . . . . . . . . . . . . . . . . . . . . . . . . . 151
Replacing the Paper Cutter Blade . . . . . . . . . . . . . . . . . . . . . . . . . . 153
Replacing the Maintenance Tank . . . . . . . . . . . . . . . . . . . . . . . . . . . 155
Cleaning the Printer . . . . . . . . . . . . . . . . . . . . . . . . . . . . . . . . . . . . . 157
Transporting or Storing the Printer . . . . . . . . . . . . . . . . . . . . . . . . . . 158
Preparing the Printer for Shipment . . . . . . . . . . . . . . . . . . . . . . 158
Moving the Printer on the Stand . . . . . . . . . . . . . . . . . . . . . . . . 161
Uninstalling and Reinstalling the Printer Software . . . . . . . . . . . . . . 162
Macintosh . . . . . . . . . . . . . . . . . . . . . . . . . . . . . . . . . . . . . . . . . 162
Windows . . . . . . . . . . . . . . . . . . . . . . . . . . . . . . . . . . . . . . . . . . 163
6 Solving Problems
Diagnosing Problems . . . . . . . . . . . . . . . . . . . . . . . . . . . . . . . . . . . . 165
Using the Control Panel to Check the Printer . . . . . . . . . . . . . . . . . . 166
Improving Print Quality . . . . . . . . . . . . . . . . . . . . . . . . . . . . . . . . . . 169
Solving Operational Problems . . . . . . . . . . . . . . . . . . . . . . . . . . . . . . 173
Solving Miscellaneous Printing Problems . . . . . . . . . . . . . . . . . . . . . 174
Solving Paper Problems . . . . . . . . . . . . . . . . . . . . . . . . . . . . . . . . . . 176
Solving Roll Paper Feeding Problems . . . . . . . . . . . . . . . . . . . . . 177
Clearing Paper Jams . . . . . . . . . . . . . . . . . . . . . . . . . . . . . . . . . . 179
A Specifications
Printing . . . . . . . . . . . . . . . . . . . . . . . . . . . . . . . . . . . . . . . . . . . . . . 181
Environmental . . . . . . . . . . . . . . . . . . . . . . . . . . . . . . . . . . . . . . . . . 182
Dimensions and Weight . . . . . . . . . . . . . . . . . . . . . . . . . . . . . . . . . . 182
Electrical . . . . . . . . . . . . . . . . . . . . . . . . . . . . . . . . . . . . . . . . . . . . . . 182
Printer Interfaces . . . . . . . . . . . . . . . . . . . . . . . . . . . . . . . . . . . . . . . . 183
Safety Approvals . . . . . . . . . . . . . . . . . . . . . . . . . . . . . . . . . . . . . . . . 183
Paper . . . . . . . . . . . . . . . . . . . . . . . . . . . . . . . . . . . . . . . . . . . . . . . . 183
Printable Area . . . . . . . . . . . . . . . . . . . . . . . . . . . . . . . . . . . . . . . 184
Ink Cartridges . . . . . . . . . . . . . . . . . . . . . . . . . . . . . . . . . . . . . . . . . . 185
Index
-8
Page 9

Introduction
Note
To set up your printer,
follow the instructions in
Chapter 1.
This Printer Guide provides important information on setting up your
printer, selecting paper, basic operation, and replacing parts such as ink
cartridges. It also tells you how to maintain your printer to keep it working
at its best, and provides troubleshooting tips in case you have a problem.
For additional information, see the following:
• The Quick Reference Guide provides a handy summary of procedures for
daily use and printer maintenance—loading paper, replacing ink
cartridges, running cleaning cycles, aligning the print head, and clearing
paper jams. Attach it to your printer for easy reference.
• The electronic Reference Guide on the CD-ROM provides additional
information about the printer, drivers, and utility software. You can read
the guide using a web browser, such as Netscape
®
Microsoft
Internet Explorer, versions 3.0 or later.
®
Navigator® or
Warnings, Cautions, and Notes
These symbols are used in this book:
Warning
Caution
Note
TIP
Warnings must be followed carefully to avoid bodily injury.
Cautions must be observed to avoid damage to your equipment.
Notes contain important information about your printer.
Tips contain additional hints on how to get the most out of your printer.
9
Page 10
10 | Introduction
TIP
Check the EPSON Pro
Graphics web site at
http://prographics.epson.
com for new accessories
and options that may
become available.
Options and Accessories
Your EPSON Stylus Pro 7600 and 9600 offer these optional upgrades and
accessories:
Optional equipment and software
Option Part number
EPSON Stylus Pro 7600 Printer Stand C12C844061
®
EFI
Fiery® Spark Professional 2.0 Software RIP C842832
Internal 10/100 BaseT (Ethernet™) Type-B interface card C12C823912
Internal IEEE 1394 (FireWire™) Type-B interface card C823722
Automatic Take-Up Reel System (Stylus Pro 9600 only) C12C815251
Replacement 44-inch Take-up Reel Core
(Stylus Pro 9600 only)
Paper Roller Spindle (Normal Tension) — 2- or 3-inch
Stylus Pro 7600:
Stylus Pro 9600:
Paper Roller Spindle (High Tension) — 2- or 3-inch
Stylus Pro 7600:
Stylus Pro 9600:
Manual Media Cutting System*
Stylus Pro 7600:
Stylus Pro 9600:
Replacement Manual Cutting Blade (for Manual Media
Cutting System)
C815121
C12C811161
C12C811151
C12C811155
C12C811152
C12C815231
C815182
C815192
* Designed for use with heavy media, which can damage the printer’s built-in
cutter.
10
Page 11
Introduction | 11
In addition, you can order these user-replaceable items:
Consumables and user-replaceable parts
Part Part number
Replacement Ink Maintenance Tank*
Stylus Pro 7600:
Stylus Pro 9600:
Replacement Printer Cutter Blade** C12C815241
Ink Cartridges See page 142 for a
Paper (roll and sheet) See page 64 for a
* See page 155 for details.
** Replaces the blade for the printer’s built-in cutter (see page 153).
C120890071
C126890071
complete listing.
complete listing.
You can purchase optional equipment and software, ink cartridges, paper,
and manuals from EPSON at (800) 873-7766, or you can visit the EPSON
SM
Store at www.epsonstore.com (U.S. sales only). In Canada, please call
(800) 463-7766 for dealer referral.
TIP
If you experience
difficulty with the
toll-free line or your
Unit ID number, call
(562) 276-1305.
Where To Get Help
EPSON provides technical support and information on the installation,
configuration, and operation of professional printing products through the
EPSON Preferred Protection Plan. Dial (888) 377-6611, 6
Pacific Time, Monday through Friday. Support hours and days are subject
to change without notice.
Before you call, make sure you have your Unit ID number, which is
included with the EPSON Preferred Protection Plan information that cam e
with your printer. You’ll also need your printer serial number and proof of
purchase.
SM
AM to 8 PM,
11
Page 12

12 | Introduction
EPSON also provides technical assistance 24 hours a day through the World
Wide Web. You can reach EPSON Support at http://support.epson.com. At
this site, you can download drivers and other files, look at product
documentation, access troubleshooting information, and receive technical
advice through e-mail.
You can purchase ink cartridges, paper, and accessories from EPSON at
(800) 873-7766, or by visiting the EPSON Store at www.epsonstore.com
(U.S. sales only). In Canada, please call (800) 463-7766 for dealer referral.
Macintosh System Requirements
To use your printer in either a standalone or peer-to-peer network
®
environment, your Macintosh
listed below:
• OS 8.5.1 through 9.X
(OS X drivers available at www.epson.com)
• 500 MHz or higher processor recommended
system should include the requirements
Caution
Using an improperly
shielded USB cable—
especially a cable more
than 6.6 ft. (2 meters)
long—may cause the
printer to malfunction.
• 256MB of RAM or higher recommended
• At least 25MB of free hard disk space to install the software, and at least
2GB of free hard disk space for processing files (8GB or more available
hard disk space recommended)
• Quad-speed (4×) or faster CD-ROM or DVD drive for installing the
printer software
• For USB connection: a compliant USB port and a shielded USB “AB”
cable from Series A (computer) to Series B (printer), up to 6.6 ft
(2 meters) long
For IEEE 1394 (FireWire) connection: the optional IEEE 1394 card
(described on page 10) and a shielded IEEE 1394 cable
For network connection: the optional Ethernet card (described on
page 10) and a compatible cable
12
Page 13

Introduction | 13
Windows System Requirements
To use your printer in either a standalone or peer-to-peer network
environment, your system should include the requirements listed below:
Caution
Using an improperly
shielded USB cable—
especially a cable more
than 6.6 ft. (2 meters)
long—may cause the
printer to malfunction.
• IBM
®
-compatible PC with a Pentium® IV 1 GHz or higher processor
recommended
• For parallel connection: Windows
®
95, 98, Me, NT® 4.0, 2000, or XP
For USB connection: PC with USB-compliant port running Windows
98 (factory installed), Me, 2000, or XP
For IEEE 1394 connection: PC with IEEE 1394 port running
Windows Me, 2000, or XP
For 10/100 BaseT Ethernet connection: Ethernet equipped PC running
Windows 95, 98, Me, NT 4.0, 2000, or XP
• 256MB of RAM or higher recommended
• At least 25MB of free hard disk space to install the software, and at least
2GB of free hard disk space for processing files (8GB or more available
hard disk space recommended)
• Quad-speed (4×) CD-ROM or DVD drive for installing the printer
software
• For parallel connection: a high-speed, bidirectional, IEEE 1284-
compliant parallel cable, 6 to 10 ft. (1.8 to 3 m) long, with a D-SUB,
®
25-pin, male connector for your computer and a 36-pin, Centronics
compatible connector for the printer
For USB connection: a computer running Windows 98, Me, 2000, or
XP with a Windows compliant USB port and a shielded USB “AB”
cable from Series A (computer) to Series B (printer), up to 6.6 ft.
(2 meters) long
For IEEE 1394 connection: the optional IEEE 1394 port (described on
page 10) and a shielded IEEE 1394 cable
For network connection: the optional Ethernet card (described on
page 10) and a compatible cable
13
Page 14

14 | Introduction
ENERGY STAR Compliance
As an ENERGY STAR Partner, EPSON has determined that this product
meets the ENERGY STAR guidelines for energy efficiency.
The EPA ENERGY STAR Office Equipment program is a voluntary
partnership with the computer and office equipment industry to promote
the introduction of energy-efficient personal computers, monitors, printers,
fax machines, and copiers in an effort to reduce air pollution caused by
power generation.
Caution
Always turn the printer
off using the Power
button. When you press
this button, the Operate
light flashes briefly, then
goes out. Do not unplug
the printer or turn off the
power to the printer until
the Operate light is off.
This ensures that the
print head is safely
capped.
Important Safety Instructions
Before using your printer, read the following safety instructions to make sure
you use the equipment safely and effectively.
• Turn off and unplug the printer before cleaning. Clean with a damp
cloth only. Do not spill liquid on the printer.
• Do not place the printer on an unstable surface or near a radiator or
heating vent. Avoid areas subject to rapid changes in temperature and
humidity or shock and vibrations.
• Do not place the printer near a window or in direct sunlight. Bright
light can interfere with the paper sensors, causing paper jams and related
problems.
• Keep the entire system away from potential sources of electromagnetic
interference, such as loudspeakers or the base units of cordless
telephones.
• Place the printer on a flat surface. It will not operate properly if it is
tilted or at an angle.
• Do not block or cover the openings in the printer case or insert objects
through the slots.
• Use only the type of power source indicated on the label.
• Connect all equipment to properly grounded power outlets. Avoid using
outlets on the same circuit as photocopiers or air control systems that
regularly switch on and off. Do not use outlets controlled by wall
switches or timers.
14
Page 15

Introduction | 15
•
Place the printer near a wall outlet where the plugs can be easily
unplugged.
Placez l’imprimante près d’une prise de contacte où la fiche peut être
débranchée facilement.
• Do not let the power cords become damaged or frayed.
• If you use an extension cord with the printer, make sure the total ampere
rating of the devices plugged into the extension cord does not exceed the
cord’s ampere rating. Also, make sure the total ampere rating of all
devices plugged into the wall outlet does not exceed the wall outlet’s
ampere rating.
• Except as specifically explained in the documentation, do not attempt to
service the printer yourself. Opening or removing those covers that are
marked “Do Not Remove” may expose you to dangerous voltage points
or other risks. Refer all servicing in those compartments to service
personnel.
• Turn off the printer using the Power button, unplug the printer, and
refer servicing to qualified service personnel under the following
conditions:
If the power cord or plug is damaged; if liquid has entered the printer; if
the equipment has been dropped or the case damaged; if the printer does
not operate normally or exhibits a distinct change in performance.
Adjust only those controls that are covered by the operating instructions.
Ink Cartridge Safety Instructions
• Do not put your hand inside the printer or touch the cartridges during
printing.
• To avoid damaging the printer, do not move the print head by hand.
• Under normal circumstances, ink will not come out of the cartridge. If it
does get on your skin, wash it off with soap and water. If it gets in your
eyes, flush them immediately with water.
• Keep ink cartridges out of the reach of children and do not drink the
ink.
• Do not store ink cartridges at high or freezing temperatures. Keep
cartridges away from direct sunlight.
15
Page 16

16 | Introduction
•
Do not dismantle the ink cartridges or try to refill them. This could
result in damage to the print head.
• Install the ink cartridge immediately after you remove it from its
package. Leaving the cartridge unpacked for a long time before use may
result in reduced print quality.
• Do not use an ink cartridge beyond the date printed on the cartridge
package. For best results, use cartridges within six months of installation.
16
Page 17

Setting Up the Printer | 17
Chapter 1:
Setting Up
the Printer
Note
When choosing a place
for the printer, leave
adequate room for easy
access and ventilation.
Avoid locations subject to
direct sunlight, excessive
heat, moisture, or dust.
Also avoid locations near
potential sources of
interference, such as loud
speakers, cordless
phones, TVs, or air
conditioners.
Follow the steps in this chapter to assemble the printer, install the software,
and make any necessary adjustments. You should allow at least two hours for
this process.
This chapter covers the following information:
• Unpacking and assembly
• Connecting the power cord
• Installing the ink cartridges
• Loading the roll paper
• Connecting the printer to your computer
• Installing the printer software
• Running a nozzle check
• Aligning the print head
1-17
Page 18
18 | Setting Up the Printer
Warning
Assembly requires two
people.
Unpacking and Assembling the Stylus Pro 7600
Follow these steps to assemble your printer. If you have a Stylus Pro 9600,
see page 27 instead.
Unpacking and Assembling the Optional Stand
If you have an optional stand for the Stylus Pro 7600, follow these steps to
unpack and assemble it. Otherwise, skip ahead to “Unpacking the Printer”
on page 21.
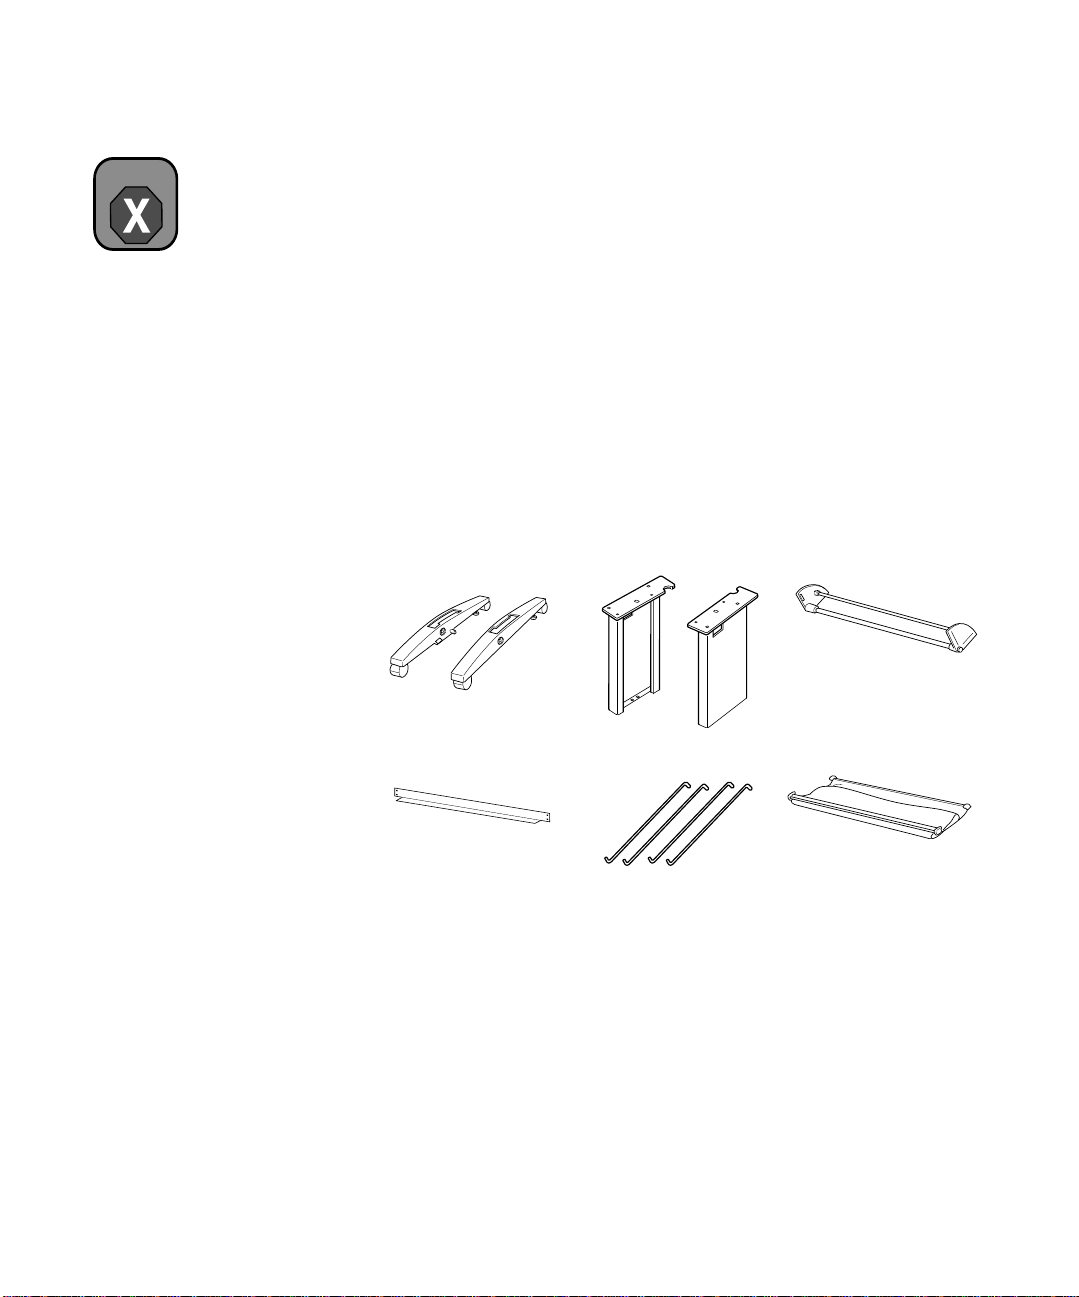
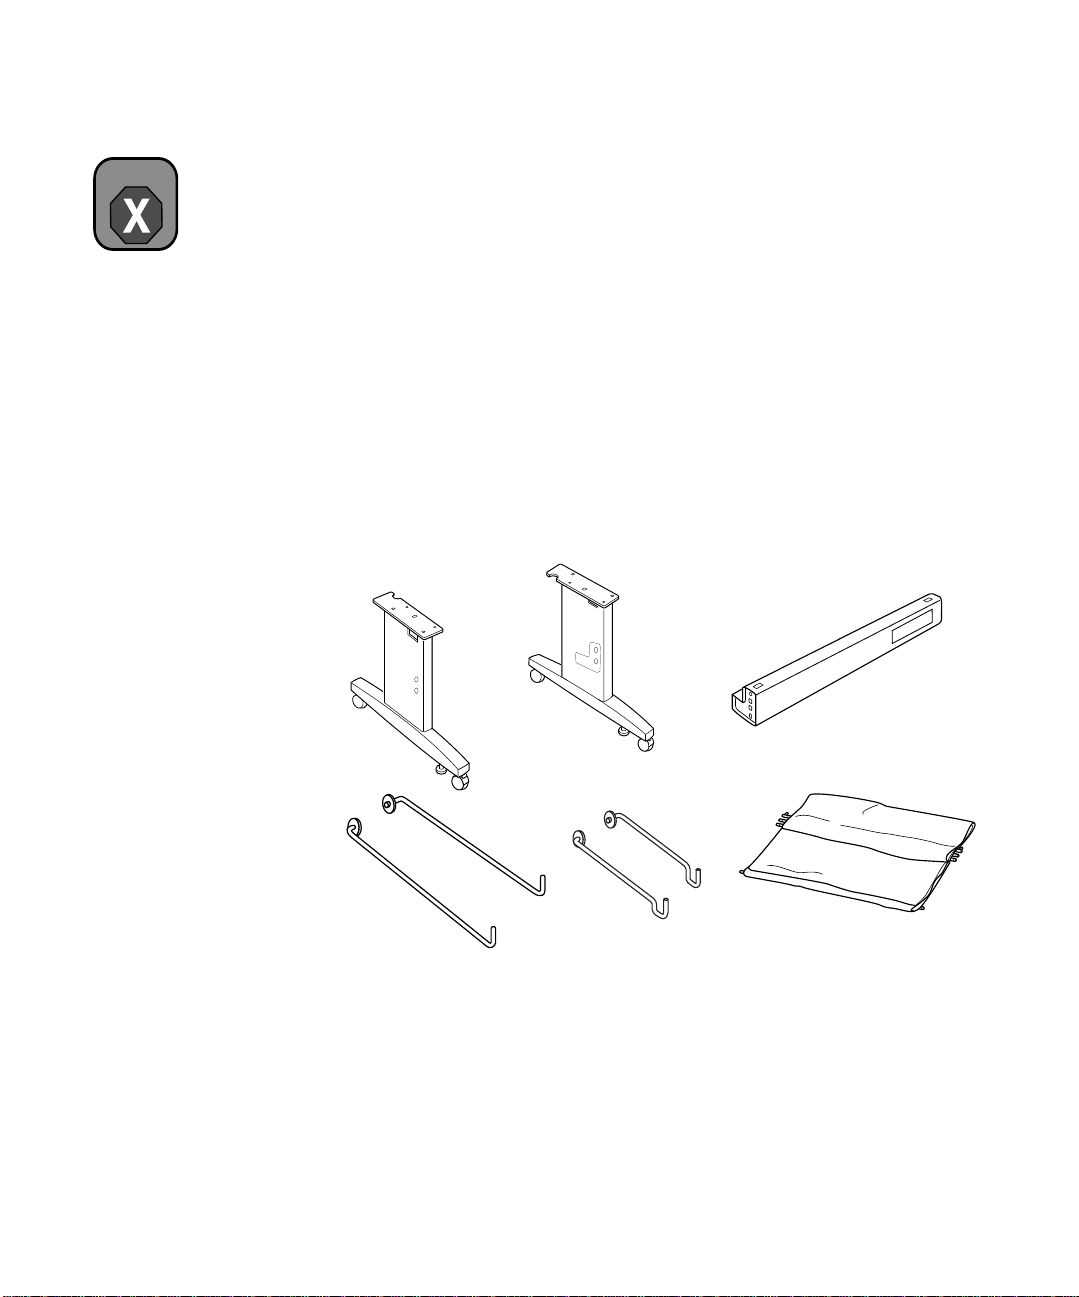
1. Unpack the stand and make sure you have all these items. You will also
need a Phillips screwdriver.
Parts:
C
A
B
D
A: Base, right and left (1 each)
B: Leg, right and left (1 each)
C: Bottom support bar(1)
D: Top support bar(1)
E: Basket hooks (4)
F: Basket (1)
1-18
E
F
Page 19
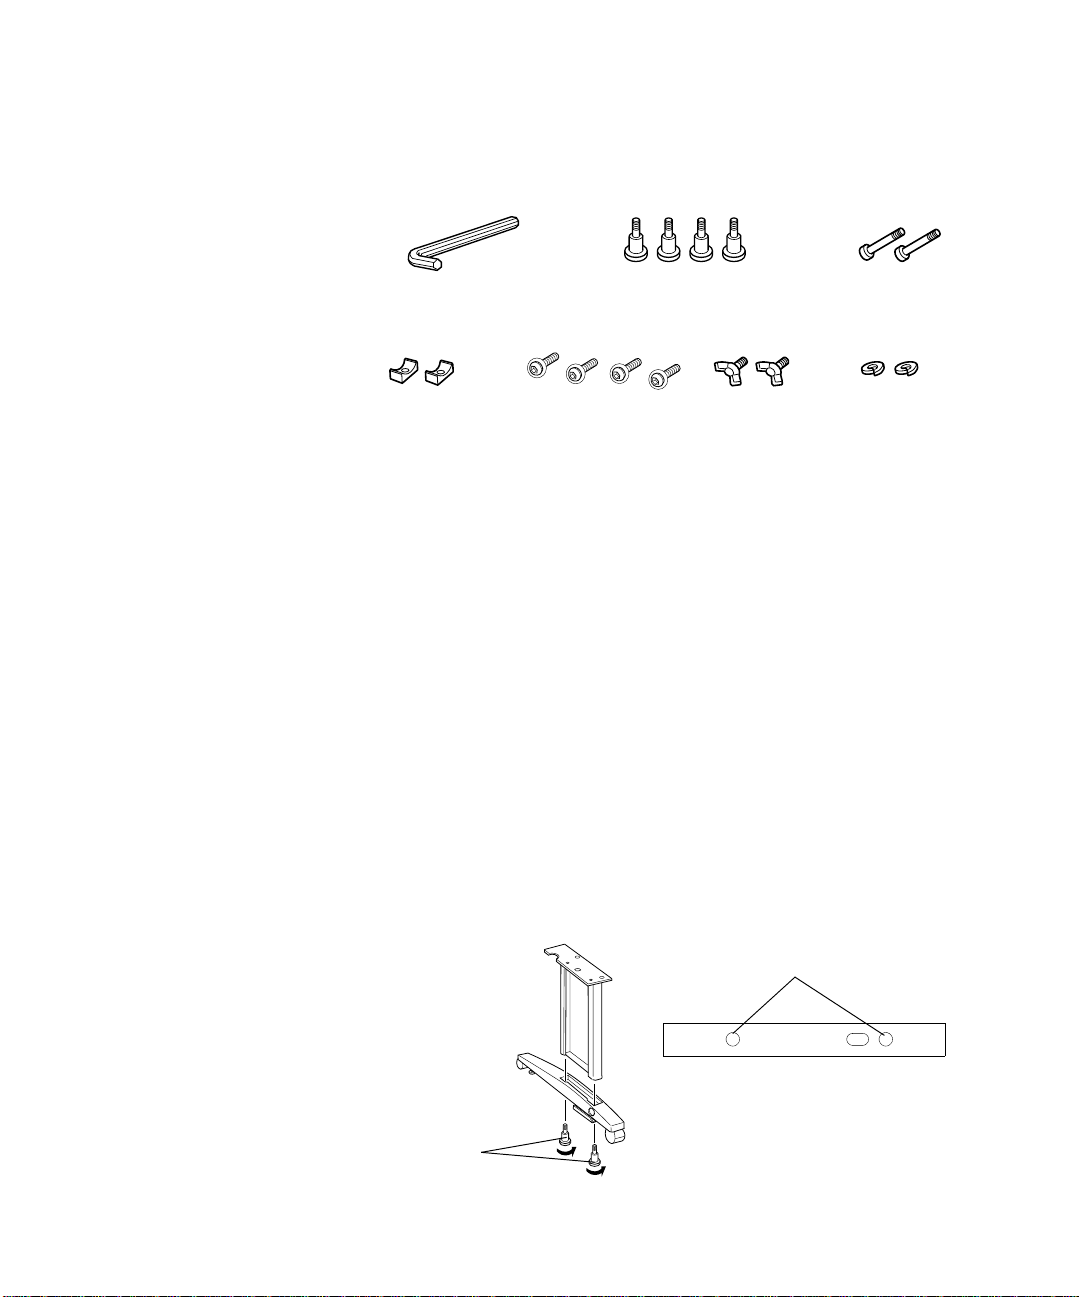
Accessories:
Setting Up the Printer | 19
G
KLJ
G: Allen wrench (1)
H: Bolts (4) for attaching legs to base
I: Bolts (2) for attaching lower bar to legs
J: Collars (2) for attaching lower bar to legs
K: Phillips screws with washers (4) for attaching top support bar to legs
L: Wing screws (2) for attaching printer to stand
M: Washers (2) for attaching printer to stand
HI
M
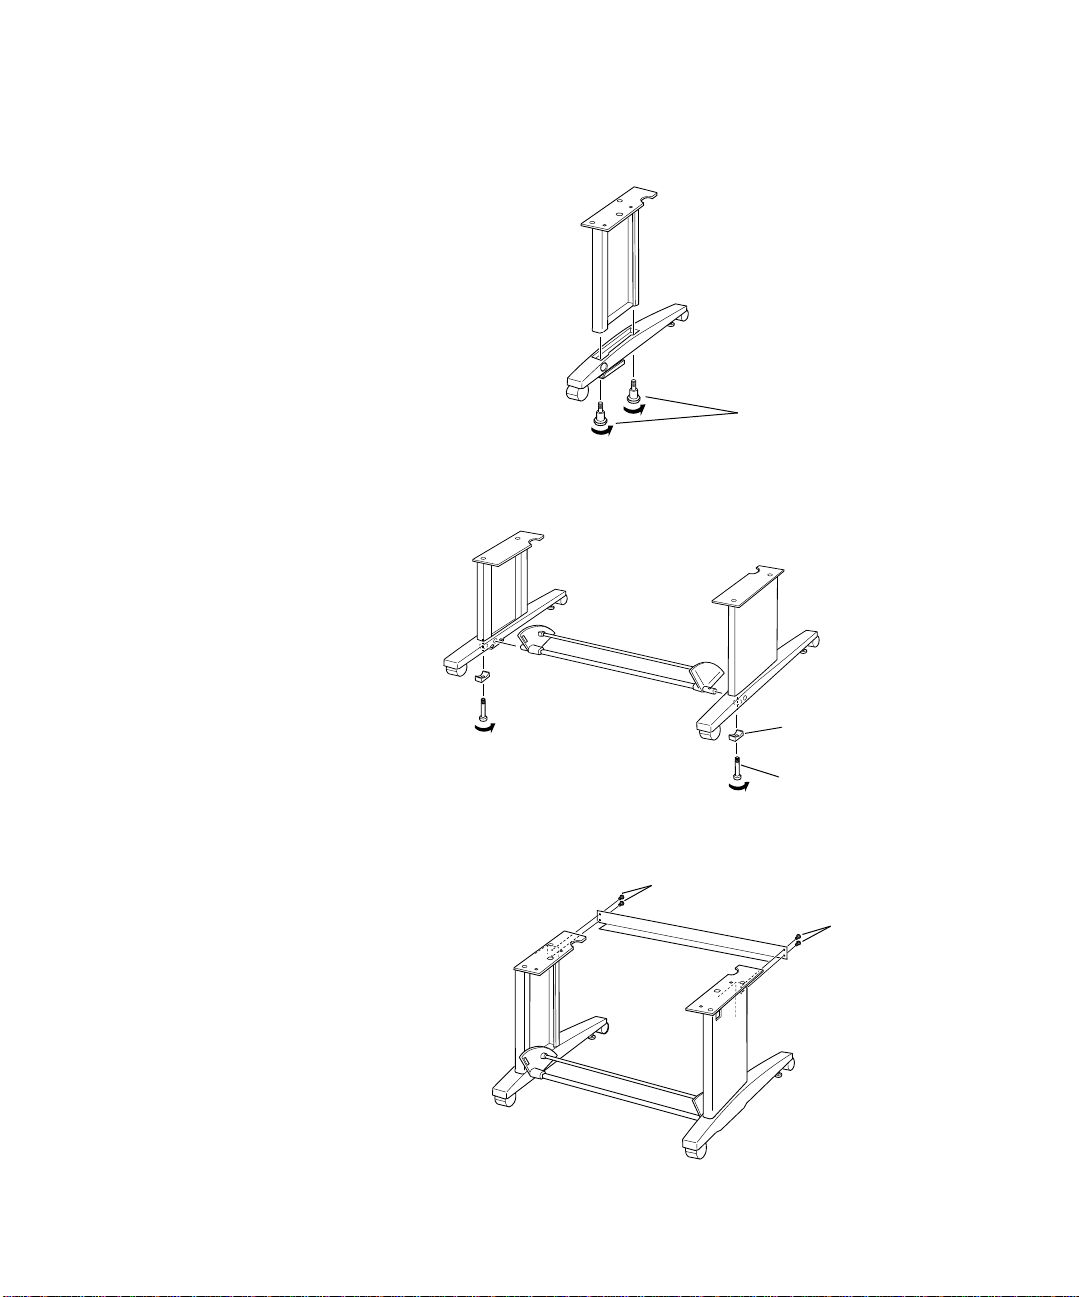
2. Insert one of the legs into the base as shown. (The bolt holes line up only
if the leg is matched with the correct base.) Use the included Allen
wrench to fasten the leg with two bolts (H).
Bolt holes
Underside view of base
showing location of bolt holes
H
1-19
Page 20
20 | Setting Up the Printer
3. Assemble the other leg and base in the same way.
4. Attach the bottom support bar as shown. Fasten the bar with one
H
collar (J) and one bolt (I) at each end.
J
K
5. Attach the top support bar as shown. Use a Phillips screwdriver to fasten
the four small screws (K).
K
K
6. Make sure each part of the stand is tightened securely.
1-20
Page 21
Setting Up the Printer | 21
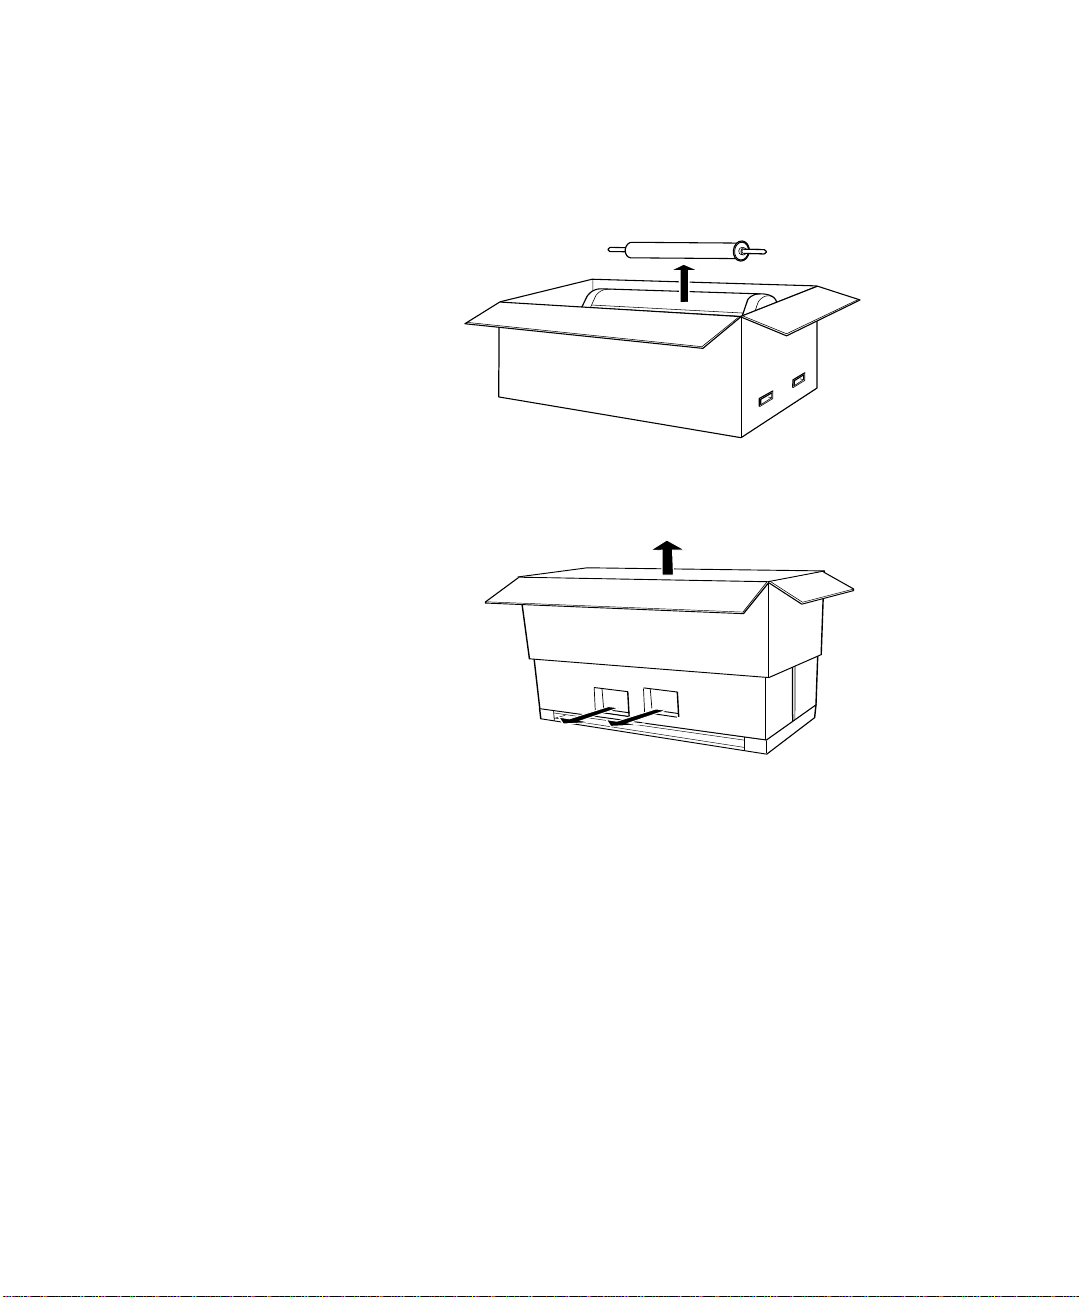
Unpacking the Printer
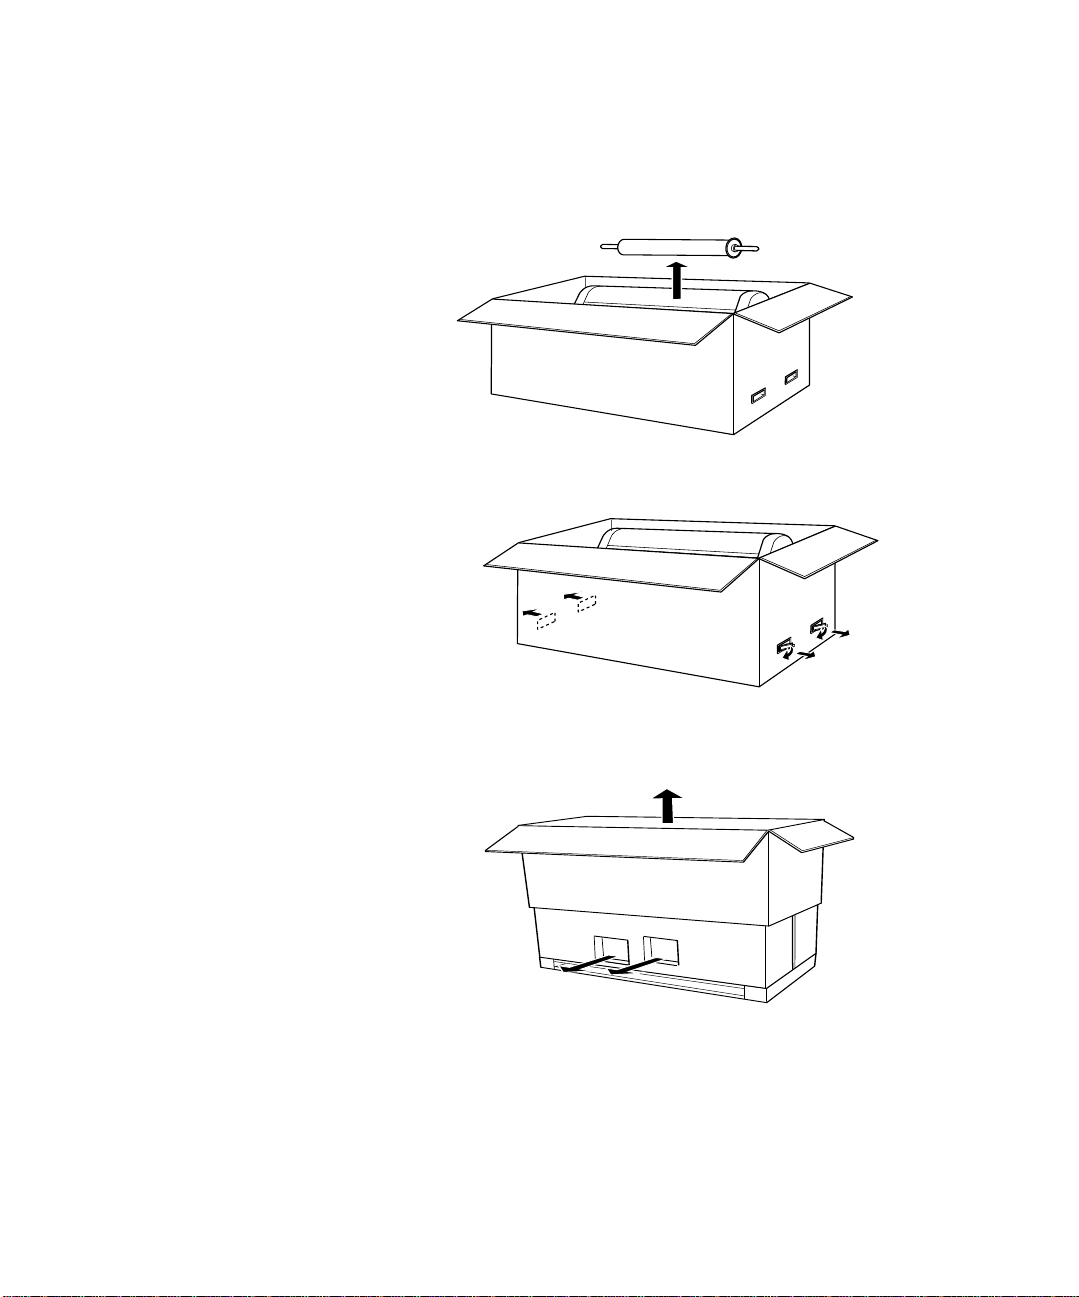
1. Remove the roll paper, polystyrene foam, and cardboard cushions.
2. Remove the handles from the sides of the box as shown.
3. Lift the box up and away from the printer. Remove the ink cartridges
and other accessories from the side as shown below.
Remove ink
cartridges and
accessories
B
A
4. Remove the cardboard panels from around the printer.
1-21
Page 22
22 | Setting Up the Printer
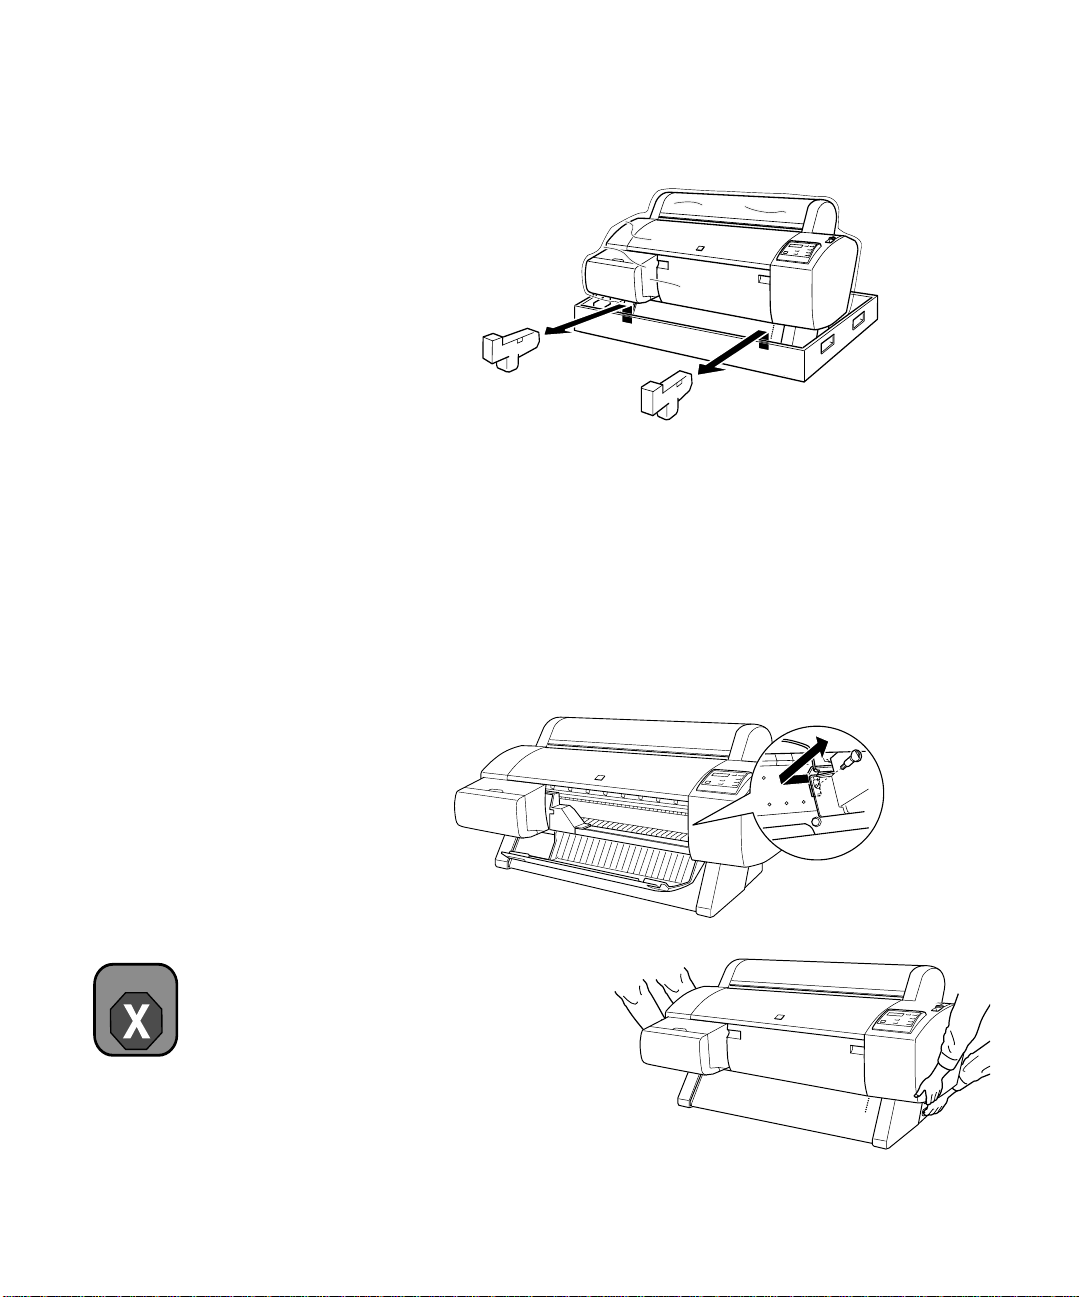
5. Take out the foam supports from under the printer.
6. Remove any packing tape. Check these areas:
7. Open the front cover. Then unscrew the bolt and remove the bracket
• the front cover
• the ink compartment cover (in front on the left)
• the maintenance tank (on the right side near the bottom)
securing the print head. Save the bolt and bracket in case you need to
ship the printer.
Warning
Two or more people are
required to lift the printer.
8. If you want to set the
printer on a desk, use at
least two people to hold
it as shown. Otherwise
follow the instructions in
the next section to mount
it on the optional stand.
1-22
Page 23
Warning
Setting Up the Printer | 23
Mounting the Printer on the Optional Stand
If you have an optional stand, follow these steps to mount the printer:
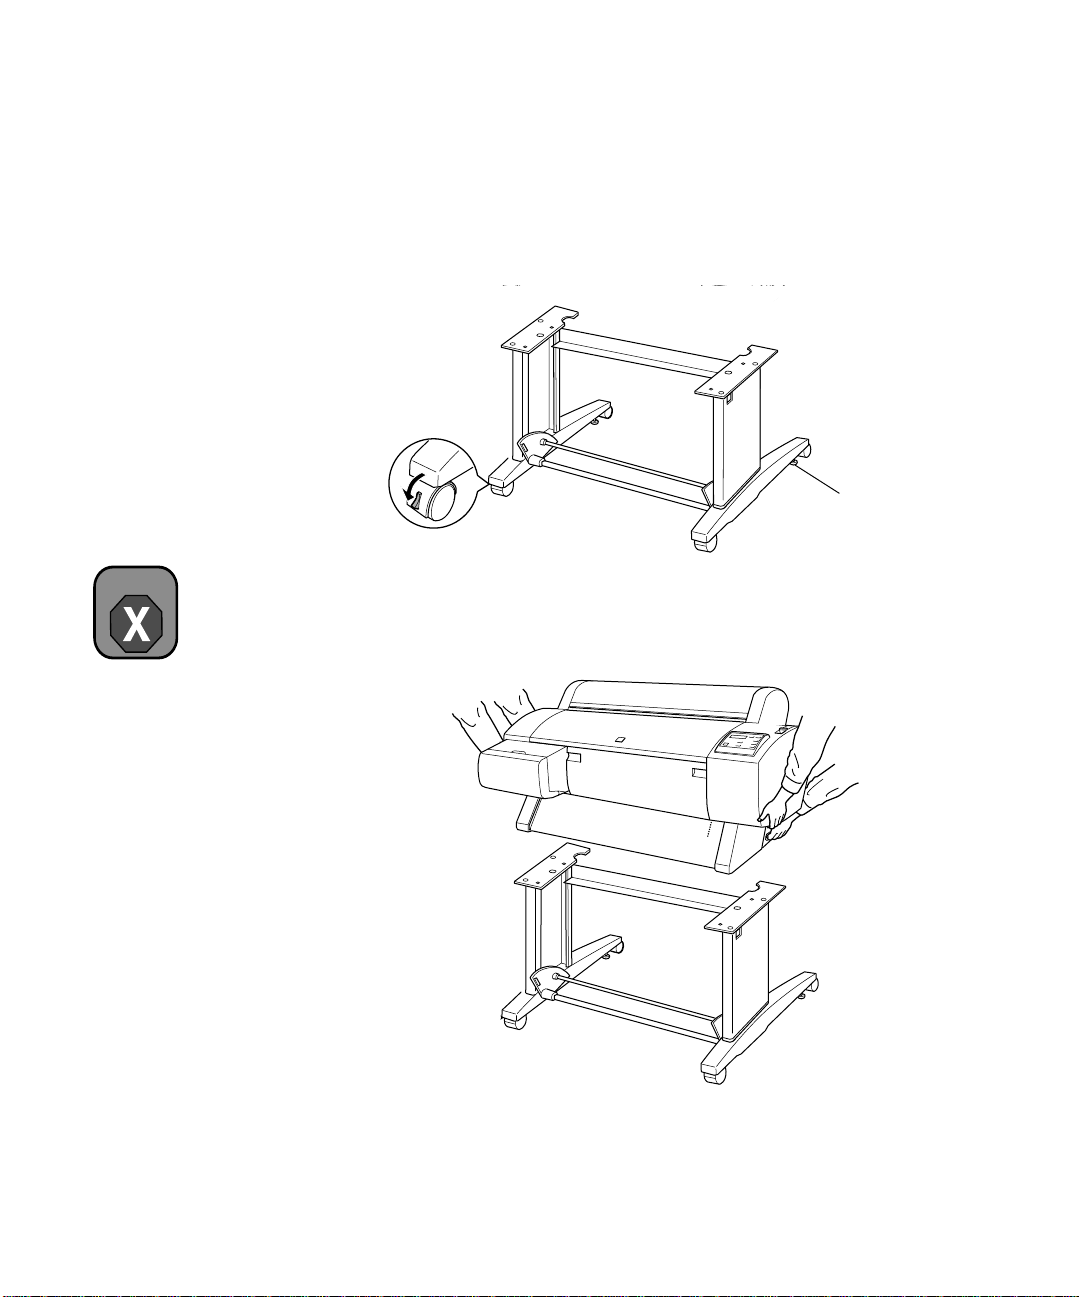
1. Lock the casters and lower the stabilizer knobs to keep the stand from
rolling.
Stabilizer knob
2. Using two people, hold the printer at the indicated locations. Then set it
on the stand as shown.
Two or more people are
required to lift the printer.
1-23
Page 24
24 | Setting Up the Printer
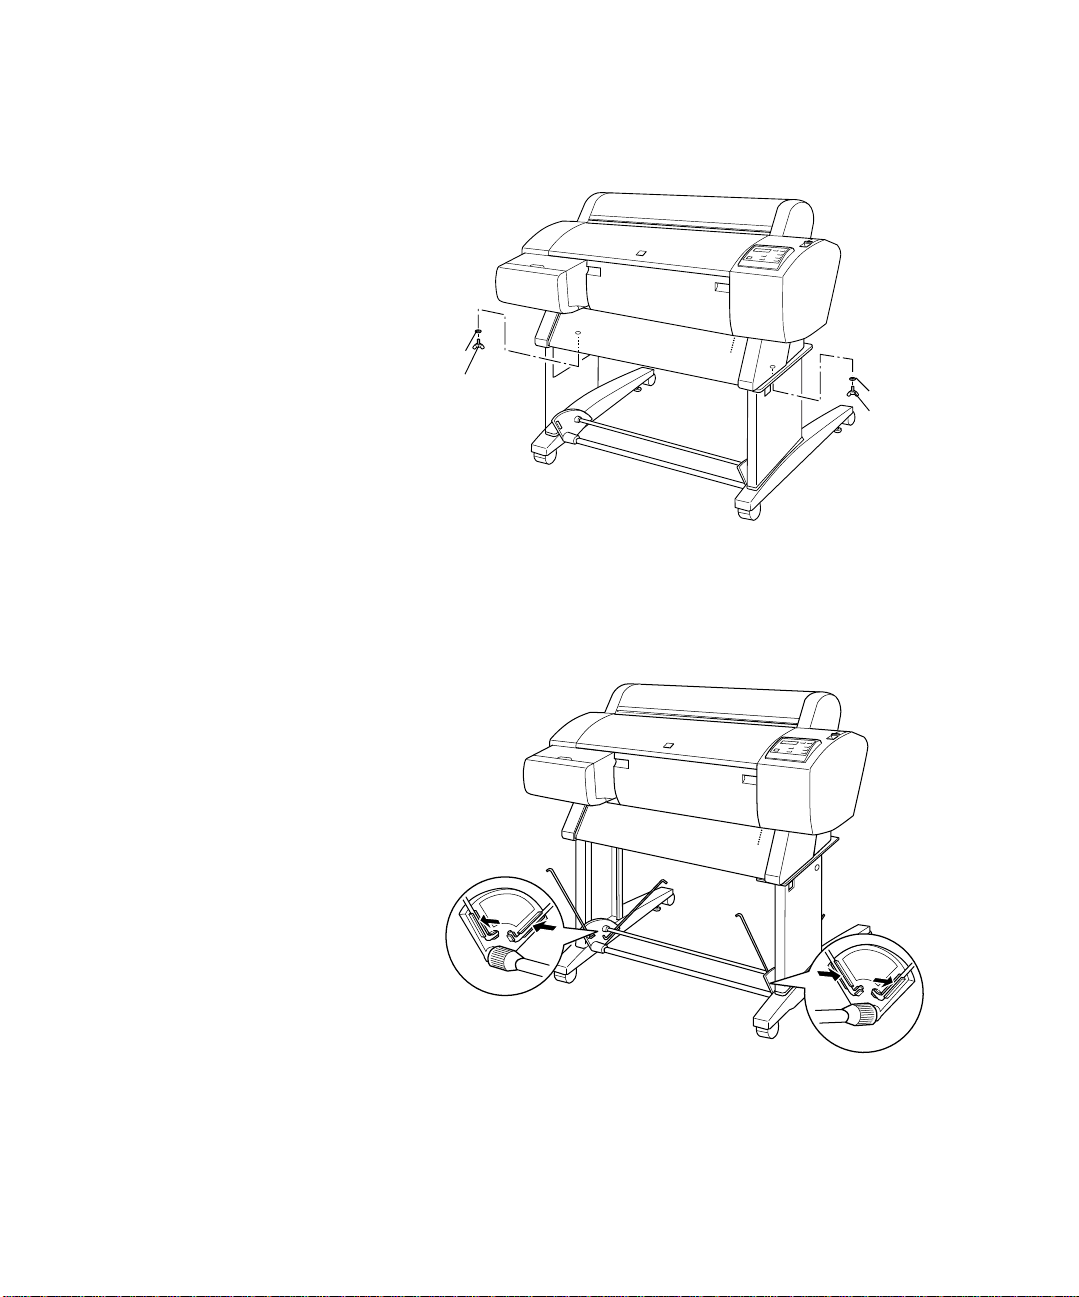
3. Fasten the printer to the stand with wing screws (L) and washers (M).
Attaching the Paper Basket
1. Attach the metal rods as shown. The free ends of the rods should point
M
L
M
L
outward.
1-24
Page 25

Setting Up the Printer | 25
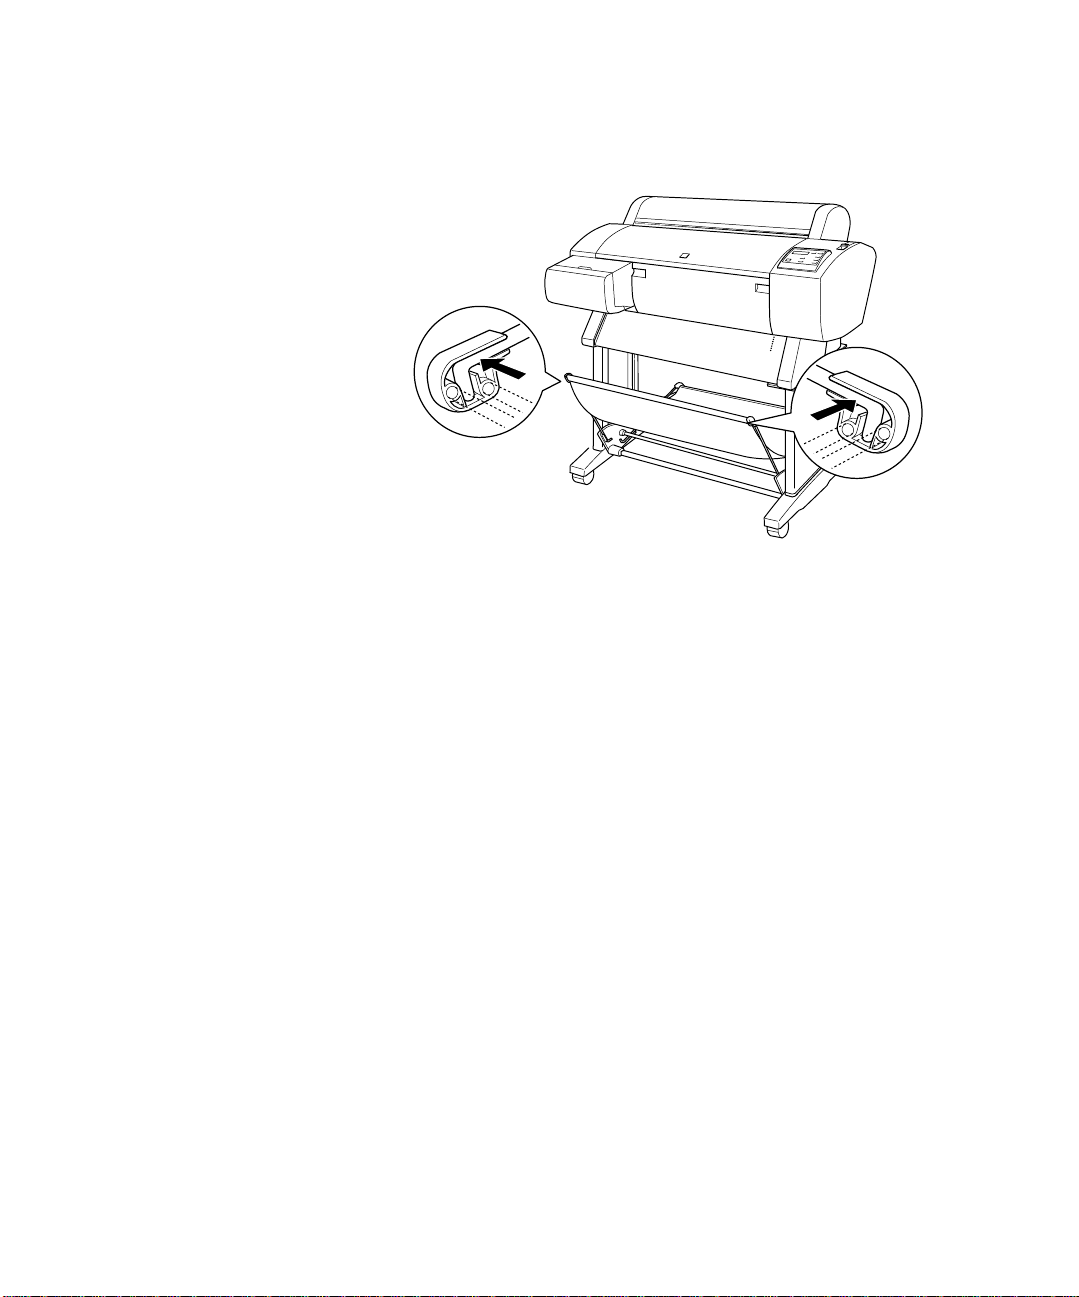
2. Snap the basket’s plastic connectors onto the metal rods at the rear of
the stand. (The rear connectors are labeled with an R.)
3. Rotate the front bar once as shown, so the fabric folds around the bar.
1-25
Page 26
26 | Setting Up the Printer
4. Snap the connectors onto the front metal rods.
5. Check underneath the printer for packing tape.
6. Raise the stabilizer knobs and unlock the casters. Then move the printer
to the place of use. (The casters are meant for moving the printer for
only a short distance.) Lock the casters and extend the stabilizer knobs
after moving.
When done, skip ahead to “Connecting the Power Cord” on page 37.
1-26
Page 27
Setting Up the Printer | 27
Warning
Two people are required to
unpack the printer, and four
are needed to set it on the
stand.
Unpacking and Assembling the Stylus Pro 9600
Follow these steps to assemble your printer. If you have a Stylus Pro 7600,
see page 18 instead.
Unpacking the Stand
1. Open the box and remove the handles from the sides of the box.
2. Lift the box up and away from the printer, then set it aside.
3. Make sure you have all these items:
Parts:
A
B
C
E
D
A: Left base section D: Basket hooks, long (2)
B: Right base section E: Basket hooks, short (2)
C: Support bar F: Paper basket
F
1-27
Page 28

28 | Setting Up the Printer
Accessories:
G
H
G: Allen wrench
H: Bolts (4)
I: Wing nuts, spring washers, and plain washers (2)
J: Paper supports (5)
I
J
Assembling the Stand
1. Insert the support bar into one of the base sections as shown. Then
attach it with two bolts (H) using the included Allen wrench. (Leave the
bolts a little loose, so that you can adjust the position when you insert
the bolts at the other end.)
H
2. Attach the base section to the other end.
3. Tighten all four bolts securely.
1-28
Page 29
Setting Up the Printer | 29
Unpacking the Printer
1. Remove the roll paper, polystyrene foam, and cardboard cushions.
2. Lift the box up and away from the printer. Remove the ink cartridges
and other accessories from the side as shown below.
Remove ink
cartridges and
accessories
B
A
3. Remove the cardboard panels from around the printer.
1-29
Page 30
30 | Setting Up the Printer
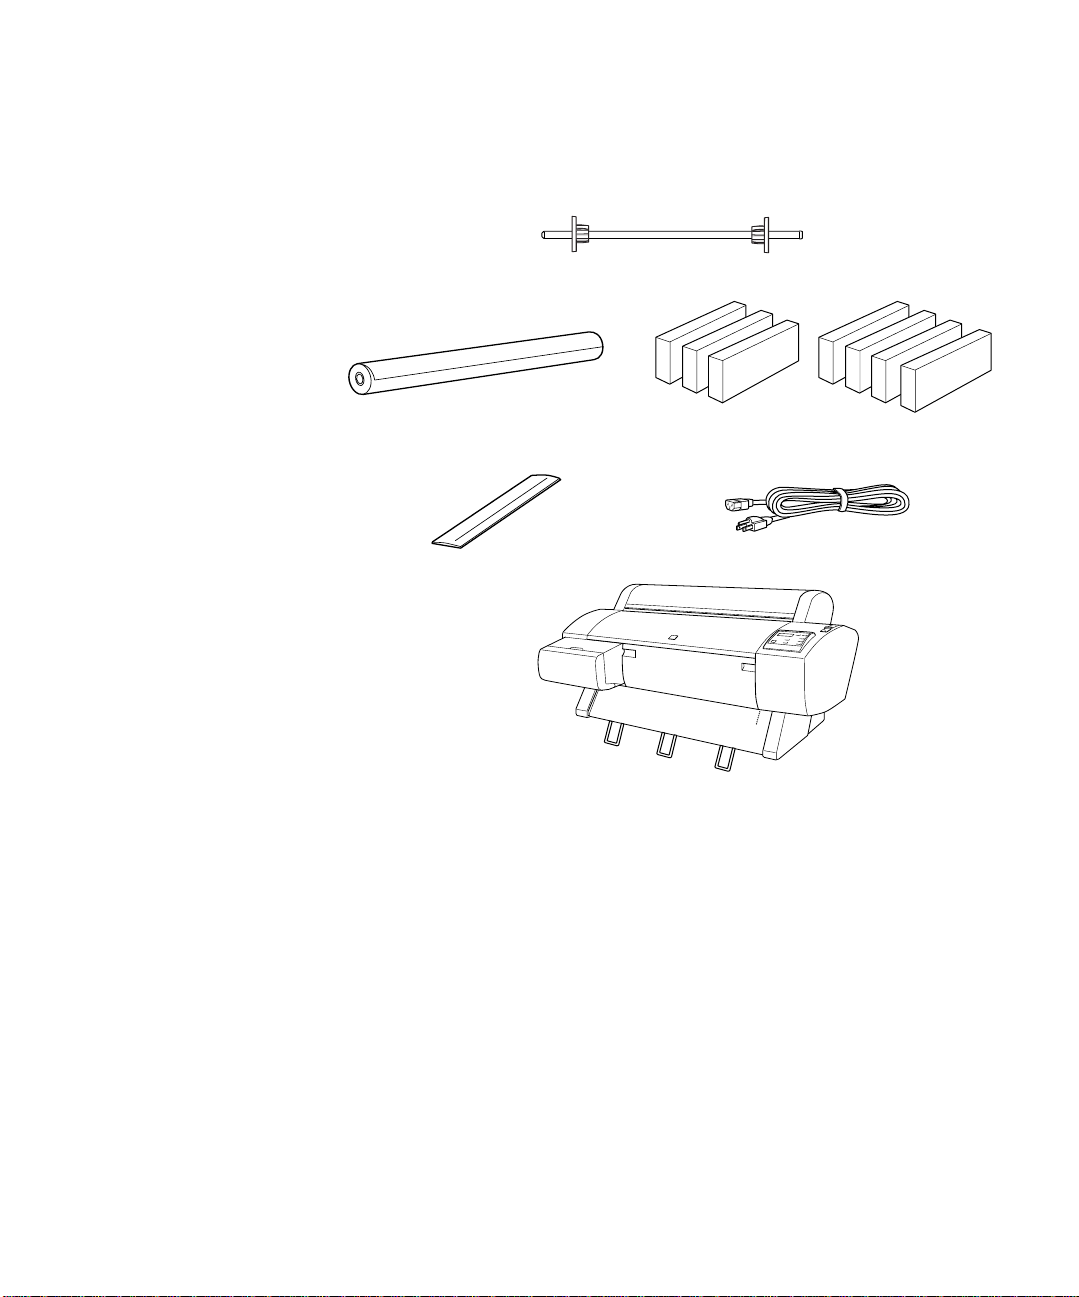
Make sure all these items are included:
M
O
N
P
R
Q
M: Roll paper spindle
N: Roll paper (EPSON Doubleweight Matte Paper)
O: Ink cartridges
P: Roll paper belt (for keeping roll paper wound up)
Q: Power cord
R: Printer
1-30
Page 31

Setting Up the Printer | 31
Mounting the Printer on the Stand
1. Lock the two casters to keep the stand from rolling. Then extend the
stabilizer knobs.
Stabilizer knob
(hidden)
2. Orient the printer in relation to the stand as shown:
1-31
Page 32

32 | Setting Up the Printer
3. Using four people, grasp the printer in the four locations as shown, and
Warning
Do not attempt to lift the
printer with fewer than four
people.
set the printer on the stand:
Top view
4. Fasten the printer to the stand with wing nuts, spring washers, and plain
washers (I).
1-32
Page 33

Setting Up the Printer | 33
5. Remove any packing tape from the printer. Be sure to check underneath
and on the sides.
6. Open the front cover. Then unscrew the bolt and remove the bracket
securing the print head, as shown above. Save these parts in case you
need to ship the printer.
7. Close the front cover.
8. Raise the stabilizer knobs and unlock the casters. Then move the printer
to the place of use. (The casters are meant for moving the printer for
only a short distance.) Lock the casters and extend the stabilizer knobs
after moving.
1-33
Page 34

34 | Setting Up the Printer
Attaching the Basket
1. Attach the short basket hooks to the upper guides:
2. Attach the long basket hooks to the lower guides:
3. Turn the basket so its seams face downward, and spread it on the floor.
Rear
Front
1-34
Page 35

Setting Up the Printer | 35
4. Pass the basket’s rear bar to the back of the printer. Rotate the bar one
revolution so that the fabric folds around the bar. Then insert the plastic
pins into the stand as shown.
5. Slide out the upper basket
hooks to their full length.
6. Hook the middle bar of
the basket as shown.
1-35
Page 36

36 | Setting Up the Printer
7. Hold the front bar and turn it one revolution. Then attach the lower
8. Push the upper and lower basket hooks back in.
9. Hook the basket rings to take up the slack.
basket hooks to the connectors.
10. Hook the paper supports so they hang along the inside of the basket.
Install them in the order indicated below.
1-36
Page 37

Caution
Do not use an outlet that
is controlled by an
automatic timer or wall
switch. Otherwise, you
may accidentally shut off
the printer and cause
damage.
Setting Up the Printer | 37
Connecting the Power Cord
1. Connect the power cord to the AC inlet on the back of the printer.
2. Route the power cord through one of the hooks on the left or right side
as shown.
3. Plug the power cord into a properly grounded electrical outlet.
1-37
Page 38

38 | Setting Up the Printer
Installing the Ink Cartridges
Make sure the first ink cartridges you install are the correct type for your
printer: EPSON UltraChrome
The chips on the cartridges are programmed to initialize the printer as the
correct ink model. This determines the type of ink your printer will use for
Warning
Make sure you’ve removed
the shipping bracket before
installing ink cartridges (see
page 22 or page 33).
its entire lifetime.
If you have an UltraChrome ink printer, two black ink cartridges are
included: Photo Black and Light Black. Installing these cartridges causes the
printer to operate in Photo Black Mode (see page 146).
• If you prefer to run your printer in Matte Black Mode, you can install
• If you want to run the printer in Dual Matte Black Mode, you should
If your printing needs change at a later time, you can switch between black
ink modes; see page 146.
™
ink or EPSON Photographic Dye™ ink.
an optional Matte Black cartridge in place of the Photo Black cartridge.
install two Matte Black cartridges in the black ink slots.
Before you begin, make sure the printer is plugged into a grounded outlet.
Follow these steps to install the cartridges:
1. Press the P
Power button on the control panel to turn the printer on.
1-38
Page 39

Setting Up the Printer | 39
2. Open the ink compartment cover.
3. Raise the ink lever to the unlocked position.
4. Locate the ink cartridges that came with the printer.
1-39
Page 40

40 | Setting Up the Printer
5. Remove each cartridge from its packaging. If you’re using EPSON
Warning
If ink gets on your hands,
wash them thoroughly with
soap and water. If ink gets
in your eyes, flush them
immediately with water.
Note
6. Install the ink cartridges in the printer. Hold each cartridge with the
If you can’t insert the
cartridge smoothly,
you may have the
wrong cartridge.
Note
UltraChrome ink, gently shake each cartridge before installing it.
arrow mark pointing toward the printer. Insert it until the
corresponding
• Photographic Dye ink users: insert the black ink cartridges in the
Ink Out light turns off on the control panel.
first two slots on the left.
• UltraChrome ink users: if you’re installing the included cartridges,
insert the Photo Black cartridge in the first slot on the left, then
insert the Light Black cartridge in the second slot. (Otherwise, see
the note at left.)
To initialize the printer in
Matte Black Mode, install
a Matte Black cartridge in
the first slot and a Light
Black cartridge in the
second slot. For Dual
Matte Black usage, install
Matte Black cartridges in
both slots.
7. After installing all the cartridges, lower the ink lever to the locked
position and close the ink compartment cover.
1-40
Page 41

Setting Up the Printer | 41
Caution
Never turn off the printer
or change the position of
the ink lever while the
Pause light is flashing.
The printer begins charging the ink delivery system and the Pause light
flashes. This takes about 10 minutes. Do not turn off the printer or
interrupt this process, or you’ll use more ink than necessary.
When the
Pause light stops flashing and Paper Out appears on the
control panel, you’re ready to load the roll paper.
1-41
Page 42

42 | Setting Up the Printer
Loading Roll Paper
Before you begin, locate the roll paper that came with your printer and
remove it from its protective packaging. The paper may already be loaded on
the spindle. (If it isn’t, see “Loading the Paper onto the Spindle” on
page 70.)
Follow these steps to place the paper in the printer:
1. Open the roll paper cover.
2. Place the roll paper in the printer as shown. (The white end of the
spindle goes on the right.)
Note
To avoid feeding excess
paper, make sure you
don’t select Sheet when
you’re using roll paper.
3. Make sure the printer is turned on, then press the
until the
Roll Auto Cut light comes on.
1-42
Paper Source button
Page 43

Setting Up the Printer | 43
4. Move the paper lever back to the released position.
5. Feed the paper into the slot.
6. Pull the paper down so it extends all the way through the slot.
1-43
Page 44

44 | Setting Up the Printer
7. Turn the roll back to remove any slack. Then align the bottom edge of
8. Pull the paper lever forward to the locked position, then close the roll
the paper with the horizontal row of holes, as shown. (Do not extend the
paper past the row of holes.)
paper cover.
9. Press the
Pause button (or wait for 5 seconds). The paper feeds into
printing position automatically and
panel.
1-44
READY appears on the control
Page 45

Setting Up the Printer | 45
Connecting the Printer to Your Computer
TIP
The optional FireWire
card allows multiple
printers to be
daisy-chained to your
system, and can keep
them all running at the full
speed of the print engine.
EPSON’s optional
Ethernet card keeps your
printer running at full
speed, limited only by
the bandwidth of your
network. To provide
adequate bandwidth,
you need a switched
100 Mbit hub on your
network.
Depending on your system, you can connect the printer to your computer
using any of the following:
• USB interface—for Windows 98, Me, 2000, XP, and Macintosh
(see page 46)
• Parallel interface—for Windows (see page 47)
• Optional IEEE 1394 FireWire interface card—for Windows Me, 2000,
XP, and Macintosh (see page 48)
• Optional 10/100 BaseT Ethernet interface card—network connectivity
for all systems (see page 48)
In some cases, it may be to your advantage to use an optional interface card
instead of the built-in port (see note to the left). If you choose to purchase an
optional interface card, see page 10 for ordering information.
1-45
Page 46

46 | Setting Up the Printer
Connecting to the USB Port
To connect the printer to a USB port, you need a standard shielded USB
cable. Follow the steps below to connect the printer to your computer:
1. Make sure both the printer and your computer are turned off.
2. Connect the square end of the USB cable to the USB port on
Note
the back of your printer.
If the printer doesn’t
work when you attach
it to a first tier USB hub
port, connect it directly
to the USB port on
your computer.
3. Connect the flat end of the USB cable to your computer’s USB
port or a first tier USB hub port.
1-46
Page 47

Setting Up the Printer | 47
Connecting to the Parallel Port (Windows Only)
To use the printer’s built-in parallel interface, you need a shielded,
bidirectional, parallel cable. Follow the steps below to connect the printer to
your computer:
1. Make sure both the printer and your computer are turned off.
2. Plug the cable connector securely into the printer’s interface. Then
squeeze the wire clips together until they lock into place on both sides.
3. Plug the other end of the cable into the computer’s parallel port.
1-47
Page 48

48 | Setting Up the Printer
Installing and Connecting to an Optional Interface Card
To connect the printer to an optional FireWire or Ethernet card, you first
need to install the card in your printer. You also need the appropriate cable.
Caution
Follow the steps below.
1. Turn off your computer and your printer.
You must unplug the
printer from the power
outlet, or you may
damage the printer and
the card.
2. IMPORTANT: Unplug the printer from its electrical outlet. Not doing
so may cause damage to the printer and the card.
3. Disconnect any interface cables from the printer.
4. Remove the two screws and take off the interface slot cover as shown:
5. Set the DIP switches and jumpers on the card, if necessary. See the
manual that came with the card for details.
1-48
Page 49

Setting Up the Printer | 49
6. Insert the interface card as shown, then secure it with the two screws.
7. Connect one end of the appropriate
cable to the card. Then connect the
other end to your computer’s
FireWire port or Ethernet port or
hub.
8. If you’re using FireWire, attach the
ferrite core included with your
printer to the cable as shown.
attach
ferrite core
If you’ve installed an Ethernet card, you can find more information on
setting up your printer in the Reference Guide included on the CD-ROM
that came with the printer. See “Setting Up Your Printer on a Network” in
the Printing with Windows or Printing with Macintosh section of the
Reference Guide.
1-49
Page 50

50 | Setting Up the Printer
Installing the Printer Software
Caution
Follow the steps below (for Macintosh) or on page 52 (for Windows) to
install your printer software.
Turn off all virus
protection programs
before you install your
printer software.
Note
OS X printer driver
software and installation
instructions are available
on the EPSON web site
at www.epson.com.
If you install OS X drivers,
you should also install the
OS 9 drivers to be able to
print from applications
running in Classic mode.
Installing the Software for Macintosh OS 8.5 to 9.x
After connecting the printer to your Macintosh, you need to install the
printer driver and utilities included on your printer software CD-ROM.
Follow these steps:
1. Turn on your Macintosh and your printer.
2. Insert the printer software CD-ROM in your computer. If necessary,
double-click the
3. Double-click the icon.
4. Double-click the menu option for your printer. Be sure to select the
correct model and ink type—UltraChrome or Photographic Dye.
EPSON CD-ROM to open its window.
Double-click
your printer
5. At the next screen, click
Continue.
6. Read the license agreement and click
1-50
Accept.
Page 51

The following dialog box appears:
Setting Up the Printer | 51
Note
If you’re on an AppleTalk
network and the
AppleTalk setting in the
Chooser is Active, you
may see an alert
message when you click
the USB port icon. Select
Inactive as the AppleTalk
setting, then select the
USB port icon. If you’re
using your Macintosh in
an Ethernet environment,
you can leave the
AppleTalk setting Active.
7. Click the
Install button, then click Continue on the next screen.
8. Follow the instructions to install your software and select a default paper
size. When you see a message informing you that installation is
complete, click
9. After your Macintosh restarts, select
If you’re going to be sharing the printer on an AppleTalk
Restart to restart your Macintosh.
Chooser from the Apple menu.
®
network, skip
ahead to page 54.
10. Click the icon for your
printer, then click the
printer port icon.
11. Select the appropriate
Background Printing
button to turn on or off
background printing.
With background
printing on, you can use
your Macintosh while
it’s preparing a document for printing, and use the EPSON Monitor3
utility to manage print jobs.
12. Close the Chooser, then go to page 54.
1-51
Page 52

52 | Setting Up the Printer
Installing Software for Windows
Note
If you’ve installed a
FireWire or Ethernet
card, you may see
additional screens as
Windows installs the
drivers for your card.
Note
If you’re connecting with
a parallel cable or
Ethernet card, do not turn
on your printer when you
see a window telling you
to do so. Instead, wait
until the Stop Searching
button appears. Then
click the button and go to
step 7.
After connecting the printer to your computer, you need to install the
printer driver and utilities on your printer software CD-ROM. Follow these
steps:
1. Make sure your printer is turned off.
2. Turn on your computer and start Windows.
3. Insert the printer software CD-ROM in your computer. The installer
starts automatically. If it doesn’t start, double-click
Start > My Computer. Then double-click your CD-ROM icon.
click
My Computer or
4. Double-click the menu option for your printer. Be sure to select the
correct model and ink type—UltraChrome or Photographic Dye.
Double-click
your printer
When installation is
complete, the port
setting defaults to LPT1
(parallel port). If you’re
using an Ethernet card,
you’ll have to reconfigure
the port setting. See your
electronic Reference
Guide for details.
5. Windows XP: If you see a message that the software you are installing
hasn’t passed Windows Logo testing, click
Continue Anyway.
If you see this message again during installation, be sure to click
Continue Anyway.
6. If you’re connecting with a parallel cable or network interface card, see
the note at left. Otherwise, follow the instructions below for your
operating system.
1-52
Page 53

Setting Up the Printer | 53
Windows 95 or NT: Turn on your printer and go to step 7.
Windows 98, Me, or 2000: When you see a window asking you to turn
on your printer, press the P
Power button. Then go to step 7.
Windows XP:
• When you see a window asking you to turn on your printer, press
the P
Power button.
• If you see a message that your printer is not connected properly,
ignore it (do not click
Retry or Cancel). If necessary, drag the
window to the side.
• Wait until you see the Found New Hardware Wizard for the Stylus
Pro 7600 or 9600. This ma y take a minute or two.
• Once the Found New Hardware Wizard appears, click Install from
a list or specific location
• Locate the Drivers\UC\Win2K_XP folder (for UltraChrome) or the
Drivers\PD\Win2K_XP folder (for Photographic Dye) on your
CD-ROM drive, as shown below. Then click
, then click Next.
Next.
7. When you see a message informing you that installation is complete,
OK or Finish. If asked to do so, restart your computer.
click
8. If any screens remain open or continue to open, close them to exit.
1-53
Page 54

54 | Setting Up the Printer
Running a Nozzle Check
The nozzle check prints a pattern of dots that lets you see if any print head
nozzles are clogged. Follow the steps below to print a nozzle check from your
printer software (this also lets you verify that your printer is connected and
working properly).
TIP
Use the paper that came
with your printer for
printing the nozzle check.
That way, you can save
your higher-quality paper
for actual print jobs.
1. Make sure the printer is turned on and the paper that came with your
printer is loaded.
2. Do one of the following:
• Macintosh: Open an application and choose Print from the File
menu. Then click the utility button.
• Windows: Click Start, point to Settings, and select Printers.
Right-click your printer icon, and then select
95, 98, or Me),
Preferences (Windows 2000). Then click the Utility tab.
• Windows XP: Click Start and select Control Panel. Double-click
Printers and Other Hardware, then double-click Printers and
Faxes
. Right-click your printer icon and select Printing
Preferences. Then click the Utility tab.
Document Defaults (Windows NT) or Printing
Properties (Windows
You see the Utility menu:
Click to run a
nozzle check
Click to run the
head cleaning
utility
1-54
Page 55

Setting Up the Printer | 55
3. Click the Nozzle Check button and follow the instructions on the
screen to print a nozzle check pattern.
Note
Use the eye loupe that
came with the printer to
examine the pattern.
Even if all the dots
printed, you may be able
to see misaligned or
“deflected” dots.
Deflected dots, like
missing ones, indicate
that you should clean the
print head.
4. Examine the nozzle check pattern. The pattern should be complete, with
no missing dots or gaps in the pattern:
5. If the pattern is complete, click
Finish and close the Utility menu, then
continue on to “Aligning the Print Head” on page 57.
6. If the pattern is missing any dots, as shown below, click
Clean and
follow the instructions on screen to clean the print head. Cleaning takes
about 60 seconds, during which the printer makes some noise and the
Pause light flashes.
7. When the
Pause light goes off, make sure paper is loaded in the printer,
then:
Macintosh: Click
Windows: Click
Confirmation, then click Next.
Print Nozzle Check Pattern, then click Print.
The nozzle check pattern prints.
8. If the nozzle check pattern is complete, click
If the pattern is still missing dots, click
Clean to clean the print head again.
Finish.
It make take several cleaning cycles to clean the print head fully. If you’re
unable to clean the print head fully from the printer software, follow the
instructions in the next section.
1-55
Page 56

56 | Setting Up the Printer
Cleaning the Print Head from the Control Panel
If you’re unable to clean the print head fully from the printer software, you
can use the printer’s control panel to perform a power cleaning. You should
not perform a power cleaning more often than necessary, since it consumes
additional ink.
1. Press the
SETUP
2. Press
CLEANING
3. Press
SelecType button on the control panel. You see PRINTER
.
u until you see MAINTENANCE, then press r. You see PWR
.
r until EXEC appears on the display, then press Enter.
The printer performs the power cleaning. Do not turn off the printer or
interrupt this process until it is complete.
If the lines on the pattern are still missing dots after running a power
cleaning, turn the printer off and leave it overnight, then clean the print
head again the following morning. If you still see no improvement, contact
EPSON for assistance.
1-56
Page 57

Setting Up the Printer | 57
Aligning the Print Head
Before using the printer, you should align the print head to ensure clean,
accurate printouts. To do the alignment, you have to print a set of alignment
patterns. Make sure you’ve run a nozzle check, as described on page 54,
before you begin. If the print head nozzles are clogged, the patterns won’t
print correctly and your print head alignment won’t be accurate.
1. Make sure the printer is turned on, then load roll paper that is at least
24 inches wide. For best results, use EPSON Doubleweight Matte paper
(this is the type of paper that came with your printer).
Caution
When performing the BI-D
alignments, always do
them in this order: UNI-D
ALL, then BI-D BLACK,
then BI-D ALL. Do not
repeat the BI-D BLACK
(K1) alignment afterward.
2. Press the
SETUP
3. Press
PAPER THKNS.
4. Press
SelecType button on the control panel. You see PRINTER
.
u until you see HEAD ALIGNMENT, then press r. You see
r until *STD appears on the display. This is the correct thickness
setting for most EPSON papers.
5. Press
6. Press the
Enter.
u or d button to select the desired alignment mode (UNI-D
ALL
, BI-D BLACK, or BI-D ALL), then press Enter to start printing the
alignment patterns. After they print, see the appropriate section on the
following pages, depending on the selected mode.
In general, you should perform all three types of alignments. If you plan
to print only unidirectionally, you may only need to adjust UNI-D
ALL. If you plan to print bidirectionally, perform the UNI-D ALL
alignment first, then BI-D BLACK, then BI-D ALL.
1-57
Page 58

58 | Setting Up the Printer
Examining the UNI-D ALL Alignment Pattern
Follow these steps when the UNI-D ALL patterns finish printing:
1. Depending on the width of the paper loaded in the printer, more than
one set of patterns may be printed. Locate the patterns in the middle of
your printout. In the steps that follow, refer to those patterns to make
your adjustments, instead of the ones printed toward the left or right.
Refer to middle set of
patterns when making
adjustments
2. Look at the display screen on the printer. Notice that it is prompting
you to choose the best line in the group labeled
Look at this group
Row #1
K2 in row #1.
1-58
Page 59

Setting Up the Printer | 59
Note
You must use at least a
10× eye loupe to check
the pattern.
Note
If number 5 is the
straightest line in each
group, the print head is
already properly aligned.
Press Pause to exit the
head alignment early.
3. Use your own eye loupe or the one that came with the printer to
determine which line is the straightest. In this example, the middle line
(numbered 5) is the best choice.
Look for the straightest line
4. If number 5 is the straightest line, press
default setting). Otherwise, use the
of the straightest line, then press
Enter.
Enter to accept it (5 is the
u or d button to select the number
5. Repeat this process to examine the remaining color groups in row #1: C,
M, Lc, Lm, and Y. In each case, select the number of the straightest line,
then press
Enter.
6. Repeat this process to examine the groups of lines in rows #2 and #3.
7. When done, press
Pause to exit the head alignment.
Examining the BI-D BLACK (K1) Alignment Pattern
Follow these steps when the BI-D BLACK (K1) patterns finish printing:
1. Depending on the width of the paper loaded in the printer, more than
one set of patterns may be printed. Locate the patterns in the middle of
your printout. In the steps that follow, refer to those patterns to make
your adjustments, instead of the ones printed toward the left or right.
Refer to middle set of patterns
when making adjustments
1-59
Page 60

60 | Setting Up the Printer
2. Look at the display screen on the printer. Notice that it is prompting
you to choose the best line in the group labeled
Look at this groupRow #1
K1 in row #1.
Note
You must use at least a
10× eye loupe to check
the pattern.
Note
If number 5 is the
straightest line in each
group, the print head is
already properly aligned.
Press Pause to exit the
head alignment early.
3. Use your own eye loupe or the one that came with the printer to
determine which line is the straightest. In this example, the middle line
(numbered 5) is the best choice.
Look for the straightest line
4. If number 5 is the straightest line, press
default setting). Otherwise, use the
of the straightest line, then press
Enter.
Enter to accept it (5 is the
u or d button to select the number
5. Repeat this process to examine the lines in rows #2 and #3. In each case,
select the number of the straightest line, then press
6. When done, press
Pause to exit the head alignment.
Enter.
1-60
Page 61

Setting Up the Printer | 61
Note
Be sure to perform the
BI-D BLACK alignment
before running this one.
Examining the BI-D ALL Alignment Pattern
Follow the steps below when the BI-D ALL patterns finish printing.
IMPORTANT: Do not enter an adjustment value for K1 when
prompted, or your color alignments won’t be accurate.
1. Depending on the width of the paper loaded in the printer, more than
one set of patterns may be printed. Locate the patterns in the middle of
your printout. In the steps that follow, refer to those patterns to make
your adjustments, instead of the ones printed toward the left or right.
Refer to middle set of patterns
when making adjustments
2. Look at the display screen on the printer. It shows
Do not change the adjustment value for K1. Press
with the following steps.
1-61
#1 K1.
Enter and continue
Page 62

62 | Setting Up the Printer
R
#1 Look
3. The printer is now prompting you to choose the best block in the group
labeled
K2 in row #1.
Note
You must use at least a
10× eye loupe to check
the pattern.
ow
at this group
4. Use your own eye loupe or the one that came with the printer to
determine which block has the least visible vertical line. In this example,
the middle block (numbered 5) is the best choice.
Look for the block with the smallest gap
Note
If number 5 is the best
block in each group, the
print head is already
properly aligned. Press
Pause to exit the head
alignment early.
5. If number 5 is the best block, press
setting). Otherwise, use the
best block, then press
u or d button to select the number of the
Enter.
Enter to accept it (5 is the default
6. Repeat this process to examine the remaining blocks in row #1: C, M,
Lc, Lm, and Y. In each case, select the number of the best block, then
press
Enter.
7. Repeat this process to examine the groups of blocks in rows #2 and #3.
IMPORTANT: Do not enter an adjustment value for K1 when
prompted, or your color alignments won’t be accurate.
8. When done, press Pause to exit the head alignment. The printer will
remember your alignment values and use them when printing.
1-62
Page 63

Chapter 2:
Handling
Paper and
Other Media
The EPSON Stylus Pro 7600 and 9600 print on a variety of media,
including roll paper and cut sheets up to 44 inches wide (for the Stylus
Pro 9600) or 24 inches wide (for the Stylus Pro 7600). You can also use
heavy stock, including posterboard up to 59 mil (1.5 mm) thick.
This chapter includes the following information:
• Selecting media for your printer
• Printing on EPSON media
• Using roll paper
• Printing on cut sheet paper and posterboard
• Using the paper basket
• Changing the settings for non-EPSON paper
Selecting Media For Your Printer
Note
You can purchase
additional roll paper
spindles and other
accessories or options
from the EPSON Pro
Graphics web site
(http://prographics.epson.
com) or your authorized
EPSON dealer.
You can print on most types of coated, glossy, plain paper, and other media.
A high-tension spindle is also available for printing on certain media such as
EPSON Synthetic Paper, Smooth Fine Art Paper, and Textured Fine Art
Paper; this keeps the correct amount of tension on the paper and prevents
horizontal banding in your printouts.
The following table shows the allowable sizes of paper you can use:
Stylus Pro 7600/9600 allowable paper sizes
Roll paper Cut sheets
Size
(Stylus Pro
9600)
Size
(Stylus Pro
7600)
Maximum
external roll
diameter
Thickness 3.15 to 19.7 mil (0.8 to 0.5 mm) 3.15 to 59 mil (0.8 to 1.5 mm)
8.3 to 44.0 in. wide
(210 to 1118 mm)
8.3 to 24.0 in. wide
(210 to 610 mm)
2 in. core: 4 in. (103 mm)
3 in. core: 6 in. (150 mm)
8.5 × 11 in. up to 44 in. wide
8.5 × 11 in. up to 24 in. wide
—
63
Page 64

64 | Handling Paper and Ot her Media
Always test samples of paper stock in the printer before purchasing large
quantities or printing large jobs. When you use non-EPSON paper or other
media, you may need to “profile” their thickness and adjust various settings.
See page 85 for instructions.
Printing on EPSON Media
Note
Check the EPSON Pro
Graphics web site
(http://prographics.epson.
com) or your authorized
EPSON dealer for other
media that may be
available.
EPSON papers, which are specially designed for the inks used in the printer,
ensure high-quality results. The following tables list the product codes for
the EPSON media available for your printer.
Stylus Pro 7600/9600 Photographic Dye ink model
Paper type Roll sizes Sheet sizes
Premium Glossy Photo
Paper (250)
Premium Luster Photo
Paper
Premium Semigloss
Photo Paper
Premium Semimatte
Photo Paper (250)
Photo Paper 13-inch roll: S041233 8.5" × 11": S041141,
Photo Glossy Paper 24-inch roll: SP91021
8.3-inch roll: S041376
13-inch roll: S041378
24-inch roll: S041638
36-inch roll: S041639
44-inch roll: S041640
10-inch roll: S041644
20-inch roll: S041645
24-inch roll: S041461
36-inch roll: S041462
44-inch roll: S041463
— 8.5" × 11": S041331
24-inch roll: S041655
36-inch roll: S041656
44-inch roll: S041657
36-inch roll: SP91001
44-inch roll: SP91002
11" × 17": S041290
11.7" × 16.5": S041288
13" × 19": S041289
8.5" × 11": S041405
11.7" × 16.5": S041406
13" × 19": S041407
13" × 19": S041327
—
S041271,S041272
8.3" × 11.7": S041140
11.7" × 16.5": S041142
11" × 17": S041156
13" × 19": S041143
8.3" × 23.4" (Panoramic):
S041145
—
2-64
Page 65

Handling Paper and Other Media | 65
Stylus Pro 7600/9600 Photographic Dye ink model (continued)
Paper type Roll sizes Sheet sizes
Photo Semigloss Paper 24-inch roll: SP91022
36-inch roll: SP91003
44-inch roll: SP91004
Photo Quality Ink Jet
Paper
™
ColorLife
Semigloss
Photo Paper
— 11" × 17": S041070
24-inch roll: S041664
44-inch roll: S041666
—
13" × 19": S041069
16.5" × 23.4": S041079
17" × 22": S041171
16.5" × 49.21' (Banner):
S041102
—
Presentation Matte
Paper
Doubleweight Matte
Paper
Enhanced Matte Paper 24-inch roll: S041595
Matte Paper Heavyweight
Enhanced Matte
Posterboard
EPSON Proofing Paper
Commercial Semimatte
Glossy Paper
Heavyweight
24-inch roll: S041295
36-inch roll: S041221
44-inch roll: S041220
24-inch roll: S041385
36-inch roll: S041386
44-inch roll: S041387
36-inch roll: S041596
44-inch roll: S041597
— 8.5" × 11": S041257
— 24" × 30": S041598
13-inch roll: S041668
24-inch roll: S041658
36-inch roll: S041659
44-inch roll: S041660
24-inch roll: S041291
36-inch roll: S041227
44-inch roll: S041226
—
—
8.5" × 11": S041341
13" × 19": S041339
11.7" × 16.5": S041260
13" × 19": S041263
30" × 40": S041599
—
—
2-65
Page 66

66 | Handling Paper and Ot her Media
Stylus Pro 7600/9600 Photographic Dye ink model (continued)
Paper type Roll sizes Sheet sizes
Semigloss Paper
Heavyweight
Posterboard Semigloss — 20.25" × 28.7": S041237
24-inch roll: S041292
36-inch roll: S041229
44-inch roll: S041228
—
28.7" × 40.6": S041236
Backlight Film 24-inch roll: S041482
36-inch roll: S041483
44-inch roll: S041484
—
2-66
Page 67

Handling Paper and Other Media | 67
Note
Check the EPSON Pro
Graphics web site
(http://prographics.epson.
com) or your authorized
EPSON dealer for other
media that may be
available.
Stylus Pro 7600/9600 UltraChrome ink model
Paper type Roll sizes Sheet sizes
Premium Glossy Photo
Paper (250)
Premium Luster Photo
Paper
Premium Semigloss
Photo Paper
Premium Semimatte
Photo Paper (250)
Photo Glossy Paper 44-inch roll: SP91002
Photo Semigloss Paper 44-inch roll: SP91004
Doubleweight Matte
Paper
Enhanced Matte Paper 24-inch roll: S041595
Enhanced Matte
Posterboard
EPSON Proofing Paper
Commercial
Semimatte
Glossy Paper Photo Weight
Watercolor PaperRadiant White
8.3-inch roll: S041376
13-inch roll: S041378
24-inch roll: S041638
36-inch roll: S041639
44-inch roll: S041640
10-inch roll: S041644
20-inch roll: S041645
24-inch roll: S041461
36-inch roll: S041462
44-inch roll: S041463
— 8.5" × 11": S041331
24-inch roll: S041655
36-inch roll: S041656
44-inch roll: S041657
36-inch roll: SP91001
24-inch roll: SP91021
36-inch roll: SP91003
24-inch roll: SP91022
44-inch roll: S041387
36-inch roll: S041386
24-inch roll: S041385
36-inch roll: S041596
44-inch roll: S041597
— 24" × 30": S041598
13-inch roll: S041668
24-inch roll: S041658
36-inch roll: S041659
44-inch roll: S041660
44-inch roll: S041389
22-inch roll: S041388
— 13" × 19": S041351
11" × 17": S041290
11.7" × 16.5": S041288
13" × 19": S041289
8.5" × 11": S041405
11.7" × 16.5": S041406
13" × 19": S041407
13" × 19": S041327
—
—
—
—
8.5" × 11": S041341
13" × 19": S041339
30" × 40": S041599
—
13" × 19": S041456
2-67
Page 68

68 | Handling Paper and Ot her Media
Stylus Pro 7600/9600 UltraChrome ink model (continued)
Paper type Roll sizes Sheet sizes
EPSON Velvet Fine Art
Paper
— 8.5" × 11": S041636
13" × 19": S041637
Somerset Velvet for
EPSON Fine Art Paper
Smooth Fine Art
Paper*
24-inch roll: SP91203
44-inch roll: SP91204
24-inch roll: S041431
36-inch roll: S041432
44-inch roll: S041433
Textured Fine Art
Paper*
24-inch roll: S041447
36-inch roll: S041448
44-inch roll: S041449
Synthetic Paper* 24-inch roll: S041399
36-inch roll: S041400
44-inch roll: S041401
Adhesive Synthetic
Paper*
24-inch roll: S041402
36-inch roll: S041403
44-inch roll: S041404
Adhesive Vinyl 24-inch roll: S041436
36-inch roll: S041437
44-inch roll: S041438
Backlight Film 24-inch roll: S041482
36-inch roll: S041483
44-inch roll: S041484
Tyvek
®
Brillion
™
24-inch roll: S041494
36-inch roll: S041495
44-inch roll: S041496
24" × 30": SP91200
36" × 44": SP91201
44" × 60": SP91202
24" × 30 " : S041434
36" × 44": S041435
24" × 30": S041450
36" × 44": S041451
—
—
—
—
—
Canvas 24-inch roll: S041531
36-inch roll: S041532
44-inch roll: S041533
* Requires optional high-tension spindle
2-68
—
Page 69

Handling Paper and Other Media | 69
Guidelines for Using EPSON Papers
Follow these guidelines, as well as those included in your paper package,
when printing on EPSON paper and other media:
• Avoid touching the printable surface with your bare hands. Fingerprints
may affect print quality. Handle media by the edges or use cotton
gloves.
• Always choose the correct Media Type setting in your printer software
before you send your job. See page 96 (Macintosh) or page 112
(Windows) for instructions.
• Always select the correct paper source (roll or sheet) in both the printer
software and on the printer’s control panel. See page 90 (Macintosh) or
page 114 (Windows) for instructions on selecting the paper source in
your printer software.
• Keep unused media in its original packaging and store it in a cool, dry
place to maintain quality. Avoid storing your printouts where they will
be exposed to high temperature, humidity, or direct sunlight.
Using Roll Paper
You can use any roll paper with a 2- or 3-inch core, up to 44 inches wide
(Stylus Pro 9600) or 24 inches wide (Stylus Pro 7600). Manually switching
from one paper roll to another is a simple process.
This section covers the following:
• Guidelines for using roll paper
• Loading roll paper onto the spindle
• Placing roll paper in the printer
• Using the roll paper belt
• Removing paper from the spindle
• Switching between 2-inch and 3-inch roll paper
• Cutting paper manually with the built-in cutter
• Printing trim lines
2-69
Page 70

70 | Handling Paper and Ot her Media
Guidelines for Using Roll Paper
When printing on roll paper, be sure to follow the media handling
guidelines on page 69, as well as these special guidelines for roll paper:
• To keep the paper from unrolling when you’re not using it, wrap one of
the roll paper belts around the paper (see page 74).
• When storing roll paper, keep it in its original packaging—including the
bag, end caps, and box.
• To avoid feeding excess paper, make sure the Sheet light on the control
panel is off. Press the
Note
comes on:
• Choose Roll Auto Cut if you want the paper to be cut automatically
after each page is printed.
Paper Source button until one of the Roll lights
The settings you choose
in your printer software
always override any
control panel settings.
Note
The spindle
accommodates both
2-inch and 3-inch roll
paper cores. To switch
between different size
cores, see page 75.
• Choose Roll Cutter Off if you’re printing on canvas, vinyl,
posterboard, or other heavy media. Media that is too thick may
damage the cutter. Also choose this setting if you’re using the
optional auto take-up reel, or if you want to print a series of pages
and keep them together for later cutting.
• If you’re loading heavy paper,
you may need to increase the
suction strength by pressing
the
u button. This helps hold
the paper in place during
loading and printing.
For lightweight paper,
decrease the suction by
pressing the
d button.
Loading the Paper onto the Spindle
Follow these steps to attach the roll to the spindle:
1. Slide the movable paper stop off the left end of the spindle.
2-70
Page 71

Handling Paper and Other Media | 71
Note
Avoid touching the
printable surface of
the paper as much as
possible. Oils from
your skin can affect
print quality.
2. Position the roll so the paper unwinds as shown, then slide it onto the
spindle:
3. Slide the movable paper stop back onto the spindle and insert it into the
end of the roll.
Make sure it is firmly fixed into the left end of the paper
roll.
Placing the Paper in the Printer
Follow these steps to place the paper in the printer:
1. Open the roll paper cover.
2. Place the roll paper in the printer as shown. (The white end of the
spindle goes on the right.)
Note
To avoid feeding excess
paper, make sure you
don’t select Sheet when
you’re using roll paper.
3. Make sure the printer is turned on, then press the
until the
Roll Auto Cut or Roll Cutter Off light comes on.
2-71
Paper Source button
Page 72

72 | Handling Paper and Ot her Media
4. Move the paper lever to the released position.
5. Feed the paper into the slot.
6. Pull the paper down so it extends all the way through the slot.
2-72
Page 73

Handling Paper and Other Media | 73
7. Turn the roll back to remove any slack. Then align the bottom edge of
the paper with horizontal the row of holes, as shown. Do not extend the
paper past the row of holes.
8. Return the paper lever to the locked position, then close the roll paper
cover.
9. Press the
Pause button (or wait for 5 seconds). The paper feeds into the
printing position automatically and
panel.
2-73
READY appears on the control
Page 74

74 | Handling Paper and Ot her Media
Using the Roll Paper Belt
To keep the paper wound when you’re not printing, use the roll paper belt
included with your printer.
Removing Paper from the Spindle
If you need to remove the paper roll from the spindle, follow
these steps:
1. Open the roll paper cover.
2. If the roll paper is loaded for printing, push the paper lever
back to the released position, then roll up the paper before
removing it. To keep the paper from unwinding, place the
belt (described in the previous section) around the roll
paper.
3. Remove the roll paper and spindle from the printer.
4. Set the spindle upright, with the white end on the floor and
the black end at the top.
5. Slide the black paper stop off the top of the spindle.
6. Remove the roll paper from the spindle, and return it to its
original packaging.
2-74
Page 75

Handling Paper and Other Media | 75
Switching Between 2-Inch and 3-Inch Roll Paper
You can convert the spindle to accept roll paper with either a 2-inch or
3-inch core. When the gray adapters are attached at each end, you can use
3-inch rolls. Follow these steps to remove the gray adapters for using 2-inch
roll paper:
1. Remove the black paper stop from the end of the spindle.
Note
Your adapter may have
only two tabs.
2. Press toward the center on the four tabs shown below to release the gray
adapter from the paper stop.
press tabs to release
3. Remove the gray adapter from the white paper stop at the other end of
the spindle.
If you need to reattach the gray adapters to use 3-inch roll paper, align the
arrow marks shown below and press the adapters on until they lock in place.
2-75
Page 76

76 | Handling Paper and Ot her Media
Cutting Paper Manually with the Built-in Cutter
Note
An optional media cutter
is available for cutting
thick media. See page 10
for details on ordering it.
When you’re not using the Auto Cut setting, you need to cut the paper
manually after your print job is finished. If you’re printing on canvas, vinyl,
or other heavy media, you should use scissors or the optional media cutter
rather than the built-in cutter. Heavy media can damage the built-in cutter.
Do not use the built-in cutter to cut any of the following materials:
• Smooth Fine Art paper • Backlight Film
• Textured Fine Art paper • Heavyweight Polyester Banner
• Canvas • Adhesive Vinyl
• Enhanced Matte Posterboard • any similar third-party papers or
• Somerset Velvet Fine Art paper
papers thicker than 10 mil
Follow these steps to cut manually with the built-in cutter:
1. If the paper is not positioned correctly, press one of the
Paper Feed
buttons to adjust the paper position. Normally, you don’t need to do
this after a print job is finished.
2. Press the
3. Press the
Paper Source button until the Roll Auto Cut light comes on.
Cut/Eject button. The paper is cut.
Note
You can also specify trim
lines from your printer
driver software. See
page 91 (Macintosh) or
page 115 (Windows) for
more information.
Printing Trim Lines
You can print trim lines on the right edge of your pages (if you’re using Auto
Cut) or on the right and bottom edge (if you’re not using Auto Cut).
1. Press the
2. Press the
3. Press the
4. Press the
SelecType button. PRINTER SETUP appears on the display.
r button until PLATEN GAP appears.
d button until PAGE LINE appears.
r button. *OFF is displayed as the current setting.
2-76
Page 77

Handling Paper and Other Media | 77
5. Press the d button until ON appears.
Note
The maximum length of
roll paper you can print on
is not limited by the
printer, but may be
limited by your application
software or operating
system.
6. Press the
appears next to
Enter button to save this as the new setting. (An asterisk
*ON.)
7. Press the Pause button to exit the menu.
Using Cut Sheet Paper
You can print on many types of cut sheet paper and other media. The Stylus
Pro 9600 accepts sheets ranging from letter-size (8.5 × 11 inches) to
44 inches wide. The Stylus Pro 7600 accepts sheets up to 24 inches wide.
You can leave your roll paper in the printer when you print on cut sheets;
make sure it is rolled up and fastened with the roll paper belt, as described
on page 74.
If you’re using stock greater than 19 mil (0.5 mm) thick, load it as described
on page 79.
Follow these steps to load cut sheets:
1. Make sure the printer is on and the roll paper cover is closed.
2. Press the
Paper Source button until the Sheet light comes on.
3. Push the paper lever back to the released position.
2-77
Page 78

78 | Handling Paper and Ot her Media
4. Feed the sheet into the paper slot. Make sure the right edge of the paper
is straight and aligned with the scale on the roll paper cover.
Note
For heavy paper, you may
need to increase the
suction strength by
pressing the
This helps hold the paper
in place during loading
and printing.
u button.
For a larger sheet of paper, feed it so that it comes out below. Then align
the edges of the sheet with the rows of holes as shown.
For lightweight paper,
decrease the suction by
pressing the
Caution
To avoid damaging the
printer, never move the
paper lever during
printing, or while the
Operate or Pause light
is flashing .
d button.
5. Pull the paper lever forward, to the secured position.
6. Press the
into printing position automatically and
Pause button (or simply wait for 5 seconds). The sheet feeds
READY appears on the control
panel.
7. Print your page. After it is finished, the sheet stays in the printer.
8. To remove your print, press the
Paper Feed d button.
2-78
Page 79

Handling Paper and Other Media | 79
Printing on Posterboard
You can print on heavy stock up to 30 × 40 inches, such as EPSON
Enhanced Matte Posterboard. Follow these instructions when you print on
posterboard or other media more than 19 mil (0.5 mm) thick.
1. Set the paper basket to catch your printouts in front of the printer. See
page 82 for instructions.
2. Make sure no other paper is loaded for printing. You can leave roll paper
in the printer, but wind it up fully and secure it with the roll paper belt
(page 74).
3. Press the
Paper Source button until the Sheet light comes on.
4. Push the paper lever back to the released position.
5. Open the front cover. (The cover has special tabs that act as paper
supports when the cover is open.)
2-79
Page 80

80 | Handling Paper and Ot her Media
Note
If you’re using stock
more than 39 inches
long, load it long-edge
first (in landscape
orientation).
6. Feed the posterboard into the paper slot until it meets resistance.
7. Align the board with the scale on the roll paper cover.
8. Pull the paper lever forward, to the secured position. Then close the
front cover.
9. Press the
Pause button (or wait for 5 seconds). The board feeds into
printing position automatically and
panel.
2-80
READY appears on the control
Page 81

Handling Paper and Other Media | 81
Caution
To avoid damaging the
printer, never move the
paper lever while the
Operate or Pause light
is flashing.
10. Print your page. After it is finished, the posterboard stays in the printer.
11. To remove the print, hold it while pushing the paper lever back to the
released position.
Adjusting the Platen Gap for Thick or Thin Paper
When you print on unusually thick or thin paper, you may need to adjust
the platen gap setting. Normally, the
to adjust automatically. However, if print quality is not satisfactory when
using very thin or very thick stock, you may need to change this setting
Follow these steps:
1. Press the
SelecType button until PRINTER SETUP appears on the
display.
2. Press the
r button twice. The display shows the current setting for the
platen gap.
3. Use the
u and d buttons to change the setting. (STANDARD is the
default setting; you can also choose
4. Press the
Enter button to save the new setting.
STANDARD setting allows the printer
.
NARROW, WIDE, or WIDER.)
5. Press the
If you’ve selected a non-standard platen gap, the letter
Pause button to exit the menu.
N or W appears in the
corner of the display to remind you of the narrow or wide setting. When you
switch media, don’t forget to change the setting back to
STANDARD.
If you’re printing on non-EPSON media, you may also need to create a
paper profile to optimize your results. See page 85.
2-81
Page 82

82 | Handling Paper and Ot her Media
Using the Paper Basket
Note
When you print on
posterboard, set the
basket to catch printouts
in front of the printer.
The paper basket attaches to your Stylus Pro 9600 and catches your
printouts as they come out. (If you’ve bought the optional stand for the
Stylus Pro 7600, it has a basket too.) The bas ket keeps your printouts from
getting dirty or scratched. You can set it up either to catch the paper under
the printer or in front of the printer.
Catching Printouts in Front of the Printer
Follow these steps to set up the basket in front of the printer:
1. Unhook the basket rings from the metal rods, if they’re hooked.
2-82
Page 83

Handling Paper and Other Media | 83
2. Slide the upper metal rods all the way in. Then fully extend the lower
rods, so that they rest on the floor.
3. Make sure the surface of the basket is taut. If there is any slack, the paper
may not slide properly to the floor.
Catching Printouts Under the Printer
To catch printouts under the printer, extend the upper metal rods all the
way out. Then push the lower rods all the way in.
2-83
Page 84

84 | Handling Paper and Ot her Media
Optimizing the Settings for Your Paper
When you choose a media type in your EPSON printer software, the driver
automatically determines the best settings for your paper. However, you may
want to fine-tune how the printer handles various papers—especially if you
use non-EPSON paper or a paper not supported by the driver. Use the paper
configuration settings described below. If you’re printing on unusually thick
or thin paper, you may also need to adjust the platen gap; if so, you should
do that first (see page 81).
Note
It’s a good idea to keep a
list describing your paper
profiles.
When adjusting the paper settings, you can have them affect all your print
jobs; or you can create a special profile, or group of settings, for each paper
type (up to ten types) and select the desired profile whenever you print on a
particular stock.
Adjusting the Paper Settings
To change paper settings and have them affect all your print jobs, follow the
steps below. If you want to create a profile for a specific paper type, see
“Creating and Selecting Paper Profiles” on page 85.
1. Press the
CONFIG
2. Press the
3. Use the
then press the
Menu option Function
PAPER NUMBER Lets you create a paper profile; see page 85.
CUT PRESSURE Decreases the cutting blade pressure for thinner
CUT METHOD Lets you choose between a 3-step and 4-step
PPR FEED
ADJUSTMENT
SelecType button, then press the d button until PAPER
appears on the display.
r button.
u and d buttons to select one of the following menu options,
r button:
papers. Provides a cleaner cut.
cutting method. For more exact cuts on thicker or
thinner paper, choose 4-step.
Lets you eliminate light or dark horizontal banding
in your printouts.
2-84
Page 85

Handling Paper and Other Media | 85
Menu option Function
DRYING TIME Use when printing with non-EPSON media. You
can make the print head wait up to 5 seconds after
each pass to allow ink to dry on the page.
SUCTION Lets you decrease the paper suction level when
printing on thinner papers (less than 12 lb), such
as CAD drafting paper or backlight film.
PRINT ADJ Adjusts the intensity of the MicroWeave
Improves print quality but lowers printing speed.
®
pattern.
4. Use the u and d buttons to make any necessary changes, then press
Enter to save your new setting.
Note
Any settings made this
way override settings
made in the driver or RIP
software .
5. To adjust another setting, press the
l button to return to the menu
options.
6. When done, press
Pause to exit the menu.
Creating and Selecting Paper Profiles
To create a profile for a specific paper type, make sure the paper you want to
profile is loaded in the printer. Then follow these steps:
1. Press the
CONFIG
2. Press the
3. Press the
4. Use the
then press
5. Press
The printer prints a pattern similar to the following:
SelecType button, then press the d button until PAPER
appears on the display.
r button until PAPER NUMBER appears.
r button.
u and d buttons to assign a paper profile number (1 to 10),
Enter.
Enter again to print the paper thickness pattern.
1 2 3 4 5 6 7 8 9 10 11 12 13 14 15 16 17
2-85
Page 86

86 | Handling Paper and Ot her Media
6. Examine the printed pattern for the most evenly overlapping lines. In
the example shown above, the lines under number 4 are the most even.
7. Use the
u and d buttons to display the selected line number, then press
Enter to save your new setting.
8. The menu options shown below appear in sequence. Make any
adjustments, as needed, and press
Enter to save each setting.
The following settings are available:
Menu option Function
CUT
PRESSURE
CUT METHOD Lets you choose between a 3-step and 4-step cutting
PPR FEED
ADJUSTMENT
DRYING TIME Use when printing with non-EPSON media. You can make
SUCTION Lets you decrease the paper suction level when printing on
PRINT ADJ Adjusts the intensity of the MicroWeave pattern. Improves
Decreases the cutting blade pressure for thinner papers.
Provides a cleaner cut.
method. For more exact cuts on thicker or thinner paper,
choose 4-step.
Lets you eliminate light or dark horizontal banding in your
printouts. When set to 0, the EPSON driver adjusts the
paper feed automatically.
the print head wait up to 5 seconds after each pass to allow
ink to dry on the page.
thinner papers (less than 12 lb), such as CAD drafting paper
or backlight film.
print quality but lowers printing speed.
9. When done, press the
Pause button.
Once you have created a paper profile, you can select it whenever you print
on that paper:
1. Press the
CONFIG
2. Press the
3. Press the
SelecType button, then press the d button until PAPER
appears on the display.
r button until PAPER NUMBER appears.
r button.
2-86
Page 87

Handling Paper and Other Media | 87
4. Use the u and d buttons to select the paper profile you want to use
(1 to 10).
Or, if you want to return to using standard EPSON paper, select
5. Press
6. Press the
Enter.
Pause button to exit the menu.
STD.
When you’re done printing with a custom profile, be sure to change the
setting back to
STD.
2-87
Page 88

88 | Handling Paper and Ot her Media
2-88
Page 89

Chapter 3:
Printing with
EPSON Drivers
for Macintosh
Your EPSON Stylus Pro 7600 or 9600 comes with drivers and utilities that
®
let you print and manage print jobs in non-PostScript
ICC profiles for ColorSync
management features from your applications or the driver itself.
The driver CD-ROM also includes an electronic Reference Guide to your
printer and EPSON printer software. You can read the guide using a web
browser, such as Netscape Navigator or Microsoft Internet Explorer,
versions 3.0 or later.
This chapter includes the following information:
• Choosing page setup options
• Choosing basic print options
• Choosing advanced print options
• Managing print jobs
• Checking printer status
®
3.x are included, so you can use advanced color
mode without a RIP.
89
Page 90

90 | Printing with EPSON Drivers for Macintosh
Note
Many application settings
override the printer’s
page setup options.
Always verify settings
to get the results
you expect.
If you need more
information about print
options, click the ? button
on any dialog box.
Creating a custom paper
size lets you make the
best use of roll paper.
You can also use the
Customize dialog box to
change the margins on
your paper.
Choosing Page Setup Options
Many of the page setup options correspond to paper handling features that
you can also set through the control panel. Software options give you
additional settings and override control panel settings. Follow these steps to
choose page setup options:
1. Start an application, open a file, and choose
application’s File menu. You see the page setup dialog box:
Select the paper size you want . . .
Page Setup from your
Or click to
create a custom
paper size
Note
Don’t select Landscape
unless you want to rotate
your image 90°.
2. Select the type of paper you loaded (Roll Paper or Sheet) from the
Paper Source list.
Or select
Roll Paper (Banner) if you want to print more than one
image edge-to-edge (for example, when tiling long images together).
This lets you print a series of continuous images without any margin
space between them.
3-90
Page 91

Printing with EPSON Drivers for Macintosh | 91
Note
The Macintosh operating
system limits the custom
page length to 90.6 inches.
Note
3. Select the Paper Size you want, based on the size of your image. If your
size is not listed, click
Customize. Then enter the size in inches or
centimeters. If you’re printing your image with borders, make your
custom page size slightly larger than the image size; if you’re printing
without borders, it should be slightly smaller (about 1/4 inch all
around).
4. If you’re using roll paper, you can set the following options:
• Auto Rotate
Saves paper if your document length is shorter than the printable
width of the paper roll. Your image is rotated automatically by
90 degrees and printed crosswise.
• Auto Cut
Choose this option if you want the paper to be cut automatically
after each page is printed (not available for thicker media types).
• Print Page Line
Prints trim lines on the right and bottom edges of your pages.
• Save Roll Paper
Saves paper by not feeding the blank portion of the last page of your
document. Available only when you’ve selected
(Banner)
as the Paper Source.
Roll Paper
For best print quality
along the upper edge of
your printout, EPSON
recommends using one
of the following papers:
• Premium Glossy
Photo Paper (250)
• Premium Semimatte
Photo Paper (250)
• Premium Luster
Photo Paper
Note that you can’t print
without borders when
using Photographic Dye
ink at 2880 dpi.
5. Make the settings you want for
Rotate, and Printable Area (if Paper Source is set to Sheet).
6. After making your settings, click
Orientation, Reduce or Enlarge,
OK.
Printing Without Borders
You can print BorderFree™ iamges on the following paper widths:
• 8 inches • 20 inches
• 10 inches • 24 inches
• 12 inches • 36 inches (Stylus Pro 9600 only)
• 14 inches • 44 inches (Stylus Pro 9600 only)
• 16 inches
3-91
Page 92

92 | Printing with EPSON Drivers for Macintosh
To print without borders on one of the listed paper sizes, follow these steps:
Note
The No Margins setting
is not available for some
paper sizes.
Note
For more information on
using cutting options and
printing without borders,
visit www.epson.com.
Under Drivers & Support,
select Manuals &
Documents. Select your
printer, then select
Product Support
Bulletin.
1. Make sure your image size is at least 1/4 inch larger all around than the
size of paper you’re printing on. If your application has margin settings,
be sure they’re turned off.
2. Select
3. On the printer’s control panel, press the
No Margins in your printer software:
Select
No Margins
SelecType button until the
Printer Setup menu appears on the display.
4. Press the
press the
5. Press the
SelecType r button again to open the menu options, then
d button until No Margins is displayed.
r button, then press the d button to select one of these paper
cutting options:
• L/R ONLY when printing without left and right margins only
•1CUT or 2CUTS when printing without any margins
(
1CUT causes the images to be printed end-to-end. If you prefer
additional space between your images, select
2CUT. This extends
the space between the images and the paper is cut twice inside this
space.)
6. Press
Enter to activate the setting, then press Pause to exit setup mode
and return to normal printer operation.
Continue on to the next section to print your image.
3-92
Page 93

Printing with EPSON Drivers for Macintosh | 93
Choosing Basic Print Options
Once you have selected your page setup options, you need to select printing
options. The EPSON driver offers automatic settings that optimize print
quality and speed when you’re using EPSON media. You can also choose
advanced settings for more control over your printer and color management
options, as described on page 98.
Follow these steps to make basic settings:
TIP
For professional
black-and-white
photography, use the
Color/B&W Photo
setting (don’t select
Black). Use a ColorSync
workflow for best results.
1. Choose
Print from the File menu of your application. A dialog box like
the following appears:
This area shows the current settings,
but you can’t change them from here
2. Choose the number of
Copies and indicate which Pages you want to
print.
3. Select a
Media Type setting appropriate for the media you’re printing
on, as listed in the table on page 96 (Photographic Dye ink users) or 97
(UltraChrome ink users).
4. For the ink type, select
color or black-and-white photo image. Select
Color/B&W Photo if you’re printing either a
Black only if you’re
printing line drawings or other non-photographic images.
3-93
Page 94

94 | Printing with EPSON Drivers for Macintosh
5. Set the Mode option as follows:
• Click Automatic to have the printer driver analyze the contents of
your image or file and make the appropriate printing adjustments. If
Quality/Speed slider appears in the Mode box, set it according to
a
the quality required for your print job. (Depending on the Media
Type setting, this slider may not appear.)
• Click Custom and then choose one of the print job types from the
custom settings list, as described in the next step, or click the
Advanced button and see “Choosing Advanced Print Options” on
page 98 for details.
6. Depending on your print mode (Automatic or Custom), you can select
one of the following options from the pull-down menu:
Automatic print mode
Setting Usage
Photo-realistic Produces sharper images and more vivid colors by
automatically adjusting the contrast, saturation,
and brightness. Corrects for overall under- or
over-exposure of the original image.
Vivid Intensifies colors and lightens the midtones and
highlights. Best for print jobs with
non-photographic images.
Note
You can also create your
own settings and add
them to this list. See
page 100 for more
information.
Custom print mode
Setting Usage
Advanced
Photo 2880
Advanced
Photo
Text/Graph Intensifies colors and lightens the midtones and
ColorSync Adjusts colors based on your printer’s ICC profile,
For smoothest color tones and highest-quality
results.
Prevents the misprinting of ink dots that may occur
because of the movement of the print head and
paper. Available only when you choose photo or
photo-quality media types.
highlights. Best for print jobs with
non-photographic images.
using the perceptual rendering intent.
3-94
Page 95

Printing with EPSON Drivers for Macintosh | 95
7. Choose from the following buttons to access additional features:
• Click to access the printer monitoring and maintenance utilities.
See page 1 06 for more information about the Status Monitor
utility. To use the nozzle check and print head cleaning utilities, see
page 132; to align the print head, see page 135.
• Click if you want to reduce your image to fit on the page, or for
other layout options.
• Click to turn on background printing. This lets you work on
your Macintosh while you’re printing and use the Monitor3 utility.
See page 103 for more information.
• Click and then click the Preview button to preview your print.
• Click to check your ink levels.
8. When you’re finished choosing print options, click
Print.
3-95
Page 96

96 | Printing with EPSON Drivers for Macintosh
Selecting the Correct Media Type Setting
The tables below list the settings designed to produce the best results on
EPSON media when printing with either Photographic Dye ink or
UltraChrome ink.
If your EPSON paper is not listed, check the instructions included with the
paper, or look on the EPSON web site (http://prographics.epson.com). If
you are using non-EPSON paper, choose the closest setting. You may have
to experiment with different settings to determine which one is best for the
media you’re using.
Media Type settings for printing with Photographic Dye ink
Note
Check the EPSON web
site (http://prographics.
epson.com) or your
authorized EPSON dealer
for other media that may
be available.
Product name Media Type setting
Premium Glossy Photo Paper (250) PREMIUM GLOSSY PHOTO
PAPER (250)
Premium Luster Photo Paper PREMIUM LUSTER PHOTO PAPER
Premium Semigloss Photo Paper PREMIUM SEMIGLOSS PHOTO
PAPER
Premium Semimatte Photo Paper (250) PREMIUM SEMIMATTE PHOTO
PAPER (250)
Photo Glossy Paper PHOTO GLOSSY PAPER
Photo Semigloss Paper PHOTO SEMIGLOSS PAPER
Doubleweight Matte Paper DOUBLEWEIGHT MATTE PAPER
Enhanced Matte Paper ENHANCED MATTE PAPER
Enhanced Matte Posterboard ENHANCED MATTE POSTER
BOARD
EPSON Proofing Paper Commercial
Semimatte
Backlight Film BACKLIGHT FILM
PHOTO SEMIGLOSS PAPER
3-96
Page 97

Printing with EPSON Drivers for Macintosh | 97
This table lists the settings to use when printing with UltraChrome ink.
Note
Check the EPSON web
site (http://prographics.
epson.com) or your
authorized EPSON dealer
for other media that may
be available.
Media Type settings for printing with UltraChrome ink
Paper type Media Type setting
Premium Glossy Photo Paper
(250)
Premium Luster Photo Paper PREMIUM LUSTER PHOTO PAPER
Premium Semigloss Photo Paper PREMIUM SEMIGLOSS PHOTO PAPER
Premium Semimatte Photo Paper
(250)
Photo Glossy Paper PHOTO GLOSSY PAPER
Photo Semigloss Paper PHOTO SEMIGLOSS PAPER
Doubleweight Matte Paper DOUBLEWEIGHT MATTE PAPER
Enhanced Matte Paper ENHANCED MATTE PAPER
Enhanced Matte Posterboard ENHANCED MATTE POSTER BOARD
EPSON Proofing Paper
Commercial Semimatte
Glossy Paper - Photo Weight GLOSSY PAPER - PHOTO WEIGHT
Watercolor Paper - Radiant White WATERCOLOR PAPER - RADIANT
Somerset Velvet for EPSON Fine
Art Paper
PREMIUM GLOSSY PHOTO PAPER (250)
PREMIUM SEMIMATTE PHOTO PAPER
(250)
PHOTO SEMIGLOSS PAPER
WHITE
ENHANCED MATTE PAPER (roll) or
ENHANCED MATTE POSTER BOARD
(sheet)
Smooth Fine Art Paper SMOOTH FI N E ART PAPER
Textured Fine Art Paper TEXT U R E D F INE ART PA P E R
Synthetic Paper ENHANCED SYNTHETIC PAPER
Adhesive Synthetic Paper ENHANCED ADHESIVE SYNTHETIC
PAPER
Adhesive Vinyl ADHESIVE VINYL
Backlight Film BACKLIGHT FILM
Tyvek Brillion TYVEK BRILLION
Canvas CANVAS
3-97
Page 98

98 | Printing with EPSON Drivers for Macintosh
Choosing Advanced Print Options
The advanced print options give you complete control over your printing
environment. Use these settings to experiment or to fine-tune a range of
options to meet your individual needs. Follow these steps to print with
advanced settings:
1. Follow steps 1 through 4 on page 93.
2. Click
Custom and then click Advanced. You see a dialog box like the
following:
3. If necessary, you can change your
4. Choose one of the following
• Economy
Print Quality settings:
To save ink
• Normal - 360dpi
For faster printing and everyday needs
These three
settings give
you different
options on the
lower part of
the screen
Media Type and Ink settings.
• Fine - 720dpi
For high quality photos and prints (deselect the High Speed
checkbox to achieve photo lab quality)
• SuperFine - 1440dpi
Better than photo lab quality
• SuperPhoto - 2880dpi
For the highest quality photos and prints; provides an astonishing
level of photographic quality
3-98
Page 99

Printing with EPSON Drivers for Macintosh | 99
The available print quality settings are limited by the Media Type
setting. Choose lower print quality for faster printing, or
2880dpi
for best quality.
5. Choose any of the following:
• MicroWeave and Super MicroWeave
Eliminate unwanted banding effects. These settings are
automatically selected for most media types. If you notice banding
with the standard
MicroWeave
• High Speed
MicroWeave setting, select Super
.
For fast, bidirectional printing at lower quality. If vertical lines in
your printout are misaligned when you use the
High Speed setting,
you may need to turn it off or realign the print head.
• Flip Horizontal
For printing a mirror image of your file. Use with backlight film.
SuperPhoto -
3-99
Page 100

100 | Printing with EPSON Drivers for Macintosh
6. Choose one of the following Color Management settings:
• Color Controls
Lets you specify individual values for adjusting brightness, contrast,
saturation, and CMY inks, or choose from the three Color
Adjustment modes. You can also choose from three Gamma
settings, which control image contrast by modifying the midtones
and midlevel grays. For descriptions of the available settings, see the
table on page 101.
• PhotoEnhance4
Allows you to correct noise and other problems common to digital
camera images. Also lets you see a sample image that reflects the
settings you choose. See page 101 for a description of the available
settings.
• ColorSync
TIP
Lets you select from three Rendering Intent settings for mapping
colors to your printer’s
descriptions of the available settings.) Normally, you should use the
color management features of your imaging software instead.
If you turn off color
management, you can
still control the ink
density. See “Paper
Configuration Options”
on page 102.
• No Color Adjustment
Disables color management in the printer driver. Choose this mode
if you want to use your own color management system.
7. Click
Save Settings if you want to have your advanced settings
available for reuse. Then type a name for the group of settings and click
Save. The name is added to your list of custom settings.
EPSON Standard profile. (See page 101 for
8. When you’re finished setting advanced printer options, click
3-100
OK.
 Loading...