


EMP 52
Table of contents
 Loading...

Notations Used in This User's Guide
Caution :
Tip :
Procedure
When "unit" or "projector" appears in the text of this User's Guide, it may refer to items which
are accessories or optional equipment in addition to the main projector unit itself.
Indicates procedures which may result in damage or injury if sufficient
care is not taken.
Indicates additional information and points which may be useful to
know regarding a topic.
Indicates that an explanation of the underlined word or words in front
of this symbol appears in the glossary of terms.
Refer to the "Glossary" in the "Appendices". (p.81)
Indicates operating methods and the order of operations.
The procedure indicated should be carried out in the order of the
numbers.
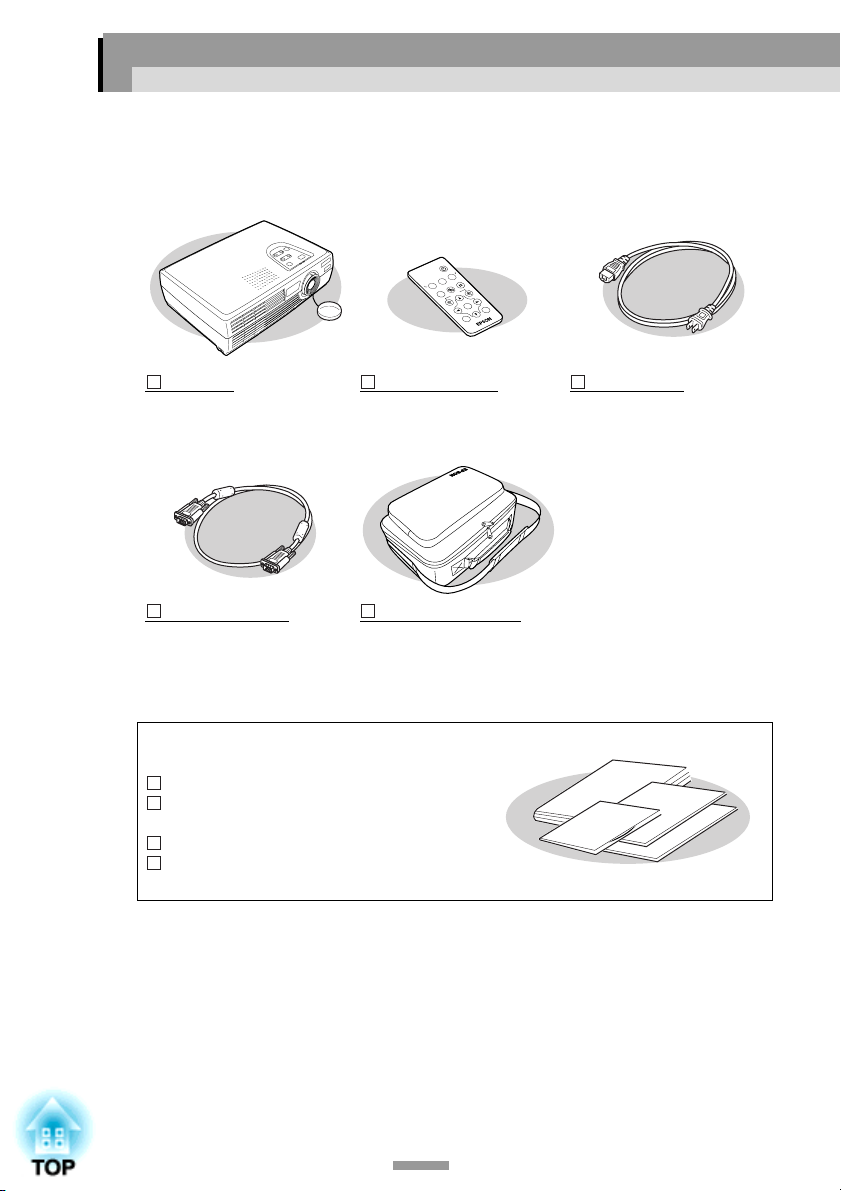
Unpacking the Projector
When you unpack the projector, make sure that you have all these components.
If any of the components are missing or incorrect, please contact the place of
purchase.
Power
Color Mode
S-Video/Video
Freeze
Computer
A/V Mute
Menu
E-Zoom
Enter
ESC
Auto
Projector
(with lens cover)
Computer cable
(mini D-Sub 15-pin/mini DSub 15-pin 1.8 m (6 ft.))
For connecting the projector
to a computer
Documentation
Read this first
Safety Instructions/
World-Wide Warranty Terms
Document CD-ROM
Quick Reference Guide
Remote control
(including a CR2025 lithium
battery)
Soft carrying case
(with shoulder strap and
handle)
For carrying the projector
Powe r ca ble
(3 m (9.8 ft.))
For connecting the projector
to a wall outlet
1
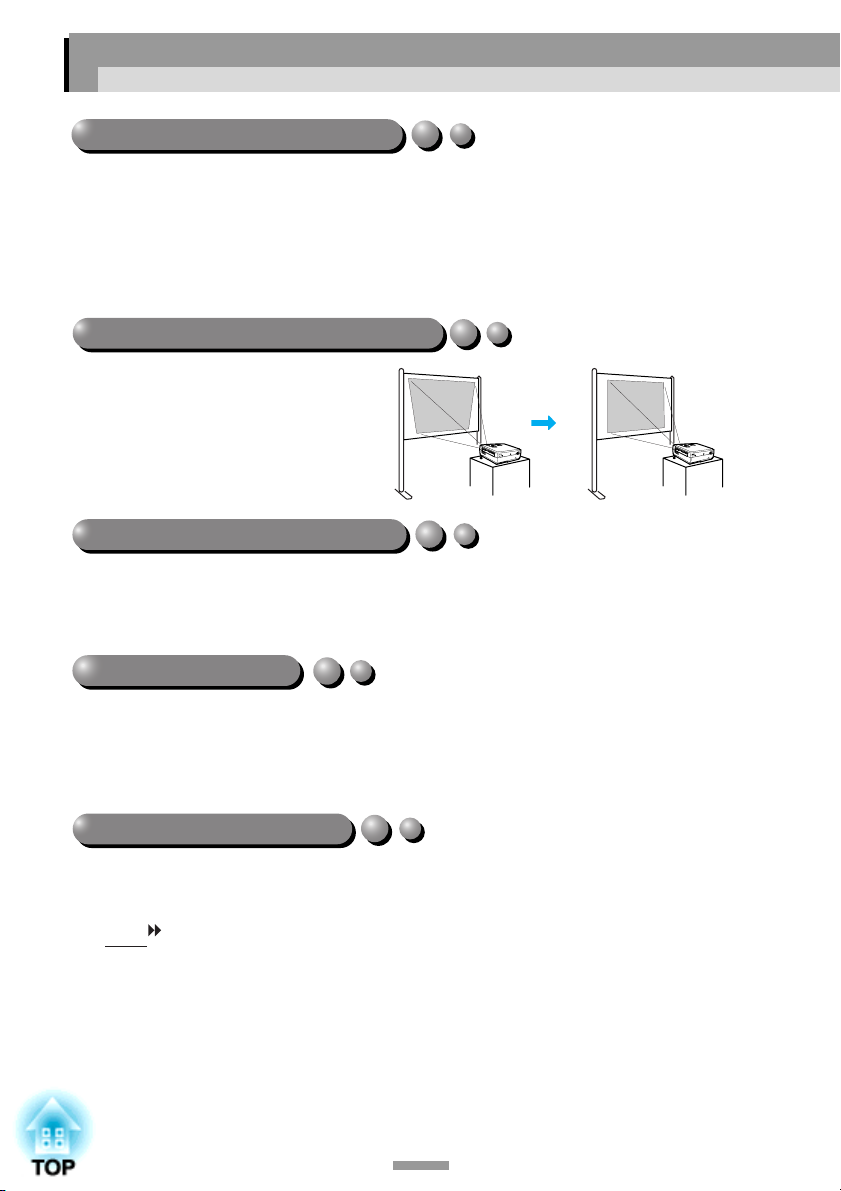
Features of the Projector
Automatic setup function
When projecting computer images, the signals from the connected computer are
detected automatically and adjusted so that the optimum images are projected. Even if
several people are giving presentations using the same projector, the optimum picture
quality can be obtained simply by disconnecting and reconnecting the computers.
Each individual setting can also be adjusted manually. (p.37)
Keystone correction function
Keystone distortion in projected images
can be corrected easily.
This makes images appear correctly
even when the projector has been set up
on a tilted vertical angle. (p.35)
Brilliant, attractive images
Despite its compact size, the projector can display images at high resolutions with a high
degree of luminance, providing beautifully clear images even in bright environments.
Easy to Operate
The accessory remote control can be used for operations such as pausing projection
(see "Freeze" on p.43) and zooming in on important areas of an image
(see "E-Zoom" on p.45).
Colour mode function
The optimum images can be projected simply by selecting the image quality from the
following six preset settings according to the projection environment being used.
No other troublesome colour adjustments are necessary. (p.47, 49)
• sRGB • Normal • Meeting
• Presentation • Theatre • Game
2
0
10
20
30
40
50
60
70
80
F
D
C
B
A
Jul
JunMar
FebJan
projector
Features of the Projector
3

Contents
Unpacking the Projector.................................................................... 1
Features of the Projector................................................................... 2
Before Using the Projector
Part Names and Functions ............................................................... 8
Front/Top................................................................................................8
Left Side................................................................................................. 9
Control Panel........................................................................................10
Rear ......................................................................................................11
Base......................................................................................................11
Remote Control....................................................................................12
Before Using the Remote Control ................................................... 13
Using the Remote Control and Remote Operating Range ................... 13
Installation ....................................................................................... 15
Setting Up the Projector....................................................................... 15
Screen Size and Projection Distance....................................................16
Connecting to a Computer .............................................................. 17
Eligible Computers ..............................................................................17
Projecting Images from the Computer.................................................18
Playing Sound from the Computer ......................................................18
Connecting to an External Monitor......................................................20
Connecting to a Video Source ........................................................ 21
Projecting Composite Video Images....................................................21
Projecting S-Video Images...................................................................22
Projecting Component Video Images ..................................................22
Projecting RGB Video Images.............................................................23
Playing Sound from the Video Equipment ..........................................24
Basic Operations
Turning On the Projector ................................................................. 28
Connecting the Power Cable................................................................28
Turning On the Power and Projecting Images .....................................29
Turning Off the Projector ................................................................. 31
Adjusting the Screen Image............................................................ 33
Adjusting the Image Size .....................................................................33
Adjusting the Image Angle .................................................................. 34
Correcting Keystone Distortion ...........................................................35
4

Contents
Adjusting the Image Quality ............................................................ 37
Focusing the Screen Image..................................................................37
Adjusting Computer Images ................................................................ 37
Selecting the Colour Mode ..................................................................40
Advanced Operations
Functions for Enhancing Projection ................................................ 42
A/V Mute ............................................................................................. 42
Freeze................................................................................................... 43
Wide-screen Projection of Component Video and Video Images
(Changing the Aspect Ratio) ............................................................. 44
E-Zoom ................................................................................................ 45
Using the Configuration Menu Functions ........................................ 46
List of Functions ..................................................................................46
Using the Configuration Menus...........................................................56
Troubleshooting
Using the Help ................................................................................ 60
When Having Some Trouble............................................................ 61
Power Indicator....................................................................................61
(Warning) Indicator.....................................................................62
When the Indicators Provide No Help ............................................. 64
Appendices
Maintenance ................................................................................... 72
Cleaning............................................................................................... 72
Replacing Consumables....................................................................... 74
Optional Accessories ...................................................................... 80
Glossary.......................................................................................... 81
List of ESC/VP21 Commands ......................................................... 84
Command List......................................................................................84
Communication Protocol ..................................................................... 84
Cable Layouts ...................................................................................... 85
List of Supported Monitor Displays ................................................. 86
Specifications .................................................................................. 88
Appearance..................................................................................... 90
Index ............................................................................................... 91
the Projector
Before Using
Basic Operations
Advanced Operations
Troubleshooting
Appendices
5


Before Using the Projector
This chapter describes the procedures for setting up the projector
before use.
Part Names and Functions .................................................8
• Front/Top ................................................................................................ 8
• Left Side.................................................................................................. 9
• Control Panel........................................................................................ 10
• Rear....................................................................................................... 11
• Base ....................................................................................................... 11
• Remote Control.................................................................................... 12
Before Using the Remote Control ....................................13
• Using the Remote Control and Remote Operating Range............... 13
Installation .........................................................................15
• Setting Up the Projector...................................................................... 15
• Screen Size and Projection Distance .................................................. 16
Connecting to a Computer ...............................................17
• Eligible Computers.............................................................................. 17
• Projecting Images from the Computer .............................................. 18
• Playing Sound from the Computer .................................................... 18
• Connecting to an External Monitor ................................................... 20
Connecting to a Video Source .........................................21
• Projecting Composite Video Images .................................................. 21
• Projecting S-Video Images.................................................................. 22
• Projecting Component Video Images................................................. 22
• Projecting RGB Video Images............................................................ 23
• Playing Sound from the Video Equipment........................................ 24
7
Part Names and Functions
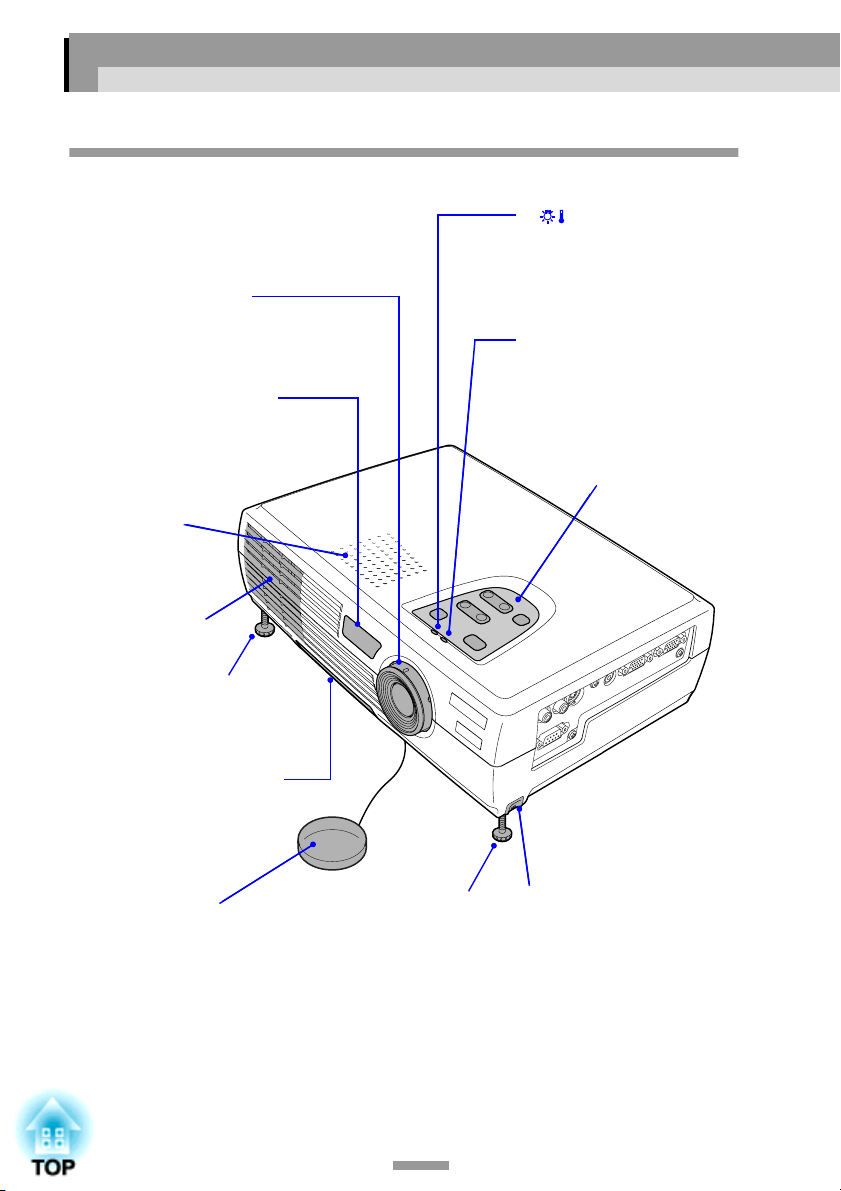
Front/Top
Focus ring (p.37)
••••
Adjusts the image focus.
Remote control light-
••••
receiving area (p.13)
Receives signals from the
remote control.
Speaker
••••
Air exhaust
••••
vent
Front adjustable foot
••••
(p.34)
Extend and retract to adjust
the projection angle.
(Warning) indicator
••••
(p.62)
The colour and on status
(illuminated/flashing) indicates
problems with the projector.
Power indicator (p.61)
••••
Flashes or lights in different
colours to indicate the
operating status of the
projector.
Control panel (p.10)
••••
Remote control holder
••••
(p.13)
Store the accessory
remote control in here
when not using it.
Foot adjust button (p.34)
Front adjustable
Lens cover
••••
Attach when not using the
projector to prevent the
lens from becoming dirty
or damaged.
8
••••
foot (p.34)
Extend and retract to
adjust the projection
angle.
8
••••
Another foot adjust button is
located on the right side.
Press both foot adjust buttons
when extending and retracting
the front adjustable feet.

Part Names and Functions
Left Side
S-Video port (p.22)
••••
Inputs S-Video
projector from other video
sources.
Video port (p.21)
••••
Inputs composite video
to the projector from other video
sources.
Use the RCA video cable for this
connection.
Audio port (p.24)
••••
Inputs audio signals from a
video source.
Connect using an RCA audio
cable.
signals to the
signals
Audio port (p.18)
••••
Inputs audio signals from a
computer or component video
equipment.
Connect using a stereo mini jack.
Computer/Component Video port
••••
(p.18, 22, 23)
Inputs analogue video signals from a
computer and component video
signals from other video sources.
The connection surface is coloured
blue.
Control (RS-232C) port
••••
(p.85)
Connects the projector to a computer
using an RS-232C cable. This port is
for service use and shou ld not be used
by the customer.
Monitor Out port (p.20)
••••
Outputs the projected analogue video
signal from a computer to an external
monitor. This feature is not available
for video equipment signals.
The connection surface is coloured
black.
9
Part Names and Functions
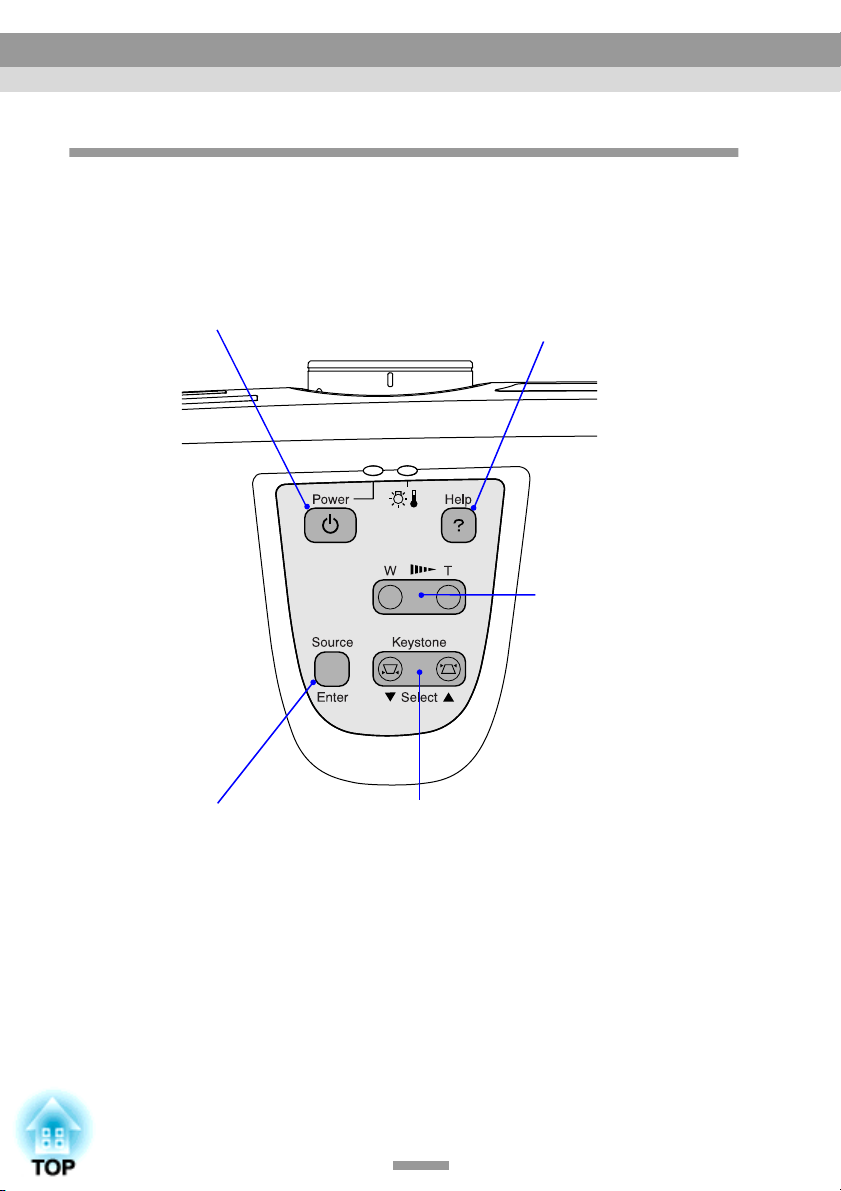
Control Panel
[Power] button (p.29, 31)
••••
Turns the projector power
on and off.
[Help] button (p.60)
••••
Displays the online help
menu to assist you if you
have a problem.
Zoom button (p.33)
••••
Press to adjust the size of
the projected images.
When pressed to the "W"
side, the images become
larger.
When pressed to the "T"
side, the images become
smaller.
[Source] button (p.30)
••••
Switches the input source between the
Computer/Component Video port, SVideo port and Video port each time the
button is pressed.
When pressed while a help menu is
being displayed, it accepts the menu
item that is currently selected. (p.60)
[Keystone] button (p.35)
••••
Press to correct keystone distortion in
images.
When pressed while a help menu is being
displayed, it selects items in the menu.
(p.60)
10
Part Names and Functions
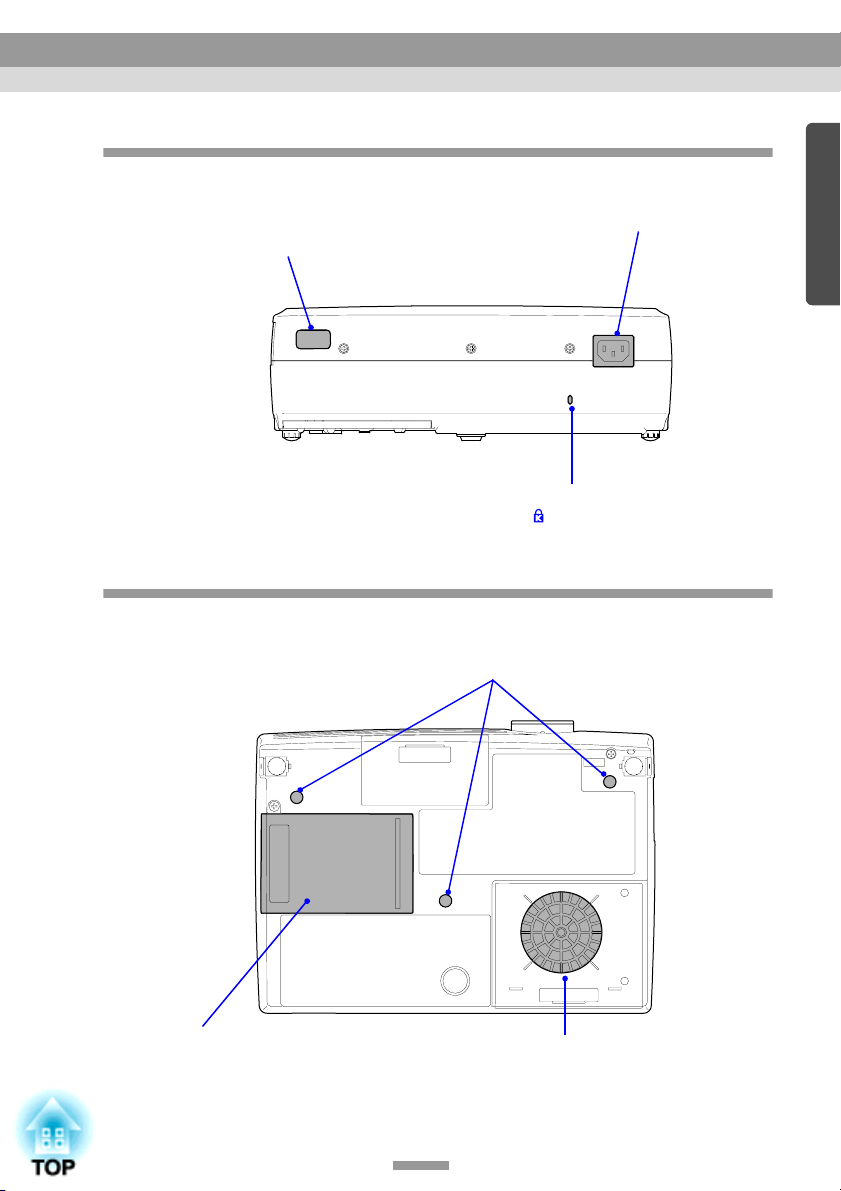
Rear
Remote control light-
••••
receiving area (p.13)
Receives signals from the
remote control.
Base
Suspension bracket fixing points (3 points) (p.15, 80)
••••
Install the optional ceiling mount here when suspending
the projector from the ceiling.
Power inlet (p.28)
••••
Connects the power cable.
Security lock
••••
( ) (p.82)
Lamp cover (p.76)
••••
Open this cover when
replacing the lamp inside the
projector.
Air filter (air intake vent) (p.73, 79)
••••
Prevents dust and other foreign particles from being drawn
into the projector. When replacing the lamp, replace the air
filter also.
11
r
Part Names and Functions
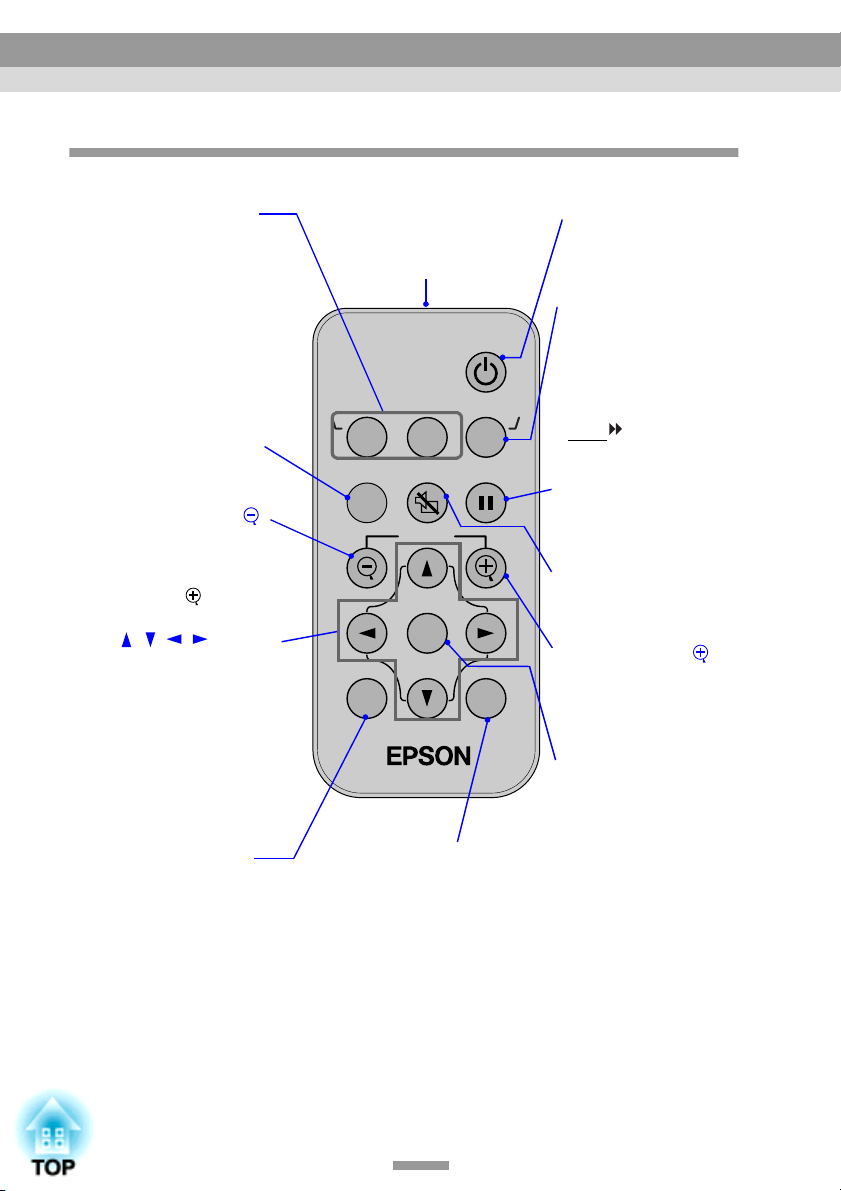
Remote Control
Input select buttons
••••
)
p.30
(
[Computer]: Switches the
signal source to the images
being input from the
Computer/Component
Video port.
[S-Video/Video]: Switches
the signal source being input
from the S-Video port and
the Video port.
[Menu] button (p.56)
••••
Displays or hides the
configuration menus.
[E-Zoom] button (
••••
)
(
p.45
Reduces the part of images
that have been enlarged
using the [ ] button.
[ ][ ][ ][ ] buttons
••••
(p.56, 60)
When a configuration menu
or help menu is displayed,
these buttons select menu
items and setting values.
When using the E-Zoom
function, these buttons
move the cross around the
screen and scroll the image.
[Auto] button (p.37)
••••
Use this button to
automatically adjust
computer images to the
optimum images when
automatic setup has been set
to "OFF".
)
Remote control
••••
light-emitting area
Outputs remote control
signals.
(
Power
S-Video/VideoComputer
A/V Mute
Menu
E-Zoom
Enter
[ESC] button (p.57)
••••
Stops the current function.
Displays the previous screen
or menu while viewing a
configuration menu.
Color Mode
Freeze
ESCAuto
p.14
[Power] button
••••
,
)
(p.29
Turns the projector powe
on and off.
[Color Mode] button
••••
(p.40)
Selects the colour mode.
The color mode changes
in the order of Normal,
Meeting, Presentation,
Theatre, Game and
sRGB
button is pressed.
[Freeze] button (p.43)
••••
Keeps the current
computer or video image
on the screen.
[A/V Mute] button (p.42)
••••
Momentarily turns off the
audio and video.
[E-Zoom] button
••••
)
(
p.45
Enlarges the part of images
without changing the size
of the projection area.
[Enter] button (p.56, 60)
••••
Accepts a menu item or
displays the next screen or
menu while viewing a
configuration menu or
help menu.
31)
each time the
()
12

Before Using the Remote Control
Using the Remote Control and Remote Operating Range
When using the remote control for the first time, pull out the insulating tape that
is protruding from the battery holder. When the insulating tape is pulled out, the
remote control can then be used.
Using the Remote Control
The remote control is used in the following way.
Procedure
Point the remote control light-emitting area toward one of the
remote control light-receiving areas on the projector and operate
the remote control buttons.
Remote control
light-receiving
area (front)
Remote control
light-emitting area
Power
S-Video/VideoComputer
Color Mode
Freeze
A/V Mute
Menu
E-Zoom
Enter
ESCAuto
Remote control
Power
S-Video/VideoComputer
Color Mode
Freeze
A/V Mute
Menu
E-Zoom
Enter
ESCAuto
light-receiving
area (back)
Tip :
• Do not allow sunlight or light from fluorescent lamps to shine directly onto the
projector's remote control light-receiving areas, otherwise it may interfere with the
reception of signals from the remote control.
• When not using the remote control, place it into the remote control holder underneath
the projector so that it does not get lost.
Hook your fingers into the
handle in the base of the
remote control holder and pull
straight out.
A
u
t
o
E
S
C
E
n
t
e
r
E
Z
o
o
m
M
e
n
u
A
/
V
C
o
M
m
u
p
t
e
u
te
r
F
r
e
e
S
z
-
e
V
id
e
o
/V
id
e
o
C
o
lo
r
M
o
d
e
P
o
w
e
r
13

Before Using the Remote Control
Remote Operating Range
Use the remote control within the ranges indicated below. If the distance or
angle between the remote control and the remote control light-receiving area is
outside the normal operating range, the remote control may not work.
Operating distance Operating angle
Approx. 6 m (20 ft.)
Approx. ±30º horizontally
Approx. ±15º vertically
Approx. ±30º horizontally
Approx. 30º
Approx. 30º
Power
S-Video/VideoComputer
Color Mode
Freeze
A/V Mute
Menu
E-Zoom
Enter
ESCAuto
Approx. ±15º vertically
Approx. 15º
When suspended from
the ceiling
Remote control
light-receiving
area
Approx. 30º Approx. 30º
Remote control
light-emitting area
Within
approx.
6 m
(20 ft.)
Power
S-Video/VideoComputer
Color Mode
Freeze
A/V Mute
Menu
E-Zoom
Enter
ESCAuto
Approx. 15º
Approx. 15º
Approx. 15º
14
Installation
Setting Up the Projector
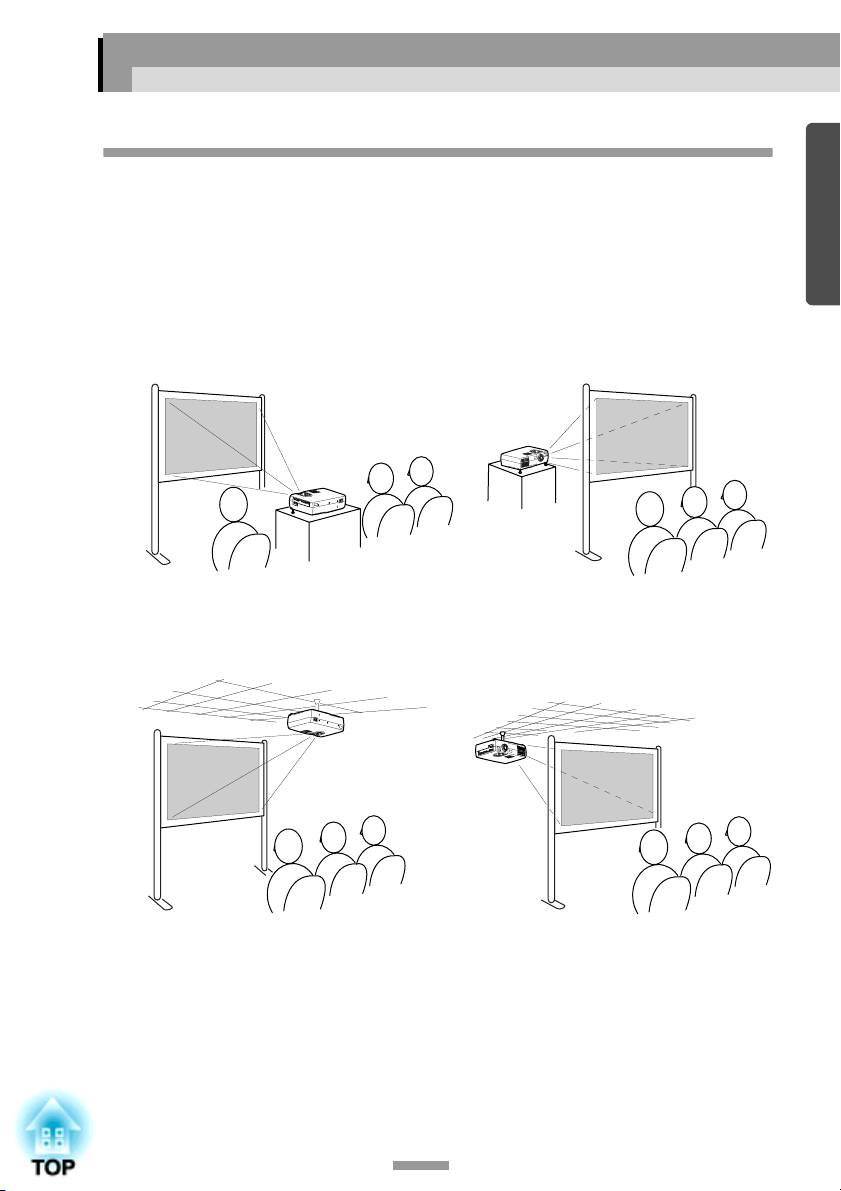
The projector supports the following two different projection methods, allowing
you to choose the best method for displaying your images.
Caution :
Before setting up the projector, be sure to first read the separate Safety Instructions/
World-Wide Warranty Terms.
• Front projection
• Front/ceiling projection • Rear projection using a
• Rear projection using a
translucent screen
translucent screen
* A special method of installation is required in order to suspend the projector from
the ceiling. Please contact the place of purchase if you would like to use this
installation method. The optional ceiling mount is required when installing the
projector to the ceiling. (p.80)
Tip :
When using rear/ceiling projection using a translucent screen, set the "Ceiling" or "Rear
Proj." command in the "Advanced" menu to match the installation method. (p.53)
15
Installation
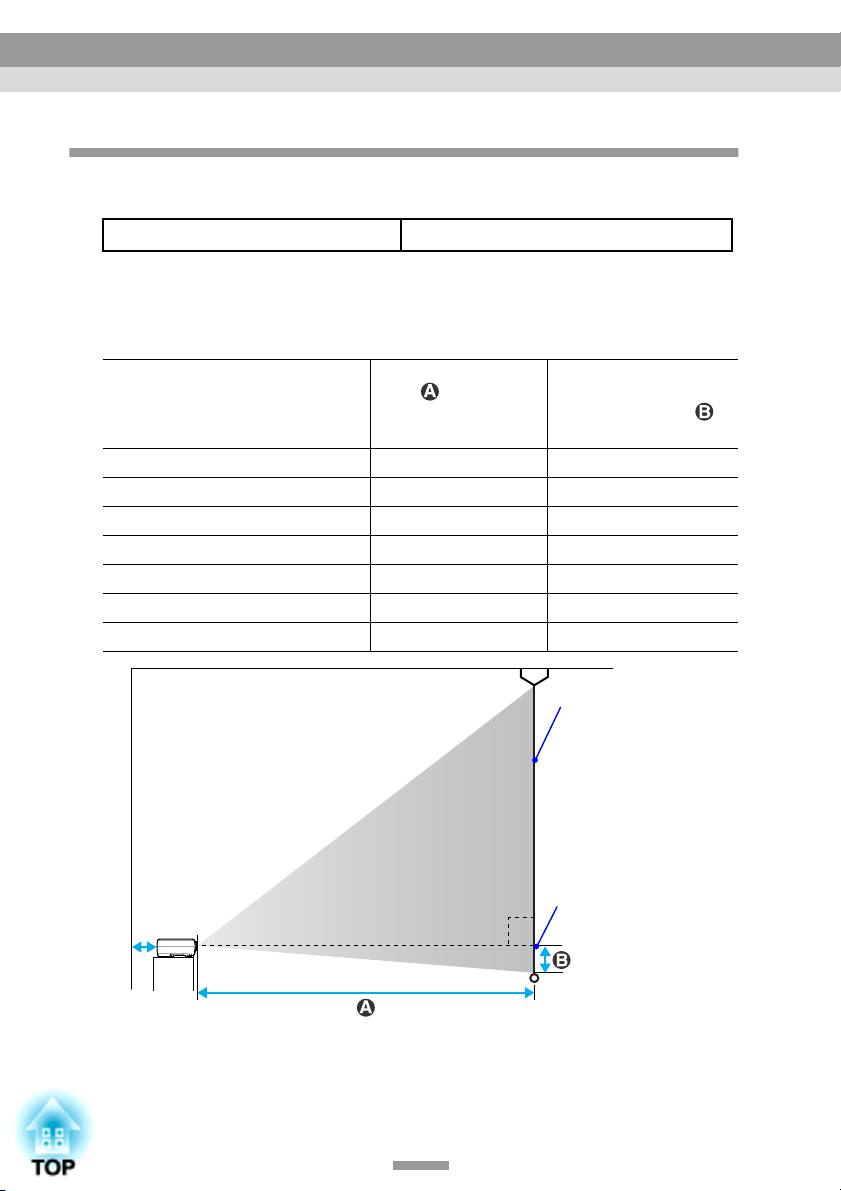
Screen Size and Projection Distance
The distance between the projector and the screen determines the actual image
size.
Recommended distance 0.9–11.3 m (2.9–37.0 ft.)
While referring to the table below, position the projector so that the image size
is smaller than the screen size.
The values should be used as a guide for setting up the projector. The actual
values will vary depending on projection conditions and the zoom setting.
4:3 Screen size
(cm (in.))
30" (61 × 46 (24.0 × 18.1)) 0.9–1.1 (2.9–3.6) 4.3 (1.7)
40" (81 × 61 (31.9 × 24.0)) 1.2–1.5 (3.9 –4.8) 5.8 (2.3)
60" (120 × 90 (47.2 × 35.4) 1.8–2.2 (5.9 –7.3) 8.6 (3.4)
80" (160 × 120 (63.0 × 47.2)) 2.4–3.0 (7.9 –9.8) 11.5 (4.5)
100" (200 × 150 (78.7 × 59.1)) 3.0–3.7 (9.9 –12.3) 14.4 (5.7)
200" (410 × 300 (161.4 × 118.1)) 6.1–7.5 (19.9 –24.6) 28.8 (11.3)
300" (610 × 460 (240.2 × 181.1)) 9.1–11.3 (29.8 –37.0) 43.1 (17.0)
Projection distance
(m (ft.))
Distance from centre
of lens to bottom
edge of screen
(cm (in.))
Screen
90º
Centre of lens
*
* When installing against a wall, leave a space of about 20 cm (7.9 in.) between the
projector and the wall.
Tip :
The image size will be reduced when keystone correction is carried out.
16

Connecting to a Computer
Caution :
When connecting the projector to a computer, be sure to check the following.
• Turn off the power for both the projector and the computer before connecting them. If
the power for either device is on at the time of connection, damage may result.
• Check the shapes of the cable connectors and the device ports before making the
connections. If you try to force a connector to fit a device port with a different shape or
number of terminals, damage to the connector or port may result.
Eligible Computers
The projector cannot be connected to some types of computer, or projection of
images may not be possible even if actual connection is possible. Make sure
that the computer you intend to use satisfies the conditions given below.
• Condition 1: The computer must have an image signal output port.
Check that the computer has a port such as an "RGB port", "monitor port" or
"CRT port" which can output image signals.
If the computer has a built-in monitor, or if using a laptop computer, it may
not be possible to connect the computer to the projector, or alternatively you
may need to purchase a separate external output port. Refer to the
documentation for your computer under a heading such as "Connecting an
external monitor" or similar for further details.
• Condition 2: The display resolution and frequency of the computer must be
listed in the "List of Supported Monitor Displays". See "Appendices: List of
Supported Monitor Displays" (p.86).
Some computers allow you to change the output resolution, so if necessary,
change the resolution to one that matches a setting in the "List of Supported
Monitor Displays", while referring to the documentation provided with the
computer.
Tip :
• You may need to purchase a separate adapter depending on the shape of the computer's
port. Refer to the documentation provided with the computer for further details.
• If the computer and projector are too far away from each other for the accessory
computer cable to reach, use the optional VGA-HD15 PC cable. See "Appendices:
Optional Accessories" (p.80)
17
Connecting to a Computer
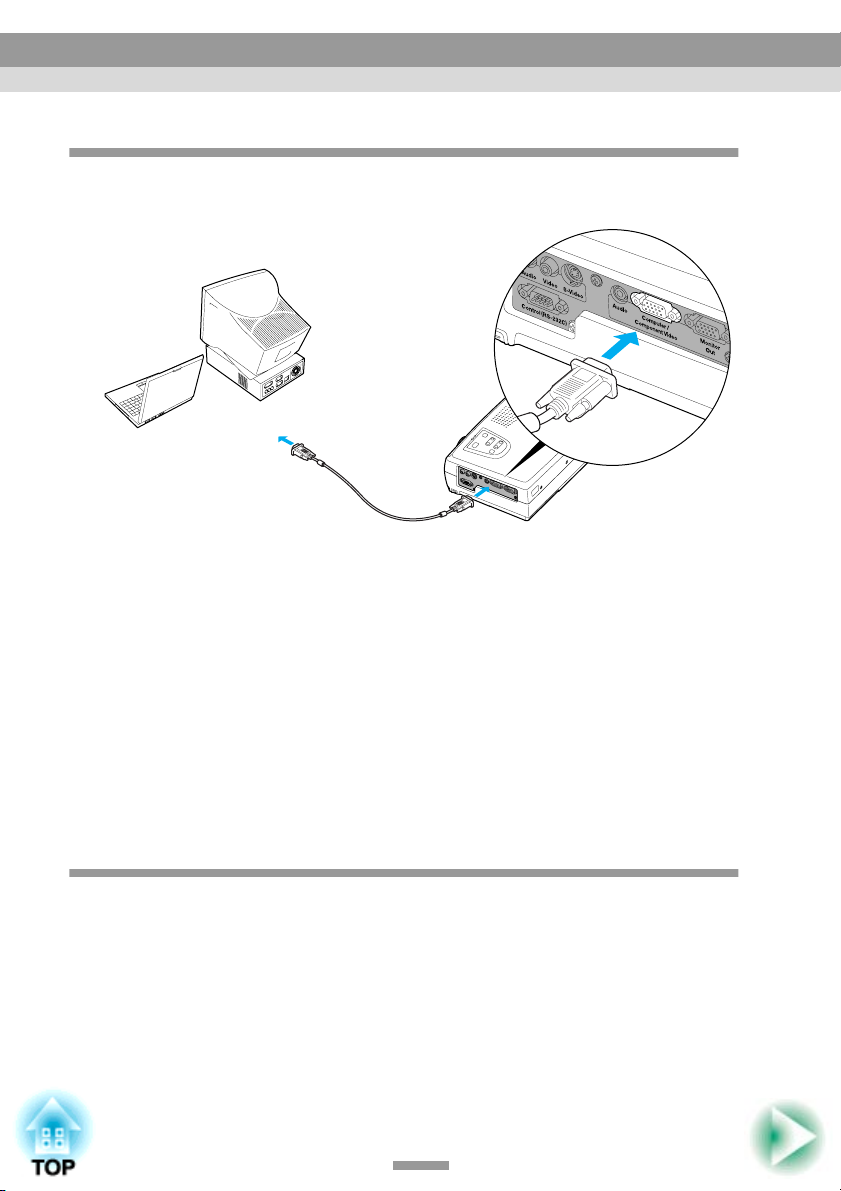
Projecting Images from the Computer
Use the accessory computer cable to connect the Computer/Component Video
port on the left side of the projector to the monitor port of the computer.
To monitor port
To Computer/
Computer cable
(accessory)
Tip :
• Change the "Input Signal" setting in the "Video" menu to "RGB" after making the
connections. (p.47)
• If more than one external component is connected to the projector, use the [Source]
button on the projector's control panel or the [Computer] button on the remote control
to select the Computer port as the input source. (p.30)
• Do not bind the power cable and the computer cable together, otherwise image
interference or errors in operation may result.
Component Video port
(blue)
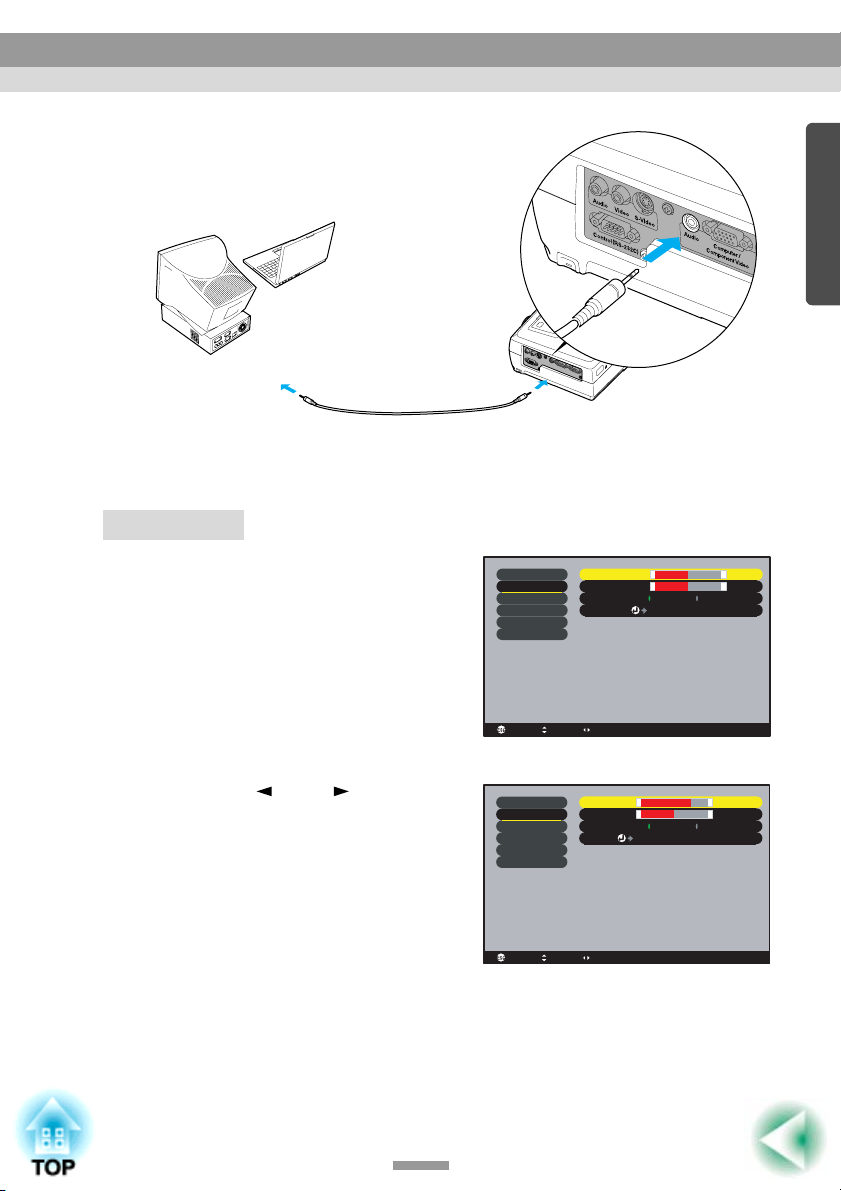
Playing Sound from the Computer
The projector has a single built-in speaker with a maximum output of 1 W. If
the computer that is connected to the projector has an audio output port, you
can output sound from the computer through the projector's speaker by
connecting the computer's audio output port and the Audio port (stereo mini
jack) on the left side of the projector using a stereo mini jack audio cable
(commercially-available). It is recommended that you use an audio cable with a
3.5 mm diameter stereo mini jack.
18
Connecting to a Computer
To audio output port
Stereo mini jack audio cable
(commercially-available)
Use the following procedure to adjust the volume of the sound output.
Procedure
To Audio port
Press the [Menu] button on the
1
remote control, and then select
"Volume" from the "Audio"
menu.
Video
Audio
Setting
Advanced
About
Reset All
Volume
Tone::
Audio Input
Reset
-
10
-
0
:
Computer Video
Execute
For details on this operation, refer to
"Using the Configuration Menus".
(p.56)
: Select: Return : Adjust
Use the [ ] and [ ] buttons to
2
adjust the volume.
The volume is increased or reduced
each time a button is pressed.
After making the adjustment, press the [Menu] button to exit
3
the configuration menu.
Video
Audio
Setting
Advanced
About
Reset All
Volume
Tone::
Audio Input
Reset
: Select: Return : Adjust
15
-
-
0
:
Computer Video
Execute
+
+
+
+
19
Connecting to a Computer
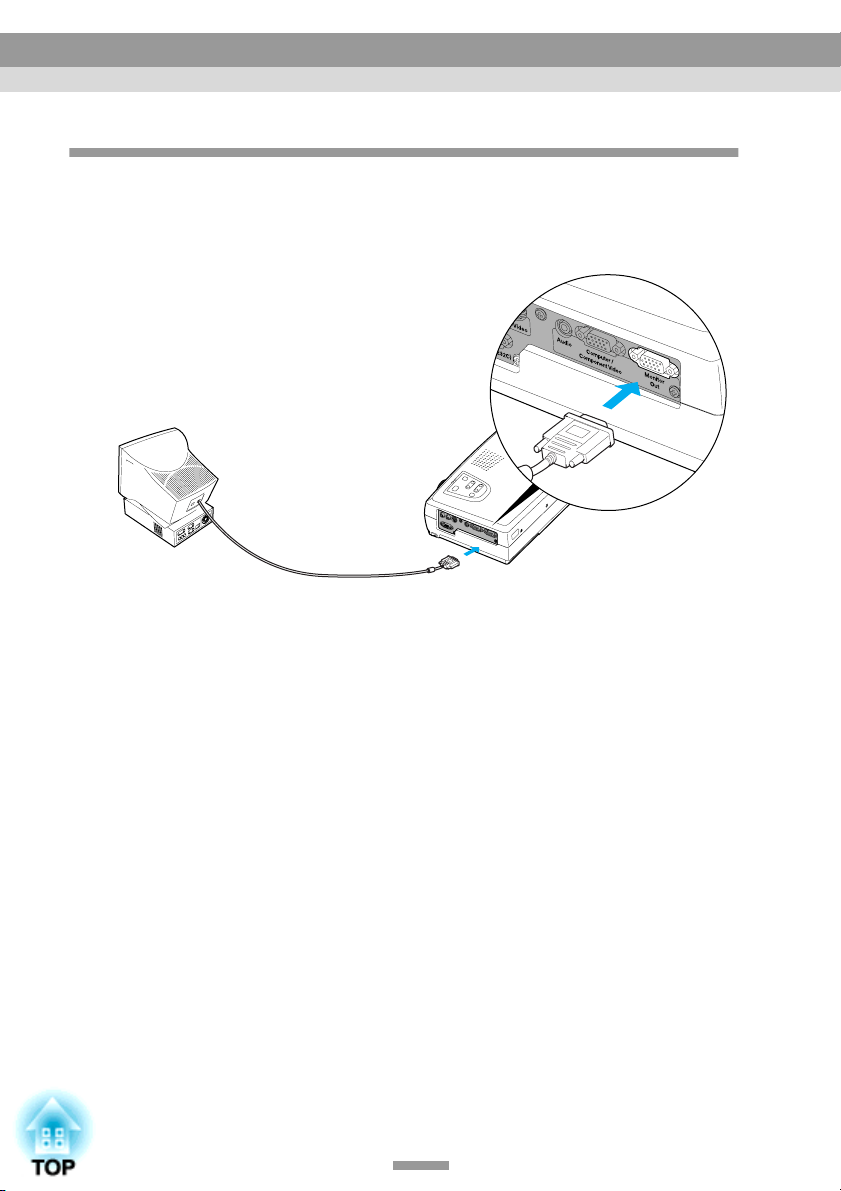
Connecting to an External Monitor
Images can be viewed on an external computer monitor at the same time they
are being projected by the projector. Use the cable provided with the computer
monitor to connect the monitor to the Monitor Out port at the left side of the
projector.
To Monitor Out port
Monitor port
Cable provided with monitor
(black)
Tip :
• Video images cannot be output to an external monitor.
• The setting gauge for keystone correction and the configuration menus and help menus
are not output to the external monitor.
20

Connecting to a Video Source
Caution :
When connecting the projector to other video sources, take the following precautions.
• Turn off the power for both the projector and the video source before connecting them.
If the power for either device is on at the time of connection, damage may result.
• Check the shapes of the cable connectors and the device ports before making the
connections. If you try to force a connector to fit a device port with a different shape or
number of terminals, a malfunction or damage to the connector or port may result.
Projecting Composite Video Images
Use a RCA video cable (commercially-available) to connect the video source to
the Video port on the left side of the projector.
To video output port (yellow)
RCA video cable
(commercially-available)
To Video port
Tip :
If more than one external component is connected to the projector, use the [Source]
button on the projector's control panel or the [S-Video/Video] button on the remote
control to select the Video port as the input source. (p.30)
21
Connecting to a Video Source
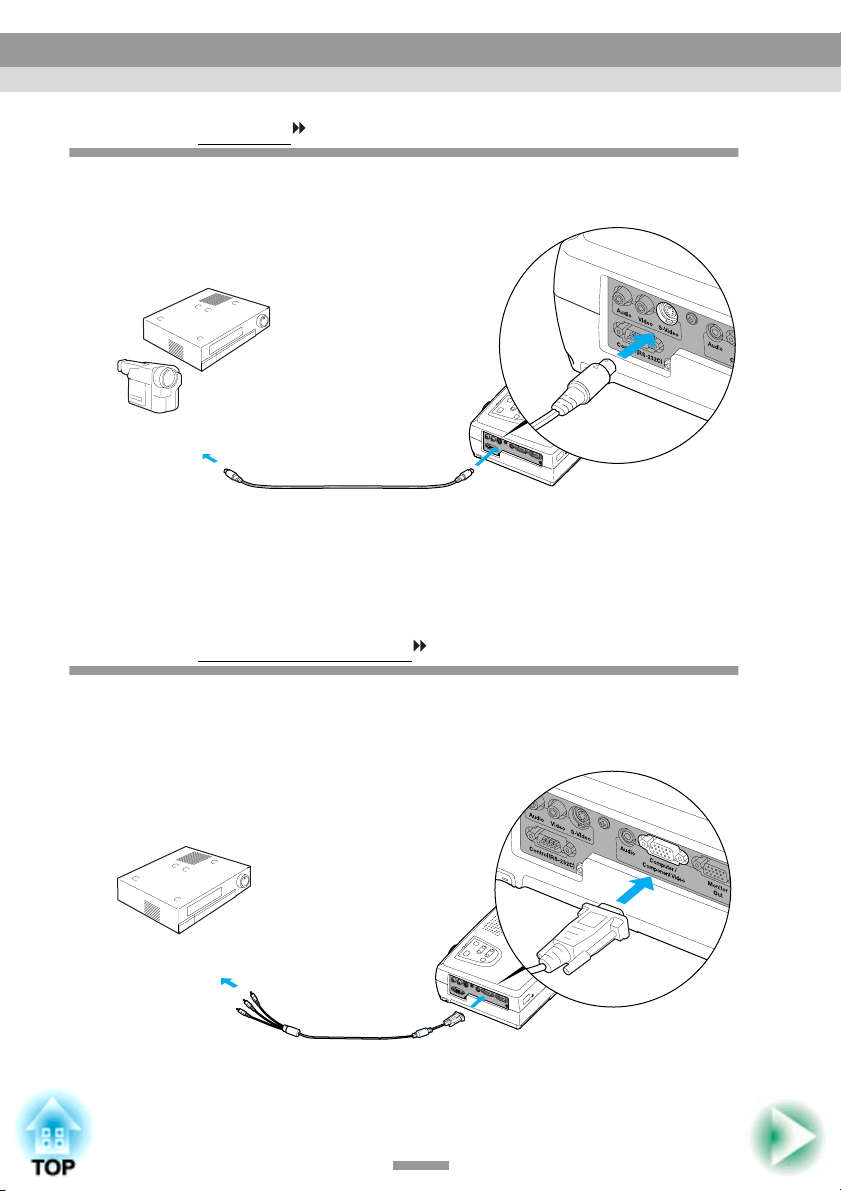
Projecting S-Video Images
Use an S-Video cable (commercially-available) to connect the video source to
the S-Video port on the left side of the projector.
To S-Video output port
S-Video cable
(commercially-available)
To S-Video port
Tip :
If more than one external component is connected to the projector, use the [Source]
button on the projector's control panel or the [S-Video/Video] button on the remote
control to select the S-Video port as the input source. (p.30)
Projecting Component Video Images
Use the optional component video cable to connect the video source to the
Computer/Component Video port on the left side of the projector. See
"Appendices: Optional Accessories" (p.80)
To component video output port
Component video cable
(optional)
To Computer/
Component Video port
(blue)
22
Connecting to a Video Source
Tip :
• Change the "Input Signal" setting in the "Video" menu to "YCbCr " or "YPbPr "
after making the connections. (p.49)
• If more than one external component is connected to the projector, use the [Source]
button on the projector's control panel or the [Computer] button on the remote control
to set the input source to "YCbCr " or "YPbPr ", depending on the type of signal being
input. (p.30)
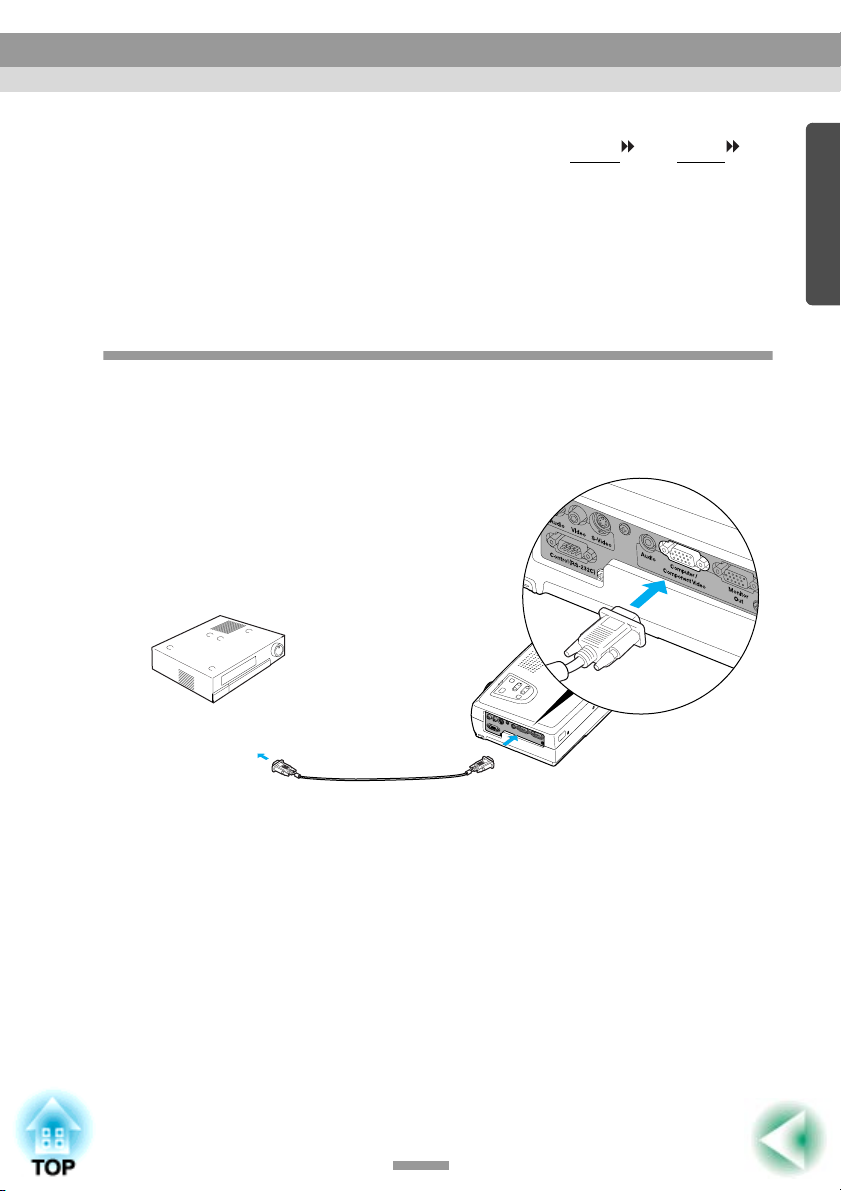
Projecting RGB Video Images
RGB video is used when RGB signals that have copy protection added are input
and projected. Use the accessory computer cable to connect the video source to
the Computer/Component Video port on the left side of the projector.
To RGB output port
Computer cable
(accessory)
To Computer/
Component Video port
(blue)
Tip :
• Change the "Input Signal" setting in the "Video" menu to "RGB" after making the
connections. (p.47)
• For a RGB connection, a commercially available adapter or converter cable might be
required.
23

Connecting to a Video Source
Playing Sound from the Video Equipment
The projector has a single built-in speaker with a maximum output of 1 W. You
can output sound from the video equipment through the projector's built-in
speaker by connecting the video equipment's audio output port and the Audio
port (RCA monaural jack) on the left side of the projector using an RCA audio
cable (commercially-available).
To audio output port
To Audio port
RCA audio cable
(commercially-available)
Use the following procedure to adjust the volume of the sound output.
Procedure
Press the [Menu] button on the
1
remote control, and then select
"Volume" from the "Audio"
menu.
For details on this operation, refer to
"Using the Configuration Menus".
(p.56)
24
Video
Audio
Setting
Advanced
About
Reset All
Volume
Tone::
Audio Input
Reset
: Select: Return : Adjust
-
10
-
0
:
Computer Video
Execute
+
+

Connecting to a Video Source
Use the [ ] and [ ] buttons to
2
adjust the volume.
The volume is increased or reduced
each time a button is pressed.
After making the adjustment, press the [Menu] button to exit
3
the configuration menu.
Video
Audio
Setting
Advanced
About
Reset All
Volume
Tone::
Audio Input
Reset
: Select: Return : Adjust
15
-
-
0
:
Computer Video
Execute
+
+
25


Basic Operations
This chapter describes basic operations such as turning projection
on and off and adjusting the projected images.
Turning On the Projector ..................................................28
• Connecting the Power Cable............................................................... 28
• Turning On the Power and Projecting Images.................................. 29
Turning Off the Projector ..................................................31
Adjusting the Screen Image .............................................33
• Adjusting the Image Size..................................................................... 33
• Adjusting the Image Angle.................................................................. 34
• Correcting Keystone Distortion.......................................................... 35
Adjusting the Image Quality .............................................37
• Focusing the Screen Image.................................................................. 37
• Adjusting Computer Images............................................................... 37
• Automatic Setup................................................................................................ 37
• Adjusting the Tracking...................................................................................... 38
• Adjusting the Sync............................................................................................ 39
• Selecting the Colour Mode.................................................................. 40
27
Turning On the Projector
Turn on the power to start projecting images.
Caution :
Be sure to read the separate Safety Instructions/World-Wide Warranty Terms before
projecting images.
Connecting the Power Cable
Procedure
Check that the power is turned off for the projector and all
1
components connected to the projector.
Connect the computer or other video source to the projector.
2
(p.17, 21)
Remove the lens cover.
3
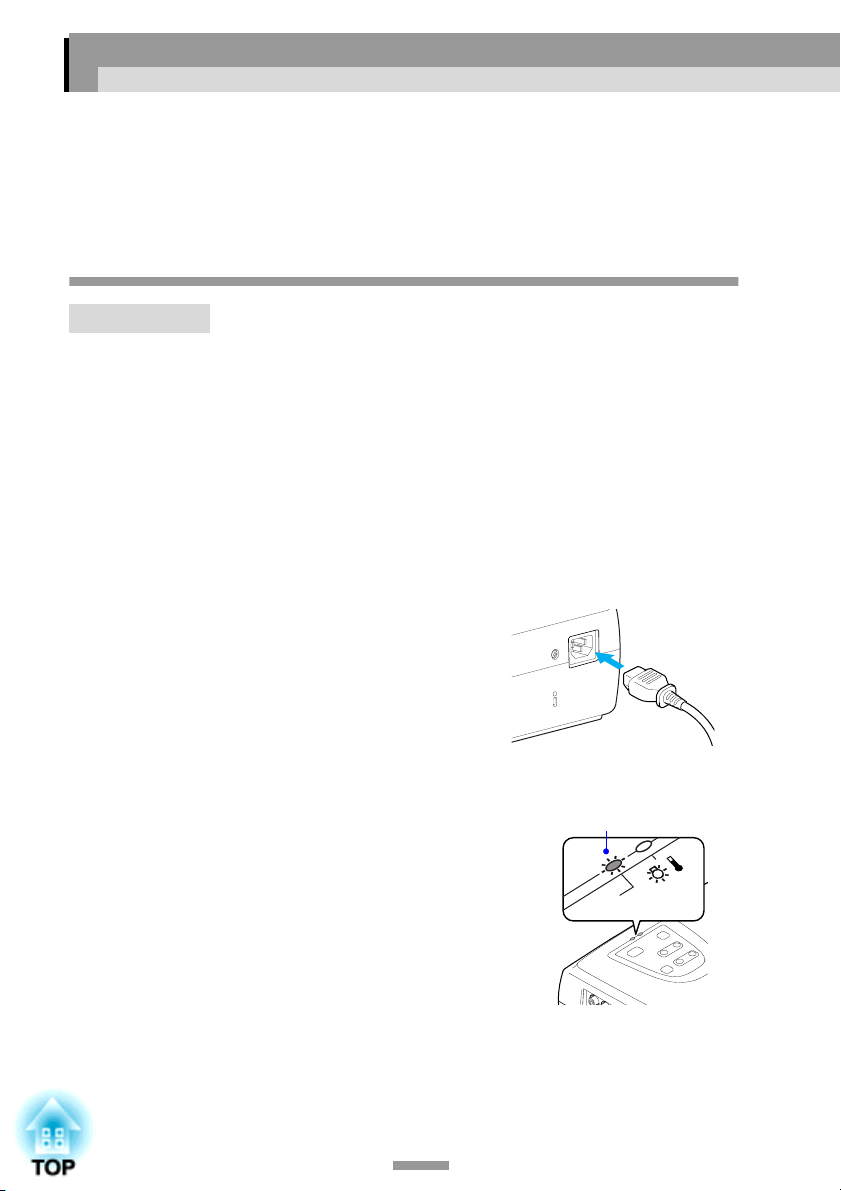
Connect the accessory power cable
4
to the projector.
Check that the power cable connector is
facing the same way as the power inlet on
the projector, and then insert the power
cable connector securely into the
projector.
Connect the other end of the power
5
cable to an earthed electrical outlet.
Wait until the Power indicator lights
orange.
Tip :
The projector's control panel and remote control
buttons cannot be operated while the Power
indicator is flashing orange.
28
Lit orange
Powe r
Loading...