

Page 1
User's Guide
Printing
Copying
Scanning
Maintaining the Printer
Solving Problems
NPD6205-01 EN
Page 2

Contents
Guide to This Manual
Introduction to the Manuals...................6
Searching for Information....................6
Printing Only the Pages You Need.............. 7
About is Manual......................... 7
Marks and Symbols.......................7
Notes on Screenshots and Illustrations.........8
Operating System References................8
Trademarks...............................9
Copyright...............................10
Important Instructions
Safety Instructions.........................12
Safety Instructions for Ink................. 12
Printer Advisories and Warnings.............. 12
Advisories and Warnings for Setting Up the
Printer................................13
Advisories and Warnings for Using the Printer. . 13
Advisories and Warnings for Using the LCD
Screen................................14
Advisories and Warnings for Using the
Printer with a Wireless Connection...........14
Advisories and Warnings for Transporting or
Storing the Printer.......................14
Protecting Your Personal Information...........14
Part Names and Functions
Front...................................16
Rear...................................17
Guide to the Control Panel
Control Panel............................ 19
Home Screen Conguration..................19
Guide to the Network Icon.................20
Entering Characters........................20
Viewing Animations....................... 21
Loading Paper
Paper Handling Precautions..................24
Paper Size and Type Settings..................24
List of Paper Types.......................25
Loading Paper in the Paper Cassette............26
Loading Envelopes in the Paper Cassette.........29
Placing Originals
Placing Originals on the Scanner Glass. . . . . . . . . . 32
Printing
Printing Documents........................35
Printing from a Computer - Windows.........35
Printing from a Computer - Mac OS..........60
Printing Documents from Smart Devices (iOS). . 67
Printing Documents from Smart Devices
(Android).............................69
Printing on Envelopes......................70
Printing on Envelopes from a Computer
(Windows)............................ 70
Printing on Envelopes from a Computer
(Mac OS)..............................70
Printing Web Pages........................ 71
Printing Web Pages from a Computer.........71
Printing Web Pages from Smart Devices.......71
Printing Using a Cloud Service................72
Registering to Epson Connect Service from
the Control Panel........................72
Copying
Copying Originals.........................75
Menu Options for Copying.................76
Copying by Enlarging or Reducing...........77
Copying Multiple Originals onto One Sheet. . . . .78
Copying ID card..........................80
Scanning
Available Scanning Methods..................83
Basic Information on Scanning................83
Recommended File Formats to Suit Your
Purpose...............................83
Recommended Resolutions to Suit Your
Purpose...............................84
Scanning Originals to a Computer............. 84
Scanning from the Control Panel............84
Scanning from a Computer.................85
Scanning Originals Using WSD............... 86
Setting Up a WSD Port....................86
Scanning Originals to a Smart Device...........88
Advanced Scanning........................89
2
Page 3

Making Custom Settings for Scanning Using
the Control Panel........................89
Decreasing the File Size of the Scanned Image. . . 92
Maintaining the Printer
Checking the Ink Levels.....................94
Checking the Ink Levels (Windows)..........94
Checking the Ink Levels (Mac OS)........... 94
Improving Paper Feeding Problems. . . . . . . . . . . . .95
Improving Print, Copy, and Scan Quality.........97
Checking and Cleaning the Print Head........97
Running Power Cleaning..................99
Preventing nozzle clogging................101
Aligning the Print Head..................101
Cleaning the Paper Path for Ink Smears.......101
Cleaning the Scanner Glass................102
Cleaning the Translucent Film............. 102
Cleaning the Printer.......................104
Cleaning Spilled ink.......................105
Checking the Total Number of Pages Fed
rough the Printer.......................105
Checking the Total Number of Pages Fed
rough
Checking the Total Number of Pages Fed
rough the Printer (Windows)............106
Checking the Total Number of Pages Fed
rough the Printer (Mac OS)............. 106
Saving Power............................106
Saving Power - Control Panel..............107
Installing or Uninstalling Applications Separately. 107
Installing the Applications Separately........107
Adding the Printer (for Mac OS Only)........110
Uninstalling Applications.................110
Updating Applications and Firmware. . . . . . . . 112
Transporting and Storing the Printer...........113
the Printer (Control Panel).........106
Solving Problems
Printer Does Not Work as Expected........ 118
e
e Printer Does Not Turn On or O........118
Paper Does Not Feed Properly. . . . . . . . . . . . . 118
Cannot Print..........................122
Cannot Start Scanning...................137
Cannot Operate the Printer as Expected. . . . . . 147
An Error Code is Displayed on the LCD Screen. . . 149
Paper Gets Jammed.......................150
Removing Jammed Paper.................150
Preventing Paper Jams...................153
It is Time to Rell the Ink...................153
Ink Bottle Handling Precautions............153
Relling the Ink Tank....................154
Printing, Copying, and Scanning Quality is Poor. . 159
Print Quality is Poor.....................159
Copy Quality is Poor.................... 164
Scanned Image Problems.................170
Cannot Solve Problem Aer Trying All Solutions. .172
Cannot Solve Printing or Copying Problems. . . 172
Adding or Replacing the Computer or
Devices
Connecting to a Printer that has been
Connected to the Network..................175
Using a Network Printer from a Second
Computer............................175
Using a Network Printer from a Smart Device. . 176
Re-setting the Network Connection........... 176
When Replacing the Wireless Router.........176
When Changing the Computer.............177
Changing the Connection Method to the
Computer............................178
Making Wi-Fi Settings from the Control Panel. .180
Connecting a Smart Device and Printer Directly
(Wi-Fi Direct)...........................183
About Wi-Fi Direct.....................183
Connecting to an iPhone, iPad, or iPod touch
using Wi-Fi Direct......................183
Connecting to Android Devices using Wi-Fi
Direct...............................187
Connecting to Devices other than iOS and
Android using Wi-Fi Direct...............189
Disconnecting Wi-Fi Direct (Simple AP)
Connection...........................192
Changing the Wi-Fi Direct (Simple AP)
Settings Such as the SSID.................192
Checking the Network Connection Status.......193
Checking the Network Connection Status
from the Control Panel...................193
Printing a Network Connection Report. . . . . . . 194
Printing a Network Status Sheet............ 200
Product Information
Paper Information........................202
Available Paper and Capacities.............202
Unavailable Paper Types..................203
Consumable Products Information............204
Ink Bottle Codes....................... 204
Soware Information......................205
3
Page 4

Soware for Printing....................205
Soware for Scanning....................210
Soware for Making Settings.............. 212
Soware for Updating................... 214
Settings Menu List........................214
Maintenance..........................214
Printer Setup..........................215
Network Settings.......................217
Epson Connect Services..................218
Google Cloud Print Services...............218
Print Status Sheet.......................219
Print Counter..........................219
Reports..............................219
Customer Research..................... 219
Restore Default Settings..................219
Firmware Update.......................220
Product Specications.....................220
Printer Specications....................220
Scanner
Interface
Network Specications...................222
Supported ird Party Services.............223
Dimensions...........................224
Electrical
Environmental Specications..............225
System Requirements....................225
Regulatory Information....................226
Standards and Approvals................. 226
Standards and Approvals for European Model. . 226
Restrictions on Copying..................226
Specications
Specications
Specications
...................221
...................222
..................224
Where to Get Help
Technical Support Web Site..................229
Contacting Epson Support..................229
Before Contacting Epson.................229
Help for Users in Europe..................229
Help for Users in Taiwan..................229
Help for Users in India...................230
Help for Users in Hong Kong..............230
4
Page 5

Guide to This Manual
Introduction to the Manuals...........................................6
Searching for Information.............................................6
Printing Only the Pages You Need.......................................7
About is Manual..................................................7
Trademarks.......................................................9
Copyright........................................................10
Page 6

Guide to This Manual
>
Searching for Information
Introduction to the Manuals
following manuals are supplied with your Epson printer. As well as the manuals, check the various types of
e
help information available from the printer itself or from the Epson soware applications.
❏ Start Here (paper manual)
Provides you with information on setting up the printer, installing the soware, using the printer, solving
problems, and so on.
❏ User's Guide (digital manual)
is manual. Provides overall information and instructions on using the printer, on network settings when
using the printer on a network, and on solving problems.
You can obtain the latest versions of the above manuals with the following methods.
❏ Paper manual
Visit the Epson Europe support website at http://www.epson.eu/Support, or the Epson worldwide support
website at http://support.epson.net/.
❏ Digital manual
is manual is available in PDF and HTML versions. You can view the HTML version from the epson.sn
support page. Start EPSON Soware Updater on your computer to view the PDF version. EPSON Soware
Updater checks for available updates of Epson soware applications and the digital manuals, and allows you to
download the latest ones.
http://epson.sn
Related Information
& “Application for Updating Soware and Firmware (EPSON Soware Updater)” on page 214
Searching for Information
e PDF manual allows you to search for information you are looking for by keyword, or jump directly to specic
ections using the bookmarks. is section explains how to use a PDF manual that has been opened in Adobe
Reader X on your computer.
Searching by keyword
Click Edit > Advanced Search. Enter the keyword (text) for information you want to nd in the search window,
and then click Search. Hits are displayed as a list. Click one of the displayed hits to jump to that page.
6
Page 7
Guide to This Manual
Jumping directly from bookmarks
Click a title to jump to that page. Click + or > to view the lower level titles in that section. To return to the previous
page, perform the following operation on your keyboard.
❏ Windows: Hold down Alt. and then press ←.
❏ Mac OS: Hold down the command key, and then press ←.
>
About This Manual>Marks and Symbols
Printing Only the Pages You Need
You can extract and print only the pages you need. Click Print in the File menu, and then specify the pages you
want to print in Pages in Pages to Print.
❏ To specify a series of pages, enter a hyphen between the start page and the end page.
Example: 20-25
❏ To specify pages that are not in series, divide the pages with commas.
Example: 5, 10, 15
About This Manual
is section explains the meaning of marks and symbols, notes on descriptions, and operating system reference
information used in this manual.
Marks and Symbols
Caution:
!
Instructions that must be followed carefully to avoid bodily injury.
7
Page 8

Guide to This Manual
Important:
>
About This Manual>Operating System References
c
Instructions that must be observed to avoid damage to your equipment.
Note:
Provides complementary and reference information.
Related Information
& Links to related sections.
Notes on Screenshots and Illustrations
❏ Screenshots of the printer driver are from Windows 10 or macOS High Sierra. e content displayed on the
screens varies depending on the model and situation.
❏ Illustrations used in this manual are examples only. Although there may be slight dierences depending on
themodel, the method of operation is the same.
❏ Some of the menu items on the LCD screen vary depending on the model and settings.
❏ You can read the QR code using dedicated app.
Operating System References
Windows
In this manual, terms such as "Windows 10", "Windows 8.1", "Windows 8", "Windows 7", "Windows Vista",
"Windows XP", "Windows Server 2019", "Windows Server 2016", "Windows Server 2012 R2", "Windows Server
2012", "Windows Server 2008 R2", "Windows Server 2008", "Windows Server 2003 R2", and "Windows Server
2003" refer to the following operating systems. Additionally, "Windows" is used to refer to all versions.
❏ Microso
❏ Microso
❏
Microso
❏ Microso
❏ Microso
❏
Microso
❏ Microso
❏ Microso
❏
Microso
❏ Microso
❏ Microso
❏
Microso
❏ Microso
❏ Microso
❏
Microso
Windows® 10 operating system
®
Windows® 8.1 operating system
®
Windows® 8 operating system
®
Windows® 7 operating system
®
Windows Vista® operating system
®
Windows® XP operating system
®
Windows® XP Professional x64 Edition operating system
®
Windows Server® 2019 operating system
®
Windows Server® 2016 operating system
®
Windows Server® 2012 R2 operating system
®
Windows Server® 2012 operating system
®
Windows Server® 2008 R2 operating system
®
Windows Server® 2008 operating system
®
Windows Server® 2003 R2 operating system
®
Windows Server® 2003 operating system
®
8
Page 9

Guide to This Manual
Mac OS
In this manual, "Mac OS" is used to refer to macOS Mojave, macOS High Sierra, macOS Sierra, OS X El Capitan,
OS X Yosemite, OS X Mavericks, OS X Mountain Lion, Mac OS X v10.7.x, and Mac OS X v10.6.8.
>
Trademarks
Trademarks
❏ EPSON® is a registered trademark, and EPSON EXCEED YOUR VISION or EXCEED YOUR VISION is a
trademark of Seiko Epson Corporation.
❏ Epson Scan 2 soware is based in part on the work of the Independent JPEG Group.
❏
libti
Copyright © 1988-1997 Sam
Copyright © 1991-1997 Silicon Graphics, Inc.
Permission to use, copy, modify, distribute, and sell this soware and its documentation for any purpose is
hereby granted without fee, provided that (i) the above copyright notices and this permission notice appear in
all copies of the soware and related documentation, and (ii) the names of Sam Leer and Silicon Graphics
may not be used in any advertising or publicity relating to the soware without the specic, prior written
permission of Sam Leer and Silicon Graphics.
THE SOFTWARE IS PROVIDED "AS-IS" AND WITHOUT WARRANTY OF ANY KIND, EXPRESS,
IMPLIED OR OTHERWISE, INCLUDING WITHOUT LIMITATION, ANY WARRANTY OF
MERCHANTABILITY OR FITNESS FOR A PARTICULAR PURPOSE.
IN NO EVENT SHALL SAM LEFFLER OR SILICON GRAPHICS BE LIABLE FOR ANY SPECIAL,
INCIDENTAL, INDIRECT OR CONSEQUENTIAL DAMAGES OF ANY KIND, OR ANY DAMAGES
WHATSOEVER RESULTING FROM LOSS OF USE, DATA OR PROFITS, WHETHER OR NOT ADVISED
OF THE POSSIBILITY OF DAMAGE, AND ON ANY THEORY OF LIABILITY, ARISING OUT OF OR IN
CONNECTION WITH THE USE OR PERFORMANCE OF THIS SOFTWARE.
Leer
❏ QR Code is a registered trademark of DENSO WAVE INCORPORATED in Japan and other countries.
❏ Intel
❏ Microso
❏ Apple, Mac, macOS, OS X, Bonjour, ColorSync, Safari, AirPrint, iPad, iPhone, iPod touch, and iTunes are
❏ Use of the Works with Apple badge means that an accessory has been designed to work specically with the
❏ Google Cloud Print, Chrome, Chrome OS, Google Play and Android are trademarks of Google LLC.
❏ Adobe and Adobe Reader are either registered trademarks or trademarks of Adobe Systems Incorporated in the
❏ Firefox is a trademark of the Mozilla Foundation in the U.S. and other countries.
❏ General Notice: Other product names used herein are for
is a registered trademark of Intel Corporation.
®
, Windows®, Windows Server®, and Windows Vista® are registered trademarks of Microso
Corporation.
trademarks of Apple Inc., registered in the U.S. and other countries.
technology identied in the badge and has been certied by the developer to meet Apple performance
standards.
United States and/or other countries.
of their respective owners. Epson disclaims any and all rights in those marks.
®
identication
purposes only and may be trademarks
9
Page 10

Guide to This Manual
>
Copyright
Copyright
No part of this publication may be reproduced, stored in a retrieval system, or transmitted in any form or by any
means, electronic, mechanical, photocopying, recording, or otherwise, without the prior written permission of
Seiko Epson Corporation. No patent liability is assumed with respect to the use of the information contained
herein. Neither is any liability assumed for damages resulting from the use of the information herein. e
information contained herein is designed only for use with this Epson product. Epson is not responsible for any
use of this information as applied to other products.
Neither Seiko Epson Corporation nor its aliates shall be liable to the purchaser of this product or third parties for
damages, losses, costs, or expenses incurred by the purchaser or third parties as a result of accident, misuse, or
abuse of this product or unauthorized modications, repairs, or alterations to this product, or (excluding the U.S.)
failure to strictly comply with Seiko Epson Corporation's operating and maintenance instructions.
Seiko Epson Corporation and its aliates shall not be liable for any damages or problems arising from the use of
any options or any consumable products other than those designated as Original Epson Products or Epson
Approved Products by Seiko Epson Corporation.
Seiko Epson Corporation shall not be held liable for any damage resulting from electromagnetic interference that
occurs from the use of any interface cables other than those designated as Epson Approved Products by Seiko
Epson Corporation.
© 2019 Seiko Epson Corporation
e contents of this manual and the specications of this product are subject to change without notice.
10
Page 11

Important Instructions
Safety Instructions................................................. 12
Printer Advisories and Warnings.......................................12
Protecting Your Personal Information................................... 14
Page 12

Important Instructions
>
Printer Advisories and Warnings
Safety Instructions
Read and follow these instructions to ensure safe use of this printer. Make sure you keep this manual for future
reference. Also, be sure to follow all warnings and instructions marked on the printer.
❏ Some of the symbols used on your printer are to ensure safety and proper use of the printer. Visit the following
Web site to learn the meaning of the symbols.
http://support.epson.net/symbols
❏ Use only the power cord supplied with the printer and do not use the cord with any other equipment. Use of
other cords with this printer or the use of the supplied power cord with other equipment may result in re or
electric shock.
❏ Be sure your AC power cord meets the relevant local safety standard.
❏ Never disassemble, modify, or attempt to repair the power cord, plug, printer unit, scanner unit, or options by
yourself, except as specically explained in the printer's manuals.
❏ Unplug the printer and refer servicing to qualied service personnel under the following conditions:
e power cord or plug is damaged; liquid has entered the printer; the printer has been dropped or the casing
damaged; the printer does not operate normally or exhibits a distinct change in performance. Do not adjust
controls that are not covered by the operating instructions.
❏ Place the printer near a wall outlet where the plug can be easily unplugged.
❏ Do not place or store the printer outdoors, near excessive dirt or dust, water, heat sources, or in locations
subject to shocks, vibrations, high temperature or humidity.
❏ Take care not to spill liquid on the printer and not to handle the printer with wet hands.
❏ Keep the printer at least 22 cm away from cardiac pacemakers. Radio waves from this printer may adversely
aect the operation of cardiac pacemakers.
❏ If the LCD screen is damaged, contact your dealer. If the liquid crystal solution gets on your hands, wash them
thoroughly with soap and water. If the liquid crystal solution gets into your eyes, ush them immediately with
water. If discomfort or vision problems remain
a thorough
aer
ushing,
see a doctor immediately.
Safety Instructions for Ink
❏ Be careful not to touch ink when you handle the ink tank, ink tank cap, and opened ink bottle or ink bottle cap.
❏ If ink gets on your skin, wash the area thoroughly with soap and water.
❏ If ink gets into your eyes, ush them immediately with water. If discomfort or vision problems continue aer
a thorough
❏ If ink gets into your mouth, see a doctor right away.
❏ Do not shake an ink bottle too vigorously or subject it to strong impacts as this can cause ink to leak.
ushing,
see a doctor immediately.
❏ Keep ink bottle and the ink tank unit out of the reach of children. Do not allow children to drink from or
handle the ink bottle and ink bottle cap.
Printer Advisories and Warnings
Read and follow these instructions to avoid damaging the printer or your property. Make sure you keep this
manual for future reference.
12
Page 13

Important Instructions
>
Printer Advisories and Warnings>Advisories and Warnings for Using the Printer
Advisories and Warnings for Setting Up the Printer
❏ Do not block or cover the vents and openings in the printer.
❏ Use only the type of power source indicated on the printer's label.
❏ Avoid using outlets on the same circuit as photocopiers or air control systems that regularly switch on and o.
❏ Avoid electrical outlets controlled by wall switches or automatic timers.
❏ Keep the entire computer system away from potential sources of electromagnetic interference, such as
loudspeakers or the base units of cordless telephones.
❏ e power-supply cords should be placed to avoid abrasions, cuts, fraying, crimping, and kinking. Do not place
objects on top of the power-supply cords and do not allow the power-supply cords to be stepped on or run over.
Be particularly careful to keep all the power-supply cords straight at the ends and the points where they enter
and leave the transformer.
❏ If you use an extension cord with the printer, make sure that the total ampere rating of the devices plugged into
the extension cord does not exceed the cord's ampere rating. Also, make sure that the total ampere rating of all
devices plugged into the wall outlet does not exceed the wall outlet's ampere rating.
❏ If you plan to use the printer in Germany, the building installation must be protected by a 10 or 16 amp circuit
breaker to provide adequate short-circuit protection and over-current protection for the printer.
❏ When connecting the printer to a computer or other device with a cable, ensure the correct orientation of the
connectors. Each connector has only one correct orientation. Inserting a connector in the wrong orientation
may damage both devices connected by the cable.
❏ Place the printer on a
will not operate properly if it is tilted at an angle.
❏ Allow space above the printer so that you can fully raise the document cover.
❏ Leave enough space in front of the printer for the paper to be fully ejected.
❏ Avoid places subject to rapid changes in temperature and humidity. Also, keep the printer away from direct
sunlight, strong light, or heat sources.
stable surface that extends beyond the base of the printer in all directions. e printer
at,
Advisories and Warnings for Using the Printer
❏ Do not insert objects through the slots in the printer.
❏ Do not put your hand inside the printer during printing.
❏ Do not touch the white at cable inside the printer.
❏ Do not use aerosol products that contain ammable gases inside or around the printer. Doing so may cause re.
❏ Do not move the print head by hand if not instructed to do so; otherwise, you may damage the printer.
❏ Be careful not to trap your ngers when closing the scanner unit.
❏ Do not press too hard on the scanner glass when placing the originals.
❏ If the ink tank is not lled up to the lower line, rell the ink soon. Continued use of the printer when the ink
level is below the lower line on the tank could damage the printer.
❏ Always turn the printer o using the
P
until the
❏ If you are not going to use the printer for a long period, be sure to unplug the power cord from the electrical
outlet.
light stops ashing.
P
button. Do not unplug the printer or turn o the power at the outlet
13
Page 14

Important Instructions
>
Protecting Your Personal Information
Advisories and Warnings for Using the LCD Screen
❏ e LCD screen may contain a few small bright or dark spots, and because of its features it may have an uneven
brightness. ese are normal and do not indicate that it is damaged in any way.
❏ Only use a dry, so cloth for cleaning. Do not use liquid or chemical cleaners.
❏ e exterior cover of the LCD screen could break if it receives a heavy impact. Contact your dealer if the
screen's surface chips or cracks, and do not touch or attempt to remove the broken pieces.
Advisories and Warnings for Using the Printer with a Wireless Connection
❏ Radio waves from this printer may negatively aect the operation of medical electronic equipment, causing
them to malfunction. When using this printer inside medical facilities or near medical equipment, follow
directions from the authorized personnel representing the medical facilities, and follow all posted warnings and
directions on the medical equipment.
❏ Radio waves from this printer may negatively
automatic doors or re alarms, and could lead to accidents due to malfunction. When using this printer near
automatically controlled devices, follow all posted warnings and directions on these devices.
the operation of automatically controlled devices such as
aect
Advisories and Warnings for Transporting or Storing the Printer
❏ When storing or transporting the printer, avoid tilting it, placing it vertically, or turning it upside down;
otherwise ink may leak.
❏ Before transporting the printer, make sure that the print head is in the home (far right) position.
Protecting Your Personal Information
When you give the printer to someone else or dispose of it, erase all the personal information stored in the printer's
memory by selecting Settings > Restore Default Settings > Clear All Data and Settings on the control panel.
14
Page 15

Part Names and Functions
Front...........................................................16
Rear............................................................17
Page 16
Part Names and Functions
Front
>
Front
Control panel Allows you to make settings and perform operations on the printer. Also
A
displays the printer’s status.
Scanner unit Scans placed originals. Open to rell the ink tank or to remove jammed
B
paper. This unit should usually be kept closed.
Ink tank cap Open to rell the ink tank.
C
Ink tank Contains black ink and is located on the print head.
D
Front cover Open to load paper in the paper cassette.
E
Output tray Holds the ejected paper.
A
Paper cassette Loads paper.
B
Edge guide Feeds the paper straight into the printer. Slide to the edges of the paper.
C
Paper guide extension Slide out to load paper larger than A4 size.
D
16
Page 17
Part Names and Functions
Document cover Blocks external light while scanning.
A
>
Rear
B
Rear
A
B
C
Scanner glass Place the originals.
Rear cover Remove when removing jammed paper.
AC inlet Connects the power cord.
USB port Connects a USB cable to connect with a computer.
17
Page 18

Guide to the Control Panel
Control Panel.....................................................19
Home Screen Conguration.......................................... 19
Entering Characters................................................ 20
Viewing Animations................................................21
Page 19
Guide to the Control Panel
Control Panel
>
Home Screen Conguration
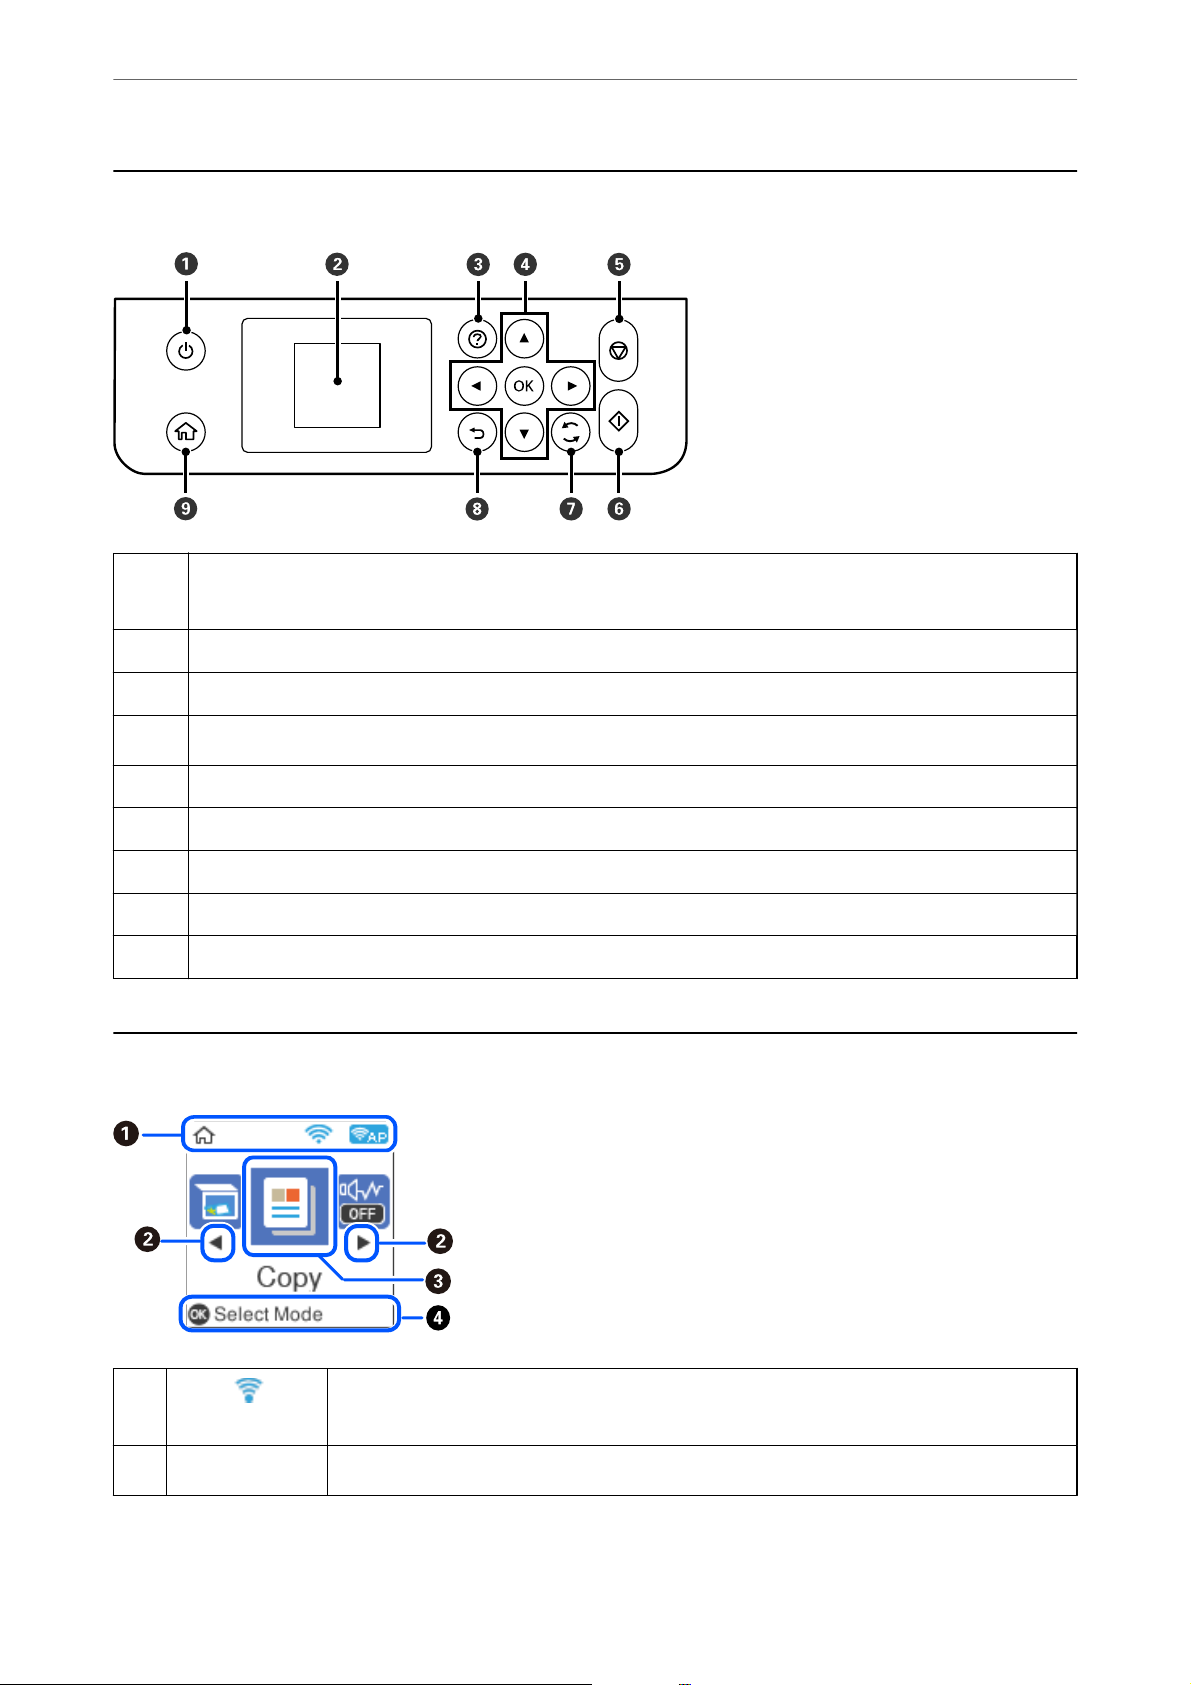
A
B
C
D
E
F
G
H
I
Turns the printer on or o.
Unplug the power cord after checking that the power light is o.
Displays menus and messages. Use buttons on the control panel to select a menu or to make settings.
Displays the solutions when you are in trouble.
Use the u d l r buttons to select a menu, and then press the OK button to enter the selected menu.
Stops the current operation.
Starts an operation such as printing or copying.
Applies to a variety of functions depending on the situation.
Returns to the previous screen.
Displays the home screen.
Home Screen
Conguration
A
B
l r
Displays the network connection status. See the following for more details.
“Guide to the Network Icon” on page 20
When l and r are displayed, you can scroll right or left by pressing the l or r button.
19
Page 20

Guide to the Control Panel
Displays each menu.
C
❏ Scan
Allows you to scan documents or photos and save them to a computer.
❏ Copy
Allows you to copy documents.
❏ Quiet Mode
Displays Quiet Mode setting that allows you to reduce the noise the printer makes. However, enabling this may
reduce print speed. Depending on the paper type and print quality settings you selected, there may be no
dierence in the printer's noise level. You can also make this setting from the Settings menu.
Settings > Printer Setup > Quiet Mode
❏ Settings
Allows you to make settings related to maintenance, printer settings, and operations.
❏ Maintenance
Displays the menus recommended to improve the quality of your printouts such as unclogging nozzles by printing
a nozzle check pattern and performing head cleaning, and improving blurring or banding in your printouts by
aligning the print head. You can also make this setting from the Settings menu.
Settings > Maintenance
>
Entering Characters
❏ Wi-Fi Setup
Displays menus that allow you to set up the printer for use on a wireless network. You can also make this setting
from the Settings menu.
Settings > Network Settings > Wi-Fi Setup
Avaiable buttons are displayed. In this example, you can proceed to the selected menu by pressing the OK button.
D
Guide to the Network Icon
Wireless (Wi-Fi) network is disabled or the printer is processing a wireless network
connection.
There is a problem with the printer's wireless (Wi-Fi) network connection or the printer
is searching for a wireless (Wi-Fi) network connection.
The printer is connected to a wireless (Wi-Fi) network.
The number of bars indicates the signal strength of the connection. The more bars
there are, the stronger the connection.
The printer is connected to a wireless (Wi-Fi) network in Wi-Fi Direct (Simple AP) mode.
The printer is not connected to a wireless (Wi-Fi) network in Wi-Fi Direct (Simple AP)
mode.
Entering Characters
To enter characters and symbols for network settings from the control panel, use the u, d, l, and r buttons and
the soware keyboard on the LCD screen. Press the
u, d, l
, or r button to select a character or function button
20
Page 21
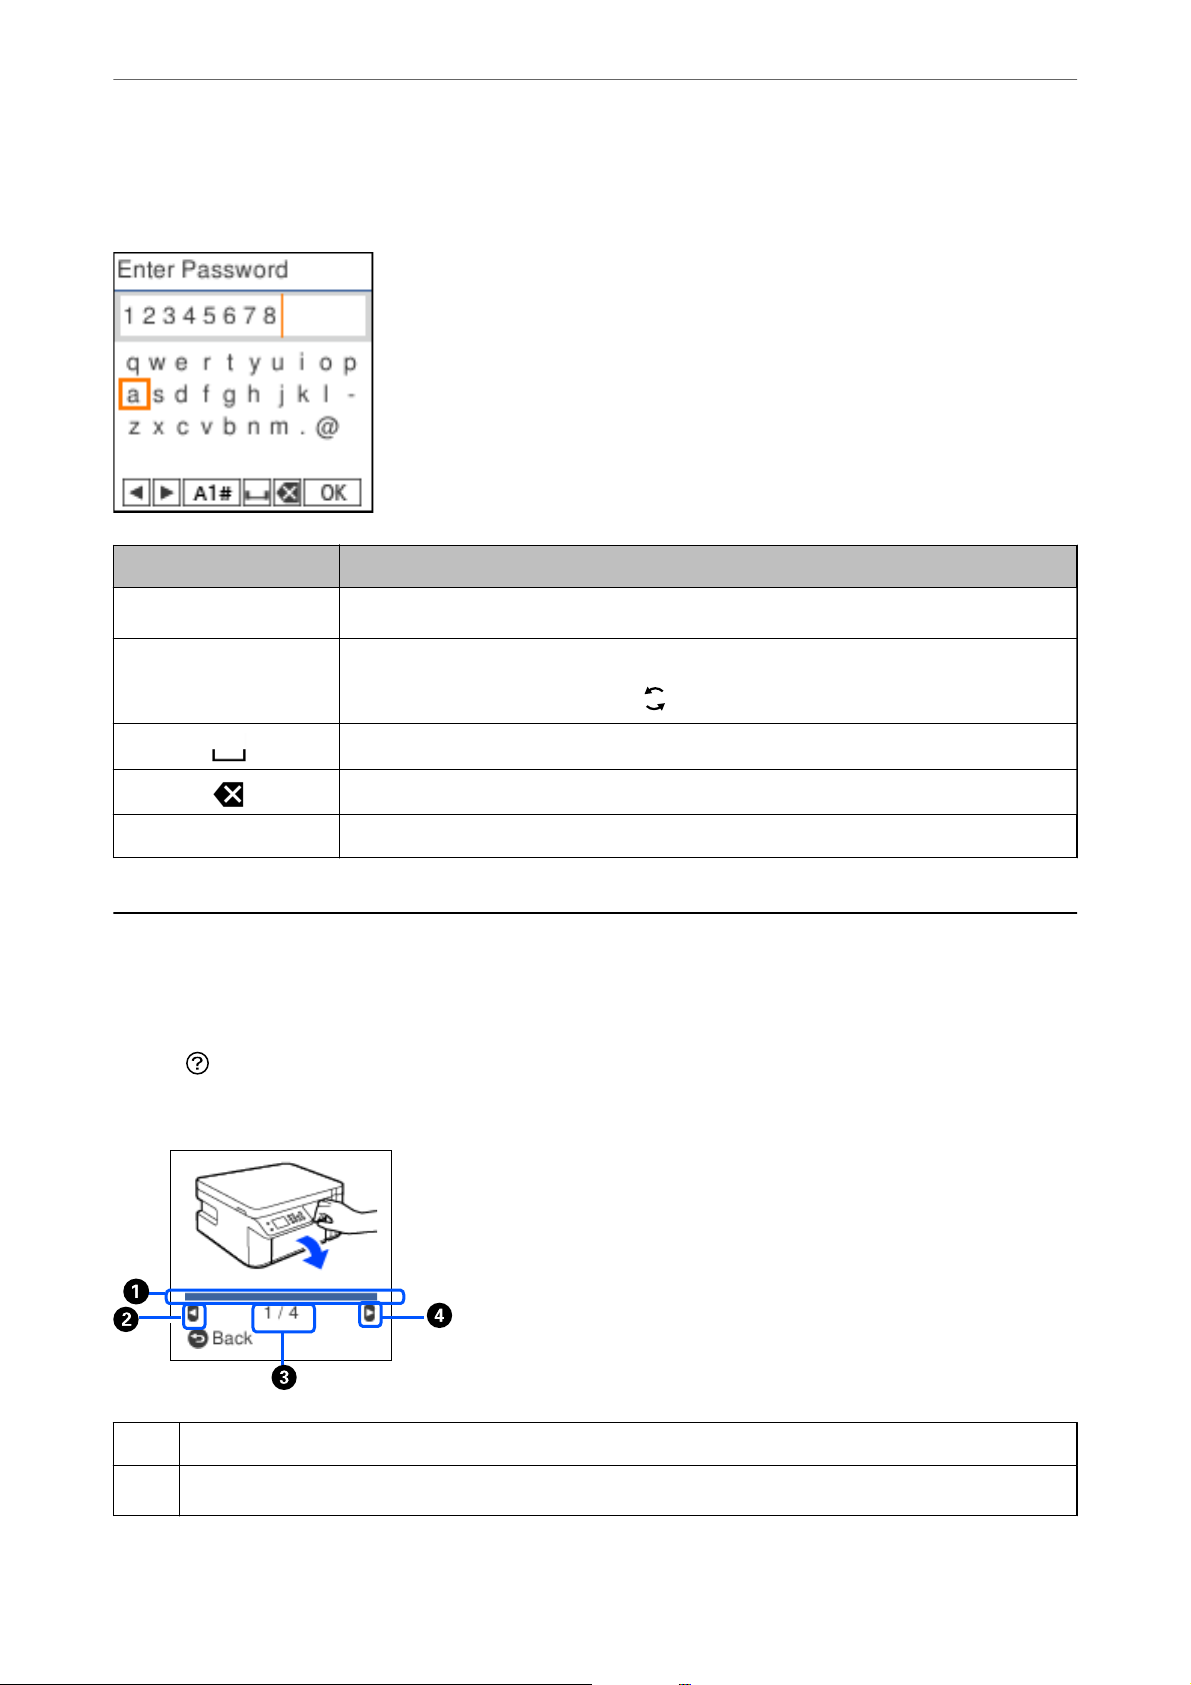
Guide to the Control Panel
>
Viewing Animations
on the keyboard, and then press the OK button. When you have nished entering characters, select OK, and then
press the OK button.
Function button Descriptions
l r
A 1 # Switches the character type. You can enter alphanumerics or symbols.
OK Enters the selected characters.
Moves the cursor to the left or right.
You can also switch them by using the
Enters a space.
Deletes a character to the left (backspace).
button.
Viewing Animations
You can view animations of operating instructions such as loading paper or removing jammed paper on the LCD
screen.
❏ Press
❏ Select How to at the bottom of the operation screen: Displays the context-sensitive animation.
button: Displays the help screen. Select How To and then select the items that you want to view.
Indicates your progress through the current step. The animation repeats when the progress bar reaches the end.
A
B
Press l button to return to the previous step.
21
Page 22

Guide to the Control Panel
Indicates the total number of steps and the current step number.
C
In the example above, it shows step 1 from 4 steps.
D
Press r button to move to the next step.
>
Viewing Animations
22
Page 23

Loading Paper
Paper Handling Precautions.......................................... 24
Paper Size and Type Settings..........................................24
Loading Paper in the Paper Cassette.....................................26
Loading Envelopes in the Paper Cassette................................. 29
Page 24
Loading Paper
>
Paper Size and Type Settings
Paper Handling Precautions
❏ Read the instruction sheets supplied with the paper.
❏ To achieve high-quality printouts with genuine Epson paper, use the paper in the environment stated on the
sheets supplied with the paper.
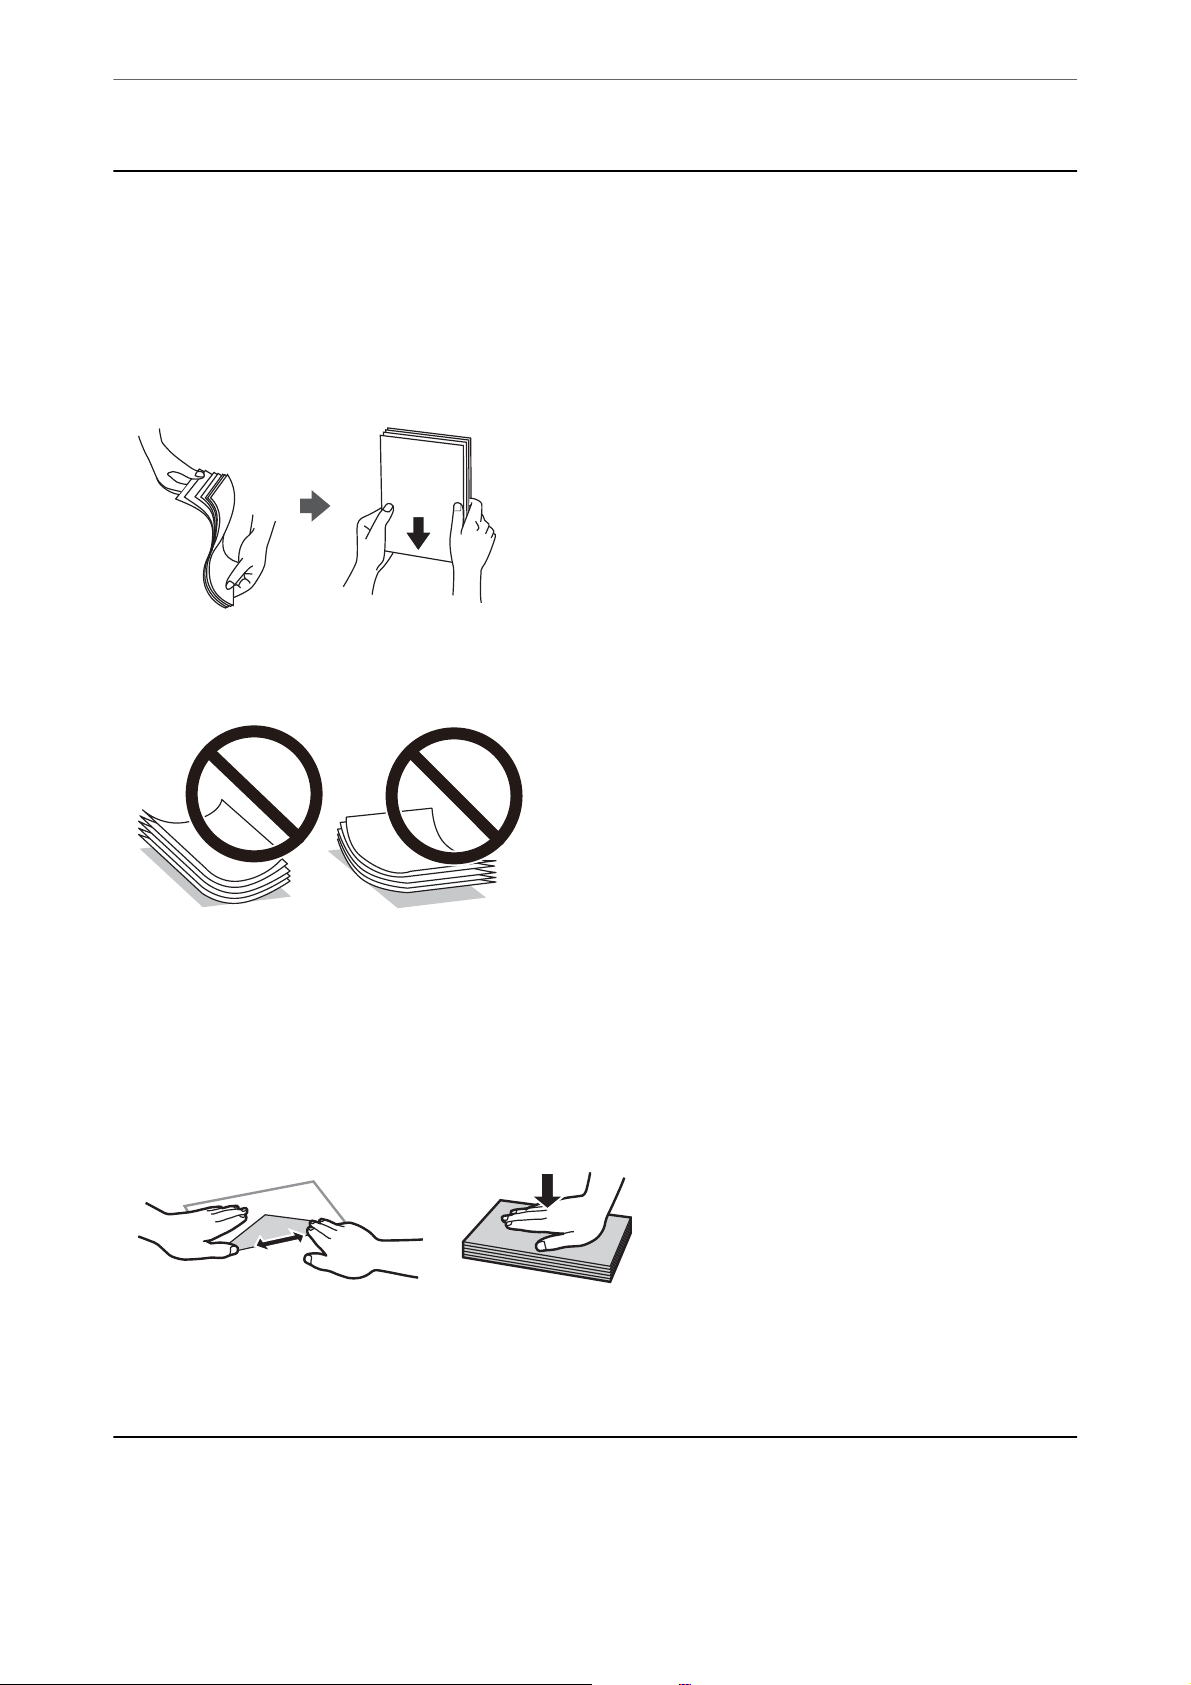
❏ Fan and align the edges of the paper before loading. Do not fan or curl photo paper. Doing so may damage the
printable side.
❏ If the paper is curled, atten it or curl it slightly in the opposite direction before loading. Printing on curled
paper may cause paper jams and smears on the printout.
❏ Paper feed problems may occur frequently for manual 2-sided printing when printing on one side of pre-
printed paper. Reduce the number of sheets to half or less, or load one sheet of paper at a time if paper jams
continue.
❏ Make sure you are using long-grain paper. If you are not sure what type of paper you are using, check the paper
packaging or contact the manufacturer to
❏ Fan and align the edges of the envelopes before loading. When the stacked envelopes are pued up with air,
press them down to atten them before loading.
conrm
the paper
specications.
Related Information
& “Unavailable Paper Types” on page 203
Paper Size and Type Settings
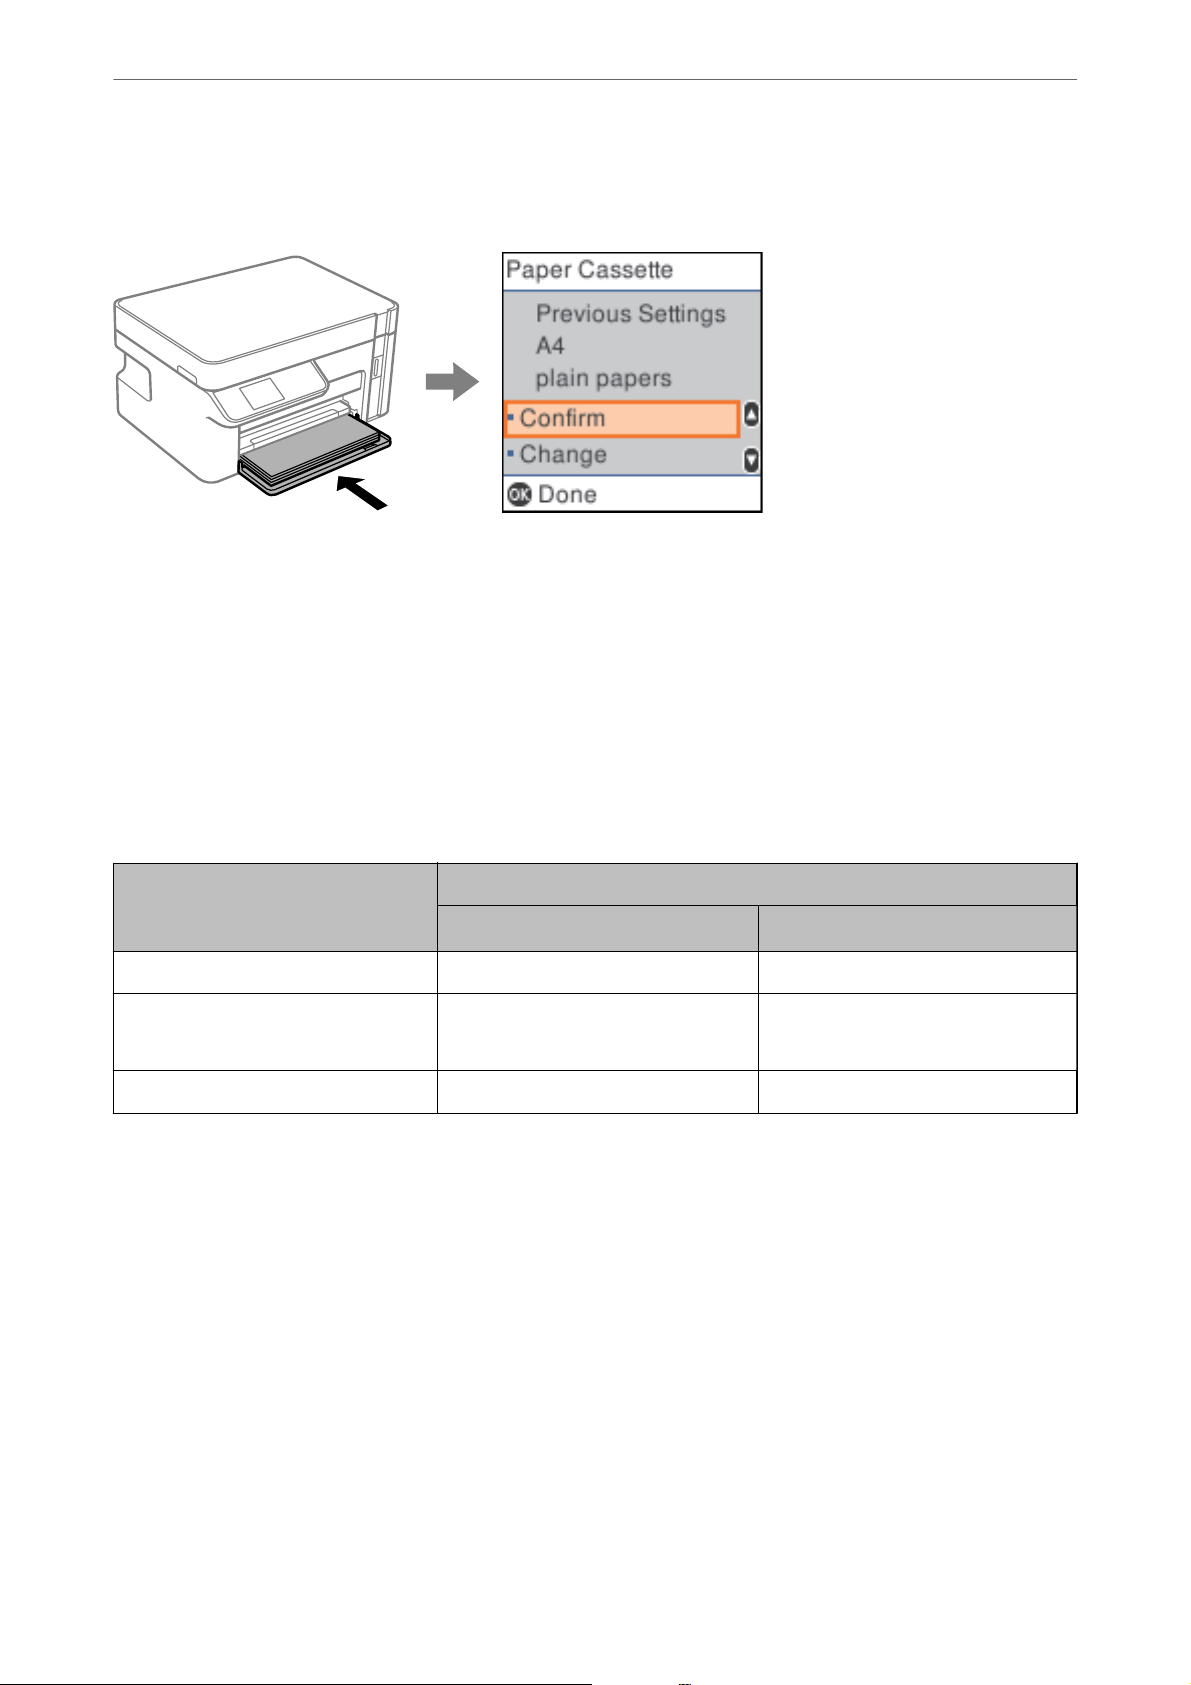
You can check or change the paper size and type on the screen displayed when you insert the paper cassette. If you
register the paper size and type, the printer informs you when the registered information and print settings dier.
24
Page 25
Loading Paper
>
Paper Size and Type Settings>List of Paper Types
is prevents you from wasting paper and ink by making sure you are not printing on the wrong paper size or
printing using poor print quality due to settings that do not match the paper type.
If displayed paper size and type dier from the loaded paper, select Change to make changes. Select the paper size
and paper type, check the settings, and then press the OK button. If the settings match the loaded paper, select
Conrm.
Note:
If you do not want to display the paper setting screen automatically when you insert the paper cassette, on the home screen
select Settings > Printer Setup > Paper Source Settings > Paper Setup Auto Display, and then select O.
List of Paper Types
To obtain optimum printing results, select the paper type that suits the paper.
Media Name Media Type
Control Panel
Epson Bright White Ink Jet Paper Plain paper Plain paper
Epson Matte Paper-Heavyweight
Epson Double-Sided Matte Paper
Epson Photo Quality Ink Jet Paper Photo Quality Ink Jet Epson Photo Quality Ink Jet
* For smart devices, these media types can be selected when printing using Epson iPrint.
Matte Epson Matte
Printer Driver, Smart device
*
25
Page 26
Loading Paper
>
Loading Paper in the Paper Cassette
Loading Paper in the Paper Cassette
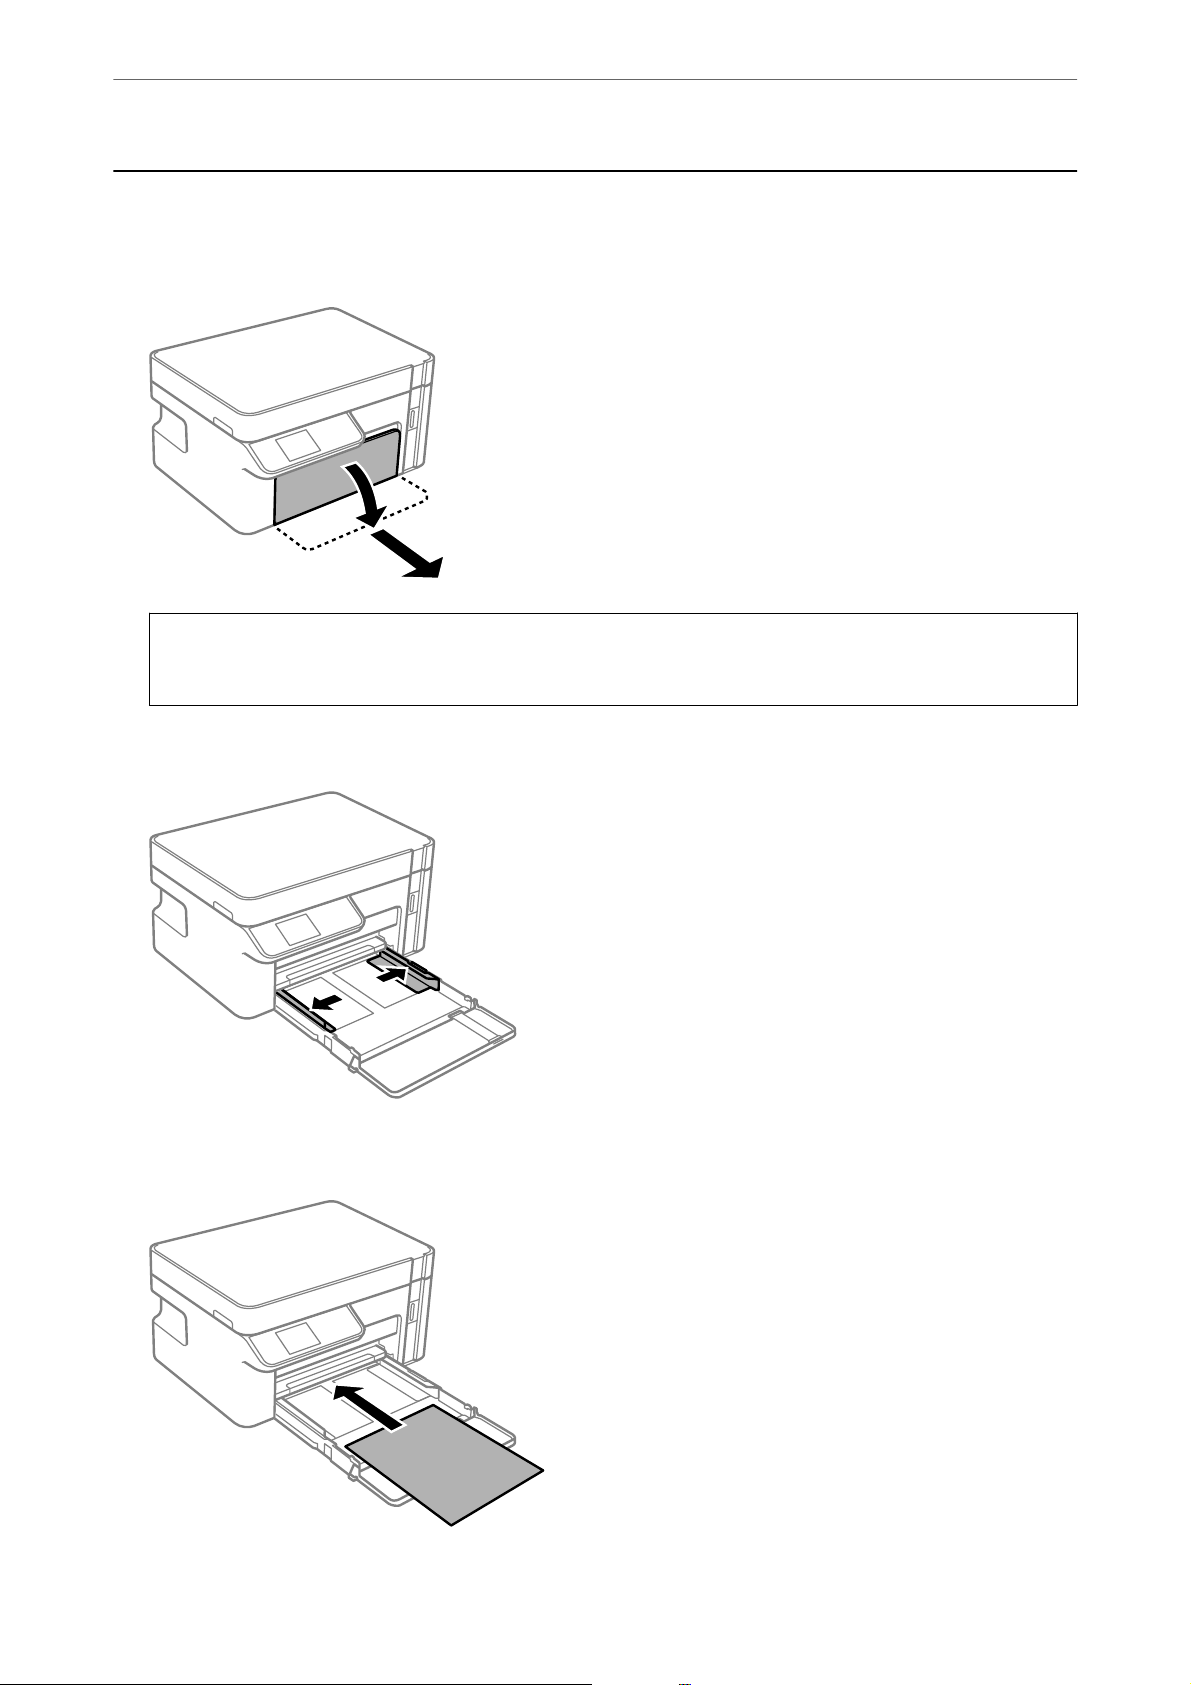
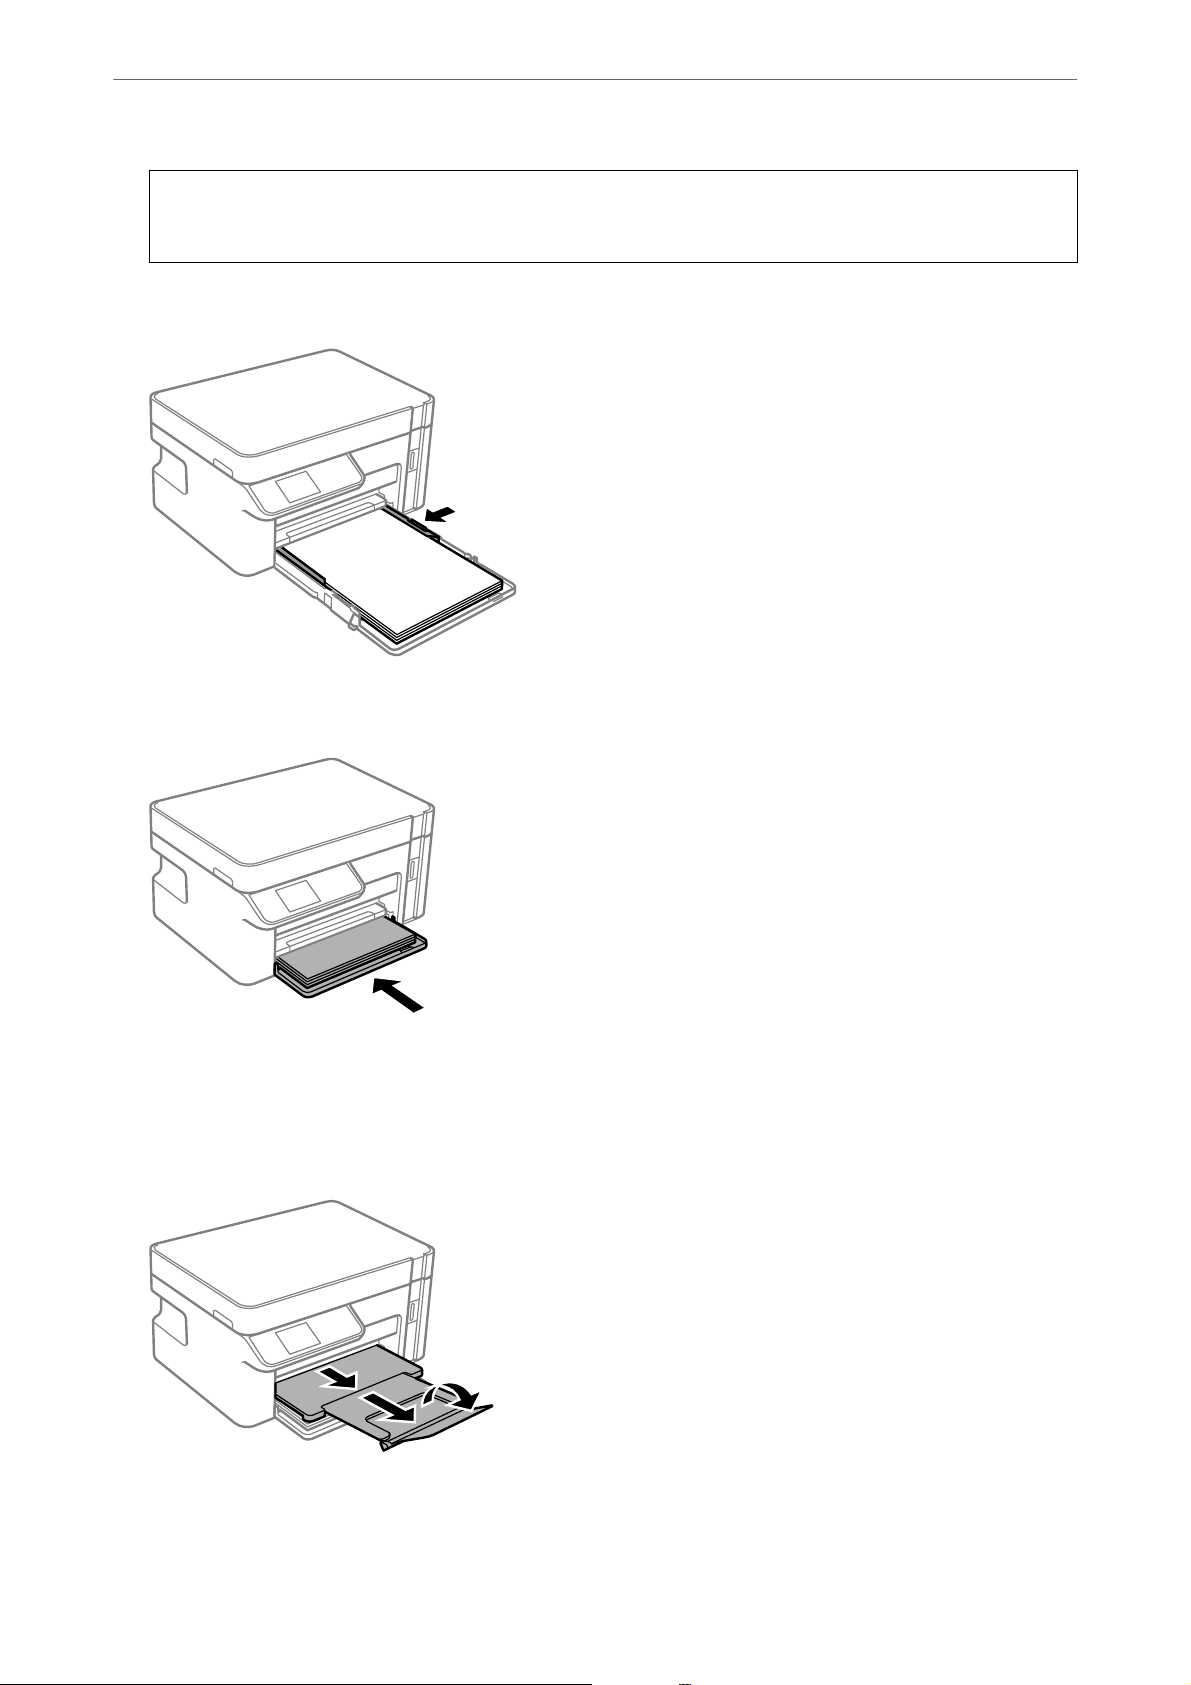
1.
Open the front cover until it clicks, and then slide out the paper cassette until it stops.
Important:
c
e paper cassette cannot be removed.
2.
Slide the edge guides to their maximum position.
3.
With the printable side facing down, load paper until it touches the back of the paper cassette.
26
Page 27
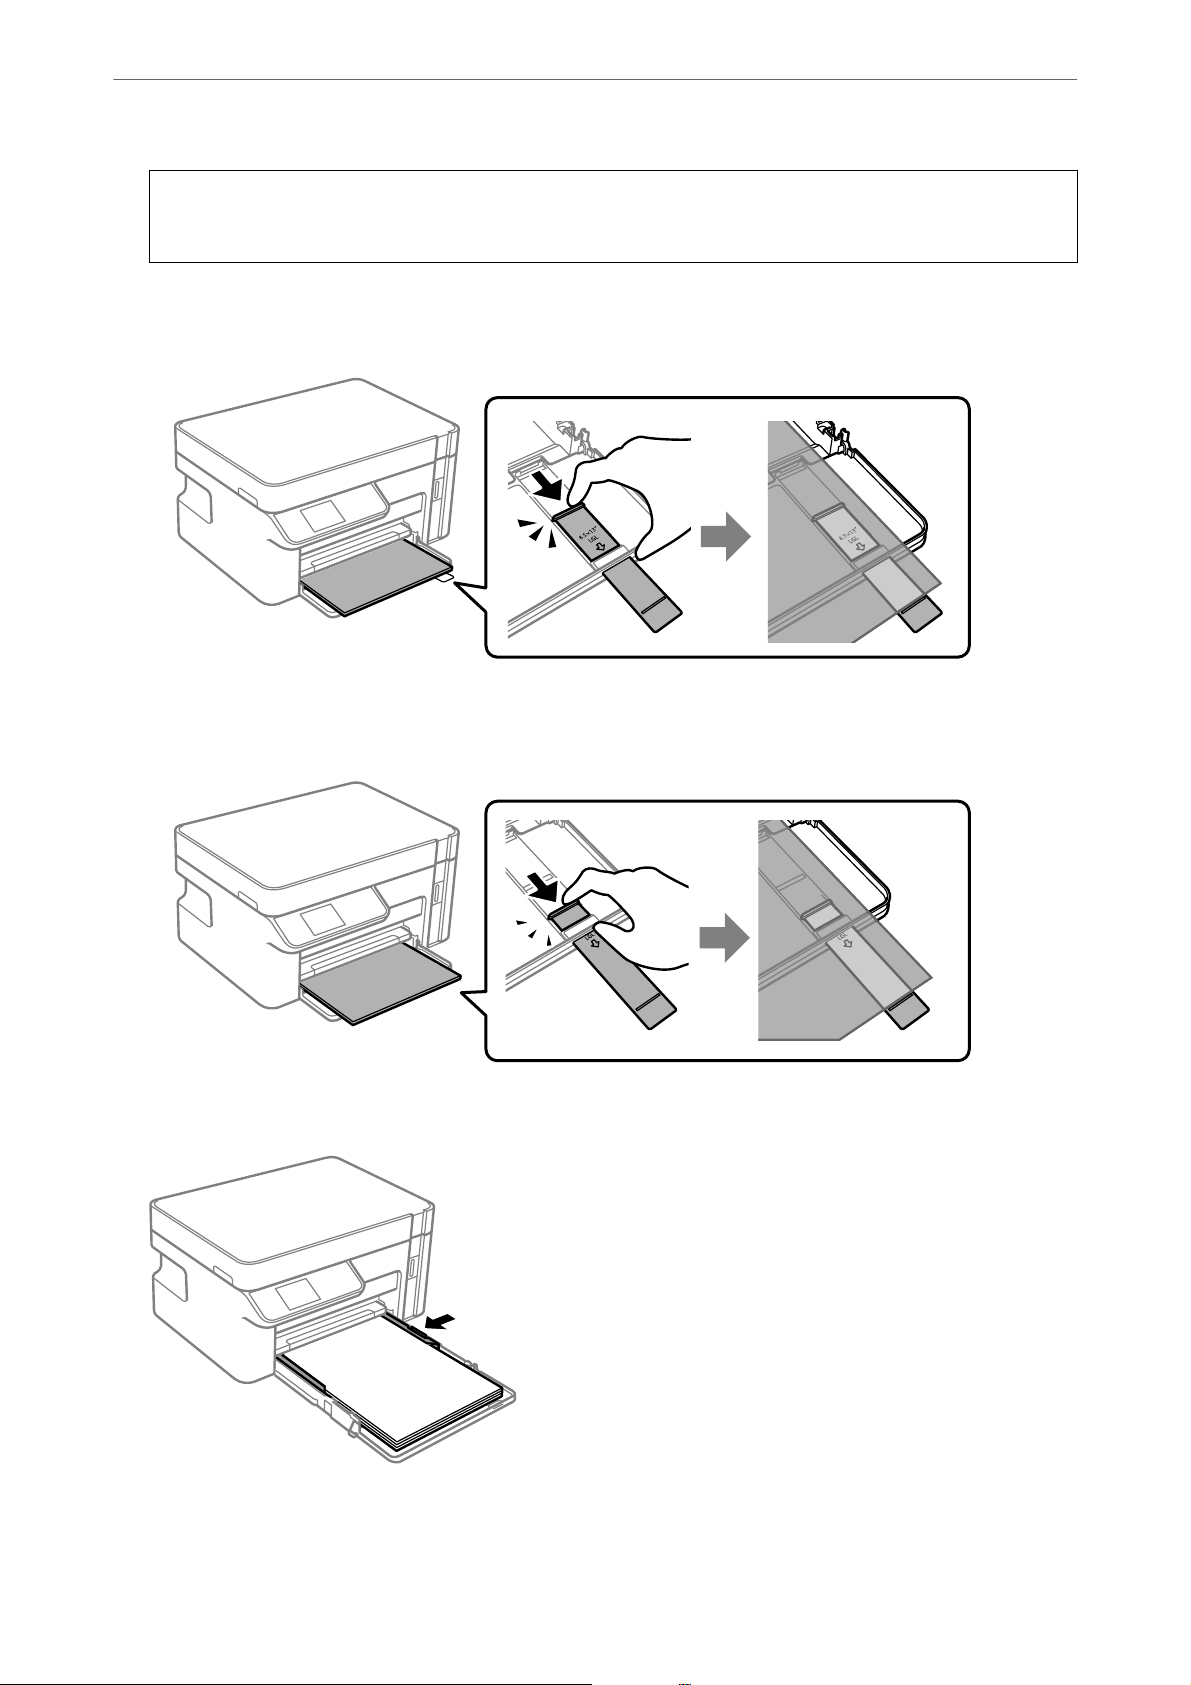
Loading Paper
Important:
c
Do not load more than the maximum number of sheets specied for the paper.
❏ 8.5×13 in.
Load paper using the line.
>
Loading Paper in the Paper Cassette
❏ Legal
Pull out the paper guide extension and load paper using the line.
4.
Slide the edge guides to the edges of the paper.
27
Page 28
Loading Paper
5.
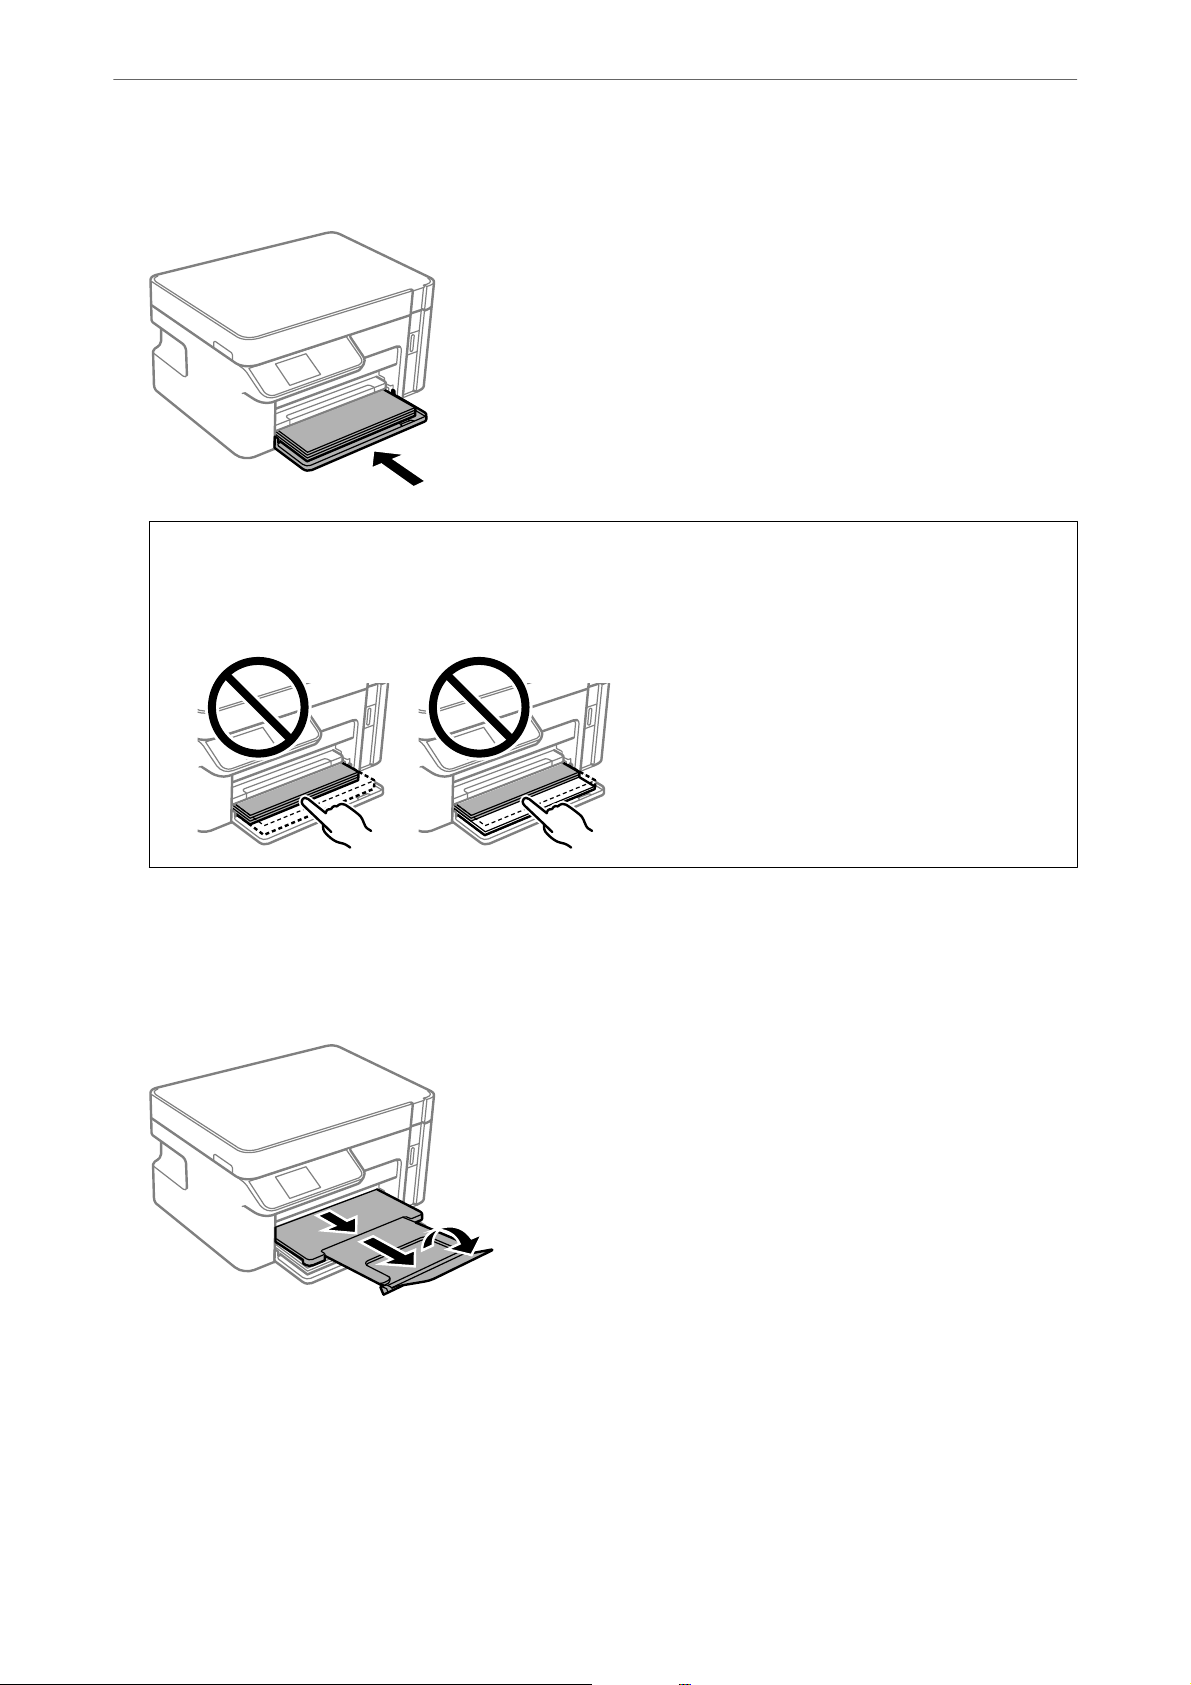
Insert the paper cassette as far as it will go.
Important:
>
Loading Paper in the Paper Cassette
c
Do not push in the paper aer inserting the paper cassette. It may cause a paper feed problem. If the paper is
pushed in, align the paper to the paper size line.
6.
Select the paper size and paper type.
“Paper Size and Type Settings” on page 24
7.
Slide out the output tray.
Related Information
& “Available Paper and Capacities” on page 202
28
Page 29
Loading Paper
>
Loading Envelopes in the Paper Cassette
Loading Envelopes in the Paper Cassette
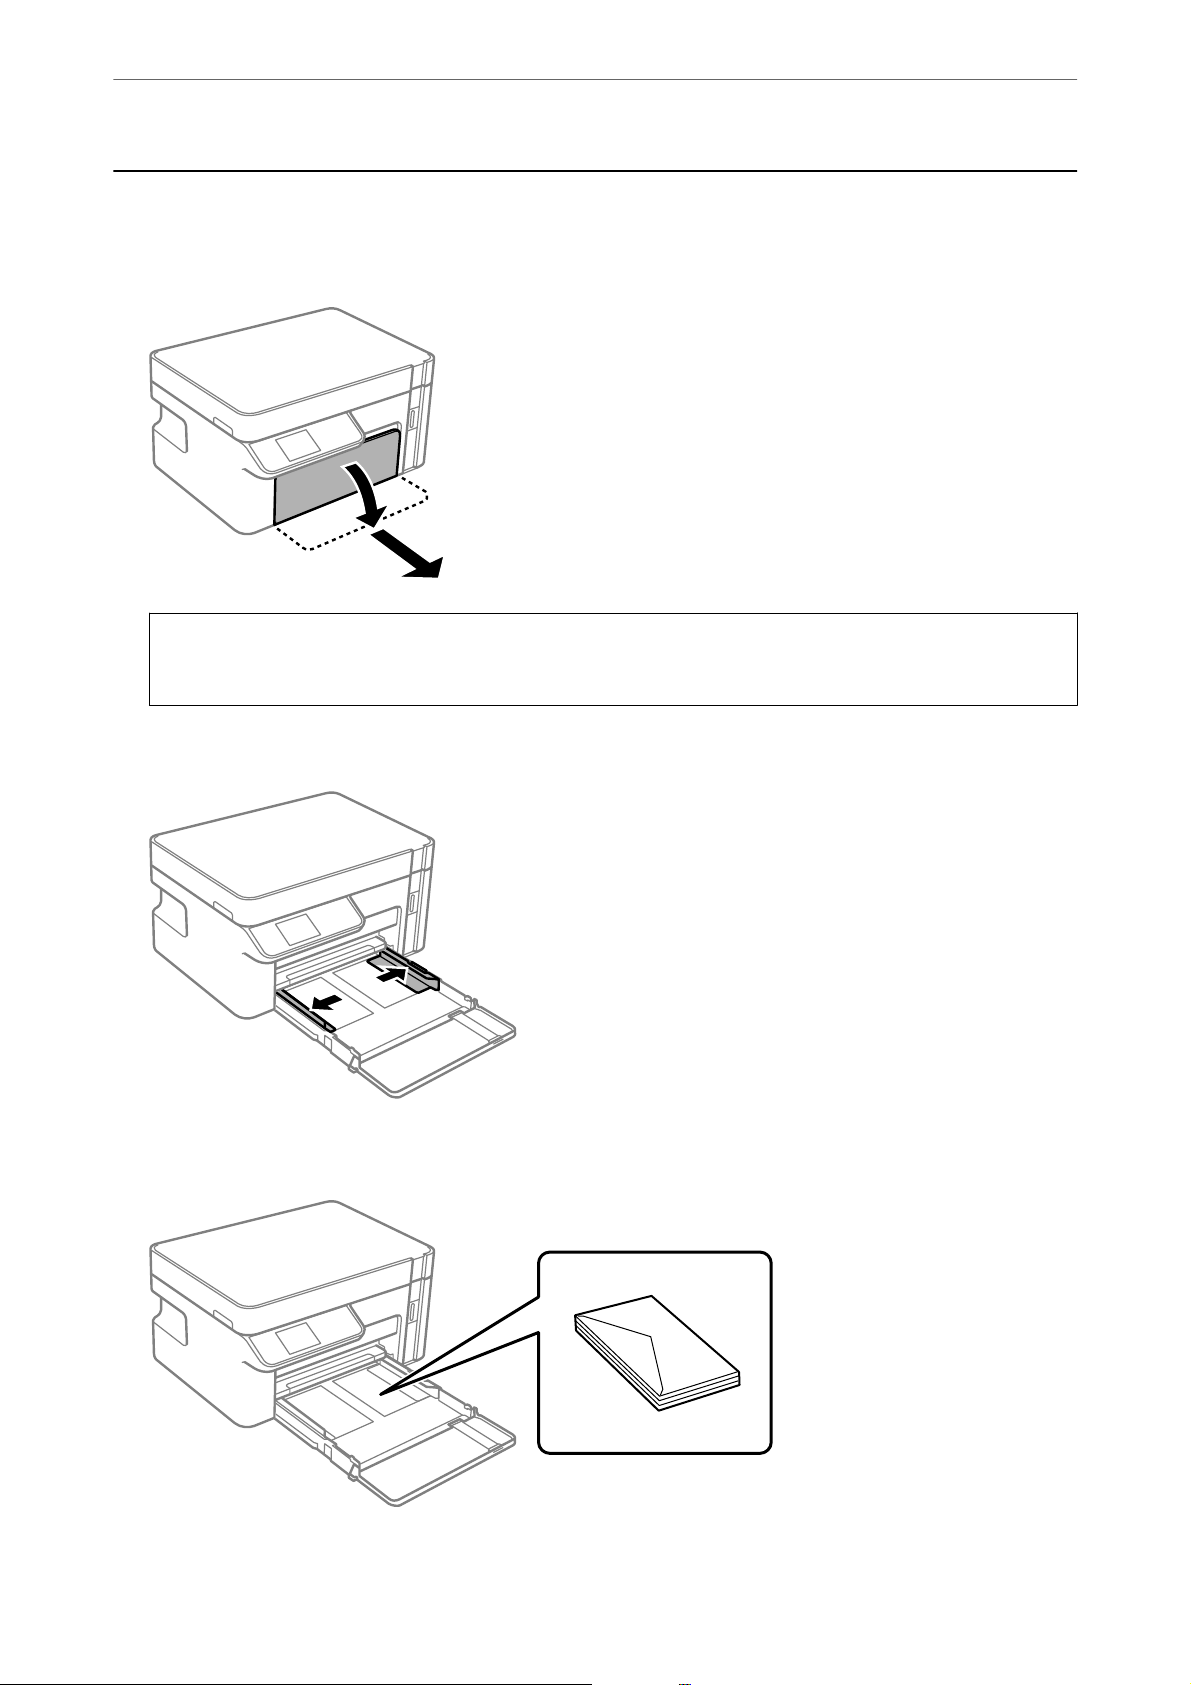
1.
Open the front cover until it clicks, and then slide out the paper cassette until it stops.
Important:
c
e paper cassette cannot be removed.
2.
Slide the edge guides to their maximum position.
3.
With the ap facing up, load envelopes until they touch the back of the paper cassette.
29
Page 30
Loading Paper
Important:
>
Loading Envelopes in the Paper Cassette
c
Do not load more than the maximum number of sheets specied for envelopes.
4.
Slide the edge guides to the edges of the envelopes.
5.
Insert the paper cassette as far as it will go.
6.
Select the paper size and paper type.
“Paper Size and Type Settings” on page 24
7.
Slide out the output tray.
Related Information
& “Available Paper and Capacities” on page 202
30
Page 31

Placing Originals
Placing Originals on the Scanner Glass...................................32
Page 32

Placing Originals
>
Placing Originals on the Scanner Glass
Placing Originals on the Scanner Glass
1.
Open the document cover.
2.
Remove any dust or stains on the surface of the scanner glass using a so, dry, clean cloth.
Note:
If there is any trash or dirt on the scanner glass, the scanning range may expand to include it, so the image of the
original may be displaced or reduced.
3.
Place the original face-down and slide it to the corner mark.
Note:
A range of 1.5 mm from the corner of the scanner glass is not scanned.
32
Page 33

Placing Originals
4.
Close the cover gently.
Important:
>
Placing Originals on the Scanner Glass
c
❏ When placing bulky originals such as books, prevent exterior light from shining directly onto the scanner
glass.
❏ Do not apply too much force to the scanner glass or the document cover. Otherwise, they may be damaged.
5.
Remove the originals aer scanning.
Note:
If you leave the originals on the scanner glass for a long time, they may stick to the surface of the glass.
33
Page 34

Printing
Printing Documents................................................35
Printing on Envelopes...............................................70
Printing Web Pages.................................................71
Printing Using a Cloud Service........................................ 72
Page 35

Printing
>
Printing Documents>Printing from a Computer - Windows
Printing Documents
Printing from a Computer - Windows
Printing Using Easy Settings
Note:
Operations may dier depending on the application. See the application's help for details.
1.
Load paper in the printer .
“Loading Paper in the Paper Cassette” on page 26
2.
Open the
3.
Select Print or Print Setup from the File menu.
4.
Select your printer.
5.
Select Preferences or Properties to access the printer driver window.
you want to print.
le
35
Page 36

Printing
6.
Change the settings as necessary.
>
Printing Documents>Printing from a Computer - Windows
See the menu options for the printer driver for details.
Note:
❏ You can also see the online help for explanations of the setting items. Right-clicking an item displays Help.
❏ When you select Print Preview, you can see a preview of your document before printing.
7.
Click OK to close the printer driver window.
8.
Click Print.
Note:
❏ When you select Print Preview, a preview window is displayed. To change the settings, click Cancel, and then repeat
the procedure from step 2.
❏ If you want to cancel printing, on your computer right-click on your printer in Devices and Printers, Printer, or in
Printers and Faxes. Click See what's printing, right-click on the job you want to cancel, and then select Cancel.
However, you cannot cancel a print job from the computer once it has been completely sent to the printer. In this
case, cancel the print job by using the printer's control panel.
Related Information
& “Available Paper and Capacities” on page 202
& “List of Paper Types” on page 25
& “Menu Options for the Printer Driver” on page 36
Menu Options for the Printer Driver
Open the print window in an application, select the printer, and then access the printer driver window.
Note:
Menus vary depending on the option you selected.
Main Tab
Printing Presets:
Add/Remove Presets:
You can add or remove your own presets for frequently used print settings. Select the preset you want
to use from the list.
Document Size:
Select the paper size on which you want to print. If you select User-Dened, enter the paper width
and height.
Orientation:
Select the orientation you want to use to print.
Paper Type:
Select the type of paper on which you print.
36
Page 37

Printing
Quality:
2-Sided Printing:
Multi-Page:
Copies:
>
Printing Documents>Printing from a Computer - Windows
Select the pint quality you want to use for printing. Available settings depend on the paper type you
select. Selecting High provides higher quality printing, but the printing speed may be slower.
Allows you to perform 2-sided printing.
Settings:
You can specify the binding edge and the binding margins.
Allows you to print several pages on one sheet or perform poster printing. Click Layout Order to
specify the order in which pages are printed.
Set the number of copies you want to print.
Collate:
Prints multi-page documents collated in order and sorted into sets.
Reverse Order:
Allows you to print from the last page so that the pages are stacked in the correct order aer
printing.
Quiet Mode:
Reduces the noise the printer makes. However, enabling this may reduce print speed.
Print Preview:
Displays a preview of your document before printing.
Job Arranger Lite:
Job Arranger Lite allows you to combine several
as a single print job.
created by
les
dierent
applications and print them
Show Settings/Hide Settings:
Displays a list of items currently set on the Main and More Options tabs. You can show or hide the
current setting list screen.
Restore Defaults:
Return all settings to their factory default values. e settings on the More Options tab are also reset
to their defaults.
Ink Levels:
Displays the approximate ink level.
37
Page 38

Printing
More Options Tab
>
Printing Documents>Printing from a Computer - Windows
Printing Presets:
Add/Remove Presets:
You can add or remove your own presets for frequently used print settings. Select the preset you want
to use from the list.
Document Size:
Select the paper size on which you want to print. If you select User-Dened, enter the paper width
and height.
Output Paper:
Select the paper size on which you want to print. If the Document Size diers from the Output
Paper, Reduce/Enlarge Document is selected automatically. You do not have to select it when
printing without reducing or enlarging the size of a document.
Reduce/Enlarge Document:
Allows you to reduce or enlarge the size of a document.
Fit to Page:
Automatically reduce or enlarge the document to t to the paper size selected in Output
Paper.
Zoom to:
Prints with a specic percentage.
Center:
Prints images in the center of the paper.
Tone Cor rection:
Automatic:
Adjusts the tone of images automatically.
Custom:
Allows you to perform manual tone correction. Click Advanced for further settings.
Image Options:
Enables print quality options such as Emphasize Text. You can also thicken thin lines to make
them visible on the printouts.
Watermark Features:
Allows you to make settings for anti-copy patterns, watermarks, or headers and footers.
Add/Delete:
Allows you to add or remove any anti-copy patterns or watermarks that you want to use.
Settings:
Allows you to set the printing method for anti-copy patterns or watermarks.
38
Page 39

Printing
>
Printing Documents>Printing from a Computer - Windows
Header/Footer:
You can print information such as a user name and printing date in headers or footers.
Additional Settings:
Rotate 180°:
Rotates pages 180 degrees before printing. Select this item when printing on paper such as
envelopes that are loaded in xed direction in the printer.
Bidirectional Printing:
Prints when the print head moves in both directions. e print speed is faster, but the quality
may decline.
Mirror Image:
Inverts the image so that it prints as it would appear in a mirror.
Show Settings/Hide Settings:
Displays a list of items currently set on the Main and More Options tabs. You can show or hide the
current setting list screen.
Restore Defaults:
Return all settings to their factory default values. e settings on the Main tab are also reset to their
defaults.
Maintenance Tab
Print Head Nozzle Check:
Prints a nozzle check pattern to check if the print head nozzles are clogged.
Print Head Cleaning:
Cleans the clogged nozzles in the print head. Because this feature uses some ink, clean the print head
only if some nozzles are clogged as shown in the illustration of the nozzle check pattern.
39
Page 40

Printing
Power Cleaning:
Job Arranger Lite:
>
Printing Documents>Printing from a Computer - Windows
Runs power cleaning to clean the clogged nozzles in the print head. Because this feature uses more
ink than head cleaning, run power cleaning only if most nozzles are clogged as shown in the
illustration of the nozzle check pattern.
Opens the Job Arranger Lite window. Here you can open and edit previously saved data.
EPSON Status Monitor 3:
Opens the EPSON Status Monitor 3 window. Here you can conrm the status of the printer and the
consumables.
Monitoring Preferences:
Allows you to make settings for items on the EPSON Status Monitor 3 window.
Extended Settings:
Allows you to make a variety of settings. Right-click each item to view the Help for more details.
Print Queue:
Displays the jobs waiting to be printed. You can check, pause, or resume print jobs.
Printer and Option Information:
Displays the number of sheets of paper fed into the printer.
Language:
Changes the language to be used on the printer driver window. To apply the settings, close the printer
driver, and then open it again.
Software Update:
Starts EPSON
Soware
Updater to check for the latest version of applications on the Internet.
Technical Su ppor t:
If the manual is installed on your computer, the manual is displayed. If it is not installed, you can
connect to the Epson Web site to check the manual and available technical support.
40
Page 41

Printing
>
Printing Documents>Printing from a Computer - Windows
Printing on 2-Sides
e printer driver will automatically print odd pages and even pages separately. When the odd pages have been
printed, turn over the paper according to the instructions and print the even pages.
Note:
❏ If you do not use paper that is suitable for 2-sided printing, the print quality may decline and paper jams may occur.
“Paper for 2-Sided Printing” on page 203
❏ Depending on the paper and the data, ink may bleed through to the other side of the paper.
❏ If EPSON Status Monitor 3 is disabled, access the printer driver window, click Extended Settings on the Maintenance
tab, and then select Enable EPSON Status Monitor 3.
❏ However, it may not be available when the printer is accessed over a network or is used as a shared printer.
1.
Load paper in the printer .
“Loading Paper in the Paper Cassette” on page 26
2.
Open the le you want to print.
3.
Select Print or Print Setup from the File menu.
4.
Select your printer.
5.
Select Preferences or Properties to access the printer driver window.
6.
On the printer driver's Main tab, select an option from 2-Sided Printing.
7.
Click Settings, make the appropriate settings, and then click OK.
8.
Set the other items on the Main and More Options tabs as necessary, and then click OK.
“Main Tab” on page 36
“More Options Tab” on page 38
9.
Click Print.
When the rst side has nished printing, a pop-up window is displayed on the computer. Follow the on-screen
instructions.
Related Information
& “Available Paper and Capacities” on page 202
& “Printing Using Easy Settings” on page 35
41
Page 42

Printing
>
Printing Documents>Printing from a Computer - Windows
Printing a Booklet
You can also print a booklet that can be created by re-ordering the pages and folding the printout.
Note:
❏ If you do not use paper that is suitable for 2-sided printing, the print quality may decline and paper jams may occur.
“Paper for 2-Sided Printing” on page 203
❏ Depending on the paper and the data, ink may bleed through to the other side of the paper.
❏ If EPSON Status Monitor 3 is disabled, access the printer driver window, click Extended Settings on the Maintenance
tab, and then select Enable EPSON Status Monitor 3.
❏ However, it may not be available when the printer is accessed over a network or is used as a shared printer.
1.
Load paper in the printer .
“Loading Paper in the Paper Cassette” on page 26
2.
Open the le you want to print.
3.
Select Print or Print Setup from the File menu.
4.
Select your printer.
5.
Select Preferences or Properties to access the printer driver window.
6.
Select the method of 2-Sided Printing on the Main tab.
7.
On the printer driver's Settings tab, select Booklet.
8.
Click OK.
❏ Center Binding: Use this method when printing a small number of pages that can be stacked and easily
folded in half.
❏ Side Binding. Use this method when printing one sheet (four pages) at a time, folding each in half, and then
putting them together in one volume.
9.
Set the other items on the Main and More Options tabs as necessary, and then click OK.
“Main Tab” on page 36
42
Page 43

Printing
“More Options Tab” on page 38
10.
Click Print.
When the rst side has nished printing, a pop-up window is displayed on the computer. Follow the on-screen
instructions.
Related Information
& “Available Paper and Capacities” on page 202
& “Printing Using Easy Settings” on page 35
>
Printing Documents>Printing from a Computer - Windows
Printing Several Pages on One Sheet
You can print several pages of data on a single sheet of paper.
1.
Load paper in the printer .
“Loading Paper in the Paper Cassette” on page 26
2.
Open the le you want to print.
3.
Select Print or Print Setup from the File menu.
4.
Select your printer.
5.
Select Preferences or Properties to access the printer driver window.
6.
On the printer driver's Main tab, select 2-Up or 4-Up, 6-Up, 8-Up, 9-Up, or 16-Up as the Multi-Page setting.
7.
Click Layout Order, make the appropriate settings, and then click OK.
8.
Set the other items on the Main and More Options tabs as necessary, and then click OK.
“Main Tab” on page 36
“More Options Tab” on page 38
43
Page 44

Printing
9.
Click Print.
Related Information
& “Printing Using Easy Settings” on page 35
>
Printing Documents>Printing from a Computer - Windows
Printing and Stacking in Page Order (Reverse Order Printing)
You can print from the last page so that documents are stacked in page order when they are ejected.
1.
Load paper in the printer .
“Loading Paper in the Paper Cassette” on page 26
2.
Open the
3.
Select Print or Print Setup from the File menu.
4.
Select your printer.
5.
Select Preferences or Properties to access the printer driver window.
6.
On the printer driver's Main tab, select Reverse Order
7.
Set the other items on the Main and More Options tabs as necessary, and then click OK.
“Main Tab” on page 36
“More Options Tab” on page 38
8.
Click Print.
Related Information
& “Printing Using Easy Settings” on page 35
you want to print.
le
44
Page 45

Printing
>
Printing Documents>Printing from a Computer - Windows
Printing to Fit the Paper Size
Select the paper size you loaded in the printer as the Destination Paper Size setting.
1.
Load paper in the printer .
“Loading Paper in the Paper Cassette” on page 26
2.
Open the
3.
Select Print or Print Setup from the File menu.
4.
Select your printer.
5.
Select Preferences or Properties to access the printer driver window.
6.
Make the following settings on the More Options tab.
❏ Document Size: Select the size of the paper you set in the application setting.
❏ Output Paper: Select the paper size you loaded in the printer.
Fit to Page is automatically selected.
Note:
Click Center to print the reduced image in the middle of the paper.
7.
Set the other items on the Main and More Options tabs as necessary, and then click OK.
“Main Tab” on page 36
“More Options Tab” on page 38
you want to print.
le
8.
Click Print.
Related Information
& “Printing Using Easy Settings” on page 35
45
Page 46

Printing
>
Printing Documents>Printing from a Computer - Windows
Printing a Reduced or Enlarged Document at any Magnication
You can reduce or enlarge the size of a document by a specic percentage.
1.
Load paper in the printer .
“Loading Paper in the Paper Cassette” on page 26
2.
Open the le you want to print.
3.
Select Print or Print Setup from the File menu.
4.
Select your printer.
5.
Select Preferences or Properties to access the printer driver window.
6.
On the printer driver's More Options tab, select the document size from the Document Size setting.
7.
Select the paper size you want to print on from the Output Paper setting.
8.
Select Reduce/Enlarge Document, Zoom to, and then enter a percentage.
9.
Set the other items on the Main and More Options tabs as necessary, and then click OK.
“Main Tab” on page 36
“More Options Tab” on page 38
10.
Click Print.
Related Information
& “Printing Using Easy Settings” on page 35
46
Page 47

Printing
>
Printing Documents>Printing from a Computer - Windows
Printing One Image on Multiple Sheets for Enlargement (Creating a Poster)
is feature allows you to print one image on multiple sheets of paper. You can create a larger poster by taping
them together.
1.
Load paper in the printer .
“Loading Paper in the Paper Cassette” on page 26
2.
Open the
3.
Select Print or Print Setup from the File menu.
4.
Select your printer.
5.
Select Preferences or Properties to access the printer driver window.
6.
Select 2x1 Poster, 2x2 Poster, 3x3 Poster, or 4x4 Poster from Multi-Page on the Main tab.
7.
Click Settings, make the appropriate settings, and then click OK.
Note:
Print Cutting Guides allows you to print a cutting guide.
8.
Set the other items on the Main and More Options tabs as necessary, and then click OK.
“Main Tab” on page 36
“More Options Tab” on page 38
9.
Click Print.
you want to print.
le
Related Information
& “Printing Using Easy Settings” on page 35
Making Posters Using Overlapping Alignment Marks
Here is an example of how to make a poster when 2x2 Poster is selected, and Overlapping Alignment Marks is
selected in Print Cutting Guides.
47
Page 48

Printing
e actual guides are printed in monochrome, but for this explanation they are shown as blue and red lines.
>
Printing Documents>Printing from a Computer - Windows
1.
Prepare Sheet 1 and Sheet 2. Cut o the margins of Sheet 1 along the vertical blue line through the center of
the top and bottom cross marks.
48
Page 49

Printing
2.
Place the edge of Sheet 1 on top of Sheet 2 and align the cross marks, then temporarily tape the two sheets
together from the back.
>
Printing Documents>Printing from a Computer - Windows
3.
Cut the taped sheets in two along the vertical red line through the alignment markers (this time, the line to the
le of the cross marks).
49
Page 50

Printing
4.
Tape the sheets together from the back.
5.
Repeat steps 1 to 4 to tape Sheet 3 and Sheet 4 together.
6.
Cut o the margins of Sheet 1 and Sheet 2 along the horizontal blue line through the center of the
side cross marks.
>
Printing Documents>Printing from a Computer - Windows
and right
le
50
Page 51

Printing
7.
Place the edge of Sheet 1 and Sheet 2 on top of Sheet 3 and Sheet 4 and align the cross marks, and then
temporarily tape them together from the back.
>
Printing Documents>Printing from a Computer - Windows
51
Page 52

Printing
8.
Cut the taped sheets in two along the horizontal red line through the alignment markers (this time, the line
above the cross marks).
>
Printing Documents>Printing from a Computer - Windows
9.
Tape the sheets together from the back.
52
Page 53

Printing
10.
Cut o the remaining margins along the outer guide.
>
Printing Documents>Printing from a Computer - Windows
Adding Printing Presets for Easy Printing
If you create your own preset of frequently used print settings on the printer driver, you can print easily by
selecting the preset from the list.
53
Page 54

Printing
1.
Load paper in the printer .
“Loading Paper in the Paper Cassette” on page 26
2.
Open the le you want to print.
3.
Select Print or Print Setup from the File menu.
4.
Select your printer.
5.
Select Preferences or Properties to access the printer driver window.
6.
Set each item (such as Document Size and Paper Type) in Main or More Options.
7.
Click Add/Remove Presets in Printing Presets.
8.
Enter a Name and, if necessary, enter a comment.
>
Printing Documents>Printing from a Computer - Windows
9.
Click Save.
Note:
To delete an added preset, click Add/Remove Presets, select the preset name you want to delete from the list, and then
delete it.
“Main Tab” on page 36
“More Options Tab” on page 38
10.
Click Print.
e next time you want to print using the same settings, select the registered setting name from Printing Presets,
and click OK.
Related Information
& “Printing Using Easy Settings” on page 35
Printing with a Header and Footer
You can print information such as a user name and printing date in headers or footers.
1.
Load paper in the printer .
“Loading Paper in the Paper Cassette” on page 26
2.
Open the
3.
Select Print or Print Setup from the File menu.
you want to print.
le
54
Page 55

Printing
4.
Select your printer.
5.
Select Preferences or Properties to access the printer driver window.
6.
On the printer driver's More Options tab, click Watermark Features, and then select Header/Footer.
7.
Settings, and then select the items you want to print.
8.
Set the other items on the Main and More Options tabs as necessary, and then click OK.
“Main Tab” on page 36
“More Options Tab” on page 38
9.
Click Print.
Related Information
& “Printing Using Easy Settings” on page 35
>
Printing Documents>Printing from a Computer - Windows
Printing a Watermark
You can print a watermark such as
anti-copy pattern, the hidden letters appear when photocopied in order to distinguish the original from the copies.
Anti-Copy Pattern is available under the following conditions:
❏ Paper: Plain paper, Copy paper, Letterhead, or High quality plain paper
❏ Quality: Standard
❏ Tone Cor re c t ion: Automat ic
Note:
You can also add your own watermark or anti-copy pattern.
1.
Load paper in the printer .
“Loading Paper in the Paper Cassette” on page 26
"Condential"
or an anti-copy pattern on your printouts. If you print with an
2.
Open the
3.
Access the printer driver window.
4.
Click Watermark Features on the More Options tab and select the type of anti-copy pattern or watermark
you want to use.
5.
Click Settings to change details such as the size, density, or position of the pattern or the mark.
you want to print.
le
55
Page 56

Printing
6.
Set the other items on the Main and More Options tabs as necessary, and then click OK.
“Main Tab” on page 36
“More Options Tab” on page 38
7.
Click Print.
Related Information
& “Printing Using Easy Settings” on page 35
>
Printing Documents>Printing from a Computer - Windows
Printing Multiple Files Together
Job Arranger Lite allows you to combine several
print job. You can specify the print settings for combined les, such as multi-page layout, and 2-sided printing.
1.
Load paper in the printer .
“Loading Paper in the Paper Cassette” on page 26
2.
Open the le you want to print.
3.
Select Print or Print Setup from the File menu.
4.
Select your printer.
5.
Select Preferences or Properties to access the printer driver window.
created by
les
dierent
applications and print them as a single
6.
Select Job Arranger Lite on the Main tab, and then click OK.
“Main Tab” on page 36
7.
Click Print.
When you start printing, the Job Arranger Lite window is displayed.
8.
With the Job Arranger Lite window opened, open the le that you want to combine with the current le, and
then repeat the above steps.
9.
When you select a print job added to Print Project Lite in the Job Arranger Lite window, you can edit the page
layout.
56
Page 57

Printing
10.
Click Print from the File menu to start printing.
Note:
If you close the Job Arranger Lite window before adding all the print data to the Print Project, the print job you are
currently working on is canceled. Click Save from the File menu to save the current job. e extension of the saved
is "ecl".
To open a Print Project, click Job Arranger Lite on the printer driver's Maintenance tab to open the Job Arranger Lite
window. Next, select Open from the File menu to select the le.
Related Information
& “Printing Using Easy Settings” on page 35
>
Printing Documents>Printing from a Computer - Windows
Adjusting the Print Tone
You can adjust the tone used in the print job. ese adjustments are not applied to the original data.
les
1.
Load paper in the printer .
“Loading Paper in the Paper Cassette” on page 26
2.
Open the le you want to print.
3.
Access the printer driver window.
4.
Select the method of color correction from Ton e C orrecti on on the More Options tab.
❏ Automaticis setting automatically adjusts the tone to match the paper type and print quality settings.
❏ If you select Custom and click Advanced, you can make your own settings.
5.
Set the other items on the Main and More Options tabs as necessary, and then click OK.
“Main Tab” on page 36
“More Options Tab” on page 38
6.
Click Print.
Related Information
& “Printing Using Easy Settings” on page 35
57
Page 58

Printing
>
Printing Documents>Printing from a Computer - Windows
Printing to Emphasize Thin Lines
You can thicken thin lines that are too thin to print.
1.
Load paper in the printer .
“Loading Paper in the Paper Cassette” on page 26
2.
Open the le you want to print.
3.
Access the printer driver window.
4.
Click Image Options from To n e C o r rection on the More Options tab.
5.
Select Emphasize
6.
Set the other items on the Main and More Options tabs as necessary, and then click OK.
“Main Tab” on page 36
“More Options Tab” on page 38
7.
Click Print.
Related Information
& “Printing Using Easy Settings” on page 35
in
Lines.
Printing to Enhance Light Text and Lines
Printing to Enhance Light Text and Lines
1.
Load paper in the printer .
“Loading Paper in the Paper Cassette” on page 26
2.
Open the le you want to print.
3.
Access the printer driver window.
58
Page 59

Printing
4.
Click Image Options from To n e C o r rection on the More Options tab.
5.
Select Enhance Light Text and Lines.
6.
Set the other items on the Main and More Options tabs as necessary, and then click OK.
“Main Tab” on page 36
“More Options Tab” on page 38
7.
Click Print.
Related Information
& “Printing Using Easy Settings” on page 35
>
Printing Documents>Printing from a Computer - Windows
Printing Clear Bar Codes
You can print a bar code clearly and make it easy to scan. Only enable this feature if the bar code you printed
cannot be scanned.
You can use this feature under the following conditions.
❏ Paper: Plain paper, Copy paper, High quality plain paper, or Envelope
❏ Quality: Standard
1.
Load paper in the printer .
“Loading Paper in the Paper Cassette” on page 26
2.
Open the le you want to print.
3.
Access the printer driver window.
4.
Click Extended Settings on the Maintenance tab, and then select Barcode mode.
5.
Set the other items on the Main and More Options tabs as necessary, and then click OK.
“Main Tab” on page 36
“More Options Tab” on page 38
6.
Click Print.
Note:
Deblurring may not always be possible depending on the circumstances.
59
Page 60

Printing
Related Information
& “Printing Using Easy Settings” on page 35
>
Printing Documents>Printing from a Computer - Mac OS
Printing from a Computer - Mac OS
Printing Using Easy Settings
Note:
Operations and screens dier depending on the application. See the application's help for details.
1.
Load paper in the printer .
“Loading Paper in the Paper Cassette” on page 26
2.
Open the
3.
Select Print from the File menu or another command to access the print dialog.
If necessary, click Show Details or
4.
Select your printer.
you want to print.
le
d
to expand the print window.
60
Page 61

Printing
5.
Select Print Settings from the pop-up menu.
>
Printing Documents>Printing from a Computer - Mac OS
Note:
If the Print Settings menu is not displayed on macOS High Sierra, macOS Sierra, OS X El Capitan, OS X Yosemite, OS
X Mavericks, OS X Mountain Lion, the Epson printer driver has not been installed correctly. Enable it from the
following menu. macOS Mojave cannot access Print Settings in applications made by Apple such as TextEdit.
Select System Preferences from the Apple menu > Printers & Scanners (or Print & Scan, Print & Fax), remove the
printer, and then add the printer again. See the following to add a printer.
“Adding the Printer (for Mac OS Only)” on page 110
6.
Change the settings as necessary.
See the menu options for the printer driver for details.
7.
Click Print.
Note:
If you want to cancel printing, on your computer click the printer icon in the Dock. Select the job you want to cancel,
and then do one of the following. However, you cannot cancel a print job from the computer once it has been completely
sent to the printer. In this case, cancel the print job by using the printer's control panel.
❏ OS X Mountain Lion or later
Click
❏ Mac OS X v10.6.8 to v10.7.x
Click Delete.
next to the progress meter.
Related Information
& “Available Paper and Capacities” on page 202
& “Menu Options for Print Settings” on page 63
61
Page 62

Printing
>
Printing Documents>Printing from a Computer - Mac OS
Menu Options for the Printer Driver
Open the print window in an application, select the printer, and then access the printer driver window.
Note:
Menus vary depending on the option you selected.
Menu Options for Layout
Pages per Sheet
Select the number of pages to be printed on one sheet.
Layout Direction
Specify the order in which the pages will be printed.
Border
Prints a border around the pages.
Reverse page orientation
Rotates pages 180 degrees before printing. Select this item when printing on paper such as envelopes
that are loaded in xed direction in the printer.
Flip horizontally
Inverts an image to print as it would appear in a mirror.
Menu Options for Color Matching
ColorSync/EPSON Color Controls
Select the method for color adjustment.
computer display to minimize the
Menu Options for Paper Handling
Collate pages
Prints multi-page documents collated in order and sorted into sets.
Pages to Print
ese
dierence
options adjusts colors between the printer and the
in color.
Select to print only odd pages or even pages.
Page Order
Select to print from the top or the last page.
Scale to t paper size
Prints to t to the paper size you loaded.
❏ Destination Paper Size
Select the paper size to print on.
62
Page 63

Printing
Menu Options for Cover Page
>
Printing Documents>Printing from a Computer - Mac OS
❏ Scale down only
Select when reducing the size of the document.
Print Cover Page
Select whether or not to print a cover page. When you want to add a back cover, select
Cover Page Type
Select the contents of the cover page.
Menu Options for Print Settings
Media Type
Select the type of paper on which you print.
Print Quality
Select the pint quality you want to use for printing. e options vary depending on the paper type.
Advanced Settings
Adjusts the brightness and the contrast of images.
Printing Several Pages on One Sheet
You can print several pages of data on a single sheet of paper.
Aer
document.
1.
Load paper in the printer .
“Loading Paper in the Paper Cassette” on page 26
2.
Open the le you want to print.
63
Page 64

Printing
3.
Select Print from the File menu or another command to access the print dialog.
4.
Select Layout from the pop-up menu.
5.
Set the number of pages in Pages per Sheet, the Layout Direction (page order), and Border.
“Menu Options for Layout” on page 62
6.
Set the other items as necessary.
7.
Click Print.
Related Information
& “Printing Using Easy Settings” on page 60
>
Printing Documents>Printing from a Computer - Mac OS
Printing and Stacking in Page Order (Reverse Order Printing)
You can print from the last page so that documents are stacked in page order when they are ejected.
1.
Load paper in the printer .
“Loading Paper in the Paper Cassette” on page 26
2.
Open the
3.
Select Print from the File menu or another command to access the print dialog.
4.
Select Paper Handling from the pop-up menu.
5.
Select Reverse as the Page Order setting.
you want to print.
le
6.
Set the other items as necessary.
7.
Click Print.
Related Information
& “Printing Using Easy Settings” on page 60
64
Page 65

Printing
>
Printing Documents>Printing from a Computer - Mac OS
Printing to Fit the Paper Size
Select the paper size you loaded in the printer as the Destination Paper Size setting.
1.
Load paper in the printer .
“Loading Paper in the Paper Cassette” on page 26
2.
Open the
3.
Select Print from the File menu or another command to access the print dialog.
4.
Select the size of the paper you set in the application as the Paper Size setting.
5.
Select Paper Handling from the pop-up menu.
6.
Select Scale to t paper size.
7.
Select the paper size you loaded in the printer as the Destination Paper Size setting.
8.
Set the other items as necessary.
9.
Click Print.
Related Information
& “Printing Using Easy Settings” on page 60
you want to print.
le
65
Page 66

Printing
>
Printing Documents>Printing from a Computer - Mac OS
Printing a Reduced or Enlarged Document at any Magnication
You can reduce or enlarge the size of a document by a specic percentage.
1.
Load paper in the printer .
“Loading Paper in the Paper Cassette” on page 26
2.
Open the le you want to print.
3.
Select Print from the File menu or another command to access the print dialog.
4.
Select Page Setup from the File menu of the application.
5.
Select Printer, Paper Size, enter percentage in Scale, and then click OK.
Note:
Select the paper size you set in the application as the Paper Size setting.
6.
Set the other items as necessary.
7.
Click Print.
Related Information
& “Printing Using Easy Settings” on page 60
66
Page 67

Printing
>
Printing Documents>Printing Documents from Smart Devices (iOS)
Adding Printing Presets for Easy Printing
If you create your own preset of frequently used print settings on the printer driver, you can print easily by
selecting the preset from the list.
1.
Load paper in the printer .
“Loading Paper in the Paper Cassette” on page 26
2.
Open the
3.
Select Print from the File menu or another command to access the print dialog.
4.
Set each item such as Print Settings and Layout (Paper Size, Media Type, and so on).
5.
Click Presets to save the current settings as a preset.
6.
Click OK.
Note:
To delete an added preset, click Presets > Show Presets, select the preset name you want to delete from the list, and then
delete it.
7.
Click Print.
e next time you want to print using the same settings, select the registered preset name from the Presets.
Related Information
& “Printing Using Easy Settings” on page 60
you want to print.
le
Printing Documents from Smart Devices (iOS)
You can print documents from a smart device such as a smartphone or tablet.
67
Page 68

Printing
>
Printing Documents>Printing Documents from Smart Devices (iOS)
Printing Documents Using Epson iPrint
Note:
Operations may dier depending on the device.
1.
Load paper in the printer.
“Loading Paper in the Paper Cassette” on page 26
2.
Set up your printer for wireless printing.
3.
If Epson iPrint is not installed, install it.
“Installing Epson iPrint” on page 208
4.
Connect your smart device to the same wireless network as your printer.
5.
Start Epson iPrint.
6.
Ta p Document on the home screen.
7.
Tap the location of the document you want to print.
8.
Select the document, and then tap Next.
9.
Ta p Print.
Printing Documents Using AirPrint
AirPrint enables instant wireless printing from iPhone, iPad, iPod touch, and Mac without the need to install
drivers or download soware.
Note:
If you disabled paper conguration messages on your printer control panel, you cannot use AirPrint. See the link below to
enable the messages, if necessary.
1.
Load paper in the printer.
“Loading Paper in the Paper Cassette” on page 26
2.
Set up your printer for wireless printing. See the link below.
http://epson.sn
3.
Connect your Apple device to the same wireless network that your printer is using.
4.
Print from your device to your printer.
Note:
For details, see the AirPrint page on the Apple website.
68
Page 69

Printing
Related Information
& “Cannot Print Even ough a Connection has been Established (iOS)” on page 136
>
Printing Documents>Printing Documents from Smart Devices (Android)
Printing Documents from Smart Devices (Android)
You can print documents from a smart device such as a smartphone or tablet.
Printing Documents Using Epson iPrint
Note:
Operations may dier depending on the device.
1.
Load paper in the printer.
“Loading Paper in the Paper Cassette” on page 26
2.
Set up your printer for wireless printing.
3.
If Epson iPrint is not installed, install it.
“Installing Epson iPrint” on page 208
4.
Connect your smart device to the same wireless network as your printer.
5.
Start Epson iPrint.
6.
Ta p Document on the home screen.
7.
Tap the location of the document you want to print.
8.
Select the document, and then tap Next.
9.
Ta p Print.
Printing Documents Using Epson Print Enabler
You can wirelessly print your documents, emails, photos, and web pages right from your Android phone or tablet
(Android v4.4 or later). With a few taps, your Android device will discover an Epson printer that is connected to
the same wireless network.
Note:
Operations may dier depending on the device.
69
Page 70

Printing
1.
Load paper in the printer.
“Loading Paper in the Paper Cassette” on page 26
2.
Set up your printer for wireless printing.
3.
On your Android device, install the Epson Print Enabler plug-in from Google Play.
4.
Connect your Android device to the same wireless network as your printer.
5.
Go to Settings on your Android device, select Printing, and then enable Epson Print Enabler.
6.
From an Android application such as Chrome, tap the menu icon and print whatever is on the screen.
Note:
If you do not see your printer, tap All Printers and select your printer.
>
Printing on Envelopes>Printing on Envelopes from a Computer (Mac OS)
Printing on Envelopes
Printing on Envelopes from a Computer (Windows)
1.
Load envelopes in the printer.
“Loading Envelopes in the Paper Cassette” on page 29
2.
Open the le you want to print.
3.
Access the printer driver window.
4.
Select the envelope size from Document Size on the Main tab, and then select Envelope from Paper Type.
5.
Set the other items on the Main and More Options tabs as necessary, and then click OK.
6.
Click Print.
Printing on Envelopes from a Computer (Mac OS)
1.
Load envelopes in the printer.
“Loading Envelopes in the Paper Cassette” on page 29
2.
Open the le you want to print.
3.
Select Print from the File menu or another command to access the print dialog.
4.
Select the size as the Paper Size setting.
5.
Select Print Settings from the pop-up menu.
70
Page 71

Printing
6.
Select Envelope as the Media Type setting.
7.
Set the other items as necessary.
8.
Click Print.
>
Printing Web Pages>Printing Web Pages from Smart Devices
Printing Web Pages
Printing Web Pages from a Computer
1.
Load paper in the printer.
“Loading Paper in the Paper Cassette” on page 26
2.
Select the printing method from the E-Web Print Toolbar.
❏ Print: Print the entire web page to t on the paper.
❏ Clip: Print only the area you selected.
3.
Make the print settings, and then click Print.
Printing Web Pages from Smart Devices
Note:
Operations may dier depending on the device.
1.
Load paper in the printer.
“Loading Paper in the Paper Cassette” on page 26
2.
Set up your printer for wireless printing.
3.
If Epson iPrint is not installed, install it.
“Installing Epson iPrint” on page 208
4.
Connect your smart device to the same wireless network as your printer.
5.
Open the web page you want to print in your web browser app.
6.
Ta p Share from the menu of the web browser application.
7.
Select iPrint.
8.
Ta p Print.
71
Page 72

Printing
>
Printing Using a Cloud Service>Registering to Epson Connect Service from the Control Panel
Printing Using a Cloud Service
By using Epson Connect service available on the Internet, you can print from your smartphone, tablet PC, or
laptop, anytime and practically anywhere. To use this service, you need to register the user and the printer in
Epson Connect.
e features available on the Internet are as follows.
❏ Email Print
When you send an email with attachments such as documents or images to an email address assigned to the
printer, you can print that email and the attachments from remote locations such as your home or oce printer.
❏ Epson iPrint
Application is for iOS and Android, and allows you to print or scan from a smartphone or tablet. You can
is
print documents, images, and web sites by sending them directly to a printer on the same wireless LAN.
❏ Remote Print Driver
is is a shared driver supported by Remote Print Driver. When printing using a printer in a remote location,
you can print by changing the printer on the usual applications window.
See the Epson Connect web portal for details on how to setup or print.
https://www.epsonconnect.com/
http://www.epsonconnect.eu (Europe only)
Registering to Epson Connect Service from the Control Panel
Follow the steps below to register the printer.
1.
Select Settings on the control panel.
To select an item, use the
u d l r
buttons, and then press the OK button.
72
Page 73

Printing
2.
Select Epson Connect Services > Register/Delete to print the registration sheet.
3.
Follow the instructions on the registration sheet to register the printer.
>
Printing Using a Cloud Service>Registering to Epson Connect Service from the Control Panel
73
Page 74

Copying
Copying Originals..................................................75
Copying ID card...................................................80
Page 75

Copying
>
Copying Originals
Copying Originals
is section explains how to use the Copy menu on the control panel to copy originals.
1.
Load paper in the printer.
“Loading Paper in the Paper Cassette” on page 26
2.
Place the originals.
“Placing Originals on the Scanner Glass” on page 32
3.
Select Copy on the home screen.
To select an item, use the
4.
Set the number of copies using the
u d l r
buttons, and then press the OK button.
u d
button.
75
Page 76

Copying
5.
Press the OK button to display and check the print settings, and then change the settings as necessary.
To change the settings, press the
the settings using the
>
Copying Originals>Menu Options for Copying
d
button, specify the setting menu using the u d buttons, and then change
l r
buttons. When you have nished, press the OK button.
“Menu Options for Copying” on page 76
6.
Press the
Note:
e size and border of the copied image are slightly dierent from the original.
x
button.
Menu Options for Copying
Available items vary depending on the menu you selected.
ID Card Copy:
Scans both sides of an ID card and copies onto one side of a paper.
Density:
Increase the level of density when the copying results are faint. Decrease the level of density when ink
smears.
Paper Setting:
Select the paper size and the paper type you loaded.
Reduce/Enlarge:
Enlarges or reduces the originals.
❏ Actual Size
Copies at 100 % magnication.
76
Page 77

Copying
>
Copying Originals>Copying by Enlarging or Reducing
❏ Auto Fit
Detects the scan area and automatically enlarges or reduces the original to t to the paper size you
selected. When there are white margins around the original, the white margins from the corner
mark of the scanner glass are detected as the scan area, but the margins at the opposite side may be
cropped.
❏ Custom
Select to specify the magnication to enlarge or reduce the original.
Custom Size:
Species the magnication used to enlarge or reduce the original within a range of 25 to 400%.
Original Size:
Select the size of your original. When copying non-standard size originals, select the size closest to
your original.
Multi-Page:
❏ Single Page
Copies a single-sided original onto a single sheet.
❏ 2-up
Copies two single-sided originals onto a single sheet in 2-up layout.
Quality:
Select the quality for copying. Selecting Best provides higher quality printing, but the printing speed
may be slower.
Copying by Enlarging or Reducing
You can copy originals at a
specied magnication.
77
Page 78

Copying
1.
Load paper in the printer.
“Loading Paper in the Paper Cassette” on page 26
2.
Place the originals.
“Placing Originals on the Scanner Glass” on page 32
3.
Select Copy on the home screen.
>
Copying Originals>Copying Multiple Originals onto One Sheet
To select an item, use the
4.
Set the number of copies using the
5.
Press the OK button, and then press the
6.
Specify Reduce/Enlarge using the
Note:
If you want to copy by reducing or enlarging the size of a document by a specic percentage, select Custom as the
Reduce/Enlarge setting, press the
percentage in increments of 10% by holding down the
7.
Change the other settings as necessary.
“Menu Options for Copying” on page 76
8.
Press the OK button, and then press the
Note:
e size and border of the copied image are slightly dierent from the original.
u d l r
buttons, and then press the OK button.
u d
button.
d
button.
u d
buttons, and then change the magnication using the l r buttons.
d
button, and then press the l rbutton to specify a percentage. You can change the
l r
buttons.
x
button.
Copying Multiple Originals onto One Sheet
Copies two single-sided originals onto a single sheet in 2-up layout.
1.
Load paper in the printer.
“Loading Paper in the Paper Cassette” on page 26
2.
Select Copy on the home screen.
To select an item, use the
3.
Set the number of copies using the
u d l r
buttons, and then press the OK button.
u d
button.
78
Page 79

Copying
>
Copying Originals>Copying Multiple Originals onto One Sheet
4.
Press the OK button, and then press the
5.
Select 2-up as the Multi-Page setting, and then press the OK button.
6.
Select the order of the layout for the Layout Order setting, and then press the OK button.
7.
Select the orientation of the original for the Original Orientation setting, and then press the OK button.
8.
Change the other settings as necessary.
“Menu Options for Copying” on page 76
9.
Place the
❏ Portrait originals
page of the original, and then press the
rst
d
button.
x
button.
79
Page 80

Copying
❏ Landscape originals
>
Copying ID card
10.
Place the second page of the original, and then press the
Note:
e size and border of the copied image are slightly dierent from the original.
x
button.
Copying ID card
Scans both sides of an ID card and copies onto one side of A4 size paper.
1.
Load paper in the printer.
“Loading Paper in the Paper Cassette” on page 26
2.
Select Copy on the home screen.
To select an item, use the
u d l r
buttons, and then press the OK button.
80
Page 81

Copying
>
Copying ID card
3.
Set the number of copies using the
4.
Select On in ID Card Copy.
5.
Check the print settings, and then change the settings as necessary.
If you want to change the settings, press the
“Menu Options for Copying” on page 76
6.
Press the
7.
Place the original face-down and slide it to the corner mark.
Place an ID card 5 mm away from the corner mark of the scanner glass.
x
button.
u d
button.
d
button. When you
it, press the OK button.
nish
8.
Place the back of the original face down, slide it to the corner mark, and then press the
Note:
e size and border of the copied image are slightly dierent from the original.
81
x
button.
Page 82

Scanning
Available Scanning Methods..........................................83
Basic Information on Scanning........................................ 83
Scanning Originals to a Computer......................................84
Scanning Originals Using WSD........................................86
Scanning Originals to a Smart Device....................................88
Advanced Scanning.................................................89
Page 83

Scanning
>
Basic Information on Scanning>Recommended File Formats to Suit Your Purpose
Available Scanning Methods
You can use any of the following methods to scan using this printer.
Scanning to a Computer
ere are two methods of scanning originals to a computer; scanning using the printer’s control panel,
and scanning from the computer.
❏ You can scan easily from the control panel. Before scanning, install Epson Event Manager and Epson
Scan 2 on your computer.
❏ Use the scanning application Epson ScanSmart to scan from the computer. You can edit images aer
scanning. Before scanning, install Epson ScanSmart on your computer.
Scanning Using WSD
You can save the scanned image to a computer connected to the printer, using WSD feature.
If you are using the Windows 7/Windows Vista, you need to make WSD settings on your computer
before scanning.
Scanning Directly from Smart Devices
You can save scanned images directly to a smart device such as a smartphone or tablet by using the
Epson iPrint application on the smart device.
Before scanning, install Epson iPrint on your smart device.
Related Information
& “Scanning Originals to a Computer” on page 84
& “Scanning Originals Using WSD” on page 86
& “Scanning Originals to a Smart Device” on page 88
Basic Information on Scanning
Recommended File Formats to Suit Your Purpose
Generally speaking, the JPEG format is suitable for photos while the PDF format is suitable for documents.
See the following descriptions to choose the best format for what you want to do.
File Format Description
JPEG (.jpg) A le format that allows you to compress the data to be saved. If the compression ratio
is high, the image quality declines, and you cannot convert the image back to the
original quality.
This is the standard image format for digital cameras. This format is suitable for images
that have many colors.
PDF (.pdf) A general le format that can be used across dierent operating systems and provides
the same level of screen display and print result.
You can view PDF les using dedicated PDF reading software or in Web browsers.
83
Page 84

Scanning
>
Scanning Originals to a Computer>Scanning from the Control Panel
Recommended Resolutions to Suit Your Purpose
Resolution indicates the number of pixels (smallest area of an image) for each inch (25.4 mm), and is measured in
dpi (dots per inch). e advantage of increasing the resolution is that the details in the image become ne.
However, it can also have the following disadvantages.
❏
e le
(When you double the resolution, the
❏ Scanning, saving, and reading the image takes a long time
❏ e image becomes too large to t the display or print on the paper
See the table and set the appropriate resolution for the purpose of your scanned image.
Displaying on a computer
Sending by email
Printing using a printer 200 to 300 dpi
size becomes large
size becomes about four times larger.)
le
Purpose Resolution (Reference)
Up to 200 dpi
Scanning Originals to a Computer
ere are two methods of scanning originals to a computer; scanning using the printer’s control panel, and
scanning from the computer.
Related Information
& “Scanning from the Control Panel” on page 84
& “Scanning from a Computer” on page 85
Scanning from the Control Panel
Note:
To use this feature, make sure the following applications are installed on your computer.
❏ Epson Event Manager
❏ Epson Scan 2
See the following to check for installed applications.
Windows 10: Click on the start button, and then select Windows System-Control Panel-Programs-Programs and
Features.
Windows 8.1/Windows 8: Select Desktop-Settings-Control Panel-Programs-Programs and Features.
Windows 7: Click the start button, and then select Control Panel-Programs-Programs and Features
Mac OS: Select Go > Applications > Epson Soware.
1.
Place the originals.
“Placing Originals on the Scanner Glass” on page 32
84
Page 85

Scanning
2.
Select Scan on the control panel.
>
Scanning Originals to a Computer>Scanning from a Computer
To select an item, use the
3.
Select how to save the scanned image to a computer from the following menus, and then press the OK button.
❏ To Comp u ter (JP E G ): Saves the scanned image in JPEG format.
❏ To Comp u ter (P D F): Saves the scanned image in PDF format.
❏ To Comp u ter (E m a i l): Starts the email client on your computer, and then automatically attaches it to an
email.
❏ To Computer (Custom): Saves the scanned image using the settings on the Epson Event Manager. You can
change the scan settings such as the scanning size, folder to save to, or save format.
“Making Custom Settings for Scanning Using the Control Panel” on page 89
u d l r
buttons, and then press the OK button.
4.
Select the computer to which you want to save the scanned images.
Note:
❏ When the printer is connected to a network, you can select the computer to which you want to save the scanned
image. You can display up to 20 computers on the printer's control panel. If you set Network Scan Name
(Alphanumeric) in Epson Event Manager, it is displayed on the control panel.
5.
Press the
x
button.
Scanning from a Computer
You can scan from a computer by using Epson ScanSmart.
is application allows you to scan documents easily, and then save the scanned images in simple steps.
1.
Place the originals.
“Placing Originals on the Scanner Glass” on page 32
2.
Start Epson ScanSmart.
❏ Windows 10
Click the start button, and then select Epson Soware > Epson ScanSmart.
❏ Windows 8.1/Windows 8
Enter the application name in the search charm, and then select the displayed icon.
85
Page 86

Scanning
❏ Windows 7
❏ Mac OS
3.
When the Epson ScanSmart screen is displayed, follow the on-screen instructions to scan.
Note:
Click Help to view detailed operation information.
>
Scanning Originals Using WSD>Setting Up a WSD Port
Click the start button, and then select All Programs > Epson
Select Go > Applications > Epson
Soware
> Epson ScanSmart.
Soware
> Epson ScanSmart.
Scanning Originals Using WSD
You can save the scanned image to a computer connected to the printer, using WSD feature.
Note:
❏ is feature is only available for computers running Windows 10/Windows 8.1/Windows 8/Windows 7/Windows Vista.
❏ If you are using Windows 7/Windows Vista, you need to setup your computer in advance using this feature.
1.
Place the originals.
“Placing Originals on the Scanner Glass” on page 32
2.
Select Scan on the control panel.
To select an item, use the
3.
Select To W SD.
u d l r
buttons, and then press the OK button.
4.
Select a computer.
5.
Press the
x
button.
Setting Up a WSD Port
is section explains how to set up a WSD port for Windows 7/Windows Vista.
Note:
For Windows 10/Windows 8.1/Windows 8, the WSD port is set up automatically.
e following is necessary to set up a WSD port.
86
Page 87

Scanning
>
Scanning Originals Using WSD>Setting Up a WSD Port
❏ e printer and the computer are connected to the network.
❏
printer driver is installed on the computer.
e
1.
Turn the print e r on.
2.
Click start, and then click Network on the computer.
3.
Right-click the printer, and then click Install.
Click Continue when the User Account Control screen is displayed.
Click Uninstall and start again if the Uninstall screen is displayed.
Note:
e printer name you set on the network and model name (EPSON XXXXXX (XX-XXXX)) are displayed on the
network screen. You can check the printer's name set on the network from the printer's control panel or by printing a
network status sheet.
4.
Click Your device is ready to use.
87
Page 88

Scanning
5.
Check the message, and then click Close.
6.
Open the Devices and Printers screen.
❏ Windows 7
❏ Windows Vista
>
Scanning Originals to a Smart Device
Click start > Control Panel > Hardware and Sound (or Hardware) > Devices and Printers.
Click start > Control Panel > Hardware and Sound > Printers.
7.
Check that an icon with the printer's name on the network is displayed.
Select the printer name when using with WSD.
Scanning Originals to a Smart Device
Note:
❏ Before scanning, install Epson iPrint on your smart device.
❏ Epson iPrint screens are subject to change without notice.
❏ Epson iPrint contents may vary depending on the product.
1.
Place the originals.
“Placing Originals” on page 31
2.
Start Epson iPrint.
3.
Ta p Scan on the home screen.
4.
Ta p Scan.
Note:
You can set the scan settings. Tap the
Scanning starts.
5.
Check the scanned image, and then select the saving method.
: Displays the screen where you can save the scanned images.
❏
: Displays the screen where you can send scanned images by email.
❏
: Displays the screen where you can print scanned images.
❏
icon at the top-right of the screen.
88
Page 89

Scanning
6.
Finally, follow the on-screen instructions.
>
Advanced Scanning>Making Custom Settings for Scanning Using the Control Panel
Advanced Scanning
Related Information
& “Making Custom Settings for Scanning Using the Control Panel” on page 89
& “Decreasing the File Size of the Scanned Image” on page 92
Making Custom Settings for Scanning Using the Control Panel
Using Epson Event Manager, you can set To Computer (Custom) for scanning to a computer using the control
panel.
See the Epson Event Manager help for details.
1.
Start Epson Event Manager.
❏ Windows 10/Windows Server 2016
Click the start button, and then select Epson Soware > Event Manager.
❏ Windows 8.1/Windows 8/Windows Server 2012 R2/Windows Server 2012
Enter the application name in the search charm, and then select the displayed icon.
❏ Windows 7/Windows Vista/Windows XP/Windows Server 2008 R2/Windows Server 2008/Windows Server
2003 R2/Windows Server 2003
Click the start button, and then select All Programs or Programs > Epson Soware > Event Manager.
❏ Mac OS
Select Go > Applications > Epson Soware > Event Manager.
89
Page 90

Scanning
2.
Make sure that your scanner is selected as the Scanner on the Button Settings tab on the main screen.
>
Advanced Scanning>Making Custom Settings for Scanning Using the Control Panel
3.
Click Make Job Settings.
90
Page 91

Scanning
4.
Make scan settings on the Job Settings screen.
>
Advanced Scanning>Making Custom Settings for Scanning Using the Control Panel
❏ Edit Job Settings: Select Custom Action.
❏ Setting: Scan using the best settings for the selected type of original. Click Detailed Settings for Scanning
to set the items such as the resolution or the color for saving the scanned image.
❏ Target Folder: Select the save folder for the scanned image.
❏ Filename (Prex + Start Number): Change the settings for the le name you want to save.
❏ File Format: Select the save format.
❏ Launch Action: Select the action when scanning.
❏ Test Settings: Starts test scanning using current settings.
5.
Click OK to return to the main screen.
91
Page 92

Scanning
6.
Make sure that the Custom Action is selected on the Custom Action list.
>
Advanced Scanning>Decreasing the File Size of the Scanned Image
7.
Click Close to close Epson Event Manager.
Decreasing the File Size of the Scanned Image
Change the scan settings to decrease the
Note:
e amount that can be decreased varies depending on the original.
❏ Change the le format:
Select PDF format to scan documents, and select JPEG format to scan photos or pictures.
❏ Lower the resolution:
200 dpi scanning provides
sucient
size of the scanned image.
le
quality when scanning documents.
92
Page 93

Maintaining the Printer
Checking the Ink Levels............................................. 94
Improving Paper Feeding Problems.....................................95
Improving Print, Copy, and Scan Quality.................................97
Cleaning the Printer............................................... 104
Cleaning Spilled ink............................................... 105
Checking the Total Number of Pages Fed rough the Printer.................105
Saving Power.................................................... 106
Installing or Uninstalling Applications Separately..........................107
Transporting and Storing the Printer................................... 113
Page 94

Maintaining the Printer
>
Checking the Ink Levels>Checking the Ink Levels (Mac OS)
Checking the Ink Levels
To
conrm
the actual ink remaining, visually check the ink level in the printer's tank.
Important:
c
If the ink tank is not lled up to the lower line, ll it to the upper line on the ink tank. Continued use of the printer
when the ink level is below the lower line on the tank could damage the printer.
You can check the approximate ink levels from the computer.
Related Information
& “It is Time to Rell the Ink” on page 153
Checking the Ink Levels (Windows)
1.
Access the printer driver window.
2.
Click EPSON Status Monitor 3 on the Maintenance tab.
Note:
If EPSON Status Monitor 3 is disabled, click Extended Settings on the Maintenance tab, and then select Enable
EPSON Status Monitor 3.
Related Information
& “Application for Printing from a Computer (Windows Printer Driver)” on page 205
& “It is Time to Rell the Ink” on page 153
Checking the Ink Levels (Mac OS)
1.
Select System Preferences from the Apple menu > Printers & Scanners (or Print & Scan, Print & Fax), and
then select the printer.
2.
Click Options & Supplies > Utility > Open Printer Utility.
3.
Click EPSON Status Monitor.
94
Page 95

Maintaining the Printer
Related Information
& “It is Time to Rell the Ink” on page 153
>
Improving Paper Feeding Problems
Improving Paper Feeding Problems
When paper is not fed from paper cassette correctly, clean the roller inside.
1.
Tu r n o the printer by pressing the
2.
Unplug the power cord, and then disconnect the power cord.
3.
Make sure that the ink tank cap is securely closed.
Important:
P
button.
c
If the ink tank cap is not securely closed, ink may leak.
4.
Close the scanner unit.
5.
Slide out the paper cassette, and then remove the paper.
95
Page 96

Maintaining the Printer
6.
Stand the printer on its side with the printer's ink tank at the bottom.
Caution:
!
Be careful not to trap your hand or
>
Improving Paper Feeding Problems
when standing the printer. Otherwise you may be injured.
ngers
Important:
c
Do not leave the printer standing for a long time.
7.
Dampen a
cloth.
8.
Return the printer to its normal position, and then insert the paper cassette.
9.
Connect the power cord.
cloth with water, wring it out thoroughly, and then wipe the roller while rotating it with the
so
96
Page 97

Maintaining the Printer
>
Improving Print, Copy, and Scan Quality>Checking and Cleaning the Print Head
Improving Print, Copy, and Scan Quality
Checking and Cleaning the Print Head
If the nozzles are clogged, the printouts become faint or there is visible banding. If the nozzles are severely clogged,
a blank sheet will be printed. When print quality has declined, rst use the nozzle check feature to check if the
nozzles are clogged. If the nozzles are clogged, clean the print head.
Important:
c
❏ Do not open the scanner unit or turn o the printer during head cleaning. If the head cleaning is incomplete, you
may not be able to print.
❏ Head cleaning consumes ink and should not be performed more than necessary.
❏ When ink is low, you may not be able to clean the print head.
❏ If print quality has not improved aer repeating nozzle check and head cleaning 3 times, wait for at least 6 hours
without printing, and then run the nozzle check again and repeat the head cleaning if necessary. We recommend
P
turning o the printer by using the
button. If print quality has still not improved, run Power Cleaning.
❏ To prevent the print head from drying out, do not unplug the printer while the power is on.
Checking and Cleaning the Print Head (Control Panel)
1.
Load A4-size plain paper in the printer.
“Loading Paper in the Paper Cassette” on page 26
2.
Select Maintenance on the home screen.
To select an item, use the
3.
Select Nozzle Check.
4.
Follow the on-screen instructions to print the nozzle check pattern.
5.
Check the printed pattern to see if the print head nozzles are clogged.
u d l r
buttons, and then press the OK button.
❏ A:
All lines are printed. No further steps are needed.
97
Page 98

Maintaining the Printer
❏ B or close to B
When some nozzles are clogged, select Ye s , and then perform head cleaning.
You can still perform head cleaning even if you select No. For details, see the related information below.
❏ C or close to C
When most lines are broken or most segments are missing, select No, and then perform power cleaning.
For details, see the related information below.
Important:
>
Improving Print, Copy, and Scan Quality>Checking and Cleaning the Print Head
c
If print quality has not improved aer repeating nozzle check and head cleaning 3 times, wait for at least 6 hours
without printing, and then run the nozzle check again and repeat the head cleaning if necessary. We recommend
P
turning o the printer by using the
Related Information
& “Running Power Cleaning - Control Panel” on page 100
button. If print quality has still not improved, run Power Cleaning.
Checking and Cleaning the Print Head (Windows)
1.
Load A4 -size plain paper in the printer.
“Loading Paper in the Paper Cassette” on page 26
2.
Access the printer driver window.
3.
Click Nozzle Check on the Maintenance tab.
4.
Follow the on-screen instructions.
Important:
c
If print quality has not improved aer repeating nozzle check and head cleaning 3 times, wait for at least 6
hours without printing, and then run the nozzle check again and repeat the head cleaning if necessary. We
P
recommend turning o the printer using the
Cleaning.
Related Information
& “Application for Printing from a Computer (Windows Printer Driver)” on page 205
& “Running Power Cleaning (Windows)” on page 100
button. If print quality has still not improved, run Power
Checking and Cleaning the Print Head (Mac OS)
1.
Load A4 -size plain paper in the printer.
“Loading Paper in the Paper Cassette” on page 26
2.
Select System Preferences from the Apple menu > Printers & Scanners (or Print & Scan, Print & Fax), and
then select the printer.
98
Page 99

Maintaining the Printer
3.
Click Option & Supplies > Utility > Open Printer Utility.
4.
Click Nozzle Check.
5.
Follow the on-screen instructions.
Important:
>
Improving Print, Copy, and Scan Quality>Running Power Cleaning
c
If print quality has not improved aer repeating nozzle check and head cleaning 3 times, wait for at least 6
hours without printing, and then run the nozzle check again and repeat the head cleaning if necessary. We
recommend turning o the printer using the
Cleaning.
Related Information
& “Running Power Cleaning (Mac OS)” on page 100
P
button. If print quality has still not improved, run Power
Running Power Cleaning
e Power Cleaning feature may improve print quality in the following cases.
❏ When most nozzles are clogged.
❏ When you have performed a nozzle check and head cleaning 3 times and waited for at least 6 hours without
printing, but print quality still did not improve.
Before running this feature, use the nozzle check feature to check if the nozzles are clogged, read the following
instructions, and then run Power Cleaning.
Important:
c
Make sure that there is enough ink in the ink tank.
Visually check the ink tank is at least a third full. Low ink levels during Power Cleaning could damage the product.
Important:
c
An interval of 12 hours is required between each Power Cleaning.
Normally, a single Power Cleaning should resolve the print quality issue within 12 hours.
unnecessary ink usage, you must wait 12 hours before you try it again.
erefore,
to avoid
Important:
c
feature
is
the ink pads have reached the end of their service life, contact Epson Support to request replacement.
Note:
When the ink levels are insucient for Power Cleaning, you cannot run this feature. Even in this case, the levels for printing
may remain.
Related Information
& “Checking and Cleaning the Print Head” on page 97
the service life of the ink pads. e ink pads reach their capacity earlier by running this feature. If
eects
99
Page 100

Maintaining the Printer
>
Improving Print, Copy, and Scan Quality>Running Power Cleaning
Running Power Cleaning - Control Panel
Read the instructions for Power Cleaning before running this feature.
1.
Press the
2.
While holding down the
light ashes.
3.
Follow the on-screen instructions to run the Power Cleaning feature.
Note:
If you cannot run this feature, solve the problems that are displayed on the screen. Next, follow this procedure from step
1 to run this feature again.
4.
Aer running this feature, run the nozzle check to make sure the nozzles are not clogged.
For details on how to run the nozzle check, see the related information below.
Related Information
& “Running Power Cleaning” on page 99
P
button to turn o the printer.
button, press the P button to display the conrmation screen until the power
Running Power Cleaning (Windows)
1.
Access the printer driver window.
2.
Click Power Cleaning on the Maintenance tab.
3.
Follow the on-screen instructions.
Note:
If you cannot run this feature, solve the problems that are displayed on the printer's control panel. Next, follow this
procedure from step 1 to run this feature again.
Running Power Cleaning (Mac OS)
1.
Select System Preferences from the Apple menu > Printers & Scanners (or Print & Scan, Print & Fax) and
then select the printer.
2.
Click Options & Supplies > Utility > Open Printer Utility.
3.
Click Power Cleaning.
4.
Follow the on-screen instructions.
Note:
If you cannot run this feature, solve the problems that are displayed on the printer's control panel. Next, follow this
procedure from step 1 to run this feature again.
100
 Loading...