

Page 1
User’s Guide
NPD4821-00 EN
Page 2
AL-M300/AL-M400 Series User's Guide
Copyright and Trademarks
No part of this publication may be reproduced, stored in a retrieval system, or transmitted in any form or by any means,
mechanical, photocopying, recording, or otherwise, without the prior written permission of Seiko Epson Corporation. No
patent liability is assumed with respect to the use of the information contained herein. Neither is any liability assumed for
damages resulting from the use of the information contained herein.
Neither Seiko Epson Corporation nor its affiliates shall be liable to the purchaser of this product or third parties for damages,
losses, costs, or expenses incurred by purchaser or third parties as a result of: accident, misuse, or abuse of this product or
unauthorized modifications, repairs, or alterations to this product, or (excluding the U.S.) failure to strictly comply with Seiko
Epson Corporation’s operating and maintenance instructions.
Seiko Epson Corporation and its affiliates shall not be liable against any damages or problems arising from the use of any options
or any consumable products other than those designated as Original Epson Products or Epson Approved Products by Seiko
Epson Corporation.
Features Zoran Corporation Integrated Print System (IPS) for print language emulation.
A part of the ICC Profile contained within this product was created by Gretag Macbeth ProfileMaker. Gretag Macbeth is the
registered trademark of Gretag Macbeth Holding AG Logo. ProfileMaker is a trademark of LOGO GmbH.
IBM and PS/2 are registered trademarks of International Business Machines Corporation.
Microsoft
Apple
Apple Chancery, Chicago, Geneva, Hoefler Text, Monaco, New York and True Type are trademarks or registered trademarks of
Apple, Inc.
EPSON and EPSON ESC/P are registered trademarks and Epson AcuLaser and Epson ESC/P 2 are trademarks of Seiko Epson
Corporation.
Bitstream is a registered trademark of Bitstream Inc. registered in the United States Patent and Trademark Office and may be
registered in certain jurisdictions.
Monotype is a trademark of Monotype Imaging, Inc. registered in the United States Patent and Trademark Office and may be
registered in certain jurisdictions.
Albertus, Arial, Coronet, GillSans, Times New Roman and Joanna are trademarks of The Monotype Corporation registered in
the United States Patent and Trademark Office and may be registered in certain jurisdictions.
ITC Avant Garde Gothic, ITC Bookman, ITC Lubalin, ITC Mona Lisa Recut, ITC Symbol, ITC Zapf-Chancery, and ITC
ZapfDingbats are trademarks of International Typeface Corporation registered in the United States Patent and Trademark
Office and may be registered in certain jurisdictions.
, Windows®, and Windows Vista® are registered trademarks of Microsoft Corporation.
®
, Mac®, Mac OS®, and Bonjour® are registered trademarks of Apple, Inc.
®
Copyright and Trademarks 2
Page 3

AL-M300/AL-M400 Series User's Guide
Clarendon, Helvetica, New Century Schoolbook, Optima, Palatino, Stempel Garamond, Times and Univers are registered
trademarks of Heidelberger Druckmaschinen AG, which may be registered in certain jurisdictions, exclusively licensed through
Linotype Library GmbH, a wholly owned subsidiary of Heidelberger Druckmaschinen AG.
Wingdings is a registered trademark of Microsoft Corporation in the United States and other countries.
Marigold is trademark of Arthur Baker and may be registered in some jurisdictions.
Antique Olive is a registered trademark of Marcel Olive and may be registered in certain jurisdictions.
Carta and Tekton are registered trademarks of Adobe Systems Incorporated.
Marigold and Oxford are trademarks of AlphaOmega Typography.
Coronet is a registered trademark of Ludlow Type Foundry.
Eurostile is a trademark of Nebiolo.
HP and HP LaserJet are registered trademarks of the Hewlett-Packard Company.
PCL is the registered trademark of Hewlett-Packard Company.
Adobe, the Adobe logo and PostScript3 are trademarks of Adobe Systems Incorporated, which may be registered in certain
jurisdictions.
General Notice: Other product names used herein are for identification purposes only and may be trademarks of their respective
owners. Epson disclaims any and all rights in those marks.
Copyright © 2012 Seiko Epson Corporation. All rights reserved.
Copyright and Trademarks 3
Page 4

AL-M300/AL-M400 Series User's Guide
Operating System Versions
In this manual, the following abbreviations are used.
Windows refers to Windows 8, 8 x64, 7, 7 x64, Vista, Vista x64, XP, XP x64, Server 2012 x64, Server 2008, Server 2008 x64,
Server 2008 R2, Server 2003, and Server 2003 x64.
❏ Windows 8 refers to Windows 8, Windows 8 Pro, Windows 8 Enterprise.
❏ Windows 8 x64 refers to Windows 8 x64, Windows 8 Pro x64, Windows 8 Enterprise x64.
❏ Windows 7 refers to Windows 7 Ultimate Edition, Windows 7 Home Premium Edition, Windows 7 Home Basic
Edition, and Windows 7 Professional Edition.
❏ Windows 7 x64 refers to Windows 7 Ultimate x64 Edition, Windows 7 Home Premium x64 Edition, Windows 7
Home Basic x64 Edition, and Windows 7 Professional x64 Edition.
❏ Windows Vista refers to Windows Vista Ultimate Edition, Windows Vista Home Premium Edition, Windows Vista
Home Basic Edition, Windows Vista Enterprise Edition and Windows Vista Business Edition.
❏ Windows Vista x64 refers to Windows Vista Ultimate x64 Edition, Windows Vista Home Premium x64 Edition,
Windows Vista Home Basic x64 Edition, Windows Vista Enterprise x64 Edition and Windows Vista Business x64
Edition.
❏ Windows XP refers to Windows XP Home Edition and Windows XP Professional.
❏ Windows XP x64 refers to Windows XP Professional x64 Edition.
❏ Windows Server 2012 x64 refers to Windows Server 2012 Essentials Edition, Server 2012 standard Edition.
❏ Windows Server 2008 refers to Windows Server 2008 Standard Edition and Windows Server 2008 Enterprise
Edition.
❏ Windows Server 2008 x64 refers to Windows Server 2008 x64 Standard Edition, Windows Server 2008 x64
Enterprise Edition, Windows Server 2008 R2 Standard Edition, and Windows Server 2008 R2 Enterprise Edition.
❏ Windows Server 2003 refers to Windows Server 2003 Standard Edition and Windows Server 2003 Enterprise
Edition.
❏ Windows Server 2003 x64 refers to Windows Server 2003 x64 Standard Edition and Windows Server 2003 x64
Enterprise Edition.
Mac OS refers to Mac OS X.
❏ Mac OS X refers to Mac OS X 10.5.8 or later.
Operating System Versions 4
Page 5

AL-M300/AL-M400 Series User's Guide
Contents
Safety Instructions
Warning, Caution, Important and Note.................................................... 13
Important Safety Instructions............................................................ 13
Setting up the printer............................................................... 13
Finding the place for the printer. . . . . . . . . . . . . ......................................... 15
Using the printer................................................................... 17
Handling the consumable products and maintenance parts................................ 18
Safety Information..................................................................... 19
Laser safety labels.................................................................. 19
Internal laser radiation.............................................................. 20
Ozone safety...................................................................... 20
Chapter 1 Getting to Know Your Printer
Printer Parts........................................................................... 21
Front view........................................................................ 21
Rear view......................................................................... 22
Inside the printer.................................................................. 23
Control panel...................................................................... 24
Options............................................................................... 25
Consumable Products................................................................... 26
Maintenance Parts...................................................................... 26
Where to Find Information. . . ........................................................... 26
Printer Features........................................................................ 27
Power saving performance........................................................... 27
Print Job Arranger................................................................. 27
Chapter 2 Printing Tasks
Loading Paper into Your Printer.......................................................... 28
MP tray.......................................................................... 28
Lower paper cassette................................................................ 32
Output Tray....................................................................... 36
Selecting and Using Print Media.......................................................... 36
Contents 5
Page 6

AL-M300/AL-M400 Series User's Guide
Labels............................................................................ 36
Envelopes......................................................................... 37
Thick paper....................................................................... 39
Custom paper size.................................................................. 40
Cancelling a Print Job................................................................... 41
From the printer................................................................... 41
From the computer................................................................. 42
Setting the Print Quality................................................................. 42
Using the Automatic setting......................................................... 42
Using the Advanced setting.......................................................... 43
Customizing print settings........................................................... 44
Toner Save mode.................................................................. 45
Improving the clarity of color documents.............................................. 46
Adjusting the weight of thin lines..................................................... 47
Setting the Advanced Layout............................................................. 48
Duplex printing.................................................................... 48
Modifying the print layout........................................................... 49
Resizing printouts. ................................................................. 50
Printing watermarks................................................................ 51
Printing headers and footers......................................................... 52
Printing with an overlay............................................................. 53
Printing the copy-protected document................................................. 56
Printing Multiple Print Jobs at Once ...................................................... 57
Using the Reserve Job Function........................................................... 57
Sending the print job............................................................... 58
Chapter 3 Using the Control Panel
Using the Control Panel Menus........................................................... 60
When to make control panel settings.................................................. 60
How to access the control panel menus................................................ 60
How to register menus as bookmarks.................................................. 61
Control Panel Menus................................................................... 62
Information Menu................................................................. 62
System Information Menu........................................................... 64
Tray Menu........................................................................ 65
Emulation Menu................................................................... 66
Printing Menu..................................................................... 66
Setup Menu....................................................................... 69
Contents 6
Page 7

AL-M300/AL-M400 Series User's Guide
Reset Menu....................................................................... 73
Quick Print JobMenu. .............................................................. 74
ConfidentialJobMenu............................................................... 74
Clock Menu....................................................................... 75
Parallel Menu (For AL-M300D only). . . . .............................................. 75
USB Menu........................................................................ 76
Network Menu.................................................................... 77
PCL Menu........................................................................ 77
PS3 Menu......................................................................... 79
ESCP2 Menu...................................................................... 80
FX Menu......................................................................... 82
I239X Menu. . . . . . . . . . . . . . . . . . . . . . . . . . . . . . . . . . . . . . . . . . . . . . . . . . . . . . . . . . . . . . . . . . . . . . . 84
Password Config Menu............................................................. 86
Energy Saver Menu................................................................. 87
Support Menu..................................................................... 88
Printer Adjust Menu................................................................ 89
Bookmark Menu................................................................... 94
Status and Error Messages............................................................... 94
Printing and Deleting Reserve Job Data................................................... 106
Using the Quick Print JobMenu..................................................... 106
Using the ConfidentialJobMenu..................................................... 107
Printing a Configuration Status Sheet..................................................... 108
Canceling Printing.................................................................... 109
Using the Pause/Release button...................................................... 109
Interrupting Printing.................................................................. 109
Chapter 4 Installing Options
Optional Paper Cassette Unit............................................................ 111
Handling precautions.............................................................. 111
Installing the optional paper cassette unit............................................. 112
Removing the optional paper cassette unit............................................. 116
Memory Module...................................................................... 116
Installing a memory module........................................................ 116
Removing a memory module........................................................ 119
CompactFlash Memory (For AL-M400 Series only)......................................... 120
Installing a CompactFlash memory.................................................. 120
Removing a CompactFlash memory.................................................. 123
Contents 7
Page 8

AL-M300/AL-M400 Series User's Guide
Chapter 5 Replacing Consumable Products/Maintenance Parts
Precautions During Replacement........................................................ 124
Replacement Messages................................................................. 124
AL-M300 Series................................................................... 125
AL-M400 Series................................................................... 125
Chapter 6 Cleaning and Transporting the Printer
Cleaning the Printer................................................................... 126
Cleaning the pickup roller.......................................................... 127
Transporting the Printer................................................................ 133
For long distances................................................................. 133
For short distances................................................................ 134
Chapter 7 Troubleshooting
Clearing Jammed Paper. ............................................................... 136
Precautions for clearing jammed paper............................................... 137
Paper Jam B (Cover B)............................................................. 137
Paper Jam MP, C1, C2, B (MP tray, Cassette1-2, Cover B)................................ 140
Paper Jam C2, C3, C4, E2, E3, B (Cassette2-4, Cover E2-E3, Cover B). . .................... 145
Printing a Configuration Status Sheet..................................................... 151
Operational Problems.................................................................. 151
The Ready light does not turn on.................................................... 151
The printer does not print (Ready light off)............................................ 152
The Ready light is on but nothing prints.............................................. 152
The remaining service life of the consumables is not updated (Windows only)............... 153
Cannot install software or drivers.................................................... 153
Cannot access the shared printer..................................................... 153
Printout Problems..................................................................... 154
The font cannot be printed......................................................... 154
Printout is garbled................................................................ 154
The printout position is not correct.................................................. 155
Graphics do not print correctly...................................................... 155
Print Quality Problems................................................................. 155
The background is dark or dirty..................................................... 155
Dots appear in the printout......................................................... 156
Print quality or tone is uneven...................................................... 156
Contents 8
Page 9

AL-M300/AL-M400 Series User's Guide
Half-tone images print unevenly..................................................... 157
Toner smudges................................................................... 158
Areas are missing in the printed image................................................ 158
Completely blank pages are output................................................... 159
Printouts are extremely curled. . . . . . . . . . . . ........................................... 159
The printed image is light or faint.................................................... 160
The non-printed side of the page is dirty.............................................. 160
Print quality decreased............................................................. 161
Memory Problems..................................................................... 161
Insufficient memory for current task................................................. 161
Insufficient memory to print all copies................................................ 162
Paper Handling Problems.............................................................. 162
Paper does not feed properly........................................................ 162
The printout was on the wrong side of the paper when I did duplex printing................. 163
Problems Using Options............................................................... 163
Paper does not feed from the optional paper cassette.................................... 163
An installed option cannot be used................................................... 164
The optional product is not available................................................. 164
Correcting USB Problems.............................................................. 164
USB connections.................................................................. 164
Windows operating system......................................................... 164
Printer software installation......................................................... 165
Status and Error Messages.............................................................. 165
Canceling Printing.................................................................... 165
Printing in the PostScript 3 Mode Problems............................................... 166
The printer does not print correctly in the PostScript mode.............................. 166
The printer does not print.......................................................... 166
The printer or its driver does not appear in utilities in the printer configuration (Mac OS only)
.............................................................................. 167
The font on the printout is different from that on the screen.............................. 167
The printer fonts cannot be installed................................................. 167
The edges of texts and/or images are not smooth....................................... 167
The printer does not print normally via the USB interface................................ 168
The printer does not print normally via the network interface............................ 168
An undefined error occurs (Mac OS only)............................................. 168
Chapter 8 About the Printer Software
Using the Printer Software for Windows.................................................. 169
Contents 9
Page 10

AL-M300/AL-M400 Series User's Guide
Using the printer driver. . .......................................................... 169
Using EPSON Status Monitor....................................................... 171
Uninstalling the printer software.................................................... 178
Sharing the printer on a network.................................................... 178
Using the PostScript Printer Driver....................................................... 188
System requirements.............................................................. 188
Using the PostScript printer driver with Windows...................................... 189
Using the PostScript printer driver with Mac OS....................................... 192
Using the PCL printer driver. . .......................................................... 194
Using Epson Universal P6 Printer Driver.............................................. 194
Appendix A Technical Specifications (AL-M300 Series)
Paper................................................................................ 197
Available paper types.............................................................. 197
Paper that should not be used....................................................... 197
Printable area.................................................................... 198
Printer.............................................................................. 199
General.......................................................................... 199
Environmental................................................................... 200
Mechanical...................................................................... 201
Electrical........................................................................ 201
Standard and approvals............................................................ 201
Interfaces............................................................................ 202
Parallel Interface (For AL-M300D only).............................................. 202
USB interface..................................................................... 202
Ethernet interface (For AL-M300DN only). . . . . . . . . . . . . . . . . . . . . . . . . . . . . . . . . . . . . . . . . . . . 203
Options.............................................................................. 203
Optional paper cassette unit........................................................ 203
Memory modules................................................................. 203
Consumable Products.................................................................. 204
Toner cartridge/Return toner cartridge............................................... 204
Photoconductor Unit. . . . . . . . ...................................................... 204
Maintenance Parts..................................................................... 204
Fuser Unit....................................................................... 204
Contents 10
Page 11

AL-M300/AL-M400 Series User's Guide
Appendix B Technical Specifications (AL-M400 Series)
Paper................................................................................ 205
Available paper types.............................................................. 205
Paper that should not be used....................................................... 205
Printable area.................................................................... 206
Printer.............................................................................. 207
General.......................................................................... 207
Environmental................................................................... 208
Mechanical...................................................................... 209
Electrical........................................................................ 209
Standard and approvals............................................................ 209
Interfaces............................................................................ 210
USB interface..................................................................... 210
Ethernet interface................................................................. 210
Options.............................................................................. 211
Optional paper cassette unit........................................................ 211
Memory modules................................................................. 211
CompactFlash memory............................................................ 211
Consumable Products.................................................................. 212
Toner cartridge/Return toner cartridge............................................... 212
Photoconductor Unit. . . . . . . . ...................................................... 212
Maintenance Parts..................................................................... 212
Maintenance unit................................................................. 212
Appendix C Where To Get Help
Contacting Epson Support.............................................................. 213
Before Contacting Epson. . . . . ...................................................... 213
Help for Users in Europe. . . . ....................................................... 213
Help for Users in Taiwan........................................................... 213
Help for Users in Singapore. ........................................................ 215
Help for Users in Thailand.......................................................... 215
Help for Users in Vietnam.......................................................... 216
Help for Users in Indonesia......................................................... 216
Help for Users in Hong Kong....................................................... 218
Help for Users in Malaysia.......................................................... 218
Help for Users in India............................................................. 219
Help for Users in the Philippines.................................................... 220
Contents 11
Page 12

Index
AL-M300/AL-M400 Series User's Guide
Contents 12
Page 13
AL-M300/AL-M400 Series User's Guide
Safety Instructions
Warning, Caution, Important and Note
Warning
!
must be followed carefully to avoid serious bodily injury.
Caution
!
must be observed to avoid bodily injury.
Important
c
must be observed to avoid damage to your equipment.
Note
contains important information and useful tips on the operation of your printer.
Important Safety Instructions
Note:
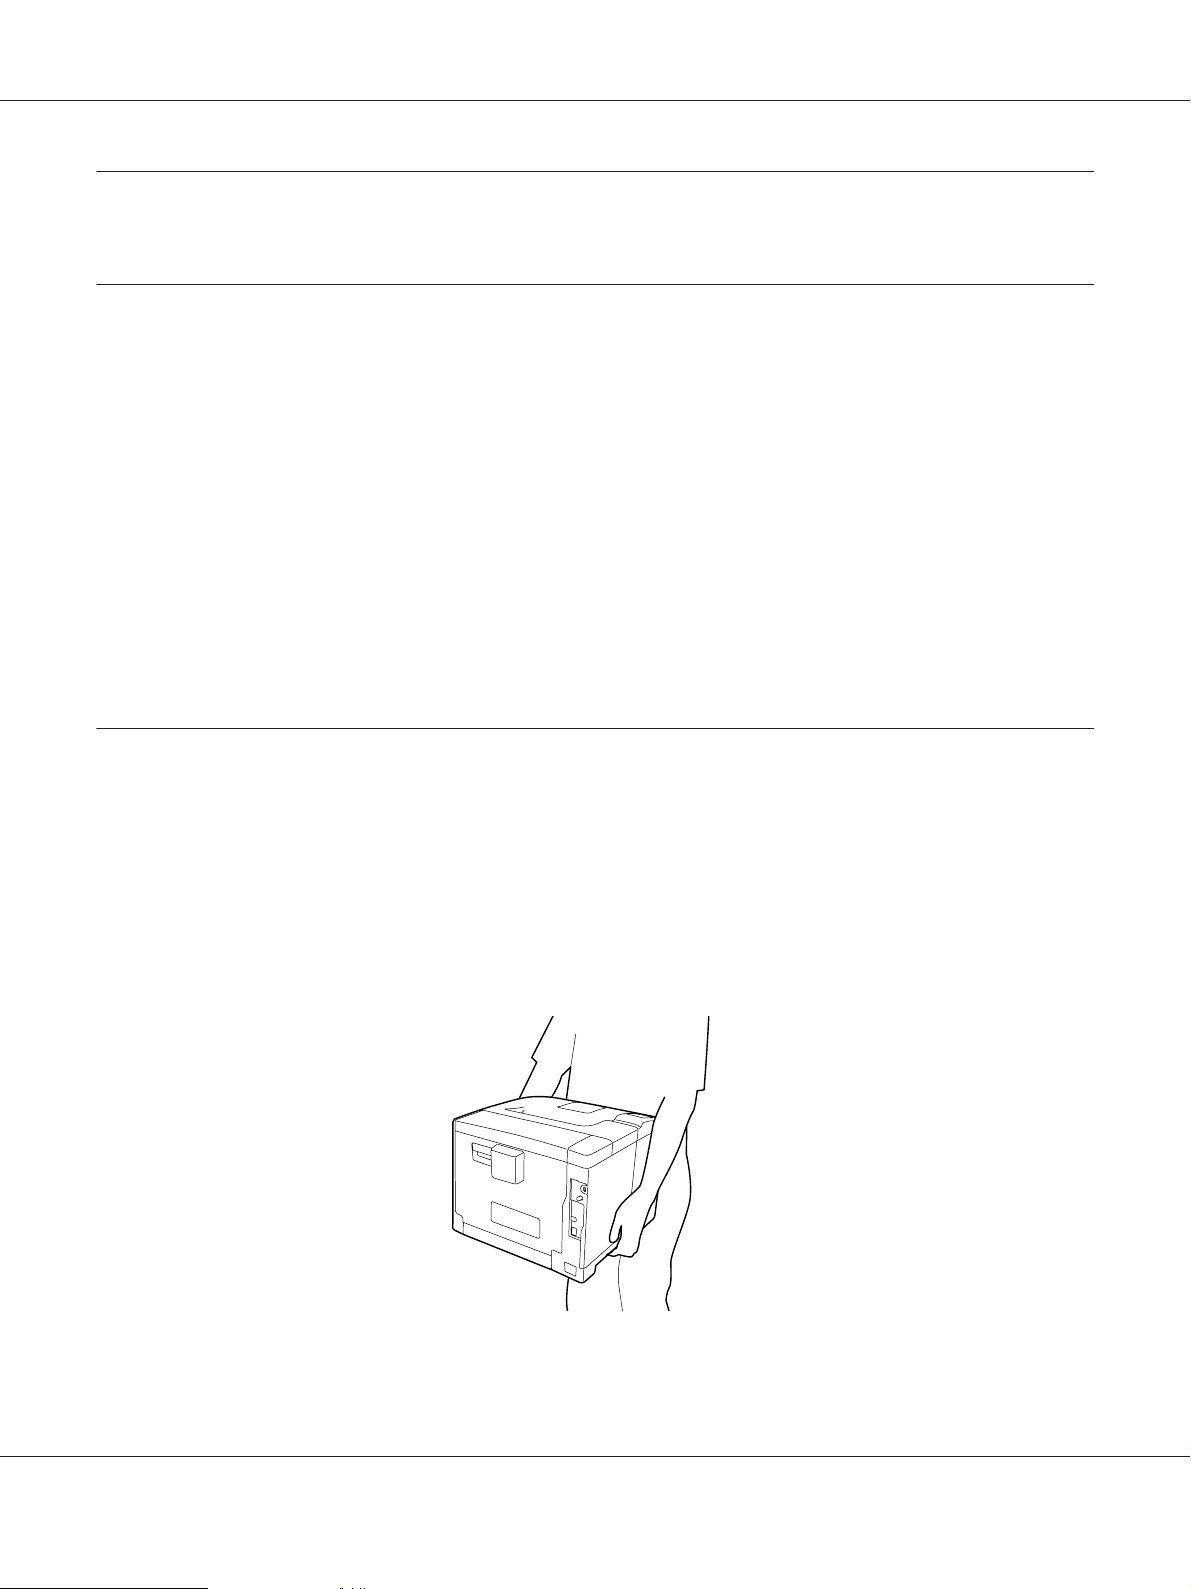
The illustrations in this section show the AL-M400 Series as an example.
Setting up the printer
❏ Be sure to lift the printer by the correct positions as shown below.
❏ When moving the printer, always keep it horizontal.
Safety Instructions 13
Page 14
AL-M300/AL-M400 Series User's Guide
❏ If you are unable to insert the AC plug into the electrical outlet, contact an electrician.
❏ Be sure the AC power cord meets the relevant local safety standards. Use only the power cord that
comes with this product. Use of the another cord may result in fire or electric shock. This product’s
power cord is for use with this product only. Use with other equipment may result in fire or electric
shock.
❏ If damage occurs to the plug, replace the cord set or consult a qualified electrician. If there are fuses
in the plug, make sure you replace them with fuses of the correct size and rating.
❏ Use a grounded outlet that matches the printer’s power plug. Do not use an adapter plug.
❏ Avoid using an electrical outl et th at is cont rolle d by w all sw itches or automatic timers. Accidental
disruption of power can erase valuable information in your computer’s and printer’s memory.
❏ Make sure that there is no dust on the socket.
❏ Be sure to insert the plug completely into the electrical outlet.
❏ Do not handle the plug with wet hands.
❏ Unplug this printer from the wall outlet and refer servicing to a qualified service representative
under the following conditions:
A. When the power cord or plug is damaged or frayed.
B. If liquid has been spilled into it.
C. If it has been exposed to rain or water.
D. If it does not operate normally when the operating instructions are followed. Adjust only those controls that
are covered by the operating instructions since improper adjustment of other controls may result in damage
and will often require extensive work by a qualified technician to restore the product to normal operation.
E. If it has been dropped or the cabinet has been damaged.
F. If it exhibits a distinct change in performance, indicating a need for service.
❏ Avoid sharing outlets with other appliances.
❏ Connect all equipment to properly grounded power outlets. Avoid using outlets on the same
circuit as photocopiers or air control systems that regularly switch on and off.
❏ Connect your printer to an electrical outlet that meets the power requirements of this printer.
Your printer’s power requirements are indicated on a label attached to the printer. If you are not
sure of the power supply specifications in your area, contact your local power company or consult
your dealer.
Safety Instructions 14
Page 15
AL-M300/AL-M400 Series User's Guide
❏ If you use an extension cord, make sure that the total of the ampere ratings on the products
plugged into the extension cord does not exceed the extension cord ampere rating.
❏ When connecting this product to a computer or other device with a cable, ensure the correct
orientation of the connectors. Each connector has only one correct orientation. Inserting a
connector in the wrong orientation may damage both devices connected by the cable.
❏ Use only optional products, such as the paper cassette units and the printer stand, produced
specifically for this product. Using options produced for other products may cause the product to
fall over and injure someone.
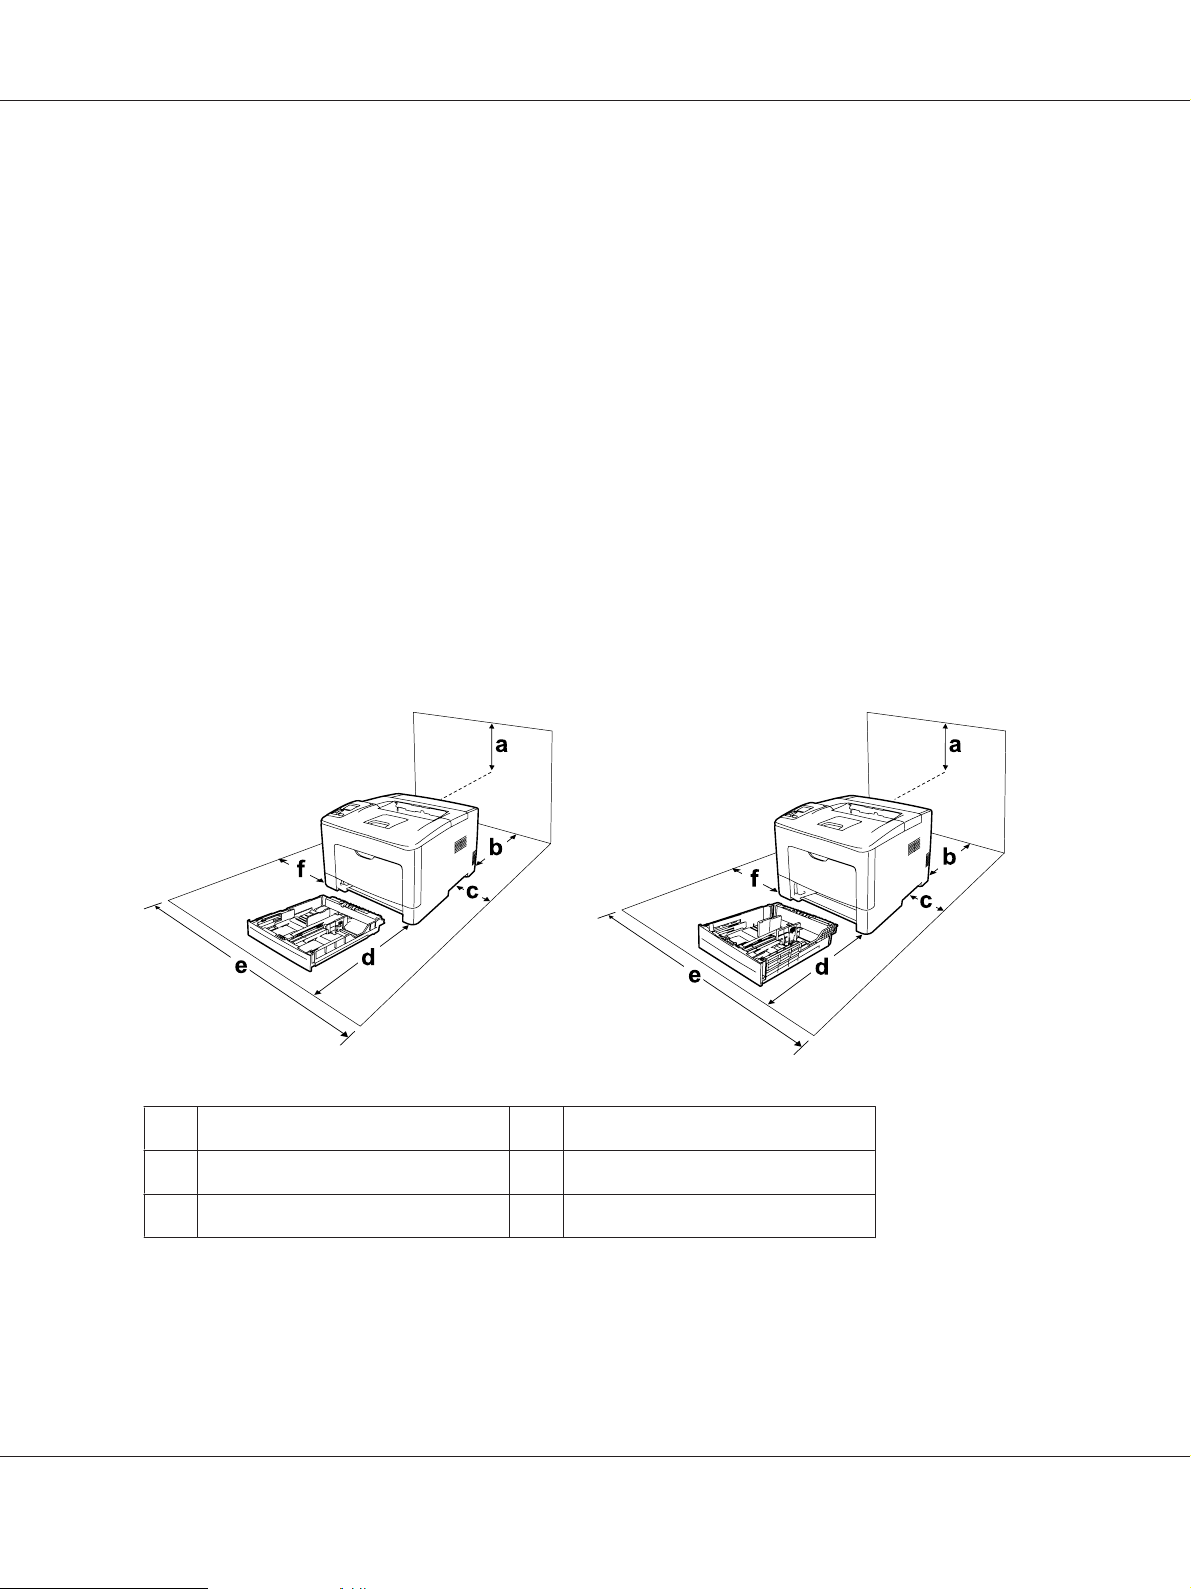
Finding the place for the printer
When relocating the printer, always choose a location that has adequate space for easy operation and
maintenance. Use the following illustration as a guide for the amount of space required around the
printer to ensure smooth operation.
AL-M300 Series AL-M400 Series
a. 40cm b. 40cm
c. 10cm d. 60cm
e. 90cm f. 40cm
To install and use any of the following options, you will need the indicated amount of additional
space.
Safety Instructions 15
Page 16

AL-M300/AL-M400 Series User's Guide
AL-M300 Series
A 250-Sheet Paper Cassette Unit adds 6.5 cm to the bottom of the printer.
AL-M400 Series
A 550-Sheet Paper Cassette Unit adds 10.0 cm to the bottom of the printer.
In addition to space considerations, always heed the following precautions when finding a place to
locate the printer:
❏ Place the printer near an electrical outlet where you can easily plug in and unplug the power cord.
❏ Do not put your printer where the cord will be stepped on.
❏ Do not use printer in a damp environment.
❏ Avoid locations that are subject to direct sunlight, excessive heat, moisture, oil vapor, or dust.
❏ Do not place the printer on an unstable surface.
❏ Slots and openings in the cabinet and the back or bottom are provided for ventilation. Do not
block or cover them. Do not put the printer on a bed, sofa, rug, or other similar surface or in a
built-in installation unless proper ventilation is provided.
❏ Keep the entire computer and printer system away from potential sources of interference, such as
loudspeakers or the base units of cordless telephones.
❏ Leave adequate room around the printer to allow for sufficient ventilation.
Safety Instructions 16
Page 17
AL-M300/AL-M400 Series User's Guide
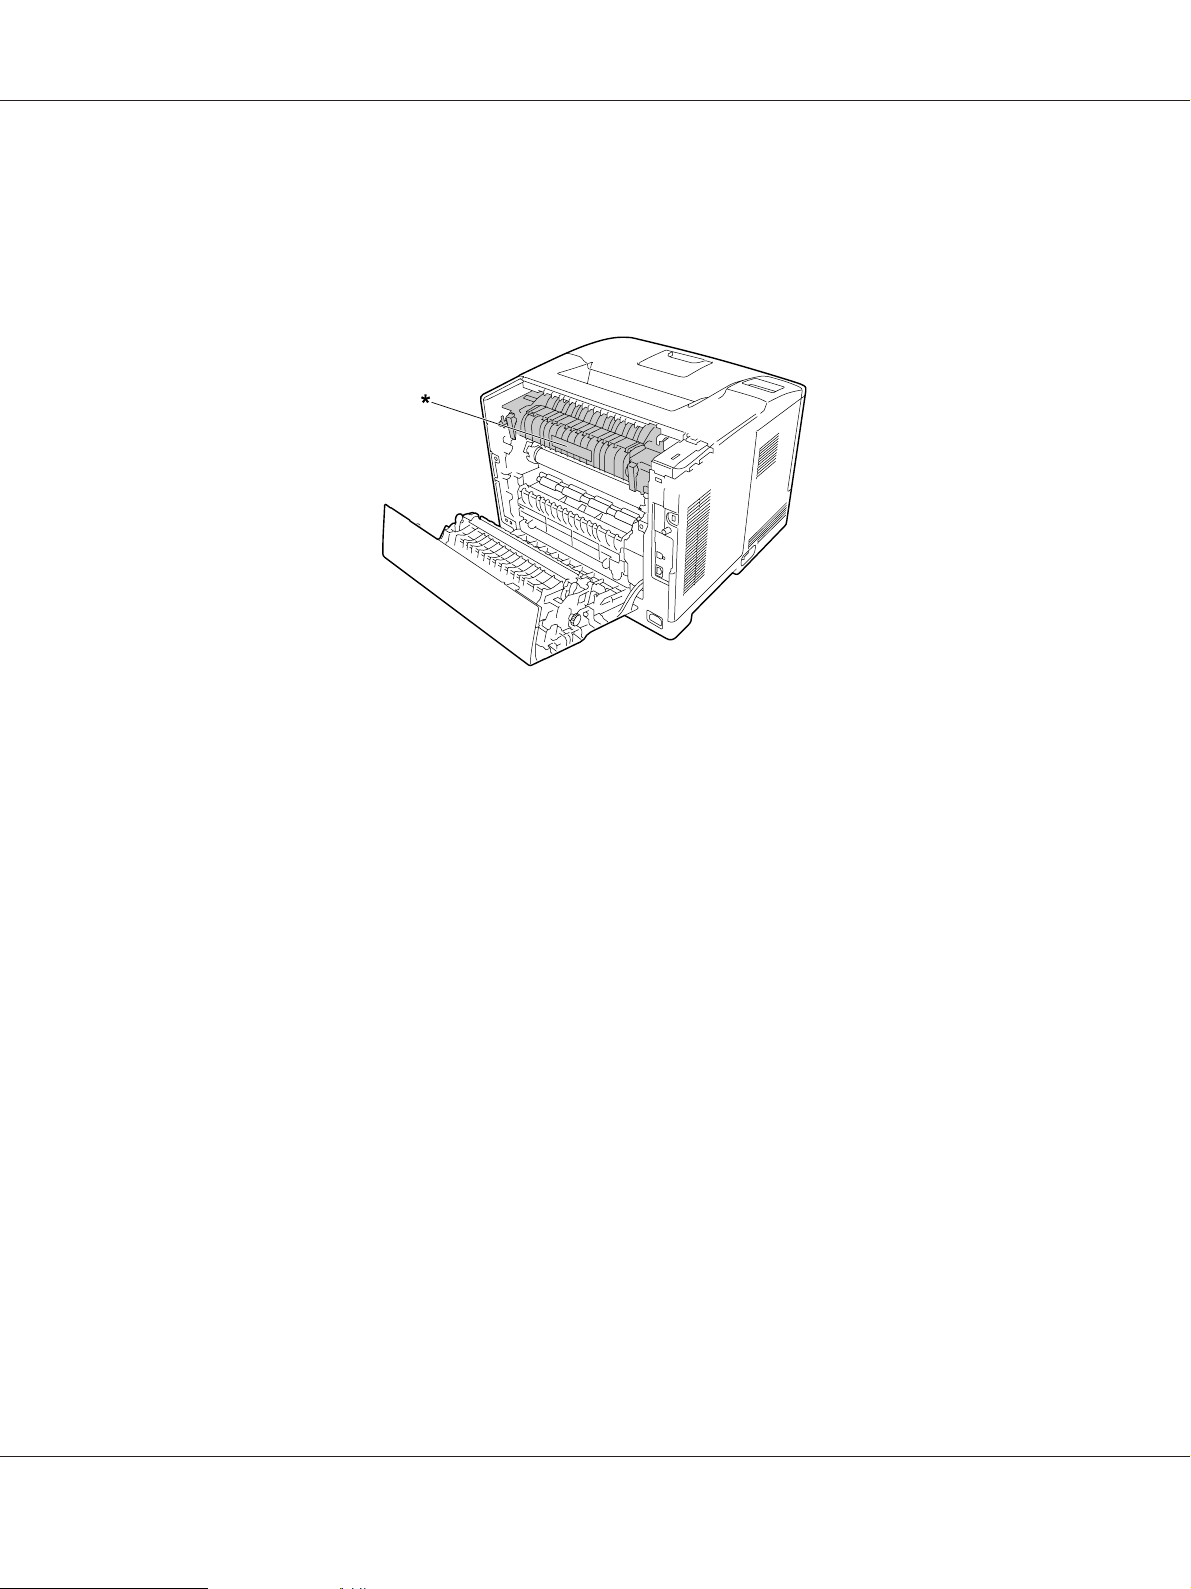
Using the printer
❏ Be careful not to touch the fuser, which is marked with a caution label, or the surrounding areas. If
the printer has been in use, the fuser and the surrounding are as may be v er y ho t. I f y ou m us t to uch
one of these areas, wait 40 minutes to allow the heat to subside before doing so.
* caution label
❏ Do not insert your hand deep into the fuser unit as some components are sharp and may cause
injury.
❏ Never push objects of any kind through cabinet slots as they may touch dangerous voltage points
or short out parts that could result in a risk of fire or electric shock.
❏ Do not sit or lean on the printer. Do not put heavy objects on the printer.
❏ Do not use any kind of combustible gases in or around the printer.
❏ Never force the printer’s components into place. Although the printer is designed to be sturdy,
rough handling can damage it.
❏ Do not leave jammed paper inside the printer. This can cause the printer to overheat.
❏ Never spill liquid of any kind on the printer.
❏ Adjust only those controls that are covered by the operating instructions. Improper adjustment of
other controls may result in damage and may require repair by a qualified service representative.
Safety Instructions 17
Page 18

AL-M300/AL-M400 Series User's Guide
❏ Do not turn off the printer:
-After turning on the printer, wait until Ready appears on the LCD panel.
-While the Ready light is flashing.
-While the Data light is on or flashing.
-While printing.
❏ Avoid touching the components inside the printer unless instructed to do so in this guide.
❏ Follow all warnings and instructions marked on the printer.
❏ Except as specifically explained in the printer’s documentation, do not attempt to service this
product yourself.
❏ Periodically disconnect the plug from the electrical outlet and clean the blades.
❏ Do not disconnect the plug while the printer is on.
❏ If the printer will not be used for a long time, disconnect the plug from the electrical outlet.
❏ Unplug this printer from the wall outlet before cleaning.
❏ Use a well-wrung cloth for cleaning and do not use liquid or aerosol cleaners.
Handling the consumable products and maintenance parts
❏ Do not burn used consumable products or maintenance parts because they might explode and
injure someone. Dispose of them according to local regulations.
❏ Be sure to keep consumable products and maintenance parts out of the reach of children.
❏ When handling a toner cartridge, always place it on a clean, smooth surface.
❏ Do not attempt to modify or take it apart consumable products or maintenance parts.
❏ Do not touch the toner. Always keep toner away from your eyes. If toner gets on your skin or
clothes, wash it off with soap and water immediately.
❏ If toner is spilled, use a broom and dustpan or a damp cloth with soap and water to clean it up.
Because the fine particles can cause a fire or explosion if they come into contact with a spark, do not
use a vacuum cleaner.
❏ Wait at least one hour before using a toner cartridge after moving it from a cool to a warm
environment to prevent damage from condensation.
Safety Instructions 18
Page 19
AL-M300/AL-M400 Series User's Guide
❏ To get the best print quality, do not store the toner cartridge or photoconductor unit in an area
subject to direct sunlight, dust, salty air, or corrosive gases (such as ammonia). Avoid locations
subject to extreme or rapid changes in temperature or humidity.
❏ When removing the photoconductor unit, do not expose it to sunlight at all and avoid exposing it
to room light for more than three minutes. The photoconductor unit contains a light-sensitive
drum. Exposure to light can damage the drum, causing dark or light areas to appear on the printed
page and reducing the service life of the drum. If you need to keep the photoconductor unit out of
the printer for long periods, cover it with an opaque cloth.
❏ Be careful not to scratch the surface of the drum. When you remove the photoconductor unit from
the printer, always place it on a clean, smooth surface. Avoid touching the drum, since oil from
your skin can permanently damage its surface and affect print quality.
❏ Do not touch the transfer roller on the transfer unit to avoid damaging it.
❏ Do not let the paper’s edge slide across your skin because the edge of the paper may cut you.
Safety Information
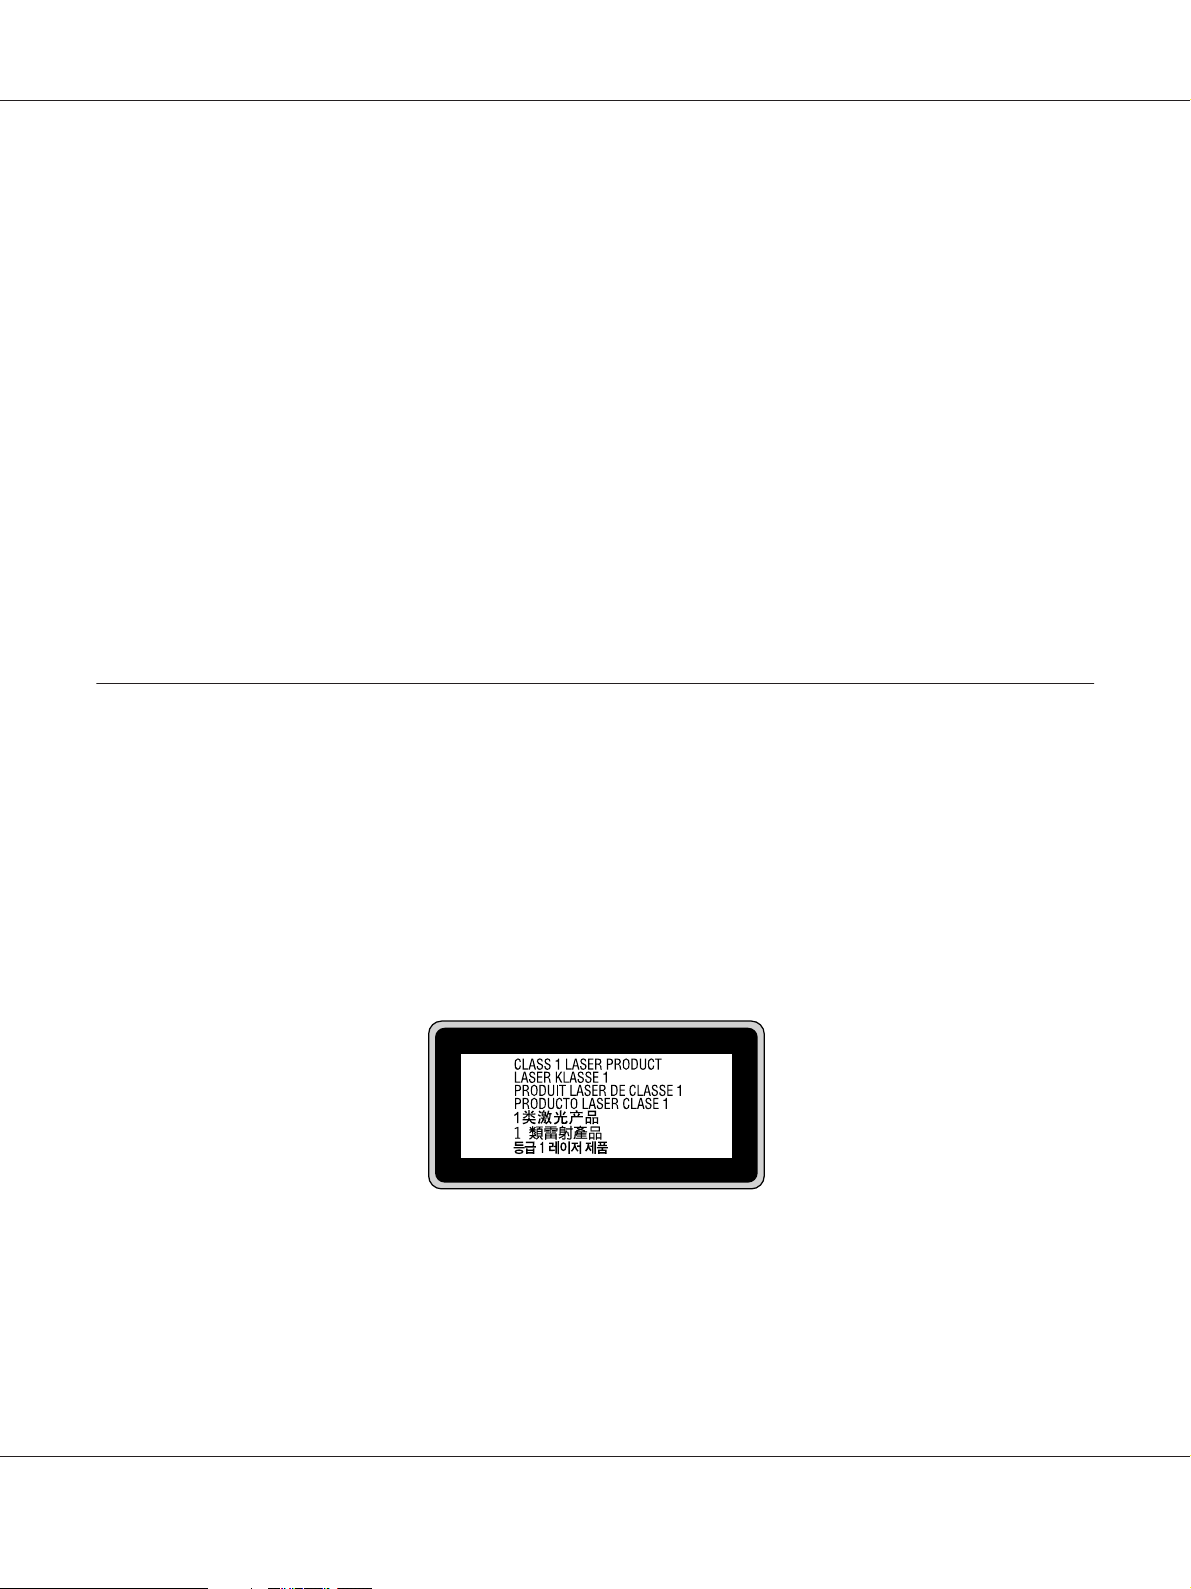
Laser safety labels
Warning:
!
The performance of procedures and adjustments other than those specified in the printer’s
documentation may result in hazardous radiation exposure. Your printer is a Class 1 laser
product as defined in the IEC60825 specifications. The label similar to the one shown below is
attached to the back of the printer in countries where required.
Safety Instructions 19
Page 20

AL-M300/AL-M400 Series User's Guide
Internal laser radiation
There is a Class III b Laser Diode Assembly that has an invisible laser beam inside the printer head unit.
The printer head unit is NOT A SERVICE ITEM, therefore, the printer head unit should not be
opened under any circumstances. An additional laser warning label is affixed to the inside of the
printer.
Ozone safety
Ozone emission
Ozone gas is generated by laser printers as a by-product of the printing process. Ozone is produced
only when the printer is printing.
Ozone exposure limit
The Epson laser printer generates less than 1.5 mg/h of continuous printing.
Minimize the risk
To minimize the risk of exposure to ozone, you should avoid the following conditions:
❏ Use of multiple laser printers in a confined area
❏ Operation in conditions of extremely low humidity
❏ Poor room ventilation
❏ Long, continuous printing together with any of the above
Printer location
The printer should be located so that the exhaust gases and heat generated are:
❏ Not blown directly into the user’s face
❏ Vented directly out of the building whenever possible
Safety Instructions 20
Page 21
Chapter 1
Getting to Know Your Printer
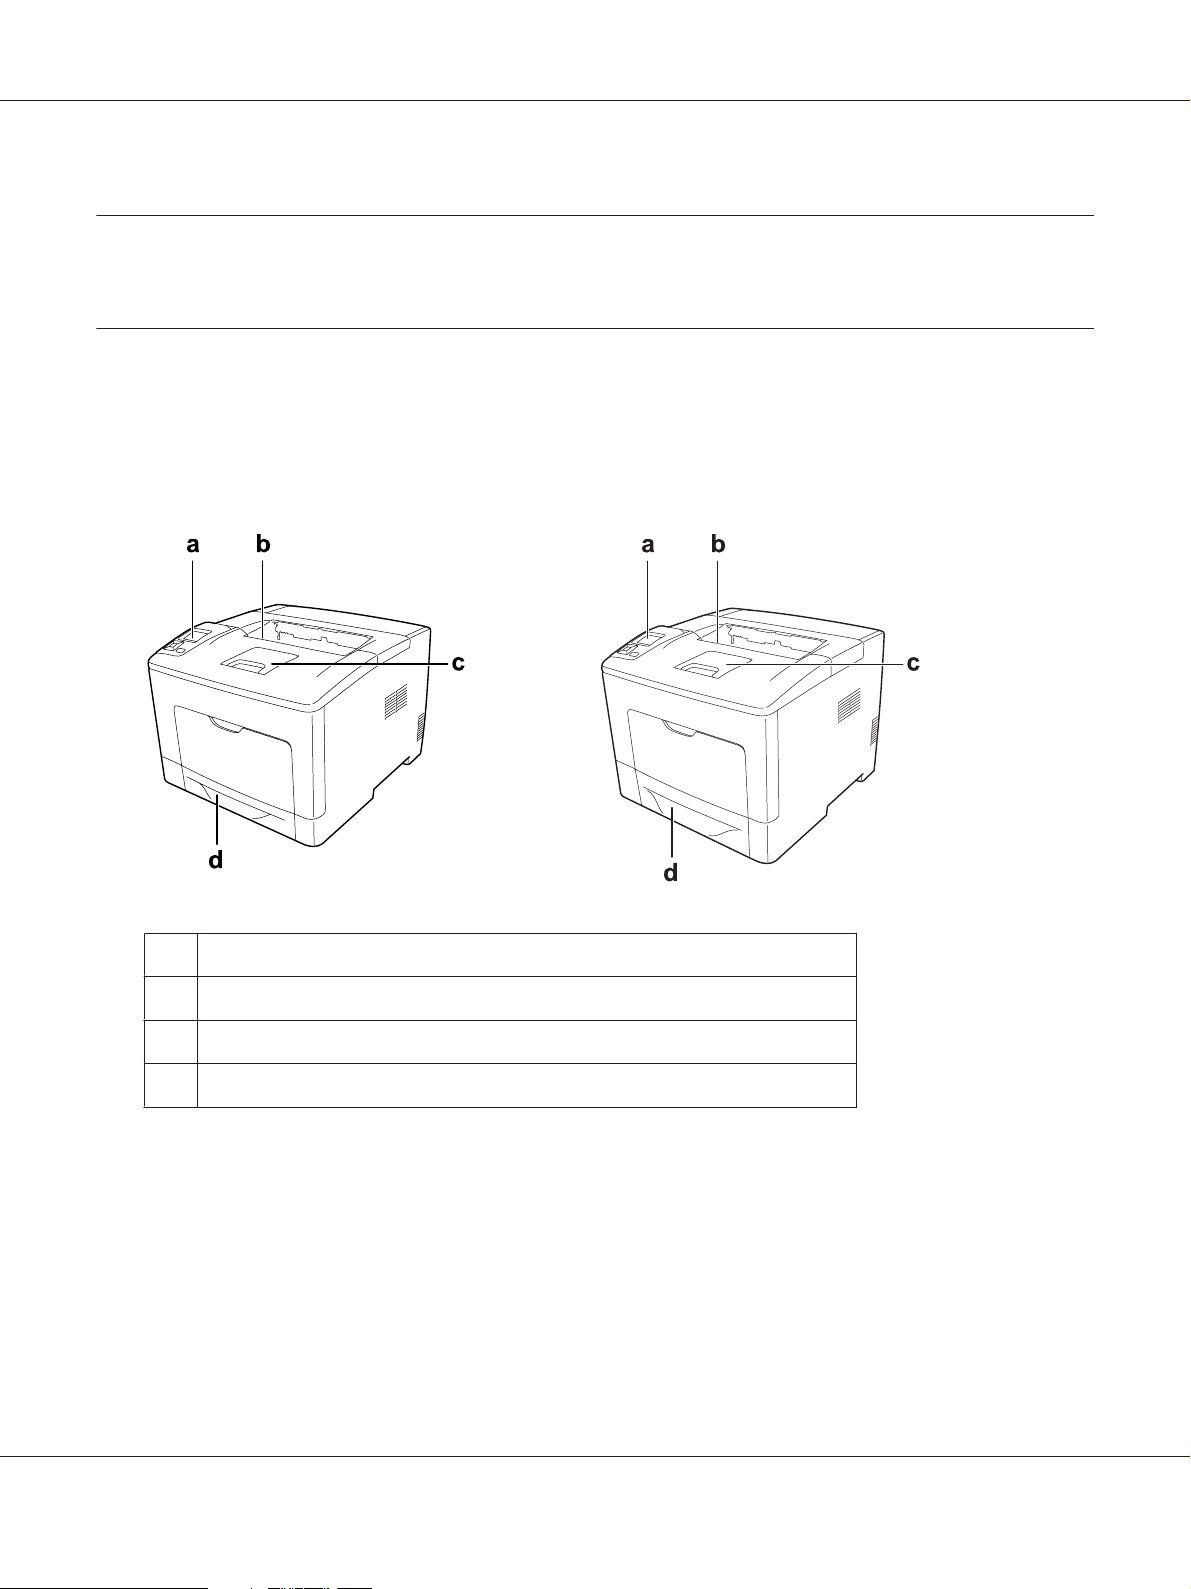
Printer Parts
Front view
AL-M300 Series AL-M400 Series
AL-M300/AL-M400 Series User's Guide
a. control panel
b. face-down tray
c. paper support
d. standard lower paper cassette
Getting to Know Your Printer 21
Page 22
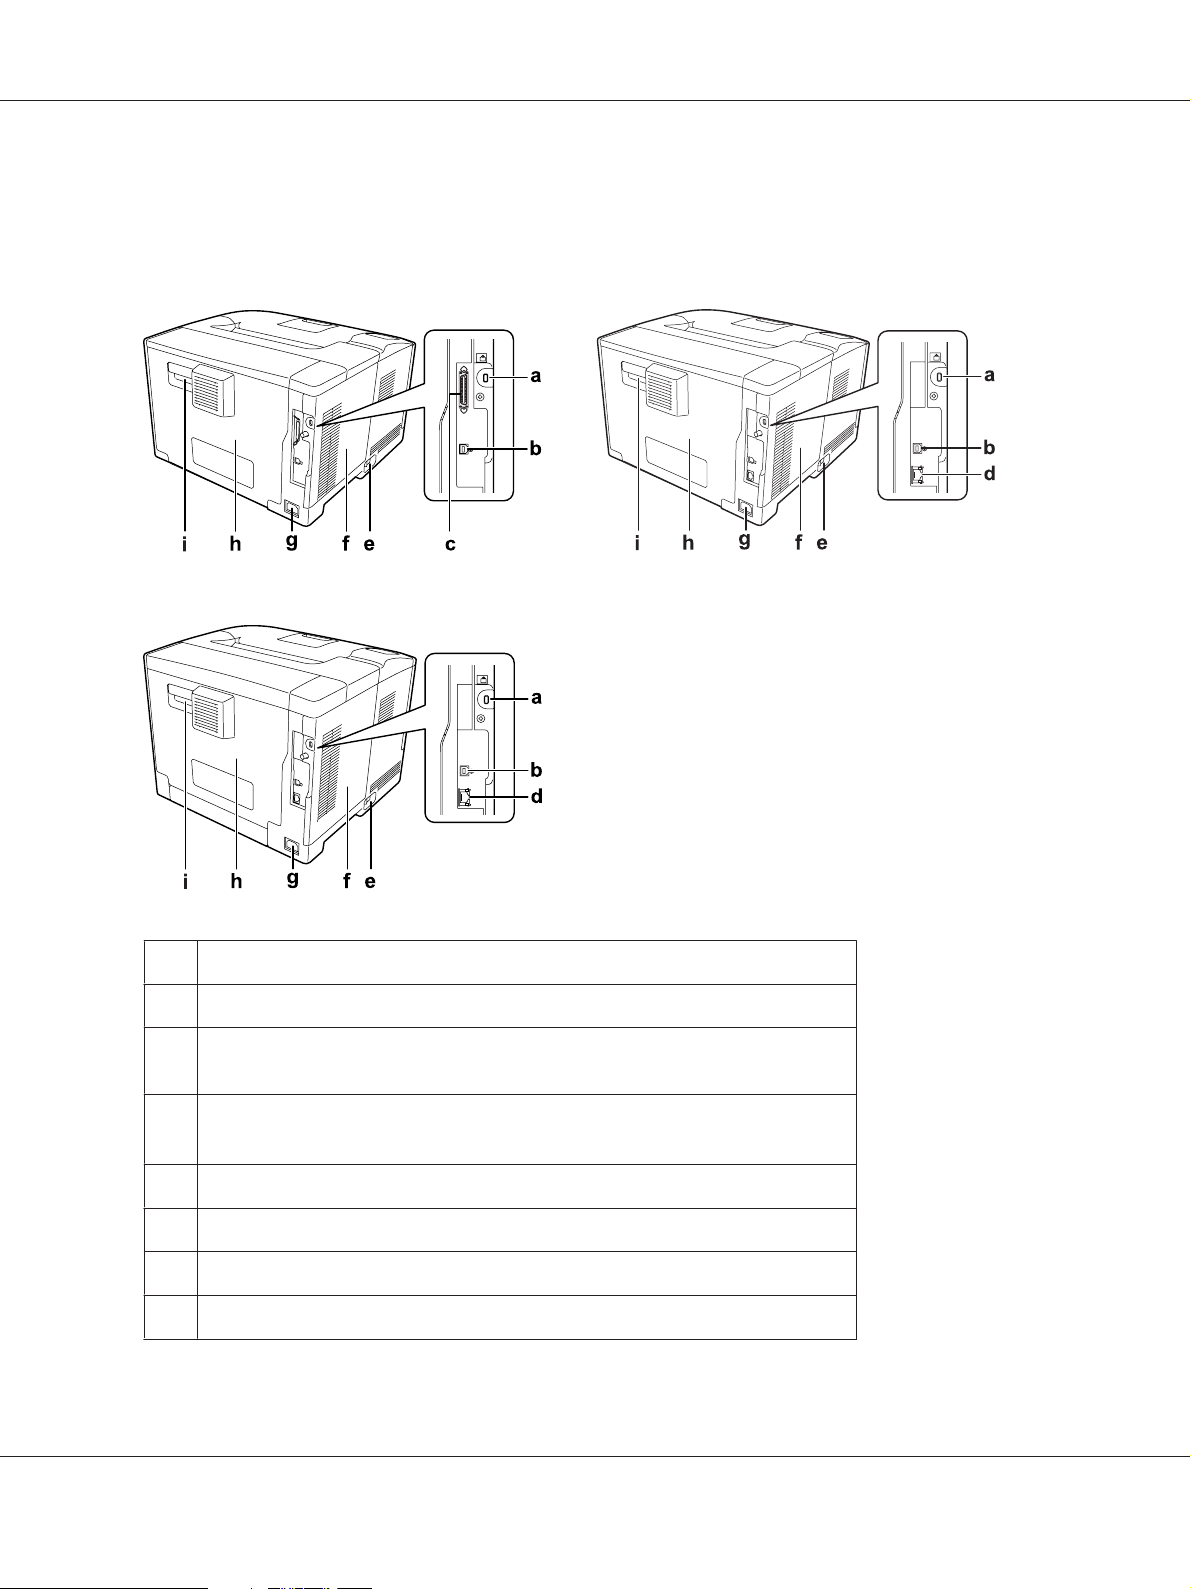
Rear view
AL-M300 Series
AL-M300/AL-M400 Series User's Guide
AL-M300D
AL-M400 Series
AL-M300DN
a. security slot
b. USB interface connector
c.
(For AL-M300D only)
parallel interface connector
d.
(For AL-M300DN/AL-M400 Series)
Ethernet interface connector
e. power switch
f. left side cover
g. AC inlet
h. cover B
*
Getting to Know Your Printer 22
Page 23
i. lever B
*
When the printer is in the deep sleep mode, the two Ethernet interface connector’s LEDs work as follows:
- if the printer is connected with 1000BASE, the upper LED only lights green.
- if the printer is connected with 10BASE/100BASE, neither LED lights.
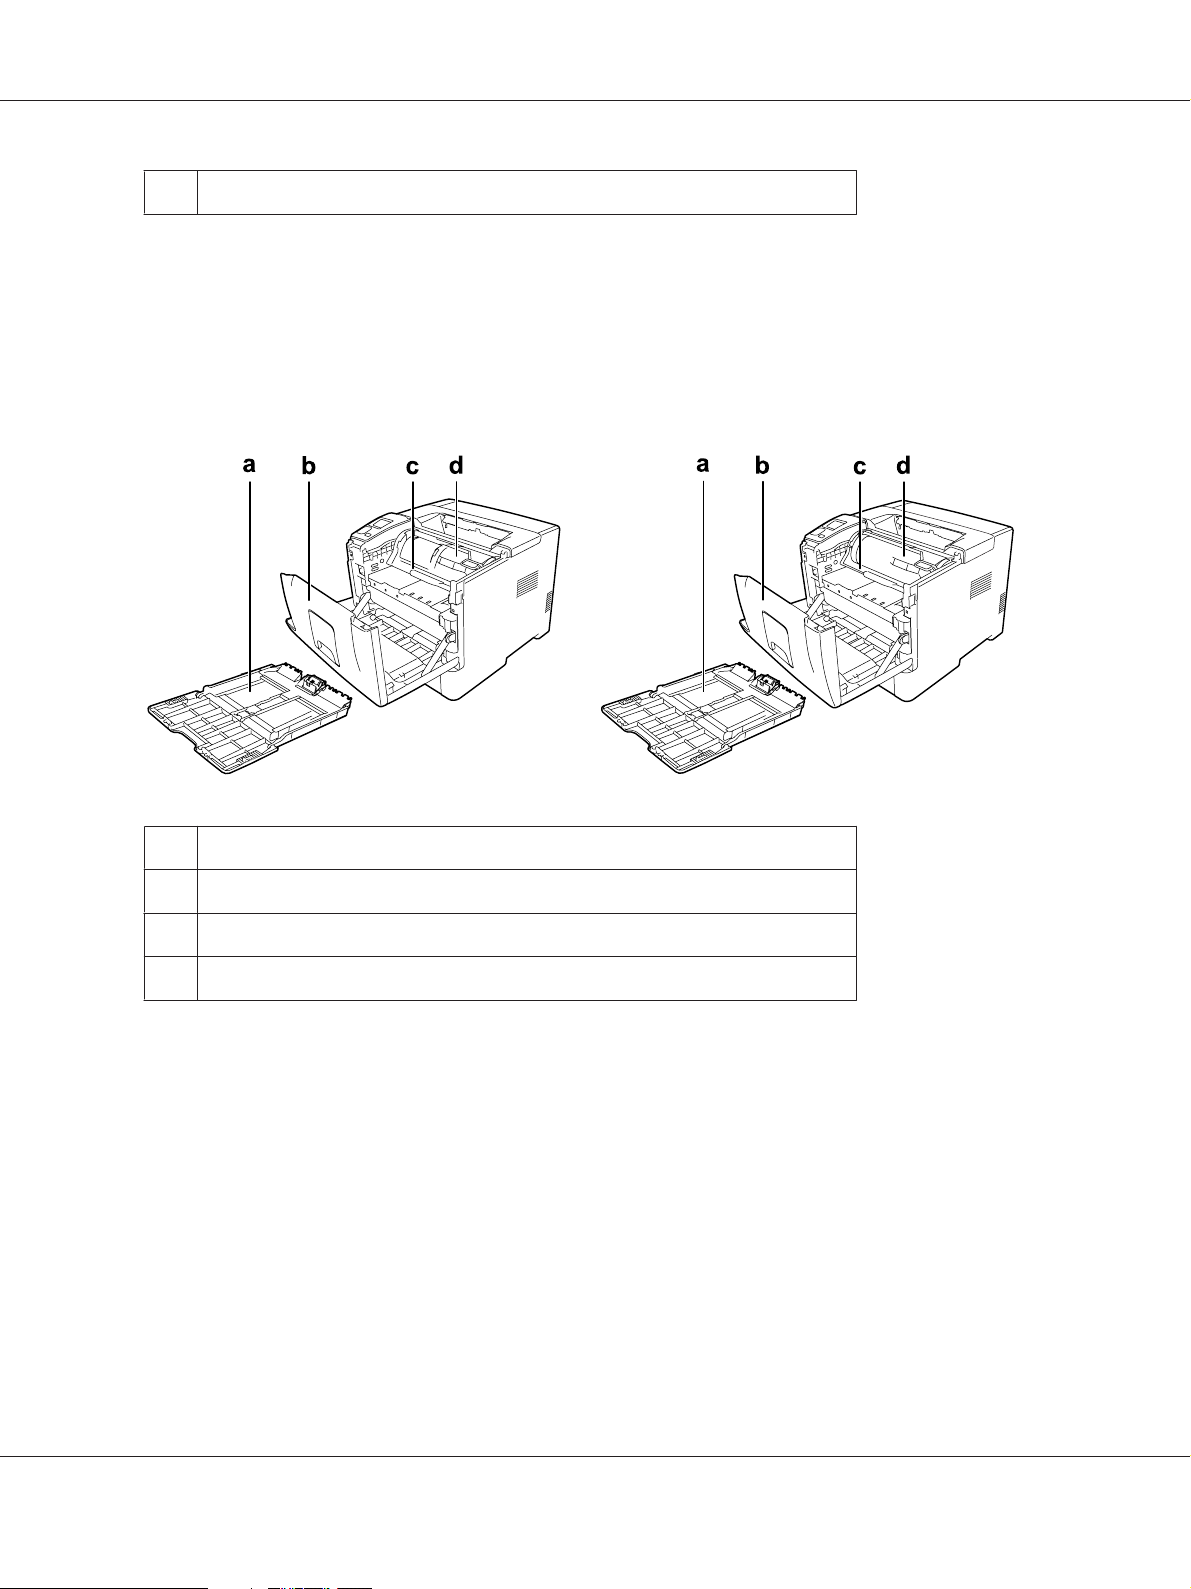
Inside the printer
AL-M300 Series AL-M400 Series
AL-M300/AL-M400 Series User's Guide
a. MP tray
b. cover A
c. photoconductor unit
d. toner cartridge
Getting to Know Your Printer 23
Page 24
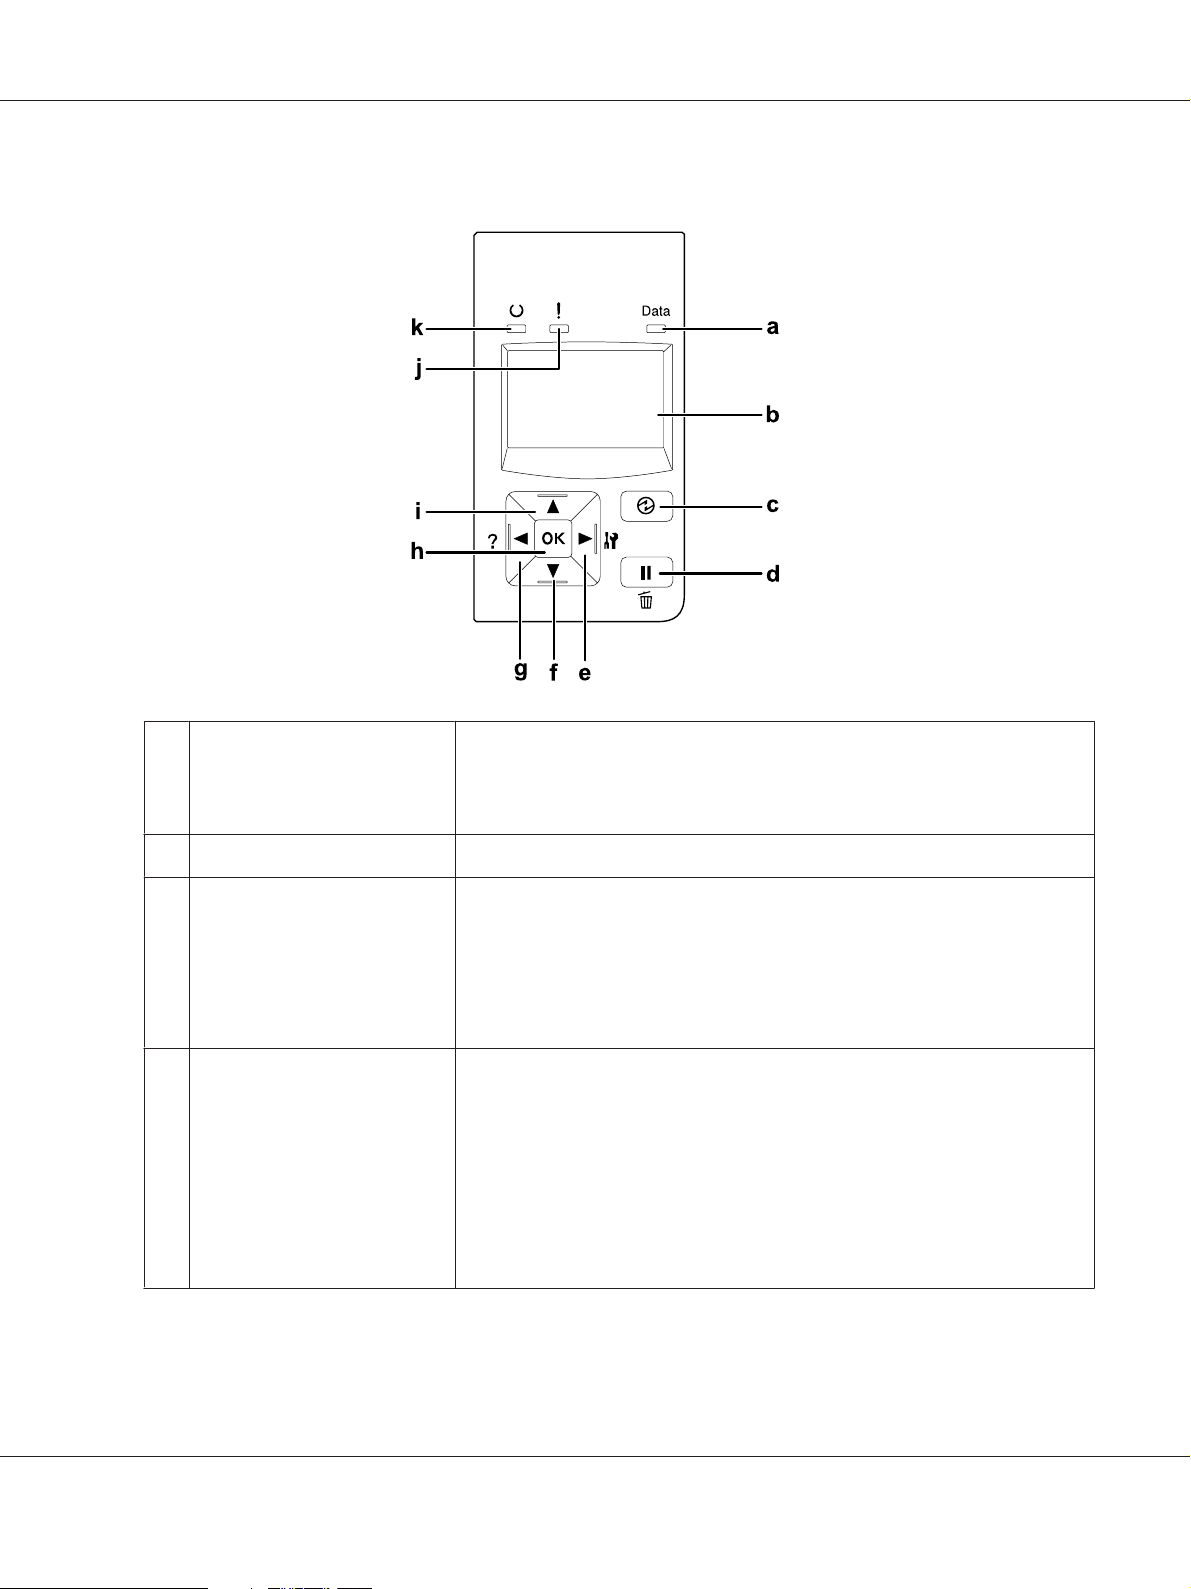
Control panel
AL-M300/AL-M400 Series User's Guide
a.
Data light (Green)
b. LCD panel Displays printer status messages and control panel menu settings.
c.
Wakeup/Sleep button
(Green)
d.
Pause/Release button
On when print data is stored in the print buffer (the section of printer memory
reserved for receiving data) but not yet printed.
Flashes when the printer is processing data.
Off when no data remains in the print buffer.
Press to switch the status between available for printing and saving power. This
button lights up when the printer is in the sleep mode (the deep sleep mode).
The printer has a power off mode which saves more power consumption as
almost all functions are not available.
For more details about the power off mode, see “Energy Saver Menu” on
page 87.
Press once to pause. Press again to recover from pause. While paused, the
following operations are available on the control panel.
- Canceling the current print job or stored print jobs.
- Interrupting print jobs to print a stored print job.
- Ejecting a paper (Form Feed) by holding down the OK button for more than 2
seconds.
For instructions on these operations, see “Canceling Printing” on page 109,
“Interrupting Printing” on page 109 and “Status and Error Messages” on
page 94.
Getting to Know Your Printer 24
Page 25
AL-M300/AL-M400 Series User's Guide
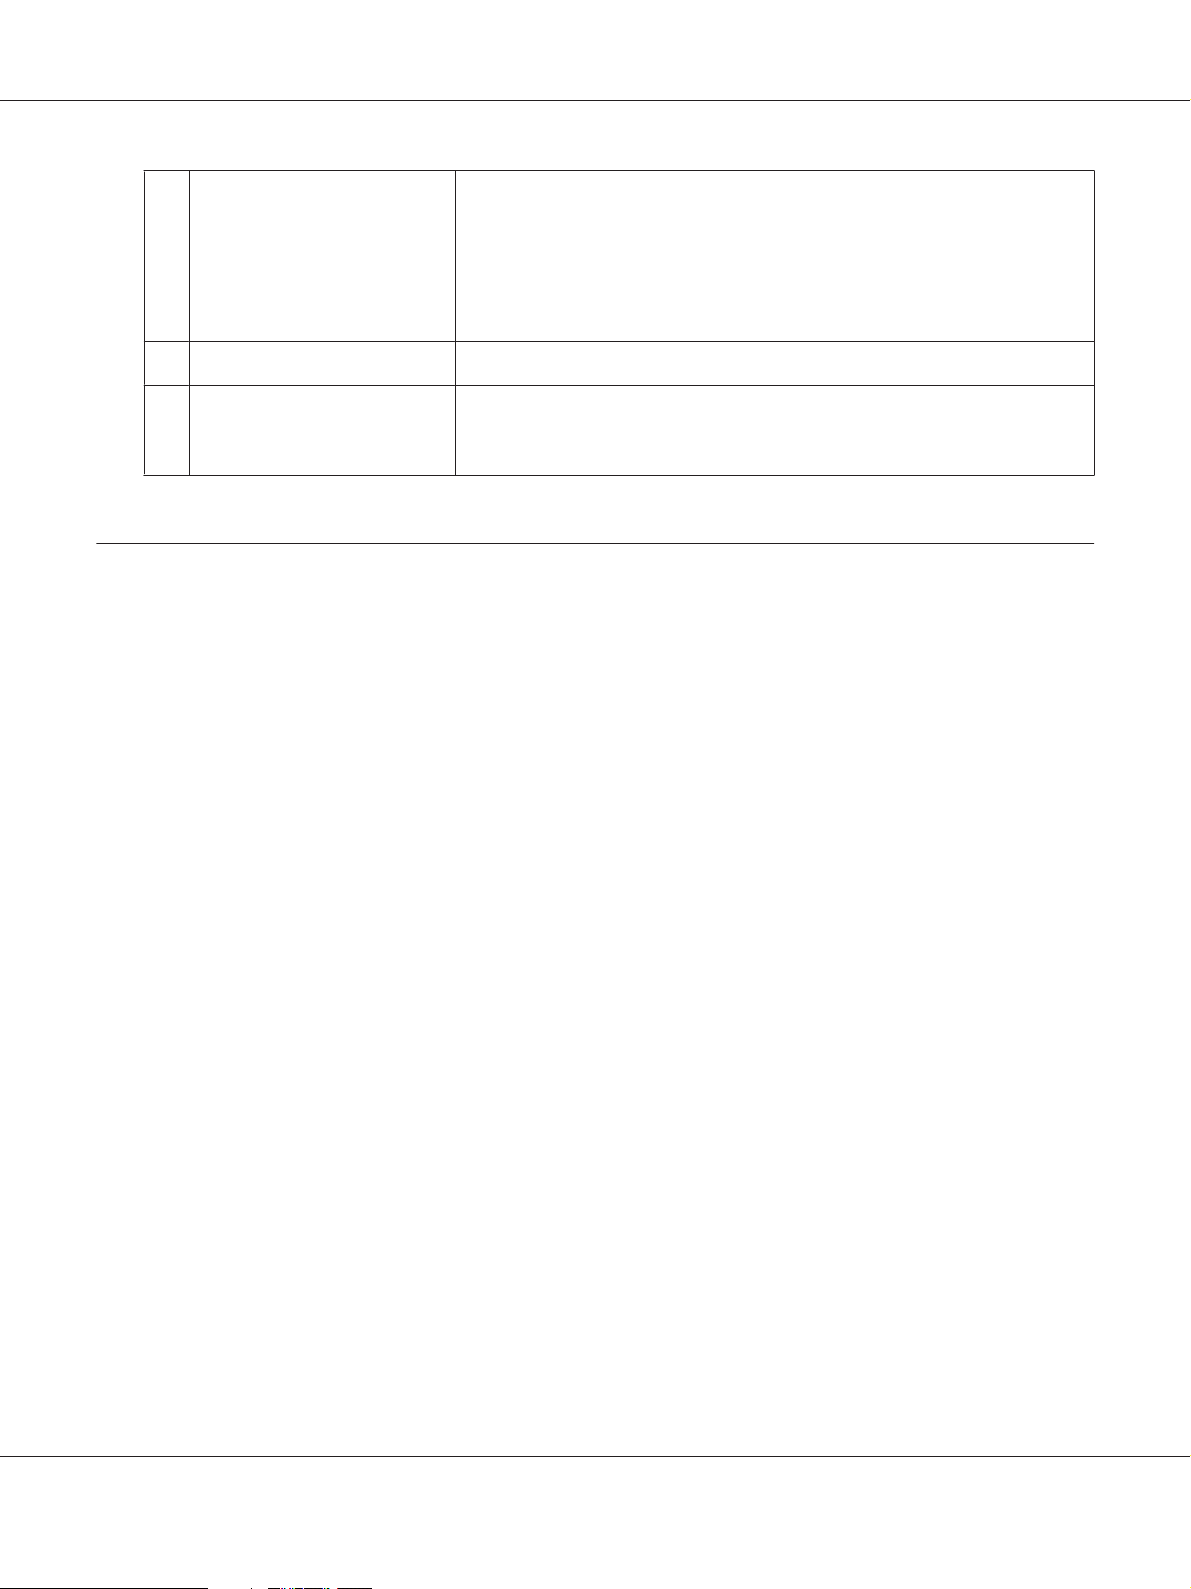
e.
Right button
f.
Down button
g.
Left button
h.
OK button
i.
Up button
j.
Error light (Orange)
k.
Ready light (Green)
Use these buttons to access the control panel menus, where you can make
printer settings and check the status of consumable products. For instructions
on how to use these buttons, see “Using the Control Panel Menus” on
page 60.
When the error light is flashing, pressing the OK button clears the error and
switches the printer to ready status.
On or flashes when an error has occurred.
On when the printer is ready, indicating that the printer is ready to receive and
print data.
Off when the printer is not ready, or in the sleep mode.
Options
You can add to your printer’s capabilities by installing any of the following options.
❏ 250-Sheet Paper Cassette Unit (C12C802761) (For AL-M300 Series only)
This unit increases paper feeding capacity up to 250 sheets of paper. You can install only one unit
on your printer.
❏ 550-Sheet Paper Cassette Unit (C12C802771) (For AL-M400 Series only)
This unit increases paper feeding capacity up to 550 sheets of paper. You can install up to three
units.
❏ CompactFlash Memory (For AL-M400 Series only)
This option enables you to store overlay forms, use Reserve Job function, and improve the collate
printing environment. By using the Reserve Job function, you can store print jobs in the printer’s
CompactFlash memory and print them later directly from the printer’s control panel. By using the
collate printing function, you can print larger and more complex print jobs.
Note:
The CompactFlash memory must be at least 4 GB.
❏ Memory Module
This option expands the printer’s memory by allowing you to print complex and
graphics-intensive documents. The printer’s RAM can be increased up to 1152 MB by adding an
additional 1024 MB RAM DIMM.
Note:
Make sure that the DIMM you purchase is compatible with Epson products. For details, contact the
store where you purchased this printer or an Epson qualified service representative.
Getting to Know Your Printer 25
Page 26
AL-M300/AL-M400 Series User's Guide
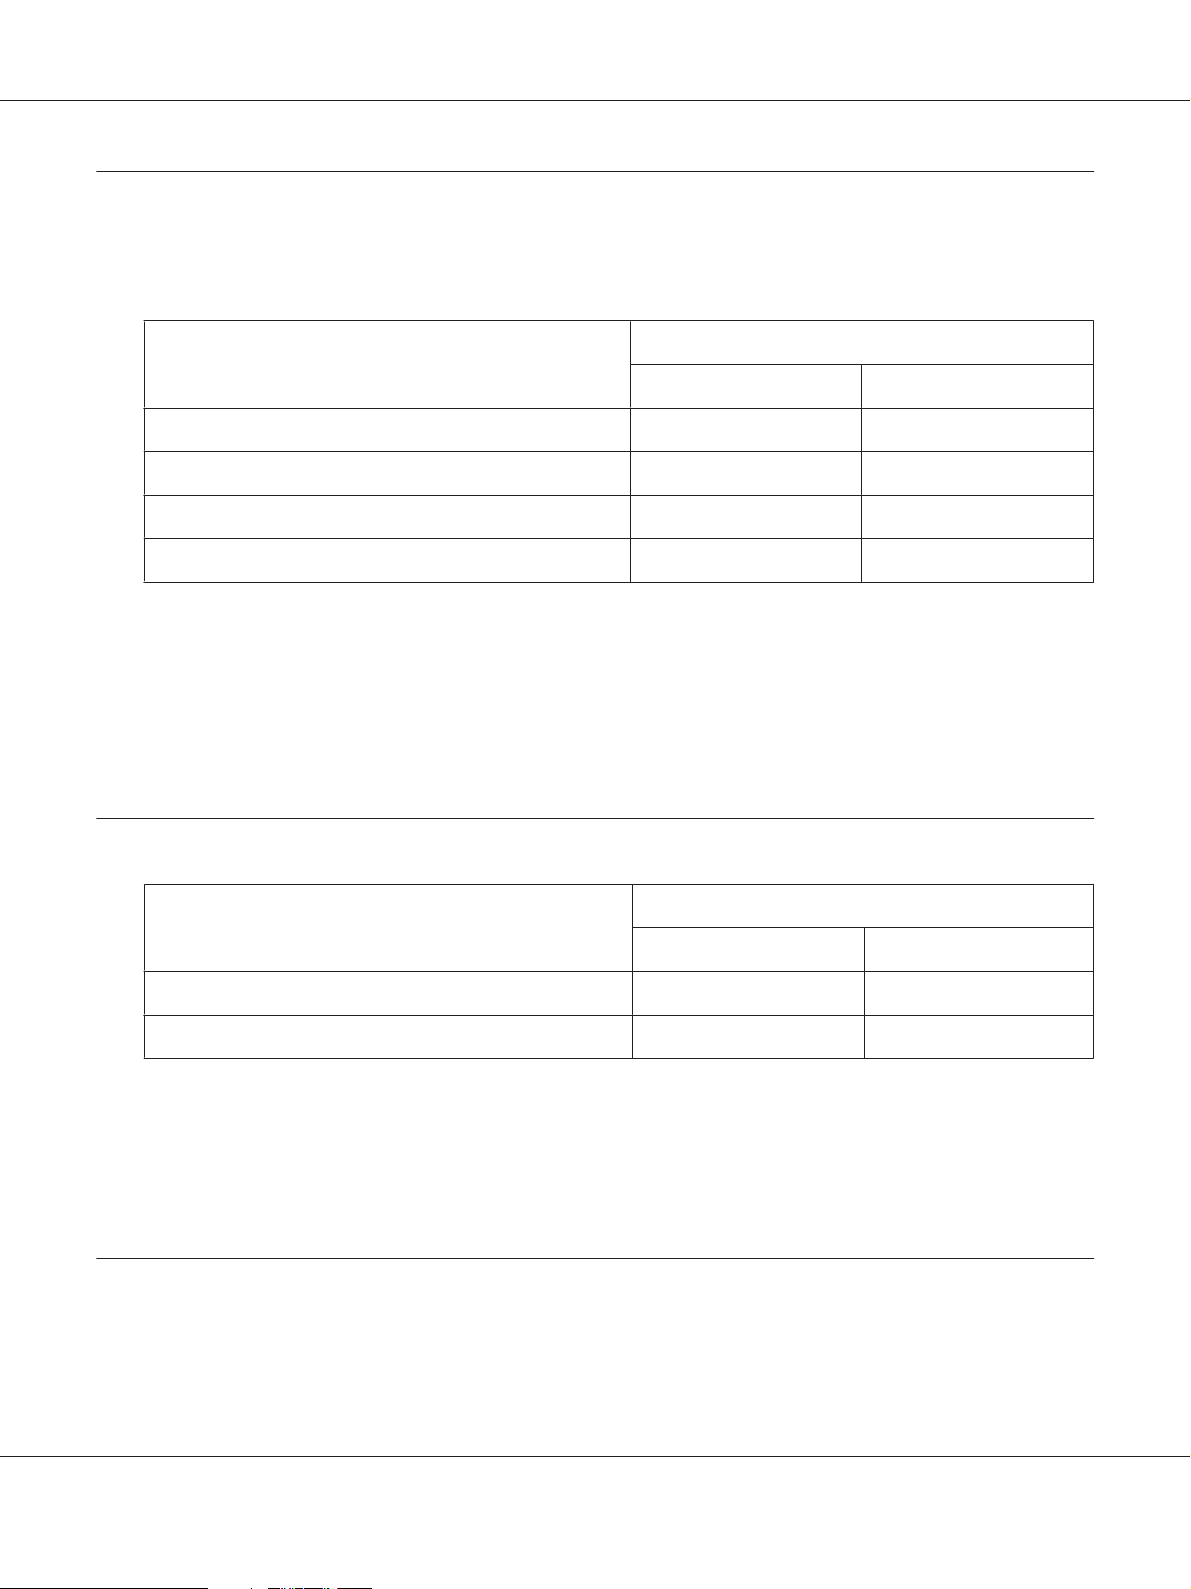
Consumable Products
The life of the following consumable products is monitored by the printer. The printer lets you know
when replacements are needed.
Product name Product code
AL-M300 Series AL-M400 Series
Standard Capacity Toner Cartridge (Black) 0690 0698
High Capacity Toner Cartridge (Black) 0689 0697
Return High Capacity Toner Cartridge (Black) 0691 0699
Photoconductor Unit (Black) 1228 1230
The life of the following consumable products is monitored by the printer. The printer lets you know
when replacements are needed.
Return toner cartridge is not sold in some areas. Contact your local Epson dealer/representative about
the availability of the Return toner cartridge scheme.
Maintenance Parts
Product name Product code
AL-M300 Series AL-M400 Series
Fuser Unit 3049/3050 -
Maintenance Unit - 3057/3058
Note:
❏ Fuser unit part numbers vary by location.
❏ Maintenance unit part numbers vary by location.
Where to Find Information
Setup Guide
Getting to Know Your Printer 26
Page 27

AL-M300/AL-M400 Series User's Guide
Provides you with information on assembling the printer and installing the printer software.
User’s Guide (this manual)
Provides you with detailed information on the printer’s functions, optional products, maintenance,
troubleshooting, and technical specifications.
Network Guide
Provides network administrators with information on both the printer driver and network settings.
Font Guide
Provides you with information on fonts used on the printer.
Online Help for printer software
Click Help for detailed information and instructions on the printer software that controls your
printer. Online help is automatically installed when you install the printer software.
Printer Features
Power saving performance
The printer has an advanced power saving feature that helps you reduce electricity consumption. In
the power off mode
For a detailed explanation, see “Energy Saver Menu” on page 87.
*
For EU models only
The printer consumes power as low as about 1 W during Deep Sleep mode because of the new
controller. Print job data is received even in this mode.
Print Job Arranger
*
, the printer consumes little electricity by disabling almost all operations.
This function allows printing settings for several documents created by different applications at the
same time. You can arrange the order in which jobs are printed and change the layout of the data.
Getting to Know Your Printer 27
Page 28

AL-M300/AL-M400 Series User's Guide
Chapter 2
Printing Tasks
Loading Paper into Your Printer
This section describes how to load paper. If you use special media such as transparencies or envelopes,
see also “Selecting and Using Print Media” on page 36. For specifications or details about the paper
types and sizes, see “Paper” on page 197 (for AL-M300 Series users), or “Paper” on page 205 (for
AL-M400 Series users).
Important:
c
Do not let the paper’s edge slide across your skin because the edge of the paper may cut you.
Note:
❏ This printer does not automatically detect paper sizes in the paper sources. Make sure to specify a
paper size using the Tray Menu on the control panel. The factory default paper size for all of the
paper sources is A4.
❏ The following procedure uses the illustration of AL-M400DN as an example.
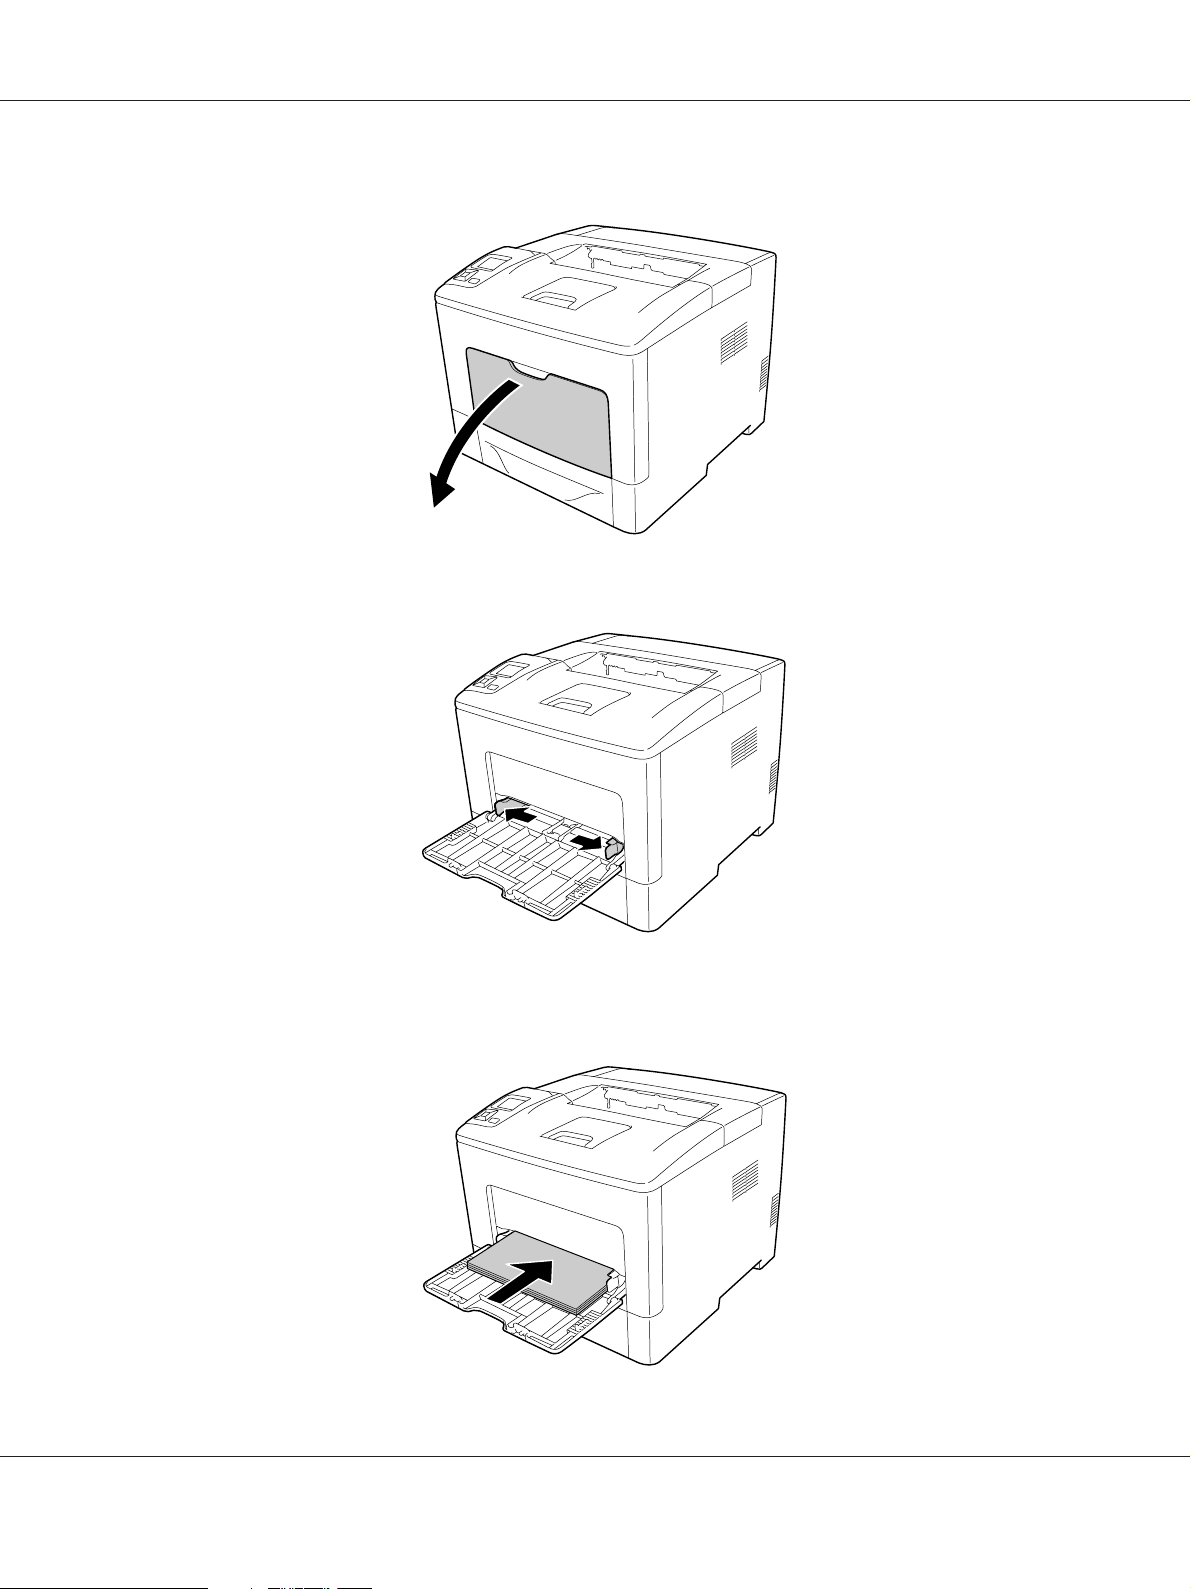
MP tray
The MP tray (Multi-purpose tray) is the paper source that is available for various types of paper, such
as labels, envelopes, and thick paper.
Note:
To load envelopes, see “Envelopes” on page 37.
Printing Tasks 28
Page 29
AL-M300/AL-M400 Series User's Guide
1. Open the MP tray.
2. Slide the paper guides to accommodate the paper you are loading.
3. Load a stack of the desired paper with the printable surface facing up. Then slide the paper guides
to get a snug fit.
Printing Tasks 29
Page 30
AL-M300/AL-M400 Series User's Guide
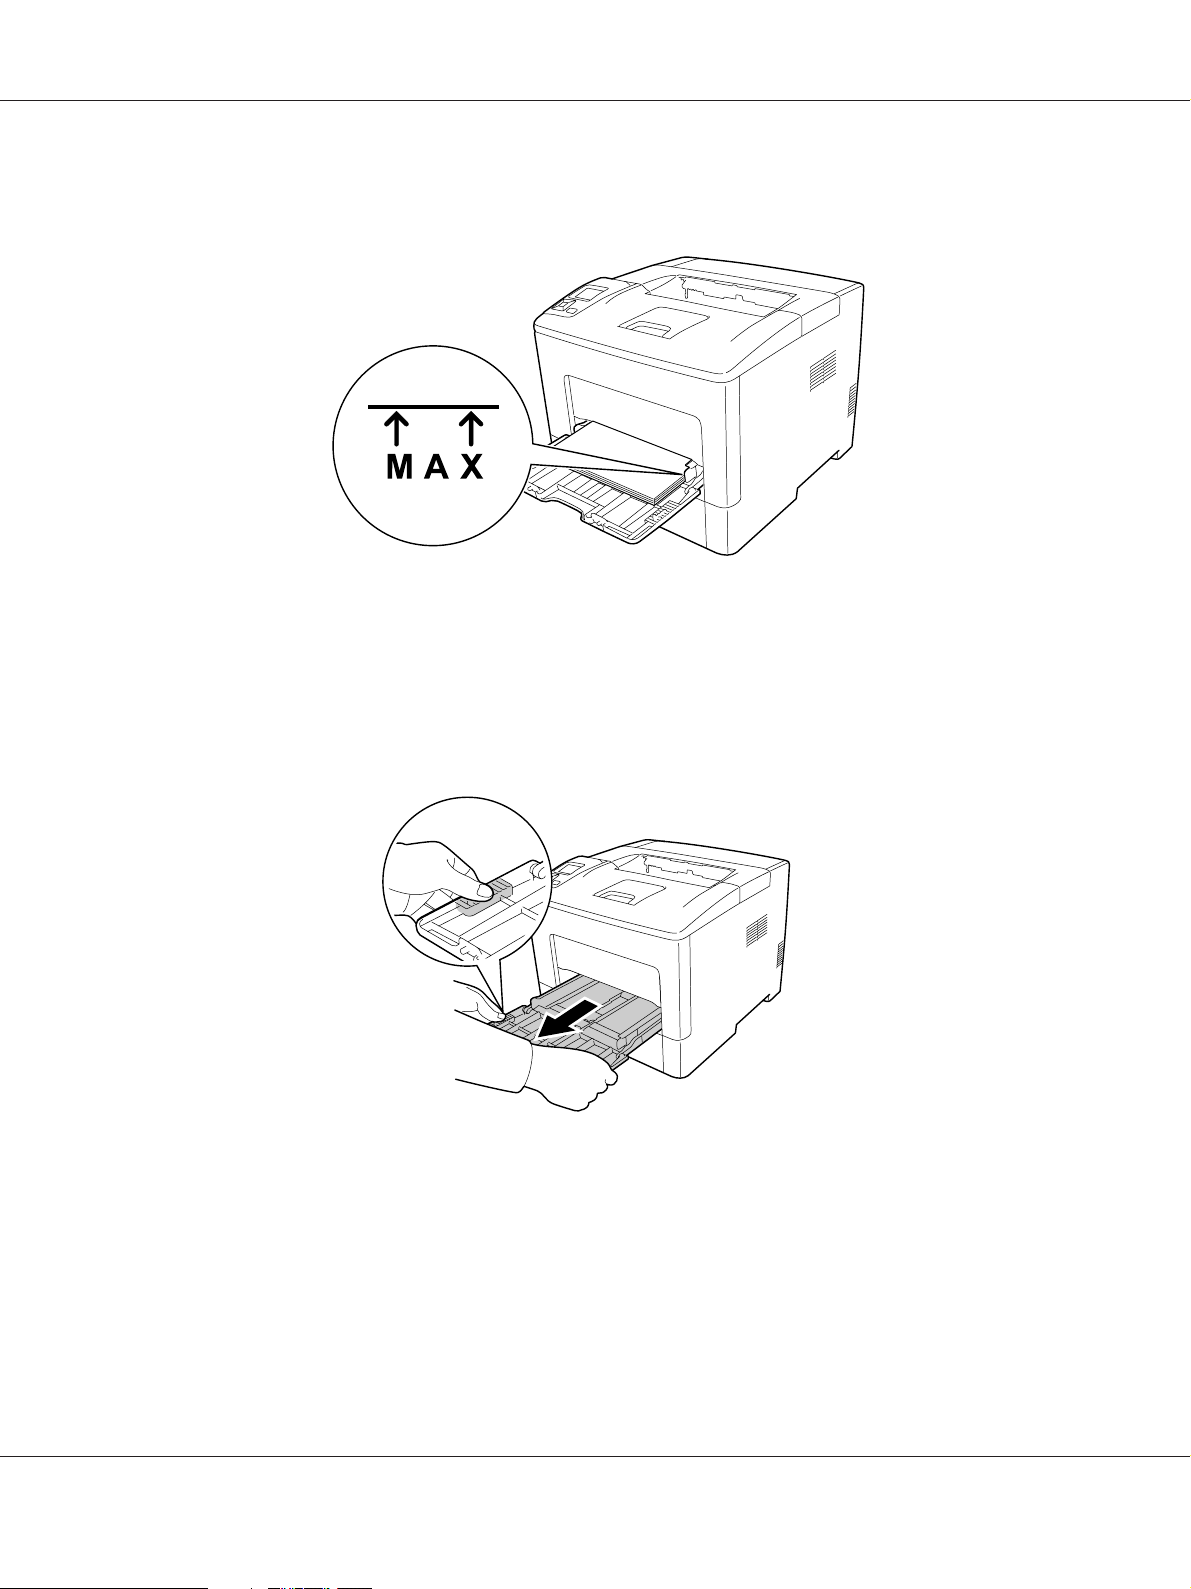
Note:
❏ Make sure that you do not load paper beyond the limit mark.
❏ After loading paper, set the MP Type setting on the control panel to match the type of paper
loaded. For details, see “Tray Menu” on page 65.
When loading A5 or smaller paper on the MP tray
1. Pull out the MP tray.
Printing Tasks 30
Page 31

AL-M300/AL-M400 Series User's Guide
2. Pull up the paper guide in the center of the MP tray.
3. Load a stack of the desired paper on the MP tray with the printable surface facing up. Then slide the
paper guides to get a snug fit.
Printing Tasks 31
Page 32

AL-M300/AL-M400 Series User's Guide
4. Insert the MP tray into the printer.
Note:
After loading paper, set the MP Type setting on the control panel to match the type of paper loaded.
For details, see “Tray Menu” on page 65.
Lower paper cassette
This cassette gives you a second paper source in addition to the MP tray.
Note:
Perform the same procedure to load paper into the optional paper cassette.
1. Pull out the paper cassette.
Printing Tasks 32
Page 33

AL-M300/AL-M400 Series User's Guide
2. Pinch the knobs and slide the paper guides to accommodate the paper you are loading.
Note:
When loading paper that is 13" or 14" portrait, extend the paper cassette. If you do not need to extend
the paper cassette, go to step 5.
Printing Tasks 33
Page 34

AL-M300/AL-M400 Series User's Guide
3. Pinch the knobs and pull out the paper tray to extend the paper cassette and align the arrow marks
according to the paper size.
4. Pinch the knobs and slide the paper guide to accommodate the paper you are loading.
Printing Tasks 34
Page 35

AL-M300/AL-M400 Series User's Guide
5. Load a stack of the desired paper on the center of the paper cassette with the printable surface
facing up.
Note:
Make sure that you do not load paper beyond the limit mark.
6. Reinsert the paper cassette into the printer.
Note:
After loading paper, set the Cassette1 Size and Cassette1 Type settings to match the loaded
paper size and paper type on the control panel. For details, see “Tray Menu” on page 65.
Printing Tasks 35
Page 36
AL-M300/AL-M400 Series User's Guide
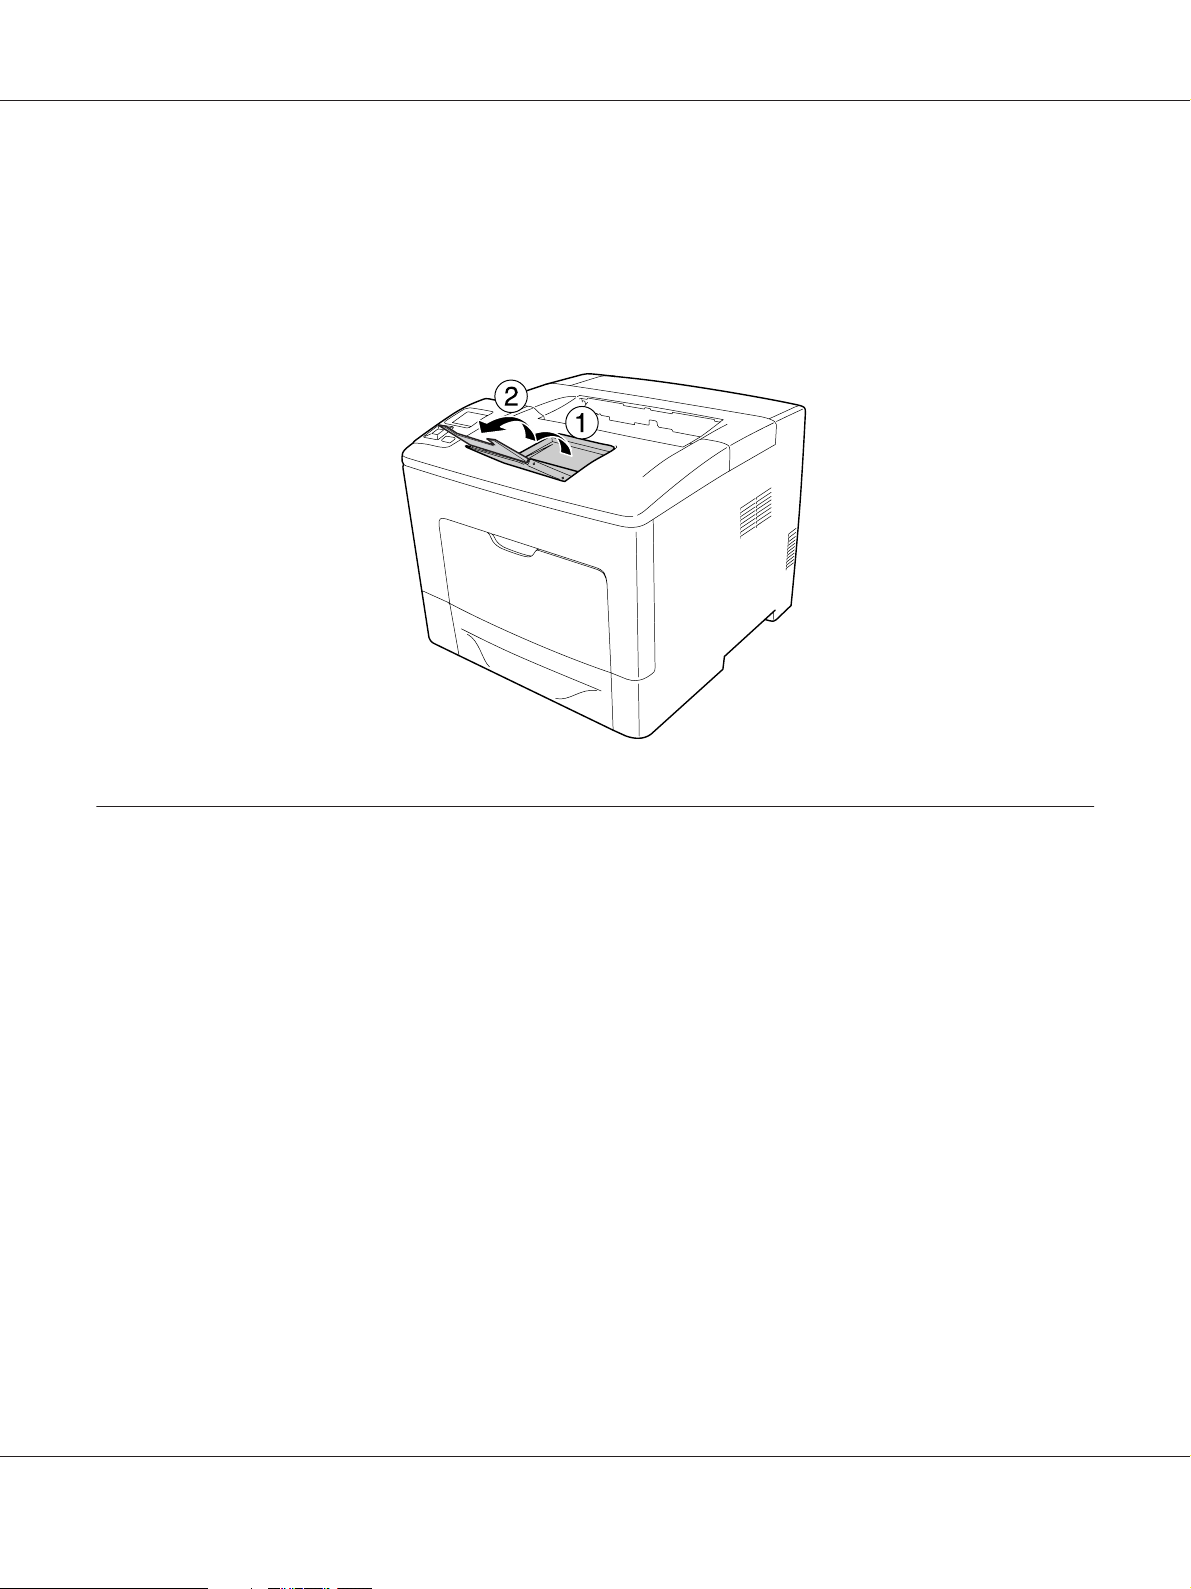
Output Tray
The output tray is located on the top of the printer. Since printouts are output face-down, this tray is
also referred to as the face-down tray. Up to 150 (for AL-M300 Series) or 250 (for AL-M400 Series)
sheets can be stacked when using the plain paper. Extend the paper support to accommodate the size
of the paper loaded in the MP tray or lower paper cassette to prevent it from slipping off the printer.
Selecting and Using Print Media
You can use special media, such as labels, envelopes, and thick paper.
When loading special media, you should make paper settings. You can also make these settings on the
Tray Menu in the control panel. See “Tray Menu” on page 65.
Note:
Since the quality of any particular brand or type of media may be changed by the manufacturer at any
time, Epson cannot guarantee the quality of any type of media. Always test samples of media stock before
purchasing large quantities or printing large jobs.
Labels
Available labels
❏ Labels designed for laser printers or plain-paper copiers
❏ Labels that completely cover the backing sheet, with no gaps between the individual labels
Printing Tasks 36
Page 37

Available paper source
❏ MP tray
❏ Lower paper cassette
Printer driver settings
MP tray
Paper Size A4, A5, A6, B5, LT, HLT, LGL, GLT, GLG, EXE, F4
Paper Source MP Tray
Paper Type Labels
Lower paper cassette
AL-M300/AL-M400 Series User's Guide
Printer driver settings
Printer driver settings
Paper Size A4, LT
Paper Source
Paper Type Labels
*1
Available only when the optional paper cassette unit is installed.
*2
Available only for AL-M400 Series.
Cassette 1, Cassette 2
*1
, Cassette 3
*1 *2
, Cassette 4
*1 *2
Note:
❏ Depending on the quality of labels, the printing environment, or the printing procedure, labels might
be wrinkled. Make a trial print run before you print on a lot of labels.
❏ Duplex printing is not available for labels.
❏ Press a sheet of paper on top of each sheet of labels. If the paper sticks, do not use those labels in your
printer.
Envelopes
Available envelopes
❏ Envelopes that have no glue or no tape
Printing Tasks 37
Page 38

Important:
c
Do not use window envelopes. The plastic on most window envelopes will melt.
Available paper source
❏ MP tray
AL-M300/AL-M400 Series User's Guide
* MON, DL, C6
Printer driver settings
MP tray
Printer driver settings
Paper Size MON, DL, C6
Paper Source MP Tray
Paper Type Envelope
Note:
❏ Depending on the quality of envelopes, the printing environment, or the printing procedure,
envelopes might be wrinkled. Make a trial print run before you print on a lot of envelopes.
❏ Duplex printing is not available for envelopes.
Printing Tasks 38
Page 39

AL-M300/AL-M400 Series User's Guide
❏ If you do not load envelopes in the MP tray right after they have been removed from the packaging,
they may bulge. To avoid jams, flatten them as shown below before loading them in the MP tray.
❏ If envelopes do not feed well, reducing the number of envelopes that are loaded may solve the
problem.
Thick paper
Available paper source
❏ MP tray
❏ Lower paper cassettes
Printer driver settings
MP tray
Paper Size A4, A5, A6, B5, LT, HLT, LGL, GLT, GLG, EXE, F4
Paper Source MP Tray
Paper Type Thick (for 106 to 163 g/m² paper), Extra Thick (for 164 to 216 g/m² paper)
Printer driver settings
Printing Tasks 39
Page 40

Lower paper cassettes
AL-M300/AL-M400 Series User's Guide
Printer driver settings
Paper Size
Paper Source
Paper Type Thick (for 106 to 163 g/m² paper), Extra Thick (for 164 to 216 g/m² paper)
*1
Available only for Cassette 1.
*2
Available only when the optional paper cassette unit is installed.
*3
Available only for AL-M400 Series.
A4, A5, A6
Cassette 1, Cassette 2
*1
, B5, LT, HLT, LGL, GLT, GLG, EXE, F4
*2
, Cassette 3
*2 *3
, Cassette 4
*2 *3
Note:
❏ Duplex printing is not available for Extra Thick.
❏ If performing manual duplex (2-sided) printing, ensure that the paper is not curled.
Custom paper size
Available paper source
❏ MP tray
❏ Lower paper cassettes
Printer driver settings
MP tray
Paper Size
Paper Source MP Tray
Paper Type Plain, Semi-Thick, Preprinted, Letterhead, Recycled, Color, Labels, Thick, Extra
*
76.2 × 127 mm at minimum and 215.9 × 355.6 mm at maximum.
Printer driver settings
User Defined Size
Thick, Special
*
Printing Tasks 40
Page 41

Lower paper cassettes
AL-M300/AL-M400 Series User's Guide
Printer driver settings
Paper Size
Paper Source
Paper Type Plain, Semi-Thick, Preprinted, Letterhead, Recycled, Color, Labels, Thick, Extra
*1
76.2 × 127 mm at minimum and 215.9 × 355.6 mm at maximum for Cassette 1
139.7 × 210 mm at minimum and 215.9 × 355.6 mm at maximum for Cassette 2, Cassette 3, and Cassette 4
*2
Available only when the optional paper cassette unit is installed.
*3
Available only for AL-M400 Series.
User Defined Size
Cassette 1, Cassette 2
Thick, Special
*1
*2
, Cassette 3
*2 *3
, Cassette 4
*2 *3
Note:
❏ Depending on the quality of the non-standard size paper, the printing environment, or the printing
procedure, the paper might skew. Make a trial print run before you print on a lot of non-standard size
paper.
❏ Duplex printing is not available for Extra Thick.
❏ For Windows, access the printer driver, then select User Defined Size fr om th e Pap er Si ze lis t on th e
Basic Settings tab. In the User defined Paper Size dialog box, adjust the Paper Width, Paper Length,
and Unit settings to match your custom paper. Then click OK and your custom paper size will be
saved.
❏ The saved paper sizes can only be used with the printer driver you saved them to. Even if multiple
printer names are set for a printer driver, the settings can be available only for the printer name in
which you saved the settings.
❏ When sharing the printer on a network, you cannot create User Defined Size at the client.
❏ If you cannot use the printer driver as explained above, make this setting at the printer by accessing
the control panel’s Printing Menu and selecting CTM (custom) as the Page Size setting.
Cancelling a Print Job
From the printer
To cancel a print job on the printer’s control panel, see “Canceling Printing” on page 109.
Printing Tasks 41
Page 42

AL-M300/AL-M400 Series User's Guide
From the computer
For Windows users
Double-click your printer’s icon on the taskbar. Select the job in the list, then click Cancel from the
Document menu.
Setting the Print Quality
You can change the print quality of printouts through settings in the printer driver.
In the Automatic setting, you can select a print mode according to your printing purpose. The printer
driver makes optimal settings depending on the print mode you have selected. In the Advanced
setting, you have more setting options.
Note:
The printer driver’s online help provides details on printer driver settings.
Using the Automatic setting
For Windows users
1. Click the Basic Settings tab.
Printing Tasks 42
Page 43

2. Click Automatic, then choose desired printing quality.
AL-M300/AL-M400 Series User's Guide
3. Click OK.
Using the Advanced setting
For Windows users
1. Click the Basic Settings tab.
Printing Tasks 43
Page 44

AL-M300/AL-M400 Series User's Guide
2. Select Advanced. Then select the most appropriate setting from the list according to the type of
document or image you want to print.
When you choose a predefined setting, other settings such as Print Quality and Graphics are set
automatically. Changes are shown in the current settings list on the Setting Information dialog box
that appears by pressing the Setting Info button on the Optional Settings tab.
Customizing print settings
If you need to change detailed settings, make the settings manually.
For Windows users
1. Click the Basic Settings tab.
2. Select Advanced, then click More Settings.
3. Make appropriate settings. For details about each setting, see online help.
4. Click OK.
Saving your settings
You can save your custom settings.
Printing Tasks 44
Page 45

AL-M300/AL-M400 Series User's Guide
Note:
❏ You cannot use a predefined setting name for your custom settings.
❏ The saved custom settings can only be used with the printer driver you saved them to. Even if multiple
printer names are set for a printer driver, the settings can be available only for the printer name in
which you saved the settings.
❏ You cannot delete predefined settings.
For Windows users
Note:
When sharing the printer on a network, Save Settings is grayed out and you cannot create a custom
setting at the client.
1. Click the Basic Settings tab.
2. Select Advanced, then click Save Settings to open the Custom Settings dialog box.
3. Type a name for your custom settings in the Name box, then click Save.
Your settings will appear in the drop-down list which appears when Advanced is selected on the Basic
Settings tab.
Note:
To delete a custom setting, follow the step 1 and 2, select the setting in the Custom Settings dialog box,
then click Delete.
You can create new settings in the More Settings dialog box. When you create new settings, Custom
Settings is displayed in the list on the Basic Settings tab. In this case, the original setting is not
overwritten. To save the new settings, save them under a new name.
Toner Save mode
To reduce the amount of toner used in printing documents, you can print rough drafts using the Toner
Save mode.
For Windows users
1. Click the Basic Settings tab.
2. Select Advanced, then click More Settings to open the More Settings dialog box.
Printing Tasks 45
Page 46

AL-M300/AL-M400 Series User's Guide
3. Select the Toner Save check box, then click OK.
Improving the clarity of color documents
Printing text clearly in black
When you print a co lor document, the qua lity of text can be m ade more legible by printing it in bla ck.
1. Click the Basic Settings tab.
2. Select Print Text in Black from the Visibility drop-down list.
3. Click OK.
Enhancing color documents
When you print a color document, the quality of document can be improved by printing text, graphs,
and images enhanced with black.
Note:
❏ This function is only for Microsoft Office Excel, Word, and PowerPoint in Windows XP, 2003, 2007,
and 2010.
❏ Set Grayscale to On when you print from Microsoft PowerPoint.
Printing Tasks 46
Page 47

AL-M300/AL-M400 Series User's Guide
❏ Text, that is 96 pt or larger, cannot be enhanced.
❏ Images, such as photos, in print data may have low quality.
❏ Printing speed may slow down.
❏ The amount of toner consumed may increase with some color documents.
1. Click the Basic Settings tab.
2. Select For Color Text, Graphs, and Images from the Visibility drop-down list.
Note:
You can select For Color Text when you print only text and For Color Graphs and Images when
you do not need to enhance texts.
3. Click Decoration Settings, and select appropriate settings in the Decoration Settings dialog
box.
Adjusting the weight of thin lines
Thin lines can be printed in thicker lines as visible.
1. Click the Basic Settings tab.
Printing Tasks 47
Page 48

AL-M300/AL-M400 Series User's Guide
2. Select Advanced, then click More Settings to open the More Settings dialog box.
3. Select the Dot Correction check box, then click OK.
The default setting for the Dot Correction is on.
Setting the Advanced Layout
Duplex printing
This function allows you to print on both sides of the paper automatically by installing the optional
Duplex Unit.
For Windows users
1. Click the Basic Settings tab.
2. Select the Duplex check box, then select Left, Top, or Right as the binding position.
3. If you want to make detailed settings, click Duplex Settings to open the Duplex Settings dialog
box.
Printing Tasks 48
Page 49

AL-M300/AL-M400 Series User's Guide
4. Make appropriate settings. For details about each setting, see online help.
5. Click OK.
Modifying the print layout
This function allows you to print multiple pages on single sheets of paper.
For Windows users
1. Click the Advanced Layout tab.
2. Select the Print Layout check box and the number of pages you want to print on one sheet of
paper.
3. If you want to make detailed settings, click More Settings. The Print Layout Settings dialog box
appears.
4. Make appropriate settings. For details about each setting, see online help.
5. Click OK.
Printing Tasks 49
Page 50

Resizing printouts
This function allows you to enlarge or reduce your document.
For Windows users
1. Click the Advanced Layout tab.
2. Select the Zoom Options check box.
AL-M300/AL-M400 Series User's Guide
3. If you want to resize pages automatically to fit the output paper, select the desired paper size from
the Output Paper drop-down list.
If you want to resize pages by a specified magnification, select the Zoom To check box, then specify
the percentage. You can also select the output paper size.
4. Select Upper Left (to print reduced page image at upper left corner of the paper) or Center (to
print reduced page image with centering) for Location setting.
Note:
This setting is not available when you select Zoom To check box.
5. Click OK.
Printing Tasks 50
Page 51

AL-M300/AL-M400 Series User's Guide
Printing watermarks
This function allows you to print a text-based or image-based watermark on your document.
For Windows users
1. Click the Advanced Layout tab.
2. Select a watermark that you want to use from the Watermark drop-down list.
3. If you want to make detailed settings, click Edit/Delete, and make appropriate settings. For
details about each setting, see online help.
4. Click OK.
Making a new watermark
For Windows users
1. Click the Advanced Layout tab.
2. Click Add New Watermark.
3. Select Text or BMP and type a name for the new watermark in the Name box.
Printing Tasks 51
Page 52

AL-M300/AL-M400 Series User's Guide
4. If you select Text, type the watermark text in the Text box. If you select BMP, select the BMP file
you want to use, then click Open.
5. Click OK.
Note:
❏ You can register up to 10 original watermarks.
❏ To edit the saved watermark, click Edit/Delete on the Advanced Layout tab, select the watermark
you want to edit in the Name box, and make appropriate settings, then click OK.
❏ To remove the saved watermark, click Edit/Delete on the Advanced Layout tab, select the
watermark you want to delete in the Name box, then click Delete.
❏ The saved watermarks can only be used with the printer driver you saved them to. Even if multiple
printer names are set for a printer driver, the settings can be available only for the printer name in
which you saved the settings.
❏ When sharing the printer on a network, you cannot create a user defined watermark at the client.
Printing headers and footers
This function allows you to print user name, computer name, date, time, or collate number, at the top
or bottom of each page in a document.
For Windows users
1. Click the Advanced Layout tab.
Printing Tasks 52
Page 53

AL-M300/AL-M400 Series User's Guide
2. Select the Header/Footer check box, then click Header/Footer Settings.
3. Select the items from the drop-down list.
Note:
❏ If you select Collate Number, the number of copies is printed.
❏ When using the reserve job function, you cannot select Collate Number.
4. Click OK.
Printing with an overlay
This function allows you to print a standard form or letterhead onto the original document.
Note:
❏ This function is for Windows only.
❏ The overlay function is available only when High Quality (Printer) is selected for the Printing Mode
in the Extended Settings dialog box from the Optional Settings tab.
Creating an overlay
1. Click the Advanced Layout tab.
Printing Tasks 53
Page 54

2. Select the Form Overlay check box.
AL-M300/AL-M400 Series User's Guide
3. Select Create Overlay Data, then click More Settings. The Create Form dialog box appears.
4. Type the form name in the Form Name box and its description in the Description box.
5. Select Foreground Document or Background Document to specify whether the overlay will
be printed as foreground or background of the document.
6. Select the Assign to Paper Source check box to display the form name in the Paper Source
drop-down list on the Basic Settings tab.
7. Click OK.
Note:
❏ To change the settings of the overlay form data you created, access the printer driver and follow the
step 1 and 2 above. Note that on the step 3, select Overlay Print, then click Edit Form.
❏ The following 9 characters cannot be used for form names: \ / : * ? " < > |.
Printing Tasks 54
Page 55

AL-M300/AL-M400 Series User's Guide
Printing an overlaid document
You can select the registered form data from the Paper Source drop-down list on the Basic Settings tab.
For registering form data in the Paper Source, see step 6 in “Creating an overlay” on page 53.
If overlay form data is not registered in the Paper Source or if you want to make detailed settings,
follow the steps below.
1. Click the Advanced Layout tab.
2. Select the Form Overlay check box.
3. Select the Overlay Print check box, then click More Settings. The Form Selection dialog box
appears.
4. Make appropriate settings. For details about each setting, see online help.
Note:
If you cannot select the form from the application, access the printer driver from the operating
system. For details, see “Accessing the printer driver” on page 169.
5. Click OK.
Saving an overlaid form pre-settings
This function allows you to save the settings you made from “Creating an overlay” on page 53.
1. From the Form Selection dialog box, click Save/Delete. To open the dialog box, see “Printing an
overlaid document” on page 55.
2. Type the pre-settings name in the Form Pre-Settings Name box, then click Save. Your
pre-settings name will appear in the Form Pre-Settings drop-down list in the Form Selection
dialog box.
3. Click OK. Your pre-settings name will appear in the Pre-Settings drop-down list in the Advanced
Layout dialog box.
Note:
❏ To delete an overlaid form pre-setting, follow the step 1, select the pre-settings name you want to
delete from Form Pre-Settings drop-down list, click Delete, and then click OK.
❏ You can save up to 20 pre-settings.
Printing Tasks 55
Page 56

AL-M300/AL-M400 Series User's Guide
Printing the copy-protected document
This function allows you to print a document as a copy-protected document. When you try to copy a
copy-protected document, “COPY” is printed several times on the document.
Note:
❏ Epson will not guarantee to secure from information leakage and any other damage by using this
function, nor hidden letters appear in all cases.
❏ Screen-tone may be too dark, hidden letters may not be printed on the entire print, or hidden letters
may not appear when photocopied depends on the models, settings, and combinations of
photocopiers, fax machine, input device such as digital cameras and scanners, output device such as
printers; printer driver settings of this product; condition of consumables such as toner and output
paper type.
For Windows users
Note:
With this function, the Print Quality setting is changed to Fine, and the Toner Save setting is disabled.
Form Overlay function is also disabled.
1. Click the Advanced Layout tab.
2. Select Copy from the Anti-Copy Pattern drop-down list.
Printing Tasks 56
Page 57

AL-M300/AL-M400 Series User's Guide
3. If you want to make detailed settings, click Edit/Delete, and make appropriate settings. For
details about each setting, see online help.
4. Click OK.
Printing Multiple Print Jobs at Once
This function allows you to print several documents created by different applications at once
arranging settings, such as the printing order, duplex, and the print layout.
1. Click the Basic Settings tab.
2. Select the Print Job Arranger check box.
3. Click OK.
The Print Job Arranger screen appears when a print job is executed. Make appropriate settings. For
details, see the Print Job Arranger help.
Using the Reserve Job Function
This function allows you to store print jobs on the printer’s memory and to print them later directly
from the printer’s control panel. You can prevent the printed document from being looked at by other
people by applying a password to the print job.
This function uses the following types of printer memory.
Printing Tasks 57
Page 58

Printer’s Storage Description
AL-M300/AL-M400 Series User's Guide
CompactFlash
R AM D is k An a dd it io na l m em or y m u st be in st al le d o n y ou r pr in te r i n o rd er to us e t he Re se rv e J ob
*
Available only for AL-M400 Series.
*
The optional CompactFlash memory must be installed on your printer in order to use
the Reserve Job function. Make sure that the CompactFlash memory is correctly
recognized by the printer driver before you start using the Reserve Job function. The
CompactFlash memory must be at least 4 GB.
function.
To enable the RAM disk, you have to set the RAM Disk setting on the control panel to
Normal or Maximum. For instructions about increasing your printer’s memory, see
“Installing a memory module” on page 116.
After the memory module is installed, you must update the option information. See
“Making Optional Settings” on page 170.
For AL-M400 Series users:
When both CompactFlash memory and a RAM disk are installed, CompactFlash
memory is given priority and makes the RAM disk unavailable.
The table below gives an overview of the Reserve Job options.
Reserve Job Option Description
Re-Print Job Lets you print the job now and store it on the printer’s memory. You can print the same
job several times.
Verify Job Lets you print one copy now to verify the content. You can print multiple copies later.
Stored Job
Confidential Job Lets you apply a password to the print job. You can print the job entering the password
*
Available only for AL-M400 Series.
*
Lets you store the print job on the printer’s memory without printing it now.
Note:
This option is not available when you have installed the optional RAM disk.
on the printer’s control panel.
Sending the print job
For Windows users
1. Click the Optional Settings tab, then click Reserve Jobs Settings. The Reserve Jobs Settings
dialog box appears.
2. Select the Reserve Job On check box, then select Re-Print Job, Verify Job, or Confidential
Job.
Printing Tasks 58
Page 59

AL-M300/AL-M400 Series User's Guide
3. Enter a user name and job name in the corresponding text boxes. If you selected Confidential
Job, enter a four-digit number in the password text box to set the password.
Note:
If you want to creat e a thumbn ail of the first page of a job, select the Create a thumbnail check box.
Thumbnails can be accessed by entering http:// followed by the internal print server’s IP address in a
Web browser.
4. Click OK.
Note:
The OK button becomes available after both the user name and job name have been entered.
If you selected Re-Print Job, the printer prints your document. If you selected Verify Job, the printer
prints one copy of your document.
To print or delete this data using the printer’s control panel, see “Printing and Deleting Reserve Job
Data” on page 106.
Printing Tasks 59
Page 60

AL-M300/AL-M400 Series User's Guide
Chapter 3
Using the Control Panel
Using the Control Panel Menus
When to make control panel settings
In general, printer driver settings override settings made using the control panel.
You should make the following settings by using the control panel because these settings cannot be
made in the printer driver.
❏ Settings to select emulation modes and IES (Intelligent Emulation Switching) mode
❏ Settings to specify a channel and configure the interface
❏ Settings to specify the size of the memory buffer used to receive data
How to access the control panel menus
1. Press the r Right button to access the control panel menus.
2. Use the u Up and d Down buttons to scroll through the menus.
3. Press the r Right button to view the items in a menu. Depending on the menu, the LCD panel
displays an item and the current setting separated (
YYYY=ZZZZ), or only an item ( YYYY).
4. Use the u Up and d Down buttons to scroll through the items, or press the l Left button to return
to the previous level.
Using the Control Panel 60
Page 61

AL-M300/AL-M400 Series User's Guide
5. Press the r Right button to carry out the operation indicated by an item, such as printing a
configuration status sheet or resetting the printer, or to view the settings available for an item, such
as paper sizes or emulation modes.
Use the u Up and d Down buttons to scroll through available settings, then press the r Right
button to select a setting and return to the previous level. Press the l Left button to return to the
previous level without changing the setting.
Note:
❏ You need to turn the printer off and then on to activate some settings. For details, see “Control
Panel Menus” on page 62.
❏ The OK button can be used instead of the r Right button in step 3 or 5.
6. Press the l Left button once or more times to exit the control panel menus.
How to register menus as bookmarks
By registering bookmarks for frequently used menus, you can display the registered menus by just
pressing the OK button while the LCD panel displays Ready.
Note:
The maximum number of menus you can register as bookmarks is 3.
1. Display the menu to register. For details, see “How to access the control panel menus” on
page 60.
2. Press the OK button for more than two seconds.
The Add Bookmark menu appears.
Note:
Some menus cannot be bookmarked. If you tried to register them, Bookmark Failed is displayed.
3. Press the u Up and d Down buttons to select the menu to delete, then press the r Right button.
Note:
To register a new menu, you have to delete one of the registered menus from the bookmark.
If Bookmark Registered is displayed, the menu is bookmarked successfully.
Using the Control Panel 61
Page 62

AL-M300/AL-M400 Series User's Guide
Note:
To restore the bookmark menus to the default values, select SelecType Init from the control panel’s
Reset Menu.
Control Panel Menus
Note:
Some menus and items appear only when a corresponding optional device is installed or an appropriate
setting has been done.
Information Menu
Press the d Down or u Up button to select an item. Press the r Right button to print a sheet or font
sample.
Item Values
Print Configuration Status Sheet -
Print Supplies Status Sheet -
Print Usage History Sheet -
Reserve Job List
Form Overlay List
Network Status Sheet
USB ExtI/FStatusSht
PS3 Status Sheet -
PS3 Font List -
PCL Font Sample -
ESCP2 Font Sample -
FX Font Sample -
I239X Font Sample -
*1
*2
*3 *4
*5
-
-
-
-
Toner E******F to E F
Using the Control Panel 62
Page 63

AL-M300/AL-M400 Series User's Guide
Item Values
Photocon E******F to E F
Fuser Unit Life
Maintenance Unit Life
Total Pages 0 to 99999999
*1
Available only when the jobs are stored by using the Quick Print Job feature.
*2
Available only for AL-M400 Series.
*3
Available only when the Network I/F setting in Network Menu is set to On.
*4
Available only for AL-M300DN and AL-M400 Series.
*5
Available only when the printer is connected to a USB device with D4 support and has been turned on when the USB I/F
setting is set to On.
*6
Available only for AL-M300 Series.
*6
*2
E******F to E F
E******F to E F
Print Configuration Status Sheet
Prints a sheet showing the current printer settings and installed options. This sheet can be useful to
confirm whether option have been installed correctly.
Print Supplies Status Sheet
Prints a sheet showing information about consumables.
Print Usage History Sheet
Prints a sheet showing the history of the printer’s usage.
Reserve Job List
Prints a list of reserved print jobs stored on the printer’s memory.
Form Overlay List (For AL-M400 Series only)
Prints a list of form overlays stored on the printer’s memory.
Network Status Sheet (For AL-M300DN and AL-M400 Series only)
Prints a sheet showing the working status of the network.
USB ExtI/FStatusSht
Using the Control Panel 63
Page 64

AL-M300/AL-M400 Series User's Guide
Prints a sheet showing the working status of the USB interface.
PS3 Status Sheet
Prints a sheet showing information about the PS3 mode such as the PS3 version.
PS3 Font List, PCL Font Sample, ESCP2 Font Sample, FX Font Sample, I239X Font Sample
Prints a sample of the fonts available for your selected printer emulation.
Toner
The number of asterisks (*) between “E” and “F” indicates the remaining service lives of consumables.
If a non-genuine consumable is used, “?” is displayed instead of the indicator.
Photocon
The number of asterisks (*) between “E” and “F” indicates the remaining service life of the
photoconductor unit.
Fuser Unit Life (For AL-M300 Series only)
The number of asterisks (*) between “E” and “F” indicates the remaining service life of the fuser unit.
Maintenance Unit Life (For AL-M400 Series only)
The number of asterisks (*) between “E” and “F” indicates the remaining service life of the
maintenance unit.
Total Pages
Displays the total number of pages printed by the printer.
System Information Menu
The following information is displayed.
❏ Main Version
❏ MCU Version
❏ Serial No
Using the Control Panel 64
Page 65
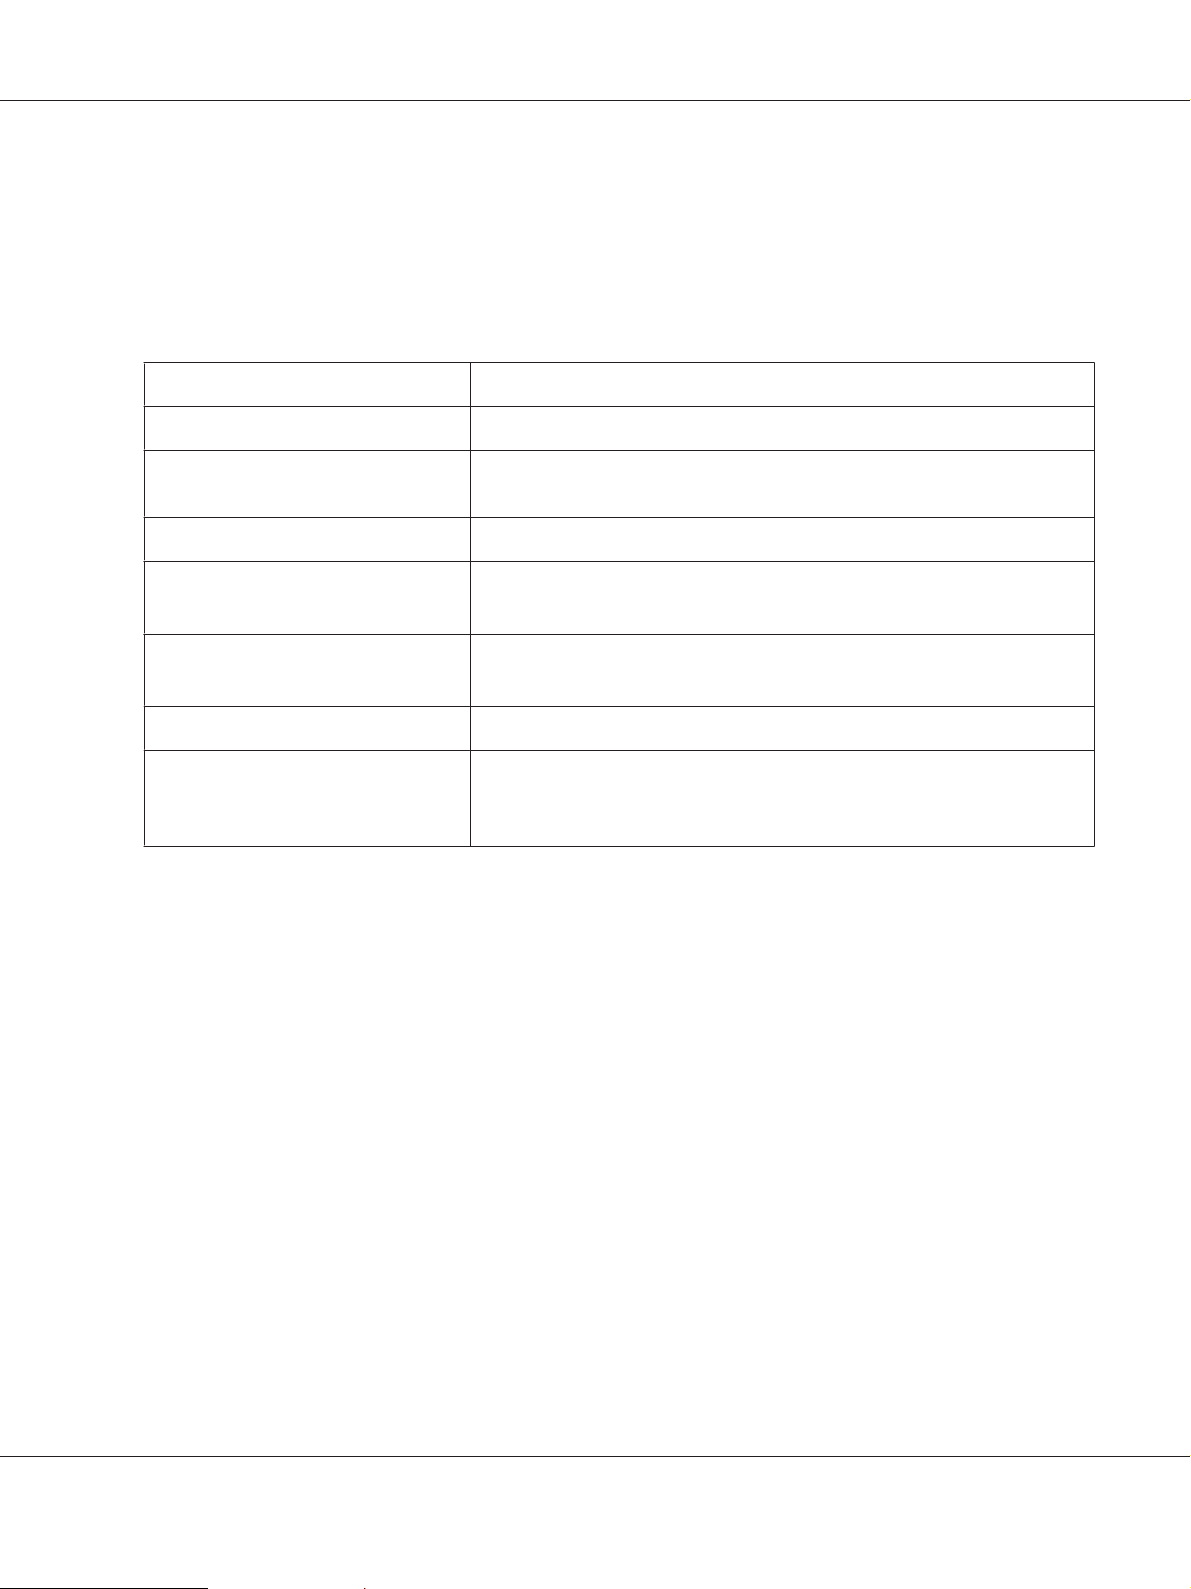
❏ Memory
❏ MAC Address
Tray Menu
Item Settings (default in bold)
AL-M300/AL-M400 Series User's Guide
MP Tray Size
MP Type
Cassette1 Size
*1
Cassette2 Size
Cassette4 Size
Cassette1 Type/ Cassette2 Type
Cassette3 Size
MP Tray AutoSel
Cassette1 AutoSel/Cassette2
AutoSel*1/ Cassette3 AutoSel
Cassette4 AutoSel
*1
Available only when the optional paper cassette unit is installed.
*2
Available only for AL-M400 Series.
/ Cassette3 Size
*1 *2
*1 *2
/ Cassette4 Size
*1 *2
*1 *2
*1 *2
*1
/
/
*1 *2
A4, A5, A6, B5, LT, HLT, LGL, GLT, GLG, EXE, F4, MON, DL, C6, CTM
Plain, SemiThk, Preprinted, Letterhead, Recycled, Color, Labels, Thick,
ExtraThk, Envelope, Special
A4, A5, A6, B5, LT, HLT, LGL, GLT, GLG, EXE, F4, CTM
A4, A5, B5, LT, HLT, LGL, GLT, GLG, EXE, F4, CTM
/
Plain, SemiThk, Preprinted, Letterhead, Recycled, Color, Labels, Thick,
ExtraThk, Special
On, Off
On, Off
MP Tray Size
Select your paper size from this menu.
MP Type
Lets you set the paper type loaded in the MP tray.
Cassette1 Size/ Cassette2 Size/ Cassette3 Size (For AL-M400 Series only)/ Cassette4 Size (For
AL-M400 Series only)
Displays the paper size loaded in the standard and optional paper cassettes.
Cassette1 Type/ Cassette2 Type/ Cassette3 Type (For AL-M400 Series only)/ Cassette4 Type
(For AL-M400 Series only)
Using the Control Panel 65
Page 66

AL-M300/AL-M400 Series User's Guide
Lets you select the paper type loaded in the standard and optional paper cassettes.
MP Tray AutoSel/ Cassette1 AutoSel/ Cassette2 AutoSel/ Cassette3 AutoSel (For AL-M400
Series only)/ Cassette4 AutoSel (For AL-M400 Series only)
Specifies whether the tray can be selected for printing when Paper Source is selected for Auto Selection
in the printer driver.
Emulation Menu
Note:
You can specify different emulations for each interfaces.
Item Settings (default in bold)
*1
Parallel
USB
Network
*1
Available only for AL-M300D.
*2
Available only for AL-M300DN and AL-M400 Series.
*2
Auto, ESCP2, FX, I239X, PS3, PCL
Auto, ESCP2, FX, I239X, PS3, PCL
Auto, ESCP2, FX, I239X, PS3, PCL
Printing Menu
Note:
The settings are overridden by the settings made in the printer driver.
Item Settings (default in bold)
Page Size
Wide A4
Media Type
A4, A5, A6, B5, LT, HLT, LGL, GLT, GLG, EXE, F4, MON, DL, C6, CTM
Off, On
Unspecified, Plain, SemiThk, Preprinted, Letterhead, Recycled, Color, Labels, Thick, ExtraThk,
Envelope, Special
*1
Page Side
Paper Source
Orientation
Front, Back
Auto, MP, Cassette1, Cassette2
Port, Land
*2
, Cassette3
*2 *3
, Cassette4
*2 *3
Using the Control Panel 66
Page 67

Item Settings (default in bold)
AL-M300/AL-M400 Series User's Guide
Resolution
RITech
Toner Save
Density
Dot Correction
Top Offset
LeftOffset
T Offset B
L Offset B
*1
The minimum and maximum of custom paper sizes vary depending on the tray.
(MP Tray/Standard paper cassette)
Minimum: 76.2 × 127.0 mm, maximum: 215.9 × 355.6 mm
(Optional paper cassette)
Minimum: 139.7 × 210.0 mm, maximum: 215.9 × 355.6 mm
*2
Available only when the optional paper cassette unit is installed.
*3
Available only for AL-M400 Series.
300, 600, 1200
On, Off
Off, On
1 to 3 to 5
Off, On
-99.0 ... 0.0 ... 99.0mm in 0.5 increments
-99.0 ... 0.0 ... 99.0mm in 0.5 increments
-99.0 ... 0.0 ... 99.0mm in 0.5 increments
-99.0 ... 0.0 ... 99.0mm in 0.5 increments
Page Size
Specifies the paper size.
Wide A4
Selecting On decreases the left and right margins to 3.4 mm.
Media Type
Specifies the paper type.
Page Side
Select Front when printing on the front of normal paper (Plain), thick paper (Thick), or extra thick
paper (Extra Thick).
Paper Source
Using the Control Panel 67
Page 68

AL-M300/AL-M400 Series User's Guide
Specifies whether paper feeds into the printer from the MP tray, the standard paper cassette, or the
optional paper cassette unit.
If you select Auto, paper feeds from the paper source containing paper that matches your Paper Size
setting.
Orientation
Specifies whether the page is printed in portrait or landscape orientation.
Resolution
Specifies the printing resolution.
RITech
Turning RITech on produces smoother and crisper lines, text, and graphics.
Toner Save
When this setting is selected, the printer saves toner by substituting a gray shade for the black inside of
characters. The characters are outlined in full black on the right and lower edges.
Density
Specifies the printing density.
Dot Correction
Adjusts the weight of thin lines so they are printed clearly.
Top Offset
Makes fine adjustments to the vertical printing position of the page.
Important:
c
Make sure that the printed image does not extend beyond the edge of the paper. Otherwise, you
may damage the printer.
LeftOffset
Makes fine adjustments to the horizontal printing position of the page. This is useful for fine
adjustments.
Using the Control Panel 68
Page 69

AL-M300/AL-M400 Series User's Guide
Important:
c
Make sure that the printed image does not extend beyond the edge of the paper. Otherwise, you
may damage the printer.
T Offset B
Adjusts the vertical printing position on the back of the paper when printing on both sides. Use this if
the printout on the back is not where you expected.
L Offset B
Adjusts the horizontal printing position on the back of the paper when printing on both sides. Use this
if the printout on the back is not where you expected.
Setup Menu
Item Settings (default in bold)
Language
Time Out
MP Mode
Manual Feed
Copies
*1
Duplex
Binding
Start Page
Skip Blank Page
Auto Eject Page
Size Ignore
Auto Cont
*1
*1
*2
*3
English, Français, Deutsch, Italiano, ESPAÑOL, SVENSKA, Dansk, Nederlands, SUOMI,
Português, Norsk,
0, 5 to 60 to 300 in increments of 1
Normal, Last
Off, 1st Page, EachPage
1 to 999
Off, On
Long Edge, Short Edge
Front, Back
Off, On
Off, On
Off, On
Off, On
, , Türkçe, , ,
Page Protect
A4/LT Auto Switching
*2
Auto, On
On, Off
Using the Control Panel 69
Page 70

Item Settings (default in bold)
AL-M300/AL-M400 Series User's Guide
Extended Mode
LCD Contrast
LCD Backlight
RAM Disk
Convert to Simplex
Confirm Media Type
Job Info. Display Pattern 1, Display Pattern 2, Off
*1
Available only when you use A4, A5, B5, LT, HLT, LGL, GLT, GLG, EXE, or F4 size paper.
*2
Available only for ESCP2, FX, or I239X mode.
*3
Not available in PS3 and PCL.
*4
Available only forAL-M400 Series.
*5
After this item is changed, the setting value takes effect after a warm boot or after the power is turned on again.
*4
*5
Off, On
0 to 7 to 15
Auto, Off
Off, Normal, Maximum
Odd Page, 1 Page, Off
No, Yes
Language
Specifies the language displayed on the LCD panel and that printed on the status sheet.
Time Out
Specifies the length of the time, in seconds, before a time out when interfaces are being switched
automatically. The time before a time out occurs is the length of time from the point when no data is
being received from an interface until the point of switching the interface. If the printer has a print job
when switching the interface, the printer prints the print job.
MP Mode
This setting determines whether the MP tray has the highest or lowest priority when Auto is selected
as the Paper Source setting in the printer driver. When Normal is selected as the MP Mode, the MP tray
has the highest priority as the paper source. If you select Last, the MP tray has the lowest priority.
Manual Feed
Allows you to select the manual feed mode for the MP tray.
Copies
Using the Control Panel 70
Page 71

AL-M300/AL-M400 Series User's Guide
Designates the number of copies to be printed, from 1 through 999.
Duplex
Turns duplex printing on or off. This allows you to print on both sides of a page.
Binding
Specifies the binding direction of the printout.
Start Page
Specifies whether duplex printing starts from the front or back of the page.
Skip Blank Page
Enables you to skip blank pages when printing.
Auto Eject Page
Specifies whether or not to eject paper when the limit specified in the Time Out setting is reached. The
default is Off, which means paper is not ejected when the time-out limit is reached.
Size Ignore
If you want to ignore a paper size error, select On. When you turn this item on, the printer keeps
printing even if the image size exceeds the printable area for the specified paper size. This may cause
smudges because of the toner that is not transferred onto the paper properly. When this item is turned
off, the printer stops printing if a paper size error occurs.
Auto Cont
When you turn this setting on, the printer automatically continues printing after a certain period of
time when one of the following errors occurs: Paper Set, Print Overrun, or Memory Overflow.
When this option is off, you must press the OK button to resume printing.
Page Protect
Using the Control Panel 71
Page 72

AL-M300/AL-M400 Series User's Guide
Allocates additional printer memory for printing data, as opposed to receiving it. You may need to
turn this setting on if you are printing a very complex page. If a Print Overrun error message appears
on the LCD panel during printing, turn this setting on and reprint your data. This reduces the amount
of memory reserved for processing data so your computer may take longer to send the print job, but it
will allow you to print complex jobs. Page Protect usually works best when Auto is selected. You
will need to increase your printer’s memory if memory errors continue to occur.
Note:
Changing the Page Protect setting reconfigures the printer’s memory, which causes any downloaded
fonts to be deleted.
A4/LT Auto Switching
When A4 or Letter size paper is selected for printing and there is no paper source set to the selected
paper size, the printout is output in an alternate paper size (Letter for A4, or A4 for Letter).
Extended Mode
If On is selected, printing continues even after the Replace Toner Cartridge error message
appears on the LCD panel. However, the printing quality is not guaranteed, and the service life of the
photoconductor unit may be affected. When a new toner cartridge is installed, the setting
automatically returns to Off.
LCD Contrast
Adjusts the contrast of the LCD panel. Use the u Up and d Down buttons to set the contrast between
0 (lowest contrast) and 15 (highest contrast.)
LCD Backlight (For AL-M400 Series only)
If Auto is selected, the LCD backlight lights. Also, it turns off during Sleep or Deep Sleep mode. If Off
is selected, the LCD backlight is always off.
RAM Disk
Specifies the RAM disk size available for the Reserve Job function. See the table below for details.
Optional RAM capacity Total RAM capacity RAM Disk capacity
Normal Maximum
0 MB 128 MB 16 MB 16 MB
Using the Control Panel 72
Page 73

AL-M300/AL-M400 Series User's Guide
Optional RAM capacity Total RAM capacity RAM Disk capacity
Normal Maximum
128 MB 256 MB 64 MB 128 MB
256 MB 384 MB 128 MB 256 MB
512 MB 640 MB 256 MB 512 MB
1024 MB 1152 MB 512 MB 1024 MB
Convert to Simplex
In the duplex printing mode, specifies whether to print the last page of a job in one side printing mode.
Setting Odd Page or 1 Page can prevent the last page from being printed on an unexpected page
when you are printing on preprinted paper or hole-punched paper.
Odd Page: 1-page jobs or the last page of a job with an odd number of pages are printed in one side
printing mode.
1 Page: 1-page jobs are printed in one side printing mode.
Off: The last page of all jobs (including 1-page jobs or jobs with an odd number of pages) is printed in
duplex printing mode.
Confirm Media Type
Displays a message when the paper type in the tra y selected for prin ting is differen t from that selected
on Paper Type in the printer driver.
Job Info.
Displays job information on the control panel, also skipping and canceling printing jobs can be done
with this setting. The pattern of items displayed on the control panel can be selected from Display
Pattern 1 and Display Pattern 2. Do not select Display Pattern 1 when the following
languages are selected as Language on Setup Menu: Norsk,
, , Türkçe, ,
, .
Reset Menu
Clear Warning
Clears warning messages that show errors except for these that occur from consumable products or
mandatory-replacement parts.
Using the Control Panel 73
Page 74

AL-M300/AL-M400 Series User's Guide
Clear All Warnings
Clears all warning messages that appear on the LCD panel.
Reset All
Stops printing and clears the printer memory. The print jobs received from all interfaces are erased.
Note:
Performing Reset All clears print jobs received from all interfaces. Be careful not to interrupt someone
else’s job.
SelecType Init
Restores the control panel menu settings to their default values.
Reset Fuser Counter (For AL-M300 Series only)
Reset the fuser unit life counter when you replace the fuser unit. For instructions on replacing the fuser
unit, see the documentation supplied with the fuser unit.
Reset Maintenance Counter (For AL-M400 Series only)
Reset the maintenance unit life counter when you replace the maintenance unit. For instructions on
replacing the maintenance unit, see the documentation supplied with the maintenance unit.
Quick Print JobMenu
This menu allows you to print or delete print jobs that were stored in the printer’s memory using the
Quick Print Job feature (Re-Print Job, Verify Job , Stored Job) of the printer driver’s Reserve Job
function. For instructions on using this menu, see “Using the Quick Print JobMenu” on page 106.
ConfidentialJobMenu
This menu allows you to print or delete print jobs stored in the printer’s memory using the
Confidential Job feature of the printer driver’s Reserve Job function. You need to enter the correct
password to access this data. For instructions on using this menu, see “Using the
ConfidentialJobMenu” on page 107.
Using the Control Panel 74
Page 75

Clock Menu
Item Settings (default in bold)
AL-M300/AL-M400 Series User's Guide
Local Time Diff.
Time Setting 2000/ 01/01 00:00 to 2099/12/31 23:59
Date Format
-13:59 … 0:00 … +13:59
DD/MM/YY, MM/DD/YY, YY/MM/DD
Local Time Diff.
Specifies the current date and time by entering the time difference from Greenwich Mean time.
Time Setting
Specifies the current date and time by entering them directly.
Date Format
Specifies the format to display the date.
Parallel Menu (For AL-M300D only)
These settings control communication between the printer and the computer when using the parallel
interface.
Item Settings (default in bold)
Parallel I/F
Speed
Bi-D
Buffer Size
*
After this item is changed, the setting value takes effect after a warm boot or after the power is turned on again. While it is
reflected in the Status Sheet and EJL read-back, the actual change takes effect after a warm boot or after the power is
turned on again.
*
*
*
*
On, Off
Fast, Normal
ECP, Off, Nibble
Normal, Maximum, Minimum
Parallel I/F
Allows you to activate or deactivate the parallel interface.
Using the Control Panel 75
Page 76

AL-M300/AL-M400 Series User's Guide
Speed
Specifies the pulse width of the ACKNLG signal when receiving data in the Compatibility mode or
Nibble mode. When Fast is selected, the pulse width is about 1 μs. When Normal is selected, the pulse
width is about 10 μs.
Bi-D
Allows you to specify the bidirectional communication mode. When you select Off, bidirectional
communication is disabled.
Buffer Size
Determines the amount of memory to be used for receiving data and printing data. If Maximum is
selected, more memory is allocated for receiving data. If Minimum is selected, more memory is
allocated for printing data.
Note:
❏ To activate Buffer Size settings, you must turn off the printer for more than five seconds then turn
it back on. Or, you can perform a Reset All operation, as explained in “Reset Menu” on
page 73.
❏ Resetting the printer erases all print jobs. Make sure the Ready light is not flashing when you reset the
printer.
USB Menu
Item Settings (default in bold)
*1
USB I/F
USB Speed
Buffer Size
*1
After this item is changed, the setting value takes effect after a warm boot or after the power is turned on again. While it is
reflected in the Status Sheet and EJL read-back, the actual change takes effect after a warm boot or after the power is
turned on again.
*2
Available only when USB I/F is set to On.
*1 *2
*1 *2
On, Off
HS, FS
Normal, Maximum, Minimum
USB I/F
Allows you to activate or deactivate the USB interface.
Using the Control Panel 76
Page 77

AL-M300/AL-M400 Series User's Guide
USB Speed
Allows you to select the operation mode of USB interface. Selecting HS is recommended. Select FS if HS
does not work on your computer system.
Buffer Size
Determines the amount of memory to be used for receiving data and printing data. If Maximum is
selected, more memory is allocated for receiving data. If Minimum is selected, more memory is
allocated for printing data.
Note:
❏ To activate Buffer Size settings, you must turn off the printer for more than five seconds then turn
it back on. Or, you can perform a Reset All operation, as explained in “Reset Menu” on
page 73.
❏ Resetting the printer erases all print jobs. Make sure the Ready light is not flashing when you reset the
printer.
Network Menu
See the Network Guide for each setting.
PCL Menu
These settings are available in the PCL mode.
Item Settings (default in bold)
FontSource
Font Number
*2
Pitch
*2
Height
SymSet
Resident, Download
0… 65535 (depending on your settings)
0.44 … 10.00 … 99.99cpi in 0.01cpi increment
4.00 … 12.00 … 999.75pt in 0.25pt increment
IBM-US, Roman-8, Roman-9, ECM94-1, 8859-2 ISO, 8859-9 ISO, 8859-10ISO, 8859-15ISO,
PcBlt775, IBM-DN, PcMultiling, PcE.Europe, PcTk437, PcEur858, Pc1004, WiAnsi, WiE.Europe,
WiTurkish, WiBALT, DeskTop, PsText, VeInternati, VeUS, MsPublishin, Math-8, PsMath, VeMath,
PiFont, Legal, UK, ANSI ASCII, Swedis2, Italian, Spanish, German, Norweg1, French2, Windows,
McText, Hebrew7, 8859-8 ISO, Hebrew8, Arabic8, OCR A, OCR B, Pc866Cyr, Pc866Ukr, WinCyr,
ISOCyr, Pc8Grk, Pc851Grk, WinGrk, ISOGrk, Greek8, Pc862Heb, Pc864Ara, HPWARA
*1
Using the Control Panel 77
Page 78

Item Settings (default in bold)
AL-M300/AL-M400 Series User's Guide
Form
CR Function
LF Function
Tray Assign
*1
Available only when downloaded fonts are available.
*2
Depending on the font that has been selected.
5 … 64 … 128Lines
CR, CR+LF
LF, CR+LF
4K, 5S, 4
FontSource
Sets the default font source.
Font Number
Sets the default font number for the default font source. The available number depends on the settings
you made.
Pitch
Specifies the default font pitch if the font is scalable and of fixed-pitch. You can select from 0.44 to
99.99 cpi (characters per inch), in 0.01-cpi increments. This item may not appear depending on the
FontSource or Font Number settings.
Height
Specifies the default font height if the font is scalable and proportional. You can select from 4.00 to
999.75 points, in 0.25-point increments. This item may not appear depending on the FontSource or
Font Number settings.
SymSet
Selects the default symbol set. If the font you selected in FontSource an d Fon t Num ber is not av ailab le
in the new SymSet setting, the FontSource and the Font Number settings are automatically replaced
with the default value, IBM-US.
Form
Selects the number of lines for the selected paper size and orientation. This also causes a line spacing
(VMI) change, and the new VMI value is stored in the printer. This means that later changes in the
Page Size or Orientation settings cause changes in the Form value, based on the stored VMI.
Using the Control Panel 78
Page 79

AL-M300/AL-M400 Series User's Guide
CR Function, LF Function
These functions are included for users of particular operating systems, such as UNIX.
Tray Assign
Changes the assignment for the paper source select command. When 4 is selected, the commands are
set as compatible with the HP LaserJet 4. When 4K is selected, the commands are set as compatible
with the HP LaserJet 4000, 5000, and 8000. When 5S is selected, the commands are set as compatible
with the HP LaserJet 5S.
PS3 Menu
Item Settings (default in bold)
Error Sheet
Image Protect
Binary
Text Detection
PDF Page Size
Off, On
Off, On
Off, On
Off, On
Auto, A4, A5, A6, B5, LT, HLT, LGL, GLT, GLG, EXE, F4, MON, DL, C6
Error Sheet
When you select On, the printer prints out an error sheet when an error occurs in the PS3 mode or
when the PDF file you tried to print is not a supported version.
Image Protect
When On is selected, the print quality is not reduced even with insufficient memory. In that case,
Memory Overflow is displayed and the printing is stopped.
When Off is selected, the print quality is reduced with insufficient memory. In that case, Image
Optimum is displayed and the printing is continued.
Binary
Specifies the data format. Select On for the Binary data and select Off for the ASCII data.
Note:
Binary can only be used with network connection.
Using the Control Panel 79
Page 80

AL-M300/AL-M400 Series User's Guide
To use the Binary data, make sure your application supports Binary data and that SEND CTRL-D
Before Each Job and SEND CTRL-D After Each Job are set to No.
When this setting is set to On, you cannot use TBCP (Tagged binary communication protocol) in the
printer driver settings.
Text Detection
When you select On, the text file is converted to a PostScript file when printing. This setting is available
only when you select PS3 in the Emulation Menu.
PDF Page Size
Specifies the paper size when you send the PDF file directory from a computer or some other device. If
Auto is selected, the paper size is determined based on the size of the first page that is printed.
ESCP2 Menu
Item Settings (default in bold)
Font
Pitch
Condensed
T.Margin
Text
CGTable
Country
Auto CR
Auto LF
Courier, Prestige, Roman, Sans serif, Roman T, Orator S, Sans H, Script, OCR A, OCR B
10 cpi, 12cpi, 15cpi, Prop.
Off, On
0.40 ... 0.50 ... 1.50inch in 0.05-inch increments
1 ... 66 ... 81Lines
PcUSA, Italic, PcMultilin, PcPortugue, PcCanFrenc, PcNordic, PcTurkish2, PcIcelandic,
PcE.Europe, BpBRASCII, BpAbicomp, Roman-8, PcEur858, ISO Latin1, 8859-15ISO, PcSI437,
PcTurkish1, 8859-9 ISO, Mazowia, CodeMJK, PcGk437, PcGk851, PcGk869, 8859-7 ISO, PcCy855,
PcCy866, PcUkr866, PcLit771, Bulgarian, Hebrew7, Hebrew8, PcHe862, PcAr864, PcAr864Ara,
PcAr720, PcLit774, Estonia, ISO Latin2, PcLat866
USA, France, Germany, UK, Denmark, Sweden, Italy, Spain1, Japan, Norway, Denmark2, Spain2,
LatinAmeric, Korea, Legal
On, Off
Off, On
Bit Image
ZeroChar
Dark, Light, BarCode
0, (or the zero character with a slash)
Using the Control Panel 80
Page 81

AL-M300/AL-M400 Series User's Guide
Font
Selects the font.
Pitch
Selects the pitch (the horizontal spacing) of the font in fixed pitch, measured in cpi (characters per
inch). You can also choose proportional spacing.
Condensed
Turns condensed printing on or off.
T.Margin
Sets the distance from the top of the page to the baseline of the first printable line. The distance is
measured in inches. The smaller the value, the closer the printable line is to the top.
Text
Sets the page length in lines. For this option, a line is assumed to be 1 pica (1/6 inch). If you change the
Orientation, Page Size, or T.Margin settings, the page length setting automatically returns to the
default for each paper size.
CGTable
Use the character generator (CG) table option to select the graphics character table or the italics table.
The graphics table contains graphic characters for printing lines, corners, shaded areas, international
characters, Greek characters, and mathematical symbols. If you select Italic, the upper half of the
character table is defined as italic characters.
Country
Use this option to select one of the fifteen international symbol sets. See the Font Guide for samples of
the characters in each country’s symbol set.
Auto CR
Specifies whether the printer performs a carriage-return/line-feed (CR-LF) operation whenever the
printing position goes beyond the right margin. If you select Off, the printer does not print any
characters beyond the right margin and does not perform any line wrapping until it receives a
carriage-return character. This function is handled automatically by most applications.
Using the Control Panel 81
Page 82

AL-M300/AL-M400 Series User's Guide
Auto LF
If you select Off, the printer does not send an automatic line-feed (LF) command with each
carriage-return (CR). If On is selected, a line-feed command is sent with each carriage-return. Select On
if your text lines overlap.
Bit Image
The printer is able to emulate the graphics densities set with the printer commands. If you select Dark,
the bit image density is high, and if you select Light, the bit image density is low.
If you select BarCode, the printer converts bit images to bar codes by automatically filling in any
vertical gaps between dots. This produces unbroken vertical lines that can be read by a bar code reader.
This mode will reduce the size of the image being printed, and may also cause some distortion when
printing bit image graphics.
ZeroChar
Specifies whether the printer prints a slashed or unslashed zero.
FX Menu
Item Settings (default in bold)
Font
Pitch
Condensed
T.Margin
Text
CGTable
Country
Auto CR
Courier, Prestige, Roman, Sans serif, Script, Orator S, OCR A, OCR B
10cpi, 12cpi, 15cpi, Prop.
Off, On
0.40 ... 0.50 ... 1.50inch in 0.05-inch increments
1 ... 66 ... 81Lines
PcUSA, Italic, PcMultilin, PcPortugue, PcCanFrenc, PcNordic, PcTurkish2, PcIcelandic,
PcE.Europe, BpBRASCII, BpAbicomp, Roman-8, PcEur858, ISO Latin1, 8859-15ISO
USA, France, Germany, UK, Denmark, Sweden, Italy, Spain1, Japan, Norway, Denmark2, Spain2,
LatinAmeric
On, Off
Auto LF
Bit Image
Off, On
Dark, Light, BarCode
Using the Control Panel 82
Page 83

Item Settings (default in bold)
AL-M300/AL-M400 Series User's Guide
ZeroChar
0, (or the zero character with a slash)
Font
Selects the font.
Pitch
Selects the pitch (the horizontal spacing) of the font in fixed pitch, measured in cpi (characters per
inch). You can also choose proportional spacing.
Condensed
Turns condensed printing on or off.
T.Margin
Sets the distance from the top of the page to the baseline of the first printable line. The distance is
measured in inches. The smaller the value, the closer the printable line is to the top.
Text
Sets the page length in lines. For this option, a line is assumed to be 1 pica (1/6 inch). If you change the
Orientation, Page Size, or T.Margin settings, the page length setting automatically returns to the
default for each paper size.
CGTable
Use the character generator (CG) table option to select the graphics character table or the italics table.
The graphics table contains graphic characters for printing lines, corners, shaded areas, international
characters, Greek characters, and mathematical symbols. If you select Italic, the upper half of the
character table is defined as italic characters.
Country
Use this option to select one of the thirteen international symbol sets. See the Font Guide for samples of
the characters in each country’s symbol set.
Auto CR
Using the Control Panel 83
Page 84

AL-M300/AL-M400 Series User's Guide
Specifies whether the printer performs a carriage-return/line-feed (CR-LF) operation whenever the
printing position goes beyond the right margin. If you select Off, the printer does not print any
characters beyond the right margin and does not perform any line wrapping until it receives a
carriage-return character. This function is handled automatically by most applications.
Auto LF
If you select Off, the printer does not send an automatic line-feed (LF) command with each
carriage-return (CR). If On is selected, a line-feed command is sent with each carriage-return. Select On
if your text lines overlap.
Bit Image
The printer is able to emulate the graphics densities set with the printer commands. If you select Dark,
the bit image density is high, and if you select Light, the bit image density is low.
If you select BarCode, the printer converts bit images to bar codes by automatically filling in any
vertical gaps between dots. This produces unbroken vertical lines that can be read by a bar code reader.
This mode will reduce the size of the image being printed, and may also cause some distortion when
printing bit image graphics.
ZeroChar
Selects whether the printer prints a slashed or unslashed zero.
I239X Menu
The I239X mode emulates IBM® 2390/2391 Plus commands.
These settings are available only when the printer is in the I239X mode.
Item Settings (default in bold)
Font
Pitch
Code Page
T.Margin
Text
Courier, Prestige, Gothic, Orator, Script, Presentor, Sans serif
10cpi, 12cpi, 15cpi, 17cpi, 20cpi, 24cpi, Prop.
437, 850, 858, 860, 863, 865
0.30 ... 0.40 ...1.50inch in 0.05-inch increments
1 ... 67 ... 81Lines
Auto CR
Off, On
Using the Control Panel 84
Page 85

Item Settings (default in bold)
AL-M300/AL-M400 Series User's Guide
Auto LF
Alt. Graphics
Bit Image
ZeroChar
CharacterSet
Off, On
Off, On
Dark, Light
0, (or the zero character with a slash)
1, 2
Font
Selects the font.
Pitch
Selects the pitch (the horizontal spacing) of the font in fixed pitch, measured in cpi (characters per
inch). You can also choose proportional spacing.
Code Page
Selects the character tables. Character tables contain the characters and symbols used by different
languages. The printer prints text based on the selected character table.
T.Margin
Sets the distance from the top of the page to the baseline of the first printable line. The distance is
measured in inches. The smaller the value, the closer the printable line is to the top.
Text
Sets the page length in lines. For this option, a line is assumed to be 1 pica (1/6 inch). If you change the
Orientation, Page Size, or T.Margin settings, the page length setting automatically returns to the
default for each paper size.
Auto CR
Specifies whether the printer performs a carriage-return/line-feed (CR-LF) operation whenever the
printing position goes beyond the right margin. If this setting is off, the printer does not print any
characters beyond the right margin and does not perform any line wrapping until it receives a
carriage-return character. This function is handled automatically by most applications.
Using the Control Panel 85
Page 86

AL-M300/AL-M400 Series User's Guide
Auto LF
If you select Off, the printer does not send an automatic line-feed (LF) command with each
carriage-return (CR). If On is selected, a line-feed command is sent with each carriage-return. Select On
if your text lines overlap.
Alt. Graphics
Turns the Alternate Graphics option on or off.
Bit Image
The printer is able to emulate the graphics densities set with the printer commands. If you select Dark,
the bit image density is high, and if you select Light, the bit image density is low.
If you select BarCode, the printer converts bit images to bar codes by automatically filling in any
vertical gaps between dots. This produces unbroken vertical lines that can be read by a bar code reader.
This mode will reduce the size of the image being printed, and may also cause some distortion when
printing bit image graphics.
ZeroChar
Selects whether the printer prints a slashed or unslashed zero.
CharacterSet
Selects character table 1 or 2.
Password Config Menu
Item Settings (default in bold)
*
Password Config
Limitation
*
The default password is blank. You can enter up to 20 characters for the password.
Password Config
Changes the password. Enter the old password first and then enter the new password twice.
-
Disable, Interface, Config, All
Using the Control Panel 86
Page 87

AL-M300/AL-M400 Series User's Guide
To enter the password, press the d Down or u Up button to select the character and press the r Right
button to determine the character. After all characters are determined, press the OK button.
Note:
If you forget your password, contact your dealer. Note that when the password is initialized, the settings
and data stored on the printer are deleted. Depending on your environment, settings, such as network
connection settings, may need to be done again. We recommend making a note or backup of the
necessary data and setting information.
Limitation
Changes the restriction range. When Interface is selected, the password is required to change the
settings in the USB and Network menus. When Config is selected, the password is required to enter
Quick Print JobMenu or ConfidentialJobMenu, or to change the settings in all menus. When
All is selected, the password is required to enter Quick Print JobMenu or
ConfidentialJobMenu, or to change the settings and to perform the items in all menus. Before
changing the setting, you have to enter the password set in the Password Config setting.
Energy Saver Menu
Item Settings (default in bold)
Time to Sleep
Deep Sleep Mode
Power Off Timer
Time to Off
*
For EU models only
*
*
Time to Sleep
Specifies the length of the time until the printer enters the sleep mode or deep sleep mode if there are
no button operations and no jobs to be printed.
Deep Sleep Mode
When this setting is set to On, the printer switches into the deep sleep mode at the time specified in the
Time to Sleep setting if the printer is not operated or receives no jobs. In the deep sleep mode, the
Wakeup/Sleep button lights and more power is saved than when in the sleep mode.
1Min, 3Min, 5Min, 15Min, 30Min, 60Min, 120Min
On, Off
On, Off
120Min, 180Min, 240Min, 360Min, 480Min
Using the Control Panel 87
Page 88

AL-M300/AL-M400 Series User's Guide
Note:
The printer does not enter the deep sleep mode in the following cases:
- PS3 is selected in Network of Emulation Menu.
- MS Network is set to On in Network Menu.
To recover from the deep sleep mode, press the Wakeup/Sleep button. The printer recovers
automatically when it receives a print job.
Power Off Timer (Power Off mode) (For EU models only)
When this setting is set to On, the printer automatically turns off at the time specified in the Time to
Off setting. The printer does not enter the power off mode if it is receiving or sending data.
The printer recovers from the power off mode when the power switch is turned on.
Time to Off (For EU models only)
Specifies the length of the time until the printer enters the power off mode if there are no button
operations and no jobs to be printed.
Note:
You can adjust the time before power management is applied. Any increase will affect the product's
energy efficiency. Please consider the environment before making any change.
Support Menu
Enter the SUPPORT MODE by pressing the d Down button while turning the printer on, to make
Support Menu and Printer Adjust Menu appear.
Important:
c
When formatting the CompactFlash or deleting the data, unplug the interface cables and do not
print files.
Support StatusSheet
Prints a sheet showing information about settings of Support Menu and Printer Adjust Menu.
Format CompactFlash (For AL-M400 Series only)
Formats the CompactFlash memory in the printer if a CompactFlash memory is installed.
Using the Control Panel 88
Page 89

AL-M300/AL-M400 Series User's Guide
Format PS3 CompactFlash (For AL-M400 Series only)
Formats the CompactFlash area where PostScript information is stored if a CompactFlash memory is
installed.
Delete All CompactFlash Data (For AL-M400 Series only)
Deletes all data in the CompactFlash memory if a CompactFlash memory is installed.
Extend Print Area
Makes the maximum print area larger according to the printed data.
Printer MIBv1 Mode
Uses MIBv1 as a policy rule definition reporting the printer information to SNMP manager.
Printer Adjust Menu
Enter the SUPPORT MODE by pressing the d Down button while turning the printer on, to make the
Printer Adjust Menu appear.
Note:
❏ This menu is a special function. You don’t have to change it for ordinary use.
❏ The settings in this menu may affect the remaining service lives of consumable products or
maintenance parts.
Item Settings (default in bold)
Plain
Preprinted
Letterhead
Recycled
Color
Special
0 , 1
0 , 1
0 , 1
0 , 1
0 , 1
0 , 1, 2
Using the Control Panel 89
Page 90

AL-M300/AL-M400 Series User's Guide
Feed Offset
Scan Offset
Feed Offset2
Scan Offset2
FeedOffsetMP
ScanOffsetMP
FeedOffsetC1
ScanOffsetC1
FeedOffsetC2
ScanOffsetC2
FeedOffsetC3
ScanOffsetC3
FeedOffsetC4
ScanOffsetC4
-3.5 ... 0.0 ... 3.5 mm in 0.5 mm increments
*
*
*
*
TR Plain1
TR Plain2
TR SemiThk
TR Labels
TR Thick
TR ExtraThck
TR Thick3
TR Envelope
1 ... 6 ... 16
Using the Control Panel 90
Page 91

AL-M300/AL-M400 Series User's Guide
Temp Plain1
Temp Plain2
Temp SemiThk
Temp Labels1
Temp Thick
Temp ExtraThck
Temp Thick3
Temp Envelope
Highland
BTR Cleaning -
Dev Refresh -
Toner Refresh -
Noise Level
Mono DiagnosisSht -
*
Aavailable only for AL-M400 Series.
-9 ... 0 ... 9
0, 2, 4, 6
0 ... 3 ... 7
Plain, Preprinted, Letterhead, Recycled, Color, Special
Adjusts the print quality according to the paper type. Select 0 when a thin paper is printed.
To print using Thick3 paper (stiff, smooth on the surface, and more than 279 mm vertically), select 2
for Special in this menu, and Special from Paper Type on the printer driver. However, duplex
printing is not available with this settings, and feeding paper takes more time.
Feed Offset
Adjusts the vertical position in which to start printing. The position moves lower on the sheet as the
value increases. This setting is used when doing single-sided printing or printing the first page for
duplex printing.
Scan Offset
Adjusts the horizontal position in which to start printing. The position moves to the right of the sheet
as the value increases. This setting is used when doing single-sided printing or printing the first page
for duplex printing.
Using the Control Panel 91
Page 92

AL-M300/AL-M400 Series User's Guide
Feed Offset2
Adjusts the vertical position in which to star printing. The position moves lower on the sheet as the
value increases. This setting is used when printing the printing on the backside of paper for duplex
printing.
Scan Offset2
Adjusts the horizontal position in which to start printing. The position moves to the right of the sheet
as the value increases. This setting is used when printing on the backside of paper for duplex printing.
FeedOffsetMP, FeedOffsetC1, FeedOffsetC2, FeedOffsetC3 (For AL-M400 Series only),
FeedOffsetC4 (For AL-M400 Series only)
Adjusts the vertical position in which to start printing. The position moves lower on the sheet as the
value increases. This setting is used when feeding the printed paper from the MP tray, C1, C2, C3 or
C4.
ScanOffsetMP, ScanOffsetC1, ScanOffsetC2, ScanOffsetC3 (For AL-M400 Series only),
ScanOffsetC4 (For AL-M400 Series only)
Adjusts the vertical position in which to start printing. The position moves to the right of the sheet as
the value increases. This setting is used when feeding the printed paper from the MP tray, C1, C2, C3 or
C4.
TR Plain1, TR Plain2, TR SemiThk, TR Labels, TR Thick, TR ExtraThck, TR Thick3, TR
Envelope
Adjusts the density or image granularity for the Plain1, Plain2, Semi-Thick, Labels, Thick, ExtraThick,
Thick3, Envelope, Postcard. The setting becomes darker as the value increases.
TEMP Plain1, TEMP Plain2, TEMP SemiThk, TEMP Labels, TEMP Thick, TEMP ExtraThck,
TEMP Thick3,
TEMP Envelope
Adjusts the fixing temperature for the Plain1, Plain2, Semi-Thick, Labels, Thick, ExtraThick, Thick3,
Envelope, Postcard. The setting becomes hotter as the value increases. Note that the curl of printouts
could increase as the value increases.
Highland
Using the Control Panel 92
Page 93

AL-M300/AL-M400 Series User's Guide
Adjust this setting if black dots appear on the printed page when using the printer in locations at high
altitudes. See the table below and select a suitable value according to the location the printer is being
used.
Value Altitude
00 m
2 1000 m
4 2000 m
6 3000 m
BTR Cleaning
Cleans the transfer roller. This may eliminate stains that appear on the backside of printed paper
documents. Do not turn off the printer until the LCD panel displays Ready.
Dev Refresh
Mixes the developer to spread it evenly. This may prevent seepage when printing low-density images.
Do not turn off the printer until the LCD panel displays Ready.
Toner Refresh
Removes deteriorated toner. If the following problems have occurred while printing low density
documents, this may improve the printouts.
- toner falls inside the printer or onto the paper
- blurring (toner adheres to entire surface of the paper)
Do not turn off the printer until the LCD panel displays Ready.
Noise Level
Adjusts the image gradation. As the value increases, the image gradation gets better, but the image
granularity gets worse.
Mono DiagnosisSht
Prints an all black sheet of paper called a mono-chrome diagnosis. The mono diagnosis sheet allows
you to check for blurring or dirt on the printout.
Using the Control Panel 93
Page 94

AL-M300/AL-M400 Series User's Guide
Bookmark Menu
The bookmark menu appears by pressing the OK button while the LCD panel displays Ready.
In the bookmark menu, the bookmarked setting items are listed and you can select one of them.
The following menus are bookmarked by default.
❏ Reset Menu
❏ MP Tray Size
❏ System Information
To register the menus in bookmark, see “How to register menus as bookmarks” on page 61 for details.
Status and Error Messages
This section contains a list of error messages shown on the LCD panel, a brief description of each
message and suggestions for correcting the problem. Note that not every message shown on the LCD
panel indicates a problem. When the
warnings have occurred. The LCD panel also displays the remaining service life of the consumables
and available paper sizes.
Adjusting Printer
Wait a few minutes. Do not open or close the covers, or turn off the printer until this message
disappears.
Bookmark Failed
The selected menu cannot be registered as a bookmark. Some menus cannot be registered as
bookmarks.
Bookmark Registered
The selected menu is registered as a bookmark.
Cancel All Print Job
mark is displayed at the right of the warning message, multiple
The printer is canceling all print jobs in the printer memory, including jobs the printer is currently
receiving or printing. This message appears when Cancel All Jobs is selected on the control panel.
Cancel Print Job
Using the Control Panel 94
Page 95

AL-M300/AL-M400 Series User's Guide
The printer is canceling the specified print job and the current print job. This message appears when
Cancel Job is selected after you specify the file to be canceled on the control panel.
Can’t Print
The print data is deleted because it is incorrect.
Make sure the appropriate paper size and printer driver are used.
Can’t Print Duplex
The printer has encountered problems during duplex printing. Make sure you are using an
appropriate type and size of paper for the duplex printing. The problem could also be a result of
incorrect settings for the paper source you are using. Pressing the OK button will print the rest of the
print job on only one side of the paper. To cancel the print job, see “Canceling Printing” on
page 109.
Can’t Use Bookmark
The registered menu cannot be used because the menu is disabled by changing any settings after
registered the menu in bookmark.
Cassette Error 001, Cassette2 Error 002, Cassette3 Error 003 (For AL-M400 Series only),
Cassette4 Error 004 (For AL-M400 Series only)
The wrong cassette unit is installed. Turn off the printer, remove the cassette unit, and then turn on the
printer.
CF CHECK (For AL-M400 Series only)
The printer is checking the CompactFlash memory.
Check Paper Size
The paper size setting is different from t he si ze of pa p er l oa ded in the printer. Check to see if the correct
size of paper is loaded in the specified paper source.
To clear this warning message, select Clear Warning from the control panel’s Reset Menu. See
“How to access the control panel menus” on page 60 for instructions.
Check Paper Type
Using the Control Panel 95
Page 96

AL-M300/AL-M400 Series User's Guide
The paper loaded in the printer does not match the paper type setting in the printer driver. Paper that
matches only the paper size setting will be used for printing.
To clear this warning message, select Clear Warning from the control panel’s Reset Menu. See
“How to access the control panel menus” on page 60 for instructions.
Clear Paper Jam wwww
The location where the paper jam occurred is displayed at WWWWW. WWWWW indicates the location of the
error.
If a paper jam occurs at two or more locations simultaneously, the corresponding multiple locations
are displayed.
For details about clearing paper jams, see “Clearing Jammed Paper” on page 136.
Close Cover wwww
The specified cover (wwww) does not close securely. Open the cover once, and then close.
Also, this warning message may appear when the photoconductor is not installed on the printer.
Collate Disabled
Printing by specifying the number of copies is no longer possible due to a lack of memory (RAM). If
this warning message appears, print only one copy at a time.
To clear this warning message, select Clear Warning from the control panel’s Reset Menu. See
“How to access the control panel menus” on page 60 for instructions.
CompactFlash Error (For AL-M400 Series only)
The installed CompactFlash memory is not supported by the printer or you selected No when the
Format Required was displayed on the control panel. Turn off the printer and remove the
CompactFlash memory. If Format Required is displayed on the control panel, select Yes.
CompactFlash Full (For AL-M400 Series only)
The optional CompactFlash memory is full and you cannot save any data. Delete the unnecessary data
from the CompactFlash memory. To clear this warning message, select Clear Warning from the
control panel’s Reset Menu. For instruction about accessing the control panel menus, see “How to
access the control panel menus” on page 60.
Using the Control Panel 96
Page 97

AL-M300/AL-M400 Series User's Guide
Cooling Down
The printer is cooling down. This is not an error message, and will clear itself.
Correct time using Time Setting
The current time setting is reset because you did not connect the power cord for a long time. To clear
this warning message, select Time Setting from Clock Menu and specify the current date and time.
Duplex Memory Overflow
There is not enough memory for duplex printing. The printer prints only on the front and ejects the
paper. To clear this error, follow the instructions below.
If Off is selected as the Auto Cont setting on the control panel’s Setup Menu, press the OK button to
print on the back of the next sheet, or cancel the print job. To cancel the print job, see “Canceling
Printing” on page 109.
If On is selected as the Auto Cont setting on the control panel’s Setup Menu, printing continues
automatically after a certain period of time.
Feed Roller C1 Needed Soon, Feed Roller C2 Needed Soon, Feed Roller C3 Needed Soon (For
AL-M400 Series only), Feed Roller C4 Needed Soon (For AL-M400 Series only)
This message indicates that the feed roller C1, C2, C3, or C4 is near the end of its service life. You can
continue to print until the Replace Feed Roller C1, Replace Feed Roller C2, Replace Feed
Roller C3, or Replace Feed Roller C4 message appears.
To clear this warning message and continue printing, select Clear All Warnings from the control
panel’s Reset Menu. For instruction about accessing the control panel menus, see “How to access the
control panel menus” on page 60.
Form Feed
The printer is ejecting paper due to a user request. This message appears when pressing the Pause/
Release button once, then holding down the OK button for more than 2 seconds in order not to
receive form feed command.
Format Required (For AL-M400 Series only)
Using the Control Panel 97
Page 98

AL-M300/AL-M400 Series User's Guide
The installed CompactFlash memory needs to be formatted to use it with the printer. Select Yes to
format the memory, or select No to cancel formatting. If you select No, CompactFlash Error is
displayed and you cannot use the memory for the printer. In that case, turn off the printer and remove
the CompactFlash memory.
Formatting CF (For AL-M400 Series only)
The CompactFlash memory is being formatted.
Fuser Needed Soon (For AL-M300 Series only)
This message indicates that the fuser unit is near the end of its service life. You can continue to print
until the Replace Fuser message appears.
To clear this warning message and continue printing, select Clear All Warnings from the control
panel’s Reset Menu. For instruction about accessing the control panel menus, see “How to access the
control panel menus” on page 60.
Image Optimum
There is insufficient memory to print the page at the specified print quality. The printer automatically
lowers the print quality so that it can continue printing. If the quality of the printout is not acceptable,
try simplifying the page by limiting the number of graphics or reducing the number and size of fonts.
To clear this warning message, select Clear Warning from the control panel’s Reset Menu. See
“How to access the control panel menus” on page 60 for instructions.
You may need to increase the amount of printer memory to be able to print at the desired print quality
for your document. For more information on adding memory, see “Memory Module” on
page 116.
Install Fuser (For AL-M300 Series only)
The fuser unit is not installed in the printer. Install the fuser unit. For details, see the documentation
supplied with the fuser unit.
Caution:
!
If the printer has been in use, the fuser and the surrounding areas may be very hot. If you must
touch one of these areas, turn off the printer and wait 40 minutes to allow the heat to subside before
doing so.
Install Maintenance Unit (For AL-M400 Series only)
Using the Control Panel 98
Page 99

AL-M300/AL-M400 Series User's Guide
The maintenance unit is not installed in the printer. Install the maintenance unit. For details, see the
documentation supplied with the maintenance unit.
Caution:
!
If the printer has been in use, the fuser and the surrounding areas may be very hot. If you must
touch one of these areas, turn off the printer and wait 40 minutes to allow the heat to subside before
doing so.
Install Photoconductor
The photoconductor unit is not installed in the printer. Install the photoconductor unit. For details,
see the documentation supplied with the photoconductor unit.
Install Toner Cartridge
The toner cartridge is not installed in the printer.
Install the toner cartridge. See “Replacing Consumable Products/Maintenance Parts” on page 124.
Invalid Data
The spool file on the driver is deleted while printing or the data is abnormal. Press the OK button to
clear the error.
Invalid PS3 (For AL-M300 Series only)
There are errors in the ROM module. Turn off the printer and contact your dealer.
Maintenance Unit Needed Soon (For AL-M400 Series only)
This message indicates that the maintenance unit is near the end of its service life. You can continue to
print until the Replace Maintenance Unit message appears.To clear this warning message and
continue printing, select Clear All Warnings from the control panel’s Reset Menu. For
instruction about accessing the control panel menus, see “How to access the control panel menus” on
page 60.
Manual Feed ssss (For AL-M300 Series only)
The manual feed mode is specified for the current print job. Make sure the paper size indicated by
ssss is loaded, then press the OK button.
Memory Overflow
Using the Control Panel 99
Page 100

AL-M300/AL-M400 Series User's Guide
The printer has insufficient memory to execute the current task. Press the OK button on the control
panel to resume printing, or cancel the print job. To cancel the print job, see “Canceling Printing” on
page 109.
Need Memory
The printer has insufficient memory to complete the current print job.
To clear this warning message, select Clear Warning from the control panel’s Reset Menu.
See“How to access the control panel menus” on page 60 for instructions.
To prevent this problem from recurring, add more memory to your printer as described in “Memory
modules” on page 203, or reduce the resolution of the image to be printed.
No trays available Cancel the Job
All of the MP Tray AutoSel, Cassette1 AutoSel, Cassette2 AutoSel, Cassette3 AutoSel,
and Cassette4 AutoSel settings in Tray Menu are set to Off, so the printer cannot feed paper. Press
the W Pause/Release button to cancel the print job. To continue printing, specify the paper source
on the printer driver, or set the above settings in Tray Menu to On.
Option Unit Error yyy
The printer cannot recognize the installed optional product. Remove the optional product and
reinstall it.
Paper Out tttt sssss
There is no paper in the specified paper source (tttt). Load paper of the size (sssss) into the paper
source.
Paper Set tttt pppp
The paper loaded in the specified paper source (tttt) does not match the required paper type (pppp).
Replace the loaded paper with the correct paper type and press the OK button to resume printing, or
cancel the print job. To cancel the print job, see “Canceling Printing” on page 109.
If you press the OK button without replacing the paper, the printer will print on the loaded paper even
though it does not match the required paper type.
Paper Set tttt sssss
Using the Control Panel 100
 Loading...