

Page 1

EPSON
Advanced Printer Driver
for TM Series Ver.3.04
Installation Manual
EPSON
Rev.B
410734002
Page 2

Page 3

Advanced Printer Driver Install Manual
Cautions
❏ No part of this document may be reproduced, stored in a retrieval system, or transmitted in any form or by any
means, electronic, mechanical, photocopying, recording, or otherwise, without the prior written permission of
Seiko Epson Corporation.
❏ The contents of this document are subject to change without notice. Please contact us for the latest information.
❏ While every precaution has been taken in the preparation of this document, Seiko Epson Corporation assumes no
responsibility for errors or omissions.
❏ Neither is any liability assumed for damages resulting from the use of the information contained herein.
❏ Neither Seiko Epson Corporation nor its affiliates shall be liable to the purchaser of this product or third parties
for damages, losses, costs, or expenses incurred by the purchaser or third parties as a result of: accident, misuse, or
abuse of this product or unauthorized modifications, repairs, or alterations to this product, or (excluding the U.S.)
failure to strictly comply with Seiko Epson Corporation's operating and maintenance instructions.
❏ Seiko Epson Corporation shall not be liable against any damages or problems arising from the use of any options
or any consumable products other than those designated as Original EPSON Products or EPSON Approved
Products by Seiko Epson Corporation.
Trademarks
EPSON and ESC/POS are registered trademarks of Seiko Epson Corporation in the U.S. and other countries.
®
Intel
, Celeron®and Pentium® are registered trademarks of Intel Corporation.
MS-DOS
Microsoft Corporation in the U.S.A. and other countries.
®
, Microsoft®, Windows®, Windows Server®,Visual Basic® and Visual C++® are registered trademarks of
General Notice: Other product and company names used herein are for identification purposes only and may be
trademarks of their respective companies.
Rev.B iii
Page 4

Revision Information
Revision APD Version Page Altered Items and Contents
Rev. A 3.02 to 3.03 All pages Newly authorized
Rev. B 3.04 Cover page Change of Ver.3.04
iv Rev.B
Page 5

Advanced Printer Driver Installation Manual
Contents
Revision Information . . . . . . . . . . . . . . . . . . . . . . . . . . . . . . . . . . . . . . . . . . . . . . . . . . . . . . . . . . . . . . . iv
Contents . . . . . . . . . . . . . . . . . . . . . . . . . . . . . . . . . . . . . . . . . . . . . . . . . . . . . . . . . . . . . . . . . . . . . . . . . v
Chapter1 APD Overview
Introduction . . . . . . . . . . . . . . . . . . . . . . . . . . . . . . . . . . . . . . . . . . . . . . . . . . . . . . . . . . . . . . . . . . . . . . 1-1
APD packages . . . . . . . . . . . . . . . . . . . . . . . . . . . . . . . . . . . . . . . . . . . . . . . . . . . . . . . . . . . . . . . . 1-1
Manual organization . . . . . . . . . . . . . . . . . . . . . . . . . . . . . . . . . . . . . . . . . . . . . . . . . . . . . . . . . . . 1-1
APD Features . . . . . . . . . . . . . . . . . . . . . . . . . . . . . . . . . . . . . . . . . . . . . . . . . . . . . . . . . . . . . . . . . . . . . 1-2
Driver . . . . . . . . . . . . . . . . . . . . . . . . . . . . . . . . . . . . . . . . . . . . . . . . . . . . . . . . . . . . . . . . . . . . . . . . . . . . 1-4
Epson Port . . . . . . . . . . . . . . . . . . . . . . . . . . . . . . . . . . . . . . . . . . . . . . . . . . . . . . . . . . . . . . . . . . . . 1-4
Printer driver . . . . . . . . . . . . . . . . . . . . . . . . . . . . . . . . . . . . . . . . . . . . . . . . . . . . . . . . . . . . . . . . . . . 1-5
Printer Driver for Each Type of Paper and Its Setting . . . . . . . . . . . . . . . . . . . . . . . . . . . . . . . . . . . . .1-6
About the EPSON Status Viewer Service - TM-C100 . . . . . . . . . . . . . . . . . . . . . . . . . . . . . . . . . . . . . . 1-7
Operating Environment . . . . . . . . . . . . . . . . . . . . . . . . . . . . . . . . . . . . . . . . . . . . . . . . . . . . . . . . . . . . . 1-8
Computer . . . . . . . . . . . . . . . . . . . . . . . . . . . . . . . . . . . . . . . . . . . . . . . . . . . . . . . . . . . . . . . . . . . . 1-8
OS . . . . . . . . . . . . . . . . . . . . . . . . . . . . . . . . . . . . . . . . . . . . . . . . . . . . . . . . . . . . . . . . . . . . . . . . . . . 1-8
Development tool . . . . . . . . . . . . . . . . . . . . . . . . . . . . . . . . . . . . . . . . . . . . . . . . . . . . . . . . . . . . . 1-8
Application . . . . . . . . . . . . . . . . . . . . . . . . . . . . . . . . . . . . . . . . . . . . . . . . . . . . . . . . . . . . . . . . . . . 1-8
Connecting a Printer . . . . . . . . . . . . . . . . . . . . . . . . . . . . . . . . . . . . . . . . . . . . . . . . . . . . . . . . . . . . . . . 1-9
Interface . . . . . . . . . . . . . . . . . . . . . . . . . . . . . . . . . . . . . . . . . . . . . . . . . . . . . . . . . . . . . . . . . . . . . 1-9
Connection pattern . . . . . . . . . . . . . . . . . . . . . . . . . . . . . . . . . . . . . . . . . . . . . . . . . . . . . . . . . . . . 1-9
Connecting cable . . . . . . . . . . . . . . . . . . . . . . . . . . . . . . . . . . . . . . . . . . . . . . . . . . . . . . . . . . . . . 1-10
Restrictions Related to Installation . . . . . . . . . . . . . . . . . . . . . . . . . . . . . . . . . . . . . . . . . . . . . . . . . . . . 1-11
To Users of Versions Older than APD Ver.3.xx . . . . . . . . . . . . . . . . . . . . . . . . . . . . . . . . . . . . . . . . . . . 1-12
Chapter2 APD Installation and Setup
Installation and Setup Sequence . . . . . . . . . . . . . . . . . . . . . . . . . . . . . . . . . . . . . . . . . . . . . . . . . . . . . 2-1
Downloading Drivers, Utilities, and Manuals . . . . . . . . . . . . . . . . . . . . . . . . . . . . . . . . . . . . . . . . . . . . 2-2
TM Printer Model and Interface Check . . . . . . . . . . . . . . . . . . . . . . . . . . . . . . . . . . . . . . . . . . . . . . . . 2-3
For USB interface . . . . . . . . . . . . . . . . . . . . . . . . . . . . . . . . . . . . . . . . . . . . . . . . . . . . . . . . . . . . . . . 2-3
For Ethernet interface . . . . . . . . . . . . . . . . . . . . . . . . . . . . . . . . . . . . . . . . . . . . . . . . . . . . . . . . . . . 2-4
For serial interface . . . . . . . . . . . . . . . . . . . . . . . . . . . . . . . . . . . . . . . . . . . . . . . . . . . . . . . . . . . . . 2-4
APD Installation and Printer Driver Setup . . . . . . . . . . . . . . . . . . . . . . . . . . . . . . . . . . . . . . . . . . . . . . 2-5
Connecting theTM Printer . . . . . . . . . . . . . . . . . . . . . . . . . . . . . . . . . . . . . . . . . . . . . . . . . . . . . . . . . . 2-12
Serial (COM) connection . . . . . . . . . . . . . . . . . . . . . . . . . . . . . . . . . . . . . . . . . . . . . . . . . . . . . . . . 2-12
USB connection . . . . . . . . . . . . . . . . . . . . . . . . . . . . . . . . . . . . . . . . . . . . . . . . . . . . . . . . . . . . . . . . 2-13
Ethernet (10/100 Base-T) connection . . . . . . . . . . . . . . . . . . . . . . . . . . . . . . . . . . . . . . . . . . . . . . 2-13
Wireless LAN (IEEE 802.11.b) connection . . . . . . . . . . . . . . . . . . . . . . . . . . . . . . . . . . . . . . . . . . . 2-13
Parallel (LPT) connection . . . . . . . . . . . . . . . . . . . . . . . . . . . . . . . . . . . . . . . . . . . . . . . . . . . . . . . . 2-13
Setting the Paper Width and Checking the Port Setting . . . . . . . . . . . . . . . . . . . . . . . . . . . . . . . . . 2-14
Procedure . . . . . . . . . . . . . . . . . . . . . . . . . . . . . . . . . . . . . . . . . . . . . . . . . . . . . . . . . . . . . . . . . . . . 2-14
Test Printing . . . . . . . . . . . . . . . . . . . . . . . . . . . . . . . . . . . . . . . . . . . . . . . . . . . . . . . . . . . . . . . . . . . . . . . 2-17
Procedure . . . . . . . . . . . . . . . . . . . . . . . . . . . . . . . . . . . . . . . . . . . . . . . . . . . . . . . . . . . . . . . . . . . . 2-17
Adding or Removing Printers . . . . . . . . . . . . . . . . . . . . . . . . . . . . . . . . . . . . . . . . . . . . . . . . . . . . . . . . 2-19
Adding a printer . . . . . . . . . . . . . . . . . . . . . . . . . . . . . . . . . . . . . . . . . . . . . . . . . . . . . . . . . . . . . . . 2-19
Removing a printer . . . . . . . . . . . . . . . . . . . . . . . . . . . . . . . . . . . . . . . . . . . . . . . . . . . . . . . . . . . . . 2-19
Replacing a printer . . . . . . . . . . . . . . . . . . . . . . . . . . . . . . . . . . . . . . . . . . . . . . . . . . . . . . . . . . . . . 2-19
Adding a Printer Driver . . . . . . . . . . . . . . . . . . . . . . . . . . . . . . . . . . . . . . . . . . . . . . . . . . . . . . . . . . . . . 2-20
Changing the Printer Driver Port Settings . . . . . . . . . . . . . . . . . . . . . . . . . . . . . . . . . . . . . . . . . . . . . . 2-23
Changing the printer driver interface . . . . . . . . . . . . . . . . . . . . . . . . . . . . . . . . . . . . . . . . . . . . .2-24
Recovering the Printer Driver - For USB Interface Printer . . . . . . . . . . . . . . . . . . . . . . . . . . . . . . . . . . 2-26
Uninstallation . . . . . . . . . . . . . . . . . . . . . . . . . . . . . . . . . . . . . . . . . . . . . . . . . . . . . . . . . . . . . . . . . . . . . 2-27
Uninstalling a printer driver . . . . . . . . . . . . . . . . . . . . . . . . . . . . . . . . . . . . . . . . . . . . . . . . . . . . . . 2-27
APD package uninstallation . . . . . . . . . . . . . . . . . . . . . . . . . . . . . . . . . . . . . . . . . . . . . . . . . . . . . 2-29
v
Page 6

Chapter3 Silent Installation
What Is a Silent Installation? . . . . . . . . . . . . . . . . . . . . . . . . . . . . . . . . . . . . . . . . . . . . . . . . . . . . . . . . . 3-1
Environments that can be copied . . . . . . . . . . . . . . . . . . . . . . . . . . . . . . . . . . . . . . . . . . . . . . . . 3-1
Creating a Package File . . . . . . . . . . . . . . . . . . . . . . . . . . . . . . . . . . . . . . . . . . . . . . . . . . . . . . . . . . . . 3-2
Installation . . . . . . . . . . . . . . . . . . . . . . . . . . . . . . . . . . . . . . . . . . . . . . . . . . . . . . . . . . . . . . . . . . . . . . . 3-5
Execution . . . . . . . . . . . . . . . . . . . . . . . . . . . . . . . . . . . . . . . . . . . . . . . . . . . . . . . . . . . . . . . . . . . . . 3-5
Chapter4 Troubleshooting
vi
Page 7

Advanced Printer Driver Installation Manual
Chapter1 APD Overview
Introduction
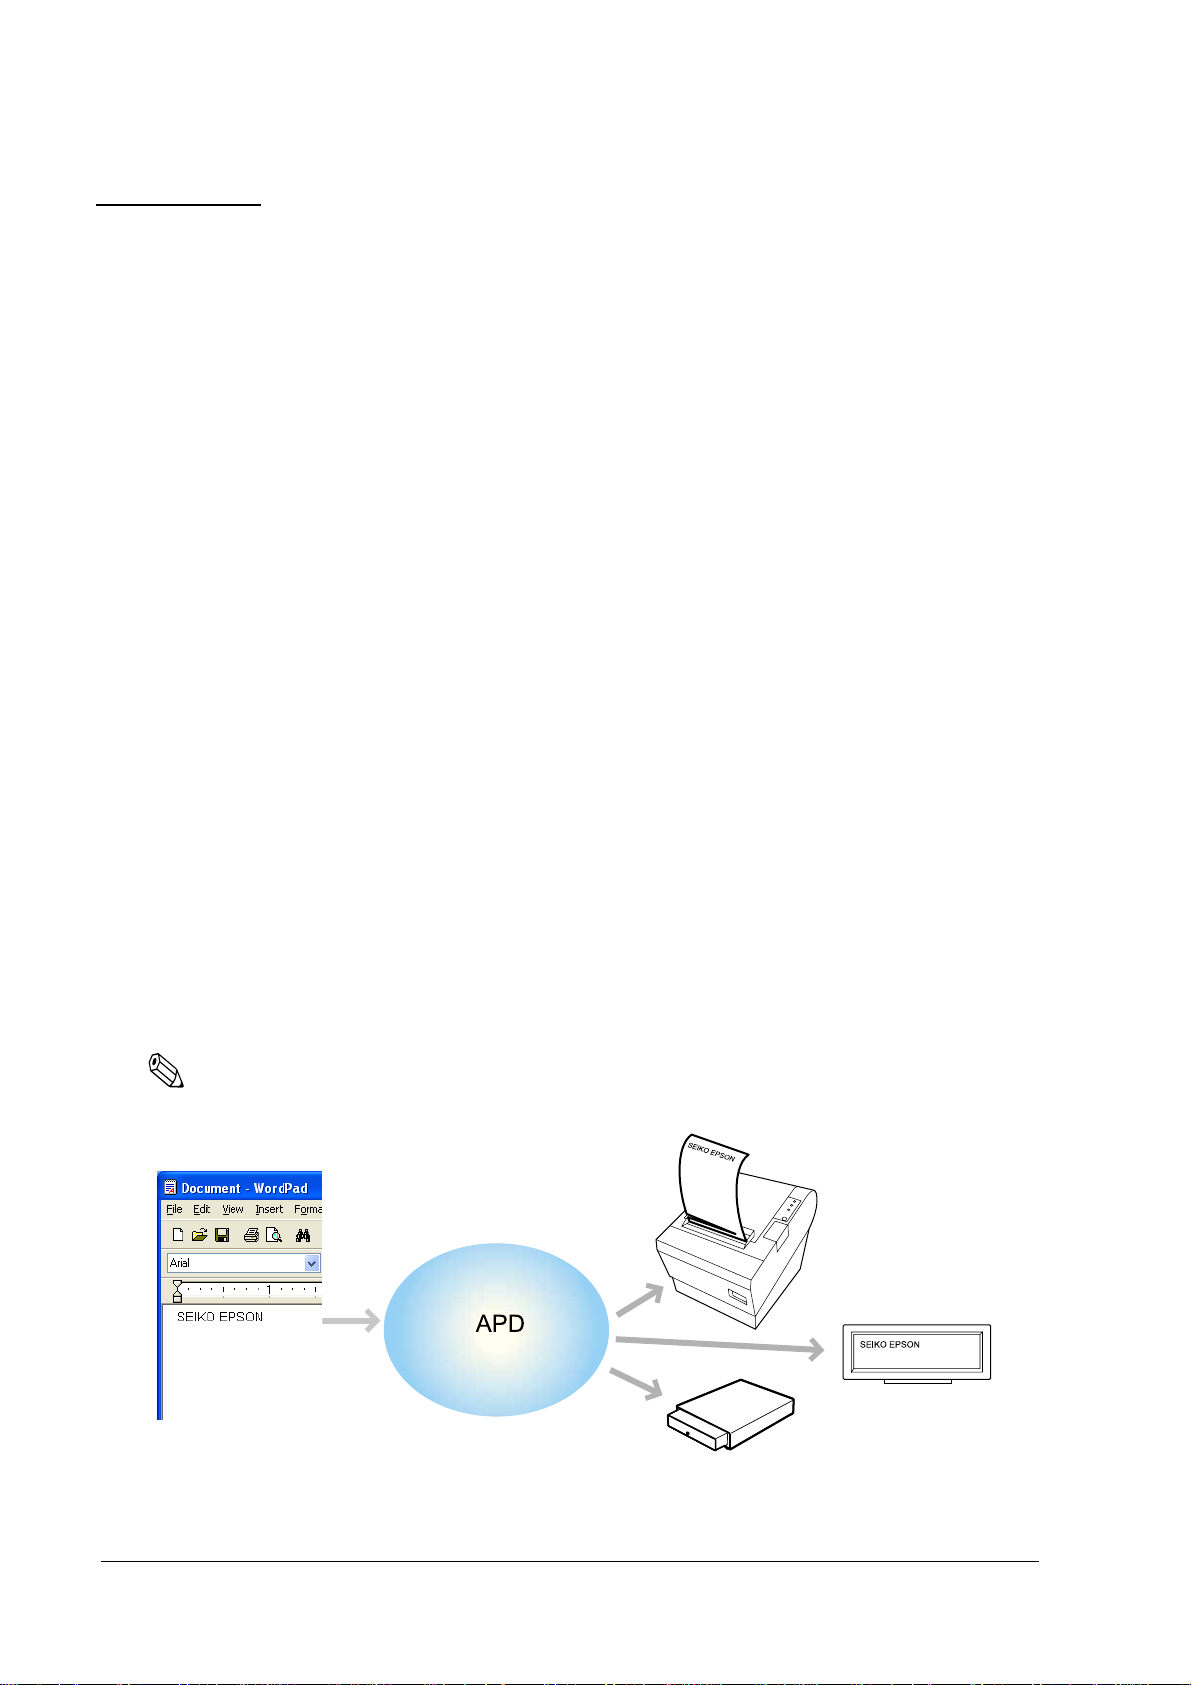
The EPSON Advanced Printer Driver (hereafter referred to as APD) is a Windows driver for
EPSON TM printers and customer displays. Built into a POS, it allows the TM printer to be
monitored using the Status API.
This document describes the necessary procedures from downloading and installing the
integrated package for TM printers to printing the Windows test page. It also describes the
procedures for adding a printer and changing a printer driver interface.
Note:
The procedures in this manual are described using the Windows XP Professional screens. When using
a different OS, the screens may look different.
Not all the functions described here are available for all TM printers and printer drivers. See the
"Printer Driver Specifications" for more information on the printer driver specifications.
APD packages
The following types of APD package are available.
• APD for TM Series TM printers.
• APD for DM-D Customer displays.
Manual organization
The following manuals are available for the APD for TM Series.
• Installation Manual This manual. Describes the procedures from
installing the APD to printing the Windows test
page, for adding a printer, and changing the
interface.
• TM Driver Manual Describes how to use the APD and its functions.
For more information on TM-C100, see the "TMC100 Printer Driver Operation Manual."
• Printer Driver Specifications Describes the specifications of each printer
driver.
• Status API Reference Manual Describes how to acquire the printer status from
an application using StatusAPI.
• TM-C100 Printer Driver Operation Manual
Describes how to operate the TM-C100 printer
driver.
Rev.B APD Overview 1-1
Page 8
APD Features
❏ Similarly to normal Windows drivers, allows you to print from commercial text editor or
spreadsheet applications easily, without any programming.
It also allows you to print from applications created using Visual Basic, Visual C++, etc.
❏ Allows you to print not only using Windows TrueType Fonts but also using printer
embedded fonts. It also allows you to print graphics data (for example, a store's logo)
registered in the printer.
❏ Allows you to print Barcodes even if you do not have Barcode Fonts installed separately.
❏ Allows you to cut the roll paper using the printer's autocutter.
❏ Allows you to sound the buzzer if the printer is equipped with one.
❏ Allows you to open the cash drawer.
❏ Allows you display on a customer display.
(Possible in environments where, for example, the APD for DM-D is installed and a DM-D
Font is available)
❏ Allows you to configure the color print settings if your printer supports color printing.
❏ Allows you to print Water Marks.
❏ Allows you specify orientation. You can print upside down to make it easier for your
customer to read the print result in vertical installation printers.
❏ Allows you to perform condensed printing. That is, you can print an A4 size ledger sheet in
receipt width.
❏ Allows you to acquire printer status such as "no paper" or "printer cover open" by using the
Status API.
❏ Allows you to copy the printer driver settings to another computer easily by using its Silent
Installation function.
Note:
❏ Coexistence with OPOS is not possible.
1-2 APD Overview Rev.B
Page 9
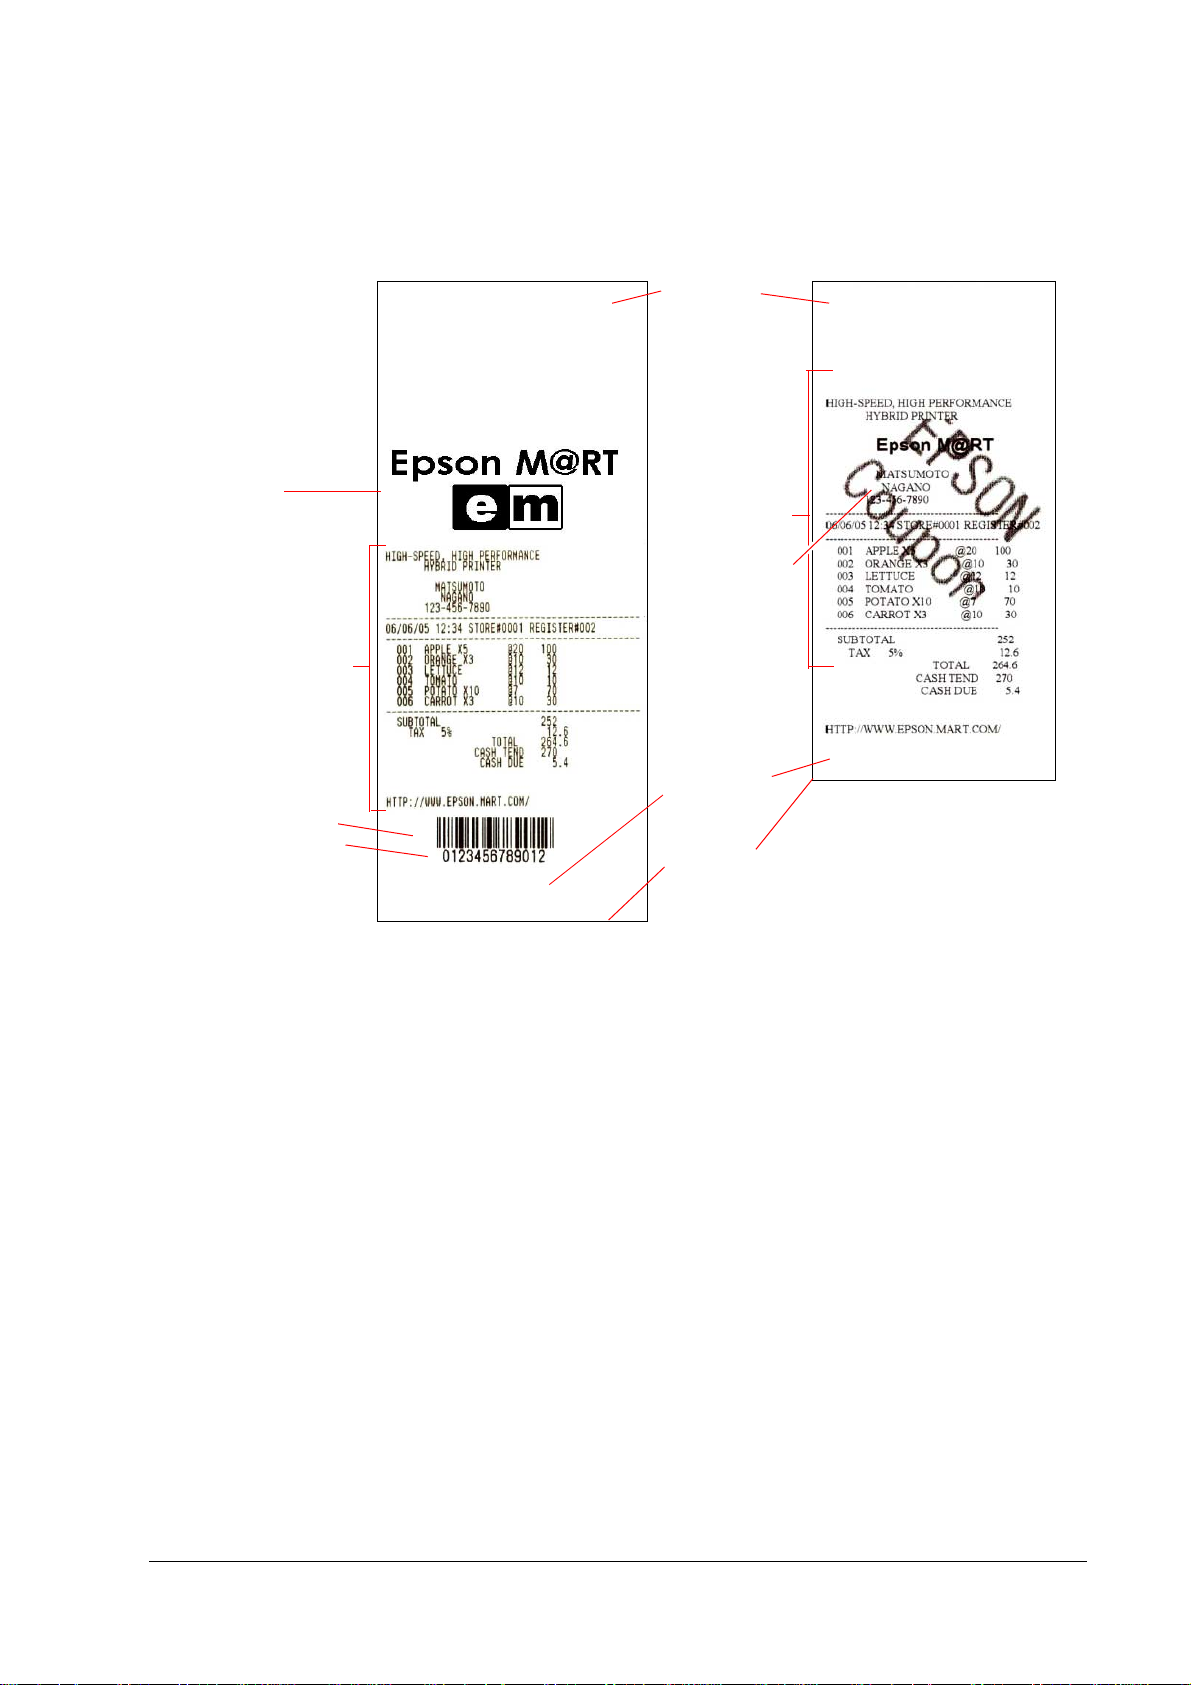
Print Example
NV Logo
Printer embedded font
Advanced Printer Driver Installation Manual
Top margin
TrueType Font
Water Mark
Barcode Font
HRI characters
Automatic
paper feed
Autocutter
cutting
Rev.B APD Overview 1-3
Page 10
Driver
The APD includes Epson Ports for communication and printer drivers.
APD
Port Driver
Serial
Parallel
Printer Driver
Printer A
Receipt Label
Printer B
Printer C
USB Ethernet
Ver.2.xx
Epson Port
There is one Epson Port for each type of computer interface. The APD communicates with a
printer through the port driver.
The Epson Ports are installed automatically during APD installation.
An Epson Port assigned to a printer driver
Epson Port
Note:
The APD communicates through an Epson Port, so do not specify any general-purpose port on the
computer such as COM or USB. Control is not possible through a general-purpose port.
The Epson Ports are numbered with an exclusive name and number (ESDPRTxxx). The numbers
are assigned automatically during installation.
1-4 APD Overview Rev.B
Page 11
Advanced Printer Driver Installation Manual
Epson Port and printer driver setting examples
Epson Port Computer interface Printer driver name
ESDPRT001 Serial COM1 TM-T88 III Receipt
ESDPRT002 Parallel None
ESDPRT003 USB TM-H6000III Receipt
TM-H6000III Slip
As seen in ESDPRT002, it is possible to register an interface even when not used.
As seen in ESDPRT003, it is possible to assign more than 1 printer driver to 1 Epson Port.
Printer driver
Multiple drivers are available for each printer model. For example, a driver for labels (Label)
and a driver for receipts (Receipt) can be used in label printers.
With hybrid printers, where two printers are combined in one, it is possible to print receipt
papers and slip papers by installing a driver for receipts and a driver for slips, respectively.
Driver types
• Receipt Receipt printing, continuous label paper printing
• Label Label printing
• Slip Slip paper printing
• Ver.2.xxCompatible APD Inherits the APDVersion2.xx environment.
Use this driver when no APD Ver.3.xx driver is
available for your printer but you want to use your
system built for APD Ver.2.xx with minimum changes
to the application due to driver change.
• Reduce35 Inherits the Reduce35 environment of APD
Version2.xx.Reduce35 reduces the printing by 35%. That
is, you can output a Windows A4 width to 80 mm width
receipt.
For more information on the driver types, see the "Printer Driver Specifications."
Rev.B APD Overview 1-5
Page 12
Printer Driver for Each Type of Paper and Its Setting
With TM-C100, the paper and feed method are configured using the Properties screen of the
printer driver. With other TM printers, the printer driver to be used is different depending on
the paper.
Paper Driver type
Receipt roll paper Receipt
Continuous label paper Receipt
Die-cut label paper Label
Validation paper Validation
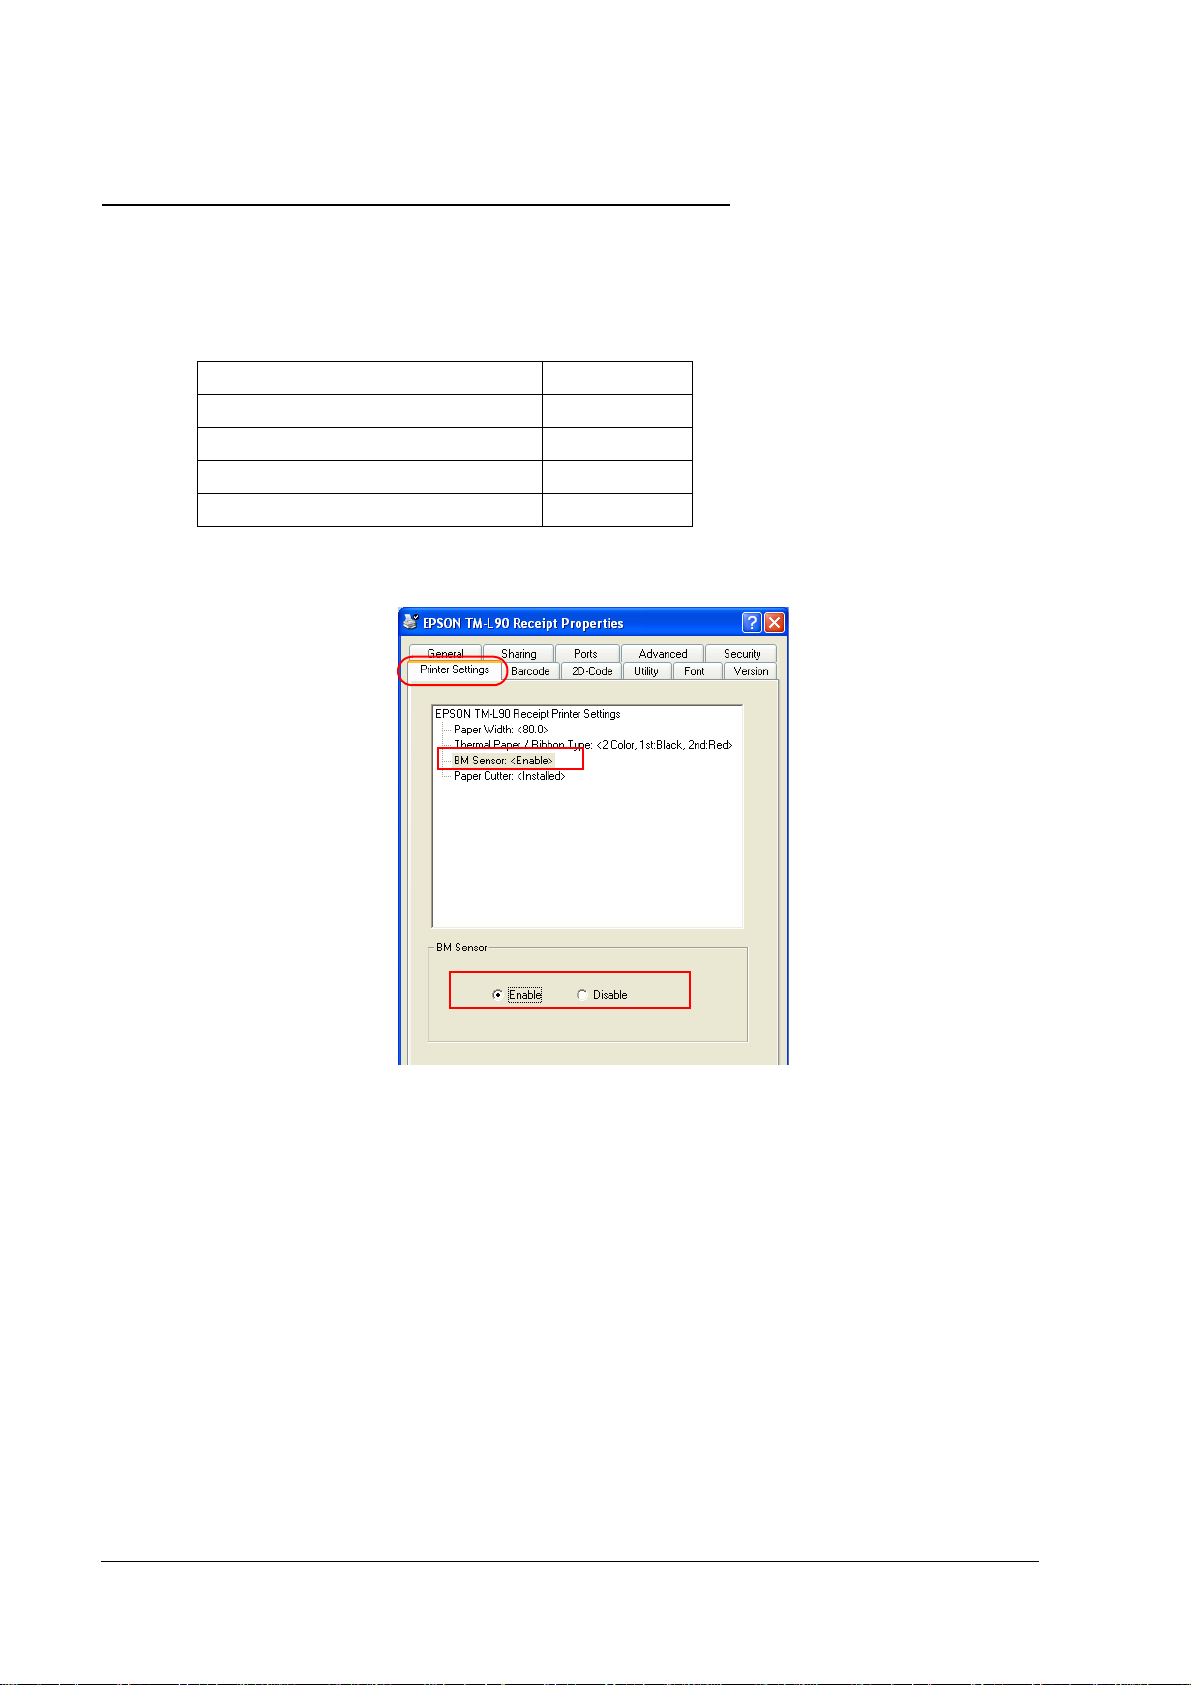
To enable the Black Mark Sensor in a printer capable of handling papers with Black Mark,
enable BM Sensor on the Properties - [Printer Settings] tab of the printer driver.
1-6 APD Overview Rev.B
Page 13
Advanced Printer Driver Installation Manual
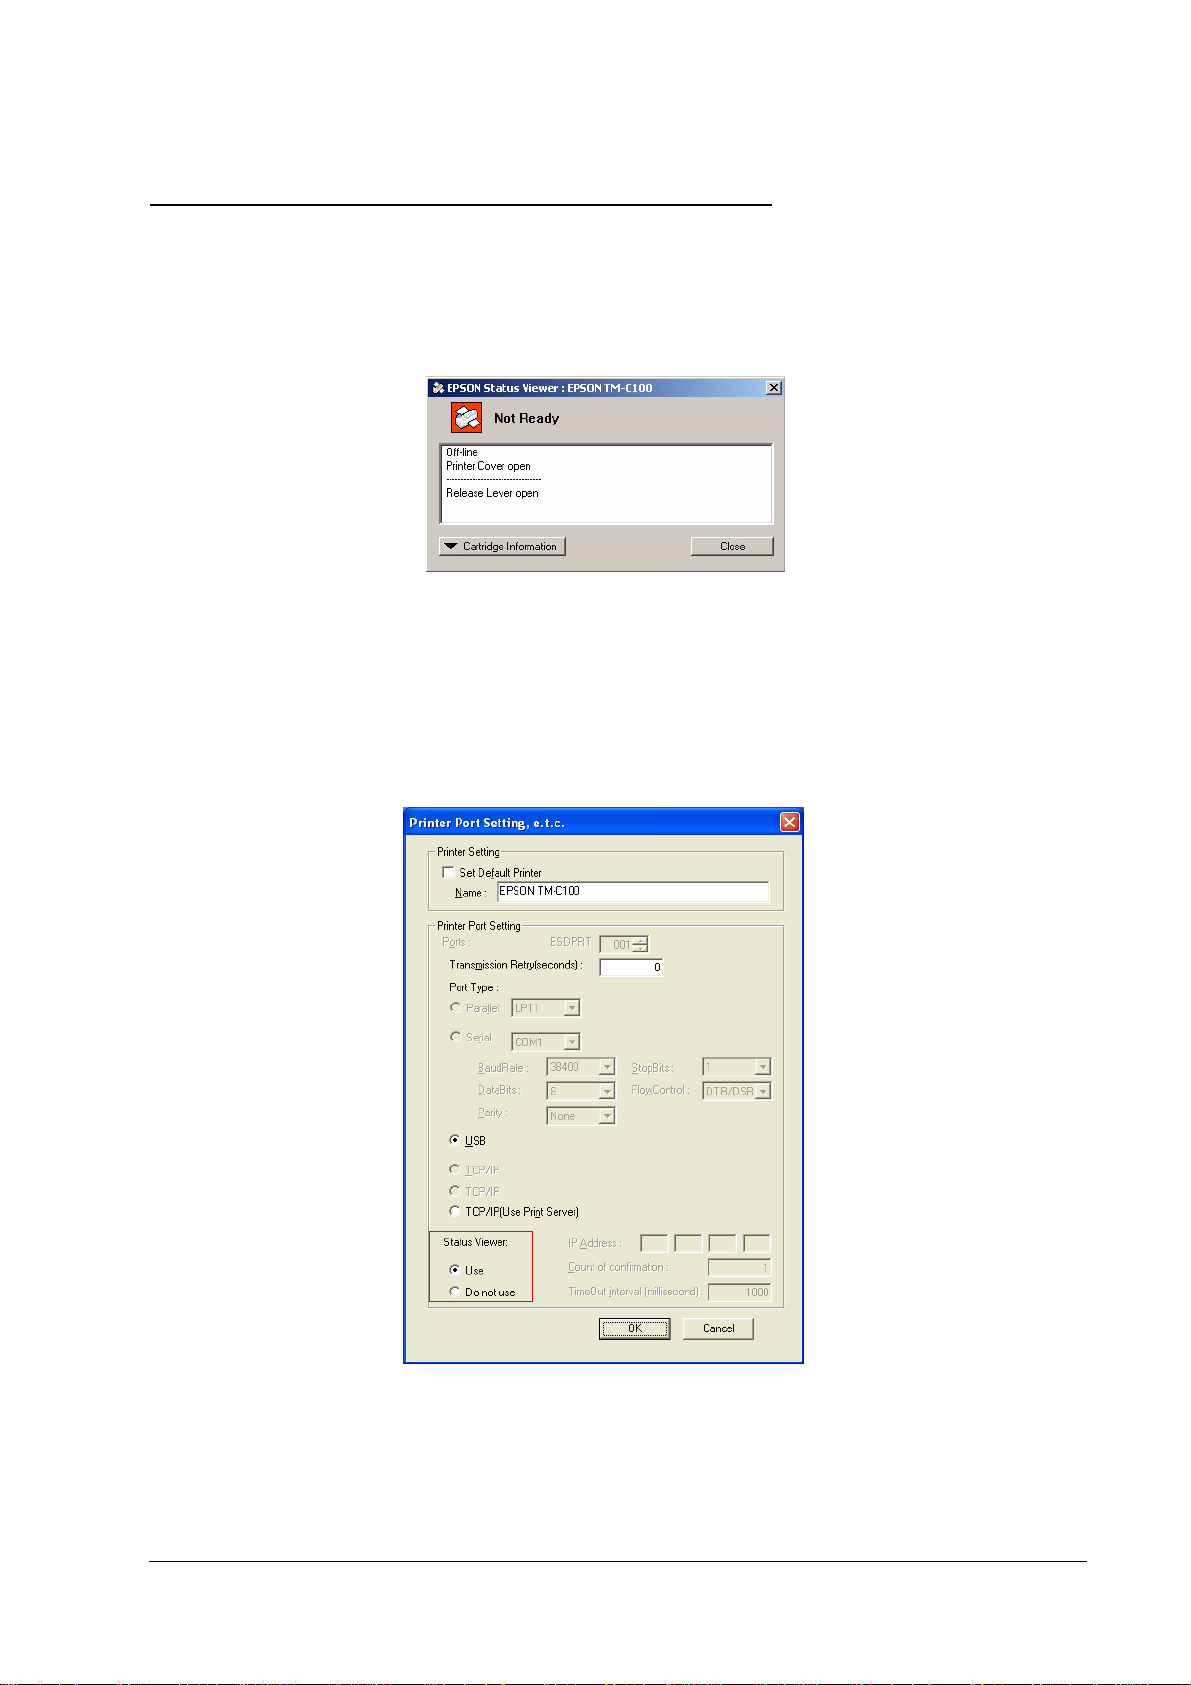
About the EPSON Status Viewer Service - TM-C100
The TM-C100 printer driver is equipped with Status Viewer (EPSON Status Viewer Service).
This function monitors the TM-C100 statuses and displays a message box similar to the one
shown in the figure below when a "cover open" or "no paper" occurs. For details on this function,
see the "TM-C100 Printer Driver Operation Manual."
This message box appears in front of the user application window. To close the message box,
click the [Close] button.
To set whether to use or not this function, select either [Use] or [Do not use] for [Status Viewer]
in the Printer Port Setting, e.t.c. screen at the time of TM-C100 printer driver installation.
To avoid the Status Viewer screen popping in front of the application window automatically,
configure it to be opened manually.
Rev.B APD Overview 1-7
Page 14

Operating Environment
The APD can be used in the following environments.
Computer
Any PC/AT compatible machine running any of the following Windows systems.
OS
• Microsoft Windows 2000 Professional SP4 English version
• Microsoft Windows XP Professional SP2 English version
• Microsoft Windows XP Embedded SP2 English version
When using the driver with Microsoft Windows XP Embedded, the following
components are required.
Volume Shadow Copy Service
System Restore Core
OLE Dialog Interfaces
Local Printing Support
Task Scheduler (Required for USB driver installation)
Primitive: DbgHelp (Required for USB driver installation)
Communications Port (If the PC has no serial or parallel port, one of them must
be installed manually.)
Primitive: Winhlp32 (Required for help file browsing)
After installing the above components, check the component's dependencies,
using the constitutive utility for Windows XP Embedded (Target Designer).
OSs other than those listed above are not supported.Windows Server 2003 is not supported.
Development tool
• Microsoft Visual Basic
• Microsoft Visual C++
Application
Allows printing from Windows applications. Printing from commercial text editor or
spreadsheet applications is possible without any programming.
To be able to acquire printer information such as "no paper" or "error" from an application, the
StatusAPI must be used. In such case, the user must develop the application him/herself.
Note:
To print from Microsoft Word, the file must be saved in Word 6.0/95 format.
1-8 APD Overview Rev.B
Page 15
Advanced Printer Driver Installation Manual
Connecting a Printer
Interface
The following Interfaces are available for TM printer connection.
• Serial
• Parallel
• USB (Revision 1.1 or 2.0 or higher)
• Ethernet (10/100 Base-T)
• Wireless LAN (IEEE 802.11b)
Furthermore, some TM printer models have interfaces for customer display and/or cash drawer
connection.
For information on TM printer and interface combinations, contact your dealer.
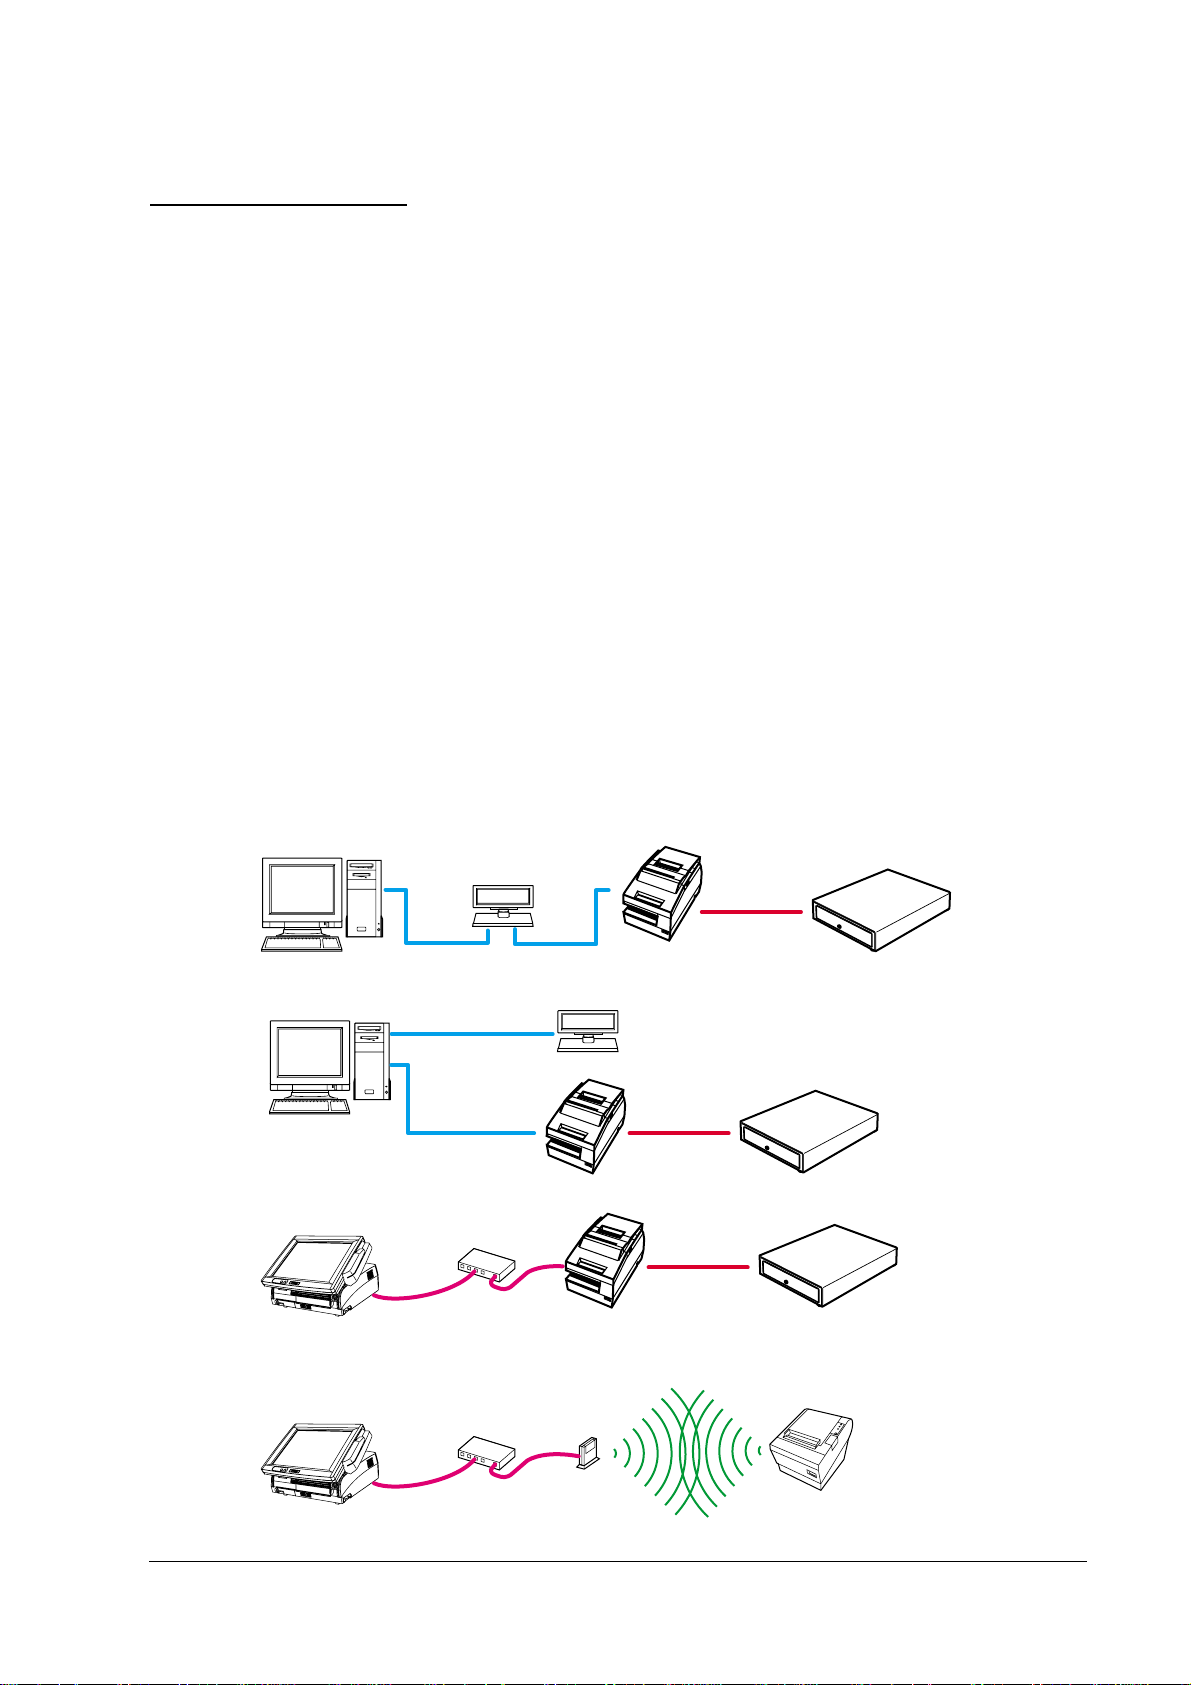
Connection pattern
The following connection patterns are available, depending on the TM printer interface for
connecting the TM printer with a customer display and/or cash drawer.
Pass-through connection
Modular
SerialSerial
Stand-alone connection
Serial
Serial
Parallel
USB
Ethernet
Ethernet connection
Hub
Ethernet
Modular
Modular
Wireless LAN connection
Hub
Ethernet
Access Point
IEEE 802.11b
Rev.B APD Overview 1-9
Page 16
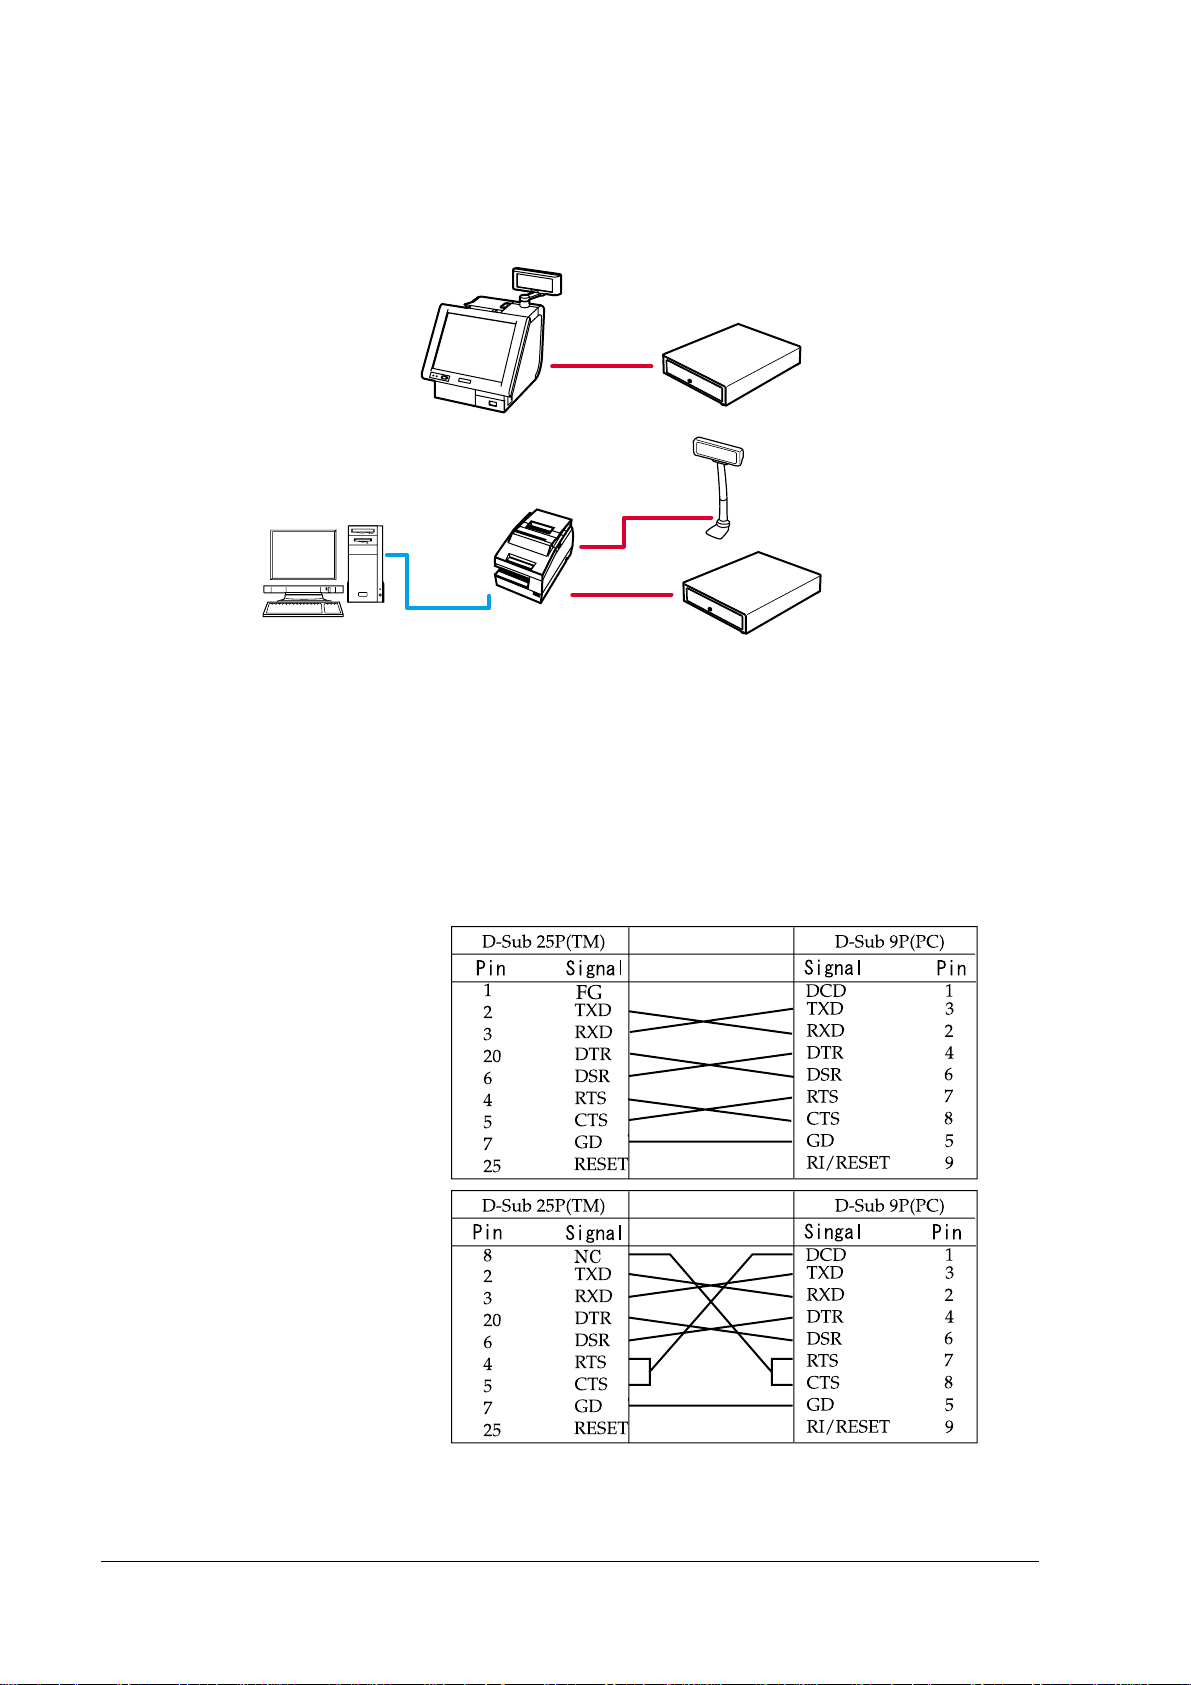
IR-700
Modular
Internal serial connection
Pass-through (Y) connection Modular
Serial
USB
Modular
Select the connection pattern for the TM printer model (interface specification) and configure the
communication settings for each interface. Communication settings for TM printers and
customer displays are normally configured using the DIP switch on the devices. For details, see
the user's manual of each device.
For information on other connection methods, contact your dealer.
Connecting cable
For serial connections, use the following wiring cable.
[Usable cable connection]
[Unusable cable connection]
1-10 APD Overview Rev.B
Page 17

Advanced Printer Driver Installation Manual
Restrictions Related to Installation
The following restrictions apply to an APD installation.
❏ Coexistence with OPOS is not possible.
❏ Restrictions apply if installing APD Ver.3.xx on a PC on which an older version (APD
Ver.2.xx) is installed. See the next section for details.
❏ The APD
installing the APD for DM-D on the same computer as the APD for TM Series. For details,
see the manual that comes with the "APD for DM-D."
Installation and uninstallation must be performed in the following order.
Installation
1. Install "APD for TM Series"
2. Install "APD for DM-D"
Uninstallation
1. Uninstall "APD for DM-D"
2. Uninstall "APD for TM Series"
❏ The following or later versions of integrated package for TM-C100/TM printers/DM-D
customer displays must be installed when used together.
• "TM-C100 Printer Driver"*1 Ver.1.20.2 or later
• "APD for DM-D"*2 Ver.3.01E or later
• "APD for TM Series" Ver.3.01aE or later
*1 APD Ver.3.02 or later is integrated into the "APD for TM Series"
for DM-D to install is different depending on the connection pattern when
*2 The "APD for DM-D" package file to install is different depending on the connection
pattern. For details, see the manual that comes with the "APD for DM-D."
Installation must be performed in the following order.
1. Install the "TM-C100 Printer Driver"
2. Install the "APD for TM Series"
3. Install the "APD for DM-D"
❏ The Windows shared printer function is not supported.
❏ Some print servers can be used with TM-C100. For details, contact your dealer. Other TM
printers cannot use either commercial print servers or commercial print adapters.
❏ The conditions for a USB connection are as follows.
USB cable no longer than 5 m, up to 5 cascaded hubs. Use USB cables and USB hubs
compliant with USB 2.0 standard.
❏ The maximum number of printers that can be connected simultaneously through a USB
connection is 8.
Rev.B APD Overview 1-11
Page 18

To Users of Versions Older than APD Ver.3.xx
❏ APD Ver.2.xx has been terminated.
For APD Ver.2.08 or earlier versions
❏ APD.3.xx cannot be used on a computer where APD Ver.2.08 or earlier is installed. Consider
migrating to APD Ver.3.xx.
The APD Ver.3.xx includes an APD Ver.2.xx compatible printer driver (the Ver.2.xx
Compatible). However, with this printer driver, you cannot use the improved functionality
of APD Ver.3.xx.
For APD Ver.2.09 or later versions
❏ Consider migrating to APD Ver.3.xx.
The APD Ver.3.xx includes an APD Ver.2.xx compatible printer driver (the Ver.2.xx
Compatible). However, with this printer driver, you cannot use the improved functionality
of APD Ver.3.xx.
❏ APD Ver3.xx can be installed on a computer on which APD Ver.2.09 or later is installed.
However, the following restrictions apply.
• Check that APD Ver.2.xx is installed first.
You will not be able to install APD Ver.2.xx on a computer on which APD Ver.3.xx is
installed. In such case, the installation will finish without showing any message when
you try to install APD Ver.2.xx.
• When uninstalling APDs, uninstall APD Ver.3.xx first and then APD Ver.2.xx.
• The same printer driver (for example, TM-T88III Receipt) cannot be installed
simultaneously with APD Ver.2.xx and APD Ver.3.xx. Use the driver of either one.
• When using on USB, an APD version selection screen appears if a printer yet to be
recognized by APD Ver.2.xx or APD Ver.3.xx driver is connected. Select one of them. To
correct or change a selection, you must uninstall both APDs first then install them again.
• When using on USB, be sure not to turn on the printer until after the installation of all
the drivers that will be used simultaneously is completed.
1-12 APD Overview Rev.B
Page 19
Advanced Printer Driver Installation Manual
Chapter2
APD Installation and Setup
This chapter describes the procedures from APD installation to test printing. Furthermore, the
procedures for adding a printer and setting up the printer driver as well as uninstalling the APD
are also described.
The procedures are described using the Windows XP Professional OS. When using a different
OS, adjust the procedures accordingly.
Installation and Setup Sequence
Installation and setup of the APD involves the following steps.
Drivers, utilities, and manuals acquisition
TM printer model and interface check
Do not connect the printer yet.
APD installation and printer driver setup
Reboot
TM printer connection
Paper width setting, printer port check
Test printing
Installation of the APD for DM-D(When using customer display)
Installation completed
Rev.B APD Installation and Setup 2-1
Page 20

Downloading Drivers, Utilities, and Manuals
Drivers, utilities, and manuals can be downloaded from one of the following URLs.
Type Notes
APD A Windows Printer Driver.
Memory Switch Setting Utility Necessary for changing the TM printer memory switch
settings.
TM NetWinConfig Utility Necessary for configuring the IP address setting in models
with Ethernet interface.
TM Flash LOGO Setup Utility Necessary for registering logos and the like in the TM printer
NV memory.
Technical Reference Guide Manual for printer/interface installers and developers.
For customers in North America, go to the following web site.
http://www.epsonexpert.com/ and follow the on-screen instructions.
For customers in other countries, go to the following web site.
http://www.epson-pos.com/
Acquire the operation manuals for your printer and
interface (wired/wireless LAN interface only).
For some printer models, no manuals are available.
Select the product name from the "Select any product" pulldown menu.
2-2 APD Installation and Setup Rev.B
Page 21

Advanced Printer Driver Installation Manual
TM Printer Model and Interface Check
Before starting with the APD installation, check the model of the TM printer to connect, the
interface for connecting to the computer, and the communication settings.
Printer type *1 Interface Check item
TM-C100
TM-H3000(R)I
TM-H5200
TM-H5000II
TM-H6000II
TM-H6000III
TM-J2000/2100
TM-J7000/7100
TM-J7500/7600
TM-L90
TM-L60II
TM-P60
TM-T70
TM-T86F
TM-T88II(R)
TM-T88III / IIIX
TM-T88IV
TM-T90
TM-U210
TM-U220
TM-U230
TM-U295
TM-U375
TM-U590
TM-U675
TM-U950
Parallel -
Serial *2 BaudRate: 38400 *3
USB -
Ethernet *2
Wireless LAN
DataBits: 8
Parity: None
StopBits: 1
FlowControl: DTR/DSR
IP Address (TCP/IP)
*1 For information on other models, contact your dealer.
*2 The TM printer self test can be used for checking the printer settings. To run the self test, turn on the power
with the Feed button held down.
*3 These are the APD default settings.
For USB interface
When using the USB interface, check that the USB port is usable in the target PC.
1. Right click the [My Computer] icon and open the [Properties] screen.
2. Select the [Hardware] tab, click [Device Manager] and open the [Device Manager] screen.
3. Check that [Universal Serial Bus controllers] is displayed.
If [Universal Serial Bus controllers] is not displayed, the USB driver for TM printers cannot
be used.
When connecting a customer display to the TM printer USB interface, set the DIP switch for
communication settings on the customer display as follows. "Bits per second: 19200 bps/Data
bits: 8 bits/Parity: none/Stop bits: 1."
Furthermore, when turning on the power, turn on the customer display first then the TM
printer. If the power is not turned on in this order, the customer display may not work correctly.
Some USB 1.1 compliant USB interfaces do not work correctly when connected through a USB
2.0 hub.
Rev.B APD Installation and Setup 2-3
Page 22

For Ethernet interface
When using the Ethernet interface, check that the TCP/IP protocol settings are configured in the
target PC. When not configured, register the TCP/IP protocol from [Control Panel] - [Network
and Internet Connections] - [Network Connections].
For serial interface
When using the serial interface, make sure the communication settings in the TM printer match
those in the printer driver. In the TM printer, the communication settings are performed using
the DIP switch. For details, see the TM printer user's manual.
2-4 APD Installation and Setup Rev.B
Page 23

APD Installation and Printer Driver Setup
Before starting with the installation, check the following.
• Installation of the APD requires Windows Administrator privileges.
• Do not connect the printer until after the installation is complete.
• Close all running applications.
• Some restrictions apply to the APD installation. For details, see "Restrictions Related to
Installation" on page 1-11 .
Installation
The procedure for installing the APD is as follows.
1. Double click the [APD] icon and start the installation.
2. The License Agreement screen appears. Check its content. Select "I accept the terms in
the license agreement" and click the [Next] button.
Advanced Printer Driver Installation Manual
Rev.B APD Installation and Setup 2-5
Page 24

3. The Location to Save Files screen appears. Specify the APD saving location and click the
[Next] button. (By default, the files are expanded into C:\EPSON Advanced Printer
Driver\Setup_TM
The files are expanded.
.)
4. The Select OS screen appears. The Windows installation environment and language are
identified automatically. Check the OS and language and click the [Next] button.
2-6 APD Installation and Setup Rev.B
Page 25

Advanced Printer Driver Installation Manual
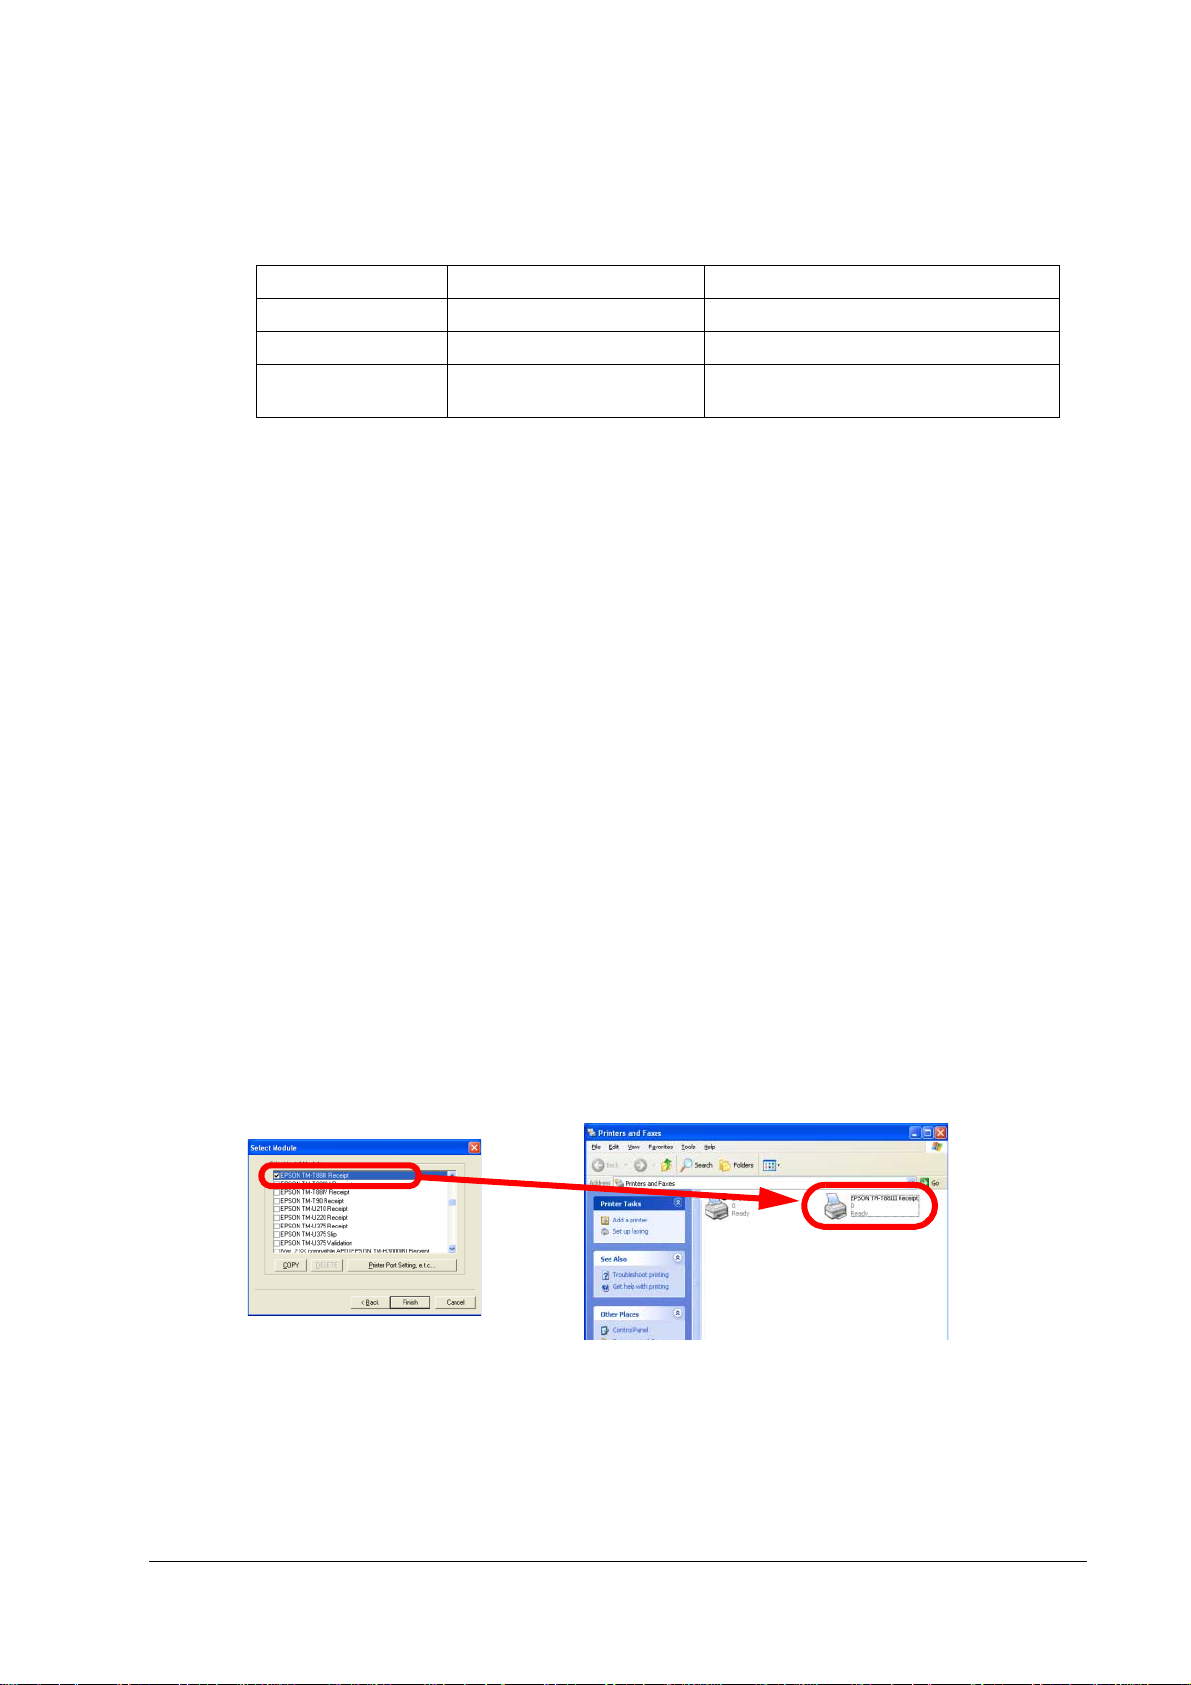
5. The Select Module screen appears. Select the printer driver module corresponding to the
printer to be connected. (This is the printer driver.)
Both "EPSON TM-xx" and "(Ver.2.xx....EPSON TM-xx)" modules may be present for
some printers. In general, select "EPSON TM-xx."
In Hybrid Printers, select all modules for the different printing methods that are present.
When connecting more than one USB interface printer, select the modules of all printers
to be connected.
For more information on the printer driver specifications, see the "Printer Driver
Specifications."
Note:
The Ver.2.xx compatible APD module is a module compatible with Ver.2.xx modules. It is
available only for models supported by Ver.2.xx.
For some models, only the Ver.2.xx compatible APD is provided.
There are no modules for cash drawers. Cash drawers can be controlled if a module for the
printer is installed.
Rev.B APD Installation and Setup 2-7
Page 26

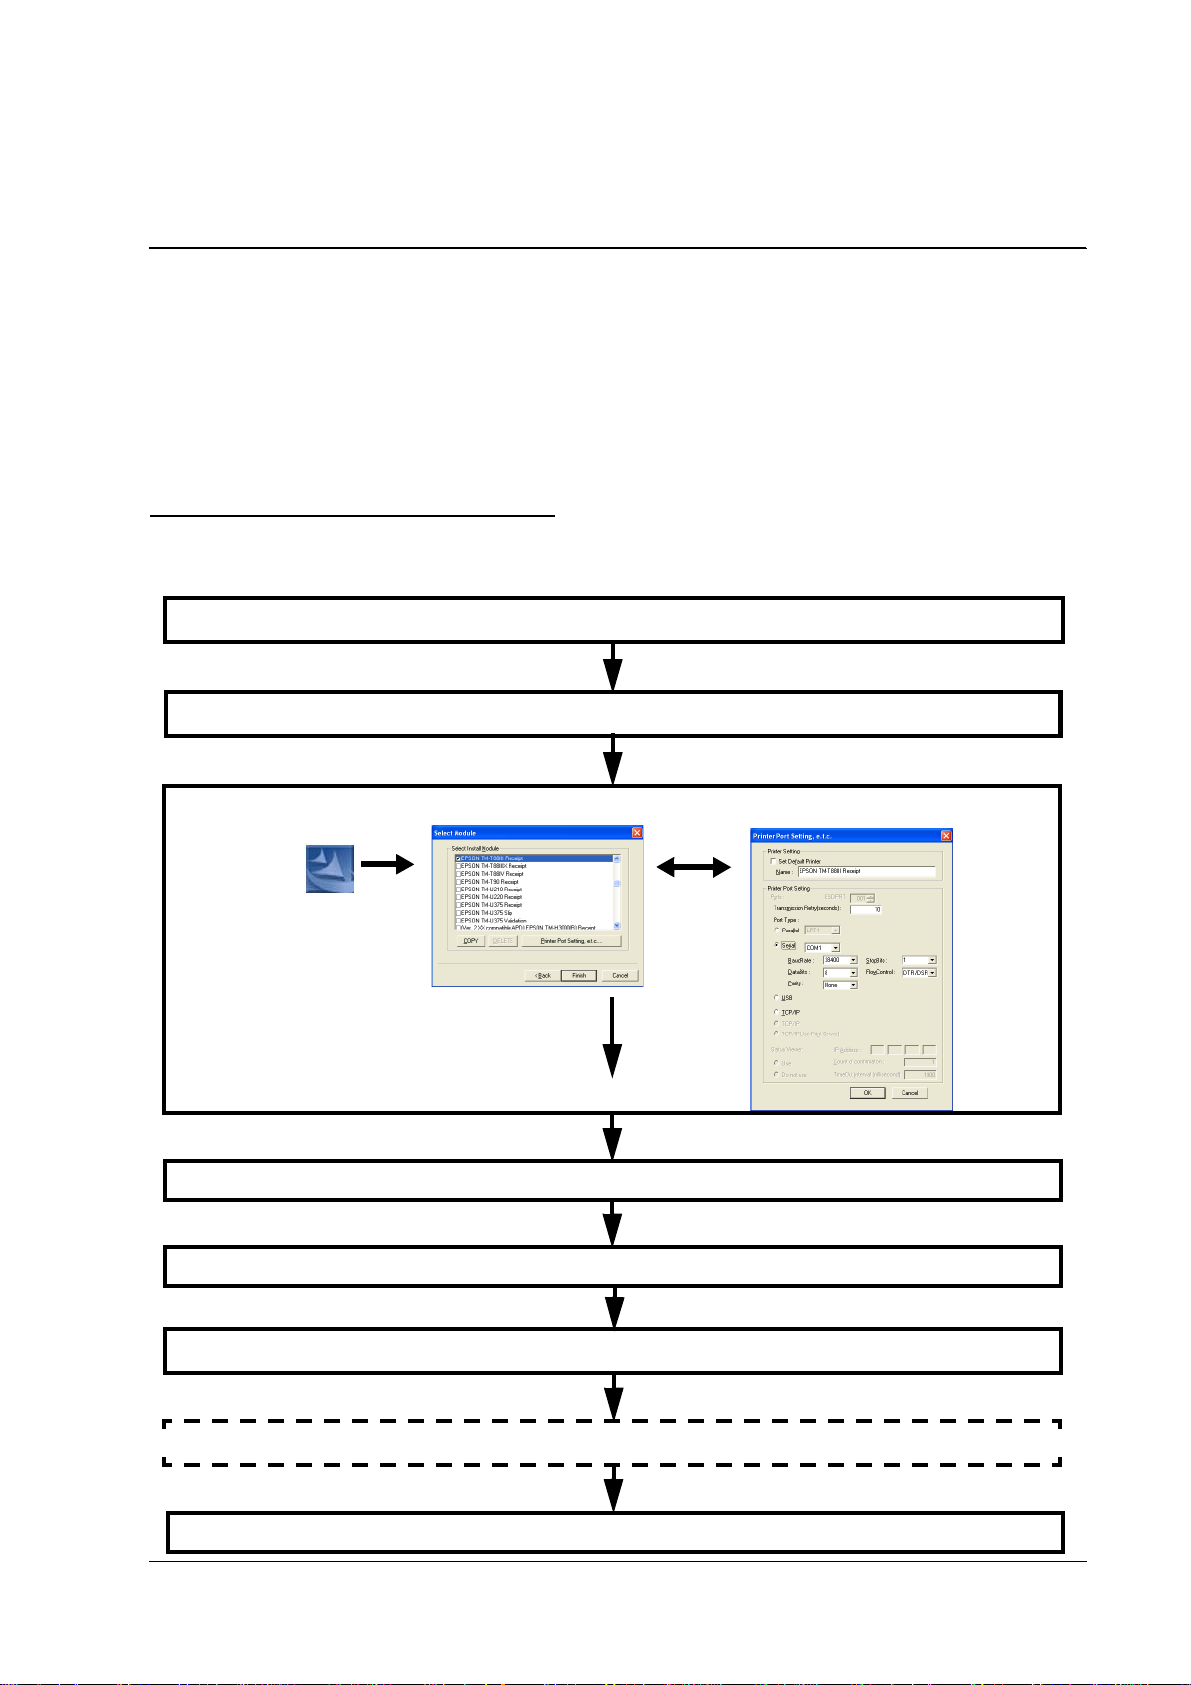
6. Configure the port settings for the printer driver. Select the printer driver to configure
and click the [Printer Port Setting, e.t.c...] button.
Note:
The port setting must be configured for each of the printer drivers to be installed.
7. The Printer Port Setting, e.t.c. screen appears. If the printer driver selected in step 6. is
"TM-C100," proceed to step 8. Configure the port settings, click the [OK] button, and
proceed to step 9.
Port types
Windows
printer driver name
Transmission retry
Settings for serial connection
TCP/IP settings
Note:
These settings can be changed also after installation.
2-8 APD Installation and Setup Rev.B
Page 27

Advanced Printer Driver Installation Manual
The setting items are as follows.
❏ Printer Setting
Set Default Printer Check when configuring the printer as that normally
used from the Windows applications.
Name The printer driver name. This is changeable.
❏ Printer Port Setting
Transmission Retry(seconds) The time interval for retrying transmission after
timeout.
The default is "10."
❏ Port Type
Selects the interface connecting the computer and printer, to which the configured
settings apply. The default is "LPT" (Parallel).
The available settings for each type of port are as follows.
• Parallel
Select the parallel port to be used.
• Serial
Port Select the COM port to be used.
BaudRate Sets the BaudRate. The default is "38400."
DataBits Sets the DataBits. The default is "8."
Parity Sets the Parity. The default is "None."
StopBits Sets the StopBits. The default is "1."
FlowControl Sets the data flow control type to be used between the
• USB
There are no items to configure.
The default is "COM1."
computer and serial device.
The default is "DTR/DSR."
• TCP/IP
IP Address Enter the printer IP address.
Rev.B APD Installation and Setup 2-9
Page 28

8. If the printer driver selected in step 6. is "TM-C100," configure the following settings.
Port types
Status
Viewer
❏ Port Type
• USB
Normally, use the USB port. When selecting the USB port, also configure the
Status Viewer settings.
• TCP/IP(Use Print Server)
The TM-C100 is a USB interface printer. However, if using Ethernet connection
through a print server, the following settings are necessary.
IP Address Enter the print server IP address.
The Status Viewer is grayed out.
❏ Status Viewer
TCP/IP settings
Configures whether to use or not the Status Viewer (EPSON Status Viewer Service).
For details, see "About the EPSON Status Viewer Service - TM-C100" on page 1-7 .
•Use Starts the Status Viewer automatically at system startup.
•Do not use Does not start the Status Viewer automatically at system startup.
2-10 APD Installation and Setup Rev.B
Page 29

Advanced Printer Driver Installation Manual
9. The screen returns to the Select Module screen. When installing multiple printer drivers,
repeat steps 7. and 8. When all the printer drivers are configured, click the [Finish]
button. The installation starts.
10. When the installation is complete, the following screen appears. Clicking the [Yes]
button reboots the computer.
Note:
Reboot is necessary for installing the APD correctly. Make sure to reboot the computer.
11. Select [Start] and open the Printers and Faxes screen. Check that the printer drivers for
the TM printer are registered.
Rev.B APD Installation and Setup 2-11
Page 30
Connecting theTM Printer
For more information on how to connect the TM printer, see the Technical Reference Guide of
each printer.
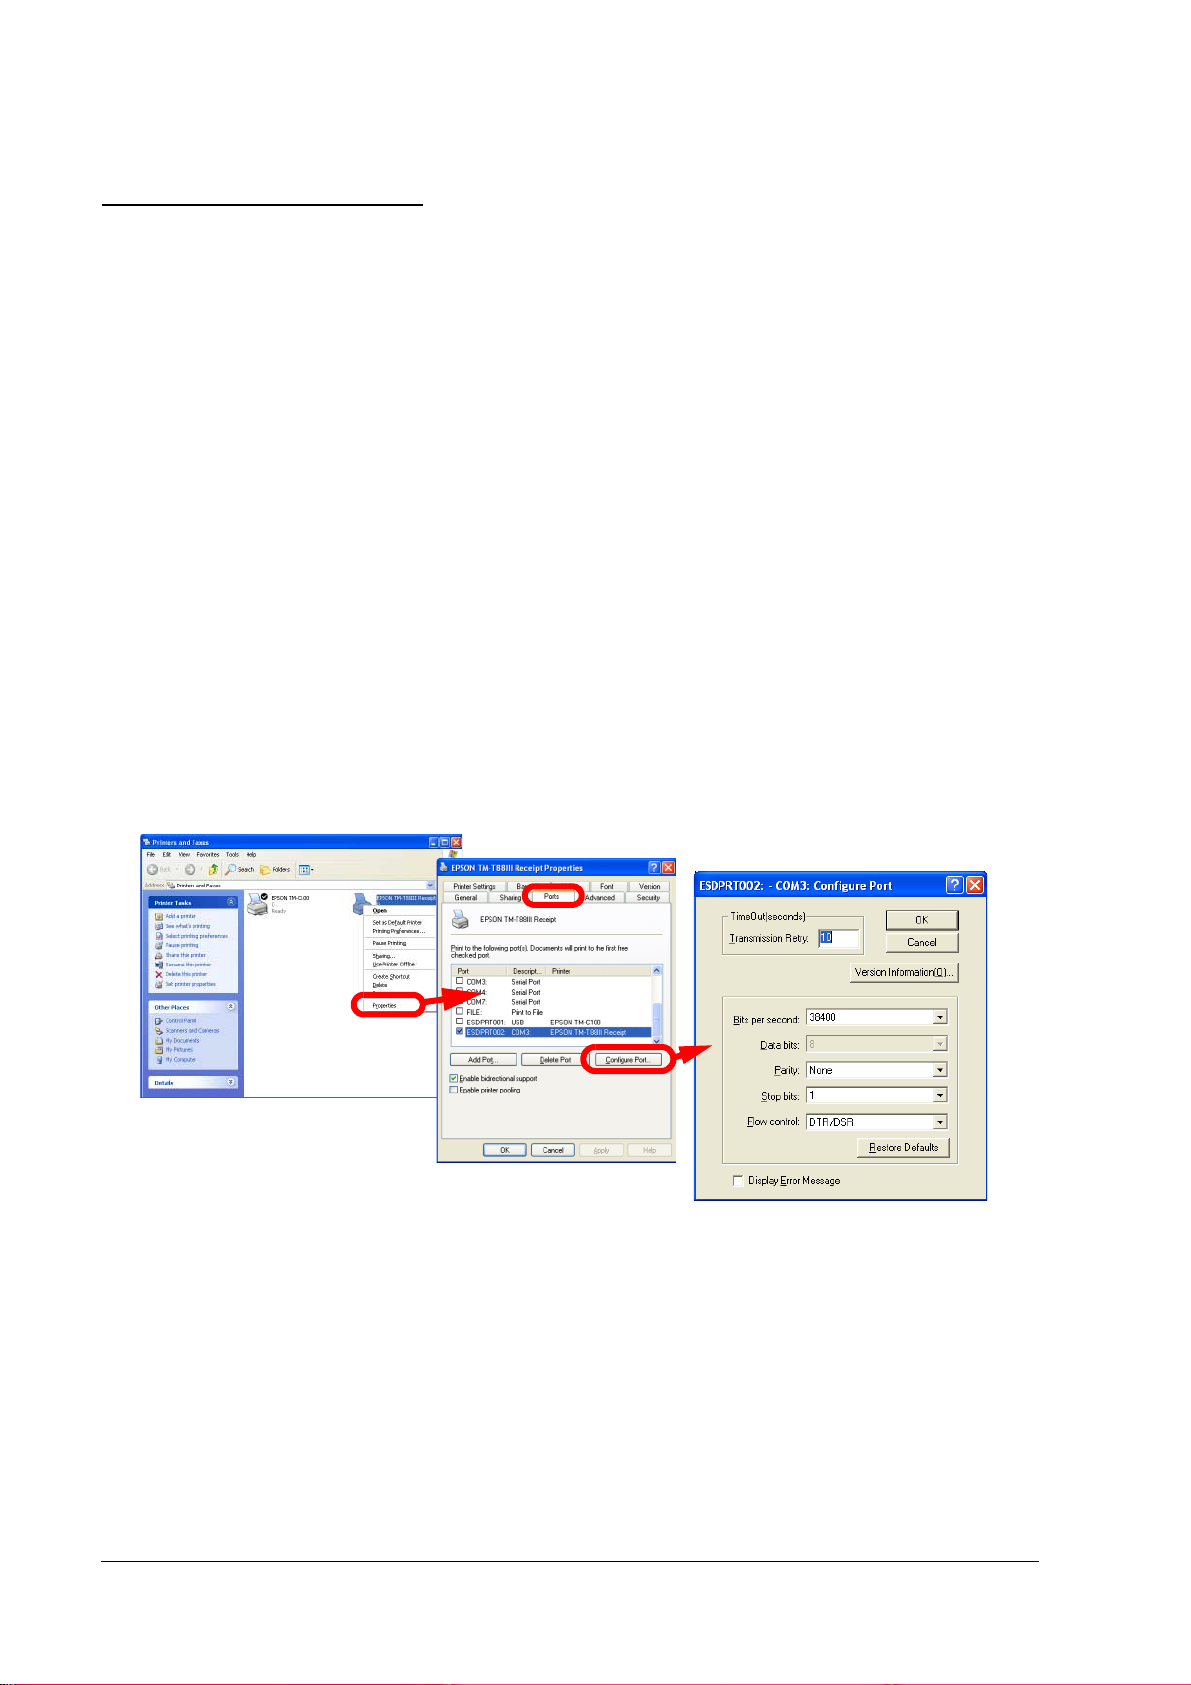
Serial (COM) connection
When using the serial connection, make sure the printer settings match the printer driver port
settings (BaudRate/DataBits/Parity/StopBits/FlowControl).
For information on the printer port settings, see the Technical Reference Guide of each printer.
Port settings confirmation procedure
❏ TM printer settings
To run the self test and print the port settings, turn on the TM printer power with the FEED
button held down.
❏ Printer driver port settings
Select [Start] and open the Printers and Faxes screen.
Right click the printer driver you have installed and select [Properties].
Select the [Ports] tab from the Properties screen and click the [Configure Port...] button. The
Configure Port screen where you can check the settings opens.
2-12 APD Installation and Setup Rev.B
Page 31

Advanced Printer Driver Installation Manual
USB connection
When using USB connection, reboot the computer after installing all the printer drivers to be
used simultaneously. Then, connect the printer and turn on the power.
Note:
To add a printer driver afterwards, install the printer driver after connecting all the TM printers
using USB connection and turning on their respective power. Otherwise, an Epson Port
reassignment may occur as the driver for disconnected or powered off printers are recognized as
replaced.
If you have connected the printer before installing the printer driver, perform a printer driver
recovery. For details, see "Recovering the Printer Driver - For USB Interface Printer" on page 2-26 .
Restrictions
• Connectable printers and USB devices: USB cable length of up to 5 m, up to 5 cascaded
hubs. Use USB cables and USB hubs compliant with USB 2.0 standard.
• The maximum number of printers that can be connected simultaneously is 8.
• When turning the power off and then on, wait at least 5 seconds between power off and
power on.
For details, see the C:\EPSON Advanced Printer Driver\Setup_TM\Usb\readme_e.txt
generated after the APD installation.
Ethernet (10/100 Base-T) connection
When using Ethernet connection, check the IP address setting. To configure the IP address, use
the Epson TM Netwingconfig Utility.
For details, see the "UB-R02 Technical Reference Guide."
Wireless LAN (IEEE 802.11.b) connection
When using wireless LAN connection, check the IP address setting. To configure the IP address,
use the Epson TM Netwingconfig Utility.
Also check the security measures and location sufficiently.
For details, see the "UB-R02 Technical Reference Guide."
Parallel (LPT) connection
When the printer is connected, the "New Hardware Detected. EPSON TM-P2.01" screen appears
then the "Found New Hardware Wizard"screen. In this case, perform the following steps.
1. Click the [Next] button to search for the driver.
2. Next, click the [Finish] button without the driver been found and close the "Found New
Hardware Wizard"screen.
Rev.B APD Installation and Setup 2-13
Page 32

Setting the Paper Width and Checking the Port Setting
When printing receipts, the paper width must be configured.
If you have not configured the port settings at installation or you want to change the settings,
configure the printer driver port settings before the test print.
If no settings are necessary, proceed to "Test Printing" in the next section.
Procedure
The configuration procedure is as follows.
1. Open the Printers and Faxes scree
2. Right click the printer driver you have installed and select [Properties].
3. The Properties screen of the printer appears. To configure the paper width, select the
[Printer Settings] tab.
Select the paper width in accordance with the printer and click the [Apply] button.
n.
2-14 APD Installation and Setup Rev.B
Page 33

Advanced Printer Driver Installation Manual
4. To check the port settings, select the [Ports] tab.
Check that the port is ESDPRTxxx and that the port matches the interface to which the
printer is connected.
Note
Note
:
NoteNote
For port, specify an Epson Port (ESDPRTxxx). Do not specify a general-purpose port such as COM
or USB because the APD can be controlled only through the Epson Port.
5. In case of parallel or USB interface, click the [OK] button and close the Properties screen.
This is the end of the port settings.
6. For serial and TCP/IP interfaces, click the [Configure Port...] button.
7. The Configure Port screen appears. Check the port settings and click the [OK] button.
❏ Serial
Configures the serial port communication settings. The [Restore Defaults] button
allows you to restore the original settings. When finished, click the [OK] button.
Rev.B APD Installation and Setup 2-15
Page 34

Note:
Make sure that the driver communication settings match those of the printer (Bits per
second/Data bits/Parity/Stop bits/Flow control).
❏ TCP/IP
Configures the TM printer IP address. When finished, click the [OK] button.
8. The screen returns to the Properties screen of the printer. Click the [OK] button to finish.
The port settings become effective.
2-16 APD Installation and Setup Rev.B
Page 35

Advanced Printer Driver Installation Manual
Test Printing
Test printing is for checking whether the APD has been installed correctly.
Procedure
The procedure for test printing is as follows.
1.Open the Printers and Faxes screen. Right click the printer driver you have
installed and select [Properties].
2. The Properties screen of the printer appears. Click the [Print Test Page] button.
3. The test print page is output.
Note:
Not all characters are printed but the print is correct.
In the test printing, characters/images are treated as image data. Printing is slow as time is required
for printer communication because the print data volume is large.
Rev.B APD Installation and Setup 2-17
Page 36

4. The following screen appears. If the test print was output correctly, click the [OK]
button. If the test print was not output correctly, click the [Troubleshoot...] button and
perform troubleshooting in accordance with the Windows message.
This is the end of the APD installation and setup procedures.
2-18 APD Installation and Setup Rev.B
Page 37

Advanced Printer Driver Installation Manual
Adding or Removing Printers
To add a printer to the computer or remove a printer that is no longer necessary from the
computer, follow the procedures below.
Adding a printer
To add a printer, install the printer driver and configure the port by following "APD Installation
and Printer Driver Setup" on page 2-5 .
Note:
You cannot add the printer driver directly from the
When connecting a USB printer, you cannot add the printer driver using the Windows plug and
play feature.
Removing a printer
To remove the driver of a printer that is no longer necessary from the computer, uninstall the
printer driver by following "Uninstalling a printer driver" on page 2-27 .
Printers and Faxes screen.
Replacing a printer
When replacing a printer for another of the same model and same interface due to repair, for
example, note the following points.
Make sure the DIP switches on the new printer are configured with the same settings as those on
the replaced printer, regardless of the interface.
❏ Serial If the DIP switch settings for serial communication are the same, no
configuration is necessary following the replacement.
❏ Parallel No configuration is necessary following the replacement.
❏ USB If the printer's interface card changes because the printer is changed, the
APD recognizes it as a new printer connection and therefore generates a
new Epson Port (USB). For this reason, you must configure the newly
generated Epson Port with the same settings as those of the Epson Port to
which the printer driver was assigned.
❏ Ethernet No configuration is necessary on the printer driver if the same IP address
as for the replaced printer is used for the new one.
Rev.B APD Installation and Setup 2-19
Page 38

Adding a Printer Driver
By having a printer driver for each print format, it is possible to lessen the burden of configuring
the print layout from an application or reduce the changes necessary in an application due to the
printer change.
The following are some case examples.
• The same printer is used for printing different print formats, such as receipts and
coupons in landscape format. (Same printer driver)
• The same label printer is used for printing label papers of different sizes. (Printer driver
for each label size)
Note:
Do not add the prin
ter driver directly from the Printers and Faxes screen.
Procedure
The following procedure, used for adding a printer driver, is the same as that used for installing
the APD. For the printer driver to become effective, a reboot is necessary.
1. Double click the [APD] icon and start the installation.
2. The License Agreement screen appears. Select "I accept the terms in the license
agreement" and click the [Next] button.
3. The Location to Save Files screen appears. Click the [Next] button.
4. The files are expanded. The Overwrite Protection screen appears. Select the [Not to All]
button.
5. The Select OS screen appears. Click the [Next] button.
6. The Select Module screen appears. Select the printer module to add.
7. If you want to install the same printer driver more than once, select the module to install
and then click the [COPY] button. If copy is not necessary, proceed to step 10.
2-20 APD Installation and Setup Rev.B
Page 39

Advanced Printer Driver Installation Manual
8. To install multiple copies of a printer driver, select the printer driver and click the
[COPY] button.
9. The Printer Driver Copy screen appears. Specify the number of copies and click the [OK]
button.
The copied printer drivers are added to the Select Module screen.
10. Configure the port settings for the printer driver. Select the printer driver to add and
click the [Printer Port Setting, e.t.c...] button.
Rev.B APD Installation and Setup 2-21
Page 40

11. The Printer Port Setting, e.t.c. screen appears. Configure the port settings. When
finished, click the [OK] button.
12. Repeat steps 10 and 11 for all printer driver modules to install.
13. When you have configured all the modules, return to the Select Module screen. Clicking
the [Finish] button starts the installation.
14. When the installation is complete, the Follow Window appears. Clicking the [Yes]
button reboots the computer.
15. Open the Printers and Faxes screen
. Check that the printer drivers added for
the TM printer are registered.
2-22 APD Installation and Setup Rev.B
Page 41

Advanced Printer Driver Installation Manual
Changing the Printer Driver Port Settings
To change the port settings of a printer driver such as the communication conditions for a serial
connection or the IP address of a printer using Ethernet connection, follow the procedure below.
Executing these steps changes the Epson Port settings.
Changing the port settings requires a reboot. Make sure to have the other applications closed
beforehand.
1. Open the Printers and Faxes scree
n.
2. Right click the printer driver whose settings you want to change and select [Properties].
3. The Properties screen of the printer appears. Select the [Ports] tab and click the
[Configure Port...] button.
4. The Configure Port screen appears. Change the settings then click the [OK] button.
Serial
Ethernet
5. The Follow Window screen appears. Click the [OK] button.
6. The Properties screen of the printer appears. Click the [Close] button.
7. The screen returns to the Printers and Faxes screen. Close the application and reboot the
system. The changes to the port becomes effective after the reboot.
Rev.B APD Installation and Setup 2-23
Page 42

Changing the printer driver interface
When connecting a printer using a different interface but without changing the connected
printer model, such as when changing the printer from a serial model to a parallel model,
change the Epson Port for the printer driver to make the changes easier.
1. Open the Printers and Faxes scree
2. Right click the printer driver whose settings you want to change and select [Properties].
3. The Properties screen of the printer appears. Select the [Ports] tab and click the
[Configure Port...] button.
4. The Configure Port screen appears. The Epson Port appears in the port drivers list.
Check whether the Epson Port you want to change is present in the list. If the
corresponding port is present, select it and click the [OK] button. If the port for the
corresponding interface is not present, proceed to step 5.
n.
This closes the Properties screen of the printer and changes the port settings of the
printer driver. Printing is possible even without reboot.
5. If the port for the corresponding interface is not present, click the [Add Port...] button.
2-24 APD Installation and Setup Rev.B
Page 43

Advanced Printer Driver Installation Manual
6. The Printer Ports screen appears. Select "EPSON TM/BU/EU Printer Port Ver3" and
click the [New Port...] button.
7. The Add Port screen appears. The procedure here is for configuring the Epson Port to be
added.
First, select the port type. Configure the port settings in accordance with the selected
port.
For USB ports, connecting a printer with USB interface generates an Epson Port
automatically.
Parallel Serial
Ethernet
8. The Printer Ports screen appears. Click the [Close] button.
9. Configuring the setting described in step 4, reassigns the Epson Ports.
10. The Properties screen of the printer appears. Clicking the [Apply] button finishes the
interface change.
Rev.B APD Installation and Setup 2-25
Page 44

Recovering the Printer Driver - For USB Interface Printer
If the TM printer has been connected and its power turned on before installing the printer
driver, printing is not possible even after a successful installation. In this case, recover the
printer driver using the following procedure.
1. Check that the TM printer is connected to the computer and its power is turned on.
2. Open the Properties screen of [My Computer], click [Hardware] - [Device Manager], and
start the Device Manager screen.
3. Right click [Universal Serial Bus controllers] - [USB print support] and select [Uninstall].
4. Turn off then on the TM printer.
5. Check that [EPSON USB Controller for TM/BA/EU Printers] is displayed under [Universal
Serial Bus controllers] on the Device Manager screen.
6. Open the Properties screen of the printer driver and click the [Ports] tab. Uncheck [USBxxx],
check [ESDPRTxxx], and then click [OK].
2-26 APD Installation and Setup Rev.B
Page 45

Advanced Printer Driver Installation Manual
Uninstallation
This section describes the procedure for uninstalling an individual printer driver or uninstalling
the APD package.
Uninstalling a printer driver
To uninstall a printer driver, follow the procedure below.
Note:
Do not delete the prin
driver disappears from the screen but it is not completely removed.
ter driver directly from the Printers and Faxes screen. The printer
To remove a printer driver, follow the procedure below.
1. Open the Control Panel screen and select [Add or Remove Programs]. The Add or
Remove Programs screen appears. Select [EPSON Advanced Printer Driver 3] from the
list of currently installed programs and click the [Change/Remove] button.
Rev.B APD Installation and Setup 2-27
Page 46
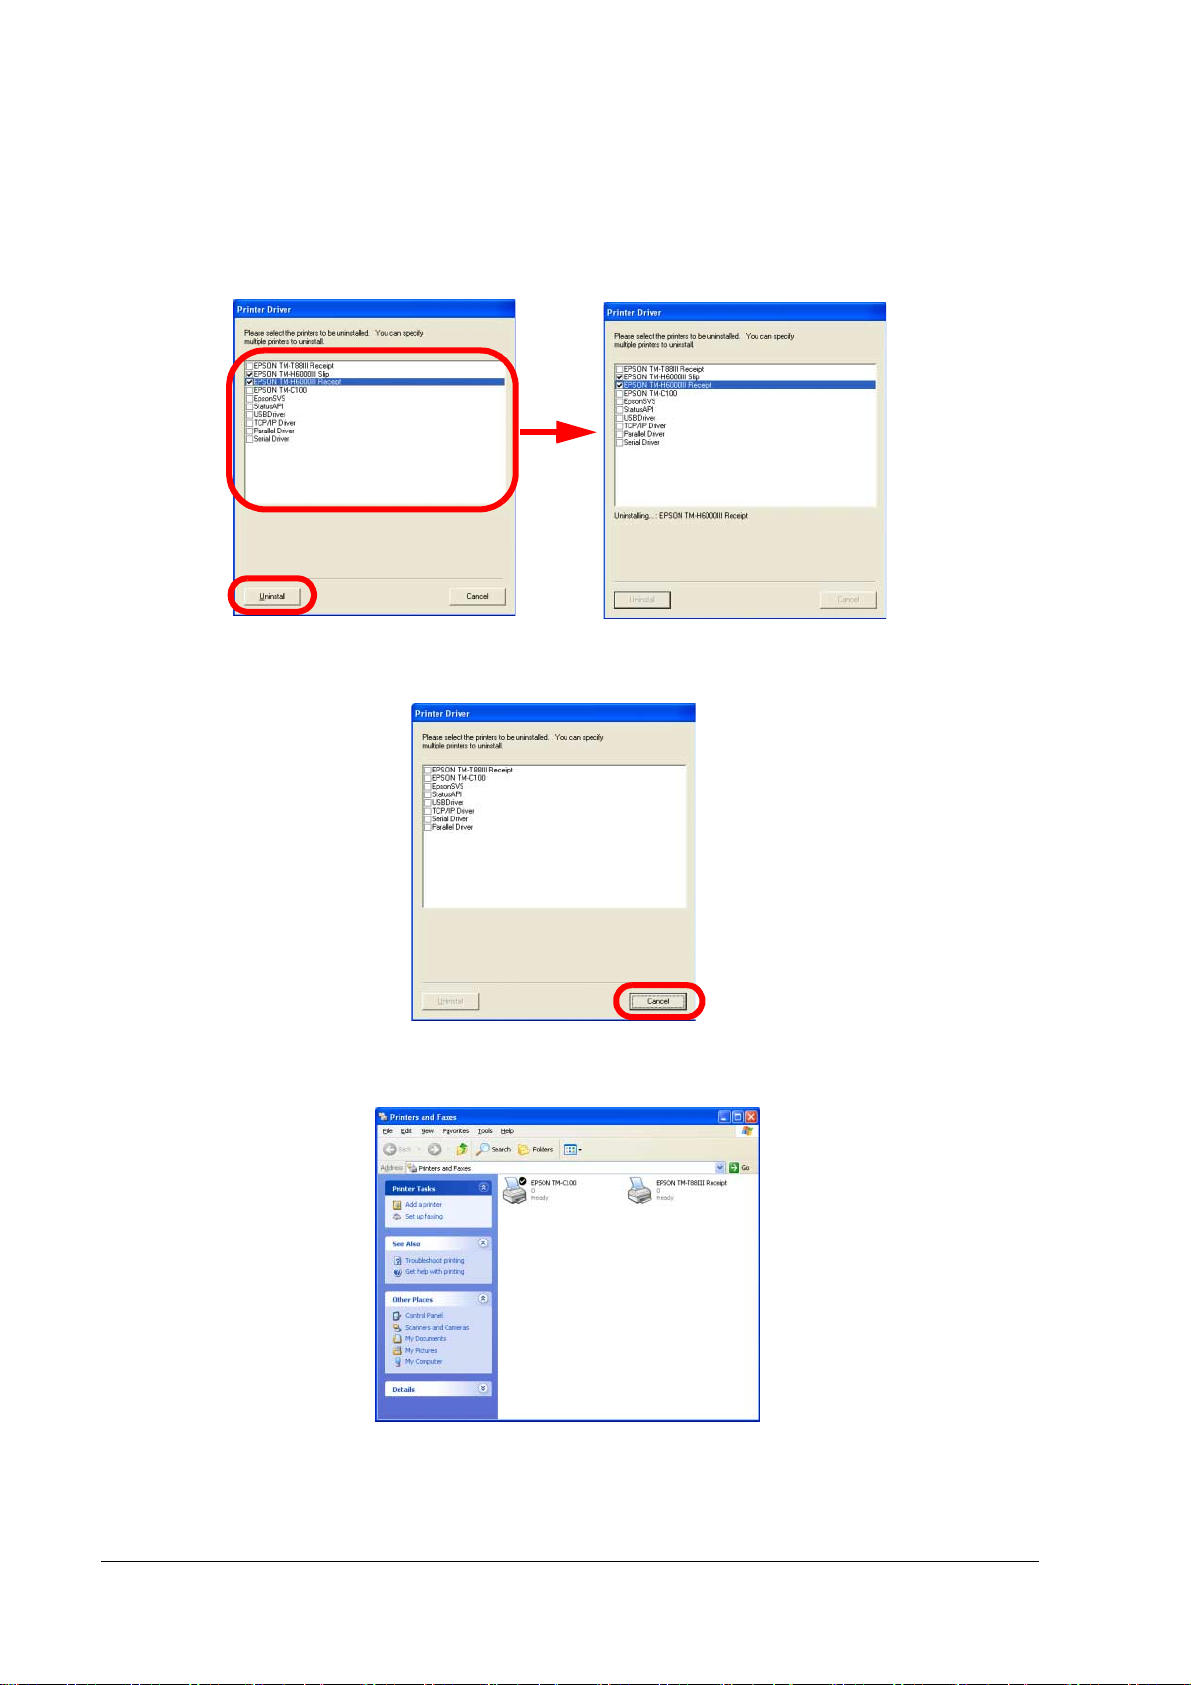
2. The Printer Driver screen appears. Select the printer driver to uninstall and click the
[Uninstall] button. The printer driver disappears from the screen. Multiple printer
drivers can be selected for uninstallation.
3. When the printer driver uninstallation is complete, the [Close] button becomes available.
Click the [Close] button.
4. You can confirm that it has been uninstalled as the printer driver has disappeared from
e Printers and Faxes screen.
th
2-28 APD Installation and Setup Rev.B
Page 47

Advanced Printer Driver Installation Manual
APD package uninstallation
When upgrading the APD, uninstall the old APD before installing the new one. To uninstall the
APD, follow the procedure below.
Note:
Do not delete the old APD directly from th
the screen but the APD is not unistalled and you will not be able to install the new APD.
1. Open the Control Panel screen and select [Add or Remove Programs].
2. The Add or Remove Programs screen appears. Select [EPSON Advanced Printer Driver
3] from the list of currently installed programs and click the [Change/Remove] button.
e Printers and Faxes screen. It disappears from
3. The Printer Driver screen appears. Select all the items and click the [Uninstall] button.
Rev.B APD Installation and Setup 2-29
Page 48

4. The APD is uninstalled.
Note:
If you select USB Driver, the USB driver is not removed but only the USB driver folder that
was expanded at the time of the installation.
5. The following screen appears. Click the [OK] button.
6. The computer reboots.
Note:
The reboot completes the uninstallation.
The printer driver is completely removed from
the Printers and Faxes screen.
2-30 APD Installation and Setup Rev.B
Page 49

Advanced Printer Driver Installation Manual
Chapter3
Silent Installation
This chapter describes the procedure for copying the APD settings from one computer to
another.
What Is a Silent Installation?
Silent installation is a method for copying the environment of an already installed APD to
another computer easily. With Silent installation, you can eliminate the need to configure the
printers one by one as well as the possibility of making mistakes in the settings.
The installed printer driver and its detailed settings are first converted into a Package File
(Executable File). By copying and executing the Package File in another computer, the same
environment is achieved there.
The printer driver to copy is selectable.
Package File
Install the APD and configure
the printer properties.
Create the Package File.
Copy the Package File; then
execute.
Environments that can be copied
The APD environments that can be copied with silent installation are as follows.
❏ Epson Port driver
❏ Printer driver
• Printer driver properties
• Port settings
Note:
No status bar is displayed during execution.
Rev.B Silent Installation 3-1
Page 50

Creating a Package File
The procedure for creating a Package File is as follows.
1. Execute the "Setup_TM\MakePackage.exe" located in the APD installation folder.
2. The MakePackage screen appears. Select the printer driver to copy and click the [Printer
Port Setting, e.t.c...] button. When installing multiple printer drivers, configure one by
one.
3. The Port Setting, e.t.c. screen appears. Check the content and click the [OK] button.
3-2 Silent Installation Rev.B
Page 51

Advanced Printer Driver Installation Manual
❏ PrinterName
Name of the printer driver to install. You can rename if you want to install with a
different name.
❏ Printer settings during install
Specify whether the printer port settings will be in accordance with the APD
default values or the (copy) source values.
• use default
The settings of the source are ignored and installed using the APD default
values (the default is LPT1).
• use current settings
The installation is done using the source setting values (the settings are
displayed at the bottom, in the Printer Port Setting area).
❏ Printer Port Setting
Displays the current settings in the source. Only the TCP/IP port IP address can be
changed.
4. Return to the MakePackage screen. When installing multiple printer drivers, repeat
steps 2. and 3. for all printer drivers.
5. Select the "Uninstall TM/BA/EU drivers installed in the target PC" check box on the
MakePackage screen as required and click the [Package] button.
• Unchecked
If the same printer name as the one you are going to install already exists,
installation is performed after uninstalling only the printer of the same name.
• Checked
Uninstalls all printer drivers for EPSON TM printers present in the destination and
reboots the computer when uninstallation is complete. Then proceeds to the
installation.
Rev.B Silent Installation 3-3
Page 52

6. The following screen appears. Click the [OK] button.
7. The Save As screen appears. Specify the saving location and file name for the Package
File to be created and click the [Save] button.
The Package File is created.
8. If the file is created successfully, the following message box appears. Click the [OK]
button.
3-4 Silent Installation Rev.B
Page 53

Advanced Printer Driver Installation Manual
Installation
Perform the installation by executing the Package File in the destination computer. Execute from
the Command Prompt. It is also possible to install it from a programmed MS-DOS Batch File.
Note:
If executed from Windows, the installation is performed without any options. The installation is
automatic followed by a Windows reboot.
If the Package File is created with "Uninstall TM/BA/EU drivers installed in the target PC"
checked and if there is an already installed driver with the same name as one of the drivers to be
installed, reboot is performed twice.
No status bar is displayed during execution.
When copying the Package File to a computer where the APD is already installed, first uninstall
the existing APD, reboot the computer then perform the installation.
Execution
The procedure for executing the Package File from the command prompt is as follows.
1. Copy the Package File to the destination computer.
2. Run "Command Prompt" from [start] - [All Programs] - [Accessories].
3. Enter the Package File path and name then press the Enter
required. (See page 3-6)
The command line is as follows.
key. Enter parameters as
> Path Package name [Destination IP address] [Log file name] [Whether or not to
reboot] [Window handler of destination of result notification] [Notification
message ID]
❏ Mandatory parameters
Path: Path to the executable file
Package name: File name of the package to execute
Rev.B Silent Installation 3-5
Page 54

❏ Optional parameters
• Destination IP address
Configures the specified IP address as connection destination for all printer drivers
to be installed. However, if the Package File was created with "use current settings"
checked on the Port Setting, e.t.c. screen, the address configured at the time of file
creation is specified.
• Log file name
Specifies the name to which the log file will be renamed after the installation is
finished.
• Whether or not to reboot
Specifies whether to reboot the computer after the installation is finished or not.
• Window handler of destination of result notification
Specifies the window to which the result of the Silent Installation will be notified.
• Notification message ID
Specifies the message ID for notifying the result of the Silent Installation to the
specified window.
: space, [ ]: option, < >: required item, /: selection
Reboot command line
Package File name[ Destination IP address][ Log file name][ Whether or not to
reboot][ Window handler of destination of result notification][ Notification message ID]
Destination IP address Semantics
None Sets the IP address specified in Setup.ini.
-P< IP address> or
-p< IP address>
IP address = nnn.nnn.nnn.nnn
Log file name Semantics
None Uses the default (APDInstall.log).
-L< "Log file name"> or
-l< "Log file name">
Whether or not to reboot Semantics
None Reboots after the installation is complete.
-R< Y/y/N/n> or
-r< Y/y/N/n >
Window handler of destination of
result notification
None Does not notify the results of the processing by using the window
-W<Window handler> or
-w<Window handler>
*Window handler is written in
hexadecimal characters
Sets the destination of connection of the printer driver to the specified
IP address.
After installation, renames the log file as specified.
*Sets the "winnt" folder as the log file's output path.
"Y" or "y": Reboots the PC.
"N" or "n": Does not reboot the PC.
Semantics
message.
Notifies the following processing results to the specified window
handler.
Notification parameters of the window message
WPARAM: 0 (Success), 1 (Failure), 2 (Execute uninstallation)
LPARAM: NULL
3-6 Silent Installation Rev.B
Page 55

Advanced Printer Driver Installation Manual
Notification message ID Semantics
None Uses ID=WM_USER+100 to notify the processing results.
-M<message ID> or
-m<message ID>
Uses the specified message ID to notify the processing results.
*Message ID is in hexadecimal
characters
Specifying a message ID that is WM_USER or later is recommended.
4. The package is executed.
Note:
No status bar is displayed during execution.
5. Reboot the computer where the package was installed.
Rev.B Silent Installation 3-7
Page 56

3-8 Silent Installation Rev.B
Page 57

Advanced Printer Driver Installation Manual
Chapter4 Troubleshooting
In this chapter, major problems are presented grouped by behavior. For details on each problem,
check the reference.
No. Trouble Cause and action
1 Cannot install APD Ver.3.xx The downloaded APD file is corrupt:
The APD file size is of approximately 7 MB. To check whether the file
has been downloaded correctly, check its file size.
2 APD Ver.2.xx is already installed:
3 APD is already installed:
During APD installation, the
4
following error code stops
the wizard and makes the
5 APD Ver.2.xx is already installed:
installation fail.
System call error
Cause: Incorrect
parameter.
Code: 0x0340001
6 There are multiple printer
drivers that can be
installed for the printer and
cannot be sure which one
to install.
7 During test printing, the job
is spooled but nothing
comes out.
8 The printer is not turned on (none of the printer's LEDs are on):
The bi-directional
communication with the
printer is not working.
9 The printer is offline (the printer's Online LED is off):
10 Printer is out of paper:
11 An error occurred in the printer (The printer's Error LED is on. *Some
12 The computer has not been rebooted after the APD installation:
Uninstall APD Ver.2.xx and reboot the computer. Then try to install
APD Ver.3.xx again.
Uninstall APD and reboot the computer. Then try to install APD
Ver.3.xx again.
Logon user has no Administrator privileges:
Log on as a user with Administrator privileges.
Uninstall APD Ver.2.xx and reboot the computer first, then try to install
APD Ver.3.xx again.
The driver to use differs depending on the printing method, the
paper used, need for compatibility with APD Ver.2.xx, etc. For
details, see the reference page.
The printer and computer are not connected:
Check the cable connecting the printer and computer.
Turn on the printer.
Place the printer online.
Add paper to the printer.
printers do not have an Error LED).
Remove the cause of the printer error. For details, see the printer's
operation manual.
Reboot the computer.
Refere
nce
Page
2-2
Page
1-12
Page
2-2
-
Page
1-12
Page
1-6
Page
2-12
-
-
-
-
Page
2-5
Rev.B Troubleshooting 4-1
Page 58

No. Trouble Cause and action
13 During test printing, the job
is spooled but nothing
comes out.
14 The computer and printer are connected through a converter/
The bi-directional
communication with the
printer is not working.
15 For serial interface models - not connected with the appropriate
16 For USB interface models - USB driver is not installed correctly:
17 For parallel interface models - "Bi-directional communication" is not
18 Printer port is not configured correctly:
19 The printer port is not an Epson Port:
20 The job disappears from
the spooler but nothing
comes out.
21 Printing is possible but the
print result contains
garbled characters.
22 For serial interface models - not connected with the appropriate
23 Connection through interface conversion cables, print servers, and
24 Printing is possible but slow. In test printing, characters/images are printed as image data. For
25 Test printing is possible but
the border is clear off
Connection port is disabled by the computer BIOS setting or the like:
Enable the connection port.
repeater:
Print data transmission may not work correctly.
Connect the computer and printer directly.
cable:
Check the cable connection.
Check that the USB driver is installed correctly.
enabled for the computer in the Onboard Parallel Mode setting
under BIOS:
Select a mode that enables bi-directional communications which
may be different depending on the computer.
When there are multiple modes (ECP, EPP, etc.) that support bidirectional communications, check the scope of each mode.
Check the printer port settings.
A standard computer port (COM, parallel, etc.) or File is not suitable
for printing.
Select the Epson Port for the connected interface.
The port settings in the Properties screen of the printer driver are not
configured in accordance with the printer connection port:
Check the printer port settings.
For serial interface models The serial communication settings in the computer does not match
those in the TM printer:
The TM printer settings can be confirmed by performing a self test.
The settings on the computer side can be confirmed from the
[Configure Port] screen. To display the screen, select the connected
Epson Port and then click the [Configure Port...] button on the [Ports]
tab of the Properties screen of the printer driver.
"Garbled characters" occur when the "communication speed" is not
configured correctly.
cable:
Check the cable connection.
the like:
Print data transmission may not work correctly.
Check whether printing is possible using a simpler connection
method.
this reason, the amount of print data to be transmitted is large and
the time required for printer communication longer. (Especially in
serial connections)
Normal behavior. See the print example in this manual. Page
Refere
nce
-
-
Page
1-10
Page
4-3
-
Page
2-14
Page
1-4
Page
2-14
Page
2-3
Page
2-14
Page
1-10
-
Page
2-17
2-17
4-2 Troubleshooting Rev.B
Page 59

Advanced Printer Driver Installation Manual
No. Trouble Cause and action
26 Upgraded from APD
Ver.2.xx to APD Ver.3.xx but
cannot test print correctly
27 The computer has not been rebooted after the APD installation:
28 Performed a silent
installation but installation
did not work.
29 The package file is corrupt:
30 The computer environment in the package file is not consistent with
31 Need to check whether
the TM printer USB driver is
installed correctly as the
USB interface printer is not
working correctly.
32 Tried to add a USB model
driver but failed.
33 A USB model port
reassignment occurred.
34 Connected a customer
display to a USB model TM
printer and turned on the
TM printer power again but
nothing is displayed on the
35 The settings of the DIP switch on the customer display are incorrect:
customer display.
The computer has not been rebooted after the APD Ver.2.xx
uninstallation:
Uninstall APD Ver.3.xx then install again.
Reboot the computer.
The command line has not been input correctly:
Re-enter the command and execute again.
Create the package file anew.
that in the destination computer.
Check the package file settings as well as the source and
destination computers' environment.
Connect the TM printer using USB and turn on its power to make
"EPSON USB Controller for TM Printer Series" driver to be displayed
under [Device Manager] - [Universal Serial Bus controllers].
To check whether the USB driver has been installed correctly or not,
perform the following steps.
1) Right click the [My Computer] icon and open the Properties
screen.
2) Select the [Hardware] tab, click [Device Manager], and open the
[Device Manager] screen.
Check the following in the [Universal Serial Bus controllers] entry.
- If the TM printer is connected using USB and its power is turned
on, the "EPSON USB Controller for TM Printer Series" line
appears.
- Disconnect the TM printer.Or turn off its power, the "EPSON USB
Controller for TM Printer Series" line disappears.
If the above behavior can be confirmed, the TM printer USB driver is
installed correctly.
If the above behavior cannot be confirmed, perform a printer driver
recovery.
If the USB driver is not installed correctly, uninstall the APD then try to
install again.
When adding the USB model printer driver, the printer was
connected before the printer driver was added:
Perform a printer driver recovery.
When adding the USB model printer driver, the printer was
connected before the printer driver was added:
Perform a printer driver recovery.
The power on order is incorrect:
When turning on the power, turn on the customer display first and
then the TM printer.
The DIP switch on the customer display must be configured as
follows.
Bits per second: 19200bps/Data bits: 8Bit/Parity: none/Stop bits: 1
Refere
nce
Page
1-12
Page
1-12
Page
3-5
Page
3-2
Page
3-2
-
Page
2-26
Page
2-29
Page
2-26
Page
2-26
-
-
If your problem is not listed here and you have any question, contact your dealer.
Rev.B Troubleshooting 4-3
Page 60

4-4 Troubleshooting Rev.B
Page 61

Page 62

EPSON
SEIKO EPSON CORPORATION
Printed in English
 Loading...