

Page 1
52 900.011-11/1008
ThermoStat plus
Operating manual
Page 2
Copyright
©
2008 Eppendorf AG, Hamburg. No part of this publication may be reproduced without
the prior permission of the copyright owner.
Trademarks
eppendorf
®
, eppendorf Thermomixer®, eppendorf Plate®, and DualChip® are registered
trademarks of Eppendorf AG, Hamburg, Germany.
Thermomixer™ is a trademark of Eppendorf AG, Hamburg, Germany.
®
Falcon
is a registered trademark of Becton Dickinson, Franklin Lakes, USA.
Trademarks are not marked in all cases with ™ or
®
in this manual.
Your Online Product Registration
Register your Eppendorf instruments online and get rewarded!
Learn more: www.eppendorf.com/myeppendorf
Not available in all countries.
5352 900.011-12/1109
Page 3

ThermoStat plus — Operating Manual
Table of contents
Table of contents
1 User instructions. . . . . . . . . . . . . . . . . . . . . . . . . . . . . . . . . . . . . . . . . . . . . . . . . . . . . . . . . 7
1.1 Using this manual. . . . . . . . . . . . . . . . . . . . . . . . . . . . . . . . . . . . . . . . . . . . . . . . . . . . . 7
1.2 Warning signs and hazard icons . . . . . . . . . . . . . . . . . . . . . . . . . . . . . . . . . . . . . . . . . 7
1.3 Symbols used. . . . . . . . . . . . . . . . . . . . . . . . . . . . . . . . . . . . . . . . . . . . . . . . . . . . . . . . 7
1.4 Abbreviations used. . . . . . . . . . . . . . . . . . . . . . . . . . . . . . . . . . . . . . . . . . . . . . . . . . . . 7
1.5 Glossary . . . . . . . . . . . . . . . . . . . . . . . . . . . . . . . . . . . . . . . . . . . . . . . . . . . . . . . . . . . . 8
2 Product description . . . . . . . . . . . . . . . . . . . . . . . . . . . . . . . . . . . . . . . . . . . . . . . . . . . . . . 9
2.1 Main illustration . . . . . . . . . . . . . . . . . . . . . . . . . . . . . . . . . . . . . . . . . . . . . . . . . . . . . . 9
2.2 Delivery package . . . . . . . . . . . . . . . . . . . . . . . . . . . . . . . . . . . . . . . . . . . . . . . . . . . . . 9
2.3 Features . . . . . . . . . . . . . . . . . . . . . . . . . . . . . . . . . . . . . . . . . . . . . . . . . . . . . . . . . . . 10
2.3.1 ThermoStat plus . . . . . . . . . . . . . . . . . . . . . . . . . . . . . . . . . . . . . . . . . . . . . . . 10
2.3.2 IsoTherm system (optional accessory) . . . . . . . . . . . . . . . . . . . . . . . . . . . . . . 10
3 Safety . . . . . . . . . . . . . . . . . . . . . . . . . . . . . . . . . . . . . . . . . . . . . . . . . . . . . . . . . . . . . . . . . 11
3.1 Intended use. . . . . . . . . . . . . . . . . . . . . . . . . . . . . . . . . . . . . . . . . . . . . . . . . . . . . . . . 11
3.2 User profile. . . . . . . . . . . . . . . . . . . . . . . . . . . . . . . . . . . . . . . . . . . . . . . . . . . . . . . . . 11
3.3 Note on product liability . . . . . . . . . . . . . . . . . . . . . . . . . . . . . . . . . . . . . . . . . . . . . . . 11
3.4 Warnings for intended use . . . . . . . . . . . . . . . . . . . . . . . . . . . . . . . . . . . . . . . . . . . . . 11
3.5 Warning and instruction signs on the device . . . . . . . . . . . . . . . . . . . . . . . . . . . . . . . 14
4 Installation . . . . . . . . . . . . . . . . . . . . . . . . . . . . . . . . . . . . . . . . . . . . . . . . . . . . . . . . . . . . . 15
4.1 Preparing installation . . . . . . . . . . . . . . . . . . . . . . . . . . . . . . . . . . . . . . . . . . . . . . . . . 15
4.2 Selecting location . . . . . . . . . . . . . . . . . . . . . . . . . . . . . . . . . . . . . . . . . . . . . . . . . . . . 15
4.3 Installing instrument . . . . . . . . . . . . . . . . . . . . . . . . . . . . . . . . . . . . . . . . . . . . . . . . . . 15
5 Operation . . . . . . . . . . . . . . . . . . . . . . . . . . . . . . . . . . . . . . . . . . . . . . . . . . . . . . . . . . . . . . 16
5.1 Overview of operating controls. . . . . . . . . . . . . . . . . . . . . . . . . . . . . . . . . . . . . . . . . . 16
5.2 Inserting exchangeable thermoblocks . . . . . . . . . . . . . . . . . . . . . . . . . . . . . . . . . . . . 17
5.2.1 Exchangeable thermoblocks for micro test tubes . . . . . . . . . . . . . . . . . . . . . . 18
5.2.2 MTP exchangeable thermoblock . . . . . . . . . . . . . . . . . . . . . . . . . . . . . . . . . . 18
5.2.3 Adapter plate for 0.2 ml tubes or 96 Well PCR plates. . . . . . . . . . . . . . . . . . . 19
5.2.4 Exchangeable thermoblocks for slides and slides DC . . . . . . . . . . . . . . . . . . 19
5.2.5 CombiBox . . . . . . . . . . . . . . . . . . . . . . . . . . . . . . . . . . . . . . . . . . . . . . . . . . . . 19
5.3 Inserting tubes and plates . . . . . . . . . . . . . . . . . . . . . . . . . . . . . . . . . . . . . . . . . . . . . 20
5.4 Tempering . . . . . . . . . . . . . . . . . . . . . . . . . . . . . . . . . . . . . . . . . . . . . . . . . . . . . . . . . 20
5.4.1 Basic temperature control. . . . . . . . . . . . . . . . . . . . . . . . . . . . . . . . . . . . . . . . 20
5.4.2 Programmable temperature control . . . . . . . . . . . . . . . . . . . . . . . . . . . . . . . . 21
6 Troubleshooting . . . . . . . . . . . . . . . . . . . . . . . . . . . . . . . . . . . . . . . . . . . . . . . . . . . . . . . . 23
6.1 General errors . . . . . . . . . . . . . . . . . . . . . . . . . . . . . . . . . . . . . . . . . . . . . . . . . . . . . . 23
Operating Manual
EN
Operating Manual
5
Page 4

Table of contents
ThermoStat plus — Operating Manual
EN
7 Maintenance . . . . . . . . . . . . . . . . . . . . . . . . . . . . . . . . . . . . . . . . . . . . . . . . . . . . . . . . . . . 24
7.1 Cleaning . . . . . . . . . . . . . . . . . . . . . . . . . . . . . . . . . . . . . . . . . . . . . . . . . . . . . . . . . . . 24
7.2 Disinfection / Decontamination. . . . . . . . . . . . . . . . . . . . . . . . . . . . . . . . . . . . . . . . . . 25
7.3 Decontamination before shipping. . . . . . . . . . . . . . . . . . . . . . . . . . . . . . . . . . . . . . . . 25
7.4 Temperature control . . . . . . . . . . . . . . . . . . . . . . . . . . . . . . . . . . . . . . . . . . . . . . . . . . 25
8 Transport, storage and disposal . . . . . . . . . . . . . . . . . . . . . . . . . . . . . . . . . . . . . . . . . . . 26
8.1 Transport . . . . . . . . . . . . . . . . . . . . . . . . . . . . . . . . . . . . . . . . . . . . . . . . . . . . . . . . . . 26
8.2 Storage. . . . . . . . . . . . . . . . . . . . . . . . . . . . . . . . . . . . . . . . . . . . . . . . . . . . . . . . . . . . 26
8.3 Disposal . . . . . . . . . . . . . . . . . . . . . . . . . . . . . . . . . . . . . . . . . . . . . . . . . . . . . . . . . . . 26
Operating Manual
9 Technical data . . . . . . . . . . . . . . . . . . . . . . . . . . . . . . . . . . . . . . . . . . . . . . . . . . . . . . . . . . 27
9.1 Power supply . . . . . . . . . . . . . . . . . . . . . . . . . . . . . . . . . . . . . . . . . . . . . . . . . . . . . . . 27
9.2 Ambient conditions. . . . . . . . . . . . . . . . . . . . . . . . . . . . . . . . . . . . . . . . . . . . . . . . . . . 27
9.3 Weight / dimensions. . . . . . . . . . . . . . . . . . . . . . . . . . . . . . . . . . . . . . . . . . . . . . . . . . 27
9.4 Application parameters. . . . . . . . . . . . . . . . . . . . . . . . . . . . . . . . . . . . . . . . . . . . . . . . 28
9.5 Additional data . . . . . . . . . . . . . . . . . . . . . . . . . . . . . . . . . . . . . . . . . . . . . . . . . . . . . . 28
10 Ordering information . . . . . . . . . . . . . . . . . . . . . . . . . . . . . . . . . . . . . . . . . . . . . . . . . . . . 29
10.1 ThermoStat plus. . . . . . . . . . . . . . . . . . . . . . . . . . . . . . . . . . . . . . . . . . . . . . . . . . . . . 29
10.2 Exchangeable thermoblocks and adapter plates . . . . . . . . . . . . . . . . . . . . . . . . . . . . 29
10.3 Tubes and plates . . . . . . . . . . . . . . . . . . . . . . . . . . . . . . . . . . . . . . . . . . . . . . . . . . . . 30
10.4 IsoTherm-System . . . . . . . . . . . . . . . . . . . . . . . . . . . . . . . . . . . . . . . . . . . . . . . . . . . . 31
10.5 Temperature sensor . . . . . . . . . . . . . . . . . . . . . . . . . . . . . . . . . . . . . . . . . . . . . . . . . . 31
11 Index. . . . . . . . . . . . . . . . . . . . . . . . . . . . . . . . . . . . . . . . . . . . . . . . . . . . . . . . . . . . . . . . . . 32
9.5.1 Interfaces . . . . . . . . . . . . . . . . . . . . . . . . . . . . . . . . . . . . . . . . . . . . . . . . . . . . 28
9.5.2 Time interval . . . . . . . . . . . . . . . . . . . . . . . . . . . . . . . . . . . . . . . . . . . . . . . . . . 28
6
Page 5
ThermoStat plus — Operating Manual
1 User instructions
1 User instructions
1.1 Using this manual
EN
Before using the device for the first time, please read the operating manual.
Please view this operating manual as part of the product and keep it somewhere easily
accessible.
If the device is transferred to a third party, include this operating manual.
1.2 Warning signs and hazard icons
Depiction Meaning
DANGER
Risk of electric shock with potential for severe injury or death as a
consequence.
DANGER
Risk of explosion with potential for severe injury or death as a
consequence.
WARNING
Warning of potential injury or health risk.
CAUTION
Refers to risk of damage to property.
Refers to particularly useful information and tips.
1.3 Symbols used
Depiction Meaning
1.
2.
•
You are requested to perform an action.
Perform these actions in the sequence described.
List.
Operating Manual
Text Terms from the device display.
1.4 Abbreviations used
DWP Deepwell plate
MTP Microplate
PCR Polymerase Chain Reaction
7
Page 6
ThermoStat plus — Operating Manual
1 User instructions
EN
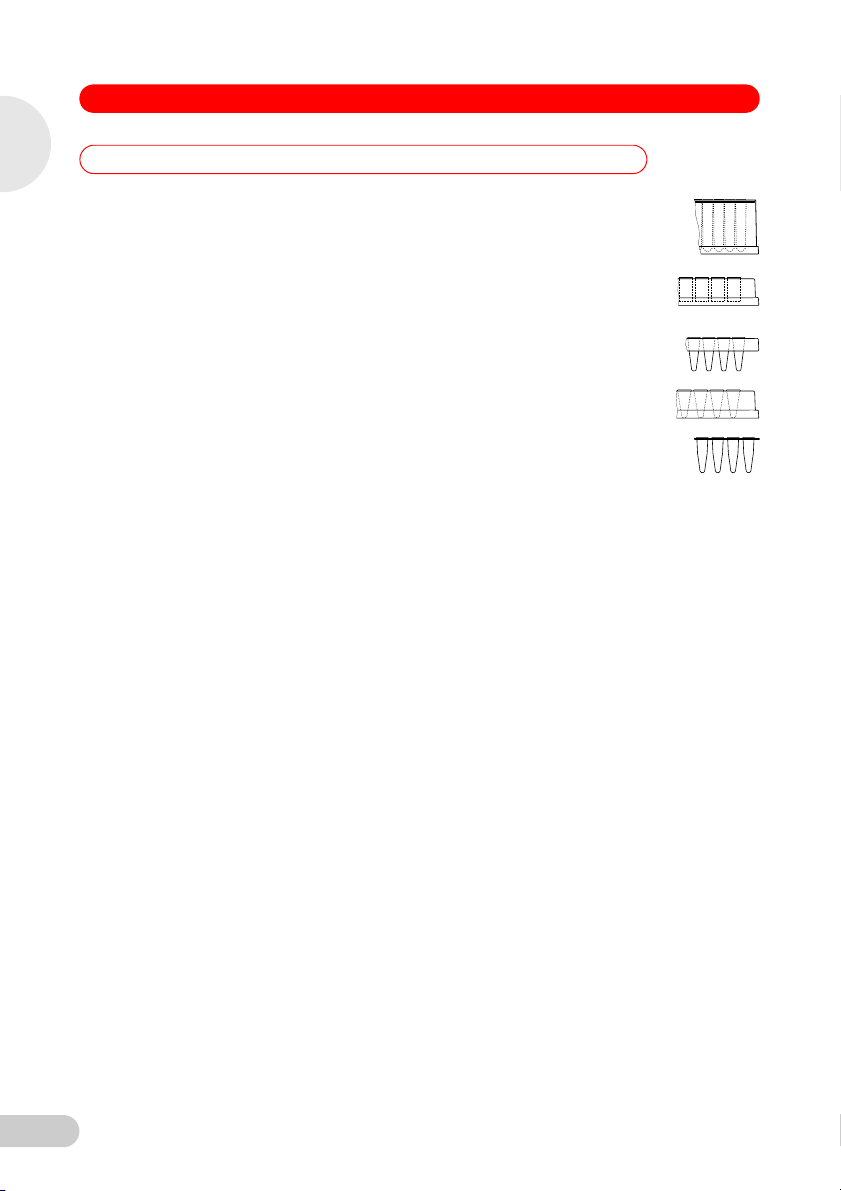
1.5 Glossary
Deepwell plate Plate with 48, 96 or 384 wells with a larger volume than
Microplate Plates with 24, 48, 96 or 384 wells for the preparation,
semi-skirted PCR
plate
Operating Manual
skirted PCR plate PCR plate with a surrounding edge.
unskirted PCR plate PCR plate without a surrounding edge.
Well Cavity. Microplate, PCR plate or Deepwell plate tube.
microplates. Suitable for the preparation, mixing,
centrifuging, transporting and storing of solid and liquid
samples.
mixing, centrifuging, transporting and storing of solid
and liquid samples.
PCR plate with surrounding half-edge.
8
Page 7
ThermoStat plus — Operating Manual
1 2 3
547
6
2 Product description
2 Product description
2.1 Main illustration
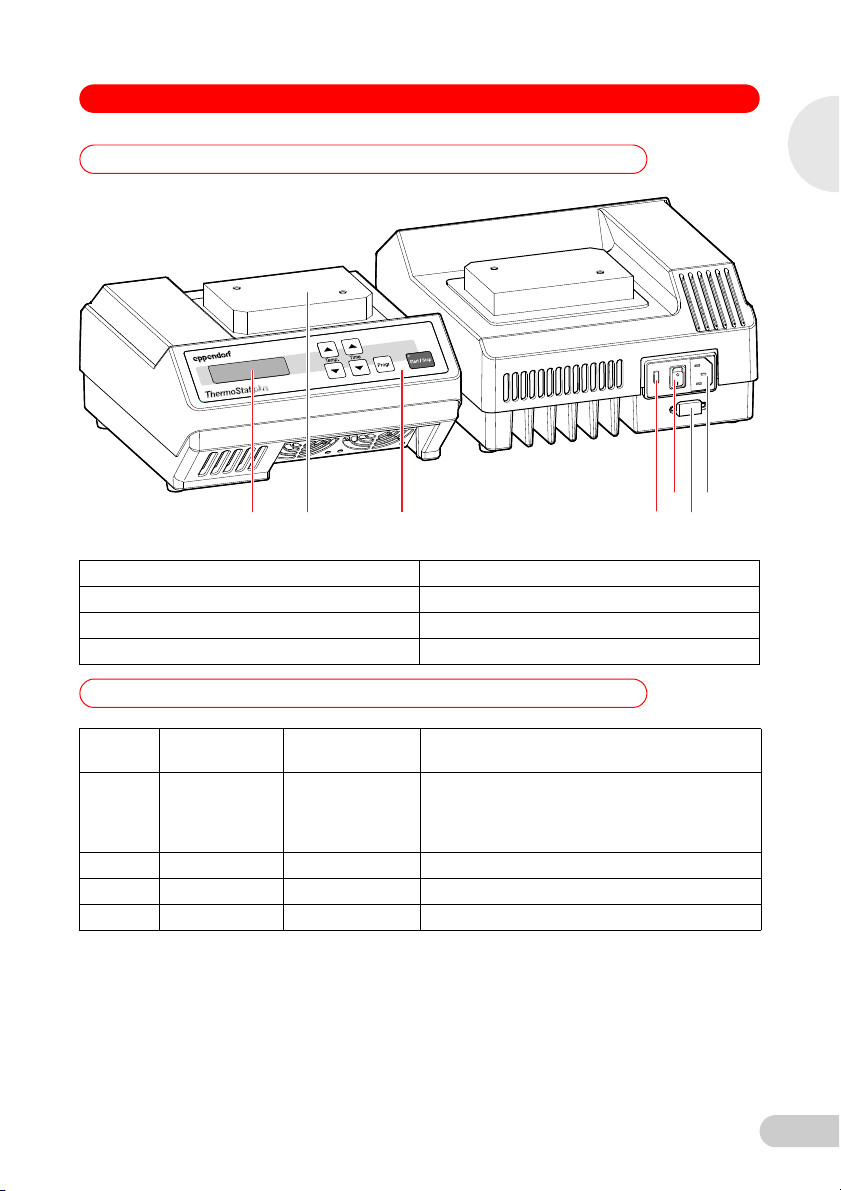
Abb. 1:ThermoStat plus
Fig. 1: ThermoStat plus
1 Display 2 Thermosocket
3 Operating controls 4 Fuse compartment
5 Power switch 6 RS-232 interface
7 Power connection socket
EN
Operating Manual
2.2 Delivery package
Quantity Order No.
(International)
1 5352 000.010 022670204
1- - Mains cable
1- - Hexagon socket key
1 5352 900.011 Operating Manual ThermoStat plus
Order No.
(North America)
Description
ThermoStat plus
basic device without exchangeable
thermoblock
100 - 240 V / 50 - 60 Hz
9
Page 8

ThermoStat plus — Operating Manual
2 Product description
EN
2.3 Features
2.3.1 ThermoStat plus
The ThermoStat plus permits the effective tempering of liquids between –5 °C (max. 30 °C
below room temperature) and +99 °C. For the temperature control of different types of tubes or
plates, different exchangeable thermoblocks can be placed on the thermoblock.
In addition to simple tempering without time limit the device can also be programmed. Here a
sequence of up to four phases with freely adjustable temperatures and time periods can be
executed. These will automatically run in sequence.
The temperature change between two subsequent phases cannot be carried out at the maximum
speed possible resulting in a linear temperature change.
Operating Manual
2.3.2 IsoTherm system (optional accessory)
With the IsoTherm system the samples can be cooled efficiently and at a constant temperature
for several hours and then be thawed gently.
In addition, the tube holder serves as a working aid during the filling of micro test tubes and the
preparation, sorting, distribution, transporting, storing and freezing of samples in micro test
tubes.
The IsoTherm system includes the components IsoRack, IsoPack, IsoSafe and PCR-Cooler.
Features
• IsoPack and IsoSafe
Cooling batteries for -21°C and 0 °C which allow temperature-sensitive samples to be
stored for hours on the lab bench in micro test tubes and in a corresponding insulated box
(IsoSafe).
• IsoRack
Tube holder for 24 micro test tubes (0.5 ml or 1.5/2.0 ml ) each to transfer the tubes from the
cooling battery to the exchangeable thermoblocks. The lockable and stackable,
snap-together IsoRacks are also particularly suited to the storage of micro test tubes in
refrigerators or freezers. The IsoRacks can be autoclaved. The spacing of the test tubes in
the IsoRack is determined by the use of multi-channel pipettes.
• PCR-Cooler
Cool pack for 0 °C for the storage of PCR tubes or plates (semi-skirted, unskirted and
skirted) on the lab bench and in an insulated box (IsoSafe).
10
Further details can be found on our homepage www.eppendorf.com and in the
operating manual for the IsoTherm system.
Hint!
Page 9
ThermoStat plus — Operating Manual
3 Safety
3Safety
3.1 Intended use
The ThermoStat plus is intended exclusively for indoor use and is for the temperature control of
liquids in closed micro test tubes and plates.
Use only Eppendorf accessories or accessories recommended by Eppendorf.
3.2 User profile
This device must only be used by skilled personnel with the appropriate training.
Before using the device, read the operating manual carefully and familiarize yourself with the
device's mode of operation.
3.3 Note on product liability
In the following cases the protection provided in the device may be impaired. The liability for the
function of the device passes to the operator if:
• The device is not used in accordance with the operating manual.
• The device is used outside the range of application described herein.
• The device is used with accessories or consumables (e.g. tubes and plates) which are not
recommended by Eppendorf.
• The device is maintained or repaired by persons not authorized by Eppendorf.
• The owner has made unauthorized modifications to the device.
EN
Operating Manual
3.4 Warnings for intended use
Please read the operating manual and note the following general safety instructions before
using the ThermoStat plus.
Risk of explosion!
Do not operate the device in rooms where work is being carried out with explosive
DANGER!
substances.
Do not use this device to process any explosive or highly reactive substances.
Do not use this device to process any substances which could create an explosive
atmosphere.
Danger! Electric shock from damage to device/power cable.
Only switch on the device if the device and the power cable are undamaged.
DANGER!
Only use devices that have been properly installed or repaired.
Danger! Lethal voltages inside the device.
Ensure that the housing is always closed and undamaged so that no parts inside
DANGER!
the device can be contacted by accident.
Do not remove the housing of the device.
Do not allow the device to be opened by anyone except service personnel who have
been specifically authorized by Eppendorf.
11
Page 10
3 Safety
EN
DANGER!
Operating Manual
DANGER!
DANGER!
WARNING!
ThermoStat plus — Operating Manual
Danger! Electric shock as a result of penetration of liquid.
Switch off the device and disconnect it from the power supply before starting
cleaning or disinfecting.
Do not allow any liquids to enter the inside of the housing.
Do not perform spay disinfection.
Only reconnect the device to the power supply once it is completely dry.
Danger! Damage to health from biologically or chemically hazardous substances.
Hazardous chemicals cause burns and other health hazards.
Observe the material safety data sheets for the biological and chemical substances
used.
Wear personal protective equipment (PPE) at all times when working with biological
or chemical substances.
Follow the instructions for cleaning and decontamination, and ensure that hygiene
safety standards are maintained.
Risk when handling toxic or radioactively-marked liquids or pathogenic germs.
Follow national regulations governing the handling of these substances.
For complete instructions regarding the handling of germs or biological material of
risk group II or higher, please refer to the "Laboratory Biosafety Manual" (Source:
World Health Organization, current edition of the Laboratory Biosafety Manual).
Warning! Risk of burns from hot surfaces.
The exchangeable thermoblock and the thermal base can be very hot after heating and
cause burns.
Allow heated exchangeable thermoblocks and the thermal base to cool down
completely before removing the exchangeable thermoblock.
12
Warning! Damage due to incorrect power supply.
Only connect the device to power sources that match the electrical specifications on
WARNING!
the device's nameplate.
Use only sockets with protective earth.
Warning! Poor safety due to incorrect accessories and spare parts.
The use of accessories and spare parts other than those recommended by Eppendorf
may impair the safety, function and precision of the device. Eppendorf accepts no
WARNING!
warranty or liability for damage caused by non-recommended accessories and spare
parts or incorrect use.
Use only accessories recommended by Eppendorf and original spare parts.
Page 11

ThermoStat plus — Operating Manual
3 Safety
Warning! Contamination due to opening tube lids.
In the following cases, the lids of PCR tubes can spring open and the sample material
can escape:
WARNING!
• high vapor pressure of the content
• improperly sealed lid
• damaged sealing lip
Always check that micro test tubes have been sealed tightly before use.
Warning! Risk to health from contaminated device
Perform decontamination before storing or dispatching the device and/or its
WARNING!
CAUTION!
CAUTION!
CAUTION!
accessories.
Caution! Device damage from improper use.
Only use the ThermoStat plus with the exchangeable thermoblock.
Caution! Damage to the display due to mechanical pressure.
Do not exert mechanical pressure on the display.
Caution! Damage to electronic components from condensation.
After moving the device from a cooler environment (e.g: cool room or outdoors),
wait at least an hour before connecting it to the mains power supply.
EN
Operating Manual
Caution when using aggressive chemicals.
CAUTION!
Aggressive chemicals may damage both the device and its accessories.
Do not use any aggressive chemicals on the device and accessories such as strong
or weak bases, strong acids, acetone, formaldehyde, halogenated hydrocarbons or
phenol.
If the device becomes contaminated with aggressive chemicals, clean it
immediately with a neutral cleaning agent.
Caution! Lack of safety due to missing operating manual.
CAUTION!
When passing on the device, always enclose the operating manual.
If you lose the operating manual, request a replacement. The current version of the
operating manual and the safety instructions can also be found on our website
www.eppendorf.com
.
13
Page 12

3 Safety
ThermoStat plus — Operating Manual
EN
3.5 Warning and instruction signs on the device
Depiction Meaning Location
Operating Manual
Warning! Risk of burns from hot
surfaces.
The exchangeable thermoblock and the
thermal base can be very hot after heating
and cause burns.
Allow heated exchangeable
thermoblocks and the thermal base to
cool down completely before removing
the exchangeable thermoblock.
Upside of device
14
Page 13

ThermoStat plus — Operating Manual
4 Installation
4 Installation
4.1 Preparing installation
EN
Retain the transport carton and the packing material for subsequent safe transport or
storage.
Hint!
Check the completeness of delivery based on the details of the scope of delivery
.(see Delivery package on page 9)
Check all parts for any transport damage.
4.2 Selecting location
Select a location for the ThermoStat plus in accordance with the following criteria:
• Mains power connection (230 V/120 V) as per device identification plate. This is located on
the rear side of the device.
• At least 10 cm away from adjacent devices and walls.
• Solid bench with stable, horizontal and even work surface.
4.3 Installing instrument
Warning! Damage due to incorrect power supply.
Only connect the device to power sources that match the electrical specifications on
WARNING!
1. Place the ThermoStat plus on a suitable work surface so that the ventilation slots on the base
of the device are not blocked.
2. Connect the power cable supplied to the mains connection socket (7) of the ThermoStat plus
and the power supply (see Fig. 1 on page 9).
3. Switch on the ThermoStat plus using the mains switch (5) (see Fig. 1 on page 9).
4. Fit the exchangeable thermoblock (see Inserting exchangeable thermoblocks on page 17).
the device's nameplate.
Use only sockets with protective earth.
Operating Manual
15
Page 14

5 Operation
ThermoStat plus
Temp. Time
Start/St op
Progr.
3 421
1 2 3 4
1 2 3 4
5 Operation
EN
5.1 Overview of operating controls
Before using the ThermoStat plus for the first time, familiarize yourself with the operating controls
and the display.
Abb. 2:Operator control elements and displ ay
Operating Manual
Fig. 2: Operator control elements and display
1 Setting the temperature 2 Setting the time
3 Call program function 4 Starting or stopping a run
Abb. 3:Display programm able tempering ph ase
ThermoStat plus — Operating Manual
Fig. 3: Display programmable tempering phase
1 Phase number 2 Nominal temperature
3 Tempering duration 4 Actual temperature
Abb. 4:Display programmable temperature change phase
Fig. 4: Display programmable temperature change phase
1 Number of temperature change phase 2 Nominal temperature
3 Duration of temperature change phase 4 Current actual temperature
After switching on, the display shows the values of the last run.
Hint!
16
Page 15

5 Operation
ThermoStat plus — Operating Manual
5.2 Inserting exchangeable thermoblocks
Warning! Contamination due to opening tube lids.
In the following cases, the lids of PCR tubes can spring open and the sample material
can escape:
WARNING!
• high vapor pressure of the content
• improperly sealed lid
• damaged sealing lip
Always check that micro test tubes have been sealed tightly before use.
The following exchangeable thermoblocks can be set on the ThermoStat plus:
Exchangeable thermoblock 0.5: 24 x 0.5 ml micro test tubes
Exchangeable thermoblock 1.5: 24 x 1.5 ml micro test tubes
Exchangeable thermoblock 2.0: 24 x 2.0 ml micro test tubes
Exchangeable thermoblock Cryo: 24 x 1.5 or 2.0 ml Cryo tubes
Exchangeable thermoblock lab tubes: 24 tubes at 11 – 11.9 mm, height 30 to 76 mm
Exchangeable thermoblock 15 ml Falcon: 8 x 15 ml Falcon tubes
Exchangeable thermoblock 50 ml Falcon: 4 x 50 ml Falcon tubes
Exchangeable thermoblock MTP: MTP and DWP, PCR tubes and plates
Exchangeable thermoblock slides: 4 slides
Exchangeable thermoblock slides DC: 4 slides DC
CombiBox
EN
Operating Manual
To insert the exchangeable thermoblocks, use the accessories supplied (e.g. screw
driver, screws, flat washers and lock washers).
Hint!
17
Page 16

5 Operation
ThermoStat plus — Operating Manual
EN
5.2.1 Exchangeable thermoblocks for micro test tubes
Operating Manual
1. Place the exchangeable thermoblock (2) on the thermosocket with both flat edges and the
writing facing the front.
2. Tighten the captive screws (1).
5.2.2 MTP exchangeable thermoblock
WARNING!
1. Insert the short screws in the MTP exchangeable thermoblock with the flat washers.
2. Secure the screws from below using the lock washers.
The lock washers prevent the screws from falling out of the bores if the exchangeable
thermoblock is not fixed on the unit.
3. Place the MTP thermoblock on the device in such a way that the spring plate is to the front
left.
4. Tighten the screws.
Caution! Microplates melt at extremely high temperatures.
Only heat microplates made of polystyrene to a maximum 70 °C.
18
Page 17

5 Operation
1
2
3
4
ThermoStat plus — Operating Manual
5.2.3 Adapter plate for 0.2 ml tubes or 96 Well PCR plates
1. Remove the lock washers (4) from the short screws in the exchangeable thermoblock.
2. Remove the short screws.
3. Connect the adapter plate (2) to the MTP thermoblock (3) using the long screws (1).
4. Secure the screws from below using the lock washers.
The lock washers prevent the screws from falling out of the bores if the exchangeable
thermoblock is not fixed on the unit.
5. Place the adapter plate on the device with the MTP thermoblock.
6. Tighten the screws.
5.2.4 Exchangeable thermoblocks for slides and slides DC
1. Open the lid.
2. Place the exchangeable thermoblock on the heating/cooling plate with the writing facing the
front.
3. Tighten the screws of the exchangeable thermoblock.
5.2.5 CombiBox
The CombiBox must not be screwed together.
Place the CombiBox on the heating/cooling plate.
EN
Operating Manual
19
Page 18

5 Operation
20° C 20° C
37° C 26° C
Temp .
37° C
00h: 12m
37° C
Start/St op
37° C 37° C
Progr.
Start/St op
ThermoStat plus — Operating Manual
EN
5.3 Inserting tubes and plates
WARNING!
1. Select a suitable exchangeable thermoblock and mount it (see Inserting exchangeable
thermoblocks on page 17).
2. Place the tubes or plate on the thermoblock.
For optimum temperature control transfer the micro test tubes to the exchangeable
Operating Manual
thermoblocks using IsoRacks. The IsoRack reduces the heat exchange of the thermoblock
with the environment. If necessary close the IsoRack lid.
3. If using the MTP thermoblock: put the lid on.
5.4 Tempering
After being switched on, the device is in simple tempering mode.
On the display, the target temperature is displayed on the left and the actual temperature on the
right. The target temperature is the last set target value. Until the device reaches the target value
"°C" flashes next to the actual temperature.
5.4.1 Basic temperature control
Caution! Microplates melt at extremely high temperatures.
Only heat microplates made of polystyrene to a maximum 70 °C.
1. Set the temperature using the "Temp." arrow keys.
The temperature between –5 °C and 99 °C is
immediately readjusted. Additionally you can switch
on the timer.
20
2. To start the timer press the "Start/Stop" key.
The control lamp illuminates in green. The tempering
duration ("--h : --m") is displayed.
3. To stop the timer press the "Start/Stop" key.
The timer is no longer shown in the display and the
control lamp goes out. Tempering continues with the
target value set. The values are retained even after
the device has been switched off.
Page 19

5 Operation
20° C 20° C
37° CP1
00h: 30m
20° C
95° CP2
00h: 05m
20° C
Progr.
Progr.
70° CP3
00h: 20m
20° C
Progr.
4° CP4
--h: --m
20° C
Progr.
95° CT1-2
00h: 00m
20° C
Progr.
70° CT2-3
00h: 00m
20° C
Progr.
4° CT3-4
00h: 00m
20° C
95° CT1-2
01h: 52m
20° C
70° CT2-3
00h: 50m
20° C
4° CT3-4
MIN:
MIN:
MIN:
02h: 12m
20° C
Progr.
Temp. Time
Temp. Time
Temp. Time
Temp. Time
Time
Time
Time
Time
Time
Time
ThermoStat plus — Operating Manual
5.4.2 Programmable temperature control
In addition to simple tempering you can also create a program with up to 4 different phases which
are sequenced automatically. You can set the desired temperature and the desired tempering
duration.
If the time is enabled you have to disable it to enter programmable tempering.
Hint!
EN
Operating Manual
1. Switch the device on.
On the display, the nominal temperature is displayed on the left, the actual temperature on
the right.
2. Press "Prog" for approx. 1 second.
On the display the phase (P1) appears on the left and to the right of it the target and actual
temperatures. In the bottom line the tempering duration is shown.
3. Set the desired temperature using the "Temp." arrow keys.
21
Page 20

5 Operation
ThermoStat plus — Operating Manual
EN
4. Set the desired tempering duration for this phase using the "Time" arrow keys.
5. Press the "Prog." key.
On the display the parameters for Phase 2 appear.
6. Set the parameters as desired using the arrow keys.
7. Repeat steps 5 and 6 to set the parameters for Phase 3 and Phase 4.
The timer in the programmable mode works continuously, i.e. the device does not take into
account the time required to reach the next temperature. You can program these so-called
temperature change phases if you have set the parameters for the phases:
8. Press the "Prog." key to change to the temperature change phases between the program
phases.
Operating Manual
On the display the first temperature change phase T1-2 appears on the left, to its right the
target temperature of phase 2 and the current actual temperature. In the bottom line the
tempering duration of this phase is shown. The duration is always automatically disabled
("--h: --m").
9. Enable the temperature change phase using the "Time" arrow keys.
The minimum time the device needs to change from the temperature of phase 1 to the
temperature of phase 2 is shown.
10. Press the "Time" arrow keys to extend the temperature change phase or disable it, if
necessary.
11. Press the "Prog." key.
On the display the parameters for the second temperature change phase T2-3 are shown,
which you can modify or enable as described above.
12. Press the "Prog." key.
On the display the parameters for the third temperature change phase T3-4 are now shown,
which you can modify or enable as described above.
13. Press the "Prog." key.
The programming is complete and the parameters of the first phase (P1) are shown.
14. Press the "Start/Stop" key to start the programmed tempering.
The program step shown in the display will always be started. The phases then run
automatically sequenced until phase 4 has been completed. A maximum of 4 phases can be
sequenced automatically, however, without roll-over (not via P4 back to P1). The values are
retained even after the device has been switched off.
22
Page 21

6 Troubleshooting
6 Troubleshooting
6.1 General errors
ThermoStat plus — Operating Manual
EN
If the proposed measures to remedy the fault repeatedly do not deliver the desired
result, contact your local Eppendorf partner. The addresses of our dealers are available
Hint!
on our website www.eppendorf.com
penultimate page of this operating manual.
Symptom /
message
No indication Power supply is interrupted.
Low temperature
value is not
reached.
Cause Remedy
Ambient temperature too high.
, the addresses of our sales offices are on the
Operating Manual
Check the mains connection
and the power supply.
Set up the device in a cooler
environment.
23
Page 22

7 Maintenance
7 Maintenance
EN
7.1 Cleaning
Regularly clean the housing of the ThermoStat plus and the exchangeable thermoblocks.
DANGER!
Operating Manual
CAUTION!
CAUTION!
ThermoStat plus — Operating Manual
Danger! Electric shock as a result of penetration of liquid.
Switch off the device and disconnect it from the power supply before starting
cleaning or disinfecting.
Do not allow any liquids to enter the inside of the housing.
Do not perform spay disinfection.
Only reconnect the device to the power supply once it is completely dry.
Caution when using aggressive chemicals.
Aggressive chemicals may damage both the device and its accessories.
Do not use any aggressive chemicals on the device and accessories such as strong
or weak bases, strong acids, acetone, formaldehyde, halogenated hydrocarbons or
phenol.
If the device becomes contaminated with aggressive chemicals, clean it
immediately with a neutral cleaning agent.
Caution! Corrosion from aggressive cleaning agents and disinfectants.
Do not use corrosive cleaning agents, aggressive solvents or abrasive polishes.
Auxiliary aids
• Lint free cloth
• Mild, soap-based household cleaning agent
• Dist. water
Cleaning the ThermoStat plus
1. Switch the ThermoStat plus off and isolate from the power supply.
2. Clean all of the outer parts of the ThermoStat plus with a mild, soap-based solution and a
lint-free cloth.
3. Wipe off the soap solution with dist. water.
4. Dry all cleaned parts.
Cleaning exchangeable thermoblocks
Remove any contamination with a damp, lint-free cloth. Use a mild lab cleaner if necessary.
24
Page 23

7 Maintenance
ThermoStat plus — Operating Manual
7.2 Disinfection / Decontamination
Danger! Electric shock as a result of penetration of liquid.
Switch off the device and disconnect it from the power supply before starting
DANGER!
cleaning or disinfecting.
Do not allow any liquids to enter the inside of the housing.
Do not perform spay disinfection.
Only reconnect the device to the power supply once it is completely dry.
Auxiliary equipment
• lint-free cloth,
• disinfectant.
1. Switch the ThermoStat plus off and isolate from the power supply.
2. Allow the device to cool down.
3. Clean the device (see Cleaning on page 24).
4. Select a disinfection method which complies with the legal requirements and regulations
applicable to your range of application.
5. Wipe the surfaces with the lint-free cloth and disinfectant.
7.3 Decontamination before shipping
If you are shipping the device to the authorized Technical Service for repairs or to your authorized
dealer for disposal please note the following:
Warning! Risk to health from contaminated device
1. Follow the instructions in the decontamination certificate. It is available in PDF
WARNING!
format on our homepage (www.eppendorf.com/decontamination)
2. Decontaminate all the parts you want to dispatch.
3. Enclose the fully-completed decontamination certificate for returned goods (incl. the
serial number of the device) with the dispatch.
.
EN
Operating Manual
7.4 Temperature control
The application parameters in the technical data (see p. 28) define the limits and deviations
(tolerances) on all positions of a thermoblock / exchangeable thermoblock.
Use the temperature validation system for an exact control of the temperatures. For the 1.5 ml
reference exchangeable thermoblock there is a temperature sensor - 1.5 mL for all Thermomixer
and ThermoState from Eppendorf which can measure the exact temperature in the block
(see Temperature sensor on page 31).
25
Page 24

8 Transport, storage and disposal
8 Transport, storage and disposal
EN
8.1 Transport
Only transport the device in the original packaging.
General
transportation
Air freight -20 to 55 °C 10 to 95% 30 to 106 kPa
8.2 Storage
Operating Manual
in transport packaging -20 to 55 °C 10 to 95% 70 to 106 kPa
without transport
packaging
8.3 Disposal
In the event of disposing of the product, please observe the applicable legal regulations.
Information on the disposal of electrical and electronic devices in the European
Community:
The disposal of electrical devices is regulated within the European Community by national
regulations based on EU Directive 2002/96/EC pertaining to waste electrical and electronic
equipment (WEEE).
In accordance with this, any devices delivered after 13/08/2005 on a business-to-business basis,
which includes this product, may no longer be disposed of in household waste. To document this
they have been marked with the following identification:
ThermoStat plus — Operating Manual
Air temperature Rel. humidity Air pressure
-20 to 60 °C 10 to 95% 30 to 106 kPa
Air temperature Rel. humidity Air pressure
-5 to 45°C 10 to 95% 70 to 106 kPa
Because disposal regulations may differ from one country to another within the EU please
contact your supplier if necessary.
26
Page 25

9 Technical data
9 Technical data
9.1 Power supply
ThermoStat plus — Operating Manual
EN
Main power connection: 100 to 240 V ±10 %, 50 to 60 Hz
Voltage is automatically adjusted.
Fuse for 100 to 240 V: T1,6 A, 250 V (2 off)
Power consumption: 75W
Maximum current consumption: < 0.8 A
Protection class: I
Overvoltage category: II (IEC 61010-1)
Degree of contamination: 2 (IEC 664)
9.2 Ambient conditions
Environment: For indoor use only
Ambient temperature: 4 to 40 °C
Relative humidity: 80 % max.
9.3 Weight / dimensions
Dimensions (W x D x H): 220 x 250 x 125 mm
Weight: 5.0 kg
Operating Manual
27
Page 26

9 Technical data
ThermoStat plus — Operating Manual
EN
9.4 Application parameters
Temperature control range: –5 °C to 99 °C
Usable tempering range: from 30 °C below room temperature to 99 °C
Usable tempering range CombiBox: 30 °C below room temperature to 95 °C
Tempering accuracy for:
0 °C ±1.0 °C
Operating Manual
37 °C ±0.5 °C
90 °C 1.0 °C
Heating rate: 5 °C/min
Cooling rate:
simple tempering operation: 6.0 °C/min between 99 °C and 25 °C
programmable tempering operation: 1 to 2 °C/min
Temperature deviation across the 24
exchangeable thermoblock:
9.5 Additional data
(dependent on filling level)
1.5 °C/min between 25 °C and –5 °C
max. 0.2 °C
9.5.1 Interfaces
EDP connection: RS-232, Sub-D9 male
Only connect devices to interfaces that meet the IEC 950/EN 60950 (UL 1950)
standards.
Hint!
9.5.2 Time interval
Programmable time interval: 1 min to 99:59 hours, infinitely adjustable
28
Page 27

ThermoStat plus — Operating Manual
10 Ordering information
10 Ordering information
Warning! Poor safety due to incorrect accessories and spare parts.
The use of accessories and spare parts other than those recommended by Eppendorf
may impair the safety, function and precision of the device. Eppendorf accepts no
WARNING!
warranty or liability for damage caused by non-recommended accessories and spare
parts or incorrect use.
Use only accessories recommended by Eppendorf and original spare parts.
10.1 ThermoStat plus
EN
Operating Manual
Order No.
(International)
5352 000.010 022670204
Order No.
(North America)
Description
ThermoStat plus
basic device without exchangeable thermoblock
100 - 240 V / 50 - 60 Hz
10.2 Exchangeable thermoblocks and adapter plates
Order No.
(International)
5361 000.015
5360 000.011
5362 000.019
5363 000.012 022670565
5363 007.009 022670573
5364 000.016 022670581
5366 000.013
5365 000.010
5367 000.017 022670557
5368 000.010 022670590
5368 000.100 022670786
Order No.
(North America)
022670506
022670522
022670549
022670531
022670514
Description
Exchangeable thermoblock for microcentrifuge tubes
complete with IsoTherm Rack and IsoTherm cool pack 0°C
24 x 0.5 mL
24 x 1.5 mL
24 x 2.0 mL
Exchangeable thermoblock for MTPs and deepwell
plates
with lid
Adapter plate for 96 x 0.2 mL PCR tubes
to insert in blocks for MTPs
Exchangeable thermoblock for 24 micro test tubes
11 - 11.9 mm diam., height 30 - 76 mm
Exchangeable thermoblock for Falcon tubes
for 8 x 15 mL
for 4 x 50 mL
Exchangeable thermoblock
for 1.5 - 2 mL Cryo tubes
Exchangeable thermoblock for 4 slides
for hybridization experiments
Exchangeable thermoblock for slides DC
holds 4 DualChip slides, with clamping plate
29
Page 28

ThermoStat plus — Operating Manual
10 Ordering information
EN
10.3 Tubes and plates
Order No.
(International)
0030 121.023 022363611
0030 120.086 -
Operating Manual
0030 120.094 -
0030 124.502 951010057
0030 124.332 951010006
0030 124.340 951010014
0030 124.359 951010022
0030 124.200 951010006
0030 128.648 951020401
0030 128.575 951020303
0030 521.102 951031003
0030 501.101 951031801
0030 501.209 951032603
0030 501.306 951033405
All plates are also available with different border colors (red, yellow, green and blue) and purity
qualities, in large packs as well as with barcoding on request. You can find further information in
our catalog or our website www.eppendorf.com
Order No.
(North
America)
Description
Safe-Lock micro test tubes
0.5 mL per 500 pcs.
colorless
Safe-Lock micro test tubes
1.5 mL per 1,000 pcs.
colorless
Safe-Lock micro test tubes
2.0 mL per 1,000 pcs.
colorless
PCR tubes
thin-walled with hinged lid, colorless, 500 pcs.
0.5 mL
0.2 mL PCR tubes
1,000 pcs., colorless
Five-tube strip for 0.2 mL PCR Tubes
colorless, pack of 125 (= 625 tubes)
Eight-tube strip, for 0.2 mL PCR Tubes
colorless, pack of 120 (= 960 tubes)
PCR Tubes
0.2 mL per 1,000 pcs.
colorless
twin.tec PCR Plate 96, skirted
Wells colorless, 25 pcs.
clear
twin.tec PCR Plate 96, semi-skirted
Wells colorless, 25 pcs.
clear
Eppendorf Deepwell Plate 384/200 μL
40 plates, border color white
Standard
Eppendorf Deepwell Plate 96/500 μL
40 plates, border color white
Standard
Eppendorf Deepwell Plate 96/1000 μL
20 plates, border color white
Standard
Eppendorf Deepwell Plate 96/2000 μL
20 plates, border color white
Standard
.
30
Page 29

ThermoStat plus — Operating Manual
10 Ordering information
10.4 IsoTherm-System
Order No.
(International)
3880 001.018
3880 000.011
3881 000.015
3881 000.023
3881 000.031
10.5 Temperature sensor
Order No.
(International)
0055 000.298 950008059
5354 850.500 on request Temperature sensor - 1.5 mL
Order No.
(North America)
022510053
022510002
022510509
022510541
022510525
Order No.
(North America)
Description
IsoTherm System
includes IsoSafe, IsoRack, 0 °C IsoPack and -21 °C for
1.5 mL / 2.0 mL tubes
0.5 mL tubes
PCR-Cooler
Starter Set (1 x pink, 1 x blue)
Pink
Blue
Description
Temperature validation system
for Mastercycler, Mastercycler ep and Mastercycler pro
EN
Operating Manual
31
Page 30

Index
ThermoStat plus — Operating Manual
EN
Operating Manual
11 Index
Ambient conditions .....................................27
Application parameters............................... 28
Cleaning ......................................... 24, 24, 24
Decontamination......................................... 25
Deepwell plate ..............................................8
Dimensions................................................. 27
Display........................................................ 16
Disposal...................................................... 26
Error messages ..........................................23
Error removal.............................................. 23
Glossary ....................................................... 8
Hazard icons................................................. 7
Installation
Device ..................................................15
Preparation........................................... 15
Select location...................................... 15
Intended use
Hazards................................................ 11
IsoPack....................................................... 10
IsoSafe........................................................ 10
IsoTherm system......................................... 10
Microplate .....................................................8
Operating controls ......................................16
A
C
D
E
G
H
M
O
P
PCR plate
semi-skirted .......................................... 8
skirted .................................................... 8
unskirted ................................................ 8
PCR-Cooler................................................ 10
Power supply.............................................. 27
S
Safety instructions...................................... 11
Safety notes
Meaning of the symbols......................... 7
Select location............................................ 15
Storage....................................................... 26
T
Technical data
Application parameters ........................ 28
Dimensions .......................................... 27
Power supply ....................................... 27
Technical data
Ambient conditions .............................. 27
Temperature control ................................... 25
Transport .................................................... 26
I
Warning signs
Device.................................................. 14
Instructions ............................................ 7
Weight
Device.................................................. 27
Well .............................................................. 8
W
32
Page 31

EG-Konformitätserklärung
EC Conformity Declaration
Das bezeichnete Produkt entspricht den einschlägigen grundlegenden Anforderungen der
aufgeführten EG-Richtlinien und Normen. Bei einer nicht mit uns abgestimmten Änderung des
Produktes oder einer nicht bestimmungsgemäßen Anwendung verliert diese Erklärung ihre Gültigkeit.
The product named below fulfills the relevant fundamental requirements of
the EC directives and standards listed. In the case of unauthorized modifications to the product
Produktbezeichnung, Product name:
ThermoStat plus 5352
einschließlich Zubehör / including accessories
Produkttyp, Product type:
Thermostat für Reaktionsgefäße / Thermostat for micro test tubes
Einschlägige EG-Richtlinien/Normen, Relevant EC directives/standards:
2006/95/EG, EN 61010-1, EN 61010-2-010
2004/108/EG, EN 55011/B, EN 61000-6-1, EN 61000-3-2, EN 61000-4-14
Vorstand, Board of Management: Projektmanagement, Project Management:
05.11.2009
Hamburg, Date:
0015 033.509-02
or an unintended use this declaration becomes invalid.
Eppendorf AG · Barkhausenweg 1 · 22339 Hamburg · Germany
5352 900.992-05
Page 32

Eppendorf offices
Eppendorf offices
AUSTRALIA & NEW ZEALAND
Eppendorf South Pacific Pty. Ltd.
Telefon: +61 2 9889 5000
Fax: +61 2 9889 5111
E-Mail: Info@eppendorf.com.au
Internet: www.eppendorf.com.au
CANADA
Eppendorf Canada Ltd.
Telefon: +1 905 826 5525
Fax: +1 905 826 5424
E-Mail: canada@eppendorf.com
Internet: www.eppendorfna.com
FRANCE
Eppendorf France S.A.R.L.
Telefon: +33 1 30 15 67 40
Fax: +33 1 30 15 67 45
E-Mail: eppendorf@eppendorf.fr
Internet: www.eppendorf.fr
ITALY
Eppendorf s.r.l.
Telefon: +390 2 55 404 1
Fax: +390 2 58 013 438
E-Mail: eppendorf@eppendorf.it
Internet: www.eppendorf.it
AUSTRIA
Eppendorf Austria GmbH
Telefon: +43 (0) 1 890 13 64 - 0
Fax: +43 (0) 1 890 13 64 - 20
E-Mail: office@eppendorf.at
Internet: www.eppendorf.at
CHINA
Eppendorf China Ltd.
Telefon: +86 21 38560500
Fax: +86 21 38560555
E-Mail: market.info@eppendorf.cn
Internet: www.eppendorf.cn
GERMANY
Eppendorf Vertrieb
Deutschland GmbH
Telefon: +49 2232 418-0
Fax: +49 2232 418-155
E-Mail: vertrieb@eppendorf.de
Internet: www.eppendorf.de
JAPAN
Eppendorf Co. Ltd.
Telefon: +81 3 5825 2363
Fax: +81 3 5825 2365
E-Mail: info@eppendorf.jp
Internet: www.eppendorf.jp
BRAZIL
Eppendorf do Brasil Ltda.
Telefon: +55 11 30 95 93 44
Fax: +55 11 30 95 93 40
E-Mail:
eppendorf@eppendorf.com.br
Internet: www.eppendorf.com.br
CZECH REP. & SLOVAKIA
Eppendorf Czech & Slovakia s.r.o.
Telefon: +420 323 605 454
Fax: +420 323 605 454
E-Mail: eppendorf@eppendorf.cz
Internet: www.eppendorf.cz /
www.eppendorf.sk
INDIA
Eppendorf India Limited
Telefon: +91 44 42 11 13 14
Fax: +91 44 42 18 74 05
E-Mail: info@eppendorf.co.in
Internet: www.eppendorf.co.in
NORDIC
Eppendorf Nordic Aps
Telefon: +45 70 22 2970
Fax: +45 45 76 7370
E-Mail: nordic@eppendorf.dk
Internet: www.eppendorf.dk
SOUTH & SOUTHEAST ASIA
Eppendorf Asia Pacific Sdn. Bhd.
Telefon: +60 3 8023 2769
Fax: +60 3 8023 3720
E-Mail:
eppendorf@eppendorf.com.my
Internet: www.eppendorf.com.my
UNITED KINGDOM
Eppendorf UK Limited
Telefon: +44 1223 200 440
Fax: +44 1223 200 441
E-Mail: sales@eppendorf.co.uk
Internet: www.eppendorf.co.uk
SPAIN
Eppendorf Ibérica S.L.U.
Telefon: +34 91 651 76 94
Fax: +34 91 651 81 44
E-Mail: iberica@eppendorf.es
Internet: www.eppendorf.es
USA
Eppendorf North America, Inc.
Telefon: +1 516 334 7500
Fax: +1 516 334 7506
E-Mail: info@eppendorf.com
Internet: www.eppendorfna.com
SWITZERLAND
Vaudaux-Eppendorf AG
Telefon: +41 61 482 1414
Fax: +41 61 482 1419
E-Mail: vaudaux@vaudaux.ch
Internet: www.eppendorf.ch
OTHER COUNTRIES
Internet: www.eppendorf.com/
worldwide
147
Page 33

Your local distributor: www.eppendorf.com/worldwide
Eppendorf AG · 22331 Hamburg · Germany · Tel: +49 40 538 01-0 · Fax: +49 40 538 01-556
Eppendorf North America, Inc. · 102 Motor Parkway, Suite 410 · Hauppauge, NY 11788-5178 · USA
Tel: +1 516 334 7500 · Toll free phone: +1 800 645 3050 · Fax: +1 516 334 7506 · E-Mail: info@eppendorf.com
Europe, International: Tel: +49 1803 666 789 · E-Mail: support@eppendorf.com
North America: Tel: +1 800 645 3050 ext. 2258 · E-Mail: techserv@eppendorf.com
Asia Pacific: Tel: +60 3 8023 6869 · E-Mail: support_asiapacific@eppendorf.com
E-Mail: eppendorf@eppendorf.com
Application Support
 Loading...