

Page 1
rating Procedure for Pipettes
Register your instrument!
www.eppendorf.com/myeppendorf
P
N)Operating Procedure for Pipettes
Eppendorf SOP
Standard Operating Procedure for Pipettes
Page 2

Copyright
©
2013 Eppendorf AG, Hamburg. No part of this publication may be
reproduced without the prior permission of the copyright owner.
®
eppendorf
Eppendorf Multipette
Biomaster
, the Eppendorf logo, Eppendorf Reference®, Eppendorf Research®,
®
, Eppendorf Xplorer®, Varipette®, Varispenser®,
®
, Combitips® and PICASO® are registered trademarks of
Eppendorf AG.
AESOP13640-08/052013
Page 3

Table of contents
Eppendorf SOP
English (EN)
Table of contents
1 Test and pipette conditions . . . . . . . . . . . . . . . . . . . . . . . . . . . . . . . . . . . . .6
1.1 Balances . . . . . . . . . . . . . . . . . . . . . . . . . . . . . . . . . . . . . . . . . . . . . . .6
1.1.1 Balance type . . . . . . . . . . . . . . . . . . . . . . . . . . . . . . . . . . . . .6
1.1.2 Accuracy . . . . . . . . . . . . . . . . . . . . . . . . . . . . . . . . . . . . . . . . 6
1.1.3 Minimum requirements for balances . . . . . . . . . . . . . . . . . .6
1.2 Measuring station . . . . . . . . . . . . . . . . . . . . . . . . . . . . . . . . . . . . . . . .7
1.2.1 Evaporation . . . . . . . . . . . . . . . . . . . . . . . . . . . . . . . . . . . . . .7
1.2.2 Measuring station . . . . . . . . . . . . . . . . . . . . . . . . . . . . . . . . .7
1.2.3 Test room . . . . . . . . . . . . . . . . . . . . . . . . . . . . . . . . . . . . . . .7
1.2.4 Temperature differences. . . . . . . . . . . . . . . . . . . . . . . . . . . .7
1.2.5 Test liquid . . . . . . . . . . . . . . . . . . . . . . . . . . . . . . . . . . . . . . .7
1.2.6 Operating Manual . . . . . . . . . . . . . . . . . . . . . . . . . . . . . . . . .7
2 Calibration . . . . . . . . . . . . . . . . . . . . . . . . . . . . . . . . . . . . . . . . . . . . . . . . . .8
2.1 Scope of testing . . . . . . . . . . . . . . . . . . . . . . . . . . . . . . . . . . . . . . . . .8
2.1.1 Adjusting adjustable volume pipettes . . . . . . . . . . . . . . . . . . 8
2.1.2 Multi-channel pipettes . . . . . . . . . . . . . . . . . . . . . . . . . . . . .8
2.1.3 Multipette . . . . . . . . . . . . . . . . . . . . . . . . . . . . . . . . . . . . . . .8
2.1.4 Bottle-top dispenser and Top Buret . . . . . . . . . . . . . . . . . . .9
2.2 Measurement . . . . . . . . . . . . . . . . . . . . . . . . . . . . . . . . . . . . . . . . . . . 9
2.2.1 Work method. . . . . . . . . . . . . . . . . . . . . . . . . . . . . . . . . . . . . 9
2.2.2 Removing the test volume from the reservoir. . . . . . . . . . . . 9
2.2.3 Dispensing the test volume into the weighing vessel . . . . . 10
3
3 Evaluation . . . . . . . . . . . . . . . . . . . . . . . . . . . . . . . . . . . . . . . . . . . . . . . . . .11
3.1 Calculating the systematic error . . . . . . . . . . . . . . . . . . . . . . . . . . . . 11
3.2 Calculating the random error . . . . . . . . . . . . . . . . . . . . . . . . . . . . . .11
4 Sterilization and cleaning . . . . . . . . . . . . . . . . . . . . . . . . . . . . . . . . . . . . .12
4.1 Sterilization . . . . . . . . . . . . . . . . . . . . . . . . . . . . . . . . . . . . . . . . . . . . 12
4.1.1 Reference and Biomaster . . . . . . . . . . . . . . . . . . . . . . . . . .12
4.1.2 Research plus and Reference 2. . . . . . . . . . . . . . . . . . . . . . 12
4.1.3 Research and Research pro . . . . . . . . . . . . . . . . . . . . . . . .13
4.1.4 Top Buret . . . . . . . . . . . . . . . . . . . . . . . . . . . . . . . . . . . . . .13
4.1.5 Varipette and Multipette . . . . . . . . . . . . . . . . . . . . . . . . . . .13
4.1.6 Varispenser . . . . . . . . . . . . . . . . . . . . . . . . . . . . . . . . . . . . .13
4.1.7 Xplorer and Xplorer plus . . . . . . . . . . . . . . . . . . . . . . . . . .14
4.2 Cleaning . . . . . . . . . . . . . . . . . . . . . . . . . . . . . . . . . . . . . . . . . . . . . . 14
Page 4

Table of contents
4
Eppendorf SOP
English (EN)
5 Leakage check . . . . . . . . . . . . . . . . . . . . . . . . . . . . . . . . . . . . . . . . . . . . . . 15
5.1 Pipette leakage check . . . . . . . . . . . . . . . . . . . . . . . . . . . . . . . . . . . .15
6 Troubleshooting . . . . . . . . . . . . . . . . . . . . . . . . . . . . . . . . . . . . . . . . . . . . .15
6.1 Potential error causes and corrections . . . . . . . . . . . . . . . . . . . . . . . 15
7 Adjustment . . . . . . . . . . . . . . . . . . . . . . . . . . . . . . . . . . . . . . . . . . . . . . . . .17
7.1 General information . . . . . . . . . . . . . . . . . . . . . . . . . . . . . . . . . . . . .17
7.2 Adjusting adjustable-volume pipettes. . . . . . . . . . . . . . . . . . . . . . . .17
7.2.1 Procedure . . . . . . . . . . . . . . . . . . . . . . . . . . . . . . . . . . . . . .18
7.2.2 Biomaster . . . . . . . . . . . . . . . . . . . . . . . . . . . . . . . . . . . . . . 19
7.2.3 Reference variable . . . . . . . . . . . . . . . . . . . . . . . . . . . . . . .19
7.2.4 Reference 2 adjustable-volume. . . . . . . . . . . . . . . . . . . . . .20
7.2.5 Research variable . . . . . . . . . . . . . . . . . . . . . . . . . . . . . . . .24
7.2.6 Research plusadjustable volume - adjustment to
environmental parameters. . . . . . . . . . .. . . . . . . . . . .. . . . . . 25
7.2.7 Research plus adjustable volume - change to the factory
adjustment.. . . . . . . . .. . . . .. . . . . . . . . . .. . . . . . . . . . . . . . . .26
7.2.8 Research Multi-channel . . . . . . . . . . . . . . . . . . . . . . . . . . .31
7.2.9 Research plus Multi-channel . . . . . . . . . . . . . . . . . . . . . . .31
7.2.10 Varispenser plus . . . . . . . . . . . . . . . . . . . . . . . . . . . . . . . . .32
7.2.11 Xplorer and Xplorer plus . . . . . . . . . . . . . . . . . . . . . . . . . .32
7.3 Adjusting fixed-volume pipettes. . . . . . . . . . . . . . . . . . . . . . . . . . . .33
7.3.1 Reference fixed . . . . . . . . . . . . . . . . . . . . . . . . . . . . . . . . . .33
7.3.2 Reference2 . . . . . . . . . . . . . . . . . . . . . . . . . . . . . . . . . . . . .34
7.3.3 Research fixed. . . . . . . . . . . . . . . . . . . . . . . . . . . . . . . . . . . 34
7.3.4 Research plus fixed. . . . . . . . . . . . . . . . . . . . . . . . . . . . . . .35
7.4 Physical influences of liquids . . . . . . . . . . . . . . . . . . . . . . . . . . . . . .35
8 Factor Z for distilled water . . . . . . . . . . . . . . . . . . . . . . . . . . . . . . . . . . . .36
8.1 Factor Z overview table. . . . . . . . . . . . . . . . . . . . . . . . . . . . . . . . . . .36
Page 5

Table of contents
Eppendorf SOP
English (EN)
9 Technical specifications. . . . . . . . . . . . . . . . . . . . . . . . . . . . . . . . . . . . . . . 37
9.1 Fixed-volume pipettes. . . . . . . . . . . . . . . . . . . . . . . . . . . . . . . . . . . .37
9.1.1 Reference fixed . . . . . . . . . . . . . . . . . . . . . . . . . . . . . . . . . .37
9.1.2 Reference 2 fixed . . . . . . . . . . . . . . . . . . . . . . . . . . . . . . . .38
9.1.3 Research fixed. . . . . . . . . . . . . . . . . . . . . . . . . . . . . . . . . . . 39
9.1.4 Research plus fixed. . . . . . . . . . . . . . . . . . . . . . . . . . . . . . .40
9.2 Adjusting adjustable volume pipettes. . . . . . . . . . . . . . . . . . . . . . . .41
9.2.1 Reference variable . . . . . . . . . . . . . . . . . . . . . . . . . . . . . . .41
9.2.2 Reference 2 adjustable-volume. . . . . . . . . . . . . . . . . . . . . .42
9.2.3 Research adjustable-volume . . . . . . . . . . . . . . . . . . . . . . . .44
9.2.4 Research pro . . . . . . . . . . . . . . . . . . . . . . . . . . . . . . . . . . . .45
9.2.5 Research plus adjustable-volume . . . . . . . . . . . . . . . . . . . .46
9.2.6 Biomaster . . . . . . . . . . . . . . . . . . . . . . . . . . . . . . . . . . . . . . 47
9.2.7 Varipette . . . . . . . . . . . . . . . . . . . . . . . . . . . . . . . . . . . . . . . 47
9.2.8 Xplorer and Xplorer plus . . . . . . . . . . . . . . . . . . . . . . . . . .48
9.3 Multi-channel pipettes . . . . . . . . . . . . . . . . . . . . . . . . . . . . . . . . . . . 49
9.3.1 Research . . . . . . . . . . . . . . . . . . . . . . . . . . . . . . . . . . . . . . . 49
9.3.2 Research pro . . . . . . . . . . . . . . . . . . . . . . . . . . . . . . . . . . . .50
9.3.3 Research plus . . . . . . . . . . . . . . . . . . . . . . . . . . . . . . . . . . .51
9.3.4 Reference2 . . . . . . . . . . . . . . . . . . . . . . . . . . . . . . . . . . . . .52
9.3.5 Xplorer and Xplorer plus . . . . . . . . . . . . . . . . . . . . . . . . . .53
9.4 Multipette . . . . . . . . . . . . . . . . . . . . . . . . . . . . . . . . . . . . . . . . . . . . . 54
9.4.1 MultipettePlus . . . . . . . . . . . . . . . . . . . . . . . . . . . . . . . . . . . 54
9.4.2 MultipetteM4 . . . . . . . . . . . . . . . . . . . . . . . . . . . . . . . . . . . 55
9.4.3 Multipette stream / Multipette Xstream . . . . . . . . . . . . . . .56
9.5 Varispenser / Top Buret . . . . . . . . . . . . . . . . . . . . . . . . . . . . . . . . . . 57
9.5.1 Varispenser and Varispenser plus. . . . . . . . . . . . . . . . . . . .57
9.5.2 Top Buret . . . . . . . . . . . . . . . . . . . . . . . . . . . . . . . . . . . . . .57
9.6 Error limits in accordance with EN ISO 8655. . . . . . . . . . . . . . . . . . 57
9.6.1 Air-cushion pipettes, fixed and adjustable volume. . . . . . .58
9.6.2 Positive displacement pipettes (Biomaster) . . . . . . . . . . . .58
9.6.3 Dispenser (Multipette) . . . . . . . . . . . . . . . . . . . . . . . . . . . .59
9.6.4 Single-stroke dispenser (Varispenser) . . . . . . . . . . . . . . . .60
9.6.5 Piston stroke burets . . . . . . . . . . . . . . . . . . . . . . . . . . . . . .60
5
Index . . . . . . . . . . . . . . . . . . . . . . . . . . . . . . . . . . . . . . . . . . . . . . . . . . . . . .61
Page 6
Test and pipette conditions
6
Eppendorf SOP
English (EN)
1 Test and pipette conditions
These test and pipetting conditions are valid for all Eppendorf pipettes
and dispensers.
Follow EN ISO 8655 "Volume-measuring equipment with pistons".
For the calibration or adjustment of pipettes, the scales and measuring station
should fulfill the following requirements:
1.1 Balances
1.1.1 Balance type
Use semi-microbalances and microbalances to calibrate pipettes.
Some companies offer balances that are specially designed to meet the
requirements of pipette calibration, e.g. Sartorius and Mettler.
1.1.2 Accuracy
When selecting the balances, ensure that they are suitable for the accuracy of
the pipette. This helps to ensure that deviations within a measuring series are
recorded exactly for the assessment of the systematic and random measurement
deviations in accordance with EN ISO 8655.
For a pipette volume of less than or equal to 10 µl, balances with a 6-digit
display must be used. With larger volumes, balances with a 5-digit display are
sufficient.
1.1.3 Minimum requirements for balances
Selected volume* of the pipette to be
tested
1 µL to 10 µL 0.001
>10 µL to 100 µL 0.01
>100 µL to 1 000 µL 0.1
>1 mL to 10 mL 0.1
>10 mL to 200 mL 1
* For practical reasons, the nominal volume can be used for the selection of the
balances.
Display resolution (mg)
Page 7

Test and pipette conditions
Eppendorf SOP
English (EN)
1.2 Measuring station
1.2.1 Evaporation
Take evaporation protection into account while carrying out the measurement.
With volumes < 50 µl in particular, errors caused by the evaporation of the test
liquid must be taken into consideration.
This can be ensured by using a liquid trap or other equipment to prevent
evaporation.
1.2.2 Measuring station
For electronic measurement data processing, we recommend calibration
software and accessories for your balance (PICASO, order no. 3113 004.001).
(see also EN ISO 8655, Part 6)
1.2.3 Test room
The tests should be carried out in a draft-free room under constant climatic
conditions.
The test room should have a constant temperature between 15 °C and 30 °C and
a constant relative humidity above 50 %.
7
1.2.4 Temperature differences
Before the test, the device to be tested and test liquid must have stood in the test
room for a sufficient amount of time, at least 2 hours, in order to reach
equilibrium with the storage conditions.
Direct sunlight and other influences which could affect the temperature should
be avoided at all costs.
1.2.5 Test liquid
Distilled or deionized water of "Quality 3 in accordance with ISO 3696",
degassed or at equilibrium with air. The water must be at room temperature.
1.2.6 Operating Manual
Observe the operating instructions for your pipette.
Page 8

Calibration
8
Eppendorf SOP
English (EN)
2 Calibration
2.1 Scope of testing
Note concerning the nominal volume:
The nominal volume of an adjustable-volume pipette is the largest volume to be
set by the user and specified by the manufacturer.
When using the Combitip with the Multipette, the nominal volume is the largest
possible dispensing volume of the Combitip. This means that for the Multipette
plus and Multipette M4, the nominal volume is 1/5 of the filling volume of the
Combitip advanced. For the Multipette stream / Xstream, the nominal volume is
the filling volume of the Combitip advanced.
2.1.1 Adjusting adjustable volume pipettes
For variable pipettes, check 3 different volumes with 10 measured values each:
• the nominal volume,
• approx. 50 % of the nominal volume,
• 10 % of the nominal volume.
2.1.2 Multi-channel pipettes
For Multi-channel pipettes check each channel separately with 3 different
volumes, each with 10 measured values:
• the nominal volume,
• approx. 50 % of the nominal volume,
• 10 % of the nominal volume.
2.1.3 Multipette
With the
• Multipette,
• Multipetteplus,
• Multipette stream,
• MultipetteXstream
• MultipetteM4
check the nominal volume with 10 measured values with the Eppendorf
Combitip used.
Page 9

Calibration
Eppendorf SOP
English (EN)
2.1.4 Bottle-top dispenser and Top Buret
For bottle-top dispensers and the Top Buret, check the nominal volume with 10
measured values.
2.2 Measurement
2.2.1 Work method
1. Place the selected pipette tip on the tip cone of the pipette or on the
corresponding Combitip in the Multipette.
2. Implement the following settings:
• Adjustable-volume piston-stroke pipettes: the smallest volume to be tested
• Multipettes: the nominal volume
• Bottle-top dispenser and Top Buret: the nominal volume
3. For all Multipettes with fully drawn up Combitip, always discard the first
dispensing step.
4. Fill test liquid up to a height of min. 3 mm in the weighing vessel.
5. For piston-stroke pipettes fill the pipette tip 5x with test liquid and empty it
(pre-wet), in order to create a moisture balance in the dead air volume.
6. Replace the single-use tip.
7. Pre-wet the tip 1x.
9
2.2.2 Removing the test volume from the reservoir
1. Hold the pipette vertically.
2. Dip the pipette tip into the test liquid by a few millimeters.
3. Draw in the volume to be tested slowly and evenly. The waiting time of 1 to
3 seconds, for Research 1 to 10 mL 5 seconds must be observed.
(the waiting time corresponds to the size of the tip, see operating
instructions.)
4. Pull the pipette tip slowly out of the liquid, wiping it on the vessel wall.
Page 10

Calibration
10
Eppendorf SOP
English (EN)
2.2.3 Dispensing the test volume into the weighing vessel
1. Rest the filled tip up against the wall of the weighing vessel at an angle.
2. Dispense the test liquid slowly until the first stop (measuring stroke).
3. Press the control button to the second stop (blow-out) and dispense the
remaining liquid in the tip (does not apply for dispensers and burets).
4. Hold down the control button and pull the tip up the vessel wall.
5. Let the control button slide back into position.
6. Determine the weight.
7. Complete all measurements of a measuring series as described and calculate
the systematic and random error (see p. 11).
8. In case of adjustable-volume pipettes, determine the measurement with the
nominal volume, 50 % and 10 % of the nominal volume. Always begin the
test with 10 % of the nominal volume.
Page 11
Evaluation
Eppendorf SOP
English (EN)
3 Evaluation
3.1 Calculating the systematic error
Mean value of the dispensed volume:
n = Number of measured values
To convert the measured values into volume values, use correction factor Z for
the dependency of the test liquid on temperature and air pressure for each
individual value (see Factor Z for distilled water on p. 36).
11
Systematic error e
Systematic error e
in micro liter:
s
in percent:
s
3.2 Calculating the random error
Random error as repeat standard s:
Random error as coefficient of variation CV:
The specifications of the tested pipette can be found in the relevant operating
instructions or technical specifications (see Technical specifications on p. 37).
Page 12

Sterilization and cleaning
12
Eppendorf SOP
English (EN)
4 Sterilization and cleaning
Further notes on cleaning and sterilization can found in the relevant
operating manual.
4.1 Sterilization
Parameter for autoclaving
• 121 °C
• 20 minutes
• 1 bar overpressure
4.1.1 Reference and Biomaster
The Reference pipettes and the Biomaster are fully autoclavable.
1. Prior to autoclaving, unscrew the upper and lower part of the pipette apart by
approx. one turn to enable the vapor to enter more easily.
2. After autoclaving, allow the pipette to cool down to room temperature and to
dry completely and then screw together.
4.1.2 Research plus and Reference 2
The Research plus pipettes and Reference 2 pipettes are fully autoclavable.
1. You can put the Research plus and Reference 2 into the autoclave as a
complete unit or with the lower part removed. Do not disassemble the lower
part.
2. For 2.5 mL, 5 mL and 10 mL pipettes: remove the old protection filter. Add a
new protection filter and install it after autoclaving. Only autoclave the
protection filter once.
After autoclaving:
3. Cool the pipette down to room temperature and leave to dry.
4. For 2.5 mL, 5 mL / 10 mL pipettes: the protection filter swells during
autoclaving. Slightly squeeze the protection filter when installing it into the
cone tip.
Page 13

Sterilization and cleaning
Eppendorf SOP
English (EN)
4.1.3 Research and Research pro
With the Research and Research pro pipettes, the lower section is autoclavable.
With single-channel models prior to autoclaving
1. Pull off the ejector sleeve with depressed ejector.
2. Unscrew the lower part of the pipette.
With the Multi-channel versions, you can autoclave the entire lower section.
After autoclaving, assemble the parts only after room temperature has been
reached and the parts have been dried.
4.1.4 Top Buret
The Top Buret can not be autoclaved.
4.1.5 Varipette and Multipette
The
• Varipette,
• Multipette,
• Multipetteplus,
• Multipette stream
• MultipetteXstream
• MultipetteM4
13
are not autoclavable.
4.1.6 Varispenser
The Varispenser and Varispenser plus are only autoclavable when fully
assembled.
With theVarispenser plus
1. Set the discharge valve toggle to the dispensing position (–>).
2. Release the volume setting knob, move to the middle position and leave
released.
3. Place the dispenser on a cloth and autoclave, avoiding contact with hot
surfaces.
4. Only use the dispenser again when it has cooled down to room temperature.
Page 14

Sterilization and cleaning
14
Eppendorf SOP
English (EN)
4.1.7 Xplorer and Xplorer plus
The lower part of theXplorer and Xplorer plus pipettes can be autoclaved.
1. Pull off the ejector sleeve with depressed ejector.
2. On the lower part of the pipette, push the ring labeled PUSH UP TO
RELEASE upward until the lower part is released.
After autoclaving, assemble the parts only after room temperature has been
reached and the parts have been dried.
4.2 Cleaning
All areas of the underside of the pipette can be cleaned in a soap
solution or isopropanol 60 % provided that no differing instructions are
given in the operating manual.
1. Clean the parts in soap solution or isopropanol.
2. Rinse the parts in distilled water.
3. Allow the parts to dry completely and then assemble.
4. Lightly lubricate the piston of the pipette (Eppendorf special grease
Page 15
Leakage check
Eppendorf SOP
English (EN)
5 Leakage check
5.1 Pipette leakage check
In order to carry out a leakage check on a pipette, follow the procedure outlined
below:
1. For adjustable-volume pipettes: set the nominal volume.
2. For volumes <20 µl pre-wet the tip several times.
3. Hold the pipette vertically with a full tip for approx. 30 sec. Do not touch the
pipette tip.
4. Observe the meniscus of the liquid on the tip opening. If there is a leak in the
pipette, a drip will form on the tip opening.
6 Troubleshooting
6.1 Potential error causes and corrections
Observe the error descriptions in the operating instructions.
Error Cause Elimination
Droplets on the
inner wall of the
pipette tip.
Pipette is dripping,
pipetted volume is
incorrect.
Uneven wetting of the plastic
wall.
• Tip loose.
• Incorrect pipette tip.
Pipette is leaking because:
•The piston is
contaminated.
• The piston is damaged.
• The seal is damaged.
Attach a new pipette tip.
Press the tip on firmly.
Use an original Eppendorf
tip.
Clean the piston and
lubricate slightly.
Replace the piston and
piston sealing and
lubricate slightly.
Replace the seal.
15
Page 16

Troubleshooting
16
Eppendorf SOP
English (EN)
Error Cause Elimination
Liquid cannot be
aspirated correctly
or dripping occurs.
• Leakage in the Combitip
advanced.
• Combitip advanced has
heated up.
Replace the Combitip
advanced with a new
Combitip advanced.
Ensure that the
temperature is uniform as
the liquid expands when
heated.
The control button
is jammed, runs
jerky.
•The piston is
contaminated.
• The seal is contaminated.
Clean the piston and
lubricate slightly.
Disassemble the pipette,
clean all seals, replace if
necessary.
• The piston is damaged.
Replace the piston and
piston seal and lubricate
slightly.
• Penetration of solvent
vapors
Unscrew the lower part of
the pipette and aerate the
lower part.
Clean the piston and
lubricate slightly.
Page 17

Adjustment
Eppendorf SOP
English (EN)
7Adjustment
7.1 General information
Prior to delivery, all pipettes are adjusted with distilled or de-ionized, degassed
water under the conditions described in Chapters 1 to 3 and according to ISO
3696 (see Calibration on p. 8).
If you have doubts regarding the accuracy of the volume entered, please check
the following points first:
• Is there a leak in the device (see Leakage check on p. 15)?
Exception: Biomaster
• Does the temperature of the pipetted liquid correspond to:
– the temperature of the device?
– the ambient air temperature?
• Is the set volume correct?
• Has the liquid density and air pressure been taken into consideration?
• Does the density of the pipetted liquid deviate from the double-distilled,
degassed water?
• Was the work completed correctly, as described in the "Calibration" chapter
(see p. 8) and "Evaluation" chapter (see p. 11)?
• Were original Eppendorf pipette tips used?
Volume errors can also occur when pipetting liquids with high vapor pressure,
where the density or viscosity deviates considerably from the values of water.
Adjustments should only be carried out on the device after these conditions have
been taken into consideration.
17
7.2 Adjusting adjustable-volume pipettes
Observe the operating instructions for your pipette. There you will find
detailed descriptions on adjustment.
The adjustment of the following adjustable-volume pipettes is a zero point offset:
• Research
• Research plus
• Reference
•Biomaster
• Reference2
Page 18

Adjustment
18
Eppendorf SOP
English (EN)
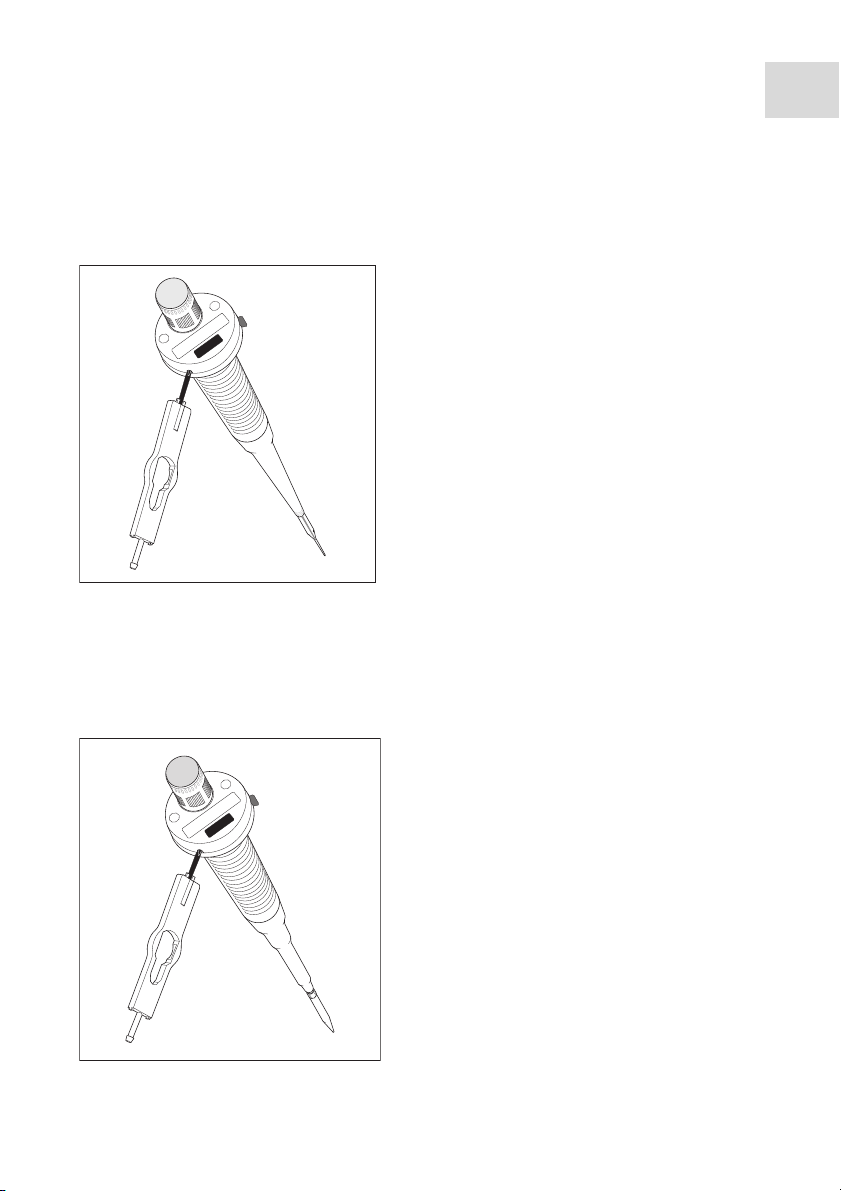
7.2.1 Procedure
Requirements
Device, original Eppendorf tip, test liquid and ambient air must have the same
temperature (15 – 30°C) at a constant temperature of ±0.5°C during the test
(according to EN ISO 8655, Part 6).
If your Research, Research plus or Reference has an adjustment, remove
it before carrying out the adjustment.
After adjusting, lock the adjustment opening with a new adjustment
seal.
Adjustment seals can be reordered (see operating manual).
1. Set the pipette to the smallest volume to be tested.
2. Use a matching original Eppendorf tip for single-channel pipettes. For
Multi-channel pipettes, use any channel.
3. Pipette the set volume 10 times.
4. Conduct a weighing after every volume dispensing.
5. Calculate the mean value after 10 measurements (see Evaluation on p. 11).
The calculated mean value of these weighings (observe conversion factor Z =
mg to µL) yields the actual volume.
6. For adjusting, introduce the suitable tool into the opening intended for this
purpose, or place it on the designated location, and adjust the actual volume
(see the following figures or operating manual).
7. Check the set volume by measuring again. If the target volume does not
match the result of the measurement, repeat steps 2 to 6.
8. After the adjustment, check the measured values for accuracy at 50% of the
nominal volume and check the nominal volume for accuracy.
Page 19
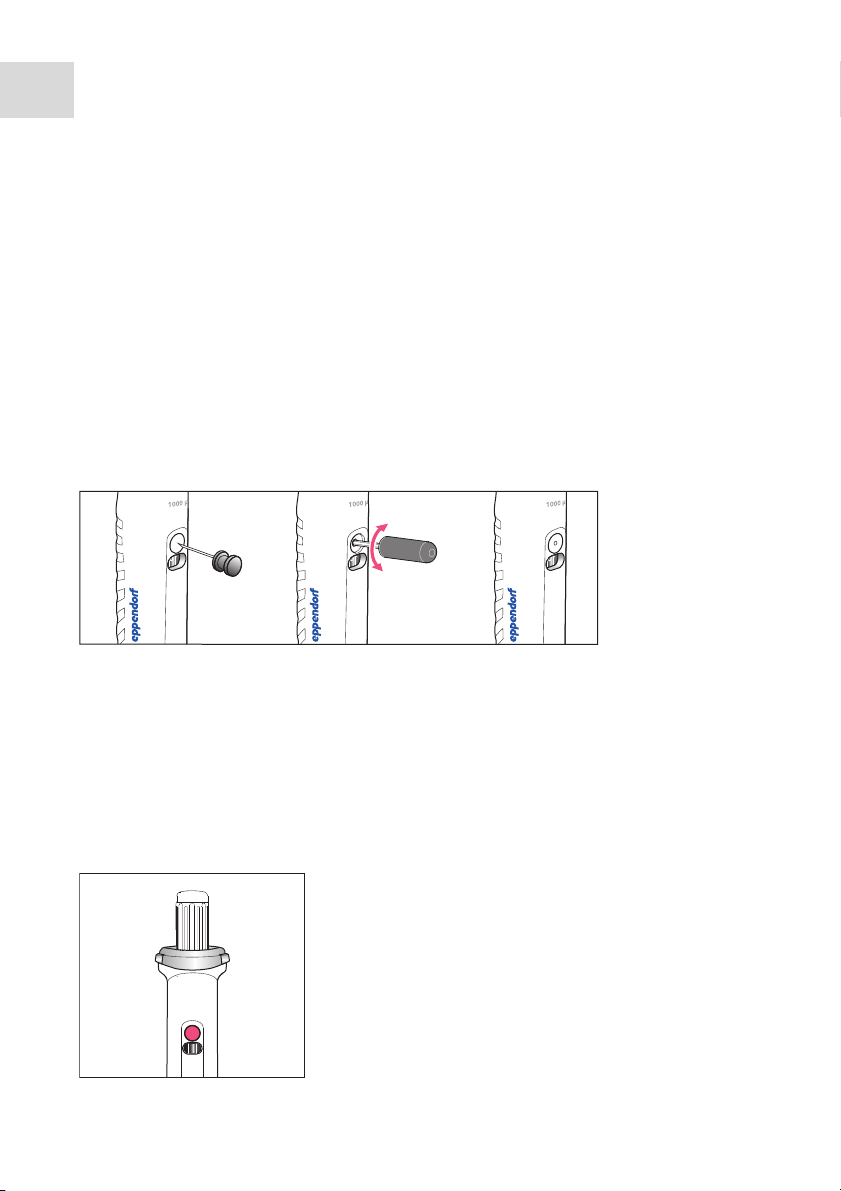
7.2.2 Biomaster
1
0
2
0
Auxiliary equipment
• Supplied pipette wrench (order no. 4910 092.001)
1. Use the pipette wrench to adjust the
volume display of the pipette, with
the piston stroke unchanged, to the
actual volume value of the
measurement.
2. Pull off the pipette wrench.
3. Set the pipette to the target volume
in the usual manner.
4. Mark the adjustment on the pipette.
7.2.3 Reference variable
Adjustment
Eppendorf SOP
English (EN)
19
Auxiliary equipment
• Supplied pipette wrench (order no. 4910 092.001)
• Supplied red CAL seal
1. Insert side B of the pipette wrench
into the adjustment opening in the
lid.
0
6
2
6
2. Using the pipette wrench, set the
digital display of the pipette, with
unaltered piston stroke, to the actual
volume value of the measurement.
3. Pull off the pipette wrench.
4. Set the pipette to the target volume
in the usual manner.
5. After the adjustment has been
successfully completed, lock the
adjustment opening with a red CAL
seal.
Page 20
Adjustment
Reference 2
ADJ
Reference 2
Reference 2
20
Eppendorf SOP
English (EN)
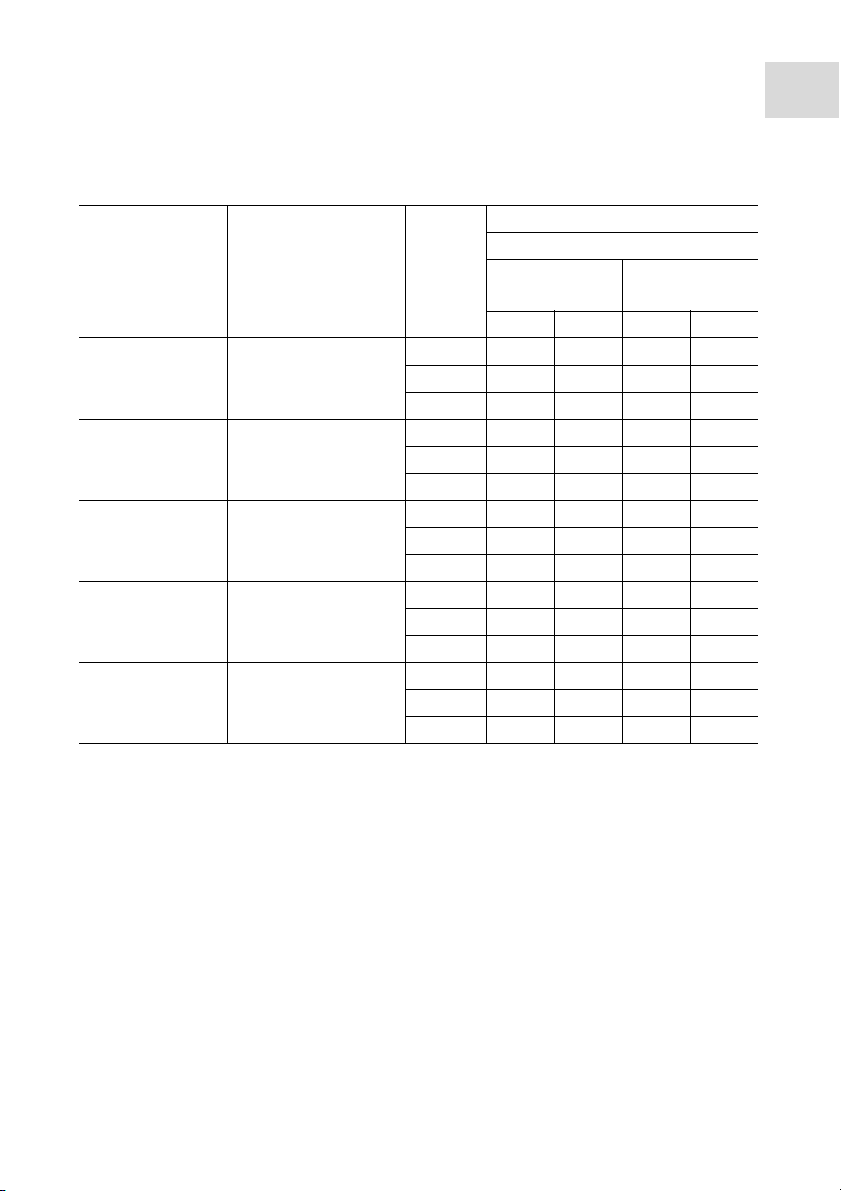
7.2.4 Reference 2 adjustable-volume
7.2.4.1 User adjustment
Changing the adjustment will change the volume by a specific value. Strictly
speaking, the change only applies to the testing volume.
Example:
You readjust a 10 – 100 µL pipette, with a volume setting of 100 µL, by 1 µL
(1 µL 1%). If the volume setting is 10 µL, the pipette is also adjusted by 1 µL
( 10%).
Auxiliary aids from the delivery package
•Pin
• Red plastic adjustment seal (ADJ)
1. Insert the pin in the middle of the gray adjustment seal (ADJ).
2. Remove the adjustment seal.
3. Insert the adjustment tool.
4. Turn the adjustment tool until the adjustment display shows the desired
value.
5. Read the set value distortion-free using the aligning aid in the viewing
window.
6. Carry out weighings to check the accuracy and precision.
1000 µL
ADJ
+-
11
Page 21

Adjustment
Eppendorf SOP
English (EN)
7. Attach the red adjustment seal after the inspections.
If the adjustment only applies to a specific liquid, mark the pipette accordingly.
Use the labeling area on the pipette and mark it with the liquid and the volume.
Carry out a gravimetric test for each adjustment change. Follow the EN ISO
8655-2 and EN ISO 8655-6 test procedures.
7.2.4.2 Changing the factory adjustment
Auxiliary aids from the delivery package
• Red plastic safety plug
•Pin
The factory adjustment can be changed using the
corresponding accessories.
The factory adjustment will be marked by a safety plug.
The color of the safety plug indicates the implementing
authority:
ADJ
•Gray - Eppendorf AG
• Red - User
21
The random and systematic errors recorded on delivery can be found in the .
This certificate is included in delivery. The certificate is no longer valid if the
default settings have been changed.
If the dispensing accuracy is only be to changed temporarily, the correct method
is to change the user adjustment. Before changing the user or factory
adjustment, observe the general notes and the associated gravimetric tests.
For the factory setting, the volume display will be set to match the piston stroke
and the detected actual volume. If a gravimetric test indicates that an error
needs to be corrected and you will be required to change to factory adjustment,
proceed as follows:
Page 22

Adjustment
e
e
e
22
Eppendorf SOP
English (EN)
ADJ
1. Check whether the adjustment display is set
to "0".
If the adjustment display is not set to “0”, it
must be set to “0” first using the adjustment
1000 µL
tool. In this case, instead of continuing with
the factory adjustment changes, carry out a
ADJ
+-
11
gravimetric test of the Reference2 with the
adjustment display set to "0".
2. Use the plug to pierce the safety plug, and
remove it.
R
3. Insert the adjustment tool.
ADJ
R
4. Hold the control button with one
hand.
ADJ
R
Page 23

Adjustment
e
Eppendorf SOP
English (EN)
5. Turn the adjustment tool to set the volume display. Set the volume display
(from the volume setting used during the inspection to the calculated volume
of the gravimetric test). The volume change applies to the entire volume
range. For the volume change, you should initially set the value for 10% of
the nominal volume of the value calculated during the gravimetric test. Then
carry out gravimetric tests to check 50% and 100% of the nominal volume
with this setting. If necessary, change the selected setting again to achieve
the best possible correction for all volumes. Use the error limits in accordance
with ISO 8655-2 and the technical data provided by Eppendorf AG to decide
whether the data obtained meets your requirements.
6. Carry out a gravimetric check of the changes that have been completed.
7. Insert the red safety plug into the
adjustment opening.
The red safety plug on the pipette indicates
that the pipette has been adjusted and
calibrated by the user.
ADJ
R
23
8. Record executed changes and measurements.
Page 24

Adjustment
200
200
Research
C
B
A
D
24
Eppendorf SOP
English (EN)
7.2.5 Research variable
Auxiliary equipment
• Supplied pipette wrench (order no. 3111 501.016)
• Supplied red CAL seal
1. Insert side D of the pipette wrench
vertically into the lateral adjustment
opening of the pipette grip.
2. Move the pipette wrench into the
vertical position.
3. Turn the volume setting ring toward
– or +.
This adjusts the piston stoke of the
pipette. The digital display does not
change in the process.
4. A revolution corresponds to:
Volume range Vol. per revolution
0.1 – 2.5 µL approx. 0.1 µL
0.5 - 10 µL approx. 0.5 µL
2 - 20 µL approx. 1 µL
10 - 100 µL approx. 5 µL
20 - 200 µL approx. 10 µL
100 - 1 000 µL approx. 50 µL
500 - 5 000 µL approx. 250 µL
1 - 10 mL approx. 510 µL
5. Pull off the pipette wrench.
6. Move the volume setting ring slightly forwards and backwards so that the
counting and stroke systems engage again.
7. After the adjustment has been successfully completed, lock the adjustment
opening with a red CAL seal.
Page 25

Adjustment
Eppendorf SOP
English (EN)
7.2.6 Research plusadjustable volume - adjustment to
environmental parameters
Adjustment change for specific liquid densities, changed altitudes or pipette tips
that are not used to calculate the random and systematic error.
The Research plus was adjusted, tested and fitted with a gray adjustment seal
with the abbreviation "ADJ" before delivery. The adjustment display on the side
reads "0". Changing the adjustment will change the volume by a specific value.
Strictly speaking, the change only applies to the testing volume.
Auxiliary equipment
• Supplied adjustment tool (order no. 3120 633.006)
• Supplied red adjustment seal (ADJ)
25
1. Remove the gray adjustment seal.
2. Keep the ejector pressed.
3. Insert the adjustment tool (from the delivery package).
4. Turn the adjustment tool until the adjustment display shows the desired value.
5. Place the Research plus on a horizontal
surface (table). When completing the
adjustment, look absolutely vertically at the
window and read the set value via the
backsight in the viewing window.
6. Carry out weighing procedures to check the accuracy and precision.
7. After the tests, close the opening with the red adjustment seal (from the
delivery package).
If the adjustment only applies to a specific liquid, mark the pipette accordingly.
Use the labeling area on the pipette and mark it with the liquid and the volume.
Page 26

Adjustment
26
Eppendorf SOP
English (EN)
7.2.7 Research plus adjustable volume - change to the factory
adjustment
Auxiliary equipment
• Supplied safety plug tool
• Supplied pin to loosen the safety plug
The factory adjustment can be changed with
the corresponding accessories on a Research
plus with variable volume setting.
You can recognize a change to the factory adjustment that was made by the user
of the Research plus from the red safety plug behind the ejector. If the Research
plus has been adjusted and calibrated by Eppendorf AG, this is indicated by a
gray safety plug.
1. Check whether the adjustment display on
the side is set to “0”.
If the adjustment display is not set to “0”, it
must be set to “0” first using the adjustment
tool. In this case, instead of continuing with
the factory adjustment changes, carry out a
gravimetric test of the Research plus with
the adjustment display set to “0”.
Page 27

Adjustment
Eppendorf SOP
English (EN)
2. Provide the volume setting ring and the
ejector with a common mark with a pen.
This mark is used for orientation purposes
when changing the factory adjustment.
When changing the factory adjustment, you
can turn the volume setting ring without
changing the volume display. The mark on
the volume setting ring and the ejector
informs you how far you have moved from
the factory setting.
3. Keep the ejector pressed and remove the
safety plug with the pin.
27
Page 28

Adjustment
28
Eppendorf SOP
English (EN)
4. Continue to keep the ejector pressed. Insert
the safety plug tool in such a way that the
counter locking mechanism is pushed down.
5. Turn the volume setting ring slightly to
change the volume. Proceed as shown in the
illustration.
Page 29

6. This results in the following approximate volume changes:
single-channel
Nominal volume
Color code
2.5 µL
+½
revolution
+¼
revolution
–¼
revolution
0.106 µL 0.053 µL -0.053 µL -0.106 µL
Dark gray
10 µL
0.53 µL 0.27 µL -0.27 µL -0.53 µL
Medium gray
20 µL
1.06 µL 0.53 µL -0.53 µL -1.06 µL
light gray
20 µL
1.07 µL 0.54 µL -0.54 µL -1.07 µL
Yellow
100 µL
5.4 µL 2.7 µL -2.7 µL -5.4 µL
Yellow
200 µL
10.8 µL 5.4 µL -5.4 µL -10.8 µL
Yellow
300 µL
10.7 µL 5.4 µL -5.4 µL -10.7 µL
Orange
1,000 µL
54 µL 27 µL -27 µL -54 µL
Blue
5 mL
271 µL 135 µL -135 µL -271 µL
Purple
10 mL
542 µL 271 µL -271 µL –542 µL
Turquoise
Adjustment
Eppendorf SOP
English (EN)
–½
revolution
29
multi-channel
Nominal volume
Color code
10 µL
+½
revolution
+¼
revolution
–¼
revolution
–½
revolution
0.53 µL 0.27 µL -0.27 µL -0.53 µL
Medium gray
100 µL
5.4 µL 2.7 µL -2.7 µL -5.4 µL
Yellow
300 µL
10.7 µL 5.4 µL -5.4 µL -10.7 µL
Orange
The values mentioned are theoretical values and are for orientation purposes
only. The volume changes mentioned apply to each volume setting.
Page 30

Adjustment
30
Eppendorf SOP
English (EN)
7. Push the locking mechanism upwards and
carry out a gravimetric test of the changes
made.
8. If the values measured during the
gravimetric test meet your requirements:
insert the red safety plug in the tool in the
opening of the Research plus and snap it off
the tool.
The red safety plug on the pipette indicates
that the Research plus has been adjusted
and calibrated by the user. If the adjustment
display had also been set to "0" previously,
you must close the opening with a new, red
adjustment seal at the position for the
adjustment seal.
9. Document the changes made and the measurements conducted. Remove the
mark on the volume setting ring and on the ejector. The red safety plug on the
pipette indicates that the Research plus has been adjusted and calibrated by
the user.
Page 31

7.2.8 Research Multi-channel
C
B
A
D
Auxiliary equipment
• Supplied pipette wrench (order no. 3111 501.016)
•Supplied red ADJ seal
1. Insert the D side of the pipette
wrench horizontally into the
adjustment opening on the side of
the pipette grip.
2. Move the pipette wrench into the
vertical position.
3. Turn the volume setting ring toward
– or +. This adjusts the piston stoke
of the pipette. The digital display
does not change in the process.
Adjustment
Eppendorf SOP
English (EN)
31
4. A revolution corresponds to:
Volume range Vol./turn
0.5 - 10 µL approx. 0.5 µL
10 - 300 µL approx. 5 µL
30 µL approx. 10 µL
5. Pull off the pipette wrench.
6. Move the volume setting ring slightly forwards and backwards so that the
counting and stroke systems engage again.
7. After the adjustment has been successfully completed, lock the adjustment
opening with a red ADJ-seal.
7.2.9 Research plus Multi-channel
Carry out the adjustment as described for the Research plus single-channel
pipette (see p. 25).
Page 32

Adjustment
32
Eppendorf SOP
English (EN)
7.2.10 Varispenser plus
7.2.11 Xplorer and Xplorer plus
The re-adjustment of the Xplorer pipette is described on the CD which is
enclosed with the pipette.
If you have selected a different adjustment in the Xplorer
pipette options, a wrench symbol will be displayed in the
header of the display.
Turn the fine adjustment toward + or
–. A revolution corresponds to the
smallest dispensing step:
Reduce volume:
Turn toward -.
Increase volume:
Turn toward +.
The factory adjustment was carried out
at 20 °C, using double-distilled,
degassed water.
Another symbol showing the selected adjustment is
displayed to the right of the wrench symbol. If you are
changing back to the factory adjustment at a later stage,
the previously selected adjustment will be deleted and
both symbols will disappear from the header.
Page 33

Adjustment
Eppendorf SOP
English (EN)
7.3 Adjusting fixed-volume pipettes
The adjustment process for fixed-volume pipettes is identical to the adjustment
process for variable pipettes
(see Adjusting adjustable-volume pipettes on p. 17)
For fixed-volume pipettes, 10 measured values of the nominal volume are checked.
7.3.1 Reference fixed
Auxiliary equipment
• Adhesive label as an adjusting aid for the basic setting
• Supplied pipette wrench (order no. 4910 092.001)
1. In order to simplify relocating the basic
setting, attach the adhesive label
0
4
4
0
supplied as an adjusting aid to the
control button.
2. Using the B side of the pipette wrench,
loosen the inside screw until the control
button can be turned.
3. Set the control button to the calculated
actual volume value of the measurement
(see Adjusting adjustable-volume
pipettes on p. 17).
.
33
One revolution of the control button corresponds to the following (based on water):
Reference fixed-volume Vol./turn
1, 2, 5, 10 µL approx. 0.5 µL
10, 20 µL approx. 1 µL
25, 50 µL approx. 2.4 µL
100 µL approx. 5 µL
200, 250 µL approx. 12 µL
500, 1 000 µL approx. 46 µL
1 500, 2 000, 2 500 µL approx. 118 µL
Page 34

Adjustment
C
B
A
D
34
Eppendorf SOP
English (EN)
7.3.2 Reference2
Adjustment is carried out as described for the Reference 2 adjustable-volume
(see p. 20).
7.3.3 Research fixed
Auxiliary equipment
• Supplied pipette wrench (order no. 3111 501.016)
1. Insert side D of the pipette wrench
vertically into the lateral adjustment
opening of the pipette grip.
2. Move the tool into the vertical
position.
3. Turn the volume setting ring toward
– or +. This adjusts the piston stoke
of the pipette.
With reference to water, one revolution of the volume setting ring corresponds to:
Volume range Vol./turn
10 approx. 0.8 µL
20 approx. 0.8 µL
25 approx. 0.8 µL
50 approx. 0.8 µL
100 approx. 0.8 µL
200 approx. 38 µL
250 approx. 38 µL
500 approx. 38 µL
1 000 approx. 38 µL
Page 35

Adjustment
Eppendorf SOP
English (EN)
7.3.4 Research plus fixed
Adjustment is carried out as described for the Research plus
adjustable-volume(see p. 25).
7.4 Physical influences of liquids
It is possible to adjust the previously described devices for a volume of a liquid
with a different density than water so that the displayed volume value
corresponds to the pipetted volume.
With adjustable-volume pipettes, all other values are then readjusted, as
the adjustable-volume pipette then becomes a fix-volume pipette.
The adjustment process is comparable to the described procedure (see p. 18).
The difference is that the mean value of the weighings is converted to
microliters according to the formula:
.
35
1. Determine the mean value and convert it to microliters.
The calculated value is the nominal value.
2. The digital display of variable pipettes, or the volume of fix-volume pipettes,
must be set to the calculated actual value.
3. Check the value set for the liquid gravimetrically. The accordingly set device
only delivers a dispensing value, which corresponds to the digital display, for
the used liquid and set volume.
4. If necessary correct and check the setting.
5. Label the measuring device following adjustment with the measured value
and the name of the liquid which was used for the adjustment.
Following adjustment, the certificate accompanying the pipette
becomes invalid.
Page 36

Factor Z for distilled water
36
Eppendorf SOP
English (EN)
8 Factor Z for distilled water
8.1 Factor Z overview table
Factor Z (µl/mg) in accordance with EN ISO 8655 for distilled water depending
on test temperature and air pressure:
Tem pera ture
(°C)
15
15.5
16
16.5
17
17.5
18
18.5
19
19.5
20
20.5
21
21.5
22
22.5
23
23.5
24
24.5
25
25.5
26
26.5
27
27.5
28
28.5
29
29.5
30 1.0052 1.0052 1.0053 1.0053 1.0054 1.0054 1.0054
80 85 90 95 100 101.3 105
1.0017
1.0018
1.0019
1.0020
1.0021
1.0022
1.0022
1.0023
1.0024
1.0025
1.0026
1.0027
1.0028
1.0030
1.0031
1.0032
1.0033
1.0034
1.0035
1.0037
1.0038
1.0039
1.0040
1.0042
1.0043
1.0045
1.0046
1.0047
1.0049
1.0050
1.0018
1.0019
1.0020
1.0020
1.0021
1.0022
1.0023
1.0024
1.0025
1.0026
1.0027
1.0028
1.0029
1.0030
1.0031
1.0032
1.0033
1.0035
1.0036
1.0037
1.0038
1.0040
1.0041
1.0042
1.0044
1.0045
1.0046
1.0048
1.0049
1.0051
Air pressure (kPa)
1.0019
1.0019
1.0020
1.0021
1.0022
1.0023
1.0023
1.0024
1.0025
1.0026
1.0027
1.0028
1.0029
1.0031
1.0032
1.0033
1.0034
1.0035
1.0036
1.0038
1.0039
1.0040
1.0041
1.0043
1.0044
1.0046
1.0047
1.0048
1.0050
1.0051
1.0019
1.0020
1.0021
1.0021
1.0022
1.0023
1.0024
1.0025
1.0026
1.0027
1.0028
1.0029
1.0030
1.0031
1.0032
1.0033
1.0034
1.0036
1.0037
1.0038
1.0039
1.0041
1.0042
1.0043
1.0045
1.0046
1.0047
1.0049
1.0050
1.0052
1.0020
1.0020
1.0021
1.0022
1.0023
1.0024
1.0025
1.0025
1.0026
1.0027
1.0028
1.0029
1.0031
1.0032
1.0033
1.0034
1.0035
1.0036
1.0037
1.0039
1.0040
1.0041
1.0042
1.0044
1.0045
1.0047
1.0048
1.0049
1.0051
1.0052
1.0020
1.0020
1.0021
1.0022
1.0023
1.0024
1.0025
1.0026
1.0027
1.0028
1.0029
1.0030
1.0031
1.0032
1.0033
1.0034
1.0035
1.0036
1.0038
1.0039
1.0040
1.0041
1.0043
1.0044
1.0045
1.0047
1.0048
1.0050
1.0051
1.0052
1.0020
1.0021
1.0022
1.0022
1.0023
1.0024
1.0025
1.0026
1.0027
1.0028
1.0029
1.0030
1.0031
1.0032
1.0033
1.0034
1.0036
1.0037
1.0038
1.0039
1.0040
1.0042
1.0043
1.0044
1.0046
1.0047
1.0048
1.0050
1.0051
1.0053
Page 37

Technical specifications
9 Technical specifications
The following specifications are valid for the following conditions:
Liquid: Distilled or deionized water
Reference temperature: 20 °C to 25 °C ±0.5 °C
Number of
determinations:
Technical specifications subject to change!
10, in accordance with EN ISO 8655 with original
Eppendorf pipette tips
9.1 Fixed-volume pipettes
9.1.1 Reference fixed
Eppendorf SOP
English (EN)
37
Model Test tip
epT.I.P.S. Color code
Volume range
Length
1 µL light gray
2 µL ±2.0 ±0.04 ±1.2 ±0.024
5 µL ±1.5 ±0.075 ±0.8 ±0.04
10 µL ±1.0 ±0.1 ±0.5 ±0.05
10 µL Yellow
20 µL ±0.8 ±0.16 ±0.3 ±0.06
25 µL ±0.8 ±0.2 ±0.3 ±0.075
50 µL ±0.7 ±0.35 ±0.3 ±0.15
100 µL ±0.6 ±0.6 ±0.2 ±0.2
200 µL Blue
250 µL ±0.6 ±1.5 ±0.2 ±0.5
500 µL ±0.6 ±3.0 ±0.2 ±1.0
1,000 µL ±0.6 ±6.0 ±0.2 ±2.0
1 500 µL Red
2 000 µL ±0.6 ±12 ±0.2 ±4.0
2,500 µL ±0.6 ±15 ±0.2 ±5.0
0.5 - 20 L L
46 mm
2 - 200 µL
53 mm
50 - 1 000 µL
71 mm
500 – 2 500 µL
115 mm
Systematic error Random error
± % ± µL ± % ± µL
±2.5 ±0.025 ±1.8 ±0.018
±1.0 ±0.1 ±0.5 ±0.05
±0.6 ±1.2 ±0.2 ±0.4
±0.6 ±9.0 ±0.2 ±3.0
Error limits
Error
Page 38

Technical specifications
38
Eppendorf SOP
English (EN)
9.1.2 Reference 2 fixed
Fixed-volume Reference2
Model Test tip
epT.I.P.S. Color code
Volume range
Length
1 µL Dark gray
2 µL ±2.0 ±0.04 ±1.2 ±0.024
0.1 µL – 10 µL
34 mm
5 µL Medium gray
10 µL ±1.0 ±0.1 ±0.5 ±0.05
0.1 µL – 20 µL
40 mm
20 µL light gray
0.5 µL – 20 µL L
46 mm
10 µL Yellow
20 µL ±1.0 ±0.2 ±0.3 ±0.06
25 µL ±1.0 ±0.25 ±0.3 ±0.075
2 L – 200 µL
53 mm
50 µL ±0.7 ±0.35 ±0.3 ±0.15
100 µL ±0.6 ±0.6 ±0.2 ±0.2
200 µL ±0.6 ±1.2 ±0.2 ±0.4
200 µL Blue
250 µL ±0.6 ±1.5 ±0.2 ±0.5
500 µL ±0.6 ±3.0 ±0.2 ±1.0
50 µL – 1 000 µL
71 mm
1,000 µL ±0.6 ±6.0 ±0.2 ±2.0
Eppendorf AG error limits
Error
Systematic error Random error
± % ± µL ± % ± µL
±2.5 ±0.025 ±1.8 ±0.018
±1.2 ±0.06 ±0.6 ±0.03
±0.8 ±0.16 ±0.3 ±0.06
±1.2 ±0.12 ±0.6 ±0.06
±0.6 ±1.2 ±0.2 ±0.4
Fixed-volume Reference2
Model Test tip
epT.I.P.S. Color code
Volume range
Length
2.0 mL Red
2.5 mL ±0.6 ±0.015 ±0.2 ±0.005
0.5 mL – 2.5 mL
Eppendorf AG error limits
Error
Systematic error Random error
± % ± mL ± % ± mL
±0.6 ±0.012 ±0.2 ±0,004
115 mm
Page 39

9.1.3 Research fixed
Technical specifications
Eppendorf SOP
English (EN)
39
Model Test tip
epT.I.P.S. Color code
Volume range
Length
10 µL Yellow
20 µL ±1.0 ±0.2 ±0.3 ±0.06
25 µL ±1.0 ±0.25 ±0.3 ±0.075
2 - 200 µL
53 mm
Systematic error Random error
± % ± µL ± % ± µL
±1.2 ±0.12 ±0.6 ±0.06
Error limits
Error
50 µL ±0.7 ±0.35 ±0.3 ±0.15
100 µL ±0.6 ±0.6 ±0.2 ±0.2
200 µL Blue
250 µL ±0.6 ±1.5 ±0.2 ±0.5
500 µL ±0.6 ±3.0 ±0.2 ±1.0
0.05 - 1 mL
71 mm
±0.6 ±1.2 ±0.2 ±0.4
1,000 µL ±0.6 ±6.0 ±0.2 ±2.0
Page 40

Technical specifications
40
Eppendorf SOP
English (EN)
9.1.4 Research plus fixed
Research plus fixed volume
Model Test tip
epT.I.P.S. Color
code
Volume range
Length
10 µL Medium gray
0.1 µL – 20 µL
40 mm
20 µL light gray
0.5 µL – 20 µL L
46 mm
10 µL Yellow
20 µL ±1.0 ±0.2 ±0.3 ±0.06
25 µL ±1.0 ±0.25 ±0.3 ±0.08
2 µL - 200 µL
53 mm
50 µL ±0.7 ±0.35 ±0.3 ±0.15
100 µL ±0.6 ±0.6 ±0.2 ±0.2
200 µL ±0.6 ±1.2 ±0.2 ±0.4
200 µL Blue
250 µL ±0.6 ±1.5 ±0.2 ±0.5
500 µL ±0.6 ±3.0 ±0.2 ±1.0
50 µL – 1 000 µL
71 mm
1,000 µL ±0.6 ±6.0 ±0.2 ±2.0
Eppendorf AG error limits
Error
Systematic
Random error
error
± %± µL± %± µL
±1.2 ±0.12 ±0.6 ±0.06
±0.8 ±0.16 ±0.3 ±0.06
±1.2 ±0.12 ±0.6 ±0.06
±0.6 ±1.2 ±0.2 ±0.4
Page 41

9.2 Adjusting adjustable volume pipettes
9.2.1 Reference variable
Technical specifications
Eppendorf SOP
English (EN)
41
Model Test tip
epT.I.P.S. Color code
Volume range
Length
0.1 - 2.5 µL Dark gray
0.1 - 10 µL
34 mm
0.5 - 10 µL light gray
0.5 – 20 µL
46 mm
2 - 20 µL light gray
0.5 – 20 µL
46 mm
2 - 20 µL Yellow
2 - 200 µL
53 mm
10 - 100 µL Yellow
2 - 200 µL
53 mm
50 – 200 µL Yellow
2 - 200 µL
53 mm
50 – 250 µL Blue
50 - 1 000 µL
71 mm
100 – 1 000 µL Blue
50 – 1 000 µL
71 mm
500 – 2 500 µL Red
500 – 2 500 µL
115 mm
Tes ting
volume
Systematic error
Error limits
Error
Random error
± % ± µL ± % ± µL
0.25 µL ±12.0 ±0.03 ±6.0 ±0.015
1.25 µL ±2.5 ±0.031 ±1.5 ±0.019
2.5 µL ±1.4 ±0.035 ±0.7 ±0.018
1 µL ±2.5 ±0.025 ±1.8 ±0.018
5 µL ±1.5 ±0.075 ±0.8 ±0.04
10 µL ±1.0 ±0.1 ±0.4 ±0.04
2 µL ±3.0 ±0.06 ±2.0 ±0.04
10 µL ±1.0 ±0.1 ±0.5 ±0.05
20 µL ±0.8 ±0.16 ±0.3 ±0.06
2 µL ±5.0 ±0.1 ±1.5 ±0.03
10 µL ±1.2 ±0.12 ±0.6 ±0.06
20 µL ±1.0 ±0.2 ±0.3 ±0.06
10 µL ±3.0 ±0.3 ±0.7 ±0.07
50 µL ±1.0 ±0.5 ±0.3 ±0.15
100 µL ±0.8 ±0.8 ±0.15 ±0.15
50 µL ±1.0 ±0.5 ±0.3 ±0.15
100 µL ±0.9 ±0.9 ±0.3 ±0.3
200 µL ±0.6 ±1.2 ±0.2 ±0.4
50 µL ±1.4 ±0.7 ±0.3 ±0.15
100 µL ±1.1 ±1.1 ±0.3 ±0.3
250 µL ±0.6 ±1.5 ±0.2 ±0.5
100 µL ±3.0 ±3.0 ±0.3 ±0.3
500 µL ±1.0 ±5.0 ±0.2 ±1.0
1,000 µL ±0.6 ±6.0 ±0.2 ±2.0
0.5 mL ±1.5 ±7.5 ±0.3 ±1.5
1.25 mL ±0.8 ±10 ±0.2 ±2.5
2.5 mL ±0.6 ±15 ±0.2 ±5.0
Page 42

Technical specifications
42
Eppendorf SOP
English (EN)
9.2.2 Reference 2 adjustable-volume
Reference2 single-channel variable
Model Test tip
epT.I.P.S. Color code
Volume range
Length
0.1 µL – 2.5 µL
Increment:
0.002 µL
0.5 µL – 10 µL
Increment:
0.01 µL
2 µL – 20 µL
Increment:
0.02 µL
2 µL – 20 µL
Increment:
0.02 µL
10 µL – 100 µL
Increment:
0.1 µL
20 µL - 200 µL
Increment:
0.2 µL
30 µL – 300 µL
Increment:
0.2 µL
100 µL – 1 000 µL
Increment:
1 µL
Dark gray
0.1 µL – 10 µL
34 mm
Medium gray
0.1 µL – 20 µL
40 mm
light gray
0.5 µL – 20 µL L
46 mm
Yellow
2 µL - 200 µL
53 mm
Yellow
2 µL - 200 µL
53 mm
Yellow
2 µL - 200 µL
53 mm
Orange
20 µL – 300 µL
55 mm
Blue
50 µL – 1 000 µL
71 mm
Tes ting
volume
Eppendorf AG error limits
Error
Systematic
Random error
error
± % ± µL ± % ± µL
0.1 µL ±48.0 ±0.048 ±12.0 ±0.012
0.25 µL ±12.0 ±0.03 ±6.0 ±0.015
1.25 µL ±2.5 ±0.031 ±1.5 ±0.019
2.5 µL ±1.4 ±0.035 ±0.7 ±0.018
0.5 µL ±8.0 ±0.04 ±5.0 ±0.0025
1 µL ±2.5 ±0.025 ±1.8 ±0.018
5 µL ±1.5 ±0.075 ±0.8 ±0.04
10 µL ±1.0 ±0,10 ±0.4 ±0.04
2 µL ±5.0 ±0,10 ±1.5 ±0.03
10 µL ±1.2 ±0.12 ±0.6 ±0.06
20 µL ±1.0 ±0.20 ±0.3 ±0.06
2 µL ±5.0 ±0.12 ±1.5 ±0.03
10 µL ±1.2 ±0.12 ±0.6 ±0.06
20 µL ±1.0 ±0.2 ±0.3 ±0.06
10 µL ±3.0 ±0.3 ±0.7 ±0.07
50 µL ±1.0 ±0.5 ±0.3 ±0.15
100 µL ±0.8 ±0.8 ±0.2 ±0.2
20 µL ±2.5 ±0.5 ±0.7 ±0.14
100 µL ±1.0 ±1.0 ±0.3 ±0.3
200 µL ±0.6 ±1.2 ±0.2 ±0.4
30 µL ±2.5 ±0.75 ±0.7 ±0.21
150 µL ±1.0 ±1.5 ±0.3 ±0.45
300 µL ±0.6 ±1.8 ±0.2 ±0.6
100 µL ±3.0 ±3.0 ±0.6 ±0.6
500 µL ±1.0 ±5.0 ±0.2 ±1.0
1,000 µL ±0.6 ±6.0 ±0.2 ±2.0
Page 43

Reference2 single-channel variable
Model Test tip
epT.I.P.S. Color code
Volume range
Length
0.25 mL – 2.5 mL
Increment:
0.002 mL
0.5 mL – 5 mL
Increment:
0.005 mL
1 mL – 10 mL
Increment:
0.01 mL
Red
0.25 mL – 2.5 mL
115 mm
Purple
0.1 mL – 5 mL
120 mm
Turquoise
1 mL – 10 mL
165 mm
Tes ting
volume
Technical specifications
Eppendorf AG error limits
Systematic
error
Eppendorf SOP
English (EN)
Error
Random
error
± % ± mL ± % ± mL
0.25 mL ±4.8 ±0.012 ±1.2 ±0,003
1.25 mL ±0.8 ±0,010 ±0.2 ±0.0025
2.5 mL ±0.6 ±0.015 ±0.2 ±0.005
0.5 mL ±2.4 ±0.012 ±0.6 ±0,003
2.5 mL ±1.2 ±0,030 ±0.25 ±0.006
5.0 mL ±0.6 ±0,030 ±0.15 ±0.0075
1.0 mL ±3.0 ±0,030 ±0.6 ±0.006
5.0 mL ±0.8 ±0,040 ±0.2 ±0,010
10.0 mL ±0.6 ±0,060 ±0.15 ±0.015
43
Page 44

Technical specifications
44
Eppendorf SOP
English (EN)
9.2.3 Research adjustable-volume
Model Test tip
epT.I.P.S. Color code
Volume range
Length
0.1 - 2.5 µL Dark gray
0.1 - 10 µL
34 mm
0.5 - 10 µL light gray
0.5 – 20 µL L
46 mm
2 - 20 µL Yellow
2 - 200 µL
53 mm
10 - 100 µL Yellow
2 – 200 µL
53 mm
20 - 200 µL Yellow
2 - 200 µL
53 mm
100 –
1 000 µL
Blue
0.05 – 1 mL
71 mm
0.5 – 5 mL Purple
0.1 – 5 mL
120 mm
1 – 10 mL Turquoise
1 – 10 mL
165 mm
Tes ting
volume
Systematic
error
Error limits
Error
Random
error
± % ± µL ± % ± µL
0.25 µL ±12.0 ±0.03 ±6.0 ±0.015
1.25 µL ±2.5 ±0.031 ±1.5 ±0.019
2.5 µL ±1.4 ±0.035 ±0.7 ±0.018
1 µL ±2.5 ±0.025 ±1.8 ±0.018
5 µL ±1.5 ±0.075 ±0.8 ±0.04
10 µL ±1.0 ±0.1 ±0.4 ±0.04
2 µL ±5.0 ±0.1 ±1.5 ±0.03
10 µL ±1.2 ±0.12 ±0.6 ±0.06
20 µL ±1.0 ±0.2 ±0.3 ±0.06
10 µL ±3.0 ±0.3 ±1.0 ±0.1
50 µL ±1.0 ±0.5 ±0.3 ±0.15
100 µL ±0.8 ±0.8 ±0.2 ±0.20
20 µL ±2.5 ±0.5 ±0.7 ±0.14
100 µL ±1.0 ±1.0 ±0.3 ±0.3
200 µL ±0.6 ±1.2 ±0.2 ±0.4
100 µL ±3.0 ±3.0 ±0.6 ±0.6
500 µL ±1.0 ±5.0 ±0.2 ±1.0
1,000 µL ±0.6 ±6.0 ±0.2 ±2.0
0.5 mL ±2.4 ±12 ±0.6 ±3.0
2.5 mL ±1.2 ±30 ±0.25 ±6.25
5.0 mL ±0.6 ±30 ±0.15 ±7.5
1.0 mL ±3.0 ±30 ±0.6 ±6.0
5.0 mL ±0.8 ±40 ±0.2 ±10
10.0 mL ±0.6 ±60 ±0.15 ±15
Page 45
9.2.4 Research pro
Technical specifications
Eppendorf SOP
English (EN)
45
Model Test tip
epT.I.P.S. Color code
Volume range
Length
0.5 - 10 µL light gray
0.5 – 20 µL L
46 mm
5 - 100 µL Yellow
2 - 200 µL
53 mm
20 – 300 µL Orange
20 – 300 µL
55 mm
50 - 1 000 µL Blue
50 - 1 000 µL
71 mm
500 – 5 000 µL Purple
0.1 – 5 mL
120 mm
Tes ting
volume
Systematic
Error limits
error
Error
Random
error
± % ± µL ± % ± µL
1 µL ±2.5 ±0.025 ±1.8 ±0.018
5 µL ±1.5 ±0.075 ±0.8 ±0.04
10 µL ±1.0 ±0.1 ±0.4 ±0.04
10 µL ±2.0 ±0.2 ±1.0 ±0.1
50 µL ±1.0 ±0.5 ±0.3 ±0.15
100 µL ±0.8 ±0.8 ±0.2 ±0.2
30 µL ±2.5 ±0.75 ±0.7 ±0.21
150 µL ±1.0 ±1.5 ±0.3 ±0.45
300 µL ±0.6 ±1.8 ±0.2 ±0.6
100 µL ±3.0 ±3.0 ±0.6 ±0.6
500 µL ±1.0 ±5.0 ±0.2 ±1.0
1,000 µL ±0.6 ±6.0 ±0.2 ±2.0
0.5 mL ±3.0 ±15 ±0.6 ±3.0
2.5 mL ±1.2 ±30 ±0.25 ±6.25
5.0 mL ±0.6 ±30 ±0.15 ±7.5
Page 46

Technical specifications
46
Eppendorf SOP
English (EN)
9.2.5 Research plus adjustable-volume
Research plus adjustable single-channel
Model Test tip
epT.I.P.S. Color code
Volume range
Length
0.1 µL – 2.5 µL
Increment:
0.002 µL
0.5 µL – 10 µL
Increment:
0.01 µL
2 µL – 20 µL
Increment:
0.02 µL
2 µL – 20 µL
Increment:
0.02 µL
10 µµL – 100 µL
Increment:
0.1 µL
20 µL - 200 µL
Increment:
0.2 µL
30 µL – 300 µL
Increment:
0.2 µL
100 µL – 1 000 µL
Increment:
1 µL
Dark gray
0.1 µL – 10 µL
34 mm
Medium gray
0.1 µL – 20 µL
40 mm
light gray
0.5 µL – 20 µL L
46 mm
Yellow
2 µL - 200 µL
53 mm
Yellow
2 µL - 200 µL
53 mm
Yellow
2 µL - 200 µL
53 mm
Orange
20 µL – 300 µL
55 mm
Blue
50 µL – 1 000 µL
71 mm
Tes ting
volume
Eppendorf AG error limits
Error
Systematic
error
Random
error
± % ± µL ± % ± µL
0.1 µL ±48 ±0.048 ±12 ±0.012
0.25 µL ±12 ±0.03 ±6.0 ±0.015
1.25 µL ±2.5 ±0.031 ±1.5 ±0.019
2.5 µL ±1.4 ±0.035 ±0.7 ±0.018
0.5 µL ±8.0 ±0.04 ±5.0 ±0.025
1 µL ±2.5 ±0.025 ±1.8 ±0.018
5 µL ±1.5 ±0.075 ±0.8 ±0.04
10 µL ±1.0 ±0.1 ±0.4 ±0.04
2 µL ±5.0 ±0.1 ±1.5 ±0.03
10 µL ±1.2 ±0.12 ±0.6 ±0.06
20 µL ±1.0 ±0.2 ±0.3 ±0.06
2 µL ±5.0 ±0.1 ±1.5 ±0.03
10 µL ±1.2 ±0.12 ±0.6 ±0.06
20 µL ±1.0 ±0.2 ±0.3 ±0.06
10 µL ±3.0 ±0.3 ±1.0 ±0.1
50 µL ±1.0 ±0.5 ±0.3 ±0.15
100 µL ±0.8 ±0.8 ±0.2 ±0.2
20 µL ±2.5 ±0.5 ±0.7 ±0.14
100 µL ±1.0 ±1.0 ±0.3 ±0.3
200 µL ±0.6 ±1.2 ±0.2 ±0.4
30 µL ±2.5 ±0.75 ±0.7 ±0.21
150 µL ±1.0 ±1.5 ±0.3 ±0.45
300 µL ±0.6 ±1.8 ±0.2 ±0.6
100 µL ±3.0 ±3.0 ±0.6 ±0.6
500 µL ±1.0 ±5.0 ±0.2 ±1.0
1,000 µL ±0.6 ±6.0 ±0.2 ±2.0
Page 47

Research plus adjustable single-channel
Model Test tip
epT.I.P.S. Color code
Tes ting
volume
Volume range
Length
0.5 µL – 5 mL
Increment:
0.005 mL
1 µL – 10 mL
Increment:
0.01 mL
Purple
0.1 µL – 5 mL
120 mm
Turquoise
1 µL – 10 mL
165 mm
0.5 mL ±2.4 ±12 ±0.6 ±3.0
2.5 mL ±1.2 ±30 ±0.25 ±6.0
5.0 mL ±0.6 ±30 ±0.15 ±8.0
1.0 mL ±3.0 ±30 ±0.6 ±6.0
5.0 mL ±0.8 ±40 ±0.2 ±10
10.0 mL ±0.6 ±60 ±0.15 ±15
9.2.6 Biomaster
Technical specifications
Eppendorf SOP
English (EN)
Eppendorf AG error limits
Error
Systematic
error
Random
error
± % ± µL ± % ± µL
47
Model Pipette tip Testing
volume
Systematic error
Error limits
Error
Random error
± % ± µL ± % ± µL
Biomaster 4830 Mastertip 2 µL ±6.0 ±0.12 ±4.0 ±0.08
3 µL ±5.0 ±0.15 ±3.0 ±0.09
5 µL ±4.0 ±0.2 ±2.0 ±0.1
10 µL ±3.0 ±0.3 ±1.5 ±0.15
20 µL ±2.5 ±0.5 ±0.8 ±0.16
9.2.7 Varipette
Model Pipette tip Testing
volume
Systematic error
± % ± mL ± % ± mL
Varipette 4720 Varitip S 2.5 mL ±1.0 ±0.025 ±0.2 ±0.005
5 mL ±0.4 ±0.02 ±0.2 ±0.01
10 mL ±0.3 ±0.03 ±0.2 ±0.02
Varipette 4720 Varitip P 1 mL ±0.6 ±0.006 ±0.2 ±0.002
5 mL ±0.5 ±0.025 ±0.1 ±0.005
10 mL ±0.3 ±0.03 ±0.1 ±0.01
Error limits
Error
Random error
Page 48

Technical specifications
48
Eppendorf SOP
English (EN)
9.2.8 Xplorer and Xplorer plus
pipette
Increment
Pipette tip
Color code
Volume range
Length
Tes ting
volume
Error limits
Systematic
error
Error
Random
error
µL µL ±% ± µL ±% ± µL
0.5 µL – 10 µL
Increment:
0.01 µL
5 µL– 100 µL
Increment:
0.1 µL
15 µL – 300 µL
Increment:
0.2 µL
50 µL – 1 000 µL
Increment:
1 µL
Medium gray
0.1 µL – 20 µL
40 mm
Yellow
2 µL - 200 µL
53 mm
Orange
15 µL – 300 µL
55 mm
Blue
50 µL – 1000 µL
71 mm
1 µL ±2.5 ±0.025 ±1.8 ±0.018
5 µL ±1.5 ±0.075 ±0.8 ±0.04
10 µL ±1.0 ±0.1 ±0.4 ±0.04
10 µL ±2.0 ±0.2 ±1.0 ±0.1
50 µL ±1.0 ±0.5 ±0.3 ±0.15
100 µL ±0.8 ±0.8 ±0.2 ±0.2
30 µL ±2.5 ±0.75 ±0.7 ±0.21
150 µL ±1.0 ±1.5 ±0.3 ±0.45
300 µL ±0.6 ±1.8 ±0.2 ±0.6
100 µL ±3.0 ±3.0 ±0.6 ±0.6
500 µL ±1.0 ±5.0 ±0.2 ±1.0
1000 µL ±0.6 ±6.0 ±0.2 ±2.0
mL mL mL ±% ± mL ±% ± mL
0.25 mL – 5 mL
Increment:
0.005 mL
0.5 mL – 10 mL
Increment:
0.01 mL
Purple
0.1 mL – 5 mL
120 mm
Turquoise
1 mL – 10 mL
165 mm
0.5 mL ±3.0 ±15.0 ±0.6 ±3.0
2.5 mL ±1.2 ±30.0 ±0.25 ±6.25
5 mL ±0.6 ±30.0 ±0.15 ±7.5
1 mL ±3.0 ±30.0 ±0.60 ±6.0
5 mL ±0.8 ±40.0 ±0.20 ±10.0
10 mL ±0.6 ±60.0 ±0.15 ±15.0
Page 49

9.3 Multi-channel pipettes
9.3.1 Research
Technical specifications
Eppendorf SOP
English (EN)
49
Model Test tip
epT.I.P.S. Color
code
Volume range
Length
Research8-channel
0.5 - 10 µL
light gray
0.5 – 20 µL
46 mm
Research12-channel
0.5 - 10 µL
Research8-channel
10 - 100 µL
Yellow
2 - 200 µL
53 mm
Research12-channel
10 - 100 µL
Research8-channel
30 - 300 µL
Orange
20 – 300 µL
55 mm
Research12-channel
30 - 300 µL
Volume
in µL
Systematic
Error limits
Error
Random error
error
± % ± µL ± % ± µL
1 ±8.0 ±0.08 ±5.0 ±0.05
5 ±4.0 ±0.2 ±2.0 ±0.1
10 ±2.0 ±0.2 ±1.0 ±0.1
see 8-channel
10 ±3.0 ±0.3 ±2.0 ±0.2
50 ±1.0 ±0.5 ±0.8 ±0.4
100 ±0.8 ±0.8 ±0.3 ±0.3
see 8-channel
30 ±3.0 ±0.9 ±1.0 ±0.3
150 ±1.0 ±1.5 ±0.5 ±0.75
300 ±0.6 ±1.8 ±0.3 ±0.9
see 8-channel
Page 50

Technical specifications
50
Eppendorf SOP
English (EN)
9.3.2 Research pro
Model Test tip
epT.I.P.S. Color code
Volume range
Length
Research pro
8-channel /12-channel
0.5 - 10 µL
Research pro
8-channel /12-channel
5 - 100 µL
Research pro
8-channel /12-channel
20 – 300 µL
Research pro
8-channel /12-channel
50 – 1 250 µL
light gray
0.5 – 20 µL L
46 mm
Yellow
2 - 200 µL
53 mm
Orange
20 – 300 µL
55 mm
Green
50 – 1 250 µL
76 mm
Tes ting
volume
Error limits
Error
Systematic
error
Random
error
± % ± µL ± % ± µL
1 µL ±5.0 ±0.05 ±3.0 ±0.03
5 µL ±3.0 ±0.15 ±1.5 ±0.075
10 µL ±2.0 ±0.2 ±0.8 ±0.08
10 µL ±2.0 ±0.2 ±2.0 ±0.2
50 µL ±1.0 ±0.5 ±0.8 ±0.4
100 µL ±0.8 ±0.8 ±0.25 ±0.25
30 µL ±2.5 ±0.75 ±1.0 ±0.3
150 µL ±1.0 ±1.5 ±0.5 ±0.75
300 µL ±0.6 ±1.8 ±0.25 ±0.75
120 µL ±6.0 ±7.2 ±0.9 ±1.08
600 µL ±2.7 ±16.2 ±0.4 ±2.4
1 200 µL ±1.2 ±14.4 ±0.3 ±3.6
Page 51

9.3.3 Research plus
Research plus adjustable multi-channel
Model Test tip
epT.I.P.S. Color code
Volume range
Length
0.5 µL – 10 µL
Increment:
0.01 µL
10 µL – 100 µL
Increment:
0.1 µL
30 µL – 300 µL
Increment:
0.2 µL
Medium gray
0.1 µL – 20 µL
40 mm
Yellow
2 µL - 200 µL
53 mm
Orange
20 µL – 300 µL
55 mm
Tes ting
volume
Technical specifications
Eppendorf AG error limits
Systematic
error
Eppendorf SOP
English (EN)
Error
Random
error
± % ± µL ± % ± µL
0.5 µL ±12 ±0.06 ±8.0 ±0.04
1 µL ±8.0 ±0.08 ±5.0 ±0.05
5 µL ±4.0 ±0.2 ±2.0 ±0.1
10 µL ±2.0 ±0.2 ±1.0 ±0.1
10 µL ±3.0 ±0.3 ±2.0 ±0.2
50 µL ±1.0 ±0.5 ±0.8 ±0.4
100 µL ±0.8 ±0.8 ±0.3 ±0.3
30 µL ±3.0 ±0.9 ±1.0 ±0.3
150 µL ±1.0 ±1.5 ±0.5 ±0.75
300 µL ±0.6 ±1.8 ±0.3 ±0.9
51
Page 52

Technical specifications
52
Eppendorf SOP
English (EN)
9.3.4 Reference2
Reference2 Variable multi-channel (8-channel/12-channel)
Model Test tip
epT.I.P.S. Color code
Volume range
Length
0.5 µL – 10 µL Medium gray
0.1 µL – 20 µL
40 mm
10 µL – 100 µL Yellow
2 µL - 200 µL
53 mm
30 µL – 300 µL Orange
20 µL – 300 µL
55 mm
Tes ting
volume
0.5 µL ±12.0 ±0.06 ±8.0 ±0.04
1 µL ±8.0 ±0.08 ±5.0 ±0.05
5 µL ±4.0 ±0.2 ±2.0 ±0.1
10 µL ±2.0 ±0.2 ±1.0 ±0.1
10 µL ±3.0 ±0.3 ±2.0 ±0.2
50 µL ±1.0 ±0.5 ±0.8 ±0.4
100 µL ±0.8 ±0.8 ±0.3 ±0.3
30 µL ±3.0 ±0.9 ±1.0 ±0.3
150 µL ±1.0 ±1.5 ±0.5 ±0.75
300 µL ±0.6 ±1.8 ±0.3 ±0.9
Eppendorf AG error limits
Error
Systematic
error
Random
error
± % ± µL ± % ± µL
Page 53

9.3.5 Xplorer and Xplorer plus
Technical specifications
Eppendorf SOP
English (EN)
53
pipette
Increment
Pipette tip
Color code
Volume range
Length
Testing
volume
Error limits
Systematic
error
Error
Random error
µL µL % µL % µL
0.5 µL – 10 µL
Increment:
0.01 µL
5 µL – 100 µL
Increment:
0.1 µL
15 µL – 300 µL
Increment:
0.2 µL
50 µL – 1200 µL
Increment:
1 µL
Medium gray
0.1 µL – 20 µL
40 mm
Yellow
2 µL –200 µL
53 mm
Orange
15 µL –300 µL
55 mm
Green
50 µL–1250 µL
76 mm
1 µL ±5.0 ±0.05 ±3.0 ±0.03
5 µL ±3.0 ±0.15 ±1.5 ±0.075
10 µL ±2.0 ±0.2 ±0.8 ±0.08
10 µL ±2.0 ±0.2 ±2.0 ±0.2
50 µL ±1.0 ±0.5 ±0.8 ±0.4
100 µL ±0.8 ±0.8 ±0.25 ±0.25
30 µL ±2.5 ±0.75 ±1.0 ±0.3
150 µL ±1.0 ±1.5 ±0.5 ±0.75
300 µL ±0.6 ±1.8 ±0.25 ±0.75
120 µL ±6.0 ±7.2 ±0.9 ±1.08
600 µL ±2.7 ±16.2 ±0.4 ±2.4
1200 µL ±1.2 ±14.2 ±0.3 ±3.6
Page 54

Technical specifications
54
Eppendorf SOP
English (EN)
9.4 Multipette
The following specifications for the Multipette plus, Multipette stream /
Multipette Xstream, Multipette M4 apply to the following conditions:
• Using the Combitips advanced
• Liquid: Distilled or deionized water
• Reference temperature: 20 to 25 °C, ±0.5 °C
• Number of determinations: 10 according to EN ISO 8655, with the original
Eppendorf Combitip advanced
Multipette stream / Multipette Xstream:
• Volume test in "DIS" mode
• Set speed level: 7
9.4.1 MultipettePlus
Combitip advanced Testing volume Error limits
Error
Systematic error Random error
± % ± µL ± % ± µL
0.1 mL
(beige piston)
0.2 mL
(blue piston)
0.5 mL 10 µL ±0.9 ±0.09 ±1.5 ±0.15
1 mL 20 µL ±0.9 ±0.18 ±0.9 ±0.18
2.5 mL 50 µL ±0.8 ±0.4 ±0.8 ±0.4
5 mL 100 µL ±0.6 ±0.6 ±0.6 ±0.6
10 mL 200 µL ±0.5 ±1.0 ±0.6 ±1.2
25 mL
(blue adapter)
50 mL
(dark gray adapter)
2 µL ±1.6 ±0.032 ±3.0 ±0.06
20 µL ±1.0 ±0.2 ±2.0 ±0.4
4 µL ±1.3 ±0.052 ±2.0 ±0.08
40 µL ±0.8 ±0.32 ±1.5 ±0.6
100 µL ±0.8 ±0.8 ±0.6 ±0.6
200 µL ±0.6 ±1.2 ±0.4 ±0.8
500 µL ±0.5 ±2.5 ±0.3 ±1.5
1,000 µL ±0.5 ±5.0 ±0.25 ±2.5
2 000 µL ±0.5 ±10 ±0.25 ±5.0
500 µL ±0.4 ±2.0 ±0.6 ±3.0
5,000 µL ±0.3 ±15 ±0.25 ±12.5
1,000 µL ±0.3 ±3.0 ±0.5 ±5.0
10,000 µL ±0.3 ±30 ±0.3 ±30
Page 55

Technical specifications
9.4.2 MultipetteM4
Combitip advanced Testing volume Error limits
Error
Systematic error Random error
± % ± µL ± % ± µL
0.1 mL
white
Increment: 1 µL
0.2 mL
light blue
Increment: 2 µL
0.5 mL
purple
Increment: 5 µL
1 mL
yellow
Increment: 10 µL
2.5 mL
green
Increment: 25 µL
5 mL
blue
Increment: 50 µL
10 mL
orange
Increment: 0.1 mL
25 mL
red
Increment: 0.25 mL
50 mL
light gray
Increment: 0.5 mL
2 µL ±1.6 ±0.032 ±3.0 ±0.06
20 µL ±1.0 ±0.2 ±2.0 ±0.4
4 µL ±1.3 ±0.052 ±2.0 ±0.08
40 µL ±0.8 ±0.32 ±1.5 ±0.6
10 µL ±0.9 ±0.09 ±1.5 ±0.15
100 µL ±0.8 ±0.8 ±0.6 ±0.6
20 µL ±0.9 ±0.18 ±0.9 ±0.18
200 µL ±0.6 ±1.2 ±0.4 ±0.8
50 µL ±0.8 ±0.4 ±0.8 ±0.4
500 µL ±0.5 ±2.5 ±0.3 ±1.5
100 µL ±0.6 ±0.6 ±0.6 ±0.6
1 000 µL ±0.5 ±5.0 ±0.25 ±2.5
200 µL
±0.5 ±1.0 ±0.6 ±1.2
0.2 mL
2 000 µL
±0.5 ±10 ±0.25 ±5.0
2 mL
500 µL
±0.4 ±2.0 ±0.6 ±3.0
0.5 mL
5 000 µL
±0.3 ±15 ±0.25 ±12.5
5 mL
1 000 µL
±0.3 ±3.0 ±0.5 ±5.0
1 mL
10 000 µL
±0.3 ±30 ±0.3 ±30
10 mL
Eppendorf SOP
English (EN)
55
Page 56

Technical specifications
56
Eppendorf SOP
English (EN)
9.4.3 Multipette stream / Multipette Xstream
Combitip
advanced
0.1 mL
(white piston)
Increment: 0.1 µL
0.2 mL
(blue piston)
Increment: 0.2 µL
0.5 mL
Increment: 0.5 µL
1 mL
Increment: 1 µL
2.5 mL
Increment: 2.5 µ
5 mL
Increment: 5 µL
10 mL
Increment: 10 µL
25 mL
(blue adapter)
Increment: 25 µL
50 mL
(dark gray adapter)
Increment: 50 µL
Volume range Testing
volume
Systematic
error
Error limits
Error
Random
error
± % ± µL ± % ± µL
1 µL - 100 µL 10 µL ±1.6 ±0.16 ±2.5 ±0.25
50 µL ±1.0 ±0.5 ±1.5 ±0.75
100 µL ±1.0 ±1.0 ±0.5 ±0.5
2 µL - 200 µL 20 µL ±1.3 ±0.26 ±1.5 ±0.3
100 µL ±1.0 ±1.0 ±1.0 ±1.0
200 µL ±1.0 ±2.0 ±0.5 ±1.0
5 µL - 500 µL 50 µL ±0.9 ±0.45 ±0.8 ±0.4
250 µL ±0.9 ±2.25 ±0.5 ±1.25
500 µL ±0.9 ±4.5 ±0.3 ±1.5
10 µL – 1 000 µL 100 µL ±0.9 ±0.9 ±0.55 ±0.55
500 µL ±0.6 ±3.0 ±0.3 ±1.5
1,000 µL ±0.6 ±6.0 ±0.2 ±2.0
25 µL – 2 500 µL 250 µL ±0.8 ±2.0 ±0.45 ±1.125
1,250 µL ±0.5 ±6.25 ±0.3 ±3.75
2,500 µL ±0.5 ±12.5 ±0.15 ±3.75
50 µL - 5 000 µL 500 µL ±0.8 ±4.0 ±0.35 ±1.75
2,500 µL ±0.5 ±12.5 ±0.25 ±6.25
5,000 µL ±0.5 ±25 ±0.15 ±7.5
0.1 mL – 10 mL 1 mL ±0.5 ±0.005 ±0.25 ±0.0025
5 mL ±0.4 ±0.02 ±0.25 ±0.0125
10 mL ±0.4 ±0.04 ±0.15 ±0.015
0.25 mL - 25 mL 2.5 mL ±0.3 ±0.0075 ±0.35 ±0.0088
12.5 mL ±0.3 ±0.0375 ±0.25 ±0.0313
25 mL ±0.3 ±0.075 ±0.15 ±0.0375
0.5 mL - 50 mL 5 mL ±0.3 ±0.015 ±0.50 ±0.025
25 mL ±0.3 ±0.075 ±0.20 ±0.05
50 mL ±0.3 ±0.15 ±0.15 ±0.075
Page 57

Technical specifications
Eppendorf SOP
English (EN)
9.5 Varispenser / Top Buret
The following specifications for Varispenser and Top Buret are valid for the
following conditions:
Liquid: Distilled or deionized water
Reference temperature: 20 to 25 °C, ±0.5 °C unchanging
Number of determinations: 10, in accordance with EN ISO 8655
9.5.1 Varispenser and Varispenser plus
57
Setting range Tested volume Systematic error
(inaccuracy)
0.5 – 2.50 mL 2.5 mL ± 0.6 % ≤ 0.1 %
1.00 – 5.00 mL 5.0 mL ±0.5 % ≤ 0.1 %
2.00 – 10.0 mL 10.0 mL ±0.5 % ≤ 0.1 %
5.00 – 25.0 mL 25.0 mL ±0.5 % ≤ 0.1 %
10.0 – 50.0 mL 50.0 mL ±0.5 % ≤ 0.1 %
20.0 – 100.0 mL 100.0 mL ±0.5 % ≤ 0.1 %
Random error
(imprecision)
9.5.2 Top Buret
Size Setting range Systematic error
(inaccuracy)
C 25 mL ±0.2 % ≤ 0.1 %
H 50 mL ±0.2 % ≤ 0.1 %
Random error
(imprecision)
9.6 Error limits in accordance with EN ISO 8655
The error limits always refer to the overall system: pipette and tip. If the nominal
volume of the pipette lies between two entries in the table, the absolute error
values for the next largest nominal volume apply.
The absolute error limits in µL referring to the nominal volume apply to each
volume which can be set on the piston stroke pipette. The list below includes the
absolute and relative error limits in relation to the volume.
Page 58
Technical specifications
58
Eppendorf SOP
English (EN)
9.6.1 Air-cushion pipettes, fixed and adjustable volume
Nominal volume Error limits
Measurement errors
Systematic Random
± % ± µL ± % ± µL
1 µl ±5.0 % ±0.05 µl ±5.0 % ±0.05 µl
2 µl ±4.0 % ±0.08 µl ±2.0 % ±0.04 µl
5 µl ±2.5 % ±0,125 µL ±1.5 % ±0.075 µl
10 µl ±1.2 % ±0,12 µL ± 0.8 % ±0.08 µl
20 µl ±1.0 % ±0.2 µl ±0.5 % ±0.1 µl
50 µl ±1.0 % ±0.5 µl ±0.4 % ±0.2 µl
100 µl ± 0.8 % ±0.8 µl ±0.3 % ±0.3 µl
200 µL ± 0.8 % ±1,6 µL ±0.3 % ±0.6 µl
500 µl ± 0.8 % ±4,0 µL ±0.3 % ±1.5 µl
1 000 µL ± 0.8 % ±8,0 µL ±0.3 % ±3,0 µL
2 000 µL ± 0.8 % ±16,0 µL ±0.3 % ±6,0 µL
5 000 µL ± 0.8 % ±40,0 µL ±0.3 % ±15,0 µL
10 000 µL ±0.6 % ±60,0 µL ±0.3 % ±30,0 µL
For Multi-channel pipettes, the error values are two times the values
specified for single-channel pipettes.
9.6.2 Positive displacement pipettes (Biomaster)
Nominal volume Error limits
Measurement errors
Systematic Random
± % ± µL ± % ± µL
5 µl ±2.5 % ±0,13 µL ±1.5 % ±0.08 µl
10 µl ±2.0 % ±0.2 µl ±1.0 % ±0.1 µl
20 µl ±2.0 % ±0.4 µl ± 0.8 % ±0,16 µL
50 µl ±1.4 % ±0,7 µL ±0.6 % ±0.3 µl
100 µl ±1.5 % ±1.5 µl ±0.6 % ±0.6 µl
200 µL ±1.5 % ±3.0 µL ±0.4 % ±0.8 µl
500 µl ±1.2 % ±6.0 µL ±0.4 % ±2.0 µL
1 000 µL ±1.2 % ±12.0 µL ±0.4 % ±4.0 µL
Page 59

Technical specifications
Eppendorf SOP
English (EN)
9.6.3 Dispenser (Multipette)
Nominal volume Error limits
Measurement errors
Systematic Random
± % ± µL ± % ± µL
0.001 mL ±5.0 % ±0.05 µl ±5.0 % ±0.05 µl
0,002 ml ±5.0 % ±0.1 µl ±5.0 % ±0.1 µl
0,003 ml ±2.5 % ±0.075 µl ±3.5 % ±0,11 µL
0,01 ml ±2.0 % ±0.2 µl ±2.5 % ±0.25 µl
0,02 ml ±1.5 % ±0.3 µl ±2.0 % ±0.4 µl
0,05 ml ±1.0 % ±0.5 µl ±1.5 % ±0.75 µl
0,1 ml ±1.0 % ±1,0 µL ±1.0 % ±1,0 µL
0.2 ml ±1.0 % ±2,0 µL ±1.0 % ±2,0 µL
0.5 ml ±1.0 % ±5,0 µL ±0.6 % ±3,0 µL
1 ml ±1.0 % ±10,0 µL ±0.4 % ±4,0 µL
2 ml ± 0.8 % ±16,0 µL ±0.4 % ±8,0 µL
5 mL ±0.6 % ±30,0 µL ±0.3 % ±15,0 µL
10 mL ±0.5 % ±50,0 µL ±0.3 % ±30,0 µL
25 ml ±0.5 % ±125,0 µL ±0.3 % ±75,0 µL
50 mL ±0.5 % ±250 µL ±0.25 % ±125.0 µL
100 ml ±0.5 % ±500 µL ±0.25 % ±250.0 µL
200 ml ±0.5 % ±1 000 µL ±0.25 % ±500,0 µL
59
Page 60

Technical specifications
60
Eppendorf SOP
English (EN)
9.6.4 Single-stroke dispenser (Varispenser)
Nominal volume Error limits
Measurement errors
Systematic Random
± % ± µL ± % ± µL
0.01 ml ±2.0 % ±0.2 µl ±1.0 % ±0.1 µl
0.02 ml ±2.0 % ±0.4 µl ±0.5 % ±0.1 µl
0.05 ml ±1.5 % ±0.75 µl ±0.4 % ±0.2 µl
0.1 ml ±1.5 % ±1.5 µl ±0.3 % ±0.3 µl
0.2 ml ±1.0 % ±2.0 µL ±0.3 % ±0.6 µl
0.5 ml ±1.0 % ±5.0 µL ±0.2 % ±1.0 µL
1 ml ±0.6 % ±6.0 µL ±0.2 % ±2.0 µL
2 ml ±0.6 % ±12.0 µL ±0.2 % ±4.0 µL
5 mL ±0.6 % ±30.0 µL ±0.2 % ±10.0 µL
10 mL ±0.6 % ±60.0 µL ±0.2 % ±20.0 µL
25 ml ±0.6 % ±150.0 µL ±0.2 % ±50.0 µL
50 mL ±0.6 % ±300.0 µL ±0.2 % ±100.0 µL
100 ml ±0.6 % ±600.0 µL ±0.2 % ±200.0 µL
200 ml ±0.6 % ±1 200 µL ±0.2 % ±400,0 µL
9.6.5 Piston stroke burets
Nominal volume Error limits
Measurement errors
Systematic Random
± % ± µL ± % ± µL
<1 mL ±0.6 % ±6,0 µL ±0.1 % ±1,0 µL
2 ml ±0.5 % ±10,0 µL ±0.1 % ±2,0 µL
5 mL ±0.3 % ±15,0 µL ±0.1 % ±5,0 µL
10 mL ±0.3 % ±30,0 µL ±0.1 % ±10,0 µL
20 ml ±0.2 % ±40,0 µL ±0.1 % ±20,0 µL
25 ml ±0.2 % ±50,0 µL ±0.1 % ±25,0 µL
50 mL ±0.2 % ±100,0 µL ±0.1 % ±50,0 µL
100 ml ±0.2 % ±200 µL ±0.1 % ±100,0 µL
Page 61

Eppendorf SOP
Index
English (EN)
61
Index
A
Accuracy............................................ 6
Adjustable-volume pipettes
Adjust......................................... 18
Adjusting adjustable volume pipettes
Technical specifications............. 41
Adjustment ...................................... 17
Fixed-volume pipettes ............... 33
General information................... 17
B
Balance
Type ............................................. 6
Balances ............................................ 6
Accuracy ...................................... 6
minimum requirements ............... 6
C
Calibration software .......................... 7
Cleaning .......................................... 14
Climatic conditions............................ 7
D
Dispensing the
test volume............................. 9, 10
E
Error causes .................................... 15
Error correction............................... 15
Error limits.......................................57
Evaporation........................................7
F
Factor Z
Table...........................................36
Fixed-volume pipettes
Adjust .........................................33
Technical specifications.............37
J
Justierung
Adjustable-volume pipettes........ 17
L
Leakage check ................................. 15
M
Measurement
Work method................................ 9
Measuring station..............................7
Multi-channel pipettes
Technical specifications.............49
Multipette
Technical specifications.............54
P
Physical influences of liquids ..........35
Pipette conditions..............................6
Page 62

Index
62
Eppendorf SOP
English (EN)
R
Random error.................................. 11
S
Scope of testing
Adjusting adjustable volume
pipettes ........................................ 8
Bottle-top dispenser, Top Buret... 9
Multi-channel pipettes................. 8
Multipette .................................... 8
Sterilization ..................................... 12
Systematic error.............................. 11
T
Technical specifications
Adjusting adjustable volume
pipettes ...................................... 41
Conditions.................................. 37
Fixed-volume pipettes ............... 37
Multi-channel pipettes............... 49
Multipette .................................. 54
Top Buret ................................... 57
Varispenser................................ 57
Temperature differences ................... 7
Test conditions.................................. 6
Test liquid.......................................... 7
Test room .......................................... 7
Top Buret
Technical specifications............. 57
Technical specifications.............57
Volume errors..................................17
W
Work method ..................................... 9
V
Varispenser
Page 63

Page 64

Evaluate your manual
Give us your feedback.
www.eppendorf.com/manualfeedback
Your local distributor: www.eppendorf.com/contact
Eppendorf AG · 22331 Hamburg · Germany
eppendorf@eppendorf.com · www.eppendorf.com
 Loading...