

Page 1

Tube
Amp
Ritchie Blackmore
Signature 100
Full Tube
Guitar Amplifier
Operator´s Manual
Please, first read this manual carefully!
Page 2
Ritchie Blackmore Signature - an all-tube guitar amp head featuring the sound and the
look that fascinates a guitar legend such as Ritchie Blackmore.
The Ritchie Blackmore Signature amp is based on a classic, proven design, but is also
equipped with a number of innovative features. For instance, you can vary the amount
crunch for the two channels Clean and Lead via the Gain Lo/Hi switch. More special features:
Two Master Volume controls, the Contour button and a Custom Footswitch Port for the
connection of a compact footpedalboard that enables the direct access to all important
switching functions of the amp.
With its high-quality components and superior finishing, this amp is built to last.
You will find guidelines on care and maintenance of tube amps on the last page of the
manual. Please read and heed these before operating your amp.
The ENGL team is absolutely convinced you will be just as facinated by this amp as Ritchie
Blackmore is.
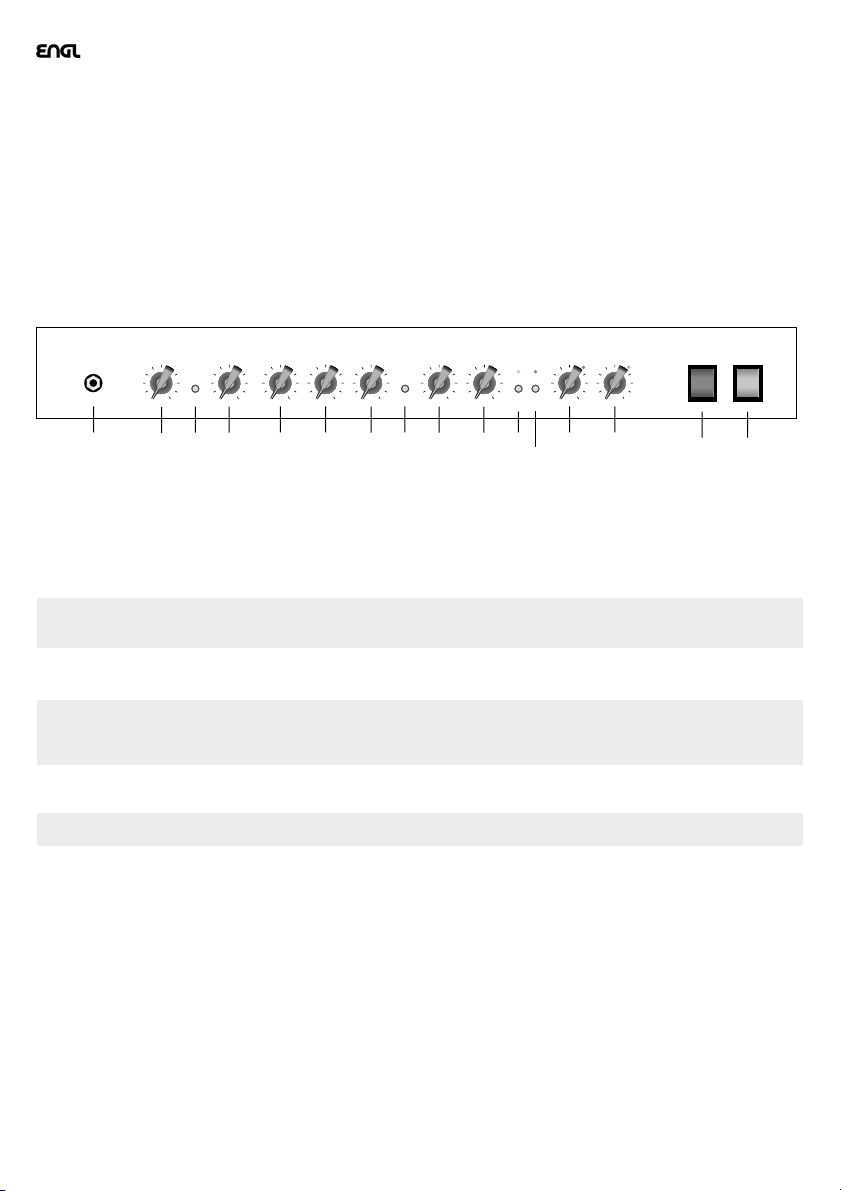
Front Panel
Ritchie Blackmore
Signature 100
Input
Clean Lead Bass Middle Treble
Lead
Presence
Lead
Volume
Master A
Lo Gain
Master B
Hi Gain
Bright Contour Gain
1
2
34
5678
1 Input: Unbalanced 1/4" input jack.
910
Clean
Lo/ Hi
Lead
11 13 14
12
Stand By
15
Power
16
2 Clean: Input sensitivity control for the Clean channel, adjust the volume by means of this control and
the Lo Gain Master (13); in the Hi Gain mode use the Hi Gain Master (14) for adjusting the volume.
3 Bright: Alters the EQ by boosting the upper treble range;
effectiveness decreases at higher Clean Gain (2) settings.
4 Lead: Gain control for the Lead channel, controls the amount of preamp overdrive in the Lead mode.
CAUTION: Extremely high gain and volume levels in the Lead mode can produce strong
feedback. Avoid feedback squeals, they lead to hearing loss and damaged speakers!
A TIP from the Designer: To get Crunch or Rhythm sounds, set this control between the 9 and 1
o´clock´s position (depending on the type of pick-up) and leave the Gain Boost pushbutton in
the Off-position.
5 Bass: Bottom end voicing control of the preamps´s passive EQ.
6 Middle: Mid-range voicing control of the preamp´s passive EQ.
7 Treble: Upper range voicing control of the preamp´s passive EQ.
A TIP from the Designer: To get an idea of this amp’s capabilities, I suggest you set all control pots to
the 12 o’clock position. For hi-gain Lead sounds, your best bet is to turn the treble and presence knobs
well down to prevent the pickups and speakers from interacting at hi levels and generating feedback
(the recommended setting is somewhere in the 8 to 12 o'clock range).
8 Contour: Press this button to alter the mid-EQ. When the button is pressed, frequencies between 300
and 500 Hz are boosted slightly. You can also activate this function via the respective footswitch
connected to Jack 19 or 21.
A TIP from the Designer: The tone is better audible while you are playing a Lead solo, when Contour is
activated. I recommend the other option (Contour off) for metal style power chords.
9 Lead Presence: This control defines the Treble response in the poweramp stage for the Lead channel.
10 Lead Volume: Volume control for the Lead channel (pre-FX loop, influences the Send level).
Use this knob to dial in the desired balance of levels between the Lead and Clean channels.
11 Gain Lo - Hi: When you press this button, the input sensitivity of both channels is increased. The
Hi-Gain function actually turns Clean into a "Crunch" channel, and Lead into a "Heavy Lead" channel.
It can also be activated via a suitable footswitch connected to Jack 19 or 20; the Gain Lo/Hi button is
automatically disabled when you connect a footswitch. The yellow LED illuminates to indicate "Hi-Gain"
mode is active.
12 Clean - Lead: Channel selector pushbutton for Clean and Lead modes, red LED indicate Lead mode;
This function can also be activated via the respective footswitch connected to jack 20 or 21.
Once a footpedal is connected, the channel selector pushbutton is deactivated.
13 Master A - Lo Gain: Located after the effects loop in the signal chain, this knob determines the
overall volume of the power amp when Lo Gain preamp mode is selected. Note that this is a dedicated
knob with a fixed assignment to Lo Gain mode. However, when you connect the respective footswitch to
jack 19 or 21, the knob is no longer assigned exclusively to Lo Gain mode. This means that you can select
the master A or the master B volume knob via footswitch to activate two different master volumes for
each preamp mode. To learn more about selecting modes and master levels, see section 19 or 21.
The red LED next to the knob lights up when this knob determines the master volume level.
Page 3

14 Master B - Hi Gain: Located after the effects loop in the signal chain, this knob determines the
overall volume of the power amp when Hi Gain preamp mode is selected. Note that this is a dedicated
knob with a fixed assignment to Hi Gain mode. However, when you connect a footswitch to jack 19 or
21, the knob is no longer assigned exclusively to Hi Gain mode. This means that you can select the
master B or the master A volume knob via footswitch to activate two different master volumes for each
preamp mode. To learn more about selecting modes and master levels, see section 19 or 21.
The green LED next to the knob lights up when this knob determines the master volume level.
15 Stand By: Power amp standby switch: Use this switch to silence (0 position) the amp when you
take a lengthier break. The amp's tubes stay warm, which means that it is ready to roll immediately
when you switch it back to full power. The standby switch is also well-suited for muting the amp for
brief breaks, for instance when you're switching guitars.
16 Power: AC power on/off.
Rear Panel
R
EPLACE FUSE
O
NLY WITH SAME TYPE
A
17
ND RATING !
18
F
MASTER
ONTOUR
C
19
A/B
OOTSWITCH
CLEAN/LEAD
GAIN LO/HI
20
C
F
OOTSWITCH
CAUTION !
USTOM
P
Connect To
Custom
Footswitch
F.X.L
ORT
Only !
OOP
S
ENDRETURNBALANCE
23 24
22
DRY EFFECT
17 AC SOCKET: Connect an AC cord here
ATTENTION: Ensure you use an intact AC cord with an insulated plug only!
Before you power the amp up, ensure the voltage value printed beside
the AC socket corresponds to the available current.
18 AC FUSE BOX: Contains mains fuse (rear chamber) and spare fuse (front chamber).
NOTE: Ensure replacement fuses bear identical ratings (refer to the table)!
19 Footswitch Master A - B; Contour: 1/4" Stereo jack designed to take a dual footswitch for
the following functions:
1. Switching between the two Master volume controls A and B (mono terminal)
2. Contour switching (stereo terminal).
Note that when you connect a footswitch to this jack, the master A/B switching option is reassigned
to the footswitch, allowing you to activate the volume level of each knob irrespective of mode
(Lo or Hi Gain).
20 Footswitch Clean - Lead; Gain Lo - Hi: 1/4" Stereo jack designed to take a dual footswitch
for the following functions:
1. Channel switching Clean - Lead (mono terminal)
2. Gain Lo - Hi (stereo terminal).
21 Custom Footswitch Port: Connect the ENGL Custom Footswitch Z-5 (optional) to this port
(Sub-D, 9-pin). This special footswitch lets you activate the four channels (Clean, Crunch, Soft
Lead, Heavy Lead) directly via dedicated buttons. Master A/B and Contour are activated via two
additional buttons.When the Z-5 footswitch is connected, the Clean/Lead, Gain Lo/Hi and Contour
buttons on the front panel as well as footswitch Jacks 19 and 20 are disabled.
Note that when you connect a footswitch to this jack, the master A/B switching option is reassigned
to the footswitch, allowing you to activate the volume level of each knob irrespective of mode
(Lo or Hi Gain).
22 F.X. Loop Send: Signal output for the Effects loop. Connect this output to a signal processor’s
input/return jack via a shielded cable with 1/4" plugs.
23 F.X. Loop Return: Signal input for the Effects loop. Connect this input to a signal processor’s
output/send jack via a shielded cable with 1/4" plugs.
24 Balance: FX mix control for the Effects loop: Rotate the knob to the "DRY" position for the pure
amp signal, i.e. no effect on the signal. Turn clockwise to blend in an effect connected to the loop
to the dry signal (parallel/passive). At the "EFFECT" position, only the wet signal, i.e. the signal
sent from the FX device is fed to the power amp (serial/passive).
NOTE: If no effects processor is connected to this loop, leave this control in the "DRY" position!
25 Poweramp Output 4 ohms parallel: 4 ohms speaker output jacks, internal parallel signal
path for the connection of one 4 ohms cabinet or two 8 ohms speaker cabinets.
26 Poweramp Output 8 ohms parallel: 8 ohms speaker output jacks, internal parallel signal
path for the connection of one 8 ohms cabinet or two 16 ohms speaker cabinets.
27 Poweramp Output 16 ohms: 16 ohms speaker output jack, for the connection
of one 16 ohms speaker cabinet.
NOTE: Never operate the amplifier without a sufficient load, otherwise you may damage or
destroy the power amp! Ensure your cabinet’s specifications match the respective output’s specs.
Possible speaker cabinet options: 1 x 4 or 2 x 8 ohms or 1 x 8 ohms or 2 x 16 or 1 x 16 ohms.
CAUTION !
DO NOT OPEN !
RISK OF ELECTRIC SHOCK !
DO NOT EXPOSE THIS EQUIPMENT
TO RAIN OR MOISTURE !
!
R
100 W All-Tube Guitar Amp Head
Ritchie Blackmore Signature 100
TYPE E650
designed by Horst Langer
MADE IN GERMANY
4 O
HMS PARALLEL
1 x 4 O
2 x 8 O
25
P
OWERAMP OUTPUT
8 O
HMS
HMS
HMS PARALLEL
1 x 8 O
2 x 16 O
26 2721
16 O
HMS
HMS
HMS
Page 4

R
EPLACE FUSE
O
NLY WITH SAME TYPE
A
ND RATING !
F
MASTER
A/B
ONTOUR
C
OOTSWITCH
CLEAN/LEAD
GAIN LO/HI
C
F
OOTSWITCH
CAUTION !
USTOM
P
Connect To
Custom
Footswitch
CAUTION !
F.X.L
ORT
Only !
OOP
S
ENDRETURNBALANCE
DRY EFFECT
RISK OF ELECTRIC SHOCK !
DO NOT EXPOSE THIS EQUIPMENT
DO NOT OPEN !
TO RAIN OR MOISTURE !
!
R
100 W All-Tube Guitar Amp Head
Ritchie Blackmore Signature 100
TYPE E650
designed by Horst Langer
MADE IN GERMANY
4 O
HMS PARALLEL
1 x 4 O
2 x 8 O
P
OWERAMP OUTPUT
8 O
HMS
HMS
HMS PARALLEL
1 x 8 O
2 x 16 O
16 O
HMS
HMS
HMS
Tube Amplifier
ON/OFF ON/OFF
Tube Amplifier
ON/OFF ON/OFF
or
MIDI SWITCHER
SWITCH
WITCH
WITCH
WITCH
S
MIDI
WRITE
LOOP 1
LOOP 2
CHANNEL
WITCH
S
S
S
LOOP 3
LOOP 4
LOOP 5
or
WITCH
S
LOOP 6
Custom Footswitch
Clean
Lo Gain
3.1. 2.
Crunch
Lead
Hi Gain
Lead
Lo Gain
Hi Gain
Contour
Reverb
Custom Footswitch Port
Caution !
Connect To Amplifier Only !
Custom
Footswitch
Type Z-5
Made in
Germany
Serial
Number
Master A/B
Lo/Hi
The different options for controlling the Ritchie Blackmore signature amp remotely:
1. Two-way footswitch (e.g. ENGL Z-4): Connect it to the amp via a stereo ¼" cord. You will
need one two-way footswitch for switching channels via Jack 20 and another footswitch for
switching Master A/B and Contour via Jack 19. Functions: Clean/Lead, Gain Lo/Hi, Master A/B
and Contour. With this solution, you can't activate the channels Crunch and Heavy Lead directly,
i.e. this requires an intermediate switching operation.
2. MIDI-Switcher (e.g. ENGL Z-11): Connect the unit to the amp via two stereo ¼" cords. The
buttons on the Switcher control Clean/Lead, Gain Lo/Hi, Master A/B and Contour. If you
program the diverse switching configurations to different MIDI program locations (e.g. Gain Hi
& Lead & Master A & Contour activ), you can activate the desired configuration directly via a
MIDI board(e.g. ENGL Z-12). This type of control option is extremely versatile, we recommend
it highly if you intend to use the amp in conjunction with a MIDI system (e.g. MIDI effects
devices).
3. ENGL Custom Footswitch Z-5: Connect it to the "Custom Footswitch Port" port via a
9-pin computer cable. Functions: Direct access to Clean (Clean & Lo Gain), Crunch (Clean &
Hi Gain), Soft Lead (Lead & Lo Gain), Heavy Lead (Lead & Hi Gain) as well as Master A/B and
Contour. This is a very convenient yet compact solution.
Technical Data:
Rated power: approx. 100 watts at 4, 8 or 16 ohms;
Tubes: V1(Input -Tube): ECC 83 / 12AX7, FQ selected;
V2, V3: ECC 83 / 12AX7 selected;
V4: ECC 83 / 12AX7, standard;
V5 - V8: 5881 (6L6GC) matched sets.
Fuses: external: 2 AT (slow) for the 230 Volt model;
2,5 AM (slow) in the 100 and 120 Volt models.
internal: 4 AT (slow) for the 230 Volt model;
5 AT (slow) in the 100 and 120 Volt models.
Important: Replace fuses only against same type and rating!
Power
Consumption:
Dimensions: approx. 71 x 27 x 27 cm (l x h x d)
Weight: approx. 20 kg
Tube array:
295 watts max.
Output
Transformer
V 5 V 6 V 7 V 8
V 1 V 2 V 3 V 4
Power
Transformer
Page 5

"Engl Amps are the best amps I´ve ever used
– not only are they powerful,
but they have texture and character too."
Page 6

Handling and Care
Protect the amp from mechanical knocks (tubes!).
Let the amp cool down before you transport it (approx. 10 minutes).
Tubes need about 20 seconds to warm up after you switch the power on,
and furtheron a few minutes before they reach their full power capability.
Avoid storing the amp in damp or dusty rooms, they are hard on jacks,
switches and potentiometers.
Make sure air can circulate at the front and top of the amp
to allow for adequate cooling (increases component life).
Never operate the amp without an adequate load.
Replace tubes with select replacement tubes (special selection criteria) to
avoid microfonic properties, undesireable noise and unbalanced performance.
Attention! Please read the following!
This guitar amplifier can produce high volume levels.
Exposure to high volume levels may cause hearing damage!
Leave tube replacement and power amp biasing to qualified professionals.
Be sure the unit is switched off and unplugged!
Caution! Tubes can get very hot and burn skin when touched.
Always use high quality cables.
Never plug the amp into an ungrounded outlet!
Never bridge a defective fuse and be sure replacement fuses feature
identical ratings!
Pull the AC mains plug before replacing fuses!
Never open the chassis or attempt repairs on your own. Consult qualified
service personnel!
Never expose the amplifier to extreme humidity or dampness!
Please read the instructions carefully before operating the unit!
Be sure to operate and handle this amp as it was designed for. To this end,
please heed the instructions in the operator's manual.
You'll find an additional pamphlet accompanying this owner's
manual entitled "Instruction for the prevention of fire, electric shock
or injury of persons". Be sure to read it before you plug
the preamp in and switch it on!
ENGL Gerätebau GmbH
internet: http\\www.engl-amps.com
Text, design, grafics amp photography and layout by Horst Langer
Photo - Ritchie Blackmore: Antonio Scettri
We reserve the right to make
unannounced technical upgrades!
 Loading...