


Gig Master 15
Tube Guitar Amplifier
Operator´s Manual
Please, first read this manual carefully!

The 
 Gig Master 15 is an amp purpose-designed for performance and voiced with premium tone in mind. Both the combo and head come in exceedingly compact housings. The Gig Master 15 is perfect for small gigs, home or studio recording, and practicing at lower volumes without sacrificing tone. In fact, because it is endowed with hip features such as a balanced Line Out with speaker simulation and a built-in Power Soak with four variable power stages, this amp is well-suited for a wide range of diverse applications. Its Master knob lets you dial in precisely the desired amount of power amp saturation. Two EL84 pentode power tubes produce the amp's trademark tone, while an ECC83 double triode preamp tube provides oodles of front-end overdrive. No one-trick pony, the Gig Master 15 offers plenty of variety for the tone connoisseur courtesy of its two channels and a specially voiced Mid Boost switch that shapes those midrange frequencies that matter so much to electric guitar tone. And although these two foot-switchable features afford you even greater flexibility to shape sounds on the fly, handling remains an exercise in convenience and simplicity. With its warm, bluesy tube tone, this amp is certainly a strong persuader: Plug in, play, and be convinced!
You'll find guidelines on care and maintenance of tube amps and details for the Power Soak handling in certain places of this manual.Please read and heed these before operating your amp. You'll also come across boxes shaded grey throughout the manual. These are located between the descriptions of the amp's functions and contain handy tips on the preceding function. All critical information pertaining to the operation of this amp is preceded by "NOTE" or "CAUTION." Please pay particular attention to these safety tips. The ENGL team wishes you all the best—may you and your amp enjoy a "harmonically rich" future together!
Front Panel Features
Input Gain Lead Drive |
Bass |
Middle |
Treble Lead Volume |
Master Gig Master 15 |
Input
Mid Clean
Boost Lead
|
|
|
|
|
|
|
|
|
|
Stand By |
Power |
1 |
2 |
3 |
4 |
5 |
6 |
7 |
8 |
9 |
10 |
11 |
12 |
1 Input: ¼" unbalanced input jack. Plug your guitar in here using a shielded cord.
2 Input Gain: This knob controls the preamp's input sensitivity. Use to dial in the desired amount of gain for the Clean and Lead channels. It and the Master (10) knob determine the Clean channel's volume. Note: Turning the Input Gain knob all the way down gives the lowest input sensitivity.
A tip from the designer:
If you want to keep the preamp signal pristine clean, dial in a setting between 7 and 11 o'clock for active and humbucking pickups, and between 9 and 1 o'clock for single-coil pickups. The power amp provides a moderate amount of headroom, so be sure to choose a relatively low Master knob setting (lower than 12 o'clock) if you wish to avoid any kind of break-up. Even in Clean mode, you can push both the amp's preamp and power amp hard enough to overdrive the signal.
3 Lead Drive: This knob controls the Lead channel's sensitivity. It and the Input Gain (2) determine the amount of preamp distortion in Lead mode.
Note: The amp's noise floor will increase appreciably if you crank both the Lead Drive and Input Gain knobs!
CAUTION: Extremely high gain and volume levels in Lead mode can produce powerful feedback. Avoid feedback squeals; they can lead to hearing loss and damage speakers! At higher volumes, back off the Gain and Treble levels in order to prevent unchecked feedback!
A tip from the designer:
Again, it's the combination of Input Gain (2) and Lead Drive (3) settings that control the amount of preamp overdrive. You can use these two knobs to set the desired amount of Gain in Clean and Lead modes, and then dial in the perfect balance between the two. Note that setting the Lead Drive knob to around 10 o'clock will give you a tougher rhythm tone with a little added edge.
4 Bass: Bottom end voicing control of the preamps´s passive EQ. 5 Middle: Mid-range voicing control of the preamps´s passive EQ.
6 Treble: Upper range voicing control of the preamps´s passive EQ.
Tips from the Designer:
To help you get acquainted with the amp's fundamental sounds, I recommend that you set all tone controls to the center or 12 o'clock position. If you want to dial in very soft lead, blues, or jazzy clean sounds, try setting the Treble knob between 11 and 1 o'clock. For more aggressive riffs or funk-approved tone, try a knob position between 1 and 4 o'clock.
7 Lead Volume: Volume control for the Lead channel (pre-FX loop, influences the Send level). The red LED above the channel switching selector (9) indicates Lead operating mode.
Use this knob to dial in the desired balance of levels between the Lead and Clean channels.
8 Mid Boost: This voicing feature operates globally, affecting both channels by boosting specific midrange frequencies when activated. The LED above the button lights up to indicate Mid Boost is activated. It may also be switched using a footswitch connected to jack 15.
When a footswitch is plugged in, the front panel Mid Boost button is disabled.
A tip from the designer:
Mid Boost targets and shapes specific midrange bands crucial in voicing a guitar's sound. This tone-shaping option is remotely controllable via footswitch, so you can adapt the amp's
fundamental sound on the fly, say to better support rhythm guitar work, singing leads, and slashing power chords.
9 Clean/Lead: Channel selector pushbutton for Clean and Lead modes, red LED indicate Lead mode; This function can also be activated via the respective footswitch connected to jack 15.
Once a footpedal is connected, the channel selector pushbutton is deactivated. 10 Master: Master volume control for power amp output (located post FX loop).
11 Stand By: Power amp standby switch: Use this switch to silence (0 position) the amp when you take a break. The amp's tubes stay warm, which means that it is ready to roll immediately when you switch it back to full power. The standby switch is also well-suited for muting the amp for brief breaks, for instance when you're switching guitars.
A tip from the designer:
I suggest you get into the habit of using standby during short breaks. In this mode, current is not piped through the power tubes, so they don't get as hot (due to the lack of anode dissipation) and are spared considerable wear. The amp is ready to run when you flip the Standby switch because the tubes are already warm and don't require time to heat up. For breaks of 30 minutes and longer, I recommend that you switch the amp off in order to conserve energy.
12 Power: AC power on/off.
Please note: ensure that the Stand By switch (11) is set to Stand By (0 position) before you switch the amp on. Let the tubes heat up for about 30 seconds before you activate the power amp. This procedure spares the tubes.
CAUTION: After an extended period of operation and higher ambient temperatures the amps's chassis can become very hot, therefore avoid touching the rear panel surface !
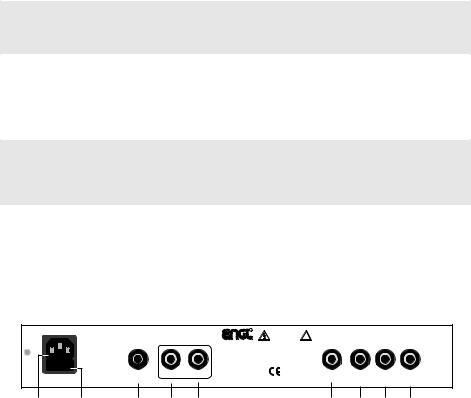
Rear Panel Features
REPLACE FUSE ONLY WITH SAME TYPE AND RATING !
Footswitch |
FX Loop |
Clean/Lead |
Send |
Return |
Mid Boost |
|
|
R
|
CAUTION ! ! |
Tube |
DO NOT OPEN ! |
Guitar Amplifier |
RISK OF ELECTRIC SHOCK ! |
Gig Master 15 |
DO NOT EXPOSE THIS |
Combo: |
EQUIPMENT TO |
Type E310 |
RAIN OR MOISTURE ! |
Head: |
|
Type E315 |
|
Amp-Design by
Horst Langer
ENGL Amps
Germany
|
|
|
|
Note: |
Balanced |
Poweramp Output |
Power Soak |
||
affects |
||||
Line Output |
|
A |
B |
8 Ohms |
|
|
|
|
output only! |
|
|
|
|
Important: |
|
|
|
|
Connect |
Frequency |
8 Ohms |
16 Ohms serial |
one 16 Ohms |
|
Comp. E310-Combo: |
1 x 16 Ohms |
cabinet to |
||
internal speaker |
2 x 8 Ohms |
output jack A! |
||
13 |
14 |
15 |
16 |
17 |
18 |
19 |
20 |
21 |
13 Mains Connector (AC Power Inlet; IEC - C14 connector)
Plug the mains cord in here. For European models, use a standard non-heating equipment connector cable.
CAUTION: Make sure you use an intact mains line cord with a grounded plug! Before you power the amp up, ensure the voltage value printed alongside the mains socket is the same as the current of the local power supply or wall outlet.
Please also heed the guidelines set forth in the separately included pamphlet, Instructions for the Prevention of Fire, Electrical Shock and Injury.
14 Mains Fuse Box: The rear chamber contains the mains fuse and in the front chamber, a spare fuse. CAUTION: ALWAYS make sure replacement fuses are of the same type and have the same ratings as the original fuse! Please refer to the fuse ratings table.
15 Footswitch Clean/Lead; Mid Boost: Use this ¼” Stereo jack to connect a conventional footswitch with two switching functions, for example, the ENGL Z-4 (2 x off/on - Single Pole Single Throw or SPST for short). This type of footswitch lets you access the two channels and Mid Boost.
One of the two switches activates Clean or Lead, while the other activates Mid Boost. Plugging a footswitch into this jack disables onboard channel (9) and Mid Boost (8) switching. Note also: A footswitch may be equipped with LEDs indicating the given switching status.
Each of the two switches is provided with approx. 10 milliamperes current, which suffices to power a standard LED. The jack's mono terminal ("tip") selects Clean / Lead switching, while the stereo terminal ("ring") controls the Mid Boost, feature.
For pin assignments, see "Wiring of Principal Connectors".
 Loading...