

Tube
Tube
Amp
Amp
Powerball
Full Tube
Guitar Amplifier
Operator´s Manual
Please, first read this manual carefully!
A four-channel, all-tube powered head, the Powerball offers sound-shaping options unrivalled
by any other amp. Designed to satisfy the exacting demands of discerning players, it delivers all the tonal
hues and colors you need to paint the most vivid musical pictures imaginable. Housed inside this newly
designed enclosure is a powerhouse 100-watt amp boasting 6L6GC tubes. It delivers the sonic goods you
need to dial in everything from contemporary ultra-high gain lead tone to crystal-clear clean and punchy
crunch sounds. An astonishing amount of gain reserves, remarkable tonal versatility, and bone-rattling
bottom end have crowned the
Powerball king of the heap among modern-day guitar amps.
Courtesy of its ability to crank out tight, focused low end, glossy top end and jaw-dropping sound
pressure levels, this amp provides the contemporary guitarist with richly detailed tone and the kind of
cut-thru-the-din assertiveness that sets standards for amps of this class. And in keeping with the ENGL
tradition of engineering excellence, it sports a host of hip features: a second master volume, electronic
power amp monitoring, an adjustable FX loop, and a Depth Punch knob that shapes the power amp's
response by beefing up the low end. But that's not the last word on this ENGL head's innovative
features: You also get two different sound voicings, Open and Focused. We created these voicings to
extend the range of lead sounds you have at your disposal by tweaking mid-range response to suit
different playing styles and applications.
There are few more handy features to rave about: The amp ships with a Z-5 Custom Footswitch Port.
Designed to take the ENGL Z-5 footswitch that lets you control all key sound-shaping functions remotely.
ENGL added another new audiophile wrinkle - an adjustable noise gate for the Lead channel. Old world
craftsmanship and highest quality components are part of what makes ENGL amps so special, and the
Powerball is no exception. On that note, please read and heed the guidelines on handling all-tube amps.
You'll find them on the last page of this manual. The ENGL team is convinced that this amp will delight
and inspire you. The
Powerball will rock your world!
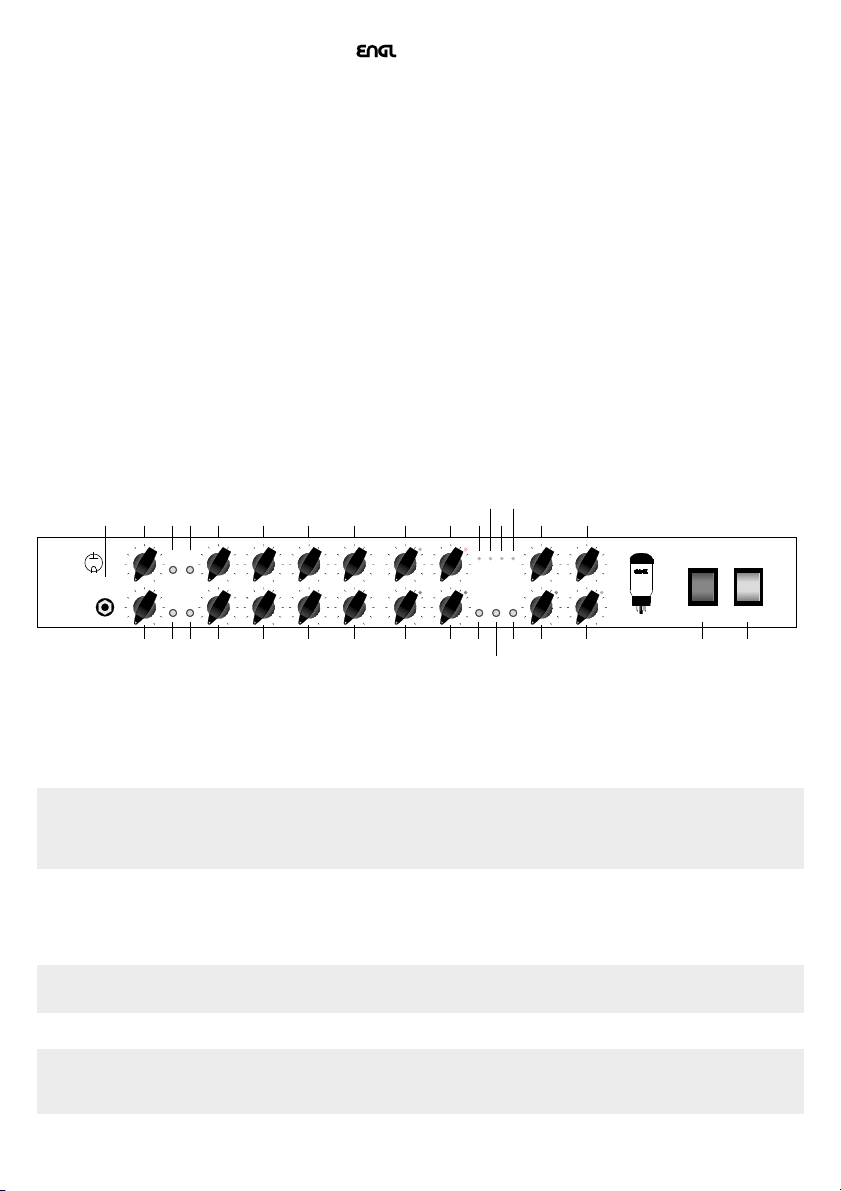
Frontpanel
2 3 4 5 6 7 8 9 10 1112131415 16
1
Ch I Gain
Tube
Amp
Ch II Gain
Input
Bright Bottom
Lo Lead
Bottom
Bass
Middle
Treble-Clean
Treble-Crunch
Clean Volume Crunch Volume
Bass
Mid-open
Mid-focused
Treble
Lo Lead Vol.
Hi Lead
Bottom
Hi Lead Vol.
V1 V2 V3 V4
Power Tube Monitor
open/
Ch I /II
focused
Presence
Depth Punch
6L6GC
Master B
powered
Master A
Gain
Lo /Hi
Powerball
R
Stand By
Power
17 1819 20 21 22 23 24 25 262728 29 30 31 32
1 Input
¼" unbalanced input. P
lug your guitar cord in here.
2 Ch I Gain
This knob determines input sensitivity of Main Channel I (Clean & Crunch), in other words, the input level
of the preamp in Ch I. In Crunch mode it determines the amount of preamp saturation.
A tip from the designer:
The amount of distortion depends on the type of pickups your guitar is equipped with. Single coil
pickups may overdrive the preamp when the knob is set to about the two o'clock position in Clean
operating mode, pickups with very high output levels (humbuckers or active pickups) will evoke
distortion at even lower settings. If you want squeaky clean tone, simply back off the Gain knob
accordingly.
CAUTION: Extremely high gain and volume levels in Crunch mode can produce strong feedback.
Avoid feedback squeals, they lead to hearing loss and damaged speakers! Reduce the Gain, Treble
and Presence levels at higher volumes in order to avoid uncontrolled feedback!
3 Bright
Alters the EQ by boosting the upper treble range; effectiveness decreases at higher Gain settings;
the Bright feature affects Clean and Crunch.
A tip from the designer:
For a crisp glassy tone, set the Bright switch to the On position.
This setting boosts the treble response of muddy pickups.
4 Bottom
Alters the EQ by boosting the low end range; the Bottom feature affects Main Channel I Clean & Crunch.
A tip from the designer:
If you want to ladle an extra helping of bottom-end oomph on crunch sounds, I recommend that you
activate the Lo End Punch button. At very high Gain knob settings (> 3 o'clock) and with high output
pickups, your best bet is to deactivate this button for a more focused, crisper tone.

5 Bass
Bottom end voicing control of the preamps´s passive EQ for Main Channel I, Clean und Crunch.
6 Middle
Mid-range voicing control of the preamps´s passive EQ for Main Channel I, Clean und Crunch.
7 Treble-Clean
Upper range voicing control of the preamps´s passive EQ for Main Channel I, Clean mode.
8 Treble-Crunch
Upper range voicing control of the preamps´s passive EQ for Main Channel I, Crunch mode.
TIP´s from the Designer:
To help you get acquainted with the amp's fundamental sounds, I recommend that you set all tone
controls to the center or 12 o'clock position. For higher Gain Crunch sounds, your best bet is to turn the
respective Treble knob well down to prevent the pickups and speakers from interacting at hi levels and
generating feedback (the recommended setting is somewhere in the 9 to 1 o'clock range).
The Clean and Crunch channels are equipped with dedicated Treble knobs. This means that you can
tweak the top end of each of the two channels separately to suit your taste and the given sonic
scenario. You will find that grittier tones generally sound better with a touch less treble because preamp
saturation makes higher frequencies figure more prominently in the signal.
9 Clean Volume
Volume control for the Clean channel (pre-FX loop, influences the Send level). The green LED beside this
control indicates Clean operating mode.
10 Crunch Volume
Volume control for the Crunch channel (pre-FX loop, influences the Send level). The yellow LED beside
this control indicates Crunch operating mode.
11 POWER TUBE MONITOR V1
This LED lights up when the current sent through the V1 power amp tube was too high and the power
tube monitor system has switched that tube off.
12 POWER TUBE MONITOR V2
This LED lights up when the current sent through the V2 power amp tube was too high and the power
tube monitor system has switched that tube off.
13 POWER TUBE MONITOR V3
This LED lights up when the current sent through the V3 power amp tube was too high and the power
tube monitor system has switched that tube off.
14 POWER TUBE MONITOR V4
This LED lights up when the current sent through the V4 power amp tube was too high and the power
tube monitor system has switched that tube off.
A few words on the POWER TUBE MONITOR system:
The electronic power amp monitoring system constantly gauges the current sent to the two power amp
tubes. If it rises to too high a level, the system shuts down the given tube.
This can occur when the amp is operated incorrectly (for example, if the impedance is wrong due to an
incorrect speaker load), at extreme power spikes, or when a tube is defective.
Reset this electronic monitoring system by switching the standby switch off and on again. When you
press the standby switch to turn the amp on again, the system again measures the current sent to the
tube. If it is still too high, the power amp must be checked by a service technician, and the tube may
have to be replaced if it is defective.
15 Presence
This control shapes the hi frequency response in the power amp stage and affects all channels.
16. Depth Punch
This control shapes the lo frequency response in the power amp stage and affects all channels.
17 Ch II Gain
This knob determines input sensitivity of Main Channel II (Lo & Hi Lead) and
it determines the amount of preamp saturation in both Lead channels.
CAUTION: Extremely high gain and volume levels in Lead mode can produce strong feedback. Avoid
feedback squeals, they lead to hearing loss and damaged speakers! Reduce the Gain, Treble and
Presence levels at higher volumes in order to avoid uncontrolled feedback!
18 Lo Lead Bottom
Alters the EQ by boosting the low end range; this Bottom feature affects the Lo Lead mode.
19 Hi Lead Bottom
Alters the EQ by boosting the low end range; this Bottom feature affects the Hi Lead mode.
A tip from the designer:
If you really want to beef up the low end of your lead tone to dial in the type of sound often employed
in contemporary styles, press the Bottom button. Note that you can activate this feature separately for
each of the two Lead channels.
20 Bass
Bottom end voicing control of the preamps´s passive EQ for Main Channel II, Lo and Hi Lead.

21 Middle open
Mid-range voicing control of the preamps´s passive EQ for Main Channel II, Lo and Hi Lead. This
control determines the response of a specific mid frequency range when sound style "open" is selected.
22 Middle focused
Mid-range voicing control of the preamps´s passive EQ for Main Channel II, Lo and Hi Lead. This control
determines the response of a specific mid frequency range when sound style "focused" is selected.
TIP from the Designer:
Try the open and focused voicings out for different applications. As the names suggest, open gives you
a more expansive sound that is excellent for grinding out heavy-duty riffs, while focused brings up the
low mids, making it a great choice for leads.
23 Treble
Upper range voicing control of the preamps´s passive EQ for Main Channel II, Lo and Hi Lead.
TIP from the Designer:
To help you get acquainted with the amp's fundamental sounds, I recommend that you set all tone
controls to the center or 12 o'clock position. For high Gain Lead sounds, your best bet is to turn the
Treble and the Presence knobs well down to prevent the pickups and speakers from interacting at hi
levels and generating feedback (the recommended setting is somewhere in the 9 to 2 o'clock range).
Since the two knobs sweep through different frequency ranges and influence the signal at different
places in the amp's internal signal chain, you can dial in different combinations of treble and presence
settings to come up with many interesting sonic variations.
24 Lo Lead Volume
Volume control for the Lo Lead channel (pre-FX loop, influences the Send level). The red LED beside this
control indicates Lo Lead operating mode.
25 Hi Lead Volume
Volume control for the Hi Lead channel (pre-FX loop, influences the Send level). The red LED beside this
control indicates Hi Lead operating mode.
26 open/focused
This button lets you select from two differnt voicings. Choose open for a looser, focused for a tighter
mid-range voicing. Twist the appropriate knob (open knob 21, focused knob 22) of Ch II to tweak the
selected mids voicing to taste. This sound shaping feature affects all four channels (Clean, Crunch, Lo
Lead and Hi Lead). You can also activate this function via a respective footswitch connected to jack 35
or 37. When a footswitch is plugged in, the front panel sound style button is disabled.
27 Ch I/II
Main Channel selector pushbutton; selects Main Channel I or II and, depending on the Gain selector
pushbutton setting 28 it activates the Clean, Crunch, Lo or Hi Lead channels. Off position: Main Channel
I (Clean or Crunch), On position (pushed in): Main Channel II (Lo or Hi Lead). This feature can also be
switched via the Custom Footswitch Port 37 or the footswitch jack 36: the channel selector pushbutton is
deactivated once a footswitch is connected.
28 Gain Lo/Hi (Gain Boost)
When you press this button, the input sensitivity of both Main channels is increased. The Hi-Gain
function switches from Clean to Crunch in Main Channel I, and from Lo Lead to Hi Lead in
Main Channel II. This function can also be activated via a suitable footswitch connected to Jack 36 or 37;
the Gain Lo/Hi button is automatically disabled when you connect a footswitch.
29 Master A
Master volume A for power amp output (located post FX loop). The red LED next to the knob lights up
when this knob determines the master volume level. Master A/B switching can be accessed via a
footswitch connected to jack 35 (e.g. ENGL Z-4) or 37 (ENGL Custom Footswitch Z-5).
30 Master B
Master volume B for power amp output (located post FX loop). The green LED next to the knob lights
up when this knob determines the master volume level. Master A/B switching can be accessed via a
footswitch connected to jack 35 (e.g. ENGL Z-4) or 37 (ENGL Custom Footswitch Z-5).
TIP from the Designer:
This option of using a footswitch to select the two master A and B knobs gives you another interesting
switching alternative: You can dial in two different volume levels and activate them in combination with
the amp's different operating modes (i.e. each of the four channels). That gives you many basic sonic
variations, each of which supports different playing techniques: In effect, you get footswitchable clean
(or slightly dirty) rhythm or chrunch and Lead tones in Main Channel I, and overdriven preamp tones in
Lead mode for power chords or distorted lead guitar in Main Channel II. And by working your guitar's
volume knob, you can expand this palette of tones accordingly.
31 Stand By
Power amp standby switch: Use this switch to silence (0 position) the amp when you take a lengthier
break. The amp's tubes stay warm, which means that it is ready to roll immediately when you switch it
back to full power.
To reset the power tube monitoring circuitry, press the standby switch briefly (see Power Tube Monitor).
32 Power
AC power on/off.

Rear Panel
REPLACE FUSE
ONLY WITH SAME TYPE
33
AND RATING !
34
Foots wi tc h
Master
Style
35
Channel
36
Custom
Noise Gate
Foot sw it ch
Lead Channel
Port
CAUTION !
Connect To
Custom
Footswitch Z-5
Only !
Off-Lo Hi
Threshold
Gain
38
F.X.Loop
Send Return Balance
40 41
39
Dry Effect
33 AC SOCKET:
Connect an AC cord here
CAUTION: Ensure you use an intact AC cord with an insulated plug only!
Before you power the amp up, ensure the voltage value printed beside the
AC socket corresponds to the available current.
34 AC Fuse Box
Contains mains fuse (rear chamber) and spare fuse (front chamber).
NOTE: Ensure replacement fuses bear identical ratings (refer to the table)!
35 Footswitch Master A - B; Style open - focused
1/4" Stereo jack designed to take a dual footswitch (e.g. ENGL Z-4) for the following functions:
1. Switching between the two Master volume controls A and B (mono terminal);
2. Switching between the Sound-Style "open" and "focused" (stereo terminal).
36 Footswitch Channel Ch I - Ch II ; Gain Lo - Hi
1/4" Stereo jack designed to take a dual footswitch (e.g. ENGL Z-4) for the following functions:
1. Channel switching between Main Channel I and Main Channel II (mono terminal);
2. Gain Lo - Hi switching (Clean -> Crunch or Lo Lead -> Hi Gain Lead) (stereo terminal).
37 Custom Footswitch Port
Connect the ENGL Custom Footswitch Z-5 (optional) to this port (Sub-D, 9-pin). This special footswitch
lets you activate the four channels (Clean, Crunch, Lo Lead, Hi Lead) directly via dedicated buttons.
Master A/B and Sound Style are activated via two additional buttons. When the Z-5 footswitch is
connected, the Channel I/II, Gain Lo/Hi and the Sound Style open/focused buttons on the front panel
as well as footswitch Jacks 35 and 36 are disabled.
38 Noise Gate Threshold
This knob activates an onboard Noise Gate serving to suppress excess noise in the lead channel
when you twist it to the right past roughly the 9 o'clock position.
Set the desired threshold within the range of 9 o'clock to 5 o'clock. The Noise Gate kicks in
when the noise level reaches the threshold that you have dialed in. The further you rotate
the knob to the right, the higher the threshold - that is, the level at which the Noise Gate activates.
39 F.X. Loop Send
Signal output for the Effects loop. Connect this output to a signal processor’s
input/return jack via a shielded cable with 1/4" plugs.
40 F.X. Loop Return
Signal input for the Effects loop. Connect this input to a signal processor’s
output/send jack via a shielded cable with 1/4" plugs.
41 Balance
FX mix control for the Effects loop: Rotate the knob to the "DRY" position for the pure amp signal,
i.e. no effect on the signal. Turn clockwise to blend in an effect connected to the loop to the dry signal
(parallel/passive). At the "EFFECT" position, only the wet signal, i.e. the signal sent from the FX device is
fed to the power amp (serial/passive).
NOTE: If no effects processor is connected to this loop, leave this control in the "DRY" position!
42 Poweramp Output 4 Ohms parallel
4 ohms speaker o
of one 4 ohms cabinet or two 8 ohms speaker cabinets.
utput jacks, internal parallel signal path for the connection
43 Poweramp Output 8 Ohms parallel
8 ohms speaker ou
of one 8 ohms cabinet or two 16 ohms speaker cabinets.
tput jacks, internal parallel signal path for the connection
44 Poweramp Output 16 Ohms
16 ohms speaker output jack, for the connection of one 16 ohms speaker cabinet.
NOTE: Never operate the amplifier without a sufficient load, otherwise you may damage or
destroy the power amp! Ensure your cabinet’s specifications match the respective output’s specs.
Possible speaker cabinet options: 1 x 4 or 2 x 8 ohms or 1 x 8 ohms or 2 x 16 or 1 x 16 ohms.
CAUTION !
DO NOT OPEN !
RISK OF ELECTRIC SHOCK !
DO NOT EXPOSE THIS EQUIPMENT
TO RAIN OR MOISTURE !
100 W All-tube Guitar Head Amp
Powerball
T
YPE
E645
designed by Horst Langer
MADE IN GERMANY
R
Poweramp Output
4 8Or 8And Or-> 8 16Or 16And
8 Ohms Parallel
4 Ohms Parallel
1 x 4 Ohms
2 x 8 Ohms
42
1 x 8 Ohms
2 x 16 Ohms
43 4437
!
16
16 Ohms

REPLACE FUSE
ONLY WITH SAME TYPE
AND RATING !
Foots wi tc h
Master
Style
Channel
CAUTION !
Custom
Noise Gate
Foot sw it ch
Lead Channel
Port
CAUTION !
Connect To
Custom
Footswitch Z-5
Only !
Off-Lo Hi
Threshold
Gain
F.X.Loop
Dry Effect
Send Return Balance
DO NOT EXPOSE THIS EQUIPMENT
DO NOT OPEN !
RISK OF ELECTRIC SHOCK !
TO RAIN OR MOISTURE !
!
100 W All-tube Guitar Head Amp
Powerball
T
YPE
E645
designed by Horst Langer
MADE IN GERMANY
R
Poweramp Output
4 8Or 8And Or-> 8 16Or 16And
8 Ohms Parallel
4 Ohms Parallel
1 x 4 Ohms
2 x 8 Ohms
1 x 8 Ohms
2 x 16 Ohms
16
16 Ohms
Tube A
ON/OFF ON/OFF
or
plifier
m
Tube A
ON/OFF ON/OFF
mplifier
MIDI SWITCHER
SWITCH
WITCH
WITCH
WITCH
S
MIDI
WRITE
LOOP 1
LOOP 2
CHANNEL
WITCH
S
S
S
LOOP 3
LOOP 4
LOOP 5
or
WITCH
S
LOOP 6
Custom Footswitch
Clean
Lo Gain
3.1. 2.
Crunch
Lead
Hi Gain
Lead
Lo Gain
Hi Gain
Contour
Reverb
Custom Footswitch Port
Caution !
Connect To Amplifier Only !
Custom
Footswitch
Type Z-5
Made in
Germany
Serial
Number
Master A/B
Lo/Hi
The different options for controlling the Powerball amp remotely:
1. Two-way footswitch (e.g. ENGL Z-4): Connect it to the amp via a stereo ¼" cord. You will
need one two-way footswitch for switching channels via Jack 36 and another footswitch for
switching Master A/B and Style via Jack 35. Functions: Ch I/II, Gain Lo/Hi, Master A/B
and Style open/focused. With this solution, you can't activate the channels Crunch and
Hi Lead directly, i.e. this requires an intermediate switching operation.
2. MIDI-Switcher (e.g. ENGL Z-11): Connect the unit to the amp via two stereo ¼" cords.
The buttons on the Switcher controls Ch I/II, Gain Lo/Hi, Master A/B and Style. If you
program the diverse switching configurations to different MIDI program locations
(e.g. Hi Lead & Master A & Style "open" to MIDI program number 1), you can activate
the desired configuration directly via a MIDI board (e.g. ENGL Z-12).
This type of control option is extremely versatile, we recommend it highly if you intend
to use the amp in conjunction with a MIDI system (e.g. MIDI effects devices).
3. ENGL Custom Footswitch Z-5: Connect it to the "Custom Footswitch Port" port via a
9-pin computer cable. Functions: Direct access to Clean (Ch I & Lo Gain), Crunch (Ch I &
Hi Gain), Lo Lead (Ch II & Lo Gain), Hi Lead (Ch II & Hi Gain) as well as Master A/B and
Style. This is a very convenient yet compact solution.
Technical Data:
Rated power: approx. 100 watts at 4, 8 or 16 ohms;
Tubes: V5 (Input -Tube): ECC 83 / 12AX7, FQ selected;
V6, V7: ECC 83 / 12AX7 selected;
V8: ECC 83 / 12AX7, standard;
V1 - V4: 6L6GC matched sets.
Fuses: external: 2 AT (slow) for the 230 Volt model;
4 AT (slow) in the 100 and 120 Volt models.
internal: 2,5 AT (slow) for the 230 Volt model;
5 AT (slow) in the 100 and 120 Volt models.
Important: Replace fuses only against same type and rating!
Power
Consumption:
Dimensions: approx. 71 x 27 x 27 cm (l x h x d)
Weight: approx. 21 kg
Tube array:
295 watts max.
Output
Transformer
V 1 V 2 V 3 V 4
V 5 V 6 V 7 V 8
Power
Transformer

Sound setting samples:
Ch I Gain
Tube
Amp
Ch II Gain
Input
Bright Bottom
Lo Lead
Bottom
Bass
Middle
Treble-Clean
Treble-Crunch
Bass
Mid-open
Hi Lead
Bottom
Mid-focused
Sound sample 1: Crystal Clear
Ch I Gain
Tube
Amp
Ch II Gain
Input
Bright Bottom
Lo Lead
Bottom
Bass
Middle
Treble-Clean
Treble-Crunch
Bass
Mid-open
Hi Lead
Bottom
Mid-focused
Sound sample 2: Power Crunch
Ch I Gain
Tube
Amp
Ch II Gain
Input
Bright Bottom
Lo Lead
Bottom
Bass
Middle
Treble-Clean
Treble-Crunch
Bass
Mid-open
Hi Lead
Bottom
Mid-focused
Sound sample 3: Ultra Scoop Metal
Ch I Gain
Tube
Amp
Ch II Gain
Input
Bright Bottom
Lo Lead
Bottom
Bass
Middle
Treble-Clean
Treble-Crunch
Bass
Mid-open
Hi Lead
Bottom
Mid-focused
Treble
Treble
Treble
Treble
Clean Volume Crunch Volume
Lo Lead Vol.
Hi Lead Vol.
Clean Volume Crunch Volume
Lo Lead Vol.
Hi Lead Vol.
Clean Volume Crunch Volume
Lo Lead Vol.
Hi Lead Vol.
Clean Volume Crunch Volume
Lo Lead Vol.
Hi Lead Vol.
V1 V2 V3 V4
Power Tube Monitor
open/
Ch I /II
focused
V1 V2 V3 V4
Power Tube Monitor
open/
Ch I /II
focused
V1 V2 V3 V4
Power Tube Monitor
open/
Ch I /II
focused
V1 V2 V3 V4
Power Tube Monitor
open/
Ch I /II
focused
Presence
Depth Punch
6L6GC
Master B
Master B
Master B
Master B
powered
6L6GC
powered
6L6GC
powered
6L6GC
powered
Master A
Gain
Lo /Hi
Presence
Depth Punch
Master A
Gain
Lo /Hi
Presence
Depth Punch
Master A
Gain
Lo /Hi
Presence
Depth Punch
Master A
Gain
Lo /Hi
Powerball
R
Stand By
Power
Powerball
R
Stand By
Power
Powerball
R
Stand By
Power
Powerball
R
Stand By
Power
Sound sample 4: Infinite Pressure
Ch I Gain
Tube
Amp
Ch II Gain
Input
Bright Bottom
Lo Lead
Bottom
Bass
Middle
Treble-Clean
Treble-Crunch
Clean Volume Crunch Volume
V1 V2 V3 V4
Bass
Mid-open
Mid-focused
Treble
Hi Lead
Bottom
Lo Lead Vol.
Hi Lead Vol.
Power Tube Monitor
open/
Ch I /II
focused
Sound sample 5: Liquid Lead
Explanations:
control settings does not care,
LED´s are not lit.
control setting for the described
sound sample; LED is lit.
button setting does not care.
button in Off position.
button in On position (pressed).
Sound setting samples created by: Bernd Aufermann
Presence
Depth Punch
6L6GC
Master B
powered
Master A
Gain
Lo /Hi
Powerball
R
Stand By
Power
Handling and Care
Protect the amp from mechanical knocks (tubes!).
Let the amp cool down before you transport it (approx. 10 minutes).
Tubes need about 20 seconds to warm up after you switch the power on,
and further few minutes before they reach their full power capability.
Avoid storing the amp in damp or dusty rooms, they are hard on jacks,
switches and potentiometers.
Make sure air can circulate at the front and top of the amp
to allow for adequate cooling (increases component life).
Never operate the amp without an adequate load.
Replace tubes with select replacement tubes (special selection criteria)
to avoid microphonic properties, undesireable noise and unbalanced performance.
Attention! Please read the following!
This guitar amplifier can produce high volume levels.
Exposure to high volume levels may cause hearing damage!
Leave tube replacement and power amp biasing to qualified professionals.
Be sure the unit is switched off and unplugged!
Caution! Tubes can get very hot and burn skin when touched.
Always use high quality cables.
Never plug the amp into an ungrounded outlet!
Never bridge a defective fuse and be sure replacement fuses feature
identical ratings!
Pull the AC mains plug before replacing fuses!
Never open the chassis or attempt repairs on your own. Consult qualified
service personnel!
Never expose the amplifier to extreme humidity or dampness!
Please read the instructions carefully before operating the unit!
Be sure to operate and handle this amp as it was designed for. To this end,
please heed the instructions in the operator's manual.
You'll find an additional pamphlet accompanying this owner's
manual entitled "Instruction for the prevention of fire, electric shock
or injury of persons". Be sure to read it before you plug
the preamp in and switch it on!
ENGL Gerätebau GmbH, Germany;
internet: http\\www.engl-amps.com
Text, design, graphics, photography and layout by
Horst Langer, ENGL Amp Designer
We reserve the right to make unannounced technical upgrades!
 Loading...