


E840
Tube Poweramp 50/50
Operator´s Manual

T I P 1
This poweramp is designed for one speaker cabinet per channel. If you decide to connect
additional speakers, ensure you keep the overall impedance in mind! For instance, if you want to
connect two 8Z systems per side, you must first connect them in series and then to the amp's
16Z outputs.
If you are using a stereo speaker cabinet for both channels, ensure it actually operates in the
stereo mode, otherwise you may damage the power amp. A convincing stereo image is achieved
via a quality stereo effects processor and a separate speaker for each channel.
For a very compact setup we recommend the ENGL speaker cabinets E112 (loaded with one 12"
Vintage speaker; wide open panoramic sound with a punchy bottom and crisp high) or the
E210" cabinet (loaded with two 10" Vintage speakers; nicely balanced, warm tone with a burly
midrange). To achieve enormous bottom end, we recommend our flagship cabinets, the E212
and the E412.
T I P 4
The VOLUME A/B switching feature can be used for the following application: In combination
with a multi channel preamp, to activate two different volumes for each channel, for instance
one for rhythm work, the other for soloing.
Use this switch to silence (0 position) the amp when you take a lengthier break. The amp's tubes
stay warm, which means that it is ready to roll immediately when you switch it back to full
power. The standby switch is also well-suited for muting the amp for brief breaks, for instance
when you're switching guitars. If you choose to use just one power amp channel, ensure you
switch the other channel's STANDBY switch off. Never operate an active stereo channel without
a connected speaker, you may destroy the power amp!
T I P 5
The two functions VOLUME A/B and PRESENCE A/B can also be switched via the ENGL MIDI
Switcher Z- 11. Simply connect the 1/4" stereo jack (23) to the stereo input of the Switcher via a
cable equipped with 1/4" stereo plugs. You can control these switching functions via the
buttons on the Switcher. The respective functions (e, g. Volume B and Presence A) are saved to
the desired MIDI program locations. The ENGL MIDI Footswitch Z-12 is ideal for activating MIDI
programs. When used in conjunction with the ENGL MIDI Switcher Z-11, this durable footswitch
does not require a separate AC power pack. The requisite power is routed via the MIDI cable.
T I P 3
T I P 2
The PRESENCE A/B switching feature can be used for the following application: In combination
with a two-channel preamp (Clean/Lead) a possible option could be a setting of 1 to 4 o´clock
for the PRESENCE A controls and a setting of 8 to 12 o´clock for the PRESENCE B controls. Use
PRESENCE A when the preamp is in the clean mode, and PRESENCE B for lead tones.
In a ddition to a first clas s tu be tone, the 84 0 poweramp offers a num be r of
pr ac ti ca l fe at ur es i n a powe rf ul 2x50 watt package. E ac h of t he two stereo
ch an ne ls features two volume a nd two pr es ence controls (A and B), so you can
di al in diverse vo lume and pres en ce settings. Th e A /B controls a re switchable via
an ex ternal footswi tc h o r t hr ou gh MIDI commands via a MID I S wi tc her.
In te ll ig en t de si gn features, superior cr af ts ma ns hi p a nd finishing and q ua li ty
co mp onents are what this devi ce is al l about. However keep in m in d, th at a few
pr ec au ti on s will ra di ca ll y extend tu be l if e (see ha nd li ng a nd c ar e guidness).
Th e e nt ir e - Te am wo ul d l ik e t o t ha nk yo u f or yo ur fa it h i n o ur pr od uct; we
ho pe you derive a great de al of jo y and sa ti sf action f ro m your T UB E
PO WERAMP 840.
PL EA SE N OT E: Read the Operator's Manual carefully and tho ro ughly, e specially
th e Han dling a nd Ca re section as wel l as the guid el in es in bold-fac e typ e. Avoi d
op erating errors and potential damage to the amp b y he ed ing th e gu id elines and
ca ut io na ry remarks in this m an ua l. The fo ot no te s also co ve r a few convenient
po in ters an d inter es ti ng t ip s on several functio ns . These are lis te d below.
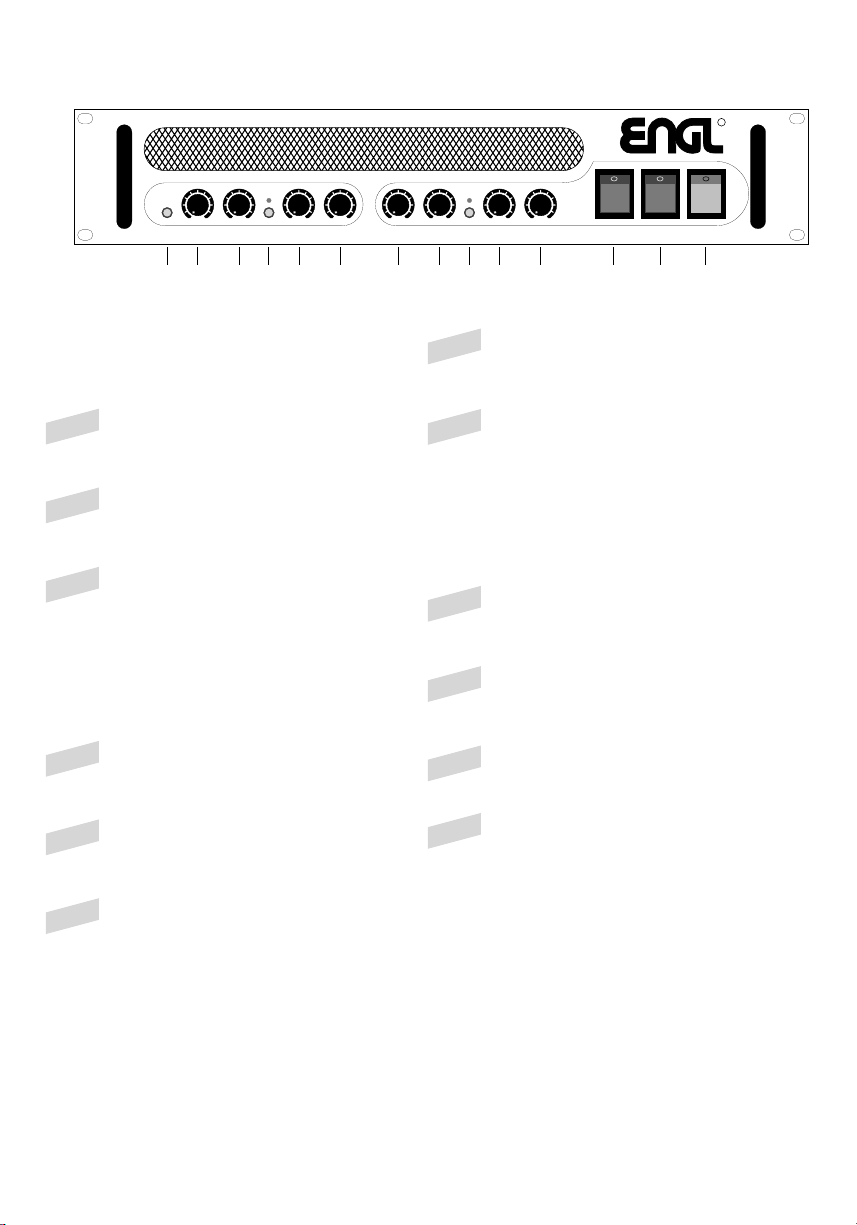
Front
1
Gain
Power amps' input sensitivity. This button
increases the gain level for both channels
at the INPUT jacks (24) and (25).
2
VOLUME LEFT A
volume control A for the left power amp.
This control is active if button A/B is in the
off position; LED does not illuminate.
3
VOLUME LEFT B
volume control B for the left power amp.
This control is active if button A/B is in the
on position (depressed); LED illuminates.
7
PRESENCE LEFT A
Treble control A for the left poweramp
channel; it is active if button A/B (9) is in the
off position; LED is not illuminating.
T I P 2
8
PRESENCE LEFT B
Treble control B for the left poweramp
channel; it is active if button A/B (9) is in the
on position; LED is illuminating.
T I P 2
STANDBY LEFT
left channel standby.
12
STANDBY RIGHT
right channel standby.
13
POWER
AC power on/off.
14
GAIN
TUBE POWERAMP 840/50
PRESENCE
A / B
L
EFT
A L
EFT
B R
IGHT
A
R
IGHT
B
STAND
B
Y POWER
R
IGHT
L
EFT
R
VOLUME
A / B
L
EFT
A L
EFT
B R
IGHT
A
R
IGHT
B
1
2 3 4 5 6 8 9 10 11 12 13 147
T I P 1
T I P 1
4
A/B VOLUME
switches between VOLUME A controls and
VOLUME B controls.
1. A/B button position off: VOLUME A
2. A/B button position on: VOLUME B,
indicated by the red LED.
This feature can also be switched via a
footswitch connected to jack 23;
the VOLUME A/B pushbutton is
deactivated once a footswitch is connected.
T I P 3
9
A/B PRESENCE
switches between PRESENCE A controls and
PRESENCE B controls.
1. A/B button position off: PRESENCE A
2. A/B button position on: PRESENCE B,
indicated by the red LED.
This feature can also be switched via a
footswitch connected to jack 23;
the PRESENCE A/B pushbutton is
deactivated once a footswitch is connected.
T I P 3
10
PRESENCE RIGHT A
Treble control A for the right poweramp
channel; it is active if button A/B (9) is in the
off position; LED is not illuminating.
T I P 2
11
PRESENCE RIGHT B
Treble control B for the right poweramp
channel; it is active if button A/B (9) is in the
on position; LED is illuminating.
T I P 2
T I P 5
T I P 5
5
VOLUME RIGHT A
volume control A for the right power amp.
This control is active if button A/B is in the
off position; LED is not illuminating.
6
VOLUME RIGHT B
volume control B for the right power amp.
This control is active if button A/B is in the
on position (depressed); LED is illuminating.
T I P 1
T I P 1

Rear Panel
15
AC Socket
connect AC cord here.
ATTENTION: Ensure you use an intact AC
cord with an insulated plug only!
Before you power the amp up, ensure the
voltage value printed above the AC socket
corresponds to the available current!
16
AC Fuse Box
contains mains fuse (rear chamber) and
spare fuse (front chamber).
NOTE: Ensure replacement fuses bear
identical ratings (refer to the table)!
23
FOOTSWITCH:
VOLUME A/B; PRESENCE A/B
1/4" stereo jack for connecting a dual
footswitch (e.g. ENGL Z-4) or a
MIDI-switching system (e.g. ENGL Z-11).
The following functions can be executed:
1. VOLUME A/B (mono terminal).
2. PRESENCE A/B (stereo terminal).
INPUT RIGHT
Signal input right stereo channel. Connect
this input to a preamp´s or a FX processor’s
right output/send jack via a shielded cable
with 1/4" plugs.
The Input sensitivity can be adjusted via the
Gain pushbutton at the frontpanel.
24
INPUT LEFT
Signal input left stereo channel. Connect this
input to a preamp´s or a FX processor’s left
output/send jack via a shielded cable with
1/4" plugs.
The Input sensitivity can be adjusted via the
Gain pushbutton at the frontpanel.
25
T I P 4
17
GROUND LIFT SWITCH
GROUND-position: direct connection
between amp´s ground and outlet ground.
GROUND FLOATED-position: no direct
connection between amp´s ground and
outlet ground => use this feature, to avoid
ground loops in combination with other
grounded 19" units.
PLEASE NOTE: If operating the Poweramp
with a preamp or FX device, that does not
have a direct connetion between internal
ground and outlet ground, ensure this
switch is set to the position "Ground".
Otherwise you may encounter a hum noise.
SPEAKER OUTPUT 8 OHMS LEFT
8Z left channel speaker output jack; connect
8Z speaker cabinet here.
IMPORTANT: If you choose to use just
one power amp channel, ensure you switch
the other channel's STANDBY switch off.
Never operate an active stereo channel
without a connected speaker, you may
destroy the power amp!
21
22
Fan Shaft
ultra-quiet fan ensures your poweramp
remains cool; hot air escapes via this shaft.
ATTENTION: Install the amp in a 19" rack
in such a manner as to ensure air
circulation is not impeded. Do not block or
cover the fan shaft, the side and the front
coolant vents.
T I P 3
16 OHM 16 OHM
SERIAL NUMBER:
WIRED FOR:
GROUND LIFT
SWITCH
GROUND
FLOATED
GROUND
DO NOT OPEN !
RISK OF ELECTRIC SHOCK !
DO NOT EXPOSE THIS EQUIPMENT
TO RAIN OR MOISTURE !
CAUTION !
!
8 OHM8 OHM
RIGHT LEFT
S
PEAKER OUTPUT
F
OOTSWITCH
I
NPUT
R
IGHTLEFT
VOLUME
A / B
S
TEREO
T
UBE POWERAMP
T
YPE
E840/50
Designed by: Horst Langer
Optically refined by: CLARK / Meinerz
MADE IN GERMANY
REPLACE FUSE
ONLY WITH SAME
TYPE AND RATING !
FUSED
VOLTAGE
100-120 V
220-240 V
3,15 AM
1,6 AM
PRESENCE
A / B
230 VOLT
099840
15 16
17
18 19 20 21 22 23 24 25
SPEAKER OUTPUT 16 OHMS RIGHT
16Z right channel speaker output jack;
connect 16Z speaker cabinet here.
18
SPEAKER OUTPUT 8 OHMS RIGHT
8Z right channel speaker output jack;
connect 8Z speaker cabinet here.
19
SPEAKER OUTPUT 16 OHMS LEFT
16Z left channel speaker output jack;
connect 16Z speaker cabinet here
20

Technical Data
Caution: Replace fuses only with others of the same rating!
Rated power: 2x50 Watt
GAIN (14) off: -5 dB max. 15 dB
GAIN (14) on: -20 dB max. 0 dB
Outlet each channel:
Input level power amp:
Tubes:
8 und 16 Ohm
Fuses
approx.12 kg
Input tube V1 => ECC83/12AX7, selected
Phase shift tube V2, V3 => ECC83/12AX7,
Power tubes V4,to V7 => 5881(or 6L6GC), matched sets
Power Tube Fuses: 2 x 315 mAM
100V and 120V
3,15 AM
3,15 AT
AC Mains:
external:
internal:
230V
1,6 AM
1,6 AT
Dimensions:
Weight:
19", 2 rack spaces; depth: 300 mm
Tube
array:
Fan
Power
Transfomer
IInternal Fuse
(Mains)
V4
left channel
right channel
V1
V3
V2
Power Tube Fuses
Output
Transformer,
left channel
Output
Transformer,
right channel
left Ch.
right Ch.
BIAS
V5 V6 V7
lleft Ch.
right Ch.
ENGL Gerätebau GmbH, Germany; Internet: www.engl-amps.com
Text, design, grafics and layout by Horst Langer

We reserve the right to make unannounced technical upgrades!
Protect the poweramp from mechanical knocks (tubes!)
Let the poweramp cool down before you transport it (app.10 minutes).
Tubes need about 20 seconds to warm up after you switch the power on,
and furtheron a few minutes before they reach their full power capability.
Avoid storing the poweramp in damp or dusty rooms, they are hard on jacks,
switches and potentiometers.
Ensure air can circulate at the rear, the front and both sides of the poweramp
to allow for adequate cooling (increases component life).
Never operate the poweramp without an adequate load!
Replace tubes with select replacement tubes (special selection criteria)
to avoid microfonic properties, undesireable noise and unbalanced
performance.
Handling and Care
Attention! Please read the following!
This Amp is in a position, to produce high volume levels. Exposure to
high volume levels may cause hearing damage!
Leave tube replacement and power amp biasing to a qualified
professional. Ensure the unit is switched off and unpluged!
Caution - tubes can get very hot and cause skin burns.
Always use high-quality cables.
Never operate the amp through an ungrounded outlet!
Never bridge a defective fuse and ensure replacement fuses feature
identical ratings!
Pull the AC mains plug before replacing fuses!
Never open the chassis or attempt repairs on your own. Consult
qualified service personnel!
Never expose the amplifier to extreme humidity or dampness!
Please read the instructions carefully before operating the unit!
Only operate the amplifier in a manner it is designed for and therefore
note this operational instructions!

Notes / Notizen

www.engl-amps.com
 Loading...