


CE-JS 12
D Originalbetriebsanleitung
Fremdstarter – Energiestation
GB Original operating instructions
Jump Start – Power Bank
F Instructions d’origine
Démarreur externe – station
d’énergie
I Istruzioni per l’uso originali
Avviatore di emergenza – Caricabatterie portatile
DK/ Original betjeningsvejledning
N Jumpstarter – Energistation
S Original-bruksanvisning
Starthjälp – Energistation
NL Originele handleiding
Externe starter – energiestation
E Manual de instrucciones original
Arrancador de batería - unidad
energética
FIN Alkuperäiskäyttöohje
Apukäynnistin / Varavirtalähde
RUS Оригинальное руководство по
эксплуатации
Внешний аккумулятор – Узел
электропитания
SLO Originalna navodila za uporabo
Zunanji zaganjač – Energetska
postaja
RO Instrucţiuni de utilizare originale
Starter auto – Staţie de energie
GR Πρωτότυπες Οδηγίες χρήσης
Βοηθητική εξωτερική εκκίνηση μονάδα ενέργειας
9
Art.-Nr.: 10.915.21 I.-Nr.: 11017
2a1
8
7
6
2b
5
2c
1 2 93 4
2d
14
13
- 2 -

3 4
5
5b
Beep,Beep
5a
(559:
XK\KXYK
IUXXKIZ
5c
Beep,Beep
- 3 -
5d 6
D E F
- 4 -

D
Gefahr!
Beim Benutzen von Geräten müssen einige Sicherheitsvorkehrungen eingehalten werden, um
Verletzungen und Schäden zu verhindern. Lesen
Sie diese Bedienungsanleitung / Sicherheitshinweise deshalb sorgfältig durch. Bewahren Sie diese gut auf, damit Ihnen die Informationen jederzeit
zur Verfügung stehen. Falls Sie das Gerät an andere Personen übergeben sollten, händigen Sie
diese Bedienungsanleitung / Sicherheitshinweise
bitte mit aus. Wir übernehmen keine Haftung für
Unfälle oder Schäden, die durch Nichtbeachten
dieser Anleitung und den Sicherheitshinweisen
entstehen.
1. Sicherheitshinweise
Die entsprechenden Sicherheitshinweise fi nden
Sie im beiliegenden Heftchen!
Gefahr!
Lesen Sie alle Sicherheitshinweise und Anweisungen. Versäumnisse bei der Einhaltung der
Sicherheitshinweise und Anweisungen können
elektrischen Schlag, Brand und/oder schwere
Verletzungen verursachen. Bewahren Sie alle
Sicherheitshinweise und Anweisungen für
die Zukunft auf.
Dieses Gerät darf nicht von Kindern benutzt werden. Kinder sollten beaufsichtigt werden, damit
sie nicht mit dem Gerät spielen. Reinigung und
Wartung darf nicht von Kindern durchgeführt
werden. Das Gerät darf nicht von Personen mit
verminderten physischen, sensorischen oder
geistigen Fähigkeiten oder Personen mit unzureichendem Wissen oder Erfahrung benutzt werden,
außer sie werden von einer für sie verantwortlichen Person beaufsichtigt oder angeleitet.
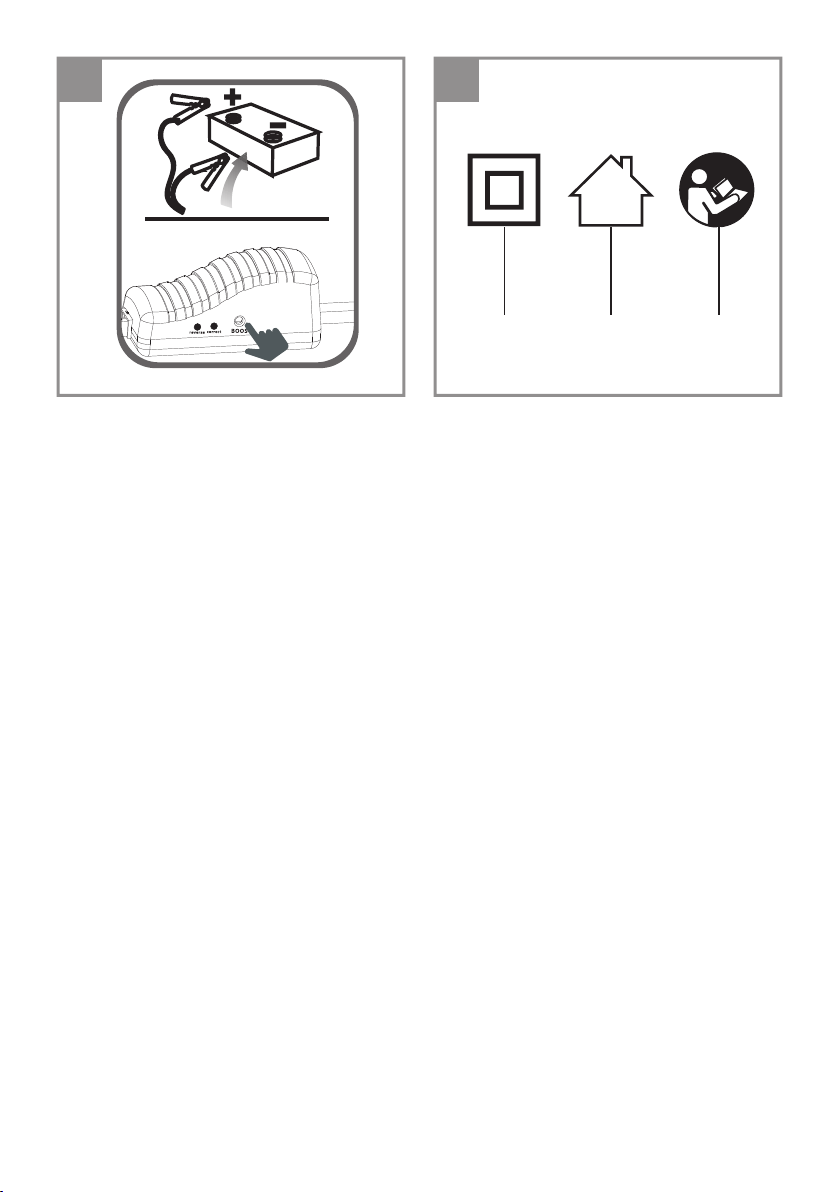
Zeichenerklärung (Abb. 6)
D = Schutzklasse II Gerät
E = Nur zur Verwendung in trockenen Innenräu-
men
F = Achtung! Vor Gebrauch Anleitung lesen!
Text auf Gerät und Starthilfekabel
Achtung! Vor Gebrauch Anleitung lesen!
1. Niemals Boost Taste drücken bevor die KFZBatterie angeschlossen ist.
2. Niemals Klemmen miteinander verbinden –
Kurzschluss und Verletzungsgefahr.
3. Starthilfe nur für 12 V KFZ, rote Klemme an
„+“, schwarze Klemme an „-“ Batteriepol.
4. Grüne LED = Motor innerhalb von 30 s starten.
5. Rote LED + Warnton = Batterie verpolt angeschlossen (siehe 3.)
6. Grüne LED blinkt + Warnton = “Boost“ Taste
drücken und Motor innerhalb 30 s starten.
7. Keine LED, kein Warnton = Steckverbindung
zum Gerät prüfen, „Boost“ Taste drücken und
Motor innerhalb von 30 s starten.
Warnung!
1. Gerät von Kindern fern halten!
2. Gerät nicht öff nen - Verletzungsgefahr!
3. Leuchten weniger als 3 LED‘s steht keine
Starthilfe zur Verfügung.
4. Startet der Motor innerhalb von 5 Sekunden
nicht, beenden Sie den Startvorgang. Warten
Sie 1 Minute, bevor Sie den Vorgang wiederholen.
2. Gerätebeschreibung und
Lieferumfang
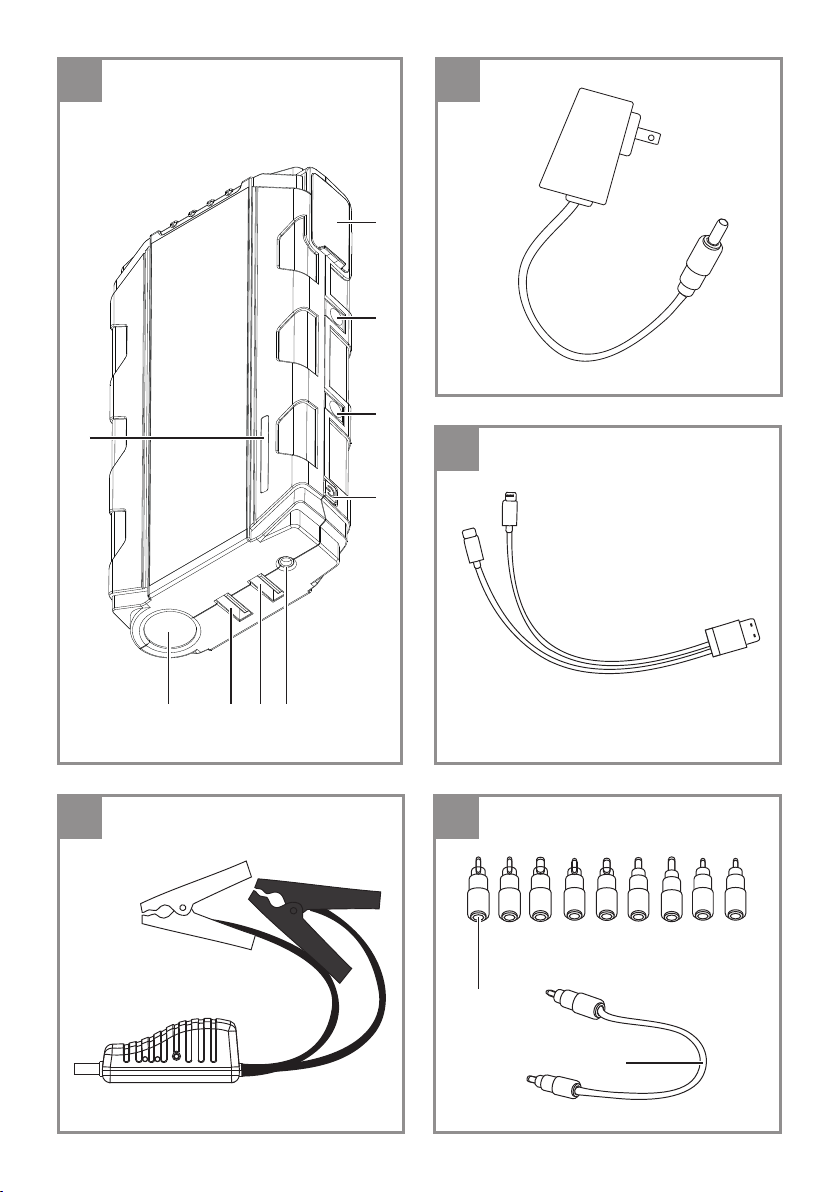
2.1 Gerätebeschreibung (Bild 1)
1. LED Licht
2. USB Ausgang 5V max. 2A
3. USB Ausgang 5V/9V
4. Ladebuchse 15V d.c. / 1A
5. Ein- Aus- Taster
6. Gleichspannungsausgang 12V max. 10 A
7. Gleichspannungsausgang 19V max. 3,5 A
8. Anschluss Starthilfekabel
9. LED Akkukapazitätsanzeige
2.2 Lieferumfang
Bitte überprüfen Sie die Vollständigkeit des Artikels anhand des beschriebenen Lieferumfangs.
Bei Fehlteilen wenden Sie sich bitte spätestens
innerhalb von 5 Arbeitstagen nach Kauf des Artikels unter Vorlage eines gültigen Kaufbeleges an
unser Service Center oder an die Verkaufstelle,
bei der Sie das Gerät erworben haben. Bitte
beachten Sie hierzu die Gewährleistungstabelle
in den Service-Informationen am Ende der Anleitung.
Öffnen Sie die Verpackung und nehmen Sie
•
das Gerät vorsichtig aus der Verpackung.
Entfernen Sie das Verpackungsmaterial so-
•
wie Verpackungs-/ und Transportsicherungen
(falls vorhanden).
Überprüfen Sie, ob der Lieferumfang vollstän-
•
dig ist.
- 5 -

Kontrollieren Sie das Gerät und die Zubehör-
•
teile auf Transportschäden.
Bewahren Sie die Verpackung nach Möglich-
•
keit bis zum Ablauf der Garantiezeit auf.
Gefahr!
Gerät und Verpackungsmaterial sind kein
Kinderspielzeug! Kinder dürfen nicht mit
Kunststoff beuteln, Folien und Kleinteilen
spielen! Es besteht Verschluckungs- und Erstickungsgefahr!
Jump-Start Power Bank
•
Starthilfekabel
•
2in 1 USB Anschlusskabel (Micro/Mini)
•
Ladegerät
•
Verbindungskabel 19V
•
Stecker Set 19V
•
Aufbewahrungsmappe
•
Originalbetriebsanleitung
•
Sicherheitshinweise
•
3. Bestimmungsgemäße
Verwendung
D
4. Technische Daten
Jump-Start Power Bank
Li-Po-Akku: ...........11,1 V – 3700 mAh – 41,1 Wh
Eingang: .......................................... 15 V d.c./1 A
Ladezeit ca.: ................................................... 5 h
Ausgang USB „OUT: „5V/2A“: 5 V d.c. / 2 A (max.)
Ausgang USB „OUT: „5V/9V “:
................................................ 5 V d.c./3 A (max.)
................................................ 9 V d.c./2 A (max.)
Gleichspannungsausgang: .........19 V max. 3,5 A
Gleichspannungsausgang: ..........12 V max. 10 A
Starthilfestrom: .......200 A (5 Sek.) / 400 A (max.)
Umgebungstemperatur
bei Starthilfe: ............................. - 15 °C - + 40 °C
Lagertemperatur: ........................+ 5 °C - + 40 °C
Schutzklasse: ....................................................III
Ladegerät
Nenneingangsspannung: ...100-240 V ~50/60 Hz
Nennausgangsspannung: ......................15 V d.c.
Nennausgangsstrom: ..................................... 1 A
Die Jump-Start Power Bank dient zum Laden von
Smartphones, Kameras, Tablets, etc. Sie kann
auch als Taschenlampe verwendet werden. Ferner kann man Notebooks und 12V Verbraucher
mit Gleichspannung versorgen. Unter Verwendung des mitgelieferten Starthilfekabels ist das
Gerät auch zur Unterstützung von schwachen
12 V Starterbatterien (Bleisäureakkus) in Kraftfahrzeugen mit Benzinmotoren bis 4000 ccm und
Dieselmotoren bis 2000 ccm Hubraum geeignet.
Das Gerät darf nur nach dessen Bestimmung verwendet werden. Jede weitere darüber hinausgehende Verwendung ist nicht bestimmungsgemäß.
Für daraus hervorgerufene Schäden oder Verletzungen aller Art haftet der Benutzer/Bediener und
nicht der Hersteller.
Bitte beachten Sie, dass unsere Geräte bestimmungsgemäß nicht für den gewerblichen, handwerklichen oder industriellen Einsatz konstruiert
wurden. Wir übernehmen keine Gewährleistung,
wenn das Gerät in Gewerbe-, Handwerks- oder
Industriebetrieben sowie bei gleichzusetzenden
Tätigkeiten eingesetzt wird.
5. Vor Inbetriebnahme
5.1 Laden der Jump-Start Power Bank mit
dem mitgelieferten Ladegerät
Für das Ladegerät gilt:
Dieses Gerät kann von Kindern ab 8 Jahren und
darüber sowie von Personen mit verringerten physischen, sensorischen oder mentalen Fähigkeiten
oder Mangel an Erfahrung und Wissen benutzt
werden, wenn sie beaufsichtigt oder bezüglich
des sicheren Gebrauchs des Gerätes unterwiesen wurden und die daraus resultierenden Gefahren verstehen. Kinder dürfen nicht mit dem
Gerat spielen. Reinigung und Benutzer-Wartung
dürfen nicht von Kindern ohne Beaufsichtigung
durchgeführt werden.
Überzeugen Sie sich vor dem Anschließen, dass
die Daten auf dem Typenschild mit den Netzdaten
übereinstimmen.
Achtung! Ziehen Sie den Netzstecker bevor Sie
Einstellungen am Gerät vornehmen. Laden Sie
das Gerät ausschließlich mit dem mitgelieferten
Ladegerät.
- 6 -

D
Beachten Sie die beiliegenden Sicherheitshinweise mit ausführlichen Hinweisen zum Ladevorgang.
Die Ausgänge dürfen während des Ladevorgangs
nicht benutzt werden.
Verbinden Sie das mitgelieferte Ladegerät
•
(Abb. 2a) mit der „Input 15 V 1A“ Ladebuchse
(Abb. 1 / Pos. 4) des Gerätes.
Stecken Sie das Ladegerät in die Netzsteck-
•
dose ein, wird der Akku geladen. Während
des Ladens leuchten (blinken) die LEDs (Abb.
1/ Pos. 9) und zeigen den Ladestatus an.
Ist das Laden abgeschlossen, leuchten alle
LEDs.
Die Ladezeit beträgt bei leerem Akku ca. 5
•
Stunden. Während des Ladevorgangs kann
sich der Akku im Gerät etwas erwärmen, dies
ist jedoch normal.
5.2 Akku- Kapazitätsanzeige
Drücken Sie den Ein- Aus-Taster (Abb. 1/Pos. 5)
kurz. Die LED der Akkukapazitätsanzeige (Abb. 1
/ Pos. 9) leuchten auf. Die Anzahl der leuchtenden
LED gibt Auskunft über den aktuellen Ladezustand des eingebauten Li-Po-Akkus.
100 % geladen = 4 LED Dauerlicht
>25 % geladen = 1 LED Dauerlicht
<25 % geladen = kein Dauerlicht
6. LED-Licht
Vorsicht! Nicht in den Lichtstrahl blicken.
Drücken Sie 3 Sekunden lang den Ein- Aus-
•
Taster – das LED-Licht (Abb. 1 / Pos. 1) leuchtet dauernd.
Drücken Sie den Ein- Aus-Taster nochmals
•
– das LED-Licht leuchtet als „Stroboskopblitzer“.
Drücken Sie den Ein- Aus-Taster nochmals –
•
das LED-Licht leuchtet als „SOS“-Morselicht.
Bei nochmaligem Drücken wird das LED-
•
Licht wieder ausgeschaltet.
7. Ausgänge
Vorsicht! Achten Sie auf die Spannungs- und
Stromwerte des zu versorgenden Gerätes (z.B.
Handy, Notebook). Beachten Sie dessen Bedienungsanleitung.
Die Versorgungsdauer variiert je nach Ladestand
der Jump-Start Power Bank, Leistungsaufnahme
und Nutzungsintensität des Anschlussgerätes.
Bei Erreichen einer Restladung von 25% (1 LED
leuchtet) ist der Akku zu laden (s. Abschnitt 5.).
Die USB Anschlüsse können parallel verwendet
werden. Bitte achten Sie darauf, dass der kumulierte Ausgangsstrom 5 A nicht überschreitet.
7.1 Laden/Betreiben von Geräten mit USB
Anschluss
a) 5V/2A USB Ausgang
1. Verbinden Sie ein vorhandenes (oder das
mitgelieferte 2 in 1) USB Anschlusskabel mit
dem USB Anschluss (Abb. 1 / Pos. 2) der
Jump-Start Power Bank und anschließend
mit dem zu versorgenden Gerät (max. 2A).
2. Drücken Sie den Ein- Austaster (Abb. 1 / Pos.
5).
b) „OUT 5V/9V“ USB Ausgang (Abb. 3)
Hinweis: Sollte das Laden an diesem Ausgang
nicht funktionieren wird das Gerät oder Kabel
nicht unterstützt. Verwenden Sie in diesem Fall
zum Laden den 5V d.c. / 2A USB Ausgang wie
zuvor beschrieben.
1. Verbinden Sie das mitgelieferte 2in1 USB
Kabel (Abb. 2b) mit dem „OUT 5V/9V“ USB
Anschluss (Abb. 1 / Pos. 3) der Jump-Start
Power Bank und anschließend mit dem zu
versorgenden Gerät.
2. Drücken Sie den Ein- Austaster (Abb. 1 / Pos.
5).
3. Am USB Ausgang werden die zum Laden
benötigten Parameter ermittelt und das angeschlossene Gerät wird geladen. Abhängig
vom Ladekabel und dem zu ladenden Gerät
kann sich die Ladezeit am „OUT 5V/9V“ USB
Ausgang im Vergleich zum „OUT 5V/2A“ USB
Ausgang verkürzen.
7.2 Betreiben von 19 V Gleichspannungsgeräten (Abb. 4)
1. Verbinden Sie das mitgelieferte Verbindungskabel (Abb. 2d / Pos. 13) mit dem 19V Gleichspannungsausgang (Abb. 1 / Pos. 7) der
Jump-Start Power Bank und anschließend
- 7 -

D
gegebenenfalls unter Verwendung eines der
mitgelieferten Stecker (Abb. 2d / Pos. 14) mit
dem 19V Gleichspannungsgerät. Die maximale Stromaufnahme darf 3,5A nicht überschreiten.
2. Drücken Sie den Ein- Austaster (Abb. 1/
Pos.5).
7.3 Betreiben von 12 V Gleichspannungsgeräten
1. Verbinden Sie ein passendes Verbindungskabel mit dem 12V Gleichspannungsausgang
(Abb. 1 / Pos. 6) der Jump-Start Power Bank
und anschließend mit dem 12V Gleichspannungsgerät. Die maximale Stromaufnahme
darf 10A nicht überschreiten.
2. Drücken Sie den Ein- Austaster
(Abb. 1/Pos. 5).
8. Starthilfe für das Kfz
Die 12V Starthilfeeinrichtung bietet bei Startschwierigkeiten aufgrund fehlender Batteriekapazität eine willkommene Hilfe.
Warnung! Während eines Starthilfevorgangs darf
nur das Starthilfekabel angeschlossen sein. Die
Versorgung eines Anschlussgerätes, z.B. über
den USB-Anschluss, muss vorher unterbrochen
werden.
Wir weisen darauf hin, dass die Fahrzeuge mit
zahlreichen Elektronikbausteinen ausgerüstet
sind. Beachten Sie bitte die Hinweise in Bedienungsanleitungen für Auto, Radio usw.
Warnung! Niemals mit der Fahrzeugkarosserie
verbinden!
Stellen Sie sicher, dass der Stecker vom
•
Starthilfekabel mit der Gerätesteckdose fest
verbunden ist. Ist die Verbindung während
des Starthilfevorgangs lose, kann die Steckverbindung aufgrund des hohen Stroms
schmelzen.
Die Pole der Kfz-Batterie müssen sauber sein
•
und die Klemmen des Starthilfekabels fest
auf den Batteriepolen sitzen.
Während des Starthilfevorganges die Klem-
•
men des Starthilfekabels nicht miteinander
verbinden – Kurzschluss.
Vergewissern Sie sich, dass mindestens 3 LED
der Akku-Kapazitätsanzeige leuchten. Die Gerätetemperatur muss im Bereich von + 5 °C - + 40
°C, die Umgebungstemperatur beim Starthilfevorgang im Bereich von – 15 °C - + 40 °C liegen.
Verwenden Sie ausschließlich das mitgelieferte
Starthilfekabel (Abb. 2c).
1. Abb. 5: Klappen Sie die Abdeckung vom
Starthilfekabelanschluss (Abb. 1 / Pos. 8) auf,
schieben Sie die darunterliegende Abdeckung zur Seite und stecken Sie das Starthilfekabel am Gerät an.
2. Abb. 5a: Schließen Sie das rote Kabel am
Pluspol und das schwarze Kabel am Minuspol der Kfz-Batterie an.
Achten Sie auf einen festen Sitz der Klemmen. Des Weiteren ist darauf zu achten,
dass die Jump-Start Power Bank sicher im
Motorraum verstaut wird und durch Erschütterungen während des Startvorganges nicht
herunterfallen kann. Die Jump-Start Power
Bank darf nicht in Reichweite bewegter Teile
gelangen. Nachfolgende Punkte 3. – 6. beschreiben die Statusmeldungen des Starthilfekabels. Bitte befolgen sie die Anweisungen.
3. Abb. 5a: Die grüne LED am Starthilfekabel
leuchtet. Alle vorhandenen Verbindungen
sind in Ordnung und das Fahrzeug kann innerhalb 30 Sekunden gestartet werden.
4. Abb. 5b: Die grüne LED am Starthilfekabel
blinkt. Alle vorhandenen Verbindungen sind
in Ordnung, jedoch ist der Ladezustand der
Kfz-Batterie sehr niedrig. Drücken Sie die
Taste „Boost“ am Starthilfekabel und warten
Sie bis die grüne LED dauerhaft leuchtet.
Starten Sie das Fahrzeug innerhalb 30 Sekunden.
Seien Sie besonders vorsichtig, da durch
Drücken der Taste „Boost“ in der Jump-Start
Power Bank integrierte Sicherheitsvorrichtungen außer Kraft gesetzt werden.
5. Abb. 5c: Die rote LED am Starthilfekabel
leuchtet und ein Warnton erklingt. Die
Klemmen des Starthilfekabels sind verpolt
an der Kfz-Batterie angeschlossen. Entfernen Sie die Klemmen und schließen Sie die
Klemmen unter Beachtung der Polarität und
den vorherigen Anweisungen neu an die KfzBatterie an.
6. Abb. 5d: Es leuchtet weder eine LED am
Starthilfekabel, noch erklingt ein Warnton.
Prüfen Sie alle Verbindungen, vor allem den
pol-richtigen Anschluss der Klemmen an der
Kfz-Batterie. Sind alle vorhandenen Verbin-
- 8 -

D
dungen in Ordnung, so ist die Ursache wahrscheinlich eine schadhafte Kfz-Batterie. Drücken Sie die Taste „Boost“ am Starthilfekabel
und warten Sie bis die grüne LED dauerhaft
leuchtet. Starten Sie das Fahrzeug innerhalb
30 Sekunden.
Seien Sie besonders vorsichtig, da durch
Drücken der Taste „Boost“ in der Jump-Start
Power Bank integrierte Sicherheitsvorrichtungen außer Kraft gesetzt werden. Ersetzen Sie
die schadhafte Kfz-Batterie baldmöglichst.
7. Sobald der Motor läuft entfernen Sie das
Starthilfekabel vom Gerät und anschließend
zuerst die rote Klemme und dann die schwarze Klemme von der Kfz-Batterie.
8. Lassen Sie den Motor laufen. Die Lichtmaschine lädt die eingebaute Kfz-Batterie.
Bei sehr niedrigen Temperaturen ist es möglich,
dass mehrere Startversuche notwendig sind um
das Kfz zu starten. Die Wartezeit zwischen zwei
Startversuchen beträgt eine Minute. Entfernen Sie
das Gerät nach erfolgreicher Starthilfe möglichst
innerhalb 30 Sekunden.
Die Anzahl der möglichen Starthilfeversuche
(max. 10) ist abhängig von der Umgebungstemperatur, dem Zustand der zu startenden Batterie
und dem Ladezustand des Jump-Start Power
Bank Akkus.
9. Reinigung, Wartung und
Ersatzteilbestellung
Gefahr!
Ziehen Sie vor allen Reinigungsarbeiten den
Netzstecker.
Entfernen Sie alle angeschlossenen Kabel von
der Jump-Start Power Bank.
9.1 Reinigung
Halten Sie Schutzvorrichtungen, Luftschlitze
•
und Motorengehäuse so staub- und schmutzfrei wie möglich. Reiben Sie das Gerät mit
einem sauberen Tuch ab oder blasen Sie es
mit Druckluft bei niedrigem Druck aus.
Wir empfehlen, dass Sie das Gerät direkt
•
nach jeder Benutzung reinigen.
Reinigen Sie das Gerät regelmäßig mit einem
•
feuchten Tuch. Verwenden Sie keine Reinigungs- oder Lösungsmittel; diese könnten die
Kunststoffteile des Gerätes angreifen. Achten
Sie darauf, dass kein Wasser in das Gerätein-
nere gelangen kann. Das Eindringen von
Wasser in ein Elektrogerät erhöht das Risiko
eines elektrischen Schlages.
9.2 Wartung
Im Geräteinneren befi nden sich keine weiteren zu
wartenden Teile.
9.3 Ersatzteilbestellung:
Bei der Ersatzteilbestellung sollten folgende Angaben gemacht werden;
Typ des Gerätes
•
Artikelnummer des Gerätes
•
Ident-Nummer des Gerätes
•
Ersatzteilnummer des erforderlichen Ersatz-
•
teils
Aktuelle Preise und Infos fi nden Sie unter
www.isc-gmbh.info
10. Reparatur
Bei eventuell auftretenden Störungen das Gerät
nur von einem autorisierten Fachmann bzw. von
einer Kundendienstwerkstatt überprüfen lassen.
11. Entsorgung und
Wiederverwertung
Das Gerät befi ndet sich in einer Verpackung um
Transportschäden zu verhindern. Diese Verpackung ist Rohstoff und ist somit wieder verwend-
bar oder kann dem Rohstoff kreislauf zurückge-
führt werden. Das Gerät und dessen Zubehör
bestehen aus verschiedenen Materialien, wie
z.B. Metall und Kunststoff e. Defekte Geräte ge-
hören nicht in den Hausmüll. Zur fachgerechten
Entsorgung sollte das Gerät an einer geeigneten
Sammelstellen abgegeben werden. Wenn Ihnen
keine Sammelstelle bekannt ist, sollten Sie bei
der Gemeindeverwaltung nachfragen.
- 9 -

12. Lagerung
Lagern Sie das Gerät und dessen Zubehör an
einem dunklen, trockenen und frostfreien Ort. Die
optimale Lagertemperatur liegt zwischen +5 und
+40 ˚C.
Beachten Sie die beiliegenden Sicherheitshinweise mit ausführlichen Hinweisen zur Lagerung.
Da der Akku auf zu hohe (über +40 °C) bzw. auf
zu niedrige Temperaturen (unter 0°C) reagiert, lagern Sie das Gerät nicht dauerhaft in einem Kfz.
Zum Transport in einem Fahrzeug, platzieren Sie
es an einer geeigneten Stelle, damit es bei plötzlichen Geschwindigkeits- und/oder Richtungsänderungen nicht in Bewegung geraten kann.
Bewahren Sie das Gerät in der Originalverpackung auf.
D
- 10 -

D
13. Fehlersuchplan
Störung Mögliche Ursache Behebung
Gerät lasst sich
nicht einschalten
Starthilfe funktioniert nicht
- Akkuspannung zu gering - Akku aufl aden
- Akkuspannung zu gering
- Anschlüsse am Fahrzeug vertauscht
- Akku aufl aden
- Auf Polarität achten und richtig anschließen
- Temperatur außerhalb des Temperaturbereiches
Alle LED‘s blinken - Überlastungsschutz hat angespro-
chen
- Gerät zu kalt / warm
- Umgebungstemperatur zu niedrig/
hoch
- Starthilfe innerhalb des Temperaturbereiches versuchen
- Gerät ausschalten, auf mögliche
Überlastung prüfen
- Gerätetemperatur +5°C - +40°C
einhalten
- Umgebungstemperaturbereich
-15°C - +40°C einhalten
- 11 -

D
Nur für EU-Länder
Werfen Sie Elektrowerkzeuge nicht in den Hausmüll!
Gemäß europäischer Richtlinie 2012/19/EU über Elektro- und Elektronik-Altgeräte und Umsetzung in
nationales Recht müssen verbrauchte Elektrowerkzeuge getrennt gesammelt werden und einer umweltgerechten Wiederverwertung zugeführt werden.
Recycling-Alternative zur Rücksendeauff orderung:
Der Eigentümer des Elektrogerätes ist alternativ anstelle Rücksendung zur Mitwirkung bei der sachgerechten Verwertung im Falle der Eigentumsaufgabe verpfl ichtet. Das Altgerät kann hierfür auch einer
Rücknahmestelle überlassen werden, die eine Beseitigung im Sinne der nationalen Kreislaufwirtschafts- und Abfallgesetze durchführt. Nicht betroff en sind den Altgeräten beigefügte Zubehörteile und
Hilfsmittel ohne Elektrobestandteile.
Der Nachdruck oder sonstige Vervielfältigung von Dokumentation und Begleitpapieren der Produkte,
auch auszugsweise, ist nur mit ausdrücklicher Zustimmung der iSC GmbH zulässig.
Technische Änderungen vorbehalten
Diese Sendung enthält Lithium-Ionen-Batterien.
Gemäß Sondervorschrift 188 unterliegt diese Sendung nicht den Vorschriften des ADR. Sorgsam
behandeln. Entzündungsgefahr bei Beschädigung des Versandstücks. Bei Beschädigung des Versandstücks: Kontrolle und erforderlichenfalls erneutes Verpacken.
Für zusätzliche Informationen rufen Sie bitte: 0049 1807 10 20 20 66 (Festnetzpreis: 14 ct/min, Mobilfunkpreise maximal: 42 ct/min) Außerhalb Deutschlands fallen stattdessen Gebühren für ein reguläres
Gespräch ins dt. Festnetz an.
- 12 -

D
Service-Informationen
Wir unterhalten in allen Ländern, welche in der Garantieurkunde benannt sind, kompetente ServicePartner, deren Kontakte Sie der Garantieurkunde entnehmen. Diese stehen Ihnen für alle ServiceBelange wie Reparatur, Ersatzteil- und Verschleißteil-Versorgung oder den Bezug von Verbrauchsmaterialien zur Verfügung.
Es ist zu beachten, dass bei diesem Produkt folgende Teile einem gebrauchsgemäßen oder natürlichen
Verschleiß unterliegen bzw. folgende Teile als Verbrauchsmaterialien benötigt werden.
Kategorie Beispiel
Verschleißteile* Akku
Verbrauchsmaterial/ Verbrauchsteile*
Fehlteile
* nicht zwingend im Lieferumfang enthalten!
Bei Mängel oder Fehlern bitten wir Sie, den Fehlerfall im Internet unter www.isc-gmbh.info anzumelden.
Bitte achten Sie auf eine genaue Fehlerbeschreibung und beantworten Sie dazu in jedem Fall folgende
Fragen:
Hat das Gerät bereits einmal funktioniert oder war es von Anfang an defekt?
•
Ist Ihnen vor dem Auftreten des Defektes etwas aufgefallen (Symptom vor Defekt)?
•
Welche Fehlfunktion weist das Gerät Ihrer Meinung nach auf (Hauptsymptom)?
•
Beschreiben Sie diese Fehlfunktion.
- 13 -

D
Garantieurkunde
Sehr geehrte Kundin, sehr geehrter Kunde,
unsere Produkte unterliegen einer strengen Qualitätskontrolle. Sollte dieses Gerät dennoch einmal nicht
einwandfrei funktionieren, bedauern wir dies sehr und bitten Sie, sich an unseren Servicedienst unter
der auf dieser Garantiekarte angegebenen Adresse zu wenden. Gerne stehen wir Ihnen auch telefonisch über die angegebene Servicerufnummer zur Verfügung. Für die Geltendmachung von Garantieansprüchen gilt folgendes:
1. Diese Garantiebedingungen richten sich ausschließlich an Verbraucher, d. h. natürliche Personen,
die dieses Produkt weder im Rahmen ihrer gewerblichen noch anderen selbständigen Tätigkeit
nutzen wollen. Diese Garantiebedingungen regeln zusätzliche Garantieleistungen, die der u. g.
Hersteller zusätzlich zur gesetzlichen Gewährleistung Käufern seiner Neugeräte verspricht. Ihre
gesetzlichen Gewährleistungsansprüche werden von dieser Garantie nicht berührt. Unsere Garantieleistung ist für Sie kostenlos.
2. Die Garantieleistung erstreckt sich ausschließlich auf Mängel an einem von Ihnen erworbenen neuen Gerät des u. g. Herstellers, die auf einem Material- oder Herstellungsfehler beruhen und ist nach
unserer Wahl auf die Behebung solcher Mängel am Gerät oder den Austausch des Gerätes beschränkt. Bitte beachten Sie, dass unsere Geräte bestimmungsgemäß nicht für den gewerblichen,
handwerklichen oder berufl ichen Einsatz konstruiert wurden. Ein Garantievertrag kommt daher nicht
zustande, wenn das Gerät innerhalb der Garantiezeit in Gewerbe-, Handwerks- oder Industriebetrieben verwendet wurde oder einer gleichzusetzenden Beanspruchung ausgesetzt war.
3. Von unserer Garantie ausgenommen sind:
- Schäden am Gerät, die durch Nichtbeachtung der Montageanleitung oder aufgrund nicht fachgerechter Installation, Nichtbeachtung der Gebrauchsanleitung (wie durch z.B. Anschluss an eine
falsche Netzspannung oder Stromart) oder Nichtbeachtung der Wartungs- und Sicherheitsbestimmungen oder durch Aussetzen des Geräts an anomale Umweltbedingungen oder durch mangelnde
Pfl ege und Wartung entstanden sind.
- Schäden am Gerät, die durch missbräuchliche oder unsachgemäße Anwendungen (wie z.B. Überlastung des Gerätes oder Verwendung von nicht zugelassenen Einsatzwerkzeugen oder Zubehör),
Eindringen von Fremdkörpern in das Gerät (wie z.B. Sand, Steine oder Staub, Transportschäden),
Gewaltanwendung oder Fremdeinwirkungen (wie z. B. Schäden durch Herunterfallen) entstanden
sind.
- Schäden am Gerät oder an Teilen des Geräts, die auf einen gebrauchsgemäßen, üblichen oder
sonstigen natürlichen Verschleiß zurückzuführen sind.
4. Die Garantiezeit beträgt 24 Monate und beginnt mit dem Kaufdatum des Gerätes. Garantieansprüche sind vor Ablauf der Garantiezeit innerhalb von zwei Wochen, nachdem Sie den Defekt erkannt
haben, geltend zu machen. Die Geltendmachung von Garantieansprüchen nach Ablauf der Garantiezeit ist ausgeschlossen. Die Reparatur oder der Austausch des Gerätes führt weder zu einer
Verlängerung der Garantiezeit noch wird eine neue Garantiezeit durch diese Leistung für das Gerät
oder für etwaige eingebaute Ersatzteile in Gang gesetzt. Dies gilt auch bei Einsatz eines Vor-OrtServices.
5. Für die Geltendmachung Ihres Garantieanspruches melden Sie bitte das defekte Gerät an unter:
www.isc-gmbh.info. Halten Sie bitte den Kaufbeleg oder andere Nachweise Ihres Kaufs des Neugeräts bereit. Geräte, die ohne entsprechende Nachweise oder ohne Typenschild eingesendet werden, sind von der Garantieleistung aufgrund mangelnder Zuordnungsmöglichkeit ausgeschlossen.
Ist der Defekt des Gerätes von unserer Garantieleistung erfasst, erhalten Sie umgehend ein repariertes oder neues Gerät zurück.
Selbstverständlich beheben wir gegen Erstattung der Kosten auch gerne Defekte am Gerät, die vom
Garantieumfang nicht oder nicht mehr erfasst sind. Dazu senden Sie das Gerät bitte an unsere Serviceadresse.
Für Verschleiß-, Verbrauchs- und Fehlteile verweisen wir auf die Einschränkungen dieser Garantie gemäß den Service-Informationen dieser Bedienungsanleitung.
iSC GmbH · Eschenstraße 6 · 94405 Landau/Isar (Deutschland)
- 14 -

D
Sehr geehrte Kundin, sehr geehrter Kunde,
um Ihnen noch mehr Service zu bieten, haben Sie die Möglichkeit auf unserem Onlineportal weitere
Informationen abzurufen.
Sollten einmal Probleme oder Fragen zu Ihrem Produkt auftreten, können Sie schnell und einfach unter
www.isc-gmbh.info viele Aktionen durchführen. Hier einige Beispiele:
Ersatzteile bestellen
•
Aktuelle Preisauskünfte
•
Verfügbarkeiten der Ersatzteile
•
Servicestellen Vorort für Benzingeräte
•
Defekte Geräte anmelden
•
Garantieverlängerungen (nur bei bestimmten Geräten)
•
Bestellverfolgung
•
Wir freuen uns auf Ihren Besuch online unter www.isc-gmbh.info!
Telefon: 09951 / 95 920 00 ·Telefax: 09951/95 917 00
E-Mail: info@einhell.de · Internet: www.isc-gmbh.info
iSC GmbH · Eschenstraße 6 · 94405 Landau/Isar (Deutschland)
- 15 -

GB
Danger!
When using the equipment, a few safety precautions must be observed to avoid injuries and
damage. Please read the complete operating
instructions and safety regulations with due care.
Keep this manual in a safe place, so that the information is available at all times. If you give the
equipment to any other person, hand over these
operating instructions and safety regulations as
well. We cannot accept any liability for damage
or accidents which arise due to a failure to follow
these instructions and the safety instructions.
1. Safety regulations
The corresponding safety information can be
found in the enclosed booklet.
Danger!
Read all safety regulations and instructions.
Any errors made in following the safety regulations and instructions may result in an electric
shock, fi re and/or serious injury.
Keep all safety regulations and instructions
in a safe place for future use.
Children are not allowed to use this equipment.
Children should be supervised so that they do not
play with the equipment. Children are not allowed
to carry out cleaning or maintenance. This equipment is not allowed to be used by people with limited physical, sensory or mental capacities or by
those with insuffi cient knowledge or experience
unless they are supervised or instructed by a person who is responsible for them.
Key (Fig. 6)
D = Protection class II for the equipment
E = For use in dry indoor areas only
F = Important! Read carefully before use!
Text on the equipment and jump start cable
Important! Read carefully before use!
1. Never press the “Boost” button before the car
battery has been connected.
2. Never connect the clamps together – risk of a
short-circuit and risk of injury.
3. Jump start only for 12 V cars; connect the red
clamp to the “+” and the black clamp to the “-”
battery pole.
4. Green LED = Start the engine within 30 seconds.
5. Red LED + acoustic warning signal = Battery
connected reverse polarity (see 3.)
6. Green LED fl ashing + acoustic warning signal
= Press the „Boost“ button and start the engine within 30 seconds.
7. No LED, no acoustic warning signal = Check
the connector to the equipment, press the
„Boost“ button and start the engine within 30
seconds.
Warning!
1. Keep the equipment out of reach of children!
2. Do not open the equipment - risk of injury!
3. If fewer than 3 LEDs are illuminated, the jump
start is not available.
4. If the engine fails to start within 5 seconds,
stop the jump start operation. Wait at least 1
minute before you repeat the operation.
2. Layout and items supplied
2.1 Layout (Fig. 1)
1. LED light
2. 5V max. 2A USB outlet
3. 5V/9V USB outlet
4. 15V d.c. /1A charging jack
5. On/Off button
6. 12V max. 10 A d.c. voltage outlet
7. 19V max. 3.5 A d.c. voltage outlet
8. Connection for jump start cable
9. LED battery capacity indicator
2.2 Items supplied
Please check that the article is complete as
specifi ed in the scope of delivery. If parts are
missing, please contact our service center or the
sales outlet where you made your purchase at
the latest within 5 working days after purchasing
the product and upon presentation of a valid bill
of purchase. Also, refer to the warranty table in
the service information at the end of the operating
instructions.
Open the packaging and take out the equip-
•
ment with care.
Remove the packaging material and any
•
packaging and/or transportation braces (if
available).
Check to see if all items are supplied.
•
Inspect the equipment and accessories for
•
transport damage.
If possible, please keep the packaging until
•
the end of the guarantee period.
- 16 -

GB
Danger!
The equipment and packaging material are
not toys. Do not let children play with plastic
bags, foils or small parts. There is a danger of
swallowing or suff ocating!
Jump start power bank
•
Jump start cable
•
2-in-1 USB connection cable (Micro/Mini)
•
Charger
•
19V connection cable
•
19V set of connectors
•
Storage case
•
Original operating instructions
•
Safety instructions
•
3. Proper use
The jump start power bank is designed for charging smart phones, cameras, tablets, etc. It can
also be used as a torch light. In addition, notebooks and 12 V consumers can be supplied with
DC voltage. Used with the supplied jump start
cable the equipment can also be used as a support for 12 V starter batteries (lead acid batteries)
in motor vehicles with maximum petrol engine
capacities of 4000 ccm and diesel engines with
capacities of up to 2000 ccm.
The equipment is to be used only for its prescribed purpose. Any other use is deemed to be a
case of misuse. The user / operator and not the
manufacturer will be liable for any damage or injuries of any kind caused as a result of this.
Please note that our equipment has not been designed for use in commercial, trade or industrial
applications. Our warranty will be voided if the
machine is used in commercial, trade or industrial
businesses or for equivalent purposes.
4. Technical data
Jump start power bank
Li-Po battery: .........11.1 V – 3700 mAh – 41.1 Wh
Input: .......................................... ....15 V d.c./1 A
Charging time, approx.: .................................. 5 h
USB outlet “OUT: “5V/2A”: .....5 V d.c. / 2 A (max.)
USB outlet “OUT:“5V/9V”:
............................................... 5 V d.c./3 A (max.)
............................................... 9 V d.c./2 A (max.)
d.c. voltage outlet: ......... ..............19 V max. 3.5 A
d.c. voltage outlet: ......... ...............12 V max. 10 A
Jump starting
current: .................... 200 A (5 sec) / 400 A (max.)
Ambient temperature
for jump starting: ....................... + 15 °C - + 40°C
Storage temperature: ................. + 5 °C - + 40 °C
Protection class: ................................................III
Charger
Nominal input voltage: ....... 100-240 V ~50/60 Hz
Nominal output voltage: ........................ 15 V DC
Nominal output current: .................................. 1 A
5. Before starting the equipment
5.1 Charging the jump start power bank with
the charger supplied
The following applies to the charger:
This equipment can be used by children of 8 years and older and by people with limited physical,
sensory or mental capacities or those with no experience and knowledge if they are supervised or
have received instruction in how to use the equipment safely and understand the dangers which
result from such use. Children are not allowed
to play with the equipment. Unless supervised,
children are not allowed to clean the equipment or
carry out user-level maintenance work.
Before you connect the equipment to the power
supply make sure that the data on the rating plate
are identical to the supply voltage.
Important! Pull out the power plug before making
adjustments to the equipment. Charge the equipment only with the charger supplied.
Observe the enclosed safety information with detailed information about charging.
- 17 -

GB
The outlets must not be used while charging is in
progress.
Connect the supplied charger (Fig. 2a) to the
•
„15 V 1A input“ charging jack (Fig. 1 / Item 4)
on the equipment.
Plug the charger into the socket outlet and
•
the battery will be charged. The LED (Fig. 1/
Item 9) shine (flash) during charging and indicate the charging status. When charging is
finished, all the LEDs shine.
The time it takes to fully recharge an empty
•
battery is approximately 5 hours. The temperature of the battery pack may rise slightly
during the charging operation. This is normal.
5.2 Battery capacity indicator
Press the ON/OFF button (Fig. 1/Item 5) briefl y.
The LED for the battery capacity indicator (Fig. 1
/ Item 9) light up. The number of LEDs that are lit
indicate the current charge level of the integrated
Li-Po battery.
100% charged = 4 LED steady on
>25% charged = 1 LED steady on
<25% charged = no LED steady on
6. LED lamp
Caution! Do not look into the light beam.
Press the ON/OFF button for 3 seconds – the
•
LED lamp (Fig. 1 / Item 1) will be permanently
lit.
Press the ON/OFF button again – the LED
•
lamp will be lit as a „strobe light“.
Press the ON/OFF button again – the LED
•
lamp will be lit as an „SOS“ Morse code signal lamp.
Press the button again to switch the LED
•
lamp off again.
shines) (see section 5). The USB ports can be
used in parallel. Please ensure that the cumulative output current does not exceed 5 A.
7.1 Charging/operating devices with a USB
connection
a) 5V/2A USB outlet
1. Connect an available (or the supplied 2-in-1)
USB connection cable to the USB port (Fig.
1 / Item 2) on the jump start power bank and
then to the device you want to connect (max.
2A).
2. Press the ON/OFF button (Fig. 1 / Item 5).
b) “OUT 5V/9V” USB outlet (Fig. 3)
Note: If charging does not work with this outlet,
this means that either the device or the cable is
not supported. In this case, use the 5V d.c. / 2A
USB outlet for charging, as described above.
1. Connect the supplied 2-in-1 USB cable (Fig.
2b) to the “OUT 5V/9V” USB port (Fig. 1 / Item
3) on the jump start power bank and then to
the device you want to connect.
2. Press the ON/OFF button (Fig. 1 / Item 5).
3. The parameters required for charging will be
determined at the USB outlet and the connected device will be charged up. Depending on
the charger cable and the device being charged, the charging time with the “OUT 5V/9V”
USB outlet may be shorter than with the “OUT
5V/2A” USB outlet.
7.2 Operating 19 V d.c. Devices (Fig. 4)
1. Connect the supplied connection cable (Fig.
2d / Item 13) to the 19 V d.c. outlet (Fig. 1 /
Item 7) on the jump start power bank and
then to the 19 V d.c. device, using the supplied connector (Fig. 2d / Item 14) if necessary. The maximum power consumption must
not exceed 3.5A.
2. Press the ON/OFF button (Fig. 1/Item 5).
7. Outputs
Caution! Check the voltage and current ratings of
the device you want to connect (e.g. mobile phone, notebook). Observe the operating instructions
for the device.
The supply time varies according to the level of
the charge of the jump start power bank, the level
of power consumption and the intensity of use of
the connected device. The battery needs charging when the remaining charge is 25% (1 LED
7.3 Operating 12 V d.c. devices
1. Connect a suitable connection cable to the 12
V d.c. outlet (Fig. 1 / Item 6) on the jump start
power bank and then to the 12 V d.c. device.
The maximum power consumption must not
exceed 10 A.
2. Press the ON/OFF button (Fig. 1/Item 5).
- 18 -

GB
8. Jump starting for the vehicle
The 12 V jump starting function provides welcome
help with starting diffi culties due to too little batte-
ry capacity.
Warning! Only the jump start cable is allowed
to be connected during jump starting. Any power
supply to a connected device, e.g. via the USB
port, must be disconnected fi rst.
We would like to point out that vehicles are fi tted
with a whole host of electronic equipment. Please
also refer to the instructions in the owner’s manuals for the car, radio, etc.
Warning! Never connect to the vehicle bodywork!
Make sure that the connector on the jump
•
start cable is securely connected to the device socket. If the connection is loose during
jump starting, the connector could melt as a
result of the high current.
The poles on the vehicle battery must be
•
clean and the clamps of the jump start cable
must be securely attached to the battery poles.
Do not connect the clamps of the jump start
•
cable together during jump starting – shortcircuit.
Check that at least 3 LED of the battery capacity
indicator are lit. The equipment temperature must
be within the range of + 5 °C - + 40°C and the ambient temperature during jump starting within the
range of – 15°C - + 40°C. Use only the supplied
jump start cable (Fig. 2c).
1. Fig. 5: Pull open the cover on the jump start
cable connection (Fig. 1 / Item 8), push the
cover underneath it to the side and plug the
jump start cable into the equipment.
2. Fig. 5a: Connect the red cable to the positive
pole on the car’s battery and the black cable
to the negative pole on the car’s battery. Make
sure that the clamps are secure. In addition,
make sure that the jump start power bank is
tucked away securely in the engine bay and
will not be able to fall as a result of vibrations
during the jump start operation. The jump
start power bank must not be allowed to
come within the range of moving parts. The
following points 3. – 6. describe the status signals of the jump start cable. Please follow the
instructions.
3. Fig. 5a: The green LED on the jump start
cable lights up. All the existing connections
are OK and the vehicle can be started within
30 seconds.
4. Fig. 5b: The green LED on the jump start
cable fl ashes. All the existing connections
are OK, but the car battery charging status is
very low. Press the “Boost” button on the jump
start cable and wait until the green LED comes on permanently. Start the vehicle within
30 seconds. Be particularly careful, because
pressing the “Boost” button has the eff ect of
overriding the safety devices integrated in the
jump start power bank.
5. Fig. 5c: The red LED on the jump start
cable lights up and an acoustic warning
signal sounds. The clamps of the jump
start cable are wrongly connected to the car
battery, i.e. with reverse polarity. Remove the
clamps and connect them to the car battery
again but with the correct polarity and in accordance with the previous instructions.
6. Fig. 5d: No LED lights up on the jump start
cable, nor is there an acoustic warning
signal. Check all the connections, espe-
cially that the clamps are connected to the
car battery with the correct polarity. If all the
connections are OK, the cause is probably a
defective car battery. Press the “Boost” button on the jump start cable and wait until the
green LED comes on permanently. Start the
vehicle within 30 seconds.
Be particularly careful, because pressing the
“Boost” button has the eff ect of overriding the
safety devices integrated in the jump start
power bank. Replace the defective car battery
as soon as possible.
7. As soon as the engine is running, remove the
jump start cable from the equipment and then
remove the red clamp from the car battery
fi rst, followed by the black clamp.
8. Let the engine run. The generator will charge
up the built-in car battery.
At very low temperatures a number of jump start
attempts may be required before the car starts up.
Allow one minute waiting time between each attempt. Remove the equipment within 30 seconds
after a successful jump start as far as possible.
The number of times that you can attempt to start
the engine (max. 10) varies according to the ambient temperature, the condition of the battery you
want to start and the charge level of the jump start
power bank battery.
- 19 -

GB
9. Cleaning, maintenance and
ordering of spare parts
Danger!
Always pull out the power plug before starting any
cleaning work.
Remove all the connected cables from the jump
start power bank.
9.1 Cleaning
Keep all safety devices, air vents and the
•
motor housing free of dirt and dust as far as
possible. Wipe the equipment with a clean
cloth or blow it with compressed air at low
pressure.
We recommend that you clean the device
•
immediately each time you have finished
using it.
Clean the equipment regularly with a damp
•
cloth. Do not use cleaning agents or solvents;
these could attack the plastic parts of the
equipment. Ensure that no water can seep
into the device. The ingress of water into an
electric tool increases the risk of an electric
shock.
9.2 Maintenance
There are no parts inside the equipment which
require additional maintenance.
9.3 Ordering replacement parts:
Please quote the following data when ordering
replacement parts:
Type of machine
•
Article number of the machine
•
Identification number of the machine
•
Replacement part number of the part required
•
For our latest prices and information please go to
www.isc-gmbh.info
11. Disposal and recycling
The equipment is supplied in packaging to prevent it from being damaged in transit. The raw
materials in this packaging can be reused or
recycled. The equipment and its accessories are
made of various types of material, such as metal
and plastic. Never place defective equipment in
your household refuse. The equipment should
be taken to a suitable collection center for proper
disposal. If you do not know the whereabouts of
such a collection point, you should ask in your
local council offi ces.
12. Storage
Store the equipment and its accessories in a dark
and dry place at above freezing temperature.
The ideal storage temperature is between +5 and
40°C.
Observe the enclosed safety information with
detailed information about storage. Since the battery reacts if the temperature is too high (above
+40°C) or too low (below 0°C), do not keep the
battery permanently in a vehicle. For transporting
in a vehicle, place the equipment in a suitable
location where it cannot move in response to an
abrupt change in speed and/or direction. Keep
the equipment in its original packaging.
10. Repair
Should the tool experience problems beyond
those mentioned above, let only an authorised
professional or a customer service shop perform
an inspection.
- 20 -

GB
13. Troubleshooting guide
Fault Possible cause Remedy
The equipment cannot be switched on:
Jump starting does
not work
All LED fl ash - The overload cutout has responded
- Battery voltage too low - Charge battery
- Battery voltage too low
- Connections on the vehicle connected with reverse polarity
- Temperature outside the temperature range
- Equipment too cold/hot
- Ambient temperature too low/high
- Charge battery
- Check the polarity and connect correctly
- Try jump starting within the temperature range
- Switch off the equipment, check for
possible overloading
- Observe equipment temperature of
+ 5°C - + 40°C.
- Observe ambient temperature range of – 15°C - + 40°C
- 21 -

GB
For EU countries only
Never place any electric power tools in your household refuse.
To comply with European Directive 2012/19/EC concerning old electric and electronic equipment and
its implementation in national laws, old electric power tools have to be separated from other waste and
disposed of in an environment-friendly fashion, e.g. by taking to a recycling depot.
Recycling alternative to the return request:
As an alternative to returning the equipment to the manufacturer, the owner of the electrical equipment
must make sure that the equipment is properly disposed of if he no longer wants to keep the equipment.
The old equipment can be returned to a suitable collection point that will dispose of the equipment in
accordance with the national recycling and waste disposal regulations. This does not apply to any accessories or aids without electrical components supplied with the old equipment.
This consignment contains lithium-ion batteries.
In accordance with special provision 188 this consignment is not subject to the ADR regulations. Handle
with care. Danger of ignition in case of damage to the consignment package. If the consignment package is damaged: Check and if necessary repackage. For further information contact: 0049 1807 10 20 20
66 (fi xed network 14 ct/min, mobile phone max. 42 ct/min) Outside Germany charges will apply instead
for a regular call to a landline number in Germany.
The reprinting or reproduction by any other means, in whole or in part, of documentation and papers
accompanying products is permitted only with the express consent of the iSC GmbH.
Subject to technical changes
- 22 -

GB
Service information
We have competent service partners in all countries named on the guarantee certifi cate whose contact
details can also be found on the guarantee certifi cate. These partners will help you with all service re-
quests such as repairs, spare and wearing part orders or the purchase of consumables.
Please note that the following parts of this product are subject to normal or natural wear and that the
following parts are therefore also required for use as consumables.
Category Example
Wear parts* Battery
Consumables*
Missing parts
* Not necessarily included in the scope of delivery!
In the eff ect of defects or faults, please register the problem on the internet at www.isc-gmbh.info. Ple-
ase ensure that you provide a precise description of the problem and answer the following questions in
all cases:
Did the equipment work at all or was it defective from the beginning?
•
Did you notice anything (symptom or defect) prior to the failure?
•
What malfunction does the equipment have in your opinion (main symptom)?
•
Describe this malfunction.
- 23 -

GB
Warranty certifi cate
Dear Customer,
All of our products undergo strict quality checks to ensure that they reach you in perfect condition. In the
unlikely event that your device develops a fault, please contact our service department at the address
shown on this guarantee card. You can also contact us by telephone using the service number shown.
Please note the following terms under which guarantee claims can be made:
1. These guarantee terms apply to consumers only, i.e. natural persons intending to use this product
neither for their commercial activities nor for any other self-employed activities. These warranty
terms regulate additional warranty services, which the manufacturer mentioned below promises to
buyers of its new products in addition to their statutory rights of guarantee. Your statutory guarantee
claims are not aff ected by this guarantee. Our guarantee is free of charge to you.
2. The warranty services cover only defects due to material or manufacturing faults on a product which
you have bought from the manufacturer mentioned below and are limited to either the rectifi cation of
said defects on the product or the replacement of the product, whichever we prefer.
Please note that our devices are not designed for use in commercial, trade or professional applications. A guarantee contract will not be created if the device has been used by commercial, trade or
industrial business or has been exposed to similar stresses during the guarantee period.
3. The following are not covered by our guarantee:
- Damage to the device caused by a failure to follow the assembly instructions or due to incorrect
installation, a failure to follow the operating instructions (for example connecting it to an incorrect
mains voltage or current type) or a failure to follow the maintenance and safety instructions or by exposing the device to abnormal environmental conditions or by lack of care and maintenance.
- Damage to the device caused by abuse or incorrect use (for example overloading the device or the
use or unapproved tools or accessories), ingress of foreign bodies into the device (such as sand,
stones or dust, transport damage), the use of force or damage caused by external forces (for example by dropping it).
- Damage to the device or parts of the device caused by normal or natural wear or tear or by normal
use of the device.
4. The guarantee is valid for a period of 24 months starting from the purchase date of the device. Guarantee claims should be submitted before the end of the guarantee period within two weeks of the
defect being noticed. No guarantee claims will be accepted after the end of the guarantee period.
The original guarantee period remains applicable to the device even if repairs are carried out or
parts are replaced. In such cases, the work performed or parts fi tted will not result in an extension
of the guarantee period, and no new guarantee will become active for the work performed or parts
fi tted. This also applies if an on-site service is used.
5. To make a claim under the guarantee, please register the defective device at: www.isc-gmbh.info.
Please keep your bill of purchase or other proof of purchase for the new device. Devices that are
returned without proof of purchase or without a rating plate shall not be covered by the guarantee,
because appropriate identifi cation will not be possible. If the defect is covered by our guarantee,
then the item in question will either be repaired immediately and returned to you or we will send you
a new replacement.
Of course, we are also happy off er a chargeable repair service for any defects which are not covered by
the scope of this guarantee or for units which are no longer covered. To take advantage of this service,
please send the device to our service address.
Also refer to the restrictions of this warranty concerning wear parts, consumables and missing parts as
set out in the service information in these operating instructions.
- 24 -

F
Danger !
Lors de l’utilisation d’appareils, il faut respecter
certaines mesures de sécurité afi n d’éviter des
blessures et dommages. Veuillez donc lire attentivement ce mode d’emploi/ces consignes de
sécurité. Veillez à le conserver en bon état pour
pouvoir accéder aux informations à tout moment.
Si l’appareil doit être remis à d’autres personnes,
veillez à leur remettre aussi ce mode d’emploi/
ces consignes de sécurité. Nous déclinons toute
responsabilité pour les accidents et dommages
dus au non-respect de ce mode d’emploi et des
consignes de sécurité.
1. Consignes de sécurité
Vous trouverez les consignes de sécurité correspondantes dans le cahier en annexe.
Danger !
Veuillez lire toutes les consignes de sécurité
et instructions. Tout non-respect des consignes
de sécurité et instructions peut provoquer une
décharge électrique, un incendie et/ou des blessures graves.
Conservez toutes les consignes de sécurité
et instructions pour une consultation ultérieure.
Cet appareil ne doit pas être utilisé par les enfants. Surveillez les enfants pour qu’ils ne jouent
pas avec l’appareil. Le nettoyage et l’entretien
ne doivent pas être eff ectués par des enfants.
Cet appareil ne doit pas être utilisé par les personnes ayant des capacités physiques, sensorielles ou intellectuelles diminuées ou manquant
d’expérience et/ou de connaissances, à moins
d’être surveillées et de recevoir les instructions
relatives à l’utilisation de l’appareil par une personne responsable de leur sécurité.
Explication des sigles (fi g. 6)
D = Catégorie de protection II appareil
E = À n’utiliser qu’à l’intérieur
F = Attention ! Lisez le mode d’emploi avant uti-
lisation !
Texte sur l’appareil et le câble de démarrage
Attention ! Lisez le mode d’emploi avant
utilisation !
1. N’appuyez jamais sur la touche Boost avant
d’avoir raccordé la batterie de véhicule.
2. Ne reliez jamais les pinces entre elles –
Court-circuit et risque de blessure.
3. Aide au démarrage seulement pour véhicule
12 V, pince rouge sur le pôle « + » de la batterie, pince noire sur le pôle « - » de la batterie.
4. Voyant LED vert = Démarrez le moteur dans
un délai de 30 s.
5. Voyant LED rouge + Avertissement sonore =
Polarité inversée de la batterie (voir 3.)
6. Voyant LED vert clignotant + Avertissement
sonore = Appuyez sur la touche « Boost » et
démarrez le moteur dans un délai de 30 s.
7. Pas de LED, pas d’avertissement sonore
= Contrôlez la connexion enfi chable sur
l’appareil, appuyez sur la touche « Boost » et
démarrez le moteur dans un délai de 30 s.
Avertissement !
1. Maintenez l’appareil hors de portée des enfants !
2. N’ouvrez pas l’appareil - Risque de blessure !
3. Si moins de 3 LED sont allumées, il n’y a pas
d’aide au démarrage.
4. Si le moteur ne démarre pas dans un délai
de 5 secondes, arrêtez l’opération de démarrage. Attendez une minute avant de répéter
l’opération.
2. Description de l’appareil et
volume de livraison
2.1 Description de l’appareil (fi gure 1)
1. Lampe LED
2. Sortie USB 5 V max. 2 A
3. Sortie USB 5 V/9 V
4. Prise de charge 15 V d.c. / 1 A
5. Bouton-poussoir marche/arrêt
6. Sortie de tension continue 12 V max. 10 A
7. Sortie de tension continue 19 V max. 3,5 A
8. Raccord câble de démarrage
9. Indicateur LED de charge de l’accumulateur
2.2 Volume de livraison
Veuillez contrôler si l‘article est complet à l‘aide
de la description du volume de livraison. S‘il
manque des pièces, adressez-vous dans un délai
de 5 jours maximum après votre achat à notre
service après-vente ou au magasin où vous avez
acheté l‘appareil muni d‘une preuve d‘achat valable. Veuillez consulter pour cela le tableau des
garanties dans les informations service aprèsvente à la fi n du mode d‘emploi.
Ouvrez l’emballage et prenez l’appareil en le
•
sortant avec précaution de l’emballage.
Retirez le matériel d’emballage tout comme
•
- 25 -

F
les sécurités d’emballage et de transport (s’il
y en a).
Vérifiez si la livraison est bien complète.
•
Contrôlez si l’appareil et ses accessoires ne
•
sont pas endommagés par le transport.
Conservez l’emballage autant que possible
•
jusqu’à la fin de la période de garantie.
Danger !
L’appareil et le matériel d’emballage ne sont
pas des jouets ! Il est interdit de laisser des
enfants jouer avec des sacs et des fi lms en
plastique et avec des pièces de petite taille.
Ils risquent de les avaler et de s’étouff er !
Jump-Start Power Bank
•
Câble de démarrage
•
Câble de raccordement USB 2 en 1 (Micro/
•
Mini)
Chargeur
•
Câble de raccordement 19 V
•
Kit fiche 19 V
•
Pochette de rangement
•
Mode d’emploi d’origine
•
Consignes de sécurité
•
3. Utilisation conforme à
l’aff ectation
Jump-Start Power Bank sert à charger des smartphones, des appareils photo, des tablettes, etc.
et peut également servir de lampe de poche. De
plus, il est possible d’alimenter des ordinateurs
portables et consommateurs 12 V en tension continue. En utilisant le câble de démarrage fourni,
l’appareil convient également à charger des batteries de démarrage 12 V faibles (accumulateurs
plomb-acide) dans les véhicules automobiles à
moteur essence jusqu’à 4000 cm
sel jusqu’à 2000 cm
La machine doit exclusivement être employée
conformément à son aff ectation. Chaque uti-
lisation allant au-delà de cette aff ectation est
considérée comme non conforme. Pour les
dommages en résultant ou les blessures de tout
genre, le producteur décline toute responsabilité
et l’opérateur/l’exploitant est responsable.
Veillez au fait que nos appareils, conformément
à leur aff ectation, n’ont pas été construits, pour
être utilisés dans un environnement professionnel, industriel ou artisanal. Nous déclinons toute
3
.
3
et moteurs die-
responsabilité si l’appareil est utilisé professionnellement, artisanalement ou dans des sociétés
industrielles, tout comme pour toute activité
équivalente.
4. Données techniques
Jump-Start Power Bank
Accumulateur
Li-Po : ....................11,1 V – 3700 mAh – 41,1 Wh
Entrée : ........................................... 15 V d.c./1 A
Durée de charge env. : ................................... 5 h
Sortie USB « OUT: 5V/2A » : .5 V d.c. / 2 A (max.)
Sortie USB « OUT: 5V/9V » : .. 5 V d.c./3 A (max.)
............................................... 9 V d.c./2 A (max.)
Sortie de tension continue : .........19 V max. 3,5 A
Sortie de tension continue : ..........12 V max. 10 A
Courant d’aide au
démarrage : ................. 200 A (5 s) / 400 A (max.)
Température ambiante pour l’aide
au démarrage : .......................... - 15 °C - + 40 °C
Température de stockage : ......... + 5 °C - + 40 °C
Catégorie de protection : ...................................III
Chargeur
Tension d‘entrée
nominale : ..........................100-240 V ~50/60 Hz
Tension de sortie nominale : .................. 15 V d.c.
Courant nominal de sortie : ............................ 1 A
5. Avant la mise en service
5.1 Charge de Jump-Start Power Bank avec le
chargeur fourni
Règles applicables au chargeur :
Cet appareil peut être utilisé par les enfants à partir de 8 ans et les personnes avec des capacités
physiques, sensorielles ou intellectuelles diminuées ou en manque d’expérience et de connaissances à condition qu’ils soient surveillés ou aient
reçu les instructions relatives à l’utilisation sûre de
l’appareil et qu’ils comprennent les risques résultant de cette utilisation. Les enfants n’ont pas le
droit de jouer avec l’appareil. Les enfants ne doivent pas eff ectuer le nettoyage et la maintenance
de l’utilisateur sans surveillance.
- 26 -

F
Assurez-vous, avant de brancher la machine, que
les données se trouvant sur la plaque signalétique correspondent bien aux données du réseau.
Attention ! Tirez la fi che de contact avant de
procéder aux réglages sur l’appareil. Chargez
l’appareil uniquement avec le chargeur fourni.
Respectez les consignes de sécurité jointes
comportant des indications détaillées sur le processus de charge.
Les sorties ne doivent pas être utilisées pendant
le processus de charge.
Raccordez le chargeur fourni (fig. 2a) à la pri-
•
se de charge « Input 15 V 1A » (fig. 1 / pos. 4)
de l’appareil.
Enfichez le chargeur dans la prise de cou-
•
rant pour charger l’accumulateur. Pendant la
charge, les LED (fig. 1 / pos. 9) sont allumées
(clignotent) et indiquent l’état de charge. Si
la charge est terminée, toutes les LED sont
allumées.
La durée de charge est d’env. 5 heures pour
•
un accumulateur vide. Un léger réchauffement de l’accumulateur peut avoir lieu pendant le processus de charge. Ce phénomène
est tout à fait normal.
5.2 Indicateur de charge de l’accumulateur
Appuyez brièvement sur le bouton-poussoir marche/arrêt (fi g. 1/pos. 5). La LED de l’indicateur de
charge de l’accumulateur (fi g. 1 / pos. 9) s’allume.
Le nombre de LED allumées indique l’état de
charge actuel de l’accumulateur Li-Po intégré.
Charge 100 % = 4 LED allumées en permanence
Charge >25 % = 1 LED allumée en permanence
Charge <25 % = Aucune LED allumée en permanence
6. Lampe LED
Attention ! Ne regardez pas en direction du
rayon lumineux.
Appuyez pendant 3 secondes sur le bouton-
•
poussoir marche/arrêt – la lampe LED (fig. 1 /
pos. 1) reste allumée en permanence.
Appuyez à nouveau sur le bouton-poussoir
•
marche/arrêt – la lampe LED s’allume comme
« flash stroboscopique ».
Appuyez à nouveau sur le bouton-poussoir
•
marche/arrêt – la lampe LED s’allume comme
lampe morse « SOS ».
Appuyez une nouvelle fois pour éteindre la
•
lampe LED.
7. Sorties
Attention ! Respectez les valeurs de tension et
d’intensité de l’appareil à alimenter (par ex. téléphone portable, ordinateur portable). Respectez
son mode d’emploi.
La durée d’alimentation varie en fonction de
l’état de charge de Jump-Start Power Bank, de la
puissance absorbée et de l’intensité d’utilisation
de l’appareil raccordé. Chargez l’accumulateur
lorsque sa charge résiduelle n’est plus que de 25
% (1 LED allumée) (voir point 5.). Les raccords
USB peuvent être utilisés en parallèle. Veillez à
ce que le courant de sortie cumulé ne dépasse
pas 5 A.
7.1 Charge/Exploitation d’appareils avec raccord USB
a) Sortie USB 5V/2A
1. Reliez un câble de raccordement USB existant (ou le câble 2 en 1 fourni) au raccord
USB (fi g. 1 / pos. 2) de Jump-Start Power
Bank et ensuite à l’appareil à alimenter (max.
2A).
2. Appuyez sur le bouton-poussoir marche/arrêt
(fi g. 1 / pos. 5).
b) Sortie USB « OUT 5V/9V » (Fig. 3)
Remarque : Si la charge ne fonctionne pas
sur cette sortie, l’appareil ou le câble n’est pas
compatible. Utilisez dans ce cas la sortie USB 5
V d.c. / 2 A pour la charge comme décrit précédemment.
1. Reliez le câble USB 2 en 1 fourni (fi g. 2b)
au raccord USB « OUT 5V/9V » (fi g. 1 / pos.
3) de Jump-Start Power Bank et ensuite à
l’appareil à alimenter.
2. Appuyez sur le bouton-poussoir marche/arrêt
(fi g. 1 / pos. 5).
3. Les paramètres nécessaires à la charge
sont déterminés à la sortie USB et l’appareil
raccordé est chargé. En fonction du câble de
charge et de l’appareil à charger, la durée de
charge à la sortie USB « OUT 5V/9V » peut
être réduite par rapport à la sortie USB « OUT
5V/2A ».
- 27 -

F
7.2 Exploitation d’appareils à tension continue 19 V (fi g. 4)
1. Raccordez le câble de raccordement fourni
(fi g. 2d / pos. 13) à la sortie de tension conti-
nue 19 V (fi g. 1 / pos. 7) de Jump-Start Power
Bank puis le cas échéant en utilisant la fi che
fournie (fi g. 2d / pos. 14) à l’appareil à tension
continue 19 V. Le courant absorbé maximum
ne doit pas excéder 3,5 A.
2. Appuyez sur le bouton-poussoir marche/arrêt
(fi g. 1/pos. 5).
7.3 Exploitation d’appareils à tension continue 12 V
1. Raccordez un câble de raccordement adapté
à la sortie de tension continue 12 V (fi g. 1
/ pos. 6) de Jump-Start Power Bank puis à
l’appareil à tension continue 12 V. Le courant
absorbé maximum ne doit pas excéder 10 A.
2. Appuyez sur le bouton-poussoir marche/arrêt
(fi g. 1/pos. 5).
8. Aide au démarrage pour le
véhicule
Le dispositif d’aide au démarrage 12 V est une
aide bienvenue en cas de diffi cultés de démar-
rage en raison du manque de capacité de la
batterie.
Avertissement ! Pendant une opération d’aide
au démarrage, seul le câble de démarrage doit
être raccordé. L’alimentation d’un appareil raccordé, par ex. via le raccord USB, doit être interrompue au préalable.
Nous attirons votre attention sur le fait que les
véhicules sont équipés de nombreux composants
électroniques. Veuillez respecter les consignes
des modes d’emploi de la voiture, de la radio, etc.
Avertissement ! Ne raccordez jamais à la carrosserie du véhicule !
Assurez-vous que la fiche du câble de dé-
•
marrage soit fixée à la prise de l’appareil. Si la
connexion est desserrée pendant l’opération
d’aide au démarrage, la connexion enfichable
peut fondre en raison du courant élevé.
Les pôles de la batterie du véhicule doivent
•
être propres et les pinces du câble de démarrage doivent être fixées solidement sur les
pôles de la batterie.
Pendant l’opération d’aide au démarrage,
•
ne reliez pas les pinces entre elles – Courtcircuit.
Assurez-vous qu’au moins 3 LED de l’indicateur
de capacité de charge sont allumées. La température de l’appareil doit être dans la plage de +
5 °C à + 40 °C, la température ambiante lors de
l’opération d’aide au démarrage dans la plage de
-15 °C à + 40 °C. Utilisez exclusivement le câble
de démarrage fourni (fi g. 2c).
1. Fig. 5 : Relevez le recouvrement du raccord
de câble de démarrage (fi g. 1 / pos. 8),
poussez le recouvrement sous-jacent vers le
côté et branchez le câble de démarrage sur
l’appareil.
2. Fig. 5a : Branchez le câble rouge sur le pôle
positif et le câble noir sur le pôle négatif de
la batterie de véhicule. Veillez à la bonne
fi xation des pinces. Veillez en outre à ranger
Jump-Start Power Bank de façon sûre dans
le compartiment moteur pour qu’il ne puisse
pas tomber pendant le démarrage en raison
des vibrations. Jump-Start Power Bank doit
rester hors de portée des pièces mobiles. Les
points 3. – 6. ci-après décrivent les messages
d’état du câble de démarrage. Veuillez respecter les instructions.
3. Fig. 5a : Le voyant LED vert du câble de
démarrage est allumé. Toutes les connexions sont OK et le véhicule peut être démarré
dans un délai de 30 secondes.
4. Fig. 5b : Le voyant LED vert du câble de
démarrage clignote. Toutes les connexions
sont OK, mais l’état de charge de la batterie
de véhicule est très faible. Appuyez sur la
touche « Boost » sur le câble de démarrage
et attendez jusqu’à ce que le voyant LED vert
reste allumé en permanence. Démarrez le véhicule dans un délai de 30 secondes. Soyez
particulièrement prudent car en appuyant sur
la touche « Boost », vous désactivez les dispositifs de sécurité intégrés dans Jump-Start
Power Bank.
5. Fig. 5c : Le voyant LED rouge du câble
de démarrage est allumé et un avertissement sonore est émis. La polarité des
pinces du câble de démarrage est inversée
sur la batterie de véhicule. Enlevez les pinces
et branchez-les à nouveau sur la batterie de
véhicule en respectant la polarité et les instructions précédentes.
- 28 -

F
6. Fig. 5d : Aucun voyant LED du câble de
démarrage n’est allumé et aucun avertissement sonore n’est émis. Contrôlez tou-
tes les connexions, en particulier le respect
de la polarité des pinces sur la batterie de
véhicule. Si toutes les connexions sont OK,
la cause est probablement une batterie de
véhicule défectueuse. Appuyez sur la touche
« Boost » sur le câble de démarrage et attendez jusqu’à ce que le voyant LED vert reste
allumé en permanence. Démarrez le véhicule
dans un délai de 30 secondes.
Soyez particulièrement prudent car en appuyant sur la touche « Boost », vous désactivez
les dispositifs de sécurité intégrés dans
Jump-Start Power Bank. Remplacez au plus
vite la batterie de véhicule défectueuse.
7. Dès que le moteur tourne, retirez le câble de
démarrage de l’appareil puis la pince rouge et
ensuite la pince noire de la batterie de véhicule.
8. Laissez tourner le moteur. Le générateur
charge la batterie de véhicule intégrée.
Lorsque les températures sont très basses, il
est possible que plusieurs essais de démarrage
soient nécessaires pour démarrer le véhicule. Le
temps d’attente entre deux essais de démarrage
est d’une minute. Retirez l’appareil si possible
dans un délai de 30 secondes après une aide au
démarrage concluante.
Le nombre d’essais d’aide au démarrage possibles (max. 10) dépend de la température ambiante, de l’état de la batterie à démarrer et de l’état
de charge de l’accumulateur Jump-Start Power
Bank.
9. Nettoyage, maintenance et
commande de pièces de
rechange
Danger !
Retirez la fi che de contact avant tous travaux de
nettoyage.
Retirez tous les câbles raccordés de Jump-Start
Power Bank.
9.1 Nettoyage
Maintenez les dispositifs de protection, les
•
fentes à air et le carter de moteur aussi propres (sans poussière) que possible. Frottez
l’appareil avec un chiffon propre ou soufflez
dessus avec de l’air comprimé à basse pression.
Nous recommandons de nettoyer l’appareil
•
directement après chaque utilisation.
Nettoyez l’appareil régulièrement à l’aide
•
d’un chiffon humide. N’utilisez aucun produit
de nettoyage ni détergeant; ils pourraient
endommager les pièces en matières plastiques de l’appareil. Veillez à ce qu’aucune
eau n’entre à l’intérieur de l’appareil. La pénétration de l’eau dans un appareil électrique
augmente le risque de décharge électrique.
9.2 Maintenance
Aucune pièce à l’intérieur de l’appareil n’a besoin
de maintenance.
9.3 Commande de pièces de rechange :
Pour les commandes de pièces de rechange,
veuillez indiquer les références suivantes:
Type de l’appareil
•
No. d’article de l’appareil
•
No. d’identification de l’appareil
•
No. de pièce de rechange de la pièce requise
•
Vous trouverez les prix et informations actuelles à
l’adresse www.isc-gmbh.info
10. Réparation
En cas de dysfonctionnements éventuels, il convient de faire contrôler l’appareil uniquement par
un spécialiste autorisé ou par un service aprèsvente.
- 29 -

11. Mise au rebut et recyclage
L‘appareil se trouve dans un emballage permettant d‘éviter les dommages dus au transport.
Cet emballage est une matière première et peut
donc être réutilisé ultérieurement ou être réintroduit dans le circuit des matières premières.
L‘appareil et ses accessoires sont en matériaux
divers, comme par ex. des métaux et matières
plastiques. Les appareils défectueux ne doivent
pas être jetés dans les poubelles domestiques.
Pour une mise au rebut conforme à la réglementation, l‘appareil doit être déposé dans un centre
de collecte approprié. Si vous ne connaissez pas
de centre de collecte, veuillez vous renseigner
auprès de l‘administration de votre commune.
12. Stockage
Entreposez l’appareil et ses accessoires dans un
endroit sombre, sec et à l’abri du gel. La température de stockage optimale est comprise entre +5
et 40 °C.
Respectez les consignes de sécurité jointes
comportant des indications détaillées sur le stockage. Étant donné que l’accumulateur réagit à
des températures trop élevées (plus de +40 °C)
ou trop faibles (moins de 0°C), ne stockez pas
durablement l’appareil dans un véhicule. Pour
le transporter dans un véhicule, placez-le à un
endroit adapté pour qu’il ne puisse pas se mettre
en mouvement en cas de changements soudains
de vitesse et/ou de direction. Conservez l’appareil
dans l’emballage d’origine.
F
- 30 -

F
13. Plan de recherche des erreurs
Dérangement Cause probable Élimination
L'appareil ne
s'allume pas
L'aide au démarrage ne fonctionne
pas
Tous les voyants
LEDs clignotent
- tension de l‘accumulateur trop faib-le- charger l‘accumulateur
- tension de l‘accumulateur trop faible
- raccordements du véhicule inversés
- Température en dehors de la plage
de température
- La protection contre la surcharge
s‘est déclenchée
- Appareil trop chaud / froid
- Température ambiante trop basse/
haute
- charger l‘accumulateur
- veiller aux polarités et à raccorder
correctement
- tenter une aide au démarrage dans
la plage de température
- Éteindre l‘appareil, contrôler la
surcharge éventuelle
- Maintenir la température de
l‘appareil de + 5 °C à + 40 °C.
- Respecter la plage de température
ambiante de – 15 °C à + 40 °C
- 31 -

F
Uniquement pour les pays de l’Union Européenne
Ne jetez pas les outils électriques dans les ordures ménagères!
Selon la norme européenne 2012/19/CE relative aux appareils électriques et systèmes électroniques
usés et selon son application dans le droit national, les outils électriques usés doivent être récoltés à
part et apportés à un recyclage respectueux de l’environnement.
Possibilité de recyclage en alternative à la demande de renvoi :
Le propriétaire de l’appareil électrique est obligé, en guise d’alternative à un envoi en retour, à contribuer à un recyclage eff ectué dans les règles de l’art en cas de cessation de la propriété. L’ancien appareil
peut être remis à un point de collecte dans ce but. Cet organisme devra l’éliminer dans le sens de la Loi
sur le cycle des matières et les déchets. Ne sont pas concernés les accessoires et ressources fournies
sans composants électroniques.
Toute réimpression ou autre reproduction de la documentation et des papiers joints aux produits, même
sous forme d’extraits, est uniquement permise une fois l’accord explicite de l’ISC GmbH obtenu.
Sous réserve de modifi cations techniques
- 32 -

F
Informations service après-vente
Nous disposons dans tous les pays mentionnés dans le bon de garantie de partenaires de service
après-vente compétents dont vous trouverez les coordonnées dans le bon de garantie. Ceux-ci se
tiennent à votre disposition pour tout ce qui concerne le service après-vente comme les réparations,
l‘approvisionnement en pièces de rechange et d‘usure ou l‘achat de pièces de consommation.
Il faut tenir compte du fait que pour ce produit les pièces suivantes sont soumises à une usure liée à
l‘utilisation ou à une usure naturelle ou que les pièces suivantes sont nécessaires en tant que consommables.
Catégorie Exemple
Pièces d‘usure* Accumulateur
Matériel de consommation/
pièces de consommation*
Pièces manquantes
*Pas obligatoirement compris dans la livraison !
En cas de vices ou de défauts, nous vous prions d‘enregistrer le cas du défaut sur internet à l‘adresse
www.isc-gmbh.info. Veuillez donner une description précise du défaut et répondre dans tous les cas aux
questions suivantes :
est-ce que l‘appareil a fonctionné une fois ou était-il défectueux dés le départ ?
•
avez-vous remarqué quelque chose avant la panne (symptôme avant la panne) ?
•
quel est le défaut de fonctionnement de l‘appareil à votre avis (symptôme principal) ?
•
Décrivez ce défaut de fonctionnement.
- 33 -

F
Bon de garantie
Chère cliente, cher client,
nos produits sont soumis à un contrôle de qualité très strict. Si toutefois, il arrivait que cet appareil ne
fonctionne pas parfaitement, nous en sommes désolés et nous vous prions de vous adresser à notre
service après-vente à l‘adresse indiquée sur le bon de garantie. Nous nous tenons également volontiers
à votre disposition par téléphone au numéro de service après-vente indiqué. La garantie est valable
dans les conditions suivantes :
1. Ces conditions de garantie s‘adressent uniquement à des consommateurs, c‘est à dire à des personnes physiques qui ne souhaitent ni utiliser ce produit dans le cadre de leur activité industrielle ou
artisanale, ni dans le cadre de toute autre activité indépendante. Les conditions de garantie réglementent les prestations de garantie supplémentaires que le fabricant mentionné ci-dessous promet
aux acheteurs de ses appareils en supplément de la prestation de garantie légale. Vos droits légaux
en matière de garantie restent inchangés. Notre prestation de garanti est gratuite pour vous.
2. La prestation de garantie s‘étend exclusivement aux défauts résultant d‘une erreur de fabrication ou
de matériau d‘un appareil neuf du fabricant mentionné ci-dessous et acheté par vos soins. La prestation de garantie se limite selon notre décision soit à la résolution de tels défauts sur l‘appareil, soit
à l‘échange de l‘appareil.
Veillez au fait que nos appareils, conformément au règlement, n‘ont pas été conçus pour être utilisés dans un environnement professionnel, industriel ou artisanal. Il n‘y a donc pas de contrat de
garantie quand l‘appareil a été utilisé professionnellement, artisanalement ou par des sociétés industrielles ou exposé à une sollicitation semblable pendant la durée de la garantie.
3. Sont exclus de notre garantie :
- les dommages liés au non-respect des instructions de montage ou en raison d‘une installation
incorrecte, au non-respect du mode d‘emploi (en raison par ex. du branchement de l‘appareil sur la
tension de réseau ou le type de courant incorrect), au non-respect des dispositions de maintenance
et de sécurité ou résultant d‘une exposition de l‘appareil à des conditions environnementales anormales ou d‘un manque d‘entretien et de maintenance.
- les dommages résultant d‘une utilisation abusive ou non conforme (comme par ex. une surcharge
de l‘appareil ou une utilisation d‘outils ou d‘accessoires non autorisés), de la pénétration d‘objets
étrangers dans l‘appareil (comme par ex. du sable, des pierres ou de la poussière), de l‘utilisation
de la force ou de la violence (comme par ex. les dommages liés aux chutes).
- les dommages sur l‘appareil ou des parties de l‘appareil résultant de l‘usure normale liée à
l‘utilisation de l‘appareil ou de toute autre usure naturelle.
4. La durée de garantie est de 24 mois et débute à la date d‘achat de l‘appareil. Les droits à la garantie
doivent être revendiqués avant l‘expiration de la durée de garantie dans un délai de deux semaines
après avoir constaté le défaut. La revendication de droits à la garantie après expiration de la durée
de garantie est exclue. La réparation ou l‘échange de l‘appareil n‘entraîne ni une extension de la durée de garantie ni le début d‘une nouvelle durée de garantie pour cet appareil ou toute autre pièce
de rechange installée sur l‘appareil. Cela est valable également dans le cas d‘une intervention du
service après-vente à domicile.
5. Pour faire valoir vos droits à la garantie, veuillez enregistrer l‘appareil défectueux à l‘adresse suivante : www.isc-gmbh.info. Veuillez garder à disposition la preuve d‘achat ou tout autre justifi catif
de l‘achat de votre nouvel appareil. Les appareils envoyés sans les justifi catifs correspondants ou
sans plaque signalétique sont exclus de la prestation de garantie en raison de l‘impossibilité de les
enregistrer. Si le défaut de l‘appareil est inclut dans la garantie, vous recevrez sans délai un appareil
réparé ou un nouvel appareil.
Bien entendu, nous réparons volontiers les défauts de votre appareil qui ne sont pas ou plus compris
dans l‘étendue de la garantie contre le remboursement des frais de réparation. Pour cela, veuillez envoyer l‘appareil à notre adresse de service après-vente.
Pour les pièces d‘usure, de consommation et manquantes, nous renvoyons aux restrictions de cette garantie conformément aux informations du service après-vente de ce mode d‘emploi.
- 34 -

I
Pericolo!
Nell’usare gli apparecchi si devono rispettare
diverse avvertenze di sicurezza per evitare lesioni e danni. Quindi leggete attentamente queste
istruzioni per l’uso/le avvertenze di sicurezza.
Conservate bene le informazioni per averle a
disposizione in qualsiasi momento. Se date
l’apparecchio ad altre persone, consegnate queste istruzioni per l’uso/le avvertenze di sicurezza
insieme all’apparecchio. Non ci assumiamo alcuna responsabilità per incidenti o danni causati
dal mancato rispetto di queste istruzioni e delle
avvertenze di sicurezza.
1. Avvertenze sulla sicurezza
Le relative avvertenze di sicurezza si trovano
nell’opuscolo allegato.
Pericolo!
Leggete tutte le avvertenze di sicurezza e le
istruzioni. Dimenticanze nel rispetto delle avver-
tenze di sicurezza e delle istruzioni possono causare scosse elettriche, incendi e/o gravi lesioni.
Conservate tutte le avvertenze e le istruzioni
per eventuali necessità future.
Questo apparecchio non deve essere utilizzato
dai bambini. I bambini devono essere sorvegliati
in modo che non giochino con l‘apparecchio. La
pulizia e la manutenzione non devono essere
eseguite dai bambini. L‘apparecchio non deve
essere utilizzato da persone con capacità fi siche,
sensoriali o mentali ridotte o con esperienze e
conoscenze insuffi cienti, a meno che esse non
vengano sorvegliate o istruite da una persona per
loro responsabile.
Spiegazione dei simboli (Fig. 6)
D = Apparecchio con grado di protezione II
E = Solo per l‘impiego in ambienti interni asciutti
F = Attenzione! Leggere le istruzioni prima
dell‘uso!
Testo sull’apparecchio e sul cavo per
l‘avviamento di soccorso
Attenzione! Leggere le istruzioni prima dell‘uso!
1. Non premete mai il tasto „Boost“ prima che
sia collegata la batteria dell‘autovettura.
2. Non collegate mai tra loro i morsetti – cortocircuito e pericolo di lesioni.
3. Avviamento di soccorso solo per autovetture
con batterie da 12 V, morsetto rosso al polo
della batteria „+“, morsetto nero al polo della
batteria „-“.
4. LED verde = avviate il motore entro 30 s.
5. LED rosso + segnale acustico = la batteria è
collegata con polarità errata (vedi 3.)
6. LED verde lampeggiante + segnale acustico
= premete il tasto „Boost“ e avviate il motore
entro 30 s.
7. Nessun LED illuminato, nessun segnale acustico = controllate la connessione
all‘apparecchio, premete il tasto „Boost“ e
avviate il motore entro 30 s.
Avvertimento!
1. Tenete l‘apparecchio fuori della portata dei
bambini!
2. Non aprite l‘apparecchio - pericolo di lesioni!
3. Se si illuminano meno di 3 LED non è disponibile l‘avviamento di soccorso.
4. Se il motore non si avvia entro 5 secondi,
terminate la procedura di avvio. Attendete 1
minuto prima di ripetere la procedura.
2. Descrizione dell’apparecchio ed
elementi forniti
2.1 Descrizione dell’apparecchio (Fig. 1)
1. Luce LED
2. Uscita USB 5V max. 2A
3. Uscita USB 5V/9V
4. Presa di ricarica 15V DC / 1A
5. Tasto ON/OFF
6. Uscita tensione continua 12V, max. 10 A
7. Uscita tensione continua 19V, max. 3,5 A
8. Presa per cavo di avviamento di soccorso
9. LED di indicazione livello batteria
2.2 Elementi forniti
Verifi cate che l‘articolo sia completo sulla base
degli elementi forniti descritti. In caso di parti
mancanti, rivolgetevi al nostro Centro Servizio Assistenza o al punto vendita in cui avete acquistato
l‘apparecchio presentando un documento di acquisto valido entro e non oltre i 5 giorni lavorativi
dall‘acquisto dell‘articolo. Al riguardo fate attenzione alla Tabella Garanzia nelle informazioni sul
Servizio Assistenza alla fi ne delle istruzioni.
Aprite l’imballaggio e togliete con cautela
•
l’apparecchio dalla confezione.
Togliete il materiale d’imballaggio e anche i
•
fermi di trasporto / imballo (se presenti).
Controllate che siano presenti tutti gli elemen-
•
ti forniti.
- 35 -

Verificate che l’apparecchio e gli accessori
•
non presentino danni dovuti al trasporto.
Se possibile, conservate l’imballaggio fino
•
alla scadenza della garanzia.
Pericolo!
L’apparecchio e il materiale d’imballaggio
non sono giocattoli! I bambini non devono
giocare con sacchetti di plastica, fi lm e pic-
coli pezzi! Sussiste pericolo di ingerimento e
soff ocamento!
Avviatore di emergenza Power Bank
•
Cavi per avviamento di soccorso
•
Cavo di collegamento USB 2 in 1 (Micro/Mini)
•
Caricabatterie
•
Cavo di collegamento 19V
•
Set di spine 19V
•
Custodia
•
Istruzioni per l’uso originali
•
Avvertenze di sicurezza
•
3. Utilizzo proprio
L‘avviatore di emergenza Power Bank serve a ricaricare smartphone, macchine fotografi che, tab-
let, ecc. Può anche essere utilizzato come torcia.
È inoltre possibile alimentare di tensione continua
notebook e utenze a 12V. L‘apparecchio è inoltre
adatto a fornire energia a batterie di avviamento
da 12 V deboli (accumulatori piombo-acido) di
veicoli con motori a benzina di cilindrata fi no a
4000 cm³ e motori diesel fi no a 2000 cm³, utiliz-
zando il cavo per l‘avviamento di soccorso fornito.
L’apparecchio deve venire usato solamente per lo
scopo a cui è destinato. Ogni altro tipo di uso che
esuli da quello previsto non è un uso conforme.
L’utilizzatore/l’operatore, e non il costruttore, è
responsabile dei danni e delle lesioni di ogni tipo
che ne risultino.
Tenete presente che i nostri apparecchi non sono
stati costruiti per l’impiego professionale, artigianale o industriale. Non ci assumiamo alcuna
garanzia quando l’apparecchio viene usato in
imprese commerciali, artigianali o industriali, o in
attività equivalenti.
I
4. Caratteristiche tecniche
Avviatore di emergenza Power Bank
Accumulatore
litio-polimero: ........11,1 V – 3700 mAh – 41,1 Wh
Ingresso: .........................................15 V DC /1 A
Tempo di ricarica ca.: ..................................... 5 h
Uscita USB „OUT: „5V / 2A“: .5 V DC / 2 A (max.)
Uscita USB „OUT: „5V/9V“: .... 5 V d.c./3 A (max.)
............................................... 9 V d.c./2 A (max.)
Uscita tensione continua: ............19 V max. 3,5 A
Uscita tensione continua: .............12 V max. 10 A
Corrente di avviamento
di soccorso: ............ 200 A (5 sec.) / 400 A (max.)
Temperatura ambiente con
avviamento di soccorso: ............ - 15 °C - + 40 °C
Temperatura per
la conservazione: ....................... + 5 °C - + 40 °C
Grado di protezione: ..........................................III
Caricabatterie
Tensione nominale
in ingresso: ........................100-240 V ~ 50/60 Hz
Tensione nominale in uscita: .................. 15 V DC
Corrente nominale in uscita: ........................... 1 A
5. Prima della messa in esercizio
5.1 Ricarica dell‘avviatore di emergenza Power Bank con il caricabatterie accluso
Per il caricabatterie vale quanto segue
Bambini a partire dagli 8 anni e persone con
capacità fi siche, sensoriali o mentali ridotte
o prive di esperienza e conoscenze possono
usare questo apparecchio solo se vengono sorvegliati o sono stati istruiti riguardo l‘uso sicuro
dell‘apparecchio e conoscono i rischi a esso
connessi. I bambini non devono giocare con
l‘apparecchio. Le operazioni di pulizia e di manutenzione a carico dell‘utilizzatore non devono venire eseguite dai bambini se non sono sorvegliati.
Prima di inserire la spina nella presa di corrente,
assicuratevi che i dati sulla targhetta di identifi ca-
zione corrispondano a quelli di rete.
Attenzione! Staccate la spina di alimentazione
prima di eff ettuare regolazioni all‘apparecchio.
Ricaricate l‘apparecchio esclusivamente con il
caricabatterie accluso.
- 36 -

I
Osservate le avvertenze di sicurezza allegate con
informazioni dettagliate sul processo di ricarica.
Le uscite non devono essere utilizzate durante la
ricarica.
Collegate il caricabatterie accluso (Fig. 2a)
•
con la presa di ricarica „Input 15 V 1A“ (Fig. 1
/ Pos. 4) dell‘apparecchio.
Inserite il caricabatterie nella presa di cor-
•
rente, la batteria viene ricaricata. Durante la
ricarica i LED (Fig. 1/ Pos. 9) sono illuminati
(lampeggiano) indicando lo stato della ricarica. Al termine della ricarica tutti i LED sono
illuminati.
Con la batteria scarica il tempo di ricarica è
•
di ca. 5 ore. Durante il processo di ricarica la
batteria nell‘apparecchio si può riscaldare un
po‘, ma ciò è del tutto normale.
5.2 Indicazione di carica della batteria
Premete brevemente il tasto ON/OFF (Fig. 1/
Pos. 5). I LED dell‘indicazione di carica della
batteria (Fig. 1 / Pos. 9) si illuminano. Il numero
di LED illuminati indica lo stato di carica attuale
dell‘accumulatore litio-polimero integrato.
Carica al 100 % = 4 LED illuminati fi ssi
Carica >25 % = 1 LED illuminato fi sso
Carica <25 % = nessun LED illuminato fi sso
6. Luce LED
Attenzione! Non rivolgete lo sguardo verso il
fascio di luce.
Premendo il tasto ON/OFF per 3 secondi, la
•
luce LED (Fig. 1 / Pos. 1) rimane illuminata.
Premendo un‘altra volta il tasto ON/OFF, la
•
luce LED si illumina come „faro stroboscopico“.
Premendo un‘altra volta il tasto ON/OFF, la
•
luce LED si illumina come „lampeggio codice
morse SOS“.
Premendo ancora una volta, la luce LED si
•
spegne.
7. Uscite
Attenzione! Fate attenzione ai valori di tensione
e corrente dell‘apparecchio da alimentare (per es.
cellulare, notebook). Osservate anche le relative
istruzioni per l‘uso.
La durata dell‘alimentazione varia in base al
livello di carica dell‘avviatore di emergenza Power Bank, alla potenza assorbita e all‘intensità di
utilizzo dell‘apparecchio collegato. Quando viene
raggiunta una carica residua del 25% (1 LED è illuminato) si deve ricaricare la batteria (vedi punto
5.). Le porte USB possono essere utilizzate paral-
lelamente. Fate attenzione che la corrente totale
in uscita non superi 5 A.
7.1 Ricarica/uso di apparecchi con porta USB
a) Uscita USB 5V/2A
1. Collegate un cavo di collegamento USB esistente (o il cavo fornito 2 in 1) con la porta USB
(Fig. 1 / Pos. 2) dell‘avviatore di emergenza
Power Bank e quindi con l‘apparecchio da
alimentare (max. 2A).
2. Premete il tasto ON/OFF (Fig. 1/Pos. 5).
b) Uscita USB „OUT 5V/9V“ (Fig. 3)
Avvertenza: Se la ricarica tramite questa uscita
non dovesse funzionare, l‘apparecchio o il cavo
non vengono supportati. In questo caso utilizzate
per la ricarica l‘uscita USB 5V DC / 2A come descritto in precedenza.
1. Collegate il cavo USB 2 in 1 fornito (Fig. 2b)
con la porta USB „OUT 5V/9V“ (Fig. 1 / Pos.3)
dell‘avviatore di emergenza Power Bank e
quindi con l‘apparecchio da alimentare.
2. Premete il tasto ON/OFF (Fig. 1/Pos. 5).
3. All‘uscita USB vengono accertati i parametri
necessari per la ricarica e l‘apparecchio collegato viene ricaricato. A seconda del cavo
di ricarica e dell‘apparecchio da ricaricare il
tempo di ricarica all‘uscita USB „OUT 5V/9V“
può ridursi rispetto a quello all‘uscita USB
„OUT 5V/2A“
7.2 Alimentazione di apparecchi a tensione
continua da 19 V (Fig. 4)
1. Collegate il cavo di collegamento fornito (Fig.
2d/ Pos. 13) con l‘uscita a tensione continua da 19V (Fig. 1 / Pos. 7) dell‘avviatore di
emergenza Power Bank e poi, eventualmente
impiegando uno dei connettori forniti (Fig. 2d
/ Pos. 14), con l‘apparecchio a tensione continua da 19V. La corrente assorbita massima
non deve superare 3,5A.
2. Premete il tasto ON/OFF (Fig. 1/Pos. 5).
7.3 Alimentazione di apparecchi a tensione
continua da 12 V
1. Collegate un cavo di collegamento adatto
con l‘uscita a tensione continua da 12V (Fig.
- 37 -

I
1 / Pos. 6) dell‘avviatore di emergenza Power
Bank e quindi con l‘apparecchio a tensione
continua da 12V. La corrente assorbita massima non deve superare 10A.
2. Premete il tasto ON/OFF (Fig. 1/Pos. 5).
8. Avviamento di soccorso per
autovettura
Il dispositivo per l‘avviamento di soccorso da 12V
rappresenta un ottimo aiuto in caso di diffi coltà di
avviamento per una capacità insuffi ciente della
batteria.
Avvertimento! Durante l‘avviamento di soccorso
deve essere collegato solo l‘apposito cavo. Si
deve quindi prima interrompere l‘alimentazione di
apparecchi collegati, per es. tramite la porta USB.
Ricordiamo che i veicoli sono dotati di numerosi
componenti elettronici. Tenete quindi presenti le
indicazioni nelle istruzioni per l‘uso dell‘auto, della
radio, ecc.
Avvertimento! Non eff ettuate mai un collega-
mento alla carrozzeria del veicolo!
Accertatevi che il connettore del cavo di
•
avviamento di soccorso sia saldamente collegato alla presa dell‘apparecchio. Se il collegamento è allentato durante l‘avviamento di
soccorso, il connettore può fondere a causa
della forte corrente.
I poli della batteria dell‘autovettura devo-
•
no essere puliti e i morsetti del cavo per
l‘avviamento di soccorso devono essere ben
fissati ai poli.
Durante l‘avviamento di soccorso non
•
collegate tra loro i morsetti del cavo per
l‘avviamento di soccorso – cortocircuito.
Accertatevi che almeno 3 LED di indicazione di
carica della batteria siano illuminati. La temperatura dell‘apparecchio deve rientrare nel range
+ 5 °C - + 40 °C e la temperatura ambiente
durante l‘avviamento di soccorso nel range – 15
°C - + 40 °C. Utilizzate esclusivamente il cavo per
l‘avviamento di soccorso fornito (Fig. 2c).
1. Fig. 5: aprite la copertura del collegamento
del cavo per l‘avviamento di soccorso (Fig. 1
/ Pos. 8), spostate di lato la copertura sottostante e inserite tale cavo nell‘apparecchio.
2. Fig. 5a: collegate il cavo rosso al polo positivo
e il cavo nero al polo negativo della batteria
dell‘autovettura. Controllate che i morsetti
siano ben fi ssati. Si deve inoltre fare atten-
zione che l‘avviatore di emergenza Power
Bank venga appoggiato in modo sicuro nel
vano motore e che non possa cadere durante
la procedura di avvio a causa delle vibrazioni. L‘avviatore di emergenza Power Bank
deve essere conservato fuori dalla portata
di parti in movimento. I seguenti punti 3. – 6.
descrivono le indicazioni di stato del cavo per
l‘avviamento di soccorso. Seguite le istruzioni.
3. Fig. 5a: il LED verde del cavo per
l‘avviamento di soccorso è illuminato.
Tutti i collegamenti presenti sono in ordine e il
veicolo può essere avviato entro 30 secondi.
4. Fig. 5b: il LED verde del cavo per
l‘avviamento di soccorso lampeggia. Tutti
i collegamenti presenti sono in ordine, tuttavia
lo stato di carica della batteria dell‘autovettura
è molto basso. Premete il tasto „Boost“ del
cavo per l‘avviamento di soccorso e aspettate
fi no a quando il LED verde si illumina in modo
fi sso. Avviate il veicolo entro 30 secondi. Sia-
te particolarmente attenti perché premendo il
tasto „Boost“ i dispositivi di sicurezza integrati
nell‘avviatore di emergenza Power Bank vengono disattivati.
5. Fig. 5c: il LED rosso del cavo per
l‘avviamento di soccorso è illuminato
e viene emesso un segnale acustico. I
morsetti del cavo per l‘avviamento di soccorso sono collegati con polarità errata alla
batteria dell‘autovettura. Togliete i morsetti e
collegate nuovamente i morsetti alla batteria
dell‘autovettura rispettando la polarità e le
istruzioni precedenti.
6. Fig. 5d: non si accende nessun LED del
cavo per l‘avviamento di soccorso e non
viene emesso nessun segnale acustico.
Controllate tutti i collegamenti, in particolare
che i morsetti siano stati collegati con la
giusta polarità alla batteria dell‘autovettura.
Se tutti i collegamenti presenti sono in ordine,
la causa è probabilmente una batteria difettosa. Premete il tasto „Boost“ del cavo per
l‘avviamento di soccorso e aspettate fi no a
quando il LED verde si illumina in modo fi sso.
Avviate il veicolo entro 30 secondi.
Siate particolarmente attenti perché premendo il tasto „Boost“ i dispositivi di sicurezza
integrati nell‘avviatore di emergenza Power
Bank vengono disattivati. Sostituite la batteria
difettosa dell‘autovettura al più presto.
7. Non appena il motore funziona, togliete il cavo per l‘avviamento di soccorso
- 38 -

I
dall‘apparecchio e poi prima il morsetto
rosso e poi il morsetto nero dalla batteria
dell‘autovettura.
8. Lasciate acceso il motore. La dinamo carica
la batteria dell‘autovettura.
In caso di temperature molto basse è possibile
che siano necessari diversi tentativi di avvio
per avviare l‘autovettura. Il tempo di attesa tra
due tentativi di avvio è di un minuto. Dopo che
l‘avviamento di soccorso è riuscito staccate
l‘apparecchio possibilmente entro 30 secondi .
Il numero dei tentativi di avviamento di soccorso
possibili (max. 10) dipende dalla temperatura ambiente, dalle condizioni della batteria da avviare e
dal livello di carica della batteria dell‘avviatore di
emergenza Power Bank.
9. Pulizia, manutenzione e
ordinazione dei pezzi di ricambio
Pericolo!
Prima di qualsiasi lavoro di pulizia staccate la spina dalla presa di corrente.
Togliete tutti i cavi collegati dall‘avviatore di emergenza Power Bank.
9.1 Pulizia
Tenete il più possibile i dispositivi di protezio-
•
ne, le fessure di aerazione e la carcassa del
motore liberi da polvere e sporco. Strofinate
l’apparecchio con un panno pulito o soffiatelo
con l’aria compressa a pressione bassa.
Consigliamo di pulire l’apparecchio subito
•
dopo averlo usato.
Pulite l‘apparecchio regolarmente con un
•
panno umido. Non usate detergenti o solventi
perché questi ultimi potrebbero danneggiare
le parti in plastica dell’apparecchio. Fate attenzione che non possa penetrare dell’acqua
nell’interno dell’apparecchio. La penetrazione
di acqua in un elettroutensile aumenta il rischio di una scossa elettrica.
9.2 Manutenzione
All’interno dell’apparecchio non si trovano altre
parti sottoposte ad una manutenzione qualsiasi.
9.3 Ordinazione di pezzi di ricambio:
Volendo commissionare dei pezzi di ricambio, si
dovrebbe dichiarare quanto segue:
modello dell’apparecchio
•
numero dell’articolo dell’apparecchio
•
numero d’ident. dell’apparecchio
•
numero del pezzo di ricambio del ricambio
•
necessitato.
Per i prezzi e le informazioni attuali si veda
www.isc-gmbh.info
10. Riparazione
In caso di anomalie fate controllare l‘apparecchio
soltanto da uno specialista autorizzato oppure da
un‘offi cina assistenza clienti.
11. Smaltimento e riciclaggio
L‘apparecchio si trova in un imballaggio per evitare i danni dovuti al trasporto. Questo imballaggio
rappresenta una materia prima e può perciò essere utilizzato di nuovo o riciclato. L‘apparecchio
e i suoi accessori sono fatti di materiali diversi,
per es. metallo e plastica. Gli apparecchi difettosi
non devono essere gettati nei rifi uti domestici. Per
uno smaltimento corretto l‘apparecchio va consegnato ad un apposito centro di raccolta. Se non
vi è noto nessun centro di raccolta, rivolgetevi per
informazioni all‘amministrazione comunale.
12. Conservazione
Conservate l‘apparecchio e i suoi accessori in un
luogo buio, asciutto e al riparo dal gelo. La temperatura ottimale per la conservazione è compresa
tra i +5 e i 40 °C.
Osservate le avvertenze di sicurezza allegate con
informazioni dettagliate sulla conservazione. Dato
che la batteria reagisce a temperature troppo alte
(superiori a +40 °C) ovvero troppo basse (inferiori a 0°C), non tenete l‘apparecchio in auto per
periodi prolungati. Per il trasporto in un veicolo,
posizionatelo in un luogo adatto in modo che non
si muova in caso di improvvisi cambiamenti di
direzione e/o variazioni della velocità. Conservate
l‘apparecchio nella confezione originale.
- 39 -

I
13. Tabella per l‘eliminazione delle anomalie
Anomalia Possibile causa Soluzione
Non è più possibile accendere
l'apparecchio
L'avviamento di
soccorso non funziona
Tutti i LED lampeggiano
- Tensione della batteria insuffi ciente - Ricaricate la batteria
- Tensione della batteria insuffi ciente
- Scambiati i collegamenti alla batteria del veicolo
- Temperatura fuori range
- È intervenuta la protezione da sovraccarico
- Apparecchio troppo freddo / caldo
- Temperatura ambiente troppo alta/
bassa
- Ricaricate la batteria
- Controllate la polarità e collegate
correttamente
- Tentate l‘avviamento di emergenza
entro il range di temperatura indicato
- Disinserite l‘apparecchio e controllate che non sia sottoposto a
sovraccarico
- Rispettate una temperatura
dell‘apparecchio di + 5 °C - + 40 °C.
- Rispettate una temperatura ambiente di – 15 °C - + 40 °C.
- 40 -

I
Solo per paesi membri dell’UE
Non smaltite gli elettroutensili nei rifi uti domestici!
Secondo la direttiva europea 2012/19/CE sui rifi uti di apparecchiature elettriche ed elettroniche e il suo
recepimento nelle normative nazionali, gli elettroutensili usati devono venire raccolti separatamente e
venire smaltiti in modo ecocompatibile.
Alternativa di riciclaggio alla richiesta di restituzione:
il proprietario dell’apparecchio elettrico è tenuto in alternativa, invece della restituzione, a collaborare in
modo che lo smaltimento venga eseguito correttamente in caso ceda l’apparecchio. L’apparecchio vecchio può anche venire consegnato ad un centro di raccolta che provvede poi allo smaltimento secondo
le norme nazionali sul riciclaggio e sui rifi uti. Non ne sono interessati gli accessori e i mezzi ausiliari sen-
za elementi elettrici forniti insieme ai vecchi apparecchi.
La ristampa o l’ulteriore riproduzione, anche parziale, della documentazione o dei documenti
d’accompagnamento dei prodotti è consentita solo con l’esplicita autorizzazione da parte della
iSC GmbH.
Con riserva di apportare modifi che tecniche
- 41 -

I
Informazioni sul Servizio Assistenza
In tutti i Paesi indicati nel certifi cato di garanzia disponiamo di competenti partner per il Servizio Assis-
tenza (per i relativi dati di contatto si veda il certifi cato di garanzia), che sono a vostra disposizione per
tutte le richieste di assistenza come riparazione, fornitura di pezzi di ricambio e parti di usura o vendita
di materiali di consumo.
Si deve tenere presente che le seguenti parti di questo prodotto sono soggette a un‘usura naturale o
dovuta all‘uso ovvero che le seguenti parti sono necessarie come materiali di consumo.
Categoria Esempio
Parti soggette ad usura * Batteria
Materiale di consumo/parti di consumo *
Parti mancanti
* non necessariamente compreso tra gli elementi forniti!
In presenza di difetti o errori vi preghiamo di denunciare il caso sul sito internet www.isc-gmbh.info. Vi
preghiamo di descrivere con precisione l‘anomalia e a tal riguardo di rispondere in ogni caso alle seguenti domande:
L‘apparecchio ha già funzionato una volta o era difettoso fin dall‘inizio?
•
Avete notato qualcosa prima che si manifestasse il difetto (sintomo prima del difetto)?
•
A vostro parere che cosa non funziona nell‘apparecchio (sintomo principale)?
•
Descrivete che cosa non funziona.
- 42 -

I
Certifi cato di garanzia
Gentili clienti,
i nostri prodotti sono soggetti ad un rigido controllo di qualità. Se l‘apparecchio non dovesse tuttavia
funzionare correttamente, ci scusiamo e vi preghiamo di rivolgervi al nostro servizio di assistenza clienti
all‘indirizzo indicato in questa scheda di garanzia. Siamo a vostra disposizione anche telefonicamente al
numero del Servizio Assistenza indicato. Per la rivendicazione dei diritti di garanzia vale quanto segue:
1. Le presenti condizioni di garanzia si rivolgono esclusivamente a consumatori, vale a dire a persone
fi siche che non intendono utilizzare questo prodotto né in ambito professionale né per altre attività
di lavoro autonomo. Le presenti condizioni di garanzia regolano prestazioni di garanzia supplementari che il produttore su indicato concede in aggiunta alla garanzia legale agli acquirenti di nuovi
apparecchi. La presente garanzia non tocca i vostri diritti al ricorso in garanzia previsti dalla legge.
Le nostre prestazioni di garanzia sono per voi gratuite.
2. La prestazione di garanzia riguarda esclusivamente i difetti di un nuovo apparecchio da voi
acquistato del produttore di cui sopra, riconducibili a errori di materiale o di produzione, ed è limitata, a nostra discrezione, all‘eliminazione di questi difetti dell‘apparecchio o alla sostituzione
dell‘apparecchio stesso.
Tenete presente che i nostri apparecchi non sono stati costruiti per l‘impiego artigianale, professionale o imprenditoriale. Pertanto un contratto di garanzia non viene concluso se l‘apparecchio è stato
usato entro il periodo di garanzia in attività artigianali, imprenditoriali o industriali o se è stato sottoposto a sollecitazioni equivalenti.
3. Sono esclusi dalla nostra garanzia:
- Danni all‘apparecchio causati dalla mancata osservanza delle istruzioni di montaggio o per
un‘installazione non corretta, dalla mancata osservanza delle istruzioni per l‘uso (come ad es. collegamento a una tensione di rete o a un tipo di corrente non corretti), dalla mancata osservanza delle
norme relative alla manutenzione e alla sicurezza, dall‘esposizione dell‘apparecchio a condizioni
ambientali anomale o per la mancata esecuzione di pulizia e manutenzione.
- Danni all‘apparecchio dovuti a usi impropri o illeciti (come per es. sovraccarico dell‘apparecchio
o utilizzo di utensili di ricambio o accessori non consentiti), alla penetrazione di corpi estranei
nell‘apparecchio (come per es. sabbia, pietre o polvere, danni dovuti al trasporto), all‘impiego della
forza o a infl ussi esterni (come per es. danni causati da caduta).
- Danni all‘apparecchio o a parti di esso da ricondurre a un‘usura comune, dovuta all‘uso o di altro
tipo naturale.
4. Il periodo di garanzia è 24 mesi e inizia a partire dalla data di acquisto dell‘apparecchio. I diritti di
garanzia devono essere fatti valere prima della scadenza del periodo di garanzia, entro due settimane dopo avere accertato il difetto. È esclusa la rivendicazione di diritti di garanzia dopo la scadenza
del relativo periodo. La riparazione o la sostituzione dell‘apparecchio non comporta una proroga del
periodo di garanzia e con questa prestazione per l‘apparecchio o per pezzi di ricambio eventualmente installati non inizia un nuovo periodo di garanzia. Ciò vale anche nel caso in cui si ricorra a un
servizio sul posto.
5. Per rivendicare il diritto di garanzia vi preghiamo di comunicare che l‘apparecchio è difettoso tramite
sito internet: www.isc-gmbh.info. Tenete a portata di mano il documento di acquisto o altri documenti
come prova dell‘acquisto del vostro apparecchio nuovo. Apparecchi inviati senza i relativi documenti
o senza targhetta d‘identifi cazione sono esclusi dalla prestazione di garanzia perché non possono
essere classifi cati in modo corrispondente. Se il difetto dell‘apparecchio rientra nella nostra presta-
zione di garanzia, ricevete prontamente l‘apparecchio riparato o un apparecchio nuovo.
Naturalmente eff ettuiamo a pagamento anche riparazioni sull‘apparecchio che non rientrano o non rien-
trano più nella garanzia. A tale scopo inviate l‘apparecchio all‘indirizzo del nostro Centro Assistenza.
Per parti mancanti, di consumo e soggette a usura rimandiamo alle limitazioni di questa garanzia secondo le informazioni sul Servizio Assistenza di queste istruzioni per l‘uso.
- 43 -

DK/N
Fare!
Ved brug af el-værktøj er der visse sikkerhedsforanstaltninger, der skal respekteres for at undgå
skader på personer og materiel. Læs derfor betjeningsvejledningen / sikkerhedsanvisningerne
grundigt igennem. Opbevar betjeningsvejledningen et praktisk sted, så du altid kan tage den frem
efter behov. Husk at lade betjeningsvejledningen
/ sikkerhedsanvisningerne følge med værktøjet,
hvis du overdrager det til andre. Vi fraskriver
os ethvert ansvar for skader på personer eller
materiel, som måtte opstå som følge af, at anvisningerne i denne betjeningsvejledning, navnlig
vedrørende sikkerhed, tilsidesættes.
1. Sikkerhedsanvisninger
Relevante sikkerhedsanvisninger fi nder du i det
medfølgende hæfte.
Fare!
Læs alle sikkerhedsanvisninger og øvrige anvisninger. Følges anvisningerne, navnlig sikker-
hedsanvisningerne, ikke nøje som beskrevet, kan
elektrisk stød, brand og/eller svære kvæstelser
være følgen. Alle sikkerhedsanvisninger og
øvrige anvisninger skal gemmes.
Denne maskine må ikke anvendes af børn. Pas
på, at børn ikke bruger maskinen som legetøj.
Rengøring og vedligeholdelse må ikke gennemføres af børn. Maskinen må ikke anvendes af
personer med begrænsede fysiske, sensoriske
eller psykiske evner eller af personer med utilstrækkelig viden eller erfaring, medmindre de er
under opsyn eller instrueres af en person, der er
ansvarlig for dem.
Signaturforklaring (fi g. 6)
D = Beskyttelsesklasse II maskine
E = Må kun bruges i tørre rum indendørs
F = Vigtigt! Læs vejledningen før brug!
Tekst på maskine og starthjælpekabel
Pas på! Læs vejledningen før brug!
1. Tryk aldrig på Boost-tasten, før bil-batteriet er
tilsluttet.
2. Forbind aldrig klemmer med hinanden –
kortslutning og fare for tilskadekomst.
3. Starthjælp kun for 12 V bil, rød klemme til „+“,
sort klemme til „-“ batteripol.
4. Grøn LED-lampe = start motor i løbet af 30 s.
5. Rød LED-lampe + advarselstone = batteri
tilsluttet forkert (se 3.)
6. Grøn LED-lampe blinker + advarselstone =
tryk på „Boost“ taste og start motor i løbet af
30 s.
7. Ingen LED-lampe, ingen advarselstone =
kontroller stikforbindelse til produkt, tryk på
„Boost“ taste og start motor i løbet af 30 s.
Advarsel!
1. Hold produktet uden for børns rækkevidde!
2. Åbn ikke produktet - fare for tilskadekomst!
3. Lyser mindre end 3 LED-lamper, står der ingen starthjælp til rådighed.
4. Starter motoren ikke i løbet af 5 sekunder,
afsluttes startprocessent. Vent i 1 minut, før
processen gentages.
2. Produktbeskrivelse og
leveringsomfang
2.1 Produktbeskrivelse (fi g. 1)
1. LED-lampe lys
2. USB udgang 5V maks. 2A
3. USB udgang 5V/9V
4. Ladebøsning 15V d.c. / 1A
5. On-off -knap
6. Jævnspændingsudgang 12V maks. 10 A
7. Jævnspændingsudgang 19V maks. 3,5 A
8. Tilslutning starthjælpkabel
9. LED-lampe akkukapacitetsindikator
2.2 Leveringsomfang
Kontroller på grundlag af det beskrevne leveringsomfang, at varen er komplet. Hvis nogle dele
mangler, bedes du senest inden 5 hverdage efter
købet af varen henvende dig til vores servicecenter eller det sted, hvor du har købt varen, med
forevisning af gyldig købskvittering. Vær her opmærksom på garantioversigten, der er indeholdt i
serviceinformationerne bagest i vejledningen.
Åbn pakken, og tag forsigtigt maskinen ud af
•
emballagen.
Fjern emballagematerialet samt emballage-/
•
og transportsikringer (hvis sådanne forefindes).
Kontroller, at der ikke mangler noget.
•
Kontroller maskine og tilbehør for transports-
•
kader.
Opbevar så vidt muligt emballagen indtil ga-
•
rantiperiodens udløb.
- 44 -

DK/N
Fare!
Maskinen og emballagematerialet er ikke
legetøj! Børn må ikke lege med plastikposer,
folier og smådele! Fare for indtagelse og
kvælning!
Jump-Start Power Bank
•
Startkabel
•
2in 1 USB tilslutningskabel (Micro/Mini)
•
Ladeaggregat
•
Forbindelseskabel 19V
•
Stik sæt 19V
•
Opbevaringsmappe
•
Original betjeningsvejledning
•
Sikkerhedsanvisninger
•
3. Formålsbestemt anvendelse
Jump-Start Power Bank bruges til at lade smartphones, kameraer, tablets osv. Den kan også
bruges som lommelygte. Desuden kan notebooks
og 12V forbrugere forsynes med jævnspænding.
Med det medleverede starthjælpekabel kan produktet også bruges til at understøtte svage 12 V
starterbatterier (blysyreakkumulatorer) i motorkøretøjer med benzinmotorer op til 4000 ccm og
dieselmotorer op til 2000 ccm kubikindhold.
Saven må kun anvendes i overensstemmelse
med dens tiltænkte formål. Enhver anden form
for anvendelse er ikke tilladt. Vi fraskriver os ethvert ansvar for skader, det være sig på personer
eller materiel, som måtte opstå som følge af, at
maskinen ikke er blevet anvendt korrekt. Ansvaret
bæres alene af brugeren/ejeren.
Bemærk, at vore produkter ikke er konstrueret til
erhvervsmæssig, håndværksmæssig eller industriel brug. Vi fraskriver os ethvert ansvar, såfremt
produktet anvendes i erhvervsmæssigt, håndværksmæssigt, industrielt eller lignende øjemed.
4. Tekniske data
Jump-Start Power Bank
Li-Po-akku: ............11,1 V – 3700 mAh – 41,1 Wh
Indgang: .......................................... 15 V d.c./1 A
Ladetid ca.: .................................................... 5 h
Udgang USB „OUT: „5V/2A“: 5 V d.c. / 2 A (maks.)
Udgang USB „OUT: „5V/9V „: 5 V d.c./3 A (maks.)
.............................................. 9 V d.c./2 A (maks.)
Jævnspændingsudgang: ......... .. 19 V maks. 3,5 A
Jævnspændingsudgang: .......... .. 12 V maks. 10 A
Starthjælpestrøm: ..200 A (5 sek.) / 400 A (maks.)
Omgivelsestemperatur ifm.
starthjælp: ................................. - 15 °C - + 40 °C
Opbevaringstemperatur: ............ + 5 °C - + 40 °C
Beskyttelsesklasse: ..........................................III
Ladeaggregat
Indgangsspænding: ..........100-240 V ~ 50/60 Hz
Udgangsspænding: ............................... 15 V d. c.
Udgangsstrøm: ..............................................1 A
5. Inden ibrugtagning
5.1 Opladning af Jump-Start Power Bank med
det medleverede ladeaggregat
For ladeaggregatet gælder:
Dette produkt må betjenes af børn, der er fyldt 8
år eller ældre, og af personer med begrænsede
fysiske eller sensoriske færdigheder eller af personer, der er psykisk ustabile eller ikke har nogen
erfaring og kendskab til produktet, hvis de er under opsyn eller er blevet instrueret i en sikker brug
af produktet og forstår de farer, der er forbundet
med at arbejde med det. Børn må ikke bruge
produktet som legetøj. Rengøring og brugervedligeholdelse må kun gennemføres af børn, hvis de
er under opsyn.
Inden produktet sluttes til strømforsyningsnettet,
skal det kontrolleres, at angivelserne på mærkepladen svarer til strømforsyningsnettets data.
Pas på! Træk stikket ud af stikkontakten, inden
du foretager indstillinger på maskinen. Oplad
udelukkende maskinen med det medleverede
ladeaggregat.
Læs og overhold de vedlagte sikkerhedsanvisninger med detaljerede henvisninger til opladningen.
- 45 -

DK/N
Udgangene må ikke bruges under opladningen.
Forbind det medleverede ladeaggregat (fig.
•
2a) med „Input 15 V 1A“ ladebøsningen (fig.
1/pos. 4) til med maskinen.
Sættes ladeaggregatet ind i stikkontakten,
•
lades akkuen. Under opladningen lyser (blinker) LED-lamperne (fig. 1/pos. 9) og viser ladestatussen. Når opladningen er færdig, lyser
alle LED-lamper.
Opladning af et tomt batteri varer ca. 5 timer.
•
Under opladningen kan akkumulatorbatteriet i
apparatet blive varmt, hvilket er helt normalt.
5.2 Akku- kapacitetsindikator
Tryk kort på on-off -knappen (fi g. 1/pos. 5). LED-
lampen til akkukapacitetsindikatoren (fi g. 1/pos.
9) lyser. Antallet af lysende LED-lamper oplyser
om den aktuelle ladetilstand for det indbyggede
Li-Po-akkumulatorbatteri.
100% ladet = 4 LED-lampe konstant lys
>25% ladet = 1 LED-lampe konstant lys
<25% ladet = intet konstant lys
6. LED-lys
Forsigtig! Kig ikke ind i lysstrålen
Tryk på on-off-knappen i 3 sekunder – LED-
•
lampen (fig. 1/pos. 1) lyser konstant.
Tryk på on-off-knappen en gang til – LED-
•
lampen lyser som „stroboskoplyn“.
Tryk på on-off-knappen en gang til – LED-
•
lampen lyser som „SOS“-morselys.
Trykkes en gang til på knappen, slukkes LED-
•
lampen igen.
7.1 Opladning/brug af maskiner med USB
tilslutning
a) 5V/2A USB udgang
1. Forbind et eksisterende (eller det medleverede 2 in 1) USB tilslutningskabel med USB
tilslutningen (fi g. 1/pos. 2) til Jump-Start
Power Bank og så med maskinen, der skal
forsynes (maks. 2A).
2. Tryk på on-off -knappen (fi g. 1/pos. 5).
b) „OUT 5V/9V“ USB udgang (Fig. 3)
Bemærk: Skulle opladningen ikke fungere på
denne udgang, understøttes maskinen eller kablet ikke. Brug i dette tilfælde 5V d.c. / 2A USB udgangen til opladningen, som beskrevet ovenfor.
1. Forbind det medleverede 2in1 USB kabel (fi g.
2b) med „OUT 5V/9V“ USB tilslutningen (fi g.
1/pos. 3) til Jump-Start Power Bank og så
med maskinen, der skal forsynes.
2. Tryk på on-off -knappen (fi g. 1/pos. 5).
3. På USB udgangen beregnes parametrene,
der er brug for til opladningen, og den tilsluttede maskine lades. Ladetiden på „OUT
5V/9V“ USB udgangen kan afkortes i forhold
til „OUT 5V/2A“ USB udgangen afhængigt af
ladekablet og maskinen, der skal lades.
7.2 Brug af 19 V jævnspændingsenheder
(fi g. 4)
1. Forbind det medleverede forbindelseskabel
(fi g. 2d/pos. 13) med 19V jævnspændingsud-
gangen (fi g. 1/pos. 7) på Jump-Start Power
Bank og herefter i givet fald med 19V jævnspændingsenheden vha. et af de medleverede stik (fi g. 2d/pos. 14). Det maks. strømfor-
brug må ikke overskride 3,5A.
2. Tryk på on-off -knappen (fi g. 1/pos.5).
7. Udgange
Forsigtig! Kontrollér spændings- og strømvær-
dierne for maskinen, der skal forsynes (f.eks.
mobiltelefon, notebook). Læs og overhold den
medfølgende betjeningsvejledning.
Forsyningsvarigheden varierer afhængigt af
ladetilstanden for for Jump-Start Power Bank,
den optagede eff ekt og brugsintensiteten af tils-
lutningsenheden. Når der nås en restopladning
på 25% (1 LED-lampe lyser), skal akkumulatorbatteriet lades (se afsnit 5.). USB tilslutningerne
kan bruges parallelt. Sørg for, at den kumulerede
udgangsstrøm ikke overskrider 5 A.
7.3 Brug af 12 V jævnspændingsenheder
1. Forbind et passende forbindelseskabel med
12V jævnspændingsudgangen (fi g. 1/pos. 6)
på Jump-Start Power Bank og herefter med
12V jævnspændingsenheden. Det maks.
strømforbrug må ikke overskride 10A.
2. Tryk på on-off -knappen (fi g. 1/pos. 5).
- 46 -

DK/N
8. Starthjælp til motorkøretøjet
12 V starthjælpanordningen er en velkommen
hjælp ved startproblemer som følge af manglende
batterikapacitet.
Advarsel! Under en starthjælp må kun starthjælpkablet være tilsluttet. Forsyningen af en
tilslutningsenhed f.eks. via USB-tilslutningen skal
afbrydes forinden.
Vi gør opmærksom på, at køretøjerne er udstyret med talrige elektroniske komponenter. Følg
anvisningerne i betjeningsvejledningerne til bil,
radio osv.
Advarsel! Forbind aldrig med køretøjets karosseri!
Sikr, at stikket fra starthjælpkablet er forbun-
•
det fast med maskinens stikdåse. Er forbindelsen løs under starthjælpen, kan stikforbindelsen smelte på grund af den høje strøm.
Polerne på bil-batteriet skal være rene, og
•
starthjælpkablets klemmer sidde fast på batteriets poler.
Forbind ikke starthjælpkablets klemmer med
•
hinanden under starthjælpen – kortslutning.
Forvis dig om, at mindst 3 LED-lamper lyser på
akku-kapacitetsindikatoren. Produkttemperaturen
skal befi nde sig inden for området + 5 °C - + 40
°C, omgivelsestemperaturen inden for området
– 15 °C - + 40 °C. Brug udelukkende det medleverede starthjælpkabel (fi g. 2c).
1. Fig. 5: Klap afdækningen til starthjælpkabeltilslutningen (fi g. 1/pos. 8) op, skub den
underliggende afdækning ud til siden og sæt
starthjælpkablet i aggregatet.
2. Fig. 5a: Slut det røde kabel til pluspolen og
det sorte kabel til minuspolen på bil-batteriet
og kontrollér, at klemmerne sidder fast. Vær
desuden opmærksom på, at Jump-Start Power Bank opbevares sikkert i motorrummet,
og at den ikke kan falde ned under starten
som følge af vibrationer. Jump-Start Power
Bank må ikke komme i nærheden af dele, der
bevæger sig. Efterfølgende punkter 3. – 6.
Beskriver starthjælpkablets statusmeldinger.
Følg instruktionerne.
3. Fig. 5a: Den grønne LED-lampe lyser på
starthjælpkablet. Alle eksisterende forbindelser er i orden, og køretøjet kan startes i
løbet af 30 sekunder.
4. Fig. 5b: Den grønne LED-lampe blinker
på starthjælpkablet. Alle eksisterende
forbindelser er i orden, dog er bil-batteriets
ladetilstand meget lav. Tryk på tasten „Boost“
på starthjælpkablet og vent, til den grønne
LED-lampe lyser konstant. Start køretøjet i
løbet af 30 sekunder. Vær særlig forsigtig,
da sikkerhedsindretninger, der er integreret
i Jump-Start Power Bank, sættes ud af kraft,
når der trykkes på tasten „Boost“.
5. Fig. 5c: Den røde LED-lampe lyser på
starthjælpkablet, og en advarselstone
høres. Starthjælpkablets klemmer er tilsluttet
forkert på bil-batteriet. Fjern klemmerne og
tilslut klemmerne rigtigt til bil-batteriet iht. de
foregående instruktioner.
6. Fig. 5d: Der lyser ingen LED-lampe på
starthjælpkablet, og der høres ingen advarselstone. Kontrollér alle forbindelserne
og især at klemmerne er tilsluttet rigtigt til
bil-batteriet. Er alle eksisterende forbindelser i
orden, kan det være, at bil-batteriet er defekt.
Tryk på tasten „Boost“ på starthjælpkablet og
vent, til den grønne LED-lampe lyser konstant. Start køretøjet i løbet af 30 sekunder.
Vær særlig forsigtig, da sikkerhedsindretninger, der er integreret i Jump-Start Power
Bank, sættes ud af kraft, når der trykkes på
tasten „Boost“. Erstat det defekte bil-batteri så
hurtigt som muligt.
7. Så snart motoren går, fjernes starthjælpkablet
fra aggregatet, herefter fjernes først den røde
klemme og så den sorte klemme fra bil-batteriet.
8. Lad motoren køre. Generatoren lader bilbatteriet.
Ved meget lave temperaturer kan det være nødvendigt at gennemføre fl ere startforsøg, før bilen
startes. Ventetiden mellem to startforsøg er et minut. Fjern helst aggregatet i løbet af 30 sekunder
efter korrekt gennemført starthjælp.
Antallet af mulige startforsøg (maks. 10) afhænger af omgivelsestemperaturen, tilstanden af batteriet, der skal startes, og ladetilstanden af JumpStart Power Bank akkumulatorbatteriet.
- 47 -

DK/N
9. Rengøring, vedligeholdelse og
reservedelsbestilling
Fare!
Træk stikket ud af stikkontakten inden renholdelse.
Fjern alle tilsluttede kabler fra Jump-Start Power
Bank.
9.1 Rengøring
Hold så vidt muligt beskyttelsesanordninger,
•
luftsprækker og motorhuset fri for støv og
snavs. Gnid maskinen ren med en ren klud,
eller foretag trykluftudblæsning med lavt tryk.
Vi anbefaler, at maskinen rengøres hver gang
•
efter brug.
Rengør aggregatet regelmæssigt med en
•
fugtig klud.Undgå brug af rengørings- eller
opløsningsmiddel, da det vil kunne ødelægge
maskinens kunststofdele. Pas på, at der ikke
kan trænge vand ind i maskinens indvendige
dele. Trænger der vand ind i et el-værktøj,
øger det risikoen for elektrisk stød.
9.2 Vedligeholdelse
Der fi ndes ikke yderligere dele, som skal
vedligeholdes inde i maskinen.
9.3 Reservedelsbestilling:
Ved bestilling af reservedele skal følgende oplyses:
Savens type.
•
Savens artikelnummer.
•
Savens identifikationsnummer.
•
Nummeret på den nødvendige reservedel.
•
Aktuelle priser og øvrige oplysninger fi nder du på
internetadressen www.isc-gmbh.info
11. Bortskaff else og genanvendelse
Produktet leveres indpakket for at undgå transportskader. Emballagen består af råmaterialer
og kan genanvendes eller indleveres på genbrugsstation. Produktet og dets tilbehør består af
forskelligartede materialer, f.eks. metal og plast.
Defekte produkter må ikke smides ud som almindeligt husholdningsaff ald. For at sikre en fagmæs-
sig korrekt bortskaff else skal produktet indleveres
på et aff aldsdepot. Hvis du ikke har kendskab til
lokalt aff aldsdepot, så kontakt din kommune.
12. Opbevaring
Produktet og dets tilbehør skal opbevares et
mørkt, tørt og frostfrit sted. Den optimale lagertemperatur er mellem +5 og 40 °C.
Læs og overhold de vedlagte sikkerhedsanvisninger med detaljerede henvisninger til opbevaringen. Da akkumulatorbatteriet reagerer på for høje
(over +40 °C) og for lave temperaturer (under 0
°C), må det ikke opbevares konstant i en bil. Til
transport i et køretøj placeres det et egnet sted,
så det ikke kan bevæge sig, hastigheden og/eller
retningen pludselig ændres. Opbevar aggregatet i
den originale emballage.
10.Reparation
I tilfælde af driftsforstyrrelse skal produktet undersøges af en autoriseret fagmand eller på et
kundeserviceværksted.
- 48 -

13. Fejlsøgningsskema
Fejl Mulig årsag Afhjælpning
Aggregat kan ikke
tændes
Starthjælp fungerer
ikke
Alle LED-lamper
blinker
- Akkubatteriets spænding er for lille - Lad akkubatteri op
- Akkubatteriets spænding er for lille
- Tilslutninger på køretøj er ombyttet
- Temperatur uden for temperaturområde
- Overbelastningsbeskyttelse har
reageret
- Aggregat for koldt/varmt
- Omgivelsestemperatur er for lille/
høj
DK/N
- Lad akkubatteri op
- Kontroller for korrekt polforbindelse
og tilslut rigtigt
- Forsøg starhjælp inden for temperaturområde
- Sluk for aggregat, kontroller for mulig overbelastning
- Overhold aggregattemperatur
+5 °C - +40 °C
- Overhold omgivelsestemperaturområde -15 °C - +40 °C
- 49 -

DK/N
Kun for EU-lande
Smid ikke el-værktøj ud som almindeligt husholdningsaff ald!
I medfør af Rådets direktiv 2012/19/EF om aff ald af elektrisk og elektronisk udstyr og dettes omsættelse
i den nationale lovgivning skal brugt el-værktøj indsamles separat og indleveres til videreanvendende
formål på miljømæssig forsvarlig vis.
Recycling-alternativ til tilbagesendelse:
Ejeren af el-værktøjet er – med mindre denne tilbagesender maskinen – forpligtet til at bortskaff e mas-
kinen og dens dele ifølge miljøforskrifterne. Den brugte maskine kan indleveres hos en genbrugsstation
– spørg evt. personalet her, eller forhør dig hos din kommune. Tilbehør og hjælpemidler, som følger med
maskinen, og som ikke indeholder elektriske dele, er ikke omfattet af ovenstående.
Genoptryk eller anden kopiering af dokumentation og følgedokumenter til produkter, også i uddrag, er
kun tilladt med udtrykkelig tilladelse fra iSC GmbH.
Ret til tekniske ændringer forbeholdes
- 50 -

DK/N
Serviceinformationer
I alle lande, der er nævnt i garantibeviset, råder vi over kompetente servicepartnere, hvis kontaktdata
fremgår af garantibeviset. De står til din rådighed i forbindelse med enhver form for service som f.eks.
reparation, anskaff else af reservedele og sliddele eller køb af forbrugsmaterialer.
Vær opmærksom på, at følgende dele på produktet slides som følge af brug eller udsættes for naturligt
slid resp. at følgende dele anses som forbrugsmaterialer.
Kategori Eksempel
Sliddele* Akku
Forbrugsmateriale/ forbrugsdele*
Manglende dele
* er ikke nødvendigvis indeholdt i leveringsomfanget!
Konstateres mangler eller fejl, bedes du melde fejlen på internettet under www.isc-gmbh.info. Det er vigtigt at beskrive fejlen så nøjagtigt som muligt og i hvert fald besvare følgende spørgsmål:
Har produktet fungeret, eller var det defekt fra begyndelsen?
•
Har du bemærket noget usædvandligt, inden defekten opstod (symptom før defekt)?
•
Hvilken fejlfunktion mener du, at produktet er berørt af (hovedsymptom)?
•
Beskriv venligst fejlfunktionen.
- 51 -

DK/N
Garantibevis
Kære kunde!
Vore produkter er underlagt en streng kvalitetskontrol. Hvis produktet alligevel på et tidspunkt skulle
udvise fejl, beklager vi naturligvis dette, i dette tilfælde beder vi dig kontakte vores kundeservice på
adressen, som er anført på dette garantibevis. Du kan naturligvis også ringe til os på det anførte servicenummer. For indfrielse af garantikrav gælder følgende:
1. Disse garantibetingelser retter sig udelukkende til forbrugere, dvs. naturlige personer, der hverken
vil bruge dette produkt i forbindelse med udøvelse af deres erhvervsmæssige eller andet selvstændigt arbejde. Disse garantibetingelser regulerer ekstra garantiydelser, som nedenstående producent
lover købere af sine nye apparater som supplement til den lovfastsatte garanti. Garantibestemmelser fastsat ved lov berøres ikke af nærværende garanti. Vores garantiydelse er gratis.
2. Garantiydelsen dækker udelukkende mangler på et nyt apparat fra nedenstående producent, der
skyldes materiale- eller produktionsfejl, og vi har ret til at vælge, om sådanne mangler afhjælpes på
produktet, eller om produktet udskiftes.
Bemærk, at vore produkter ikke er konstrueret til erhvervsmæssig, håndværksmæssig eller faglig
brug. Garantien dækker således ikke forhold, hvor produktet er blevet brugt i erhvervsmæssige,
håndværksmæssige eller faglige virksomheder eller er blevet udsat for lignende belastning.
3. Garantien dækker ikke følgende:
- Skader på produktet som følge af tilsidesættelse af montagevejledningens anvisninger eller som
følge af usagkyndig installation, tilsidesættelse af brugsanvisningen (f.eks. tilslutning til forkert netspænding eller strømtype) eller tilsidesættelse af vedligeholdelses- og sikkerhedsforskrifter eller
som følge af at produktet udsættes for ikke normale miljøbetingelser eller manglende pleje og vedligeholdelse.
- Skader på produktet som følge af misbrug eller usagkyndig anvendelse (f.eks. overbelastning af
produktet eller brug af værktøj eller tilbehør, som ikke er godkendt), indtrængen af fremmedlegemer
i produktet (f.eks. sand, sten eller støv, transportskader), brug af vold eller eksterne påvirkninger
udefra (f.eks. fordi produktet tabes).
- Skader på produktet eller dele af produktet, der skyldes almindelig brug, normalt eller andet naturligt slid.
4. Garantiperioden udgør 24 måneder at regne fra købsdatoen. Garantikrav skal gøres gældende inden garantiperiodens udløb og inden for to uger, efter at defekten er blevet konstateret. Garantikrav
kan ikke gøres gældende efter garantiperiodens udløb. Reparation eller udskiftning af produktet
medfører ikke forlængelse af garantiperioden, heller ikke for eventuelt indbyggede reservedele. Dette gælder også servicearbejder, der foretages på stedet.
5. Hvis du ønsker at gøre brug af garantien, bedes du melde det defekte produkt til: www.isc-gmbh.
info. Sørg for at have købskvitteringen eller anden form for dokumentation af købet af det nye apparat ved hånden. Apparater, der sendes ind uden passende dokumentation eller uden typeskilt, er
udelukket fra garantiydelsen på grund af manglende identifi cering. Er defekten omfattet af garanti-
en, vil produktet omgående blive repareret og returneret, eller du vil modtage et helt nyt.
Mod betaling udbedrer vi naturligvis også gerne defekter på produktet, som ikke/ikke længere er omfattet af garantien. Du skal blot indsende produktet til vores serviceadresse.
Hvad angår slid- og forbrugsdele samt manglende dele henviser vi til garantiens indskrænkninger i henhold til serviceinformationerne i nærværende betjeningsvejledning.
- 52 -

S
Fara!
Innan maskinen kan användas måste särskilda
säkerhetsanvisningar beaktas för att förhindra
olyckor och skador. Läs därför noggrant igenom
denna bruksanvisning och dessa säkerhetsanvisningar. Förvara dem på ett säkert ställe så att du
alltid kan hitta önskad information. Om maskinen
ska överlåtas till andra personer måste även
denna bruksanvisning och dessa säkerhetsanvisningar medfölja. Vi övertar inget ansvar för olyckor
eller skador som har uppstått om denna bruksanvisning eller säkerhetsanvisningarna åsidosätts.
1. Säkerhetsanvisningar
Gällande säkerhetsanvisningar fi nns i det bifoga-
de häftet.
Fara!
Läs alla säkerhetsanvisningar och instruktioner. Försummelser vid iakttagandet av säker-
hetsanvisningarna och instruktionerna kan förorsaka elstöt, brand och/eller svåra skador. Förvara
alla säkerhetsanvisningar och instruktioner
för framtiden.
Denna apparat får inte användas av barn. Barn
ska hållas under uppsikt så att de inte använder
apparaten som leksak. Apparaten får inte rengöras eller underhållas av barn. Apparaten får inte
användas av personer med begränsad fysisk,
sensorisk eller mental förmåga, eller av personer
med bristfällig kunskap eller erfarenhet, såvida
inte en ansvarig person håller uppsikt eller ger
instruktioner.
Teckenförklaring (bild 6)
D = Skyddsklass II apparat
E = Får endast användas i torra inomhusutrym-
men
F = Obs! Läs igenom instruktionerna före använd-
ning!
Text på apparat och hjälpstartkabel
Obs! Läs igenom instruktionerna före användning!
1. Tryck aldrig på knappen „Boost“ om fordonsbatteriet ännu inte har anslutits.
2. Koppla aldrig samman klämmorna – kortslutning och risk för personskador.
3. Starthjälp endast för 12 V motorfordon, röd
klämma till batteripol „+“, svart klämma till „-“.
4. Grön LED = Starta motorn inom 30 sek.
5. Röd LED + varningston = Batteriet har anslutits med omskiftade poler (se 3.)
6. Grön LED blinkar + varningston = Tryck på
knappen „Boost“ och starta motorn inom 30
sek.
7. Ingen LED, ingen varningston = Kontrollera
stickanslutningen till apparaten, tryck på
knappen „Boost“ och starta motorn inom 30
sek.
Varning!
1. Håll barn på avstånd från apparaten.
2. Öppna inte apparaten – Risk för personskador!
3. Om färre än tre lysdioder är tända är ingen
starthjälp möjlig.
4. Om motorn inte startar inom 5 sek måste du
avsluta startförsöket. Vänta i 1 minut innan du
försöker starta igen.
2. Beskrivning av maskinen samt
leveransomfattning
2.1 Beskrivning av maskinen (bild 1)
1. LED-ljus
2. USB-utgång 5 V max. 2 A
3. USB-utgång 5 V / 9V
4. Laddningsuttag 15 V DC / 1 A
5. Strömbrytare
6. Likspänningsutgång 12 V max. 10 A
7. Likspänningsutgång 19 V max. 3,5 A
8. Anslutning för hjälpstartkabel
9. LED-kapacitetsindikering för batteri
2.2 Leveransomfattning
Kontrollera att produkten är komplett med hjälp av
beskrivningen av leveransen. Om delar saknas vill
vi be dig ta kontakt med vårt servicecenter eller
butiken där du köpte produkten inom fem dagar
efter att du köpte artikeln. Tänk på att du måste
visa upp ett giltigt kvitto. Beakta även garantitabellen i serviceinformationen i slutet av bruksanvisningen.
Öppna förpackningen och ta försiktigt ut pro-
•
dukten ur förpackningen.
Ta bort förpackningsmaterialet samt förpack-
•
nings- och transportsäkringar (om förhanden).
Kontrollera att leveransen är komplett.
•
Kontrollera om produkten eller tillbehörsdelar-
•
na har skadats i transporten.
Spara om möjligt på förpackningen tills ga-
•
rantitiden har gått ut.
- 53 -

S
Fara!
Produkten och förpackningsmaterialet är
ingen leksak! Barn får inte leka med plastpåsar, folie eller smådelar! Risk för att barn
sväljer delar och kvävs!
Jump-Start Power Bank
•
Hjälpstartkabel
•
2 in 1 USB-anslutningskabel (Micro/Mini)
•
Laddare
•
Anslutningskabel 19 V
•
Stickkontaktset 19 V
•
Förvaringsmapp
•
Original-bruksanvisning
•
Säkerhetsanvisningar
•
3. Ändamålsenlig användning
Jump-Start Power Bank används till att ladda
smarttelefoner, kameror, pekplattor och liknande.
Den kan även användas som fi cklampa. Dessu-
tom kan bärbara datorer och annan utrustning för
12 V matas med likspänning. Med hjälp av den
bifogade hjälpstartkabeln kan apparaten även
användas till att understödja svaga 12 V startbatterier (blysyrabatterier) i motorfordon med bensinmotorer upp till 4000 ccm och dieselmotorer upp
till 2000 ccm cylindervolym.
Maskinen får endast användas till sitt avsedda
ändamål. Användningar som sträcker sig utöver
detta användningsområde är ej ändamålsenliga.
För materialskador eller personskador som resulterar av sådan användning ansvarar användaren/
operatören själv. Tillverkaren påtar sig inget
ansvar.
Tänk på att våra produkter endast får användas
till ändamålsenligt syfte och inte har konstruerats
för yrkesmässig, hantverksmässig eller industriell
användning. Vi ger därför ingen garanti om produkten ska användas inom yrkesmässiga, hantverksmässiga eller industriella verksamheter eller
vid liknande aktiviteter.
4. Tekniska data
Jump-Start Power Bank
Li-Po-batteri: .........11,1 V – 3700 mAh – 41,1 Wh
Ingång: ............................................ 15 V DC /1 A
Laddningstid ca.: ............................................ 5 h
Utgång USB „OUT:5V/2A“: ....5 V DC / 2 A (max.)
Utgång USB „OUT:“5V/9V“: .. 5 V DC / 3 A (max.)
.............................................. 9 V DC / 2 A (max.)
Likspänningsutgång: ...................19 V max. 3,5 A
Likspänningsutgång: ....................12 V max. 10 A
Starthjälpström ....... 200 A (5 sek.) / 400 A (max.)
Omgivningstemperatur v
id starthjälp: ................................ - 15°C - + 40°C
Förvaringstemperatur .................. + 5°C - + 40°C
Skyddsklass ......................................................III
Laddare
Ingångsspänning ................100-240 V ~50/60 Hz
Utgångsspänning ................................... 15 V DC
Utgångsström ................................................1 A
5. Före användning
5.1 Ladda Jump-Start Power Bank med den
bifogade laddaren
Följande gäller för laddaren:
Denna apparat kan användas av barn från 8 års
ålder samt av personer med begränsade fysiska,
sensoriska eller mentala förmågor eller som saknar erfarenhet och kunskap, under förutsättning
att de hålls under uppsikt eller har instruerats om
säker användning av apparaten och förstår vilka
faror som kan uppstå. Barn får inte leka med apparaten. Barn får endast rengöra och underhålla
apparaten under uppsikt.
Innan du ansluter apparaten ska du övertyga dig
om att informationen på märkskylten stämmer
överens med nätets data.
Obs! Dra alltid ut stickkontakten innan du gör några inställningar på apparaten. Ladda apparaten
endast med den medföljande laddaren.
Beakta bifogade säkerhetsanvisningar med detaljerad information om laddning.
Utgångarna får inte användas medan apparaten
laddas.
- 54 -

S
Anslut den bifogade laddaren (bild 2a) med
•
„Input 15 V 1 A“ laddningsuttaget (bild 1 / pos.
4) på apparaten.
Anslut laddaren till eluttaget. Batteriet lad-
•
das därefter. Medan laddningen pågår lyser
(blinkar) lysdioderna (bild 1 / pos. 9) och visar
aktuell laddningsstatus. Samtliga lysdioder är
tända efter att laddningen har avslutats.
Batteriets laddningstid uppgår till ca 5 timmar.
•
Under uppladdningen kan batteriet i apparaten bli varmt. Detta är dock normalt.
5.2 Kapacitetsindikering för batteri
Tryck kort på strömbrytaren (bild 1/pos. 5). Lysdioderna för kapacitetsindikeringen (bild 1 / pos. 9)
tänds kort. Antalet tända lysdioder informerar om
aktuell laddningsstatus för det inbyggda Li-Pobatteriet.
100 % laddning = 4 LED lyser ständigt
>25 % laddning = 1 LED lyser ständigt
<25 % laddning = ingen LED lyser ständigt
6. LED-ljus
Obs! Titta inte in i ljusstrålen.
Håll strömbrytaren intryckt i 3 sekunder –
•
LED-ljuset (bild 1 / pos. 1) lyser ständigt.
Tryck på strömbrytaren en gång till – LED-
•
ljuset lyser som stroboskopblixt.
Tryck på strömbrytaren en gång till – LED-
•
ljuset lyser som SOS-morseljus.
Tryck en gång till för att slå ifrån LED-ljuset.
•
7. Utgångar
Obs! Beakta avsedda spännings- och strömvär-
den för apparaten som ska matas (t ex mobiltelefon, bärbar dator). Beakta motsvarande bruksanvisningar.
Matningstiden är beroende av laddningsnivån
i Jump-Start Power Bank, eff ektförbrukningen
och användningsintensiteten med den anslutna
apparaten. Ladda batteriet när restladdningen
har nått 25 % (1 LED lyser) (se avsnitt 5.). USBanslutningarna kan användas parallellt. Se till att
den sammanlagda utgångsströmmen inte överstiger 5 A.
7.1 Ladda/använda apparater med USBanslutning
a) 5 V / 2 A USB-utgång
1. Anslut en egen (eller bifogad 2 in 1) USBanslutningskabel till USB-anslutningen (bild
1 / pos. 2) på Jump-Start Power Bank och
därefter till apparaten som ska matas (max. 2
A).
2. Tryck på strömbrytaren (bild 1 / pos. 5).
b) „OUT 5V/9V“ USB-utgång (bild 3)
Märk: Om det inte fungerar att ladda från denna
utgång stöds apparaten eller kabeln inte. I sådana
fall måste du använda 5 V DC / 2 A USB-utgången enligt beskrivningen ovan.
1. Anslut den bifogade 2 in 1 USB-kabeln (bild
2b) till „OUT 5V/9V“ USB-anslutningen (bild 1
/ pos. 3) på Jump-Start Power Bank och därefter till apparaten som ska matas.
2. Tryck på strömbrytaren (bild 1 / pos. 5).
3. Vid USB-utgången bestäms parametrarna för
laddning varefter den anslutning apparaten
laddas. Beroende på laddningskabeln och
apparaten som ska laddas kan laddningstiden vid „OUT 5V/9V“ USB-utgången förkortas jämfört med „OUT 5V/2A“ USB-utgången.
7.2 Använda 19 V likspänningsapparater (bild
4)
1. Anslut den bifogade anslutningskabeln (bild
2d / pos. 13) till 19 V likspänningsutgången
(bild 1 / pos. 7) på Jump-Start Power Bank
och därefter till 19 v likspänningsapparaten
med en av de bifogade stickkontakterna (bild
2d / pos. 14). Överskrid inte maximal strömförbrukning 3,5 A.
2. Tryck på strömbrytaren (bild 1/pos. 5).
7.3 Använda 12 V likspänningsapparater
1. Anslut en passande anslutningskabel med 12
V likspänningsutgången (bild 1 / pos. 6) på
Jump-Start Power Bank och därefter till 12 V
likspänningsapparaten. Överskrid inte maximal strömförbrukning 10 A.
2. Tryck på strömbrytaren (bild 1/pos. 5).
- 55 -

S
8. Starthjälp för motorfordon
12 V starthjälpen är en välkommen hjälp om det
går svårt att starta fordonet pga. låg batterikapacitet.
Varning! När starthjälp ges får endast hjälpstartkabeln anslutas. Försörjningen till en ansluten
apparat, t ex via USB-anslutningen, måste först
avbrytas.
Tänk på att motorfordon är utrustade med många
elektroniska moduler. Beakta instruktionerna i
bruksanvisningarna till fordonet, radion osv.
Varning! Anslut aldrig till fordonskarossen!
Se till att stickkontakten på hjälpstartkabeln
•
är fast ansluten till apparatens stickuttag.
Om anslutningen är lös medan starthjälp ges
finns det risk för att stickanslutningen smälter
på grund av den höga strömmen.
Polerna på fordonsbatteriet måste vara rena
•
och klämmorna på hjälpstartkabeln sitta fast
ordentligt på batteripolerna.
Medan starthjälp ges får klämmorna inte
•
komma i kontakt med varandra – Kortslutning!
Kontrollera att minst tre lysdioder i kapacitetsindikeringen för batteriet lyser. Apparattemperaturen
måste befi nna sig inom området + 5°C - + 40°C,
omgivningstemperaturen vid starthjälp inom
– 15°C - + 40°C. Använd endast den bifogade
hjälpstartkabeln (bild 2c).
1. Bild 5: Fäll upp locket från anslutningen för
hjälpstartkabeln (bild 1 / pos. 8), skjut locket
undertill åt sidan och anslut sedan hjälpstartkabeln till apparaten.
2. Bild 5a: Anslut den röda kabeln till pluspolen
och den svarta kabeln till minuspolen på
fordonsbatteriet. Se till att klämmorna sitter
fast ordentligt. Kontrollera dessutom att
Jump-Start Power Bank har placerats säkert i
motorrummet och inte kan falla ned av vibrationer under startförloppet. Jump-Start Power
Bank får inte komma i närheten av rörliga
delar. Nedanstående punkt 3. – 6. beskriver
statusindikeringar för hjälpstartkabeln. Läs
igenom instruktionerna.
3. Bild 5a: Den gröna lysdioden vid hjälp-
startkabeln är tänd. Alla befi ntliga anslutnin-
gar är intakta och fordonet kan startas inom
30 sekunder.
4. Bild 5b: Den gröna lysdioden vid hjälp-
startkabeln blinkar. Alla befi ntliga anslut-
ningar är intakta, men laddningsnivån för
fordonets batteri är mycket lågt. Tryck på
knappen „Boost“ vid hjälpstartkabeln och
vänta tills den gröna lysdioden lyser konstant.
Starta fordonet inom 30 sekunder. Var särskilt
försiktig eftersom de integrerade säkerhetsanordningarna i Jump-Start Power Bank tas ur
drift när knappen „Boost“ trycks in.
5. Bild 5c: Den röda lysdioden vid hjälpstart-
kabeln lyser och en varningston hörs.
Klämmorna på hjälpstartkabeln har anslutits
förväxlat till fordonsbatteriet. Ta av klämmorna
och anslut dem därefter till fordonsbatteriet
med hänsyn till rätt polaritet och enligt instruktionerna ovan.
6. Bild 5d: Ingen lysdiod lyser vid hjälpstart-
kabeln, ingen varningston hörs. Kontrollera alla anslutningar, framför allt att klämmorna
har anslutits till rätt poler på fordonsbatteriet.
Om alla anslutningar stämmer, är orsaken
troligtvis ett defekt fordonsbatteri. Tryck på
knappen „Boost“ vid hjälpstartkabeln och
vänta tills den gröna lysdioden lyser konstant.
Starta fordonet inom 30 sekunder.
Var särskilt försiktig eftersom de integrerade
säkerhetsanordningarna i Jump-Start Power
Bank tas ur drift när knappen „Boost“ trycks
in. Byt ut det defekta fordonsbatteriet så snart
som möjligt.
7. Så snart motorn har startat ska hjälpstartkabeln tas av. Lossa först på den röda klämman
och därefter den svarta klämman från fordonsbatteriet.
8. Låt motorn köra. Generatorn laddar det inbyggda fordonsbatteriet.
Vid mycket låga temperaturer är det möjligt att
man behöver fl era startförsök innan fordonet
startar. Väntetiden mellan två startförsök uppgår
till en minut. Ta om möjligt bort apparaten inom 30
sekunder efter att starthjälp har getts.
Antalet möjliga startförsök (max. 10) är beroende
av omgivningstemperatur, status i batteriet som
ska startas och laddningsnivån i batteriet i JumpStart Power Bank.
- 56 -

S
9. Rengöring, Underhåll och
reservdelsbeställning
Fara!
Dra alltid ut stickkontakten om apparaten ska
rengöras.
Avlägsna alla anslutna kablar från Jump-Start
Power Bank.
9.1 Rengöra maskinen
Håll skyddsanordningarna, ventilationsöpp-
•
ningarna och motorkåpan i så damm- och
smutsfritt skick som möjligt. Torka av maskinen med en ren duk eller blås av den med
tryckluft med svagt tryck.
Vi rekommenderar att du rengör maskinen
•
efter varje användningstillfälle.
Rengör apparaten med jämna mellanrum
•
med en fuktig duk. Använd inga rengöringseller lösningsmedel. Dessa kan skada maskinens plastdelar. Se till att inga vätskor tränger
in i maskinens inre. Om vatten tränger in i ett
elverktyg höjs risken för elektriska slag.
9.2 Underhåll
I maskinens inre fi nns inga delar som kräver un-
derhåll.
9.3 Reservdelsbeställning
Lämna följande uppgifter vid beställning av reservdelar:
Maskintyp
•
Maskinens artikel-nr.
•
Maskinens ident-nr.
•
Reservdelsnummer för erforderlig reservdel
•
Aktuella priser och ytterligare information fi nns på
www.isc-gmbh.info
11. Skrotning och återvinning
Produkten ligger i en förpackning som fungerar
som skydd mot transportskador. Denna förpackning består av olika material som kan återvinnas.
Lämna in förpackningen till ett insamlingsställe för
återvinning. Produkten och dess tillbehör består
av olika material som t ex metaller och plaster.
Defekta produkter får inte kastas i hushållssoporna. Lämna in produkten till ett insamlingsställe
i din kommun för professionell avfallshantering.
Hör efter med din kommun om du inte vet var
närmsta insamlingsställe fi nns.
12. Förvaring
Förvara apparaten och dess tillbehör på en mörk,
torr och frostfri plats. Den optimala förvaringstemperaturen är mellan +5 och 40°C.
Beakta bifogade säkerhetsanvisningar med detaljerad information om förvaring. Eftersom batteriet
reagerar på alltför höga (över +40°C) resp. låga
temperaturer (under 0°C), ska apparaten inte
förvaras permanent i ett motorfordon. För transport i ett fordonet ska apparaten placeras på ett
lämpligt ställe så att den inte kan rubbas om hastigheten eller riktningen plötslig ändras. Förvara
apparaten i originalförpackningen.
10. Reparation
Vid eventuella störningar får apparaten endast
kontrolleras av en behörig tekniker eller av en
kundtjänstverkstad.
- 57 -

S
13. Felsökning
Störning Möjlig orsak Åtgärder
Det går inte att slå
på apparaten
Starthjälpen fungerar inte
Alla lysdioder blinkar
- För låg batterispänning - Ladda upp batteriet
- För låg batterispänning
- Anslutningarna på fordonet har förväxlats
- Temperatur utanför temperaturområde
- Överbelastningsskyddet har löst ut
- Apparat för kall / varm
- Omgivningstemperaturen för låg/
hög
- Ladda upp batteriet
- Kontrollera polariteten och anslut
rätt
- Försök att ge starthjälp inom avsett
temperaturområde
- Slå ifrån apparaten, kontrollera avseende ev. överbelastning
- Beakta apparattemperatur
+5°C till +40°C
- Beakta omgivningstemperatur
-15°C till +40°C
- 58 -

S
Endast för EU-länder
Kasta inte elverktyg i hushållssoporna.
Enligt det europeiska direktivet 2012/19/EG om avfall som utgörs av eller innehåller elektriska eller
elektroniska produkter och dess tillämpning i den nationella lagstiftningen, måste förbrukade elverktyg
källsorteras och lämnas in för miljövänlig återvinning.
Återvinnings-alternativ till begäran om återsändning:
Som ett alternativ till returnering är ägaren av elutrustningen skyldig att bidraga till ändamålsenlig avfallshantering för det fall att utrustningen ska skrotas. Efter att den förbrukade utrustningen har lämnats
in till en avfallsstation kan den omhändertas i enlighet med gällande nationella lagstiftning om återvinning och avfallshantering. Detta gäller inte för tillbehörsdelar och hjälpmedel utan elektriska komponenter vars syfte har varit att komplettera den förbrukade utrustningen.
Eftertryck eller annan duplicering av dokumentation och medföljande underlag för produkterna, även
utdrag, är endast tillåtet med uttryckligt tillstånd från iSC GmbH.
Med förbehåll för tekniska ändringar.
- 59 -

S
Serviceinformation
I alla länder som nämns i garantibeviset har vi kompetenta servicepartners. Adresserna till dessa partners fi nns i garantibeviset. Våra partners står gärna till tjänst för alla slags servicearbeten såsom repara-
tion och tillhandahållande av reservdelar, slitagedelar och förbrukningsmaterial.
Kom ihåg att följande delar i denna produkt är utsatta för ett bruksmässigt och naturligt slitage samt att
följande delar krävs som förbrukningsmaterial.
Kategori Exempel
Slitagedelar* Batteri
Förbrukningsmaterial/förbrukningsdelar*
Delar som saknas
* ingår inte tvunget i leveransomfattningen!
Vid brister eller störningar kan du anmäla detta på webbplatsen www.isc-gmbh.info. Ge en detaljerad
beskrivning av felet som har uppstått och besvara alltid följande frågor:
Fungerade produkten först eller var den defekt från början?
•
Märkte du av någonting innan produkten slutade att fungera (symptomer före defekt)?
•
Enligt din åsikt, vilken funktion är felaktig i produkten (huvudsymptom)?
•
Beskriv den felaktiga funktionen.
- 60 -

S
Garantibevis
Bästa kund,
våra produkter genomgår en sträng kvalitetskontroll. Om denna produkt mot förmodan inte fungerar på
rätt sätt, beklagar vi detta och ber dig att kontakta vår serviceavdelning under adressen som anges på
garantikortet. Vi står även gärna till tjänst på telefon under servicenumret som anges nedan. Följande
punkter gäller för att du ska kunna göra anspråk på garantin:
1. Dessa garantivillkor vänder sig enbart till konsumenter, dvs. naturliga personer som inte har för avsikt att använda denna produkt i kommersiellt syfte eller inom egen verksamhet. Dessa garantivillkor
reglerar ytterligare garantitjänster som nedanstående tillverkare erbjuder köpare av nya produkter.
Dessa tjänster är en komplettering till den lagstadgade garantin. Garantianspråk som regleras enligt
lag påverkas inte av denna garanti. Våra garantitjänster är gratis för dig.
2. Garantitjänsterna omfattar endast sådana brister som bevisligen kan härledas till material- eller tillverkningsfel. Produkten som du har köpt ska vara ny och härstamma från nedanstående tillverkare.
Vi avgör om sådana brister i produkten ska åtgärdas eller om produkten ska bytas ut.
Tänk på att våra produkter endast får användas till ändamålsenligt syfte och inte har konstruerats
för kommersiell, hantverksmässig eller yrkesmässig användning. Ett garantiavtal sluts därför ej om
produkten inom garantitiden har använts inom yrkesmässiga, hantverksmässiga eller industriella
verksamheter eller har utsatts för liknande påkänning.
3. Garantin omfattar inte:
- Skador på produkten som kan härledas till att monteringsanvisningen missaktats eller på grund av
felaktig installation, åsidosatt bruksanvisning (t ex anslutning till felaktig nätspänning eller strömart),
missaktade underhålls- och säkerhetsbestämmelser, om produkten utsätts för onormala miljöfaktorer eller bristfällig skötsel och underhåll.
- Skador på produkten som kan härledas till missbruk eller ej ändamålsenlig användning (t ex överbelastning av produkten eller användning av ej godkända insatsverktyg eller tillbehör), främmande
partiklar som har trängt in i produkten (t ex sand, sten eller damm, transportskador), yttre våld eller
yttre påverkan (t ex skador efter att produkten fallit ned).
- Skador på produkten eller delar av produkten som kan härledas till bruksmässigt, normalt eller för
övrigt naturligt slitage .
4. Garantitiden uppgår till 24 månader och gäller från datumet när produkten köptes. Medan garantitiden fortfarande gäller ska anspråk på garanti ställas inom två veckor efter att defekten fastställdes.
Det är inte möjligt att ställa anspråk på garanti efter att garantitiden har löpt ut. Garantitiden förlängs
inte när produkten repareras eller byts ut, dessutom medför sådana arbeten inte att en ny garantitid
börjar gälla för produkten eller för ev. reservdelar som har monterats in. Detta gäller även vid hembesök.
5. Anmäl den defekta produkten på följande webbplats för att göra anspråk på garantin: www.iscgmbh.info. Se till att du har sparat på kvittot eller ett annat köpebevis som påvisar att du har köpt
denna produkt i nytt skick. Produkter som sänds in utan köpebevis eller utan märkskylt täcks inte av
våra garantitjänster eftersom de inte kan identifi eras. Om defekten i produkten täcks av våra garan-
titjänster, får du genast en reparerad eller ny produkt av oss.
Givetvis kan vi även, mot debitering, åtgärda skador som antingen inte täcks av garantin eller som har
uppstått efter garantitidens slut. Skicka in produkten till nedanstående serviceadress.
För slitage- och förbrukningsdelar samt för delar som saknas hänvisar vi till begränsningarna i garantin
enligt serviceinformationen som anges i denna bruksanvisning.
- 61 -

NL
Gevaar!
Bij het gebruik van toestellen dienen enkele
veiligheidsmaatregelen te worden nageleefd om
lichamelijk gevaar en schade te voorkomen. Lees
daarom deze handleiding / veiligheidsinstructies
zorgvuldig door. Bewaar deze goed zodat u de informatie op elk moment kunt terugvinden. Mocht
u dit toestel aan andere personen doorgeven,
gelieve dan deze handleiding / veiligheidsinstructies mee te geven. Wij zijn niet aansprakelijk
voor ongevallen of schade die te wijten zijn aan
niet-naleving van deze handleiding en van de veiligheidsinstructies.
1. Veiligheidsaanwijzingen
De overeenkomstige veiligheidsinstructies vindt u
in de bijgaande brochure.
Gevaar!
Lees alle veiligheidsinstructies en aanwijzingen. Nalatigheden bij de inachtneming van de
veiligheidsinstructies en aanwijzingen kunnen
elektrische schok, brand en/of zware letsels tot
gevolg hebben. Bewaar alle veiligheidsinstruc-
ties en aanwijzingen voor de toekomst.
Dit apparaat mag niet door kinderen worden
gebruikt. Op kinderen moet toezicht worden gehouden om te voorkomen dat ze met het apparaat
spelen. Reiniging en onderhoud mag niet door
kinderen worden uitgevoerd. Het apparaat mag
niet door personen met verminderde fysieke, sensorische of mentale capaciteiten of door personen met onvoldoende kennis of ervaring worden
gebruikt, tenzij een voor hen verantwoordelijke
persoon op hen toeziet of hen instrueert.
Verklaring van symbolen (afb. 6)
D = Beschermklasse II apparaat
E = Alleen voor gebruik in droge binnenruimtes
F = Opgelet! Vóór gebruik handleiding lezen!
Tekst op apparaat en startkabel
Opgelet! Vóór gebruik handleiding lezen!
1. Nooit de Boost toets indrukken voordat de
accu van het voertuig is aangesloten.
2. Klemmen nooit met elkaar verbinden – kortsluiting en verwondingsgevaar.
3. Starthulp alleen voor 12 V voertuigen, rode
klem aan „+“, zwarte klem aan „-“ accupool.
4. Groene LED = motor binnen 30 s starten.
5. Rode LED + waarschuwingssignaal = accu
met de verkeerde polen aangesloten (zie 3.).
6. Groene LED knippert + waarschuwingssignaal = „Boost“ toets indrukken en motor binnen
30 s starten.
7. Geen LED, geen waarschuwingssignaal =
steekverbinding met het apparaat controleren, „Boost“ toets indrukken en motor binnen
30 s starten.
Waarschuwing!
1. Apparaat uit de buurt houden van kinderen!
2. Apparaat niet openen - verwondingsgevaar!
3. Als er minder dan 3 LEDs branden, dan is
geen starthulp beschikbaar.
4. Als de motor binnen 5 seconden niet start,
beëindig dan de startpoging. Wacht 1 minuut
voordat u het proces herhaalt.
2. Beschrijving van het gereedschap
en leveringsomvang
2.1 Beschrijving van het gereedschap
(fi g. 1)
1. LED licht
2. USB uitgang 5 V max. 2 A
3. USB uitgang 5 V/9 V
4. Laadbus 15 V DC / 1 A
5. Aan/Uit-knop
6. Gelijkspanningsuitgang 12 V max. 10 A
7. Gelijkspanningsuitgang 19 V max. 3,5 A
8. Aansluiting startkabel
9. LED accucapaciteitsindicatie
2.2 Leveringsomvang
Gelieve de volledigheid van het artikel te controleren aan de hand van de beschreven omvang
van de levering. Indien er onderdelen ontbreken,
gelieve u dan binnen 5 werkdagen na aankoop
van het artikel te wenden tot ons servicecenter of
tot het verkooppunt waar u het apparaat heeft gekocht, en leg een geldig bewijs van aankoop voor.
Gelieve daarvoor de garantietabel in de serviceinformatie aan het einde van de handleiding in
acht te nemen.
Open de verpakking en neem het toestel
•
voorzichtig uit de verpakking.
Verwijder het verpakkingsmateriaal alsmede
•
verpakkings-/transportbeveiligingen (indien
aanwezig).
Controleer of de leveringsomvang compleet
•
is.
Controleer het toestel en de accessoires op
•
transportschade.
- 62 -

Bewaar de verpakking indien mogelijk tot het
•
verloop van de garantieperiode.
Gevaar!
Het toestel en het verpakkingsmateriaal zijn
geen speelgoed voor kinderen! Kinderen mogen niet met plastic zakken, folies en kleine
stukken spelen! Er bestaat inslik- en verstikkingsgevaar!
Jump Start Power Bank
•
Startkabel
•
2in1 USB aansluitkabel (Micro/Mini)
•
Lader
•
Verbindingskabel 19 V
•
Stekkerset 19 V
•
Bewaarmap
•
Originele handleiding
•
Veiligheidsinstructies
•
3. Reglementair gebruik
De Jump Start Power Bank dient voor het laden
van smartphones, camera’s, tablets enz. Hij kan
ook als zaklamp worden gebruikt. Verder kan
men notebooks en 12V verbruikers voeden met
gelijkspanning. Met behulp van de meegeleverde startkabel is het apparaat ook geschikt voor
de ondersteuning van zwakke 12V startaccu‘s
(loodzuuraccu‘s) in voertuigen met benzinemotoren tot 4000 ccm en dieselmotoren tot 2000 ccm
cilinderinhoud.
De machine mag slechts voor werkzaamheden
worden gebruikt waarvoor ze bedoeld is. Elk
ander verder gaand gebruik is niet reglementair.
Voor daaruit voortvloeiende schade of verwondingen van welke aard dan ook is de gebruiker/
bediener, niet de fabrikant, aansprakelijk.
Wij wijzen erop dat onze gereedschappen overeenkomstig hun bestemming niet geconstrueerd
zijn voor commercieel, ambachtelijk of industrieel
gebruik. Wij geven geen garantie indien het gereedschap in ambachtelijke of industriële bedrijven alsmede bij gelijk te stellen activiteiten wordt
gebruikt.
NL
4. Technische gegevens
Jump Start Power Bank
Li-Po accu: ............11,1 V – 3700 mAh – 41,1 Wh
Ingang: .............................................15 V DC/1 A
Laadduur ca.: ................................................. 5 h
Uitgang USB „OUT:„5V/2A“: ..5 V DC / 2 A (max.)
Uitgang USB „OUT: „5V/9V “: .. 5 V DC/3 A (max.)
................................................ 9 V DC/2 A (max.)
Gelijkspanningsuitgang: ..............19 V max. 3,5 A
Gelijkspanningsuitgang: ...............12 V max. 10 A
Starthulpstroom: .....200 A (5 sec.) / 400 A (max.)
Omgevingstemperatuur
bij starthulp: ............................... - 15 °C - + 40 °C
Opslagtemperatuur: ................... + 5 °C - + 40 °C
Beschermklasse: ..............................................III
Lader
Nominale
ingangsspanning: ...............100-240 V ~50/60 Hz
Nominale uitgangsspanning: ................. 15 V DC
Nominale uitgangsstroom: ............................. 1 A
5. Vóór inbedrijfstelling
5.1 Laden van de Jump Start Power Bank met
de meegeleverde lader
Voor de lader geldt:
Dit apparaat kan door kinderen vanaf 8 jaar en
ouder en ook door personen met verminderde
fysieke, sensorische of mentale vaardigheden
of een gebrek aan ervaring en kennis worden
gebruikt, mits deze onder toezicht staan of met
betrekking tot het veilige gebruik van het apparaat
geïnstrueerd werden en begrijpen welke gevaren
van het apparaat kunnen uitgaan. Kinderen mogen niet met het apparaat spelen. Reiniging en
onderhoud door de gebruiker mogen niet zonder
toezicht door kinderen worden uitgevoerd.
Controleer of de gegevens vermeld op het typeplaatje overeenkomen met de gegevens van het
stroomnet, alvorens het apparaat aan te sluiten.
Opgelet! Trek de netstekker uit het stopcontact
voordat u instellingen aan het apparaat uitvoert.
Laad het apparaat uitsluitend met de meegeleverde lader.
- 63 -

NL
Neem de bijgevoegde veiligheidsinstructies met
uitvoerige aanwijzingen over het laadproces in
acht.
De uitgangen mogen tijdens het laadproces niet
worden gebruikt.
Verbind de meegeleverde lader (afb. 2a) met
•
de „Input 15 V 1 A“ laadbus (afb. 1/pos. 4) van
het apparaat.
Als u de lader in het stopcontact steekt, dan
•
wordt de accu geladen. Tijdens het laden
branden (knipperen) de LEDs (afb. 1/pos. 9)
en geven de laadstatus aan. Als het laden is
afgesloten, dan branden alle LEDs.
De laadduur bedraagt ca. 5 uur als de accu
•
leeg is. Tijdens het laden kan de accu in het
apparaat iets warm worden, dat is echter normaal.
5.2 Accucapaciteitsindicatie
Druk kort op de Aan/Uit-knop (afb. 1/pos. 5). De
LEDs van de accucapaciteitsindicatie (afb. 1/pos.
9) lichten op. Het aantal brandende LEDs geeft
de huidige laadtoestand van de ingebouwde LiPo-accu aan.
100 % geladen = 4 LED continu licht
>25 % geladen = 1 LED continu licht
<25 % geladen = geen continu licht
6. LED-licht
Voorzichtig! Niet in de lichtstraal kijken
Druk 3 seconden lang op de Aan/Uit-knop –
•
het LED-licht (afb. 1/pos. 1) brandt continu.
Druk nog eens op de Aan/Uit-knop – het LED-
•
licht brandt als „stroboscoop flitser“.
Druk nog eens op de Aan/Uit-knop – het LED-
•
licht brandt als „SOS“ morse licht.
Als er nog eens op wordt gedrukt, dan wordt
•
het LED-licht weer uitgeschakeld.
7. Uitgangen
Voorzichtig! Houd rekening met de spannings-
en stroomwaarde van het te voeden apparaat
(bijv. GSM, notebook). Neem de handleiding van
het apparaat in acht.
De voedingsduur varieert al naargelang de
laadtoestand van de Jump Start Power Bank, de
krachtontneming en gebruiksintensiteit van het
aangesloten apparaat. Als een restlading van
25% (1 LED brandt) wordt bereikt, dan moet de
accu worden geladen (z. hoofdstuk 5). De USB
aansluitingen kunnen parallel worden gebruikt.
Zorg ervoor dat de geaccumuleerde uitgangsstroom 5 A niet overschrijdt.
7.1 Laden/Inzetten van apparaten met USB
aansluiting
a) 5V/2A USB uitgang
1. Verbind een voorhanden (of de meegeleverde 2in1) USB aansluitkabel met de USB
aansluiting (afb. 1/pos. 2) van de Jump Start
Power Bank en vervolgens met het te voeden
apparaat (max. 2A).
2. Druk op de Aan/Uit-knop (afb. 1/pos. 5).
b) „OUT 5V/9V“ USB uitgang (afb. 3)
Aanwijzing: Als het laden aan deze uitgang niet
functioneert, dan wordt het apparaat of de kabel
niet ondersteund. Gebruik in dit geval voor het
laden de 5V DC / 2A USB uitgang zoals hiervoor
beschreven.
1. Verbind de meegeleverde 2in1 USB kabel
(afb. 2b) met de „OUT 5V/9V“ USB aansluiting (afb. 1/pos. 3) van de Jump Start Power
Bank en vervolgens met het te voeden apparaat.
2. Druk op de Aan/Uit-knop (afb. 1/pos. 5).
3. Aan de USB uitgang worden de voor het
laden benodigde parameters vastgesteld en
het aangesloten apparaat wordt geladen. Afhankelijk van de laadkabel en het te laden apparaat kan de laadduur aan de „OUT 5V/9V“
USB uitgang korter zijn in vergelijking met de
„OUT 5V/2A“ USB uitgang.
7.2 Inzetten van 19 V gelijkspanningsapparaten (afb. 4)
1. Verbind de meegeleverde verbindingskabel
(afb. 2d/pos. 13) met de 19 V gelijkspanningsuitgang (afb. 1/pos. 7) van de Jump Start
Power Bank en vervolgens eveneens met
behulp van de meegeleverde stekker (afb.
2d/pos. 14) met het apparaat dat werkt op 19
V gelijkspanning. De maximale krachtontneming mag 3,5 A niet overschrijden.
2. Druk op de Aan/Uit-knop (afb. 1/pos. 5).
7.3 Inzetten van apparaten die werken op 12
V gelijkspanning
1. Verbind een passende verbindingskabel met
de 12 V gelijkspanningsuitgang (afb. 1/pos. 6)
van de Jump Start Power Bank en vervolgens
- 64 -

NL
met het apparaat dat werkt op 12 V gelijkspanning. De maximale krachtontneming
mag 10 A niet overschrijden.
2. Druk op de Aan/Uit-knop (afb. 1/pos. 5).
8. Starthulp voor de auto
De 12V starthulpinrichting biedt een welkome
hulp in het geval van startproblemen op grond van
onvoldoende accucapaciteit.
Waarschuwing! Tijdens een starthulpproces
mag alleen de startkabel zijn aangesloten. De voeding van een aangesloten apparaat, bijv. via de
USB aansluiting, moet eerst worden onderbroken.
Wij wijzen erop dat de voertuigen zijn uitgerust
met tal van elektronische modules. Gelieve de instructies in de handleidingen voor auto, radio enz.
in acht te nemen.
Waarschuwing! Nooit verbinden met de carrosserie van het voertuig!
Controleer of de stekker van de startkabel
•
vast is verbonden met de contactdoos van
het apparaat. Als de verbinding tijdens het
starthulpproces los zit, dan kan de steekverbinding door de hoge stroom smelten.
De polen van de accu van het voertuig moe-
•
ten schoon zijn en de klemmen van de startkabel vast op de accupolen zitten.
Tijdens het starthulpproces de klemmen van
•
de startkabel niet met elkaar verbinden –
kortsluiting.
Vergewis u ervan dat minstens 3 LEDs van de
accucapaciteitsindicatie branden. De temperatuur
van het apparaat moet in het bereik van + 5 °C - +
40 °C, de omgevingstemperatuur bij het starthulpproces in het bereik van – 15 °C - + 40 °C liggen.
Gebruik uitsluitend de meegeleverde startkabel
(afb. 2c).
1. Afb. 5: Klap de afdekking van de aansluiting
van de startkabel (afb. 1/pos. 8) open, schuif
de daaronder liggende afdekking opzij en
sluit de startkabel aan op het apparaat.
2. Afb. 5a: Sluit de rode kabel aan op de
pluspool en de zwarte kabel aan de minpool
van de accu van het voertuig. Zorg ervoor
dat de klemmen goed vastzitten. Verder moet
men erop letten dat de Jump Start Power
Bank goed in de motorruimte wordt geplaatst
en niet door schokken tijdens het starten kan
vallen. De Jump Start Power Bank mag niet
in de buurt komen van bewegende delen.
Volgende punten 3. – 6. beschrijven de statusmeldingen van de startkabel. Gelieve de
aanwijzingen te volgen.
3. Afb. 5a: De groene LED aan de startkabel
brandt. Alle voorhanden verbindingen zijn in
orde en het voertuig kan binnen 30 seconden
worden gestart.
4. Afb. 5b: De groene LED aan de startkabel
knippert. Alle voorhanden verbindingen
zijn in orde, maar de laadtoestand van de
accu van het voertuig is zeer laag. Druk op
de toets „Boost“ aan de startkabel en wacht
tot de groene LED continu brandt. Start het
voertuig binnen 30 seconden. Wees bijzonder
voorzichtig, aangezien door indrukken van de
toets „Boost“ in de Jump Start Power Bank
geïntegreerde veiligheidsinrichtingen buiten
werking worden gesteld.
5. Afb. 5c: De rode LED aan de startkabel
brandt en er weerklinkt een waarschuwingstoon. De klemmen van de startkabel
zijn verkeerd gepoold aangesloten aan de
accu van het voertuig. Verwijder de klemmen
en sluit de klemmen met inachtneming van de
polariteit en de bovenstaande aanwijzingen
opnieuw aan op de accu van het voertuig.
6. Afb. 5d: Er brandt geen LED aan de start-
kabel noch weerklinkt er een waarschuwingstoon. Controleer alle verbindingen,
vooral de juiste polariteit van de aan de accu
van het voertuig aangesloten klemmen. Als
alle voorhanden verbindingen in orde zijn,
dan is de oorzaak waarschijnlijk een defecte
accu. Druk op de toets „Boost“ aan de startkabel en wacht tot de groene LED continu
brandt. Start het voertuig binnen 30 seconden.
Wees bijzonder voorzichtig, aangezien door
indrukken van de toets „Boost“ in de Jump
Start Power Bank geïntegreerde veiligheidsinrichtingen buiten werking worden gesteld.
Vervang de beschadigde accu van het voertuig zo snel mogelijk.
7. Zodra de motor loopt verwijdert u de startkabel van het apparaat en vervolgens eerst
de rode klem en dan de zwarte klem van de
accu.
8. Laat de motor lopen. De dynamo laadt de
ingebouwde accu.
Bij zeer lage temperaturen is het mogelijk dat
meerdere startpogingen noodzakelijk zijn om
het voertuig te starten. De wachttijd tussen twee
- 65 -

NL
startpogingen bedraagt een minuut. Verwijder het
apparaat na succesvolle starthulp indien mogelijk
binnen 30 seconden.
Het aantal mogelijke startpogingen (max. 10) is
afhankelijk van de omgevingstemperatuur, de
toestand van de te starten accu en van de laadtoestand van de Jump Start Power Bank accu.
9. Reiniging, onderhoud en
bestellen van wisselstukken
Gevaar!
Trek vóór alle reinigingswerkzaamheden de
netstekker uit het stopcontact.
Verwijder alle aangesloten kabels van de Jump
Start Power Bank.
9.1 Reiniging
Hou de veiligheidsinrichtingen, de ventila-
•
tiespleten en het motorhuis zo veel mogelijk
vrij van stof en vuil. Wrijf het toestel met een
schone doek af of blaas het met perslucht bij
lage druk schoon.
Het is aan te bevelen het toestel direct na elk
•
gebruik te reinigen.
Maak het apparaat regelmatig schoon
•
met een vochtige doek. Gebruik geen
reinigings- of oplosmiddelen; die zouden de
kunststofcomponenten van het toestel kunnen aantasten. Let er goed op dat geen water
in het toestel terechtkomt. Door binnendringen van water in een elektrische apparatuur
verhoogt het risico van een elektrische schok.
9.2 Onderhoud
In het toestel zijn er geen andere te onderhouden
onderdelen.
10. Reparatie
Bij eventueel optredende storingen het apparaat
alleen laten controleren door een geautoriseerde
vakman resp. door een werkplaats van de klantendienst.
11. Verwijdering en recyclage
Het toestel bevindt zich in een verpakking om
transportschade te voorkomen. Deze verpakking
is een grondstof en bijgevolg herbruikbaar of kan
naar de grondstofkringloop worden teruggevoerd. Het toestel en zijn accessoires bestaan uit
diverse materialen, zoals b.v. metaal en kunststof.
Defecte toestellen horen niet thuis in het huisvuil.
Om zich van het toestel naar behoren te ontdoen
dient het naar een geschikte verzamelplaats te
worden gebracht. Als u geen verzamelplaats kent
gelieve u dan bij de gemeente te informeren.
12. Opslag
Bewaar het apparaat en het toebehoren op een
donkere, droge en vorstvrije plaats. De optimale
opslagtemperatuur ligt tussen +5 en 40 °C.
Neem de bijgevoegde veiligheidsinstructies met
uitvoerige aanwijzingen over de opslag in acht.
Aangezien de accu reageert op te hoge (boven
+40 °C) resp. op te lage temperaturen (onder
0°C), mag u het apparaat niet permanent opbergen in een voertuig. Voor het transport in een voertuig plaatst u het op een geschikte plaats, opdat
het bij veranderingen van snelheid en/of richting
niet in beweging kan komen. Bewaar het apparaat
in de originele verpakking.
9.3 Bestellen van wisselstukken:
Gelieve bij het bestellen van wisselstukken volgende gegevens te vermelden:
Type van het toestel
•
Artikelnummer van het toestel
•
Ident-nummer van het toestel
•
Wisselstuknummer van het benodigd stuk
•
Actuele prijzen en info vindt u terug onder
www.isc-gmbh.info
- 66 -

NL
13. Schema voor foutopsporing
Storing Mogelijke oorzaak Oplossing
Apparaat kan niet
worden ingeschakeld
Starthulp werkt niet - Accuspanning te laag
Alle LEDs knipperen
- Accuspanning te laag - Accu laden
- Aansluitingen aan het voertuig verwisseld
- Temperatuur buiten het temperatuurbereik
- Beveiliging tegen overbelasting
heeft gereageerd
- Apparaat te koud / warm
- Omgevingstemperatuur te laag/
hoog
- Accu laden
- Op polariteit letten en juist aansluiten
- Starthulp proberen binnen het temperatuurbereik
- Apparaat uitschakelen, controleren
op mogelijke overbelasting
- Temperatuur van het apparaat
+ 5 °C - + 40 °C aanhouden
- Omgevingstemperatuurbereik
– 15 °C - + 40 °C aanhouden
- 67 -

NL
Enkel voor EU-landen
Elektrisch gereedschap hoort niet bij het huisvuil thuis!
Volgens de Europese richtlijn 2012/19/EG op afgedankte elektrische en elektronische toestellen en
omzetting in nationaal recht dienen afgedankte elektrische gereedschappen afzonderlijk te worden verzameld en milieuvriendelijk te worden gerecycleerd.
Recyclagealternatief i.p.v. het toestel terug te sturen:
De eigenaar van het elektrische toestel is alternatief verplicht, i.p.v. het toestel terug te sturen, mede te
werken bij de behoorlijke recyclage in geval hij zich van het eigendom ontdoet. Het afgedankte toestel
kan hiervoor ook bij een verzamelplaats worden afgegeven die voor een verwijdering als bedoeld in de
wetgeving in zake recyclage en afvalverwerking zorgt. Hieronder vallen niet bij de afgedankte toestellen
gevoegde accessoires en hulpmiddelen zonder elektrische componenten.
Nadruk of andere reproductie van documentatie en geleidepapieren van de producten, geheel of gedeeltelijk, enkel toegestaan mits uitdrukkelijke toestemming van iSC GmbH.
Technische wijzigingen voorbehouden
- 68 -

NL
Service-informatie
Wij werken in alle landen die in het garantiebewijs zijn genoemd, samen met competente servicepartners, wier contactgegevens u kunt afl eiden uit het garantiebewijs. Deze staan voor alle diensten zoals
reparatie, het verschaff en van wisselstukken of slijtdelen of voor de aankoop van verbruiksmaterialen te
uwer beschikking.
U moet er rekening mee houden dat bij dit product de volgende delen onderhevig zijn aan een slijtage
door gebruik of een natuurlijke slijtage, resp. dat de volgende delen nodig zijn als verbruiksmaterialen.
Categorie Voorbeeld
Slijtstukken* Accu
Verbruiksmateriaal/verbruiksstukken*
Ontbrekende onderdelen
* niet verplicht bij de leveringsomvang begrepen!
Bij gebreken of defecten verzoeken wij u om de fout te melden op het internet onder www.isc-gmbh.info.
Gelieve te zorgen voor een nauwkeurige beschrijving van de fout en daarbij in elk geval de volgende
vragen te beantwoorden:
Heeft het toestel reeds eenmaal gewerkt of was het vanaf het begin defect?
•
Is u iets opgevallen voordat het defect zich voordeed (symptoom vóór het defect)?
•
Welke foutieve werkwijze vertoont het toestel volgens u (hoofdsymptoom)?
•
Beschrijf deze foutieve werkwijze.
- 69 -

NL
Garantiebewijs
Geachte klant,
onze producten worden onderworpen aan een strenge kwaliteitscontrole. Mocht dit apparaat echter ooit
niet naar behoren functioneren, spijt dit ons ten zeerste en vragen u zich te wenden tot onze servicedienst onder het adres vermeld op dit garantiebewijs. Wij staan ook graag telefonisch tot uw dienst via
het vermelde servicetelefoonnummer. Voor eisen in verband met het recht garantie geldt het volgende:
1. Deze garantievoorwaarden zijn uitsluitend gericht aan de gebruikers, d.w.z. natuurlijke personen die
dit product niet in het kader van hun ambachtelijke noch van een andere zelfstandige activiteit willen
gebruiken. Deze garantievoorwaarden regelen aanvullende garantieprestaties, die de hieronder genoemde fabrikant kopers van zijn nieuwe apparaten toezegt in aanvulling tot de wettelijke garantie.
Uw wettelijke garantieclaims blijven onaangetast door deze garantie. Onze garantieprestatie is voor
u gratis.
2. De garantieprestatie geldt uitsluitend voor gebreken aan een door u aangekocht nieuw apparaat
van de hieronder genoemde fabrikant die aantoonbaar berusten op een materiaal- of productiefout,
en is naar onze keuze beperkt tot het verhelpen van zulke gebreken aan het apparaat of de vervanging ervan.
Wij wijzen erop dat onze apparaten overeenkomstig hun bestemming niet ontworpen zijn voor commercieel, ambachtelijk of industrieel gebruik. Van een garantiecontract is derhalve geen sprake, als
het apparaat binnen de garantieperiode in commerciële, ambachtelijke of industriële bedrijven werd
ingezet of aan een daarmee gelijk te stellen belasting werd blootgesteld.
3. Van onze garantie zijn uitgesloten:
- Schade aan het apparaat als gevolg van niet-inachtneming van de montagehandleiding of op
grond van ondeskundige installatie, als gevolg van niet-inachtneming van de gebruiksaanwijzing
(zoals bijv. door aansluiting aan een verkeerde netspanning of stroomsoort) of niet-inachtneming
van de onderhouds- en veiligheidsvoorschriften, door blootstelling van het apparaat aan abnormale
omgevingsvoorwaarden of door nalatig onderhoud en verzorging.
- Schade aan het apparaat als gevolg van misbruik of ondeskundige toepassingen (zoals bijv. overbelasting van het apparaat of de inzet van niet toegelaten gereedschappen of toebehoren), binnendringen van vreemde voorwerpen in het apparaat (zoals bijv. zand, stenen of stof, transportschade),
gebruik van geweld of als gevolg van externe invloeden (zoals bijv. schade door vallen).
- Schade aan het apparaat of aan delen van het apparaat die valt te herleiden tot slijtage als gevolg
van gebruik, en als gevolg van normale of andere natuurlijke slijtage.
4. De garantieperiode bedraagt 24 maanden en gaat in op de datum van aankoop van het apparaat.
Garantieclaims dienen voor het verloop van de garantieperiode binnen de twee weken na het vaststellen van het defect geldend te worden gemaakt. Het indienen van garantieclaims na verloop van
de garantieperiode is uitgesloten. De herstelling of vervanging van het apparaat leidt niet tot een
verlenging van de garantieperiode noch wordt door deze prestatie een nieuwe garantieperiode voor
het apparaat of voor eventueel ingebouwde wisselstukken op gang gebracht. Dit geldt ook bij het ter
plaatse uitvoeren van een serviceactiviteit.
5. Gelieve om een garantieclaim in te dienen het defecte apparaat aan te melden onder: www.iscgmbh.info. Houd het aankoopbewijs of een ander bewijs van uw aankoop van het nieuwe apparaat
bij de hand. Apparaten die zonder bijhorende bewijzen of zonder typeplaatje worden teruggestuurd,
worden op grond van de ontbrekende mogelijkheid om het apparaat toe te kennen uitgesloten van
de garantieprestatie. Valt het defect van het apparaat binnen onze garantieprestatie, dan bezorgen
wij u per omgaande een gerepareerd of nieuw apparaat terug.
Uiteraard staan wij ook tot u dienst om, mits betaling van de kosten, defecten van het apparaat te verhelpen die buiten de garantieomvang vallen. Te dien einde stuurt u het apparaat aan ons serviceadres
op.
Voor slijtstukken, verbruiksmateriaal en ontbrekende onderdelen wordt verwezen naar de beperkingen
van deze garantie conform de service-informatie van deze handleiding.
- 70 -

E
Peligro!
Al usar aparatos es preciso tener en cuenta una
serie de medidas de seguridad para evitar lesiones o daños. Por este motivo, es preciso leer
atentamente este manual de instrucciones/advertencias de seguridad. Guardar esta información
cuidadosamente para poder consultarla en cualquier momento. En caso de entregar el aparato
a terceras personas, será preciso entregarles,
asimismo, el manual de instrucciones/advertencias de seguridad. No nos hacemos responsables
de accidentes o daños provocados por no tener
en cuenta este manual y las instrucciones de
seguridad.
1. Instrucciones de seguridad
Encontrará las instrucciones de seguridad correspondientes en el prospecto adjunto.
Peligro!
Lea todas las instrucciones de seguridad e
indicaciones. El incumplimiento de dichas inst-
rucciones e indicaciones puede provocar descargas, incendios y/o daños graves. Guarde todas
las instrucciones de seguridad e indicaciones para posibles consultas posteriores.
Los niños no deben usar el aparato. Vigilar a
los niños para asegurarse de que no jueguen
con el aparato. Los niños no pueden limpiar ni
realizar trabajos de mantenimiento en el aparato.
El aparato no puede ser utilizado por personas
cuyas capacidades estén limitadas física, sensorial o psíquicamente, o que no dispongan de la
experiencia y/o los conocimientos necesarios a
no ser que estén vigiladas o hayan recibido instrucciones de una persona que se responsabilice
de ellos.
Explicación de símbolos (fi g. 6)
D = Clase de protección II del aparato
E = Solo para usar en interiores secos
F = ¡Atención! ¡Leer las instrucciones antes de
utilizarlo!
Texto en el aparato y cable de ayuda de arranque
¡Atención! ¡Leer las instrucciones antes de utilizarlo!
1. No pulsar nunca la tecla Boost antes de que
esté conectada la batería del coche.
2. No conectar nunca las pinzas entre sí: ¡Cortocircuito y peligro de sufrir daños!
3. Ayuda de arranque solo para coche de 12 V,
pinza roja al polo de la batería „+“, pinza negra al polo de la batería „-“.
4. LED verde = arrancar el motor en los próximos 30 segundos.
5. LED rojo + señal de aviso = polaridad de la
batería incorrecta (ver 3.)
6. LED verde parpadea + señal de aviso = „pulsar la tecla „Boost“ y arrancar el motor en los
próximos 30 segundos.
7. Ningún LED, ninguna señal de aviso = comprobar la conexión al aparato, pulsar la tecla
„Boost“ y arrancar el motor en los próximos
30 segundos.
¡Aviso!
1. Mantener el aparato alejado de los niños.
2. No abrir el aparato, ¡peligro de sufrir daños!
3. Si se encienden menos de 3 LED no se podrá utilizar la ayuda de arranque.
4. Si el motor no arranca en los siguientes 5
segundos, concluir el proceso de arranque.
Esperar 1 minuto para volver a repetir el proceso.
2. Descripción del aparato y
volumen de entrega
2.1 Descripción del aparato (fi g. 1)
1. Luz LED
2. Salida USB 5V máx. 2A
3. Salida USB 5V/9V
4. Hembrilla de carga 15V CC / 1A
5. Botón ON/OFF
6. Salida de tensión continua 12V máx. 10 A
7. Salida de tensión continua 19V máx. 3,5 A
8. Conexión para el cable de ayuda de arranque
9. LED indicador de la capacidad de la batería
2.2 Volumen de entrega
Sirviéndose de la descripción del volumen de
entrega, comprobar que el artículo esté completo.
Si faltase alguna pieza, dirigirse a nuestro Service Center o a la tienda especializada más cercana en un plazo máximo de 5 días laborales tras
la compra del artículo presentando un recibo de
compra válido. A este respeto, observar la tabla
de garantía de las condiciones de garantía que se
encuentran al fi nal del manual.
Abrir el embalaje y extraer cuidadosamente
•
el aparato.
Retirar el material de embalaje, así como los
•
dispositivos de seguridad del embalaje y para
- 71 -

E
el transporte (si existen).
Comprobar que el volumen de entrega esté
•
completo.
Comprobar que el aparato y los accesorios
•
no presenten daños ocasionados durante el
transporte.
Si es posible, almacenar el embalaje hasta
•
que transcurra el periodo de garantía.
Peligro!
¡El aparato y el material de embalaje no son
un juguete! ¡No permitir que los niños jueguen con bolsas de plástico, láminas y piezas pequeñas! ¡Riesgo de ingestión y asfi xia!
Arrancador de batería Power Bank
•
Cable de ayuda de arranque
•
USB cable de conexión 2 en 1 (Micro/Mini)
•
Cargador
•
Cable de conexión 19V
•
Juego de enchufes 19V
•
Carpeta archivadora
•
Manual de instrucciones original
•
Instrucciones de seguridad
•
3. Uso adecuado
El arrancador de batería Power Bank sirve para
cargar smartphones, cámaras, tablets, etc. También se puede utilizar a modo de linterna. También se pueden alimentar con tensión continua portátiles y consumidores de 12 V. Utilizando el cable
de ayuda de arranque adjunto, el aparato también
se puede emplear como auxiliar de baterías de
arranque de 12 V (baterías de plomo) poco cargadas en vehículos con motores de gasolina con
una cilindrada de hasta 4000 cm
sel con una cilindrada de hasta 2000 cm
Utilizar la máquina sólo en los casos que se indican explícitamente como de uso adecuado. Cualquier otro uso no será adecuado. En caso de uso
inadecuado, el fabricante no se hace responsable
de daños o lesiones de cualquier tipo; el responsable es el usuario u operario de la máquina.
Tener en consideración que nuestro aparato no
está indicado para un uso comercial, industrial o
en taller. No asumiremos ningún tipo de garantía
cuando se utilice el aparato en zonas industriales, comerciales o talleres, así como actividades
similares.
3
y motores dié-
3
.
4. Características técnicas
Arrancador de batería Power Bank
Batería LiPo: ..........11,1 V – 3700 mAh – 41,1 Wh
Entrada: .......................................... .15 V CC/1 A
Tiempo de carga aprox.: ................................ 5 h
Salida USB „OUT: „5V/2A“: ...5 V CC / 2 A (máx.)
Salida USB „OUT: „5V/9V“:
................................................ 5 V CC/3 A (máx.)
................................................ 9 V CC/2 A (máx.)
Salida de tensión continua: .........19 V máx. 3,5 A
Salida de tensión continua: ..........12 V máx. 10 A
Corriente ayuda de
arranque: .....................200 A (5 s) / 400 A (máx.)
Temperatura ambiente en ayuda
de arranque: ............................... - 15°C - + 40 °C
Temperatura de
almacenamiento: .........................+ 5 °C - + 40 °C
Clase de protección: .........................................III
Cargador
Tensión nominal
de entrada: .........................100-240 V ~50/60 Hz
Tensión de salida nominal: .....................15 V d.c.
Corriente nominal de salida: ...........................1 A
5. Antes de la puesta en marcha
5.1 Cómo cargar el arrancador de batería
Power Bank con el cargador suministrado
Información relativa al cargador:
Este aparato podrá ser utilizado por niños a partir
de 8 años y personas cuyas capacidades estén
limitadas física, sensorial o psíquicamente o que
no dispongan de la experiencia o los conocimientos necesarios, siempre y cuando estén vigiladas
o hayan recibido formación o instrucciones sobre
el funcionamiento seguro del aparato y comprendan los posibles peligros. Está prohibido que los
niños jueguen con el aparato. Los niños no podrán realizar los trabajos de limpieza y mantenimiento a no ser que estén vigilados por un adulto.
Antes de conectar la máquina, asegurarse de
que los datos de la placa de identifi cación coinci-
dan con los datos de la red eléctrica.
¡Atención! Desenchufar el aparato antes de realizar ajustes. Cargar el aparato exclusivamente
con el cargador suministrado.
- 72 -

E
Tener en cuenta las instrucciones de seguridad
adjuntas con advertencias detalladas sobre el
proceso de carga.
No utilizar las salidas durante el proceso de carga.
Conectar el cargador suministrado (fig. 2a)
•
con la hembrilla de carga „Input 15V 1A“ (fig.
1/pos. 4) del aparato.
Enchufar el cargador en la toma de corriente
•
para cargar la batería. Durante la carga se
encienden (parpadean) los LED (fig. 1/pos. 9)
y muestran el estado de carga. Una vez finalizada la carga, se encienden todos los LED.
El tiempo de carga cuando la batería está
•
vacía es de aprox. 5 horas. Es posible que la
batería se caliente durante el proceso de carga. Esto es normal.
5.2. Indicador de capacidad de batería
Pulsar brevemente el interruptor ON/OFF (fi g. 1/
pos. 5). El LED de la indicación de capacidad de
la batería (fi g. 1/pos. 9) se enciende. El número
de LED encendidos indica el estado actual de
carga de la batería Li-Po integrada.
100 % cargada = 4 LED luz continua
>25 % cargada = 1 LED luz continua
<25 % cargada = sin luz continua
6. Luz LED
¡Cuidado! No mirar directamente a la luz.
Pulsar durante 3 segundos el interruptor ON/
•
OFF - la luz LED se enciende de forma duradera (fig. 1/pos. 1).
Volver a pulsar el interruptor ON/OFF - la luz
•
LED se enciende como una sirena.
Volver a pulsar el interruptor ON/OFF - la luz
•
LED se enciende con la luz morse de „SOS“.
Si se vuelve a pulsar se apaga de nuevo la
•
luz LED.
7. Salidas
¡Cuidado! Tener en cuenta los valores de ten-
sión y corriente de los aparatos a alimentar (p.
ej., móvil, portátil). Consultar sus manuales de
instrucciones.
La duración de suministro varía en función del
estado de carga del arrancador de batería Power
Bank, de la unidad energética, del consumo y de
la intensidad de uso del aparato de conexión. Cuando se alcance una carga restante del 25 % (1
LED encendido), cargar la batería (ver apartado
5.). Las conexiones USB se pueden utilizar en
paralelo. Asegurarse de no superar la corriente
de salida acumulada de 5 A.
7.1 Cómo cargar/operar aparatos con conexión USB
a) Salida USB de 5V/2A
1. Conectar el cable de conexión USB (o en 2
en 1 suministrado) con la conexión USB (fi g.
1/pos 2) del arrancador de batería Power
Bank y, a continuación, con el aparato a cargar (máx. 2A).
2. Pulsar el interruptor ON/OFF (fi g. 1/pos 5).
b) Salida USB „OUT 5V/9V“ (Fig. 3)
Aviso: si la carga no funciona en esta salida, el
aparato o el cable no es compatible. En tal caso,
utilizar para la carga la salida USB 5V CC / 2A
como se ha descrito anteriormente.
1. Conectar el cable USB 2 en 1 (fi g. 2b) a la
conexión USB „OUT 5V/9V“ (fi g. 1/pos. 3) del
arrancador de batería Power Bank y, a continuación, con el aparato a cargar.
2. Pulsar el interruptor ON/OFF (fi g. 1/pos 5).
3. En la salida USB se determinan los parámetros para cargar y se carga el aparato
conectado. En función del cable de carga y
del aparato a cargar, el tiempo de carga en la
salida USB „OUT 5V/9V“ se puede acortar en
comparación con la salida USB „OUT 5V/2A“.
7.2 Cómo operar aparatos de tensión continua de 19 V (fi g. 4)
1. Conectar el cable de conexión suministrado
(fi g. 2d/pos. 13) con la salida de tensión con-
tinua de 19 V (fi g. 1/pos. 7) del arrancador
de batería Power Bank y a continuación, y si
es necesario utilizando uno de los enchufes
suministrados (fi g. 2d/pos. 14), con el aparato
de tensión continua de 19 V. El consumo máximo de corriente no debe de superar los 3,5
A.
2. Pulsar el interruptor ON/OFF (fi g. 1/pos 5).
7.3 Cómo operar aparatos de tensión continua de 12 V
1. Conectar el cable de conexión con la salida
de tensión continua de 12 V (fi g. 1/pos. 6) del
arrancador de batería Power Bank, y a continuación con el aparato de tensión continua
de 12V. El consumo máximo de corriente no
- 73 -

E
debe de superar los 10 A.
2. Pulsar el interruptor ON/OFF (fi g. 1/pos 5).
8. Ayuda de arranque para el
vehículo
El dispositivo de ayuda de arranque de 12 V
ofrece una gran ayuda en caso de difi cultades al
arrancar por falta de carga de la batería.
Aviso: Durante el proceso de ayuda de arranque
solo puede estar conectado el cable de ayuda de
arranque. Por este motivo, es preciso interrumpir
previamente el posible suministro de un aparato
de conexión, por ejemplo a través de una conexión de USB.
Advertimos de que los vehículos están dotados
de sufi cientes componentes eléctricos. Es pre-
ciso observar las advertencias que se hallan en
los manuales del vehículo, de la radio, etc.
Aviso: ¡No conectar nunca con la carrocería del
vehículo!
Asegurarse de que el enchufe con el cable de
•
ayuda de arranque esté bien introducido en
la toma de corriente del aparato. Si estuviese
suelta, el enchufe se podría fundir debido a la
elevada corriente.
Los polos de la batería de coche deben de
•
estar limpios y las pinzas del cable de ayuda
de arranque estar bien sujetas a los polos de
la batería.
Durante el proceso de ayuda de arranque es
•
preciso no conectar las pinzas del cable entre
sí, se podría producir un cortocircuito.
Asegurarse de que al menos 3LED del indicado
de capacidad de la batería estén encendidos. La
temperatura del aparato se debe de encontrar
entre + 5 °C y + 40 °C, la temperatura ambiente
durante el proceso de ayuda de arranque entre –
15 °C - y 40 °C. Emplear exclusivamente el cable
de ayuda de arranque suministrado (fi g. 2c).
1. Fig. 5: Abrir la tapa de la conexión del cable
de ayuda de arranque (fi g. 1/pos. 8), poner
hacia un lado la tapa de abajo y conectar el
cable de ayuda de arranque al aparato.
2. Fig. 5a: Conectar el cable rojo al polo + y el
cable negro al polo - de la batería del coche
y asegurar que las pinzas estén bien sujetas.
Asegurarse también de que el arrancador de
batería Power Bank esté bien colocado en el
compartimento del motor de manera que no
se pueda caer por las vibraciones del proceso de arranque. El arrancador de batería
Power Bank no debe entrar en contacto ni
estar al alcance de piezas móviles. Punto 3
a continuación. – 6. Describe los mensajes
de estado del cable de ayuda de arranque.
Seguir las instrucciones.
3. Fig. 5a: Se enciende el LED verde en el
cable de ayuda de arranque. Todas las
conexiones están bien y el vehículo se puede
arrancar en 30 segundos.
4. Fig. 5b: Parpadea el LED verde en el cable
de ayuda de arranque. Todas las conexiones están bien puestas, pero la batería del
coche está muy poco cargada. Pulsar la tecla
„Boost“ en el cable de ayuda de arranque
y esperar a que el LED verde se encienda.
Arrancar el coche en los siguientes 30 segundos. Tener especial cuidado puesto que
al pulsar la tecla „Boost“ en el arrancador de
batería Power Bank se ponen fuera de servicio los dispositivos de seguridad integrados.
5. Fig. 5c: El LED en el cable de ayuda de
arranque se enciende y se emite una
señal de aviso. Las pinzas del cable están
conectadas a la batería del coche con la polaridad incorrecta. Quitar las pinzas y volver a
conectarlas teniendo en cuenta la polaridad
de las instrucciones anteriores.
6. Fig. 5d: No se enciende ningún LED en el
cable de ayuda de arranque ni se emite
ninguna señal de aviso. Comprobar todas
las conexiones, especialmente que las pinzas
estén conectadas a la batería con la polaridad correcta. Si todas las conexiones están
bien, la causa es probablemente un defecto
de la batería del coche. Pulsar la tecla „Boost“
en el cable de ayuda de arranque y esperar
a que el LED verde se encienda. Arrancar el
coche en los siguientes 30 segundos.
Tener especial cuidado puesto que al pulsar
la tecla „Boost“ en el arrancador de batería
Power Bank se ponen fuera de servicio los
dispositivos de seguridad integrados. Cambiar la batería defectuosa lo antes posible.
7. En cuanto se arranque el motor, quitar el
cable de ayuda de arranque del aparato y, a
continuación en este orden: primero la pinza
roja y luego la pinza negra de la batería de
coche.
8. Dejar el motor en marcha. El dínamo carga la
batería incorporada.
- 74 -

E
Si hace mucho frío, es posible que sea necesario
realizar varios intentos de arranque para arrancar
el coche. Es preciso esperar un minuto entre intento e intento. Después de arrancarlo con éxito,
retirar el aparato a ser posible en los siguientes
30 segundos.
El número de los posibles intentos de ayuda de
arranque (máx. 10) depende de la temperatura
ambiente, del estado de la batería a arrancar y
del estado de carga de la batería del arrancador
de batería Power Bank.
9. Mantenimiento, limpieza y pedido
de piezas de repuesto
Peligro!
Desenchufar el aparato siempre antes de realizar
cualquier trabajo de limpieza.
Quitar todos los cables del arrancador de batería
Power Bank.
9.1 Limpieza
Reducir al máximo posible la suciedad y
•
el polvo en los dispositivos de seguridad,
las rendijas de ventilación y la carcasa del
motor. Frotar el aparato con un paño limpio o
soplarlo con aire comprimido manteniendo la
presión baja.
Se recomienda limpiar el aparato tras cada
•
uso.
Limpiar regularmente el aparato con un paño
•
húmedo. No utilizar productos de limpieza o
disolventes ya que se podrían deteriorar las
piezas de plástico del aparato. Es preciso tener en cuenta que no entre agua en el interior
del aparato. Si entra agua en el aparato eléctrico existirá mayor riesgo de una descarga
eléctrica.
9.2 Mantenimiento
No hay que realizar el mantenimiento a más
piezas en el interior del aparato.
10. Reparación
En caso de que se produjeran averías, llevar el
aparato a un especialista autorizado o un taller de
servicio técnico.
11. Eliminación y reciclaje
El aparato está protegido por un embalaje para
evitar daños producidos por el transporte. Este
embalaje es materia prima y, por eso, se puede
volver a utilizar o llevar a un punto de reciclaje. El
aparato y sus accesorios están compuestos de
diversos materiales, como, p. ej., metal y plástico.
Los aparatos defectuosos no deben tirarse a la
basura doméstica. Para su eliminación adecuada, el aparato debe entregarse a una entidad
recolectora prevista para ello. En caso de no
conocer ninguna, será preciso informarse en el
organismo responsable del municipio.
12. Almacenamiento
Guardar el aparato y sus accesorios en un lugar
oscuro, seco y protegido de las heladas. La temperatura de almacenamiento óptima se encuentra
entre los 5 y 40 ˚ C.
Tener en cuenta las instrucciones de seguridad
adjuntas con advertencias detalladas sobre el almacenamiento. La batería reacciona a temperaturas excesivas (por encima de los 40°C), así como
a temperaturas demasiado bajas (por debajo de
los 0°C), por lo que se recomienda no guardar
el aparato de manera permanente en un coche.
Para transportarlo en un vehículo, colocarlo en un
lugar adecuado para que no se pueda mover en
caso de que se produzcan cambios bruscos de
velocidad y/o dirección. Guardar el aparato en su
embalaje original.
9.3 Pedido de piezas de recambio:
Al solicitar recambios se indicarán los datos siguientes:
Tipo de aparato
•
No. de artículo del aparato
•
No. de identidad del aparato
•
No. del recambio de la pieza necesitada.
•
Encontrará los precios y la información actual en
www.isc-gmbh.info
- 75 -

E
13. Plan para localización de averías
Avería Posibles causas Solución
El aparato no se
puede conectar
La ayuda de arranque no funciona
- La tensión de la batería es demasiado baja
- La tensión de la batería es demasiado baja
- Cargar la batería
- Cargar la batería
Si todos los LED
parpadean
- Conexiones incorrectas en el coche
- Temperatura fuera del margen de
temperatura
- La protección contra sobrecarga ha
saltado
- Aparato excesivamente frío/caliente
- La temperatura ambiente es demasiado baja/excesiva
- Comprobar la polaridad y conectar
correctamente
- Intentar la ayuda de arranque dentro del margen de temperatura
- Apagar el aparato, comprobar posibles sobrecargas
- Mantener la temperatura del aparato entre + 5 °C y + 40 °C.
- Mantener el margen de temperatura ambiente entre – 15 °C y + 40 °C
- 76 -

E
Sólo para países miembros de la UE
No tirar herramientas eléctricas en la basura casera.
Según la directiva europea 2012/19/CE sobre aparatos usados electrónicos y eléctricos y su aplicación
en el derecho nacional, dichos aparatos deberán recojerse por separado y eliminarse de modo ecológico para facilitar su posterior reciclaje.
Alternativa de reciclaje en caso de devolución:
El propietario del aparato eléctrico, en caso de no optar por su devolución, está obligado a reciclar adecuadamente dicho aparato eléctrico. Para ello, también se puede entregar el aparato usado a un centro
de reciclaje que trate la eliminación de residuos respetando la legislación nacional sobre residuos y
su reciclaje. Esto no afecta a los medios auxiliares ni a los accesorios sin componentes eléctricos que
acompañan a los aparatos usados.
Sólo está permitido copiar la documentación y documentos anexos del producto, o extractos de los
mismos, con autorización expresa de iSC GmbH.
Nos reservamos el derecho a realizar modifi caciones técnicas
- 77 -

E
Información de servicio
En todos los países mencionados en el certifi cado de garantía disponemos de distribuidores compe-
tentes cuyos datos de contacto podrán consultar en dicho certifi cado. Dichos distribuidores están a su
disposición para cualquier asunto relacionado con el servicio como reparación, suministro de piezas de
repuesto y desgaste, o con respecto a los materiales de consumo.
Es preciso tener en cuenta, que las siguientes piezas de este producto se someten a desgaste natural
o provocado por el uso o que se necesitan las siguientes piezas como materiales de consumo.
Categoría Ejemplo
Piezas de desgaste* Batería
Material de consumo/Piezas de consumo*
Falta de piezas
*¡no tiene por qué estar incluido en el volumen de entrega!
En caso de defi ciencia o fallo, rogamos que lo registre en la página web www.isc-gmbh.info. Describa
exactamente el fallo y responda siempre a las siguientes preguntas:
¿Ha funcionado el aparato en algún momento o estaba defectuoso desde el principio?
•
¿Le ha llamado algo la atención antes de surgir el fallo (indicio antes del fallo)?
•
¿Qué fallo de funcionamiento le parece que presenta el aparato (indicio principal)?
•
Describa ese fallo en el funcionamiento.
- 78 -

E
Certifi cado de garantía
Estimado cliente:
Nuestros productos están sometidos a un estricto control de calidad. No obstante, lamentaríamos que
este aparato dejara de funcionar correctamente, en tal caso, le rogamos que se dirija a nuestro servicio
de atención al cliente en la dirección indicada en la parte inferior de la presente tarjeta de garantía. Con
mucho gusto le atenderemos también telefónicamente en el número de servicio indicado a continuación. Para hacer válido el derecho de garantía, proceda de la siguiente forma:
1. Estas condiciones de garantía van dirigidas exclusivamente a los consumidores, es decir, personas
naturales que no desean emplear este producto en el marco de su actividad comercial ni autónoma. Estas condiciones de garantía regulan prestaciones adicionales de garantía que el fabricante
abajo mencionado se compromete a otorgar, de manera adicional a la garantía legal, a los compradores de sus nuevos aparatos. Las prestaciones de garantía que le corresponden conforme a ley
no se ven afectadas por la presente. Nuestra prestación de garantía es gratuita para usted.
2. La garantía se extiende exclusivamente a defectos en un aparato nuevo adquirido por usted del
fabricante abajo mencionado, ocasionados por fallos de material o de producción, y está limitada,
según nuestra elección, a la reparación de los defectos o al cambio del aparato.
Es preciso tener en consideración que nuestro aparato no está indicado para un uso comercial,
industrial o en taller. Por lo tanto, no procederá un contrato de garantía cuando se utilice el aparato
dentro del periodo de garantía en zonas industriales, comerciales o talleres, así como actividades
similares.
3. Nuestra garantía no cubre:
- Daños en el aparato ocasionados por la no observancia de las instrucciones de montaje o por una
instalación no profesional, no observancia de las instrucciones de uso (como, p. ej., conexión a una
tensión de red o corriente no indicada) o la no observancia de las disposiciones de mantenimiento
y seguridad o por la exposición del aparato a condiciones anormales del entorno o por la falta de
cuidado o mantenimiento.
- Daños en el aparato ocasionados por aplicaciones impropias o indebidas (como, p. ej., sobrecarga del aparato o uso de herramientas o accesorios no homologados), introducción de cuerpos
extraños en el aparato (como, p. ej., arena, piedras o polvo, daños producidos por el transporte),
uso violento o infl uencias externa (como, p. ej., daños por caídas).
- Daños en el aparato o en piezas del aparato provocados por el desgaste natural, habitual o producido por el uso.
4. El periodo de garantía es de 24 meses y comienza en la fecha de la compra del aparato. El derecho
de garantía debe hacerse válido, antes de fi nalizado el plazo de garantía, dentro de un periodo de
dos semanas una vez detectado el defecto. El derecho de garantía vence una vez transcurrido el
plazo de garantía. La reparación o cambio del aparato no conllevará ni una prolongación del plazo
de garantía ni un nuevo plazo de garantía ni para el aparato ni para las piezas de repuesto montadas. Esto también se aplica en el caso de un servicio in situ.
5. Para hacer efectivo su derecho a garantía, registre su aparato defectuoso en: www.isc-gmbh.info.
Tenga a mano el recibo de compra o cualquier otro comprobante que acredite la compra del aparato nuevo. La garantía no cubre aquellos aparatos que se envíen sin el comprobante pertinente
o sin la placa de identifi cación puesto que resulta difícil clasifi carlos del modo correspondiente. Si
nuestra prestación de garantía incluye el defecto aparecido en el aparato, recibirá de inmediato un
aparato reparado o nuevo de vuelta.
Naturalmente, también solucionaremos los defectos del aparato que no se encuentren comprendidos
o ya no se encuentren comprendidos en la garantía, en este caso contra reembolso de los costes. Para
ello, envíe el aparato a nuestra dirección de servicio técnico.
Para piezas de desgaste, de repuesto y falta de piezas nos remitimos a las limitaciones de esta garantía
conforme a la información de servicio de este manual de instrucciones.
- 79 -

FIN
Vaara!
Laitteita käytettäessä tulee noudattaa tiettyjä
turvallisuusvarotoimia tapaturmien ja vaurioiden
välttämiseksi. Lue sen vuoksi tämä käyttöohje /
nämä turvallisuusmääräykset huolellisesti läpi.
Säilytä ne hyvin, jotta niissä olevat tiedot ovat
myöhemminkin milloin vain käytettävissäsi. Jos
luovutat laitteen muille henkilöille, ole hyvä ja
anna heille myös tämä käyttöohje / nämä turvallisuusmääräykset laitteen mukana. Emme ota
mitään vastuuta tapaturmista tai vaurioista, jotka
ovat aiheutuneet tämän käyttöohjeen tai turvallisuusohjeiden noudattamisen laiminlyönnistä.
1. Turvallisuusmääräykset
Laitetta koskevat turvallisuusmääräykset löydät
oheistetusta vihkosesta.
Vaara!
Lue kaikki turvallisuusmääräykset ja ohjeet.
Jos turvallisuusmääräyksiä tai muita ohjeita ei
noudateta, saattaa tästä aiheutua sähköiskuja,
tulipaloja ja/tai vaikeita vammoja. Säilytä kaikki
turvallisuusmääräykset ja ohjeet myöhempää
tarvetta varten.
Lapset eivät saa käyttää tätä laitetta. Lapsia tulee
valvoa, jotta varmistetaan, etteivät he voi leikkiä
laitteella. Lapset eivät saa suorittaa puhdistus- tai
huoltotoimia. Henkilöt, joiden fyysiset, aistiperäiset tai henkiset kyvyt ovat rajoitetut, tai henkilöt,
joilla ei ole tarvittavia tietoja tai kokemusta, eivät
saa käyttää laitetta muuten kuin heistä vastuullisen henkilön valvonnassa ja ohjaamina.
Merkkien selitys (kuva 6)
D = Suojausluokan II laite
E = Käytetään vain kuivissa sisätiloissa
F = Huomio! Lue ohje ennen käyttöä!
Teksti laitteessa ja käynnistysapukaapelissa
Huomio! Lue ohje ennen käyttöä!
1. Älä koskaan paina boost-painiketta ennen
kuin auton akku on liitetty.
2. Älä koskaan yhdistä pinteitä keskenään - oikosulun ja tapaturman vaara.
3. Käynnistysapu vain 12 V -ajoneuvoon, punainen pinne akun „+“-napaan, musta pinne
akun „-“-napaan.
4. Vihreä LED = käynnistä moottori 30 sek:n
aikana.
5. Punainen LED + varoitusäänimerkki = akku
liitetty vääriin napoihin (katso 3.)
6. Vihreä LED vilkkuu + varoitusäänimerkki =
paina „boost“-painiketta ja käynnistä moottori
30 sek:n aikana.
7. LEDit eivät pala, ei merkkiääntä = tarkasta
pistoliitännät laitteeseen, paina „boost“-painiketta ja käynnistä moottori 30 sek:n aikana.
Varoitus!
1. Säilytä laite poissa lasten ulottuvilta!
2. Älä avaa laitetta - tapaturman vaara!
3. Jos vähemmän kuin 3 LEDiä palaa, ei käynnistysapua voi antaa.
4. Jos moottori ei käynnisty 5 sekunnin aikana,
keskeytä käynnistäminen. Odota 1 minuutin
ajan, ennen kuin toistat menettelyn.
2. Laitteen kuvaus ja toimituksen
sisältö
2.1 Laitteen kuvaus (kuva 1)
1. LED-valaisin
2. USB-antoliitäntä 5 V enint. 2 A
3. USB-antoliitäntä 5 V / 9 V
4. Latausholkki 15 V tasavirta / 1 A
5. Päälle-/pois-katkaisin
6. Tasajännite-antoliitäntä 12 V enint. 10 A
7. Tasajännite-antoliitäntä 19 V enint. 3,5 A
8. Virranantokaapelin liitäntä
9. Akun LED-tehonäyttö
2.2 Toimituksen sisältö
Tarkasta tässä kuvatun toimitusselostuksen avulla, että tuote on täysimääräinen. Jos osia puuttuu,
ota viimeistään 5. arkipäivänä oston jälkeen
yhteyttä asiakaspalveluumme tai siihen myyntipisteeseen, josta olet ostanut laitteen, ja esitä
vastaava ostotosite. Huomioi tässä myös tämän
ohjekirjan lopussa olevat asiakaspalveluohjeet ja
takuusuoritustaulukko.
Avaa pakkaus ja ota laite varovasti pakkauk-
•
sesta.
Poista pakkausmateiriaalit sekä pakkaus- ja
•
kuljetusvarmistukset (mikäli käytetty).
Tarkasta, onko toimitus täysilukuinen.
•
Tarksta, onko laitteessa ja varusteissa kulje-
•
tusvaurioita.
Säilytä pakkaus, mikäli mahdollista, takuua-
•
jan loppuun saakka.
- 80 -

FIN
Vaara!
Laite ja pakkausmateriaalit eivät ole lasten
leikkikaluja! Lapset eivät saa leikkiä muovipusseilla, kelmuilla tai pienillä osilla! Niistä
uhkaa nielaisu- ja tukehtumisvaara!
Käynnistysapu-virtavaraaja
•
Virranantokaapeli
•
2-in-1 -USB-liitäntäjohto (mikro/mini)
•
Latauslaite
•
Liitäntäjohto 19 V
•
Pistokesarja 19 V
•
Säilytyskansio
•
Alkuperäiskäyttöohje
•
Turvallisuusmääräykset
•
3. Määräysten mukainen käyttö
Käynnistysapu-virtavaraajaa käytetään älypuhelimien, kameroiden, tablettitietokoneiden jne.
lataamiseen. Sitä voidaan käyttää myös taskulamppuna. Lisäksi kannettaviin tietokoneisiin ja 12
V -kuluttajiin voidaan syöttää tasavirtaa. Mukana
toimitettua virranantokaapelia käyttämällä laitetta
voidaan käyttää myös heikkojen 12 V -starttiakkujen (lyijyhappoakkujen) käynnistysapuna
moottoriajoneuvoissa, joiden moottorin tilavuus
on bensiinimoottoreissa enintään 4000 ccm ja
dieselmoottoreissa enintään 2000 ccm.
Konetta saa käyttää ainoastaan sille määrättyyn
tarkoitukseen. Kaikkinainen tämän ylittävä käyttö
ei ole määräysten mukaista. Kaikista tästä aiheutuvista vahingoista tai loukkaantumisista on vastuussa laitteen omistaja/käyttäjä eikä suinkaan
sen valmistaja.
Ole hyvä ja ota huomioon, että laitteitamme ei ole
suunniteltu ja valmistettu käytettäväksi pienteollisuus- tai teollisuustarkoituksiin. Emme siksi ota
mitään vastuuta vaurioista, jos laitetta käytetään
pienteollisuus-, käsityöläis- tai teollisuustyöpaikoilla tai näihin verrattavissa olevissa toimissa.
4. Tekniset tiedot
Käynnistysapu-virtavaraaja
Li-Po-akku: ............11,1 V – 3700 mAh – 41,1 Wh
Tuloliitäntä: ........................... 15 V vaihtovirta /1 A
Latausaika (n.): ....................................... 5 tuntia
Antoliitäntä USB
„OUT: 5V/2A“: ...............5 V tasavirta / 2 A (enint.)
Antoliitäntä USB „OUT: 5V/9V“:
..................................... 5 V tasavirta / 3 A (enint.)
...................................... 9 V tasavirta /2 A (enint.)
Tasajännite-antoliitäntä: ......... .....19 V enint. 3,5 A
Tasajännite-antoliitäntä: ......... ......12 V enint. 10 A
Käynnistysapuvirta: 200 A (5 sek) / 400 A (enint.)
Ympäristölämpötila käynnistysapua
annettaessa: ................................ -15°C - +40°C
Säilytyslämpötila: .......................... +5°C - +40°C
Suojaluokka: ....................................................III.
Latauslaite
Tulojännite: .........................100-240 V ~50/60 Hz
Lähtöjännite: ..................................15 V tasavirta
Antovirta: ........................................................ 1 A
5. Ennen käyttöönottoa
5.1 Käynnistysapu-virtavaraajan lataaminen
mukanan toimitetulla latauslaitteella
Latauslaitteen turvallisuusohjeet:
Tätä laitetta saavat vähintään 8-vuotiaat lapset
sekä henkilöt, joiden fyysiset, aistiperäiset tai
henkiset kyvyt ovat rajoitetut tai joilla ei ole tarvittavaa kokemusta ja tietoutta, käyttää ainoastaan
valvottuina tai jos heitä on opastettu käyttämään
laitetta turvallisesti ja he ymmärtävät sen käytöstä
aiheutuvat vaarat. Lapset eivät saa leikkiä laitteella. Lapset saavat suorittaa puhdistus- ja käyttäjähuoltotoimia ainoastaan valvottuina.
Tarkasta ennen laitteen liittämistä sähköverkkoon,
että tyyppikilven tiedot vastaavat käytettävän verkkovirran tietoja.
Huomio! Irrota aina verkkopistoke ennen kuin
teet laitteeseen säätöjä. Lataa laite ainoastaan
mukana toimitetulla latauslaitteella.
Noudata oheistettuja turvallisuusmääräyksiä ja
niiden tarkkoja ohjeita lataamisesta.
Antoliitäntöjä ei saa käyttää lataamisen aikana.
- 81 -

FIN
Liitä mukana toimitettu latauslaite (kuva 2a)
•
laitteen „Input 15 V 1 A“ -latausholkkiin (kuva
1 / nro 4).
Kun työnnät latauslaitteen verkkopistorasi-
•
aan, niin akku ladataan. Lataamisen aikana
palavat (vilkkuvat) LEDit (kuva 1 / nro 9) ja
ilmoittavat lataustilan. Kun lataaminen on
päättynyt, niin kaikki LEDit palavat.
Lataaminen kestää n. 5 tuntia akun ollessa
•
tyhjä. Lataamisen aikana laitteessa oleva
akku saattaa lämmetä hieman, mutta tämä on
aivan tavallista.
5.2 Akun tehonnäyttö
Paina päälle-/pois-katkaisinta (kuva 1 / nro 5)
lyhyesti. Akun tehonnäytön LEDit (kuva 1 / nro 9)
syttyvät palamaan. Palavien LEDien lukumäärä
ilmoittaa laitteeseen asennetun Li-Po-akun senhetkisen lataustilan.
100 % ladattu = 4 LEDiä palavat jatkuvasti
>25 % ladattu = 1 LED palaa jatkuvasti
<25 % ladattu = ei jatkuvaa valoa
6. LED-valaisin
Varo! Älä katso säteeseen.
Paina 3 sekunnin ajan päälle-/pois-katkaisinta
•
– LED-lamppu (kuva 1 / nro 1) palaa jatkuvasti.
Paina päälle-/pois-katkaisinta uudelleen –
•
LED-lamppu palaa lyhyin välähdyksin („stroboskooppisalama“).
Paina päälle-/pois-katkaisinta uudelleen –
•
LED-lamppu palaa „SOS“-morsetusmerkein.
Sammuta LED-lamppu painamalla katkaisinta
•
vielä kerran.
7. Antoliitännät
Var o! Huomioi sen laitteen jännite- ja virta-arvot,
johon virtaa syötetään (esim. älypuhelin, kannettava tietokone). Noudata sen käyttöohjetta.
Virransyötön kestoaika vaihtelee käynnistysapuvirtavaraajan lataustilan, liitetyn laitteen tehonoton ja sen käyttöintensiivisyyden mukaan. Kun
lataustila on enää 25 % ( 1 LED palaa), täytyy
akku ladata uudelleen (ks. osio 5.). USB-liitäntöjä
voidaan käyttää samanaikaisesti. Ole hyvä ja
huolehdi siitä, ettei yhteenlaskettu antovirta ylitä
arvoa 5 A.
7.1 Laitteiden lataaminen/käyttö USB-liitännällä
a) 5 V / 2 A -USB-anto
1. Liitä jo sinulla oleva (tai mukana toimitettu
2-in-1) USB-liitäntäjohto käynnistysapuvirtavaraajan USB-liitäntään (kuva 1 / nro 2)
ja sitten laitteeseen, johon virtaa annetaan
(enint. 2 A).
2. Paina päälle-/pois-katkaisinta (kuva 1 / nro 5).
b) „OUT 5 V / 9 V“ -USB-anto (kuva 3)
Viite: Jos lataaminen ei onnistu tällä antoliitännällä, niin laitetta tai johtoa ei tueta. Käytä siinä
tapauksessa lataamiseen 5 V tasavirta / 2 A
-USB-antoliitäntää kuten edellä selostettiin.
1. Liitä mukana toimitettu 2-in-1 USB-liitäntäjohto käynnistysapu-virtavaraajan „OUT 5 V /
9 V“ -USB-liitäntään (kuva 1 / nro 3) ja sitten
laitteeseen, johon virtaa annetaan.
2. Paina päälle-/pois-katkaisinta (kuva 1 / nro 5).
3. USB-liitännässä tutkitaan lataamiseen tarvittavat parametrit ja liitetty laite ladataan.
Latausjohdosta ja ladattavasta laitteesta
riippuen latausaika „OUT 5 V / 9 V“ -USBantoliitäntää käyttäen olla lyhyempi kuin „OUT
5 V / 2 A“ -antoliitännässä.
7.2 19 V tasajännitelaitteiden käyttö (kuva 4)
1. Liitä mukana toimitettu liitäntäjohto (kuva
2d / nro 13) käynnistysapu-virtavaraajan 19
V -tasajänniteantoliitäntään (kuva 1 / nro 7)
ja sitten tarvittaessa käyttäen yhtä mukana
toimitetuista pistokkeista (kuva 2d / nro 14) 19
V -tasajännitelaitteeseen. Suurin virranotto ei
saa ylittää 3,5 A.
2. Paina päälle-/pois-katkaisinta (kuva 1 / nro 5).
7.3 12 V tasajännitelaitteiden käyttö
1. Liitä sopiva liitäntäjohto käynnistysapuvirtavaraajan 12 V -tasajänniteantoliitäntään
(kuva 1 / nro 6) ja sitten 12 V -tasajännitelaitteeseen. Suurin virranotto ei saa ylittää 10 A.
2. Paina päälle-/pois-katkaisinta (kuva 1 / nro 5).
- 82 -

FIN
8. Moottoriajoneuvon käynnistysapu
12 V -käynnistysapumahdollisuus on tervetullut
apu akun riittämättömän varaustehon aiheuttamien käynnistysvaikeuksien poistamisessa.
Varoitus! Käynnistysapua annettaessa vain
käynnistysapukaapeli saa olla liitettynä. Liitetyn
laitteen virransyöttö, esim. USB-litännän kautta,
täytyy keskeyttää sitä ennen.
Viittaamme siihen, että ajoneuvot varustetaan
nykyisin lukuisilla elektronisilla rakennusosilla. Ole
hyvä ja noudata autosi, radiosi jne. käyttöohjeissa
annettuja ohjeita.
Varoitus! Älä koskaan liitä laitetta ajoneuvon
koriin!
Varmista, että virranantokaapelin pistoke
•
on tiukasti kiinni laitteen pistorasiassa. Jos
liitäntä on löysä käynnistämisen aikana, niin
pistoliitäntä voi sulaa korkean virran vuoksi.
Auton akun napojen tulee olla puhtaat ja
•
virranaontokaapelin pinteiden tiukasti kiinni
akun navoissa.
Älä liitä virranantokaapelin pinteitä käynnisty-
•
savun aikana yhteen – oikosulku.
Varmista, että vähintään 3 akun tehonnäytön LEDiä palaa. Laitteen lämpötilan tulee olla + 5 °C ja
+ 40 °C välillä, ympäristön lämpötilan - 15 °C ja +
40 °C välillä käynnistysapua annettaessa. Käytä
ainoastaan mukana toimitettua virranantokaapelia
(kuva 2c).
1. Kuva 5: Käännä virranantokaapelin liitännän
suojus (kuva 1 / nro 8) auki, työnnä sen alla
oleva kansi sivuun ja työnnä virranantokaapeli
laitteen liitäntään.
2. Kuva 5a: Liitä punainen johto auton akun
plussanapaan ja musta johto miinusnapaan.
Huolehdi siitä, että pinteet ovat tiukasti kiinni.
Lisäksi tulee huolehtia siitä, että käynnistysapu-virtavaraaja on asetettu tukevasti moottoritilaan eikä voi pudota alas käynnistyksen
aikana syntyvän tärinän vuoksi. Käynnistysapu-virtavaraajaa ei saa asettaa liikkuvien
osien ulottuville. Seuraavat kohdat 3. – 6. kuvaavat virranantokaapelin tilailmoituksia. Ole
hyvä ja noudata ohjeita.
3. Kuva 5a: Virranantokaapelin vihreä LED
palaa. Kaikki tehdyt liitännät ovat oikein ja
ajoneuvon saa käynnistää 30 sekunnin kuluessa.
4. Kuva 5b: Virranantokaapelin vihreä LED
vilkkuu. Kaikki tehdyt liitännät ovat oikein,
mutta auton akun lataustila on erittäin alhainen. Paina virranantokaapelin „boost“painiketta ja odota, kunnes vihreä LED palaa
jatkuvasti. Käynnistä ajoneuvo 30 sekunnin
kuluessa. Ole erityisen varovainen, koska
painamalla „boost“-painiketta käynnistysapuvirtavaraajaan asennetut turvallisuuslaitteet
on kytketty pois.
5. Kuva 5c: Virranantokaapelin punainen
LED palaa ja kuuluu varoitusäänimerkki.
Virranantokaapelin pinteet on liitetty auton
akun vääriin napoihin. Ota pinteet pois ja liitä
ne uudelleen auton akun oikeisiin napoihin
noudattaen edellä annettuja ohjeita.
6. Kuva 5d: Mikään LED ei pala virrananto-
kaapelissa, eikä myöskään kuulu varoitusäänimerkkiä. Tarkasta kaikki liitännät, en-
nen muuta pinteiden liitännät oikeisiin auton
akun napoihin. Jos kaikki tehdyt liitännät ovat
oikein, niin syynä on todennäköisesti auton
akun vika. Paina virranantokaapelin „boost“painiketta ja odota, kunnes vihreä LED palaa
jatkuvasti. Käynnistä ajoneuvo 30 sekunnin
kuluessa.
Ole erityisen varovainen, koska painamalla
„boost“-painiketta käynnistysapu-virtavaraajaan asennetut turvallisuuslaitteet on kytketty
pois. Korvaa viallinen auton akku uudella
mahdollisimman pian.
7. Heti kun moottori käy, irrota virranantokaapeli
ensin laitteesta ja sitten ensin punainen pinne
ja lopuksi musta pinne auton akusta.
8. Anna moottorin käydä. Auton laturi lataa autoon asennetun akun.
Hyvin alhaisissa lämpötiloissa voidaan tarvita
useampia käynnistysyrityksiä, kunnes auto lähtee
käyntiin. Kahden käynnistysyrityksen välinen
odotusaika on yksi minuutti. Ota laite pois virranannon onnistuttua 30 sekunnin kuluttua, mikäli
mahdollista.
Mahdollisten käynnistysyritysten lukumäärä (enint. 10) on riippuvainen ympäristön lämpötilasta,
käynnistettävän auton akun tilasta ja käynnistysapu-virtavaraajan akun lataustilasta.
- 83 -

FIN
9. Puhdistus, huolto ja varaosatilaus
Vaara!
Irrota verkkopistoke ennen kaikkia puhdistustoimia.
Irrota kaikki siihen liitetyt kaapelit käynnistysapuvirtavaraajasta.
9.1 Puhdistus
Pidä suojalaitteet, ilmaraot ja moottorin kotelo
•
niin puhtaina pölystä ja liasta kuin suinki mahdollista. Pyyhi laite puhtaalla rievulla tai puhalla se puhtaaksi vähäpaineisella paineilmalla.
Suosittelemme laitteen puhdistamista heti
•
joka käytön jälkeen.
Puhdista laite säännöllisin väliajoin kostealla
•
rievulla. Älä käytä sellaisia puhdistusaineita
tai liuotteita, jotka saattavat syövyttää laitteen muoviosia. Huolehdi siitä, ettei laitteen
sisäpuolelle pääse vettä. Veden tunkeutuminen sähkötyökaluun lisää sähköiskun vaaraa.
9.2 Huolto
Laitteen sisäpuolella ei ole mitään huoltoa tarvitsevia osia.
9.3 Varaosatilaus:
Varaosia tilatessasi anna seuraavat tiedot:
Laitteen tyyppi
•
Laitteen tuotenumero
•
Laitteen tunnusnumero
•
Tarvittavan varaosan varaosanumero.
•
Ajankohtaiset hinnat ja muut tiedot löydät osoitteesta www.isc-gmbh.info
11. Käytöstäpoisto ja uusiokäyttö
Laite on pakattu kuljetuspakkaukseen, jotta vältetään kuljetusvauriot. Tämä pakkaus on raaka-ainetta ja sitä voi siksi käyttää uudelleen tai sen voi
toimittaa kierrätyksen kautta takaisin raaka-ainekiertoon. Laite ja sen varusteet on valmistettu eri
materiaaleista, kuten esim. metallista ja muoveista. Vialliset laitteet eivät kuulu kotitalousjätteisiin.
Laite tulee toimittaa asianmukaiseen keräyspisteeseen ammattitaitoista hävittämistä varten. Jos
et tiedä, missä on tällainen keräyspiste, tiedustele
asiaa kuntasi hallinnosta.
12. Varastointi
Säilytä laite ja sen varusteet valolta, kosteudelta
ja pakkaselta suojatussa tilassa. Optimaalinen
säilytyslämpötila on +5 °C ja 40 °C välillä.
Noudata oheistettuja turvallisuusmääräyksiä ja niiden tarkkoja ohjeita varastoimisesta. Koska akku
reagoi liian korkeisiin (yli +40 °C) tai liian alhaisiin
(alle 0 °C) lämpötiloihin, ei sitä saa säilyttää jatkuvasti autossa. Ajoneuvossa kuljetettaessa aseta
se sopivaan paikkaan, niin ettei se lähde liikkumaan äkillisten nopeuden- ja/tai suunnanmuutosten
aikana. Säilytä laite alkuperäispakkauksessaan.
10. Korjaukset
Jos laitteessa ilmenee häiriöitä, anna ainoastaan
valtuutetun alan ammattihenkilön tai ammattikorjaamon tarkastaa se.
- 84 -

FIN
13. Vianhakukaavio
Häiriö Mahdollinen syy Poisto
Laitetta ei voi käynnistää
Virrananto ei toimi - akun jännite liian vähäinen
Kaikki LEDit vilkkuvat
- akun jännite liian vähäinen - lataa akku
- liitännät ajoneuvoon väärin päin
- lämpötila sallittujen rajojen ulkopuolella
- ylikuormitussuojaus on lauennut
- laite liian kylmä / lämmin
- ympäristön lämpötila liian alhainen/
korkea
- lataa akku
- liitä oikein huomioiden napaisuus
- yritä antaa virtaa lämpötila-alueen
puitteissa
- sammuta laite ja tarkasta, onko ylikuormitus mahdollinen
- noudata laitteen lämpötilarajoja
+5 °C - +40 °C
- noudata ympäristön lämpötilarajoja
-15°C - +40 °C
- 85 -

FIN
Koskee ainoastaan EU-maita
Älä heitä sähkötyökaluja kotitalousjätteisiin!
Euroopan direktiivin 2012/19/EY loppuunkäytetyistä sähkö- ja elektronisista laitteista ja sen kansalliseksi laiksi muuntamisen mukaan tulee käytetyt sähkötyökalut koota erikseen ja toimittaa ne ympäristöystävälliseen kierrätykseen.
Kierrätysvaihtoehto takaisinlähetykselle:
Sähkölaitteen omistaja on velvoitettu laitteen palauttamisen vaihtoehtona vaikuttamaan siihen, että
hänen luovuttamansa omaisuus hävitetään asianmukaisesti. Loppuun käytetty laite voidaan tätä varten
luovuttaa myös keräyspisteeseen, joka suorittaa sen käytöstäpoiston kansallisten kierrätystalous- ja
jätehuoltolakien tarkoittamalla tavalla. Tämä ei koske käytettyihin laitteisiin liitettyjä lisävarusteita ja apuvälineitä, joissa ei ole sähköosia.
Tuotedokumentaation ja tuotteen mukana toimitettujen papereiden osittainenkin kopiointi tai muu monistaminen on sallittu ainoastaan iSC GmbH:n nimenomaisella luvalla.
Oikeus teknisiin muutoksiin pidätetään
- 86 -

FIN
Asiakaspalvelutiedot
Meillä on kaikissa takuutodistuksessa mainituissa maissa päteviä asiakaspalvelusta huolehtivia kumppaneita, joiden yhteystiedot löydät takuutodistuksesta. Heidän kauttaan voit saada kaikki asiakaspalvelut, kuten korjaukset, varaosien ja kulumaosien sekä tarvittavien käyttömateriaalien toimitukset.
Huomaa, että seuraaviin tämän tuotteen osiin kohdistuu käytöstä johtuvaa, luonnollista kulumista, ja että
seuraavia osia tarvitaan käyttömateriaaleina.
Laji Esimerkki
Kuluvat osat* Akku
Käyttömateriaali / käyttöosat*
Puuttuvat osat
* ei välttämättä kuulu toimitukseen!
Puutteellisuuksien tai vikojen ilmetessä pyydämme ilmoittamaan virheestä verkossa sivustoon www.
isc-gmbh.info. Ole hyvä ja anna vian tarkka kuvaus ja vastaa sen lisäksi joka tapauksessa seuraaviin
kysymyksiin:
Onko laite toiminut jo ainakin kerran, vai oliko se jo alusta lähtien viallinen?
•
Havaitsitko jotain erikoista ennen vian ilmenemistä (oireita ennen vikaa)?
•
Mikä mielestäsi on laitteessa vikana (pääasiallinen vika)?
•
Kuvaa tätä toimintavirhettä.
- 87 -

FIN
Takuutodistus
Arvoisa asiakas,
tuotteemme läpikäyvät erittäin tiukan laadunvalvontatarkastuksen. Mikäli tämä laite ei kuitenkaan toimi
moitteettomasti, valitamme tapahtunutta suuresti ja pyydämme sinua kääntymään teknisen asiakaspalvelumme puoleen käyttäen tässä takuukortissa annettua osoitetta. Selvitämme asian mielellämme
myös puhelimitse allaolevan palvelunumeron kautta. Takuuvaateiden esittämistä koskevat seuraavat
määräykset:
1. Nämä takuuehdot koskevat ainoastaan kuluttajia, ts. luonnollisia henkilöitä, jotka eivät käytä tätä
tuotetta sen enempää pienteollisessa kuin muussakaan itsenäisessä ammatinharjoituksessa. Nämä
takuuehdot säätelevät täydentäviä takuusuorituksia, jotka allamainittu valmistaja lupaa uusien
laitteidensa ostajille lakimääräisen takuun lisäksi. Ne eivät vaikuta lakimääräisiin takuusuoritusvaateisiisi millään tavalla. Takuumme on sinulle maksuton.
2. Takuusuoritus kattaa ainoastaan sellaiset hankkimasi allamainitun valmistajan uuden laitteen
puutteellisuudet, jotka todistettavasti aiheutuvat materiaali- tai valmistusvirheistä, ja se on rajattu
valintamme mukaan ainoastaan näiden laitteen vikojen korjaamiseen tai laitteen korvaamiseen uudella.
Ole hyvä ja ota huomioon, että laitteitamme ei ole suunniteltu käytettäväksi pienteollisuus-, käsityöläis- tai ammattitarkoituksiin. Takuusopimusta ei siksi synny, jos laitetta on takuun kestoaikana
käytetty pienteollisuus-, käsityöläis- tai teollisuustyöpaikoilla tai siihen on kohdistunut näihin verrattavissa oleva rasitus.
3. Antamamme takuu ei kata näitä vaurioita:
- laitteessa esiintyneet vauriot, jotka aiheutuvat asennusohjeen noudattamatta jättämisestä tai asiantuntemattomasta asennuksesta, käyttöohjeen noudattamatta jättämisestä (kuten esim. liitäntä
väärään verkkojännitteeseen tai virtalajiin) tai huolto- ja turvallisuusmääräysten laiminlyönnistä tai
laitteen altistamista epänormaaleille ympäristöolosuhteille tai puutteellisesta hoidosta ja huollosta.
- laitteessa esiintyneet vauriot, jotka aiheutuvat määräysten vastaisesta tai virheellisestä käytöstä
(esim. laitteen ylikuormitus tai hyväksymättömien liitostyökalujen tai varusteiden käyttö), vieraiden
esineiden tunkeutumisesta laitteeseen (esim. hiekka, kivet tai pöly, kuljetusvauriot), väkivoiman käytöstä tai ulkopuolisista tekijöistä (esim. putoamisesta aiheutuneet vahingot).
- laitteessa tai sen osissa esiintyneet vauriot, jotka aiheutuvat käytöstä johtuvasta, tavanomaisesta
tai muuten tavallisesta kulumisesta.
4. Takuuajan kesto on 24 kuukautta ja se alkaa laitteen ostopäivästä. Takuuvaateet tulee esittää ennen takuuajan päättymistä kahden viikon kuluessa siitä, kun olet havainnut vian. Takuuvaateiden
esittäminen takuuajan päätyttyä ei ole mahdollista. Laitteen korjaus tai vaihto ei johda takuuajan
pitenemiseen tai laitteen tai siihen mahdollisesti asennettujen varaosien takuuajan alkamiseen uudelleen alusta. Tämä koskee myös paikan päällä suoritettuja palveluja.
5. Viallista laitetta koskevat takuuvaateet tulee esittää osoitteella: www.isc-gmbh.info. Pidä uuden
laitteesi ostotosite tai muu ostonäyttö valmiina. Ilman vastaavia tositteita tai tyyppikilpeä meille lähetettyjen laitteiden osalta takuuvaateet on suljettu pois, koska mahdollisuudet laitteen tunnistamiseen
puuttuvat. Mikäli takuumme kattaa laitteen vian, asiakkaalle toimitetaan korjattu tai uusi laite viipymättä.
Tietysti korjaamme mielellämme korvausta vastaan myös sellaiset laitteiden viat, jotka eivät kuulu tai
eivät enää kuulu takuumme piiriin. Lähetä tätä varten laite teknisen asiakaspalvelumme osoitteeseen.
Kuluvien osien, käyttöosien ja puuttuvien osien suhteen viittaamme tämän takuun rajoituksiin, jotka on
selostettu tämän käyttöohjeen asiakaspalvelutiedoissa.
- 88 -

RUS
Опасность!
При использовании устройств необходимо
соблюдать определенные правила техники
безопасности для того, чтобы избежать
травм и предотвратить ущерб. Поэтому
внимательно прочитайте настоящее
руководство по эксплуатации / указания по
технике безопасности полностью. Храните
их в надежном месте для того, чтобы иметь
необходимую информацию, когда она
понадобится. Если Вы даете устройство
другим для пользования
это руководство по эксплуатации / указания
по технике безопасности. Мы не несем
никакой ответственности за травмы и ущерб,
которые были получены или причинены
в результате несоблюдения указаний
этого руководства и указаний по технике
безопасности.
, то приложите к нему
1. Указания по технике
безопасности
Соответствующие указания по технике
безопасности находятся в приложенных
брошюрах!
Опасность!
Прочитайте все указания по технике
безопасности и технические требования.
При невыполнении указаний по технике
безопасности и технических требований
возможно получение удара током,
возникновение пожара и/или получение
серьезных травм. Храните все указания
по технике безопасности и технические
требования для того,
возможно воспользоваться ими в
будущем.
Запрещается использование данного
устройства детьми. Дети должны
находиться под присмотром, чтобы они
не играли с устройством. Запрещается
очистка и техническое обслуживание
данного устройства детьми. Запрещается
использование устройства лицами с
ограниченными физическими, сенсорными
или умственными способностями, а также
лицами, не обладающими достаточными
знаниями или опытом
когда они работают под наблюдением или
руководством отвечающего за них лица.
чтобы было
, кроме случаев,
Условные обозначения (рис. 6)
D = Устройство, имеющее класс защиты II
E = Использовать только в сухих помещениях
F = Внимание! Перед использованием
прочитать инструкцию!
Текст , размещенный на устройстве и
кабеле для облегчения пуска
Внимание! Перед использованием прочитать
инструкцию!
1. Никогда не нажимать кнопку ускоренной
зарядки, если автомобильный
аккумулятор не подключен.
2. Никогда не соединять клеммы друг с
другом – опасность короткого замыкания
и травмирования.
3. Механизм облегчения пуска может
быть использован только для зарядки
автомобильных аккумуляторов
напряжением 12 В, красная
клемма должна быть подключена к
положительному полюсному выводу
аккумуляторной батареи, а черная клемма
– к отрицательному.
4. Зеленый светодиод
в течение 30 секунд.
5. Красный светодиод + предупредительный
сигнал = неправильное подключение
аккумулятора в результате несоблюдения
полярности (см. 3).
6. Зеленый светодиод мигает +
предупредительный сигнал = нажать
кнопку ускоренной зарядки и запустить
двигатель в течение 30 секунд.
7. Не горят светодиоды, не раздается
предупредительный сигнал = проверить
штекерное соединение устройства,
нажать кнопку ускоренной зарядки и
запустить
Предупреждение!
1. Не подпускать детей близко к устройству!
2. Не открывать устройство – опасность
травмирования!
3. Если не горят 3 светодиода, не доступен
механизм облегчения пуска.
4. Если двигатель не запускается в течение
5 секунд, завершить процесс запуска.
Подождать 1 минуту, прежде чем
повторить процесс.
двигатель в течение 30 секунд.
= запустить двигатель
- 89 -

2. Состав устройства и состав
упаковки
2.1 Состав устройства (рисунки 1)
1. Светодиодная лампочка
2. USB-выход 5 В, макс. 2A
3. USB-выход 5 В/9 В
4. Гнездо для зарядки 15 В пост. тока /1A
5. Кнопка включения/выключения
6. Выход постоянного напряжения 12 В,
макс. 10 А
7. Выход постоянного напряжения 19 В,
макс. 3,5 А
8. Ввод кабеля для облегчения пуска
9. Светодиодный индикатор заряда
аккумулятора
2.2 Состав комплекта устройства
Проверьте комплектность изделия на
основании
При обнаружении недостатка компонентов
обратитесь в наш сервисный центр
или магазин, в котором Вы приобрели
устройство, не позднее чем в течение 5-ти
рабочих дней после приобретения изделия,
предъявив действительную квитанцию о
покупке. Обратите внимание на таблицу с
указанием гарантийных сроков в документе с
информацией о сервисном обслуживании.
•
•
•
•
•
Опасность!
Устройство и упаковка не являются
детскими игрушками! Запрещено детям
играть с пластиковыми пакетами,
пленками и мелкими деталями! Опасность
заключается в том, что они могут
проглотить или погибнуть от удушья!
•
•
описанного объема поставки.
Откройте упаковку и выньте осторожно из
упаковки устройство.
Удалите упаковочный материал, а также
приспособления защиты устройства при
упаковывании и транспортировке (при
наличии).
Проверьте комплектность устройства.
Проверьте устройство и принадлежности
на наличие возникших при
транспортировке повреждений.
Сохраняйте упаковку по возможности
до истечения срока гарантийных
обязательств.
Пуско-зарядное устройство с внешним
аккумулятором
Кабель для облегчения пуска
RUS
Соединительный кабель USB 2 в 1 (Micro/
•
Mini)
Зарядное устройство
•
Соединительный кабель 19 В
•
Набор штекеров 19 В
•
Папка для хранения
•
Оригинальное руководство по
•
эксплуатации
Указания по технике безопасности
•
3. Использование в соответствии
с предназначением
Пуско-зарядное устройство с внешним
аккумулятором предназначено для зарядки
смартфонов, камер, планшетов и т. д. Оно
может также использоваться в качестве
карманного фонарика. Более того, существует
возможность обеспечивать постоянное
напряжение для ноутбуков и устройств,
работающих с напряжением 12 В. При
использовании входящего в комплект
поставки кабеля для облегчения пуска
устройство пригодно также
слабых стартерных аккумуляторных батарей
мощностью 12 В (свинцово-кислотных
аккумуляторов) в автомобилях с бензиновым
двигателем объемом до 4000 куб. см и с
дизельным двигателем объемом
до 2000 куб. см.
Разрешается использовать устройство только
в соответствии с его предназначением. Любое
другое, отличающееся от этого использование
считается не соответствующим
предназначению. За все возникшие
результате такого использования ущерб или
травмы любого вида несет ответственность
пользователь и работающий с устройством, а
не его изготовитель.
Учтите, что конструкция наших устройств
не предназначена для использования
их в промышленной, ремесленной или
индустриальной области. Мы не несем
никакой ответственности по гарантийным
обязательствам при использовании
устройства в промышленной, ремесленной
или
индустриальной области, а также в
подобной деятельности.
для зарядки
в
- 90 -

RUS
4. Технические данные
Пуско-зарядное устройство с внешним
аккумулятором
Литий-полимерный
аккумулятор: ........11,1 В – 3700 мАч – 41,1 Втч
Вход: .................................... 15 В пост. тока/1 A
Прибл. время зарядки: ................................. 5 ч
Выход USB
«ВЫХ.: «5 В/2 A»: ..... 5 В пост. тока /2 A (макс.)
Выход USB «ВЫХ.: «5 В/9 В»:
................................... 5 В пост. тока/3 A (макс.)
................................... 9 В пост. тока/2 A (макс.)
Выход постоянного
напряжения: ...........................19 В, макс. 3,5 A
Выход постоянного
напряжения: ............................12 В, макс. 10 A
Ток в
режиме облегчения
пуска: .................... 200 A (5 сек.)/400 A (макс.)
Температура окружающей среды при
процессе
облегчения пуска: .................. от -15 до +40 °C
Температура хранения: ......... от + 5 до + 40 °C
Класс защиты: .................................................III
Зарядное устройство
Входное напряжение: ......100-240 В ~50/60 Гц
Выходное напряжение: ............ 15 В пост. тока
Выходной ток: ............................................... 1 А
5. Перед вводом в эксплуатацию
5.1 Зарядка пуско-зарядного устройства с
внешним аккумулятором и входящим
в комплект поставки зарядным
устройством
Для зарядного устройства действуют
следующие инструкции:
Данное устройство может использоваться
детьми в возрасте 8-ми лет и старше, а
также лицами со сниженными физическими,
сенсорными или умственными способностями
либо с недостатком опыта и знаний
под надзором или после
инструктажа касательно безопасного
применения устройства при условии
понимания связанных с этим опасностей.
Детям запрещается играть с устройством.
Чистка и техническое обслуживание не
должны выполняться детьми без надзора.
прохождения
Перед подключением проверить соответствие
данных на фирменной табличке параметрам
электросети.
Внимание! Извлекайте штекер из розетки
электросети перед настройкой устройства.
Осуществляйте зарядку устройства
при помощи входящего в комплект поставки
зарядного устройства.
Соблюдайте прилагаемые указания по
технике безопасности с подробными
инструкциями, касающимися процесса
зарядки.
Во время процесса зарядки запрещено
использовать выходы.
Соедините входящее в комплект поставки
•
зарядное устройство (рис. 2a) с гнездом
для зарядки «Вход 15 В, 1A» (рис. 1/поз. 4)
в устройстве.
Вставьте зарядное устройство в розетку
•
электросети для зарядки аккумулятора.
Во время зарядки светодиоды (рис. 1/поз.
9) горят (мигают) и указывают на уровень
заряда. После завершения зарядки
загораются все светодиоды.
Время зарядки полностью разряженного
•
аккумулятора составляет примерно
5 часов. Во время процесса зарядки
аккумулятор в устройстве может слегка
нагреваться, что является вполне
нормальным.
5.2 Индикатор заряда аккумулятора
Коротко нажмите кнопку включения/
выключения (рис. 1/поз. 5). Загораются
светодиоды индикатора заряда аккумулятора
(рис. 1/поз. 9). Количество светящихся
светодиодов дает информацию о текущем
уровне заряда встроенного литий
полимерного аккумулятора.
Уровень заряда 100 % = постоянно горит 4
светодиода
Уровень заряда >25 % = постоянно горит 1
светодиод
Уровень заряда <25 % = не горят постоянно
светодиоды
только
-
- 91 -

RUS
6. Светодиодная лампочка
Осторожно! Запрещено смотреть в
направлении источника излучения.
Нажимайте кнопку включения/
•
выключения в течение 3 секунд –
светодиодная лампочка (рис. 1/поз. 1)
горит постоянно.
Повторно нажмите кнопку включения/
•
выключения – светодиодная лампочка
горит в режиме «стробоскопа».
Повторно нажмите кнопку включения/
•
выключения – светодиодная лампочка
горит, генерируя сигнал SOS с помощью
азбуки Морзе.
При повторном нажатии светодиодная
•
лампочка выключается.
7. Выходы
Осторожно! Обращайте внимание на
значения напряжения и силы тока питаемого
устройства (например, мобильного
телефона, ноутбука). Соблюдайте указания,
содержащиеся в соответствующем
руководстве по эксплуатации.
Время подачи электропитания варьируется
в зависимости от уровня заряда пускозарядного устройства с внешним
аккумулятором, а также потребляемой
мощности и интенсивности использования
подключаемого устройства. При достижении
остаточного заряда
необходимо зарядить аккумулятор (см. раздел
5). USB-разъемы могут использоваться
параллельно. Следите за тем, чтобы
накопленный выходной ток не превышал 5 А.
7.1 Зарядка/эксплуатация устройств с
USB-разъемом
a) USB-выход 5 В/2 A
1. Соедините имеющийся соединительный
кабель USB (или входящий в комплект
поставки кабель 2 в 1) с USB-разъемом
(рис. 1/поз. 2) пуско-зарядного устройства
с внешним
питаемым устройством (макс. 2A).
2. Нажмите кнопку включения/выключения
(рис. 1/поз. 5).
25 % (горит 1 светодиод)
аккумулятором, а затем с
b) USB-выход «ВЫХ. 5 В/9 В» (рис. 3)
Указание: Если зарядка не осуществляется
на данном выходе, то не обеспечивается
поддержка устройства или кабеля. В этом
случае используйте для зарядки USB-выход 5
В пост. тока /2A, как описано выше.
1. Соедините входящий
USB-кабель 2 в 1 (рис. 2b) с USB-
разъемом «ВЫХ. 5 В/9 В» (рис. 1/поз. 3)
пуско-зарядного устройства с внешним
аккумулятором, а затем с питаемым
устройством.
2. Нажмите кнопку включения/выключения
(рис. 1/поз. 5).
3. На USB-выходе устанавливаются
требуемые для зарядки параметры, затем
осуществляется зарядка подключенного
устройства. В зависимости от зарядного
кабеля и
уменьшить время зарядки на USB-выходе
«ВЫХ. 5 В/9 В» по сравнению с USBвыходом «ВЫХ. 5 В/2 А».
7.2 Эксплуатация устройств постоянного
напряжения на 19 В (рис. 4)
1. Подключите входящий в комплект
поставки соединительный кабель (рис. 2d/
поз. 13) к выходу постоянного напряжения
19 В (рис. 1/поз. 7) пуско-зарядного
устройства с внешним аккумулятором, а
затем
постоянного напряжения на 19 В,
используя прилагаемый штекер (рис. 2d/
поз. 14). Максимальный потребляемый ток
не должен превышать 3,5 А.
2. Нажмите кнопку включения/выключения
(рис. 1/поз. 5).
7.3 Эксплуатация устройств постоянного
напряжения на 12 В
1. Подключите подходящий соединительный
кабель к выходу постоянного напряжения
12 В (рис. 1/поз. 6) пуско-зарядного
устройства с внешним
а затем к устройству постоянного
напряжения на 12 В. Максимальный
потребляемый ток не должен превышать
10 А.
2. Нажмите кнопку включения/выключения
(рис. 1/поз. 5).
заряжаемого устройства можно
при необходимости к устройству
в комплект поставки
аккумулятором,
- 92 -

RUS
8. Облегчение пуска двигателя
автомобиля
Приспособление для облегчения пуска
мощностью 12 В помогает запустить
двигатель при трудностях, обусловленных
разряженным аккумулятором.
Предупреждение! Во время процесса
облегчения пуска может быть подключен
только кабель для облегчения пуска.
Предварительно необходимо отключить
электропитание подключаемого устройства,
например, через USB-разъем.
Мы напоминаем, что автомобили оснащены
многочисленными электронными
компонентами. Следуйте указаниям,
содержащимся в руководствах
эксплуатации автомобиля, радио и т. д.
Предупреждение! Запрещено подключать к
кузову автомобиля!
Убедитесь, что штекер кабеля для
•
облегчения пуска надежно соединен с
розеткой устройства. Если соединение
во время процесса облегчения пуска
ослабло, штекерное соединение в
результате воздействия высокого тока
может оплавиться.
Полюса автомобильного аккумулятора
•
должны содержаться в чистоте, а клеммы
кабеля для облегчения пуска должны
быть надежно закреплены в полюсах
аккумулятора.
Во время процесса облегчения пуска
•
клеммы соответствующего кабеля
запрещено соединять друг с другом –
опасность короткого замыкания.
Убедитесь, что горит не менее 3 светодиодов
индикатора заряда аккумулятора.
Температура устройства должна составлять
от +5 до +40 °C; температура окружающей
среды при процессе облегчения пуска должна
находиться в диапазоне от –15 до +40 °C.
Используйте только входящий в комплект
поставки кабель
2c).
1. Рис. 5: Откройте крышку ввода кабеля
для облегчения пуска (рис. 1/поз. 8),
уберите в сторону лежащую ниже крышку
и вставьте кабель для облегчения пуска в
устройство.
для облегчения пуска (рис.
по
2. Рис. 5a: Подсоедините красный кабель к
положительному полюсу автомобильного
аккумулятора, а черный кабель – к
отрицательному полюсу. Следите за
надежностью крепления клемм. Кроме
того, необходимо следить за тем, чтобы
пуско-зарядное устройство с внешним
аккумулятором было надежно размещено
в моторном отсеке, а также защищено
от падения в результате воздействия
вибрации во время процесса запуска.
Пуско-зарядное устройство с внешним
аккумулятором не должно находиться в
зоне досягаемости движущихся частей. В
следующих разделах 3– 6 представлена
информация
кабеля для облегчения пуска. Следуйте
приведенным указаниям.
3. Рис. 5a: Зеленый светодиод на кабеле
для облегчения пуска горит. Все
имеющиеся соединения в порядке,
а автомобиль может быть запущен в
течение 30 секунд.
4. Рис. 5b: Зеленый светодиод на кабеле
для облегчения пуска мигает. Все
имеющиеся соединения в порядке, однако
имеет место
автомобильного аккумулятора. Нажмите
кнопку ускоренной зарядки на кабеле
для облегчения пуска и дождитесь,
когда зеленый светодиод будет гореть
в течение длительного промежутка
времени. Запустите автомобиль
в течение 30 секунд. Соблюдайте
предельную осторожность, поскольку
при нажатии кнопки ускоренной
зарядки предохранительные устройства,
встроенные в пуско-зарядное устройство
с внешним аккумулятором, будут
выключены.
5. Рис. 5c: Горит красный светодиод
на кабеле для облегчения пуска,
раздается предупредительный
сигнал. Клеммы кабеля для облегчения
пуска подключены к автомобильному
аккумулятору без соблюдения полярности.
Удалите клеммы и подключите их заново к
автомобильному аккумулятору, соблюдая
правильную полярность и приведенные
выше указания.
6. Рис. 5d: На кабеле для облегчения
пуска не горят
раздается предупредительный сигнал.
Проверьте все соединения, прежде всего
правильное с точки зрения полярности
- 93 -
о статусных сообщениях
критически низкий заряд
светодиоды, не

RUS
подключение клемм к автомобильному
аккумулятору. Если все имеющиеся
соединения в порядке, возможной
причиной неисправности является выход
автомобильного аккумулятора из строя.
Нажмите кнопку ускоренной зарядки на
кабеле для облегчения пуска и дождитесь,
когда зеленый светодиод будет гореть
в течение длительного промежутка
времени. Запустите автомобиль в течение
30 секунд.
Соблюдайте предельную осторожность,
поскольку
ускоренной зарядки предохранительные
устройства, встроенные в пускозарядное устройство с внешним
аккумулятором, будут выключены.
Замените поврежденный автомобильный
аккумулятор в кратчайшие сроки.
7. Как только двигатель запустится,
отключите кабель для облечения пуска
от устройства. Снимите красную, а
затем черную клеммы с автомобильного
аккумулятора.
8. Дайте двигателю поработать. Генератор
заряжает встроенный
аккумулятор.
При очень низких температурах может
потребоваться несколько попыток для
запуска двигателя автомобиля. Время между
попытками запуска должно составлять одну
минуту. После успешного запуска отключите
устройство по возможности в течение 30
секунд.
Количество возможных попыток облегчения
пуска (макс. 10) зависит от температуры
окружающей среды, состояния подлежащего
запуску аккумулятора и уровня зарядки
аккумулятора пуско-зарядного устройства.
при нажатии кнопки
автомобильный
9. Очистка, техобслуживание и
заказ запасных деталей
Опасность!
Перед всеми работами по очистке необходимо
вынуть штекер из розетки электросети.
Удалите все подключенные кабели
пуско-зарядного устройства с внешним
аккумулятором.
9.1 Очистка
Содержите защитные приспособления,
•
вентиляционные щели и корпус двигателя
свободными насколько это возможно от
пыли и грязи. Протрите устройство чистой
ветошью или продуйте сжатым воздухом
под низким давлением.
Мы рекомендуем очищать устройство
•
сразу после каждого использования.
Регулярно чистите устройство влажной
•
ветошью. Не используйте средства
для очистки или растворы; они могут
повредить пластмассовые части
устройства. Следите за тем, чтобы вода не
попала вовнутрь устройства. Попадание
воды в электрическое устройство
повышает опасность получения удара
током.
9.2 Техобслуживание
Внутри устройства нет никаких деталей,
нуждающихся в техническом уходе.
9.3 Заказ запасных деталей:
При заказе запасных деталей необходимо
указать следующие данные;
Тип устройства
•
Номер артикула устройства
•
Идентификационный номер устройства
•
Номер необходимой запасной детали
•
Актуальные цены и информация находятся на
странице www.isc-gmbh.info
10. Ремонт
При возможном возникновении
неисправностей поручайте проверку
устройства только авторизованному
специалисту или сотрудникам сервисной
мастерской.
- 94 -

11. Утилизация и вторичное
использование
Устройство поставляется в упаковке
для предотвращения повреждений при
транспортировке. Эта упаковка является
сырьем и поэтому может быть использована
вновь или направлена на повторную
переработку сырья. Устройство и его
принадлежности изготовлены из различных
материалов, например, металла и пластмасс.
Не выбрасывайте дефектные устройства
вместе с бытовыми отходами. Для правильной
утилизации устройство необходимо сдать в
подходящий пункт приема. Если Вы не знаете,
где находится пункт приема, уточните это в
органах коммунального управления.
12. Хранение
Храните устройство и его принадлежности
в темном сухом незамерзающем месте.
Оптимальная температура хранения
составляет от 5 до 40 ˚C.
Соблюдайте прилагаемые указания по
технике безопасности с подробными
инструкциями по хранению. Поскольку
аккумулятор реагирует на слишком
высокие (свыше +40 °C) и слишком низкие
температуры (ниже 0 °C), запрещается
хранить устройство в автомобиле в течение
длительного времени. При транспортировке
устройства в автомобиле поместите его
в подходящее место, что исключить его
перемещение при внезапном изменении
скорости и (или) направления движения.
Храните устройство в оригинальной упаковке.
RUS
- 95 -

RUS
13. Таблица поиска неисправностей
Неисправность Возможные причины Устранение
Устройство не
включается
Механизм
облегчения пуска
не работает
Мигают все
светодиоды
- Критически низкое напряжение
аккумулятора
- Критически низкое напряжение
аккумулятора
- Перепутаны клеммы в
транспортном средстве
- Температура за пределами
допустимого диапазона
- Сработала защита от перегрузки
- Устройство
теплое
- Температура окружающей среды
слишком низкая/высокая
слишком холодное/
- Зарядить аккумулятор
- Зарядить аккумулятор
- Правильно подключить,
соблюдая полярность
- Запустить механизм облегчения
пуска в пределах температурного
диапазона
- Выключить устройство,
проверить на предмет
перегрузки
- Поддерживать температуру
устройства в диапазоне от
+5 °C до +40 °C
- Поддерживать температуру
окружающей среды в диапазоне
от -15 °C до +40 °C
- 96 -

RUS
Только для стран ЕС
Запрещено выбрасывать электроинструмент в обычный домашний мусор.
Согласно европейской директиве 2012/19/EG об использованных электрических и электронных
устройствах и реализации в правовой системе соответствующей страны необходимо
использованный электрический инструмент утилизировать отдельно и направлять на вторичную
переработку для охраны окружающей среды.
Вторичная переработка - альтернатива обязятельной отсылке устройства назад изґотовителю:
Владелец электрическоґо устройства в случае избавления от собственности обязан,в
качестве альтернативы отсылки назад изґотовителю, содействовать надлежащей утилизации.
Пришедшее в неґодность устройство может быть передано в приемный пункт, который
осуществит ликвидацию в соответствии с законом страны о цикличном производстве
и обращении с мусором. Это не относится к приложенным к пришедшему в неґодность
оборудованию дополнительным устройствам и вспомоґательным средствам, не содержащим
электрические части.
Перепечатывание или прочие виды размножения документации и сопроводительных листов
продукции фирмы, полностью или частично, разрешено производить только с однозначного
разрешения ISC GmbH.
Сохpaняeтcя прaво на тeхничeскиe изменения
- 97 -

RUS
Информация о сервисном обслуживании
Во всех странах, указанных в гарантийном свидетельстве, у нас имеются компетентные
сервисные партнеры, контактные данные которых Вы найдете в гарантийном свидетельстве.
Они всегда в Вашем распоряжении для решения любых вопросов, связанных с обслуживанием,
например, для ремонта, поставки запчастей и быстроизнашивающихся деталей, а также
приобретения расходных материалов.
Следует обратить внимание на то
естественному износу или износу в связи с эксплуатацией / следующие детали требуются в
качестве расходных материалов.
Категория Пример
Быстроизнашивающиеся детали* Аккумулятор
Расходный материал/расходные части*
Недостающие компоненты
* Не обязательно входят в объем поставки!
При обнаружении дефектов или неисправностей мы просим Вас заявить о таком случае в сети
Интернет на сайте www.isc-gmbh.info. Обратите внимание на точное описание неисправности и в
любом случае ответьте на следующие вопросы:
Устройство уже работало или оно было неисправным с самого начала?
•
Вам бросилось что-либо в глаза перед возникновением неисправности (признак перед
•
неисправностью)?
Какую неисправность имеет устройство, по Вашему мнению (основной признак)?
•
Опишите эту неисправность.
, что в этом изделии следующие детали подвержены
- 98 -

RUS
Гарантийное свидетельство
Уважаемая покупательница, уважаемый покупатель,
наши продукты проходят тщательнейший контроль качества. Если это устройство все же не будет
функционировать безупречно, мы просим Вас обратиться в наш сервисный отдел по адресу,
указанному в этом гарантийном талоне. Мы также охотно ответим на Ваши вопросы по телефону,
номер которого приведен ниже. При предъявлении гарантийных требований
условия.
1. Настоящие правила гарантии действуют исключительно в отношении пользователей, т.е.
физических лиц, которые не намереваются использовать настоящее изделие в рамках своей
профессиональной или другой самостоятельной деятельности. Настоящие правила гарантии
регулируют дополнительные условия оказания гарантийных услуг, которые нижеупомянутый
производитель обеспечивает покупателям своих новых устройств в дополнение к условиям
гарантии в соответствии с законом. Эти гарантийные обязательства не затрагивают Ваши
законные гарантийные требования. Наши гарантийные услуги для Вас бесплатны.
2. Гарантийные услуги распространяются только на дефекты нового устройства нижеупомянутого
производителя, которое вы приобрели, связанные с недостатком материала или
производственным браком, и ограничиваются по нашему выбору устранением таких дефектов
устройства или
использования в промышленных целях, в ремесленном производстве и на профессиональной
основе. Поэтому гарантийный договор считается недействительным, если устройство
использовалось в течение гарантийного срока на кустарных, промышленных предприятиях или
в ремесленном производстве, а также подвергалось сопоставимой нагрузке.
3. Наша гарантия не распространяется на
- повреждения устройства, возникшие в результате несоблюдения руководства по монтажу
или неправильного монтажа, несоблюдения руководства по эксплуатации (например, при
подключении к сети с неправильным напряжением или родом тока), несоблюдения требований
касательно технического обслуживания и требований техники безопасности, воздействия на
устройство аномальных условий окружающей среды или недостаточного ухода и технического
обслуживания;
повреждения устройства, возникшие в результате неправильного или ненадлежащего
-
использования (например, перегрузка устройства или применение не допущенных к
использованию насадок или принадлежностей), попадания в устройство посторонних
предметов (например, песка, камней или пыли, повреждения при транспортировке),
применения силы или внешних воздействий (например, повреждения при падении);
- повреждения устройства или частей устройства, связанные с
эксплуатацией, обычным или другим естественным износом.
4. Гарантийный срок составляет 24 месяца, отсчет начинается со дня покупки устройства.
Гарантийные права необходимо предъявлять до истечения срока гарантии в течении
двух недель после того как будет обнаружена неисправность. Заявления на гарантийное
обслуживание после истечения срока гарантии не принимаются. Ремонт или
устройства не ведет к продлению гарантийного срока, также при оказании такой услуги отсчет
нового гарантийного срока на устройство или возможно установленные детали не начинается
заново. Это условие действует также при обращении в местный сервисный отдел.
5. Для предъявления гарантийных требований сообщите о неисправности устройства на сайте
www.isc-gmbh.info. Приготовьте квитанцию о покупке
Вами нового устройства. Оказание гарантийных услуг применительно к устройствам,
направленным на рассмотрение без соответствующих доказательств или фирменной
таблички, исключается ввиду недостатка данных для идентификации таких устройств. Если
наша гарантия распространяется на неисправность устройства, Вы немедленно получите
отремонтированное или новое устройство.
заменой устройства. Учтите, что наши устройства не предназначены для
:
износом в связи с
или другие доказательства приобретения
действуют следующие
замена
Само собой разумеется, мы можем также
которые не входят в объем гарантийных услуг или при истечении срока гарантии. Для этого Вам
необходимо выслать устройство на адрес нашей службы сервиса.
Что касается быстроизнашивающихся, расходных деталей и недостающих компонентов,
мы обращаем внимание на ограничения этой гарантии согласно информации о сервисном
обслуживании настоящего руководства
устранить при оплате затрат неисправности устройства,
по эксплуатации.
- 99 -

SLO
Nevarnost!
Pri uporabi naprav je potrebno upoštevati nekaj
varnostnih ukrepov, da bi preprečili poškodbe
in materialno škodo. Zato skrbno preberite ta
navodila za uporabo/varnostne napotke. Le-te
dobro shranite tako, da boste imeli zmeraj pri
roki potrebne informacije. Če bi napravo izročili
drugim osebam, Vas prosimo, da jim izročite tudi
ta navodila za uporabo/varnostne napotke. Ne
prevzemamo nobene odgovornosti za nezgode
ali škodo, ki bi nastale zaradi neupoštevanja teh
navodil za uporabo in varnostnih napotkov.
1. Varnostni napotki
Odgovarjajoče varnostne napotke lahko preberete v priloženi knjižici!
Nevarnost!
Preberite varnostne napotke in navodila.
Neupoštevanje varnostnih napotkov in navodil
ima lahko za posledico električni udar, požar in/ali
hude poškodbe. Shranite vse varnostne napot-
ke in navodila za kasnejšo uporabo.
Otroci naprave ne smejo uporabljati. Otroci morajo biti pod nadzorom, da se ne igrajo z napravo.
Otroci naprave ne smejo čistiti ali vzdrževati. Naprave ne smejo uporabljati osebe z zmanjšanimi
fi zičnimi, čutnimi ali duševnimi sposobnostmi ali
osebe, ki nimajo dovolj znanja ali izkušenj, razen
če jih nadzira ali vodi odgovorna oseba.
Pojasnilo znakov (sl. 6)
D = naprava zaščitnega razreda II
E = le za uporabo v suhih notranjih prostorih
F = Pozor! Pred uporabo preberite navodilo!
Besedilo na napravi in kablu zaganjača
Pozor! Pred uporabo preberite navodilo!
1. Nikoli ne pritisnite na tipko „Boost“, dokler ni
akumulator motornega vozila priključen.
2. Sponk nikoli ne povezujte med seboj – nevarnost kratkega stika in poškodovanja.
3. Zaganjač samo za vozila 12 V, rdečo sponko
na „+“, črno sponko na „-“ pola akumulatorja.
4. Zelena LED = motor zaženite v 30 s.
5. Rdeča LED + opozorilni zvok = akumulator je
priključen z zamenjanimi poli (glejte 3.)
6. Zelena LED utripa + opozorilni ton = pritisnite
tipko „Boost“ ni motor zaženite v 30 s
7. Ni LED, ni opozorila = preverite vtično povezavo k napravi, pritisnite tipko „Boost“ in
motor zaženite v 30 s.
Opozorilo!
1. Otroci naj se napravi ne približujejo!
2. Naprave ne odpirajte – nevarnost poškodb!
3. Če svetijo manj kot 3 LED lučke, zaganjač ni
na voljo.
4. Če se motor v 5 sekundah ne zažene,
končajte postopek zagona. Pred ponovitvijo
počakajte 1 minuto.
2. Opis naprave na obseg dobave
2.1 Opis naprave (Slika 1)
1. LED lučka
2. USB izhod 5 V maks. 2 A
3. USB izhod 5 V/9 V
4. Polnilna vtičnica 15 V d.c./1 A
5. Tipka za vklop/izklop
6. Izhod za enosmerno napetost 12 V
maks. 10 A
7. Izhod za enosmerno napetost 19 V
maks. 3,5 A
8. Priključek za kabel zaganjača
9. LED prikaz zmogljivosti akumulatorja
2.2 Obseg dobave
S pomočjo opisanega obsega dobave preverite,
ali je artikel popoln. Če deli manjkajo, se najkasneje v 5 delovnih dnevih po nakupu izdelka
obrnite na naš servisni center ali na prodajno
mesto, kjer ste napravo kupili, in predložite račun.
Upoštevajte preglednico garancijskih storitev ob
koncu tega navodila.
Odprite embalažo in previdno vzemite napra-
•
vo iz embalaže.
Odstranite embalažni material in embalažne
•
in transportne varovalne priprave (če obstajajo).
Preverite, če je obseg dobave popoln.
•
Preverite morebitne poškodbe naprave in
•
delov pribora, do katerih bi lahko prišlo med
transportom.
Po možnosti shranite embalažo do poteka
•
garancijskega roka.
Nevarnost!
Naprava in embalažni material nista igrača za
otroke! Otroci se ne smejo igrati s plastičnimi
vrečkami, folijo in malimi deli opreme! Obstaja nevarnost zadušitve in zaužitja takšnih
delov materiala!
- 100 -
 Loading...