

Originalbetriebsanleitung
Benzin-Heckenschere
Original operating instructions
Petrol Hedge Trimmer
Mode d’emploi d’origine
taille-haies à essence
Istruzioni per l’uso originali
Cesoie per siepi a benzina
Original betjeningsvejledning
Benzindrevet hækkeklipper
Original-bruksanvisning
Bensindriven häcksax
Originele handleiding
benzine heggenschaar
Manual de instrucciones original
Tijeras recortasetos con motor de
gasolina
Manual de instruções original
para corta-sebes a gasolina
X
Originalna navodila za uporabo
Bencinske škarje za živo mejo
Πρωτότυπο Οδηγιών χρήσης
Θαμνοκόπτης βενζίνας
Art.-Nr.: 34.038.35 I.-Nr.: 11012
GE-PH
2555 A
Anleitung_GE_PH_2555_SPK7__ 11.02.14 10:23 Seite 1

2
Vor Inbetriebnahme Bedienungsanleitung und
Sicherheitshinweise lesen und beachten
Read and follow the operating instructions and safety information
before using for the first time.
Avant la mise en service, lisez le mode d’emploi et les consignes
de sécurité et respectez-les.
Prima della messa in esercizio leggete e osservate le istruzioni
per l’uso e le avvertenze di sicurezza.
Betjeningsvejledningen og sikkerhedsanvisningerne skal læses,
inden maskinen tages i brug. Alle anvisninger skal følges.
Läs igenom och beakta bruksanvisningen och säkerhetsanvisningarna
före användning.
Vóór ingebruikneming de handleiding en de
veiligheidsvoorschriften lezen en in acht nemen!
Leer detenidamente las instrucciones de uso y las advertencias de
seguridad antes de poner en marcha el aparato.
Leia e respeite as instruções de serviço e de segurança antes de
colocar o aparelho em funcionamento.
X Pred uporabo preberite in upoštevajte navodila za uporabo in
varnostne napotke.
z Πριν τη θέση σε λειτουργία διαβάστε τις Οδηγίες χρήσης και
ακολουθήστε τις Υποδείξεις ασφαλείας
Anleitung_GE_PH_2555_SPK7__ 11.02.14 10:23 Seite 2
3
1
2
613
1
2
3
4
11
8
20
18
19
7
3
14
17
1216
15
5
9
10
14
21
8 6 13
Anleitung_GE_PH_2555_SPK7__ 11.02.14 10:23 Seite 3
4
4 5
6 7
8 9
9
A
90°
90°
5
B
A
Anleitung_GE_PH_2555_SPK7__ 11.02.14 10:23 Seite 4
5
10 11
12 13
14 15
A
Anleitung_GE_PH_2555_SPK7__ 11.02.14 10:23 Seite 5
6
16
5
17
12 3
4
56 7
8
Anleitung_GE_PH_2555_SPK7__ 11.02.14 10:23 Seite 6

7
D
Achtung!
Beim Benutzen von Geräten müssen einige
Sicherheitsvorkehrungen eingehalten werden, um
Verletzungen und Schäden zu verhindern. Lesen Sie
diese Bedienungsanleitung / Sicherheitshinweise
deshalb sorgfältig durch. Bewahren Sie diese gut
auf, damit Ihnen die Informationen jederzeit zur
Verfügung stehen. Falls Sie das Gerät an andere
Personen übergeben sollten, händigen Sie diese
Bedienungsanleitung / Sicherheitshinweise bitte mit
aus. Wir übernehmen keine Haftung für Unfälle oder
Schäden, die durch Nichtbeachten dieser Anleitung
und den Sicherheitshinweisen entstehen.
1. Sicherheitshinweise
Die entsprechenden Sicherheitshinweise finden Sie
im beiliegenden Heftchen!
WARNUNG
Lesen Sie alle Sicherheitshinweise und
Anweisungen. Versäumnisse bei der Einhaltung der
Sicherheitshinweise und Anweisungen können
elektrischen Schlag, Brand und/oder schwere
Verletzungen verursachen.
Bewahren Sie alle Sicherheitshinweise und
Anweisungen für die Zukunft auf.
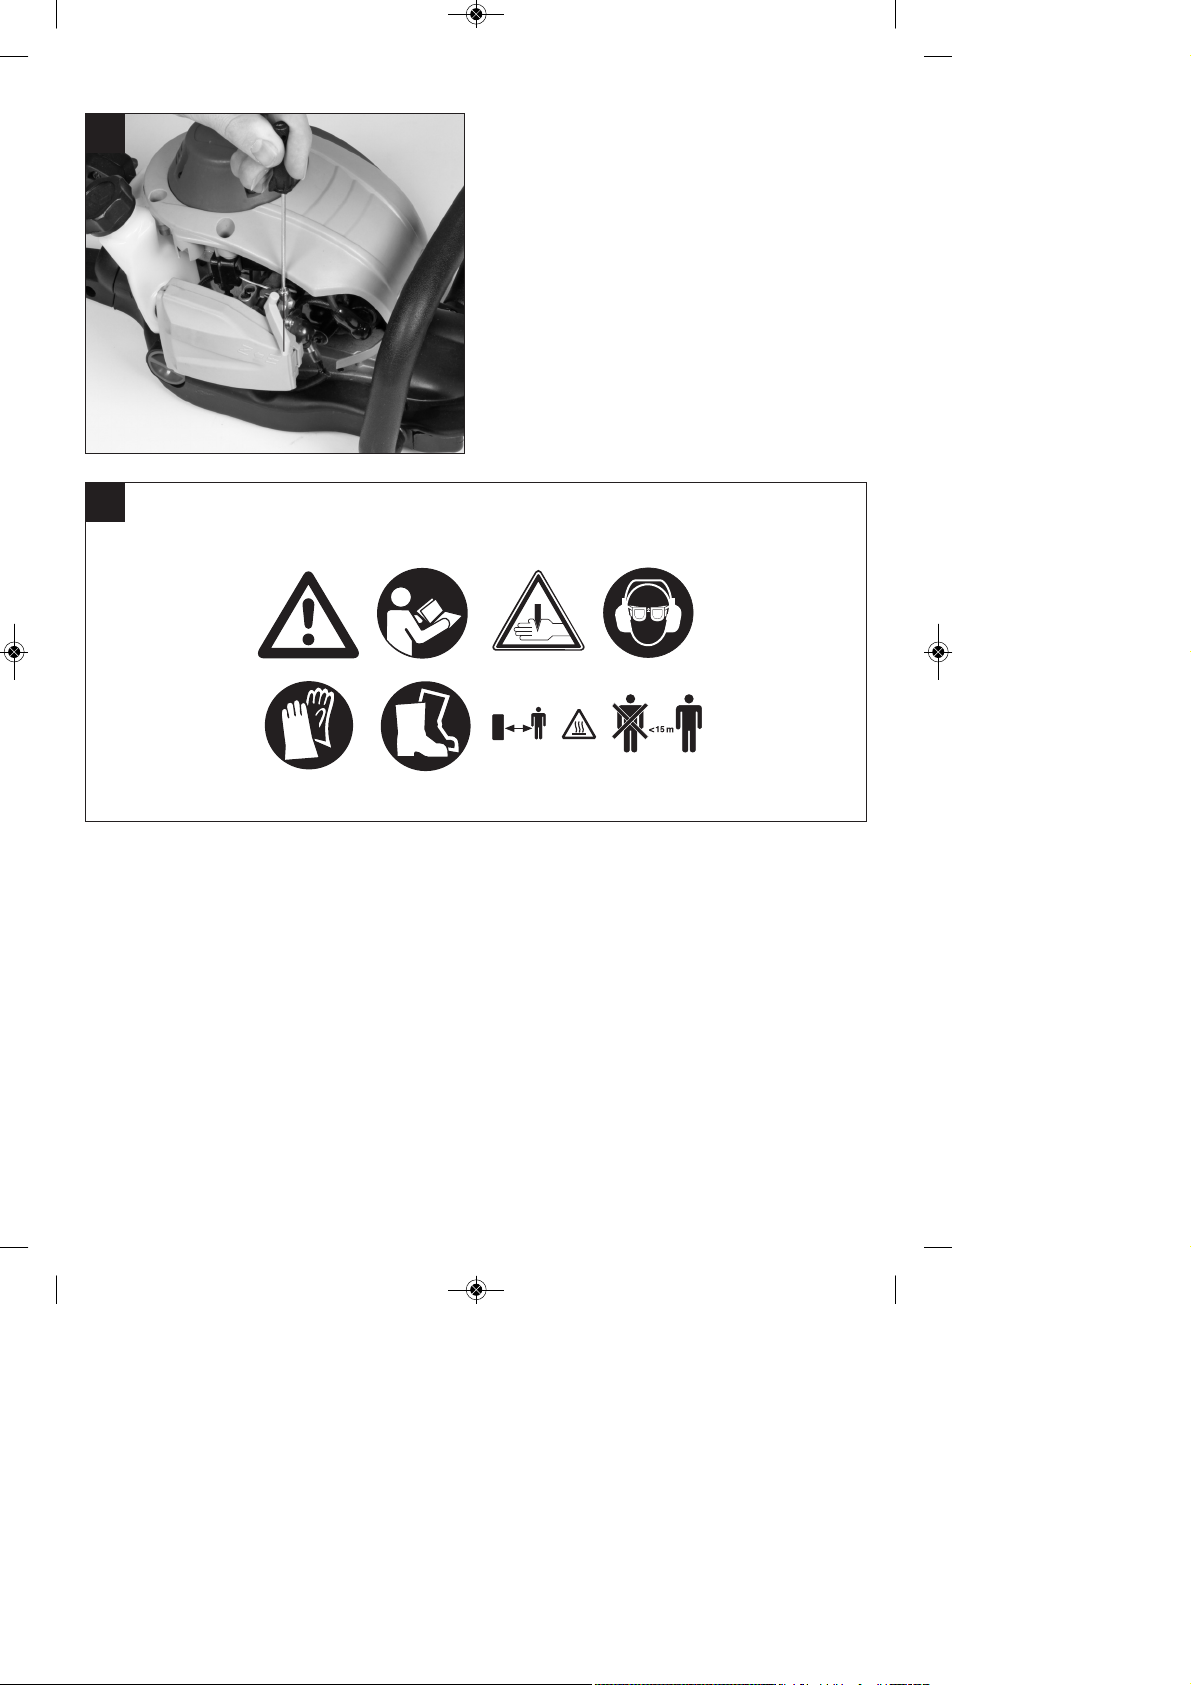
Erklärung des Hinweisschildes auf dem Gerät
(siehe Bild 17)
1. Warnung!
2. Vor Inbetriebnahme Gebrauchsanleitung lesen!
3. Scharfe Messer! Hände und Füße immer von
Messern fernhalten.
4. Augenschutz und Gehörschutz tragen!
5. Schutzhandschuhe tragen!
6. Festes Schuhwerk tragen!
7. Sehr heiße Oberfläche. Nicht den heißen
Auspufftopf, Getriebegehäuse oder Zylinder
berühren. Sie könnten sich verbrennen. Diese
Teile werden durch den Betrieb sehr heiß und
bleiben, auch nachdem das Gerät ausgeschaltet
ist, lange heiß.
8. Abstand von mind. 15m zu anderen Presonen
einhalten.
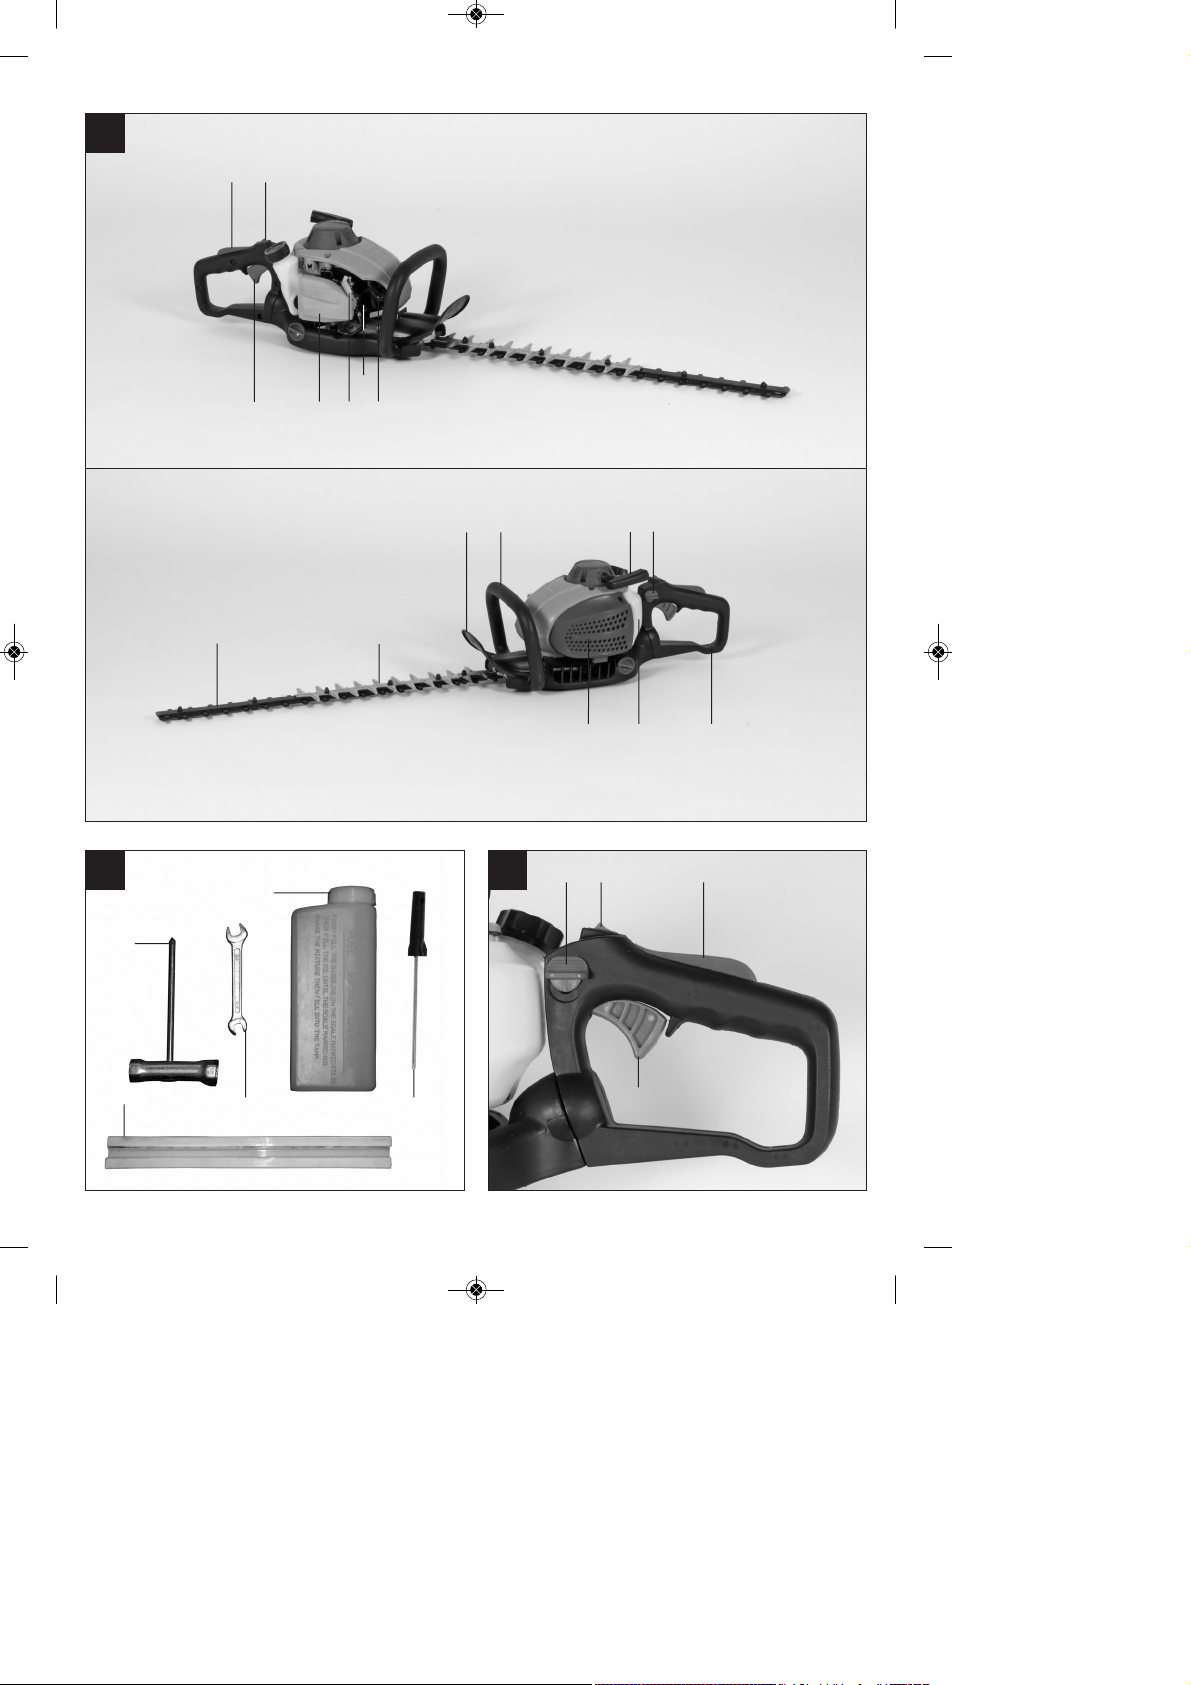
2. Aufbauübersicht und Lieferumfang
(Abb. 1-2)
1. Schneideblatt
2. Schutzabdeckung Schneideblatt
3. Schutzschild
4. Vorderer Handgriff
5. Choke Hebel
6. Ein-/ Aus- Schalter
7. Schraubendreher
8. Arretierhebel für Drehgriff
9. Kraftstoffpumpe (Primer)
10. Luftfilterabdeckung
11. Startergriff
12. Hinterer Handgriff
13. „Freigabe“ Gashebel
14. Gashebel
15. Schalldämpferabdeckung
16. Tank für Kraftstoffgemisch
17. Zündkerzenstecker
18. Zündkerzenschlüssel
19. Gabelschlüssel SW8/SW10
20. Öl/Benzin Mischflasche
21. Schwertabdeckung
3. Bestimmungsgemäße Verwendung
Achtung! Diese Heckenschere ist zum Schneiden
von Hecken, Büschen und Sträuchern geeignet.
Die Maschine darf nur nach ihrer Bestimmung
verwendet werden. Jede weitere darüber
hinausgehende Verwendung ist nicht
bestimmungsgemäß. Für daraus hervorgerufene
Schäden oder Verletzungen aller Art haftet der
Benutzer/Bediener und nicht der Hersteller.
Bitte beachten Sie, dass unsere Geräte
bestimmungsgemäß nicht für den gewerblichen,
handwerklichen oder industriellen Einsatz konstruiert
wurden. Wir übernehmen keine Gewährleistung,
wenn das Gerät in Gewerbe-, Handwerks- oder
Industriebetrieben sowie bei gleichzusetzenden
Tätigkeiten eingesetzt wird.
Anleitung_GE_PH_2555_SPK7__ 11.02.14 10:23 Seite 7

D
8
4. Technische Daten
Motortyp: 2-Takt-Motor; Luftgekühlt; Chromzylinder
Motorleistung max.: 0,85 kW/1,15 PS
Hubraum: 24,5 cm
3
Leerlaufdrehzahl Motor: 3300 min
-1
Drehzahl Motor max.: 8000 min
-1
Gewicht (leerer Tank): 5,4 kg
Schnittlänge: 55 cm
Schnittleistung max.: 19 mm
Zündkerze: Champion RCJ7Y
Schnittgeschwindigkeit max.: 1900 Schnitte/min
Geräusch und Vibration
Die Geräusch- und Vibrationswerte wurden entsprechend ISO 3477 bzw. ISO 11201 ermittelt.
Schalldruckpegel L
pA
98,9 dB
Unsicherheit K 3 dB
Schallleistungspegel L
WA
104,5 dB
Unsicherheit K 3 dB
Schwingungsemissionswert (vorderer Handgriff)
a
hv
= 6,41 m/s
2
Schwingungsemissionswert (hinterer Handgriff)
ahv= 6,24 m/s
2
Unsicherheit K = 1,5 m/s
2
Tragen Sie einen Gehörschutz.
Die Einwirkung von Lärm kann Gehörverlust bewirken.
Warnung!
Der angegebene Schwingungsemissionswert ist
nach einem genormten Prüfverfahren gemessen
worden und kann sich, abhängig von der Art und
Weise, in der das Werkzeug verwendet wird, ändern
und in Ausnahmefällen über dem angegebenen Wert
liegen.
Der angegebene Schwingungsemissionswert kann
zum Vergleich eines Werkzeuges mit einem anderen
verwendet werden.
Der angegebene Schwingungsemissionswert kann
auch zu einer einleitenden Einschätzung der
Beeinträchtigung verwendet werden.
Beschränken Sie die Geräuschentwicklung und
Vibration auf ein Minimum!
n Verwenden Sie nur einwandfreie Geräte.
n Warten und reinigen Sie das Gerät regelmäßig.
n Passen Sie Ihre Arbeitsweise dem Gerät an.
n Überlasten Sie das Gerät nicht.
n Lassen Sie das Gerät gegebenenfalls
überprüfen.
n Schalten Sie das Gerät aus, wenn es nicht
benutzt wird.
n Tragen Sie Handschuhe.
Restrisiken
Auch wenn Sie dieses Werkzeug
vorschriftsmäßig bedienen, bleiben immer
Restrisiken bestehen. Folgende Gefahren können
im Zusammenhang mit der Bauweise und
Ausführung dieses Werkzeuges auftreten:
1. Augenschäden, falls kein geeigneter
Augenschutz getragen wird.
2. Gehörschaden, falls kein geeigneter
Gehörschutz getragen wird.
5. Vor Inbetriebnahme
5.1 Montage
Die Heckenschere ist fertig montiert. Es sind keine
Montagearbeiten notwendig.
Zum besseren Führen ist das Gerät mit einem
Drehgriff ausgestattet, der sich je nach Anforderung
in die Positionen -90°/0°/+90° einstellen lässt.
Drücken Sie hierzu den Hebel (Abb. 5/Pos. B) nach
unten, drehen Sie den Drehgriff in die gewünschte
Position und lassen Sie den Hebel wieder nach oben
einrasten. Durch die verschiedenen einstellbaren
Positionen werden Arbeiten über Kopfhöhe oder an
anderen schwer zugänglichen Stellen erleichtert.
Achtung: Die Einstellung des Drehgriffes darf nur
bei abgestelltem Motor durchgeführt werden.
5.2 Treibstoff und Öl
Empfohlene Treibstoffe
Benutzen Sie nur ein Gemisch aus normalem
bleifreiem Benzin und speziellem 2-Takt-Motoröl.
Mischen Sie das Treibstoffgemisch nach der
Treibstoff-Mischtabelle an.
Achtung: Verwenden Sie kein Treibstoffgemisch,
das mehr als 90 Tage lang aufbewahrt wurde.
Achtung: Verwenden Sie kein 2-Takt-Öl mit einem
empfohlenen Mischverhältnis von 100:1. Verursacht
ungenügende Schmierung einen Motorenschaden
entfällt die Motorgarantie des Herstellers.
Anleitung_GE_PH_2555_SPK7__ 11.02.14 10:23 Seite 8

D
9
Achtung: Verwenden Sie zum Transport und zur
Lagerung von Kraftstoff nur dafür vorgesehene und
zugelassene Behälter.
Geben Sie jeweils die richtige Menge Benzin und 2Takt-Öl in die beiliegende Mischflasche (Siehe
aufgedruckte Skala). Schütteln Sie anschließend den
Behälter gut durch.
5.3 Treibstoff-Misch-Tabelle:
Mischverfahren: 40 Teile Benzin auf 1 Teil Öl
6. Betrieb
Beachten Sie bitte die gesetzlichen Bestimmungen
zur Lärmschutzverordnung, die örtlich
unterschiedlich sein können.
Betreiben und starten Sie das Gerät nur im Freien in
gut belüfteten Gebieten um die Gefahr von
Verletzungen durch giftige Gase zu reduzieren.
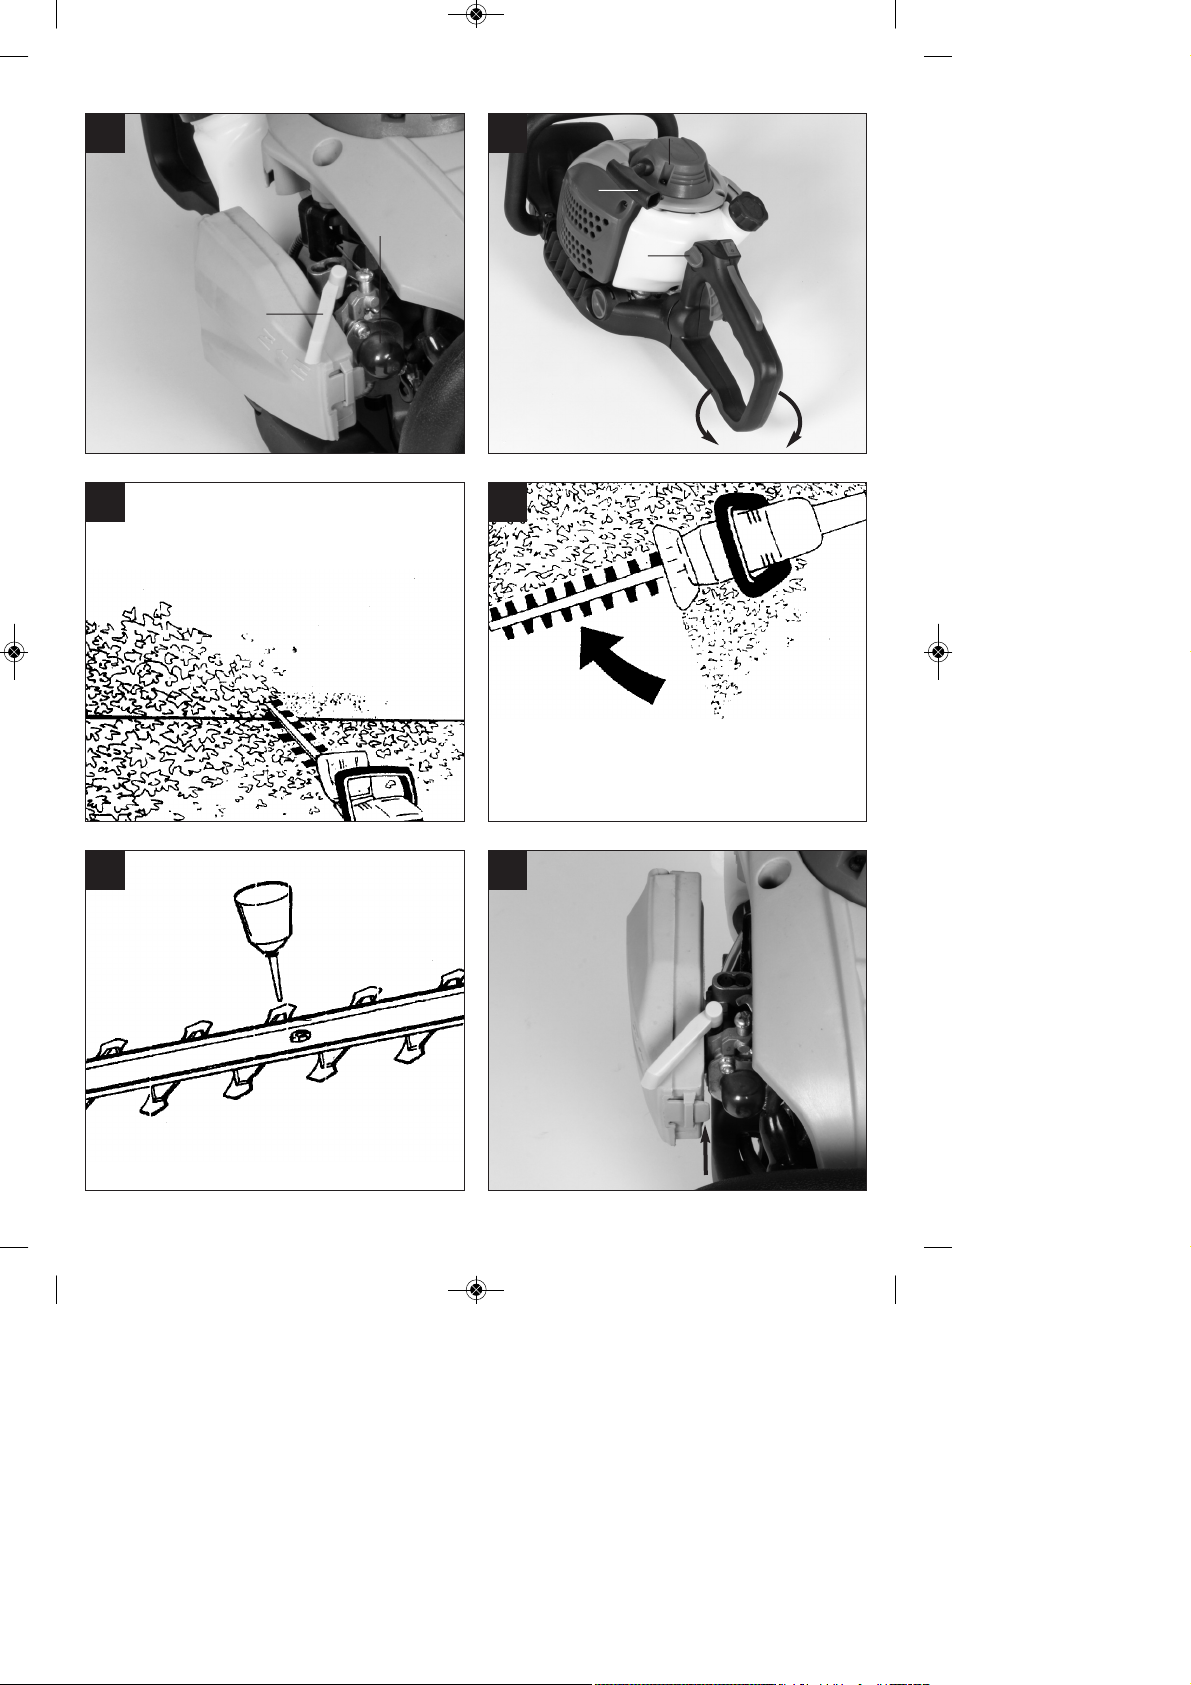
6.1 Kalten Motor starten (Abb. 3-5)
Füllen Sie den Tank mit einer angemessenen Menge
Benzin/Öl-Gemisch.
1. Gerät auf eine harte, ebene Fläche stellen.
2. Choke-Hebel (Abb. 4/Pos. 5) auf „ “ stellen.
3. Kraftstoffpumpe (Primer) (Abb. 4/Pos. 9) 10x
drücken.
4. Ein-/ Aus-Schalter (Abb. 3/Pos. 6) auf „I“
schalten
5. Das Gerät am vorderen Handgriff mit der linken
Hand gut festhalten und mit der rechten Hand
die Starterleine (Abb. 5/Pos. A) bis zum ersten
Widerstand (ca. 10cm) herausziehen. Jetzt die
Starterleine 4x rasch anziehen. Das Gerät sollte
starten.
Achtung: Die Starterleine nicht zurückschleudern lassen. Dies kann zu Beschädigungen
führen.
6. Ist der Motor gestartet, das Gerät ca. 10 sek.
warmlaufen lassen.
Achtung: Durch den festgestellten Choke Hebel
beginnt das Schneidwerkzeug bei startendem
Motor zu arbeiten.
Anschließend Choke Hebel durch einfaches
Betätigen des Gashebels (Pos. 14) entriegeln
(Der Motor kehrt in den Leerlauf zurück).
Beachten Sie: Bevor Sie den Gashabel betätigen
können, müssen Sie den Hebel “Freigabe”
Gashebel bis zum Anschlag durchdrücken.
7. Sollte der Motor nicht starten wiederholen Sie die
Schritte 5-6.
Zur Beachtung: Springt der Motor auch nach
mehreren Versuchen nicht an, lesen Sie den
Abschnitt „Fehlerbehebung am Motor“.
Zur Beachtung: Ziehen Sie die Anlasserschnur
stets gerade heraus. Wird sie in einem Winkel
herausgezogen, entsteht Reibung an der Öse. Durch
diese Reibung wird die Schnur durchgescheuert und
nutzt sich schneller ab.
6.2 Warmen Motor Starten (Das Gerät stand für
nicht mehr als 15-20min still)
1. Gerät auf harte, ebene Fläche stellen.
2. Ein-/Aus-Schalter auf „I“ schalten.
3. Gerät am vorderen Handgriff mit der linken Hand
gut festhalten und mit der rechten Hand die
Starterleine bis zum ersten Widerstand (ca.
10cm) herausziehen. Jetzt die Starterleine rasch
anziehen. Das Gerät sollte nach 1-2 Zügen
starten. Falls die Maschine nach 6 Zügen immer
noch nicht startet wiederholen Sie die Schritte 17 unter kalten Motor starten.
6.3 Motor abstellen
Not-Aus Schrittfolge:
Falls es notwendig ist, die Maschine sofort
anzuhalten, stellen Sie hierzu den Ein-/Aus-Schalter
auf „Stop“ bzw. „0“
Normale Schrittfolge:
Lassen Sie den Gashebel los und warten Sie bis der
Motor in Leerlaufgeschwindigkeit übergegangen ist.
Stellen Sie dann den Ein-/ Aus-Schalter auf „Stop“
bzw. „0“.
6.4 Arbeitshinweise
Lassen Sie die Maschine während des Starts oder
beim Schneiden nicht mit niedriger Drehzahl laufen.
Schneiden für dichteres Wachstum: Am
effektivsten ist eine breite, durchgezogene
Bewegung, dabei führen Sie die Messer der
Schneide direkt durch die Zweige. Eine leichte
Neigung der Schneide nach unten, in der Richtung
der Bewegung ergibt den besten Schnitt.
Um eine gleichmäßige Heckenhöhe zu erreichen,
wird das Spannen eines Fadens als Richtschnur
entlang der Heckenkante empfohlen. Die überstehenden Zweige werden abgeschnitten. (Abb. 6)
Benzin
2-Takt-Öl
1 Liter
25 ml
5 Liter
125 ml
Anleitung_GE_PH_2555_SPK7__ 11.02.14 10:23 Seite 9

D
10
Seitliches Zuschneiden einer Hecke: Die
Seitenflächen einer Hecke werden mit
bogenförmigen Bewegungen von unten nach oben
geschnitten. (Abb. 7)
Achtung: Bauartbedingt kann es bei längeren
seitlichen Arbeiten mit nicht vollständig gefülltem
Tank vorkommen, dass der Motor abstirbt.
7. Reinigung, Wartung, Lagerung und
Ersatzteilbestellung
7.1 Reinigung
n Halten Sie Schutzvorrichtungen, Luftschlitze und
Motorengehäuse so staub- und schmutzfrei wie
möglich. Reiben Sie das Gerät mit einem
sauberen Tuch ab oder blasen Sie es mit
Druckluft bei niedrigem Druck aus.
n Wir empfehlen, dass Sie das Gerät direkt nach
jeder Benutzung reinigen.
n Reinigen Sie das Gerät regelmäßig mit einem
feuchten Tuch und etwas Schmierseife.
Verwenden Sie keine Reinigungs- oder
Lösungsmittel; diese könnten die Kunststoffteile
des Gerätes angreifen. Achten Sie darauf, dass
kein Wasser in das Geräteinnere gelangen kann.
7.2 Wartung
Schalten Sie die Heckenschere vor
Wartungsarbeiten immer aus und ziehen Sie den
Zündkerzenstecker ab.
1. Die Schneidemesser sind von hoher Qualität,
aus gehärtetem Stahl und bei normaler
Handhabung wird ein Schärfen der Messer nicht
notwendig sein. Falls Sie aus Versehen gegen
einen Draht, Stein, Glas oder andere harte
Objekte stoßen, könnte dies eine Kerbe in der
Schneide verursachen. Es ist nicht notwendig die
Kerbe zu entfernen, solange sie die Bewegung
der Messer nicht beeinträchtigt. Falls sie die
Bewegung beeinträchtigen sollte, schalten Sie
die Maschine aus und nehmen Sie eine feine
Feile oder einen feinen Schleifstein um die Kerbe
zu entfernen. Achten Sie darauf, dass das
Schneidmesser immer gut geölt ist
(Siehe Abb. 8).
2. Falls Sie die Heckenschere fallen lassen sollten
kontrollieren Sie ob Beschädigungen aufgetreten
sind. Bei Beschädigungen nehmen Sie Kontakt
zu einem autorisierten Kundendienst auf oder
senden Sie das Gerät an die ISC-GmbH um es
reparieren zu lassen.
3. Reinigen Sie die Maschine nur in
ausgeschaltetem Zustand. Benutzen Sie nur
milde Seife und einen feuchten Lappen um sie
zu säubern. Lassen Sie niemals Flüssigkeit ins
innere der Maschine gelangen. Verwenden Sie
keine ätzenden Reiniger.
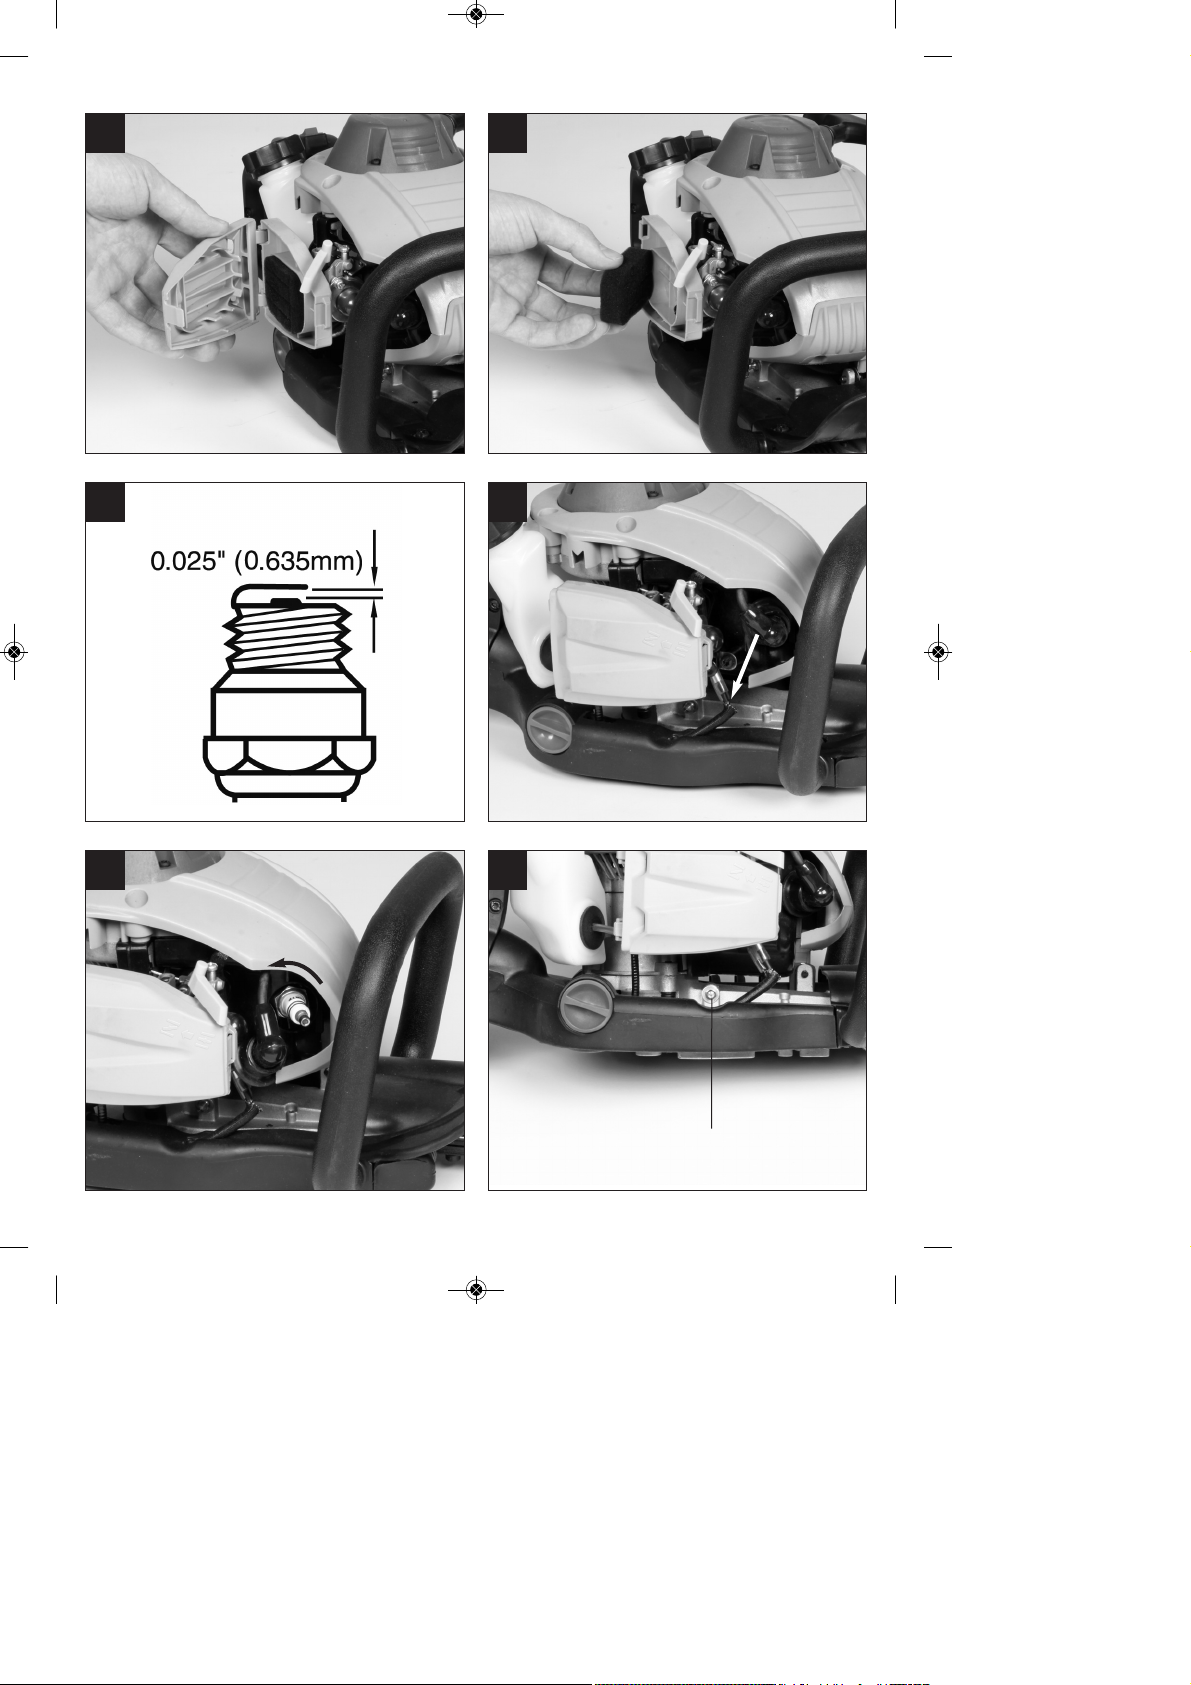
7.2.1 Wartung des Luftfilters (Abb. 9-11)
Verschmutzte Luftfilter verringern die Motorleistung
durch zu geringe Luftzufuhr zum Vergaser.
Regelmäßige Kontrolle ist daher unerlässlich. Der
Luftfilter sollte alle 25 Betriebsstunden kontrolliert
und bei Bedarf gereinigt werden. Bei sehr staubiger
Luft ist der Luftfilter öfters zu überprüfen.
1. Entfernen Sie den Luftfilterdeckel (Abb. 9-10)
2. Entnehmen Sie das Filterelement (Abb. 11)
3. Reinigen Sie das Filterelement durch ausklopfen
oder ausblasen.
4. Der Zusammenbau erfolgt in umgekehrter
Reihenfolge.
Achtung: Luftfilter nie mit Benzin oder brennbaren
Lösungsmitteln reinigen. Luftfilter mit Druckluft oder
durch Ausklopfen reinigen.
7.2.2 Wartung der Zündkerze (Abb. 12-14)
Zündkerzenfunkenstrecke = 0,025 Inch (0,635 mm)
Ziehen Sie die Zündkerze mit 14,7-21,5Nm an.
Überprüfen Sie die Zündkerze erstmals nach 10
Betriebsstunden auf Verschmutzung und reinigen
Sie diese gegebenenfalls mit einer
Kupferdrahtbürste. Danach die Zündkerze alle 50
Betriebsstunden warten.
1. Ziehen Sie den Zündkerzenstecker (Abb. 13) mit
einer Drehbewegung ab.
2. Entfernen Sie die Zündkerze (Abb. 14) mit dem
beiliegenden Zündkerzenschlüssel.
3. Der Zusammenbau erfolgt in umgekehrter
Reihenfolge.
7.2.3 Wartung des Getriebes (Abb. 15)
Das Getriebe muss jährlich vor Saisonbeginn am
Schmiernippel (Abb. 15/Pos. A) geschmiert werden.
Stecken Sie hierzu eine handelsübliche Fettpresse
auf den Schmiernippel und pressen Sie ca. 3 Hübe
handelsübliches Maschinenfett in das Getriebe. Bei
übermäßigem Gebrauch sollte das Getriebe öfters
gefettet werden.
Anleitung_GE_PH_2555_SPK7__ 11.02.14 10:23 Seite 10

D
11
7.2.4 Vergaser Einstellungen
Achtung! Einstellungen am Vergaser dürfen nur
durch autorisierten Kundendienst vorgenommen
werden.
Einstellen des Standgases:
Achtung! Standgas in warmem Betriebszustand
einstellen.
Sollte das Gerät bei nicht betätigtem Gashebel
ausgehen und sämtliche anderen Ursachen nach
Abschnitt 9 Fehlerbehebung ausgeschlossen sein,
ist ein Nachjustieren des Standgases notwendig.
Drehen Sie hierzu die Standgasschraube (Abb.
16/Pos. 5) im Uhrzeigersinn bis das Gerät im
Leerlauf sicher läuft.
Sollte das Standgas so hoch sein, dass die
Schneidmesser nicht stillstehen, muss das Standgas
durch Linksdrehen der Standgasschraube (Abb. 16/
Pos. 5) soweit verringert werden bis die
Schneidmesser stillstehen.
7.3 Lagerung
Achtung: Ein Fehler bei der Befolgung dieser
Schritte kann zur Folge haben, dass sich
Ablagerungen an der Vergaserinnenwand bilden,
was ein erschwertes Anlassen oder einen
dauerhaften Schaden an der Maschine zu Folge
haben kann.
1. Führen Sie alle Wartungsarbeiten durch.
2. Lassen Sie den Treibstoff aus dem Tank ab
(Benutzen Sie hierzu eine handelsübliche
Kunststoff-Benzinpumpe aus dem Baumarkt).
3. Nachdem der Treibstoff abgelassen ist, starten
Sie die Maschine.
4. Lassen Sie die Maschine im Leerlauf
weiterlaufen bis sie stoppt. Das reinigt den
Vergaser vom restlichen Treibstoff.
5. Lassen Sie die Maschine abkühlen.(ca. 5
Minuten)
6. Entfernen Sie die Zündkerze (siehe Punkt 7.2.2).
7. Füllen Sie eine Teelöffel große Menge 2-Takt
Motoröl in den Brennraum. Ziehen Sie einige
male vorsichtig die Anlasserleine heraus, um die
inneren Bauteile mit dem Öl zu benetzen. Setzen
Sie die Zündkerze wieder ein.
8. Säubern Sie das äußere Gehäuse der Maschine.
9. Bewahren Sie die Maschine an einem kalten,
trockenen Platz außerhalb der Reichweite von
Zündquellen und brennbaren Substanzen auf.
10. Beim Transportieren oder bei der Lagerung der
Heckenschere ist die Schneideinrichtung immer
mit dem Schutz für die Schneideinrichtung
abzudecken.
Düngemittel oder andere chemische Gartenprodukte
beinhalten häufig Substanzen, welche die Korrosion
von Metallen beschleunigen. Lagern Sie die
Maschine nicht auf oder in der Nähe von Düngemitteln oder anderen Chemikalien.
Wiederinbetriebnahme
1. Entfernen Sie die Zündkerze.
2. Ziehen Sie die Starterleine mehrmals heraus um
den Brennraum von Ölrückständen zu reinigen.
3. Säubern Sie die Zündkerzenkontakte oder
setzen Sie eine neue Zündkerze ein.
4. Füllen Sie den Tank. Siehe Abschnitt Treibstoff
und Öl.
5. Führen Sie die Schritte 1-7 unter Punkt „Kalten
Motor starten“ durch.
7.4 Ersatzteilbestellung:
Bei der Ersatzteilbestellung sollten folgende
Angaben gemacht werden;
n Typ des Gerätes
n Artikelnummer des Gerätes
n Ident-Nummer des Gerätes
n Ersatzteilnummer des erforderlichen Ersatzteils
Aktuelle Preise und Infos finden Sie unter
www.isc-gmbh.info
8. Entsorgung und Wiederverwertung
Das Gerät befindet sich in einer Verpackung um
Transportschäden zu verhindern. Diese Verpackung
ist Rohstoff und ist somit wieder verwendbar oder
kann dem Rohstoffkreislauf zurückgeführt werden.
Das Gerät und dessen Zubehör bestehen aus
verschiedenen Materialien, wie z.B. Metall und
Kunststoffe. Führen Sie defekte Bauteile der
Sondermüllentsorgung zu. Fragen Sie im
Fachgeschäft oder in der Gemeindeverwaltung nach!
Anleitung_GE_PH_2555_SPK7__ 11.02.14 10:23 Seite 11
D
12
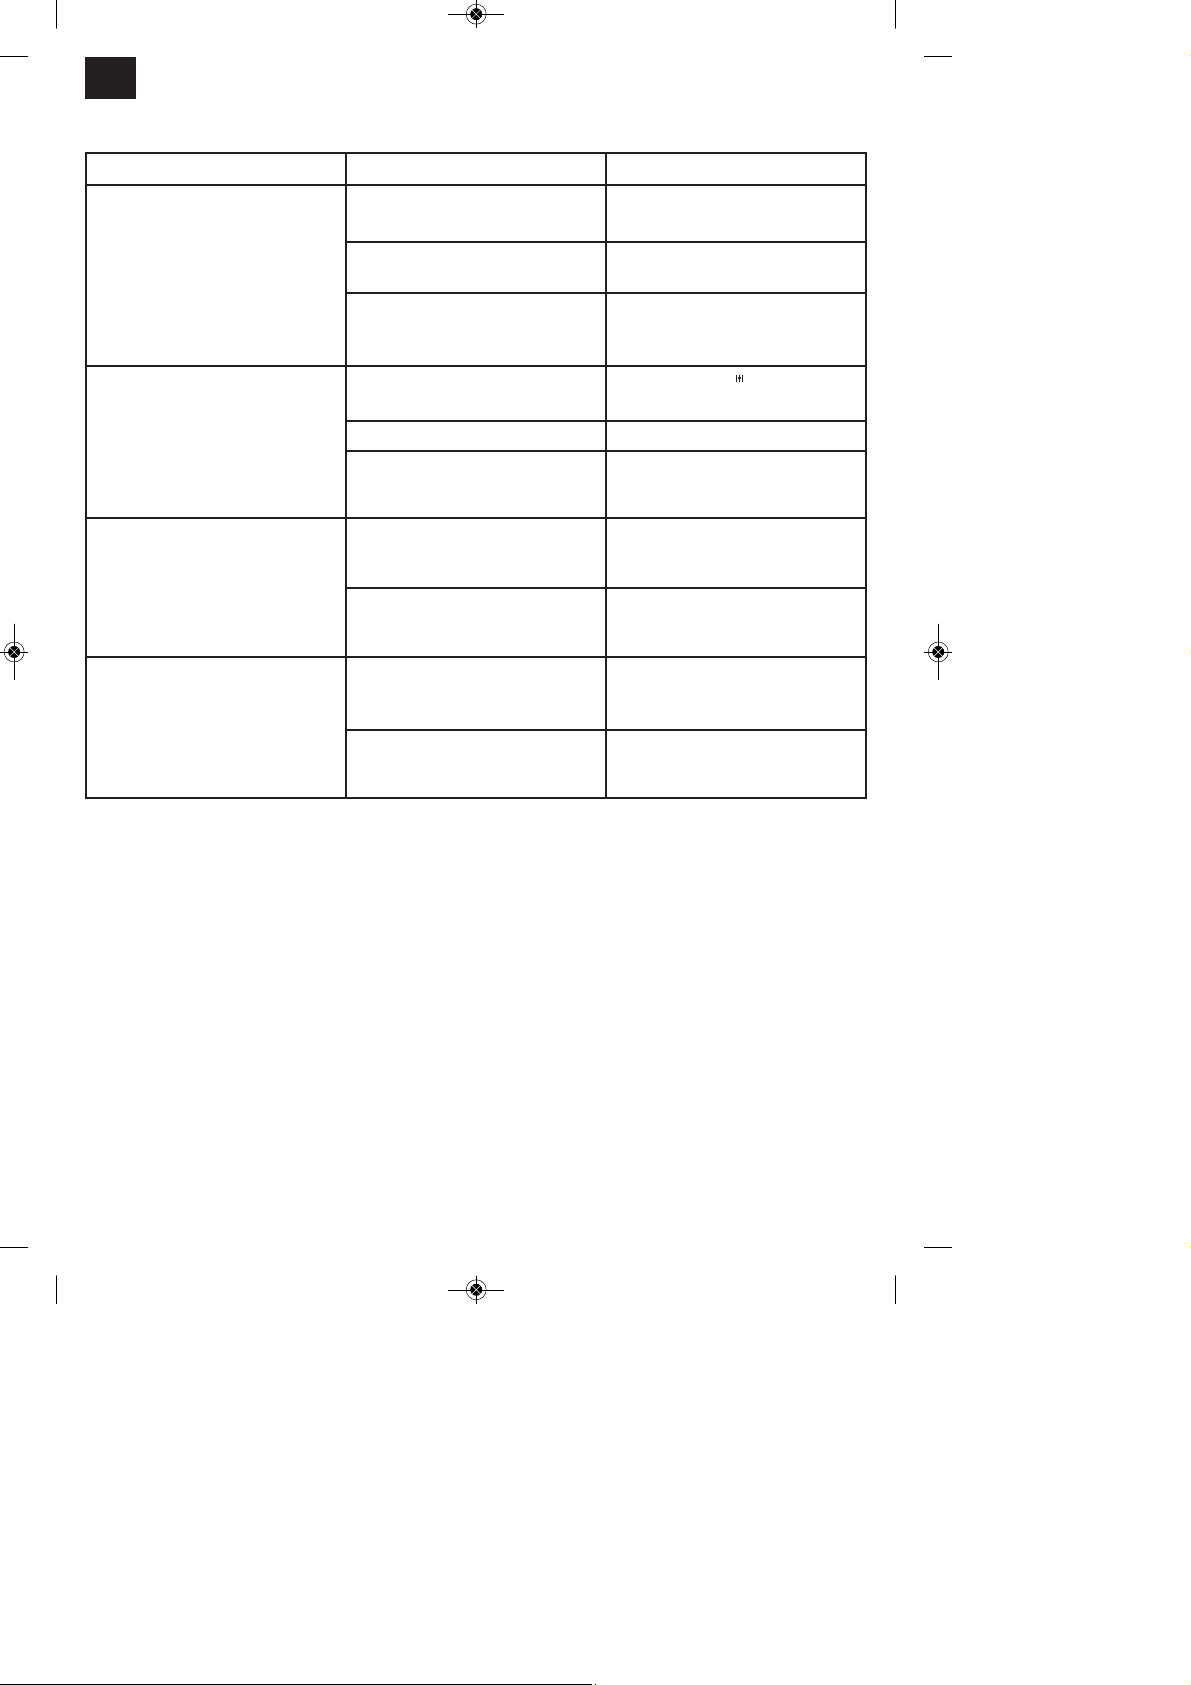
Störung Mögliche Ursache Störungsbehebung
Das Gerät springt nicht an. Fehlerhaftes Vorgehen beim
Starten.
Folgen Sie den Anweisungen zum
Starten
Verrußte oder feuchte Zündkerze Zündkerze reinigen oder durch
neue ersetzen.
Falsche Vergasereinstellung Autorisierten Kundendienst
aufsuchen, oder das Gerät an die
ISC-GmbH senden.
Das Gerät springt an, hat aber
nicht die volle Leistung.
Falsche Einstellung des
Chokehebels
Chokehebel auf „ “ stellen.
Verschmutzter Luftfilter Luffilter reinigen
Falsche Vergasereinstellung Autorisierten Kundendienst
aufsuchen, oder das Gerät an die
ISC-GmbH senden.
Der Motor läuft unregelmäßig Falscher Elektrodenabstand der
Zündkerze
Zündkerze reinigen und
Elektrodenabstand einstellen oder
neue Zündkerze einsetzen.
Falsche Vergasereinstellung Autorisierten Kundendienst
aufsuchen, oder das Gerät an die
ISC-GmbH senden.
Motor raucht übermäßig Falsche Treibstoffmischung Richtige Treibstoffmischung
verwenden (siehe TreibstoffMischtabelle)
Falsche Vergasereinstellung Autorisierten Kundendienst
aufsuchen, oder das Gerät an die
ISC-GmbH senden.
9. Fehlerbehebung
Anleitung_GE_PH_2555_SPK7__ 11.02.14 10:23 Seite 12

D
13
Garantiebedingungen:
Die Fa. iSC GmbH garantiert die Behebung von Mängeln bzw. den Geräteaustausch entsprechend der unten
stehenden Übersicht, wobei die gesetzlichen Gewährleistungsansprüche unberührt bleiben.
Bezüglich Verschleißteilen, Verbrauchsmaterial und Fehlteilen garantiert die Fa. iSC GmbH eine
Mängelbehebung bzw. eine Nachlieferung nur, wenn der Mangel innerhalb von 24h (Verbrauchsmaterial), 5
Arbeitstagen (Fehlteilen) oder 6 Monaten (Verschleißteile) nach Kauf angezeigt und das Kaufdatum durch
Kaufbeleg nachgewiesen wird.
Bei Mängeln an Material oder Konstruktion, bitten wir Sie im Garantiefall das Gerät zusammen mit beiliegender
Gerätekarte einzureichen und diese vollständig auszufüllen. Wichtig ist hierbei eine genaue Fehlerbeschreibung
anzugeben.
Beantworten Sie hierfür folgende Fragen:
n Hat das Gerät bereits einmal funktioniert oder war es von Anfang an defekt?
n Ist Ihnen vor dem Auftreten des Defektes etwas aufgefallen (Symptom vor Defekt)?
n Welche Fehlfunktion weist das Gerät Ihrer Meinung nach auf (Hauptsymptom)?
Beschreiben Sie diese Fehlfunktion.
Kategorie Beispiel Garantieleistung
Mängel an Material oder
Konstruktion
24 Monate
Verschleißteile Zündkerze, Luftfilter 6 Monate
Verbrauchsmaterial/
Verbrauchsteile
Schnittmesser Garantie nur bei Sofortdefekt (24h
nach Kauf / Kaufbelegdatum)
Fehlteile 5 Arbeitstage
Anleitung_GE_PH_2555_SPK7__ 11.02.14 10:23 Seite 13

Important!
When using the equipment, a few safety precautions
must be observed to avoid injuries and damage.
Please read the complete operating instructions and
safety regulations with due care. Keep this manual in
a safe place, so that the information is available at all
times. If you give the equipment to any other person,
hand over these operating instructions and safety
regulations as well. We cannot accept any liability for
damage or accidents which arise due to a failure to
follow these instructions and the safety instructions.
1. Safety regulations
The corresponding safety information can be found
in the enclosed booklet.
CAUTION!
Read all safety regulations and instructions.
Any errors made in following the safety regulations
and instructions may result in an electric shock, fire
and/or serious injury.
Keep all safety regulations and instructions in a
safe place for future use.
Explanation of the warning signs on the
equipment (see Fig. 17)
1. Warning!
2. Read the directions for use before operating the
equipment.
3. Sharp blades! Always keep hands and feet away
from the blades.
4. Wear eye protection and ear plugs!
5. Wear safety gloves!
6. Wear sturdy, non-slip footwear!
7. Very hot surface. Do not touch the hot exhaust
silencer, gearbox or cylinder. You may burn
yourself. These parts have become very hot
during operation and remain very hot over a long
period, even after the equipment has been
switched off.
8. Maintain a distance of at least 15 m from other
persons.
2. Layout and items supplied (Fig. 1-2)
1. Cutting blade
2. Cutting blade safety cover
3. Safety plate
4. Front handle
5. Choke lever
6. ON/OFF switch
7. Screwdriver
8. Locking knob for rotary handle
9. Fuel pump (primer)
10. Air filter cover
11. Starter handle
12. Rear handle
13. Throttle lever “release”
14. Throttle lever
15. Silencer cover
16. Tank for fuel mixture
17. Spark plug boot
18. Spark plug wrench
19. 8 mm / 10 mm open-ended spanner
20. Combined oil/petrol cylinder
21. Cutter rail cover
3. Proper use
Important. This hedge trimmer is suitable for cutting
hedges, bushes and shrubs.
The machine is to be used only for its prescribed
purpose. Any other use is deemed to be a case of
misuse. The user / operator and not the
manufacturer will be liable for any damage or injuries
of any kind caused as a result of this.
Please note that our equipment has not been
designed for use in commercial, trade or industrial
applications. Our warranty will be voided if the
machine is used in commercial, trade or industrial
businesses or for equivalent purposes.
GB
14
Anleitung_GE_PH_2555_SPK7__ 11.02.14 10:23 Seite 14

4. Technical data
Engine type:
2-stroke engine, air-cooled, chrome cylinder
Engine output (max.): 0.85 kW / 1.15 hp
Displacement: 24.5 cm
3
Idle speed of engine: 3300 min
-1
Max. engine speed 8000 min
-1
Weight (with empty tank): 5.4 kg
Cutting length: 55 cm
Cutting capacity (max.) 19 mm
Spark plug: Champion RCJ7Y
Max. cutting speed 1900 cuts/min
Sound and vibration
Sound and vibration values were measured in
accordance with ISO 3477, ISO 11201.
LpAsound pressure level 98.9 dB(A)
KpAuncertainty 3 dB
LWAsound power level 104.5 dB(A)
KWAuncertainty 3 dB
Vibration emission value (front handle)
Vibration emission value a
h
= 6.41 m/s
2
K uncertainty = 1.5 m/s
2
Vibration emission value (rear handle)
Vibration emission value a
h
= 6.24 m/s
2
K uncertainty = 1.5 m/s
2
Wear ear-muffs.
The impact of noise can cause damage to hearing.
Additional information for electric power tools
Warning!
The specified vibration value was established in
accordance with a standardized testing method. It
may change according to how the electric equipment
is used and may exceed the specified value in
exceptional circumstances.
The specified vibration value can be used to compare
the equipment with other electric power tools.
The specified vibration value can be used for initial
assessment of a harmful effect.
Keep the noise emissions and vibrations to a
minimum.
n Only use appliances which are in perfect working
order.
n Service and clean the appliance regularly.
n Adapt your working style to suit the appliance.
n Do not overload the appliance.
n Have the appliance serviced whenever
necessary.
n Switch the appliance off when it is not in use.
n Wear protective gloves.
Residual risks
Even if you use this electric power tool in
accordance with instructions, certain residual
risks cannot be rules out. The following hazards
may arise in connection with the equipment’s
construction and layout:
1. Lung damage if no suitable protective dust mask
is used.
2. Damage to hearing if no suitable ear protection is
used.
5. Before starting the machine
5.1 Assembly
The hedge trimmer is supplied fully assembled. No
assembly work is required.
To make it easier to control, the machine is fitted with
a rotary handle that can be adjusted as required into
positions at angles of -90°/0°/+90°. To do this, press
the lever (Fig. 5/Item B) downwards, turn the rotary
handle into the required position and then allow the
lever to rise and latch in place again. The various
adjustable positions facilitate working above head
height or in other places with different access.
Important: The rotary handle may only be adjusted
when the engine is switched off.
5.2 Fuel and oil
Recommended fuels
Use only a mixture of normal unleaded petrol and
special 2-stroke engine oil. Mix the fuel mixture as
indicated on the fuel mixing table.
Please note: Do not use a fuel mixture which has
been kept for longer than 90 days.
Please note: Do not use 2-stroke oil with a
recommended mixing ration of 100:1. If inadequate
GB
15
Anleitung_GE_PH_2555_SPK7__ 11.02.14 10:23 Seite 15

lubrication causes engine damage, the
manufacturer’s engine warranty will be voided.
Please note: Only use containers designed and
approved for the purpose to transport and store fuel.
Pour the correct quantities of petrol and 2-stroke oil
into the mixing bottle (see scale printed on the
bottle). Then shake the bottle well.
5.3 Fuel mixture table
Mixing procedure: 40 parts petrol to 1 part oil
6. Operation
Please note that the statutory regulations governing
noise abatement may differ from one location to
another.
Operate and start the equipment only outdoors in well
ventilated areas to reduce the danger of injury from
toxic gases.
6.1 Starting the engine from cold (Fig. 3-5)
Fill the tank with the required amount of oil/petrol mix.
1. Set the equipment down on a hard, level surface.
2. Set the choke lever (Fig. 4/Item 5) to “ ”.
3. Press the fuel pump (primer) (Fig. 4/Item 9) 10
times.
4. Move the On/Off switch (Fig. 3/Item 6) to “I”.
5. Hold the machine by the front handle in your left
hand and pull the starter cable (Fig. 5/Item A) up
to the first resistance point (approx. 10 cm) with
your right hand. Then tug sharply on the starter
cable 4 times. The equipment should start.
Important: Never allow the starter line to snap
back. This may result in damage.
6. Once the engine has started, allow the equipment
to warm up for 10 seconds.
Important: Since the choke lever is secured, the
cutting tool will start to operate when the engine is
started.
Actuate the choke lever once to release the
throttle (Item 14). (The engine will then return to
idle mode.) Remember: Before you can actuate
the throttle lever, you must press the throttle lever
“Release” lever through as far as the stop.
7. If the engine does not start up, repeat steps 5-6.
Please note: If the engine does not start up even
after several attempts, read the section “Engine
troubleshooting”.
Please note: Always pull the starter cable out in a
straight line. If it is pulled out at an angle, friction will
occur on the eyelet. As a result of this friction, the
cable will become frayed and will wear away faster.
6.2 Starting the engine when warm (if the
machine has not been switched off for more than
15-20 minutes)
1. Put the equipment down on a hard, level surface.
2. Move the On/Off switch to “I”.
3. Hold the machine by the front handle in your left
hand and pull the starter cable up to the first
resistance point (approx. 10 cm) with your right
hand. Then tug sharply on the starter cable. The
equipment should start after 1-2 tugs. If the
equipment does not start after 6 pulls, repeat
steps 1-7 of the procedure for starting the engine
from cold.
6.3 Switching off the engine
Emergency Stop procedure:
If it becomes necessary to stop the machine
immediately, set the ON/OFF switch to “Stop” or “0”
Normal procedure:
Let go of the throttle lever and wait until the engine
has changed to idling speed. Then set the ON/OFF
switch to “Stop” or “0”.
6.4 Practical tips
Never allow the machine to run at low speed for
starting or for cutting.
Cutting for dense growth: The most effective
method is to use wide, sweeping movements,
guiding the cutting edge of the blade straight through
the branches. A slight incline of the blade downwards
towards the movement will produce best cutting
results.
It is recommended to tie a guide line of string or the
like along the hedge so that you cut the hedge to a
level height. The branches above it will be cut off.
(Fig. 6)
Cutting the side of a hedge: Cut the sides of the
hedge with curve-shaped movements from the
bottom up. (Fig. 7)
Please note: As a result of its design, if you work
with the machine on its side for a lengthy period and
the tank not completely filled, the motor may stall.
GB
16
Petrol 2-stroke oil
1 liters 25 ml
5 liters 125 ml
Anleitung_GE_PH_2555_SPK7__ 11.02.14 10:23 Seite 16

7. Cleaning, maintenance, storage and
ordering of spare parts
7.1 Cleaning
n Keep all safety devices, air vents and the motor
housing free of dirt and dust as far as possible.
Wipe the equipment with a clean cloth or blow it
with compressed air at low pressure.
n We recommend that you clean the device
immediately each time you have finished using it.
n Clean the equipment regularly with a moist cloth
and some soft soap. Do not use cleaning agents
or solvents; these could attack the plastic parts of
the equipment. Ensure that no water can seep
into the device.
7.2 Maintenance
Always switch off the head trimmer and remove the
spark plug boot before carrying out any maintenance
work.
1. The cutter blades are high quality, made of
tempered steel and in normal use there is no
need to sharpen the blades. If you accidentally
strike a wire, stone, glass or other hard object,
this may cause a notch in the blade. There is no
need to remove the notch as long as it does not
adversely affect the movement of the cutting
edges. If it does adversely affect this movement,
switch off the machine and use a fine file or a
fine grinding stone to remove the notch. Ensure
that the blade’s cutting edge is always well oiled
(see Fig. 8).
2. If you drop the hedge trimmer, check whether it
has suffered any damage. If it is damaged
contact an authorized customer service outlet or
send the machine to ISC GmbH to have it
repaired.
3. Only clean the machine after it has been
switched off. Use only mild soap and a damp
cloth to clean it. Never allow fluid to get into the
machine. Do not use caustic cleaning products.
7.2.1 Maintenance of the air filter (Fig. 9-11)
Soiled air filters reduce the engine output by supply
too little air to the carburetor.
Regular checks are therefore essential. The air filter
should be checked after every 25 hours of use and
cleaned if necessary. If the air contains a lot of dust,
the air filter should be checked more frequently.
1. Remove the air filter cover (Fig. 9-10)
2. Remove the filter element (Fig. 11)
3. Clean the filter element by tapping it or blowing
it.
4. Assemble in reverse order.
Please note: Never clean the air filter with petrol or
inflammable solvents. Clean the air filter with
compressed air or by tapping it.
7.2.2 Maintenance of the spark plug (Fig. 12-14)
Spark plug gap = 0.025 inch (0.635 mm). Tighten the
spark plug with a torque of 14.7-21.5 Nm.
Check the spark plug for dirt and grime after 10
hours of operation and if necessary clean it with a
copper wire brush. Thereafter service the spark plug
after every 50 hours of operation.
1. Pull off the spark plug boot (Fig. 13) by twisting.
2. Remove the spark plug (Fig. 14) with the
supplied spark plug wrench.
3. Assemble in reverse order.
7.2.3 Maintenance of the gearbox (Fig. 15)
The gearbox must be lubricated every year before
the start of the season at the lubrication nipple (Fig.
15/Item A). Place a conventional grease gun on the
nipple and press approx. 3 strokes of conventional
machine grease into the gearbox. If you use the
trimmer frequently, grease the gearbox more often.
7.2.4 Carburetor settings
Important. Settings on the carburetor may only be
made by authorized customer service personnel.
Setting the idling speed:
Important. Set the idling speed when the machine is
warm.
If the engine stalls when the throttle is not pressed
and you have ruled out all the other causes listed in
section 9 Troubleshooting, the idling speed must be
adjusted. To do this turn the idling speed screw (Fig.
16/Item 5) clockwise until the machine runs smoothly
at idling speed.
If the idling speed is so fast that the cutting blades do
not reach a standstill, the idling speed must be
reduced by turning the idling speed screw (Fig.
16/Item 5) counterclockwise until the cutting blades
stop.
7.3 Storage
Please note: If you fail to follow these instructions
correctly, deposits may form on the interior of the
carburetor which may result in the engine being more
difficult to start or the machine suffering permanent
damage.
1. Carry out all the maintenance work.
2. Drain the fuel out of the tank (use a conventional
plastic petrol pump from a DIY store for this
purpose).
GB
17
Anleitung_GE_PH_2555_SPK7__ 11.02.14 10:23 Seite 17

3. When the fuel has been drained, start the
engine.
4. Allow the engine to run at idling speed until it
stops. This will clean the remainder of the fuel
out of the carburetor.
5. Leave the machine to cool (approx. 5 minutes).
6. Remove the spark plug (see point 7.2.2).
7. Place a teaspoon full of 2-stroke engine oil into
the combustion chamber. Pull the starter cable
several times carefully to wet the internal
components with the oil. Fit the spark plug again.
8. Clean the exterior housing of the machine.
9. Store the machine in a cold, dry place where it is
out of the reach of ignition sources and
inflammable substances.
10. Always place the cover over the cutter when
transporting or storing the equipment.
Fertilizers and other chemical garden products often
contain substances that accelerate the rate of
corrosion of metals. Do not store the machine on or
near fertilizers or other chemicals.
Restarting
1. Remove the spark plug.
2. Pull the starter cable several times to clean the
oil residue out of the combustion chamber.
3. Clean the spark plug contacts or fit a new spark
plug.
4. Fill the tank. See the section entitled Fuel and oil.
5. Complete steps 1-7 described under the point
entitled “Starting the engine from cold”.
7.4 Ordering replacement parts
Please quote the following data when ordering
replacement parts:
앬 Type of machine
앬 Article number of the machine
앬 Identification number of the machine
앬 Replacement part number of the part required
For our latest prices and information please go to
www.isc-gmbh.info
8. Disposal and recycling
The unit is supplied in packaging to prevent its being
damaged in transit. This packaging is raw material
and can therefore be reused or can be returned to
the raw material system.
The unit and its accessories are made of various
types of material, such as metal and plastic.
Defective components must be disposed of as
special waste. Ask your dealer or your local council.
GB
18
Anleitung_GE_PH_2555_SPK7__ 11.02.14 10:23 Seite 18

GB
19
Fault Possible cause Troubleshooting
The machine does not start. Correct starting procedure not
followed.
Follow the instructions for starting.
Sooted or damp spark plug Clean the spark plug or replace it
with a new one.
Incorrect carburetor setting Contact an authorized customer
service outlet or send the machine
to ISC-GmbH.
The machine starts but does not
develop its full output.
Incorrect choke lever setting Set choke lever to
Soiled air filter Clean the air filter
Incorrect carburetor setting Contact an authorized customer
service outlet or send the machine
to ISC-GmbH.
The engine does not run smoothly Incorrect electrode gap on the
spark plug
Clean the spark plug and adjust
the electrode gap or fit a new spark
plug.
Incorrect carburetor setting Contact an authorized customer
service outlet or send the machine
to ISC-GmbH.
Engine smokes excessively Incorrect fuel mix Use the correct fuel mix (see fuel
mixing table)
Incorrect carburetor setting Contact an authorized customer
service outlet or send the machine
to ISC-GmbH.
9. Troubleshooting
Anleitung_GE_PH_2555_SPK7__ 11.02.14 10:23 Seite 19

GB
20
Warranty conditions:
iSC GmbH guarantees the repair of defects or replacement of the equipment in accordance with the overview
below, whereby statutory guarantee claims are not affected.
With regard to consumables, wear parts and missing parts iSC GmbH guarantees a correction of defects or a
new delivery only if the defect is reported within 24 hours (consumables), 5 work days (missing parts) or 6
months (wear parts) after purchase and the purchase date is verified with the bill.
In case of defects concerning the material or construction, we kindly request you to submit the equipment
together with the fully completed warranty card supplied with the equipment. It is important that you enter an
exact description of the defect.
To do so, answer the following questions:
n Did the equipment work at all or was it defective from the beginning?
n Did you notice anything (symptom or defect) prior to the failure?
n What malfunction does the equipment have in your opinion (main symptom)?
Describe this malfunction.
Category Example Warranty
Defect with regard to material or
construction
24 months
Wear parts Spark plug, air filter 6 months
Consumables Cutting blade Warranty only in case of an
immediate defect (24 hours after
purchase / date on the bill)
Missing parts 5 work days
Anleitung_GE_PH_2555_SPK7__ 11.02.14 10:23 Seite 20

Attention !
Lors de l’utilisation d’appareils, il faut respecter
certaines mesures de sécurité afin d’éviter des
blessures et dommages. Veuillez donc lire
attentivement ce mode d’emploi/ces consignes de
sécurité. Veillez à le conserver en bon état pour
pouvoir accéder aux informations à tout moment. Si
l’appareil doit être remis à d’autres personnes, veillez
à leur remettre aussi ce mode d’emploi/ces
consignes de sécurité. Nous déclinons toute
responsabilité pour les accidents et dommages dus
au non-respect de ce mode d’emploi et des
consignes de sécurité.
1. Consignes de sécurité:
Vous trouverez les consignes de sécurité
correspondantes dans le cahier en annexe.
AVERTISSEMENT !
Veuillez lire toutes les consignes de sécurité et
instructions.
Tout non-respect des consignes de sécurité et
instructions peut provoquer une décharge électrique,
un incendie et/ou des blessures graves.
Conservez toutes les consignes de sécurité et
instructions pour une consultation ultérieure.
Explication de la plaque signalétique sur
l’appareil (Voir figure 17)
1. Avertissement !
2. Avant la mise en service, lisez le mode d’emploi !
3. Lame aiguisée ! Tenez toujours vos mains et
pieds éloignés des lames.
4. Portez des protections pour les yeux et l’ouïe !
5. Portez des gants de protection !
6. Portez des chaussures rigides !
7. Surface brûlante. Ne touchez pas les pièces
d’échappement, le carter d’engrenages ou le
cylindre qui sont brûlants. Vous pourriez vous
brûler. Ces pièces deviennent extrêmement
chaudes lorsqu’elles fonctionnent et restent
brûlantes même lorsque l’appareil a été mis hors
service.
8. Gardez une distance d’au moins 15 m par rapport
aux autres personnes.
2. Conception et étendue de la livraison
(fig. 1-2)
1. Lame de coupe
2. Recouvrement de protection de la lame de
coupe
3. Ecran protecteur
4. Poignée avant
5. Levier étrangleur
6. Interrupteur Marche/Arrêt
7. Tournevis
8. Levier d’arrêt pour poignée tournante
9. Pompe à carburant (Primer)
10. Couvercle du filtre à air
11. Poignée de démarrage
12. Poignée arrière
13. “Libération” de l’accélérateur
14. Accélérateur
15. Recouvrement du silencieux
16. Réservoir à mélange de carburants
17. Cosse de bougie d’allumage
18. Clé à bougie
19. Clé à fourche ouverture 8/10
20. Flacon d’huile/essence
21. Recouvrement de lame
3. Utilisation conforme à l’affectation
Attention ! Ce taille-haies convient à tailler des
haies, des buissons et des broussailles.
La machine doit exclusivement être employée
conformément à son affectation. Chaque utilisation
allant au-delà de cette affectation est considérée
comme non conforme. Pour les dommages en
résultant ou les blessures de tout genre, le
producteur décline toute responsabilité et
l’opérateur/l’exploitant est responsable.
Veillez au fait que nos appareils, conformément à
leur affectation, n’ont pas été construits, pour être
utilisés dans un environnement professionnel,
industriel ou artisanal. Nous déclinons toute
responsabilité si l’appareil est utilisé
professionnellement, artisanalement ou dans des
sociétés industrielles, tout comme pour toute activité
équivalente.
F
21
Anleitung_GE_PH_2555_SPK7__ 11.02.14 10:23 Seite 21

4. Caractéristiques techniques
Type de moteur : Moteur deux temps ;
refroidi par air ; cylindre chromé
Puissance du moteur (maxi.) : 0,85 kW/ 1,15 CV
Cylindrée : 24,5 cm
3
Vitesse de rotation à vide du moteur : 3300 tr/min
Vitesse moteur maxi. : 8000 tr/min
Poids (réservoir vide) : 5,4 kg
Longueur de coupe : 55 cm
Puissance de coupe (maxi.) : 19 mm
Bougie d’allumage : Champion RCJ7Y
Vitesse de découpage maxi. : 1900 coupes/mn
Bruit et vibration
Les valeurs de bruit et de vibration ont été
déterminées conformément à la norme ISO 3477,
ISO 11201.
Niveau de pression acoustique L
pA
98,9 dB(A)
Imprécision K
pA
3 dB
Niveau de puissance acoustique L
WA
104,5 dB(A)
Imprécision K
WA
3 dB
Valeur d’émission des vibrations (poignée avant)
Valeur d’émission des vibrations a
h
= 6,41 m/s
2
Imprécision K = 1,5 m/s
2
Valeur d’émission des vibrations (poignée arrière)
Valeur d’émission des vibrations ah= 6,24 m/s
2
Imprécision K = 1,5 m/s
2
Portez une protection acoustique.
L’exposition au bruit peut entraîner la perte de l’ouïe.
IAvertissement !
La valeur d’émission de vibration a été mesurée selon
une méthode d’essai normée et peut être modifiée,
en fonction du type d’emploi de l’outil électrique ; elle
peut dans certains cas exceptionnels être supérieure
à la valeur indiquée.
La valeur d’émission de vibration indiquée peut être
utilisée pour comparer un outil électrique à un autre.
La valeur d’émission de vibration indiquée peut
également être utilisée pour estimer l’altération au
début.
Limitez le niveau sonore et les vibrations à un
minimum !
n Utilisez exclusivement des appareils en excellent
état.
n Entretenez et nettoyez l’appareil régulièrement.
n Adaptez votre façon de travailler à l’appareil.
n Ne surchargez pas l’appareil.
n Faites contrôler l’appareil le cas échéant.
n Mettez l’appareil hors circuit lorsque vous ne
l’utilisez pas.
n Portez des gants.
Risques résiduels
Même en utilisant cet outil électrique
conformément aux prescriptions, il reste
toujours des risques résiduels. Les dangers
suivants peuvent apparaître en rapport avec la
construction et le modèle de cet outil électrique :
1. Lésions des poumons si aucun masque antipoussière adéquat n’est porté.
2. Déficience auditive si aucun casque anti-bruit
approprié n’est porté.
5. Avant la mise en service
5.1 Montage
Le taille-haies est déjà monté. Il ne nécessite aucun
travail de montage.
Pour un guidage plus facile, l’appareil est équipé
d’une poignée rotative qui peut être ajustée selon les
exigences sur les positions -90°/0°/+90°. Pour cela,
appuyez sur le levier (fig. 5/pos. B) vers le bas,
tournez la poignée rotative dans la position souhaitée
et laissez le levier s’enclencher de nouveau vers le
haut. Les différentes positions réglables facilitent les
travaux au-dessus de la tête ou à d’autres endroits
difficilement accessibles.
Attention : le réglage de la poignée rotative doit être
effectué uniquement à moteur éteint.
5.2 Carburant et huile
Carburants recommandés
Utilisez uniquement un mélange fait d’essence
normale sans plomb et d’une huile spéciale moteur à
2 temps. Mélangez le carburant comme indiqué dans
le tableau de mélange de carburant.
Attention : N‘utilisez jamais de mélange de
carburant ayant été stocké plus de 90 jours.
Attention : N’utilisez aucune huile 2 temps dans le
rapport de mélange recommandé de 100:1. Le
producteur décline toute responsabilité en cas de
F
22
Anleitung_GE_PH_2555_SPK7__ 11.02.14 10:23 Seite 22

lubrification insuffisante qui entraînerait un dommage
du moteur.
Attention : Pour le transport et le stockage de
carburant, utilisé exclusivement les réservoirs prévus
et homologués à cet effet.
Remplacez respectivement de la bonne quantité
d’essence et d’huile deux temps dans la bouteille de
mélange ci-jointe (voir l’échelle imprimée). Secouez
ensuite bien la bouteille.
5.3 Tableau de mélange du carburant :
Mélanger : 40 parts d’essence pour une part d’huile
6. Fonctionnement
Veuillez respecter les directives légales relatives à
l’ordonnance de la protection contre le bruit. Elles
peuvent différer d’un endroit à l’autre.
Utilisez et faites démarrer l’appareil uniquement à l’air
libre, dans des zones bien aérées, afin de réduire le
danger de blessures par des gaz toxiques.
6.1 Faire démarrer le moteur froid (fig. 3-5)
Remplissez le réservoir de la quantité correcte de
mélange essence/huile.
1. Placez l’appareil sur une surface solide et plane.
2. Mettez le levier étrangleur (fig. 4/pos. 5) en
position ““ ”.
3. Appuyez 10x sur la pompe de carburant (Primer)
(fig. 4/pos. 9).
4. Positionnez l’interrupteur marche/arrêt (fig. 3/pos.
6) sur « I »
5. Tenez fermement l’appareil par la poignée avant,
de la main gauche et avec la main droite, tirez le
cordon de démarrage (fig. 5/pos. A) jusqu’à la
première résistance (env. 10 cm). Tirez ensuite
d’un coup 4 fois le cordon de démarrage.
L’appareil devrait démarrer.
Attention : ne laissez pas le cordon de
démarrage revenir trop rapidement. Ceci peut
entraîner des dommages.
6. Lorsque le moteur est démarré, le faire chauffer
env. 10 sec.
Attention : en raison du verrouillage du levier
étrangleur, le dispositif de coupe commence à
fonctionner dès que le moteur démarre.
Déverrouiller ensuite le levier étrangleur en
actionnant simplement le levier de l’accélérateur
(pos. 14) (Le moteur se remet en marche à vide).
A respecter : avant de pouvoir actionner
l’accélérateur, vous devez pousser le levier
« Libération » accélérateur jusqu’à la butée.
7. Si le moteur ne démarre pas, recommencez les
étapes 5-6.
A noter : si le moteur ne démarre toujours pas au
bout de plusieurs essais, veuillez lire le paragraphe
« élimination des erreurs ».
A noter : tirez toujours le cordon du démarreur de
façon rectiligne. Si vous le tirez en lui faisant faire un
angle, une friction aura lieu au niveau de l’œillet. Ce
frottement écorche le cordon qui s’use plus vite.
6.2 Faire démarrer le moteur lorsqu’il est chaud
(l’appareil n’est pas resté plus de 15-20 min à
l’arrêt)
1. Placez l’appareil sur une surface dure et plane.
2. Positionnez l’interrupteur marche/arrêt sur « I ».
3. Tenez fermement l’appareil par la poignée avant,
de la main gauche et avec la main droite, tirez le
cordon de démarrage jusqu’à la première
résistance (env. 10 cm). Maintenant, tirez
fortement sur le cordon de démarrage. L’appareil
doit démarrer au bout de 1 à 2 essais. Si la
machine ne démarre toujours pas au bout de 6
essais, recommencez les étapes 1 à 7 avec un
démarrage à froid.
6.3 Mettre le moteur hors circuit
Suite des étapes pour un arrêt d’urgence :
S’il est nécessaire de mettre la machine
immédiatement hors circuit, mettez l’interrupteur
Marche/arrêt sur “Stop” ou “0”.
Suite d’étapes normale :
Relâchez l’accélérateur et attendez jusqu’à ce que le
moteur passe en vitesse de marche à vide. Mettez
ensuite l’interupteur Marche / Arrêt sur „Stop“ ou
encore „0“.
6.4 Consignes de travail
Ne laissez pas la machine tourner à petite vitesse
pendant le démarrage ou pendant la coupe.
Couper une végétation dense : Le plus effectif est
un mouvement large et étendu en guidant les lames
du couteau directement à travers les branches. Une
légère inclinaison de la lame vers le bas, dans le
sens du mouvement donne la meilleure coupe.
Pour obtenir une hauteur de haie régulière, il est
recommandé de tendre un fil comme repère le long
F
23
Essence Huile deux temps
1 litre 25 ml
5 litres 125 ml
Anleitung_GE_PH_2555_SPK7__ 11.02.14 10:23 Seite 23

de l’arête de la haie. Les branches le dépassant sont
alors coupées. (fig. 6)
Découper une haie latéralement : Les surfaces
latérales d’une haie doivent être coupées en
effectuant des mouvements en forme d’arc de bas
en haut. (fig. 7)
Attention : En fonction du type de taille-haies avec
lequel vous travaillez, il est possible que le moteur
s’arrête pendant une coup latérale prolongée si le
réservoir n’est pas complètement plein.
7. Nettoyage, maintenance,
entreposage et commande de pièces
de rechange
7.1 Nettoyage
n Maintenez les dispositifs de protection, les fentes
à air et le carter de moteur aussi propres (sans
poussière) que possible. Frottez l’appareil avec
un chiffon propre ou soufflez dessus avec de l’air
comprimé à basse pression.
n Nous recommandons de nettoyer l’appareil
directement après chaque utilisation.
n Nettoyez l’appareil régulièrement à l’aide d’un
chiffon humide et un peu de savon. N’utilisez
aucun produit de nettoyage ni détergeant ; ils
pourraient endommager les pièces en matières
plastiques de l’appareil. Veillez à ce qu’aucune
eau n’entre à l’intérieur de l’appareil.
7.2 Maintenance
Mettez toujours le taille-haies hors circuit avant tout
travail d’entretien et retirez la cosse de la bougie
d’allumage.
1. Les lames sont de grande qualité, en acier
trempé. Lorsque le taille-haie est utilisé
normalement, il n’est pas besoin de les aiguiser.
Si par mégarde, vous rencontrez un fil
métallique, du verre ou d’autres objets solides, il
est possible que cela occasionne une encoche
sur la lame. Il n’est pas nécessaire d’éliminer
l’encoche tant qu’elle n’altère pas au mouvement
de la lame. Si toutefois, cela devait altérer le
mouvement, mettez la machine hors circuit et
prenez une lime ou une pierre à limer pour
éliminer l’encoche. Veillez à ce que la lame de
coupe soit toujours bien huilée (voir fig. 8).
2. Si vous faites tomber le taille-haies, contrôlez s’il
a été détérioré. En cas d’endommagement,
veuillez contacter un service après vente dûment
autorisé au envoyez l’appareil à la société iSCGmbH pour le faire réparer.
3. Nettoyez la machine uniquement lorsqu’elle est
hors circuit. Utilisé exclusivement du savon doux
et un chiffon humide pour la nettoyer. Ne laissez
jamais de liquide s’immiscer dans la machine.
N’utilisez jamais de nettoyant corrodant.
7.2.1 Maintenance du filtre à air (fig. 9-11)
Les filtres à air encrassés réduisent la puissance
motrice en raison d’une amenée d’air au carburateur
trop réduite.
Des contrôles réguliers sont par conséquent
indispensables. Il faut contrôler le filtre à air toutes
les 25 heures de service et le nettoyer le cas
échéant. Si l’ai est très chargé de poussière,
contrôlez plus souvent le filtre à air.
1. Retirez le couvercle du filtre à air (fig. 9-10)
2. Sortez l’élément filtrant (fig. 11)
3. Nettoyez l’élément filtrant en tapotant dessus ou
en soufflant dessus.
4. Le montage est effectué dans l’ordre inverse des
étapes.
Attention : Ne nettoyez jamais le filtre avec de
sence ni avec des solvants inflammables. Nettoyez
le filtre à air avec de l’air comprimé ou en tapotant
dessus.
7.2.2 Maintenance des bougies d’allumage (fig.
12-14)
Distance explosive des bougies d’allumage = 0,025
pouces (0,635 mm). Serrez la bougie d’allumage
avec 14,7 - 21,5 Nm.
Contrôlez la bougie d’allumage pour la première fois
au but de 10 heures de service. Repérez les
encrassements et nettoyez-les le cas échéant à
l’aide d’une brosse à fils de cuivre. Effectuez ensuite
une maintenance de la bougie d’allumage toutes les
50 heures de service.
1. Retirez la cosse de bougie d’allumage (fig. 13)
avec un mouvement rotatif.
2. Retirez la bougie d’allumage (fig. 14) avec la clé
à bougie ci-jointe.
3. Le montage est effectué dans l’ordre inverse des
étapes.
7.2.3 Maintenance du filtre à air (fig. 15)
Il faut effectuer un graissage de l’engrenage chaque
année avant le début de la saison par le raccord
fileté de graissage (fig. 15/pos. A). Pour ce faire,
placez une presse à graisse sur le raccord fileté de
graissage et effectuer environ trois pressions pour
faire entrer dans l’engrenage une graisse à machine
courante dans le commerce. Si vous utilisez
F
24
Anleitung_GE_PH_2555_SPK7__ 11.02.14 10:23 Seite 24

l’appareil très souvent, il faut effectuer plus souvent
un graissage.
7.2.4 Réglages du carburateur
Attention ! Les réglages du carburateur doivent
uniquement être entrepris par un service après-vente
dûment autorisés.
Réglage de la vitesse à l’arrêt :
Attention ! Réglez la vitesse à l’arrêt lorsque
l’appareil est encore chaud.
Si l’appareil se met hors circuit lorsque le levier de
l’accélérateur n’est pas actionné et que toutes les
causes ont été exclues conformément au chapitre 9
« Elimination des erreurs », c’est qu’il est nécessaire
de réajuster la vitesse à l’arrêt. Tournez la vis de
vitesse à l’arrêt (fig. 16/pos. 5) dans le sens des
aiguilles d’une montre jusqu’à ce que l’appareil
fonctionne correctement à vide.
Si la vitesse à l’arrêt est si élevée que les lames ne
s’arrêtent pas, il faut alors diminuer la vitesse à
l’arrêt en tournant la vis de vitesse à l’arrêt vers la
gauche (fig. 16/pos. 5) jusqu’à ce que les lames
s’arrêtent.
7.3 Stockage
Attention : Une erreur pendant que vous suivez ces
étapespeut entraîner des dépôts sur la paroi
intérieure de l’accélérateur, ce qui à son tour
entraîne un démarrage difficile ou un dommage
durable sur la machine.
1. Effectuez tous les travaux d’entretien.
2. Faites couler le carburant du réservoir (utilisez à
ce propos une pompe à essence en plastique
courante achetée dans un magasin
d’accessoires de construction).
3. Une fois le combustible sorti, faites démarrer la
machine.
4. Laissez la machine fonctionner à vide jusqu’à ce
qu’elle s’arrête. Cela nettoie le carburateur de
tout reste de combustible.
5. Faites refroidir la machine. (env. 5 minutes)
6. Retirez la bougie d’allumage (voir point 7.2.2).
7. Remplissez une cuiller à café d’huile à moteur 2
temps dans la chambre d’explosion. Tirez
quelques fois précautionneusement le cordon de
démarrage pour humidifier les composants
intérieurs d’huile. Remontez la bougie
d’allumage.
8. Nettoyez le boîtier externe de la machine.
9. Conservez la machine dans un endroit frais et
sec hors de portée de sources d’inflammation et
de substances inflammables.
10. Lors du transport ou de l’entreposage, le
dispositif de découpage du taille-haies doit
toujours être recouvert de la protection du
dispositif de découpage.
Les engrais ou autres produits chimiques pour
jardins comprennent fréquemment des substances
qui accélèrent la corrosion des métaux. N’entreposez
pas la machine à proximité d’engrais ou d’autre
agents chimiques.
Remise en service
1. Retirez la bougie d’allumage.
2. Tirez plusieurs fois le cordon de démarrage pour
nettoyer la chambre d’explosion de tout résidu
d’huile.
3. Nettoyez les contacts de la bougie d’allumage ou
montez une nouvelle bougie d’allumage.
4. Remplissez le bac. Voir chapitre Combustible et
huile.
5. Effectuez les étapes 1 à 7 du point “Lancer le
moteur froid”.
7.4 Commande de pièces de rechange
Pour les commandes de pièces de rechange,
veuillez indiquer les références suivantes:
n Type de l’appareil
n No. d’article de l’appareil
n No. d’identification de l’appareil
n No. de pièce de rechange de la pièce requise
Vous trouverez les prix et informations actuelles à
l’adresse www.isc-gmbh.info
8. Mise au rebut et recyclage
L’appareil se trouve dans un emballage permettant
d’éviter les dommages dus au transport. Cet
emballage est une matière première et peut donc
être réutilisé ultérieurement ou être réintroduit dans
le circuit des matières premières. L’appareil et ses
accessoires sont en matériaux divers, comme par
ex. des métaux et matières plastiques. Eliminez les
composants défectueux dans les systèmes
d’élimination des déchets spéciaux. Renseignezvous dans un commerce spécialisé ou auprès de
l’administration de votre commune !
F
25
Anleitung_GE_PH_2555_SPK7__ 11.02.14 10:23 Seite 25

F
26
Dérangement Cause probable Elimination du dérangement
L’appareil ne démarre pas. Manière de procéder incorrecte
pendant le démarrage.
Respectez les instructions de
démarrage
Bougie d’allumage encrassée ou
humide
Nettoyez la bougie d’allumage ou
la remplacer par une nouvelle.
Mauvaise régulation du
carburateur
Demandez au service après vente
autorisé ou envoyez l’appareil à la
société iSC-GmbH.
L’appareil démarre mais n’atteint
pas sa pleine puissance.
Mauvais réglage du levier
étrangleur
Mettez le levier étrangleur sur „ “.
Encrassement du filtre à air Nettoyez le filtre à air
Mauvaise régulation du
carburateur
Demandez au service après vente
autorisé ou envoyez l’appareil à la
société iSC-GmbH.
Le moteur ne fonctionne pas
régulièrement
Mauvaise distance entre les
électrodes de la bougie d’allumage
Nettoyez la bougie d’allumage et
réglez la distance entre les
électrodes ou montez une nouvelle
bougie d’allumage.
Mauvaise régulation du
carburateur
Demandez au service après vente
autorisé ou envoyez l’appareil à la
société iSC-GmbH.
Le moteur fume trop Mauvais mélange de carburant Utilisez un mélange correct de
carburant (voir le tableau de
mélange de carburant)
Mauvaise régulation du
carburateur
Demandez au service après vente
autorisé ou envoyez l’appareil à la
société iSC-GmbH.
9. Elimination des erreurs
Anleitung_GE_PH_2555_SPK7__ 11.02.14 10:23 Seite 26

F
27
Conditions de garantie :
L’entreprise ISC Gmbh garantit l’élimination des défauts ou le remplacement de l’appareil selon le plan qui suit,
les droits de garantie légaux restent cependant inchangés.
En ce qui concerne les pièces d’usure, les matériels de consommation et les pièces manquantes, l’entreprise
ISC Gmbh garantit réparation des défauts et livraison complémentaire uniquement si les vices ont été déclarés
dans un délai de 24h (matériel de consommation), 5 jours ouvrables (pièces manquantes) ou 6 mois (les pièces
d’usure) sur présentation de la preuve d’achat.
En cas de vices de matériel ou de construction, nous vous demandons, dans le cas où cela est pris en compte
par la garantie, de nous rendre l’appareil avec la carte de l’appareil ci-jointe entièrement remplie. Il est important
ce faisant de bien décrire l’erreur.
Répondez pour cela aux questions suivantes :
n Est-ce que l’appareil a déjà fonctionné ou était-il défectueux dès le départ ?
n Avez-vous remarqué quelque chose avant la panne (symptôme de panne) ?
n Quel est le défaut de fonctionnement de l’appareil à votre avis (symptôme principal) ?
Décrivez ce défaut de fonctionnement.
Catégorie Exemple Prestation de garantie
Défauts de matériel ou de
construction
24 mois
Pièces d’usure Bougies, filtres à air 6 mois
Matériels de consommation/
pièces de consommation
Lames Garantie uniquement en cas de
défaut immédiat (24h après
l’achat/sur présentation d’une
preuve d’achat datée)
Pièces manquantes 5 jours ouvrables
Anleitung_GE_PH_2555_SPK7__ 11.02.14 10:23 Seite 27

Attenzione!
Nell’usare gli apparecchi si devono rispettare diverse
avvertenze di sicurezza per evitare lesioni e danni.
Quindi leggete attentamente queste istruzioni per
l’uso. Conservatele bene per avere a disposizione le
informazioni in qualsiasi momento. Se date
l’apparecchio ad altre persone consegnate loro
queste istruzioni per l’uso insieme all’apparecchio!
Non ci assumiamo alcuna responsabilità per incidenti
o danni causati dal mancato rispetto di queste
istruzioni e delle avvertenze di sicurezza.
1. Avvertenze di sicurezza
Le relative avvertenze di sicurezza si trovano
nell’opuscolo allegato.
AVVERTIMENTO!
Leggete tutte le avvertenze di sicurezza e le
istruzioni.
Dimenticanze nel rispetto delle avvertenze di
sicurezza e delle istruzioni possono causare scosse
elettriche, incendi e/o gravi lesioni.
Conservate tutte le avvertenze e le istruzioni per
eventuali necessità future.
Spiegazione della targhetta di avvertenze
sull’apparecchio (vedi Fig. 17)
1. Avvertimento!
2. Prima della messa in esercizio leggete le
istruzioni per l’uso!
3. Lame affilate! Mani e piedi vanno sempre tenuti
lontani dalle lame.
4. Indossate occhiali protettivi e cuffie antirumore!
5. Indossate guanti protettivi!
6. Indossate scarpe chiuse!
7. Superficie molto calda. Non toccate il tubo di
scappamento caldo, l’involucro degli ingranaggi o
il cilindro. Vi potreste ustionare. Queste parti si
riscaldano molto durante il funzionamento e
rimangono a lungo calde anche dopo lo
spegnimento dell’apparecchio.
8. Mantenete una distanza minima di 15 m da altre
persone.
2. Struttura generale ed elementi forniti
(Fig. 1-2)
1. Lama
2. Copertura di protezione della lama
3. Schermo di protezione
4. Impugnatura anteriore
5. Levetta dell’aria
6. Interruttore ON/OFF
7. Cacciavite
8. Leva di bloccaggio per manopola
9. Pompa del carburante (arricchitore)
10. Copertura del filtro dell’aria
11. Impugnatura dello starter
12. Impugnatura posteriore
13. “Sbloccaggio” della leva dell’acceleratore
14. Leva dell’acceleratore
15. Copertura del silenziatore
16. Serbatoio per miscela di carburante
17. Connettore della candela
18. Chiave della candela di accensione
19. Chiave fissa n. 8/n. 10
20. Recipiente di miscela olio/benzina
21. Copertura del braccio
3. Utilizzo proprio
Attenzione! Queste cesoie per siepi sono adatte per
tagliare siepi, cespugli ed arbusti.
L’apparecchio deve venire usato solamente per lo
scopo a cui è destinato. Ogni altro tipo di uso che
esuli da quello previsto non è un uso conforme.
L’utilizzatore/l’operatore, e non il costruttore, è
responsabile dei danni e delle lesioni di ogni tipo che
ne risultino.
Tenete presente che i nostri apparecchi non sono
stati costruiti per l’impiego professionale, artigianale
o industriale. Non ci assumiamo alcuna garanzia
quando l’apparecchio viene usato in imprese
commerciali, artigianali o industriali, o in attività
equivalenti.
I
28
Anleitung_GE_PH_2555_SPK7__ 11.02.14 10:23 Seite 28

4. Caratteristiche tecniche
Tipo del motore:
motore a 2 tempi, raffreddato ad aria, cilindri cromati
Potenza del motore (max.): 0,85 kW / 1,15 cv
Cilindrata: 24,5 cm³
Numero di giri del motore al minimo: 3300 min
-1
Numero max. di giri del motore: 8000 min
-1
Peso (serbatoio vuoto): 5,4 kg
Lunghezza di taglio: 55 cm
Rendimento di taglio (max.): 19 mm
Candela di accensione: Champion RCJ7Y
Velocità di taglio max.: 1900 tagli/min.
Rumore e vibrazioni
I valori del rumore e delle vibrazioni sono stati rilevati
secondo la norma ISO 3477, ISO 11201.
Livello di pressione acustica L
pA
98,9 dB (A)
Incertezza K
pA
3 dB
Livello di potenza acustica L
WA
104,5 dB (A)
Incertezza K
WA
3 dB
Valore emissione vibrazioni (impugnatura anteriore)
Valore emissione vibrazioni a
h
= 6,41 m/s
2
Incertezza K = 1,5 m/s
2
Valore emissione vibrazioni (impugnatura posteriore)
Valore emissione vibrazioni a
h
= 6,24 m/s
2
Incertezza K = 1,5 m/s
2
Portate cuffie antirumore.
L’effetto del rumore può causare la perdita dell’udito
Avvertimento!
Il valore di emissione di vibrazioni indicato è stato
misurato secondo un metodo di prova normalizzato e
può variare a seconda del modo in cui l’elettroutensile
viene utilizzato e, in casi eccezionali, può essere
superiore al valore riportato.
Il valore di emissione di vibrazioni indicato può essere
usato per il confronto tra elettroutensili di marchi
diversi.
Il valore di emissione di vibrazioni può essere
utilizzato anche per una valutazione preliminare dei
rischi.
Limitate al minimo lo sviluppo di rumore e le
vibrazioni!
n Utilizzate soltanto apparecchi in perfetto stato.
n Eseguite regolarmente la manutenzione e la
pulizia dell’apparecchio.
n Adattate il vostro modo di lavorare
all’apparecchio.
n Non sovraccaricate l’apparecchio.
n Fate eventualmente controllare l’apparecchio.
n Spegnete l’apparecchio se non lo utilizzate.
n Indossate i guanti.
Rischi residui
Anche se questo elettroutensile viene utilizzato
secondo le norme, continuano a sussistere
rischi residui. In relazione alla struttura e al
funzionamento di questo elettroutensile
potrebbero presentarsi i seguenti pericoli:
1. Danni all’apparato respiratorio nel caso in cui non
venga indossata una maschera antipolvere
adeguata.
2. Danni all’udito nel caso in cui non vengano
indossate cuffie antirumore adeguate.
5. Prima della messa in esercizio
5.1 Montaggio
Il decespugliatore a scoppio è completamente
montato. Non è necessario alcun lavoro di montaggio.
Per una migliore manovrabilità l’apparecchio è
provvisto di una impugnatura ruotabile che, a
seconda delle esigenze, si può regolare nelle
posizioni di -90°/0°/+90°. A tal fine premete la leva
(Fig. 5/Pos. B) verso il basso, girate l’impugnatura
ruotabile nella posizione desiderata e fate scattare di
nuovo la leva verso l’alto. Grazie alle diverse posizioni
regolabili vengono facilitati i lavori al di sopra della
propria altezza o in altri punti difficili da raggiungere.
Attenzione: la regolazione dell’impugnatura ruotabile
deve essere effettuata solo a motore spento.
5.2 Carburante e olio
Carburanti consigliati
Utilizzate solo una miscela di benzina normale senza
piombo e olio speciale per motori a 2 tempi.
Preparate la miscela di carburante in base alla
tabella corrispondente.
Attenzione: non impiegate una miscela di
carburante che sia stata conservata per più di 90
giorni.
I
29
Anleitung_GE_PH_2555_SPK7__ 11.02.14 10:23 Seite 29

Attenzione: non utilizzate oli per motori a 2 tempi
con un rapporto di miscela consigliato di 100:1. Se
una lubrificazione insufficiente causa un danno al
motore decade la garanzia del produttore.
Attenzione: per il trasporto e la conservazione del
carburante utilizzate solo i recipienti previsti e
consentiti.
Versate rispettivamente la giusta quantità di benzina
e di olio per motore a 2 tempi nel recipiente per la
miscela fornito (vedi scala riportata). Agitate quindi
bene il recipiente.
5.3 Tabella miscela carburante
Procedimento di miscelazione: 40 parti benzina su 1
parte olio
6. Esercizio
Rispettate le disposizioni di legge sulla protezione dal
rumore che possono variare a seconda del luogo di
impiego.
Utilizzate e avviate l’apparecchio solo all’aperto in
zone ben areate per ridurre il pericolo di lesioni a
causa di gas tossici.
6.1 Avvio a motore freddo (Fig. 3-5)
Riempite il serbatoio con un’adeguata miscela di
benzina/olio.
1. Appoggiate l’apparecchio su una superficie piana
e stabile.
2. Portate la levetta dell’aria (Fig. 4/Pos. 5) su “ ”.
3. Premete 10 volte la pompa del carburante
(arricchitore) (Fig. 4/Pos. 9).
4. Portate l’interruttore ON/OFF (Fig. 3/Pos. 6) su “I”
5. Tenete bene l’apparecchio sull’impugnatura
anteriore con la mano sinistra e tirate la corda
dello starter con la mano destra (Fig. 5/Pos. A)
fino alla prima resistenza (ca. 10 cm). Ora tirate
rapidamente la fune dello starter 4 volte.
L’apparecchio dovrebbe avviarsi.
Attenzione: non fate riavvolgere la fune dello
starter in modo incontrollato. Ciò può provocare
danni.
6. Una volta avviato il motore, lasciate riscaldare
l’apparecchio per ca. 10 sec.
Attenzione: con la levetta dell’aria fissata
l’utensile di taglio inizia a lavorare non appena
avviato il motore.
Sbloccate poi la levetta dell’aria semplicemente
azionando la leva dell’acceleratore (Pos. 14) (il
motore torna a funzionare al minimo). Da tenere
presente Prima di azionare la leva
dell’acceleratore dovete premere la leva
“Sbloccaggio” fino alla battuta.
7. Se il motore non si dovesse avviare, ripetete le
operazioni 5-6.
Da tenere presente: se dopo vari tentativi il motore
continua a non avviarsi, leggete il punto “Soluzioni di
eventuali problemi al motore”.
Da tenere presente: estraete la fune dello starter
sempre con un movimento diritto. Se viene estratta in
posizione obliqua, si produce attrito sull’occhiello.
Questo attrito provoca uno sfregamento della fune e
un’usura precoce.
6.2 Avvio a motore caldo (l’apparecchio non è
stato fermo per più di 15-20 minuti)
1. Appoggiate l’apparecchio su una superficie piana
e stabile.
2. Portate l’interruttore ON/OFF su “I”.
3. Tenete bene l’apparecchio sull’impugnatura
anteriore con la mano sinistra e tirate la corda
dello starter con la mano destra fino alla prima
resistenza (ca. 10 cm). Ora tirate rapidamente la
fune dello starter. L’apparecchio dovrebbe
avviarsi dopo 1-2 strattoni. Nel caso l’apparecchio
non si avviasse anche dopo 6 strattoni, ripetete le
operazioni 1-7 in “Avvio a motore freddo”.
6.3 Spegnere il motore
Procedura d’emergenza:
Se è necessario fermare subito l’utensile, portate
l’interruttore ON/OFF su STOP o “0”.
Procedura normale:
Lasciate andare la leva del gas e aspettate che il
motore passi al minimo. Portate poi l’interruttore
ON/OFF su “Stop” o “0”.
6.4 Istruzioni di lavoro
Non fate funzionare l’utensile durante l’avviamento o
il taglio con un numero di giri basso.
Taglio per una crescita più folta: un movimento
ampio e continuo è il più efficace, facendo passare la
lama direttamente attraverso i rami. Una leggera
inclinazione della lama verso il basso, in direzione
del movimento, permette il taglio migliore.
Per ottenere un’altezza omogenea della siepe si
I
30
Benzina Olio per 2 tempi
1 litro 25 ml
5 litri 125 ml
Anleitung_GE_PH_2555_SPK7__ 11.02.14 10:23 Seite 30

consiglia di tendere un filo all’altezza voluta come
linea di riferimento. I rami che sporgono vengono
tagliati. (Fig. 6)
Taglio laterale di una siepe: le superfici laterali di
una siepe vengono tagliate dall’alto verso il basso
con movimenti a semicerchio. (Fig. 7)
Attenzione: in caso di lavori di taglio laterale per
periodi di tempo prolungati e con un serbatoio non
completamente pieno, può accadere che il motore si
ingolfi per motivi dovuti alla struttura interna.
7. Pulizia, manutenzione,
conservazione e ordinazione dei
pezzi di ricambio
7.1 Pulizia
n Tenete il più possibile i dispositivi di protezione, le
fessure di aerazione e la carcassa del motore
liberi da polvere e sporco. Strofinate
l’apparecchio con un panno pulito o soffiatelo con
l’aria compressa a pressione bassa.
n Consigliamo di pulire l’apparecchio subito dopo
averlo usato.
n Pulite l’apparecchio regolarmente con un panno
asciutto ed un po’ di sapone. Non usate
detergenti o solventi perché questi ultimi
potrebbero danneggiare le parti in plastica
dell’apparecchio. Fate attenzione che non possa
penetrare dell’acqua nell’interno dell’apparecchio.
7.2 Manutenzione
Disinserite sempre le cesoie prima di qualsiasi lavoro
di manutenzione e sfilate il connettore della candela.
1. Le lame sono di acciaio temprato di alta qualità e
in caso di uso normale non è necessario affilarle.
Qualora veniate inavvertitamente in contatto con
filo metallico, pietre, vetro o altri oggetti duri, ne
potrebbe risultare una tacca nella. Non è
necessario eliminare la tacca finché non
compromette il movimento delle lame. Se invece
ne dovesse compromettere il movimento,
disinserite l’utensile e prendete una lima o una
pietra abrasiva fine per eliminarla. Assicuratevi
che il vostro apparecchio sia sempre ben oliato
(vedi Fig. 8).
2. Nel caso in cui le cesoie dovessero cadervi a
terra, controllate se vi siano danni. In caso di
danni mettetevi in contatto con un servizio
autorizzato d’assistenza clienti o inviate
l’apparecchio alla ISC-GmbH per farlo riparare.
3. Pulite l’apparecchio solo se disinserito. Per
pulirlo utilizzate solo un detergente delicato ed
un panno umido. Non fate mai penetrare liquidi
all’interno dell’apparecchio. Non impiegate
detergenti caustici.
7.2.1 Manutenzione del filtro dell’aria (Fig. 9-11)
I filtri dell’aria sporchi riducono la potenza del motore
a causa di un apporto insufficiente di aria verso il
carburatore.
Un controllo regolare è quindi indispensabile. Il filtro
dell’aria dovrebbe essere controllato ogni 25 ore di
esercizio e, se necessario, pulito. In caso di aria
molto polverosa il filtro dell’aria deve essere
controllato più spesso.
1. Togliete il coperchio del filtro dell’aria (Fig. 9-10)
2. Togliete l’elemento filtrante (Fig. 11)
3. Pulite l’elemento filtrante dando dei leggeri colpi
o soffiando.
4. L’assemblaggio avviene nell’ordine inverso.
Attenzione: non pulite mai il filtro dell’aria con
benzina o solventi infiammabili. Pulite il filtro dell’aria
con aria compressa o dandogli dei leggeri colpi.
7.2.2 Manutenzione della candela (Fig. 12-14)
Distanza per la scintilla della candela = 0,025 pollici
(0,635 mm)
Avvitate la candela con 14,7 - 21,5Nm.
Controllate per la prima volta dopo 10 ore di
esercizio che la candela di accensione non sia
sporca e pulitela eventualmente con una spazzola a
setole di rame. Successivamente provvedete alla
manutenzione della candela ogni 50 ore di esercizio.
1. Sfilate la candela di accensione con un
movimento rotatorio (Fig. 13).
2. Togliete la candela di accensione (Fig. 14 )
facendo uso dell’apposita chiave in dotazione.
3. L’assemblaggio avviene nell’ordine inverso.
7.2.3 Manutenzione degli ingranaggi (Fig. 15)
Gli ingranaggi devono essere lubrificati sull’apposito
nipplo (Fig. 15/Pos. A) ogni anno prima dell’inizio
della stagione. Inserite a tal fine un ingrassatore a
siringa comunemente reperibile in commercio sul
nipplo di lubrificazione e premete il comune grasso
per macchine negli ingranaggi spingendo
l’ingrassatore per ca. 3 volte. In caso di uso
superiore alla media gli ingranaggi dovrebbero
essere lubrificati più spesso.
7.2.4 Impostazioni carburatore
Attenzione! Le impostazioni sul carburatore devono
essere eseguite soltanto dal servizio autorizzato di
assistenza clienti.
I
31
Anleitung_GE_PH_2555_SPK7__ 11.02.14 10:23 Seite 31

Impostazione del minimo:
Attenzione! Impostazione del minimo in stato di
esercizio a caldo.
Se l’apparecchio si dovesse spegnere in caso di
mancato azionamento della leva dell’acceleratore e
tutte le altre cause secondo il punto 9 “Soluzioni di
eventuali problemi” dovessero venire escluse, allora
è necessaria una nuova impostazione del minimo. A
tal fine girate la vite del minimo (Fig. 16/Pos. 5) in
senso orario fino a quando l’apparecchio funziona al
minimo in modo sicuro.
Se il minimo dovesse essere così alto che le lame
non rimangono immobili, allora deve essere
abbassato girando a sinistra la vite del minimo (Fig.
16/Pos. 5) fino a quando le lame si non si muovono
più.
7.3 Conservazione
Attenzione: un errore durante l’esecuzione di queste
operazioni può provocare la formazione di depositi
sulla parete interna del carburatore, con
conseguente avviamento difficoltoso o danni
permanenti all’apparecchio.
1. Eseguite tutti i lavori di manutenzione
2. Togliete il carburante dal serbatoio (a tal fine
utilizzate una pompa per benzina di plastica
comunemente reperibile in commercio presso un
centro fai-da-te).
3. Dopo aver tolto il carburante, avviate
l’apparecchio.
4. Fate girare al minimo l’utensile fino a quando si
ferma. Questa operazione pulisce il carburatore
dal carburante residuo.
5. Fate raffreddare l’apparecchio (ca. 5 minuti).
6. Togliete la candela di accensione (vedi punto
7.2.2).
7. Versate nel vano di combustione un cucchiaino
di olio per motori a 2 tempi. Tirate con cautela la
corda di avviamento un paio di volte, per
umettare i componenti interni con l’olio. Inserite
di nuovo la candela di accensione.
8. Pulite l’involucro esterno dell’apparecchio.
9. Conservate l’utensile in un luogo freddo e
asciutto, distante da fonti di accensione e
sostanze combustibili.
10. Durante il trasporto e la conservazione della
cesoia per siepi il dispositivo di taglio deve essere
sempre coperto con l’apposita protezione.
Concimi o altri prodotti chimici per il giardinaggio
contengono spesso sostanze che accelerano la
corrosione dei metalli. Non conservate l’apparecchio
al di sopra o nelle vicinanze di concimi o altri prodotti
chimici.
Rimessa in esercizio
1. Togliete la candela di accensione.
2. Tirate la corda dello starter più volte per pulire il
vano di combustione da residui di olio.
3. Pulite i contatti della candela di accensione o
mettetene una nuova.
4. Riempite il serbatoio. Si veda il punto
“Carburante e olio”.
5. Eseguite le operazioni 1-7 descritte al punto
“Avvio a motore freddo”.
7.4 Commissione dei pezzi di ricambio
Volendo commissionare dei pezzi di ricambio, si
dovrebbe dichiarare quanto segue:
앬 modello dell’apparecchio
앬 numero dell’articolo dell’apparecchio
앬 numero d’ident. dell’apparecchio
앬 numero del pezzo di ricambio del ricambio
necessitato.
Per i prezzi e le informazioni attuali si veda
www.isc-gmbh.info
8. Smaltimento e riciclaggio
L’apparecchio si trova in una confezione per evitare i
danni dovuti al trasporto. Questo imballaggio
rappresenta una materia prima e può perciò essere
utilizzato di nuovo o riciclato.
L’apparecchio e i suoi accessori sono fatti di
materiali diversi, per es. metallo e plastica.
Consegnate i pezzi difettosi allo smaltimento di rifiuti
speciali. Per informazioni rivolgetevi ad un negozio
specializzato o all’amministrazione comunale!
I
32
Anleitung_GE_PH_2555_SPK7__ 11.02.14 10:23 Seite 32

I
33
Anomalia Possible causa Eliminazione delle anomalie
L’apparecchio non si accende!. Procedura di avvio errata Seguite le istruzioni di avvio
Candela di accensione arrugginita
o umida
Pulite la candela e sostituitela con
una nuova
Regolazione errata del carburatore Rivolgetevi ad un servizio di
assistenza clienti autorizzato o
spedite l’apparecchio alla ISCGmbH
L’apparecchio si avvia ma non
raggiunge il rendimento massimon
Regolazione errata della levetta
dell’aria
Regolate la levetta dell’aria su “ ”
Filtro dell’aria sporco Pulite il filtro dell’aria
Regolazione errata del carburatore Rivolgetevi ad un servizio di
assistenza clienti autorizzato o
spedite l’apparecchio alla ISCGmbH
Il motore non funziona
regolarmente
Distanza errate degli elettrodi della
candela di accensione
Pulite la candela e regolate la
distanza degli elettrodi o sostituite
la candela con una nuova
Regolazione errata del carburatore Rivolgetevi ad un servizio di
assistenza clienti autorizzato o
spedite l’apparecchio alla ISCGmbH
Il motore produce troppo fumo Miscela errata del carburante Utilizzate la miscela corretta di
carburante (vedi la tabella di
miscela del carburante)
Regolazione errata del carburatore Rivolgetevi ad un servizio di
assistenza clienti autorizzato o
spedite l’apparecchio alla ISCGmbH
9. Soluzione di eventuali problemi
Anleitung_GE_PH_2555_SPK7__ 11.02.14 10:23 Seite 33

I
34
Condizioni di garanzia
La ditta iSC GmbH garantisce l’eliminazione di difetti ovvero la sostituzione dell’apparecchio in conformità con
la tabella seguente, senza che ciò influisca sui diritti di garanzia previsti dalla legge.
Relativamente a parti soggette ad usura, materiale di consumo e parti mancanti, la ditta iSC GmbH garantisce
un’eliminazione dei difetti ovvero una fornitura sostitutiva solo se il difetto viene comunicato entro 24h (materiale
di consumo), 5 giorni lavorativi (parti mancanti) o 6 mesi (parti soggette ad usura) dall’acquisto e se la data di
acquisto viene documentata tramite il documento di acquisto.
In caso di difetti del materiale o di fabbricazione vi preghiamo in caso di garanzia di presentare l’apparecchio
con il certificato di garanzia accluso, compilato in tutte le sue parti. In questo caso è importante che riportiate
una precisa descrizione del difetto.
Per questo vi preghiamo di rispondere alle seguenti domande
n L’apparecchio ha già funzionato una volta o era difettoso fin dall’inizio?
n Avete notato qualcosa prima che si manifestasse il difetto (sintomo prima del difetto)?
n A vostro parere che cosa non funziona nell’apparecchio (sintomo principale)?
Descrivete che cosa non funziona.
Categoria Esempio Prestazione di garanzia
Difetti di materiale o fabbricazione 24 mesi
Parti soggette ad usura Candela di accensione, filtro
dell’aria
6 mesi
Materiale di consumo/
Parti di consumo
Lama Garanzia solo in caso di difetto
immediato (24h dopo acquisto/data
documento di acquisto)
Parti mancanti 5 giorni lavorativi
Anleitung_GE_PH_2555_SPK7__ 11.02.14 10:23 Seite 34

Vigtigt!
Ved brug af el-værktøj er der visse
sikkerhedsforanstaltninger, der skal respekteres for
at undgå skader på personer og materiel. Læs derfor
betjeningsvejledningen grundigt igennem. Opbevar
vejledningen et praktisk sted, så du altid kan tage
den frem efter behov. Husk at lade
betjeningsvejledningen følge med maskinen, hvis du
overdrager den til andre!
Vi fraskriver os ethvert ansvar for skader på personer
eller materiel, som måtte opstå som følge af, at
anvisningerne i denne betjeningsvejledning, navnlig
vedrørende sikkerhed, tilsidesættes.
1. Sikkerhedsanvisninger
Relevante sikkerhedsanvisninger finder du i det
medfølgende hæfte.
ADVARSEL!
Læs alle sikkerhedsanvisninger og øvrige
anvisninger.
Følges anvisningerne, navnlig
sikkerhedsanvisningerne, ikke nøje som beskrevet,
kan elektrisk stød, brand og/eller svære kvæstelser
være følgen.
Alle sikkerhedsanvisninger og øvrige
anvisninger skal gemmes.
Oplysningsskiltenes betydning (se fig. 17)
1. Advarsel!
2. Læs betjeningsvejledningen, inden du tager
maskinen i brug!
3. Skarpe knive! Hold altid hænder og fødder på
afstand af knivene.
4. Brug øjen- og høreværn!
5. Brug beskyttelseshandsker!
6. Bær solidt fodtøj!
7. Meget varm overflade. Rør ikke den varme
lyddæmper, gearkassen eller cylinderen. Fare for
forbrændinger. Disse dele bliver meget varme
under drift og forbliver varme, også efter at
maskinen er blevet slukket.
8. Hold en afstand på mindst 15 m til andre
personer.
2. Maskinens opbygning og pakkens
indhold (fig. 1-2)
1. Skæreblad
2. Sikkerhedsskærm skæreblad
3. Skjold
4. Håndtag foran
5. Chokerarm
6. Tænd/Sluk-knap
7. Skruetrækker
8. Låsegreb til drejehåndtag
9. Brændstofpumpe (primer)
10. Luftfilterskærm
11. Starterhåndtag
12. Håndtag bagpå
13. “Frigørelse“ gasregulator
14. Gasregulator
15. Overdækning til lyddæmper
16. Tank til brændstofblanding
17. Tændrørshætte
18. Tændrørsnøgle
19. Gaffelnøgle NV8/NV10
20. Olie/Benzin blandeflaske
21. Sværdkappe
3. Formålsbestemt anvendelse
Vigtigt! Denne hækkeklipper er konstrueret til
klipning af hække, krat og buske.
Saven må kun anvendes i overensstemmelse med
dens tiltænkte formål. Enhver anden form for
anvendelse er ikke tilladt. Vi fraskriver os ethvert
ansvar for skader, det være sig på personer eller
materiel, som måtte opstå som følge af, at maskinen
ikke er blevet anvendt korrekt. Ansvaret bæres alene
af brugeren/ejeren.
Bemærk, at vore produkter ikke er konstrueret til
erhvervsmæssig, håndværksmæssig eller industriel
brug. Vi fraskriver os ethvert ansvar, såfremt
produktet anvendes i erhvervsmæssigt,
håndværksmæssigt, industrielt eller lignende
øjemed.
DK/N
35
Anleitung_GE_PH_2555_SPK7__ 11.02.14 10:23 Seite 35

4. Tekniske data
Motortype: 2-takts-motor; luftkølet; chromcylinder
Motorydelse maks.: 0,85 kW/1,15 PS
Kubikindhold: 24,5 cm
3
Motoromdrejningstal, ubelastet: 3300 min
-
1
Omdrejningstal motor maks.: 8000 min
-1
Vægt (tom tank): 5,4 kg
Skærelængde: 55 cm
Skæreydelse maks.: 19 mm
Tændrør: Championa RCJ7Y
Skærehastighed maks.: 1900 snit/min
Støj og vibration
Støj- og vibrationstal er beregnet i henhold til ISO
3477, ISO 11201.
Lydtryksniveau L
pA
98,9 dB(A)
Usikkerhed K
pA
3dB
Lydeffektniveau L
WA
104,5 dB(A)
Usikkerhed K
WA
3dB
Svingningsemissionstal (håndtag foran)
Svingningsemissionstal a
h
= 6,41 m/s
2
Usikkerhed K = 1,5 m/s
2
Svingningsemissionstal (håndtag bagpå)
Svingningsemissionstal ah= 6,24 m/s
2
Usikkerhed K = 1,5 m/s
2
Brug høreværn.
Støjudviklingen fra maskinen kan forårsage høretab.
Advarsel!
Det angivne svingningsemissionstal er målt ud fra en
standardiseret prøvningsmetode og kan – afhængig
af den måde, el-værktøjet anvendes på – ændre sig
og i undtagelsestilfælde ligge over den angivne værdi.
Det angivne svingningsemissionstal kan anvendes til
at sammenligne et el-værktøj med et andet.
Det angivne svingningsemissionstal kan også
anvendes til en indledende skønsmæssig vurdering af
den negative påvirkning.
Støjudvikling og vibration skal begrænses til et
minimum!
n Brug kun intakte og ubeskadigede maskiner.
n Vedligehold og rengør maskinen med jævne
mellemrum.
n Tilpas arbejdsmåden efter maskinen.
n Overbelast ikke maskinen.
n Lad i givet fald maskinen underkaste et eftersyn.
n Sluk maskinen, når den ikke benyttes.
n Bær handsker.
Tilbageværende risici
Også selv om du betjener el-værktøjet
forskriftsmæssigt, er der stadigvæk nogle
risikofaktorer at tage højde for. Følgende farer
kan opstå, alt efter el-værktøjets type og
konstruktionsmåde:
1. Lungeskader, såfremt der ikke bæres egnet
støvmaske.
2. Høreskader, såfremt der ikke bæres egnet
høreværn.
5. Før ibrugtagning
5.1 Montage
Hækkeklipperen leveres samlet. Ingen
monteringsarbejde.
For bedre føring er maskinen udstyret med et
drejehåndtag, som kan indstilles til positionerne 90°/0°/+90°, alt efter behov. Indstilling foretages ved
at trække grebet (fig. 5/pos. B) bagud, dreje
håndtaget i den ønskede position og herefter igen
lade grebet gå i indgreb fortil. De forskellige
indstillelige positioner gør arbejder over hovedhøjde
eller på andre svært tilgængelige steder nemmere.
Vigtigt: Drejehåndtaget må kun indstilles med
motoren slukket.
5.2 Brændstof og olie
Anbefalet brændstof
Der må udelukkende benyttes en blanding af
almindelig, blyfri benzin og særlig 2-takts-motorolie.
Bland brændstofblandingen i henhold til brændstofblandetabellen.
Vigtigt: Benyt aldrig en brændstofblanding, som har
været opbevaret i mere end 90 dage.
Vigtigt: Benyt ikke 2-takts-olie med et anbefalet
blandingsforhold på 100:1. Motorskade, som måtte
følge af utilstrækkelig smøring, medfører, at
motorgarantien fra producenten bortfalder.
DK/N
36
Anleitung_GE_PH_2555_SPK7__ 11.02.14 10:23 Seite 36

Vigtigt: Transport og opbevaring af brændstof må kun
ske i de særlige brændstofbeholdere.
Hæld den rigtige mængde benzin og 2-taktsolie i den
medfølgende blandeflaske (se påtrykt skala). Ryst
flasken godt.
5.3 Brændstof-blandetabel:
Blandingsprocedure: 40 dele benzin til 1 del olie
6. Drift
Bemærk venligst lovmæssige bestemmelser
vedrørende støjbeskyttelse, som kan variere lokalt.
Maskinen må kun startes og benyttes i det fri på
steder med fri gennemluftning – ellers er der fare for
giftige gasser.
6.1 Start af kold motor (fig. 3-5)
Fyld tanken op med en passende mængde
benzin/olie-blanding.
1. Stil maskinen på en hård, plan overflade.
2. Sæt chokerarmen (fig. 4/pos. 5) på “”.
3. Tryk på brændstofpumpen (primer) (fig. 4/pos. 9)
10x.
4. Sæt tænd/sluk-knappen (fig. 3/pos.6) på „I“
5. Hold godt fast i hækkeklipperens forreste håndtag
med den venstre hånd, mens du med den højre
hånd trækker ud i startsnoren (fig. 5/pos. A), indtil
du mærker den første modstand (ca. 10 cm).
Træk nu 4x hurtigt efter hinanden i startsnoren.
Maskinen skal nu starte.
Vigtigt: Pas på, at startsnoren ikke smælder
tilbage. Dette kan medføre beskadigelse.
6. Når motoren er startet, skal maskinen køre varm i
ca. 10 sek.
Vigtigt: Den fikserede chokerarm gør, at
skæreværktøjet begynder at arbejde, når motoren
startes.
Bagefter frikobler du chokerarmen ved at aktivere
gasregulatoren (pos. 14) en gang (motoren
vender tilbage til tomgang). Bemærk: Inden du
kan aktivere gasregulatoren, skal du presse
armen “frigøring” gasregulator helt ind, indtil den
går i anslag.
7. Hvis motoren ikke vil starte, gentages skridt 5-6.
Bemærk: Vil motoren ikke starte efter flere forsøg,
henvises til afsnittet „Fejlafhjælpning motor“.
Bemærk: Træk altid lige ud i startsnoren. Trækkes
kablet ud i en vinkel, vil den skure mod ringen.
Grundet friktionen vil snoren slides og efterhånden
blive gnavet over.
6.2 Start af varm motor (hækkeklipperen har
højst været slukket i 15-20 min.)
1. Stil maskinen på en hård, plan overflade.
2. Sæt tænd/sluk-knappen på „I“.
3. Hold godt fast i hækkeklipperens forreste håndtag
med den venstre hånd, mens du med den højre
trækker ud i startsnoren, indtil du mærker den
første modstand (ca. 10 cm). Træk nu hurtigt ud i
startsnoren. Maskinen skal starte efter 1-2 træk.
Hvis maskinen stadigvæk ikke starter efter 6 træk
i snoren, skal du gentage skridt 1-7 under ”Start
af kold motor”.
6.3 Slukning af motor
Fremgangsmåde ved nødstop:
Hvis det bliver nødvendigt at standse maskinen
omgående, sætter du tænd/sluk-knappen på „Stop“
eller „0“
Normal fremgangsmåde:
Slip gasregulatoren, og vent, indtil motoren er slået
over i tomgangshastighed. Sæt så tænd/slukknappen på „Stop“ eller „0“.
6.4 Arbejdsanvisninger
Lad ikke hækkeklipperen køre med lavt
omdrejningstal under start og ved klipning.
Klipning for tættere vækst: Mest effektiv er en bred,
gennemgående bevægelse, hvor knivene på skæret
føres lige igennem grenene. Det bedste snit fås ved at
lade skæret hælde let nedad i bevægelsesretningen.
For at få en lige højde på hækken anbefales det at
spænde en snor ud langs hækkens kant, som så
fungerer som lodmærke. De grene, der rager op,
klippes af (fig. 6).
Sideværts tilskæring af hæk: Hækkens sideflader
klippes i buebevægelser nedefra og op (fig. 7).
Vigtigt: Ved længere tids arbejde på skrånende
flader med halvfuld tank kan det forekomme, at
motoren dør ud.
DK/N
37
Benzin 2-taktsolie
1 liter 25 ml
5 liter 125 ml
Anleitung_GE_PH_2555_SPK7__ 11.02.14 10:23 Seite 37

7. Rengøring, vedligeholdelse,
opmagasinering og reservedelsbestilling
Træk stikket ud af stikkontakten inden
vedligeholdelsesarbejde.
7.1 Rengøring
n Hold så vidt muligt beskyttelsesanordninger,
luftsprækker og motorhuset fri for støv og snavs.
Gnid maskinen ren med en ren klud, eller foretag
trykluftudblæsning med lavt tryk.
n Vi anbefaler, at maskinen rengøres hver gang
efter brug.
n Rengør af og til maskinen med en fugtig klud og
lidt blød sæbe. Undgå brug af rengørings- eller
opløsningsmiddel, da det vil kunne ødelægge
maskinens kunststofdele. Pas på, at der ikke kan
trænge vand ind i maskinens indvendige dele.
7.2 Vedligeholdelse
Sluk for hækkeklipperen, og træk tændrørshætten ud
før vedligeholdelse.
1. Skæreknivene er af høj kvalitet, af hærdet stål, og
ved normal anvendelse er det ikke nødvendigt at
hvæsse knivene. Hvis du kommer til at støde mod
et stykke ståltråd, sten, glas eller andre hårde
genstande, kan dette efterlade et indhak i skæret.
Det er ikke nødvendigt at fjerne indhakket, så
længe det ikke begrænser knivenes bevægelse.
Hvis knivenes bevægelse begrænses af
indhakket, skal du slukke maskinen og tage en fin
fil eller en fin slibesten og udjævne indhakket.
Sørg for, at skærekniven hele tiden er godt smurt
ind i olie (se fig. 8).
2. Hvis du kommer til at tabe hækkeklipperen, skal
du undersøge den for skader. Er den beskadiget,
skal du kontakte en autoriseret kundeservice eller
indsende produktet til ISC-GmbH for reparation.
3. Maskinen skal være slukket, når den rengøres.
Brug kun mild sæbe og en fugtig klud til
rengøring. Lad aldrig væske trænge ind i
maskinen. Ingen brug af ætsende
rengøringsmidler.
7.2.1 Vedligeholdelse af luftfilter (fig. 9-11)
Et snavset luftfilter nedsætter lufttilførslen til
karburatoren og forringer dermed motorydelsen.
Regelmæssig kontrol er nødvendig. Luftfiltret skal
kontrolleres hver 25. driftstime og renses ved behov.
Ved meget støvholdig luft skal luftfiltret efterses med
korte intervaller.
1. Tag luftfilterdækslet af (fig. 9-10)
2. Tag filterelementet ud (fig. 11).
3. Rens filterelementet ved udbankning eller
udblæsning.
4. Samling sker tilsvarende i modsat rækkefølge.
Vigtigt: Rens aldrig luftfiltret med benzin eller
brændbare opløsningsmidler. Rens luftfiltret med
trykluft eller ved at banke det ud.
7.2.2 Vedligeholdelse af tændrør (fig. 12-14)
Tændrørets gnistgab = 0,025 inch (0,635 mm)
Spænd tændrøret med 14,7 - 21,5 Nm.
Tjek tændrøret for snavs første gang efter 10
driftstimer, og rens det om nødvendigt med en
kobbertrådsbørste. Herefter efterses tændrøret i
intervaller à 50 driftstimer.
Træk tændrørshætten (fig. 13) ud med en drejende
bevægelse.
Fjern tændrøret (fig. 14) med den medfølgende
tændrørsnøgle.
Samling sker tilsvarende i modsat rækkefølge.
7.2.3 Vedligeholdelse af gear (fig. 15)
Gearet skal smøres på smøreniplen en gang om året
før sæsonstarten (fig. 15/pos. A). Sæt en fedtsprøjte
på smøreniplen, og pres ca. 3 stød almindelig
maskinfedt ind i gearet. Ved særlig hyppig anvendelse
skal gearet smøres oftere.
7.2.4 Kaburator-indstillinger
Vigtigt! Indstillinger på karburatoren må kun
foretages af autoriseret kundeservice.
Indstilling af tomgangshastighed:
Vigtigt! Indstil tomgangshastigheden, mens
hækkeklipperen er driftsvarm.
Hvis maskinen går ud, når gasregulatoren ikke er
trykket ind, og alle andre årsager kan udelukkes i
henhold til afsnit 9 om fejlafhjælpning, er det
nødvendigt at efterjustere tomgangshastigheden. Det
gøres ved at dreje tomgangsskruen (fig. 16/pos. 5) i
urets retning, indtil maskinen kører stabilt i tomgang.
Hvis tomgangshastigheden er så høj, at
skæreknivene ikke standser, skal den reduceres ved
at dreje standgasskruen (fig. 16/pos. 5) venstre om,
indtil skæreknivene standser.
7.3 Opmagasinering
Vigtigt: Hvis der begås fejl i forbindelse med
opmagasinering, kan følgen være, at der danner sig
aflejringer på karburatorens indervæg; dette kan
besværliggøre startproceduren eller forårsage varig
skade på maskinen.
1. Udfør samtlige vedligeholdelsesarbejder.
2. Tøm tanken for brændstof (hertil benyttes en
DK/N
38
Anleitung_GE_PH_2555_SPK7__ 11.02.14 10:23 Seite 38

almindelig benzinpumpe af plastik, som fås i
byggemarkeder).
3. Når brændstoffet er aftappet, startes maskinen.
4. Lad maskinen køre videre i tomgang, indtil den
stopper. Det vil rense kaburatoren for resterende
brændstof.
5. Lad maskinen køle af (i ca. 5 min.).
6. Tag tændrøret ud (se punkt 7.2.2).
7. Fyld en teskefuld 2-takts-motorolie i
forbrændingskammeret. Træk forsigtigt
startsnoren ud nogle gange, så de indvendige
komponenter gennemvædes med olien. Sæt
tændrøret i igen.
8. Rengør maskinens udvendige hus.
9. Opbevar maskinen et koldt, tørt sted på god
afstand af tændkilder og brændbare substanser.
10. Under transport og opbevaring af hækkeklipperen
skal skæreværktøjet dækkes af med
beskyttelseskappen.
Gødningsmidler eller andre kemiske haveprodukter
indeholder ofte substanser, som fremskynder
korrosion af metaller. Opbevar ikke maskinen på eller
i nærheden af gødningsmidler eller andre kemikalier.
Genoptagelse af drift
1. Fjern tændrøret.
2. Træk ud i startsnoren flere gange for at fjerne
olierester fra forbrændingskammeret.
3. Rens tændrørskontakterne, eller sæt et nyt
tændrør i.
4. Fyld tanken op. Se afsnittet om brændstof og olie.
5. Udfør trin 1-7 under punktet „Start af kold motor“.
7.4 Reservedelsbestilling:
Ved bestilling af reservedele skal følgende oplyses:
n Savens type.
n Savens artikelnummer.
n Savens identifikationsnummer.
n Nummeret på den nødvendige reservedel.
Aktuelle priser og øvrige oplysninger finder du på
internetadressen www.isc-gmbh.info
8. Bortskaffelse og genanvendelse
Maskinen er pakket ind for at undgå transportskader.
Emballagen består af råmaterialer og kan således
genanvendes eller indleveres på genbrugsstation.
Maskinen og dens tilbehør består af forskellige
materialer, f.eks. metal og plast. Defekte
komponenter skal kasseres ifølge miljøforskrifterne
og må ikke smides ud som almindeligt
husholdningsaffald. Hvis du er i tvivl: Spørg din
forhandler, eller forhør dig hos din kommune!
DK/N
39
Anleitung_GE_PH_2555_SPK7__ 11.02.14 10:23 Seite 39

DK/N
40
Fejl Mulig årsag Afhjælpning af driftsforstyrrelser
Hækkeklipperen starter ikke. Fejl i startprocedure Følg startanvisningerne
Tilsodede eller fugtige tændrør Rens tændrør, eller sæt nyt i.
Forkert karburatorindstilling Kontakt autoriseret kundeservice,
eller indsend hækkeklipperen til
ISC-GmbH.
Hækkeklipperen starter, men
arbejder ikke med fuld ydelse.
Forkert indstilling af chokerarm
Sæt chokerarmen på “ ”.
Tilsmudset luftfilter Rensning af luftfilter
Forkert karburatorindstilling Kontakt autoriseret kundeservice,
eller indsend hækkeklipperen til
ISC-GmbH.
Motor kører uregelmæssigt Forkert elektrodeafstand ved
tændrør
Rens tændrør, og indstil
elektrodeafstanden, eller indsæt
nyt tændrør.
Forkert karburatorindstilling Kontakt autoriseret kundeservice,
eller indsend hækkeklipperen til
ISC-GmbH.
Kraftig røg fra motor Forkert brændstofblanding Brug den rigtige brændstofblanding
(se brændstof-blandetabel)
Forkert karburatorindstilling Kontakt autoriseret kundeservice,
eller indsend hækkeklipperen til
ISC-GmbH.
9. Fejlafhjælpning
Anleitung_GE_PH_2555_SPK7__ 11.02.14 10:23 Seite 40

DK/N
41
Garantibetingelser:
iSC GmbH garanterer afhjælpning af mangler eller vareombytning i henhold til nedenstående oversigt, uden at
lovfastsatte garantikrav berøres heraf.
Med hensyn til sliddele, forbrugsmateriale og manglende dele garanterer iSC GmbH afhjælpning af mangler
eller omlevering under forudsætning af, at manglen er blevet anmeldt inden for 24 t (forbrugsmateriale), 5
hverdage (manglende dele) eller 6 måneder (sliddele) efter købet, og at købsdatoen dokumenteres ved
fremvisning af købskvittering.
Ved mangler i materiale eller konstruktion, som er omfattet af garantien, bedes varen indsendt sammen med
vedlagte produktkort i komplet udfyldt stand. Det er her vigtigt, at der angives en nøjagtig fejlbeskrivelse.
Derfor bedes følgende spørgsmål besvares:
n Har produktet fungeret, eller var det defekt fra begyndelsen?
n Har du bemærket noget usædvanligt, inden defekten opstod (symptom før defekt)?
n Hvilken fejlfunktion mener du, at produktet er berørt af (hovedsymptom)?
Beskriv venligst fejlfunktionen.
Kategori Eksempel Garanti
Mangler i materiale eller
konstruktion
24 måneder
Sliddele Tændrør, luftfilter 6 måneder
Forbrugsmateriale/
forbrugsdele
Skærekniv Garanti kun ved omgående defekt
(24 t efter køb / dato på
købskvittering)
Manglende dele 5 hverdage
Anleitung_GE_PH_2555_SPK7__ 11.02.14 10:23 Seite 41

Obs!
Innan maskinen kan användas måste särskilda
säkerhetsanvisningar beaktas för att förhindra olyckor
och skador. Läs därför noggrant igenom denna
bruksanvisning och dessa säkerhetsanvisningar.
Förvara dem på ett säkert ställe så att du alltid kan
hitta önskad information. Om maskinen ska överlåtas
till andra personer måste även denna bruksanvisning
och dessa säkerhetsanvisningar medfölja. Vi övertar
inget ansvar för olyckor eller skador som har uppstått
om denna bruksanvisning eller
säkerhetsanvisningarna åsidosätts.
1. Säkerhetsanvisningar:
Gällande säkerhetsanvisningar finns i det bifogade
häftet.
VARNING!
Läs alla säkerhetsanvisningar och instruktioner.
Försummelser vid iakttagandet av
säkerhetsanvisningarna och instruktionerna kan
förorsaka elstöt, brand och/eller svåra skador.
Förvara alla säkerhetsanvisningar och
instruktioner för framtiden.
Förklaring av skylten på maskinen (se bild 17)
1. Varning!
2. Läs igenom bruksanvisningen före användning.
3. Vassa knivar! Håll alltid undan händer och fötter
från knivarna.
4. Bär ögonskydd och hörselskydd.
5. Bär skyddshandskar.
6. Bär fasta skor.
7. Mycket het yta. Rör inte vid den heta
ljuddämparen, växelhuset eller cylindern. Det
finns risk för att du bränner dig. Under drift blir
dessa delar mycket heta och förblir även heta
lång tid efter att maskinen har slagits ifrån.
8. Håll minst 15 m avstånd till andra personer.
2. Översikt över maskinen och samt
leveransens omfattning (bild 1-2)
1. Klinga
2. Skydd till kniven
3. Skyddsplatta4. Främre handtag
5. Chokereglage
6. Strömbrytare
7. Skruvmejsel
8. Spärrdon för vridbart handtag
9. Bränslepump (primer)
10. Luftfilterlock
11. Starthandtag
12. Bakre handtag
13. Gasreglagespärr
14. Gasreglage
15. Ljuddämparlock
16. Tank för bränsleblandning
17. Tändstiftskontakt
18. Tändstiftsnyckel
19. Gaffelnyckel strl. 8/strl. 10
20. Olje-/bensin-blandningsflaska
21. Svärdskydd
3. Ändamålsenlig användning
Obs! Denna häcksax är endast avsedd för klippning
av häckar, buskar och plantor.
Maskinen får endast användas till sitt avsedda
ändamål. Användningar som sträcker sig utöver detta
användningsområde är ej ändamålsenliga. För
materialskador eller personskador som resulterar av
sådan användning ansvarar användaren/operatören
själv. Tillverkaren påtar sig inget ansvar.
Tänk på att våra produkter endast får användas till
ändamålsenligt syfte och inte har konstruerats för
yrkesmässig, hantverksmässig eller industriell
användning. Vi ger därför ingen garanti om
produkten ska användas inom yrkesmässiga,
hantverksmässiga eller industriella verksamheter
eller vid liknande aktiviteter.
S
42
Anleitung_GE_PH_2555_SPK7__ 11.02.14 10:23 Seite 42

4. Tekniska data
Motortyp: Tvåtaktsmotor, luftkyld, kromcylindrar
Motoreffekt (max.): 0,85 kW / 1,15 hk
Cylindervolym: 24,5 cm
3
Motorns tomgångsvarvtal: 3300 min
-1
Motorns max. varvtal: 8000 min
-1
Vikt (tom tank): 5,4 kg
Klipplängd: 55 cm
Max. klippkapacitet: 19 mm
Tändstift: Champion RCJ7Y
Max. klipphastighet: 1900 snitt/min.
Buller och vibration
Buller- och vibrationsvärden har bestämts enligt ISO
3744, ISO 11201.
Ljudtrycksnivå L
pA
98,9 dB(A)
Osäkerhet K
pA
3dB
Ljudeffektnivå L
WA
104,5 dB(A)
Osäkerhet K
WA
3dB
Vibrationsemissionsvärde (främre handtaget)
Vibrationsemissionsvärde a
h
= 6,41 m/s
2
Osäkerhet K = 1,5 m/s
2
Vibrationsemissionsvärde (bakre handtaget)
Vibrationsemissionsvärde ah= 6,24 m/s
2
Osäkerhet K = 1,5 m/s
2
Bär hörselskydd.
Buller kan leda till att hörseln förstörs.
Extra information för elverktyg
Varning!
Vibrationsemissionsvärdet som anges har mätts upp
med en standardiserad provningsmetod och kan
variera beroende på vilket sätt som elverktyget
används. I undantagsfall kan det faktiska värdet
avvika från det angivna värdet.
Vibrationsemissionsvärdet som anges kan användas
om man vill jämföra olika elverktyg.
Vibrationsemissionsvärdet som anges kan även
användas för en första bedömning av inverkan från
elverktyget.
Begränsa uppkomsten av buller och vibration till
ett minimum!
n Använd endast intakta maskiner.
n Underhåll och rengör maskinen regelbundet.
n Anpassa ditt arbetssätt till maskinen.
n Överbelasta inte maskinen.
n Lämna in maskinen för översyn vid behov.
n Slå ifrån maskinen om den inte används.
n Bär handskar.
Kvarstående risker
Kvarstående risker föreligger alltid även om
detta elverktyg används enligt föreskrift.
Följande risker kan uppstå på grund av
elverktygets konstruktion och utförande:
1. Lungskador om ingen lämplig dammfiltermask
används.
2. Hörselskador om inget lämpligt hörselskydd
används.
5. Före användning
5.1 Montera maskinen
Häcksaxen levereras i färdigmonterat skick. Inga
monteringsarbeten krävs.
För att häcksaxen ska kunna styras bättre är den
utrustad med ett vridbart handtag som beroende på
arbetssituation kan ställas in i positionerna 90°/0°/+90°. Tryck spärrdonet (bild 5/pos. B) nedåt,
vrid runt handtaget till avsedd position och låt sedan
spärrdonet snäppa upp igen. Tack vare dessa
inställbara positioner blir det lättare att arbeta ovanför
huvudhöjd eller vid andra svåråtkomliga ställen.
Obs! Det vridbara handtaget får endast ställas in om
motorn först har slagits ifrån.
5.2 Bränsle och olja
Rekommenderade bränslen
Använd endast en blandning av normal blyfri bensin
och en speciell tvåtaktsmotorolja. Tillred
bränsleblandningen enligt blandningstabellen.
Obs! Använd inga bränsleblandningar som har
lagrats längre än 90 dagar.
Obs! Använd ingen tvåtaktsolja med ett
rekommenderat blandningsförhållande på 100:1. Om
otillräcklig smörjning leder till motorskador gäller inte
tillverkarens motorgaranti längre.
Obs! Bränsle får endast transporteras och lagras i
härför avsedda och godkända behållare.
S
43
Anleitung_GE_PH_2555_SPK7__ 11.02.14 10:23 Seite 43

Mät upp avsedd mängd bensin och tvåtaktsolja i den
bifogade blandningsflaskan (se skalan på flaskan).
Skaka därefter flaskan ordentligt.
5.3 Blandningstabell för bränsle
Blandningsförhållande: 40 delar bensin på 1 del olja
6. Användning
Beakta de lokala bullerbestämmelserna. Dessa kan
avvika mellan olika orter.
Använd och starta maskinen endast utomhus där
ventilationen är tillräcklig för att reducera risken för
skador av giftiga gaser.
6.1 Starta kall motor (bild 3-5)
Fyll på tanken med en lämplig mängd bensin/oljeblandning.
1. Ställ maskinen på en fast och jämn yta.
2. Ställ chokereglaget (bild 4/pos. 5) på “”.
3. Tryck 10 ggr. på bränslepumpen (primern) (bild
4/pos. 9).
4. Ställ strömbrytaren (bild 3/pos. 6) på “I”.
5. Håll fast maskinen med vänster hand på det
främre handtaget och dra sedan ut startsnöret
(bild 5/pos. A) med höger hand tills du märker av
ett motstånd (ca 10 cm). Dra nu ut startsnöret
snabbt fyra gånger. Maskinen ska nu starta.
Obs! Låt inte startsnöret slå tillbaka plötsligt.
Detta kan leda till skador.
6. När motorn har startat ska maskinen varmköras i
ca 10 sekunder.
Obs! Eftersom chokereglaget har spärrats börjar
knivarna genast slå när motorn startar.
Dra åt gasreglaget (pos. 14) kort så att
chokereglaget reglas upp (motor går tillbaka till
tomgång). Obs! Innan gasreglaget kan tryckas in
måste spärren för gasreglaget tryckas in tills det
tar emot.
7. Om motorn inte startar måste du upprepa steg 5-
6.
Kom ihåg: Om motorn inte startar fastän du har
försökt flera gånger, läs igenom kapitlet
“Störningsåtgärder på motorn”.
Kom ihåg: Dra alltid startsnöret rakt ut. Om snöret
dras ut i vinkel uppstår en friktionsverkan på öglan. På
grund av denna friktion utsätts snöret för slitage vilket
innebär att det slits ned snabbare.
6.2 Starta varm motor (maskinen har stått stilla i
maximalt 15-20 minuter)
1. Ställ maskinen på en fast och jämn yta.
2. Ställ strömbrytaren på “I”.
3. Håll fast maskinen med vänster hand på det
främre handtaget och dra sedan ut startsnöret
med höger hand tills du märker av ett motstånd
(ca 10 cm). Dra nu ut startsnöret snabbt. Efter 1-2
drag ska maskinen starta. Om maskinen inte har
startat efter sex drag måste du upprepa steg 1-7
under “Starta vid kall motor”.
6.3 Stänga av motorn
Arbetsföljd vid nödstopp:
Ställ strömbrytaren på “Stopp” resp. “0” om du måste
stoppa maskinen genast.
Normal arbetsföljd:
Släpp gasreglaget och vänta tills motorn kör i
tomgångsvarvtal. Ställ därefter strömbrytaren på
“Stopp” resp. “0”.
6.4 Arbetsanvisningar
Låt inte maskinen köra med lågt varvtal medan du
startar eller använder häcksaxen.
Klippa för att få tät vegetation: Den mest effektiva
arbetsmetoden är en bred, genomgående rörelse. För
svärdet direkt genom grenarna. Luta svärdet en aning
nedåt - en rörelse i denna riktning ger bästa
snittresultat.
För att vara säker på att få en jämn höjd
rekommenderar vi att du spänner ett snöre längs
häckens kant. Klipp av grenarna som skjuter ut (bild
6).
Klippa häckens sidor: Klipp häckens sidor med
svängande rörelser nedifrån och upp (bild 7).
Obs! Beroende på häcksaxens modell är det möjligt
att motorn stannar om du enbart klipper häckens
sidor under längre tid och om tanken inte är helt fylld.
S
44
Bensin Tvåtaktsolja
1 liter 25 ml
5 liter 125 ml
Anleitung_GE_PH_2555_SPK7__ 11.02.14 10:23 Seite 44

7. Rengöring, underhåll, förvaring och
reservdelsbeställning
7.1 Rengöra maskinen
앬 Håll skyddsanordningarna,
ventilationsöppningarna och motorkåpan i så
damm- och smutsfritt skick som möjligt. Torka av
maskinen med en ren duk eller blås av den med
tryckluft med svagt tryck.
앬 Vi rekommenderar att du rengör maskinen efter
varje användningstillfälle.
앬 Rengör maskinen med jämna mellanrum med en
fuktig duk och en aning såpa. Använd inga
rengörings- eller lösningsmedel. Dessa kan skada
maskinens plastdelar. Se till att inga vätskor
tränger in i maskinens inre.
7.2 Underhåll
Slå alltid ifrån häcksaxen och dra av
tändstiftskontakten innan du utför underhåll.
1. Knivarna är av hög kvalitet, av härdat stål, och
behöver vid normal användning inte slipas i
efterhand. Om du av misstag kör emot tråd, sten,
glas eller andra hårda föremål, finns det risk för
att hack uppstår i kniven. Hacken behöver inte tas
bort om knivarna fortfarande kan röra sig fritt. Om
du dock märker att knivarnas rörelse är
begränsad, slå ifrån maskinen och fila bort hacket
med en fin fil eller slipsten. Se alltid till att
knivarna är tillräckligt smorda (se bild 8).
2. Om häcksaxen har fallit ned måste du kontrollera
om delar har skadats. Om skador har uppstått
måste du kontakta behörig kundtjänst eller skicka
in maskinen till ISC GmbH för reparation.
3. Maskinen måste slås ifrån innan den får
rengöras. Använd endast milt tvål och en fuktig
tygduk till rengöringen. Se till att vätska aldrig
tränger in i maskinens inre. Använd inga frätande
rengöringsmedel.
7.2.1 Underhålla luftfiltret (bild 9-11)
Smutsiga luftfilter försämrar motorprestandan
eftersom luftmatningen till förgasaren är reducerad.
Kontrollera filtret med jämna mellanrum. Luftfiltret bör
kontrolleras var 25:e drifttimme och rengöras vid
behov. Kontrollera luftfiltret oftare om luften är mycket
dammig.
1. Demontera luftfilterlocket (bild 9-10).
2. Ta bort filterelementet (bild 11).
3. Rengör filterelementet genom att slå ur det eller
blåsa rent.
4. Montera samman i omvänd ordningsföljd.
Varning! Rengör aldrig luftfiltret med bensin eller
brännbara lösningsmedel. Rengör luftfiltret med
tryckluft eller genom att slå ur det.
7.2.2 Underhålla tändstiftet (bild 12-14)
Tändstiftets gnistgap = 0,025” (0,635 mm). Dra åt
tändstiftet med 14,7 - 21,5 Nm.
Kontrollera tändstiftet för första gången efter
10 drifttimmar med avseende på nedsmutsning och
rengör det vid behov med en trådborste av koppar.
Utför därefter underhåll på tändstiftet var
50:e drifttimme.
1. Dra av tändstiftskontakten (bild 13) med en
vridande rörelse.
2. Ta av tändstiftet (bild 14) med den bifogade
tändstiftsnyckeln.
3. Montera samman i omvänd ordningsföljd.
7.2.3 Underhålla växeln (bild 15)
Växeln måste smörjas in vid smörjnippeln (bild
15/pos. A). Detta ska utföras varje år innan säsongen
börjar. Sätt en vanlig smörjspruta på smörjnippeln och
tryck in normalt maskinfett i växeln ca 3 ggr. Om
maskinen användas oftaren än normalt ska växeln
smörjas in oftare.
7.2.4 Förgasarinställningar
Obs! Endast personal från behörig kundtjänst får
utföra inställningar på förgasaren.
Ställa in tomgångsgas:
Obs! Ställ in tomgångsgas medan maskinen är
driftvarm.
Om maskinen stannar medan gasreglaget inte trycks
in och samtliga andra orsaker som anges i kapitel 9
“Störningsåtgärder” kan uteslutas, kan det vara
nödvändigt att justera in tomgångsgasen. Vrid runt
skruven till tomgångsgas (bild 16/pos. 5) i medsols
riktning tills maskinen kör säkert i tomgång.
Om tomgångsgasen är så pass hög att knivarna inte
står stilla, måste tomgångsgasen reduceras med
skruven (bild 16/pos. 5) så pass mycket tills knivarna
stannar.
7.3 Förvaring
Obs! Om dessa arbetssteg inte beaktas finns det risk
för att avlagringar bildas på förgasarens innervägg.
Denna avlagring kan leda till att det blir svårt att starta
maskinen eller att permanenta skador uppstår under
förvaringen.
1. Genomför alla underhållsarbeten.
2. Tappa av bränslet som finns i tanken (använd en
normal bensinpump av plast som du kan köpa på
S
45
Anleitung_GE_PH_2555_SPK7__ 11.02.14 10:23 Seite 45

en byggmarknad).
3. Starta maskinen efter att du har tappat ur
bränslet.
4. Låt maskinen köra i tomgång tills den stannar av
sig själv. Detta rengör förgasaren från resterande
bränsle.
5. Låt maskinen svalna (ca 5 minuter).
6. Skruva ut tändstiftet (se punkt 7.2.2).
7. Fyll på en tesked tvåtaktsmotorolja i
förbränningskammaren. Dra ut startsnöret
försiktigt ett par gånger så att oljan appliceras på
de inre komponenterna. Sätt i tändstiftet på nytt.
8. Rengör maskinens ytterkåpa.
9. Förvara maskinen på en sval och torr plats på
tillräckligt avstånd från tändkällor och brännbara
ämnen.
10. Se alltid till att svärdskyddet har satts på
klippanordningen innan du transporterar eller
lägger undan häcksaxen för förvaring.
Gödselmedel och andra kemiska trädgårdsprodukter
innehåller ämnen som starkt främjar korrodering av
metall. Förvara aldrig maskinen på eller i närheten av
gödselmedel eller andra kemikalier.
Ny driftstart
1. Ta ut tändstiftet.
2. Dra ut startsnöret flera gånger för att rengöra
förbränningskammaren från oljerester.
3. Rengör tändstiftskontakterna eller montera in ett
nytt tändstift.
4. Fyll på tanken. Se avsnitt “Bränsle och olja”.
5. Genomför arbetsstegen 1-7 under punkt “Starta
kall motor”.
7.4 Reservdelsbeställning
Lämna följande uppgifter vid beställning av
reservdelar:
앬 Maskintyp
앬 Maskinens artikel-nr.
앬 Maskinens ident-nr.
앬 Reservdelsnummer för erforderlig reservdel
Aktuella priser och ytterligare information finns på
www.isc-gmbh.info
8. Skrotning och återvinning
Produkten ligger i en förpackning som fungerar som
skydd mot transportskador. Denna förpackning
består av olika material som kan återvinnas. Lämna
in förpackningen till ett insamlingsställe för
återvinning.
Produkten och tillbehören består av olika material
som t ex metaller och plaster. Lämna in defekta
komponenter till ett godkänt insamlingsställe i din
kommun. Hör efter med din kommun eller med
försäljaren i din specialbutik.
S
46
Anleitung_GE_PH_2555_SPK7__ 11.02.14 10:23 Seite 46

S
47
Störning Möjlig orsak Störningsåtgärder
Maskinen startar inte. Maskinen har startats felaktigt Följ instruktionerna för start.
Sotigt eller fuktigt tändstift. Rengör tändstiftet eller byt ut mot
ett nytt.
Förgasaren är felaktigt inställd. Kontakta behörig kundtjänst eller
skicka in maskinen till ISC GmbH.
Maskinen startar, men avger inte
full effekt.
Chokereglaget är felaktigt inställt. Ställ chokereglaget på " ".
Luftfiltret är smutsigt. Rengör luftfiltret.
Förgasaren är felaktigt inställd. Kontakta behörig kundtjänst eller
skicka in maskinen till ISC GmbH.
Motorn kör ryckigt. Felaktigt elektrodavstånd i
tändstiftet.
Rengör tändstiftet och ställ in
elektrodavståndet, eller sätt in ett
nytt tändstift.
Förgasaren är felaktigt inställd. Kontakta behörig kundtjänst eller
skicka in maskinen till ISC GmbH.
Motorn avger ovanligt mycket
avgaser.
Felaktig bränsleblandning Använd rätt bränsleblandning (se
blandningstabellen)
Förgasaren är felaktigt inställd. Kontakta behörig kundtjänst eller
skicka in maskinen till ISC GmbH.
9. Störningsåtgärder
Anleitung_GE_PH_2555_SPK7__ 11.02.14 10:23 Seite 47

S
48
Garantivillkor
Firman iSC GmbH garanterar att åtgärda brister eller byta ut produkten enligt nedanstående översikt, varvid
lagstadgade garantianspråk inte påverkas.
När det gäller slitagedelar, förbrukningsmaterial och delar som saknas garanterar firman iSC GmbH endast att
bristerna åtgärdas resp. reservdelar skickas ut, om bristerna reklameras inom 24 timmar (förbrukningsmaterial),
5 arbetsdagar (delar som saknas) resp. 6 månader (slitagedelar) efter köp och köpdatum kan påvisas med
kvitto.
Vid brister i material eller konstruktion vill vi be dig att skicka in produkten tillsammans med ett komplett ifyllt
produktkort. Det är viktigt att du ger en detaljerad beskrivning av felet.
Besvara följande frågor:
n Fungerade produkten först eller var den defekt från början?
n Märkte du av någonting innan produkten slutade att fungera (symptomer före defekt)?
n Enligt din åsikt, vilken funktion är felaktig i produkten (huvudsymptom)?
Beskriv den felaktiga funktionen.
Kategori Exempel Garanti
Brister i material eller konstruktion 24 månader
Slitagedelar Tändstift, luftfilter 6 månader
Förbrukningsmaterial/
förbrukningsdelar
Röjkniv Garanti endast vid omedelbar
defekt (24 tim efter köp / köpdatum)
Delar som saknas 5 arbetsdagar
Anleitung_GE_PH_2555_SPK7__ 11.02.14 10:23 Seite 48

Let op!
Bij het gebruik van gereedschappen dienen enkele
veiligheidsmaatregelen te worden nageleefd om
lichamelijk gevaar en schade te voorkomen. Lees
daarom deze handleiding/veiligheidsinstructies
zorgvuldig door. Bewaar deze goed zodat u de
informatie op elk moment kunt terugvinden. Mocht u
dit gereedschap aan andere personen doorgeven,
gelieve dan deze handleiding/veiligheidsinstructies
mee te geven. Wij zijn niet aansprakelijk voor
ongevallen of schade die te wijten zijn aan nietnaleving van deze handleiding en van de
veiligheidsinstructies.
1. Veiligheidsvoorschriften :
De overeenkomstige veiligheidsinstructies vindt u in
de bijgaande brochure.
WAARSCHUWING!
Lees alle veiligheidsinstructies en aanwijzingen.
Nalatigheden bij de inachtneming van de
veiligheidsinstructies en aanwijzingen kunnen
elektrische schok, brand en/of zware letsels tot
gevolg hebben.
Bewaar alle veiligheidsinstructies en
aanwijzingen voor de toekomst.
Verklaring van het aanwijzingsbord op het
toestel (zie fig. 17)
1. Waarschuwing!
2. Vóór inbedrijfstelling handleiding lezen!
3. Scherpe messen! Handen en voeten steeds
weghouden van de messen.
4. Oog- en gehoorbeschermer dragen!
5. Veiligheidshandschoenen dragen!
6. Vast schoeisel dragen!
7. Zeer warme oppervlakken. Niet de warme
uitlaatpot, de behuizing van de transmissie of de
cilinder aanraken. U zou brandwonden kunnen
oplopen. Deze delen worden door het gebruik
zeer warm en blijven lange warm ook al is het
gereedschap uitgeschakeld.
8. Afstand van minstens 15 m tot andere personen
in acht nemen.
2. Overzicht van de opbouw en omvang
van de levering (fig. 1-2)
1. Snijblad
2. Beschermende afdekking snijblad
3. Beschermschild
4. Voorste handgreep
5. Choke hendel
6. AAN/UIT-schakelaar
7. Schroevendraaier
8. Grendelknop voor draaigreep
9. Brandstofpomp (primer)
10. Luchtfilterafdekking
11. Starterhandgreep
12. Achterste handgreep
13. „Loszetten“ gashendel
14. Gashendel
15. Geluidsdemperafdekking
16. Tank voor brandstofmengeling
17. Bougiestekker
18. Bougiesleutel
19. Platte open sleutel sw8/sw10
20. Olie/benzine mengfles
21. Zwaardafdekking
3. Reglementair gebruik
Let op! Deze heggenschaar is geschikt voor het
snoeien van heggen, struiken en heesters.
De machine mag slechts voor werkzaamheden
worden gebruikt waarvoor ze bedoeld is. Elk ander
verder gaand gebruik is niet reglementair. Voor
daaruit voortvloeiende schade of verwondingen van
welke aard dan ook is de gebruiker/bediener, niet de
fabrikant, aansprakelijk.
Wij wijzen erop dat onze gereedschappen
overeenkomstig hun bestemming niet geconstrueerd
zijn voor commercieel, ambachtelijk of industrieel
gebruik. Wij geven geen garantie indien het
gereedschap in ambachtelijke of industriële bedrijven
alsmede bij gelijk te stellen activiteiten wordt
gebruikt.
NL
49
Anleitung_GE_PH_2555_SPK7__ 11.02.14 10:23 Seite 49

4. Technische gegevens
Motortype:
tweetaktmotor, luchtgekoeld, chroomcilinder
Motorvermogen (max.): 0,85 kW / 1,15 pk
Cilinderinhoud: 24,5 cm³
Stationair toerental motor: 3300 t/min
Toerental motor max.: 8000 t/min.
Gewicht (lege tank): 5,4 kg
Snijlengte: 55 cm
Snijcapaciteit (max.): 19 mm
Bougie: Champion RCJ7Y
Snijsnelheid max.: 1900 sneden/min.
Geluid en vibratie
De geluids- en vibratiewaarden werden bepaald
volgens ISO 3477, ISO 11201.
Geluidsdrukniveau L
pA
98,9 dB (A)
Onzekerheid K
pA
3 dB
Geluidsvermogen L
WA
104,5 dB (A)
Onzekerheid K
WA
3dB
Trillingsemissiewaarde (voorste handgreep)
Trillingsemissiewaarde a
h
= 6,41 m/s
2
Onzekerheid K = 1,5 m/s
2
Trillingsemissiewaarde (achterste handgreep)
Trillingsemissiewaarde a
h
= 6,24 m/s
2
Onzekerheid K = 1,5 m/s
2
Draag een gehoorbeschermer.
Lawaai kan aanleiding geven tot gehoorverlies.
Waarschuwing!
De opgegeven trillingsemissiewaarde is gemeten
volgens een genormaliseerde testprocedure en kan
veranderen naargelang van de wijze waarop het
elektrische gereedschap wordt gebruikt en in
uitzonderingsgevallen boven de opgegeven waarde
liggen.
De vermelde trillingsemissiewaarde kan worden
gebruikt om elektrische gereedschappen onderling te
vergelijken.
De vermelde trillingsemissiewaarde kan ook worden
gebruikt om voor begin van de werkzaamheden de
nadelige gevolgen te beoordelen.
Beperk de geluidsontwikkeling en vibratie tot
een minimum!
n Gebruik enkel intacte toestellen.
n Onderhoud en reinig het toestel regelmatig.
n Pas uw manier van werken aan het toestel aan.
n Overbelast het toestel niet.
n Laat het toestel indien nodig nazien.
n Schakel het toestel uit als het niet wordt gebruikt.
n Draag handschoenen.
Restrisico’s
Er blijven altijd restrisico’s over ook al wordt dit
elektrisch gereedschap naar behoren bediend.
Volgende gevaren kunnen zich voordoen in
verband met de bouwwijze en uitvoering van dit
elektrisch gereedschap:
1. Longletsels indien geen gepaste stofmasker
wordt gedragen.
2. Gehoorschade indien geen gepaste
gehoorbeschermer wordt gedragen.
5. Vóór inbedrijfstelling
5.1 Montage
De heggenschaar is kant-en-klaar gemonteerd. Er
zijn geen montagewerkzaamheden nodig.
Om het gereedschap beter te kunnen geleiden is de
heggenschaar voorzien van een draaigreep die u
naar behoefte in de standen -90°/0°/+90 kan
brengen. Trek te dien einde de hendel (fig. 5, pos. B)
naar beneden, breng de draaigreep in de gewenste
stand en laat dan de hendel terug naar boven
vastklikken. Dankzij de verschillende instelbare
standen wordt het bovenhoofds werken of het werken
op andere moeilijk te bereiken plaatsen
vergemakkelijkt.
Let op: Het veranderen van stand van de draaigreep
mag slechts bij afgezette motor gebeuren.
5.2 Brandstof en olie
Aanbevolen brandstoffen
Gebruik alleen een mengeling van normale loodvrije
benzine en speciale tweetaktmotorolie. Meng de
brandstofmengeling volgens de brandstofmengtabel.
Let op! Gebruik geen brandstofmengeling die langer
dan 90 dagen werd bewaard.
NL
50
Anleitung_GE_PH_2555_SPK7__ 11.02.14 10:23 Seite 50

Let op! Gebruik geen tweetaktolie waarvoor een
mengverhouding van 100 tot 1 wordt aanbevolen.
Wordt door onvoldoende smering schade aan de
motor berokkend, komt de motorgarantie van de
fabrikant te vervallen.
Let op! Gebruik voor het transport en bewaren van
brandstof alleen vaten die daarvoor voorzien en
toegelaten zijn.
Giet telkens de juiste hoeveelheid benzine en
tweetaktolie de bijgaande mengfles in (zie
opgedrukte schaal). Schud daarna de fles flink door.
5.3 Brandstofmengtabel:
Mengmethode: 40 delen benzine op 1 deel olie
6. Gebruik
Gelieve de wettelijke bepalingen m.b.t. de
verordening inzake de bestrijding van lawaaioverlast
na te leven die plaatselijk kunnen verschillen.
Gebruik en start het gereedschap enkel in open lucht
in goed verluchte bereiken om het lichamelijk gevaar
door giftige gassen te verminderen.
6.1 Koude motor starten (fig. 3-5)
Giet in de tank de behoorlijke hoeveelheid benzine/oliemengeling.
1. Het gereedschap op een hard effen vlak
plaatsen.
2. Choke-hendel (fig. 4, pos. 5) naar de stand ““ ”
brengen.
3. Tien keer op de brandstofpomp (primer) (fig. 4,
pos. 9) drukken.
4. AAN/UIT-schakelaar (fig. 3, pos. 6) naar de stand
“I” brengen.
5. Het gereedschap aan de voorste handgreep met
de linkerhand goed vasthouden en met de
rechterhand de starterkoord (fig. 5, pos. A)
uittrekken tot de eerste weerstand (ca. 10 cm).
Haal dan de starterkoord 4 keer flink door. Het
toestel zou moeten starten.
Let op: De starterkoord niet terug laten springen.
Dit zou tot beschadigingen kunnen leiden.
6. Is de motor gestart, het toestel ongeveer 10 s
laten warmlopen.
Let op: Door de vastgezette chokehendel begint
het snijgereedschap bij startende motor te
werken.
Daarna chokehendel ontgrendelen door de
gashendel (pos. 14) te bedienen (de motor keert
weer naar zijn stationair toerental). Let wel :
Voordat u de gashendel kunt bedienen moet u de
hendel „loszetten“ gashendel doordrukken tot
tegen de aanslag.
7. Mocht de motor niet aanslaan, herhaalt u de
stappen 5 tot 6.
Opgelet! Slaat de motor ook na meerdere pogingen
niet aan, gelieve het hoofdstuk “Fouten verhelpen aan
de motor” te raadplegen.
Opgelet! Haal de startkoord steeds recht door. Wordt
de kabel met een hoek doorgehaald, ontstaat wrijving
aan het oog. Door deze wrijving wordt de koord open
geschuurd en gaat sneller verslijten.
6/2 Warme motor starten (het gereedschap stond
voor niet meer dan 15 à 20 min. stil)
1. Het toestel op een hard effen vlak plaatsen.
2. AAN/UIT schakelaar naar de stand “I” brengen.
3. Het gereedschap aan de voorste handgreep met
de linkerhand goed vasthouden en met de
rechterhand de starterkoord tot de eerste
weerstand (ca. 10 cm) uittrekken. Haal dan de
starterkoord flink door. Het toestel zou na 1 tot 2
keer doorhalen moeten starten. Mocht het toestel
na 6 keer doorhalen nog altijd niet starten,
herhaalt u de stappen 1 tot 7 beschreven onder
“koude motor starten”.
6.3 Motor afzetten
Stappenvolgorde bij noodstop:
Wanneer het nodig is het gereedschap onmiddellijk
te stoppen brengt u de AAN/UIT-schakelaar naar de
stand “stop” of “0”.
Normale stappenvolgorde:
Laat de gashendel los en wacht tot de motor
stationair draait. Breng dan de AAN/UIT-schakelaar
naar de stand “stop” of “0”.
6.4 Werkinstructies
Laat het gereedschap bij het starten of snoeien niet
met een laag toerental draaien.
Snoeien voor een dichter groei: Een brede
doorgehaalde beweging is het meest effectief;
daarbij leidt u de messen van het zwaard
rechtstreeks doorheen de takken. Het beste
snoeiresultaat behaald u door de snijkant lichtjes
schuin omlaag te houden, in de richting van de
bewegingen.
NL
51
Benzine 2-takt olie
1 liter 25 ml
5 liter 125 ml
Anleitung_GE_PH_2555_SPK7__ 11.02.14 10:23 Seite 51

Teneinde de haag gelijkmatig hoog te snoeien is het
aan te raden een draad als richtsnoer langs de kant
van de haag te spannen. De er bovenuit stekende
takken worden weggesnoeid. (Fig. 6)
Zijdelings snoeien van een haag: De zijvlakken
van een haag worden met boogvormige bewegingen
van beneden naar boven gesnoeid. (Fig. 7)
Let op! Afhankelijk van het model kan het gebeuren
dat de motor afslaat als u vrij lang zijdelings snoeit
en de tank niet helemaal vol is.
7. Reiniging, onderhoud, opbergen en
bestellen van wisselstukken
7.1 Reiniging
n Hou de veiligheidsinrichtingen, de
ventilatiespleten en het motorhuis zo veel
mogelijk vrij van stof en vuil. Wrijf het toestel met
een schone doek af of blaas het met perslucht bij
lage druk schoon.
n Het is aan te bevelen het toestel direct na elk
gebruik te reinigen.
n Reinig het toestel regelmatig met een vochtige
doek en wat zachte zeep. Gebruik geen
reinigings- of oplosmiddelen; die zouden de
kunststofcomponenten van het toestel kunnen
aantasten. Let er goed op dat geen water in het
toestel terechtkomt.
7.2 Onderhoud
Zet voor begin van onderhoudswerkzaamheden
steeds de motor van de heggenschaar af en trek de
bougiestekker af.
1. De snijmessen zijn van hoge kwaliteit, van
gehard staal en het zal bijgevolg niet nodig zijn
om de messen bij normaal hanteren bij te slijpen.
Mocht u per ongeluk tegen een metalen draad,
steen, glas of andere harde voorwerpen stoten,
zou dit een inkeping in de snijkant kunnen
veroorzaken. Het is niet nodig de inkeping te
verwijderen zolang als ze de messen in hun
beweging niet belemmert. Mocht dit toch het
geval zijn, zet u de motor van het gereedschap
af en neemt u een fijne vijl of een fijne slijpsteen
om de inkeping te verwijderen. Let er goed op
dat het snijmes steeds voldoende geolied is (zie
fig. 8).
2. Mocht u de heggenschaar laten vallen, dient u
na te gaan of het gereedschap beschadigd is. Bij
beschadigingen neemt u contact op met een
geautoriseerde klantenservice of stuurt u het
gereedschap naar ISC-GmbH om het te laten
herstellen.
3. Maak het gereedschap enkel bij stopgezette
motor schoon. Gebruik voor een
schoonmaakbeurt alleen milde zeep en een
vochtige doek. Laat nooit vloeistof binnen in het
gereedschap terechtkomen. Gebruik geen
bijtende reinigers.
7.2.1 Onderhoud van de luchtfilter (fig. 9-11)
Als luchtfilters vervuild zijn, gaat het motorvermogen
achteruit omdat te weinig lucht naar de carburator
wordt toegevoerd.
De filter dient daarom regelmatig te worden
gecontroleerd. De luchtfilter dient om de 25
bedrijfsuren te worden gecontroleerd en, indien
nodig, schoongemaakt. Bij zeer stoffige lucht dient
de luchtfilter vaker te worden gecontroleerd.
1. Verwijder het luchtfilterdeksel (fig. 9-10).
2. Ontneem het filterelement (fig. 11).
3. Maak het filterelement door uitkloppen of
uitblazen schoon.
4. De assemblage gebeurt in omgekeerde
volgorde.
Let op! Luchtfilter nooit met benzine of brandbare
oplosmiddelen schoonmaken. Luchtfilter met
perslucht of door uitkloppen reinigen.
7.2.2 Onderhoud van de bougie (fig. 12-14)
Vonkafstand van de bougie = 0,025 inch (0,635 mm).
Haal de bougie met een kracht van 14,7 - 21,5 Nm
aan.
Controleer de bougie voor het eerst na 10
bedrijfsuren op vervuiling en reinig haar, indien
nodig, m.b.v. een koperdraadborstel. Daarna de
bougie om de 50 bedrijfsuren onderhouden.
1. Trek er de bougiestekker (fig. 13) met een
draaiende beweging af.
2. Verwijder de bougie (fig. 14) m.b.v. de bijgaande
bougiesleutel.
3. De assemblage gebeurt in omgekeerde
volgorde.
7.2.3 Onderhoud van de transmissie (fig. 15)
De transmissie dient jaarlijks voor seizoenbegin via
de smeernippel (fig. 15, pos. A) te worden gesmeerd.
Steek daarvoor een in de handel verkrijgbare
vetspuit de smeernippel op en pers ca. 3 slagen in
de handel verkrijgbaar machinevet de transmissie in.
Bij bovenmatig gebruik moet de transmissie vaker
worden bijgesmeerd.
NL
52
Anleitung_GE_PH_2555_SPK7__ 11.02.14 10:23 Seite 52

7.2.4 Carburator afstellingen
Let op! Afstellingen van de carburator mogen
slechts door de geautoriseerde klantenservice
worden uitgevoerd.
Afstellen van het stationaire toerental:
Let op! Het stationaire toerental bij warme motor
afstellen.
Mocht de motor van het gereedschap bij niet
ingedrukte gashendel afslaan en alle andere
oorzaken volgens hoofdstuk 9 ”verhelpen van fouten”
uitgesloten zijn, dient het stationaire toerental te
worden bijgeregeld. Draai te dien einde de
afstelschroef voor het stationaire toerental (fig. 16,
pos. 5) met de wijzers van de klok mee tot de motor
zonder te haperen stationair blijft draaien.
Mocht het stationaire toerental te hoog zijn zodat de
snijmessen niet stilstaan, dient u het stationaire
toerental door draaien van de desbetreffende
afstelschroef (fig. 16, pos. 5) te verlagen tot de
snijmessen stil blijven staan.
7.3 Opbergen
Let op! Een fout bij het naleven van deze stappen
kan leiden tot vorming van aankoekingen aan de
binnenwand van de carburator zodat de motor
mogelijk moeilijker start of een permanente schade
aan de motor wordt berokkend.
1. Voer alle onderhoudswerkzaamheden uit.
2. Laat de brandstof uit de tank af (gebruik
daarvoor een in de bouwmarkt verkrijgbaar
plastic hevelpompje voor benzine).
3. Na het aflaten van de brandstof start u de motor.
4. Laat de motor stationair draaien tot hij stopt.
Daardoor wordt de carburator van de resterende
brandstof ontdaan.
5. Laat de motor afkoelen (ca. 5 minuten).
6. Verwijder de bougie (zie punt 7.2.2).
7. Giet een koffielepel tweetaktmotorolie de
verbrandingskamer in. Trek enkele keren
voorzichtig de starterkoord eruit teneinde de
binnenste onderdelen met de olie te
bevochtigen. Draai de bougie er terug in.
8. Maak de behuizing van de motor aan de
buitenkant schoon.
9. Berg het gereedschap op een koude droge
plaats buiten het bereik van ontstekingsbronnen
en van brandbare stoffen.
10. Tijdens het transport of opbergen van de
heggenschaar dient de snij-inrichting steeds met
de daarvoor voorziene bescherming te worden
afgedekt.
Meststoffen en andere chemische tuinproducten
bevatten vaak stoffen die het corroderen van metaal
bespoedigen. Berg het gereedschap niet boven op of
in de buurt van meststoffen of andere chemicaliën.
Heringebruikneming
1. Verwijder de bougie.
2. Haal de starterkoord meermaals door om de
verbrandingskamer van resterende olie te
ontdoen.
3. Maak de contacten van de bougie schoon of
draai er een nieuwe bougie in.
4. Vul de tank. Zie hoofdstuk brandstof en olie.
5. Voer de stappen 1 tot 7 onder punt “koude motor
starten” uit.
7.4 Bestellen van wisselstukken
Gelieve bij het bestellen van wisselstukken volgende
gegevens te vermelden:
앬 Type van het toestel
앬 Artikelnummer van het toestel
앬 Ident-nummer van het toestel
앬 Wisselstuknummer van het benodigd stuk
Actuele prijzen en info vindt u terug onder
www.isc-gmbh.info
8. Afvalbeheer en recyclage
Het toestel bevindt zich in een verpakking om
transportschade te voorkomen. Deze verpakking is
een grondstof en bijgevolg herbruikbaar of kan de
grondstofkringloop terug worden ingebracht.
Het toestel en zijn accessoires bestaan uit diverse
materialen, zoals b.v. metaal en kunststof. Ontdoet u
zich van defecte onderdelen op de inzamelplaats
waar u gevaarlijke afvalstoffen mag afgeven.
Informeer u in uw speciaalzaak of bij uw
gemeentebestuur!
NL
53
Anleitung_GE_PH_2555_SPK7__ 11.02.14 10:23 Seite 53

NL
54
Storing Megelijke oorzaak Oplossing
De motor van het gereedschap
start niet.
Foutieve procedure bij het starten. Neem de aanwijzingen voor het
starten in acht.
Bougie vol roet of vochtig Bougie reinigen of door een
nieuwe vervangen.
Carburator fout afgesteld Naar de geautoriseerde
klantenservice gaan of het
gereedschap naar ISC-GmbH
sturen.
De motor van het toestel slaat aan
maar heeft niet het volle vermogen
Choke-hendel niet correct
afgesteld
Choke-hendel naar de stand “ ”
brengen.
Vervuilde luchtfilter Luchtfilter schoonmaken
Carburator fout afgesteld Naar de geautoriseerde
klantenservice gaan of het
gereedschap naar ISC-GmbH
sturen
Motor draait onregelmatig Foutieve elektrodeafstand van de
bougie
Bougie schoonmaken en
elektrodeafstand instellen of een
nieuwe bougie indraaien..
Carburator fout afgesteld Naar de geautoriseerde
klantenservice gaan of het
gereedschap naar ISC-GmbH
sturen
Engine smokes excessively Verkeerde brandstofmengeling Use the correct fuel mix (see fuel
mixing table)
Carburator fout afgesteld Naar de geautoriseerde
klantenservice gaan of het
gereedschap naar ISC-GmbH
sturen
9. Verhelpen van fouten
Anleitung_GE_PH_2555_SPK7__ 11.02.14 10:23 Seite 54

NL
55
Garantievoorwaarden:
De firma iSC GmbH garandeert het verhelpen van gebreken resp. de vervanging van het toestel overeenkomstig
het onderstaande overzicht waarbij de wettelijke garantieclaims onaangetast blijven.
Wat betreft slijtstukken, verbruiksmateriaal en ontbrekende onderdelen garandeert de firma iSC GmbH het
verhelpen van gebreken resp. een nalevering alleen indien het gebrek binnen de 24u (verbruiksmateriaal), 5
werkdagen (ontbrekende onderdelen) of 6 maanden (slijtstukken) na aankoop wordt aangegeven en de datum
van aankoop door het bewijs van aankoop wordt aangetoond.
Bij materiaal- of constructiegebreken verzoeken wij u ons het toestel in geval van garantie samen met de
bijgaande garantiekaart te bezorgen en deze kaart volledig in te vullen. Belangrijk is hierbij een nauwkeurige
beschrijving van de fout op te geven.
Gelieve daarvoor onderstaande vragen te beantwoorden:
n Heeft het toestel reeds eenmaal gewerkt of was het vanaf het begin defect?
n Is u iets opgevallen voordat het defect zich voordeed (symptoom voor het defect)?
n Welke foutieve werkwijze vertoont het toestel volgens u (hoofdsymptoom)?
Beschrijf deze foutieve werkwijze.
Categorie Voorbeeld Garantieprestatie
Gebreken aan materiaal of
constructie
24 maanden
Slijtstukken Bougie, luchtfilter 6 maanden
Verbruiksmateriaal/
verbruiksstukken
Snijmes Garantie enkel in geval van
onmiddellijk defect (24u na datum
van aankoop/bewijs van aankoop)
Ontbrekende onderdelen 5 Arbeitstage
Anleitung_GE_PH_2555_SPK7__ 11.02.14 10:23 Seite 55

¡Atención!
Al usar aparatos es preciso tener en cuenta una serie
de medidas de seguridad para evitar lesiones o
daños. Por este motivo, es preciso leer atentamente
este manual de instrucciones/advertencias de
seguridad. Guardar esta información
cuidadosamente para poder consultarla en cualquier
momento. En caso de entregar el aparato a terceras
personas, será preciso entregarles, asimismo, el
manual de instrucciones/advertencias de seguridad.
No nos hacemos responsables de accidentes o
daños provocados por no tener en cuenta este
manual y las instrucciones de seguridad.
1. Instrucciones de seguridad
Encontrará las instrucciones de seguridad
correspondientes en el prospecto adjunto.
¡AVISO!
Lea todas las instrucciones de seguridad e
indicaciones.
El incumplimiento de dichas instrucciones e
indicaciones puede provocar descargas, incendios
y/o daños graves.
Guarde todas las instrucciones de seguridad e
indicaciones para posibles consultas
posteriores.
Explicación de la placa de advertencia del
aparato (véase fig. 17)
1. ¡Aviso!
2. ¡Leer el manual de instrucciones antes de la
puesta en marcha!
3. ¡Cuchillas afiladas! Mantener las manos y los
pies alejados de las cuchillas.
4. Ponerse protección para los oídos y para la vista.
5. ¡Llevar guantes de protección!
6. ¡Llevar calzado resistente!
7. Superficie muy caliente. No tocar los
silenciadores, las cajas de engranajes o los
cilindros calientes. Podría sufrir quemaduras.
Estas piezas se calientan demasiado durante el
funcionamiento y permanecen calientes durante
mucho tiempo incluso una vez desconectado el
aparato.
8. Mantener una distancia de al menos 15 m con
respecto a las demás personas.
2. Estructura detallada y volumen de
entrega (fig. 1-2)
1. Hoja de corte
2. Cubierta de protección hoja de corte
3. Panel protector
4. Empuñadura delantera
5. Palanca del estárter
6. Interruptor ON/OFF
7. Destornillador
8. Palanca de detención para empuñadura giratoria
9. Bomba de combustible (inyector)
10. Cubierta del filtro de aire
11. Palanca de puesta en marcha
12. Empuñadura trasera
13. “Desbloqueo” acelerador
14. Acelerador
15. Cubierta del amortiguador de sonido
16. Depósito para mezcla de combustible
17. Enchufe de la bujía de encendido
18. Llave de bujía de encendido
19. Llave fija 8/10
20. Botella de mezcla aceite/gasolina
21. Cubierta de espada
3. Uso adecuado
¡Atención! Las tijeras recortasetos han sido
diseñadas para la poda de setos, arbustos y
matorrales.
Utilizar la máquina sólo en los casos que se indican
explícitamente como de uso adecuado. Cualquier
otro uso no será adecuado. En caso de uso
inadecuado, el fabricante no se hace responsable de
daños o lesiones de cualquier tipo; el responsable es
el usuario u operario de la máquina.
Tener en consideración que nuestro aparato no está
indicado para un uso comercial, industrial o en taller.
No asumiremos ningún tipo de garantía cuando se
utilice el aparato en zonas industriales, comerciales
o talleres, así como actividades similares.
E
56
Anleitung_GE_PH_2555_SPK7__ 11.02.14 10:23 Seite 56

4. Características técnicas
Tipo de motor: Motor de 2 tiempos refrigeración
por aire; cilindro de cromo
Potencia del motor (máx.): 0,85 kW/ 1,15 CV
Cilindrada: 24,5 cm
3
Velocidad en vacío motor: 3300 r.p.m.
Velocidad máx. motor: 8000 r.p.m.
Peso (depósito vacío): 5,4 kg
Longitud de corte: 55 cm
Potencia de corte (máx.): 19 mm
Bujía de encendido: Champion RCJ7Y
Velocidad de corte máx.: 1900 cortes/min
Ruido y vibración
Los valores con respecto al ruido y la vibración se
determinaron conforme a la norma ISO 3477, ISO
11201.
Nivel de presión acústica L
pA
98,9 dB(A)
Imprecisión K
pA
3 dB
Nivel de potencia acústica L
WA
104,5 dB(A)
Imprecisión K
WA
3 dB
Valor de emisión de vibraciones (empuñadura
delantera)
Valor de emisión de vibraciones a
h
= 6,41 m/s
2
Imprecisión K = 1,5 m/s
2
Valor de emisión de vibraciones (empuñadura
trasera)
Valor de emisión de vibraciones ah= 6,24 m/s
2
Imprecisión K = 1,5 m/s
2
Usar protección para los oídos.
La exposición al ruido puede ser perjudicial para el
oído.
¡Aviso!
El valor de emisión de vibraciones indicado se ha
calculado conforme a un método de ensayo
normalizado, pudiendo, en algunos casos
excepcionales, variar o superar el valor indicado
dependiendo de las circunstancias en las que se
utilice la herramienta eléctrica.
El valor de emisión de vibraciones indicado puede
utilizarse para comparar la herramienta con otras.
El valor de emisión de vibraciones indicado también
puede utilizarse para una valoración preliminar de los
riesgos.
¡Reducir la emisión de ruido y las vibraciones al
mínimo!
n Emplear sólo aparatos en perfecto estado.
n Realizar el mantenimiento del aparato y limpiarlo
con regularidad.
n Adaptar el modo de trabajo al aparato.
n No sobrecargar el aparato.
n En caso necesario dejar que se compruebe el
aparato.
n Apagar el aparato cuando no se esté utilizando.
n Llevar guantes.
Riesgos residuales
Incluso si esta herramienta se utiliza
adecuadamente, siempre existen
riesgos residuales. En función de la estructura y
del diseño de esta herramienta eléctrica pueden
producirse los siguientes riesgos:
1. Lesiones pulmonares en caso de que no se
utilice una mascarilla de protección antipolvo.
2. Lesiones auditivas en caso de que no se utilice
una protección para los oídos adecuada.
5. Antes de la puesta en marcha
5.1 Montaje
Las tijeras recortasetos ya vienen montadas, por lo
que no se precisan trabajos de montaje.
Para poder guiar mejor el aparato, viene equipado
con una empuñadura giratoria que, dependiendo de
las necesidades, se puede ajustar en las posiciones 90°/0°/+90°. Para ello, presionar la palanca (fig. 5/pos.
B) hacia abajo, girar la empuñadura giratoria a la
posición deseada y dejar que la palanca se vuelva a
encajar hacia arriba. Con las diferentes posiciones de
ajuste se pretende facilitar los trabajos por encima de
la cabeza o en otros puntos de difícil acceso.
Atención: Regular la empuñadura solo cuando el
motor esté apagado.
5.2 Combustible y aceite
Combustible recomendado
Utilizar exclusivamente una mezcla de gasolina
normal sin plomo y aceite de motor de 2 tiempos
especial. Mezclar el combustible según la tabla de
mezcla.
E
57
Anleitung_GE_PH_2555_SPK7__ 11.02.14 10:23 Seite 57

Atención: No usar nunca una mezcla de
combustible que se hubiese hecho hace más de 90
días.
Atención: No usar aceite de 2 tiempos con una
mezcla de componentes recomendada de 100:1. En
el caso de que se produzcan daños en el motor
debido a insuficiente lubricación, se perdería el
derecho a la garantía del fabricante.
Atención: Para el transporte y almacenamiento del
combustible utilizar sólo un recipiente homologado
para ello.
Introducir la cantidad correcta de gasolina y aceite
de 2 tiempos en la botella de mezcla adjunta (véase
la escala marcada). A continuación, agitar bien el
recipiente.
5.3 Tabla de mezcla de combustible:
Mezcla: 40 partes de gasolina por 1 de aceite
6. Servicio
Respetar las disposiciones legales vigentes sobre la
emisión de ruidos en el lugar de uso pueden variar
según el lugar.
Para reducir el riesgo de lesiones provocadas por
gases nocivos poner en funcionamiento y arrancar el
aparato únicamente al aire libre, en zonas bien
ventiladas.
6.1 Arrancar el motor en frío (fig. 3-5)
Llenar el depósito con una cantidad adecuada de
mezcla de gasolina/aceite.
1. Poner el aparato sobre una superficie dura y
plana.
2. Colocar la palanca del estárter (fig. 4/pos. 5) en
la posición „ “.
3. Presionar 10 veces la bomba de combustible
(inyector) (fig. 4/pos. 9).
4. Llevar el interruptor ON/OFF (fig. 3/pos. 6) a la
posición “I”
5. Sujetar bien el aparato con la mano izquierda en
la empuñadura delantera y con la derecha tirar
del cable de arranque (fig. 5/pos. A) hasta el
primer tope (aprox. 10 cm). A continuación, tirar
rápidamente del cable 4 veces. El aparato
debería arrancar.
Atención: No permitir que el cable rebote. Esto
podría provocar daños.
6. Cuando el motor arranque, dejar que se caliente
durante aprox. 10 s.
Atención: Con la palanca del estárter bloqueada,
las cuchillas empiezan a trabajar cuando se pone
en marcha el motor.
A continuación, desbloquear la palanca del
estárter simplemente activando el acelerador
(pos. 14) (el motor vuelve a la marcha en vacío).
Tener en cuenta lo siguiente: Antes de poder
activar el acelerador es preciso empujar hacia el
tope la palanca “Desbloqueo” del acelerador.
7. Si el motor no se pone en marcha, repetir los
pasos 5 a 6.
Tener en cuenta: Leer el apartado “Reparación de
fallos en el motor”, si no se enciende el motor tras
varios intentos.
Tener en cuenta: Es preciso tirar del cable de
arranque en línea recta hacia afuera. Si se tira del
cable con inclinación, se produce fricción en el ojete.
Esta fricción desgasta más rápidamente el cable por
efecto de roce.
6.2 Arrancar el motor en caliente (el aparato no
ha estado parado más de 15-20 min.)
1. Poner el aparato sobre una superficie dura y
plana.
2. Poner el interruptor ON/OFF en “I”.
3. Sujetar bien el aparato con la mano izquierda en
la empuñadura delantera y con la derecha tirar
del cable de arranque hasta el primer tope (aprox.
10 cm). A continuación, tirar rápidamente del
cable. El aparato se deberá poner en marcha tras
1-2 tirones. Si la máquina no se pone en marcha
tras 6 tirones, repetir los pasos del 1 al 7 con el
motor en frío.
6.3 Desconectar el motor
Procedimiento a seguir en caso de paro de
emergencia:
Si se necesita parar la máquina de inmediato, poner
el interruptor ON/OFF en “Stop” o “0”.
Procedimiento normal a seguir:
Soltar el acelerador y esperar hasta que el motor se
ponga en velocidad en vacío. A continuación, poner
el interruptor ON/OFF en “Stop” o “0”.
6.4 Instrucciones relativas al trabajo
No dejar que la máquina funcione durante el
arranque o el proceso de corte a una velocidad baja.
E
58
Gasolina Aceite de 2 tiempos
1 litros 25 ml
5 litros 125 ml
Anleitung_GE_PH_2555_SPK7__ 11.02.14 10:23 Seite 58

Cortar césped espeso: Lo más efectivo es un
movimiento amplio y regular, para ello dirigir la
cuchilla para cortar directamente a través de las
ramas. El mejor resultado se obtiene inclinando el
corte hacia abajo, en dirección al movimiento.
Para alcanzar una altura uniforme del seto, se
recomienda tensar un hilo que sirva de referencia a
lo largo del borde del seto. Se cortarán las ramas
que sobresalgan. (Fig. 6)
Corte lateral de un seto: Los laterales de un seto
se recortarán con movimientos en forma de arco
desde abajo hacia arriba. (fig. 7)
Atención: Dependiendo del modelo, cuando se
trabaja por largo tiempo lateralmente y el depósito
no está completamente lleno, podría pasar que se
pare el motor.
7. Limpieza, mantenimiento,
almacenamiento y pedido de piezas
de repuesto
7.1 Limpieza
n Reducir al máximo posible la suciedad y el polvo
en los dispositivos de seguridad, las rendijas de
ventilación y la carcasa del motor. Frotar el
aparato con un paño limpio o soplarlo con aire
comprimido manteniendo la presión baja.
n Se recomienda limpiar el aparato tras cada uso.
n Limpiar el aparato con regularidad con un paño
húmedo y un poco de jabón blando. No utilizar
productos de limpieza o disolventes ya que se
podrían deteriorar las piezas de plástico del
aparato. Es preciso tener en cuenta que no entre
agua en el interior del aparato.
7.2. Mantenimiento
Antes de realizar los trabajos de mantenimiento
apagar siempre las tijeras recortasetos y retirar el
enchufe de la bujía de encendido.
1. Las cuchillas son de alta calidad, de acero
endurecido y en uso normal no se precisa
afilarlas. Cualquier descuido, por ej. cortar un
alambre, chocar contra una piedra, vidrio u otro
objeto duro, podrá dañar el filo de la cuchilla. No
es necesario eliminar esta entalladura, siempre y
cuando no influya negativamente en el
movimiento de la cuchilla. De lo contrario,
apagar la máquina y afilar la cuchilla con una
lima o piedra de afilar finas. Asegurarse que la
cuchilla esté siempre bien lubricada (véase pág.
8).
2. Si por accidente se caen las tijeras recortasetos
controlar que no hayan sufrido daños. De ser
así, contactar el servicio técnico postventa o
enviar el aparato a ISC-GmbH para que lo
reparen.
3. Limpiar la máquina sólo cuando esté
desconectada. Utilizar exclusivamente jabón
suave y un trapo húmedo. No permitir nunca que
un líquido penetre en la máquina. No utilizar
limpiadores abrasivos.
7.2.1 Mantenimiento del filtro del aire (fig. 9-11)
Los filtros de aire sucios aminoran la potencia del
motor puesto que la alimentación de aire al
carburador es insuficiente.
Por lo tanto, es de rigor realizar controles periódicos.
Controlar el filtro de aire cada 25 horas de servicio y,
en caso necesario, limpiarlo. Cuando el contenido de
polvo en el aire sea elevado, comprobar el filtro de
aire con mayor asiduidad.
1. Retirar la tapa del filtro de aire (fig. 9-10)
2. Retirar el elemento del filtro (fig. 11)
3. Limpiar el filtro sacudiéndolo o soplando.
4. Para volver a montarlas se deberá seguir el
mismo orden a la inversa.
Atención: No limpiar nunca el filtro de aire con
gasolina o disolventes inflamables. Limpiar el filtro
de aire sólo con aire comprimido o sacudiéndolo.
7.2.2 Mantenimiento de la bujía de encendido (fig.
12-14)
Recorrido de las chispas de la bujía de encendido =
0,025 pulgadas (0,635 mm) Apretar la bujía de
encendido con 14,7 - 21,5 Nm.
Tras las primeras 10 horas de servicio, controlar que
la bujía de encendido no esté sucia y, en caso
necesario, limpiarla con un cepillo de hilos de cobre.
A partir de ahí, comprobar la bujía cada 50 horas de
servicio.
1. Desmontar el enchufe de la bujía de encendido
(fig. 13) dándole un giro.
2. Retirar la bujía de encendido (fig. 14) con ayuda
de la llave suministrada.
3. Para volver a montarlas se deberá seguir el
mismo orden a la inversa.
7.2.3 Mantenimiento del engranaje (fig. 15)
Lubricar el engranaje en el niple de lubricación cada
año antes de empezar la temporada (fig. 15/pos. A).
Para ello, introducir una pistola neumática de
engrasar común en el niple y pulsar unas 3 veces de
tal forma que la grasa común para máquinas entre
E
59
Anleitung_GE_PH_2555_SPK7__ 11.02.14 10:23 Seite 59

en el engranaje. En caso de uso excesivo engrasar
el engranaje con más frecuencia.
7.2.4 Ajustes del carburador
¡Atención! Sólo el servicio técnico postventa puede
realizar los ajustes en el carburador.
Ajuste del ralentí:
¡Atención! Ajustar el ralentí en caliente.
Si el aparato se apaga con el acelerador accionado y
se han excluido todas las posibles causas según el
apartado 9, solución de fallos, es posible que sea
necesario ajustar el cable del acelerador. Para ello
girar el tornillo de ralentí (fig. 16/pos. 5) en el sentido
de las agujas del reloj, hasta que el aparato funcione
seguro en marcha en vacío.
Si el ralentí es tan fuerte que las cuchillas no se
paran, reducirlo girando el tornillo hacia la derecha
(fig. 16/pos. 5) hasta que se paren.
7.3 Almacenamiento
Atención: Cualquier error al seguir estos pasos
podría conllevar la formación de incrustaciones en la
pared interna del carburador, lo que tiene como
consecuencia que cueste poner en marcha la
máquina y se dañe de forma duradera.
1. Realizar todos los trabajos de mantenimiento.
2. Vaciar el depósito de combustible (para ello,
utilizar una bomba de plástico común para
gasolina de una tienda especializada).
3. Una vez se haya sacado el combustible, poner
en funcionamiento la máquina.
4. Dejar que funcione en marcha en vacío hasta
que se pare. De esta forma se limpia el
carburador de los restos de combustible.
5. Esperar a que se enfríe la máquina (unos 5
minutos).
6. Retirar la bujía de encendido (véase punto
7.2.2).
7. Introducir una cucharilla de aceite de motor de 2
tiempos en la cámara de combustión. Tirar
algunas veces y con cuidado del cordón de
arranque para impregnar el interior con aceite.
Volver a colocar la bujía de encendido.
8. Limpiar la carcasa exterior de la máquina.
9. Guardar la máquina en un sitio fresco, seco y
alejado de fuentes de ignición y sustancias
inflamables.
10. Siempre que se transporten y guarden las tijeras
recortasetos se habrá de cubrir el dispositivo de
corte con la protección correspondiente.
Los abonos y otros productos químicos de jardinería
suelen contener sustancias que aceleran la
corrosión de los metales. No guardar la máquina en
las inmediaciones de abonos u otros productos
químicos.
Nueva puesta en marcha
1. Retirar la bujía de encendido.
2. Tirar varias veces del cable de arranque para
limpiar la cámara de combustión de restos de
aceite.
3. Limpiar los contactos de la bujía de encendido o
colocar una bujía nueva.
4. Rellenar el depósito. Véase sección combustible
y aceite.
5. Seguir los pasos 1 a 7 en el apartado “Arrancar
el motor en frío”.
7.4 Pedido de piezas de recambio
Al solicitar recambios se indicarán los datos
siguientes:
앬 Tipo de aparato
앬 No. de artículo del aparato
앬 No. de identidad del aparato
앬 No. del recambio de la pieza necesitada.
Encontrará los precios y la información actual en
www.isc-gmbh.info
8. Eliminación y reciclaje
El aparato está protegido por un embalaje para
evitar daños producidos por el transporte. Este
embalaje es materia prima y, por eso, se puede
volver a utilizar o llevar a un punto de reciclaje.
El aparato y sus accesorios están compuestos de
diversos materiales, como, p. ej., metal y plástico.
Depositar las piezas defectuosas en un contenedor
destinado a residuos industriales. Informarse en el
organismo responsable al respecto en su municipio
o en establecimientos especializados.
E
60
Anleitung_GE_PH_2555_SPK7__ 11.02.14 10:23 Seite 60

E
61
Avería Posibles causas Reparación de averías
El aparato no arranca Se ha procedido de forma
incorrecta al realizar la puesta en
marcha
Seguir las indicaciones para
arrancar
Bujía de encendido con hollín o
húmeda
Limpiar la bujía de encendido o
sustituirla por otra nueva
Ajuste incorrecto del carburador Buscar un servicio técnico
postventa o enviar el aparato a
ISC-GmbH
El aparato arranca pero no llega a
su potencia máxima
Ajuste incorrecto de la palanca del
estárter
Poner la palanca del estárter en
Filtro de aire sucio Limpiar el filtro de aire
Ajuste incorrecto del carburador Buscar un servicio técnico
postventa o enviar el aparato a
ISC-GmbH
El motor funciona de forma
irregular
Distancia de electrodos incorrecta
en la bujía de encendido
Limpiar la bujía y ajustar la
distancia de los electrodos o poner
una nueva bujía
Ajuste incorrecto del carburador Buscar un servicio técnico
postventa o enviar el aparato a
ISC-GmbH
El motor desprende demasiado
humo
Mezcla de combustible falsa Utilizar la mezcla de combustible
correcta (véase tabla de mezcla)
Ajuste incorrecto del carburador Buscar un servicio técnico
postventa o enviar el aparato a
ISC-GmbH
9. Reparación de fallos
Anleitung_GE_PH_2555_SPK7__ 11.02.14 10:23 Seite 61

E
62
Condiciones de garantía:
La empresa iSC GmbH garantiza la reparación de los fallos o el cambio del aparato de acuerdo con la siguiente
tabla, sin que por ello se vean afectados los derechos legales a prestación de garantía.
En lo que se refiere a piezas de desgaste, material de consumo y falta de piezas, la empresa iSC GmbH
garantiza una reparación del fallo o una sustitución del producto, únicamente si el defecto se indica en un plazo
de 24h (material de consumo), 5 días laborales (piezas que faltan) o 6 meses (piezas de desgaste) tras la
compra y se justifica la fecha de compra mediante el recibo de compra.
En caso de daños de material o diseño dentro del período de garantía, envíenos el aparato con la tarjeta que lo
acompaña completamente cumplimentada. Es importante indicar una descripción exacta del fallo.
Para ello, es preciso responder a las siguientes preguntas:
n Ha funcionado el aparato en algún momento o estaba defectuoso desde el principio?
n Le ha llamado algo la atención antes de surgir el fallo (indicio antes del fallo)?
n Qué fallo de funcionamiento le parece que presenta el aparato (indicio principal)?
Describa ese fallo en el funcionamiento.
Categoría Ejemplo Prestación de garantía
Fallos de material o de diseño 24 meses
Piezas de desgaste Bujía de encendido, filtro de aire 6 meses
Material de consumo/
Piezas de consumo
Cuchilla de corte Garantía sólo en caso de
notificación inmediata del defecto
(24h después de la compra / fecha
del recibo de compra)
Falta de piezas 5 días laborales
Anleitung_GE_PH_2555_SPK7__ 11.02.14 10:23 Seite 62

Atenção!
Ao utilizar ferramentas, devem ser respeitadas
algumas medidas de segurança para prevenir
ferimentos e danos. Por conseguinte, leia
atentamente este manual de instruções e as
instruções de segurança. Guarde-os num local
seguro, para que os possa consultar a qualquer
momento. Caso passe o aparelho a outras pessoas,
entregue também este manual de instruções e as
instruções de segurança. Não nos responsabilizamos
pelos acidentes ou danos causados pela não
observância deste manual e das instruções de
segurança.
1. Instruções de segurança
Pode encontrar as respectivas instruçoes de
segurança no pequeno caderno fornecido junto.
AVISO!
Leia todas as instruções de segurança e
indicações.
O incumprimento das instruções de segurança e
indicações pode provocar choques eléctricos,
incêndios e/ou ferimentos graves.
Guarde todas as instruções de segurança e
indicações para mais tarde consultar.
Explicação da placa de indicação no aparelho
(ver figura 17)
1. Aviso!
2. Antes da colocação em funcionamento, leia o
manual de instruções!
3. Lâminas afiadas! Mantenha sempre as mãos e
os pés afastados da lâmina.
4. Use óculos de protecção e protecção auditiva!
5. Use luvas de protecção!
6. Use calçado firme!
7. Superfície muito quente. Não toque na panela de
escape, na carcaça da engrenagem e cilindro
quando estiverem quentes. Poderá sofrer
queimaduras. Estas peças aquecem muito
durante o funcionamento e permanecem durante
bastante tempo quentes, mesmo após o aparelho
ter sido desligado.
8. Manter uma distância mínima de 15 m
relativamente a terceiros.
2. Vista geral da estrutura e material a
fornecer (fig. 1 e 2)
1. Lâmina de corte
2. Cobertura de protecção da lâmina de corte
3. Máscara de mão
4. Punho anterior
5. Alavanca Choke
6. Interruptor para ligar/desligar
7. Chave de parafusos
8. Alavanca de retenção para punho giratório
9. Bomba de combustível (botão injector de
gasolina)
10. Cobertura do filtro de ar
11. Pega de arranque
12. Punho posterior
13. “Destravamento” da alavanca aceleradora
14. Alavanca aceleradora
15. Cobertura para o silenciador
16. Depósito para mistura de combustível
17. Cachimbo da vela de ignição
18. Chave para velas de ignição
19. Chave de bocas tamanhos 8/10
20. Garrafa de mistura óleo/gasolina
21. Cobertura da lâmina
3. Utilização adequada
Atenção! Este corta-sebes destina-se ao corte de
sebes, moitas e arbustos.
A máquina só pode ser utilizada para os fins a que se
destina. Qualquer outro tipo de utilização é
considerado inadequado. Os danos ou ferimentos de
qualquer tipo daí resultantes são da responsabilidade
do utilizador/operador e não do fabricante.
Chamamos a atenção para o facto de os nossos
aparelhos não terem sido concebidos para uso
comercial, artesanal ou industrial. Não assumimos
qualquer responsabilidade se o aparelho for utilizado
no comércio, artesanato ou indústria ou em
actividades equiparáveis.
P
63
Anleitung_GE_PH_2555_SPK7__ 11.02.14 10:23 Seite 63

4. Dados técnicos
Tipo de motor:
motor a 2 tempos; arrefecido a ar; cilindro cromado
Potência do motor (máx.): 0,85 kW/ 1,15 CV
Cilindrada: 24,5 cm
3
Rotações em vazio do motor: 3300 r.p.m.
Rotação máx. do motor: 8000 r.p.m.
Peso (depósito vazio): 5,4 kg
Comprimento de corte: 55 cm
Rendimento de corte (máx.): 19 mm
Vela de ignição: Champion RCJ7Y
Velocidade de corte máx.: 1900 cortes/min.
Ruído e vibração
Os valores de ruído e de vibração foram apurados
de acordo com a ISO 3477, ISO 11201.
Nível de pressão acústica L
pA
98,9 dB(A)
Incerteza K
pA
3 dB
Nível de potência acústica L
WA
104,5 dB(A)
Incerteza K
WA
3 dB
Valor de emissão de vibração (punho anterior)
Valor de emissão de vibração a
h
= 6,41 m/s
2
Incerteza K = 1,5 m/s
2
Valor de emissão de vibração (punho posterior)
Valor de emissão de vibração a
h
= 6,24 m/s
2
Incerteza K = 1,5 m/s
2
Use uma protecção auditiva.
O ruído pode provocar danos auditivos.
Aviso!
O valor de emissão de vibração indicado foi medido
segundo um método de ensaio normalizado,
podendo, consoante o tipo de utilização da
ferramenta eléctrica, sofrer alterações e em casos
excepcionais ultrapassar o valor indicado.
O valor de emissão de vibração indicado pode ser
comparado com o de uma outra ferramenta eléctrica.
O valor de emissão de vibração indicado também
pode ser utilizado para um cálculo prévio de
limitações.
Reduza a produção de ruído e de vibração para
o mínimo!
n Utilize apenas aparelhos em bom estado.
n Limpe e faça a manutenção do aparelho
regularmente.
n Adapte o seu modo de trabalho ao aparelho.
n Não sobrecarregue o aparelho.
n Se necessário, submeta o aparelho a uma
verificação.
n Desligue o aparelho, quando este não estiver a
ser utilizado.
n Use luvas.
Riscos residuais
Mesmo quando esta ferramenta eléctrica é
utilizada adequadamente, existem sempre
riscos residuais. Dependendo do formato e do
modelo desta ferramenta eléctrica podem
ocorrer os seguintes perigos:
1. Lesões pulmonares, caso não seja utilizada uma
máscara de protecção para pó adequada.
2. Lesões auditivas, caso não seja utilizada uma
protecção auditiva adequada.
5. Antes da colocação em
funcionamento
5.1 Montagem
O corta-sebes está completamente montado. Não é
necessário efectuar quaisquer trabalhos de
montagem.
Para uma melhor condução, o aparelho está
equipado com um punho giratório que é possível
ajustar, conforme a necessidade, para as posições 90°/0°/+90°. Para tal, prima a alavanca (fig. 5/pos. B)
para baixo, rode o punho giratório para a posição
desejada e deixe que a alavanca volte a engatar para
cima. Os trabalhos a executar acima do nível da
cabeça ou em outros locais de difícil acesso são
facilitados devido às diversas posições de ajuste.
Atenção: o ajuste do punho giratório só pode ser
efectuado quando o motor estiver desligado.
5.2 Combustível e óleo
Combustíveis recomendados
Use apenas uma mistura composta por gasolina
normal sem chumbo e óleo especial para motores a
2 tempos. Doseie a mistura de combustível de
acordo com a respectiva tabela de combustível.
Atenção: não utilize uma mistura de combustível
que esteja guardada há mais de 90 dias.
P
64
Anleitung_GE_PH_2555_SPK7__ 11.02.14 10:23 Seite 64

Atenção: não utilize nenhum óleo para motores a 2
tempos com uma relação de mistura recomendada
de 100:1. Se uma lubrificação insuficiente causar
danos no motor, a garantia do fabricante perde a
validade.
Atenção: para o transporte e armazenagem de
combustível use unicamente reservatórios previstos
e adequados.
Ponha a quantidade correcta de gasolina e óleo para
motores a 2 tempos respectivamente na garrafa de
mistura fornecida (ver a escala impressa). De
seguida, agite bem o reservatório.
5.3 Tabela de mistura de combustível:
Procedimento de mistura: 40 partes de gasolina para
1 parte de óleo
6. Funcionamento
Respeite as disposições legais que regulam a
protecção contra o ruído, pois estas podem divergir
de local para local.
Utilize e inicie o aparelho somente ao ar livre em
ambientes bem arejados para reduzir o perigo de
ferimentos devido a gases tóxicos.
6.1 Ligar o motor frio (fig. 3 a 5)
Ateste o depósito com uma quantidade adequada de
mistura de gasolina/óleo.
1. Coloque o aparelho sobre uma superfície dura e
plana.
2. Coloque a alavanca Choke (fig. 4/pos. 5) na
posição “ ”.
3. Pressione a bomba de combustível (botão
injector de gasolina) (fig. 4/pos. 9) 10 vezes.
4. Coloque o interruptor para ligar/desligar (fig.
3/pos. 6) na posição "I".
5. Com a mão esquerda, segure bem o aparelho no
punho dianteiro e com a mão direita puxe o
cordão de arranque (fig. 5/pos. A) para fora até à
primeira resistência (aprox. 10cm). Puxe agora
rapidamente o cordão de arranque 4 vezes. O
aparelho liga-se.
Atenção: não deixe que o cordão de arranque
seja projectado para trás. Tal pode causar danos.
6. Com o motor ligado, deixe o aparelho aquecer
durante aprox. 10 s.
Atenção: se a alavanca do choke estiver bem
fixada e o motor estiver ligado, o dispositivo de
corte começa a funcionar.
Em seguida, basta accionar o acelerador para
desbloquear a alavanca do choke (pos. 14) (O
motor regressa ao ralenti). Atenção: Antes de
poder accionar o acelerador, tem de deixar que a
alavanca “Destravamento” do acelerador possa
ser pressionada até ao encosto.
7. Se o motor não arrancar, repita os passos 5 a 6.
Indicação: se o motor não pegar após várias
tentativas, leia a secção "Eliminação de falhas no
motor".
Indicação: puxe sempre o cabo de arranque em
linha recta. Se for puxado em ângulo, haverá fricção
no olhal. Através desta fricção, o cabo é esfolado,
desgastando-se rapidamente.
6.2 Ligar o motor quente (o aparelho esteve
parado não mais que 15 a 20 min)
1. Coloque o aparelho sobre uma superfície dura e
plana.
2. Coloque o interruptor para ligar/desligar na
posição "I".
3. Com a mão esquerda segure bem o aparelho no
punho dianteiro e com a mão direita puxe o
cordão de arranque para fora até à primeira
resistência (aprox. 10cm). Puxe agora
rapidamente o cordão de arranque. O aparelho
liga-se depois de 1 a 2 puxões. Se depois de 6
puxões a máquina continuar a não arrancar repita
os passos 1 a 7 sob "Ligar o motor frio".
6.3 Desligar o motor
Etapas da parada de emergência:
se necessário, pare imediatamente a máquina. Para
tal, coloque o interruptor para ligar/desligar na
posição “Stop” ou “0”.
Etapas normais:
largue a alavanca aceleradora e aguarde até o motor
passar para a velocidade de marcha em vazio.
Então, coloque o interruptor para ligar/desligar na
posição “Stop” ou “0”.
6.4 Indicações de trabalho
Não deixe a máquina funcionar a baixas rotações
durante o arranque ou durante o corte.
Corte para vegetação densa: o mais eficaz é um
movimento que atravessa a vegetação no sentido da
largura. Para tal, conduza a lâmina de corte
P
65
Gasolina Óleo para motores a 2
tempos
1 litro 25 ml
5 litros 125 ml
Anleitung_GE_PH_2555_SPK7__ 11.02.14 10:23 Seite 65

directamente pelos ramos. Uma ligeira inclinação da
lâmina de corte para baixo na direcção do
movimento resulta no corte ideal.
Para a sebe ficar toda da mesma altura,
aconselhamos que estique um fio, que fará as vezes
de um fio-de-prumo, ao longo do rebordo da sebe.
Corte os ramos que ficarem para além da linha (fig.
6)
Corte lateral de uma sebe: as superfícies laterais
de uma sebe cortam-se com movimentos arqueados
de baixo para cima. (fig. 7).
Atenção: em função da estrutura da máquina e ela
for utilizada em posição deitada durante muito
tempo, o motor pode desligar-se se o depósito não
estiver atestado.
7. Limpeza, manutenção, armazenagem
e encomenda de peças
sobressalentes
7.1 Limpeza
n Mantenha os dispositivos de segurança, ranhuras
de ventilação e a carcaça do motor o mais limpo
possível. Esfregue o aparelho com um pano
limpo ou sopre com ar comprimido a baixa pres
são.
n Aconselhamos a limpar o aparelho directamente
após cada utilização.
n Limpe regularmente o aparelho com um pano
húmido e um pouco de sabão. Não utilize
detergentes ou solventes; estes podem corroer
as peças de plástico do aparelho. Certifique-se
de que não entra água para o interior do aparel
ho.
7.2 Manutenção
Desligue sempre o corta-sebes e o cachimbo da vela
de ignição antes de efectuar trabalhos de
manutenção.
1. As lâminas de corte são de elevada qualidade e
fabricadas em aço endurecido. Num
manuseamento normal não é necessário afiar a
lâmina. O fio de corte da lâmina pode ficar com
um entalhe se, por descuido, embater num
arame, numa pedra, em vidro ou num outro
objecto duro. Não é necessário remover o
entalhe desde que o movimento da lâmina não
seja afectado. Se o movimento da lâmina for
afectado desligue a máquina, pegue numa lima
ou num amolador fino para remover o entalhe.
Assegure-se de que a lâmina de corte está
sempre bem lubrificada (ver fig. 8).
2. Se deixar o corta-sebes cair verifique se
ocorreram danos. Em caso de danos contacte
um serviço de assistência técnica autorizado ou
envie o aparelho para a ISC-GmbH para ser
reparado.
3. Limpe a máquina só quando estiver desligada.
Para a limpar utilize apenas sabão suave e
panos húmidos. Nunca deixe entrar líquido para
o interior da máquina. Não utilize produtos de
limpeza abrasivos.
7.2.1 Manutenção do filtro de ar (fig. 9 a 11)
O filtro de ar sujo diminui a potência do motor devido
a uma entrada de ar muito reduzida para o
carburador.
É, assim, indispensável um controlo regular.
Verifique o filtro do ar a cada 25 horas de serviço e,
se necessário, limpe. Se o ar tiver muito pó, o filtro
de ar deve ser verificado mais frequentemente.
1. Retire a tampa do filtro de ar (fig. 9 a 10).
2. Retire o elemento filtrante (fig. 11)
3. Limpe o elemento filtrante sacudindo-o ou
soprando-o.
4. A montagem é realizada na sequência inversa.
Atenção: nunca limpe o filtro de ar com gasolina ou
solventes inflamáveis. Limpe o filtro de ar com ar
comprimido ou sacudindo.
7.2.2 Manutenção da vela de ignição (fig. 12 a 14)
Distância entre os eléctrodos da vela de ignição =
0,025 pol. (0,635 mm)
Aperte a vela de ignição com um binário de 14,7 a
21,5 Nm.
Verifique a vela de ignição quanto a sujidade, pela
primeira vez, após 10 horas de serviço e, se
necessário, limpe-a com uma escova de arame de
cobre. A seguir, faça a manutenção à vela de ignição
a cada 50 horas de serviço.
1. Puxe a alavanca do travão do motor (fig. 13)
com um movimento rotativo.
2. Retire a vela de ignição (fig. 14) com a chave
para velas de ignição fornecida.
3. A montagem é realizada na sequência inversa.
7.2.3 Manutenção da engrenagem (fig. 15)
Uma vez por ano, antes do início de cada época, a
engrenagem tem de ser lubrificada no niple de
lubrificação (fig. 15/pos. A). Para isso, insira uma
bomba de lubrificação corrente no niple de
lubrificação e aplique cerca de 3 bombadas de
massa consistente corrente para máquinas para
dentro da engrenagem. A engrenagem deve ser
P
66
Anleitung_GE_PH_2555_SPK7__ 11.02.14 10:23 Seite 66

lubrificada com maior frequência em caso de
utilização excessiva.
7.2.4 Ajustes do carburador
Atenção! Só o serviço de assistência técnica
autorizado pode efectuar ajustes no carburador.
Ajuste do ralenti:
Atenção! Ajustar o ralenti com a máquina quente.
Se o aparelho se desligar sem a alavanca
aceleradora estar activada e tiverem sido excluídas
todas as outras causas, de acordo com a secção 9
“Eliminação de falhas”, é necessário ajustar o ralenti.
Para o efeito, rode o parafuso do ralenti (fig. 16/pos.
5) no sentido dos ponteiros do relógio até o aparelho
funcionar de forma estável em ralenti.
Se o ralenti estiver tão elevado que as lâminas de
corte não param, tem de se rodar o parafuso do
ralenti para a esquerda (fig. 16/pos. 5) de modo a
diminuir o ralenti até que a lâmina de corte pare.
7.3 Armazenagem
Atenção: uma falha durante a execução destes
passos pode ter como consequência a formação de
detritos na parede interior do carburador que, por
sua vez, podem provocar um arranque mais pesado
ou danos irremediáveis na máquina.
1. Execute todos os trabalhos de manutenção.
2. Deixe o combustível escorrer do depósito (para
o efeito, utilize uma bomba de gasolina de
plástico normal que pode ser adquirida na
drogaria).
3. Depois de o depósito estar vazio ligue a
máquina.
4. Deixe a máquina continuar a funcionar na
marcha em vazio até parar. Isto faz com que o
carburador fique limpo do restante combustível.
5. Deixe a máquina arrefecer (aprox. 5 minutos).
6. Retire a vela de ignição (ver ponto 7.2.2).
7. Deite uma colher de chá de óleo para motores a
2 tempos na câmara de combustão. Puxe
algumas vezes o cabo do motor de arranque
cuidadosamente para fora, para cobrir os
componentes interiores com o óleo. Volte a
colocar a vela de ignição.
8. Limpe a carcaça exterior da máquina.
9. Guarde a máquina num local fresco e seco fora
do alcance de fontes de ignição e substâncias
inflamáveis.
10. Durante o transporte ou armazenagem do corta-
sebes, cubra sempre o dispositivo de corte com a
respectiva protecção.
Os fertilizantes ou outros produtos químicos
utilizados na jardinagem contêm frequentemente
substâncias que aceleram a corrosão. Não guarde a
máquina sobre ou na proximidade de fertilizantes ou
outros químicos.
Recolocação em funcionamento
1. Retire a vela de ignição.
2. Puxe o cordão de arranque várias vezes para
fora para limpar os resquícios de óleo existentes
na câmara de combustão.
3. Limpe os contactos da vela de ignição ou insira
uma nova.
4. Encha o depósito. Ver secção combustível e
óleo.
5. Execute os passos 1 a 7 descritos no ponto
“Ligar o motor frio”.
7.4 Encomenda de peças sobressalentes
Ao encomendar peças sobressalentes, devem-se
fazer as seguintes indicações:
앬 Tipo da máquina
앬 Número de artigo da máquina
앬 Número de identificação da máquina
앬 Número da peça sobressalente necessária
Pode encontrar os preços e informações actuais em
www.isc-gmbh.info
8. Eliminação e reciclagem
O aparelho encontra-se dentro de uma embalagem
para evitar danos de transporte. Esta embalagem é
matéria-prima, podendo ser reutilizada ou reciclada.
O aparelho e os respectivos acessórios são de
diferentes materiais, como por ex. o metal e o
plástico. Os componentes que não estiverem em
condições devem ter tratamento de lixo especial.
Informe-se junto das lojas da especialidade ou da
sua Câmara Municipal
P
67
Anleitung_GE_PH_2555_SPK7__ 11.02.14 10:23 Seite 67

P
68
Anomalia Possível causa Eliminação de anomalias
O aparelho não pega. Procedimento errado ao ligar. Siga as instruções para ligar
Vela de ignição coberta de fuligem
ou húmida
Limpe a vela de ignição ou
substitua-a.
Ajuste incorrecto do carburador Consulte o serviço de assistência
técnica autorizado ou envie o
aparelho para a ISC-GmbH.
O aparelho pega mas não tem a
potência total.
Ajuste errado da alavanca de
Choke
Coloque a alavanca de Choke na
posição “ ”.
Filtro de ar sujo Limpe o filtro do ar
Ajuste incorrecto do carburador Consulte o serviço de assistência
técnica autorizado ou envie o
aparelho para a ISC-GmbH.
O motor funciona de forma
irregular
Distância incorrecta entre os
eléctrodos da vela de ignição
Limpe a vela de ignição e ajuste a
distância dos eléctrodos ou
coloque uma vela de ignição nova.
Ajuste incorrecto do carburador Consulte o serviço de assistência
técnica autorizado ou envie o
aparelho para a ISC-GmbH.
O motor deita demasiado fumo Mistura de combustível incorrecta Utilize a mistura de combustível
correcta (ver tabela de mistura de
combustível)
Ajuste incorrecto do carburador Consulte o serviço de assistência
técnica autorizado ou envie o
aparelho para a ISC-GmbH.
9. Eliminação de falhas
Anleitung_GE_PH_2555_SPK7__ 11.02.14 10:23 Seite 68

P
69
Termos de garantia:
A empresa iSC GmbH assegura a reparação de defeitos ou a substituição de aparelhos de acordo com o
quadro abaixo, sendo que os direitos legais de garantia permanecem válidos.
Relativamente às peças de desgaste, aos consumíveis e peças em falta, a empresa iSC GmbH só assegura a
reparação de defeitos ou a substituição se o defeito for apresentado num prazo de 24h (consumíveis), 5 dia
úteis (peças em falta) ou 6 meses (peças de desgaste) após a compra e a data de compra for comprovada por
um talão.
Em caso de defeitos no material ou na estrutura dentro do período de garantia, pedimos-lhe que entregue o
aparelho juntamente com a ficha em anexo, totalmente preenchida. É importante fornecer uma descrição
precisa do erro.
Para isso, responda às seguintes questões:
n O aparelho já funcionou alguma vez ou possui o defeito desde o início?
n Antes do surgimento do defeito, apercebeu-se de algo estranho (sintoma antes do defeito)?
n Na sua opinião, que erro de funcionamento apresenta o aparelho (sintoma principal)?
Descreva este erro de funcionamento.
Categoria Exemplo Serviço de garantia
Defeito no material ou na estrutura 24 meses
Peças de desgaste Vela de ignição, filtro de ar 6 meses
Peças consumíveis Lâmina de corte Garantia apenas em caso de
defeitos imediatos (24h após a
compra / data do talão de compra)
Peças em falta 5 dias úteis
Anleitung_GE_PH_2555_SPK7__ 11.02.14 10:23 Seite 69

SLO
70
Pozor!
Pri uporabi naprav je potrebno upoštevati
preventivne varnostne ukrepe, da bi tako preprečili
poškodbe in škodo na napravi. Zato ta navodila
skrbno preberite. Ta varnostna navodila shranite
dobro, da Vam bodo informacije vsak čas na
razpolago. V primeru, da bi to napravo predali
drugim osebam, Vas prosimo, da ta navodila za
uporabo izročite skupaj z napravo.
Mi ne prevzemamo nobene odgovornosti za nesreče
ali škodo, ki bi nastala zaradi neupoštevanja teh
navodil in varnostnih navodil.
1. Varnostni napotki
Odgovarjajoče varnostne napotke lahko preberete v
priloženi knjižici.
OPOZORILO!
Preberite varnostne napotke in navodila.
Neupoštevanje varnostnih napotkov in navodil ima
lahko za posledico električni udar, požar in/ali hude
poškodbe.
Shranite vse varnostne napotke in navodila za
kasnejšo uporabo.
Obrazložitev napisov na napravi (glej sliko 17)
1. Opozorilo!
2. Pred začetkom uporabe si preberite navodila za
uporabo!
3. Ostra rezila! Rok in nog ne približujte rezilom.
4. Uporabljajte ščitnik za oči in zaščitne slušalke!
5. Uporabljajte zaščitne rokavice!
6. Nosite zaščitne čevlje!
7. Zelo vroča površina. Ne dotikajte se vročega
izpušnega lonca, ohišja menjalnika ali cilindra.
Lahko se opečete. Ti deli postanejo z delovanjem
zelo vroči in ostanejo vroči še dolgo po izklopu
naprave.
8. Upoštevajte vsaj 15 m razdaljo do drugih oseb.
2. Pregled montaže in obseg dobave
(Sliki 1-2)
1. Rezalni list
2. Zaščitni pokrov rezalnega lista
3. Ščitnik
4. Sprednji ročaj
5. Choke ročica
6. Stikalo za vklop/izklop
7. Izvijač
8. Aretirna ročica za vrtljivi ročaj
9. Črpalka za gorivo (Primer)
10. Pokrov zračnega filtra
11. Zagonski ročaj
12. Zadnji ročaj
13. „Sprostitev-odprtje“ ročica za plin
14. Ročica za plin
15. Pokrov dušilca zvoka
16. Rezervoar za mešanico goriva
17. Stikalo vžigalne svečke
18. Ključ za vžigalno svečko
19. Viličasti ključ SW8/SW10
20. Steklenica za mešanje olja/bencina
21. Pokrov meča
3. Predpisana namenska uporaba
Pozor! Te škarje za živo mejo so primerne za rezanje
žive meje, grmičevja in grmovja.
Stroj je dovoljeno uporabljati samo za namene, za
katere je bil konstruirani. Vsaka druga uporaba ni
dovoljena. Za kakršnokoli škodo ali poškodbe, ki bi
nastale zaradi nedovoljene uporabe, nosi
odgovornost uporabnik / upravljalec, ne pa
proizvajalec.
Prosimo, da upoštevate, da naše naprave niso bile
konstruirane za namene profesionalne, obrtniške ali
industrijske uporabe. Ne prevzemamo nobenega
jamstva, če se naprava uporablja za profesionalne,
obrtniške ali industrijske namene ali za izvajanje
podobnih dejavnosti.
Anleitung_GE_PH_2555_SPK7__ 11.02.14 10:23 Seite 70

SLO
71
4. Tehnični podatki
Tip motorja:
2-taktni motor; zračni hlajen; krom-cilinder
Moč motorja maks.: 0,85 kW/1,15 KM
Delovna prostornina: 24,5 ccm
3
Število vrtljajev v prostem teku - motor: 3300 min
-1
Maksimalno število vrtljajev.: 8000 min
-1
Teža (prazni rezervoar): 5,4 kg
Dolžina rezanja: 55 cm
Zmogljivost rezanja maks.: 19 mm
Vžigalna svečka: Champion RCJ7Y
Hitrost rezanja maks.: 1900 rezov/min
Hrup in vibracije
Vrednosti hrupa in vibracij so bile ugotavljane v
skladu z ISO 3477, ISO 11201.
Nivo zvočnega tlaka L
pA
98,9 dB (A)
Negotovost K
pA
3 dB
Nivo zvočne moči L
WA
104,5 dB (A)
Negotovost K
WA
3 dB
Emisijska vrednost vibracij (sprednji ročaj)
Emisijska vrednost vibracij a
h
= 6,41 m/s
2
Negotovost K = 1,5 m/s
2
Emisijska vrednost vibracij (zadnji ročaj)
Emisijska vrednost vibracij a
h
= 6,24 m/s
2
Negotovost K = 1,5 m/s
2
Uporabljajte zaščito za ušesa.
Hrup lahko povzroči izgubo sluha.
Opozorilo!
Navedena vrednost emisije tresljajev je bila izmerjena
po normiranem postopku in se lahko spreminja in v
izjemnih primerih prekorači navedeno vrednost glede
na vrsto in in način uporabe električnega orodja.
Navedena vrednost emisije tresljajev se lahko
uporablja v primerjavo električnega orodja z enim
drugim orodjem.
Navedena vrednost emisije tresljajev se lahko
uporablja tudi za uvodno oceno škodovanja.
Omejite hrupnost in vibracije na minimum!
n Uporabljajte samo brezhibne naprave.
n Redno vzdržujte in čistite napravo.
n Vaš način dela prilagodite napravi.
n Ne preobremenjujte naprave.
n Po potrebi dajte napravo v preverjanje.
n Izključite napravo, ko je ne uporabljate.
n Uporabljajte rokavice.
Ostala tveganja
Tudi, če delate s tem električnim orodjem po
predpisih, zmeraj obstaja nekaj ostalih tveganj.
Nastopijo lahko sledeče nevarnosti v zvezi s
konstrukcijo in izvedbo tega električnega orodja:
1. Poškodbe pljuč, če ne uporabljate primerne
protiprašne zaščitne maske.
2. Poškodbe sluha, če ne uporabljate primerne
zaščite za ušesa.
5. Pred prvim zagonom
5.1 Montaža
Škarje za rezanje žive meje so montirane. Dodatna
montažna dela niso potrebna.
Za boljše vodenje je naprava opremljena z vrtljivim
ročajem, ki ga je po potrebi mogoče nastaviti v
položaje -90°/0°/+90°. V ta namen potisnite ročico (sl.
5/poz. B) navzdol, obrnite vrtljivi ročaj v želeni položaj
in potisnite ročico navzgor, da se znova zaskoči v
položaju. Z različnimi položaji, ki jih je mogoče
nastaviti, so mogoča dela nad višino glave in na
drugih težko dostopnih mestih.
Pozor: Nastavitve vrtljivega ročaja opravljajte samo
pri izklopljenem motorju.
5.2 Gorivo in olje
Priporočeno gorivo
Uporabljajte le mešanico iz normalnega
neosvinčenega bencina in posebnega olja za 2taktne motorje. Mešanico goriva mešajte po tabeli za
mešanje goriv.
Pozor: Ne uporabljajte mešanice goriva, ki ste ga
hranili dlje kot 90 dni.
Pozor: Ne uporabljajte olja za 2-taktne motorje, za
katerega je priporočeno razmerje mešanja 100:1. V
primeru, da okvara motorja nastane zaradi
nezadostnega mazanja, ima to za posledico, da
ugasne garancija za motor.
Pozor: Za transport in za skladiščenje goriva
uporabljajte le za to predvideno in dopustno posodo.
Anleitung_GE_PH_2555_SPK7__ 11.02.14 10:23 Seite 71

SLO
72
V priloženo posodo za mešanje dajte pravilno količino
bencina in olja za 2-taktne motorje (Glej natisnjeno
skalo). Nato pa posodo dobro pretresite.
5.3 Tabela za mešanje goriva:
Postopek mešanja: 40 dele bencina na 1 del olja
6. Delovanje
Upoštevajte zakonska določila za zaščito pred
hrupom, ki se lahko krajevno razlikujejo.
Napravo uporabljajte in zaganjajte le na prostem, da
zmanjšate nevarnost poškodovanja zaradi strupenih
plinov.
6.1 Zagon hladnega motorja (Slike 3-5)
Rezervoar napolnite s primerno količino mešanice
bencina in olja.
1. Napravo postavite na trdo ravno površino.
2. Choke-ročico (Slika 4/Poz. 5) postavite v položaj
„“.
3. 10x pritisnite na črpalko za gorivo (Primer) (sl.
4/poz. 9)
4. Stikalo za vklop/izklop (sl. 3/pol. 6) preklopite na
„I“.
5. Napravo z levo roko dobro držite na sprednjem
ročaju in z desno roko izvlecite zagonsko vrvico
(sl. 5/poz. A) do upora (ca. 10 cm). Sedaj 4x hitro
povlecite zagonsko vrvico. Naprava se mora
zagnati.
Pozor: Ne dovolite, da skoči zagonska vrvica
nazaj. Ta lahko povzroči poškodbe.
6. Po zagonu motorja počakajte, da se naprava ca.
10 sek. ogreva.
Pozor: Z nastavljeno ročico za hladni zagon
začne rezalno orodje delati, ko se motor zaganja.
Ročico za hladni zagon odpahnite s enkratnim
aktiviranjem ročice za plin (poz. 14) (motor se
vrne v prazni tek). Upoštevajte: Preden lahko
aktivirate ročico za plin, morate do omejila
pritisnite ročico za plin „sprostitev“.
7. Če se motor ne zažene, ponovite korake 5-6.
Upoštevajte: Če se motor po več poskusih ne
zažene, preberite poglavje „Odstranjevanje motenj na
motorju“.
Upoštevajte: Zagonsko ročico vedno vlecite
naravnost ven. Če ga vlečete pod kotom, prihaja na
ušescu to drgnjenja. S tem trenjem se vrvica guli in se
hitreje obrabi.
6.2 Zagon toplega motorja (naprava ne miruje
več kot 15-20 min)
1. Napravo položite na trdo, ravno površino.
2. Stikalo za vklop/izklop preklopite na „I“.
3. Napravo dobro držite z levo roko na sprednjem
ročaju in z desno roko izvlecite zagonsko ročico
do prvega upora (ca. 10 cm). Sedaj hitro
pritegnite zagonsko vrvico. Naprava se mora
zagnati po 1-2 potegih. Če se stroj po 6 potegih
še vedno ne zažene, ponovite korake 1-7 pri
hladnem motorju.
6.3 Zaustavitev motorja
Postopek za izklop v sili:
V primeru, da je potrebno stroj takoj zaustaviti,
postavite stikalo za vklop/izklop v položaj „Stop“ oz.
„0“.
Normalni postopek:
Spustite ročico za plin in počakajte, da motor preide v
hitrost prostega teka. Potem pa postavite stikalo za
vklop/izklop v položaj „Stop“ oz. „0“.
6.4 Napotki za delo
Ne pustite, da bi stroj med zagonom ali med
postopkom dela deloval z nizkim številom vrtljajev.
Rezanje gostejšega grmičevja: Najbolj efektivno je,
da izvedete široki neprekinjen gib, pri tem pa vodite
nož direktno skozi vejevje. Rahli nagib rezina navzdol,
v smeri rezanja povzroči najboljši rez.
Da bi dosegli enakomerno višino žive meje, Vam
priporočamo, da napnete nitko, po kateri se lahko
orientirate pri rezanju vzdolž živo mejo. Veje, ki štrlijo
preko nitke, se odrežejo. (Slika 6)
Stransko rezanje žive meje: Stranske površine žive
meje se reže z upognjenimi gibi s spodnje strani
navzgor. (Slika 7)
Pozor: Konstrukcijsko pogojeno lahko v primeru, da
rezervoar ni popolnoma poln, motor pri dalj časa
trajajočemu rezanju stranskih površin ugasne.
Bencin
Olje za 2-taktne motorje
1 liter 25 ml
5 litrov 125 ml
Anleitung_GE_PH_2555_SPK7__ 11.02.14 10:23 Seite 72

SLO
73
7. Čiščenje, vzdrževanje in naročanje
rezervnih delov
7.1 Čiščenje
n Zaščitne naprave, zračne reže in ohišje motorja
vzdržujte v karseda čistem stanju. Napravo
zdrgnite s čisto krpo ali pa jo izpihajte s
komprimiranim zrakom (pod nizkim pritiskom).
n Priporočamo, da napravo očistite takoj po vsaki
uporabi.
n V rednih intervalih napravo očistite tudi z mokro
krpo in mazavim milom. Ne uporabljajte nobenih
čistilnih sredstev ali razredčil; ta sredstva lahko
začnejo nažirati dele iz umetne mase. Pazite na
to, da voda ne more prodreti v notranjost
naprave.
7.2 Vzdrževanje
Pred vsakim vzdrževalnim delom je potrebno škarje
za živo mejo ugasniti in sneti kapico z vžigalne
svečke.
1. Rezalni noži so visoke kvalitete (iz legiranega
jekla) in jih pri normalni uporabi ni potrebno
dodatno naostriti. V primeru, da bi po pomoti s
škarjami naleteli na žico, kamen, steklo ali na
druge trde objekte, lahko to povzroči zareze na
rezilu. Ni potrebno, da se zareza odpravi, dokler
ne vpliva na gibanje nožev. V primeru, da vpliva
na gibanje nožev pa stroj izklopite in vzemite fino
pilo ali brusilni kamen, da odpravite zarezo. Pazite
na to, da bodo noži vedno dobro naoljeni (glej
sliko 8).
2. V primeru, da Vam škarje za živo mejo padejo iz
rok, jih preglejte glede morebitnih poškodb. V
primeru poškodb pa stopite v stik s pooblaščeno
servisno službo ali pa napravo pošljite na firmo
ISC-GmbH na popravilo.
3. Stroj čistite le, ko je ugasnjen. Za čiščenje
uporabljajte le blago milo in vlažno krpo. Nikoli ne
pustite, da bi v notranjost stroja prišla tekočina.
Ne uporabljajte jedkih čistilnih snovi.
7.2.1 Vzdrževanje zračnega filtra (Slike 9-11)
Umazani zračni filtri zmanjšajo moč motorja zaradi
zmanjšanega dovajanja zraka do uplinjača. Redna
kontrola je zato nujna. Zračni filter je potrebno
kontrolirati po 25 delovnih urah in ga po potrebi
očistiti. V primeru, da napravo uporabljate v zelo
prašnem okolju, je zračni filter potrebno pregledati
pogosteje.
1. Snemite pokrov zračnega filtra (Slike 9-10)
2. Snemite filtrirni element (Slika 11)
3. Filtrirni element očistite tako, da ga iztepete ali
izpihate.
4. Montaža poteka v obratnem vrstnem redu.
Pozor: Zračni filter nikoli ne čistite z bencinom ali z
vnetljivimi razredčili. Zračni filter očistite tako, da ga
iztepete ali ga izpihate s komprimiranim zrakom.
7.2.2 Vzdrževanje vžigalne svečke (Slike 12-14)
Iskrišče vžigalne svečke = 0,025 Inch (0,635 mm)
Vžigalno svečko privijte z 14,7 - 21,5 Nm.
Po 10 delovnih urah vžigalno svečko prvič preverite
glede umazanije in jo po potrebi očistite z bakreno
žično ščetko. Po tem pa vžigalno svečko vzdržujte
vsakih 50 delovnih ur.
1. Vžigalno svečko snemite z vrtljivim gibom (Slika
13).
2. Vžigalno svečko odstranite (Slika 14) s priloženim
ključem za vžigalne svečke.
3. Montaža se izvrši v obratnem vrstnem redu.
7.2.3 Vzdrževanje gonila (Slika 15)
Gonilo je potrebno letno pred začetkom sezone
namazati preko mazalke (Slika 15/Poz. A). Za to na
mazalko nataknite običajno tlačilko za mazivo in v
gonilo vtisnite pribl. 3 hode običajne strojne masti. Ob
prekomerni uporabi je gonilo potrebno mazati bolj
pogosto.
7.2.4 Nastavitve uplinjača
Pozor! Nastavitve uplinjača lahko opravlja le
pooblaščena servisna služba.
Nastavitev plina za prosti tek motorja:
Pozor! Plin za prosti tek motorja nastavljajte, ko je
motor segret na delovno temperaturo.
V primeru, da se naprava ob neuporabi ročice za plin
ugasne in so izključeni vsi vzroki iz oddelka 9 za
odpravljanje napak, je mogoče, da je potrebna
nastavitev žicovoda za plin. Za to vijak za nastavitev
števila vrtljajev v prostem teku obračajte (Slika
16/Poz. 5) v smeri urinega kazalca tako dolgo, da bo
naprava v prostem teku varno delovala.
V primeru, da je plin za prosti tek nastavljen tako
visoko, da rezalni noži niso v mirovanju, je potrebno
plin za prosti tek z vrtenjem vijaka v levo smer (Slika
16/Poz. 5) zmanjšati tako, da bodo rezalni noži
mirovali.
7.3 Skladiščenje
Pozor: Napaka pri upoštevanju teh korakov ima lahko
za posledico, da se na notranji steni uplinjača začnejo
nabirati usedline, to pa povzroči otežen zagon ali
trajno škodo na stroju.
1. Izvajajte vsa vzdrževalna dela.
2. Ne spustite goriva iz rezervoarja (za to uporabite
običajno plastično bencinsko črpalko iz
Anleitung_GE_PH_2555_SPK7__ 11.02.14 10:23 Seite 73

SLO
74
prodajalne).
3. Po tem, ko izpraznite rezervoar, zaženite stroj.
4. Pustite, da stroj v prostem teku deluje tako dolgo,
da se ugasne. Tako se uplinjač izprazni.
5. Pustite, da se stroj ohladi (pribl. 5 minut).
6. Odstranite vžigalno svečko (glej točko 7.2.2).
7. V zgorevalni prostor nalijte za eno čajno žličko 2taktnega motornega olja. Nekajkrat počasi
potegnite za zagonsko vrvico, da notranje dele
namažete z oljem. Ponovno vstavite vžigalno
vrvico.
8. Očistite zunanje ohišje stroja.
9. Stroj hranite na hladnem, suhem prostoru, ki ni v
bližini virov vžiga in vnetljivih snovi.
10. Pri transportu ali shranjevanju škarij za živo mejo
morate rezalno napravo vedno prekriti z zaščito
za rezalno napravo.
Gnojila in drugi kemični proizvodi pogosto vsebujejo
snovi, ki pospešujejo korozijo kovin. Stroj ne hranite v
bližini gnojil ali drugih kemikalij.
Ponovni zagon
1. Odstranite vžigalno svečko.
2. Zagonsko vrvico večkrat potegnite ven, da
odstranite ostanke olja iz zgorevalnega prostorja.
3. Očistite kontakte vžigalne svečke ali vstavite novo
vžigalno svečko.
4. Napolnite rezervoar. Glej poglavje „Gorivo in olje“.
5. Izvedite korake 1-7 pod točko „Zagon hladnega
motorja“.
7.4 Naročanje rezervnih delov:
Pri naročilu rezervnih delov navedite naslednje
podatke:
n Tip stroja
n Številka artikla/stroja
n Identifikacijska številka stroja
n Številka rezervnega dela, ki ga naročate
Aktualne cene in informacije najdete na spletni strani
www.isc-gmbh.info
8. Odstranjevanje in reciklaža
Naprava je ovita v ovojnino, da bi preprečili
poškodovanje zaradi transporta. Ta ovojnina je
surovina in jo kot tako lahko ponovno uporabimo ali
pa jo predamo v reciklažo.
Naprava in njegov pribor so sestavljeni iz različnih
materialov, kot n.pr. kovina in umetna masa.
Defektne konstrukcijske dele predajte na deponijo
za posebne odpadke. Povprašajte v strokovni
trgovini ali pri občinski upravi!
Anleitung_GE_PH_2555_SPK7__ 11.02.14 10:23 Seite 74

SLO
75
Motnja Možen vzrok Odprava motnje
Naprava se ne zažene Napa no postopanje pri zagonu. Sledite navodilom za zagon.
Korodirana ali vlažna vžigalna
sve ka.
O istite vžigalno sve ko ali pa jo
zamenjajte z novo.
Napa na nastavitev uplinja a. Poiš ite pomo pri pooblaš enem
servisu ali pa napravo pošljite na
ISC-GmbH.
Naprava se zažene, ampak nima
polne mo i
Napa na nastavitev Choke ro ice.
Choke ro ico postavite v položaj „
“
Umazan zra ni filter. O istite zra ni filter.
Napa na nastavitev uplinja a. Poiš ite pooblaš eni servis ali pa
napravo pošljite na ISC-GmbH.
Motor deluje neenakomerno Napa na razdalja elektrod na
vžigalni sve ki.
O istite vžigalno sve ko in nastavite
razdaljo elektrod ali zamenjajte
vžigalno sve ko.
Napa na nastavitev uplinja a. Poiš ite pooblaš eni servis ali pa
napravo pošljite na ISC-GmbH.
Iz motorja se prekomerno kadi Napa na mešanica goriva. Uporabljajte pravilno mešanico
goriva (glej tabelo za mešanje
goriva)
Napa na nastavitev uplinja a. Poiš ite pooblaš eni servis ali pa
napravo pošljite na ISC-GmbH.
9. Odprava napak
Anleitung_GE_PH_2555_SPK7__ 11.02.14 10:23 Seite 75

SLO
76
Garancijski pogoji
Družba iSC GmbH jamči za odpravo napak ali menjavo naprave v skladu s spodaj navedeno preglednico, pri
čemer to ne vpliva na zakonske garancijske zahtevke.
Glede obrabnih delov, potrošnega materiala in manjkajočih delov jamči družba iSC GmbH odpravo
pomanjkljivosti ali naknadno dobavo, če pride do pomanjkljivosti v roku 24 ur (potrošni material), 5 delovnih dni
(manjkajoči deli) ali 6 mesecev (obrabni deli) po nakupu in stranka datum nakupa dokaže z originalnim
računom.
Pri pomanjkljivosti na materialu ali konstrukciji vas prosimo, da v primeru garancije napravo skupaj s priloženo
povsem izpolnjeno garancijsko kartico. Pomembno je, da navedete natančen opis napake.
Odgovorite na naslednja vprašanja:
n Je naprava nekoč delovala, ali je bila od vsega začetka okvarjena?
n Ste pred okvaro opazili kaj neobičajnega (simptom ali okvaro)?
n Kaj na napravi po vašem mnenju ne dela (glavni simptom)?
Opišite to napačno delovanje.
Kategorija Primer Garancijska storitev
Pomanjkljivosti na materialu ali
konstrukciji
24 mesecev
Potrošni deli Vžigalna svečka, zračni filter 6 mesecev
Obrabni material/
obrabni deli
Rezalni nož Garancija le pri takojšnji okvari (24
ur po nakupu/datumu računa)
Manjkajoči deli 5 delovnih dni
Anleitung_GE_PH_2555_SPK7__ 11.02.14 10:23 Seite 76

GR
77
Προσοχή!
Κατά τη χρήση των συσκευών πρέπει, προς
αποφυγή τραυματισμών και ζημιών, να τηρούνται
και να λαμβάνονται ορισμένα μέτρα ασφαλείας.
Διαβάστε για το λόγο αυτό προσεκτικά τις Οδηγίες
χρήσης / Υποδείξεις ασφαλείας. Φυλάξτε τις καλά
για να έχετε τις πληροφορίες πάντα στη διάθεσή
σας. Εάν παραδώσετε τη συσκευή σε άλλα άτομα,
δώστε μαζί και αυτές τις Οδηγίες χρήσης /
Υποδείξεις ασφαλείας. Δεν αναλαμβάνουμε καμία
ευθύνη για ατυχήματα ή βλάβες που οφείλονται σε
μη τήρηση αυτών των Οδηγιών χρήσης και των
Υποδείξεων ασφαλείας.
1. Υποδείξεις ασφαλείας
Θα βρείτε τις ανάλογες υποδείξεις ασφαλείας στο
επισυναπτόμενο βιβλιάριο!
Προειδοποίηση
Διαβάστε όλες τις Υποδείξεις ασφαλείας και
τις Οδηγίες.
Σε περίπτωση παραλείψεων κατά την τήρηση των
Υποδείξεων ασφαλείας μπορεί να προκληθεί
ηλεκτροπληξία, πυρκαγιά και/ή σοβαροί
τραυματισμοί.
Φυλάξτε για μελλοντική χρήση όλες τις
Υποδείξεις ασφαλείας και τις οδηγίες.
Εξήγηση της ετικέτας στη συσκευή (βλ. εικ. 17)
1. Προειδοποίηση!
2. Πριν τη θέση σε λειτουργία να διαβάσετε τις
οδηγίες χρήσης!
3. Αιχμηρά μαχαίρια! Να κρατάτε χέρια και πόδια
μακριά από τα μαχαίρια.
4. Να φοράτε προστασία ματιών και ωτοασπίδες!
5. Να φοράτε προστατευτικά γάντια!
6. Να φορά γερά παπούτσια!
7. Καυτή επιφάνεια Μην αγγίζετε την ζεστή
εξάτμιση, το ζεστό περίβλημα του κιβωτίου ή
τον κύλινδρο. Κίνδυνος εγκαύματος. Αυτά τα
τμήματα θερμαίνονται πολύ από τη λειτουργία
και παραμένουν για αρκετό χρόνο καυτά μετά
την απενεργοποίηση της συσκευής.
8. Να κρατάτε απόσταση. τουλ. 15 μ. προς άλλα
άτομα.
2. Επισκόπηση κατασκευής και
συμπαραδιδόμενα (εικ. 1-2)
1. Λάμα κοπής
2. Προτατευτικό κάλυμμα λάμας κοπής
3. Προστατευτική ασπίδα
4. Μπροστινή χειρολαβή
5. Μοχλός τσοκ
6. Διακόπτης ενεργοποίησης/απενεργοποίησης
7. Κατσαβίδι
8. Μοχλός ασφάλισης για περιστρεφόμενη λαβή
9. Αντλία καύσιμου (Primer)
10. Kάλυμμα φίλτρου αέρα
11. Λαβή μίζας
12. Πίσω χειρολαβή
13. Διακόπτης μοχλού γκαζιού
14. Μοχλός γκαζιού
15. Κάλυμμα σιγαστήρα
16. Ντεπόζιτο για μίγμα καυσίμου
17. Βύσμα για μπουζί
18. Μπουζόκλειδο
19. Διπλό κλειδί SW8/SW10
20. Μπουκάλι ανάμιξης λαδιού/βενζίνης
21. Κάλυμμα λόγχης
3. Ενδεδειγμένη χρήση
Προσοχή! Αυτό το θαμνοκοπτικό προορίζεται για να
κόβετε πρασιές, μικρούς και μεγάλους θάμνους.
Η μηχανή να χρησιμοποιείται μόνο για το σκοπό για
τον οποίο προορίζεται. Κάθε πέραν τούτου χρήση
δεν είναι ενδεδειγμένη. Για ζημιές ή τραυματισμούς
παντός είδους που οφείλονται σε μη ενδεδειγμένη
χρήση ευθύνεται ο χρήστης / χειριστής και όχι ο
κατασκευαστής.
Παρακαλούμε να προσέξετε, πως οι συσκευές μας
δεν έχουν κατασκευαστεί για επαγγελματική,
βιοτεχνική και βιομηχανική χρήση. Δεν
αναλαμβάνουμε καμία εγγύηση, εάν η συσκευή
χρησιμοποιηθεί σε βιοτεχνίες ή βιομηχανίες ή σε
παρόμοιες εργασίες.
4. Τεχνικά χαρακτηριστικά
Anleitung_GE_PH_2555_SPK7__ 11.02.14 10:23 Seite 77

GR
78
Τύπος κινητήρα: Δίχρονος, υδρόψυκτος κινητήρας,
κύλινδρος χρωμίου
Μέγιστη ισχύς κινητήρα: 0,85 kW/1,15 PS
Κυβισμός: 24,5 cm
3
Αριθμός στροφών κενού του κινητήρα: 3300 min
-1
Μέγ. αριθμός στροφών του κινητήρα: 8000 min
-1
Βάρος (άδειο ντεπόζιτο) 5,4 kg
Μήκος κοπής: 55 cm
Μέγιστη κοπτική ισχύς κινητήρα: 19 mm
Μπουζί: Champion RCJ7Y
Μέγιστη ταχύτητα κοπής: 1900 κοπές/λεπτό
Θόρυβος και δόνηση
O θόρυβος και οι δονήσεις μετρήθηκαν σύμφωνα με
το πρότυπο ISO 3477 ή ISO 11201.
Στάθμη ηχητικής πίεσης L
pA
98,9 dB
Αβεβαιότητα K 3 dB
Στάθμη ακουστικής ισχύος LWA: 104,5 dB
Αβεβαιότητα K 3 dB
Τιμή μετάδοσης δόνησης (μπροστινή χειρολαβή)
ahv= 6,41 m/s
2
Τιμή μετάδοσης δόνησης (πίσω χειρολαβή)
ahv= 6,24 m/s
2
Αβεβαιότητα K = 1,5 m/s
2
Να χρησιμοποιείτε ωτοασπίδες.
Η επίδραση του θορύβου μπορεί να προκαλέσει την
απώλεια της ακοής.
Προειδοποίηση!
Η αναφερόμενη τιμή μετάδοσης δόνησης
μετρήθηκε βάσει τυποποιημένης μεθόδου ελέγχου
και μπορεί να μεταβληθεί ή και σε εξαιρετικές
περιπτώσεις να κυμαίνεται άνω της αναφερόμενης
τιμής, ανάλογα από τον τρόπο χρήσης του
ηλεκτρικού εργαλείου.
H αναφερόμενη μετάδοση δονήσεων μπορεί να
χρησιμοποιηθεί και για σύγκριση με άλλο ηλεκτρικό
εργαλείο.
Η αναφερόμενη τιμή μετάδοσης δονήσεων μπορεί
επίσης να χρησιμοποιηθεί και για αρχική εκτίμηση
της έκθεσης.
Περιορίστε τη δημιουργία θορύβου και
δόνησης στο ελάχιστο!
앬 Να χρησιμοποιείτε μόνο συσκευές σε άψογη
κατάσταση.
앬 Να συντηρείτε και να καθαρίζετε τακτικά τη
συσκευή.
앬 Προσαρμόστε τον τρόπο εργασίας σας στη
συσκευή.
앬 Προσέξτε να μην υπερφορτώνετε τη συσκευή.
앬 Ενδεχομένως δώστε τη συσκευή για έλεγχο.
앬 Απενεργοποιήστε τη συσκευή όταν δεν
χρησιμοποιείται.
n Να φοράτε γάντια.
ΥΠΟΛΕΙΠΟΜΕΝΟΙ ΚΙΝΔΥΝΟΙ
Aκόμη και σε περίπτωση σωστής και κανονικής
χρήσης αυτού του ηλεκτρικού εργαλείου,
υφίστανται πάντα υπολειπόμενοι κίνδυνοι. Oι
ακόλουθοι κίνδυνοι μπορούν να
παρουσιαστούν ανάλογα με το είδος
κατασκευής και το μοντέλο αυτού του
ηλεκτρικού εργαλείου:
1. Βλάβες ματιών σε περίπτωση που δεν
χρησιμοποιηθεί προστασία ματιών.
2. Bλάβες της ακοής, εάν δεν χρησιμοποιηθεί
κατάλληλη ηχοπροστασία.
5. Πριν τη θέση σε λειτουργία
5.1 Τοποθέτηση
Το θαμνοκοπτικό είναι έτοιμο συναρμολογημένο.
Δεν απαιτούνται εργασίες συναρμολόγησης.
Για καλύτερη οδήγηση η συσκευή έχει εξοπλισθεί με
μία περιστρεφόμενη λαβή η οποία μπορεί ανάλογα
με τη χρήση της να ρυθμιστεί σε γωνία -90°/0°/+90°.
Για το σκοπό αυτό τραβήξτε το μοχλό (εικ. 5/αρ. Β)
προς τα πίσω, στρίψτε την περιστρεφόμενη λαβή
στην επιθυμούμενη θέση και αφήστε πάλι το μοχλό
να κουμπώσει μπροστά. Χάρη στη δυνατότητα
ρύθμισης διαφορετικών θέσεων διευκολύνεται η
εκτέλεση εργασιών πάνω από το ύψος του
κεφαλιού ή σε δυσπρόσβατα σημεία.
Προσοχή: Η ρύθμιση της περιστρεφόμενης λαβής
επιτρέπεται να γίνει μόνο όταν είναι
ακινητοποιημένο το μοτέρ.
5.2 Καύσιμο και λάδι
Συνιστώμενα καύσιμα
Να χρησιμοποιε΄τιε ένα μίγμα από απλή αμόλυβδη
βενζίνα και ειδικό λάδι για δίχρονο κινητήρα.
Ανακατέψτε το μίγμα καυσίμου σύμφωνα με τον
πίνακα ανάμιξης καυσίμου.
Προσοχή: Μη χρησιμοποιείτε μίγμα καυσίμου που
Anleitung_GE_PH_2555_SPK7__ 11.02.14 10:23 Seite 78

GR
79
φυλάχθηκε για περισσότερο από 90 ημέρες.
Προσοχή: Μη χρησιμοποιείτε λάδι για δίχρονο
κινητήρα με συνιστώμενη αναλογία ανάμιξης 100:1.
Εάν από ανεπαρκή λίπανση προκληθεί βλάβη του
κινητήρα, εκπίπτει η εγγύηση του κατασκευαστή.
Προσοχή: Για τη μεταφορά και αποθήκευση του
καυσίμου να χρησιμοποιείτε μόνο τους
προβλεπόμενους για το σκοπό αυτό περιέκτες.
Βάλτε την εκάστοτε σωστή ποσότητα βενζίνης και
λαδιού για δίχρονο κινητήρα στο συμπαραδιδόμενο
μπουκάλι (βλέπε την τυπωμένη κλίμακα).
Ανακινήστε κατόπιν καλά το δοχείο.
5.3 Πίνακας ανάμιξης καυσίμου:
Διαδικασία ανάμιξης: 40 μέρη βενζίνα σε 1 μέρος
λάδι
6. Λειτουργία
Παρακαλούμε να προσέξετε τις νόμιμες διατάξεις
του Κανονισμού Ηχοπροστασίας, που ενδεχομένως
να διαφέρουν από τόπο σε τόπο.
Να χρησιμοποιείτε τη συσκευή μόνο στο ύπαιθρο σε
καλά αεριζόμενους χώρους προς αποφυγή
τραυματισμών από τοξικά αέρια.
6.1 Εκκίνηση ψυχρού κινητήρα (εικ. 3-5)
Γεμίστε στο ρεζερβουάρ την απαιτούμενη ποσότητα
μίγματος βενζίνης/λαδιού.
1. Τοποθετήστε τη συσκευή σε σκληρή, επίπεδη
επιφάνεια
2. Βάλτε το τσοκ (εικ. 4/αρ. 5) στη θέση „ “.
3. Πιέστε την αντλία καύσιμου (Primer) (εικ. 4/αρ.
9) 10 φορές.
4. Αφήστε ελεύθερο τον διακόπτη
ενεργοποίησης/απενεργοποίησης (εικ. 3/αρ. 6)
στη θέση „I“.
5. Κρατήστε καλά τη συσκευή από την μπροστινή
χειρολαβή με το αριστερό χέρι και με το δεξί
χέρι κρατήστε το σχοινί εκκίνησης (εικ. 5/αρ. Α)
μέχρι την πρώτη αντίσταση (περ. 10cm) προς τα
έξω. Τώρα τραβήξτε γρήγορα 4 φορές το σχοινί
εκκίνησης. Η συσκευή πρέπει τώρα να πάρει
μπροστά.
Προσοχή: Μην αφήνετε το σχοινί εκκίνησης να
πεταχτεί πάλι προς τα πίσω. Αυτό μπορεί να
προκαλέσει ζημιές.
6. Όταν αρχίσει να παίρνει μπροστά ο κινητήρας,
αφήστε τον να ζεσταθεί περ. 10 δευτερόλεπτα.
Προσοχή: Με τον ασφαλισμένο μοχλό τσοκ
αρχίζει η λειτουργία του κοπτικού εργαλείου
όταν πάρει μπροστά ο κινητήρας.
Κατόπιν απασφαλίζετε το τσοκ με απλό
χειρισμό του μοχλού του γκαζιού (αρ. 14). (Ο
κινητήρας επιστρέφει στο ρελαντί). Προσοχή:
Προτού χειριστείτε τον μοχλό γκαζιού πρέπει να
πιέσετε τον μοχλό ελευθέρωσης του μοχλού του
γκαζιού μέχρι το τέρμα.
7. Εάν δεν πάρει μπροστά ο κινητήρας
επαναλάβετε τα βήματα στο εδάφιο 5-6.
Προσέξτε: Εάν ο κινητήρας δεν πάρει μπροστά
ακόμη και μετά από περισσότερες προσπάθειες,
διαβάστε το κεφάλαιο „Αποκατάσταση βλαβών στον
κινητήρα“.
Προσέξτε: Να τραβάτε το σχοινί εκκίνησης πάντα
ίσια προς τα έξω. Εάν τραβηχτεί σε γωνία,
δημιουργείται τριβή στη θηλιά. Εξαιτίας της τριβής
αυτής φθείρεται το σχοινί και καταστρέφεται
ταχύτερα.
6.2 Εκκίνηση θερμού κινητήρα (Ακινητοποίηση
της συσκευής όχι για πάνω από 15-20 λεπτά)
1. Τοποθετήστε τη συσκευή σε σκληρή, επίπεδη
επιφάνεια.
2. Βάλτε τον διακόπτη
ενεργοποίησης/απενεργοποίησης στις θέση „I“
3. Κρατήστε καλά τη συσκευή από την μπροστινή
χειρολαβή με το αριστερό χέρι και με το δεξί
χέρι τραβήξτε το σχοινί εκκίνησης μέχρι την
πρώτη αντίσταση (εικ. 10cm) προς τα έξω. Τώρα
τραβήξτε γρήγορα το σχοινί εκκίνησης. Η
συσκευή πρέπει τώρα να πάρει μπροστά μετά
από 1-2 τραβήγματα. Εάν μετά από 6
τραβήγματα δεν πάρει μπροστά η συσκευή,
επαναλάβετε τα βήματα 1-7 με ψυχρό κινητήρα.
6.3 Σβήσιμο του κινητήρα
Βήματα για απενεργοποίησης σε περίπτωση
ανάγκης:
Εάν χρειαστεί να διακοπεί άμεσα η λειτουργία της
μηχανής, βάλτε τον διακόπτη
ενεργοποίησης/απενεργοποίοησης στην θέση
„ΣΤΟΠ“ ή „0“
Βήματα για απενεργοποίησης σε κανονική
διαδικασία:
Αφήστε ελεύθερο το μοχλό γκαζιού και περιμένετε
μέχρι να έλθει ο κινητήρας στην ταχύτητα ρελαντί.
Τότε βάλτε τον διακόπτη
ενεργοποίησης/απενεργοποίησης στη θέση ΣΤΟΠ ή
Βενζίνη
Λάδι δίχρονου κινητήρα
1 λίτρα 25 ml
5 λίτρα 125 ml
Anleitung_GE_PH_2555_SPK7__ 11.02.14 10:23 Seite 79

GR
80
„0“.
6.4 Υποδείξεις για την εργασία
Μην αφήνετε τη συσκευή στην αρχή της εργασίας
να λειτουργεί με χαμηλό αριθμό στροφών.
Κοπή πυκνών κλαδιών: Πιο αποτελεσματική είναι
μία πλατιά, σταθερή και αδιάκοπη κίνηση,
οδηγώντας τα μαχαίρια της κοπτικής μονάδας
απευθεάις μέσα στα κλαδιά. Με μία ελαφριά κλίση
προς τα κάτω, προς την κατεύθυνση της κίνησης,
θα έχει καλύτερα αποτελέσματα.
Για να πετύχετε ομοιόμορφο ύψος κοπής,
συνιστάται να τεντώσετε ένα σπάγγο για ίσια
γραμμή κατά μήκος της πρασιάς ή του θάμνου. Έτσι
κόβονται τα κλαδιά που ξεπερνούν τη γραμμή του
σπάγγου. (εικ. 6)
Kόψιμο πλευράς μίας πρασιάς ή θάμνου: Οι
πλευρές μίας πρασιάς κόβονται με κινήσεις σε
μορφή τόξου από κάτω προς τα επάνω. (εικ. 7)
Προσοχή: Λόγω της κατασκευής δεν αποκλείεται
να σβήσει το μοτέρ όταν κόβετε τις πλευρές και το
ντεπόζιτο δεν είναι γεμάτο.
7. Καθαρισμός, συντήρηση,
αποθήκευση και παραγγελία
ανταλλακτικών
7.1 Καθαρισμός
앬 Να κρατάτε όσο πιο ελεύθερα από σκόνη και
ακαθαρσίες γίνεται τα συστήματα προστασίας,
τις σχισμές εξαερισμού και το κέλυφος του
μοτέρ. Σκουπίζετε τη συσκευή με ένα καθαρό
πανί, ή καθαρίστε το με πεπεισμένο αέρα σε
χαμηλή πίεση.
앬 Συνιστούμε να καθαρίζετε τη συσκευή αμέσως
μετά από κάθε χρήση.
앬 Να καθαρίζετε τη συσκευή τακτικά με ένα νωπό
πανί και λίγο μαλακό σαπούνι. Μη
χρησιμοποιείτε καθαριστικά ή διαλύτες, γιατί
δεν αποκλείεται να καταστρέψουν την
επιφάνεια της συσκευής. Προσέξτε να μην
περάσει νερό στο εσωτερικό της συσκευής.
7.2 Συντήρηση
Πριν από όλες τις εργασίες συντήρησης να
απενεργοποιείτε πάντα το θαμνοκοπτικό και να
βγάζετε το βύσμα του μπουζί.
1. Τα μαχαίρια είναι εξαιρετικής ποιότητας, από
σκληρυμένο χάλυβα και εφόσον χειριστούν
κανονικά δεν πρέπει να ακονιστούν. Εάν κατά
λάθος έρθετε σε επαφή με σύρμα, πέτρα, γυαλί
ή άλλα σκληρά αντικείμενα, μπορεί η επαφή
αυτή να προκαλέσει εγκοπή στην κόψη. Δεν
χρειάζεται να απομακρύνετε την εγκοπή,
εφόσον δεν εμποδίζει τις κινήσεις των
μαχαιριών. Εάν εμποδίζει τις κιν΄σηεις των
μαχαιριών, απενεργοποιήστε τη μηχανή, πάρτε
μία λεπτή λίμα ή ένα ακονιστήρι ακριβείας για
να απομακρύνετε την εγκοπή. Προσέξτε να είναι
καλά λαδωμένο το μαχαίρι κοπής (βλ. εικ. 8).
2. Εάν πέσει κάτω ο θαμνοκόπτης, ελέγξτε εάν
δημιουργήθηκαν ζημιές. Σε περίπτωση ζημιών
επικοινωνήστε με συμβεβλημένο συνεργείο
εξυπηρέτησης πελατών ή στείλτε τη συσκευή
στην ISC-GmbH για επισκευή.
3. Να καθαρίζετε τη συσκευή μόνο όταν είναι
απενεργοποιημένη. Να χρησιμοποιείτε μόνο
ήπιο σαπούνι και ένα νωπό πανί για τον
καθαρισμό. Ποτέ μην αφήνετε να εισέλθει υγρό
στο εσωτερικό της συσκευής. Μη
χρησιμοποιείτε διαβρωτικά καθαριστικά.
7.2.1 Εργασίες συντήρησης του φίλτρου του
αέρα (εικ. 9-11)
Τα ακάθαρτα φίλτρα του αέρα μειώνουν την ισχύ
του κινητήρα λόγω μειωμένης παροχής αέρα στο
καρμπυρατέρ. Για το λόγο αυτό είναι απαραίτητος ο
συνεχής έλεγχος. Το φίλτρο του αέρα να ελέγχεται
κάθε 25 ώρες λειτουργίας και να καθαρίζεται όταν
χρειαστεί. Εάν ο αέρας είναι πολύ σκονισμένος, να
ελέγχεται συχνότερα το φίλτρο του αέρα.
1. Αφαιρέστε το καπάκι του φίλτρου του αέρα (εικ.
9-10)
2. Αφαιρέστε το στοιχείο του φίλτρου (εικ. 11)
3. Καθαρίστε το στοιχείο του φίλτρου κτυπώντας
το ή φυσώντας το.
4. Η συναρμολόγηση εκτελείται στην αντίστροφη
σειρά.
Προσοχή: Ποτέ μην καθαρίζετε το φίλτρο του αέρα
με βενζίνη ή εύφλεκτους διαλύτες. Να καθαρίζετε
το φίλτρο του αέρα μόνο με πεπιεσμένο αέρα ή
κτυπώντας το.
7.2.2 Συντήρηση του μπουζί (εικ. 12-14)
Διαδρομή σπινθήρων του μπουζί = 0,025 Inch (0,635
mm)
Σφίξτ το μπουζί με 14,7-21,5 Nm.
Να ελέγξετε για πρώτη φορά το μπουζί μετά από 10
ώρες λειτουργίας για ακαθαρσίες και καθαρίστε το
ενδεχομένως με χάλκινη συρματόβουρτσα. Κατόπιν
η συντήρηση του μπουζί να γίνεται κάθε 50 ώρες
λειτουργίας.
1. Για το σκοπό αυτό τραβήξτε το βύσμα του
μπουζί (εικ. 13) με περιστροφική κίνηση.
Anleitung_GE_PH_2555_SPK7__ 11.02.14 10:23 Seite 80

GR
81
2. Απομακρύνετε το μπουζί (εικ. 14) με το
συμπαραδιδόμενο κλειδί για το μπουζί.
3. Η συναρμολόγηση εκτελείται στην αντίστροφη
σειρά.
7.2.3 Εργασίες συντήρησης του κιβωτίου (εικ.
15)
Το κιβώτιο μετάδοσης κίνησης να λιπαίνετε ετησίως
πριν την αρχή της σαιζόν από το στόμιο εισαγωγής
γράσου (εικ. 15/αρ. Α). Βάλτε στο στόμιο εισαγωγής
γράσου ένα κοινό πιστολάκι λίπανσης και πιέστε
περ. 3 φορές κοινό λάδι για λάδωμα μηχανών στο
κιβώτιο μετάδοσης κίνησης. Εάν η συσκευή
χρησιμοποιείται πολύ συχνά, πρέπει το κιβώτιο να
λιπαίνεται συχνότερα.
7.2.4 Ρυθμίσεις καρμπυρατέρ
Προσοχή! Οι ρυθμίσεις στο καρμπυρατέρ
επιτρέπεται να εκτελούνται μόνο από
συμβεβλημένο συνεργείο εξυπηρέτησης πελατών.
Ρύθμιση ρελαντί:
Προσοχή! Ρυθμίστε το ρελαντί σε θερμή
κατάσταση λειτουργίας.
Εάν η συσκευή σβήσει χωρίς να γίνει χειρισμός του
γκαζιού και εφόσον αποκλεισθούν όλες οι αιτίες του
εδαφίου 9 Αποκατάσταση βλαβών, απαιτείται η
ρύθμιση του ρελαντί. Στρίψτε τη βίδα του γκαζιού
ρελαντί (εικ. 16/αρ. 5) αριστερόστροφα μέχρι να
λειτουργεί η συσκευή καλά στη λειτουργία κενού.
Εάν το γκάζι ρελαντί είναι έτσι ώστε να
περιστρέφεται μαζί και το κοπτικό εργαλείο, πρέπει
να ελαττωθεί με αριστερόστροφη περιστροφή της
βίδας γκαζιού ρελαντί (εικ. 16/αρ. 5) μέχρι να
ακινητοποιηθούν τα μαχαίρια.
7.3 Αποθήκευση
Προσοχή: Ένα σφάλμα στην εκτέλεση αυτών των
βημάτων μπορεί να έχει σαν συνέπεια τον
σχηματισμό εναποθέσεων στο εσωτερικό τοίχωμα
του καρμπυρατέρ που συνεπάγεται δύσκολη
ενεργοποίηση ή μόνιμη βλάβη της μηχανής.
1. Να εκτελέσετε όλες τις εργασίες συντήρησης.
2. Εκκενώστε το καύσιμο από το ντεπόζιτο
(χρησιμοποιήστε κοινή πλαστική αντλία
βενζίνης που θα βρε΄τιε σε τεχνικά
σούπερμαρκετ)
3. Αφού εκκενωθεί το καύσιμο, βάλτε μπροστά τη
μηχανή.
4. Αφήστε τη μηχανή να περιστραφεί σε
λειτουργία κενού μέχρι να σταματήσει. Έτσι
καθαρίζεται το καρμπυρατέρ από το υπόλοιπο
καύσιμο.
5. Αφήστε τη μηχανή να κρυώσει (περ. 5 λεπτά)
6. Απομακρύντε το μπουζί (βλέπε εδάφιο 7.2.2).
7. Γεμίστε ένα κουταλάκι του γλυκού λάδι δίχρονου
κινητήρα στο θάλαμο καύσης. Τραβήξτε μερικές
φορές προσεκτικά το σχοινί εκκίνησης, για να
εμποτιστούν τα εσωτερικά εξαρτήματα με το
λάδι. Επανατοποθετήστε το μπουζί.
8. Καθαρίστε το εξωτερικό περίβλημα της
μηχανής.
9. Φυλάξτε τη μηχανή σε κρύο, στεγνό χώρο,
μακριά από πηγές ανάφλεξης και εύφλεκτες
ουσίες.
10. Κατά τη μεταφορά ή αποθήκευση να καλύπτετε
πάντα το κοπτικό σύστημα με το προστατευτικό
κάλυμμα.
Λιπάσματα και άλλα χημικά προϊόντα κήπου
περιέχουν συχνά ουσίες που επιταχύνουν τη
διάβρωση των μετάλλων. Μην αποθηκεύετε τη
μηχανή πάνω ή κοντά σε λιπάσματα ή άλλες
χημικές ουσίες.
Νέα θέση σε λειτουργία
1. Απομακρύντε το μπουζί.
2. Τραβήξτε το σχοινί εκκίνησης περισσότερες
φορές για να καθαρίσετε το θάλαμο καύσης από
κατάλοιπα λαδιού.
3. Καθαρίστε τις επαφές του μπουζί ή
τοποθετήστε νέο μπουζί.
4. Γεμίστε το ντεπόζιτο. Βλέπε το κεφάλαιο
Καύσιμο και λάδι.
5. Εκτελέστε τα βήματα 1-7 στο εδάφιο „Εκκίνηση
με ψυχρό κινητήρα“.
7.4 Παραγγελία ανταλλακτικών
Κατά την παραγγελία ανταλλακτικών να αναφέρετε
τα εξής:
앬 Τύπος της συσκευής
앬 Αριθμός είδους της συσκευής
앬 Αριθμός ταύτισης της συσκευής
앬 Αριθμός ανταλλακτικού
Θα βρείτε τις ισχύουσες τιμές και πληροφορίες
στην ιστοσελίδα www.isc-gmbh.info
Anleitung_GE_PH_2555_SPK7__ 11.02.14 10:23 Seite 81

GR
82
8. Διάθεση στα απορρίμματα και
επαναχρησιμοποίηση
Η συσκευή βρίσκεται σε μία συσκευασία προς
αποφυγή ζημιών κατά τη μεταφορά Αυτή η
συσκευασία αποτελείται από πρώτες ύλες και έτσι
μπορεί να επαναχρησιμοποιηθεί ή να ανακυκλωθεί.
Η συσκευή και τα εξαρτήματά της αποτελούνται από
διάφορα υλικά, όπως π.χ. μέταλλο και πλαστικά
υλικά. Να παραδίδετε τα ελαττωματικά εξαρτήματα
σε κέντρα συλλογής ειδικών απορριμμάτων.
Ενημερωθείτε στα ειδικά καταστήματα ή στην
διοίκηση της κοινότητας!
Anleitung_GE_PH_2555_SPK7__ 11.02.14 10:23 Seite 82

GR
83
Βλάβη Ενδεχόμενη αιτία Αποκατάσταση βλάβης
Δεν παίρνει μπροστά η συσκευή. Λάθος διαδικασία εκκίνησης. Ακολουθήστε τις οδηγίες για την
εκκίνηση
Καπνισμένο ή υγρό μπουζί Καθαρίστε το μπουζί ή
αντικαταστήστε το.
Λάθος ρύθμιση καρμπυρατέρ Συμβουλευθείτε συμβεβλημένο
συνεργείο εξυπηρέτησης πελατών
ή στείλτε τη συσκευή προς την
ISC-GmbH.
Η συσκευή παίρνει μπροστά, αλλά
δεν φτάνει την πλήρη ισχύ του.
Λάθος ρύθμιση του τσοκ Βάλτε το τσοκ στη θέση “ ”.
Ακάθαρτο φίλτρο αέρα αθαρισμός φίλτρου αέρα
Λάθος ρύθμιση καρμπυρατέρ Συμβουλευθείτε συμβεβλημένο
συνεργείο εξυπηρέτησης πελατών
ή στείλτε τη συσκευή προς την
ISC-GmbH.
Ανομοιόμορφη λειτουργία του
μοτέρ
Λάθος απόσταση ηλεκτροδίων του
μπουζί
Καθαρίστε το μπουζί και ρυθμίστε
την απόσταση των ηλεκτροδίων ή
αντικαταστήστε το.
Λάθος ρύθμιση καρμπυρατέρ Συμβουλευθείτε συμβεβλημένο
συνεργείο εξυπηρέτησης πελατών
ή στείλτε τη συσκευή προς την
ISC-GmbH.
Το μοτέρ καπνίζει υπερβολικά Λάθος μείγμα καυσίμου Χρησιμοποιήστε το σωστό μίγμα
καυσίμου (βλέπε πίνακα ανάμιξης
καυσίμου)
Λάθος ρύθμιση καρμπυρατέρ Συμβουλευθείτε συμβεβλημένο
συνεργείο εξυπηρέτησης πελατών
ή στείλτε τη συσκευή προς την
ISC-GmbH.
9. Αποκατάστηας βλάβης
Anleitung_GE_PH_2555_SPK7__ 11.02.14 10:23 Seite 83

84
Όροι εγγύησης:
Η εταιρεία iSC GmbH εγγυάται την επισκευή ελαττωμάτων ή την αντικατάσταση της συσκευής βάσει του
ακόλουθου πίνακα, χωρίς να θίγονται οι νόμιμες αξιώσεις εγγύησης.
Ως προς τα αναλώσιμα ή φθειρόμενα εξαρτήματα εγγυάται η εταιρεία iSC GmbH την αποκατάσταση του
ελαττώματος ή την αντικατάσταση μόνο εφόσον το ελάττωμα κοινοποιηθεί εντός 24 ωρών (αναλώσιμα
υλικά), 5 εργάσιμων ημερών (λείπουν τμήματα) ή 6 μηνών (αναλώσιμα εξαρτήματα) και αποδειχθεί με
απόδειξη αγοράς.
Σε περίπτωση ελαττωμάτων υλικού ή λειτουργίας παρακαλούμε σε περίπτωση εγγύησης να μας
παραδώσετε τη συσκευή μαζί με την επισυναπτόμενη κάρτα εγγύησης, την οποία πρέπει να έχετε
συμπληρώσει. Σημαντικό ρόλο παίζει μία αναλυτική περιγραφή του σφάλματος.
Για το λόγο αυτό παρακαλούμε να απαντήσετε στις ακόλουθες ερωτήσεις:
n Λειτούργησε σωστά η συσκευή ή είχε από την αρχή κάποιο ελάττωμα?
n Μήπως προσέξατε κάτι περίεργο προτού παρουσιαστεί το ελάττωμα (σύμπτωμα ή βλάβη)?
n Ποια δυσλειτουργία παρατηρείται στη συσκευή (κύριο σύμπτωμα)?
Περιγράψετε αυτή τη δυσλειτουργία.
Kατηγορία Παράδειγμα Εγγύηση
Ελαττώματα υλικού ή λειτουργίας 24 μήνες
Αναλώσιμα Μπουζί ανάφλεξης, φίλτρο αέρα 6 μήνες
Αναλώσιμα υλικά/αναλώσιμα
εξαρτήματα*
Αναλώσιμα υλικά
Μαχαίρι κοπής Εγγύηση μόνο σε ειδικό ελάττωμα
(24 ΄ρες μετά την αγορά /
ημερομηνία αγοράς)
Ελλείψεις 5 εργάσιμες ημέρες
GR
Anleitung_GE_PH_2555_SPK7__ 11.02.14 10:23 Seite 84

85
k erklärt folgende Konformität gemäß EU-Richtlinie und
Normen für Artikel
t explains the following conformity according to EU
directives and norms for the following product
p déclare la conformité suivante selon la directive CE et les
normes concernant l’article
C dichiara la seguente conformità secondo la direttiva UE e
le norme per l’articolo
N verklaart de volgende overeenstemming conform EU
richtlijn en normen voor het product
m declara la siguiente conformidad a tenor de la directiva y
normas de la UE para el artículo
O declara a seguinte conformidade, de acordo com a
directiva CE e normas para o artigo
l attesterer følgende overensstemmelse i medfør af
EU-direktiv samt standarder for artikel
U förklarar följande överensstämmelse enl. EU-direktiv och
standarder för artikeln
q vakuuttaa, että tuote täyttää EU-direktiivin ja standardien
vaatimukset
. tõendab toote vastavust EL direktiivile ja standarditele
j vydává následující prohlášení o shodě podle směrnice
EU a norem pro výrobek
X potrjuje sledečo skladnost s smernico EU in standardi za
izdelek
W vydáva nasledujúce prehlásenie o zhode podľa smernice
EÚ a noriem pre výrobok
A a cikkekhez az EU-irányvonal és Normák szerint a
következő konformitást jelenti ki
P deklaruje zgodność wymienionego poniżej artykułu z
następującymi normami na podstawie dyrektywy WE.
e декларира съответното съответствие съгласно
Директива на ЕС и норми за артикул
H paskaidro šādu atbilstību ES direktīvai un standartiem
G apibūdina šį atitikimą EU reikalavimams ir prekės
normoms
Q declară următoarea conformitate conform directivei UE
şi normelor pentru articolul
z δηλώνει την ακόλουθη συμμόρφωση σύμφωνα με την
Οδηγία ΕΚ και τα πρότυπα για το προϊόν
B potvrđuje sljedeću usklađenost prema smjernicama EU
i normama za artikl
f potvrđuje sljedeću usklađenost prema smjernicama EU
i normama za artikl
4 potvrđuje sledeću usklađenost prema smernicama EZ i
normama za artikal
T следующим удостоверяется, что следующие
продукты соответствуют директивам и нормам ЕС
1 проголошує про зазначену нижче відповідність
виробу директивам та стандартам ЄС на виріб
5 ја изјавува следната сообрзност согласно
ЕУ-директивата и нормите за артикли
Z Ürünü ile ilgili AB direktifleri ve normları gereğince
aşağıda açıklanan uygunluğu belirtir
L erklærer følgende samsvar i henhold til EU-direktivet
og standarder for artikkel
E Lýsir uppfyllingu EU-reglna og annarra staðla vöru
Konformitätserklärung
ISC GmbH · Eschenstraße 6 · D-94405 Landau/Isar
Benzin-Heckenschere GE-PH 2555 A (Einhell)
Standard references: EN 14982; EN ISO 10517
Landau/Isar, den 14.01.2014
First CE: 12 Archive-File/Record: NAPR004327
Art.-No.: 34.038.35 I.-No.: 11012 Documents registrar: Jehl Markus
Subject to change without notice Wiesenweg 22, D-94405 Landau/Isar
Weichselgartner/General-Manager Luo Yong/Product-Management
x
x
x
x
2006/42/EC
2004/26/EC
Emission No.: e11*97/68SA*2010/26*1329*04
2000/14/EC_2005/88/EC
Annex IV
Notified Body:
Notified Body No.:
Reg. No.:
Annex V
Annex VI
Noise: measured LWA= 104,5 dB (A); guaranteed LWA= 110 dB (A)
P = 0,85 KW; L/Ø = cm
Notified Body:
x
87/404/EC_2009/105/EC
2005/32/EC_2009/125/EC
2006/95/EC
2006/28/EC
2004/108/EC
2004/22/EC
1999/5/EC
97/23/EC
90/396/EC_2009/142/EC
89/686/EC_96/58/EC
2011/65/EC
Anleitung_GE_PH_2555_SPK7__ 11.02.14 10:23 Seite 85

86
Der Nachdruck oder sonstige Vervielfältigung von Dokumentation und
Begleitpapieren der Produkte, auch auszugsweise ist nur mit ausdrücklicher Zustimmung der ISC GmbH zulässig.
The reprinting or reproduction by any other means, in whole or in part,
of documentation and papers accompanying products is permitted only
with the express consent of ISC GmbH.
La réimpression ou une autre reproduction de la documentation et des
documents d’accompagnement des produits, même incomplète, n’est
autorisée qu’avec l’agrément exprès de l’entreprise ISC GmbH.
La ristampa o l’ulteriore riproduzione, anche parziale, della
documentazione o dei documenti d’accompagnamento dei prodotti è
consentita solo con l’esplicita autorizzazione da parte della ISC GmbH.
Eftertryk eller anden form for mangfoldiggørelse af skriftligt materiale,
ledsagepapirer indbefattet, som omhandler produkter, er kun tilladt
efter udtrykkelig tilladelse fra ISC GmbH.
Eftertryck eller annan duplicering av dokumentation och medföljande
underlag för produkter, även utdrag, är endast tillåtet med uttryckligt
tillstånd från ISC GmbH.
Nadruk of andere reproductie van documentatie en geleidepapieren
van de producten, geheel of gedeeltelijk, enkel toegestaan mits
uitdrukkelijke toestemming van ISC GmbH.
La reimpresión o cualquier otra reproducción de documentos e
información adjunta a productos, incluida cualquier copia, sólo se
permite con la autorización expresa de ISC GmbH.
A reprodução ou duplicação, mesmo que parcial, da documentação e
dos anexos dos produtos, carece da autorização expressa da ISC
GmbH.
X
Ponatis ali druge vrste razmnoževanje dokumentacije in spremljajočih
dokumentov proizvodov proizvajalca, tudi v izvlečkih, je dovoljeno
samo z izrecnim soglasjem firme ISC GmbH.
z
∏ ·У·Щ‡ˆЫЛ ‹ ¿ППЛ ·У··Ъ·БˆБ‹ ЩВОМЛЪИТЫВˆУ О·И Ы˘УФ‰В˘ЩИОТУ
К˘ПП·‰›ˆУ ЩˆУ ЪФ˚fiУЩˆУ ЩЛ˜ ВЩ·ИЪВ›·˜, ·ОfiМЛ О·И ЫВ
·ФЫ¿ЫМ·Щ·, ВИЩЪ¤ВЩ·И МfiУФ МВЩ¿ ·fi ЪЛЩ‹ ¤БОЪИЫЛ ЩЛ˜
ВЩ·ИЪВ›·˜ ISC GmbH.
Anleitung_GE_PH_2555_SPK7__ 11.02.14 10:23 Seite 86

87
Technische Änderungen vorbehalten
Technical changes subject to change
Sous réserve de modifications
Con riserva di apportare modifiche tecniche
Der tages forbehold för tekniske ændringer
Förbehåll för tekniska förändringar
Technische wijzigingen voorbehouden
Salvo modificaciones técnicas
Salvaguardem-se alterações técnicas
X Tehnične spremembe pridržane.
√ О·Щ·ЫОВУ·ЫЩ‹˜ ‰И·ЩЛЪВ› ЩФ ‰ИО·›ˆМ· ЩВ¯УИОТУ ·ПП·БТУ
Anleitung_GE_PH_2555_SPK7__ 11.02.14 10:23 Seite 87

88
Anleitung_GE_PH_2555_SPK7__ 11.02.14 10:23 Seite 88

89
t
GUARANTEE CERTIFICATE
Dear Customer,
All of our products undergo strict quality checks to ensure that they reach you in perfect condition. In the unlikely
event that your device develops a fault, please contact our service department at the address shown on this
guarantee card. You can also contact us by telephone using the service number shown. Please note the
following terms under which guarantee claims can be made:
1. These guarantee conditions regulate additional guarantee services. Your statutory guarantee claims are not
affected by this guarantee. Our guarantee is free of charge to you.
2. Our guarantee only covers defects suffered by the device which have been verifiably caused by a material
or manufacturing fault and is limited to the rectification of such defects or the replacement of the device at
our discretion.
Please note that our devices are not designed for use in commercial, trade or professional applications. A
guarantee contract will not be created if the device has been used by commercial, trade or industrial
business or has been exposed to similar stresses during the guarantee period.
3. The following are not covered by our guarantee:
- Damage to the device caused by a failure to follow the assembly instructions or due to incorrect
installation, a failure to follow the operating instructions (for example connecting it to an incorrect mains
voltage or current type) or a failure to follow the maintenance and safety instructions or by exposing the
device to abnormal environmental conditions or by lack of care and maintenance.
- Damage to the device caused by abuse or incorrect use (for example overloading the device or the use or
unapproved tools or accessories), ingress of foreign bodies into the device (such as sand, stones or dust,
transport damage), the use of force or damage caused by external forces (for example by dropping it).
- Damage to the device or parts of the device caused by normal or natural wear or tear or by normal use of
the device.
4. The guarantee is valid for a period of 24 months starting from the purchase date of the device. Guarantee
claims should be submitted before the end of the guarantee period within two weeks of the defect being
noticed. No guarantee claims will be accepted after the end of the guarantee period. The original guarantee
period remains applicable to the device even if repairs are carried out or parts are replaced. In such cases,
the work performed or parts fitted will not result in an extension of the guarantee period, and no new
guarantee will become active for the work performed or parts fitted. This also applies if an on-site service is
used.
5. Please report the defective device on the following internet address to register your guarantee claim:
www.isc-gmbh.info. If the defect is covered by our guarantee, then the item in question will either be repaired
immediately and returned to you or we will send you a new replacement device.
Of course, we are also happy offer a chargeable repair service for any defects which are not covered by the
scope of this guarantee or for units which are no longer covered. To take advantage of this service, please send
the device to our service address.
Also refer to the restrictions of this warranty concerning wear parts, consumables and missing parts as set out in
the service information in these operating instructions.
Anleitung_GE_PH_2555_SPK7__ 11.02.14 10:23 Seite 89

90
p
BULLETIN DE GARANTIE
Chère Cliente, Cher Client,
nos produits sont soumis à un contrôle de qualité très strict. Si toutefois, il arrivait que cet appareil ne fonctionne
pas parfaitement, nous en sommes désolés et nous vous prions de vous adresser à notre service après-vente à
l'adresse indiquée sur le bon de garantie. Nous nous tenons également volontiers à votre disposition par
téléphone au numéro de service après-vente indiqué. La garantie est valable dans les conditions suivantes :
1. Ces conditions de garantie gèrent des prestations de garantie supplémentaires. Vos droits légaux en
matière de garantie restent inchangés. Notre prestation de garanti est gratuite pour vous.
2. La prestation de garantie concerne uniquement les défauts de l'appareil dont il est prouvé qu'ils résultent
d'un défaut de matériau ou de fabrication et se limite en fonction de notre décision soit à l'élimination de tels
défauts sur l'appareil, soit au remplacement de l'appareil.
Veillez au fait que nos appareils, conformément au règlement, n'ont pas été conçus pour être utilisés dans
un environnement professionnel, industriel ou artisanal. Il n'y a donc pas de contrat de garantie quand
l'appareil a été utilisé professionnellement, artisanalement ou par des sociétés industrielles ou exposé à
une sollicitation semblable pendant la durée de la garantie.
3. Sont exclus de notre garantie :
- les dommages liés au non-respect des instructions de montage ou en raison d'une installation incorrecte,
au non-respect du mode d'emploi (en raison par ex. du branchement de l'appareil sur la tension de réseau
ou le type de courant incorrect), au non-respect des dispositions de maintenance et de sécurité ou résultant
d'une exposition de l'appareil à des conditions environnementales anormales ou d'un manque d'entretien et
de maintenance.
- les dommages résultant d'une utilisation abusive ou non conforme (comme par ex. une surcharge de
l'appareil ou une utilisation d'outils ou d'accessoires non autorisés), de la pénétration d'objets étrangers
dans l'appareil (comme par ex. du sable, des pierres ou de la poussière), de l'utilisation de la force ou de la
violence (comme par ex. les dommages liés aux chutes).
- les dommages sur l'appareil ou des parties de l'appareil résultant de l'usure normale liée à l'utilisation de
l'appareil ou de toute autre usure naturelle.
4. La durée de garantie est de 24 mois et débute à la date d'achat de l'appareil. Les droits à la garantie doivent
être revendiqués avant l'expiration de la durée de garantie dans un délai de deux semaines après avoir
constaté le défaut. La revendication de droits à la garantie après expiration de la durée de garantie est
exclue. La réparation ou l'échange de l'appareil n'entraîne ni une extension de la durée de garantie ni le
début d'une nouvelle durée de garantie pour cet appareil ou toute autre pièce de rechange installée sur
l'appareil. Cela est valable également dans le cas d'une intervention du service après-vente à domicile.
5. Pour faire valoir vos droits à la garantie, veuillez enregistrer l'appareil défectueux à l'adresse suivante :
www.isc-gmbh.info. Si le défaut de l'appareil est inclut dans la garantie, vous recevrez sans délai un appareil
réparé ou un nouvel appareil.
Bien entendu, nous réparons volontiers les défauts de votre appareil qui ne sont pas ou plus compris dans
l'étendue de la garantie contre le remboursement des frais de réparation. Pour cela, veuillez envoyer l'appareil à
notre adresse de service après-vente.
Pour les pièces d'usure, de consommation et manquantes, nous renvoyons aux restrictions de cette garantie
conformément aux informations du service après-vente de ce mode d'emploi.
Anleitung_GE_PH_2555_SPK7__ 11.02.14 10:23 Seite 90

91
C
CERTIFICATO DI GARANZIA
Gentili clienti,
i nostri prodotti sono soggetti ad un rigido controllo di qualità. Se l'apparecchio non dovesse tuttavia funzionare
correttamente, ci scusiamo e vi preghiamo di rivolgervi al nostro servizio di assistenza clienti all'indirizzo
indicato in questa scheda di garanzia. Siamo a vostra disposizione anche telefonicamente al numero del
Servizio Assistenza indicato. Per la rivendicazione dei diritti di garanzia vale quanto segue:
1. Queste condizioni di garanzia regolano ulteriori prestazioni di garanzia. La presente garanzia non tocca i
vostri diritti al ricorso in garanzia previsti dalla legge. Le nostre prestazioni di garanzia sono per voi gratuite.
2. La prestazione di garanzia riguarda esclusivamente i difetti dell'apparecchio provatamente riconducibili a
errori del materiale o di produzione ed è limitata, a nostra discrezione, all'eliminazione di questi difetti o alla
sostituzione dell'apparecchio.
Tenete presente che i nostri apparecchi non sono stati costruiti per l'impiego artigianale, professionale o
imprenditoriale. Pertanto un contratto di garanzia non viene concluso se l'apparecchio è stato usato entro il
periodo di garanzia in attività artigianali, imprenditoriali o industriali o se è stato sottoposto a sollecitazioni
equivalenti.
3. Sono esclusi dalla nostra garanzia:
- Danni all'apparecchio causati dalla mancata osservanza delle istruzioni di montaggio o per
un'installazione non corretta, dalla mancata osservanza delle istruzioni per l'uso (come ad es. collegamento
a una tensione di rete o a un tipo di corrente non corretti), dalla mancata osservanza delle norme relative
alla manutenzione e alla sicurezza, dall'esposizione dell'apparecchio a condizioni ambientali anomale o per
la mancata esecuzione di pulizia e manutenzione.
- Danni all'apparecchio dovuti a usi impropri o illeciti (come per es. sovraccarico dell'apparecchio o utilizzo
di utensili di ricambio o accessori non consentiti), alla penetrazione di corpi estranei nell'apparecchio (come
per es. sabbia, pietre o polvere, danni dovuti al trasporto), all'impiego della forza o a influssi esterni (come
per es. danni causati da caduta).
- Danni all'apparecchio o a parti di esso da ricondurre a un'usura comune, dovuta all'uso o di altro tipo
naturale.
4. Il periodo di garanzia è 24 mesi e inizia a partire dalla data di acquisto dell'apparecchio. I diritti di garanzia
devono essere fatti valere prima della scadenza del periodo di garanzia, entro due settimane dopo avere
accertato il difetto. È esclusa la rivendicazione di diritti di garanzia dopo la scadenza del relativo periodo. La
riparazione o la sostituzione dell'apparecchio non comporta una proroga del periodo di garanzia e con
questa prestazione per l'apparecchio o per pezzi di ricambio eventualmente installati non inizia un nuovo
periodo di garanzia. Ciò vale anche nel caso in cui si ricorra a un servizio sul posto.
5. Per rivendicare il diritto di garanzia vi preghiamo di denunciare l'apparecchio difettoso sul sito internet:
www.isc-gmbh.info. Se il difetto dell'apparecchio rientra nella nostra prestazione di garanzia, ricevete
prontamente l'apparecchio riparato o un apparecchio nuovo.
Naturalmente effettuiamo a pagamento anche riparazioni sull'apparecchio che non rientrano o non rientrano più
nella garanzia. A tale scopo inviate l'apparecchio all'indirizzo del nostro Centro Assistenza.
Per parti mancanti, di consumo e soggette a usura rimandiamo alle limitazioni di questa garanzia secondo le
informazioni sul Servizio Assistenza di queste istruzioni per l'uso.
Anleitung_GE_PH_2555_SPK7__ 11.02.14 10:23 Seite 91

92
GARANTIBEVIS
Kære kunde!
Vore produkter er underlagt en streng kvalitetskontrol. Hvis produktet alligevel på et tidspunkt skulle udvise fejl,
beklager vi naturligvis dette, i dette tilfælde beder vi dig kontakte vores kundeservice på adressen, som er anført
på dette garantibevis. Du kan naturligvis også ringe til os på det anførte servicenummer. For indfrielse af
garantikrav gælder følgende:
1. Nærværende garanti fastsætter betingelserne for udvidede garantiydelser. Garantibestemmelser fastsat ved
lov berøres ikke af nærværende garanti. Vores garantiydelse er gratis.
2. Garantiydelsen dækker udelukkende mangler på produktet, der bevisligt skyldes materiale- eller
produktionsfejl, og vi har ret til at vælge, om sådanne mangler afhjælpes på produktet, eller om produktet
udskiftes.
Bemærk, at vore produkter ikke er konstrueret til erhvervsmæssig, håndværksmæssig eller faglig brug.
Garantien dækker således ikke forhold, hvor produktet er blevet brugt i erhvervsmæssige,
håndværksmæssige eller faglige virksomheder eller er blevet udsat for lignende belastning.
3. Garantien dækker ikke følgende:
- Skader på produktet som følge af tilsidesættelse af montagevejledningens anvisninger eller som følge af
usagkyndig installation, tilsidesættelse af brugsanvisningen (f.eks. tilslutning til forkert netspænding eller
strømtype) eller tilsidesættelse af vedligeholdelses- og sikkerhedsforskrifter eller som følge af at produktet
udsættes for ikke normale miljøbetingelser eller manglende pleje og vedligeholdelse.
- Skader på produktet som følge af misbrug eller usagkyndig anvendelse (f.eks. overbelastning af produktet
eller brug af værktøj eller tilbehør, som ikke er godkendt), indtrængen af fremmedlegemer i produktet (f.eks.
sand, sten eller støv, transportskader), brug af vold eller eksterne påvirkninger udefra (f.eks. fordi produktet
tabes).
- Skader på produktet eller dele af produktet, der skyldes almindelig brug, normalt eller andet naturligt slid.
4. Garantiperioden udgør 24 måneder at regne fra købsdatoen. Garantikrav skal gøres gældende inden
garantiperiodens udløb og inden for to uger, efter at defekten er blevet konstateret. Garantikrav kan ikke
gøres gældende efter garantiperiodens udløb. Reparation eller udskiftning af produktet medfører ikke
forlængelse af garantiperioden, heller ikke for eventuelt indbyggede reservedele. Dette gælder også
servicearbejder, der foretages på stedet.
5. Hvis du ønsker at gøre brug af garantien, bedes du melde det defekte produkt til følgende adresse: www.isc-
gmbh.info. Er defekten omfattet af garantien, vil produktet omgående blive repareret og returneret, eller du
vil modtage et helt nyt.
Mod betaling udbedrer vi naturligvis også gerne defekter på produktet, som ikke/ikke længere er omfattet af
garantien. Du skal blot indsende produktet til vores serviceadresse.
Hvad angår slid- og forbrugsdele samt manglende dele henviser vi til garantiens indskrænkninger i henhold til
serviceinformationerne i nærværende betjeningsvejledning.
Anleitung_GE_PH_2555_SPK7__ 11.02.14 10:23 Seite 92

93
U
GARANTIBEVIS
Bästa kund,
våra produkter genomgår en sträng kvalitetskontroll. Om denna produkt mot förmodan inte fungerar på rätt sätt,
beklagar vi detta och ber dig att kontakta vår serviceavdelning under adressen som anges på garantikortet. Vi
står även gärna till tjänst på telefon under servicenumret som anges nedan. Följande punkter gäller för att du
ska kunna göra anspråk på garantin:
1. I dessa garantivillkor regleras extra garantitjänster. Garantianspråk som regleras enligt lag påverkas inte av
denna garanti. Våra garantitjänster är gratis för dig.
2. Garantitjänsterna omfattar endast sådana brister i produkten som bevisligen kan härledas till material- eller
tillverkningsfel. Vi avgör om sådana brister i produkten ska åtgärdas eller om produkten ska bytas ut.
Tänk på att våra produkter endast får användas till ändamålsenligt syfte och inte har konstruerats för
kommersiell, hantverksmässig eller yrkesmässig användning. Ett garantiavtal sluts därför ej om produkten
inom garantitiden har använts inom yrkesmässiga, hantverksmässiga eller industriella verksamheter eller
har utsatts för liknande påkänning.
3. Garantin omfattar inte:
- Skador på produkten som kan härledas till att monteringsanvisningen missaktats eller på grund av felaktig
installation, åsidosatt bruksanvisning (t ex anslutning till felaktig nätspänning eller strömart), missaktade
underhålls- och säkerhetsbestämmelser, om produkten utsätts för onormala miljöfaktorer eller bristfällig
skötsel och underhåll.
- Skador på produkten som kan härledas till missbruk eller ej ändamålsenlig användning (t ex
överbelastning av produkten eller användning av ej godkända insatsverktyg eller tillbehör), främmande
partiklar som har trängt in i produkten (t ex sand, sten eller damm, transportskador), yttre våld eller yttre
påverkan (t ex skador efter att produkten fallit ned).
- Skador på produkten eller delar av produkten som kan härledas till bruksmässigt, normalt eller för övrigt
naturligt slitage .
4. Garantitiden uppgår till 24 månader och gäller från datumet när produkten köptes. Medan garantitiden
fortfarande gäller ska anspråk på garanti ställas inom två veckor efter att defekten fastställdes. Det är inte
möjligt att ställa anspråk på garanti efter att garantitiden har löpt ut. Garantitiden förlängs inte när produkten
repareras eller byts ut, dessutom medför sådana arbeten inte att en ny garantitid börjar gälla för produkten
eller för ev. reservdelar som har monterats in. Detta gäller även vid hembesök.
5. Anmäl den defekta produkten på följande webbplats för att göra anspråk på garantin: www.isc-gmbh.info.
Om defekten i produkten täcks av våra garantitjänster, får du genast en reparerad eller ny produkt.
Givetvis kan vi även, mot debitering, åtgärda skador som antingen inte täcks av garantin eller som har uppstått
efter garantitidens slut. Skicka in produkten till nedanstående serviceadress.
För slitage- och förbrukningsdelar samt för delar som saknas hänvisar vi till begränsningarna i garantin enligt
serviceinformationen som anges i denna bruksanvisning.
Anleitung_GE_PH_2555_SPK7__ 11.02.14 10:23 Seite 93

94
N
GARANTIEBEWIJS
Geachte klant,
onze producten worden onderworpen aan een strenge kwaliteitscontrole. Mocht dit apparaat echter ooit niet
naar behoren functioneren, spijt dit ons ten zeerste en vragen u zich te wenden tot onze servicedienst onder het
adres vermeld op dit garantiebewijs. Wij staan ook graag telefonisch tot uw dienst via het vermelde
servicetelefoonnummer. Voor eisen in verband met het recht garantie geldt het volgende:
1. Deze garantievoorwaarden regelen bijkomende garantieprestaties. Uw wettelijke garantieclaims blijven
onaangetast door deze garantie. Onze garantieprestatie is voor u gratis.
2. De garantie geldt uitsluitend voor gebreken aan het apparaat die aantoonbaar vallen te herleiden tot een
materiaal- of fabricagefout, en is naar ons goeddunken beperkt tot het verhelpen van zulke defecten of de
vervanging van het apparaat.
Wij wijzen erop dat onze apparaten overeenkomstig hun bestemming niet ontworpen zijn voor commercieel,
ambachtelijk of industrieel gebruik. Van een garantiecontract is derhalve geen sprake, als het apparaat
binnen de garantieperiode in commerciële, ambachtelijke of industriële bedrijven werd ingezet of aan een
daarmee gelijk te stellen belasting werd blootgesteld.
3. Van onze garantie zijn uitgesloten:
- Schade aan het apparaat als gevolg van niet-inachtneming van de montagehandleiding of op grond van
ondeskundige installatie, als gevolg van niet-inachtneming van de gebruiksaanwijzing (zoals bijv. door
aansluiting aan een verkeerde netspanning of stroomsoort) of niet-inachtneming van de onderhouds- en
veiligheidsvoorschriften, door blootstelling van het apparaat aan abnormale omgevingsvoorwaarden of door
nalatig onderhoud en verzorging.
- Schade aan het apparaat als gevolg van misbruik of ondeskundige toepassingen (zoals bijv. overbelasting
van het apparaat of de inzet van niet toegelaten gereedschappen of toebehoren), binnendringen van
vreemde voorwerpen in het apparaat (zoals bijv. zand, stenen of stof, transportschade), gebruik van geweld
of als gevolg van externe invloeden (zoals bijv. schade door vallen).
- Schade aan het apparaat of aan delen van het apparaat die valt te herleiden tot slijtage als gevolg van
gebruik, en als gevolg van normale of andere natuurlijke slijtage.
4. De garantieperiode bedraagt 24 maanden en gaat in op de datum van aankoop van het apparaat.
Garantieclaims dienen voor het verloop van de garantieperiode binnen de twee weken na het vaststellen
van het defect geldend te worden gemaakt. Het indienen van garantieclaims na verloop van de
garantieperiode is uitgesloten. De herstelling of vervanging van het apparaat leidt niet tot een verlenging van
de garantieperiode noch wordt door deze prestatie een nieuwe garantieperiode voor het apparaat of voor
eventueel ingebouwde wisselstukken op gang gebracht. Dit geldt ook bij het ter plaatse uitvoeren van een
serviceactiviteit.
5. Gelieve om een garantieclaim geldend te maken het defecte apparaat aan te melden onder: www.isc-
gmbh.info. Valt het defect van het apparaat binnen onze garantieprestatie, dan bezorgen wij u per
omgaande een hersteld of nieuw apparaat terug.
Uiteraard staan wij ook tot u dienst om, mits betaling van de kosten, defecten van het apparaat te verhelpen die
buiten de garantieomvang vallen. Te dien einde stuurt u het apparaat aan ons serviceadres op.
Voor slijtstukken, verbruiksmateriaal en ontbrekende onderdelen wordt verwezen naar de beperkingen van deze
garantie conform de service-informatie van deze handleiding.
Anleitung_GE_PH_2555_SPK7__ 11.02.14 10:23 Seite 94

95
m
CERTIFICADO DE GARANTÍA
Estimado cliente:
Nuestros productos están sometidos a un estricto control de calidad. No obstante, lamentaríamos que este
aparato dejara de funcionar correctamente, en tal caso, le rogamos que se dirija a nuestro servicio de atención
al cliente en la dirección indicada en la parte inferior de la presente tarjeta de garantía. Con mucho gusto le
atenderemos también telefónicamente en el número de servicio indicado a continuación. Para hacer válido el
derecho de garantía, proceda de la siguiente forma:
1. Estas condiciones de garantía regulan prestaciones de la garantía adicionales. Las prestaciones de
garantía que le corresponden conforme a ley no se ven afectadas por la presente. Nuestra prestación de
garantía es gratuita para usted.
2. La prestación de garantía se extiende exclusivamente a defectos que se pueda demostrar que han sido
ocasionados por fallos de material o de producción y está limitada, según nosotros mismo decidamos, a la
reparación de los mismos o al cambio del aparato.
Es preciso tener en consideración que nuestro aparato no está indicado para un uso comercial, industrial o
en taller. Por lo tanto, no procederá un contrato de garantía cuando se utilice el aparato dentro del periodo
de garantía en zonas industriales, comerciales o talleres, así como actividades similares.
3. Nuestra garantía no cubre:
- Daños en el aparato ocasionados por la no observancia de las instrucciones de montaje o por una
instalación no profesional, no observancia de las instrucciones de uso (como, p. ej., conexión a una tensión
de red o corriente no indicada) o la no observancia de las disposiciones de mantenimiento y seguridad o
por la exposición del aparato a condiciones anormales del entorno o por la falta de cuidado o
mantenimiento.
- Daños en el aparato ocasionados por aplicaciones impropias o indebidas (como, p. ej., sobrecarga del
aparato o uso de herramientas o accesorios no homologados), introducción de cuerpos extraños en el
aparato (como, p. ej., arena, piedras o polvo, daños producidos por el transporte), uso violento o influencias
externa (como, p. ej., daños por caídas).
- Daños en el aparato o en piezas del aparato provocados por el desgaste natural, habitual o producido por
el uso.
4. El periodo de garantía es de 24 meses y comienza en la fecha de la compra del aparato. El derecho de
garantía debe hacerse válido, antes de finalizado el plazo de garantía, dentro de un periodo de dos
semanas una vez detectado el defecto. El derecho de garantía vence una vez transcurrido el plazo de
garantía. La reparación o cambio del aparato no conllevará ni una prolongación del plazo de garantía ni un
nuevo plazo de garantía ni para el aparato ni para las piezas de repuesto montadas. Esto también se aplica
en el caso de un servicio in situ.
5. Para hacer efectivo su derecho a garantía, registre su aparato defectuoso en: www.isc-gmbh.info. Si nuestra
prestación de garantía incluye el defecto aparecido en el aparato, recibirá de inmediato un aparato
reparado o nuevo de vuelta.
Naturalmente, también solucionaremos los defectos del aparato que no se encuentren comprendidos o ya no
se encuentren comprendidos en la garantía, en este caso contra reembolso de los costes. Para ello, envíe el
aparato a nuestra dirección de servicio técnico.
Para piezas de desgaste, de repuesto y falta de piezas nos remitimos a las limitaciones de esta garantía
conforme a la información de servicio de este manual de instrucciones.
Anleitung_GE_PH_2555_SPK7__ 11.02.14 10:23 Seite 95

96
O
CERTIFICADO DE GARANTIA
Estimado(a) cliente,
os nossos produtos são submetidos a um rigoroso controlo de qualidade. Se, ainda assim, o aparelho não
funcionar nas devidas condições, lamentamos esse facto e pedimos-lhe que se dirija ao nosso serviço de
assistência técnica na morada indicada no presente certificado de garantia. Se preferir, também pode
contactar-nos telefonicamente através do número de assistência técnica indicado. O exercício dos direitos de
garantia está sujeito às seguintes condições:
1. As presentes condições de garantia regem as prestações de garantia complementar e não afectam os seus
direitos legais de garantia. O nosso serviço de garantia é prestado gratuitamente.
2. O serviço de garantia cobre exclusivamente as deficiências do aparelho decorrentes de erros de material
ou de fabrico comprovados, e está, por nossa opção, limitado à eliminação de tal falta no aparelho ou à
substituição do mesmo.
Chamamos a atenção para o facto de os nossos aparelhos não terem sido concebidos para uso comercial,
artesanal ou profissional. Não haverá, por isso, lugar a um contrato de garantia no caso de o aparelho ter
sido utilizado, dentro do período de garantia, em empresas do sector comercial, artesanal ou industrial ou
actividades equiparáveis.
3. Excluídos pela nossa garantia estão:
- Danos no aparelho resultantes da inobservância das instruções de montagem ou de uma instalação
incorrecta, da inobservância do manual de instruções (como p. ex. a ligação a uma tensão de rede ou tipo
de corrente errada) ou da inobservância das disposições de segurança ou da exposição do aparelho a
condições ambientais anormais ou de uma conservação e manutenção insuficientes.
- Danos no aparelho resultantes de utilizações abusivas ou indevidas (como p. ex. uma sobrecarga do
aparelho ou utilização de ferramentas de trabalho ou acessórios não autorizados), a penetração de corpos
estranhos no aparelho (como p. ex. areia, pedras ou pó, danos de transporte), o uso de força ou impactos
externos (como p. ex. danos resultantes de quedas).
- Danos no aparelho ou nas peças do aparelho associados a um desgaste decorrente do uso, um desgaste
natural habitual ou de outro tipo.
4. O período de garantia é de 24 meses a contar da data de compra do aparelho. Os direitos de garantia
devem ser reclamados dentro do período de garantia, no prazo de duas semanas após ter sido detectado o
defeito. Está excluída a reclamação de direitos de garantia após o termo do período de garantia. A
reparação ou a substituição do aparelho não implica o prolongamento do período de garantia nem dá
origem à contagem de um novo período de garantia para o aparelho ou para eventuais peças
sobressalentes montadas no mesmo. O mesmo se aplica no caso de a assistência técnica ter sido
prestada no local.
5. Para activar a garantia, denuncie o aparelho defeituoso em: www.isc-gmbh.info. Se o defeito do aparelho
estiver abrangido pelo nosso serviço de garantia, ser-lhe-á imediatamente enviado um aparelho novo ou
reparado.
Naturalmente, também teremos todo o gosto em efectuar reparações que não estão, ou deixaram de estar,
abrangidas pelo serviço de garantia. Nesse caso, terá de suportar os custos da reparação. Para este efeito,
deverá enviar o aparelho para a morada do nosso serviço de assistência técnica.
Para peças de desgaste, consumíveis e em falta, consulte as restrições desta garantia, de acordo com as
informações do serviço de assistência técnica deste manual de instruções.
Anleitung_GE_PH_2555_SPK7__ 11.02.14 10:23 Seite 96

97
X
GARANCIJSKI LIST
Spoštovana stranka!
za naše izdelke izvajamo strogo končno kontrolo kakovosti. Če ta naprava kljub temu ne deluje brezhibno, to
zelo obžalujemo in vas prosimo, da se obrnete na našo servisno službo na naslovu, ki je naveden na tej
garancijski kartici. Z veseljem vam bomo svetovali tudi po telefonu na navedeni številki servisne službe. Za
uveljavljanje garancijskih zahtevkov velja naslednje:
1. Ti garancijski pogoji urejajo dodatne garancijske storitve. Ta garancija ne vpliva na vaše zakonske
garancijske zahtevke. Naše garancijske storitve so za vas brezplačne.
2. Garancijske storitve se nanašajo izključno na napake na napravi, ki dokazljivo temeljijo na napaki v
materialu ali izdelavi, in jih lahko po izbiri popravimo ali pa napravo zamenjamo.
Prosimo, upoštevajte, da naše naprave niso bile zasnovane za uporabo v poklicu, obrti ali za poklicno
uporabo. Garancijska pogodba tako ne nastane, če napravo v garancijskem obdobju uporabljate za v
obrtnih, rokodelskih ali industrijskih obratih ali če je bila izpostavljena obremenitvam, ki so temu
enakovredna.
3. Iz garancije so izvzeti:
- Škoda na napravi, ki je nastala zaradi neupoštevanja navodil za montažo ali zaradi nestrokovne inštalacije,
neupoštevanja navodil za uporabo (kot npr. s priključitvijo na napačno omrežno napetost ali vrsto toka),
neupoštevanja navodil za vzdrževanje in varnostnih določil ali zaradi izpostavitve naprave nenormalnim
okoljskim pogojem ali zaradi neustrezne nege in vzdrževanja.
- Škoda na napravi, ki je nastala zaradi nenamenske ali nestrokovne uporabe (npr. zaradi preobremenitve
naprave ali uporabe v orodjih ali opremi, za katera ni odobrena), vdor tujkov v napravo (npr. peska, kamnov
ali prahu, poškodb pri transportu), uporabe sile ali zunanje sile (npr. poškodbe pri padcih).
- Škode na napravi ali delih naprave, ki je nastala kot posledica uporabe oz. običajne ali drugačne obrabe.
4. Garancijsko obdobje traja 24 mesecev in se začne z datumom nakupa naprave. Garancijske zahtevke je
treba uveljaviti pred potekom garancijskega obdobja v roku dveh tednov, ko opazite okvaro. Uveljavljanje
garancijskih zahtevkov po poteku garancijskega obdobja je izključeno. Popravilo ali menjava naprave ne
podaljša garancijskega obdobja, niti ne predstavlja začetka novega garancijskega obdobja za storitev,
izvedeno na napravi ali za morebitne vgrajene nadomestne dele. To velja tudi pri servisih na kraju samem.
5. Za uveljavljanje vašega garancijskega zahtevka okvarjeno napravo prijavite na: www.isc-gmbh.info. Če sodi
okvara v obseg garancijske storitve, vam bomo takoj vrnili popravljeno ali novo napravo.
Seveda bomo proti plačilu z veseljem odpravili tudi okvare na napravi, ki v garancijski obseg ne sodijo ali ne
sodijo več. Napravo nam pošljite na spodaj naveden naslov servisa.
Opozarjamo na omejitve v okviru te garancije za obrabne, potrošne in manjkajoče dele v skladu s servisnimi
informacijami, opisanimi v teh navodilih za uporabo.
Anleitung_GE_PH_2555_SPK7__ 11.02.14 10:23 Seite 97

98
z
ΕΓΓΥΗΣΗ
Αξιότιμη πελάτισα, αξιότιμε πελάτη,
τα προϊόντα μας υπόκεινται σε αυστηρό έλεγχο ποιότητας. Εάν η συσκευή αυτή παρ΄όλα αυτά κάποτε δεν
λειτουργήσει άψογα, λυπούμαστε πολύ και σας παρακαλούμε να αποτανθείτε προς το τμήμα μας
εξυπηρέτησης πελατών στην διεύθυνση που αναφέρεται στην κάρτα αυτή. Ευχαρίστως είμαστε και
τηλεφωνικά στη διάθεσή σας στον αριθμό σέρβις που αναφέρεται στην κάρτα εγγύησης. Για την αξίωση της
εγγύησης ισχύουν τα εξής:
1. Αυτοί οι όροι εγγύησης ρυθμίζουν πρόσθετες παροχές εγγύησης. Δεν θίγονται από την εγγύηση αυτή οι
νόμιμες αξιώσεις σας εγγύησης. Η εγγύησή μας σας παρέχεται δωρεάν.
2. Η εγγύηση καλύπτει μόνο ελαττώματα της συσκευής που οφείλονται αποδεδειγμένα σε σφάλμα υλικού ή
παραγωγής και περιορίζεται κατά την κρίση μας σε αποκατάσταση αυτών των ελαττωμάτων ή σε
αντικατάσταση της συσκευής σας.
Παρακαλούμε να προσέξετε πως οι συσκευές μας δεν προορίζονται για επαγγελματική, βιοτεχνική ή
βιομηχανική χρήση. Για το λόγο αυτό δεν συνάπτεται σύμβαση εγγύησης σε περίπτωση κατά την οποία η
συσκευή χρησιμοποιήθηκε κατά τη διάρκεια της εγγύησης σε βιομηχανικές ή βιοτεχνικές επιχειρήσεις ή
εάν εκτέθηκε σε παρόμοια εντατική χρήση.
3. Από την εγγύησή μας εξαιρούνται τα εξής:
- Βλάβες της συσκευής που οφείλονται σε μη τήρηση των οδηγιών συναρμολόγησης ή σε όχι σωστή
εγκατάσταση, μη τήρηση των οδηγιών χρήσης (όπως π.χ. σύνδεση σε εσφαλμένη τάση ή σε λάθος είδος
ρεύματος) ή σε μη τήρηση των όρων συντήρησης και ασφαλείας ή σε περίπτωση έκθεσης της συσκευής
σε ασυνήθιστες καιρικές συνθήκες ή σε έλλειψη φροντίδας και συντήρησης.
- Βλάβες της συσκευής που οφείλονται σε καταχρηστική ή εσφαλμένη χρήση (όπως π.χ. υπερφόρτωση
της συσκευής ή χρήση μη εγκεκριμένων εργαλείων ή αξεσουάρ), σε είσοδο ξένων αντικειμένων στη
συσκευή (όπως π.χ. άμμος, πέτρες ή σκόνη, βλάβες μεταφοράς), άσκηση βίας ή ξένη επέμβαση (όπως π.
χ. βλάβη από πτώση).
- Βλάβες της συσκευής ή τμημάτων της συσκευής που οφείλονται σε συνήθη ή φυσική φθορά.
4. Η διάρκεια της εγγύησης ανέρχεται σε 24 μήνες και αρχίζει από την ημερομηνία της αγοράς της
συσκευής. Οι αξιώσεις εγγύησης πρέπει να εγερθούν πριν τη λήξη της διάρκειας της εγγύησης εντός
δύο εβδομάδων από την διαπίστωση του ελαττώματος. Αποκλείονται αξιώσεις εγγύησης μετά την
πάροδο της διάρκειας της εγγύησης. Η επισκευή ή η αντικατάσταση δεν συνεπάγεται την επέκταση της
διάρκειας της εγγύησης ούτε την νέα έναρξη της διάρκειας της εγγύησης για τη συσκευή ή για
ενδεχομένως χρησιμοποιηθέντα νέα ανταλλακτικά. Αυτό ισχύει και στην περίπτωση σέρβις επί τόπου.
5. Για την αξίωση της εγγύησης παρακαλούμε να δηλώσετε την ελαττωματική σας συσκευή στο: www.isc-
gmbh.info. Εάν το ελάττωμα καλύπτεται από την εγγύηση, θα σας επιστραφεί αμέσως είτε η
επισκευασμένη συσκευή είτε μία καινούργια συσκευή.
Ευχαρίστως επισκευάζουμε ελαττώματα της συσκευής έναντι πληρωμής, εάν τα ελαττώματα αυτά δεν
καλύπτονται από την εγγύηση. Για το σκοπό αυτό παρακαλούμε να στείλετε τη συσκευή στη διεύθυνση του
σέρβις μας.
Για αναλώσιμα και σε περίπτωση που λείπουν εξαρτήματα παραπέμπουμε στους περιορισμούς αυτής της
εγγύησης σύμφωνα με τους πληροφορίες σέρβις αυτών των οδηγιών χρήσης.
Anleitung_GE_PH_2555_SPK7__ 11.02.14 10:23 Seite 98

99
k
GARAN
TIEURKUNDE
Sehr geehrte Kundin, sehr geehrter Kunde,
unsere Produkte unterliegen einer strengen Qualitätskontrolle. Sollte dieses Gerät dennoch einmal nicht
einwandfrei funktionieren, bedauern wir dies sehr und bitten Sie, sich an unseren Servicedienst unter der auf
dieser Garantiekarte angegebenen Adresse zu wenden. Gerne stehen wir Ihnen auch telefonisch über die
angegebene Servicerufnummer zur Verfügung. Für die Geltendmachung von Garantieansprüchen gilt
folgendes:
1. Diese Garantiebedingungen regeln zusätzliche Garantieleistungen. Ihre gesetzlichen
Gewährleistungsansprüche werden von dieser Garantie nicht berührt. Unsere Garantieleistung ist für Sie
kostenlos.
2. Die Garantieleistung erstreckt sich ausschließlich auf Mängel am Gerät, die nachweislich auf einem
Material- oder Herstellungsfehler beruhen und ist nach unserer Wahl auf die Behebung solcher Mängel am
Gerät oder den Austausch des Gerätes beschränkt. Bitte beachten Sie, dass unsere Geräte
bestimmungsgemäß nicht für den gewerblichen, handwerklichen oder beruflichen Einsatz konstruiert
wurden. Ein Garantievertrag kommt daher nicht zustande, wenn das Gerät innerhalb der Garantiezeit in
Gewerbe-, Handwerks- oder Industriebetrieben verwendet wurde oder einer gleichzusetzenden
Beanspruchung ausgesetzt war.
3. Von unserer Garantie ausgenommen sind:
- Schäden am Gerät, die durch Nichtbeachtung der Montageanleitung oder aufgrund nicht fachgerechter
Installation, Nichtbeachtung der Gebrauchsanleitung (wie durch z.B. Anschluss an eine falsche
Netzspannung oder Stromart) oder Nichtbeachtung der Wartungs- und Sicherheitsbestimmungen oder
durch Aussetzen des Geräts an anomale Umweltbedingungen oder durch mangelnde Pflege und Wartung
entstanden sind.
- Schäden am Gerät, die durch missbräuchliche oder unsachgemäße Anwendungen (wie z.B. Überlastung
des Gerätes oder Verwendung von nicht zugelassenen Einsatzwerkzeugen oder Zubehör), Eindringen von
Fremdkörpern in das Gerät (wie z.B. Sand, Steine oder Staub, Transportschäden), Gewaltanwendung oder
Fremdeinwirkungen (wie z. B. Schäden durch Herunterfallen) entstanden sind.
- Schäden am Gerät oder an Teilen des Geräts, die auf einen gebrauchsgemäßen, üblichen oder sonstigen
natürlichen Verschleiß zurückzuführen sind.
4. Die Garantiezeit beträgt 24 Monate und beginnt mit dem Kaufdatum des Gerätes. Garantieansprüche sind
vor Ablauf der Garantiezeit innerhalb von zwei Wochen, nachdem Sie den Defekt erkannt haben, geltend zu
machen. Die Geltendmachung von Garantieansprüchen nach Ablauf der Garantiezeit ist ausgeschlossen.
Die Reparatur oder der Austausch des Gerätes führt weder zu einer Verlängerung der Garantiezeit noch
wird eine neue Garantiezeit durch diese Leistung für das Gerät oder für etwaige eingebaute Ersatzteile in
Gang gesetzt. Dies gilt auch bei Einsatz eines Vor-Ort-Services.
5. Für die Geltendmachung Ihres Garantieanspruches melden Sie bitte das defekte Gerät an unter: www.isc-
gmbh.info. Ist der Defekt des Gerätes von unserer Garantieleistung erfasst, erhalten Sie umgehend ein
repariertes oder neues Gerät zurück.
Selbstverständlich beheben wir gegen Erstattung der Kosten auch gerne Defekte am Gerät, die vom
Garantieumfang nicht oder nicht mehr erfasst sind. Dazu senden Sie das Gerät bitte an unsere Serviceadresse.
Für Verschleiß-, Verbrauchs- und Fehlteile verweisen wir auf die Einschränkungen dieser Garantie gemäß den
Service-Informationen dieser Bedienungsanleitung.
iSC GmbH • Eschenstraße 6 • 94405 Landau/Isar (Deutschland)
Anleitung_GE_PH_2555_SPK7__ 11.02.14 10:24 Seite 99

EH 02/2014 (02)
09951 / 95 920 + Durchwahl:
Allgemeine Fragen -00 Klima / Heizen / Entfeuchten -30
Stromerzeuger -05 Werkzeugtechnik - Handgeführt -35
Gartentechnik - Benzin -10 Werkzeugtechnik - Stationär -40
Gartentechnik - Elektro -15 Fragen zur Rechnung -50
Gartentechnik - Akku -20 Reparaturanfragen -60
Gewächshaus / Metallgerätehaus -25
Telefax: 01805 / 835 830 (Festnetz: 14 ct/min, Mobilfunk max.: 42 ct/min)
E-Mail: info@isc-gmbh.info · Internet: www.isc-gmbh.info
iSC GmbH · Eschenstraße 6 · 94405 Landau/Isar (Deutschland)
Anleitung_GE_PH_2555_SPK7__ 11.02.14 10:24 Seite 100
 Loading...