

Dymo LabelWriter 450 Turbo LW Holly & Ivy Holiday Labels, LabelWriter 400, LabelWriter 450, LabelWriter 450 Turbo Setup Manual

®
Setting Up a DYMO LabelWriter 400,
450, or 450 Turbo Printer with
Terminal Services
If you are using OfficeMate or OfficeMate Enterprise with Terminal Services, also
known as Remote Desktop Services, you can still use your DYMO LabelWriter 400,
450, or 450 Turbo printer even though your OfficeMate software is running on a
remote computer. In order to use a DYMO LabelWriter 400, 450, or 450 Turbo printer
with Terminal Services, you must allow your local USB port to be available during a
terminal server session and install the DYMO LabelWriter Software and DYMO
printer driver on the remote computer.
This document describes the steps required to set up your DYMO LabelWriter 400,
450, or 450 Turbo printer for use with Terminal Services, including how
• To install the DYMO Label Software on the terminal server, 3
• To install and test the DYMO printer on the local workstation, 5
• To allow your local USB port to be available during a terminal server session, 6
• To test the DYMO printer through a terminal server session, 8
Setting Up a DYMO LabelWriter 400, 450, or 450 Turbo Printer with Terminal Services 1

Setting Up a DYMO LabelWriter 400, 450, or 450 Turbo Printer with Terminal Services
NOTES • The instructions in this document pertain only to the DYMO
LabelWriter 400, 450, and 450 Turbo printers. Eyefinity does not
support the use of any other DYMO equipment.
• You cannot use a DYMO printer in all Terminal Services or cloud
computing environments. A DYMO printer cannot print a job sent
from an outside network. For example, a DYMO printer will not print
jobs sent from the World Wide Web. However, if set up correctly, a
DYMO printer can prints jobs that are sent from a VPN or a local
network.
• DYMO does not directly support Windows Terminal Services. More
information can be found on DYMO’s Web site at
http://sites.dymo.com/Search/Pages/SupportSearchResults.aspx?
k=Terminal server.
• For more information about DYMO printers, go to the DYMO Web
site at http://www.dymo.com/.
• Depending on the policies of your network, local serial port
mapping might be disabled for some or all remote connections.
• You might see a security warning message asking if you want to
connect your local disk drives, local ports, or smart card to the
remote computer. To enable one or more of these connections,
select the appropriate check boxes. If you choose not to enable
these connections, a remote connection is still established, but
these resources are not available to the remote computer.
• Microsoft Remote Desktop Connection 6 (or later) must be installed
on the local computer in order to use Terminal Services. Information
about Remote Desktop Connection can be found on Microsoft’s
Web site at http://support.microsoft.com/kb/925876/en-us.
2 Setting Up a DYMO LabelWriter 400, 450, or 450 Turbo Printer with Terminal Services
Setting Up a DYMO LabelWriter 400, 450, or 450 Turbo Printer with Terminal Services
To install the DYMO Label Software on the terminal server
NOTE • You must install the DYMO LabelWriter software and DYMO
printer driver manually on the terminal server. Otherwise, the
server may install a generic driver for the DYMO printer when
the local computer connects to the server. The DYMO printer
will not function without a DYMO printer driver installed on
the server.
• Installing the DYMO LabelWriter software from the DYMO
LabelWriter CD automatically installs the DYMO printer
driver.
• You may need to install either v7.8 or 8.x of the DYMO
LabelWriter software.
1. Install the DYMO LabelWriter software from the CD that came with your
printer.
NOTE If you do not have the DYMO LabelWriter CD, download the
printer driver and software application from the DYMO Web site
at http://sites.dymo.com/Support/Pages/LandingPage.aspx.
When the DYMO Label Software installation launches, the License
Agreement window opens.
2. Select the I Accept radio button and click Next.
3. Click Next to bypass the welcome message.
4. Click Browse, select where to install the DYMO Label Software, and click
Next.
5. Click Next to bypass the installation message.
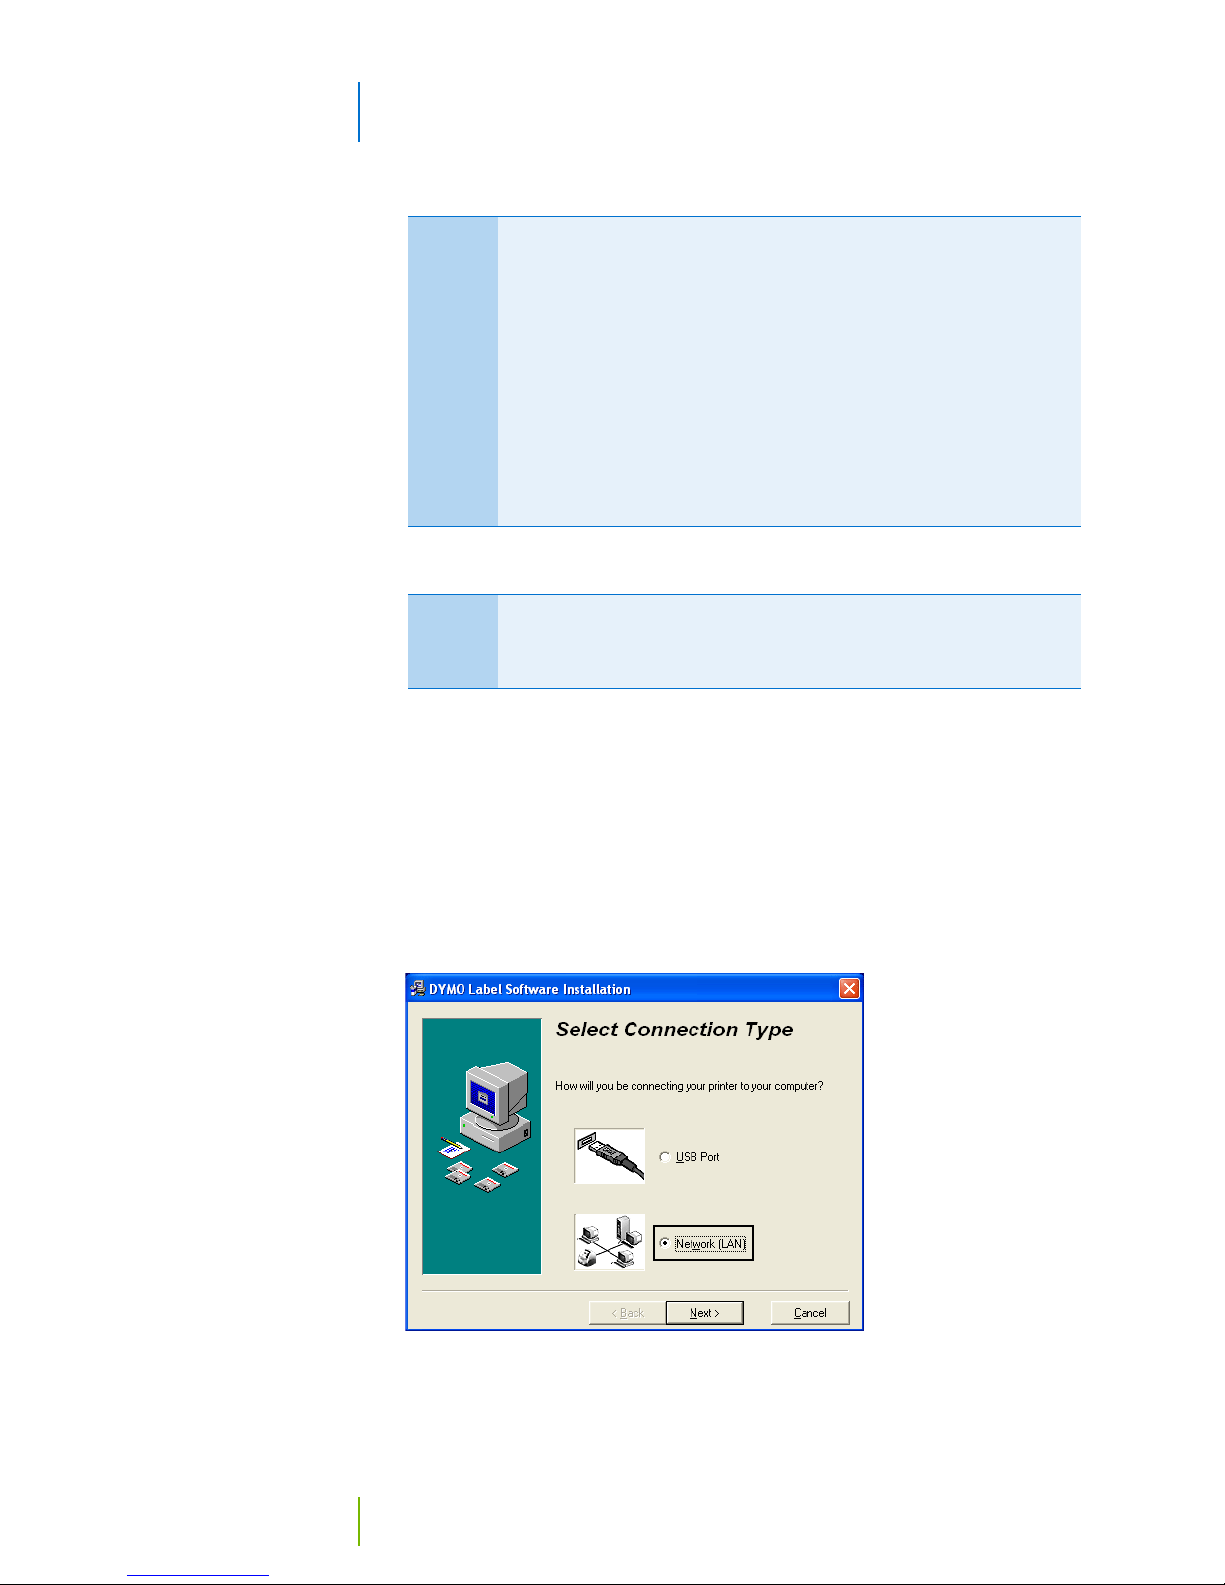
6. When asked to select a connection method, select the Network (LAN) radio
button and click Next.
Setting Up a DYMO LabelWriter 400, 450, or 450 Turbo Printer with Terminal Services 3
 Loading...