


WARNING
This manual contains information on limitations regarding product use
and function and information on the limitations as to liability of the manufacturer. The entire manual should be carefully read.
Now classified in accordance with ANSI/SIA CP-01-2000 (SIA-FAR)
User’s
Guide
®
Power864TM
S E C U R I T Y S Y S T E M
Quick Reference Guide
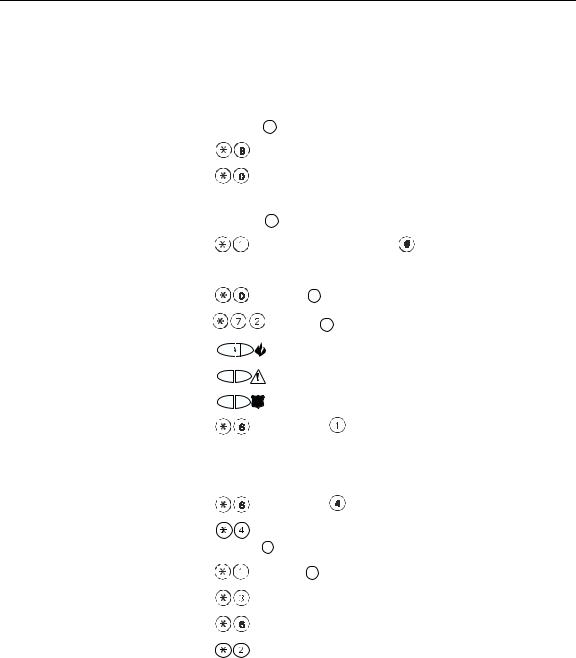
The following chart lists the basic functions of your system alphabetically, and the keys to press for each function. Refer to the listed page number for more information.
NOTE: Some functions may not be available on your system. Ask your installer for more information.
To do this: |
Press this: |
|
|
|
See page: |
|
Arm system (Away): ................................ |
[access code], leave through entry/exit door |
7 |
||||
|
OR press |
Away (if enabled) |
|
|
||
Arm system (No Entry Delay): .................. |
[access code] |
|
|
9 |
||
Arm system (Quick, if enabled): ............... |
(from Ready state) |
|
9 |
|||
Arm system (Stay):................................... |
[access code], do not exit premises |
|
8 |
|||
|
OR press |
Stay |
(if enabled) |
|
|
|
Bypass zones: .......................................... |
[two-digit zone number(s)], |
to exit |
15 |
|||
Disarm system: ........................................ |
[access code] |
|
|
|
11 |
|
Exit premises when system armed: .......... |
OR press |
|
Exit (if enabled) |
|
11 |
|
Reset smoke detectors............................. |
|
OR press |
Reset (if enabled) |
12 |
||
Send Fire message:.................................. |
|
(press & hold for 2 seconds, if enabled) |
14 |
|||
Send Auxiliary message: .......................... |
|
(press & hold for 2 seconds, if enabled) |
14 |
|||
Send Panic message: ............................... |
|
(press & hold for 2 seconds, if enabled) |
14 |
|||
Set time and date:................................... |
[master code] |
|
|
21 |
||
Silence fire alarm:.................................... |
[access code] |
|
|
|
12 |
|
Silence intrusion alarm: ........................... |
[access code] |
|
|
|
13 |
|
Test system.............................................. |
[master code] |
|
|
18 |
||
Turn door chime on/off:............................. |
to toggle on or off |
|
19 |
|||
|
OR press |
Chime |
(if enabled) |
|
|
|
Turn on bypassed zones (if Stay armed): .. |
OR press |
|
Away (if enabled) |
|
9 |
|
View alarm memory: ............................... |
|
|
|
|
|
13 |
View event buffer.................................... |
[master code], scroll to View Event Buffer |
18 |
||||
View troubles .......................................... |
|
|
|
|
|
17 |

Table of Contents
Keypad Buttons & Lights |
1 |
Displays (LCD Keypads): ........................................................................................................ |
2 |
Status Lights (All Keypads): ................................................................................................... |
2 |
Number Pad (All Keypads): .................................................................................................. |
2 |
Function Buttons (All Keypads): ........................................................................................... |
2 |
Arrow Keys (LCD5500Z Keypad Only): .................................................................................. |
2 |
Emergency Keys (All Keypads): .............................................................................................. |
2 |
Zone Lights (PC55XXZ Keypads): .......................................................................................... |
2 |
Function Indicators (LCD5501Z and PC55XXZ Keypads): ...................................................... |
2 |
About This Guide |
3 |
Introduction |
4 |
How Your System Works ....................................................................................................... |
4 |
IMPORTANT NOTICE .............................................................................................................. |
4 |
Fire Detection ........................................................................................................................ |
5 |
Testing .................................................................................................................................. |
5 |
Remote Monitoring ............................................................................................................... |
5 |
Maintenance ......................................................................................................................... |
5 |
Arming and Disarming Your System |
6 |
Getting Ready to Arm Your System ....................................................................................... |
6 |
Arming Your System .............................................................................................................. |
7 |
Away Arming ........................................................................................................................ |
7 |
Bell/Siren Sounds After Away Arming .................................................................................... |
8 |
|
8 |
Stay Arming .......................................................................................................................... |
8 |
Quick Arm ............................................................................................................................. |
9 |
“No Entry” Arming ................................................................................................................ |
9 |
Automatic Arming ............................................................................................................... |
10 |
Quick Exit ............................................................................................................................ |
11 |
Disarming Your Security System ........................................................................................... |
11 |
Dealing With Alarms and Emergencies |
12 |
Fire Alarms .......................................................................................................................... |
12 |
Intrusion (Burglary) Alarms ................................................................................................... |
13 |
Viewing Alarms in Memory .................................................................................................. |
13 |
Calling for Help ................................................................................................................... |
14 |
Using Advanced Functions |
15 |
Bypassing Zones .................................................................................................................. |
15 |
Recalling Bypassed Zones ..................................................................................................... |
16 |
Bypass Groups ..................................................................................................................... |
16 |
Identifying Trouble Conditions ............................................................................................. |
17 |
Viewing the Event Buffer from an LCD5500Z Keypad .......................................................... |
18 |
Testing Your System ............................................................................................................ |
18 |
Allowing Computer Access to Your System ......................................................................... |
19 |
Turning the Door Chime On or Off ...................................................................................... |
19 |
i

Customizing Your System |
20 |
Programming Access Codes ................................................................................................. |
20 |
Setting the Time and Date ................................................................................................... |
21 |
Changing the LCD5500Z Display Language ......................................................................... |
21 |
Changing LCD5500Z Display Brightness/Contrast ................................................................ |
21 |
Changing Keypad Sounder Loudness ................................................................................... |
21 |
Fire Safety |
22 |
Household Fire Safety Audit ................................................................................................. |
22 |
Fire Escape Planning ............................................................................................................ |
22 |
Glossary |
23 |
System Information |
25 |
For Service ........................................................................................................................... |
25 |
Access Codes ...................................................................................................................... |
25 |
System Information ............................................................................................................. |
25 |
Zone Information ................................................................................................................. |
26 |
ii

Keypad Buttons & Lights
LCD5501Z Keypad
PC5532Z (LED) Keypad
LCD5500Z Keypad
PC5508Z PC5516Z
Your installer may have installed one of these LED keypads if you have 16 or fewer zones on your system. These keypads operate in the same way as the PC5532 keypad.
1
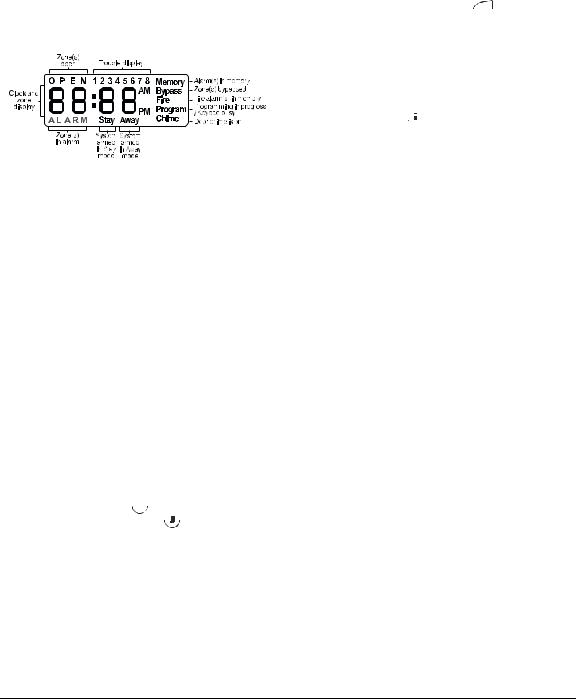
Displays (LCD Keypads):
Fixed Message Display (LCD5501Z Keypad)
Shows the status of your security system using an LCD showing fixed words/icons and numbers. The display is described below.
Liquid Crystal Display (LCD5500Z Keypad)
The LCD shows prompts and system information on two 16-character lines.
Press the 


 keys on the number pad as prompted by the LCD to view alarms or troubles, to arm and disarm the system and to bypass zones.
Status Lights (All Keypads):
Ready Light
If the Ready light is ON, the system is ready for arming. The system cannot be armed unless the Ready light is ON (see “Getting Ready to Arm Your System” on page 6).
Armed Light
If the Armed light is ON, the system has been armed successfully.
Trouble Light
A flashing Trouble Light indicates AC Trouble. If the Trouble light is ON, see “Identifying Trouble Conditions” on page 17.
Number Pad (All Keypads):
To select a function press  . To exit a function and return to the Ready state, press
  .
.
Function Buttons (All Keypads):
If your installer has enabled them, you can use the function buttons to access the Stay arm, Away arm, door chime, sensor reset and quick exit features by pressing and holding a button for two seconds. Refer to the manual for more information on these features.
Arrow Keys (LCD5500Z Keypad Only):
If “< >” appears, more information can be accessed by using the 


 keys. Press
  to see the previous function or item of information. Press

 to advance the display to the next function or item of information.
Emergency Keys (All Keypads):
Press both  * keys for two seconds to send a Fire message. Press both
  * Keys for two seconds to send an Auxiliary message. Press both
  * Keys for two seconds to send a Panic message.
IMPORTANT: *(All Keypads) The Fire, Auxiliary and Panic keys will NOT function unless programmed by the installer. If these keys are in service and the installer has enabled audible feedback, holding down the key for two seconds will cause the keypad sounder to beep indicating that the input has been accepted and sent.
Zone Lights (PC55XXZ Keypads):
The system uses the zone lights to indicate zone alarms, troubles, alarms in memory, and to aid programming.
Function Indicators (LCD5501Z and
PC55XXZ Keypads):
Memory
Upon disarming, if an alarm has occurred while the system was armed, the Memory indicator will turn on (See “Viewing Alarms in Memory” on page 13).
Bypass
If the Bypass indicator is ON, one or more zones are bypassed (See “Bypassing Zones” on page 15).
Fire
If the Fire indicator is on, a fire alarm has occurred (See “Fire Alarms” on page 12).
Program
The Program indicator will flash when you are programming access codes, or performing other programming functions. If someone is programming at another keypad, the Program indicator will turn ON to indicate that the system is busy.
IMPORTANT: Test system weekly and have any system trouble conditions corrected by your alarm installer.
2

About This Guide
This Power864 User’s Guide is for anybody using a Power864 Security System.
Read this guide thoroughly to learn how to use your security system. Ensure that all users of this system are equally instructed in its use.
Important information about fire and burglary alarms is in section 3 on page 12. Read this section carefully!
This guide provides step-by-step instructions for each function. Each key you need to press will be indicated by its symbol (e.g. 
 ).
).
For some functions you will need to enter your access code (indicated by [access code]) or your master code (indicated by [master code]). You can use the master code for the same functions as a regular access code, but you cannot use a regular access code for master code functions (e.g., programming access codes).
Some functions have separate sets of instructions for the LCD5500Z, LCD5501Z, and PC55XXZ keypads. You can check the kind of keypad you have by referring to the diagrams on pages 1 and 2. If only one set of instructions is given, the procedure will work at any of the keypads.
The instructions for LCD keypads will refer to “scrolling”. To scroll, press the  key to move to the next message, or the
  key to move back a message.
The keypads and their lights and buttons are described on pages 1 and 2.
The Quick Reference Guide inside the front cover shows you the commands required to access each system function, and the page number each function is described on.
Fill out the “System Information” page (Section 8, p. 25) with all of your zone information and access codes, and store this manual in a safe place for future reference.
3
Section 1: Introduction
How Your
System Works
IMPORTANT NOTICE
Your security system can provide up to three kinds of monitoring: intrusion, fire, and emergency. We have designed your DSC Power864 security system to provide you with both flexibility and convenience. Your installer has set up your system with your home or business in mind. You may not need all of the features described in this manual. Your installer will only turn on the features that you need, and should explain all the active features to you. If you have any questions about which features are included on your system, please ask your installer.
NOTE: The Power864 security system includes specific false alarm reduction features and is classified with ANSI / SIA CP-01-2000. To comply with this specification, your installation must have a minimum of two keypads. Please consult your installer for further information regarding the false alarm reduction features built into your system as all are not covered in this guide.
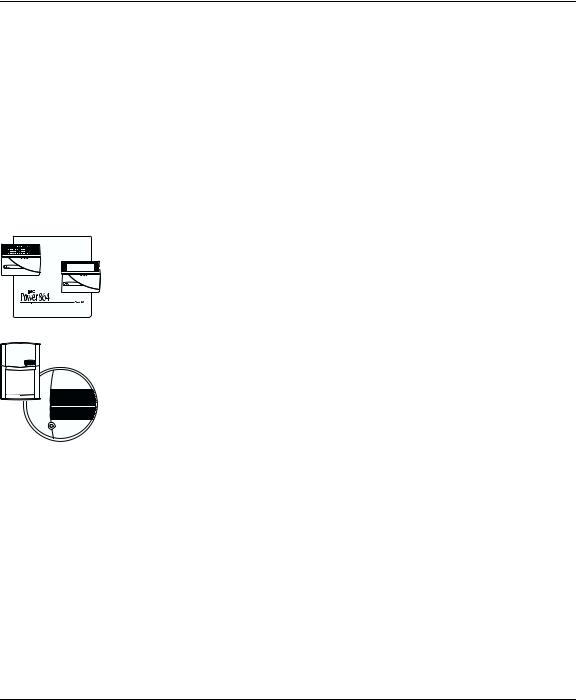
Your security system is made up of a DSC Power864 control panel, one or more Power864 keypads, and various sensors and detectors.
The control panel is the “brain” of your security system. It controls and monitors all the keypads and sensors, and communicates with the central station (if remote monitoring is enabled). The control panel will be mounted out of the way, in a utility closet or in a basement. The metal cabinet contains the system electronics, fuses and stand-by battery. There is normally no reason for anyone but the installer or service professional to have access to the control panel.
You will access system functions from your keypad(s), which are described on pages 1 and 2 of this manual. Each keypad has a sounder and five function keys. The LCD5500Z keypad has a liquid crystal display (LCD) which will show system messages. The LCD5501Z LCD keypad uses fixed messages to display your system’s status. The LED (PC55XXZ) keypads have a group of zone and system status lights. The keypads can send commands to the system and show the current system status. Your installer will mount the keypad(s) inside your premises, close to the entry/exit door(s).
The security system has several zones (monitored areas). Each of these zones will be connected to a sensor (motion detectors, glassbreak detectors, door contacts, etc.). If a sensor goes into alarm, the zone light for that sensor will flash (LCD5501Z and PC55XXZ keypads), or there will be a message shown on the LCD5500Z keypad.
A security system cannot prevent emergencies. It is only intended to alert you and
– if included – your central station of an emergency situation. Security systems are generally very reliable but they may not work under all conditions and they are not a substitute for prudent security practices or life and property insurance. Your security system should be installed and serviced by qualified security professionals who should instruct you on the level of protection that has been provided and on system operations. For important warnings and cautions, please see inside the back cover.
4

|
Introduction: Fire Detection |
Fire Detection |
This equipment is capable of monitoring fire detection devices such as smoke detectors and |
|
providing a warning if a fire condition is detected. Good fire detection depends on having |
|
an adequate number of detectors placed in appropriate locations. This equipment must be |
|
installed in accordance with NFPA 72 (N.F.P.A., Batterymarch Park, Quincey MA 02269). |
|
Carefully review Section 6:“Fire Safety” on page 22. |
|
NOTE: Your installer must enable the fire detection portion of this equipment for |
|
it to work. |
Testing |
To make sure your system continues to work as intended, you must test your system weekly. |
|
Please refer to “Testing Your System” on page 18. If your system does not work correctly, |
|
call your installer for service. |
Remote
Monitoring
Maintenance
This system can send alarms, troubles and emergency messages over telephone lines to a central station (this must be enabled by your installer). If you accidentally initiate an alarm, immediately call the central station to prevent an unnecessary response.
By default, an alarm transmission can be cancelled by entering a valid access code within 30 seconds of the alarm.
With normal use, the system requires minimum maintenance. Note the following points:
1.Do not wash the security equipment with a wet cloth. Light dusting with a slightly moistened cloth should remove normal accumulations of dust.
2.Use the system test described in “Testing Your System” on page 18 to check the battery condition. We recommend, however, that the standby batteries be replaced every 3 years.
3.For other system devices such as smoke detectors, passive infrared, ultrasonic or microwave motion detectors or glassbreak detectors, consult the manufacturer’s literature for testing and maintenance instructions.
5

Section 2: Arming and Disarming Your System
Getting Ready to Arm Your System
This section describes how to perform the basic functions of your system: arming and disarming. Read this section carefully.
Before you arm your system, make sure that the system is Ready. You can tell that the system is ready when the Ready light is ON. If this is the case, you can arm your system - use one of the arming methods described on pages 7-9.
If the Ready light is ON and the LCD5500Z keypad displays “Secure System or Enter Code”, you can arm your system. However, some zones on the system are still open. Before arming, confirm that no zones are left open unintentionally.
If your system is not ready, do the following:
On an LCD5500Z keypad:
1.If the Ready light is OFF, or if the keypad displays “Secure System Before Arming”:
•Close all doors and windows
•Stop motion in all zones with motion detectors
2.If LCD5500Z keypads show “<>”, use the 

 keys to scroll through system messages and check that the system is clear of troubles and that no zones are bypassed unintentionally. See “Identifying Trouble Conditions” on page 17 and/or“Bypassing Zones” on page 15.
On a PC55XXZ or LCD5501Z keypad:
1.If the Ready light is OFF, the system is not ready to be armed:
•Close all doors and windows
•Stop motion in all zones with motion detectors
2.If the Trouble light is ON, view and correct any existing troubles. See “Identifying Trouble Conditions” on page 17.
3.If the Bypass indicator is ON, check that no zones are bypassed unintentionally. See
“Bypassing Zones” on page 15.
6
Arming Your
System
Away Arming
Arming and Disarming Your System: Arming Your System
There are two basic methods for arming your security system.
•Away Arming: Use this method when everyone will be away from the premises. See below.
•Stay Arming: Use this method when one or more people will stay on the premises. See page 8.
You can also use any of these methods to arm your system (see pages 10 to 11):
•Quick Arming: Arm your system without having to enter an access code. This feature must be turned on by your installer before it will work.
•“No Entry” Arming: Arm your system with no entry delay - use this method when no one else will be entering the premises.
•Automatic Arming: The system will arm itself at pre-programmed times. This feature must be turned on by your installer before it will work.
•No Activity Arming: The system will arm itself after a pre-programmed delay after no zone activity. This feature must be turned on by your installer before it will work.
When you arm your system using the Away arming method, both interior zones (e.g., motion detectors) and border zones (e.g., door and window contacts) will be active and will cause an alarm to sound when opened.
1.Check that your system is ready to be armed (Ready light is ON).
2.Enter your [access code]. As you enter each digit, the keypad sounder beeps.
If you enter the access code incorrectly, the keypad sounder buzzes steadily for two seconds. Re-enter your access code correctly.
When you enter a valid access code:
•The keypad sounds fast beeps.
•The Armed light turns ON.
•LCD5500Z keypads display “Exit Delay in Progress”.
•The exit delay begins and the keypad beeps once every second until the end of the exit delay. The keypad beeps quickly for the last 10 seconds of the exit delay.
3.Exit the premises through the entry/exit door. Doing this tells the system that you are away, and the system arms all the interior zones.
At the end of the exit delay, all keypad lights, except the Armed light, turn OFF. LCD5500Z keypads display “System Armed in Away Mode” and “Enter Code to Disarm System”. The system is now armed.
NOTE: If LCD5500Z keypads display: “* WARNING * Bypass Active”, or if the Bypass indicator is ON at PC55XXZ and LCD5501Z keypads, there are one or more zones bypassed (i.e., not armed). See “Bypassing Zones” on page 15. If you arm the system with a zone bypassed or a trouble present, your security protection is reduced.
Away Button
You may also be able to quickly Away arm your system using the “Away” function button on your keypad. If your installer has programmed this button, press and hold it for two seconds to arm in Away mode.
7
 Loading...