

Page 1
IMPORTANT:
Read Before Using
IMPORTANT :
IMPORTANTE:
Lire avant usage
Leer antes de usar
Call Toll Free for Consumer Information
and Service Locations.
Pour obtenir des informations et les
adresses de nos centres de service après-
Operating/Safety Instructions
Consignes de sécurité/d’utilisation
Instrucciones de funcionamiento y seguridad
vente, appelez ce numéro gratuit.
Llame gratis para obtener información
para el consumidor y ubicaciones de
servicio.
1-800-4-DREMEL (1-800-437-3635)
www.dremel.com
For English Version see page 2
Version française voir page 17
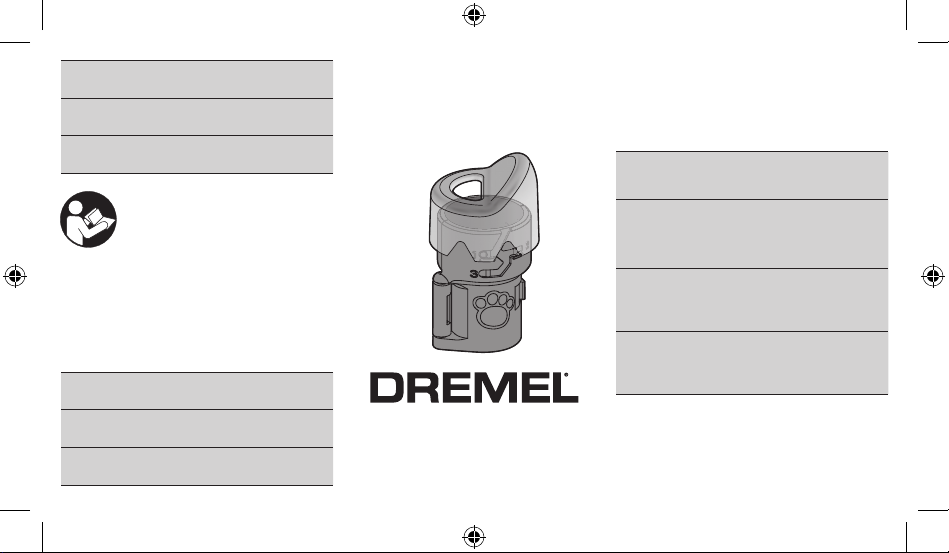
AT01-PGA
DREMEL
Versión en español ver la página 35
2610046267.indd 1 3/2/17 1:00 PM
P.O. Box 081126
Racine, WI 53408-1126
Page 2
Safety Symbols
The definitions below describe the level of severity for each
signal word. Please read the manual and pay attention to these
symbols.
This is the safety alert symbol. It is used
to alert you to potential personal injury
hazards. Obey all safety messages that
follow this symbol to avoid possible injury or death.
DANGER indicates a hazardous situation
which, if not avoided, will result in death
or serious injury.
WARNING indicates a hazardous situation which, if not avoided, could result in
death or serious injury.
CAUTION, used with the safety alert
symbol, indicates a hazardous situation
which, if not avoided, will result in minor
or moderate injury.
2
2610046267.indd 2 3/2/17 1:00 PM
manual. Failure to follow the warnings and instructions may result in electric shock, fire and/or serious injury to a person or
animal.
SAVE ALL WARNINGS AND INSTRUCTIONS FOR FUTURE
Keep away from water. Use extra caution when using rotary tool
near a tub or pet washing area. Water entering a power tool will
increase the risk of electric shock.
Use personal protective equipment. Always wear eye protection.
This product is intended only for grooming the toenails of a
dog or cat. This product is not intended for use as a dental
drill, in human or veterinary medical applications. Serious
injury may result.
This attachment is only intended for use with Dremel rotary
tool models 3000, 4000, 4300, 7300-PGT, 7700, 8100, or
8220. Use of this attachment with any other rotary tool may re-
sult in serious injury.
Safety Warnings
Read all safety warnings and all instructions in rotary tool manual and in this
REFERENCE
Page 3
Safety Warnings
Use only sanding disc accessory SD60-PGA and EZ Lock™
mandrel EZ402 with this attachment. Use of any other acces-
sory may result in serious injury.
Do not use attachment without all components installed according to operating instructions. Any other use is a misuse
and could result in injury.
Maximum operating speed for pet grooming applications is
10,000/min. Use of higher operating speeds may cause heat
buildup and injury to the pet. Refer to ‘Operating Speeds’ section
for proper tool speed setting.
Keep pet hair away from spinning parts. Hair can entangle in
the tool, causing injury to your pet. Refer to ‘Pet Safety Tips’ section for more information.
2610046267.indd 3 3/2/17 1:00 PM
IMPORTANT: Some of the following symbols may be used on
your product. Please study them and learn their meaning.
Proper interpretation of these symbols will allow you to operate
the product better and safer.
Symbol Designation/Explanation
Alerts user to read manual
Alerts user to wear eye protection
.../min Revolutions per minute (RPM)
n Rated speed (maximum attainable speed)
Symbols
3
Page 4
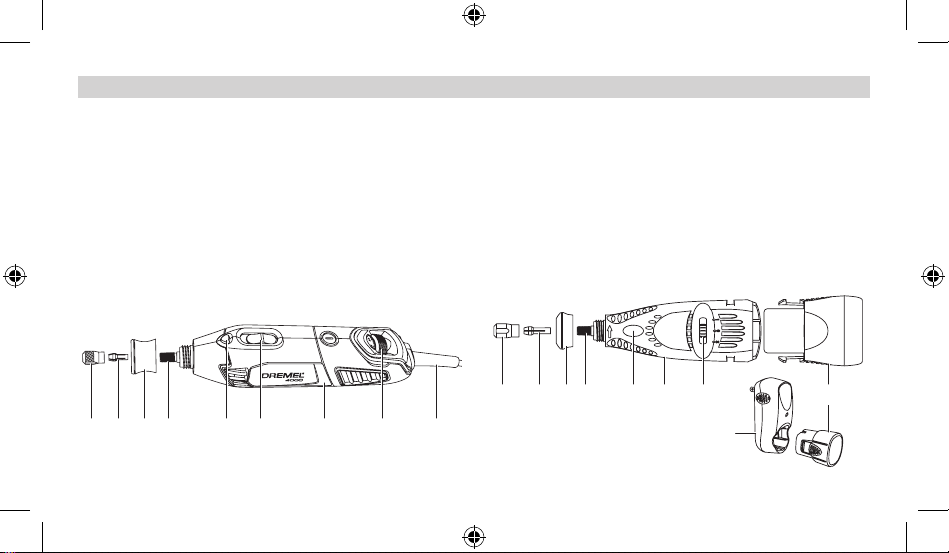
Corded rotary tool
1 Collet nut
2 Collet
3 Threaded nose cap
4 Output shaft
5 Shaft lock button
6 Rotary tool
7 On/Off Switch
8 Speed dial
9 Power cord
Getting to know your Dremel® tool and accessories
Cordless (battery-operated) rotary tool
1 Collet nut
2 Collet
3 Threaded nose cap
4 Output shaft
5 Shaft lock button
6 Rotary tool
7 On/Off Switch and Speed dial
8 Battery pack
9 Battery charger
R
1 2 3 4 5 6 7
8
1 2 3 4 5 6 87 9
4
2610046267.indd 4 3/2/17 1:00 PM
9
Page 5
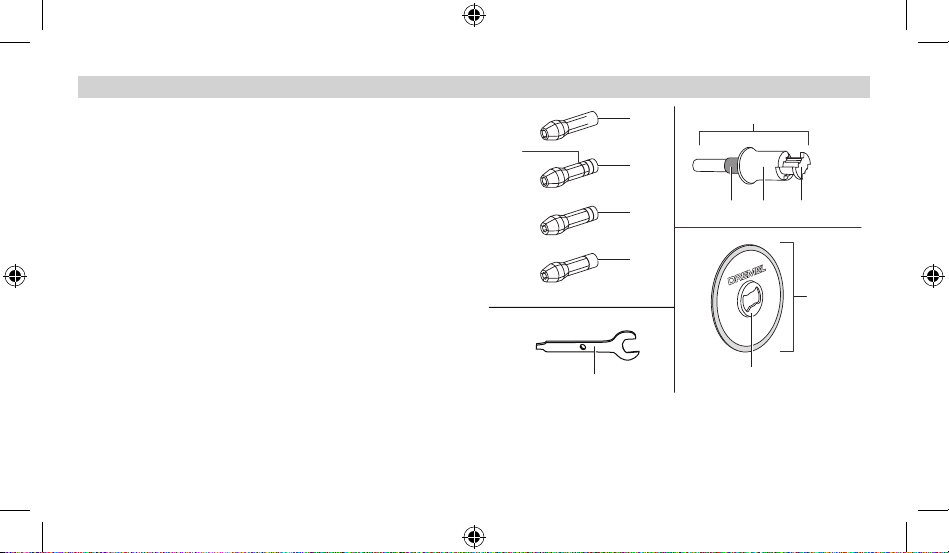
Getting to know your Dremel® tool and accessories
Rotary tool accessories
1 1/8" collet 480 (no Identification rings)
2 3/32" collet 481 (3 Identification rings)
3 1/16" collet 482 (2 Identification rings)
4 1/32" collet 483 (1 Identification ring)
5 Identification rings
5
1
2
3
6 Wrench
7 EZ Lock™ mandrel EZ402
4
8 Blue spacer
9 Spring-loaded sleeve
10 Bow tie interface
11 Sanding disc SD60-PGA
12 Bow tie interface
6
2610046267.indd 5 3/2/17 1:00 PM
7
8 9 10
11
12
5
Page 6
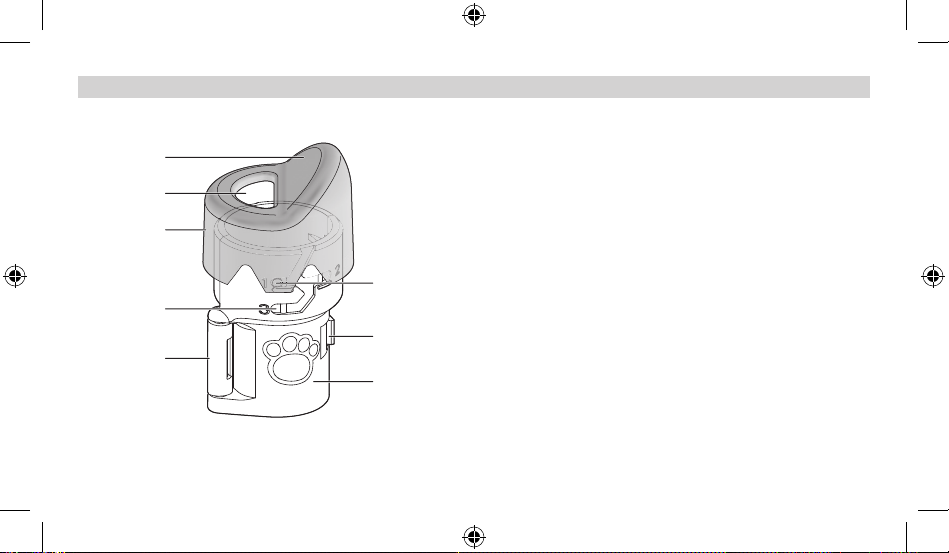
Getting to know your Dremel® tool and accessories
AT01-PGA Pet grooming
8
5
2
6
7
3
4
1
6
2610046267.indd 6 3/2/17 1:00 PM
attachment
1 Attachment housing
2 Clear cap
3 Clasp
4 Hinge
5 Sanding disc opening
6 Tab (part of clear cap)
7 Depth guide
8 Ramp
Page 7
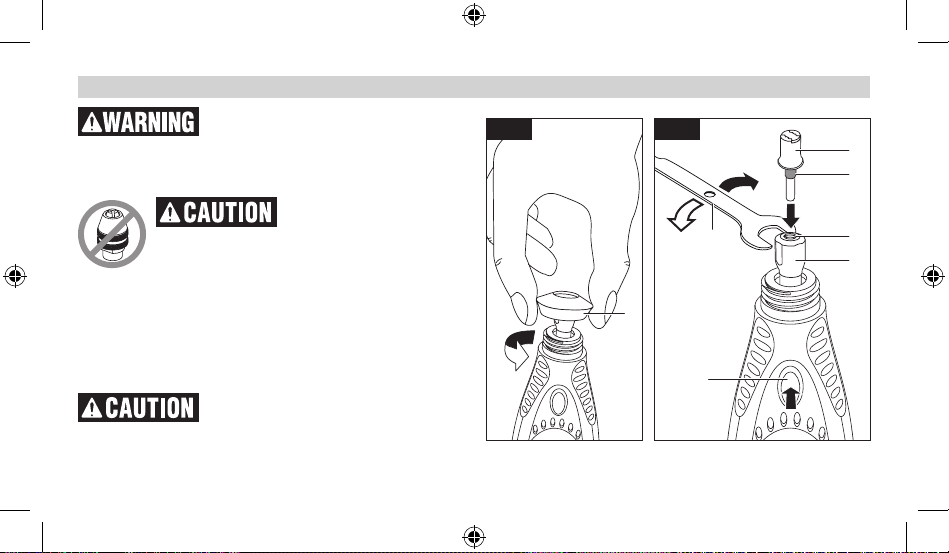
Assembly
Disconnect the tool from power source
and ensure the rotary tool is “OFF” before making any assembly, adjustments or changing accessories. Such preventative measures reduce the risk of starting
the tool accidentally.
Do not use Dremel chuck
with this attachment. Use
only 1/8” collet and collet nut. Use of the Dremel
chuck may result in damage to the attachment.
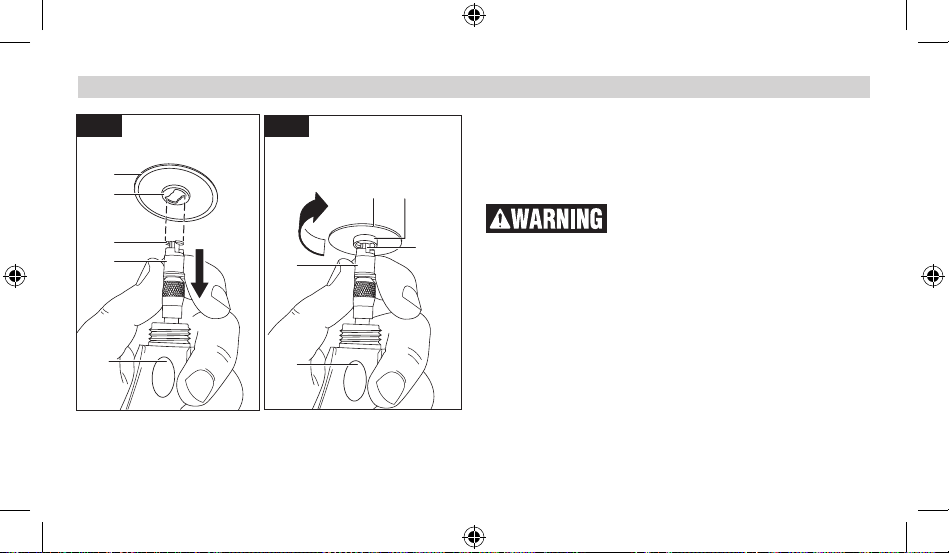
To load mandrel:
1. Unscrew and remove the nose cap 1 from the tool by twisting
it counter-clockwise until it comes off the tool (Fig. 1).
2. To loosen the collet nut, first press shaft lock button 2 and ro-
tate the collet nut 3 by hand until the lock engages the shaft
preventing further rotation (Fig. 2).
Do not engage shaft lock while the tool
is running.
3. With the shaft lock 2 engaged, loosen the collet nut 3 (turn
2610046267.indd 7 3/2/17 1:00 PM
Fig. 1
Fig. 2
T
6
5
L
7
4
3
1
2
7
Page 8
Assembly
Fig. 3
6
counterclockwise L). Use the wrench 7 if necessary. The collet nut must be loosely threaded on when inserting an accessory (Fig2).
4. Insert EZ Lock™ mandrel 6 into collet 4
(Fig.2).
Make sure the blue spacer
5 on the mandrel bottoms
out on the collet nut, setting the mandrel to
3
the correct depth. Failure to set the mandrel to
the correct depth can result in damage to the attachment.
4
8
5. With the shaft lock 2 engaged, tighten the
collet nut 3 securely (turn clockwise T) with
wrench 7 (Fig. 2).
Note: If the EZ Lock™ mandrel does not fit into the
collet, it is possible that the collet is stuck within
the collet nut. If this happens, remove the collet
nut from the tool by continuing to twist it coun-
8
2610046267.indd 8 3/2/17 1:00 PM
terclockwise. If the collet does not separate from
the collet nut when removed from the tool, push
the shank of the EZ Lock™ mandrel 6 into the hole
in the collet nut 3. This should cause the collet
4 to pop out of the collet nut 3. Re-assemble by
placing the collet 4 into the output shaft 8 and
twisting the collet nut 3 clockwise over the collet
to tighten it back onto the output shaft 8 (Fig. 3).
Then proceed with installing the EZ Lock™ mandrel according to the instructions.
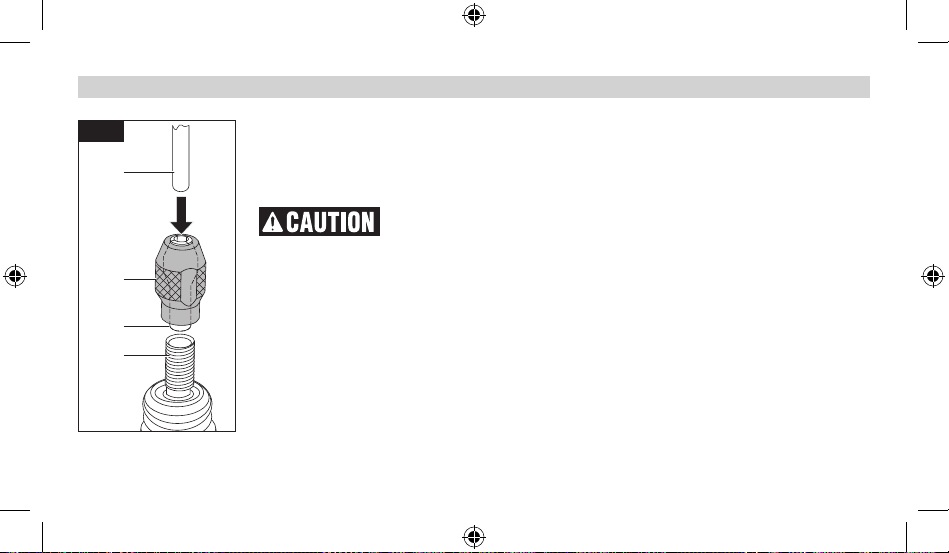
To load sanding disc:
1. Pull spring-loaded sleeve 9 DOWN towards
tool with one hand and hold. You can brace the
tool on the body or workbench for extra leverage (Fig. 4).
2. With the other hand, align bow tie interface 10
on mandrel with metal bow tie interface 11 on
bottom of sanding disc 12 (Fig. 4).
Page 9
Assembly
Fig. 4
Fig. 5
3. Place sanding disc on the mandrel to a point just below the
bow tie on the mandrel 10 and twist 90 degrees until the bow
tie interface 11 on the sanding disc 12 aligns with the sleeve
12
11
10
90°
9
9
12 11
10
9. Release sleeve 9. Sanding disc 12 should lock in place
(Fig.5).
Incorrect seating of sanding disc on
mandrel may lead to personal injury or
property damage. To check for proper seating, hold shaft lock
button 2 and twist the sanding disc 12. The sanding disc 12 will
not be able to rotate on mandrel.
To unload sanding disc:
1. Pull spring-loaded sleeve 9 DOWN toward tool with one hand
2
2
(Fig. 5).
2. Hold sleeve 9 down while twisting sanding disc 12 90 degrees
(Fig. 5).
3. Remove sanding disc 12 (Fig. 5).
9
2610046267.indd 9 3/2/17 1:00 PM
Page 10

Assembly
Fig. 6
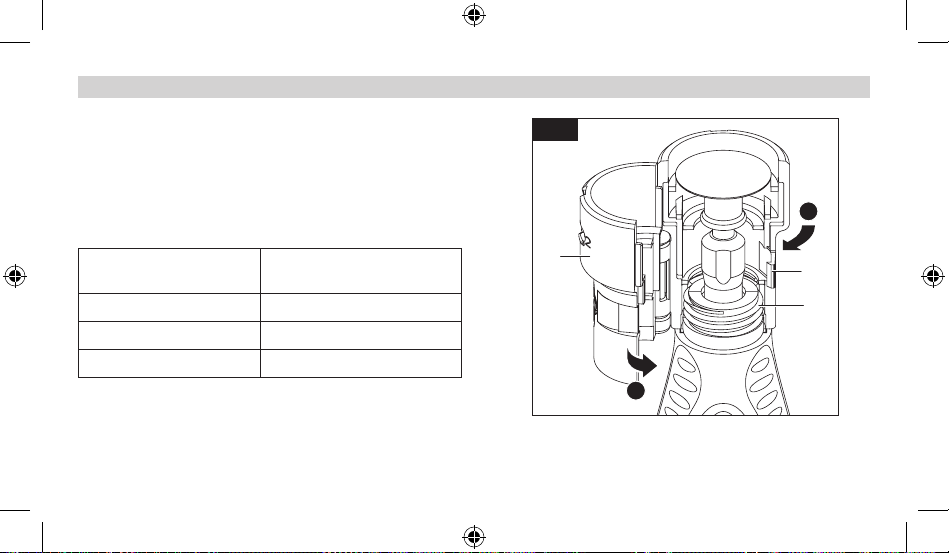
To attach nail guard attachment:
Note: Make sure that the mandrel and the sanding disc are
mounted properly before mounting the attachment.
A. Detach the clear cap 2 from the attachment by running the
small knobs 6 on the inside of the clear cap up along the
2
A
height adjustment guide 7 until they reach the guided opening (Fig. 6).
B. Unlock the clasp 3.
7
6
B
3
1
C
C. Open the attachment 1 (Fig. 6).
D. Position the attachment 1 around the threaded nose of the
tool 8 and close the attachment together until the clasp 3 is
fully engaged (Fig. 7).
E. Turn the whole attachment 1 clockwise to screw it into place
on the threaded nose 8. Make sure that it is securely tightened
so that it will not shift positions during use (Fig. 7).
F. Re-attach the clear cap 2 (simply perform step A in reverse
order).
10
2610046267.indd 10 3/2/17 1:00 PM
Page 11
Assembly
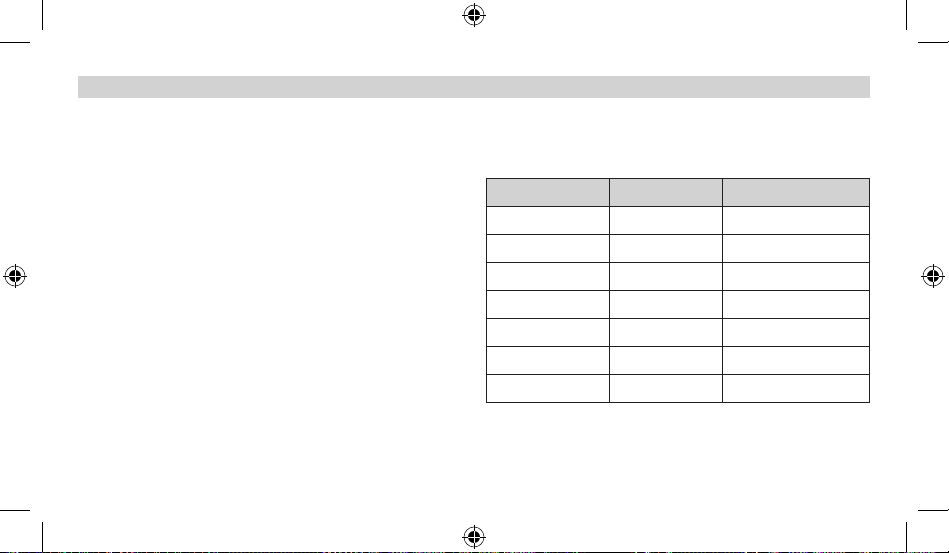
G. Find the correct height adjustment guide position for your
Dremel tool model in the chart below, and turn the clear cap
Fig. 7
so that the small knobs are all the way to the end of corresponding slot on the attachment. You will hear the cap click
into place when fully installed. Do not force the clear cap out
of the guides.
E
Height Position Chart
Height Adjustment Guide
Position
1 8100
Compatible Dremel
Models
1
3
8
2 3000, 4000, 4300, 8220
3 7300-PGT, 7700
D
11
2610046267.indd 11 3/2/17 1:00 PM
Page 12

Operating Instructions
Observe all provided warnings and safety instructions in tool manual and at-
tachment manual.
Why Use a Dremel Rotary Tool to Groom Pet Nails?
Scissors and guillotine-type clippers apply pressure and pinch
the nail, which can be uncomfortable for pet toes and feet. Clipping toenails also increases the likelihood of cutting the internal
blood supply to the nail, called the quick; grinding is more gradual and controlled. If the quick is nicked using a rotary tool, the
cut is usually smaller and will heal quicker than a cut made with
a nail clipper.
Before you start
Grooming a pet’s nails for the first time can be a worrisome experience for both the pet and pet owner. Rest assured that nail
grooming does not have to be a stressful experience. By starting
early and considering grooming to be part of your pet’s training,
your pet will grow used to the experience.
12
2610046267.indd 12 3/2/17 1:00 PM
First, train your pet to feel comfortable with their paws being
touched and handled before exposing them to the rotary tool.
One way to do this is to massage their legs, paws, and individual
toes for a few minutes at least once a day. Afterwards, create a
positive association with this experience by rewarding your pet
with its favorite snack.
Next, help your pet grow gradually accustomed to the rotary tool.
Let your pet sniff the tool while it is turned off. Then, while keeping the tool in your hand, let your pet listen to the sound the tool
makes when it is turned on. Ideally, have your pet sit or lay on its
side while the tool is in your hand and running. Gradually work
up to having your pet’s toenails touch the rotating sanding disc
for less than a second. Do not grind the nails yet; simply let your
pet become familiar with the tool. Throughout the acclimation
process, continue to praise your pet and reward good behavior
with a snack. This process may take a couple of days or weeks.
Before long, both you and your pet will be able to relax and even
enjoy the grooming time that you share together.
Page 13
Operating Instructions
154 2 3
Fig. 8
45°
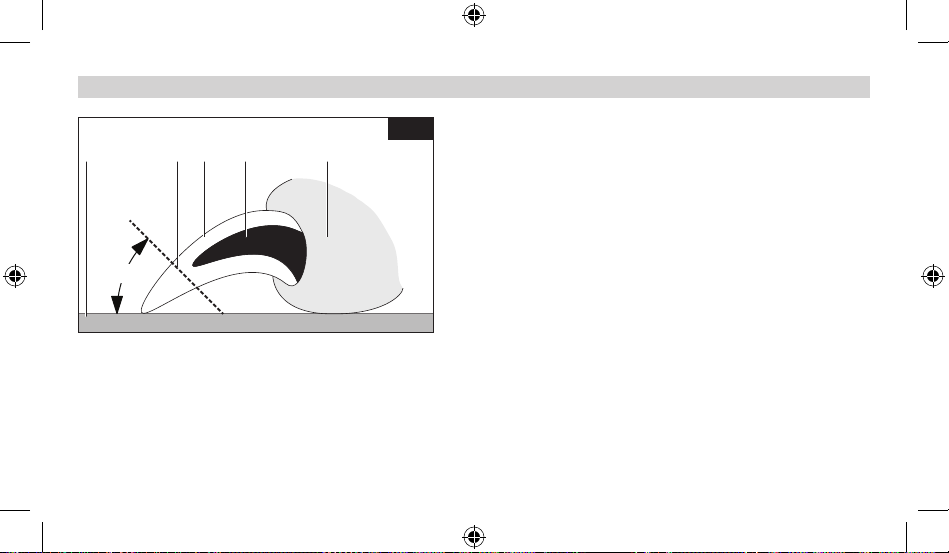
Nail Anatomy
1 Nail / Claw
2 Quick
3 Paw
4 Floor
5 Trim line
2610046267.indd 13 3/2/17 1:00 PM
Nail Anatomy
The nails/claws containing quick vessels described in this section are
relevant to several types of pets, including dogs and cats.
Before trimming your pet’s nails, you will need to identify the quick.
The diagram (Fig. 8) shows the basic anatomy of a pet’s toenail. The
outer nail is hard and has no feeling because it has no nerve endings.
The core of the nail is the quick. It is made up of tiny blood vessels
and nerve endings and is very sensitive. The quick is a vein that
“feeds” the toenail. Should you cut the quick while trimming a nail,
the nail will start to bleed.
Light colored nails are often transparent enough to allow you to see
the quick’s pink core. Dark colored nails may not allow you to see
where the quick is located. Pets may have both light and dark colored
nails that allow you to estimate the length of the quick.
The diagram also shows an estimate of the proper angle at which to
trim a pet’s nails. A rule of thumb for the proper angle is 45 degrees
upwards from the bottom of the paw. The proper angle may vary according to the pet owner’s wishes or the pet’s unique anatomy. Trim
nails so that they almost touch the ground when your pet is walking.
13
Page 14
Operating Instructions
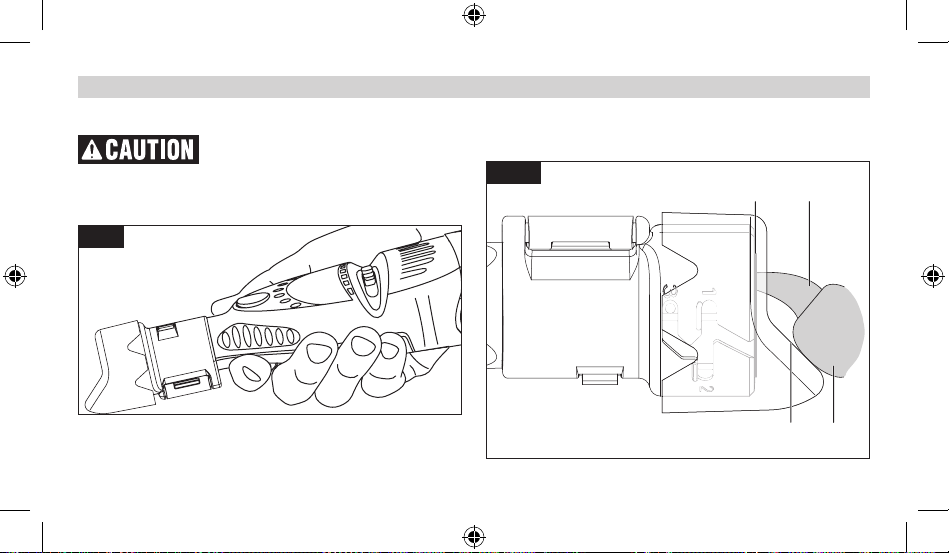
The Nail Grooming Process
Use only “golf grip” or “hand grip” method of holding the tool. Never hold the
tool by the attachment. Holding the tool by the attachment
could cause it to unexpectedly shift, causing loss of control
(Fig.9).
Fig. 9
14
2610046267.indd 14 3/2/17 1:00 PM
Place the pet’s paw 4 on the ramp 1 so that the nail 3 is close
to - but not touching - the sanding disc 2 (Fig.10).
Fig. 10
3
124
Page 15
Operating Instructions
Set the speed of your rotary tool to match the ‘Operating Speeds’
chart. Support the toe and nail in one hand while using the rotary
tool in the other hand. This is more comfortable for your pet as it
lessens vibration on the paw. Pushing gently on the bottom of the
paw’s pad extends the nail slightly for easier grooming.
It is important to let the speed of the rotary tool do the work;
never apply pressure to the toenail with the spinning sanding
disc. Pressure may cause the nail to grow too hot, resulting in
discomfort for your pet. The rotary tool’s spinning sanding disc
should not be kept against the nail longer than three seconds at
a time. Instead of focusing on completing one nail at a time, it is
recommended to briefly trim each nail on one paw, and then the
other, in several passes. This allows time for the nails to cool. You
may repeat this process as needed. Trim nails so that they almost
touch the ground when your pet is walking.
2610046267.indd 15 3/2/17 1:00 PM
Operating Speeds
Refer to your power tool manual for more information on how to
change tool speed.
Tool Model Speed Setting Approximate RPM
3000 2 5,000-10,000
4000 5-10 5,000-10,000
4300 5-10 5,000-10,000
7300-PGT LO (1) 6,500
7700 LO (1) 10,000
8100 2 5,000
8220 5-10 5,000-10,000
15
Page 16

Operating Instructions
Pet Safety Tips
Some pets may become nervous in the presence of the tool so it
is best to secure your pet. The operator will need both hands to
groom the nails so it may be helpful to have another person assist
in restraining your pet.
Cleaning the Pet Grooming Attachment
Remove the pet grooming attachment from the rotary tool as
needed to clean out any nail dust or debris. Wash only the attachment with warm water and dry thoroughly with a clean cloth
before reinstalling on rotary tool.
If hair is accidentally caught in the rotary tool, immediately turn
off the tool and untangle the hair from the tool. For pets with particularly long hair, use an old sock to cover the toe, foot, and leg
of the pet and isolate the nail. Push the nail out through a small
opening at the tip of the sock to groom the nail. Keep styptic
powder on hand in case of bleeding. Styptic powder is available
at most pet supplies stores. Follow the directions on the packaging for proper use instructions.
16
2610046267.indd 16 3/2/17 1:00 PM
Page 17

Symboles relatifs à la sécurité
Les définitions ci-dessous décrivent le niveau de gravité pour chaque terme signalant
un danger. Veuillez lire le mode d’emploi et lire la signification de ces symboles.
C’est le symbole d’alerte relatif à la sécurité. Il est
utilisé pour vous avertir de l’existence possible d’un
danger de lésion corporelle. Obéissez à tous les
messages relatifs à la sécurité qui suivent ce symbole pour éviter tout risque de blessure ou même
de mort.
DANGER indique une situation dangereuse qui,
si elle n’est pas évitée, causera la mort d’une personne ou une blessure grave.
AVERTISSEMENT indique une situation dangereuse
qui, si elle n’est pas évitée, pourrait causer la mort
d’une personne ou une blessure grave.
MISE EN GARDE, conjointement avec le symbole
d’alerte en liaison avec la sécurité, indique une
situation dangereuse qui, si elle n'est pas évitée,
causera une blessure légère ou modérée.
17
2610046267.indd 17 3/2/17 1:00 PM
Page 18

Avertissements relatifs à la sécurité
Lisez tous les avertissements
relatifs à la sécurité et toutes les
instructions dans le mode d’emploi de l’outil rotatif et dans ce
mode d’emploi. La non-observation des avertissements et des in-
structions pourrait causer un choc électrique, un incendie et/ou des
blessures graves à une personne ou un animal.
CONSERVEZ TOUS LES AVERTISSEMENTS ET TOUTES LES
INSTRUCTIONS POUR RÉFÉRENCE FUTURE
Maintenir à distance de l’eau. Faites particulièrement atten-
tion lorsque vous utilisez un outil rotatif près d’une baignoire ou
d’un endroit où vous pouvez laver un animal de compagnie. La
pénétration d’eau dans un outil électrique augmentera le risque
de choc électrique.
Utilisez des équipements de protection personnelle. Portez
toujours des équipements de protection des yeux.
Ce produit n’est conçu que pour les soins des ongles des
pattes d’un chien ou d’un chat. Ce produit n’a pas été conçu
pour une utilisation comme foret dentaire ou pour d’autres
applications médicales ou vétérinaires. Cela risquerait de
causer des blessures graves.
18
2610046267.indd 18 3/2/17 1:00 PM
Cet accessoire n’est conçu que pour emploi avec des outils rotatifs Dremel modèles 3000, 4000, 4300, 7300-PGT,
7700, 8100 ou 8220. L’utilisation de cet accessoire avec tout
autre outil rotatif pourrait causer de graves blessures.
N’utilisez que l’accessoire de disque de ponçage SD60-PGA
et le mandrin EZ Lock™ EZ402 avec ce produit. L’utilisation de
tout autre accessoire pourrait causer de graves blessures.
N’utilisez pas cet accessoire sans que tous les composants
n’aient été installés conformément au mode d’emploi. Toute
autre utilisation serait inappropriée et pourrait entraîner des
blessures.
La vitesse de fonctionnement maximum pour les applications concernant le toilettage des animaux de compagnie est
de 10 000 tr/min. L’utilisation de ce dispositif à des vitesses de
fonctionnement plus élevées pourrait causer une accumulation
de chaleur et des blessures aux animaux. Référez-vous à la section consacrée aux vitesses de fonctionnement pour trouver le
réglage de vitesse approprié pour l’outil.
Page 19

Avertissements relatifs à la sécurité
Assurez-vous qu’il n’y a pas de poils d’animaux sur les pièces
en rotation. Les poils risqueraient de se coincer dans l’outil et de
causer des blessures à votre animal. Référez-vous à la section «
Conseils de sécurité pour les animaux de compagnie » pour plus
d’informations.
2610046267.indd 19 3/2/17 1:00 PM
IMPORTANT : Certains des symboles suivants peuvent être
utilisés sur votre produit. Veuillez les étudier et apprendre
leur signification. L’interprétation correcte de ces symboles
vous aidera à mieux utiliser le produit et à vous en servir plus
efficacement et en toute sécurité.
Symbole Désignation / Explication
.../min Tours/minute (tr/min)
n
Symboles
Alerte l’utilisateur pour lire le mode d’emploi
Alerte l’utilisateur pour porter des lunettes
de sécurité
Vitesse nominale (vitesse maximum possible)
19
Page 20

Familiarisez-vous avec votre outil Dremel® et ses accessoires
Outil rotatif câblé
1 Écrou de fixation de la douille
2 Douille
3 Bec de fixation fileté
4 Arbre de sortie
5 Bouton de verrouillage de l’arbre
6 Outil rotatif
7 Interrupteur marche/arrêt (on/off)
8 Cadran de réglage de la vitesse
9 Cordon d’alimentation
Outil rotatif sans fil (alimenté par pile)
1 Écrou de fixation de la
douille
2 Douille
3 Bec de fixation fileté
4 Arbre de sortie
5 Bouton de verrouillage de
6 Outil rotatif
7 Interrupteur marche/
arrêt (on/off) et cadran de
réglage de la vitesse
8 Bloc-piles
9 Chargeur de piles
l’arbre
R
1 2 3 4 5 6 87 9
20
2610046267.indd 20 3/2/17 1:00 PM
1 2 3 4 5 6 7
8
9
Page 21

Familiarisez-vous avec votre outil Dremel® et ses accessoires
Accessoires de l’outil rotatif
1 Douille 480 de 1/8 po (pas d’anneaux d’identification)
2 Douille 481 de 3/32 po (3 anneaux d’identification)
3 Douille 482 de 1/16 po (2 anneaux d’identification)
4 Douille 483 de 1/32 po (1 anneau d’identification)
5 Anneaux d’identification
5
1
2
3
6 Clé
7 Mandrin EZ Lock™ EZ402
4
8 Entretoise bleue
9 Manchon à ressort
10 Interface à nœud papillon
11 Disque de ponçage SD60-PGA
12 Interface à nœud papillon
6
2610046267.indd 21 3/2/17 1:00 PM
7
8 9 10
11
12
21
Page 22

Familiarisez-vous avec votre outil Dremel® et ses accessoires
Accessoire de soins pour les animaux de compagnie
8
5
2
6
7
3
4
1
22
2610046267.indd 22 3/2/17 1:00 PM
AT01-PGA
1 Boîtier de l’accessoire
2 Capuchon transparent
3 Fermoir
4 Charnière
5 Ouverture du disque de ponçage
6 Languette (faisant partie du capuchon transparent)
7 Guide de profondeur
8 Rampe
Page 23

Assemblage
Débranchez toujours l’outil de
la prise de courant et assurezvous que l’outil rotatif est en position « OFF » (Arrêt) avant
de procéder à un assemblage, à des réglages ou à des
changements d’accessoires. De telles mesures de sécurité
préventives réduisent le risque de démarrage accidentel de
l’outil.
N’utilisez pas un man-
drin Dremel avec cet
accessoire. Utilisez seulement une douille de
1/8 po et un écrou de fixation de douille correspondant. L’utilisation du mandrin Dremel pourrait
endommager l’accessoire.
Pour charger le mandrin :
1. Dévissez le bec de fixation 1 et détachez-le de l’outil en le fai-
sant tourner dans le sens contraire des aiguilles d’une montre
jusqu’à ce qu’il se sépare de l’outil (Fig. 1).
2. Pour desserrer l’écrou de fixation de la douille, commencez
par appuyer sur le bouton de verrouillage de l’arbre 2, puis
2610046267.indd 23 3/2/17 1:00 PM
Fig. 1
Fig. 2
T
6
5
L
7
4
3
1
2
23
Page 24

Assemblage
Fig. 3
6
faites tourner l’écrou de fixation de la douille
3 à la main jusqu’à ce que le verrou s’engage
dans l’arbre, ce qui empêchera toute continuation de la rotation (Fig. 2).
N’engagez pas le verrou de l’arbre alors
que l’outil est en train de tourner.
3. Pendant que le verrou de l’arbre 2 est engagé,
3
desserrez l’écrou de fixation de la douille 3
(tournez dans le sens contraire des aiguilles
d’une montre L). Utilisez la clé 7 si néces-
4
8
saire. L’écrou de fixation de la douille doit être
légèrement engagé lors de l’insertion d’un accessoire (Fig. 2).
4. Insérez le mandrin EZ Lock™ 6 dans la douille 4
(Fig. 2).
Assurez-vous que
l’entretoise bleue 5
qui repose sur le mandrin ne descend pas plus
24
2610046267.indd 24 3/2/17 1:00 PM
bas que l’écrou de fixation de la douille, car
ceci réglera le mandrin à la profondeur appropriée. Si vous ne réglez pas le mandrin à la pro-
fondeur appropriée, cela risquerait d’endommager l’accessoire.
5. Une fois le verrou de l’arbre 2 engagé, serrez
à fond l’écrou de fixation de la douille 3 (en le
tournant dans le sens des aiguilles d’une montre T) au moyen de la clé 7 (Fig. 2).
Remarque : Si le mandrin EZ Lock™ ne tient pas
dans la douille, il est possible que la douille soit
coincée à l’intérieur de l’écrou de fixation de la
douille. Si tel est le cas, retirez l’écrou de fixation de la douille de l’outil en continuant à le faire
tourner dans le sens contraire des aiguilles d’une
montre. Si la douille ne se sépare pas de l’écrou
de fixation de la douille quand elle est retirée de
l’outil, poussez la tige du mandrin EZ Lock™ 6
dans le trou de l’écrou de fixation de la douille 3.
Page 25

Assemblage
Ceci devrait causer l’éjection de la douille 4 de l’écrou de fixation
3. Effectuez le réassemblage en plaçant la douille 4 sur l’arbre
de sortie 8 et en faisant tourner l’écrou de fixation de la douille
3 dans le sens des aiguilles d’une montre au-dessus de la dou-
ille afin de le serrer à nouveau sur l’arbre de sortie 8 (Fig. 3).
Fig. 4
12
11
10
9
Fig. 5
90°
9
12 11
10
Puis passez à l’installation du mandrin EZ Lock™ en suivant les
instructions.
Pour charger un disque de ponçage :
1. Tirez le manchon à ressort 9 VERS LE BAS, en direction de
l’outil, d’une main et tenez-le dans cette position. Vous pouvez
caler l’outil sur le corps ou sur la table de travail pour augmenter la force disponible (Fig. 4).
2. De l’autre main, alignez l’interface à nœud papillon 10 sur le
mandrin de façon que l’interface à nœud papillon en métal 11
soit au fond du disque de ponçage 12 (Fig. 4).
3. Placez le disque de ponçage sur le mandrin jusqu’à un point
situé juste en dessous du nœud papillon sur le mandrin 10 et
2
2
tournez sur 90 degrés jusqu’à ce que l’interface à nœud papillon 11 sur le disque de ponçage 12 soit aligné sur le manchon
9. Relâchez le manchon 9. Le disque de ponçage 12 devrait
alors se verrouiller en place (Fig. 5).
25
2610046267.indd 25 3/2/17 1:00 PM
Page 26

Assemblage
Un placement incorrect du
disque de ponçage dans le man-
Fig. 6
drin pourrait causer des blessures corporelles ou des dommages aux biens. Pour vous assurer qu’il repose bien à l’endroit
correct, tenez le bouton de verrouillage de l’arbre 2 et faites
tourner le disque de ponçage 12. Le disque de ponçage ne pourra alors pas tourner sur le mandrin.
2
A
Pour détacher un disque de ponçage :
1. Tirez le manchon à ressort 9 VERS LE BAS, en direction de
l’outil, d’une main (Fig. 5).
2. Tenez le manchon 9 enfoncé tout en faisant tourner le disque
de ponçage 12 sur 90 degrés (Fig. 5).
3. Détachez le disque de ponçage 12 (Fig. 5).
7
6
B
3
1
C
26
2610046267.indd 26 3/2/17 1:00 PM
Page 27

Assemblage
Pour attacher le dispositif de protection des ongles :
Remarque : Assurez-vous que le mandrin et le disque de pon-
Fig. 7
çage sont assemblés correctement avant de monter l’accessoire.
A. Détachez le capuchon transparent 2 de l’accessoire en pous-
sant les petits boutons 6 à l’intérieur du capuchon transparent vers le haut, le long du guide de réglage de la hauteur 7,
E
jusqu’à ce qu’ils atteignent l’ouverture guidée (Fig. 6).
B. Déverrouillez le fermoir 3.
C. Ouvrez l’accessoire 1 (Fig. 6).
D. Positionnez l’accessoire 1 autour du bec fileté de l’outil 8 et
fermez l’accessoire jusqu’à ce que le fermoir 3 soit totalement
1
3
8
engagé (Fig. 7).
E. Faites tourner tout l’accessoire 1 dans le sens des aiguilles
d’une montre pour le visser en place sur le bec fileté 8. Assurez-vous qu’il est bien sécurisé de telle façon qu’il ne change
pas de position pendant son utilisation (Fig. 7).
D
F. Rattachez le capuchon transparent 2 (répétez simplement la
procédure de l’étape A dans l’ordre inverse).
27
2610046267.indd 27 3/2/17 1:00 PM
Page 28

Assemblage
G. Déterminez la position correcte du guide de réglage de la
hauteur pour votre modèle d’outil Dremel dans le tableau cidessous, et faites tourner le capuchon transparent de telle
manière que les petits boutons soient tout à fait au fond de
la fente correspondante sur l’accessoire. Vous entendrez un
déclic indiquant que le capuchon a été installé dans la position
appropriée. Ne forcez pas le capuchon transparent dans une
position à l’extérieur des guides.
28
2610046267.indd 28 3/2/17 1:00 PM
Tableau des positions pour lé réglage de la hauteur
Position du guide de
réglage de la hauteur
Modèles Dremel com-
patibles
1 8100
2 3000, 4000, 4300, 8220
3 7300-PGT, 7700
Page 29

Instructions pour l’utilisation
Observez tous les avertisse-
ments et toutes les consignes
de sécurité figurant dans le mode d’emploi de l’outil et le
mode d’emploi de l’accessoire.
Pourquoi utiliser un outil rotatif Dremel pour les soins
des ongles des animaux de compagnie ?
Les ciseaux et les tondeuses de type guillotine font pression et
pincent l’ongle, ce qui peut être inconfortable pour les doigts
et les pattes des animaux de compagnie. Le cisaillement des
ongles des pattes augmente également le risque de coupure de
l’alimentation interne en sang de l’ongle, dans ce que l’on appelle
la partie rose ; le ponçage est plus progressif et contrôlé. En cas
de coupure accidentelle de la partie rose par un outil rotatif, la
plaie est habituellement plus petite et se cicatrisera plus vite
qu’en cas de coupure causée par un coupe-ongles.
Avant de commencer
Les soins des ongles des animaux de compagnie pour la première
fois peuvent être une expérience inquiétante pour l’animal aussi
2610046267.indd 29 3/2/17 1:00 PM
bien que pour son maître. Mais ne vous inquiétez pas. Les soins
des ongles des animaux ne doivent pas obligatoirement être une
expérience stressante. Votre animal de compagnie s’habituera à
cette expérience si vous commencez à l’y exposer à un très jeune
âge et si vous l’incorporez à son dressage.
En premier lieu, apprenez à votre animal de compagnie à ne
plus avoir peur quand vous touchez et manipulez les extrémités
de ses pattes avant de l’exposer à l’outil rotatif. Une façon de
faire ceci consiste à masser ses jambes, ses pattes et ses doigts
pendant quelques minutes au moins une fois par jour. Ensuite,
créez une association positive avec cette expérience. Pour cela,
récompensez votre animal en lui donnant un peu de sa nourriture
préférée.
Puis aidez-le à s’habituer progressivement à l’outil rotatif. Laissez votre animal de compagnie renifler l’outil quand il est hors
tension. Ensuite, tout en continuant à tenir l’outil dans votre
main, laissez votre animal de compagnie écouter le bruit que
fait l’outil quand il est mis en marche. Dans l’idéal, faites asseoir
votre animal ou couchez-le sur son flanc pendant que l’outil est
29
Page 30

Instructions pour l’utilisation
154 2 3
Fig. 8
45°
dans votre main en train de fonctionner. Avancez progressivement
votre animal de compagnie jusqu’à ce que ses ongles touchent le
disque de ponçage en rotation pendant moins d’une seconde. Ne
travaillez pas encore sur les ongles ; laissez simplement votre animal de compagnie se familiariser avec l’outil. Tout au long de ce
processus d’acclimatation, continuez à féliciter votre animal et à
récompenser son bon comportement en lui donnant un peu de sa
nourriture préférée. Ce processus peut prendre plusieurs jours – ou
même semaines. Il ne faudra pas beaucoup de temps pour que votre
animal de compagnie et vous-même puissiez vous détendre et même
apprécier le temps que vous passez ensemble pour le toilettage.
Anatomie des ongles
Anatomie des ongles
1 Ongle / griffe
2 Veine de la partie rose
3 Patte
4 Sol
5 Ligne de coupe
30
2610046267.indd 30 3/2/17 1:00 PM
La partie rose des ongles/griffes contenant des vaisseaux qui est
décrite dans cette section existe chez différents types d’animaux de
compagnie, y compris les chiens et les chats.
Avant de commencer à couper les ongles de votre animal de compagnie, vus devrez identifier la partie rose. Le schéma (Fig. 8) montre
l’anatomie basique de l’ongle d’un animal de compagnie. La partie
extérieure de l’ongle est dure et n’est pas sensible parce qu’elle n’a
Page 31

Instructions pour l’utilisation
pas de terminaison nerveuse. La partie intérieure de l’ongle est
la partie rose. Elle comprend de minuscules vaisseaux sanguins
et des terminaisons nerveuses, et elle est très sensible. La partie
rose est en fait une veine qui « alimente » l’ongle en sang. Si vous
coupez accidentellement la partie rose pendant que vous êtes en
train de couper un ongle, cet ongle commencera à saigner.
Les ongles de couleur claire sont souvent assez transparents
pour vous permettre de voir la partie intérieure rose. Les ongles
de couleur foncée ne vous permettront peut-être pas de voir où
se trouve la partie rose. Les animaux de compagnie peuvent
avoir à la fois des ongles de couleur claire et de couleur foncée
vous permettant d’estimer la longueur de la veine de la partie
rose.
Le schéma montre une estimation de l’angle correct pour couper
les ongles d’un animal de compagnie. Une règle de base pour
l’angle approprié est de 45 degrés vers le haut à partir du bas de
la patte. L’angle approprié peut varier en fonction des souhaits
du propriétaire de l’animal ou de l’anatomie unique de l’animal.
Coupez les ongles afin qu’ils touchent presque le sol lorsque
votre animal de compagnie est en train de marcher.
2610046267.indd 31 3/2/17 1:00 PM
Soins des ongles – Processus
N’utilisez que la méthode « préhension
de golf » ou « préhension manuelle »
pour tenir l’outil. Ne tenez jamais l’outil par son élément de
fixation. Si vous tenez l’outil par son élément de fixation, l’outil
risquerait de se déplacer soudainement et de causer une perte
de contrôle (Fig. 9).
Fig. 9
31
Page 32

Instructions pour l’utilisation
Placez la patte de l’animal 4 sur la rampe 1 de telle manière que
Fig. 10
3
124
32
2610046267.indd 32 3/2/17 1:00 PM
l’ongle 3 soit près du disque de ponçage 2 – mais sans le toucher
(Fig. 10).
Réglez la vitesse de votre outil rotatif de façon à ce qu’elle corresponde à la vitesse correspondante du tableau « Vitesses de fonctionnement ». Tenez le doigt et l’ongle d’une main tout en utilisant
l’outil rotatif de l’autre. Ceci est plus confortable pour votre animal
de compagnie étant que cela réduit les vibrations sur la patte. Si
vous appuyez doucement sur le bas de la patte, cela allonge légèrement l’ongle et facilite ainsi l’administration des soins.
Il est important de laisser la vitesse de l’outil rotatif faire le travail; ne faites jamais pression sur l’ongle avec le disque de ponçage en rotation. Une telle pression pourrait chauffer excessivement l’ongle, causant ainsi de l’inconfort pour votre animal de
compagnie. Le disque de ponçage en rotation de l’outil rotatif ne
doit pas être gardé en contact avec l’ongle plus de trois secondes
à la fois. Au lieu de faire tout le travail sur un ongle à la fois, il est
recommandé de travailler brièvement en succession sur chaque
ongle d’une patte, puis ceux des autres pattes, en plusieurs pass-
Page 33

Instructions pour l’utilisation
es. Ceci donne le temps aux ongles de refroidir. Vous pouvez recommencer ce processus autant de fois que nécessaire. Coupez
les ongles afin qu’ils touchent presque le sol lorsque votre animal
de compagnie est en train de marcher.
Vitesses de fonctionnement
Reportez-vous au mode d’emploi de votre outil électrique pour
plus d’informations sur la façon de modifier la vitesse de l’outil.
Modèle de l’outil Réglage de la
vitesse
Nombre approx. de
tr/min
3000 2 5,000-10,000
4000 5-10 5,000-10,000
4300 5-10 5,000-10,000
7300-PGT LO (1) 6,500
7700 LO (1) 10,000
8100 2 5,000
8220 5-10 5,000-10,000
33
2610046267.indd 33 3/2/17 1:00 PM
Page 34

Instructions pour l’utilisation
Conseils de sécurité pour les animaux de compagnie
Certains animaux de compagnie peuvent devenir nerveux en
présence de l’outil ; il est donc préférable de sécuriser votre
animal de compagnie. L’opérateur aura besoin des deux mains
pour toiletter les ongles ; il pourrait donc être utile de demander
à une autre personne de vous aider à contrôler votre animal de
compagnie.
Si des poils sont accidentellement attrapés dans l’outil rotatif,
éteignez immédiatement l’outil et dégagez les poils de l’outil.
Pour les animaux de compagnie ayant des poils particulièrement
longs, utilisez une vieille chaussette pour couvrir le doigt, le pied
et la jambe de l’animal, et pour isoler l’ongle. Poussez l’ongle
à travers une petite ouverture dans la pointe de la chaussette
afin de travailler sur l’ongle. Gardez de la poudre styptique à
portée de la main en cas de saignement. Vous trouverez de la
poudre styptique dans la plupart des magasins de fournitures
pour animaux de compagnie. Consultez les instructions figurant
sur l’emballage pour trouver les instructions d’utilisation appropriées.
34
2610046267.indd 34 3/2/17 1:00 PM
Nettoyage de l’accessoire pour les soins aux animaux
de compagnie
Retirez l’accessoire pour les soins aux animaux de compagnie de
l’outil rotatif suivant les besoins pour nettoyer toute poussière
ou débris d’ongle. Lavez uniquement l’accessoire avec de l’eau
chaude et faites-le sécher complètement avec un tissu propre
avant de le réinstaller sur l’outil rotatif.
Page 35

Símbolos de seguridad
Las definiciones que aparecen a continuación describen el nivel de gravedad de cada
palabra de señal de seguridad. Por favor, lea el manual y preste atención a estos símbolos.
Éste es el símbolo de alerta de seguridad. Se utiliza para alertarle a usted de posibles peligros de
lesiones corporales. Obedezca todos los mensajes
de seguridad que sigan a este símbolo para evitar
posibles lesiones o muerte.
PELIGRO indica una situación peligrosa que, si no
se evita, causará la muerte o lesiones graves.
ADVERTENCIA indica una situación peligrosa que,
si no se evita, podría causar la muerte o lesiones
graves.
PRECAUCIÓN, cuando se utiliza con el símbolo de
alerta de seguridad, indica una situación peligrosa
que, si no se evita, causará lesiones leves o moderadas.
35
2610046267.indd 35 3/2/17 1:00 PM
Page 36

Advertencias de seguridad
Lea todas las advertencias de se-
guridad y todas las instrucciones
contenidas en el manual de la herramienta rotativa y en este
manual. Si no se siguen las advertencias e instrucciones, es po-
sible que el resultado sea descargas eléctricas, incendios y/o lesiones graves a una persona o un animal.
GUARDE TODAS LAS ADVERTENCIAS E INSTRUCCIONES
PARA REFERENCIA FUTURA
Mantenga la herramienta alejada del agua. Tenga precaución
adicional cuando utilice la herramienta rotativa cerca de una tina
o un área de lavado de animales domésticos. Si entra agua en
una herramienta eléctrica se aumentará el riesgo de descargas
eléctricas.
Use equipo de protección personal. Use siempre protección
de los ojos.
Este producto está diseñado únicamente para arreglar uñas
de perro o de gato. Este producto no está diseñado para utilizarse como taladro dental en aplicaciones médicas en seres
humanos ni en veterinaria. En caso de hacer dicho uso, es po-
sible que el resultado sea lesiones graves.
36
2610046267.indd 36 3/2/17 1:00 PM
Este aditamento está diseñado solamente para utilizarse con
los modelos de herramienta rotativa Dremel 3000, 4000,
4300, 7300-PGT, 7700, 8100 u 8220. Es posible que el uso de
este aditamento con cualquier otra herramienta rotativa cause
lesiones graves.
Utilice únicamente el disco de lijar accesorio SD60-PGA y el
mandril EZ Lock™ EZ402 con este aditamento. Es posible que
el uso de cualquier otro accesorio cause lesiones graves.
No utilice el aditamento sin tener todos los componentes
instalados de acuerdo con las instrucciones de utilización.
Cualquier otro uso es un uso indebido y podría causar lesiones.
La máxima velocidad de funcionamiento para aplicaciones
de arreglo de uñas de animales domésticos es 10.000/min.
Es posible que el uso de velocidades de funcionamiento más
altas cause una acumulación de calor y lesiones al animal doméstico. Consulte la sección “Velocidades de funcionamiento”
para obtener el ajuste adecuado de la velocidad de la herramienta.
Page 37

Advertencias de seguridad
Mantenga el pelo de su animal doméstico alejado de las piezas que giran. El pelo se puede enganchar en la herramienta
y con ello causar lesiones a su animal doméstico. Consulte la
sección “Consejos de seguridad para animales domésticos” para
obtener más información.
2610046267.indd 37 3/2/17 1:00 PM
IMPORTANTE: Es posible que algunos de los siguiente símbolos
se usen en su producto. Por favor, estúdielos y aprenda su
significado. La interpretación correcta de estos símbolos le
permitirá utilizar el producto mejor y de manera más segura.
Símbolo Désignación / Explicación
.../min Revoluciones por minuto (RPM)
n
Símbolos
Alerta al usuario para que lea el manual.
Alerta al usuario para que use protección de
los ojos.
Velocidad nominal (máxima velocidad obtenible)
37
Page 38

Familiarización con su herramienta y sus accesorios Dremel®
Herramienta rotativa alámbrica
1 Tuerca del portaherramienta
2 Portaherramienta
3 Tapa de punta roscada
4 Eje de salida
5 Botón de fijación del eje
6 Herramienta rotativa
7 Interruptor de encendido y apagado
8 Dial de velocidad
9 Cable de alimentación
R
1 2 3 4 5 6 87 9
38
2610046267.indd 38 3/2/17 1:00 PM
Herramienta rotativa inalámbrica (operada por batería)
1 Tuerca del portaherramienta
2 Portaherramienta
3 Tapa de punta roscada
4 Eje de salida
5 Botón de fijación del eje
6 Herramienta rotativa
7 Interruptor de encendido y apagado y dial de velocidad
8 Paquete de batería
9 Cargador de baterías
1 2 3 4 5 6 7
8
9
Page 39

Familiarización con su herramienta y sus accesorios Dremel®
Accesorios de la herramienta rotativa
1 Portaherramienta de 1/8 de pulgada 480
(sin anillos de identificación)
2 Portaherramienta de 3/32 de pulgada 481
5
1
2
(3 anillos de identificación)
3 Portaherramienta de 1/16 de pulgada 482
3
(2 anillos de identificación)
4 Portaherramienta de 1/32 de pulgada 483
(1 anillo de identificación)
4
5 Anillos de identificación
6 Llave de tuerca
7 Mandril EZ Lock™ EZ402
8 Espaciador azul
9 Manguito accionado por resorte
10 Interfaz de corbatín
6
11 Disco de lijar SD60-PGA
12 Interfaz de corbatín
2610046267.indd 39 3/2/17 1:00 PM
7
8 9 10
11
12
39
Page 40

Familiarización con su herramienta y sus accesorios Dremel®
Aditamento para arreglar uñas de animales
8
5
2
6
7
3
4
1
40
2610046267.indd 40 3/2/17 1:00 PM
domésticos AT01-PGA
1 Carcasa del aditamento
2 Tapa transparente
3 Presilla
4 Bisagra
5 Abertura para el disco de lijar
6 Lengüeta (parte de la tapa transparente)
7 Guía de profundidad
8 Rampa
Page 41

Ensamblaje
Desconecte la herramienta de la
fuente de alimentación y asegúrese
de que la herramienta rotativa esté “APAGADA” antes de
hacer cualquier ensamblaje o ajuste, o cambiar accesorios.
Dichas medidas preventivas reducen el riesgo de arrancar accidentalmente la herramienta.
No utilice una boquilla
Dremel con este aditamento. Utilice únicamente un portaherramienta
de 1/8 de pulgada y una tuerca de portaherramienta. El uso de la boquilla Dremel podrá causar
daños al aditamento.
Para cargar el mandril:
1. Desenrosque y retire la tapa de punta 1 de la herramienta
girándola en sentido contrario al de las agujas del reloj hasta
que se separe de la herramienta (Fig. 1).
2. Para aflojar la tuerca del portaherramienta, presione primero
el botón de fijación del eje 2 y rote a mano la tuerca del portaherramienta 3 hasta que el cierre acople el eje e impida su
2610046267.indd 41 3/2/17 1:00 PM
rotación adicional (Fig. 2).
Fig. 1
Fig. 2
T
6
5
L
7
4
3
1
2
41
Page 42

Ensamblaje
Fig. 3
6
mienta esté en funcionamiento.
3. Con el cierre del eje 2 acoplado, afloje la tuer-
No acople el cierre del
eje mientras la herra-
ca del portaherramienta 3 (gírela en sentido
contrario al de las agujas del reloj L). Utilice la
llave de tuerca 7 si es necesario. La tuerca del
portaherramienta debe estar enroscada floja-
3
mente cuando se inserte un accesorio (Fig 2).
4. Inserte el mandril EZ Lock™ 6 en el portaherramienta 4 (Fig. 2).
4
8
en el mandril toque fondo en la tuerca del por-
Asegúrese de que el espaciador azul 5 ubicado
taherramienta, ajustando el mandril a la profundidad correcta. Si no se ajusta el mandril a la
profundidad correcta, el resultado puede ser daños al aditamento.
5. Con el cierre del eje 2 acoplado, apriete firme-
42
2610046267.indd 42 3/2/17 1:00 PM
mente la tuerca del portaherramienta 3 (gírela
en el sentido de las agujas del reloj T) con la
llave de tuerca 7 (Fig. 2).
Nota: Si el mandril EZ Lock™ no encaja en el
portaherramienta, es posible que el portaherramienta esté atorado dentro de la tuerca del portaherramienta. Si esto sucede, retire la tuerca del
portaherramienta de la herramienta, para lo cual
deberá continuar girándola en sentido contrario
al de las agujas del reloj. Si el portaherramienta
no se separa de la tuerca del portaherramienta
al retirarlo de la herramienta, empuje el vástago
del mandril EZ Lock™ 6 hacia el interior del agujero de la tuerca del portaherramienta 3. Esto
debería hacer que el portaherramienta 4 salga
de la tuerca del portaherramienta 3. Efectúe el
reensamblaje colocando el portaherramienta 4
dentro del eje de salida 8 y girando la tuerca del
portaherramienta 3 en el sentido de las agujas
del reloj sobre el portaherramienta para apre-
Page 43

Ensamblaje
tarlo de vuelta sobre el eje de salida 8 (Fig. 3). Luego proceda
a realizar la instalación del mandril EZ Lock™ de acuerdo con las
instrucciones.
Fig. 4
Fig. 5
Para cargar el disco de lijar:
1. Jale el manguito accionado por resorte 9 HACIA ABAJO, hacia
la herramienta, con una mano, y manténgalo en esa posición.
Puede apoyar la herramienta en el cuerpo o sobre un banco
de trabajo para hacer palanca adicional (Fig. 4).
2. Con la otra mano, alinee la interfaz de corbatín 10 ubicada en
12
11
10
90°
9
9
12 11
10
el mandril con la interfaz de corbatín de metal 11 ubicada en
la parte inferior del disco de lijar 12 (Fig. 4).
3. Coloque el disco de lijar en el mandril hasta un punto justo de-
bajo del corbatín ubicado en el mandril 10 y gírelo 90 grados
hasta que la interfaz de corbatín 11 ubicada en el disco de
lijar 12 se alinee con el manguito 9. Suelte el manguito 9. El
disco de lijar 12 debería quedar sujeto en la posición correcta
(Fig.5).
Es posible que un asentamiento incorrecto del disco de lijar sobre el
2
2610046267.indd 43 3/2/17 1:00 PM
2
mandril cause lesiones corporales o daños materiales. Para
comprobar si el asentamiento es correcto, mantenga presionado
43
Page 44

Ensamblaje
el botón de fijación del eje 2 y gire el disco de lijar 12. El disco de
lijar 12 no podrá rotar sobre el mandril.
Para descargar el disco de lijar:
1. Jale el manguito accionado por resorte 9 HACIA ABAJO, hacia
la herramienta, con una mano (Fig. 5).
2. Sujete el manguito 9 hacia abajo mientras gira el disco de lijar
12 90 grados (Fig. 5).
3. Retire el disco de lijar 12 (Fig. 5).
44
2610046267.indd 44 3/2/17 1:00 PM
Para instalar el aditamento protector de uñas:
Nota: Asegúrese de que el mandril y el disco de lijar esté monta-
dos correctamente antes de montar el aditamento.
A. Retire la tapa transparente 2 del aditamento haciendo pasar
los pomos pequeños 6, ubicados en el interior de la tapa
transparente, hacia arriba a lo largo de la guía de ajuste de la
altura 7 hasta que lleguen a la abertura guiada (Fig. 6).
B. Desbloquee la presilla 3.
C. Abra el aditamento 1 (Fig. 6).
D. Posicione el aditamento 1 alrededor de la punta roscada de la
herramienta 8 y cierre el aditamento juntándolo hasta que la
presilla 3 esté completamente acoplada (Fig. 7).
E. Gire todo el aditamento 1 en el sentido de las agujas del
reloj hasta la posición correcta sobre la punta roscada 8.
Asegúrese de que esté apretado firmemente para que no
cambie de posiciones durante el uso (Fig. 7).
F. Reinstale la tapa transparente 2 (simplemente realice el paso
A en orden inverso).
Page 45

Ensamblaje
Fig. 6
2
7
A
6
B
Fig. 7
E
1
3
8
3
1
C
2610046267.indd 45 3/2/17 1:00 PM
D
45
Page 46

Ensamblaje
Instrucciones de utilización
G. Localice la posición correcta de la guía de ajuste de la altura
para su modelo de herramienta Dremel en el cuadro que aparece a continuación y gire la tapa transparente de manera que
los pomos pequeños estén totalmente al final de la ranura
correspondiente del aditamento. Usted oirá como la tapa se
acopla a presión con un clic en la posición correcta cuando
esté completamente instalada. No fuerce la tapa transparente
para sacarla de las guías.
Cuadro de posiciones de altura
Posición de la guía de
ajuste de la altura
1 8100
2 3000, 4000, 4300, 8220
3 7300-PGT, 7700
46
2610046267.indd 46 3/2/17 1:00 PM
Modelos Dremel
compatibles
en el manual de la herramienta y el manual del aditamento.
¿Por qué usar una herramienta rotativa Dremel para
arreglar uñas de animales domésticos?
Las tijeras y los cortauñas tipo guillotina aplican presión y pellizcan
la uña, lo cual puede ser incómodo para los dedos y los pies de los
animales domésticos. Además, al recortar las uñas se aumenta la
probabilidad de cortar la vía de suministro interno de sangre a
la uña, que se conoce como la raíz; la acción de amolado es más
gradual y más controlada. Si se mella la raíz usando una herramienta
rotativa, generalmente el corte será más pequeño y se curará más
rápidamente que un corte hecho con un cortauñas.
Antes de comenzar
Arreglar las uñas de un animal doméstico por primera vez puede
ser una experiencia preocupante tanto para el animal como para
su dueño. Tenga la seguridad de que el arreglo de las uñas no
tiene que ser una experiencia estresante. Al comenzar pronto y
Siga todas las advertencias e instrucciones de seguridad provistas
Page 47

Instrucciones de utilización
considerar que el arreglo de las uñas forma parte del adiestramiento del animal, éste se acostumbrará a la experiencia.
Primero, entrene a su animal doméstico para que se sienta
cómodo con que le toquen y manipulen las patas antes de exponerlo a la herramienta rotativa. Una manera de hacer esto es
masajearle las piernas, las patas y los dedos individuales unos
cuantos minutos por lo menos una vez al día. Después, cree una
asociación positiva con esta experiencia recompensando a su
animal doméstico con su golosina favorita.
Luego, ayude a su animal a acostumbrarse gradualmente a la
herramienta rotativa. Deje que el animal huela la herramienta
mientras está apagada. Luego, mientras sostiene la herramienta
en la mano, deje que su animal doméstico oiga el sonido que la
herramienta hace al encenderla. Idealmente, haga que el animal
se siente o se acueste sobre un lado mientras usted sostiene la
herramienta en la mano y la tiene en marcha. Progrese gradualmente hasta hacer que las uñas de su animal doméstico toquen
el disco de lijar que rota durante menos de un segundo. No amuele todavía las uñas; simplemente deje que su animal doméstico
2610046267.indd 47 3/2/17 1:00 PM
se familiarice con la herramienta. Durante todo el proceso de
aclimatación, siga felicitando a su animal doméstico y recompense su buena conducta con una golosina. Es posible que este
proceso tome unos cuantos días o semanas. En poco tiempo
tanto usted como su animal doméstico podrán relajarse e incluso
disfrutar del tiempo que comparten para arreglar las uñas.
Anatomía de la uña
Las uñas/garras que contienen vasos sanguíneos de raíz que se
describen en esta sección son relevantes para varios tipos de
animales domésticos, incluyendo perros y gatos.
Antes de recortar las uñas de su animal doméstico, usted tendrá que identificar la raíz. En el diagrama (Fig. 8) se muestra la
anatomía básica de la uña de un animal doméstico. La uña exterior es dura y no tiene sensación debido a que no tiene terminaciones nerviosas. El núcleo de la uña es la raíz. Está formado por
diminutos vasos sanguíneos y terminaciones nerviosas y es muy
sensible. La raíz es una vena que “alimenta” a la uña. Si usted
corta la raíz mientras está recortando una uña, ésta comenzará
a sangrar.
47
Page 48

Instrucciones de utilización
154 2 3
Fig. 8
45°
Anatomía de la uña
1 Uña / garra
2 Raíz
3 Pata
4 Piso
5 Línea de corte
48
2610046267.indd 48 3/2/17 1:00 PM
Las uñas de color claro son a menudo lo suficientemente transparentes como para permitirle ver el núcleo rosado de la raíz. Es posible
que las uñas de color oscuro no le permitan ver dónde está ubicada
la raíz. Es posible que los animales domésticos tengan uñas de color
tanto claro como oscuro que le permitan a usted estimar la longitud
de la raíz.
En el diagrama también se muestra un estimado del ángulo adecuado
con el que recortar las uñas de un animal doméstico. Una regla práctica para el ángulo adecuado es 45 grados hacia arriba desde la parte
inferior de la pata. El ángulo apropiado podrá variar de acuerdo con
los deseos del dueño del animal doméstico o con la anatomía especial de dicho animal. Recorte las uñas de manera que casi toquen el
piso cuando su animal doméstico esté caminando.
El proceso de arreglo de las uñas
Use sólo el método de “empuñadura de
golf” o “empuñadura agarre con la mano”
para agarrar la herramienta. No agarre nunca la herramienta por
el aditamento. Si agarra la herramienta por el aditamento, el resul-
Page 49

Instrucciones de utilización
tado podría ser que se desplace inesperadamente, causando
pérdida de control (Fig. 9).
Coloque la pata del animal doméstico 4 sobre la rampa 1 de
manera que la uña 3 esté cerca del disco de lijar 2 pero no lo
toque (Fig. 10).
Ajuste la velocidad de su herramienta rotativa para que coincida
con el cuadro de “Velocidades de funcionamiento”. Sostenga
el dedo y la uña de su animal doméstico en una mano mientras
Fig. 9
2610046267.indd 49 3/2/17 1:00 PM
utiliza la herramienta rotativa en la otra mano. Esto es más cómodo para su animal, ya que reduce la vibración en la pata. Si
se empuja suavemente sobre la parte inferior de la almohadilla
Fig. 10
3
124
49
Page 50

Instrucciones de utilización
de la pata se extiende ligeramente la uña para poder arreglarla
más fácilmente.
Es importante dejar que la velocidad de la herramienta rotativa
haga el trabajo; no aplique nunca presión a la uña con el disco
de lijar que gira. Es posible que la presión haga que la uña se
caliente demasiado, lo cual le causará molestias a su animal doméstico. El disco de lijar que gira de la herramienta rotativa no se
debería mantener contra la uña más de tres segundos a la vez.
En lugar de concentrarse en completar una uña a la vez, se recomienda recortar brevemente cada uña de una pata y luego de
la otra, en varias pasadas. Esto deja tiempo para que las uñas se
enfríen. Usted podrá repetir este proceso según sea necesario.
Recorte las uñas de manera que casi toquen el piso cuando su
animal doméstico esté caminando.
50
2610046267.indd 50 3/2/17 1:00 PM
Velocidades de funcionamiento
Consulte el manual de su herramienta eléctrica para obtener más
información sobre cómo cambiar la velocidad de la misma.
Modelo de
herramienta
Ajuste de
velocidad
RPM
aproximadas
3000 2 5,000-10,000
4000 5-10 5,000-10,000
4300 5-10 5,000-10,000
7300-PGT LO (1) 6,500
7700 LO (1) 10,000
8100 2 5,000
8220 5-10 5,000-10,000
Page 51

Instrucciones de utilización
Consejos de seguridad para animales domésticos
Es posible que algunos animales domésticos se pongan nerviosos en presencia de la herramienta, por lo que lo mejor es sujetar firmemente a su animal doméstico. El operador necesitará
las dos manos para arreglar las uñas, por lo que puede que sea
útil tener a otra persona para que le ayude a sujetar a su animal.
Si el pelo se engancha accidentalmente en la herramienta rotativa, apague inmediatamente la herramienta y desenrede el pelo
de la herramienta. En el caso de animales domésticos que tengan el pelo especialmente largo, use una media vieja para cubrir
el dedo, el pie y la pata del animal y aísle la uña. Empuje la uña
hacia fuera a través de una abertura pequeña en la punta de la
media para arreglar la uña. Mantenga a mano polvo estíptico por
si el animal sangra. El polvo estíptico está disponible en la mayoría de las tiendas de productos para animales domésticos. Siga
las instrucciones indicadas en el paquete para el uso correcto del
producto.
2610046267.indd 51 3/2/17 1:00 PM
Limpieza del aditamento para arreglar uñas de
animales domésticos
Retire el aditamento para arreglar uñas de animales domésticos
de la herramienta rotativa según sea necesario para eliminar
todo el polvo o residuo de uñas que tenga. Lave sólo el aditamento con agua templada y séquelo completamente con un paño
limpio antes de reinstalarlo en la herramienta rotativa.
51
Page 52

Exportado por: © Robert Bosch Tool Corporation
Mt. Prospect, IL 60056 -2230, E.U.A.
Importado a México por: Robert Bosch, S. de R.L. de C.V.
Calle Robert Bosch No. 405 - 50071 Toluca, Edo. de Méx. - México
Tel. 052 (722) 279 2300 ext 1160
Fax. 052 (722) 216-6656
!2610046267AA!
03/2017
2610046267.indd 52 3/2/17 1:00 PM
 Loading...