

Page 1
DECT OFFICE
English
User Guide
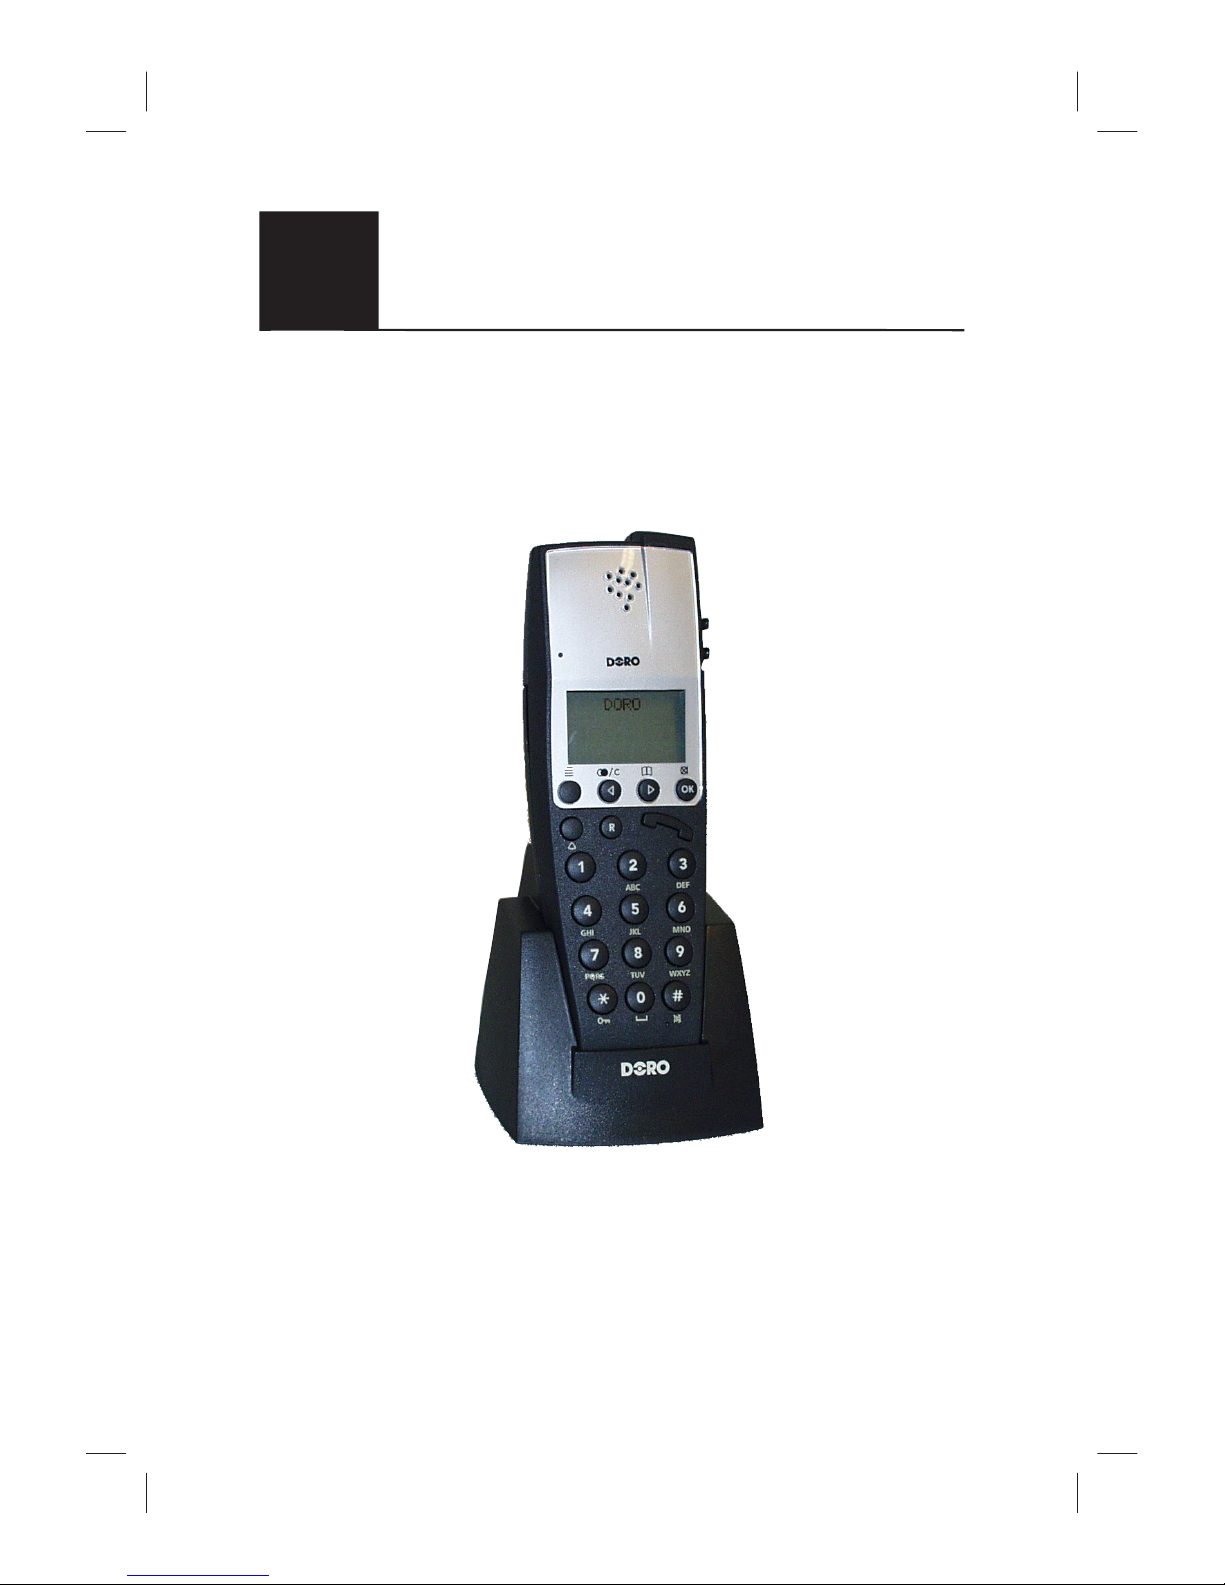
DECT Handset
Page 2
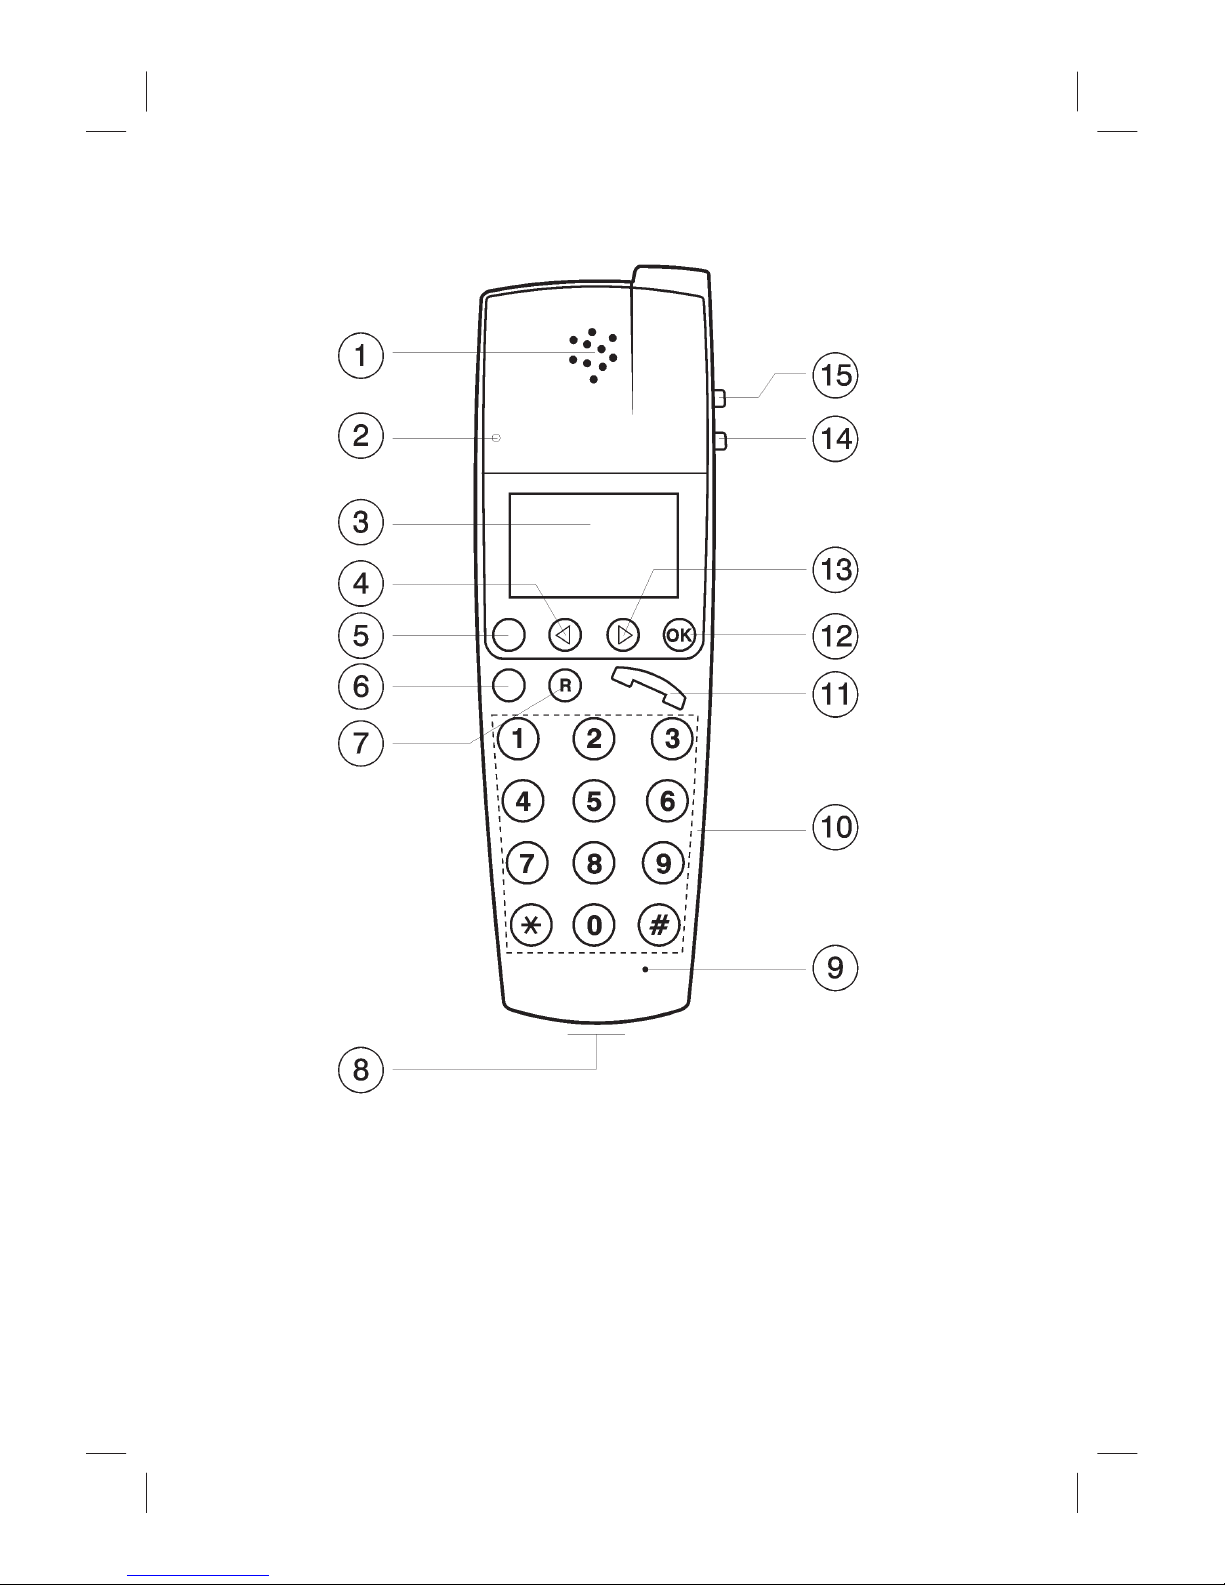
1 Earpiece
2 Call indicator LED
3 Display
4 Scroll arrow/Redial
5 Menu button
6 Special button DECT OFFICE
7 Recall button
8 Headset socket (located on
bottom edge)
9 Microphone
10 Number buttons 0-9, *, #
11 Talk button
12 OK/Mute
13 Scroll arrow/Phone book
14 Volume - reduce
15 Volume - increase
Page 3

www.doro.com 3
Index
Installation 4
Unpacking........................... 4
Connection ......................... 4
Battery ................................ 4
Range ................................. 5
The display ......................... 6
Call indicator ....................... 6
Handling 7
On/Off function................... 7
Receiving a call .................. 7
Temporary silent mode....... 7
Silent mode......................... 7
Making a call....................... 8
Redial button ...................... 8
Mute button......................... 9
Volume control.................... 9
Key lock ............................. 9
Settings 10
Main menu .......................... 10
Prole setting...................... 11
Ext. service......................... 15
Battery ................................ 15
Phone book ........................ 16
Call log................................ 19
Messages ........................... 21
Registering ......................... 21
Other 24
Belt clips ............................. 24
Headset .............................. 24
Guarantee........................... 25
Trouble shooting ................. 25
Declaration of conformity ... 26
Page 4

4 www.doro.com
Installation
Unpacking
In the box you should nd the following items:
- Handset and rechargeable battery pack
- Mains power adapter
- Charging base
Connection
1. Connect the power adapter to the power socket on the underside of the
charging base.
2. The battery pack is located underneath the handset battery cover, press down
and push out to remove the cover.
3. Connect the battery pack into the handset using the white plastic plug, push
the plug into the handset socket so that the red wire is closest to the side of
the handset on which the volume buttons are located.
4. Replace the battery cover.
5. Place the handset on to the base unit with the keypad facing out. The red
indicator LED on the handset will begin to ash and the display will show
the handset charging.
Battery
The telephone is supplied with a nickel metal hydride (NiMH) battery pack. The
battery performance will be dependent of correct charging and discharging by
the end user and will vary dependant on individual usage.
A fully charged battery will give approximately 90 hours standby time and 10
hours call time. These times will vary dependant on ambient temperatures,
correct charging, usage, and will be reduced if the back lighting function is
enabled.
A completely discharged battery will take approximately 4 hours to fully
recharge (24 hours from new).
The handset has an automatic charging mechanism that prevents the battery
from overcharging, once charge the red indicator LED will illuminate and the
display will go blank (idle mode), when recharging begins the display will show
CHARGE BATT!
Page 5

www.doro.com 5
Installation
Please note!
The battery is not supplied connected so this will have to be done separately.
When the telephone is installed for the rst time, the batteries must be charged for 24 hours
before using the telephone.
Only DORO original batteries should be used. The guarantee does not cover any damages
caused by incorrect batteries.
Due to the automatic charging mechanism, the capacity can sometimes be misleading – even if
the battery is fully charged, the display will not always say that this is the case. Check the correct
capacity of the battery in the menu on page 15.
Range
The range of the telephone will vary depending on surrounding environmental
conditions, in an ideal installation (line of sight, with no obstructions), the range
will be up to 300 meters.
Where problems are experienced with range attempt to reposition the base unit,
ideally as high as possible and clear of any possible obstruction or interference.
More than one base unit or repeater may be used to obtain an improved range.
Range warning
If during a conversation the handset moves out of range the quality of the
call will deteriorate, the display will show RANGE and the handset will beep
(if selected). If you do not move closer to the base unit or a repeater the call
will be lost.
Page 6

6 www.doro.com
Installation
The display
- Indicates that the handset is connected to the base unit.
- Flashes when the base unit/repeater is engaged.
- Indicates that there is a new message.
- This is not compatible with all systems.
8 9 - Indicates menu options.
q
- Indicates a connected call.
Call indicator
A red call indicator LED is located above and to the left of the display and will.
- Flash slowly during charging or to indicate a missed call.
- Flash quickly when the telephone is ringing.
- Permanently illuminate when charging is complete or when incoming
numbers are in the call log.
Page 7

www.doro.com 7
Handling
On/off function
To turn the handset on press the talk button O for more than half a second,
or place the handset into the base unit, a short beep will be heard and the
display will become active.
To turn the handset off press and hold the OK button for 3 seconds, a long
beep will be heard and the display will switch off, WARNING, in the off mode
no calls can be made or received.
The default setting of the handset is on, however we would advise that if
the handset is not to be used for long periods (holidays), that the handset be
switched off. If the handset battery runs low, the handset will automatically
switch to the off mode.
Receiving a call
On receiving an incoming call the call indicator LED will ash.
1. Press O to receive the incoming call.
2. Finish the call by pressing O again.
Temporary silent mode
This feature allows the handset ringer to be temporarily switched off during an
incoming call. Press OK to temporarily turn off the handset ringer, the display
will show TEMP. MUTED.
Silent mode
If you do not wish to be disturbed when a call is coming in, the handset can
be put in Silent Mode. All incoming calls will then be quiet irrespective of
current setting.
The red call indicator will ash when a call is coming in and the vibrator will
be activated if turned on. Also the key click will be turned off as long as the
handset is set to Silent Mode.
1. Press w followed by #. The display shows SILENT.
2. Press w followed by # again to deactivate the Silent Mode.
Page 8

8 www.doro.com
Handling
Making a call
1. Key in the desired number using the number buttons. The number is then
shown in the display. Mistakes can be erased with < .
2. Press O to dial the number shown in the display.
3. Finish the call by pressing O again.
You can also connect to a line rst by pressing O and then dial the number.
See also how to dial from the phone book on page 16.
Please note!
If the telephone cannot connect to a line, a warning signal will be heard. The problem may be
due to the battery running low, the handset being too far from the base unit or the transmission
channels being engaged ( ashes).
Redial button
The last 10 (incoming and outgoing) telephone numbers are stored in the call
log and can easily be redialled.
1. Press r/ C (< ).
2. Press > to scroll through the most recent dialled numbers. The last dialled
number is shown rst.
3. Press O and the telephone will dial the number selected.
See page 18 for more information about the call log.
Please note!
Storing incoming numbers (number presentation) is only possible when the handset is connected
to a base unit and a supporting exchange.
Page 9

www.doro.com 9
Handling
Mute button
The z button can be used to disconnect the microphone on the handset
during a call. This is a double action button, i.e. press once to disconnect the
microphone, press a second time to reactivate the microphone.
The display shows MIC MUTED for as long as the function is active.
Volume control
The volume during a call can be adjusted using the buttons $ and £ (on the
side). The display shows the current setting. When a call is nished, the volume
will return to its default setting. See page 13.
Key lock
This function locks the buttons on the handset to prevent unintentional usage.
1. Press w followed by *. The display shows KEY LOCKED.
2. Press w and * again to remove the key lock.
Calls can still be received, even if the key lock is active. When the call is nished,
the handset returns to locked mode.
Page 10

10 www.doro.com
Settings
Main menu
The handset has a simple menu system with clear display texts.
The menu system operates via four buttons:
w The menu button takes you in and out of the menu system.
< > The arrow buttons are used to scroll through the menus.
OK Conrms a selection or an input and proceeds to the next level
in the menu system.
The main menu consists of eight essential groups:
PROFILE SET UP. Here, you set the dialling signal, start volume, key click,
etc. Your handset can have two settings for different purposes, i.e. proles.
EXT. SERVICE This menu is only available when the handset is connected
to a DORO DECT Ofce base unit and is primarily used by the system
controller.
BATTERY Shows the battery charging status.
PHONE BOOK Can store up to 80 names and telephone numbers. Under this
setting you can store, change or erase entries in the phone book.
REDIAL Shows a list of the ten most recent called and received telephone
numbers.
MAIL This is only available when the handset is connected to a DORO DECT
ofce base unit, and will show the most recent system messages.
LOGIN Includes functions for logging in and off a handset from base units
and for selecting a base unit.
MSF FUNCTIONS This menu is reserved for future DORO DECT Ofce
system functions.
Page 11

www.doro.com 11
Settings
Prole setting
The handset can be set to two different user proles. These are INDOORS
(prole 1) and OUTDOORS (prole 2). In each prole, various settings can be
altered. It is then very easy to shift between the two user proles depending on
the current usage of the handset.
The proles can provide the telephone with different ringer tones, illumination,
start volume, etc, depending on whether it is used in or out of doors, or by two
people requiring individual settings.
This section explains the various prole settings.
Select prole 1 or 2
1. Press w, the display shows PROFILE SET UP.
2. Press OK.
3. Scroll to the desired prole using < >, INDOORS or OUTDOORS.
4. Press OK to select prole and proceed to settings or press w to end.
Ringer tone
1. Select prole 1 or 2 as described above.
2. The display shows RINGER TONE. Press OK.
3. Scroll between the various ringer tones. Press OK to store.
4. Press w to end or OK to proceed to the next setting in the current user
prole.
Page 12

12 www.doro.com
Settings
Ringer volume
1. Select prole 1 or 2 as described on page 11.
2. Scroll to RINGER VOL. Press OK.
3. Use the arrow buttons to select preferred setting. Press OK to store.
4. Press w to end or OK to proceed to the next setting in the current user
prole.
Key click
You can set the sound level of the click you hear every time you press a button.
1. Select prole 1 or 2 as described on page 11.
2. Scroll to KEY CLICK. Press OK.
3. Use the arrow buttons to select preferred setting. Press OK to store.
4. Press w to end or OK to proceed to the next setting in the current user
prole.
Vibrator
1. Select prole 1 or 2 as described on page 11.
2. Scroll to VIBRATOR. Press OK.
3. Use the arrow buttons to select preferred setting. Press OK to store.
4. Press w to end or OK to proceed to the next setting in the current user
prole.
Page 13

www.doro.com 13
Settings
B_Answer
B_Answer means that the handset automatically answers incoming calls after
the rst ring signal. This function is primarily intended for headset users.
1. Select prole 1 or 2 as described on page 11.
2. Scroll to B_ANSWER. Press OK.
3. Use the arrow buttons to select preferred setting. Press OK to store.
4. Press w to end or OK to proceed to the next setting in the current user
prole.
Start volume
This setting controls the default start volume. Regardless of the adjustments
made during a call (see page 9), the volume will return to the default setting
when the call is nished.
1. Select prole 1 or 2 as described on page 11.
2. Scroll to START VOL. Press OK.
3. Use the arrow buttons to select preferred setting. Press OK to store.
4. Press w to end or OK to proceed to the next setting in the current user
prole.
Page 14

14 www.doro.com
Settings
Out of range warning
This function is used during the installation of DORO DECT Ofce system
to check the range of the system. For more information, please contact the
system controller.
1. Select prole 1 or 2 as described on page 11.
2. Scroll to OUT OF RANGE. Press OK.
3. Use the arrow buttons to select preferred setting. Press OK to store.
4. Press w to end or OK to proceed to the next setting in the current user
prole.
Back lighting
If back lighting is selected the display will illuminate upon any button press, or
upon receiving an incoming call, the illumination will automatically time out
after 10 seconds. Back lighting will not operate when the key lock is activated
(see page 9).
Please note that the handset requires more battery power with back lighting
operative.
1. Select prole 1 or 2 as described on page 11.
2. Scroll to BACKLIGHT. Press OK.
3. Use the arrow buttons to select preferred setting. Press OK to store.
4. Press w to end or OK to return to the rst setting in the current user prole.
Page 15

www.doro.com 15
Settings
Ext. service
This menu is available when the handset is connected to a DORO DECT Ofce
base unit. The functions in the menu are primarily used during the installation
of the system and are only fully available in handset 1. For more information,
please contact the system controller.
Battery
No settings can be made in this menu. Only the current charging status of
the battery is shown here.
1. Press w.
2. Scroll to MENU BATTERY.
3. Press OK to show current battery status.
4. Press w to end or OK to return to main menu.
For more information about the battery and how it is charged, please see pages
4 - 5.
Page 16

16 www.doro.com
Settings
Phone book
The handset incorporates a phone book in which up to 80 names and telephone
numbers can be stored. A stored telephone number is dialled using fewer
buttons than if the number was dialled manually. Every name and telephone
number can be up to 24 characters long. The phone book is alphabetically
arranged.
Store name/number
1. Press the desired telephone number (the handset should be idle).
2. Press >. The display shows STORE NO?
3. Press OK.
4. Enter the name using the number buttons. Please refer to the table on the
following page.
5. Press OK to store. The handset returns to idle mode.
Page 17

www.doro.com 17
Settings
Letters
Each number button has been allocated certain letters. Some letters and special
characters, e.g. Å, Ä and Ö, are stored in the memory even if they are not
displayed on the buttons. Please see the table below.
Button Letters/characters
1.......................................... Æ Ø Å @ Ä Ö ß Ü 1
2.......................................... A B C @ Ä Á À Â 2
3.......................................... D E F 3
4.......................................... G H I Ï Î 4
5.......................................... J K L 5
6.......................................... M N O Ö Ó Ò 6
7.......................................... P Q R S ß 7
8.......................................... T U V Ü Ú Ù Û 8
9.......................................... W X Y Z 9
0.......................................... [Space character] . , _ - + : ? ! 0
* .......................................... * # / \ ( ) = &
#.......................................... Change between upper/lower case
You can do the following when storing or changing:
- Move the cursor forward using > and backward using < .
-
Erase the character to the left of the cursor by pressing < for approx. 2
seconds.
- For a space, press 0.
- For changing between upper and lower case, press #.
Ringing using the phone book
1. Press
>. The display shows the rst entry in the phone book.
2. Scroll through the entries using
< >. You can also do a quick search by
pressing the number button corresponding with the rst letter of the entry
(please see the table above).
3. Press
O to ring up the entry shown in the display.
Page 18

18 www.doro.com
Settings
Changing a name/number
1. Press w.
2. Scroll to MENU PHONE BOOK. Press OK.
3. Scroll to preferred entry. Press OK.
4. Scroll to EDIT NAME? or EDIT NO? depending on what you want to
change. Press OK.
5. Erase the number completely by pressing < for 2 seconds, or one number at a
time by repeatedly pressing < . To edit a name move the cursor to the right of
the position required using the arrow keys, press the < for 2 seconds to erase
the letter to the left of the cursor.
6. Press OK to store. The handset returns to idle mode.
Erasing a phone book entry
1. Press w.
2. Scroll to MENU PHONE BOOK. Press OK.
3. Scroll to preferred entry. Press OK.
4. Scroll to DELETE?
5. Press OK to conrm. The handset returns to idle mode.
Page 19

www.doro.com 19
Settings
Call log
This menu incorporates a list of the 10 most recent telephone numbers.
The telephone numbers consist of dialled and incoming numbers (number
presentation).
The call log is a list of the last 10 telephone numbers dialled, and may be
accessed by pressing the redial button (see page 8).
From this list you can dial a telephone number, move an entry to the phone
book, or erase all - or individual - entries on the list.
Ringing from the call log
1. Press w.
2. Scroll to MENU REDIAL. Press OK.
3. Scroll to preferred entry. Press O to dial the telephone number.
Erasing numbers in the call log
1. Press w.
2. Scroll to MENU REDIAL. Press OK.
3. Scroll to preferred entry. Press OK.
4. The display shows DELETE NO?
5. Press OK to erase. The handset returns to idle mode.
Page 20

20 www.doro.com
Settings
Erasing all numbers in the call log
1. Press w.
2. Scroll to MENU REDIAL. Press OK.
3. The display shows an entry. Press OK.
4. Scroll to ERASE ALL.
5. Press OK. The handset returns to idle mode.
Transferring numbers to the phone book
1. Press w.
2. Scroll to MENU REDIAL. Press OK.
3. Scroll to preferred entry. Press OK.
4. Scroll to STORE NO? Press OK.
5. Names are entered following the procedure in the section headed phone
book (see page 16).
6. Press OK. The handset returns to idle mode.
Page 21

www.doro.com 21
Settings
Messages
This menu is only available when the handset is connected to a DORO DECT
Ofce base unit.
This menu is used to access any text messages stored in the system while the
handset has been either operational, or switched off.
Reading a message
1. Press w.
2. Scroll to MENU MAIL. Press OK.
3. The message is shown in the display.
4. Press W to end or OK twice to erase the message.
Registering
Please note!
Registration will usually be carried out by the controller of the DORO DECT ofce system.
Your handset must be logged on to the base unit or DECT system with which
it is to be used. The handset can be logged on to a maximum of four base
units/systems. However, it can only be logged on to one base unit at a time.
Use this menu to log on to a base unit, select base unit (if you have logged
more than one base unit) or to erase logins. The handset is intended to be used
with the DORO DECT Ofce system but can also be used with other GAP
compatible DECT base units and exchange systems.
Page 22

22 www.doro.com
Settings
To login a handset to a DORO DECT Ofce system
The login is carried out be a system controller and is only described in the
English system manual.
To login a handset to other systems/base units
The login consists of two phases. The rst is to set the base unit in login mode
and the other to initiate the login from the handset. How the base unit is set in
login mode depends on the base unit or the DECT system used. Please refer to
the Base Unit Operating Instructions for further information.
If you wish to login the base unit to a DECT system, please contact the system
controller.
1. Make sure that the base unit is set to login mode.
2. Press w and scroll to LOGIN.
3. Press OK.
4. Scroll to SUBSCRIPTION CREATE, press OK. The handset will now
search for a new base unit.
5. The display shows the ID number(s) of the base unit(s) found. If more than
one base unit is found, select the preferred base unit using < >.
6. The display shows AC:_ _ _ _ _ _. Key in the login code (the PIN number of
the base unit) and nish with OK. The PIN number can normally be found
in the Base Unit Operating Instructions.
7. If the login was unsuccessful, press OK and try again.
8. Press w to end.
Page 23

www.doro.com 23
Settings
Select system/base unit
You can decide yourself to which system/base unit the handset should be
connected. You can also set the handset to automatically select the base unit
with the best connection.
1. Press w and scroll to LOGIN. Press OK.
2. Scroll to SELECT LOGIN. Press OK.
3. The display shows the ID number for the rst logged on base unit. You
can scroll between the logged on base units. You can also select AUTO
(A). The handset will then automatically select the base unit with the best
connection. The base unit to which the handset is connected will be marked
with * or A.
4. Press OK to select the base unit indicated.
5. Press w to end.
Log off
The logged on base units can at any time be removed – logged off – from the
handset. However, please note that it may not be possible to log on the removed
base unit again without contacting the system controller.
1. Press w and scroll to LOGIN. Press OK.
2. Scroll to REMOVE. Press OK.
3. Enter PIN number (0000 when supplied). Press OK.
4. Conrm by pressing OK again or end by pressing w.
5. Scroll to the base unit that is to be removed.
6. Press OK to conrm.
Page 24

24 www.doro.com
Other
Belt clips
A belt clip is included as an extra accessory for fastening on the back of the
handset. The belt clip enables the handset to be attached to a belt, waistband or
similar. You can acquire a belt clip from your DORO retailer.
Afxing the belt clip
1. The package includes two clip holders. Use the one with the metal tab.
2. Remove the battery cover.
3. Afx the circular clip holder by inserting the metal tab through the notch on
the handset. (The notch along the top edge of the battery cover).
4. Replace the battery cover.
5. Afx the belt clip by inserting the circular clip holder into the notch on the
belt clip . A click will be heard when the belt clip is in place.
For a quick release of the handset from the belt clip, press the button on top of
the clip and push the handset upwards – very useful when you do not want to
remove the belt clip from the belt, etc.
Headset
The handset can be used with a headset via the socket located on the handsets
bottom edge. A headset comes as an accessory and can be acquired from your
local DORO retailer. When using a headset, there is no change in the way a call
is received or made. When a headset is connected, the microphone and speakers
on the handset are automatically disconnected. Please see also B Answer on
page 13.
Page 25

www.doro.com 25
Other
Guarantee
This product is guaranteed for a period of 12 months from the date of purchase.
Proof of purchase is required for any service or support required during the
guarantee period.
This guarantee shall not apply to a fault caused by an accident or a similar
incident or damage, liquid ingress, negligence, abnormal usage or any other
circumstances on the purchaser’s part. Furthermore, this guarantee shall not
apply to a fault caused by a thunderstorm or any other voltage uctuations.
This guarantee does not in any way affect your statutory rights. (As a matter of
precaution, we recommend disconnecting the telephone during a thunderstorm.)
Trouble shooting
Faulty handset
- Check if the handset is turned on.
- Check that the battery is charged and correctly installed. Please refer to
pages 4-5.
Warning signal during call/No line connection
- The batteries may be running low (recharge the handset).
- The handset may be out of range. Move it closer to the base unit/repeater.
Page 26

Page 27

www.doro.com
 Loading...