

Page 1

Version 1 | 11/01/2017
User Manual
AC2000 VDSL2 VoIP Gigabit Modem Router
DVA-5592
Page 2
Preface
D-Link reserves the right to revise this publication and to make changes in the content hereof without obligation to notify any
person or organization of such revisions or changes.
Manual Revisions
Revision Date Description
1.00 November 01, 2017 • Initial release, hardware Revision A1
Trademarks
D-Link and the D-Link logo are trademarks or registered trademarks of D-Link Corporation or its subsidiaries in the United
States or other countries. All other company or product names mentioned herein are trademarks or registered trademarks of
their respective companies.
Copyright © 2017 by D-Link Corporation.
All rights reserved. This publication may not be reproduced, in whole or in part, without prior expressed written permission
from D-Link Corporation.
ErP Power Usage
This device is an Energy Related Product (ErP) that automatically switches to a power-saving Network Standby mode within 1 minute of no
packets being transmitted. It can also be turned o through a power switch to save energy when it is not needed.
Network Standby: 6.21 watts
Switched O: 0.17 watts
iD-Link DVA-5592 User Manual
Page 3

Table of Contents
Table of Contents
Product Overview ..............................................................1
Package Contents .........................................................................1
System Requirements ................................................................. 2
Introduction ................................................................................... 3
Features ............................................................................................3
Hardware Overview .....................................................................4
Front Panel .............................................................................. 4
Rear View .................................................................................6
Installation ......................................................................... 7
Conguration ..................................................................... 8
Home ................................................................................................9
Users ........................................................................................11
WiFi-2.1 (5GHz) ....................................................................12
WiFi-1.1 (2.4GHz) .................................................................14
Parental Control ..................................................................16
Service Status ..................................................................17
Administration ................................................................18
Host-Policy Association ...............................................19
Black/White List ..............................................................20
Policy Conguration .....................................................21
Home Network ....................................................................22
Port Mapping .......................................................................23
Dynamic DNS .......................................................................24
Storage Service ....................................................................25
Storage Device ................................................................26
Network File Sharing ....................................................27
User Accounts .................................................................28
FTP Server .........................................................................29
Security ...................................................................................30
Firewall ...............................................................................31
DMZ ....................................................................................32
Parental Control..............................................................33
Settings ..................................................................................34
Physical Interfaces .........................................................37
Modem ..............................................................................38
SIM Card ......................................................................39
USB Modem ...............................................................40
Operator ......................................................................41
Network Connections ..................................................42
Bridge and VLAN ............................................................ 43
Bridge List ...................................................................44
Bridge Filters ..............................................................45
DHCP Server and Relay ................................................46
DNS Client and Relay ....................................................47
DNS Client ...................................................................48
DNS Relay ....................................................................49
Hostnames .................................................................50
Routing and QoS ............................................................51
Routing Policy ...........................................................52
Trac Classication .................................................53
ALG Flows ...................................................................54
iiD-Link DVA-5592 User Manual
Page 4

Table of Contents
Policers .........................................................................55
Queues .........................................................................56
ALG ......................................................................................57
NAT and Port Mapping ................................................58
NAT Interface Settings ............................................ 59
Port Mapping ............................................................60
Public Addresses ......................................................61
Proxies ................................................................................62
IGMP Proxy .................................................................63
RTSP Proxy ..................................................................64
PPPoE Proxy ...............................................................65
VPN ......................................................................................66
PPTP / L2TP Server ................................................... 67
IPsec ..............................................................................68
Dynamic DNS ..................................................................69
Date / Time .......................................................................70
Management ...................................................................71
UPnP Agent ................................................................72
Telnet Server .............................................................. 73
SSH Server ..................................................................74
Web GUI .......................................................................75
VoIP Service......................................................................76
IPv6 .....................................................................................77
Global Settings..........................................................78
Autosense Failover ........................................................79
System ....................................................................................80
UDP Echo ....................................................................83
Ping ...............................................................................84
Download ...................................................................85
Upload .........................................................................86
Traceroute ...................................................................87
Interfaces Summary ................................................88
CPU Load Memory Usage .....................................89
Active Connections .................................................90
Reboot ...............................................................................91
Factory Reset ...................................................................92
Save Conguration ........................................................93
Backup Conguration File ..........................................94
Load Conguration File ...............................................95
Firmware Upgrade .........................................................96
Connect a Wireless Client to your Router ......................97
WPS Button ...................................................................................97
Windows® 8 ...................................................................................98
WPA/WPA2 ............................................................................98
Windows® 7 ................................................................................100
WPA/WPA2 .........................................................................100
WPS ....................................................................................... 103
Windows Vista® .........................................................................107
WPA/WPA2 .........................................................................108
Windows® XP .............................................................................110
WPA/WPA2 .........................................................................111
Logging .............................................................................81
Diagnostic.........................................................................82
Troubleshooting ............................................................113
iiiD-Link DVA-5592 User Manual
Page 5

Table of Contents
Wireless Basics ...............................................................117
What is Wireless? ...................................................................... 118
Tips ................................................................................................120
Wireless Modes .........................................................................121
Networking Basics .........................................................122
Check your IP address ............................................................ 122
Statically Assign an IP address ............................................ 123
Wireless Security ......................................................... 124
What is WPA? ................................................................ 124
Technical Specications ................................................125
ivD-Link DVA-5592 User Manual
Page 6

Section 1 - Product Overview
DVA-5592 AC2000 VDSL2 VoIP Gigabit Modem Router
Ethernet Cable
DSL Cable
Product Overview
Package Contents
Power Adaptor
If any of the above items are missing, please contact your reseller.
Note: Using a power supply with a dierent voltage rating than the one included with the DVA-5592 will cause damage and void the warranty
for this product.
1D-Link DVA-5592 User Manual
Page 7

Section 1 - Product Overview
System Requirements
Network Requirements
Web-based Conguration
Utility Requirements
• A DSL Internet connection
• Wireless 802.11ac, n, g, b, or an Ethernet LAN port
Computer with the following:
• Windows 10/8.1/8/7/Vista/XP SP3 or Mac OS X 10.3 or higher
• An installed Ethernet adapter
Browser Requirements:
• Internet Explorer 10 or higher, Edge 13 or higher
• Firefox 36 or higher
• Safari 8 or higher
• Chrome 40 or higher
®
Windows
installed. Visit www.java.com to download the latest version.
Users: Make sure you have the latest version of Java
2D-Link DVA-5592 User Manual
Page 8

Section 1 - Product Overview
Introduction
The DVA-5592 AC2000 VDSL2 VoIP Gigabit Modem Router is a highly integrated router with everything your home or small
business needs for high-speed Internet access. It combines an ADSL2+/VDSL2 modem, Gigabit Ethernet Internet Port, 4G
mobile Internet support, Voice over Internet Protocol (VoIP), and Gigabit wireless together in a single, easy to use product that
shares an Internet connection for all your devices.
Features
• User-friendly GUI for web conguration
• Compatible with all standard Internet applications
• Industry standard and interoperable DSL interface
• WLAN with high-speed data transfer rates of up to 2000 Mbps*, compatible with IEEE 802.11n/g/b, 2.4GHz
compliant equipment
• IP routing and bridging
• Asynchronous transfer mode (ATM) and digital subscriber line (DSL) support
• Packet Transfer Mode (PTM) and digital subscriber line (VDSL) support
• Point-to-point protocol (PPP)
• Network/port address translation (NAT/PAT)
• Quality of service (QoS)
• Wireless LAN security features: WPA/WPA2, 802.1x, RADIUS client
• Universal Plug and Play(UPnP)
• Web ltering
• 3G/4G Mobile WAN connection
• USB Mass Storage, SAMBA
• System statistics and monitoring
• VoIP Integration
* Maximum wireless signal rate derived from IEEE Standard 802.11a, 802.11b, 802.11g, 802.11n, and 802.11ac specications. Actual data throughput will vary. Network conditions
and environmental factors, including volume of network trac, building materials and construction, and network overhead, lower actual data throughput rate. Environmental
conditions will adversely aect wireless signal range.
3D-Link DVA-5592 User Manual
Page 9
Section 1 - Product Overview
Hardware Overview
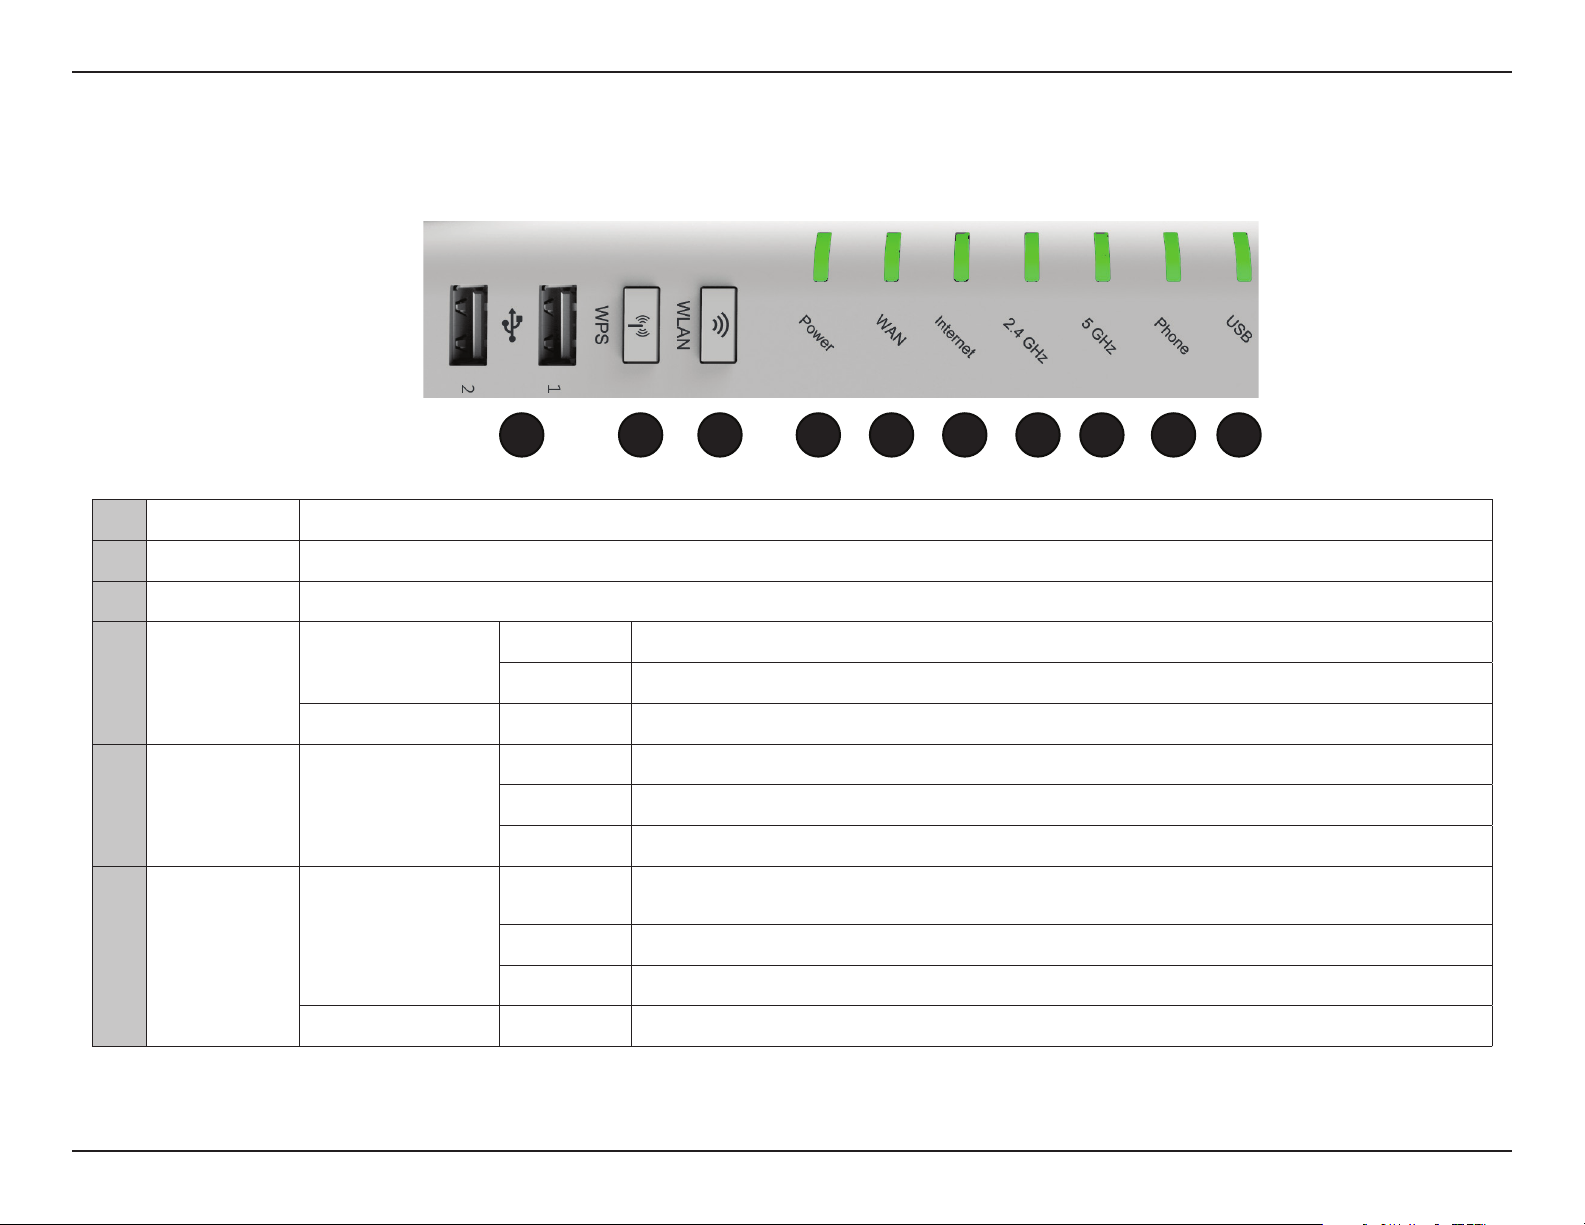
Front Panel
4 5 62 3 71 8 9 10
1 USB Ports USB port, for connecting a 3G/4G dongle or other USB storage devices.
2 WPS Button Press for 1 second to enable WPS pairing.
3 WLAN Button Press to toggle Wireless radios.
Green
4 Power
Orange On Power failure.
5 WAN Green
Green
6 Internet
Orange On The device attempted an Internet connection, but failed.
O Power is o.
On System startup is complete.
O No signal detected.
Blinking Initializing DSL.
On DSL Online.
O
Blinking Internet data is being transmitted.
On An Internet connection is established.
Either the device is in Bridge Mode, the DSL connection is not present, or the power is
o.
4D-Link DVA-5592 User Manual
Page 10
Section 1 - Product Overview
Blinking Data is being transmitted through the WLAN interface.
Green
7 2.4 GHz
Orange Blinking WPS pairing in Progress.
Green
8 5 GHz
Orange Blinking WPS pairing in Progress.
Green
9 Phone (1/2)
Orange On No VoIP account registered.
10 USB Green
On The connection of WLAN interface is normal.
O The WLAN connection is not established.
Blinking Data is being transmitted through the WLAN interface.
On The connection of WLAN interface is normal.
O The WLAN connection is not established.
O No phone signal detected.
Blinking Active call.
On The phone interface is ready.
On The connection of a 3G or USB device has been established.
Blinking Data is being transmitted.
O No connection of a 3G or USB device is established.
5D-Link DVA-5592 User Manual
Page 11
Section 1 - Product Overview
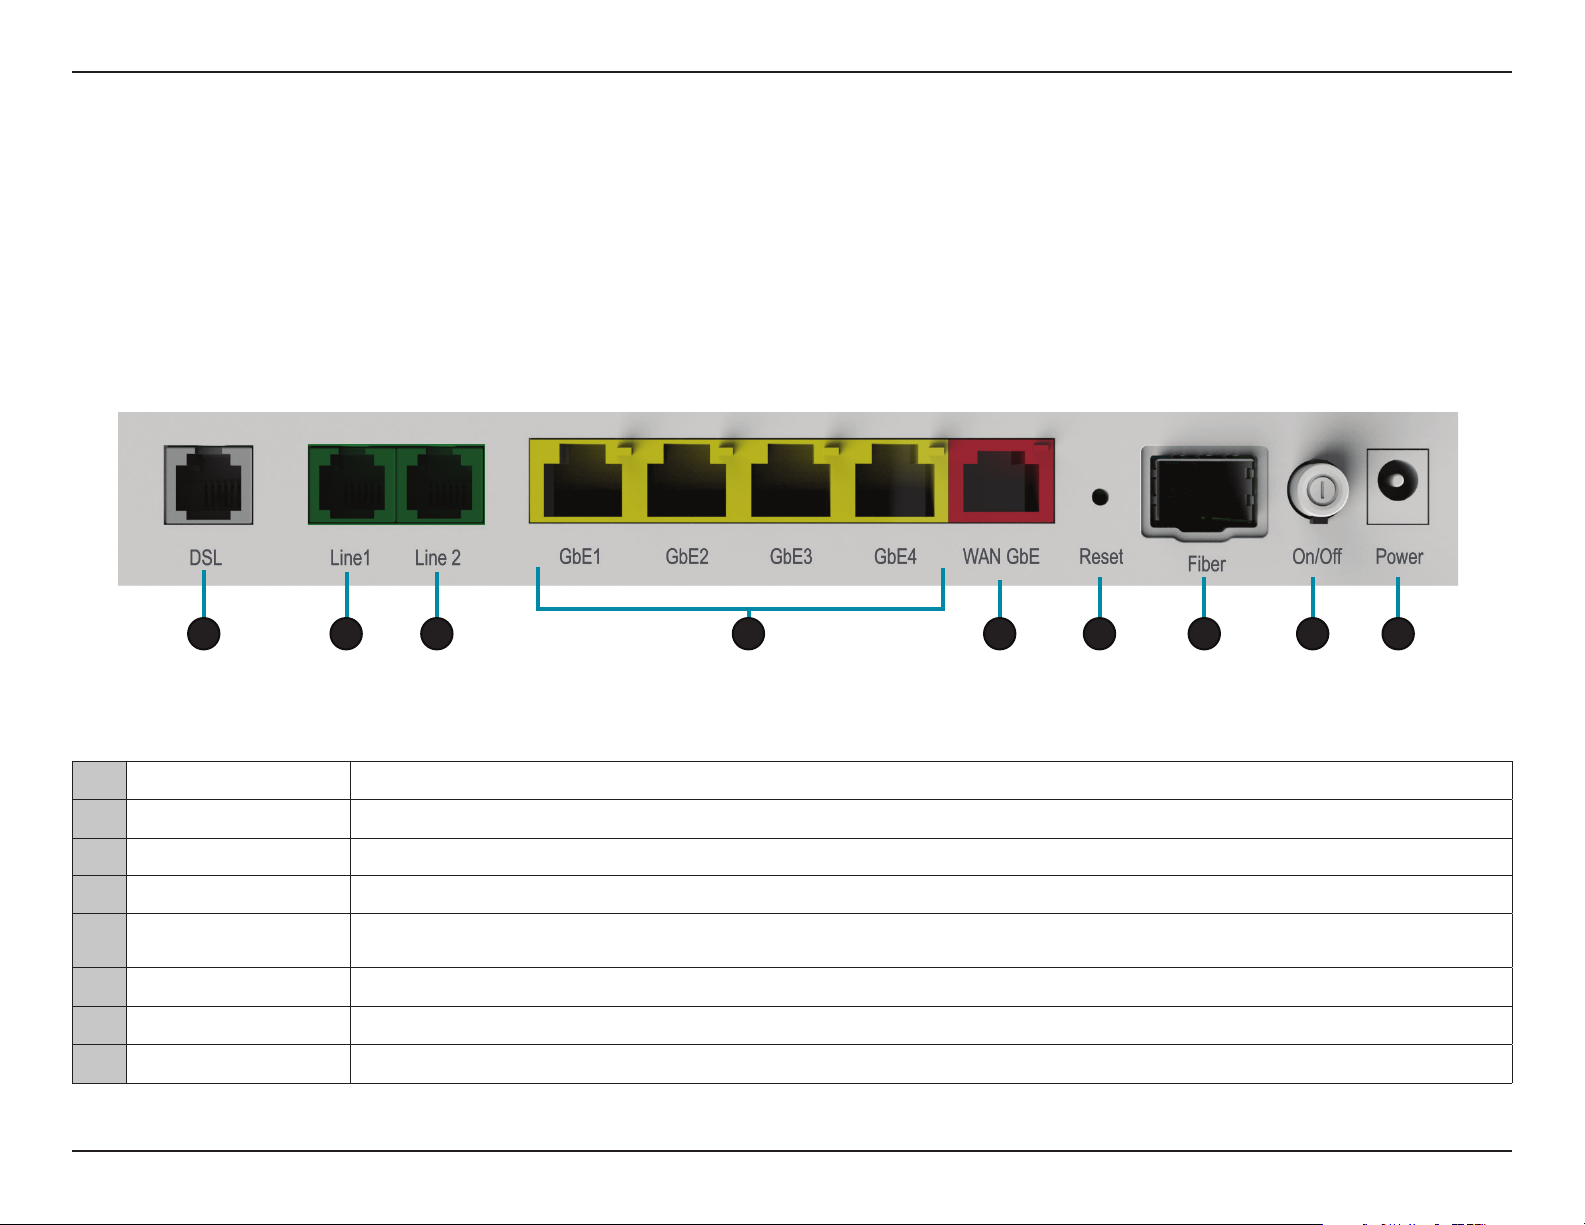
Hardware Overview
Rear View
1
1 DSL RJ-11 interface. Connect the router to DSL connector through a telephone cable.
2 PHONE (1/2) RJ-11 interface, using the telephone cable to connect the telephone set.
3 Gigabit LAN (1-4) RJ-45 interface for connecting to the Ethernet interface of PC or other Ethernet devices through an Ethernet cable.
4 Gigabit WAN RJ-45 interface for connecting to another router or Ethernet modem.
5 RESET
6 SFP Port for SFP ber module.
7 Power Button Power on or o the device.
8 Power Input For connecting the power adapter. Power input is 12V DC, 2A.
2
Reset to the factory defaults. Keep the device powered on, push a paper clip into the hole, press and hold the button
for 5 seconds, and then the system restores the default settings.
2
3
54
6 7 8
6D-Link DVA-5592 User Manual
Page 12
Section 2 - Installation
Installation
Choosing a Location
Many environmental factors may aect the wireless function of the router. If this
is the rst time that you have set up a wireless network device, read the following
information.
The router can be placed on a shelf or desktop and ideally the LED indicators should
be facing towards the front, as you may need to view them for troubleshooting.
Designed to have a range of up to 100 meters indoors and up to 300 meters outdoors,
wireless LAN lets you access your network from anywhere nearby. However, the
numbers of walls, ceilings, or other objects that the wireless signals must pass through
may limit the signal range. Typical ranges vary depending on types of materials and
background RF noise in your home or business.
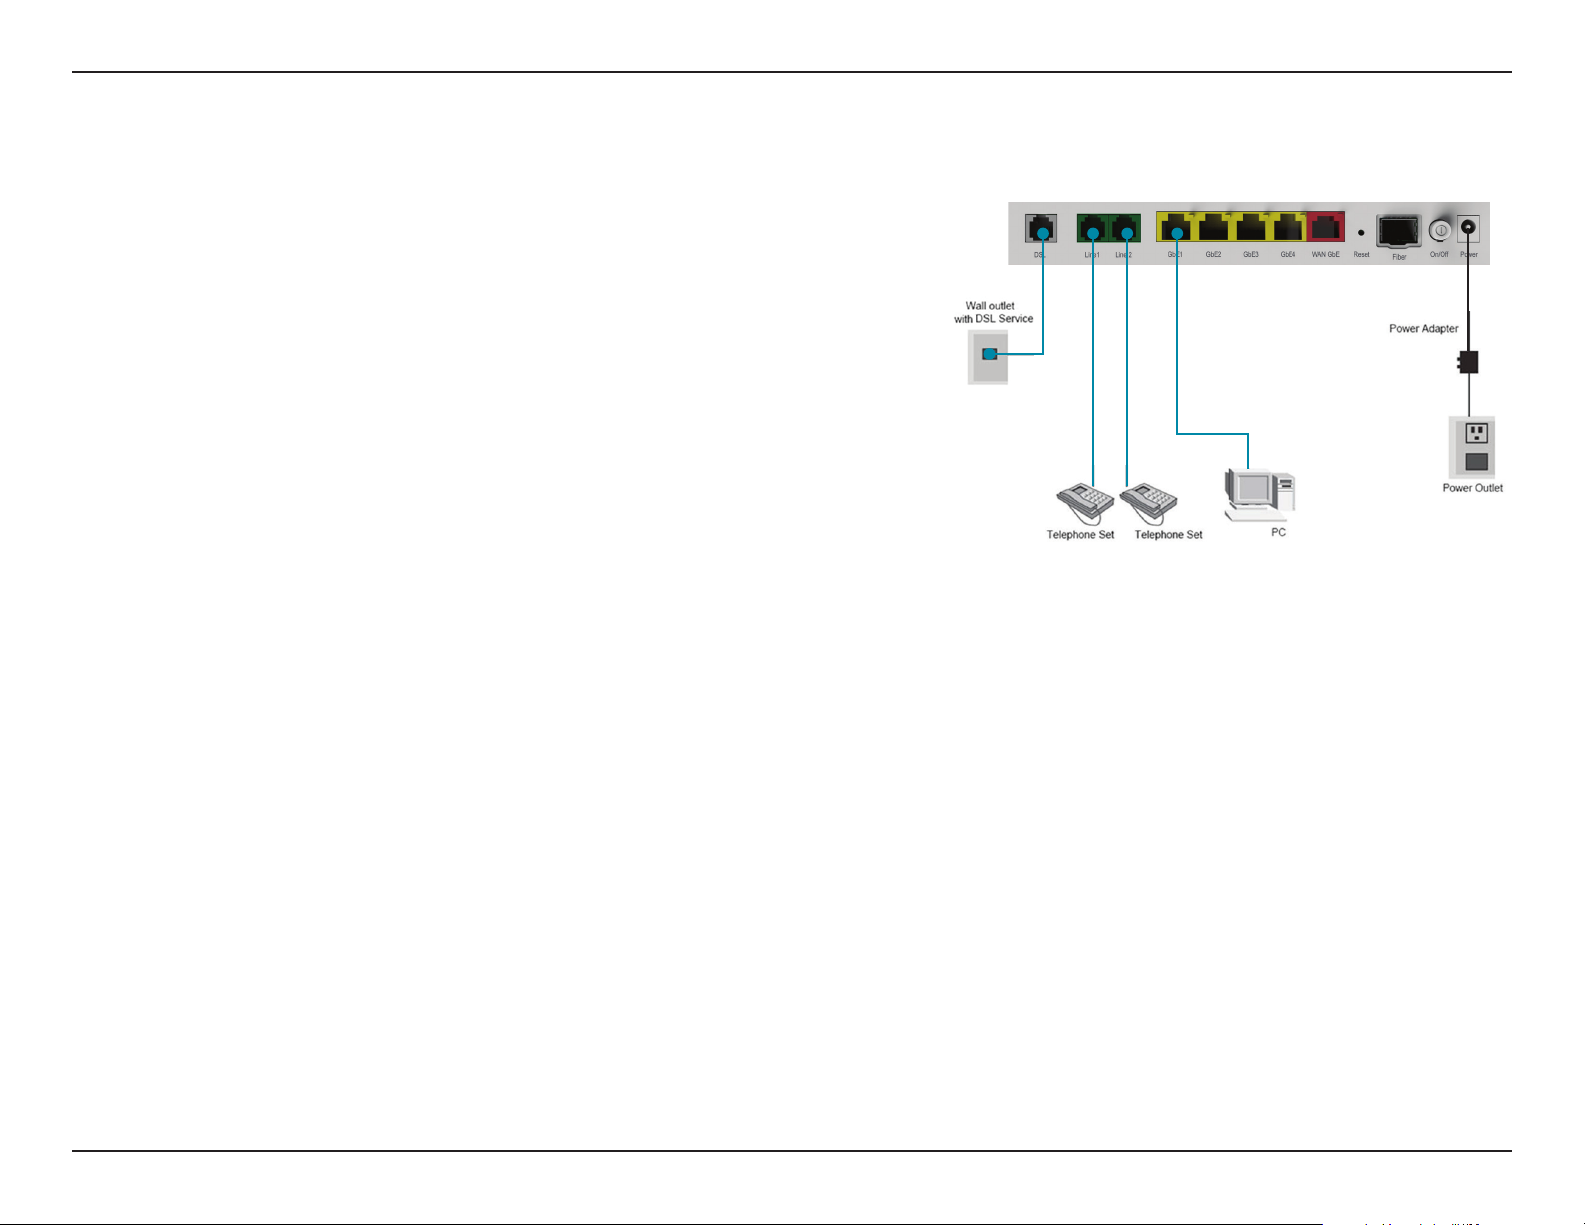
Connecting the Router
Step 1:
Connect the DSL port on the router to the wall outlet with a telephone cable. Next,
connect the phone handset the LINE port of the router.
Step 2:
Connect the LAN port of the router to an Ethernet LAN port on a PC using an Ethernet
cable (MDI/MDIX).
Step 3:
Plug the power adapter into the wall outlet and then connect the other end of it to
the Power Input port on the router.
The following gure shows the connection of the router, PC, and telephones handsets.
Step 4:
If you use 3G/4G Internet service, connect the 3G USB data card to the USB interface
on the side panel. If you use phone service through the Internet, connect a telephone
handset to the PHONE interface on the rear panel.
7D-Link DVA-5592 User Manual
Page 13
Section 3 - Conguration
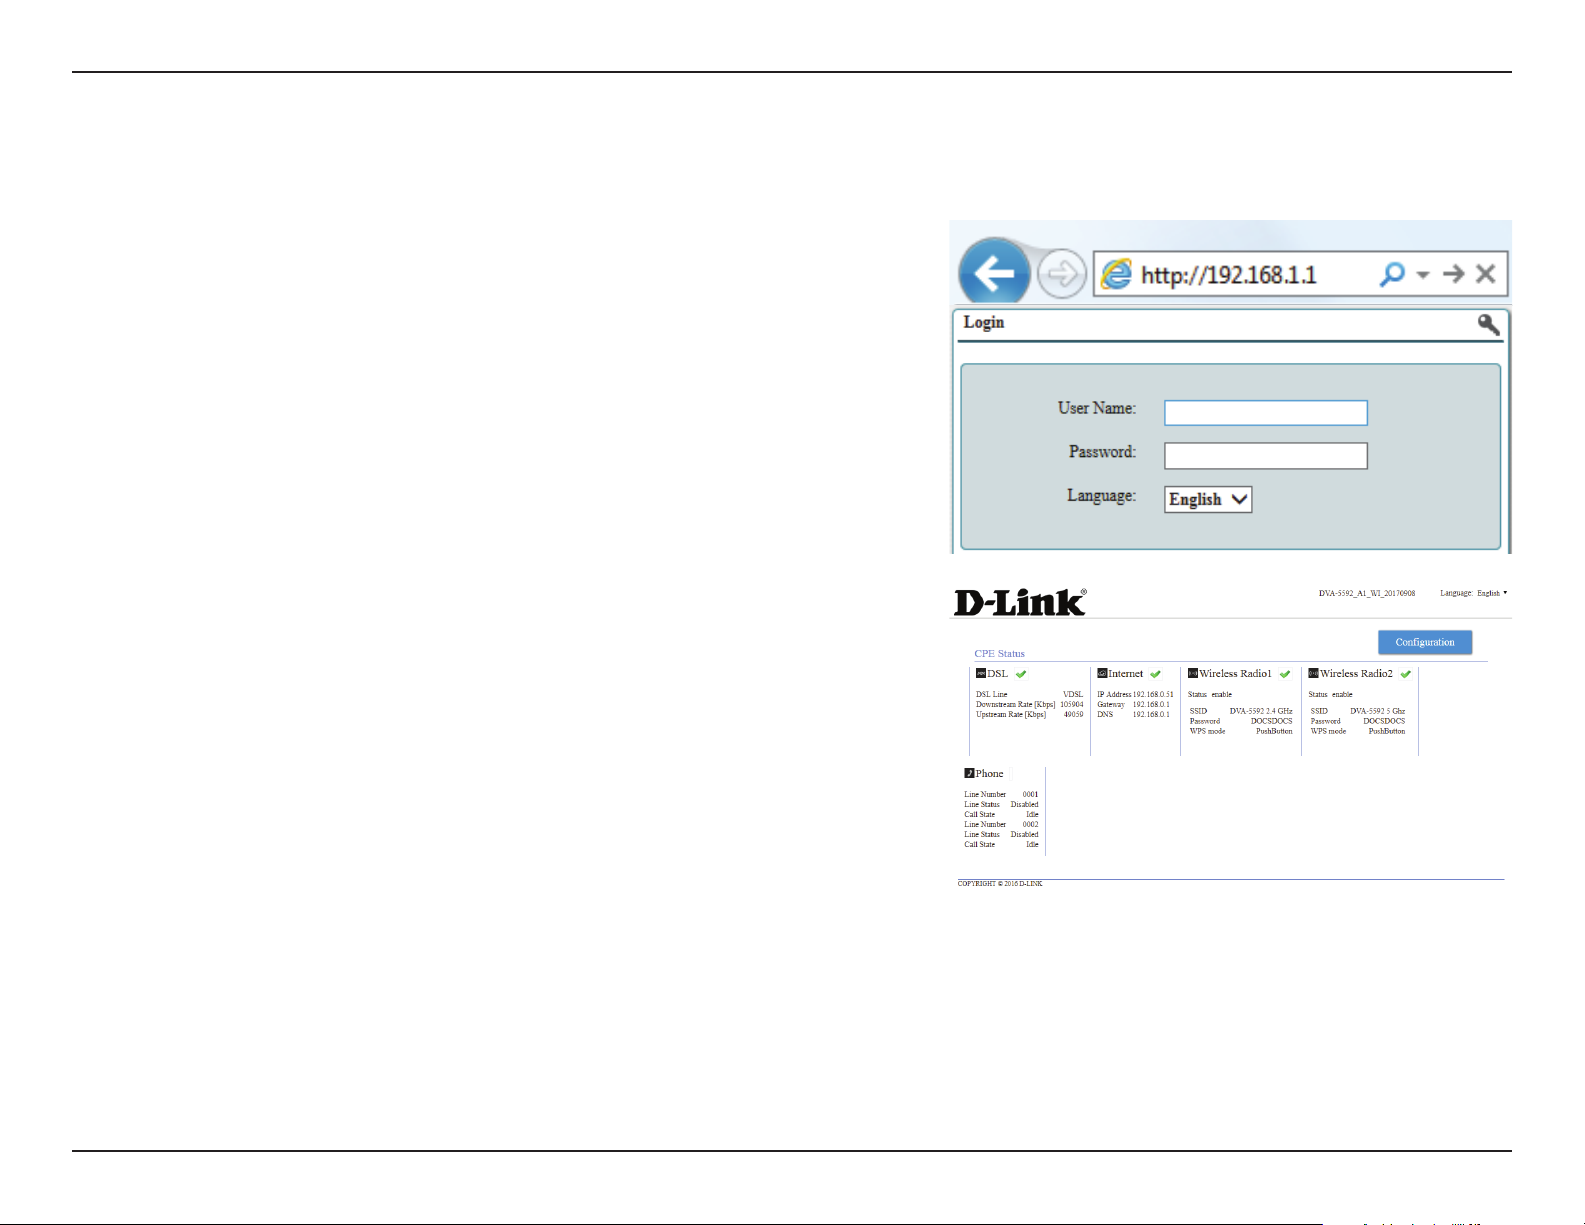
Conguration
To access the conguration utility, open a web browser such as Internet Explorer and
enter the IP address of the router (default: 192.168.1.1).
You will be presented with the login screen. The username is admin, and the default
password is admin.
Once you are logged in successfully, you will be presented with the Status screen
which will give you a brief overview of the router's current status and conguration.
To proceed with conguration, click Advanced Conguration. If you are conguring
the DVA-5592 for the rst time, you will be able to access the Conguration Wizard
from that screen.
8D-Link DVA-5592 User Manual
Page 14
Section 3 - Conguration
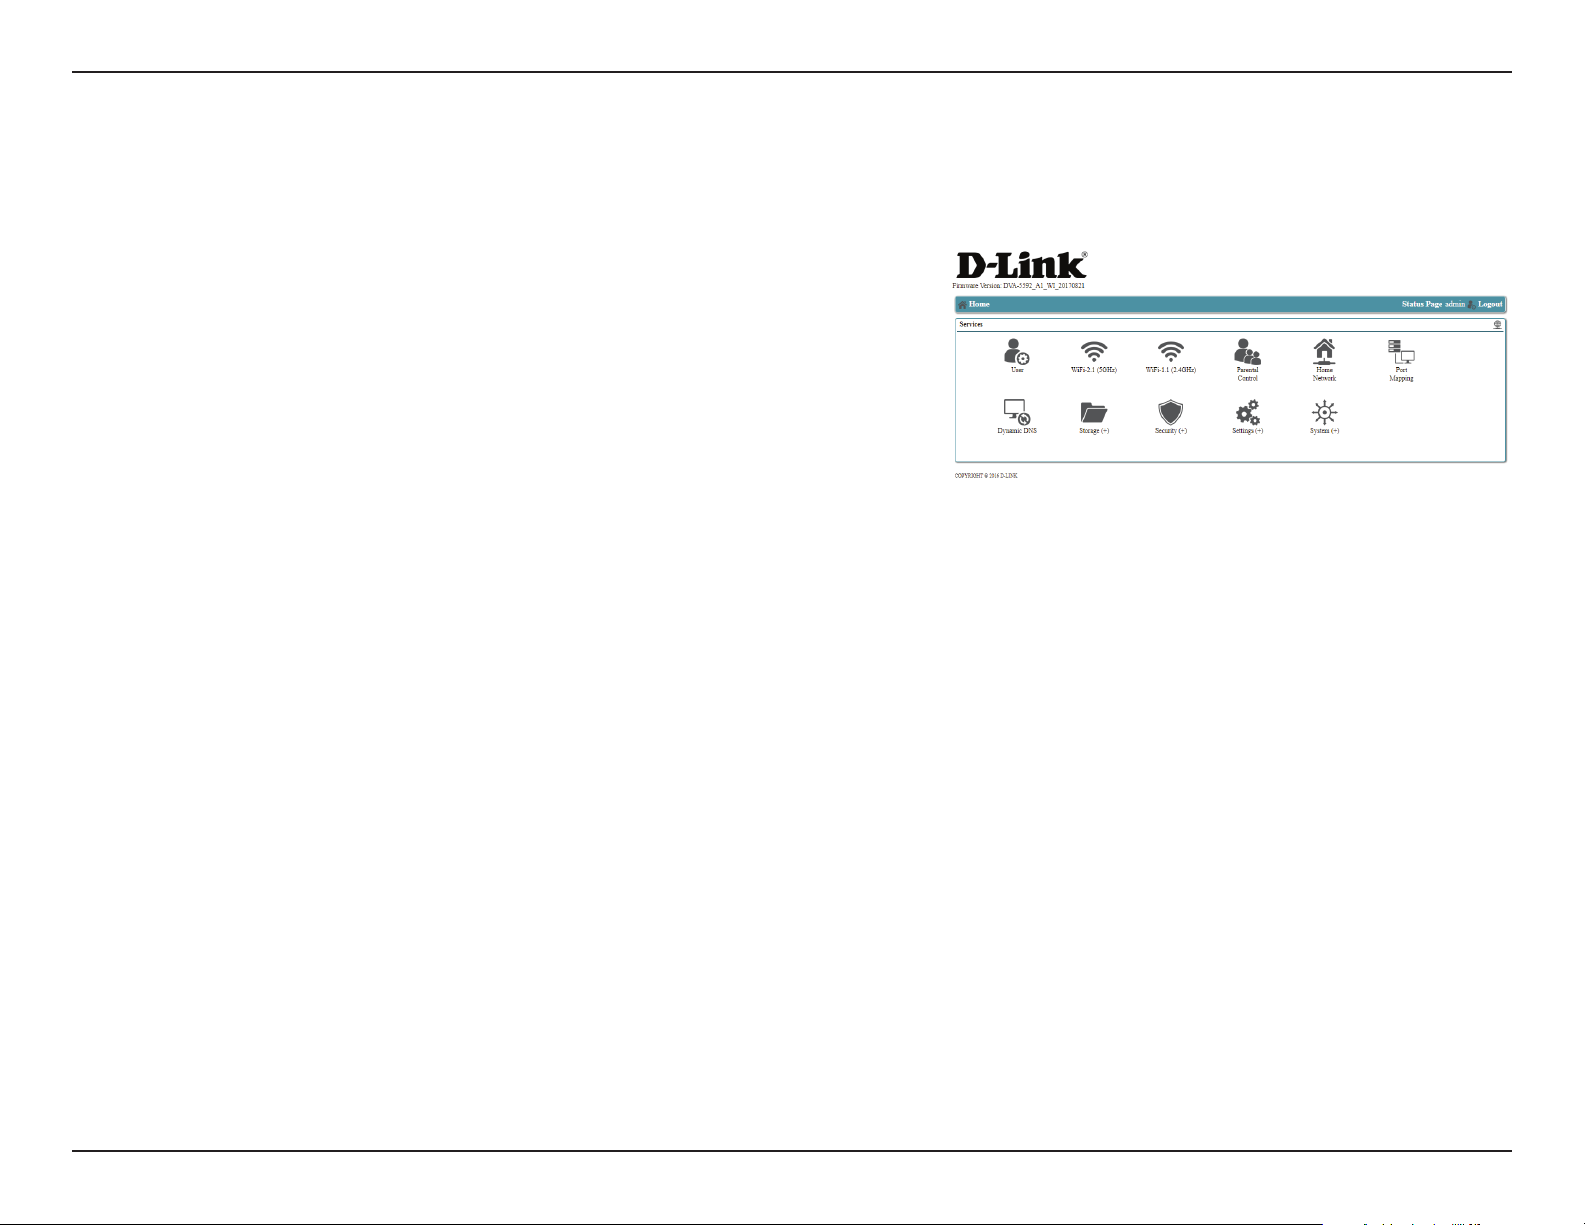
Home
The Home screen provides a list of all available functions,. Items listed with a +
symbol have sub menus that appear when the mouse passes over them to enable
quick-and-easy access to all submenu items.
User: The User menu item allows the user to change the default
administrator name and password. For details see Users on page
11 for details.
WiFi-1.1
(2.4GHz) and
WiFi-2.1 (5GHz):
Parental Control:
Home Network: The Home Network menu item shows a map of the local network,
Port Mapping: Port mapping allows you to configure port forwarding for NAT
Dynamic DNS:
Storage: The Storage menu item has a pop-up menu, and allows you to set
The WiFi-1.1 (2.4GHz) and WiFi-2.1 (5GHz) are direct links to the Wi-
Fi conguration for each channel. For details, see WiFi-1.1 (2.4GHz)
on page 14 and WiFi-2.1 (5 GHz) on page 12.
Parental control allows you to adjust a cloud-based service for
content classication or to manually congure a list of blocked sites
and keywords. For details, see Parental Control on page 16.
lists all network interfaces, and provides links to both firewall
conguration and WAN conguration. For details, see Home Network
on page 22.
traversal. For Details, see
The Dynamic DNS menu option allows you to congure a Dynamic
DNS service to compensate for a dynamic IP. For details, see
Dynamic DNS on page 69.
up Network File Sharing, User Accounts for remote access, and
FTP Server conguration. For details, see Storage Service on page
25 for details.
Port Mapping on page 60
9D-Link DVA-5592 User Manual
Page 15

Section 3 - Conguration
Home (cont)
Security: The Settings menu item has a pop-up menu, and contains links to
all settings relevant to network connections and administration. For
more information see Settings on page 34 for details.
System: The System menu item has a pop-up menu, and contains links to
general administrative tasks, such as the system clock, creating
backups of router settings, system reset, and rmware upgrades. For
details, see System on page 80.
Status Page: Takes you back to the Status page shown after login.
Logout: Logs out of the web GUI session.
10D-Link DVA-5592 User Manual
Page 16
Section 3 - Conguration
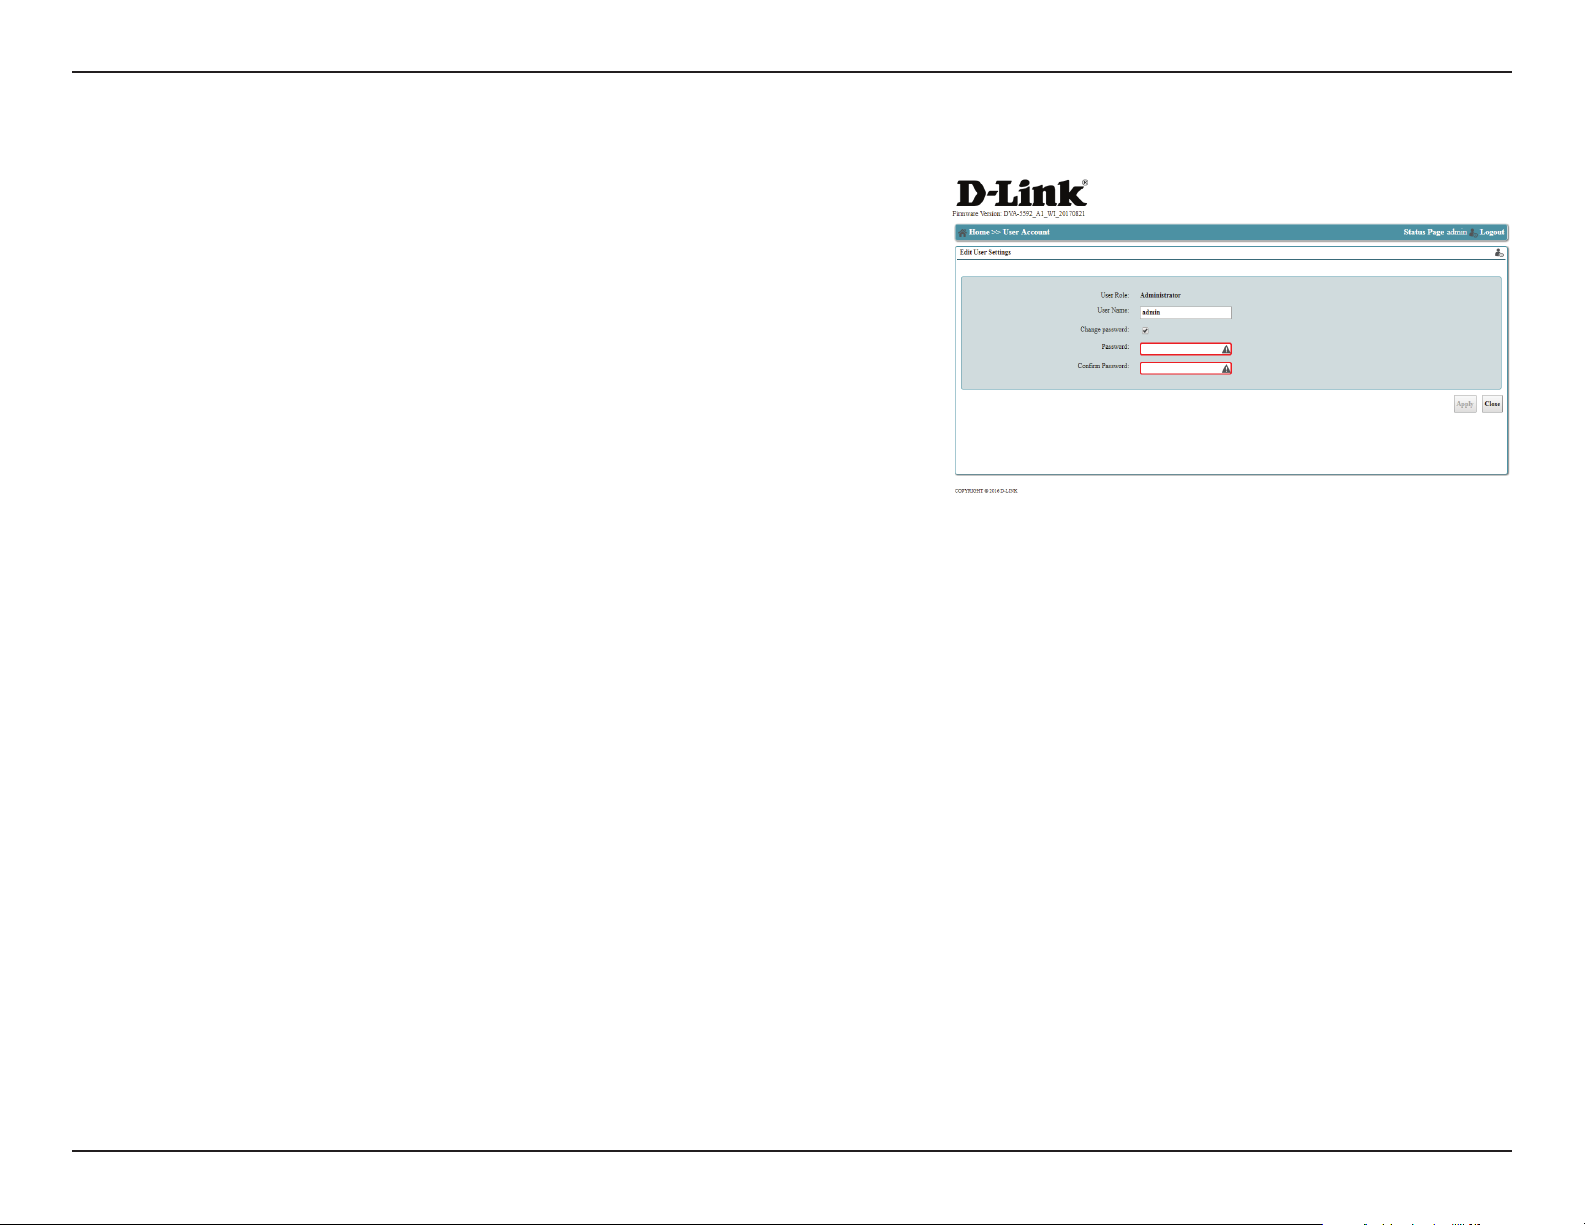
Users
The Users screen allows you to congure the administrative user name and password.
User Role:
User Name:
Change
Password:
Password:
Conrm
Password:
Indicates the role of the user. By default, the device only supports
one user, who has the Administrator role.
Enter the user name of the Administrator account here. The default
username is admin.
Check this box to change the administrator password.
Enter a new administrator password here.
Re-enter the password to conrm the change.
Click Apply to save your changes, or Close to return to the previous menu without
saving.
11D-Link DVA-5592 User Manual
Page 17
Section 3 - Conguration
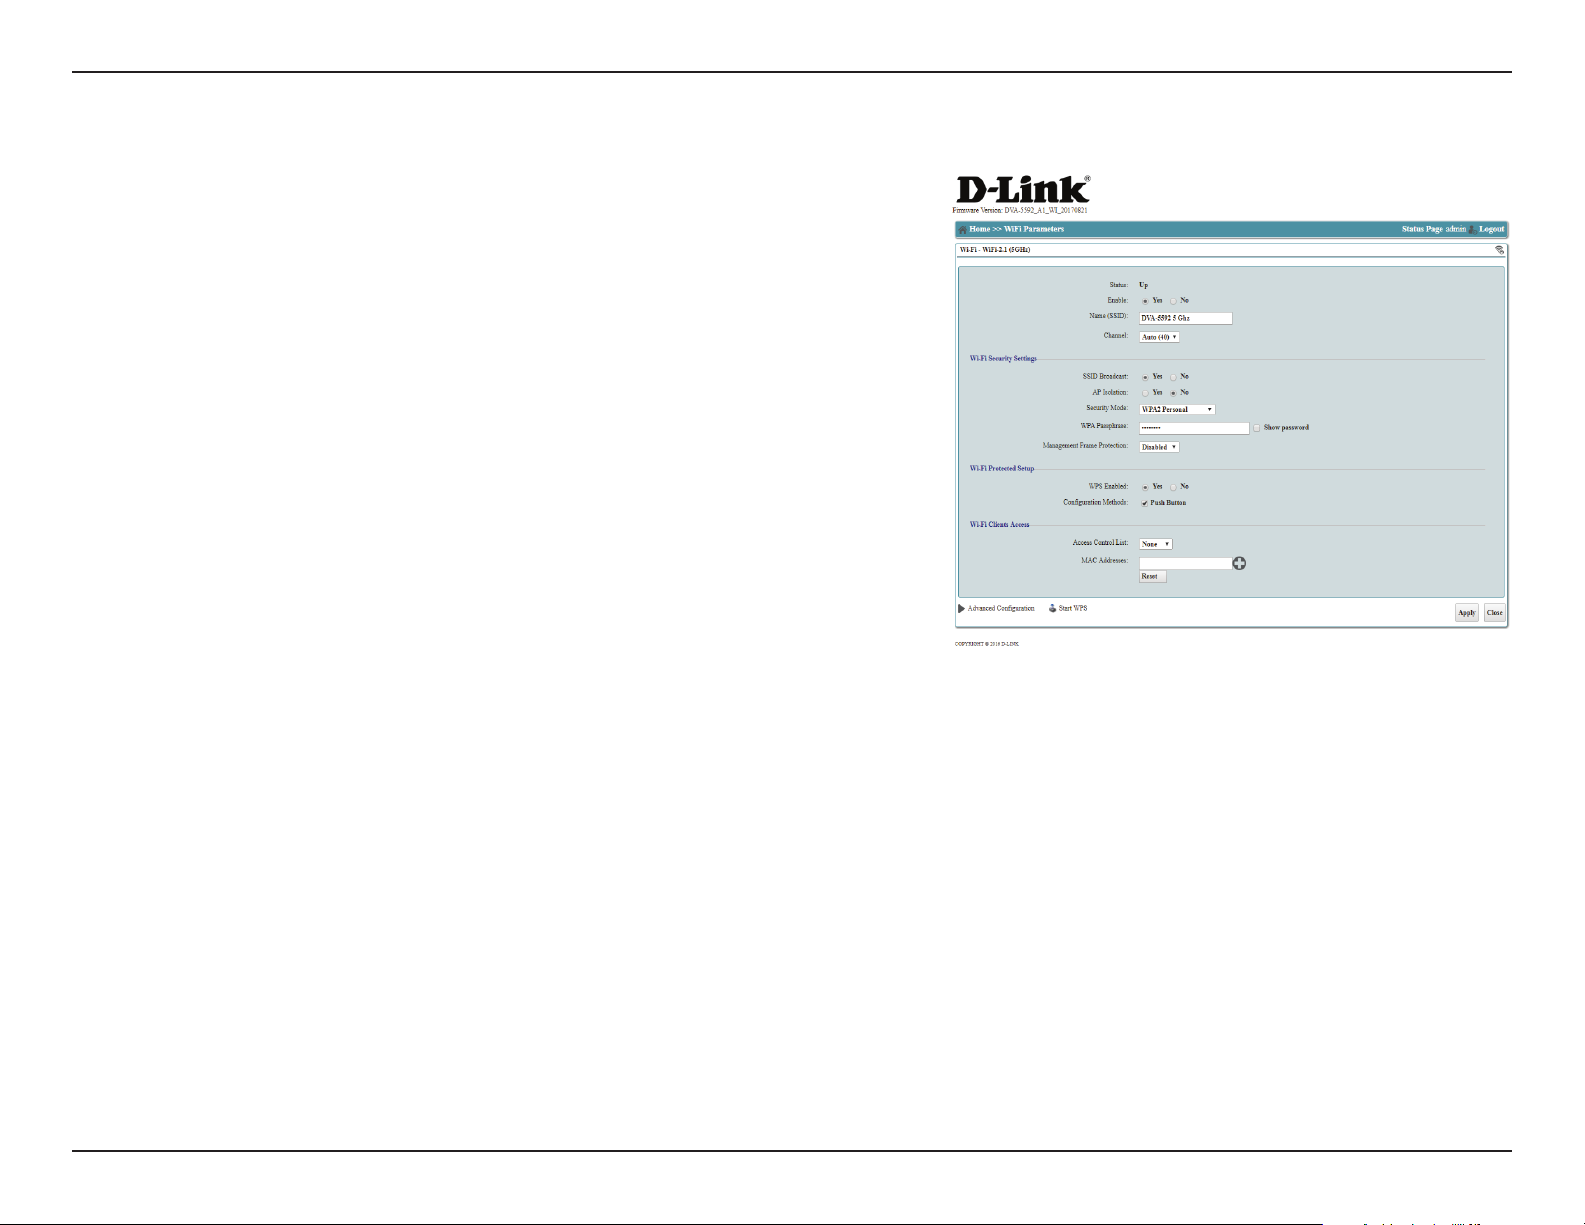
WiFi-2.1 (5GHz)
Your device has two wireless radios, one operating on 5 GHz and one at 2.4 GHz.
This screen allows you to congure the 5 GHz radio for 802.11ac/n/a wireless access.
Status: Indicates whether the interface is Up or Down.
Enable: Select Yes to enable the Wi-Fi access point. Selecting No will disable
Wi-Fi on this frequency
Name (SSID): Enter the name of your Wi-Fi access point.
Channel: Specify the channel number your access point will use.
Wi-Fi Security Settings
SSID Broadcast: Select Yes to broadcast the SSID. Selecting No will require all devices
wishing to connect to your network to enter the SSID manually in
addition to any security.
AP Isolation: Select Yes to isolate the wireless network from other devices on the
LAN while retaining Internet access. The default is No.
Security Mode: Select an encryption mode to help protect your Wi-Fi network from
being accessed by unauthorized devices. WPA2 Personal is the
default and recommended mode. WEP and older WPA standards
are less secure and provided for compatibility with older devices.
WPA Passphrase: Choose a strong password to help protect your network. The longer
and harder to guess a password is, the stronger the protection. The
password can be any letter, number, symbol, or space. Accent marks
and non-ASCII characters are not supported. Passwords must be at
least 8 characters.
12D-Link DVA-5592 User Manual
Page 18

Section 3 - Conguration
WiFi-2.1 (5 GHz) (Cont)
Show Password: This option shows the password as you type it.
Management
Frame Protection
Select Enable to enable this feature. It is disabled by default.
Wi-Fi Protected Setup
WPS Enabled: Select Yes to enable Wi-Fi Protected Setup (WPS) as a quick-and-easy
way to setup an encrypted wireless network.
Conguration
Methods:
Select a WPS conguration method. As of this writing, the rmware
only supports WPS Push Button for security reasons.
Wi-Fi Clients Access
Access Control
MAC Addresses: Enter the MAC address of the client to which to apply your lter. Click
You can choose to ACCEPT or DENY wireless access to specic MAC
List:
addresses. Selecting ACCEPT will allow access only to those devices
you specify, while selecting DENY will block specied addresses.
Only one rule can be active at a time.
the "+" button to add additional elds, or click Reset to clear all elds.
Advanced
Conguration:
Start WPS: Starts the WPS pairing process as though you had pressed the WPS
Click Apply to save your changes, or Close to return to the previous menu without
saving.
This option allows you to congure advanced wireless settings. This
section is for advanced users and network professionals only and
can be safely ignored by a majority of users.
button on your router.
13D-Link DVA-5592 User Manual
Page 19

Section 3 - Conguration
WiFi-1.1 (2.4GHz)
This screen allows you to congure the 2.4 GHz radio for 802.11n/g/b wireless access.
Status: Indicates whether the interface is Up or Down.
Enable: Select Yes to enable the Wi-Fi access point. Selecting no will disable
Wi-Fi on this frequency.
Name (SSID): Enter the name of your Wi-Fi access point.
Channel: Specify the channel number your access point will use.
Wi-Fi Security Settings
SSID Broadcast: Select Yes to broadcast the SSID. Selecting No will require all devices
wishing to connect to your network to enter the SSID manually in
addition to any security.
AP Isolation: Select Yes to isolate the wireless network from other devices on the
LAN while retaining Internet access. The default is No.
Security Mode: Select an encryption mode to help protect your Wi-Fi network from
being accessed by unauthorized devices. WPA2 Personal is the
default and recommended mode. WEP and older WPA standards
are less secure and provided for compatibility with older devices.
WPA Passphrase: Choose a strong password to help protect your network. The longer
and harder to guess a password is, the stronger the protection. The
password can be any letter, number, symbol, or space. Accent marks
and non-ASCII characters are not supported. Passwords must be at
least 8 characters.
14D-Link DVA-5592 User Manual
Page 20

Section 3 - Conguration
WiFi-1.1 (2.4GHz) (Cont)
Show Password: This option shows the password as you type it..
Management
Frame Protection
Select Enable to enable to enable this feature. It is disabled by
default.
Wi-Fi Protected Setup
WPS Enabled: Select Yes to enable Wi-Fi Protected Setup (WPS) as a quick-and-easy
way to setup an encrypted wireless network.
Conguration
Methods:
Select a WPS conguration method. As of this writing, the rmware
only supports WPS Push Button for security reasons.
Wi-Fi Clients Access
Access Control
MAC Addresses: Enter the MAC address of the client to which to apply your lter. Click
You can choose to ACCEPT or DENY wireless access to specic MAC
List:
addresses. Selecting ACCEPT will allow access only to those devices
you specify, while selecting DENY will block specied addresses.
Only one rule can be active at a time.
the "+" button to add additional elds, or click Reset to clear all elds.
Advanced
Conguration:
Start WPS: Starts the WPS pairing process as though you had pressed the WPS
Click Apply to save your changes, or Close to return to the previous menu without
saving.
This option allows you to congure advanced wireless settings. This
section is for advanced users and network professionals only and
can be safely ignored by a majority of users.
button on your router.
15D-Link DVA-5592 User Manual
Page 21
Section 3 - Conguration
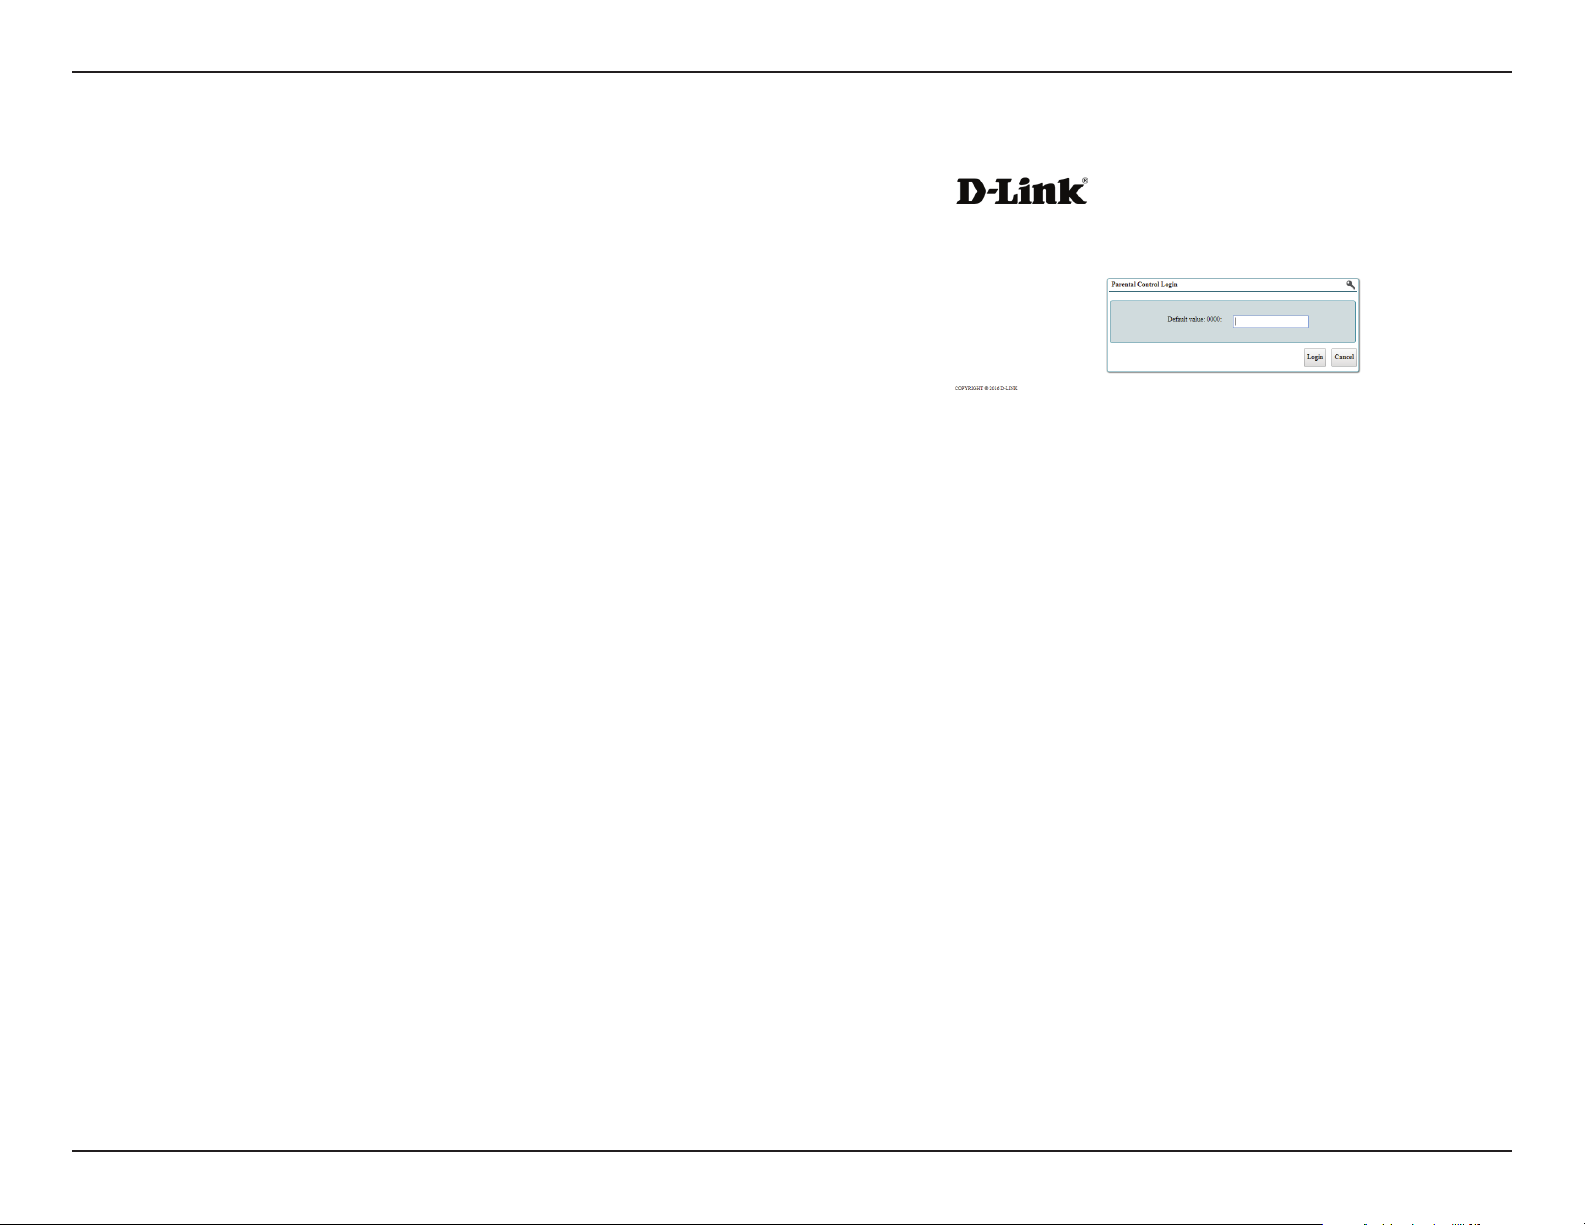
Parental Control
Parental control allows you to adjust a cloud-based service for content classication
or to manually congure a list of blocked sites and keywords.
When accessing this function, you will be prompted to enter a PIN. The default PIN
is 0000. If you have changed this from the default, enter your new PIN. If you have
lost of forgotten your PIN, you must reset your device.
Once you have entered your password, you can select Login to proceed to Service
Status on page 17.
Alternatively, you can click Close to return to the previous screen.
16D-Link DVA-5592 User Manual
Page 22
Section 3 - Conguration
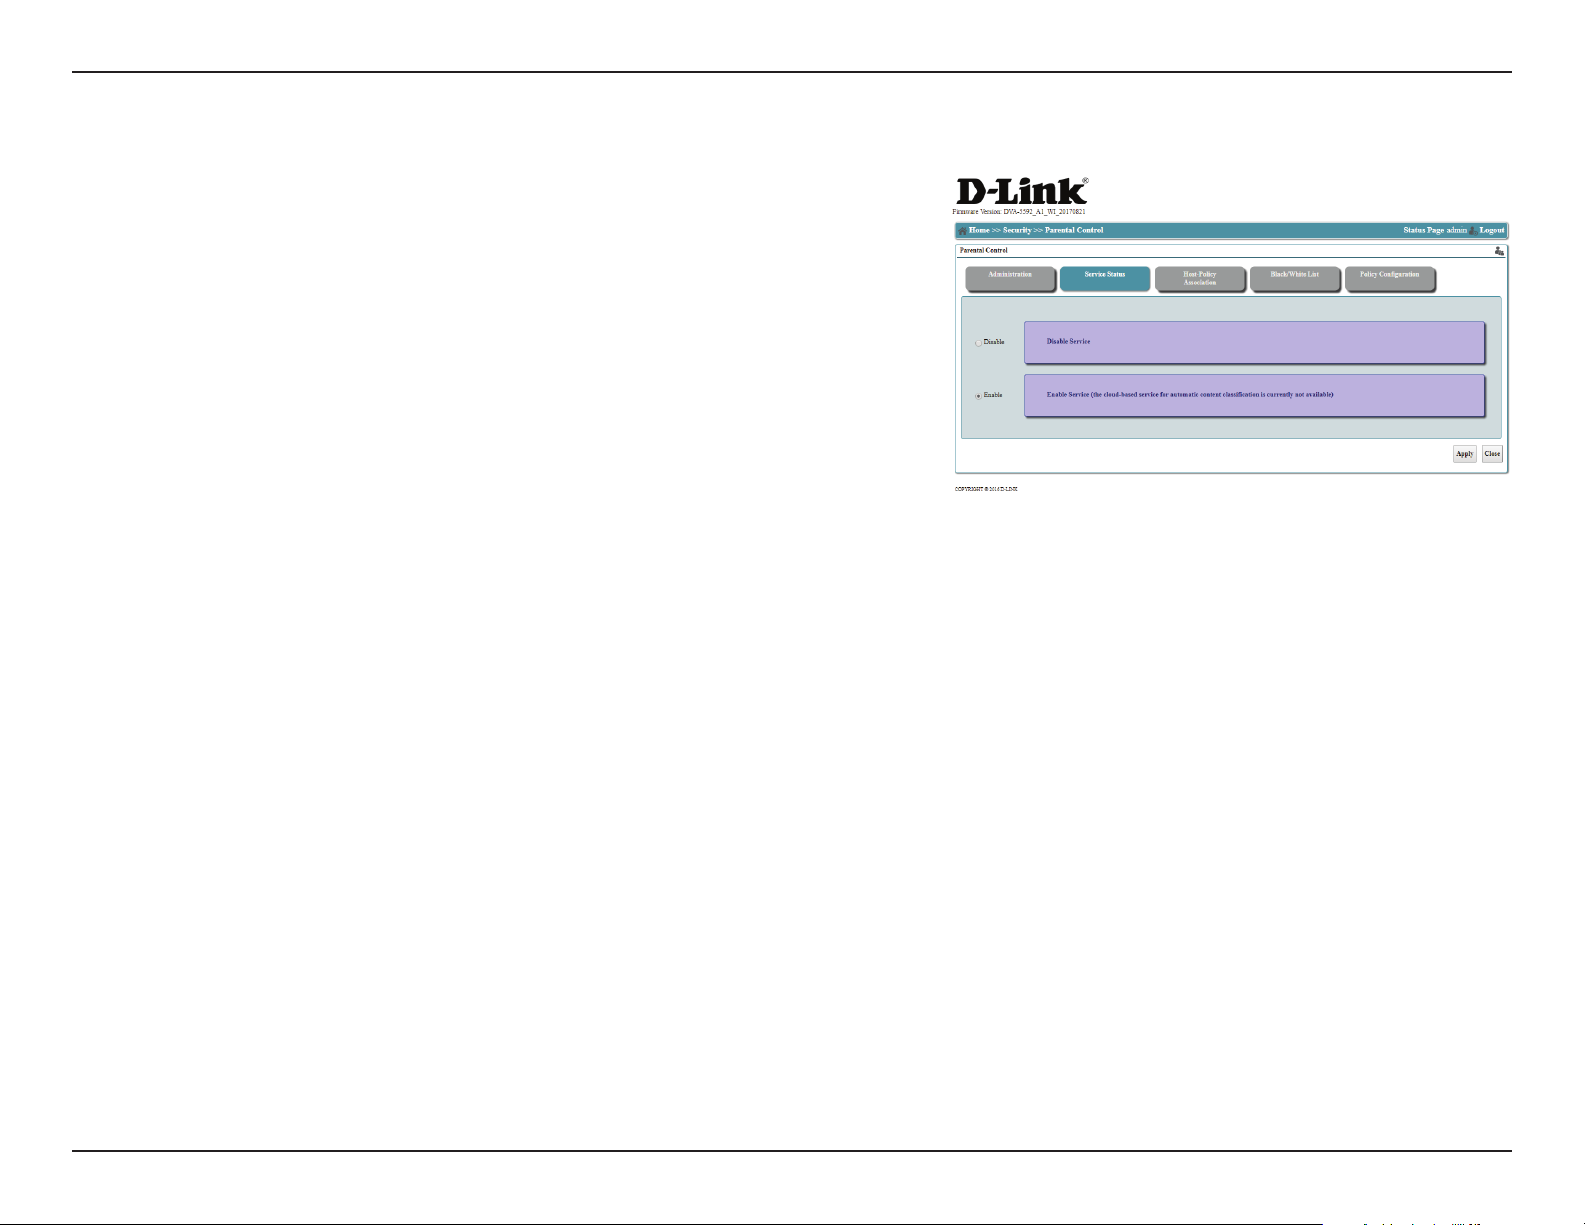
Service Status
This page allows you to Enable or Disable the Parental Control service.
Disable: This option disables the Parental Control service. This is the default
option.
Enable: Select Enable to enable the Parental Control service. This will
allow Host-Policy Association, Black/White List, and Policy
Conguration.
Note: As of this writing, the cloud-based service that provides automatic content classication
is not available. The user can develop their own access-control list manually.
Click Apply to save your changes, or Close to return to the previous menu without
saving.
17D-Link DVA-5592 User Manual
Page 23

Section 3 - Conguration
Administration
The administration tab allows you to manage the Administration PIN, Policy Override
Period, and Content Classication Cache Period.
Administration
PIN code:
Policy Override
Time Period:
Content
Classication
Cache Period:
Enter a PIN which will be required for any changes to the parental
control settings.
When a blocked website or service is detected, the user will have
the option to temporarily override the parental controls by entering
a PIN. Specify the time in minutes that the override should remain
in place.
Specied the amount of time content classication data should be
cached.
Click Apply to save your changes, or Close to return to the previous menu without
saving.
18D-Link DVA-5592 User Manual
Page 24
Section 3 - Conguration
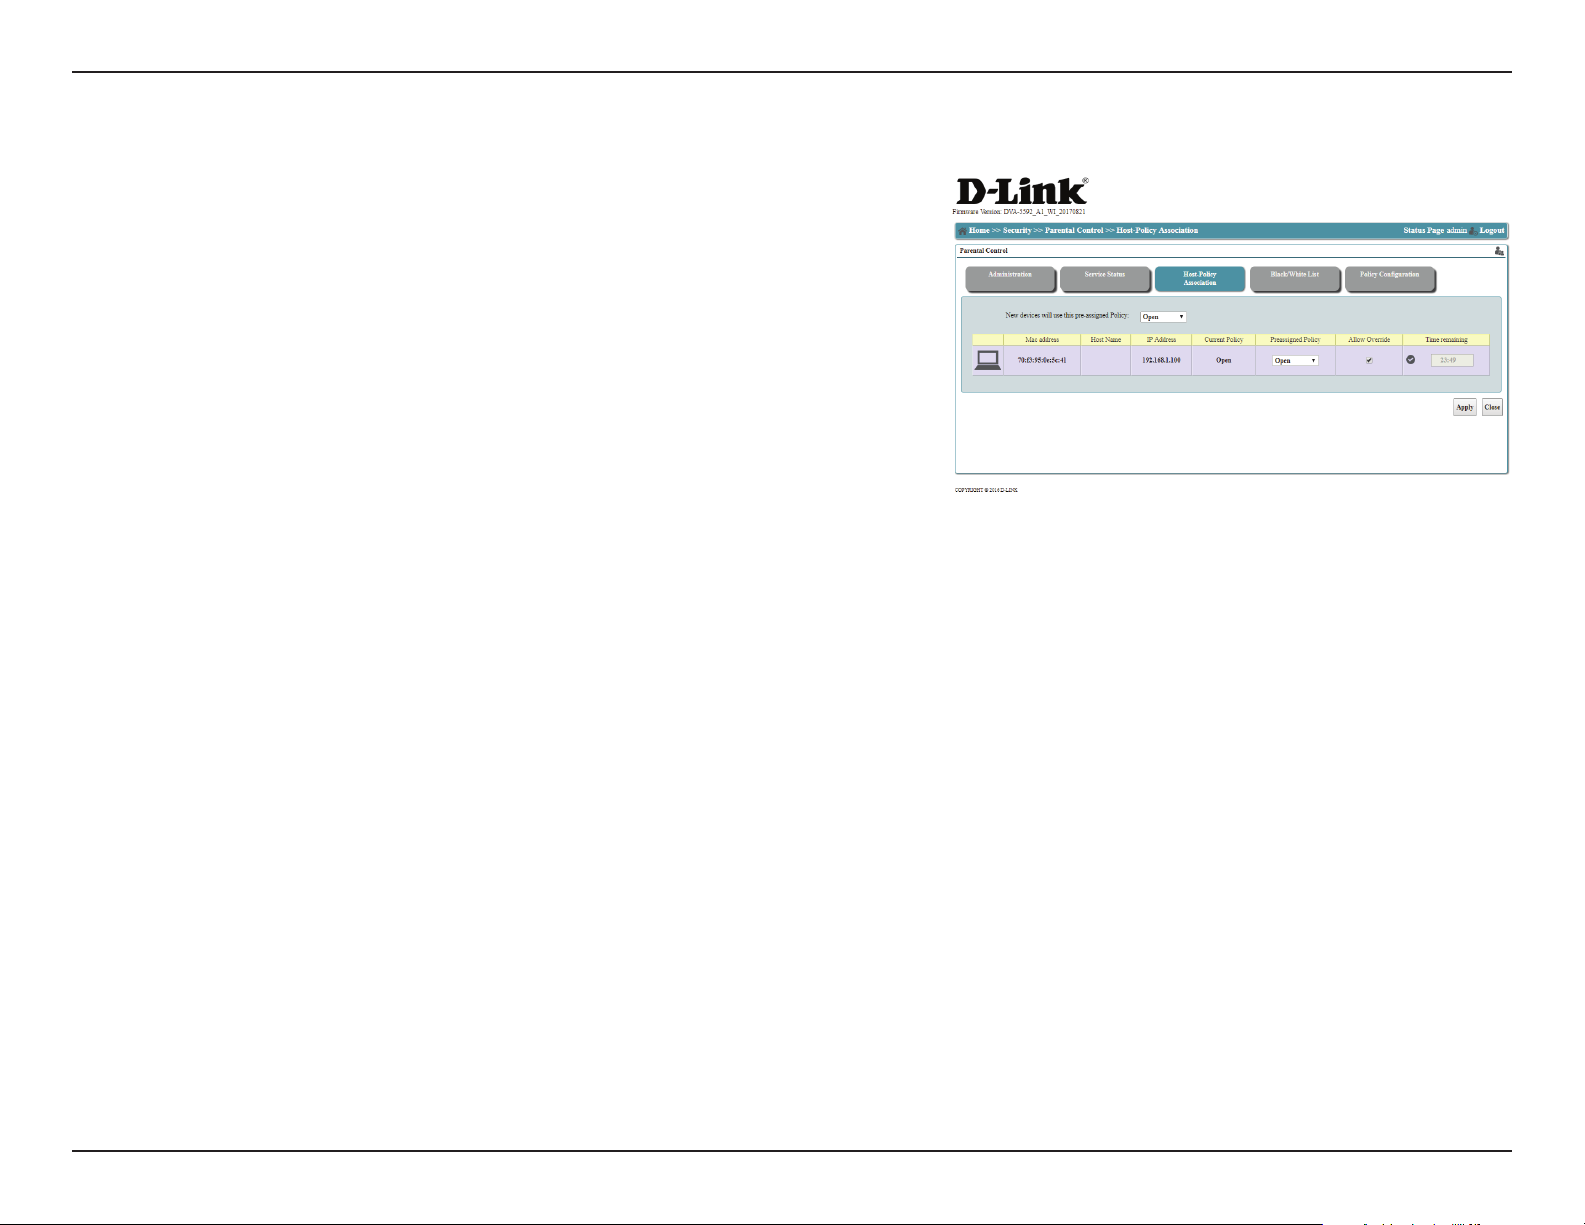
Host-Policy Association
This menu allows you to assign parental control policies to specic devices attached
to your network. Attached devices are referred to as hosts.
New devices
will use this pre-
assigned Policy:
Mac address: Displays the MAC address of the client.
Host Name: Displays the host name (if any) of the connected client.
IP Address: Displays the IP address of the client.
Current Policy: Indicates which policy is currently assigned to the client.
Pre-assigned
Policy:
Allow override: Check this box to allow overrides from the device when specifying
Time Remaining: Indicates the amount of time remaining on the device's time budget.
Select a policy that new devices will use by default. To congure
policies, see Policy Conguration on page 21.
Select a policy from the list to assign it to the current client.
the correct PIN.
To specify a time budget on a given day, Policy Conguration on
page 21.
Click Apply to save your changes, or Close to return to the previous menu without
saving.
19D-Link DVA-5592 User Manual
Page 25

Section 3 - Conguration
Black/White List
The Black/White list allows you to establish a list of permitted or blocked sites based
on URL strings.
Input Site Here: Enter a URL or partial URL to add to the list. You can then specify
whether the site is allowed or blocked for each prole.
Allow: Select green check mark corresponding to each site and prole to
Allow that site for that prole.
Add: Click Add to add the new URL or partial URL to the list which has
been entered into Input Site Here.
Block: Select the red circle with a single white line corresponding to each
Site and prole to Block that site for that prole.
Remove: Select the red x at the end of the row to Remove the corresponding
site.
Click Apply to save your changes, or Close to return to the previous menu without
saving.
20D-Link DVA-5592 User Manual
Page 26
Section 3 - Conguration
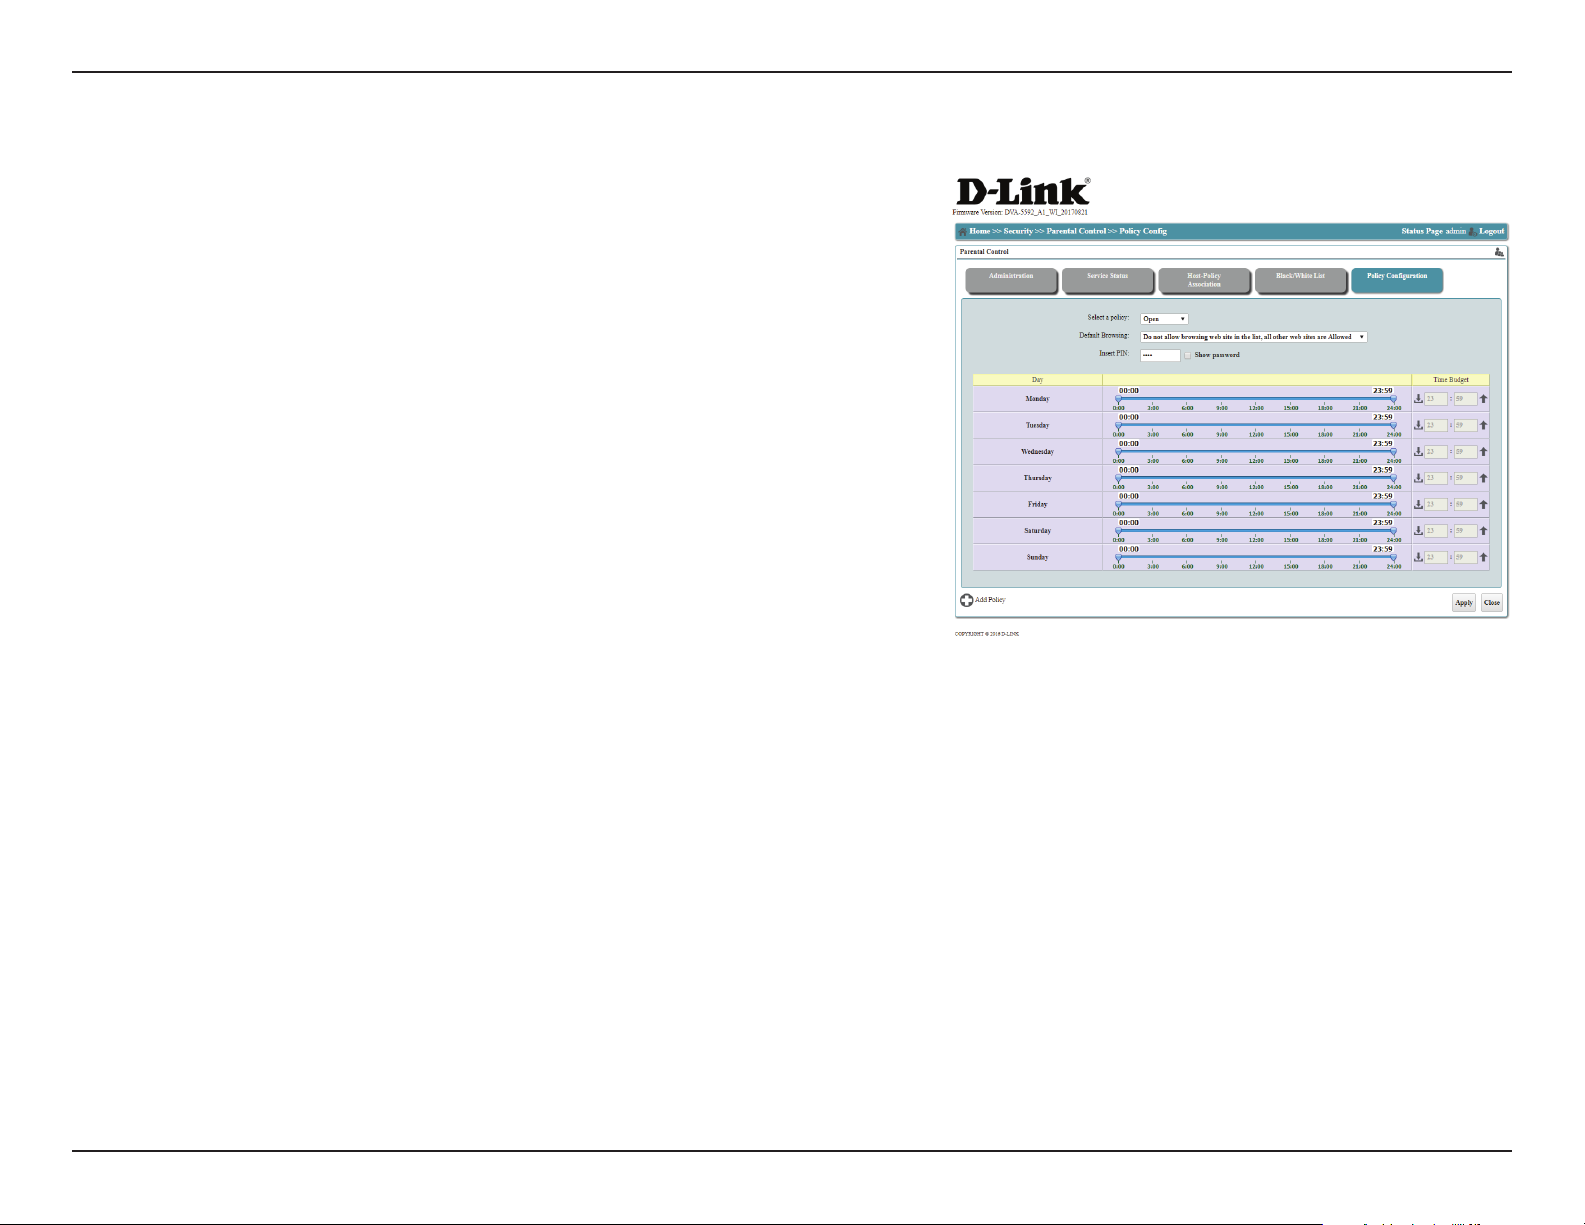
Policy Conguration
Policies allow you to set allowed time windows for browsing, as well as time budgets
for individual devices on each policy. This allows you to limit Internet time to certain
periods of the day or for a certain amount of total time per day.
Select a policy: Select an existing policy from the list to edit. To add a new policy
instead, select Add Policy below.
Default Browsing: This allows you to specify whether the list on the previous page
functions as a black list or a white list. To restrict access to a specic
list of sites, creating a blacklist, select Do not allow browsing web
site in the list, all other web sites are allowed. To allow only those
sites on the list, creating a whitelist, select Allow browsing web site
in the list only, all the other web sites are Blocked.
Insert PIN: Specify a four digit, numerical PIN to be used for overrides.
Day: Indicates the day of the week the policy will apply to.
Time Specify an absolute time each day during which the policy will apply.
You can only create one block of time each day.
Time Budget Select an amount of time each device will be budgeted. Once the
budget runs out, the device will no longer be able to connect to the
Internet until the next day.
Add policy Click Add Policy to create a new, blank policy.
21D-Link DVA-5592 User Manual
Page 27
Section 3 - Conguration
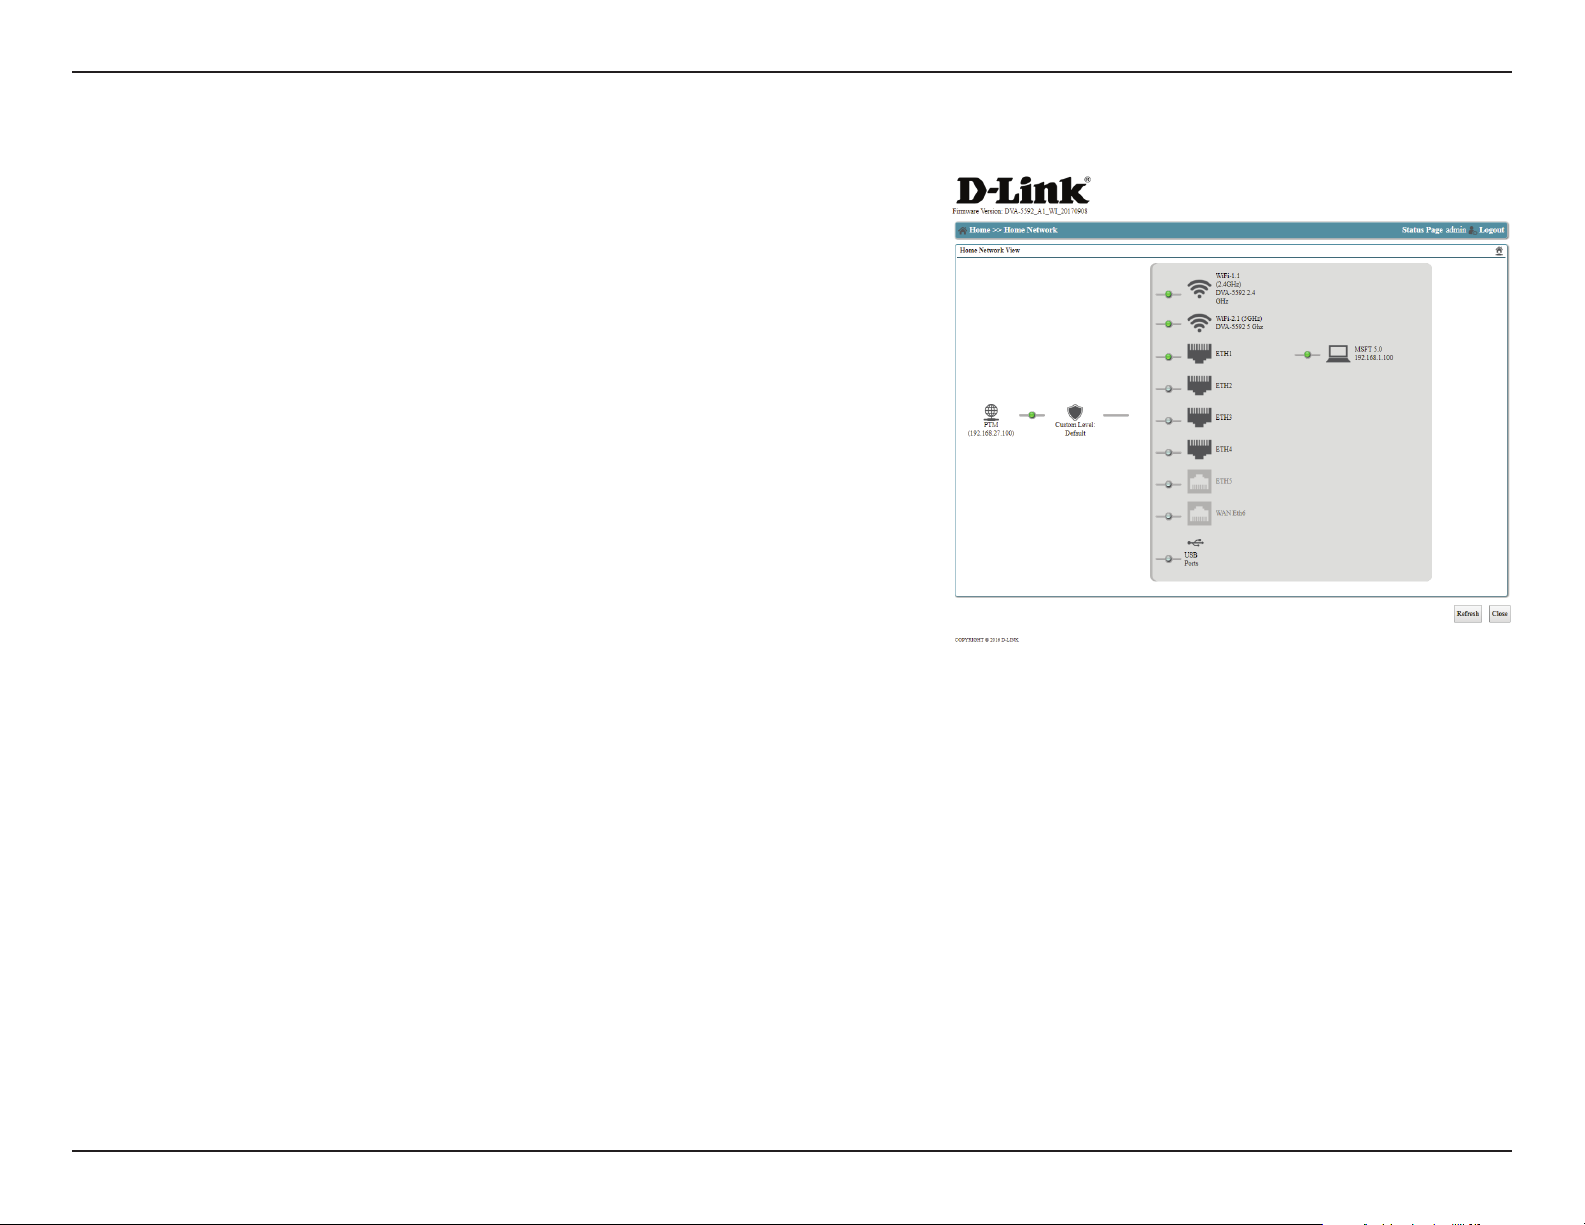
Home Network
This menu gives you a graphical view of all interfaces on your router. Click any
interface to be taken to the relevant conguration page. This section is for advanced
users and network professionals only and can be safely ignored by a majority of users.
Click Refresh to update the page, or click Close to return to the previous screen.
22D-Link DVA-5592 User Manual
Page 28
Section 3 - Conguration
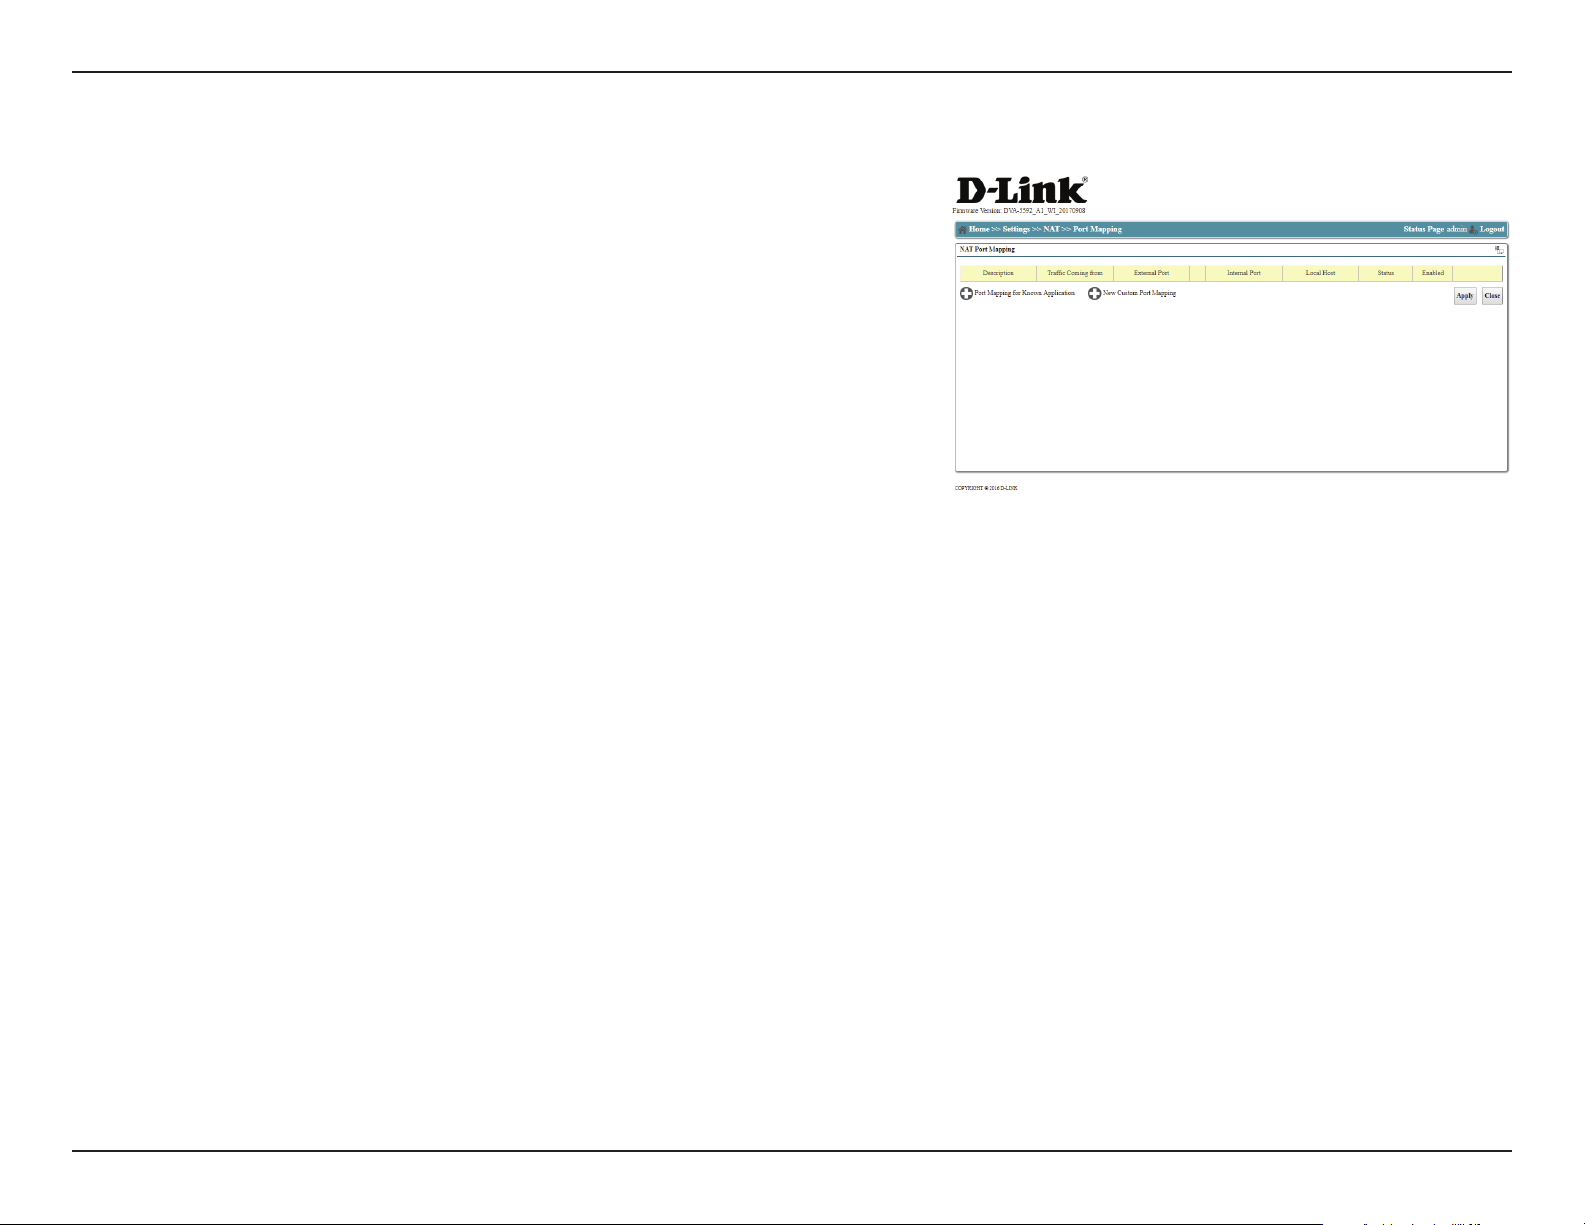
See Port Mapping on page 60 for more detail.
Port Mapping
Click Apply to save your changes, or Close to return to the previous menu without
saving.
23D-Link DVA-5592 User Manual
Page 29
Section 3 - Conguration
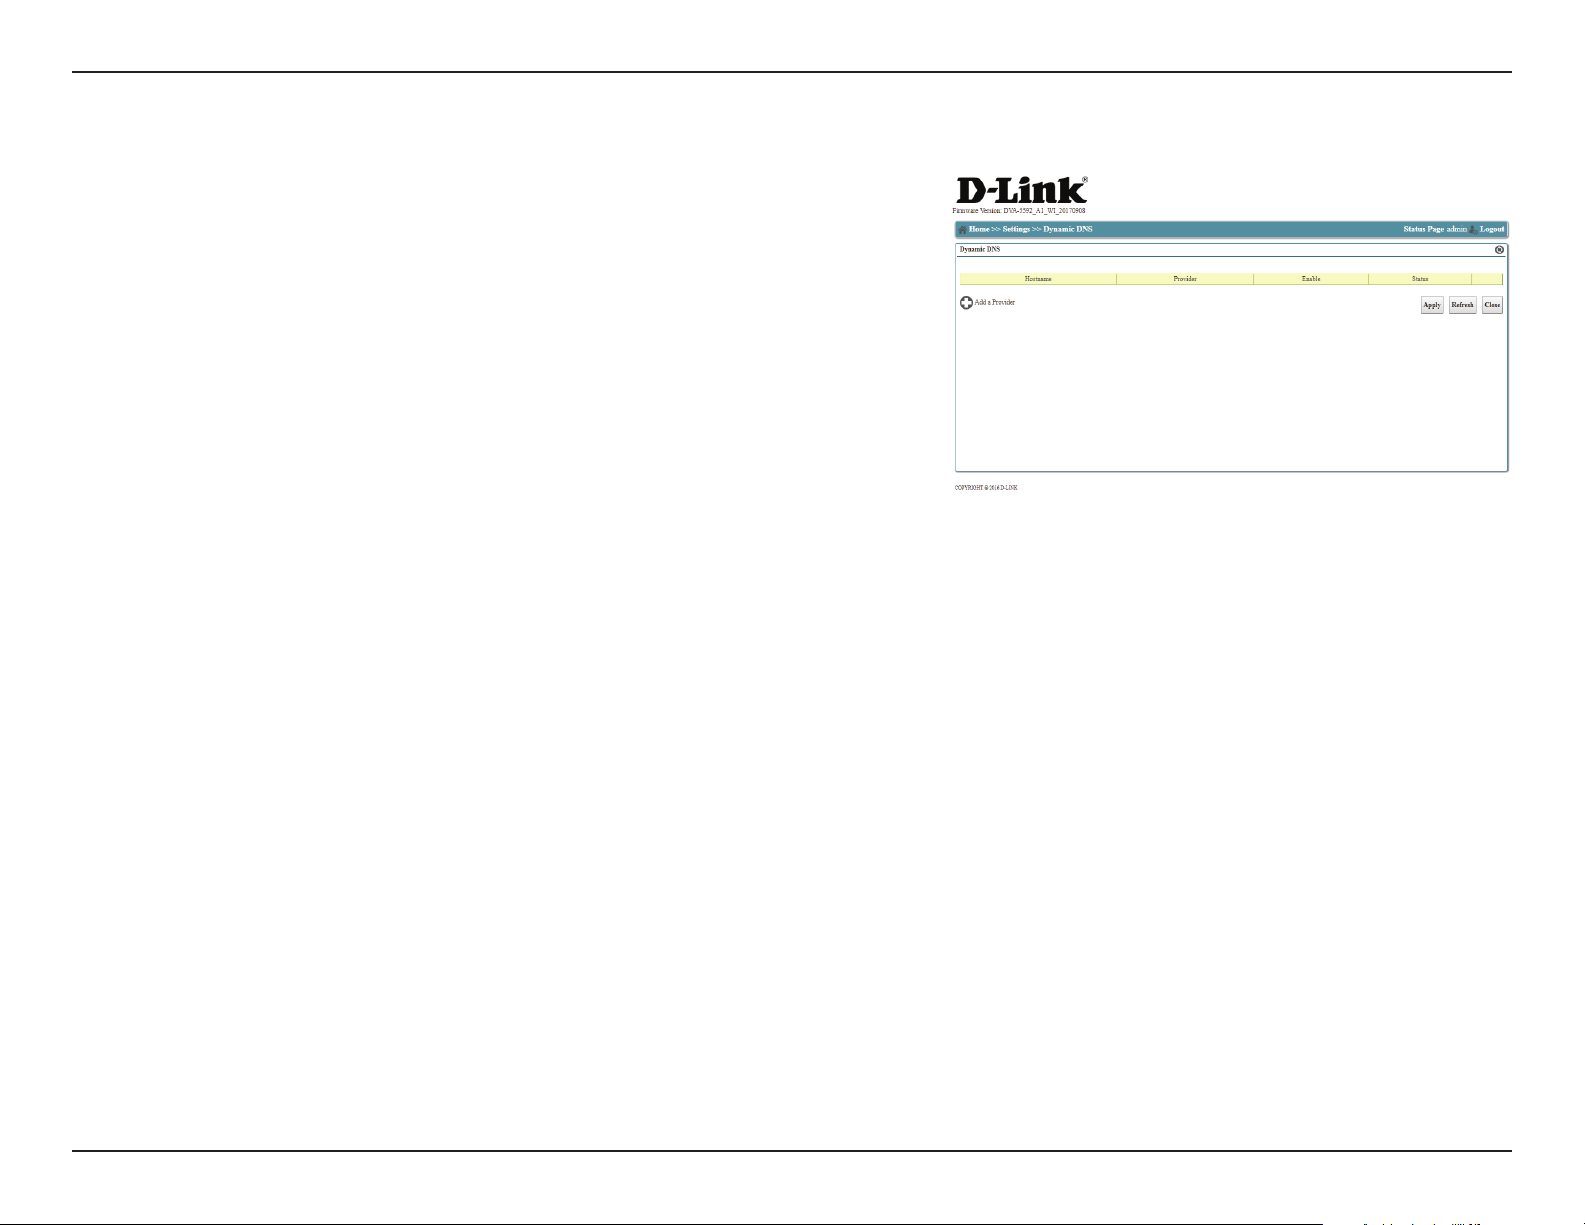
Dynamic DNS
The Dynamic DNS menu option allows you to congure a Dynamic DNS service to
compensate for a dynamic IP. For details, see Dynamic DNS on page 69.
24D-Link DVA-5592 User Manual
Page 30

Section 3 - Conguration
Storage Service
The Storage Service allows you to remotely access storage devices connected to
your router.
This section contains a status display and four submenus described on the following
pages:
Storage Device on page 26
Network File Sharing on page 27
User Accounts on page 28
FTP Server on page 29
DLNA Media Sharing on page 77
Click Close to return to the previous menu.
25D-Link DVA-5592 User Manual
Page 31

Section 3 - Conguration
Storage Device
If an external storage device is attached, it will appear at that top of the Storage
Service screen. To congure a device, click the corresponding Settings button. To
disable the device, click Disable.
Click Share to share this device and all its volumes over all available network
connections.
Click Close to return to the previous menu.
26D-Link DVA-5592 User Manual
Page 32

Section 3 - Conguration
Network File Sharing
This page allows you to enable and congure basic le sharing features to remotely
access your media across the network.
Click Apply to save your changes, or Close to return to the previous menu without
saving.
27D-Link DVA-5592 User Manual
Page 33

Section 3 - Conguration
User Accounts
If User Authentication has been enabled, you may need to configure login
credentials to access storage over the network. User accounts may also be required
to access FTP services.
Click Add User to create a new user.
Click Add Group to add a new user group.
Click Apply to save your changes, or Close to return to the previous menu without
saving.
28D-Link DVA-5592 User Manual
Page 34

Section 3 - Conguration
FTP Server
This page allows you to congure remote access to storage using the industrystandard FTP protocol.
Click Apply to save your changes, or Close to return to the previous menu without
saving.
29D-Link DVA-5592 User Manual
Page 35

Section 3 - Conguration
Security
The Security section allows you to congure rewall, authentication, and security
features. This section is for advanced users and network professionals only and can
be safely ignored by a majority of users. Note that improper conguration of these
items could expose your network to attacks over the Internet.
This section contains three submenus described on the following pages:
Firewall on page 31
DMZ on page 32
Captive Portal on page 99
Close to return to the previous screen.
30D-Link DVA-5592 User Manual
Page 36

Section 3 - Conguration
Firewall
This screen allows you to congure the router's built in rewall. Note that disabling
the firewall may expose your network to attacks over the Internet and is not
recommended.
Click Apply to save your changes, or Close to return to the previous menu without
saving.
31D-Link DVA-5592 User Manual
Page 37

Section 3 - Conguration
DMZ
This page allows you to manually congure the router’s DMZ settings. Since some
applications are not compatible with NAT, the device supports the use of a DMZ IP
address for a single host on the LAN. This IP address is not protected by NAT and it
is visible on the Internet with the correct type of software. Note that any client PC in
the DMZ is exposed to various types of security risks. If you use DMZ, take measures
(such as client-based virus protection) to protect the remaining client PCs on your
LAN from possible contamination through DMZ.
Click Apply to save your changes, or Close to return to the previous menu without
saving.
32D-Link DVA-5592 User Manual
Page 38

Section 3 - Conguration
Parental Control
Parental control is described in more detail in Parental Control on page 16.
33D-Link DVA-5592 User Manual
Page 39

Section 3 - Conguration
Settings
The Settings screen provides access to advanced network conguration settings.
These settings are for advanced use cases, and should not need to be congured
for normal use. Items listed with a + symbol have sub menus that appear when the
mouse passes over them to enable quick-and-easy access to all submenu items.
Physical
Interfaces:
The Physical Interfaces menu item has a pop-up menu, and contains
links to advanced settings for xDSL, Ethernet, USB, phone, and Wi-Fi
interfaces. For details, see Physical Interfaces on page 37.
Mobile
Network:
Network
Connections:
Bridge and
VLAN:
DHCP Server
and Relay:
DNS Client
and Relay:
The Mobile Network menu item has a pop-up menu, and contains
links to help you congure a 3G/4G USB dongle to connect to the
Internet. For details, see Modem on page 38.
The Network Connections menu item contains links to WAN
connections. From this menu item, you can create, manage, or
remove WAN interfaces and VPN clients. For details, see Network
Connections on page 42.
The Bridge and VLAN menu item has a pop-up menu, and allows
you to manage bridges and VLAN termination. For details, see Bridge
List on page 44.
The DHCP Server and Relay menu item allows direct management
of the router's internal DHCP server, as well as for conguration of
relay protocols. For details, see DHCP Server and Relay on page
46.
The DNS Client and Relay menu item has a pop-up menu, and allows
you to congure how local devices use DNS (Domain Name System)
servers. For details, see DNS Client and Relay on page 47.
34D-Link DVA-5592 User Manual
Page 40

Section 3 - Conguration
The ALG (application layer gateway) menu item allows the direct
ALG:
conguration of ALG modules. For details, see ALG on page 57.
Settings (Cont)
NAT and Port
Mapping:
Proxies:
VPN:
Dynamic DNS:
Date / Time:
Management:
The NAT and Port Mapping menu item has a pop-up menu, and
allows you to congure NAT (network address translation) rewall
features as well as map ports for specialized applications. For details
see NAT and Port Mapping on page 58.
The Proxies menu item allows you to control pass-throughs for
media devices and multicast, as well as PPPoE connections to your
ISP. For details, see Proxies on page 62.
The VPN menu item has a pop-up menu, and allows you to congure
your router as a VPN server to gain remote access to your network
resources. For details, see VPN on page 66.
The Dynamic DNS menu option allows you to congure a Dynamic
DNS service to compensate for a dynamic IP. For details, see Dynamic
DNS on page 69.
The Date / Time menu item contains settings for conguring the
router's Internet clock. For details, see Date / Time on page 70.
The Management menu item has a pop-up menu, and contains
options for conguring remote management and UPnP. For details,
see Management on page 71.
VoIP Service:
The VoIP Service menu item contains settings for conguring Voice
over IP service provided by your ISP. For details, see VoIP Service on
page 76.
35D-Link DVA-5592 User Manual
Page 41

Section 3 - Conguration
Settings (Cont)
IPv6:
Autosense
Failover:
The IPv6 menu item has a pop-up menu, and allows you to set global
IPv6 conguration policy. For details, see IPv6 on page 77.
The Autosense Failover menu item allows you to congure backup
Internet connections should your primary WAN go down. For details,
see Autosense Failover on page 79.
Click Close to return to the homescreen.
36D-Link DVA-5592 User Manual
Page 42

Section 3 - Conguration
Physical Interfaces
This screen displays a list of all physical interfaces. Clicking any one will bring up a
sub menu with conguration options. Active interfaces are highlighted in green.
Click Close to return to the previous screen.
37D-Link DVA-5592 User Manual
Page 43

Section 3 - Conguration
Modem
The modem section provides conguration options for an external USB modem.
It contains the following submenus:
SIM Card on page 39
USB Modem on page 40
Operator on page 41
Close to return to the previous screen.
38D-Link DVA-5592 User Manual
Page 44

Section 3 - Conguration
SIM Card
If you have attached a compatible USB modem and SIM card, information about the
SIM will be displayed on this page.
Close to return to the previous screen.
39D-Link DVA-5592 User Manual
Page 45

Section 3 - Conguration
USB Modem
This screen displays a full list of all pre-congured USB 3G/4G modems. Existing
modems may be deleted or modied. If you wish to attach a new modem, click Add
New USB Modem and follow the on-screen instructions.
Close to return to the previous screen.
40D-Link DVA-5592 User Manual
Page 46

Section 3 - Conguration
Operator
On this screen you will see the current Layer 2 (L2) interface conguration. Click Add
to add another interface, or Delete to delete the currently selected interface.
Close to return to the previous screen.
41D-Link DVA-5592 User Manual
Page 47

Section 3 - Conguration
Network Connections
This screen displays all active network connections, both LAN and WAN. This section
is for advanced users and network professionals only and can be safely ignored by
a majority of users.
Click the
Click the
be deleted permanently.
Select New WAN Connection to begin the New WAN Conguration wizard.
Select New LAN Interface and follow the on-screen instructions to create a new
LAN interface.
Selection New VPN Client and follow the on-screen instructions to setup a new
VPN client.
icon to access a detailed view of the selected interface.
button to delete the connection. Note that all associated settings will
Click Close to return to the previous screen.
42D-Link DVA-5592 User Manual
Page 48

Section 3 - Conguration
Bridge and VLAN
This screen allows you to view and congure network bridges and bridge lters.
This section is for advanced users and network professionals only and can be safely
ignored by a majority of users.
Bridge List:
Bridge Filters:
The menu displays a list of all bridges and provides options managing
them. For details, see Bridge List on page 44.
This menu displays a list of all bridge lters and provides options
for managing them. For details, see Bridge Filters on page 45.
Click Close to return to the previous menu.
43D-Link DVA-5592 User Manual
Page 49

Section 3 - Conguration
Bridge List
This screen allows you to view and congure network bridges and bridge lters.
This section is for advanced users and network professionals only and can be safely
ignored by a majority of users.
You may Modify, Delete, or Filter by clicking on the buttons to the right-hand side
of the corresponding bridge.
Select Add New Bridge and follow the on-screen instructions to add a new bridge
Click Apply to save settings or Close to return to the previous menu.
44D-Link DVA-5592 User Manual
Page 50

Section 3 - Conguration
Bridge Filters
This screen allows you to view and congure network bridges and bridge lters.
This section is for advanced users and network professionals only and can be safely
ignored by a majority of users.
Click Add New Bridge Filter and follow the on-screen instructions to add a new
bridge lter.
Click Apply to save settings or Close to return to the previous menu.
45D-Link DVA-5592 User Manual
Page 51

Section 3 - Conguration
DHCP Server and Relay
On this screen, you can congure advanced DHCP settings. This section is for
advanced users and network professionals only and can be safely ignored by a
majority of users. Select Yes to enable the internal DHCP server and allow all LAN
devices to be issued local IPs. Select No to disable local DHCP assignment and receive
IPs directly from your ISP.
Note: Disabling the DHCP server will preventing you from accessing the conguration
interface. In order to regain access, a factory reset will be required.
Click Apply to save settings or Close to return to the previous menu.
46D-Link DVA-5592 User Manual
Page 52

Section 3 - Conguration
DNS Client and Relay
These pages allow you to congure advanced DNS settings for special usage cases.
This section is for advanced users and network professionals only and can be safely
ignored by a majority of users.
This section has three sub-menus which are described on the following pages:
DNS Client on page 48
DNS Relay on page 49
Hostnames on page 50
Click Apply to save settings or Close to return to the previous menu.
47D-Link DVA-5592 User Manual
Page 53

Section 3 - Conguration
DNS Client
This screen allows you to congure advanced DNS Client settings. This section is
for advanced users and network professionals only and can be safely ignored by a
majority of users. This information should be provided by your ISP.
You may modify or delete items by clicking on the button of the corresponding item.
Select Add Server to and follow the on-screen instructions to add a new server.
Select Add Rule for Dynamic Server to add new rules to the list.
Click Apply to save settings or Close to return to the previous menu.
48D-Link DVA-5592 User Manual
Page 54

Section 3 - Conguration
DNS Relay
This screen allows you to congure advanced DNS relay settings. This section is
for advanced users and network professionals only and can be safely ignored by a
majority of users. This information should be provided by your ISP.
You may modify or delete items by clicking on the button of the corresponding item.
Select Add Server to and follow the on-screen instructions to add a new server.
Select Add Rule for Dynamic Server to add new rules to the list.
Click Apply to save settings or Close to return to the previous menu.
49D-Link DVA-5592 User Manual
Page 55

Section 3 - Conguration
Hostnames
This screen allows you to congure a local hostname for easy access to your router
without needing to keep track of your router's IP address.
Click Apply to save settings or Close to return to the previous menu.
50D-Link DVA-5592 User Manual
Page 56

Section 3 - Conguration
Routing and QoS
This section provides advanced settings for Routing and QoS (quality of service).
It has ve submenus described below:
Routing Policy on page 52
Trac Classication on page 53
ALG Flows on page 54
Policers on page 55
Queues on page 87
This section is for advanced users and network professionals only and can be safely
ignored by a majority of users.
51D-Link DVA-5592 User Manual
Page 57

Section 3 - Conguration
Routing Policy
This section allows you to manually congure routing tables. The table displays
current information about this route. Click the check boxes to disable any specic
route. Click Add New Route to add a new route.
Click Apply to save your changes, or Close to return to the previous menu without
saving.
52D-Link DVA-5592 User Manual
Page 58

Section 3 - Conguration
Trac Classication
On this screen, you are able to directly edit trac classication. Trac classication
is used to prioritize certain trac (such as VoIP) to ensure correct functioning of
time-sensitive services.
From this screen, the Order of given trac may be moved up or down, with trac
at the top of the list receiving highest priority. Trac classes may be modied or
deleted with the buttons on the right hand side of the screen.
Click Add New Class to add a new trac class.
Click Close to return to the previous menu.
53D-Link DVA-5592 User Manual
Page 59

Section 3 - Conguration
ALG Flows
The Application Layer Gateway (ALG) ows allows you to congure dynamic port
and address translation for traversal over the NAT rewall.
Click Add New Flow to congure this for a new application and follow the on-screen
instructions.
Click Close to return to the previous menu.
54D-Link DVA-5592 User Manual
Page 60

Section 3 - Conguration
Policers
Conguring Policers allows you to control the ow rate of certain kinds of trac. When
trac exceeds this limit, it can be dropped or sent to a dierent forwarding class.
Click Add QoS Policer and follow the on-screen instructions to congure a new
policer.
Click Close to return to the previous menu.
55D-Link DVA-5592 User Manual
Page 61

Section 3 - Conguration
Queues
The Queues screen allows you to prioritize trac based on trac class and interface.
The default layout includes PTM, ATM, and Ethernet WAN interfaces. You may modify
or delete existing queues using the modify and delete buttons to the right. Click Add
QoS Queue and follow the on-screen instructions to add a new queue.
Click Close to return to the previous menu.
56D-Link DVA-5592 User Manual
Page 62

Section 3 - Conguration
ALG
An application-level gateway (ALG) is a security component that augments a rewall
or NAT employed in a network. It allows customized NAT lters to support address
and port translation for specied application layer protocols. To edit modules, select,
the Modify icon on the right-hand side corresponding to the module you wish to
change.
This section is for advanced users and network professionals only and can be safely
ignored by a majority of users.
Click Close to return to the previous menu.
57D-Link DVA-5592 User Manual
Page 63

Section 3 - Conguration
NAT and Port Mapping
This menu provides links to congure NAT and port mapping. This section is for
advanced users and network professionals only and can be safely ignored by a
majority of users.
It has three sub menus described on the following pages:
NAT Interface Settings on page 59
Port Mapping on page 60
Public Addresses on page 61
Click Close to return to the previous menu.
58D-Link DVA-5592 User Manual
Page 64

Section 3 - Conguration
NAT Interface Settings
This page allows you to congure NAT rewalls individually for each external interface.
To change the prioritization of NAT interfaces, use the arrows on the left hand side.
To modify or delete a NAT interface, select the appropriate button on the right-hand
side corresponding to the interface you wish to change.
Click Add new NAT and follow the on-screen instructions to create a new NAT
interface.
Click Apply to save your changes, or Close to return to the previous menu without
saving.
59D-Link DVA-5592 User Manual
Page 65

Section 3 - Conguration
Port Mapping
Port mapping allows you to specify a port or range of ports to open for specic
devices on the network. This might be necessary for certain applications to connect
through the router. In some cases you may have two applications running on dierent
devices which require the same public port. Port mapping also allows you to remap
a dierent external port to each device.
You may Modify, Delete, or Reload by clicking on the buttons to the right-hand
side of the corresponding port map.
Select Port Mapping for Known Application to create a mapped port from an
internal database of protocols.
Select New Custom Port Mapping to create a custom mapped port.
Click Apply to save your changes, or Close to return to the previous menu without
saving.
60D-Link DVA-5592 User Manual
Page 66

Section 3 - Conguration
Public Addresses
This menu allows you to bind trac from one interface to another, allowing you to
bypass local bridges and NAT in certain circumstances. Mapping can also allow you
to forward only specic protocols to specic targets. These maps can be accessed
from other menus to synergize with other options. Mappings may be modied or
deleted by selecting the appropriate buttons on the right-hand side corresponding
to the target mapping.
Select Add Mapping to add a new port mapping.
Selecting bridges or DHCP servers will take you to their respective conguration
pages.
Click Apply to save your changes, or Close to return to the previous menu without
saving.
61D-Link DVA-5592 User Manual
Page 67

Section 3 - Conguration
Proxies
This menu allows direct control of proxies for specic protocols pertaining to multicast
functionality. This section is for advanced users and network professionals only and
can be safely ignored by a majority of users.
This section contains three submenus described on the following pages:
IGMP Proxy on page 63
RTSP Proxy on page 64
PPPoE Proxy on page 65
Click Close to return to the previous menu.
62D-Link DVA-5592 User Manual
Page 68

Section 3 - Conguration
IGMP Proxy
Creating an IGMP proxy enables the system to issue IGMP host messages on behalf of
hosts that the system has discovered through standard IGMP interfaces. This allows
the system to act as a proxy for its hosts after being enabled. If applicable, these
settings should be provided by your network administrator.
Click Apply to save your changes, or Close to return to the previous menu without
saving.
63D-Link DVA-5592 User Manual
Page 69

Section 3 - Conguration
RTSP Proxy
Enabling this feature allows applications that uses Real Time Streaming Protocol
(RTSP) to receive streaming media from the Internet. If applicable, these settings
should be provided by your network administrator.
Click Apply to save your changes, or Close to return to the previous menu without
saving.
64D-Link DVA-5592 User Manual
Page 70

Section 3 - Conguration
PPPoE Proxy
Specic settings may be required to use proxy conguration. If applicable, these
settings should be provided by your network administrator.
Click Apply to save your changes, or Close to return to the previous menu without
saving.
65D-Link DVA-5592 User Manual
Page 71

Section 3 - Conguration
VPN
This section provides conguration options to use your router as a VPN server. This
section is for advanced users and network professionals only and can be safely
ignored by a majority of users.
This section contains two submenus described on the following pages:
PPTP / L2TP Server on page 67
IPsec on page 68
Click Close to return to the previous menu.
66D-Link DVA-5592 User Manual
Page 72

Section 3 - Conguration
PPTP / L2TP Server
This page allows you to congure your router as a VPN server to enable remote access
to your network. Select New VPN Server and follow the on-screen instructions to
congure a new VPN server using the PPTP or L2TP protocols.
Click Apply to save your changes, or Close to return to the previous menu without
saving.
67D-Link DVA-5592 User Manual
Page 73

Section 3 - Conguration
IPsec
This page allows you to congure your router as a VPN server to enable remote access
to your network using the IPsec protocol. Select IPsec wizard and follow the onscreen instructions to congure a new VPN server using the PPTP or L2TP protocols.
Click Apply to save your changes, or Close to return to the previous menu without
saving.
68D-Link DVA-5592 User Manual
Page 74

Section 3 - Conguration
Dynamic DNS
This feature is available both under Settings and from the Home Screen. The DDNS
feature allows you to host a server (Web, FTP, Game Server, etc…) using a domain
name that you have purchased (www.yourname.com) with your dynamically assigned
IP address. Most broadband Internet Service Providers assign dynamic (changing)
IP addresses. Using a DDNS service provider, your friends can enter in your domain
name to connect to your server no matter what your IP address is.
Select Add a Provider and follow the on-screen instructions to congure a new
DDNS provider.
Click Apply to save settings, Refresh to update the page, or click Close to return to
the previous screen.
69D-Link DVA-5592 User Manual
Page 75

Section 3 - Conguration
Date / Time
This screen allows you to congure date and time settings for your router. Enter one
or more NTP servers to automatically synchronize your date and time settings across
the Internet. If you choose not to use an NTP server, you will be prompted to enter
date and time manually. Note that manual date/time information may be lost in the
event of a power failure.
Click Apply to save settings, Refresh to update the page, or click Close to return to
the previous screen.
70D-Link DVA-5592 User Manual
Page 76

Section 3 - Conguration
Management
The management section provides links to administrative and management features
available on your router. This section is for advanced users and network professionals
only and can be safely ignored by a majority of users.
This section contains four submenus described on the following pages:
UPnP Agent on page 72
Telnet Server on page 73
SSH Server on page 74
Users on page 67
Click Close to return to the previous menu.
71D-Link DVA-5592 User Manual
Page 77

Section 3 - Conguration
UPnP Agent
This page is used to congure UPnP. UPnP helps to automatically congure software
and devices on your network to access the resources they require.
Click Apply to save your changes, or Close to return to the previous menu without
saving.
72D-Link DVA-5592 User Manual
Page 78

Section 3 - Conguration
Telnet Server
This page allows you to enable and congure telnet remote administration of the
device. Use of this feature is not recommended for novice users.
Click Apply to save your changes, or Close to return to the previous menu without
saving.
73D-Link DVA-5592 User Manual
Page 79

Section 3 - Conguration
SSH Server
This page allows you to enable and congure SSH remote administration of the
device. Use of this feature is not recommended for novice users.
Click Apply to save your changes, or Close to return to the previous menu without
saving.
74D-Link DVA-5592 User Manual
Page 80

Section 3 - Conguration
Web GUI
The Web GUI page allows you to congure Web GUI settings. This section is intended
for advanced users and network professionals, and can safely be ignored by most
users.
Click Apply to save your changes, or Close to return to the previous menu without
saving.
75D-Link DVA-5592 User Manual
Page 81

Section 3 - Conguration
VoIP Service
This menu provides advanced conguration options for VoIP service. If your service
has not been pre-congured by your ISP, this information should be provided by
your ISP. This section is for advanced users and network professionals only and can
be safely ignored by a majority of users.
Click Apply to save settings, Refresh to update the page, or click Close to return to
the previous screen.
76D-Link DVA-5592 User Manual
Page 82

Section 3 - Conguration
IPv6
The IPv6 menu provides a links to congure IPv6 settings across all interfaces. This
section is for advanced users and network professionals only and can be safely
ignored by a majority of users.
This section contains one submenu described on the following page:
Global Settings on page 78
Click Close to return to the previous menu.
77D-Link DVA-5592 User Manual
Page 83

Section 3 - Conguration
Global Settings
This menu allows you to congure global IPv6 settings. This information should be
provided by your ISP or network administrator.
Click Apply to save your changes, or Close to return to the previous menu without
saving.
78D-Link DVA-5592 User Manual
Page 84

Section 3 - Conguration
Autosense Failover
This section will allow you to congure your Internet fail over priority. In the event
that your primary Internet connection method fails, this device can automatically
fall back to using a secondary connection in order to maintain Internet connectivity.
This section is for advanced users and network professionals only and can be safely
ignored by a majority of users.
Failover interfaces are managed in groups to allow redundancy across dierent
interface types. To modify or delete a group, select the corresponding Modify or
Delete button on the right-hand side.
To create a new failover group, select New Group and follow the on-screen
instructions.
Click Apply to save your changes, or Close to return to the previous menu without
saving.
79D-Link DVA-5592 User Manual
Page 85

Section 3 - Conguration
System
The system section provides quick links for administration, troubleshooting, and
updates for your router. This section is for advanced users and network professionals
only and can be safely ignored by a majority of users.
It contains seven submenus described on the following pages:
Logging on page 81
Diagnostic on page 82
Reboot on page 91
Factory Reset on page 92
Save Conguration on page 93
Backup Conguration File on page 94
Load Conguration File on page 95
Firmware Upgrade on page 96
Click Close to return to the previous menu.
80D-Link DVA-5592 User Manual
Page 86

Section 3 - Conguration
Logging
The logging menu provides a detailed log of all router activity and allows ne control
over logging information. Logs can be downloaded as text les for analysis and
archiving.
Click System in the top left corner to return to the previous menu.
81D-Link DVA-5592 User Manual
Page 87

Section 3 - Conguration
Diagnostic
You can use diagnostic tools to examine performance and troubleshoot problems
your router may have. This section is for advanced users and network professionals
only and can be safely ignored by a majority of users.
This section contains eight submenus described on the following pages:
UDP Echo on page 83
Ping on page 84
Download on page 85
Upload on page 86
Traceroute on page 87
Interfaces Summary on page 88
CPU Load Memory Usage on page 89
Active Connections on page 90
Click Close to return to the previous menu.
82D-Link DVA-5592 User Manual
Page 88

Section 3 - Conguration
UDP Echo
UDP Echo can be used to test the roundtrip times of packets over a network. Enter
the appropriate test parameters
Click Apply to save your changes, or Close to return to the previous menu without
saving.
83D-Link DVA-5592 User Manual
Page 89

Section 3 - Conguration
The Ping section enables you to run an IPv4 connectivity test.
Ping
Click Apply to save your changes, or Close to return to the previous menu without
saving.
84D-Link DVA-5592 User Manual
Page 90

Section 3 - Conguration
Download
This section allows you to measure network performance by downloading a test le
from a URL of your choice.
Click Apply to save your changes, or Close to return to the previous menu without
saving.
85D-Link DVA-5592 User Manual
Page 91

Section 3 - Conguration
Upload
This section allows you to measure network performance by uploading a test le
from a URL of your choice.
Click Apply to save your changes, or Close to return to the previous menu without
saving.
86D-Link DVA-5592 User Manual
Page 92

Section 3 - Conguration
Traceroute
The Traceroute section enables you to run a traceroute test to see how your trac
traverses the Internet.
Input a Hostname or IP Address and select an interface.
Click Apply to save your changes, or Close to return to the previous menu without
saving.
87D-Link DVA-5592 User Manual
Page 93

Section 3 - Conguration
Interfaces Summary
This screen displays a complete summary of all interfaces on the router.
Click Close to return to the previous menu.
88D-Link DVA-5592 User Manual
Page 94

Section 3 - Conguration
CPU Load Memory Usage
This screen shows the current status of the router's CPU and memory usage.
Click Refresh to update the page, or click Close to return to the previous screen.
89D-Link DVA-5592 User Manual
Page 95

Section 3 - Conguration
Active Connections
This screen lists all active connections over all interfaces. It can be used to diagnose
connectivity and unusual trac activity from you network.
Click Refresh to update the page, or click Close to return to the previous screen.
90D-Link DVA-5592 User Manual
Page 96

Section 3 - Conguration
Reboot
This screen allows you to reboot the router over the GUI, without having to toggle the
power manually. It also allows you to schedule a reboot on a timer of up to one hour.
Click Reboot to restart the router or execue a scheduled reboot, or click Cancel to
return to the previous screen.
91D-Link DVA-5592 User Manual
Page 97

Section 3 - Conguration
Factory Reset
This setting allows you to reset the router to factory defaults over the UI.
Note: Resetting the router will cause all settings to be lost. Wi-Fi will be oine until
recongured.
Click Reset to activate the factory reset procedure, or click Cancel to return to the
previous screen.
92D-Link DVA-5592 User Manual
Page 98

Section 3 - Conguration
Save Conguration
This screen allows you to save settings to be persistent across device reboot.
Note: Most settings are generally saved when you click Apply, but this is provided
as an extra layer of verication
Click Save Conguration to save all settings to persistent memory, or click Cancel
to return to the previous screen.
93D-Link DVA-5592 User Manual
Page 99

Section 3 - Conguration
Backup Conguration File
This screen allows you to create a backup of your router's conguration that can be
saved on external storage (such as a PC). This allows you to quickly restore all settings
in the event of a factory reset or device replacement with just a few clicks.
As of this writing, Full Device Conguration is the only backup option.
Click Save Conguration to download a copy of your settings, or click Cancel to
return to the previous screen.
94D-Link DVA-5592 User Manual
Page 100

Section 3 - Conguration
Load Conguration File
This screen allows you to restore settings previous backed up using Backup
Conguration File on page 94. Select Browse and navigate to your conguration
le.
Click Upload to upload your settings and reboot, or click Cancel to return to the
previous screen.
95D-Link DVA-5592 User Manual
 Loading...