


DSL-2730B
Table of contents
 Loading...
DSL-2730B
User Manual

DSL-2730B User Manual
Federal Communication Commission Interference Statement
This equipment has been tested and found to comply with the limits for a Class B digital device, pursuant to Part 15 of the FCC Rules. These limits are designed to
provide reasonable protection against harmful interference in a residential installation. This equipment generates, uses and can radiate radio frequency energy and, if
not installed and used in accordance with the instructions, may cause harmful interference to radio communications. However, there is no guarantee that interference will
not occur in a particular installation. If this equipment does cause harmful interference to radio or television reception, which can be determined by turning the equipment
off and on, the user is encouraged to try to correct the interference by one of the following measures:
- Reorient or relocate the receiving antenna.
- Increase the separation between the equipment and receiver.
- Connect the equipment into an outlet on a circuit different from that to which the receiver is connected.
- Consult the dealer or an experienced radio/TV technician for help.
This device complies with Part 15 of the FCC Rules. Operation is subject to the following two conditions: (1) This device may not cause harmful interference, and (2) this
device must accept any interference received, including interference that may cause undesired operation.
FCC Caution: Any changes or modifications not expressly approved by the party responsible for compliance could void the user's authority to operate this equipment.
IMPORTANT NOTE:
FCC Radiation Exposure Statement:
This equipment complies with FCC radiation exposure limits set forth for an uncontrolled environment. This equipment should be installed and operated with minimum
distance 20cm between the radiator & your body.
This transmitter must not be co-located or operating in conjunction with any other antenna or transmitter.

DSL-2730B User Manual
Table of Contents
1 Safety Precautions..........................................................................................1
2 Introduction ..................................................................................................... 1
2.1 LEDs and Interfaces..............................................................................2
2.2 System Requirements ...........................................................................4
2.3 Features ................................................................................................4
2.4 Standards Compatibility and Compliance..............................................5
3 Hardware Installation.......................................................................................5
3.1 Choosing the Best Location for Wireless Operation..............................5
3.2 Connecting the Router...........................................................................6
4 About the Web Configuration..........................................................................7
4.1 Preparation Before Login.......................................................................7
4.2 Logging In to the Router........................................................................7
4.2.1 First-Time Login.........................................................................8
4.3 Setup.....................................................................................................9
4.3.1 Wizard.......................................................................................9
4.3.2 Internet Setup..........................................................................18
4.3.3 Wireless Connection................................................................24
4.3.4 Local Network..........................................................................29
4.3.5 Time and Date.........................................................................31
4.3.6 Logout .....................................................................................32
4.4 Advanced.............................................................................................33
4.4.1 Wireless Settings.....................................................................33
4.4.2 Port Forwarding.......................................................................41
4.4.3 Port Triggering.........................................................................43
4.4.4 DMZ.........................................................................................45
4.4.5 Parental Control.......................................................................45
4.4.6 Filtering Options ......................................................................49
4.4.7 DNS.........................................................................................53
4.4.8 Dynamic DNS..........................................................................54
4.4.9 Multicast..................................................................................55
4.4.10 Network Tools..........................................................................56
4.4.11 Routing.................................................................................... 67
4.4.12 RIP..........................................................................................70
4.4.13 MultiNat...................................................................................70
4.4.14 Schedules ...............................................................................71
4.4.15 Logout.....................................................................................72
4.5 Maintenance........................................................................................73
4.5.1 System....................................................................................73
4.5.2 Firmware Update.....................................................................74
4.5.3 Access Controls ......................................................................74
4.5.4 Diagnostics..............................................................................77
4.5.5 System Log .............................................................................78
4.5.6 Logout.....................................................................................78
4.6 Status ..................................................................................................79
4.6.1 Device Info..............................................................................80
4.6.2 Wireless Clients.......................................................................81
4.6.3 DHCP Clients..........................................................................81
4.6.4 Logs ........................................................................................ 82
4.6.5 Statistics ..................................................................................83
4.6.6 Route info................................................................................84
4.6.7 Logout.....................................................................................84
5 FAQs ............................................................................................................. 85
i

DSL-2730B User Manual
1 Safety Precautions
Follow the following instructions to prevent the device from risks and damage caused by fire or electric power:
Use volume labels to mark the type of power.
Use the power adapter packed within the device package.
Pay attention to the power load of the outlet or prolonged lines. An overburden power outlet or damaged lines and plugs may cause electric shock or fire accident.
Check the power cords regularly. If you find any damage, replace it at once.
Proper space left for heat dissipation is necessary to avoid damage caused by overheating to the device. The long and thin holes on the device are designed for
heat dissipation to ensure that the device works normally. Do not cover these heat dissipation holes.
Do not put this device close to a place where a heat source exists or high temperature occurs. Avoid the device from direct sunshine.
Do not put this device close to a place where it is over damp or watery. Do not spill any fluid on this device.
Do not connect this device to any PCs or electronic products, unless our customer engineer or your broadband provider instructs you to do this, because any wrong
connection may cause power or fire risk.
Do not place this device on an unstable surface or support.
2 Introduction
The DSL-2730B is a highly integrated ADSL2/2+ Integrated Access Device. It provides DSL uplink, Ethernet LAN and wireless LAN services. The wireless LAN is
complied with the IEEE802.11b/g /n standards. It is usually prefered to provide high access performance applications for the individual users, the SOHO, the small
enterprise and so on.
1
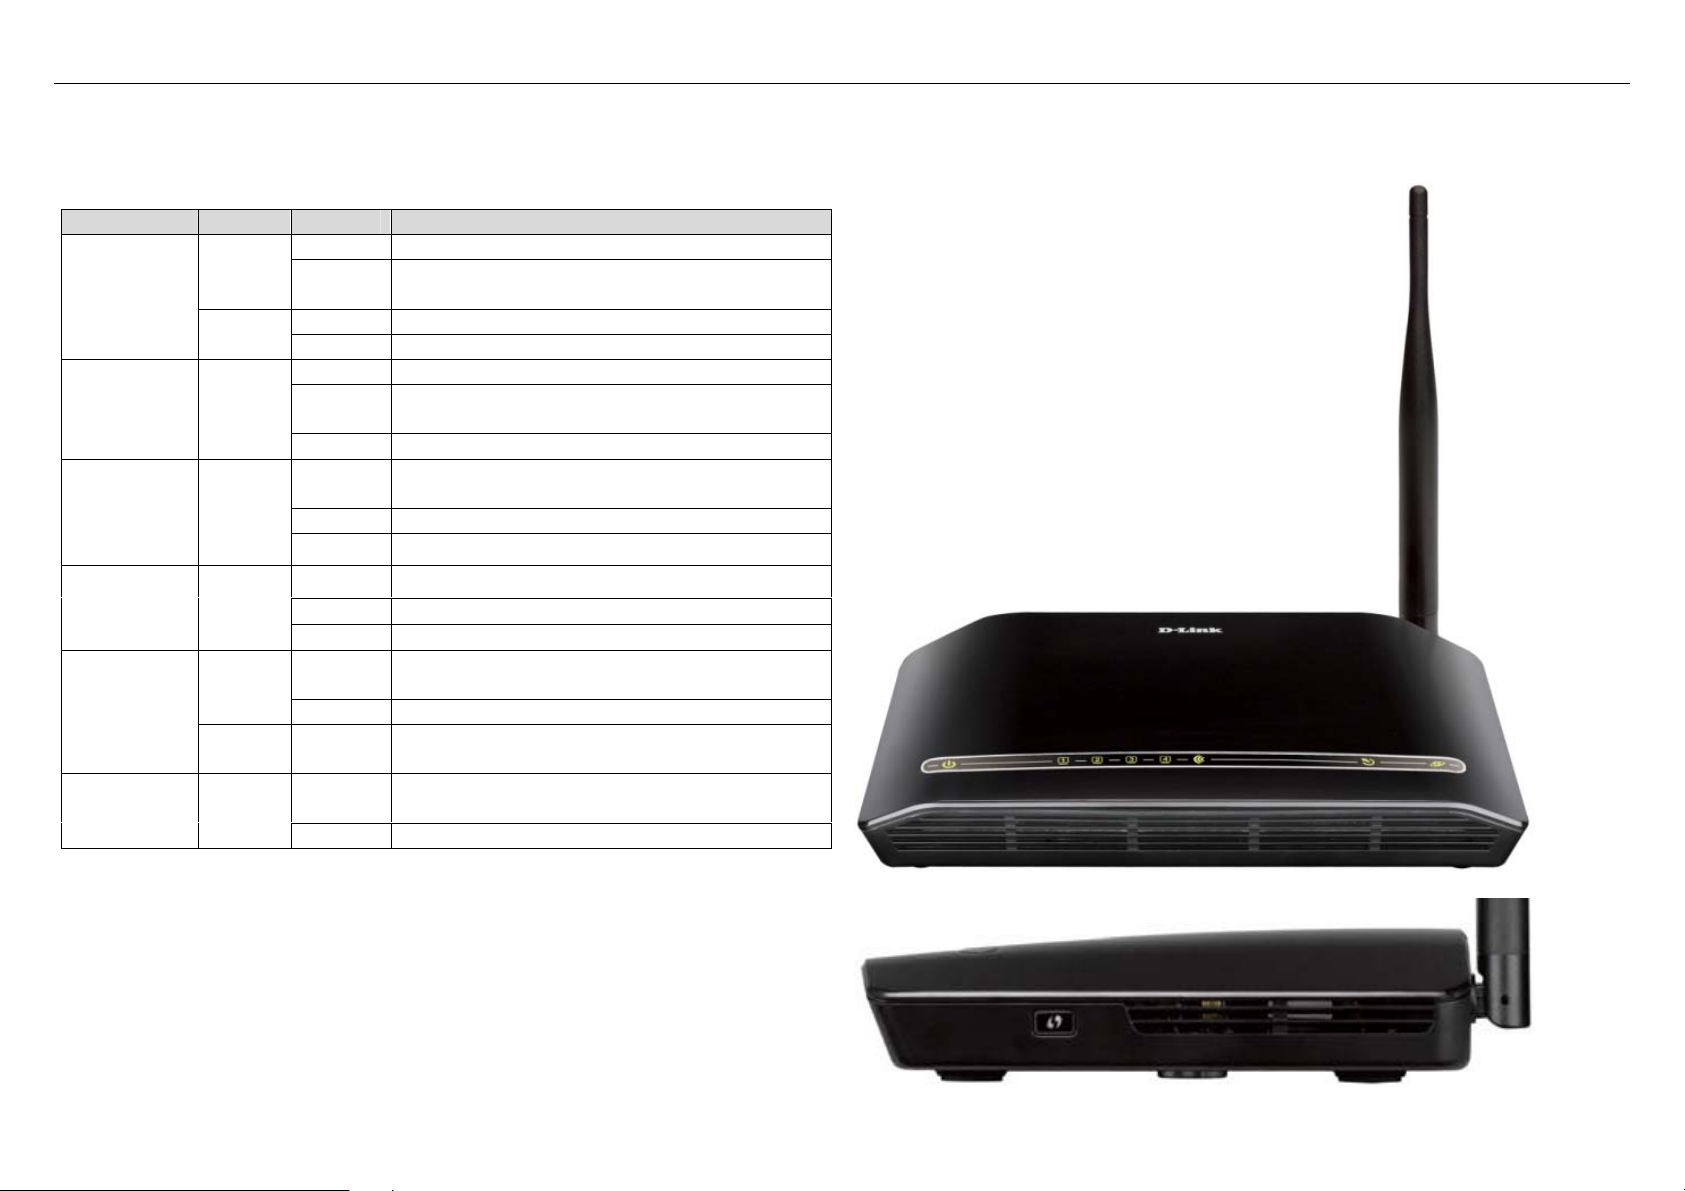
2.1 LEDs and Interfaces
Front Panel
LED Color Status Description
Off The power is off.
Green
Power
Red
LAN 1/2/3/4 Green
WLAN Green
DSL Green
Green
Internet
Red On
WPS (on
the side
panel)
Green
On
On The device is initiating.
Blinks The firmware is upgrading.
Off No LAN link.
Blinks
On The connection of LAN interface is normal.
Blinks
On The connection of WLAN interface is normal.
Off
Off Initial self-test is failed.
Blinks The device is detecting itself.
On Initial self-test of the unit has passed.
Off
On IP is connected and no traffic is detected.
Blinks
Off Device is ready for new WPS to setup.
The power is on and the initialization is
normal.
Data is being transmitted through the LAN
interface.
Data is transmitted through the WLAN
interface.
The WLAN connection is not established.
The device is under the Bridge mode, DSL
connection is not present, or the power is off.
The device is attempted to become IP
connected, but failed.
WPS negotiation is enabled, waiting for the
clients.
DSL-2730B User Manual
2
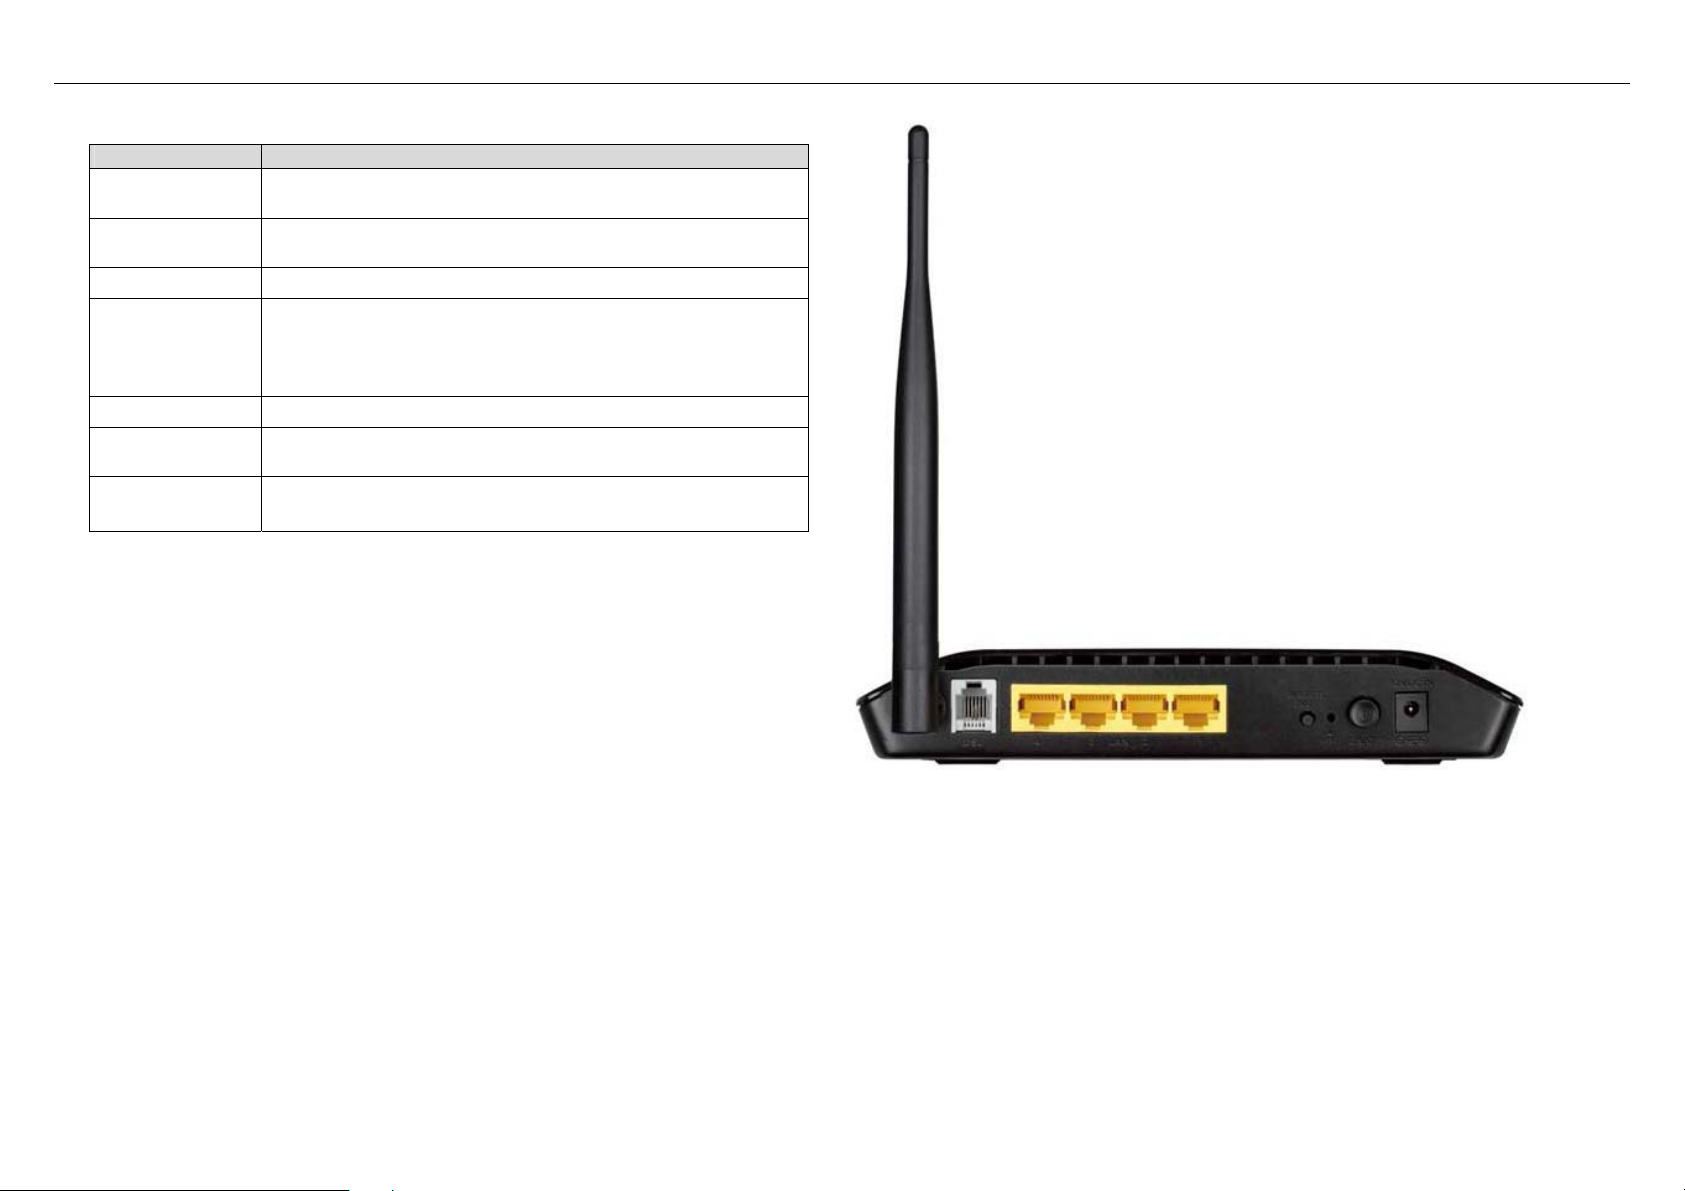
Rear Panel
Interface/Button Description
DSL
LAN4/3/2/1
RJ-1 1 interface that connect s to the telephone set through
the telephone cable.
Ethernet RJ-45 interfaces that connect to the Ethernet
interfaces of computers or Ethernet devices.
WLAN Button to enable or disable WLAN.
Reset to the factory defaults. To restore factory defaults,
RESET
keep the device powered on and push a paper clip into
the hole. Press down the button for one second, and then
release.
ON/OFF Power on or off.
POWER
WPS (on the
side panel)
Interface that connects to the power adapter. The power
adapter output is: 12 V DC, A.
WPS button to setup connection to client.
DSL-2730B User Manual
3

DSL-2730B User Manual
2.2 System Requirements
Recommended system requirements are as follows:
An 10 baseT/100BaseT Ethernet card is installed on your PC
A hub or switch (attached to several PCs through one of Ethernet interfaces on the device)
Operating system: Windows 98SE, Windows 2000, Windows ME, Windows XP, Windows Vista or Windows 7
Internet Explorer V5.0 or higher, Netscape V4.0 or higher, or Firefox 1.5 or higher
2.3 Features
The device supports the following features:
User-friendly GUI for web configuration
Several pre-configured popular games. Just enable the game and the port settings are automatically configured.
Compatible with all standard Internet applications
Industry standard and interoperable DSL interface
Simple web-based status page displays a snapshot of system configuration, and links to the configuration pages
Downloadable flash software updates
Support for up to 8 permanent virtual circuits (PVC)
Support for up to 8 PPPoE sessions
Support RIP v1 & RIP v2
WLAN with high-speed data transfer rates of up to 130 Mbps, compatible with IEEE 802.11b/g/n, 2.4GHz compliant equipment
Optimized Linux 2.6 Operating System
IP routing and bridging
Asynchronous transfer mode (ATM) and digital subscriber line (DSL) support
Point-to-point protocol (PPP)
Network/port address translation (NAT/PAT)
Quality of service (QoS)
Wireless LAN security: WPA, 802.1x, RADIUS client
Universal plug-and-play(UPnP)
File server for network attached storage (NAS) devices
Web filtering
Management and control
- Web-based management (WBM)
- Command line interface (CLI)
- TR-069 WAN management protocol
Remote update
System statistics and monitoring
4

DSL-2730B User Manual
2.4 Standards Compatibility and Compliance
Support application level gateway (ALG)
ITU G.992.1 (G.dmt)
ITU G.992.2 (G.lite)
ITU G.994.1 (G.hs)
ITU G.992.3 (ADSL2)
ITU G.992.5 (ADSL2+)
ANSI T1.413 Issue 2
IEEE 802.3
IEEE 802.3u
IEEE 802.11b
IEEE 802.11g
IEEE 802.11n
3 Hardware Installation
3.1 Choosing the Best Location for Wireless Operation
Many environmental factors may affect the effective wireless function of the DSL Router. If this is the first time that you set up a wireless network device, read the
following information:
The access point can be placed on a shelf or desktop, ideally you should be able to see the LED indicators in the front, as you may need to view them for
troubleshooting.
Designed to go up to 100 meters indoors and up to 300 meters outdoors, wireless LAN lets you access your network from anywhere you want. However, the numbers
of walls, ceilings, or other objects that the wireless signals must pass through limit signal range. Typical ranges vary depending on types of materials and background
RF noise in your home or business.
5
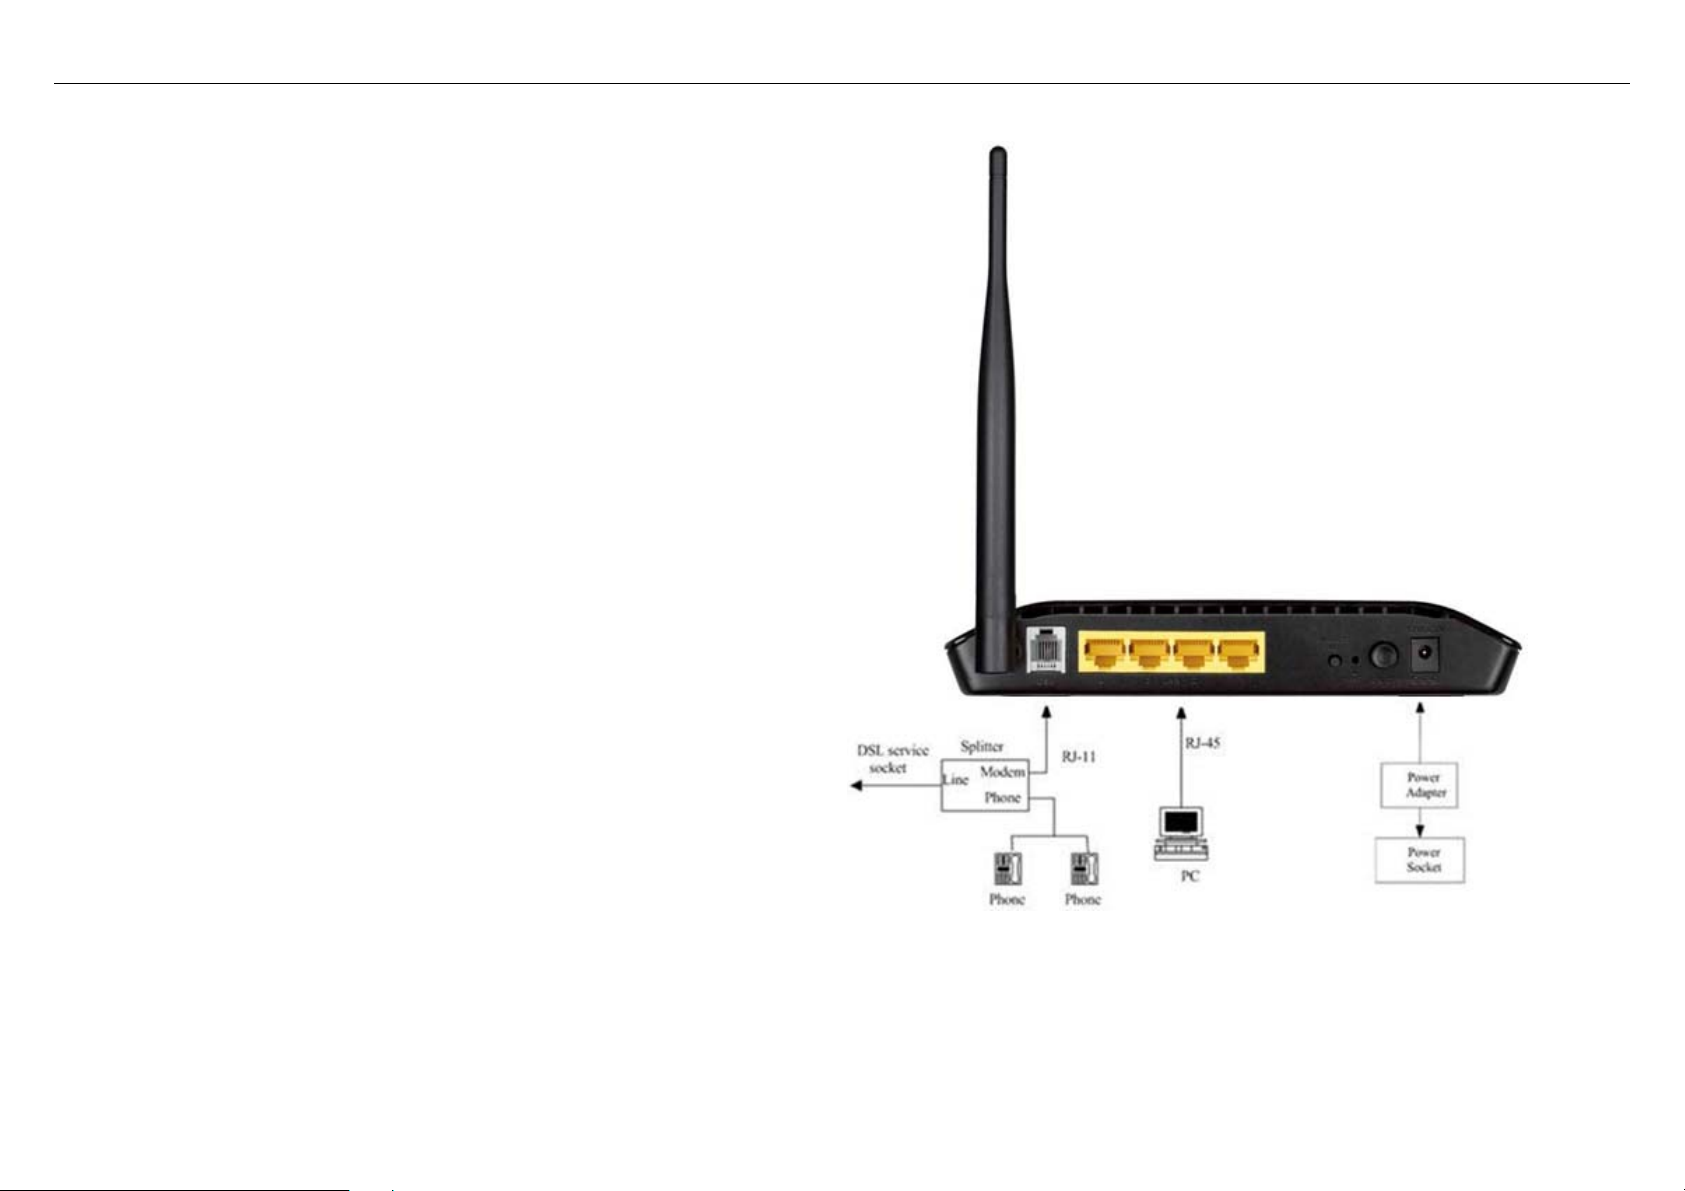
3.2 Connecting the Router
(1) Connect the DSL port of the router and the Modem port of the splitter
with a telephone cable; connect the phone to the phone port of the
splitter through a cable; and connect the incoming line to the Line port of
the splitter.
The spliiter has three ports:
LINE: Connect to a wall phone jack (RJ-11 jack)
Modem: Connect to the Line interface of the router
PHONE: Connect to a telephone set
(2) Connect the LAN port of the router to the network interface card (NIC) of
the PC through an Ethernet cable (MDI/MDIX).
(3) Plug the power adapter to the wall outlet and then connect the other end
of it to the Power port of the router.
DSL-2730B User Manual
6
DSL-2730B User Manual
4 About the Web Configuration
The first time you setup the Router. It is recommended that you configure the WAN connection using a single computer, to ensure that both the computer and the
Router are not connected to the LAN. Once the WAN connection operates properly, you may continue to make changes to Router configuration, including IP settings
and DHCP setup. This chapter is concerned with using your computer to configure the WAN connection. The following chapter describes the various menus used to
configure and monitor the Router, including how to change IP settings and DHCP server setup.
4.1 Preparation Before Login
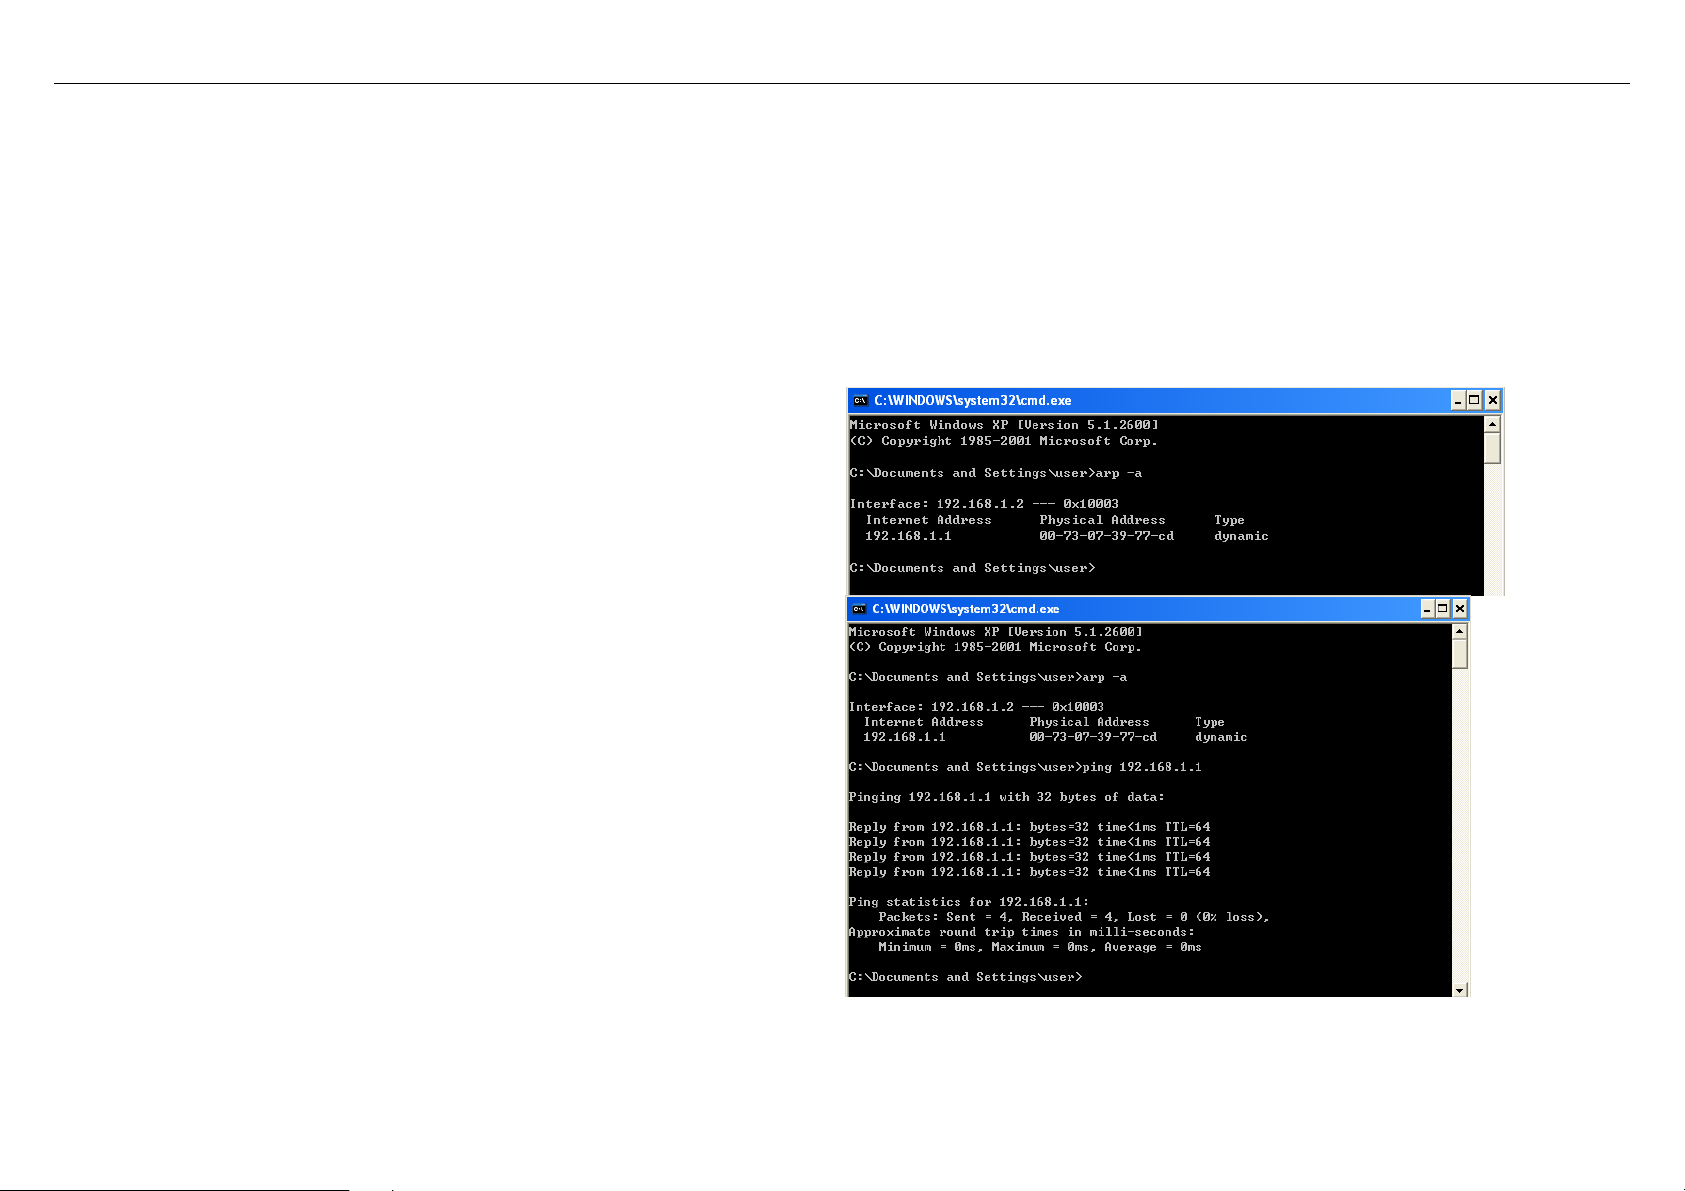
Before accessing the Routerre the communication between PC and Router is normal. Check the communication as follows.
Configure the IP address of the PC as 192.168.1.X (2~254), net mask as
255.255.255.0, gateway address as 192.168.1.1 (for customized version,
configure them according to the actual version).
Enter arp -a in the DOS window to check whether the PC can read the MAC
address of the Router.
Ping the MAINTENANCE IP address (192.168.1.1 by default) of the Router.
If the PC can read the MAC address of the Router and can ping through the
MAINTENANCE IP address of the Router, that means the communication of
the PC and the Router is normal.
Note:
When you manage the Router through Web, you must keep the Router
power on. Otherwise, the Router may be damaged.
4.2 Logging In to the Router
7
DSL-2730B User Manual
The following description is a detail “How-To” user guide and is prepared for first time users.
4.2.1 First-Time Login
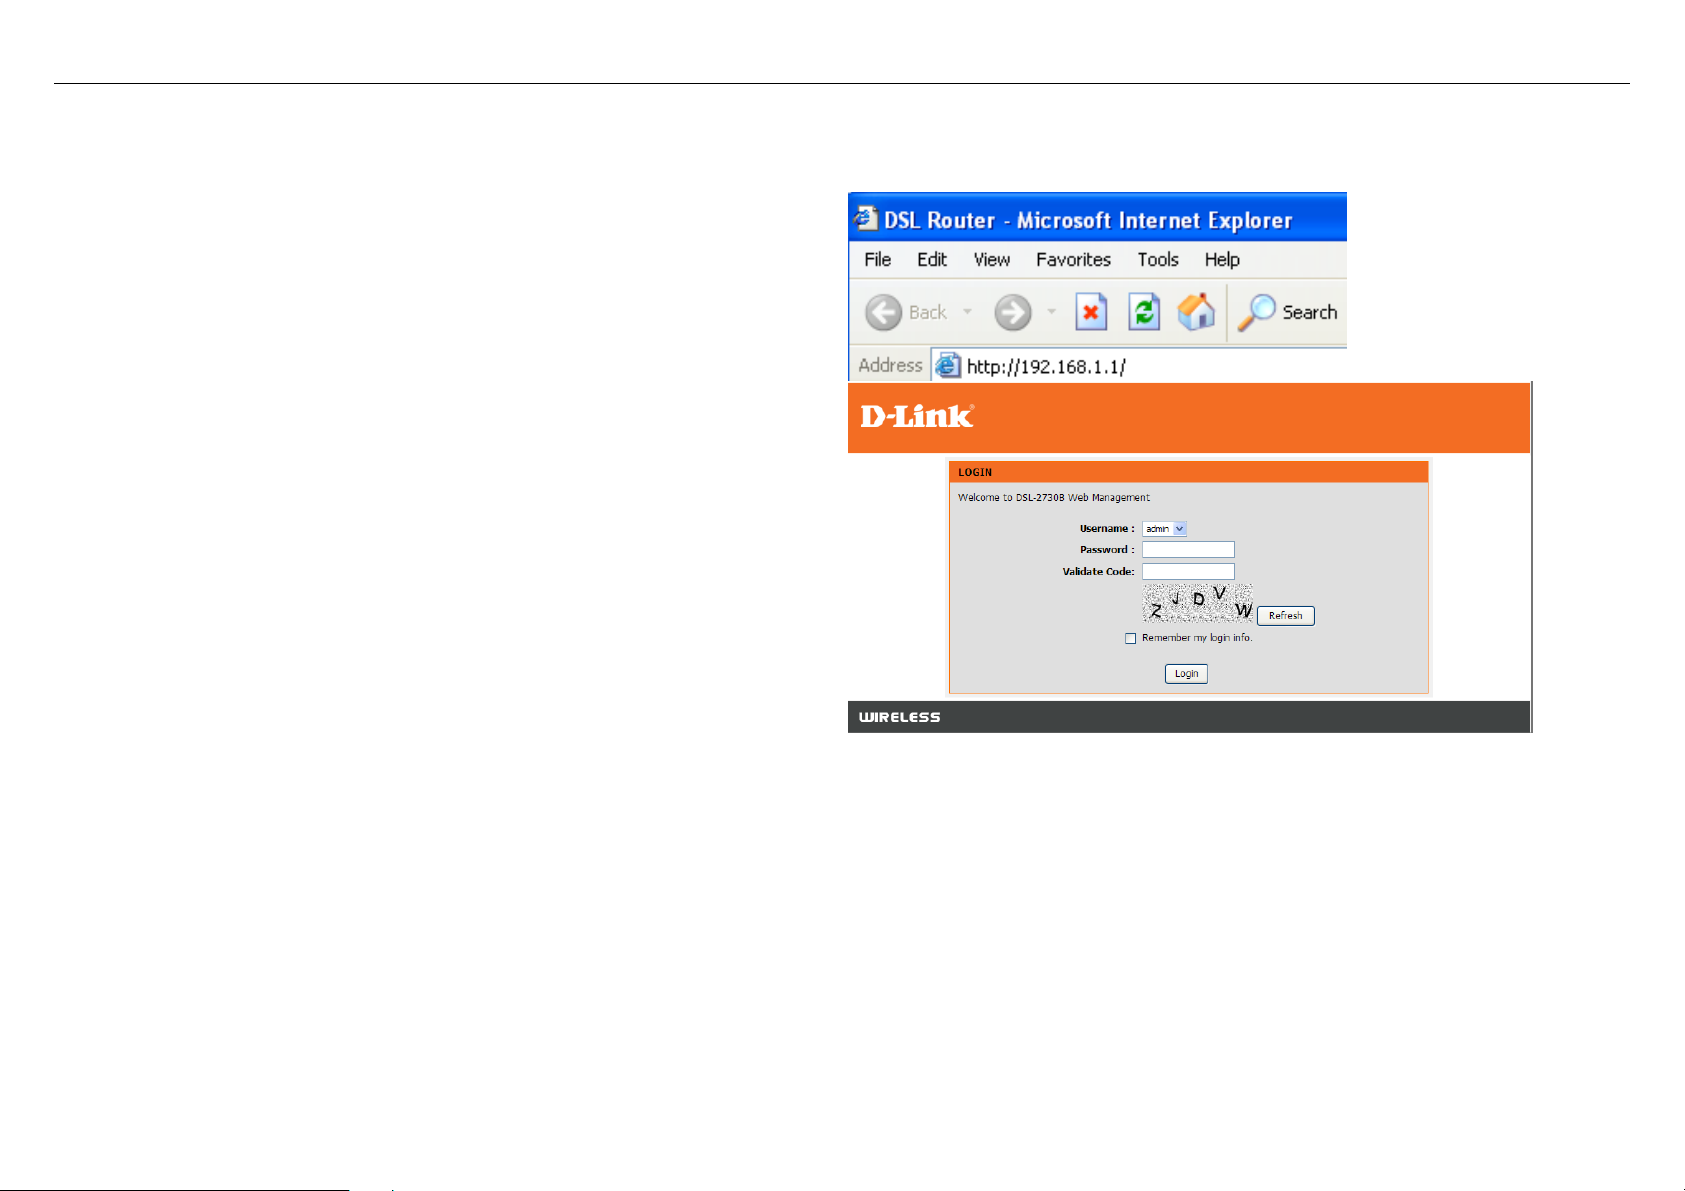
When you log in to the DSL Router for the first time, the login wizard appears.
Step 1 Open a Web browser on your computer.
Step 2 Enter http://192.168.1.1 (DSL router default IP address) in the
address bar. The login page appears.
Step 3 Enter a user name and the password. The default username and
password of the super user are admin and admin. The username
and password of the common user are user and user. You need not
enter the username and password again if you select the option
Remember my password. It is recommended to change these
default values after logging in to the DSL router for the first time.
Step 4 Click Login to log in.
8
DSL-2730B User Manual
4.3 Setup
4.3.1 Wizard
Wizard enables fast and accurate configuration of Internet connection and other important parameters. The following sections describe these various configuration
parameters.
When subscribing to a broadband service, you should be aware of the method, by which you are connected to the Internet. Your physical W AN device can be Ethernet,
DSL, or both. Technical information about the properties of your Internet connection is provided by your Internet service provider (ISP). For example, your ISP should
inform you whether you are connected to the Internet using a static or dynamic IP address, or the protocol, such as PPPoA or PPPoE, that you use to communicate
over the Internet.
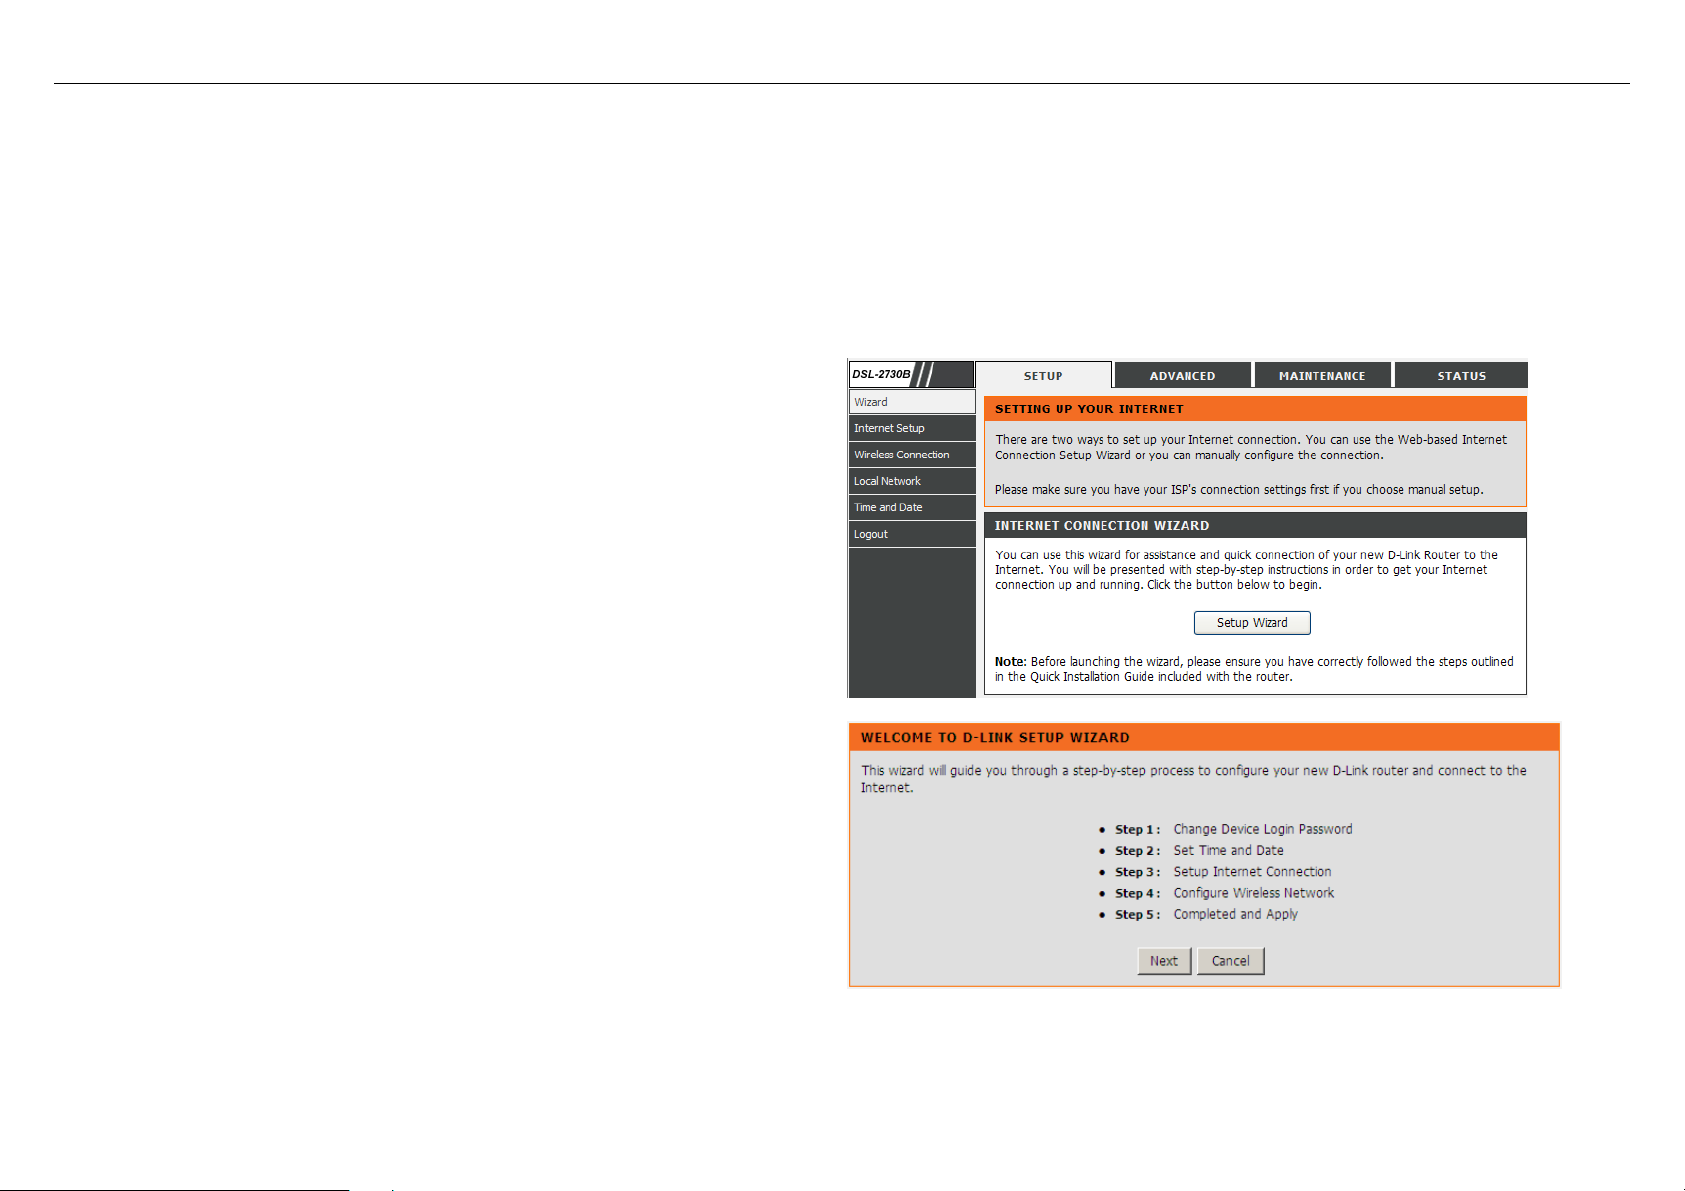
Choose Setup > Wizard. The page shown in the figure appears.
Click Setup Wizard. The page shown in the right figure appears.
9
DSL-2730B User Manual
There are four steps to configure the device. Click Next to continue.
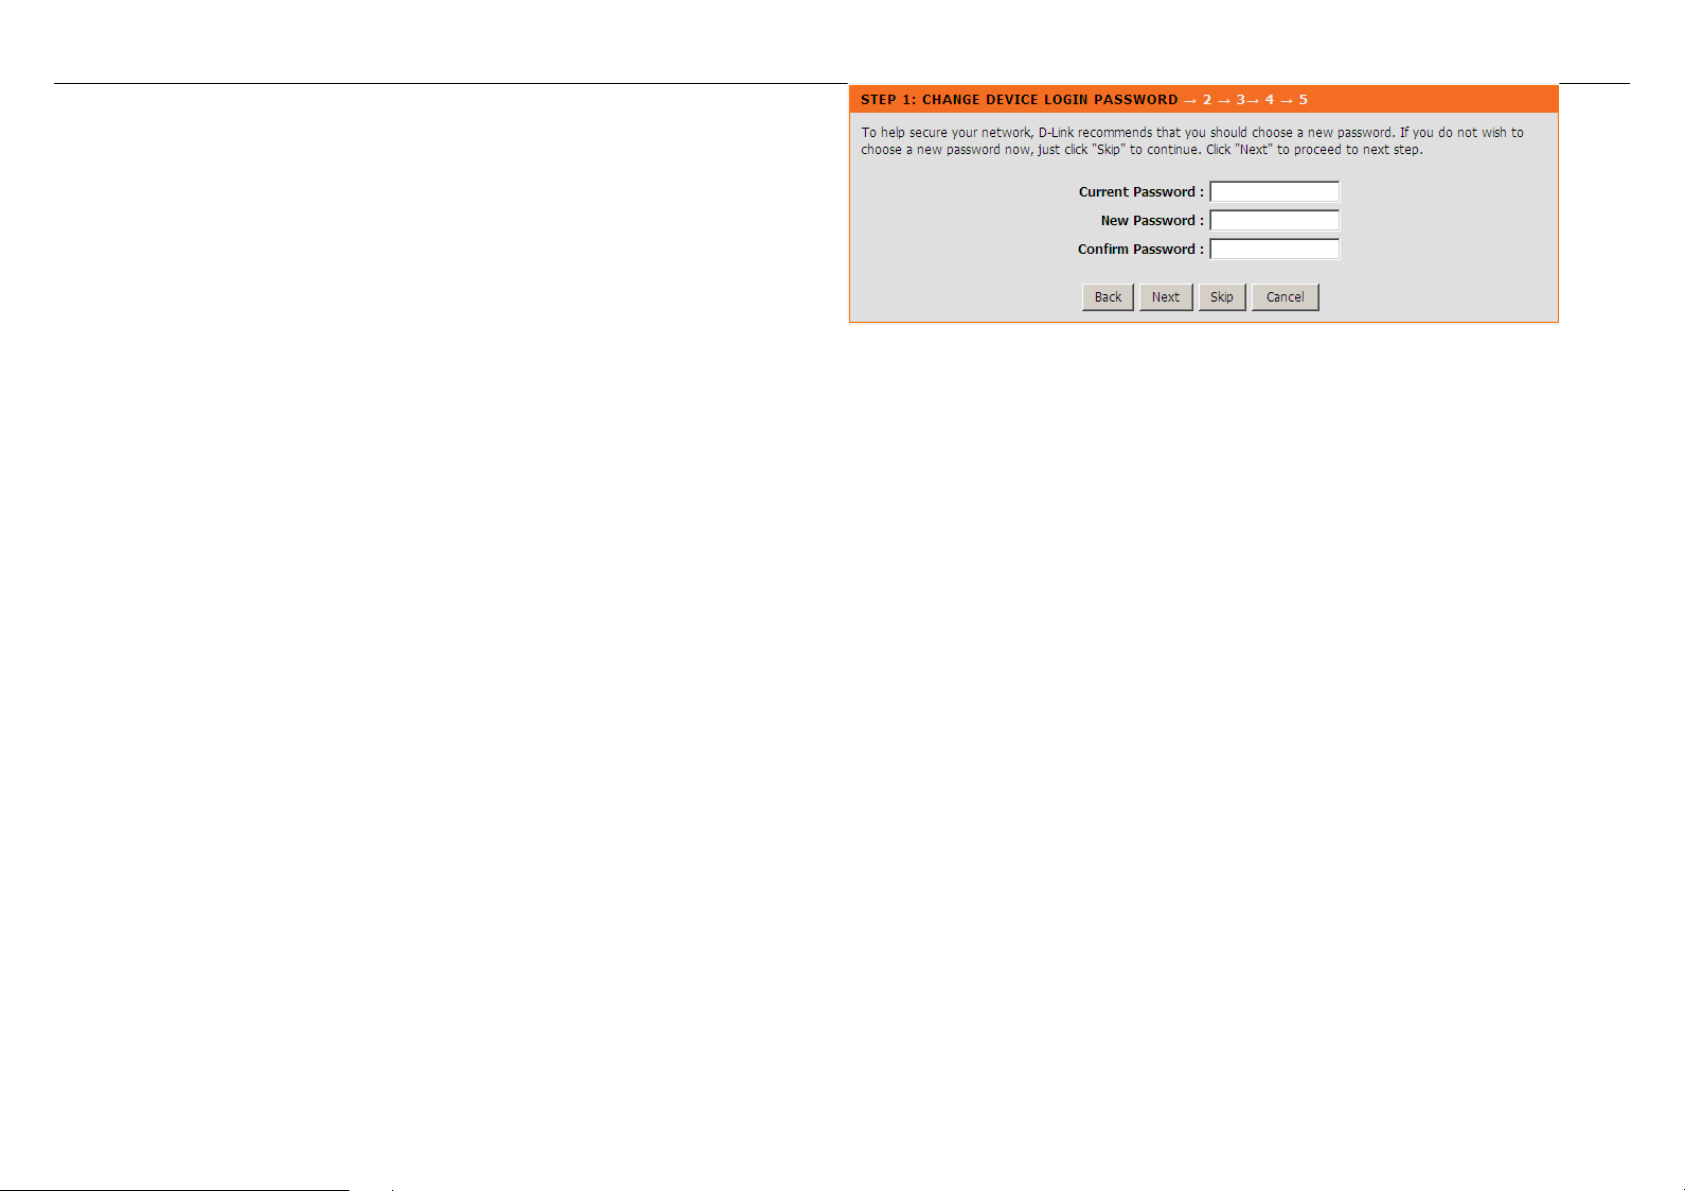
Change the password for logging in to the device.
The default password is admin. To secure your network, modify the password
timely.
Note:
Confirm password must be the same as the new password.
To ignore the step, click Skip.
10
DSL-2730B User Manual
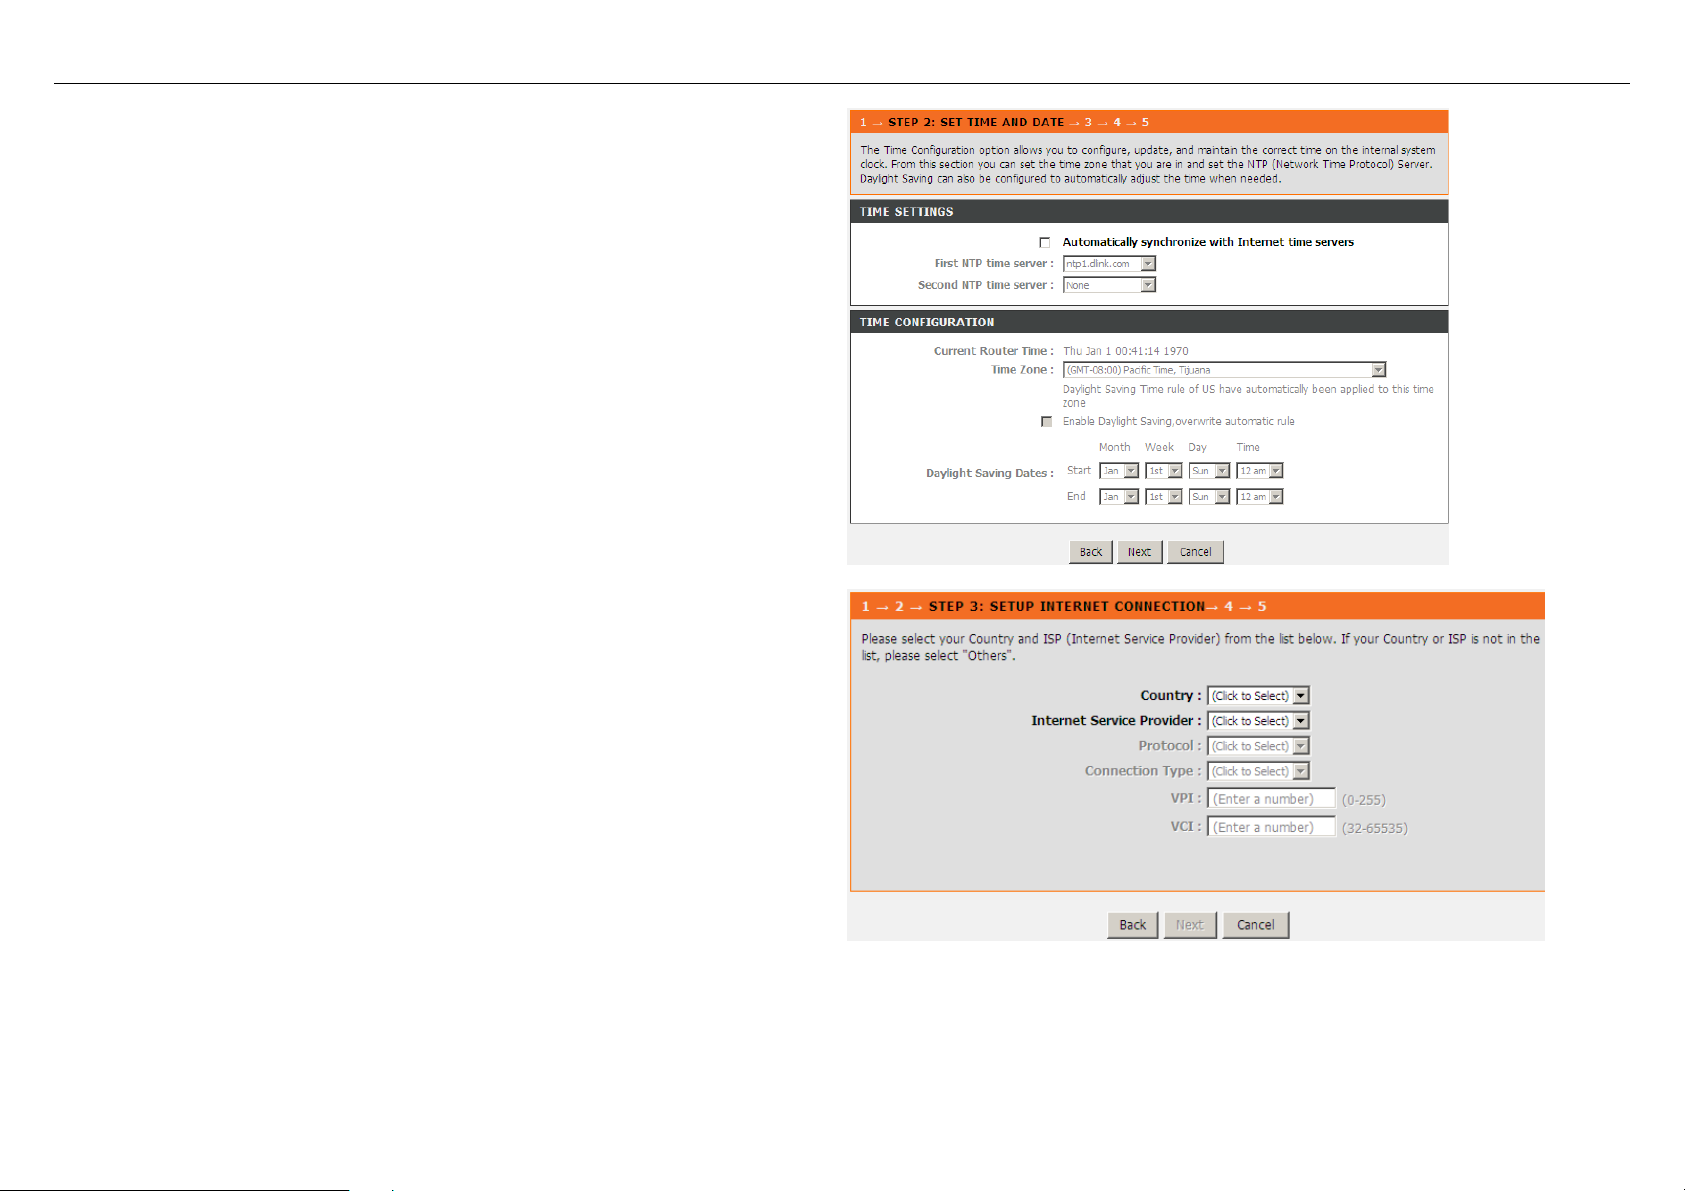
Set the time and date.
First NTP time server: Select the domain of the time server to which system
time will be synchronized.
Configure the Internet connection.
Select the country and ISP. Set the VPI and VCI. If you fail to find the country
and ISP from the drop-down lists, select Others.
Protocol: The protocol connection type of the interface. You can select
PPPoE, PPPoA, Dynamic IP, Static IP, or Bridge.
Connection Type: You can select it from the drop-down list according to the
uplink equipment. You can select LLC or VC-Mux.
VPI: The virtual path identifier of the WAN interface (provided by your ISP).
The range is 0 to 255.
VCI: The virtual channel identifier for the WAN interface. The range is 32 to
65535 (1 to 31 are reserved for known protocols).
11

DSL-2730B User Manual
If the Protocol is PPPoE or PPPoA, the page shown in either of the two figures
appears.

Set the user name and password as provided by your ISP.
DSL-2730B User Manual

DSL-2730B User Manual
If the Protocol is Static IP, the page shown in the figure appears.
Enter the IP Address, Subnet Mask, Default Gateway, and Primary DNS Server.

After proper configuration, click Next.
DSL-2730B User Manual

DSL-2730B User Manual
Configure the wireless network, or keep the default settings. Enter the
information and click Next.
Enable Y our W ireless Network: Enable wireless settings on LAN interface.
Wireless Network Name (SSID): SSID is the name of your wireless
network. All wireless-equipped devices share the same SSID to
communicate with each other. It must be unique to identify separated
wireless network. For security, you should change the default SSID to a
special ID.
Visibility Status: You can select visible or invisible.
Security Level: In order to protect your network from hackers and
unauthorized users, it is highly recommended you choose one of the
following wireless network security settings.
WPA Pre-Shared Key: Please set it. Then you will need to enter the same
key here into your wireless clients in order to enable proper wireless

DSL-2730B User Manual
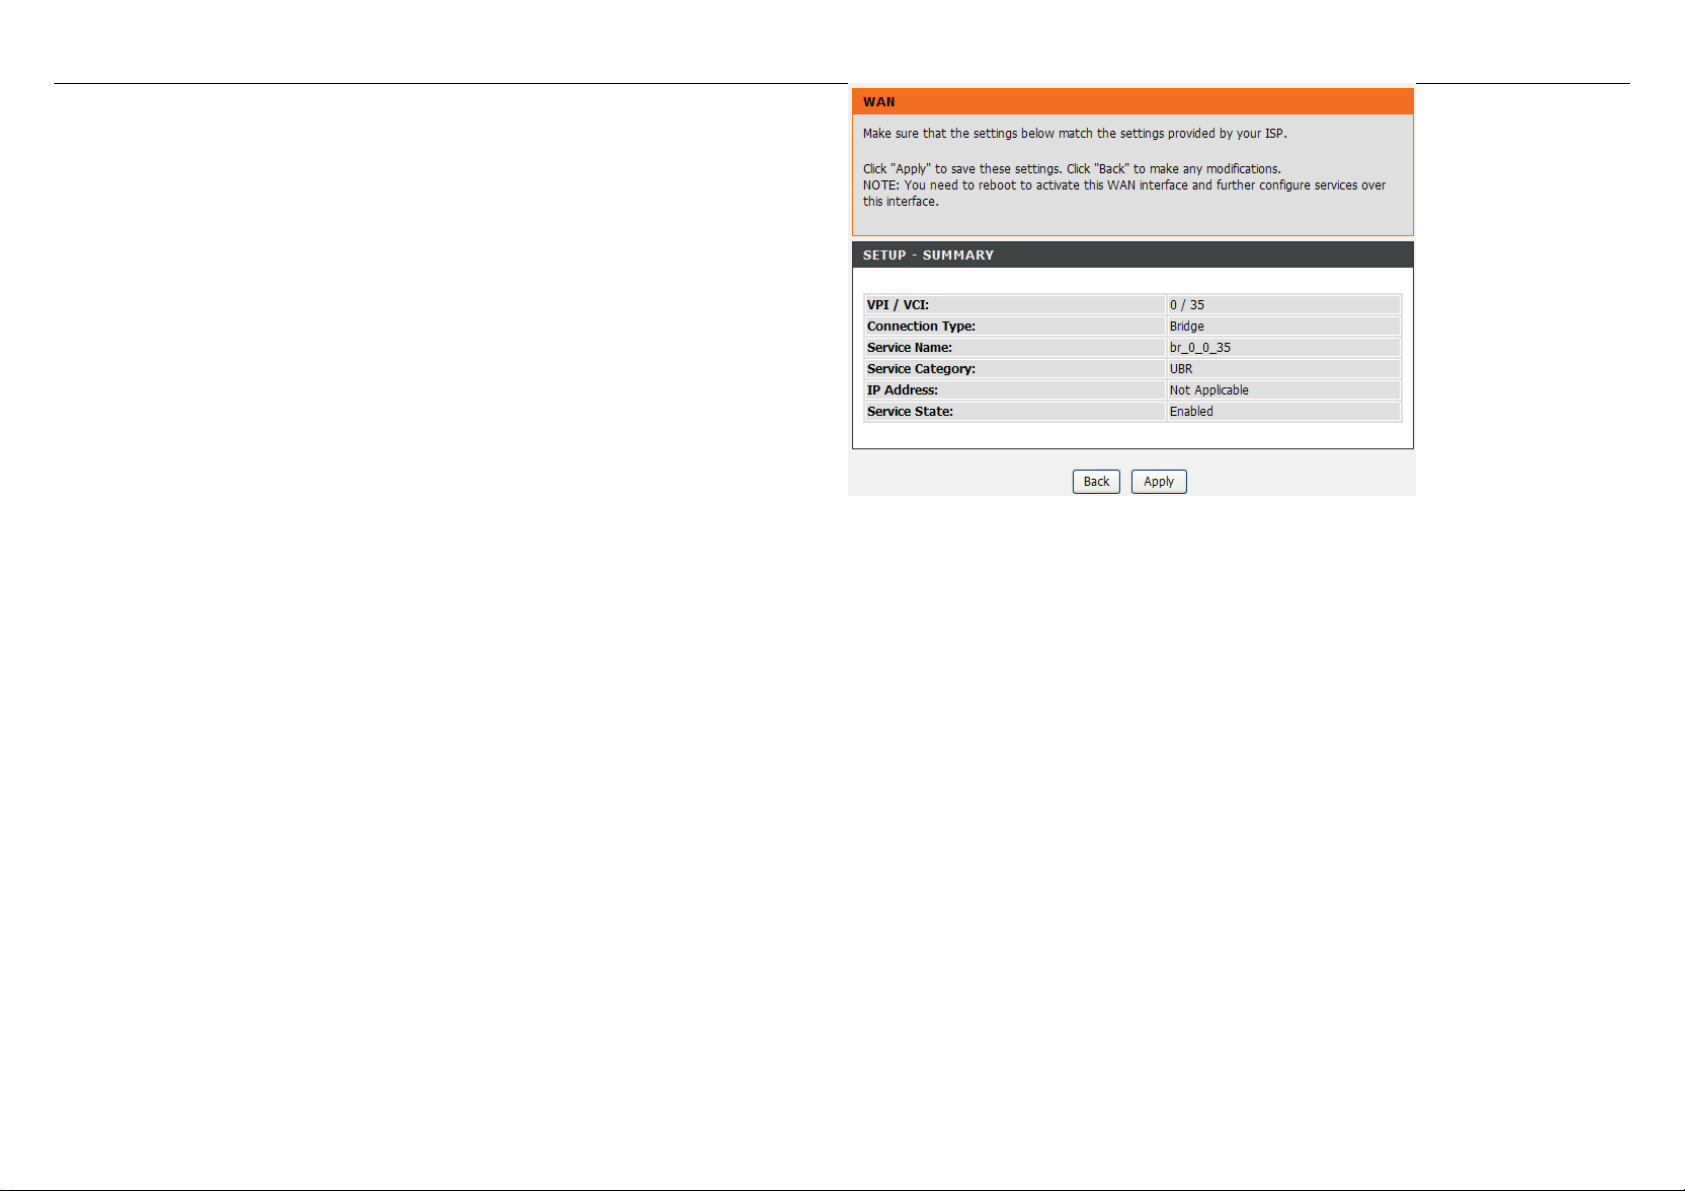
The page shown in the right figure appears. In this page, you can view the
configuration information. You can check weather the configurations match the
information provided by your ISP.
17

DSL-2730B User Manual
4.3.2 Internet Setup
Choose Setup > Internet Setup. The page as shown in the right figure
appears. In this page, you can configure the WAN interface of the device.
18
DSL-2730B User Manual
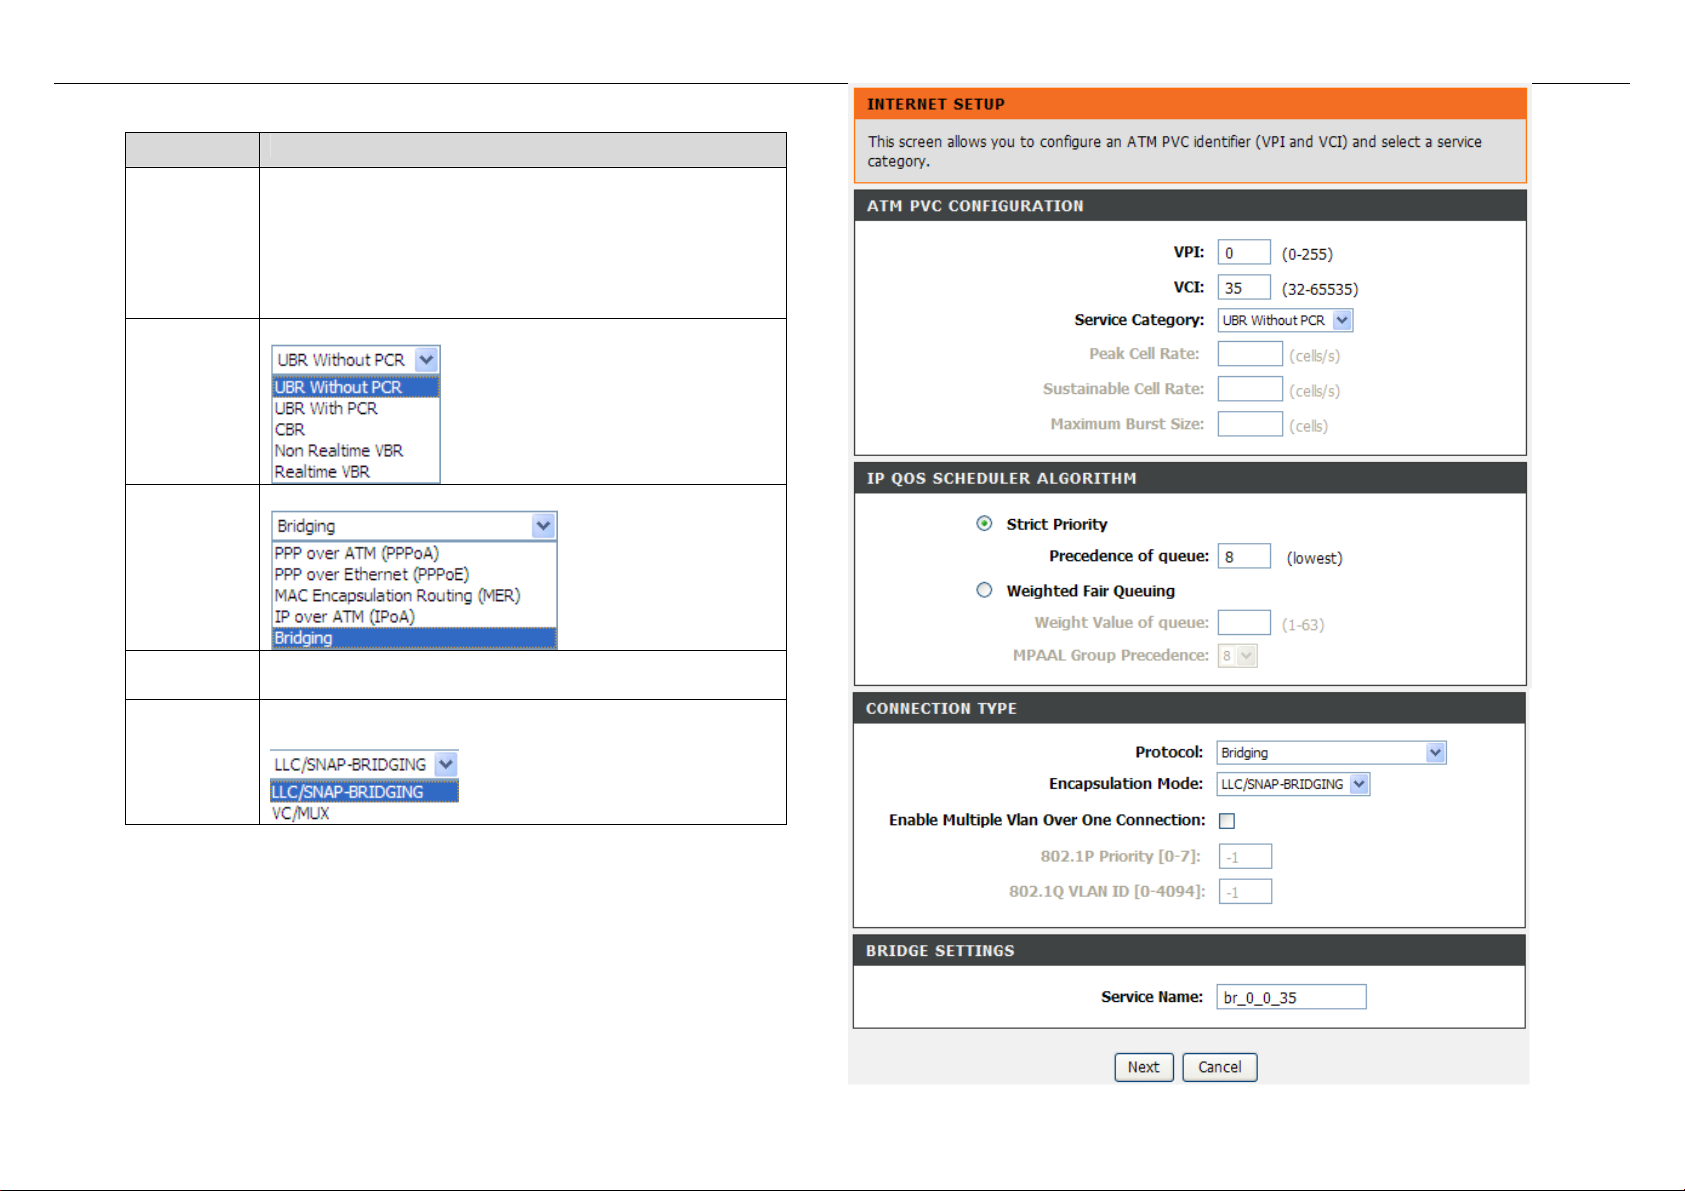
Click Add in “INTERNET SETUP”. The page shown in the following figure
appears.
Field
Description
The virtual path between two points in an ATM
network and its valid value is from 0 to 255.
PVC
Settings
The virtual channel between two points in an ATM
network, ranging from 32 to 65535 (0 to 31 is
reserved for local management of ATM traffic).
You can select from the drop-down list.
Service
Category
You can select from the drop-down list.
Protocol
QoS
scheduler
You can select one of the item between Strict Priority
and Weighted Fair Queuing.
Select the method of encapsulation provided by your
Encapsulati
ISP. You can select from the drop-down list.
on Mode
19
Click Next, the page shown in the following figure appears.
DSL-2730B User Manual
20
DSL-2730B User Manual
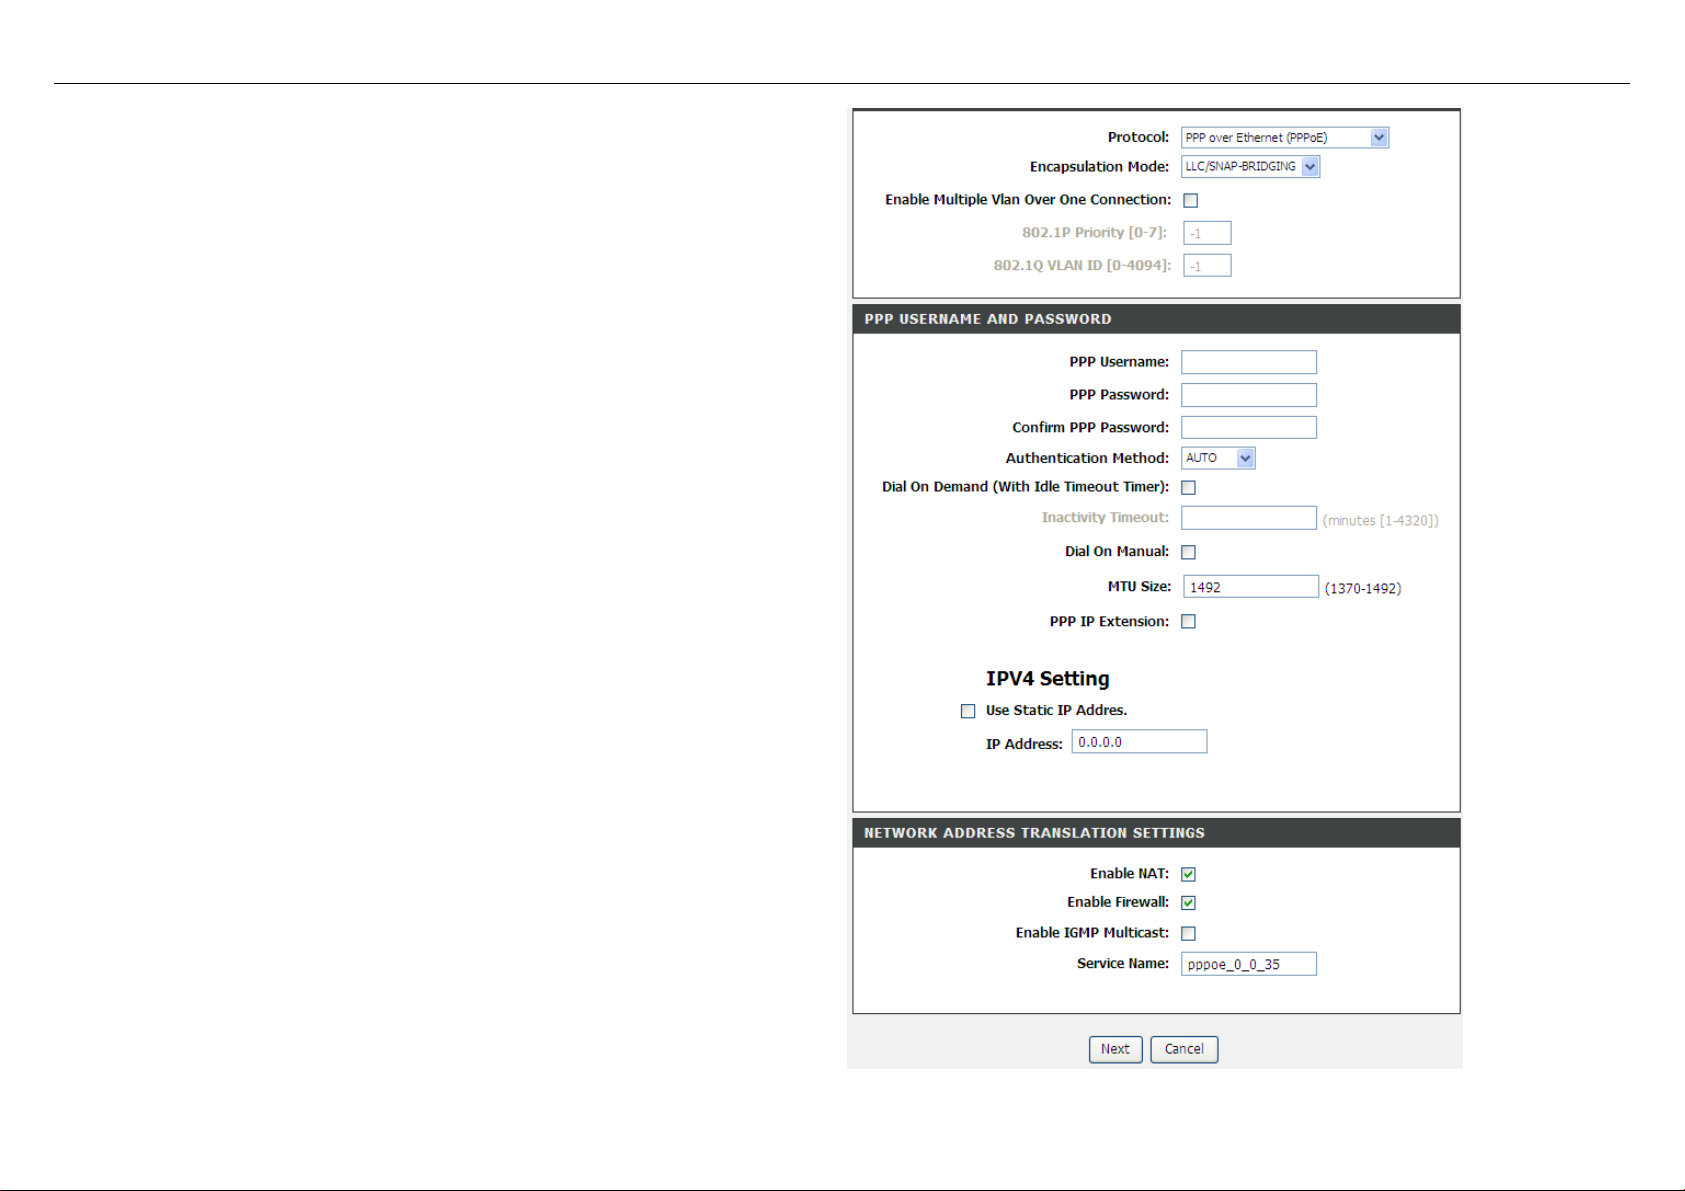
If you select the PPP over Ethernet (PPPoE) or PPP over ATM (PPPoA) as
the connection protocol, the following page appears.
PPP Username: The correct user name that your ISP provides to you.
PPP Password: The correct password that your ISP provides to you.
Authentication Method: The value can be AUTO, PAP, CHAP, or
MSCHAP. Usually, you can select AUTO.
Dial on demand (with idle timeout timer): If this function is enabled,
you need to enter the idle timeout time. Within the preset minutes, if the
router does not detect the flow of the user continuously, the router
automatically stops the PPPoE connection. Once it detects the flow (like
access to a webpage), the router restarts the PPPoE dialup.
If this function is disabled, the router performs PPPoE dial-up all the
time. The PPPoE connnection does not stop, unless the router is
powered off and DSLAM or uplink equipment is abnormal.
MTU Size: Maximum Transmission Unit. Sometimes, you must modify
this function to access network successfully.
PPP IP extension: If this function is enabled, the WAN IP address
obtained by the router through built-in dial-up can be directly assigned to
the PC being attached to the router (at this time, the router connects to
only one PC). From the aspect of the PC user, the PC dials up to obtain
an IP addres. But actually, the dial-up is done by the router. If this
function is disabled, the router itself obtains the WAN IP address.
Use Static IP Address: If this function is disabled, the router obtains an
IP address assigned by an uplink equipment such as BAS, through
PPPoE dial-up.
If this function is enabled, the router uses this IP address as the WAN IP
address.
Enable NAT: Select it to enable the NAT functions of the router. If you do
not want to enable NAT and wish the router user to access the Internet
normally, you must add a route on the uplink equipment. Otherwise, the
access to the Internet fails. Normally, NAT should be enabled.
Enable Firewall: Enable or disable IP filtering.
Enable IGMP Multicast: IGMP proxy. For example, if you wish that the
PPPoE mode supports IPTV, enable this function.
21
DSL-2730B User Manual
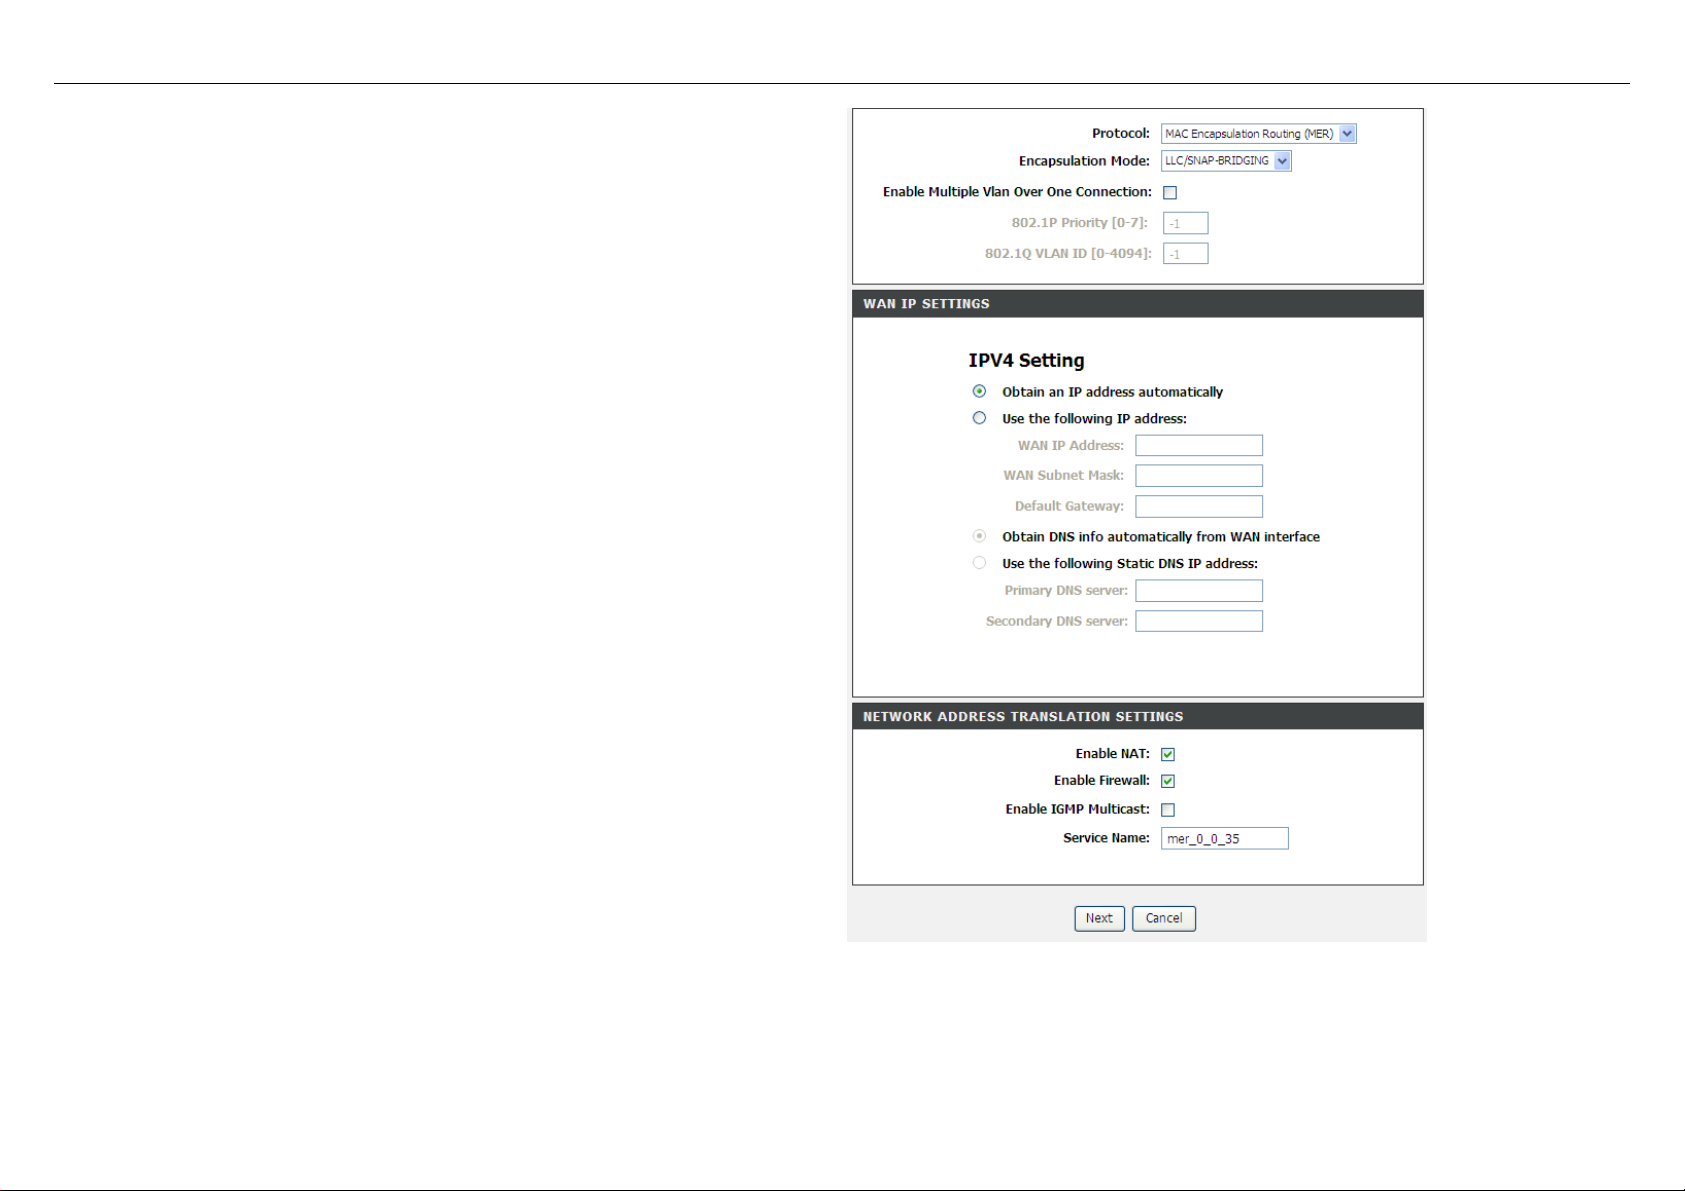
If you select the MAC Encapsulation Routing(MER) as the connection
protocol, the following page appears.
Obtain an IP address automatically: The modem obtains a WAN IP
address automatically and at this time it enables DHCP client functions.
The WAN IP address is obtained from the uplink equipment like BAS and
the uplink equipment is required to enable the DHCP server functions.
Use the following IP address: If you want to manually enter the WAN IP
address, select this check box and enter the information in the field.
WAN IP Address: Enter the IP address of the W AN interface provided by
your ISP.
WAN Subnet Mask: Enter the subnet mask concerned to the IP address
of the WAN interface provided by your ISP.
Default Gateway: Enter the default gateway.
Obtain DNS info automatically from WAN interface: You can get DNS
server information from the selected WAN interface
Use the following Static DNS IP address: If you want to manually enter
the IP address of the DNS server, select this check box and enter the
information in the fields.
Primary DNS server: Enter the IP address of the primary DNS server.
Secondary DNS server: Enter the IP address of the secondary DNS
server provided by your ISP.
22
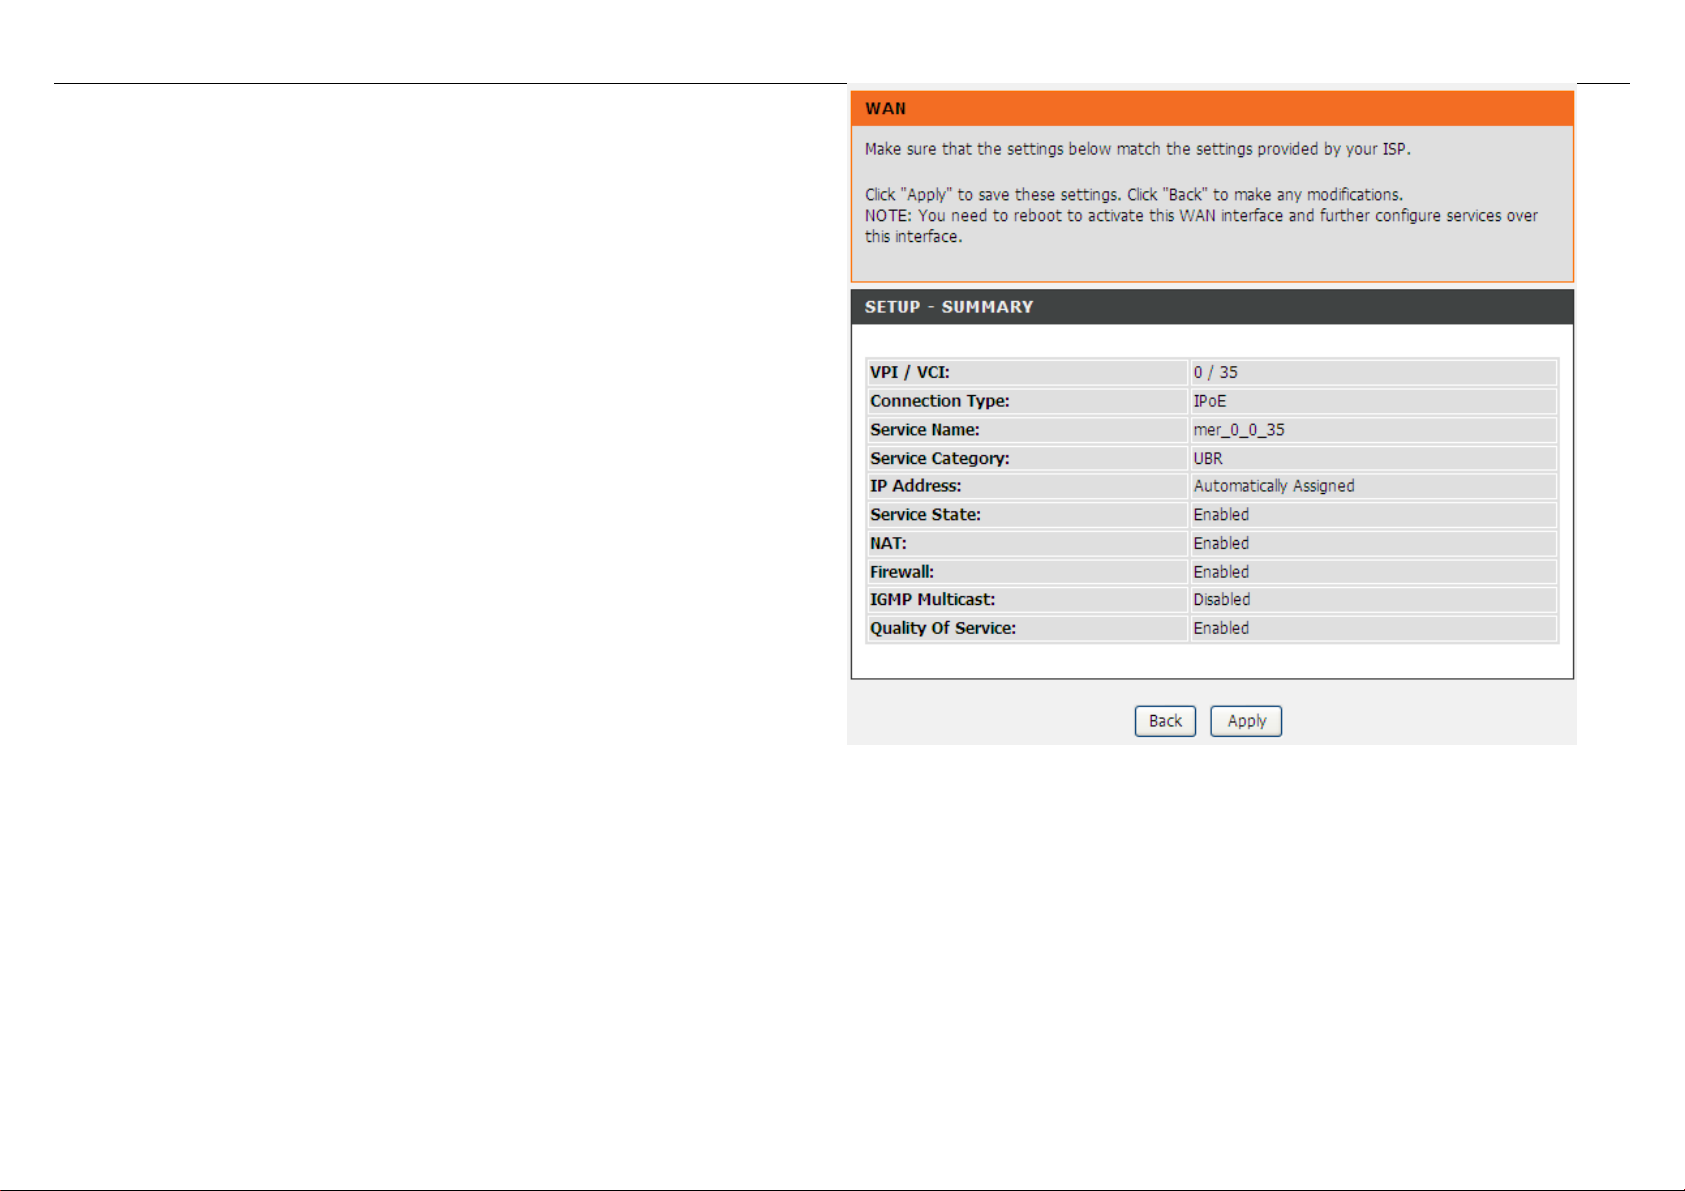
After proper settings, click Next.
DSL-2730B User Manual
23
DSL-2730B User Manual
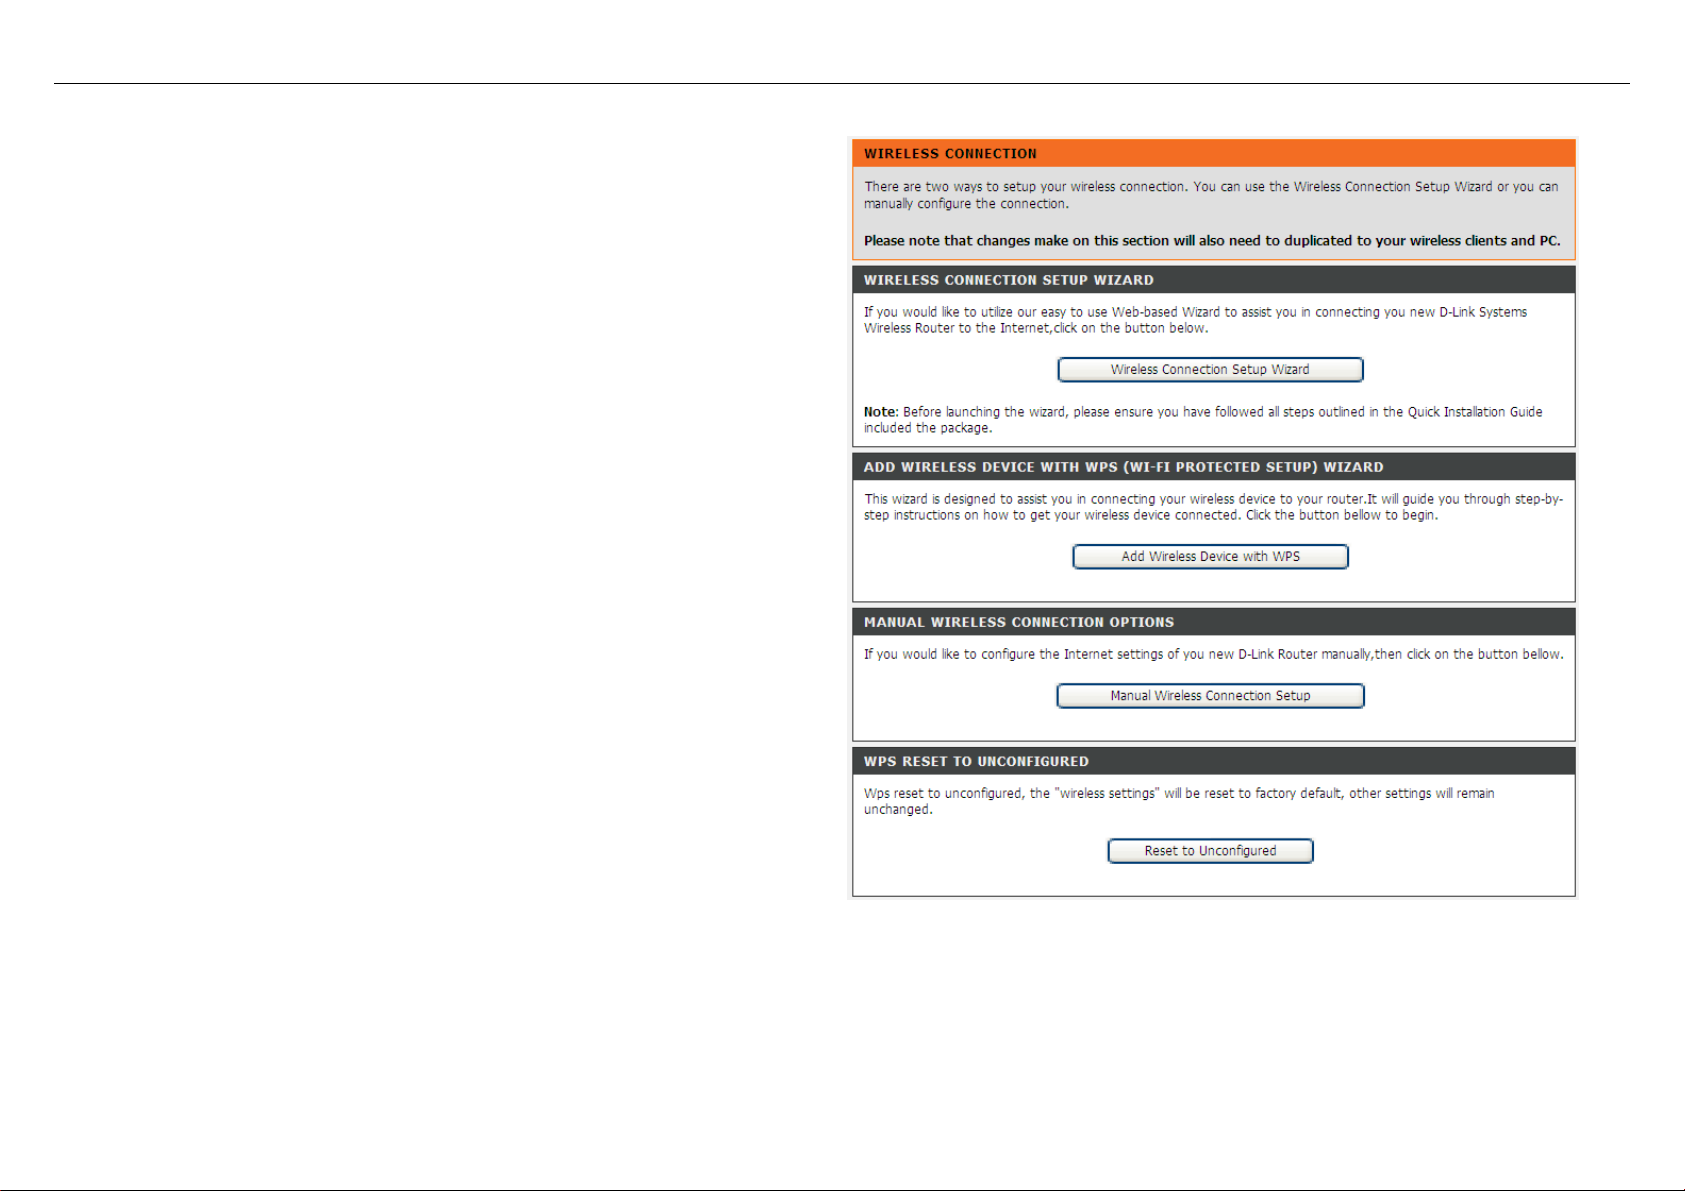
4.3.3 Wireless Connection
This section includes the wireless connection setup wizard and WPS setup
wizard. There are two ways to setup your wireless connection. You can use the
Wireless Connection Setup Wizard or you can manually configure the
connection.
Choose Setup > Wireless Connection. The Wireless Connection page
shown in the following figure appears.
24
Loading...