

Page 1

DSA-3600
Quick Install Guide
Version 3.00 December, 2007
Page 2
1. Introduction
1.1 Preface
DSA-3600 is a Multi-Service Business Gateway, specially designed for small and medium business, and
branch office operational environments. The major functional areas include user management, access
control, AP management, security management, and VLAN. This Quick Installation Guide provides
instructions and reference material for getting started with DSA-3600. The Guide will illustrate how to
install the DSA-3600 and configure its basic setting.
1.2 Package Contents
DSA-3600 x 1
Quick Install Guide x 1
CD-ROM x 1
Console Cable x 1
Straight-through Ethernet Cable x 1
Power Cord x 1
Power Adapter x 1
Note: It is recommended the original packing materials be kept in case of product service requirements.
Any returned product should be packed according to its original package content, together with its
relevant packing materials used for protecting the equipment from damage during delivery.
DSA-3600 Quick Install Guide
1
Page 3
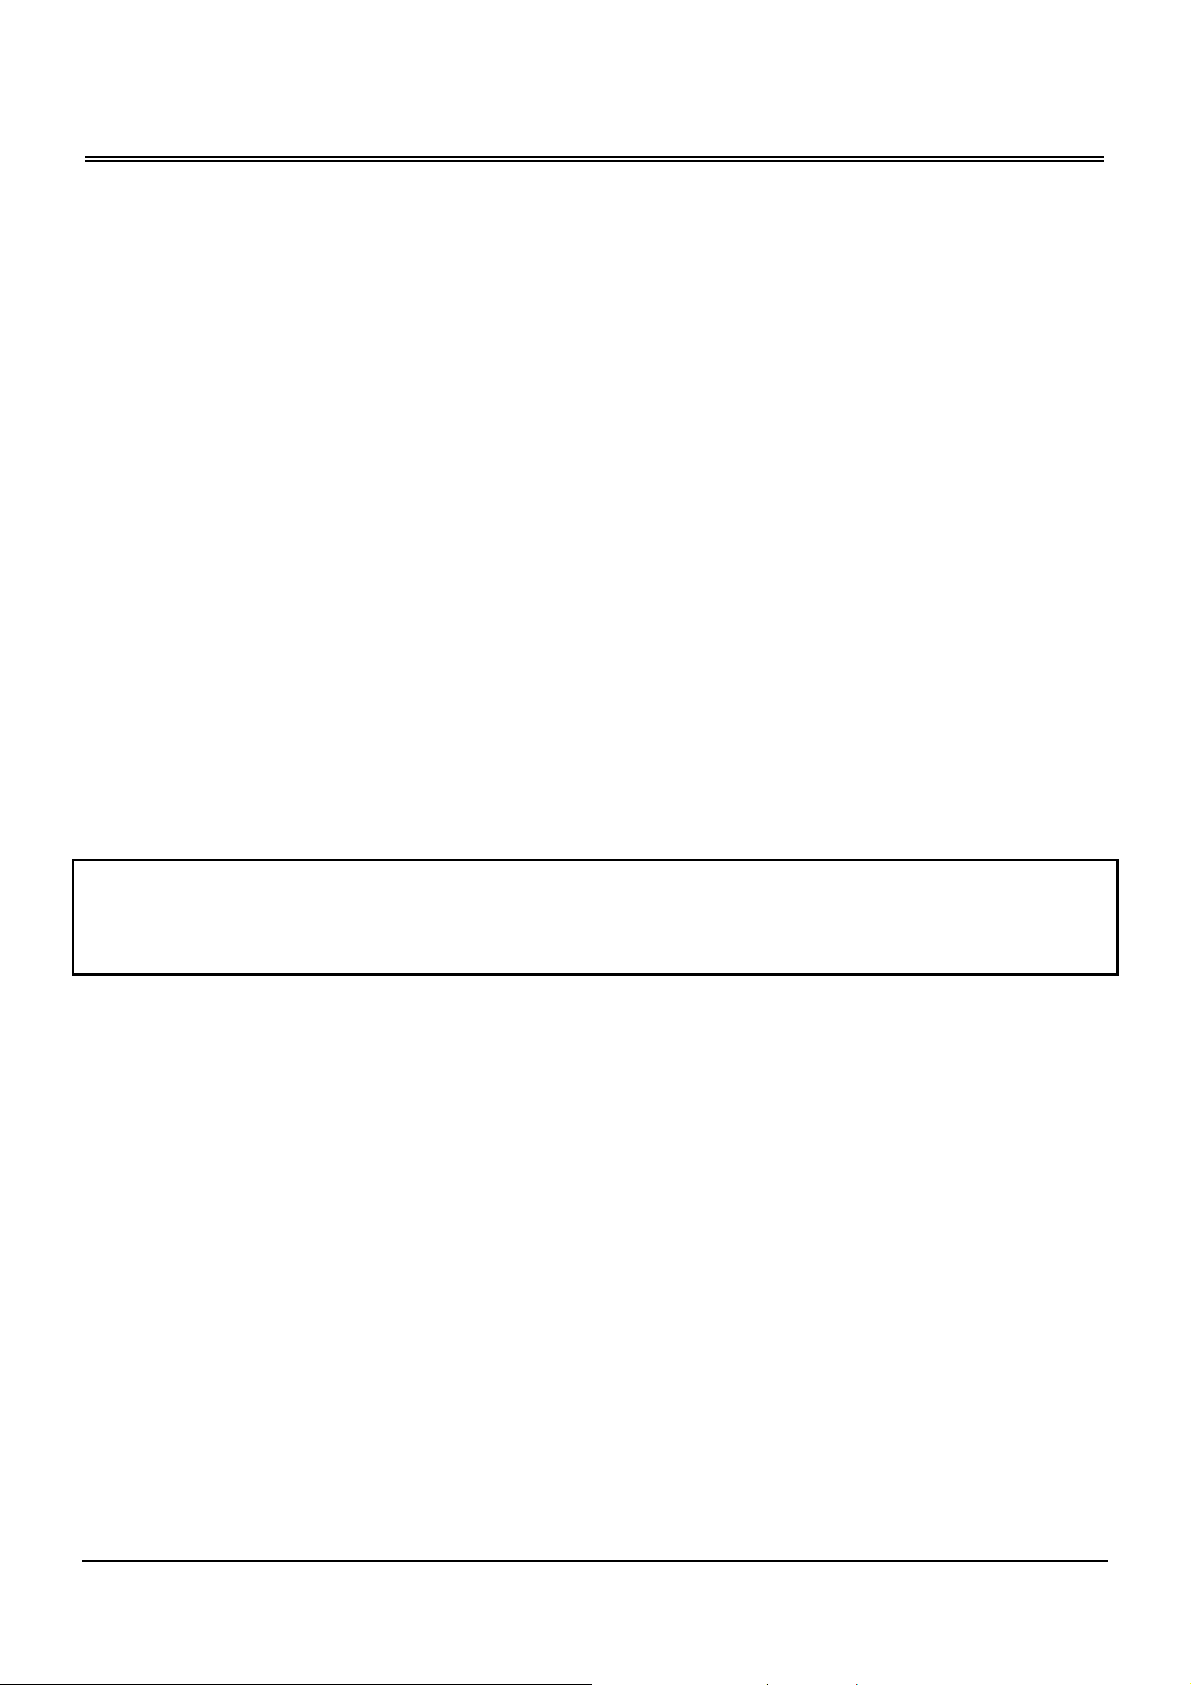
1.3 Hardware Introduction
The DSA-3600 is implemented on an embedded platform with mini-desktop form factor. On the front panel of
the product, there are eight LEDs that are used to indicate the system power, system status, and the link
status of the six Fast Ethernet ports. The interface ports are installed on the rear panel. Six Fast Ethernet
(100Mbps) ports are provided by DSA-3600. Two are configured as WAN Ports, and the other four are
configured as LAN Ports. Located on the rear panel are a serial console port, a reset button, and the power
socket.
Front Panel
1. Power
ON indicates the power is on, and OFF indicates the power is off.
1 2 3 4 5 6
1. Power 3. WAN1~WAN2 LEDs 5. Sign: Link
2. Status 4. LAN1~LAN4 LEDs 6. Sign: Act
2. Status
While system power is on, status OFF indicates BIOS is running, BLINKING indicates the OS is
running, and ON indicates system is ready.
3. WAN1~WAN2 LEDs
OFF indicates no connection, ON indicates connection, and BLINKING indicates transmitting
data.
4. LAN1~LAN4 LEDs
OFF indicates no connection, ON indicates connection, and BLINKING indicates transmitting
data.
5. Link: Indicates status of WAN1~WAN2 and LAN1~LAN4 connection.
6. Act: Indicates status of WAN1~WAN2 and LAN1~LAN4 data transmission.
DSA-3600 Quick Install Guide
2
Page 4
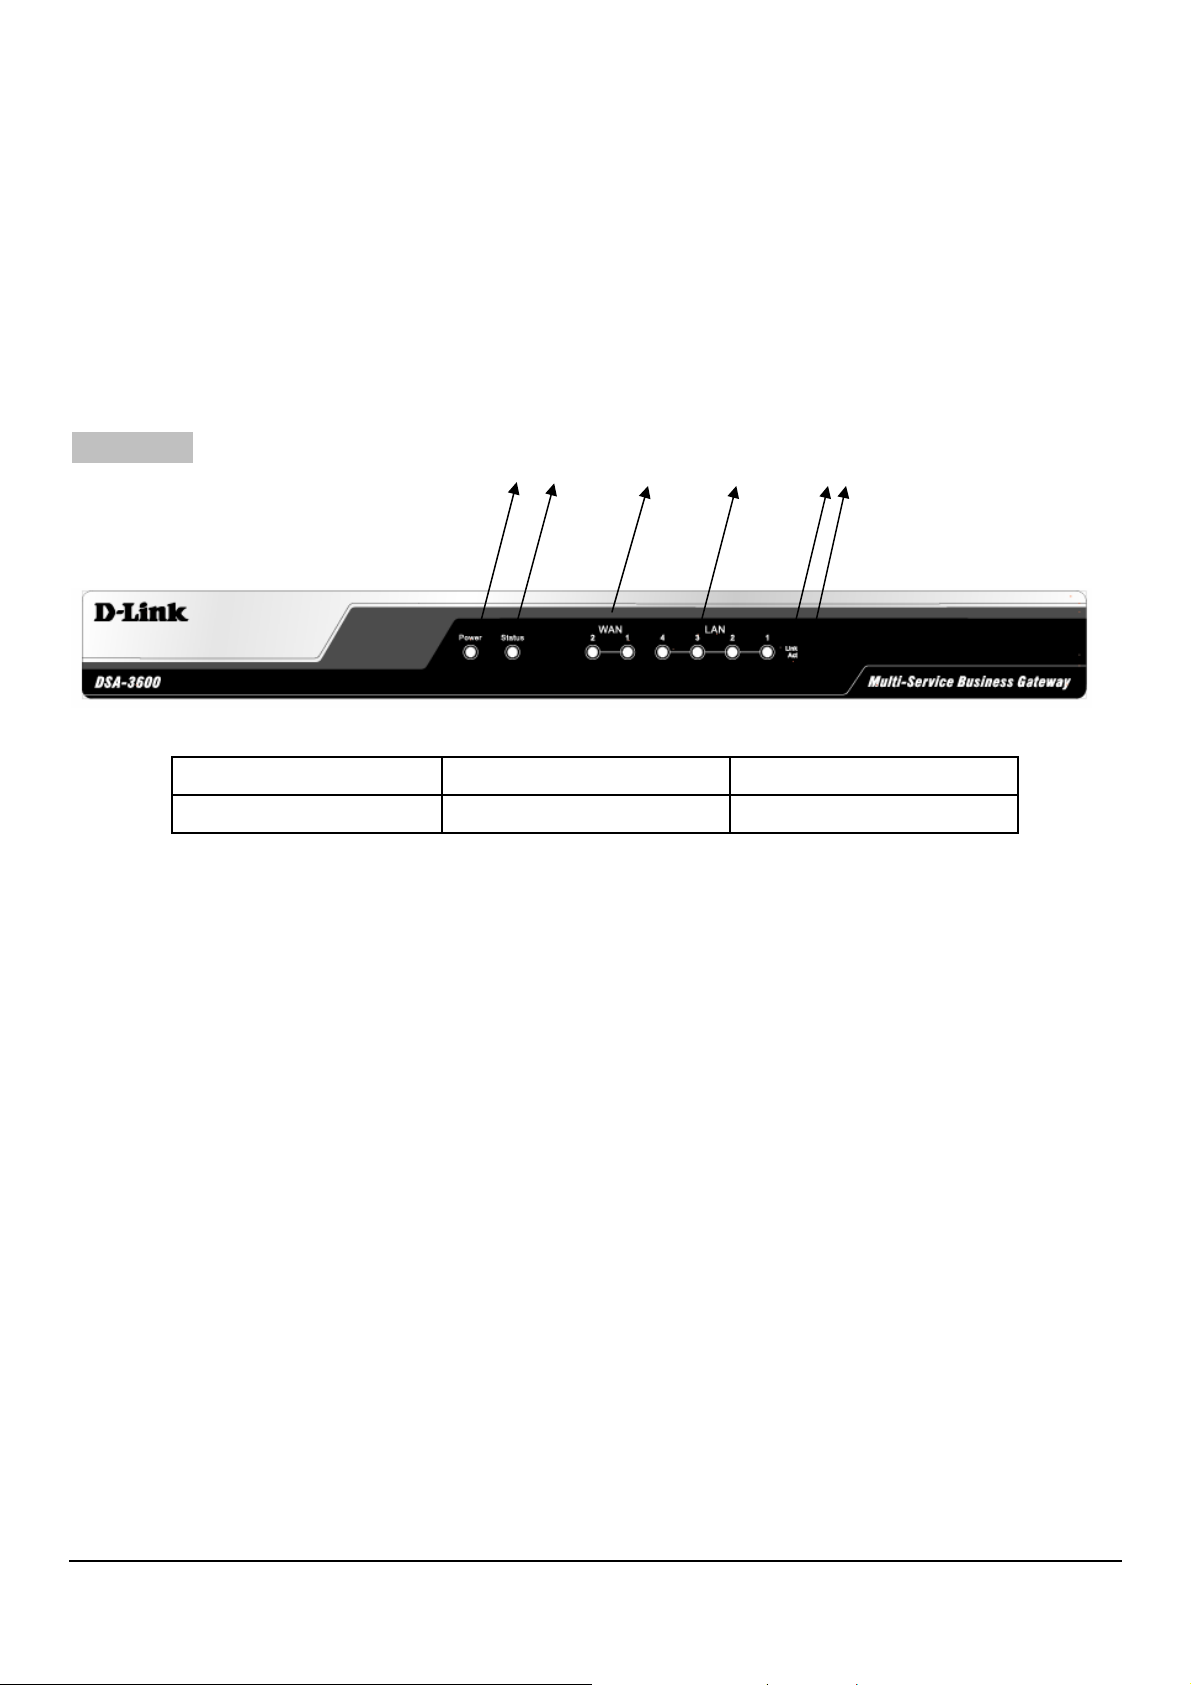
Rear Panel
1. Power Socket: The power adapter attaches here.
2. Reset Button
Press and hold the Reset button for about 5 seconds and status of LED on front panel will start to
blink before restarting the DSA-3600.
Press and hold the Reset button for more than 10 seconds and status of LED on the front panel
will start to speed up blinking before resetting the DSA-3600 to default configuration.
3. WAN1~WAN2
The two WAN ports are for connection to external network not managed by the DSA-3600. These
ports may be used to connect to the ATU-Router of an ADSL, or the port of a Cable Modem, or a
Switch or Hub on the LAN of an organization.
4. LAN1~LAN4
The four LAN ports are for connection to networks managed by DSA-3600, such as to clients’
networking devices or APs. There are two modes of service zone supported by DSA-3600:
Port-Based and Tag-Based. By default, all LAN ports are in Tag-based service zone. Under
Tag-Based mode, service zones are distinguished by VLAN tagging instead of physical LAN
ports.
5. Console: The serial RS-232 DB9 cable attaches here.
DSA-3600 Quick Install Guide
3
Page 5
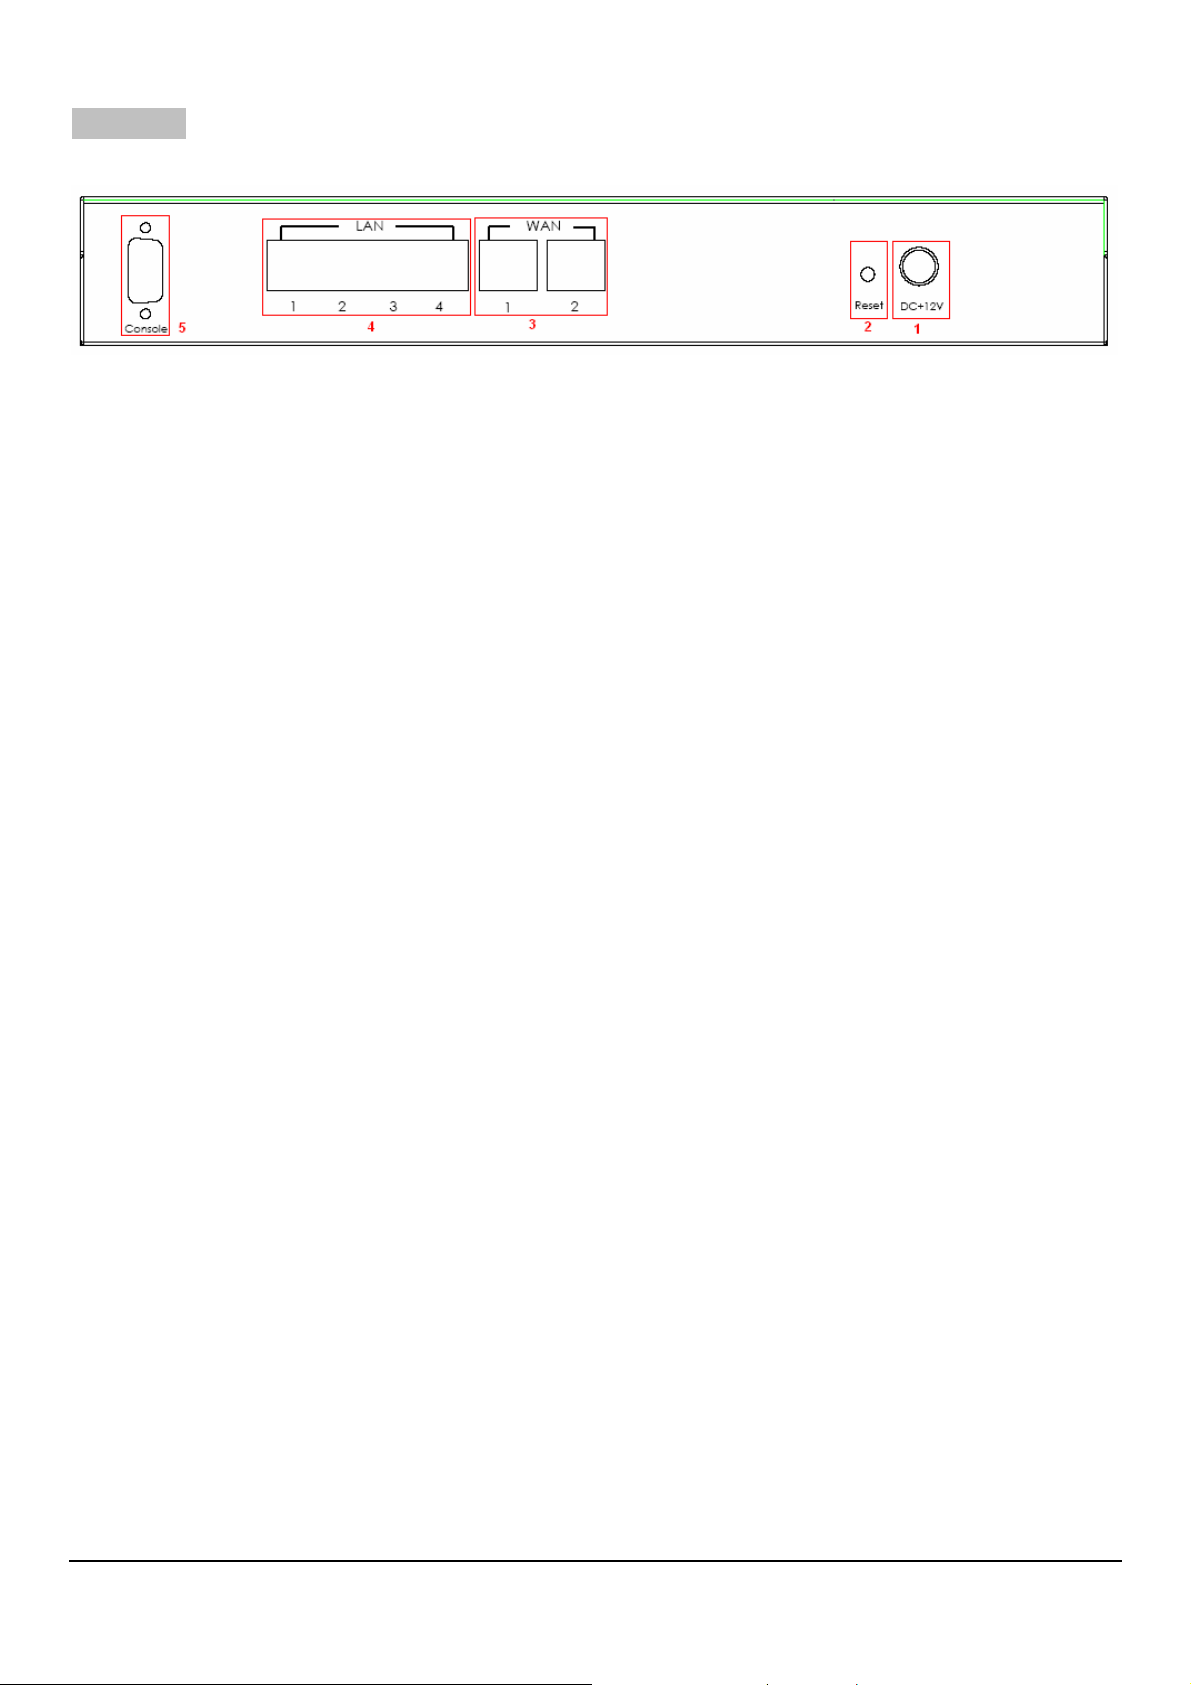
1.4 Hardware Installation
Please follow the steps mentioned below to setup the hardware of DSA-3600.
1. Connect the power adapter to the power socket on the rear panel. The Power LED on the front panel
should be ON to indicate a proper connection.
Warning: Using a non-certified power adapter may damage this product.
2. Connect an Ethernet cable to the WAN1 Port on the rear panel. Connect the other end of the Ethernet
cable to a networking device such as an ADSL modem, a cable modem, a switch, or a hub. The LED of
WAN1 port should light up to indicate a proper connection.
3. Connect an Ethernet cable to any LAN Port on the rear panel. Connect the other end of the cable to a
networking device such as the administrator’s PC. The LED of the LAN port should be ON to indicate a
proper connection.
DSA-3600 Quick Install Guide
4
Page 6
1.5 Web Management Interface
The DSA-3600 provides a web management interface for configuration. After completing the hardware
installation, the administrator can configure the DSA-3600 via web browsers with JavaScript enabled, such
as Internet Explorer version 6.0 or above.
First, set a PC as DHCP in the network TCP/IP setting to get an IP address from DHCP server automatically.
Next, connect the PC to the DSA-3600 via any LAN port. An IP address will be assigned to the PC
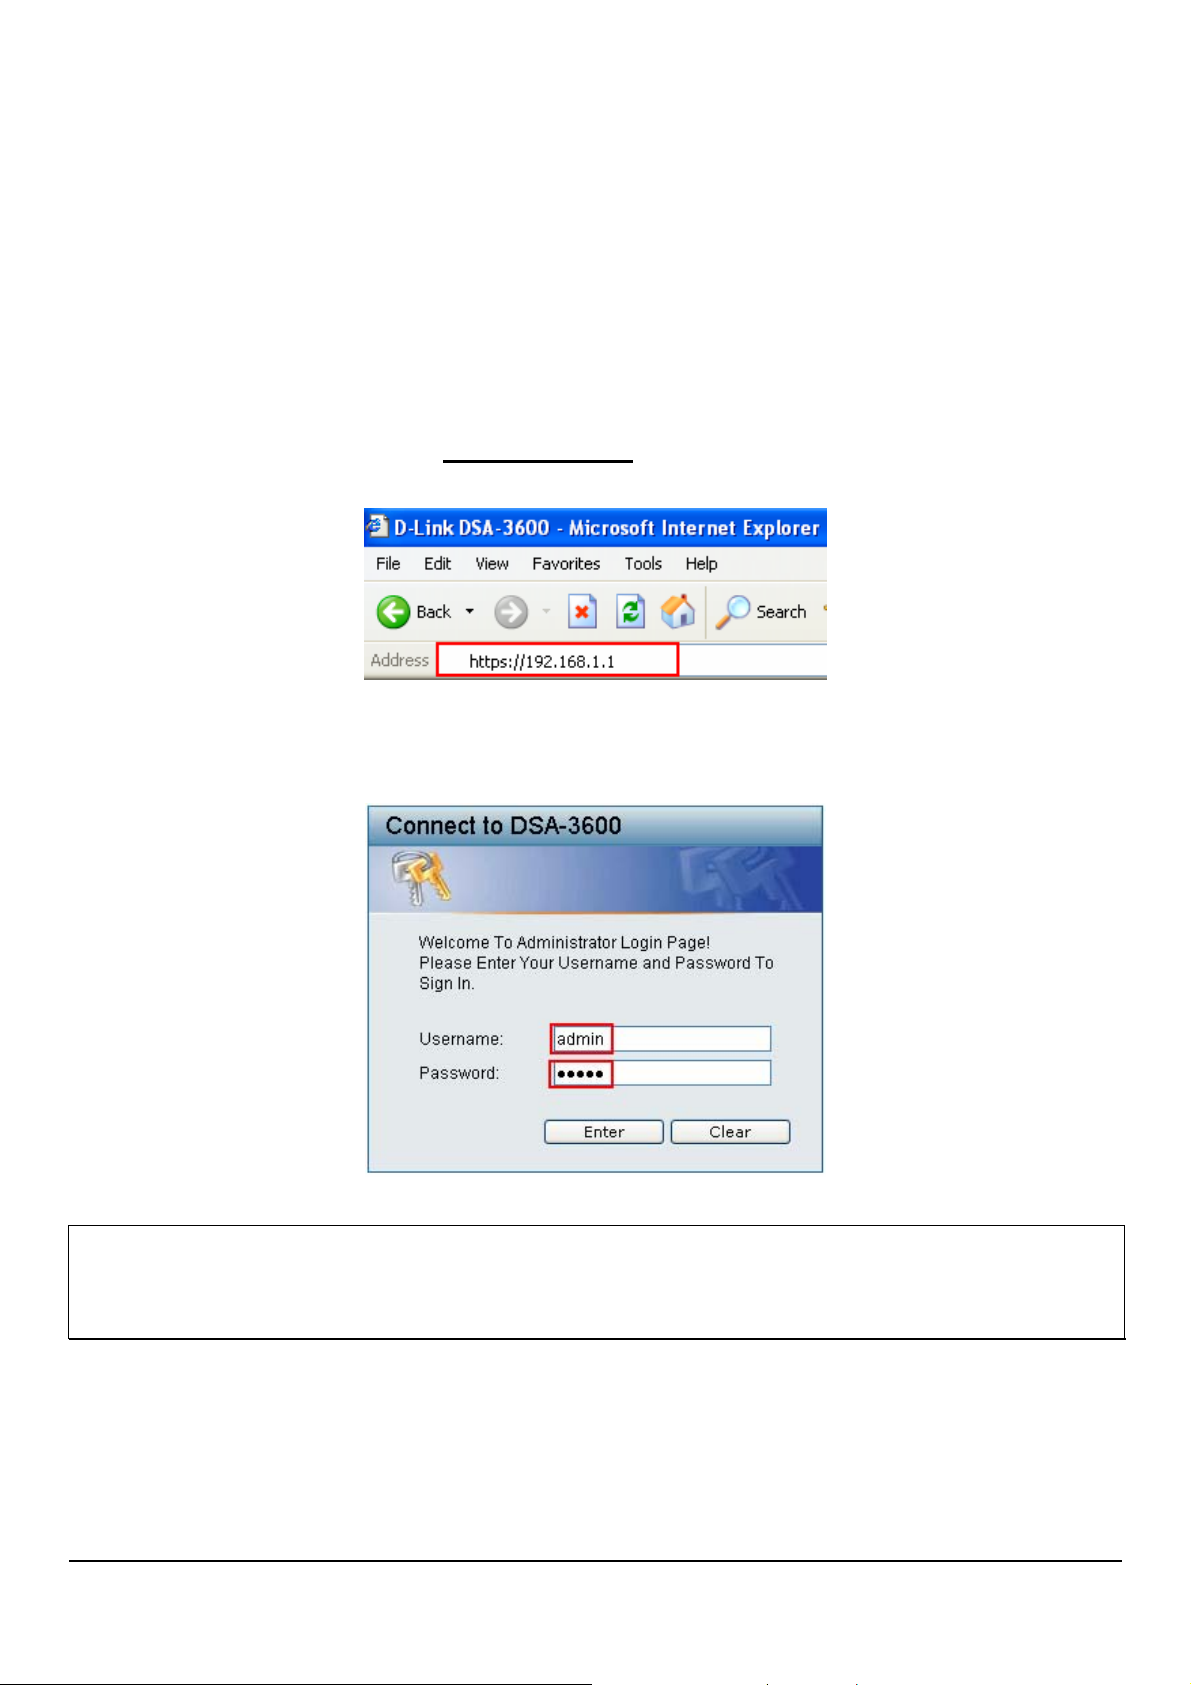
automatically via DSA-3600 built-in DHCP server. Launch a web browser to access the web management
interface of DSA-3600 by entering “https://192.168.1.1
” in the URL. (Note: https is used for secured
connection.)
Once the DSA-3600 has been connected, the Administrator Login Page will appear. Enter “admin” for both
the default username and password in the Username and Password fields, and then select the Enter button
to log in.
Note: When the DSA-3600 is new or has just been reset back to the factory default settings (with firmware
version 3.00.00 or later), the Setup Wizard (see next page) will automatically show up after reboot. You can
choose to follow the Wizard instructions or ignore this step.
After successfully logging into the DSA-3600 at the first time, the Setup Wizard will appear automatically.
After the second time logging in, the System Overview page of the web management interface will appear.
To logout, simply click the Logout icon on the upper right corner of the interface to return to the
Administrator Login Page.
DSA-3600 Quick Install Guide
5
Page 7

2. Quick Setup
This chapter will provide a step-by-step guide to administrators on how to configure DSA-3600 via Setup
Wizard.
2.1 Quick Setup by Wizard
The administrator can configure the DSA-3600 via its web management interface as specified in section 1.5
of this document. In order to connect to the Internet, TCP/IP related information such as IP address, subnet
mask, and gateway address must first be obtained from the ISP.
The Setup Wizard page will appear after the fist logging into the system. After the second time logging,
select ToolsÆSetup Wizard in the left-top menu, and the Setup Wizard page will appear. Recommendation
for each step is provided at the left of the Setup Wizard page.
Step 1: General
Enter the administrator’s new password in the New Password field and retype it again in the Verify
Password field. To secure the system, administration account password change is recommended. Select
the proper time zone from the Time Zone drop-down menu to set the system time. Click Next to continue.
Note: The maximum length of the password is twenty-character and no space is allowed.
DSA-3600 Quick Install Guide
6
Page 8

7
Step 2: WAN1 Interface
There are three connection types provided by DSA-3600, Static, Dynamic, and PPPoE. Contact your
ISP or the network administrator if you are not sure what the connection type for WAN1 is, then select
the Internet connection type for WAN1 interface. The following is an example of a PPPoE connection
type. To configure other connection types, please refer to the User Manual for more information. Enter
the Username and Password provided by the ISP. Click Next to continue or click Back to change
configurations in previous step.
Step 3: Local User Account (Optional)
In this step, new local accounts can be added into the local user database. Enter the Username (e.g.
testuser) and Password (e.g. testuser) of the desired new account to add a new local account into the
system. Click Skip to exit step 3 or click Next to validate added local accounts and continue.
DSA-3600 Quick Install Guide
Page 9

Step 4: Confirm and Restart
Click Finish to save the current settings and restart the DSA-3600. A confirmation message will appear
after clicking Finish. Click OK to continue. The Setup Wizard is now completed.
During the DSA-3600 restarting, a “Confirm and Restart.” page will appear on the screen. Please do
not interrupt the DSA-3600 until the DSA-3600 Administrator Login Page reappears. This indicates that
the restart process has been completed.
DSA-3600 Quick Install Guide
8
Page 10

Note: During every step of the wizard, if you wish to go back to modify the settings, please click the Back
button to go back to the previous step. Click Exit to leave the Wizard.
The DSA-3600 uses virtual LAN (VLAN) along with a SSID to separate service zones. At this stage, the
system is ready for use with minimum configuration. The factory default configuration uses tag-based
VLAN. The ‘Default’ service zone (with SSID=’dlink’) is enabled and requires no user authentication at
this initial stage.
Section 2.3 below show an example on how to configure two service zones that require user
authentication, one zone for internal staff, while the other zone for guests. At the end of section 2.3, the
Service Zones will have been configured to use tag-based VLAN in the deployment shown in Figure-2.
Section 2.4 demonstrates how to map two service zones using port-based VLAN.
DSA-3600 Quick Install Guide
Figure-1: An example using Tag-Based service zones
9
Page 11

2.2 Small and Mid-size Business Network Environment
Networking devices such as switches, hubs, and access points are usually forms a part of SMB
environments. The Internet connection of a SMB is usually via ADSL or cable modem. Figure-2 shows a
typical network deployment example which includes switches, access points, and connections to the Internet
via ADSL/cable modem. Note that external authentication server in the diagram is not required. Figure-1
shows that DSA-3600 can authenticate the users of its built-in database, as well as authenticate the users of
external authentication database.
The DSA-3600 supports either tag-based VLAN or port-based VLAN, but they are mutually exclusive. In the
wireless environment, a service zone of DSA-3600 is mapped to a VLAN with an associated SSID. Figure-2
shows a tag-based deployment scenario. When the DSA-3600 is set for tag-based VLAN, an Access Point,
with multiple SSIDs turned on, can service multiple service zones.
DSA-3600 Quick Install Guide
Figure-2: An example deploym ent using DSA-3600
10
Page 12

2.3 Tag-based Service Zones Configuration Example – Enabling
Two Service Zones
This section assumes that a factory default system has just been rebooted after running through the Wizard.
Log in to the web management interface and enter “admin” for both the default username and password in
the Username and Password fields of the Administrator Login Page. After logging-in the web management
interface, from the Menu Tree, click System and then click LAN Port Mapping to verify that Tag-Based
service zone mode is selected.
Click System and then click Service Zones to enter the Service Zone Settings page as shown below.
DSA-3600 Quick Install Guide
11
Page 13

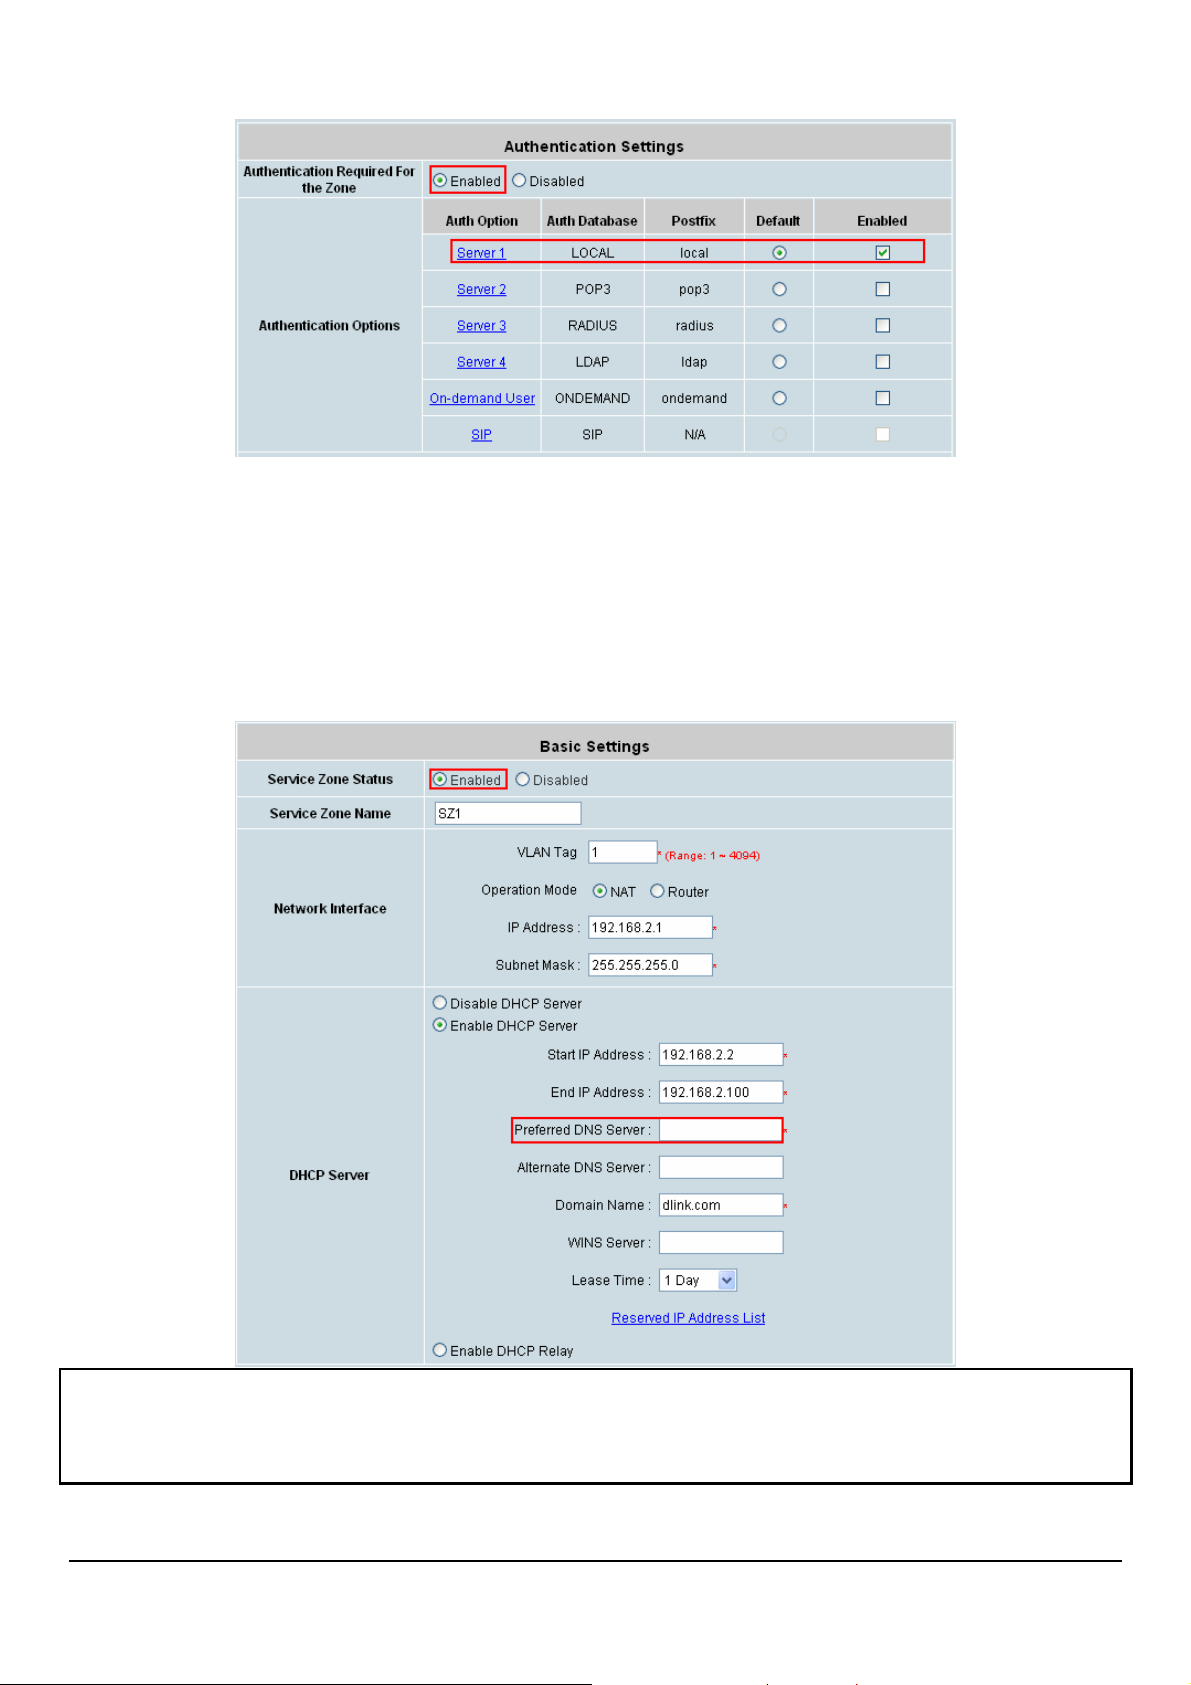
Click the Configure button of Default Service zone to enter its Basic Settings page. While in this Basic
Settings page, enter an IP address for Preferred DNS Server (e.g. 168.95.1.1) in the area of DHCP Server.
(Empty Preferred DNS Server will result in problems when using the Internet.)
Scroll down to the bottom of the page and at the Wireless Settings area enter the SSID (e.g. dlink-staff) for
connecting to this service zone.
Scroll up to the middle of the page where the Authentication Settings is, and check the Enabled box for
the Authentication Required for the Zone option. The users will now need to be authenticated to connect
to the service zone. Make sure only Server1 is checked Enabled for this service zone.
DSA-3600 Quick Install Guide
12
Page 14
Click the Apply button to activate the changes for the default service zone. (We can restart the system later
since we will want to continue to configure a second service zone for the guest users.)
Following similar procedures as above, click on Service Zones menu item on the Menu Tree again, this time
to configure anther service zone such as SZ1. Enter its Basic Settings page. Enable the service zone, enter
the IP address of the Network Interface and Preferred DNS server, and set its SSID for guests such as
‘dlink-guest’.
Note: The default management IP address is 192.168.1.0/24. Please change it accordingly at
SystemÆGeneralÆManagement IP Address List to let the administrator to login to the DSA-3600 admin
page after the default IP address of Network Interface is changed.
DSA-3600 Quick Install Guide
13
Page 15

Remember to enable Authentication requirement for this service zone and enable the On-demand Users
authentication options only.
Click Apply to activate the changes for the second service zone.
Now is the time to restart the system. After the restart, the system will be configured according to Figure-1.
DSA-3600 Quick Install Guide
14
Page 16

2.4 Port-based Service Zones Configuration Example
After running through the Setup Wizard using a factory default settings, the DSA-3600 is ready to use the
default tag-based VLAN for separating networks. Section 2.4 of this document will demonstrate how to map
service zones to LAN ports if port-based VLAN is desired.
Log in to the web management interface and enter “admin” for both the default username and password in
the Username and Password fields of the Administrator Login Page. After logging-in the web management
interface, from the Menu Tree, click System then Service Zones to enter the Service Zone Settings page.
At the desired service zone, click Configure to enter its Basic Settings page, then enable the service zone to
be used for the port-based service zone deployment.
Click System from the Menu Tree, then click LAN Port Mapping. Select Port-Based mode for service
zone.
DSA-3600 Quick Install Guide
15
Page 17

Assume LAN1, LAN2, LAN3 are to use the Default service zone for internal staff while LAN4 is to be
assigned to another service zone for external guests only. In the abovementioned page, click LAN4’s
drop-down menu to select the desired second zone such as ‘SZ1’ for LAN4 (select only enabled service
zones). Click Apply and reboot the system.
In tag-based mode, each LAN port can serve traffic from any service zone. This is because VLAN tags
carried in message frame will not be modified. In port-based mode, each LAN port can only service the traffic
of one service zone, and all messages through the LAN port will be re-tagged with the tag assigned to the
port. Compare Figure-1 of this document and Figure-3 below to see the differences.
Figure-3: An example using Port-Based service zones
For single zone deployment, use the Default service zone with port-based mode.
For further information, please refer to the User’s Manual.
DSA-3600 Quick Install Guide
16
 Loading...