

Page 1
Wireless Print Server
Wireless G USB 2.0 Adapter
with 3G Mobile Video
Page 2
System Requirements
• 10/100 Fast Ethernet Wired or 802.11b/g Wireless Network
• Printer with USB Port*
• Computer with:
• Windows® XP (SP2) or Windows® 2000 (SP4)
• Internet Explorer 6.0 or Mozilla Firefox 1.5 or higher
• CD-ROM Drive
• Network Interface Card
* For a list of compatible printers, visit http://support.dlink.com.
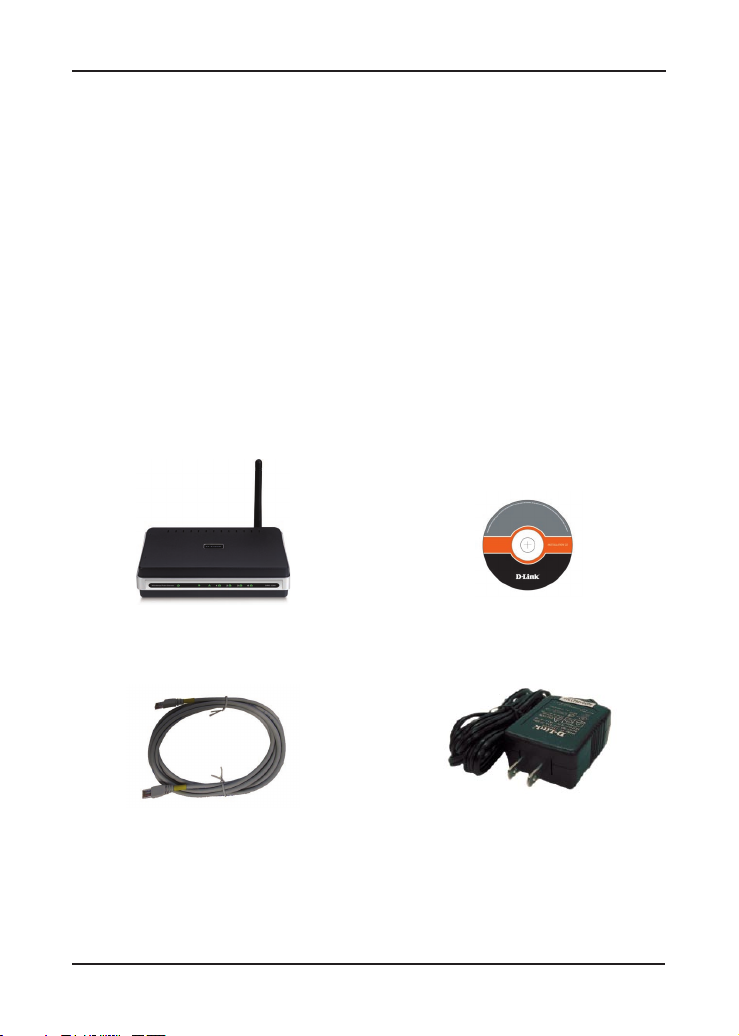
Package Contents
D-Link DPR-1260
Multi-Function Print Server
CAT5 Ethernet Cable
Note: Using a power supply with a different voltage rating than the one included with
the DPR-1260 will cause damage and void the warranty for this product.
If any of the above items are missing, please contact your reseller.
Manual and Software on CD
Power Adapter
2D-Link DPR-1260 Quick Install Guide
Page 3
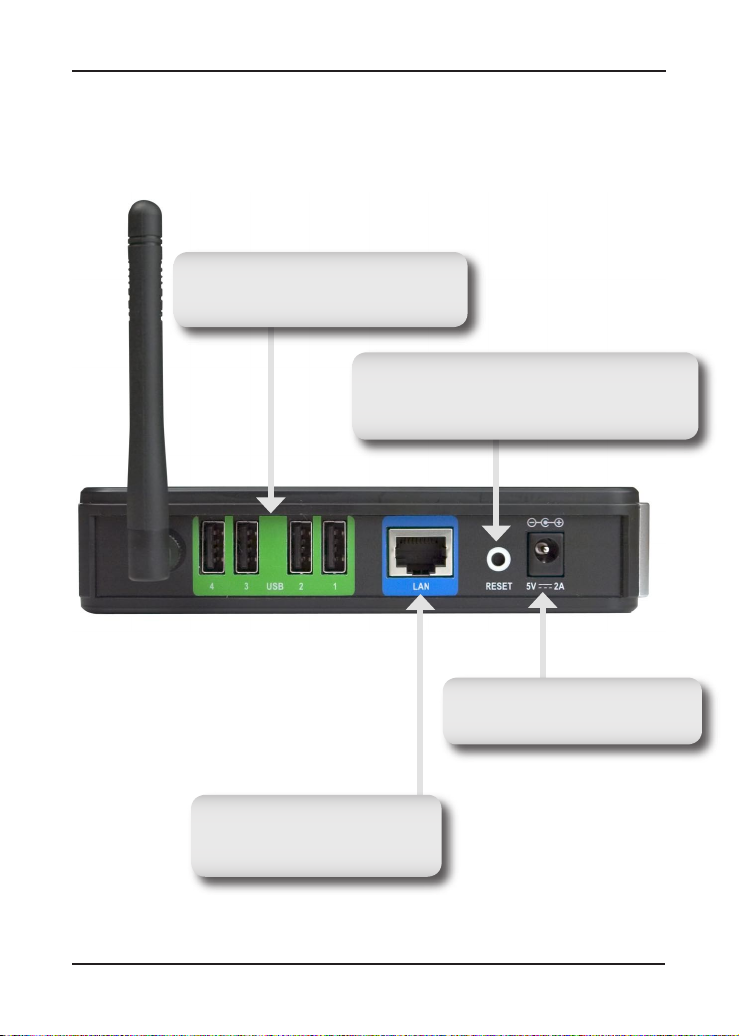
Hardware Overview
Connections
USB Ports
Connect USB printers using an USB
cable.
Reset Button
Pressing the Reset Button restores the router
to its original factory default settings.
Power Receptor
Receptor for the Power Adapter.
LAN Port
Connect to a network using an
Ethernet cable.
3 D-Link DPR-1260 Quick Install Guide
Page 4
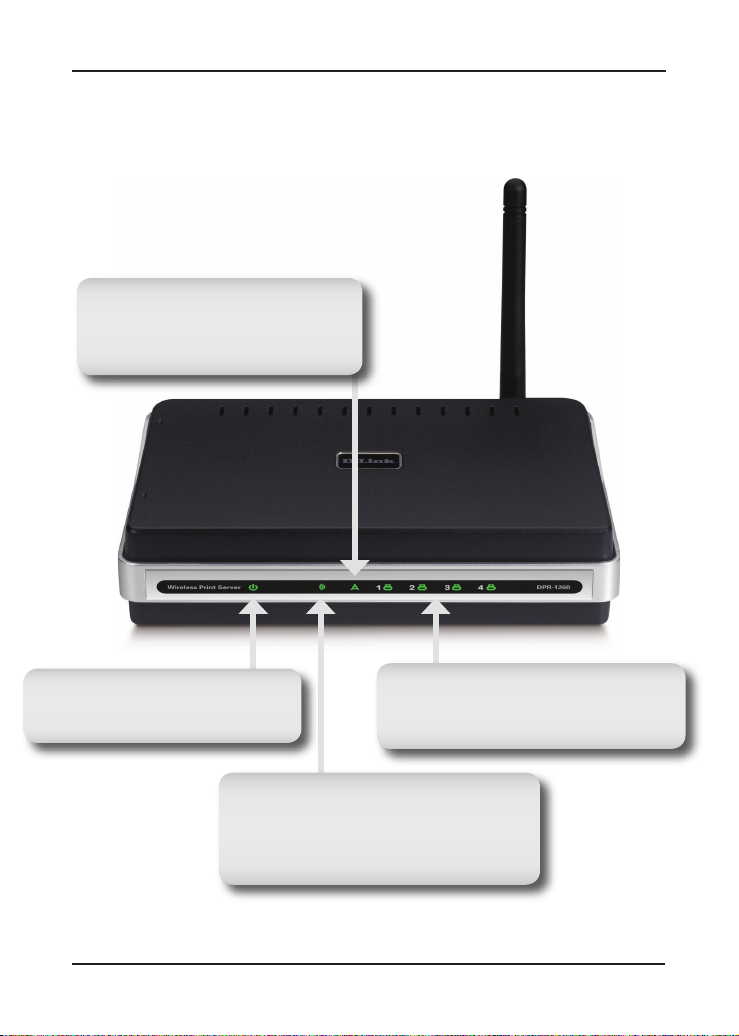
Hardware Overview
LAN LED
A solid light indicates connection on
the LAN port. This LED blinks during
data transmission.
LEDs
Power LED
A solid light indicates a proper
connection to the power supply.
WLAN LED
A solid light indicates that the wireless
segment is ready. This LED blinks during
wireless data transmission.
USB LEDs (1-4)
A solid light indicates connectivity to an
USB printer or scanner.
4D-Link DPR-1260 Quick Install Guide
Page 5

Installation
Connect an Ethernet cable to the Ethernet connector located on the
Print Server’s back panel and attach it to the network.
Note: It is required that an Ethernet cable is used during initial
setup. Once your wireless configuration is set, you may disconnect
the Ethernet cable and begin communicating wirelessly with your
DPR-1260.
Attach the external power supply to the DC power input connector
located on the Print Server’s bottom panel and connect it to a power
outlet or power strip. Connect your USB printer to an available USB
port on your print server.
The IP address of your print server will be automatically assigned
by your router. To access the print server’s web-based configuration
interface:
Windows XP users:
Dou b l e- c l ick o n t h e M y Ne t wor k Pl a ce s ic o n o n you r
deskt op. Your print ser ver will be displayed as “DPR-1260:
dlink-xxxxxx” (where xxxxxx is the last 6 characters of your print
server’s MAC address). If you do not see the print server or have
UPnP enabled, please refer to the Installation > UPnP section in
the manual that is on the D-Link CD.
Windows 2000 users:
You will need to write down the MAC address located on the bottom
of the print server (E.G. 00-15-E9-F9-6B-BC).
5 D-Link DPR-1260 Quick Install Guide
Page 6

Open a web browser and enter
the following:
http://dlink-XXXXXX
XXXXXX = the last six characters of your MAC address.
Wireless Settings
If you want to connect to a wireless network, click on the Setup tab
and then click Wireless Settings on the left side.
You will be asked to enter a password. Leave the box empty if you
have not set up a password.
Set the Wireless on/off to
On. If you want to disable the
wireless feature, select Off.
Select the Wireless Network Name (SSID) from the drop-down menu.
If you do not see your network in the list, select Enter Manually and
enter the SSID.
If you are connecting to an access point or wireless router, select
Infrastructure. If you are connecting directly to a computer with a
wireless adapter, click Ad-Hoc.
Select None (to use connect to an unsecure network), WEP, or
WPA.
Click Save to update your settings.
6D-Link DPR-1260 Quick Install Guide
Page 7

WEP Encryption
It is recommended to enable encryption on your wireless router before
your wireless print server. Please establish wireless connectivity
before enabling encryption. Your wireless signal may degrade when
enabling encryption due to the added overhead.
1. Log into the web-based
configuration (refer to page
5). Click on Setup and then
Wireless Settings on the
left side.
2. N ext to Secur ity Mode ,
select WEP.
3. Next to Authentication,
select Shared Key.
4. Select either 64-bit or 128-bit encryption from the drop-down
menu next to WEP Encryption.
5. Next to Key 1, enter a WEP key that you create. Make sure you
enter this key exactly on all your wireless devices. You may enter
up to 4 different keys.
6. Click Save Settings to save your settings.
7 D-Link DPR-1260 Quick Install Guide
Page 8

WPA Encryption
It is recommended to enable encryption on your wireless router before
your wireless network adapters. Please establish wireless connectivity
before enabling encryption. Your wireless signal may degrade when
enabling encryption due to the added overhead.
1. Log into the web-based
configuration (refer to
page 5).
2. Next to Security Mode,
select WPA.
3. Next to Cipher Mode,
se lect T KIP, A ES, or
TKIP and AES.
4. Next to PSK, enter a key (pass p h rase). The key is an
alpha-numeric password between 8 and 63 characters long. The
password can include symbols (!?*&_) and spaces. Make sure
you enter this key exactly the same as on your wireless router or
access point.
5. Click Save to save your settings.
8D-Link DPR-1260 Quick Install Guide
Page 9

D-Link Setup Wizard
Once you have successfully configured the wireless settings, you
are now ready to setup your network printer. You can disconnect
the Ether net cable and configure the printer from a wireless
connection.
Note: You will need to run this wizard from each computer that wishes
to use the printer.
To access the configuration utility, double-click on the My Network
Places icon on your desktop and then double-click on “DPR-1260:
dlink-xxxxxx”.
Wi ndow s® 2000 users can open a web brow ser and e nter
http://dlink-xxxxxx (where xxxxxx is the last 6 characters of the print
server’s MAC address).
If you get a Page Cannot be Displayed error, please refer to the
Troubleshooting section of the manual for assistance.
From the Status screen, click on the Setup tab, and then click Next
to start the wizard.
9 D-Link DPR-1260 Quick Install Guide
Page 10

Click the radio button next
to the printer you want to
configure. Click Next to
continue.
Click Next to continue.
You may need to insert
your printer driver CD to
load the drivers to your
computer.
If the a u t or u n scre e n
appears when inserting
your printer driver CD, click
cancel or close.
Click Finish to complete
the setup wizard.
10D-Link DPR-1260 Quick Install Guide
Page 11

Scan
If you have a compatible multi-function printer with a scanner, you
may scan using the print server’s web-based utility.
1. Select Scanner Bed (most common) or Automatic Document
Feeder (ADF). If you select ADF, select the document size from
the drop-down menu.
2. Select the size, resolution, color copy, and file format.
3. Click the Scan button to scan the document.
For more information regarding your scanner, please refer to the
scanner’s documentation.
Unfortunately not all scanners will operate or be detected when
connected to the D-Link print server. Please visit http://support.dlink.
com for an updated compatibility list.
11 D-Link DPR-1260 Quick Install Guide
Page 12

Technical Support
D-Link’s website contains the latest user documentation and
software updates for D-Link products.
U.S. and Canadian customers can contact D-Link Technical
Support through our website or by phone.
United States
Telephone
(877) 453-5465
Twenty four hours a day, seven days a week.
World Wide Web
http://support.dlink.com
Canada
Telephone
(800) 361-5265
Monday through Friday, 7:30am to 9:00pm EST.
World Wide Web
http://support.dlink.ca
Version 1.3
January 23, 2007
Copyright ©2006-2007 D-Link Corporation/D-Link Systems, Inc. All rights reserved. D-Link and the D-Link logo are registered
trademarks of D-Link Corporation or its subsidiaries in the United States and other countries. Other trademarks are the property
of their respective owners. Maximum wireless signal rate based on IEEE Standard 802.11g specifications. Actual data throughput
will vary. Network conditions and environmental factors, including volume of network traffic, building materials and construction,
and network overhead lower actual data throughput rate. Product specifications, size and shape are subject to change without
notice, and actual product appearance may differ from that depicted on the packaging. Visit www.dlink.com for more details.
12D-Link DPR-1260 Quick Install Guide
 Loading...