

Page 1
Page 2
Preface
D-Link reserves the right to revise this publication and to make changes in the content hereof without obligation to
notify any person or organization of such revisions or changes.
Manual Revisions
Revision Date Description
1.0
1.1 February 10, 2010 2
1.2 November 15, 2010 Modify HSUPA spec, Add DDNS, MAC Address Filter, and Schedules
December
10, 2009
First Draft
nd
Revision
Trademarks
D-Link and the D-Link logo are trademarks or registered trademarks of D-Link Corporation or its subsidiaries in the
United States or other countries. All other company or product names mentioned herein are trademarks or registered
trademarks of their respective companies.
Copyright © 2009 by D-Link Systems, Inc.
All rights reserved. This publication may not be reproduced, in whole or in part, without prior expressed written permission
from D-Link Systems, Inc.
iD-Link DIR-457 User Manual
Page 3

Table of Contents
Table of Contents
Preface...........................................................................i
Manual Revisions ..................................................... i
Trademarks .............................................................. i
Product Overview ........................................................1
Package Contents ...................................................1
System Requirements .............................................2
Features ..................................................................3
Hardware Overview ................................................. 4
Connections ....................................................... 4
Top View ............................................................ 5
Switching Between 3G Modem Mode and Wi-Fi
Router Mode ......................................................6
Battery Facts ...........................................................7
Installation ....................................................................8
Product Setup .......................................................... 9
Hardware Setup ................................................. 9
Installing the SIM Card ...................................9
Installing the Battery ....................................... 9
Power Management ......................................... 10
Connection Setup .................................................. 11
USB Modem Mode Connection .......................11
Connection Setup .................................................. 12
Wi-Fi Router Mode ........................................... 12
Device Setup using D-Link Connection Manager
(Windows) ..................................................................13
Manager or Web-based Tool ................................. 13
Managing the 3G Connection ................................ 13
New Prole ............................................................14
Use Default Prole (Preset) ................................... 14
User-Dened Prole ..............................................15
Establishing a Connection ..................................... 15
Ending a Connection .............................................15
Prole Management ..............................................16
Connection Management ......................................17
Current Connection .......................................... 17
Connection History ..........................................18
Usage Management ..............................................19
Usage ..............................................................19
Usage Statistics ...............................................20
Text Messaging (SMS) .......................................... 21
New/Reply/Forward Text Message .................. 22
Deleting a Message .........................................22
Saving a Sender to Contacts ........................... 22
SMS Settings ...................................................23
Contact Management ............................................24
Adding Contacts ..............................................24
Editing Contacts ............................................... 24
Deleting Contacts ............................................24
Importing vCards to Contacts ..........................25
Exporting Contacts to vCards .......................... 25
SIM Management ..................................................26
SIM Information ...............................................26
iiD-Link DIR-457 User Manual
Page 4

Table of Contents
Enabling or Disabling a PIN Code ...................27
Changing a PIN Code ...................................... 28
Unlocking a PIN Code .....................................28
Prole Settings ......................................................29
Band Settings ..................................................29
Network Selection ............................................ 30
Call Settings ..................................................... 31
Missed Calls ....................................................31
Startup Options ...................................................... 32
Version Information ...............................................32
Wi-Fi and Basic Settings .......................................33
Changing the Prole Information .....................34
Changing the SSID ..........................................35
Conguring the Wireless Channel ...................36
Conguring the Security Mode ........................36
Setting the Administrator Password ................. 37
Device Information ........................................... 38
Statistics ..........................................................44
Text Messaging (SMS) .......................................... 45
New/Reply/Forward Text Message .................. 46
Deleting a Message .........................................46
Saving a Sender to Contacts ........................... 46
SMS Settings ...................................................47
Contact Management ............................................48
Adding Contacts ..............................................48
Editing Contacts ............................................... 49
Deleting Contacts ............................................49
SIM Management ..................................................50
Enabling or Disabling a PIN Code ...................50
Changing a PIN Code ...................................... 51
Unlocking a PIN Code .....................................51
Prole Settings ......................................................52
Band Settings ..................................................52
Network Selection ............................................ 53
Device Setup using D-Link Connection Manager
(MAC OS) ....................................................................39
New Prole ............................................................39
Create Prole ......................................................... 39
Establishing a Connection ..................................... 40
Ending a Connection .............................................40
Prole Management ..............................................41
Connection Management ......................................42
Current Connection .......................................... 42
Connection History ..........................................43
Usage Management ..............................................44
Call Settings ..................................................... 54
Missed Calls ....................................................54
WEB Conguration .................................................... 55
Internet Connection Setup Wizard ................... 56
Manual Conguration 3G Internet Connection 59
Wireless Settings ............................................. 60
Wireless Connection Setup Wizard .................61
Manual Wireless Connection Setup ............. 63
LAN Setup .......................................................64
DHCP Reservation .......................................65
Time and Date .................................................66
iiiD-Link DIR-457 User Manual
Page 5

Table of Contents
Port Forwarding ...............................................67
MAC Address Filter .......................................... 68
Filter Rules ....................................................... 69
Firewall & DMZ ................................................70
File Sharing ...................................................... 71
Advanced Network ........................................... 76
Device Administration ...................................... 77
Save and Restore ............................................78
Firmware Update .............................................79
Log Settings .....................................................80
DDNS ............................................................... 81
Schedules ........................................................82
Device Information ........................................... 83
Logs .................................................................84
Statistics ..........................................................85
Support ............................................................86
Add Wireless Device with WPS Wizard .................87
Tips ........................................................................ 98
Networking Basics ..................................................100
Check your IP address ........................................100
Statically Assign an IP address ...........................101
Technical Specications......................................... 102
Connect to the Wireless Network Using Windows
®
Vista
..................................................................... 88
Conguring WPA-PSK/WPA2-PSK .................89
Connect Using WCN 2.0 .................................. 91
®
Connect to the Wireless Network Using Windows
XP .......................................................................... 92
Conguring WPA-PSK/WPA2-PSK .................93
Troubleshooting ........................................................ 95
Wireless Basics ......................................................... 95
What is Wireless? .................................................. 96
ivD-Link DIR-457 User Manual
Page 6
Section 1 - Product Overview
Product Overview
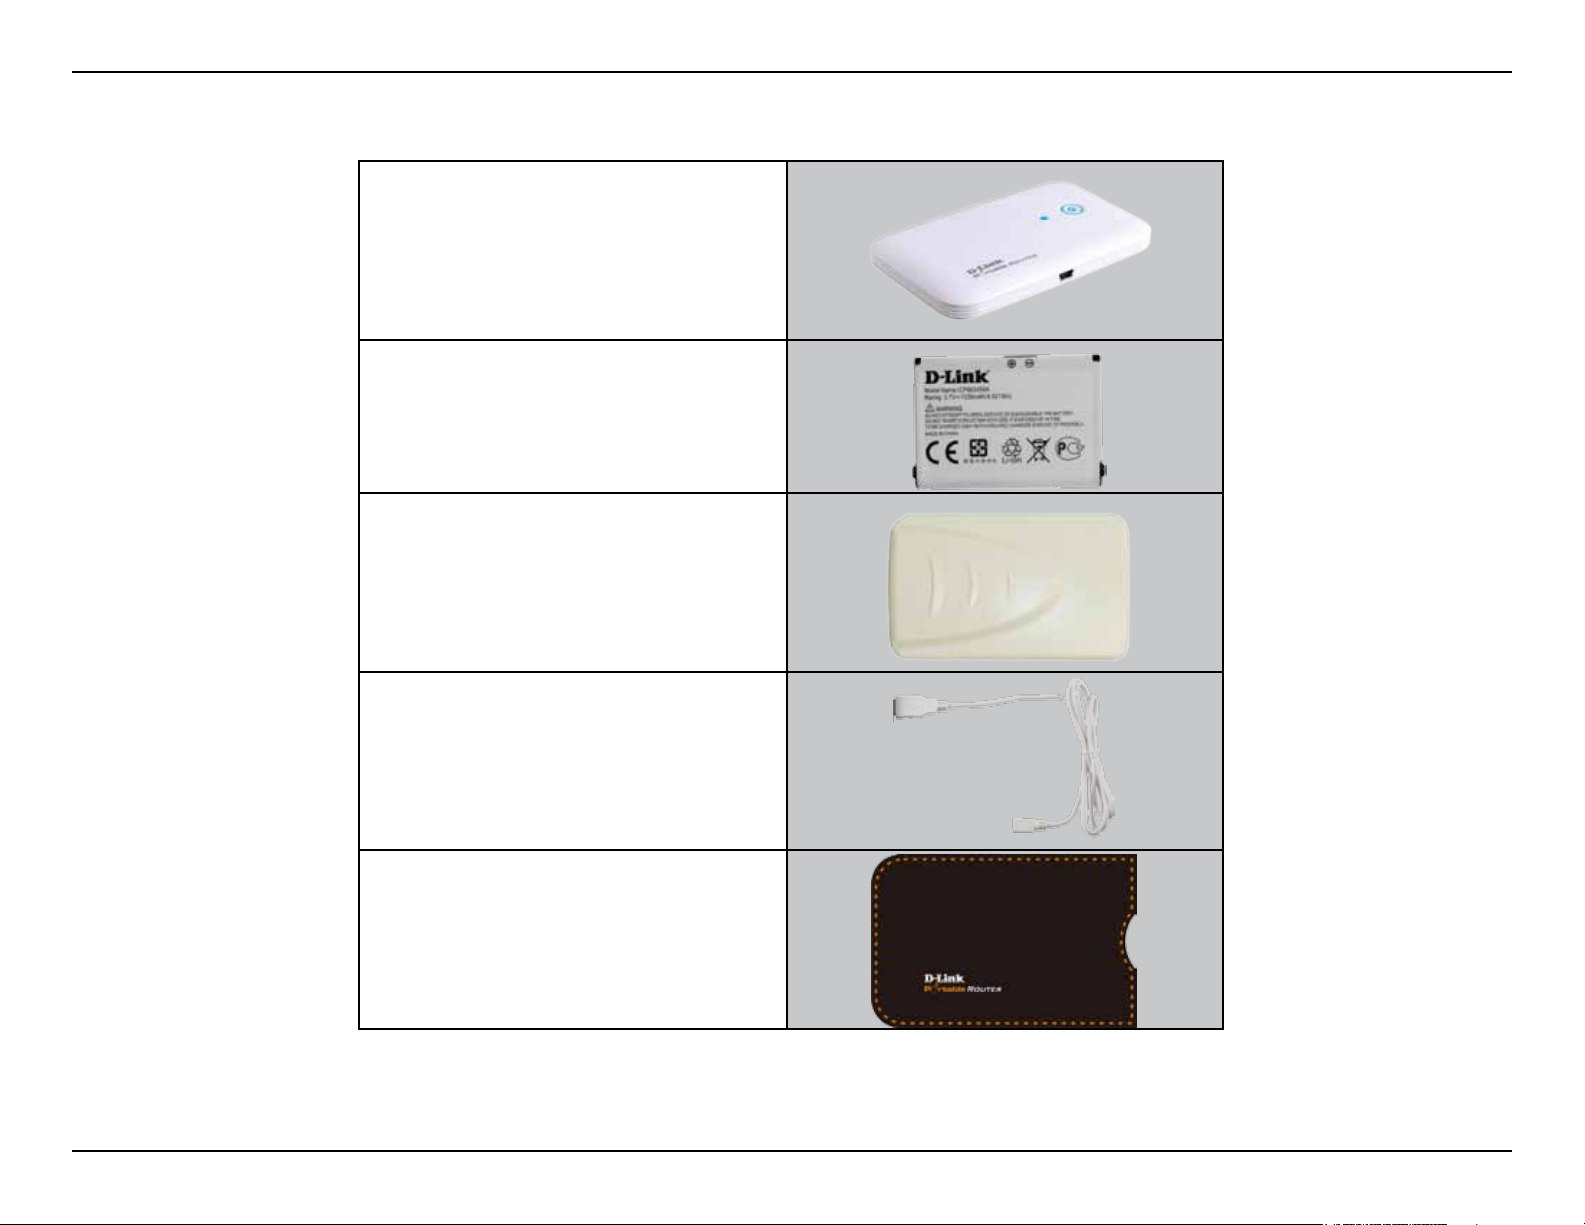
Package Contents
D-Link DIR-457
Battery
Power Adapter
USB Cable
Travel Case
Note: Using a power supply with a different voltage rating than the one included with the DIR-457 will cause damage and void the warranty for this
product.
1D-Link DIR-457 User Manual
Page 7

Section 1 - Product Overview
System Requirements
Network Requirements
Web-based Conguration
Utility Requirements
• IEEE 802.11g/b wireless clients
• 3G SIM card for 3G Wireless Internet
Computer with the following:
• Windows
system
• MicroSD card
Browser Requirements:
• Internet Explorer 6.0 or higher
• Mozilla 1.7.12 or higher
• Firefox 1.5 or higher
• Safari 1.0 or higher (with Java 1.3.1 or higher)
• Flock 0.7.14 or higher
• Opera 6.0 or higher
Windows
of Java installed. Visit www.java.com to download the
latest version.
®
, Macintosh, or Linux-based operating
®
Users: Make sure you have the latest version
2D-Link DIR-457 User Manual
Page 8

Section 1 - Product Overview
• Wireless Access Point - The DIR-457 provides up to 54 Mbps* wireless connection with other 802.11g
wireless clients.
• Compatible with 802.11b Devices - The DIR-457 is still fully compatible with the IEEE 802.11g standard,
so it can connect with existing 802.11g or 802.11b devices.
• 3G Internet Connection Support - HSUPA modem built-in to access 3G Internet Services. Download
throughput up to 7.2Mbps, upload up to 5.76Mbps.
• SMS Support - SMS stored in SIM card (not included), SMS management, SMS notication.
• VPN Support - Passthrough support for PPTP, L2TP and IPSec.
• Advanced Network Filter and Firewall Features - The Web-based user interface displays a number
of advanced network management features including:
Features
• MAC Address Filtering - Easily applied content ltering based on MAC Address.
• Firewall - Congurable options used to prevent common methods of attack from the WAN.
• User-friendly Setup Wizard - Through its easy-to-use Web-based user interface for 3G Internet and
Wireless LAN.
* Maximum wireless signal rate derived from IEEE Standard 802.11g specications. Actual data throughput will vary. Network conditions and environmental factors,
including volume of network trafc, building materials and construction, and network overhead, lower actual data throughput rate. Environmental conditions will
adversely affect wireless signal range.
3D-Link DIR-457 User Manual
Page 9
Section 1 - Product Overview
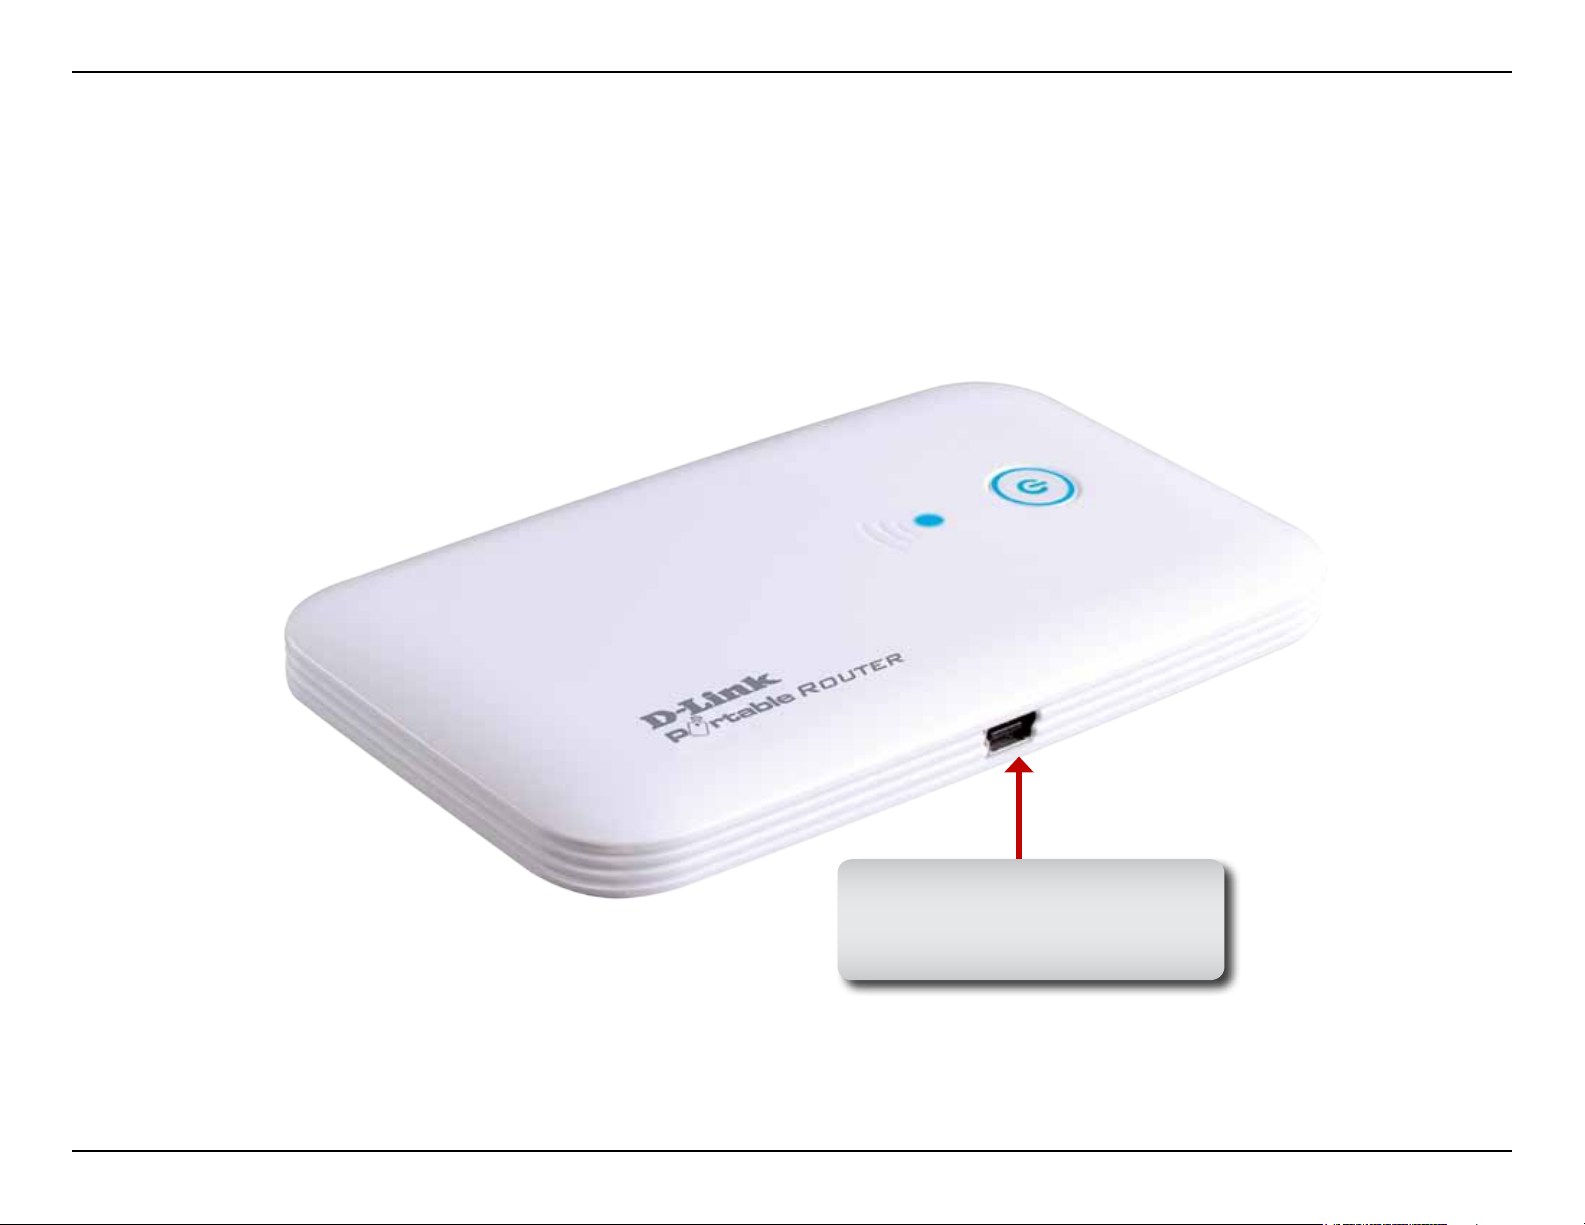
Hardware Overview
Connections
Power Receptor
USB receptor for the supplied
power adapter and power cable.
4D-Link DIR-457 User Manual
Page 10
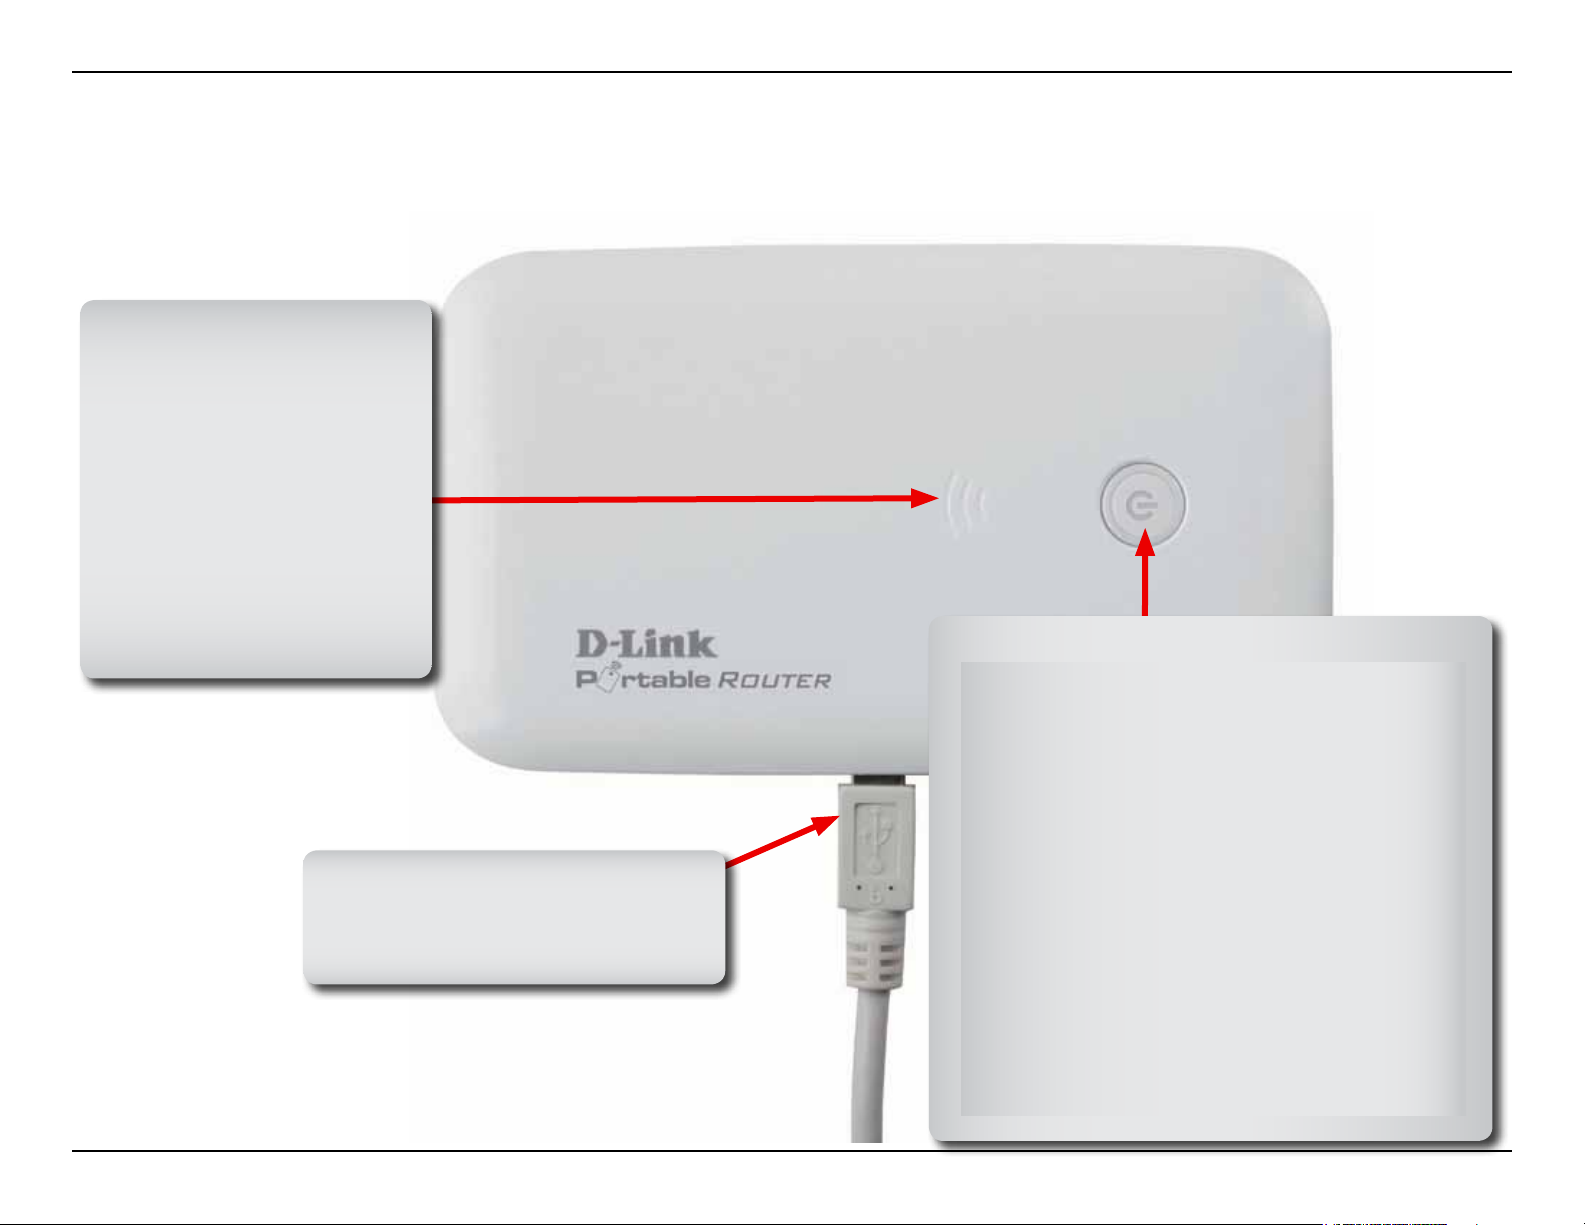
Section 1 - Product Overview
3G Signal LED
A RED light indicates poor
signal strength.
A GREEN light indicates
normal signal strength.
A BLUE light indicates
excellent signal strength.
A Blinking 3G Signal LED
Hardware Overview
Top View
indicates 3G activity.
USB Connection
Connect either the USB power cable
or USB power adapter to charge the
battery.
Power LED
Device not plugged into a USB port:
A steady RED light indicates A SIM card error
or no service.
A blinking RED light indicates the battery is
low.
A steady GREEN light indicates 2G Wireless
service.
A steady BLUE light indicates 3G service,
Device plugged into a USB port:
A blinking RED light indicates the battery is
charging when powered off.
A blinking RED/GREEN/BLUE light indicates
the battery is charging when powered on.
5D-Link DIR-457 User Manual
Page 11
Section 1 - Product Overview
Hardware Overview
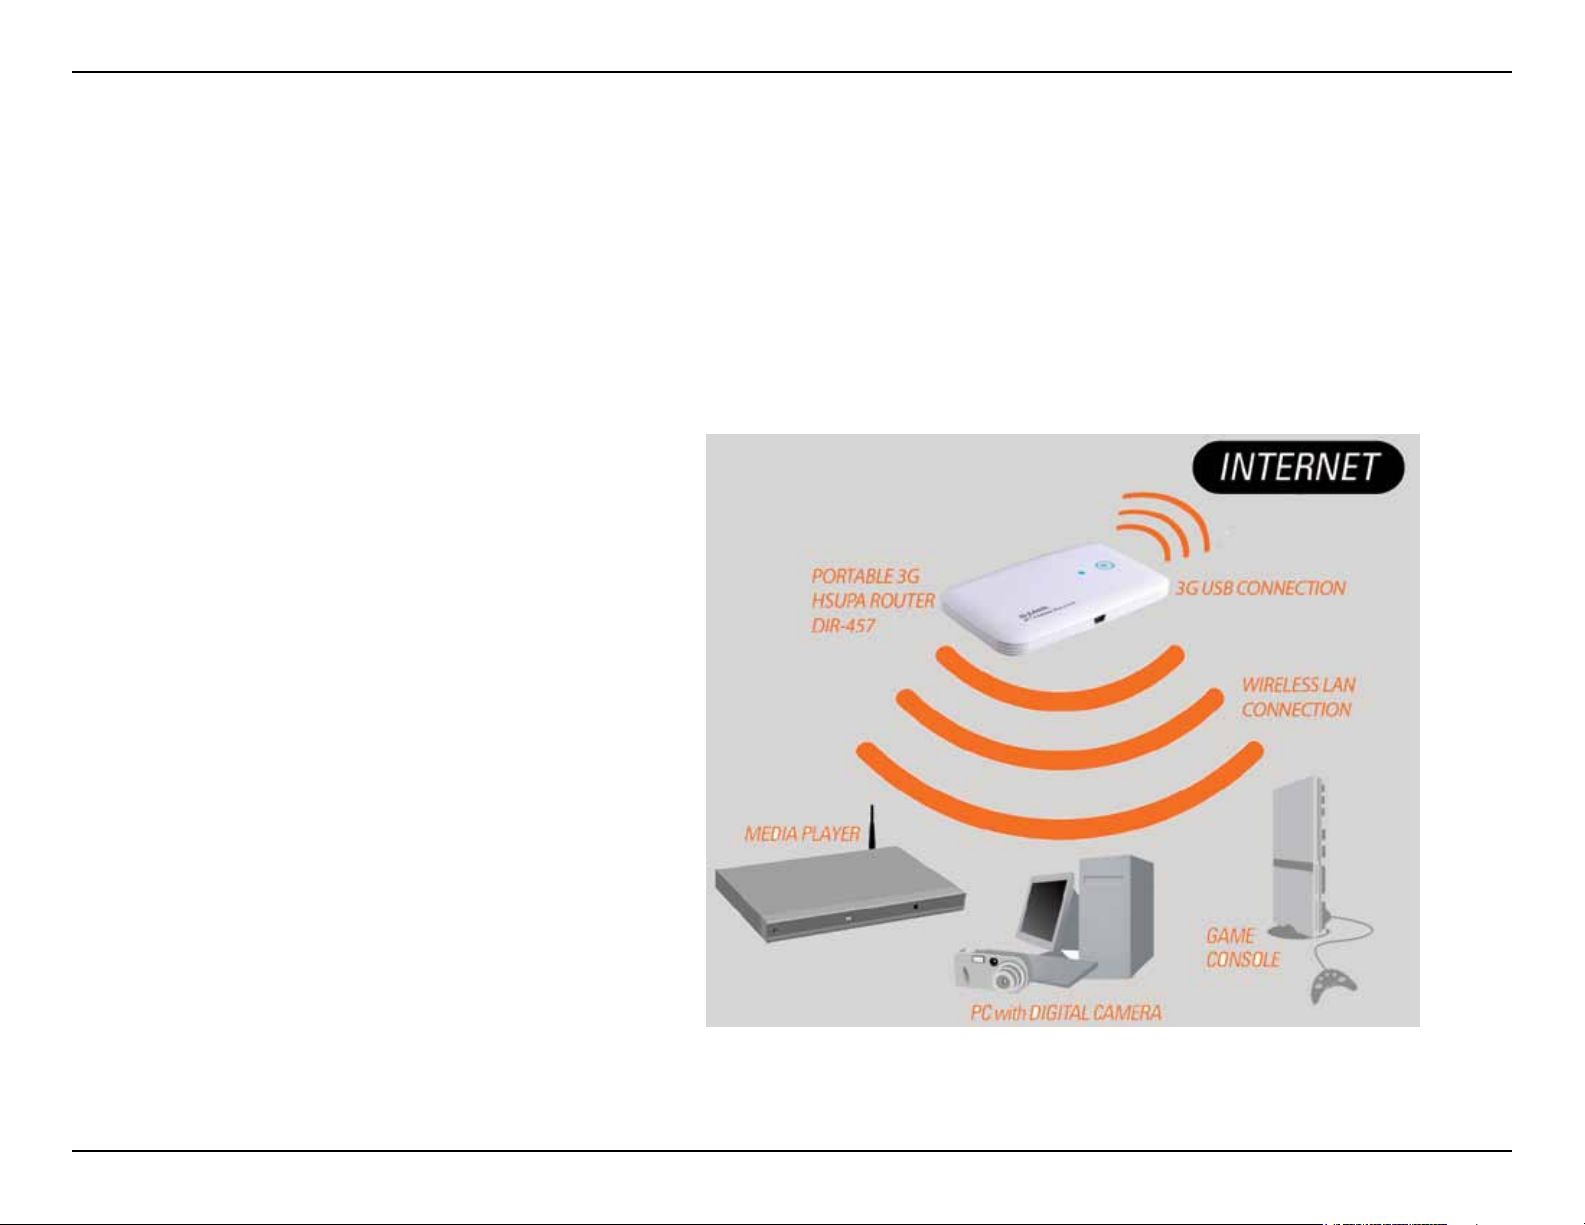
Switching Between 3G Modem Mode and Wi-Fi Router Mode
The DIR-457 features a hardware switch that enables users to switch between 3G Modem mode and Wi-Fi Router
mode.
When the DIR-457 is in 3G modem mode, the device connected via the included USB cable maintains a direct 3G
Internet connection. Use the Connection Manager to congure the 3G connection sharing for additional wireless devices
when the DIR-457 is changed to Wi-Fi Router mode.
In Wi-Fi Router mode, the DIR-457 can share
the 3G Internet connection with multiple Wi-Fi
clients. Use DIR-457 to connect notebooks, game
consoles, smart phones and other wireless clients.
6D-Link DIR-457 User Manual
Page 12

Section 1 - Product Overview
• It usually takes a minimum of 3 hours to fully charge the battery.
• Battery power lasts up to 4 hours in standby status.
• Battery life depends on network, signal strength, temperature, features, and accessories.
• New batteries or batteries not used for an extended period may take longer to fully charge.
• Always charge the battery at room temperature.
• The battery may perform best after several full cycles of charging and discharging.
• Store the battery uncharged in a cool, dark, dry place.
Battery Facts
• Never expose batteries to temperatures below –10°C (14°F) or above 45°C (113°F).
• Leaving the battery in a hot vehicle may degrade long-term performance of Li-Ion batteries..
• It is normal for batteries to gradually wear down and require longer charging times.
7D-Link DIR-457 User Manual
Page 13

Section 2 - Installation
Installation
When using the DIR-457 in Wi-Fi router mode, placement of the device is very important. Do not place the device in
an enclosed area such as a closet, cabinet, or in the attic or garage. Please install the device considering the following
points:
The D-Link DIR-457 in Wi-Fi router mode lets you access your network using a wireless connection from virtually anywhere within the
operating range of your wireless network. Keep in mind, however, that the number, thickness and location of walls, ceilings, or other objects
that the wireless signals must pass through, may limit the range. Typical ranges vary depending on the types of materials and background
RF (radio frequency) noise in your home or business. The key to maximizing wireless range is to follow these basic guidelines:
1. Keep the number of walls and ceilings between the D-Link router and other network devices to a minimum - each wall or
ceiling can reduce your adapter’s range from 3-90 feet (1-30 meters.) Position your devices so that the number of walls
or ceilings is minimized.
2. Be awar e of th e direct line between netw ork devices. A wall that is 1.5 feet thick (.5 meters ), at a
45-degree angle appears to be almost 3 feet (1 meter) thick. At a 2-degree angle it looks over 42 feet (14 meters)
thick! Position devices so that the signal will travel straight through a wall or ceiling (instead of at an angle) for better
reception.
3. Building Materials make a difference. A solid metal door or aluminum studs may have a negative effect on range. Try
to position access points, wireless routers, and computers so that the signal passes through drywall or open doorways.
Materials and objects such as glass, steel, metal, walls with insulation, water (sh tanks), mirrors, le cabinets, brick, and
concrete will degrade your wireless signal.
4. Keep your product away (at least 3-6 feet or 1-2 meters) from electrical devices or appliances that generate RF noise.
5. If you are using 2.4GHz cordless phones or X-10 (wireless products such as ceiling fans, lights, and home security
systems), your wireless connection may degrade dramatically or drop completely. Make sure your 2.4GHz phone base
is as far away from your wireless devices as possible. The base transmits a signal even if the phone in not in use.
8D-Link DIR-457 User Manual
Page 14
Section 2 - Installation
Product Setup
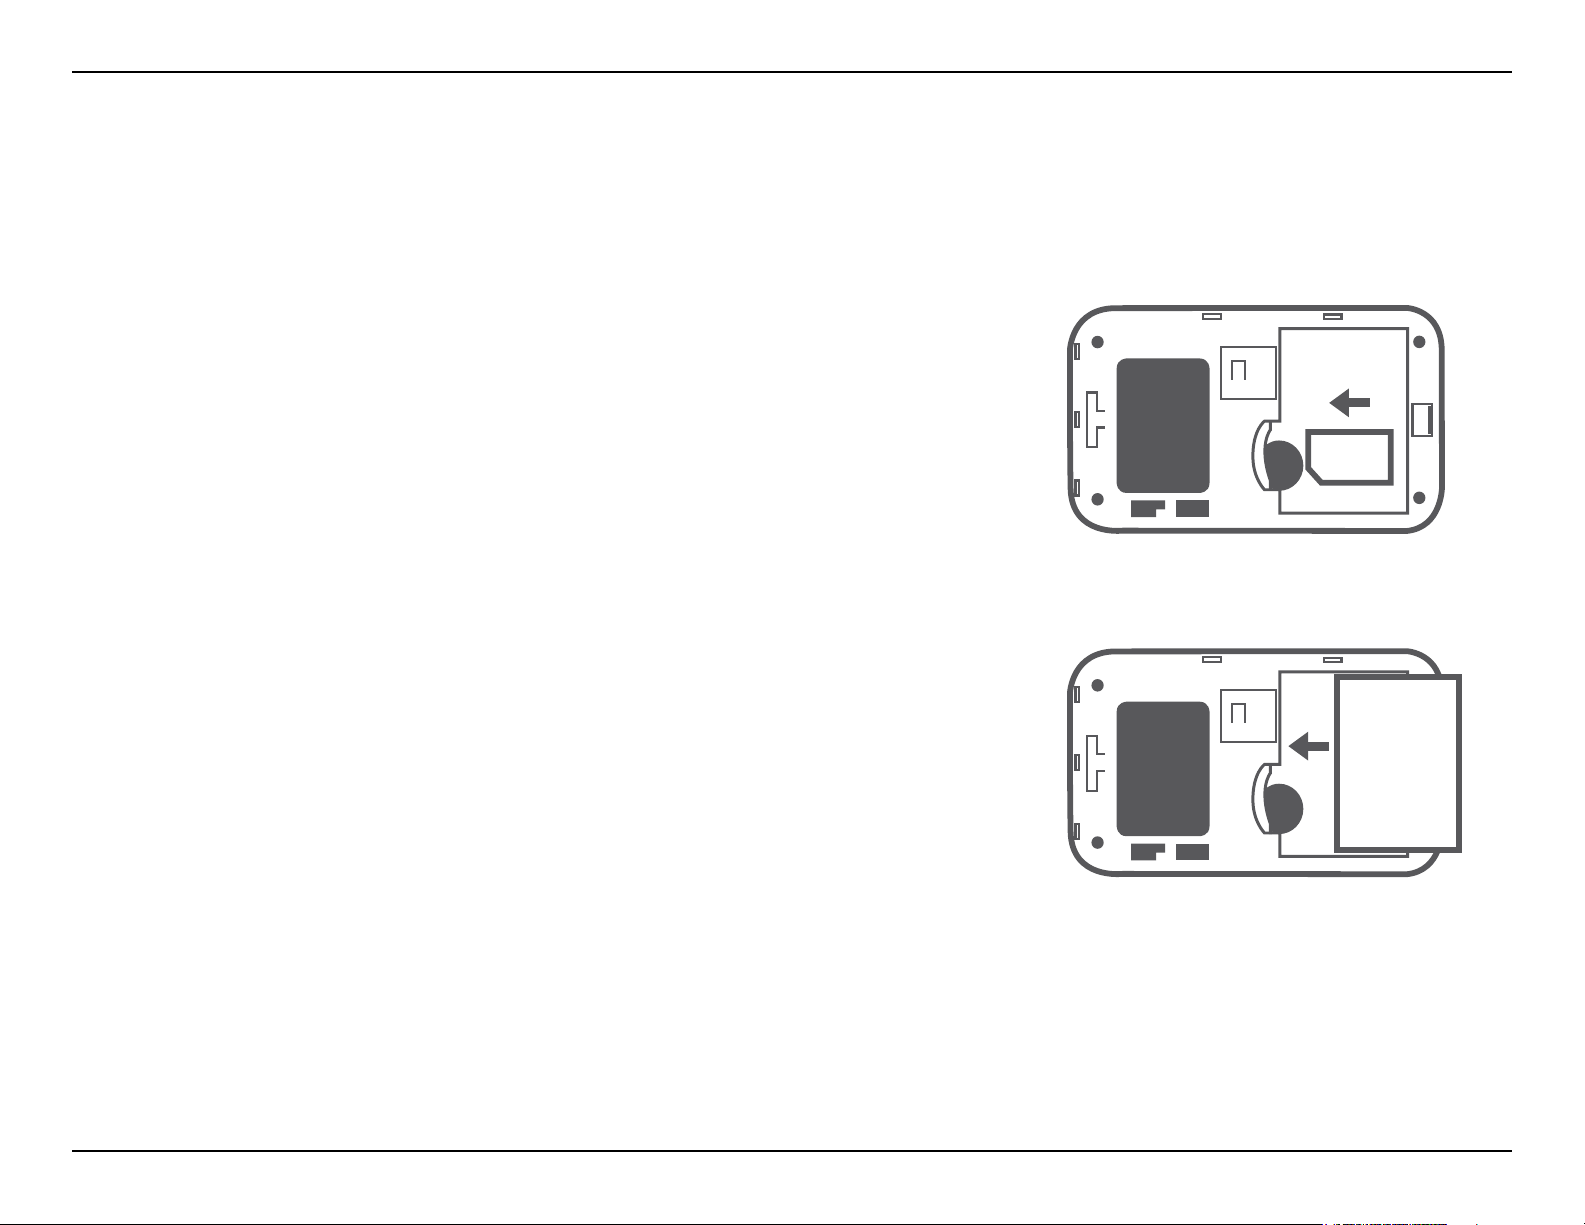
Hardware Setup
Installing the SIM Card
Open the SIM card and battery compartment, located on the bottom of the
device. Insert the SIM card by lining up the contact points on the SIM card with
the contact points in the SIM card compartment.
Installing the Battery
Insert the battery by lining up the contact points on the battery with the contact
points in the battery compartment. The included battery lasts up to four
hours.
Note: The battery is required to power the DIR-457 Portable Router in either
Wi-Fi router or USB modem mode.
9D-Link DIR-457 User Manual
Page 15
Section 2 - Installation
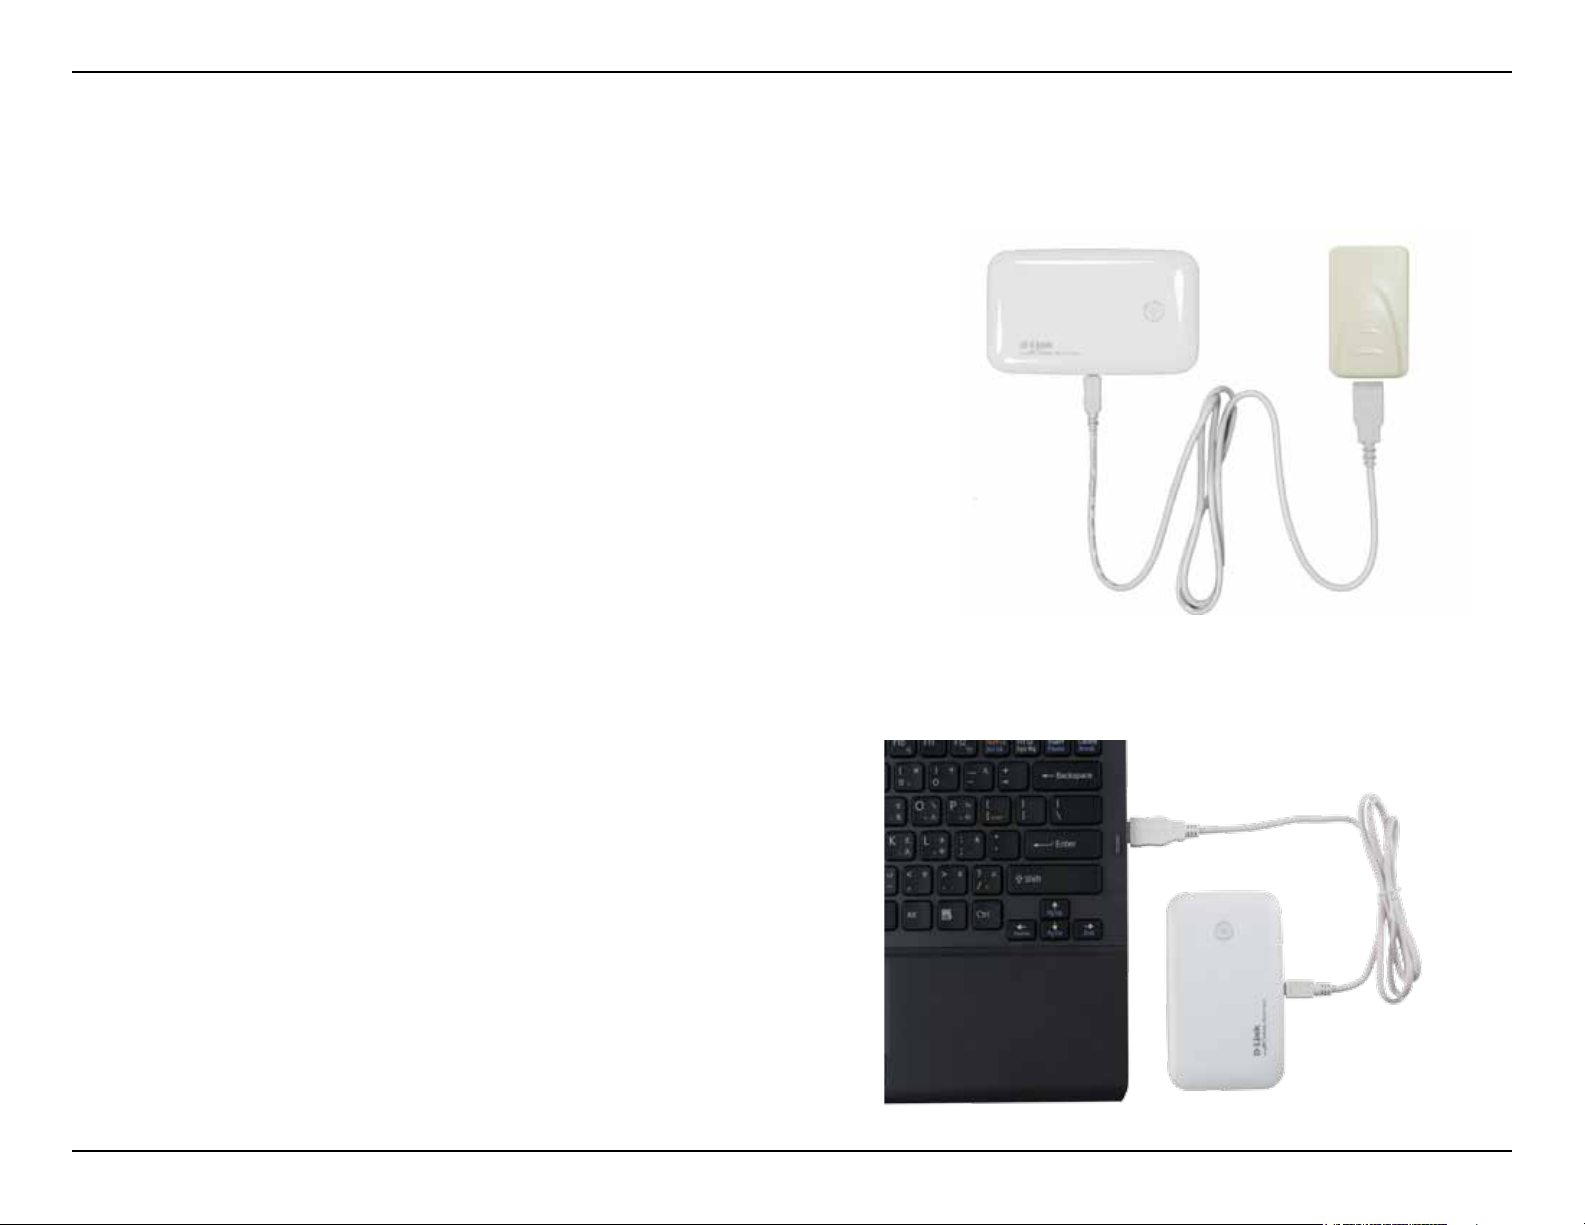
Power Management
Charging with the Power Adapter
To charge the battery insert one end of the USB cable into the USB port
of the power adapter and the other end into the Mini-USB port of the DIR457 Portable Router, then plug the power adapter into a wall socket. While
charging, the Power/3G network LED will ash. When battery power is low,
the LED will ash red.
Charging with the USB Cable
To charge the battery insert the USB cable into the Mini-USB port of the
DIR-457 Portable Router and the other end into a free USB port of your
computer. While charging, the Power/3G network LED will ash. When
battery power is low, the LED will ash red.
Note: Both USB modem mode and Wi-Fi router mode support above two
charging methods.
10D-Link DIR-457 User Manual
Page 16
Section 2 - Installation
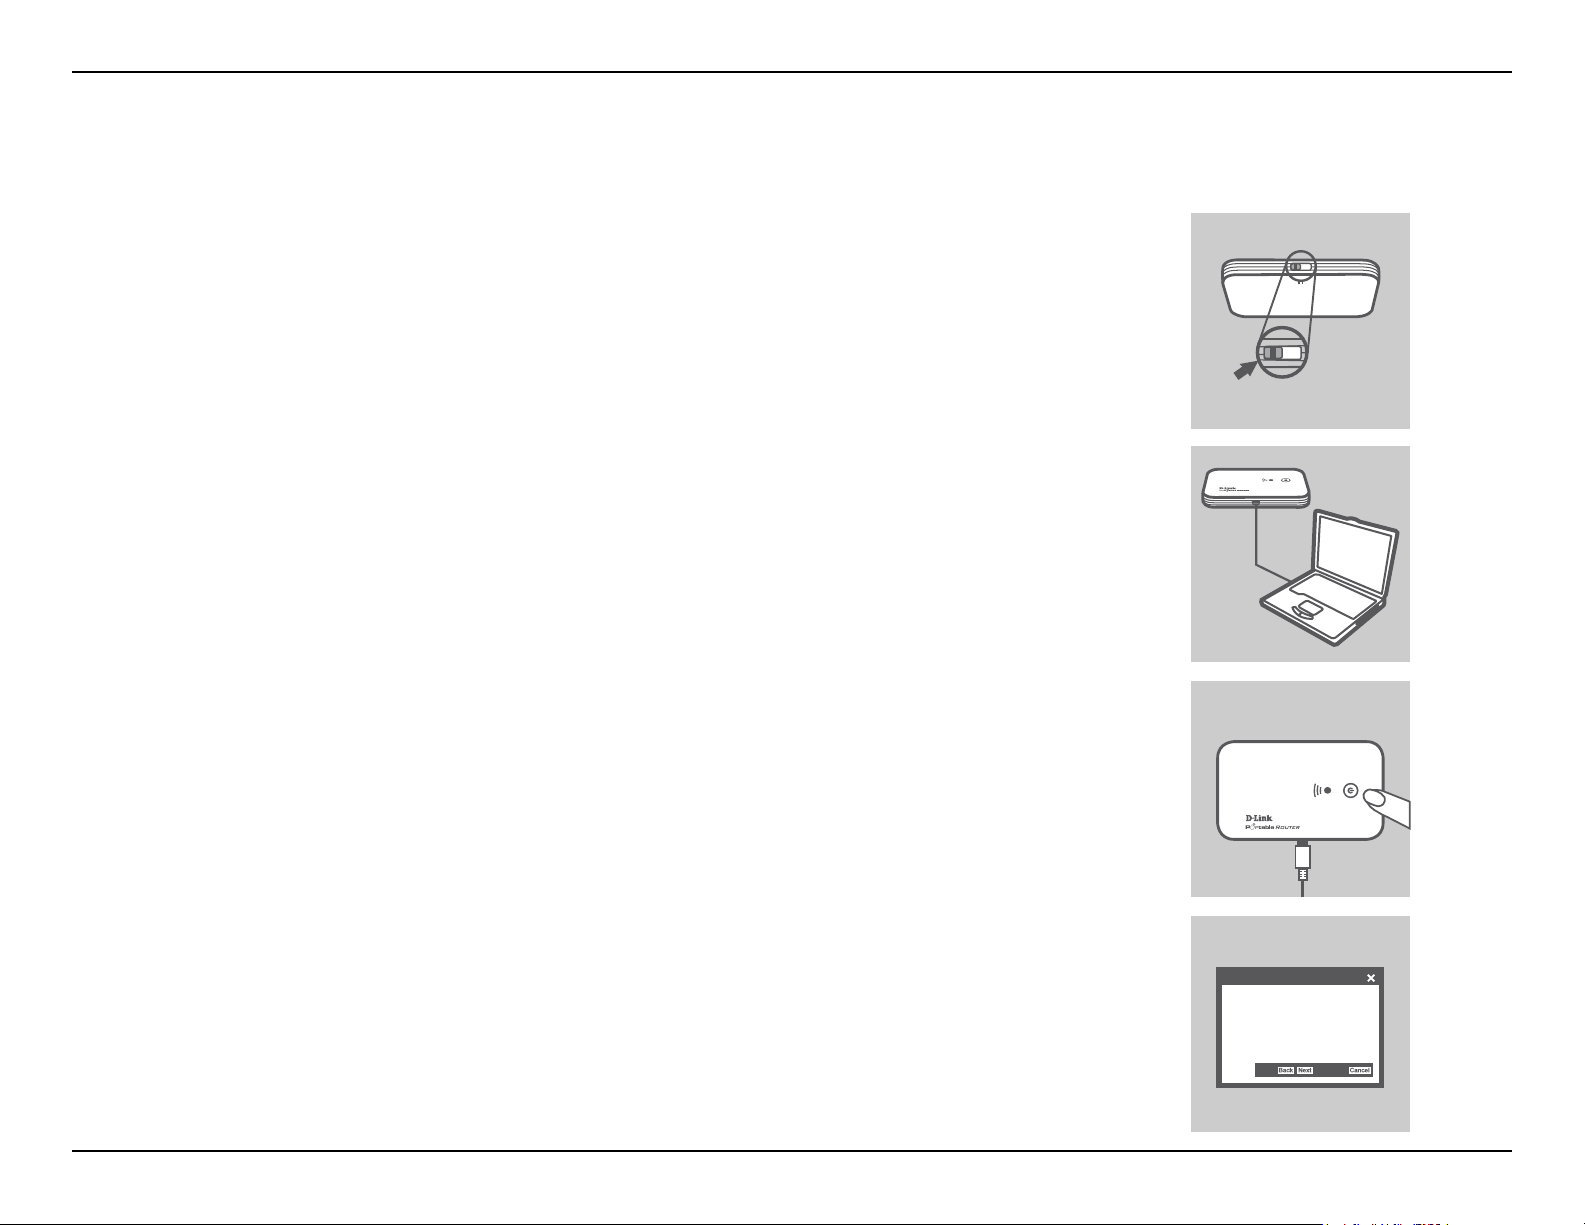
Connection Setup
USB Modem Mode Connection
1. Move the router/modem selection switch to USB modem mode.
2. Connect the DIR-457 Portable Router to your computer with the included USB
cable. To do this, insert the USB cable into the Mini-USB port of the DIR-457
Portable Router and the other end into a free USB port of your computer.
3. Press the power button on the DIR-457.
MODEM ROUTER
MODEM
4. The Connection Manager software will automatically start up.
5. Congure your router/modem settings using the Connection Manager.
6. You can now use the DIR-457 Portable Router as a USB modem.
Note: You have to install the Connection Manager software when using the DIR-457 for
the rst time. After successful installation, you can congure USB modem and Wi-Fi router
basic settings. When the DIR-457 is used in USB modem mode, you can manage your
3G connection using the D-Link Mobile Connection Manager (please refer to session 2 Managing 3G connection).
InstallShield Wizard
Welcome to the InstallShield Wizard for
DIR-457 USB Modem
11D-Link DIR-457 User Manual
Page 17
Section 2 - Installation
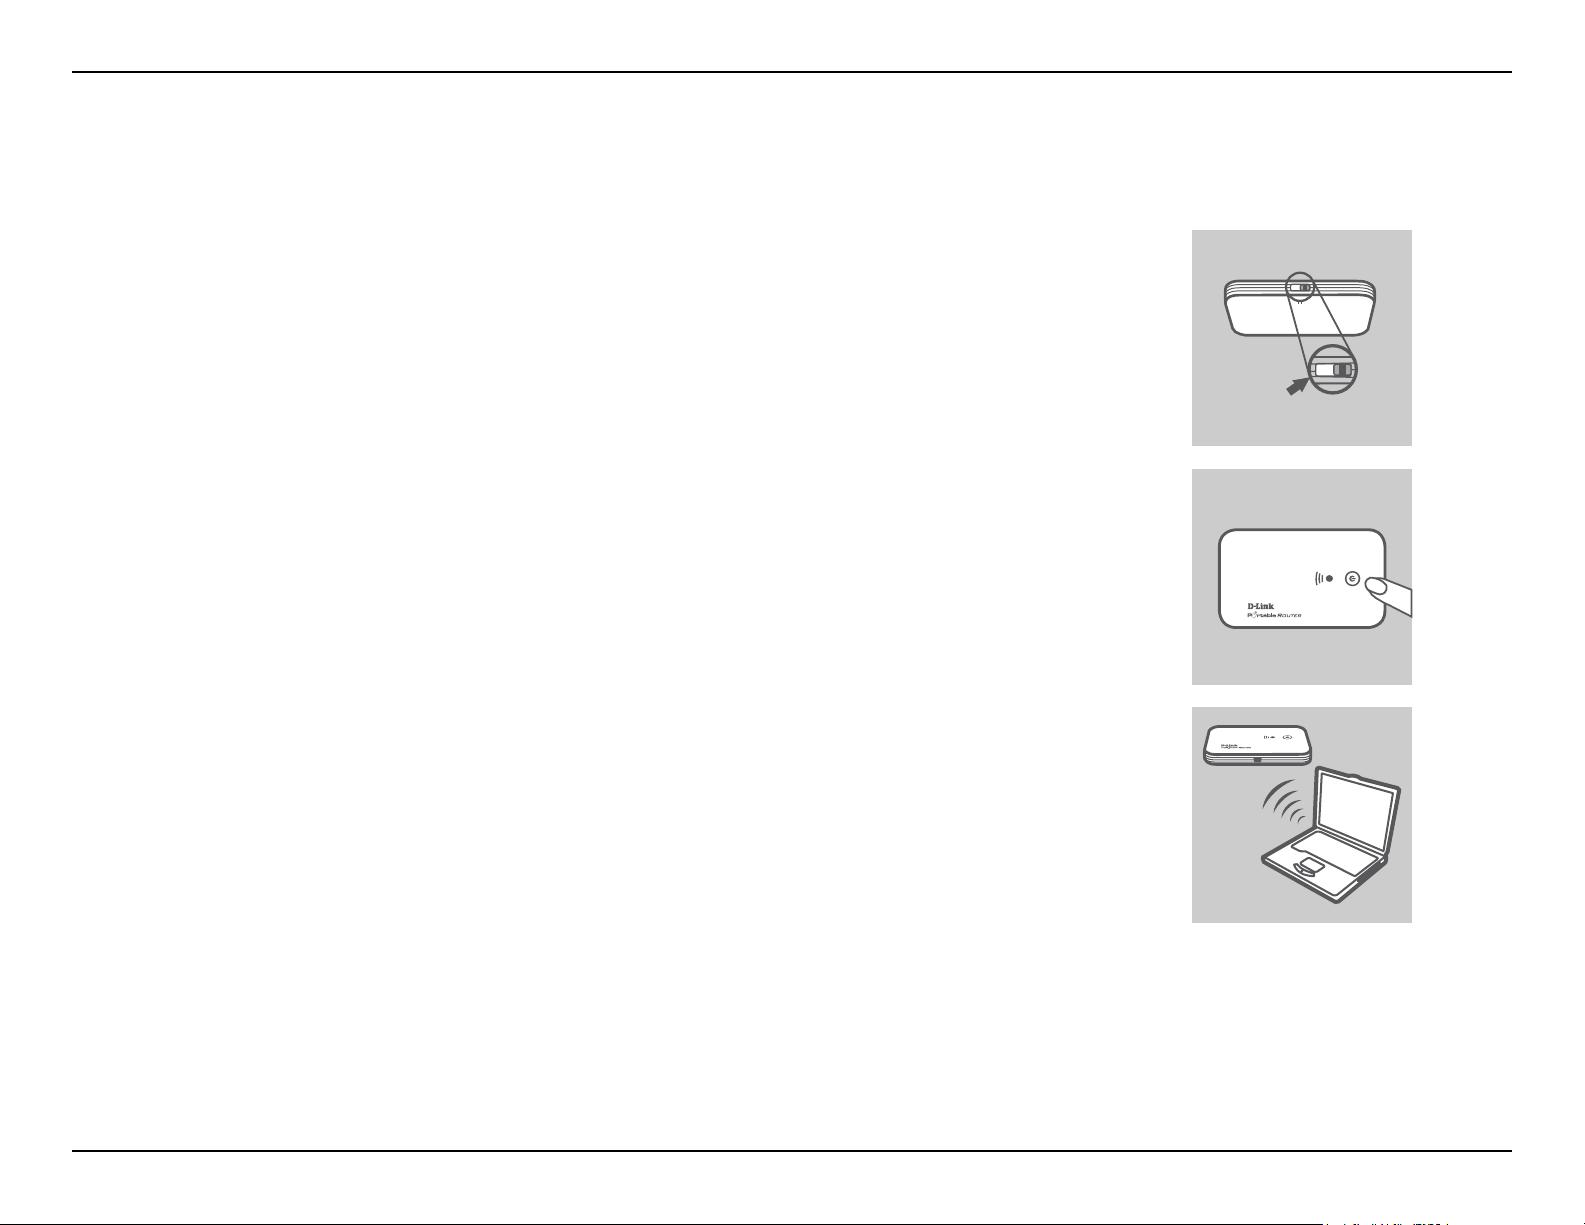
Wi-Fi Router Mode
Connection Setup
1. Move the router/modem selection switch to Wi-Fi router mode.
2. Press the power button on the DIR-457.
3. You can now use the DIR-457 Portable Router as a wireless access point and connect
to the router with any Wi-Fi capable devices.
MODEM ROUTER
ROUTER
12D-Link DIR-457 User Manual
Page 18
Section 3 - Device Setup using D-Link Connection Manager (Windows)
Device Setup using D-Link Connection Manager
(Windows)
Manager or Web-based Tool
The DIR-457 provides two different ways of device setup. For changing settings, you can choose either the D-Link
Mobile Connection Manager or the Web-based Conguration Utility (please refer to Section 5 - WEB Conguration).
The D-Link Mobile Connection Manager offers an easier and simpler way, and allows for both 3G and Wi-Fi settings
to be adjusted. The following instructions will show you how to congure the 3G connection.
Note: These settings will only take effect when you use the DIR-457 as a 3G USB modem.
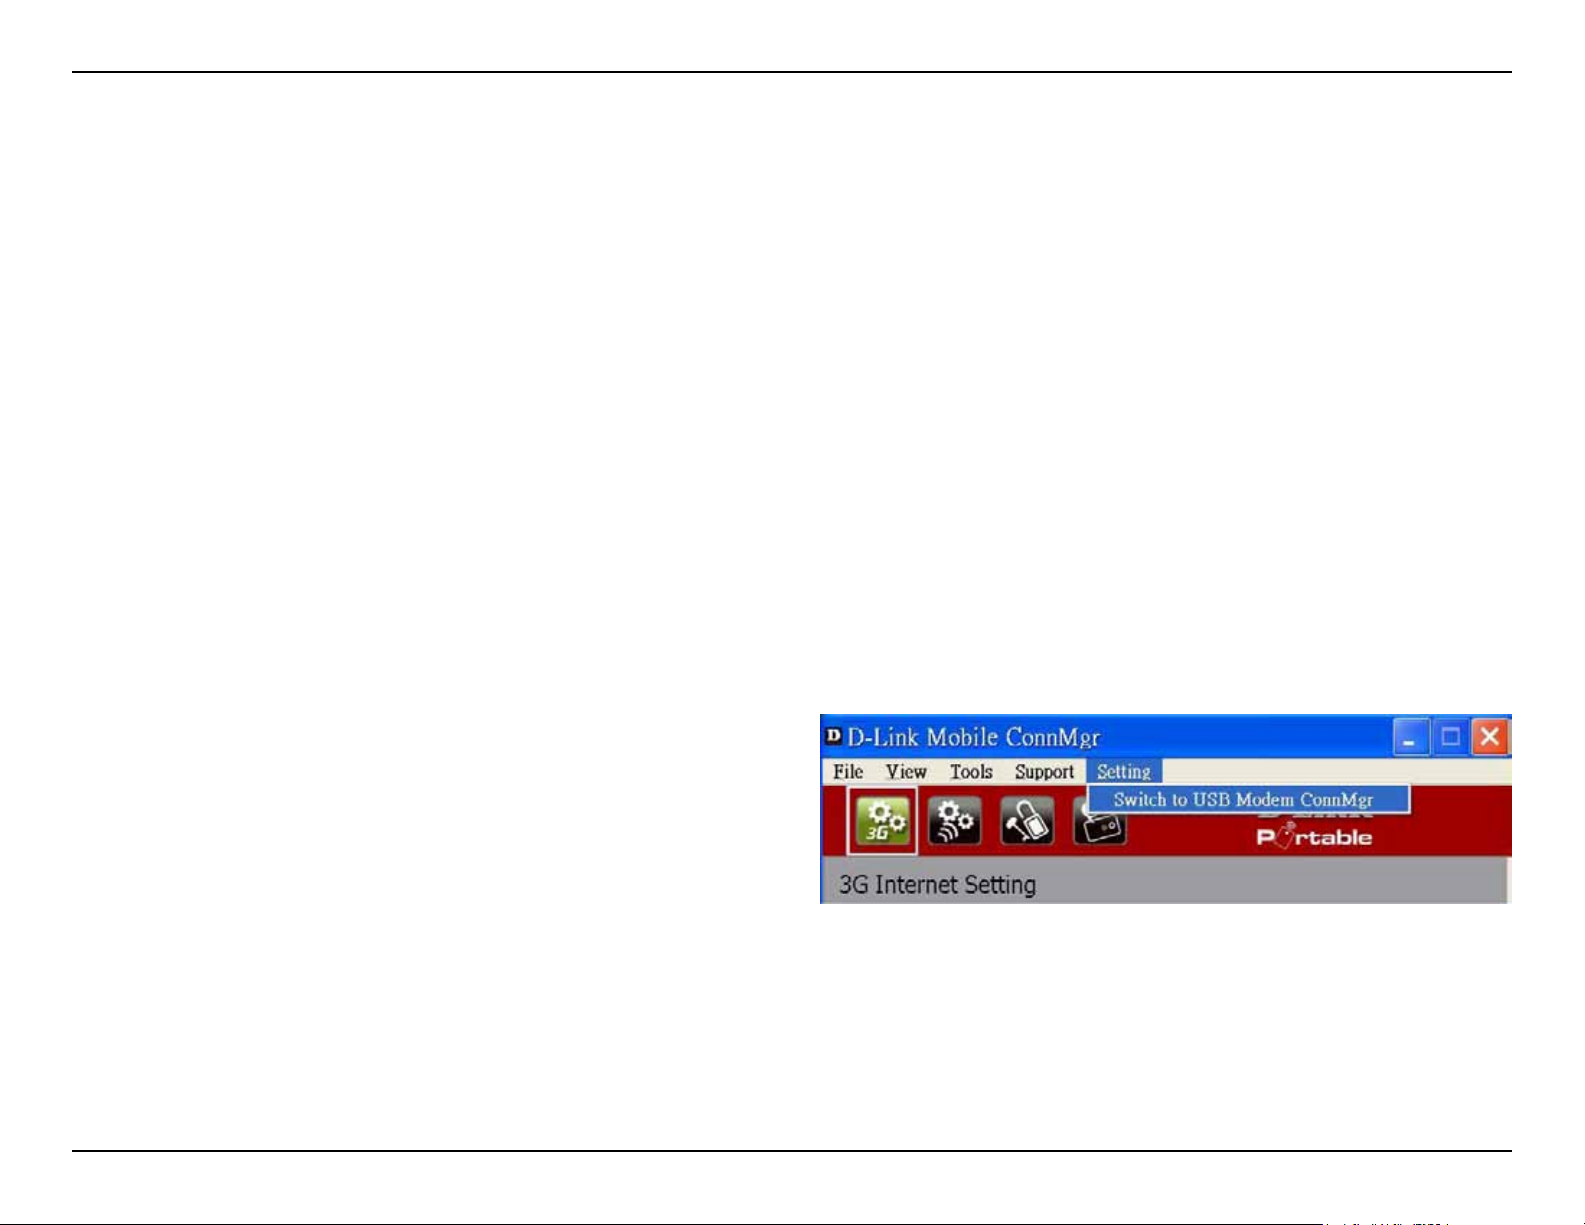
Managing the 3G Connection
To configure the 3G connection of your DIR-457 go to
Settings > Switch to USB Modem ConnMgr.
13D-Link DIR-457 User Manual
Page 19
Section 3 - Device Setup using D-Link Connection Manager (Windows)
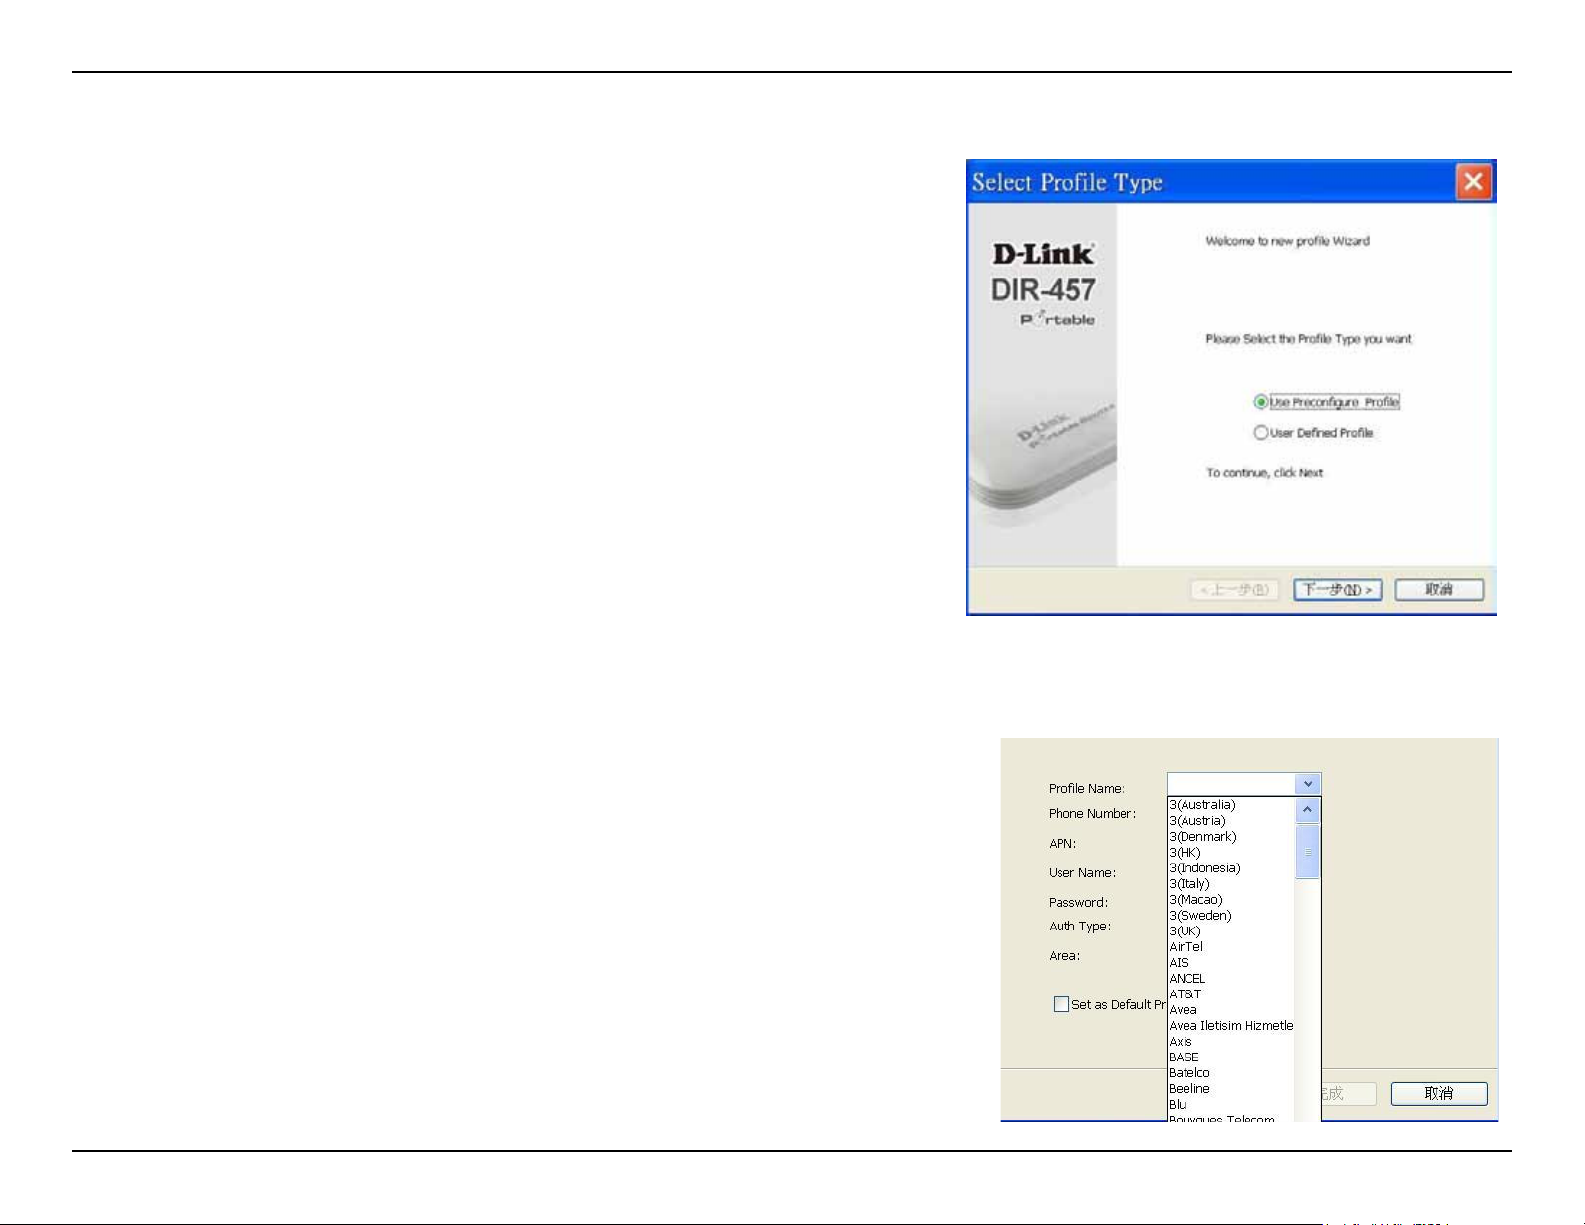
New Profile
Before starting, if the mobile service provider associated with your
SIM card is listed in the preset prole list, you can directly connect
to the desired network using its pre-dened prole.
You also can create your own prole by following the steps below:
1. Click the Prole button.
2. Click the New button to activate the wizard which will help you
create a new prole.
3. Select the prole type, Precongured Prole or User Dened
Prole. Click Next to continue.
Use Default Profile (Preset)
1. Select a Prole Name from the drop-down menu. Most of the required
information will be populated into the elds automatically.
2. If needed, ll in the Phone Number, APN (Access Point Network),
User Name, and Password.
3. If desired, click the check box to set this as the default prole.
4. Click Next to continue.
14D-Link DIR-457 User Manual
Page 20
Section 3 - Device Setup using D-Link Connection Manager (Windows)
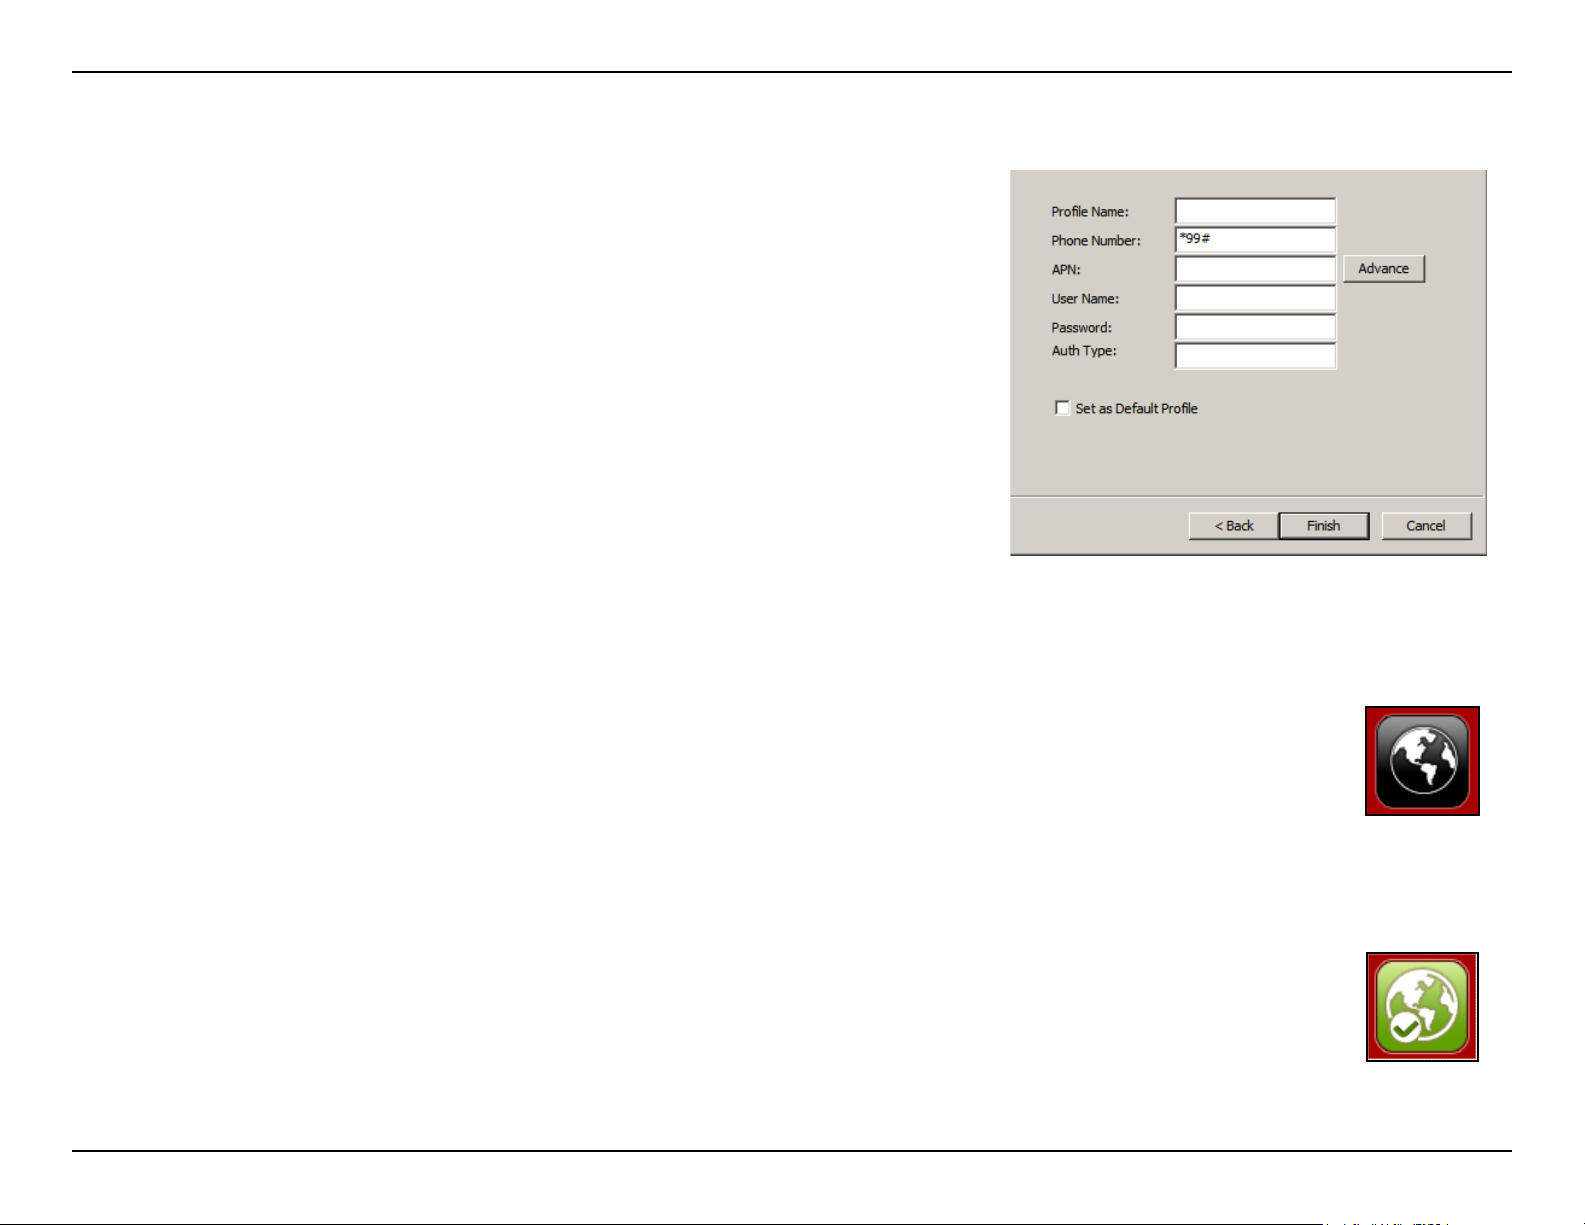
User-Defined Profile
1. Fill in the Prole Name, Phone Number, APN, User Name,
Password, and Authorization Type.
2. Click Finish to complete.
3. Click the Advanced button to display APN details.
4. Highlight an APN and click OK.
5. Click Next to continue.
Establishing a Connection
The Connect/Disconnect button will be black when you are ofine. You can click the Connect button to
connect to the network via the default prole. After you are connected, the button will turn green with
a checkmark. Once connected, you can use the mobile service network to browse the Internet, send
e-mail, send text messages, and perform other tasks online.
Ending a Connection
If you wish to disconnect, click the button again, and the button will turn black to indicate you have
successfully disconnected and are ofine.
Connect
Disconnect
15D-Link DIR-457 User Manual
Page 21

Section 3 - Device Setup using D-Link Connection Manager (Windows)
Profile Management
Under the Proles icon, users can create, edit and delete proles as well as preset proles.
Editing
1. Click the Prole button.
2. Select a prole and click the Edit button.
3. Click the appropriate tab and enter the information in the elds.
4. Click the Advanced button to display a list of operators and their areas
in the window below.
5. Click OK to close the APN window.
6. Click OK to close the Edit Prole window.
Note: Proles may only be edited when you are disconnected.
Deleting a Prole
Click the Prole button.
Select a user-dened prole and click the Delete button.
Click Yes to conrm the deletion.
Profile
Deleting All Proles
Click the Prole button.
Click the Delete All button.
Setting the Default Prole
Click the Prole button.
Highlight the prole to use when the DIR-457 is started.
Click Set as Default prole.
Reset to Factory Default
Click the Prole button.
Click Set as Factory Default to return the DIR-457 to the factory settings.
16D-Link DIR-457 User Manual
Page 22
Section 3 - Device Setup using D-Link Connection Manager (Windows)
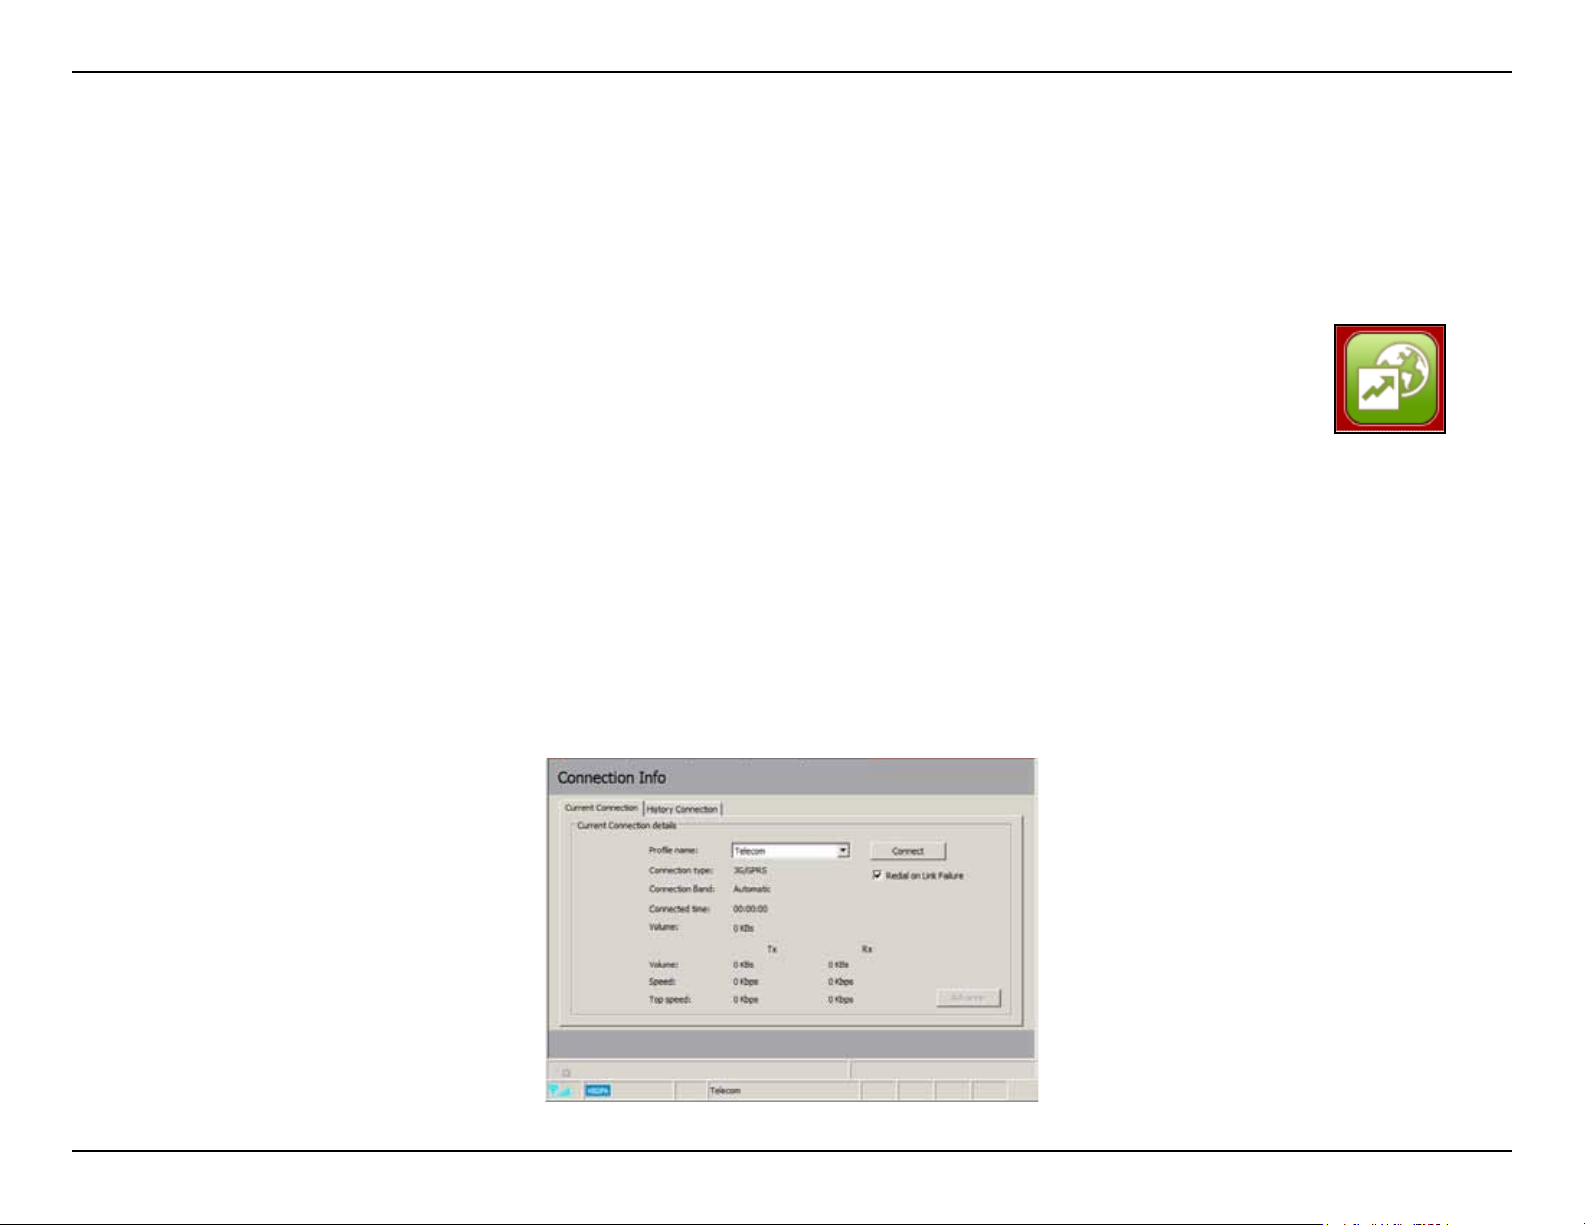
Connection Management
The Connection Information window allows users to manage not only the current connection (if connected), but also
their connection history. Click the Connection Info button to open the Connection Information window.
Current Connection
The Current Connection tab displays the following information:
Prole Name - Displays the current prole. Select other proles from the drop down menu.
Connection Type - Displays the mobile service technology that the service network uses.
Connection Band - Displays the band of the current connection.
Connected Time - Displays how long the current session has been active for.
Volume - Displays the total amount of data received (Rx) and transmitted (Tx).
Speed - Displays the speeds for both transmitted and received data.
Top Speed - Displays the maximum transmitted and received speeds attained.
Redial on Link Failure - Redial if the connection is somehow disconnected.
Connection
Information
Note: Windows Vista requires your conrmation to redial on link failure.
17D-Link DIR-457 User Manual
Page 23
Section 3 - Device Setup using D-Link Connection Manager (Windows)
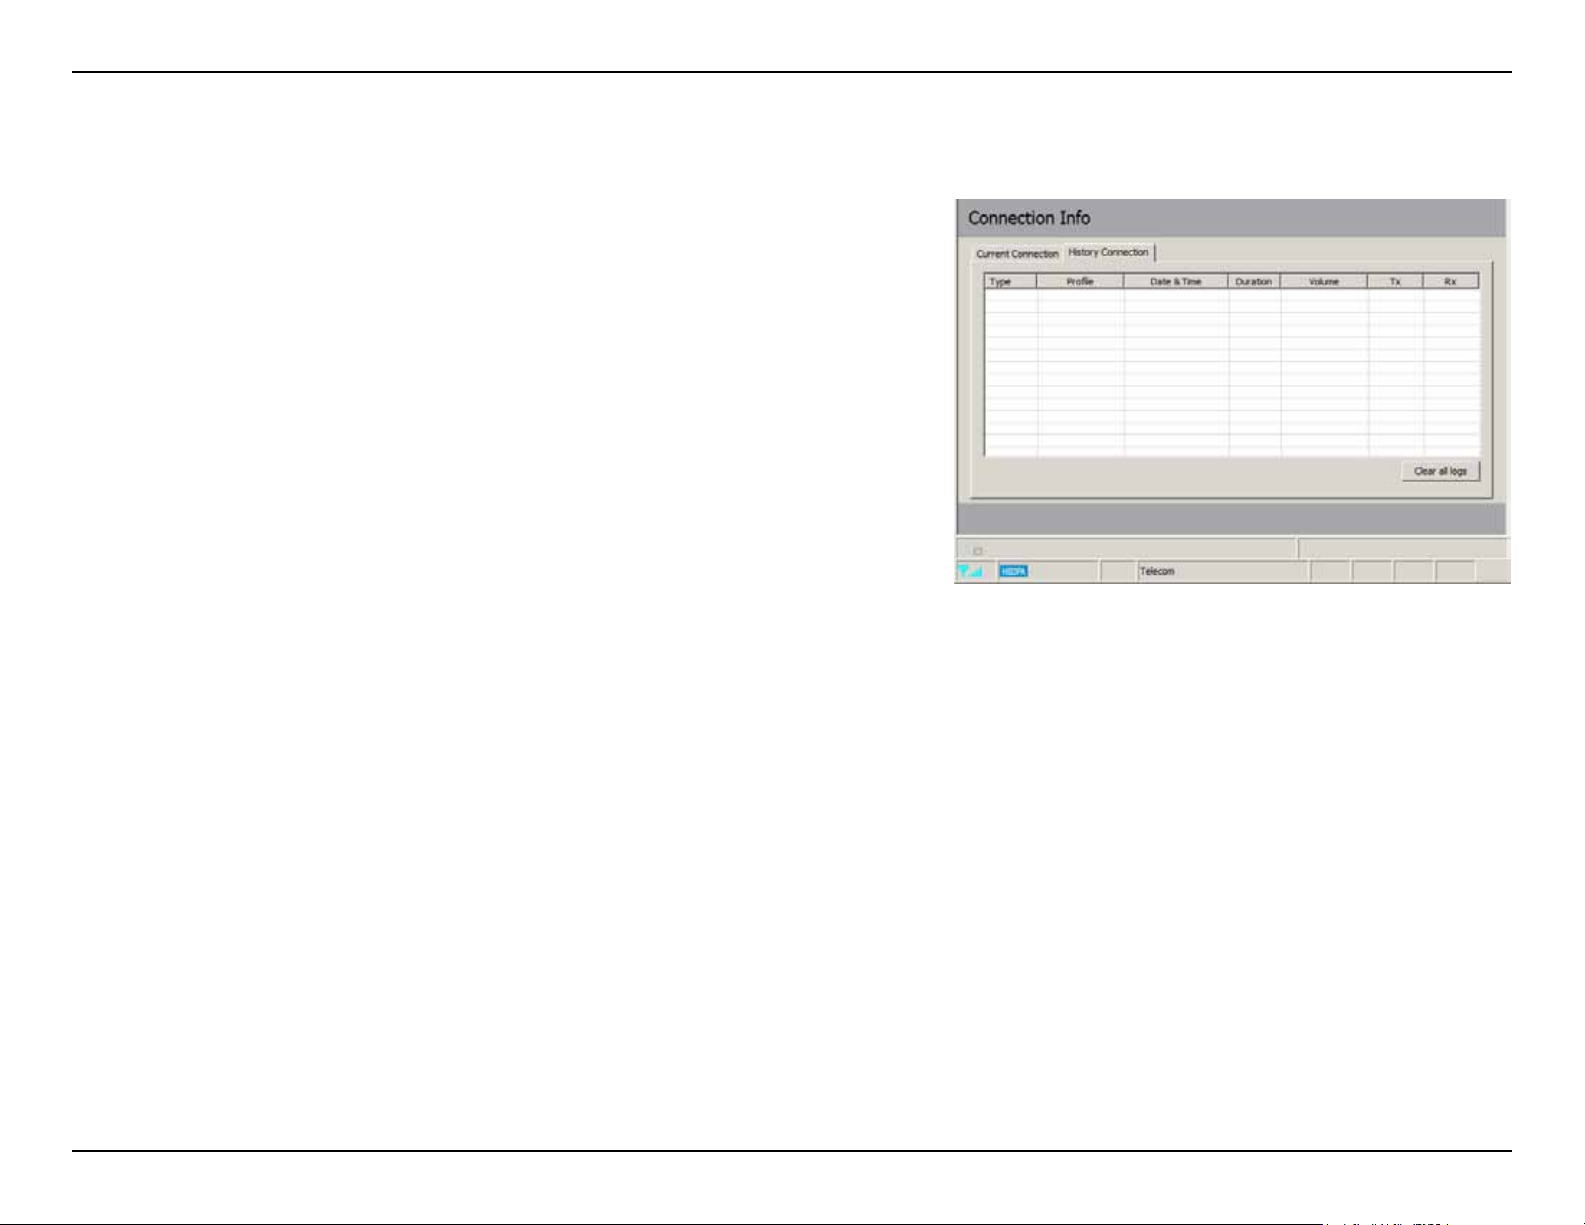
Connection History
The History Connection tab displays the following information:
Type - The type of connections made.
Prole - The names of the proles used.
Date & Time - The date and time of the connection.
Duration - The duration of the connection in hours, minutes,
and seconds.
Volume - The total amount of data transmitted and received.
Tx - The total number of bytes transmitted.
Rx - The total number of bytes received.
Follow the steps below to clear the Connection History:
1. Click Clear All Logs to clear the logs.
2. Click Yes to conrm.
18D-Link DIR-457 User Manual
Page 24
Section 3 - Device Setup using D-Link Connection Manager (Windows)
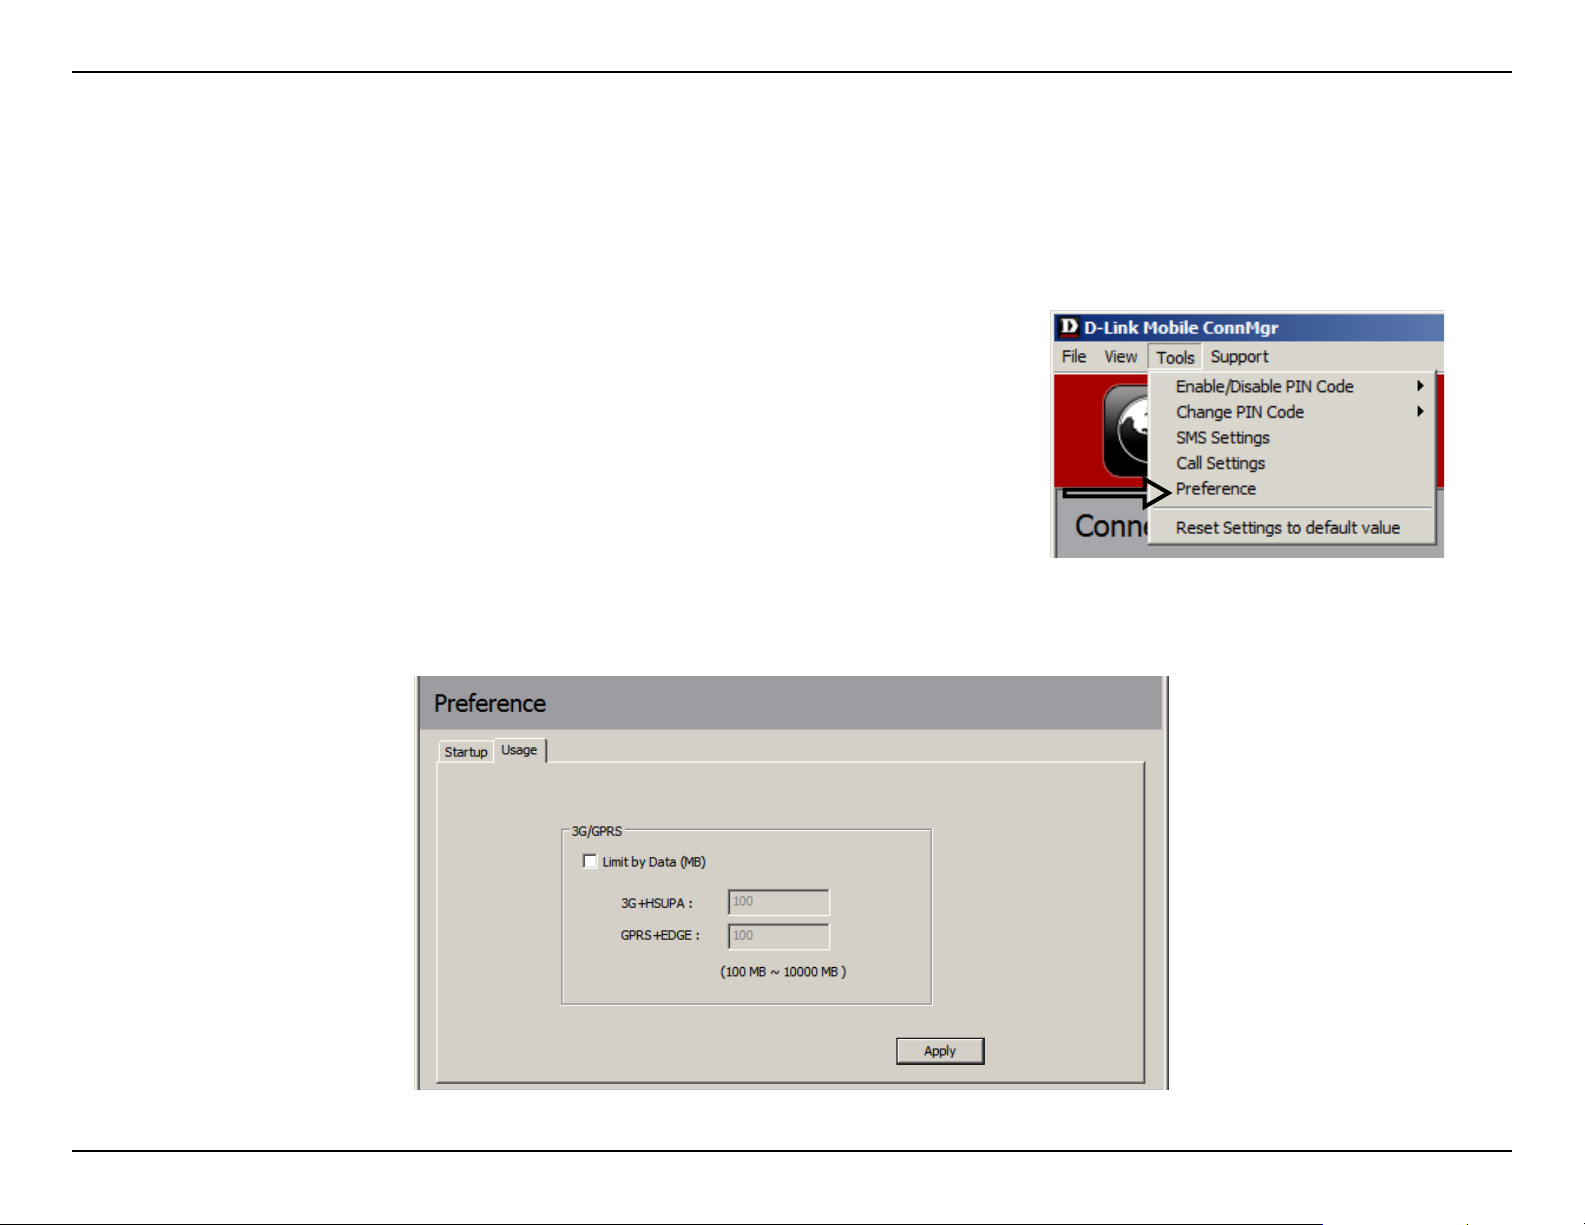
Usage Management
Limits can be set on how long a connection will last. These limits can either be set by usage (3G/GPRS connections)
or by time (Dialup connections).
Usage
1. Select Tools > Preference.
2. Select the Usage tab.
3. Check the Limit by Data checkbox.
4. Enter the desired value between 100MB and 10,000MB.
5. Click Apply to save the settings.
19D-Link DIR-457 User Manual
Page 25
Section 3 - Device Setup using D-Link Connection Manager (Windows)
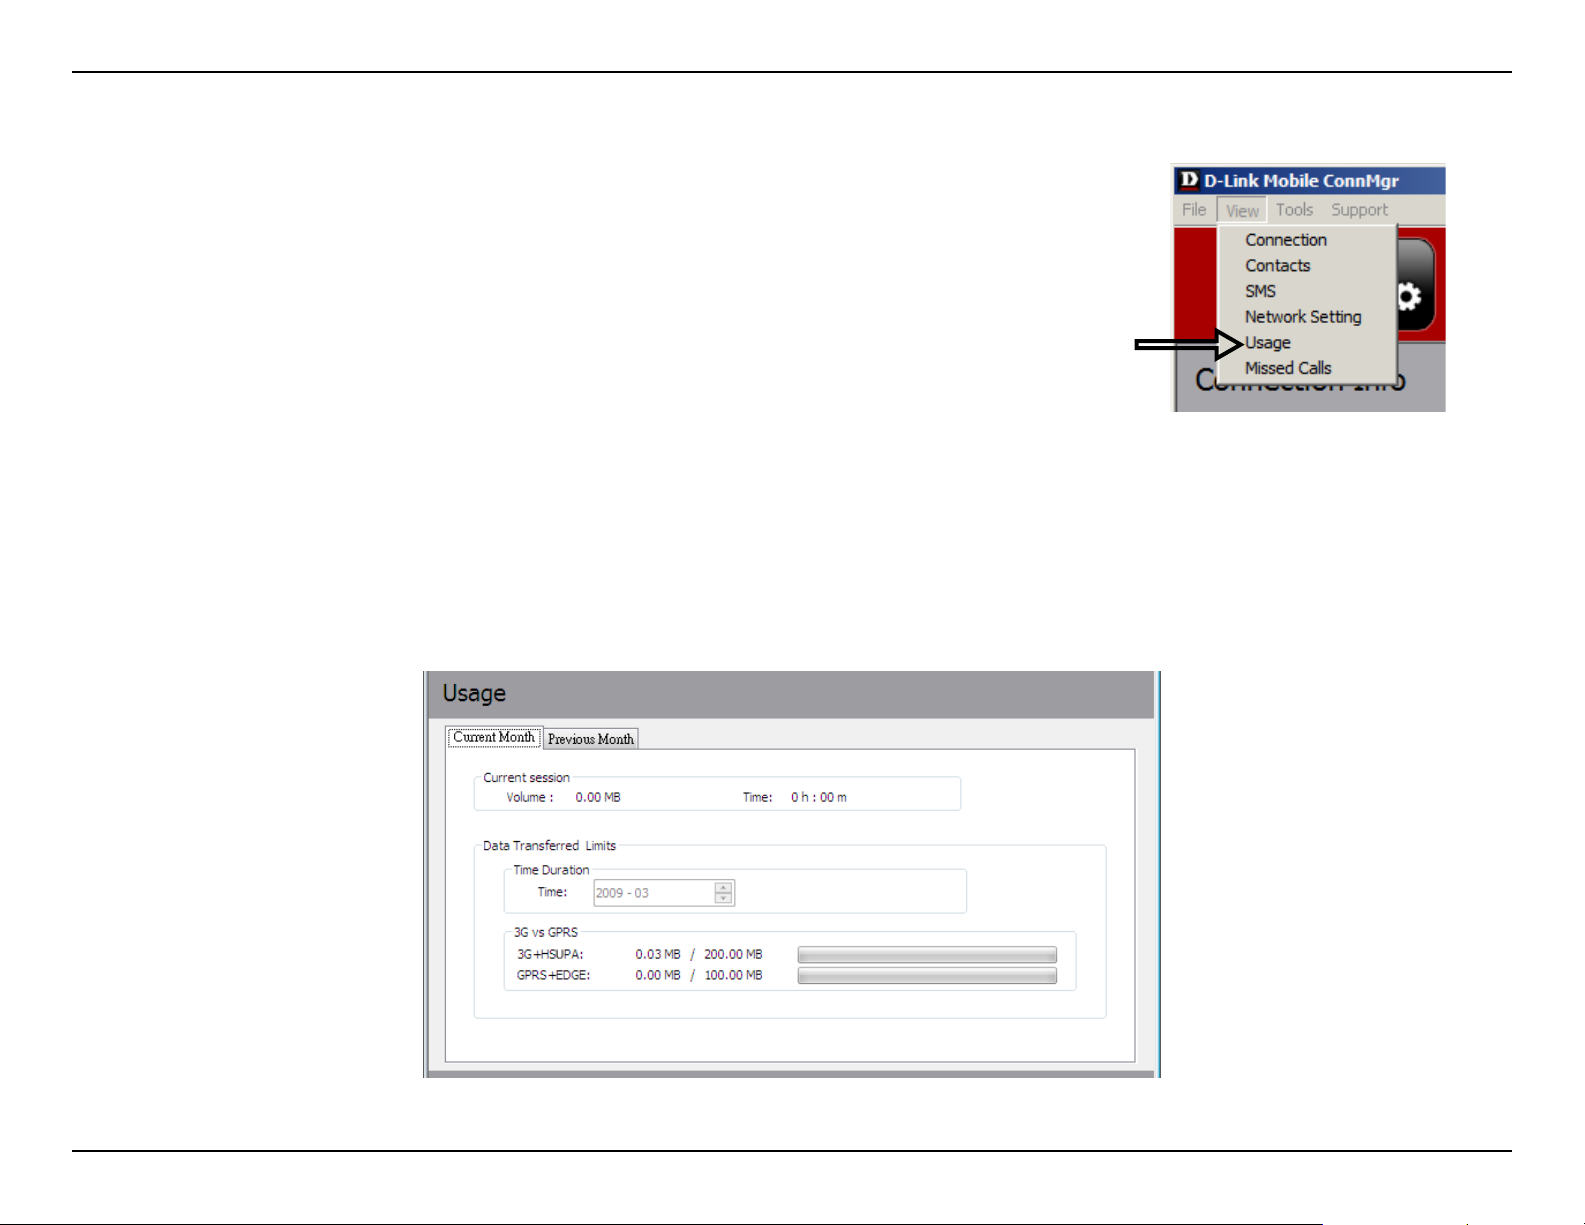
Usage Statistics
Statistics for both usage and time can be viewed from the usage menu.
1. Select View > Usage.
2. Select either the Current Month or Previous Month tab.
Follow the steps below to clear the Previous month’s logs:
1. Select View > Usage.
2. Select Previous Month tab.
3. Click Clear all logs.
4. Click Yes to conrm.
20D-Link DIR-457 User Manual
Page 26
Section 3 - Device Setup using D-Link Connection Manager (Windows)
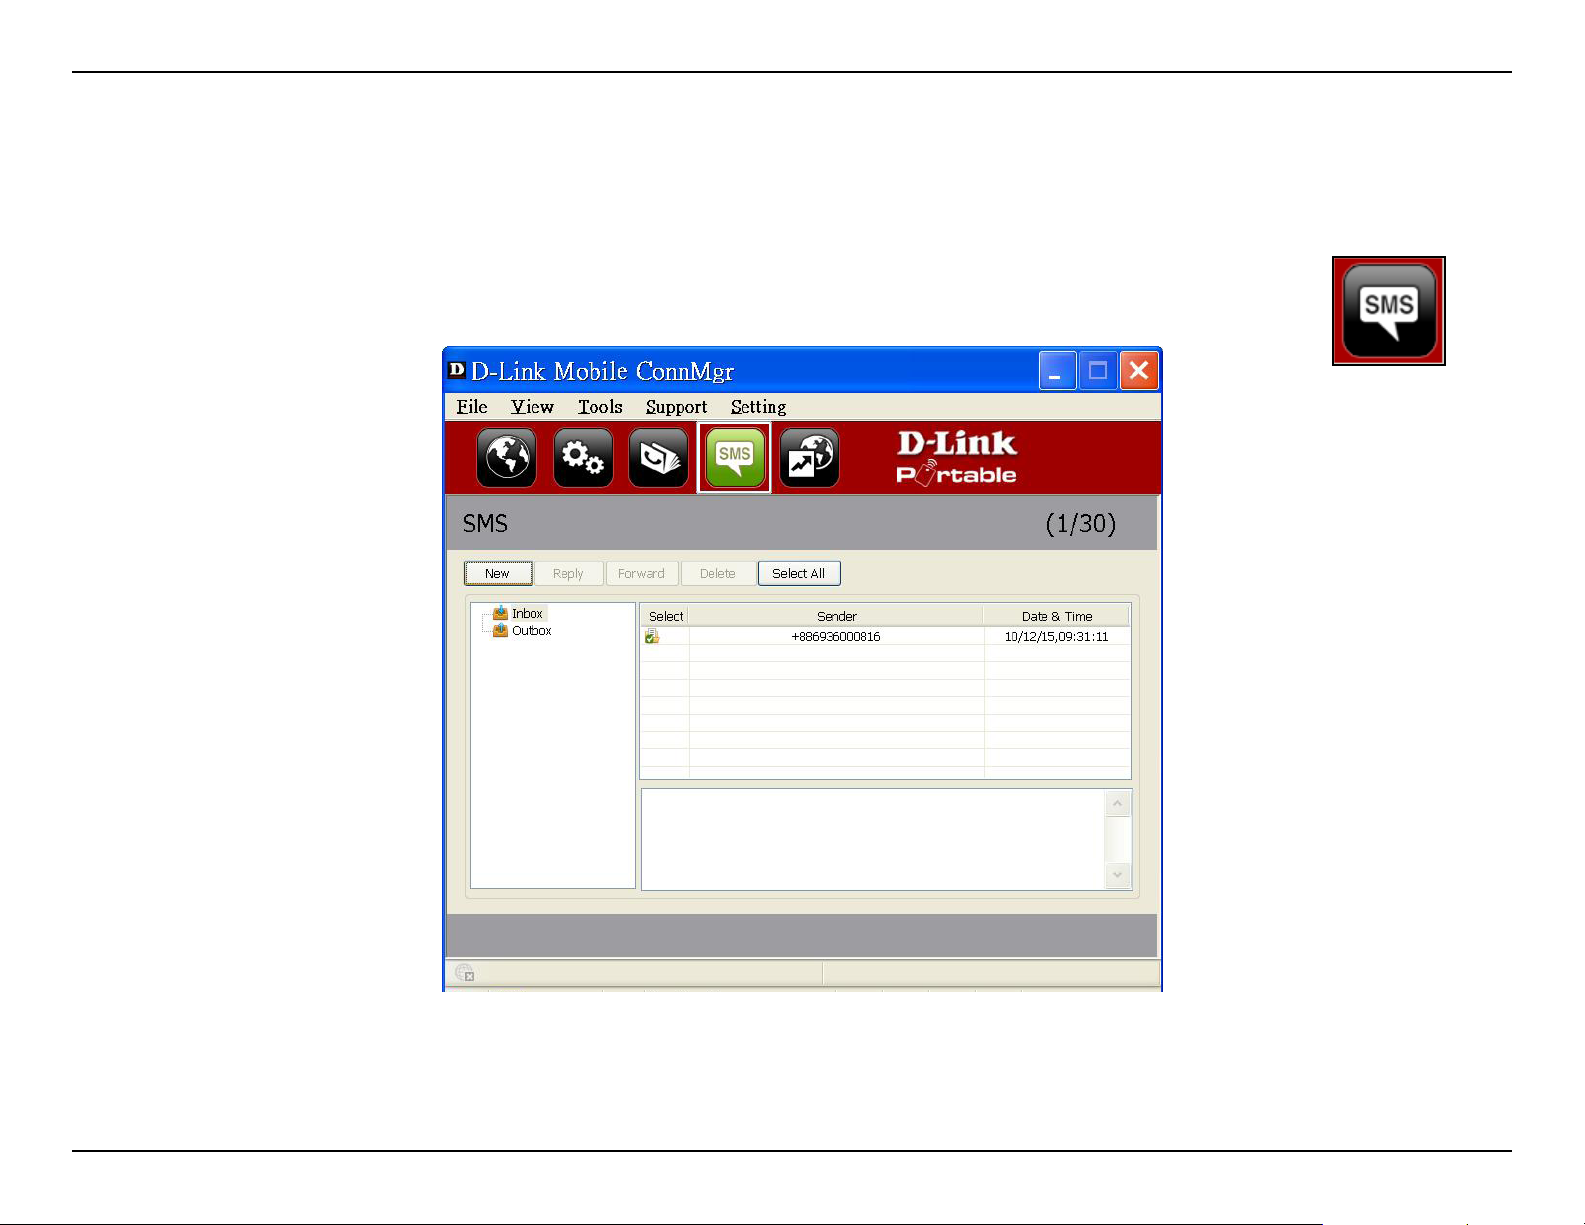
Text Messaging (SMS)
The DIR-457 can be used to perform all the text messaging functions that can be done on a mobile phone such as
sending, receiving, replying, forwarding and deleting.
SMS
21D-Link DIR-457 User Manual
Page 27
Section 3 - Device Setup using D-Link Connection Manager (Windows)
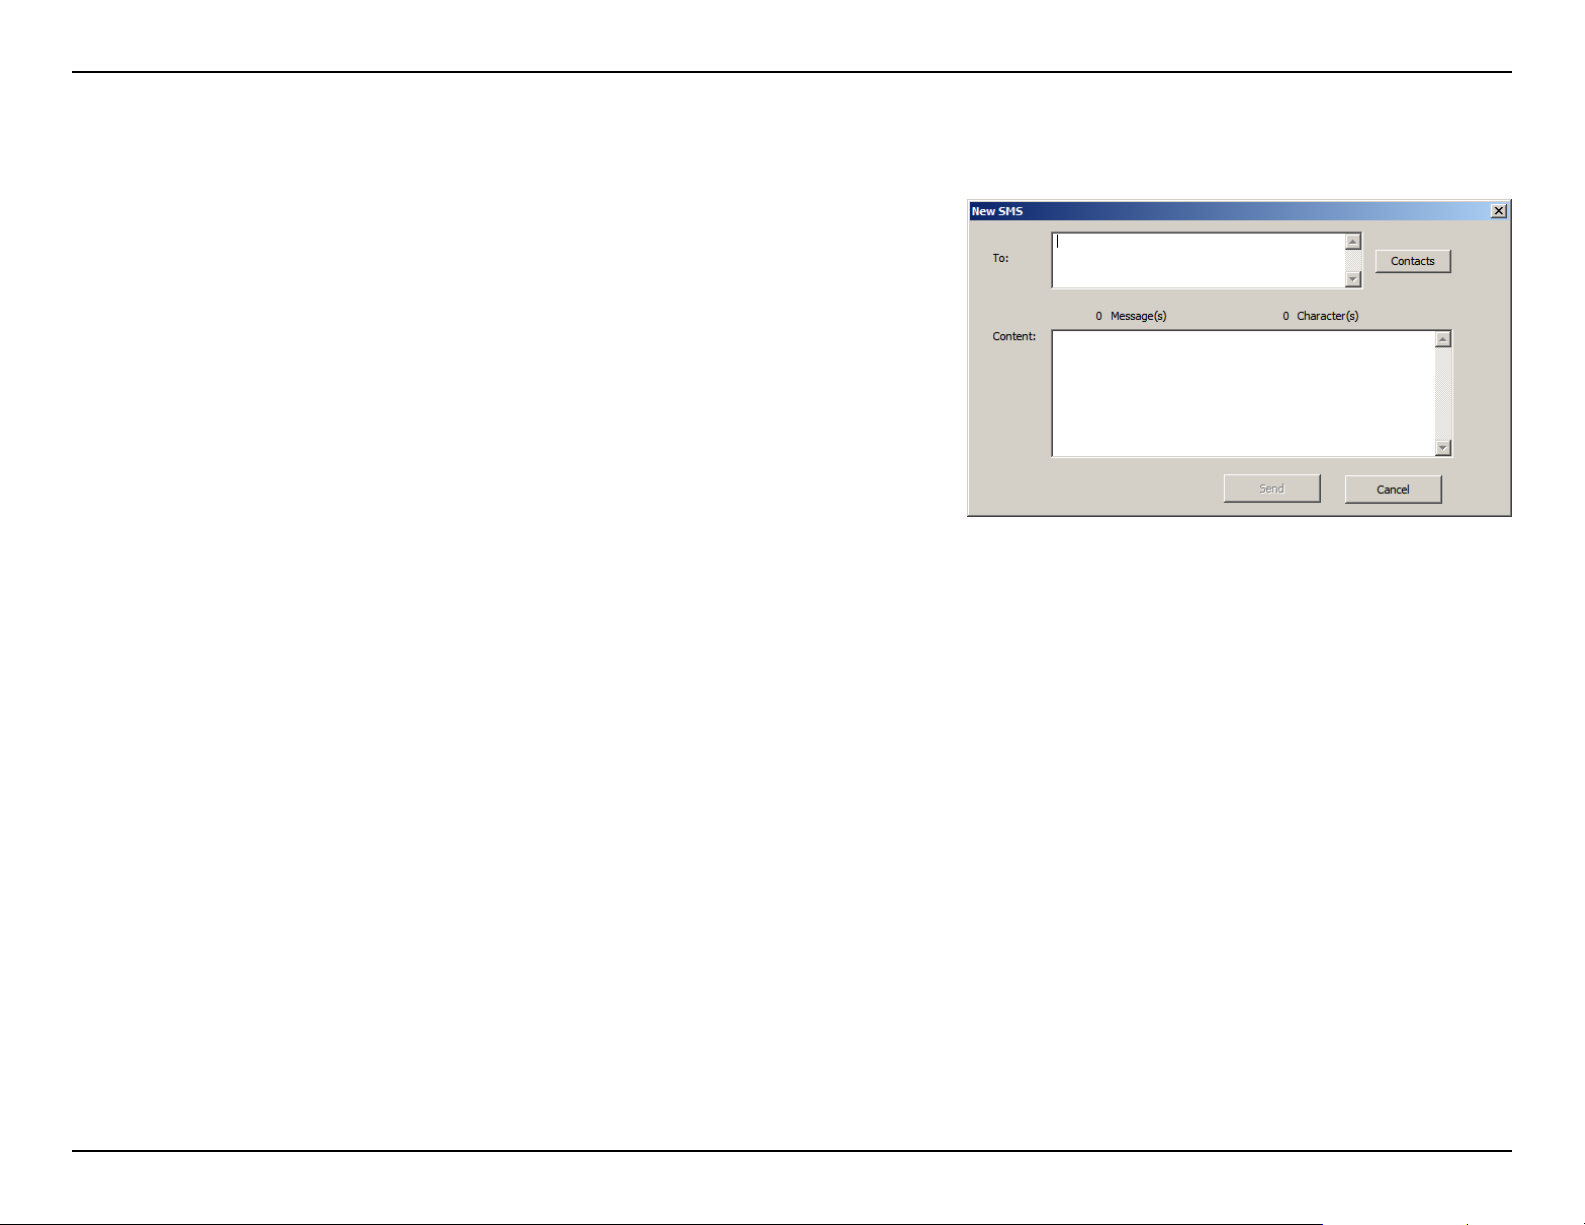
New/Reply/Forward Text Message
1. Click the SMS button.
2. Click New, Reply, or Forward.
3. Enter the recipient’s phone number or click Contacts to see the
contacts stored to the SIM card. In the contacts window, click
the box next to the recipients name and click Add to return to the
New SMS window.
4. Enter a message to send.
5. Click Send to send the message.
Deleting a Message
1. Click the SMS button.
2. Select the messages you want to delete. If you would like to delete all messages, click Select All.
3. Click Delete to delete the selected messages.
4. Click Yes to conrm.
Saving a Sender to Contacts
1. Click the SMS button.
2. Select a message.
3. Right click on the selected message and click Save to Contacts.
4. In the Add Contact window enter the contact name.
5. Click OK to save the contact.
6. Once the contact has been saved, a conrmation window will be displayed.
Click OK to close it.
22D-Link DIR-457 User Manual
Page 28
Section 3 - Device Setup using D-Link Connection Manager (Windows)
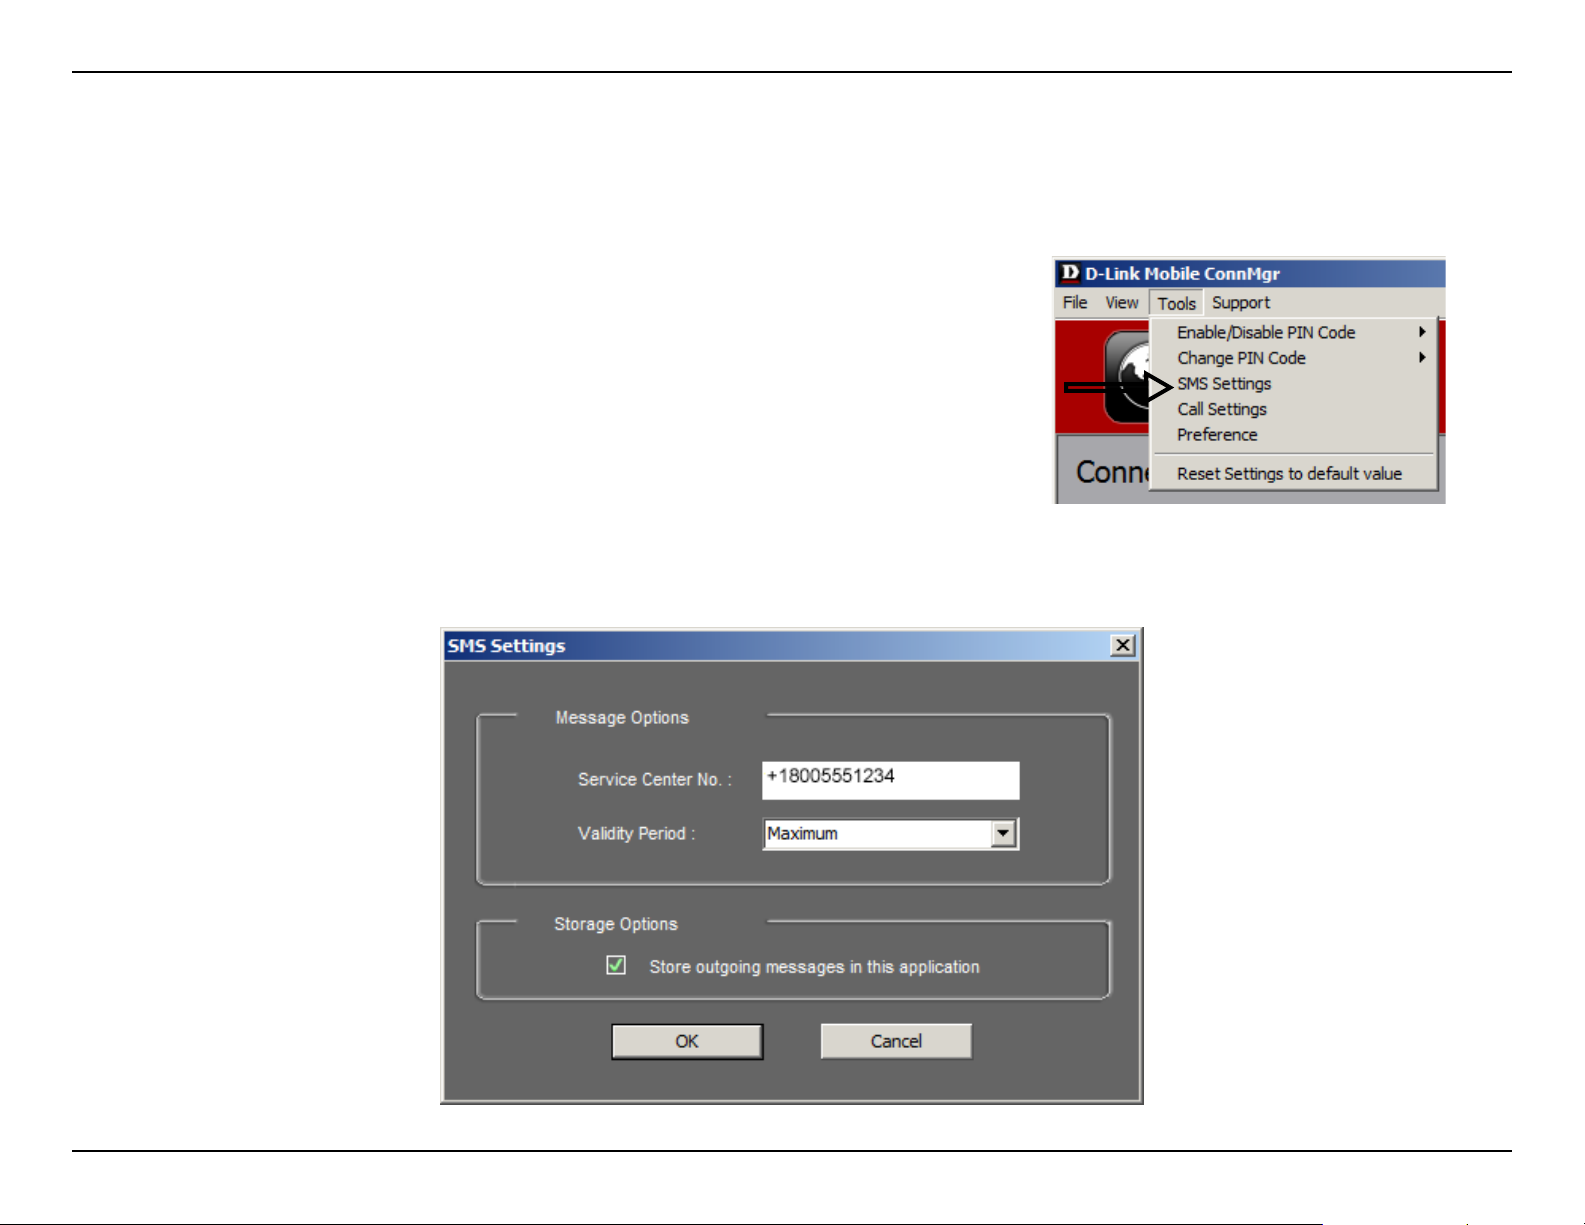
SMS Settings
This menu allows you to change the service center number, its validity period, and whether to store outgoing messages
within the DIR-457 Mobile Connection Manager.
1. Click Tools > SMS Settings.
2. If needed, enter the new Service Center number. Choose the Validity
Period from the drop-down list.
3. Check the box to store outgoing messages in the application.
4. Click OK to save the details.
23D-Link DIR-457 User Manual
Page 29

Section 3 - Device Setup using D-Link Connection Manager (Windows)
Contact Management
The DIR-457 contacts manager displays all the contacts on the SIM Card. Contacts can be added, edited, deleted
and imported.
Adding Contacts
1. Click the Contacts button.
2. Click the Add button.
3. In the Add Contact window, enter the contact name and telephone number.
4. Click OK to add the contact.
Editing Contacts
1. Click the Contacts button.
2. Select the contact to edit.
3. Click the Edit button.
4. Modify the contacts details.
5. Click OK to save the changes.
Contacts
Deleting Contacts
1. Click the Contacts button.
2. Select the contact to delete. If you would like to delete all contacts, click Select All.
3. Click the Delete button.
4. Click Yes to conrm the deletion.
24D-Link DIR-457 User Manual
Page 30

Section 3 - Device Setup using D-Link Connection Manager (Windows)
Importing vCards to Contacts
1. Click the Contacts button.
2. Click the Import button.
3. Select the source of the vCard(s).
4. Click Open to import the card(s).
5. After the import, a message will display the import information. Click OK to close.
Exporting Contacts to vCards
1. Click the Contacts button.
2. Click the Export button.
3. Select the destination to save the vCard(s).
4. Click OK to export the card(s).
5. After the export, a message will be displayed. Click OK to close.
25D-Link DIR-457 User Manual
Page 31

Section 3 - Device Setup using D-Link Connection Manager (Windows)
SIM Management
SIM Management includes functions such as enabling/disabling a PIN, changing the PIN1/PIN2 codes, checking SIM
information, adjusting the phone number, viewing contacts usage, and viewing SMS usage.
SIM Information
SIM details regarding the IMEI, Phone Number, Contact Usage, and SMS Usage cab be found by clicking
Support > About D-Link Mobile Connection Manager.
26D-Link DIR-457 User Manual
Page 32

Section 3 - Device Setup using D-Link Connection Manager (Windows)
Enabling or Disabling a PIN Code
Enable PIN Code
To prevent unauthorized use of the SIM card a PIN code can be enabled.
1. Select Tools > Enable/Disable PIN code > Enabled.
2. Enter the correct PIN code to enable.
3. Click OK to enable PIN code protection.
If a PIN number has been enabled, you will always be asked to enter it before
accessing the D-Link Mobile Connection Manager software.
Disable
If a PIN code is no longer required, you may disable it via the following steps.
1. Click Tools > Enable/Disable PIN code > Disabled.
2. Enter the correct PIN code.
3. Click OK to disable the PIN.
Note: The PIN is provided by your network service provider.
Warning: The PIN code must be entered correctly within three tries. Failure to
do so will cause the SIM card to become locked.
27D-Link DIR-457 User Manual
Page 33

Section 3 - Device Setup using D-Link Connection Manager (Windows)
Changing a PIN Code
SIM cards often contain two PIN codes that can be changed.
1. Click Tools > Change PIN Code > PIN1 or PIN2.
2. Enter the details in the following elds: Current PIN Code, Enter New PIN
Code and Conrm New PIN Code.
3. Click OK to change.
4. Once complete, a conrmation window will be displayed. Click OK to close
the window.
Warning: The PIN code must be entered correctly within three tries. Failure to
do so will cause the SIM card to become locked.
Note: The PIN codes cannot be changed while the DIR-457 is connected to a
mobile network.
Unlocking a PIN Code
If the PIN code has been entered incorrectly three times and the SIM card has been locked, follow the steps below to
unlock it:
1. If a PIN is blocked, the unblock window will be displayed.
2. Enter the PUK code. Enter the new PIN Code, and conrm the new code.
3. Click OK to conrm the new PIN code.
Note: The PUK number is provided by your mobile service provider.
28D-Link DIR-457 User Manual
Page 34

Section 3 - Device Setup using D-Link Connection Manager (Windows)
Profile Settings
The Prole Settings page allows you to manually change your Band and Network setting in case your DIR-457 can
not automatically connect to your network provider.
Band Settings
The DIR-457 supports two band selection options:
Automatic - The DIR-457 automatically selects the band based on
the networks available in current area.
3G Only - Restricts the DIR-457 to using 3G service on WCDMA
850/1900/2100 bands.
2G Only - Restricts the DIR-457 to using 2G service on GPRS
850/900/1800/1900 bands.
Note: If you accidentally congure the wrong settings, go to Tools >
Reset Settings to Default Value.
To adjust the band settings follow the instructions below:
1. Click the Prole button.
2. Select Band tab.
3. Select Automatic, 3G only, or 2G only.
4. Click Apply and OK.
29D-Link DIR-457 User Manual
Page 35

Section 3 - Device Setup using D-Link Connection Manager (Windows)
Network Selection
The current location of the DIR-457 may be covered by more than
one network. The DIR-457 supports two network selection options:
Automatic - By default the DIR-457 will automatically select the
network based on the user’s account and network availability.
Manual - Users can also use DIR-457 to get the network list, and
select an available network to use.
To manually set the network, follow the steps below:
1. Click the Prole button.
2. Select the Network Selection tab.
3. Select Manual.
4. Click Search to see all available networks.
5. Select a network operator and click Apply.
6. Click OK to nish.
Note: When the band is set to 3G Only, manual selection will only
list 3G networks.
30D-Link DIR-457 User Manual
Page 36

Section 3 - Device Setup using D-Link Connection Manager (Windows)
Call Settings
Select Tools > Call Setting.
You may select from one of the following options:
None - No answer.
Send Busy Tone - The caller will hear a busy tone, or will be transferred to
voice mail.
Call Forward - The incoming call will be forwarded to the phone number you
enter into the Telephone Number text box.
Note: The call settings query may fail if the network is busy; in this case please
try again later.
Missed Calls
1. Select View > Missed Calls.
2. If the call setting is None or Send Busy Tone, D-Link Mobile Connection
Manager AP will register the incoming call in the missed calls list.
31D-Link DIR-457 User Manual
Page 37

Section 3 - Device Setup using D-Link Connection Manager (Windows)
Startup Options
Users can specify how the application should start up.
1. Click Tools > Preferences > Startup.
2. Check the box next to the desired options.
• Always ask before closing a connection.
• Always ask before exiting application.
• Enable Quick Start. (This mode runs a program in the background
to help the D-Link Mobile Connection Manager launch
quickly.)
3. Click Apply to save the settings and nish.
Note: Please reset these settings when you want to install on another
PC or remove the driver.
Version Information
The application version, rmware version and rmware release date can be
found by selecting Support > About D-Link Mobile Connection Manager.
32D-Link DIR-457 User Manual
Page 38

Section 3 - Device Setup using D-Link Connection Manager (Windows)
Wi-Fi and Basic Settings
The following steps will show you how to adjust the settings for
both Wi-Fi and 3G connections. When you use this device as a
3G router, the Wi-Fi and 3G functionalities will both be enabled.
You can adjust both of them under “Wi-Fi and Basic Settings”.
Note: These settings will only take effect when you use the DIR457 as a 3G router.
To congure the Wi-Fi and basic settings of your DIR-457 go to
Settings > Switch to Wi-Fi & Basic Settings.
To change the 3G Internet settings, click the corresponding
symbol.
3G Settings
33D-Link DIR-457 User Manual
Page 39

Section 3 - Device Setup using D-Link Connection Manager (Windows)
Changing the Profile Information
You can either set the Prole Information to Auto Congure or
manually choose a Phone Number, APN, User Name, Password,
and Authentication Type.
In the Wi-Fi settings screen you can set the SSID, Wireless
Channel, and Security Mode for the DIR-457.
Wi-Fi Settings
34D-Link DIR-457 User Manual
Page 40

Section 3 - Device Setup using D-Link Connection Manager (Windows)
Changing the SSID
To manually choose an SSID, type a new name for the network
in the SSID text eld.
35D-Link DIR-457 User Manual
Page 41

Section 3 - Device Setup using D-Link Connection Manager (Windows)
Configuring the Wireless Channel
The Wireless Channel can be manually chosen (1 to 13) or set to
Auto.
Configuring the Security Mode
The Security Mode can be set to WEP-64bit, WEP-128bit, WPA-PSK,
and WPA2-SPK.
36D-Link DIR-457 User Manual
Page 42

Section 3 - Device Setup using D-Link Connection Manager (Windows)
Setting the Administrator Password
To change the Administrator Password, click the corresponding
symbol.
Administrator
Password
1. For security reasons, please repeat the current password.
2. Next, choose a new password.
3. Conrm the new password.
37D-Link DIR-457 User Manual
Page 43

Section 3 - Device Setup using D-Link Connection Manager (Windows)
Device Information
To display information about your device, click the corresponding symbol.
This screen displays the Model Name, the Firmware Version, and
the Battery status of your device.
Device
Information
38D-Link DIR-457 User Manual
Page 44

Section 4 - Device Setup using D-Link Connection Manager (MAC OS)
Device Setup using D-Link Connection Manager
(MAC OS)
New Profile
1. Click the Prole button.
2. Click the New button to open the New Prole window.
Create Profile
1. Enter the Prole Name, Phone Number, and APN (Access Point Network)
2. Select the Authentication Type.
3. Click Save Account if you would like to save the username and password
between login sessions.
4. If desired, click the check box to set this as the default prole.
5. Click Next to continue.
Prole
39D-Link DIR-457 User Manual
Page 45

Section 4 - Device Setup using D-Link Connection Manager (MAC OS)
Establishing a Connection
You can click the Connect button to connect to the network via the default prole. Once connected, the icon
on the right side of the window will display a green checkmark instead of a red X. Once connected, you can
use the mobile service network to browse the Internet, send e-mail, send text messages, and perform other
tasks online.
Note: The Connect/Disconnect button will be grayed-out when no SIM card is present.
Connect
Ending a Connection
If you wish to disconnect, click the Disconnect button.
40D-Link DIR-457 User Manual
Page 46

Section 4 - Device Setup using D-Link Connection Manager (MAC OS)
Profile Management
Under the Proles icon, users can create, edit and delete proles as well as preset proles.
Editing a Prole
1. Click the Prole button.
2. Select a prole and click the Edit button.
3. Click the appropriate tab and enter the information in the elds.
4. Click OK to close the Edit Prole window.
Note: Proles may only be edited when you are disconnected.
Deleting a Prole
1. Click the Prole button.
2. Select a user-dened prole and click the Delete button.
3. Click Yes to conrm the deletion.
Setting the Default Prole
1. Click the Prole button.
2. Highlight the prole to use when the DIR-457 is started.
3. Click Set as Default prole.
Prole
41D-Link DIR-457 User Manual
Page 47

Section 4 - Device Setup using D-Link Connection Manager (MAC OS)
Connection Management
The Connection Information window allows users to manage not only the current connection (if connected), but also
their connection history. Click the Connection Info button to open the Connection Information window.
Current Connection
The Current Connection tab displays the following information:
Prole Name - Displays the current prole.
Connection Type - Displays the mobile service technology that the service network uses.
Connected Time - Displays how long the current session has been active for.
Volume - Displays the total amount of data received (Rx) and transmitted (Tx).
Speed - Displays the speeds for both transmitted and received data.
Top Speed - Displays the maximum transmitted and received speeds attained.
Disconnect - Click this button to disconnect.
Connection
Information
42D-Link DIR-457 User Manual
Page 48

Section 4 - Device Setup using D-Link Connection Manager (MAC OS)
Connection History
The History Connection tab displays the following information:
Prole - The name of the prole
APN - The access point name
Time Start - The time the connection was initiated
Time End - The time that the connected ended
Data Sent - The total amount of data sent
Data Received - The total amount of data received
Max Speed Up/Down - The highest recorded upload/download speed for the session
Average Speed Up/Down - The average upload/download speed for the session
To clear the Connection History:
1. Click Clear All Logs to clear the logs.
2. Click Yes to conrm.
Usage
43D-Link DIR-457 User Manual
Page 49

Section 4 - Device Setup using D-Link Connection Manager (MAC OS)
Usage Management
The Usage window allows users to manage not only the current connection (if connected), but also their
connection history. Click the Connection Info button to open the Connection Information window.
Statistics
The Statistics tab displays the following information:
Settings - You may choose to limit data collection by data or by a specied number of days in a month.
Click Reset to restart the data collection. Click Apply to apply any changes to the settings.
Data Transferred and Limits: Displays the total amount of data transferred within the specied period.
Usage
44D-Link DIR-457 User Manual
Page 50

Section 4 - Device Setup using D-Link Connection Manager (MAC OS)
Text Messaging (SMS)
The DIR-457 can be used to perform the text messaging functions that can be done on a mobile phone such
as sending, receiving, replying, forwarding and deleting.
SMS
45D-Link DIR-457 User Manual
Page 51

Section 4 - Device Setup using D-Link Connection Manager (MAC OS)
New/Reply/Forward Text Message
1. Click the SMS button.
2. Click New, Reply, or Forward.
3. Enter the recipient’s phone number or click Contacts to see
the contacts stored to the SIM card. In the contacts window,
click the box next to the recipients name and click Save to
return to the New SMS window.
4. Enter a message to send.
5. Click Send to send the message.
Deleting a Message
1. Click the SMS button.
2. Select the messages you want to delete.
3. Click Delete to delete the selected messages.
4. Click Yes to conrm.
Saving a Sender to Contacts
1. Click the SMS button.
2. Select a message.
3. Shift click on the selected message and click Save as Contact.
4. In the Add Contact window enter the contact name.
5. Click OK to save the contact.
6. Once the contact has been saved, a conrmation window will be displayed. Click
OK to close it.
46D-Link DIR-457 User Manual
Page 52

Section 4 - Device Setup using D-Link Connection Manager (MAC OS)
SMS Settings
This menu allows you to change the service center number, its validity period, and whether to store outgoing messages within the DIR457 Mobile Connection Manager.
1. Click SMS > Settings.
2. If needed, enter the new Service Center number. Choose a
Validity Period from the drop-down list.
3. Check the box to request delivery notications or play sound
effects if desired.
4. Click OK to save the details.
47D-Link DIR-457 User Manual
Page 53

Section 4 - Device Setup using D-Link Connection Manager (MAC OS)
Contact Management
The DIR-457 contacts manager displays all the contacts on the SIM Card. Contacts can be added, edited,
deleted and imported.
Adding Contacts
1. Click the Contacts button.
2. Click the Add button.
3. Click OK to add the contact.
Contacts
48D-Link DIR-457 User Manual
Page 54

Section 4 - Device Setup using D-Link Connection Manager (MAC OS)
Editing Contacts
1. Click the Contacts button.
2. Select the contact to edit.
3. Click the Edit button.
4. Modify the contacts details.
5. Click OK to save the changes.
Deleting Contacts
1. Click the Contacts button.
2. Select the contact to delete.
3. Click the Delete button.
4. Click Yes to conrm the deletion.
49D-Link DIR-457 User Manual
Page 55

Section 4 - Device Setup using D-Link Connection Manager (MAC OS)
SIM Management
SIM Management includes functions such as enabling/disabling a PIN, changing the PIN1/PIN2 codes, adjusting the phone number,
viewing contacts usage, and viewing SMS usage.
Enabling or Disabling a PIN Code
Enable PIN Code
To prevent unauthorized use of the SIM card a PIN code can be enabled.
1. Select Tools > Enable/Disable PIN code > Enabled.
2. Enter the correct PIN code to enable.
3. Click OK to enable PIN code protection.
If a PIN number has been enabled, you will always be asked to enter it before
accessing the D-Link Mobile Connection Manager software.
Disable
If a PIN code is no longer required, you may disable it via the following steps.
1. Click Tools > Enable/Disable PIN code > Disabled.
2. Enter the correct PIN code.
3. Click OK to disable the PIN.
Note: The PIN is provided by your network service provider.
Warning: The PIN code must be entered correctly within three tries.Failure to do
so will cause the SIM card to become locked.
50D-Link DIR-457 User Manual
Page 56

Section 4 - Device Setup using D-Link Connection Manager (MAC OS)
Changing a PIN Code
SIM cards often contain two PIN codes that can be changed.
1. Click Tools > Change PIN Code > PIN1 or PIN2.
2. Enter the details in the following elds: Current PIN Code, Enter New PIN
Code and Conrm New PIN Code.
3. Click OK to change.
4. Once complete, a conrmation window will be displayed. Click OK to close
the window.
Warning: The PIN code must be entered correctly within three tries. Failure to do
so will cause the SIM card to become locked.
Note: The PIN codes cannot be changed while the DIR-457 is connected to a
mobile network.
Unlocking a PIN Code
If the PIN code has been entered incorrectly three times and the SIM card has been locked, follow the steps below to unlock it:
1. If a PIN is blocked, the unblock window will be displayed.
2. Enter the PUK code. Enter the new PIN Code, and conrm the new code.
3. Click OK to conrm the new PIN code.
Note: The PUK number is provided by your mobile service provider.
51D-Link DIR-457 User Manual
Page 57

Section 4 - Device Setup using D-Link Connection Manager (MAC OS)
Profile Settings
The Prole Settings page allows you to manually change your Band and Network setting in case your DIR-457 can not automatically
connect to your network provider.
Band Settings
The DIR-457 supports two band selection options:
Automatic - The DIR-457 automatically selects the band based on
the networks available in current area and those supported by the
DIR-457.
UMTS/HSUPA Only - Restricts the DIR-457 to using 3G service on
UMTS/HSUPA bands.
GSM/GPRS/EDGE Only - Restricts the DIR-457 to using 2G service
on GSM/GPRS/EDGE bands.
To adjust the band settings follow the instructions below:
1. Click the Prole button.
2. Select Band tab.
3. Select Automatic, UMTS/HSUPA only, or GSM/GPRS/EDGE only.
4. Click Apply and OK.
52D-Link DIR-457 User Manual
Page 58

Section 4 - Device Setup using D-Link Connection Manager (MAC OS)
Network Selection
The current location of the DIR-457 may be covered by more than one
network. The DWM-156 supports two network selection options:
Automatic - By default the DIR-457 will automatically select the
network based on the user account and network availability.
Manual - You may choose from the list of operators.
To manually set the network, follow the steps below:
1. Click on the Tools menu.
2. Click on Network Settings.
3. Select Manual.
4. Click Search to see all available networks.
5. Select a network operator and click Apply.
6. Click OK to nish.
Note: When the band is set to 3G Only, manual selection will only list 3G
networks.
53D-Link DIR-457 User Manual
Page 59

Section 4 - Device Setup using D-Link Connection Manager (MAC OS)
Call Settings
Select Tools > Call Setting.
You may select from one of the following options:
None - No answer.
Send Busy Tone - The caller will hear a busy tone, or will be transferred to
voice mail.
Call Forward - The incoming call will be forwarded to the phone number you
enter into the Telephone Number text box.
Note: The call settings query may fail if the network is busy; in this case please
try again later.
Missed Calls
1. Select View > Missed Calls.
2. If the call setting is None or Send Busy Tone, D-Link Mobile Connection
Manager AP will register the incoming call in the missed calls list.
54D-Link DIR-457 User Manual
Page 60

Section 5 - WEB Configuration
WEB Configuration
In order to congure basic and advanced settings for DIR-457, rst establish a connection through the 802.11g wireless
interface, then launch a web browser and direct it to the IP address of the DIR-457. Once the connection is made,
options for quick setup include using the Internet Connection Wizard to congure the 3G interface, or the Wireless
Connection Wizard to congure the 802.11g Wireless interface. Alternatively, the Internet and Wireless network settings
can be congured manually without using the connection wizards. The DIR-457 web interface is used for conguration
of basic device settings, advanced network settings, device management and status monitoring. Follow the instructions
below to connect to the web-based management interface.
To access the conguration utility, open a web-browser
such as Internet Explorer and enter the IP address of
the router (192.168.0.1).
Type Admin in the User Name eld and then enter your
password. Leave the password blank by default.
Click the Login button to log in to the router.
If you get a Page Cannot be Displayed error, please
refer to the Troubleshooting section for assistance.
55D-Link DIR-457 User Manual
Page 61

Section 5 - WEB Configuration
Internet Connection Setup Wizard
Once logged into the web interface of the router, the Setup > Internet page will appear. Click the Internet Connection
Setup Wizard button to quickly congure your router using the setup wizard.
If you want to enter your settings without running the wizard, click Manual Internet Connection Setup and skip to
“Manual Internet Conguration”.
56D-Link DIR-457 User Manual
Page 62

Section 5 - WEB Configuration
Click Next to continue.
Create a new password and then click Next to
continue.
Select your time zone from the drop-down menu and
then click Next to continue.
57D-Link DIR-457 User Manual
Page 63

Section 5 - WEB Configuration
Congure your 3G Internet Connection settings and
then click Next to continue.
Click Connect to save your settings. Once the router
has nished rebooting, click Continue. Please allow
1-2 minutes to connect.
58D-Link DIR-457 User Manual
Page 64

Section 5 - WEB Configuration
Manual Configuration 3G Internet Connection
If you opt to set up your Internet connection manually, you will be redirected to a Internet Connection menu that allows you to congure
your 3G conguration parameters.
Mode:
Choose Auto mode for automatic conguration of the 3G
connection. If you choose this mode, no other conguration
is required; simply click on the Save Settings button to
save the conguration and the device begins to negotiate
the 3G connection. If you opt to use the Manual setup
mode, congure the parameters remaining according to
the requirements of your 3G account.
Country:
ISP:
PIN:
User Name:
Password:
Dial Number:
Authentication
Protocol:
APN:
Reconnect Mode:
Maximum Idle
Time:
This displays the country after the 3G setup is done.
This displays the Internet Service Provider (ISP) after 3G
setup is done.
If you have a Personal Identication Number (PIN) for
your 3G account, enter that number here.
Enter the user name for your 3G Internet connection.
Enter the password for your 3G Internet connection.
Enter the dial number for your 3G service provider.
Choose the Authentication Protocol used.
Enter the Access Point Name (APN) for your 3G service
provider.
Click a radio button to choose a reconnection mode. The options are Always-on, Connect on demand, or Manual.
Enter the maximum amount of time the Internet connection should be maintained during inactivity. To disable this feature,
enable the Always-on reconnect mode.
Click the Save Settings button when you have nished conguring the 3G connection.
59D-Link DIR-457 User Manual
Page 65

Section 5 - WEB Configuration
Wireless Settings
If you want to congure the wireless settings on your
router using the wizard, click Wireless Connection
Setup Wizard.
If you want to manually congure the wireless settings
on your router click Manual Wireless Connection
Setup and refer to “Manual Wireless Connection
Setup”.
Click the Wireless Connection Setup Wizard
button to view the Wireless Security Setup Wizard
menu. The Welcome menu lists the steps used for
setup. Click on the Next button to continue.
60D-Link DIR-457 User Manual
Page 66

Section 5 - WEB Configuration
Wireless Connection Setup Wizard
Enter the SSID (Service Set Identier). The SSID
is the name of your wireless network. Create a
name using up to 20 characters. The SSID is casesensitive.
If you would like the router to automatically assign a
network key to your network, click the Automatically
assign a network key radio button.
Click Next to continue.
Alternatively, click the Manually assign a network
key radio button to create your own network key; or,
click to check the Use WPA encryption... box.
Click Next to continue.
The following window appears if you selected the
option to manually create your own network key.
Type a password that you would like to use for
wireless security in the Network Key: entry eld.
Click Next to continue.
61D-Link DIR-457 User Manual
Page 67

Section 5 - WEB Configuration
If you choose the WPA encryption option, a new
menu appears. Enter the Network Key of 64
hexadecimal characters in the entry eld. This will
be the WPA password required to use the DIR-457.
Click Next to continue.
The nal menu appears to indicate that the setup is
completed.
If you selected the option that automatically generated
a network key, the automatically generated key will
display next to the Network Key eld.
If you manually specied a network key, the Wireless
Security Password that you specied will display
next to the Network Key eld.
Click Save to nish the Security Wizard.
62D-Link DIR-457 User Manual
Page 68

Section 5 - WEB Configuration
Enable Auto
Manual Wireless Connection Setup
To add a wireless client with WPS, please see the section Add Wireless Device With WPS.
Wireless Network
Name:
Channel Selection:
Wireless Channel:
Transmission
Rate:
WMM Enable:
Service Set Identier (SSID) is the name of your
wireless network. Create a name using up to 20
characters. The SSID is case-sensitive.
The Auto Channel Scan setting can be selected to
allow the DIR-457 to choose the channel with the least
amount of interference.
Indicates the channel setting for the DIR-457. By
default the channel is set to 6. The Channel can
be changed to t the channel setting for an existing
wireless network or to customize the wireless network.
If you enable Auto Channel Scan, this option will be
greyed out.
Select the transmit rate. It is strongly suggested to
select Best (Auto) for best performance.
WMM (Wi-Fi Multimedia) is QoS for your wireless
network. Check this box to improve the quality of video
and voice applications for your wireless clients.
Enable Hidden
Wireless:
Wireless Security:
Enabling Hidden Mode is another way to secure your network. With this option enabled, no wireless clients
will be able to see your wireless network when they perform a scan to see what’s available. In order for your
wireless devices to connect to your router, you will need to manually enter the Wireless Network Name on
each device.
Choose the wireless security method used for your network and congure the settings according to the
requirements of the selected security mode. Wireless security options include WEP, WPA, and WPA2.
63D-Link DIR-457 User Manual
Page 69

Section 5 - WEB Configuration
LAN Setup
This section will allow you to change the local network settings of the router and to congure the DHCP settings.
Router IP Address:
Default Subnet
Mask:
Local Domain
Name:
Enable DNS Relay:
Enter the IP address of the router. The default
IP address is 192.168.0.1.
If you change the IP address, once you click
Save Settings, you will need to enter the new
IP address in your browser to get back into
the conguration utility.
Enter the Subnet Mask. The default subnet
mask is 255.255.255.0.
Enter the Domain name (Optional).
Uncheck the box to transfer the DNS server
information from your ISP to wireless clients.
If checked, your computers will use the router
for DNS relay.
64D-Link DIR-457 User Manual
Page 70

Section 5 - WEB Configuration
DHCP Reservation
If you want a computer or device to always have the same IP address assigned, you can create a DHCP reservation. The router will assign
the IP address only to that computer or device. Congure the parameters, as described below, to create a new DHCP Reservation.
DHCP
Reservations List:
Number of
Dynamic DHCP
Clients:
Computer Name:
IP Address:
MAC Address:
Displays a list of the DHCP reservations
that have been congured on the router.
In this section, you can see information
about the LAN devices that are currently
being leased IP addresses.
Enter the computer name or select a
computer name from the drop-down menu
on the right-hand side and click <<.
Enter the IP address you want to assign
to the computer or device.
Enter the MAC address of the computer
or device.
When you have nished conguring the above settings, check the boxes next
to the DHCP Reservation entries you want to add to the DHCP Reservations
List and click the Save Settings button at the top or bottom of the window to
save your entries and activate your reservations.
65D-Link DIR-457 User Manual
Page 71

Section 5 - WEB Configuration
Time and Date
The Time Conguration option allows you to congure, update, and maintain the correct time on the internal system clock. From this
section you can set the time zone that you are in and set the Time Server. Daylight Saving can also be congured to automatically adjust
the time when needed.
Time Zone:
Enable Daylight
Saving:
Sync your
Computer’s Time
Settings:
Automatic
Time and Date
Configuration:
NTP Server Used:
Select the Time Zone from the drop-down
menu.
Check the box to enable Daylight Saving
time.
Click this button to set the device’s time
the same to local PC.
Check the box to enable the device to
automatically synchronize with a D-Link
NTP Server. NTP stands for Network Time
Protocol. NTP synchronizes computer
clock times in a network of computers.
This will only connect to a server on the
Internet, not a local server.
Select one of the D-Link NTP Servers
from the drop-down menu. The DIR-457
will then synchronize it’s clock to be the
same time as the D-Link Internet time
server. Click the Update Now button to
synchronize with the D-Link Internet time
server immediately.
Click the Save Settings button at the top or bottom of the window to save
the Time and Date settings.
Set the Time and
Date Manually:
To manually input the time, use the dropdown menus to enter the values in these
elds for the Year, Month, Day, Hour,
Minute, and Second.
66D-Link DIR-457 User Manual
Page 72

Section 5 - WEB Configuration
Port Forwarding
Port Forwarding is a feature that allows you to open a single port or a range of ports and redirect the data received through those ports to
a single PC on your network.
Name:
IP Address:
Public Port/
Private Port:
Traffic Type:
Enter a name for the rule or select an application
from the drop-down menu. Select an application
and click << to populate the elds.
Enter the IP address of the computer on your
local network that you want to allow the incoming
service to in the Private IP eld. You have the
option of specifying a Public IP address for the
incoming connection.
Enter the range of ports that you want to open
next to the Private Port and Public Port elds.
The private and public ports are usually the
same. The private ports are the ports being
used by the application on the computer within
your local network, and the public ports are the
ports seen from the Internet side.
Use the drop-down menu to select whether
TCP, UDP, or Any types of trafc are being
used for the port forwarding rule.
Schedule:
When you have nished conguring the above settings, click to check the boxes next to the Forwarding Rules entries you want to be active
and click the Save Settings button at the top or bottom of the window to save the settings. .
Select a schedule for when the Port Forwarding
Rule will be enabled. The schedule may be set
to Always, which will allow the particular service
to always be enabled.
67D-Link DIR-457 User Manual
Page 73

Section 5 - WEB Configuration
MAC Address Filter
Use MAC (Media Access Control) Filters to allow or deny LAN (Local Area Network) computers by manually entering their MAC addresses
from accessing the Network.
MAC Address
Filter:
MAC Address:
Select Accept, Reject, or Disable
from the drop-down menu
Enter the MAC address you would like
to lter.
68D-Link DIR-457 User Manual
Page 74

Section 5 - WEB Configuration
Filter Rules
Use MAC (Media Access Control) Filters to allow or deny LAN (Local Area Network) computers by their MAC addresses from accessing
the Network. You can add a MAC address of any clients and allow or deny access.
MAC Address:
Destination Port:
Traffic Type:
Action:
Schedule:
Enter the MAC address you would like
to lter.
(Optional) Enter a port or range of ports
used for the lter rule.
Select the protocol of the rewall port
(TCP, UDP, or Any).
Choose to Allow or Deny the trafc.
Select a schedule for when the Network
Filter from the drop-down menu or click
the New Schedule button to congure
a new schedule.
When you have nished conguring the above settings, click to check the boxes next to the Filter Rules entries you want to be active and
click the Save Settings button at the top or bottom of the window to save the settings.
69D-Link DIR-457 User Manual
Page 75

Section 5 - WEB Configuration
Firewall & DMZ
A rewall protects your network from intrusion and other malicious actions from the public Internet or WAN. The D-Link DIR-457 offers a
Firewall type functionality. It might be desirable disable rewall protection for a LAN client running certain application that are incompatible
with the rewall. If you choose to expose a single system, you can enable DMZ for one IP address on the private network. DMZ is short
for Demilitarized Zone. This option will expose the chosen system and make it visible on the Internet.
Enable WAN to
LAN Firewall:
DMZ Host:
Schedule:
Firewall Rules:
This is enabled by default. To disable the Firewall,
click to remove the check mark.
Check the DMZ Enable box and specify the IP
address of the computer on the LAN that you
want to have unrestricted Internet communication
in the DMZ IP Address eld.
Select a schedule for when the DMZ will be
enabled from the drop-down menu or click
the New Schedule button to congure a new
schedule.
Use this section to select rules used for the
Firewall. The rule options include some of the
commonly used methods of attack and port
scanning. The service lters for FTP, Telnet
and Ping from the WAN are not enabled by
default. If these are enabled these services will
be unavailable from the WAN.
Click the Save Settings button at the top or bottom of the
window to save the Firewall settings.
70D-Link DIR-457 User Manual
Page 76

Section 5 - WEB Configuration
File Sharing
The File Sharing menu is used to set up le sharing for clients connected to the DIR-457. The DIR-457 uses the Samba protocol for network
le sharing. In order to use this feature, a micro SD memory card must rst be installed and formatted on the DIR-457. The Share Folder on
the DIR-457 functions in a way similar to a shared folder on a Network Attached Storage device or on a Networked Computer in the LAN.
Storage Server
Name:
Share Folder:
The default Storage Server Name is DIR-457.
The default name for the Share Folder is mydisk.
Note: Any les in the Share Folder can be read/written by other wireless clients connected to the Access Point. This device does not
support hot-plugging for the micro SD memory card.
71D-Link DIR-457 User Manual
Page 77

Section 5 - WEB Configuration
For accessing the shared folder in the router using Windows® XP or Windows® Vista, you can choose one of following methods to read
or write the shared les.
Windows XP
Step 1 Open a browser window.
Step 2 Input \\ followed by the Storage
Server name or the IP address of
the router in the URL input text box
(\\DIR-457 or \\192.168.0.1).
(you can enter default Storage
Server name or user-congured
name ).
Note: If prompted for the username and password, please keep the password eld blank to log in.
72D-Link DIR-457 User Manual
Page 78

Section 5 - WEB Configuration
Windows Vista
Step 1 Open a browser window.
Step 2 Input \\ followed by the Storage
Server name or the IP address of
the router in the URL input text box
(\\DIR-457 or \\192.168.0.1).
(you can enter default Storage
Server name or user-congured
name ).
Note: If an Internet Security warning pops up, please click Allow. If prompted for the username and password, please
keep the password eld blank to log in.
73D-Link DIR-457 User Manual
Page 79

Section 5 - WEB Configuration
For accessing the shared folder in the router using Mac OS X, follow these steps to read or write the shared les.
Mac OS
Step 1 Open the Finder window.
Step 2 To bring up a server connection
window, hit the [Apple] key and
the [K] key together. You will then
be prompted to enter a server
address. Enter smb://DIR-457
(or smb://192.168.0.1) and click
Connect.
74D-Link DIR-457 User Manual
Page 80

Section 5 - WEB Configuration
Step 3 Next, you will be prompted for the
username and password. You can
keep the password eld blank to
log in.
Step 4 You will be prompted: “Select the
volume you want to mount on DIR457” Select mydisk, and then click
OK.
75D-Link DIR-457 User Manual
Page 81

Section 5 - WEB Configuration
Advanced Network
UPnP:
Multicast
Streams:
Click the Save Settings button at the top or bottom of the
window to save the Advanced Network settings.
To use the Universal Plug and Play (UPnP
feature check the Enable UPNP box. UPNP
provides compatibility with network ing
equipment, software and peripherals.
Check the Enable Multicast Streams box
to allow multicast trafc to pass through the
router from the Internet.
Check the Wireless Enhance Mode box
to enable the router to forward all multicast
streams from the Internet to the wireless
station using a unicast stream. This feature
helps improve the quality of multimedia
applications for wireless users.
™
76D-Link DIR-457 User Manual
Page 82

Section 5 - WEB Configuration
Device Administration
This page will allow you to change the Administrator password. You can also enable Remote Management.
Note: The default User Name (admin) for the device cannot be changed.
Admin
Password:
Enable Remote
Management:
Remote Control
IP Addres:
Port:
Enter and conrm a new password for the
administrator login name. The administrator
can change the password but not the login
name “admin”.
Remote management allows the DIR-457
to be congured from the Internet by a web
browser. A username and password is still
required to access the Web-Management
interface. In general, only a member of your
network can browse the built-in web pages
to perform Administrator tasks. This feature
enables you to perform Administrator tasks
from the remote (Internet) host.
Enter the remote IP address from which
the administrator logs in when remote
management is enabled.
The port number used to access the DIR-457.
Enable Remote
Telnet:
Remoter
Control IP
Address:
Click the Save Settings button at the top or bottom of the window to save the Administrator settings.
Check this to enable remo t e de v i c e
management via Telnet.
Enter the remote IP address from which the
administrator logs in when remote Telnet
management is enabled.
77D-Link DIR-457 User Manual
Page 83

Section 5 - WEB Configuration
Save and Restore
Save Settings
to Local Hard
Drive:
Load Settings
from Local Hard
Drive:
Restore to
Factory Default
Settings:
Use this option to save the current router
conguration settings to a le on the hard
disk of the computer you are using. First,
click the Save button. You will then see a
le dialog, where you can select a location
and le name for the settings.
Use this option to load previously saved
router conguration settings. First, use the
Browse control to nd a previously saved
le of conguration settings. Then, click the
Upload Settings button to transfer those
settings to the router.
Click the Restore Device button to restore
all conguration settings back to the settings
that were in effect at the time the router was
shipped from the factory. Any settings that
have not been saved will be lost, including
any rules that you have created. If you want
to save the current router configuration
settings, use the Save button above.
Reboot:
Click to Reboot button located in the left
panel of the menu to restart the router.
78D-Link DIR-457 User Manual
Page 84

Section 5 - WEB Configuration
Firmware Update
You can upgrade the rmware of the Router here. Make sure the rmware you want to use is on the local hard drive of the computer.
Click on Browse to locate the rmware le to be used for the update. Click on the Check Now button or go to the D-Link support site for
rmware updates at http://support.dlink.com. You can download rmware upgrades to your hard drive from the D-Link support site.
Current
Firmware
Information:
Firmware
Upgrade:
Displays the current rmware version and date.
You can also check the availability of a new
rmware version online. If so, download the
new rmware to your hard drive.
After you have downloaded the new rmware,
click the Browse button to locate the rmware
update on your hard drive. Click Upload to
complete the rmware upgrade.
79D-Link DIR-457 User Manual
Page 85

Section 5 - WEB Configuration
Log Settings
The router automatically logs (records) events of possible interest in its internal memory. If there isn’t enough internal memory for all
events, logs of older events are deleted but logs of the latest events are retained. The Logs option allows you to view the router logs. You
can dene what types of events you want to view and the level of the events to view. This router also has external Syslog Server support
so you can send the log les to a computer on your network that is running a Syslog utility.
Log Type:
Click the Save Settings button at the top or bottom of the window to save the settings.
Use the selection boxes to choose
the types of messages that should be
displayed from the log.
80D-Link DIR-457 User Manual
Page 86

Section 5 - WEB Configuration
DDNS
The DDNS feature allows you to host a server (Web, FTP, Game Server, etc…) using a domain name that you have
purchased (www.whateveryournameis.com) with your dynamically assigned IP address. Most broadband Internet
Service Providers assign dynamic (changing) IP addresses. Using a DDNS service provider, your friends can enter in
your domain name to connect to your server no matter what your IP address is.
Enable DDNS:
Server Address:
Host Name:
User Account:
Password:
DDNS Account
Testing:
Dynamic Domain Name System is a method of
keeping a domain name linked to a changing
IP Address. Check the box to enable DDNS.
Choose your DDNS provider from the drop
down menu.
Enter the Host Name that you registered with
your DDNS service provider.
Enter the User Name for your DDNS account.
Enter the Password for your DDNS account.
This is to test if the DDNS account is valid
for use.
81D-Link DIR-457 User Manual
Page 87

Section 5 - WEB Configuration
Schedules
Name:
Days:
Time:
Schedule
Rules List:
Enter a name for your new schedule.
Select a day, a range of days, or All Week to
include every day.
Check All Day - 24hrs or use the Start Time
and End Time elds to specify the start and end
time for your schedule.
The list of schedules will be listed here. Click the
Edit icon
icon to remove the schedule.
to make changes or click the Delete
82D-Link DIR-457 User Manual
Page 88

Section 5 - WEB Configuration
Device Information
This page displays the current information about the DIR-457 and the rmware version.
Displays the MAC address and the private
LAN:
(local) IP settings for the router.
Internet:
Wireless
802.11g:
3G:
Displays the MAC address and the public IP
settings for the router.
The connection status is displayed along
with Connect and Disconnect buttons
used to connect or disconnect the Internet
connection.
Displays the wireless MAC address and your
wireless settings such as SSID and Channel.
Displays the 3G network information, battery
status and 3G signal strength.
83D-Link DIR-457 User Manual
Page 89

Section 5 - WEB Configuration
Logs
The router automatically logs (records) events of possible interest in its internal memory. If there isn’t enough internal
memory for all events, logs of older events are deleted but logs of the latest events are retained. The Logs option allows
you to view the router logs. You can dene what types of events you want to view and the level of the events to view.
This router also has external Syslog Server support so you can send the log les to a computer on your network that
is running a Syslog utility.
First Page:
Last Page:
Previous:
Next:
Clear:
Link to Log
Settings:
Click this button to view the rst page of the log le.
Click this button to view the last page of the log le.
Click this button to view the previous page of the log
le.
Click this button to view the next page of the log
le.
Clears all of the log contents.
The user can click the button to “link to log settings”
and save the logs to a local hard drive or to a Syslog
server.
84D-Link DIR-457 User Manual
Page 90

Section 5 - WEB Configuration
Statistics
The screen below displays the Trafc Statistics. Here you can view the amount of packets that pass through the DIR-457 on the Internet, LAN
and Wireless connections. The trafc counter will reset if the device is rebooted.
85D-Link DIR-457 User Manual
Page 91

Section 5 - WEB Configuration
Support
Click on the links in the Help menu for a brief description of the of the conguration menus.
86D-Link DIR-457 User Manual
Page 92

Section 5 - WEB Configuration
Add Wireless Device with WPS Wizard
From the Setup > Wireless Setup menu, click Manual Wireless Connection Setup button. Under the heading Wi-Fi
Protected Setup, click the Enable option box and click on the Save Settings button to rst enable WPS.
Click on the Add Wireless Device with WPS button.
There are two options for establishing the WPS
connection:
PIN: In order to use this method you must know the
wireless client’s 8 digit PIN and click Connect. After the
connection is established, the web menu returns to the
Manual Wireless Connection Setup page.
Push Button: To use the Push Button method, click on
the Virtual Push Button, then press the WPS connection
button on the wireless client that is trying to connect,
or follow the instructions included with the WPS client
device. After the connection is established, the web
menu returns to the Manual Wireless Connection Setup
page.
87D-Link DIR-457 User Manual
Page 93

Section 5 - WEB Configuration
Connect to the Wireless Network Using Windows Vista
®
Windows Vista® users may use the built-in wireless utility. If you are using another company’s utility or Windows® 2000,
please refer to the user manual of your wireless adapter for help with connecting to a wireless network. Most utilities
will have a “site survey” option similar to the Windows Vista® utility as seen below.
If you receive the Wireless Networks Detected bubble, click
on the center of the bubble to access the utility.
or
Right-click on the wireless computer icon in your system tray
(lower-right corner next to the time). Select Connect to a
network.
The utility will display any available wireless networks in your
area. Click on a network (dlink_DIR-457) and click the Connect
button.
If you get a good signal but cannot access the Internet,
check you TCP/IP settings for your wireless adapter. Refer
to the Networking Basics section in this manual for more
information.
88D-Link DIR-457 User Manual
Page 94

Section 5 - WEB Configuration
Configuring WPA-PSK/WPA2-PSK
It is recommended to enable wireless security (WPA-PSK/WPA2-PSK) on DIR-457 router before conguring your
wireless adapter. If you are joining an existing network, you will need to know the security key or passphrase being used.
1. Open the Windows Vista® Wireless Utility by right-clicking
on the wireless computer icon in your system tray (lower
right corner of screen). Select Connect to a network.
2. Highlight the wireless network dlink_DIR-457 and click
Connect.
89D-Link DIR-457 User Manual
Page 95

Section 5 - WEB Configuration
3. Enter the same security key or passphrase that is on your DIR-457
router and click Connect.
It may take 20-30 seconds to connect to the wireless network. If the
connection fails, please verify that the security settings are correct.
The key or passphrase must be exactly the same as on the wireless
router.
90D-Link DIR-457 User Manual
Page 96

Section 5 - WEB Configuration
Connect Using WCN 2.0
The DIR-457 router supports Wi-Fi protection, referred to as WCN 2.0 in Windows Vista®. The following instructions
for setting this up depends on whether you are using Windows Vista® to congure the router or third party software.
When you rst set up the router, Wi-Fi protection is disabled and uncongured. To enjoy the benets of Wi-Fi protection,
the router must be both enabled and congured. There are three basic methods to accomplish this: use Windows
Vista’s built-in support for WCN 2.0, use software provided by a third party, or manually congure.
If you are running Windows Vista®, log into the router and click the Enable checkbox in the Advanced > Wi-Fi Protected
Setup window. Use the Current PIN that is displayed in the PIN Settings section of Advanced > Wi-Fi Protected
Setup window or choose to click the Generate New PIN button or Reset PIN to Default button.
If you are using third party software to set up Wi-Fi Protection, carefully follow the directions. When you are nished,
proceed to the next section to set up the newly-congured router.
91D-Link DIR-457 User Manual
Page 97

Section 5 - WEB Configuration
Connect to the Wireless Network Using Windows® XP
Windows® XP users may use the built-in wireless utility (Zero Conguration Utility). The following instructions are for
®
Service Pack 2 users. If you are using another company’s utility or Windows
of your wireless adapter for help with connecting to a wireless network. Most utilities will have a “site survey” option
®
similar to the Windows
If you receive the Wireless Networks Detected bubble, click
on the center of the bubble to access the utility.
or
Right-click on the wireless computer icon in your system tray
(lower-right corner next to the time). Select View Available
Wireless Networks.
XP utility as seen below.
2000, please refer to the user manual
The utility will display any available wireless networks in your
area. Click on a network (dlink_DIR-457) and click the Connect
button.
If you get a good signal but cannot access the Internet, check you
TCP/IP settings for your wireless adapter. Refer to the Networking
Basics section in this manual for more information.
92D-Link DIR-457 User Manual
Page 98

Section 5 - WEB Configuration
Configuring WPA-PSK/WPA2-PSK
It is recommended to enable wireless security (WPA-PSK/WPA2-PSK) on DIR-457 router before conguring your
wireless adapter. If you are joining an existing network, you will need to know the WPA-PSK/WPA2-PSK passphrase
being used.
1. Open the Windows® XP Wireless Utility by right-clicking
on the wireless computer icon in your system tray
(lower-right corner of screen). Select View Available
Wireless Networks.
2. Highlight the wireless network (dlink_DIR-457) and click
Connect.
93D-Link DIR-457 User Manual
Page 99

Section 5 - WEB Configuration
3. The Wireless Network Connection box will appear. Enter the
WPA-PSK/WPA2-PSK passphrase and click Connect.
It may take 20-30 seconds to connect to the wireless network. If the
connection fails, please verify that the WPA-PSK/WPA2-PSK settings
are correct. The WPA-PSK/WPA2-PSK passphrase must be exactly
the same as on the DIR-457 router.
94D-Link DIR-457 User Manual
Page 100

Appendix A - Wireless Basics
Troubleshooting
This chapter provides solutions to problems that can occur during the installation and operation of the DIR-457. Read
the following descriptions if you are having problems. (The examples below are illustrated in Windows® XP. If you have
a different operating system, the screen shots on your computer will look similar to the following examples.) Please
refer to the Quick Installation Troubleshooting section.
Wireless Basics
D-Link wireless products are based on industry standards to provide easy-to-use and compatible high-speed wireless
connectivity within your home, business or public access wireless networks. Strictly adhering to the IEEE standard,
the D-Link wireless family of products will allow you to securely access the data you want, when and where you want
it. You will be able to enjoy the freedom that wireless networking delivers.
A wireless local area network (WLAN) is a cellular computer network that transmits and receives data with radio signals
instead of wires. Wireless LANs are used increasingly in both home and ofce environments, and public areas such
as airports, coffee shops and universities. Innovative ways to utilize WLAN technology are helping people to work and
communicate more efciently. Increased mobility and the absence of cabling and other xed infrastructure have proven
to be benecial for many users.
Wireless users can use the same applications they use on a wired network. Wireless adapter cards used on laptop
and desktop systems support the same protocols as Ethernet adapter cards.
Under many circumstances, it may be desirable for mobile network devices to link to a conventional Ethernet LAN in
order to use servers, printers or an Internet connection supplied through the wired LAN. A Wireless Router is a device
used to provide this link.
95D-Link DIR-457 User Manual
 Loading...