

Page 1
Page 2

Warning
For your protection, please read the following:
Important Safety Instructions
1.Read these instructions.
2.Keep these instructions.
3.Heed all warnings.
4.Do not use this apparatus near water.
5.Clean only with dry cloth.
6.Do not block any ventilation openings. Install in
accordance with the manufacturer’s instructions.
7.Do not install near any heat sources such as radiators,
heat registers,stoves,or other apparatus (including
amplifiers) that produce heat.
8.Protect the power cord from being walked on or
pinched particularly at plugs, convenience receptacles,
and the point where they exit from the apparatus.
9.Unplug this apparatus during lightning storms or when
unused for long periods of time.
10.No user serviceable parts inside. Refer all servicing to
qualified service personnel. Servicing is required when
the apparatus has been damaged in any way, such as
power-supply cord or plug is damaged, liquid has been
spilled or objects have fallen into the apparatus, the
apparatus has been exposed to rain or moisture,does
not operate normally,or has been dropped.
11.WARNING:To reduce the risk of fire or electric shock,
do not expose this apparatus to rain or moisture.
12.Refer to labels on the unit,including bottom cover, or
other markings and pertinent information.
DECLARATION OF CONFORMITY
Manufacturer’s Name: DigiTech
Manufacturer’s Address: 8760 S. Sandy Parkway
Sandy,Utah 84070, USA
declares that the product:
Product name: The Weapon
Product option: all (requires Class II power
adapter that conforms to the
requirements of EN60065,
EN60742,or equivalent.)
conforms to the following Product Specifications:
Safety: IEC 60065 (1998)
EMC: EN 55013 (1990)
EN 55020 (1991)
Supplementary Information:
The product herewith complies with the requirements of the Low
Voltage Directive 72/23/EEC and the EMC Directive 89/336/EEC
as amended by Directive 93/68/EEC.
Vice-President of Engineering
8760 S.Sandy Parkway
Sandy,Utah 84070, USA
Date:December 5,2003
European Contact: Your local DigiTech Sales and
Service Office or
Harman Music Group
8760 South Sandy Parkway
Sandy,Utah 84070 USA
Ph:(801) 566-8800
Fax:(801) 568-7583
Page 3

WARRANTY: We at DigiTechare proud of our products and back-up each one with the following warranty:
1.The warranty registration card must be mailed within ten days after purchase date to validate this
warranty.
2.DigiTech warrants this product,when used solely within the U.S.,to be free from defects in materials
and workmanship under normal use and service.
3.DigiTech liability under this warranty is limited to repairing or replacing defective materials that show
evidence of defect,provided the product is returned to DigiTech WITH RETURN AUTHORIZATION,
where all parts and labor will be covered up to a period of one year (this warranty is extended to a
period of six years when the product has been properly registered by mail or through our website).
A Return Authorization number may be obtained from DigiTech by telephone. The company shall not
be liable for any consequential damage as a result of the product's use in any circuit or assembly.
4.Proof-of-purchase is considered to be the burden of the consumer.
5.DigiTech reserves the right to make changes in design,or make additions to,or improvements upon
this product without incurring any obligation to install the same on products previously manufactured.
6.The consumer forfeits the benefits of this warranty if the product's main assembly is opened and
tampered with by anyone other than a certified DigiTech technician or, if the product is used with AC
voltages outside of the range suggested by the manufacturer.
7.The foregoing is in lieu of all other warranties, expressed or implied, and DigiTech neither assumes nor
authorizes any person to assume any obligation or liability in connection with the sale of this product.
In no event shall DigiTech or its dealers be liable for special or consequential damages or from any
delay in the performance of this warranty due to causes beyond their control.
NOTE:The information contained in this manual is subject to change at any time without notification. Some
information contained in this manual may also be inaccurate due to undocumented changes in the product or
operating system since this version of the manual was completed. The information contained in this version
of the owner's manual supersedes all previous versions.
Page 4

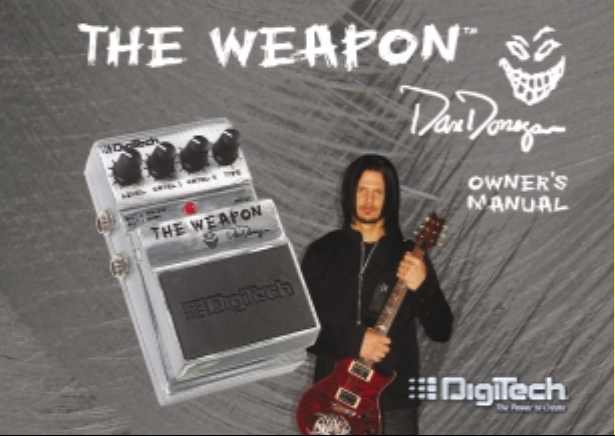
DigiTech®products have long been the effects processors of choice for
musicians around the world. Our philosophy for developing new
products always starts with the ar tist in mind and the desire to give
them the best-sounding,most creative tools possible. Along the way
we’ve built special relationships with numerous musicians and our
Artist Series is the result of that dedication and our commitment to
building the best stompboxes period. The Artist Series pedals help you
sound just like your favorite artist.
The W eapon™ is the product of our collaboration with Dan Donegan,
guitarist of the multi-platinum selling band Disturbed. It is an exciting
combination of seven of Dan’s signature sounds and tones including
distortion, phaser, wah, and sitar simulator. Dan is a longtime DigiTech
endorsee and prior to the release of this pedal,he needed numerous
effects devices to recreate some of the sounds and studio production
techniques you hear on his recordings.
"DigiTech helped me recreate some of the effects I used in the studio and
then put them all into one pedal. It’s now easier to pull off live!”
Page 5

Included Items
Before you get started,please make sure that the following items have
been included:
• DigiTech
®
’s Artist Series Dan Donegan Pedal - The Weapon™
• Artist Series Pedal Gig Bag
• PS200R Power Supply
• Artist Series Dan Donegan Guitar Pick
• This Owner’ s Manual
Page 6
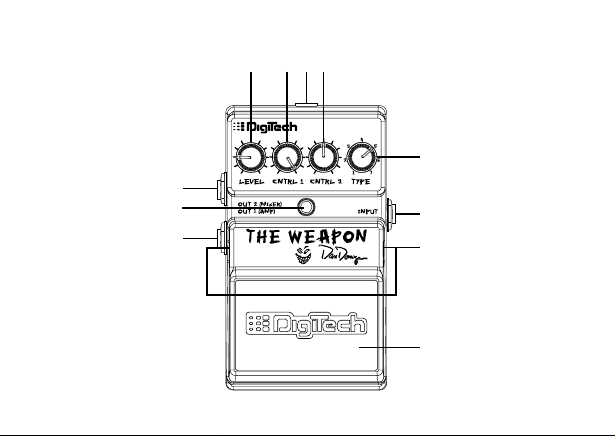
11
10
152 3 4
6
9
7
8
Page 7

1. Level Knob
Controls the output level of the effect. Turn this knob clockwise to
increase the output level,and counter-clockwise to decrease the
output level.
2. Cntrl 1
Controls different functions depending on which Weapon™Type is
selected. See the Knob Function Descriptions section on
following pages for a more detailed explanation of the Cntrl 1 knob’s
functions.
3. A C Adapter Jack
Connect only the included DigiTech
®
PS200R (9V DC) power supply
to this jack.
4. Cntrl 2
Controls different functions depending on which Weapon Type is
selected. See the Knob Function Descriptions section on
following pages for a more detailed explanation of the Cntrl 2 knob’s
functions.
Page 8

5.Type Knob
Selects one of the seven different signature Dan Donegan tones.
1.“Stupify” Rhythm Guitar - Distortion
2.“Mistress” Rhythm Guitar - Medium Distortion
3.“Voices” Intro Phaser/Ramp to Full Distortion
4.“Bound” Intro - Wah w/Distortion
5.“Rise” and “Intoxication” Octave Pitch Shift Effect
6.“Stupify” Bridge - Sitar Effect
7.“Mistress” Radio-Style Guitar Break - Distortion
Please refer to the Knob Function Descriptions section for
detailed information regarding each type.
6. Input Jack
Connect your instrument to this jack. Connecting a guitar cable to
this jack supplies battery power even though the Indicator LED may
not be lit. To prolong battery life,disconnect all cables when not in
use.
Page 9

7. Pedal Release Pins
These two pins are spring-loaded hinges that hold the pedal in place.
Push these pins in to release the pedal from the pedal chassis
exposing the battery compartment. (See the Battery Replacement
Diagram at the end of this Owner’s Manual.)
8. Pedal
Press the pedal to turn the effect on and off.
9. Out 1(Amp) Jack
Connect this output to your guitar amplifier.
10.Indicator LED
This LED indicates when the effect is turned on. If the LED
becomes dim or does not light when using battery power (with the
cables connected),the battery needs to be replaced.
11.Out 2 (Mixer) Jack
The Out 2 (Mixer) output has been specifically designed for use with
a full range audio system. This means that it is to be plugged directly
into a mixer or recording device connected to full range speakers
for optimal performance.
Page 10

Knob Function Descriptions
Type 1.“Stupify” Rhythm Guitar - Distortion -This is Dan’s high
gain rhythm guitar sound for the song “Stupify”. Set the Cntrl
1 and Cntrl 2 knobs to the twelve o’clock position to produce
this sound.
Type 2.“Mistress” Rhythm Guitar - Moderate Distortion - To
get the moderate distortion sound heard in the bridge section
of the song “Mistress” (studio version),Dan rolled back the
volume on his guitar. Type 2 emulates that same tone without
having to touch the volume knob. Set the Cntrl 1 and Cntrl 2
knobs to the twelve o’clock position to produce this sound.
LEVEL
Output Level Low Freq. EQ Boost/Cut High Freq. EQ Boost/Cut
Output Level Low Freq. EQ Boost/Cut High Freq. EQ Boost/Cut
Output Level Phase Amount Ramp Time
Output Level
Output Level Wet/Dry Mix Shift Amount +/- Octave
Output Level Fret Buzz Amount Reverb Level
Output Level Low Freq. EQ Boost/Cut High Freq. EQ Boost/Cut
CNTRL 1
Wah Sensitivity
CNTRL 2
Wah Attack
1- "Stupify" Rhythm Guitar - Distortion
2- "Mistress" Rhythm Guitar - Moderate Distortion
3- "Voices" Intro - Phaser/Ramp to Full Distortion
4- "Bound" Intro - Wah with Distortion
5- "Rise" and "Intoxication" Octave Pitch Shift Effect
6- "Stupify" Bridge - Sitar Simulator
7- "Mistress" Radio Style Guitar Break -
TYPE
Distortion
Page 11

Type 3.“Voices” Intro - Phaser/Ramp to Full Distortion - This
type recreates the clean phaser fading into full distortion effect
heard during the intro of the song “Voices”. In the studio,this
was produced by using two separate guitar tracks and
automated mixing,but it can now be created using only the
Weapon. When the pedal is first engaged,a clean phaser effect
is present. You can adjust the amount of the phaser intensity
using the Cntrl 1 knob. To get the distortion sound to fade in
press and hold the pedal for 2 seconds while the phaser effect
is still on. You will then begin to hear the distorted tone
gradually increase in volume. Once you have reached the
maximum distortion level,release the pedal and the clean
phaser effect will be muted leaving only the distortion effect
present. You can adjust the rate of how long it takes for the
distortion effect to reach maximum level using the Cntrl 2
knob. Setting the Cntrl 2 knob fully counter-clockwise
produces the quickest transition time while setting it fully
clockwise produces the longest transition time. The Level
knob controls the distortion level only.
Page 12

Type 4.“Bound” Intro - Wah with Distortion-This effect
recreates the wah effect used by Dan in the song “Bound”.
Rather than having to use an actual physical wah,this wah effect
is controlled by playing dynamics. The harder you play, the
more the wah effect reacts like the sweeping of a pedal from
heel to toe. The Cntrl 2 knob adjusts the wah effect’s heel to
toe sweep speed while the Cntrl 1 knob adjusts the wah
sensitivity. Set the Cntrl 1 and Cntrl 2 knobs to the twelve
o’clock position to produce this sound.
Type 5.“Rise” and “Intoxication” Octave Pitch Shift Effect -
This is the DigiTech
®
Whammy™ octave effect Dan used in the
songs “Rise” and “Intoxication”. The Cntrl 1 knob adjusts the
Wet/Dry ratio of the pitch shift effect. The Cntrl 2 knob
adjusts the pitch shift amount from two octaves down to two
octaves up in one octave intervals. Set the knobs as shown
below to produce this sound.
Page 13

Type 6.“Stupify” Bridge - Sitar Simulator - This effect simulates
the sitar sound Dan used for the bridge section of the song
“Stupify”. The Cntrl 1 knob adjusts the amount of fret buzz
which is a typical characteristic found in the sound of sitars.
The Cntrl 2 knob adjusts the reverb level to give the sitar
effect added dimension. Set the Cntrl 1 and Cntrl 2 knobs to
the twelve o’clock position to produce this effect.
Type 7.“Mistress” Radio-Style Guitar Break - Distortion -This is
the DigiTech
®
Metal Master™ distortion sound that Dan uses
live during the radio-style guitar break section of the song
“Mistress”. This effect type allows you to create the distortion
tone of the X-Series™ Metal Master pedal. Set the knobs as
shown below to produce this sound.
Page 14

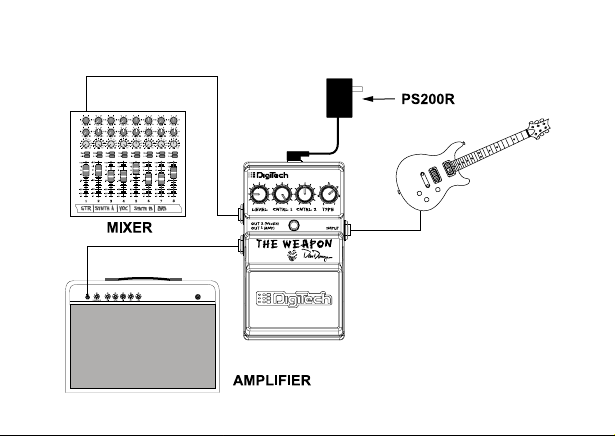
Set Up Directions
Follow these set up directions before use:
1.Turn the volume down on the amplifier/mixer you are connecting to.
2.Connect the pedal output to the amplifier/mixer input. (Please refer
to the Connections Diagrams on the following pages.)
3.Connect the guitar to the pedal input. (Please refer to the
Connections Diagrams on the following pages.)
4.Connect the power supply to the pedal. (Please refer to the
Connections Diagrams on the following pages.)
5.Set the Weapon’s Level control to the minimum position.
6. Turn up your amplifier/mixer level to your desired listening level.
7.Turn on the pedal by pressing the pedal switch and gradually turn up
the W eapon’s Level control to the desired listening level.
Page 15

Connections
The W eapon™ has a single Input and a pair of outputs, Out 1 (Amp)
and Out 2 (Mixer). These two outputs give you the option of running
into a guitar amplifier, running directly to a mixing console or recording
device,or both simultaneously. The Out 2 (Mixer) output has been
specially designed to faithfully reproduce Dan’s studio guitar amplifier
tones without having to use an amp.
Connections Diagram (Amp)
Page 16
Connections Diagram (Amp and Mixer)
Page 17

Specifications:
• Controls - Level,Cntrl 1,Cntrl 2,Type, On/Off Pedal
• Jacks - Input,Output 1 (Amp), Output 2 (Mixer)
• Input Impedance - 1 MOhms
• Output Impedance - 100 Ohms
• Power Supply - 9V Alkaline Dry Batter y
• Power Consumption - 4.8 Watts (w/PS200R power supply)
• Battery Life - Approximately 4 hours (with continuous usage)
• Dimensions - 4 15/16”(L) x 3 1/8”(W) x 2 1/8”(H)
• Weight - 2 lbs.
• Included Power Supply
PS200R - 100 (100V ~ 50/60Hz)
PS200R - 120 (120V ~ 60Hz)
PS200R - 230 (230V ~ 50Hz)
PS200R - 240 (240V ~ 50Hz)
Page 18

Battery Replacement
1.Using the tip of a 1/4” guitar cable , push one of the release pins in on
either side of the pedal,and remove the pedal from the pedal chassis.
2.Remove the battery from the batter y compartment and disconnect
the battery cable.
3.Connect a new batter y to the batter y cable and put it back in the
battery compartment. Make sure the battery cable does not interfere
with the spring or pedal switch arm.
4.Place one hole of the pedal over its corresponding pin.
5.Push the opposite pin in and lower the other side of the pedal into
place over the depressed pin. Release the pin. When the pedal is
properly fastened,both release pins are flush with the outer side of
the pedal.
Page 19

Battery Replacement Diagram
Page 20

DigiTech
8760 South Sandy Parkway
Sandy,Utah 84070
PH (801) 566-8800
FAX (801) 566-7005
DigiTech and The Weapon are trademarks
of the Harman Music Group Inc.
Copyright - Harman Music Group
Printed 3/2004
Manufactured in the USA
The Wea pon™
Owners Manual 18-1820-B
Please visit DigiTech
on the W orld Wide W eb at:
www.digitech.com
 Loading...