


Simple Version
Version simplifiée
Versión sencilla
BLU-RAY DISC/DVD SURROUND RECEIVER
S-5BD
Owner’s Manual
Manuel de l’Utilisateur
Manual del usuario
The operations described in this manual are
•
based mainly on use of the remote control
unit buttons.
The same operations can also be performed
using the buttons with the same names on
the main unit.
Les opérations décrites dans ce manuel
•
reposent principalement sur l’utilisation des
touches de la télécommande.
Il est également possible d’effectuer ces
opérations à l’aide des touches qui portent
le même nom sur l’appareil principal.
Para realizar las operaciones que se describen
•
en este manual se utiliza, sobre todo, el
mando a distancia.
Estas operaciones se pueden realizar con
los botones del mismo nombre que se
encuentran en la unidad principal.
v
3
Basic Version
Version basique
Versión básica
v
11
Advanced Version
Version avancée
Versión avanzada
v
33
Information
“Part Names and Functions“ (vpage 62)
Informations
“Nomenclature et fonctions“ (vpage 62)
Información
“Nombres y funciones de las piezas“ (vpágina 62)
v
61

ESPAÑOLENGLISH FRANCAIS
CAUTION
RISK OF ELECTRIC SHOCK
DO NOT OPEN
$-"44
-"4&3
130%6$5
SAFETY PRECAUTIONS
n
CAUTION:
TO REDUCE THE RISK OF ELECTRIC SHOCK, DO NOT REMOVE
COVER (OR BACK). NO USER-SERVICEABLE PARTS INSIDE.
REFER SERVICING TO QUALIFIED SERVICE PERSONNEL.
The lightning flash with arrowhead symbol, within an equilateral
triangle, is intended to alert the user to the presence of
uninsulated “dangerous voltage” within the product’s enclosure
that may be of sufficient magnitude to constitute a risk of electric
shock to persons.
The exclamation point within an equilateral triangle is intended
to alert the user to the presence of important operating
and maintenance (servicing) instructions in the literature
accompanying the appliance.
WARNING:
TO REDUCE THE RISK OF FIRE OR ELECTRIC SHOCK, DO NOT
EXPOSE THIS APPLIANCE TO RAIN OR MOISTURE.
CAUTION:
USE OF CONTROLS OR ADJUSTMENTS OR PERFORMANCE OF
PROCEDURES OTHER THAN THOSE SPECIFIED HEREIN MAY
RESULT IN HAZARDOUS RADIATION EXPOSURE.
THIS PRODUCT SHOULD NOT BE ADJUSTED OR REPAIRED BY
ANYONE EXCEPT PROPERLY QUALIFIED SERVICE PERSONNEL.
Laser Class (IEC 60825-1:2001)
n
IMPORTANT SAFETY
INSTRUCTIONS
1. Read these instructions.
2. Keep these instructions.
3. Heed all warnings.
4. Follow all instructions.
5. Do not use this apparatus near water.
6. Clean only with dry cloth.
7. Do not block any ventilation openings.
Install in accordance with the manufacturer’s instructions.
8. Do not install near any heat sources such as radiators, heat registers,
stoves, or other apparatus (including amplifiers) that produce heat.
9. Do not defeat the safety purpose of the polarized or grounding-type plug. A
polarized plug has two blades with one wider than the other. A grounding
type plug has two blades and a third grounding prong. The wide blade or the
third prong are provided for your safety. If the provided plug does not fit into
your outlet, consult an electrician for replacement of the obsolete outlet.
10. Protect the power cord from being walked on or pinched particularly at
plugs, convenience receptacles, and the point where they exit from the
apparatus.
11. Only use attachments/accessories specified by the manufacturer.
12. Use only with the cart, stand, tripod, bracket, or table
specified by the manufacturer, or sold with the apparatus.
When a cart is used, use caution when moving the cart/
apparatus combination to avoid injury from tip-over.
13. Unplug this apparatus during lightning storms or when
unused for long periods of time.
14. Refer all servicing to qualified service personnel.
Servicing is required when the apparatus has been damaged in any way,
such as power-supply cord or plug is damaged, liquid has been spilled or
objects have fallen into the apparatus, the apparatus has been exposed to
rain or moisture, does not operate normally, or has been dropped.
15. Batteries shall not be exposed to excessive heat such as sunshine, fire or
the like.
CAUTION:
• The ventilation should not be impeded by covering the ventilation
openings with items, such as newspapers, tablecloths, curtains,
etc.
• No naked flame sources, such as lighted candles, should be
placed on the unit.
• Observe and follow local regulations regarding battery disposal.
• Do not expose the unit to dripping or splashing fluids.
• Do not place objects filled with liquids, such as vases, on the
unit.
ATTENTION:
• La ventilation ne doit pas être gênée en recouvrant les ouvertures
de la ventilation avec des objets tels que journaux, rideaux, tissus,
etc.
• Aucune flamme nue, par exemple une bougie, ne doit être placée
sur l’appareil.
• Veillez à respecter les lois en vigueur lorsque vous jetez les piles
usagées.
• L’appareil ne doit pas être exposé à l’eau ou à l’humidité.
• Ne pas poser d’objet contenant du liquide, par exemple un vase,
sur l’appareil.
PRECAUCIÓN:
• La ventilación no debe quedar obstruida por haberse cubierto las
aperturas con objetos como periódicos, manteles, cortinas, etc.
• No debe colocarse sobre el aparato ninguna fuente inflamable sin
protección, como velas encendidas.
• A la hora de deshacerse de las pilas, respete la normativa para el
cuidado del medio ambiente.
• No exponer el aparato al goteo o salpicaduras cuando se utilice.
• No colocar sobre el aparato objetos llenos de líquido, como
jarros.
CAUTION:
To completely disconnect this product from the mains, disconnect
the plug from the wall socket outlet.
The mains plug is used to completely interrupt the power supply to
the unit and must be within easy access by the user.
PRECAUTION:
Pour déconnecter complètement ce produit du courant secteur,
débranchez la prise de la prise murale.
La prise secteur est utilisée pour couper complètement
l’alimentation de l’appareil et l’utilisateur doit pouvoir y accéder
facilement.
PRECAUCIÓN:
Para desconectar completamente este producto de la alimentación
eléctrica, desconecte el enchufe del enchufe de la pared.
El enchufe de la alimentación eléctrica se utiliza para interrumpir por
completo el suministro de alimentación eléctrica a la unidad y debe
de encontrarse en un lugar al que el usuario tenga fácil acceso.
I
I
ENGLISHFRANCAISESPAÑOL
FCC INFORMATION (For US customers)
1. PRODUCT
This product complies with Part 15 of the FCC Rules. Operation is subject to the following two conditions: (1) this
product may not cause harmful interference, and (2) this product must accept any interference received, including
interference that may cause undesired operation.
2. IMPORTANT NOTICE: DO NOT MODIFY THIS PRODUCT
This product, when installed as indicated in the instructions contained in this manual, meets FCC requirements.
Modification not expressly approved by DENON may void your authority, granted by the FCC, to use the product.
3. NOTE
This product has been tested and found to comply with the limits for a Class B digital device, pursuant to Part 15
of the FCC Rules. These limits are designed to provide reasonable protection against harmful interference in a
residential installation.
This product generates, uses and can radiate radio frequency energy and, if not installed and used in accordance
with the instructions, may cause harmful interference to radio communications. However, there is no guarantee
that interference will not occur in a particular installation. If this product does cause harmful interference to radio or
television reception, which can be determined by turning the product OFF and ON, the user is encouraged to try to
correct the interference by one or more of the following measures:
• Reorient or relocate the receiving antenna.
• Increase the separation between the equipment and receiver.
• Connect the product into an outlet on a circuit different from that to which the receiver is connected.
• Consult the local retailer authorized to distribute this type of product or an experienced radio/TV technician for
help.
This Class B digital apparatus complies with Canadian ICES-003.
Cet appareil numérique de la classe B est conforme à la norme NMB-003 du Canada.
Copyrights / Droits d’auteur / Derechos de Autor
n
• It is prohibited by law to reproduce, broadcast, rent or play discs in public without the consent of the
copyright holder.
• La reproduction, la diffusion, la location, le prêt ou la lecture publique de ces disques sont interdits sans
le consentement du détenteur des droits d’auteur.
• De acuerdo con las leyes está prohibido reproducir, emitir, alquilar o interpretar discos en público sin la
autorización del propietario de los derechos de autor.
NOTE ON USE / OBSERVATIONS RELATIVES A L’UTILISATION /
n
NOTAS SOBRE EL USO
• Do not let foreign objects into the unit.
• Ne pas laisser des objets étrangers dans
l’appareil.
• No deje objetos extraños dentro del
equipo.
• Do not let insecticides, benzene, and
thinner come in contact with the unit.
• Ne pas mettre en contact des insecticides,
du benzène et un diluant avec l’appareil.
• No permita el contacto de insecticidas,
gasolina y diluyentes con el equipo.
• Avoid high temperatures.
Allow for sufficient heat dispersion when
installed in a rack.
• Eviter des températures élevées.
Tenir compte d’une dispersion de chaleur
suffisante lors de l’installation sur une
étagère.
• Evite altas temperaturas.
Permite la suficiente dispersión del calor
cuando está instalado en la consola.
• Keep the unit free from moisture, water,
and dust.
• Protéger l’appareil contre l’humidité, l’eau
et la poussière.
• Mantenga el equipo libre de humedad,
agua y polvo.
• Unplug the power cord when not using the
unit for long periods of time.
• Débrancher le cordon d’alimentation
lorsque l’appareil n’est pas utilisé pendant
de longues périodes.
• Desconecte el cordón de energía cuando
no utilice el equipo por mucho tiempo.
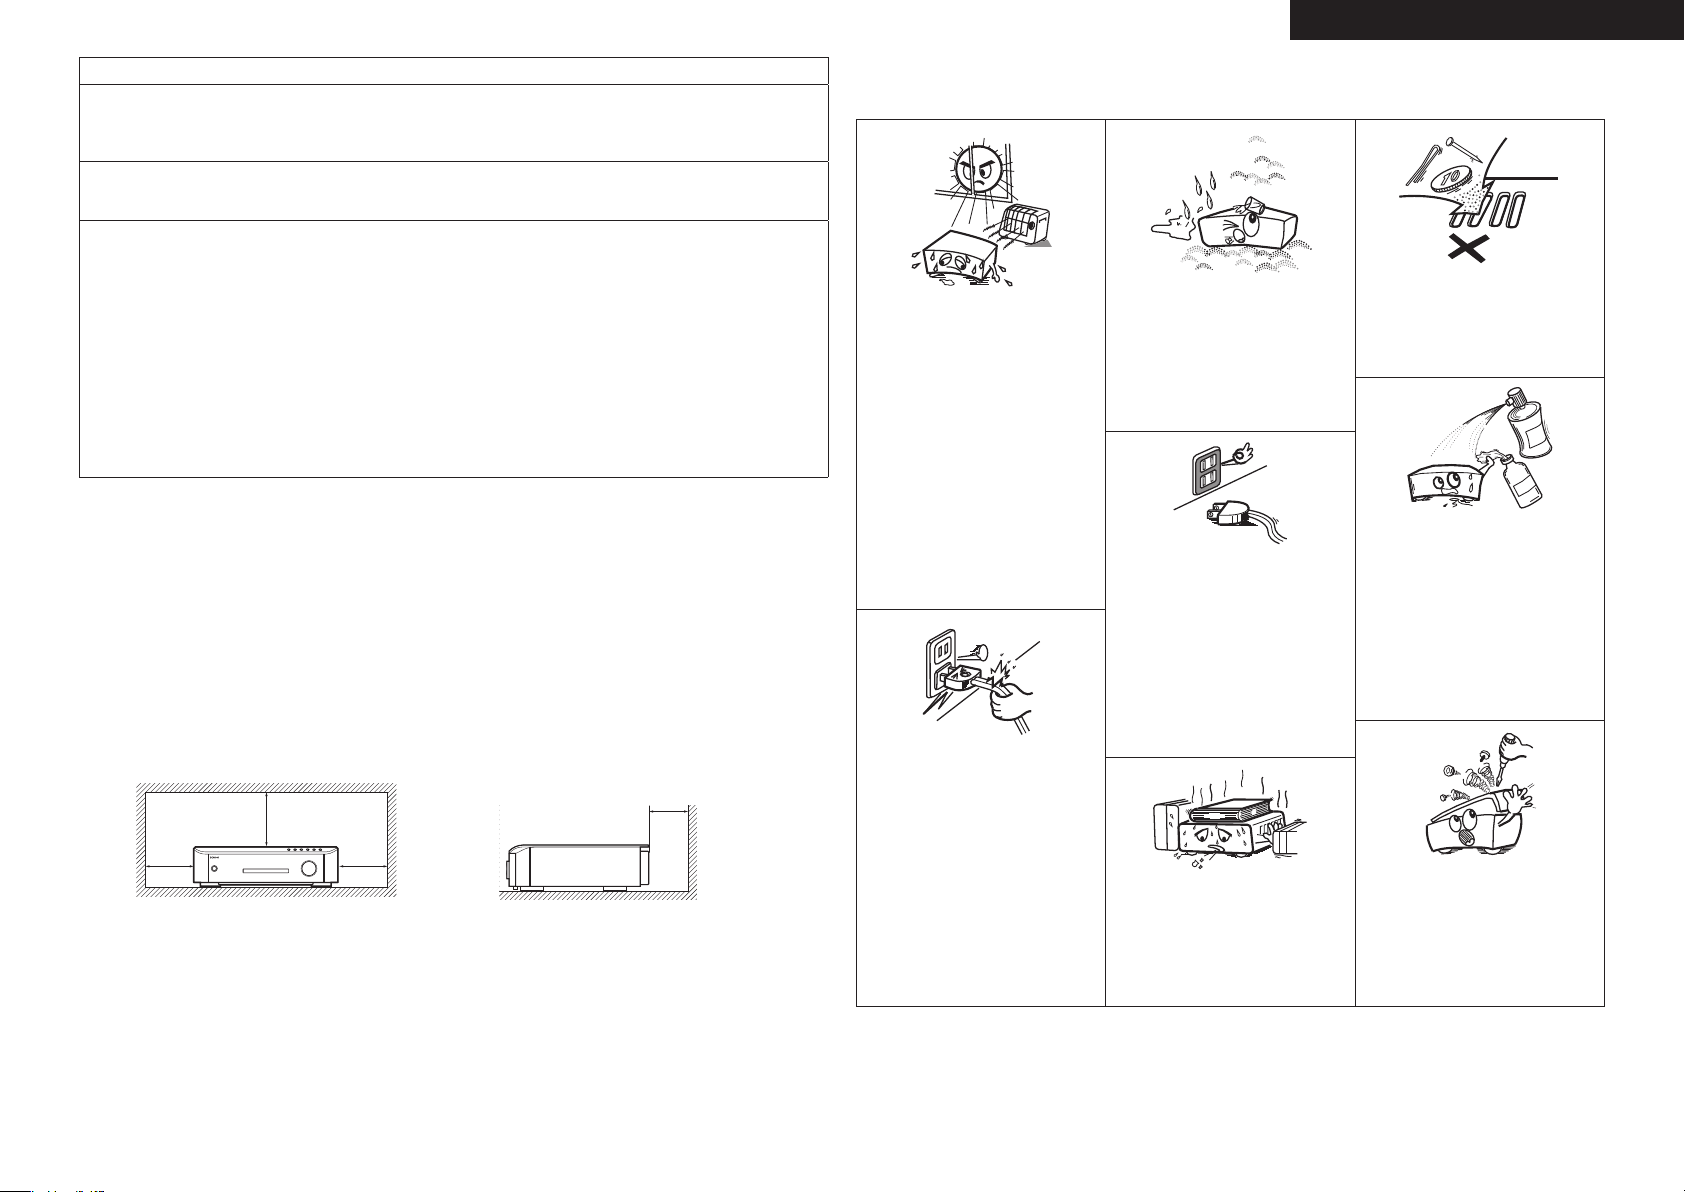
n Cautions On Installation / Précautions d’installation /
Emplazamiento de la Instalación
z
z z
For proper heat dispersal, do not install this unit in a confined space, such as a bookcase or similar enclosure.
z
More than 20 cm (8 in.) is recommended.
•
Do not place any other equipment on this unit.
•
Pour permettre la dissipation de chaleur requise, n’installez pas cette unité dans un espace confiné tel qu’une
z
bibliothèque ou un endroit similaire.
Une distance de plus de 20 cm (8 po) est recommandée.
•
Ne placez aucun matériel sur cet appareil.
•
Para la dispersión del calor adecuadamente, no instale este equipo en un lugar confinado tal como una librería
z
o unidad similar.
Se recomienda dejar más de 20 cm (8 pulg.) alrededor.
•
No coloque ningún otro equipo sobre la unidad.
•
z
Wall
Paroi
Pared
• Handle the power cord carefully.
Hold the plug when unplugging the cord.
• Manipuler le cordon d’alimentation avec
précaution.
Tenir la prise lors du débranchement du
cordon.
• Maneje el cordón de energía con cuidado.
Sostenga el enchufe cuando desconecte el
cordón de energía.
* (For apparatuses with ventilation holes)
• Do not obstruct the ventilation holes.
• Ne pas obstruer les trous d’aération.
• No obstruya los orificios de ventilación.
• Never disassemble or modify the unit in
any way.
• Ne jamais démonter ou modifier l’appareil
d’une manière ou d’une autre.
• Nunca desarme o modifique el equipo de
ninguna manera.
II
II


e r
i
y
u
Getting Started
Thank you for purchasing this DENON product. To ensure proper operation, please read this owner’s manual carefully before using the product.
After reading them, be sure to keep them for future reference.
Contentsn
Getting Started ·············································································1
Accessories ··················································································1
Features ························································································2
Cautions on Handling ····································································2
Simple Version (Simple Setup Guide) ························3
Basic Version ·········································································11
Connections ·················································································12
Connecting an HDMI-Compatible Device ···································12
Connecting a TV··········································································13
Connecting a Control Dock for iPod ············································14
Connecting an iPod or USB Memory Device to the USB Port ····14
Connecting a Set-Top Box (Satellite Tuner/Cable TV) ·················15
Connecting an Antenna ······························································15
Connecting to the Network ························································16
Connecting an External Control Device ······································17
Playback (Basic) ···········································································18
About Playback Information ························································18
Playable Media············································································19
Selecting the Input Source ·························································20
Playing Blu-ray Disc and DVD-Video ···········································20
Playing CD ··················································································21
Playing an iPod® ·········································································22
Playing a USB Memory Device ··················································· 24
Playing Files ················································································25
Tuning in Radio Stations ·····························································27
Basic Operation ··········································································28
Surround Mode ···········································································31
Playing Back Surround Sound Using 2.0-channel or
2.1-channel Speakers··································································31
Surround Playback Using more than 2.1-channel Speakers ·······32
Advanced Version ······························································33
Settings for Speakers Other Than 5.1-channel ························34
Install ··························································································34
Connect ······················································································35
Set Up Speakers ·········································································36
Playback (Advanced) ···································································37
Advanced Operation ···································································37
Convenient Functions ·································································39
Playback (Multi-zone Function) in ZONE2
(Separate Room) ········································································41
Multi-zone Connections ······························································41
Playback ······················································································41
How to Make Detailed Settings ·················································42
Menu Map ··················································································42
GUI Menu Operation ··································································43
Language Setup ··········································································44
Video Setup ················································································44
Ratings ························································································45
Network Setup············································································45
Display Setup ··············································································46
Other Setup ················································································46
Source Select··············································································47
Audio Adjust ···············································································48
Auto Setup ··················································································52
Manual Setup··············································································53
Information ·················································································57
Setting Various Modes ·······························································58
Operating the Connected Devices by Remote Control Unit ···59
Registering Preset Codes ···························································59
Operating Components ······························································59
Information ·············································································61
Part Names and Functions ·························································62
Front Panel / Top Panel / Display ················································62
Rear Panel···················································································63
Remote Control Unit ···································································64
Inserting a Disc ···········································································65
Other Information ·······································································66
About Discs and Files ·································································66
About Handling of Media ···························································66
Cleaning Discs ············································································66
About Copyright ··········································································67
AL24 Processing ·········································································67
Trademark Information ·······························································67
Surround ·····················································································68
Language Code List ····································································70
Country Code List ·······································································71
Explanation of Terms ··································································72
ENGLISH
Troubleshooting ··········································································74
Resetting the Microprocessor ····················································77
Attaching the Door······································································77
Specifications ··············································································78
License ····························································End of this manual
List of preset codes ··································End of this manual
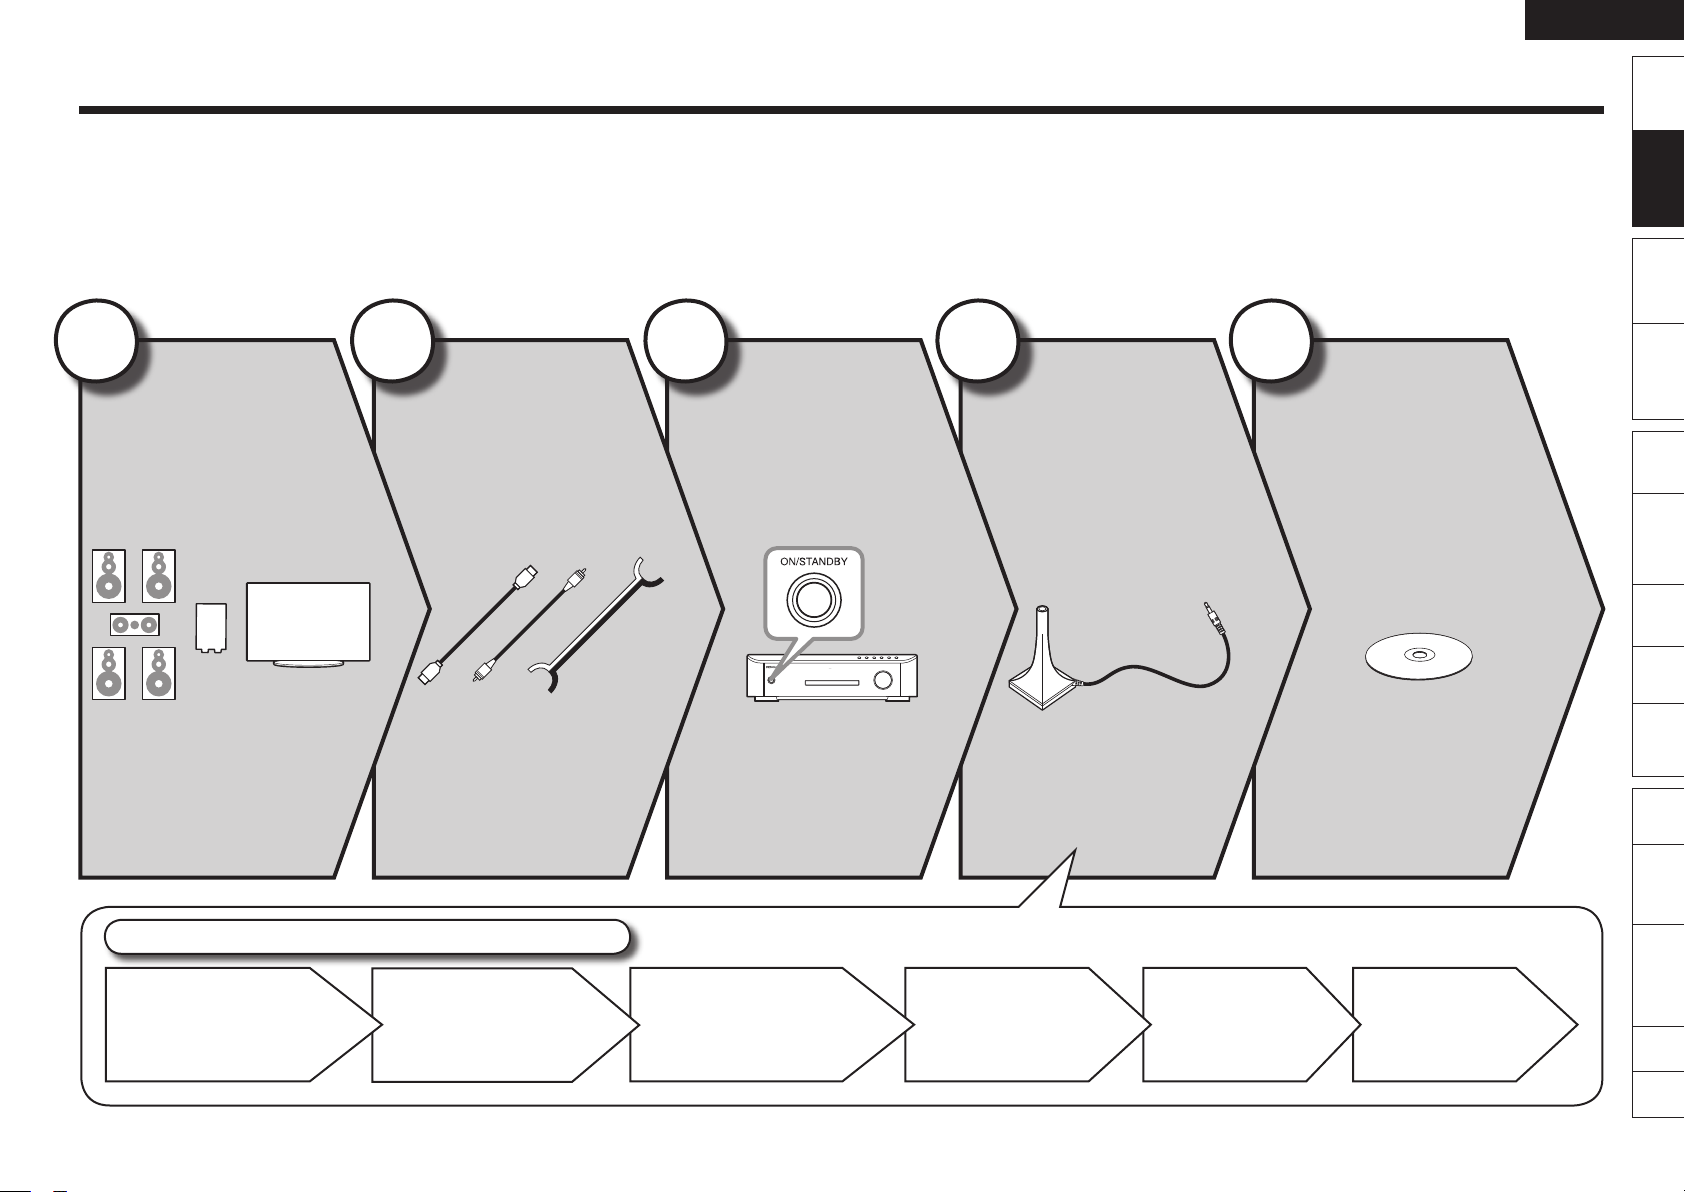
Accessories
Check that the following parts are supplied with the product.
q Owner’s manual ......................................................................1
w Service station list ...................................................................1
e Power cord (Cord length: Approx. 6 ft / 1.8 m) .......................1
r Remote control unit (RC-1122) ................................................1
t R6/AA batteries .......................................................................2
y Setup microphone
(DM-A409, Cord length: Approx. 25 ft / 7.6 m) .......................1
u AM loop antenna .....................................................................1
i FM indoor antenna ..................................................................1
o Warranty (for North America model only) ................................ 1
Getting
Started
Version
Simple
Connections
Playback
(Basic)
(Advanced)
Playback
Multi-
zone
GUISettings
Remote
Control
Names
Part
Information
Other
Troubleshooting
Spec. Index

ENGLISH
Getting
Started
Version
Simple
Connections
Playback
(Basic)
(Advanced)
Playback
Multi-
zone
GUISettings
Remote
Control
Names
Part
Information
Other
Troubleshooting
Spec. Index
Features
Audio and video engineering design of high-end
components, premium HD audio & video quality
Support for HD audio formats and latest surround formats
•
DENON’s original high-end Blu-ray Disc drive mechanism for
•
faithful reading and accurate playback of high-definition A/V
signals from Blu-ray Disc
DENON craftsmanship, in assiduous pursuit of the ideal in A/V
•
playback devices
DENON’s pure audio technologies
•
Video technologies inherited from DENON’s high-end
•
components
Advanced DENON technologies
•
AL24 Processing (vpage 67) / Restorer (vpage 26)
Speaker Flexibility
Drivability of full-bandwidth speakers from 4 to 16 ohms
•
2.0/2.1-channel Dynamic Play Mode (vpage 56), to
•
automatically assign surround channel amplifiers to the front
channel amplifiers
Digital Content Friendliness
HDMI (v. 1.4 with Audio Return Channel) (vpage 12 “About
•
ARC Function”)
Front inputs for iPod, USB memory player, digital camcorder
•
via HDMI, and SD card (vpage 12 “Connecting an HDMICompatible Device”, vpage 14 “Connecting an iPod or USB
Memory Device to the USB Port”)
HDMI inputs for Set-top box and video games on back panel
•
(vpage 12 “Connecting an HDMI-Compatible Device”)
BD-Live support (Profile 2.0) (vpage 21)
•
Network music ready
•
Network music can be enjoyed via the DENON Networked
Control Dock. (Requires separately-sold ASD-3N/3W/51N/51W.)
Advanced GUI (Graphical User Interface)
(vpage 43)
Enables easy, intuitive operation.
First Setup function
(vpage 6 “Audyssey™ Auto Setup”)
This unit carefully measures and analyses your room’s acoustics
and your speakers’ characteristics to ensure the optimum acoustic
settings (Audyssey MultEQ® (vpage 51).
Audyssey Dynamic Volume™ (vpage 52) &
Dynamic EQ™ (vpage 51)
Dynamic Volume solves the problem of large variations in volume
level between TV, movies and other content. Dynamic EQ
solves the problem of deteriorating sound quality as volume is
decreased.
One Touch Play function (vpage 39)
The remote control unit includes a ONE TOUCH PLAY button that
automatically turns on power to the TV, switches the TV’s input
line, and immediately starts the movie.
Automatic Sound Mode
Automatically switches to stereo sound when you’re listening to
a music source or to surround sound when you’re enjoying video
programs.
Plug ‘n’ Play
Starts playback immediately when an iPod or USB memory device
is connected (vpage 23 “Connect the iPod Directly to the USB
Port to Play Back”, vpage 24 “Playing a USB Memory
Device”).
Remote Control Unit with buttons designed for
easy operation
Custom Install features
2 Source 2 Zone (vpage 41 “Multi-zone Connections”) / IR
Remote in/out ports (vpage 17 “REMOTE CONTROL Jacks”)
/ AMX, Crestron third party serial control support with RS-232C
port (vpage 17 “RS-232C Connector”) / 150mA Trigger output
(vpage 17 “TRIGGER OUT Jacks”)
Cautions on Handling
Before turning the power switch on
•
Check once again that all connections are correct and that there are
no problems with the connection cables.
Power is supplied to some of the circuitry even when the unit is
•
set to the standby mode. When traveling or leaving home for long
periods of time, be sure to unplug the power cord from the power
outlet.
Image persistence (image burn-in)
•
Do not leave the still images of the disc menu, the unit menu, etc.,
displayed on the TV screen for long periods. This can result in image
persistence (image burn-in) on the screen.
About Condensation
•
If this unit is moved from a cold place to a warm place, or installed
in a room subject to rapid temperature rise from a heater, etc.,
condensation (dew) may form on the internal parts of the unit
(operating parts and lenses).
If used in this condition, this unit will not operate correctly and
damage may result. If condensation is formed on the unit, leave this
unit for 1 to 2 hours with the power off before use.
Cautions on using mobile phones
•
Using a mobile phone near this unit may result in noise. If so, move
the mobile phone away from this unit when it is in use.
Moving the unit
•
Be sure to remove a disc, turn off the power and unplug the power
cord from the power outlet. Next, disconnect the connection cables
to other system equipment before moving the unit.
About Care
•
Wipe the cabinet and control panel clean with a soft cloth.
•
Follow the instructions when using a chemical cleaner.
•
Benzene, paint thinner or other organic solvents as well as
•
insecticide may cause material changes and discoloration if brought
into contact with the unit, and should, therefore, not be used.
Sufficiently ventilate the place of installation
•
If the unit is left in a room full of the smoke from cigarettes, etc., for
long periods of time, the surface of the optical pickup could get dirty,
in which case it will not be able to read the signals properly.
Note that the illustrations in these instructions may differ from the
•
actual unit for explanation purposes.
Simple Version (Simple Setup Guide)
ENGLISH
Getting
Started
Here, we explain the entire setup procedure, from unboxing the unit to using it in a home theater.
The “Simple Version” describes the installation, connection and setup methods for 5.1-channel speakers.
See page 34 for the installation, connection and setup methods for speakers other than 5.1-channel speakers.
Before connecting the unit, turn off the power to all devices.
n
For operation of the connected devices, refer to the user manuals for each device.
n
1
Install
(vpage 4)
Enjoy better audio, using
the correct install method.
2
Connect
(vpage 4)
Connect 5.1-channel
speakers and a TV
equipped with an HDMI
connector.
3
Turn on
Power
(vpage 5)
4
Set Up
Speakers
(vpage 6)
Use the setup microphone
(DM-A409) included
with the product, for
automatic setup.
5
Play Back
Disc
Enjoy Blu-ray Disc and DVD
in surround sound.
(vpage 10)
Version
Simple
Connections
Playback
(Basic)
(Advanced)
Playback
Multi-
zone
GUISettings
Remote
Control
Names
Part
Information
Other
Set Up Speakers (Audyssey™ Auto Setup)
STEP 1
Preparation
STEP 2
Speaker
Detection
STEP 3
Measurement
STEP 4
Calculation
STEP 5
Check
STEP 6
Store
Troubleshooting
Spec. Index
ENGLISH
FL FR
SW
C
SL
SR
120˚
22 – 30˚
FL FR
SW
C
SL
SR
Getting
Started
11
Version
Simple
This unit can perform 2.0/2.1 to 7.1-channel surround playback.
Install
1 2 4 53
Here, we explain setup using the example of 5.1-channel speaker
playback.
Connections
Playback
(Basic)
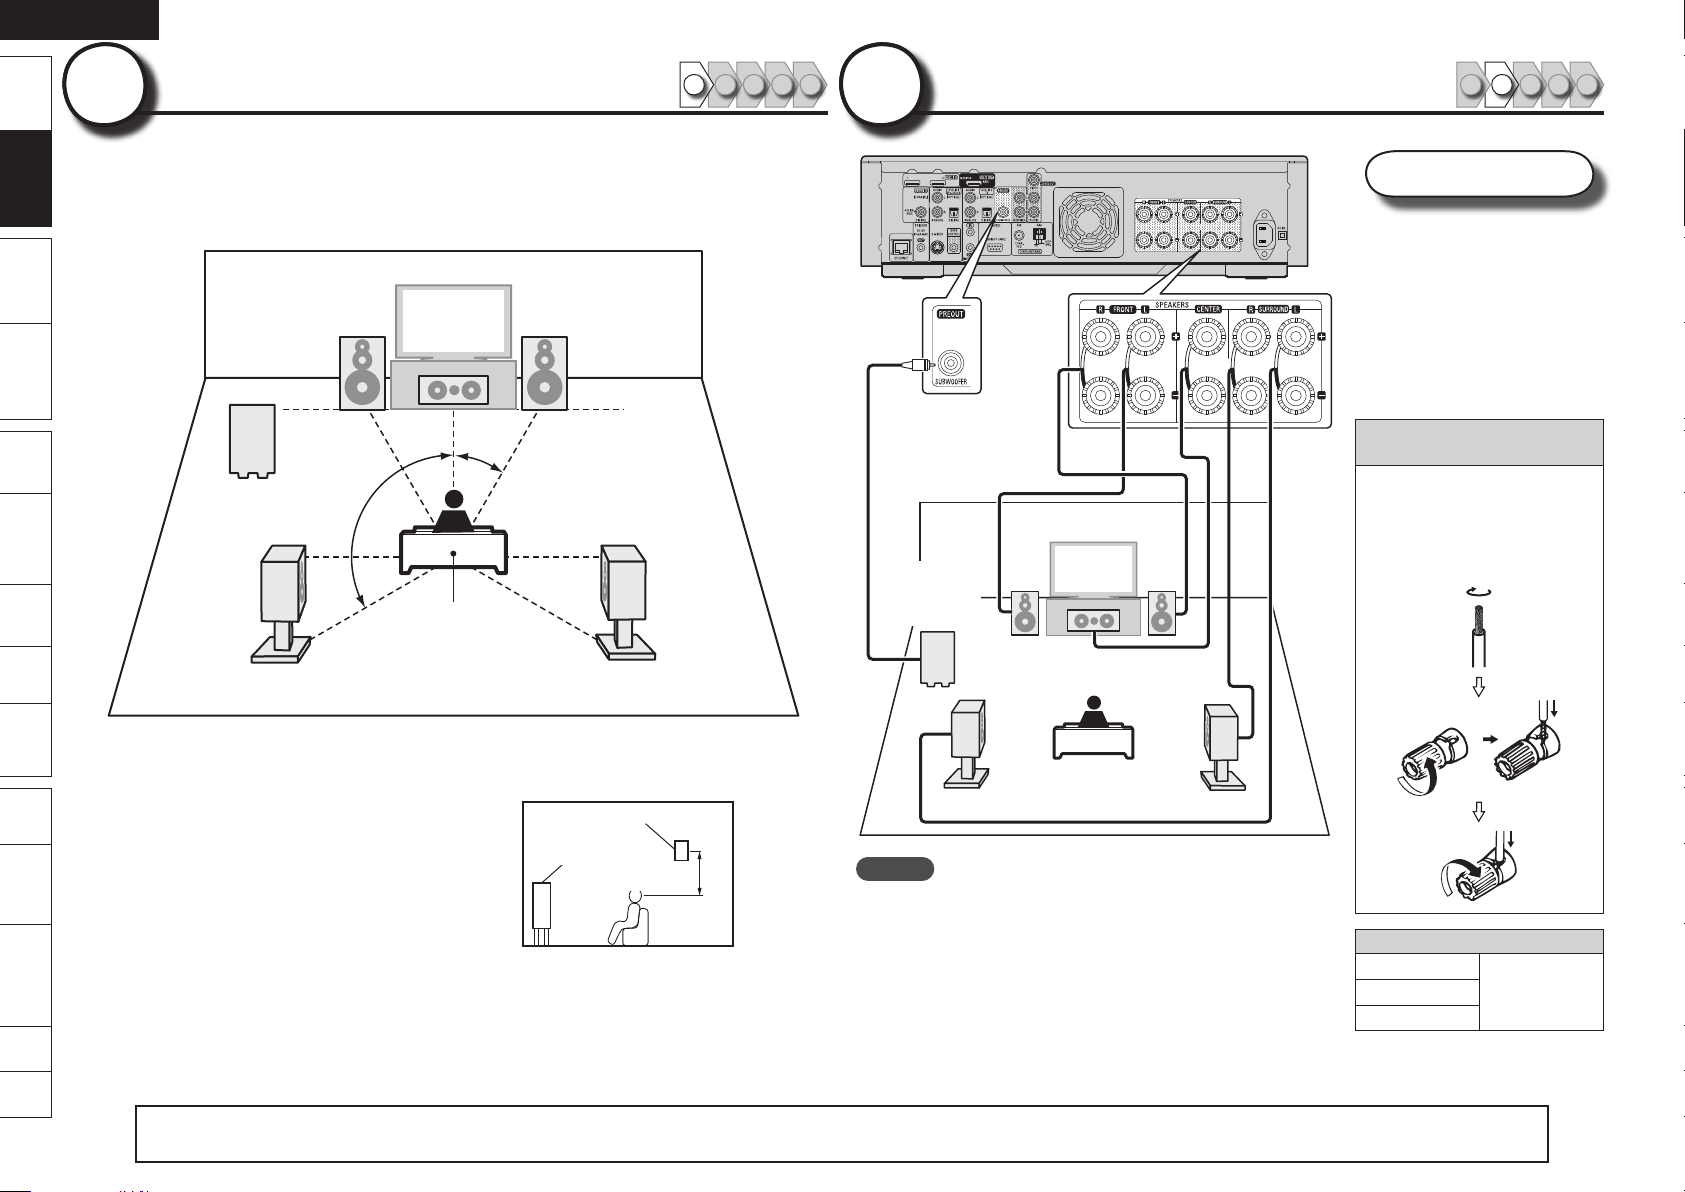
22
Connect
1 2 4 53
Speakers
Carefully check the left (L)
and right (R) channels and +
(red) and – (black) polarities
on the speakers being
connected to the this unit,
and be sure to interconnect
the channels and polarities
correctly.
(Advanced)
Playback
Multi-
zone
GUISettings
Remote
Control
Names
Part
Information
Other
Troubleshooting
Spec. Index
Listening position
FL Front speaker (L) Install the surround speakers in a position
FR Front speaker (R)
C Center speaker
SW Subwoofer
SL Surround speaker (L)
SR Surround speaker (R)
•
2 to 3 feet/60 to 90 cm higher than ear
level.
Surround
Front
speaker
speaker
2 – 3 feet
60 – 90 cm
GViewed from the sideH
Audio cable
(sold separately)
Subwoofer
with builtin amplifier
Speaker cables
(sold separately)
NOTE
Connect so that the speaker cable core wires do not protrude
•
from the speaker terminal. The protection circuit may be
activated if the core wires touch the rear panel or if the + and
– sides touch each other (vpage 74 “Protection Circuit”).
Never touch the speaker terminals while the power supply is
•
connected. Doing so could result in electric shock.
Connecting the speaker
cables
Peel off about 10 mm of
sheathing from the tip of the
speaker cable, then either
twist the core wire tightly or
terminate it.
Speaker impedance
Front
Center
Surround
4 – 16 Ω
The “Simple Version” describes the installation, connection and setup methods for 5.1-channel speakers.
See page 34 for the installation, connection and setup methods for speakers other than 5.1-channel speakers.
ENGLISH
Simple
Version
Remote
Control
Playback
(Advanced)
Connections
Playback
(Basic)
Multi-
zone
GUISettings
Getting
Started
Troubleshooting
Other
Information
Spec. Index
Part
Names
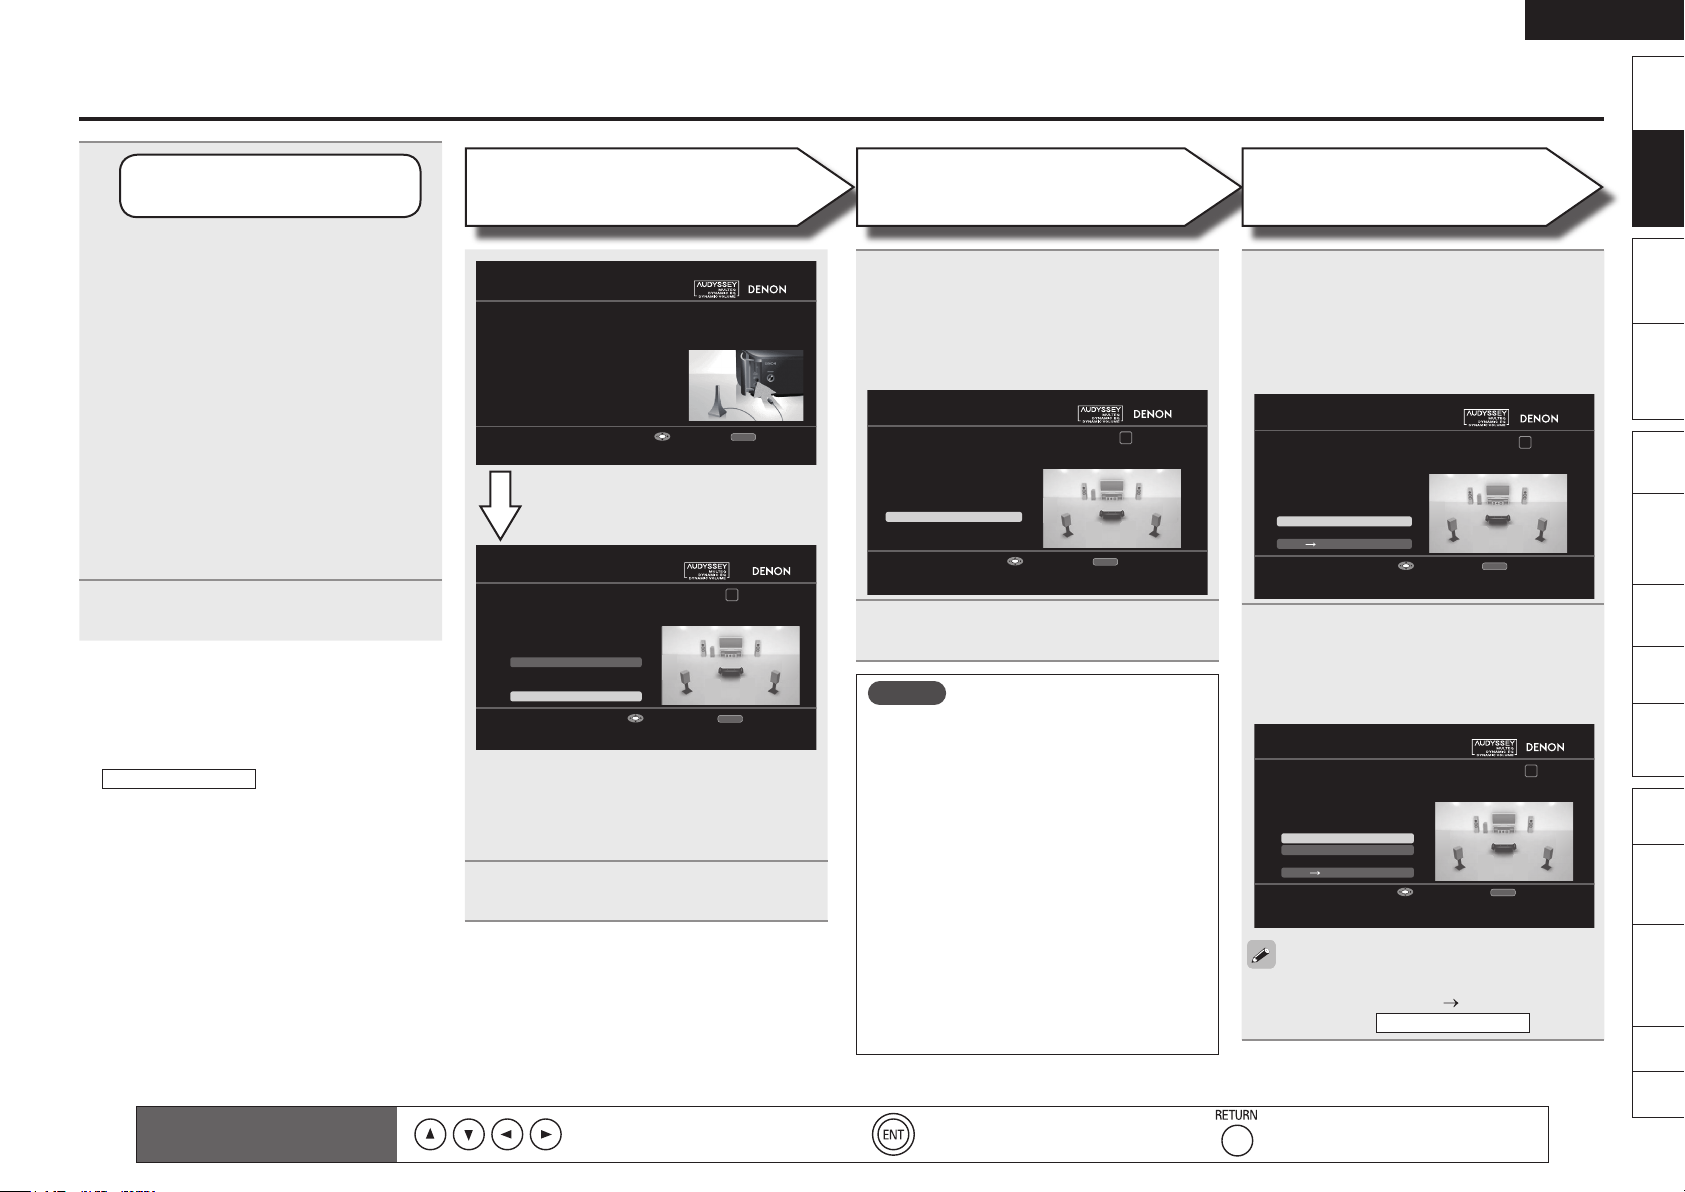
FIRST S ETUP 1/2
RETURN
GUI Lan guage
Select the lang uage dis played o n the GUI scree n
Enter Cancel
English
Deutsch
Nederla nds
Svenska
Françai s
Italian o
Español
*/
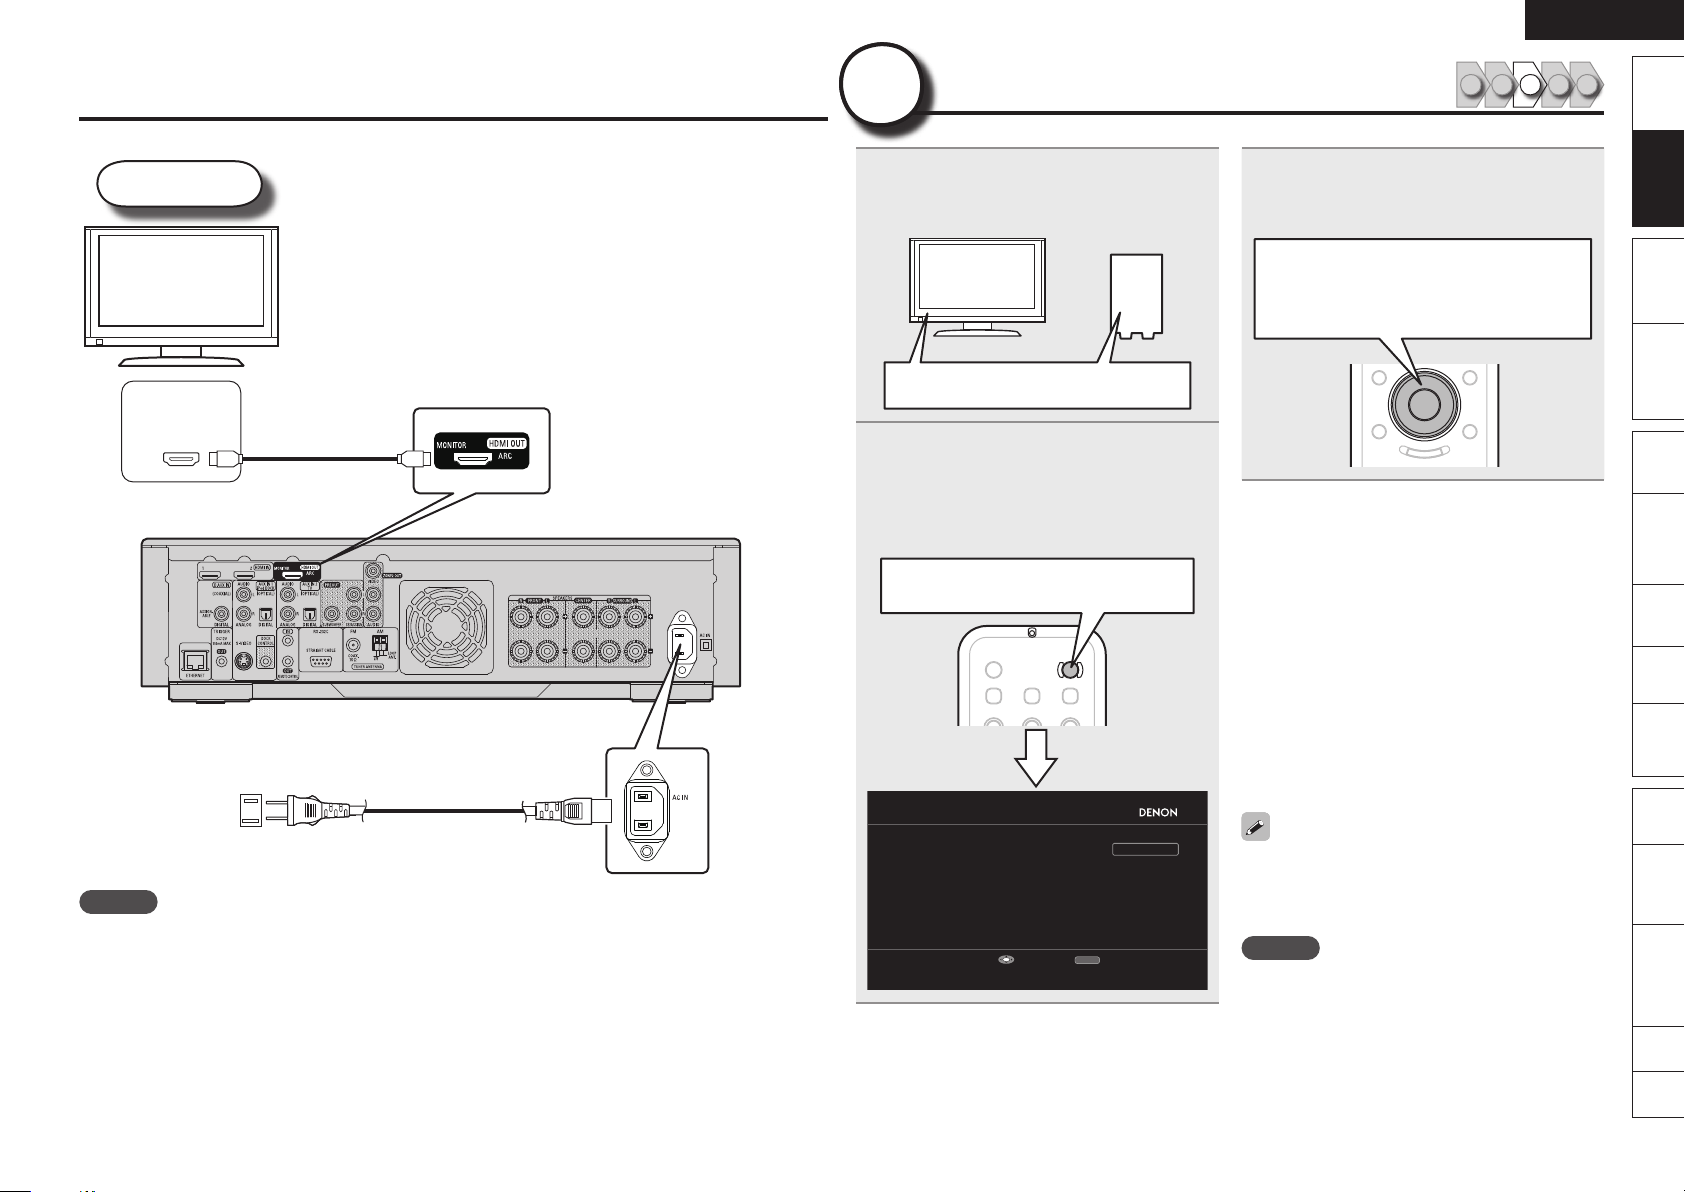
)%.*
TV
Use only HDMI (High Definition Multimedia Interface)
cable that bears the HDMI logo (genuine HDMI product).
Using cable without the HDMI logo (non-genuine HDMI
product) may result in abnormal playback.
When outputting deep color or 1080p, etc., we
recommend you use High Speed HDMI cable for
enhanced high-quality playback.
HDMI cable
(sold separately)
Power cord
(included)
Connect
33
Turn on Power
Turn on the TV and subwoofer
1
power.
Change the TV input to the input of this unit.
Power on
Press ON to turn on power to the
2
unit.
The power indicator lights blue.
•
The “FIRST SETUP” screen is displayed on
•
the TV.
ON ··········· Power on
1 2 4 53
Select your desired language from the
3
on-screen list and press ENTER.
The “FIRST SETUP 2/2” screen is displayed.
ui ········· Select
ENTER ····· Confirm
If “Cancel” is Selected
n
“Cancel setup?” is displayed on the GUI screen.
If “Yes” is selected, “FIRST SETUP” closes.
The GUI Language returns to the factory setting
(English).
Continuing with speaker setup
•
See “Set Up Speakers (Audyssey™ Auto
Setup)” (vpage 6).
The title of the GUI screen will change from
“FIRST SETUP” to “AUDYSSEY AUTO SETUP”
at this point, but the operation method is the
same.
Setting the GUI Language again
•
Set the language using “Manual Setup” – “GUI
Language” (vpage 57) on the GUI menu.
To household power outlet
(AC 120 V, 60 Hz)
NOTE
Do not plug in the power cord until all connections have been completed.
•
Do not bundle power cords together with connection cables. Doing so can result in humming or noise.
•
“FIRST SETUP” is a guide for items required for
initial setup after the power is first turned on.
This screen is displayed when the power is first
turned on.
NOTE
The “FIRST SETUP” screen will not appear if
headphones are connected.

ENGLISH
Front
FL SW C FR
SRSL
*
M
FL SW C FR
SRSL
*
M
Getting
Started
44
Version
The acoustic characteristics of the connected speakers and listening room are measured and the optimum settings are made
Simple
Set Up Speakers (Audyssey™ Auto Setup)
1 2 4 53
automatically. This is called “Audyssey Auto Setup”.
To perform measurement, place the setup microphone in multiple locations all around the listening area. For best results, we recommend
you measure in six positions, as shown in the illustration (up to six positions).
Connections
When performing Audyssey Auto Setup, MultEQ®/Dynamic EQ™/Dynamic Volume™ functions become active (vpage 51).
•
To set up the speakers manually, use “Manual Setup” – “Speaker Setup” (vpage 53) on the GUI menu.
•
NOTE
Playback
(Basic)
(Advanced)
Playback
Multi-
zone
GUISettings
Remote
Control
Make the room as quiet as possible. Background noise can disrupt the room
•
measurements. Close windows, silence cell phones, televisions, radios, air
conditioners, fluorescent lights, home appliances, light dimmers, or other
devices as measurements may be affected by these sounds.
Cell phones should be placed away from all audio electronics during the
•
measurement process as Radio Frequency Interference (RFI) may cause
measurement disruptions (even if the cell phone is not in use).
Do not unplug the setup microphone from the main unit until Audyssey Auto
•
Setup is completed.
Do not stand between the speakers and setup microphone or allow obstacles
•
in the path while the measurements are being made. This will cause inaccurate
readings.
Loud test sounds may be played during Audyssey
•
MultEQ automatic speaker setup. This is part of normal
operation. If there is background noise in room, these
test signals will increase in volume.
Operating VOLUME during the measurements will cancel
•
the measurements.
Measurement cannot be performed when headphones
•
are connected.
•
•
About Setup Microphone Placement
Measurements are performed by placing the setup microphone successively
at multiple positions throughout the entire listening area, as shown in
GExample qH. For best results, we recommend you measure in six positions,
as shown in the illustration (up to six positions).
Even if the listening environment is small as shown in GExample wH,
measuring at multiple points throughout the listening environment results in
more effective correction.
GExample qH GExample wH
( : Measuring positions)
( : Measuring positions)
1
Prepare the Setup
Microphone
Mount the setup microphone on a
tripod or stand and place it in the
main listening position.
When placing the setup microphone, adjust
the height of the sound receptor part to the
level of the listener’s ear.
Sound receptor
Setup
microphone
Names
Part
Information
Other
Troubleshooting
Spec. Index
If the result differs from the actual connection status, or if “Caution!” is
•
displayed, see “Error Messages” (vpage 9). Then carry out Audyssey Auto
Setup again.
If the result still differs from the actual connection status after remeasurement
•
or the error message still appears, it is possible that the speakers are not
connected properly. Turn this unit off, check the speaker connections and
repeat the measurement process from the beginning.
If you change a speaker position or orientation, perform Audyssey Auto Setup
•
again to obtain optimal equalizer correction.
The “Simple Version” describes the installation, connection and setup methods for 5.1-channel speakers.
See page 34 for the installation, connection and setup methods for speakers other than 5.1-channel speakers.
FL Front speaker (L) SW Subwoofer
FR Front speaker (R) SL Surround speaker (L)
C Center speaker SR Surround speaker (R)
About the Main Listening Position (*M)
n
The main listening position is the position where listeners would normally
sit or where one would normally sit alone within the listening environment.
Audyssey MultEQ uses the measurements from this position to calculate
speaker distance, level, polarity, and the optimum crossover value for the
subwoofer.
NOTE
Do not hold the setup microphone in your hand
•
during measurements.
Avoid placing the setup microphone close to a
•
seat back or wall as sound reflections may give
inaccurate results.
ENGLISH
Simple
Version
Remote
Control
Playback
(Advanced)
Connections
Playback
(Basic)
Multi-
zone
GUISettings
Getting
Started
Troubleshooting
Other
Information
Spec. Index
Part
Names
2
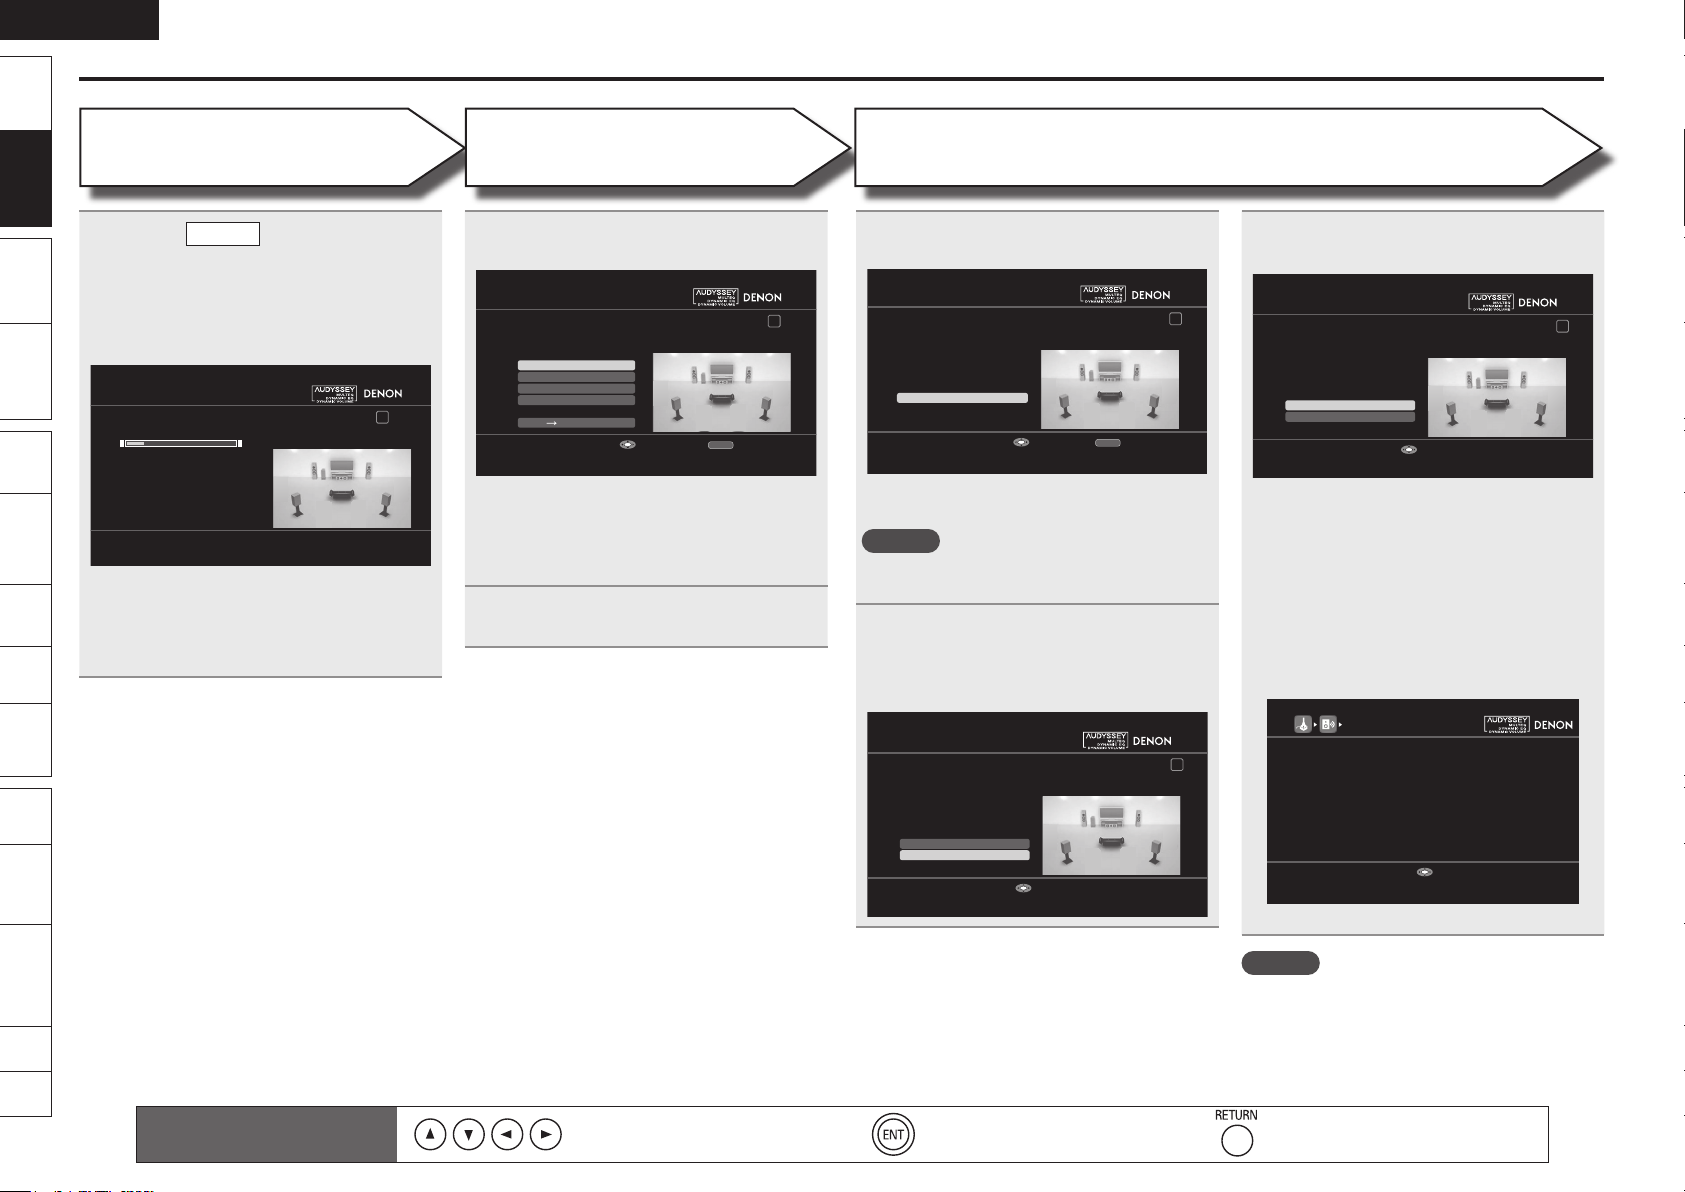
FIRST S ETUP 2/2
1 2 3 4 5 6
Speaker Assign
RETURN
Auto Se tup Star t
STEP1 P reparati on
In a ty pical se tup, sel ect "Auto Setup Start". When c onnectin g
speaker s in a s etup oth er than 2ch/2.1ch/5.1ch , select
"Speake r Assign ".
Start A uto Setu p
Enter Cancel
FIRST S ETUP 2/2
RETURN
STEP1 P reparati on
Please connect the incl ude calibrated setup mi crophone
It prep ares for beginni ng an au to setup.
Enter Cancel
FIRST S ETUP 2/2
1 2 3 4 5 6
RETURN
Measure
STEP2 S peaker D etection
Plea se pla ce the micro phon e at ear
heig ht at main l istenin g posi tion.
Start m easureme nt. Outp ut large test tone duri ng measu ring
Enter Cancel
FIRST S ETUP 2/2
1 2 3 4 5 6
RETURN
Next Calcu lation
Measure
STEP3 M easureme nt
Plea se pla ce the micro phon e at ear
heig ht at 2nd li stening posit ion (u p to 6 pos itio n).
Start m easurmen t. Outpu t large test tone durin g measur ing
Enter Cancel
FIRST S ETUP 2/2
1 2 3 4 5 6
Measure
RETURN
Next C alculati on
Retry
STEP3 M easureme nt
Plea se pla ce the micro phon e at ear
heig ht at 3rd li stening posit ion (u p to 6 pos itio n).
Start m easurmen t. Outpu t large test tone durin g measur ing
Enter Cancel
Set Up
the Subwoofer
If using a subwoofer capable of the
following adjustments, set up the
subwoofer as shown below.
When using a subwoofer with a direct
n
mode
Set the direct mode to “On” and disable the
volume adjustment and crossover frequency
setting.
When using a subwoofer without a
n
direct mode
Make the following settings:
Volume : “12 o’clock position”
•
Crossover frequency :
•
“Maximum/Highest Frequency”
Low pass filter : “Off”
•
Standby mode : “Off”
•
Connect the setup microphone to the
3
SETUP MIC jack of this unit.
If “Cancel” is Selected
n
“Cancel setup?” is displayed on the GUI screen.
If “Yes” is selected, “FIRST SETUP” closes.
Setting up the speakers again
•
Repeat the operation from step 3 of
STEP1 Preparation
The title of the GUI screen will change from
“FIRST SETUP” to “AUDYSSEY AUTO SETUP”
at this point, but the operation method is the
same.
Remote control operation
.
buttons
STEP 1
Preparation
When the setup microphone is connected,
the following screen is displayed.
When setting up speakers other than 5.1-channel
speakers, select “Speaker Assign”. When
the “Speaker Assign” setup screen appears,
perform the operations in Step 2 and 3 of “Set Up
Speakers” (vpage 36).
Select “Auto Setup Start” and then
4
press ENTER.
Move the cursor
(Up/Down/Left/Right)
STEP 2
Speaker Detection
Select “Measure” and then press
5
ENTER.
When measuring begins, a test tone is output
from each speaker.
When measuring ends, the speaker detection
results are displayed.
Select “Next → Measurement” and
6
then press ENTER.
NOTE
If “Caution!” is displayed:
Go to “Error Messages” (vpage 9), check
any related items, and perform the necessary
procedures.
If the problem is resolved, return and restart
“Audyssey Auto Setup”.
When Performing Audyssey
n
Auto Setup Over Again
Press ui to select “Retry”, and then press
ENTER.
When Measuring has Stopped
n
Press RETURN, and the “Cancel setup?”
prompt is displayed.
Press o p and select “Yes”, then press
ENTER.
Confirm the setting Return to previous menu
Set Up Speakers (Audyssey™ Auto Setup)
STEP 3
Measurement
Move the setup microphone to
7
position 2, select “Measure”, and
then press ENTER.
The measurement of the second position
starts. Measurements can be made in up to
six positions.
Repeat step 7, measuring positions 3
8
to 6.
When measurement of position 6 is
completed, a “Measurements finished.”
message is displayed.
If you want to omit measurements from the next
point onward, select “Next Calculation”.
(Go to vpage 8
STEP4 Calculation
)
ENGLISH
FIRST S ETUP 2/2
1 2 3 4 5 6
STEP4 C alculati on
20%
Now calcul ating. .. Plea se wai t.
FIRST S ETUP 2/2
1 2 3 4 5 6
Ch. Lev el Check
RETURN
Next S tore
Crossov er Check
Spkr Co nfig Che ck
Distanc e Check
STEP5 C heck
Chec k proc essing result s.
To p roceed , pres s “Next ”.
Select item to check
Enter Cancel
FIRST S ETUP 2/2
1 2 3 4 5 6
RETURN
Store
STEP6 S tore
Pres s “Sto re” to store cal cula tion r esul ts.
Apply a nd store measure ment result
Enter Cancel
FIRST SETUP 2/ 2
1 2 3 4 5 6
No
Yes
Finish
Stor ing co mplete .
Auto Setup is no w finis hed.
Plea se unp lug mi cropho ne.
Turn on Dy namic Volume?
Do not use "Dyn amic Vol ume".
Enter
FIRST SETUP 2/ 2
1 2 3 4 5 6
No
Yes
Finish
Stor ing co mplete .
Auto Setup is no w finis hed.
Plea se unp lug mi cropho ne.
Turn on Dy namic Volume?
Use "Dy namic Vo lume".
Enter
CD MultEQ : OFF
BD/D VD
FM/A M
HDMI 1/2/3
USB
AUX1 /2
MultEQ : ON
MultEQ : OFF
MultEQ : ON
MultEQ : OFF
MultEQ : ON
Shows i nformati on about current settings
Exit
FIRST SETUP 2/ 2
Set Up Speakers (Audyssey™ Auto Setup)
Getting
Started
Version
Simple
Connections
Playback
(Basic)
(Advanced)
Playback
Multi-
zone
GUISettings
Remote
Control
STEP 4
Calculation
On the
9
→ Calculation”, and then press
ENTER.
Measuring results are analyzed, and the
frequency response of each speaker in the
listening room is determined.
Analysis takes several minutes to complete. The
•
time required for this analysis depends on the
number of speakers connected.
The more connected speakers there are, the
longer it takes to perform analysis.
STEP3
screen, select “Next
STEP 5
Check
Select the item you want to check,
10
and then press ENTER.
Subwoofers may measure a greater reported
•
distance than the actual distance due to added
electrical delay common in subwoofers.
If you want to check another item, press
•
RETURN.
Select “Next → Store” and then press
11
ENTER.
STEP 6
Store
Press ENTER.
12
Save the measuring results.
The save operation takes about 30 seconds to
•
complete.
NOTE
During saving of measuring results, be sure not to
turn off the power.
When the following screen is
13
displayed, unplug the setup
microphone from the unit’s SETUP
MIC jack.
Set Dynamic Volume.
14
For details of Dynamic Volume settings, see
•
page 52.
When turning Dynamic Volume on
n
Select “Yes”, and then press ENTER.
•
This completes speaker setup.
When turning Dynamic Volume off
n
Select “No”, and then press ENTER.
•
The MultEQ default settings are displayed.
Press ENTER to exit.
•
Names
Part
Information
Other
Troubleshooting
Spec. Index
Remote control operation
buttons
Move the cursor
(Up/Down/Left/Right)
For details of MultEQ settings, see page 51.•
NOTE
After performing Audyssey Auto Setup, do not
change the speaker connections or subwoofer
volume. In event of a change, perform Audyssey
Auto Setup again.
Confirm the setting Return to previous menu
ENGLISH
Simple
Version
Remote
Control
Playback
(Advanced)
Connections
Playback
(Basic)
Multi-
zone
GUISettings
Getting
Started
Troubleshooting
Other
Information
Spec. Index
Part
Names
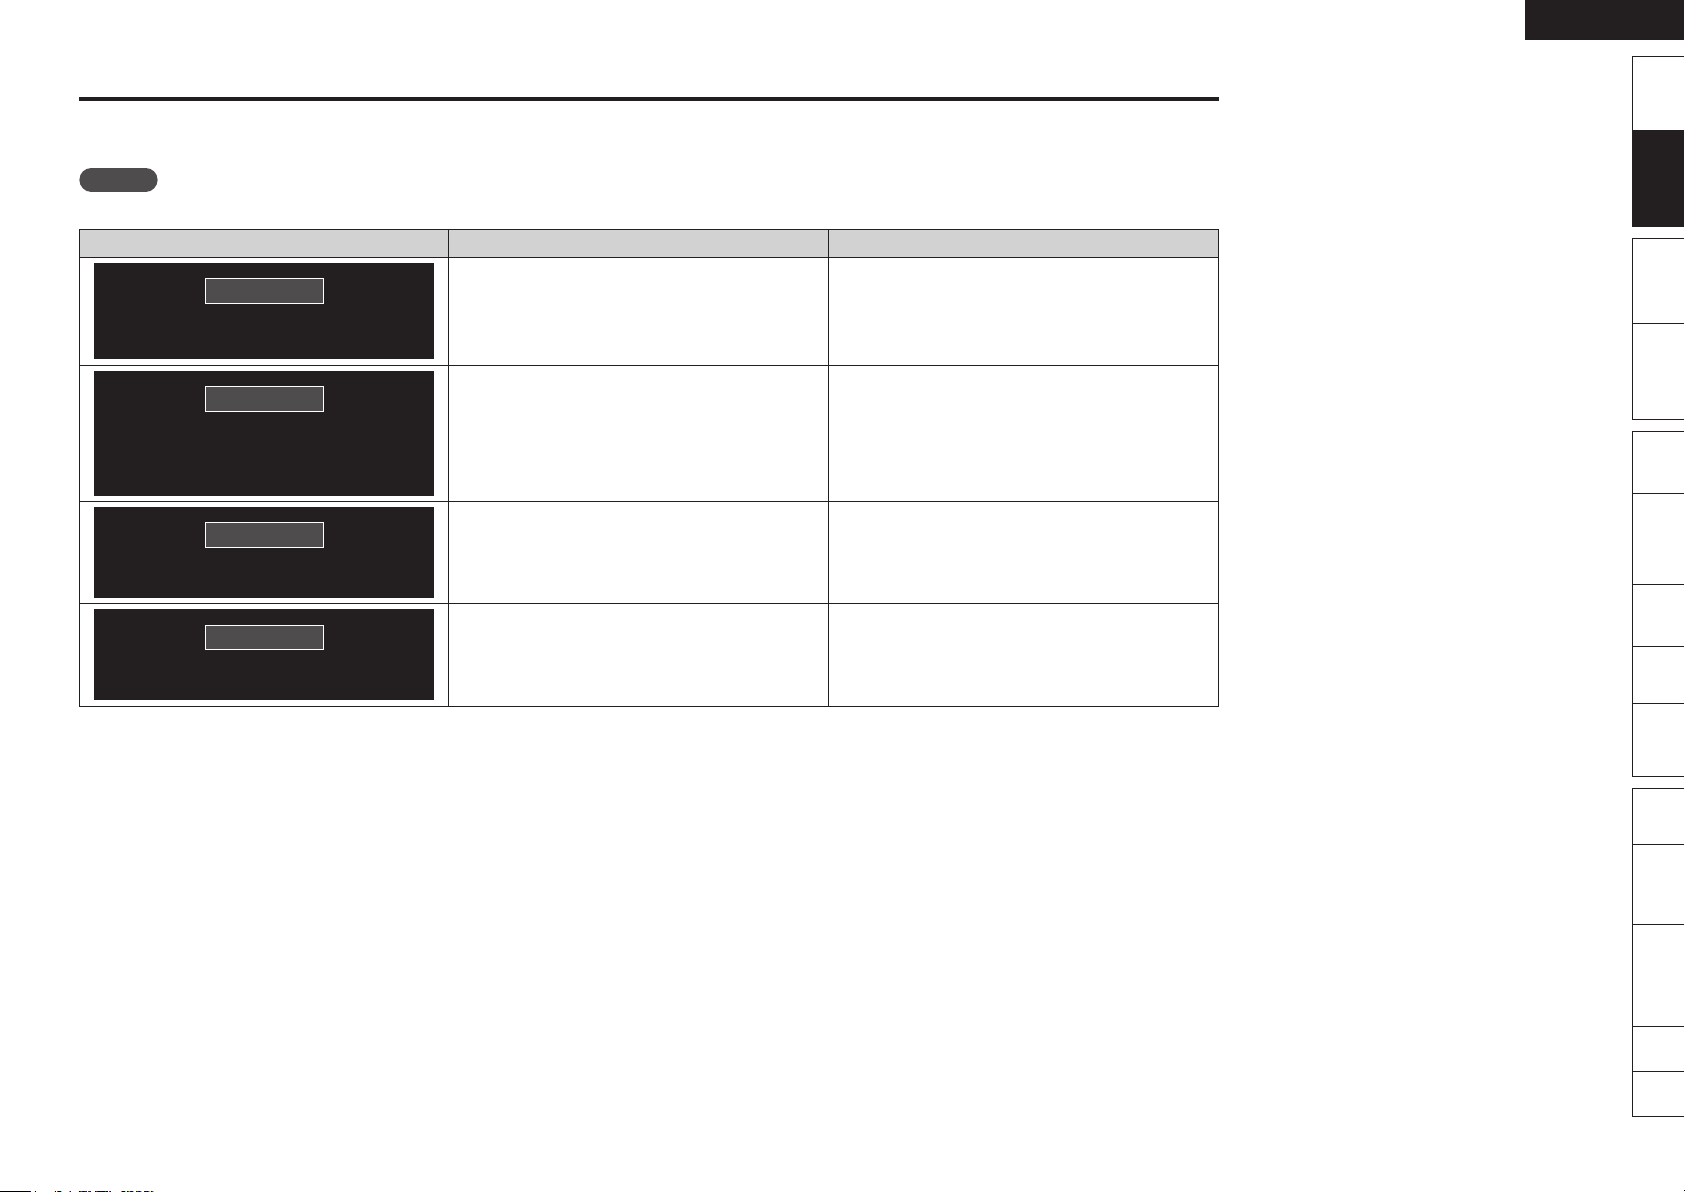
Error Messages
An error message is displayed if Audyssey™ Auto Setup could not be completed due to speaker placement, the measurement environment, etc. If this happens,
check the relevant items, be sure to take the necessary measures, then perform Audyssey Auto Setup over again.
NOTE
Be sure to turn off the power before checking speaker connections.
Examples Error details Measures
The connected setup microphone is broken, or a
Caution!
•
device other than the supplied setup microphone
Connect the included setup microphone to the
•
SETUP MIC jack of this unit.
is connected.
No microphone or speaker
Caution!
Ambinet noise is too high
or Level is too low
Not all speakers could be detected.
•
The front L speaker was not properly detected.
•
There is too much noise in the room for accurate
•
measurements to be made.
Speaker or subwoofer sound is too low for accurate
•
measurements to be made.
Check the speaker connections.
•
Either turn off any device generating noise or move
•
it away.
Perform again when the surroundings are quieter.
•
Check the speaker installation and the direction in
•
which the speakers are facing.
Adjust the subwoofer’s volume.
•
The displayed speaker could not be detected.• Check the connections of the displayed speaker.•
Caution!
Front R None
The displayed is connected with the polarities
Caution!
Front L Phase
• Check the polarities of the displayed speaker.
reversed.
•
For some speakers, this error message may be
•
displayed even if the speaker is properly connected.
If you are sure the connection is correct, press ui
to select “Skip”, then press ENTER.
ENGLISH
Getting
Started
55
Version
Simple
1
Connections
Playback
(Basic)
2
uio p················································ Select
(Advanced)
zone
Control
Names
Information
ENTER·················································· Confirm
Playback
You can make the following settings on the
•
Multi-
GUISettings
Remote
Part
Other
Troubleshooting
Spec. Index
disc menu. (Settable items vary depending on
the disc.)
•
•
•
During playback, press TOP MENU or POPUP/
•
MENU to display the menu.
If the menu continues, press uio p to get
to the next part.
3
uio p················································ Select
ENTER················································· Playback
NOTE
When playing back a high-quality signal such as Dolby TrueHD, Dolby
Digital Plus, or DTS-HD, set the “BD Audio Mode” (vpage 58) to
“HD Audio Output”.
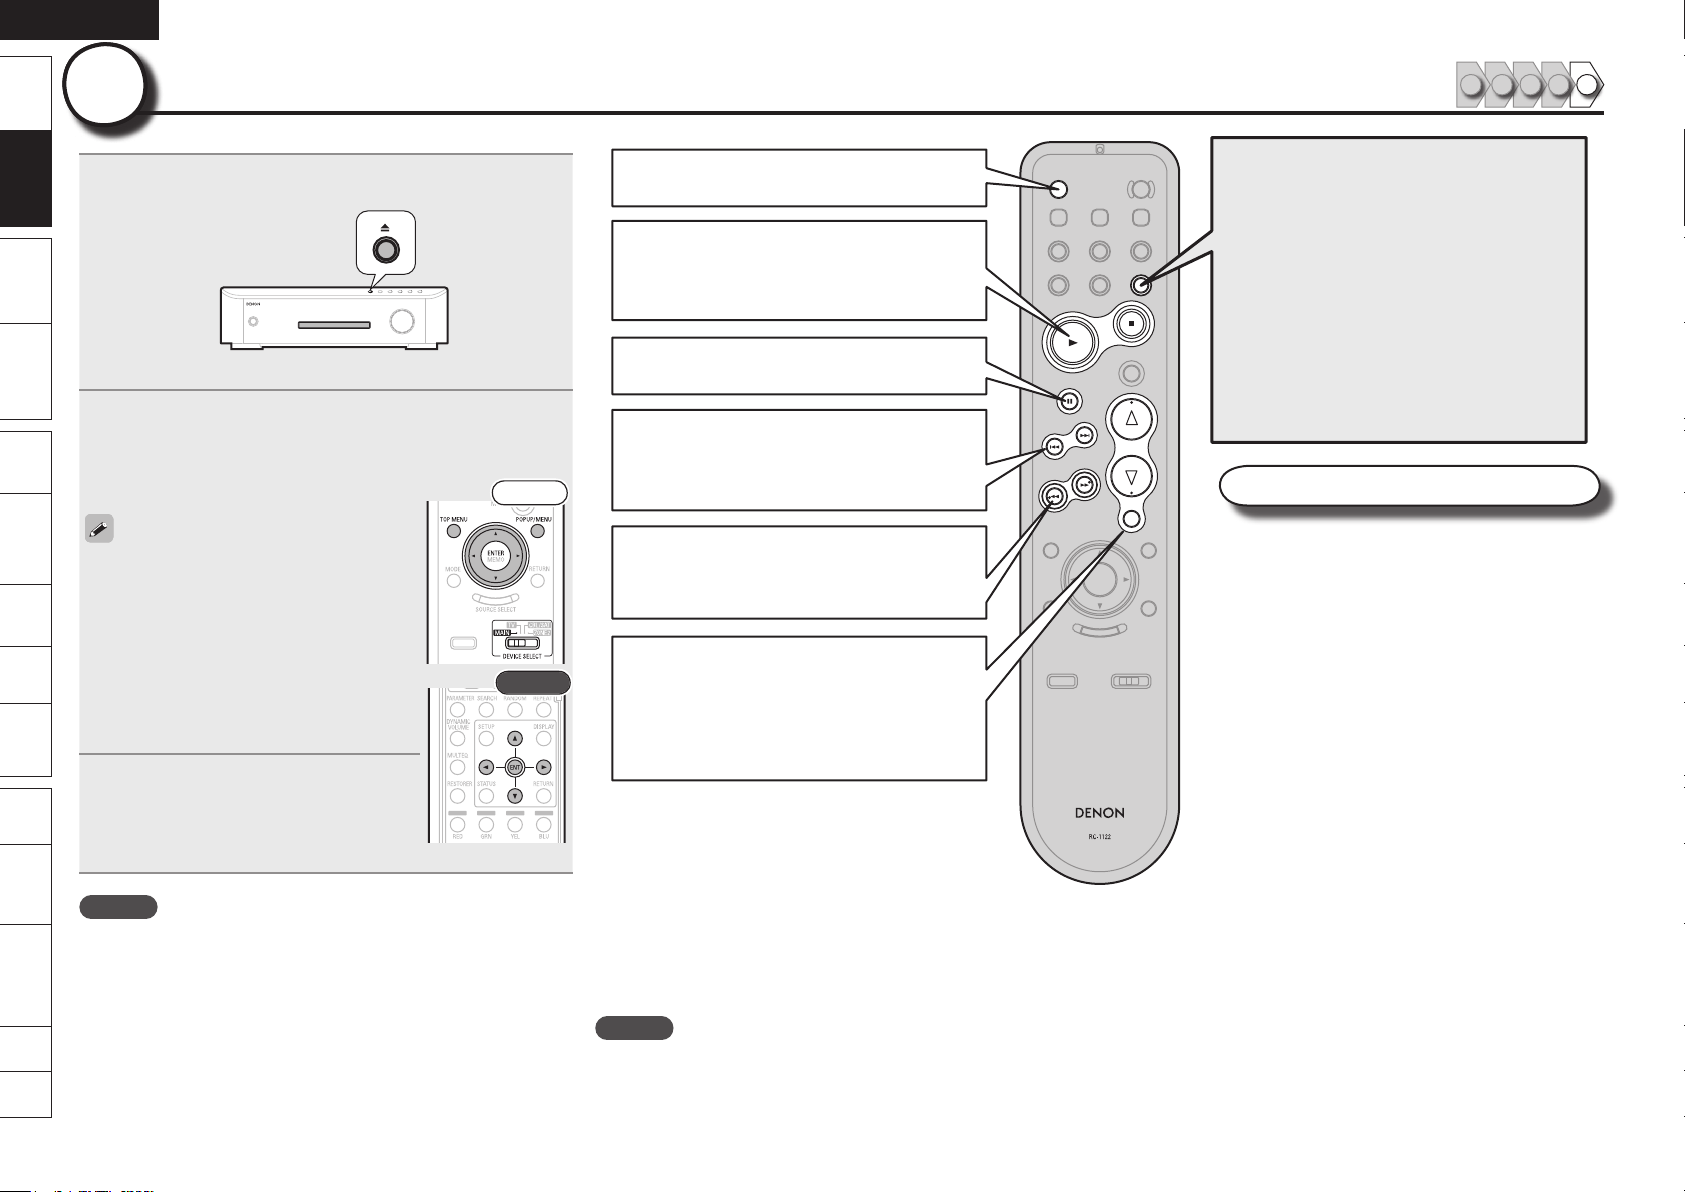
Play Back Disc
Insert a disc.
Press 5 on the main unit to open/close the disc tray.
•
Insert the disc with the side you want to play facing down.
•
Make the various settings for playback on the disc
menu.
Subtitle language
Audio language
Audio format etc.
Select the playback title or chapter
from the top menu for playback.
Front
Rear
OFF ·········· Standby
1 ············· Playback
2 ·············· Stop
3 ·············· Pause/Still
9 ········· Forward-Skip
8 ········· Reverse-Skip
7 ·········· Forward-Search
6 ·········· Reverse-Search
d ·············· Volume up
f ·············· Volume down
MUTE ······ Muting
When Power is Switched to Standby
n
Press OFF.
GPower indicator status in standby modeH
Normal standby : Off
•
When “HDMI Control” is set to “ON” : Red
•
When “Quick Start Mode” is set to “ON” : Red
•
NOTE
During power standby, a slight amount of power is consumed. To totally cut off the
power, remove the power cord from the power outlet.
1 2 4 53
ONE TOUCH PLAY
Turns on this unit and the TV, and disc playback
starts automatically.
To use this function you need to set up this unit
in advance. For details of setup, see the following
items.
“One Touch Play Function”
n
(vpage 39)
“HDMI Control Function”
n
(vpage 39)
Other operations
Random Playback (vpage 29)
n
Repeat Playback (vpage 29)
n
Switching Audio (vpage 30)
n
Switching the Angle (vpage 30)
n
Changing the Subtitles and Subtitle
n
Style (vpage 31)
Surround Mode (vpage 31)
n
Looking for Specific Sections Using
n
the Search Modes (vpage 37)
Setting Locations to Play Back Again
n
(Marker Function) (vpage 38)
0

Basic Version
Here, we explain the connections and basic operation methods
for this unit.
F Connections
F Playback (Basic Operation/Surround Mode)
Refer to the pages indicated below for information on connecting and playing back the various media
n
and external devices.
Audio and Video
Blu-ray Disc –
DVD-Video –
CD –
Set-Top Box (Satellite Tuner or Cable TV)
Digital Camcorder
Game Device
Control Dock for iPod
BD-LIVE
Audio
TV Audio
®
iPod
USB Memory Device
SD Memory Card
Radio
Others
Update the Unit Software
External Control Device
vpage 12, 15
vpage 12
vpage 12
vpage 14 vpage 22
vpage 16
vpage 13
vpage 14 vpage 23
vpage 14 vpage 24
vpage 62 vpage 25
vpage 15 vpage 27
vpage 16 vpage 46
vpage 17
PlaybackConnection
vpage 20
vpage 20
vpage 21, 25
–
–
–
–
–
–
For speaker and TV connections, see page 4, 5.
ENGLISH
065
)%.*
065
)%.*
065
)%.*
*/
)%.*
Getting
Started
Connections
Connect this unit as follows before using. Make connections according to the equipment you are
•
Version
Simple
connecting.
Some settings of this unit may be necessary depending on the connection method. Check each
•
connection item for more information.
Select the cables (sold separately) according to the components being connected.
•
Connections
Connections
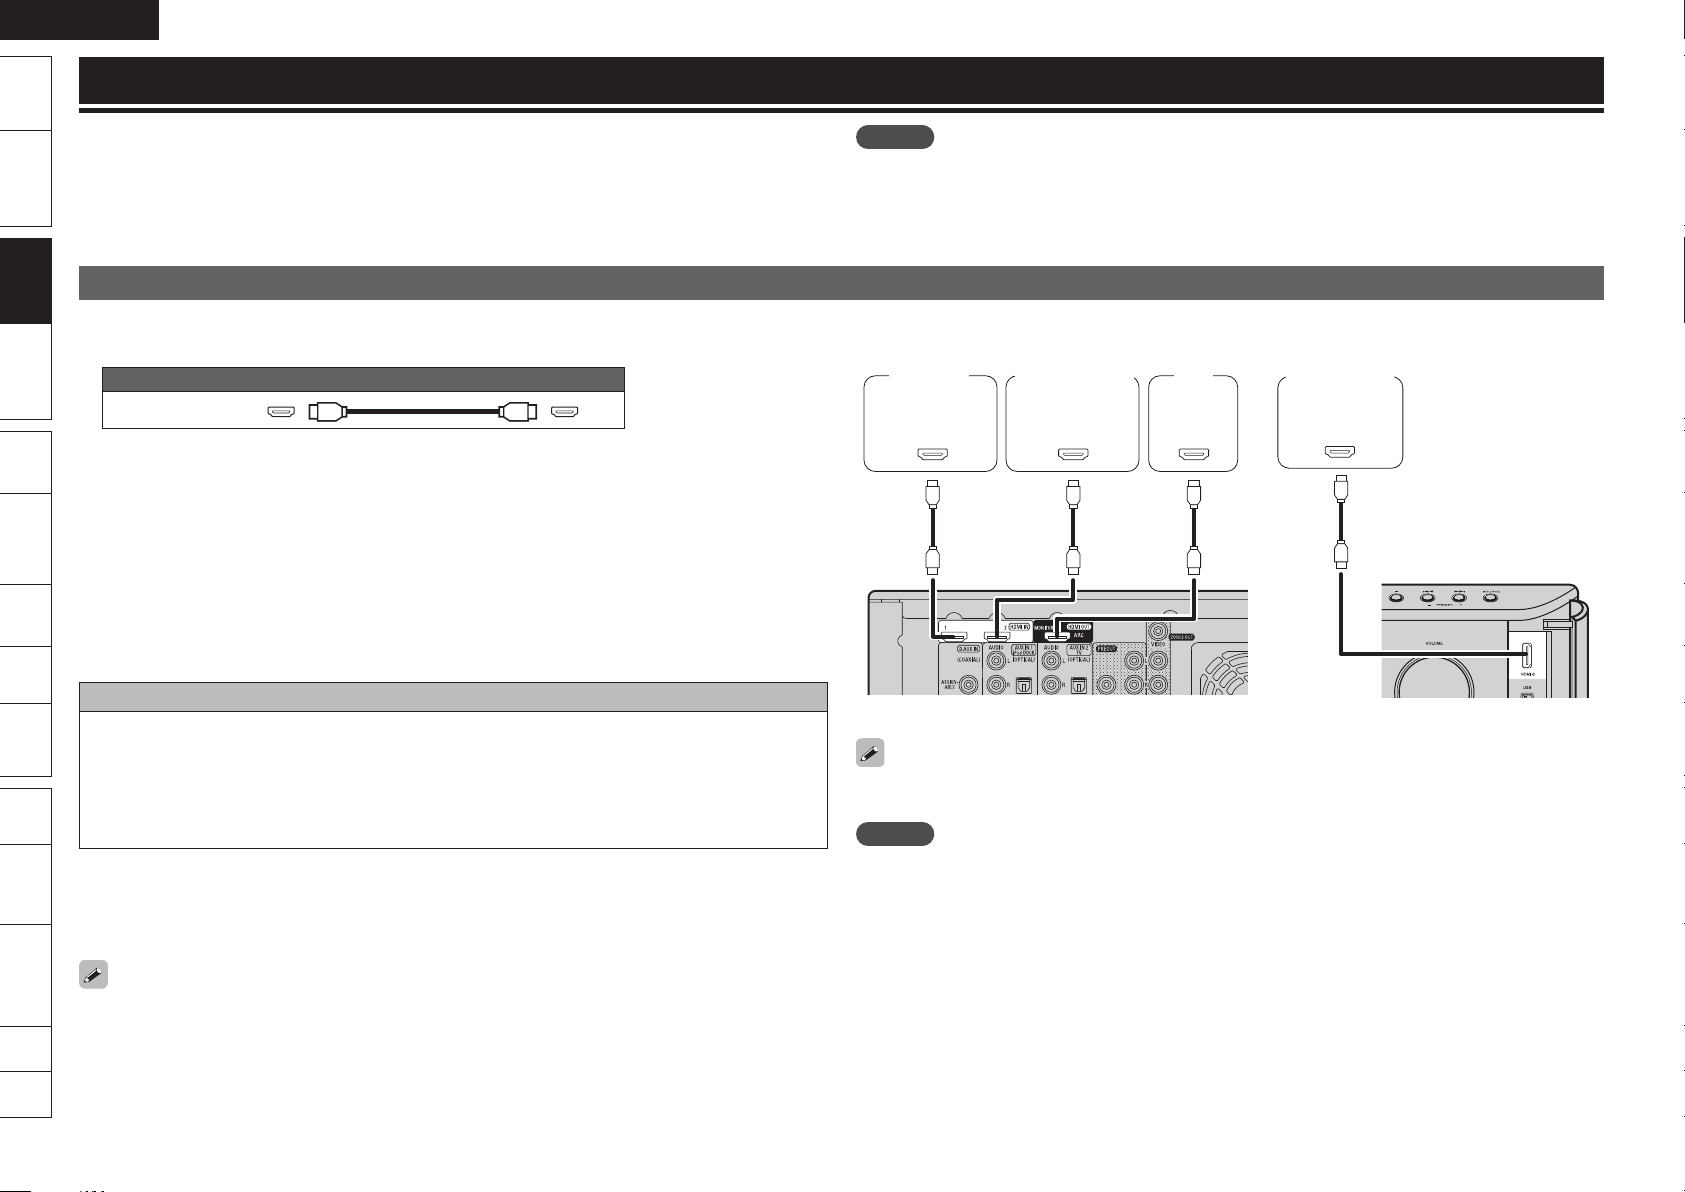
Connecting an HDMI-Compatible Device
You can connect up to three HDMI-compatible devices to the unit.
Playback
(Basic)
(Advanced)
Playback
Multi-
zone
GUISettings
Remote
Control
Names
Part
Information
Other
Troubleshooting
Cables Used for Connections
n
Audio and video cable (sold separately)
HDMI cable
•
This interface allows transfer of digital video signals and digital audio signals over a single HDMI cable.
n
About HDMI Cables
•
Use a cable on which the HDMI logo is indicated (a certified HDMI product) for connection to the HDMI
connector. Normal playback may not be possible when using a cable other than one on which the HDMI
logo is indicated (a non-HDMI-certified product).
•
When a device supporting Deep Color signal transfer is connected, use a cable compatible with HDMI
version 1.3a.
•
When outputting Deep Color or 1080p, etc., we recommend you use High Speed HDMI cable for
enhanced high-quality playback.
•
This unit supports “Deep Color” and “x.v.Color”. For details about “Deep Color” and “x.v.Color”, see
page 72, 74.
Copyright protection system
In order to play back digital video and audio such as BD-Video or DVD-Video via HDMI connection, both
this unit and TV need to support the copyright protection system known as HDCP (High-bandwidth
Digital Content Protection System). HDCP is copyright protection technology comprised of data
encryption and authentication of the connected AV device. This unit supports HDCP.
If a device that does not support HDCP is connected, video and audio are not output correctly. Read
•
the owner’s manual of your television for more information.
About ARC (Audio Return Channel) Function
n
The Audio Return Channel in HDMI 1.4 enables a TV, via a single HDMI cable, to send audio data
“upstream” to this unit, increasing user flexibility and eliminating the need for any separate S/PDIF
audio connection.
NOTE
Do not plug in the power cord until all connections have been completed.
•
When making connections, also refer to the operating instructions of the other components being
•
connected.
Be sure to connect the left and right channels properly (left with left, right with right).
•
Do not bundle power cords together with connection cables. Doing so can result in noise.
•
Digital video
Satellite
tuner
recorder/Game
device, etc.
TV
[Rear Panel]
Digital
camcorder
[Front Panel]
By connecting to a device with an HDMI control function, you can use the unit to operate an external
device, or use an external device to operate the unit (vpage 39 “HDMI Control Function”).
NOTE
If the GUI menu “HDMI Audio Out” setting (vpage 55) is set to “Amp”, the sound may be interrupted
•
when the TV’s power is turned off.
Audio signal input may not be supported depending on the HDMI compatible TV (projector, etc.) being
•
used.
When this unit is connected to this kind of device, audio signals are not output from the HDMI
connector.
Spec. Index
To enable the ARC function, set “HDMI Control” to “ON” (vpage 55).
•
Connect using a cable compatible with HDMI 1.4.
•

ENGLISH
Remote
Control
Playback
(Advanced)
Connections
Simple
Version
Playback
(Basic)
Multi-
zone
GUISettings
Getting
Started
Connections Troubleshooting
Other
Information
Spec. Index
Part
Names
Auto
480/576i
1080P 1080i
480/576P
Source Direct
R
L
R
L
R
L
R
L
3-
065
"6%*0
065
015*$"-"6%*0
$0"9*"-
065
Connecting an HDMI-Compatible Device
Required Settings for HDMI Connection
Settings can only be made when the input source is “BD/SD”.
Set as necessary. For details, see the respective reference pages.
Make the Video Output Signal Setting for the Connected Television
n
“Video Setup” (vpage 44)
About HDMI Video Resolution Setting
n
Change the HDMI video resolution by pressing RESOLUTION. Switch the output
•
mode as follows. (Default settings are underlined.)
(480/576 interlaced)
If the HDMI resolution is not set to “Auto”, set it to correspond with the resolution of your
•
television.
NOTE
When ZONE2 is powered on, the HDMI video resolution in the MAIN ZONE switches automatically
according to the input signal. When this happens, it is not possible to switch to a different video resolution,
even by pressing RESOLUTION. (See page 41 for information on ZONE2).
(480/576 progressive)
(1080 interlaced)(1080 progressive)
Rear
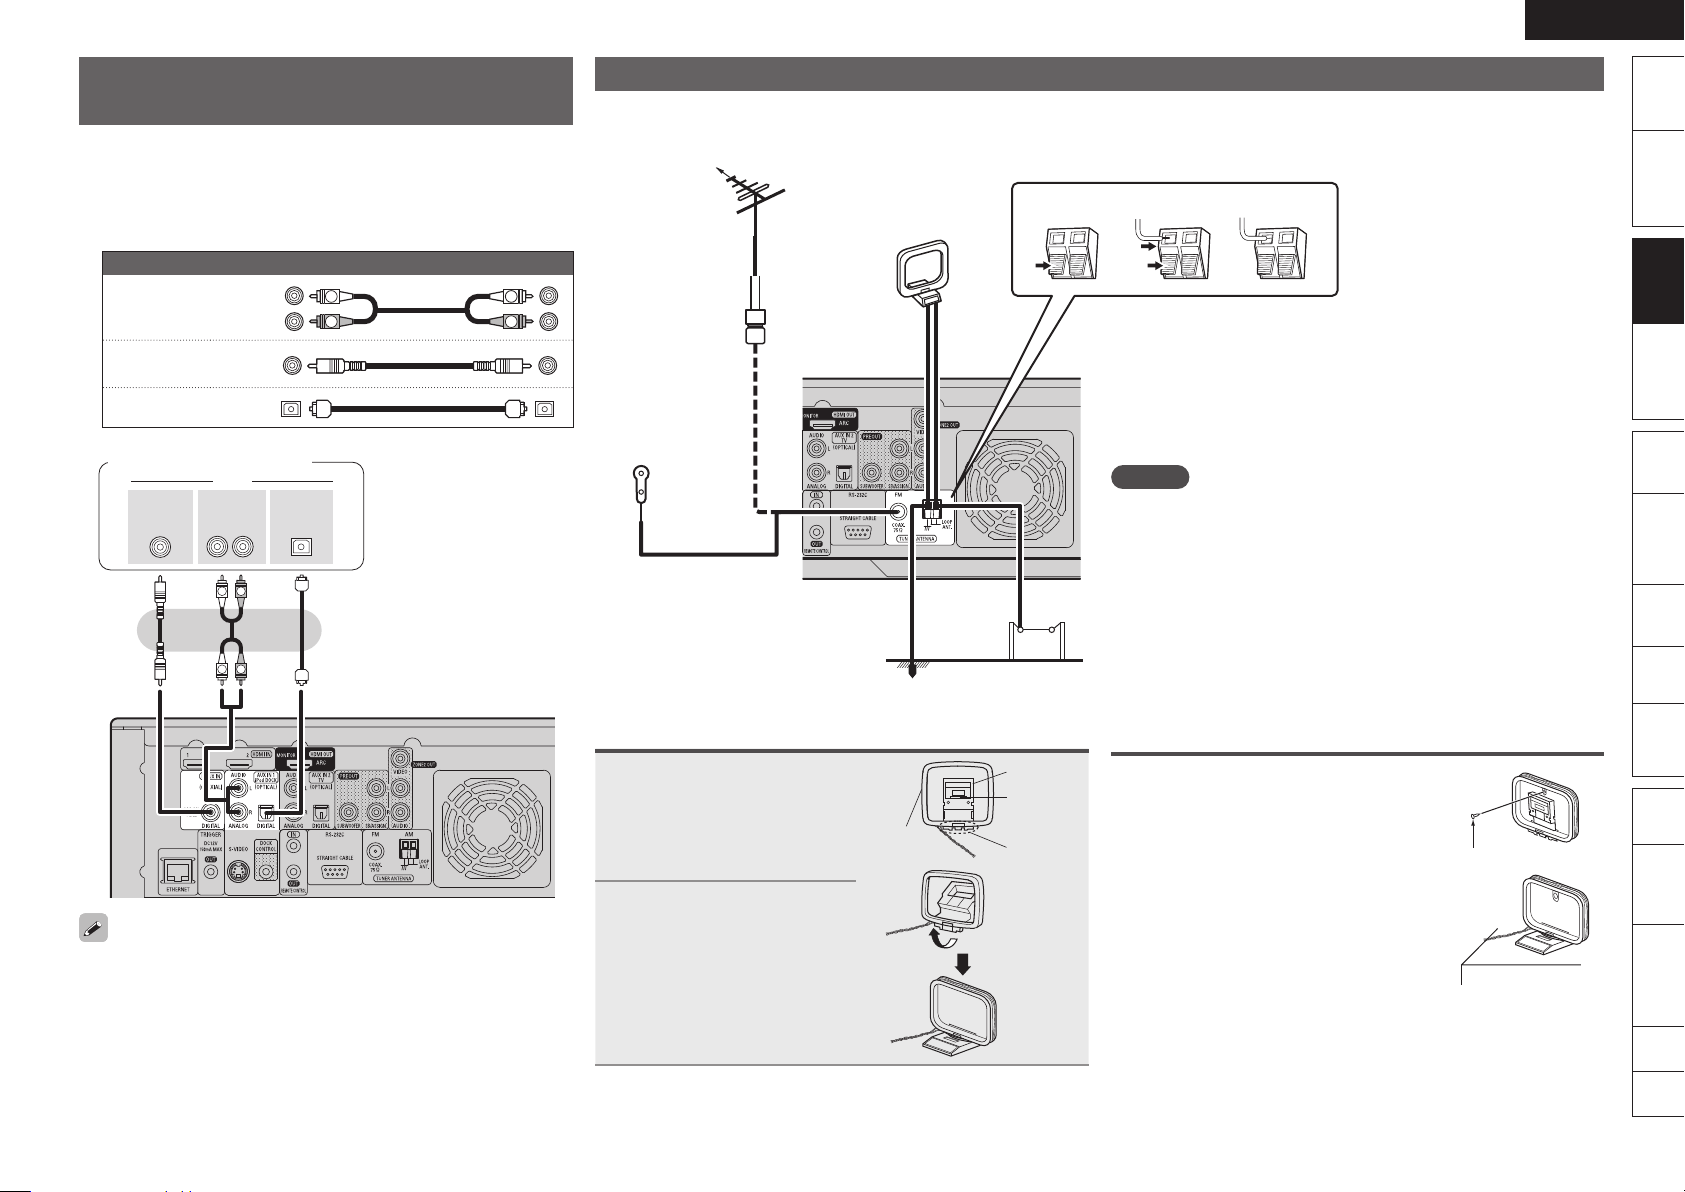
Connecting a TV
•
You can listen to TV audio only.
•
Select the terminal to use and connect the device.
•
For instructions on HDMI connections, see “Connecting an HDMI-Compatible Device” on page 12.
This connection is not required when a TV compatible with the ARC function (Audio Return Channel
(HDMI1.4 standard function)) is connected to this unit via an HDMI connection.
For details, see “About ARC (Audio Return Channel) Function” (vpage 12) or refer to the instruction
manual for your TV.
Cables Used for Connections
n
Audio cables (sold separately)
Audio cable
Coaxial digital cable
Optical cable
(White)
(Red)
(Orange)
TV
When using a coaxial digital cable for the digital audio connection, set “Manual Setup” – “Audio Setup”
– “COAX Input Assign” on the GUI menu (vpage 56) to “AUX2”.

ENGLISH
R
L
R
L
"4%/
Getting
Started
•
•
•
Version
Simple
n
Connections
Connections
Connecting a Control Dock for iPod
Connect the Control Dock for iPod to the unit to enjoy video and music stored on an iPod.
For the Control Dock for iPod, use ASD-11R/3N/3W/51N/51W made by DENON (sold separately).
For instructions on the control dock for iPod settings, refer to the control dock for iPod’s operating
instructions.
Cables Used for Connections
Audio cable (sold separately)
Coaxial digital cable
(Orange)
Control dock for iPod
Connecting an iPod or USB Memory Device to the
USB Port
When you connect an iPod or USB memory device to the USB port, you can enjoy music, stored on the
iPod or USB memory device.
Cables Used for Connections
n
To connect an iPod to this unit, use the USB cable supplied with the iPod.
iPod
USB memory
device
Playback
(Basic)
(Advanced)
Playback
Multi-
zone
GUISettings
Remote
Control
Names
Part
Information
Other
Troubleshooting
Use the AV/Control Cable (analog
z
connection) supplied with the
DENON control dock for iPod.
When connecting to the Digital audio output connector of ASD-51N / 51W, set “Manual Setup” –
z
“Audio Setup” – “COAX Input Assign” (vpage 56) on the GUI menu to “AUX1”.
or
When you want to playback a video file stored on an iPod, use the DENON control dock for iPod (ASD-
•
11R/3N/3W/51N/51W, sold separately) (vpage 14 “Connecting a Control Dock for iPod”).
This unit supports audio playback from the iPod (fifth generation or later), iPod nano, iPod classic, and
•
iPod touch (it is not compatible with iPod shuffle). For details, check the Web.
DENON does not guarantee that all USB memory devices will operate or receive power. When using
•
a portable USB connection type HDD of the kind to which an AC adapter can be connected to supply
power, use the AC adapter.
NOTE
USB memory devices will not work via a USB hub.
•
It is not possible to connect and use a computer via the USB port of this unit using a USB cable.
•
You can also connect the iPod you are using directly to the USB port of this unit (vpage 14 “Connecting
an iPod or USB Memory Device to the USB Port”).
Spec. Index
ENGLISH
Remote
Control
Playback
(Advanced)
Connections
Simple
Version
Playback
(Basic)
Multi-
zone
GUISettings
Getting
Started
Connections Troubleshooting
Other
Information
Spec. Index
Part
Names
Connecting a Set-Top Box
R
L
R
L
R
L
R
L
3-
065
"6%*0
065
015*$"-"6%*0
$0"9*"-
065
w eq
(Satellite Tuner/Cable TV)
You can watch satellite or cable TV.
•
Select the terminal to use and connect the device.
•
For instructions on HDMI connections, see “Connecting an HDMI-
•
Compatible Device” on page 12.
Cables Used for Connections
n
Audio cables (sold separately)
(White)
(Red)
(Orange)
Audio cable
Coaxial
digital cable
Optical cable
Satellite Tuner/Cable TV
Set when coaxial digital connector (COAXIAL) input is assigned.
“COAX Input Assign” (vpage 56)
Connecting an Antenna
Connect the FM antenna or AM loop antenna included with the unit to enjoy listening to radio broadcasts.
•
After connecting the antenna and receiving a broadcast signal (vpage 27 “Listening to FM/AM Broadcasts”), use tape to fix the antenna in
•
a position where noise is the lowest.
FM outdoor
antenna
75 Ω Coaxial
cable
FM indoor
antenna
(supplied)
AM Loop Antenna Assembly
Put the stand section
1
through the bottom of
the loop antenna from
the rear and bend it
forward.
Insert the projecting part
2
into the square hole in
the stand.
AM loop antenna
(supplied)
Ground
Loop
antenna
AM outdoor
antenna
Stand
Square
hole
Projecting
part
NOTE
Do not connect two FM antennas simultaneously.
•
Even if an external AM antenna is used, do not disconnect the AM
•
loop antenna.
Make sure the AM loop antenna lead terminals do not touch metal
•
parts of the panel.
If the signal has noise interference, connect the ground terminal
•
(GND) to reduce noise.
If you are unable to receive a good broadcast signal, we recommend
•
installing an outdoor antenna. Inquire at the retail store where you
purchased the unit for details.
Using the AM Loop Antenna
To Use Suspended on a Wall
n
Suspend directly on the wall without
assembling.
Nail, tack, etc.
To Use Standing Alone
n
Use the procedure below to assemble.
ENGLISH
Getting
Started
•
•
Version
Simple
•
Connections
Connections
n
Playback
(Basic)
(Advanced)
Playback
Multi-
zone
GUISettings
Remote
Control
Names
Part
Information
Other
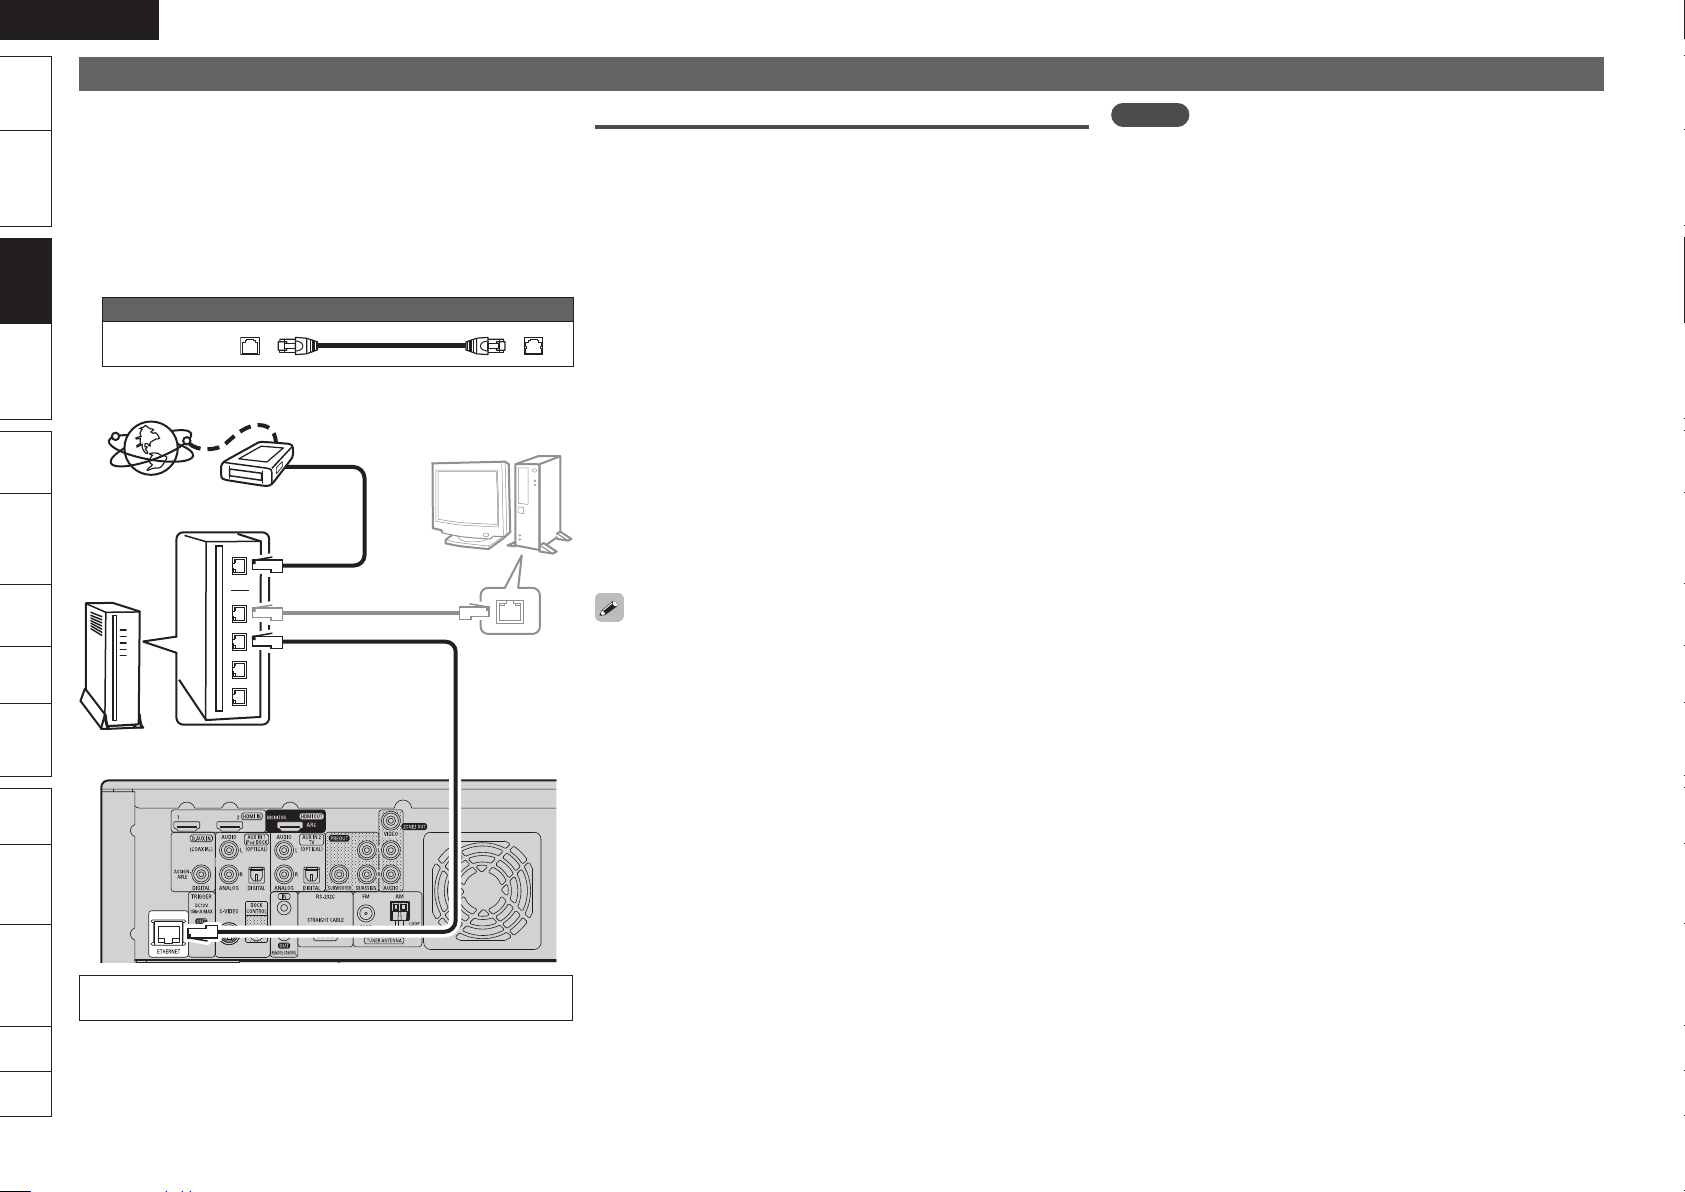
Connecting to the Network
You can use a disc which offers BD-LIVE function by connecting the
unit to the Internet (vpage 21).
You can update by downloading the latest firmware from the DENON
website.
For more information, on the GUI menu, select “Other Setup” –
“Firmware Update” (vpage 46).
See “Network Setup” on the GUI menu (vpage 45) for more
information on network setting.
Cables Used for Connections
Cable (sold separately)
Ethernet
cable
Internet
Modem
To WAN side
To LAN port
To LAN port
Router
Computer
LAN port/
Ethernet
connector
Required system
Broadband Internet Connection
n
Modem
n
Device that connects to the broadband circuit and conducts
communications on the Internet.
A type that is integrated with a router is also available.
Router
n
When using this unit, we recommend you use a router equipped
•
with the following functions:
Built-in DHCP server
•
This function automatically assigns IP addresses on the LAN.
Built-in 100BASE-TX switch
•
When connecting multiple devices, we recommend a switching
hub with a speed of 100 Mbps or greater.
Ethernet Cable (CAT-5 or Greater Recommended)
n
Use for wired LAN.
•
Use only shielded STP or ScTP LAN cable which is available at
•
retailer.
Some flat type Ethernet cables are easily affected by noise.
•
We recommend using a normal type cable.
If you have an Internet provider contract for a line on which network
•
settings are made manually, make the settings at “Network Setup”
(vpage 45).
With this unit, it is possible to use the DHCP and Auto IP functions
•
to make the network settings automatically.
When using this unit with the broadband router’s DHCP function
•
enabled, this unit automatically performs the IP address setting and
other settings.
When using this unit connected to a network with no DHCP function,
make the settings for the IP address, etc., at “Network Setup”
(vpage 45).
When setting manually, check the setting contents with the network
•
administrator.
NOTE
A contract with an ISP is required to connect to the Internet.
•
No additional contract is needed if you already have a broadband
connection to the Internet.
The types of routers that can be used depend on the ISP. Contact an
•
ISP or a computer shop for details.
DENON assumes no responsibility whatsoever for any
•
communication errors or troubles resulting from customer’s
network environment or connected devices.
This unit is not compatible with PPPoE. A PPPoE-compatible router
•
is required if you have a contract for a type of line set by PPPoE.
Do not connect an ETHERNET connector directly to the LAN port/
•
Ethernet connector on your computer.
Troubleshooting
Spec. Index
For connections to the Internet, contact an ISP (Internet
Service Provider) or a computer shop.
ENGLISH
Remote
Control
Playback
(Advanced)
Connections
Simple
Version
Playback
(Basic)
Multi-
zone
GUISettings
Getting
Started
Connections Troubleshooting
Other
Information
Spec. Index
Part
Names
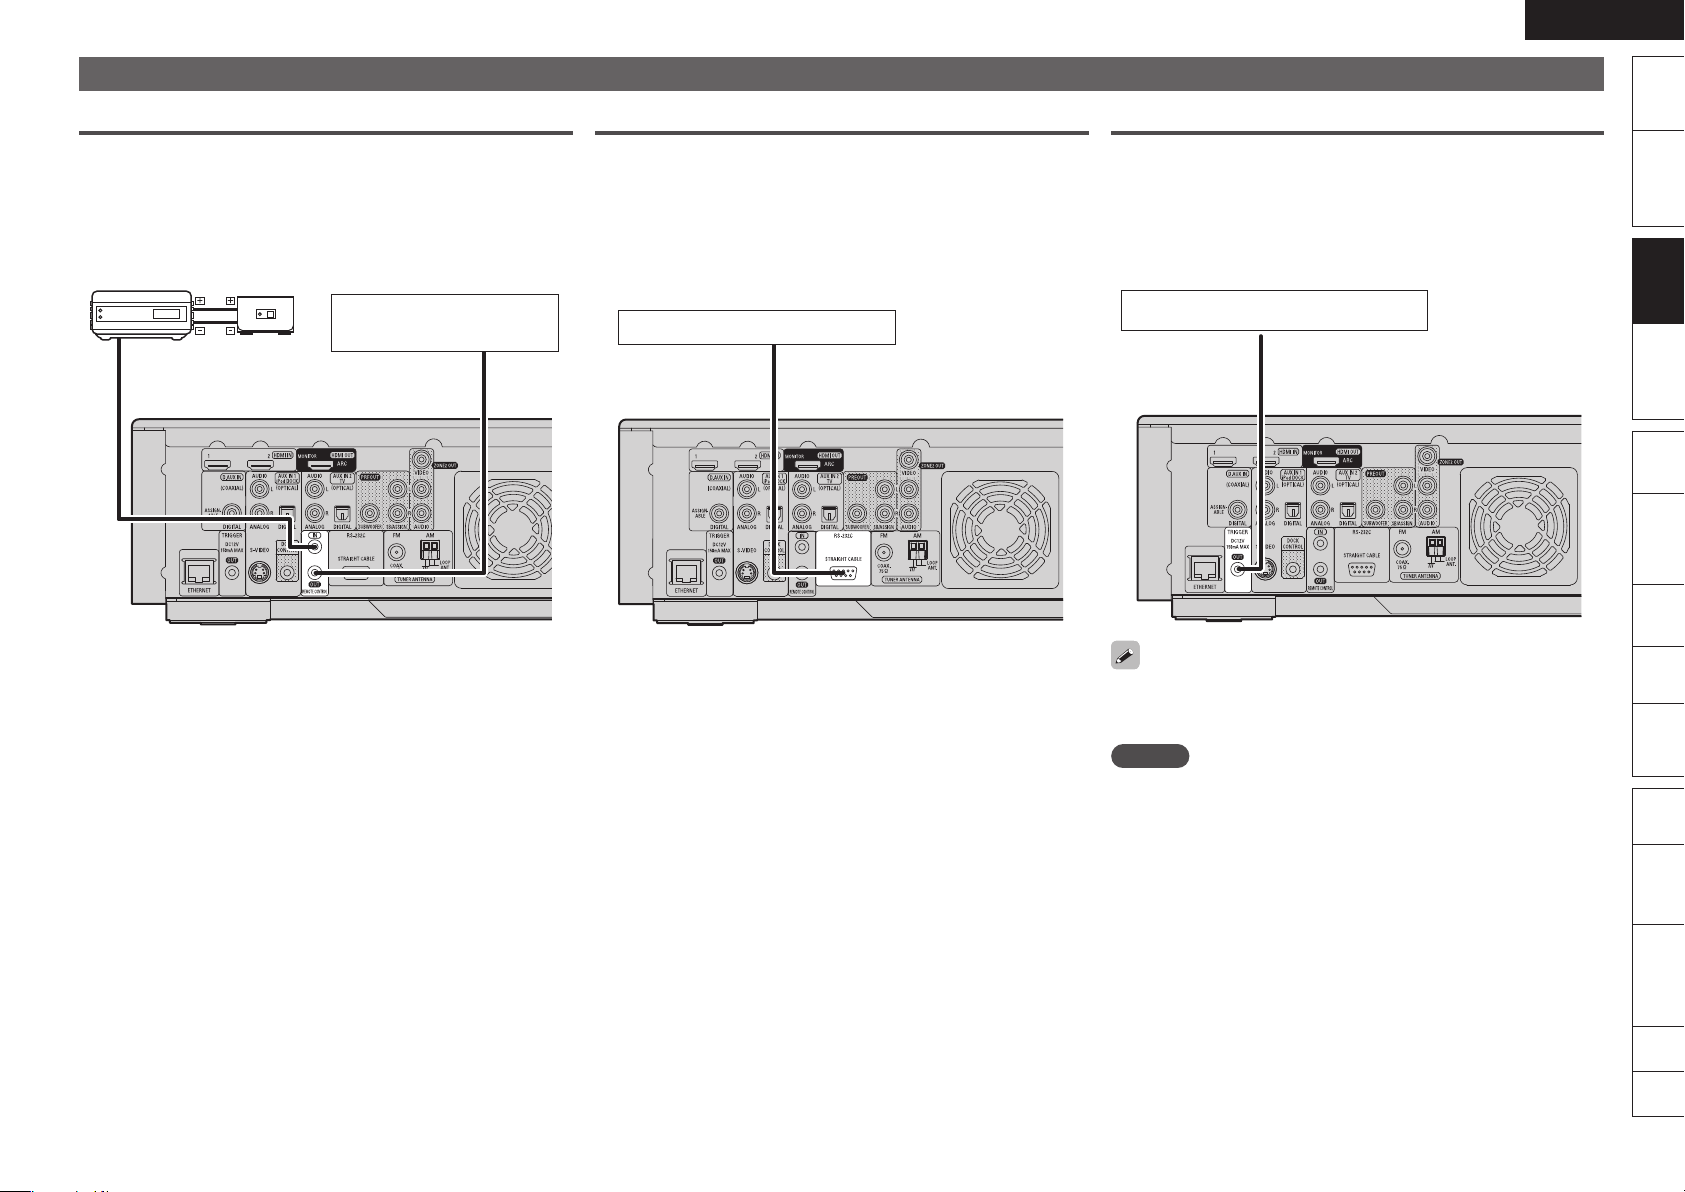
Connecting an External Control Device
"69
065
REMOTE CONTROL Jacks
If this unit is installed in a location that is out of range of the signal
from the remote control unit, you can still operate the unit and the
devices connected to it by using a commercially available IR receiver.
You can also use it to remotely control ZONE2 (another room).
Infrared
retransmitter
Input
Infrared
sensor
Output
Device equipped with a
REMOTE CONTROL IN jack
RS-232C Connector
By connecting an external serial controller, you can control all sorts of
household electrical devices (including lights, electric curtains, and air
conditioning units) in addition to your audio and video devices.
External serial controller
TRIGGER OUT Jacks
When a device with TRIGGER IN jack is connected, the connected
device’s power on/standby can be controlled through linked operation
to this unit.
The TRIGGER OUT jack outputs a maximum 12 V/150 mA electrical
signal.
12 V/150 mA trigger-compatible device
Set to change the conditions for linked operation via the TRIGGER
OUT jack.
“Trigger Out” (vpage 56)
NOTE
If the permissible trigger input level for the connected device is larger
than 12V/150mA, or has shorted, the TRIGGER OUT jack cannot be
used.
In this case, turn off the power to the unit, and disconnect it.
ENGLISH
Title
Title Elapse d
Chapter
00:05:52
1/61/1
HDMI
Video Info
Audio Info
Max Channel
: YCbCr / 1080P
: Dolby Digi tal
: 8ch
DATA DISC
Single Elapsed
00:25
Song
Artist
Album
Now PlayingTrack 2
Getting
Started
Playback (Basic)
Version
Simple
Connections
Playback
Playback
(Basic)
(Basic)
(Advanced)
Playback
Multi-
zone
GUISettings
Remote
Control
About Playback Information (vpage 18)
n
Playable Media (vpage 19)
n
Selecting the Input Source (vpage 20)
n
Playing Blu-ray Disc and DVD-Video
n
(vpage 20)
Playing CD (vpage 21)
n
Playing an iPod® (vpage 22)
n
Playing a USB Memory Device (vpage 24)
n
Playing Files (vpage 25)
n
Tuning in Radio Stations (vpage 27)
n
Basic Operation (vpage 28)n
Surround Mode (vpage 31)
Playback (Advanced) (vpage 37)
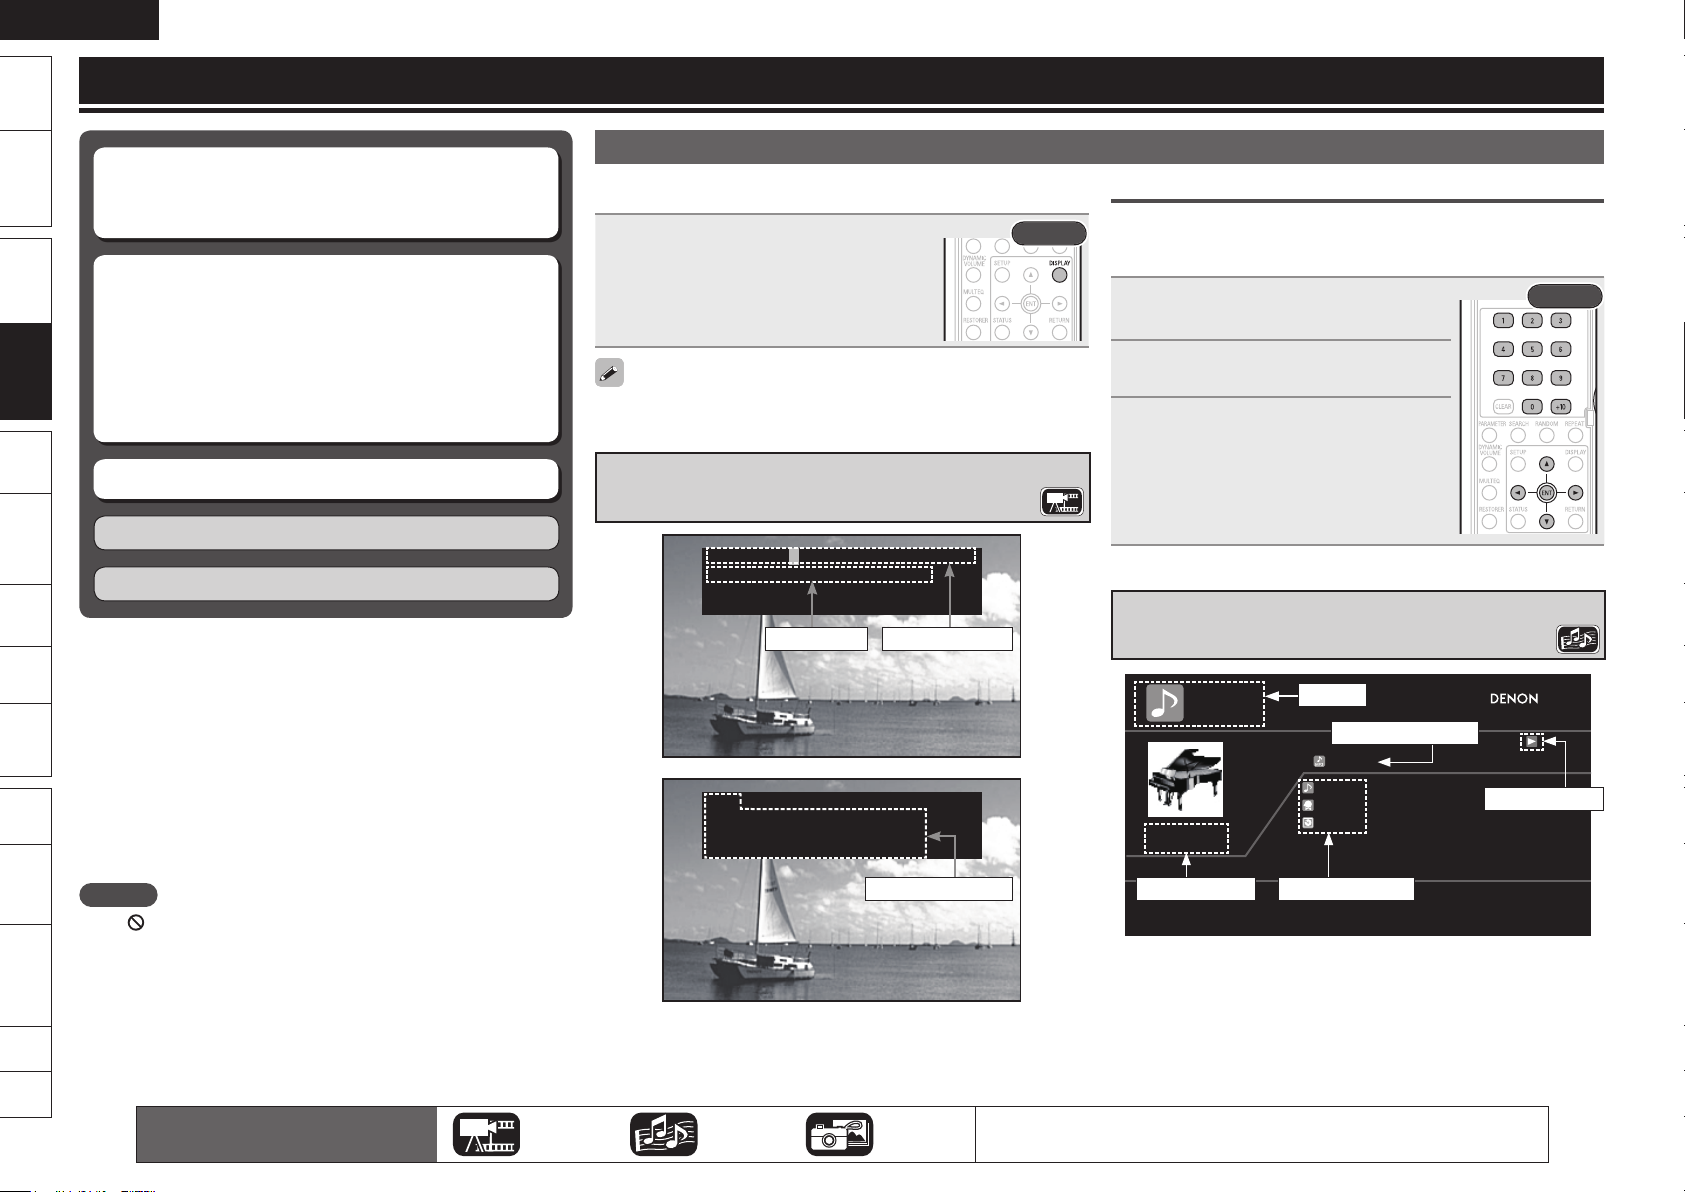
About Playback Information
Displays playback information on the information bar and media player
screen.
Press DISPLAY.
Each time the button is pressed, it switches to
the next playback information.
To erase display, press DISPLAY until it goes
•
away.
Displayed content differs depending on the media being played back.
Also, the information displayed during playback and stop differs.
Information Bar Display
Disc informationTime display
Rear
Search Using Information Bar
In the orange color cursor area, when you enter the number that you
wish to search, that location is searched. There are 2 search modes,
“Title search” and “Chapter search”.
Use uio p to move the cursor
1
to the item that you wish to search.
Use 0 – 9 and +10 to enter a value.
2
Press ENTER.
3
Search is executed and playback begins.
If the input number information is not on the
•
disc, the current playback display reappears.
Media Player Display
Media
Track being played
Rear
Names
Part
Information
Other
•
Troubleshooting
•
•
Spec. Index
NOTE
The (prohibited mark) may appear on the top right of the TV
screen during an operation. This means that the operation being
conducted is prohibited.
Depending on the disc, certain operations may not be as described in
this manual. Check each disc owner’s manual for more information.
During playback of a 2-layered disc, pictures may stop momentarily.
This happens when the first layer switches to the second layer. This
is not a malfunction.
content applicable to each operation.
The icons show the category of
Video Audio Photo
HDMI information
For details of the media corresponding to each icon, see “Playable Media”
(vpage 19).
Playback mode
Time Display Disc Information
ENGLISH
Remote
Control
Playback
(Advanced)
Connections
Simple
Version
Playback
(Basic)
Multi-
zone
GUISettings
Getting
Started
Playback
(Basic)
Troubleshooting
Other
Information
Spec. Index
Part
Names
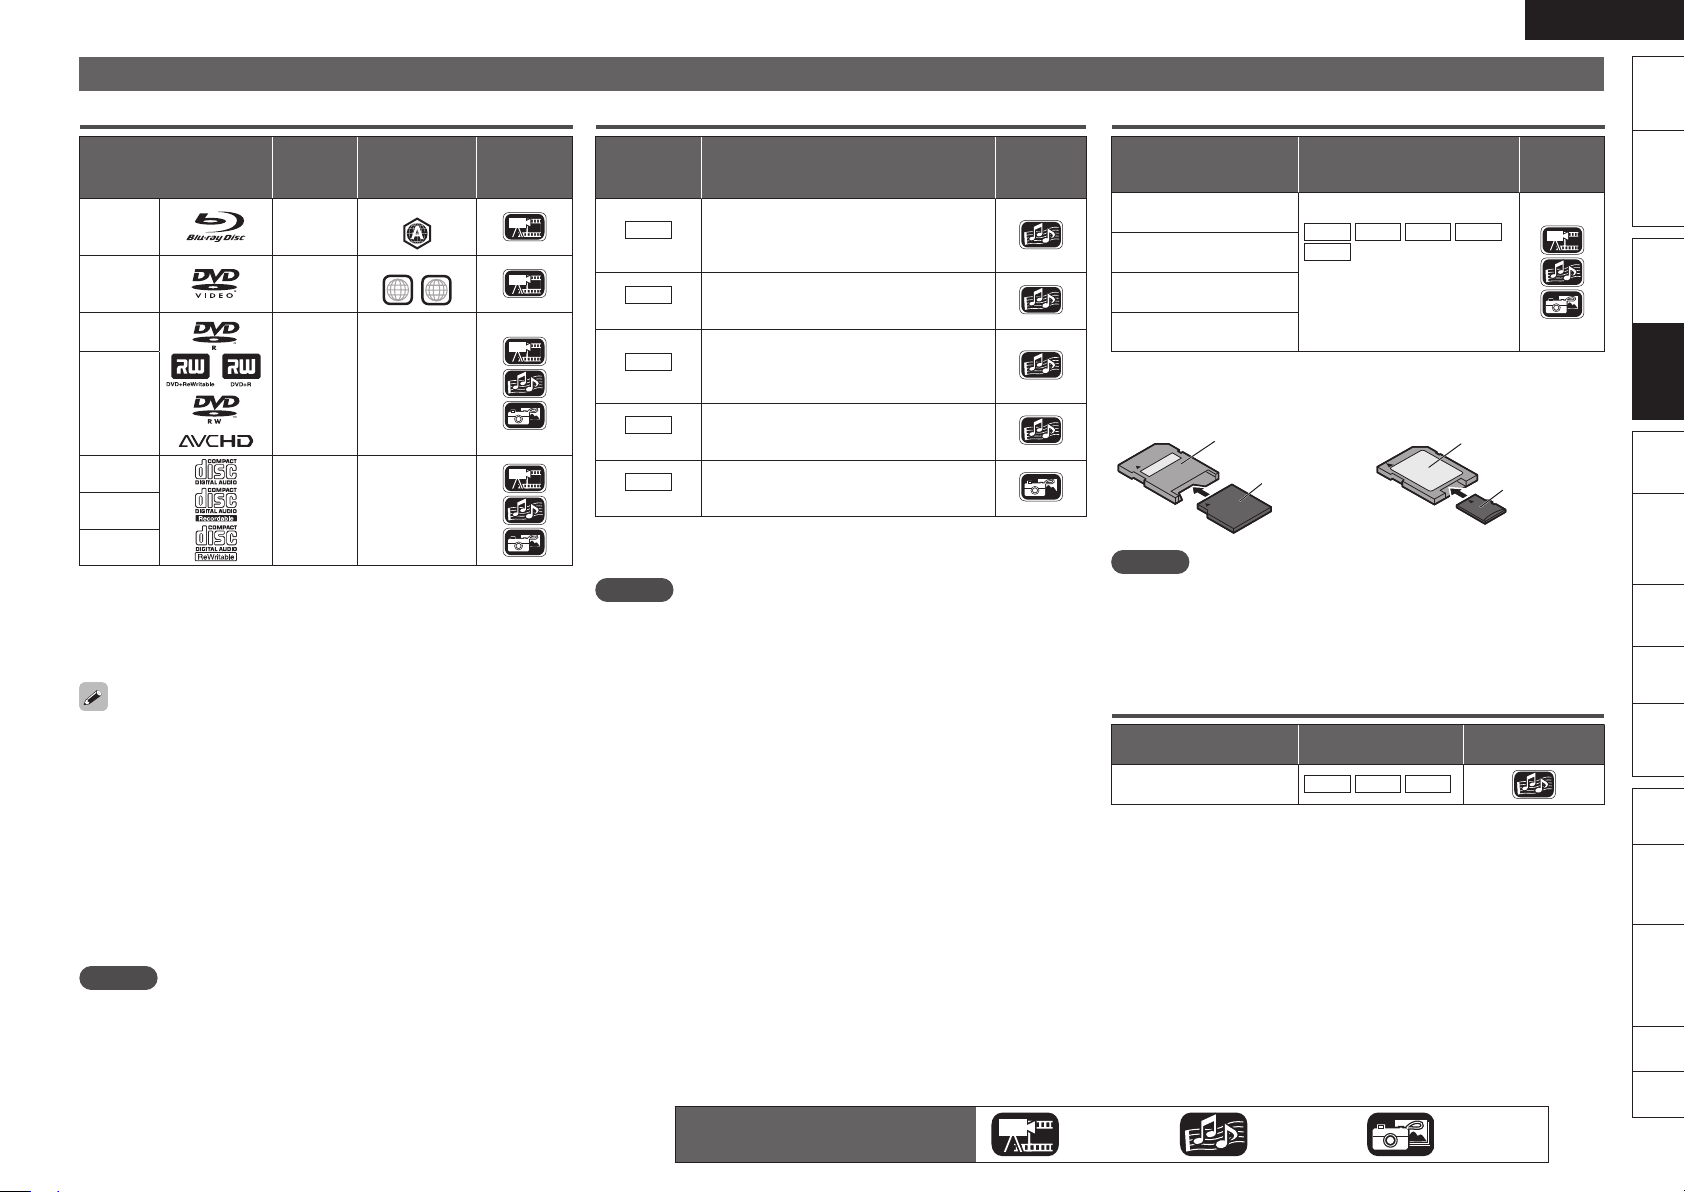
Playable Media
ALL
1
Discs
Playable
Playable discs
formats/
modes
BD-Video
z1,z2
DVD-Video
z1,z2
DVD-R,
DVD+R
DVD-RW,
DVD+RW
CD
CD-RW
–
–
Video
mode,
AVCHD
format
– –CD-R
z1 BD-Video/DVD-Video discs may not operate as described in this
manual due to menu structure.
z2 The Blu-ray Disc player and BD-Video disc, and DVD player and
DVD-Video disc each have their region codes (code assigned for
each region). Playback is not possible if the codes do not match.
The following discs will not play back on this unit.
BD-RE Ver1.0 (BD disc with cartridge)
•
BD-ROM/BD-R/BD-RE discs containing recorded movie, still image,
•
audio, etc., files
BD-R/BD-RE in which BDMV/BDAV is recorded
•
HD DVD / DVD-RAM / DVD-Audio
•
CDV (Only the audio part can be played)
•
CD-G (Only the audio signals can be output)
•
Non-standard CD (CD with copy protection, etc.)
•
Unauthorised disc (Pirated disc)
•
Disc with recording area less than 55 mm in diameter
•
Video Single Disc (VSD) / CVD / Video CD / Super Video CD /
•
Compact Disc-Interactive (CD-I) / Photo CDs / Super Audio CD
NOTE
A disc may not be accessible or play back incorrectly due to audio
•
and video interruptions, etc., depending on the recording conditions
when recorded with a Blu-ray Disc recorder or DVD recorder.
Unfinalised DVD-R/-RW/+R/+RW, and CD-R/-RW discs may not play
•
back. Finalise discs before playing.
Playable
region codes
Include region
Include region
–
Category
type
Files
Playable
files
File specification
(Extension)
Sampling frequency: 44.1 kHz, 48 kHz
•
Bit rate: 64 kbps – 320 kbps
MP3
(.mp3)
WMA
(.wma) z
AAC
(.m4a) z
LPCM
(.wav)
JPEG
(.jpg/.jpeg)
This unit cannot play back files recorded under DRM (Digital Rights
z
•
(144 kbps non-compatible)
Audio type: MPEG 1 Audio Layer 3
•
Sampling frequency: 44.1 kHz, 48 kHz
•
Bit rate: 48 kbps – 192 kbps
•
Audio type: WMA Version 9
•
Sampling frequency: 44.1 kHz, 48 kHz
•
Bit rate: 64 kbps – 192 kbps
•
(Variable Bit Rate non compatible)
Audio type: AAC
•
Sampling frequency: 44.1 kHz, 48 kHz
•
Bit length: 16 bit
•
Number of channels: 2 ch
•
Maximum resolution: 4,096 x 4,096 pixels
•
Minimum resolution: 32 × 32 pixels
•
Maximum file size: 12 MB
•
Management).
NOTE
The abovementioned file type may also fail to play back depending
•
on conditions at the time of recording.
If characters not supported on the menu screen are included in a
•
file name, title, artist name or album title, those are not displayed
correctly.
JPEG format images stored in progressive format cannot be played
•
back.
Category
type
SD Memory Cards
Playable cards Playable files
SD memory card
(8 MB – 2 GB)
SDHC memory card z1
(4 GB)
miniSD card z2
(8 MB – 2 GB)
microSD card z2
(8 MB – 2 GB)
MP3 WMA AAC LPCM
JPEG
Data recorded for BD
•
BONUS VIEW or BD-LIVE
use.
z1 This unit supports SD memory card with FAT16 file system, and
SDHC memory card with FAT32 file system.
z2 For miniSD card and microSD card adapter is necessary.
miniSD card
Adapter
miniSD card
NOTE
This unit is not compatible with the miniSDHC card or microSDHC
•
card.
Insert or remove a SD memory card while the power is in standby. If
•
you insert a SD memory card while the power is ON, the SD memory
card may not be read.
Category
microSD card
Adapter
microSD card
type
USB Memory Devices
Standard Playable files Category type
USB Mass Storage Class z
This unit is compatible with USB memory devices in “FAT16” or
z
“FAT32” format.
MP3 WMA AAC
The icons show the category of
content applicable to each operation.
Video Audio Photo
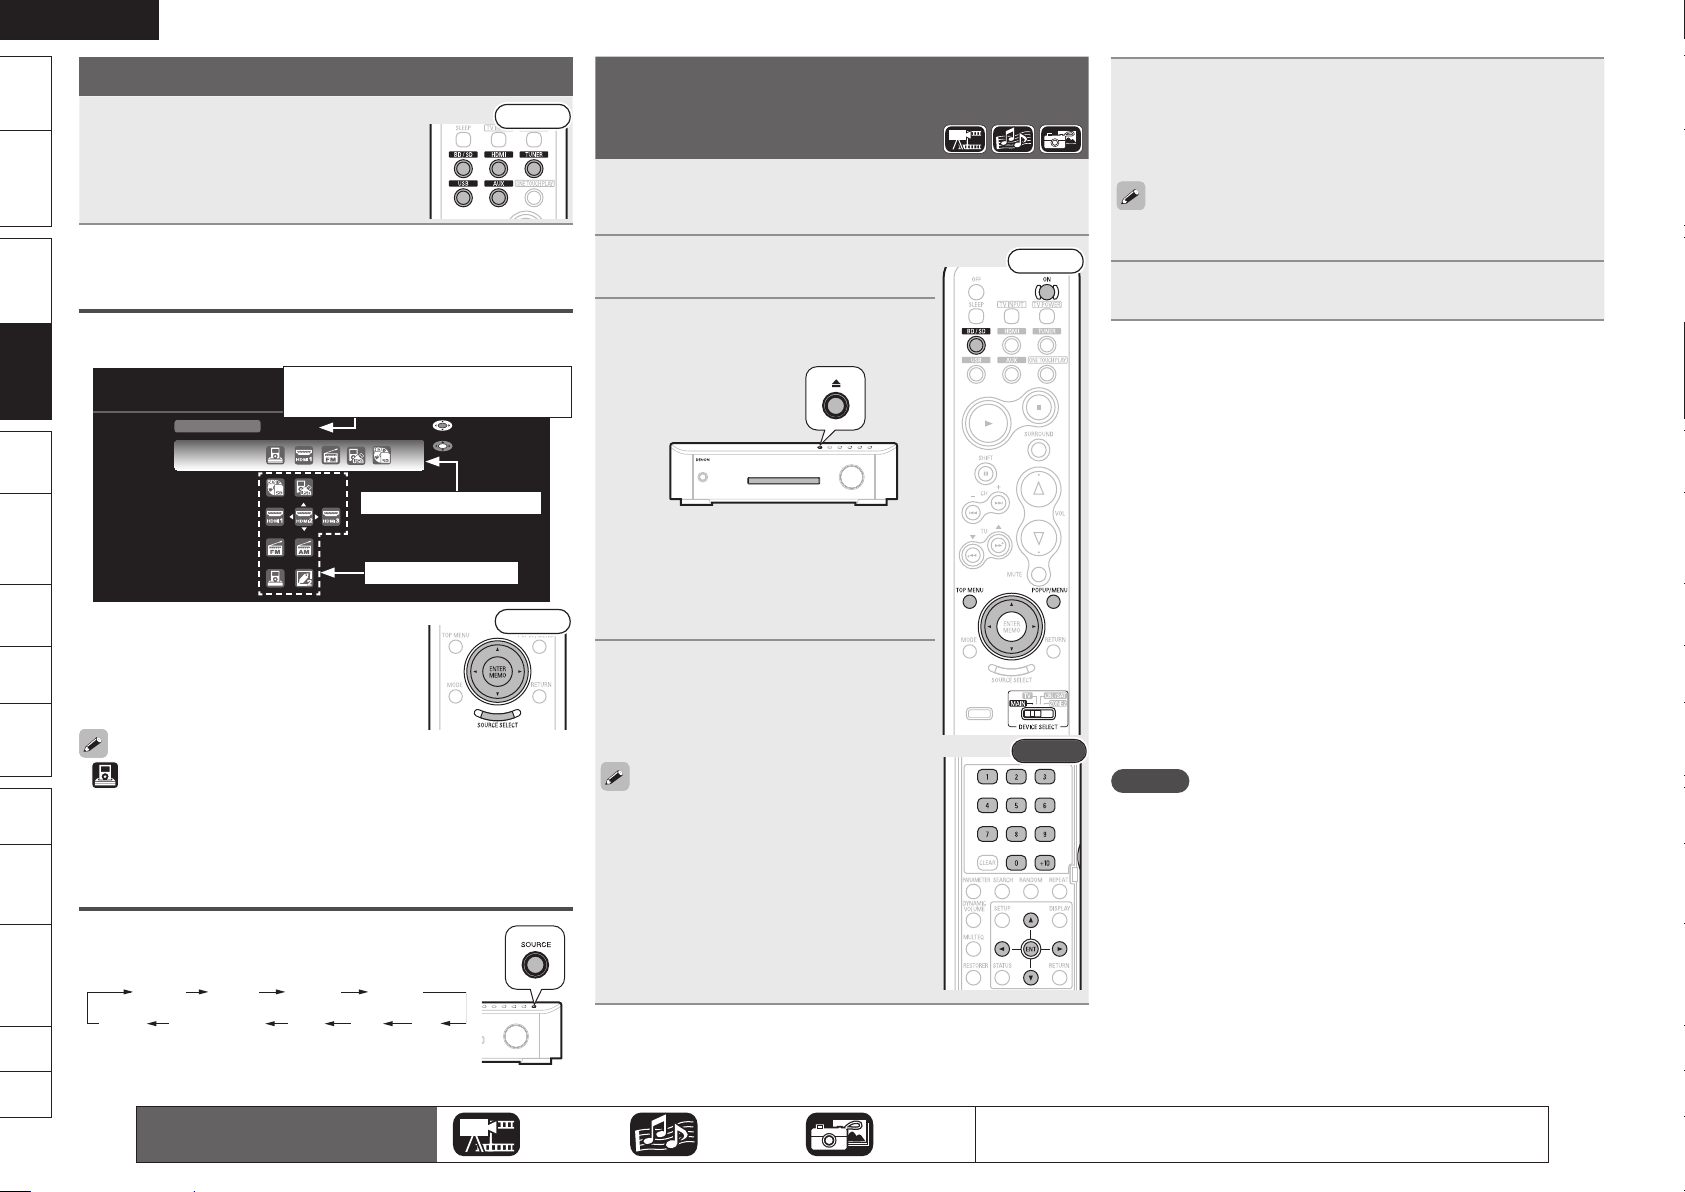
ENGLISH
SOURCE SELECT
Source
HDMI2
Recent
BD/USB
HDMI
Tuner
AUX
Enter
Move
BD/SD
HDMI1
HDMI2
HDMI3
FMAMAUX1(DOCK)AUX2 USB
z z
Getting
Started
Version
Connections
(Basic)
(Basic)
(Advanced)
zone
GUISettings
Control
Names
Information
Troubleshooting
Spec. Index
Selecting the Input Source
Press the input source select button
(BD/SD, HDMI, TUNER, USB, AUX) to
Simple
be played back.
The desired input source can be selected
directly.
You can also use the following operation to select an input
source.
Using the “Source Select” Menu
q Press SOURCE SELECT.
Playback
Playback
Display the “SOURCE SELECT” menu.
The currently selected input source
is highlighted.
Playback
Multi-
w Use uio p to select the input source
icon, then press ENTER.
The input source is set and the source
selection menu is turned off.
Remote
is displayed when using a Control dock for iPod.
•
When using with an iPod connected directly to the USB port of this
•
Part
unit, select “USB” for the input source.
To turn off the source selection menu without selecting an input
•
source, press SOURCE SELECT again.
Other
Using the Button on the Main Unit
Press SOURCE.
Each time the button is pressed, it switches to the next
input source.
If the TUNER “(FM or AM)” is selected in ZONE2,
z
only the same band as in ZONE2 is displayed.
0
The icons show the category of
content applicable to each operation.
Recently used sources
Selectable sources
Playing Blu-ray Disc and
Front
Front
Video Audio Photo
DVD-Video
Prepare for playback.
q Turn on the TV and subwoofer power.
1
w Change the TV input to the input of this unit.
Press ON to turn on power to the
2
unit.
Insert a disc.
Press 5 on the main unit to open/close
•
3
the disc tray.
When the disc tray opens, the input
•
source automatically switches to “BD/
SD” and the unit enters “Disc Mode”.
If a disc is already inserted in the
•
disc tray, switch to “Disc Mode” by
selecting BD/SD.
Make the various settings for
4
playback on the disc menu.
uio p················································ Select
ENTER·················································· Confirm
You can make the following settings on the
•
disc menu. (Settable items vary depending
on the disc.)
Subtitle language
•
Audio language
•
Audio format etc.
•
During DVD-Video playback, press TOP MENU
•
or POPUP/MENU to display the menu.
If the menu continues, press uio p to
get to the next part.
Press uio p in the Top Menu screen to select the
5
title or chapter.
If you use 1 – 9, +10 to select the chapter or title, you can start
•
playback.
With Blu-ray Disc, depending on the disc, you can select title and
chapter from the popup menu.
Front
Press ENTER.
6
Playback starts.
Adjusting the Master Volume (vpage 28)
n
Press VOL df.
Stop Playback (Resume Function) (vpage 28)
n
Press 2.
Pause Playback (vpage 28)
n
Press 3.
Step-by-Step Playback (vpage 28)
n
During pause, press 3.
Fast Forward/Fast Reverse Playback (vpage 29)
n
During playback, press 6 7.
Slow Forward/Slow Reverse Playback (vpage 29)
n
During pause, press 6 7.
Skipping to the Chapter (vpage 29)
n
During playback, press 8 9 or ui.
Repeat Playback (vpage 29)
n
Press REPEAT.
Switching Audio (vpage 30)
n
During playback of a Primary Audio/Secondary Audio title, press
Rear
For details of the media corresponding to each icon, see “Playable Media”
(vpage 19).
AUDIO/RDS.
NOTE
When playing back a high-quality signal such as Dolby TrueHD, Dolby
Digital Plus, or DTS-HD, set the “BD Audio Mode” (vpage 58) to
“HD Audio Output”.
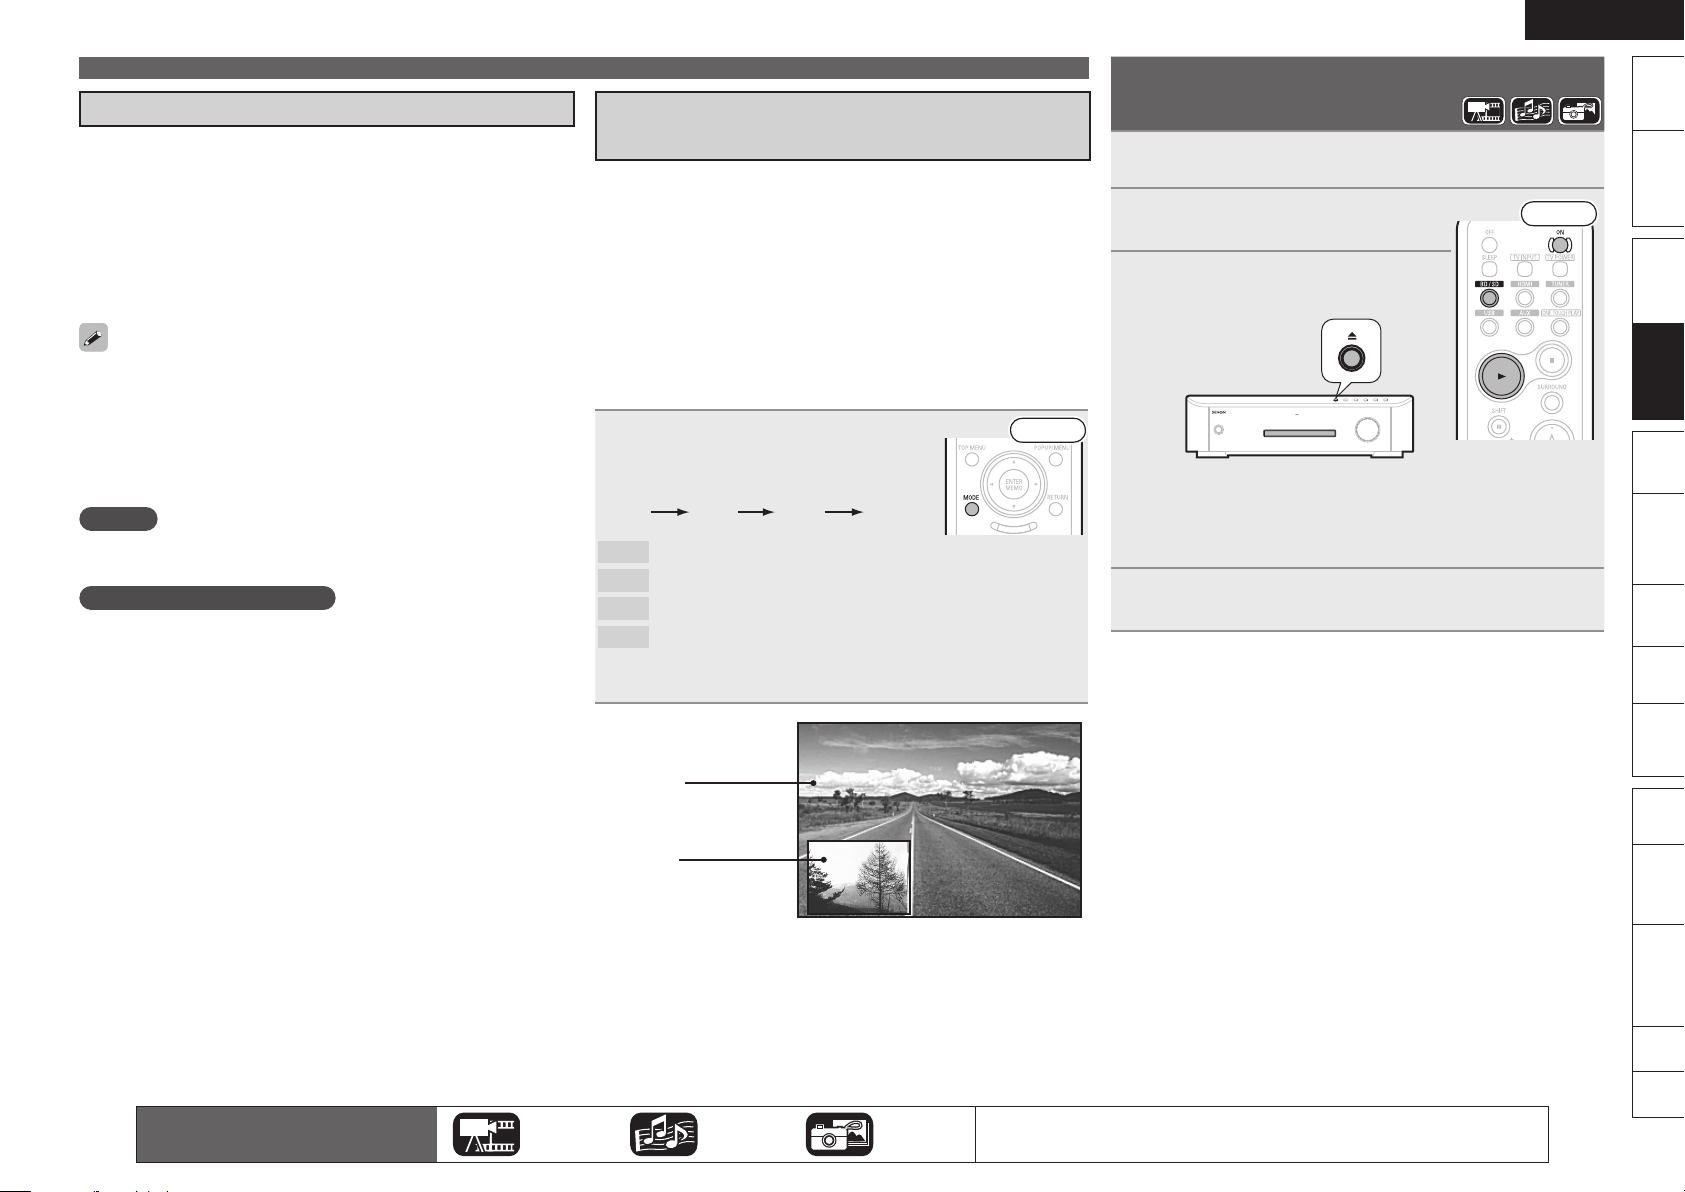
ENGLISH
Remote
Control
Playback
(Advanced)
Connections
Simple
Version
Playback
(Basic)
Multi-
zone
GUISettings
Getting
Started
Playback
(Basic)
Troubleshooting
Other
Information
Spec. Index
Part
Names
Off
1/X 2/X X/X
Enjoying BD-LIVE Features
While playing back a disc compatible with BD-LIVE, you can connect to
the BD-LIVE site for Blu-ray Discs via the Internet and display special
features and caption information not available on the disc.
The functions that can be used with BD-LIVE differ from disc to
•
disc.
For details on the functions and how to operate them, see the
•
individual disc’s on-screen displays and explanations.
To play back a BD-LIVE-compatible Blu-ray Disc, you should first
•
install an SD memory card in this unit.
To use BD-LIVE functions, connect this unit to the Internet and make
•
the settings described below, as necessary:
Connections : “Connecting to the Network” (vpage 16)
Settings : “Network Setup” (vpage 45)
Depending on your network environment, in some cases time may
•
be required to connect to the network or connection may not be
possible.
NOTE
Do not remove the SD memory card from this unit while playing a BDLIVE compatible disc.
NOTE for SD memory card
Insert or remove a SD memory card while the power is in standby. If
•
you insert a SD memory card while the power is ON, the SD memory
card may not be read.
Use an SD memory card with a capacity of 1 GB or greater. Also, the
•
SD memory card must be formatted on this unit (vpage 46).
Remove the write protection of a SD memory card.
•
Playing Blu-ray Disc and DVD-Video
Playing BD-Video Compatible with
Bonus View
With a disc that is compatible with bonus view (picture-in-picture),
besides the main video (primary video) stored on the disc, you can
play back the video director’s commentary and simultaneously
ongoing sub-story, as well as sub-video such as alternative camera
angle (secondary video).
The playback method, etc., is determined by the disc, and varies
•
depending on the disc.
For details on the functions and how to operate them, see the
•
individual disc’s on-screen displays and explanations.
Some Blu-ray Discs use SD memory cards as the recording memory
•
for Bonus View playback. You should install an SD memory card
before using these discs.
Press MODE and ui to select the
secondary video you want to play
back.
Off
Does not display secondary video.
z
1/X
2/X
X/X
z
Main video
(primary video)
Sub video
(secondary video)
Displays the first secondary video.
z
Displays the second secondary video.
z
Displays the X th secondary video.
“X” is the number of Secondary Videos recorded and differs
depending on the disc.
GExampleH Bonus view
Front
Playing CD
Prepare for playback.
Turn on the subwoofer power.
1
Press ON to turn on power to the
2
unit.
Insert a disc.
Press 5 on the main unit to open/close
•
3
the disc tray.
When the disc tray opens, the input source automatically
•
switches to “BD/SD” and the unit enters “Disc Mode”.
If a disc is already inserted in the disc tray, switch to “Disc
•
Mode” by selecting BD/SD.
Press 1.
4
Playback starts.
Adjusting the Master Volume (vpage 28)
n
Press VOL df.
Stop Playback (vpage 28)
n
Press 2.
Pause Playback (vpage 28)
n
Press 3.
Fast Forward/Fast Reverse Playback (vpage 29)
n
During playback, press 6 7.
Skipping to the Track (vpage 29)
n
During playback, press 8 9 or ui.
Random Playback (vpage 29)
n
During stop, press RANDOM.
Repeat Playback (vpage 29)
n
Press REPEAT.
Front
The icons show the category of
content applicable to each operation.
Video Audio Photo
For details of the media corresponding to each icon, see “Playable Media”
(vpage 19).
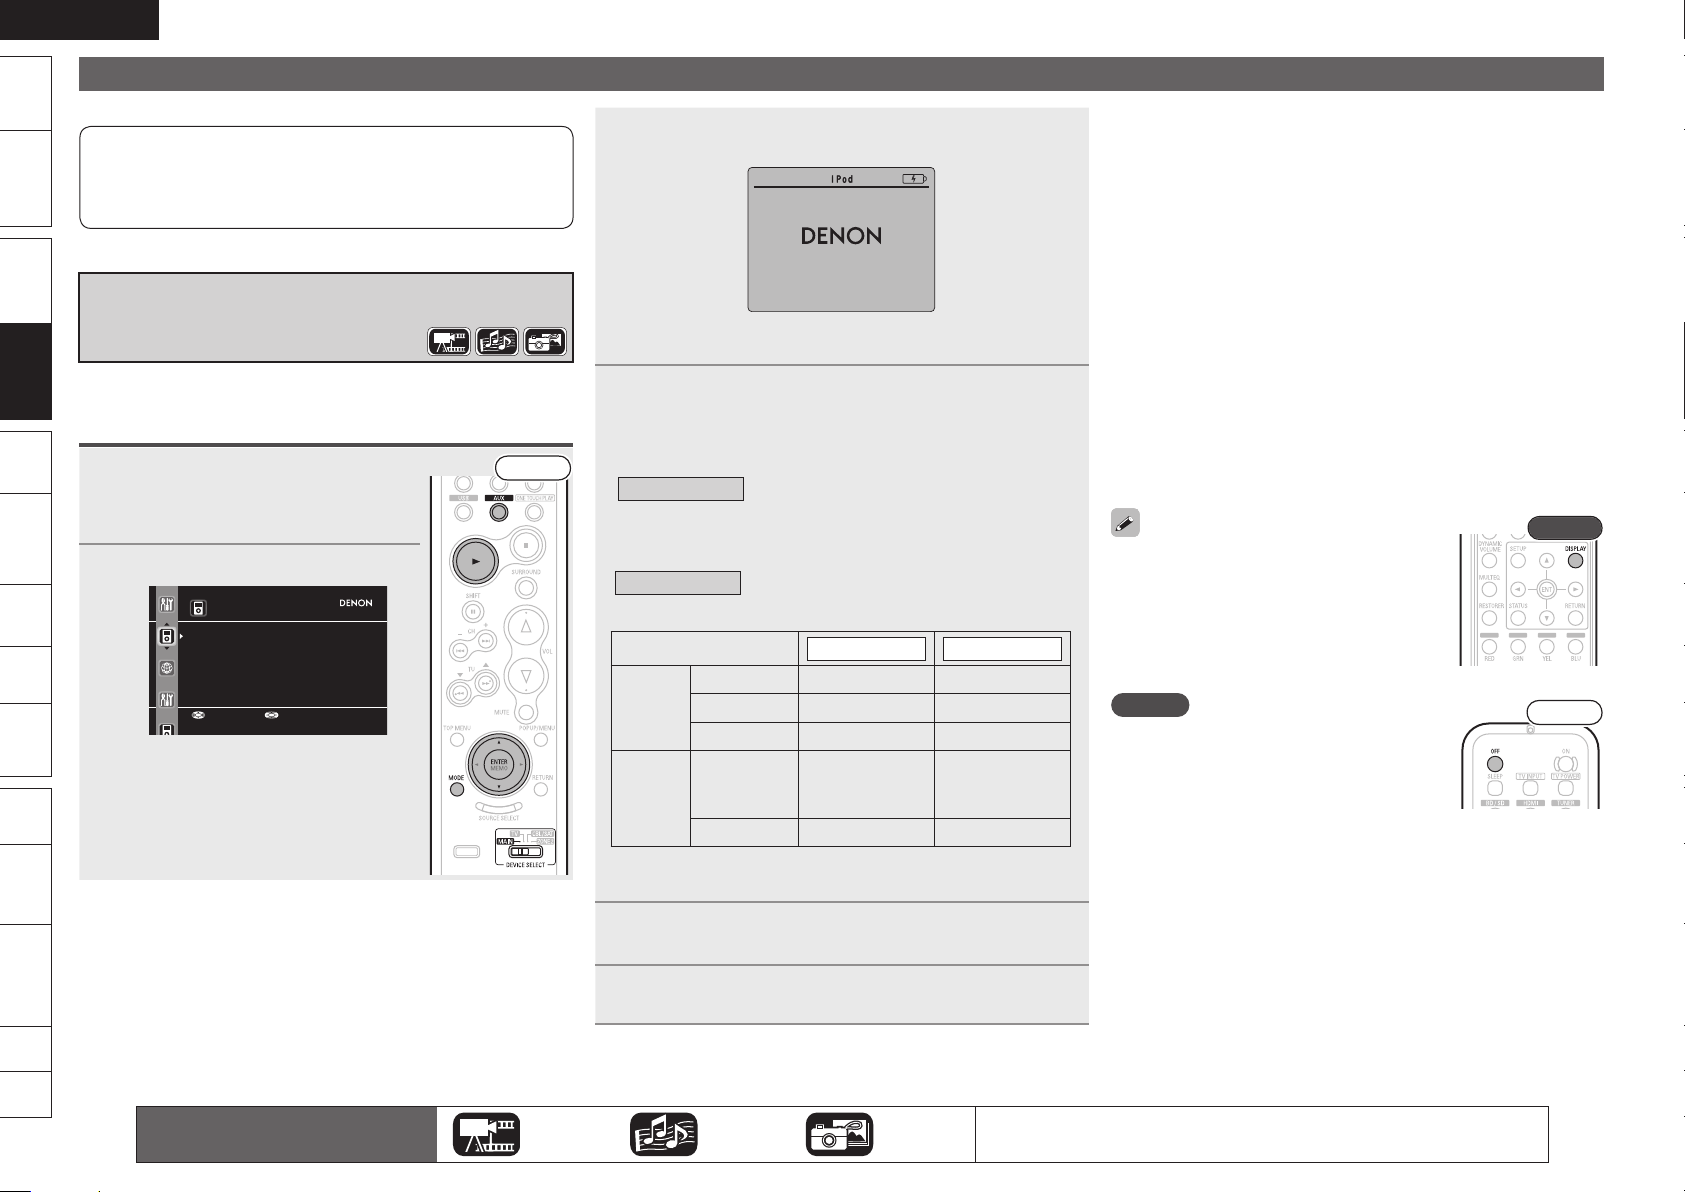
ENGLISH
iPod
Music
Video
Up/Down Select
Rear
Front
Getting
Started
Version
Playing an iPod
There are two methods for iPod playback.
q Use the DENON Control dock for iPod to play back.
Simple
You can play back both video and audio.
w Connect the iPod directly to the USB port to play back.
You can play back audio only.
Connections
q Use the DENON Control Dock for iPod
to Play Back
Playback
Playback
(Basic)
(Basic)
DENON Control dock for iPod usable on this unit
ASD-11R/ASD-3N/ASD-3W/ASD-51N/ASD-51W
•
Listening to Music on an iPod
Prepare for playback.
Connect the DENON control dock for iPod
(Advanced)
zone
Control
Names
Information
1
Playback
2
Multi-
GUISettings
Remote
Part
Other
Troubleshooting
to this unit (vpage 14 “Connecting a
Control Dock for iPod”).
Press AUX to select “DOCK”.
®
Adjusting the Master Volume (vpage 28)
When communication between this unit and the iPod is completed,
•
the following connection screen is displayed on the iPod.
OK to disconnect
If the connections screen is not displayed, the iPod may not be
•
properly connected. Reconnect it.
Press MODE to select the display mode.
3
®
Front
There are two modes for display the contents recorded on the
•
iPod.
Browse mode
z
With the display of this unit, only English letters and numbers
and certain symbols can be displayed. Any characters that
cannot be displayed are replaced with “z”.
Remote mode
z
“Remote Dock” is displayed on the display of this unit.
Display mode
Playable
files
Active
buttons
Video may not be output, depending on the combination of ASD-
z
11R/3N/3W/51N/51W DENON control dock for iPod and iPod.
Display iPod information on the TV screen.
Display iPod information on the iPod screen.
Browse mode Remote mode
Music file
Photo file
Video file
Remote
control unit
(This unit)
®
iPod
P P
P P
P P
z
P
z
P
Use ui to select the item, then press ENTER to
4
select the le to be played.
n
Press VOL df.
Stop Playback (vpage 28)
n
Press 2.
Pause Playback (vpage 28)
n
Press 3 or ENTER.
Fast Forward/Fast Reverse Playback (vpage 29)
n
During playback, press 6 7.
Skipping to the Track (vpage 29)
n
During playback, press 8 9 or ui.
Repeat Playback (vpage 29)
n
Press REPEAT.
Shuffling Playback (vpage 24)
n
Switching the Display Page (vpage 24)
n
Press SEARCH, then press o (previous page) or p (next
page). (only ASD-11R)
Press 8 (previous page) or 9 (next page). (ASD-3N /
3W / 51N / 51W)
To play back compressed audio with extended
•
bass or treble reproduction, we recommend
playback in RESTORER mode (vpage 26).
The default setting is “Mode 3”.
In Browse mode, press DISPLAY during
•
playback to check the title name, artist name,
and album name.
NOTE
Press OFF and set this unit’s power to the
•
standby mode before disconnecting the iPod.
Also switch the input source to one to which
the menu “AUX1” is not assigned before
disconnecting the iPod.
Depending on the type of iPod and the software version, some
•
functions may not operate.
Note that DENON will accept no responsibility whatsoever for any
•
problems arising with the data on an iPod when using this unit in
conjunction with the iPod.
Spec. Index
The icons show the category of
content applicable to each operation.
Press 1.
5
Playback starts.
Video Audio Photo
For details of the media corresponding to each icon, see “Playable Media”
(vpage 19).
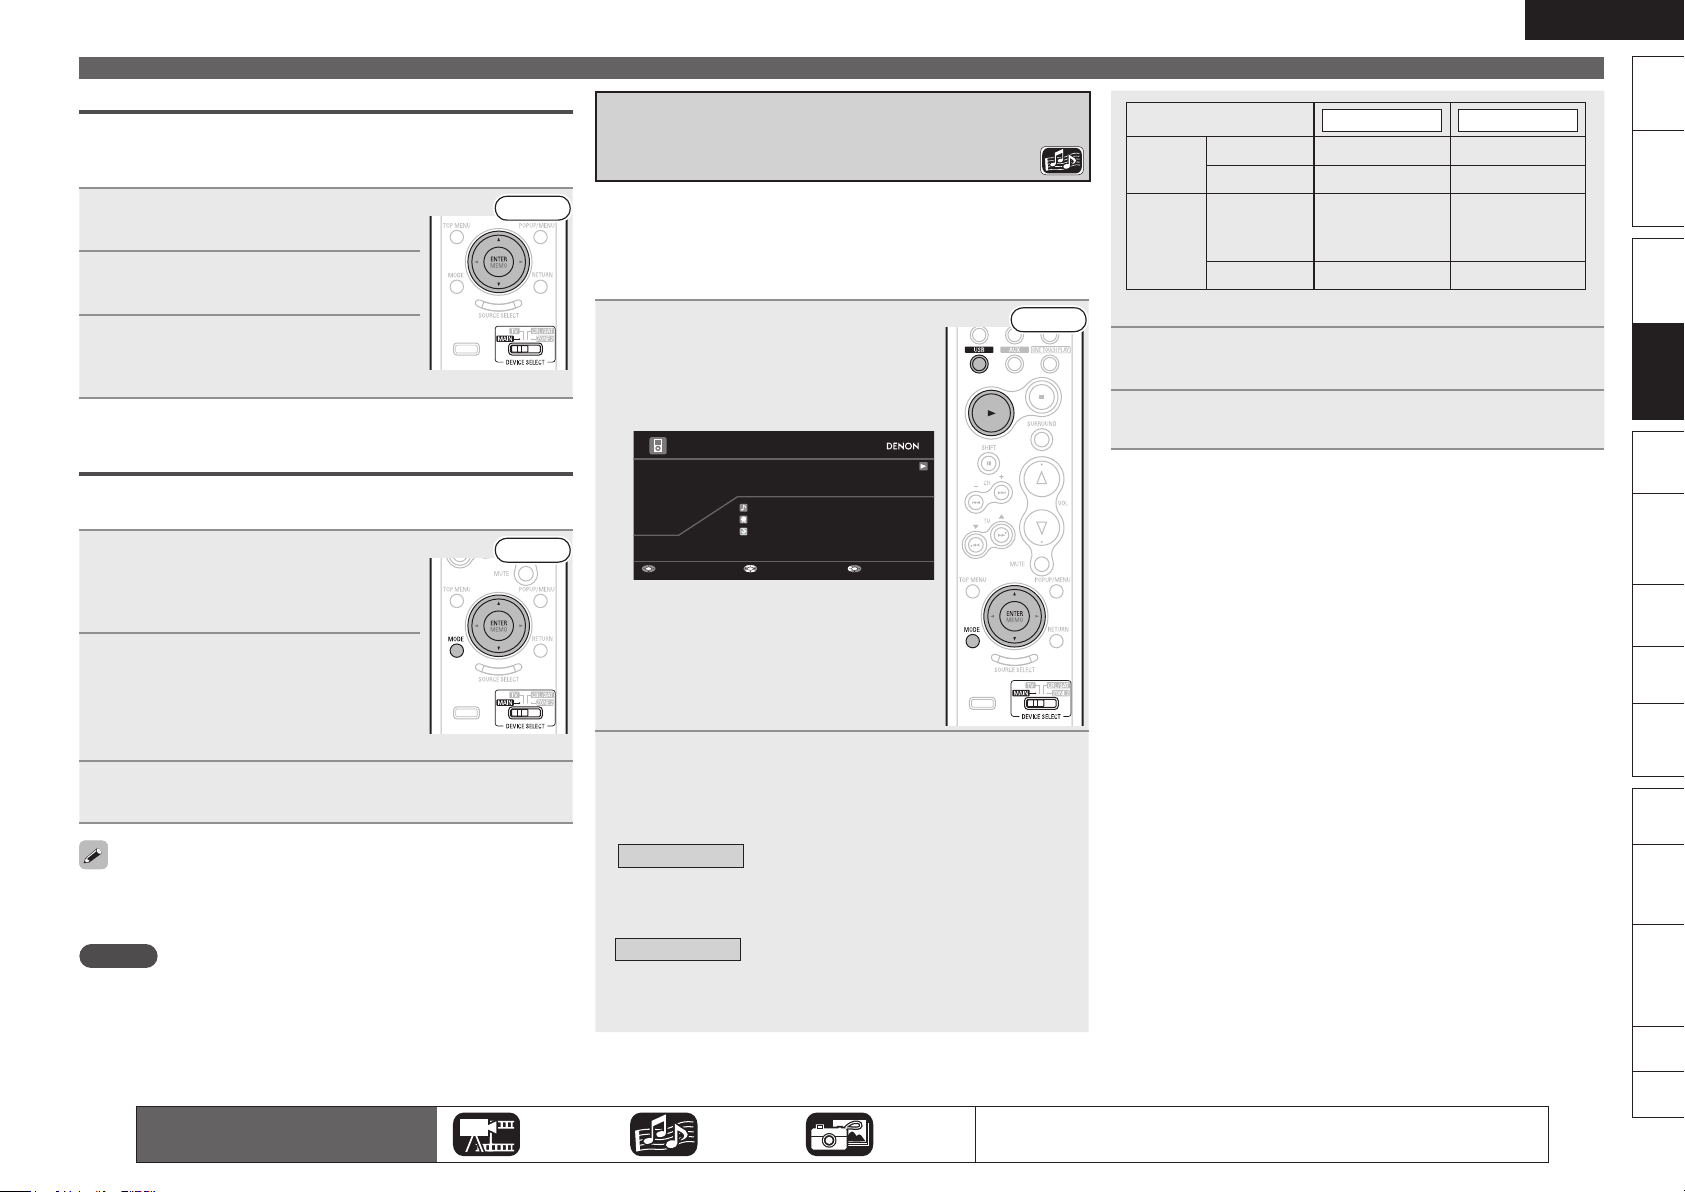
ENGLISH
Remote
Control
Playback
(Advanced)
Connections
Simple
Version
Playback
(Basic)
Multi-
zone
GUISettings
Getting
Started
Playback
(Basic)
Troubleshooting
Other
Information
Spec. Index
Part
Names
Pause Track Sel ect
iPod
0:16
Song
Artist
Album
Now Playing
Viewing Videos on an iPod® in the Browse Mode
When an iPod equipped with a video function is connected to a
DENON ASD-11R control dock for iPod, image files can be played in
the browse mode.
Use ui to select “Videos”, then
1
press ENTER.
Use ui to select the search item
2
or folder, then press ENTER.
Use ui to select the video le,
3
then press ENTER.
Playback starts.
Viewing Photos and Videos on an iPod® in the
Remote Mode
This unit can play back on a TV screen photos and data stored on an
iPod equipped with a slide show or video function.
Press MODE to set the Remote
1
mode.
“Remote Dock” is displayed on the display
of this unit.
Watching the iPod’s screen,
2
use ui to select “Photos” or
“Videos”.
Depending on the iPod used, you may need
•
to operate the iPod unit directly.
Press ENTER until the image you want to view is
3
displayed.
“TV Out” at the iPod’s “Slide show Settings” or “Video Settings”
must be set to “On” in order to display the iPod’s photo data or videos
on the monitor. For details, see the iPod’s operating instructions.
NOTE
Video may not be output, depending on the combination of ASD-11R /
3N / 3W / 51N / 51W DENON control dock for iPod and iPod.
Front
Front
w Connect the iPod Directly to the USB
Port to Play Back
You can use the USB cable provided with the iPod® to connect the
iPod with the unit’s USB port and enjoy music stored on the iPod.
This unit supports audio playback from the iPod (fifth generation or
•
later), iPod nano, iPod classic, and iPod touch (it is not compatible
with iPod shuffle).
Connect the iPod to the USB port
(vpage 14 “Connecting an iPod
1
Front
or USB Memory Device to the
USB Port”).
Playback starts automatically.
If the screens above are not displayed, the
•
iPod may not be properly connected. Try
connecting again.
Press MODE to select the display mode.
2
There are two modes for display the contents recorded on the
•
iPod.
Browse mode
z
With the display of this unit, only English letters and numbers
and certain symbols can be displayed. Any characters that
cannot be displayed are replaced with “z”.
Remote mode
z
“Remote iPod” is displayed on the display of this unit.
The Remote mode is not supported on fifth generation iPods or
•
iPod nanos.
Display iPod information on the TV screen.
Display iPod information on the iPod screen.
Display mode
Playable
files
Active
buttons
z
Only the sound is played.
Music file
Video file
Remote
control unit
(This unit)
®
iPod
Browse mode Remote mode
P P
P P
Use ui to select the item, then press ENTER to
3
select the le to be played.
Press 1.
4
Playback starts.
Adjusting the Master Volume (vpage 28)
n
Press VOL df.
Stop Playback (vpage 28)
n
Press 2.
Pause Playback (vpage 28)
n
Press 3 or ENTER.
Fast Forward/Fast Reverse Playback (vpage 29)
n
During playback, press 6 7.
Skipping to the Track (vpage 29)
n
During playback, press 8 9 or ui.
Repeat Playback (vpage 29)
n
Press REPEAT.
Shuffling Playback (vpage 24)
n
Press RANDOM.
Playing an iPod
z
P
P
®
The icons show the category of
content applicable to each operation.
Video Audio Photo
For details of the media corresponding to each icon, see “Playable Media”
(vpage 19).

ENGLISH
Rear
Pause Track Sel ect
USB
3:25
Song
Artist
Album
Now Playing
MP3 160kbps
Getting
Started
Version
Simple
Connections
Playing an iPod
To play back compressed audio with extended
•
bass or treble reproduction, we recommend
playback in RESTORER mode (vpage 26).
The default setting is “Mode 3”.
In Browse mode, press DISPLAY during
•
playback to check the title name, artist name,
and album name.
®
NOTE
Depending on the type of iPod and the software version, some
•
functions may not operate.
Playback
Playback
(Basic)
(Basic)
(Advanced)
zone
GUISettings
Control
Names
Information
Note that DENON will accept no responsibility whatsoever for any
•
problems arising with the data on an iPod when using this unit in
conjunction with the iPod.
It is not possible to playback LPCM files recorded on an iPod.
•
“Made for iPod” means that an electronic accessory has been
Playback
designed to connect specifically to iPod and has been certified by the
developer to meet Apple performance standards.
Apple is not responsible for the operation of this device or its
compliance with safety and regulatory standards.
Multi-
iPod is a trademark of Apple Inc., registered in the U.S. and other
countries.
The iPod may only be used to copy or play content that are not
•
copyrighted or content for which copying or playback is legally
permitted for your private use as an individual. Be sure to comply
Remote
with applicable copyright legislation.
Part
Other
Shuffling Playback
During playback, press RANDOM.
1
•
is displayed on the screen.
The mode is switched each time the button
is pressed.
Display Setting contents
Songs Shuffle songs.
Albums Shuffle albums.
OFF Cancel shuffle mode.
Press 1.
2
Playback starts.
Switching the Display Page
Press SEARCH, then press o (previous
page) or p (next page).
To cancel, press SEARCH.•
Rear
Front
Rear
Playing a USB Memory Device
Playing back music files recorded on a USB memory device.
Connect the USB memory device to the USB port
1
(vpage 14 “Connecting an iPod or USB Memory
Device to the USB Port”).
Playback starts automatically.
Press TOP MENU, select the folder or le you want to
2
play back using ui and press ENTER.
Adjusting the Master Volume (vpage 28)
n
Press VOL df.
Stop Playback (vpage 28)
n
Press 2.
Pause Playback (vpage 28)
n
Press 3 or ENTER.
Fast Forward / Fast Reverse Playback (vpage 29)
n
During playback, press 6 7.
Skipping to the File (vpage 29)
n
During playback, press 8 9 or ui.
Repeat Playback (vpage 29)
n
Press REPEAT.
Random Playback (vpage 29)
n
Press RANDOM.
Switching the Display Page (vpage 24)
n
Front
Troubleshooting
Spec. Index
The icons show the category of
content applicable to each operation.
Video Audio Photo
To play back compressed audio with extended bass or treble
reproduction, we recommend playback in RESTORER mode (vpage
26). The default setting is “Mode 3”.
NOTE
Note that DENON will accept no responsibility whatsoever for any
•
problems arising with the data on a USB memory device when using
this unit in conjunction with the USB memory device.
It is not possible to play back LPCM or JPEG files recorded on a USB
•
memory device.
For details of the media corresponding to each icon, see “Playable Media”
(vpage 19).
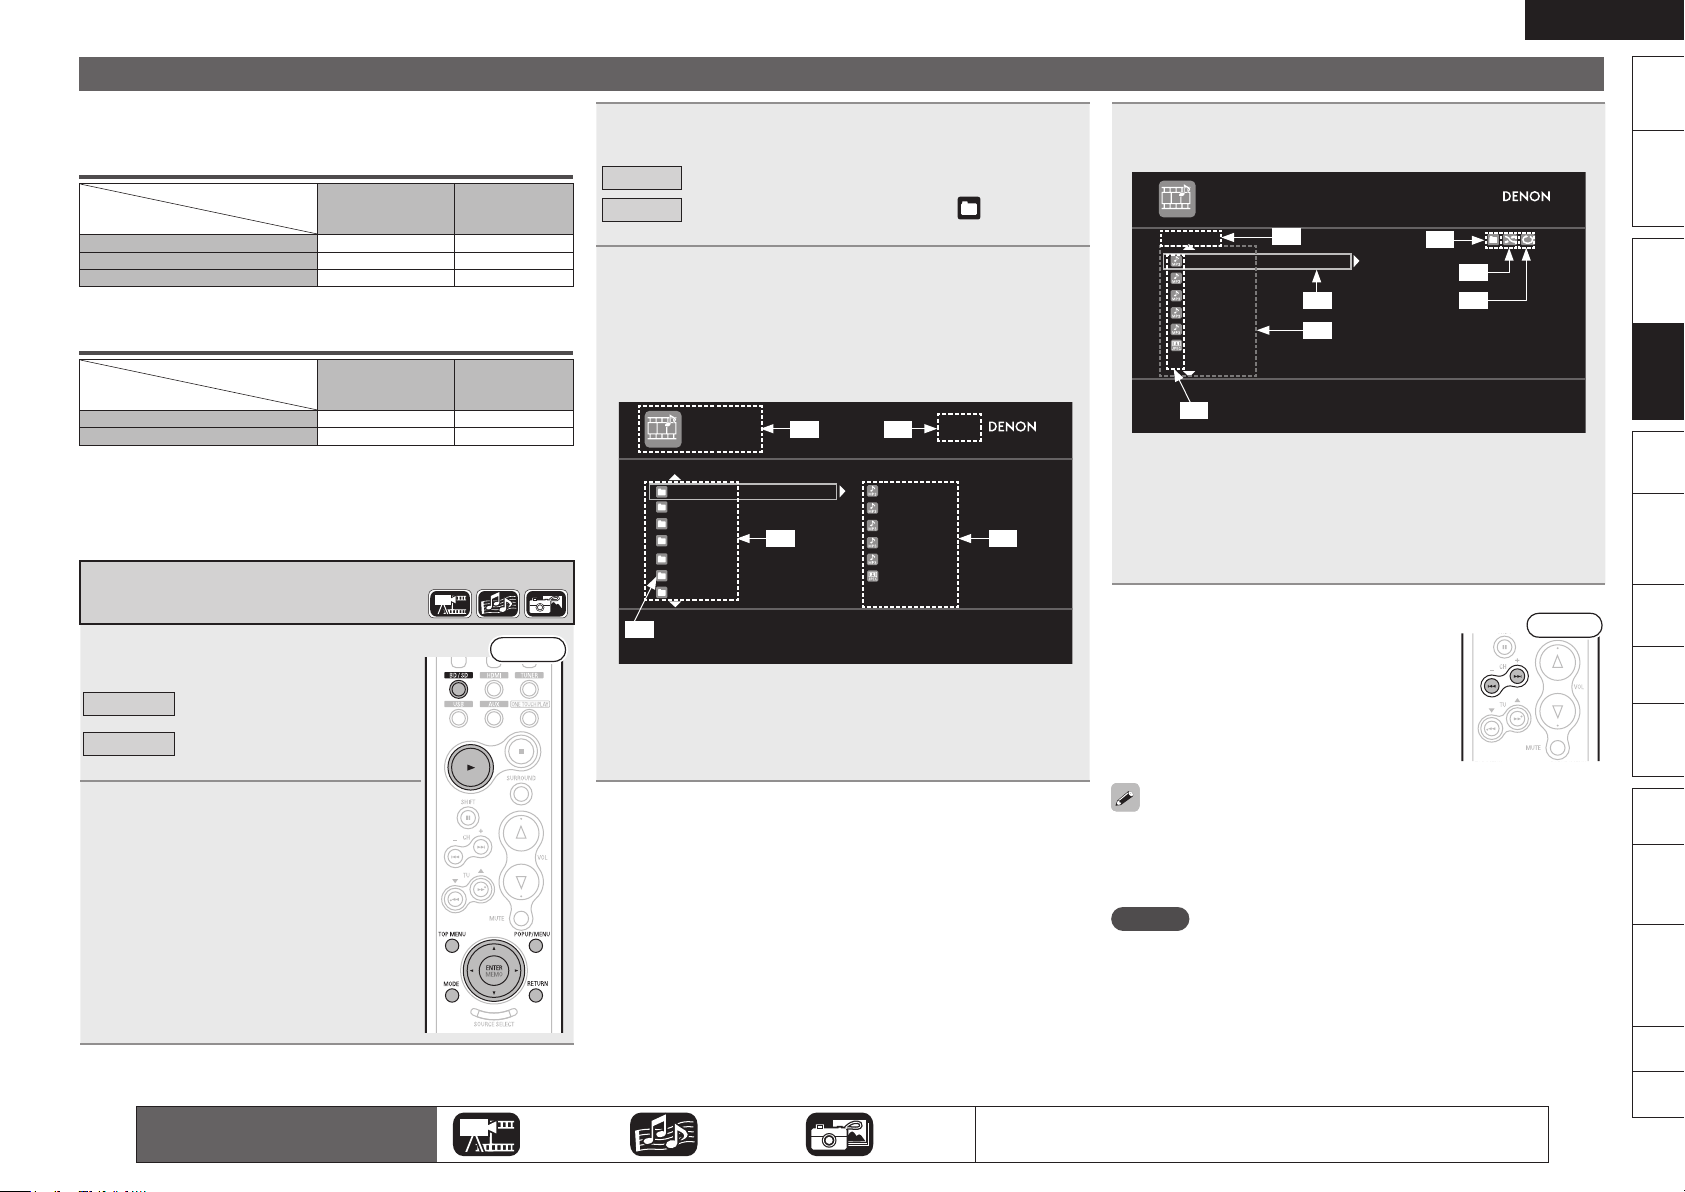
ENGLISH
Remote
Control
Playback
(Advanced)
Connections
Simple
Version
Playback
(Basic)
Multi-
zone
GUISettings
Getting
Started
Playback
(Basic)
Troubleshooting
Other
Information
Spec. Index
Part
Names
Playing Files
DATA DISC
Root/
Folder A
Folder B
File A
File B
File C
File D
File E
JPEG File 1
Folder C
Folder D
Folder E
Folder F
Folder G
[1/18]
DATA DISC
Folder A
File A
File B
File C
File D
File E
JPEG File 1
[1/12]
The limits on the number of folders and files that can be displayed by
this unit are as follows.
Maximum Number of Playable Files and Forder
Media
Item
Number of folder directory levels
Number of folders 999
Number of files 9999 6000
The limited number includes the root folder.
•
Maximum Number of Text Display Characters
Media
Item
File name, Folder name 32 64
Artist name, title, etc. 60 64
Text more than one line is scroll displayed.
•
If characters not supported on the menu screen are included in a
•
file name, title, artist name or album title, those are not displayed
correctly.
Playing File
Press BD/SD to select “Disc Mode”
1
or “SD Mode”.
When playing back files stored
on a DVD or CD.
When playing back files stored
on an SD memory card.
The icons show the category of
content applicable to each operation.
Disc Mode
SD Mode
Load media.
The file browser screen will appear.
2
See “Inserting a Disc” (vpage 65) and “Q1
•
SD CARD slot” (vpage 62) for how to load
media.
When file browser screen does not appear,
•
press POPUP/MENU.
Disc or
SD memory card
8 levels
Disc or
SD memory card
USB memory
device
8 levels
2000
USB memory
device
Front
Video Audio Photo
Press MODE to select a playback mode.
3
Plays back all files in the media.
Disc
Folder
4
z1 Media currently playing back
z2 Selected folder number/Total number of folders
z3 Current level folder or file list
z4 Files inside selected folder
z5 Folder icon
Plays back files in the selected folder. is displayed in
the playback mode indicator.
Select a folder of the data to be played back and
press ENTER.
uio p··················· Display screen selection
RETURN ···································To next level up
ENTER·································To next level down
TOP MENU ······························ To the top level
z1 z2
z3
z5
z4
For details of the media corresponding to each icon, see “Playable Media”
(vpage 19).
Use ui to select a le, and press ENTER to play
5
back.
z1
z2
z3
z4
z1 Current level folder name
z2 Selected file
z3 File for playback
z4 File types
z5 Folder mode
z6 Random playback mode
z7 Repeat playback mode
Switching the Display Page
n
Press 9 to display the next page.
Press 8 to display the previous page.
For playable media and files, see “Playable Media” (vpage 19).
•
To play back compressed audio with extended bass or treble
•
reproduction, we recommend playback in RESTORER mode
(vpage 26). The default setting is “Mode 3”.
NOTE
This unit cannot play back an SD memory card containing video
recorded with a digital camcorder.
z5
z6
z7
Front

ENGLISH
DATA DISC
Single Elapsed
00:25
Song
Artist
Album
Now PlayingTrack 2
1/25
OFF Mode 1
(RESTORER 64)
Mode 2
(RESTORER 96)
Mode 3
(RESTORER HQ)
Playing Files
Getting
Started
Display during Playback of Music Files
Version
Simple
z4
z2
Connections
Playback
Playback
(Basic)
(Basic)
z1 Elapsed time or remaining time
z2 Track number during playback
z3 File name/Artist name/Album title
z4 Playback mode display
(Advanced)
Playback
z1
z3
Playing JPEG File (Photo)
Slide show playback of JPEG format photo files stored on CD-R/-RW,
Multi-
zone
DVD-R/-RW/+R/+RW disc and SD memory card.
GUISettings
Remote
Control
Press POPUP/MENU while the le
1
browser screen is displayed.
The thumbnail screen will appear.
Front
Set the photo display time on the GUI menu with: “Display Setup”
•
– “Slide Show Time” (vpage 46).
With a large photo file, the display time may be longer than the set
•
time.
Changing the Photo being
n
Played Back
Press 8, 9.
Before playback, or display of next photo.
•
Pausing the Display
n
Press 3.
To cancel pause, press 1.
•
Changing the Photo Orientation
n
During pause, press uio p.
Front
ui ··········································180° rotation
o ···········································Rotate 90° left
p ·········································Rotate 90° right
Returning to Thumbnail Display
n
Screen
Press POPUP/MENU.
Playback by Restoring Compressed
Audio to a State Close to the PreCompression State (RESTORER)
Compressed audio formats such as MP3, WMA (Windows Media
Audio) and MPEG-4 AAC reduce the amount of data by eliminating signal
components that are hard for the human ear to hear. The RESTORER
function generates the signals eliminated upon compression,
restoring the sound to conditions near those of the original sound
before compression. It also corrects the sense of volume of the bass
to obtain richer sound with compressed audio signals.
Press RESTORER to select RESTORER
mode.
The mode is switched each time the button
b
is pressed.
OFF
Mode 1
Mode 2
Mode 3
(RESTORER 64)
(RESTORER 96)
(RESTORER HQ)
Do not use RESTORER.
Optimized mode for compressed
sources with very weak highs.
Apply suitable bass and treble boost for
all compressed sources.
Optimized mode for compressed
sources with normal highs.
Rear
Names
Part
Information
Other
Pressing POPUP/MENU while the thumbnail screen is displayed
•
returns you to the file browser screen.
Troubleshooting
Use uio p to select photos.
2
Press ENTER.
3
Spec. Index
Display selected photo on full screen.
The icons show the category of
content applicable to each operation.
Video Audio Photo
This item can be set with analog signals or when a PCM signal (fs =
•
44.1/48 kHz) is input.
The default setting is “Mode 3” for discs with recorded data files,
•
SD memory cards, iPod Dock, and USB. All other settings are set to
“OFF” by default.
When set to something other than “OFF”, is displayed.
•
For details of the media corresponding to each icon, see “Playable Media”
(vpage 19).

ENGLISH
Remote
Control
Playback
(Advanced)
Connections
Simple
Version
Playback
(Basic)
Multi-
zone
GUISettings
Getting
Started
Playback
(Basic)
Troubleshooting
Other
Information
Spec. Index
Part
Names
Tuning in Radio Stations
Listening to FM/AM Broadcasts
Press TUNER to select “FM” or
1
“AM”.
When listening to an FM broadcast.
FM
When listening to an AM broadcast.
AM
Tune in the desired broadcast
2
station.
q To tune in automatically (Auto Tuning)
Press MODE to light the “AUTO” indicator
on the display, then use TU d or TU f to
select the station you want to hear.
To cancel Auto tuning, press TU d or
•
TU f.
w To tune in manually (Manual Tuning)
Press MODE to turn off the display’s
“AUTO” indicator, then use TU d or TU f
to select the station you want to hear.
Adjusting the Master Volume (vpage 28)
n
Press VOL df.
If the desired station cannot be tuned in with auto tuning, tune it in
•
manually.
When tuning in stations manually, press and hold TU d or TU f to
•
change frequencies continuously.
Front
Presetting Radio Stations (Manual Preset)
Your favorite broadcast stations can be preset so that you can tune
them in easily. Up to 56 stations can be preset. Multicasts can also
be preset.
Stations can be preset automatically at “Auto Preset” (vpage
•
48). If “Auto Preset” is performed after performing “Manual Preset”,
the “Manual Preset” settings will be overwritten.
Tune in the broadcast station you
1
want to preset.
Front
Press MEMO.
2
Press SHIFT to select the block (A to
3
G) in which the channel (1 to 8 per
a block) is to be preset, then press
CHANNEL +, – or 1 – 8 to select the
preset number.
Press MEMO again to complete the
4
setting.
To preset other stations, repeat steps 1
to 4.
Default Settings
n
Block (A – G)
and
Channel (1 – 8)
A1 – A8
B1 – B8
C1 – C8 90.1 MHz
D1 – D8 90.1 MHz
E1 – E8 90.1 MHz
F1 – F8 90.1 MHz
G1 – G8 90.1 MHz
87.5 / 89.1 / 98.1 / 107.9 / 90.1 / 90.1 / 90.1 /
90.1 MHz
520 / 600 / 1000 / 1400 / 1500 / 1710 kHz,
90.1 / 90.1 MHz
Default Settings
Rear
Listening to Preset Stations
Press SHIFT to select the memory
1
block.
Press CHANNEL +, – or 1 – 8 to
2
select the desired preset channel.
You can also operate via the main unit. In this
case, perform the following operations.
Press PRESET + or PRESET – to select the
preset radio station.
Direct Frequency Tuning
You can enter the receiving frequency directly to tune in.
Press SEARCH.
1
Input frequencies using 0 – 9.
2
If o is pressed, the immediately preceding
•
input is cancelled.
When setting is completed, press
3
ENTER.
The preset frequency is tuned in.
Front
Rear
Rear
Specify a Name for the Preset Broadcast Station
n
(Preset Name) (vpage 48)

ENGLISH
Rear
Getting
Started
Basic Operation
Version
Simple
Connections
Playback (Basic) (vpage 18)
Adjusting the Master Volume (vpage 28)
n
Stop Playback (vpage 28)
n
Pause Playback (vpage 28)
n
Step-by-Step Playback (vpage 28)
n
Fast Forward/Fast Reverse Playback
n
(vpage 29)
Slow Forward/Slow Reverse Playback
Playback
Playback
(Basic)
(Basic)
(Advanced)
Playback
n
(vpage 29)
Skipping to the Chapter/Track/File (vpage 29)
n
Random Playback (vpage 29)
n
Repeat Playback (vpage 29)
n
Switching Audio (vpage 30)
n
Switching the Angle (vpage 30)
n
Changing the Subtitles and Subtitle Style
n
(vpage 31)
zone
Multi-
Surround Mode (vpage 31)
Playback (Advanced) (vpage 37)
GUISettings
Remote
Control
Names
Part
Information
Other
Troubleshooting
Performance of the following operations can
sometimes result in video discontinuities.
Pause Playback
•
Step-by-Step Playback
•
Slow Forward/Slow Reverse Playback
•
Spec. Index
If this happens, stop playback, then press SETUP and on the GUI menu
switch “Display Setup” – “Still Mode” to “Field” (vpage 46).
Adjusting the Master Volume
Press VOL df to adjust the volume.
GVariable rangeH
The variable range differs according to the
•
input signal and channel level setting.
You can also operate via the main unit. In this
case, perform the following operations.
Use VOLUME to adjust the volume.
0 – 99
Stop Playback
During playback, press 2.
Playback stops.
About Resume Functionn
When playback is stopped, the stop position is memorized.
The 1 indicator flashes on the display. When playing back
•
data from the stop position, press 1 while stop by the resume
function.
To Cancel the Resume Function
n
Perform one of the following operations.
During stop, press 2.
•
Change the playback media mode with BD/SD.
•
Open the disc tray.
•
Remove the SD memory card.
•
Front
Front
The resume function remains valid even when the standby mode
•
is set.
The resume function is cancelled when the power is turned off by
•
unplugging the power cord.
NOTE
The resume function does not work with menu playback or BD-J
•
(Blu-ray Disc Java) compatible disc.
Pause Playback
During playback, press 3.
The 3 indicator will light on the display.
Resume normal playback by pressing 1. •
Front
Step-by-Step Playback
During pause, press 3.
The disc advances frame by frame each time
the button is pressed.
Resume normal playback by pressing 1. •
NOTE
Step-by-step reverse playback is not available with this unit.
Front
The icons show the category of
content applicable to each operation.
Video Audio Photo
For details of the media corresponding to each icon, see “Playable Media”
(vpage 19).

ENGLISH
Remote
Control
Playback
(Advanced)
Connections
Simple
Version
Playback
(Basic)
Multi-
zone
GUISettings
Getting
Started
Playback
(Basic)
Troubleshooting
Other
Information
Spec. Index
Part
Names
DATA DISC
Now PlayingTrack 2
Fast Forward/Fast Reverse Playback
During playback, press 6 or 7.
The fast forward/fast reverse speed changes
•
each time the button is pressed.
Speed varies with the disc and file.
•
Resume normal playback by pressing 1.
•
Front
NOTE
You cannot fast forward/fast reverse across files or tracks during
•
program or random playback.
Audio is not output during fast forward/fast reverse of a Blu-ray Disc
•
or DVD.
Slow Forward/Slow Reverse Playback
During pause, press 6 or 7.
The speed changes each time the button is
pressed.
The speed of the slow reverse playback is
•
not switched.
Resume normal playback by pressing 1.
•
Audio is not output during slow forward/slow reverse playback.
Front
Skipping to the Chapter/Track/File
During playback, press 8 or 9.
Playback begins from the start of the
8
chapter/track/file being played.
Playback begins from the start of the
9
next chapter/track/file.
Continue pressing and skip to the chapter/track/file with just the
•
number of times pressed.
NOTE
Skipping to the start of a title may be prohibited depending on the
disc.
Random Playback
During stop, press RANDOM.
1
The “RAND” lights on the display and
is displayed on the screen.
Press 1.
2
Playback starts.
Resuming Normal Playback
n
During stop, press RANDOM.
NOTE
Random playback may not be enabled depending on the disc.
Front
Front
Rear
Basic Operation
Repeat Playback
Press REPEAT.
1
The repeat mode icon is displayed at the
top of the screen.
The repeat mode changes each time
•
the button is pressed.
Repeat mode
GAbout Repeat ModeH
Settable repeat modes vary depending on the disc or file you are
playing back.
Contents
Mode
Chapter repeat
Track repeat
Title repeat
All repeat
Folder repeat
Only when playing back files in a USB memory devicez
Resuming Normal Playback
n
Press REPEAT.
P
P P
P
P P
z
P
NOTE
Some repeat modes may not be accessible depending on the disc.
•
Depending on the disc, even when set to repeat playback, the disc
•
may not return to the start of title or chapter, and may advance to
the next scene.
There is no “Off” setting in the USB memory device repeat mode.
•
Repeat mode
display
Rear
The icons show the category of
content applicable to each operation.
Video Audio Photo
For details of the media corresponding to each icon, see “Playable Media”
(vpage 19).

ENGLISH
Angle
1/3
Angle
2/3
Audio
: Dolby Digital1/5 3/2.1 English
Audio
: Dolby Digital2/5 3/2.1 Japanese
Audio
Primary
1/5 : Dolby Digital 3/2.1 English
Secondary
–/1 : Off
Audio
Primary
2/5 : Dolby Digital 3/2.1 Japanese
Secondary
–/1 : Off
Getting
Started
Basic Operation
Switching Audio
Version
Simple
With discs and files that have multiple audio track recording, you can
change the audio during playback.
With Blu-ray Disc, you can set sub-track audio such as interactive
audio and audio commentary, etc., with “Secondary”.
Connections
Switching a Blu-ray Disc’s Primary Audio/
Secondary Audio
Playback
Playback
(Basic)
(Basic)
(Advanced)
Playback
Multi-
zone
GUISettings
Remote
Control
During playback of a Primary Audio/Secondary
1
Audio title, press AUDIO/RDS.
The audio number currently being played is displayed.
Press ui, select “Primary”
2
or “Secondary”, and then press
ENTER.
If multiple audio items are recorded, “the
•
current audio number/number of recorded
audio items” is displayed.
When “BD Audio Mode” is set to “HD Audio
•
Output” (vpage 58), “Secondary” audio is
not output.
Select your desired audio language
3
with ui.
Rear
Depending on the disc, audio switching may be restricted to operation
•
of the disc menu. In this case, switch the audio on the disc menu.
Be sure to set “BD Audio Mode” to “Mix Audio Output” (vpage
•
58) for playing back secondary audio.
Depending on the Blu-ray Disc, even if picture-in-picture playback is
•
set to “Off”, Secondary Audio only may be output.
Audio Switching (Media Other than Blu-ray Disc)
During playback, press AUDIO/RDS.
1
The audio number currently being played is displayed.
Use ui to select audio.
2
Press AUDIO/RDS.
3
The setup screen disappears.
NOTE
Audio switching may vary depending on the playback media used.
•
With DTS-CD (5.1 music disc), you cannot switch audio modes.
•
Rear
Switching the Angle
During playback of a Blu-ray Disc or DVD-Video recorded with several
camera angles, you can change the angle.
During playback, press ANGLE/
1
RT.
The angle number currently being played
is displayed.
Rear
Use ui to select angle.
2
Press ANGLE/RT.
3
The setup screen disappears.
NOTE
Angle changing may be restricted, depending on the disc.
Names
Part
Information
Other
Troubleshooting
Spec. Index
Press AUDIO/RDS.
4
The setup screen disappears.
0
The icons show the category of
content applicable to each operation.
Video Audio Photo
For details of the media corresponding to each icon, see “Playable Media”
(vpage 19).

ENGLISH
Remote
Control
Playback
(Advanced)
Connections
Simple
Version
Playback
(Basic)
Multi-
zone
GUISettings
Getting
Started
Playback
(Basic)
Troubleshooting
Other
Information
Spec. Index
Part
Names
Subtitle
–/5
: Off
Subtitle
1/5
: English
Subtitle
Primary
1/5 : English
Off
Secondary
Style
–/1 :
1 :
Subtitle
Primary
Off
Secondary
Style
–/1 :
1 :
1/5 : English
Changing the Subtitles and Subtitle
Style
During playback of a disc or file with recorded subtitles, you can switch
subtitle on/off as well as subtitle language.
With Blu-ray Disc, you can change the style of displayed subtitles.
Switching a Blu-ray Disc’s Primary Subtitle/
Secondary Subtitle and Subtitle Style
During playback, press SUBTITLE/PTY.
1
The subtitle number currently being played is displayed.
Rear
With ui, select “Primary”,
2
“Secondary” and “Style”, and
then press ENTER.
Use ui to select your desired
3
subtitle language and subtitle
style.
Press SUBTITLE/PTY.
4
The setup screen disappears.
If a disc does not include subtitles and subtitle style, “Not Available”
•
is displayed.
Depending on the disc, subtitle switching may be restricted to
•
operation of the disc menu. In this case, switch the subtitles on the
disc menu.
Selecting DVD-Video Subtitle
During playback, press SUBTITLE/
1
PTY.
The subtitle number currently being
played is displayed.
Use ui to select subtitle.
2
Basic Operation
Rear
Surround Mode
You can select surround mode to enjoy surround playback with your
favorite acoustic field effects.
Surround mode setting items will vary depending on the combination
of speakers connected and input signals.
Playing Back Surround Sound
Using 2.0-channel or 2.1-channel
Speakers
When your speaker system is 2.0-channel or 2.1-channel, you
can select one of the following modes.
Playing the source (vpage 20).
Front
1
Press SURROUND to select the
2
surround mode.
STEREO
DOLBY VS
REFERENCE
DOLBY VS WIDE
Press PARAMETER to select a mode
3
aligned with the source.
Cinema
Music
You cannot perform this operation if the input signal is multi-
•
channel, or if the surround mode is “STEREO”.
This is the mode for playing stereo. If the input
signal is multi-channel, down-mix to 2.1-channel
or 2-channel.
This is the standard mode for Dolby Virtual
Speaker.
This mode emphasizes a wide feel.
Rear
This mode is suited for movie
sources.
This mode is suited for music
sources.
The icons show the category of
content applicable to each operation.
Video Audio Photo
For details of the media corresponding to each icon, see “Playable Media”
(vpage 19).

ENGLISH
Getting
Started
Surround Playback Using more
than 2.1-channel Speakers
The selectable surround modes depend on the following:
Version
Simple
Format of the audio signals being input
•
Number of channels of the audio signals being input
•
The set speaker assignment (vpage 53)
•
Connections
Playing the source (vpage 20).
1
Press SURROUND to select the
2
Playback
Playback
(Basic)
(Basic)
(Advanced)
Playback
Multi-
zone
GUISettings
Remote
Control
Names
Part
Information
Other
Troubleshooting
surround mode.
STEREO
z
MULTI CH
STEREO
ROCK ARENA
JAZZ CLUB
The displayed surround mode changes depending on factors
z
such as the input signal and speaker settings (vpage 69).
This is the mode for playing stereo. Sound is
output from the front left and right speakers and
subwoofer.
This mode is for surround playback aligned with
the source.
This is an original DENON surround mode. This
mode is for enjoying stereo sound from all
speakers.
This is an original DENON surround mode. This
mode is for enjoying the atmosphere of a live
concert in an arena.
This is an original DENON surround mode. This
mode is for enjoying the atmosphere of a live
concert in a jazz club.
Front
GWhen “z” was selected in Step 2H
3
Press PARAMETER to select a mode
Rear
aligned with the source.
The modes that can be selected depend on the input source being
•
played.
When Performing Surround Playback for a
n
2-channel Source
DOLBY PLg
Cinema
DOLBY PLg
Music
DOLBY PLg
Game
DTS NEO:6
Cinema
DTS NEO:6
Music
DOLBY PLgz
Height
z1 When the two conditions below are satisfied, signals are
z2 You can select this when the following 3 conditions are
z1
The signals are decoded in DOLBY PLg for
surround playback. This mode is suited for movie
sources.
z1
The signals are decoded in DOLBY PLg for
surround playback. This mode is suited for music
sources.
z1
The signals are decoded in DOLBY PLg for
surround playback. This mode is suited for games.
The signals are decoded in DTS NEO:6 for surround
playback. This mode is suited for movie sources.
The signals are decoded in DTS NEO:6 for surround
playback. This mode is suited for music sources.
z2
The signals are decoded in DOLBY PLgz for
surround playback. This is the Front Height
playback mode. You can select this when the
“Front Height” setting is “ON” (vpage 49).
decoded in DOLBY PLgx for surround playback. In this case,
the display shows “DOLBY PLgx”.
Set “Speaker Assign” to “5.1CH + Surround Back” (vpage
•
53).
Set “Speaker Configuration” – “Surround Back” to something
•
other than “None” (vpage 54).
satisfied.
Set “Speaker Assign” to “5.1CH + Front Height” (vpage
•
53).
Set “Speaker Configuration” – “Front Height” to something
•
other than “None” (vpage 54).
Set “Front Height” to “ON” (vpage 49).
•
When the Multi-channel Source is Surround
n
Playback
When the “Speaker Assign” setting on the GUI menu is “5.1CH
+ Surround Back”, you can select the parameters.
Depending on the input signal, there may be signals that you
•
cannot select.
GDisplaying the Currently Playing Surround ModeH
Input signal Display
DOLBY DIGITAL
(other than 2ch)/
DOLBY DIGITAL EX
DOLBY DIGITAL Plus
DOLBY TrueHD
DTS (5.1ch)/
DTS-ES Discrete 6.1/
DTS-ES Matrix 6.1/
DTS 96/24
DTS-HD
PCM (multi ch)
z1 You can select this when the “Speaker Assign” setting on the
GUI menu is “5.1CH + Front Height” (vpage 53).
z2 This is displayed when the input signal is “DTS-ES Matrix 6.1”
and this unit’s “AFDM” setting is set to “ON” (vpage 49).
z3 This is displayed when the input signal is “DTS-ES Discrete
6.1”.
z4 This is displayed when the input signal is “DTS 96/24”.
DOLBY DIGITAL
DOLBY DIGITAL EX
DOLBY DIGITAL+PLgx CINEMA
DOLBY DIGITAL+PLgx MUSIC
DOLBY DIGITAL+PLgz HEIGHT z1
DOLBY DIGITAL+
DOLBY DIGITAL+ +EX
DOLBY DIGITAL+ + PLgx CINEMA
DOLBY DIGITAL+ + PLgx MUSIC
DOLBY DIGITAL+ + PLgz HEIGHT z1
DOLBY TrueHD
DOLBY TrueHD+EX
DOLBY TrueHD+PLgx CINEMA
DOLBY TrueHD+PLgx MUSIC
DOLBY TrueHD+PLgz HEIGHT z1
DTS SURROUND
DTS+PLgx CINEMA
DTS+PLgx MUSIC
DTS+PLgz HEIGHT z1
DTS+NEO:6
DTS ES MTRX6.1 z2
DTS ES DSCRT6.1 z3
DTS 96/24 z4
DTS-HD HI RES
DTS-HD MSTR
DTS-HD+NEO:6
DTS-HD+PLgx CINEMA
DTS-HD+PLgx MUSIC
DTS-HD+PLgz HEIGHT z1
DTS EXPRESS
MULTI CH IN
MULTI IN+PLgz HEIGHT z1
MULTI CH IN 7.1
Spec. Index
For details, see page 68.

Advanced Version
Here, we explain functions and operations that let you make
better use of this unit.
F Settings for Speakers Other Than 5.1-channel
F Playback (Advanced)
F Playback (Multi-zone Function) in ZONE2 (Separate
Room)
F How to Make Detailed Settings
F Operating the Connected Devices by Remote
Control Unit

ENGLISH
z
FL FR
SW
FHRFHL
C
SL
SR
z1
z2
z3
FL FR
SW
C
SL
SR
SBL SBR
z1
z2
z3
FL FR
SW
C
SB
SL
SR
z1
z2
FL FR
SW
Getting
Started
Settings for Speakers Other Than 5.1-channel
Here we describe the installation, connection and setup methods for speakers other than 5.1-channel speakers. For the installation, connection and setup methods
Version
Simple
for 5.1-channel speakers, see “Simple Version” (vpage 3).
When 7.1ch (Front Height Speaker) Installed
Procedure for speaker settings
n
n
When 6.1ch (Surround Back Speaker) Installed
n
Connections
Playback
(Basic)
(Advanced)
Playback
Multi-
zone
GUISettings
Remote
Control
Names
Part
Information
Other
Troubleshooting
Spec. Index
Install
Connect (vpage 35)
Set Up Speakers (vpage 36)
Install
This unit is compatible with Dolby Pro Logic gz (vpage 73),
which offers an even wider and deeper surround sensation.
When using Dolby Pro Logic gz, install front height speakers.
Install the surround back speakers in a position 2 to 3 feet/60 to 90cm
higher than ear level.
Surround
speaker
2 – 3 feet /
60 – 90 cm
Point slightly
downwards
Surround
back speaker
Front height
speaker
3.3 feet / 1 m
Front speaker
Recommended for Dolby Pro Logic gzz
NOTE
It is not possible to use the surround back speakers and front height
speakers simultaneously.
Point slightly
downwards
At least
GViewed from the sideH
Listening position
z1 22˚ – 30˚ z2 22˚ – 45˚ z3 90˚ – 110˚
When 7.1ch (Surround Back Speaker) Installed
n
Listening
position
z1 22˚ – 30˚ z2 90˚ – 110˚ z3 135˚ – 150˚
Listening position
z1 22˚ – 30˚ z2 90˚ – 110˚
When 2.1ch Installed
n
Listening position
FL Front speaker (L) SBL Surround back speaker (L)
FR Front speaker (R) SBR Surround back speaker (R)
C Center speaker FHL Front height speaker (L)
SW Subwoofer FHR Front height speaker (R)
SL Surround speaker (L)
SR Surround speaker (R)

ENGLISH
Remote
Control
Playback
(Advanced)
Connections
Simple
Version
Playback
(Basic)
Multi-
zone
GUISettings
Getting
Started
Troubleshooting
Other
Information
Spec. Index
Part
Names
Connect
FL FR
SW
FHRFHL
C
SL
SR
"69
*/
R
L
R
L
FL FR
SW
C
SL
SR
SBL SBR
"69
*/
R
L
R
L
For the method of connecting 5.1-channel speakers, see page 4.
•
For the method of connecting the TV, see page 5.
•
7.1-channel (Front Height Speaker) Connection
n
A power amplifier (sold separately) is required for this connection.
•
For 7.1-channel (Front height speaker) playback, set “Speaker Assign” in “Set Up Speakers”
•
(vpage 36) to “5.1CH + Front Height”.
7.1-channel/6.1-channel (Surround Back Speaker) Connection
n
A power amplifier (sold separately) is required for this connection.
•
For 7.1-channel (Surround back speaker) playback, set “Speaker Assign” in “Set Up Speakers”
•
(vpage 36) to “5.1CH + Surround Back”.
Power amplifier
Power amplifier
6.1-channel Connection
n
If using just one surround back
speaker (with a 6.1-channel
connection), connect to the “L”
side of the PREOUT connector.

ENGLISH
1 2 3 4 5 6
Speaker Assign
RETURN
Auto Se tup Star t
STEP1 P reparati on
In a ty pical se tup, sel ect "Auto Setup Start". When
connect ing spea kers in a setup other than 2ch/2.1ch/5. 1ch,
select "Speaker Assign" .
Start A uto Setu p
Enter Cancel
AUDYSSE Y AUTO S ETUP
1 2 3 4 5 6
Speaker Assign
RETURN
Auto Se tup Star t
STEP1 P reparati on
IIn a t ypical s etup, se lect "Auto Setup Start". When connecti ng
speaker s in a s etup oth er than 2ch/2.1ch/5.1ch , select
"Speake r Assign ".
Select speaker configur ation
Enter Cancel
AUDYSSE Y AUTO S ETUP
1 2 3 4 5 6
Speaker Assign
RETURN
Auto Se tup Star t
STEP1 P reparati on
Connect the spe akers an d place them according
to the recommen dations in he ma nual.
Set the followi ng items
if nese ssary.
Select speaker configur ation
EnterU p/Down Cancel
AUDYSSE Y AUTO S ETUP
5.1CH
Speaker Assign
2.0CH/2 .1CH
5.1CH + Surroun d Back
5.1CH + Front H eight
Use pre -out for surroun d back
Enter Can cel
RETURN
FL FR
SW
Connect
Getting
Started
2.1-channel Connection
n
Version
Simple
Connections
Playback
(Basic)
(Advanced)
Playback
Multi-
zone
GUISettings
Remote
Control
NOTE
Connect so that the speaker cable core wires do not protrude
•
Names
Part
from the speaker terminal. The protection circuit may be
activated if the core wires touch the rear panel or if the + and
Information
Troubleshooting
Spec. Index
– sides touch each other (vpage 74 “Protection Circuit”).
Never touch the speaker terminals while the power supply is
•
Other
connected. Doing so could result in electric shock.
Remote control operation
buttons
Speakers
Carefully check the left (L) and
right (R) channels and + (red)
and – (black) polarities on the
speakers being connected to this
unit, and be sure to interconnect
the channels and polarities
correctly.
Connecting the speaker
cables
Peel off about 10 mm of
sheathing from the tip of the
speaker cable, then either
twist the core wire tightly or
terminate it.
Speaker impedance
Front
Center
Surround
Move the cursor
(Up/Down/Left/Right)
4 – 16 Ω
Set Up Speakers
Here we describe how to set up speakers other than 5.1-channel speakers.
For the method of setting up 5.1-channel speakers, see “Simple Version”, “r Set Up Speakers
(Audyssey™ Auto Setup)” (vpage 6).
First install and connect the speakers to this unit.
Connect the setup microphone.
The following screen is displayed.
1
5.1CH
2.0CH/2.1CH
5.1CH +
Surround Back
5.1CH +
Front Height
Select “Speaker Assign” and then
2
press ENTER.
Select “Auto Setup Start” and then
4
press ENTER.
Proceed to page 7
“
STEP1 Preparation
NOTE
The “FIRST SETUP” screen is displayed
•
only when the power is first turned on after
purchase.
After performing Audyssey Auto Setup, do not
•
change the speaker connections or subwoofer
Select the conguration of the
3
connected speakers, and then press
volume. In event of a change, perform Audyssey
Auto Setup again.
ENTER.
Confirm the setting Return to previous menu
Connect 5.1-channel speakers.
Connect the front speakers and
subwoofer only.
Connect the surround back
speakers to the PRE OUT
connectors.
Connect the front height
speakers to the PRE OUT
connectors.
” Step 4.

ENGLISH
Remote
Control
Playback
(Advanced)
Connections
Simple
Version
Playback
(Basic)
Multi-
zone
GUISettings
Getting
Started
Troubleshooting
Other
Information
Spec. Index
Part
Names
Chapte r – –/21
Title –/5
Track – –/15
Total Time 10 : 15 11Time Search – – – : – – : – –
Marker
Time – – : – – : – –
1 2 3 4 5 6 7 8
AC
Rear
Front
Playback (Advanced)
Advanced Operation
Playback (Basic) (vpage 18)
Basic Operation (vpage 28)
Surround Mode (vpage 31)
Looking for Specific Sections Using the Search
n
Modes (vpage 37)
Setting Locations to Play Back Again
n
(Marker Function) (vpage 38)
HDMI Control Function (vpage 39)
n
One Touch Play Function (vpage 39)
n
Sleep Timer Function (vpage 40)
n
Various Memory Functions (vpage 40)
n
Looking for Specific Sections Using the
Search Modes
During playback, press SEARCH, and then search
1
mode.
The search mode setting bar is displayed at the top of the
screen.
The search mode changes each time the button is pressed.•
GContent compatible with Search modeH
Contents
Search mode
Chapter search
Title search
Track search
Time search
Marker search
About Marker Search
z
Plays back from your selected marker number.
You will need to set the marker function before using marker
search.
z
P
P
P P
P P
P
Conducting search condition entry
2
or setting on the search mode
setting bar.
Search specified location on completion
of entry.
0 – 9, +10·····································Number entry
ENTER···································· Finalizes number
o p ·························Marker number selection
ENTER·······························································
·······Finalizes the marker number or plays back
CLEAR ··························· Marker number cancel
Entering numbers
•
Entering 3 ···································3, ENTER
Entering 26 ·······2, 6, ENTERz or +10, +10, 6
Entering 138 ······················· 1, 3, 8, ENTER
Depending on number of recorded songs or chapters, you don’t
z
need to use ENTER.
Time search corresponds with title and track playback time. It is not
•
compatible chapter playback time.
NOTE
Search mode does not operate during random
•
playback. Use 8, 9 to cue.
Search mode may not operate depending on
•
the disc.
z
z
The icons show the category of
content applicable to each operation.
When the entry mode for chapter/title/track search continues for
about 5 seconds with no operation, it is cancelled.
Video Audio Photo
For details of the media corresponding to each icon, see “Playable Media”
(vpage 19).

ENGLISH
Marker
Time – – : – – : – –
1 2 3 4 5 6 7 8
AC
Marker
Time – – : – – : – –
1 2 3 4 5 6 7 8
AC
Marker
Time 1 : 23 : 45
1 3 4 5 6 7 8
AC
Advanced Operation
Getting
Started
Setting Locations to Play Back Again
Version
Simple
Connections
Playback
(Basic)
(Marker Function)
You can attach a marker to a location you want to view or hear again,
so that playback begins at that location.
During playback, press SEARCH until “Marker” is
1
displayed on the screen.
The search mode setting bar is displayed at the top of the
screen.
Use o p to select the number.
2
(Advanced)
Playback
Numbers you have already set will be
•
displayed as .
Multi-
zone
Rear
To Play Back Memorized
n
Locations
Use o p to select the marker number, then
press ENTER.
To Erase Markers
n
Select the number you want to erase, and
then press CLEAR.
To Erase All Markers
n
Select “AC” and press ENTER.
NOTE
Subtitles may not appear depending on the locations you have
•
memorized.
The markers you have set will be erased if you turn the power to
•
standby or eject the disc.
The marker function does not operate across titles.
•
Rear
GUISettings
Remote
Control
Names
Part
Information
Other
Troubleshooting
Spec. Index
Press ENTER at the location you want to memorize.
3
The location is registered for the selected marker number.
The elapsed playing time at the set location is displayed.•
The icons show the category of
content applicable to each operation.
Video Audio Photo
For details of the media corresponding to each icon, see “Playable Media”
(vpage 19).

ENGLISH
Remote
Control
Playback
(Advanced)
Connections
Simple
Version
Playback
(Basic)
Multi-
zone
GUISettings
Getting
Started
Troubleshooting
Other
Information
Spec. Index
Part
Names
Convenient Functions
HDMI Control Function
When you make an HDMI connection with a TV compatible with
this unit and HDMI control functions, you can perform the following
operations by setting the HDMI control function of each device.
The unit power off can be linked to the TV power
n
off step.
When you set “Output audio from amp” in the TV audio output
setup operation, you can switch the amp power on.
You can switch audio output devices with a TV
n
operation.
You can adjust the unit volume in the TV volume
n
adjustment operation.
You can switch the unit input source through
n
linkage to TV input switching.
When playing the player, the unit input function
n
switches to the function of that player.
NOTE
When “HDMI Control” is set to “ON”, it consumes more standby
•
power.
The HDMI control function controls operations of a TV that is
•
compatible with the HDMI control function. Make sure that the TV
and HDMI are connected when you perform HDMI control.
Some functions may not operate depending on the connected TV.
•
Check the owner’s manual of each device for details beforehand.
When “HDMI Setup” – “HDMI Control” – “Power Off Control” on
•
the GUI menu is set to “OFF” (vpage 55), this unit is not set to
standby even if the connected device is in the standby mode.
When connection changes are implemented, such as adding
•
connections to HDMI devices, linked operations may be initialized.
In this case, you will need to reconfigure the settings.
Set the HDMI output connector corresponding with
1
the HDMI control function.
On the GUI menu, set “Manual Setup” – “HDMI Setup” –
“HDMI Control” (vpage 55).
Turn the power on for all the equipment connected
2
by HDMI cable.
Set the HDMI control function for all equipment
3
connected by HDMI cable.
Set “HDMI Control” – “Control” (vpage 55) to “ON“.
Please consult the operating instructions for the connected
•
equipment to check the settings.
Carry out steps 1 and 2 should any of the equipment be
•
unplugged.
Switch the television input to the HDMI input
4
connected to this unit.
Switch the unit input to the HDMI input source and
5
check if the picture from the player is ok.
When you turn the TV’s power to standby, check
6
that the power of this unit also goes to standby.
If the HDMI control function does not operate properly, check the
following points.
Is the TV compatible with the HDMI control function?
•
Is the “HDMI Control” – “Control” (vpage 55) set to “ON”?
•
Is the “Power Off Control” (vpage 55) set to “ON”?
•
Are the HDMI control function settings of all equipment correct?
•
(Step 3)
One Touch Play Function
When this unit is in standby mode and contains a disc, the following
sequence of playback operations can be performed automatically
simply by pressing ONE TOUCH PLAY.
This unit and TV turn on.
•
This unit’s input source switches to “BD/SD”.
•
The TV input switches to this unit’s input.
•
Disc playback starts.
•
Setting Requirements
n
To use this function, connect this unit and the TV with an HDMI
•
cable and turn on the HDMI control function on both devices.
Set “Manual Setup” – “HDMI Setup” – “HDMI Control” (vpage
•
55) on the GUI menu on this unit to “ON”.
Press ONE TOUCH PLAY.
NOTE
The One touch play function will not operate if another device is
connected between this unit and the TV. Connect this unit directly
to the TV.
Front

ENGLISH
OFF 120 min 90 min
60 min30 min
Getting
Started
Convenient Functions
Sleep Timer Function
The power automatically goes into standby once the set time has
Version
Simple
elapsed.
This is convenient for playing sources while going to sleep.
Press SLEEP and display the time you
want to set.
Connections
The indicator on the display lights.
The time switches as shown below each
•
time SLEEP is pressed.
Playback
(Basic)
To Cancel the Sleep Timer
n
Press SLEEP to set “OFF”.
(Advanced)
Playback
Multi-
zone
GUISettings
The indicator on the display turns off.
NOTE
If the sleep timer is activated while ZONE2 is in operation, the ZONE2
•
power switches to OFF along with the MAIN ZONE power.
The sleep timer setting is canceled if this unit’s power is set to
•
standby or turned off.
Front
Various Memory Functions
Personal Memory Plus Function
This function sets the settings (input mode, surround mode,
MultEQ®, Dynamic EQ™, Dynamic Volume™, audio delay etc.) last
selected for the individual input sources.
Last Function Memory
This function stores the settings which were made before going into
the standby mode.
When the power is turned back on, the settings are restored.
Remote
Control
Names
Part
Information
Other
Troubleshooting
Spec. Index
0

Playback (Multi-zone Function) in ZONE2 (Separate Room)
"69*/
7*%&0
*/
R
L
You can operate this unit so as to enjoy audio and video in a room (ZONE2) other than the MAIN ZONE
•
(room where the unit is located).
You can simultaneously play back the same source in both the MAIN ZONE and ZONE2. You can also
•
play back separate sources in the MAIN ZONE and ZONE2.
ENGLISH
Getting
Started
Version
Simple
Multi-zone Connections
MAIN ZONE ZONE2
This unit
Pre main
amplifier
See “REMOTE CONTROL Jacks” (vpage 17) for connection information concerning remote
•
control operation in ZONE2.
Audio and video Signals which can be Output in ZONE2
Audio
n
Audio from a disc or SD memory card played back on this unit
•
A multichannel source is converted to a 2-channel downmix signal and output.
Analog audio input to this unit
•
Audio of a device connected to the USB port
•
Control dock for iPod (analog audio)
•
Video
n
Video from a disc or SD memory card played back on this unit
•
Video input to this unit from a Control dock for iPod
•
We recommend using high quality pin-plug cables for audio and video connections in order to prevent
noise.
NOTE
Audio and video input to this unit via HDMI is not output.
•
The GUI menu screen is not output.
•
DENON control dock for iPod ASD-11R switches to Browse Mode and cannot be operated.
•
The following media and sources cannot be played back simultaneously in the MAIN ZONE and ZONE2.
•
Disc (BD/DVD/CD) and SD memory card
•
FM and AM
•
Playback
Turn on the pre main amplier for
1
ZONE2.
Switch DEVICE SELECT to
2
“ZONE2”.
The remote control unit switches to the
operating mode for ZONE2.
Press ON to turn on the ZONE2
3
power.
The indicator on the display lights.
Also press input source select button when in
•
standby mode, the power turns on.
When OFF is pressed, ZONE2 turns off.
•
NOTE
When ZONE2 is powered on, the HDMI
video resolution in the MAIN ZONE switches
automatically according to the input signal.
When this happens, it is not possible to switch
to a different video resolution, even by pressing
RESOLUTION.
Press input source select button.
The audio/video signal of the selected
4
source is output to ZONE2.
To switch the source output to ZONE2 to the
•
source playing back at the MAIN ZONE, press
SOURCE SELECT.
Adjust the volume of the pre main amplier for
5
ZONE2.
Input source
select buttons
Front
Connections
Playback
(Basic)
(Advanced)
Playback
Multi-
zone
GUISettings
Remote
Control
Names
Part
Information
Other
Troubleshooting
Spec. Index

ENGLISH
Getting
Started
How to Make Detailed Settings
Version
Simple
Menu Map
The GUI menu consists of a “BD/DVD SETUP” for performing video-related settings, and an “AMP/SPK SETUP” for audio-related settings.
The “BD/DVD SETUP” is displayed only when the input source is “BD/SD”.
For the method of GUI menu operation, see page 43.
Connections
BD/DVD SETUP
n
Playback
(Basic)
(Advanced)
Playback
Multi-
zone
GUISettings
Remote
Control
Names
Part
Information
Other
Language Setup (vpage 44)
Set the language used for playback dialogs, subtitles,
and menus.
Dialog
n
Subtitle
n
Disc Menus
n
Video Setup (vpage 44)
Set the video output signal according to the connected
TV.
TV Aspect
n
Progressive Mode
n
Auto Format
n
AMP/SPK SETUP
n
Source Select (vpage 47)
Use this to make settings related to playing input
sources.
Input Mode
n
Decode Mode
n
Rename
n
Deep Colorn
Auto Preset
n
Preset Name
n
Ratings (vpage 45)
Set Blu-ray Disc or DVD parental lock.
Password
n
BD Rating Level
n
DVD Rating Level
n
Rating Country Coden
Network Setup (vpage 45)
Set to connect to the Internet.
DHCP
n
Proxy
n
IP Address
n
MAC Addressn
Auto Setup (vpage 52)
Makes the optimum speaker settings and corrects for
the acoustic characteristics of the room.
Audyssey Auto Setup
n
Parameter Check
n
Display Setup (vpage 46)
Set display-related items.
Still Mode
n
Slide Show Time
n
Captions
n
Other Setup (vpage 46)
Set other items.
Disc Layer
n
Information
n
BD Data Utility
n
Initialize
n
Firmware Update
n
Information (vpage 57)
Show information about receiver settings, input signals,
etc.
Status
n
Audio Input Signal
n
HDMI Information
n
Auto Surround Mode
n
Preset Channel
n
Troubleshooting
Spec. Index
Audio Adjust (vpage 48)
Adjust various audio parameters.
Surround Parameters
n
Tone
n
Audyssey Settings
n
Manual Setup (vpage 53)
Use this to make various types of detailed settings.
Audio Delayn
Speaker Setup
n
HDMI Setup
n
Audio Setup
n
Option Setup
n
GUI Language
n

ENGLISH
Remote
Control
Playback
(Advanced)
Connections
Simple
Version
Playback
(Basic)
Multi-
zone
GUISettings
Getting
Started
Troubleshooting
Other
Information
Spec. Index
Part
Names
GUI Menu Operation
BD/DVD SETUP AMP/SPK SETUP
SETUP OFF
AMP/SPK SETUP SETUP OFF
LANGUAGE SETUP
Dialog
Subtitle
Disc Menus
Set the language used for playback dialogs, subtitles, and
menus.
VIDEO SETUP
TV Aspect 16:9 Squeeze Auto
Progressive Mode WIDE(16:9)
4:3 PS
4:3 LB
Deep Color
Auto Format
Set the screen type and display mode of the
TV.
TV Aspect
Progressive Mode
Deep Color
Auto Format
Press SETUP and select the menu for the settings you
1
want to make.
The GUI menu is displayed on the TV screen.
The menus that can be displayed differ depending on the selected
•
input source.
When the input source is “BD/SD”
n
When the input source is not “BD/SD”
n
Press ui p to select the menu to
2
be set or operated.
To return to the previous item, press o or
•
Rear
RETURN.
Press ENTER to enter the setting.
3
Exiting the GUI Menu
n
Press SETUP until the GUI menu disappears.
NOTE
You must use the GUI menu to make settings or operate while a disc
or SD memory card is not inserted. In cases in which the resume
function is activated, you may not make correct settings.
Examples of GUI Menu Screen Displays
Typical examples are described below.
GExample 1H Menu Selection Screen (Top Menu)
z1
z2
z1 List of GUI menu setup icons
z2 Currently selected setup icon
z3 Currently selected setup item
z4 List of currently selected setup
subcategory
z5 Guide text for the currently selected
setup item
Press i to select and
then press p.
(Or press ENTER.)
z3
z4
z5
Icon
n
Switch the selected item
Proceed to the
subcategory
Selected item
Switch the selected item
List
n
Returns to the previous item
(Use u or ENTER to switch.)
(Use p to switch.)
(Use i to switch.)
(Use o or RETURN to switch.)
Proceed to the
subcategory
(Use p to switch.)
Selected item
Switch the selected item
•
using ui.
Example of GUI Mark at Title
Items for which this mark is indicated at the title can be
operated from the GUI.
We recommend performing such operations from the GUI.
Manual Setup
z6
z7
z6 Selected setup icon
z7 Options of the selected setup item
Text colors of selected items of the GUI menu are as follows:
White : These items can be selected.
•
Gray : These items cannot be selected.
•

ENGLISH
Getting
Started
Set the language used for playback dialogs, subtitles, and menus.
Version
Simple
Dialog
Set the dialog language
used to play Blu-ray Discs
Connections
or DVDs.
Playback
(Basic)
Subtitle
Set the subtitle language
used to play Blu-ray Discs
or DVDs.
(Advanced)
Playback
Disc Menus
Set the language used for
Blu-ray Disc or DVD menus.
Multi-
zone
GUISettings
NOTE
Remote
Control
The setting may not be active depending on the disc.
Names
Part
Information
Other
Language Setup
Setting items Setting details
Original : Plays the dialog selected at the top in the
language menu stored in the disc.
English / French / Spanish / German / Japanese /
Italian / Swedish / Dutch / Russian / Chinese /
Korean / Danish / Finnish / Norwegian / Icelandic /
Hungarian / Romanian / Turkish / Greek / Irish /
Portuguese / Polish / Czech / Slovak / Bulgarian
Others : Enter the language code. Refer to
“Language Code List” (vpage 70), use 0 – 9 to
input the language code, then press ENTER to set.
Off : Do not display subtitles.
English / French / Spanish / German / Japanese / Italian / Swedish /
Dutch / Russian / Chinese / Korean / Danish / Finnish / Norwegian /
Icelandic / Hungarian / Romanian / Turkish / Greek / Irish / Portuguese /
Polish / Czech / Slovak / Bulgarian
Others : Enter the language code. Refer to “Language Code List” (vpage
70), use 0 – 9 to input the language code, then press ENTER to set.
Default settings are underlined.
Rear
Video Setup
Default settings are underlined.
Set the video output signal according to the connected TV.
Setting items Setting details
TV Aspect (Aspect ratio)
Set the screen type and
display mode of the TV.
Progressive Mode
Set an appropriate
progressive conversion
mode for the source video
material.
Auto Format
Set the content of HDMI
video output resolution item
“Auto” (vpage 13) with
RESOLUTION.
Rear
Deep Color
Extends the degree of color
depth in the HDMI video
signal (number of colors
used), to play back more
natural colors without color
fringing.
z1 Depending on the video content, even though you set the 4:3 PS (Pan Scan), the content may be
output in 4:3 LB (Letter Box).
z2 Only valid for content recorded in 480i/576i.
16:9 Squeeze Auto : Output to a wide screen TV. For 4:3 video, display in
the center of the screen without changing the aspect ratio.
WIDE (16:9) : Output to a wide screen TV.
4:3 PS : Output to a 4:3 TV. For wide video, trim the left and right side of
the image and display in 4:3 aspect ratio. z1
4:3 LB : Output to a 4:3 TV. Display all of the wide video. z2
Auto : Detect the type of video material and automatically switch the
mode. Normally, this setting is used.
Video1 : Select when video appears unnatural in Auto or Video2 mode.
Video2 : Select when video appears unnatural in Auto or Video1 mode.
Max Res. : Output data using the maximum resolution that can be handled
by the connected TV.
Panel Res. : Output data using the maximum resolution of the panel of
the connected TV.
Auto : Deep Color is automatically output when the connected HDMI
device supports Deep Color.
Off : Do not output Deep Color.
Troubleshooting
Spec. Index
Remote control operation
buttons
Display the menu
Cancel the menu
Move the cursor
(Up/Down/Left/Right)
Confirm the setting Return to previous menu

ENGLISH
Remote
Control
Playback
(Advanced)
Connections
Simple
Version
Playback
(Basic)
Multi-
zone
GUISettings
Getting
Started
Troubleshooting
Other
Information
Spec. Index
Part
Names
Ratings
Set Blu-ray Disc or DVD parental lock.
Setting items Setting details
Password
Sets the password for
changing the parental
control level and parental
control country code of Bluray Disc and DVD.
BD Rating Level
Set the parental level for
playing Blu-ray Disc.
DVD Rating Level
Set the parental level for
playing DVD.
Rating Country Code
Sets the standard country
parental control.
Apply the parental level of
the set country.
Change : Change the password. Use 0 – 9 to enter a
password and then press ENTER to finalize it.
The default setting is “0000”. To clear the entered
password, press CLEAR.
Level 0 – 254 : Set the age allowed to play back media. Restricts playback
of discs with relevant parental control.
No Limit : Do not restrict playing of Blu-ray Discs.
Lock All : Restrict playing of all DVDs.
Level1 – 8 : Set the parental level for playing DVD.
No Limit : Do not restrict playing of DVDs.
Argentina / Australia / Austria / Belgium / Brazil / Canada / Chile / China /
Denmark / Finland / France / Germany / Hong Kong / India / Indonesia /
Italy / Japan / Korea, Republic of / Malaysia / Mexico / Netherlands /
New Zealand / Norway / Pakistan / Philippines / Portugal /
Russian Federation / Singapore / Spain / Switzerland / Sweden /
Taiwan / Thailand / United Kingdom / United States / Colombia /
Greece / Ireland / Luxembourg / Poland
Others : Inputs the country code. Refer to “Country Code List” (vpage
71) and, with the virtual keyboard, use 0 – 9 and ENTER to input the country
code. To clear the entered country code, press CLEAR.
Default settings are underlined.
Rear
Network Setup
Default settings are underlined.
Set to connect to the Internet.
You can use a disc which offers BD-LIVE function by connecting the unit to the Internet (vpage 21).
To obtain update support for this unit, you can download the latest firmware from our website.
Make a network connect beforehand according to “Connecting to the Network” (vpage 16).
Setting items Setting details
DHCP
Set how to perform network
configuration, automatically
or manually.
Since the factory default
setting is “On”, you do not
need to set items such as
the IP address if the DHCP
server of the broadband
router is set to “Enable”.
Configure a proxy server if
necessary.
Proxy
Set to connect to the
Internet via a proxy server.
IP Address
This unit’s IP address is
displayed.
MAC Address
Displays the MAC address
of this unit.
GOnH : Automatically configure the network by the
DHCP function.
Rear
GOffH : When connecting to a network, which does
not have the DHCP function, manually configure
the following network settings. For the details of
the settings, confirm with the provider or network
administrator. Use 0 – 9 to enter a value and then
press ENTER to finalize it.
IP Address : Manually set the IP address of this unit.
•
Subnet Mask : If the xDSL modem or terminal adaptor is directly
•
connected to this unit, enter the subnet mask notified by the provider
usually in a document. Usually, “255.255.255.0” is set.
Default Gateway : If the device is connected to a gateway (router),
•
enter its IP address.
Primary DNS : Enter the primary DNS.
•
Secondary DNS : Enter the secondary DNS.
•
GOffH : Do not use a proxy server.
GOn (Address)H : Set to connect to the Internet via a proxy server. Use the
address to specify the proxy server. Use 0 – 9 to enter the address and
then press ENTER to finalize it.
Port : Use 0 – 9 to enter a port number and then press ENTER to finalize
•
it.
GOn (Name)H : Set to connect to the Internet via a proxy server. Specify
the proxy server using the domain name. Input the domain name with the
virtual keyboard, using uio p and ENTER.
Port : Use 0 – 9 to enter a port number and then press ENTER to finalize
•
it.
If the IP address cannot be obtained or is not set, “···” is displayed.
In that case, check that the connection and network configuration is
correct.
Remote control operation
buttons
Display the menu
Cancel the menu
Move the cursor
(Up/Down/Left/Right)
Confirm the setting Return to previous menu

ENGLISH
Getting
Started
Set display-related items.
Version
Simple
Still Mode
Set image quality during
pause.
Connections
Slide Show Time
Sets the display time of
Playback
(Basic)
(Advanced)
zone
Control
Names
Information
JPEG files.
Captions
This setting output a
subtitles signal to a closed
caption decoder (sold
separately).
Playback
Multi-
Set other items.
Disc Layer
GUISettings
Sets the layer to play back in
a hybrid disc.
Remote
Information
Displays the license for
the IPA font used by this
product.
Part
BD Data Utility
Erases data on SD memory
Other
card, and initializes cards.
Troubleshooting
Display Setup
Default settings are underlined.
Setting items Setting details
Automatic : Display automatically using “Field” or “Frame” per the still
image information.
Field : Set when there is a blurred image when “Automatic” image display
is set.
Frame : Set to display non moving images in high resolution.
3 – 5 – 100sec : This sets the display time per frame of a JPEG file during
slideshow playback.
On : Output the closed caption (subtitle) signal.
Off : Do not output the closed caption (subtitle) signal.
Other Setup
Default settings are underlined.
Setting items Setting details
BD : Plays back the Blu-ray Disc layer.
DVD : Plays back the DVD layer.
GFont LicenseH
Japanese (Original) : Displays in Japanese.
The font used in this product’s GUI menu screen conforms to IPA font
specifications. See the following URL for the IPA font license agreement.
http://ipafont.ipa.go.jp/enduser_license.html
GBD Data EraseH : Erases both internal memory and SD memory card
storage.
No
•
Yes
•
GInitialize SD CardH : Initialize the SD memory card to be used for the
Bonus View and BD-LIVE function.
No
•
Yes
•
Setting items Setting details
BD Data Utility
(Continued)
NOTE
Insert or remove a SD memory card while the power is in standby.
•
If you insert a SD memory card while the power is ON, the SD memory
card may not be read.
The SD memory card used for the Bonus View function must have a
•
capacity of 1 GB or greater. Also the SD memory card must be initialized
on this unit.
This operation will delete all the data. Do not perform this operation
•
when an SD memory card containing MP3 or JPEG data is inserted.
Firmware Update
Update the firmware of the
unit via the Internet.
NOTE
“Firmware Update” cannot
be selected when there is a
disc in the disc tray.
Check for Update : Check if the latest firmware exists. You can also check
approximately how long it will take to complete an update.
Start : Starts firmware update.
When updating starts, the power indicator lights red and the GUI screen
is shut down.
During update, a rough remaining time is indicated on the display.
When updating is complete the power indicator lights green and normal
status is resumed.
Cautions on “Firmware Update”
In order to use this functions, you must have the correct system
•
requirements and settings for a broadband Internet connection
(vpage 16).
Do not turn off the power until updating is completed.
•
Information regarding the “Firmware Update” function will be
•
announced on the DENON web site each time related plans are
defined.
Even with a broadband connection to the Internet, approximately 1
•
hour is required for the updating procedure to be completed.
Once updating starts, normal operations on this unit cannot be
•
performed until updating is completed. In addition, the unit’s GUI menu
settings may be initialized.
In the event of an update error during update or upgrade, turn the
•
power of this unit off and then on again. “Update retry” appears on the
display and update restarts from the point at which update failed.
If the error continues despite this, check the network environment.
Spec. Index
Remote control operation
buttons
Display the menu
Cancel the menu
Move the cursor
(Up/Down/Left/Right)
Confirm the setting Return to previous menu

ENGLISH
Remote
Control
Playback
(Advanced)
Connections
Simple
Version
Playback
(Basic)
Multi-
zone
GUISettings
Getting
Started
Troubleshooting
Other
Information
Spec. Index
Part
Names
Source Select
Perform settings related to input source playback.
You do not have to change the settings to use the unit. Make settings when needed.
•
Items that can be Set with the Source Select Procedure
n
Input Mode vpage 47
Decode Mode vpage 47
Rename vpage 47
Decode Mode
Set the decode mode for input source.
Setting items Setting details
Decode Mode
Set the decode mode for
input source.
BD/SD HDMI1 HDMI2
HDMI3 AUX1 AUX2
Auto : Detect type of digital input signal and decode and play
automatically.
PCM : Decode and play only PCM input signals.
DTS : Decode and play only DTS input signals.
Normally set this mode to “Auto”. Set “PCM” and “DTS” when
inputting the corresponding input signal.
Default settings are underlined.
Auto Preset vpage 48
Preset Name vpage 48
Important Information
About the Display of Input Sources
In this section, the configurable input sources for each item are shown as follows.
BD/SD HDMI1 HDMI2 HDMI3 FM AM USB AUX1 AUX2
To perform the following settings, select the input source and then select the items you want to set.
GTo select the input sourceH Use ui to select the input source and press p.
Input Mode
Default settings are underlined.
The input modes available for selection may vary depending on the input source.
Setting items Setting details
Input Mode
Set the audio input modes
for the AUX1/2.
AUX1 AUX2
Auto : Automatically detect input signal and perform playback.
Digital : Play only signals from digital input.
Analog : Play only signals from analog input.
When digital signals are properly input, the indicator lights on
the display. If the indicator does not light, check the digital input
connector assignment and the connections.
Rename
Change the display name of the selected input source.
Setting items Setting details
Rename
Change the display name of
•
the selected input source.
BD/SD HDMI1 HDMI2
HDMI3 FM AM
USB AUX1 AUX2
When the input source is
•
HDMI1, HDMI2, HDMI3
, or
AUX1
can change the displayed
icon.
Default
Reset all settings to factory
default.
AUX2
, you
1. Press p or ENTER.
2. Press o p, align the cursor to the icon to be changed, and press
ENTER.
At this time, the input source name is also automatically changed.•
3. To change the input source name, press ui to
change the characters, and press ENTER.
Up to eight characters can be input.
•
The input character type can be switched by
•
pressing SEARCH while the display name is
,
being changed.
The types of characters that can be input are as
•
shown below.
GUpper case charactersH
GLower case charactersH
GSymbolsH
GNumbersH
4. Repeat steps 2 and 3 to change the display name.
No
Yes
! # % & ‘ ( ) * + , - . / : ; < = “ > ? @ [ \ ]
0123456789 (Space)
Rear
ABCDEFGHIJKLMNOPQRSTUVWXYZ
abcdefghijklmnopqrstuvwxyz
Remote control operation
buttons
Display the menu
Cancel the menu
Move the cursor
(Up/Down/Left/Right)
Confirm the setting Return to previous menu

ENGLISH
Getting
Started
Source Select
Audio Adjust
Auto Preset
Use the auto preset function to program radio stations.
Version
Simple
Setting items Setting details
Start
Start the auto preset
Connections
process.
If an FM station cannot be preset automatically, select the desired
station by tuning it in manually, then preset it manually.
NOTE
FM
Playback
(Basic)
If “Auto Preset” is performed after performing “Manual Preset” (vpage
27), the “Manual Preset” settings will be overwritten.
Preset Name
Assign name to a preset memory.
Setting items Setting details
(Advanced)
Playback
Multi-
zone
GUISettings
Remote
Control
Names
Part
Information
Other
Troubleshooting
A1 – G8
Select the preset channel.
FM AM
Default
Reset all settings to factory
default.
1. Press p or ENTER.
2. Use o p to set the cursor to the character you want to change.
3. Use ui to change the character, then press
ENTER.
Up to eight characters can be input.
•
The input character type can be switched by
•
pressing SEARCH while the display name is
being changed.
The types of characters that can be input are as
•
shown below.
GUpper case charactersH
GLower case charactersH
GSymbolsH
GNumbersH
4. Repeat steps 2 and 3 to change the display name.
No
Yes
ABCDEFGHIJKLMNOPQRSTUVWXYZ
abcdefghijklmnopqrstuvwxyz
! # % & ‘ ( ) * + , - . / : ; < = “ > ? @ [ \ ]
0123456789 (Space)
Rear
The sound being played in the surround mode can be adjusted to your liking.
The items (parameters) that can be adjusted depend on the signal being input and the currently set
surround mode. For details on the adjustable parameters, see “Surround Modes and Audio Adjust”
(vpage 68).
Items that can be Set with the Audio Adjust Procedure
n
Surround Parameters vpage 48
Tone vpage 50
Audyssey Settings vpage 51
Audio Delay vpage 52
Surround Parameters
Default settings are underlined.
Adjust surround sound parameters. It may not be possible to set this item depending on the input signal.
Setting items Setting details
DOLBY VS Mode
Select the Dolby Virtual
Speaker mode.
Mode
Set the play modes for the
different surround modes.
REF : This is the standard Dolby Virtual Speaker mode.
WIDE : This mode creates the sense of a wider sound.
In the PLgx or PLg Mode
n
Cinema : Surround sound mode optimized for movie sources.
Music : Surround sound mode optimized for music sources.
Game : Surround sound mode optimized for games.
Pro Logic : Dolby Pro Logic playback mode (PLg mode only).
In the PLgz Mode
n
Height : Dolby PLgz Height playback mode.
In the DTS NEO:6 Mode
n
Cinema : Surround sound mode optimized for movie sources.
Music : Surround sound mode optimized for music sources.
Spec. Index
Remote control operation
buttons
Display the menu
Cancel the menu
Move the cursor
(Up/Down/Left/Right)
When “Surround Parameters” – “Front Height” (vpage 49) is set to
•
“ON”, the “Height” mode is set automatically.
The “Music” mode is also effective for movie sources including a lot of
•
stereo music.
Confirm the setting Return to previous menu

ENGLISH
Remote
Control
Playback
(Advanced)
Connections
Simple
Version
Playback
(Basic)
Multi-
zone
GUISettings
Getting
Started
Troubleshooting
Other
Information
Spec. Index
Part
Names
Setting items Setting details
Cinema EQ
Soften the treble range
ON
OFF
of movie soundtracks for
better understanding.
DRC
Compress dynamic range
(difference between loud
and soft sounds).
D.COMP
Compress dynamic range
OFF : Dynamic range compression always off.
Low / Middle / High : These set the compression level.
Auto : Automatic dynamic range compression on/off control according to
source. This can be set in the Dolby TrueHD mode.
OFF : Turn dynamic range compression off.
Low / Middle / High : These set the compression level.
(difference between loud
and soft sounds).
LFE
Adjust the low-frequency
effects level (LFE).
Center Image
Assign center channel
signal to front left and right
–10dB – 0dB
For proper playback of the different sources, we recommend setting
to the values below.
Dolby Digital sources : “0dB”
•
DTS movie sources : “0dB”
•
DTS music sources : “–10dB”
•
0.0 – 1.0 (0.3)
Only DTS NEO:6 MUSIC mode
channels for wider sound.
Panorama
Assign front L/R signal also
to surround channels for
wider sound.
Dimension
Shift sound image center
to front or rear to adjust
OFF
ON
Only Dolby PLg/PLgx MUSIC mode
0 – 6 (3)
Only Dolby PLg/PLgx MUSIC mode
playback balance.
Center Width
Assign center channel
signal to front left and right
0 – 7 (3)
Only Dolby PLg/PLgx MUSIC mode
channels for wider sound.
Setting items Setting details
Front Height
Set the Dolby PLgz Height
mode to ON or OFF.
When “Speaker Assign”
is set to “5.1CH + Front
Height”, you can stop the
front height speaker output.
ON : Audio is output from the front height speaker.
OFF : Audio is not output from the front height speaker.
NOTE
“Front Height” is not displayed with the settings listed below.
•
When the “Speaker Assign” setting (vpage 53) is set to something
•
other than “5.1CH + Front Height”.
When the “Speaker Configuration” – “Front Height” setting (vpage
•
54) is set to “None”.
“Front Height” cannot be set if the HD Audio source being played
•
includes a front height channel. In this case, the Front height channel is
played back without decoding in PLgz mode, using the input signal.
AFDM
(Auto flag detect mode)
Detect the source’s
surround back channel
signal and set the
optimum surround mode
automatically.
ON
OFF
[Example] Playing Dolby Digital software (with EX flag)
When “AFDM” is set to “ON”, the surround mode is automatically set
•
to the DOLBY D + PLgx C mode.
To play in the DOLBY DIGITAL EX mode, set “AFDM” to “OFF” and
•
“Surround Back” to “MTRX ON”.
Some Dolby Digital EX sources do not include EX flags. If the playback
mode does not switch automatically even when “AFDM” is set to
“ON”, set “Surround Back” to “MTRX ON” or “PLgx CINEMA”.
NOTE
If the setting in “Speaker Configuration” – “Surround Back” (vpage 54)
is “None”, “Surround Back” is not displayed.
Audio Adjust
Remote control operation
buttons
Display the menu
Cancel the menu
Move the cursor
(Up/Down/Left/Right)
Confirm the setting Return to previous menu

ENGLISH
Getting
Started
Audio Adjust
Version
Simple
Connections
Playback
(Basic)
(Advanced)
Playback
Multi-
zone
GUISettings
Remote
Control
Names
Part
Information
Other
Setting items Setting details
Surround Back
Sets the method of
generating of the surround
For 2-channel Sources
n
OFF : No signal is played from the surround back channels.
ON : The surround back channel is used.
back channel.
For Multi-channel Sources
n
Set the decoding method for the surround back channel.
DSCRT ON : Play the surround back signals included in the 7.1-channel
source.
MTRX ON : Generate and play the surround back signals from the
surround channel signals.
ES MTRXz1 : Generate and play the surround back signals from the
surround channel signals of the DTS source.
ES DSCRTz2 : Play the surround back signals included in the 6.1-
channel DTS source.
PLgx CINEMAz3 : Generate and play the surround back signals by
decoding the signals in the Dolby Pro Logic gx Cinema mode.
PLgx MUSIC : Generate and play the surround back signals by decoding
the signals in the Dolby Pro Logic gx Music mode.
OFF : Do not play the surround back channel.
z1 This can be selected when playing DTS sources.
z2 This can be selected when playing DTS sources including a signal to
identify discrete 6.1-channel signals.
z3 This can be selected when “Speaker Configuration” – “Surround
Back” (vpage 54) is set to “2spkrs”.
If the source being played contains a surround back signal, the decoder
type is automatically selected by the AFDM function. Set “AFDM” to
“OFF” to switch to your preferred decoder.
NOTE
If the setting in “Speaker Configuration” – “Surround Back” (vpage 54)
is “None”, “Surround Back” is not displayed.
Default
Restore all the surround
parameter settings to their
defaults.
Yes
No
Tone
Adjust the tonal quality of the sound.
Setting items Setting details
Tone Control
Set the tone control function
to ON and OFF.
Bass
Adjust low frequency range
(bass).
Treble
Adjust high frequency range
(treble).
ON : Allow tone adjustment (bass, treble).
OFF : Playback without tone adjustment.
“Tone Control” can be set when “Dynamic EQ” (vpage 51) is set
to “OFF”.
–6dB – +6dB
“Bass” can be set when “Tone Control” is set to “ON”.
–6dB – +6dB
“Treble” can be set when “Tone Control” is set to “ON”.
Default settings are underlined.
Troubleshooting
Spec. Index
0
Remote control operation
buttons
Display the menu
Cancel the menu
Move the cursor
(Up/Down/Left/Right)
Confirm the setting Return to previous menu

ENGLISH
Remote
Control
Playback
(Advanced)
Connections
Simple
Version
Playback
(Basic)
Multi-
zone
GUISettings
Getting
Started
Troubleshooting
Other
Information
Spec. Index
Part
Names
Audyssey Settings
Default settings are underlined.
Set MultEQ®, Dynamic EQ™ and Dynamic Volume™. These can be selected after Audyssey Auto Setup
has been performed. For additional information on Audyssey technology, please see page 72.
NOTE
If you have not performed Auto Setup, or if you change the speaker settings after performing Auto Setup,
you may not be able to select Dynamic EQ/Dynamic Volume, and “Run Audyssey” may be displayed.
In this case, either perform Audyssey Auto Setup over again or perform “Restore” (vpage 52) to return
to the settings after Audyssey Auto Setup was run.
Setting items Setting details
MultEQ
Select one equalizer from
three modes. MultEQ
corrects both time and
frequency response
problems in the listening
area based on Audyssey
Auto Setup calibration.
MultEQ is the prerequisite
function for Dynamic EQ
and Dynamic Volume. If
“MultEQ” is set to “OFF”
when “Dynamic EQ” or
“Dynamic Volume” is set
to “ON”, “Dynamic EQ”
and “Dynamic Volume” are
automatically set to “OFF”.
Audyssey : Optimize the frequency response of all speakers.
Audyssey Byp.L/R : Optimize frequency response of speakers except
front L and R speakers.
Audyssey Flat : Optimize frequency response of all speakers to flat
response.
OFF : Turn “MultEQ” equalizer off.
“Audyssey”, “Audyssey Byp. L/R” and “Audyssey Flat” can be
•
selected after Audyssey Auto Setup has been performed. “Audyssey”
is automatically selected after performing Audyssey Auto Setup. “When
“Audyssey”, “Audyssey Byp. L/R” or “Audyssey Flat” is selected,
lights.
After running Audyssey Auto Setup, if the Speaker Configuration,
•
Distance, Channel Level, and Crossover Frequency have changed without
increasing the number of speakers measured, only lights.
If “Dynamic EQ” or “Dynamic Volume” is set to
•
“ON” when “MultEQ” is set to “OFF”, “MultEQ”
Rear
is automatically set to “Audyssey”.
You can also press MULTEQ to set this item.
•
NOTE
When using headphones, “MultEQ” is automatically set to “OFF”.
Setting items Setting details
Dynamic EQ™
Solve the problem of
ON : Use Dynamic EQ.
OFF : Do not use Dynamic EQ.
deteriorating sound quality
as volume is decreased by
taking into account human
perception and room
acoustics.
After performing “Audyssey Auto Setup”, the “Dynamic EQ” setting
•
automatically becomes “ON”.
is displayed when set to “ON”.
•
When “MultEQ” is set to “OFF”, “Dynamic EQ” is automatically set to
•
“OFF”.
If “Dynamic Volume” is set to “ON”, “Dynamic EQ” is automatically
•
set to “ON”.
When you set ”Dynamic EQ” to ”ON”, “Tone Control” is switched
•
”OFF”.
Reference Level Offset
Audyssey Dynamic EQ is
referenced to the standard
film mix level. It makes
adjustments to maintain
the reference response
and surround envelopment
when the volume is turned
down from 0 dB. However,
film reference level is not
always used in music or
other non-film content.
0dB (Film Ref) : This is the default setting and should be used when
listening to movies.
5dB : Select this setting for content that has a very wide dynamic range,
such as classical music.
10dB : Select this setting for jazz or other music that has a wider dynamic
range. This setting should also be selected for TV content as that is usually
mixed at 10 dB below film reference.
15dB : Select this setting for pop/rock music or other program material
that is mixed at very high listening levels and has a compressed dynamic
range.
Setting is enabled when “Dynamic EQ” is “ON”.
Dynamic EQ Reference
Level Offset provides three
offsets from the film level
reference (5 dB, 10 dB, and
15 dB) that can be selected
when the mix level of the
content is not within the
standard.
Audio Adjust
Remote control operation
buttons
Display the menu
Cancel the menu
Move the cursor
(Up/Down/Left/Right)
Confirm the setting Return to previous menu

ENGLISH
Dynamic EQ : ON /
Dynamic Volume : OFF
Dynamic EQ : OFF /
Dynamic Volume : OFF
Dynamic EQ : ON /
Dynamic Volume : ON
Getting
Started
Dynamic Volume™
Version
(Basic)
(Advanced)
zone
Solve the problem of large
Simple
variations in volume level
between TV, movies and
other content (between
quiet passages and
Connections
loud passages, etc.) by
automatically adjusting to
the user’s preferred volume
setting.
Playback
Setting
Set “Dynamic Volume”
equalizer effect.
Playback
Multi-
Audio Adjust
Setting items Setting details
ON : Use “Dynamic Volume”. Dynamic Volume effect will be at the level
of the “Setting”.
OFF : Do not use “Dynamic Volume”.
is displayed when set to “ON”.
•
When “MultEQ” is set to “OFF”, “Dynamic
•
Volume” is automatically set to “OFF”.
You can also press DYNAMIC VOLUME to set this
•
item.
Midnight : High setting affects volume the most, causing all sounds to be
of equal loudness.
Evening : Middle setting prevents loud and soft sounds from being much
louder and softer respectively than average sounds.
Day : Low setting provides the least adjustments to the loudest and
softest of sounds.
“Setting” can be set when “Dynamic Volume” is set to “ON”.
Rear
Auto Setup
Setting items Setting details
Audyssey™ Auto Setup
Analyzes the acoustic
characteristics of the
listening point measured
with the supplied
setup microphone and
automatically makes the
optimum output settings for
each speaker to match the
environment of the listening
room.
Parameter Check
Enables you to check the
measurement results and
equalizer characteristics
after Audyssey Auto Setup.
For details, see “Set Up Speakers (Audyssey™ Auto Setup)” (vpage 6)
and “Setting for Speakers Other Than 5.1-channel” (vpage 34).
Speaker Config. Check : Check the speaker configuration.
Distance Check : Check the distance.
Channel Level Check : Check the channel level.
Crossover Freq. Check : Check the crossover frequency.
EQ Check : Check MultEQ parameters.
Restore : Restore auto setup mesurement result.
GUISettings
Remote
Control
Audio Delay
While viewing video, manually adjust the time to delay audio output.
Setting details
Names
Information
0ms – 200ms
Part
Other
Troubleshooting
Spec. Index
Store “Audio Delay” for each input source.
Remote control operation
buttons
Display the menu
Cancel the menu
Default settings are underlined.
Move the cursor
(Up/Down/Left/Right)
Confirm the setting Return to previous menu

ENGLISH
Remote
Control
Playback
(Advanced)
Connections
Simple
Version
Playback
(Basic)
Multi-
zone
GUISettings
Getting
Started
Troubleshooting
Other
Information
Spec. Index
Part
Names
Manual Setup
OPTION
Set when changing Audyssey™ Auto Setup settings, or when changing the audio, video, display
or other settings.
If you change the speaker settings after performing Audyssey Auto Setup, it will not be possible
•
to set MultEQ®, Dynamic EQ™ and Dynamic Volume™ (vpage 51, 52).
Can be used without changing the settings. Please set if necessary.
•
Items that can be Set with the Manual Setup Procedure
n
Speaker Setup vpage 53
HDMI Setup vpage 55
Audio Setup vpage 56
Option Setup vpage 56
GUI Language vpage 57
Speaker Setup
Default settings are underlined.
Perform this operation when manually setting the speakers, or when the changing the setting content in
“FIRST SETUP” (Audyssey Auto Setup).
Setting items Setting details
Speaker Assign
Set the speakers connected
to this unit. By performing
this setting, you can shorten
the automatic detection
time for the speakers during
“FIRST SETUP” (Audyssey
Auto Setup).
Speaker Configuration
Select speaker configuration
and size (bass reproduction
capability).
NOTE
Do not use the outward
shape of the speaker to
determine selection of a
“Large” or “Small” speaker.
Instead, use the frequencies
set in “Crossover
Frequency” (vpage 55) as
the standard for determining
bass reproduction capability.
5.1CH : Set when using 5.1-channel (Front/Center/Surround/Subwoofer)
speakers.
2.0CH / 2.1CH : Set when only using front speakers and a subwoofer.
5.1CH + Surround Back : Set when using the 5.1-channel speaker and
surround back speaker.
5.1CH + Front Height : Set when using 5.1-channel speakers and front
height speakers.
Connect the surround back speakers or front height speakers to the
PRE OUT SURR. BACK connector (vpage 35).
Front : Set the front speaker size.
Large : Use a large speaker that can adequately play back low
•
frequencies.
Small : Use a small speaker that has inadequate playback capacity for
•
low frequencies.
Center : Set the presence and size of the center speaker.
Large : Use a large speaker that can adequately play back low
•
frequencies.
Small : Use a small speaker that has inadequate playback capacity for
•
low frequencies.
None : Select when a center speaker is not connected.
•
Subwoofer : Set the presence of a subwoofer.
Yes : Use a subwoofer.
•
No : Select when a subwoofer is not connected.
•
Surround : Set the presence and size of the surround speakers.
Large : Use a large speaker that can adequately play back low
•
frequencies.
Small : Use a small speaker that has inadequate playback capacity for
•
low frequencies.
None : Select when the surround speakers are not connected.
•
Remote control operation
buttons
Display the menu
Cancel the menu
Move the cursor
(Up/Down/Left/Right)
Confirm the setting Return to previous menu

ENGLISH
Getting
Started
Manual Setup
Version
Simple
Connections
Playback
(Basic)
(Advanced)
Playback
Multi-
zone
GUISettings
Remote
Control
Names
Part
Information
Other
Troubleshooting
Setting items Setting details
Speaker Configuration
(Continued)
Surround Back : Set the presence, size and number of surround back
speakers.
Large : Use a large speaker that can adequately play back low
•
frequencies.
Small : Use a small speaker that has inadequate playback capacity for
•
low frequencies.
None : Select when the surround back speakers are not connected.
•
2spkrs : Use two surround back speakers.
•
1spkr : Use only one surround back speaker. When you select this
•
setting, connect the surround back speaker to the left (L) channel.
Even when the “Surround Back“ setting is other than “None”, sound
may not be emitted from the surround back speaker, depending
on the playback source. In this case, make “Surround Parameters”
– “Surround Back” setting other than “OFF” (vpage 50).
NOTE
When the “Speaker Assign” setting (vpage 53) is other than “5.1CH +
Surround Back”, you cannot make the “Surround Back” setting.
Front Height : Set the presence and size of the front height speakers.
Large : Use a large speaker that can adequately play back low
•
frequencies.
Small : Use a small speaker that has inadequate playback capacity for
•
low frequencies.
None : Select when the front height speakers are not connected.
•
NOTE
When the “Speaker Assign” setting (vpage 53) is other than “5.1CH +
Front Height”, you cannot make the “Front Height” setting.
Bass Setting
Set subwoofer and LFE
signal range playback.
Subwoofer Mode : Select low range signals to be reproduced by
subwoofer.
LFE : The low range signal of the channel set to “Small” speaker size is
•
added to the LFE signal output from the subwoofer.
LFE+Main : The low range signal of all channels is added to the LFE
•
signal output from the subwoofer.
This item can be set when “Speaker Configuration” – “Subwoofer”
•
(vpage 53) is set to “Yes”.
Play music or a movie source and select the mode offering the strongest
•
bass.
Select “LFE+Main” if you want the bass signals to always be produced
•
from the subwoofer.
Setting items Setting details
Bass Setting
(Continued)
LPF for LFE : Set LFE signal playback range.
80Hz / 90Hz / 100Hz / 110Hz / 120Hz / 150Hz / 200Hz / 250Hz
•
“LPF for LFE” can be set when “Speaker Configuration” – “Subwoofer”
(vpage 53) is set to “Yes”.
Distance
Set distance from listening
position to speakers.
Measure beforehand the
distance from the listening
position to each speaker.
Feet / Meters : Set the unit of distance.
Step : Set the minimum variable width of the distance.
1ft / 0.1ft
•
0.1m / 0.01m
•
Default : Reset all distance settings to factory default.
Yes
•
No
•
When you select “Default” and press ENTER, the “Return all settings
to the default?” prompt is displayed. Select either “Yes” or “No”, and
press ENTER.
Front L / Front R / Center / Subwoofer / Surround L / Surround R /
Surround Back Lz / Surround Back Rz / Front Height L / Front Height
R : Select the speaker.
When the “Speaker Configuration” – “Surround Back” setting
z
(vpage 54) is set to “1spkr”, “Surround Back” is displayed.
0.0ft – 60.0ft / 0.00m – 18.00m : Set the distance.
•
The speakers that can be selected differ depending on the “Speaker
•
Assign” (vpage 53) and “Speaker Configuration” (vpage 53, 54)
settings.
Default settings :
•
Front/Center/Subwoofer/Front Height : 12.0 ft (3.60 m)
Surround/Surround Back : 10.0 ft (3.00 m)
Set the difference in the distance between the speakers to less than 20
•
feet (6.0 meters).
NOTE
Speakers set to “None” in “Speaker Configuration” (vpage 53, 54) are
not displayed.
Spec. Index
Remote control operation
buttons
Display the menu
Cancel the menu
Move the cursor
(Up/Down/Left/Right)
Confirm the setting Return to previous menu

ENGLISH
Remote
Control
Playback
(Advanced)
Connections
Simple
Version
Playback
(Basic)
Multi-
zone
GUISettings
Getting
Started
Troubleshooting
Other
Information
Spec. Index
Part
Names
Setting items Setting details
Channel Level
Set the volume of the test
tone to be the same when it
is output from each speaker.
Test Tone : Output test tone.
Front L / Front Height L / Center / Front Height R / Front R / Surround R /
•
Surround Back Rz / Surround Back Lz / Surround L / Subwoofer :
Select the speaker.
When the “Speaker Configuration” – “Surround Back” setting
z
(vpage 54) is set to “1spkr”, “Surround Back” is displayed.
–12dB – +12dB (0dB) : Adjust the volume.
•
When o is pressed while the subwoofer volume is set to “–12 dB”,
the “Subwoofer” setting switches to “OFF”.
NOTE
Speakers set to “None” in the “Speaker Configuration” (vpage 53,
•
54) settings are not displayed.
When using surround speakers, be sure to adjust the volume of the
•
different speakers.
When a headphones jack is inserted in the PHONES terminal of this unit,
•
the “Channel Level” is not displayed.
Default : Reset all channel level settings to factory default.
YesNo•
•
Crossover Frequency
Set the maximum frequency
of the bass signal output
from each channel to
the subwoofer. Set the
Crossover Frequency to
suit the bass reproduction
capability of the speaker
being used.
40Hz / 60Hz / 80Hz / 90Hz / 100Hz / 110Hz / 120Hz / 150Hz / 200Hz /
250Hz : Set the crossover frequency.
Advanced : Specify crossover frequency for each speaker.
Front / Center / Surround / Surround Back / Front Height : Select the
•
speaker.
40Hz / 60Hz / 80Hz / 90Hz / 100Hz / 110Hz / 120Hz / 150Hz / 200Hz /
•
250Hz : Set the crossover frequency.
Crossover frequency can be set when the “Speaker Configuration”
•
– “Subwoofer” (vpage 53) setting is “Yes”, or when you have a
speaker that is set to “Small”.
Always set the crossover frequency to “80Hz”. When using small
•
speakers, however, we recommend setting the crossover frequency to
a higher frequency.
The speakers that can be set when “Advanced” is selected differ
•
according to the “Subwoofer Mode” setting (vpage 54).
When “LFE” is selected, speakers set to “Small” at “Speaker
•
Configuration” can be set. If the speakers are set to “Large”, “Full
Band” is displayed and the setting cannot be made.
If set to “LFE+Main”, this setting can be made regardless of the
•
speaker size.
HDMI Setup
Make settings for HDMI video/audio output.
Setting items Setting details
HDMI Audio Out
Select HDMI audio output
device.
This can be set when the
input source on the unit
is “BD/SD”, “HDMI1”,
“HDMI2” or “HDMI3”.
HDMI Control
You can link operations with
devices connected to HDMI
and compatible with HDMI
Control.
•
Please consult the
operating instructions for
each connected component
to check the settings.
•
Refer to “HDMI Control
Function” (vpage 39) for
more information about the
HDMI control function.
NOTE
The HDMI control function
•
controls operations of a
TV that is compatible with
the HDMI control function.
Make sure that the TV and
HDMI are connected when
you perform HDMI control.
If the “Control” settings
•
have been changed,
always reset the power to
connected devices after
the change.
Amp : Plays back using the speakers.
TV : Plays back on the TV.
When the HDMI control function is activated, priority is given to the TV
audio setting (vpage 39 “HDMI Control Function”).
Control
ON : Use HDMI control function.
•
OFF : Do not use HDMI control function.
•
When a device that is not compatible with the HDMI control function
is connected, set “Control” to “OFF”.
NOTE
When “Control” is set to “ON”, it consumes more standby power.
•
If you are not using this unit for an extended period, it is recommended
that you unplug the power cord from the power outlet.
“HDMI Control” does not work when the power to the equipment is off.
•
Either turn power on or set to standby.
Standby Source : Sets the HDMI input source to put into standby when
the power is on.
Last : This item is set at the last-used input source.
•
HDMI1 / HDMI2 / HDMI3 : Put the respective input source into
•
standby.
“Standby Source” can be set when “Control” is set to “ON”.
Power Off Control : Links the power standby of this unit to external
equipment.
ON
•
OFF
•
“Power Off Control” can be set when “Control” is set to “ON”.
Manual Setup
Default settings are underlined.
Remote control operation
buttons
Display the menu
Cancel the menu
Move the cursor
(Up/Down/Left/Right)
Confirm the setting Return to previous menu

ENGLISH
OPTION
Getting
Started
Manual Setup
Version
Simple
Set the audio input and output.
Setting items Setting details
COAX Input Assign
Connections
Assign coaxial digital
connector.
Playback
(Basic)
Dynamic Play Mode
When playing back on a
2.0/2.1-channel setup, the
unused surround channels
(amps) are used together
with the front channels
(Advanced)
zone
Control
(amps) to give improved
Playback
sound quality.
Multi-
GUISettings
Make various other settings.
Remote
Setting items Setting details
Volume Control
Names
Set the MAIN ZONE (room
Part
where the unit is located)
volume setting.
Information
Other
GUI
Troubleshooting
Make GUI related settings.
Spec. Index
Audio Setup
OFF : Do not assign coaxial digital connector.
AUX1 : Sets to the digital audio input connector for AUX1.
AUX2 : Sets to the digital audio input connector for AUX2.
When set to “AUX1” or “AUX2”, priority is given to output of COAXIAL
input signals over analog or OPTICAL input signals.
AUTO : Automatically ON when parallel drive possible.
OFF : Parallel drive is not performed.
Option Setup
Volume Limit : Make a setting for maximum volume.
•
•
Power On Level : Define the volume setting that is active when the
power is turned on.
•
•
Screensaver : Make screensaver settings.
•
•
Default settings are underlined.
NOTE
Default settings are underlined.
OFF : Do not set a maximum volume.
60 / 70 / 80
Last : Use the memorized setting from the last session.
0 – 99 : The volume is adjusted to the set level.
ON : If is no operation is performed for approximately three minutes
while the GUI menu or iPod playback screen is displayed, a screen saver
is activated. When you press uio p, the screen saver is cancelled
and the screen before that screen saver started is displayed.
OFF : Screen saver is not activated.
Setting items Setting details
GUI
(Continued)
Text : Display the details of operation when switching surround mode,
input mode, etc.
ON
•
OFF
•
Master Volume : Display the master volume during adjustment.
Bottom : Display at the bottom.
•
Top : Display at the top.
•
OFF : Turn display off.
•
When the master volume display is hard to see when superimposed
on movie subtitles, set to “Top”.
Quick Start Mode
Make Quick Mode settings.
ON : Start up time is faster but power consumption during standby is
higher.
OFF : Turn off Quick Mode.
Remote Preset Codes
By registering the preset
codes in the supplied
remote control unit, you can
operate a TV, satellite tuner
or cable TV made by other
manufacturers.
1. Select the device you want to register using ui and press ENTER to
confirm.
2. Select the first letter of the manufacturer’s name using ui and press
ENTER to confirm.
3. Select the manufacturer’s name using ui and press ENTER to
confirm.
4. The procedures for registering remote control codes and remote
control preset registration are displayed.
Some devices you want to register may have more than one preset code.
•
In this case, after registering the preset code, try operating the device
with the remote control unit to check that it is working properly.
For details on operating devices with the remote control unit after
•
registering the preset code, see “Operating Components” (vpage
59).
Trigger Out
Select the condition for
activating Trigger Out for
the input source, surround
mode, etc.
See “TRIGGER OUT Jacks”
(vpage 17) for more
information on trigger out.
When Setting for Zone (MAIN ZONE/ZONE2):
Trigger out is activated through linkage to the power of the zone set to
“ON”.
When Setting for Input Source:
Activate trigger out when the input source set to “ON” is selected.
Active for the zone set to “ON” with “When Setting for Zone”.
When Setting for Surround Mode:
Activate trigger out when the surround mode set to “ON” is selected.
Active when the “MAIN ZONE” set to “ON” with “When Setting
for Zone” is selected, and when the input source set to “ON” with
“When Setting for Input Source” is selected.
ON : Activate trigger on this mode.
•
– – – : Do not activate trigger on this mode.
•
Remote control operation
buttons
Display the menu
Cancel the menu
Move the cursor
(Up/Down/Left/Right)
Confirm the setting Return to previous menu

ENGLISH
Remote
Control
Playback
(Advanced)
Connections
Simple
Version
Playback
(Basic)
Multi-
zone
GUISettings
Getting
Started
Troubleshooting
Other
Information
Spec. Index
Part
Names
Setting items Setting details
Dimmer Sensor
Detects the level of
ON : Automatically adjusts the brightness of the unit’s display.
OFF : Does not automatically adjust the brightness of the unit’s display.
brightness around the unit
and automatically adjusts
the brightness of the display
accordingly.
Dimmer
Adjust the display
brightness of this unit.
Bright : Normal display brightness.
Dim : Reduced display brightness.
Dark : Very low display brightness.
OFF : Turns the display off.
“Dimmer” can be set when “Dimmer Sensor” is set to “OFF”.
Setup Lock
Protect settings from
inadvertent change.
ON
OFF
When canceling the setting, set “Setup Lock” to “OFF”.
NOTE
When “Setup Lock” is set to “ON”, the settings listed below can no
longer be changed. Also, “SETUP LOCKED!” is displayed if you attempt
to operate related settings.
· GUI menu operations · Dynamic Volume™
· RESTORER · Audio Adjust
· Audio Delay · MultEQ
· Dynamic EQ™
GUI Language
Default settings are underlined.
Set the language for display on the GUI screen.
Setting details
English / Deutsch / Français / Italiano / Español / Nederlands / Svenska
Manual Setup
Information
Show information about receiver settings, input signals, etc.
Items Setting details
Status
Show information about
current settings.
MAIN ZONE
n
This item shows information about settings for MAIN ZONE.
The information displayed differs according to the input source.
Select Source / Name / Surround Mode / Input Mode / Decode
Mode / Digital
ZONE2
n
This item shows information about settings for multi-zone.
Power / Select Source
Surround Mode : The currently set surround mode.
Audio Input Signal
Signal : The input signal type.
fs : The input signal’s sampling frequency.
Show information about
audio input signals.
Format : The number of channels in the input signal (front, surround,
LFE).
Offset : The dialogue normalization correction value.
Flag : This is displayed when inputting signals including a surround back
channel. “MATRIX” is displayed with Dolby Digital EX and DTS-ES Matrix
signals, “DISCRETE” with DTS-ES Discrete signals.
Dialogue normalization function
This function is automatically activated when
®
playing Dolby Digital sources.
It automatically corrects the standard signal level
Rear
for individual program sources.
The correction value can be checked using the
STATUS.
HDMI Information
Show information about
HDMI input/output signals
and monitor.
The figure is the correction value when the standard level is corrected.
Signal Info.
Resolution / Color Space / Pixel Depth
Monitor
Interface / Supported resol.
Remote control operation
buttons
Display the menu
Cancel the menu
Move the cursor
(Up/Down/Left/Right)
Confirm the setting Return to previous menu

ENGLISH
Play Mode
All
Disc
BD Audio Mode
Mix Audio Output
File filter
Getting
Started
Version
Simple
Show information about
auto surround mode
settings.
Connections
Show information about
Playback
(Basic)
preset channels.
Information
Auto Surround
Mode
Preset Channel
Items Setting details
Analog/PCM 2ch / Digital 2ch / Digital 5.1ch / Multi ch
This item can be checked when the input source is set to
A / B / C / D / E / F / G
A1 – A8 / B1 – B8 / C1 – C8 / D1 – D8 / E1 – E8 / F1 – F8 / G1 – G8
FM AM
Setting Various Modes
When the input source of this unit is “BD/SD”, you can switch the following modes and change the
settings from the menu displayed on the screen.
Press MODE.
1
Displays the currently settable menu.
The display content changes depending on the media being played back. •
.
Select the setting item using ui, and then press ENTER or p.
2
Use ui to select a setting and use ENTER to change the setting.
3
Front
(Advanced)
Playback
Multi-
zone
GUISettings
Remote
Control
Names
Part
Information
Other
Troubleshooting
Setting items
BD Audio Mode
Switch Blu-ray Disc audio
playback mode.
File filter
Selects the file format you
want to play back from
among the files mixed on
a disc.
Play Mode
Selects the file Play mode.
Setting details
HD Audio Output : Can view by outputting high quality signals such as
Dolby TrueHD, Dolby Digital Plus, or DTS-HD as its high sound quality
bitstream. Cannot listen to interactive or secondary audio.
Mix Audio Output : Outputs a mix of primary audio/interactive audio/
secondary audio.
In the case of Dolby TrueHD, Dolby Digital Plus and DTS-HD audio
playback, set to “HD Audio Output”.
NOTE
When “Mix Audio Output” is set and DTS-HD audio signals are played,
only the DTS digital surround stream of the DTS-HD audio stream is
decoded and output.
All : Plays back MP3/WMA/AAC/LPCM/JPEG files.
Audio : Plays back MP3/WMA/AAC/LPCM files.
Picture : Plays back JPEG files.
Audio & Picture : Plays back MP3/WMA/AAC/LPCM/JPEG files.
This operation is effective only when playback is stopped.
Disc : Plays back all files in the media.
Folder : Plays back files in the selected folder.
Spec. Index
Remote control operation
buttons
Display the menu
Cancel the menu
Move the cursor
(Up/Down/Left/Right)
Confirm the setting Return to previous menu

Operating the Connected Devices by Remote Control Unit
Registering the supplied preset codes in the remote control unit enables you to operate devices made by other manufacturers.
Registering Preset Codes
Set DEVICE SELECT to the
1
component to be registered.
TV
TV
CBL/SAT
Satellite tuner or cable TV
Press RESOLUTION and ANGLE/RT
2
at the same time.
The signal transmission indicator starts
flashing.
Press 0 – 9 and input the 3-
3
digit number of the brand of
the component to be preset. The
numbers are shown in the Preset
Code Table (vEnd of this
manual).
To store the codes of another component in the
4
memory, repeat steps 1 to 4.
You can also register the preset codes from the GUI menu using
•
“Manual Setup” – “Option Setup” – “Remote Preset Codes”
(vpage 56).
Some manufacturers use more than one type of remote control code.
•
Refer to the included list of preset codes to change the number and
verify correct operation.
The preset memory can be set for one component only among the
•
following: CBL/SAT.
NOTE
Depending on the model and year of manufacture of your equipment,
some buttons may not operate.
Front
Rear
Operating Components
Set DEVICE SELECT to the
1
component you want to operate.
MAIN
CBL/SAT
Main unit (including operation of
an iPod, Control dock for iPod,
USB memory device or SD
memory card connected to this
unit)
TV
TV
Satellite tuner or cable TV
Operate the component.
Front
2
For details, refer to the component’s operating instructions.•
NOTE
Depending on the model and year of manufacture, this function cannot
be used for some models, even if they are of makes listed in the list
of preset codes.
TV Operation
Front
ENGLISH
Front
DEVICE SELECT
ON Power on/Standby
TV INPUT Switch TV input
TV POWER TV power on/off
CH + – Switch channels (+, –)
VOLUME df
MUTE TV mute
TOP MENU Menu
uio p
ENTER Enter setting
RETURN Return
Rear
1 – 9 Channels
SETUP Setup
Default setting
(Preset code)
Special Remarks
GSpecial RemarksH
q Only one device can be set in the preset
memory for each mode.
When a new preset code is registered, the
existing code is automatically erased.
d : TV Volume (+)
f : TV Volume (–)
Cursor operation
HITACHI
(014)
q
Getting
Started
Version
Simple
Connections
Playback
(Basic)
(Advanced)
Playback
Multi-
zone
GUISettings
Remote
Control
Names
Part
Information
Other
Troubleshooting
Rear
Spec. Index

ENGLISH
Operating Components
Getting
Started
Set-Top Box (Satellite Tuner/Cable TV) Operation
Version
Simple
Connections
Playback
(Basic)
(Advanced)
Playback
Multi-
zone
GUISettings
Remote
Control
Front
Front
DEVICE SELECT
ON Power on/Standby
TV INPUT Switch TV input
TV POWER TV power on/off
CH + –
Switch channels (+, –)
TOP MENU Menu
uio p
Cursor operation
ENTER Enter setting
RETURN Return
Rear
0 – 9, +10 Channels
SETUP Setup
Satellite
Default setting
(Preset code)
Tuner
–
Special Remarks
GSpecial RemarksH
q Only one device can be set in the preset
memory for each mode.
When a new preset code is registered, the
existing code is automatically erased.
Cable TV
ABC
(009)
q
Names
Part
Information
Other
Troubleshooting
Spec. Index
Rear
0

Information
Here, we list various information related to this unit.
Please refer to this information as needed.
F Part Names and Functions
F Other Information
F Troubleshooting
F Specifications
F Index

ENGLISH
q w e
Q0Q2 Q1i io
r t y u
Q7Q6Q5Q4Q3
W2W3W8
E1
E2 W4
W9
W5W7
W6
E0
Q9Q8 W0 W1
Getting
Started
Part Names and Functions
Version
Connections
(Basic)
(Advanced)
zone
Front Panel / Top Panel / Display
Simple
For buttons not explained here, see the page indicated in parentheses ( ).
Playback
Playback
Multi-
GUISettings
Remote
Control
Names
Part
Information
Other
Troubleshooting
Top Panel
Front Panel
n
q Power operation button
(ON/STANDBY) ············································(5)
Turns power to this unit on and off (standby).
w Power indicator ············································(5)
e Disc tray ······················································(10)
r Dimmer sensor ···········································(57)
t VOLUME control knob ······························· (28)
y HDMI-3 input connector ····························(12)
n
Q3 Disc tray open/close button (5) ················ (10)
Q4 Play/Pause button (1/3) ··············· (21, 28, 29)
SHIFT button ···············································
(27)
Q5 Stop button (2) ··········································(28)
Q6 Revers-skip/Forward-skip buttons
(8, 9) ··················································(29)
PRESET +, – buttons ···································
(27)
Q7 SOURCE button ·········································· (20)
u USB (iPod) port ··········································· (14)
i Door ·····························································(77)
To open, pull lightly on the lower part of the
door.
NOTE
Be careful not to catch your finger in the door.
o Remote control sensor ······························(65)
Q0 SETUP MIC jack ······································(7, 36)
Q1 SD CARD slot
Position the SD memory card
•
so that the label side is on the
right, and insert into the SD
CARD slot, in the direction of
the arrow.
Insert the card straight into SD
•
CARD slot until it clicks.
To remove the card, push it in
•
the direction of insertion, and
then release to eject.
When power is in standby mode, press Q3 and Q4
to turn the power on.
Display
n
Q8 Playback format indicators
Q9 Input signal channel indicators
These light when digital signals are input.
W0 Information display
The input source name, surround mode, setting
values and other information are displayed here.
W1 Output signal channel indicators
The channel currently being played back is
displayed.
W2 Master volume indicator
W3 MUTE indicator
This lights when the mute mode is selected.
Q2 Headphones jack
When the headphones are plugged into this
jack, audio will no longer be output from the
connected speakers or from the PRE OUT
connectors.
NOTE
To prevent hearing loss, do not raise the volume
level excessively when using headphones.
Spec. Index

ENGLISH
Remote
Control
Playback
(Advanced)
Connections
Simple
Version
Playback
(Basic)
Multi-
zone
GUISettings
Getting
Started
Troubleshooting
Other
Information
Spec. Index
Part
Names
q w e rt u i o Q0y r
Q1Q4 Q2Q3Q3Q5
Front Panel / Top Panel / Display
W4 AUDYSSEY MULTEQ
Lighting is as follows, depending on the setting
of “Dynamic EQ” (vpage 51) and “Dynamic
Volume” (vpage 52).
When “Dynamic EQ” and “Dynamic
Volume” are “ON”.
When “Dynamic EQ” is “ON” and
“Dynamic Volume” is “OFF”.
When “Dynamic EQ” and “Dynamic
Volume” are “OFF”.
®
indicators
W5 SLEEP indicator
This lights when the sleep mode is selected.
W6 RESTORER indicator
This lights when the RESTORER mode is
selected (vpage 26).
W7 ZONE2 indicators
This lights up when ZONE2 (separate room)
power is turned on.
W8 AL24 indicator
This lights when AL24 Processing (vpage 67) is
activated.
W9 Input mode indicators
Set the audio input modes for the different input
sources (vpage 47).
E0 HDMI indicator
This lights when playing using HDMI connections.
E1 Tuner reception mode indicators
These light according to the reception conditions
when the input source is set to “TUNER”.
STEREO: In the FM mode, these light when
receiving analog stereo broadcasts.
TUNED: Lights when the broadcast is properly
tuned in.
AUTO: These light when in the auto tuning
mode.
E2 Decoder indicators
These light when the respective decoders are
operating.
Rear Panel
See the page indicated in parentheses ( ).
q ETHERNET connector ································(16)
w TRIGGER OUT jack ·····································(17)
e S-VIDEO connector ····································(14)
r OPTICAL connector ······························(13, 15)
t DOCK CONTROL jack ·································(14)
y REMOTE CONTROL jacks ··························(17)
u RS-232C connector ····································· (17)
i FM/AM antenna terminals ························(15)
o Speaker terminals ··································(4, 35)
Q0 AC inlet (AC IN) ············································· (5)
Q1 ZONE2 OUT connectors ····························· (41)
Q2 PREOUT connectors ··································· (35)
Q3 Analog audio connectors ··················· (13 – 15)
Q4 HDMI connectors ········································ (12)
Q5 COAXIAL connector ···························(13 – 15)
When using the COAXIAL connector, set “Manual
Setup” – “Audio Setup” – “COAX Input Assign”
(vpage 56) on the GUI menu to “AUX1” or
“AUX2”.
NOTE
Do not touch the inner pins of the connectors on
•
the rear panel. Electrostatic discharge may cause
permanent damage to the unit.
Do not put your finger or foreign object in the
•
fan opening. Doing so could cause injury or unit
failure.

ENGLISH
q
r
y
e
w
i
o
Q0
Q1
Q2
Q3
Q4
u
t
Q5
Q6
Q7
Q8
W0
W1
W3
Q9
W2
W4
w
q
e
r
y
u
i
Q1
o
Q0
Q2
t
Q3
Q6
Q7
W0
Q9
Q8
Q5
Q4
Getting
Started
Version
Simple
Connections
Playback
(Basic)
(Advanced)
Playback
Multi-
zone
GUISettings
Remote
Control
Names
Part
Information
Other
Troubleshooting
Spec. Index
Remote Control Unit
For buttons not explained here, see the page indicated in parentheses ( ).
Front
n
NOTE
If buttons on the front or rear are pressed strongly,
the button on the opposite side will be activated
too.
q Remote control signal transmitter ···········(65)
w Signal transmission indicator ···················(59)
e Power buttons (ON, OFF) ····························(5)
r SLEEP button ·············································· (40)
t TV INPUT selector button ···················(59, 60)
y Input source select buttons ······················· (20)
u Play (1) button ···········································(10)
i Pause (3) button ········································(28)
SHIFT button ···············································
o SKIP (8, 9) buttons ···························(29)
CHANNEL +, – buttons ·······························
Q0 SEARCH (6, 7) buttons ······················(29)
TUNING +, – buttons ··································
Q1 TOP MENU button ·····································(20)
Q2 Cursor buttons (uio p) ··························(20)
Q3 MODE button ·············································· (58)
Q4 SOURCE SELECT button ···························(20)
Q5 TV POWER button ································(59, 60)
Q6 ONE TOUCH PLAY button ·························(39)
Q7 Stop (2) button ·········································· (28)
Q8 SURROUND button ···································· (31)
Q9 Master volume control buttons
(VOLUME) ···················································(28)
W0 Muting button (MUTE)
Temporarily mutes the audio.
To cancel, press MUTE again.
W1 POPUP/MENU button ································(20)
W2 RETURN button ··········································(43)
W3 ENTER button ·············································(43)
MEMO button ·············································
W4 DEVICE SELECT switch ······························ (59)
MAIN: Select this to operate this unit and the
iPod.
TV: Select this to operate the TV.
CBL/SAT: Select this to operate the satellite
tuner or cable TV.
ZONE2: Select this to operate ZONE2 (separate
room).
Rear
n
(27)
(27)
(27)
(27)
For TV, satellite tuner, or cable TV operation, be
sure to set the code for the remote control unit
before operating the device (vpage 59).
q RESOLUTION button ·································(13)
w AUDIO/RDS button ····································(30)
e Number buttons ···································(18, 59)
r CLEAR button ·············································(37)
t SEARCH button ··········································(37)
y PARAMETER button ··································· (32)
u DYNAMIC VOLUME™ button ···················(52)
i SETUP button ·············································(43)
o MULTEQ
®
button ······································· (51)
Q0 RESTORER button ······································ (26)
Q1 STATUS button ··········································(57)
Q2 RED/GRN/YEL/BLU buttons
Q3 ANGLE/RT button ······································(30)
Q4 SUBTITLE/PTY button ·······························(31)
Q5 RANDOM button ········································(29)
Q6 REPEAT button ···········································(29)
Q7 DISPLAY button ·········································· (18)
Q8 ENTER button ·············································(43)
Q9 Cursor buttons (uio p) ··························(20)
W0 RETURN button ··········································(43)

ENGLISH
Remote
Control
Playback
(Advanced)
Connections
Simple
Version
Playback
(Basic)
Multi-
zone
GUISettings
Getting
Started
Troubleshooting
Other
Information
Spec. Index
Part
Names
Inserting the Batteries
q Slide the rear lid in the
direction of the arrow and
remove it.
e Put the rear cover back on.
NOTE
Insert the specified batteries in the remote control unit.
•
Replace the batteries with new ones if the set does not operate
•
even when the remote control unit is operated close to the unit. (The
supplied batteries are only for verifying operation.)
When inserting the batteries, be sure to do so in the proper direction,
•
following the q and w marks in the battery compartment.
To prevent damage or leakage of battery fluid:
•
Do not use a new battery together with an old one.
•
Do not use two different types of batteries.
•
Do not attempt to charge dry batteries.
•
Do not short-circuit, disassemble, heat or dispose of batteries in
•
flames.
If the battery fluid should leak, carefully wipe the fluid off the inside
•
of the battery compartment and insert new batteries.
Remove the batteries from the remote control unit if it will not be in
•
use for long periods.
Used batteries should be disposed of in accordance with the local
•
regulations regarding battery disposal.
w Load the two batteries
properly as indicated by
the marks in the battery
compartment.
Remote Control Unit
Operating Range of the Remote Control
Unit
Point the remote control unit at the remote sensor when operating it.
30°
30°
Approx. 23 feet/7 m
NOTE
The set may function improperly or the remote control unit may not
operate if the remote control sensor is exposed to direct sunlight,
strong artificial light from an inverter type fluorescent lamp or infrared
light.
Inserting a Disc
Set the disc with the labeled side facing up.
•
Make sure the disc tray is fully open when inserting the disc.
•
Place the disc horizontally in the tray, aligned with the tray guide.
•
If a disc that cannot be played is loaded or the disc is loaded
up-sidedown, “NO DISC” is displayed on the player’s display.
NOTE
Only load one disc at a time. Loading two or more discs can damage
•
the unit or scratch the discs.
Do not use cracked or warped discs or discs that have been repaired
•
with adhesive, etc.
Do not use discs on which the sticky part of cellophane tape or labels
•
is exposed or on which there are traces of where labels have been
removed. Such discs can get caught inside the player and damage
it.
Do not use discs with special shapes, as they could damage the
•
player.
Do not push the disc tray in by hand when the power is turned off.
•
Doing so could damage the set.

ENGLISH
BD、DVD
タイトル1
チャプター1 チャプター2 チャプター1 チャプター2 チャプター3
タイトル2
SD
Memory Card
DVD-R/-RW、CD-R/-RWまたはSDカード
File1 File2 File3 Folder3
1st level
2nd level
3rd level
File4 File5
File6 File7
Folder1 Folder2
Getting
Started
Other Information
Version
Simple
Connections
Playback
(Basic)
(Advanced)
Playback
Multi-
zone
GUISettings
Remote
Control
Names
Part
About Discs and Files (vpage 66)
n
About Handling of Media (vpage 66)
n
Cleaning Discs (vpage 66)
n
About Copyright (vpage 67)
n
AL24 Processing (vpage 67)
n
Trademark Information (vpage 67)
n
Surround (vpage 68)
n
Language Code List (vpage 70)
n
Country Code List (vpage 71)
n
Explanation of Terms (vpage 72)
n
About Discs and Files
BD-Video, DVD-Video
n
BD-Video/DVD-Video discs are divided into several large sections
(titles) and small sections (chapter). These sections are all allotted
numbers, called the title numbers and chapter numbers.
GExampleH
Blu-ray Disc, DVD
Title1 Title2
CD
n
CDs are divided into several sections (tracks). These sections are
all allotted numbers, called the track numbers.
Track1 Track2 Track3 Track4 Track5
File
n
MP3/WMA/AAC/LPCM/JPEG files recorded on DVD-R/-RW/+R/
+RW, CD-R/-RW and SD memory card are divided into large
segments (folders) and small segments (files). Files are stored in
folders, and folders can be placed for storage in a hierarchy. This
unit can recognize up to 8 hierarchies of folder.
DVD-R/-RW/+R/+RW, CD-R/-RW
or SD memory card
Chapter 2Chapter 1Chapter 2Chapter 1
Chapter 3
About Handling of Media
Do not get fingerprints, oil or dirt on discs.
•
Take special care not to scratch discs when removing them from
•
their cases.
Do not bend or heat discs.
•
Do not enlarge the hole at the center.
•
Do not write on the labeled (printed) surface with ball-point pens,
•
pencils, etc., or stick new labels on discs.
Water droplets may form on discs if they are moved suddenly from
•
a cold place (outdoors for example) to a warm place, but do not try to
dry them off using a hairdryer, etc.
Do not eject an SD memory card or turn off this unit’s power while
•
the card content is in playback. This may result in malfunction or loss
of the card’s data.
Do not attempt to open or modify SD memory cards.
•
SD memory cards and files can be damaged by static electricity.
•
Do not touch the metal contacts of an SD memory card with your
fingers.
Do not use warped SD memory cards.
•
After use, be sure to remove any disc or SD memory card, and store
•
it in its proper card case, to avoid dust, scratches and deformation.
Do not store discs in the following places:
•
1. Places exposed to direct sunlight for long periods of time
2. Dusty or humid places
3. Places exposed to heat from heating appliances, etc.
Cleaning Discs
If there are fingerprints or dirt on discs, wipe them off before using
•
the disc.
Use a commercially available disc cleaning set or a soft cloth to clean
•
discs.
Information
Other
Troubleshooting
Spec. Index
When writing MP3/WMA/AAC/JPEG files on a CD-R/-RW disc, set
the writing software’s format to “ISO9660”. The files may not play
properly if they are recorded in other formats. For details, refer to the
instructions of your writing software.
Gently wipe the disc from the
inside towards the outside.
Do not wipe with a circular
motion.
NOTE
If buttons on the front or rear are pressed strongly, the button on the
opposite side will be activated too.

ENGLISH
Remote
Control
Playback
(Advanced)
Connections
Simple
Version
Playback
(Basic)
Multi-
zone
GUISettings
Getting
Started
Troubleshooting
Other
Information
Spec. Index
Part
Names
About Copyright
Unauthorised copying, broadcasting, public performance and lending
•
of discs are prohibited.
This product incorporates copyright protection technology that is
•
protected by U.S. patents and other intellectual property rights.
Use of this copyright protection technology must be authorised by
Macrovision, and is intended for home and other limited viewing
uses only unless otherwise authorised by Macrovision. Reverse
engineering or disassembly is prohibited.
Portions of this product are protected under copyright law and
•
provided under license by ARIS/SOLANA/4C.
AL24 Processing
AL24 Processing has inherited the technology of the original ALPHA
Processing that was used in DENON’s highly-successful referenceclass audio components.
AL24 Processing further reduces quantization distortion and represents
the ultimate analog waveform reproduction technology designed to
support the higher numbers of bits and higher sampling.
AL24 Processing senses the nature of the digital data being input and
interpolates the data so that it faithfully replicates the original analog
waveform. AL24 Processing operates when CD, MP3 or WMA data
is inputted.
Trademark Information
This product uses the following technologies:
is a trademark of the DVD Format /
Logo licensing Corporation.
Manufactured under license from Dolby
Laboratories. Dolby, Pro Logic and the
double-D symbol ( ) are trademarks of
Dolby Laboratories.
Manufactured under license under
U.S. Patent #’s: 5,451,942; 5,956,674;
5,974,380; 5,978,762; 6,226,616; 6,487,535;
7,212,872; 7,333,929; 7,392,195; 7,272,567
& other U.S. and worldwide patents issued
& pending. DTS is a registered trademark
and the DTS logos, Symbol, DTS-HD and
DTS-HD Master Audio are trademarks of
DTS, Inc.© 1996-2008 DTS, Inc. All Rights
Reserved.
“BD-LIVE” logo is trademark of Blu-ray
Disc Association.
“AVCHD” and “AVCHD” logo is the
trademark of Panasonic Corporation and
Sony Corporation.
HDMI, the HDMI logo and High-Definition
Multimedia Interface are trademarks or
registered trademarks of HDMI Licensing
LLC.
Manufactured under license from Audyssey
Laboratories™. U.S. and foreign patents
pending. Audyssey MultEQ® is a registered
trademark of Audyssey Laboratories.
Audyssey Dynamic EQ™ is a trademark of
Audyssey Laboratories. Audyssey Dynamic
Volume™ is a trademark of Audyssey
Laboratories.
“Blu-ray Disc” and are
trademarks.
Windows Media and the Windows logo
are trademarks or registered trademarks of
Microsoft Corporation in the United States
and/or other countries.
“BONUSVIEW” is the trademark of Blu-ray
Disc Association.
SDHC logo is a trademark.
Java and all other trademarks and logos are
trademarks or registered trademarks of Sun
Microsystems, Inc. in the United States
and/or other countries.

ENGLISH
Getting
Started
Surround
This unit is equipped with a digital signal processing circuit that lets you play program sources in the surround mode to achieve the same sense of presence as in a movie theater.
Version
Simple
Connections
Playback
(Basic)
(Advanced)
Playback
Multi-
zone
GUISettings
Remote
Control
Names
Part
Information
Other
Troubleshooting
Surround Modes and Audio Adjust
Surround Mode
(vpage 31)
STEREO
DOLBY PRO LOGIC gz S D D D D
DOLBY PRO LOGIC gx S D D D D
DOLBY PRO LOGIC g S D D D
DTS NEO:6
DOLBY DIGITAL
DOLBY DIGITAL Plus
DOLBY TrueHD
DTS SURROUND
DTS 96/24
DTS-HD
DTS EXPRESS
MULTI CH STEREO
ROCK ARENA
JAZZ CLUB
DOLBY VIRTUAL SPEAKER
Surround Mode
(vpage 31)
STEREO
DOLBY PRO LOGIC gz S (Height) S (OFF) S (Auto) S (OFF) S (0 dB) S S (OFF) S (OFF) S S
DOLBY PRO LOGIC gx S (Cinema) S (NOTE2) S (Auto) S (OFF) S (OFF) S (3) S (3) S S (OFF) S (OFF) S S
DOLBY PRO LOGIC g S (Cinema) S (NOTE3) S (Auto) S (OFF) S (OFF) S (3) S (3) S S S (OFF) S (OFF) S S
DTS NEO:6
DOLBY DIGITAL
DOLBY DIGITAL Plus
DOLBY TrueHD
DTS SURROUND
DTS 96/24
DTS-HD
DTS EXPRESS
MULTI CH STEREO
ROCK ARENA
JAZZ CLUB
DOLBY VIRTUAL SPEAKER
Front L/R Center Surround L/R Surround Back L/R Subwoofer Front Height L/R
S D
S D D D D
S D D D D D (NOTE1)
S D D D D D (NOTE1)
S D D D D D (NOTE1)
S D D D D D (NOTE1)
S D D D D D (NOTE1)
S D D D D D (NOTE1)
S D D D D D (NOTE1)
S D D D D D
S D D D D D
S D D D D D
S D
Mode Cinema EQ.
S (Cinema) S (NOTE2) S (OFF) S (0.3) S S (OFF) S (OFF) S S
S (OFF) S (OFF) S (0 dB) S S (ON) S S (OFF) S (OFF) S S
S (OFF) S (OFF) S (0 dB) S S (ON) S S (OFF) S (OFF) S S
S (OFF) S (Auto) S (0 dB) S S (ON) S S (OFF) S (OFF) S S
S (OFF) S (OFF) S (0 dB) S S (ON) S S (OFF) S (OFF) S S
S (OFF) S (OFF) S (0 dB) S S (ON) S S (OFF) S (OFF) S S
S (OFF) S (OFF) S (0 dB) S S (ON) S S (OFF) S (OFF) S S
S (OFF) S (OFF) S (0 dB) S S (ON) S S (OFF) S (OFF) S S
Signals and adjustability in the different modes
Channel output
S Signal/Adjustable
D Turned on or off by speaker configuration setting
NOTE1 This parameter is availabe when the “Front Height” is set to “ON”
(vpage 49).
NOTE2 This parameter is availabe when the “Mode” is set to “Cinema”
(vpage 32).
NOTE3 This parameter is availabe when the “Mode” is set to “Cinema” or
“ProLogic” (vpage 32).
NOTE4 BASS +6 dB, TREBLE +4 dB
NOTE :
z1 When playing Dolby TrueHD signal.
z2 When playing Dolby Digital and DTS signals.
Signals and adjustability in the different modes
Audio Adjust (default values are shown in parentheses) (vpage 48)
DRC
z1
S (Auto) S (OFF) S (0 dB) S (OFF) S (OFF) S S
S (Auto) S (OFF) S (0 dB) S (OFF) S (OFF) S S
D. COMP
z2
S (OFF) S (0 dB) S S (OFF) S (OFF) S S
S (OFF) S (0 dB) S S (NOTE4) S (OFF) S S
S (OFF) S (0 dB) S S (OFF) S (OFF) S S
LFE
z2
NEO:6 MUSIC mode only
Center Image Panorama Dimension Center Width
PRO LOGIC g/gx MUSIC mode only
Front Height
AFDMz2Surround
Back
Tone Control MultEQ Dynamic EQ
Dynamic
Volume
Spec. Index

ENGLISH
Remote
Control
Playback
(Advanced)
Connections
Simple
Version
Playback
(Basic)
Multi-
zone
GUISettings
Getting
Started
Troubleshooting
Other
Information
Spec. Index
Part
Names
Types of Input Signals, and Corresponding Surround Modes
Operation Buttons
WMA (Windows
Surround Mode (vpage 31)
SURROUND button
DTS SURROUND
DTS-HD MSTR
DTS-HD HI RES
DTS ES DSCRT6.1
DTS ES MTRX6.1
DTS SURROUND
DTS 96/24
DTS (–HD) + PLgx CINEMA z2 S S S S S S S
DTS (–HD) + PLgx MUSIC z1 S S S S S S S
DTS (–HD) + PLgz HEIGHT z3 S S S S S S S
DTS EXPRESS
DTS (–HD) + NEO:6
DTS NEO:6 CINEMA
DTS NEO:6 MUSIC
DOLBY SURROUND
DOLBY TrueHD
DOLBY DIGITAL+
DOLBY DIGITAL EX
DOLBY (D+) (HD) +EX
DOLBY DIGITAL
DOLBY (D) (D+) (HD) +PLgx CINEMA z2 S S F D S S S
DOLBY (D) (D+) (HD) +PLgx MUSIC z1 S S S S S S
DOLBY (D) (D+) (HD) +PLgz HEIGHT z3 S S S S S S
DOLBY PRO LOGIC gz HEIGHT z3 S S S S S
DOLBY PRO LOGIC gx CINEMA z1 S S S S S
DOLBY PRO LOGIC gx MUSIC z1 S S S S S
DOLBY PRO LOGIC gx GAME z1 S S S S S
DOLBY PRO LOGIC g CINEMA S S S S S
DOLBY PRO LOGIC g MUSIC S S S S S
DOLBY PRO LOGIC g GAME S S S S S
DOLBY PRO LOGIC
DOLBY VIRTUAL SPEAKER REFERENCE
DOLBY VIRTUAL SPEAKER WIDE
MULTI CH STEREO
ROCK ARENA
JAZZ CLUB
STEREO
Note
z1 F D
z1 F D
z1 S S S S S S
z1 S S S S
z1 S S
z4 S S S S S S S S S S S S S S S S S S S
z4 S S S S S S S S S S S S S S S S S S S
LINEAR
ANALOG
S S S S S
S S S S S
S S S S S
S S S S S S S S S S S S S S S
S S S S S S S S S S S S S S S
S S S S S S S S S S S S S S S
F F F S S S S S S S S S S S S S F S F
PCM/
WAV
Media Audio)/
MP3/MPEG-4
AAC/FLAC
DTS-HD DTS DOLBY DOLBY DIGITAL MULTI CH PCM
DTS-HD
Master Audio
F
DTS-HD High
Resolution
Audio
F
EXPRESS
DTS
F
DTS ES
DSCRT
(With Flag)
S S F
NOTE
z1 This mode is not available when the surround back speaker setup is set to “None”.
z2 This mode is not available when the surround back speaker setup is set to “1spkr” or “None”.
z3 This mode is not available when the front height speaker setup is set to “None”.
z4 This mode is available when the speaker setting is “2ch/2.1ch”.
Input Signal Types and Formats
DTS ES
MTRX
(With Flag)
DTS
(5.1ch)
DTS
96/24
F
DOLBY
TrueHD
F
DOLBY
DIGITAL
Plus
F
DOLBY DIGITAL
EX (With Flag)
DOLBY DIGITAL
EX (With no
Flag)
S F F F
F Mode selectable in initial status
D Mode fixed when “AFDM” is “ON”
S Selectable mode
DOLBY
DIGITAL
(5.1/5/4ch)
DOLBY
DIGITAL
(4/3ch)
DOLBY
DIGITAL
(2ch)
Surround
PCM
(multi ch)
PCM
(2ch)

ENGLISH
Getting
Started
Language Code List
Version
Simple
Connections
Playback
(Basic)
(Advanced)
Playback
Multi-
zone
GUISettings
Remote
Control
Names
Part
Information
Other
Troubleshooting
Spec. Index
Language Code
Abkhazian 4748
A
Afar 4747
Afrikaans 4752
Albanian 6563
Amharic 4759
Arabic 4764
Armenian 5471
Assamese 4765
Aymara 4771
Azerbaijani 4772
Bashkir 4847
B
Basque 5167
Bengali;Bangla 4860
Bhutani 5072
Bihari 4854
Bislama 4855
Breton 4864
Bulgarian 4853
Burmese 5971
Byelorussian 4851
Cambodian 5759
C
Catalan 4947
Chinese 7254
Corsican 4961
Croatian 5464
Czech 4965
Danish 5047
D
Dutch 6058
English 5160
E
Esperanto 5161
Estonian 5166
Faroese 5261
F
Fiji 5256
Finnish 5255
French 5264
Frisian 5271
Galician 5358
G
Georgian 5747
German 5051
Greek 5158
Greenlandic 5758
Guarani 5360
Gujarati 5367
Hausa 5447
H
Hebrew 5569
Hindi 5455
Hungarian 5467
Language Code
Icelandic 5565
I
Indonesian 5560
Interlingua 5547
Interlingue 5551
Inupiak 5557
Irish 5347
Italian 5566
Japanese 5647
J
Javanese 5669
Kannada 5760
K
Kashmiri 5765
Kazakh 5757
Kinyarwanda 6469
Kirghiz 5771
Kirundi 6460
Korean 5761
Kurdish 5767
Laothian 5861
L
Latin 5847
Latvian; Lettish 5868
Lingala 5860
Lithuanian 5866
Macedonian 5957
M
Malagasy 5953
Malay 5965
Malayalam 5958
Maltese 5966
Maori 5955
Marathi 5964
Moldavian 5961
Mongolian 5960
Nauru 6047
N
Nepali 6051
Norwegian 6061
Occitan 6149
O
Oriya 6164
Oromo (Afan) 6159
Panjabi 6247
P
Pashto; Pushto 6265
Persian 5247
Polish 6258
Portuguese 6266
Quechua 6367
Q
Rhaeto-Romance 6459
R
Romanian 6461
Russian 6467
Language Code
Samoan 6559
S
Sangho 6553
Sanskrit 6547
Scots Gaelic 5350
Serbian 6564
Serbo-Croatian 6554
Sesotho 6566
Setswana 6660
Shona 6560
Sindhi 6550
Singhalese 6555
Siswat 6565
Slovak 6557
Slovenian 6558
Somali 6561
Spanish 5165
Sundanese 6567
Swahili 6569
Swedish 6568
Tagalog 6658
T
Tajik 6653
Tamil 6647
Tatar 6666
Telugu 6651
Thai 6654
Tibetan 4861
Tigrinya 6655
Tonga 6661
Tsonga 6665
Turkish 6664
Turkmen 6657
Twi 6669
Ukrainian 6757
U
Urdu 6764
Uzbek 6772
Vietnamese 6855
V
Volapuk 6861
Welsh 4971
W
Wolof 6961
Xhosa 7054
X
Yiddish 5655
Y
Yoruba 7161
Zulu 7267
Z
0

ENGLISH
Remote
Control
Playback
(Advanced)
Connections
Simple
Version
Playback
(Basic)
Multi-
zone
GUISettings
Getting
Started
Troubleshooting
Other
Information
Spec. Index
Part
Names
Country Code List
Country Code
AFGHANISTAN AF
A
ÅLAND ISLANDS AX
ALBANIA AL
ALGERIA DZ
AMERICAN SAMOA AS
ANDORRA AD
ANGOLA AO
ANGUILLA AI
ANTARCTICA AQ
ANTIGUA AND BARBUDA AG
ARMENIA AM
ARUBA AW
AZERBAIJAN AZ
BAHAMAS BS
B
BAHRAIN BH
BANGLADESH BD
BARBADOS BB
BELARUS BY
BELIZE BZ
BENIN BJ
BERMUDA BM
BHUTAN BT
BOLIVIA BO
BOSNIA AND
HERZEGOVINA
BOTSWANA BW
BOUVET ISLAND BV
BRITISH INDIAN OCEAN
TERRITORY
BRUNEI DARUSSALAM BN
BULGARIA BG
BURKINA FASO BF
BURUNDI BI
CAMBODIA KH
C
CAMEROON CM
CAPE VERDE CV
CAYMAN ISLANDS KY
CENTRAL AFRICAN
REPUBLIC
CHAD TD
CHRISTMAS ISLAND CX
COCOS (KEELING) ISLANDS CC
COMOROS KM
CONGO CG
CONGO, THE DEMOCRATIC
REPUBLIC OF THE
COOK ISLANDS CK
COSTA RICA CR
CÔTE D’IVOIRE CI
BA
IO
CF
CD
Country Code
CROATIA HR
CUBA CU
CYPRUS CY
CZECH REPUBLIC CZ
DJIBOUTI DJ
D
DOMINICA DM
DOMINICAN REPUBLIC DO
ECUADOR EC
E
EGYPT EG
EL SALVADOR SV
EQUATORIAL GUINEA GQ
ERITREA ER
ESTONIA EE
ETHIOPIA ET
FALKLAND ISLANDS
F
(MALVINAS)
FAROE ISLANDS FO
FIJI FJ
FRENCH GUIANA GF
FRENCH POLYNESIA PF
FRENCH SOUTHERN
TERRITORIES
GABON GA
G
GAMBIA GM
GEORGIA GE
GHANA GH
GIBRALTAR GI
GREENLAND GL
GRENADA GD
GUADELOUPE GP
GUAM GU
GUATEMALA GT
GUERNSEY GG
GUINEA GN
GUINEA-BISSAU GW
GUYANA GY
HAITI HT
H
HEARD ISLAND AND
MCDONALD ISLANDS
HOLY SEE (VATICAN CITY
STATE)
HONDURAS HN
HUNGARY HU
ICELAND IS
I
IRAN, ISLAMIC REPUBLIC
OF
IRAQ IQ
ISLE OF MAN IM
ISRAEL IL
FK
TF
HM
VA
IR
Country Code
JAMAICA JM
J
JERSEY JE
JORDAN JO
KAZAKHSTAN KZ
K
KENYA KE
KIRIBATI KI
KOREA, DEMOCRATIC
PEOPLE’S REPUBLIC OF
KUWAIT KW
KYRGYZSTAN KG
LAO PEOPLE’S
L
DEMOCRATIC REPUBLIC
LATVIA LV
LEBANON LB
LESOTHO LS
LIBERIA LR
LIBYAN ARAB JAMAHIRIYA LY
LIECHTENSTEIN LI
LITHUANIA LT
MACAO MO
M
MACEDONIA, THE FORMER
YUGOSLAV REPUBLIC OF
MADAGASCAR MG
MALAWI MW
MALDIVES MV
MALI ML
MALTA MT
MARSHALL ISLANDS MH
MARTINIQUE MQ
MAURITANIA MR
MAURITIUS MU
MAYOTTE YT
MICRONESIA, FEDERATED
STATES OF
MOLDOVA MD
MONACO MC
MONGOLIA MN
MONTENEGRO ME
MONTSERRAT MS
MOROCCO MA
MOZAMBIQUE MZ
MYANMAR MM
NAMIBIA NA
N
NAURU NR
NEPAL NP
NETHERLANDS ANTILLES AN
NEW CALEDONIA NC
NICARAGUA NI
NIGER NE
KP
LA
MK
FM
Country Code
NIGERIA NG
NIUE NU
NORFOLK ISLAND NF
NORTHERN MARIANA
ISLANDS
OMAN OM
O
PALAU PW
P
PALESTINIAN TERRITORY,
OCCUPIED
PANAMA PA
PAPUA NEW GUINEA PG
PARAGUAY PY
PERU PE
PITCAIRN PN
PUERTO RICO PR
QATAR QA
Q
RÉUNION RE
R
ROMANIA RO
RWANDA RW
SAINT BARTHÉLEMY BL
S
SAINT HELENA SH
SAINT KITTS AND NEVIS KN
SAINT LUCIA LC
SAINT MARTIN MF
SAINT PIERRE AND
MIQUELON
SAINT VINCENT AND THE
GRENADINES
SAMOA WS
SAN MARINO SM
SAO TOME AND PRINCIPE ST
SAUDI ARABIA SA
SENEGAL SN
SERBIA RS
SEYCHELLES SC
SIERRA LEONE SL
SLOVAKIA SK
SLOVENIA SI
SOLOMON ISLANDS SB
SOMALIA SO
SOUTH AFRICA ZA
SOUTH GEORGIA AND
THE SOUTH SANDWICH
ISLANDS
SRI LANKA LK
SUDAN SD
SURINAME SR
SVALBARD AND JAN
MAYEN
SWAZILAND SZ
MP
PS
PM
VC
GS
SJ
Country Code
SYRIAN ARAB REPUBLIC SY
TAJIKISTAN TJ
T
TANZANIA, UNITED
REPUBLIC OF
TIMOR-LESTE TL
TOGO TG
TOKELAU TK
TONGA TO
TRINIDAD AND TOBAGO TT
TUNISIA TN
TURKEY TR
TURKMENISTAN TM
TURKS AND CAICOS
ISLANDS
TUVALU TV
UGANDA UG
U
UKRAINE UA
UNITED ARAB EMIRATES AE
UNITED STATES MINOR
OUTLYING ISLANDS
URUGUAY UY
UZBEKISTAN UZ
VANUATU VU
V
VATICAN CITY STATE VA
VENEZUELA VE
VIET NAM VN
VIRGIN ISLANDS, BRITISH VG
VIRGIN ISLANDS, U.S. VI
WALLIS AND FUTUNA WF
W
WESTERN SAHARA EH
YEMEN YE
Y
ZAMBIA ZM
Z
ZIMBABWE ZW
TZ
TC
UM

ENGLISH
Getting
Started
Explanation of Terms
Numerics
4:3 LB (letterbox)
Version
Simple
When a wide (16:9) disc is played back by connecting
a 4:3 TV and this unit, this function plays back the
image with black area at the top and bottom.
4:3 PS (pan scan)
Connections
When a wide (16:9) disc is played back by
connecting a 4:3 TV and this unit, this function cuts
left and right of the played back image to the 4:3
size according to the disc’s control information.
Playback
(Basic)
AAC (Advanced Audio Coding)
A
This is an internationally standardized audio data
compression scheme. It has a compression ratio
1.4 times higher than the “MP3 audio compression
scheme adopted for “MPEG-1.
Aspect ratio
This is the length and width ratio of the TV screen.
The conventional TV’s screen ratio is 4:3 and the
(Advanced)
Playback
wide screen TV’s screen ratio is 16:9.
Audio commentary
This is an audio program included as a bonus
feature in a DVD-Video or BD-Video. It uses a multi-
Multi-
audio function to provide an audio explanation or
zone
commentary by members of the crew or director,
etc. to accompany the video.
Audyssey Dynamic EQ™
GUISettings
Audyssey Dynamic EQ solves the problem of
deteriorating sound quality as volume is decreased
Remote
Control
by taking into account human perception and room
acoustics. Audyssey Dynamic EQ works in tandem
with Audyssey MultEQ® to provide well-balanced
sound for every listener at any volume level.
Names
Part
Information
Other
Troubleshooting
Spec. Index
Audyssey Dynamic Volume™
Audyssey Dynamic Volume solves the problem of
large variations in volume level between television
programs, commercials, and between the soft and
loud passages of movies. Audyssey Dynamic EQ
is integrated into Dynamic Volume so that as the
playback volume is adjusted automatically, the
perceived bass response, tonal balance, surround
impression, and dialog clarity remain the same.
Audyssey MultEQ
®
Audyssey MultEQ is a room equalization solution
that calibrates any audio system so that it can
achieve optimum performance for every listener
in a large listening area. Based on several room
measurements, MultEQ calculates an equalization
solution that corrects for both time and frequency
response problems in the listening area and also
performs a fully automated surround system
setup.
AVCHD (Advanced Video Codec High
Definition)
This is a high-definition digital camera (HD) standard
using high-efficiency encoding technology for
recording high-definition Hi-Vision signals to various
media.
B
BD-J (Blu-ray Disc Java)
With BD-Videos, there are fun software with
more interactive functions (games) using Java
applications.
BD-LIVE
This unit can be connected to the Internet to enjoy
a number of features, including additional contents
such as special videos or subtitles, network games,
etc.
Bit rate
This expresses the read amount per 1 second of
video/audio data recorded in a disc.
Blu-ray Disc
This is one-side 1 layer disc having 25 GB capacity
and can record high vision video movie and games.
Bonus View
Special images for BD-Videos. It includes comment
of the movie director, simultaneously developing
sub-story, and images from different angles.
C
Chapter
This is a break intended by a producer who
organizes the title of Blu-ray Disc or DVD-Video. The
chapter search function searches the beginning of
this break.
D
Deep Color
This technology allows expression of more number
of colors than the conventional 8 bits and can
reproduce colors close to natural ones without color
streak.
DHCP (Dynamic Host Configuration Protocol)
This mechanism automatically perform network
configuration such as IP address for network devices
including the unit, PC, and broadband router.
Dolby Digital
Dolby Digital is a multi-channel digital signal format
developed by Dolby Laboratories.
A total of 5.1 channels are played: 3 front channels
(“FL” , “FR” and “C”), 2 surround channels
(“SL” and “SR”) and the “LFE” channel for low
frequencies.
Because of this, there is no crosstalk between
channels and a realistic sound field with a “threedimensional” feeling (sense of distance, movement
and positioning) is achieved.
A realistic, powerful sense of presence is achieved
when playing movie sources in AV rooms as well.
Dolby Digital EX
Dolby Digital EX is a 6.1-channel surround format
proposed by Dolby Laboratories that allows users
to enjoy in their homes the “DOLBY DIGITAL
SURROUND EX” audio format jointly developed by
Dolby Laboratories and Lucas Films.
The 6.1 channels of sound, including surround back
channels, provide improved sound positioning and
expression of space.
Dolby Digital Plus
Dolby Digital Plus is an improved Dolby Digital signal
format that is compatible with up to 7.1 channels
of discrete digital sound and also improves sound
quality thanks to extra data bit rate performance.
It is upwardly compatible with conventional Dolby
Digital, so it offers greater flexibility in response to
the source signal and the conditions of the playback
equipment.
Dolby TrueHD
Dolby TrueHD is a high definition audio technology
developed by Dolby Laboratories, using lossless
coding technology to faithfully reproduce the sound
of the studio master.
This format is compatible with a maximum sampling
frequency of 96 kHz and up to 7.1 channels, so it is
used for applications particularly prioritizing sound
quality.
Dolby Pro Logic g
Dolby Pro Logic g is a matrix decoding technology
developed by Dolby Laboratories.
Regular music such as that on CDs is encoded into
5 channels to achieve an excellent surround effect.
The surround channel signals are converted into
stereo and full band signals (with a frequency
response of 20 Hz to 20 kHz or greater) to create
a “three-dimensional” sound image offering a rich
sense of presence for all stereo sources.
Dolby Pro Logic gx
Dolby Pro Logic gx is a further improved version of
the Dolby Pro Logic g matrix decoding technology.
Audio signals recorded in 2 channels are decoded
to achieve a natural sound with up to 7.1 channels.
There are three modes: “Music” suited for playing
music, “Cinema” suited for playing movies, and
“Game” which is optimized for playing games.

ENGLISH
Remote
Control
Playback
(Advanced)
Connections
Simple
Version
Playback
(Basic)
Multi-
zone
GUISettings
Getting
Started
Troubleshooting
Other
Information
Spec. Index
Part
Names
Dolby Pro Logic gz
Dolby Pro Logic gz introduces a new dimension to
Home Entertainment through the addition of a pair
of front height channels. Compatible with stereo,
5.1-channel and 7.1-channel content, Dolby Pro
Logic gz provides enhanced spaciousness, depth
and dimension to movies, concert video and video
game playback while maintaining the full integrity
of the source mix.
Dolby Pro Logic gz identifies and decodes spatial
cues that occur naturally in all content, directing
this information to the front height channels,
complementing the performance of left and right
surround sound speakers. Content that is encoded
with Dolby Pro Logic gz height channel information
can be even more revealing, with perceptually
discrete height channel information bringing an
exciting new dimension to home entertainment.
Dolby Pro Logic gz, with front height channels is
also an ideal alternative for households that cannot
support the placement of back surround speakers
of a typical 7.1-channel system but may have
bookshelf space available to support the addition of
height speakers.
Dolby Virtual Speaker
This is technology from Dolby Laboratories.
It is a surround system using just two speakers to
create the effect of surround sound, with sound
even coming from behind you as if it was a 5.1channel system.
Downmix
This function converts the number of channels of
surround audio to less number of channels and
plays back.
DTS
This is an abbreviation of Digital Theater System,
which is a digital audio system developed by DTS.
When playing back audio by connecting this system
with a device such as DTS amplifier, accurate sound
field position and realistic sound effect as if you are
in a movie theater can be obtained.
DTS 96/24
DTS 96/24 is a digital audio format enabling high
sound quality playback in 5.1 channels with a
sampling frequency of 96 kHz and 24 bit quantization
on DVD-Video.
DTS Digital Surround
DTS Digital Surround is the standard digital surround
format of DTS, Inc., compatible with a sampling
frequency of 44.1 or 48 kHz and up to 5.1 channels
of digital discrete surround sound.
DTS-ES™ Discrete 6.1
DTS-ES™ Discrete 6.1 is a 6.1-channel discrete
digital audio format adding a surround back (SB)
channel to the DTS digital surround sound.
Decoding of conventional 5.1-channel audio signals
is also possible according to the decoder.
DTS-ES™ Matrix 6.1
DTS-ES™ Matrix 6.1 is a 6.1-channel discrete digital
audio format inserting a surround back (SB) channel
to the DTS digital surround sound through matrix
encoding. Decoding of conventional 5.1-channel
audio signals is also possible according to the
decoder.
DTS Express
DTS Express is an audio format supporting low bit
rates (max. 5.1 channels, 24 to 256 kbps).
Manufactured under license under U.S. Patent
#s: 5,451,942; 5,956,674; 5,974,380; 5,978,762;
6,226,616; 6,487,535; 7,212,872; 7,333,929;
7,392,195; 7,272,567 & other U.S. and worldwide
patents issued & pending. DTS is a registered
trademark and the DTS logos, Symbol, DTS-HD and
DTS-HD Master Audio are trademarks of DTS, Inc.
© 1996-2008 DTS, Inc. All Rights Reserved.
DTS-HD
This audio technology provides higher sound quality
and enhanced functionality than the conventional
DTS and is adopted as an optional audio for Blu-ray
Disc. This technology supports multi-channel, high
data transfer speed, high sampling frequency, and
lossless audio playback. Maximum 7.1-channels are
supported in Blu-ray Disc.
DTS-HD High Resolution Audio
DTS-HD High Resolution Audio is an improved
version of the conventional DTS, DTS-ES and
DTS 96/24 signals formats, compatible with
sampling frequencies of 96 or 48 kHz and up to
7.1 channels of discrete digital sound. High data
bit rate performance provides high quality sound.
This format is fully compatible with conventional
products, including conventional DTS digital
surround 5.1-channel data.
DTS-HD Master Audio
DTS-HD Master Audio is DTS, Inc’s lossless audio
format compatible with up to 96 kHz/7.1 channels.
The lossless audio coding technology faithfully
reproduces the sound of the studio master. It
is fully compatible with conventional products,
including conventional DTS digital surround 5.1channel data.
DTS NEO:6™ Surround
DTS NEO:6™ is a matrix decoding technology for
achieving 6.1-channel surround playback with 2channel sources. It includes “DTS NEO:6 Cinema”
suited for playing movies and “DTS NEO:6 Music”
suited for playing music.
Dynamic range
The difference between the maximum undistorted
sound level and the minimum sound level that is
discernible above the noise emitted by the device.
F
Finalise
This is processing that enables playing back of
disc of BD/DVD/CD, which was recorded using a
recorder, by other players.
H
HDCP
When transmitting digital signals between devices,
this copyright protection technology encrypts
the signals to prevent content from being copied
without authorization.
HDMI
This is an abbreviation of High-Definition Multimedia
Interface, which is an AV digital interface that can
be connected to a TV or amplifier. Video signal and
audio signal can be connected using 1 cable.
I
Interlacing (interlaced scanning)
This conventional method used to project images
on a TV displays 1 frame of image in half and half,
respectively as 2 fields.
Interactive audio
Audio such as click sound that is generated during
operation and is recorded in the title of BD-Videos.
Explanation of Terms
J
JPEG (Joint Photo graphic Experts Group)
This is a still picture data compression standard. Its
ability to reduce the size of a file with relatively little
deterioration in image quality means that it is widely
used for storing images in video cameras, etc.
L
LFE
This is an abbreviation of Low Frequency Effect,
which is an output channel that emphasizes low
frequency effect sound. Surround audio is intensified
by outputting 20 Hz to 120 Hz deep bass.
Linear PCM
This signal is uncompressed PCM (Pulse Code
Modulation) signal. This is the same system as the
CD audio but this uses 192 kHz, 96 kHz, and 48 kHz
sampling frequencies in Blu-ray Disc or DVD and
provides higher sound quality than CD.
M
MP3 (MPEG AudioPlayer 3)
This is an internationally standardized audio data
compression scheme, using the “MPEG-1” video
compression standard. It compresses the data
volume to about one eleventh its original size while
maintaining sound quality equivalent to a music
CD.
MPEG (Moving Picture Experts Group), MPEG-2,
MPEG-4
These are the names for digital compression format
standards used for the encoding of video and audio.
Video standards include “MPEG-1 Video”, “MPEG2 Video”, “MPEG-4 Visual”, “MPEG-4 AVC”. Audio
standards include “MPEG-1 Audio”, “MPEG-2
Audio”, “MPEG-4 AAC”.
Multi-zone
This is a function for sharing audio and video from
an AV device across several rooms.
For example, you could have 5.1-channel surround
playing in the MAIN ZONE (the room in which this
unit is located) and video and audio from an iPod in
ZONE2 (another room).

ENGLISH
Getting
Started
P
Picture-in-picture
This BD-Video function allows you to view making
Version
Simple
or commentary scenes in the secondary video while
viewing the main story in the primary video.
Popup menu
This menu recorded in Blu-ray Disc software.
While playing back a Blu-ray Disc, this menu can
Connections
be displayed on the front of the screen and can be
operated.
Primary audio
This audio signal is recorded in the main story in
BD-Video.
Playback
(Basic)
Progressive (sequential scanning)
This is a scanning system of video signal that
displays 1 frame of video as one image. Compared
to the interlace system, this system provides
images with less flickering and bleeding.
Protection Circuit
This is a function to prevent damage to components
within the power supply when an abnormality such
(Advanced)
Playback
as an overload or excess voltage occurs for any
reason.
In this unit, the power indicator blinks and the unit
enters standby mode when an abnormality occurs.
Multi-
zone
R
Rating
Depending on the age of the viewer, this function
GUISettings
restricts playing back of BD-Video or DVD-Video.
This unit can be set to restrict viewing in 0 to 254
level for BD-Video, and 1 to 8 level for DVD-Video.
Remote
Control
Region code
This code indicates country or region where the
Blu-ray Disc or DVD-Video can be played back.
Names
Part
S
Sampling frequency
Sampling involves taking a reading of a sound wave
Information
Other
(analog signal) at regular intervals and expressing
the height of the wave at each reading in digitized
format (producing a digital signal).
The number of readings taken in one second is
Troubleshooting
called the “sampling frequency”. The larger the
value, the closer the reproduced sound is to the
original.
Secondary audio
This is audio signals of comment of movie director
Spec. Index
and other data recorded in the bonus view of BDVideo.
Explanation of Terms
T
Title
This is the unit of content that consists of chapters
of Blu-ray Disc or DVD-Video. Some Blu-ray Disc or
DVD-Video may include multiple titles.
W
WMA (Windows Media Audio)
This is audio compression technology developed by
Microsoft Corporation.
WMA data can be encoded using Windows
Media® Player Ver.7, 7.1, Windows Media® Player
for Windows® XP and Windows Media® Player 9
Series.
To encode WMA files, only use applications
authorized by Microsoft Corporation. If you use
an unauthorized application, the file may not work
properly.
X
x.v.Color
This function lets HDTVs display colors more
accurately. It enables display with natural, vivid
colors. “x.v.Color” is a Sony registered trademark.
Troubleshooting
If a problem should arise, first check the following:
1. Are the connections correct?
2. Is the set being operated as described in the owner’s manual?
3. Are the other components operating properly?
If this unit does not operate properly, check the items listed in the table below. Should the problem persist,
there may be a malfunction.
In this case, disconnect the power immediately and contact your store of purchase.
GGeneralH
Symptom Cause/Solution Page
Power does not turn
on.
Display is off. Set “Dimmer” on the GUI menu to something other than “OFF”.• 57
The power indicator
is blinking red
in intervals of
approximately 2
seconds.
The power indicator
is blinking red
in intervals of
approximately 0.5
seconds.
After turning on the
power, the power
indicator is blinking
red in intervals of
approximately 0.5
seconds.
Set does not operate
properly.
The power turns off
or the input source
suddenly switches
for no reason.
Check whether the power plug is correctly inserted into the power
•
outlet.
Check whether the power cord is correctly inserted into the AC
•
inlet.
The protection circuit is active. Disconnect the power plug from
•
the electric outlet, wait 5 to 10 seconds and then insert it back
into the outlet.
The temperature inside the unit has risen. Please turn off power
•
once, and re-apply the power after the temperature has fallen
sufficiently.
Please re-install this unit in a place having good ventilation.
•
Please use speakers which have the specified impedance.
•
The speaker cable has shorted (is touching). Firmly twist the core
•
wire in the speaker cable, and then re-connect it to the speaker
terminal.
The unit amplifier circuit has failed. Turn off the power and please
• –
contact the DENON service adviser.
Reset the microprocessor.• 77
When “HDMI Control” – “Control” on the GUI menu is set to
• 55
“ON“, operation of this unit is linked to the operation of the TV.
5
5
5
–
–
4
4

ENGLISH
GAudioH
Symptom Cause/Solution Page
Audio is not output. Check the connections for all devices.
•
Check the speaker connections.
•
Check whether the audio device power is turned on.
•
Adjust the master volume.
•
Cancel the mute mode.
•
Select a suitable input source.
•
Select a suitable input mode.
•
Disconnect the headphones. No sound is output from the speakers
•
or the PRE OUT connectors when headphones are connected.
No sound is
produced from
surround back
speaker.
Set “Speaker Assign” on the GUI menu to “5.1CH + Surround
•
Back”.
Set “Speaker Configuration” – “Surround Back” on the GUI menu
•
to something other than “None”.
Set “Surround Parameters” – “Surround Back” on the GUI menu
•
to something other than “OFF”.
Set the surround mode to something other than “STEREO”.
•
No sound is
produced from front
height speaker.
Set “Audio Adjust” – “Surround Parameters” – “Front Height” on
•
the GUI menu to “ON”.
Set “Manual Setup” – “Speaker Setup” – “Speaker Assign” on
•
the GUI menu to “5.1CH + Front Height”.
No sound is
produced from
subwoofer.
DTS sound is not
Check the subwoofer connections.
•
Turn on the subwoofer’s power.
•
Set “Subwoofer” on the GUI menu to “Yes”.
•
Set “Decode Mode” on the GUI menu to “Auto” or “DTS”.• 47
output.
Dolby TrueHD, DTS-
Make HDMI connections.• 12
HD, Dolby Digital
Plus audio is not
output.
HD audio is not
output.
Audio input to the
COAXIAL connector
Set “BD Audio Mode” on the MODE menu to “HD Audio
• 58
Output”.
Set “Manual Setup” – “Audio Setup” – “COAX Input Assign” on
• 56
the GUI menu to “AUX1” or “AUX2”.
is not output.
Audio input to the
OPTICAL connector
is not output.
Set “Source Select” – “Input Mode” on the GUI menu to “Auto”
•
or “Digital”.
Set “Manual Setup” – “Audio Setup” – “COAX Input Assign” on
•
the GUI menu to “OFF”.
12
4, 35
5
28
10, 64
20
47
62
53
54
50
31
49
53
4
–
53
47
56
GVideoH
Symptom Cause/Solution Page
No picture appears. Check the TV connection.
No picture appears,
the picture is
disrupted, or the Bluray disc or DVD video
picture appears in
black and white.
Picture quality has
deteriorated.
•
Set the TV input correctly.
•
The picture may be slightly disturbed directly after fast-forwarding
•
or reversing. This is not a malfunction.
Discs not compatible with this unit, or discs with different region
•
codes, cannot be played back. The region codes compatible with
this unit include “A” for BD-Video and “1” or “ALL” for DVD
video.
When ZONE2 is powered on, the HDMI video resolution in the
MAIN ZONE switches automatically according to the input signal.
GHDMIH
Symptom Cause/Solution Page
No audio is
output with HDMI
connection.
Check the connection of the HDMI connectors.
•
When outputting HDMI audio from the speakers, set “HDMI
•
Audio Out” on the GUI menu to “AMP”.
When outputting HDMI audio from a TV, set “HDMI Audio Out”
•
on the GUI menu to “TV”.
No video is
output with HDMI
connection.
Check the connection of the HDMI connectors.
•
Set the input source to match the connected HDMI connector.
•
Check whether the TV is compatible with copyright protection
•
(HDCP). If connected to a device not compatible with HDCP, video
will not be output correctly.
Check whether the HDMI video resolution set in this unit is
•
compatible with the TV resolution. If set to “Auto”, this unit sets
it automatically.
When the following
operations are
performed on
Set “HDMI Control” – “Control” on the GUI menu to “OFF”. To
• 55
operate power only for each device, set “Power Off Control” to
“OFF”.
devices compatible
with HDMI control,
the same operations
occur on this unit.
Power ON/OFF
•
Switching audio
•
output devices
Adjust volume
•
Switch input source
•
12, 13
–
29
19
13, 41
12
55
55
12
20
–
13
Getting
Started
Version
Simple
Connections
Playback
(Basic)
(Advanced)
Playback
Multi-
zone
GUISettings
Remote
Control
Names
Part
Information
Other
Troubleshooting
Spec. Index

ENGLISH
Getting
Started
Version
Simple
Connections
Playback
(Basic)
(Advanced)
Playback
Multi-
zone
GUISettings
Remote
Control
Names
Part
Information
Other
Troubleshooting
GBlu-ray DiscH
Symptom Cause/Solution Page
Picture freezes
momentarily during
playback.
Playback does not
start even when 1 is
pressed, or starts but
stops immediately.
The disc may not play back correctly if it is scratched or dirty.
•
Either clean the disc or replace it.
There may be a problem with the recorded disc.
•
Check whether there is condensation on the inside of the unit or
•
disc. If there is condensation, turn off the power and let the unit
stand for 1 to 2 hours.
The disc may not play back correctly if it is scratched or dirty.
•
Either clean the disc or replace it.
Check whether the disc has been inserted upside down. Insert
•
the disc so that the recording surface to be played back faces
downward.
Check whether a disc that cannot be played back on this unit has
•
been inserted.
Subtitles are not
displayed.
Wallpaper is not
displayed even after
Subtitles cannot be displayed for BD-Video or DVD-Video that do
•
not contain subtitles.
Check whether the subtitles setting is set to “OFF”.
•
An internal error may have occurred in the unit. Set the power to
• –
standby, wait awhile, then turn the power back on.
the disc has been
removed.
Button operation
does not work. The
unit fails to operate.
Operations may not be permitted by the disc. Refer to the
•
instructions of the disc.
The protection circuit is active. In this case, disconnect the power
•
plug from the electric outlet, wait 5 to 10 seconds and then insert
it back into the outlet.
The unit fails to read
the disc.
The pickup lens may be dirty. Use a commercially available lens
• –
cleaner to clean the laser pickup. Avoid use of cleaners equipped
with brushes, since they may scratch the lens.
Angle does not
switch.
If a BD-Video or DVD-Video does not record multiple angles, angle
• 30
cannot be switched. Also, multiple angles may be recorded for
specific scenes.
Playback does not
start when the title is
Playback may be prohibited by the viewing restriction setting.
• 45
Check “Ratings” on the GUI menu.
selected.
The password for
Reset the microprocessor.• 77
rating level has been
forgotten.
66
65
19
31
44
65
74
GRadioH
Symptom Cause/Solution Page
–
–
2
Reception fails, or
there is a lot of noise
or distortion.
Change the antenna orientation or position.
•
Separate the AM loop antenna from the unit.
•
Use an FM outdoor antenna.
•
Separate the antenna from other connection cables.
•
15
15
15
15
GSD memory cardH
Symptom Cause/Solution Page
Unable to play back
bonus view.
Check that capacity on the SD memory card is 1 GB or more.
•
Initialize the SD memory card on this unit.
•
Was the SD memory card mounted while the power was turned
•
19
46
19
on? Mount the SD memory card while in Standby state.
SD memory card
cannot be read.
An incompatible SD memory card may have been inserted, or the
• 19
recording format may not be compatible with the unit, preventing
recognition.
GUSB memory deviceH
Symptom Cause/Solution Page
When a USB
memory device is
connected, “USB” is
not displayed on the
GUI menu.
Files on a USB
memory device
cannot be played.
The set cannot recognize a USB memory device. Check the
•
connection.
A USB memory device not conforming to mass storage class is
•
connected. Connect a USB memory device conforming to mass
storage class.
A USB memory device cannot be connected via a USB hub.
•
Set the USB memory device format to “FAT16” or “FAT32”. For
•
details, refer to the USB memory device’s operating instructions.
If the USB memory device is divided into multiple partitions, only
•
14
19
14
19
–
files stored in the top partition can be played.
The file is recorded in an incompatible format. Please record it in
•
19
a compatible format.
This unit cannot play back files covered by copyright protection.
The sound quality is
•
The file being played back has a low bit rate.• –
12
poor or there is noise
during playback.
“Connection Error”
is displayed.
“Communication
Error” is displayed.
Unable to communicate properly. Turn off the power to this unit,
• –
unplug the USB memory device and then plug it back in.
The USB memory device is not responding. Turn off the power
• –
to this unit, unplug the USB memory device and then plug it back
in.
“Overcurrent” is
displayed.
The USB memory device is consuming too much power. When
• –
using a USB portable hard disk that can be powered by an AC
adapter, connect its AC adapter.
Spec. Index

ENGLISH
Remote
Control
Playback
(Advanced)
Connections
Simple
Version
Playback
(Basic)
Multi-
zone
GUISettings
Getting
Started
Troubleshooting
Other
Information
Spec. Index
Part
Names
9
SOURCEON/STANDBY
q
w
e
GiPodH
Symptom Cause/Solution Page
iPod cannot be
played.
The file names
are not displayed
properly (“...”, etc.).
“Connection Error”
is displayed.
“Not Support” is
displayed.
“Communication
Error” is displayed.
GRemote Control UnitH
Symptom Cause/Solution Page
The set cannot be
operated with the
remote control unit.
Check the iPod connections.
•
Plug the control dock for iPod’s AC adapter into a power outlet.
•
Switch the input source to “AUX1”.
•
If using an iPod connected to the USB terminal, incompatible iPod
•
types cannot be played back.
Characters that cannot be displayed on this unit are replaced by
• 22
“z”.
Unable to communicate properly. Turn off the power to this unit,
• –
disconnect the iPod and then reconnect it.
The iPod connected to the unit is not compatible. Please make
•
sure the iPod you are connecting is compatible.
The software version of the connected iPod is an old one. Please
•
update to the latest version.
The iPod is not responding.Turn off the power to this unit,
• –
disconnect the iPod and then reconnect it.
Batteries are worn out. Replace with new batteries.
•
Operate the remote control unit within a distance of about 23
•
feet/7 m from this unit and at an angle of within 30°.
Remove any obstacle between this unit and the remote control
•
unit.
Insert the batteries in the proper direction, checking the q and
•
w marks.
The set’s remote control sensor is exposed to strong light (direct
•
sunlight, inverter type fluorescent bulb light, etc.). Move the set
to a place in which the remote control sensor will not be exposed
to strong light.
Set the remote control unit’s device selection switch properly.
•
14
20
14
14
65
65
65
59
Resetting the Microprocessor
Perform this procedure if the display is abnormal or if operations cannot be performed.
–
–
When the microprocessor is reset, all the settings are reset to their default values.
During standby, press ON/STANDBY while pressing 9 and SOURCE
1
simultaneously.
Once the display starts ashing at intervals of about 1 second, release the two
2
buttons.
After “INITIALIZED” is displayed on the screen, the “FIRST SETUP” screen is displayed
automatically.
If in step 2 the display does not flash at intervals of about 1 second, start over from step 1.
–
–
Attaching the Door
If the door on the front panel comes off, reattach it as shown below.
NOTE
Some function may not be used in some operation status and this is not failure of the unit. Read the
•
description in this Owner’s Manual for details on correct operations.
The volume may differ from disc to disc. This is due to the differences in how the signals are recorded
•
on the disc, and is not a malfunction.
Some functions are prohibited on some discs.
•
The illustration shows how to attach the door on
the left. The process for attaching the door on the
right is the same.

ENGLISH
Getting
Started
Specifications
Version
Simple
Connections
Playback
(Basic)
(Advanced)
Playback
Multi-
zone
GUISettings
Remote
Control
Names
Part
Information
Other
Audio Sectionn
Power amplifier•
Rated output: Front:
75 W + 75 W (1 kHz, 4 Ω, T.H.D. 0.7 %)
Center:
75 W (1 kHz, 4 Ω, T.H.D. 0.7 %)
Surround:
75 W + 75 W (1 kHz, 4 Ω, T.H.D. 0.7 %)
Output connectors: Front, Center, Surround : 4 – 16 Ω
Analog•
Input sensitivity/Input impedance: 160 mV/47 kΩ
Digital•
Digital input: Format — Digital audio interface
Video Sectionn
S-Video connectors•
Input/output level and impedance: Y (brightness) signal — 1 Vp-p, 75 Ω
C (color) signal — 0.286 (NTSC) / 0.3 (PAL) Vp-p, 75 Ω
Frequency response: 5 Hz – 6 MHz — +0, –3 dB
Tuner sectionn [FM] [AM]
Reception frequency range: 87.50 MHz – 107.90 MHz 520 kHz – 1710 kHz
Receiving sensitivity: 1.5 μV / 75 Ω 20 μV
FM stereo separation: 35 dB (1 kHz)
Applicable Discs/Memory Cards :n
BD-Video discs : 12 cm 1 side 1 layer, 12 cm 1 side 2 layers
DVD-Video discs : 12 cm 1 side 1 layer, 12 cm 1 side 2 layers/
12 cm 2 sides 2 layers (1 side 1 layer)
8 cm 1 side 1 layer, 8 cm 1 side 2 layers/
8 cm 2 sides 2 layers (1 side 1 layer)
Compact Discs (CD-DA) : 12 cm / 8 cm discs
Memory cards : SD memory card/SDHC memory card/miniSD card/microSD card
Generaln
Power supply: AC 120 V, 60 Hz
Power consumption: 110 W
0.3 W (Normal standby)
Maximum external dimensions: With the doors closed
434 (W) x 119 (H) x 365 (D) mm (17-3/32” x 4-11/16” x 14-3/8”)
With the doors open
445 (W) x 119 (H) x 365 (D) mm (17-33/64” x 4-11/16” x 14-3/8”)
Weight: 7.8 kg (17 lbs 3.1 oz)
Troubleshooting
Remote Control Unit (RC-1122)n
Batteries: R6/AA Type (two batteries)
Maximum external dimensions: 52 (W) x 243 (H) x 21 (D) mm (2-3/64” x 9-9/16” x 53/64”)
Weight: 175 g (Approx. 6.2 oz) (including batteries)
For purposes of improvement, specifications and design are subject to change without notice.
Spec. Index

ENGLISH
Index
n
Numerics
v
2.1-channel ·············································31, 34, 36
4:3 LB (letterbox) ·········································· 44, 72
4:3 PS (pan scan) ·········································· 44, 72
5.1-channel ···························································4
6.1-channel ···················································34, 35
7.1-channel ···················································34, 35
A
v
AAC ······························································19, 72
Accessories ··························································1
AFDM ·································································49
AL24 Processing ··········································63, 67
AM loop antenna ················································15
Angle ··································································30
ARC function ······················································12
Aspect ratio ··················································44, 72
Attaching the door ·············································· 77
Audio Adjust ·················································48, 68
Audio cable ··············································· 4, 13, 15
Audio commentary ·······································30, 72
Audio Delay ························································52
Audio Setup ························································ 56
Audyssey Auto Setup ······························· 6, 36, 52
Audyssey Dynamic EQ ································· 51, 72
Audyssey Dynamic Volume ························· 52, 72
Audyssey MultEQ ········································63, 72
Audyssey Settings ·············································51
Auto Format ·······················································44
Auto Preset ························································48
Auto Setup ·························································52
AVCHD ·························································19, 72
B
v
Bass ···································································50
Bass Setting ·······················································54
BD-J (Blu-ray Disc Java) ·······························28, 72
BD-LIVE ························································21, 72
BD-Video ······················································19, 66
BD Audio Mode ·················································· 58
BD Data Utility ···················································· 46
BD Rating Level ·················································45
Bit rate ·························································· 19, 72
Blu-ray Disc ············································20, 66, 72
Bonus View ··················································21, 72
Browse mode ··············································· 22, 23
C
v
Cable
Audio cable ············································ 4, 13, 15
Coaxial digital cable······························ 13, 14, 15
Ethernet cable·················································· 16
HDMI cable ·················································· 5, 12
Optical cable ·············································· 13, 15
Speaker cable ····················································4
Captions ·····························································46
CD-R ·····························································19, 66
CD-RW ·························································19, 66
Center Image ·····················································49
Center Width ······················································49
Channel Level ····················································· 55
Chapter ························································· 66, 72
Chapter search ·············································18, 37
Cinema EQ ·························································49
Coaxial digital cable ································13, 14, 15
COAX Input Assign ············································56
Condensation ·······················································2
Connection
Antenna ···························································15
Cable TV··························································· 15
Control dock for iPod ······································· 14
Digital camcorder ············································· 12
Digital video recorder ······································· 12
Game device ···················································· 12
HDMI ······························································· 12
iPod (USB)························································ 14
Network ···························································16
Power cord ························································5
REMOTE CONTROL ········································ 17
RS-232C ··························································· 17
Satellite tuner············································· 12, 15
Set-top box ······················································15
Speaker ························································ 4, 35
TRIGGER OUT ················································· 17
TV··························································· 5, 12, 13
USB memory device ········································ 14
Copyright protection ··········································· 67
Country code ······················································71
Crossover Frequency ·········································55
D
v
D.COMP ·····························································49
Decode Mode ····················································47
Deep Color ·············································12, 44, 72
DEVICE SELECT ················································· 64
DHCP ···························································45, 72
Dialog ·································································44
Dimension ··························································49
Dimmer ······························································57
Dimmer Sensor ··················································57
Disc Layer ··························································46
Disc Menus ························································44
Disc Mode ··························································25
Display ································································ 62
Display Setup ·····················································46
Distance ·····························································54
Dolby
Dolby Digital··············································· 32, 72
Dolby Digital EX ········································· 32, 72
Dolby Digital Plus ······································· 32, 72
Dolby PLII (Dolby Pro Logic II) ··················· 32, 72
Dolby PLIIx (Dolby Pro Logic IIx) ················ 32, 72
DOLBY PLIIz (Dolby Pro Logic IIz) ······· 32, 34, 73
Dolby TrueHD ············································ 32, 72
Dolby Virtual Speaker ································· 31, 73
Downmix ····························································73
DRC ····································································49
DTS ······························································32, 73
DTS-ES Discrete 6.1 ·································· 32, 73
DTS-ES Matrix 6.1 ·····································32, 73
DTS-HD ······················································ 32, 73
DTS-HD High Resolution Audio ······················· 73
DTS-HD Master Audio ····································· 73
DTS 96/24 ··················································32, 73
DTS Digital Surround ·······································73
DTS Express ···················································· 73
DTS NEO:6 ······················································32
DTS NEO:6™ Surround ···································73
DVD+R ························································· 19, 66
DVD+RW······················································ 19, 66
DVD-R ··························································19, 66
DVD-RW ·······················································19, 66
DVD-Video ··············································19, 20, 66
DVD Rating Level ···············································45
Dynamic EQ ·······················································51
Dynamic Play Mode ···········································56
Dynamic range ···················································73
Dynamic Volume ················································52
E
v
Error messages ····················································9
Ethernet cable ····················································16
F
v
Fast forward ·······················································29
Fast reverse ·······················································29
File ·························································· 19, 25, 66
File filter ·····························································58
Finalise ·······························································73
Firmware Update ··············································· 46
FIRST SETUP ·················································6, 36
Folder ·································································66
Front Height ·················································49, 54
Front Height Speaker ···································34, 35
Front Panel ·························································62
G
v
GUI ·····································································56
GUI Language ················································5, 57
GUI menu operation ···········································43
H
v
HDCP ···························································12, 73
HDMI ···························································· 12, 73
HDMI Audio Out ················································55
HDMI cable ····················································5, 12
HDMI Control ···············································39, 55
HDMI Setup ·······················································55
HDMI version 1.3a ·············································12
HDMI version 1.4 ···············································12
HDMI video resolution ·······································13
Headphones ·······················································62
I
v
Indicator ·····························································62
Information ···················································46, 57
Audio Input Signal ············································ 57
Auto Surround Mode ······································· 58
HDMI Information ············································ 57
Preset Channel ················································58
Status······························································· 57
Input Mode ························································· 47
Input signal ···················································32, 69
Inserting a disc ···················································65
Interactive audio ···········································30, 73
Interlacing ····················································· 13, 73
IP Address ··························································45
J
v
JPEG ······················································19, 26, 73
L
v
Language code ···················································70
Language Setup ·················································44
LFE ·······························································49, 73
LPCM (Linear PCM) ····································· 19, 73
Getting
Started
Version
Simple
Connections
Playback
(Basic)
(Advanced)
Playback
Multi-
zone
GUISettings
Remote
Control
Names
Part
Information
Other
Troubleshooting
Spec. Index

ENGLISH
Getting
Started
Version
Simple
Connections
Playback
(Basic)
(Advanced)
Playback
Multi-
zone
GUISettings
Remote
Control
Names
Part
Information
Other
Troubleshooting
Spec. Index
M
v
MAC Address ·····················································45
MAIN ZONE ·······················································41
Manual Setup ·····················································53
Marker function ··················································38
Marker search ····················································37
Master Volume ··················································· 56
Menu map ··························································42
microSD card ······················································ 19
miniSD card ························································19
Mode ··································································48
MP3 ······························································ 19, 73
MPEG ·································································73
MultEQ ·······························································51
Multi-channel source ··········································32
Multi-zone ····················································41, 73
MUTE ···························································62, 64
N
v
Network Setup ···················································45
O
v
One touch play ···················································39
Operation
Fast forward····················································· 29
Fast reverse ·····················································29
Pause ·······························································28
Random ···························································29
Repeat ·····························································29
Shuffle (iPod) ···················································24
Skip ··································································29
Slow forward ···················································29
Slow reverse ···················································· 29
Step-by-step····················································· 28
Stop ·································································28
Optical cable ················································· 13, 15
Option Setup ······················································56
Dimmer ···························································· 57
Dimmer Sensor················································ 57
GUI··································································· 56
Quick Start Mode············································· 56
Remote Preset Codes ·····································56
Setup Lock ······················································· 57
Trigger Out······················································· 56
Volume Control ················································56
Other Setup ························································ 46
BD Data Utility ················································· 46
Firmware Update ·············································46
Information ······················································46
0
P
v
Panorama ···························································49
Parameter Check ················································ 52
Password ···························································45
Pause ·································································28
Picture-in-picture ··········································21, 74
Playable cards ····················································19
Playable discs ·····················································19
Playable files ······················································19
Playback
AAC·································································· 25
Blu-ray Disc ······················································ 20
CD ···································································· 21
DVD ·································································20
FM/AM broadcasts ·········································· 27
iPod (Control dock for iPod) ····························· 22
iPod (USB)························································ 23
JPEG ································································26
LPCM ······························································· 25
MP3 ································································· 25
USB memory device ········································ 24
WMA ·······························································25
Playback mode (Disc/Folder) ······························ 25
Play Mode ··························································58
Popup menu ·······················································74
Power Off Control ··············································55
Preset codes ················································56, 59
Preset Name ······················································48
Presetting radio stations ···································· 27
Primary audio ···············································30, 74
Progressive ··················································13, 74
Progressive Mode ··············································44
Protection circuit ················································74
Proxy ··································································45
Q
v
Quick Start Mode ···············································56
R
v
Random ······························································29
Rating Country Code ··········································45
Ratings ·······························································45
Rear panel ··························································63
Reference Level Offset ······································51
Region code ·················································19, 74
Remote control unit ·····································59, 64
Inserting the batteries······································ 65
Operating components ····································59
Registering Preset Codes ································59
Remote mode ··············································22, 23
Remote Preset Codes ········································56
Rename ······························································47
Repeat ································································29
Resetting the microprocessor ····························77
RESTORER ························································· 26
Resume function ················································28
S
v
Sampling frequency ·····································19, 74
Screensaver ·······················································56
SD CARD slot ·····················································62
SDHC memory card ···········································19
SD memory card ··········································19, 66
SD Mode ····························································25
Search mode ······················································37
Chapter search··········································· 18, 37
Marker search ·················································· 37
Time search ····················································· 37
Title search ················································18, 37
Track search····················································· 37
Secondary audio ···········································30, 74
Selecting the input source ································· 20
Setting (Audyssey) ·············································52
Setup Lock ·························································57
Set up the subwoofer ··········································7
Shuffle (iPod) ······················································24
Skip ····································································29
Sleep timer ·························································40
Slide Show Time ················································46
Slow forward ······················································29
Slow reverse ······················································29
Source Select ···············································20, 47
Speaker
Connect ·······················································4, 35
Install ···························································4, 34
Set up ··························································6, 36
Speaker Assign ··················································53
Speaker cable ·······················································4
Speaker Configuration ········································53
Speaker Setup ····················································53
Standby Source ··················································55
Step-by-step ·······················································28
Still Mode ···························································46
Stop ····································································28
Subtitle ·························································31, 44
Surround Back ··············································50, 54
Surround back speaker ································· 34, 35
Surround Mode ············································31, 68
Surround Parameters ·········································48
Switching audio ··················································30
Switching the display page ································ 24
T
v
Thumbnail screen ···············································26
Time search ························································ 37
Title ······························································66, 74
Title search ···················································18, 37
Tone Control ······················································· 50
Top Panel ···························································62
Track ··································································· 66
Track search ·······················································37
Trademark ··························································67
Treble ·································································50
Trigger Out ·························································56
Turn off power (standby) ····································10
Turn on power ······················································5
TV Aspect ···························································44
V
v
Video Setup ························································44
Volume ·······························································28
Volume Control ··················································56
Volume Limit ······················································56
W
v
WMA ····························································19, 74
X
v
x.v.Color ·······················································12, 74
Z
v
ZONE2 ·························································· 41, 63

License / Licence / License
This section describes software license used for this unit. To maintain the correct content, the
original (English) is used.
Cette section concerne la licence du logiciel utilisé pour cet appareil. Le document d’origine (en
anglais) est utilisé afin d’assurer l’exactitude du contenu.
Esta sección describe el contenido de la licencia del software para esta unidad. Para mantener el
contenido correcto, se utiliza el original (Inglés).
Exhibit-A
n
Version 2, June 1991
Copyright (C) 1989, 1991
Free Software Foundation, Inc. 59 Temple Place, Suite 330, Boston,
MA 02111-1307 USA
Everyone is permitted to copy and distribute verbatim copies of this
license document, but changing it is not allowed.
Preamble
The licenses for most software are designed to take away your
freedom to share and change it. By contrast, the GNU General
Public
License is intended to guarantee your freedom to share and change
free software--to make sure the software is free for all its users.
This General Public License applies to most of the Free Software
Foundation’s software and to any other program whose authors
commit to using it. (Some other Free Software Foundation software
is covered by the GNU Library General Public License instead.) You
can apply it to your programs, too.
When we speak of free software, we are referring to freedom, not
price. Our General Public Licenses are designed to make sure that
you have the freedom to distribute copies of free software (and
charge for this service if you wish), that you receive source code
or can get it if you want it, that you can change the software or use
pieces of it in new free programs; and that you know you can do
these things.
To protect your rights, we need to make restrictions that forbid
anyone to deny you these rights or to ask you to surrender the rights.
These restrictions translate to certain responsibilities for you if you
distribute copies of the software, or if you modify it.
For example, if you distribute copies of such a program, whether
gratis or for a fee, you must give the recipients all the rights that
you have. You must make sure that they, too, receive or can get the
source code. And you must show them these terms so they know
their rights.
We protect your rights with two steps: (1) copyright the software,
and (2) offer you this license which gives you legal permission to
copy, distribute and/or modify the software.
Also, for each author’s protection and ours, we want to make certain
that everyone understands that there is no warranty for this free
software. If the software is modified by someone else and passed
on, we want its recipients to know that what they have is not the
original, so that any problems introduced by others will not reflect on
the original authors’ reputations.
Finally, any free program is threatened constantly by software
patents. We wish to avoid the danger that redistributors of a free
program will individually obtain patent licenses, in effect making the
program proprietary. To prevent this, we have made it clear that any
patent must be licensed for everyone’s free use or not licensed at
all.
GNU GENERAL PUBLIC LICENSE
The precise terms and conditions for copying, distribution and
modification follow.
TERMS AND CONDITIONS FOR COPYING, DISTRIBUTION AND
MODIFICATION
0. This License applies to any program or other work which contains
a notice placed by the copyright holder saying it may be distributed
under the terms of this General Public License. The “Program”,
below, refers to any such program or work, and a “work based
on the Program” means either the Program or any derivative
work under copyright law: that is to say, a work containing the
Program or a portion of it, either verbatim or with modifications
and/or translated into another language. (Hereinafter, translation
is included without limitation in the term “modification”.) Each
licensee is addressed as “you”.
Activities other than copying, distribution and modification are not
covered by this License; they are outside its scope. The act of
running the Program is not restricted, and the output from the
Program is covered only if its contents constitute a work based
on the Program (independent of having been made by running
the Program). Whether that is true depends on what the Program
does.
1. You may copy and distribute verbatim copies of the Program’s
source code as you receive it, in any medium, provided that
you conspicuously and appropriately publish on each copy an
appropriate copyright notice and disclaimer of warranty; keep
intact all the notices that refer to this License and to the absence
of any warranty; and give any other recipients of the Program a
copy of this License along with the Program.
You may charge a fee for the physical act of transferring a copy,
and you may at your option offer warranty protection in exchange
for a fee.
2. You may modify your copy or copies of the Program or any portion
of it, thus forming a work based on the Program, and copy and
distribute such modifications or work under the terms of Section
1 above, provided that you also meet all of these conditions:
a) You must cause the modified files to carry prominent notices
stating that you changed the files and the date of any change.
b) You must cause any work that you distribute or publish, that in
whole or in part contains or is derived from the Program or any
part thereof, to be licensed as a whole at no charge to all third
parties under the terms of this License.
c) If the modified program normally reads commands interactively
when run, you must cause it, when started running for such
interactive use in the most ordinary way, to print or display
an announcement including an appropriate copyright notice
and a notice that there is no warranty (or else, saying that
you provide a warranty) and that users may redistribute the
program under these conditions, and telling the user how to
view a copy of this License.
(Exception: if the Program itself is interactive but does not
normally print such an announcement, your work based on the
Program is not required to print an announcement.)
These requirements apply to the modified work as a whole. If
identifiable sections of that work are not derived from the
Program, and can be reasonably considered independent and
separate works in themselves, then this License, and its terms,
do not apply to those sections when you distribute them as
separate works. But when you distribute the same sections
as part of a whole which is a work based on the Program, the
distribution of the whole must be on the terms of this License,
whose permissions for other licensees extend to the entire
whole, and thus to each and every part regardless of who wrote
it.
Thus, it is not the intent of this section to claim rights or contest
your rights to work written entirely by you; rather, the intent is
to exercise the right to control the distribution of derivative or
collective works based on the Program.
In addition, mere aggregation of another work not based on the
Program with the Program (or with a work based on the Program)
on a volume of a storage or distribution medium does not bring
the other work under the scope of this License.
3. You may copy and distribute the Program (or a work based on
it, under Section 2) in object code or executable form under the
terms of Sections 1 and 2 above provided that you also do one of
the following:
a) Accompany it with the complete corresponding machine-
readable source code, which must be distributed under the
terms of Sections 1 and 2 above on a medium customarily
used for software interchange; or,
b) Accompany it with a written offer, valid for at least three
years, to give any third party, for a charge no more than your
cost of physically performing source distribution, a complete
machine-readable copy of the corresponding source code, to
be distributed under the terms of Sections 1 and 2 above on a
medium customarily used for software interchange; or,
c) Accompany it with the information you received as to the offer
to distribute corresponding source code. (This alternative is
allowed only for noncommercial distribution and only if you
received the program in object code or executable form with
such an offer, in accord with Subsection b above.)
The source code for a work means the preferred form of the work
for making modifications to it. For an executable work, complete
source code means all the source code for all modules it contains,
plus any associated interface definition files, plus the scripts used
to control compilation and installation of the executable.
However, as a special exception, the source code distributed need
not include anything that is normally distributed (in either source
or binary form) with the major components (compiler, kernel, and
so on) of the operating system on which the executable runs,
unless that component itself accompanies the executable.
If distribution of executable or object code is made by offering
access to copy from a designated place, then offering equivalent
access to copy the source code from the same place counts as
distribution of the source code, even though third parties are not
compelled to copy the source along with the object code.
4. You may not copy, modify, sublicense, or distribute the Program
except as expressly provided under this License. Any attempt
otherwise to copy, modify, sublicense or distribute the Program
is void, and will automatically terminate your rights under this
License. However, parties who have received copies, or rights,
from you under this License will not have their licenses terminated
so long as such parties remain in full compliance.
5. You are not required to accept this License, since you have not
signed it. However, nothing else grants you permission to modify
or distribute the Program or its derivative works. These actions
are prohibited by law if you do not accept this License. Therefore,
by modifying or distributing the Program (or any work based on
the Program), you indicate your acceptance of this License to do
so, and all its terms and conditions for copying, distributing or
modifying the Program or works based on it.
6. Each time you redistribute the Program (or any work based on the
Program), the recipient automatically receives a license from the
original licensor to copy, distribute or modify the Program subject
to these terms and conditions. You may not impose any further
restrictions on the recipients’ exercise of the rights granted
herein.
You are not responsible for enforcing compliance by third parties
to this License.
7. If, as a consequence of a court judgment or allegation of patent
infringement or for any other reason (not limited to patent
issues), conditions are imposed on you (whether by court order,
agreement or other wise) that contradict the conditions of this
License, they do not excuse you from the conditions of this
License. If you cannot distribute so as to satisfy simultaneously
your obligations under this License and any other pertinent
obligations, then as a consequence you may not distribute the
Program at all. For example, if a patent license would not permit
royalty-free redistribution of the Program by all those who receive
copies directly or indirectly through you, then the only way you
could satisfy both it and this License would be to refrain entirely
from distribution of the Program.
If any portion of this section is held invalid or unenforceable under
any particular circumstance, the balance of the section is intended
to apply and the section as a whole is intended to apply in other
circumstances.
It is not the purpose of this section to induce you to infringe any
patents or other property right claims or to contest validity of
any such claims; this section has the sole purpose of protecting
the integrity of the free software distribution system, which is
implemented by public license practices. Many people have made
generous contributions to the wide range of software distributed
through that system in reliance on consistent application of that
system; it is up to the author/donor to decide if he or she is willing
to distribute software through any other system and a licensee
cannot impose that choice.
This section is intended to make thoroughly clear what is believed
to be a consequence of the rest of this License.
8. If the distribution and/or use of the Program is restricted in
certain countries either by patents or by copyrighted interfaces,
the original copyright holder who places the Program under this
License may add an explicit geographical distribution limitation
excluding those countries, so that distribution is permitted only
in or among countries not thus excluded. In such case, this
License incorporates the limitation as if written in the body of this
License.
9. The Free Software Foundation may publish revised and/or new
versions of the General Public License from time to time. Such
new versions will be similar in spirit to the present version, but
may differ in detail to address new problems or concerns.
Each version is given a distinguishing version number. If the
Program specifies a version number of this License which applies
to it and “any later version”, you have the option of following the
terms and conditions either of that version or of any later version
published by the Free Software Foundation. If the Program does
not specify a version number of this License, you may choose any
version ever published by the Free Software Foundation.
10. If you wish to incorporate parts of the Program into other free
programs whose distribution conditions are different, write to the
author to ask for permission. For software which is copyrighted
by the Free Software Foundation, write to the Free Software
Foundation; we sometimes make exceptions for this. Our
decision will be guided by the two goals of preserving the free
status of all derivatives of our free software and of promoting the
sharing and reuse of software generally.
NO WARRANTY
11. BECAUSE THE PROGRAM IS LICENSED FREE OF CHARGE,
THERE IS NO WARRANTY FOR THE PROGRAM, TO THE EXTENT
PERMITTED BY APPLICABLE LAW. EXCEPT WHEN OTHERWISE
STATED IN WRITING THE COPYRIGHT HOLDERS AND/OR
OTHER PARTIES PROVIDE THE PROGRAM “AS IS” WITHOUT
LICENSE

LICENSE
WARRANTY OF ANY KIND, EITHER EXPRESSED OR IMPLIED,
INCLUDING, BUT NOT LIMITED TO, THE IMPLIED WARRANTIES
OF MERCHANTABILITY AND FITNESS FOR A PARTICULAR
PURPOSE. THE ENTIRE RISK AS TO THE QUALITY AND
PERFORMANCE OF THE PROGRAM IS WITH YOU. SHOULD
THE PROGRAM PROVE DEFECTIVE, YOU ASSUME THE COST
OF ALL NECESSARY SERVICING, REPAIR OR CORRECTION.
12. IN NO EVENT UNLESS REQUIRED BY APPLICABLE LAW OR
AGREED TO IN WRITING WILL ANY COPYRIGHT HOLDER, OR
ANY OTHER PARTY WHO MAY MODIFY AND/OR REDISTRIBUTE
THE PROGRAM AS PERMITTED ABOVE, BE LIABLE TO YOU FOR
DAMAGES, INCLUDING ANY GENERAL, SPECIAL, INCIDENTAL
OR CONSEQUENTIAL DAMAGES ARISING OUT OF THE USE
OR INABILITY TO USE THE PROGRAM (INCLUDING BUT NOT
LIMITED TO LOSS OF DATA OR DATA BEING RENDERED
INACCURATE OR LOSSES SUSTAINED BY YOU OR THIRD
PARTIES OR A FAILURE OF THE PROGRAM TO OPERATE WITH
ANY OTHER PROGRAMS), EVEN IF SUCH HOLDER OR OTHER
PARTY HAS BEEN ADVISED OF THE POSSIBILITY OF SUCH
DAMAGES.
END OF TERMS AND CONDITIONS
How to Apply These Terms to Your New Programs
If you develop a new program, and you want it to be of the greatest
possible use to the public, the best way to achieve this is to make
it free software which everyone can redistribute and change under
these terms.
To do so, attach the following notices to the program. It is safest
to attach them to the start of each source file to most effectively
convey the exclusion of warranty; and each file should have at least
the “copyright” line and a pointer to where the full notice is found.
<one line to give the program’s name and a brief idea of what
it does.>
Copyright (C) <year> <name of author>
This program is free software; you can redistribute it and/or
modify it under the terms of the GNU General Public License as
published by the Free Software Foundation; either version 2 of the
License, or (at your option) any later version.
This program is distributed in the hope that it will be useful, but
WITHOUT ANY WARRANTY; without even the implied warranty of
MERCHANTABILITY or FITNESS FOR A PARTICULAR PURPOSE.
See the GNU General Public License for more details.
You should have received a copy of the GNU General Public
License along with this program; if not, write to the Free Software
Foundation, Inc., 59 Temple Place, Suite 330, Boston, MA 021111307 USA
Also add information on how to contact you by electronic and paper
mail.
If the program is interactive, make it output a short notice like this
when it starts in an interactive mode:
Gnomovision version 69, Copyright (C) year name of author
Gnomovision comes with ABSOLUTELY NO WARRANTY; for
details type ‘show w’. This is free software, and you are welcome
to redistribute it under certain conditions; type ‘show c’ for
details.
The hypothetical commands ‘show w’ and ‘show c’ should show
the appropriate parts of the General Public License. Of course,
the commands you use may be called something other than ‘show
w’ and ‘show c’; they could even be mouse-clicks or menu items-whatever suits your program.
You should also get your employer (if you work as a programmer) or
your school, if any, to sign a “copyright disclaimer” for the program,
if necessary. Here is a sample; alter the names:
Yoyodyne, Inc., hereby disclaims all copyright interest in the
program ‘Gnomovision’ (which makes passes at compilers)
written by James Hacker.
<signature of Ty Coon>, 1 April 1989
Ty Coon, President of Vice
This General Public License does not permit incorporating your
program into proprietary programs. If your program is a subroutine
library, you may consider it more useful to permit linking proprietary
applications with the library. If this is what you want to do, use the
GNU Library General Public License instead of this License.
Exhibit-B
n
Version 2.1, February 1999
Copyright (C) 1991, 1999 Free Software Foundation, Inc.
59 Temple Place, Suite 330, Boston, MA 02111-1307 USA
Everyone is permitted to copy and distribute verbatim copies of this
license document, but changing it is not allowed.
[This is the first released version of the Lesser GPL. It also counts
as the successor of the GNU Library Public License, version 2, hence
the version number 2.1.]
Preamble
The licenses for most software are designed to take away your
freedom to share and change it. By contrast, the GNU General
Public Licenses are intended to guarantee your freedom to share
and change free software--to make sure the software is free for all
its users.
This license, the Lesser General Public License, applies to some
specially designated software packages--typically libraries--of the Free
Software Foundation and other authors who decide to use it. You can
use it too, but we suggest you first think carefully about whether this
license or the ordinary General Public License is the better strategy
to use in any particular case, based on the explanations below.
When we speak of free software, we are referring to freedom of use,
not price. Our General Public Licenses are designed to make sure
that you have the freedom to distribute copies of free software (and
charge for this service if you wish); that you receive source code or
can get it if you want it; that you can change the software and use
pieces of it in new free programs; and that you are informed that you
can do these things.
To protect your rights, we need to make restrictions that forbid
distributors to deny you these rights or to ask you to surrender these
rights. These restrictions translate to certain responsibilities for you
if you distribute copies of the library or if you modify it.
For example, if you distribute copies of the library, whether gratis
or for a fee, you must give the recipients all the rights that we gave
you. You must make sure that they, too, receive or can get the
source code. If you link other code with the library, you must provide
complete object files to the recipients, so that they can relink them
with the library after making changes to the library and recompiling
it. And you must show them these terms so they know their rights.
We protect your rights with a two-step method: (1) we copyright
the librar y, and (2) we offer you this license, which gives you legal
permission to copy, distribute and/or modify the library.
To protect each distributor, we want to make it very clear that there
is no warranty for the free librar y. Also, if the library is modified
by someone else and passed on, the recipients should know that
what they have is not the original version, so that the original author’s
reputation will not be affected by problems that might be introduced
by others.
Finally, software patents pose a constant threat to the existence of
any free program. We wish to make sure that a company cannot
effectively restrict the users of a free program by obtaining a
restrictive license from a patent holder. Therefore, we insist that any
patent license obtained for a version of the library must be consistent
with the full freedom of use specified in this license.
Most GNU software, including some libraries, is covered by the
ordinary GNU General Public License. This license, the GNU Lesser
General Public License, applies to certain designated libraries, and is
quite different from the ordinary General Public License. We use this
license for certain libraries in order to permit linking those libraries
into non-free programs.
When a program is linked with a library, whether statically or using
a shared library, the combination of the two is legally speaking
a combined work, a derivative of the original library. The ordinary
General Public License therefore permits such linking only if the
entire combination fits its criteria of freedom. The Lesser General
Public License permits more lax criteria for linking other code with
the library.
We call this license the “Lesser” General Public License because it
does Less to protect the user’s freedom than the ordinary General
Public License. It also provides other free software developers
Less of an advantage over competing non-free programs. These
disadvantages are the reason we use the ordinary General Public
License for many libraries. However, the Lesser license provides
GNU LESSER GENERAL PUBLIC LICENSE
advantages in certain special circumstances.
For example, on rare occasions, there may be a special need to
encourage the widest possible use of a certain library, so that it
becomes a de-facto standard. To achieve this, non-free programs
must be allowed to use the library. A more frequent case is that
a free library does the same job as widely used non-free libraries.
In this case, there is little to gain by limiting the free library to free
software only, so we use the Lesser General Public License.
In other cases, permission to use a particular library in non-free
programs enables a greater number of people to use a large body of
free software. For example, permission to use the GNU C Library in
non-free programs enables many more people to use the whole GNU
operating system, as well as its variant, the GNU/Linux operating
system.
Although the Lesser General Public License is Less protective of the
users’ freedom, it does ensure that the user of a program that is
linked with the Library has the freedom and the wherewithal to run
that program using a modified version of the Library.
The precise terms and conditions for copying, distribution and
modification follow. Pay close attention to the difference between a
“work based on the library” and a “work that uses the library”.
The former contains code derived from the library, whereas the latter
must be combined with the library in order to run.
TERMS AND CONDITIONS FOR COPYING, DISTRIBUTION AND
MODIFICATION
0. This License Agreement applies to any software library or other
program which contains a notice placed by the copyright holder
or other authorized party saying it may be distributed under the
terms of this Lesser General Public License (also called “this
License”).
Each licensee is addressed as “you”.
A “library” means a collection of software functions and/or
data prepared so as to be conveniently linked with application
programs (which use some of those functions and data) to form
executables.
The “Library”, below, refers to any such software library or work
which has been distributed under these terms. A “work based on
the Library” means either the Library or any derivative work under
copyright law: that is to say, a work containing the Library or a
portion of it, either verbatim or with modifications and/or translated
straightforwardly into another language. (Hereinafter, translation
is included without limitation in the term “modification”.)
“Source code” for a work means the preferred form of the work
for making modifications to it. For a library, complete source
code means all the source code for all modules it contains, plus
any associated interface definition files, plus the scripts used to
control compilation and installation of the library.
Activities other than copying, distribution and modification are not
covered by this License; they are outside its scope. The act of
running a program using the Library is not restricted, and output
from such a program is covered only if its contents constitute a
work based on the Library (independent of the use of the Library
in a tool for writing it). Whether that is true depends on what the
Library does and what the program that uses the Library does.
1. You may copy and distribute verbatim copies of the Library’s
complete source code as you receive it, in any medium, provided
that you conspicuously and appropriately publish on each copy
an appropriate copyright notice and disclaimer of warranty; keep
intact all the notices that refer to this License and to the absence
of any warranty; and distribute a copy of this License along with
the Library.
You may charge a fee for the physical act of transferring a copy,
and you may at your option offer warranty protection in exchange
for a fee.
2. You may modify your copy or copies of the Library or any portion
of it, thus forming a work based on the Library, and copy and
distribute such modifications or work under the terms of Section
1 above, provided that you also meet all of these conditions:
a) The modified work must itself be a software library.
b) You must cause the files modified to carry prominent notices
stating that you changed the files and the date of any change.
c) You must cause the whole of the work to be licensed at no
charge to all third parties under the terms of this License.
d) If a facility in the modified Library refers to a function or a table
of data to be supplied by an application program that uses the
facility, other than as an argument passed when the facility is
invoked, then you must make a good faith effort to ensure that,
in the event an application does not supply such function or
table, the facility still operates, and performs whatever part of its
purpose remains meaningful.
(For example, a function in a library to compute square roots
has a purpose that is entirely well-defined independent of
the application. Therefore, Subsection 2d requires that any
application-supplied function or table used by this function
must be optional: if the application does not supply it, the
square root function must still compute square roots.)
These requirements apply to the modified work as a whole. If
identifiable sections of that work are not derived from the Library,
and can be reasonably considered independent and separate
works in themselves, then this License, and its terms, do not
apply to those sections when you distribute them as separate
works. But when you distribute the same sections as part of a
whole which is a work based on the Library, the distribution of the
whole must be on the terms of this License, whose permissions
for other licensees extend to the entire whole, and thus to each
and every part regardless of who wrote it.
Thus, it is not the intent of this section to claim rights or contest
your rights to work written entirely by you; rather, the intent is
to exercise the right to control the distribution of derivative or
collective works based on the Library.
In addition, mere aggregation of another work not based on the
Library with the Library (or with a work based on the Library) on
a volume of a storage or distribution medium does not bring the
other work under the scope of this License.
3. You may opt to apply the terms of the ordinary GNU General
Public License instead of this License to a given copy of the
Library. To do this, you must alter all the notices that refer to this
License, so that they refer to the ordinary GNU General Public
License, version 2, instead of to this License. (If a newer version
than version 2 of the ordinary GNU General Public License has
appeared, then you can specify that version instead if you wish.)
Do not make any other change in these notices.
Once this change is made in a given copy, it is irreversible for that
copy, so the ordinary GNU General Public License applies to all
subsequent copies and derivative works made from that copy.
This option is useful when you wish to copy part of the code of
the Library into a program that is not a library.
4. You may copy and distribute the Library (or a portion or derivative
of it, under Section 2) in object code or executable form under the
terms of Sections 1 and 2 above provided that you accompany it
with the complete corresponding machine-readable source code,
which must be distributed under the terms of Sections 1 and 2
above on a medium customarily used for software interchange.
If distribution of object code is made by offering access to copy
from a designated place, then offering equivalent access to copy
the source code from the same place satisfies the requirement
to distribute the source code, even though third parties are not
compelled to copy the source along with the object code.
5. A program that contains no derivative of any portion of the Library,
but is designed to work with the Library by being compiled or
linked with it, is called a “work that uses the Library”. Such a
work, in isolation, is not a derivative work of the Library, and
therefore falls outside the scope of this License.
However, linking a “work that uses the Library” with the Library
creates an executable that is a derivative of the Library (because
it contains portions of the Library), rather than a “work that uses
the library”. The executable is therefore covered by this License.
Section 6 states terms for distribution of such executables.
When a “work that uses the Librar y” uses material from a header
file that is part of the Library, the object code for the work may
be a derivative work of the Library even though the source code
is not.
Whether this is true is especially significant if the work can be
linked without the Library, or if the work is itself a library. The
threshold for this to be true is not precisely defined by law.
If such an object file uses only numerical parameters, data
structure layouts and accessors, and small macros and small
inline functions (ten lines or less in length), then the use of the
object file is unrestricted, regardless of whether it is legally a
derivative work. (Executables containing this object code plus

LICENSE
portions of the Library will still fall under Section 6.)
Otherwise, if the work is a derivative of the Library, you may
distribute the object code for the work under the terms of Section
6. Any executables containing that work also fall under Section 6,
whether or not they are linked directly with the Library itself.
6. As an exception to the Sections above, you may also combine or
link a “work that uses the Library” with the Library to produce
a work containing portions of the Library, and distribute that
work under terms of your choice, provided that the terms permit
modification of the work for the customer’s own use and reverse
engineering for debugging such modifications.
You must give prominent notice with each copy of the work
that the Library is used in it and that the Library and its use are
covered by this License. You must supply a copy of this License.
If the work during execution displays copyright notices, you must
include the copyright notice for the Library among them, as well
as a reference directing the user to the copy of this License. Also,
you must do one of these things:
a) Accompany the work with the complete corresponding
machine-readable source code for the Librar y including
whatever changes were used in the work (which must be
distributed under Sections 1 and 2 above); and, if the work
is an executable linked with the Library, with the complete
machine-readable “work that uses the Library”, as object code
and/or source code, so that the user can modify the Library
and then relink to produce a modified executable containing
the modified Library. (It is understood that the user who
changes the contents of definitions files in the Library will not
necessarily be able to recompile the application to use the
modified definitions.)
b) Use a suitable shared library mechanism for linking with
the Library. A suitable mechanism is one that (1) uses at
run time a copy of the library already present on the user’s
computer system, rather than copying library functions into
the executable, and (2) will operate properly with a modified
version of the library, if the user installs one, as long as the
modified version is interface-compatible with the version that
the work was made with.
c) Accompany the work with a written offer, valid for at least
three years, to give the same user the materials specified in
Subsection 6a, above, for a charge no more than the cost of
performing this distribution.
d) If distribution of the work is made by offering access to copy
from a designated place, offer equivalent access to copy the
above specified materials from the same place.
e) Verify that the user has already received a copy of these
materials or that you have already sent this user a copy.
For an executable, the required form of the “work that uses
the Library” must include any data and utility programs needed
for reproducing the executable from it. However, as a special
exception, the materials to be distributed need not include
anything that is normally distributed (in either source or binary
form) with the major components (compiler, kernel, and so on) of
the operating system on which the executable runs, unless that
component itself accompanies the executable.
It may happen that this requirement contradicts the license
restrictions of other proprietary libraries that do not normally
accompany the operating system. Such a contradiction means
you cannot use both them and the Library together in an
executable that you distribute.
7. You may place library facilities that are a work based on the Library
side-by-side in a single library together with other library facilities
not covered by this License, and distribute such a combined
library, provided that the separate distribution of the work based
on the Library and of the other library facilities is otherwise
permitted, and provided that you do these two things:
a) Accompany the combined library with a copy of the same
work based on the Library, uncombined with any other library
facilities. This must be distributed under the terms of the
Sections above.
b) Give prominent notice with the combined library of the fact
that part of it is a work based on the Library, and explaining
where to find the accompanying uncombined form of the
same work.
8. You may not copy, modify, sublicense, link with, or distribute
the Library except as expressly provided under this License.
Any attempt otherwise to copy, modify, sublicense, link with, or
distribute the Library is void, and will automatically terminate your
rights under this License. However, parties who have received
copies, or rights, from you under this License will not have
their licenses terminated so long as such parties remain in full
compliance.
9. You are not required to accept this License, since you have not
signed it. However, nothing else grants you permission to modify
or distribute the Library or its derivative works. These actions are
prohibited by law if you do not accept this License. Therefore,
by modifying or distributing the Library (or any work based on
the Library), you indicate your acceptance of this License to do
so, and all its terms and conditions for copying, distributing or
modifying the Library or works based on it.
10. Each time you redistribute the Library (or any work based on the
Library), the recipient automatically receives a license from the
original licensor to copy, distribute, link with or modify the Library
subject to these terms and conditions. You may not impose
any further restrictions on the recipients’ exercise of the rights
granted herein. You are not responsible for enforcing compliance
by third parties with this License.
11. If, as a consequence of a court judgment or allegation of patent
infringement or for any other reason (not limited to patent
issues), conditions are imposed on you (whether by court order,
agreement or other wise) that contradict the conditions of this
License, they do not excuse you from the conditions of this
License. If you cannot distribute so as to satisfy simultaneously
your obligations under this License and any other pertinent
obligations, then as a consequence you may not distribute the
Library at all. For example, if a patent license would not permit
royalty-free redistribution of the Library by all those who receive
copies directly or indirectly through you, then the only way you
could satisfy both it and this License would be to refrain entirely
from distribution of the Library. If any portion of this section is
held invalid or unenforceable under any particular circumstance,
the balance of the section is intended to apply, and the section as
a whole is intended to apply in other circumstances.
It is not the purpose of this section to induce you to infringe any
patents or other property right claims or to contest validity of
any such claims; this section has the sole purpose of protecting
the integrity of the free software distribution system which is
implemented by public license practices. Many people have made
generous contributions to the wide range of software distributed
through that system in reliance on consistent application of that
system; it is up to the author/donor to decide if he or she is willing
to distribute software through any other system and a licensee
cannot impose that choice.
This section is intended to make thoroughly clear what is believed
to be a consequence of the rest of this License.
12. If the distribution and/or use of the Library is restricted in
certain countries either by patents or by copyrighted interfaces,
the original copyright holder who places the Library under this
License may add an explicit geographical distribution limitation
excluding those countries, so that distribution is permitted only
in or among countries not thus excluded. In such case, this
License incorporates the limitation as if written in the body of this
License.
13. The Free Software Foundation may publish revised and/or new
versions of the Lesser General Public License from time to time.
Such new versions will be similar in spirit to the present version,
but may differ in detail to address new problems or concerns.
Each version is given a distinguishing version number. If the
Library specifies a version number of this License which applies
to it and “any later version”, you have the option of following the
terms and conditions either of that version or of any later version
published by the Free Software Foundation. If the Library does
not specify a license version number, you may choose any version
ever published by the Free Software Foundation.
14. If you wish to incorporate parts of the Library into other free
programs whose distribution conditions are incompatible with
these, write to the author to ask for permission. For software
which is copyrighted by the Free Software Foundation, write to
the Free Software Foundation; we sometimes make exceptions
for this. Our decision will be guided by the two goals of
preserving the free status of all derivatives of our free software
and of promoting the sharing and reuse of software generally.
NO WARRANTY
15. BECAUSE THE LIBRARY IS LICENSED FREE OF CHARGE,
THERE IS NO WARRANTY FOR THE LIBRARY, TO THE EXTENT
PERMITTED BY APPLICABLE LAW. EXCEPT WHEN OTHERWISE
STATED IN WRITING THE COPYRIGHT HOLDERS AND/OR
OTHER PARTIES PROVIDE THE LIBRARY “AS IS” WITHOUT
WARRANTY OF ANY KIND, EITHER EXPRESSED OR IMPLIED,
INCLUDING, BUT NOT LIMITED TO, THE IMPLIED WARRANTIES
OF MERCHANTABILITY AND FITNESS FOR A PARTICULAR
PURPOSE. THE ENTIRE RISK AS TO THE QUALITY AND
PERFORMANCE OF THE LIBRARY IS WITH YOU. SHOULD THE
LIBRARY PROVE DEFECTIVE, YOU ASSUME THE COST OF ALL
NECESSARY SERVICING, REPAIR OR CORRECTION.
16. IN NO EVENT UNLESS REQUIRED BY APPLICABLE LAW OR
AGREED TO IN WRITING WILL ANY COPYRIGHT HOLDER, OR
ANY OTHER PARTY WHO MAY MODIFY AND/OR REDISTRIBUTE
THE LIBRARY AS PERMITTED ABOVE, BE LIABLE TO YOU FOR
DAMAGES, INCLUDING ANY GENERAL, SPECIAL, INCIDENTAL
OR CONSEQUENTIAL DAMAGES ARISING OUT OF THE USE OR
INABILITY TO USE THE LIBRARY (INCLUDING BUT NOT LIMITED
TO LOSS OF DATA OR DATA BEING RENDERED INACCURATE
OR LOSSES SUSTAINED BY YOU OR THIRD PARTIES OR A
FAILURE OF THE LIBRARY TO OPERATE WITH ANY OTHER
SOFTWARE), EVEN IF SUCH HOLDER OR OTHER PARTY HAS
BEEN ADVISED OF THE POSSIBILITY OF SUCH DAMAGES.
END OF TERMS AND CONDITIONS
How to Apply These Terms to Your New Libraries
If you develop a new library, and you want it to be of the greatest
possible use to the public, we recommend making it free software
that everyone can redistribute and change. You can do so by
permitting redistribution under these terms (or, alternatively, under
the terms of the ordinary General Public License).
To apply these terms, attach the following notices to the library.
It is safest to attach them to the start of each source file to most
effectively convey the exclusion of warranty; and each file should
have at least the “copyright” line and a pointer to where the full
notice is found.
<one line to give the library’s name and a brief idea of what it
does.>
Copyright (C) <year> <name of author>
This library is free software; you can redistribute it and/or modify
it under the terms of the GNU Lesser General Public License as
published by the Free Software Foundation; either version 2.1 of the
License, or (at your option) any later version.
This library is distributed in the hope that it will be useful, but
WITHOUT ANY WARRANTY; without even the implied warranty of
MERCHANTABILITY or FITNESS FOR A PARTICULAR PURPOSE.
See the GNU Lesser General Public License for more details.
You should have received a copy of the GNU Lesser General Public
License along with this library; if not, write to the Free Software
Foundation, Inc., 59 Temple Place, Suite 330, Boston, MA 021111307 USA
Also add information on how to contact you by electronic and paper
mail.
You should also get your employer (if you work as a programmer) or
your school, if any, to sign a “copyright disclaimer” for the library, if
necessary. Here is a sample; alter the names:
Yoyodyne, Inc., hereby disclaims all copyright interest in the
library ‘Frob’ (a library for tweaking knobs) written by James
Random Hacker.
<signature of Ty Coon>, 1 April 1990
Ty Coon, President of Vice
That’s all there is to it!
Exhibit-C
n
Copyright notice:
(C) 1995-2004 Jean-loup Gailly and Mark Adler
This software is provided ‘as-is’, without any express or implied
warranty. In no event will the authors be held liable for any damages
arising from the use of this software.
Permission is granted to anyone to use this software for any purpose,
including commercial applications, and to alter it and redistribute it
freely, subject to the following restrictions:
1. The origin of this software must not be misrepresented; you
must not claim that you wrote the original software. If you use
this software in a product, an acknowledgment in the product
documentation would be appreciated but is not required.
2. Altered source versions must be plainly marked as such, and
must not be misrepresented as being the original software.
3. This notice may not be removed or altered from any source
distribution.
Jean-loup Gailly Mark Adler
@gzip.org madler@alumni.caltech.edu
jloup
If you use the zlib librar y in a product, we would appreciate *not*
receiving lengthy legal documents to sign. The sources are provided
for free but without warranty of any kind. The library has been entirely
written by Jean-loup Gailly and Mark Adler; it does not include thirdparty code.
If you redistribute modified sources, we would appreciate that you
include in the file ChangeLog history information documenting your
changes. Please read the FAQ for more information on the distribution
of modified source versions.
Exhibit-D
n
Copyright (c) 1998, 1999, 2000 Thai Open Source Software Center
Ltd and Clark Cooper
Copyright (c) 2001, 2002 Expat maintainers.
Permission is hereby granted, free of charge, to any person obtaining
a copy of this software and associated documentation files (the
“Software”), to deal in the Software without restriction, including
without limitation the rights to use, copy, modify, merge, publish,
distribute, sublicense, and/or sell copies of the Software, and to
permit persons to whom the Software is furnished to do so, subject
to the following conditions:
The above copyright notice and this permission notice shall be
included in all copies or substantial portions of the Software.
THE SOFTWARE IS PROVIDED “AS IS”, WITHOUT WARRANTY OF
ANY KIND, EXPRESS OR IMPLIED, INCLUDING BUT NOT LIMITED
TO THE WARRANTIES OF MERCHANTABILITY, FITNESS FOR A
PARTICULAR PURPOSE AND NONINFRINGEMENT.
IN NO EVENT SHALL THE AUTHORS OR COPYRIGHT HOLDERS
BE LIABLE FOR ANY CLAIM, DAMAGES OR OTHER LIABILITY,
WHETHER IN AN ACTION OF CONTRACT, TORT OR OTHERWISE,
ARISING FROM, OUT OF OR IN CONNECTION WITH THE SOFTWARE
OR THE USE OR OTHER DEALINGS IN THE SOFTWARE.
Exhibit-E
n
The Independent JPEG Group’s JPEG software
README for release 6b of 27-Mar-1998
This distribution contains the sixth public release of the Independent
JPEG Group’s free JPEG software. You are welcome to redistribute
this software and to use it for any purpose, subject to the conditions
under LEGAL ISSUES, below.
Serious users of this software (particularly those incorporating it into
larger programs) should contact IJG at jpeg-info@uunet.uu.net to be
added to our electronic mailing list. Mailing list members are notified of
updates and have a chance to participate in technical discussions, etc.
This software is the work of Tom Lane, Philip Gladstone, Jim
Boucher, Lee Crocker, Julian Minguillon, Luis Ortiz, George Phillips,
Davide Rossi, Guido Vollbeding, Ge’ Weijers, and other members of
the Independent JPEG Group.
IJG is not affiliated with the official ISO JPEG standards committee.
DOCUMENTATION ROADMAP
This file contains the following sections:
OVERVIEW General description of JPEG and the IJG
LEGAL ISSUES Copyright, lack of warranty, terms of
REFERENCES Where to learn more about JPEG.
ARCHIVE LOCATIONS Where to find newer versions of this
RELATED SOFTWARE Other stuff you should get.
FILE FORMAT WARS Software *not* to get.
TO DO Plans for future IJG releases.
software.
distribution.
software.

Other documentation files in the distribution are:
User documentation:
install.doc How to configure and install the IJG
usage.doc Usage instructions for cjpeg, djpeg,
*.1 Unix-style man pages for programs
wizard.doc Advanced usage instructions for JPEG
change.log Version-to-version change highlights.
Programmer and internal documentation:
libjpeg.doc How to use the JPEG library in your own
example.c Sample code for calling the JPEG library.
structure.doc Overview of the JPEG library’s internal
filelist.doc Road map of IJG files.
coderules.doc Coding style rules --- please read if you
Please read at least the files install.doc and usage.doc. Useful
information can also be found in the JPEG FAQ (Frequently Asked
Questions) article. See ARCHIVE LOCATIONS below to find out
where to obtain the FAQ article.
If you want to understand how the JPEG code works, we suggest
reading one or more of the REFERENCES, then looking at the
documentation files (in roughly the order listed) before diving into
the code.
OVERVIEW
This package contains C software to implement JPEG image
compression and decompression. JPEG (pronounced “jay-peg”)
is a standardized compression method for full-color and gray-scale
images. JPEG is intended for compressing “real-world” scenes; line
drawings, cartoons and other non-realistic images are not its strong
suit. JPEG is lossy, meaning that the output image is not exactly
identical to the input image. Hence you must not use JPEG if you
have to have identical output bits. However, on typical photographic
images, very good compression levels can be obtained with no
visible change, and remarkably high compression levels are possible
if you can tolerate a low-quality image. For more details, see the
references, or just experiment with various compression settings.
This software implements JPEG baseline, extended-sequential, and
progressive
compression processes. Provision is made for supporting all variants
of these
processes, although some uncommon parameter settings aren’t
implemented yet.
For legal reasons, we are not distributing code for the arithmeticcoding
variants of JPEG; see LEGAL ISSUES. We have made no provision
for supporting
the hierarchical or lossless processes defined in the standard.
We provide a set of library routines for reading and writing JPEG
image files, plus two sample applications “cjpeg” and “djpeg”, which
use the library to perform conversion between JPEG and some other
popular image file formats.
The library is intended to be reused in other applications.
In order to support file conversion and viewing software, we have
included considerable functionality beyond the bare JPEG coding/
decoding capability; for example, the color quantization modules
are not strictly part of JPEG decoding, but they are essential for
output to colormapped file formats or colormapped displays. These
extra functions can be compiled out of the library if not required for
a particular application. We have also included “jpegtran”, a utility
for lossless transcoding between different JPEG processes, and
“rdjpgcom” and “wrjpgcom”, two simple applications for inserting
and extracting textual comments in JFIF files.
The emphasis in designing this software has been on achieving
portability and flexibility, while also making it fast enough to be
useful. In particular, the software is not intended to be read as a
tutorial on JPEG. (See the REFERENCES section for introductory
material.) Rather, it is intended to be reliable, portable, industrialstrength code. We do not claim to have achieved that goal in every
aspect of the software, but we strive for it.
We welcome the use of this software as a component of commercial
LICENSE
software.
jpegtran, rdjpgcom, and wrjpgcom.
(same info as usage.doc).
wizards only.
programs.
structure.
contribute code.
products.
No royalty is required, but we do ask for an acknowledgement in
product documentation, as described under LEGAL ISSUES.
LEGAL ISSUES
In plain English:
1. We don’t promise that this software works. (But if you find any
bugs, please let us know!)
2. You can use this software for whatever you want. You don’t have
to pay us.
3. You may not pretend that you wrote this software. If you use
it in a program, you must acknowledge somewhere in your
documentation that you’ve used the IJG code.
In legalese:
The authors make NO WARRANTY or representation, either express
or implied, with respect to this software, its quality, accuracy,
merchantability, or fitness for a particular purpose. This software is
provided “AS IS”, and you, its user, assume the entire risk as to its
quality and accuracy.
This software is copyright (C) 1991-1998, Thomas G. Lane.
All Rights Reserved except as specified below.
Permission is hereby granted to use, copy, modify, and distribute this
software (or portions thereof) for any purpose, without fee, subject
to these conditions:
(1) If any part of the source code for this software is distributed,
then this README file must be included, with this copyright
and no-warranty notice unaltered; and any additions, deletions,
or changes to the original files must be clearly indicated in
accompanying documentation.
(2) If only executable code is distributed, then the accompanying
documentation must state that “this software is based in part on
the work of the Independent JPEG Group”.
(3) Permission for use of this software is granted only if the user
accepts full responsibility for any undesirable consequences; the
authors accept NO LIABILITY for damages of any kind.
These conditions apply to any software derived from or based on the
IJG code, not just to the unmodified library. If you use our work, you
ought to acknowledge us.
Permission is NOT granted for the use of any IJG author’s name or
company name in advertising or publicity relating to this software or
products derived from it. This software may be referred to only as
“the Independent JPEG Group’s software”.
We specifically permit and encourage the use of this software as the
basis of commercial products, provided that all warranty or liability
claims are assumed by the product vendor.
ansi2knr.c is included in this distribution by permission of L. Peter
Deutsch, sole proprietor of its copyright holder, Aladdin Enterprises
of Menlo Park, CA.
ansi2knr.c is NOT covered by the above copyright and conditions,
but instead by the usual distribution terms of the Free Software
Foundation; principally, that you must include source code if you
redistribute it. (See the file ansi2knr.c for full details.) However,
since ansi2knr.c is not needed as part of any program generated
from the IJG code, this does not limit you more than the foregoing
paragraphs do.
The Unix configuration script “configure” was produced with GNU
Autoconf.
It is copyright by the Free Software Foundation but is freely
distributable.
The same holds for its supporting scripts (config.guess, config.sub,
ltconfig, ltmain.sh). Another support script, install-sh, is copyright by
M.I.T. but is also freely distributable.
It appears that the arithmetic coding option of the JPEG spec is
covered by patents owned by IBM, AT&T, and Mitsubishi. Hence
arithmetic coding cannot legally be used without obtaining one or
more licenses. For this reason, support for arithmetic coding has
been removed from the free JPEG software.
(Since arithmetic coding provides only a marginal gain over
the unpatented Huffman mode, it is unlikely that very many
implementations will support it.)
So far as we are aware, there are no patent restrictions on the
remaining code.
The IJG distribution formerly included code to read and write GIF
files.
To avoid entanglement with the Unisys LZW patent, GIF reading
support has been removed altogether, and the GIF writer has been
simplified to produce “uncompressed GIFs”. This technique does not
use the LZW algorithm; the resulting GIF files are larger than usual,
but are readable by all standard GIF decoders.
We are required to state that
“The Graphics Interchange Format(c) is the Copyright property of
CompuServe Incorporated. GIF(sm) is a Service Mark property of
CompuServe Incorporated.”
REFERENCES
We highly recommend reading one or more of these references
before trying to understand the innards of the JPEG software.
The best short technical introduction to the JPEG compression
algorithm is
Wallace, Gregory K. “The JPEG Still Picture Compression
Standard”, Communications of the ACM, April 1991 (vol. 34 no.
4), pp. 30-44.
(Adjacent articles in that issue discuss MPEG motion picture
compression, applications of JPEG, and related topics.) If you don’t
have the CACM issue handy, a PostScript file containing a revised
version of Wallace’s article is available at ftp://ftp.uu.net/graphics/
jpeg/wallace.ps.gz. The file (actually a preprint for an article that
appeared in IEEE Trans. Consumer Electronics) omits the sample
images that appeared in CACM, but it includes corrections and some
added material. Note: the Wallace article is copyright ACM and IEEE,
and it may not be used for commercial purposes.
A somewhat less technical, more leisurely introduction to JPEG can
be found in “The Data Compression Book” by Mark Nelson and Jeanloup Gailly, published by M&T Books (New York), 2nd ed. 1996, ISBN
1-55851-434-1. This book provides good explanations and example C
code for a multitude of compression methods including JPEG. It is
an excellent source if you are comfortable reading C code but don’t
know much about data compression in general. The book’s JPEG
sample code is far from industrial-strength, but when you are ready
to look at a full implementation, you’ve got one here...
The best full description of JPEG is the textbook “JPEG Still Image
Data Compression Standard” by William B. Pennebaker and Joan
L. Mitchell, published by Van Nostrand Reinhold, 1993, ISBN 0-44201272-1. Price US$59.95, 638 pp.
The book includes the complete text of the ISO JPEG standards (DIS
10918-1 and draft DIS 10918-2).
This is by far the most complete exposition of JPEG in existence, and
we highly recommend it.
The JPEG standard itself is not available electronically; you must
order a paper copy through ISO or ITU. (Unless you feel a need to
own a certified official copy, we recommend buying the Pennebaker
and Mitchell book instead; it’s much cheaper and includes a great
deal of useful explanatory material.)
In the USA, copies of the standard may be ordered from ANSI Sales
at (212) 642-4900, or from Global Engineering Documents at (800)
854-7179. (ANSI doesn’t take credit card orders, but Global does.)
It’s not cheap: as of 1992, ANSI was charging $95 for Part 1 and $47
for Part 2, plus 7% shipping/handling. The standard is divided into
two parts, Part 1 being the actual specification, while Part 2 covers
compliance testing methods. Part 1 is titled “Digital Compression
and Coding of Continuous-tone Still Images, Part 1: Requirements
and guidelines” and has document numbers ISO/IEC IS 109181, ITU-T T.81. Part 2 is titled “Digital Compression and Coding of
Continuous-tone Still Images, Part 2: Compliance testing” and has
document numbers ISO/IEC IS 10918-2, ITU-T T.83.
Some extensions to the original JPEG standard are defined in JPEG
Part 3, a newer ISO standard numbered ISO/IEC IS 10918-3 and ITUT T.84. IJG currently does not support any Part 3 extensions.
The JPEG standard does not specify all details of an interchangeable
file format. For the omitted details we follow the “JFIF” conventions,
revision 1.02. A copy of the JFIF spec is available from:
Literature Department
C-Cube Microsystems, Inc.
1778 McCarthy Blvd.
Milpitas, CA 95035
phone (408) 944-6300, fax (408) 944-6314
A PostScript version of this document is available by FTP at ftp://ftp.
uu.net/graphics/jpeg/jfif.ps.gz. There is also a plain text version at
ftp://ftp.uu.net/graphics/jpeg/jfif.txt.gz, but it is missing the figures.
The TIFF 6.0 file format specification can be obtained by FTP from
ftp://ftp.sgi.com/graphics/tiff/TIFF6.ps.gz. The JPEG incorporation
scheme found in the TIFF 6.0 spec of 3-June-92 has a number of
serious problems.
IJG does not recommend use of the TIFF 6.0 design (TIFF
Compression tag 6).
Instead, we recommend the JPEG design proposed by TIFF Technical
Note #2 (Compression tag 7). Copies of this Note can be obtained
from ftp.sgi.com or from ftp://ftp.uu.net/graphics/jpeg/. It is expected
that the next revision of the TIFF spec will replace the 6.0 JPEG
design with the Note’s design.
Although IJG’s own code does not support TIFF/JPEG, the free libtiff
library uses our library to implement TIFF/JPEG per the Note. libtiff
is available from ftp://ftp.sgi.com/graphics/tiff/.
ARCHIVE LOCATIONS
The “official” archive site for this software is ftp.uu.net (Internet
address 192.48.96.9). The most recent released version can always
be found there in directory graphics/jpeg. This particular version will
be archived as ftp://ftp.uu.net/graphics/jpeg/jpegsrc.v6b.tar.gz.
If you don’t have direct Internet access, UUNET’s archives are also
available via UUCP; contact help@uunet.uu.net for information on
retrieving files that way.
Numerous Internet sites maintain copies of the UUNET files.
However, only ftp.uu.net is guaranteed to have the latest official
version.
You can also obtain this software in DOS-compatible “zip” archive
format from the SimTel archives (ftp://ftp.simtel.net/pub/simtelnet/
msdos/graphics/), or on CompuServe in the Graphics Support forum
(GO CIS:GRAPHSUP), library 12 “JPEG Tools”. Again, these versions
may sometimes lag behind the ftp.uu.net release.
The JPEG FAQ (Frequently Asked Questions) article is a useful
source of general information about JPEG. It is updated constantly
and therefore is not included in this distribution. The FAQ is posted
every two weeks to Usenet newsgroups comp.graphics.misc, news.
answers, and other groups.
It is available on the World Wide Web at http://www.faqs.org/faqs/
jpeg-faq/ and other news.answers archive sites, including the official
news.answers archive at rtfm.mit.edu: ftp://rtfm.mit.edu/pub/usenet/
news.answers/jpeg-faq/.
If you don’t have Web or FTP access, send e-mail to mail-server@
rtfm.mit.edu with body
send usenet/news.answers/jpeg-faq/part1
send usenet/news.answers/jpeg-faq/part2
RELATED SOFTWARE
Numerous viewing and image manipulation programs now support
JPEG. (Quite a few of them use this library to do so.) The JPEG FAQ
described above lists some of the more popular free and shareware
viewers, and tells where to obtain them on Internet.
If you are on a Unix machine, we highly recommend Jef Poskanzer’s
free PBMPLUS software, which provides many useful operations on
PPM-format image files. In particular, it can convert PPM images to
and from a wide range of other formats, thus making cjpeg/djpeg
considerably more useful. The latest version is distributed by the
NetPBM group, and is available from numerous sites, notably ftp://
wuarchive.wustl.edu/graphics/graphics/packages/NetPBM/.
Unfortunately PBMPLUS/NETPBM is not nearly as portable as the
IJG software is; you are likely to have difficulty making it work on any
non-Unix machine.
A different free JPEG implementation, written by the PVRG group
at Stanford,
is available from ftp://havefun.stanford.edu/pub/jpeg/. This program
is designed for research and experimentation rather than production
use; it is slower, harder to use, and less portable than the IJG code,
but it is easier to read and modify. Also, the PVRG code supports
lossless JPEG, which we do not. (On the other hand, it doesn’t do
progressive JPEG.)
FILE FORMAT WARS
Some JPEG programs produce files that are not compatible with our
library.
The root of the problem is that the ISO JPEG committee failed to
specify a concrete file format. Some vendors “filled in the blanks” on
their own, creating proprietary formats that no one else could read.
(For example, none of the early commercial JPEG implementations
for the Macintosh were able to exchange compressed files.)
The file format we have adopted is called JFIF (see REFERENCES).
This format has been agreed to by a number of major commercial
JPEG vendors, and it has become the de facto standard. JFIF is a
minimal or “low end” representation.
We recommend the use of TIFF/JPEG (TIFF revision 6.0 as modified

by TIFF Technical Note #2) for “high end” applications that need to
record a lot of additional data about an image. TIFF/JPEG is fairly new
and not yet widely supported, unfortunately.
The upcoming JPEG Part 3 standard defines a file format called
SPIFF.
SPIFF is interoperable with JFIF, in the sense that most JFIF decoders
should be able to read the most common variant of SPIFF. SPIFF has
some technical advantages over JFIF, but its major claim to fame is
simply that it is an official standard rather than an informal one. At
this point it is unclear whether SPIFF will supersede JFIF or whether
JFIF will remain the de-facto standard. IJG intends to support SPIFF
once the standard is frozen, but we have not decided whether it
should become our default output format or not.
(In any case, our decoder will remain capable of reading JFIF
indefinitely.)
Various proprietary file formats incorporating JPEG compression also
exist.
We have little or no sympathy for the existence of these formats.
Indeed, one of the original reasons for developing this free software
was to help force convergence on common, open format standards
for JPEG files. Don’t use a proprietary file format!
TO DO
The major thrust for v7 will probably be improvement of visual
quality.
The current method for scaling the quantization tables is known
not to be very good at low Q values. We also intend to investigate
block boundar y smoothing, “poor man’s variable quantization”, and
other means of improving quality-vs-file-size performance without
sacrificing compatibility.
In future versions, we are considering supporting some of the
upcoming JPEG Part 3 extensions --- principally, variable quantization
and the SPIFF file format.
As always, speeding things up is of great interest.
Please send bug reports, offers of help, etc. to jpeg-info@uunet.
uu.net.
Exhibit-F
n
COPYRIGHT NOTICE, DISCLAIMER, and LICENSE:
If you modify libpng you may insert additional notices immediately
following this sentence.
libpng version 1.2.6, August 15, 2004, is Copyright (c) 2004 Glenn
Randers-Pehrson, and is distributed according to the same disclaimer
and license as libpng-1.2.5 with the following individual added to the
list of Contributing Authors
Cosmin Truta
libpng versions 1.0.7, July 1, 2000, through 1.2.5 - October 3, 2002, are
Copyright (c) 2000-2002 Glenn Randers-Pehrson, and are distributed
according to the same disclaimer and license as libpng-1.0.6 with the
following individuals added to the list of Contributing Authors
Simon-Pierre Cadieux
Eric S. Raymond
Gilles Vollant
and with the following additions to the disclaimer:
There is no warranty against interference with your enjoyment
of the library or against infringement. There is no warranty that
our efforts or the library will fulfill any of your particular purposes
or needs. This library is provided with all faults, and the entire
risk of satisfactory quality, performance, accuracy, and effort is
with the user.
libpng versions 0.97, January 1998, through 1.0.6, March 20, 2000, are
Copyright (c) 1998, 1999 Glenn Randers-Pehrson, and are distributed
according to the same disclaimer and license as libpng-0.96, with the
following individuals added to the list of Contributing Authors:
Tom Lane
Glenn Randers-Pehrson
Willem van Schaik
libpng versions 0.89, June 1996, through 0.96, May 1997, are
Copyright (c) 1996, 1997 Andreas Dilger Distributed according to
the same disclaimer and license as libpng-0.88, with the following
individuals added to the list of Contributing Authors:
John Bowler
Kevin Bracey
Sam Bushell
Magnus Holmgren
Greg Roelofs
Tom Tanner
libpng versions 0.5, May 1995, through 0.88, January 1996, are
Copyright (c) 1995, 1996 Guy Eric Schalnat, Group 42, Inc.
For the purposes of this copyright and license,“Contributing Authors”
is defined as the following set of individuals:
Andreas Dilger
Dave Martindale
Guy Eric Schalnat
Paul Schmidt
Tim Wegner
The PNG Reference Library is supplied “AS IS”. The Contributing
Authors and Group 42, Inc. disclaim all warranties, expressed or
implied, including, without limitation, the warranties of merchantability
and of fitness for any purpose. The Contributing Authors and Group
42, Inc. assume no liability for direct, indirect, incidental, special,
exemplary, or consequential damages, which may result from the
use of the PNG Reference Library, even if advised of the possibility
of such damage.
Permission is hereby granted to use, copy, modify, and distribute this
source code, or portions hereof, for any purpose, without fee, subject
to the following restrictions:
1. The origin of this source code must not be misrepresented.
2. Altered versions must be plainly marked as such and must not be
misrepresented as being the original source.
3. This Copyright notice may not be removed or altered from any
source or altered source distribution.
The Contributing Authors and Group 42, Inc. specifically permit,
without fee, and encourage the use of this source code as a
component to supporting the PNG file format in commercial
products. If you use this source code in a product, acknowledgment
is not required but would be appreciated.
A “png_get_copyright” function is available, for convenient use in
“about” boxes and the like: printf(“%s”,png_get_copyright(NULL));
Also, the PNG logo (in PNG format, of course) is supplied in the files
“pngbar.png” and “pngbar.jpg (88x31) and “pngnow.png” (98x31).
Libpng is OSI Certified Open Source Software. OSI Certified Open
Source is a certification mark of the Open Source Initiative.
Glenn Randers-Pehrson
glennrp@users.sourceforge.net
August 15, 2004
Exhibit-G
n
Copyright (c) 2001,2003 Keith Packard
Permission to use, copy, modify, distribute, and sell this software
and its documentation for any purpose is hereby granted without
fee, provided that the above copyright notice appear in all copies and
that both that copyright notice and this permission notice appear in
supporting documentation, and that the name of Keith Packard not
be used in advertising or publicity pertaining to distribution of the
software without specific, written prior permission. Keith Packard
makes no representations about the suitability of this software
for any purpose. It is provided “as is” without express or implied
warranty.
KEITH PACKARD DISCLAIMS ALL WARRANTIES WITH REGARD
TO THIS SOFTWARE, INCLUDING ALL IMPLIED WARRANTIES
OF MERCHANTABILITY AND FITNESS, IN NO EVENT SHALL
KEITH PACKARD BE LIABLE FOR ANY SPECIAL, INDIRECT OR
CONSEQUENTIAL DAMAGES OR ANY DAMAGES WHATSOEVER
RESULTING FROM LOSS OF USE, DATA OR PROFITS, WHETHER
IN AN ACTION OF CONTRACT, NEGLIGENCE OR OTHER TORTIOUS
ACTION, ARISING OUT OF OR IN CONNECTION WITH THE USE OR
PERFORMANCE OF THIS SOFTWARE.
Exhibit-H
n
The FreeType Project LICENSE
2002-Apr-11 Copyright 1996-2002 by David Turner, Robert Wilhelm,
and Werner Lemberg
Introduction
The FreeType Project is distributed in several archive packages; some
of them may contain, in addition to the FreeType font engine, various
tools and contributions which rely on, or relate to, the FreeType
Project.
This license applies to all files found in such packages, and which
do not fall under their own explicit license. The license affects thus
the FreeType font engine, the test programs, documentation and
makefiles, at the very least.
This license was inspired by the BSD, Artistic, and IJG (Independent
JPEG Group) licenses, which all encourage inclusion and use of
free software in commercial and freeware products alike. As a
consequence, its main points are that:
We don’t promise that this software works. However, we will be
•
interested in any kind of bug reports. (‘as is’ distribution)
You can use this software for whatever you want, in parts or full
•
form, without having to pay us. (‘royalty-free’usage)
You may not pretend that you wrote this software. If you use it, or
•
only parts of it, in a program, you must acknowledge somewhere
in your documentation that you have used the FreeType code.
(‘credits’)
We specifically permit and encourage the inclusion of this software,
with or without modifications, in commercial products.
We disclaim all warranties covering The FreeType Project and
assume no liability related to The FreeType Project.
Finally, many people asked us for a preferred form for a credit/
disclaimer to use in compliance with this license. We thus encourage
you to use the following text:
Portions of this software are copyright © 1996-2002 The FreeType
Project (www.freetype.org). All rights reserved.
Legal Terms
0. Definitions
Throughout this license, the terms ‘package’, ‘FreeType Project’,
and ‘FreeType archive’ refer to the set of files originally distributed
by the authors (David Turner, Robert Wilhelm, and Werner
Lemberg) as the ‘FreeType Project’, be they named as alpha, beta
or final release.
‘You’ refers to the licensee, or person using the project, where
‘using’ is a generic term including compiling the project’s source
code as well as linking it to form a ‘program’ or ‘executable’.
This program is referred to as ‘a program using the FreeType
engine’.
This license applies to all files distributed in the original FreeType
Project, including all source code, binaries and documentation,
unless otherwise stated inthe file in its original, unmodified form
a distributed in the original archive.
If you are unsure whether or not a particular file is covered by this
license, you must contact us to verify this.
The FreeType Project is copyright (C) 1996-2000 by David Turner,
Robert Wilhelm, and Werner Lemberg. All rights reserved except
as specified below.
1. No Warranty
THE FREETYPE PROJECT IS PROVIDED ‘AS IS’ WITHOUT
WARRANTY OF ANY KIND, EITHER EXPRESS OR IMPLIED,
INCLUDING, BUT NOT LIMITED TO, WARRANTIES OF
MERCHANTABILITY AND FITNESS FOR A PARTICULAR
PURPOSE. IN NO EVENT WILL ANY OF THE AUTHORS OR
COPYRIGHT HOLDERS BE LIABLE FOR ANY DAMAGES
CAUSED BY THE USE OR THE INABILITY TO USE, OF THE
FREETYPE PROJECT.
2. Redistribution
This license grants a worldwide, royalty-free, perpetual and
irrevocable right and license to use, execute, perform, compile,
display, copy, create derivative works of, distribute and sublicense
the FreeType Project (in both source and object code forms) and
derivative works thereof for any purpose; and to authorize others
to exercise some or all of the rights granted herein, subject to the
following conditions:
Redistribution of source code must retain this license file (‘FTL.
•
TXT’) unaltered; any additions, deletions or changes to the original
files must be clearly indicated in accompanying documentation.
The copyright notices of the unaltered, original files must be
preserved in all copies of source files.
Redistribution in binary form must provide a disclaimer that states
•
that the software is based in part of the work of the FreeType
Team, in the distribution documentation. We also encourage you
to put an URL to the FreeType web page in your documentation,
though this isn’t mandatory.
These conditions apply to any software derived from or based on the
FreeType Project, not just the unmodified files. If you use our work,
you must acknowledge us. However, no fee need be paid to us.
3. Advertising
Neither the FreeType authors and contributors nor you shall use
the name of the other for commercial, advertising, or promotional
purposes without specific prior written permission.
We suggest, but do not require, that you use one or more of the
following phrases to refer to this software in your documentation
or advertising materials: ‘FreeType Project’, ‘FreeType Engine’,
‘FreeType library’, or ‘FreeType Distribution’.
As you have not signed this license, you are not required to accept
it. However, as the FreeType Project is copyrighted material, only
this license, or another one contracted with the authors, grants
you the right to use, distribute, and modify it.
Therefore, by using, distributing, or modifying the FreeType
Project, you indicate that you understand and accept all the terms
of this license.
4. Contacts
There are two mailing lists related to FreeType:
freetype@freetype.org
•
Discusses general use and applications of FreeType, as well as
future and wanted additions to the library and distribution.
If you are looking for support, start in this list if you haven’t found
anything to help you in the documentation.
devel@freetype.org
•
Discusses bugs, as well as engine internals, design issues,
specific licenses, porting, etc.
http://www.freetype.org
•
Holds the current FreeType web page, which will allow you
to download our latest development version and read online
documentation.
You can also contact us individually at:
David Turner <david.turner@freetype.org>
Robert Wilhelm <robert.wilhelm@freetype.org>
Werner Lemberg <werner.lemberg@freetype.org>
Exhibit-I
n
z This document is freely plagiarised from the ‘Artistic Licence’,
distributed as part of the Perl v4.0 kit by Larry Wall, which is
available from most major archive sites
This documents purpose is to state the conditions under which these
Packages (See definition below) viz: “Crack”, the Unix Password
Cracker, and “CrackLib”, the Unix Password Checking library, which
are held in copyright by Alec David Edward Muffett, may be copied,
such that the copyright holder maintains some semblance of artistic
control over the development of the packages, while giving the
users of the package the right to use and distribute the Package in
a more-or-less customary fashion, plus the right to make reasonable
modifications.
So there.
Definitions:
A “Package” refers to the collection of files distributed by the
Copyright Holder, and derivatives of that collection of files created
through textual modification, or segments thereof.
“Standard Version” refers to such a Package if it has not been
modified, or has been modified in accordance with the wishes of
the Copyright Holder.
“Copyright Holder” is whoever is named in the copyright or
copyrights for the package.
“You” is you, if you’re thinking about copying or distributing this
Package.
“Reasonable copying fee” is whatever you can justify on the basis
of media cost, duplication charges, time of people involved, and so
on. (You will not be required to justify it to the Copyright Holder, but
only to the computing community at large as a market that must
bear the fee.)
“Freely Available” means that no fee is charged for the item itself,
though there may be fees involved in handling the item. It also
means that recipients of the item may redistribute it under the same
conditions they received it.
1. You may make and give away verbatim copies of the source
form of the Standard Version of this Package without restriction,
provided that you duplicate all of the original copyright notices and
associated disclaimers.
2. You may apply bug fixes, portability fixes and other modifications
derived from the Public Domain or from the Copyright Holder.
A Package modified in such a way shall still be considered the
Standard Version.
3. You may otherwise modify your copy of this Package in any way,
provided that you insert a prominent notice in each changed file
stating how and when AND WHY you changed that file, and
LICENSE

provided that you do at least ONE of the following:
a) place your modifications in the Public Domain or otherwise
make them Freely Available, such as by posting said
modifications to Usenet or an equivalent medium, or placing
the modifications on a major archive site such as uunet.
uu.net, or by allowing the Copyright Holder to include your
modifications in the Standard Version of the Package.
b) use the modified Package only within your corporation or
organization.
c) rename any non-standard executables so the names do
not conflict with standard executables, which must also be
provided, and provide separate documentation for each nonstandard executable that clearly documents how it differs from
the Standard Version.
d) make other distribution arrangements with the Copyright
Holder.
4. You may distribute the programs of this Package in object code
or executable form, provided that you do at least ONE of the
following:
a) distribute a Standard Version of the executables and library
files, together with instructions (in the manual page or
equivalent) on where to get the Standard Version.
b) accompany the distribution with the machine-readable source
of the Package with your modifications.
c) accompany any non-standard executables with their
corresponding Standard Version executables, giving the
non-standard executables non-standard names, and clearly
documenting the differences in manual pages (or equivalent),
together with instructions on where to get the Standard
Version.
d) make other distribution arrangements with the Copyright
Holder.
5. You may charge a reasonable copying fee for any distribution of
this Package. You may charge any fee you choose for support of
this Package.
YOU MAY NOT CHARGE A FEE FOR THIS PACKAGE ITSELF.
However, you may distribute this Package in aggregate with
other (possibly commercial) programs as part of a larger (possibly
commercial) software distribution provided that YOU DO NOT
ADVERTISE this package as a product of your own.
6. The name of the Copyright Holder may not be used to endorse
or promote products derived from this software without specific
prior written permission.
7. THIS PACKAGE IS PROVIDED “AS IS” AND WITHOUT ANY
EXPRESS OR IMPLIED WARRANTIES, INCLUDING, WITHOUT
LIMITATION, THE IMPLIED WARRANTIES OF MERCHANTIBILITY
AND FITNESS FOR A PARTICULAR PURPOSE.
Exhibit-J
n
Unless otherwise “explicitly” stated, the following text describes the
licensed conditions under which the contents of this libcap release
may be used and distributed:
Redistribution and use in source and binary forms of libcap, with
or without modification, are permitted provided that the following
conditions are met:
1. Redistributions of source code must retain any existing copyright
notice, and this entire permission notice in its entirety, including
the disclaimer of warranties.
2. Redistributions in binar y form must reproduce all prior and
current copyright notices, this list of conditions, and the following
disclaimer in the documentation and/or other materials provided
with the distribution.
3. The name of any author may not be used to endorse or promote
products derived from this software without their specific prior
written permission.
ALTERNATIVELY, this product may be distributed under the terms
of the GNU General Public License, in which case the provisions of
the GNU GPL are required INSTEAD OF the above restrictions. (This
clause is necessary due to a potential conflict between the GNU GPL
and the restrictions contained in a BSD-style copyright.)
THIS SOFTWARE IS PROVIDED “AS IS” AND ANY EXPRESS OR
IMPLIED WARRANTIES, INCLUDING, BUT NOT LIMITED TO, THE
IMPLIED WARRANTIES OF MERCHANTABILITY AND FITNESS FOR
A PARTICULAR PURPOSE ARE DISCLAIMED.
IN NO EVENT SHALL THE AUTHOR(S) BE LIABLE FOR ANY
LICENSE
DIRECT, INDIRECT, INCIDENTAL, SPECIAL, EXEMPLARY, OR
CONSEQUENTIAL DAMAGES (INCLUDING, BUT NOT LIMITED TO,
PROCUREMENT OF SUBSTITUTE GOODS OR SERVICES; LOSS
OF USE, DATA, OR PROFITS; OR BUSINESS INTERRUPTION)
HOWEVER CAUSED AND ON ANY THEORY OF LIABILITY,
WHETHER IN CONTRACT, STRICT LIABILITY, OR TORT (INCLUDING
NEGLIGENCE OR OTHERWISE) ARISING IN ANY WAY OUT OF THE
USE OF THIS SOFTWARE, EVEN IF ADVISED OF THE POSSIBILITY
OF SUCH DAMAGE.
Exhibit-K
n
Copyright 1995 by Wietse Venema. All rights reserved. Some
individual files may be covered by other copyrights.
This material was originally written and compiled by Wietse Venema
at Eindhoven University of Technology, The Netherlands, in 1990,
1991, 1992, 1993, 1994 and 1995.
Redistribution and use in source and binary forms are permitted
provided that this entire copyright notice is duplicated in all such
copies.
This software is provided “as is” and without any expressed or implied
warranties, including, without limitation, the implied warranties of
merchantibility and fitness for any particular purpose.
Exhibit-L
n
Copyright (c) 1989 The Regents of the University of California.
All rights reserved.
Redistribution and use in source and binary forms, with or without
modification, are permitted provided that the following conditions are
met:
1. Redistributions of source code must retain the above copyright
notice, this list of conditions and the following disclaimer.
2. Redistributions in binary form must reproduce the above copyright
notice, this list of conditions and the following disclaimer in
the documentation and/or other materials provided with the
distribution.
3. All advertising materials mentioning features or use of this
software must display the following acknowledgement:
This product includes software developed by the University of
California, Berkeley and its contributors.
4. Neither the name of the University nor the names of its
contributors may be used to endorse or promote products derived
from this software without specific prior written permission.
THIS SOFTWARE IS PROVIDED BY THE REGENTS AND
CONTRIBUTORS “AS IS” AND ANY EXPRESS OR IMPLIED
WARRANTIES, INCLUDING, BUT NOT LIMITED TO, THE IMPLIED
WARRANTIES OF MERCHANTABILITY AND FITNESS FOR A
PARTICULAR PURPOSE ARE DISCLAIMED. IN NO EVENT
SHALL THE REGENTS OR CONTRIBUTORS BE LIABLE FOR
ANY DIRECT, INDIRECT, INCIDENTAL, SPECIAL, EXEMPLARY,
OR CONSEQUENTIAL DAMAGES (INCLUDING, BUT NOT
LIMITED TO, PROCUREMENT OF SUBSTITUTE GOODS OR
SERVICES; LOSS OF USE, DATA, OR PROFITS; OR BUSINESS
INTERRUPTION) HOWEVER CAUSED AND ON ANY THEORY
OF LIABILITY, WHETHER IN CONTRACT, STRICT LIABILITY, OR
TORT (INCLUDING NEGLIGENCE OR OTHERWISE) ARISING
IN ANY WAY OUT OF THE USE OF THIS SOFTWARE, EVEN IF
ADVISED OF THE POSSIBILITY OF SUCH DAMAGE.
Exhibit-M
n
Copyright (c) 1998 Red Hat Software
Permission is hereby granted, free of charge, to any person obtaining
a copy of this software and associated documentation files (the
“Software”), to deal in the Software without restriction, including
without limitation the rights to use, copy, modify, merge, publish,
distribute, sublicense, and/or sell copies of the Software, and to
permit persons to whom the Software is furnished to do so, subject
to the following conditions:
The above copyright notice and this permission notice shall be
included in all copies or substantial portions of the Software.
THE SOFTWARE IS PROVIDED “AS IS”, WITHOUT WARRANTY
OF ANY KIND, EXPRESS OR IMPLIED, INCLUDING BUT NOT
LIMITED TO THE WARRANTIES OF MERCHANTABILITY, FITNESS
FOR A PARTICULAR PURPOSE AND NONINFRINGEMENT. IN NO
EVENT SHALL THE X CONSORTIUM BE LIABLE FOR ANY CLAIM,
DAMAGES OR OTHER LIABILITY, WHETHER IN AN ACTION OF
CONTRACT, TORT OR OTHERWISE, ARISING FROM, OUT OF OR
IN CONNECTION WITH THE SOFTWARE OR THE USE OR OTHER
DEALINGS IN THE SOFTWARE.
Except as contained in this notice, the name of the X Consortium
shall not be used in advertising or otherwise to promote the sale, use
or other dealings in this Software without prior written authorization
from the X Consortium.
Exhibit-N
n
Copyright (c) 2004-2005 by Internet Systems Consortium, Inc.
(“ISC”)
Copyright (c) 1995-2003 by Internet Software Consortium
Permission to use, copy, modify, and distribute this software for
any purpose with or without fee is hereby granted, provided that
the above copyright notice and this permission notice appear in all
copies.
THE SOFTWARE IS PROVIDED “AS IS” AND ISC DISCLAIMS ALL
WARRANTIES WITH REGARD TO THIS SOFTWARE INCLUDING
ALL IMPLIED WARRANTIES OF MERCHANTABILITY AND FITNESS.
IN NO EVENT SHALL ISC BE LIABLE FOR ANY SPECIAL, DIRECT,
INDIRECT, OR CONSEQUENTIAL DAMAGES OR ANY DAMAGES
WHATSOEVER RESULTING FROM LOSS OF USE, DATA OR PROFITS,
WHETHER IN AN ACTION OF CONTRACT, NEGLIGENCE OR OTHER
TORTIOUS ACTION, ARISING OUT OF OR IN CONNECTION WITH
THE USE OR PERFORMANCE OF THIS SOFTWARE.
Internet Systems Consortium, Inc.
950 Charter Street Redwood City, CA 94063
<info@isc.org> http://www.isc.org/
Exhibit-O
n
OpenBSD: telnet.c,v 1.6 1998/07/27 15:29:29 millert Exp
NetBSD: telnet.c,v 1.7 1996/02/28 21:04:15 thorpej Exp
Copyright (c) 1988, 1990, 1993
The Regents of the University of California. All rights reserved.
Redistribution and use in source and binary forms, with or without
modification, are permitted provided that the following conditions are
met:
1. Redistributions of source code must retain the above copyright
notice, this list of conditions and the following disclaimer.
2. Redistributions in binary form must reproduce the above copyright
notice, this list of conditions and the following disclaimer in
the documentation and/or other materials provided with the
distribution.
3. All advertising materials mentioning features or use of this
software must display the following acknowledgement:
This product includes software developed by the University of
California, Berkeley and its contributors.
4. Neither the name of the University nor the names of its
contributors may be used to endorse or promote products derived
from this software without specific prior written permission.
THIS SOFTWARE IS PROVIDED BY THE REGENTS AND
CONTRIBUTORS “AS IS” AND ANY EXPRESS OR IMPLIED
WARRANTIES, INCLUDING, BUT NOT LIMITED TO, THE IMPLIED
WARRANTIES OF MERCHANTABILITY AND FITNESS FOR A
PARTICULAR PURPOSE ARE DISCLAIMED. IN NO EVENT
SHALL THE REGENTS OR CONTRIBUTORS BE LIABLE FOR ANY
DIRECT, INDIRECT, INCIDENTAL, SPECIAL, EXEMPLARY, OR
CONSEQUENTIAL DAMAGES (INCLUDING, BUT NOT LIMITED TO,
PROCUREMENT OF SUBSTITUTE GOODS OR SERVICES; LOSS
OF USE, DATA, OR PROFITS; OR BUSINESS INTERRUPTION)
HOWEVER CAUSED AND ON ANY THEORY OF LIABILITY,
WHETHER IN CONTRACT, STRICT LIABILITY, OR TORT (INCLUDING
NEGLIGENCE OR OTHERWISE) ARISING IN ANY WAY OUT OF THE
USE OF THIS SOFTWARE, EVEN IF ADVISED OF THE POSSIBILITY
OF SUCH DAMAGE.
Exhibit-P
n
ORIGINAL LICENSE:
This software is
(c) Copyright 1992 by Panagiotis Tsirigotis
The author (Panagiotis Tsirigotis) grants permission to use, copy,
and distribute this software and its documentation for any purpose
and without fee, provided that the above copyright notice extant in
files in this distribution is not removed from files included in any
redistribution and that this copyright notice is also included in any
redistribution.
Modifications to this software may be distributed, either by
distributing the modified software or by distributing patches to the
original software, under the following additional terms:
1. The version number will be modified as follows:
a. The first 3 components of the version number
(i.e <number>.<number>.<number>) will remain unchanged.
b. A new component will be appended to the version number to
indicate the modification level. The form of this component is
up to the author of the modifications.
2. The author of the modifications will include his/her name by
appending it along with the new version number to this file
and will be responsible for any wrong behavior of the modified
software.
The author makes no representations about the suitability of this
software for any purpose. It is provided “as is” without any express
or implied warranty.
Modifications:
Version: 2.1.8.7-current
Copyright 1998-2001 by Rob Braun
Sensor Addition
Version: 2.1.8.9pre14a
Copyright 2001 by Steve Grubb
This is an exerpt from an email I recieved from the original author,
allowing xinetd as maintained by me, to use the higher version
numbers:
I appreciate your maintaining the version string guidelines as
specified in the copyright. But I did not mean them to last as long
as they did.
So, if you want, you may use any 2.N.* (N >= 3) version string for
future xinetd versions that you release. Note that I am excluding
the 2.2.* line; using that would only create confusion. Naming the
next release 2.3.0 would put to rest the confusion about 2.2.1 and
2.1.8.*.
Exhibit-Q
n
Except where otherwise noted in the source code (e.g. the files
hash.c, list.c and the trio files, which are covered by a similar licence
but with different Copyright notices) all the files are:
Copyright (C) 1998-2003 Daniel Veillard. All Rights Reserved.
Permission is hereby granted, free of charge, to any person obtaining
a copy of this software and associated documentation files (the
“Software”), to deal in the Software without restriction, including
without limitation the rights to use, copy, modify, merge, publish,
distribute, sublicense, and/or sell copies of the Software, and to
permit persons to whom the Software is furnished to do so, subject
to the following conditions:
The above copyright notice and this permission notice shall be
included in all copies or substantial portions of the Software.
THE SOFTWARE IS PROVIDED “AS IS”, WITHOUT WARRANTY OF
ANY KIND, EXPRESS OR IMPLIED, INCLUDING BUT NOT LIMITED
TO THE WARRANTIES OF MERCHANTABILITY, FITNESS FOR A
PARTICULAR PURPOSE AND NONINFRINGEMENT. IN NO EVENT
SHALL THE DANIEL VEILLARD BE LIABLE FOR ANY CLAIM,
DAMAGES OR OTHER LIABILITY, WHETHER IN AN ACTION OF
CONTRACT, TORT OR OTHERWISE, ARISING FROM, OUT OF OR
IN CONNECTION WITH THE SOFTWARE OR THE USE OR OTHER
DEALINGS IN THE SOFTWARE.
Except as contained in this notice, the name of Daniel Veillard shall
not be used in advertising or otherwise to promote the sale, use
or other dealings in this Software without prior written authorization
from him.
Exhibit-R
n
LICENSE ISSUES
The OpenSSL toolkit stays under a dual license, i.e. both the
conditions of the OpenSSL License and the original SSLeay license
apply to the toolkit.
See below for the actual license texts. Actually both licenses are BSDstyle Open Source licenses. In case of any license issues related to
OpenSSL please contact openssl-core@openssl.org.
OpenSSL License
Copyright (c) 1998-2004 The OpenSSL Project. All rights reserved.
Redistribution and use in source and binary forms, with or without
modification, are permitted provided that the following conditions are
met:

LICENSE
1. Redistributions of source code must retain the above copyright
notice, this list of conditions and the following disclaimer.
2. Redistributions in binary form must reproduce the above copyright
notice, this list of conditions and the following disclaimer in
the documentation and/or other materials provided with the
distribution.
3. All advertising materials mentioning features or use of this
software must display the following acknowledgment:
“This product includes software developed by the OpenSSL
Project for use in the OpenSSL Toolkit. (http://www.openssl.
org/)”
4. The names “OpenSSL Toolkit” and “OpenSSL Project” must
not be used to endorse or promote products derived from this
software without prior written permission. For written permission,
please contact openssl-core@openssl.org.
5. Products derived from this software may not be called “OpenSSL”
nor may “OpenSSL” appear in their names without prior written
permission of the OpenSSL Project.
6. Redistributions of any form whatsoever must retain the following
acknowledgment:
“This product includes software developed by the OpenSSL
Project for use in the OpenSSL Toolkit (http://www.openssl.org/)”
THIS SOFTWARE IS PROVIDED BY THE OpenSSL PROJECT
“AS IS” AND ANY EXPRESSED OR IMPLIED WARRANTIES,
INCLUDING, BUT NOT LIMITED TO, THE IMPLIED WARRANTIES OF
MERCHANTABILITY AND FITNESS FOR A PARTICULAR PURPOSE
ARE DISCLAIMED.IN NO EVENT SHALL THE OpenSSL PROJECT
OR ITS CONTRIBUTORS BE LIABLE FOR ANY DIRECT, INDIRECT,
INCIDENTAL, SPECIAL, EXEMPLARY, OR CONSEQUENTIAL
DAMAGES (INCLUDING, BUT NOT LIMITED TO, PROCUREMENT
OF SUBSTITUTE GOODS OR SERVICES; LOSS OF USE, DATA, OR
PROFITS; OR BUSINESS INTERRUPTION) HOWEVER CAUSED AND
ON ANY THEORY OF LIABILITY, WHETHER IN CONTRACT, STRICT
LIABILITY, OR TORT (INCLUDING NEGLIGENCE OR OTHERWISE)
ARISING IN ANY WAY OUT OF THE USE OF THIS SOFTWARE, EVEN
IF ADVISED OF THE POSSIBILITY OF SUCH DAMAGE.
This product includes cryptographic software written by Eric Young
(eay@cryptsoft.com). This product includes software written by Tim
Hudson (tjh@cryptsoft.com).
Original SSLeay License
Copyright (C) 1995-1998 Eric Young (eay@cryptsoft.com)
All rights reserved.
This package is an SSL implementation written by Eric Young (eay@
cryptsoft.com).
The implementation was written so as to conform with Netscapes
SSL.
This library is free for commercial and non-commercial use as long
as the following conditions are aheared to. The following conditions
apply to all code found in this distribution, be it the RC4, RSA, lhash,
DES, etc., code; not just the SSL code. The SSL documentation
included with this distribution is covered by the same copyright
terms except that the holder is Tim Hudson (tjh@cryptsoft.com).
Copyright remains Eric Youngs, and as such any Copyright notices in
the code are not to be removed.
If this package is used in a product, Eric Young should be given
attribution as the author of the parts of the library used.
This can be in the form of a textual message at program startup or in
documentation (online or textual) provided with the package.
Redistribution and use in source and binary forms, with or without
modification, are permitted provided that the following conditions are
met:
1. Redistributions of source code must retain the copyright notice,
this list of conditions and the following disclaimer.
2. Redistributions in binary form must reproduce the above copyright
notice, this list of conditions and the following disclaimer in
the documentation and/or other materials provided with the
distribution.
3. All advertising materials mentioning features or use of this
software must display the following acknowledgement:
“This product includes cryptographic software written by Eric
Young (eay@cryptsoft.com)”
The word ‘cryptographic’ can be left out if the rouines from the
library being used are not cryptographic related :-).
4. If you include any Windows specific code (or a derivative thereof)
from the apps directory (application code) you must include an
acknowledgement:
“This product includes software written by Tim Hudson (tjh@
cryptsoft.com)”
THIS SOFTWARE IS PROVIDED BY ERIC YOUNG “AS IS” AND
ANY EXPRESS OR IMPLIED WARRANTIES, INCLUDING, BUT NOT
LIMITED TO, THE IMPLIED WARRANTIES OF MERCHANTABILITY
AND FITNESS FOR A PARTICULAR PURPOSE ARE DISCLAIMED.
IN NO EVENT SHALL THE AUTHOR OR CONTRIBUTORS BE LIABLE
FOR ANY DIRECT, INDIRECT, INCIDENTAL, SPECIAL, EXEMPLARY,
OR CONSEQUENTIAL DAMAGES (INCLUDING, BUT NOT LIMITED
TO, PROCUREMENT OF SUBSTITUTE GOODS OR SERVICES;
LOSS OF USE, DATA, OR PROFITS; OR BUSINESS INTERRUPTION)
HOWEVER CAUSED AND ON ANY THEORY OF LIABILITY,
WHETHER IN CONTRACT, STRICT LIABILITY, OR TORT (INCLUDING
NEGLIGENCE OR OTHERWISE) ARISING IN ANY WAY OUT OF THE
USE OF THIS SOFTWARE, EVEN IF ADVISED OF THE POSSIBILITY
OF SUCH DAMAGE.
The licence and distribution terms for any publically available version
or derivative of this code cannot be changed. i.e. this code cannot
simply be copied and put under another distribution licence [including
the GNU Public Licence.]
Exhibit-S
n
Copyright (c) 1998-2001,2002 Free Software Foundation, Inc.
Permission is hereby granted, free of charge, to any person obtaining
a copy of this software and associated documentation files (the
“Software”), to deal in the Software without restriction, including
without limitation the rights to use, copy, modify, merge, publish,
distribute, distribute with modifications, sublicense, and/or sell
copies of the Software, and to permit persons to whom the Software
is furnished to do so, subject to the following conditions: The above
copyright notice and this permission notice shall be included in all
copies or substantial portions of the Software.
THE SOFTWARE IS PROVIDED “AS IS”, WITHOUT WARRANTY OF
ANY KIND, EXPRESS OR IMPLIED, INCLUDING BUT NOT LIMITED
TO THE WARRANTIES OF MERCHANTABILITY, FITNESS FOR A
PARTICULAR PURPOSE AND NONINFRINGEMENT.
IN NO EVENT SHALL THE ABOVE COPYRIGHT HOLDERS BE LIABLE
FOR ANY CLAIM, DAMAGES OR OTHER LIABILITY, WHETHER
IN AN ACTION OF CONTRACT, TORT OR OTHERWISE, ARISING
FROM, OUT OF OR IN CONNECTION WITH THE SOFTWARE OR
THE USE OR OTHER DEALINGS IN THE SOFTWARE.
Except as contained in this notice, the name(s) of the above copyright
holders shall not be used in advertising or otherwise to promote the
sale, use or other dealings in this Software without prior written
authorization.
Exhibit-T
n
Copyright (c) 1990 The Regents of the University of California.
All rights reserved.
Redistribution and use in source and binary forms, with or without
modification, are permitted provided that the following conditions are
met:
1. Redistributions of source code must retain the above copyright
notice, this list of conditions and the following disclaimer.
2. Redistributions in binary form must reproduce the above copyright
notice, this list of conditions and the following disclaimer in
the documentation and/or other materials provided with the
distribution.
3. All advertising materials mentioning features or use of this
software must display the following acknowledgement:
This product includes software developed by the University of
California, Berkeley and its contributors.
4. Neither the name of the University nor the names of its
contributors may be used to endorse or promote products derived
from this software without specific prior written permission.
THIS SOFTWARE IS PROVIDED BY THE REGENTS AND
CONTRIBUTORS “AS IS” AND ANY EXPRESS OR IMPLIED
WARRANTIES, INCLUDING, BUT NOT LIMITED TO, THE IMPLIED
WARRANTIES OF MERCHANTABILITY AND FITNESS FOR
A PARTICULAR PURPOSE ARE DISCLAIMED. IN NO EVENT
SHALL THE REGENTS OR CONTRIBUTORS BE LIABLE FOR ANY
DIRECT, INDIRECT, INCIDENTAL, SPECIAL, EXEMPLARY, OR
CONSEQUENTIAL DAMAGES (INCLUDING, BUT NOT LIMITED TO,
PROCUREMENT OF SUBSTITUTE GOODS OR SERVICES; LOSS
OF USE, DATA, OR PROFITS; OR BUSINESS INTERRUPTION)
HOWEVER CAUSED AND ON ANY THEORY OF LIABILITY,
WHETHER IN CONTRACT, STRICT LIABILITY, OR TORT (INCLUDING
NEGLIGENCE OR OTHERWISE) ARISING IN ANY WAY OUT OF THE
USE OF THIS SOFTWARE, EVEN IF ADVISED OF THE POSSIBILITY
OF SUCH DAMAGE.
Copyright (C) 1985-2005 by the Massachusetts Institute of
Technology.
All rights reserved.
Export of this software from the United States of America may
require a specific license from the United States Government. It is
the responsibility of any person or organization contemplating export
to obtain such a license before exporting.
WITHIN THAT CONSTRAINT, permission to use, copy, modify, and
distribute this software and its documentation for any purpose and
without fee is hereby granted, provided that the above copyright
notice appear in all copies and that both that copyright notice and
this permission notice appear in supporting documentation, and that
the name of M.I.T. not be used in advertising or publicity pertaining to
distribution of the software without specific, written prior permission.
Furthermore if you modify this software you must label your software
as modified software and not distribute it in such a fashion that it
might be confused with the original MIT software.
M.I.T. makes no representations about the suitability of this software
for any purpose. It is provided “as is” without express or implied
warranty.
THIS SOFTWARE IS PROVIDED “AS IS” AND WITHOUT ANY
EXPRESS OR IMPLIED WARRANTIES, INCLUDING, WITHOUT
LIMITATION, THE IMPLIED WARRANTIES OF MERCHANTIBILITY
AND FITNESS FOR A PARTICULAR PURPOSE.
Individual source code files are copyright MIT, Cygnus Support,
OpenVision, Oracle, Sun Soft, FundsXpress, and others.
Project Athena, Athena, Athena MUSE, Discuss, Hesiod, Kerberos,
Moira, and Zephyr are trademarks of the Massachusetts Institute of
Technology (MIT). No commercial use of these trademarks may be
made without prior written permission of MIT.
“Commercial use” means use of a name in a product or other forprofit manner. It does NOT prevent a commercial firm from referring
to the MIT trademarks in order to convey information (although in
doing so, recognition of their trademark status should be given).
The following copyright and permission notice applies to the
OpenVision Kerberos Administration system located in kadmin/
create, kadmin/dbutil, kadmin/passwd, kadmin/server, lib/kadm5,
and portions of lib/rpc:
Copyright, OpenVision Technologies, Inc., 1996, All Rights
Reserved
WARNING: Retrieving the OpenVision Kerberos Administration
system source code, as described below, indicates your acceptance
of the following terms. If you do not agree to the following terms,
do not retrieve the OpenVision Kerberos administration system.
You may freely use and distribute the Source Code and Object Code
compiled from it, with or without modification, but this Source
Code is provided to you “AS IS” EXCLUSIVE OF ANY WARRANTY,
INCLUDING, WITHOUT LIMITATION, ANY WARRANTIES OF
MERCHANTABILITY OR FITNESS FOR A PARTICULAR PURPOSE,
OR ANY OTHER WARRANTY, WHETHER EXPRESS OR IMPLIED.
IN NO EVENT WILL OPENVISION HAVE ANY LIABILITY FOR ANY
LOST PROFITS, LOSS OF DATA OR COSTS OF PROCUREMENT
OF SUBSTITUTE GOODS OR SERVICES, OR FOR ANY SPECIAL,
INDIRECT, OR CONSEQUENTIAL DAMAGES ARISING OUT OF
THIS AGREEMENT, INCLUDING, WITHOUT LIMITATION, THOSE
RESULTING FROM THE USE OF THE SOURCE CODE, OR THE
FAILURE OF THE SOURCE CODE TO PERFORM, OR FOR ANY
OTHER REASON.
OpenVision retains all copyrights in the donated Source Code.
OpenVision also retains copyright to derivative works of the
Source Code, whether created by OpenVision or by a third party.
The OpenVision copyright notice must be preserved if derivative
works are made based on the donated Source Code.
OpenVision Technologies, Inc. has donated this Kerberos
Administration system to MIT for inclusion in the standard Kerberos
5 distribution. This donation underscores our commitment to
continuing Kerberos technology development and our gratitude
for the valuable work which has been performed by MIT and the
Kerberos community.
Portions contributed by Matt Crawford <crawdad@fnal.gov> were
work performed at Fermi National Accelerator Laboratory, which is
operated by Universities Research Association, Inc., under contract
DE-AC02-76CHO3000 with the U.S. Department of Energy.
The implementation of the Yarrow pseudo-random number generator
in src/lib/crypto/yarrow has the following copyright:
Copyright 2000 by Zero-Knowledge Systems, Inc.
Permission to use, copy, modify, distribute, and sell this software
and its documentation for any purpose is hereby granted without
fee, provided that the above copyright notice appear in all copies and
that both that copyright notice and this permission notice appear in
supporting documentation, and that the name of Zero-Knowledge
Systems, Inc. not be used in advertising or publicity pertaining to
distribution of the software without specific, written prior permission.
Zero-Knowledge Systems, Inc. makes no representations about the
suitability of this software for any purpose. It is provided “as is”
without express or implied warranty.
ZERO-KNOWLEDGE SYSTEMS, INC. DISCLAIMS ALL WARRANTIES
WITH REGARD TO THIS SOFTWARE, INCLUDING ALL IMPLIED
WARRANTIES OF MERCHANTABILITY AND FITNESS, IN NO
EVENT SHALL ZERO-KNOWLEDGE SYSTEMS, INC. BE LIABLE
FOR ANY SPECIAL, INDIRECT OR CONSEQUENTIAL DAMAGES
OR ANY DAMAGES WHATSOEVER RESULTING FROM LOSS OF
USE, DATA OR PROFITS, WHETHER IN AN ACTION OF CONTRACT,
NEGLIGENCE OR OTHER TORTUOUS ACTION, ARISING OUT OF
OR IN CONNECTION WITH THE USE OR PERFORMANCE OF THIS
SOFTWARE.
The implementation of the AES encryption algorithm in
src/lib/crypto/aes has the following copyright:
Copyright (c) 2001, Dr Brian Gladman <brg@gladman.uk.net>,
Worcester, UK.
All rights reserved.
LICENSE TERMS
The free distribution and use of this software in both source and
binary form is allowed (with or without changes) provided that:
1. distributions of this source code include the above copyright
notice, this list of conditions and the following disclaimer;
2. distributions in binary form include the above copyright notice,
this list of conditions and the following disclaimer in the
documentation and/or other associated materials;
3. the copyright holder’s name is not used to endorse products built
using this software without specific written permission.
DISCLAIMER
This software is provided “as is” with no explcit or implied warranties
in respect of any properties, including, but not limited to, correctness
and fitness for purpose.
The implementation of the RPCSEC_GSS authentication flavor in src/
lib/rpc has the following copyright:
Copyright (c) 2000 The Regents of the University of Michigan.
All rights reserved.
Copyright (c) 2000 Dug Song <dugsong@UMICH.EDU>.
All rights reserved, all wrongs reversed.
Redistribution and use in source and binary forms, with or without
modification, are permitted provided that the following conditions are
met:
1. Redistributions of source code must retain the above copyright
notice, this list of conditions and the following disclaimer.
2. Redistributions in binary form must reproduce the above copyright
notice, this list of conditions and the following disclaimer in
the documentation and/or other materials provided with the
distribution.
3. Neither the name of the University nor the names of its
contributors may be used to endorse or promote products derived
from this software without specific prior written permission.
THIS SOFTWARE IS PROVIDED “AS IS” AND ANY EXPRESS OR
IMPLIED WARRANTIES, INCLUDING, BUT NOT LIMITED TO, THE
IMPLIED WARRANTIES OF MERCHANTABILITY AND FITNESS
FOR A PARTICULAR PURPOSE ARE DISCLAIMED. IN NO EVENT
SHALL THE REGENTS OR CONTRIBUTORS BE LIABLE FOR ANY
DIRECT, INDIRECT, INCIDENTAL, SPECIAL, EXEMPLARY, OR
CONSEQUENTIAL DAMAGES (INCLUDING, BUT NOT LIMITED TO,
PROCUREMENT OF SUBSTITUTE GOODS OR SERVICES; LOSS
OF USE, DATA, OR PROFITS; OR BUSINESS INTERRUPTION)
HOWEVER CAUSED AND ON ANY THEORY OF LIABILITY,

WHETHER IN CONTRACT, STRICT LIABILITY, OR TORT (INCLUDING
NEGLIGENCE OR OTHERWISE) ARISING IN ANY WAY OUT OF THE
USE OF THIS SOFTWARE, EVEN IF ADVISED OF THE POSSIBILITY
OF SUCH DAMAGE.
Acknowledgments
Appreciation Time!!!! There are far too many people to try to thank
them all; many people have contributed to the development of
Kerberos V5. This is only a partial listing....
Thanks to Kevin Coffman and the CITI group at the University of
Michigan for providing patches for implementing RPCSEC_GSS
authentication in the RPC library.
Thanks to Derrick Schommer for reporting multiple memory leaks.
Thanks to Quanah Gibson-Mount of Stanford University for helping
exercise the thread support code.
Thanks to Michael Tautschnig for reporting the heap buffer overflow
inthe password history mechanism. [MITKRB5-SA-2004-004]
Thanks to Wyllys Ingersoll for finding a buffer-size problem in
theRPCSEC_GSS implementation.
Thanks to the members of the Kerberos V5 development team at
MIT, both past and present: Danilo Almeida, Jeffrey Altman, Jay
Berkenbilt, Richard Basch, Mitch Berger, John Carr, Don Davis,
Alexandra Ellwood, Nancy Gilman, Matt Hancher, Sam Hartman, Paul
Hill, Marc Horowitz, Eva Jacobus, Miroslav Jurisic, Barry Jaspan,
Geoffrey King, John Kohl, Peter Litwack, Scott McGuire, Kevin
Mitchell, Cliff Neuman, Paul Park, Ezra Peisach, Chris Provenzano,
Ken Raeburn, Jon Rochlis, Jeff Schiller, Jen Selby, Brad Thompson,
Harry Tsai, Ted Ts’o, Marshall Vale, Tom Yu.
Very special thanks go to Marshall Vale, our departing team leader.
Over the past few years, Marshall has been extremely valuable to
us as mentor, advisor, manager, and friend. Marshall’s devotion as a
champion of Kerberos has helped our team immensely through many
trials and hardships. We will miss him tremendously, and we wish
him the best in his future endeavors.
Exhibit-U
n
Copyright (c) 1989 The Regents of the University of California.
All rights reserved.
This code is derived from software contributed to Berkeley by Mike
Muuss.
Redistribution and use in source and binary forms, with or without
modification, are permitted provided that the following conditions are
met:
1. Redistributions of source code must retain the above copyright
notice, this list of conditions and the following disclaimer.
2. Redistributions in binary form must reproduce the above copyright
notice, this list of conditions and the following disclaimer in
the documentation and/or other materials provided with the
distribution.
3. All advertising materials mentioning features or use of this
software must display the following acknowledgement:
This product includes software developed by the University of
California, Berkeley and its contributors.
4. Neither the name of the University nor the names of its
contributors may be used to endorse or promote products derived
from this software without specific prior written permission.
THIS SOFTWARE IS PROVIDED BY THE REGENTS AND
CONTRIBUTORS “AS IS” AND ANY EXPRESS OR IMPLIED
WARRANTIES, INCLUDING, BUT NOT LIMITED TO, THE IMPLIED
WARRANTIES OF MERCHANTABILITY AND FITNESS FOR
A PARTICULAR PURPOSE ARE DISCLAIMED. IN NO EVENT
SHALL THE REGENTS OR CONTRIBUTORS BE LIABLE FOR ANY
DIRECT, INDIRECT, INCIDENTAL, SPECIAL, EXEMPLARY, OR
CONSEQUENTIAL DAMAGES (INCLUDING, BUT NOT LIMITED TO,
PROCUREMENT OF SUBSTITUTE GOODS OR SERVICES; LOSS
OF USE, DATA, OR PROFITS; OR BUSINESS INTERRUPTION)
HOWEVER CAUSED AND ON ANY THEORY OF LIABILITY,
WHETHER IN CONTRACT, STRICT LIABILITY, OR TORT (INCLUDING
NEGLIGENCE OR OTHERWISE) ARISING IN ANY WAY OUT OF THE
USE OF THIS SOFTWARE, EVEN IF ADVISED OF THE POSSIBILITY
OF SUCH DAMAGE.
License Information for the Software
Used in the Unit
About GPL (GNU-General Public
License), LGPL (GNU Lesser General
Public License) License
This product uses GPL/LGPL software and software
made by other companies.
After you purchase this product, you may procure,
modify or distribute the source code of the GPL/
LGPL software that is used in the product.
DENON provides the source code based on the
GPL and LPGL licenses at the actual cost upon your
request to our customer service center. However,
note that we make no guarantees concerning the
source code. Please also understand that we do not
offer support for the contents of the source code.
LICENSE

List of preset codes / Liste de codes préréglés / Lista de códigos pre-ajustados
DEVICE SELECT : TV
Television
3M 100
Addison 163
A
Admiral 033, 044, 050, 141
Advent 130
Adventura 041
Aiko 138
Akai 018, 019, 034, 119, 137, 151
Albatron 127, 131
Alleron 039
America Action 139
Ampro 129
Amtron 038
Anam 139
Anam National 035, 038
AOC 030, 036, 079, 137 151, 154
Apex 048, 062
Apex Digital 174
Audiovox 038, 067, 071, 138, 139, 140
Aventura 029
Axion 120
Bang & Olufsen 146
B
Barco 020
Baur 034
Belcor 030
Bell & Howell 033
Benq 089, 135
Blue Sky 020
Bradford 038, 139
Brillian 145
Brockwood 030
Broksonic 050, 139, 141
byd:sign 123
Candle 037, 041, 137, 151
C
Carnivale 137, 151
Carver 155
CCE 147, 152
Celebrity 034
Celera 048
Changhong 048
Ching Tai 163
Chun Yun 157, 163, 169, 173
Chung Hsin 160, 169
Citizen
Clarion 139
037, 038, 049, 137, 138,
151, 153, 156
Coby 074
Contec 139
Contec/Cony 038
Craig 038, 139
Crosley 049, 155
Crown 038, 139, 153
CTX 082
Curtis Mathes
CXC 038, 139
Cytron 118
Daewoo 030, 036, 049, 138, 140, 153
D
Daytron 030
Dell 012, 032
Denon 143
DiamondVision 125
Dimensia 010
Disney 060
Dumont 013, 030
Durabrand
Dwin 044, 128
Electroband 034
E
Electrograph 142
Electrohome 034, 035, 050
Element 106
Emerson
Emprex 124
Envision 137, 151
Epson 080, 097
Erres 149
ESA 018, 029
Ether 158
Firstar 170
F
Fujitsu 037, 039, 077
Funai 029, 038, 039, 139
Furi 165
Futuretech 038, 139
Gateway 085, 142, 144
G
GE
GFM 027, 028
Gibralter 013, 030, 137, 151
Go Video 134
Goldstar 012, 030, 036, 137, 151
Gradiente 084
Grundig 152
Grunpy 038, 039, 139
Haier 107, 114, 136, 148
H
Hallmark 012
010, 019, 044, 137, 140,
143, 151, 153, 155, 156
012, 029, 050, 111, 136,
139, 141
012, 029, 030, 038, 039,
049, 050, 139, 141, 153
010, 012, 035, 040, 045,
055, 140
Hankook 158, 168, 169
Harman/Kardon 155
Harvard 038, 139
Havermy 044
Hello Kitty 140
Hewlett Packard 068
Hisense 087, 167, 174
Hitachi [014]z, 058, 103, 143, 181
HP 031
Hyundai 133
Ilo 090, 115, 117, 122
I
IMA 038
Infinity 155
InFocus 099
Initial 117
Innova 152
Insignia 029, 108, 109, 110
Janeil 041
J
JBL 155
JC Penney 010, 036, 037, 040
JCB 034
Jean 159, 163, 167, 170
Jinxing 161, 165, 167
JVC 023, 024, 025, 040, 050
Kawasho 034
K
Kaypani 154
KEC 139
Kenwood 030, 137, 151
Kioto 020, 155
KLH 048
Kloss Novabeam 038, 041
Kolin 166, 169
KTV 038, 137, 139, 147, 151, 153
LG 012, 030, 036, 127, 151
L
Logik 033
LXI 010, 012, 155
M & S 155
M
Magnasonic 049
Magnavox
Majestic 033
Marantz 046, 137, 151, 152, 155
Maxent 112, 142
Mediator 149
Megapower 127
Megatron 012, 143
Memorex 012, 029, 033, 036, 050, 141
MGA 012, 030, 036, 137, 151
Megatron 013, 040, 153
Mintek 117
028, 037, 047, 054, 056,
137, 151, 155
Mitsubishi 012, 030, 036, 044, 057, 178
Monivision 127, 131
Montgomery Ward 033
Motorola 035, 044
MTC 030, 036, 137, 151, 156
Multitech 038, 139, 147
NAD 012, 152
N
NEC 030, 035, 036, 081, 137, 151
Netsat 152
Net-TV 090, 142
Newave 163, 164, 168
Nikko 012, 137, 138, 151
Norcent 079, 174
Norwood Micro 090
Noshi 150
NTC 138
Olevia 064, 072, 078
O
Onwa 038, 139
Oppo 121
Optoma 098
Optonica 044
Orion 050, 141
Otto Versand 034
Panasonic
P
Penney
Philco
Philips
Philips Magnavox 020, 046, 047
Phonola 149
Pilot 030, 137, 151, 153
Pioneer 180, 184
Polaroid 030, 048, 075
Portland 030, 036, 138, 153
Prima 083, 130
Princeton 127
Prism 040
Proscan 010
Proton 012, 154
Protron 073
Proview 086, 106
Pulsar 013, 030
Pye 149
Quasar 035, 040
Q
Quelle 034
Radio Shack/
R
Realistic
Radiola 149
RadioShack 012, 030, 137, 139, 151, 153
007, 008, 009, 035, 040,
059, 069, 176
012, 030, 137, 150, 151,
153, 156
030, 035, 036, 037, 050,
137, 151, 155
020, 021, 022, 035, 037,
046, 066, 105, 149, 152,155
010, 038
RCA
Realistic 012, 030, 137, 139, 151, 153
Runco 013, 137, 151
Sampo 137, 142, 151, 153, 154
S
Samsung
Samsux 153
Sansui 050, 141
Sanyo 092
SBR 149
Sceptre 096
Scimitsu 030
Scotch 012
Scott 012, 030, 038, 039, 116, 139
Sears 010, 012, 029, 039, 088, 155
SEI 034
Sharp
Shen Ying 163
Sheng Chia 044, 164
Shogun 030
Signature 033
Simpson 037
Sinudyne 034
SKY 152
Skygiant 169
Sony
Soundesign 012, 037, 038, 039, 139
Sova 073
Sowa 162, 167
Squareview 029
SSS 030, 038, 139
Starlite 038, 139
Studio Experience 131
Superscan 044
Supre-Macy 041
Supreme 034
SVA 020, 113, 148, 174
Sylvania
Symphonic 029, 038, 139
Synco 157, 162, 163, 164, 168, 172
Syntax 072
Syntax-Brillian 072, 088
Tacico 163, 168
T
Tandy 044
Tatung 035, 090, 144, 159, 162, 167
Technics 040
Techview 132
010, 011, 030, 035, 036,
043, 045, 150, 156
012, 018, 019, 030, 036,
101, 102, 137, 147, 151,
152, 156
015, 016, 017, 044, 070,
153, 179, 183
000, 001, 002, 034, 052,
053, 175, 182
026, 027, 028, 029, 037,
063, 104, 137, 151, 155
PRESET CODE

Techwood 040
Teco 159, 164, 168
Teknika
Telefunken 019
TMK 012
Toshiba
Totevision 153
Trutech 091
Tuntex 158, 163
TVS 050, 141
US Logic 090
U
Vector Research 137, 151
V
Vidikron 155
Vidtech 012, 030, 036
Viewsonic 061, 076, 142
Viking 041
Viore 115
Vizio 061, 093, 094, 095, 126, 144
Wards
W
Westinghouse 061, 065, 140
White
Westinghouse
Yamaha 030, 036, 137, 151
Y
Yapshe 171
Zenith
Z
030, 033, 036, 037, 038,
039, 138, 139, 153, 155, 156
003, 004, 005, 006, 030,
051, 156, 177
010, 012, 030, 033, 036,
039, 137, 151, 155
049, 050, 141
012, 013, 014, 030, 033,
042, 050, 138, 141
DEVICE SELECT : SAT/CBL
Satellite Receiver
AccessHD 109
A
Alpha Digital 109
Alphastar 083
Artec 106
CaptiveWorks 102
C
Channel Master 111
Chaparral 077
Coolsat 103
Coship 114
Crossdigital 120
Digital Stream 110
D
DIRECTV
Dish Network
Dishpro 115, 119
Drake 078
Echostar 052, 065, 091, 115, 119
E
Expressvu 119
058, 059, 060, 061, 062, 063,
064, 068, 069, 073, 074, 075,
076, 088, 089, 090, 093,
095, 116
052, 053, 054, 055, 065, 091,
115, 119
GE 056, 057, 112
G
General Instrument 079, 117
GOI 119
Goodmind 112
Hisense 118
H
Hitachi 074, 084
HTS 119
Hughes Network
Systems
Humax 104
Ilo 118
I
Insignia 096
Jerrold 117
J
JVC 052, 065, 091, 119
Lasonic 113
L
LG 096, 105
Magnavox 073, 107
M
Memorex 073
MicroGem 108
Mitsubishi 068, 099
Motorola 117
Next Level 117
N
Panasonic 061, 095, 097
P
Pansat 100
Paysat 073
PCT 111
Philco 107
Philips
Pioneer 060
Primestar 082
Proscan 056, 057
Proton 118
RadioShack 117
R
RCA
Realistic 080
Samsung 060, 062, 069, 070, 071, 094
S
Sharp 098
Sony 059, 066, 116
Star Choice 117
STS 085
Tivax 109
T
Tivo 060, 070
Toshiba 063
UltimateTV 116
U
Uniden 073, 081
US Digital 118
Viewsat 101
V
Voom 117
Zenith 064, 096
Z
060, 062, 067, 068, 070,
075, 093
060, 067, 068, 070, 072,
073, 090
056, 057, 058, 070, 076, 086,
087, 088, 089, 092
Cable TV
ABC [009]z, 010, 012, 028, 040
A
Adelphia 007
Americast 047
Antronix 014, 015
Archer 015
AT&T 003
Bell South 047
B
Cable Vision 006
C
Cabletenna 014
Cableview 013
Clearmaster 046
ClearMax 046
Colour Voice 016
Comcast 000, 005, 033
Comtronics 017
Contec 018
Coolmax 046
COX 005
Daeryung 036
D
Director 033
Dumont 051
Eastern 019
E
Everquest 041
Focus 045
F
GC Electronics 015
G
GE 009, 010
Gehua 033
Gemini 020, 041
General Instrument 005, 010, 033, 044
Goldstar 042
Hamlin 021
H
Hitachi 010
Jasco 041
J
Jerrold
LG 050
L
Magnavox 022
M
MegaCable 005
Memorex 023, 040
Motorola
Movie Time 024
Multitech 046
NEC 011
N
NET Brazil 035
NSC 024
Oak 018
O
Pace 008, 043
P
Panasonic 026, 027, 040
Paragon 040
Philips 016, 022
005, 010, 020, 028, 029, 033,
041, 044
000, 003, 005, 033, 037,
039, 044
Pioneer 002, 030, 036, 042
Popular Mechanics 045
Proscan 009, 010
Pulsar 040
Quasar 040
Q
RadioShack 041, 046
R
RCA 013, 027
Realistic 015
Recoton 045
Regal 021
Regency 019
Rembrandt 010
Runco 040
Samsung 008, 034, 042
S
Scientific Atlanta
Signal 020, 041
Signature 010
Sony 006, 048
Sprucer 027
Standard
Component
Starcom 020, 028, 041
Stargate 020, 041
Starquest 020, 041
Supercable 044
Supermax 046
Time Warner 004
T
Tocom 031
Torx 049
Toshiba 040
Trans PX 044
Tristar 046
TS 049
Tusa 020, 041
TV86 024
Unika 014, 015
U
United Cable 028
Universal 014, 015
V2 046
V
View Star 018, 022, 024
Viewmaster 046
Vision 046
Vortex View 046
Zenith 032, 040, 047
Z
Zentek 045
001, 002, 003, 007, 012,
036, 038
025
[ ]*: Preset codes set upon shipment
from the factory.
[ ]*: Les codes préréglés diffèrent en
fonctiom des livraison de l’usine.
[ ]*: Los códigos vienen preprogramados
de fábrica.
PRESET CODE

www.denon.com
Printed in China 5411 10392 008D
D&M Holdings Inc.
 Loading...