

Page 1

DVD HOME THEATER SYSTEM
S-101
OPERATING INSTRUCTIONS
MODE D’EMPLOI
INSTRUCCIONES DE OPERACION
Page 2
FCC INFORMATION (For US customers)
2 SAFETY PRECAUTIONS
1. PRODUCT
This product complies with Part 15 of the FCC Rules. Operation is
subject to the following two conditions: (1) this product may not cause
harmful interference, and (2) this product must accept any interference
received, including interference that may cause undesired operation.
2. IMPORTANT NOTICE: DO NOT MODIFY THIS PRODUCT
This product, when installed as indicated in the instructions contained
in this manual, meets FCC requirements. Modification not expressly
approved by DENON may void your authority, granted by the FCC, to
use the product.
3. NOTE
This product has been tested and found to comply with the limits for a
Class B digital device, pursuant to Part 15 of the FCC Rules. These
limits are designed to provide reasonable protection against harmful
interference in a residential installation.
This product generates, uses and can radiate radio frequency energy
and, if not installed and used in accordance with the instructions, may
cause harmful interference to radio communications. However, there
is no guarantee that interference will not occur in a particular
installation. If this product does cause harmful interference to radio or
television reception, which can be determined by turning the product
OFF and ON, the user is encouraged to try to correct the interference
by one or more of the following measures:
• Reorient or relocate the receiving antenna.
• Increase the separation between the equipment and receiver.
• Connect the product into an outlet on a circuit different from that
to which the receiver is connected.
• Consult the local retailer authorized to distribute this type of
product or an experienced radio/TV technician for help.
CAUTION:
TO REDUCE THE RISK OF ELECTRIC SHOCK, DO NOT
REMOVE COVER (OR BACK). NO USER-SERVICEABLE
PAR TS INSIDE. REFER SERVICING TO QUALIFIED SERVICE
PERSONNEL.
The lightning flash with arrowhead symbol, within an
equilateral triangle, is intended to alert the user to the
presence of uninsulated “dangerous voltage” within the
product’s enclosure that may be of sufficient magnitude
to constitute a risk of electric shock to persons.
The exclamation point within an equilateral triangle is
intended to alert the user to the presence of important
operating and maintenance (servicing) instructions in the
literature accompanying the appliance.
WARNING:
TO REDUCE THE RISK OF FIRE OR ELECTRIC SHOCK, DO
NOT EXPOSE THIS APPLIANCE TO RAIN OR MOISTURE.
1. Read Instructions – All the safety and operating instructions should be
read before the product is operated.
2. Retain Instructions – The safety and operating instructions should be
retained for future reference.
3. Heed Warnings – All warnings on the product and in the operating
instructions should be adhered to.
4. Follow Instructions – All operating and use instructions should be
followed.
5. Cleaning – Unplug this product from the wall outlet before cleaning.
Do not use liquid cleaners or aerosol cleaners.
6. Attachments – Do not use attachments not recommended by the
product manufacturer as they may cause hazards.
7. Water and Moisture – Do not use this product near water – for
example, near a bath tub, wash bowl, kitchen sink, or laundry tub; in
a wet basement; or near a swimming pool; and the like.
8. Accessories – Do not place this product on an unstable cart, stand,
tripod, bracket, or table. The product may fall, causing serious injury
to a child or adult, and serious damage to the product. Use only with
a cart, stand, tripod, bracket, or table recommended by the
manufacturer, or sold with the product. Any
mounting of the product should follow the
manufacturer’s instructions, and should use a
mounting accessory recommended by the
manufacturer.
9. A product and cart combination should be moved
with care. Quick stops, excessive force, and
uneven surfaces may cause the product and cart
combination to overturn.
10. Ventilation – Slots and openings in the cabinet are provided for
ventilation and to ensure reliable operation of the product and to
protect it from overheating, and these openings must not be blocked
or covered. The openings should never be blocked by placing the
product on a bed, sofa, rug, or other similar surface. This product
should not be placed in a built-in installation such as a bookcase or
rack unless proper ventilation is provided or the manufacturer’s
instructions have been adhered to.
11. Power Sources – This product should be operated only from the type
of power source indicated on the marking label. If you are not sure of
the type of power supply to your home, consult your product dealer
or local power company. For products intended to operate from
battery power, or other sources, refer to the operating instructions.
12. Grounding or Polarization – This product may be equipped with a
polarized alternating-current line plug (a plug having one blade wider
than the other). This plug will fit into the power outlet only one way.
This is a safety feature. If you are unable to insert the plug fully into
the outlet, try reversing the plug. If the plug should still fail to fit,
contact your electrician to replace your obsolete outlet. Do not defeat
the safety purpose of the polarized plug.
13. Power-Cord Protection – Power-supply cords should be routed so that
they are not likely to be walked on or pinched by items placed upon
or against them, paying particular attention to cords at plugs,
convenience receptacles, and the point where they exit from the
product.
15. Outdoor Antenna Grounding – If an outside antenna or cable system
is connected to the product, be sure the antenna or cable system is
grounded so as to provide some protection against voltage surges
and built-up static charges. Article 810 of the National Electrical Code,
ANSI/NFPA 70, provides information with regard to proper grounding
of the mast and supporting structure, grounding of the lead-in wire to
an antenna discharge unit, size of grounding conductors, location of
antenna-discharge unit, connection to grounding electrodes, and
requirements for the grounding electrode. See Figure A.
16. Lightning – For added protection for this product during a lightning
storm, or when it is left unattended and unused for long periods of
time, unplug it from the wall outlet and disconnect the antenna or
cable system. This will prevent damage to the product due to
lightning and power-line surges.
17. Power Lines – An outside antenna system should not be located in
the vicinity of overhead power lines or other electric light or power
circuits, or where it can fall into such power lines or circuits. When
installing an outside antenna system, extreme care should be taken to
keep from touching such power lines or circuits as contact with them
might be fatal.
18. Overloading – Do not overload wall outlets, extension cords, or
integral convenience receptacles as this can result in a risk of fire or
electric shock.
19. Object and Liquid Entry – Never push objects of any kind into this
product through openings as they may touch dangerous voltage
points or short-out parts that could result in a fire or electric shock.
Never spill liquid of any kind on the product.
20. Servicing – Do not attempt to service this product yourself as opening
or removing covers may expose you to dangerous voltage or other
hazards. Refer all servicing to qualified service personnel.
21. Damage Requiring Service – Unplug this product from the wall outlet
and refer servicing to qualified service personnel under the following
conditions:
a) When the power-supply cord or plug is damaged,
b) If liquid has been spilled, or objects have fallen into the product,
c) If the product has been exposed to rain or water,
d) If the product does not operate normally by following the operating
instructions. Adjust only those controls that are covered by the
operating instructions as an improper adjustment of other controls
may result in damage and will often require extensive work by a
qualified technician to restore the product to its normal operation,
e) If the product has been dropped or damaged in any way, and
f) When the product exhibits a distinct change in performance – this
indicates a need for service.
22. Replacement Parts – When replacement parts are required, be sure
the service technician has used replacement parts specified by the
manufacturer or have the same characteristics as the original part.
Unauthorized substitutions may result in fire, electric shock, or other
hazards.
23. Safety Check – Upon completion of any service or repairs to this
product, ask the service technician to perform safety checks to
determine that the product is in proper operating condition.
24. Wall or Ceiling Mounting – The product should be mounted to a wall
or ceiling only as recommended by the manufacturer.
25. Heat – The product should be situated away from heat sources such
as radiators, heat registers, stoves, or other products (including
amplifiers) that produce heat.
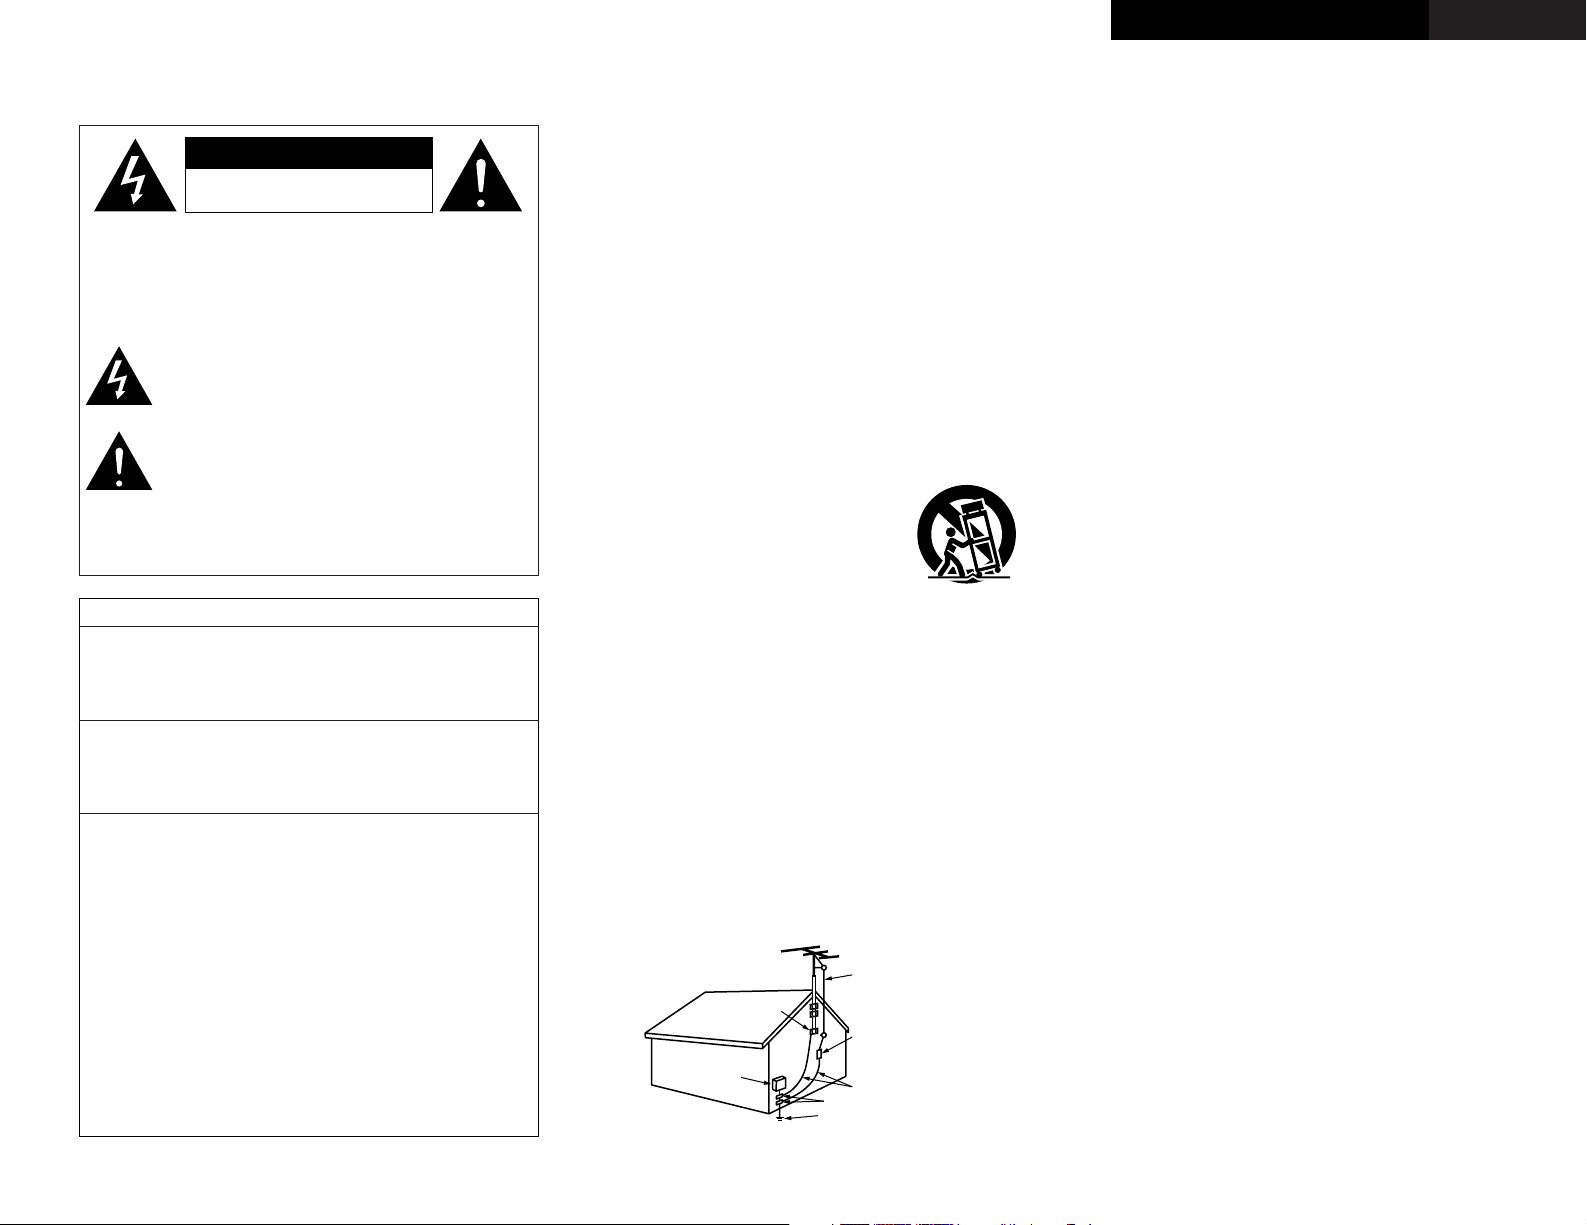
SAFETY INSTRUCTIONS
FIGURE A
EXAMPLE OF ANTENNA GROUNDING
AS PER NATIONAL
ELECTRICAL CODE
ANTENNA
LEAD IN
WIRE
GROUND
CLAMP
ELECTRIC
SERVICE
EQUIPMENT
ANTENNA
DISCHARGE UNIT
(NEC SECTION 810-20)
GROUNDING CONDUCTORS
(NEC SECTION 810-21)
GROUND CLAMPS
POWER SERVICE GROUNDING
ELECTRODE SYSTEM
(NEC ART 250, PART H)
NEC – NATIONAL ELECTRICAL CODE
ENGLISHFRANCAISESPAÑOL
RISK OF ELECTRIC SHOCK
CAUTION
DO NOT OPEN
Page 3
2 System setup menu / Menu de configuration système / Menú System Setup
page 45 ~ 50page 43, 44
page 45 page 50, 51
page 51 ~ 53
page 53, 54
ENGLISH FRANCAIS ESPAÑOL
Page 4

ENGLISH
Getting Started
1
ENGLISH
Contents
Getting Started
Accessories ··············································································2
Before using·············································································3
Cautions on installation
DVD Surround receiver···························································3
Speaker system and subwoofer·········································3, 4
Cautions on handling
DVD Surround receiver···························································4
Speaker system ·····································································4
Subwoofer ·············································································4
Discs ·························································································5
Disc terminology·····································································5
Cautions on handling disc
Discs·······················································································5
Holding discs ··········································································5
Cleaning discs·········································································6
Cautions on handling discs·····················································6
Storing discs···········································································6
Loading discs··········································································6
Operating range of the remote control unit ························6
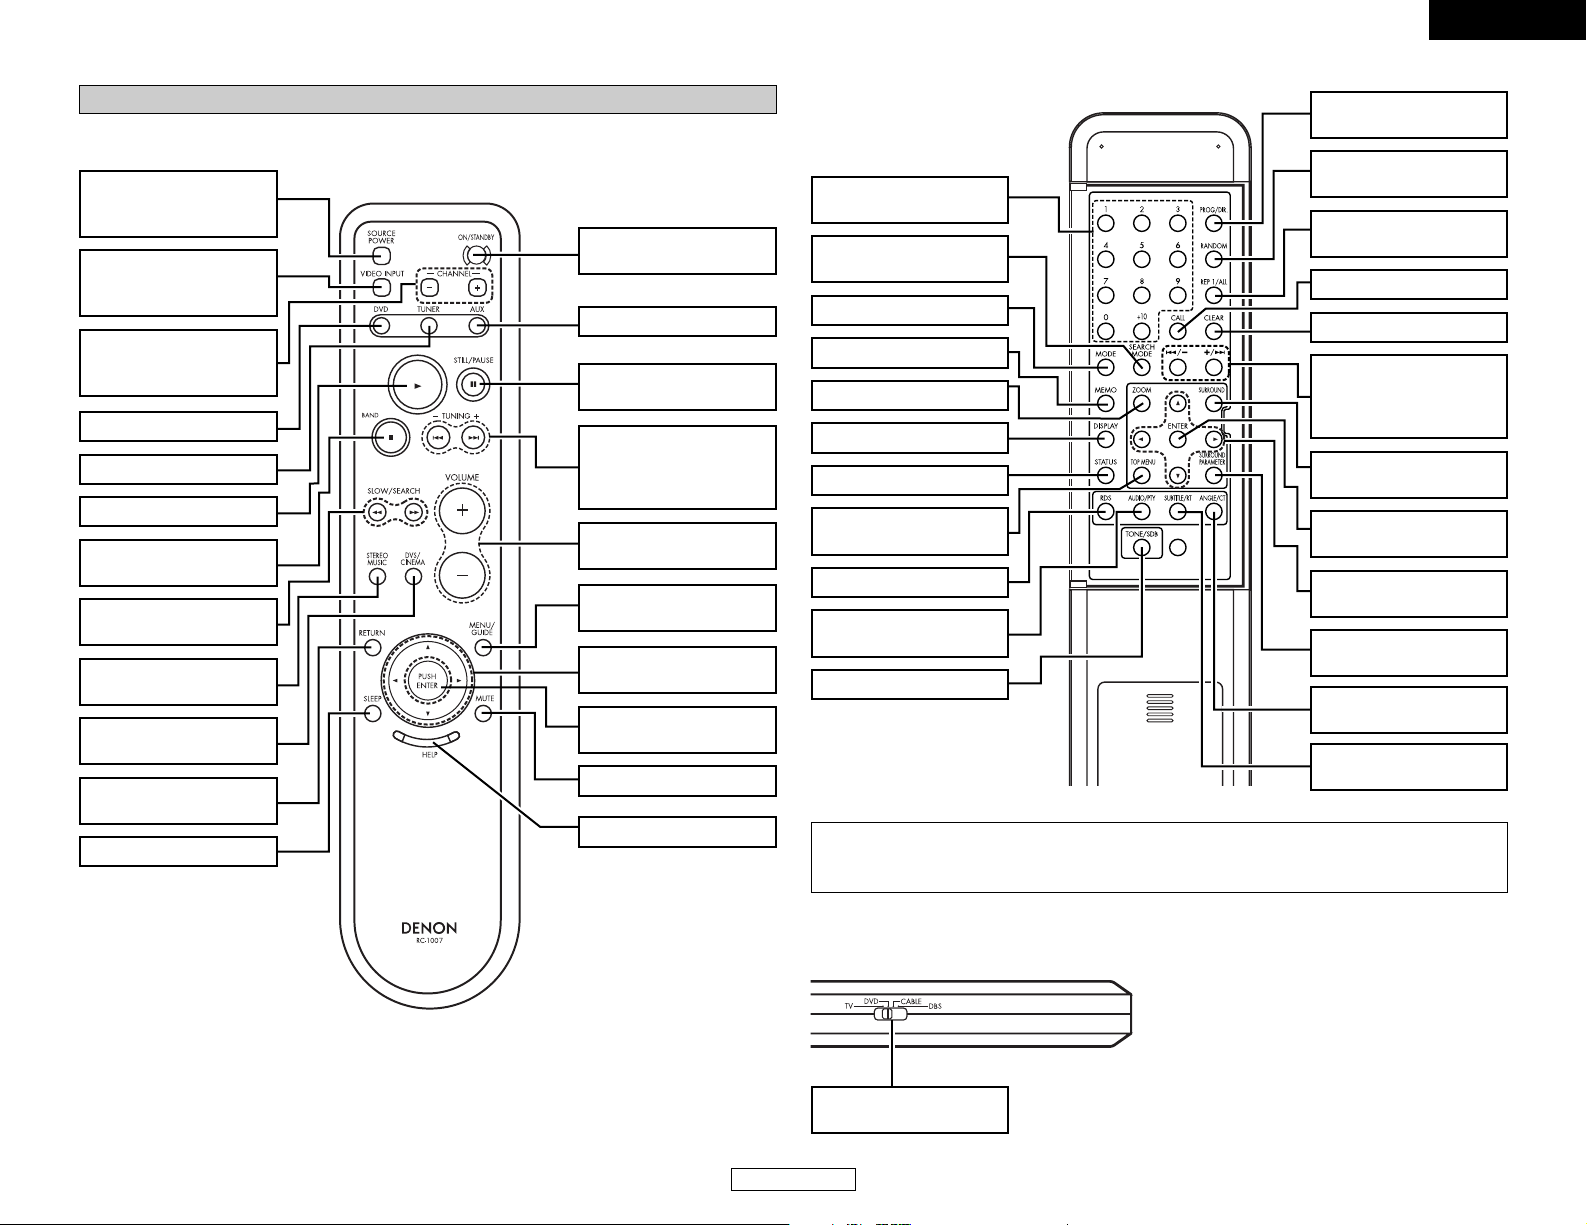
Part names and functions
DVD surround receiver front panel·········································7
Subwoofer rear panel ·····························································7
Display ····················································································7
Remote control unit····························································8, 9
Advanced setup options
Cable indications···································································14
Connecting a DBS/Cable tuner/VCR·····································15
Connecting a tape deck, MD recorder or CD recorder ········15
Connecting a S-Video connections
(Better picture quality) ··························································15
Connecting a component connections
(Better than S-Video picture quality)·····································16
To change the speaker cable ················································16
Connecting the antenna terminals ·······································16
Using other playback function (playing the disc)
Playing repeatedly ································································35
Playing tracks in the desired order (Program) ······················36
Playing tracks in the random order·······································36
Playing in the zoom mode····················································36
Using the RDS (Radio Data System)
RDS (Radio Data System)·····················································37
RDS search···········································································37
PTY search············································································37
TP search··············································································38
RT (Radio Text) ·····································································38
On-screen display
Operating using the disc information OSD ····················38, 39
Operating using the multiple audio,
subtitle and angle OSD···················································39, 40
Adjusting the picture quality·················································40
Other functions
Adjusting the sound quality (TONE/SDB) ·····························41
Auto power on function························································41
System functions··································································41
Initialization of the microprocessor·······································41
Changing the default settings
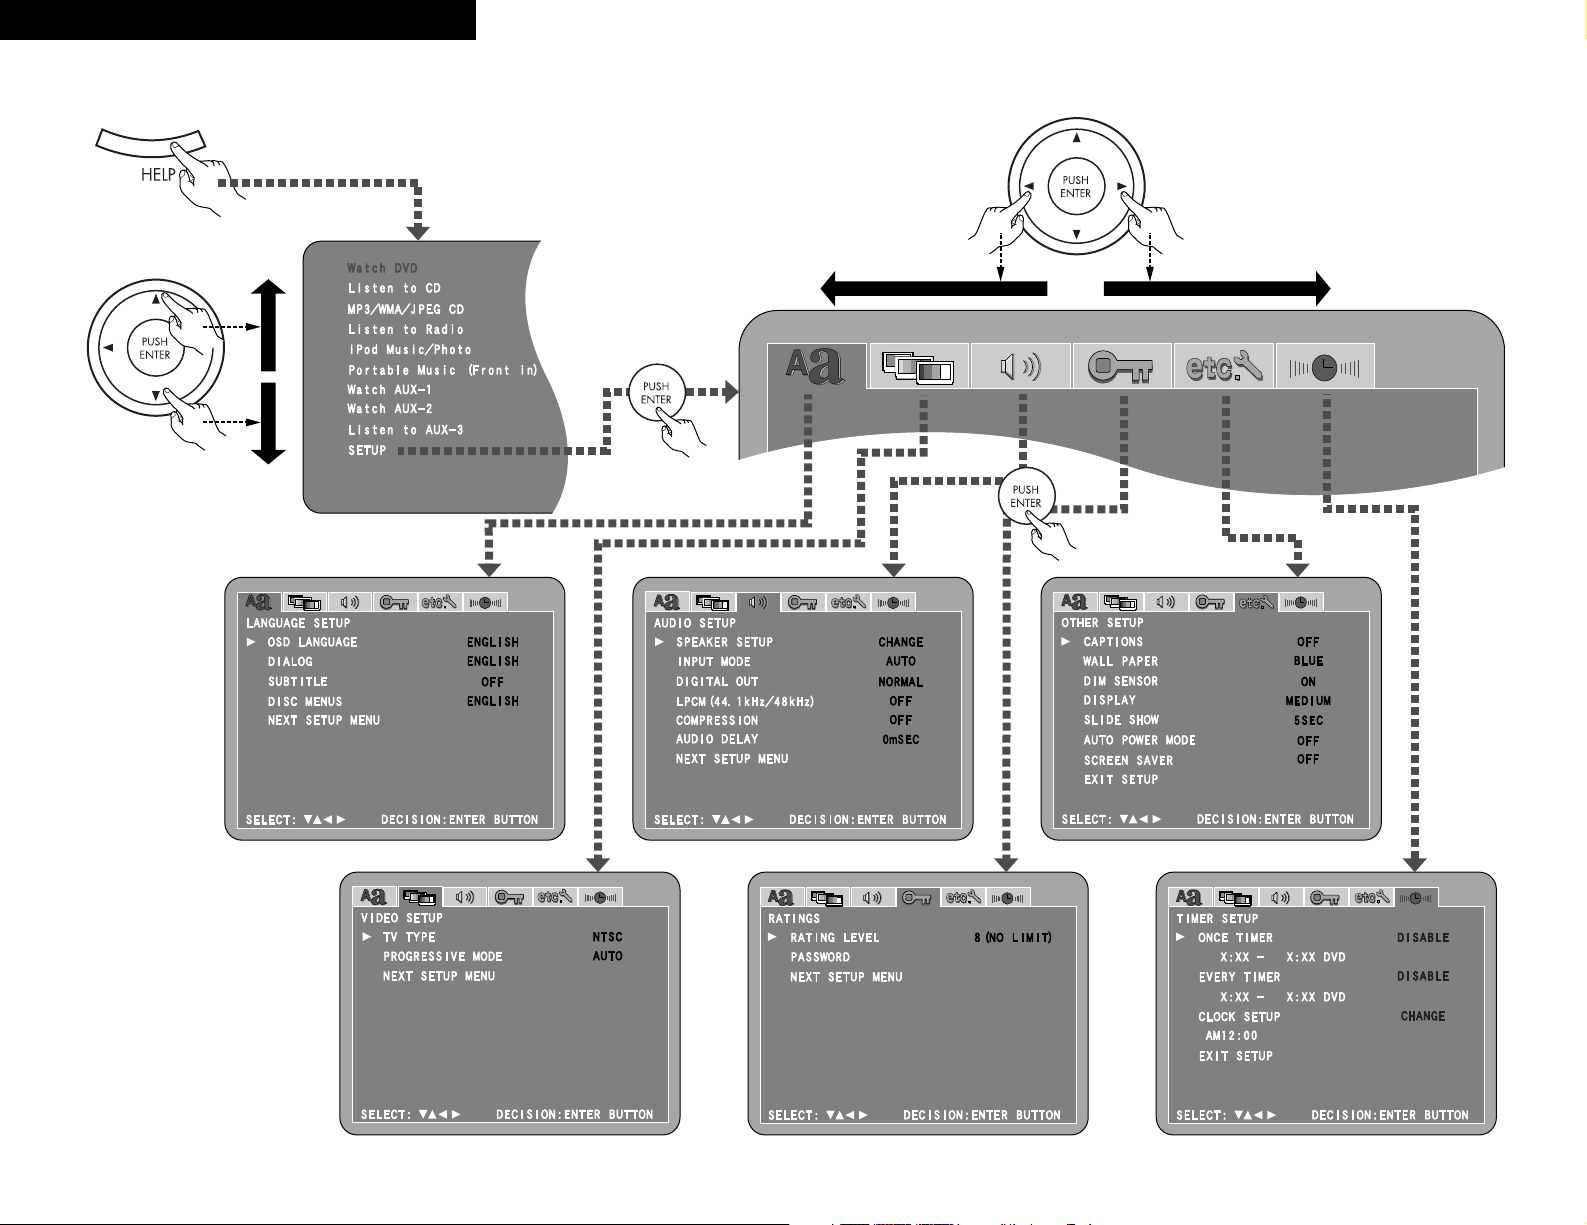
System setup items ·····························································42
Setting “LANGUAGE SETUP” ·······································43, 44
Setting “VIDEO SETUP” ······················································45
Setting “AUDIO SETUP”·············································45 ~ 47
Setting “CHANNEL LEVEL”···········································47, 48
Setting “DISTANCE”······················································48, 49
Setting “SPEAKER LOCATION” ····································49, 50
Setting “RATINGS”························································50, 51
Setting “OTHER SETUP” ············································51 ~ 53
Setting “TIMER SETUP”················································53, 54
After changing the system settings ·····································54
System setup items and default values
(set upon shipment from the factory) ····························55, 56
About digital audio signal output
When a disc is played on the S-101 (DIGITAL OUT)············57
Setting up the remote control unit
to control other audio / video devices
TV, cable tuner and satellite receiver
preset memories ··································································58
Operating the TV, cable tuner and satellite receiver
after storing its remote control signals
in the preset memory···························································58
Special punch through setting··············································58
Connecting Other Sources
Getting Started
System Setup
Playing a disc
Playback··········································································17, 18
Stopping playback·································································18
Playing still pictures (Pausing) ··············································18
Forward / Reverse searching················································19
Skipping to the beginning of chapters or tracks···················19
Playing frame by frame (for DVDs and video CDs only) ······19
Slow playback (for DVDs and video CDs only)·····················19
Listening to recorded MP3 or WMA CD-R/CD-RW············20, 21
Playing still picture files (JPEG format) ··························22, 23
Listening to the radio
Manual tuning·······································································24
Auto tuner presets (for main unit only) ································24
Listening to preset stations··················································24
Presetting stations that have been tuned in
and giving names to stations
(for remote control unit only)················································25
Playing the iPod
Connecting the iPod ·····························································26
Playback················································································27
Viewing the slideshow ························································28
Disconnecting the iPod·························································28
Playing and recording other sources
Connecting the portable player ············································28
Playing a portable audio (stereo mini plug)···························28
About analog recording onto
an external audio component (AUX3)···································28
Function setting ······························································29, 30
Operating the surround functions
Playing Dolby Digital and DTS surround sound
(with digital inputs only)························································30
2-channel mode settings ······················································31
Paying in the DENON original surround modes·············31, 32
Playback using the Dolby Headphone mode ·····················32
Using the “HELP” menu·······················································33
Using the sleep timer
Setting the clock (12-hour display) ·································33, 34
Setting the sleep timer·························································34
Basic Operation
Advanced Operation
Connecting the system ························································10
Connecting the supplied antennas·······································11
Connecting a TV ··································································11
Inserting the batteries ··························································12
Connecting the power supply cord ······································12
Playing a DVD disc··························································13, 14
Easy Setup and Operation
Page 5
2
ENGLISH
ENGLISH
Getting Started Getting Started
Troubleshooting······························································62, 63
Specifications ········································································64
Surround··········································································59, 60
Dolby Virtual Speaker ···························································60
Dolby Headphone·································································60
Surround modes and parameters·········································61
HDCD (High Definition Compatible Digital) decoder·········61
AL24 Processing (Stereo mode only)··································61
Additional information
List of preset codes ····································End of this manual
Thank you for choosing the DENON S-101 DVD Home Theater System. This remarkable
component has been engineered to provide superb surround sound listening with home theater
sources such as DVD, as well as providing outstanding high fidelity reproduction of your favorite
music sources.
As this product is provided with an immense array of features, we recommend that before you
begin hookup and operation that you review the contents of this manual before proceeding.
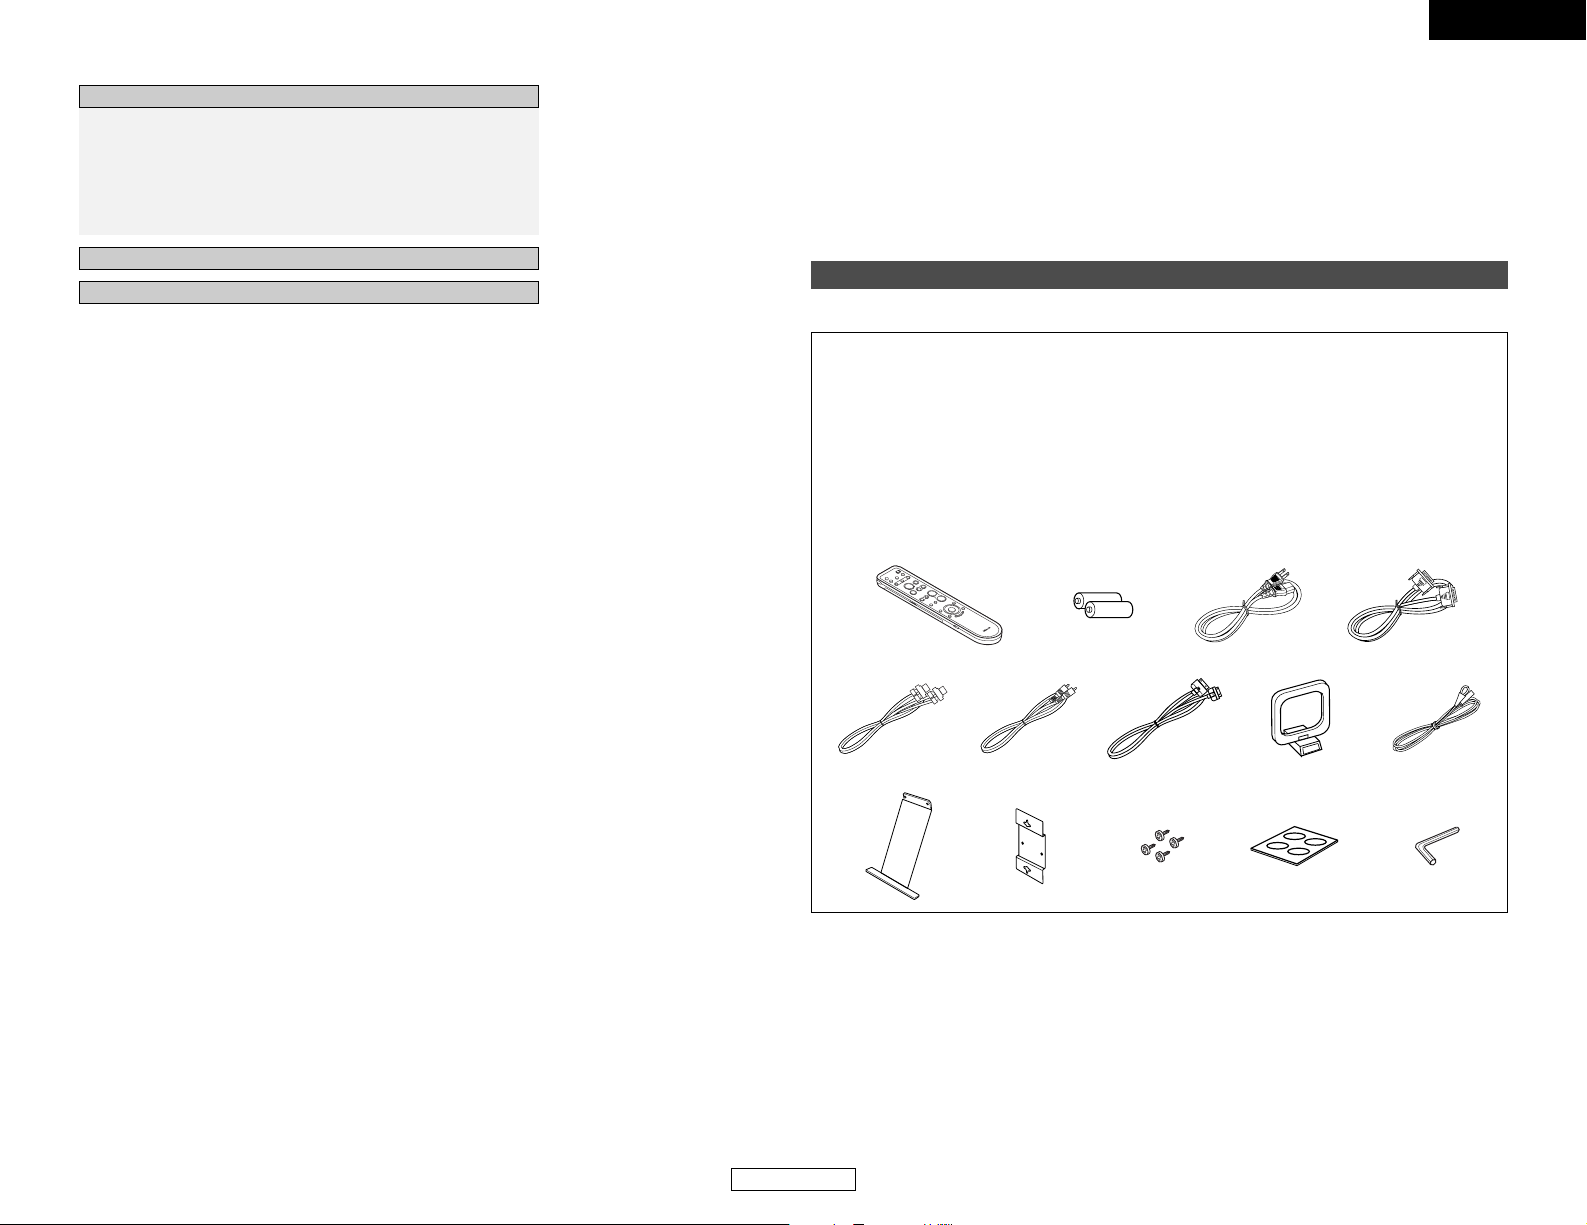
Accessories
Check that the following parts are included in addition to the S-101:
rtyu
i o!0 !1 !2
!3 !4 !5 !6 !7
q Operating instructions
(with Quick setup sheet) ........................1
w Warranty
(for North America model only) ..............1
e Service station list ..................................1
r Remote control unit (RC-1007)...............1
t R6P/AA batteries ....................................2
y Power supply cord..................................1
u System cable (D-SUB25P)......................1
i Speaker cable .........................................2
o Video cable .............................................1
!0 iPod cable ...............................................1
!1 AM loop antenna....................................1
!2 FM indoor antenna .................................1
!3 Speaker stand.........................................2
!4 Wall bracket ............................................2
!5 Screw......................................................4
!6 Cushion pad.......................4 pcs./1 sheet
!7 Hexagonal wrench..................................1
Page 6
3
ENGLISH
ENGLISH
Getting Started Getting Started
NOTE:
• This DVD surround receiver uses the semiconductor laser. To allow you to enjoy music at a
stable operation, it is recommended to use this in a room of 5 °C (41 °F) ~ 35 °C (95 °F).
Copyrights
•It is prohibited by law to reproduce, broadcast, rent or play discs in public without the consent
of the copyright holder.
Before using
Pay attention to the following before using this unit:
• Handle the power supply cord carefully
Do not damage or deform the power supply
cord. If it is damaged or deformed, it may
cause electric shock or malfunction when
used. When removing from wall outlet, be
sure to remove by holding the plug
attachment and not by pulling the cord.
• Do not open the top cover
In order to prevent electric shock, do not open
the top cover.
•Do not place anything inside
Do not place metal objects or spill liquid inside
the DVD surround receiver.
Electric shock or malfunction may result.
• Moving the set
To prevent short circuits or damaged wires in
the connection cables, always unplug the
power supply cord and disconnect the
connection cables between all other audio
components when moving the set.
•Before turning the power switch on
Check once again that all connections are
proper and that there are not problems with
the connection cables. Always set the power
switch to the standby position before
connecting and disconnecting connection
cables.
• Store this instruction in a safe place.
After reading, store these instructions along in
a safe place.
• Note that the illustrations in this
instruction may differ from the actual set
for explanation purposes.
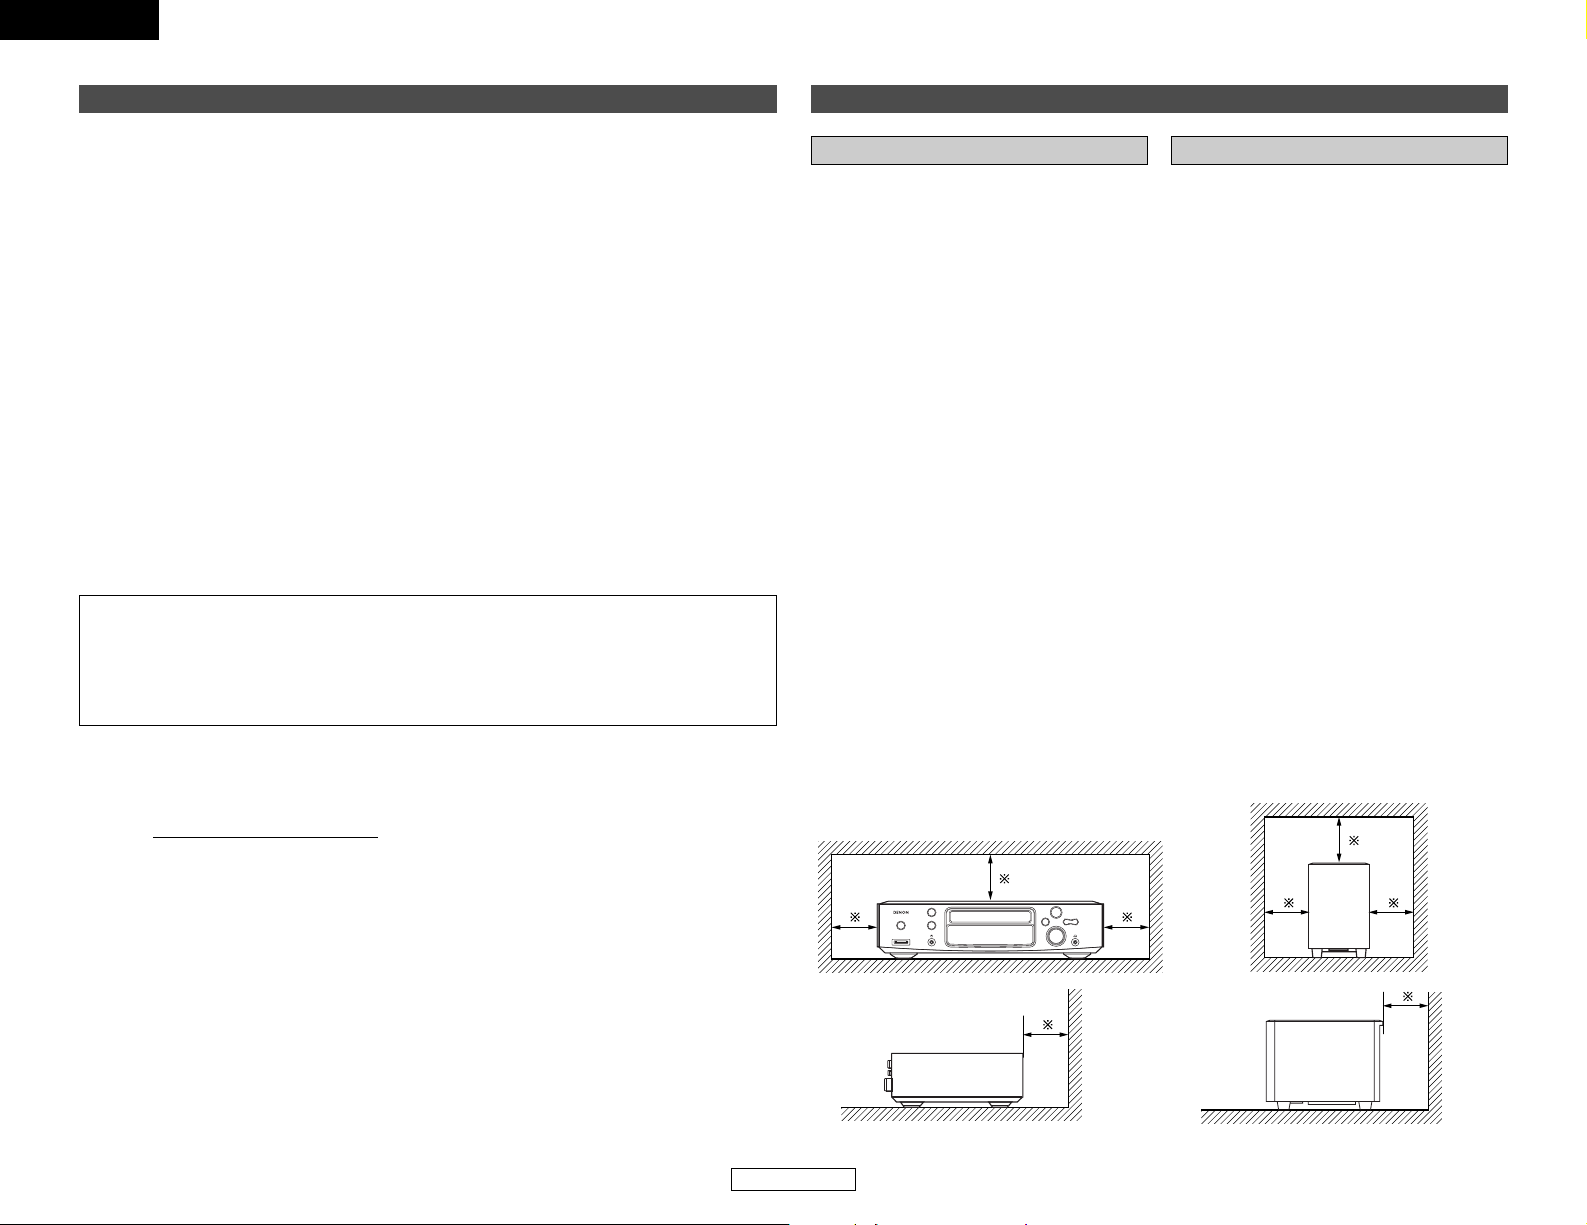
Cautions on installation
Noise or disturbance of the picture may be
generated if this unit or any other electronic
equipment using microprocessors is used near
a tuner or TV.
If this happens, take the following steps:
• Install this unit as far as possible from the
tuner or TV.
• Set the antenna wires from the tuner or TV
away from this unit’s power supply cord and
input/output connection cords.
• Noise or disturbance tends to occur
particularly when using indoor antennas or
300 Ω/ohms feeder wires. We recommend
using outdoor antennas and 75 Ω/ohms
coaxial cables.
DVD Surround receiver
Note:
For heat dispersal, do not install this
equipment in a confined space such as a
book case or similar unit.
Wall
Note
Speaker system and subwoofer
The quality of the sound produced from the
speaker system is affected by the size and type
of the room, as well as by the method of
installation. Consider the points listed below
before installing the speaker system.
• Note that placing the speaker system on the
same stand or shelf as a record player may
result in howling.
• If there is a wall, glass door, etc., directly in
front of or behind the speaker system, cover
the wall or door with a thick curtain to prevent
resonance and reflection.
• The speaker systems are of the low-leakageflux type and can be used near televisions, but
depending on the TV there may be color
blotching on the picture. If this happens, turn off
the TV’s power, move the TV and speaker
system a little apart, wait 15 to 30 minutes,
then turn the TV’s power back on. The TV’s
automatic degaussing circuit should reduce the
blotching on the picture. If blotching persists,
move the speaker and TV further away from
each other.
• Install on a firm, flat floor to prevent accidents
due to toppling down.
• Do not place a record player, CD player or
other AV components on top of the
subwoofer.
Wall
Please, record and retain the Model name and serial number of your set shown on the rating label.
Model name : S-101
Serial No.
Page 7
4
ENGLISH
ENGLISH
Getting Started Getting Started
NOTE:
•To ensure safety, do not place any objects
on top or lean objects against the speaker
system.
• The speaker may topple down or fall if
force is applied to the sides. Be particularly
careful to avoid this, as this could cause
injury or other serious accidents.
• When installing the speaker systems on
the wall, to ensure safety, have specialists
do the installation work.
• Be sure to fasten the speaker cords to a
wall, etc., to prevent people from tripping
over them or otherwise pulling on them
accidentally, causing the speaker systems
to fall.
• Be sure to check for safety after installing
the speaker systems. Afterwards, perform
safety inspections at regular intervals to be
sure there is no danger that the speaker
systems will fall. Denon will accept no
responsibility for damages or accidents
caused by inappropriate choice of the
place of installation or improper installation
procedures.
• For your safety, do not put anything nor
lean yourself on the loudspeakers.
• Do not push the loudspeaker
from aside to protect it from
toppling that may cause
serious accident.
• Fix speaker cables to prevent being caught
on it and making loudspeakers toppling
down.
SC-S101
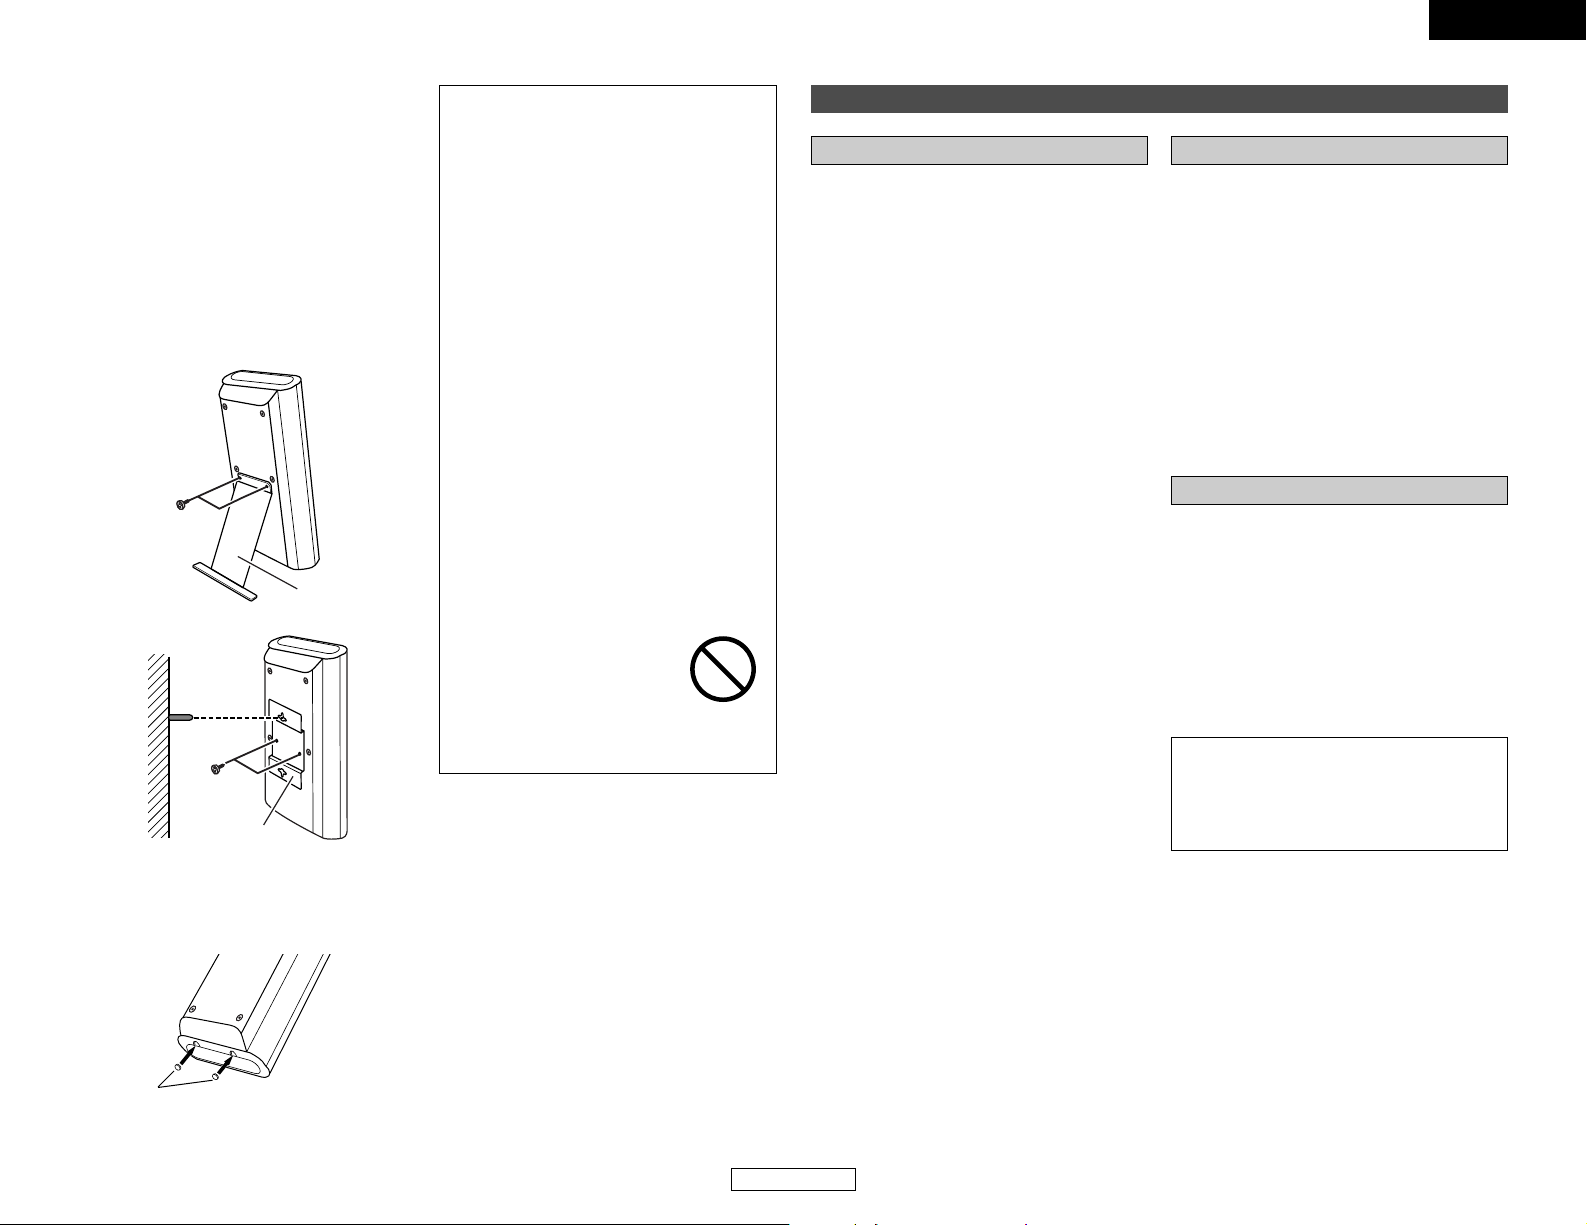
• When mounting the speaker system (SCS101) on a speaker stand or wall bracket.
As shown in the diagram, fasten the speaker
stand to the back of the speaker using the two
included screws.
When mounting, be sure to install properly
and securely.
• When placing the included SC-S101 speakers
on a rack or shelf, fasten the included speaker
stand securely using the screws included with
the SC-S101 speakers (left and right).
2 Speaker stand installation
Speaker stand
Screws
SC-S101
Wall
Screws
Wall bracket
• When placing the speaker system (SC-S101)
on a stand, etc., stick the included cushion
pads at the two corners of the bottom
surface. (Refer to the illustration below.)
Stick the cushion pad here.
Bottom of SC-S101
Cautions on handling
• Switching the input function when input
terminals are not connected.
A clicking noise may be produced if the input
function is switched when nothing is
connected to the input terminals. If this
happens, either turn down the VOLUME knob
or connect components to the input terminals.
• Muting of HEADPHONE jack and SPEAKER
terminals.
The HEADPHONE jack and SPEAKER
terminals include a muting circuit. Because of
this, the output signals are greatly reduced for
several seconds after the power switch is
turned on or input function, surround mode or
any other-set-up is changed. If the volume is
turned up during this time, the output will be
very high after the muting circuit stops
functioning. Always wait until the muting
circuit turns off before adjusting the volume.
• Whenever the power switch is in the
STANDBY state, the apparatus is still
connected on AC line voltage.
Please be sure to unplug the cord when
you leave home for, say, a vacation.
DVD Surround receiver Speaker system
•Muting of after power is turned ON.
The built-in amplifier of the active subwoofer
includes a muting circuit. The output signal is
strongly attenuated for several seconds after
the power is turned on. If the volume is
adjusted during this time, the output may be
extremely high when the muting circuit is
deactivated. Be sure to wait for the muting
circuit to be deactivated before adjusting the
volume.
• Magnetic force of speaker system.
Note that color blotching may occur on a TV,
etc., due to interaction with the speaker
system if there is a magnet or an object
generating magnetic force nearby.
Example:
(a) When there are magnets on the door of the
rack, stand, etc.
(b) When a health device, etc., equipped with
magnets is placed nearby.
(c) When toys or other objects using magnets are
placed nearby.
NOTE:
• Be sure to fasten the power supply cord
to a wall, etc., to prevent people from
tripping over it or otherwise pulling on it
accidentally, causing the subwoofer to fall.
Subwoofer
Page 8
ENGLISH
ENGLISH
Getting Started Getting Started
5
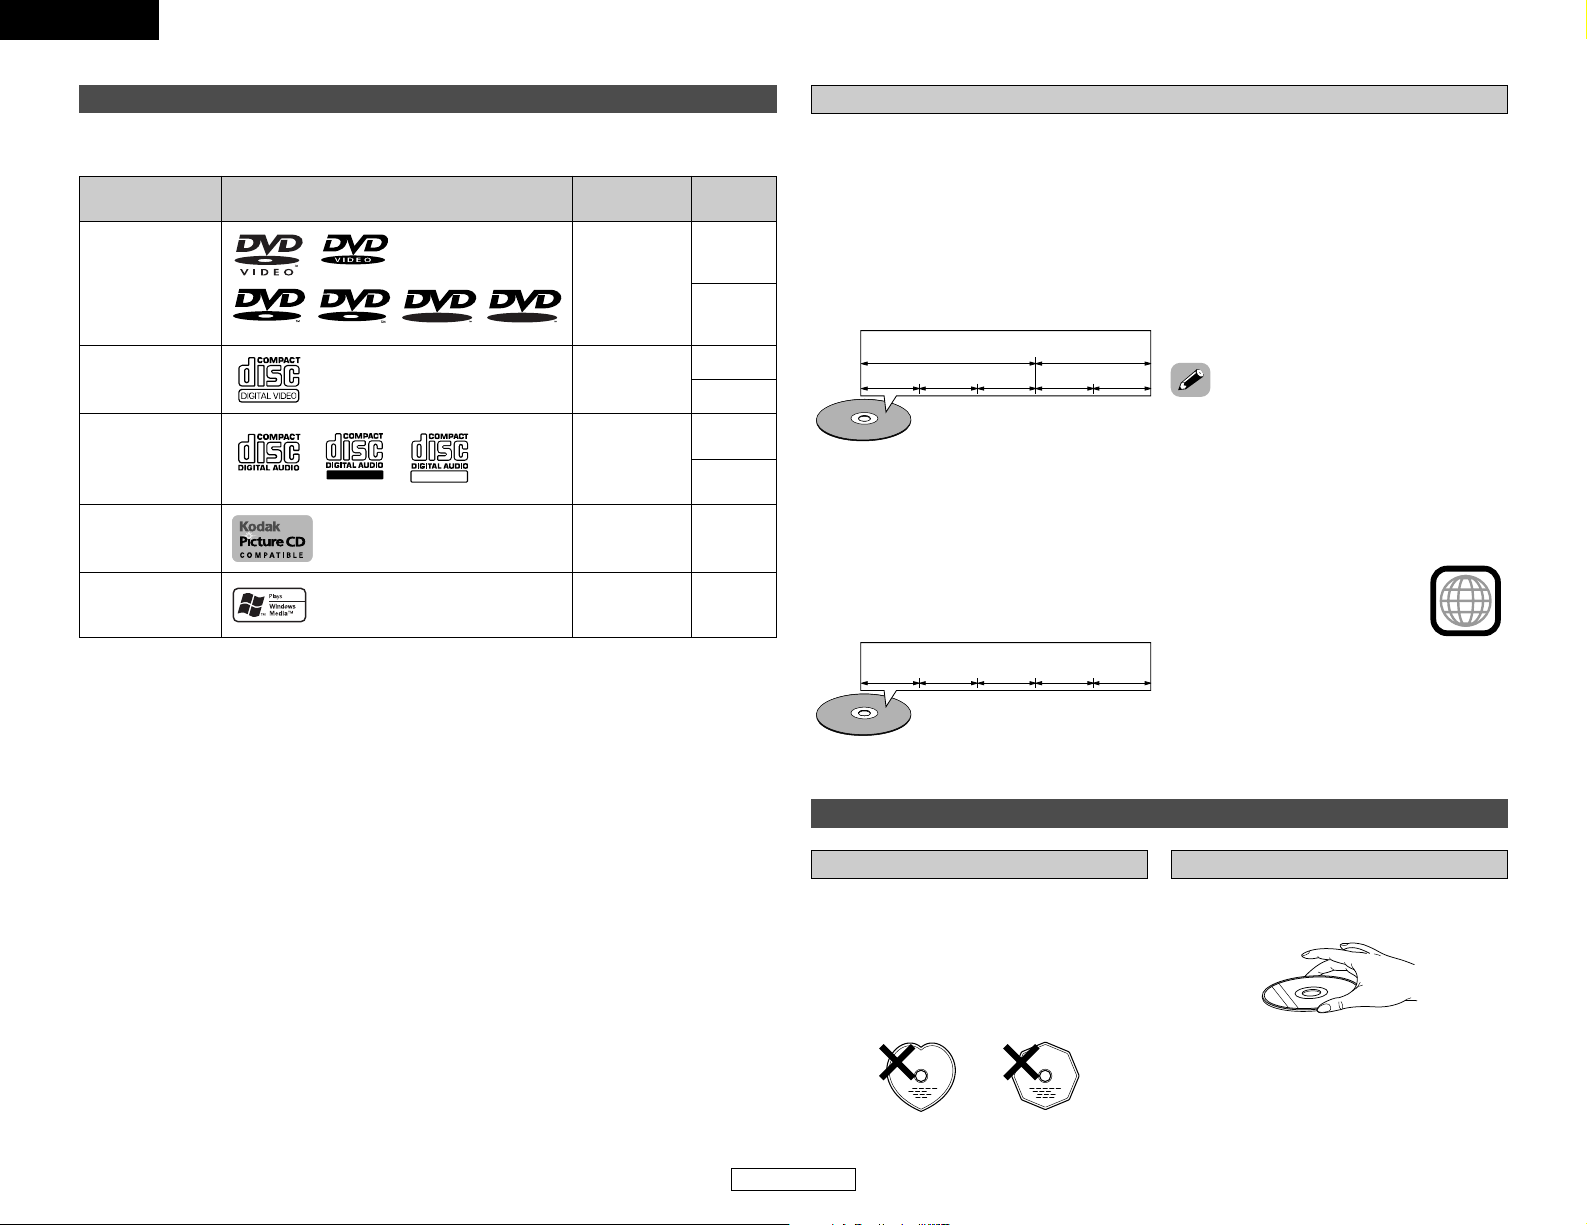
Disc size
Recorded
signals
Mark (logo)Usable discs
DVD video
(NOTE 1)
DVD-R
DVD-RW
(NOTE 2)
Digital video
(MPEG2)
12 cm
8 cm
12 cm
8 cm
12 cm
8 cm
Digital video
(MPEG1)
Digital audio
MP3
Digital picture
(JPEG)
Video CD
CD
CD-R
CD-RW
(NOTE 3)
Recordable
ReWritable
12 cm
Digital picture
(JPEG)
Picture CD
R
R
R
W
R
W
12 cmDigital audio
WMA
(Windows Media
Audio)
• NOTE 1:
Video part which based on DVD-video specification only can be played.
• NOTE 2:
Playing DVD-R and DVD-RW discs
DVD-R and DVD-RW discs recorded in video format on a DVD recorder can be played on the S-
101.
Discs that have not be finalized cannot be played.
The S-101 cannot play DVD-R and -RW discs recorded in the “VR” mode or with “CPRM”.
Depending on the disc’s recording status, the disc may not be accepted or may not be played
normally (the picture or sound may be not be smooth, etc.).
• NOTE 3:
According to recording quality, some CD-R/CD-RW cannot be played.
• “KODAK” is a trademark of Eastman Kodak Company.
•Windows Media, and the Windows logo are trademarks, or registered trademarks of Microsoft
Corporation in the United States and/or other countries.
Discs
The types of discs listed on the table below can be used on the S-101.
The marks are indicated on the disc labels or jackets.
2 The following types of discs cannot be played on the S-101:
• DVDs with region numbers other than “1” or “ALL”
• DVD-ROM/RAMs
• CVD
• CD-ROMs (Only JPEG/MP3/WMA file can be played)
• VSDs
• CDVs (Only the audio part can be played.)
• CD-Gs (Only the audio is output.)
• Photo CDs (NEVER play such discs on the S-101)
DVD-videos are divided into several large
sections called “titles” and smaller sections
called “chapters”.
Numbers are allotted to these sections. These
numbers are called “title numbers” and
“chapter numbers”.
For example:
For example:
Title 1 Title2
Track 1
Chapter 1
Video and music CDs are divided into sections
called “tracks”.
Numbers are allotted to these sections. These
numbers are called “track numbers”.
Video CDs including the words “playback
control” on the disc or jacket are equipped with
a function for displaying menus on the TV
screen for selecting the desired position,
displaying information, etc., in dialog fashion.
In this manual, playing video CDs using such
menus is referred to “menu playback”.
Video CDs with playback control can be used on
the S-101.
• This DVD video player is designed and
manufactured to respond to the Region
Management Information that is recorded on
a DVD disc.
If the Region number described on the DVD
disc does not correspond to the Region
number of this DVD video player, this DVD
video player cannot play this disc.
The Region number for this DVD
video player is 1.
1
2 Titles and chapters (DVD-videos)
2 Tracks (video and music CDs)
2 Playback control (video CDs)
Disc terminology
Chapter 2 Chapter 3 Chapter 1 Chapter 2
Track 2 Track 3 Track 4 Track 5
Discs
Only the discs including the marks shown on
page 5 can be played on the S-101.
Note, however, that discs with special shapes
(heart-shaped discs, hexagonal discs, etc.)
cannot be played on the S-101. Do not attempt
to play such discs, as they may damage the
player.
Be careful not to get fingerprints on
the signal surface (the side which
shines in rainbow colors).
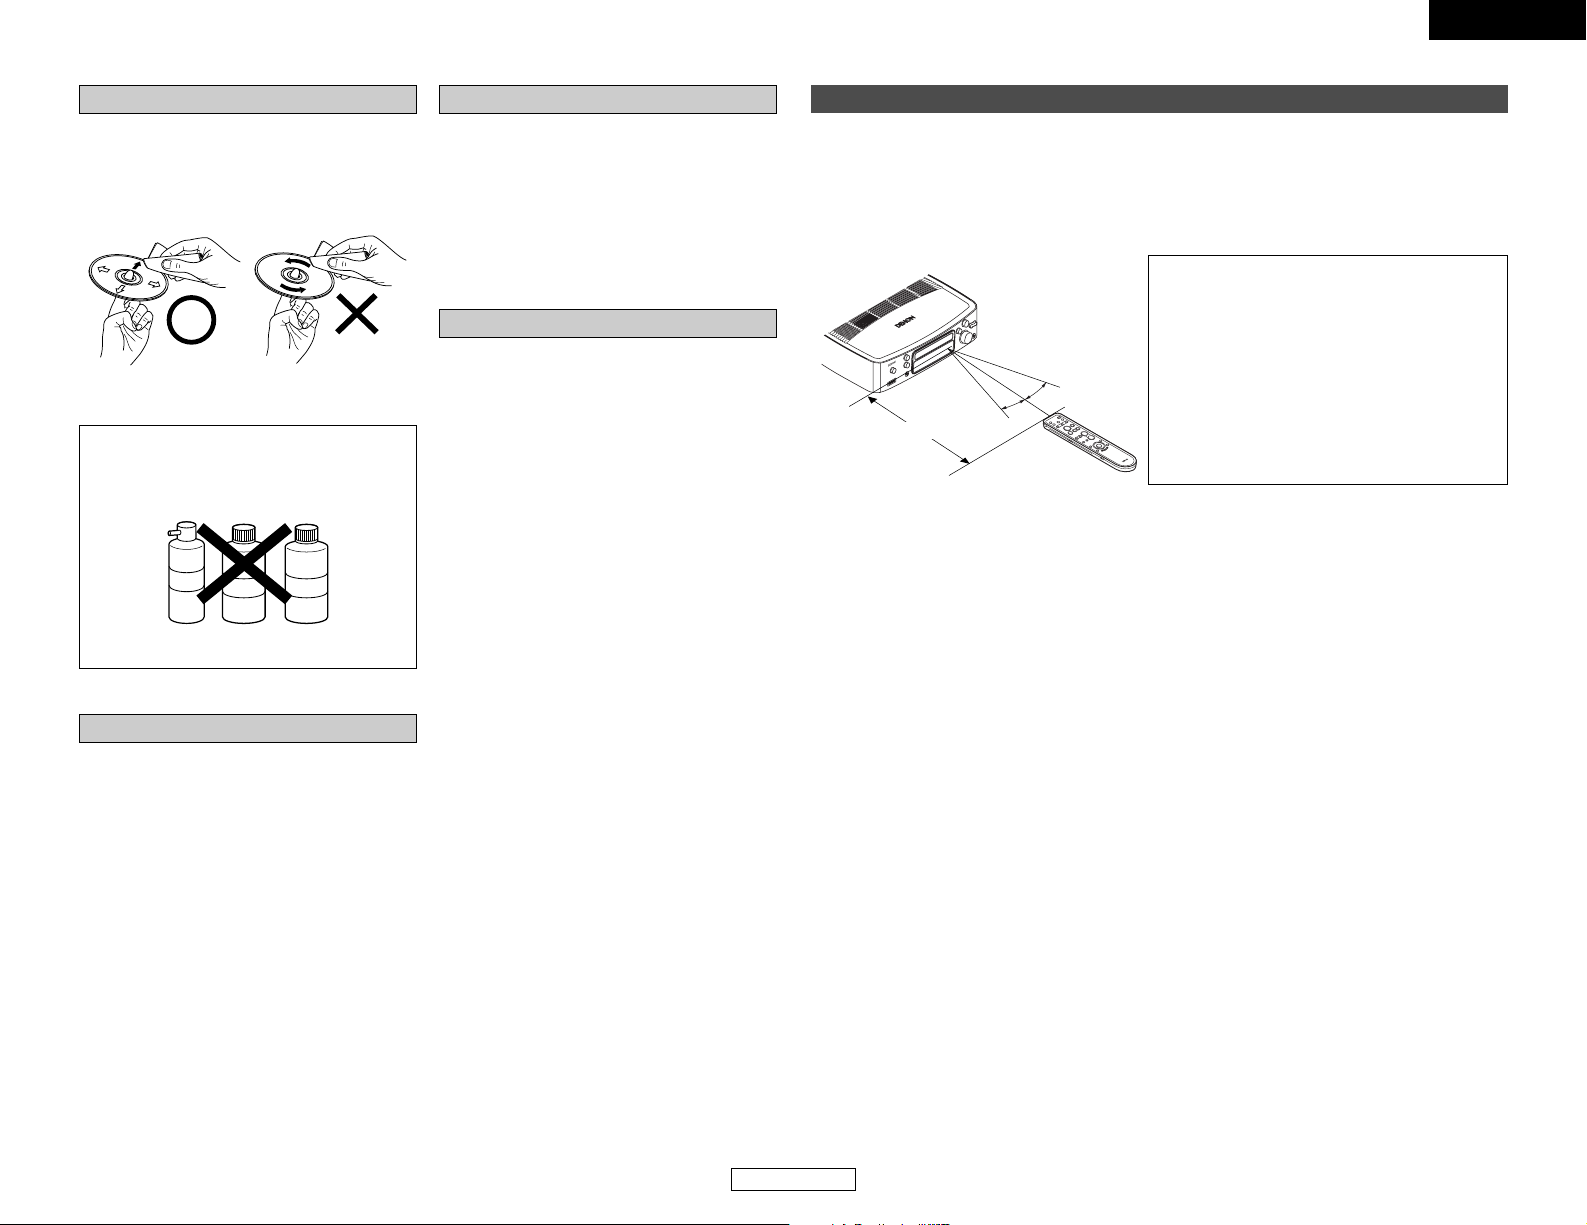
Holding discs
Avoid touching the surface of discs when
loading and unloading them.
Cautions on handling discs
Page 9
6
ENGLISH
ENGLISH
Getting Started Getting Started
Wipe gently from the
middle outwards.
Do not wipe with a
circular motion.
NOTE:
Do not use record spray or antistatic. Also
do not use volatile chemicals such as
benzene or thinner.
Record
spray
Thinner Benzene
Cleaning discs
• Fingerprints or dirt on the disc may lower
sound and picture quality or cause breaks in
playback. Wipe off fingerprints or dirt.
• Use a commercially available disc cleaning set
or a soft cloth to wipe off fingerprints or dirt.
Cautions on handling discs
• Do not get fingerprints, grease or dirt on
discs.
• Be especially careful not to scratch discs
when removing them from their cases.
• Do not bend discs.
• Do not heat discs.
• Do not enlarge the center hole.
• Do not write on the labeled (printed) side with
a ball-point pen or a pencil.
•Water droplets may form on the surface if the
disc is moved suddenly from a cold place to a
warm one. Do not use a hairdryer, etc., to dry
the disc.
Storing discs
• Always eject discs after playing them.
• Keep discs in their cases to protect them from
dust, scratches and warping.
• Do not put discs in the following places:
1. Places exposed to direct sunlight for long
periods of time
2. Humid or dusty places
3. Places exposed to heat from heaters, etc.
Loading discs
• Only load one disc at a time. Loading one disc
on top of another may result in damage or
scratch the discs.
• Load 8 cm discs securely in the disc guide,
without using an adapter. If the disc is not
properly loaded, it may slip out of the guide
and block the disc tray.
• Be careful not to let your fingers get caught
when the disc tray is closing.
• Do not place anything but discs in the disc
tray.
• Do not load cracked or warped discs or discs
that have been fixed with adhesive, etc.
• Do not use discs on which the adhesive part
of cellophane tape or glue used to attach the
label is exposed, or discs with traces of tape
or labels that have been peeled off. Such
discs may get stuck inside the player,
resulting in damage.
Operating range of the remote control unit
30°
30°
Approx. 7m / 22 feet
• Point the remote control unit at the remote sensor on the main unit as shown on the diagram.
• The remote control unit can be used from a straight distance of approximately 7 meters/22 feet
from the main unit, but this distance will be shorter if there are obstacles in the way or if the
remote control unit is not pointed directly at the remote sensor.
• The remote control unit can be operated at a horizontal angle of up to 30 degrees with respect
to the remote sensor.
NOTE:
• It may be difficult to operate the remote
control unit if the remote sensor is exposed to
direct sunlight or strong artificial light.
• Do not press buttons on the main unit and
remote control unit simultaneously. Doing so
may result in malfunction.
• Neon signs or other devices emitting pulsetype noise nearby may result in malfunction,
so keep the set as far away from such devices
as possible.
Page 10
7
ENGLISH
ENGLISH
Getting Started Getting Started
For details on the functions of these parts, refer to the pages given in parentheses ( ).
q e tw r u i o !0y
!1!2!4 !3
q
Power ON/STANDBY switch··············(13)
w
iPod connector ·····································(26)
e
OPEN/CLOSE (5) button·····················(13)
r
Portable jack ········································(28)
t
FUNCTION button································(29)
y
Display ····················································(7)
u
Remote control sensor··························(6)
i
Display illuminance sensor ·················(51)
o
VOLUME control knob ························(13)
!0
Headphones jack (PHONES) ···············(32)
!1
SKIP (8, 9) buttons····················(19)
TUNING +, – buttons ···························(24)
!2
PLAY/PAUSE (1/3) button···········(17, 18)
!3
STOP (2)/BAND button ················(18, 24)
!4
Disc holder············································(13)
DVD surround receiver front panel
Part names and functions
Subwoofer rear panel
q
Power input (AC IN)
w
PROTECT indicator
This indicator lights red when the system
cable is not properly connected or the
protection circuit in the subwoofer (DSWS101) is activated.
e
SYSTEM CONNECTOR
r
SPEAKER SYSTEMS connector
Display
q
1 (the play indicator) lights when a disc is
playing, and 3 (the pause mode) is set.
w
These light to indicate the names of sections
of the disc being played.
e
This lights when a station is tuned in
properly.
r
This lights when RDS broadcast has been
received.
t
This lights when the TONE is adjusted.
y
This lights when SDB mode is on.
u
Displays the file, track number and elapsed
time during playback.
i
Flashes when remote control signals are
received.
o
The current volume is displayed.
!0
This lights when the sleep timer is
operating.
NOTE:
The timer standby mark does not light if
the current time and the timer current time
and the timer have not been set.
!1
Lights when HDCD is playing.
!2
Lights in the Dolby Virtual Speaker mode.
!3
Lights to indicate the currently playing audio
format.
!4
These display the FM reception mode.
AUTO:
This lights when the
BAND button is
pressed, setting the “FM AUTO” mode.
ST:
This lights when a stereo program is
received in the “FM AUTO” mode.
MONO:
This lights when a monaural program is
received in the “FM AUTO” mode and
when the BAND button is pressed, setting
the “FM MONO” mode.
!5
Lights in the Dolby Headphone mode.
!6
Lights to indicate the currently playing disc.
!7
Lights in the programmed play mode,
random play mode and repeat play mode.
!8
Lights when progressive video signals are
being output.
!6 !6!7!8 !3 !5!4 !3 !2 !1 !0 o i
twq ure y
q
w e
r
Page 11
8
ENGLISH
ENGLISH
Getting Started Getting Started
• For details on the functions of these parts, refer to the pages given in parentheses ( ).
Remote control unit
Front
PLAY (1) button·······(17)
STOP (2)/BAND button
·····························(18, 24)
CHANNEL +/–buttons
(for selected mode)
···································(58)
DVD button ··············(29)
SOURCE POWER button
(for selected mode)
···································(58)
ON/STANDBY button
···································(13)
TUNER button··········(24)
SLOW/SEARCH (6, 7)
buttons······················(19)
STEREO MUSIC button
···································(32)
DVS/CINEMA button
···································(31)
RETURN button
···································(17)
CURSOR (0, 1, •,ª)
buttons······················(42)
VIDEO INPUT button
(for selected mode)
···································(58)
PUSH ENTER button
···································(42)
SLEEP button ···········(34)
HELP button ·············(42)
MUTE button············(13)
MENU/GUIDE button
···································(17)
STILL/PAUSE (3) button
···································(18)
AUX button ··············(29)
SKIP (8, 9)
buttons······················(19)
TUNING +, – buttons
···································(24)
VOLUME +, – button
···································(13)
Rear
Side
DISPLAY button ·······(38)
TOP MENU button
···································(17)
MODE button ···········(24)
MEMO button ··········(25)
NUMBER button
···································(17)
PROGRAM/DIRECT
button ······················(36)
ZOOM button ···········(23)
STATUS button ········(29)
RDS button···············(37)
AUDIO/PTY button
·····························(18, 37)
SUBTITLE/RT button
·····························(18, 37)
CURSOR (0, 1, •,ª)
buttons······················(42)
SEARCH MODE button
···································(19)
ENTER button
···································(42)
ANGLE/CT button
·····························(18, 37)
TONE/SDB button ···(41)
SURROUND PARAMETER
button ·······················(30)
SURROUND button
···································(29)
REP 1/ALL button
···································(35)
RANDOM button
···································(36)
CALL button ·············(36)
CLEAR button···········(36)
SKIP (8, 9)
buttons······················(19)
TUNING +, – buttons
···································(24)
MODE SELECTOR
switch························(58)
NOTE:
• If buttons on the front or rear are pressed strongly, the button on the opposite side will be
activated too.
TV··········To operate the preset TV
DVD·······To operate this unit
CABLE···To operate the preset cable tuner
DBS ·······To operate the preset satellite receiver
Page 12
9
ENGLISH
ENGLISH
Getting Started Getting Started
DVD function
2 Valid buttons on the each functions
TUNER function AUX function
Page 13
10
ENGLISH
ENGLISH
Easy Setup and Operation
(L)(
R
)
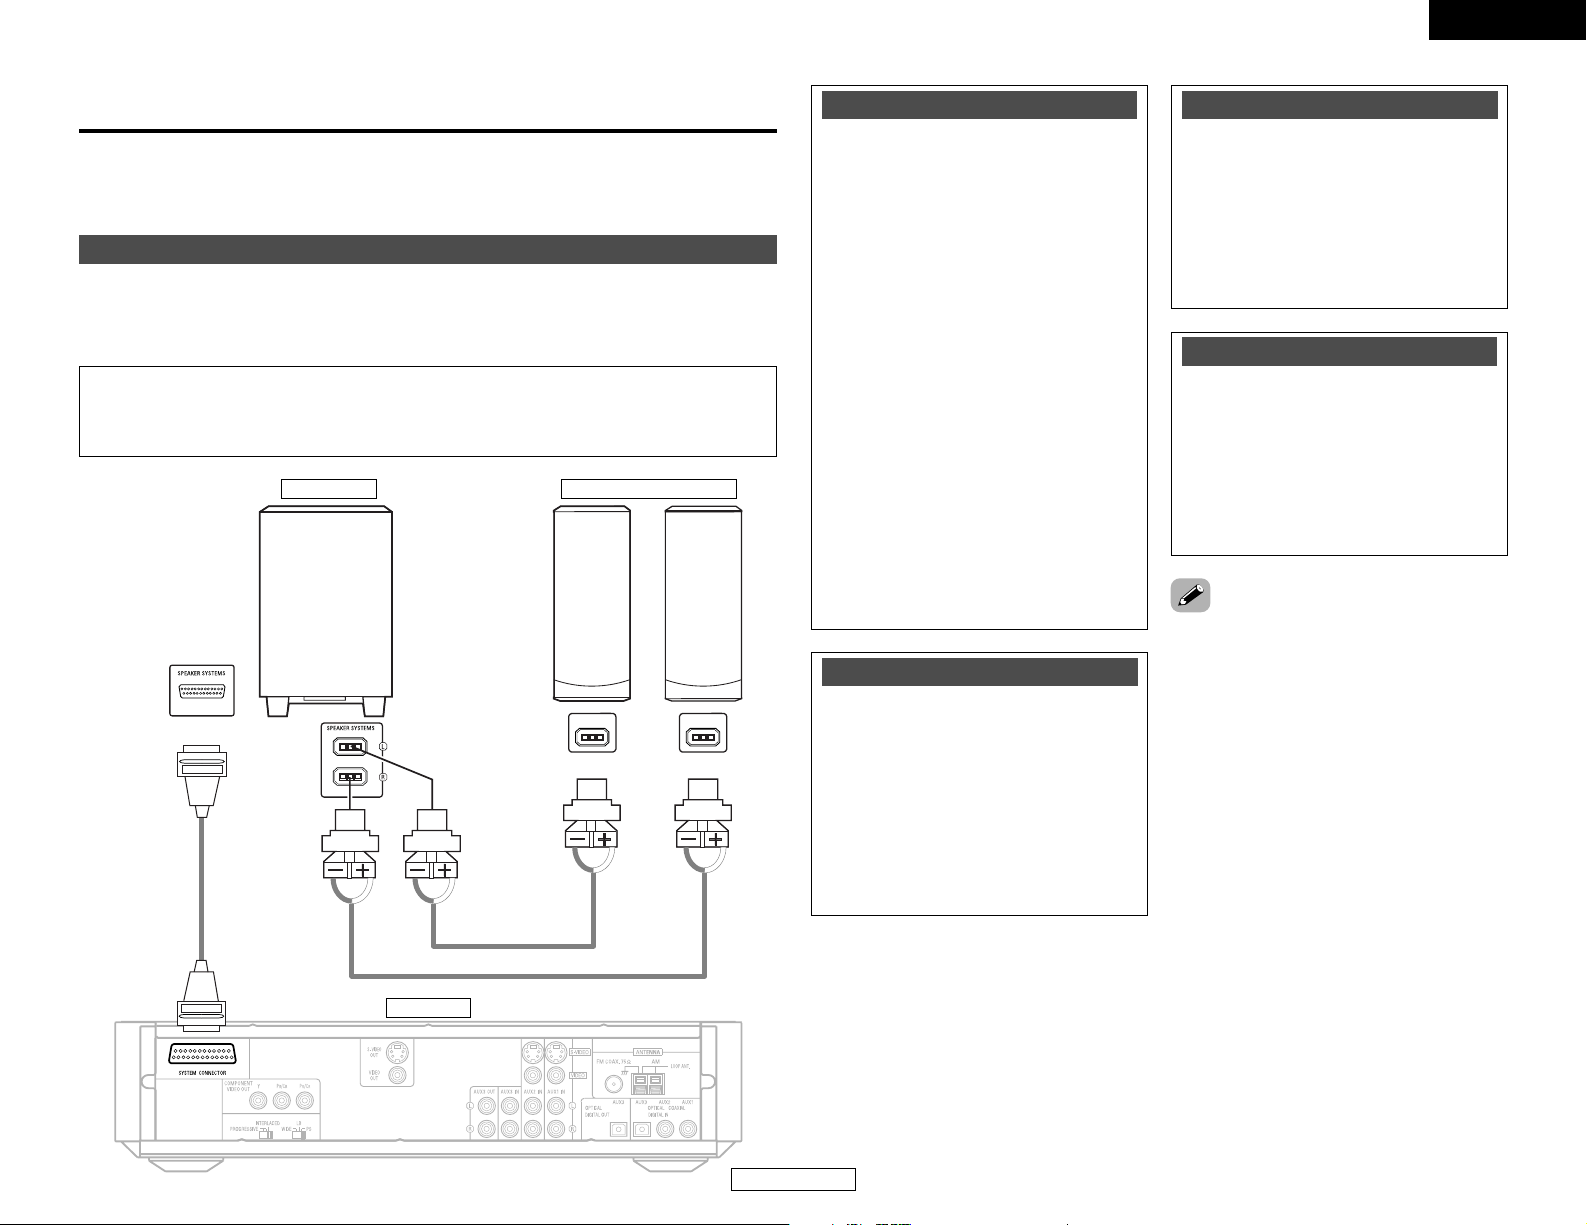
Connecting the system
NOTE:
• Do not plug the power supply cord into the power outlet until all connections are completed.
Be sure to interconnect the channels (L to L (white) and R to R (red)) properly, as shown on
the diagram.
ADV-S101
SC-S101
System cable
Speaker cable
DSW-S101
Connect the speaker system for the left channel (the left side as seen from the front) to the L
terminals, the speaker system for the right channel to the R terminals. Be sure to use speaker
systems with an impedance of 4 Ω/ohms.
Speaker cable
White Red
2
1
there is a hole
there is a bump
With the S-101 it is possible to enjoy a home theater easily, simply by using the included cables to
connect a subwoofer, speakers and your TV. “Easy setup and operation” offers an easy guide for
the series of procedures from making connections to playing a DVD.
• Insert the plugs securely. Incomplete
connections may result in noise.
• Noise or humming may be generated if a
connected audio equipment is used
independently without turning the power of
this unit on. If this happens, turn on the power
of the this unit.
• This system includes digital circuitry which
may cause interference such as color
blotching or changes in the color on TVs. If
this happens, move the system and the TV as
far apart as possible.
• Whenever the power operation switch is in
the STANDBY position, the unit is still
connected to AC line voltage.
• Please be sure to unplug the power supply
cord when you leave home for, e.g.,a
vacation, etc.
• After unplugging the power supply cord, wait
about 5 seconds before plugging it back in.
• Note that setting the connection cords (pinplug cords etc.) next to the power supply
cords may result in humming or other noise.
MEMO
White
Red
Cautions on connecting
With this unit’s speaker outputs, signals
with the reverse phase of the “+” side
output terminal’s signals are also output
from the “–” side output terminal.
Do not connect to a device for switching
between multiple speakers (a speaker
selector or audio channel selector) or
connect in ways other than described in this
manual. Doing so will result in damage.
Speaker system connections
Be sure to turn the amplifier’s power off
when connecting the speaker systems.
Use the included speaker cables to connect
the input terminals on the back of the
speaker systems to the amplifier’s speaker
output terminals. Connect the speaker
system for the left channel to the amplifier’s
“L” terminals, the one for the right channel
to the amplifier’s “R” terminals.
Protector circuit
This unit is equipped with a high-speed
protection circuit. The purpose of this circuit
is to protect the speakers under
circumstances such as when the output of
the power amplifier is inadvertently shortcircuited and a large current flows, when the
temperature surrounding the unit becomes
unusually high, or when the unit is used at
high output over a long period which results
in an extreme temperature rise.
When the protection circuit is activated, the
speaker output is cut off and the power
supply indicator LED flashes. Should this
occur, please follow these steps: be sure to
switch off the power of this unit, check
whether there are any faults with the wiring
of the speaker cables or input cables, and
wait for the unit to cool down if it is very hot.
Improve the ventilation condition around the
unit and switch the power back on.
If the protection circuit is activated again
even though there are no problems with the
wiring or the ventilation around the unit,
switch off the power and contact a DENON
service center.
The protector circuit may be activated if the
set is played for long periods of time at high
volumes when speakers with an impedance
lower than the specified impedance (for
example speakers with an impedance of
lower than 4 Ω/ohms) are connected. If the
protector circuit is activated, the speaker
output is cut off. Turn off the set’s power,
wait for the set to cool down, improve the
ventilation around the set, then turn the
power back on.
Note on speaker impedance
Easy Setup and Operation
Page 14
AM loop antenna assembly
11
ENGLISH
ENGLISH
Easy Setup and Operation Easy Setup and Operation
Connection of AM antennas
Connecting the supplied antennas
FM indoor antenna
AM loop antenna
Note to CATV system installer:
This reminder is provided to call the CATV
system installer’s attention to Article 820-40
of the NEC which provides guidelines for
proper grounding and, in particular, specifies
that the cable ground shall be connected to
the grounding system of the building, as
close to the point of cable entry as practical.
1
4
2
3
Remove the vinyl tie
and take out the
connection line.
Bend in the reverse
direction.
a. With the antenna
on top any stable
surface.
b. With the antenna
attached to a wall.
Mount
Installation hole Mount on wall, etc.
1. Push the lever. 2. Insert the
conductor.
3. Return the
lever.
WIDE:
Select this to play wide DVDs in the full-screen mode.
LB:
Select this to play wide DVDs in the letter box mode (with black strips at the top and bottom).
PS:
Select this to play wide DVDs in the pan & scan mode (with the sides of the picture cut off).
Discs for which pan & scan is not specified are played in the letter box mode.
• Choose settings according to the TV to be connected.
• Set the WIDE/LB/PS switch on the ADV-S101’s rear panel to select the
aspect ratio of the TV.
Connecting a TV
• When making connections, also refer to the operating instructions of the TV or monitor.
TV
VIDEO
IN
WIDE/LB/PS
2 Setting the aspect ratio of your TV (DVD function only)
• If the ADV-S101’s image does not appear on the TV, check whether or not the
PROGRESSIVE/INTERLACED switch on the ADV-S101’s rear panel is set to “INTERLACED”. If it is
set to “PROGRESSIVE”, set it back to “INTERLACED”.
• If your TV is of the conventional size (4:3), select “LB” or “PS”. If you have a wide size TV (16:9),
select “WIDE”.
Black
White
Page 15
12
ENGLISH
ENGLISH
Easy Setup and Operation Easy Setup and Operation
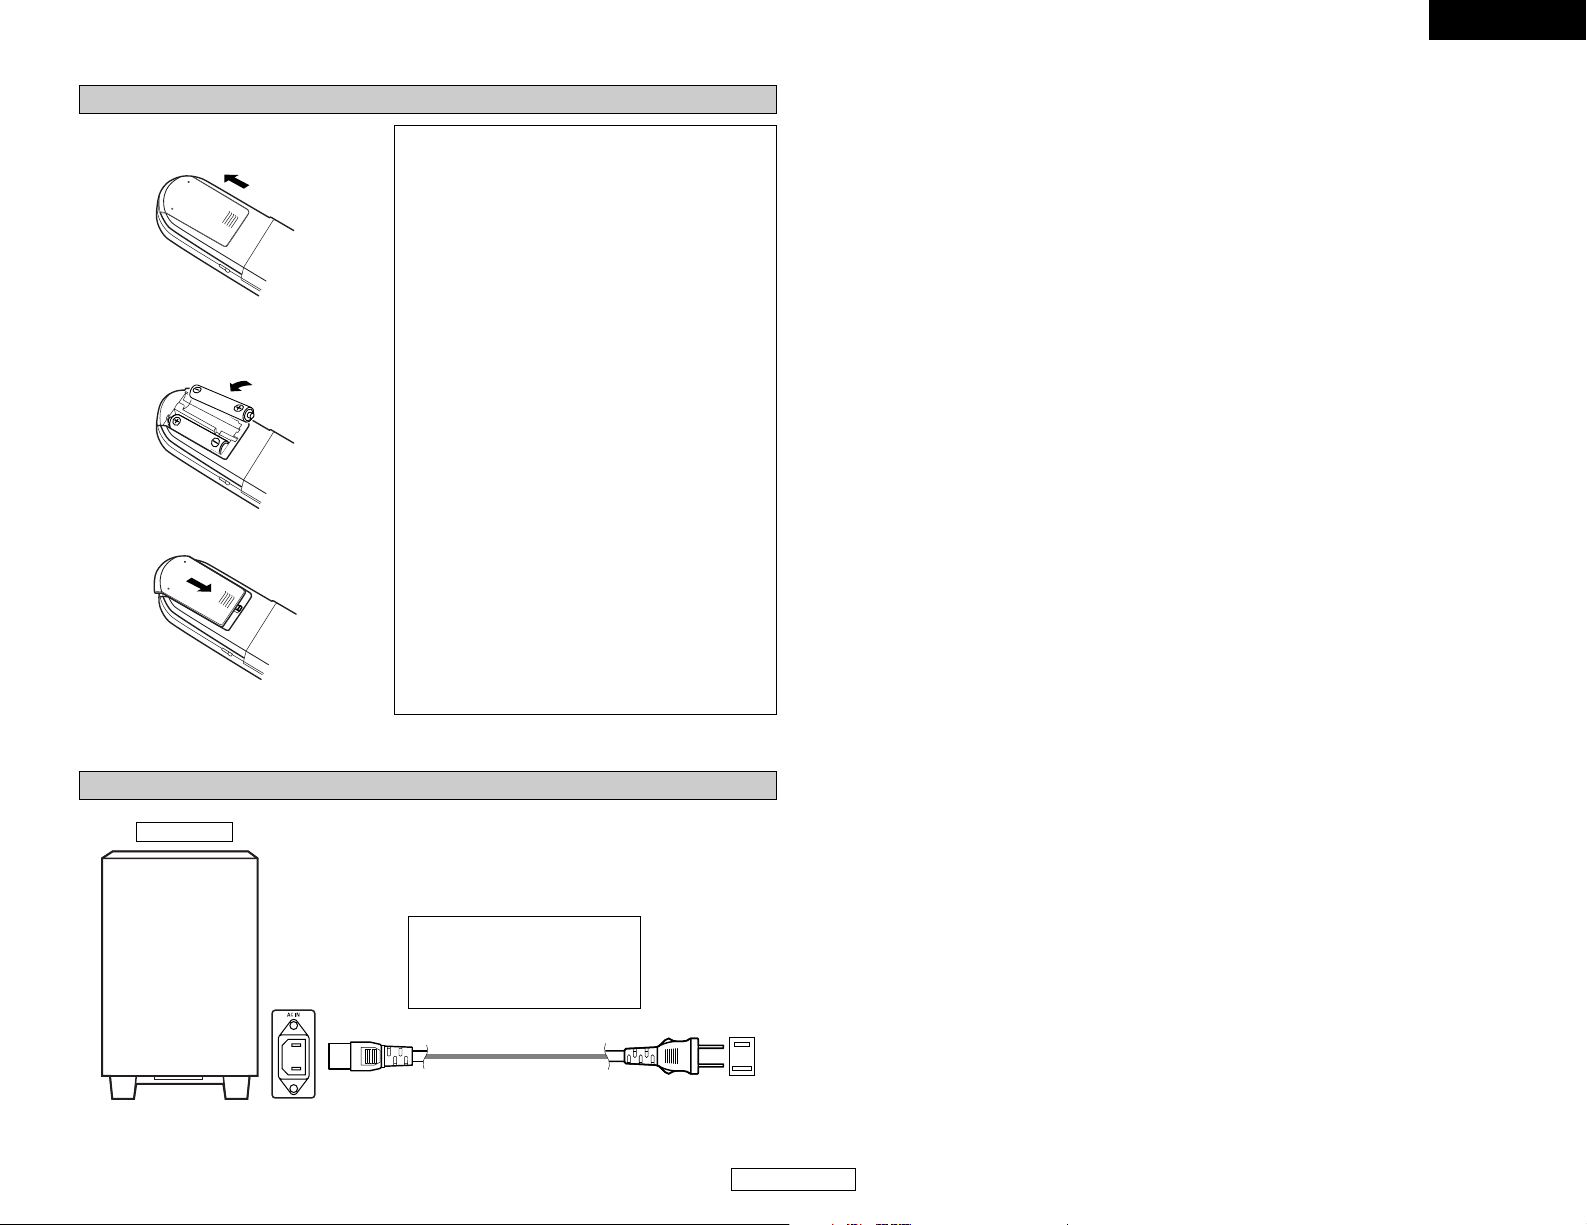
Inserting the batteries
q Remove the remote control unit’s rear
cover.
w Set two R6P/AA batteries in the
battery compartment in the indicated
direction.
e Put the rear cover back on.
Notes on batteries:
• Use R6P/AA batteries in the remote control unit.
• The batteries should be replaced with new ones
approximately once a year, though this depends
on the frequency of usage.
• Even if less than a year has passed, replace the
batteries with new ones if the set does not
operate even when the remote control unit is
operated nearby the set. (The included battery is
only for verifying operation. Replace it with a new
battery as soon as possible.)
• When inserting the batteries, be sure to do so in
the proper direction, following the “<” and “>”
marks in the battery compartment.
•To prevent damage or leakage of battery fluid:
• Do not use a new battery together with an old
one.
•Do not use two different types of batteries.
• Do not short-circuit, disassemble, heat or
dispose of batteries in flames.
• Remove the batteries from the remote control
unit when you do not plan to use it for an
extended period of time.
• If the battery fluid should leak, carefully wipe the
fluid off the inside of the battery compartment
and insert new batteries.
•When replacing the batteries, have the new
batteries ready and insert them as quickly as
possible.
AC outlets (wall)
AC 120 V, 60 Hz
The S-101 includes a built-in clock
function, so plug its power supply
cord into a wall AC outlet to
which electricity is supplied
constantly.
DSW-S101
1
Power supply cord
2
Connecting the power supply cord
Page 16

13
ENGLISH
Easy Setup and Operation Easy Setup and Operation
ENGLISH
Playing a DVD disc
1
Check that all connections are correct.
• If appears on the TV screen while buttons are being
operated, that operation is not possible on the S-101 or with
that disc.
• The disc keeps turning while the menu screen is displayed on
the TV screen.
Disc tray
• Pick up the disc carefully so as not to touch the signal surface and hold it with the labeled side facing up.
•With the disc tray fully open, set the disc in the disc tray.
NOTE:
• Do not press the disc tray in by hand when the power is off.
Doing so will damage it.
• Do not place foreign objects in the disc tray. Doing so will
damage it.
• If a foreign object is caught in the disc tray during closing,
simply press the 55button again and the tray will open.
Press the 55button to set the DVD disc in the
disc tray.
4
2
Turn on your monitor (TV).
Switch the input selector on the TV to this unit.
The disc tray can also be closed automatically to load the
disc by pressing the 11button. After this, playback starts
automatically.
7
Adjust the volume.
The volume is shown on
the display.
(Main unit) (Remote control unit)
Press the 55button.
5
Press the 11button.
6
VOLUMEON/STANDBY
5 12
VOLUME
ON/STANDBY
MUTE
1
2
3
Press the ON/STANDBY switch.
• The power indicator lights orange, the power turns on
and the display lights.
Several seconds are required from the time the ON/STANDBY
switch is pressed until the power turns on. This is due to the
built-in muting circuit that turns off (mutes) the sound when
the power is turned on and off. The power indicator flashes
orange while the muting circuit is activated.
Even when the ON/STANDBY switch has been pressed again
and the power has been set to the standby mode, power is
still supplied to some circuits. When leaving home or
traveling, be sure to unplug the power supply cord from the
power outlet. In the standby mode, the power indicator is
lights red. The indicator is yellow when the timer is set.
Page 17
14
ENGLISH
Connecting Other Sources
ENGLISH
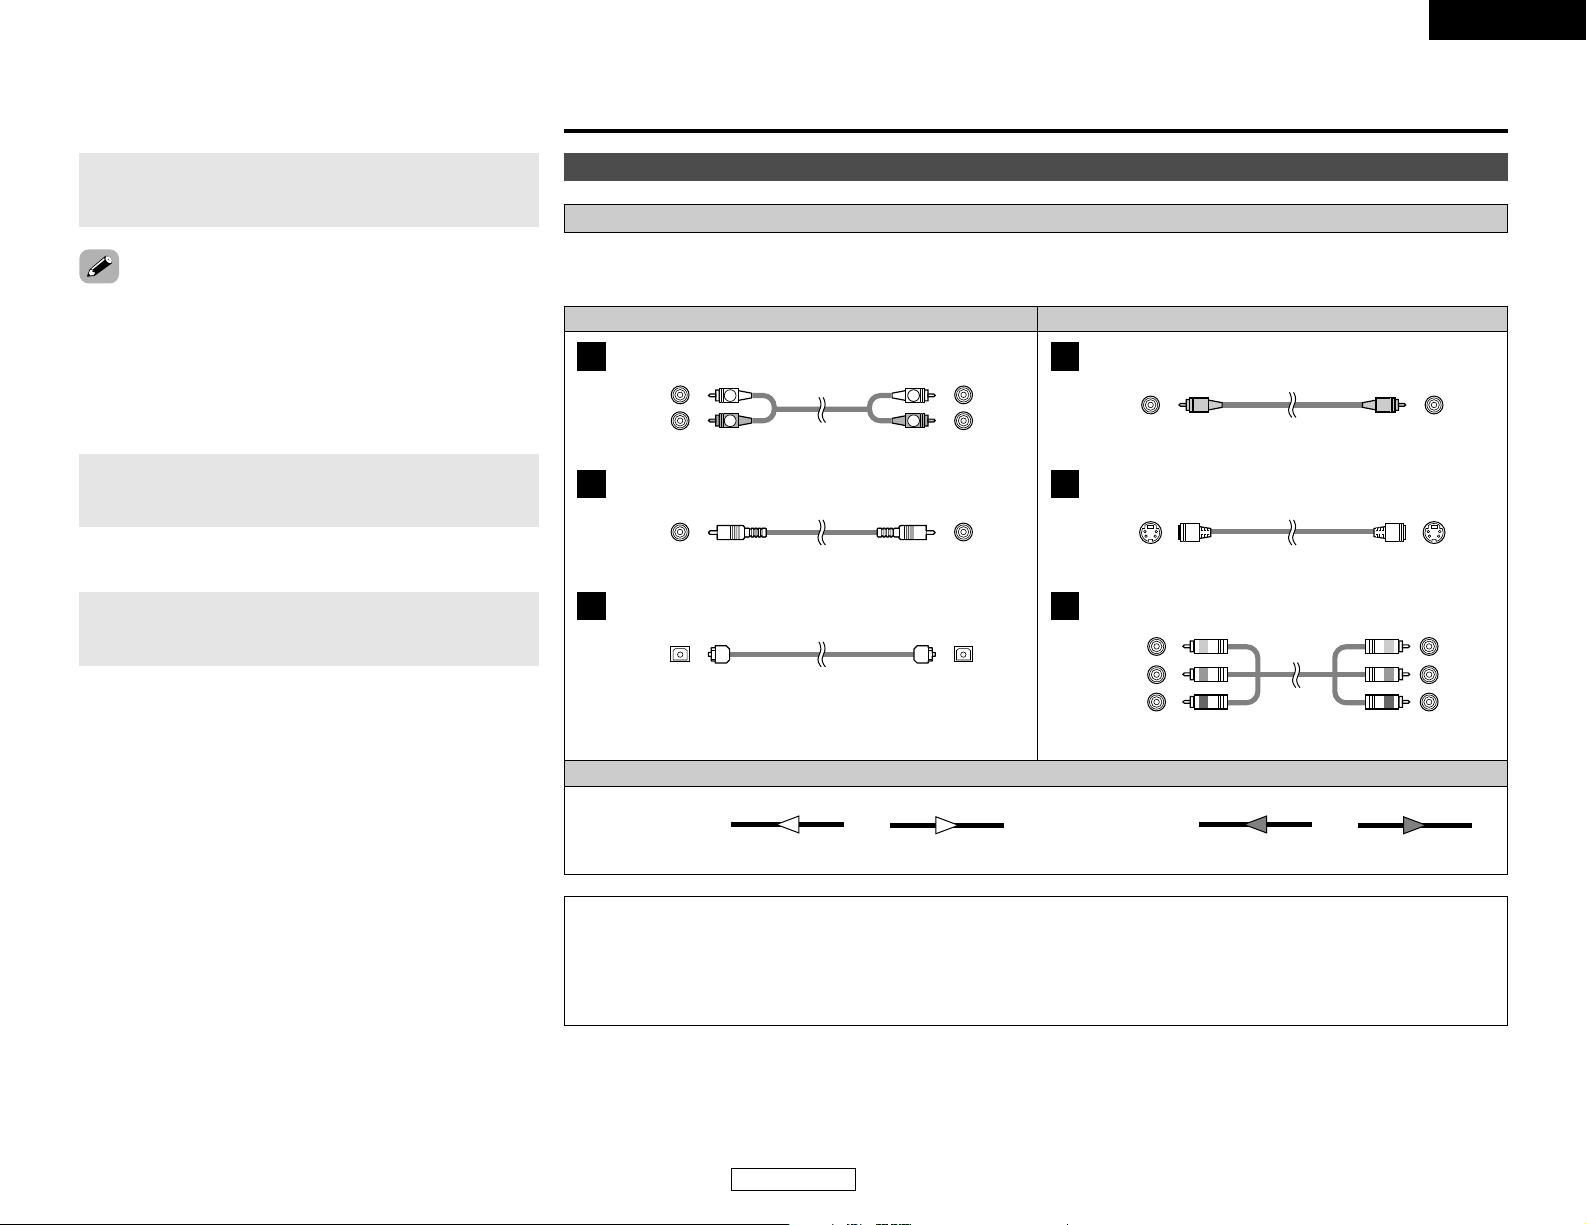
Cable indications
Signal direction
The hookup diagrams on the subsequent pages assume the use of the following optional connection cables (not supplied).
When connecting other equipment, disconnect the power supply cord from the AC power outlet before connecting other equipment.
Video cableAudio cable
NOTE:
• Do not plug in the power supply cord until all connections have been completed.
• When making connections, also refer to the operating instructions of the other components.
• Be sure to connect the left and right channels properly (left with left, right with right).
• Note that binding pin-plug cables together with power supply cords or placing them near a power transformer will result in
generating hum or other noise.
Analog terminal (Stereo)
A
R
L
R
L
(Orange)
Pin-plug cable
Digital terminal (Coaxial)
B
Coaxial cable (75 Ω/ohms pin-plug cable)
Digital terminal (Optical)
C
Optical cable (Optical fiber cable)
Video terminal
D
Video cable (75 Ω/ohms video pin-plug cable)
S-Video terminal
E
S Video cable
(Yellow)
Audio signal Video signal
(White)
(Red)
Component video terminal
F
Component video cable
(Y)
(PB/CB)
(P
R/CR)
(Green)
(Blue)
(Red)
IN OUT OUT IN
IN OUT OUT IN
Connecting Other Sources
Advanced setup options
During playback, press the 22button.
2 To stop the playback
2 To turn off the main unit
Press the ON/STANDBY switch.
Press the MUTE button.
• Cancelling MUTING mode:
q Press the MUTE button again.
w Press the VOLUME button on the remote control unit, or
adjust the volume up or down via the front panel VOLUME
control knob.
Use this to turn off the audio output temporarily.
2 To mute the sound
Page 18
15
ENGLISH
ENGLISH
Connecting Other Sources Connecting Other Sources
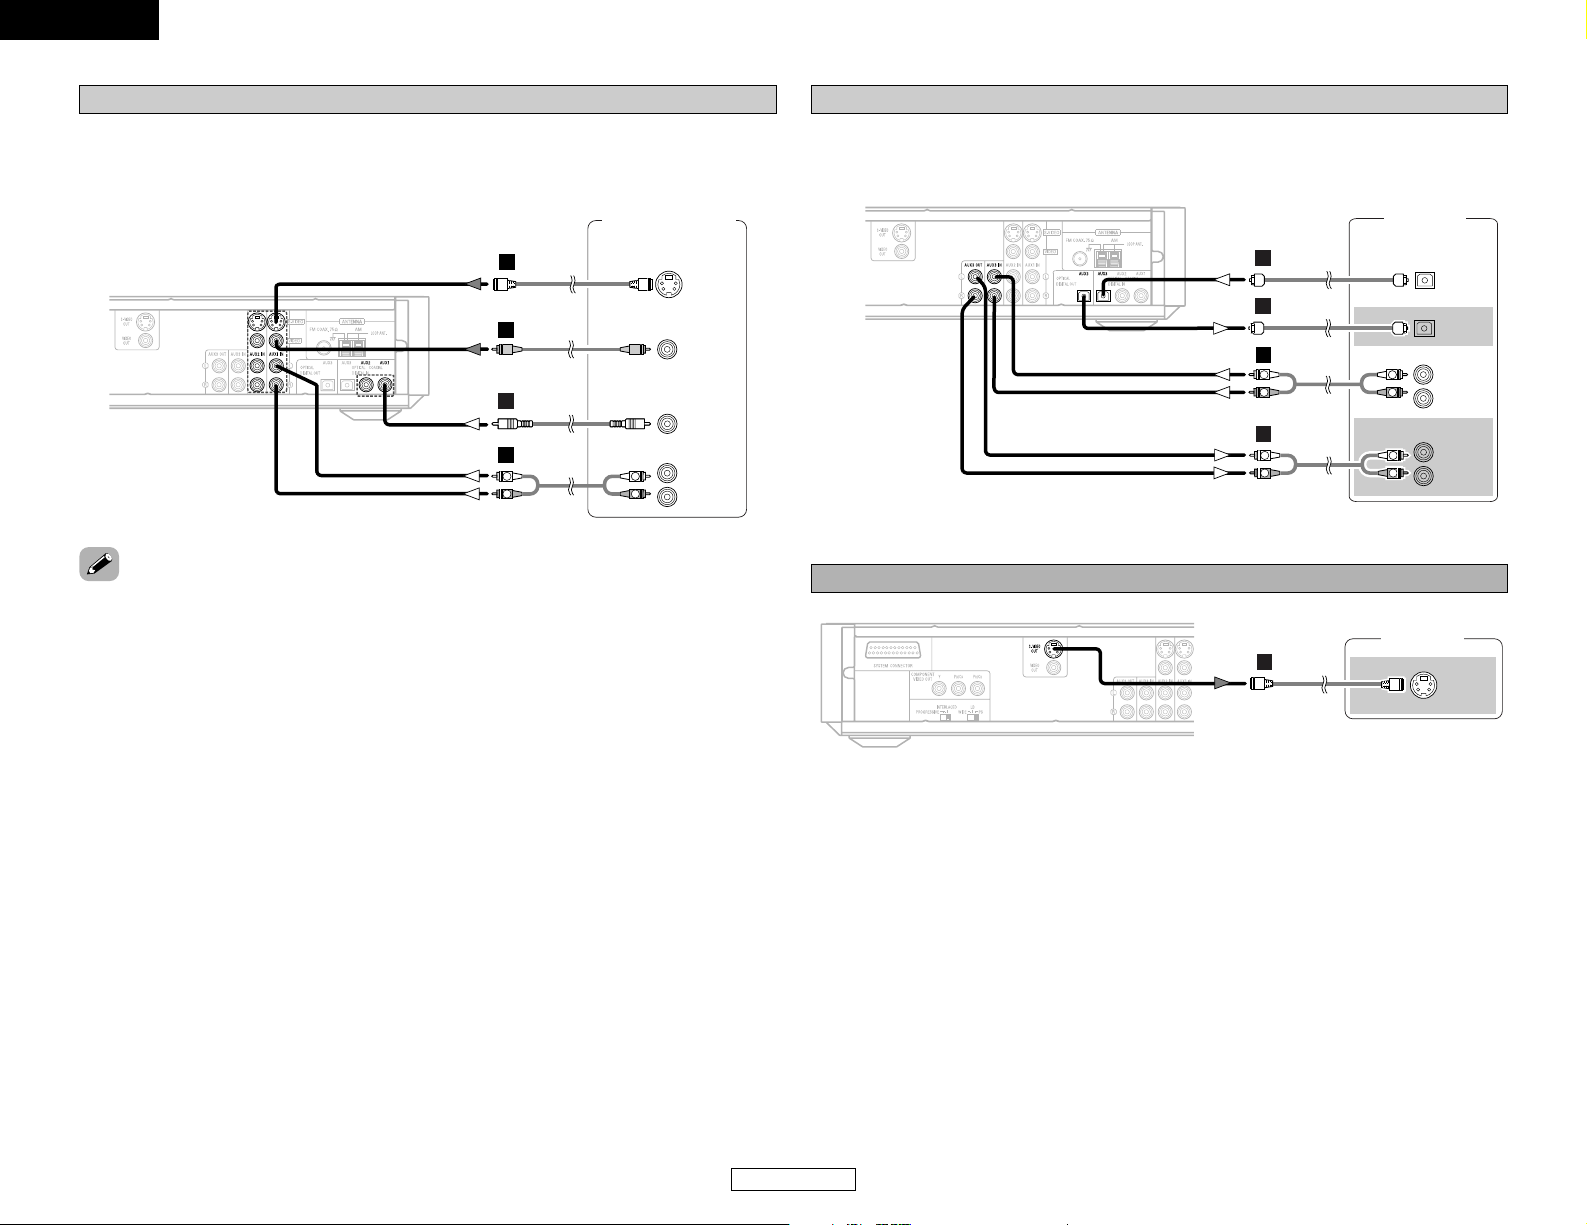
Connecting a DBS/Cable tuner/VCR
• When making connections, also refer to the operating instructions of the other components.
• If the device to be connected is equipped with a digital audio output (COAXIAL), connect it to the
DIGITAL Input (COAXIAL) on the ADV-S101.
DBS / Cable Tuner/
VCR
R
L
AUDIO OUT
COAXIAL
OUT
S VIDEO
OUT
VIDEO
OUT
R
L
R
L
B
E
D
A
Connecting a tape deck, MD recorder or CD recorder
• When making connections, also refer to the operating instructions of the other components.
• Connect the tape deck’s audio output and audio input terminals to the ADV-S101’s AUX3 using
pin-plug cords.
Tape deck /
MD recorder /
CD recorder
R
L
AUDIO OUT
R
L
AUDIO IN
OPTICAL
IN
R
L
R
L
R
L
R
L
A
A
C
OPTICAL
OUT
C
Monitor TV
S VIDEO
IN
E
Connecting a S-Video connections (Better picture quality)
• When there are multiple input signals, the input signals are detected and the input signal to be
output from the video monitor output terminal is selected automatically in the following order: SVideo, composite video.
Page 19

q Insert the included hexagonal wrench into the hole
at the side of the connector’s “+” side. (Arrow A)
w Tu rn the hexagonal wrench in the direction of
arrow B to loosen the cable.
e Pull out the old cable. Be careful not to leave any
broken wire parts inside the connector. (Arrow C)
r Peel off the cable’s sheath and insert the new
cable with the copper colored core wire twisted
tightly together into the connector. (Arrow D)
t Tu rn the hexagonal wrench in the direction of
Arrow E and tighten securely so that the cable cannot be pulled out. Be sure to connect both
sides of the cable to the connectors with the proper polarities.
If the polarities are inverted, the phase may be off and the bass sound may be missing, resulting
in an unnatural sound.
16
ENGLISH
ENGLISH
Connecting Other Sources Connecting Other Sources
COMPONENT VIDEO IN
Y
PB/CB
PR/CR
Monitor TV
D
F
• Set the “TV TYPE” in “VIDEO SETUP” in “SETUP” in “HELP” to comply with your TV’s video
format. When the TV is NTSC formatted set to NTSC.
• When the PROGRESSIVE/INTERLACED switch on the ADV-S101’s rear panel is set to
“PROGRESSIVE”, no video signals are output from the VIDEO OUT or S-VIDEO OUT terminals.
Set the PROGRESSIVE/INTERLACED switch on the ADV-S101’s rear panel to “INTERLACED”, if you
want to use the VIDEO OUT or S-VIDEO OUT signals. ( page 11, 15).
Connecting a component connections
(Better than S-Video picture quality)
• For the component output only, it is possible to switch between interlace image output and
progressive image output. It is not possible to specify progressive image output for the Video
output connectors or S-Video output connector.
PROGRESSIVE:
Select this when using the ADV-S101 connected to a progressive type TV.
INTERLACED:
Select this when using the ADV-S101 connected to an interlace type TV.
2 To switch from interlace to progressive
•Turn off the power before changing the switch.
• Choose settings according to the TV to be connected.
• Set the PROGRESSIVE/INTERLACED switch on the ADV-S101’s rear panel to
select the type of the TV.
To change the speaker cable
Connecting the antenna terminals
• An F-type FM antenna cable plug can be connected directly.
• If the FM antenna cable’s plug is not of the F-type, connect using the F-type antenna adapter
(Option).
Direction of
broadcasting station
75 Ω/ohms
COAXIAL cable
FM antenna
AM loop antenna
(Supplied)
AM outdoor
antenna
Ground
FM antenna
adapter
(Option)
C
D
Refer to the procedure below if you want to switch to a different speaker cable. This example
describes how to mount the “+” side cable to the connector. Mount the “–“ side cable in the same
way.
A
E
B
NOTE:
• Do not connect two FM antennas
simultaneously.
• Even if an external AM antenna is used, do
not disconnect the AM loop antenna.
• Make sure AM loop antenna lead terminals
do not touch metal parts of the panel.
PROGRESSIVE/INTERLACED
Black
White
Page 20
17
ENGLISH
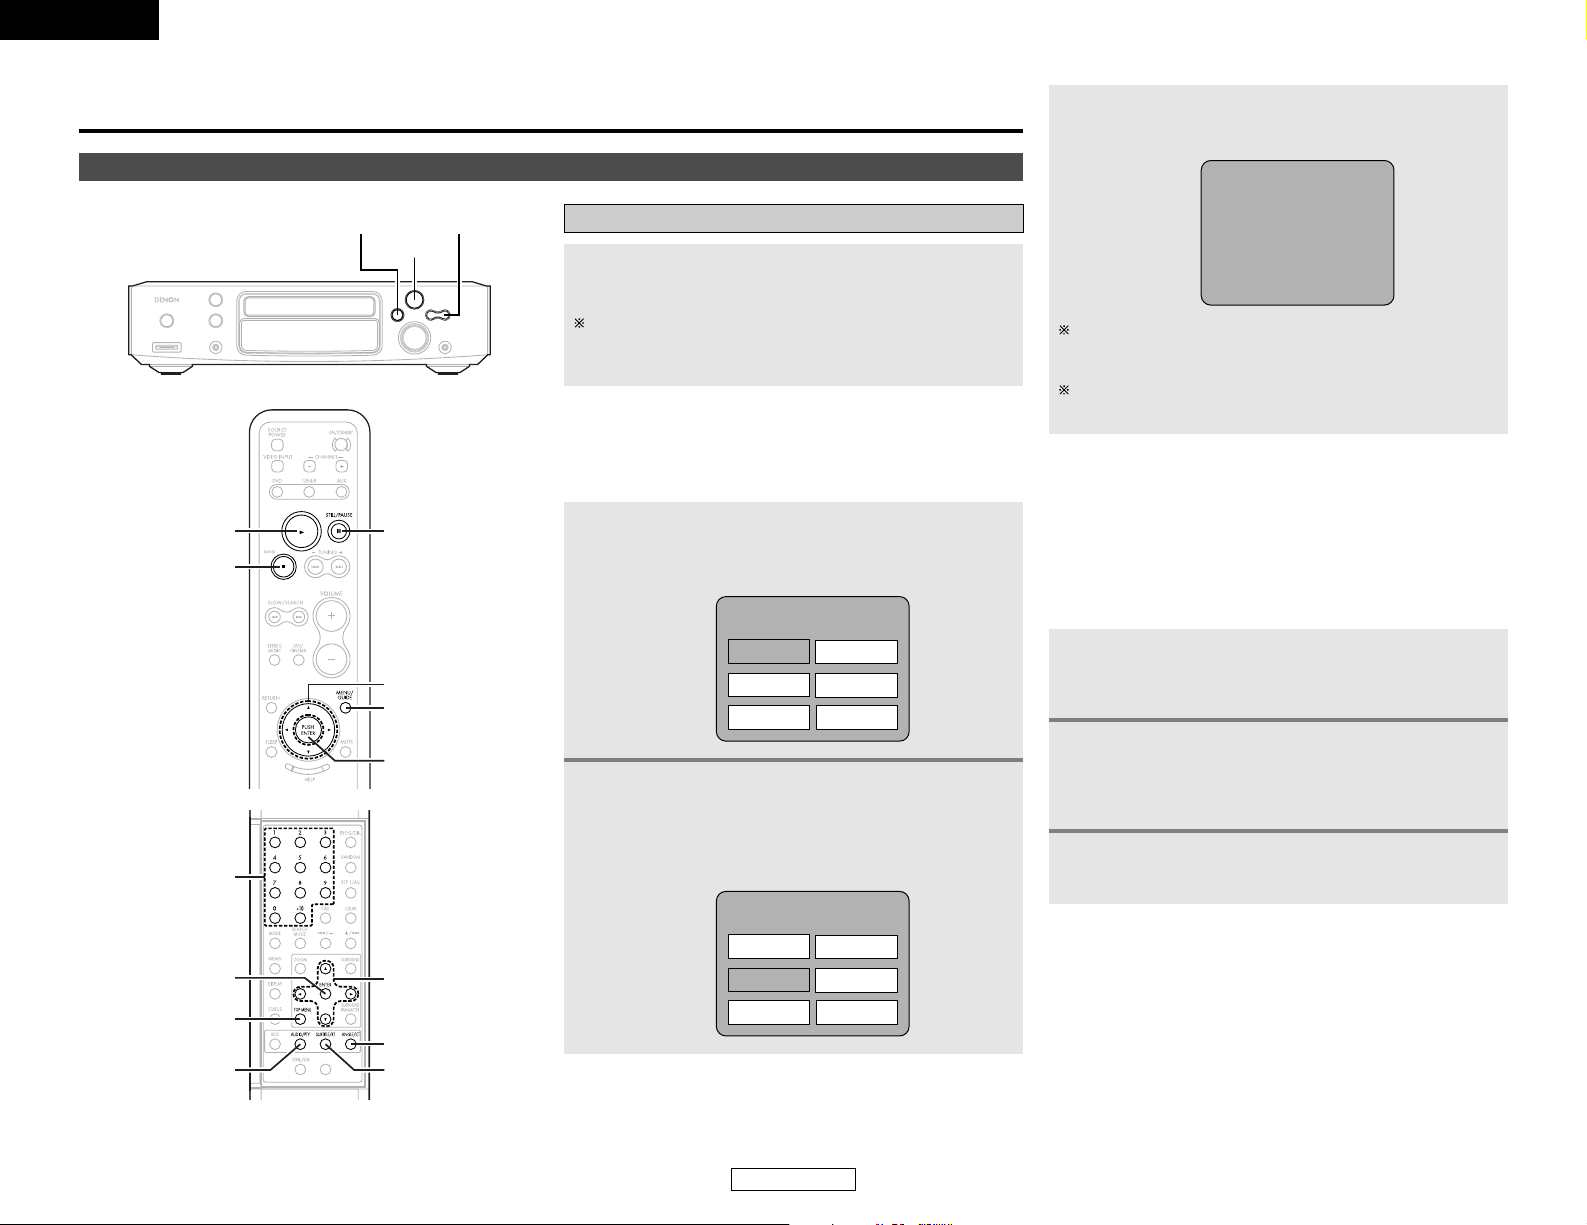
Basic Operation
ENGLISH
Playback
Playing a disc
1/ 3
2 8, 9
CURSOR
ANGLE/CT
SUBTITLE/RT
ENTER
NUMBER
TOP MENU
AUDIO/PTY
Basic Operation
Press the 11button.
Playback will start from the first chapter or track of the disc.
If the playback does not start automatically, press the 1
button.
2
Press the CURSOR orNUMBER buttons to select
the desired title.
• If you select the title number pressing the NUMBER
buttons, skip step 3 below.
Example: When “Orange” is selected
3
Press the ENTER button.
• Playback also starts if the 1 button is pressed.
• Some DVDs include special menus called DVD menus.
• For example, DVDs with complex contents may contain guide
menus, and DVDs with multiple languages may contain audio
and subtitle language menus.
• These menus are called “DVD menus”.
• Here we describe the general procedure for using DVD menus.
1
During playback, press the MENU/GUIDE
button.
• The DVD menu screen appears.
2
Press the CURSOR orNUMBER buttons to select
the desired item.
• If you select the title number pressing the NUMBER
buttons, skip step 3 below.
3
Press the ENTER button.
•If more menus appear, repeat steps 2 and 3.
Banana
Strawberry
Pineapple
TOP MENU
Orange
Peach
Apple
2 Using the DVD menus
Orange
Example:
3
MENU/GUIDE
CURSOR
ENTER
1
2
1
During playback, press the TOP MENU button.
• The top menu screen appears.
Example:
2 Using the top menu
Banana
Strawberry
Pineapple
TOP MENU
Orange
Peach
Apple
For DVDs containing multiple titles, the desired title can be
selected and played from the top menu.
You can return to the menu screen by pressing the TOP
MENU button while the DVD is playing, though this depends
on the disc.
Press the RETURN button during playback of a video CD to
return to the menu screen.
Page 21
18
ENGLISH
Basic Operation Basic Operation
ENGLISH
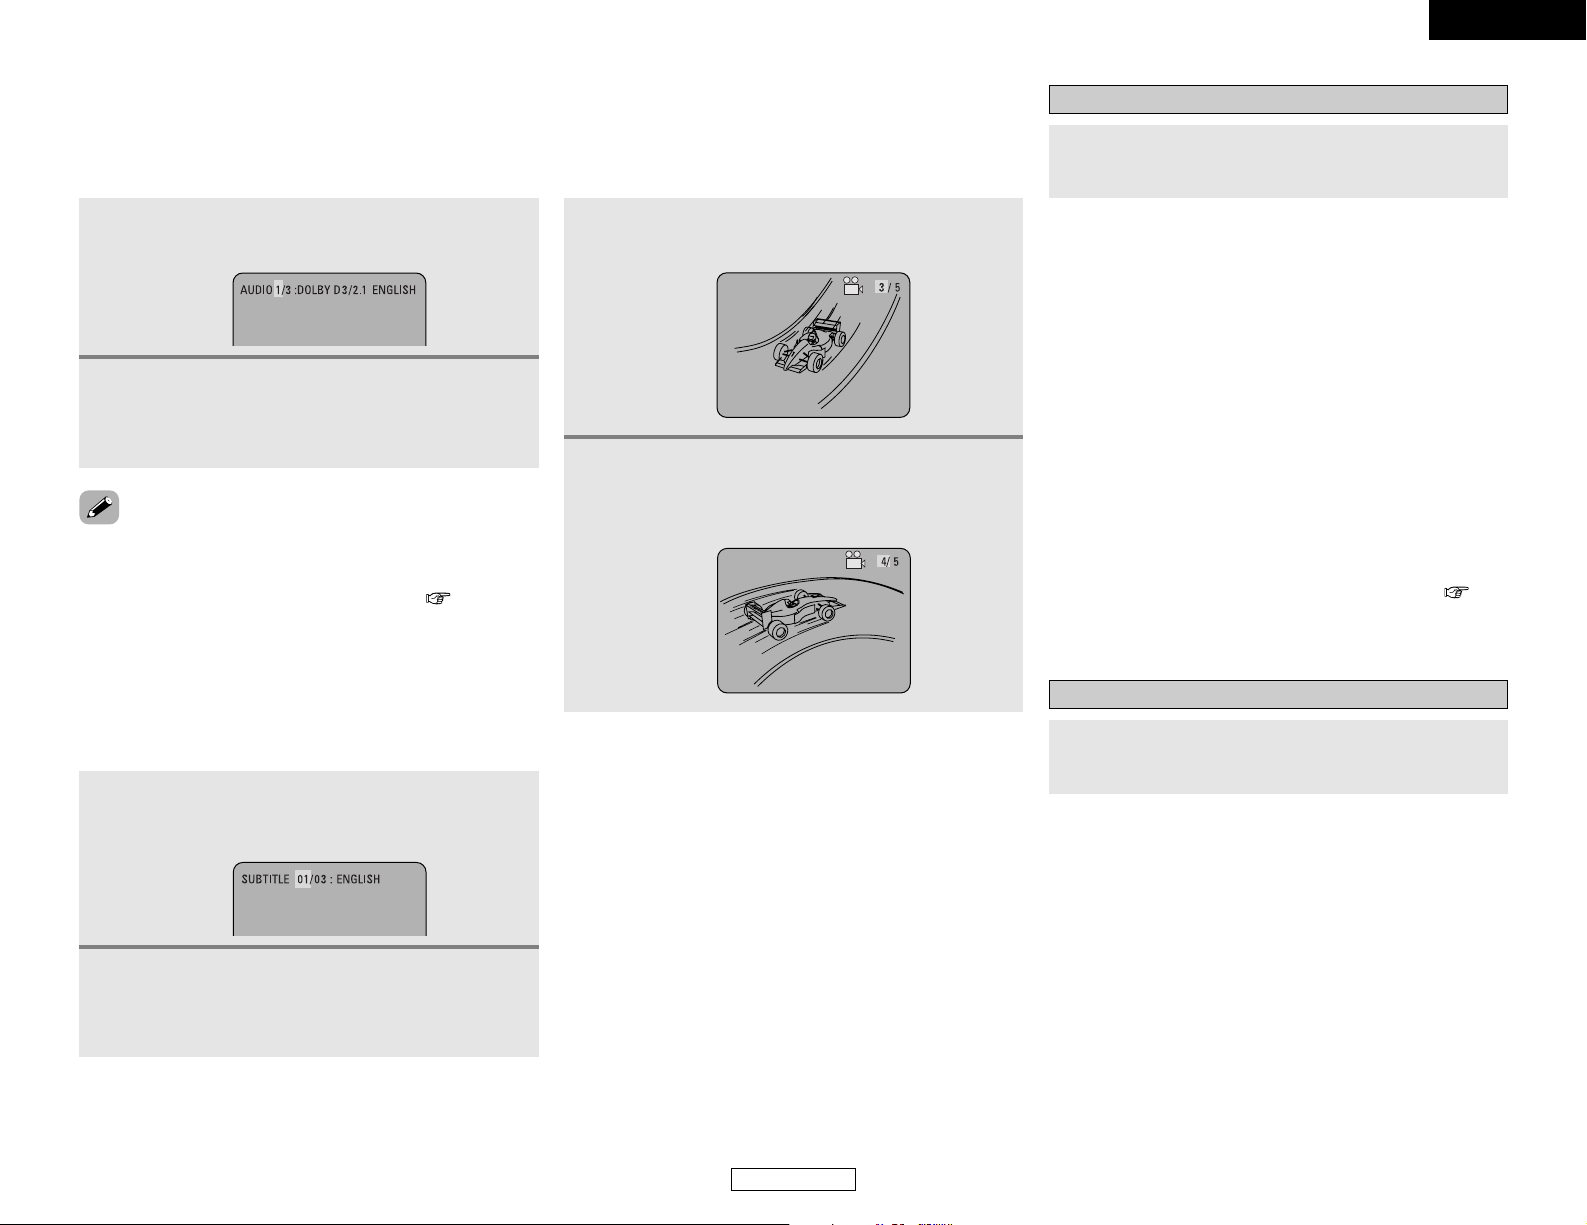
2 Switching the audio language
(Multiple audio function)
1
During playback, Press the AUDIO/PTY button.
• The current audio language number is displayed.
Press the CURSOR•orªbutton to select the
desired language.
• The display turns off when the AUDIO/PTY button is
pressed.
2
With DVDs containing multiple audio language signals, the audio
language can be switched during playback.
•With some discs it is not possible to change the audio language
during playback. In such cases, select from the “SETUP”
menu.
• The language selected in the default settings ( page 43) is
set when the power is turned on and when the disc is replaced.
2 Switching the subtitle language
(Multiple subtitle function)
1
During playback, Press the SUBTITLE/RT
button.
• The current audio language number is displayed.
Press the CURSOR•orªbutton to select the
desired language.
• The display turns off when the SUBTITLE/RT button is
pressed.
2
With DVDs containing multiple subtitle language signals, the
subtitle language can be switched during playback.
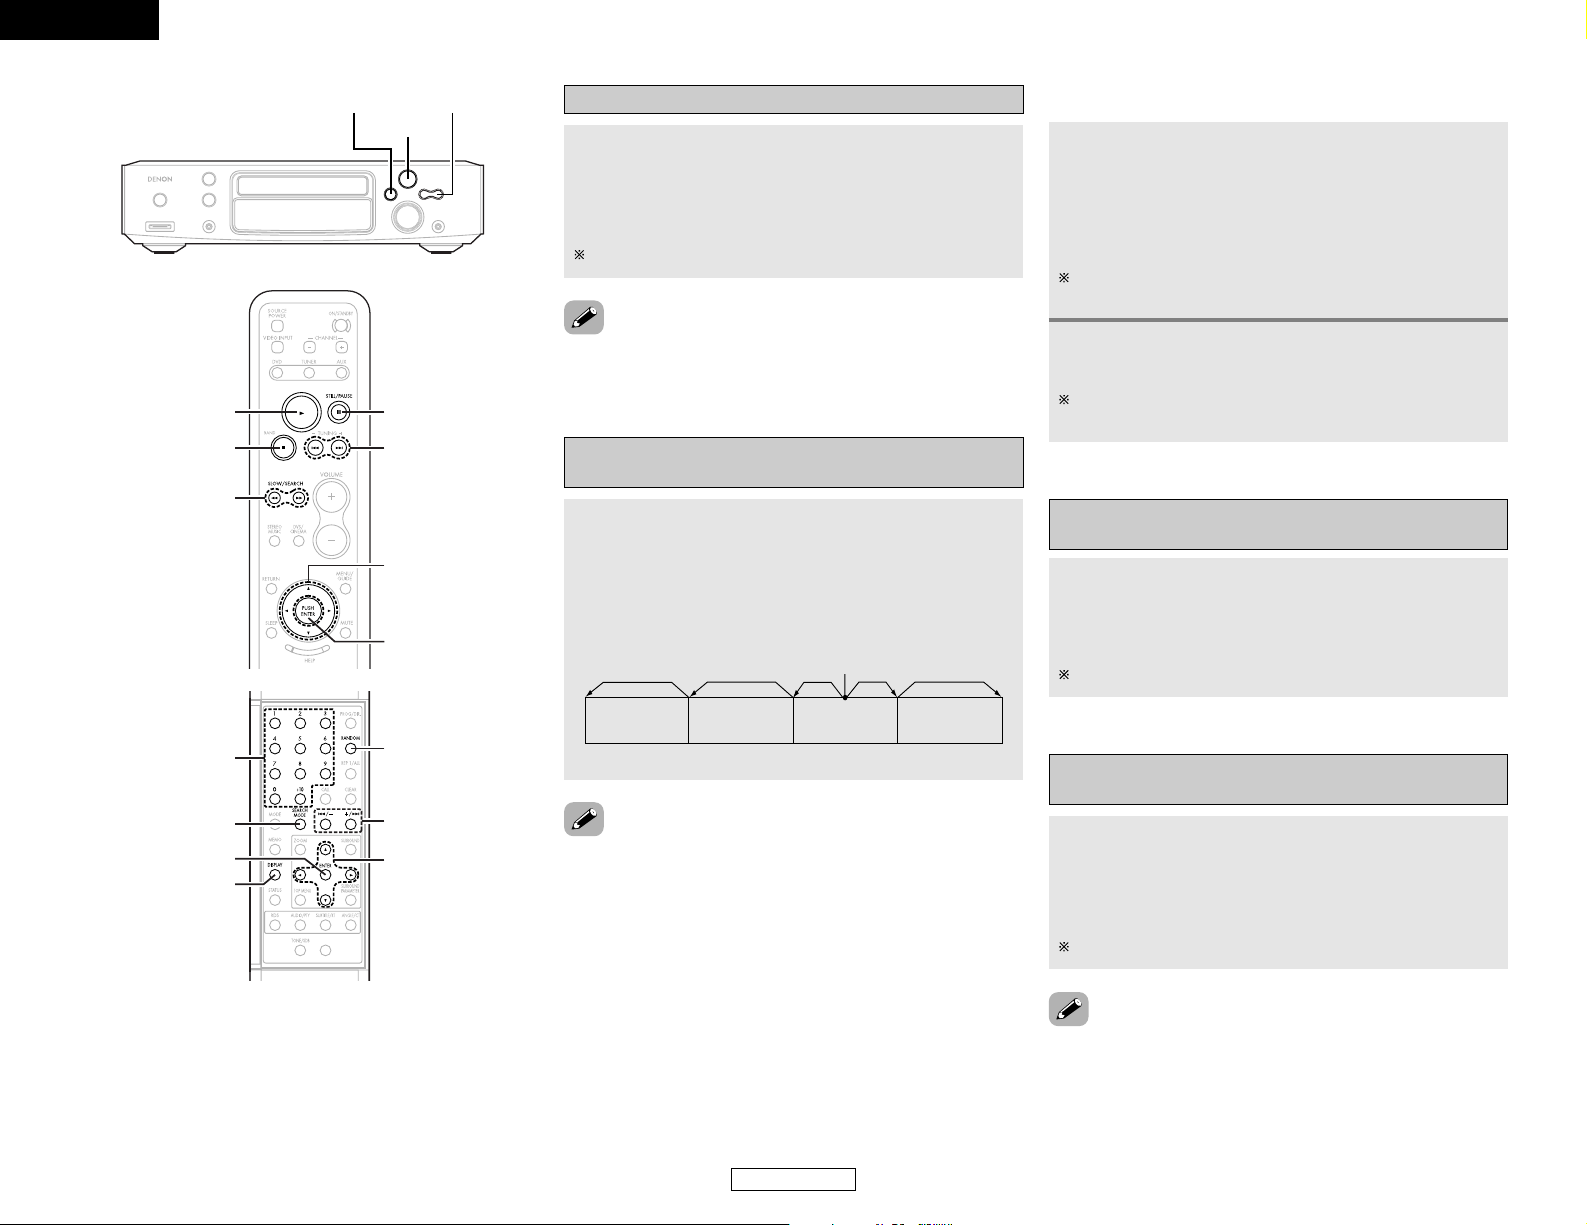
2 Switching the angle
(Multiple angle function)
1
During playback, Press the ANGLE/CT button.
• The current angle number is displayed.
Press the CURSOR•orªbutton to select the
desired angle.
• The display turns off when the ANGLE/CT button is
pressed.
2
With DVDs containing multiple angle signals, the angle can be
switched during playback.
Stopping playback
During playback, press the 22button.
• Playback stops and wall paper is displayed.
2 Resume play memory function (DVD only)
•With the S-101, when the 22button is pressed, that position is
stored in the memory. At this time, “1” flashes on the display.
When the 1 button is pressed after pressing the 22button,
playback resumes from the position at which it was stopped.
The resume play memory function is canceled if the disc tray is
opened or the 22button is pressed a second time.
• The resume play memory function only works for discs for
which the elapsed time is shown on the display during
playback.
2 Auto power off function
• The S-101 is equipped with a function that automatically
switches the power to standby if no operation is performed for
30 minutes while in the stop mode with the function set to
DVD.
• This function is set to off upon shipment from the factory. If you
wish to turn it on, set the “AUTO POWER MODE ” ( page
51) setting to “ON”.
Playing still pictures (Pausing)
During playback, press the 33button.
•Press the 1 button to resume normal playback.
Page 22
19
ENGLISH
Basic Operation Basic Operation
ENGLISH
Skipping to the beginning of chapters or
tracks
During playback, press the
88 or99
button.
•A number of chapters or tracks equal to the number of times
the button is pressed is skipped.
• When the 88button is pressed once, the pickup returns to
the beginning of the currently playing chapter or track.
88
: Reverse direction (Previous)
99
: Forward direction (Next)
Playing position
Chapter/Track Chapter/Track Chapter/Track Chapter/Track
Reverse direction ←→Forward direction (direction of playback)
• In some cases the menu screen may reappear when the
88
or 99button is pressed during menu playback on a video CD.
Forward / Reverse searching
During playback, press the
66or77
button.
• When pressed again, the search speed increases (DVD,
VIDEO CD in seven steps, CD in four steps).
6 : Reverse direction
7 : Forward direction
• In some cases the menu screen may reappear when the
66
or 77button is pressed during menu playback on a video CD.
Press the
1 button to resume normal playback.
2 Cueing using the NUMBER buttons
1
During playback, press the SEARCH MODE
button.
• The mode switches as shown below each time the
button is pressed:
For DVDs : Title ←→ Chapter
For CDs and video CDs : Track (no switching)
The search mode set by pressing the SEARCH MODE button
is stored in the memory until the power is turned off.
2
Press the NUMBER buttons to input the number
of the title, chapter or track to be played.
Some DVDs or video CDs may be designed to operate in
special ways and will not operate as described here.
Playing frame by frame
(for DVDs and video CDs only)
In the still mode, press the 33button on the remote
control unit.
• The picture moves forward one frame each time the button is
pressed.
Slow playback
(for DVDs and video CDs only)
In the still mode, press the
66or77
button.
• When pressed again, the slow play speed increases.
(Four step) (Three step on video CDs)
6 : Reverse direction
7 : Forward direction
Press the
11
button to resume normal playback.
Press the 11button to resume normal playback.
• Reverse slow play is not possible on video CDs.
1/ 3
2 8, 9
CURSOR
RANDOM
8, 9
ENTER
DISPLAY
NUMBER
SEARCH MODE
8, 9
3
CURSOR
ENTER
1
2
6, 7
Page 23
20
ENGLISH
Basic Operation Basic Operation
ENGLISH
Listening to recorded MP3
or WMA CD-R/CD-RW
• There are many music distribution sites on the internet from
which music files in MP3 format can be downloaded. Music
downloaded as instructed on the site and written onto a CDR/CD-RW disc can be played on the S-101.
•If music recorded on commercially available music CDs is
converted on a computer into MP3 files using an MP3 encoder
(conversion software), the data on a 12 cm CD is reduced into
about 1/10 the amount of the original data. Thus, when written in
MP3 format, the data of about 10 music CDs can fit onto a single
CD-R/CD-RW disc. A single CD-R/CD-RW disc can contain over
100 tracks.
•Values when 5-minute tracks are converted with a standard bit
rate of 128 kbps into MP3 files and using a CD-R/CD-RW disc
with a capacity of 650 MB.
• This unit can play CD-R/CD-RW music files that have been
recorded in the WMA (Windows Media Audio)* audio
compression format.
*WMA (Windows Media Audio): Coding of Microsoft
Corporation (U.S.A.)
Windows Media, and the Windows logo are
trademarks, or registered trademarks of
Microsoft Corporation in the United States
and/or other countries.
• In the file display of the disc information screen, WMA files will
be displayed with the “WMA” icon instead of the “MP3” icon.
(Files for which the “WMA” icon is not displayed cannot be
played.)
• Uses of recordings you have made other than for your
personal enjoyment are not permitted under the Copyright
Law without permission of the copyright holder.
1
Load the CD-R/CD-RW disc on which the MP3
or WMA format music files have been written
into this unit. ( page 13)
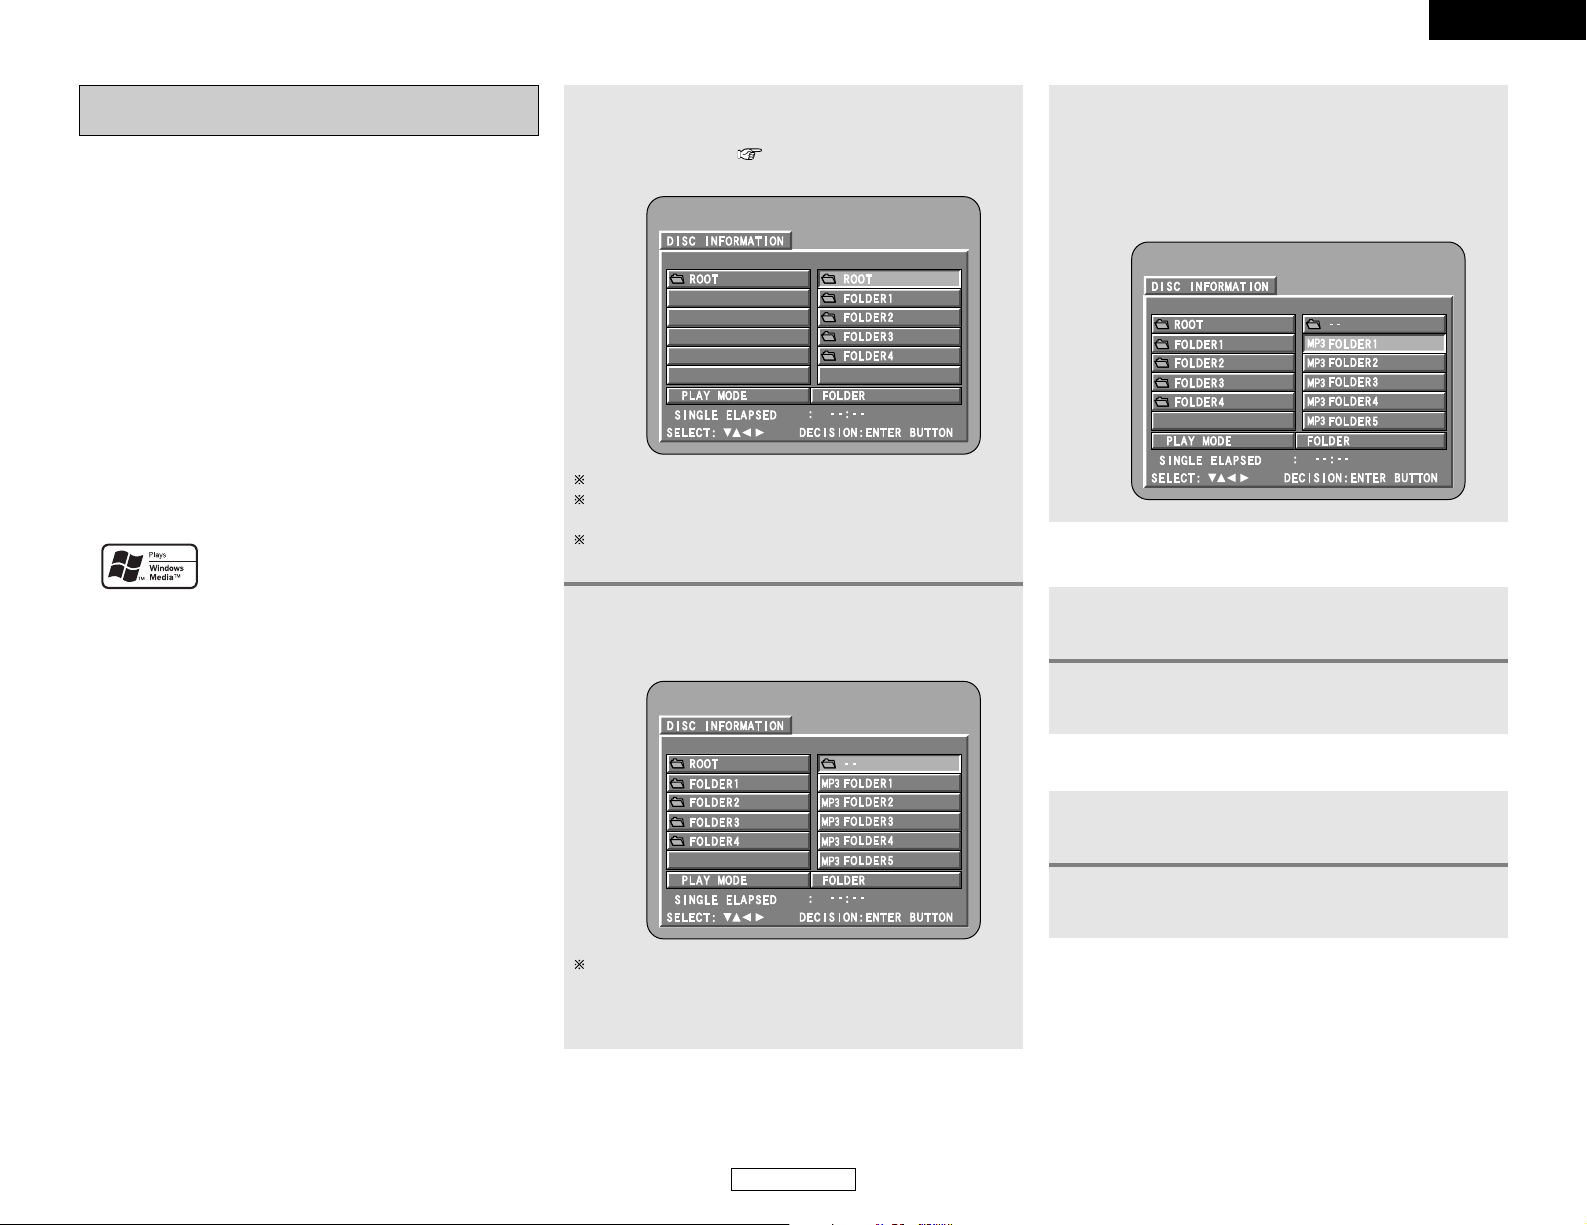
• The disc information screen appears.
If there are multiple folders, proceed to step 2.
If there are no folders on the disc (if the disc only contains
MP3 or WMA files), proceed to step 3.
All the folders recorded on the disc are displayed. (The
folders are not displayed by layer.)
2
Press the CURSOR•orªbutton to select the
folder containing the file(s) you want to play,
then press the ENTER button.
To change the folder
Press the CURSOR••button to select “ROOT” at the upper
right of the screen, then press the ENTER button. The screen
in step 1 reappears. Select the desired folder.
2 To change the MP3 or WMA file
1
Press the 22button.
2
Press the CURSOR•orªbutton to reselect the
desired MP3 or WMA file.
3
Press the CURSOR•orªbutton to select the
MP3 or WMA file, then press the 11button or
ENTER button.
• The display can be switched between the single elapsed
time, the single remaining time, track name, title name
and artist name by pressing the DISPLAY button.
2 To set the random play mode
1
In the stop mode, press the RANDOM button.
2
Press the 11button or ENTER button.
Page 24
21
ENGLISH
Basic Operation Basic Operation
ENGLISH
•Programmed playback is not possible with MP3/WMA discs.
• The S-101 is compatible with the “MPEG-1 Audio Layer 3”
standards (sampling frequency of 32, 44.1 or 48 kHz). It is not
compatible with such other standards as “MPEG-2 Audio Layer
3”, “MPEG-2.5 Audio Layer 3”, MP1, MP2, etc. WMA files
recorded with a sampling frequency (fs) of 32, 44.1, and 48 kHz
are supported.
• It may not be possible to play some CD-R/CD-RW discs due to
disc properties, dirt, warping, etc.
• In general, the higher an MP3 file’s bit rate, the better the
sound quality. On the S-101, we recommend using MP3 files
recorded with bit rates of 128 kbps or greater.
• Applicable bit rates: 32 to 320 kbps for MP3 files, 64 k to 160
kbps for WMA files.
• The digital signals output when playing MP3 files are MP3
signals converted into PCM, regardless of whether the audio
output presenting is set to “normal” or “PCM conversion”. The
signals are output with the same sampling frequency as that of
the music source.
• MP3/WMA files may not be played in the expected order, since
the writing software may change the position of the folders and
the order of the files when writing them on the CD-R/CD-RW.
• When writing MP3/WMA files on CD-R/CD-RW discs, select
“ISO9660 level 1” as the writing software format. This may not
be possible with some types of writing software. For details,
refer to the writing software’s usage instructions.
•With the S-101 it is possible to display folder names and file
names on the screen like titles. The S-101 can display up to 63
characters, consisting of numbers, capital letters, small letters
and the “_” (underscore) mark.
2 To return to the initial disc information screen
1
Press the 22button.
2
Press the CURSOR•button to select “ROOT”
at the upper right of the screen, then press the
ENTER button.
•If recorded in a format other than “ISO9660 level 1”, normal
display and playback may not be possible. In addition, folder
and file names including other symbols will not be displayed
properly.
• Be sure to add the extension “.MP3/WMA” to MP3/WMA files.
Files cannot be played if they have any extension other than
“.MP3/WMA” or if they have no extension. (with Macintosh
computers, MP3/WMA files can be played by adding the
extension “.MP3/WMA” after the file name consisting of up to
63 capital letters, small letters or numbers and recording the
files on the CD-R/CD-RW.)
• Do not apply stickers, tape, etc., to either the label side or the
signal side of CD-R/CD-RW discs. If adhesive gets on the
surface of a disc, the disc may get stuck inside the S-101 and
be impossible to eject.
• Copyright protected WMA files cannot be played. Also note
that depending on the writing software and conditions,
playback might not be possible, or the files might not be
displayed properly.
• While in the stop condition, the DISPLAY button of the remote
control can be used to switch and display the title names and
the artist names. (One folder has a capacity of up to 99 files.)
• Recorded discs with no more than 99 files per folder are
recommended. Multiple folder configurations are possible;
however, depending on the configuration, playback of all the
folders and files might not be possible.
• Multi-session discs and CD-R/CD-RW that have not been
finalized can also be played back; however, playback of discs
that have had session closure within 10 sessions or have been
finalized is recommended.
• Direct track selection using the NUMBER button on the remote
control unit can specify up to 999 tracks (999 files) per folder.
• When 999 tracks are exceeded, while the unit is stopped press
the CURSOR buttons at the disc information screen to select the
files, and press the 11button of the ENTER button to play.
• The MP3 ID3-Tag (Ver. 1, Ver. 2) function is compatible with title
and artist names.
• The WMA meta tag function is compatible with title, artist and
album names.
• The S-101 is not compatible with packet write software.
• The S-101 is not compatible with play lists.
• The S-101 is not compatible with MP3 PRO.
2 To set the repeat mode
The repeat mode changes each time the REP 1/ALL
button is pressed.
TRACK REPEATFOLDER FOLDER REPEAT
1/ 3
2 8, 9
CURSOR
REP 1/ALL
8, 9
ENTER
NUMBER
DISPLAY
8, 9
3
CURSOR
ENTER
1
2
Page 25
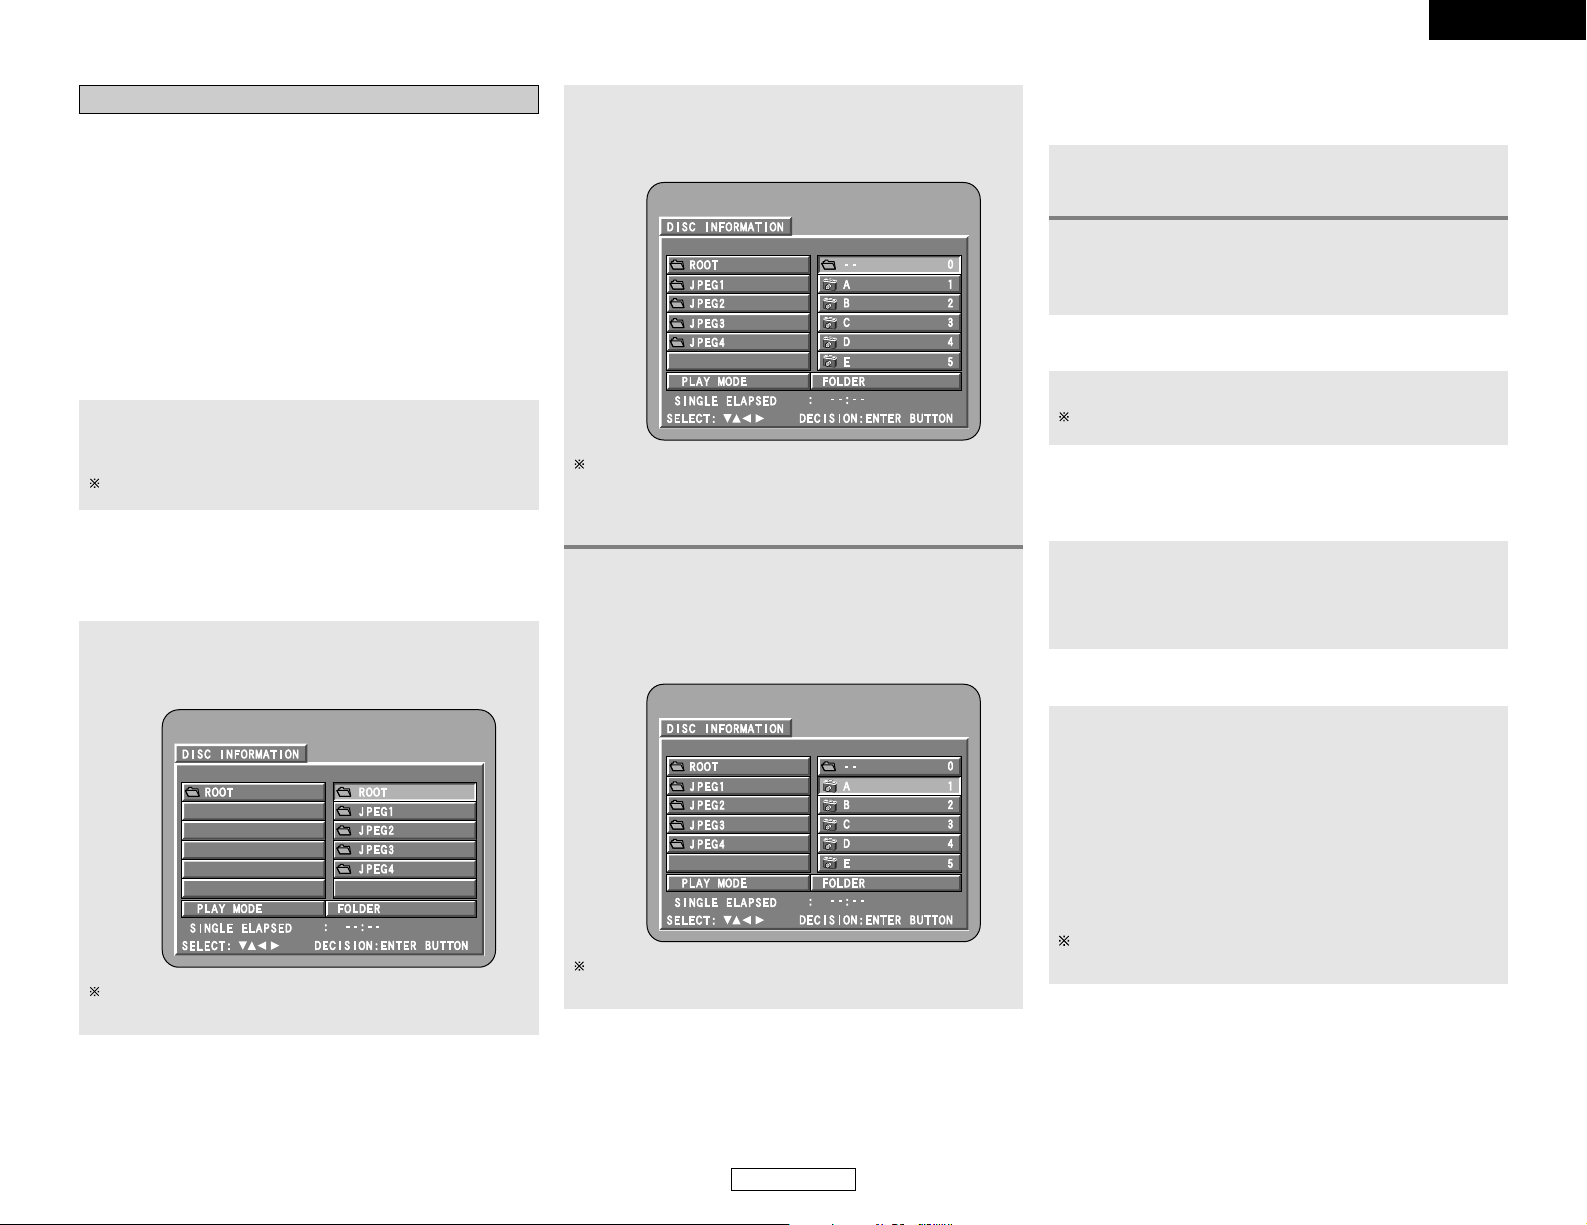
22
ENGLISH
Basic Operation Basic Operation
ENGLISH
Playing still picture files (JPEG format)
JPEG files stored on Kodak picture CDs, CD-Rs and CD-RWs can
be played as a slide show and enjoyed on the S-101.
The S-101 can play Kodak Picture CDs so you can view the
photographs stored on them on a TV screen.
(Picture CDs are CDs containing photographs taken on
conventional silver film cameras which have been converted into
digital data. For details on Kodak Picture CDs, please contact a
store providing Kodak development services. For details on
Fujicolor CDs, please contact a store providing Fuji Photo Film
development services.)
“KODAK” is the registered trademark of Eastman kodak Co.
1
Load the CD-R/CD-RW on which the still
pictures have been written into the S-101.
• The disc information screen appears.
2
Press the CURSOR•orªbutton to select the
folder containing the file(s) you want to play,
then press the ENTER button.
If there are multiple folders, proceed to step 2.
If there are no folders on the disc, proceed to step 3.
Load the Picture CDs into the set.
• Playback of the still pictures starts automatically when the
disc is loaded.(For Picture CDs)
Press the 2 button to stop playback.
To change the folder
Press the CURSOR •button to select “ROOT” at the upper
right of the screen, then press the ENTER button.
The screen in step 1 reappears. Select the desired folder.
2 Playing picture CD
2 Playing still pictures stored on CD-R/CD-RW
Once all the still picture files in the folder have been played,
the disc information screen reappears.
3
Press the CURSOR•orªbutton to select the
still picture file, then press the 11button or the
ENTER button.
• Only the still picture files in the selected folder are
played.
2 To view several of the still pictures stored on
the disc at once
1
Press the 22button to display up to 9 still
pictures at once.
2
Press the CURSOR•, ª, 00or
11
button to
select the desired still picture, then press the
ENTER button.
2 To temporarily stop the slide show
Press the 33button.
To resume the slide show, press the 11button.
2 To cue a still picture you want to view (from
which you want to start the slide show)
During the slide show, press one of the
88
or
99
button.
• 8 button : Cue back to the previous still picture
• 9 button : Cue ahead to the next still picture
2 Flipping and rotating still pictures
Press the CURSOR•, ª, 00or
11
button to flip the
still picture.
• CURSOR •button: The currently displayed still picture is
flipped vertically.
• CURSOR ªbutton: The currently displayed still picture is
flipped horizontally.
• CURSOR 0 button: The currently displayed still picture is
rotate 90° counterclockwise.
• CURSOR 1button: The currently displayed still picture is
rotate 90° clockwise.
Once all the still picture files in the folder have been played,
the disc information screen reappears.
Page 26
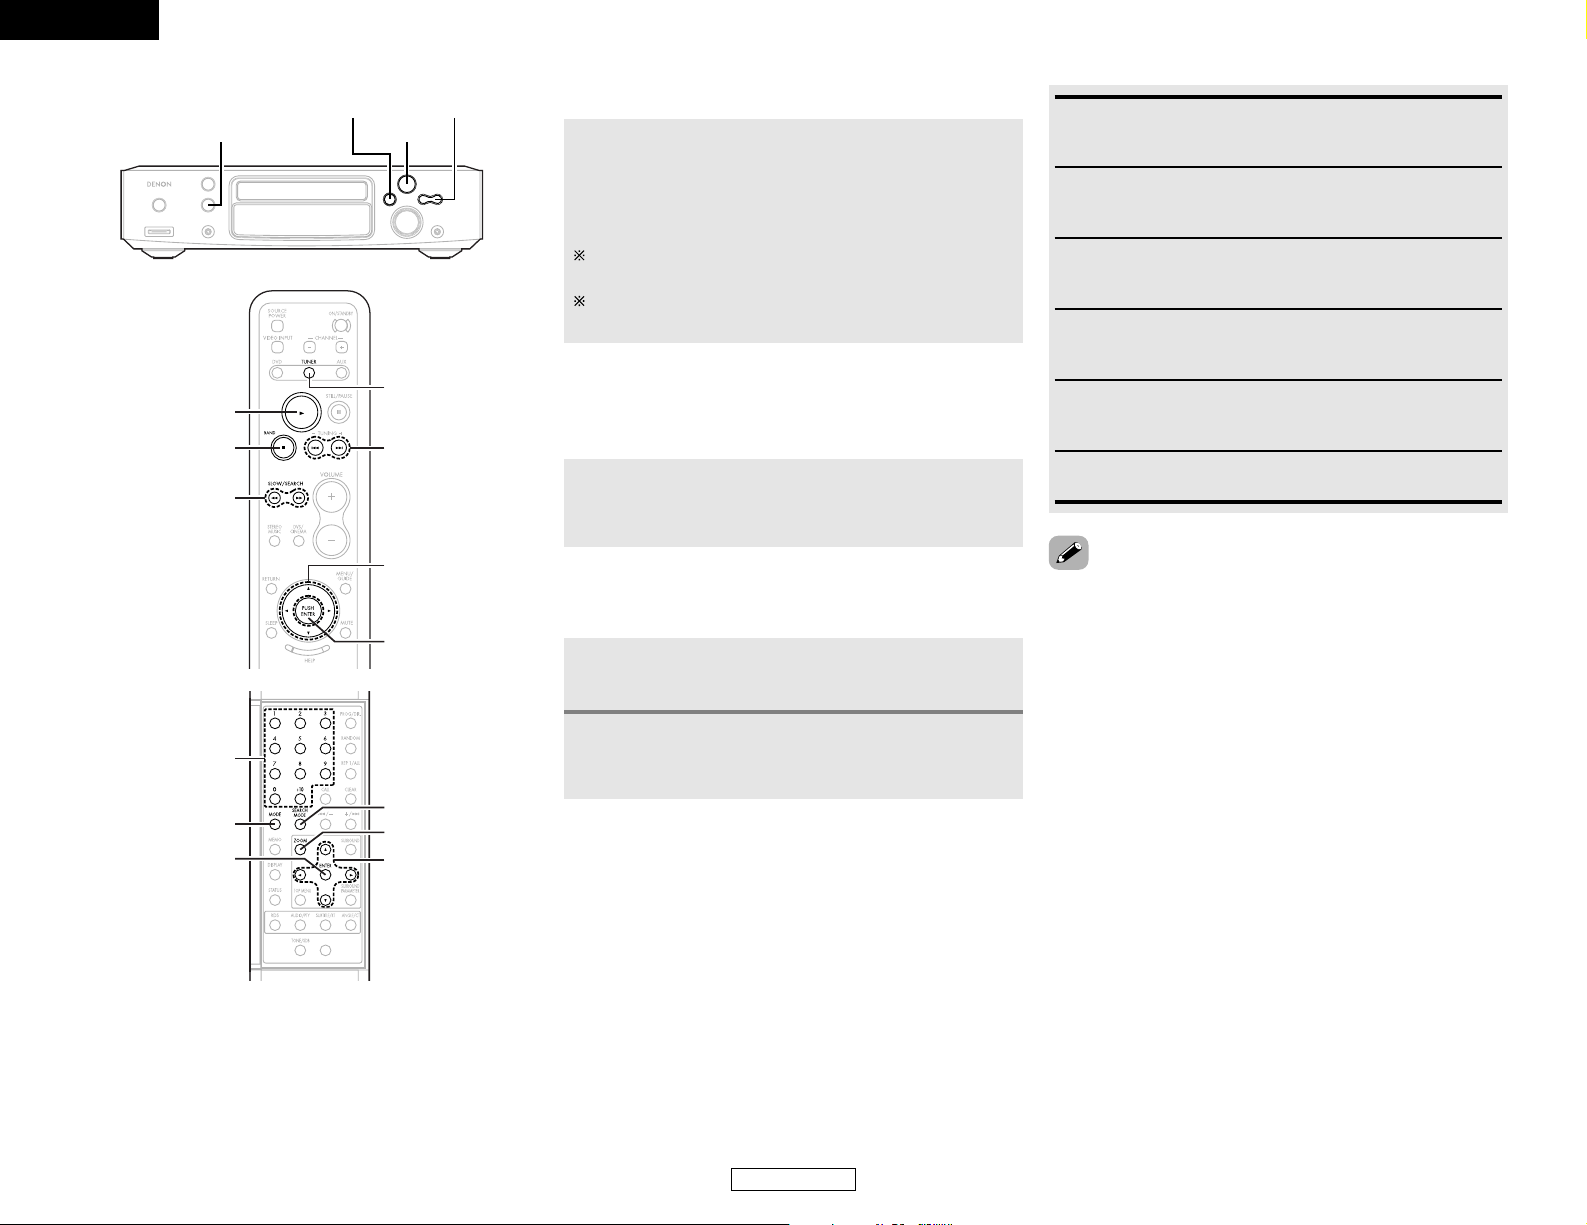
23
ENGLISH
Basic Operation Basic Operation
ENGLISH
2 The way of switching to the next image
during continuous JPEG image playback
(SLIDE SHOW) can be selected
Press the SEARCH MODE button.
• Select from SLIDE SHOW MODE 1 to MODE 11, MODE
RAND and MODE OFF.
2 Play the image in the zoom mode
Press the ZOOM button while playing a JPEG image,
then press the
6or7
button to zoom in and
zoom out.
•
6
button : zoom out
•
7
button : zoom in
Press the CURSOR
•, ª
, 0 or 1button (to move the
zoomed picture.
Continuous playback (SLIDE SHOW) is not possible in the
zoom mode.
1FUNCTION
BAND + , –
CURSOR
ZOOM
SEARCH MODE
ENTER
MODE
NUMBER
TUNING +,
–
CURSOR
TUNER
ENTER
1
BAND
SLOW/SEARCH
6, 7
• The S-101 is compatible with image data stored in JPEG
format, but Denon does not guarantee that all image data
stored in JPEG format can be viewed.
•Pictures with resolutions of up to 2048 x 1536 pixels can be
displayed.
• It may not be possible to play some CD-R/CD-RW due to disc
properties, dirt, scratches, etc.
• When storing JPEG files on the CD-R/CD-RW, set the writing
program to store the files in the “ISO9660 level 1” format.
• Be sure to give JPEG files the extension “.JPG” and “.JPE”.
Files with other extensions or with no extensions cannot be
viewed on the S-101.
• Do not apply stickers, tape, etc., to either the label side or the
signal side of CD-R/CD-RW discs. If adhesive gets on the
surface of a disc, the disc may get stuck inside the S-101 and
be impossible to eject.
• Do not play CD-R/CD-RW discs containing any files other than
music CD files (in CDA format), MP3/WMA and JPEG files.
Doing so may result in malfunction or damage, depending on
the type of file.
• JPEG files written using Macintosh computers cannot be
played.
RANDOM ON:
All the MP3/WMA and JPEG files in the folder are played in
random order starting from the selected file
TRACK REPEAT:
The select MP3/WMA or JPEG file is played repeatedly
FOLDER:
The MP3/WMA and JPEG files in the folder are played in
order starting from the selected file.
FOLDER REPEAT:
All the MP3/WMA and JPEG files in the folder are played
repeatedly starting from the selected file.
DISC:
All the MP3/WMA and JPEG files on the disc are played in
order starting from the selected file
DISC REPEAT:
All the MP3/WMA and JPEG files on the disc are played
repeatedly starting from the selected file
2 Special play modes for MP3/WMA and JPEG
files
1
Press the CURSOR 0 or 1 button to select the
play mode.
2
Press the CURSOR•orªbutton to select the
special play mode.
Page 27
24
ENGLISH
Basic Operation Basic Operation
ENGLISH
Manual tuning
2
Press the BAND button on the main unit to
select “FM AUTO”, “FM MONO” or “AM”.
3
Adjust the receiving frequency.
• When a station is received, the “TUNED” indication will
light.
•A humming sound may be heard when using a TV nearby while
receiving AM programs. If this happens, move the system as
far from the TV as possible.
Listening to the radio
1
Set the input source to “TUNER”.
(Main unit) (Remote control unit)
When using the remote control, the BAND button is pressed
to select “FM” or “AM”, then the MODE button is pressed
to select “FM AUTO” and “FM MONO”.
2 FM stereo perception
• When a program being broadcast in “FM AUTO” is received,
the “ST” indicator lights and the program is received in stereo.
•If reception is poor and there is much noise in the stereo
signals, set the “FM AUTO” mode.
2 Auto tuning
• When one of the + or – button on the main unit (or the
SLOW/SEARCH button on the remote control unit) is pressed, the
frequency changes in steps of 0.2 MHz in the FM band, 10 kHz
in the AM band.
• If one of the + or – button on the main unit (or the SLOW/SEARCH
button on the remote control unit) is held for over 1 second, the
frequency continues to change when the button is released
(Auto tuning) and stops when a station is tuned in. Tuning will
not stop at stations whose reception is poor.
•To stop the auto tuning function, press the + or – button on the
main unit (or the SLOW/SEARCH button on the remote control
unit) once.
2 About the tuning mode and the preset mode
• The function of the + and – buttons on the main unit can be
switched so that they can be used for either tuning (selecting
the reception frequency) or for selecting preset stations.
• The buttons are set to the tuning mode upon shipment. The
mode can be switched to the preset mode by pressing the +
button while pressing in the BAND button. (When this is done,
“PRESET” is flashes for approximately 5 seconds.)
•Press the – button while pressing in the BAND button to switch
to the tuning mode. (When this is done, “TUNING” is flashes
for approximately 5 seconds.)
(Main unit) (Remote control unit)
• The CURSOR 0 and 1 buttons function in the same way as the
+ and – buttons on the main unit and remote control unit.
Auto tuner presets (for main unit only)
Use this to automatically search for FM broadcasts and store up
to 60 stations at preset channels 1 to 60.
• If an FM station cannot be preset automatically due to poor
reception, use the “Manual tuning” ( page 24) operation to
tune in the station, then preset it using the manual “Preset
memory” ( page 25) operation.
•When the auto preset function is performed, the previously
presettings are cleared and replaced with the new presettings.
1
Set the input source to “TUNER”, then press
and hold the 11button for 2 seconds or longer.
• “AUTO PRESET?” and “–:NO/+: START” will alternately
appear on the display of the main unit.
2
Press the + button to select “START”.
• “SEARCH” flashes on the display and searching begins.
“COMPLETED” appears once searching is completed.
Press the – button to cancel.
Listening to preset stations
Press the + or – button on the main unit, or TUNING
+
or – button on the remote control unit to select the
preset number.
The preset number can also be input directly pressing the
NUMBER buttons on the remote control unit.
The + and – buttons on the main unit can be selected when
the preset mode has been set.
(Main unit) (Remote control unit)
The buttons are set to the tuning mode upon shipment. The
mode can be switched to the preset mode by pressing the +
button while pressing in the BAND button. (When this is done,
“PRESET” is flashes for approximately 5 seconds.)
Page 28
25
ENGLISH
Basic Operation Basic Operation
ENGLISH
Presetting stations that have been tuned in
and giving names to stations (for remote
control unit only)
•A total of 60 stations (including both FM and AM stations) can
be preset.
•Preset stations can be given names with up to 8 characters
(letters, numbers and symbols).
•Preset stations using the including remote control unit.
1
Tune in the station you want to preset.
P0- FM 2.50M
2
Press the MEMO button twice in a row.
• The name input mode is set.
P0- _
3
Press the CURSOR•orªbutton to select the
character, then press the ENTER button to input
that character.
P0- F
P0- F_
When the CURSOR11button is pressed, the selected
character is entered, the cursor moves to the next position
and the next character can be input.
When the CURSOR00button is pressed, the selected
character is entered, the cursor moves to the previous
position. Use this to correct characters that have already
been input.
4
Press the ENTER button to enter the station
name you have input.
• The preset number indicator, “P0– ”, flashes.
P0- FM-DENON
5
Press the CURSOR•orªbutton to select the
preset number, then press the ENTER button to
enter the preset number.
• The preset number, band and reception frequency are
displayed, then the station name appears.
The preset number can also be input directly pressing the
NUMBER buttons on the remote control unit.
P03 FM-92.50M
P03 FM-DENON
•To stop in the middle of the procedure, press the MODE button
before pressing the ENTER button at step 4. Everything you
have input is cleared.
•To clear a station name that has been set in the memory, call
out that station, set the name input mode in step 2, then press
the CLEAR button. The station name is cleared and the preset
channel frequency is displayed.
• If you only want to preset a station, press the MEMO button
once while the station is tuned in. The preset number indicator,
“P0–”, flashes, and the preset number input mode is set. Press
the CURSOR•or ªbutton to select the preset number, then
press the ENTER button again to store that station at the
selected number. (The number can also be specified directly
using the NUMBER buttons on the numeric keypad.)
FUNCTION
CURSOR
CLEAR
ENTER
MODE
MEMO
NUMBER
CURSOR
AUX
ENTER
Page 29
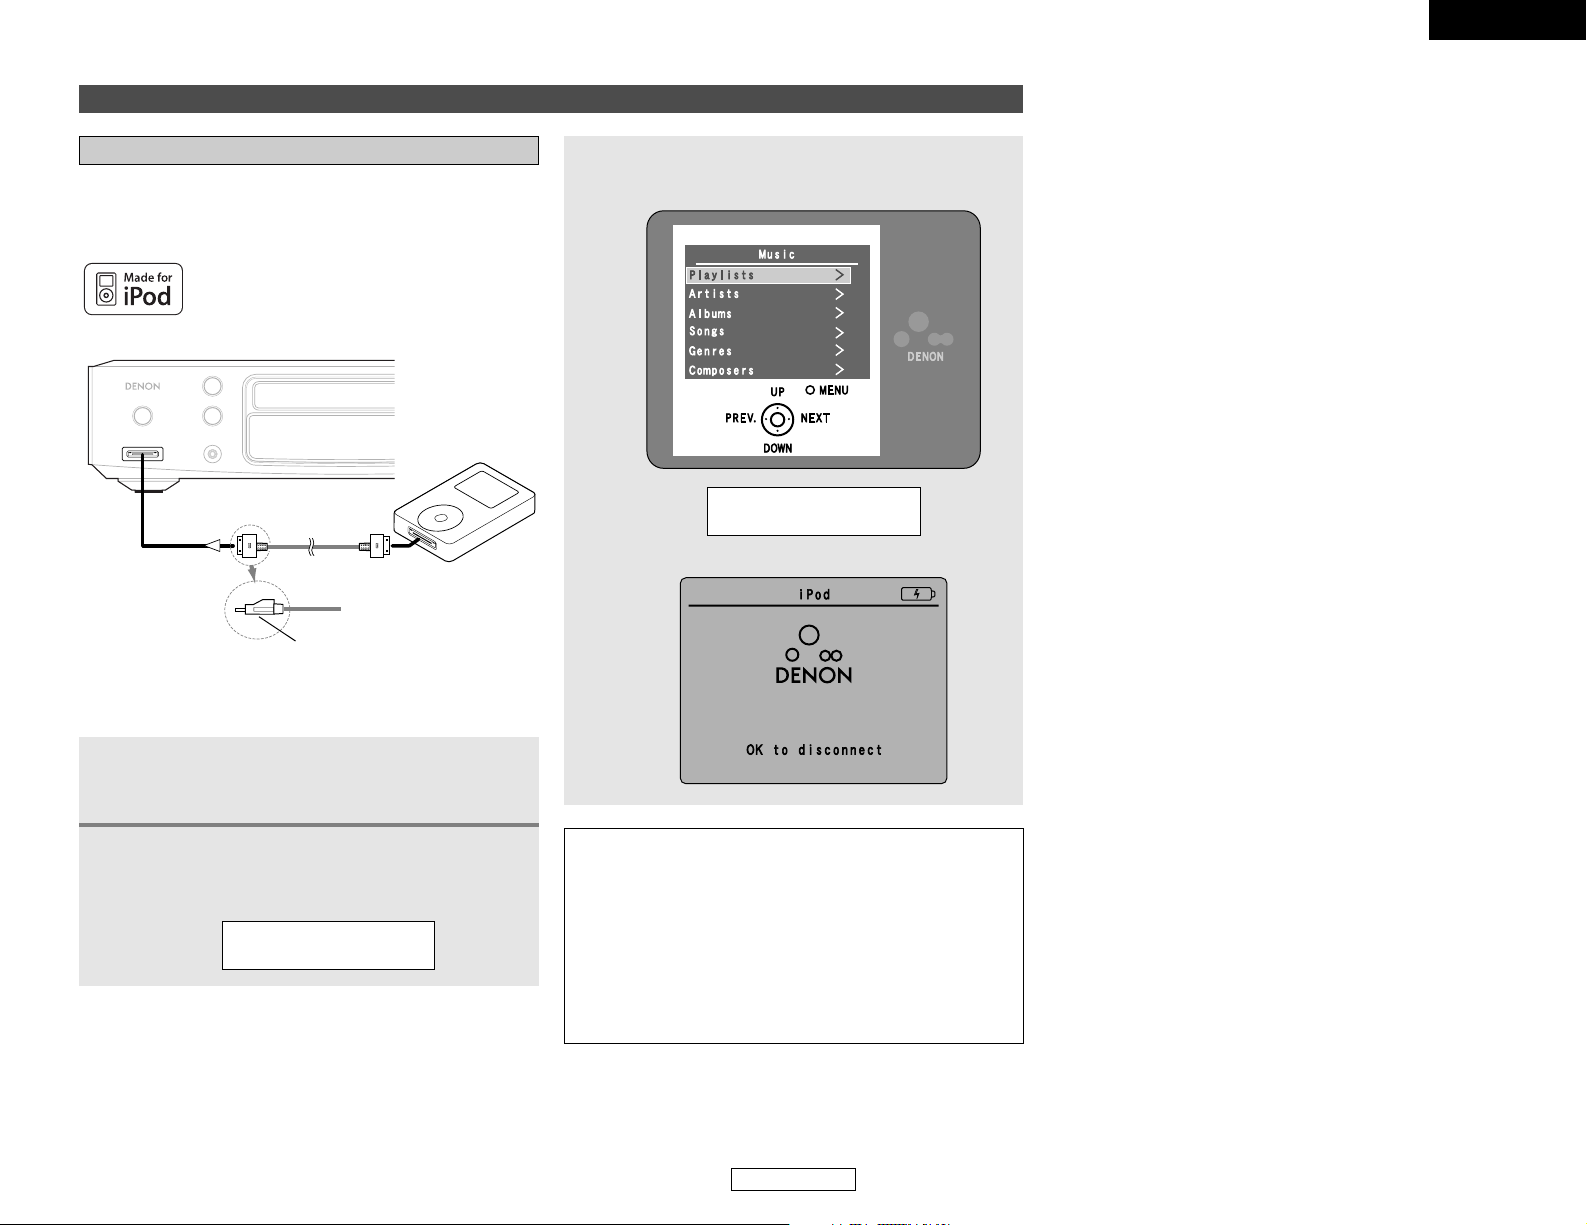
26
ENGLISH
Basic Operation Basic Operation
ENGLISH
Connect the ADV-S101 with the iPod with the marked side of the
connector facing up.
Connecting the iPod
Music on your iPod can be played by connecting the iPod to the
ADV-S101’s iPod connector. The iPod can also be controlled with
the buttons on the remote control unit and on the main unit.
iPod
Connect to the ADV-S101’s iPod
connector in this direction.
Connect the ADV-S101 and iPod using the
included iPod cable.
•Turn the iPod’s power on.
1
2
Press the FUNCTION button on the main unit or
AUX button on the remote control unit to select
“IN iPod”
IN iPod
Turn on the TV’s power. Set the TV’s input
function to the ADV-S101 input.
3
NOTE:
•With the S-101, only iPod can be operated with the S-101’s
remote control unit and the buttons on the main unit. In this
case it is not possible to operate using the S-101’s remote
control unit and the buttons on the main unit, but it is
possible to play the tracks on the iPod.
• If the screen in step 3 is not displayed, the iPod may not be
properly connected. Reconnect it.
• The maximum battery charge output from the iPod
connector is 8W.
Browse iPod
iPod screen
Playing the iPod
®
iPod is a trademark of Apple Computer, Inc.,
registered in the U.S. and other countries.
Page 30
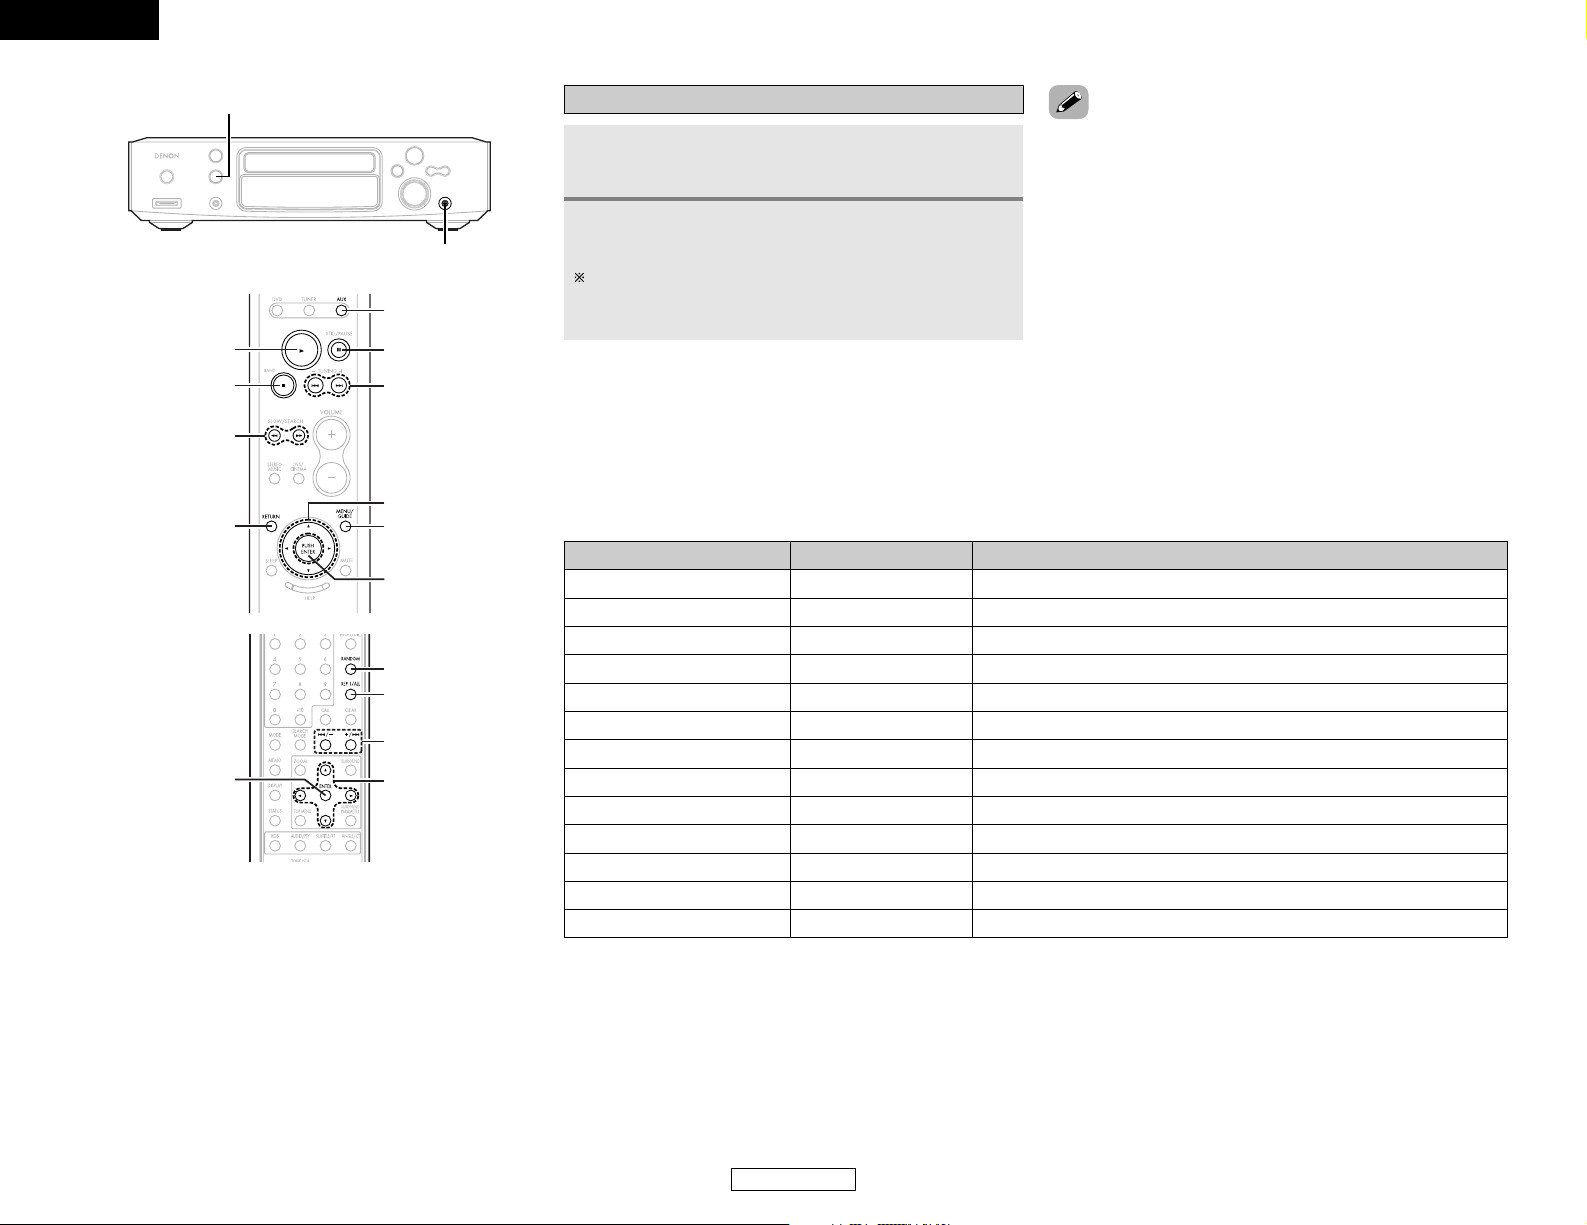
Operation on the S-101Remote control unit buttons iPod buttons
27
ENGLISH
Basic Operation Basic Operation
ENGLISH
2 The buttons on the remote control unit correspond to the buttons on the iPod as shown below.
113
Play the track.
2
– Stop playback of the track.
313
Pause the track.
MENU/GUIDE MENU Display the menu or return to the previous menu.
99
Play the next track.
88
Play the track from the beginning.
77
Fast-forward the track.
66
Fast-reverse the track.
•, ª
, 0, 1
Click Wheel Select an item.
ENTER Select Enter the selection or plays the track.
RETURN – Switch between the browse mode and the remote mode.
REP 1/ALL – Switch the repeat function.
RANDOM – Switch the shuffle function.
FUNCTION
PHONES
CURSOR
REP 1/ALL
RANDOM
8, 9
ENTER
8, 9
3
CURSOR
ENTER
MENU/GUIDE
AUX
1
2
6, 7
RETURN
Playback
Use the CURSOR•,ªand ENTER buttons to
display the list of tracks.
1
2
Press the ENTER button to play.
• Depending on your iPod’s software version, it may not be
possible to control your iPod from the S-101. We recommend
installing the latest software version.
• For information and instructions on upgrading to the latest
software version, see the Apple Computer, Inc. website.
•For iPods, only the 11, 22, 33, 88, 99, 66and 77buttons
operate when in the “Remote iPod” mode.
• In the browse mode, when “Songs” is selected from the “TOP
MENU” while a track is playing, the track stops.
• In the “Remote iPod” mode, when the MENU button on the
remote control unit is pressed for 2 seconds to turn the
backlight off, the backlight may turn back on, depending on the
timing at which the button is released.
• When in the “Remote iPod” mode, the 11button on the
remote control unit functions as the
1133
button.
For iPod operations, also refer to the iPod’s operating
instructions.
The display can be switched between title name, album
title, artist name, the elapsed time and the remaining time
by pressing the DISPLAY button.
Page 31

28
ENGLISH
Basic Operation Basic Operation
ENGLISH
Playing and recording other sources
Connecting the portable player
Your portable audio player can be connected to the ADV-S101’s
portable jack to play tracks on the portable audio player.
PORTABLE
AUDIO LINE
OUT
1
Connect the ADV-S101 and portable audio player
using a separately sold mini-stereo audio cable.
Playing a portable audio (stereo mini plug)
2
Play the portable audio player.
• The signals of the portable audio are output through the
S-101.
For instructions on playing the portable audio player, see the
portable audio player’s operating instructions.
About analog recording onto an external
audio component (AUX3)
NOTE:
Cautions during analog recording of DVDs or digital input
sources:
• Do not switch the S-101’s input mode, surround mode or
surround parameters during recording. Doing so will
interrupt the sound being recorded.
We recommend setting the surround mode to “STEREO”.
• When using headphones, recording is automatically
performed in the Dolby Headphone mode.
2 When the DVD is selected
Dolby Digital, DTS and PCM digital signals are automatically
converted to 2-channel stereo signals before being output
(except when in the Dolby Headphone mode) and can be
recorded in analog. (For what happens in the Dolby Headphone
mode, see below.)
2 When other functions (analog) are selected
(aside from “AUX3”)
The analog audio signal selected from among the functions other
than DVD is output unchanged, regardless of the S-101’s input
mode or surround mode.
Press the FUNCTION button on the main unit or
AUX button on the remote control unit to select
“IN Front IN”.
Viewing the slideshow
For instructions on connections, see page 26.
1
2
Press the RETURN button to switch from the
browse mode to the remote mode.
iPod’s photographs can be displayed on the TV monitor.
Disconnecting the iPod
3
Watching the iPod’s display, press the CURSOR
•
orªbutton to select “Photos”.
4
Press the ENTER button to play.
• The iPod’s photographs are displayed on the TV monitor.
• The battery is not charged while a slideshow is playing. Be sure
the battery is sufficiently charged before starting the slideshow.
We recommend either pressing the ON/STANDBY
switch to set the S-101’s power to the standby mode,
or pressing the FUNCTION button on the main unit
or the DVD, TUNER or AUX button on the remote
control unit and setting the input function to
something other than iPod.
IN Front IN
Page 32

29
ENGLISH
Basic Operation Basic Operation
ENGLISH
2
Press the SURROUND button to select the
surround mode.
• The surround mode switches as shown below each
time the SURROUND button is pressed.
STEREODOLBY VS WIDEDOLBY VS REF.
ROCK ARENAJAZZ CLUB
4
Start playback on the selected component.
The volume can be adjusted within the range –60 to 0 to
+18 dB. Note that depending on the input signal, surround
mode, speaker settings and channel level setting, it may not
be possible to adjust the volume up to +18 dB.
Function setting
1
Press the FUNCTION button on the main unit,
and DVD, TUNER or AUX button on the remote
control unit to select the input function to be
played.
• The function switches as shown below.
When the FUNCTION button on the main unit is pressed:
iPodTUNERDVD
AUX1
AUX3 AUX2
Portable
When the AUX button on the remote control unit is
pressed:
AUX3 AUX2
iPod
Portable
AUX1
iPod and Portable are only displayed and selectable
when the corresponding components is connected.
(Main unit) (Remote control unit)
For operating instructions, refer to the component’s manual.
5
Adjust the volume.
The volume is shown on
the display.
(Main unit) (Remote control unit)
2 To check the currently playing program
source, etc.
Press the STATUS button.
• The current program source and surround settings are shown
on the display each time the button is pressed.
FUNCTION
VOLUME
CURSOR
SURROUND
SURROUND
PARAMETER
STATUS
CURSOR
AUX
VOLUME
DVD
TUNER
DVS/CINEMA
3
When “STEREO” is selected:
Press the SURROUND PARAMETER button,
then press the CURSOR 0 or 1 button to set.
DIRECT ON OFF
DIRECT MODE:
• ON:
The analog input signals are played without DSP processing.
The settings made at “DISTANCE” under “SETUP” (
page 48) are not reflected.
• OFF:
The analog input signals are converted into digital signals and
undergo DSP processing.
The “DIRECT MODE” only functions with analog inputs and
in the stereo mode.
2 Surround parameters q
• DOLBY DIGITAL • DTS
2 Input signal display
Page 33

30
ENGLISH
Basic Operation Basic Operation
ENGLISH
Operating the surround functions
Playing Dolby Digital and DTS surround
sound (with digital inputs only)
Applicable sources:
• Digital input (AUX functions, including DVD playback discs)
• Dolby Digital multi-channel sources
• DTS sources
3
Play a program source including the
or mark.
• The Dolby Digital indicator ( ) lights when playing
Dolby Digital sources.
• The DTS indicator ( ) lights when playing DTS
sources.
This switches automatically according to the format of the
playback source.
DOLBY VS REF.
DOLBY VS WIDE
1
Select the digital input function (DVD, AUX1,
AUX2 or AUX3 digital input).
(Main unit) (Remote control unit)
2
Press the DVS/CINEMA button to select
“DOLBY VS REF” or “DOLBY VS WIDE” for
the Dolby Virtual Speaker mode.
• The Dolby Virtual Speaker indicator ( ) lights.
2 Surround parameters w
DOLBY VS (Dolby Virtual Speaker):
• REF. (Reference):
This is the standard mode.
• WIDE:
This mode expands the front channel sound field.
LFE (Low Frequency Effect):
Program source and adjustment range:
1. Dolby Digital: –10 dB to 0 dB
2. DTS Surround: –10 dB to 0 dB
When Dolby Digital encoded software is played, it is
recommended that the LFE LEVEL be set to 0 dB.
When DTS encoded movie
software is played, it is
recommended that the LFE LEVEL be set to 0 dB.
When DTS encoded music
software is played, it is
recommended that the LFE LEVEL be set to –10 dB.
• Once the surround parameters have been set, stop operating
the buttons. After several seconds, the normal display
reappears and the settings are automatically entered.
• When playing in the DTS mode, noise may be produced when
playback starts and during searching. If so, switch the “INPUT
MODE” to “DTS”.
For a description of “INPUT MODE”, refer to page 46.
NIGHT MODE:
• When listening at night or at lower volumes, the night mode
improves listenability.
Press the CURSOR
0 or 1 button to select “ON” or “OFF”.
When “ON” is selected, the “NIGHT” mode is enabled.
• The night mode only works when playing program sources
recorded in Dolby Digital or DTS.
5
Press the SURROUND PARAMETER button,
then press the CURSOR 0 or 1 button to set.
NIGHT ON OFF
4
Press the SURROUND PARAMETER button,
then press the CURSOR 0 or 1 button to set
“ON” or “OFF”.
C.EQ ON OFF
6
Press the SURROUND PARAMETER button,
then press the CURSOR 0 or 1 button to set
the LFE level.
LFE 0dB
Cinema EQ:
The Cinema EQ function gently decreases the level of the
extreme high frequencies, compensating for overly-bright
sounding motion picture soundtrack. Select the function if the
sound from the front speakers is too bright.
This function only works in the DVS and DHP (w/o BYPASS
MODE). (The same contents are set for all operating modes.)
Input mode when playing CD sources
• When playing CDs containing recordings of live concerts,
etc., in the “AUTO” mode, the sound may be slightly broken
at the beginning. If this happens, switch to the “PCM”
mode.
Input mode when playing DTS sources
• If DTS-compatible CDs are played in the “PCM” mode,
noise is output because DTS playback is not possible.
To play a DTS-compatible source, be sure to set the input
mode to “AUTO” or “DTS”.
• Noise may be generated at the beginning of playback and
while searching during DTS playback in the AUTO mode. If
so, play in the DTS mode.
Page 34

31
ENGLISH
Basic Operation Basic Operation
ENGLISH
JAZZ CLUB
ROCK ARENA
Playing in the DENON original surround
modes
This unit is equipped with a high performance DSP (Digital Signal
Processor) which uses digital signal processing to synthetically
recreate the sound field. One of 3 preset surround modes can be
selected according to the program source and the parameters
can be adjusted according to the conditions in the listening room
to achieve a more realistic, powerful sound. These surround
modes can also be used for program sources not recorded in
Dolby Surround Pro Logic or Dolby Digital.
Depending on the source being played, the effect may not be
very strong.
In such cases, try other surround modes without paying too
much attention to their names and choose the one you feel is
best.
Use this mode to achieve the feeling of a
live concert in an arena with reflected
sounds coming from all directions.
This mode creates the sound field of a live
house with a low ceiling and hard walls.
This mode gives jazz a very vivid realism.
2
1
2-channel mode settings
When 2-channel signals are input, one of two playback modes
can be selected and set according to the 2-channel mode setting,
VIRTUAL 1 or VIRTUAL 2. (The VIRTUAL 1 mode is set by factory
default.)
NOTE:
• The 2-channel mode cannot be set when Dolby Digital or
DTS 5.1-channel signals.
• The 2-channel mode is set and stored in the memory
individually for the different functions.
This can be selected if there is no digital input signal, if the
digital input is a PCM or Dolby Digital 2-channel signal and if
the input is analog.
2 Surround parameters e
VIRTUAL 1:
In this mode, 2-channel sources are played with Dolby Pro
Logic II Cinema processing. This mode is suited for playing
movie sources recorded in Dolby Surround and regular stereo
sources.
VIRTUAL 2:
In this mode, 2-channel sources are played with Dolby Pro
Logic processing. This mode is compatible with regular Dolby
Pro Logic playback. With it, the recorded playback image of
sources recorded in Dolby Surround is recreated faithfully.
1
Press the DVS/CINEMA button to select
“DOLBY VS REF” or “DOLBY VS WIDE” for
the Dolby Virtual Speaker mode.
• The Dolby Virtual Speaker indicator ( ) lights.
2
Press the SURROUND PARAMETER button,
then press the CURSOR 0 or 1 button to select
“VIRTUAL1” or “VIRTUAL 2”.
VIRTU L 1
• Once the surround parameters have been set, stop operating
the buttons. After several seconds, the normal display
reappears and the settings are automatically entered.
2 Surround modes and their features
CURSOR
SURROUND
SURROUND
PARAMETER
CURSOR
DVS/CINEMA
STEREO MUSIC
PHONES
Page 35

32
ENGLISH
Basic Operation Basic Operation
ENGLISH
Playback using the Dolby Headphone mode
• The S-101 is equipped with the Dolby Headphone mode, a
technology developed jointly by Dolby Laboratories and Lake
Technology for achieving 3D sound over regular headphones.
• The Dolby Headphone mode is set when headphones are
connected to the S-101’s PHONES jack.
• There are actually two Dolby Headphone modes creating
different sound field effects: Dolby before H/P and BYPASS
(normal stereo playback).
• The Dolby Headphone mode is compatible with Dolby Digital
and DTS multi-channel sources.
1
Connect headphones (sold separately) to the
PHONES jack.
• When headphones are plugged in, the output to the
speakers is automatically turned off and no sound is
produced from the speakers.
DOLBY H/P
2
Press the SURROUND button to select “DOLBY
H/P”.
If nothing is done for 6 seconds from when the parameter is
displayed, the normal display reappears.
3
When there is no signal or when playing a 2channel source:
Press the SURROUND PARAMETER button,
then press the CURSOR 0 or 1 button to select
“CINEMA” or “MUSIC”.
5
Press the SURROUND PARAMETER button,
then press the CURSOR 0 or 1 button to set
the CINEMA EQ, NIGHT MODE and LFE
level ( page 30).
2 Surround parameters r
• DOLBY H/P (Dolby Headphone):
Live room (room with more reverberation than reference room)
• DOLBY H BYPAS (Dolby Headphone Bypass):
Stereo playback.
These can be selected when playing 2-channel sources (analog,
PCM, etc.). The signals are processed by one of the following
decoders to achieve multiple channels then played in the Dolby
Headphone mode.
In the Bypass mode, these are not displayed.
• CINEMA:
Dolby Pro Logic II Cinema mode
• MUSIC:
Dolby Pro Logic II Music mode
4
Play a program source.
2 Personal memory plus
This set is equipped with a personal memorize function that
automatically memorizes the surround modes and input modes
selected for the input different sources. When the input source
is switched, the modes set for that source last time it was used
are automatically recalled.
• Settings automatically stored in the memory for the individual
input functions using the Personal Memory plus function:
q Surround mode (including 2-channel decode mode and
Dolby Pro Logic IImode settings)
w Input mode selection function
The surround parameters, TONE/SDB control settings and
playback level balance for the different output channels are
memorized for each surround mode.
Press the STEREO MUSIC button.
2 To change to the stereo mode
Page 36

33
ENGLISH
Basic Operation Basic Operation
ENGLISH
Using the “HELP” menu
It is possible to check the currently set function and switch it from the OSD.
1
Press the HELP button.
• The “HELP” menu screen appears.
The selected item is displayed in light blue.
The gray parts indicate that the corresponding input device
is not connected.
Press the HELP button again to turn off the “HELP” menu
screen.
3
Press the ENTER button to enter the setting.
• The HELP mode is canceled and the selected function
operation is performed.
2
Press the CURSOR•orªbutton to select the
desired item.
• The selected item is displayed in blue.
Watch DVD:
Select this to play a DVD and Video CD.
Listen to CD:
Select this to play a music CD.
MP3/WMA/JPEG CD:
Select this to play an MP3, WMA or JPEG disc.
Listen to Radio:
Use this to set the function to TUNER.
iPod Music/Photo:
Select this to control the iPod connected to the iPod
connector on the ADV-S101’s front panel.
Portable Music (Front in):
Select this to output the signals of the portable audio player
connected to the portable jack on the ADV-S101’s front panel.
Watch AUX-1:
Select this to view the picture of the external device
connected to the AUX1 terminal.
Watch AUX-2:
Select this to view the picture of the external device
connected to the AUX2 terminal.
Listen to AUX-3:
Select this to listen to the sound of the audio component
connected to the AUX3 terminal.
SETUP:
Select this to make changes to the system settings.
CURSOR
ENTER
STATUS
CURSOR
ENTER
HELP
SLEEP
Using the sleep timer
Setting the clock (12-hour display)
1
Press the CURSOR•orªbutton to select
“SETUP” at the “HELP” menu, then press the
ENTER button.
• The “SETUP” menu screen appears.
Be sure to set the current time beforehand. The timer will not
operate if the current time is not set.
2
Press the CURSOR 0 or 1 button to select
“TIMER SETUP” icon, then press the ENTER
button.
• The “TIMER SETUP” menu screen appears.
Page 37

34
ENGLISH
Basic Operation Basic Operation
ENGLISH
4
Press the CURSOR•, ª, 00or
11
button to set
the current time, then press the ENTER button.
5
Press the ENTER button to enter the setting.
•To check the current time when the regular display is displayed,
press the STATUS button once.
• The time can be displayed by pressing the STATUS button when
the power is in the standby mode. (When this is done, the set
is no longer in the low power consumption standby mode.)
When pressed twice while the time is displayed, the display
turns off and the set is put back in the low power consumption
standby mode.( page 54).
• The clock runs by synchronizing with the power supply
frequency. The time may be off by 2 to 3 minutes per month. If
so, reset the time.
3
Press the ENTER button twice to change the
current time.
Example: When the current time is set to “PM 7:30”
Setting the sleep timer
• The included remote control unit can be used to turn the power
to the standby mode after a maximum of 120 minutes. (Sleep
timer)
• Use this function to automatically switch the power to the
standby mode after a specific amount of time (minutes).
Example: To set the power to the standby mode in 50 minutes
according to the clock.
1
Select and play the desired function.
2
Press the SLEEP button.
• “120” is displayed and the “SLEEP” indicator flashes.
120
The display switches as follows each time the SLEEP button
is pressed:
90120 60 50 3040 20 10
“SLEEP” indicator off
3
When the “SLEEP” indicator is flashing, press
the SLEEP button again until “50” is displayed.
• “50” is displayed and the “SLEEP” indicator flashes.
50
After 4 seconds, the display returns to as it was before the
sleep timer was set, and the “SLEEP” indicator stops
flashing, remaining lit. (This completes the sleep timer
setting.)
4
The power is set to the standby mode 50 minutes
later.
To turn the sleep timer off, press the SLEEP button
repeatedly until the “SLEEP” indicator turns off. The sleep
timer can also be turned off by press the ON/STANDBY
switch on the main unit or the remote control unit to turn the
entire system’s power to the standby mode.
• If the SLEEP button is pressed while the sleep timer is
operating, the setting returns to 120 minutes. Make the setting
over.
• If the sleep timer and everyday timer settings overlap, the sleep
timer has priority.
8:00p.m. 9:00p.m. 10:00p.m.
8:00p.m. 9:00p.m. 10:00p.m.
ON OFF
ON OFF
+
ON OFF
8:00p.m. 9:00p.m. 10:00p.m.
ON OFF
ON OFF
+
• Also, the everyday timer will not operate if its start time is set
within the time during which the sleep timer is operating.
Everyday timer
once timer setting
Sleep timer
setting
Timer operation
If the timers overlap like this, the timer operates as follows:
Everyday timer
once timer setting
Sleep timer
setting
Does not operate
Does not operate
• The remaining time of the sleep timer can be checked with
the STATUS button.
Page 38

35
ENGLISH
Advanced Operation
ENGLISH
2 To return to normal playback
Playing repeatedly
Use this function to play your favorite audio or video sections
repeatedly.
1
During playback, press the REP 1/ALL button.
• The display on the TV screen switches each time the
button is pressed, and the corresponding repeat play or
stop mode is set.
Normal playback
Title repeated
Chapter repeated
Repeat playback cancelled
CHAPTER REPEAT ON
TITLE REPEAT ON
REPEAT OFF
DVDs:
Video and music CDs:
Normal playback
Track repeated
Entire disc repeated
Repeat playback cancelled
TRACK REPEAT
DISC REPEAT
REPEAT OFF
“”lights on the display when the repeat play mode is
set.
“” lights when the track or chapter repeat play mode
is set.
Advanced Operation
Using other playback function (playing the disc)
Press the REP 1/ALL button until “REPEAT OFF”
appears on the TV screen.
CURSOR
REP 1/ALL
CLEAR
CALL
RANDOM
PROG/DIR.
ZOOM
NUMBER
CURSOR
1
2
12
Page 39

36
ENGLISH
Advanced Operation Advanced Operation
ENGLISH
Playing tracks in the desired order (Program)
Use this function with video and music CDs to play the tracks in
the desired order.
This function does not affect with DVD and MP3/WMA.
1
In the stop mode, press the PROG/DIR. button.
• The program selection screen appears.
2
Press the NUMBER buttons to select the number
you want to program.
• For example, to program track 5 and the 12, press
NUMBER 5, +10 and 2 button.
• Up to 20 tracks can be programmed.
3
Press the 1 button.
• The tracks start playing in the programmed order.
2 To return to normal playback
1
Press the 22button to stop programmed
playback, then press the PROG/DIR. button.
2
Press the 11button.
• Normal playback begins from the beginning of the disc.
2 Clearing individual tracks from the program
1
Press the 22button to stop programmed
playback.
2
Press the CLEAR button.
• The last item track programmed is cleared each time the
button is pressed.
2 Clearing the entire program
1
Press the 22button to stop programmed
playback.
2
Press the PROG/DIR. button.
2 Checking the programmed tracks:
In the stop mode, press the CALL button.
•Display the programmed tracks in screen.
• The programmed tracks are displayed to display each time the
button is pressed.
Playing tracks in the random order
• Use this function with video and music CDs to play the tracks
in random order.
• This function does not affect with DVD.
1
In the stop mode, press the RANDOM button.
RANDOM ON
2
Press the 11button.
• The tracks start playing in random order.
Random playback is not possible for some discs.
To return to normal playback:
Press the
22
button to stop random playback, then press the
RANDOM button once.
Playing in the zoom mode
1
During playback or pause mode, press the
ZOOM button.
• The zoom rate increases each time the ZOOM button is
pressed.
For DVD video discs and video CDs:
OFF Æ x1.5 Æ x2 Æ x4 Æ OFF
2
Press the CURSORª, •, 0 or 1 button to
move the zoomed picture.
• Zooming is not possible with some discs.
• The zoom function may not work properly at some scenes.
• Zooming is not possible at the top menu or the menu screen.
Page 40

37
ENGLISH
Advanced Operation Advanced Operation
ENGLISH
RDS (works only on the FM band) is a broadcasting service which
allows radio stations to send additional information along with
the regular radio program signal.
The following three types of RDS information can be received on
this unit:
RDS (Radio Data System)
2 Program Type (PTY)
PTY identifies the type of RDS program.
The program types and their displays are as follows:
NEWS
INFORM
SPORTS
ROCK
CLS ROCK
SOFT RCK
TOP 40
COUNTRY
OLDIES
SOFT
R & B
SOFT R&B
REL MUSC
PERSNLTY
PUBLIC
COLLEGE
T LK
DLT HIT
NOST LG
CL SSICL
J ZZ
L NGU GE
REL T LK
WE THER
News
Information
Sports
Talk
Rock
Classical Rock
Adult Hits
Soft Rock
Top 40
Country
Oldies Music
Soft
Nostalgia
Jazz Music
Classical Music
R & B
Soft R & B
Language
Religious Music
Religious Talk
Personality
Public
College
Weather
2 Traffic Program (TP)
TP identifies programs that carry traffic announcements.
This allows you to easily find out the latest traffic conditions in
your area before you leaving home.
2 Radio Text (RT)
RT allows the RDS station to send text messages that appear on
the display.
NOTE:
• The operations described below using the AUDIO/PTY,
SUBTITLE/RT and ANGLE/CT buttons will not function in areas
in which there are no RDS broadcasts.
PTY search
Use this function to find RDS stations broadcasting a designated
program type (PTY).
For a description of each program type, refer to “Program Type
(PTY)”.
1
Set the band to “FM”, then press the RDS
button until “PTY SEARCH” appears on the
display.
2
Watching the display, press the AUDIO/PTY
button to call out the desired program type.
3
Press the TUNING + or – button.
• The PTY search operation starts automatically.
• The station name is displayed on the display after
searching stops.
If no station broadcasting the designated program type is
found when all the frequencies are searched, “NO
PROGRAM” is displayed.
RDS search
Use this function to automatically tune to FM stations that
provide RDS service.
1
Set the band to “FM”, then press the RDS
button until “RDS SEARCH” appears on the
display.
2
Press the TUNING + or – button.
• The RDS search operation starts automatically.
• When a broadcast station is found, that station’s name
appears on the display.
If no RDS station is found when all the frequencies are
searched, “NO PROGRAM” is displayed.
Using the RDS (Radio Data System)
• When the CURSOR 0 or 1 button is pressed during the RDS
search operation, all frequencies are searched once.
CURSOR
ANGLE/CT
TUNING +,
–
SUBTITLE/RT
ENTER
DISPLAY
RDS
AUDIO/PTY
TUNING +/
–
CURSOR
ENTER
2 Clock Time (CT)
Use this to correct the time of the clock on the this unit.
Press this button when the time service of an RDS station is
being properly received. “TIME” is displayed for 2 seconds and
the this units clock is corrected. “NO TIME DATA” is displayed
if the RDS station does not offer a time service and when the
broadcast is not being received properly.
• When the CURSOR 0 or 1 button is pressed during the PTY
search operation, all frequencies are searched once.
Page 41

38
ENGLISH
Advanced Operation Advanced Operation
ENGLISH
On-screen displayTP search
Use this function to find RDS stations broadcasting traffic
program (TP stations).
1
Set the band to “FM”, then press the RDS
button until “TP SEARCH” appears on the
display.
2
Press the TUNING + or – button.
• The TP search operation starts automatically.
• The station name is displayed on the display after
searching stops.
If no TP station is found when all the frequencies are
searched, “NO PROGRAM” is displayed.
RT (Radio Text)
“RT” appears on the display when radio text data is received.
Set the input source to “TUNER”, then press the
SUBTITLE/RT button.
• When the station currently tuned in is offering a radio text
message service, the message scrolls on the display.
When the RT mode is turned on while an RDS radio station
not offering an RT service is tuned in, “NO TEXT DATA” is
displayed on the display, then the mode automatically
switches to the PS mode.
In the same way, the mode automatically switches to the PS
mode when the RT service is finished. In this case, the
mode automatically switches from the PS mode back to the
RT mode when an RT broadcast is resumed.
To turn the RT mode off, press the SUBTITLE/RT button and
switch to the desired display mode.
• The RT mode cannot be set in the AM band or for FM stations
not offering RDS broadcasts.
• When the CURSOR 0 or 1 button is pressed during the TP
search operation, all frequencies are searched once.
3
Press the CURSOR•orªbutton to select the
item you wish to change.
• The picture on the TV screen switches each time the
DISPLAY button is pressed.
The items displayed differ from disc.
• The selected item is displayed with a yellow frame.
For DVDs:
“TITLE”, “CHAPTER” and “TITLE ELAPSED” can be
selected.
For video and music CDs:
“TRACK” and “SINGLE ELAPSED” can be selected.
Use this function to display and change information on the disc
(titles, chapters, time, etc.)
1
During playback, press the DISPLAY button.
•A screen with the time display icon ( ), selection
icon ( ) and picture quality adjustment icon
() are displayed.
Example: For DVDs
Operating using the disc information OSD
Example: For video and music CDs
Example: For DVDs
2
Press the CURSOR 0 or 1 button to select
“” icon.
For the on-screen display for DVD-Video, video CDs and
music CDs, only the disc time changes.
Page 42

39
ENGLISH
Advanced Operation Advanced Operation
ENGLISH
2 Changing the elapsed time
2 Changing the title, track or chapter
Input pressing the NUMBER buttons, then press the
ENTER button. (For DVDs)
• For some discs it is not possible to change the title or chapter.
Input pressing the NUMBER buttons. (For video and
music CDs)
• Playback starts from that track.
Input pressing the NUMBER buttons, then press the
ENTER button.
Example: For 1 minute 26 seconds Æ “00126”
Operating using the multiple audio, subtitle
and angle OSD
For DVDs containing audio language, subtitle language and angle
signals, the audio language, subtitle language and angle can be
switched during playback.
1
During playback, press the DISPLAY button.
•A screen with the time display icon ( ), selection
icon ( ) and picture quality adjustment icon
() are displayed.
2 Switching the audio language
(Multiple audio function)
3
Press the CURSOR
•
orªbutton to select
“AUDIO”.
2
Press the CURSOR 0 or 1 button to select
“” icon.
• The current AUDIO, SUBTITLE and ANGLE numbers are
displayed.
The display turns off when the DISPLAY button is pressed.
Press the CURSOR 0 or 1 button and the
NUMBER buttons to select and set the different
parameters.
4
2 Switching the subtitle language
(Multiple subtitle function)
• If the desired language is not set after pressing the CURSOR
00
or 11button several times, the disc does not include that
language.
• The subtitle language set with the default settings is set when
the power is turned on and when the disc is replaced. If that
language is not included on the disc, the disc’s default language
is set.
• When the subtitle language is changed, several seconds may
be required for the new language to appear.
• When a disc supporting the closed caption is played, the
subtitle and the closed caption may overlap each other on the
TV monitor. In this case, turn the subtitle off.
•With some discs it is not possible to change the audio language
during playback. In such cases, select from the DVD menus
( page 17).
• If the desired language is not set after pressing the CURSOR
00
or 11button several times, the disc does not include that
language.
• The language selected in the default settings is set when the
power is turned on and when the disc is replaced.
1
Press the CURSOR•orªbutton to select
“SUBTITLE”.
Press the CURSOR 0 or 1 button and the
NUMBER buttons to select and set the different
parameters.
2
CURSOR
ENTER
DISPLAY
NUMBER
Page 43

40
ENGLISH
Advanced Operation Advanced Operation
ENGLISH
2 Switching the angle
(Multiple angle function)
• The multiple angle function only works with discs on which
multiple angles are recorded.
•At scenes where multiple angles are recorded, the angle can be
switched.
1
Press the CURSOR
•
orªbutton to select
“ANGLE”.
Press the CURSOR 0 or 1 button and the
NUMBER buttons to select.
2
Adjusting the picture quality
The quality of the picture when playing discs can be adjusted.
4
Press the CURSOR 0 or 1 button to select the
picture quality item, then press the CURSOR
•
orªbutton to adjust the value.
• All the adjustments are stored in the memory.
1
2
Press the CURSOR 0 or 1 button to select the
item, then press the ENTER button.
STD:
Both the picture quality and functions are set back to the
standard settings set upon shipment from the factory.
M1 ~ M5:
Picture quality settings you have adjusted can be stored at
five memory positions. (Set at step 4)
When DVD function is selected:
During playback, press the DISPLAY button.
•A screen with the time display icon ( ), selection
icon ( ) and picture quality adjustment icon
() are displayed.
Press the CURSOR 0 or 1 button to select
“” icon, then press the CURSOR ªbutton.
3
CONTRAST (–6 ~ +6) (Factory default: 0):
This adjusts the contrast between light and dark portions of
the picture.
BRIGHTNESS (0 ~ +12) (Factory default: 0):
This adjust the brightness (vividness) of the picture.
COLOR (–6 ~ +6) (Factory default: 0):
This adjusts the color density.
HUE (–6 ~ +6) (Factory default: 0):
This adjusts the balance between green and red. (This setting
does not affect component outputs.)
•To complete the picture quality adjustment:
Press the DISPLAY button again.
NOTE:
• Depending on the disc being played, the picture or sound
may be disturbed when the on-screen display is displayed.
This is not a malfunction.
Page 44

41
ENGLISH
Advanced Operation Advanced Operation
ENGLISH
1
Press the TONE/SDB button.
• The tone switches as shown below each time the
TONE/SDB button is pressed.
BASSSDB
(ON/OFF)
DEFEAT TREBLE
2
With the name of the item to be adjusted
selected, press the CURSOR 0 or 1 button to
adjust the level.
BASS, TREBLE:
•To increase the bass or treble:
Press the CURSOR 1 button. (The bass or treble sound can be
increased to up to +10 dB in steps of 2 dB.)
•To decrease the bass or treble:
Press the CURSOR 0 button. (The bass or treble sound can be
decreased to up to –10 dB in steps of 2 dB.)
When TONE/SDB is displayed, the item can be switched
pressing the CURSOR
•
or ªbutton, and TONE/SDB button.
If no operation is performed within 4 seconds, the display
switches back to what was previously displayed.
Adjusting the sound quality (TONE/SDB)
DEFEAT:
The signals do not pass through the SDB, bass and treble
adjustment circuits, providing higher quality sound.
SDB (Supper Dynamic Bass):
Press the CURSOR 0 or 1 button to select “ON” or “OFF”.
Setting SDB to “ON” makes for powerful bass sound.
Other functions
• When the 1 button is pressed while the power is in the
standby mode, the ADV-S101’s power turns on automatically,
and if a disc is loaded in the S-101 the disc is played.
• The auto power on function also turns the power on when the
disc holder is opened while the ADV-S101 is in the standby
mode.
• This unit is equipped with a last function memory which stores
the input and output setting conditions as they were
immediately before the power is switched off.
This function eliminates the need to perform complicated
resettings when the power is switched on.
• The unit is also equipped with a back-up memory. This function
provides memory storage when the power switch is off and
with the power supply cord disconnected.
Auto power on function
System functions
Initialization of the microprocessor
When the indication of the display is not normal or when the
operation of the unit does not shows the reasonable result, the
initialization of the microprocessor is required by the following
procedure.
1
Press the ON/STANDBY switch to set the
standby mode, then unplug the set’s power
supply cord from the wall power outlet.
2
Hold the following 55button and FUNCTION
button after 30 second, and plug the power
supply cord into the outlet.
3
Check that the entire display is flashing with an
interval of about 1 second, and release your
fingers from the 2 buttons.
The microprocessor will be initialized.
• If step 3 does not work, start over from step 1.
• If the microprocessor is reset, all the buttons and the setup
settings are reset to the factory default values.
1
ON/STANDBY
5 FUNCTION 1
ON/STANDBY
ENTER
TONE/SDB
CURSOR
Page 45

42
ENGLISH
System Setup
ENGLISH
System Setup
The initial setting that was set prior to shipping from the factory can be changed.
The setting contents are maintained until they are next changed even when the power is switched off.
3
Changing the default settings
Press the CURSOR 0 or 1 button to select the
desired setting icon, then press the ENTER button.
VIDEO SETUP:
Use this to set this unit screen mode.
(“TV TYPE” and “PROGRESSIVE MODE” can be set.)
AUDIO SETUP:
Use this to set this unit audio output mode.
(“SPEAKER SETUP”, “INPUT MODE”, “DIGITAL OUT”,
“LPCM”, “COMPRESSION” and “AUDIO DELAY” can be
set.)
RATINGS:
Use this to disable playback of adult DVDs so that children
cannot watch them. Note that playback of adult DVDs cannot
be disabled if the rating level is not recorded on the DVD, but
that it is possible to disable playback of all DVDs.
LANGUAGE SETUP:
Use this to set the language to be used when playing the disc.
If the set language is not offered on that disc, the discs
default language is set.
OTHER SETUP:
“CAPTIONS”, “WALL PAPER”, “DIM SENSOR”,
“DISPLAY”, “SLIDE SHOW”, “AUTO POWER MODE” and
“SCREEN SAVER” can be set.
TIMER SETUP:
“ONCE TIMER”, “EVERY TIMER” and “CLOCK SETUP” can
be set.
“ONCE TIMER” and “EVERY TIMER” can be set if the time
is set at “CLOCK SETUP”.
CURSOR buttons
0
and
1: Use these to move the cursors (
0
and
1) to the
left and right on the screen.
•
and
ª
: Use these to move the cursors (
•
and
ª
) to the up
and down on the screen.
ENTER button
Press this to switch the display.
Also use this button to complete the setting.
HELP button
Press this to display the system setup menu.
System setup items
• Once all connections with other AV components have been
completed as described in page 10 or 15, make the various
settings described below on the monitor screen using the S101’s on-screen display function.
• Use the following buttons to set up the system:
ENTER
CURSOR
HELP
1
Press the HELP button.
• The “HELP” menu screen appears.
2
Press the CURSOR
•
orªbutton to select
“SETUP”, then press the ENTER button.
• The “LANGUAGE SETUP” menu screen appears.
1
Press the CURSOR 0 or 1 button select
“TIMER SETUP” icon, then press the CURSOR
ª
button to select “EXIT SETUP”.
2
Press the ENTER button.
It is also possible to quit by pressing the HELP button.
2 To exit the setup mode
Page 46

43
ENGLISH
System Setup System Setup
ENGLISH
1
Press the CURSOR 0 or 1 button to select
“LANGUAGE SETUP” icon, then press the
ENTER button.
• The “LANGUAGE SETUP” menu screen appears.
When “OSD LANGUAGE” is selected:
Press the CURSOR•orªbutton to select the
desired setting language, then press the ENTER
button.
DIALOG:
Use this to set the language of the sound output from the
speakers.
SUBTITLE:
Use this to set the language of the subtitles displayed on the
TV.
DISC MENUS:
Use this to set the language of the menus recorded on the
disc (top menu, etc.).
OSD LANGUAGE:
Use to set the language of the OSD screen.
When “DIALOG” is selected:
Press the CURSOR•orªbutton to select the
desired setting language, then press the ENTER
button.
3
-2
Setting “LANGUAGE SETUP”
The language set here is reflected on the dialog, subtitle and
disc menus.
3
-1
2
Press the CURSOR•orªbutton to select the
desired setting item, then press the ENTER
button.
When “OTHERS” is selected, refer to the “Language code
list” ( page 44) and use the NUMBER buttons to input the
code number.
When “SUBTITLE” is selected:
Press the CURSOR•orªbutton to select the
desired setting language, then press the ENTER
button.
3
-3
When “DISC MENUS” is selected:
Press the CURSOR•orªbutton to select the
desired setting language, then press the ENTER
button.
3
-4
4
Press the CURSORªbutton to select “NEXT
SETUP MENU”, then press the ENTER button
to enter the setting.
• The next screen in the “SETUP” menu screen appears.
When “OTHERS” is selected, refer to the “Language code
list” ( page 44) and use the NUMBER buttons to input the
code number.
When “OTHERS” is selected, refer to the “Language code
list” ( page 44) and use the NUMBER buttons to input the
code number.
Page 47

44
ENGLISH
System Setup System Setup
ENGLISH
Code
6565
6566
6570
6577
6582
6583
6588
6590
6665
6669
6671
6672
6678
6679
6682
6765
6779
6783
6789
6865
6869
6890
6976
6978
6979
6983
6984
Code
6985
7065
7073
7074
7079
7082
7089
7165
7168
7176
7178
7185
7265
7273
7282
7285
7289
7365
7378
7383
7384
7387
7465
7473
7487
7565
7575
Language
Afar
Abkhazian
Afrikaans
Ameharic
Arabic
Assamese
Aymara
Azerbaijani
Bashkir
Byelorussian
Bulgarian
Bihari
Bengali; Bangla
Tibetan
Breton
Catalan
Corsican
Czech
Welsh
Danish
German
Bhutani
Greek
English
Esperanto
Spanish
Estonian
Language
Basque
Persian
Finnish
Fiji
Faroese
French
Frisian
Irish, Scots
Gaelic
Galician
Guarani
Gujarati
Hausa
Hindi
Croatian
Hungarian
Armenian
Interlingua
Indonesian
Icelandic
Italian
Hebrew
Japanese
Yiddish
Javanese
Georgian
Kazakh
Language
Greenlandic
Cambodian
Kannada
Korean
Kashmiri
Kurdish
Kirghiz
Latin
Lingala
Laothian
Lithuanian
Latvian, Lettish
Malagasy
Maori
Macedonish
Malayalam
Mongolian
Moldavian
Marathi
Malay
Maltese
Burmese
Nauru
Nepali
Dutch
Norwegian
Oriya
Code
8065
8076
8083
8084
8185
8277
8279
8285
8365
8368
8372
8373
8375
8376
8377
8378
8379
8381
8382
8385
8386
8387
8465
8469
8471
8472
8473
Language
Panjabi
Polish
Pashto, Pushto
Portuguese
Quechua
Rhaeto-Romance
Romanian
Russian
Sanskrit
Sindhi
Serbo-Croatian
Singhalese
Slovak
Slovenian
Samoan
Shona
Somali
Albanian
Serbian
Sundanese
Swedish
Swahili
Tamil
Telugu
Taji k
Thai
Tigrinya
Code
8475
8476
8479
8482
8484
8487
8575
8582
8590
8673
8679
8779
8872
8979
9072
9085
Language
Turkmen
Tagalog
Tonga
Turkish
Tatar
Twi
Ukrainian
Urdu
Uzbek
Vietnamese
Volapük
Wolof
Xhosa
Yo ruba
Chinese
Zulu
Code
7576
7577
7578
7579
7583
7585
7589
7665
7678
7679
7684
7686
7771
7773
7775
7776
7778
7779
7782
7783
7784
7789
7865
7869
7876
7879
7982
2 Language code list
Page 48

45
ENGLISH
System Setup System Setup
ENGLISH
When “TV TYPE” is selected:
Press the CURSOR•orªbutton to select the
desired setting item, then press the ENTER
button.
PROGRESSIVE MODE:
Use this to select the progressive mode (AUTO, FILM or
VIDEO).
TV TYPE:
Use this to set your TV’s video format (NTSC, PAL or MULTI).
PAL:
Select this when your TV’s video format is PAL.
If PAL is selected, output format is fixed to PAL.
MULTI:
Select this when your TV is compatible with both the NTSC
and PAL formats.
NTSC signals are output from the video output terminals
when discs recorded in NTSC format are played, and PAL
signals are output from the video output terminals when discs
recorded in PAL format are played.
NTSC (Factory default):
Select this when your TV’s video format is NTSC.
If NTSC is selected, output format is fixed to NTSC.
FILM:
The setting is suited for playing film material discs or video
material discs recorded with progressive scanning.
VIDEO:
The setting is suited for playing video material discs.
AUTO (Factory default):
The mode is selected by identifying the type of material (film
or video flag) from the disc.
Setting “VIDEO SETUP”
3
-1
3
-2
When “PROGRESSIVE MODE” is selected:
Press the CURSOR•orªbutton to select the
desired setting item, then press the ENTER
button.
1
Press the CURSOR 0 or 1 button to select
“VIDEO SETUP” icon, then press the ENTER
button.
• The “VIDEO SETUP” menu screen appears.
2
Press the CURSOR•orªbutton to select the
desired setting item, then press the ENTER
button.
4
Press the CURSORªbutton to select “NEXT
SETUP MENU”, then press the ENTER button
to enter the setting.
• The next screen in the “SETUP” menu screen appears.
INPUT MODE:
When DVD or AUX was selected as the input function, use
this to select the input mode.
SPEAKER SETUP:
“CHANNEL LEVEL” ( page 47), “DISTANCE” ( page
48) and “SPEAKER LOCATION” ( page 49) can be set.
DIGITAL OUT:
Use this to select the digital output’s signal format.
LPCM (44.1 kHz / 48 kHz):
Use this to set the digital audio output when playing DVDs
recorded in linear PCM audio.
COMPRESSION:
Use this to adjusts the dynamic range of the Dolby Digital or
DTS sound.
Setting “AUDIO SETUP”
AUDIO DELAY:
Use this to synchronize the sound and video.
1
Press the CURSOR 0 or 1 button to select
“AUDIO SETUP” icon, then press the ENTER
button.
• The “AUDIO SETUP” menu screen appears.
2
Press the CURSOR•orªbutton to select the
desired setting item, then press the ENTER
button.
Page 49

46
ENGLISH
System Setup System Setup
ENGLISH
3
-1
When “INPUT MODE” is selected:
Press the CURSOR•orªbutton to select the
desired setting item, then press the ENTER
button.
AUTO (Factory default):
In this mode, the type of signal being input to the digital and
analog input terminals is detected and the program in the
set’s surround decoder is switched automatically to play the
signals for the selected input function.
The presence or absence of digital signals is detected, the
signals input to the digital input are identified and decoding
and playback are performed automatically in DTS, Dolby
Digital or PCM (2 channel stereo) format.
If no digital signal is being input, the analog input terminals are
selected.
Use this mode to play Dolby Digital signals.
DTS:
Decoding and playback are only performed when DTS signals
are being input.
PCM:
Decoding and playback are only performed when PCM signals
are being input.
ANALOG:
The signals input to the analog input terminals are played.
(This cannot be selected in the DVD mode.)
Different input modes can be selected for each input
function. The selected input mode is stored in the memory
for the individual input functions.
When the input function is set to something other than the
above, “ANALOG ONLY” is displayed and the input mode
cannot be selected.
The input mode automatically switches to “AUTO” if you
switch the input function to DVD from anything other than
DVD.
NORMAL (Factory default):
Make the selection when playing back in surround playback a
DVD that has been recorded with Dolby Digital or DTS on this
unit.
The Dolby Digital or DTS digital signal is also output from the
digital output terminals.
PCM:
DVDs that were recorded in Dolby Digital or DTS are
converted to linear PCM 48 kHz/16 bit (2 channels). Make the
selection when making a digital recording.
When “DIGITAL OUT” is selected:
Press the CURSOR•orªbutton to select the
desired setting item, then press the ENTER
button.
3
-2
When playing Dolby Digital / DTS surround DVDs or 96 kHz
linear PCM DVDs on the S-101, be sure to set “DIGITAL
OUT” to “NORMAL” and “LPCM (44.1 kHz/48 kHz)” to
“OFF”.
When and only when you want to output the signals of the
Dolby Digital/DTS surround DVD being played on the S-101
to a digital PCM components, set “DIGITAL OUT” to
“PCM”.
With this setting, DVDs cannot be played on the S-101 in the
Dolby Digital / DTS surround mode. (The surround mode is
set to the mode in which PCM 2-channel signals can be
played.)
When and only when you want to make a digital recording
of the signals of a 48 kHz/20-bit/24-bit or 96 kHz linear PCM
DVD being played on the S-101 onto a digital recorder, set
the “LPCM (44.1 kHz/48 kHz)” to “ON”.
With this setting it is not possible to decode and play 48
kHz/20-bit/24-bit or 96 kHz linear PCM signals on the S-101
during recording. (Decoding and playback is in 48 kHz/16-bit
linear PCM format.)
When “LPCM (44.1 kHz/48 kHz)” is selected:
Press the CURSOR•orªbutton to select the
desired setting item, then press the ENTER
button.
3
-3
ON:
DVDs that were recorded with linear PCM 48 kHz/20/24 bit
and 96 kHz modes are all converted to 48 kHz/16 bits. Make
this selection at the time of digital recording.
OFF (Factory default):
Make the selection when playing back to a decoder DVDs that
were recorded with this unit using linear PCM 48 kHz/20/24
bit and 96 kHz modes. Note that DVDs with Copyright
Protection are converted to 48 kHz/16 bits and played back.
The same signal is output from the digital output terminals.
Page 50

47
ENGLISH
System Setup System Setup
ENGLISH
When “AUDIO DELAY” is selected:
Press the CURSOR•orªbutton to select the
desired setting item, then press the ENTER
button.
3
-5
0 ~ 200mSEC (Factory default 0mSEC) :
When watching a DVD or other video source, the picture on the
monitor may seem delayed with respect to the sound. In this
case, adjust the audio delay to delay the sound and synchronize
it with the picture.
The audio delay setting is stored separately for each input
source.
With a movie source, for example, adjust so that the
movement of the actor‘s lips is synchronized with the sound.
The audio delay setting does not apply when playing in the
analog input and stereo mode. (DIRECT ON)
4
Press the CURSORªbutton to select “NEXT
SETUP MENU”, then press the ENTER to enter
the setting.
• The next screen in the “SETUP” menu screen appears.
When “COMPRESSION” is selected:
Press the CURSOR•orªbutton to select the
desired setting item, then press the ENTER
button.
3
-4
OFF (Factory default):
Set to “OFF” to turn this function off.
LOW, MID, HIGH:
This parameter adjusts the dynamic range of the Dolby Digital or
DTS sound. When listening with the volume turned relatively
low, at night for example, set this to the “HIGH” side to lower
the peak of the sound and amplify the quieter sounds, narrowing
the dynamic range and making the sound easier to listen to.
With DTS source, only displayed for sources compatible with
dynamic range compression.
Setting “CHANNEL LEVEL”
• Adjust so that the playback levels of the different channels are
equal.
• Make this adjustment by listening to the test tones output from
the speakers at the listening position.
Use the VOLUME control knob on the main unit or the VOLUME
buttons on the remote control unit to adjust the volume of the
test tone to a level at which it is easy to make this adjustment.
1
Press the CURSOR•orªbutton to select
“SPEAKER SETUP” at the “AUDIO SETUP”,
then press the ENTER button.
•The “SPEAKER SETUP” screen appears.
Page 51

48
ENGLISH
System Setup System Setup
ENGLISH
2
Press the CURSOR
•
orªbutton to select
“CHANNEL LEVEL”, then press the ENTER
button.
• The channel level setting screen appears.
3
Press the CURSOR 0 or 1 button to select
“AUTO”, “MANUAL” or “OFF” for the
“TEST TONE” mode, then press the ENTER
button.
AUTO:
Adjust the levels listening to test tones automatically output
from the different speakers.
MANUAL:
Select the speakers from which the test tones are output
when adjusting the levels.
OFF (Factory default):
The test tones are not output.
Detailed settings can be made when this is set to
“MANUAL” first.
• When the channel levels are adjusted at the channel level
settings, the adjusted values are applied to all playback modes.
4
-1
When “AUTO” mode is selected:
Press the CURSOR 0 or 1 button to adjust all
the speakers to the same volume.
•Test tones are automatically output from the speakers at
intervals of 4 seconds for two of the cycles shown
below, then at intervals of 2 seconds from the third
cycle on.
4
-2
When “MANUAL” or “OFF” mode is selected:
Press the CURSOR•orªbutton to select the
speaker , then pr ess the CURSOR 0 or 1 button
to adjust all the speakers to the same volume.
The level changes in units of 1 dB each time the
CURSOR00or 11button is pressed.
The level can be adjusted in the range –12 dB to +12
dB.
5
Press the ENTER button twice.
• The “SPEAKER SETUP” screen appears.
Front left Front right
Subwoofer
Setting “DISTANCE”
• Input the distances from the listening position and the various
speakers to set the surround delay time.
• Upon shipment from the factory default the distance is set to
the default values in step 4 below.
FR
FL
Subwoofer
L1: Distance between front right speaker and listening position
L2: Distance between front left speaker and listening position
L3: Distance between subwoofer speaker and listening position
Preparation:
Measure the distance from the listening position to the various
speakers.
1
Press the CURSOR•orªbutton to select
“SPEAKER SETUP” at the “AUDIO SETUP”,
then press the ENTER button.
•The “SPEAKER SETUP” screen appears.
7
Press the CURSORªbutton to select “NEXT
SETUP MENU”, then press the ENTER to enter
the setting.
• The next screen in the “SETUP” menu screen appears.
listening position
6
Press the CURSORªbutton to select “SETUP
MENU”, then press the ENTER button.
• The “AUDIO SETUP” screen appears.
Page 52

49
ENGLISH
System Setup System Setup
ENGLISH
2
Press the CURSOR
•
orªbutton to select
“DISTANCE”, then press the ENTER button.
• The distance setting screen appears.
3
Press the CURSOR 0 or 1 button to select
“FEET” or “METERS” for the “DISTANCE”
mode, then press the CURSORªbutton.
4
Press the CURSOR•orªbutton to select the
speaker , then pr ess the CURSOR 0 or 1 button
to set the distance between the speaker and the
listening position.
• The distance changes by 1 foot (or 0.1 meters when the
unit is set to feet) each time the CURSOR00or 11button
is pressed. Select the value closest to the measured
distance.
Make sure the difference in the distances set for the
various speakers is no greater than 15 feet (4.5 meters).
If an inappropriate distance is set, “CAUTION: INVALID
DISTANCE” is displayed. Change the position of the
speaker and make the setting over.
To set the distance of the various speakers back to their
default values, press the CURSOR
•
or ªbutton to select
“DEFAULT” then press the ENTER button.
Setting “SPEAKER LOCATION”
The optimum acoustics can be achieved by setting the location
of the speakers and the conditions in the room.
1
Press the CURSOR
•
orªbutton to select
“SPEAKER SETUP” at the “AUDIO SETUP”,
then press the ENTER button.
• The “SPEAKER SETUP” screen appears.
2
Press the CURSOR•orªbutton to select
“SPEAKER LOCATION”, then press the
ENTER button.
• The speaker locations setting screen appears.
LOCATION:
Select the speaker setting location.
ROOM DAMPING:
Select the reverberation of the sound in the room in which the
speakers are located.
3
Press the CURSOR 0 or 1 button to select “1”,
“2” or “3” for the “LOCATION” mode, then
press the CURSORªbutton.
•The “SPEAKER SETUP” screen appears.
1 (ON WALL):
Select this when satellite speakers are installed on the walls
or when there is a wall directly behind the speakers.
2 (ON SHELF) (Factory default):
Select this when the speakers are installed on a table or rack
using the included speaker stands.
3 (FREE STANDING):
Select this when a separately sold floor stand is installed.
Select “ON WALL” when there is a wall directly behind the
speakers, regardless of the “ON SHELF” or “FREE
STANDING” setting.
5
Press the CURSORªbutton to select “SETUP
MENU”, then press the ENTER button.
• The “SPEAKER SETUP” screen appears.
6
Press the CURSORªbutton to select “NEXT
SETUP MENU”, then press the ENTER to enter
the setting.
• The next screen in the “SETUP” menu screen appears.
Page 53

50
ENGLISH
System Setup System Setup
ENGLISH
4
Press the CURSOR 0 or 1 button to select
“LOW”, “MID” or “HIGH” for the “ROOM
DAMPING” mode, then press the ENTER
ª
button.
LOW:
Select this for rooms with many hard walls and strong
reverberations (when the treble sound seems strong).
MID (Factory default):
Select this for rooms for which neither “LOW” or “HIGH”
apply.
HIGH:
Select this for rooms with thick curtains and little
reverberation (when the treble sound seems weak).
Setting “RATINGS”
PASSWORD:
Use this to change the password.
The set’s password is set to “0000” by default.
RATING LEVEL:
Use this to restrict playback of adult DVDs you do not want
children to view. Note that even with adult DVDs, viewing
cannot be restricted unless the restriction level is recorded on
the disc.
It is however possible to disable playback of all DVDs.
1
Press the CURSOR 0 or 1 button to select
“RA TINGS” icon, then pr ess the ENTER button.
• The “RATINGS” menu screen appears.
2
Press the CURSOR•orªbutton to select the
desired setting item, then press the ENTER
button.
3
-2
0 (LOCK ALL):
Select this to disable playback of all DVDs.
Use this for example to disable playback of adult DVDs on
which the rating level is not recorded.
1:
Select this to play only DVDs for children. (Adult and general
audience DVDs cannot be played.)
2 to 7:
Select this to play DVDs for general audiences and children.
Adult DVDs cannot be played.
8 (NO LIMIT) (Factory default):
Select this to play all DVDs.
When “RATING LEVEL” is selected:
Press the CURSOR•orªbutton to select the
desired setting item, then press the ENTER
button.
Press the NUMBER button to input a 4-digit
password, then press the ENTER button.
• The set's password is set to “0000” by default.
The setting cannot be changed without inputting the correct
password.
3
-1
5
Press the CURSORªbutton to select “SETUP
MENU”, then press the ENTER button.
• The “SPEAKER SETUP” screen appears.
6
Press the CURSORªbutton to select “NEXT
SETUP MENU”, then press the ENTER to enter
the setting.
• The next screen in the “SETUP” menu screen appears.
Page 54

51
ENGLISH
System Setup System Setup
ENGLISH
4
-2
Press the NUMBER button to input a 4-digit
password (OLD PASSWORD, NEW
PASSWORD, CONFIRM PASSWORD), then
press the ENTER button.
Setting “OTHER SETUP”
1
Press the CURSOR 0 or 1 button to select
“OTHER SETUP” icon, then press the ENTER
button.
• The “OTHER SETUP” menu screen appears.
5
Press the CURSORªbutton to select “NEXT
SETUP MENU”, then press the ENTER to enter
the setting.
• The next screen in the “SETUP” menu screen appears.
AUTO POWER MODE:
Setting the power to the standby mode automatically if no
operation is performed for 30 minutes when the function is
set to DVD. Here set whether to use this function or not.
SCREEN SAVER:
Use to set the screen saver function to on or off.
WALL PAPER:
Use this to select the image to be shown on the screen in the
stop mode and CD play mode.
CAPTIONS:
Set whether or not to display the closed captions (subtitles)
recorded on the DVD. (A caption decoder (commercially
available) is required to display captions.)
DIM SENSOR:
Use to set the adjustment mode for adjusting the brightness
of the main unit’s display and buttons.
DISPLAY:
Use to set the brightness of the main unit’s display and
buttons in the manual mode.
SLIDE SHOW:
Set the time interval for switching to the next still image (in
JPEG format) when playing slides.
2
Press the CURSOR•orªbutton to select the
desired setting item, then press the ENTER
button.
It is not possible to select “DISPLAY” when “DIM
SENSOR” is set to “ON”.
When “PASSWORD” is selected:
Press the ENTER button twice.
4
-1
Page 55

52
ENGLISH
System Setup System Setup
ENGLISH
GRAY:
Select this to display a gray background on the TV display.
BLUE (Factory default):
Select this to display a blue background on the TV display.
BLACK:
Select this to display a black background on the TV display.
PICTURE:
Select this to display the background image used on the
“HELP” screen on the TV screen.
3
-2
When “WALL PAPER” is selected:
Press the CURSOR•orªbutton to select the
desired setting item, then press the ENTER
button.
ON (Factory default):
Select this to enable the illuminance sensor and automatically
adjust the brightness of the main unit’s display and buttons
within a set range. The brightness increases if the
surroundings are bright and decreases if the surroundings are
dark.
OFF:
Select this to disable the illuminance sensor and adjust the
brightness of the main unit’s display manually.
When “DIM SENSOR” is selected:
Press the CURSOR•orªbutton to select the
desired setting item, then press the ENTER
button.
3
-3
MEDIUM (Factory default):
Select this to make the brightness of the main unit’s display
medium.
BRIGHT:
Select this to make the brightness of the main unit’s display
bright.
DIM:
Select this to make the brightness of the main unit’s display
dark.
OFF:
The main unit’s display is off and turns on when an operation
is performed.
When “DISPLAY” is selected:
Press the CURSOR•orªbutton to select the
desired setting item, then press the ENTER
button.
3
-4
When “DIM SENSOR” is set to “OFF”, the brightness of
the main unit’s display can be set in the following four steps.
ON:
Select this to display the captions on the screen when playing
DVDs containing English captions.
OFF (Factory default):
Select this when you do not want to display the captions on
the screen when playing DVDs containing English captions.
3
-1
When “CAPTIONS” is selected:
Press the CURSOR•orªbutton to select the
desired setting item, then press the ENTER
button.
An English caption decoder is required to display English
captions.
DVDs with caption signals are indicated by the , ,
mark.
English captions cannot be displayed when playing DVDs
which do not contain caption signals.
The characters in which the captions are displayed (capital
letters, small letters, italics, etc.) depend on the DVD and
cannot be selected with this unit.
Page 56

53
ENGLISH
System Setup System Setup
ENGLISH
ON:
Select this to start up the screen saver. The screen saver
starts up if no operation is performed for about 5 minutes.
OFF (Factory default):
Select this when you do not want the screen saver to operate.
3
-7
When “SCREEN SAVER” is selected:
Press the CURSOR•orªbutton to select the
desired setting item, then press the ENTER
button.
4
Press the CURSORªbutton to select “NEXT
SETUP MENU”, then press the ENTER to enter
the setting.
• The next screen in the “SETUP” menu screen appears.
Setting “TIMER SETUP”
•With the S-101, the timer only works when the function is set
to “TUNER” or “DVD”.
• Be sure to set the current time ( page 33). The timer will not
operate if the current time is not set.
1
Press the CURSOR 0 or 1 button to select
“TIMER SETUP” icon, then press the ENTER
button.
• The “TIMER SETUP” menu screen appears.
2 Setting the “ONCE TIMER” and “EVERY
TIMER”
2
Press the CURSOR •orªbutton to select
“ONCE TIMER” or “EVERY TIMER”, then
press the ENTER button.
• The respective timer setting screens are displayed.
EVERY TIMER:
Use the every timer to switch the power on and off (standby)
once at the same time each day.
ONCE TIMER:
Use the once timer to switch the power on and off (standby)
at the specified time once only.
CLOCK SETUP:
Use to set the current time ( page 33, 34).
ON:
The function for automatically turning the power off when the
function is set to DVD is activated.
OFF (Factory default):
The auto power off function is not activated.
When “SLIDE SHOW” is selected:
Press the CURSOR•orªbutton to select the
desired setting item, then press the ENTER
button.
3
-5
3
-6
When “AUTO POWER MODE” is selected:
Press the CURSOR•orªbutton to select the
desired setting item, then press the ENTER
button.
5 ~ 15SEC (Factory default : 5 SEC):
The interval can be set from 5 to 15 seconds in steps of 1
second.
Page 57

54
ENGLISH
System Setup System Setup
ENGLISH
•To exit the once timer or every timer set mode:
Press the RETURN button, you can go back to the previous
screen.
1
Press the HELP button to display the help
screen.
2 Checking the timer settings
2
Press the CURSOR
•
orªbutton to select
“SETUP”, then press the ENTER button.
3
Press the CURSOR 0 or 1 button to select
“TIMER SETUP”, then press the ENTER
button.
2 Changing the timer settings
Reset the timer from the start using the desired settings.
The new settings overwrite the previous settings.
2 Quitting the timer setting
(turning the operation of the timer off)
Select ”DISABLE” at the ”ONCE TIMER” or ”EVERY TIMER”
setting screen.
2 If there is a power failure
• If there is a power failure or the power supply cord is unplugged
from the power outlet, the time display flashes when the
power comes back on. Reset the current time.
• The once timer settings are deleted. Remake the settings.
• If the everyday timer settings and the tuner presettings have
been deleted, reset them.
If the times set for the sleep timer, every timer and once timer
overlap, the priority is as follows:
every timer → once timer → sleep timer
2 Sleep timer, every timer and once timer
priority
• This completes the procedure for changing the system
settings. Once the channel levels, distances and speaker
location have been set, there is no need to change the settings
again unless the connected AV components or speakers are
changed or the speakers are moved to different positions.
• DVD auto power off as necessary.
At the “SETUP” menu screen, press the HELP
button.
• The new settings are entered and the on-screen display turns
off.
The setup procedure can be quit at any point by pressing
this button.
After changing the system settings
6
Press the ON/STANDBY switch.
• The standby mode is set.
(The power indicator turns yellow.)
4
Press the CURSOR
•
, ª,
0 or 1 button to
select start time, end time, and function, then
press the ENTER button.
5
Press the CURSOR
•
orªbutton to select
“EXIT SETUP”, then press the ENTER button.
• The timer is turned on and the timer standby indicator
lights. This completes the setting of the timer.
When the timer start time is reached, the timer operates.
Example:
Listening to P01 (FM 92.5 MHz) from “PM 0:35” to
“PM 0:56” using the “EVERY TIMER”.
3
Press the CURSOR
•
orªbutton to select
“ENABLE”.
ENABLE:
Set this to enable the “ONCE TIMER” or “EVERY TIMER”
function that has been set.
DISABLE (Factory default):
Set this to disable the “ONCE TIMER” or “EVERY TIMER”
function that has been set.
When “TUNER” is selected, the preset frequency can also
be selected.
•Press the STATUS button in the standby mode to show on the
S-101’s display whether the timer is turned on or off.
Example:
When the “ONCE TIMER” is on and the “EVERY TIMER” is
off
1 on/Eoff
Page 58

55
ENGLISH
System Setup System Setup
ENGLISH
PageDefault settingsSetup items
System setup items and default values (set upon shipment from the factory)
LANGUAGE
SETUP
OSD LANGUAGE
Set the OSD setup display language for modes other than playback
and pause.
ENGLISH
DIALOG Set the language of the sound output from the speakers.
Set the language of the subtitles displayed on the TV.
Set the language of the menus recorded on the disc (top menu, etc.).
ENGLISH
SUBTITLE OFF
DISC MENUS ENGLISH
TV TYPE
Set your TV’s video format (NTSC, PAL or MULTI). NTSC
PROGRESSIVE MODE Set the progressive mode (AUTO, FILM, VIDEO). AUTO
VIDEO
SETUP
SPEAKER SETUP
AUDIO
SETUP
CHANNEL
LEVEL
TEST TONE FRONT LCH FRONT RCH SUBWOOFER
DISTANCE
This parameter is for optimizing the timing with which
the audio signals are produced from the speakers and
subwoofer according to the listening position.
At the listening position, listen to the test tones
output from the different speakers and set so that the
playback level from the different speakers is equal.
OFF 0 dB 0 dB 0 dB
DISTANCE
FRONT
LCH
FRONT
RCH
SUBWOOFER DEFAULT
SPEAKER
LOCATION
INPUT MODE
DIGITAL OUT
LPCM (44.1 kHz/48 kHz)
COMPRESSION
AUDIO DELAY
FEET 9 ft 9 ft 9 ft ON
To achieve the best acoustics, set the location of the
speakers and the conditions in the room.
LOCATION
When DVD or AUX was selected as the input function, use this to
select the input mode.
Use this to select the digital output’s signal format.
Use this to set the digital audio output when playing DVDs recorded
in linear PCM audio.
Use this to adjusts the dynamic range of the Dolby Digital or DTS
sound.
Use this to synchronize the sound and video.
AUTO
NORMAL
OFF
OFF
0 mSEC
48, 49
49, 50
46
46
46
47
47
43
43
43
43
45
45
47, 48
ROOM DAMPING
2:ON SHELF MID
Page 59

56
ENGLISH
System Setup System Setup
ENGLISH
PageDefault settingsSetup items
RATINGS
RATING LEVEL
Make the playback restriction setting for DVDs with restricted
viewing.
8 (NO LIMIT)
Set the password required for changing the setting.PASSWORD 0000
CAPTIONS
Set whether or not to display the closed captions (subtitles) recorded
on the DVD. (A caption decoder (commercially available) is required to
display captions.)
OFF
WALL PAPER Set the wallpaper for the setup and operation screens. BLUE
DIM SENSOR
Set the adjustment mode for adjusting the brightness of the main
unit’s display and buttons.
ON
DISPLAY BRIGHT
OTHER
SETUP
SLIDE SHOW
AUTO POWER MODE
SCREEN SAVER
ONCE TIMER
EVERY TIMER
CLOCK SETUP
Set the time interval for switching to the next still image (in JPEG
format) when playing slides.
The power automatically switches to standby if no operation is
performed for 30 minutes while in the stop mode with the function
set to DVD.
Set the screen saver function to on or off.
Set so that the power switches on then switches to the standby
mode (off) once only at the set times.
Set so that the power switches on then switches to the standby
mode (off) once every day at the set times.
Set the current time.
5 SEC
OFF
OFF
DISABLE
DISABLE
AM12:00
52
53
52
53
53
33, 34
50, 51
51
51
52
52
52
Set the brightness of the main unit’s display and buttons in the
manual mode.
TIMER
SETUP
Page 60

57
ENGLISH
System Setup System Setup
ENGLISH
Digital audio data outputPageSettingsAudio recording format
DVD video
(video part
only)
Dolby Digital
CP : ON
Video CD
CP : OFF
DTS
48 kHz
Music CD
MP3/WMA CD
Linear PCM
96 kHz
32 ~ 48 kHz/16 bit PCM
44.1 kHz/16 bit PCM
44.1 kHz/16 bit PCM
LPCM (44.1 kHz/48 kHz) : OFF
LPCM (44.1 kHz/48 kHz) : OFF
MPEG 1
Linear PCM
MP3/WMA
LPCM (44.1 kHz/48 kHz) : ON
LPCM (44.1 kHz/48 kHz) : ON
LPCM (44.1 kHz/48 kHz) : OFF
DIGITAL OUT : PCM
DIGITAL OUT : NORMAL
DIGITAL OUT : PCM
DIGITAL OUT : NORMAL
96 kHz PCM (when not copy-protected)
48 kHz/16 bit PCM (when copy-protected)
48 kHz/16 bit PCM
48 kHz/16 bit PCM
48 kHz/16 ~24 bit PCM
2 channels PCM data (48 kHz/16 bit)
DTS bitstream
2 channels PCM data (48 kHz/16 bit)
Dolby Digital bitstream
46
46
About digital audio signal output
When a disc is played on the S-101 (DIGITAL OUT)
Linear PCM audio is the signal recording format used for music CDs.
While the signals are recorded at 44.1 kHz/16 bit for music CDs, for DVDs they are recorded at 48 kHz/16 bit to 96 kHz/24 bit, providing
higher sound quality than music CDs.
• Linear PCM audio is the signal recording format used for music CDs.
While the signals are recorded at 44.1 kHz/16 bit for music CDs, for DVDs they are recorded at 48 kHz/16 bit to 96 kHz/24 bit,
providing higher sound quality than music CDs.
Page 61

58
ENGLISH
System Setup System Setup
ENGLISH
2
Press the PROG/DIR. button for at least 3
seconds.
3
Input the 4-digit number corresponding to the
brand of the component whose signals are to be
stored in the preset memory (refer to the “List
of preset codes” ( End of this manual)).
• The code is set when 4 digits are input.
• Input the first digit within 3 seconds of performing step 2.
• Input the other digits within 60 seconds of each other.
• If any buttons other than the PROG/DIR. button or a
NUMBER button is pressed, the preset mode is canceled
and the previous settings remain valid.
• Set the MODE SELECTOR switch to the “DVD” position to
operate the S-101.
• When buttons are pressed while setting the preset memory,
their signals are sent from the remote control transmitter, so
cover the remote control sensor when setting the preset
memory to prevent accidental operation.
• Depending on the model and year of make, some of the remote
control codes for the brands included on the tables may not
operate properly.
• For some brands there are multiple types of remote control
codes. If an operation does not work, try changing to one of the
other codes.
2
Operate the component.
• For details, refer to the component’s operating
instructions.
It may not be possible to operate some models.
The buttons listed below can be used to operate the device
selected with the MODE SELECTOR switch.
SOURCE POWER, VIDEO INPUT, CHANNEL –, CHANNEL +, GUIDE,
CURSOR
•, ª
, 00, 11and ENTER buttons
Special punch through setting
1
2
Normally use with the MODE SELECTOR switch set at “DVD”.
At this time, the SOURCE POWER, VIDEO INPUT, CHANNEL + and
CHANNEL – buttons are valid for the TV (default value). Perform
the operation below to make the buttons valid for the cable tuner
or satellite receiver.
Change MODE SELECTOR switch (TV, CABLE or
DBS) that intend to setup for special punch
through.
Press and hold ON/STANDBY button at least 3
seconds while SOURCE POWER button is held
down.
The unit will detect mode switch and setup
punch through setting.
• The default (TV) is set when the batteries are replaced,
so set over from step 1.
Operating the TV, cable tuner and satellite
receiver after storing its remote control
signals in the preset memory
1
Set MODE SELECTOR switch to the position of the
mode you want to operate (TV, CABLE or
DBS).
Default deviceMODE SELECTOR
TV, cable tuner and satellite receiver preset
memories
Components (TV, cable tuner or satellite receiver) of other brands
can be operated with the included remote control unit by storing
their codes in the preset memory.
SOURCE POWER, VIDEO INPUT, CHANNEL –, CHANNEL +, GUIDE,
CURSOR •, ª, 00, 11and ENTER buttons on the remote control
unit (front) are valid for the device specified with this setting.
Note that depending on the model some operations may not be
possible and some buttons (SOURCE POWER, VIDEO INPUT,
CHANNEL –, CHANNEL +, GUIDE, CURSOR •, ª, 00, 11or ENTER )
may not operate properly.
Set as shown below upon shipment from the factory.
TV
CABLE
DBS
0047
0476
0392
RCA TV
Motorola
RCA SAT for DirecTV
Setting up the remote control unit to control other audio / video devices
1
Set MODE SELECTOR switch to the position of the
mode you want to operate (TV, CABLE or
DBS).
PROG/DIR.
NUMBER
CHANNEL +,
–
ON/STANDBY
SOURCE POWER
VIDEO INPUT
MENU/GUIDE
ENTER
MODE SELECTOR
CURSOR
Page 62

59
ENGLISH
Additional information
ENGLISH
Playback method
(reference page)
Dolby Digital output
terminals
Media
Dolby Pro LogicDolby Digital
Comparison of home
surround systems
Surround
[1] Dolby Surround
q Dolby Digital
Dolby Digital is the multi-channel digital signal format
developed by Dolby Laboratories.
Dolby Digital consists of up to “5.1” channels – front left,
front right, center, surround left, surround right, and an
additional channel exclusively reserved for additional deep
bass sound effects (the Low Frequency Effects –LFE–
channel, also called the “.1” channel, containing bass
frequencies of up to 120 Hz).
Unlike the analog Dolby Pro Logic format, Dolby Digital’s main
channels can all contain full range sound information, from the
lowest bass, up to the highest frequencies – 22 kHz. The
signals within each channel are distinct from the others,
allowing pinpoint sound imaging, and Dolby Digital offers
tremendous dynamic range from the most powerful sound
effects to the quietest, softest sounds, free from noise and
distortion.
No. recorded channels
(elements)
No. playback channels
Playback channels
(max.)
Audio processing
High frequency
playback limit of
surround channel
5.1 ch
5.1 ch
L, R, C, SL, SR, SW
Digital discrete
processing Dolby
Digital encoding /
decoding
20 kHz
2 ch
4 ch
L, R, C, S
(SW – recommended)
Analog matrix
processing Dolby
Surround
7 kHz
2 Dolby Digital and Dolby Pro Logic
2 Dolby Digital compatible media and playback methods
Marks indicating Dolby Digital compatibility:
The following are general examples. Also refer to the player’s
operating instructions.
1: Use a commercially available adapter to connect Dolby
Digital RF output signals to the digital input terminals.
(Refer to the adapter’s operating instructions.)
Please refer to the instruction manual of the adapter when
making connection.
2: To play in Dolby Digital Surround on the S-101, set
“SETUP” – “AUDIO SETUP” – “DIGITAL OUT” to
“NORMAL” in the setup. (The factory default is
“NORMAL”.)
LD (VDP)
DVD
Others
(satellite broadcasts,
CATV, etc.)
Coaxial Dolby Digital
RF output terminal
1
Optical or coaxial
digital output
(same as for PCM)
2
Optical or coaxial
digital output
(same as for PCM)
Set the input mode to
“AUTO”
( page 46).
Set the input mode to
“AUTO”
( page 46).
Set the input mode to
“AUTO”
( page 46).
Additional Information
w Dolby Pro Logic II
• Dolby Pro Logic II is a new multi-channel playback format
developed by Dolby Laboratories using feedback logic steering
technology and offering improvements over conventional Dolby
Pro Logic circuits.
• Dolby Pro Logic II can be used to decode not only sources
recorded in Dolby Surround ( ) but also regular stereo sources
into five channels (front left, front right, center, surround left
and surround right) to achieve surround sound.
• Whereas with conventional Dolby Pro Logic the surround
channel playback frequency band was limited, Dolby Pro Logic
II offers a wider band range (20 Hz to 20 kHz or greater). In
addition, the surround channels were monaural (the surround
left and right channels were the same) with previous Dolby Pro
Logic, but Dolby Pro Logic II they are played as stereo signals.
Sources recorded in Dolby Surround
• These are sources in which three or more channels of surround
have been recorded as two channels of signals using Dolby
Surround encoding technology.
• Dolby Surround is used for the sound tracks of movies recorded
on DVDs, LDs and Video cassettes to be played on stereo
VCRs, as well as for the stereo broadcast signals of FM radio,
TV, satellite broadcasts and cable TV.
• Decoding these signals with Dolby Pro Logic II makes it
possible to achieve multi-channel surround playback. The
signals can also be played on ordinary stereo equipment, in
which case they provide normal stereo sound.
• There are two types of DVD Dolby surround recording signals.
q 2-channel PCM stereo signals
w 2-channel Dolby Digital signals
Manufactured under license from Dolby Laboratories.
“Dolby”, “Pro Logic” and the double-D symbol are
trademarks of Dolby Laboratories.
2 Sources recorded in Dolby Surround are indicated with
the logo mark shown below
Dolby Surround support mark:
Page 63

60
ENGLISH
Additional information Additional information
ENGLISH
[2] DTS Digital Surround
Digital Theater Surround (also called simply DTS) is a multichannel digital signal format developed by Digital Theater
Systems.
DTS offers the same “5.1” playback channels as Dolby Digital
(front left, front right and center, surround left and surround right)
as well as the stereo 2-channel mode. The signals for the
different channels are fully independent, eliminating the risk of
deterioration of sound quality due to interference between
signals, crosstalk, etc.
DTS features a relatively higher bit rate as compared to Dolby
Digital (1234 kbps for CDs and LDs, 1536 kbps for DVDs) so it
operates with a relatively low compression rate. Because of this
the amount of data is great, and when DTS playback is used in
movie theaters, a separate CD-ROM synchronized with the film
is played.
With LDs and DVDs, there is of course no need for an extra disc;
the pictures and sound can be recorded simultaneously on the
same disc, so the discs can be handled in the same way as discs
with other formats.
Other media include CDs recorded in DTS. These are the same
discs as conventional CDs (recorded in 2 channels) but include
5.1 channel surround signals. They do not include images, but
they do permit surround playback on the S-101 and on CD
players.DTS surround track playback offers the same intricate,
grand sound as in a movie theater, right in your own listening
room.
2 DTS compatible media and playback methods
Marks indicating DTS compatibility: and
The following are general examples. Also refer to the player’s
operating instructions.
“DTS” and “DTS Digital Surround” are registered trademarks
of Digital Theater Systems, Inc.
“DTS” and “DTS Virtual” are trademarks of Digital Theater
Systems, Inc.
1: DTS signals are recorded in the same way on CDs and LDs
as PCM signals. Because of this, the un-decoded DTS
signals are output as random “hissy” noise from the CD or
LD player’s analog outputs. If this noise is played with the
amplifier set at a very high volume, it may possibly cause
damage to the speakers. To avoid this, be sure to switch
the input mode to “AUTO” or “DTS” before playing CDs or
LDs recorded in DTS. Also, never switch the input mode to
“ANALOG” or “PCM” during playback. The same is true
when playing CDs and LDs recorded in DTS on the S-101
or on LD/DVD compatible players. With DVDs, the DTS
signals are recorded with a special recording method so
there is no problem. For DVDs, the DTS signals are
recorded in a special way so this problem does not occur.
2: The signals provided at the digital outputs of a CD or LD
player may undergo some sort of internal signal processing
(output level adjustment, sampling frequency conversion,
etc.). In this case the DTS-encoded signals may be
processed erroneously, in which case they cannot be
decoded by this unit, or may only produce noise. Before
playing DTS signals for the first time, turn down the master
volume to a low level, start playing the DTS disc, then
check whether the DTS indicator on this unit ( page 46)
lights before turning up the master volume.
3: To play in DTS Digital Surround on the S-101, set “SETUP”
– “AUDIO SETUP” – “DIGITAL OUT” to “NORMAL” in the
setup. (The factory default is “NORMAL”.)
Playback method
(reference page)
Dolby Digital output
terminals
Media
CD
LD (VDP)
DVD
Optical or coaxial digital
output
(same as for PCM)
2
Optical or coaxial digital
output
(same as for PCM)
2
Optical or coaxial digital
output
(same as for PCM)
3
Set the input mode to
“AUTO” or “DTS”
( page 46).
Never set the mode to
“ANALOG” or “PCM”.
1
Set the input mode to
“AUTO” or “DTS”
( page 46).
Never set the mode to
“ANALOG” or “PCM”.
1
Set the input mode to
“AUTO” or “DTS”
( page 46).
Dolby Virtual Speaker technology uses proprietary technology of
Dolby Laboratories to create a virtual surround sound field using
only two speakers for the front channels, allowing the user to
experience sound as if surround speakers were actually being
used.
Reference mode Wide mode
: 2 front channels
: Virtual sound field created with the
Dolby Virtual Speaker mode
Dolby Virtual Speaker
2 Features of Dolby Virtual Speaker sound
• Accurate surround sound field positioning
The virtual surround speakers are positioned at 105° to the left
and 105° to the right.
• Multi-channel programs played according to the producer’s
intentions
The sound of the different channels is played in the position set
upon mixing. For example, sound set at the rear left is heard
from the rear left.
• Stereo programs played in surround
The Dolby Pro Logic II circuit is used together with the Dolby
Virtual Speaker circuitry to create a rich virtual surround sound
field with stereo programs as well.
• Selecting the listening mode
Two listening modes are provided: Reference and Wide.
Dolby Headphone is a 3D sound technology developed jointly by
Dolby Laboratories and Lake Technology of Australia achieving
surround sound with regular headphones.
Normally when using headphones all the sounds are sounded in
the head, making it uncomfortable to listen with headphones for
long periods of time. Dolby Headphone simulates speaker
playback in a room and positions the sound sources to the front
or the sides, outside of the head, achieving a powerful sound
similar to that of a movie theater or home theater. This
technology is aimed mainly at multi-channel audio or video
equipment including Dolby Digital or Dolby Pro Logic Surround
decoding functions and operates inside a high performance
digital signal processing chip (DSP).
The Dolby Headphone mode can be used not only with multichannel sources but also with stereo programs.
Dolby Headphone
Page 64

61
ENGLISH
Additional information Additional information
ENGLISH
Surround modes and parameters
Presence/absence of signals and controllability in the various modes
Channel output
FRONT
L/R
SUB-
WOOFER
Surround Mode
DVS:
Dolby Virtual Speaker
DHP:
Dolby Headphone
REFERENCE
WIDE
DOLBY H/P
BYPASS
STEREO
ROCK ARENA
JAZZ CLUB
C
C
C (H/P ONLY)
C (H/P ONLY)
C
C
C
B
B
E
E
B
B
B
DVS
DHP
B : Can be either present or absent, depending on speaker configuration setting.
C : Signal present or controllable.
4
: Can be selected with 2-channel decode mode.
E : No signal or not controllable.
D.MIX : Compatible with down-mixing.
PL
II :Compatible with PLII processing.
Playback signals and surround modes for the various input functions
DVD / AUX (AUX1, 2, 3)
When playing
Dolby Digital signals
When playing
DTS signals
When playing
PCM signals
2-channel
Multi-
channel
Multi-channel 2-channel
AUX1 / AUX2 /
AUX3 / TUNER /
iPod / Portable
When playing
analog signals
2-channel
4 PLII
4 PLII
4 PLII
C
C
C
C
C
C
C
C D.MIX
C
C
C D.MIX
C
4 PL
II
C
4 PL
II
C
4 PL
II
C D.MIX C
C D.MIX C
CC
CC
4 PL
II
4 PLII
4 PLII
C
C
C
C
Presence / absence of signals and controllability in the various modes
SDB
TONE
CONTROL
Surround Mode
DVS:
Dolby Virtual Speaker
DHP:
Dolby Headphone
C (OFF)
C (OFF)
C (OFF)
C (OFF)
C (OFF)
C (OFF)
C (OFF)
C (OFF)
C (OFF)
C (OFF)
C (OFF)
C (OFF)
C (OFF)
C (OFF)
C : Signal present or controllable.
E : No signal or not controllable.
*1 : 2ch DECODE MODE (VIRTUAL1, VIRTUAL2) selectable.
*2 : 2ch DECODE MODE (CINEMA or MUSIC mode) selectable.
( ) : Parameter’s default value
Surround parameter –
default value indicated in (parentheses)
2ch DECODE MODE
Dolby Digital / DTS signal
C *1 (VIRTUAL1)
C *2 (CINEMA)
E
E
C (0dB)
C (0dB)
C (0dB)
E
C (0dB)
C (0dB)
C (0dB)
E
LFE
C *1 (VIRTUAL1)
C *2 (CINEMA)
REFERENCE
WIDE
DOLBY H/P
BYPASS
STEREO
ROCK ARENA
JAZZ CLUB
DVS
DHP
HDCD is an encoding/decoding technology that greatly reduces
the distortion occurring at the time of digital recording while
maintaining compatibility with the conventional CD format.
HDCD allows 20-bit data to be converted into the 16-bit data of
current CDs with no loss in sound quality.
The use of this HDCD decoder makes it possible to achieve the
high resolution and low distortion characteristic of HDCD when
playing HDCD-compatible discs, and DENON’s digital technology
optimizes the high sound quality possibilities of HDCD
technology. Furthermore, normal CDs and HDCD-compatible
CDs are automatically identified, and the optimum digital signal
processing for that type of disc is used.
®
, HDCD®, High Definition Compatible Digital®and
Microsoft®are either registered trademarks or trademarks of
Microsoft Corporation, Inc. in the United States and/or other
countries. HDCD system manufactured under license from
Microsoft Corporation, Inc. This product is covered by one or
more of the following: In the USA: 5,479,168, 5,638,074,
5,640,161, 5,808,574, 5,838,274, 5,854,600, 5,864,311,
5,872,531, and in Australia: 669114. Other patents pending.
HDCD®(High Definition Compatible Digital®)
decoder
AL24 Processing has inherited the technology of the original
ALPHA Processing that was used in DENON’s highly-successful
reference-class audio components. AL24 Processing further
reduces quantization distortion and represents the ultimate
analog waveform reproduction technology designed to support
the higher numbers of bits and higher sampling. AL24 Processing
senses the nature of the digital data being input and interpolates
the data so that it faithfully replicates the original analog
waveform. AL24 processing operates when PCM, MP3 or WMA
data is inputted.
AL24 Processing (Stereo mode only)
Page 65

62
ENGLISH
ENGLISH
Troubleshooting
PageMeasuresCause
Symptom
Display not lit and
sound not produced
when power switch set
to on.
• Power supply cord not plugged in
securely.
• Check the insertion of the power
supply cord plug.
12
Display
lit but sound not
produced.
• Speaker cables not securely
connected.
• Improper position of the
FUNCTION button.
•Volume control set to minimum.
• MUTING is on.
• Digital signals not input Digital
input selected.
• Connect securely.
• Set to a suitable position.
•Turn volume up to suitable level.
•Switch off MUTING.
• Input digital signals or select input
terminal to which digital signals
are being input.
Monitor does not
display an image.
• Connections between the video
output terminal of this unit and the
input connector of the monitor are
incomplete.
• The input setting of the monitor
TV is different.
• When “PROGRESSIVE” is set, no
video signals are output from the
VIDEO OUT or S-VIDEO OUT
terminals.
• Check whether the connections
are correct.
• Set the input switching of the TV
to the terminal to which the video
input is connected.
• Set “INTERLACED” if you want to
use the VIDEO OUT or S-VIDEO
OUT signals.
The program cannot be
copied from DVD to the
VCR.
• Almost all movie software
contains a copy prevention signal.
•A copy cannot be made.
Common problems when listening to the discs, tapes and FM broadcasts, etc.
Troubleshooting
If a problem should arise,first check the following.
1. Are all the connections correct ?
2. Are you following the instructions in the manual ?
3. Are the speakers and other components operating property?
If this unit does not seem to be functioning properly, check the table below. If this does not solve
the problem, this unit may be damaged. Turn off the power, unplug the power supply cord from
the power outlet, and contact your store of purchase or nearest DENON sales office.
10
29
13
14
15, 30
11, 15,
16
—
16
—
PageCheck
Symptom
—
5
6
—
—
DVD operation
Playback does not start
when
1 button is
pressed.
Playback stops
immediately.
• Is there condensation on the disc or player ? (Let stand for 1 or 2 hours.)
• Discs other than DVDs, video CDs and music CDs cannot be played.
•Disc is dirty. Wipe off the dirt.
Menu playback of video
CD’s is not possible.
• Menu playback is not possible with anything but video CDs with
playback control.
Picture is disturbed
during the search
operation.
• Some disturbance is normal.
Buttons do not operate. • Some operations are disabled for some discs.
No subtitles are
displayed.
• Subtitles are not displayed for DVDs not containing subtitles.
• Subtitles are turned off. Turn the subtitles setting on.
Audio (or subtitle)
language does not
switch.
• The audio (or subtitle) language does not switch for discs which do not
include multiple audio (or subtitle) languages.
• For some discs the audio (or subtitle) language cannot be switched
when the operation to switch it is performed, but can be switched on
the menu screens.
Angle does not switch.
• The angle cannot be switched for DVDs which do not contain multiple
angles. In some cases multiple angles are only recorded for specific
scenes.
Playback does not start
when the title is
selected.
• Check the “RATINGS” setting.
The password for rating
level has been
forgotten.
Reset all the DVD
setting to Factory
Preset.
• Initialize using the procedure described at “Initialization of the
microprocessor”.
The disc is not played
with the audio or
subtitle language set as
the default setting.
• The disc does not play with the selected audio or subtitle language if
that audio or subtitle language is not included on that DVD.
Picture is not displayed
in 4:3 (or 16:9).
• Set the WIDE/LB/PS switch on the rear panel for the type of TV being
used.
Menu screen messages
for the desired language
do not display.
• Check the default setting for the disc language’s menu language.
—
—
43
—
18
—
50
41
43
11
43
When the subwoofer
indicator has lit.
• The subwoofer and main unit are
not properly connected with the
system cable.
• Check whether or not the cable is
properly connected.
If the indicator lights even though
the cable is properly connected,
there may be a malfunction.
10
Page 66

63
ENGLISH
ENGLISH
Troubleshooting Troubleshooting
PageMeasures
Symptom
Cause
Continuous noise is
heard when receiving
FM programs
• Antenna cable is not properly
connected.
• Connect the antenna cable
properly.
• Connect an outdoor antenna.
16
16
Tuner
This unit does not
operate properly when
remote control unit is
used.
• Batteries dead.
• Remote control unit too far from this
unit.
• Obstacle between this unit and
remote control unit.
• Different button is being pressed.
• < and > ends of battery inserted
in reverse.
• The mode selection of the remote
control is not properly selected.
The TV mode, DVD mode, CABLE
mode, or DBS mode is not
properly selected.
• Replace with new batteries.
• Move closer.
• Remove obstacle.
•Press the proper button.
• Insert batteries properly.
•Press the remote control MODE
SELECTOR switch for the item
you wish to operate. To operate
this unit, use with the DVD mode.
12
6
6
—
12
58
Remote control unit
Hissing or continuous
noise is heard when
receiving AM programs
• This may be noise from a TV or
interference from a radio station.
•Turn off the TV.
• Change the position and direction
of the AM loop antenna.
—
—
2 NOTE ON USE
•Avoid high temperatures.
Allow for sufficient heat
dispersion when installed on a
rack.
• Keep the apparatus free from
moisture, water, and dust.
• Do not let foreign objects into the
apparatus.
• Handle the power cord carefully.
Hold the plug when unplugging
the cord.
• Unplug the power cord when not
using the apparatus for long
periods of time.
• Do not let insecticides, benzene,
and thinner come in contact with
the apparatus.
• Never disassemble or modify the
apparatus in any way.
• Do not obstruct the ventilation
holes.
* (For apparatuses with ventilation holes)
Page 67

64
ENGLISH
ENGLISH
Specifications
2 General
Power supply: 120 V AC, 60 Hz
Power consumption: 75 W (67 W + 8 W (iPod))
(At standby: Approximately 0.7 W)
Maximum external
dimensions: 380 (W) x 97 (H) x 250 (D) mm
(14-61/64” x 3-13/16” x 9-27/32”)
(including feet, knobs, and connectors)
Mass: 4.2 kg (9 lbs 4 oz)
2 Remote control unit (RC-1007)
Remote control method: IR pulse method
Power supply: 3 V DC, using two AA batteries
2 Speakers
• Speaker system (SC-S101)
Type: 2-way, 2-speakers
Closed box / Low-leakage-flux
Speakers: 10 cm cone bass-mid x 1
2.5 cm high range x 1
Dimensions: 134 (W) x 335 (H) x 76 (D) mm (5-9/32” x 13-3/16” x 2-63/64”)
Mass: 1.42 kg (3 lbs 2 oz)
• Active subwoofer (DSW-S101)
Type: 1-way, 1-speaker
Reflex box / Low-leakage-flux / Built-in amplifier
Speaker: 20 cm cone x 1
Dimensions: 236 (W) x 368 (H) x 460 (D) mm
(9-9/32” x 14-31/64” x 18-7/64”) (including foot)
Mass: 15.4 kg (33 lbs 15 oz) (including base)
* For purposes of improvement, specifications and design are subject to change without notice.
* This product incorporates copyright protection technology that is protected by method claims of certain U.S.
patents and other intellectual property rights owned by Macrovision Corporation and other rights owners. Use
of this copyright protection technology must be authorized by Macrovision Corporation, and is intended for
home and other limited viewing uses only unless otherwise authorized by Macrovision Corporation. Reverse
engineering or disassembly is prohibited.
2 Audio section
• Power amplifier section
Rated output: Front : 50 W + 50 W
Subwoofer: 100 W
• Analog section
Input sensitivity /
Input impedance: 200 mV/47 kΩ/ohms
Signal-to-noise ratio: 92 dB (STEREO MODE, DIRECT MODE: ON)
2 Tuner section
Reception frequency range: FM: 87.5 MHz to 107.9 MHz
AM: 520 kHz to 1710 kHz
Receiving sensitivity: FM: 1.5 µV/75 Ω/ohms
AM: 20 µV
FM stereo separation: 35 dB (1 kHz)
2 Video section
• Standard video terminal
Output level/impedance: 1 Vp-p/75 Ω/ohms
• S-video connector
Output level/impedance: Y (Brightness) signal — 1 Vp-p/75 Ω/ohms
C (Color) signal — 0.286 Vp-p/75 Ω/ohms
• Color difference (Component)
Video connector:
Output level/impedance: Y (Brightness) signal — 1 Vp-p/75 Ω/ohms
CB/PB (Blue) signal — 0.648 Vp-p/75 Ω/ohms
CR/PR (Red) signal — 0.648 Vp-p/75 Ω/ohms
2 DVD section
Signal format: NTSC/PAL
Supported discs: (1) DVD-VIDEO discs
12 cm single side 1 layer, 12 cm single side 2 layers,
12 cm both sides 2 layers (single side 1 layer),
8 cm single side 1 layer, 8 cm single side 2 layers,
8 cm both sides 2 layers (single side 1 layer)
(2) Compact Disc (CD-DA, VIDEO CD)
12 cm discs, 8 cm discs
Analog audio output: Output level: 2 Vrms (AUX3 OUT)
2 Clock/Timer section
Clock method: Power line frequency synchronized method
Timer: Everyday/Once timer: One system each
Sleep timer: 120 minutes, maximum
Specifications
Page 68

Introduction
1
FRANCAIS
Contenu
Introduction
Accessoires ··············································································2
Avant l’utilisation ····································································2
Precautions d’installation
Recepteur DVD surround ·······················································3
Système d’enceintes
et subwoofer
·······································3, 4
Precautions de manipulation
Recepteur DVD Surround·······················································4
Enceintes ···············································································4
Subwoofer ·············································································4
Disques·····················································································5
La terminologie du disque······················································5
Precautions de manipulation des diaques
Disques···················································································5
Manipulation des disques·······················································5
Nettoyage des disques···························································6
Précautions lors du chargement des disques ························6
Rangement des disques·························································6
Chargement des disques ·······················································6
Portée de fonctionnement de la télécommande ·················6
Appellation des pieces et fonctions
Panneau avant recepteur DVD surround································7
Panneau arrière du Subwoofer···············································7
Affichage·················································································7
Unité de télécommande·····················································8, 9
Advanced setup options
Indications de câblages ························································14
Brancher un DBS / Radio câble / VCR··································15
Brancher une platine cassette,
un enregistreur MD ou CD···················································15
Connecting a S-Video connections
(Better picture quality) ··························································15
Brancher Etablir des connexions S-Vidéo
(meilleure qualité d'image) ···················································16
Pour changer le câble d'enceinte ·········································16
Brancher les bornes de l’antenne ········································16
Utiliser une autre fonction de lecture (lecture du disque)
Lecture en répétition ····························································35
Lecture des plages dans l’ordre souhaité (Programme)·······36
Lecture aléatoire de plages ··················································36
Lecture en mode zoom ························································36
Utilisation des RDS (Système de données radio)
RDS (Système de données radio) ········································37
Recherche RDS ····································································37
Recherche PTY·····································································37
Recherche TP ·······································································38
RT (Texte Radio) ···································································38
Affichage à l’écran
Fonctionnement en utilisant l’OSD des
informations concernant le disque ·································38, 39
Activer l’audio multiple, les sous-titres et l’angle OSD ······39, 40
Ajustement de la qualité de l’image·····································40
Autres fonctions
Réglage de la qualité du son (TONE/SDB) ···························41
Fonction de mise sous tension automatique ·······················41
Fonctions du système ··························································41
Initialisation du microprocesseur··········································41
Changer les reglaes par defaut
Articles de réglage du système············································42
Régler le “REGLAGE LANGUE” ····································43, 44
Régler le “MENU REGLAGE VIDEO” ··································45
Régler le “CONFIGURATION AUDIO” ························45 ~ 47
Régler le “REGLAGE DES NIVEAUX” ···························47, 48
Régler le “DISTANCE”···················································48, 49
Régler le “POSITION DES HP”······································49, 50
Régler le “MENU NIVEAU DE PROTECTION”··············50, 51
Régler le “CHOIX DE MENU”·····································51 ~ 53
Régler le “REGLAGE DU TIMER” ·································53, 54
Après avoir changé les réglages système····························54
Items d’installation du système et valeurs par défaut
(réglées à la sortie de l’usine)·········································55, 56
A propos de la sortie du signal audio numérique
Lorsqu’un disque est lu avec le S-101 (DIGITAL OUT) ········57
Régler la télécommande pour commander
d’autres appareils audio / vidéo
Mémoires présélectionnées TV,
radio câble et récepteur satellite ·········································58
Fonctionnement du TV, radio câble et récepteur
satellite après avoir stocké leurs signaux de
télécommande dans la mémoire préréglée ························58
Réglages de la pénétration spéciale ····································58
Options de réglage avancées
Introduction
Réglage du système
Lecture d'un disque
Lecture ···········································································17, 18
Interrompre la lecture···························································18
Lecture de vues fixes (Pause) ··············································18
Recherche avant/arrière························································19
Saut en début de chapitre ou de plage ································19
Lecture cadre par cadre
(pour les DVD et les CD vidéo uniquement) ························19
Ralenti (pour les DVD et les CD vidéo uniquement) ············19
L’écoute de MP3 ou WMA CD-R/CD-RW ························20, 21
Lecture de fichiers d’image fixe (format JPEG ) ············22, 23
Ecouter la radio
Réglage manuel····································································24
Présélections automatiques du syntoniseur
(pour l'unité principale seulement) ·······································24
Ecoute de stations préréglées··············································24
Préréglage des stations syntonisées et
dénomination des stations
(télécommande uniquement) ···············································25
Lecture d'un la iPod
Brancher la iPod····································································26
Lecture··················································································27
Visionner le diaporama ·························································28
Débrancher le iPod ·······························································28
Lecture et enregistrement d’autres sources
Brancher le lecteur portable ·················································28
Lecture d'un lecteur audio portable (mini fiche stéréo) ·······28
A propos de l'enregistrement analogique sur
un composant audio externe (AUX3) ···································28
Réglage du Fonction·······················································29, 30
Fonctionnement des fonctions ambiance
Reproduction des sons d’ambiance DTS et Dolby Digital
(avec des entrées numériques seulement)··························30
Réglages du mode 2 canaux ················································31
Lecture avec les modes ambiance DENON originaux ···31, 32
Lecture à l’aide du mode Dolby Headphone······················32
Utiliser le menu “HELP”·······················································33
Utilisation du réveil
Réglage de l’horloge (Affichage sur 12 heures)·············33, 34
Réglage de la minuterie de sommeil····································34
Fonctionnement élémentaire
Fonctionnement avancé
Raccordement des enceinte·················································10
Brancher les antennes fournies············································11
Brancher un TV ····································································11
Insertion des piles ································································12
Réglez le format d'image de votre télé
Brancher le cordon d'alimentation········································12
Lecture d'un disque DVD ···············································13, 14
Fonctionnement et configuration simples
FRANCAIS
Page 69

2
FRANCAIS
Introduction Introduction
Dépistage des pannes ····················································62, 63
Caractéristiques techniques·················································64
Surround··········································································59, 60
Dolby Virtual Speaker ···························································60
Dolby Headphone·································································60
Modes surround et paramètres············································61
Décodeur HDCD (High Definition Compatible
Digital) decoder·····································································61
AL24 Processing (mode stéréo uniquement)·····················61
Informations supplémentaires
Liste de codes préréglés
··································
La fin d’un livre
Nous vous remercions d'avoir choisi le Home Cinema DENON S-101 DVD. Ce remarquable
composant a été fabriqué pour fournir une superbe écoute de sons d’ambiance avec des sources
de cinéma domestique telles que DVD, ainsi que pour assurer une formidable reproduction haute
fidélité de vos sources musicales favorites.
Ce produit étant équipé d’une immense foule de caractéristiques, nous vous recommandons avant
de commencer l’installation et l’utilisation de l’appareil de bien lire le contenu de ce manuel avant
de procéder.
Accessoires
Veuillez contrôler que les articles suivants sont bien joints à la S-101 dans le carton:
rtyu
i o!0 !1 !2
!3 !4 !5 !6 !7
q Mode d’emploi
(avec la feuille d’installation rapide .........1
w Certificat de garantie
(pour l’Amérique du Nord uniquement)..1
e Liste des centres d’entretien..................1
r Télécommande (RC-1007)......................1
t Piles R6P/AA ..........................................2
y Cordon d’alimentation.............................1
u Câble du système (D-SUB25P)...............1
i Câble pour enceinte................................2
o Video cable .............................................1
!0 Câble pour iPod ......................................1
!1 AM loop antenna....................................1
!2 FM indoor antenna .................................1
!3 Support d'enceinte .................................2
!4 Support mural.........................................2
!5 Vis...........................................................4
!6 Coussinets amortisseurs
.......................................4 pavés./1 feuille
!7 Clé hexagonale .......................................1
FRANCAIS
Page 70

3
FRANCAIS
Introduction Introduction
REMARQUE:
• Ce récepteur ambiance DVD fonctionne à l'aide du semi-conducteur laser.
Pour vous permettre de profiter de la musique dans des conditions d'utilisation stables, nous
vous recommandons d'utiliser cet appareil dans une pièce dont la température est comprise
entre 5 C (41 F) et 35 C (95 F).
Copyrights
• La loi interdit toute reproduction, émission, location ou lecture de disques en public sans le
consentement du détenteur du copyright.
Avant l’utilisation
Faire attention aux points suivants avant d’utiliser cet appareil:
•
Manier soigneusement le cordon d’alimentation
Ne pas endommager ou déformer le cordon
d’alimentation. S’il est endommagé ou déformé,
une décharge électrique ou un mauvais
fonctionnement risque de se produire en cas
d’utilisation d’un tel cordon. Lors du retrait de la
prise murale, retirer le cordon en le tenant par la
fiche, mais ne pas tirer sur le cordon lui-même.
• Ne pas ouvrir le couvercle supérieur
Afin d’éviter une décharge électrique, ne pas
ouvrir le couvercle supérieur.
• Ne rien placer à l’intérieur de l’appareil
Ne pas introduire d'objets métalliques et ne
pas reverser de liquide à l'intérieur du
récepteur ambiance DVD.
Une décharge électrique ou un mauvais
fonctionnement risque de se produire.
• Déplacement de l’appareil
Pour éviter des court-circuits ou des fils
endommagés dans les câbles de connexion,
toujours débrancher le cordon d’alimentation,
et déconnecter les câbles de connexion entre
tous les autres composants audio lors du
déplacement de l’appareil.
•Avant de mettre sous tension
Vérifier une nouvelle fois si toutes les connexions
sont bonnes et s’il n’y a pas de problèmes avec
les câbles de connexion. Toujours placer
commutateur de mise sous tension en position
d’attente avant de connecter et de déconnecter
les câbles de connexion.
• Ranger ces instructions dans un endroit sûr
Après la lecture, conservez ces instructions
dans un endroit sûr.
• Noter que les illustrations de ces
instructions peuvent varier de l’appareil
actuel dans un but d’explication.
Precautions d’installation
L’utilisation simultanée de cet appareil ou d’autres
appareils électroniques à microprocesseur avec un
tuner ou un téléviseur peut produire des parasites
dans le son ou l’image.
Si cela se produit, prendre les mesures suivantes:
• Installer cet appareil aussi loin que possible du
tuner ou du téléviseur.
• Eloigner les câbles d’antenne du tuner ou du
téléviseur aussi loin que possible du cordon
d’alimentation et des câbles de connexion
d’entrée/sortie de cet appareil.
• Ce problème est fréquemment rencontré lors
de l’utilisation cordon d'alimentation ou de
câbles d’arrivée de 300 Ω/ohms. L’utilisation
d’antennes extérieures et de câbles
coaxiaux de 75 Ω/ohms est recommandée.
Recepteur DVD surround
Remarque:
Pour permettre la dissipation de chaleur,
n’installez pas cet équipement dans un
espace confiné tel qu’une bibliothèque ou
un endroit similaire.
Mur
Remarque
Système d’enceintes
et subwoofer
La qualité du son produit par le système
d’enceintes est affectée par la taille et la forme de
la pièce, ainsi que par la méthode d’installation.
Soyez attentifs aux remarques inscrites ci-dessous
avant l’installation du système d’enceintes.
•Veuillez noter que quand le système
d’enceintes est disposé sur le même support
ou la même étagère qu’une platine disque, un
bruit gênant peut se produire.
• S’il y a un mur, une porte vitrée, etc., situé
directement en face ou derrière le système
d’enceintes, couvrez le mur ou la porte avec
un rideau épais pour éviter toute résonance
ou réflexion.
•Les systèmes d’enceintes sont de type à faible
écoulement de flux et peuvent être utilisés près
de télévisions. Mais selon la télévision, il peut y
avoir des taches de couleur sur l’image. Si cela
se produit, éteignez la télé, écartez-la un peu de
l'enceinte, attendez 15 à 30 minutes, puis
rallumez la télé. Le circuit automatique de
démagnétisation de la télé devrait réduire le
tachage sur l'image. Si le tachage persiste,
écartez davantage l'enceinte de la télé.
• Installez le subwoofer sur un sol ferme, plat
pour éviter des accidents dus à une chute.
• Ne pas mettre de platine disque, de lecteur de
CD ou d’autres composants AV sur le
subwoofer.
Mur
Veuillez enregistrer et conserver le nom de modèle et le numéro de série de votre ensemble
indiqués sur l'étiquette de caractéristiques.
Nom du modèle : S-101
No de série.
FRANCAIS
Page 71

4
FRANCAIS
Introduction Introduction
REMARQUE:
• Pour assurer la sécurité, ne pas placer
d’objets sur ou appuyés contre le système
d’enceintes.
•L’enceinte peut s’affaisser ou tomber si
une forte pression est appliquée sur les
côtés. Soyez très attentifs à éviter cette
situation car cela pourrait causer des
blessures ou d’autres accidents sérieux.
• Si vous souhaitez installer l'enceinte au
mur, vous devriez, par soucis de sécurité,
demander à un spécialiste de procéder à
l'installation.
•Veillez à fixer les cordons des enceintes au
mur, etc., pour éviter que les gens
trébuchent dessus ou bien tirent dessus
accidentellement, provoquant la chute des
systèmes d’enceintes.
•Veillez à effectuer un contrôle de sécurité
après l’installation des systèmes
d’enceintes. Par la suite, effectuez des
vérifications de sécurité à intervalles
réguliers pour vous assurer qu’il n’y a
aucun risque de chute des systèmes
d’enceintes.
• Pour votre sécurité, ne rien placer sur les
haut-parleurs et ne pas non plus s’appuyer
contre.
• Ne pas pousser le haut-parleur
sur le côté pour le remettre
droit car cela pourrait causer
un accident grave.
• Fixer les câbles de haut-parleur afin de ne
pas trébucher ce qui ferait tomber le hautparleur.
SC-S101
• Lorsque vous montez l'enceinte satellite (SCS101) sur un support d'enceinte ou un
support mural.
Comme montré sur le schéma, attachez le
support de l'enceinte au dos de l'enceinte à
l'aide des deux vis fournies.
Lors du montage, assurez-vous de procéder à
une installation correcte et sûre.
• Lorsque vous placez les enceintes incluses
SC-S101 sur une baie ou sur une étagère,
fixez solidement le support d'enceinte fourni à
l'aide des vis fournies avec les enceintes SCS101 (gauche et droite).
2 Installation du support d'enceinte
Support d’enceinte
Vis
SC-S101
Mur
Vis
Support de mural
• Lorsque vous placez l'enceinte satellite (SC-
S101) sur un support, etc., collez les
coussinets amortisseurs inclus aux deux
coins du dessous de la surface inférieure.
(Référez-vous à l'illustration ci-dessous.)
Collez les coussinets
amortisseurs ici.
Partie inférieure du
SC-S101
Precautions de manipulation
• Commutation de la fonction d’entrée
lorsque les bornes d’entrée ne sont pas
connectées
Un déclic peut être produit si la fonction
d’entrée est commutée lorsque rien n’est
connecté aux bornes d’entrée. Dans ce cas,
abaisser la commande VOLUME knob ou
connecter des composants aux prises
d’entrée.
• Mise en sourdine des prise HEADPHONE et
de la bornes SPEAKER.
Les prises HEADPHONE et les bornes
SPEAKER sont équipées d’un circuit de
sourdine. Pour cette raison, les signaux de
sortie sont fortement réduits pendant
plusieurs secondes après que commutateur
de mise sous tension ait été allumé ou après
le changement de fonction d’entrée, de mode
d’ambiance ou de toute autre installation. Si le
volume est augmenté pendant cet instant, la
sortie sera très élevée après l’arrêt du circuit
de mise en sourdine. Toujours attendre que le
circuit de mise en sourdine se désactive avant
de régler le volume.
• Chaque fois que commutateur de mise
sous tension est en position STANDBY,
l’appareil est toujours connecté à une
tension de ligne secteur.
Toujours débrancher le câble pour aller, par
exemple, en vacances.
Recepteur DVD Surround Enceintes
• Le réglage silencieux après la mise sous
tension est sur ON.
L’amplificateur intégré du subwoofer actif
comprend un circuit silencieux. Le signal de
sortie est fortement atténué pendant
plusieurs secondes après la mise sous
tension. Si le volume est ajusté pendant ce
temps, la sortie peut être très élevée quand le
circuit silencieux est désactivé. Attendez que
le circuit silencieux soit bien désactivé avant
d’ajuster le volume.
• Force magnétique de l'enceinte.
Notez que des taches de couleur peuvent
apparaître sur une télévision, etc., du fait
d’une interaction avec le système d’enceintes
s’il y a un aimant ou un objet engendrant une
force magnétique à proximité.
Exemple:
(a) Quand il y a des aimants sur la porte de
l’armoire, le support, etc.
(b) Quand un appareil médical, etc., équipé
d’aimants est placé à proximité.
(c) Quand des jouets ou d’autres objets utilisant
des aimants sont placés à proximité.
REMARQUE:
•Veillez à fixer le cordon d’alimentation au
mur, etc., pour éviter que les gens
trébuchent dessus ou bien tirent dessus
accidentellement, provoquant la chute du
subwoofer.
Subwoofer
FRANCAIS
Page 72

FRANCAIS
Introduction Introduction
5
Dimension
du disque
Signaux
enregistrés
Marque (logo)
Disques
utilisables
DVD-vidéo
(REMARQUE 1)
DVD-R
DVD-RW
(REMARQUE 2)
Vidéo
numérique
(MPEG2)
12 cm
8 cm
12 cm
8 cm
12 cm
8 cm
Vidéo
numérique
(MPEG1)
Audionumérique
MP3
Photo numérique
(JPEG)
Video CD
CD
CD-R
CD-RW
(REMARQUE 3)
Recordable
ReWritable
12 cm
Photo
numérique
(JPEG)
CD de photos
R
R
R
W
R
W
12 cm
Audionumérique
WMA
(Windows Media
Audio)
• REMARQUE 1:
Seules les sections vidéo conformes à la norme vidéo DVD peuvent être jouées.
• REMARQUE 2:
Lecture de disques DVD-R et DVD-RW
Les disques DVD-R et DVD-RW enregistrés en format vidéo sur un enregistreur DVD peuvent
être lus sur le S-101.
Les disques qui n’ont pas été finalisés ne peuvent pas être lus.
Le S-101 ne peut pas lire les disques DVD-R et -RW enregistrés en mode “VR” ou avec “CPRM”.
Selon l’état d’enregistrement du disque, le disque risque de ne pas être accepté ou lu
normalement (l’image ou le son risque de ne pas être normal, etc.).
• REMARQUE 3:
Suivant la qualité d’enregistrement, certains CD-R/RW ne peuvent être joués.
• “KODAK” est une marque déposée de la société Eastman Kodak..
•Windows Media et le logo Windows sont des marques ou des marques déposées appartenant à
Microsoft Corporation (U.S.A.) aux Etats-Unis et dans d’autres pays.
Disques
Les types de disques énumérés dans le tableau ci-dessous peuvent être utilisés sur le S-101.
Les marques de disque sont indiquées sur les étiquettes ou boîtiers de disque.
2 Les types de disques suivants ne peuvent pas être lus sur le S-101:
• Les DVD avec des nombres de région autres que “1” ou “ALL” (TOUS)
• Les DVD-ROM/RAM
• CVD
• Les CD-ROM (Seul les fichiers MP3/WMA peuvent être joués.)
• Les VSD
• Les CDV (Seule la bande son peut être lue)
• Les CD-G (Seul le son est reproduit)
• Les Photo CD (Ne jamais lire ce type de disque sur le S-101)
Les DVD-vídeo sont divisés en plusieurs
grandes sections appelées “Titres” et en
sections plus petites appelées “Chapitres”.
Des numéros sont attribués à ces sections. Ces
numéros sont appelés “Numéros de titre” et
“Numéros de chapitre”.
Par exemple:
Par exemple:
Titre 1 Titre 2
Piste 1
Chapitre 1
Les CD vidéo et audio sont divisés en sections
appelées “pistes”.
Des numéros sont attribués à ces sections. Ces
numéros sont appelés “numéros de piste”.
Les CD vidéo comportant la mention “Menu de
commande” (“playback control”) sur le disque
ou le boîtier possèdent une fonction permettant
d’afficher des menus sur l’écran de télévision
pour sélectionner les pistes ou afficher des
informations, etc., en mode interactif.
Les CD vidéo avec menus de commande
peuvent être utilisés sur le S-101.
• Ce lecteur DVD est conçu et fabriqué pour
prendre en compte les informations de
gestion de région (Region Management
Information) enregistrées sur les disques
DVD.
Ce lecteur vidéo DVD ne peut lire que les
disques DVD dont le numéro de région est
identique au sien.
Le numéro de région de ce
lecteur vidéo DVD est le 1.
1
2 Titres et chapitres (DVD-vídeo)
2 Les pistes (CD vidéo et audio)
2 Commande de lecture (CD vidéo)
La terminologie du disque
Chapitre 2 Chapitre 3 Chapitre 1 Chapitre 2
Piste 2 Piste 3 Piste 4 Piste 5
Disques
Seuls les disques de marques énumérées page
5 peuvent être joués sur le S-101.
Remarque, les disques de forme particulière
(disques en forme de cœur, disques
hexagonaux, etc.) ne peuvent pas être lus sur le
S-101. Ne pas tenter leur lecture car ils peuvent
endommager le lecteur.
Prendre soin de pas laisser
d’empreintes digitales sur la face
des données (le côté qui brille
comme un arc-en-ciel).
Manipulation des disques
Eviter de toucher la surface du disque lors du
chargement et déchargement.
Precautions de manipulation des diaques
FRANCAIS
Page 73

6
FRANCAIS
Introduction Introduction
Nettoyer avec précaution à
partir du centre vers l’extérieur.
Ne pas faire de
mouvement circulaire.
REMARQUE:
Ne pas utiliser d’aérosol pour disque ou
antistatique. Ne pas utiliser non plus de
solvant chimique volatile tel que le benzène
ou le dissolvant.
Aérosol pour
disque
Dissolvant Benzène
Nettoyage des disques
• Les empreintes digitales ou salissures sur le
disque peuvent entamer la qualité du son et
de l’image ou causer des coupures lors de la
lecture. Enlever toute empreinte de doigt ou
salissures.
• Utiliser un nécessaire de nettoyage de disque
disponible dans le commerce ou un chiffon
doux pour nettoyer toute empreinte de doigt
ou salissures.
Précautions lors du chargement
des disques
• Eviter toute empreinte digitale, graisse ou
salissure sur les disques.
•Prendre particulièrement soin de ne pas rayer
les disques en les sortant de leur boîtier.
• Ne pas tordre les disques.
• Ne pas chauffer les disques.
• Ne pas agrandir le trou central.
• Ne pas écrire sur les étiquettes (imprimées)
de disque avec un stylo à bille ou un crayon.
• Des gouttelettes de l’eau de condensation
peuvent se former sur la surface si le disque
est soudainement déplacé d’un endroit froid à
un endroit chaud. Ne pas utiliser de sèchecheveux, etc., pour sécher le disque.
Rangement des disques
•Toujours éjecter les disques une fois la lecture
terminée.
• Remettre les disques dans leur boîtier pour
les protéger de la poussière, des rayures et
des déformations.
• Ne pas placer les disques dans les endroits
suivants :
1. Exposés longtemps au soleil
2. Exposés à l’humidité ou à la poussière
3. Exposés à la chaleur d’appareils de
chauffage, etc.
Chargement des disques
• Charger un seul disque à la fois. L’empilage de
disques les uns sur les autres peut les abîmer
ou les rayer.
• Charger les disques de 8 cm de manière sûre
dans le guide de disque, sans adaptateur. Si le
disque n’est pas mis en place correctement, il
peut glisser hors du guide et bloquer le tiroir
du disque.
• Faire attention aux doigts quand le tiroir de
disque se referme.
• Ne pas mettre autre chose que des disques
dans le tiroir de disque.
•Ne pas charger de disques fêlés, déformés ou
réparés avec de l’adhésif, etc.
• Ne pas utiliser de disques s’ils portent du
ruban adhésif, si une partie de la colle de
l’étiquette est exposée, si l’étiquette a été
décollée. De tels disques peuvent rester
coincés à l’intérieur du lecteur et causer des
dommages.
Portée de fonctionnement de la télécommande
30°
30°
Approx. 7m / 22 pieds
• Diriger l’unité de télécommande vers le capteur de télécommande situé sur l’unité principale de
la manière indiquée dans le diagramme.
•L’unité de télécommande peut être utilisée d’une distance droite d’environ 7 mètres/22 pieds de
l’unité principale, mais cette distance sera raccourcie s’il y a un obstacle dans le chemin ou si
l’unité de télécommande n’est pas directement pointée vers le capteur de télécommande.
•L’unité de télécommande peut être actionnée à un angle horizontal d’un maximum de 30 degrés
par rapport au capteur de télécommande.
REMARQUE:
• Il peut être difficile d’actionner l’unité de
télécommande si le capteur de télécommande
est exposé aux rayons directs du soleil ou à une
forte lumière artificielle.
• Ne pas appuyer simultanément sur les
touches de l’unité principale et de l’unité de
télécommande pour ne pas entraîner de
mauvais fonctionnement.
• Des enseignes au néon ou autres appareils
qui génèrent des parasites de type
impulsionnel peuvent entraîner des erreurs de
fonctionnement, par conséquent, garder
l’appareil aussi loin que possible de tels tubes
au néon.
FRANCAIS
Page 74

7
FRANCAIS
Introduction Introduction
Pour plus de détails sur les fonctions de ces pièces, se référer aux pages indiquées entre
parenthèses ( ).
q e tw r u i o !0y
!1!2!4 !3
q
Commutateur d'alimentation
ON/STANDBY·······································(13)
w
iPod branché ·······································(26)
e
Touche OPEN/CLOSE (5) ····················(13)
r
Prise de portable ································(28)
t
Touche FUNCTION ·······························(29)
y
Affichage·················································(7)
u
Capteur de télécommande ···················(6)
i
Affichage du capteur lumineux ··········(51)
o
Commande VOLUME ··························(13)
!0
Prise de Headphones (PHONES) ········(32)
!1
To uc hes de SKIP (8, 9)················(19)
Touches TUNING +, – ···························(24)
!2
Touche PLAY/PAUSE (1/3)··········(17, 18)
!3
Touche STOP (2)/BAND················(18, 24)
!4
Plateau du disque ································(13)
Panneau avant recepteur DVD surround
Appellation des pieces et fonctions
Panneau arrière du Subwoofer
q
Arrivée secteur (AC IN)
w
Indicateur de PROTECTION
Cet indicateur s'allume en rouge lorsque le
câble de l'enceinte n'est pas correctement
branché ou que le circuit de protection dans
le subwoofer (DSW-S101) s'est activé.
e
CONNECTEUR DU SYSTEME
r
Connecteurs des ENCEINTES
Affichage
q
1 (le témoin de lecture) apparaît pendant la
lecture d’un disque tandis que 3 (le témoin
de pause) s’affiche en mode de pause.
w
S’allument pour indiquer les noms des
sections du disque en cours de lecture.
e
Apparaît lorsqu’une station est
correctement syntonisée.
r
Voyant qui s'allume lorsqu'une émission
RDS est reçue.
t
Cela s’allume lorsque la fonction TONE est
réglée.
y
Ce voyant s’allume lorsque le mode SDB est
activé.
u
Affiche le fichier, le numéro de piste et le
temps écoulé pendant la lecture.
i
Ce témoin clignote pendant la réception des
signaux de la télécommande.
o
Le volume actuel s'affiche.
!0
Apparaît lorsque la minuterie de mise hors
tension programmée est activée.
REMARQUE:
Le témoin de veille de la minuterie
n’apparaît pas si l’heure actuelle et la
minuterie n’ont pas été réglées.
!1
S’allume lorsque HDCD est lu.
!2
S'allume en mode Dolby Virtual Speaker.
!3
S'allume pour indique le format audio
actuellement lu.
!4
Les indications suivantes vous renseignent
sur le mode de FM réception
AUTO:
Apparaît lorsque la touche BAND est
enfoncée, commandant ainsi le passage
en mode ”FM AUTO”.
ST:
Apparaît lorsqu’une émission en stéréo est
captée en mode ”FM AUTO”.
MONO:
Apparaît lorsqu’un programme mono est
capté en mode ”FM AUTO” et que la
touche BAND est enfoncée, commandant
ainsi le passage en mode ”FM MONO”.
!5
S'allume en mode Dolby Headphone.
!6
S’allume pour indiquer le disque en cours de
lecture.
!7
S’allume en mode de lecture programmée,
mode lecture aléatoire et mode répéter
lecture.
!8
S’allume lorsque des signaux vidéo
progressifs sont en cours d’émission.
FRANCAIS
!6 !6!7!8 !3 !5!4 !3 !2 !1 !0 o i
twq ure y
q
w e
r
Page 75

8
FRANCAIS
Introduction Introduction
• Pour les détails sur les fonctions de ces pièces, se reporter aux pages données entre parenthèses ( ).
Unité de télécommande
Avant
Touche PLAY (1) ······(17)
Touche STOP (2)/BAND
·····························(18, 24)
Touches CHANNEL +/–
(Pour les modes sélectionnés)
···································(58)
Touche DVD ··············(29)
Touche SOURCE POWER
(Pour les modes sélectionnés)
···································(58)
Touche ON/STANDBY
···································(13)
Touche TUNER··········(24)
Touche SLOW/SEARCH
(6, 7)··················(19)
Touche STEREO MUSIC
···································(32)
Touche DVS/CINEMA
···································(31)
Touche RETURN
···································(17)
Touches de CURSOR (0,
1,
•,ª
) ···················(42)
Touche VIDEO INPUT
(Pour les modes sélectionnés)
···································(58)
Touche PUSH ENTER
···································(42)
Touche SLEEP···········(34)
To uche HELP ·············(42)
Touche MUTE ············(13)
Touche MENU/GUIDE
···································(17)
Touche STILL/PAUSE (3)
···································(18)
Touche AUX ··············(29)
Touches de SKIP (8,
9) ··························(19)
Touches de TUNING +/–
···································(24)
Touche VOLUME +/–
···································(13)
Arrière
Côté
Touche DISPLAY········(38)
Touche TOP MENU
···································(17)
Touche MODE············(24)
Touche MEMO···········(25)
Touche NUMBER
···································(17)
Touche PROGRAM/DIRECT
···································(36)
Touche ZOOM ···········(23)
Touche STATUS ········(29)
Touche RDS ···············(37)
Touche AUDIO/PTY
·····························(18, 19)
To uche SUBTITLE/RT
·····························(18, 37)
Touches de CURSOR
(0 , 1, •,ª) ······(42)
Touche SEARCH MODE
···································(19)
To uche ENTER
···································(42)
To uche ANGLE/CT
·····························(18, 37)
Touche TONE/SDB····(41)
To uche SURROUND
PARAMETER ··············(30)
To uche SURROUND
···································(29)
To uche REP 1/ALL
···································(35)
To uche RANDOM
···································(36)
To uche CALL··············(36)
To uche CLEAR···········(36)
Touches de SKIP
(8, 9)
···································(19)
Touches de TUNING +/–
···································(24)
Commutateur MODE SELECTOR
.....................................................(58)
REMARQUE:
• Une pression forte sur les touches à l'avant ou à l'arrière activera également les touches de
l'autre côté.
TV··········Pour activer la télé présélectionnée
DVD·······Pour activer cette unité
CABLE···Pour activer le radio câble
présélectionné
DBS ·······Pour activer le récepteur satellite
présélectionné
FRANCAIS
Page 76

9
FRANCAIS
Introduction Introduction
Fonction DVD
2 Touches valides pour chacune des fonctions
Fonction TUNER Fonction AUX
FRANCAIS
Page 77

10
FRANCAIS
Fonctionnement et configuration simples
(L)(
R
)
Raccordement des enceinte
REMARQUE:
• Ne pas insérer le cordon d'alimentation dans la prise de courant avant d'avoir effectué tous
les branchements.N’oubliez pas de raccorder correctement les canaux (L à L (blanc) et R à R
(rouge)), de la manière illustrée.
ADV-S101
SC-S101
Câble du système
Câble de l'enceinte
DSW-S101
Raccordez l’enceinte du canal gauche (située sur la gauche lorsque du système de face) aux bornes
L (gauche) et l’enceinte du canal droit aux bornes R (droite). Pour plus d’informations, reportez-vous
au mode d’emploi des enceintes. Veillez à ce que celles-ci aient une impédance égale ou à 4
Ω/ohms.
Câble de l'enceinte
Blanc Rouge
2
1
il y a un trou
il y a une bosse
Avec le S-101, vous pouvez profiter facilement d'un home cinéma, en utilisant simplement les
câbles fournis pour brancher un subwoofer et des enceintes à votre télé. “Installation et
fonctionnement faciles” est un guide facile qui donne une série de procédures allant de
l'établissement des connexions à la lecture d'un DVD.
• Insérez correctement les fiches. Tout mauvais
raccordement risque de provoquer du bruit.
• Du bruit ou un bourdonnement risque de se
produire si le matériel audio connecté est
utilisé indépendamment sans que cet appareil
ait été mis sous tension. Le cas échéant,
activer cet appareil.
• Ce système contient des circuits numériques
qui peuvent provoquer des interférences, un
brouillage des couleurs ou des changements
de couleur sur les téléviseurs. Si cela se
produit, éloignez le système le plus possible
du téléviseur.
• Quand commutateur d’alimentation est en
position de veille (STANDBY), le système
demeure sous tension.
•Veillez à débrancher le cordon d’alimentation
pendant votre absence, lorsque vous partez
en vacances, par exemple.
• Si vous débranchez le cordon d’alimentation,
attendez environ 5 secondes avant de le
rebrancher.
• Si vous rassemblez les cordons de
raccordement (cordons avec fiche à broche
etc.) à proximité des enceintes, ils risquent de
provoquer des ronflements ou du bruit.
MEMORANDUM
Blanc
Rouge
Précautions pour la connexion
Avec les sorties d’enceinte de cet appareil, les
signaux ayant la phase inversée des signaux
de la borne de sortie “+” sont également
envoyés de la borne de sortie “–”.
Ne pas connecter à un appareil pour
commuter entre enceintes multiples (un
sélecteur d’enceinte ou un sélecteur de
canal audio) ou connecter d’une autre
manière que décrite dans ce manuel. Ceci
risque de causer des dommages.
Connexions des enceintes
S’assurer de bien éteindre l’amplificateur
lors de la connexion des enceintes.
Utiliser les câbles fournis pour connecter les
bornes d’entrées à l’arrière des enceintes
(voir schéma) sur les bornes de sortie de
l’amplificateur. Connecter l'enceinte pour le
canal de gauche aux bornes “L” de
l'amplificateur et celle pour le canal droit aux
bornes “R” de l'amplificateur.
Circuit de protection
Cet appareil est équipé d’un circuit de
protection haute vitesse. Le but de ce circuit
est de protéger les enceintes contre des
situations telles que lorsque la sortie de
l’amplificateur de puissance est
accidentellement court-circuitée et qu’un
fort courant passe, lorsque la température
avoisinant l’appareil devient anormalement
élevée, ou lorsque l’appareil est utilisé à
puissance élevée pendant une longue
durée, ce qui entraîne une augmentation de
température extrême.
Lorsque le circuit de protection est activé, la
sortie des enceintes est coupée, et la DEL
du témoin d’alimentation clignote. Dans ce
cas, suivre ces étapes: toujours couper
l’alimentation de cet appareil, vérifier s’il y a
des défauts de connexion des cordons
d’enceintes ou des câbles d’entrée, et
attendre que l’appareil refroidisse, s’il est
très chaud. Améliorer la ventilation autour de
l’appareil, et remettre sous tension.
Si le circuit de protection est à nouveau
activé bien qu’il n’y ait pas de problème de
câblage ou de ventilation autour de
l’appareil, couper l’alimentation, et contacter
un centre d’entretien DENON.
Le circuit de protection peut être activé si
l’appareil est utilisé pendant une longue
durée à un volume élevé lorsque des
enceintes d’une impédance inférieure à
celle spécifiée (par exemple, enceintes
ayant une impédance inférieure à 4 Ω/ohms)
sont connectées. Si le circuit de protection
est activé, la sortie des enceintes est
coupée. Couper l’alimentation de l’appareil,
attendre qu’il refroidisse, améliorer la
ventilation autour de lui, puis remettre sous
tension.
Remarque sur l’impédance
des enceintes
Fonctionnement et configuration simples
FRANCAIS
Page 78

11
FRANCAIS
Fonctionnement et configuration simples Fonctionnement et configuration simples
Connexion des antennes AMEnsemble d’antenne-cadre AM
Brancher les antennes fournies
Antenne interIeure FM
Cadre d’antenne AM
1
4
2
3
Défaire le noeud en
vinyle et sortir la
ligne de connexion.
Plier dans la
direction inverse.
a. Avec l’antenne sur
\le haut de toute
surface stable.
b. Avec l’antenne fixée
au mur.
Monter
Trou d’installation Monter au mur, etc.
1. Appuyer sur le
levier.
2. Insérer le
conducteur.
3. Insérer le
conducteur.
WIDE:
Sélectionner cette fonction pour lire les DVD grand écran dans le mode plein écran.
LB:
Sélectionner ce mode pour lire les DVD grand écran en mode boîte aux lettres (avec des bandes
noires en haut et en bas).
PS:
Sélectionner ce mode pour lire les DVD grand écran en mode recadrage automatique (avec les
cotés de l’image coupés). Les disques pour lesquels la fonction recadrage automatique n’est
pas spécifiée sont lus en mode boîte aux lettres.
• Choisir les réglages en fonction de la télé à connecter.
• Régler commutateur WIDE/LB/PS à du panneau arrière de l'ADV-S101 et
sélectionner le format d'image de la télé.
Brancher un TV
• Lorsque vous effectuez les branchements, reportez-vous également au mode d'emploi de la
télé ou du moniteur.
TV
VIDEO
IN
WIDE/LB/PS
2 Réglez le format d'image de votre télé (fonction DVD uniquement)
• Si l’image du ADV-S101 n’apparaît pas sur votre télé, vérifiez que commutateur
PROGRESSIVE/INTERLACED du panneau arrière de l'ADV-S101 est bien réglé sur
“INTERLACED”. S’il est réglé sur “PROGRESSIVE”, remettez-le sur “INTERLACED”.
• Si votre télé est d'une taille conventionnelle (4:3), sélectionnez “LB” ou “PS”. Si vous avez une
télé à écran large (16:9), sélectionnez “WIDE”.
FRANCAIS
Noir
Blanc
Page 79

12
FRANCAIS
Fonctionnement et configuration simples Fonctionnement et configuration simples
Insertion des piles
q Déposer le couvercle arrière de l’unité
de télécommande.
w Placer les trois piles R6P/AA dans le
compartiment à piles dans la direction
indiquée.
e Remettre le couvercle arrière en place.
Remarques sur les piles:
• Utiliser des piles R6P/AA dans l’unité de
télécommande.
• Les piles doivent être remplacées par des neuves
approximativement une fois par an, bien que cela
dépende de la fréquence d’utilisation.
• Même si moins d’un an s’est écoulé, remplacer
les piles par des neuves si l’appareil ne
fonctionne pas lorsque l’unité de télécommande
est actionnée à proximité. (La pile fournie ne sert
que pour la vérification du fonctionnement. La
remplacer par une neuve le plus tôt possible.)
• Lors de l’insertion des piles, toujours procéder
dans la bonne direction, en suivant les marques
“<” et “>” du compartiment à piles.
• Pour éviter des dommages ou une fuite du
liquide de pile:
• Ne pas utiliser de pile neuve avec une ancienne.
• Ne pas utiliser deux types de pile différents.
• Ne pas court-circuiter, démonter, chauffer ou
jeter les piles dans des flammes.
• Enlever les piles de l’unité de télécommande
chaque fois que vous prévoyez de ne pas l’utiliser
pendant une longue durée.
• Si le liquide de pile devait fuir, essuyer
soigneusement le liquide de l’intérieur du
compartiment à piles, et insérer de nouvelles piles.
• Lors du remplacement des piles, avoir les piles
neuves à portée de la main, et les insérer aussi
rapidement que possible.
AC outlets (
mur
)
CA 120 V, 60 Hz
Le S-101 est équipé d'une
fonction d'horloge intégrée, il
vous faut donc brancher son
cordon d'alimentation à une prise
de courant CA ou le courant arrive
constamment.
DSW-S101
1
Cordon d'alimentation
2
Brancher le cordon d'alimentation
FRANCAIS
Page 80

13
Fonctionnement et configuration simples Fonctionnement et configuration simples
FRANCAIS
Lecture d'un disque DVD
1
Vérifiez que tous les branchements sont
corrects.
• Si cela apparaît sur l’écran de TV lorsque les touches sont
utilisées, cette opération n’est pas possible sur le S-101 ou
avec ce disque.
• Lorsque l’écran de menu est affiché sur l’écran de TV, le disque
continue à tourner.
•Prendre le disque avec précaution, de sorte à ne pas toucher la surface comportant les signaux et le tenir avec la face imprimée
tournée vers le haut.
• Lorsque le plateau à disque est complètement ouvert, placer le disque sur le plateau.
REMARQUE:
• Ne pas pousser le plateau à disque avec la main lorsque
l’appareil est éteint. Ceci endommagerait l’appareil.
• Ne pas placer de corps étrangers dans le plateau à disque.
Ceci endommagerait l’appareil.
• Si un corps étranger est accroché au plateau à disque lors de
la fermeture, appuyer simplement de nouveau sur la touche
55
et le plateau s’ouvrira.
2
Commutez le sélecteur d’entrée du téléviseur
sur votre unité.
7
Ajustez le volume.
Le volume est indiqué à
l’affichage.
(Unité principale) (Unité de télécommande)
Appuyez sur la touche 11.
6
VOLUMEON/STANDBY
5 12
VOLUME
ON/STANDBY
MUTE
1
2
Appuyez sur la touche 55pour insérer le disque
DVD dans le plateau à disque.
4
Le plateau à disque peut également être fermé
automatiquement pour charger le disque en appuyant sur la
touche 11. Après cela, la lecture commencera
automatiquement.
Appuyez sur la touche 55.
5
Plateau à disque
3
Appuyez sur la touche commutateur
ON/STANDBY.
•L’indicateur d’alimentation produit une lumière orange,
l’alimentation s’allume et l’affichage s’allume.
Plusieurs secondes sont nécessaires entre le moment où
l’on appuie sur le commutateur ON/STANDBY d’alimentation
et celui où l’alimentation s’allume. Ceci est dû au circuit
intégré silencieux qui éteint (coupe) le son quand
l’alimentation est allumée ou éteinte. L’indicateur
d’alimentation clignote d’une couleur orange pendant que le
circuit silencieux est activé.
Même quand la commutateur ON/STANDBY a été enfoncée de
nouveau et que l’alimentation a été réglée en mode veille,
l’alimentation pourvoit toujours certains circuits. Quand vous
quittez votre maison ou voyagez, assurez-vous d’avoir
débranché le cordon d’alimentation de la prise d’alimentation.
En mode veille, l’indicateur d’alimentation est allumé en rouge.
L’indicateur est jaune si le minuteur est réglé.
FRANCAIS
Page 81

14
Connexion d'autres sources
FRANCAIS
Indications de câblages
Direction des signaux
Les schémas de liaisons des pages suivantes impliquent l'utilisation des câbles de connexion optionnels suivants (non fournis).
Lorsque vous branchez un autre équipement , Débranchez la prise du cordon d'alimentation avant de brancher un autre équipement.
Câble vidéoCâble audio
REMARQUE:
• Ne pas brancher les Cordon Secteur avant d’avoir terminé toutes les connexions.
• Lorsque vous effectuez les connexions, référez-vous également au mode d'emploi des autres composants.
• S’assurer de connecter correctement les canaux, gauche (L) avec gauche (L) et droit (R) avec droit (R).
• Remarquer que le groupement de cordons à fiches à broche avec des Cordon Secteur ou le fait de les placer près de
transformateurs de puissance peut provoquer un bourdonnement ou du bruit.
Borne analogique (Stéréo)
A
R
L
R
L
(Orange)
Câble à broche
Borne numérique (Coaxiale)
B
Câble coaxial (câble à broche 75 Ω/ohms)
Borne numérique (Optique)
C
Câble optique (câble en fibre optique)
Borne vidéo
D
Câble vidéo (câble vidéo à broche 75 Ω/ohms)
Borne S-Vidéo
E
Câble S-Vidéo
(Jaune)
Signal audio Signal vidéo
(Blanc)
(Rouge)
Borne vidéo composante
F
Câble vidéo composante
(Y)
(PB/CB)
(P
R/CR)
(Vert)
(Bleu)
(Rouge)
IN OUT OUT IN
IN OUT OUT IN
Connexion d'autres sources
Options de réglage avancées
Appuyez sur la touche MUTE.
• Annuler le mode silence (MUTING):
q Appuyer de nouveau sur la touche MUTE.
w Appuyez sur la touche de VOLUME de la télécommande, ou
ajustez le volume à l'aide de la touche de contrôle VOLUME
du panneau avant.
Utiliser cette fonction afin d’inactiver temporairement la sortie audio.
Pendant la lecture, appuyer sur la touche 22.
2 Pour mettre le son en sourdine
2 Pour arrêter la lecture
2 Pour éteindre l'unité principale
Appuyez sur la commutateur ON/STANDBY.
FRANCAIS
Page 82

15
FRANCAIS
Connexion d'autres sources Connexion d'autres sources
Brancher un DBS / Radio câble / VCR
• En faisant les connexions, référez-vous aussi au mode d’emploi des autres composants.
• Si l'appareil à brancher est équipé d'une sortie audio numérique (COAXIAL), branchez-le à la sortie
NUMERIQUE (COAXIAL) du ADV-S101.
DBS / Cable Tuner/
VCR
R
L
AUDIO OUT
COAXIAL
OUT
S VIDEO
OUT
VIDEO
OUT
R
L
R
L
B
E
D
A
Brancher une platine cassette, un enregistreur MD ou CD
• En faisant les connexions, référez-vous aussi au mode d’emploi des autres composants.
• Branchez les bornes de sortie et d'entrée audio de la platine cassette au AUX3 du ADV-S101 à
l'aide des cordons enfichables.
Tape deck /
MD recorder /
CD recorder
R
L
AUDIO OUT
R
L
AUDIO IN
OPTICAL
IN
R
L
R
L
R
L
R
L
A
A
C
OPTICAL
OUT
C
Monitor TV
S VIDEO
IN
E
Brancher Etablir des connexions S-Vidéo (meilleure qualité d'image)
• Dans le cas de signaux d'entrée multiples, les signaux d'entrée sont détectés et celui qui doit
sortir de la borne de sortie du moniteur vidéo est automatiquement sélectionné dans l'ordre
suivant : S-Vidéo, vidéo composite.
FRANCAIS
Page 83

q Insérez la clé hexagonale fournie dans le trou sur le
côté “+” du connecteur. (Flèche A)
w Tournez la clé hexagonale dans le sens de la flèche
B pour desserrer le câble.
e Ti rez l'ancien câble. Faites attention à ne pas laisser
de parties de fil cassé à l'intérieur du connecteur.
(Flèche C)
r Retirez la gaine du câble et insérez le nouveau
câble dont vous aurez fermement entortillé les fils
de couleur cuivre à l'intérieur du connecteur.
(Flèche D)
t Tournez la clé hexagonale dans le sens de la flèche E et serrez fermement de façon que le câble
ne puisse pas sortir si l'on tire dessus.
Assurez-vous de connecter les deux côtés du câble aux connecteurs avec les bonnes polarités.
16
FRANCAIS
Connexion d'autres sources Connexion d'autres sources
COMPONENT VIDEO IN
Y
PB/CB
PR/CR
Monitor TV
D
F
• Régler le “TYPE DE TV” dans “MENU REGLAGE VIDEO” dans “CONFIGURATION” dans
“HELP” pour vous conformer au format vidéo de votre télé. Si la télé est configurée en NTSC,
régler sur NTSC.
• Lorsque commutateur PROGRESSIVE/INTERLACED à l'arrière de l'ADV-S101 est réglé sur
“PROGRESSIVE”, aucun signal vidéo ne sort des bornes VIDEO OUT ou S-VIDEO OUT.
Réglez commutateur PROGRESSIVE/INTERLACED du panneau arrière de l'ADV-S101 sur
“INTERLACED”, si vous souhaitez utiliser les signaux VIDEO OUT ou S-VIDEO OUT. ( page
11, 15).
Brancher Etablir des connexions de composant
(qualité d'image meilleure qu'en S-Vidéo)
• Pour la sortie composant uniquement, il est possible de basculer entre la sortie image interlace
et la sortie image progressive. Il n'est pas possible de spécifier la sortie image progressive pour
les connecteurs de sortie Vidéo ou les connecteurs de sortie S-Vidéo.
PROGRESSIVE:
A sélectionner lorsque le ADV-S101 est connecté à une télé de type progressif.
INTERLACED:
A sélectionner lorsque le ADV-S101 est connecté à une télé de type interlace.
2 Pour passer de interlace à progressive
• Eteignez l'appareil avant de changer la position de commutateur.
• Choisir les réglages en fonction de la télé à connecter.
• Réglez commutateur PROGRESSIVE/INTERLACED du panneau arrière
de l'ADV-S101 et sélectionner le type de télé.
Pour changer le câble d'enceinte
Brancher les bornes de l’antenne
• Une prise de câble d’antenne FM de type F peut être connectée directement.
• Si la fiche du câble d’antenne FM n’est pas de type F, connecter à l’aide de l’adaptateur d’antenne
de type F (Option).
Antenne Interieure FM
Cable COAXIAL
75 Ω/ohms
FM antenne
Cadre D’antenne AM
(Fourni)
Antenne
Exterieure AM
Masse
Adaptateur
D’antenne FM
(Option)
C
D
Référez-vous à la procédure ci-dessous si vous souhaitez basculer sur un câble d'enceinte
différent. Cet exemple décrit la façon de monter le câble latéral “+” sur le connecteur. Montez le
câble latéral “–“ de la même façon.
A
E
B
REMARQUE:
• Ne pas connecter simultanément deux
antennes FM.
• Même si une antenne extérieure AM est
utilisée, ne pas déconnecter l’antennecadre AM.
• Vérifier que les bornes de fil d’antenne-
cadre AM ne touchent pas les parties
métalliques du panneau.
PROGRESSIVE/INTERLACED
FRANCAIS
Noir
Blanc
Page 84

17
Fonctionnement élémentaire
FRANCAIS
Lecture
Lecture d'un disque
1/ 3
2 8, 9
CURSOR
ANGLE/CT
SUBTITLE/RT
ENTER
NUMBER
TOP MENU
AUDIO/PTY
Fonctionnement élémentaire
Appuyez sur la touche 11.
La lecture commencera au premier chapitre ou à la première
piste du disque.Si la lecture ne démarre pas automatiquement,
appuyez sur la touche 11.
3
Appuyez sur la touche ENTER.
• La lecture démarre également si la touche 1 est enfoncée.
• Certains DVD comportent des menus spéciaux appelés menus
de DVD.
• Par exemple, les DVD avec un contenu complexe peuvent
parfois contenir des menus de guide, et les DVD avec plusieurs
langues peuvent également comprendre des menus audio et
de langues de sous-titres.
• Ces menus sont appelés “Menus de DVD”.
• Nous décrivons ici la procédure générale pour utiliser des
menus de DVD.
1
Pendant la lecture, appuyer sur la touche
MENU/GUIDE.
• L'écran du menu DVD apparaît.
2
Appuyez sur la touche CURSOR ou NUMBER
pour sélectionner de l'élément souhaité.
• Si vous sélectionnez le numéro du titre en appuyant sur
les touches de NUMBER, passez à l'étape 3 ci-dessous.
3
Appuyez sur la touche ENTER.
• Si d’autres menus apparaissent, répéter les étapes 2 et 3.
2 Utilisation du menus de DVD
Orange
Exemple:
3
MENU/GUIDE
CURSOR
ENTER
1
2
1
Pendant la lecture, appuyer sur la touche TOP
MENU
.
• L'écran du menu du haut apparaît.
Exemple:
2 Utilisation du menu de début
Banana
Strawberry
Pineapple
TOP MENU
Orange
Peach
Apple
Pour les DVD comprenant des titres multiples, le titre souhaité
peut être sélectionné et lu à partir du menu de début.
2
Appuyez sur la touche CURSOR ou NUMBER
pour sélectionner de titre souhaité.
• Si vous sélectionnez le numéro du titre en appuyant sur
les touches de NUMBER, passez à l'étape 3 ci-dessous.
Exemple: Lorsque“Orange” est sélectionné
Banana
Strawberry
Pineapple
TOP MENU
Orange
Peach
Apple
Il est possible de restituer l’écran de menu en appuyant sur
la touche TOP MENU lors de la lecture du DVD, bien que cela
dépende du disque.
Appuyez sur la touche RETURN lors de la lecture d’un CD
vidéo pour restituer l’écran de menu.
FRANCAIS
Page 85

18
Fonctionnement élémentaire Fonctionnement élémentaire
FRANCAIS
2 Changer la langue audio
(Fonction sons multiples)
1
Pendant la lecture, appuyer sur la touche
AUDIO/PTY.
• Le numéro de la langue des sous-titre en cours est affiché.
Appuyez sur la touche CURSOR•ouªpour
sélectionner de langue souhaité.
•L’affichage s’éteint lorsque la touche AUDIO/PTY est
activée.
2
Pour les DVD contenant des signaux de langue audio multiples,
la langue audio peut être changée pendant la lecture.
•Avec certains disques, il n’est pas possible de modifier la
langue audio pendant la lecture. Dans ce cas, la sélectionner à
partir du menu du “CONFIGURATION”.
• La langue choisie dans les réglages par défaut ( page 43)
iest sélectionnée lorsque l’appareil est mis sous tension et
lorsque le disque est remplacé.
2 Changer la langue des sous-titres
(Fonction sous-titres multiples)
1
Pendant la lecture, appuyer sur la touche
SUBTITLE/RT.
• Le numéro de le langue audio en cours est affiché.
Appuyez sur la touche CURSOR•ouªpour
sélectionner de langue souhaité.
•L’affichage s’éteint lorsque la touche SUBTITLE/RT est
activée.
2
Pour les DVD comportant des signaux de langues de sous-titres
multiples, la langue des sous-titres peut être modifiée pendant la
lecture.
2 Changer l’angle (Fonction angles multiples)
1
Pendant la lecture, appuyer sur la touche
ANGLE/CT.
• Le numéro de l’angle en cours est affiché.
Appuyez sur la touche CURSOR•ouªpour
sélectionner de angle souhaité.
•L’affichage s’éteint lorsque la touche ANGLE/CT est
activée.
2
Pour les DVD contenant des signaux d’angles multiples, l’angle
peut être modifié pendant la lecture.
Interrompre la lecture
Pendant la lecture, appuyer sur la touche 22.
• La lecture s'arrête et l'arrière-plan s'affiche.
2 Fonction de mémoire de reprise de lecture
(DVD uniquement)
•Avec le S-101, lorsque la touche 22est activée, cette position
est enregistrée dans la mémoire. A cet instant, “1” clignote
sur l’affichage. Lorsque la touche 1 est activée après avoir
appuyé sur la touche 22, la lecture reprend à l’endroit où elle a
été interrompue. La fonction de mémoire de reprise de lecture
est annulée si le plateau à disque est ouvert ou si la touche
22
est activée une seconde fois.
• La fonction de mémoire de reprise de lecture ne fonctionne que
pour les disques pour lesquels le temps écoulé est affiché
pendant la lecture.
2 Fonction arrêt automatique
•L’ S-101 est équipé d’une fonction qui active automatiquement
le mode de veille si aucune opération n’est effectuée pendant
30 minutes en mode stop et dans la fonction DVD.
• Cette fonction est inactivée lorsque l’appareil quitte l’usine. Si
vous souhaitez l’activer, régler la fonction “VEILLE
AUTOMATIQUE” ( page 51) sur “OUI”.
Lecture de vues fixes (Pause)
Pendant la lecture, appuyer sur la touche 33.
• Appuyez sur la touche 1 pour reprendre la lecture normale.
FRANCAIS
Page 86

19
Fonctionnement élémentaire Fonctionnement élémentaire
FRANCAIS
Saut en début de chapitre ou de plage
Pendant la lecture, appuyez sur la touche
88
ou
99
.
• Le nombre de chapitres ou de plages équivalent au nombre
de fois où la touche est activée est sauté.
• Lorsque la touche 88est activée une fois, la tête de lecture
retourne au début de la plage ou du chapitre en cours.
88
: Sens arrière (Previous)
99
: Sens avant (Next)
Position de lecture
Chapitre/Plage Chapitre/Plage Chapitre/Plage Chapitre/Plage
Sens arrière ←→Sens avant (sens de lecture)
• Dans certains cas, l’écran de menu réapparaît lorsque la touche
88
ou
99
est activée pendant la lecture de menu d’un CD
vidéo.
Recherche avant/arrière
Pendant la lecture, appuyez surla touche
66
ou
77
.
• Lorsque cette touche est de nouveau activée, la vitesse de
recherche augmente (DVD, CD VIDEO en sept pas, CD en
quatre pas).
6 : Sens arrière
7 : Sens avant
• Dans certains cas, l’écran de menu réapparaîtra lorsque la
touches 66ou 77est activée lors de la lecture du menu d’un
CD vidéo.
Appuyez sur la touche 1 pour reprendre la lecture normale.
2 Repérage utilisant les touches de NUMBER
1
Pendant la lecture, appuyer sur la touche
SEARCH MODE.
• Le mode commute comme montré ci-dessous chaque
fois que la touche est enfoncée
Pour les DVD : Titre ←→ Chapitre
Pour les CD et les CD vidéo : Piste (Pas de commutation)
Le mode recherche réglé en appuyant sur la touche de
SEARCH MODE est mémorisé jusqu’à ce que l’alimentation
soit éteinte.
2
Appuyez sur les touches NUMBER pour saisir le
numéro du titre, du chapitre ou de la piste que
vous souhaitez lire.
Certains DVDs ou video CDs vidéo peuvent être conçus
pour fonctionner de façons spéciales et ne fonctionneront
pas comme décrit ici.
Lecture cadre par cadre
(pour les DVD et les CD vidéo uniquement)
En mode pause, appuyer sur la touche 33de la
télécommande.
•L’image avance d’un cadre chaque fois que la touche est
activée.
Ralenti
(pour les DVD et les CD vidéo uniquement)
En mode pause, appuyer surla touche
66
ou
77
.
• Lorsque la touche est activée à nouveau, la vitesse du ralenti
augmente. (Quatre étapes) (Trois étapes pour les CD vidéo)
6 : Sens arrière
7 : Sens avant
Appuyez sur la touche 11pour reprendre la lecture normale.
Appuyez sur la touche 11pour reprendre la lecture normale.
• Le ralenti en arrière n’est pas compatible avec les CD vidéo.
1/ 3
2 8, 9
CURSOR
RANDOM
8, 9
ENTER
DISPLAY
NUMBER
SEARCH MODE
8, 9
3
CURSOR
ENTER
1
2
6, 7
FRANCAIS
Page 87

20
Fonctionnement élémentaire Fonctionnement élémentaire
FRANCAIS
L’écoute de MP3 ou WMA CD-R/CD-RW
• Il existe de nombreux sites Internet de distribution de musique
à partir desquels il est possible de télécharger des fichiers
musicaux en format MP3. Les morceaux de musique
téléchargés selon les instructions du site et gravés sur des
disques CD-R/CD-RW peuvent être lus sur l’S-101.
• Si des morceaux de musique ont été enregistrés sur des CD
musicaux disponibles dans le commerce et qu’ils ont été
convertis dans les fichiers MP3 d’un ordinateur à l’aide d’un
encodeur MP3 (logiciel de conversion), les données contenues
sur un disque de 12 cm sont réduites environ au 1/10 des
données originales. Ainsi, lorsque des données sont gravées
sur un CD dans le format MP3, il est possible d’inscrire environ
10 fois plus de données sur un disque CD-R/CD-RW. Un seul
disque CD-R/CD-RW peut contenir plus de 100 plages.
•Valeurs prises lorsque des plages de 5 minutes sont converties
avec un débit binaire standard de 128 Kbit/s en fichiers MP3 et
en utilisant un disque CD-R/CD-RW d’une capacité de 650 MB.
• Cet appareil peut lire des fichiers musicaux CD-R/CD-RW
enregistrés en format de compression audio WMA (Windows
Media Audio)*.
*WMA (Windows Media Audio): Codage de Microsoft
Corporation (Etats-Unis)
Windows Media et le logo Windows sont des
marques ou des marques déposées
appartenant à Microsoft Corporation (U.S.A.)
aux Etats-Unis et dans d’autres pays.
• Dans l’affichage de fichiers de l’écran d’informations du disque,
les fichiers WMA seront affichés avec l’icône “WMA” au lieu
de l’icône “MP3”.
(Les fichiers pour lesquels l’icône “WMA” n’est pas affichée ne
peuvent pas être lus.)
• L’utilisation d’enregistrements autres que pour votre
plaisir personnel n’est pas autorisée sans la permission du
détenteur des droits d’auteurs, conformément à la loi sur
les droits d’auteurs.
1
Charger le disque CD-R/CD-RW sur lequel les
fichiers musicaux en format MP3 ou WMA ont été
inscrits dans cet appareil. ( page 13)
• L'écran d'informations du disque apparaît.
S’il existe plusieurs dossiers, passer à l’étape 2.
Si le disque ne contient pas de dossiers (s’il ne contient que
des fichiers MP3 ou WMA ), passer à l’étape 3.
Tous les dossiers enregistrés sur le disque sont affichés.
(Les dossiers ne sont pas affichés par couche.)
2
Appuyer sur la touche CURSOR•et ªafin de
sélectionner le dossier contenant le fichier(s) que
vous souhaitez lire, puis appuyez sur la touche
ENTER.
Pour changer de dossier
Appuyer sur la touche CURSOR••afin de sélectionner
“ROOT” en haut à droite de l’écran, appuyer ensuite sur la
touche ENTER. L’écran de l’étape 1 réapparaît. Sélectionner
le dossier souhaité.
2 Pour changer de MP3 ou fichiers WMA
1
Appuyer sur la touche 22.
2
Appuyez sur la touche CURSOR•ouªpour resélectionner le desired MP3 ou fichier WMA
souhaité.
3
Appuyez sur la touche de CURSOR•ouªpour
sélectionner de MP3 ou fichier WMA, puis
appuyez sur la touche 11ou touche ENTER.
• L'affichage peut être basculé entre le temps simple écoulé,
le temps simple restant, le nom de la piste, le nom du titre
et le nom de l'artiste, en appuyant sur la touche DISPLAY.
2 Pour sélectionner le mode de lecture aléatoire
1
En mode stop, appuyez sur la touche RANDOM.
2
Appuyez sur la touche
11
ou
ENTER.
FRANCAIS
Page 88

21
Fonctionnement élémentaire Fonctionnement élémentaire
FRANCAIS
• La programmation de lecture n'est pas possible avec des
disques MP3/WMA.
• Le S-101 est compatible avec les normes “MPEG-1 Audio
Layer 3” (fréquence d'échantillonnage de 32, 44,1 ou 48 kHz).
Il n'est pas compatible avec d'autres normes telles que
“MPEG-2 Audio Layer 3”, “MPEG-2.5 Audio Layer 3”, MP1,
MP2, etc. Les fichiers WMA enregistrés avec une fréquence
d'échantillonnage (fs) de 32, 44,1, et 48 kHz sont supportés.
• Il peut arriver que certains disques CD-R/CD-RW ne se lisent
pas à cause des caractéristiques du disque, de la poussière, de
la déformation, etc.
• En général, un fichier MP3 à débit binaire élevé produira une
meilleure qualité d'écoute. Avec le S-101, nous recommandons
d'utiliser des fichiers MP3 enregistrés avec un débit binaire de
128 kbit/s ou plus.
• Débit binaires applicables : 32 à 320 kbit/s pour les fichiers
MP3, 63k à 160 kbit/s pour les fichiers WMA.
• Les sorties de signaux numériques lors de la lecture de fichiers
MP3 sont des signaux MP3 convertis en PCM, que la sortie
audio présélectionnée soit réglée sur “normal” ou sur “PCM
conversion”. Les signaux sont émis avec la même fréquence
d'échantillonnage que celle de la source musicale.
• Il se peut que les fichiers MP3/WMA ne soient pas lus dans
l'ordre attendu, car le logiciel de gravure peut modifier la
position des dossiers et l'ordre des fichiers lorsqu'il les grave
sur le CD-R/CD-RW.
• Lorsque vous gravez des fichiers MP3/WMA sur des disques
CD-R/CD-RW, veuillez sélectionner “ISO9660 level 1” comme
format du logiciel de gravure. Cela peut s'avérer impossible
avec certains types de logiciel de gravure. Pour plus
d'informations, consultez les instructions d'utilisation du logiciel
de gravure.
•Avec le S-101, il est possible d'afficher sur l'écran les noms de
dossier et les noms de fichier comme des titres. Le S-101 peut
afficher jusqu'à 63 caractères, constitués de chiffres, lettres
majuscules, lettres minuscules et du signe “_” (souligné).
2 Pour restituer l’écran d’informations du
disque initial
1
Appuyez sur la touche 22.
2
Appuyez sur la touche CURSOR
•
pour
sélectionner “ROOT” en haut, à droite de
l’écran et appuyez sur la touche ENTER.
• Si l'enregistrement a été effectué dans un format autre que
“ISO9660 level 1”, il se peut que l'affichage et la lecture
classiques ne soient pas possibles. De plus, les noms des
dossiers et des fichiers ainsi que les autres symboles peuvent
ne pas apparaître correctement.
• Assurez-vous d'ajouter l'extension “.MP3/WMA” aux fichiers
MP3/WMA. Il sera impossible de lire les fichiers dont
l'extension est autre que “.MP3/WMA” ou qui n'ont pas
d'extension du tout. (Avec les ordinateurs Macintosh, les
fichiers MP3/WMA peuvent être lus en ajoutant l'extension
“.MP3/WMA” après le nom du fichier constitué de jusqu'à 63
lettres majuscules, lettres minuscules ou chiffres, ainsi que
pour l'enregistrement des fichiers sur le CD-R/CD-RW.)
• Ne pas poser d'autocollants, de bande adhésive, etc., sur la
face de l'étiquette ou la face de signal des disques CD-R/CDRW. S'il y a de la bande adhésive sur la surface d'un disque,
celui-ci risque de se coincer à l'intérieur du S-101 et devenir
impossible à éjecter.
• Les fichiers WMA protégés par copyright ne peuvent pas être
lus. Notez également qu'en fonction du logiciel de gravure et
des conditions, la lecture peut ne pas être possible, ou bien les
fichiers peuvent ne pas s'afficher correctement.
• Lorsque l'appareil est arrêté, le bouton DISPLAY de la
télécommande peut être utilisé pour basculer et afficher le nom
des titres et le nom des artistes. (La capacité d'un dossier va
jusqu'à 99 fichiers.)
• Les disques enregistrés ne contenant pas plus de 99 fichiers par
dossiers sont recommandés. Plusieurs configurations de dossier
sont possibles ; toutefois, en fonction de la configuration, il se
peut que la lecture des dossiers et des fichiers soit impossible.
• Les disques à multi-sessions et les disques CD-R/CD-RW qui
n'ont pas été finalisés peuvent aussi être lus ; toutefois, il est
recommandé de lire des disques dont la fermeture de session
est de 10 sessions ou des disques qui ont été finalisés.
• La sélection directe de piste à l'aide du bouton NUMBER de la
télécommande peut spécifier jusqu'à 999 pistes (999 fichiers)
par dossier.
• Lorsque vous dépassez 999 pistes, si l'unité est à l'arrêt, appuyez
sur les boutons du CURSOR dans l'écran d'informations du
disque pour sélectionner les fichiers, apuis appuyez sur le bouton
11
du bouton ENTER pour démarrer la lecture.
• La fonction repère MP3 ID3 est compatible avec les noms de
titre et d'artiste.
• La fonction méta repère WMA est compatible avec les noms
de titre, d'artiste et d'album.
• Le S-101 n'est pas compatible avec les logiciels de gravure en
paquet.
• Le S-101 n'est pas compatible avec les playlists.
• Le S-101 n'est pas compatible avec le MP3 PRO.
2 Pour sélectionner le mode de répétition
Le mode de répétition change à chaque fois que la
touche REP 1/ALL est activée.
TRACK REPEATFOLDER FOLDER REPEAT
1/ 3
2 8, 9
CURSOR
REP 1/ALL
8, 9
ENTER
NUMBER
DISPLAY
8, 9
3
CURSOR
ENTER
1
2
FRANCAIS
Page 89

22
Fonctionnement élémentaire Fonctionnement élémentaire
FRANCAIS
Lecture de fichiers d’image fixe (format JPEG )
Les fichiers JPEG stockés sur des CD d'images Kodak, des CD-R
et des CD-RW peuvent être lus comme diaporama avec le S-101.
Le S-101 peut lire des CD d'images Kodak, vous permettant de
visionner les photographies qui y sont stockées sur un écran télé.
(Les Picture CD sont des CD contenant des photos prises sur des
appareils photo traditionnels qui ont été converties en données
numériques. Pour plus d'informations sur les CD d'images Kodak,
veuillez contacter un magasin fournissant des services de
développement Kodak. Pour plus d'informations sur les CD Fujicolor,
veuillez contacter un magasin fournissant des services de
développement de Fuji Photo Film.)
“KODAK” est la marque déposée de Eastman kodak Co.
1
Charger le CD-R/CD-RW sur lesquel les images
fixes ont été gravées dans le S-101.
• L'écran d'informations du disque apparaît.
2
Appuyez sur la touche CURSOR•ou
ª
pour
sélectionner le dossier contenant le(s) fichier(s) que
vous souhaitez lire, puis appuyez sur la touche
ENTER.
S’il y a plusieurs dossiers, passez à l’étape 2.
Si le disque ne contient aucun dossier, passez à l’étape 3.
Charger les Picture CD dans l’appareil.
• La lecture d’image fixes commence automatiquement
lorsque le disque est inséré.(Pour les Picture CD)
Appuyez sur la touche 2 pour arrêter la lecture.
Pour changer de dossier
Appuyez sur la touche CURSOR •pour sélectionner “ROOT”
en haut à droite de l’écran, appuyer ensuite sur la touche
ENTER.
L’écran de l’étape 1 réapparaît. Sélectionner le dossier souhaité.
2 Lire des Picture CD
2 Lecture d’images fixes mémorisées sur des
CD-R/CD-RW
Dès que tous les fichiers d’image fixe dans le dossier ont
été lus, l’écran d’information sur le disque réapparaît.
3
Appuyez sur la touche CURSOR•ouªpour
sélectionner le fichier d’image, puis appuyez sur
la touche 11ou la touche ENTER.
• Seuls les fichiers d’image fixe dans le dossier
sélectionné sont lus.
2 Pour visualiser instantanément plusieurs
images fixes mémorisées sur le disque
1
Appuyez sur les touche de 22pour afficher
simultanément 9 images fixes.
2
Appuyez sur la touche CURSOR•, ª, 00ou
11
pour sélectionner de d’image fixe, puis appuyez
sur la touche ENTER.
2 Pour arrêter momentanément la présentation
de diapositives:
Appuyez sur la touche 33.
Pour reprendre la présentation de diapositives, appuyez sur
la touche 11.
2 Pour repérer une image fixe à visualiser
(à partir de la quelle on veut commencer la
présentation de diapositives)
Pendant le diaporama, appuyez sur les touches
88
ou
99
.
•Touche 8 : Repérage en arrière vers l’image fixe précédente
•Touche 9 : repérage en avant vers l’image fixe suivante
2 Basculement et rotation d’images fixes
Appuyez sur la touche CURSOR•, ª, 00ou
11
bacsuler l’image fixe.
•Touche CURSOR •:L’image fixe en cours d’affichage
est basculée verticalement.
•Touche CURSOR ª:L’image fixe en cours d’affichage
est basculée horizontalement.
•Touche CURSOR 0:L’image fixe en cours d’affichage est
tournée 90° dans le sens contraire
des aiguilles d’une montre.
•Touche CURSOR 1:L’image fixe en cours d’affichage
est tournée 90° dans le sens des
aiguilles d’une montre.
Dès que tous les fichiers d’image fixe dans le dossier ont
été lus, l’écran d’information sur le disque réapparaît.
FRANCAIS
Page 90

23
Fonctionnement élémentaire Fonctionnement élémentaire
FRANCAIS
2 Il est possible de choisir la méthode de
commutation vers la prochaine image durant
une lecture en continu d’images JPEG (SLIDE
SHOW).
Appuyez sur la touche SEARCH MODE.
• Sélectionner parmi SLIDE SHOW MODE 1 à MODE 11,
MODE RAND et MODE OFF.
2 Lire l’image en mode de zoom
Appuyez sur la touche de ZOOM pendant la lecture
de l'image JPEG, puis appuyez sur les touches
6
ou
7
pour effectuer un zoom avant ou un zoom
arrière.
•Touche
6
: rétrécissement
•Touche
7
: agrandir
Appuyez sur la touche CURSOR
•, ª
, 0 ou 1(pour déplacer
l'image zoomée).
La lecture en continu (SLIDE SHOW) n’est pas possible en
mode de zoom.
1FUNCTION
BAND + , –
CURSOR
ZOOM
SEARCH MODE
ENTER
MODE
NUMBER
TUNING +,
–
CURSOR
TUNER
ENTER
1
BAND
SLOW/SEARCH
6, 7
• Le S-101 est compatible avec des données d’image
mémorisées en format JPEG, mais Denon ne garantit pas que
toutes les données d’image mémorisées en format JPEG
peuvent être visualisées.
• Des images avec des résolutions jusqu’à 2048 x 1536 pixels
peuvent être affichées.
• Il peut être impossible de lire certains CD-R/CD-RW due aux
propriétés du disque, la saleté, les rayures, etc.
• Lors de la mémorisation des fichiers JPEG sur le CD-R/CD-RW,
régler le programme d’écriture pour mémoriser les fichiers en
format “ISO9660 niveau 1”.
• S’assurer d’attriber aux fichiers JPEG l’extension “.JPG” et
“.JPE”. Des fichiers avec d’autres extensions ou sans
extension ne peuvent pas être visualisés sur le S-101.
• Ne collez pas d’autocollants, d’adhésif, etc. sur les disques CDR/CD-RW; ni sur la face comportant l’étiquette ni sur la face
comportant les signaux. Si la face d’un disque est recouverte
d’adhésif, le disque risque de rester coincé dans le S-101 et de
ne pas pouvoir etre éjecté.
• Ne pas lire des disques CD-R/CD-RW contenant des fichiers
autres que des fichiers de CD musique (en format CDA), les
fichiers MP3/WMA et JPEG. A défaut d’une telle précaution, le
lecteur risque de mal fonctionner ou d’être endommagé, selon
le type de fichier.
• Les fichiers JPEG créés sur Macintosh ne peuvent pas être lus.
ALÉATOIRE: OUI:
Tous les fichiers MP3/WMA et JPEG dans le dossier sont lus
dans un ordre aléatoire en commençant par le fichier sélectionné
RÉPÉTITION DE PLAG:
Le fichier MP3/WMA ou JPEG sélectionné est lu répétitivement
FICHIER:
Les fichiers MP3/WMA et JPEG dans le dossier sont lus dans
l’ordre en commençant par le fichier sélectionné
RÉPÉTITION DE FICH:
Tous les fichiers MP3/WMA et JPEG dans le dossier sont lus
répétitivement en commençant par le fichier sélectionné
DISQUE:
Tous les fichiers MP3/WMA et JPEG sur le disque sont lus
dans l’ordre en commençant par le fichier sélectionné
RÉPÉTITION DE DISQ:
Tous les fichiers MP3/WMA et JPEG sur le disque sont lus
répétitivement en commençant par le fichier sélectionné
2 Modes de lecture spéciaux pour les fichiers
MP3/WMA et JPEG
1
Appuyez sur la touche CURSOR 0 ou 1
sélectionner le mode de lecture.
2
Appuyez sur la touche CURSOR
•
ou
ª
sélectionner le mode de lecture spécial.
FRANCAIS
Page 91

24
Fonctionnement élémentaire Fonctionnement élémentaire
FRANCAIS
Réglage manuel
2
Appuyez sur la touche BAND de l’unité
principale pour sélectionner “FM AUTO”, “FM
MONO” ou “AM”.
3
Régler la fréquence de réception.
• Lorsqu’une station est reçue, l’indication “TUNED”
s’affichera.
• Un bourdonnement peut se faire entendre lors de l’utilisation
d’une TV à proximité lors de la réception de programmes AM.
Dans ce cas, déplacer le système aussi loin que possible de la
TV.
Ecouter la radio
1
Réglez la source d'entrée sur “TUNER”.
(Unité principale) (Unité de télécommande)
Lorsque vous utilisez la télécommande, appuyez sur la
touche BAND pour sélectionner “FM” ou“AM”, puis sur la
touche MODE pour sélectionner “FM AUTO” et “FM
MONO”.
2 Réception stéréo FM
• Lorsqu’un programme radiodiffusé en mode “FM AUTO” est
reçu, le témoin “ST” s’allume et le programme est reçu en
stéréo.
• Si la réception est mauvaise et qu'il y a beaucoup de bruit dans
les signaux stéréo, réglez sur mode “FM MONO”.
2 Recherche automatique
• Lorsque vous appuyez sur les touches + ou – de l'unité
principale (ou la touche SLOW/SEARCH de la télécommande), la
fréquence change par étapes de 0,2 MHz dans la bande FM, et
de 10 kHz dans la bande AM.
• Si vous maintenez l'une des touches + ou – de l'unité principale
(ou la touche SLOW/SEARCH de l'unité de la télécommande)
enfoncée pendant plus d'une seconde, la fréquence continue à
changer lorsque la touche est relâchée (Auto tuning) et s'arrête
lorsqu'une station est trouvée. Le réglage ne s'arrêtera pas sur
les stations dont la réception est médiocre.
• Pour arrêter la fonction auto tuning, appuyez une fois sur les
touches + ou – de l'unité principale (ou sur la touche
SLOW/SEARCH de la télécommande).
2 À propos du mode de synchronisation tuner
et du mode de présélection
• La fonction des touches + et – de l’unité principale peut être
changée afin qu’elles puissent être utilisées soit pour la
synchronisation tuner (sélection de la fréquence de réception)
soit pour la sélection de stations préréglées.
•À leur livraison, les touches sont réglée en mode tuner. Le
mode peut être passé au mode présélection en appuyant sur la
touche + tout en appuyant sur la touche BAND. (Lorsque l’on
fait cela, “PRESET” clignote pendant environ 5 secondes.)
• Appuyer sur la touche – tout en appuyant sur la touche BAND
pour passer au mode tuner. (Lorsque l’on fait cela, “TUNING”
clignote pendant environ 5 secondes.)
(Unité principale) (Unité de télécommande)
• Les touches de 0 et 1 fonctionnent de la même manière
que les touches + et – de l'unité principale et de la
télécommande.
Présélections automatiques du syntoniseur
(pour l'unité principale seulement)
Utiliser cette fonction pour rechercher automatiquement des
stations FM de radiodiffusion et enregistrer jusqu’à 60 stations
sur des canaux préréglés, de 1 à 60.
• Si une station FM ne peut pas être préréglée automatiquement
en raison d’une mauvaise réception, utiliser la fonction
“Manual tuning” ( page 24) pour trouver la station, puis la
prérégler à l’aide de la fonction manuelle “Preset memory”
( page 25) .
• Lorsque la fonction auto preset est effectuée, les préréglages
précédents sont effacés et remplacés par les nouveaux.
1
Réglez la source d'entrée sur “TUNER”, puis
appuyez et maintenez la touche 11pendant au
moins 2 secondes.
• “AUTO PRESET?” et “–:NO/+: START” apparaîtront
alternativement sur l’affichage de l’unité principale.
2
Appuyez sur la touche + pour sélectionner
“START”.
• “SEARCH” clignote sur l’affichage et la recherche
commence.“COMPLETED” apparaît une fois que la
recherche est terminée.
Appuyez sur la touche – pour annuler.
Ecoute de stations préréglées.
Appuyez sur la touche + ou – l’unité principale peut ,
ou TUNING + ou – la télécommande pour sélectionner
le numéro de préréglage.
Le numéro présélectionné peut aussi être directement saisi
en appuyant sur les touches NUMBER de la télécommande.
Les touches + et – de l’unité principale peuvent être
sélectionnées lorsque le mode de préréglage a été réglé.
(Unité principale) (Unité de télécommande)
FRANCAIS
À leur livraison, les touches sont réglée en mode tuner. Le mode
peut être passé au mode présélection en appuyant sur la touche
+ tout en appuyant sur la touche BAND. (Lorsque l’on fait cela,
“PRESET” clignote pendant environ 5 secondes.)
Page 92

25
Fonctionnement élémentaire Fonctionnement élémentaire
FRANCAIS
Préréglage des stations syntonisées et
dénomination des stations (télécommande
uniquement)
• Un total de 60 stations (comprenant les stations FM et AM)
peut être préréglagené.
• Les stations préréglagenées peuvent être dénommées avec un
mot de 8 caractères (lettres, chiffres et symboles).
• Préréglez les stations à l’aide de la télécommande.
1
Syntonisez la station que vous souhaitez
prérégler.
P0- FM 2.50M
2
Appuyez sur la touche MEMO deux fois de suite.
• Le mode d’entrée des noms est sélectionné.
P0- _
3
Appuyez sur la touche CURSOR•ouªpour
sélectionner le caractère, puis appuyez sur la
touche ENTER pour saisir ce caractère.
P0- F
P0- F_
Lorsque la touche de CURSOR11est enfoncée, le caractère
sélectionné est saisi, le curseur se déplace alors sur la
position suivante et le prochain caractère peut être saisi.
Lorsque la touche de CURSOR00est enfoncée, le caractère
sélectionné est saisi, le curseur se déplace alors sur la
position précédente. Servez-vous de cela pour corriger les
caractères qui ont déjà été saisis.
4
Appuyez sur la touche ENTER poursaisir le nom
de la station que vous avez choisie.
• Le voyant du numéro de préréglage “P0– ” clignote.
P0- FM-DENON
5
Appuyez sur la touche CURSOR•ouªpour
choisir le numéro présélectionné, puis appuyez
sur la touche ENTER pour saisir le numéro
présélectionné.
• Le numéro de préréglage, la bande et la fréquence de
réception sont affichés, puis le nom de la station apparaît.
Le numéro présélectionné peut aussi être saisi directement
en appuyant sur les touches NUMBER de la télécommande.
P03 FM-92.50M
P03 FM-DENON
• Pour s’arrêter en cours de procédure, appuyez sur la touche
MODE avant d’appuyer sur la touche ENTER à l’étape 4.
Tout ce que vous avez entré, est effacé.
• Pour effacer le nom d’une station qui a été entré en mémoire,
appelez cette station, réglez le mode d’entrée de dénomination
à l’étape 2, puis appuyez sur la touche CLEAR. Le nom de la
station est effacé et la fréquence du canal préréglagené est
affichée.
• Si vous souhaitez seulement prérélger une station, appuyez sur
la touche MEMO une fois lorsque la station est syntonisée. Le
voyant du numéro de préréglage, “P0–”, clignote et le mode
d’entrée du nombre de préréglage est réglé. Appuyez sur la
touche CURSOR•ou ªpréréglage pour sélectionner le numéro
de préréglage puis appuyez sur la touche ENTER de nouveau
pour mémoriser cette station au numéro sélectionné. (Le
numéro peut également être directement spécifié en utilisant
les touches NUMBER du clavier décimal.)
FUNCTION
CURSOR
CLEAR
ENTER
MODE
MEMO
NUMBER
CURSOR
AUX
ENTER
FRANCAIS
Page 93

26
Fonctionnement élémentaire Fonctionnement élémentaire
FRANCAIS
Branchez le ADV-S101 au iPod avec les côtés marqués du
connecteur vers le haut.
Brancher la iPod
Vous pouvez lire la musique de votre iPod en connectant le iPod
au connecteur iPod du ADV-S101. Le iPod peut aussi être
commandé à l'aide des touches de la télécommande et de celles
de l'unité principale.
iPod
Branchez sur le connecteur iPod
du ADV-S101 dans ce sens.
Branchez sur le connecteur iPod du ADV-S101 à
l'aide du câble iPod fourni.
• Allumez le iPod.
1
2
Appuyez sur la touche FUNCTION de l’unité
principale ou touche AUX de la télécommande
pour sélectionner le “IN iPod”.
IN iPod
Allumez la télé. Réglez la fonction d'entrée de la
télé sur l'entrée du ADV-S101.
3
REMARQUE:
•Avec le S-101, seul l’iPod peut être commandé à partir de la
télécommande du S-101 et des touches sur l’unité
principale. Dans ce cas, il n’est pas possible de le
commander à l’aide de la télécommande ou des touches de
l’unité principale du S-101, mais il est possible de lire les
pistes stockées dans le iPod.
• Si l’écran de l’étape 3 ne s’affiche pas, il se peut que le iPod
ne soit pas branché correctement. Rebranchez-le.
• La sortie maximum du connecteur du iPod est de 8W.
Browse iPod
Ecran du iPod
Lecture d'un la iPod
®
iPod est une marque appartenant à Apple
Computer, Inc., déposée aux USA et dans
d'autres pays.
FRANCAIS
Page 94

Opération sur le S-101
Touches de l'unité de la télécommande
Touches du iPod
27
Fonctionnement élémentaire Fonctionnement élémentaire
FRANCAIS
2 Les touches de la télécommande correspondent aux touches du iPod tel que montré ci-dessous.
113
Lecture de la piste.
2
– Arrêt de la lecture de la piste.
313
Pause de la piste.
MENU/GUIDE MENU Affiche le menu ou retourne au menu précédent.
99
Lecture de la piste suivante.
88
Lecture de la piste depuis le début.
77
Avance rapide de la piste.
66
Retour rapide de la piste.
•, ª
, 0, 1
Click Wheel Sélection d'un élément.
ENTER Select Saisie de la sélection ou lecture de la piste.
RETURN – Bascule entre Browse mode et Remote mode.
REP 1/ALL – Bascule la fonction répéter.
RANDOM – Bascule la fonction aléatoire.
FUNCTION
PHONES
CURSOR
REP 1/ALL
RANDOM
8, 9
ENTER
8, 9
3
CURSOR
ENTER
MENU/GUIDE
AUX
1
2
6, 7
RETURN
Lecture
Utilisez les touches CURSOR •, ª et ENTER
pour afficher la liste des pistes.
1
2
Appuyez sur la touche ENTER pour démarrer la
lecture.
Il est possible de basculer l’affichage entre nom du
titre, nom d'album, nom d’artiste, temps écoulé et
temps restant, en appuyant sur la touche DISPLAY.
• En fonction de la version de logiciel de votre iPod, il se peut se
révéler impossible de commander votre iPod depuis le S-101. Nous
vous recommandons d'installer la dernière version du logiciel.
• Pour plus d'informations et d'instructions sur la mise à jour de la
dernière version du logiciel, voir le site web Apple Computer, Inc.
• Pour le iPod, seules les touches 1, 2, 3, 8, 9, 6 et
7 avec le mode “Remote iPod”.
• En Browse mode, lorsque “Songs” est sélectionné dans le
“TOP MENU” pendant la lecture d'une piste, la lecture de la
piste s'arrête.
• En mode “Remote iPod”, lorsque la touche MENU de la
télécommande est enfoncée pendant 2 secondes pour
éteindre le rétroéclairage, il se peut que le rétroéclairage
s'allume, en fonction du moment où vous relâchez la touche.
• Lorsque l'appareil est en mode “Remote iPod”, la touche 1 de
la télécommande fonctionne comme la touche 13.
Pour les opérations du iPod, reportez-vous également au mode
d'emploi du iPod.
FRANCAIS
Page 95

28
Fonctionnement élémentaire Fonctionnement élémentaire
FRANCAIS
Lecture et enregistrement d’autres sources
Brancher le lecteur portable
Votre lecteur audio portable peut être connecté à la prise
“portable” du ADV-S101 pour la lecture des pistes du lecteur
audio portable.
PORTABLE
AUDIO LINE
OUT
1
Connectez le ADV-S101 et le lecteur audio portable à
l'aide d'un câble audio mini-stéréo acheté
séparément.
Lecture d'un lecteur audio portable (mini fiche
stéréo)
2
Lecture du lecteur audio portable.
• Les signaux du lecteur audio portable sont émis à
travers le S-101
Pour plus d'instructions sur la lecture du lecteur audio
portable, consultez le mode d'emploi du lecteur audio
portable.
A propos de l'enregistrement analogique sur
un composant audio externe (AUX3)
REMARQUE:
Précautions lors de l’enregistrement analogique de DVD
ou de sources d’entrée numériques
:
• Ne pas activer le mode d’entrée de l’S-101, le mode surround
ou les paramètres surround pendant l’enregistrement. Cela
interromprait le son en cours d’enregistrement.
Nous recommandons de régler le mode surround sur
“STEREO”.
• Lors de l’utilisation d’un casque, l’enregistrement est
automatiquement réalisé en mode Dolby Headphone.
2 Lorsque le sélectionné le DVD est sélectionné
Les signaux numériques Dolby Digital, DTS et PCM sont
automatiquement convertis en signaux stéréo 2 canaux avant
d’être générés (sauf en mode Dolby Headphone) et peuvent être
enregistrés en analogique. (Pour connaître ce qui se passe en
mode Dolby Headphone, voir point ci-dessous.)
2 Lorsque les autres fonctions (analogiques)
sont sélectionnées (à part “AUX3”)
La sortie du signal audio analogique sélectionné parmi les
fonctions autres que DVD reste inchangée, indépendamment du
mode entrée ou du mode satellite du S-101.
Appuyez sur la touche FUNCTION sur la
télécommande AUX de la télécommande pour
sélectionner “IN Front IN”.
FRANCAIS
Débrancher le iPod
Visionner le diaporama
Pour plus d’instructions sur les branchements,
voir page 26.
1
2
Utilisez la touche RETURN pour basculer de
browse mode à remote mode.
Les photographies de l’iPod peuvent être affichées sur l’écran du
téléviseur.
3
Lorsque vous regardez l’affichage du iPod,
appuyer servez-vous des touches du CURSOR •
ou ª curseur pour sélectionner “Photos”.
4
Appuyez sur la touche ENTER pour commencer
la lecture.
• Les photographies de l’iPod sont affichées sur l’écran
du téléviseur.
• La batterie ne se recharge pas lors de la lecture d’un diaporama.
Assurez-vous que la batterie soit suffisamment chargée avant
de commencer le diaporama.
Nous vous recommandons soit d’appuyer sur le
commutateur ON/STANDBY pour régler le S-101 sur
le mode veille, ou d’appuyer sur la touche
FUNCTION de l’unité principale ou sur la touche
DVD, TUNER ou AUX sur la télécommande et de
régler la fonction entrée sur quelque chose d’autre
que iPod.
IN Front IN
Page 96

29
Fonctionnement élémentaire Fonctionnement élémentaire
FRANCAIS
2
Appuyez sur la touche SURROUND pour
sélectionner le mode surround.
• Le mode ambiance bascule tel que montré ci-dessous
chaque fois que la touche SURROUND est enfoncée.
STEREODOLBY VS WIDEDOLBY VS REF.
ROCK ARENAJAZZ CLUB
Le volume peut être ajusté dans l’intervalle limite de -60 à 0
à +18 dB. Noter qu’en fonction du signal d’entrée, du mode
d’ambiance, des réglages d’enceinte et du réglage du
niveau des canaux, il peut s’avérer impossible d’ajuster le
volume jusqu’à +18 dB.
Réglage du
Fonction
1
Appuyez sur la touche FUNCTION de l'unité
principale, et la touche DVD, TUNER ou AUX de
la télécommande pour sélectionner la fonction
d'entrée pour la lecture.
• La fonction change comme indiqué ci-dessous.
Lorsque la touche FUNCTION de l'unité principale est
enfoncée :
iPodTUNERDVD
AUX1
AUX3 AUX2
Portable
Lorsque la touche AUX de la télécommande est
enfoncée :
AUX3 AUX2
iPod
Portable
AUX1
iPod et Portable ne s'affichent et ne peuvent être
sélectionnés que lorsque le périphérique
correspondant est branché.
(Unité principale) (Unité de télécommande)
4
Débuter la lecture du composant sélectionné.
Pour les instructions de fonctionnement, se référer aux
manuels des composants.
5
Ajustez le volume.
Le volume est indiqué à
l’affichage.
(Unité principale) (Unité de télécommande)
2 Pour vérifier la source de programme en
cours de lecture, etc.
• DOLBY DIGITAL • DTS
Appuyez sur la touche STATUS.
• La source de programme actuelle et les réglages d’ambiance sont
indiqués sur l’affichage chaque fois que la touche.
2 Affichage du signal d’entrée
FUNCTION
VOLUME
CURSOR
SURROUND
SURROUND
PARAMETER
STATUS
CURSOR
AUX
VOLUME
DVD
TUNER
DVS/CINEMA
FRANCAIS
3
Quand “STEREO” est sélectionné:
Appuyez sur la touche SURROUND PARAMETER,
puis appuyez sur la touche CURSOR 0 ou 1 pour
régler.
DIRECT ON OFF
DIRECT MODE:
• ON:
Les signaux d'entrée analogiques sont lus sans traitement DSP.
Les réglages effectués à “DISTANCE” sous “SETUP” (Page
48) ne sont pas activés.
• OFF:
Les signaux d'entrée analogiques sont convertis en signaux
numériques et sont traités par DSP.
Le “DIRECT MODE” ne fonctionne qu'avec des entrées
analogiques et en mode stéréo.
2 Paramètres ambiance q
Page 97

30
Fonctionnement élémentaire Fonctionnement élémentaire
FRANCAIS
Fonctionnement des fonctions ambiance
Reproduction des sons d’ambiance DTS et
Dolby Digital (avec des entrées numériques
seulement)
Sources applicables:
• Entrée numérique (fonctions AUX, y compris les disques de
lecture DVD)
• Sources multi-canaux Dolby Digital
• Sources DTS
3
Lisez une source programme avec la marque
ou .
•L’indicateur Dolby Digital s’allume ( ) quand des
sources Dolby Digital sont lues.
•L’indicateur DTS s’allume ( ) quand des sources
DTS sont lues.
Ceci commute automatiquement selon le format de la
source de lecture.
DOLBY VS REF.
DOLBY VS WIDE
1
Sélectionnez la fonction entrée numérique (DVD,
AUX1, AUX2 ou entrée numérique AUX3).
(Unité principale) (Unité de télécommande)
2
Appuyez sur la touche DVS/CINEMA pour
sélectionner “DOLBYVS REF” ou “DOLBYVS
WIDE” pour le mode Dolby Virtual Speaker.
• L'indicateur du Dolby Virtual Speaker ( ) s'allume.
DOLBY VS (Mode Dolby Virtual Speaker):
• REF. (Mode référence):
Ceci est le mode standard.
• WIDE:
Ce mode étend le champ sonore du canal frontal.
LFE (Effet de basse fréquence):
Source de programme et plage de réglage:
1. Dolby Digital: –10 dB à 0 dB
2. DTS Surround: –10 dB à 0 dB
Lorsque le logiciel codé Dolby numérique est lu, il est
recommandé de régler le niveau LFE sur 0 dB pour une
lecture Dolby numérique correcte.
Lorsque un logiciel de film codé DTS est lu, il est
recommandé de régler le LFE LEVEL sur 0 dB pour une
lecture DTS correcte.
Lorsque un logiciel musical codé DTS est lu, il est
recommandé de régler le LFE LEVEL sur –10 dB.
• Une fois que les paramètres d’ambiance ont été réglés, arrêtez
d’actionner les touches. Après plusieurs secondes, l’affichage
normal réapparaît et les réglages sont automatiquement entrés.
• Lors de la lecture en mode DTS, il se peut que vous entendiez
du bruit lorsque la lecture commence et pendant la recherche.
Si cela se produit, basculez le “INPUT MODE” sur “DTS”.
Pour une description du “INPUT MODE”, référez-vous à la
page 46.
NIGHT MODE:
• Lorsque vous écoutez de nuit à des volumes faibles, le mode
nuit améliore l'écoute.
Appuyez sur la touche CURSOR 0 ou 1 pour sélectionner “ON”
ou “OFF”.
Lorsque “ON” est sélectionné, le mode “NIGHT” est désactivé.
• Le mode nuit ne fonctionne que pour la lecture de sources de
programme enregistrées en Dolby Digital ou DTS.
5
Appuyez sur la touche SURROUND PARAMETER ,
puis appuyez sur la touche CURSOR 0 ou 1 pour
effectuer le réglage.
NIGHT ON OFF
4
Appuyez sur la touche SURROUND PARAMETER,
puis appuyez sur la touche CURSOR 0 ou 1 pour
régler sur “ON” ou “OFF”.
C.EQ ON OFF
6
Appuyez sur la touche SURROUND PARAMETER ,
puis appuyez sur la touche CURSOR 0 ou 1 pour
régler le niveau LFE.
LFE 0dB
Cinema EQ:
• La fonction Cinema EQ diminue progressivement le niveau des
ondes à extrême haute fréquence, en compensant les bandes-son
trop aiguës. Sélectionnez la fonction si le son des enceintes
frontales est trop aigu.
• Cette fonction ne fonctionne qu'avec DVS et DHP (w/o
BYPASS MODE). (Le même contenu est réglé pour tous les
modes d'opération.)
FRANCAIS
Mode d’entrée lors de la lecture de source CD
• Lors de la lecture de CD contenant des enregistrements de
concerts en direct, etc., en mode “AUTO”, le son risque
d’être légèrement cassé au début. Si cela se produit,
commuter au mode “PCM”.
Mode d’entrée lors de la lecture de source DTS
• Si des CD compatibles DTS sont lus en mode “PCM”, du bruit est émis
parce qu’il n’est pas possible d’effectuer la lecture DTS.
Pour lire une source compatible DTS, s’assurer de régler le
mode d’entrée sur “AUTO” ou “DTS”.
• Il est possible qu’un bruit soit généré au début de la lecture et
lors de la recherche en mode AUTO lors de la lecture DTS. Dans
ce cas, effectuer la lecture en mode DTS.
2 Paramètres ambiance w
Page 98

31
Fonctionnement élémentaire Fonctionnement élémentaire
FRANCAIS
JAZZ CLUB
ROCK ARENA
Lecture avec les modes ambiance DENON
originaux
Cet appareil est équipé d’un DSP (Processeur de signaux
numériques) très performant qui utilise le traitement des signaux
numériques pour recréer le champ acoustique de façon
synthétique. Un mode surround préréglé peut être sélectionné
parmi 3 modes en accord avec la source de programme et les
paramètres peuvent être ajustés selon les conditions d’écoute
dans la pièce pour obtenir un son plus puissant et plus réaliste.
Ces modes surround peuvent également être utilisés pour des
sources de programme n’étant pas enregistrées en mode Dolby
surround Pro Logic ni Dolby numérique.
En fonction de la source lue, l’effet peut ne pas être très
marqué.
Dans de tels cas, essayez d’autres modes ambiance sans
guère prêter attention à leur dénomination et choisissez celui
qui vous convient le mieux.
Utiliser ce mode pour retrouver les
sensations d’un concert live dans une
arène avec des sons réfléchis provenant de
toutes les directions.
Ce mode crée le champ acoustique d’une
maison au plafond bas et aux murs épais.
Ce mode donne au jazz un réalisme très vif.
2
1
Réglages du mode 2 canaux
Quand les signaux 2 canaux sont entrés, un des deux modes de
lecture peut être sélectionné et réglé en fonction du réglage de
mode des 2 canaux, Virtuel 1 ou Virtuel 2. (Le mode Virtuel 1 est
réglé en usine par défaut.)
REMARQUE:
• Le mode bicanal ne peut pas être sélectionné en présence
des signaux Dolby numérique ou DTS à 5.1 canaux.
• Le mode 2 canaux est réglé et stocké dans la mémoire
indépendamment des autres fonctions.
Ceci peut être sélectionné s’il n’y a pas de signal d’entré
numérique, si l’entrée numérique est un signal 2 canaux
Dolby Digital ou PCM et si l’entrée est analogique.
2 Paramètres ambiance e
VIRTUAL 1 (mode virtuel 1):
Dans ce mode, des sources à 2 canaux sont reproduites en
Dolby Pro Logic II Cinema. Ce mode convient pour lire des
sources films en Dolby Surround et des sources stéréo
normales.
VIRTUAL 2 (mode virtuel 2):
Dans ce mode, des sources à 2 canaux sont reproduites en
Dolby Pro Logic. Ce mode est compatible avec la lecture normale
en Dolby Pro Logic. II permet de récréer fidèlement l’image
enregistrée des sources enregistrées en Dolby Surround.
1
Appuyez sur la touche DVS/CINEMA pour
sélectionner “DOLBYVS REF” ou “DOLBYVS
WIDE” pour le mode Dolby Virtual Speaker.
• L'indicateur Dolby Virtual Speaker ( ) s'allume.
2
Appuyez sur la touche SURROUND
PARAMETER
, puis appuyez sur la touche
CURSOR 0 ou 1 pour sélectionner
“VIRTUAL1” ou “VIRTUAL 2”.
VIRTU L 1
• Une fois que les paramètres d’ambiance ont été réglés, arrêtez
d’actionner les touches. Après plusieurs secondes, l’affichage
normal réapparaît et les réglages sont automatiquement entrés.
2 Les modes satellite et leurs caractéristiques
CURSOR
SURROUND
SURROUND
PARAMETER
CURSOR
DVS/CINEMA
STEREO MUSIC
PHONES
FRANCAIS
Page 99

32
Fonctionnement élémentaire Fonctionnement élémentaire
FRANCAIS
Lecture à l’aide du mode Dolby Headphone
• Le S-101 est équipé d’un mode Dolby Headphone, une technologie
développée conjointement par Dolby Laboratories et Lake
Technology pour obtenir un son 3D avec des écouteurs normaux.
• Le mode Dolby Headphone est réglé lorsque les écouteurs
sont connectés dans la prise PHONES du S-101’s
• Il existe actuellement deux modes Dolby Headphone créant
différents effets de champ sonore : Dolby before H/P et
BYPASS (lecture stéréo normale).
• Le mode Dolby Headphone est compatible avec les sources
multi-canaux DTS et Dolby Digital.
1
Connecter les écouteurs (vendus séparément) à
la prise PHONES.
• Lorsque les écouteurs sont branchés, la sortie vers les
enceintes est automatiquement coupée et aucun son
ne sera reproduit par les enceintes.
DOLBY H/P
2
Appuyez sur la touche SURROUND pour
sélectionner “DOLBY H/P”.
Si rien n’est fait pendant 6 secondes à partir de l’affichage
des paramètres, l’affichage normal réapparaît.
3
Lorsqu'il n'y a aucun signal ou lors de la lecture
d'une source à 2 canaux :
Appuyez sur la touche SURROUND PARAMETER,
puis appuyez sur la touche CURSOR 0 ou 1
pour sélectionner “CINEMA” ou “MUSIC”.
5
Appuyez sur la touche SURROUND PARAMETER ,
puis appuyez sur la touche CURSOR 0 ou 1 pour
régler le CINEMA EQ , NIGHT MODE et
niveau LFE ( page 30).
2 Paramètres ambiance r
• DOLBY H/P (Dolby Headphone):
Live room (pièce avec plus de réverbération que la pièce de
référence)
• DOLBY H BYPAS (Dolby Headphone Bypass):
Lecture stéréo.
Peuvent être sélectionnés lors de la lecture de sources 2 canaux
(analogique, PCM, etc.). Les signaux sont traités par l’un des
décodeurs suivants afin d’obtenir un son multi-canaux reproduit
en mode Dolby Headphone.
En mode Bypass, ceux-ci se sont pas affichés.
• CINEMA:
Mode Dolby Pro Logic II Cinema
• MUSIC:
Mode Dolby Pro Logic II Music
4
Lire une source de programme.
2 Mémoire personnalisée plus
Cet appareil est équipé d’une fonction de mémoire
personnalisée qui enregistre automatiquement les modes
surround et les modes d’entrée sélectionnés pour les
différentes sources d’entrée. Lorsque la source d’entrée est
commutée, les modes réglés pour cette source la dernière fois
qu’elle fut utilisée sont restitués.
• Les réglages sont automatiquement enregistrés dans la
mémoire pour les fonctions d’entrée individuelles grâce à la
fonction de mémoire personnalisée plus:
q Mode Surround (incluant mode de décodage bicanal et les
réglages du mode Dolby Pro Logic II)
w Fonction de sélection du mode d’entrée
Les paramètres surround, les réglages de la commande
TONE/SDB et la balance du niveau de lecture pour les
différents canaux de sortie sont mémorisés pour chaque
mode surround.
Appuyez sur la touche STEREO MUSIC.
2 Pour passer en mode stéréo
FRANCAIS
Page 100

33
Fonctionnement élémentaire Fonctionnement élémentaire
FRANCAIS
Utiliser le menu “HELP”
Il est possible de vérifier la fonction activée et de la basculer à partir de l’OSD.
1
Appuyez sur la touche HELP.
•L’écran du menu “HELP” apparaît.
L’élément sélectionné est affiché en bleu clair.
Les parties grises indiquent que l’entrée du périphérique
correspondant n’est pas connectée.
Appuyez sur la touche HELP à nouveau pour éteindre l’écran
du menu “HELP”.
3
Appuyez sur la touche ENTER pour entrer les
réglage.
• Le mode HELP est annulé et l’opération de la fonction
sélectionnée est effectuée.
2
Appuyez sur la touche CURSOR
•
ouªde
sélectionner l’item souhaité.
•L’élément sélectionné est affiché en bleu.
Regarder des films:
A sélectionner pour lire un DVD et un CD Vidéo.
Ecouter le CD:
A sélectionner pour lire un CD de musique.
Ecouter des MP3/ WMA / Jpeg Photo:
A sélectionner pour lire un disque en MP3, WMA ou JPEG.
Ecouter la radio:
A utiliser pour régler la fonction sur TUNER.
iPod musique / photo:
A sélectionner pour commander le iPod branché au
connecteur du iPod sur le panneau avant du ADV-S101.
Baladeur sur entrée frontale:
A sélectionner pour transmettre les signaux du lecteur audio
portable connecté à la prise de portable du panneau avant du
ADV-S101.
Regarder entrée Auxiliaire1:
A sélectionner pour visionner l’image du périphérique externe
connecté à la borne AUX1.
Regarder entrée Auxiliaire 2:
A sélectionner pour visionner l’image du périphérique externe
connecté à la borne AUX2.
Ecouter entrée Auxiliaire 3:
A sélectionner pour écouter le son d’un composant audio
connecté à la borne AUX3.
CONFIGURATION:
A sélectionner pour effectuer les changements de réglage du
système.
CURSOR
ENTER
STATUS
CURSOR
ENTER
HELP
SLEEP
Utilisation du réveil
Réglage de l’horloge (Affichage sur 12 heures)
1
Appuyez sur la touche CURSOR•ouªpour
sélectionner “CONFIGURATION” sur la
“HELP” menu, puis appuyez surla touche ENTER.
•L’écran du menu “CONFIGURATION” apparaît.
Assurez-vous de bien régler l’heure actuelle à l'avance. La
minuterie ne fonctionnera pas si l'heure actuelle n’est pas réglée.
2
Appuyez sur la touche CURSOR 0 ou 1 pour
sélectionner l'icône “REGLAGE DU TIMER” ,
puis appuyez sur la touche ENTER.
•L’écran du menu “REGLAGE DU TIMER” apparaît.
FRANCAIS
 Loading...