

Page 1

AV SURROUND RECEIVER
AVR-5805
AVR-4806
OPERATING INSTRUCTIONS
Upgrade version for network function
Page 2
2
Contents
Getting Started
This manual includes explanations of functions that are added after upgrading the amplifier.
For instructions on operating the amplifier, also refer to the operating instructions included with the amplifier.
Basic Operation···································································4
~8
Getting Started ···································································2, 3
Getting Started
Additional Information ···························································9
About Network Settings ························································3
Connecting Other Sources·····················································3
Using the Network Audio Function
Internet radio function
Internet radio refers to radio programs broadcast over the
Internet.
There are many stations throughout the world broadcasting
Internet radio programs. These stations are of all sizes and types,
some run by individuals, others by ground wave broadcast
stations.
While ground wave radio stations can only be listened to within
the range in which the waves reach, Internet radio can be
listened to anywhere in the world.
The AVR-5805/4806 is equipped with the following Internet radio
functions:
• Stations can be selected by genre and region.
• Up to 56 Internet radio stations can be preset.
• MP3 format Internet radio programs can be listened to.
•Your favorite radio stations can be registered by accessing the
exclusive DENON Internet radio URL using a computer’s
browser. (The AV amplifier automatically downloads the
registration settings (approximately once every other day).)
(This is managed separately for each unit, so a MAC address or
e-mail address must be registered.)
Exclusive URL : http://www.RadioDenon.com
Use the MAC address you used when you applied for the
amplifier’s upgrade.
2 vTuner
The AVR-5805/4806’s Internet radio station list uses “vTuner”, a
radio station database service. This database service is edited
and prepared for the AVR-5805/4806.
Music server function
The AVR-5805/4806 is equipped with a network audio playback
function allowing music files stored on a computer to be played
via a LAN (local area network).
The AVR-5805/4806’s network audio playback function connects
to servers using the following technologies:
•Windows Media Connect
• The Designed to DLNA Guideline
•Windows Media DRM 10 (for network devices)
System requirements
The preparations described below must be made in order to use
the Internet radio and music server functions.
2 Broadband Internet connection
A broadband connection to the Internet is necessary in order to
use the AVR-5805/4806’s Internet radio function.
NOTE:
• You must have a contract with an Internet Service
Provider (ISP) in order to connect to the Internet. For
instructions on connecting to the Internet, contact your ISP
or a computer store.
If you already have a broadband Internet connection there is
no need to take out another contract.
2 Modem
A modem is a device for exchanging signals over the Internet
using a broadband connection. Some are integrated into routers.
For instructions on connecting to the Internet, contact your ISP
or a computer store.
2 Router
A router is a device for connecting multiple pieces of equipment
(computers, the AVR-5805/4806, etc.) to the Internet
simultaneously.
When using the AVR-5805/4806, we recommend a router
equipped with the following functions:
• Built-in DHCP (Dynamic Host Configuration Protocol) server.
Function for automatically assigning the device’s IP address on
the LAN.
• Built-in 100 base TX switch
When connecting multiple devices, it is recommended to have
a built-in switching hub with a speed of 100 Mbps or greater.
NOTE:
• The type of router that can be used differs for different
ISPs. For details, contact your ISP or a computer store.
2 Ethernet cable (CAT-5)
The AVR-5805/4806 does not come with an Ethernet cable.
Purchase one of the required length.
2 Personal Computer
Install “Windows Media Connect” on your computer.
The required system for forming a music server is as described
below.
1) OS (Operating system):
Windows® XP Service pack2
2) Processor:
Intel PentiumII or AMD processor, etc., 1 GHz or greater
optimum.
3) RAM:
Min. 128 MB, 256 MB or greater recommended.
4) Software:
.NET Framework 1.1
5) Internet browser:
Microsoft Internet Explorer 5.01 or later
• LAN port required
• 300 MB or greater free hard disc space required
Page 3
3
Per one hour
Per one
minute
Bit rateFormat
060 MB0.1 MB0128 kbps
MP3/WMA
090 MB1.5 MB0192 kbps
120 MB0.2 MB0256 kbps
180 MB0.3 MB0392 kbps
600 MB.10 MB1400 kbpsWAV (LPCM)
2 Others
• When the contract with your provider is of the type by which
the network settings are made manually, you must make the
network-related settings.
• The AVR-5805/4806 is not compatible with PPPoE. If your
contract is of the PPPoE setting type, you need a PPPoEcompatible router.
• For some ISPs (Internet Service Providers), you may have to
make proxy server settings in order to use the Internet radio
function. If proxy server settings for connecting to the Internet
have been made on the computer, make the same settings on
the AVR-5805/4806.
• The AVR-5805/4806 is designed to make the network settings
automatically using the DHCP and Auto IP functions.
•Video files may be displayed with some servers, but they
cannot be placed with this amplifier.
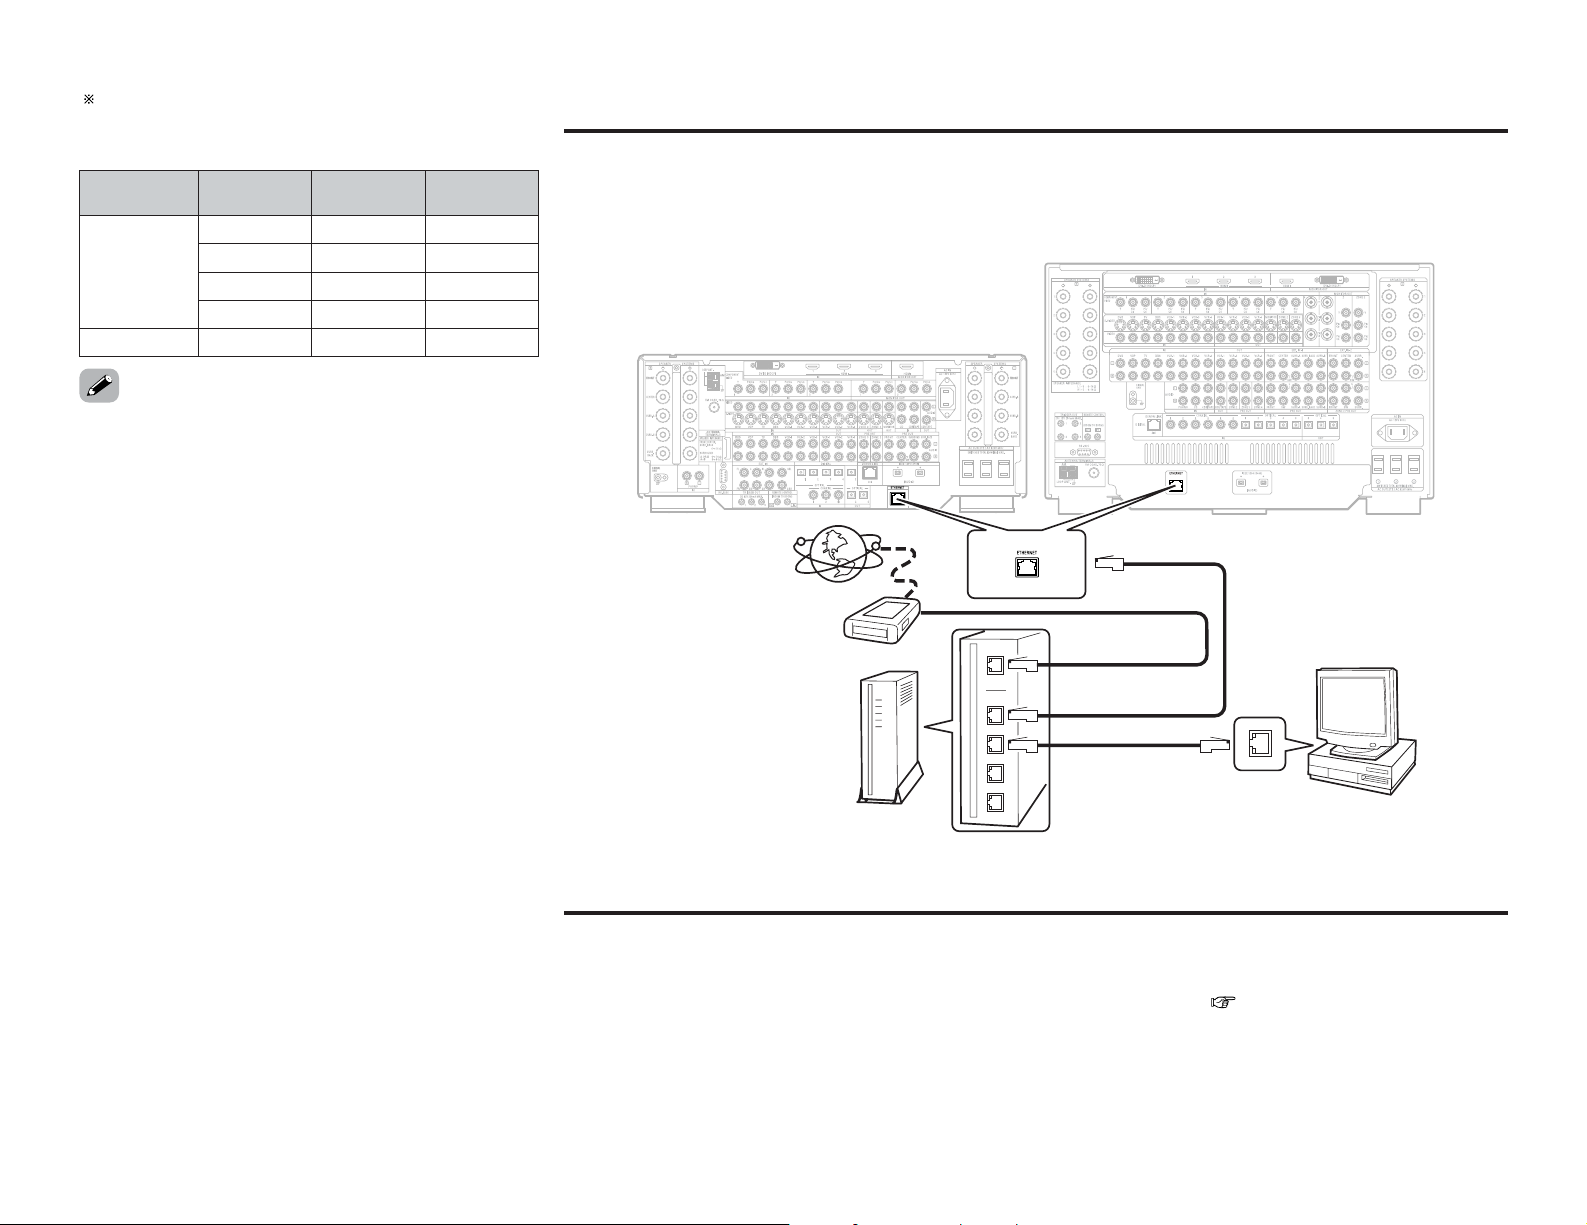
2 Connections
Connect one side of the Ethernet cable (CAT-5) to the ETHERNET connector on the AVR-5805/4806’s rear panel, the other side to
the router.
Internet radio
Modem
To WAN side
To LAN side port
To LAN side port
Router
Computer
LAN port/Ethernet port
2 Network settings
When using a broadband router (DHCP function), the network settings are made automatically, so there is no need to make the
settings from the setup menu.
If the broadband router’s DHCP function is turned off, make the network-related settings ( page 8).
Connecting Other Sources
About Network Settings
AVR-4806
AVR-5805
Extra free space is necessary to store music files.
The following table gives an approximate estimate of the
required free space.
Page 4

4
Basic Operation
ENTER
NUMBER
CURSOR
MEMORY
MEMORY
BLOCK
(AMP mode)
AUX
Listening to Internet radio
The required system connections and settings must be made in
order to listen to Internet radio.
“Update?” appears on the display when connecting to an
Internet radio station for the first time.
1
Press the AUX (AMP mode) button.
• The “Network Audio” menu screen appears.
3
Connecting to an Internet radio station for the
first time:
Press the ENTER or CURSORGGbutton.
• The update screen appears.
Basic Operation
Operating the remote control unit
•, ª : Character search
MODE : Configuration mode selection
MEM :Preset and favorite registration
CH +, – :Preset channel selection
A ~ G :Preset memory blocks
1 ~ 8 :Preset numbers
•, ª
, 0, 1 : Cursor up, down, left and right
ENTER : Enter settings
4
Press the ENTER or CURSORGGbutton once
again.
• The latest list of radio stations is downloaded from the
vTuner site. (Several minutes are required for this
download.)
The digital tuner system buttons shown on the diagram below
are used for net audio operations.
2
Press the CURSOR
DD
or
HH
button to select
“Internet Radio”, then press the ENTER or
CURSOR
GG
button.
• The initial screen when not connected to the Internet is
displayed.
RC-995
Page 5

5
Basic Operation Basic Operation
5
Press the CURSORDDorHHbutton to select the
desired setting item, then press the ENTER or
CURSOR
GG
button.
6
Select the station, then press the ENTER or
CURSOR
GG
button to set.
• Connection starts, and the station starts playing once the
buffer reaches “100%”.
The pause mode is set if the ENTER button is pressed for
less than 2 seconds while playing an Internet radio program,
and playback resumes if the ENTER button is pressed again
for less than 2 seconds.
If the ENTER button is pressed and held in for more than 2
seconds when in the play or pause mode, playback stops
and the previous menu window reappears.
Finally, the list of Internet radio stations is displayed and
those that can be played are indicated by the “∗” mark in
front of them.
• There are many Internet radio stations on the Internet. The
programs they broadcast and their bit rates vary widely.
Generally, the higher the bit rate, the higher the sound quality,
but streamed music or sound may be broken if the
communication lines or servers are busy. Inversely, programs
with low bit rates have lower sound quality but tend to be more
stable.
• “Server Full” or “Connection Down” is displayed if the station
is congested or if it is not broadcasting.
Presetting (registering) Internet radio stations
There are two ways to register stations: by presetting them or by
storing them in your favorites.
Stations that are preset can be tuned in directly from the remote
control unit.
1
Press the MEMORY button while playing the
Internet radio station you want to register.
• The registration menu screen appears.
2
Press the CURSOR
DD
or
HH
button to select
“Preset”, then press the ENTER or CURSOR
GG
button.
•The preset registration screen appears.
3
Press a MEMORY BLOCK (A ~ G) button, then
press a NUMBER (1 ~ 8) button to register the
station at the desired preset channel.
• This completes registration.
If no button is pressed, the set times out and the normal
display reappears.
Registered presettings can be checked on the on-screen
display.
The presettings can only be displayed with the on-screen
display when the “Network Audio” function is selected.
NOTE:
• Registered presettings are deleted when they are
overwritten.
When the “Network Audio” function is selected,
press a MEMORY BLOCK (A ~ G) button, then press
a NUMBER (1 ~ 8) button.
• The connection is made automatically and playback starts.
2 Listening to preset Internet radio stations
Registering Internet radio stations in your
favorites
Your favorites are listed at the top of the menu screen, so
registered stations can be tuned in easily.
1
Press the MEMORY button while playing the
Internet radio station you want to register.
• The registration menu screen appears.
2
Press the CURSOR
DD
or
HH
button to select
“Favorites”, then press the ENTER or CURSOR
GG
button.
• The favorites registration screen appears.
3
Press the CURSORFFbutton to register the
station.
To cancel without registering, press the CURSOR GGbutton.
1
When the “Network Audio” function is selected,
press the CURSOR
DD
or
HH
button to select
“Favorites”, then press the ENTER or CURSOR
GG
button.
• The Internet radio stations registered in your favorites
are displayed.
2
Press the CURSORDDorHHbutton to select the
desired radio station, then press the ENTER or
CURSOR
GG
button.
• Playback starts.
2 Listening to Internet radio stations registered
in your favorites
Page 6

6
Basic Operation Basic Operation
2 Deleting radio stations from your favorites
1
At the screen on which the Internet radio
stations registered in your favorites are
displayed, press the CURSORDDorHHbutton to
choose the radio station you want to delete, then
press the MEMORY button.
• The delete screen appears.
2
Press the CURSORFFbutton to delete the station.
To cancel without deleting, press the CURSOR GGbutton.
1
While the menu screen is displayed, press the
TUNING
•orª
button.
• The character search screen appears.
2
Press the TUNING•orªbutton to select the
first letter of the item you want to search for.
• After several seconds, the menu screen is displayed with
the cursor set to the item starting with the letter selected
in step 2.
If there is more than one item starting with the letter
selected in step 2, the items are displayed in alphabetical
order.
Character search function (searching by first
letter)
The character search function (searching by first letter) can be
used to select the desired item from the menu screen displaying
the list of Internet radio stations or music files stored on the
computer.
ENTER
CURSOR
MEMORY
MODE
TUNING
(MODE AMP)
AUX
Updating the list of radio stations
1
When the “Network Audio” function is selected,
press the MODE button to select the configuation
mode, then press the ENTER or CURSOR
GG
button.
• The settings screen appears.
2
Press the CURSOR
DD
or
HH
button to select
“Automatic Update” or “Manual Update”, then
press the ENTER or CURSORGGbutton.
• The update screen appears.
Select “Radio List Version” to display the current version.
3
-1
When “Automatic Update” is selected:
Press the ENTER or CURSORGGbutton to select
“Yes”.
• The list of radio stations is updated approximately once
every other day.
3
-2
When “Manual Update” is selected:
Press the ENTER or CURSORGGbutton.
• The list of radio stations is updated this one time.
• When “Yes” is set for “Automatic Update”, set “Power
Saving” in the network-related settings to “OFF”. ( page 8)
When used with “Power Saving” set to “ON”, we recommend
performing the “Manual Update” procedure periodically (about
once a week).
Page 7

7
Basic Operation Basic Operation
Playing music files stored on the computer
(music server)
The necessary system connections and settings must be made
in order to play music files.
Music files (of WMA, MP3 or WAV format) or playlists (of m3u or
wpl format) stored on a computer (music server) connected to
the amplifier via a network are played. The computer’s server
software must be launched in advance and the files to be played
must be set as server contents. For details see the server
software’s operating instructions.
2
Press the CURSORDDorHHbutton to select the
host name of the computer (music server) on
which the music file you want to play is located,
then press the ENTER or CURSORGGbutton.
1
Press the AUX button.
• The “Network Audio” menu screen appears.
The host names of the computer(s) (music server(s)) on the
network are displayed.
The same operations as for Internet radio stations can be used to
preset music files or register them in your favorites and play
them.
NOTE:
• Registered presettings are deleted when they are
overwritten.
• When the operations describe below are performed, the
music server database is updated and it may no longer be
possible to play the music files that have been preset or
registered in your favorites.
When the music server is stopped and restarted
When music files are deleted from or added to the music
server
• When using an ESCIENT server, place ESCIENT before the
server name.
2 Playing music files that have been preset or
registered in your favorites
Internet Explorer can be used on the computer connected to the
AVR-5805/4806 over the network to operate the AVR-5805/4806.
Check the AVR-5805/4806’s IP address beforehand and input this
IP address in Internet Explorer to display the AVR-5805/4806’s
control panel.
Operate in the same way as with normal Internet browsing to
control the AVR-5805/4806.
Check the AVR-5805/4806’s IP address at: “System Setup
Menu” – *“7.Option Setup” – “7.Network Setup” – “IP
Address”.
When you use this function, set “Standby Mode Power Saving”
to “OFF”. (“System Setup” – *“7.Option Setup” – “7.Network
Setup” – “Network Option”).
*
AVR-5805 only
3
Press the CURSORDDorHHbutton to select the
search item or the desired folder, then press the
ENTER or CURSOR
GG
button.
Playable music files are indicated by the “∗” mark in front
of them.
Operating the AVR-5805/4806 using a browser
4
Press the CURSORDDorHHbutton to select the
music file, then press the ENTER or CURSOR
GG
button.
• Connection starts, and playback starts once the buffer
reaches “100%”.
Press the CURSOR HHbutton to select the next file, the
CURSOR DDbutton to select the previous file.
During playback, press the ENTER button once to pause
playback, then press the ENTER button again to resume
playback.
If the ENTER button is pressed and held in for more than 2
seconds when in the play or pause mode, playback stops
and the previous menu screen reappears.
Page 8

Basic Operation Basic Operation
8
Network-related settings (Network Setup)
If you are using a broadband router (DHCP function), there is no need to make the settings at “System Setup Menu” - *“7.Option
Setup” - “7.Network Setup”, since the DHCP function is set to “ON” in the AVR-5805/4806’s default settings.
If the AVR-5805/4806 is being used connected to a network without the DHCP function, the network settings must be made. In this
case, some knowledge of networks is required.
*
AVR-5805 only
Setting the IP Address
Setting the Proxy
Make this setting when connecting to the Internet via a proxy
server.
3.Subnet Mask
When connecting an xDSL modem or terminal adapter
directly to the AVR-5805/4806, input the subnet mask
indicated in the documentation supplied by your provider.
Normally input 255.255.255.0.
4.Gateway
Set the IP address within the ranges shown below.
When connected to a gateway (router), input its IP address.
1.Proxy:
In some cases it is necessary to pass through a proxy server
to connect to the Internet.
2 DHCP (Dynamic Host Configuration Protocol)
and Auto IP
These are systems by which the IP address and other
network settings are automatically set for the AVR-
5805/4806, computer, broadband router and network devices.
2 DNS (Domain Name System)
This is a system for converting the domain names used when
browsing Internet sites (for example, “www.jp”) into the IP
addresses actually used for communications (for example,
“202.221.192.106”).
2.IP Address
Set the IP address within the ranges shown below. The Net
Audio function cannot be used if other IP addresses are set.
CLASS A: 10.0.0.0 ~ 10.255.255.255
CLASS B: 172.16.0.0 ~ 172.31.255.255
CLASS C: 192.168.0.0 ~ 192.168.255.255
1.DHCP Settings
Set whether or not to make the DHCP settings automatically.
ON (default settings):
The DHCP function is enabled.
OFF:
The DHCP function is disabled.
ON:
The proxy server is enabled.
OFF (default settings):
The proxy server is disabled.
2.Proxy Address/Name
Input the proxy server domain name or address. If “ON” has
been set at the “Proxy” setting, the character input mode is
set when this item is selected and the CURSOR GGbutton is
pressed. Use the CURSORDD, HH, FFand GGbuttons to choose
the character, then press the ENTER button. Once all the
characters have been input, the character input mode is
canceled.
3.Port
Input the proxy server port number. If “ON” has been set at
the “Proxy” setting, the number input mode is set when this
item is selected and the CURSOR GGbutton is pressed. Use the
CURSORDD, HH, FFand GGbuttons to choose the number, then
press the ENTER button. Once all the numbers have been
input, the number input mode is canceled.
• Once the settings are completed, press the ENTER button three
times to quit the “System Setup Menu”.
Standby Mode Power Saving
When not using the AVR-5805/4806 connected in a network, set
“ON” to reduce the power consumption when in the standby
mode.
Set “OFF” when using the AVR-5805/4806 connected in a
network.
PC Language
Select according to the language of the computer being used.
The languages are indicated with three letters conforming to
ISO639-2.
5.Primary DNS / Secondary DNS
Set the IP address within the ranges shown below.
If there is only one DNS address indicated in the
documentation supplied by your provider, input it at “e. 1st”.
If there are two or more DNS addresses, input the first one at
“f. 2nd”.
Page 9

9
Additional Information
Windows Media Connect
This is a media server provided free of charge by Microsoft since
October 2004.
It operates with all types of music jukebox programs, but is
optimum with Windows Media Player Ver. 10.
Windows Media Connect can be used to play playlists created
on jukebox software such as Windows Media Player Ver. 10, as
well as WMA, DRM WMA, MP3 and WAV files.
2 Explanation for installing Windows Media
Connect
1. If installation of Windows XP Service Pack 2 is not yet
complete, either download free of charge from Microsoft
or via the Windows Update installer.
2. Download the latest version of Windows Media Player Ver.
10 either directly from Microsoft or using the Windows
Update installer.
3. Download Windows Media Connect (usable since October
12, 2004) either directly from Microsoft or using the
Windows Update installer.
vTuner
This is an Internet radio free online contents server. Note that
usage fess are included in upgrade costs.
For inquiries about this service, visit the vTuner site below.
vTuner website: http://www
.radiodenon.com
This product is protected by certain intellectual property rights of
Nothing Else Matters Software and BridgeCo. Use or distribution
of such technology outside of this product is prohibited without
a license from Nothing Else Matters Software and BridgeCo or
an authorized subsidiary.
Windows Media DRM
A copyright-protected technology developed by Microsoft.
Content providers are using the digital rights management
technology for Windows Media contained in this device (“WMDRM”) to protect the integrity of their content (“Secure
Content”) so that their intellectual property, including copyright,
in such content is not misappropriated. This device uses WMDRM software to play Secure Content (“WM-DRM Software”).
If the security of the WM-DRM Software in this device has been
compromised, owners of Secure Content (“Secure Content
Owners”) way request that Microsoft revoke the WM-DRM
Software's right to acquire new licenses to copy, display and/or
play Secure Content. Revocation does not alter the WM-DRM
Software’s ability to play unprotected content. A list of revoked
WM-DRM Software is sent to your device whenever you
download a license for Secure Content from the Internet or from
PC. Microsoft may, in conjunction with such license, also
download revocation list onto your device on behalf of Secure
Content Owners.
Windows Media, and Windows Logo are trademarks, or
registered trademark of Microsoft corporation in the united
states and/or other countries.
Additional Information
• No signals are output to the digital output terminals when
playing copyright-protected music files.
• The AVR-5805/4806 is compatible with “MPEG-1 Audio Layer3” MP3 files (with sampling frequencies of 32, 44.1 or 48 kHz).
It is not compatible with “MPEG-2 Audio Layer-3”, “MPEG-2.5
Audio Layer-3”, “MP1” or “MP2” files.
• The AVR-5805/4806 is compatible with bit rates of 32 to 320
kpbs for MP3 files and 48 to 192 kpbs for WMA files.
• The AVR-5805/4806 is compatible with WMA files with
sampling frequencies of 32, 44.1 or 48 kHz.
• The AVR-5805/4806 is compatible with MP3 ID3-Tag (Ver.2).
• The AVR-5805/4806 is compatible with WMA meta tags.
•With the AVR-5805/4806, the folder names, file names, etc.,
can be displayed on the main unit’s display and the OSD. Up to
95 characters can be displayed.
FCC INFORMATION (For US customers)
1. COMPLIANCE INFORMATION
Product Name: AV Surround Receiver
Model Number: AVR-5805/4806
This product complies with Part 15 of the FCC Rules. Operation is
subject to the following two conditions: (1) this product may not cause
harmful interference, and (2) this product must accept any interference
received, including interference that may cause undesired operation.
Denon Electronics (USA), LLC
19C Chapin Road, Suite 205
Pine Brook, NJ 07058-9385
Tel. 973-396-0810 (Main)
2. IMPORTANT NOTICE: DO NOT MODIFY THIS PRODUCT
This product, when installed as indicated in the instructions contained
in this manual, meets FCC requirements. Modification not expressly
approved by DENON may void your authority, granted by the FCC, to
use the product.
3. NOTE
This product has been tested and found to comply with the limits for a
Class B digital device, pursuant to Part 15 of the FCC Rules. These
limits are designed to provide reasonable protection against harmful
interference in a residential installation.
This product generates, uses and can radiate radio frequency energy
and, if not installed and used in accordance with the instructions, may
cause harmful interference to radio communications. However, there
is no guarantee that interference will not occur in a particular
installation. If this product does cause harmful interference to radio or
television reception, which can be determined by turning the product
OFF and ON, the user is encouraged to try to correct the interference
by one or more of the following measures:
• Reorient or relocate the receiving antenna.
• Increase the separation between the equipment and receiver.
• Connect the product into an outlet on a circuit different from that
to which the receiver is connected.
• Consult the local retailer authorized to distribute this type of
product or an experienced radio/TV technician for help.
This class B digital apparatus complies with Canadian ICES-003.
Page 10

Denon Brand Company, D&M Holdings Inc.
Printed in Japan 00D 511 4425 000
TOKYO, JAPAN
www.denon.com
 Loading...