


IMPORTANT INSTRUCTIONS
ELECTRIC OIL FILLED RADIATORS
SAVE THESE INSTRUCTIONS
INSTRUÇÕES PARA O USO
CONSERVE AS PRESENTES INSTRUÇÕES
The De’ Longhi electric oil filled radiators are the
finest and most versatile portable heaters available.
Please review the following to ensure the fullest benefit from their features.
Os aquecedores a óleo são os melhores e os mais
versáteis atualmente disponíveis no mercado. Leia
com atenção o manual de instruções para ter o
melhor proveito possível.

IMPORTANT SAFEGUARDS
When using electrical appliances, basic precautions should always be followed to reduce risk of
fire, electric shock, and injury to persons, including the following:
1. Read all instructions before using this heater.
2. Never for any reason cover the appliance during operation as this could lead to dangerous
overheating.
3. This heater is hot when in use. To avoid burns, do not let bare skin touch hot surfaces. Use
handle when moving this heater. Keep combustible materials, such as furniture, pillows, bedding, papers, clothes, and curtains at least 3 feet (0,9 m) from the front and top of the heater
and keep them away from the sides and rear.
4. Extreme caution is necessary when any heater is used by or near children or invalids and whenever the heater is left operating and unattended.
5. Always unplug heater when not in use.
6.
Do not operate any heater with a damaged cord or plug or after the heater malfunctions, has been
dropped or damaged in any manner. If heater has leaked any oil, discontinue using the heater and
contact the service center as indicated in this instructions leaflet. Return heater to authorized service facility for examination, electrical or mechanical adjustment, or repair.
7. Do not use outdoors.
8. This heater is not intended for use in bathrooms, laundry areas and similar indoor locations.
Never locate heater where it may fall into a bathtub or other water container.
9.
Do not run cord under carpeting. Do not cover cord with throw rugs, runners, or the like.
Arrange cord away from traffic area and where it will not be tripped over.
10. To disconnect heater, turn controls to off, then remove plug from outlet.
11. Connect to properly polarized outlets only.
12. Do not insert or allow foreign objects to enter any ventilation or exhaust opening as this may
cause an electric shock, fire, or damage the heater.
13. To prevent a possible fire, do not block air intakes or exhaust in any manner. Do not use on
soft surfaces, like a bed, where openings may become blocked.
14.
A heater has hot or arcing or sparking parts inside. Do not use it in areas where gasoline,
paint, or flammable liquids are used or stored.
15. Use this heater only as described in this manual. Any other use not recommended by the
manufacturer may cause fire, electric shock, or injury to persons.
16. To prevent overload and blown fuses, be sure that no other appliance is plugged into the
same outlet (receptacle) or into anolher outlet (receptacle) wired into the same circuit.
17. It is normal for the heater’s plug and cord to feel warm to the touch. A plug or cord which becomes
hot to the touch or becomes distorted in shape may be a result of a worn electrical outlet. Worn
outlets or receptacles should be replaced prior to further use of the heater. Plugging heater into a
worn outlet /receptacle/ may result in overheating of the power cord or fire.
18.
Do not use an extension cord because it may overheat and cause a risk of fire. However, if you have to use
an extension cord, the cord shall be properly grounded No. 1 4 AWG minimum size and rated not less than
1875 watts, and has to be used only for supplying power to this heater.
19. Be sure that the plug is fully inserted into an appropriate receptacle in order to prevent any danger of
overheating or arcing. Please remember that receptacles also deteriorate due to aging and continuous
use: check periodically if signs overheating or deformations are evidenced by the plug. Do not use the
receptacle and CALL your electrician.
20. Check that neither the appliance nor the power cable have been damaged in any way during
transportation.
21. Make sure that no pieces of polystyrene or other packaging material have been left between
one element of the appliance and another. It may be necessary to pass over the appliance with
a vacuum cleaner.
22. When switching on the appliance for the first time, allow it to run at full power for about two
hours to get rid of the unpleasant smell. Make sure that the room in which the appliance is
located is well ventilated during this operation. It is normal for the appliance to emit small
cracking sounds when you turn it on for the first time.
SAVE THESE INSTRUCTIONS
2
If necessary please call: 0800 77 06 222
3
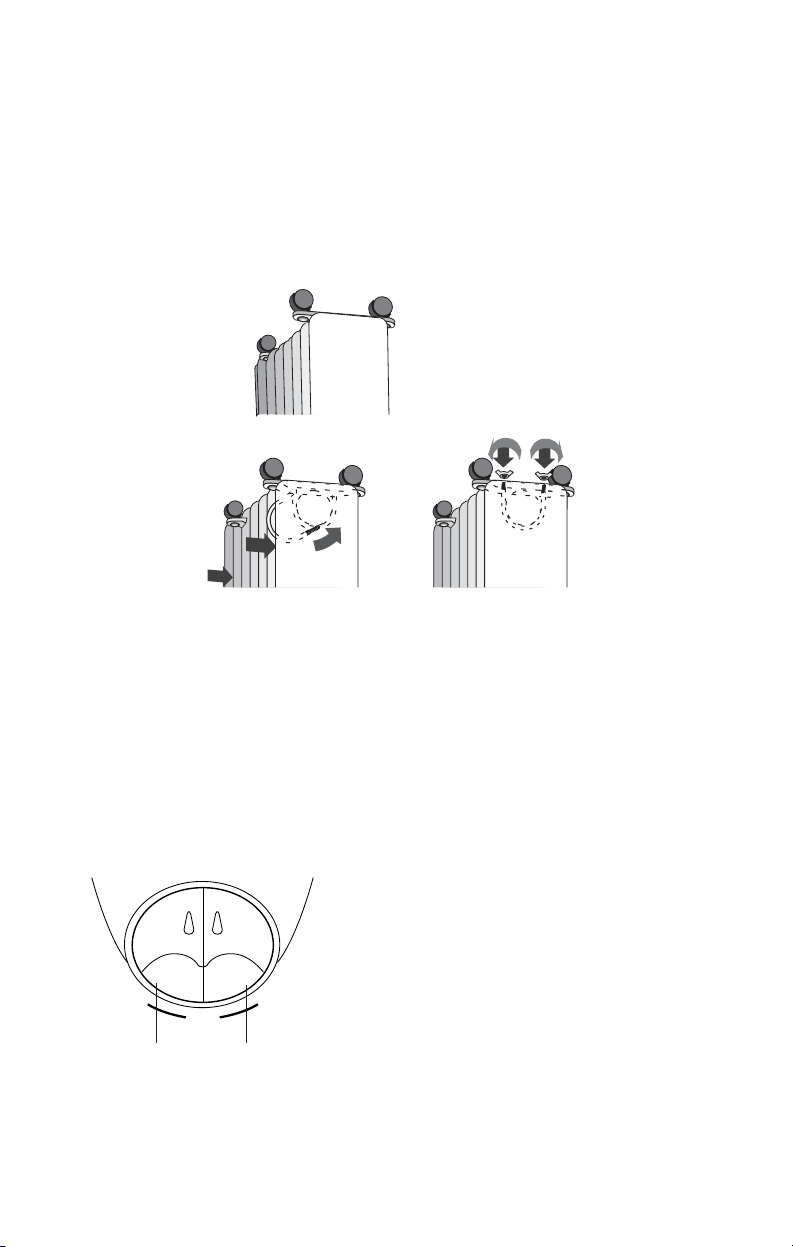
FITTING THE WHEELS
Remove the feet with the bracket wheels from the polystyrene packing. Turn the radiator upsidedown and rest on the polystyrene.
Fit the wheels to the spindles on the feet and push firmly until they click into position. Pull each
wheel to check that it is correctly inserted.
The feet with the casters must be fitted with two arc-shaped brackets only between the 1st and 2nd
element and the penultimate (see fig. 1 to 3 inclusive).
CAUTION
Always operate the heater in upright position only (wheels on the bottom, controls on top). Any
other position could create hazardous situation!
ECONOMIZER
For more economical use, the Min. or Med. Watt switches
may be used individually, after unit has reached the operating temperature.
With pilot lights ON, the heater is ON!
HOW TO USE YOUR HEATER
M
I
N
I
MAX
I
I
M
E
D
ON/OFF switches
800 Watts700 Watts
Both switches 1500 Watts
fig. 1
fig. 2
fig. 3

1. LOCATION
Place heater on floor beneath coldest window in the room or any desired location. Your heater will
minimize the effect of cold drafts.
The heater must not be located immediately below a socket-outlet.
Do not use this radiator in rooms having a surface area less than 4 m
2
.
2. CONNECTION
The radiator must be connected to a properly polarized A/C 115/220 V (check the voltage on the
label positioned on the cable) household outlet in perfect working conditions.
Keep loose clothing or bedding, furniture and flammable material away from the wall outlet where
the heater plug is fitted in.
3. SWITCHING ON TWO-SWITCHES MODELS
Turn thermostat clockwise to the maximum position. Switch on both switches. When room reaches
desired temperature, turn the thermostat knob counter clockwise very slowly and carefully until you
hear a “click”. This will automatically set your unit to cycle on and off at that desired heat setting.
(For timer instructions, see point 5)
Note: It will normally require approx.15 minutes to reach operating temperature.
4. USE OF THERMOSTAT
The thermostat operates on room air temperature and not radiator temperature. Counter clockwise
direction - lower number, lower temperature. Clockwise direction- higher number, higher temperature.
Antifreeze function
Turn the thermostat to the position and press the switches. The appliance will maintain a minimum room temperature of approximately 5°C thus preventing freezing with a minimum energy
consumption.
REMINDER
To completely shut unit off, ON/OFF switches must be placed in OFF position.
5. UNITS WITH TIMER
Clock setting
The programme/timer, as in all clocks, must be set to the correct time. If for example the time is
9.30 a.m. (day zone), rotate the dial clockwise (following the direction of the arrow) until 9.30 is
aligned with the triangular pointer.
IMPORTANT:
DO NOT ROTATE CLOCK DIAL COUNTER CLOCKWISE.
The timer is in effect an electric clock and only works while plug is connected to the power supply.
Whenever the plug is disconnected, the timer stops and must be re-set.
Your product is equipped with a polarized alternating current line plug (a plug having one blade
wider than the other). There is only one way it can be plugged into a power supply.
This is a safety feature. If you are unable to insert the plug fully into the outlet, try again by turning it the other way. If it would still not go in, it is probably due to an obsolete outlet which
should be replaced.
Do not temper with the plug or outlet to defeat the purpose of this safety mechanism.
4
*

5
HOW TO USE THE TIMER
Please refer to the illustration below:
IMPORTANT: There are 96 tabs around the dial. Each tab represents a 1/4 hour
(15 minutes) and there is a tab for every quarter hour of the 24 hour day. Your appliance can be
programmed to switch itself ON and OFF at the time you want. With the timer you can approximate your setting to within 15 minutes and program up to 48 cycles (1 cycle = 1 “ON” + 1 “OFF”)
over a period of 24 hours (12 hours a.m.+12 hours p.m.).
The tabs can be pushed inwards or pulled outwards by merely using your fingers. When the tab is
in the inward position (towards the center of the dial), the heater
will operate during that 15 minu-
te period. If the tab is in the outward position, the heater
will not operate during this period.
Please note when you first use your heater, all the tabs are inwards. You must push in those tabs
for the period that you want the heater to work. (If you want to bypass the timer check that the all
96 tabs inward).
The appliance is fitted with a safety device which will switch off it in case of accidental overheating. To reset,
disconnect the plug from the power for 30 minutes, remove the cause of overheating then plug the appliance
in again.
ATTENTION: in order to avoid any danger caused by an accidental resetting of the safety system,
this appliance must not be powered through an external timer.
6. MAINTENANCE AND SERVICE
Always remove the plug from the power socket and allow the radiator to cool. Wipe radiator with
a soft damp cloth, do not use detergents and abrasives.
Should the radiator not be in use over a certain length of time, wind the cable round the holder
and store it in a dry place (see fig. in front page).
This appliance has been built to give many years of trouble free service.
In case of malfunction or doubt, do not try to repair the heater by yourself: it may results in fire
hazard or electric shock.
Call nearest Service Center (see "Important safeguards” on page 2).
1
0
11
12
13
14
15
16
17
18
19
2
0
2
1
22
23
24
2
1
1
24
2
1
0
9
1
1
8
2
1
13
1
14
5
1
6
1
7
1
8
1
19
7
1
2
4
20
2
1
3
2
2
2
3
6
5
4
3
2
3
4
5
6
7
8
9
0
1
1
1
14
2
1
3
1
2
23
2
2
2
1
2
0
1
9
18
17
1
6
15
3

6
Everyone opening the box containing the De'Longhi product should read the entire
instruction manual carefully before performing any operation involving the product. Most importantly, you should make sure the voltage of the appliance is compatible with the voltage of the mains socket.All De'Longhi electrical appliances are
guaranteed free of all material and manufacturing defects.
According to the terms of this Guarantee, our obligations are limited to replacement or repair free of charge at one of our authorised service centres of parts or
assemblies with fabrication defects or damaged during transport to the shop of
your choice. The date considered will always be the date of sale to the consumer.
Improper use of the product invalidates the guarantee. This De'Longhi product is
designed and produced for domestic use only. Its use on commercial premises is
not recommended and will invalidate the Guarantee.
With the exception of authorised De'Longhi centres, no person or company is
authorised to repair our products. No third party is authorised to assume responsibility for our products on our behalf.
This guarantee is valid for a twelve month (one year) period from the date of sale
to the first consumer. The tax code or number of an alternative identity document
of the purchaser must be given on the official receipt.
IMPORTANT: the OFFICIAL RECEIPT must be attached to the guarantee in order to
take advantage of your rights.
M.Cassab Comércio e Industria Ltda
SAC: 0800 77 06 222
www.mcassab.co.br

7
INFORMAÇÕES IMPORTANTES
Quando o aparelho estiver ligado à rede elétrica, devese levar em consideração as seguintes normas:
1. Leia atentamente as presentes instruções antes de usar o aparelho.
2. Verifique se a voltagem do aparelho é compativel com o voltagem da tomada onde ele vaiser ligado.
3. Não cobrir em caso algum o aparelho durante o funcionamento, pois provocaria un perigoso
aumento da temperatura do mesmo.
4. Quando funciona, o aparelho se aquece. Evite tocá-lo para não se queimar. Ao deslocá-lo, use a
alça. Os materiais inflamáveis (tais como móveis, almofadas, lençóis, papéis, roupas e cortinas)
devem ficar a pelo menos 90 cm. do aparelho.
5. Não deixe que o aparelho seja manuseado por crianças ou pessoas não responsáveis se não supervisionadas.
6.
Retire o plugue da tomada quando o aparelho não estiver sendo utilizado.
7. Não ligue o aparelho se o cabo de alimentação, o plugue do aparelho ou a tomada da parede estiverem danificados, ou se o aparelho tiver sido amassado em qualquer lugar ou tenha apresentado
um funcionamento anômalo. Se o aquecedor tiver vazado óleo, deixe de usá-lo e contate o serviço
autorizado, como indicado nestas instruções. Devolva o aquecedor para o serviço autorizado para
exames elétricos ou ajustes mecânicos ou reparos.
8. Não deixe o aparelho exposto aos agentes atmosféricos e não o utilize em lugar aberto.
9. Este aparelho não pode ser usado em banheiros, lavanderias e locais semelhantes fechados. Não
coloque o aparelho onde possa cair em lavatórios ou outros recipientes de água.
10. Não deixar o cabo de alimentação sob tapetes. O cabo deve ficar sempre à vista e não deve ser
coberto de maneira alguma. Colocar o cabo fora das áreas de passagem e onde não se possa tropeçar.
11. Para desligar o aparelho, coloque os comandos em “OFF” e retire o plugue do aparelho da tomada
de parede.
12. Só conectar o aparelho de 1500W em tomadas 15 ampéres.
13. Não colocar objetos nas aberturas de ventilação porque poderiam causar descargas elétricas, fogo
ou danificar o aparelho.
14.
Para prevenir o risco de incêndio, não obstrua, de modo algum, as aberturas de entrada ou de
saída de ar. Não o utilize sobre superfícies macias, tais como camas, onde as aberturas poderiamser bloqueadas.
15. O aquecedor possui partes quentes em seu interior. Por isso, não pode ser utilizado em áreas onde
são usados ou armazenados gasolina, tinta ou líqüidos inflamáveis.
16. Utilize o aparelho somente como descrito neste manual de instruções. Qualquer outro uso deve ser
considerado impróprio e perigoso.
17. Para prevenir sobrecargas de corrente, certifique-se que nenhum outro aparelho esteja conectado à
mesma tomada ou na mesma rede.
18.
É normal que o plugue e o cabo de alimentação do aparelho se aqueçam levemente durante o
uso. Se o cabo de alimentação do aparelho ou o plugue ficarem muito quentes ou se deformarem, isto pode ser causado por um defeito da tomada de corrente da parede (por exemplo: tomadas frouxas, fiação fina). É aconselhável substituir esta tomada antes de utilizar novamente o
aparelho. Ligar o aparelho em uma tomada defeituosa pode causar incêndios ou superaquecimentos do mesmo.
19. Não é aconselhado o uso de extensões e benjamins, pois extensões inadequadas poderiam danificar o aparelho, ou se superaquecer e causar, consequentemente, incêndios. Todavia, se for necessária a utilização de uma extensão, o cabo (fio) deve ter a medida mínima de 14 AWG, ter uma
capacidade de pelo menos 1875 watts e ser usado somente para este aparelho.
20. Certifique-se que a tomada do aparelho esteja totalmente enfiada na tomada de corrente. Lembre-se
que as tomadas de corrente também se deterioram por causa do desgaste e do uso contínuo: verifique periodicamente se existem sinais de superaquecimento ou deformações; se existirem, não utilizá-las e entre em contato com um eletricista qualificado.
21. Verifique se o aparelho ou o cabo de alimentação sofreu algum dano durante o transporte..
22. A primeira vez que ligar o aparelho, para o seu bom funcionamento, ligue na potência máxima
durante algumas horas. Durante esta operação mantenha-o em ambiente ventilado para eliminar o
cheiro de “novo” que sai do aparelho.
É normal que o aparelho emita pequenos sons e estalos quando é ligado pela primeira vez.
CONSERVE AS PRESENTES INSTRUÇÕES
Em caso de Duvidas Ligue para Nosso SAC 0800 77 06 222

8
COMO USAR O SEU AQUECEDOR
MONTAGEM DAS RODAS
Remover os pés e as rodas da embalagem de poliestireno.
Vire o aquecedor, apoiando-o em um tapete ou outra superfície que não seja dura, para não
danificar o verniz.Posicione os suportes entre os dois últimos e os dois primeiros elementos,
conforme indicado na figura (sempre na parte do radiador).
Introduzir as rodas no pino dos pés e empurrar o fundo até o estalo.
PRECAUÇÃO
Opere somente em posição vertical (as rodas embaixo, os controles acima). Qualquer outra
posição pode constituir uma situação de risco!
ECONOMIZADOR DE CONSUMO
Para uso econômico, as chaves de mínimo ou médio,
podem ser usadas individualmente, depois que a unidade
tenha atingido uma determinada temperatura de funcionamento.
As lâmpadas piloto acesas indicam que o
aparelho está ligado.
fig. 1 fig. 2
fig. 3
fig. 4
chaves ON/OFF
800 Watts700 Watts
1500 Watts
M
I
N
I
MAX
I
I
M
E
D

1. LOCALIZAÇÃO
Coloque o aquecedor no chão embaixo da janela mais fria do quarto ou em qualquer lugar onde
gostar. O seu aquecedor reduzirá o efeito de correntes de ar frio. O aparelho não deve ser colocado diretamente sob uma tomada fixa.
Não utilizar este radiador em cômodos que tenham uma superfície menor que 4 m
2
.
2. LIGAÇÃO
O aquecedor deve ser apropriadamente ligado em uma tomada de saída polarizada em
115/220 V de C.A (corrente alternada) (PARA A VOLTAGEM DEVE REFERIR-SE AO QUE ESTA
MENCIONADO NA ETIQUETA DO CABO DE ALIMENTACAO) em perfeitas condições de operação. Mantenha vestidos ou lençóis, móveis e materiais inflamáveis distantes do plugue de saída
onde o aquecedor foi ligado.
3. LIGANDO OS MODELOS COM DUAS CHAVES
Gire o termostato no sentido horário, na posição máxima. Abaixe as duas chaves. Quando o
cômodo atingir a temperatura desejada, gire o botão do termostato em sentido anti-horário, lentamente e pare quando ouvir um “clique”. Isto ajustará automaticamente o aparelho no ciclo de
liga-desliga na temperatura desejada. (Para instruções do temporizador, vide o item 5).
Nota: normalmente, são requeridos 15 minutos para atingir a temperatura de funcionamento.
4. USO DO TERMOSTATO
O termostato funciona à temperatura do ar do aposento e não à temperatura do radiador.
A direção anti-horária, temperatura baixa. Direção no sentido horário, temperatura alta.
Função antigelo
Gire o comando do termostato para a posição e pressione os botões. O aparelho mantém o
ambiente numa temperatura de 5 °C e impede a formação de gelo, com um gasto mínimo de
energia. Nos modelos que dispõem de temporizador, os marcadores devem estar na posição
para dentro.
LEMBRETE
Para desligar completamente o aparelho, as chaves LIGA/DESLIGA (ON/OFF) devem ser colocadas na posição DESLIGA (OFF).
5. UNIDADES COM TEMPORIZADOR (TIMER)
Ajuste do relógio
O programa/temporizador, como em todos os relógios, deve ser ajustado na hora correta. Se,
por exemplo, a hora for 9h 30min da manhã, gire o dial no sentido horário (seguindo a direção
da seta) até que a hora 9h 30min esteja alinhada com o ponteiro triangular.
IMPORTANTE: NÃO GIRE O DIAL NO SENTIDO ANTI-HORÁRIO.
O temporizador é de fato um relógio eletrônico e somente funciona enquanto o plugue está
conectado à corrente elétrica.
Toda vez que o plugue for desconectado, o temporizador pára e deve ser reajustado.
O seu aparelho é dotado de uma ficha polarizada para a linha de corrente alternada (uma ficha
que tem um pino mais largo do que o outro). Esta ficha se adaptará na tomada somente de um
modo. Esta é uma característica de segurança. Case não se consiga inserir completamente a ficha
na tomada, tentar invertê-la. Se a ficha ainda não entra, contactar o seu electricista para que substitua a sua tomada anômala. Não elude a finalidade de segurança da ficha polarizada.
9
*

10
COMO USAR O TEMPORIZADOR
Refira-se à ilustração abaixo:
IMPORTANTE: Há 96 marcadores em torno do dial. Cada marcador representa 1/4 de hora (15 minutos)
e há um marcador para cada quarto de hora do dia de 24 horas. Seu aparelho pode ser programado
para ligar e desligar sozinho na hora que você quiser. Com o temporizador você pode aproximar o seu
ajuste até o limite de 15 minutos e programar até 48 ciclos (1 ciclo = 1 “liga” + 1 “desliga”) por um
período de 24 horas (12 horas do dia + 12 horas da noite).
Os marcadores podem ser empurrados para dentro ou puxados para fora simplesmente usando seus
dedos. Quando o marcador estiver na posição para dentro (em direção ao centro do dial), o aquecedor
irá operar durante aquele período de 15 minutos. Se o marcador estiver na posição para fora, o aquecedor não irá operar durante este período.
Observe que quando você usar seu aquecedor pela primeira vez, todos os marcadores estão para fora.
Você deve empurrar aqueles marcadores pelo período que você quer que seu aquecedor funcione (se
você quiser ignorar o temporizador você deve empurrar todos os 96 marcadores para dentro).
Operação do temporizador
a) Ligue o aquecedor na tomada
b) Gire o dial do temporizador no sentido horário para ajustar o relógio com a hora certa do dia (veja
AJUSTE DO RELÓGIO).
c) Empurre os marcadores para dentro pelo período que você quer que o aquecedor opere. Por exem-
plo, a ilustração mostra que o aparelho irá funcionar das 2h às 4h 30m da tarde e das 4h 45min às
5h da manhã.
d) Empurre o(s) botão(ões) para dentro.
e) Uma vez ajustado os marcadores para os períodos de tempo de aquecimento desejado, o seu aque-
cedor irá fazer o ciclo de ligar e desligar de acordo com estes ajustes.
f) Enquanto você mantiver o aquecedor ligado à corrente elétrica, o temporizador irá continuar a man-
ter o tempo correto.
6. MANTENIMIENTO Y SERVICIO
Antes de efetuar qualquer operação de manutenção e limpeza, desconecte a tomada e deixe esfriar o
aparelho. Retire o pó com um pano úmido, não use detergentes ou substâncias abrasivas.
Se o aparelho não for utilizado por um longo período, enrole o cabo no prendedor e guarde-o em um
local seco (veja a figura na página frontal).
Este aparelho foi fabricado de modo a garantir vários anos de funcionamento sem a necessidade de
manutenção.
Em caso de funcionamento incorreto, não tente consertar o aparelho por sua própria conta: isto poderia
causar riscos de incêndio e choques elétricos. Contate o Centro de Assistência mais próximo (consulte o
parágrafo “Informações importantes” na pág.7).
19
20
2
1
2
2
2
3
2
4
1
2
3
4
5
6
7
8
9
1
0
1
1
1
2
13
1
8
14
1
5
1
6
1
7
1
1
2
2
3
3
4
4
5
5
6
6
7
7
8
8
9
9
1
0
1
0
1
1
11
1
2
12
1
3
13
14
14
15
15
1
6
16
17
17
18
18
1
9
19
2
0
2
0
2
1
2
1
2
2
22
23
23
24
24
1
1
2
2
3
3

11
GARANTIA
Solicitamos a todas as pessoas que, ad abrir a embalagem do produto De’Longhi; antes
de qualquer atitude com relação a ele, leiam atenciosamente o manual por inteiro e principalmente verifiquem se a voltagem do aparelho e compativel com a da sua tomada.
Nós garantimos que todos os aparelhos elétricos De’Longhi, são isentos de quaisquer
defeitos de materiáis bem como de sua manufatura.
Nossa obrigação sobre este termo de Garantia está limitada á troca ou conserto gratuito,
desde que exucutados em nossa rede autorizada de assisténcia técnica, das peças ou dos
conjuntos quo apresentem defeitos de fabricação, bem como problemas ocorridos durante o transporte até o revendedor de sua escolha, valendo sempre a data da venda ao
consumidor. Esta garantia não se aplica caso seja comprovado o uso indevido do produto. Este produto De’Longhi é fabricado para uso doméstico, não se recomenda sua urtilização em locais comercias sob pena de perda de sua Garantia.
Não autorizamos qualaquer outra pessoa ou empresa, que não seja posto autorizado
De’ Longhi a efetuar reparo em nossos produtos, ben como não autorizamos quaisquer
terceiros a assumier em nosso nome qualquer produto.
Esta garantia tem prazo de validade de doze meses (Hum Ano) a partir da data de sua
venda ao primeiro consumidor, com a obrigadoriedade de constar na nota fiscal o
numero do CPF do mesmo.
ATENÇÃO:A NOTA FISCAL deverá. ser apresentada com a garantia no exercicio dos
seus direitos.
M.Cassab Comércio e Industria Ltda
SAC: 0800 77 06 222
www.mcassab.co.br

5785005000/01.05
 Loading...