

Page 1

Dell Canvas Pen
User's Guide
Page 2

Notes, cautions, and warnings
NOTE: A NOTE indicates important information that helps you make better use of your product.
CAUTION: A CAUTION indicates either potential damage to hardware or loss of data and tells you how to avoid the problem.
WARNING: A WARNING indicates a potential for property damage, personal injury, or death.
Copyright © 2017 Dell Inc. or its subsidiaries. All rights reserved. Dell, EMC, and other trademarks are trademarks of Dell Inc. or its subsidiaries. Other
trademarks may be trademarks of their respective owners.
2017 - 08
Rev. A03
Page 3

Contents
1 Canvas Pen.................................................................................................................................................... 4
2 Canvas Pen features......................................................................................................................................5
Nib holder............................................................................................................................................................................5
Nibs......................................................................................................................................................................................6
3 Installing software drivers.............................................................................................................................. 8
4 User interactions........................................................................................................................................... 9
5 Customizing the Pen....................................................................................................................................10
Button functions................................................................................................................................................................11
Calibrating the Pen display.............................................................................................................................................. 13
Associating the Pen and Touch inputs...........................................................................................................................14
Conguring Dell Canvas as the main display...........................................................................................................14
Using Dell Canvas as an extended display............................................................................................................... 14
Radial menu settings........................................................................................................................................................ 18
Pen and Windows ink settings........................................................................................................................................19
6 Replacing the Pen nib...................................................................................................................................21
7 Troubleshooting........................................................................................................................................... 23
Contents
3
Page 4

Canvas Pen
The Canvas Pen is designed for a highly precise and natural writing experience and can be used directly on the Dell Canvas screen. The Pen
uses electro-magnetic resonance (EMR) technology and gets activated when brought within the proximity of the Dell Canvas screen.
1
4 Canvas Pen
Page 5
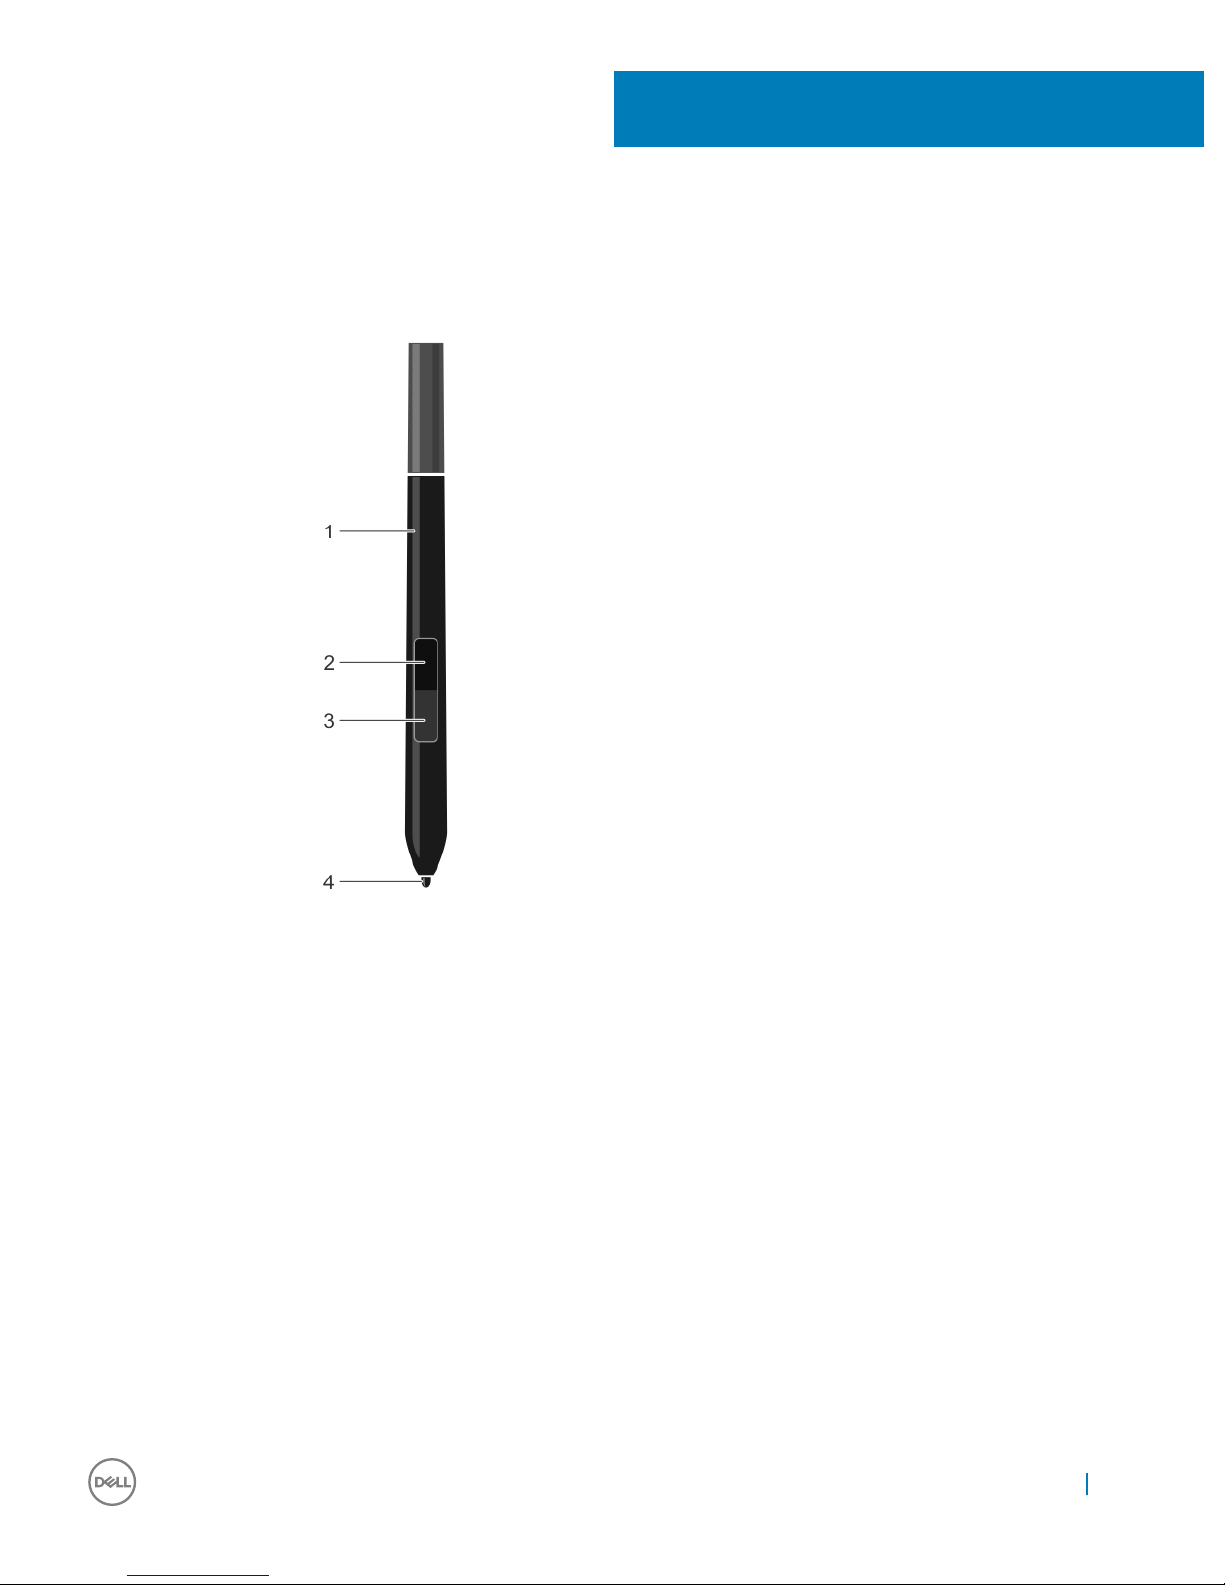
Canvas Pen features
1 Pen 2 Top barrel button
3 Bottom barrel button 4 Pen tip—nib
For more information about customizing the settings for these features, see customizing the Pen.
Nib holder
The nib holder includes a nib removal tool and compartments to hold the nibs.
2
Canvas Pen features 5
Page 6
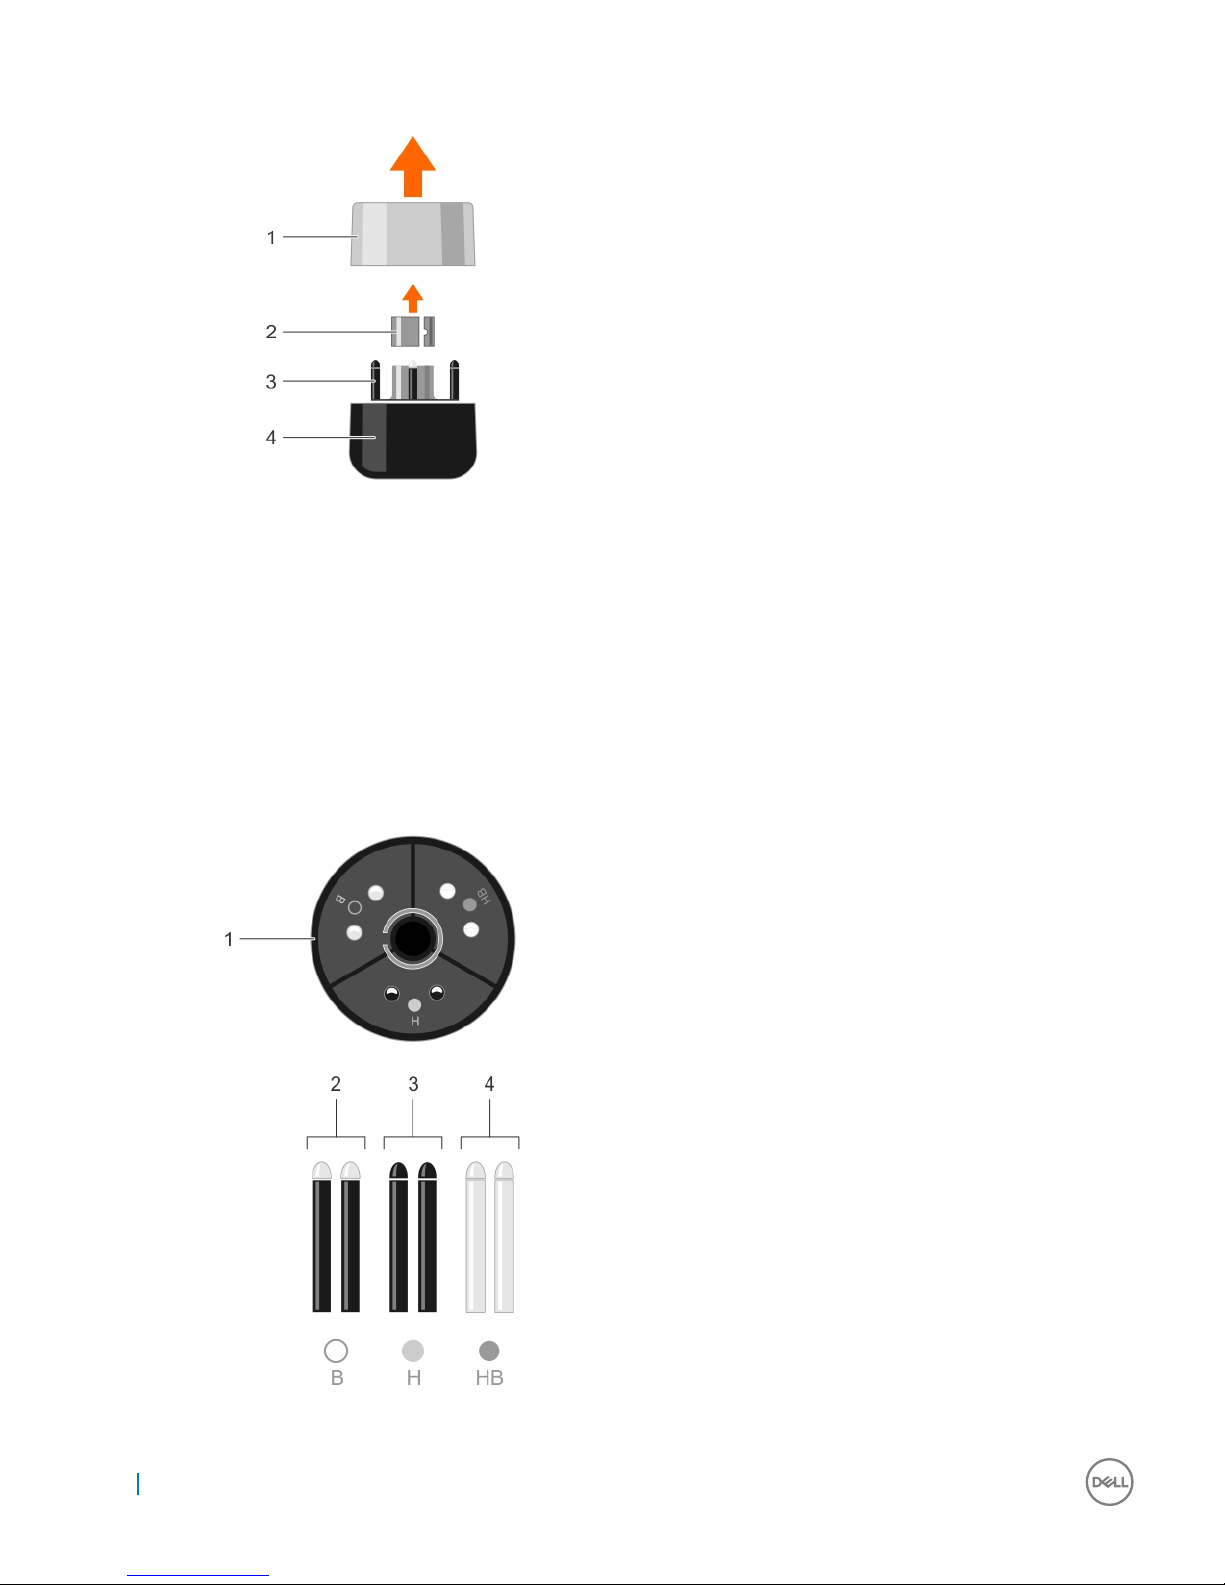
1 Cap of the nib holder 2 Nib removal tool
3 Nib holder 4 Base of the nib holder
Nibs
The Pen ships with a total of seven nibs. One hard nib is installed in the Pen. In addition, there are six nibs in the nib holder with two nibs
each of the type: hardest, medium hard, and soft.
6
Canvas Pen features
Page 7

1 Nib holder 2 B—Soft nib
3 H—Hard nib 4 HB—Medium nib
Canvas Pen features 7
Page 8

Installing software drivers
Microsoft Windows 10 Anniversary version 1607 update or later supports the Pen features.
You can log in to dell.com/support to download the Canvas Installer application.
3
8 Installing software drivers
Page 9

User interactions
The Pen does not require a battery or a power cord to function. It senses the amount of pressure and tilt applied to the tip. The four basic
techniques for using the Pen are: pointing, clicking, double-clicking, and dragging.
NOTE: When not using the Pen, place it on the magnetic retention which is on either side of the Canvas, or in the Pen and nib
holder, or on a at surface.
Table 1. User actions for the Pen
User action Description
Positioning To position the screen cursor, move the Pen slightly above the Dell
Canvas screen without touching the screen surface. To make a
selection, press the Pen tip on the display screen.
Clicking Tap the display screen once with the Pen tip, or touch the Pen to
the Canvas screen with enough pressure to register a click.
Dragging Select an object, then slide the Pen tip across the Canvas screen to
move the object.
Using the Top and Bottom barrel buttons The buttons have customizable options. By default, the Top button
is set to Erase, and the lower barrel button is set to Barrel button.
You can customize the options in the Canvas Pen settings page.
Working with pressure sensitivity To draw, ink, or write with pressure sensitivity, move the Pen along
the display screen surface while applying various amounts of
pressure downward on the tip of the Pen. Press hard for thick lines
or dense color. Press gently for thin lines or softer color.
Drawing with Tilt Tilt can be used to control line shape and thickness in any
application that supports this feature.
Erasing In applications that support this feature, the Pen eraser works like a
pencil eraser.
4
User interactions 9
Page 10

Customizing the Pen
Go to Start > Dell Canvas > Canvas Pen in the Windows operating system and customize settings for the Pen.
The following settings are available in the Canvas Pen control panel settings:
Table 2. Can Pen control panel settings
Function Description
Tilt sensitivity
Allows you to adjust the Tilt sensitivity of your Pen. It determines
how far you can tilt the tool to produce maximum tilt eect. You
need to tilt the pen less, at high sensitivity than at low sensitivity.
Drag the slider to increase or decrease the Tilt.
Top Barrel Button
The option Erase is selected by default. You can customize the
setting by choosing a dierent function from the drop-down list.
For more information about dierent functions in the list, see
button functions.
5
10 Customizing the Pen
Page 11

Function Description
Bottom Barrel Button
The option Barrel button is selected by default. You can customize
the setting by choosing a dierent function from the drop-down
list. For more information about dierent functions in the list, see
button functions.
Hover Click
Click the check box to hold the pen tip close to the screen and
press the side switch to perform a set function.
Pen Tip Options
Pen tip sensitivity
Allows you to adjust the click pressure and pressure-sensitivity.
Drag the slider to change it to the required setting.
Calibrate
You can calibrate the Pen display to align the screen cursor with the
position of the pen on the Canvas screen. For more information,
see calibrating the pen display.
Congure Displays
Allows you to congure the display settings.
Show Ripple Eect
To enable visual feedback for the pen, click the checkbox.
Restore default settings
Restores the changes to the default settings
Topics:
• Button functions
• Calibrating the Pen display
• Associating the Pen and Touch inputs
• Radial menu settings
• Pen and Windows ink settings
Button functions
The topic describes dierent settings that can be congured for the Top and Bottom barrel buttons. The options are similar for both the
buttons.
Customizing the Pen
11
Page 12

Table 3. Button functions
Function Description
Left Click Performs a function similar to a left mouse button click.
Right Click Performs a function similar to a right mouse button click, which
displays a menu.
Middle Click Performs a function similar to a middle mouse button click.
Double Click Performs a function similar to a left double-click.
Click Lock It is useful to either drag objects or selecting text blocks.
4th Click Performs a function similar to a 4th mouse button click.
5th Click Performs a function similar to a 5th mouse button click.
Keystrokes Choosing this option helps you to simulate keystrokes.
Modier Choosing this option helps you to simulate modier keys like: Shift,
Alt, or CTRL.
Radial Menu Displays the Radial Menu options.
Pan/Scroll It enables you to position an image in any direction within the active
pane.
Open/Run It opens a dialog box where you can choose a specic application or
le.
12 Customizing the Pen
Page 13

Function Description
Erase The tip of the pen functions like an Eraser in all the applications that
support this functionality.
Barrel Button Barrel button supports the default Pen button function in Windows
10.
Sketchpad Opens the Sketchpad.
OneNote Opens the One Note.
Screen Sketch Opens the Sketchpad from the Windows Ink Workspace.
Sticky Notes Opens the Sticky Notes.
Ink Workspace Opens the Ink Workspace
Cortana Open the help application in Windows
Disabled Disables the button
Calibrating the Pen display
For optimum performance, calibrate the Pen display to align the screen cursor with the position of the Pen on the Canvas screen. You can
perform the following steps to calibrate the Pen on the Dell Canvas screen:
1 Go to Start > Dell Canvas > Canvas Pen in the Windows operating system.
The Canvas Pen control panel settings page is displayed.
2 Click Calibrate.
3 To calibrate the Pen display, follow the instruction given on the screen.
4 To calibrate on the edges of the screen, click Run Additional Edge Calibration if necessary.
Customizing the Pen
13
Page 14

Associating the Pen and Touch inputs
To ensure that the Pen and Touch inputs are properly associated to the Dell Canvas screen, it is recommended to have the Dell Canvas set
as main display. You can also associate the Pen and Touch inputs to the Dell canvas screen when it is used as an extended display.
For more information about conguring these settings, see the following topics:
• Using Dell Canvas as a main display
• Using Dell Canvas as an extended display
Conguring Dell Canvas as the main display
To set the Dell Canvas as the main display screen, perform the following steps:
1 Go to Start > Windows Settings > System > Display.
2 Click Identify.
3 Select the Dell Canvas display from the Customize your display window.
4 Select Make this my main display.
5 Click Apply.
Using Dell Canvas as an extended display
Associate the Pen and Touch inputs with the Dell Canvas screen when using the Dell Canvas as an extended display.
1 Type Calibrate in the Search eld on the taskbar.
2 Select the search result Calibrate the screen for pen or touch input.
14
Customizing the Pen
Page 15

3 In the Tablet PC Settings control panel, select Dell Canvas from the drop-down list in the Display options section and then click
Setup in the Congure section.
Customizing the Pen
15
Page 16

4 Choose either the Pen input or the Touch input in the Identify pen or touch screens control panel.
5 Read the instructions carefully and press Enter until the conguration screen shows on the Canvas screen.
16 Customizing the Pen
Page 17

6 Touch the Canvas screen with the Pen or your nger to associate the input with the Canvas screen.
,
7 Click OK on the Tablet PC Settings control panel.
Customizing the Pen
17
Page 18

Radial menu settings
The Radial Menu control panel provides quick access to editing, navigation, and media control functions. You can customize the label and
choose dierent functions from the drop-down list and add them to the Radial Menu settings.
You can click the radial menu to see all the functions that can be added to the Radial Menu settings.
18
Customizing the Pen
Page 19

Pen and Windows ink settings
Go to Start > Windows Settings > Devices > Pen & Windows Ink and customize settings for the Canvas Pen in the Windows operating
system. For more detailed information about the settings, see the Microsoft website at https://microsoft.com.
The following settings in the image can be customized in the Windows control panel:
Customizing the Pen
19
Page 20

20 Customizing the Pen
Page 21

Replacing the Pen nib
To protect your pen display screen from scratching and for better performance, replace the Canvas Pen nib periodically.
You can order new nibs online from the Dell Canvas product page on Dell.com.
CAUTION: The tip of the pen nib wears out with normal use. Replace the pen nib when it starts to get too short or develops a at
point. Excessive pressure causes it to wear out sooner.
1 To remove the nib, hold the nib removal tool [A], [1] with the opening pointing toward the nib [A], [2].
2 Clasp the nib with the tool and remove the nib out of the pen barrel [B], [C].
3 To insert the nib, clasp the nib with your ngers [D], [1].
4 Slide the end of the new nib straight into the barrel of the pen [E], [F].
6
Replacing the Pen nib 21
Page 22

22
Replacing the Pen nib
Page 23

Troubleshooting
The following table lists common issues that may occur when using the Canvas Pen and possible solutions:
Table 4. Canvas Pen issues
Issue Solution
The Pen works only in the mouse mode and does not draw or write
with pressure sensitivity.
• Ensure that the Pen driver software is installed correctly.
• Reinstall the driver software.
• Ensure that the tool selected in the application and the
application where the Pen is being used support pressure
sensitivity.
The Pen does not draw or write with pressure sensitivity.
• Ensure that the application where the Pen is being used
supports this functionality with pressure sensitivity.
• Ensure that the right options are selected within the application
itself.
Clicking is dicult.
• Adjust the Pen tip sensitivity settings.
• Calibrate the Pen accuracy from the Canvas Pen settings page.
The Pen selects everything or will not stop drawing. Adjust the Pen tip sensitivity settings.
The Pen cursor mapping becomes misaligned when duplicating two
or more displays with dierent aspect ratios.
Extend image across displays or project to one display.
The Pen does not function. Check the USB connection between the Dell Canvas and the host
system.
The Pen cursor appears on a display other than Dell Canvas.
Calibrate the pen display to align the screen cursor with the
position of the pen on the display screen.
Run the Tablet PC Settings tool to assign the Pen input to the
correct screen.
7
Troubleshooting 23
 Loading...