


Dell™ C5765dn
Color Laser Multifunction Printer
Administrator Guide
Regulatory Model: C5765dn

Information in this document is subject to change without notice.
© 2013 Dell Inc. All rights reserved.
als in an
Reproduction of these materi
Trademarks used in this text:
Windows Vista, Microsoft Network, and Internet Explorer
United States and/or other countries;
Macintosh, and Mac OS
registered trademarks or trademarks of Adobe Systems Incorporated in the United States and/or other countries;
are registered trademarks of Hewlett-Packard Corporation;
countries;
RSA and BSAFE
are trademarks of Apple Inc., registered in the U.S. and other countries.
are either registered trademarks or trademarks of EMC Corporation in the United States and/or other countries.
XML Paper Specification (XPS)
conditions upon which Microsoft is licensing such intellectual property may be found at http://go.microsoft.com/fwlink/?LinkId=52369;
DES
: This product includes software developed by Eric Young (eay@mincom.oz.au);
Worcester, UK. All rights reserved. This product uses published AES software provided by Dr Brian Gladman under BSD licensing terms;
TIFF (libtiff)
(c) 1998-2004 Marti Maria.
Nuance
Other trademarks and trade names may be used in this document to refer to either the entities claiming the marks and names or their
products. Dell Inc. disclaims any proprietary interest in trademarks and trade names other than its own.
The printer software uses some of the codes defined by the Independent JPEG Group.
WSD stands for Web Services on Devices.
: Copyright (c) 1988-1997 Sam Leffler and Copyright (c) 1991-1997 Silicon Graphics, Inc.;
TM
OCR © 1994-2013 Nuance Communications. All Rights Reserved.
SD Logo is a trademark of SD-3C, LLC.
y manner whatsoever without the written permission of Dell Inc. is strictly forbidden.
Dell
and the
DELL
NetWare
logo are trademarks of Dell Inc.;
are either trademarks or registered trademarks of Microsoft Corporation in the
is a registered trademark of Novell, Inc. in the United States and other countries;
Microsoft, Windows, Windows NT, Windows Server,
Adobe, Acrobat, and PostScript
PCL, HP-GL, and HP-GL/2
ThinPrint
: This product may incorporate intellectual property owned by Microsoft Corporation. The terms and
is a registered trademark of ThinPrint GmbH in Germany and other
AES
: Copyright (c) 2003, Dr Brian Gladman,
ICC Profile (Little cms)
EtherTalk,
are either
: Copyright
As for RSA BSAFE
This printer includes RSA® BSAFE® Cryptographic software from EMC Corporation.
____________________
UNITED STATES GOVERNMENT RESTRICTED RIGHTS
This software and documentation are provided with RESTRICTED RIGHTS. Use, duplication or disclosure by the Government is subject
to restrictions as set forth in subparagraph (c)(1)(ii) of the Rights in Technical Data and Computer Software clause at DFARS 252.227-7013
and in applicable FAR provisions: Dell Inc., One Dell Way, Round Rock, Texas, 78682, USA.
August 2013 Rev. A00

Table of Contents
1 Before Using the Machine .................................................................................................................... 13
Table of Contents
Preface.........................................................................................................................................
Types of Manuals.............................................................................................................................
Using This Guide..............................................................................................................................
Organization of This Guide......................
Conventions................................................................................................................................
Interface Cables............................................................................................................................
Using the USB Interface ................................................................................................................... 19
Using the Ethernet Interface
Power Saver Mode............................................................................................................................
Changing the Interval for Entering Power Saver Mode........
Customizing the Control Panel ............................................
Changing the Default Screen........................................................................................................... 24
Setting the Screen
Customizing the Button Layout
Assigning Services to the Custom Buttons...
Adjusting the Screen Brightness.................................................................................................... 31
Entering Text
2 Paper and Other Media.......................................................................................................................... 33
...............................................................................................................................
After Auto Clear............................................................................................... 25
............................................................................................................
........................................................................................................ 26
......................................................................................... 16
...................................................... 21
.................................................................. 24
.........
....................................................................... 30
.............. 14
........ 15
........ 16
......... 17
........... 19
19
...... 21
.............. 32
Print Media G
Paper ............................................................................................................................................
Transparencies.............................................................................................................................
Envelopes .................................................................................................................................
Labels ........................................................................................................................................
Storing Print Media ........................................................................................................................
Identifying Print Media and Specifications.................................................................................. 39
Loading P
Loading Paper in Trays 1 to 4..................
Loading an Envelope in Trays 1 to 4 ................................
Loading Paper in Tray 5 (Bypass Tray)...............................
Loading an Envelope in Tray 5 (Bypass Tray) ......................
Changing the Paper Settings .................................................................................................................
3 Maintenance............................................................................................................................................
Replacing Consumables......................................................................................................................
Replacing Toner Cartridges ............................................................................................................. 53
Replacing Waste Toner Container
Replacing Drum Cartridges C, M, Y, or K ...
Replacing Staple Cartridge (for Finisher-AB1).......................
Replacing Fusing Unit ......................................................................................................................
Replacing Transfer Belt Unit ............................................
Replacing Transfer Roller ............................................................................................................... 68
Replacing Separator Rollers
uidelines.....................................................................................................................
aper...................................................................................................................................
......................................................................................... 41
............................................................... 43
............................................................45
......................................................... 46
.................................................................................................. 55
.......................
.............................................
............................................................ 57
...................................................... 61
............................................................... 64
............................................................... 70
...... 34
........ 34
...... 36
........... 37
........... 38
........ 41
... 38
48
51
... 52
62
3

Cleaning the Machine .............................................................................................................................74
Cleaning the Exterior .........................................................................................................................74
Cleaning the Interior (Laser Scanners) ..........................................................................................74
Cleaning the
Cleaning the Touch Screen ..............................................................................................................7
Cleaning Document Cover and Document Glass ......................
Cleaning the White Chute and Constant Velocity Transport Glass...........
Cleaning Document Feeder Rollers ................................................................................................81
Conductivity Temperature Depth (CTD) Sensor...........
....................................................80
.........................................76
9
................................80
Executing Calibration.....
Adjusting Color Registration.................................................................................................................
Auto Color Registration ....................................................................................................................
Side Color Registration ....................................................................................................................
Printing a Report/List......................................................................................................................
Deleting a Private Charge Print Job with an Invalid User ID ...
Setting Restore Tool........................................................................................................................
4 Machine Status ........................................................................................................................................
Overview of Machine Status.................................................................................................................
Machine Information
General Information
Paper Tray Status
Print Reports
Automatically Printed Reports/Lists ...........
Overwrite Hard Disk
Print Mode
Fax Receiving Mode
Faults
.........................................................................................................................................................107
........................................................................................................................................95
..........................................................................................................................................104
..........................
...............................................................................................................................93
...........................................................................................................................93
................................................................................................................................94
.........................................................................................................................103
........................................................................................................................106
...............................................................................................82
.........88
.......................................................89
.........90
..................................................................................102
.85
.85
.86
91
.92
Supplies
Billing Information
5 Tools.........................................................................................................................................................
System Settings Procedure ..................................................................................................................
Tools Menu List....
Common Service Settings.....................................................................................................................
....................................................................................................................................................108
.................................................................................................................................109
Billing Information
User Account Billing Information
Step 1 Entering System Administration Mode ...........
Step 2 Entering the System Administrator User ID and Passcode......
Step 3 Selecting [Tools] .................................................
Step 4 Selecting a Tab on the [Tools] Screen.....................
Step 5 Setting a Feature ..................................................................................................................
Step 6 Exiting System Administration Mode...............................................................................117
Machine Clock/Timers ....................................................................................................................129
Audio Tones
Screen/Button Settings ...................................................................................................................133
Paper Tray
Image Quality Adjustment..........................
Settings........................................................................................................................
...........................................................................................................................109
..................................................................................................110
.................................................................114
....................................114
.................................................................115
........................................................115
.........................................................................................................................
.....................................................................................................................................
.....................................................................................138
..........118
113
114
117
129
..132
..135
4

Table of Contents
Reports ............................................................................................................................................... 140
Maintenance..................................................................................................................................... 141
Notify Job Completion by E-mail................................................................................................... 142
Plug-in Settings...............................................
Other Settings ...............................................................................................................................
.............................................................................
.... 142
.... 143
Copy Service Settings.......................................................................................................................
Copy Tab - Features Allocation..................................................................................................... 150
Preset Buttons ......
Copy Defaults................................................................................................................................
Copy Control..................................................................................................................................
Original Size Defaults .....................................................................................................................
Reduce/Enlarge Presets ................................................................................................................. 157
Custom Col
Connectivity & Network Setup............................................................................................................ 158
Port
Settings..................................................................................................................................
Protocol Settings..........................................................................................................................
Machine's E-mail Address/Host Name....................................
Proxy Server Settings......................................................................................................................
Outgoing/Incoming E-mail Settings.............................................................................................. 167
Remote Authentication/Directory Service....
Security Settings..........................................................................................................................
Other Settings ...............................................................................................................................
Print Service Settings .......................................................................................................................
Allocate Memory.............................................................................................................................
Delete Form ................................................................................................................................
Other Settings ...............................................................................................................................
ors...............................................................................................................................
........................................................................................................................
.................................................... 165
..........................
.................................................... 169
.... 150
.... 151
.... 151
.... 155
157
.... 157
.... 158
.... 162
166
.... 174
.... 178
.... 179
. 179
....... 181
.... 181
Scan Service Settings.......................................................................................................................
First Tab .................................................................................................................................
Scan Defaults................................................................................................................................
Scan to PC Defaults ........................................................................................................................
Original Size Defaults .....................................................................................................................
Output Size Defaults .......................................................................................................................
Reduce/Enlarge Presets ................................................................................................................. 190
Other Settings
Fax Service Settings .........................................................................................................................
Screen Defaults............................................................................................................................
Fax Defaults ..................................................................................................................................
Fax Control ..................................................................................................................................
Fax Received Options......................................................................................................................
Reduce/Enlarge Presets ................................................................................................................. 200
Original
Local Terminal Information............................................................................................................
E-mail Service Settings ....................................................................................................................
E-mail Control ...............................................................................................................................
Folder Service Settings ....................................................................................................................
...............................................................................................................................
Size Defaults .....................................................................................................................
............ 186
.... 186
.... 187
. 189
189
. 190
.... 190
.... 193
.... 193
.... 194
...... 194
199
200
200
.... 202
.... 202
.... 205
Job Flow Service Settings ..................................................................................................................
Media Print Service Settings .....................................................................................................
......... 207
. 206
5

Stored File Settings................................................................................................................................208
Web Applications Service Setup ........................................................................................................210
Server Setup ................................................................................................................................
Other Settings...............................................................................................................................
......210
.....212
Web Browser Setup..........................................................................................................................
Setup ......................................................................................................................................
Create Folder ................................................................................................................................
Stored Programming ........................................................................................................................
Create Job Flow Sheet ....................................................................................................................217
Create
Add Address Book Entry......
Create Fax Group Recipients..........................................................................................................231
Add Fax Comment...
Paper Tray Attributes.......................................................................................................................
Accounting..................................................................................................................................
Create/View User Accounts ...........................................................................................................233
View Accounts.....
Reset User Accounts........................................................................................................................
System Administrator's Meter (Copy Jobs)............................
Accounting Type.............................................................................................................................
Accounting Login Screen Settings................................................................................................238
Fax Billing Data.....................................................
Accounting/Billing Device Settings .............................................................................................240
Job Flow Sheet Keyword ...................................................................................................224
..............................................
..........................................................................................................................
...........................................................................................................................
.......................................................................
..............................................................224
.....................................................237
...................215
.............233
.....213
.....215
217
232
232
..236
236
..237
.....239
Authentication/Security Settings......................................................................................................
System Administrator Settings ......................................................................................................242
Authentication......
Job Status Default ..........................................................................................................................
Overwrite Hard Disk.........................................................................................................................
6 Dell Printer Configuration Web Tool Settings.....................
Installation of Dell Printer Configuration Web Tool................
Preparations ................................................................................................................................
Configuration on the Machine .......................................................................................................255
Starting Dell Printer Configuration Web Tool
Configuring Machine Settings Using Dell Printer Configuration Web Tool ...............................
7 Printer Environment Settings...............................................................................................................261
Print Overview
Installation When Using USB Port......................................................................................................265
Step 1 Preparations...
Step 2 Configuration on the Machine............
Step 3 Configuration on the Computer..................................
Dell Printer Configuration Web Tool Setting Items ...................................................................266
........................................................................................................................
.............................................................253
........................................................254
..........
.........................................................................256
..............................................................................................................................
.....................................................................................................................
...............................................................................265
........................................................266
..242
.....243
..250
250
......254
257
..........262
..265
Installation When Using TCP/IP (LPD/Port 9100)..............................................................................267
Step 1 Preparations.............................................................................................................
Step 2 Configuration on the Machine............
Step 3 Configuration on the Computer..................................
...............................................................................267
........................................................268
...........
..267
6

Table of Contents
Dell Printer Configuration Web Tool Setting Items................................................................... 268
Installation When Using NetWare ..................................................................................................... 270
Step 1 Preparations ........................................................................................................................
Step 2 Configuration on the Machine........................................................................................... 270
Step 3 Configuration on the Computer ......................................................................................... 271
Dell Printer Configuration Web Tool Setting Items...............
.................................................... 272
. 270
Installation When Using Microsoft Network (SMB).......
Step 1 Preparations ........................................................................................................................
Step 2 Configuration on the Machine........................................................................................... 273
Step 3 Configuration on the Computer ......................................................................................... 274
Dell Printer Configuration Web Tool Setting Items...............
Installation When Using Internet Printing Protocol (IPP).......
Step 1 Preparations ........................................................................................................................
Step 2 Configuration on the Machine........................................................................................... 275
Step 3 Configuration on the Computer ......................................................................................... 276
Dell Printer Configuration Web Tool Setting Items...............
Installation When Using EtherTalk .............
Step 1 Preparations ........................................................................................................................
Step 2 Configuration on the Machine .......................................................................................... 277
Step 3 Configuration on the Computer ......................................................................................... 278
Dell Printer Configuration Web Tool Setting Items...............
8 E-mail Environment Settings............................................................................................................... 279
E-mail Overview...
Preparations ..................................................................................................................................
............................................................................................................................
....................................................................................... 277
................................................................ 273
. 273
.................................................... 274
....................................................... 275
. 275
.................................................... 276
. 277
.................................................... 278
...... 280
......... 281
Installation Procedures ............................
Step 1 Enabling Port and Setting up TCP/IP................................................................................ 283
Step 2 Conf
Dell Printer Configuration Web Tool Setting Items...............
9 Scanner Environment Settings ........................................................................................................... 287
Scan Service Overview ..
Configuration of Store to Folder.......................................
Step 1 Enabling Port and Setting up TCP/IP................................................................................ 289
Step 2 Regi
Step 3 C
Configuration of Scan to PC...
Step 1 Preparations ........................................................................................................................
Step 2 Enabling Port and Setting up TCP/IP................................................................................ 292
Step 3 Conf
Configuration of Store to USB .............................................................................................................
Step 1 Available USB Memory Devices....................................................................................... 294
Step 2 Dell Printer Configuration Web Tool Setting Items....................................................... 294
Configuration of Job Flow Sheets .
Step 1 Enabling Ports and Setting up TCP/IP.............................................................................. 295
Step 2 Configuring the SNMP Port.
Step 3 Configuration on the Computer
iguring E-mail Environment....................................................................................... 284
...................................................
stering a Folder ............................................................................................................ 290
onfiguring a Computer...................................................................................................... 290
...............
iguration on the Computer ......................................................................................... 293
............................................................................................ 283
.................................................... 285
................................................................... 288
................................................................... 289
............................................................................................... 291
.....................................
............................................................................................... 296
......................................................................................... 296
................................................................ 295
. 291
294
7

Configuration of Store & Send Link.....................................................................................................297
Step 1 Configuring E-mail ...............................................................................................................297
Step 2 Enabling Authentication .....................................................................................................297
Step 3 Other Settings
Step 4 Dell Printer Configuration Web Tool Setting Items .......................................................298
.......................................................................................................................
297
10 Encryption and Digital Signature Settings.....................
Encryption and Digital Signature Overview..............................
Types of Certificate ........................................................................................................................
Encryption Features for Communication..........
Encryption and Digital-Signature Features for Scan Files ..........
Configuration of HTTP Communications Encryption ..................
Installation Overview ......................................................................................................................
Step1 Configuration on the Machine..........
Step2 Configuration on the Computer............
Configuration of Encryption using IPSec................................
Installation Overview ......................................................................................................................
Step1 Import and Configuration of a Certificate .........................................................................
Step2 Configuration on the Machine (Configuration of IPSec)............
Step3 Configuration on the Computer............
Configuration of E-mail Encryption/Digital Signature................
Installation Overview ......................................................................................................................
Step1 Configuration on the Machine..........
Step2 Configuration on Sender and Recipient.......................
Configuration of PDF/XPS Signature...................................................................................................311
Installation O
Step1 Configuration on the Machine..........
Step2 Configuration on the Computer............
verview ......................................................................................................................
..................................................................................302
..................................................................................307
..................................................................................311
...................................................................
........................................................300
............................................................................300
.............................................301
.....................................................302
...............................................................................303
...........................................................304
....................................305
...............................................................................306
.....................................................307
.....................................................309
...............................................................................312
299
..300
302
304
304
307
311
11 Authentication and Accounting Features .........................................................................................313
Overview of Authe
Overview of Authentication Feature...........
Overview of Accounting Feature.................
Authentication...............................................................................................................................
User Types Managed by Authentication Feature.....................
User Roles and Authorization Groups......................................
Types of Authentication ..........................
Types of Account Administration ..................................................................................................318
Authentication and Accounting Relationship.........
Services Controlled by Authentication .........
Overview .....................................................................................................................................
Services Restricted by User ID Authentication .........
Services Restricted by the Combined Use of
Smart Card Authentication and User ID Authentication ...........
Authentication for Job Flow Sheets and Folders.....................
Overview .....................................................................................................................................
When the Authentication Feature is Disabled.......................
When the Authentication Feature is Enabled .........
ntication and Accounting Feature................
..................................................................................314
..................................................................................315
........................................................................................317
....................................................................319
.....................................................................................320
.................................................................320
....................................................................331
.....................................................314
..........316
..................................................316
.....................................................316
.......320
................................................322
........................................................325
.......325
.....................................................328
8

Table of Contents
Jobs Manageable by Account Administration................................................................................. 334
Configuration for Authentication ........................................................................................................ 337
Installation Overview......................................................................................................................
Enabling Authentication ....................................................
Changing the Default Authorization Group Settings ................
Creating an Authorization Group..................
................................................................................. 340
............................................................. 337
................................................. 339
337
Configuration for Account Administration..........
Step 1 Selecting an Accounting Type.......................................................................................... 341
Step 2 Registering User Information ............................................................................................341
User Authentication Operations .......
Authenticating Login Users........................
Changing Passcode .........................................................................................................................
12 Problem Solving .................................................................................................................................... 345
oubleshooting ...............................................................................................................................
Tr
Machine Trouble..............................................................................................................................
Image Quality Trouble.......................................................................................................................
Trouble during Copying ............................
Unable to Copy..............................................................................................................................
The Copy Result is Not What was Expected............................................................................... 359
Trouble during Printing....................................................
Unable to Print..............................................................................................................................
The Print Result is Not What was Expected............................................................................... 363
Trouble during Faxing.......................................................................................................................
Sending Problems...........................................................................................................................
Receiving Problems.........................................................................................................................
...........
............................................................................................ 358
.............................................................................. 341
....................................................................................... 343
.................................................................................... 343
344
...... 346
...... 347
.... 352
.... 358
..................................................................... 362
.... 362
.... 365
. 365
367
Trouble during Scanning.................
Unable to Scan with the Machine.........
Unable to Import Scanned Documents to the Computer............
Unable to Send a Scanned Document over the Network (FTP/SMB) .......
Unable to Send E-mail...........................
The Image is not What was Expected.......................................................................................... 372
Network-related Problems ..................................................................................................................
When using SMB .............................................................................................................................
When using NetWare...................................................................................................................... 376
When using
When using EtherTalk.....................................................................................................................
Dell Printer Configuration Web Tool Problems..........
E-mail Features Problems ..............................................................................................................
Internet/Intranet Connection Problems ....................................................................................... 384
IPv4
and IPv6 Connection Problems............................................................................................. 385
Media Print - Text Trouble..................................................................................................................
Media Print - Photos Trouble ..............................................................................................................
Status Code ................................................................................................................................
Other Errors ................................................................................................................................
TCP/IP ..........................................................................................................................
..................................................................................................... 369
....................................................................................... 369
............................................... 370
............................. 371
.......................................................................................... 372
................................................................ 382
............. 390
....... 452
374
374
380
381
383
. 388
389
Paper Jams .................................................................................................................................
............ 454
9

Paper Jams in Trays 1 to 4 ..............................................................................................................454
Paper Jams in Tray 5 (Bypass).......................................................................................................456
Paper Jams in Fusing Unit ..............................................................................................................
Paper Jams in Duplex Module.......................................................................................................458
Paper Jams in Finisher-AB1.....
Paper Jams in H
Transport Unit.....................................................................................................460
......................................................................................................459
457
Document Jams ......
Duplex Automatic Document Feeder B1-C............
Stapler Faults ...................................................................................................................................
Staple Jams in Staple Cartridge (for Finisher-AB1)..............
13 Appendix ................................................................................................................................................
Specifications...............................................................................................................................
Printable Area...............................................................................................................................
Standard Printable Area..................................................................................................................476
Extended Pri
Int
ernal Fonts..............................................................................................................................
Optional Components........................................................................................................................
ESC/P-K Emulation ............................................................................................................................
Emulation.....................................................................................................................................
Fonts....................................................................................................................................
Output Feature..............................................................................................................................
ESC/P-K Emulation Print Features.................................................................................................482
ESC/P-K Emulation Settings ......................................................................................................
Magnification Table
Paper Size and Number of Printable Characters........................................................................492
.........................................................................................................................
......................................................................461
.....................................................464
ntable Area .................................................................................................................476
.........................................................................................................................
.......461
.......463
..........468
..........476
.............477
.....479
.....480
.......480
................481
.....481
.....483
.467
488
PDF Direct Print ............................................................................................................................
PDF Direct Print Settings ................................................................................................................494
PCL Emulation
Emulation.....................................................................................................................................
Fonts....................................................................................................................................
Output Feature..............................................................................................................................
PCL Emulation Settings ...................................................................................................................498
HP-GL/2 Emulati
Emulation.....................................................................................................................................
Fonts....................................................................................................................................
Output Feature..............................................................................................................................
Factory Default Settings..................................................................................................................
HP-GL/2 Emulation Settings............................................................................................................505
Hard Clip Area...
Printable Area ..............................................................................................................................
Auto Layout ................................................................................................................................
Notes and Restrictions.....................................................................................................................
Notes and Restrictions on the Use of the Machine ..............
Notes and Restrictions on the Use of the Copy Feature.......
Notes and Restrictions on the Use of the Print Feature..........
Notes and Restrictions on the Use of the Scan Features..........
...............................................................................................................................
on...........................................................................................................................
...........................................................................................................................
.....................................................520
.....................................................522
..................................................522
................................................524
..........494
..........496
................497
................503
.......496
.....498
.......503
.......503
.....504
504
.....510
.....511
........513
.....520
10

Table of Contents
Notes and Restrictions on the Use of the Fax Feature.............................................................. 527
Notes and Restrictions on the Use of the E-mail Feature......................................................... 528
Notes and Restrictions when Connecting with Internet Service Provider............
Notes and Restrictions on the Interrupt Mode.......................
Notes and Restrictions on Folders......................................
Notes and Restrictions when Connecting to Internet or Intranet.....
Notes and Restrictions when Operating from Computers............
Notes and Restrictions on Job Flows ......................................
Notes and Restrictions on the Security Features ..................
Notes and Restrictions on the Authentication and Accounting..............
Notes and Restrictions for Using SMB........................................................................................ 536
Notes and Restrictions for Using TCP/IP..............................
Notes and Restrictions for Using EtherTalk.........................
Notes and Restrictions for Using Bonjour............................
Notes and Restrictions for IPv6 Connection...........................
Notes and Restrictions for Print E-mail....................................................................................... 541
.................................................... 531
.......................................................... 533
...................................... 533
............................................ 533
.................................................... 534
.................................................... 535
................................ 535
....................................................... 537
....................................................... 538
....................................................... 539
.................................................... 539
............... 530
Using the Telephone .........................................................................................................................
Placing a Call..............................................................................................................................
Activity Report...............................................................................................................................
Index....................................................................................................................................................
.... 542
...... 542
......... 544
............ 547
11

12

1 Before Using the Machine
This chapter describes the organization of this guide and conventions used in this guide.
• Preface ....................................................................................................................................
• Types of Manuals ..................................................................................................................15
• Using This Guide.....
• Interface Cables......
• Power Saver Mode.
• Customizing the Control Pa
• Entering Text ..........................................................................................................................32
...............................................................................................................16
...............................................................................................................19
...............................................................................................................21
nel............................................................................................24
14

1 Before Using the Machine
Preface
Thank you for selecting the Dell C5765dn Color Laser Multifunction Printer (hereafter
referred to as "the machine").
This guide is intended for system administrators, and provides maintenance information
such as how to replace consumables, how to configure network, and troubleshooting
procedures.
The guide assumes that you are familiar with a personal computer
knowledgeable of computer networks. When you need
manuals provided with the personal computer, operating system, and network products.
After reading this guide, be sure to keep it handy for quick reference. It will be useful in case
you forget how to perform operations or if a problem occurs
For more information on how to copy, print, scan, and fax, refer to the User Guide. For
information about optional components for the
with each optional component.
and that are
additional information, refer to the
with the machine.
Print feature, refer to the guide provided
14

Types of Manuals
The following guides are provided with the machine.
Accompanying Manuals
User's Guide (PDF)
Types of Manuals
The guide describes the basic operations of the machine, as well
maintenance. This guide is included in the Documentation CD-ROM.
PostScript User Guide (PDF)
The guide describes how to install the print driver and configure the functions in order to
use the machine as a PostScript
Library" CD-ROM.
Driver CD Kit Documentation (HTML)
The documentation describes installation and configuration procedures for print drivers and
the printe
r environment. This documentation is included in the Driver CD Kit.
Guides for Optional Components
Optional components are available for the machine. Some of them come with user guides.
The guides for optional components describe all the necessary steps for using the optional
components and installing the software.
as daily management and
printer. This guide is included in the "PostScript Driver
15

1 Before Using the Machine
Using This Guide
This guide is intended for system administrators, and provides maintenance information
such as how to replace consumables, how to configure network, and troubleshooting
procedures.
Organization of This Guide
This guide consists of the following chapters.
1 Before Using the Machine
Describes the organization of this guide and conventions.
2 Paper and Other Media
Describes the types of paper and other media that you can use on the machine and how to
load media in a
3 Maintenance
tray.
Describes how to replace consumables and to clean the machine.
4 Machine
Describes how to check the faults that occurred on the machine and to print various reports/
lists.
5
Tools
Describes the procedures to set up the system.
6 Dell Printer Configuration Web Tool Settings
Describes how to use Dell Printer Configuration Web Tool.
7 Printer Environment Settings
Describes the settings to use the Print feature on the machine.
8 E-
9 Scanner Environment Settings
10 Encryptio
mail Environment Settings
Describes the settings to use various services via e-mail on the machine.
Describes the settings to use the Scan services on the machine.
Status
n and Digital Signature Settings
16
Describes how to configure the machine to use the Encryption and the Digital Signature
features with your co
11 Authentication and Accounting Features
The machine has the Authentication feature to restrict the availability of services for each
feature and the Accounting feature to manage the use of each feature
Type selected.
12 Problem Solving
Describes troubleshooting procedures to solve the problems with the machine.
mmunications and documents.
based on the Login

13 Appendix
Conventions
Using This Guide
Describes the specifications of the machine, optional accessories, and cautions/restrictions.
• The screen shots and illustrations used in this guide vary depending on the machine
configuration and optional components installed. Some of the items in the screen shots
may not be displayed or available depending on your machine configuration.
• The procedures in this guide may vary depending on the
used due to the upgrades.
• In this guide, "Computer" refers to
• The following term is used in this g
Note : Additional information on operations or features.
• The following symbols are used in this guide:
" " : • A cross-reference included in this guide.
• Names of CD-ROM, features, and
input text.
[
< > button : Hardware buttons on the control panel.
< > key : Keys on the keyboard of the computer.
> : • Path to a certain item within a procedure on the control panel.
] : • Folders, files, applications, button or menu names displayed on
the touch screen.
• Names of menus, commands, windows, or dialog boxes
displayed on the computer screen and their buttons and menu
names
a personal computer or workstation.
uide:
.
driver and utility software being
touch screen messages and
For example: When you see the procedure "select [Tools] >
[Setup] > [Create Folder]", this means that you need to
[Tools], select [Setup], and then select [Create Folder].
• Path to a certain item within a procedure on a computer.
For example: When you see the procedure "to search for files
and folders, click [Start] > [Search] > [For Files or Folders]",
this
means that you need to click
then click [For Files or Folders] to search for files and folders.
• Cross-reference
For example: "Refer to "5 Tools" > "Common Service Settings"
> "Audio Tones" in the Administrator Guide."
The sentence above m
the section "Audio Tones" in "Common Service Settings" in
chapter 5 "Tools" of the Administrator Guide.
eans that it is recommended to refer to
[Start], click [Search], and
select
17

1 Before Using the Machine
LEF Orientation
Paper feed direction
SEF Orientation
Paper feed direction
• Orientation of documents or paper is described in this guide as follows:
, , Long Edge Feed (LEF):Loading the document or paper in portrait orientation
when viewed from the front of the machine.
, , Short Edge Feed (SEF):Loading the document or paper in landscape orientation
when viewed from the front of the machine.
18
Interface Cables
When you connect the machine directly to your computer, use the USB interface. When you
connect the machine to a network, use the Ethernet interface.
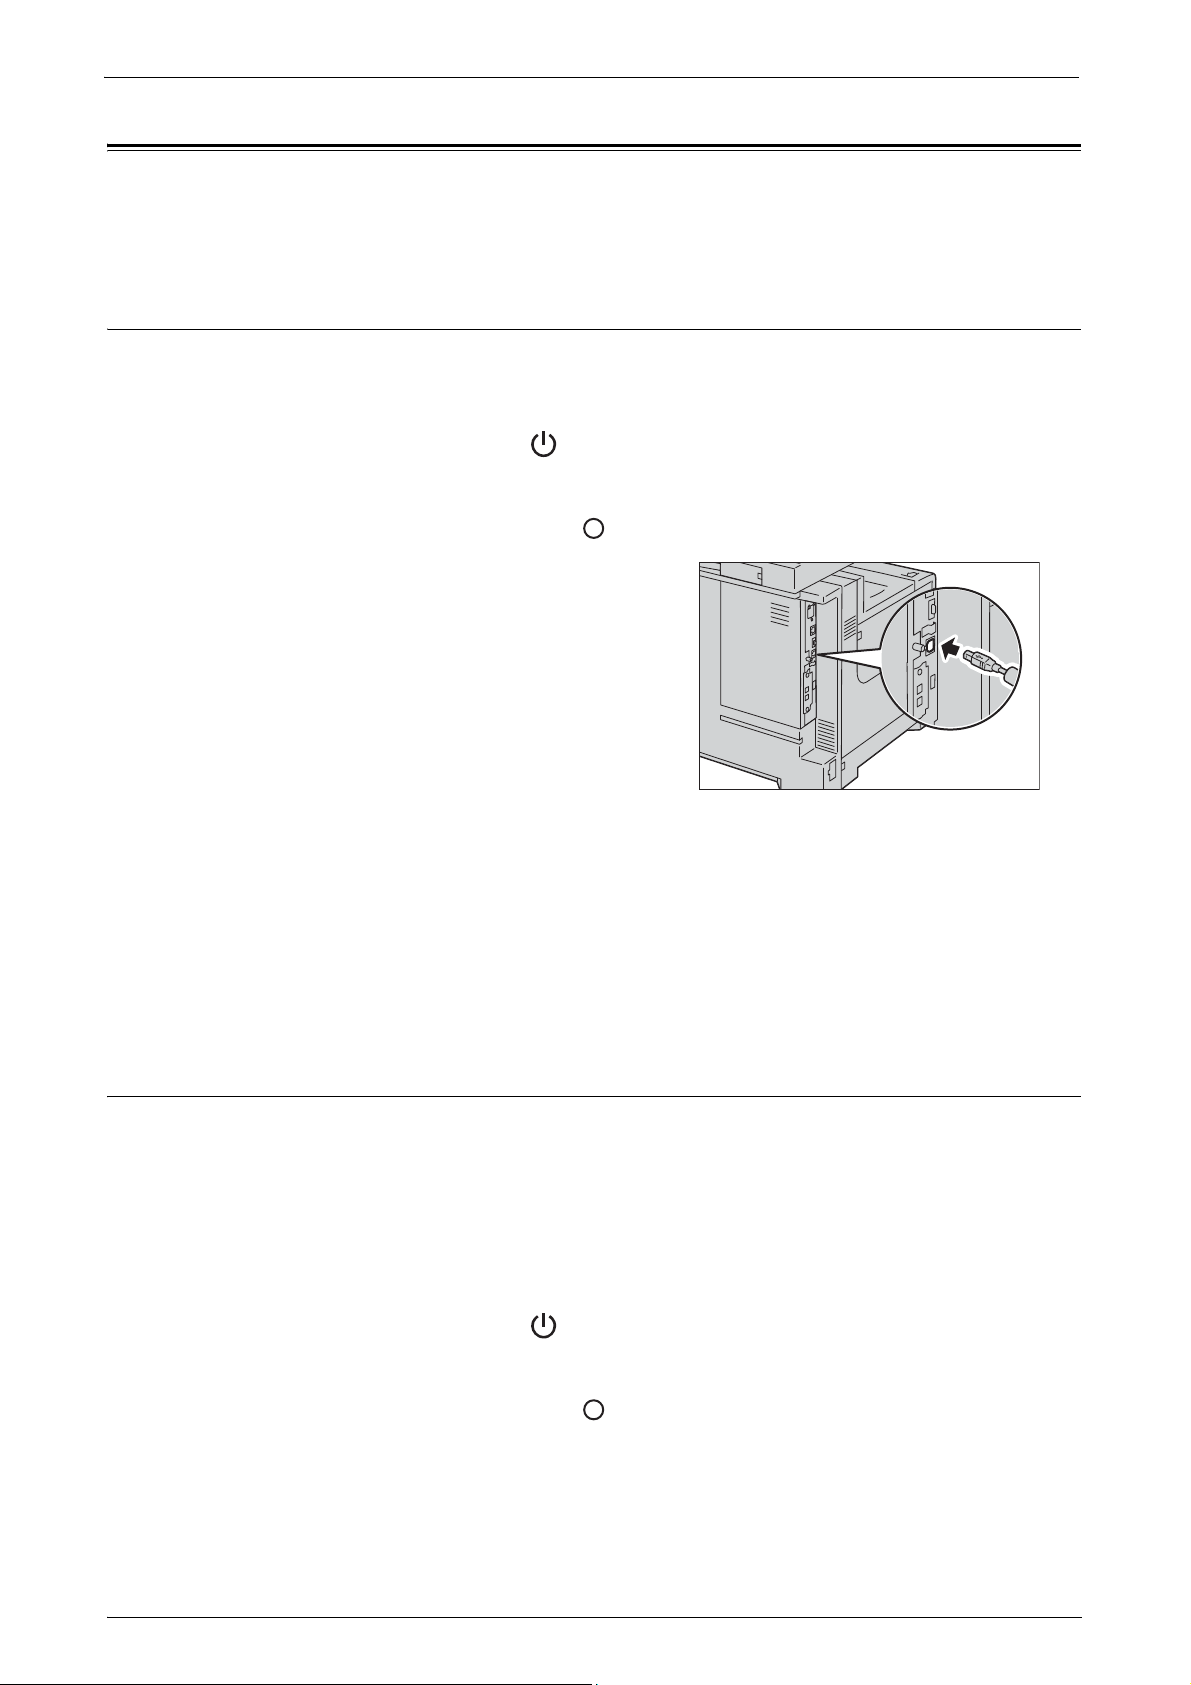
Using the USB Interface
The USB interface of the machine supports USB 2.0.
This section describes the installation procedures for the USB interface.
1
Press the power switch to the [ ] position to switch off the power.
2
Make sure that the touch screen is blank and the <Power Saver> button is not lit.
3
Press the main power switch to the [ ] position to switch off the main power.
4
Connect the USB cable to the USB 2.0
interface connector.
Interface Cables
5
Connect the other end of the USB cable to the computer.
6
Press the main power switch to the [ | ] position to switch on the main power.
7
Press the power switch to the [ | ] position to switch on the power.
8
Restart the computer.
For more information on setting items, refer to "Printer Environment Settings" (P.261).
Using the Ethernet Interface
The Ethernet interface of the machine supports the following three types.
• 1000BASE-T
•100BASE-TX
•10BASE-T
This section describes the installation proced
1
Press the power switch to the [ ] position to switch off the power.
2
Make sure that the touch screen is blank and the <Power Saver> button is not lit.
3
Press the main power switch to the [ ] position to switch off the main power.
ures for the Ethernet interface.
19

1 Before Using the Machine
4
Connect the network cable to the Ethernet
interface connector.
Note • Always use the correct network cable with
5
Press the main power switch to the [ | ] position to switch on the main power.
6
Press the power switch to the [ | ] position to switch on the power.
For more information on setting items, refer to "Printer Environment Settings" (P.261).
your network connection. When you replace
the cable, contact Customer Support at
dell.com/contactdell.
20

Power Saver Mode
<Log In/Out> button
The machine is equipped with the Power Saver mode that reduces the power consumption
by saving the electricity to the machine when no copy or print data is received for a specified
time.
There are two types of Power Saver modes: the Low Power mode and the Sleep mode.
When you press the <Power Saver> button or do not use the machine for a specified period
of time, the machine
When time exceeds the time specified in the Low Power mode, the machine then enters the
Sleep mode.
Press the <Power Saver> button on the control panel to make the machine enter the
Saver mode.
Note • When the following device is connected to the machine and a user operates the device, the Low
• When the machine is in the Authentication mode, the Authentication mode is exited once the machine
Power Saver Mode
enters the Low Power mode.
Power
Power mode can be deactivated without pressing the <Power Saver> button. If the machine is in the
Sleep mode, however, the Sleep mode will not be deactivated by the following operation. Set the time
long to elapse until the machine enters the Sleep mode from the Low Power mode. For information on
how to change the interval to enter the Low Power mode and Sleep mode, refer to "Changing the
Interval for Entering Power Saver Mode" (P.21).
- Placing a smart card on the smart card reader
enters the Low Power mode.
Low Power Mode
The Low Power mode reduces the power to the control panel and the fusing unit.
Note • While the machine is in the Low Power mode, the power supply to the fusing unit is also reduced.
Sleep Mode
The Sleep mode reduces the power to the machine even more than the Low Power mode.
It takes longer time than the Low Power mode to deactivate the Sleep mode and enable to
use the machine.
Changing the Interval for Entering Power Saver Mode
This section describes the procedures for setting the Power Saver mode.
To activate the Power Saver, set the time to elapse until the machine enters the Low Power
mode as well as the time to elapse until the machine enters the Sleep mode.
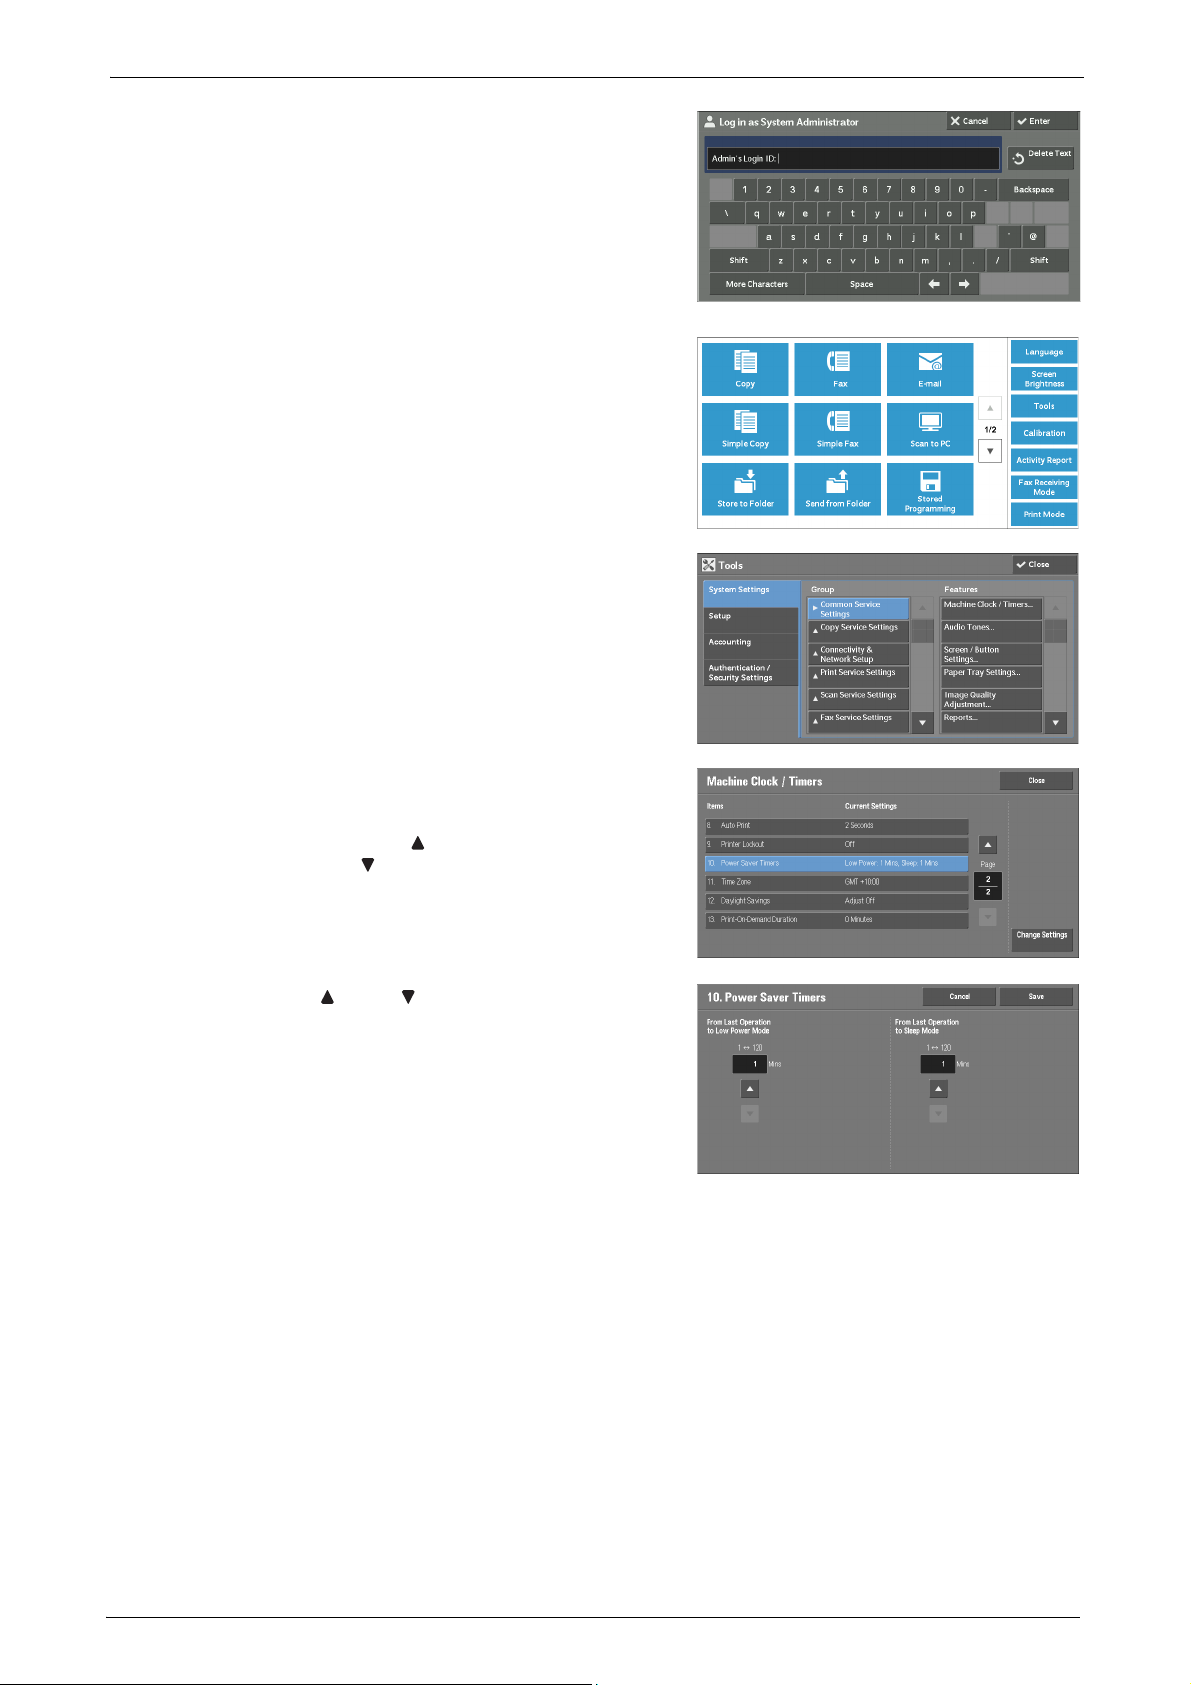
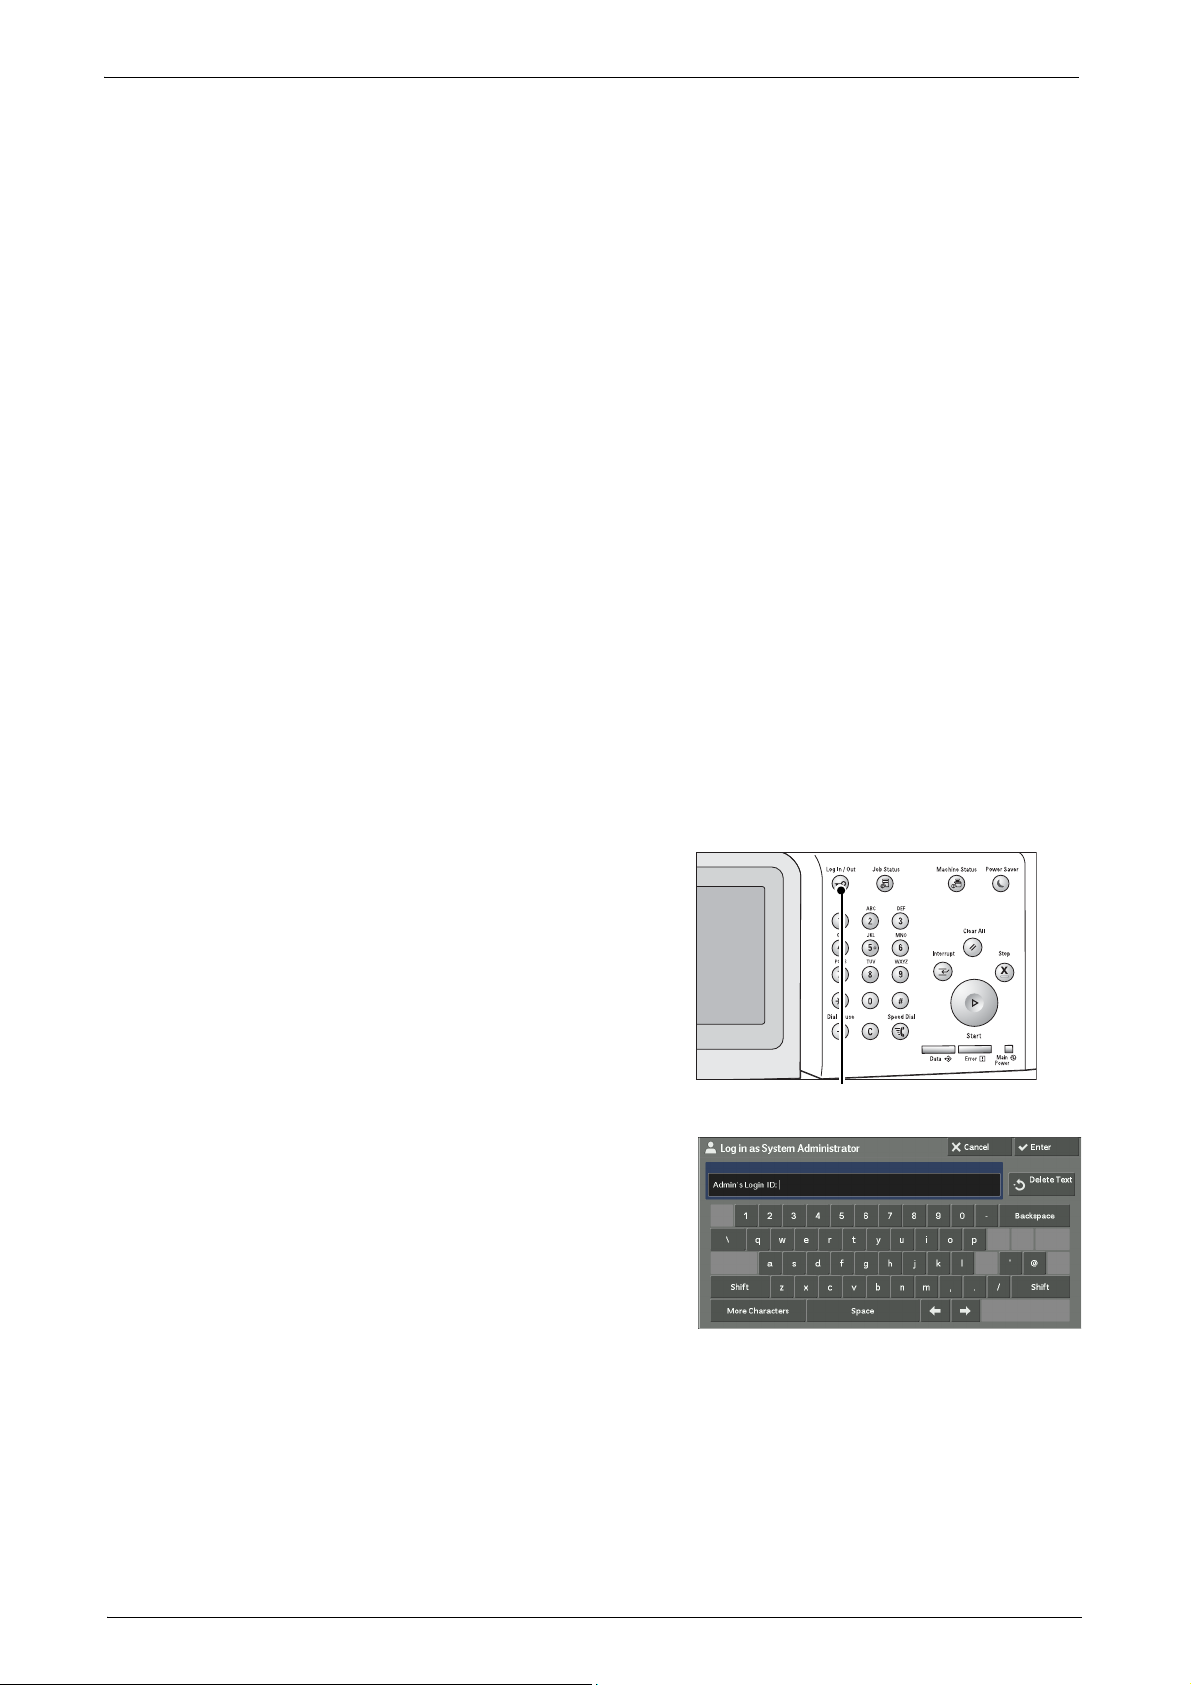
1
Press the <Log In/Out> button.
21
1 Before Using the Machine
2
Enter the system administrator's user ID with
the numeric keypad or the keyboard displayed
on the screen, and select [Enter].
When a passcode is required, select [Next] and
enter the system administrator's passcode, and
select [Enter].
Note • The default user ID is "admin".
3
Select [Tools] on the [Home] screen.
Note • When the [Home] screen is not displayed on
4
Select [System Settings] > [Common Service
Settings] > [Machine Clock/Timers].
• The default passcode is "1111".
the touch screen, press the <Home> button.
5
Select [Power Saver Timers], and then select
[Change Settings].
Note • Select [ ] to display the previous screen or
[ ] to display the next screen.
6
Using [ ] and [ ], set the time to elapse until
entering the Power Saver mode, in 1 minute
increments.
From Last Operation to Low Power Mode
Set the time to elapse from the last operation until the machine enters the
Note • The default value for [From Last Operation to Low Power Mode] is [10] minutes. You cannot disable the
Low Power mode.
Low Power mode.
22
From Last Operation to Sleep Mode
Set the time to elapse from the last operation until the machine enters the Sleep mode.
Note • The default value for [From Last Operation to Sleep Mode] is [10] minutes. To make the machine enter
the Low Power mode, set a longer period of time for [From Last Operation to Sleep Mode] than for
[From Last Operation to Low Power Mode].
7
Select [Save].

8
Select [Close] repeatedly until the [Tools] screen is displayed.
9
Select [Close].
Power Saver Mode
23
1 Before Using the Machine
<Log In/Out> button
Customizing the Control Panel
You can change the services displayed on the touch screen or the features assigned to the
buttons to make best use of the machine.
This section describes how to change the screen default, the services displayed after Auto
Clear, the services displayed on the [Home] screen, and the services
buttons, and how to adjust the screen brightness.
For information on how to change the other settings of the control panel, refer to "Screen/Button
Settings" (P.133).
Changing the Default Screen
You can specify what screen to display when the machine is turned on or the Power Saver
mode is deactivated.
The [Home] screen is displayed by factory default.
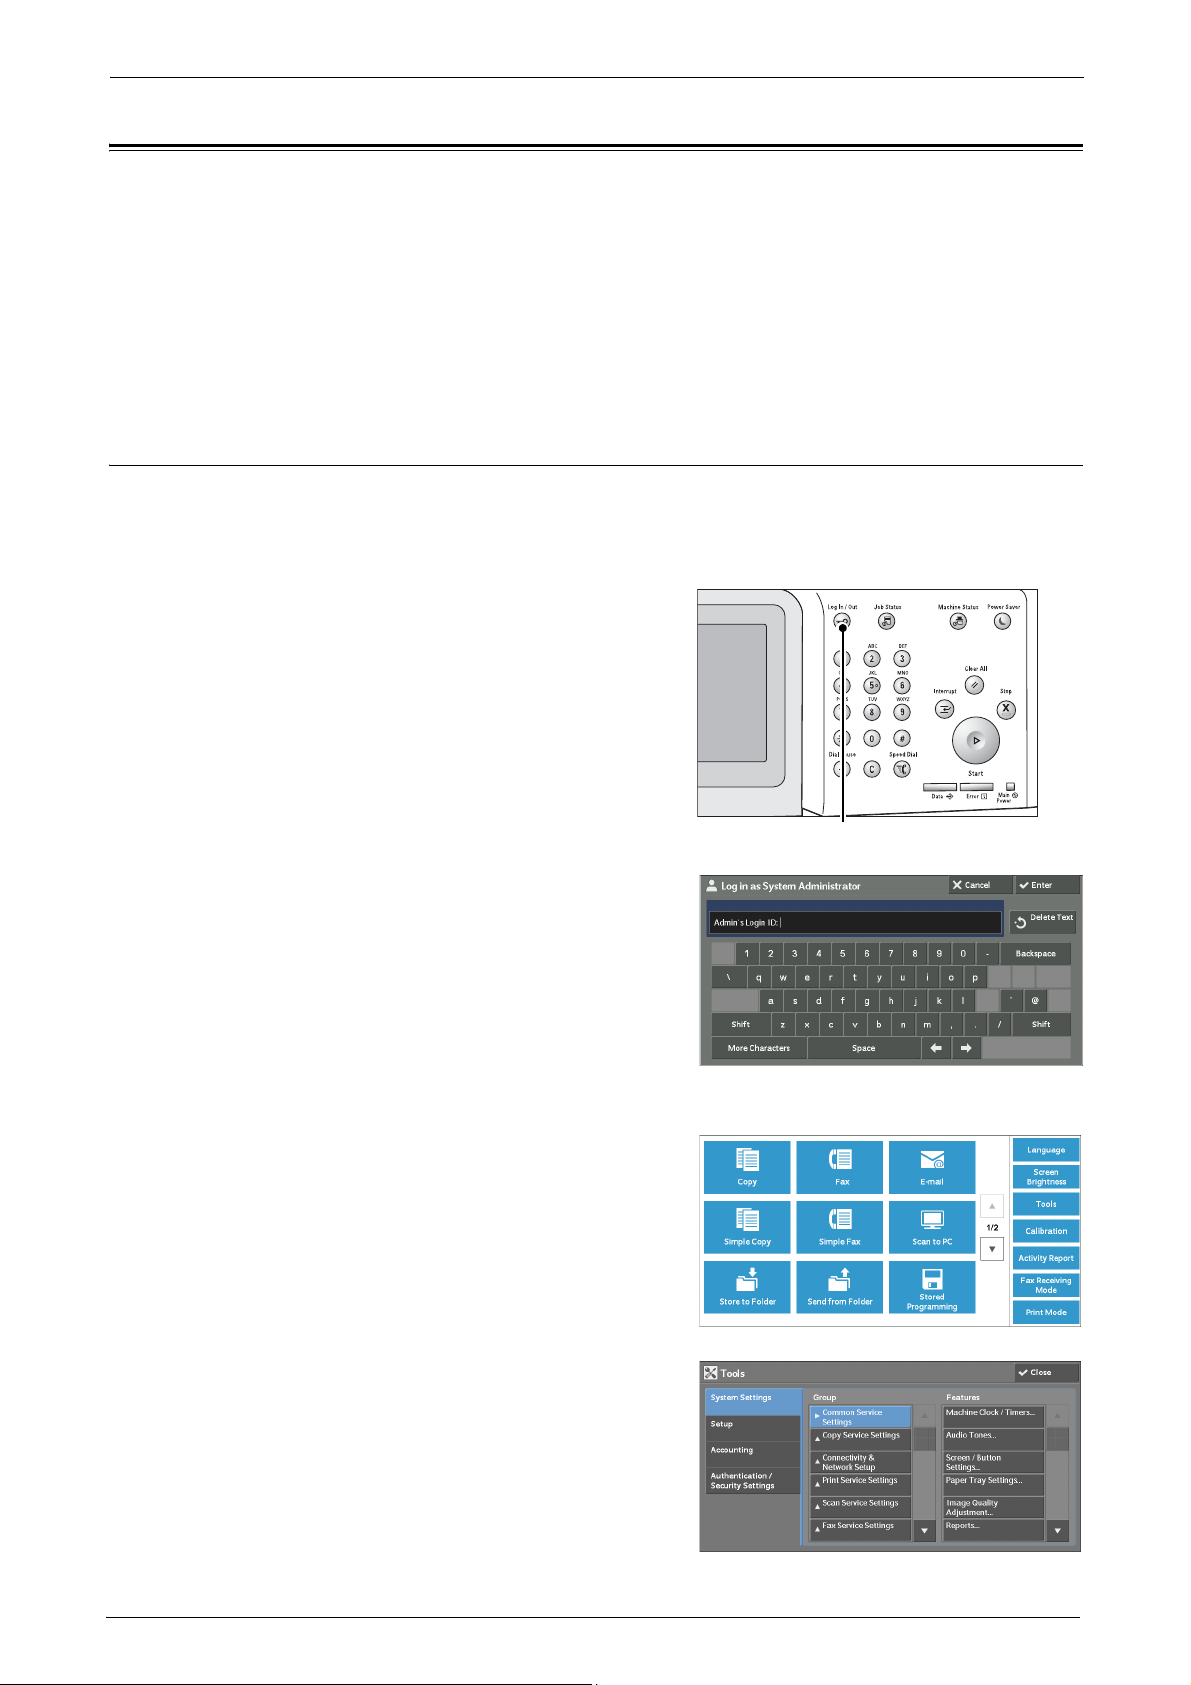
1
Press the <Log In/Out> button.
assigned to the custom
2
Enter the system administrator's user ID with
the numeric keypad or the keyboard displayed
on the screen, and select [Enter].
When a passcode is required, select [Next] and
enter the system administrator's passcode, and
select [Enter].
Note • The default user ID is "admin".
• The default passcode is "1111".
3
Select [Tools] on the [Home] screen.
Note • When the [Home] screen is not displayed on
the touch screen, press the <Home> button.
4
Select [System Settings] > [Common Service
Settings] > [Screen/Button Settings].
24

5
<Log In/Out> button
Select [Screen Default], and then select
[Change Settings].
6
Select a service you want to display.
Note • Select [ ] to display the previous screen or
] to display the next screen.
[
7
Select [Save].
Customizing the Control Panel
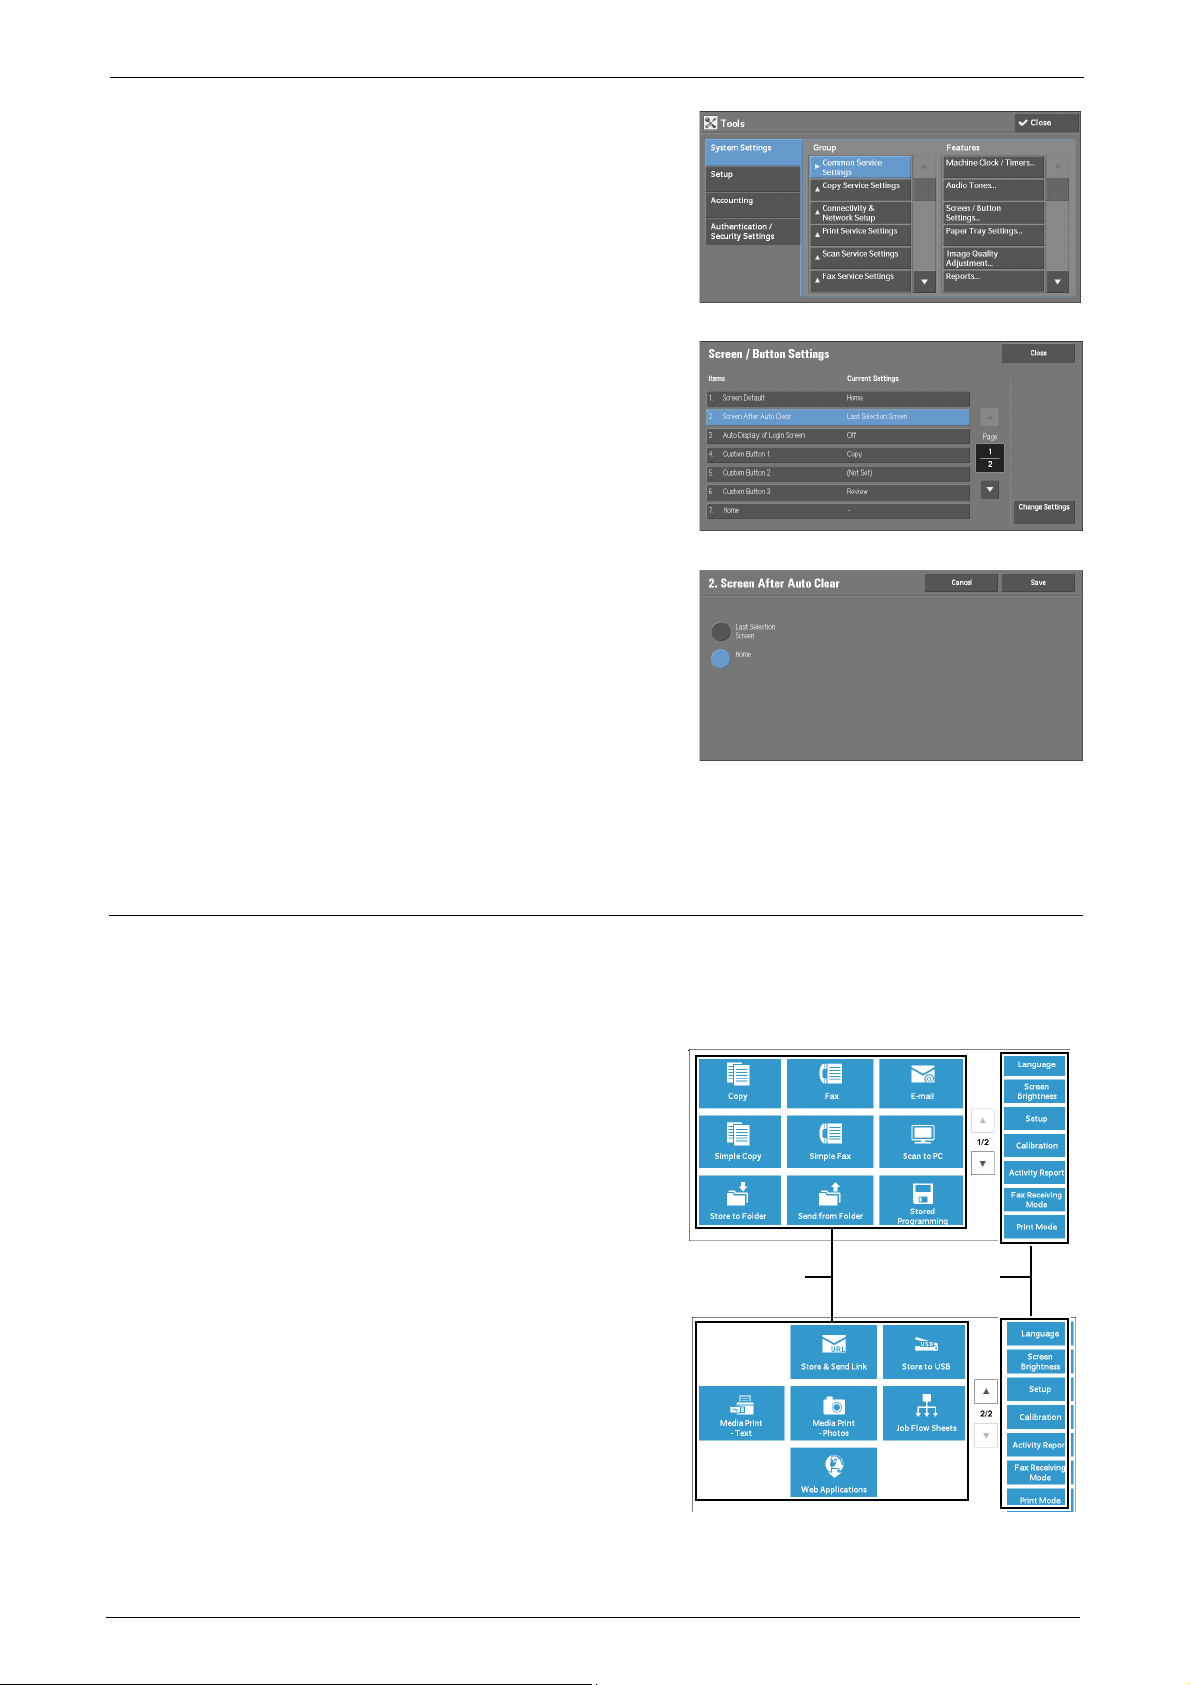
Setting the Screen After Auto Clear
You can specify what screen to display when the settings are reset with Auto Clear. [Last
Selection Screen] or [Home] can be selected.
For information on Auto Clear, refer to "Auto Clear" (P.130).
1
Press the <Log In/Out> button.
2
Enter the system administrator’s user ID with
the numeric keypad or the keyboard displayed
on the screen, and select [Enter].
When a passcode is required, select [Next] and
enter the system administrator's passcode, and
select [Enter].
Note • The default user ID is "admin".
• The default passcode is "1111".
3
Select [Tools] on the [Home] screen.
Note • When the [Home] screen is not displayed on
the touch screen, press the <Home> button.
25
1 Before Using the Machine
Service buttons
Additional feature
buttons
4
Select [System Settings] > [Common Service
Settings] > [Screen/Button Settings].
5
Select [Screen After Auto Clear], and then
select [Change Settings].
6
Select [Last Selection Screen] or [Home].
7
Select [Save].
Customizing the Button Layout
You can specify the button layout and what buttons to display on the [Home] screen, which
can be displayed by pressing the <Home> button on the control panel.
Note • The feature unsupported by the machine will not be displayed, and the feature unavailable due to a
failure will be grayed out.
•Copy
•Fax
•E-mail
• Simple Copy
• Simple Fax
•Scan to PC
• Store to Folder
• Send from Folder
26
• Stored Programming
•Store & Send Link
Note • This service is displayed when the User
• Store to USB
• Media Print - Text
Authentication feature is used.
Customizing the Control Panel
<Log In/Out> button
• Media Print - Photos
• Job Flow Sheets
• Web Applications
•Custom Services
Note • This service is for service representative use. For more information, contact Customer Support at
dell.com/contactdell.
• Language
• Screen Brightness
•Setup
•Calibration
• Activity Report
• Fax Receiving Mode
•Print Mode
• Lockout Printer/Release Printer
Note • [Lockout Printer]/[Release Printer] is not displayed by default. To display this feature, select [Allow
User to Lock Out] in [Printer Lockout] under [Tools] > [System Settings] > [Common Service Settings] >
[Machine Clock/Timers], and then assign [Disable Auto Printing] to a button on the [Home - Additional
Features] screen.
Home
You can select service buttons, which are displayed on the [Home] screen.
If you select [(Not Assigned)], the position of the selected button becomes blank.
1
Press the <Log In/Out> button.
2
Enter the system administrator’s user ID with
the numeric keypad or the keyboard displayed
on the screen, and select [Enter].
When a passcode is required, select [Next] and
enter the system administrator's passcode, and
select [Enter].
Note • The default user ID is "admin".
• The default passcode is "1111".
27
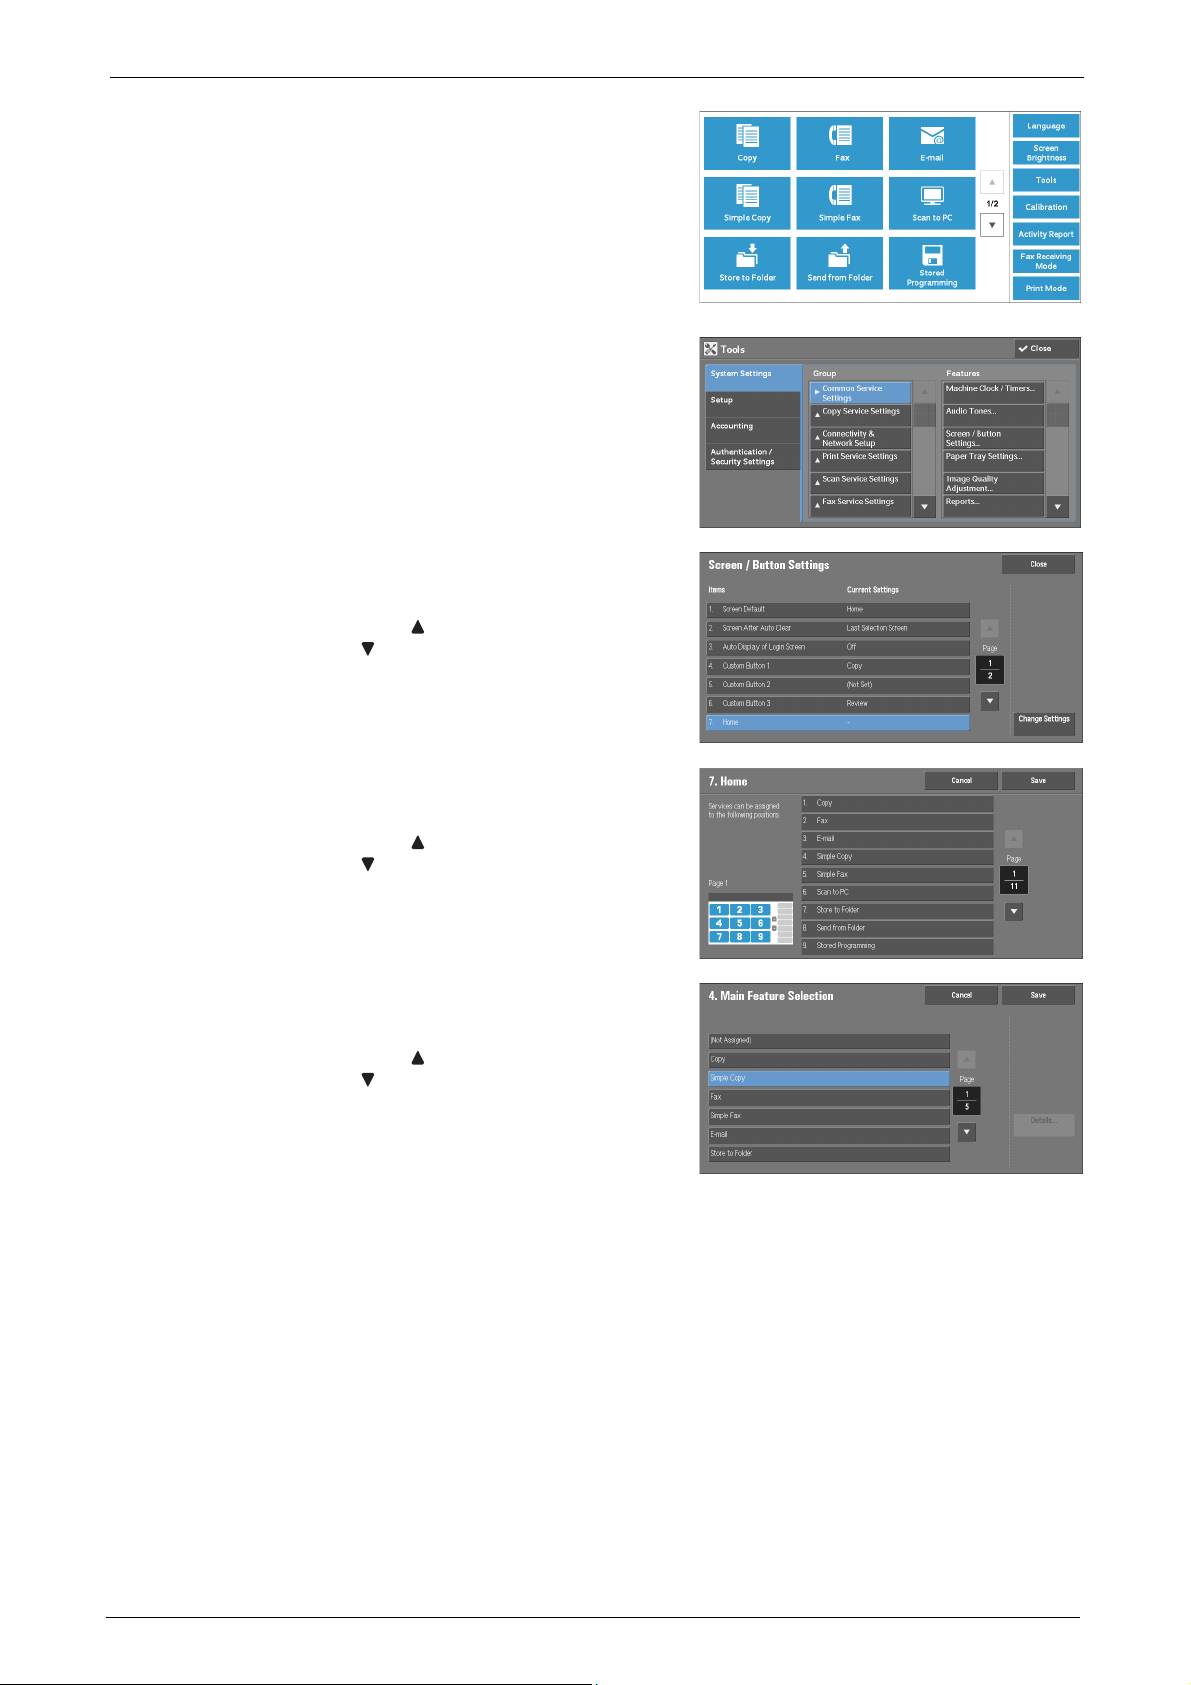
1 Before Using the Machine
3
Select [Tools] on the [Home] screen.
Note • When the [Home] screen is not displayed on
4
Select [System Settings] > [Common Service
Settings] > [Screen/Button Settings].
5
Select [Home], and then select [Change
Settings].
Note • Select [ ] to display the previous screen or
the touch screen, press the <Home> button.
[ ] to display the next screen.
6
Select the position where you want to assign a
service.
Note • Select [ ] to display the previous screen or
[ ] to display the next screen.
• The layout of the buttons in this screen
corresponds to the layout of those on the
[Home] screen.
7
Select the service to assign to the selected
position.
Note • Select [ ] to display the previous screen or
[
• You cannot assign the same feature to more
than one
8
Select [Save].
9
Select [Save].
Home - Additional Features
You can select additional feature buttons, which are displayed on the [Home] screen.
If you select [(Not Assigned)], the position of the selected button becomes blank.
] to display the next screen.
button.
28
You cannot assign [Setup] to [(Not Assigned)]. If you do not want to display the [Setup]
button, select the [Show
this in Admin mode] check box.

1
<Log In/Out> button
Press the <Log In/Out> button.
2
Enter the system administrator’s user ID with
the numeric keypad or the keyboard displayed
on the screen, and select [Enter].
When a passcode is required, select [Next] and
enter the system administrator's passcode, and
select [Enter].
Note • The default user ID is "admin".
• The default passcode is "1111".
Customizing the Control Panel
3
Select [Tools] on the [Home] screen.
Note • When the [Home] screen is not displayed on
the touch screen, press the <Home> button.
4
Select [System Settings] > [Common Service
Settings] > [Screen/Button Settings].
5
Select [Home - Additional Features], and then
select [Change Settings].
Note • Select [ ] to display the previous screen or
[ ] to display the next screen.
6
Select the position where you want to assign an
additional feature.
Note • The layout of buttons in this screen is
corresponding to the layout of those on the
[Home] screen.
29
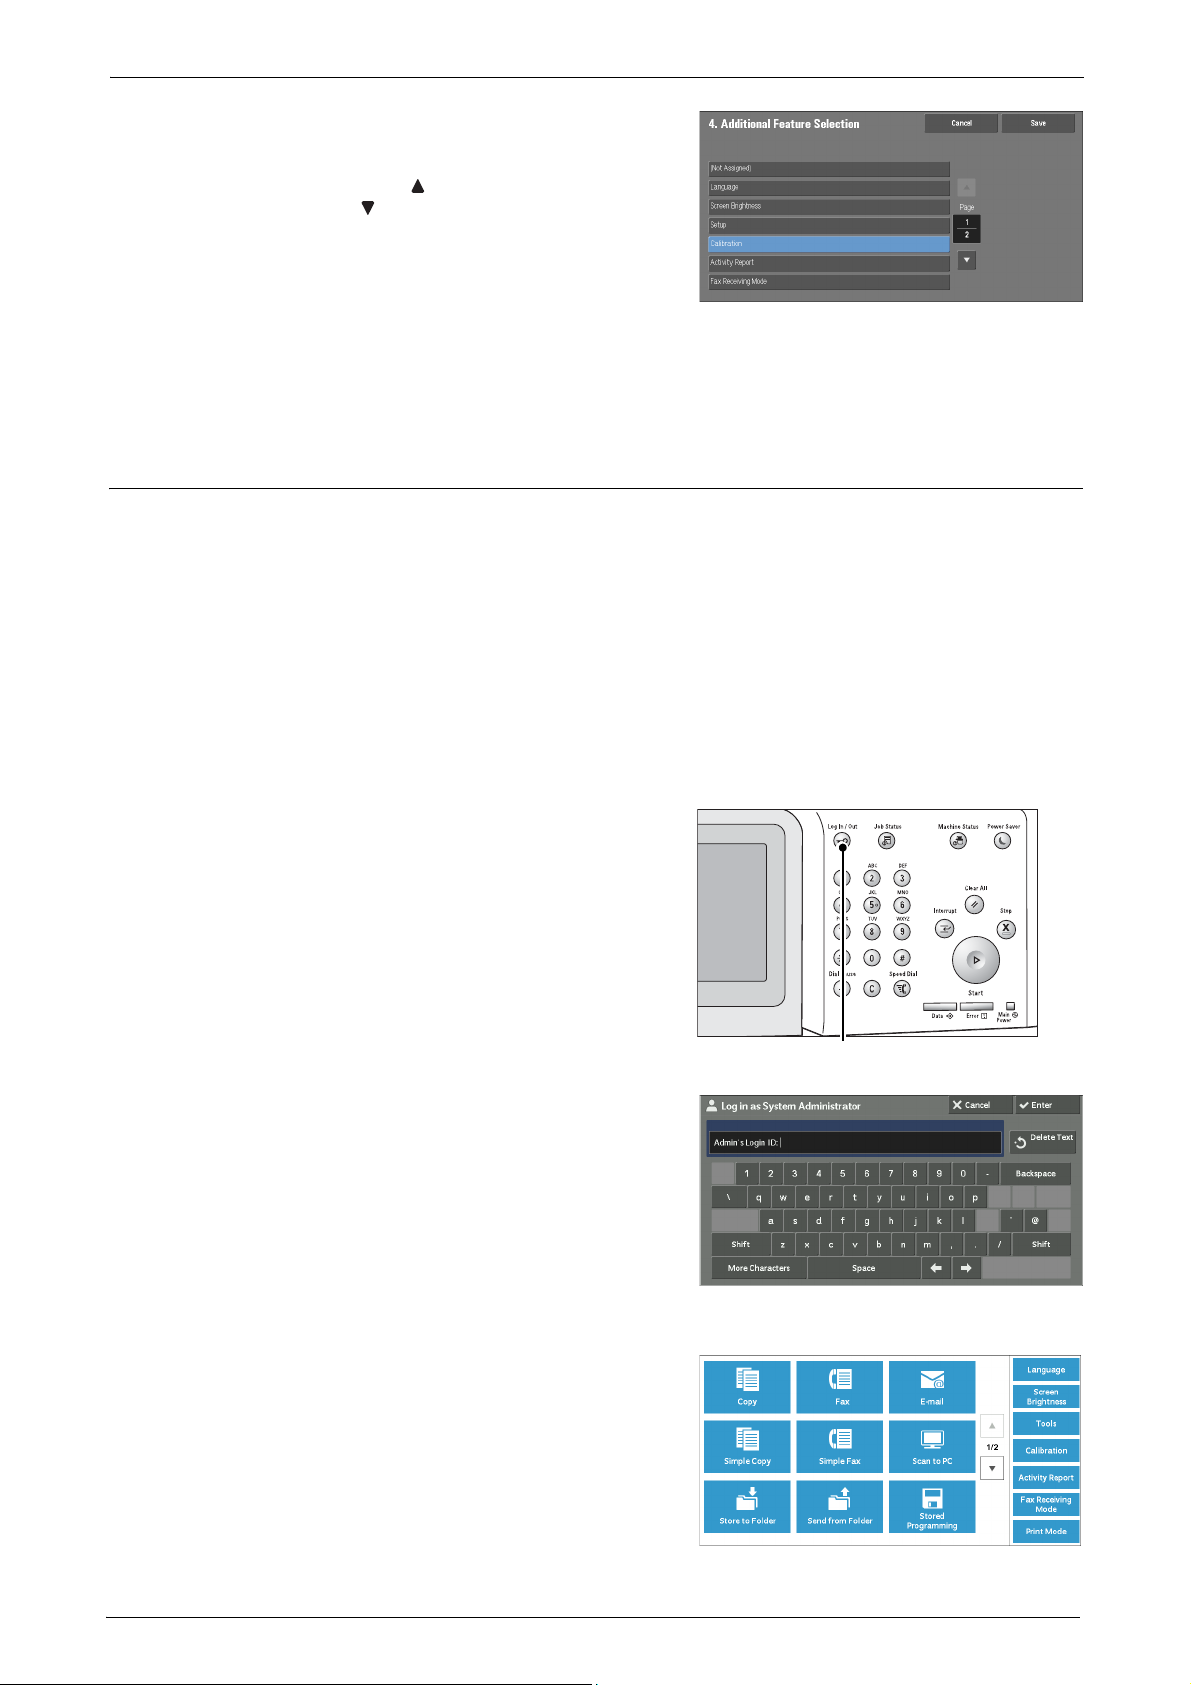
1 Before Using the Machine
<Log In/Out> button
7
Select a service you want to display on the
[Home] screen.
Note • Select [ ] to display the previous screen or
[ ] to display the next screen.
• You cannot assign the same feature to more
than one button.
8
Select [Save].
9
Select [Save].
Assigning Services to the Custom Buttons
You can assign services to the <Copy>, <Shortcut 1>, and <Shortcut 2> buttons on the
control panel.
Assigning a service to a custom button allows you to switch to this service without having to
return
select [(Not Set)].
to the [Home] screen. If you do not need to assign any service to a custom button,
[Copy] is assigned to the <Copy> button and [Review] is assigned to the <Shortcut 2>
button by factory defau
This section describes how to assign [Send from Folder] to the <Shortcut 1> button, as an
example.
Note • After you change the assignment, apply the labels provided with the machine.
1
Press the <Log In/Out> button.
2
Enter the system administrator’s user ID with
the numeric keypad or the keyboard displayed
on the screen, and select [Enter].
When a passcode is required, select [Next] and
enter the system administrator's passcode, and
select [Enter].
Note • The default user ID is "admin".
• The default passcode is "1111".
lt, while the <Shortcut 1> button has no assignment.
30
3
Select [Tools] on the [Home] screen.

Customizing the Control Panel
Note • When the [Home] screen is not displayed on the touch screen, press the <Home> button.
4
Select [System Settings] > [Common Service
Settings] > [Screen/Button Settings].
5
Select [Custom Button 2], and then select
[Change Settings].
6
Select [Send from Folder].
Note • Select [ ] to display the previous screen or
] to display the next screen.
[
7
Select [Save].
Adjusting the Screen Brightness
You can adjust the screen brightness of the screen on the [Home] screen.
1
Select [Screen Brightness] on the [Home] screen.
2
Press [+] or [-] to adjust the screen brightness.
3
Select [Save].
To adjust the screen brightness from the [Tools] screen, refer to "Screen Brightness" (P.135).
31

1 Before Using the Machine
Entering Text
During operations, a screen for entering text sometimes appears. The following describes
how to enter text.
You can enter the following characters: numerals, alphabets, and symbols
Entering alphabets and numerals To enter uppercase letters, select [Shift]. To return to the
Entering symbols Select [More Characters].
Item Description
lowercase letters, select [Shift] again.
Note • Depending on the keyboard, you can select a symbol
from the pull-up options displayed on the bottom left of
the screen.
Entering a space Select [Space].
Deleting characters Select [Backspace] to delete one character at a time.
32

2 Paper and Other Media
This chapter describes the paper that can be used with the machine, precautions when
handling paper, and how to load paper in trays.
• Print Media Guidelines........................................................................................................34
• Loading Paper ........................................................................................................................41
• Changing t
he Paper Settings...............................................................................................48

2 Paper and Other Media
Print Media Guidelines
Print media is paper, labels, envelopes, and coated paper among others. Your machine
provides high-quality printing on a variety of print media. Selecting the appropriate print
media for your machine helps avoid printing troubles.
This section describes selecting print media, caring for print media, and loading the print
media in the paper trays.
Paper
For the best print quality in color, use 75 gsm xerographic, grain long paper. For the best
print quality in black and white, use 90 gsm xerographic, grain long paper. It is recommended
that you try a sample first before buying large quantities of any print media.
When loading paper, identify the recommended print side on the paper package, and load
the paper ac
Paper Characteristics
The following paper characteristics affect print quality and reliability. It is recommended
that you follow these guidelines when evaluating new paper stock.
cordingly. See "Loading Paper" (P.41) for detailed loading instructions.
Weight
The tray automatically feeds paper weights from 60 to 216 gsm grain long. Paper lighter than
60 gsm may not feed properl
grain long paper.
Curl
Curl is the tendency of print media to curve at its edges. Excessive curl
feeding problems. Curl usua
is exposed to high temperatures. Storing paper unwrapped, even in the paper tray, can
contribute to paper curling prior to printing and cause feeding problems regardless of
humidity. When printing on curled paper, straighten the paper and then insert it into the
Tray 5.
Smoothness
The degree of paper smoothness directly affects print quality. If the paper is too rough, the
toner does not fuse to the paper properly, result
smooth, it can cause paper feeding problems. Smoothness between 150 and 250 Sheffield
points produces the best print quality.
Moisture Content
The amount of moisture in the paper affects both print quality and the ability of the machine
to feed the
it. This limits the exposure of the paper to moisture changes that can degrade its
performance.
paper properly. Leave the paper in its original packaging until you are ready to use
y, and could cause paper jams. For best performance, use 75 gsm
can cause paper
lly occurs after the paper passes through the machine, where it
ing in poor print quality. If the paper is too
34
Grain Direction
Grain refers to the alignment of the paper fibers in a sheet of paper. Grain is either grain long,
running the length of the paper,
gsm paper, grain long fibers are recommended. For paper heavier than 135 gsm, grain short
is preferred.
or grain short, running the width of the paper. For 60 to 135

Fiber Content
Most high-quality xerographic paper is made from 100% chemically pulped wood. Paper
containing fibers such as cotton possess characteristics that can resul
handling.
Recommended Paper
To ensure the best print quality and feed reliability, use 75 gsm xerographic paper. Business
paper designed for general business use also provide acceptable print quality. Only use paper
able to withstand high temperatures without discoloring, bleeding, or releasing hazardous
emissions.
The laser printing process heats paper to high tempe
or vendor to deter
Always print several samples before buying large quantities of any type of print media. When
choosing any print media,
Unacceptable Paper
The following paper types are not recommended for use with the machine:
• Chemically treated paper used to make copies without carbon paper, also known as
carbonless paper, carbonless copy paper (CCP), or no carbon required (NCR)
Print Media Guidelines
t in degraded paper
ratures. Check with the manufacturer
mine whether the paper you have chosen is acceptable for laser printers.
you should consider the weight, fiber content, and color.
paper
Selecting Paper
• Preprinted paper with chemicals that may contaminate the machine
• P
reprinted paper that can be affected by the temperature in the fusing unit
• Preprinted paper that require a registration (the precise print location on the page) greater
than
±0.09 inches, such as optical character recognition (OCR) forms
In some cases, you can adjust registration with your software program to successfully print
on these forms.
• Coated paper (erasable bond), synthetic paper, therma
• Rough-edged, rough or heavily textured surface paper, or curled paper
• Recycled paper containing more than 25% post-consumer waste
309
Multiple-part forms or documents
•
• Print quality may deteriorate (blank spaces or blotches may appear in the text) when
printing on talc or
Proper paper selection helps prevent jams and ensures trouble-free printing.
To help avoid jams or poor print quality:
• Always use new, undamaged paper.
acid paper.
l paper
that do not meet DIN 19
• Before loading the paper, identify the recommended print side of the paper. This
information is usually indicated on the
• D
o not use paper that you have cut or trimmed yourself.
• Do not mix print media sizes, weights, or types in the
paper jam.
o not remove the tray while a job is printing.
• D
• Ensure that the paper is properly loaded in the tray.
• Flex paper back and forth, and then fan them. Straighten the edges of the stack on a level
surface.
paper package.
same source. This may result in a
35

2 Paper and Other Media
Selecting Preprinted Media and Letterhead
When selecting preprinted media and letterhead paper for the machine.
• Use grain long paper for best results.
• Use only media and letterhead printed using an offset lithographic or engraved printing
process.
• Select paper that absorb ink, but do not bleed.
• Avoid paper with rough or heavily textured surfaces.
• Use paper printed with heat-resistant inks designed for use in xerographic copiers. The ink
must withstand
temperatures of 225°C without melting or releasing hazardo
us emissions.
• Use inks that are not affected by the resin in toner
are oxidation-set or oil-based should meet these requirements; latex inks might not.
that
If you are in doubt, contact your paper supplier.
Printing on Letterhead
Check with the manufacturer or vendor to determine whether the pre-printed letterhead you
have selected is acceptable for laser printers.
Page orientation is important when printing on letterhead. Use the following table for help
when loading letterhead in the print media sources.
Print M
Tray 1
550-sheet feeder
1100-sheet feeder
Tray 5 Face down Letterhead enters the
edia Source Print Side Page Orientation
Selecting Pre-Punched Paper
Pre-punched paper brands can differ in the number and placement of holes and in
manufacturing techniques. However, it may not be possible to print on the paper depending
on the placement of holes on the paper.
To select and use pre-punched paper:
or the silicone in the fusing unit. Inks
Face up Letterhead enters the
machine first
machine first
• Test paper from several manufacturers before ordering and using large
• Paper should be punched at the pape
• Pre-punched paper can include more paper dust than standard paper. Your machine may
• Weight guidelines for pre-punched paper are the same as non-punched paper.
Transparencies
You can load up to 75 sheets of transparencies in the Tray 1 or 5 for a single print job. It is
recommended that you try a sample first before buying large quantities of any print media.
When printing on transparencies:
• Set the paper type to [Transparency] from the
36
quantities of pre-
punched paper.
r manufacturer and not drilled into paper already
packaged in a ream. Drilled paper can cause jams when multiple sheets feed through the
machine. This may result
require more frequent cleaning and feed reliability may not be
in a paper jam.
as good as standard paper.
printer driver to avoid damaging your
machine.

Print Media Guidelines
• Use transparencies designed specifically for laser printers. Do not use regular
transparencies. Transparencies must be able to withstand temperatures of 205°C without
melting, discoloring, offsetting or releasing hazardous emissions.
• Avoid getting fingerprints on the transparencies.
• B
efore loading transparencies, fan the stack to prevent sheets from sticking together.
• Non-white transparencies are not supported with the machine.
Selecting Transparencies
The machine can print directly on transparencies designed for use in laser printers. Print
quality and durability depend on the transparency used. It is recommended that you try a
sample first before buying large quantities of any print media.
The paper type setting for the Tray 5 should be set to [Transparency] to help prevent jams.
(See "Changing
Check with the manufacturer or vendor to determine whether your transparencies are
compatible with laser printers that reach temperatures
transparencies that are able to withstand these temperatures without melting, discoloring,
offsetting, or releasing hazardous emissions.
Note • For the Tray 1, setting paper size is not required. The Tray 1 detects the paper size automatically. For
Envelopes
Depending on the choice of envelopes, it is possible to expect variable levels of light
wrinkling. It is recommended that you try a sample first before buying large quantities of any
print media. See "Loading Paper" (P.41) for instructions on loading an envelope.
When printing on envelopes:
This may result in poor print quality.
the Paper Settings" (P.48) for detailed information about this setting.)
as high as 205°C. Only use
more information on supported paper size for the standard and optional trays, see "Supported Paper
Sizes" (P.39).
• Use only high-quality envelopes that are designed
• Set the print media source to the paper tray. Se
the correct size of envelope from
the printer driver.
• For best performance, use envelopes made from 75
for use in laser printers.
t the paper type to [Envelope], and select
gsm paper. You can use
up to 105 gsm
weight for the envelope feeder as long as the cotton content is 25% or less. Envelopes with
100% cotton content must not exceed 90 gsm weight.
• Use only freshly unpacked, undamaged envelopes.
• Use envelopes that can withstand temperatures of 205°C
without sealing, excessive
curling, wrinkling, or releasing hazardous emissions. If you have any doubts about the
envelopes
you are considering, check with the envelope supplier.
• Adjust the guide to fit the width of the envelopes.
• To load envelope in the Tray 5, insert the envelopes with the flaps closed and the shortedge of the envelopes facing into
the machine. The print side must be facing down.
• See "Loading an Envelope in Tray 5 (Bypass Tray)" (P.46) for instructions on loading an
envelope.
• Use one envelope size during a print job.
• Ensure the humidity is low because high humidity (more than 60%) and the high printing
temperatures
may seal the envelopes.
• For best performance, do not use envelopes
- Have excessive curl or twist
- Are stuck together or damaged in any way
that:
37

2 Paper and Other Media
- Contain windows, holes, perforations, cutouts, embossing
- Use metal clasps, string ties, or metal folding bars
- Have an interlocking design
- Have postage stamps attached
- Have any exposed adhesive when the flap is in the sealed or closed position
- Have nicked edges or bent corners
- Have rough, cockle, or laid finishes
Note • You can load envelopes also on the Tray 1. For more information, see "Loading an Envelope in Trays 1
Labels
Your machine can print on many labels designed for use with laser printers.
Label adhesives, face sheet (printable stock), and topcoats must be able to withstand
temperatures of 205°C and pressure of 25 pounds pe
that you try a sample first before buying large quantities of any print media.
When printing on labels:
• Set the paper type to [Label] from the printer driver.
to 4" (P.43).
r square inch (psi). It is recommended
• Do not load labels together with paper in the same tray. This may result in a jam.
• Do not use label sheets with a slick backing material.
• Do not print within 1 mm of the die cut.
• Use full label sheets. Partial sheets may cause labels to peel off during printing, resulting
in a
jam. Partial sheets also contaminate your machine and your cartridge with adhesive,
and could void your machine
• Use labels that can withstand temperatures of 205°C without sealing, excessive curling,
wrinkling, or releasing hazardous emissions.
• Do not print within 1
of the label.
Do not use label sheets that have adhesive to the edge of the sheet. It is recommended
•
that zone coating of the adhesive is at least
contaminates your machine and could void your warranty.
• If zone coating of the adhesive is not possible, a 3 mm strip should be removed on the
leading and driver edge, and a non-oozing adhesive should be used.
• R
emove a 3 mm strip from the leading edge to prevent l
machine.
• Portrait orientation is preferred,
mm of the edge of the label, of the perforations, or between die-cuts
and cartridge warranties.
1 mm away from edges. Adhesive material
abels from peeling inside the
especially when printing bar codes.
• Do not use labels that have exposed adhesive.
Storing Print Media
For proper print media storage, the following guidelines help avoid media feeding problems
and uneven print quality.
• For best results, store print media in an environment where the temperature is
approximately 21°C and the rela
• Store cartons of print media on a pallet or shelf, rather than directly on the floor.
38
tive humidity is 40%.

• If you store individual packages of print media out of the original carton, ensure that they
rest on a flat surface so that the edges do not buckle or curl.
• Do not place anything on top of the print media packages.
Identifying Print Media and Specifications
The following tables provide information on standard and optional print media.
Supported Paper Sizes
Print Media Guidelines
A4
(210 x 297 mm)
A5
(148 x 210 mm)
B5
(182 x 257 mm)
Letter
(8.5 x 11 in.)
Folio
(8.5 x 13 in.)
Legal
(8.5 x 14 in.)
Executive
(7.25 x 10.5 in.)
Envelope #10
(4.125 x 9.5 in.)
Monarch
(3.875 x 7.5 in.)
DL
(4.25 x 8.75 in.)
C5
(9 x 6.5 in.)
Finisher-
AB1
*1
(Sheet
)
Tray 1 Tray 2 to 4 Tray 5
Duplex
Module
0 0 0 0 X 0
0 0 0 0 0 X
0 0 0 0 X 0
0 0 0 0 X 0
0 0 0 0 X 0
0 0 0 0 X 0
0 0 0 0 X 0
*3
0
*3
0
*3
0
*3
0
X 0 X 0 X
X 0 X 0 X
X 0 X 0 X
X 0 X 0 X
Finisher-
AB1 (Set
*2
)
Custom 0 0 0 0 0 0
0X::Available
Not available
*1 :In this mode, each page is output separately to the left tray.
*2 :In this mode, the document is sorted into sets or jobs and output to the left tray.
:To print envelopes using the Tray 1, you must select the kind of the envelope in the [Tray
*3
Tray Attributes" (P.232).
1] settings. For details, see "Paper
39

2 Paper and Other Media
Supported Paper Types
Finisher-
AB1
(Sheet
One-
sided
*1
Two-
sided
-
Duplex
Module
One-
sided
Two-
sided
eft tray.
Tray 1 Tray 2 to 4 Tray 5
One-
sided
Plain Normal 0 X 0 X 0 0 0 X X X 0 X
Thick 0 X 0 X 0 0 0 X X X 0 X
Covers Normal 0 X 0 X 0 0 0 X X X 0 X
Thick 0 X 0 X 0 0 X X X X 0 X
Coated Normal 0 X X X 0 0 0 X 0 X X X
Thick 0 X X X 0 0 X X 0 X X X
Label Normal 0 X X X 0 X X X 0 X X X
Envelope 0 X X X 0 X X X 0 X X X
Recycled 0 X
Transparency 0 X X X 0 X X X 0 X X X
0X::Available
Not available
*1 :In this mode, each page is output separately to the left tray.
*2 :In this mode, the document is sorted into sets or jobs and output to the l
Two-
sided
One-
sided
Twosided
0 X 0 0 0 X X X 0 X
One-
sided
Two
sided
)
Finisher-
AB1 (Set
One-
sided
Two-
sided
*2
)
Paper Type Specifications
Paper Type Weight (gsm) Remarks
Plain Paper 60-80 -
Plain Thick Paper 81-105 -
Covers 106-162 -
Covers Thick 163-216 -
Coated Normal 106-162 Inkjet printer paper
Coated Thick 163-216 Inkjet printer paper
Transparency - Inkjet printer paper
Label Normal - Inkjet printer paper
Label Thick - Inkjet printer paper
Envelopes - -
cannot be used.
cannot be used.
cannot be used.
cannot be used.
cannot be used.
40
Recycled - -

Loading Paper
This section describes how to load paper.
Types of paper loaded in trays
The machine automatically detects the size and orientation of loaded paper in a tray, but not
a paper type. Normally, each tray is
paper, you must change the paper type setting. You can name paper types and can set up to
five paper types as user-defined paper.
For information on changing the paper type settings, refer to "Changing the Paper Settings" (P.48).
Automatic Tray Selection
Loading Paper
set to plain paper. When loading paper other than plain
If you set paper source on the [Paper/Output] tab to [Paper Tray] in the PCL print
screen when printing, the machine automatically selects the paper tray according to the size
and orientation of the document to be printed. This is called the Automatic Tray Selection.
When copying, selecting [Auto Select] for [Paper Supply] enables automatic tray selection.
If the machine detects two or more corresponding trays for
the automatic tray selection, the
machine selects the tray with the highest priority specified in [Paper Type Priority] among
the trays set under [Paper Type]. Trays whose [Paper Type Priority] setting is set to [Auto
Paper Off] are ignored in automatic tray selection. Also, if the [Paper Type Priority] settings
are identical, the tray priority is determined by [Paper Tray Priority].
Note • Some trays may not be selected in automatic tray selection depending on the setting of that tray for
[Auto Paper Select]. For more information, refer to "Change Settings" (P.135).
• Tray 5 cannot be selected in automatic tray selection.
• When the paper runs out during copying or printing, select a tray
orientation, and the machine continues copying or printing (Auto Tray Switching feature). The
machine cannot switch to a tray containing a paper type for which [Paper Type Priority] is set to [Auto
Paper Off].
For information about [Paper Type], [Paper Type Priority], and [Paper Tray Priority] settings, and the
paper substitute feature, refer to "Paper Tray Settings" (P.135). You can also set these settings from
Dell Printer Configuration Web Tool.
containing the same sized paper and
Adding paper
When the machine runs out of paper during copying or printing, a message appears on the
touch screen. Add paper according to the message instructions. Copying or printing
automatically resumes when paper is added.
Note • Carefully fan the paper before loading it in a tray. Otherwise, the paper may stick together, resulting in
paper jams, or multiple sheets being fed to the machine simultaneously.
driver's
Loading Paper in Trays 1 to 4
The following describes the procedures to load paper in Trays 1 to 4.
When the machine runs out of paper during copying or printing, a message appears on the
touch screen. Add paper according to the message instructions. Copying or printing
automatically resumes when paper is added.
Note • Carefully fan the paper before loading it in a tray. Otherwise, the paper may stick together, resulting in
paper jams.
• Use only laser print med
ia. Do not use ink jet paper in this printer.
41

2 Paper and Other Media
1
Pull out the tray until it stops.
Note • While the machine is processing a job, do not
2
While pinching the two paper guides, move
them to the edges of the tray.
3
Before loading the paper, flex the sheets back
and forth, and then fan them.
pull out the tray that is being used for the job.
• To prevent paper jams or erroneous detection
of loaded paper in a tray by the machine, do
not add paper on top of any remaining paper in
the tray. Remove any remaining paper in the
tray, and then load that paper on top of the
newly loaded paper.
4
Load and align the edge of the paper against
the paper guides, with the side to be copied or
printed on facing up.
5
While pinching the two paper guides, lightly
align the edges to the edge of the paper.
Note • When loading standard size paper in the tray,
move the paper guides to the marks
corresponding to the paper size.
6
Push the tray in gently until it stops.
Note • When inserting the tray, push it gently. Forcibly pushing the tray in may cause machine malfunction.
42

Loading an Envelope in Trays 1 to 4
The following describes the procedures to load an envelope in Trays 1 to 4.
1
Raise the latch on the handle of the right hand
cover to open the cover.
2
Press down the lever to set the envelope mode.
Loading Paper
Note • If you insert media other than envelopes, lift
up the lever.
• To load envelopes using the optional FinisherAB1, raise the lever as shown in the
illustration.
• To load print media other than envelopes
using the optional Finisher-AB1, check if the
lever is pulled down as shown in the
illustration.
43

2 Paper and Other Media
3
Close the right hand cover
Note • When closing the right hand cover, apply your
4
Load the envelope into the tray.
When Loading Envelope#10, Monarch, or
DL
When Loading C5
hand in the vicinity of the handle as shown in
the illustration, and then press the cover firmly
toward the machine.
Note • Never use envelopes with window, coated
linings, or self-stick adhesives. These lead to
paper jams and can cause damage to the
printer.
• Ensure that you load an envelope with the flap
completely closed.
• If envelopes are still not fed correctly,
some bending to the lead edge of the
envelopes as shown in the following
illustration.
• The amount of the bending should be 5 mm or
less.
add
44

Loading Paper in Tray 5 (Bypass Tray)
When printing or copying on a size or type of paper that cannot be set in Trays 1 to 4, use
Tray 5 (bypass tray). The following describes the procedures to load paper in Tray 5. To use
Tray 5 when printing, select Tray 5 and specify the paper type on the [Paper/Output] tab of
the print driver.
Note • To prevent paper jams and erroneous detection of paper loaded in the tray by the machine, do not take
out paper of a package until the tray runs out of paper.
• Carefully fan the paper before loading it in a tray. Otherwise, the paper may stick together, resulting in
paper jams, or multiple sheets being fed to the machine simultaneously.
1
Open Tray 5.
Loading Paper
2
Slide the width guides to the edge of the tray.
The width guides should be fully extended.
3
Load paper with the side to be copied or
printed on facing down, inserting the paper
until its edge lightly touches against the paper
feed entrance.
Note • Do not force paper into Tray 5.
• Do not load mixed paper types into the tray.
• Do not load paper above the maximum fill line.
It may cause paper jams o
malfunction.
• Depending on the type of the heavyweight
paper, paper may not be fed to the machine or
image quality may deteriorate.
4
Adjust the paper guides to align the edges of
r machine
the paper loaded.
5
Instruct a copy or print job.
45

2 Paper and Other Media
Loading an Envelope in Tray 5 (Bypass Tray)
The following describes the procedures for loading an envelope in Tray 5.
1
Open the right hand cover.
2
Press down the lever to set the envelope mode.
Note • To load the print media other than envelopes,
lift up the lever.
3
Close the right hand cover.
Note • When closing the right hand cover, apply your
hand in the vicinity of the handle as shown in
the illustration, and then press the cover firmly
toward the machine.
4
Insert the envelopes with the flaps closed and
the short-edge of the envelopes facing into the
printer. Orient the print side facing down and
slide the envelope into the entry slot.
Note • You can load envelopes up to the maximum fill
line in the tray at one time.
46

When Loading Envelope#10, Monarch, or
DL
When Loading C5
Note • Never use envelopes with window, coated
linings, or self-stick adhesives. These lead to
paper jams and can cause damage to the
printer.
• Ensure that you load an envelope with the flap
completely closed.
• If you do not load envelopes in the Tray 5 right
after they have been removed from th
packaging, they may bulge. To avoid jams,
flatten them as shown below when loading
them in the Tray 5.
• If envelopes are still not fed correctly, add
some bendin
envelopes as shown in the following
illustration.
• The amount of the bending should be 5 mm or
less.
g to the lead edge of the
e
Loading Paper
Using the Tray 5
• Load only one size and type of print media during a single print job.
• Do not add or remove print media when there is still print media in the Tray 5 or when
the machine is printing from the Tray
5. This may result in a paper jam.
• Print media should be loaded with the recommended print side down and the top of the
print media going into the machine first.
• D
o not place objects on the Tray 5. Also, avoid pressing down or applying
excessive force
on it.
47

2 Paper and Other Media
<Log In/Out> button
Changing the Paper Settings
This section describes how to change the paper type for Trays and how to set image quality
processing by the individual paper type.
After loading paper in a tray, specify the type of paper loaded and select image quality for the
paper type. Setting image quality for each paper type enable
suitable image quality for the paper type.
For information on image quality processing for each paper type, refer to "Image Quality" (P.137).
Note • Users can name Custom 1 to Custom 5 displayed in the paper type settings. For information on how to
set names to Custom 1 to Custom 5, refer to "Custom Paper Name/Color" (P.135).
• You can change the paper type setting without entering to the System Administration mode on the
[Setup] screen, which is displayed by selecting [Setup] in the [Home] screen if you configure the
settings in advance. For more information, refer to "Customize Paper Supply Screen" (P.136).
1
Press the <Log In/Out> button.
s you to print with the most
2
Enter the system administrator's user ID with
the numeric keypad or the keyboard displayed
on the screen, and select [Enter].
When a passcode is required, select [Next] and
enter the system administrator's passcode, and
select [Enter].
Note • The default user ID is "admin".
• The default passcode is "1111".
3
Select [Tools] on the [Home] screen.
Note • When the [Home] screen is not displayed on
the touch screen, press the <Home> button.
4
Select [System Settings] > [Common Service
Settings] > [Paper Tray Settings].
48

5
Select [Paper Tray Attributes].
6
Select a paper tray for changing the paper type
setting under [Items].
7
Select [Change Settings].
Changing the Paper Settings
8
Select the [Paper Type], [Paper Size], [Paper
Color], and [Auto Paper Select] respectively.
9
Select [Save], [Confirm], or [Close] repeatedly until the [Paper Tray Settings] screen is
displayed.
10
Select [Image Quality].
Note • Select [ ] to display the previous screen or
[
] to display the next screen.
11
Select the paper type for changing the image
quality settings under [Items], and then select
[Change Settings].
Note • Select [ ] to display the previous screen or
] to display the next screen.
[
49

2 Paper and Other Media
12
Select the image quality, and then select [Save].
13
Make sure that the paper type you selected is displayed under [Current Settings] of [Items],
and then select [Close].
14
Select [Close] repeatedly until the [Tools] screen is displayed.
15
Select [Close].
50

3 Maintenance
This chapter describes how to replace consumables, clean the machine, calibrate colors, print
a report/list, and delete a print job with an invalid User ID.
• Replacing Consumables.......................................................................................................52
• Cleaning the Machine ..........................................................................................................74
• Executing Calibration...........................................................................................................82
• Adjusting Color Registration
• Printing a Report/List............................................................................................................88
• Deleting a
• Setting Restore Tool..............................................................................................................90
Private Charge Print Job with an Invalid User ID
............................................
...................................................85
.......................................89

3 Maintenance
Replacing Consumables
Use the supplies recommended by Dell. Visit the Dell Printer Supplies website at
dell.com/supplies, or order Dell Printer Supplies by phone.
Handling consumable
s/periodic replacement parts
• Do not store boxes of consumables/periodic replacement parts upright.
• Do not unpack consumables/periodic replacement parts before use. Avoid storing
consumables/periodic replacement
parts in the following locations:
- In high temperature and humid locations
- Near heat-generating devices
- Areas exposed to direct sunlight
- Dusty areas
• When using consumables/periodic replacement parts, carefully read precautions for use.
Precautions for use are instructed on their bodies or packages,
or a precaution sheet is
included in their packages.
• We recommend always keeping spare consumables/periodic replacement parts in stock.
• When calling customer support to order consumables/periodical replacement parts, have
your Dell printer Service Tag available.
• The use
of consumables/periodic replacement parts not recommended by Dell could
impair machine quality and performance. Use only consumables/periodic replacement
parts recommended by Dell
.
Checking the status of consumables
You can check the status of consumables on the [Supplies] screen.
For information on consumables, refer to "Supplies" (P.108).
The following shows the reference section for each procedure.
Replacing Toner Cartridges.......................................................................................................53
Replacing Waste Toner Container ...........................................................................................55
Replacing Drum Cartridges C, M, Y, or K................................................................................57
Replacing Staple Cartridge (for Finisher-AB1) .........
Replacing Fusing Unit ...............................................................................................................62
Replacing
Replacing Transfer Roller .
Replacing Separator Rollers
Transfer Belt Unit.....................................................................................................64
.........................................................................................................68
..............................................
...............................................................61
.........................................................70
52

Replacing Toner Cartridges
The following messages are displayed on the touch screen depending on the amount of toner
remaining. Replace the toner cartridge according to the message.
Replacing Consumables
Message*
1
Please order a Yellow Toner
[Y] Cartridge.
Remaining Page Yield*
Black: Approx. 3,200 pages
Other than Black: Approx. 2,400
pages
2
Solution
You do not need to replace the
Toner Cartridge immediately.
Order the Toner Cartridge
displayed on the screen.
Yellow Toner [Y] Cartridge
needs to be replaced soon.
Yellow Toner [Y] Cartridge
needs to be replaced. -
Approx. 20 pages Replace the toner cartridge with
a new one.
The machin
e will stop. Replace
the toner cartridge with a new
one.
*1 :The messages in the above table apply to Yellow Toner. "Yellow Toner [Y]" shown in the messages varies depending on the
color and number of the applicable toner.
*2 :The remaining page yield for copy/print jobs is applicable when A4 paper LEF (
varies depending on the conditions such as the content printed, dot coverage (area cove
print density, output image type, and the machine operating environment.
Note • To prevent electric shock, always turn off the machine and disconnect the power cable from the
grounded outlet before performing maintenance.
• When replacing a toner cartridge, toner may spill and soil the floor. We recommend laying paper on
the floor beforehand.
• The use of toner cartridges not recommended by Dell may degrade image quality and performance.
Use only toner cartridges recommended by Dell.
• When the remaining amount of toner is low, the machine
this occurs, replace the toner cartridge to resume copying or printing.
• Replace toner cartridges while the machine is on.
• Copy or print density may decrease slightly after the message "Please order a XXX Toner Cartridge"
appears on the touch scree
• If you replace a toner cartridge with a partially used toner cartridge, the number of pages that you can
copy or print after the message "Please order a XXX Toner Cartridge" is displayed may differ
significantly from the values described in the above table.
n.
may stop printing and display a message. If
) is used. The value is an estimate and
rage), paper size, paper type, copy/
1
Make sure that the <Data> indicator light is off and there are no jobs currently in process.
2
Press the power switch to the [ ] position
to switch the power off.
53

3 Maintenance
3
Open the front cover.
4
Pull out the toner cartridge you want to replace.
Note • Always pull out the cartridge slowly so that
you do not spill any toner.
• Do not touch the parts shown in the
illustration. Toner can
hands.
• Be careful not to spill toner when handling the
toner cartridge.
5
Unpack a new toner cartridge of the desired
dirty and stain your
color.
6
Shake the toner cartridge 5 to 6 times to
distribute the toner evenly.
Note • Do not touch the area shown in the illustration
when you shake the cartridge.
• Be careful not to spill toner when handling the
toner cartridge.
7
Hold the cartridge with the arrow facing up,
and push the cartridge in slowly until it stops.
8
Close the front cover.
Note • If the front cover is not closed completely, a
message appears and the machine will remain
paused.
54

Replacing Waste Toner Container
The waste toner container holds used toner. The following messages are displayed on the
touch screen according to the status of the waste toner container. Follow the messages as
necessary.
Message Remaining Page Yield* Solution
Replacing Consumables
Please order a Waste Toner
Container.
The Waste Toner Container
needs to be replaced.
* :The remaining page yield for copy/print jobs is applicable when A4 paper LEF ( ) is used. The value is an estimate and
varies depending on the conditions such as the content printed, dot coverage (area c
print density, output image type, and machine operating environment.
Approx. 2,500 pages Order the waste toner container.
- The machine will st
the waste toner container with a
new one.
overage), paper size, paper type, copy/
op. Replace
When replacing the waste toner container, clean the laser scanners located behind the waste
toner container by using the cleaning rod supplied with a new waste toner container to
prevent inconsistencies in density or color in copies and prints.
Note • To prevent electric shock, always turn off the machine and disconnect the power cable from the
grounded outlet before performing maintenance.
• Do not touch the five gray-colored sponge parts on the back side of the waste toner container.
Otherwise, your hands may get dirty with toner.
• When replacing the waste toner container, toner may spill and soil the floor. We recommend laying
paper on the floor beforehand.
• The proper disposal of used waste toner containers is required.
• The use o
performance. Use only waste toner containers recommended by Dell.
1
Make sure that the machine is not operating,
f waste toner containers not recommended by Dell may degrade image quality and
and open the front cover.
2
Hook your finger under the waste toner
container handle.
55

3 Maintenance
3
Pull out the waste toner container slowly while
holding its left side with one hand.
Note • Be careful not to drop the waste toner
container while you are removing it.
• Do not touch the shutter part as shown in the
illustration. Toner can dirty and stain your
hands.
• Be careful not to spill toner when handling the
waste toner container.
4
While holding the left side of the waste toner
container, push the container in until it clicks.
5
Close the front cover.
Note • If the front cover is not closed completely, a
message appears and the machine will remain
paused.
56

Replacing Drum Cartridges C, M, Y, or K
The machine displays the following messages when a drum cartridge C, M, Y or K needs to
be replaced. When the message is displayed, contact Customer Support at
dell.com/contactdell.
Follow the instructions described below and replace the drum cartridge.
If you continue to cop
displayed on the touch screen, the machine will stop after copying or printing the numb
pages shown in the following table.
Message Remaining Page Yield Solution
y or print without replacing the drum cartridge after the message is
Replacing Consumables
er of
Please order a Drum
Cartridge XX.
Drum Cartridge needs
to be replaced.
Note • To protect the drum cartridges against bright light, close the inner cover within five minutes. If the
front cover remains open for more than five minutes, print quality may deteriorate.
• The use of drum cartridges not recommended by Dell may degrade image quality and performance.
Use only drum cartridges recommended by Dell.
• To prevent electric shock, always turn off the machine and disconnect the power cable from the
grounded outlet before performing maintenance.
• Do not expose drum cartridges to direct sunlight or strong light from indoor fluorescent lighting. Do not
touch or scratch the sur
• The remaining page yield is applicable when A4 paper LEF ( ) is used. The value is an estimate and
varies depending on the conditions such as the paper size, the paper orientation, the number of pages
continuously print, and the machine operating environment.
• Images output from the machine may get dirty after the message "Please order a Drum Cartridge XXX"
appears on the touch screen.
Approx. 10,000 pages You do not need to
replace the Drum
Cartridge immediately.
Order the Drum
Cartridge displayed on
the screen.
- Replace the drum
tridge with a new
car
one.
face of the drum. Doing so may result in unsatisfactory printing.
1
Make sure that the <Data> indicator light is off and there are no jobs currently in process.
2
Press the power switch to the [ ] position to
switch the power off.
3
Open the front cover.
57

3 Maintenance
4
Rotate the lock levers of the inner cover to open
it.
5
Grasp the handle of the drum cartridge C, M,
Y, or K indicated in the message and gently
slide out the cartridge.
Note • When removing the drum cartridge, be careful
not to drop it on the floor.
• The illustrations in this section explains how
to replace the drum cartridge Y, as an
example.
6
Hold the bottom of the drum cartridge as
shown in the illustration, and pull it out from
the machine.
Note • Do not touch the parts as shown in the
illustration. Toner can dirty and stain your
hands.
• Be careful not to spill toner when handling the
drum cartridge.
7
Take the new drum cartridge out of the box, and insert the used drum cartridge into the
supplied plastic bag and place it into the box.
Note • To protect the drum from overexposure to bright light, do not remove the orange protective covering
until you insert the cartridge in the machine.
• Do not place the new drum cartridge in an upright position.
• Be caref
8
Pull out the two ribbons.
9
Slide the cartridge into the correct slot.
ul not to spill toner when handling the drum cartridge.
58

10
Remove the orange protective covering of the
installed drum cartridge and discard it.
11
Close the inner cover.
Replacing Consumables
12
Rotate the lock levers to secure the inner cover
while pressing the cover with the other hand.
13
Remove the cleaning rod from the backside of
the front cover.
59

3 Maintenance
14
15
16
Remove the cleaning pad by pressing the amber
gold tabs between your thumb and index finger.
Unpack a new cleaning pad.
Attach the new cleaning pad to the cleaning
rod.
17
Insert the cleaning rod fully into one of the four
holes until it clicks into the interior of the
machine as shown in the illustration, and then
pull it out.
18
Repeat step 17 also on the other three holes. One time insertion is enough for each hole.
19
Return the cleaning rod to its original location.
20
Close the front cover.
60
Note • If the front cover is not closed completely, a
message appears and the machine will remain
paused.

Replacing Staple Cartridge (for Finisher-AB1)
When the optional Finisher-AB1 is installed and the staple cartridge needs to be replaced, a
message appears on the touch screen. When the message appears, load a new staple case into
the staple cartridge.
1
Make sure that the machine is not operating,
and open the finisher front cover.
2
Take the staple cartridge out of the finisher.
Replacing Consumables
3
After you take out the staple cartridge, check
inside of the finisher for any remaining staples.
4
Pinch both sides of the empty staple case with
your fingers (1), and remove the staple case
from the cartridge (2).
5
Insert the front side of the new staple case into
the staple cartridge (1), and then push the rear
side into the cartridge (2).
61

3 Maintenance
6
Push the staple cartridge into the finisher until
it clicks into place.
7
Close the finisher front cover.
Note • If the front cover is not closed completely, a message appears and the machine will remain paused.
Replacing Fusing Unit
When the fusing unit is near or reaches the end of its life, the following messages are
displayed on the touch screen. Follow the messages.
Message Remaining Page Yield Solution
Consumables need to
be ordered. Press
Machine Status button
and select the Supplies
tab for details.
Consumables need to
be replaced.
Machine Status button
and select the S
tab for details.
Note • To prevent electric shock, always turn off the machine and disconnect the power cable from the
1
Make sure that the <Data> indicator light is off and there are no jobs currently in process.
2
Press the power switch to the [ ] position to
Press
upplies
grounded outlet before performing maintenance.
• To avoid burns, do not replace the fusing unit imm
extremely hot during use.
Approx. 20,000 pages Order the fusing unit.
- Replace the fusing unit
th a new one.
wi
ediately after printing. The fusing unit becomes
switch the power off and wait for 30 minutes
before removing the fusing unit.
62

3
Raise the latch of the right hand cover and open
the cover.
4
Hold the fusing unit by the grips on both sides,
and remove the fusing unit from the machine.
5
Take out a new fusing unit from the box.
Replacing Consumables
6
Hold the new fusing unit by the grips on both
sides, and then place the fusing unit onto the
machine.
Note • Hold the fusing unit with both hands so that
you do not drop it.
7
Close the right hand cover.
Note • When closing the right hand cover, apply your
hand in the vicinity of the handle as shown in
the illustration, and then press the cover firmly
toward the machine.
• If the front cover is not closed completely, a
message appears and the machine will remain
paused.
8
Switch on the main power, and then switch on the power.
For information on how to switch on the power and the main
Overview" > "Power Source" in the User Guide.
power, refer to "2 Product
63

3 Maintenance
Replacing Transfer Belt Unit
When the transfer belt unit is near or reaches the end of its life, the following messages are
displayed on the touch screen. Follow the messages.
Message Remaining Page Yield Solution
Consumables need to
be ordered. Press
Machine Status button
and select the Supplies
tab for details.
Consumables need to
be replac
Machine Status button
and
tab for details.
Note • To prevent electric shock, always turn off the machine and disconnect the power cable from the
1
Make sure that the <Data> indicator light is off and there are no jobs currently in process.
2
Press the power switch to the [ ] position to
ed. Press
select the Supplies
grounded outlet before performing maintenance.
• Ensure nothing touches or scratches the surface (black-colored film) of the transfer belt unit.
Scratche
• To protect the drum cartridges from overexposure to bright light, close the inner cover within five
minutes. If the front cover remains open for more than five minutes, print quality may degrade.
Approx. 30,000 pages Order the Transfer Belt
Kit.
- Replace the Transfer
Belt Kit with a new one.
s, dirt, or oil from your hands on the film of the transfer belt unit may reduce print quality.
switch the power off and wait for 30 minutes
before removing the transfer belt unit.
64
3
Raise the latch of the right hand cover and open
the cover.

4
Open the front cover.
5
Rotate the lock levers of the inner cover to open
it.
6
Grasp the handle on the front of the transfer
belt unit.
Replacing Consumables
7
Pull out the transfer belt unit until the line on
the unit becomes completely visible.
8
Grasp the handles on the top of the transfer
belt unit. Pull out the unit to remove it from
the machine.
65

3 Maintenance
10
Note • Do not hold the parts shown in the illustration.
9
Slide the blue tab back-and-forth five times to
clean the conductivity temperature depth
sensor.
Note • Be careful not to touch the fusing unit. It can
burn your fingers.
Unpack a new transfer belt unit and place the
unit on a level surface.
11
Remove the protective parts shown in the
illustration.
66

12
Grasp the handles on top of the transfer belt
unit.
Note • Do not hold the sides of the transfer belt unit.
It may degrade print quality.
13
Align the arrows on the transfer belt unit with
the arrows on the machine.
14
Slide the unit into the machine and stop when
the visible line reaches the machine.
Replacing Consumables
15
Lower the handles.
16
Push the front of the transfer belt unit to
reinstall it in the machine until it stops.
67

3 Maintenance
17
18
19
Close the inner cover.
Rotate the lock levers to secure the inner cover
while pressing the cover with the other hand.
Close the front cover.
20
Close the right hand cover.
Note • When closing the right hand cover, apply your
hand in the vicinity of the handle as shown in
the illustration, and then press the cover firmly
toward the machine.
• If the front cover is not closed completely, a
message appears and the machine will
paused.
Replacing Transfer Roller
Note • To prevent electric shock, always turn off the machine and disconnect the power cable from the
grounded outlet before performing maintenance.
1
Make sure that the <Data> indicator light is off and there are no jobs currently in process.
2
Press the power switch to the [ ] position to
switch the power off.
remain
68

3
Raise the latch of the right hand cover and open
the cover.
4
Unlock the two levers on the transfer roller and
lift up the roller to remove it.
5
Grasp the levers on both sides of the new
transfer roller and align the arrows on the
transfer roller with the arrows inside the
machine.
Replacing Consumables
6
Lower the front of the transfer roller to until
the roller clicks into place.
7
Close the right hand cover.
Note • When closing the right hand cover, apply your
hand in the vicinity of the handle as shown in
the illustration, and then press the cover firmly
toward the machine.
• If the front cover is not closed completely, a
message appears and the machine will remain
paused.
69

3 Maintenance
Replacing Separator Rollers
There are three separator rollers in the machine which need to be replaced periodically. One
is in the tray and the others are inside the machine. All the separator rollers are replaced in
the same way as described in this section.
Replacing the Separator Roller in a tray
1
Remove the tray from the machine.
Note • Remove all paper or media from the tray
before pulling the tray out of the machine.
2
Turn the separator roller cover to the left to
open it, and then hold the cover.
3
Turn the separator roller cartridge to the right.
4
Pull out the rear axle, then the front axle from
the holes of the tray and remove the separator
roller cartridge.
5
Prepare a new separator roller.
70

6
Turn the separator roller cover to the left to
open it, and then hold the cover.
7
Slide the front axle, then the rear axle of the
separator roller cartridge in the holes of the
tray.
8
Turn the separator roller cartridge to the left to
fix it in place.
Replacing Consumables
9
Turn the separator roller cover to the right to
close it.
10
Load paper in the tray and replace the tray in
the machine.
71

3 Maintenance
Replacing the Separator Rollers Inside the Machine
1
Remove the tray from the machine.
2
Push the left part of the chute upper feed and
pull down the unit to remove it.
3
Turn the separator roller until the roller hook is
visible.
Note • The roller is located approximately 165 mm
(6.5 inches) inside the machine when
measured from the face of the proper tray
opening.
4
Pull the separator roller hook out of the groove
on the axle, and then slide the separator roller
to the front.
72
5
Repeat steps 3 and 4 to remove the other separator rollers.
6
Prepare two new separator rollers.

7
Align the hole of the new separator roller with
the axle.
8
Slide the separator roller along the axle so the
protrusions fit completely into the slots and the
roller hook reseats into the groove on the axle.
9
Repeat steps 7 and 8 to install the other separator roller.
Replacing Consumables
10
Put the chute upper feed back in place.
11
Replace the tray into the machine.
73

3 Maintenance
Cleaning the Machine
This section describes how to clean the machine such as the machine exterior, document
cover, document feeder, and document glass.
Cleaning the Exterior
The following describes how to clean the exterior of the machine.
Note • Do not use benzene, paint thinner, or other volatile liquids or spray insect repellent on the machine as
they might discolor, deform, or crack covers.
• Cleaning the machine with an excessive amount of water may cause the machine to malfunction or
damage documents during copying.
1
Wipe the exterior with a firmly wrung soft cloth
moistened with water.
Note • Do not use cleaning agents other than water
or neutral detergent.
• If you cannot remove the dirt easily, gently
wipe
with a small amount of neutral detergent.
the machine with a soft cloth moistened
2
Wipe off any excess water with a soft cloth.
Cleaning the Interior (Laser Scanners)
The following describes how to clean the interior (laser scanners or Raster Output Scanner
(ROS)) of the machine.
Normally, clean the laser scanners when you replace the drum cartridges or waste toner
container. However, if you have image quality problems
appear on copied or printed outputs, clean the laser scanners.
Note • To prevent electric shock, always turn off the machine and disconnect the power cable from the
grounded outlet before performing maintenance.
• Clean the laser scanners periodically when you replace the drum cartridges or waste toner
1
Make sure that the machine is not operating,
and open the front cover.
such as white or colored stripes
container.
74

2
Remove the cleaning rod from the backside of
the front cover.
3
Insert the cleaning rod fully into one of the four
holes until it clicks into the interior of the
machine as shown in the illustration, and then
pull it out.
4
Return the cleaning rod to its original location.
Cleaning the Machine
5
Close the front cover.
Note • If the front cover is not closed completely, a
message appears and the machine will remain
paused.
75

3 Maintenance
Cleaning the Conductivity Temperature Depth (CTD) Sensor
Note • To prevent electric shock, always turn off the machine and disconnect the power cable from the
grounded outlet before performing maintenance.
• Ensure nothing touches or scratches the surface (black-colored film) of the transfer belt unit.
Scratches, dirt, or oil from your hands on the film of the transfer belt unit may reduce print quality.
• To protect the drum cartridges from overexposure to bright light, close the inner cover within five
minutes. If the front cover remains open for more than five minutes, print quality may degrade.
1
Make sure that the <Data> indicator light is off and there are no jobs currently in process.
2
Press the power switch to the [ ] position to
switch the power off.
3
Raise the latch of the right hand cover and open
the cover.
4
Open the front cover.
5
Rotate the lock levers of the inner cover to open
it.
76

6
Grasp the handle on the front of the transfer
belt unit.
7
Pull out the transfer belt unit until the line on
the unit becomes completely visible.
8
Grasp the handles on the top of the transfer
belt unit. Pull out the unit to remove it from
the machine.
Cleaning the Machine
Note • Do not hold the parts shown in the illustration.
9
Slide the blue tab back-and-forth five times.
Note • Be careful not to touch the fusing unit. It can
burn your fingers.
77

3 Maintenance
10
11
Grasp the handles on top of the transfer belt
unit.
Note • Do not hold the sides of the transfer belt unit.
It may degrade print quality.
Align the arrows on the transfer belt unit with
the arrows on the machine.
12
Slide the unit into the machine and stop when
the visible line reaches the machine.
13
Lower the handles.
14
Push the front of the transfer belt unit to
reinstall it in the machine until it stops.
78

15
Close the inner cover.
16
Rotate the lock levers to secure the inner cover
while pressing the cover with the other hand.
Cleaning the Machine
17
Close the front cover.
18
Close the right hand cover.
Note • When closing the right hand cover, apply your
hand in the vicinity of the handle as shown in
the illustration, and then press the cover firmly
toward the printer.
• If the front cover is not closed completely, a
message appears and the machine will remain
paused.
Cleaning the Touch Screen
This section describes how to clean the touch screen of the machine.
1
Wipe the LCD only with a soft cloth moistened
with neutral detergent or alcohol.
Note • Do not apply too much neutral detergent or
alcohol. Squeeze out excess moisture before
you wipe the LCD if the fluid drips.
• Do not use volatile solvent such as benzene
and paint thinner or insect killer. Doing so
might cause discolored, deformed, or cracked
parts.
• Wipe the panel softly, otherwise, the parts
might be damaged.
79

3 Maintenance
Cleaning Document Cover and Document Glass
If the document cover and document glass become soiled, smudges may appear on copies,
faxes, or scanned documents and the machine may not properly detect document sizes.
To ensure clear copies at all times, clean the document cover and the document glass about
once a month.
Note • Do not use benzene, paint thinner, or other organic solvents. Doing so might damage paint or coating
on plastic parts.
• Cleaning the machine with an excessive amount of water may cause the machine to malfunction or
damage documents during copying, faxing, or scanning.
1
Wipe the document cover with a soft cloth
moistened with water to remove any dirt, and
then wipe it with a soft, dry cloth.
Note • Do not use cleaning agents other than water
or neutral detergent.
• If you cannot remove dirt easily, gently wipe
the document cover
moistened with a small amount of neutral
detergent.
with a soft cloth
2
Wipe the document glass with a soft cloth
moistened with water to remove any dirt, and
then wipe it with a soft, dry cloth.
Note • Do not use cleaning agents other than water
or neutral detergent.
• If you cannot remove dirt easily, gently wipe
the document glass with a soft cloth
moistened with a small amount of neutral
detergent.
Cleaning the White Chute and Constant Velocity Transport Glass
If the white chute or constant velocity transport glass become soiled, smudges may appear
on copies, faxes, or scanned documents and the machine may not properly detect document
sizes.
To ensure clear copies at all times, clean the white chute and the constant velocity transport
glass about once a month.
Note • Do not use benzene, paint thinner, or other organic solvents. Doing so might damage paint or coating
on plastic parts.
• Cleaning the machine with an excessive amount of water may cause the machine to malfunction or
damage documents during copying, faxing, or scanning.
80
1
Wipe the white chute with a soft cloth
moistened with water to remove any dirt, and
then wipe it with a soft, dry cloth.
Note • Do not press the film with an excessive force
as it can be easily damaged.
• Do not use cleaning agents other than water
or neutral detergent.
• If you cannot remove dirt easily, gently wipe
the film with a soft
small amount of neutral detergent.
cloth moistened with a

2
Wipe the constant velocity transport glass with
a soft cloth moistened with water to remove any
dirt, and then wipe it with a soft dry cloth.
Note • Do not use cleaning agents other than water
or neutral detergent.
• If you cannot remove dirt easily, gently wipe
the
glass with a soft cloth moistened with a
small amount of neutral detergent.
Cleaning Document Feeder Rollers
If the document feeder rollers become soiled, smudges may appear on copies, faxes, or
scanned documents and paper jams may occur.
To ensure clean copies at all times, clean the document feeder roller about once a mo
Note • Do not use benzene, paint thinner, or other organic solvents. Doing so might damage paint or coating
on plastic parts.
• Cleaning the machine with an excessive amount of water may cause the machine to malfunction or
damage documents during copying, faxing, scanning, or printing.
Cleaning the Machine
nth.
1
Pull up the knob on the left cover of the
document feeder, and open the cover
completely.
Note • When you fully open the cover, it enters a
fixed position. Open the cover gently.
2
While turning the rollers, wipe them with a soft
cloth moistened with water.
Note • Do not use cleaning agents other than water
or neutral detergent.
• Use a cloth firmly wrung to prevent water
drops from falling into the machine. If water
gets into the machine, it may cause the
machine to malfunction.
• If you cannot remove dirt easily,
llers with a soft cloth moistened with a
the ro
small amount of neutral detergent.
3
Close the document feeder left cover until it clicks into place, and confirm that there is no
gently wipe
space between the near or far side of the cover and the document feeder.
81

3 Maintenance
Executing Calibration
The machine can automatically calibrate colors when the reproducibility of density or color
in copies and prints deteriorates. The machine can adjust the gradation for each screen type.
The following three screen types of screen are available.
•Copy Job
Calibrates the screen for [Tex
t], [Photo
& Text], or [
Map] of [Original Type].
•Print Job 1
For PCL print drivers
- Calibrates the screen used for the functions [Image Quality], [Image Adjustment
Mode], and [I
mage Types]set in the [Color Options] tab.
- Calibrates the screen when [Auto Screening], [Fineness], or [Standard] is selected for
[Screen] on the [Advanced] tab.
For PostScript print drivers
alibrates the screen when [High Quality] or [High Resolution] of [Image Quality] and
- C
[Auto
Screening], [Fineness], or [Standard] of [Screen] in the [Color Options] tab is
selected.
- Calibrates the screen when [High Speed] of [Image Quality] and [Fineness] or
[Standard] of [Screen] in the [Color Options
] tab is selected.
•Print Job 2
For PCL print drivers
- Calibrates the screen when [Gradation] is selected for [Screen]
(except when
[High Resolution] is selected for [Image Quality]).
- Calibrates the screen when [Print Page Mode] is selected in the [Advanced]
in the [Advanced] tab
tab (except
when [High Resolution] is selected for [Image Quality]).
For PostScript print drivers
- Calibrates the screen when [High Quality] or [High Resolution] of [Image Quality] and
[Gradation] of [Screen] in the [Colo
r Options] tab is selected.
- Calibrates the screen when [High Speed] of [Image Quality] and [Auto Screening] or
[Gradation] of [Screen] on the [Co
Note • It is recommended to execute calibration for each of the four screen types. After calibration for the
first screening type, select the next screen type and repeat the procedure.
• When the printed colors
contact Customer Support at dell.com/contactdell.
• Make sure that the following settings are specified under [Tools] > [Copy Service Settings] >
Defaults] in the System Administration mode before calibration.
-Lighten/Darken: Normal
-Contrast: Normal
-Sharpness: Normal
-Saturation: Normal
-Color Balance: 0, 0, 0
-Color Shift: Normal
• You can change
• For information on [Copy Defaults], refer to "Copy Defaults" (P.151).
• During calibration, the machine cannot receive print jobs and faxes.
do not seem to have been corrected properly despite regular calibration,
the above [Copy Defaults] settings after calibration.
lor Options] tab is selected.
[Copy
The following describes how to calibrate the machine.
82

1
Magenta
Select [Calibration] on the [Home] screen.
Note • When the [Home] screen is not displayed on
the touch screen, press the <Home> button.
• You can also access [Calibration] under [Tools]
> [System Settings] > [Common Service
Settings] > [Image Quality Adjustment] >
[Calibration].
2
Select [Screen Type], [Paper Supply] and
[Target].
Note • [Copy Job] is selected here as an example.
• For Paper Supply, select the paper tray on
which A4 or 8.5 x 11" white paper is
loaded.
• For Target, select from [Copy & Print Jobs],
[Copy Jobs Only], [Print Jobs Only], and
[None].
3
Select [Start].
Note • A message saying "Outputting the Calibration
Chart... - Copy Job " appears, and the machine
prints the Calibration Chart.
Executing Calibration
4
Place the Calibration Chart face down on the
document glass with the magenta marks on
corners on your left hand side.
Note • Place the Calibration Chart on the document
glass.
5
Place at least five sheets of white paper on the
Calibration Chart to cover the Chart and close
the document cover.
6
Select [Start].
The machine starts calibration. It takes about 10 seconds to complete the calibration.
The calibration result will be shown on the
screen.
7
Select [Confirm].
8
To execute calibration for another screen type, repeat steps 2 to 7.
9
Select [Close] repeatedly until the [Tools] screen is displayed.
83

3 Maintenance
10
11
12
Select [Close].
Copy to confirm the image quality.
Note • During calibration, the machine cannot receive print jobs or faxes.
• After executing the calibration, you can manually perform horizontal color calibration. For more
information, refer to "Adjusting Color Registration" (P.90).
Select [Close].
84

Adjusting Color Registration
<Log In/Out> button
Allows you to calibrate the color registration automatically or manually.
Note • The color registration is automatically adjusted and usually without any user action. However, if the
misregistration becomes large during the next automatic adjustment from the last adjustment, you can
adjust the color registration using this feature.
Auto Color Registration
1
Press the <Log In/Out> button.
Adjusting Color Registration
2
Enter the System Administrator’s user ID with
the numeric keypad or the keyboard displayed
on the screen, and select [Enter].
When a passcode is required, select [Next] and
enter the System Administrator’s passcode, and
select [Enter].
Note • The default user ID is "admin".
• The default passcode is "1111".
3
Select [Tools] on the [Home] screen.
Note • When the [Home] screen is not displayed on
the touch screen, press the <Home> button.
4
Select [System Settings] > [Common Service
Settings] > [Maintenance].
85

3 Maintenance
5
Select [ ] to display the next screen.
6
Select [Adjust Color Registration].
7
Select [Auto Color Registration].
8
Select [Start].
Side Color Registration
After executing the automatic color calibration, you can manually adjust the horizontal
colors for yellow, magenta, and cyan by entering values.
Note • Use Tray 5 and plain A4 size paper for this feature.
1
Repeat step 1 to 6 from the previous section.
2
Select [Side Color Registration].
86
3
Insert an A4 paper into Tray 5, and press [Sample Printout].
Note • An error occurs if any paper other than A4 paper is set to Tray 5.

4
Cyan
Cyan
Magenta
Yellow
Yellow
(Left)
(Lead Edge)
(Right)
Find the values of the straightest lines from the
LY (left) and RY (right) patterns for yellow.
5
Select [Yellow] and enter the values that you
found in the color registration chart to make
adjustments.
Adjusting Color Registration
6
7
Repeat steps 3 to 5 for [Magenta] and [Cyan].
Press [Adjust].
87

3 Maintenance
<Machine Status> button
Printing a Report/List
You can print a report/list to check the settings and communication status.
This section describes how to print a report/ list.
Note • When the <Data> indicator is not lit, you cannot print the Stored File List.
For information on the types of report/list, refer to "Print Reports" (P.95).
1
Press the <Machine Status> button.
2
Select [Print Reports].
Note • If [Print Reports Button] under [Reports] is set
to [Disabled], the [Print Reports] button
appears only when the [Tools] button is
displayed on the [Home] screen. For more
information on [Reports], refer to "Reports"
(P.140).
• If you want to print [Billing Data List] or
[Auditron Report (Fax Jobs)], insert a card to
the machine before instructing print.
3
Select the service that you want a report or list
for.
4
Select a report or list to print, and then press the <Start> button.
88

Deleting a Private Charge Print Job with an Invalid User ID
Deleting a Private Charge Print Job with an Invalid User ID
When the Private Charge Print feature is used, all the print jobs with a User ID, regardless
of its validity, are stored with the Private Charge Print feature. The system administrator can
set the expiration date and can set up the machine to delete the expired jobs automatically,
or manually delete them.
This section describes how to delete documents with an invalid User ID stored with the
Private Charge Print feature.
For more information on how to set the period of time save jobs, refer to "Stored File Settings"
(P.208).
1
Press the <Log In/Out> button.
2
Enter the system administrator's user ID with
the numeric keypad or the keyboard displayed
on the screen, and select [Enter].
When a passcode is required, select [Next] and
enter the system administrator's passcode, and
select [Enter].
Note • The default user ID is "admin".
• The default passcode is "1111".
3
Press the <Job Status> button.
4
Select the [Secure Print Jobs & More] tab.
5
Select [Private Charge Print].
6
Select the User ID of the job to delete, and then select [Job List].
7
Select the job to delete, and then select [Delete].
89

3 Maintenance
Setting Restore Tool
Setting Restore Tool backs up the settings data of the machine to a network-connected
computer to prevent the loss of data resulting from the malfunction of the machine's hard
disk.
The feature is designed to restore data to the machine after the hard disk is replaced.
For more information on Setting Restore Tool, contact Customer Support at dell.com/contactdell.
The following data can be backed up on the computer:
• Address Book
• Folder (except for document files)
• User account list
• Job Flow
• Stored Programming
• Job log
• Error log
• Auditron log
• Other information such as user setting data
Users cannot replace the hard disk by themselves.
Customer Support at dell.com/contactdell.
When replacing the hard disk, contact
90

4 Machine Status
This chapter describes the features for checking the machine status.
• Overview of Machine Status...............................................................................................92
• Machine Information ............................................................................................................93
• Faults......................................................................................................................................107
• Supplies...
• Billing Information..............................................................................................................109
..............................................................................................................................
108

4 Machine Status
<Machine Status> button
Overview of Machine Status
You can check machine status and the number of printed pages on the screen. You can also
print various reports/lists to check the job history, settings and registered information.
1
Press the <Machine Status> button.
You can check the following information on the [Machine Status] screen:
Machine Information
You can check the machine configuration, paper tray status, and hard disk overwriting status.
You can also change or set print modes, and check the number of pages printed per meter or
per user.
registered information.
For more information, refer to "Machine Information" (P.93).
Faults
You can check the information on errors that occurred on the machine.
For more information, refer to "Faults" (P.107).
Supplies
You can check the status of consumables.
For more information, refer to "Supplies" (P.108).
Billing Information
You can check the number of pages printed by meter.
For more information, refer to "Billing Information" (P.109).
You can also print various reports/lists to check the job history, settings and
92

Machine Information
On the [Machine Information] screen, you can check the machine configuration and paper
tray status, print various reports/lists, and change and set print mode settings.
The following shows the reference section for each item.
General Information.................................................................................................................. 93
Paper Tray Status ...................................................................................................................... 94
Print Reports
Aut
omatically Printed Reports/Lists ...................................................................................... 102
Overwrite Hard Disk ...............................................................................................................103
Print Mode.....
Fax Receiving Mode................................................................................................................ 106
1
Press the <Machine Status> button.
2
On the [Machine Information] screen
displayed, you can check the machine status.
Machine Information
.............................................................................................................................. 95
.......................................................................................................................... 1
04
General Information
In the [General Information] area, you can check the serial number of the machine, machine
configuration, and software version.
1
Check the general information.
Website:
Tells you whom to contact when making inquiries about maintenance and operation.
Machine Serial Number:
Indicates the serial number of the machine.
Service Tag / Express Code:
Displays the Service Tag and the Express Code of the machine.
IP Address
Indicates the IP address of the machine.
Machine Configuration
Displays the [Machine Configuration] screen.
For more information, refer to "[Machine Configuration] Screen" (P.94).
Software Version
Displays the [Software Version] screen.
For more information, refer to "[Software Version] Screen" (P.94).
93

4 Machine Status
[Machine Configuration] Screen
You can check the machine configuration.
1
Select [Machine Configuration].
2
Check the machine configuration on the screen
displayed.
Note • Select [ ] to display the previous screen or
] to display the next screen.
[
[Software Version] Screen
You can check the software version.
1
Select [Software Version].
2
Check the software versions.
Paper Tray Status
You can check the paper trays set on the machine. On the screen, you can check the following
items:
• Status
• % Full (Amount of paper remaining)
• Paper Size
• Paper Type
1
Select [Paper Tray Status].
2
Check the status of the paper trays.
94

Print Reports
The following describes how to print a report and a list.
Note • The items displayed vary depending on the optional features installed.
1
Select [Print Reports].
2
Select the type of a report or a list to print.
Note • The screen on the right appears when the
[Tools] button is displayed on the [Home]
screen.
Job Status / Activity Report
1
Select [Job Status / Activity Report].
Note • To display the [Job Status / Activity Report] screen, press the <Machine Status> button, and then
select [Machine Information] > [Print Reports] > [Job Status / Activity Report].
Machine Information
2
Select a report or a list to print.
3
Press the <Start> button.
Job History Report
You can check the status or result of each job. Up to 200 latest jobs can be printed. Select a
report to print from [A
Transfer Jobs], or [Job Flow & File Transfer Jobs].
Selecting [Include Child Jobs] check box prints each related job on each line. Deselecting
this check box prints the multiple
You can also set up the machine to automatically print a [Job History Report] every 50 jobs.
For information on the auto print of a job history report, refer to "Reports" (P.140). When you set the
machine to print a job history report automatically, the ma
Error History Report
ll Jobs], [Printer & Print from Folder Jobs], [Scan & Fax Jobs], [File
related jobs (such as job flow jobs) on one line.
chine prints the results of all jobs.
You can print information on errors occurred in the machine. The latest 50 errors are printed.
Activity Report
You can check whether transmissions completed successfully or not. The remote terminal
name and the result and status are recorded by sorting
The following information is not included in the Activity Report.
•
Redialed transmissions and pollings.
• Wh
en the power is shut off, or when a system error occurs during an activity.
• Deleted documents that were waiting to be transmitted.
into incoming or outgoing fax.
95

4 Machine Status
Stored File List
Copy Reports
1
2
3
You can also set up the machine to automatically print the [Activity Report] every 100
activities.
For information on the settings, refer to "Reports" (P.140).
For more information about the Activity Report, refer to "Activity Report" (P.544).
You can print a list of uncompleted jobs (uncompleted transmissions/receptions or those
stored for polling) stored in folders.
Select [Copy Reports].
Note • To display the [Copy Reports] screen, press the <Machine Status> button, and then select [Machine
Information] > [Print Reports] > [Copy Reports].
Select [Configuration Report].
Press the <Start> button.
Configuration Report
Printer Reports
1
2
3
You can check the hardware configuration, network information, and print and copy settings
of the machine.
Note • The contents of [Configuration Report] are identical whether it is printed from [Copy Reports], [Printer
Reports], [Scan Reports], or [Fax Reports].
Select [Printer Reports].
Note • To display the [Printer Reports] screen, press the <Machine Status> button, and then select [Machine
Information] > [Print Reports] > [Printer Reports].
Select a list to print.
Note • The items displayed vary depending on the
options installed.
Press the <Start> button.
96
Configuration Report
You can check the hardware configuration, network information, and print and copy settings
of the machine with the report.
Note • The contents of [Configuration Report] are identical whether it is printed from [Copy Reports], [Printer
Reports], [Scan Reports], or [Fax Reports].
PCL Settings List
Prints the settings for the PCL printer.

PCL Macro List
Prints the list of forms registered for PCL.
PDF Settings List
Prints the settings configured in the PDF printer mode.
TIFF / JPEG Settings List
Machine Information
Prints the se
ttings configured in the TIFF and JPEG printer m
ode.
TIFF / JPEG Logical Printers List
Prints the list of logical printers created in the TIFF and JPEG printer mode.
Note • You can configure the setting for TIFF and JPEG logical printers using Dell Printer Configuration Web
Tool.
PostScript Logical Printers List
Prints the list of logical printers created in PostScript.
Note • You can configure the setting for PostScript logical printers using Dell Printer Configuration Web Tool.
ESC/P Settings List
Prints the settings configured in the ESC/P-K emulation mode.
ESC/P Logical Printers List
Prints the
HP-GL/2
Prints the settings for the HP-GL
programming settings configured in the ESC/P-K emulation mode.
Settings List
®
, HP-GL/2® and HP-RTL emulation modes.
HP-GL/2 Logical Printers List
Scan Reports
1
Prints the stored programming settings for the HP-GL, HP-GL/2, and HP-RTL emulation
modes.
HP-GL/2 Pale
tte List
Prints the sample list in 256 colors that can be set with the pen attribute on HP-GL and HPGL/2 emulation modes.
Font List
Prints
the list of fonts available on the machine.
Note • Information printed varies depending on the options installed.
PCL Font List
Prints the fonts available in PCL.
PostScript Font List
Prints the fonts available in PostScript.
Select [Scan Reports].
Note • To display the [Scan Reports] screen, press the <Machine Status> button, and then select [Machine
Information] > [Print Reports] > [Scan Reports].
97

4 Machine Status
2
3
Reports
Select a list to print.
Press the <Start> button.
You can print the Configuration Report, Scan/Fax Configuration Report, and Domain Filter
List. Select a list
• Configuration Report
You can check the hardware configuration, network information, and print and copy
settings of the machine.
Note • The contents of [Configuration Report] are identical whether it is printed from [Copy Reports], [Printer
• Scan / Fax Configuration
You can check the settings configured for the Scan feature and the Fax feature.
to print, and then press the <Start> button.
Reports], [Scan Reports], or [Fax Reports].
Fax Reports
•Dom
Address Book
You can check the settings
numbers, the list of settings for the specified address numbers is printed. Each page contains
the settings information on 50 address num
1
Select [Address Book].
2
Specify a range of address numbers to print.
3
Press the <Start> button.
1
Select [Fax Reports].
Note • To display the [Fax Reports] screen, press the <Machine Status> button, and then select [Machine
ain Filter List
You can check the settings configured for the d
for the address numbers. When you specify
bers.
Information] > [Print Reports] > [Fax Reports].
omain which filters data transmissions.
a range of address
98
2
Select a list to print.
3
Press the <Start> button.

Machine Information
Reports
You can print the Configuration Report, Scan/Fax Configuration Report, Folder Selector
List, Inbound Fax Spam List, and Domain Filter List. Select a list to print, and then press
the <
Start> button.
• Configuration Report
You can check the hardware configuration, network information, and print and copy
settings of the machine.
Note • The contents of [Configuration Report] are identical whether it is printed from [Copy Reports], [Printer
Reports], [Scan Reports], or [Fax Reports].
• Scan / Fax Configuration
You can check the settings configured for the Fax feature and the Scan feature.
Note • The contents of [Configuration Report] are identical whether it is printed from [Copy Reports], [Printer
Reports], [Scan Reports], or [Fax Reports].
• Folder Selector List
You can check the settings for the Folder Sorting feature.
• Inbound Fax Spam List
You
can check the settings for the G3-ID (telephone numbers) for which fax reception is
restricted.
• Domain Filter List
You
can check the settings configured for the domain which filters data transmissions.
Address Book
You can check the settings for the address numbers
(speed dial), fax group recipients, and
relay stations.
When you specify a range of address numbers, th
numbers and relay stations are printed. Each page co
e lists of settings for the specified address
ntains the settings information on 50
address numbers.
For information on how to register speed dial and fax group recipients, refer to "Add Address Book
Entry" (P.224) and "Create Fax Group Recipients" (P.231).
Selecting [Address Book] displays the screen for specifying a range of address numbers.
Select a range of numbers, and then press the <Start> button.
• Fax Group Recipients
You can print the list of settings for Fax Group Recipients.
• Select All
You
can print the lists of settings for all address numbers, fax group recipients, and relay
stations.
Fax Comments
List
You can check the registered comments to use on fax cover sheets.
99

4 Machine Status
Billing Data List
Folder List
You can check the registration status of the billing data.
Note • [Billing Data List] is displayed when [Fax Service] is set to [Enable Accounting] under [Accounting] >
[Accounting Type] > [Local Accounting] > [Auditron Mode].
Selecting [Billing Data List] displays the screen for specifying a range of address numbers.
Select a range of numbers, and then press the <Start> button.
• Select All
You can print the list of all billing data.
Prints the list of folder settings and the procedure for saving files to folders.
Note • [Folder List] appears when the [Tools] button is displayed on the [Home] screen.
For information on how to create a folder, refer to "Create Folder" (P.215).
1
Select [Folder List].
Note • To display the [Folder List] screen, press the <Machine Status> button, and then select [Machine
2
Select a range of folder numbers to print.
3
Press the <Start> button.
Job Counter Report
Prints the counter report for each job. You can check the breakdown of the number of actual
use of the machine by feature (such as the number of pages printed and the number of times
used) and cumulative time when the machine is used (such as runtime, standby time, Low
Power mode, Sleep mode, and power-off time) by minutes on the Job Counter Report.
Note • [Job Counter Report] appears when the [Tools] button is displayed on the [Home] screen.
1
Select [Job Counter Report].
Note • To display the [Job Counter Report] screen, press the <Machine Status> button, and then select
Information] > [Print Reports] > [Folder List].
[Machine Information] > [Print Reports] > [Job Counter Report].
100
2
Select [Job Counter Report].
3
Press the <Start> button.
 Loading...