

Page 1

FR GUIDE D'UTILISATION
DA BRUGERVEJLEDNING
DE BETRIEBSANLEITUNG
EN USER GUIDE
ES MANUAL DE UTILIZACIÓN
IT MANUALE D'USO
NL GEBRUIKSAANWIJZING
PT MANUAL DE UTILIZAÇÃO
Four
Ovn
Backofen
Oven
Horno
Forno
Oven
Forno
99643551_A_ML.qxp 30/08/2007 11:19 Page 1
Page 2

71
FR
02
DE
48
EN
71
ES
94
IT
117
NL
140
PT
163
DA
25
Dear Customer,
You have purchased a
DDEE DDIIEETTRRIICCHH
oven and we would like to say
thank you.
Our research teams have designed a new generation of appliances for
you, which, thanks to their quality, esthetics and technological
advances have resulted in exceptional products, a testament to our
know-how.
Your new
DDEE DDIIEETTRRIICCHH
oven will fit in harmoniously in your kitchen,
combining top cooking performance with ease of use. Our wish is to
offer you a product of excellence.
In the
DDEE DDIIEETTRRIICCHH
line of products, you will also find a wide range of
cookers, hobs, ventilation hoods, dishwashers, built-in refrigerators,
which can be coordinated with your new
DDEE DDIIEETTRRIICCHH
oven.
Of course, in an ongoing effort to better satisfy your demands with
regard to our products, our after-sales service department is at your
disposal and ready to listen in order to respond to all of your questions
and suggestions (contact information at the end of this booklet).
You can also log on to our web site:
wwwwww..ddeeddiieettrriicchh--eelleeccttrroommeennaaggeerr..ccoomm
where you will find our latest
innovations as well as useful and additional information.
DDEE DDIIEETTRRIICCHH
SSeettttiinngg NNeeww VVaalluueess
As part of our commitment to constantly improving our products, we reserve the right to make
changes to them based on advances to their technical, functional and/or aesthetic properties.
Attention:
Before installing and using your appliance, please read this Installation and Usage
Guide carefully, which will allow you to quickly familiarize yourself with its operation.
99643551_A_ML.qxp 30/08/2007 11:22 Page 71
Page 3

72
TABLE OF CONTENTS
EN
1 / INFORMATION FOR THE USER
••
Steam cooking ______________________________________________ 73
••
Safety instructions
___________________________________________
74
••
Care for the environment______________________________________ 75
2 / INSTALLING YOUR APPLIANCE
••
Choice of location
___________________________________________
76
••
Fitting
______________________________________________________
76
••
Electric connection
__________________________________________
77
3 / DESCRIPTION OF YOUR APPLIANCE
••
Operating principle___________________________________________ 78
••
Introduction to your oven
_____________________________________
78
••
Accessories
________________________________________________
79
••
Introduction to the programmer ________________________________ 80
••
Introduction to the selecting touch controls ______________________ 80
4 / USING YOUR APPLIANCE
••
Setting and adjusting the time _________________________________ 81
••
Preprogrammed cooking time _________________________________ 81
••
Steam cooking ______________________________________________ 82
••
Cancelling cooking in progress ________________________________ 83
••
At the end of a cooking programme ____________________________ 83
••
Water management __________________________________________ 83
••
Delayed cooking_____________________________________________ 84
••
Using the timer function ______________________________________ 85
••
Control panel locking (child safety device) _______________________ 85
••
Display stand-by mode________________________________________ 86
5 / FUNCTION DESCRIPTION AND COOKING CHART___________________ 87
6 / CARING FOR AND CLEANING YOUR APPLIANCE
••
Cleaning the outer surfaces
___________________________________
90
••
Cleaning the ca
vity
___________________________________________
90
••
Cleaning the water intake tube _________________________________ 90
••
Cleaning the steam generator__________________________________ 90
••
Cleaning the gutter___________________________________________ 90
7 / TROUBLESHOOTING____________________________________________ 91
••
Changing the bulb
___________________________________________
92
8 / AFTER-SALES SERVICE
••
Repairs
____________________________________________________
93
99643551_A_ML.qxp 30/08/2007 11:22 Page 72
Page 4

73
1 / INFORMATION FOR THE USER
EN
STEAM COOKING
Overview
Steam cooking presents nothing but advantages if you follow the instructions for use. Healthy
and natural, steam cooking preserves the full flavour of foods. A delicate sauce or aromatic herb
seasonings add that something extra that makes the difference.
This kind of cooking releases no odours. There is no need to season the cooking water with
herbs or spices; however, you can flavour a fish by placing it on a bed of seaweed or make a
savoury poultry dish by adding a bunch of rosemary or tarragon.
You can simultaneously cook meat, fish and vegetables.
Steam cooking gently reheats pasta, rice and mashed potatoes with no risk of food sticking or
drying out.
It facilitates cooking custard creams and tarts, rice pudding... covered with aluminium foil, the
condensation water does not add moisture to the preparations.
There is no need to season before cooking, not even the steam water.
To make meat look more appetising, quickly brown it on all sides with hot butter in a pan.
Compared to boiling, steam offers nothing but advantages:
It is quick: cooking starts immediately whereas for food in a water-filled dish, the cook time only
begins counting down once the water returns to a full boil.
It is healthy: vitamins (those that are water soluble) and minerals are well preserved because
they scarcely dissolve in the condensation water that touches the food.
Moreover, no fats are used for this type of cooking.
The steam maintains the taste of food. It does not add odours, nor the taste of the grill or the
pan. Furthermore, it takes nothing away because the food is not diluted in the water.
Words of advice: there is no point in using this cooking method to prepare fish that is not fresh
or vegetables left in the refrigerator for a week: the results will be catastrophic!
Therefore do not hesitate to save both time and money by cooking items side by side, but
without touching. For example, you can cook a fish next to a dessert.
Steam is also appropriate for blanching, defrosting and reheating or even keeping warm,
especially sauces.
First use a very small amount of fat to heat meats like poultry, veal and pork so that they take on
an appetizing browned appearance. Then finish cooking them using the steam method.
Cut into pieces, food cooks faster and more evenly than if left whole.
••
99643551_A_ML.qxp 30/08/2007 11:22 Page 73
Page 5

74
1 / INFORMATION FOR THE USER
EN
••
Warning
Keep this user guide with your appliance. If the appliance is ever sold or transferred to
another person, ensure that the new owner receives the user guide. Please become familiar
with these recommendations before installing and using your oven. They were written for
your safety and the safety of others.
SAFETY INSTRUCTIONS
— This oven was designed for use by private
persons in their homes. It is intended solely
for cooking foodstuffs. This oven does not
contain any asbestos-based components.
— This appliance is not intended for use by
people with (including children) impaired
physical, sensorial or mental abilities, or
people lacking in knowledge or experience,
unless they receive prior supervision or
instructions on using the appliances through
a person responsible for their safety.
— When you receive the appliance, unpack it
or have it unpacked immediately. Give it an
overall inspection. Make note of any concerns
or reservations on the delivery slip and make
sure to keep a copy of this form.
— Your appliance is intended for standard
household use. Do not use it for commercial
or industrial purposes or for any other
purpose than that for which it was designed.
— Do not modify or attempt to modify any of
the characteristics of this appliance. This
would be dangerous to your safety.
— Keep young children away from the
appliance while it is in operation. In this way
you will avoid the danger of them being
burned by knocking over cooking recipients.
— Never pull your appliance by the door
handle.
— During cooking, ensure that the door of
your oven is completely closed so that the
seal can do its job properly.
— When in use, the appliance becomes hot.
Do not touch the heating elements located
inside the oven. In doing so, you would run
the risk of suffering serious burns.
— When placing dishes inside or removing
them from the oven, use heat-protective
kitchen gloves.
— At the end of cooking, do not touch the
dishes with bare hands.
— Do not place heavy weights on the open
oven door, and make sure that children are
able neither to climb nor sit on it.
— The oven must be turned off when cleaning
inside the oven.
— Intensive and prolonged use of the
appliance may give rise to the need for
additional ventilation, by opening a window, or
by increasing the power of the mechanical
fan.
— Additionally to the accessories supplied
with your oven, only use dishes which resist
high temperatures (follow the manufacturer’s
instructions).
— After using your oven, make sure that all the
controls are in their stop position.
— Never use steam or high-pressure devices
to clean the oven (requirement imposed by
electrical safety concerns).
99643551_A_ML.qxp 30/08/2007 11:22 Page 74
Page 6

75
1 / INFORMATION FOR THE USER
EN
CARE FOR THE ENVIRONMENT
••
— This appliance’s packing materials are recyclable. Recycle them and play a role in protecting
the environment by depositing them in municipal containers provided for this purpose.
— Your appliance also contains many recyclable materials. It is therefore marked with this logo
to indicate that used appliances must not be mixed with other waste. Recycling of the appliances
organised by your manufacturer will thus be undertaken in optimum conditions, in
accordance with European directive EC/2002/96 relating to electrical and electronic
equipment waste. Consult your city hall or your retailer to find the drop-off points for
used appliances that is nearest to your home.
— We thank you for your help in protecting the environment.
Warning
Installation should only be performed by installers and qualified technicians.
This appliance complies with the following European directives:
- low voltage Directive EEC/73/23 modified by directive EEC/93/68 for insertion of
EC marking.
- Electromagnetic Compatibility Directive 89/336/EEC modified by directive 93/68/EEC for
insertion of EC marking.
- EC regulation no. 1935/2004 concerning materials and objects intended for contact with
food substances.
99643551_A_ML.qxp 30/08/2007 11:22 Page 75
Page 7
76
2 / INSTALLING YOUR APPLIANCE
EN
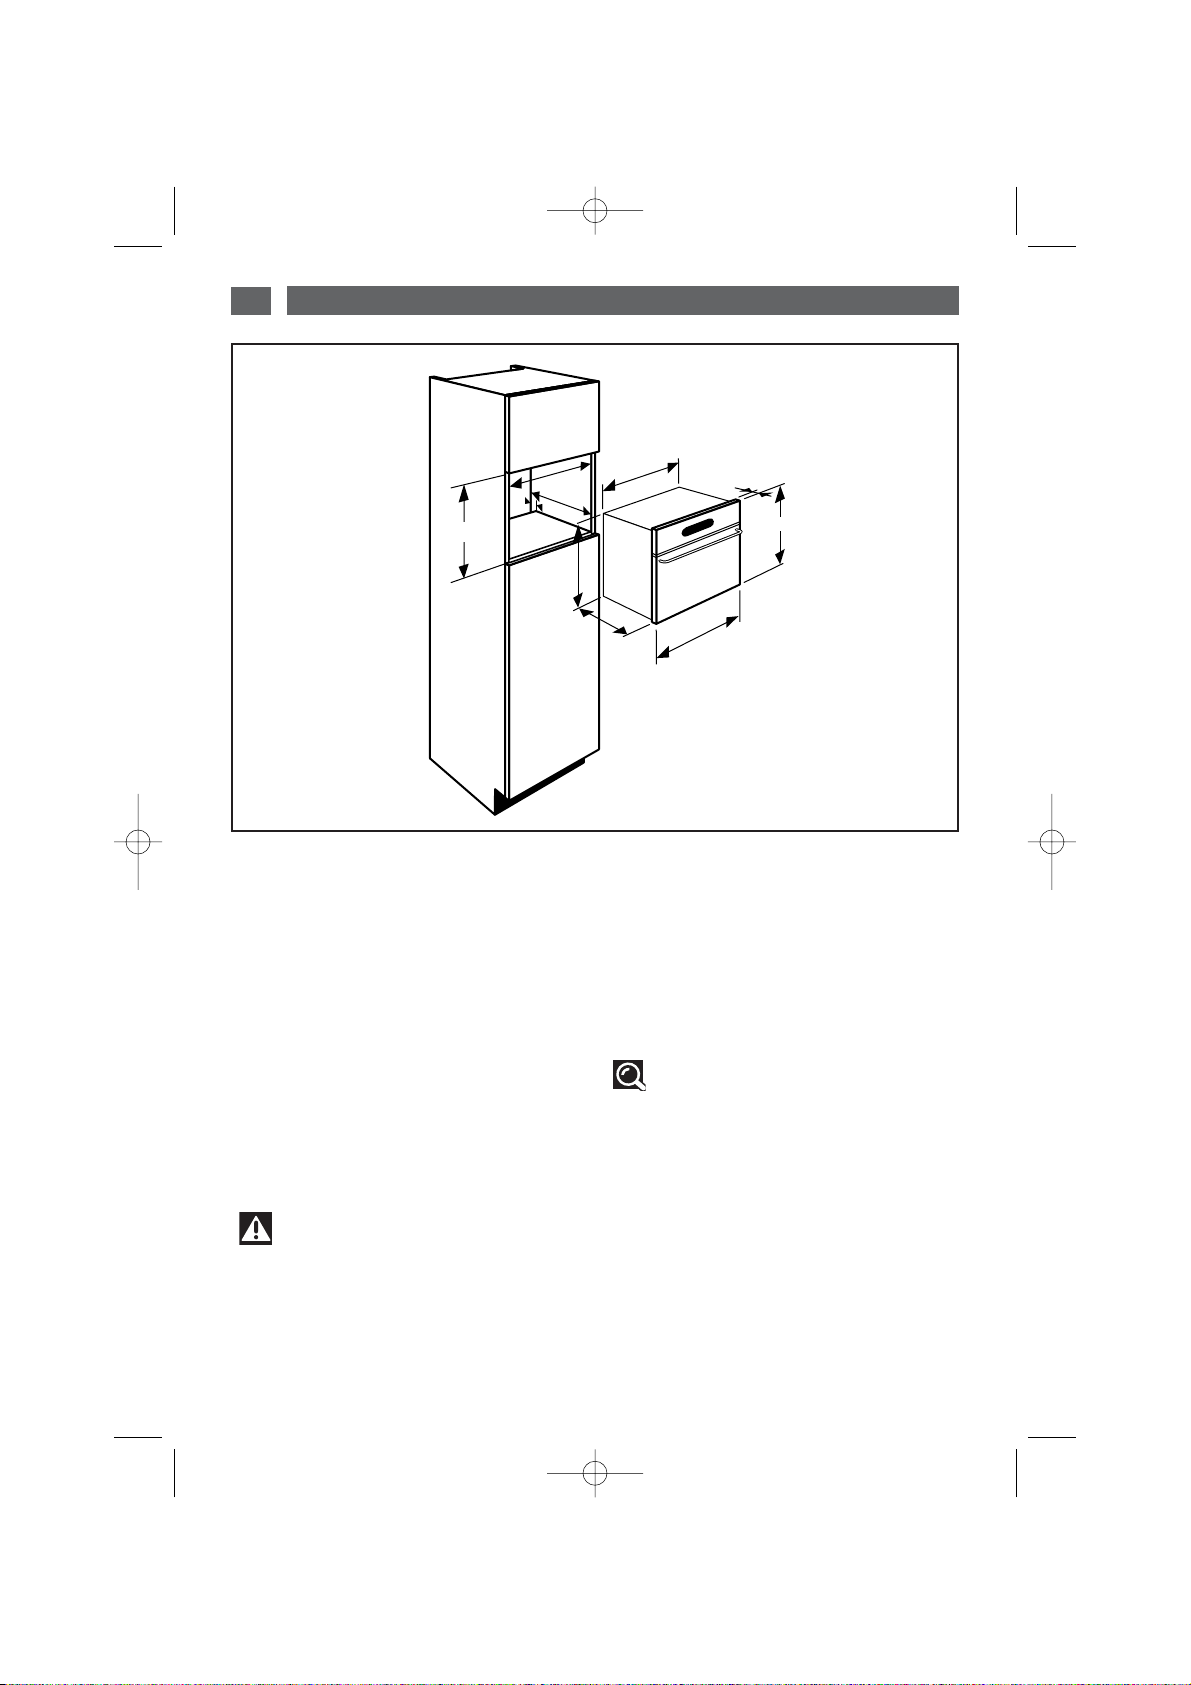
FITTING
To do this:
1) Drill a Ø 2 mm hole in the cabinet panel to
avoid splitting the wood.
2) Attach the oven with the two screws.
Tip
To be certain that you have properly
installed your appliance, do not hesitate to
seek advice from a household appliance
specialist.
••
CHOICE OF LOCATION
The diagrams above determine the
dimensions of a cabinet that will be able to
hold your oven.
The oven may be installed either under a
worktop or in a column of cabinetry (open or
closed) that has the appropriate dimensions
for built-in installation.
• For greater stability, attach the oven in the
cabinet with 2 screws through the holes
provided for this purpose on either side of the
front inner panel.
••
Warning
We cannot be held responsible for any accident or incident resulting from nonexistent, defective or incorrect earthing.
If the electrical installation in your residence requires any changes in order to hook up your
appliance, call upon a professional electrician.
If the oven malfunctions in any way, unplug the appliance or remove the fuse corresponding
to the sector where the oven is hooked up.
99643551_A_ML.qxp 30/08/2007 11:22 Page 76
380
560
mini
500
50
378
405
550
20
390
595
Page 8
77
2 / INSTALLING YOUR APPLIANCE
EN
••
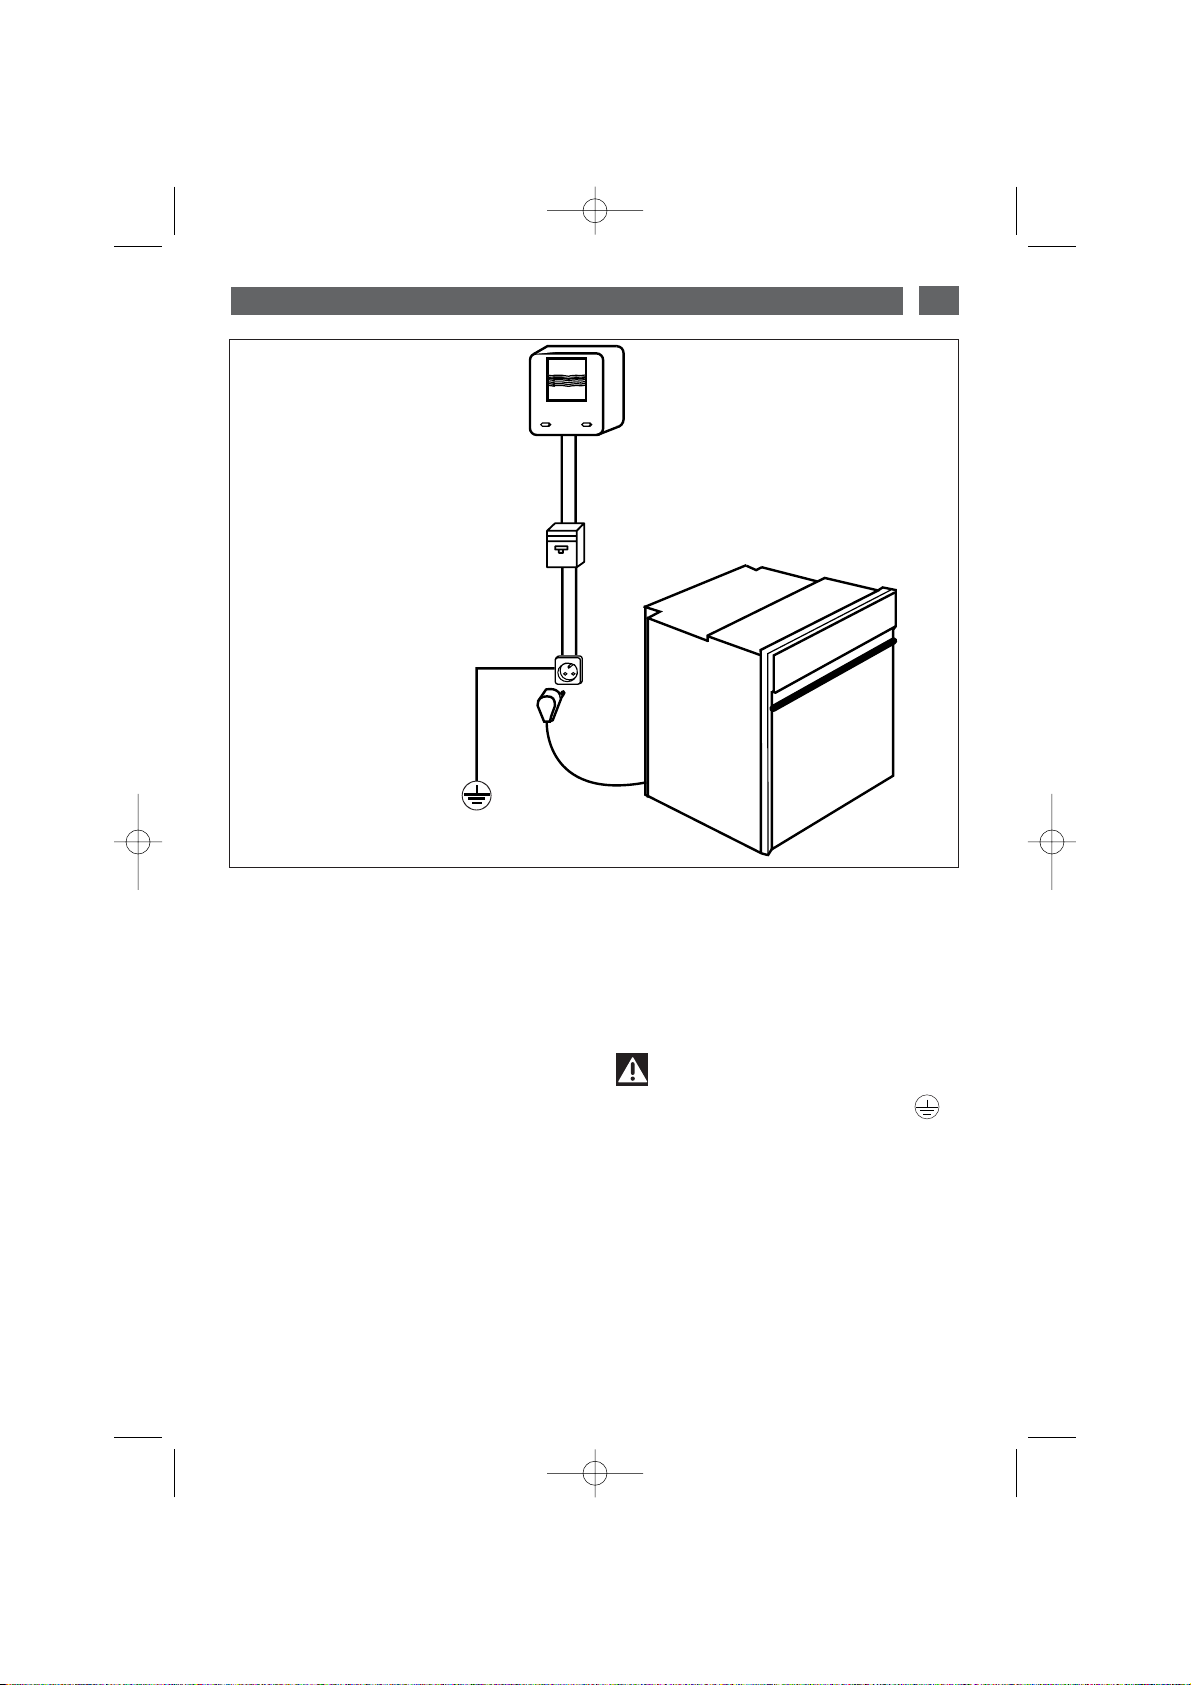
ELECTRIC CONNECTION
Monophase 20A Counter
220-240V~ 50Hz
Electrical outlet
2 prong receptacle +
eeaarrtthh
CEI Standard 60083
Monophase line 220-240 V ~
Power
supply cable
length 1.50 m approx.
10A fuse or differential
circuit breaker
Electrical safety must be provided by a
correct build-in. During fitting and
maintenance operations, the appliance must
be unplugged from the electrical grid; fuses
must be switched off or removed.
The electrical connection should be
performed before the appliance is installed in
the cabinet.
Ensure that:
- the electrical installation has sufficient
voltage,
- the electrical wires are in good condition
- the diameter of the wires complies with the
installation requirements.
Your oven must be connected with a
(standardised) power cable with
3 conductors of 1.5mm2 (1 live + 1 neutral +
earth) which must be connected to a
220-240V~ single-phase grid via the
intermediary of a 1 live + 1 neutral + earth CEI
60083 standardised power socket or via an
all-pole cut-off device or in compliance with
the installation rules.
Warning
The safety wire (green-yellow) is
connected to the appliance’s terminal
and must be connected to the ground lead
of the electrical set-up.
In the case of connection to an electric wall
socket, it must remain accessible after
installation.
The fuse in your set-up must be 10 amperes.
If the power cable is damaged, it must be
replaced by the manufacturer, its AfterSales Service Department or a similarly
qualified person to avoid danger.
99643551_A_ML.qxp 30/08/2007 11:22 Page 77
Page 9

78
3 / DESCRIPTION OF YOUR APPLIANCE
EN
INTRODUCTION TO YOUR OVEN
••
A
B
Display
Water intake tube
Steam generator
C
D
E
Control panel
Tank
Gutter
B
A
D
C
E
F
F
OPERATING PRINCIPLE
••
The water contained in the tank arrives in the
cavity via a pipe. This water is transformed
into steam when it comes into contact with a
hot surface located in the lower part of the
cavity:
this is the steam generator.
There is no need to add water to the cooking
dish. To guarantee REAL STEAM COOKING,
your oven is furnished with specially designed
cookware that will allow for perfect cooking.
Warning
You MUST fill the water tank to the
max. level before cooking. Return the tank
to its housing by firmly pushing ALL THE
WAY until you feel the tank LOCK INTO
POSITION.
Warning
When in use, the appliance becomes
hot. Hot steam will escape when you open
the door of the appliance. Keep children
away.
99643551_A_ML.qxp 30/08/2007 11:22 Page 78
Page 10

79
3 / DESCRIPTION OF YOUR APPLIANCE
EN
• Food dish (fig.1)
Pierced stainless steel cooking dish to
prevent contact between food and the
condensation water.
ACCESSORIES
••
fig.1
• Condensate dish (fig.2)
Dish that makes it possible to recover the
condensation water.
• Removable tank (fig.4)
Tank that allows for independent water supply
to the oven.
Its capacity is approximately one litre
(maximum level).
fig.3
fig.4
• Grid (fig.3)
Stainless steel removable support grid: it
must be placed in the oven.
Tip
The cookware may be cleaned in the
dishwasher.
Warning
Demineralised water must not be used
(not for human consumption).
fig.2
Tip
When cooking place the fig.1 dish on
the fig.2 dish in reverse order so that that
do not fit into each other (see diagram).
When storing place the fig.1 dish on the
fig.2 dish in the same order so that that
they fit into each other.
99643551_A_ML.qxp 30/08/2007 11:22 Page 79
Page 11

80
3 / DESCRIPTION OF YOUR APPLIANCE
EN
••
INTRODUCTION TO THE PROGRAMMER
Control panel lock indicator
(child safety device).
Cooking time indicator
Cooking modes display
Water circuit problem indicator
Cooking time indicator
Oven temperature display.
Clock or timer display
Timer indicator
Cooking end time display
Cooking end time indicator
Cooking time display
H
J
G
F
B
G
I
K
C
D
H
K
J
A
A
B
C
D
E
F
INTRODUCTION TO THE SELECTING TOUCH CONTROLS
••
A
B
C
D
E
F
E
B
Start / Stop
Cooking mode selection
Cooking temperature
Touch controls
Cooking time
End of cooking
Timer
Locking
F
G
H
A
C
D
G
H
E
I
99643551_A_ML.qxp 30/08/2007 11:22 Page 80
Page 12

81
4 / USING YOUR APPLIANCE
EN
•
How to set the time
--
When supplied with electricity
The display flashes at 12:00 (fig.1)
Set the time by pressing the + or - touch
controls (holding your finger on the touch
control allows you to scroll through the
numbers rapidly) (fig.2).
Example: 12:30
Press the
SSTTAARRTT
touch control to validate.
The display stops flashing.
fig.1
fig.2
fig.2
fig.1
•
How to change the time
- To reset the time on the clock
Press and hold the touch control for a few
seconds until the display is flashing (fig.1),
then release.
Audible beeps indicate that it is now possible
to set the time.
Adjust the clock setting with the + and touch controls (fig.2).
Press the
SSTTAARRTT
touch control to validate.
CCooookkiinngg
TTeemmppeerraattuurree °°CC
TTiimmee
pprreepprrooggrraammmmeedd
MMiinn.. sseettttiinngg ttiimmee MMaaxx.. sseettttiinngg ttiimmee
25 minutes
15 minutes
15 minutes
20 minutes
30 minutes
15 minutes
30 minutes
30 minutes
5 minutes
5 minutes
5 minutes
5 minutes
5 minutes
5 minutes
5 minutes
5 minutes
1 hour
1 hour
1 hour
1 hour
1 hour
1 hour
1 hour
1 hour
100
85
75
90
95
80
55
60
COOKING TIMES PROGRAMMED FOR DIFFERENT
FUNCTIONS
••
99643551_A_ML.qxp 30/08/2007 11:22 Page 81
Page 13

82
4 / USING YOUR APPLIANCE
EN
Tip
To avoid compromising the cooking
results, do not open the appliance door
during cooking.
IMMEDIATE STEAM COOKING AT 100°C
fig.2
Warning
Never turn on the oven without first putting
water in the tank.
fig.1
fig.3
Press once on the START touch control to
select the function (fig.1).
Press the START button a second time to
access the cooking time settings.
SS
EETTTTIINNGG TTHHEE CCOOOOKKIINNGG TTIIMMEE
::
- 0:25 flashes (fig.2).
- Adjust by pressing the + or – buttons.
Example: 30 minutes
SS
EETTTTIINNGG TTHHEE TTEEMMPPEERRAATTUURREE WWIITTHH TTHHEE
FFUUNNCCTTIIOONN OONNLLYY
:
- Press the
°°CC
touch control until the “°C”
symbol begins flashing (fig.3).
- Adjust by pressing the - touch control to
change the temperature.
Example: 90°C
- Make sure that the door is firmly closed.
Confirm your selection by pressing START.
Your oven starts by counting down second by
second.
If necessary, cooking can be stopped by
pressing on START/STOP for 1 second.
YOUR OVEN HAS 8 STEAM COOKING
FUNCTIONS
••
99643551_A_ML.qxp 30/08/2007 11:22 Page 82
Page 14

83
4 / USING YOUR APPLIANCE
EN
Warning
You MUST empty the tank.
0m00s is displayed. The display animation
ceases. Discontinuous beeps are emitted for
three minutes.
To silence the beeps, press the Stop touch
control or open the door.
You can stop cooking at any time by pressing
the Stop touch control (press and hold for
approximately one second).
If steam generation has not yet begun
(approximately 1 minute), the oven stops
immediately and the time disappears.
If steam generation has already begun, the
time converts to 3 minutes; a countdown
begins and the steam escapes before the
door is opened.
CANCELLING COOKING IN PROGRESS
••
AT THE END OF A COOKING PROGRAMME
••
In the event of a water circuit-related problem
during cooking, the indicator appears and a
beep is emitted.(fig.1).
This error is specifically associated with:
- An empty tank.
- A poorly fitted tank.
After checking these two items, cooking
automatically restarts as soon as the door is
closed.
WATER MANAGEMENT
••
fig.1
99643551_A_ML.qxp 30/08/2007 11:23 Page 83
Page 15

84
4 / USING YOUR APPLIANCE
EN
•Delayed cooking with
programmed cooking end
Delayed cooking is possible in all cases
eexxcceepptt ffoorr ddeeffrroossttiinngg ffuunnccttiioonnss
:
- Proceed as for an immediate cooking
programme, after entering the cooking time,
- Press the “end of cooking” touch
control, the end of cooking time appears and
flashes, to indicate that it is now possible to
set the time.
Example: It is 12:30 (fig.1).
You programmed a cooking time of
25 minutes.
The displayed end of cooking time is 12:55.
- Adjust the end of cooking time by pressing
the + or - touch controls.
Example: End of cooking 14:00 (fig.2).
-Confirm with the “End of cooking” .
Once the cooking end time has been
programmed, the time comes back on the
display.
After these steps, oven heating is delayed so
that cooking ends at 14:00.
When the cooking cycle is finished, a series of
beeps is emitted for several minutes You can
stop the beeps by pressing START/STOP for
one second.
fig.1
Tip:
You can view or change the end of cooking
by pressing the touch control. To cancel
your programme, press the START/STOP
touch control.
DELAYED COOKING
••
fig.2
99643551_A_ML.qxp 30/08/2007 11:23 Page 84
Page 16

85
4 / USING YOUR APPLIANCE
EN
LOCKING THE CONTROLS (CHILD SAFETY)
OVEN OFF
You have the option of preventing access to
the oven controls by taking the following
steps:
When the oven is off, hold down the
touch control for a few seconds; a “key” will
then be displayed on the screen -> access to
the oven controls is now blocked (fig.1).
To unlock access, hold down the touch
control for a few seconds.
The oven controls are once again accessible.
••
Warning
You cannot lock the oven if you have programmed a cooking cycle.
fig.1
-- YYoouurr oovveenn’’ss pprrooggrraammmmeerr ccaann bbee uusseedd aass aann
iinnddeeppeennddeenntt ttiimmeerr tthhaatt aalllloowwss yyoouu ttoo ccoouunntt
ddoowwnn aa ttiimmee wwiitthhoouutt ooppeerraattiinngg tthhee oovveenn..
In this case, the timer display has priority over
the clock display.
- Press the button (fig.1).
The
timer symbol and 0m00s flash
- Adjust the chosen time by pressing the + or touch controls (max 59 minutes 50 seconds)
(fig.2).
- Press the START touch control to validate.
Warning
It is possible to change or cancel the timer programme at any time by turning it to 0:00 and
pressing the START/STOP.
fig.1
fig.2
USING THE TIMER FUNCTION
••
The display stops flashing after a few seconds and the timer starts working, counting down the
time in seconds.
Once the time has expired, the timer emits a series of beeps to notify you.
The beeps can be stopped by pressing any touch control.
99643551_A_ML.qxp 30/08/2007 11:23 Page 85
Page 17

86
4 / USING YOUR APPLIANCE
EN
- To limit your oven’s consumption of energy
when it is not in use, you may put it on
STAND-BY MODE.
To do so, perform the following procedure:
AACCTTIIVVAATTIIOONN OOFF SSTTAANNDD--BBYY MMOODDEE::
Your oven must be in time display mode.
- Press the + and – touch controls
simultaneously for 5 seconds (fig.1).
- Your display indicates “LCD OFF” (fig.2).
- Release the buttons.
- 30 seconds later, your display will turn off.
Your oven is now in stand-by mode, it will
automatically turn off after 30 seconds in time
display mode.
DDEEAACCTTIIVVAATTIIOONN OOFF SSTTAANNDD--BBYY MMOODDEE::
- Your oven must be in time display mode.
- Press the + and – touch controls
simultaneously for 5 seconds (fig.1).
- Your display indicates “LCD ON” (fig.2).
- Release the buttons.
- You are out of STAND-BY MODE, your
display will remain on constantly.
DISPLAY STAND-BY MODE
••
fig.2
fig.1
fig.2
fig.1
99643551_A_ML.qxp 30/08/2007 11:23 Page 86
Page 18

87
5 / DESCRIPTION OF THE FUNCTIONS
EN
VVeeggeettaabblleess aanndd mmeeaattss
DDeelliiccaattee wwhhoollee ffiisshh ((ttrroouutt))
CCooookkiinngg ddeelliiccaattee ffiisshh
((ssaarrddiinnee ffiilllleettss,, rreedd mmuulllleett))
BBooiilleedd eeggggss;; ssttuuffffeedd ttoommaattooeess tthhaatt
mmaaiinnttaaiinn tthheeiirr sshhaappee..
RRaammeekkiinnss,, ccuussttaarrdd ccrreeaammss,, eettcc..
TTeerrrriinneess,, cchhiicckkeenn lliivveerr..
RReehheeaattiinngg ccooookkeedd ddiisshheess
MMeellttiinngg cchhooccoollaattee,, bbuutttteerr..
SSlliigghhttllyy wwaarrmm ffrruuiitt ffoorr iimmmmeeddiiaattee
sseerrvviinngg
DDeeffrroossttiinngg ffiisshh ffiilllleettss bbeeffoorree bbrreeaaddiinngg..
BBeerrrriieess tthhaatt mmuusstt rreemmaaiinn ccooooll ((ffoorr ppiieess
aanndd ssaauucceess))
DDeeffrroossttiinngg mmeeaattss bbeeffoorree ggrriilllliinngg
((ee..gg..:: ssaauussaaggeess))
SStteeaamm ccooookkiinngg mmooddee mmoosstt
oofftteenn uusseedd
FFoorr ccooookkiinngg
ffrraaggiillee ffoooodd
TThhee mmeeaatt rreemmaaiinnss
iirriiddeesscceenntt,, tthhee ccoollllaaggeenn
ddooeess nnoott aappppeeaarr
FFoorr ccooookkiinngg
ffrraaggiillee ffoooodd,, ffrruuiitt,,
ccoommppootteess
LLooww hheeaatt
SSllooww ddeeffrroossttiinngg wwiitthhoouutt
ccooookkiinngg
FFUUNNCCTTIIOONNSS
TTeemmppeerraattuurree
CCOOOOKKIINNGG
CCOOOOKKIINNGG EEXXAAMMPPLLEESS
100
85
75
90
95
80
55
60
°°CC
99643551_A_ML.qxp 30/08/2007 11:23 Page 87
Page 19

88
5 / OVEN COOKING CHART
EN
FOOD
whatever the quantity
TIMES °C PREPARATIONS NOTES
VEGETABLES
Artichokes (small)
40 to 45 min. 100
Placed upside down in the dish
• These times
depend on the
type, size and
freshness of
the vegetables.
Follow the
indications that
appear in the
“Preparations”
column.
• The cooking
time remains
the same
regardless of
the quantity to
be cooked.
Example:
1 or 4
artichokes
require the
same cooking
time.
• To check the
level of
cooking, insert
the tip of a
knife into the
thickest part of
the vegetable;
if it is cooked
there should
be no
resistance.
Asparagus
35 to 40 min. 100
For tips only, decrease cooking
time
Broccoli
18 min. 100
In small bunches
Carrots
20 to 22 min. 100
In thin, round slices
Celeriac
25 to 30 min. 100
In thin slices
Pumpkin
15 to 20 min. 100
In cubes
Mushrooms
15 min. 100
In thin strips
Cabbage
30 to 35 min.
22 min.
30 to 35 min.
100
Brussels sprouts
Cauliflower in small bunches
Green, chopped
Courgettes
10 to 15 min. 100
In round slices
Chinese artichokes
20 min. 100
Spinach
20 min.
35 min.
100
(fresh) stir while cooking
(frozen) ” ”
Endives
30 min. 100
Core removed, cut in half
lengthwise
Fennel
22 min. 100
Cut in half
Green beans
30 to 35 min. 100
Turnips
15 to 20 min. 100
In cubes
Fresh peas
20 to 25 min. 100
/
Leeks
25 min. 100
Cut in half
Potatoes
25 min.
40 to 45 min.
100
Cut in round slices
Whole
SHELLFISH
CRUSTACEANS
Scallops
10 to 12 min. 90
With seasoning
• Place the
scallops on the
grid of the
glass dish, add
aromatic herbs.
• Place the
shell fish on a
bed of
seaweed.
Mussels/periwinkles
20 to 25 min. 95
With seasoning
Crabs/hermit crabs
25 min. 95
/
Lobsters
30 to 35 min. 95
Depending on weight
Langoustines
12 to 15 min. 90
/
FRUITS
PUDDINGS
Apples/pears/
peaches
10 to 15 min. 90
Whole, peeled
• Times
depend on
ripeness.
Compote
25 min. 95
Fruit in strips
Custard creams
10 min. 90
In ramekins
99643551_A_ML.qxp 30/08/2007 11:23 Page 88
Page 20

89
5 / OVEN COOKING CHART
EN
FOOD
whatever the quantity
TIMES °C PREPARATIONS NOTES
FISH
Northern pike
25 to 30 min. 85
Whole (1 kg)
• *Steaks:
round slices of
fish of 2 to
3 cm in
thickness
(180/200g) per
person.
• Insist on very
fresh products.
• Place whole
fish in the dish
as is or on bay
leaves, fennel
or other
aromatic herbs.
• As soon as
cooking is
complete,
remove the
skin, which will
detach easily.
Cod/hake
13 to 15 min. 85
Steaks (180 g)*
Sea bream
20 to 25 min. 85
Whole (1kg)
Haddock
15 min. 75
Filets
Herring
20 min. 85
Whole (200g)
Pollack/black cod
15 to 20 min. 85
Steaks (180 g)
Monkfish
15 min. 80
Depending on thickness
Mackerel
20 min. 85
Whole (250g)
Atlantic cod
15 min. 75
Filets
Ray
25 to 30 min. 80
Red mullet
15 min. 80
Whole (200g)
Red mullet/Sole
10 min. 75
Filets
Spotted dogfish
20 min. 85
Thick steaks
(6 to 10 cm in length)
Salmon
15 to 20 min. 85
Steaks (180/200 g)
Tuna
20 to 25 min. 100
Steaks (180/200 g)
Trout
Whole (1kg)
20 to 25 min. 100
Whole (200g)
13 to 15 min.
MEATS
Beef
15 to 30 min. 100
Roast 800 g.: 55 to 60 min.
• Then brown
under the grill
in another dish.
Pork (tenderloin)
25 min. 100
Chicken thighs: 35 to 40 min.
Poultry (breast)
(stuffed)
20 to 25 min.
25 min.
100
95
Roast turkey: 50 -60 minutes.
Sausages
20 min. 90
Morteau 400 g
Boudins
10 to 15 min. 90
EGGS
Start with very fresh
eggs kept at room
temperature
7 min. 100
Boiled
: placed directly on the grid.
8 min. 100
Softboiled: placed directly on the grid.
10 to 12 min. 100
Har
d-boiled
5 to 6 min. 100
Sunny side up: broken in an individual dish
placed on the grid and covered with cooking
wrap.
90
Cocotte: See detailed recipes.
RICE, PASTA
SEMOLINA
Place directly in a dish then cover with water or milk. The steam is not enough to
saturate these inflating foods. Place a sheet of aluminium foil on the dish to prevent
water droplets from falling in.
Rice pudding
30 min. 100
100 g rinsed rice - 20 cl milk -
2 dessertspoons sugar
• Fluff with a
fork when
cooking is
complete.
Semolina
20 min. 100
200 gr (1/4 litre water)
99643551_A_ML.qxp 30/08/2007 11:23 Page 89
Page 21

90
6 / CARING FOR AND CLEANING YOUR APPLIANCE
EN
CLEANING THE OUTER SURFACES
••
To clean both the electronic programmer window and the oven door, use a window washing
product applied to a soft cloth.
Do not use abrasive cleaning products or hard metallic scrapers for cleaning the oven’s glass
door, which could scuff the surface and cause the glass to shatter.
To preserve your appliance, we recommend that you use Clearit cleaning products.
Clearit offers you professional products and solutions designed for the daily care of your
household appliances and kitchens.
They are on sale at your regular retailer, along with a complete line of accessories and
consumable products.
PPrrooffeessssiioonnaall eexxppeerrttiissee
wwoorrkkiinngg ffoorr yyoouu aatt hhoommee
CLEANING THE CAVITY
(AFTER EACH USE)
••
CLEANING THE WATER INTAKE TUBE
(ONCE A MONTH)
••
CLEANING THE STEAM GENERATOR
(ONCE A MONTH)
••
Wipe the cavity with a dry cloth after the steam generator has cooled or let the cavity air-dry by
leaving the door open.
Remove the water intake tube by unscrewing it
Remove any hard-water deposits that may be inside (using a thin, pointed object such as a thin
skewer or a knitting needle).
Pour 1/2 cup of white alcohol vinegar on the element.
Let sit for a few minutes, then clean and rinse with water.
Do not use sponges or abrasive powders, nor coffee maker cleaning agents.
Remove the gutter by pulling it upward. Wipe
it off and return it to its position using the
three notches provided.
CLEANING THE GUTTER
••
Warning
The oven should not be cleaned with a
steam cleaner.
99643551_A_ML.qxp 30/08/2007 11:23 Page 90
Page 22

91
7 / TROUBLESHOOTING
EN
Tip
In all circumstances, if your efforts are not sufficient, contact the After-Sales Service
Department without delay.
WWHHAATT SSHHOOUULLDD YYOOUU DDOO??
PPOOSSSSIIBBLLEE
CCAAUUSSEESS
YYOOUU OOBBSSEERRVVEE
TTHHAATT……
WWaatteerr oorr sstteeaamm lleeaakk
aarroouunndd tthhee ddoooorr dduurriinngg
ccooookkiinngg..
-- TThhee ddoooorr iiss nnoott pprrooppeerrllyy
cclloosseedd..
-- TThhee ddoooorr sseeaall iiss ddeeffeeccttiivvee..
-- CCaallll tthhee AAfftteerr SSaalleess SSeerrvviiccee
DDeeppaarrttmmeenntt..
-- OOvveenn iiss nnoott ccoonnnneecctteedd ttoo
ppoowweerr ssoouurrccee..
-- EElleeccttrroonniicc bbooaarrdd iiss nnoott
ffuunnccttiioonniinngg..
YYoouurr ddiissppllaayy ddooeess nnoott
lliigghhtt uupp..
-- CChheecckk tthhaatt tthhee aapppplliiaannccee iiss
rreecceeiivviinngg eelleeccttrriicciittyy ((rriigghhtt ffuussee))..
-- CCaallll tthhee AAfftteerr SSaalleess SSeerrvviiccee
DDeeppaarrttmmeenntt..
IIff yyoouu hhaavvee aa ddoouubbtt aabboouutt tthhee ccoorrrreecctt ffuunnccttiioonniinngg ooff yyoouurr oovveenn,,
this does not
necessarily mean that there is a malfunction.
IInn aannyy eevveenntt,, cchheecckk tthhee ffoolllloowwiinngg iitteemmss::
-- TThhee lliigghhtt iiss oouutt ooff oorrddeerr..
-- TThhee oovveenn iiss nnoott ccoonnnneecctteedd
oorr tthhee ffuussee iiss nnoott wwoorrkkiinngg..
TThhee oovveenn lliigghhtt iiss nnoott
wwoorrkkiinngg..
-- RReeppllaaccee tthhee lliigghhtt..
-- CCoonnnneecctt tthhee oovveenn oorr rreeppllaaccee tthhee
ffuussee..
Warning
- Repairs to your appliance should only be performed by professionals. Non-standard
repairs may be a source of danger for the user.
99643551_A_ML.qxp 30/08/2007 11:23 Page 91
Page 23

92
7 / TROUBLESHOOTING
EN
CHANGING THE BULB
••
Tip
To unscrew the port and the bulb, use a rubber glove, which will make disassembly
easier.
Warning
- Disconnect your oven before performing any task on the bulb to avoid the risk of
electric shock and, if necessary, let the appliance cool down.
fig.1
The bulb is located at the back right of your
oven’s cavity.
- Disconnect your oven before performing any
task on the bulb to avoid the risk of electric
shock.
- Turn the view port a quarter turn to the left.
- Unscrew the bulb in the same direction.
Bulb specifications:
- 15 W - 220-240 V
- 300°C - E 14 cap
- Replace the bulb then reposition the view
port, making sure the joints are correctly
positioned.
- Reconnect your oven.
Bulb
View port
99643551_A_ML.qxp 30/08/2007 11:23 Page 92
Page 24

93
8 / AFTER-SALES SERVICE
EN
Any repairs that are made to your appliance
must be handled by a qualified professional
authorised to work on the brand. When you
call, mention your appliance’s complete
reference (model, type, serial number). This
information appears on the manufacturer’s
nameplate (fig.1).
SPARE PARTS
During any servicing, ask that they use only
ggeennuuiinnee rreeppllaacceemmeenntt ppaarrttss..
BBrraannddtt AApppplliiaanncceess
- simplified shareholder company with capital of 10,000,000 Euro RCS Nanterre 440,302,347.
BRANDT APPLIANCES SAS
7 rue Henri Becquerel
92500 RUEIL MALMAISON
230V ~ 50 Hz
MADE IN FRANCE
fig.1
REPAIRS
••
99643551_A_ML.qxp 30/08/2007 11:23 Page 93
 Loading...