

Page 1

TallyCom III Twinax
IIF-4
Print Server
English
Quick Installation Guide
10584-03
| Deutsch | Français | Español | Italiano
DASCOM Europe GmbH
Heuweg 3
D-89079 Ulm
Germany
www.dascom.com
E-mail: support.de@dascom.com or
support.gb@dascom.com
Page 2

ENGLISH
This Quick Installation Guide explains how to install your
PrintServer.
Caution: Static electricity can damage the interface. You
should either wear an antistatic wrist wrap, or frequently
touch the metal surface of the printer.
Install Interface in Printer
1. Make sure no power cord is connected to the printer.
2. Install the interface into the printer’s slot by way of the
printer's manual.
3. Find an unused device address (0-6) on the iSeries/
AS/400. Use the prtdevadr command.
Network Installation
1. Set the device address (0-6) using the red ADDR switch
on the Twinax interface. The white marker on the switch
indicates the current setting.
Possible positions of the ADDR switch:
• 0,...,6 - Device address (0-6).
• T - Test and settings printout.
• A and B - For service personnel only.
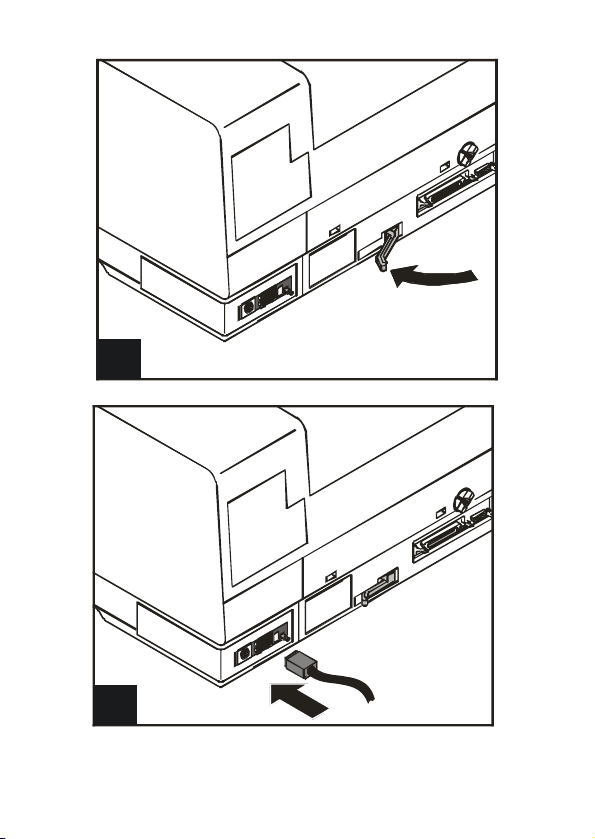
2. Connect the Twinax cable and power on the printer.
Generate Settings Printout
1. Record the current position of the red ADDR switch on
the rear panel of the interface.
2. Turn the switch (clockwise) to position T (TEST) and
back to the original position when the printer has started
printing.
3. Verify correct device address on the printout.
Page 3

DEUTSCH
Diese Kurzanleitung hilft Ihnen bei der Installation des
Printservers.
Achtung: Statische Elektrizität kann die Schnittstelle
beschädigen. Sie sollten entweder ein antis tatisches Armband
tragen, oder ab und an die Metalloberfläche des Druckers
berühren.
Installieren der Schnittstelle im Drucker
1. Vergewissern Sie sich das das Netzkabel NICHT an den
Drucker angeschlossen ist.
2. Schieben Sie das Interface in den im Drucker
vorgesehenen Platz wie im Druckerhandbuch
beschrieben.
3. Suchen Sie eine unbenutzte Deviceadresse (0-6) auf der
iSeries/ AS/400. Benutzen Sie den Prtdevadr Befehl.
Netzwerk Installation
1. Setzen Sie die Device Adresse, (0-6), indem Sie den
roten ADDR Schalter an dem Twinax Interface drehen.
Der weiße Strich an dem Schalter zeigt die momentane
Einstellung an.
Mögliche Positionen des ADDR Schalters:
• 0,...,6 - Device Adresse (0-6).
• T - Test und Statusausdruck.
• A und B - Nur zu Servicezwecken.
2. Schließen Sie das Twinax Kabel an und schalten Sie den
Drucker ein.
Page 4

Erzeugen des Status Ausdrucks
1. Notieren Sie die augenblickliche Position des roten
ADDR Schalters an der Rückseite des Int erfaces.
2. Drehen Sie den Schalter (im Uhrzeigersinn) zur Position
T (TEST), warten Sie bis der Drucker anfängt zu drucken
und drehen Sie dann den Schalter zurück auf die
ursprüngliche Position.
3. Überprüfen Sie nun ob die Device Adresse auf dem
Ausdruck Ihren Wünschen entspricht .
Page 5

FRANÇAIS
Ce Guide d'installation rapide vous explique comment installer
le serveur d'impression.
Attention: L'électricité statique peut endommager l'interface.
Vous devriez porter un bracelet antistatique, ou souvent
toucher la surface métallique de l'imprimante.
Installation de l'interface dans l'imprimante
1. Mettez l'imprimante hors tension et débranchez le
cordon d'alimentation.
2. Installer l'interface dans le slot EIO de l'imprimante
(complément d'information dans le Manuel de
l'imprimante).
3. Trouver une adresse non utilisée (0-6) sur l'iSeries/
AS/400. Utilisez la commande prtdevadr.
Network Installation
1. Réglez l'adresse du périphérique (0-6) en utilisant
l'interrupteur ADDR rouge sur l'interface Twinax. La
marque blanche sur le commutateur indique le réglage
en cours.
Les positions du commutateur ADDR sont:
• 0,..., 6 - adresse du périphérique (0-6).
• T - Essai et impression des paramètres de
configuration.
• A et B - Réservé.
2. Branchez le câble Twinax et allumez l'imprimante.
Impression des paramètres de configuration
1. Enregistrer la position actuelle de l'interrupteur ADDR
rouge sur le panneau arrière de l'interface.
Page 6

2. Tournez l'interrupteur (dans le sens horaire) vers la
position T (TEST), puis revenir à la position d'origine
lorsque L'imprimante a commencé l'impression.
3. Vérifiez l'adresse du périphérique sur cette page de
configuration.
Page 7

ESPAÑOL
Esta guía le indica la manera de instalar el servidor de
impresión.
Precaución: La electricidad estática puede producir daños en
la interfaz. Deberá llevar puesta una muñequera antiestática
o tocar con frecuencia la superficie metálica de la impresora.
Instalar la interfaz en la impresora
1. Asegurese de que el cable de corriente NO esta
conectado a la impresora.
2. Inserte la tarjeta inteface en la ranura de la
impresora según indica el manual de la impresora.
3. Busque una dirección de dispositivo libre (0-6) en el
servidor iSeries/ AS/400. Utilice el comando
Instalación en la red
Imprimir listado de parámetros
prtdevadr.
1. Ajuste la dirección del dispositivo (0-6) utilizando el
selector ADDR el el interface Twinax. La marca
Blanca en el selector indica la posición seleccionada.
Posibles posiciones del selector ADDR :
• 0,...,6 – Direcciones de dispositivo (0-6).
• T - Test e impresión de parametros.
• A y B – Solo para personal de servicio.
2. Conecte el cable Twinax y la corriente a la
impresora.
1. Anote la posición del selector rojo ADDR ubicado en
la parte trasera del interface.
Page 8

2. Gire el slecctor (en el sentido de las agujas del reloj)
a la posición T (TEST) y vuelva a ponerlo en su
posición original cuándo la impresora haya
comenzado a imprimir.
3. Verifique que la dirección impresa en los parámetros
es la correcta.
Page 9

ITALIANO
Guida Rapida, Istruzioni per installare il PrintServer.
Attenzione: L'elettricità statica può danneggiare l'interfaccia.
Si consiglia di portare un bracciale antistatico o di toccare
spesso la superficie metallica della stampante.
Installazione dell'interfaccia nella stampante
4. Accertarsi che la stampante sia spenta con il cavo
d’alimentazione NON inserito.
5. Inserire l’interfaccia nell’apposita sede, fare riferimento
al manuale della stampante.
6. Trovare un indirizzo libero (0-6) nel sistema iSeries/
AS/400. Usare il comando prtdevadr .
Installazione in rete
3. Impostare un indirizzo (0-6) tramite il selettore ADDR
sull’interfaccia Twinax. Il segno bianco indica la
posizione.
Le posizioni possibili del selet tore ADDR sono:
• 0,...,6 – Indirizzo Device (0-6).
• T – Stampa Test e Configurazione.
• A e B – Riservato a personale tecnico.
4. Collegare il cavo Twinax ed accendere la stampante.
Stampa delle impostazioni
4. Memorizzare l’attuale posizione del selettore ADDR
sull’interfaccia.
5. Girare il selettore (in senso o rario) fino alla posizione T
(TEST) e poi indietro alla posizione originale quando la
stampante ha iniziato a stampare.
6. Verificare l’esattezza dell’indirizzo.
Page 10

Switch of f
the printer
Drucker
ausschalten
Mettre l’imprimant e
hors tension
Spegnete
la stampante
Apagar
la impresora
A
B
Page 11

30°
C
D
Page 12
E
F
Page 13

Page 14

NOTE:
This equipment has been tested and found to comply with the limits
for a Class B digital device, pursuant to part 15 of the FCC Rules.
These limits are designed to provide reasonable protection against
harmful interference in a residential installation.
This equipment generates, uses and can radiate radio frequency
energy and, if not installed and used in accordance with the
instructions, may cause harmful interference to radio Communications.
However, there is no guarantee that interferenc e will not occur in a
particular installation. If this equipment does cause harmful
interference to radio or television reception, which can be dete rmined
by turning the equipment off and on, the user is e ncouraged to try to
correct the interference by one or more of the following measures:
-Reorient or relocate the receiving antenna.
-Increase the separation between the equipment and rece iver.
-Connect the equipment into an outlet on a circuit different from that
to which the receiver is connected.
-Consult the dealer or an experienced radio/TV technician for help.
CAUTION:
Changes or modifications not expressly approved by Dascom could
void the user’s authority to operate this equipment according to part
15 of the FCC rules.
CE conformance
This product has been developed and produced in accordance with the
EMC directive and the Low Voltage directive and therefore carries the
CE mark.
Company and product names mentioned in this guide are trademarks
or registered trademarks of their respective owners.
 Loading...