


User Guide |
T5040 Flatbed Printer |
|
|
|
|
|
|
TRADEMARK ACKNOWLEDGEMENTS
•Centronics is a trademark of Centronics Data Computer Corporation.
•PCL and PCL6 are trademarks of Hewlett-Packard Company.
•IBM and IBM PC are trademarks of International Business Machines Corporation.
•Apple, AppleTalk, TrueType, Laser Writer and Macintosh are trade-marks of Apple Computer, Inc.
•Microsoft, Windows, Windows 9x, Windows ME, Windows 2000, Windows NT, Windows XP and MSDOS are registered trademarks of Microsoft Corporation.
•PostScript is a trademark of Adobe Systems Inc.
•All other brand or product names are trademarks of their respective companies or organizations.

User Guide |
Table of contents |
Table of contents
Introduction |
1 |
Printer features |
1 |
Interfaces |
1 |
Emulations |
1 |
Symbols used |
1 |
About this manual |
2 |
1 Printer at a glance |
3 |
View from the front |
3 |
View with cover opened |
3 |
View from the rear |
4 |
2 Installation |
5 |
Unpacking the printer |
5 |
Placing your printer |
6 |
Checking the printer voltage |
8 |
Connecting the printer |
8 |
Switching on the printer |
10 |
3 Printer drivers and firmware |
11 |
Printer drivers |
11 |
Installing a printer driver in Windows 95/98/ME |
11 |
Installing a printer driver in Windows 2000/ |
|
2003/XP |
11 |
Installing a printer driver in Windows 7 |
13 |
Installing a printer driver in Windows Vista |
14 |
Other operating systems |
15 |
Changing printer settings |
15 |
Form settings (Windows 2000/2003/XP/Vista/ |
|
Windows 7/2008) |
16 |
Loading firmware |
17 |
I

Table of contents |
User Guide |
4
5
6
7
Interface |
17 |
Serial interface |
17 |
Parallel interface |
18 |
USB interface (Windows2000/XP) |
18 |
Downloading firmware to the printer |
18 |
Control panel |
19 |
Display, indicators and keys |
20 |
Status indicators |
21 |
Status indicator variations |
21 |
Ready indicator (STOP LED) |
22 |
Paper indicator (PAPER LED) |
23 |
USER1 and USER2 indicators |
24 |
Key functions during operation |
25 |
STOP/EJECT key |
25 |
USER1 and USER2 key |
26 |
Key functions when powering on |
27 |
STOP/EJECT key |
27 |
USER2 key |
27 |
USER1 key |
28 |
Key functions in menu mode |
29 |
USER1 key |
29 |
USER2 key |
29 |
STOP/EJECT key |
29 |
Print media |
31 |
Inserting a document |
31 |
Inserting a passbook |
32 |
Removing media |
34 |
Changing the ribbon cassette |
35 |
Removing the ribbon cassette |
35 |
Inserting the ribbon cassette |
37 |
Replacing the print head |
41 |
Removing the print head |
41 |
Inserting new print head |
44 |
II

User Guide |
Table of contents |
8
9
Menu |
47 |
Programming using the control panel |
47 |
Calling up the menu |
48 |
Menu configurations (USER1/USER2) |
48 |
Menu handling |
49 |
Key functions |
49 |
USER1 key |
49 |
USER2 key |
49 |
STOP/EJECT key |
50 |
Setting parameters (principle) |
51 |
Terminating menu mode |
52 |
Selecting the LC display language |
53 |
Printing out the status page |
55 |
Power on + USER2 key |
55 |
Print out status page in menu mode |
56 |
Status page (example) |
58 |
Menu parameters |
59 |
Test function |
65 |
Hex Dump |
65 |
Activating Hex Dump |
65 |
Exiting the test mode |
66 |
Test printout Hex Dump (Example) |
66 |
Troubleshooting |
67 |
General print problems |
68 |
The display remains dark |
68 |
The display is lit, but the printer does |
|
not print |
68 |
Problems with paper feed |
69 |
Problems with the print quality |
70 |
Print is faulty |
70 |
Print is too pale |
70 |
Smudged print |
70 |
Dots within characters are missing |
70 |
Prints undefined characters |
70 |
Error messages and warnings |
71 |
Unrecoverable errors |
72 |
Recoverable errors |
73 |
III

Table of contents User Guide
Print Head Hot Error |
73 |
Ribbon Cassette Error |
73 |
Paper Length Error |
73 |
Framing Error (Serial I/F) |
74 |
Parity Error (Serial I/F) |
74 |
Overrun Error (Serial I/F) |
74 |
Cover Open Error |
74 |
Cover Open Error |
74 |
Warnings |
75 |
Data in Buffer |
75 |
Remove Paper |
75 |
Clearing paper jams |
76 |
10Care and maintenance |
79 |
Cleaning the housing |
79 |
Cleaning the interior |
79 |
Cleaning the MSR-H magnetic stripe |
80 |
Transport of the printer |
82 |
Preparations for transport |
82 |
Shipping the printer |
82 |
A Specifications |
83 |
Printer specifications |
83 |
Paper specifications |
87 |
Interface specifications |
89 |
B Character sets |
91 |
OCR-A character set |
92 |
Epson character sets |
93 |
Italic |
93 |
Graphic1 |
93 |
Graphic2 |
94 |
IBM code pages |
95 |
Code page 437 |
95 |
Code page 850 |
95 |
Code page 860 |
96 |
Code page 863 |
96 |
IV

User Guide Table of contents
Code page 865 |
97 |
Code page 851 |
97 |
Code page 852 |
98 |
Code page 853 |
98 |
Code page 855 |
99 |
Code page 857 |
99 |
Code page 866 |
100 |
Code page 869 |
100 |
Code page USSR Gost |
101 |
Code page 864 |
101 |
Code page 437G |
102 |
Code page 920 (equivalent to ISO 8859-9) |
102 |
Code page 858 |
103 |
Code page 923 (equivalent to ISO 8859-15) 103
C
D
ISO code pages |
104 |
ISO 8859-2 |
104 |
ISO 8859-5 |
104 |
ISO 8859-7 |
105 |
ISO 8859-8 |
105 |
Available code pages and fonts |
106 |
Emulations |
109 |
Escape sequences |
109 |
What are escape sequences? |
110 |
Control codes |
110 |
How are escape sequences used? |
110 |
List of available control codes |
111 |
PR2 mode |
111 |
PR50 mode |
114 |
PR2845 mode |
117 |
IBM mode |
120 |
Epson mode |
123 |
Interfaces |
127 |
Interface settings for User 1 and USER2 |
127 |
Parallel interface |
128 |
Connector assignment |
128 |
Nibble Mode |
128 |
ECP mode |
129 |
V

Table of contents User Guide
Serial interface RS232C |
130 |
Connector assignment |
130 |
Serial attachment characteristics |
131 |
Data rates |
131 |
Supported protocols |
131 |
Data Transfer |
131 |
Parity |
131 |
Handshake |
132 |
Ready/Busy (Hardware Handshake) |
132 |
XON/XOFF (Software Handshake) |
132 |
Configuring the serial interface of the PC |
133 |
DOS mode/Command line |
133 |
Windows 95/98 |
133 |
Windows 2000/XP |
133 |
USB interface |
134 |
E Consumables and accessories |
135 |
Consumables |
135 |
Accessories |
135 |
VI

User Guide |
Introduction |
Introduction
Printer features |
|
This printer is a document printer for printing manually inserted docu- |
|
|
ments as well as passbooks (vertical and horizontal fold passbooks). |
|
|
Manual insertion of the documents is supported by an automatic docu- |
|
|
ment alignment function. |
|
|
The printer has a high processing speed and compact design. The |
|
|
24-needle print head guarantees excellent print quality. |
|
|
Different factory installed models can be delivered: MSR (magnetic |
|
|
stripe read/writer), scanner and second serial interface. |
Interfaces |
|
The basic printer model is provided with three interfaces: serial |
|
|
(RS-232C), parallel (IEEE1284) and USB 2.0 (Full speed). A special |
|
|
printer version has a second serial (RS-232C) interface. |
Emulations |
|
As standard, the printer is delivered with three emulations: EPSON |
|
|
ESC/P, IBM 4722 + PP XL24e, Olivetti PR2e, PR50 and PR2845. |
Symbols used |
|
Important information is highlighted in this manual by two symbols. |
|
STOP |
CAUTION highlights information which must be observed in order to |
|
prevent injuries to the user and damage to the printer. |
|
|
|
|
|
|
NOTE highlights general or additional information about a specific to- |
|
|
pic. |
1

Introduction |
User Guide |
About this manual
This user guide contains a detailed description of the printer, its characteristic features and additional information.
`Chapter 1 Printer at a glance lists all the parts of the printer.
`Chapter 2 Installation contains start-up instructions and points to note.
`Chapter 3 Printer drivers and firmware provides instructions for installing the printer driver.
`Chapter 4 Control panel explains how to control printer operations.
`Chapter 5 Print media tells you how to load, transport and eject media.
`Chapter 6 Changing the ribbon cassette explains how to remove and install a ribbon cassette.
`Chapter 7 Replacing the print head explains how to remove and install a print head.
`Chapter 8 Menu contains all the information necessary for controlling the printer via the control panel.
`Chapter 9 Troubleshooting provides instructions for rectifying faults which do not require the intervention of qualified personnel.
`Chapter 10 Care and maintenance provides information on the upkeep of the printer and contains important information in case the printer has to be transported.
`Appendix A Specifications informs you about the technical specifications of your printer and the paper which should be used.
`Appendix B Character sets lists the available character sets.
`Appendix C Emulations deals with programming via the interface.
`Appendix D Interfaces explains the interfaces.
`Appendix E Consumables and accessories contains information about consumables and accessories which can be purchased for your printer.
2

User Guide Printer at a glance
1 Printer at a glance
View from the front
Cover
 Power switch (On/Off)
Control panel |
Paper tray |
View with cover opened
Ribbon cassette
Release lever
Print head
3
Printer at a glance |
User Guide |
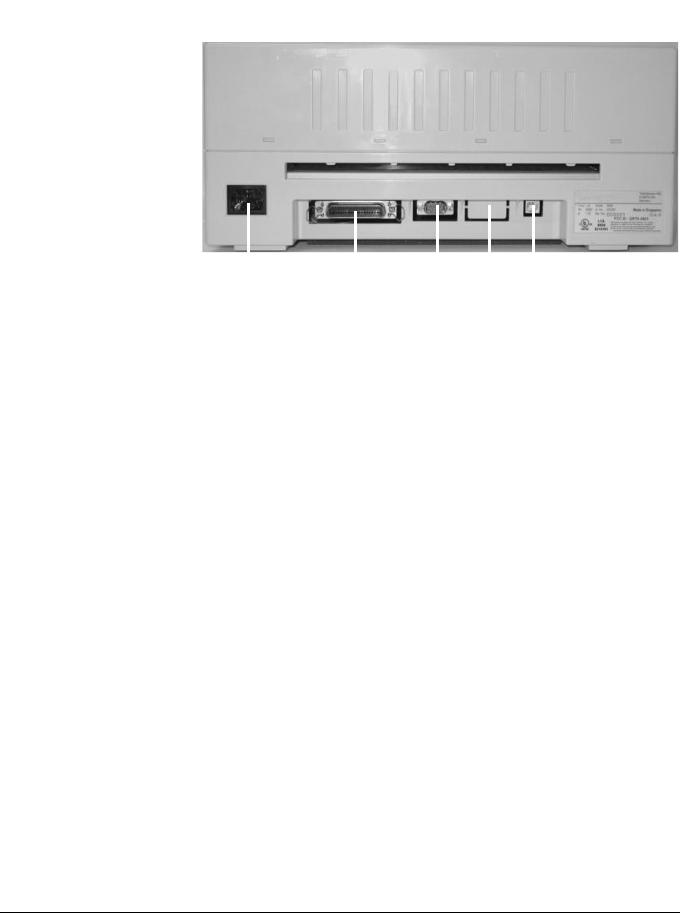
View from the rear
|
|
|
|
|
|
|
|
|
|
|
|
|
|
Power |
|
1st Serial |
USB |
|||
inlet |
|
interface |
interface |
|||
|
|
|
|
|
|
|
|
Parallel |
|
2nd Serial |
|||
|
interface |
|
interface |
|||
|
|
|
|
(special version) |
||
4

User Guide |
Installation |
2 Installation
Unpacking the printer Place your packaged printer on a solid base. Make sure that the “Up” symbols is pointing up.
Open the packaging, lift the printer out of the cardboard box and remove the remaining packaging material.
Check the printer for any visible transport damage and missing items. The following items should be enclosed:
`The Quick start guide (QSG)
`This CD-ROM (at the back of the Quick start guide)
`The power cable
`The ribbon cartridge
If you find any transport damage or if any accessories are missing, please contact your dealer.
5

Installation |
User Guide |
Placing your printer
Place the printer on a solid, flat, surface, ensuring that the printer is positioned in such a way that it can not topple, and that there is easy access to the control panel and paper input tray. Also ensure there is sufficient space for the printed output.
min. 1 cm |
min. 1 cm |
min. 2 cm
min. 10 cm
Location |
|
Minimum |
|
space |
|
|
|
|
|
|
|
Left and right side of the printer |
1 cm |
|
|
|
|
Top of the printer |
|
2 cm |
|
|
|
Rear of the printer |
to ensure sufficient |
10 cm |
|
ventilation |
|
|
|
|
|
to print on a DIN A4 sheet |
12 cm |
|
|
|
The power supply cable may be damaged if the paper edges con-
STOP
stantly chafe the insulating sheath. The user must always ensure that there is sufficient distance between the power supply cable and the paper.
6

User Guide |
Installation |
When selecting the printer location, observe the following additional instructions:
Never place the printer in the vicinity of inflammable gas or
STOP
explosive substances.
`Protect the printer from shock, impact and vibration.
`Be sure to connect the printer to a socket with the correct mains voltage.
`Do not expose the printer to direct sunlight. If you cannot avoid placing the printer near a window, protect it from the sunlight with a curtain.
`When connecting the computer with the printer, make sure not to exceed the permitted cable length (see Interface specifications, page 89).
`Ensure sufficient distance between the printer and any heating radiators.
`Avoid exposing the printer to extreme temperature or air humidity fluctuations. Take care to avoid the influence of dust.
`Always disconnect the system from the mains before opening the device to perform maintenance work or remedy errors.
7

Installation |
User Guide |
Checking the printer voltage
Make sure that the device has been set to the correct voltage (e.g. 230 V in Europe, 120 V in the USA). To do this, check the type plate at the back of the printer. Contact your dealer if the setting is incorrect.
Never switch on the printer if the voltage setting is incorrect,
STOP
since this may result in severe damage to the printer.
Type plate |
Connecting the printer
Connect the power cable to the power inlet of the printer. Connect the power cable plug to a mains socket.
8

User Guide |
Installation |
Make sure that the printer and the computer are switched off and connect the data cable between the printer and the computer. This example shows a 36-pin centronics parallel cable.
9

Installation |
User Guide |
Switching on the printer
Before switching the printer on, make sure that it is connected correctly and that you have followed all the safety and installation instructions (see section Placing your printer, page 6).
Press the power switch which is located at the front bottom right of the printer to switch on the printer.
The printer initializes.
PAPER 
USER1 STOP USER2 SETUP  /EJECT
When initialization is completed, the Ready indicator and the USER1 indicator light up. The message ONLINE NO PAPER appears on the LCD. The printer is in the online status and ready to accept data from the system. You can now insert a document or passbook.
10

User Guide |
Printer drivers and firmware |
3 Printer drivers and firmware
Printer drivers
You must install a printer driver so that the printer can process the data from your application programs.
An original driver offers the best conditions for optimal printing results. All available Windows printer drivers can be found on the CD-ROM en-closed with the printer, and also from our Internet site, from which you can download updated versions as required.
The use of any Windows printer driver from the CD-ROM requires that the printer is set to Epson emulation (see Menu parameters, page 59 and chapter Emulations, page 109).
Installing a printer driver in Windows 95/98/ME

 In this operating system the compatible 5040 driver can be used.
Installing a printer driver in Windows 2000/2003/XP
The online CD-ROM contains printer drivers for the most common
Windows applications. To install the printer driver, proceed as follows.
1.Insert the supplied online CD-ROM in the CD-ROM drive.
2.Click on the Start button in the Windows taskbar.
3.Click on Printers and Faxes to open the printer folder.
4.Click on File and Add Printer in the menu bar.
5.Click on Next In the Printer Installation Wizard.
6.Specify whether you want to operate the printer as a Local Printer or Network Printer by clicking on the relevant option, then press
Next.
For instructions on installing the printer as a network printer, please consult the documentation supplied with your network operating system and/or printer server, or contact the network administrator.
To install a network printer, you will need Administrator rights.
If you are using the printer locally, you can continue installing the driver
11

Printer drivers and firmware |
User Guide |
in one of two possible ways:
`Manual installation of printer driver: in this case, continue with Step 7.
`Automatic installation of printer driver via Plug & Play function: in this case, continue with Step 12 once the printer installation wizard has determined the printer, port and printer name.
Then click on Next.
7.Select the port to which your printer is connected, then click on
Next.
8.Click on Data Carrier, then click on Browse.
9.Select the CD-ROM drive and open the directory n:\driver (“n“ stands for the letter of your PC drive).
10.Open the folder 32Bit or 64Bit.
11.Select the printer type and then click on Next.
12.If required, edit the name of the default printer and specify whether you wish to use the printer as a default printer by clicking on the relevant option. Then click on Next.
13.If you are using the printer as a network printer, you have the option of sharing it with other network users. In this case you must enter an access name which will be displayed to the other network users.
Then click on Next.
14.Specify whether you wish to print out a test page (recommended) by selecting the relevant option and click on Finish. The printer driver will now be installed.
12
User Guide |
Printer drivers and firmware |
Installing a printer driver in Windows 7
The online CD-ROM contains printer drivers for the most common
Windows applications. To install the printer driver, proceed as follows.
1.Insert the supplied online CD-ROM in the CD-ROM drive.
2.Click on the Start button in the Windows taskbar.
3.Click on Devices and Printers to open the printer folder.
4.Click on Add a Printer in the menu bar.
5.Specify whether you want to operate the printer as a Local Printer or Network, wireless or Bluetooth printer by clicking on the relevant option, then press Next.
For instructions on installing the printer as a network printer, please consult the documentation supplied with your network operating system and/or printer server, or contact the network administrator.
To install a network printer, you will need Administrator rights.
If you are using the printer locally, you can continue installing the driver in one of two possible ways:
`Manual installation of printer driver: in this case, continue with Step 6.
`Automatic installation of printer driver via Plug & Play function: in this case, continue with Step 11 once the printer installation wizard has determined the printer, port and printer name.
6.Select the port to which your printer is connected, then click on
Next.
7.Click on Have Disk, then click on Browse.
8.Select the CD-ROM drive and open the directory n:\driver (“n“ stands for the letter of your PC drive).
9.Open the folder 32Bit or 64Bit.
10.Select the printer type and then click on Next.
11.If you are using the printer as a network printer, you have the option of sharing it with other network users. In this case you must enter an access name which will be displayed to the other network users.
Then click on Next.
12.If required, edit the name of the default printer and specify whether you wish to use the printer as a default printer by clicking on
13

Printer drivers and firmware |
User Guide |
the relevant option. Then click on Next.
13.Specify whether you wish to print out a test page (recommended) by selecting the relevant option and click on Finish. The printer driver will now be installed.
Installing a printer driver in Windows Vista
The online CD-ROM contains printer drivers for the most common
Windows applications. To install the printer driver, proceed as follows.
1.Insert the supplied online CD-ROM in the CD-ROM drive.
2.Click on the Start button in the Windows taskbar.
3.Click on All Programs.
4.Click on Devices and Printers to open the printer folder.
5.Click on Printers in the menu window.
6.Click on Add a Printer in the menu bar.
7.Specify whether you want to operate the printer as a Local Printer or Network, wireless or Bluetooth printer by clicking on the relevant option, then press Next.
For instructions on installing the printer as a network printer, please consult the documentation supplied with your network operating system and/or printer server, or contact the network administrator.
To install a network printer, you will need Administrator rights.
If you are using the printer locally, you can continue installing the driver in one of two possible ways:
`Manual installation of printer driver: in this case, continue with Step 8.
`Automatic installation of printer driver via Plug & Play function: in this case, continue with Step 13 once the printer installation wizard has determined the printer, port and printer name.
8.Select the port to which your printer is connected, then click on
Next.
9.Click on Have Disk, then click on Browse.
10.Select the CD-ROM drive and open the directory n:\driver (“n“ stands for the letter of your PC drive).
11.Open the folder 32Bit or 64Bit.
12.Select the printer type and then click on Next.
14

User Guide |
Printer drivers and firmware |
13.If you are using the printer as a network printer, you have the option of sharing it with other network users. In this case you must enter an access name which will be displayed to the other network users.
Then click on Next.
14.If required, edit the name of the default printer and specify whether you wish to use the printer as a default printer by clicking on the relevant option. Then click on Next.
15.Specify whether you wish to print out a test page (recommended) by selecting the relevant option and click on Finish. The printer driver will now be installed.
Other operating systems The printer can also be used with other operating systems such as Linux or Unix. In this case, set the printer to the EPSON or IBM Proprinter emulation for which default drivers are available in most operating systems.
Changing printer settings You can make permanent changes to the printer settings using the control panel of the printer (see chapter Menu, page 47). Various printer settings can also be entered in the operating system of your PC, however.
1.Click on the Start button in the Windows taskbar.
2.Windows 95/98: move the mouse to Settings and click on Printers to open the printer folder.
Windows 2000/XP: click on Printers and Faxes to open the printer folder.
3.Move the mouse pointer to the appropriate printer symbol, press the right mouse key and click on Properties.
Details of the settings available in this window can be found in the Windows documentation or help pages.
Settings entered in the printer driver via Windows have priority over settings entered via the printer menu.
15

Printer drivers and firmware |
User Guide |
Form settings (Windows 2000/2003/XP/ Vista/Windows 7/2008)
In contrast to Windows versions 95/98, in which forms are defined in the printer driver itself, Windows versions 2000/2003/XP/Vista/Windows 7/2008 have a central facility for managing form properties and assign one paper feed only.
If you want to set up a form not included in the Windows default settings, proceed as follows.

 You will need Administrator rights to define new forms.
1.Click on the Start button in the Windows taskbar.
2.Click on Printers and Faxes to open the printer folder.
3.In the menu bar, click on File and Server Properties.
4.In the window Printer Server Properties, click on Form if necessary.
5.Either select an existing form from the Forms list or activate the option New Form.
6.Enter a form name and the desired values.
7.Click on Save to save the new form.
You can now assign this form to the paper feeds of your printer (see
Changing printer settings, page 15).
The form cannot be assigned if its dimensions exceed the permissible paper sizes of the specified paper feed.
16

User Guide |
Printer drivers and firmware |
Loading firmware
The most current version of the firmware can be downloaded from our Internet site. There you will find also additional informations regarding the firmware and printer upgrades. Make sure that the download consists of the following files:
`Standard Model PB Flash VX.XX.exe: the memory writer (flash)
`BL_XXXX.IPL: Bootblock of the printer
`FWXXXX.mfw: Main firmware of the printer
`PBCGXXXX.BIN: Character generator (EU/US)
You can select the standard character generator (CG) or four optional character generators. Every optional CG provides the standard fonts and one additional font:
Standard CG |
Optional CG 1 |
Optional CG 2 |
Optional CG 3 |
Optional CG 4 |
|
|
|
|
|
PBCGSTD.BIN |
PBCGPE.BIN |
PBCGSC.BIN |
PBCGOR.BIN |
PBCGBO.BIN |
|
|
|
|
|
Draft |
Draft |
Draft |
Draft |
Draft |
|
|
|
|
|
Draft Ban- |
Draft Ban- |
Draft Ban- |
Draft Ban- |
Draft Ban- |
king |
king |
king |
king |
king |
|
|
|
|
|
Roman |
Roman |
Roman |
Roman |
Roman |
|
|
|
|
|
Courier |
Courier |
Courier |
Courier |
Courier |
|
|
|
|
|
Sans Serif |
Sans Serif |
Sans Serif |
Sans Serif |
Sans Serif |
|
|
|
|
|
Gothic |
Gothic |
Gothic |
Gothic |
Gothic |
|
|
|
|
|
OCR-A |
OCR-A |
OCR-A |
OCR-A |
OCR-A |
|
|
|
|
|
OCR-B |
OCR-B |
OCR-B |
OCR-B |
OCR-B |
|
|
|
|
|
– |
Prestige Elite |
Script |
Orator |
Bold |
|
|
|
|
|
Interface |
|
You can use the serial, the parallel or the USB interface to download |
|
|
the firmware to the printer. |
|
|
Make sure that the selected interface is not connected to another |
|
|
|
|
|
printer. |
Serial interface |
|
Make sure that the serial interface is selected in the printers menu for |
|
|
USER1 and that the settings for Baudrate and Protocol on printer and |
|
|
PC are identical. |
17

Printer drivers and firmware |
|
User Guide |
Parallel interface |
Make sure that the parallel interface is selected in the printers menu for |
|
|
USER1, that in the PCs BIOS the parallel port is set to ECP and that |
|
|
the parallel cable meets the IEEE1284 standard. |
|
USB interface (Windows2000/ |
Make sure that the USB interface is selected in the printers menu for |
|
XP) |
USER1, that a printer driver has been installed and the printer is defi- |
|
|
ned as default printer. |
|
Downloading firmware to |
To load new firmware to the printer, proceed as follows. As mentioned |
|
the printer |
before it is important that no other device (printer) is set to the inter- |
|
|
face you want to use for the download. |
|
|
Click therefore Start > Control Panel > Printers and Faxes and |
|
|
check that no printer is set to the port you want to use. E.g. if you want |
|
|
to use the serial interface RS232 no printer may have connected to the |
|
|
COM1 port. |
|
|
1. |
Browse to the folder where the firmware files are stored. |
|
2. |
Double-click the Standard Model PB Flash VX.XX.exe file. |
|
3. |
On the Memory Writer screen select the interface (in our example |
|
|
serial port). |
|
4. |
Make sure that the settings for port, baudrate, parity bit and stop |
|
|
bit are correct. |
|
5. |
Select IPL FIRMWARE from Download Type. |
|
6. |
Click Browse and select the BL_XXXX.IPL file. |
|
7. |
Click FLASH NOW; the download process starts. |
|
|
When the download process is finished, the printer performs an initiali- |
|
|
zation |
|
8. |
Repeat step 5 to 7 for the FWXXX.mfw file and the |
|
|
PBCGXXXX.BIN file. |
18

User Guide |
Control panel |
4 Control panel
The control panel allows the user to set some functions in the printer and set up the basic printer parameters on installation. The control panel is located on the front right side of your printer and consists of a two-line LC display with 2 x 16 digits, three keys for controlling the printer functions and four LED indicators displaying the status of the printer.
The functions of the keys depend on the printer’s current mode (status). There are three basic modes.
`The Online mode is the printer’s normal operating mode. Data from your computer can be received and printed.
`In the Offline (STOP) mode the link between printer and computer is interrupted, i.e. no data can be received and printed.
`In the Menu mode printer settings (line spacing, size of the interface buffer etc.) can be changed and saved permanently.
19

Control panel |
User Guide |
Display, indicators and keys
1 |
2 |
3 |
4 |
5 |
|
PAPER |
|
|
|
|
|
|
|
|
|
|
|
|
|
|
USER1 |
STOP |
USER2 |
|
|
SETUP |
/EJECT |
|
|
|
8 |
7 |
6 |
|
1LCD display: Displays the internal printer status, operating instructions and error messages.
2Paper LED: Indicates whether paper is loaded; on = paper is inserted, off = no paper inserted; blinking = indicates that data has been sent to the printer.
3USER1 LED: Blinks if the printer is receiving data via the first interface, lights if a job is printed (see below).
4Ready LED: Indicates Offline or Online status; on = online, off = offline; blinking = indicates that an error has occured, the cause of the error is indicated in the display.
5USER2 LED: Blinks if the printer is receiving data via the second interface, lights if a job is printed (see below).
6USER2 key: Activated by application only; the functionality of the key depends on the emulation and the application used (see also USER2 LED).
7STOP/EJECT key: Sets the printer to Online/Offline mode (see also Ready LED); ejects inserted paper (see also Paper LED).
8USER1 key: Activated by application only; the functionality of the key depends on the emulation and the application used (see also USER1 LED).
Please be aware that some emulations and applications may use the LEDs and keys in an entirely different way defined by the emulation and/or host software and outside the definitions contained in this document.
20

User Guide |
Control panel |
Status indicators
Status indicator variations
This section defines the status of the control panel. The LED lights will be on, off or blinking coupled with messages from the LCD. In this way the printer reports its current status.
Read |
Paper |
USER |
USER |
LCD |
Indicated Printer Status |
y |
|
1 |
2 |
|
|
off |
off |
— |
— |
STOP |
Offline, no paper loaded |
|
|
|
|
NO |
|
|
|
|
|
PAPER |
|
|
|
|
|
|
|
off |
off |
on |
— |
LOAD |
Offline, printer waiting for |
|
|
|
|
PAPER |
paper as it has received |
|
|
|
|
|
data from the host |
|
|
|
|
|
(if data + Print Start com- |
|
|
|
|
|
mand are transferred from |
|
|
|
|
|
Host)* |
|
|
|
|
|
|
off |
off |
— |
on |
LOAD |
Offline, printer waiting for |
|
|
|
|
PAPER |
paper as it has received |
|
|
|
|
|
data from the host |
|
|
|
|
|
(If data + Print Start com- |
|
|
|
|
|
mand are transferred |
|
|
|
|
|
from Host)* |
|
|
|
|
|
|
on |
off |
on |
— |
LOAD |
Online, paper required |
|
|
|
|
PAPER |
(If data + Print Start com- |
|
|
|
|
|
mand are transferred from |
|
|
|
|
|
Host)* |
|
|
|
|
|
|
on |
off |
— |
on |
LOAD |
Online, paper required |
|
|
|
|
PAPER |
(If data + Print Start com- |
|
|
|
|
|
mand are transferred |
|
|
|
|
|
from Host)* |
|
|
|
|
|
|
on |
on |
— |
— |
ONLINE |
Online, paper is loaded |
|
|
|
|
PAPER |
|
|
|
|
|
|
|
on |
off |
— |
— |
ONLINE |
Online, no paper is loaded |
|
|
|
|
NO |
|
|
|
|
|
PAPER |
|
|
|
|
|
|
|
blink |
blink |
— |
— |
xxxxx |
Error. The cause of the |
|
|
|
|
xxxxx |
error is displayed on the |
|
|
|
|
|
LCD |
|
|
|
|
|
|
— |
— |
on |
off |
|
Printer is under USER1 con- |
|
|
|
|
|
trol |
|
|
|
|
|
|
— |
— |
off |
on |
|
Printer is under USER2 con- |
|
|
|
|
|
trol |
|
|
|
|
|
|
* applies to EPSON/IBM emulation only |
|
||||
|
|
|
|
|
|
21

Control panel |
User Guide |
Ready indicator (STOP LED)
PAPER 
USER1 |
STOP USER2 |
SETUP |
/EJECT |
PAPER 
USER1 |
STOP USER2 |
SETUP |
/EJECT |
PAPER 
USER1 STOP USER2 SETUP /EJECT
Ready indicator (STOP LED) not lit:
`The printer is in the stop status (Offline) and will not receive data from the system.
Ready indicator (STOP LED) lit:
`The printer is switched on in the online status. It is ready to receive data from the system.
Ready (STOP LED) and Paper indicators (PAPER LED) blink:
`The printer is not ready. A device error has occurred. Any data transferred from the system is deleted. The cause of the error is indicated on the LCD.
22
 Loading...