


 Loading...
User guide |
Matrix printer 2810 2820 |

Important Safety Instructions |
User Guide |
|
|
Important Safety Instructions (English)
Read the following instructions thoroughly before starting up your printer.
Never carry out maintenance or repair work yourself. Always contact a qualified service technician.
Keep this Operator’s Manual in a place which is easily accessible at all times.
Place the printer on a solid and even base so that it cannot fall.
Never place the printer in the vicinity of inflammable gas or explosive substances.
Ensure the printer is connected to a socket with the correct mains voltage.
Always disconnect the printer from the mains before opening the device to perform maintenance work or remedy errors.
Do not expose the printer to high temperatures, direct sunlight or dust.
Keep all liquids away from the printer.
Protect the printer from shock, impact and vibration.
Make sure that the printer and computer are switched off before connecting the data cable.
The print head will become very hot during printing; avoid contact with the print head after printing has finished.
Do not perform any operation or action in any way other than those provided in this manual. When in doubt, contact your dealer or your customer support.
The device and mains-socket must all times be easily accessible.
Only straight connector can be used for power cord.
WARNING: Hazardous moving parts. Keep away from moving fan blades.

User Guide |
Important Safety Instructions |
|
|
Wichtige Sicherheitshinweise (German)
Lesen Sie bitte diese Sicherheitshinweise durch, bevor sie den Drucker in Betrieb nehmen.
Führen Sie Wartungsarbeiten und Reparaturen keinesfalls selbst aus, sondern verständigen Sie immer einen qualifizierten Servicetechniker.
Bewahren Sie diese Dokumentation an einem jederzeit zugänglichen Ort auf.
Den Drucker auf stabilem und ebenem Untergrund so aufstellen, dass er nicht zu Boden fallen kann.
Stellen Sie den Drucker keinesfalls in der Nähe von leicht entzündlichen Gasen oder explosiven Stoffen auf.
Den Drucker nur an eine Steckdose mit der richtigen Spannung anschließen.
Wenn Sie den Drucker vom Netz trennen wollen, den Drucker ausschalten und immer den Netzstecker an der Steckdose ziehen.
Den Drucker weder hohen Temperaturen noch direktem Sonnenlicht und Staub aussetzen.
Keine Flüssigkeiten mit dem Drucker in Berührung bringen.
Den Drucker keinen Erschütterungen, Stößen oder Vibrationen aussetzen.
Sicherstellen, dass der Drucker und der Computer ausgeschaltet sind, bevor das Datenkabel angeschlossen wird.
Der Druckkopf wird während des Druckens heiß. Vor dem Berühren deshalb einige Zeit abkühlen lassen.
Weichen Sie bei der Bedienung des Druckers nicht von den Anweisungen in der Dokumentation ab.
Bei Unklarheiten wenden Sie sich bitte an Ihren Händler oder Ihren Kundendienst.
Maschinenlärminformations – Verordnung – 3.GPSGV, der höchste Schalldruckpegel beträgt 70 dB(A) oder weniger gemäß EN ISO 7779.
Das Gerät und die Netzsteckdose müssen jeder Zeit leicht zugänglich sein.
Nur Netzkabel mit geraden Steckern verwenden.
ACHTUNG: Gefährliche, bewegte Teile. Halten Sie sich fern von bewegten Ventilator-Flügeln.

User Guide |
Important Safety Instructions |
|
|
Consignes importantes de sécurité (French)
Lire attentivement les instructions suivantes avant de mettre l’imprimante en service.
Ne jamais effectuer soi-même les travaux d’entretien et de réparations. Contacter toujours un dépanneur qualifié.
Placer l’imprimante sur un support stable de façon à ce qu’elle ne puisse pas tomber.
Ne jamais placer l’imprimante à proximité de sources de gaz aisément inflammables ou de substances explosives.
Ne connecter l’imprimante à une prise que lorsque la tension est correcte.
Pour déconnecter l’imprimante de l’alimentation principale, mettre l’imprimante hors tension et toujours débrancher le connecteur secteur de la prise murale.
Ne pas exposer l’imprimante à des températures élevées, à la lumière directe du soleil ou à la poussière.
Ne pas mettre l’imprimante en contact avec des liquides.
Ne pas exposer l’imprimante à des chocs, impacts ou vibrations.
S’assurer que l’imprimante et l’ordinateur sont hors tension avant de connecter le câble de données.
La tête d’impression est brûlante pendant l’impression. C’est pourquoi laissez-la refroidir quelques instants avant d’y toucher.
N'exécutez aucune opération ni action d'une autre manière que celle indiquée dans ce manuel. En cas de doute, veuillez contacter votre distributeur ou service après-vente.
Le dispositif et la prise principale doivent toujours être accessibles facilement.

User Guide |
Important Safety Instructions |
|
|
Indicazioni di sicurezza importanti (Italian)
Prima di mettere in funzione la stampante, leggere attentamente le seguenti indicazioni.
Non eseguire mai da sé gli interventi di manutenzione e riparazione, ma rivolgersi sempre a un tecnico di assistenza qualificato.
Conservare le presenti istruzioni per l’uso in un luogo sempre accessibile.
Collocare la stampante su una superficie stabile, per evitare che cada a terra.
Non collocare la stampante in prossimità di gas facilmente infiammabili o di sostanze esplosive.
Collegare la stampante a una presa di corrente con tensione adeguata.
Per scollegare la stampante dalla rete di alimentazione, spegnere la stampante e disinserire sempre il connettore di rete dalla presa.
Non esporre la stampante ad elevate temperature né alla luce solare diretta e alla polvere.
Evitare il contatto della stampante con liquidi.
Non esporre la stampante a colpi, scosse o vibrazioni.
Verificare che la stampante e il computer siano spenti prima di collegare il cavo di trasmissione dati.
Durante la stampa, la testina si surriscal-da notevolmente. Prima di toccarla, se necessario opportuno quindi lasciarla raffreddare qualche istante.
Non eseguire alcuna operazione o azione se non nella maniera descritta nel presente manuale. In caso di dubbio, contattare il rivenditore o dalla società incaricata dell’assistenza.
Il dispositivo e la presa di corrente devono essere sempre facilmente accessibili.

User Guide |
Important Safety Instructions |
|
|
Instrucciones de seguridad importantes (Spanish)
Lea las siguientes instrucciones con esmero antes de poner la impresora en servicio.
Nunca lleve a cabo trabajos de mantenimiento o reparación Ud. mismo, sino consulte a un técnico de servicio calificado.
Guarde las presentes instrucciones de servicio en un lugar de fácil acceso en cualquier momento.
Ponga la impresora sobre un base estable de manera que no pueda caer al suelo.
Nunca coloque la impresora en la vecindad de gases de fácil inflamabilidad o sunstancias explosivas.
Asegure conectar la impresora sólo a un enchufe con un voltaje correcto.
Cuando quiera desconectar la impresora de la red, apague la impresora y siempre tire la clavija de alimentación del enchufe.
No exponga la impresora a temperaturas altas, a la luz solar directa y al polvo.
No ponga la impresora en contacto con fluidos.
Nunca exponga la impresora a sacudidas, choques o vibraciones.
Asegúrese de que la impresora y el ordenador estén apagdos antes de conectar el cable de datos.
La cabeza de impresión se pone muy caliente durante la impresión. Por lo tanto, deje enfriarlo algún tiempo antes de tocarla.
No permita que se realice cualquier operación o acción de una forma diferente a lo que se señala en el manual. En caso de duda, póngase en contacto con su comerciante o con su servicio post-venta.
El dispositivo y la toma de corriente deben estar ubicados de forma que sea fácil acceder a ellos.

Important Safety Instructions |
User Guide |
|
|
Instruções Importantes sobre Segurança (Portuguese)
Leia as instruções de segurança antes de usar a impressora.
Consulte sempre um técnico qualificado para executar uma reparação .
Coloque a impressora sobre uma base sólida e nivelada, para que ela não sofra quedas.
Jamais instale a impressora nas proximidades de lugares onde haja gás inflamável ou substâncias explosivas.
Assegure-se de conectar a impressora à tomada elétrica com a voltagem apro-priada.
Quando desligar a impressora da rede, desligue sempre a impressora e retire o cabo da tomada.
Não exponha a impressora a temperaturas altas ou luz solar direta.
Não aproxime substâncias líquidas da impressora.
Proteja a impressora de choques, impactos e vibrações.
Desligue a impressora e o computador antes de conectar o cabo da rede.
A cabeça da impressora pode ficar muito quente . Portanto, espere algum tempo antes de tocá-la.
Não faça nenhuma operação ou ação além das recomendadas neste manual. Em caso de dúvida, contate seu revendedor ou companhia de serviço.
A impressora e a tomada devem ser facilmente em todos os momentos acessíveis.

User Guide |
Important Safety Instructions |
|
|
Правила по технике безопасности. (Russian)
Прочитайте, пожалуйста, инструкцию по технике безопасности перед включением в работу принтера.
Не выполняйте технические работы и ремонт техники самостоятельно, но сообщайте о неисправностях квалифицированным сервисным техникам.
Данная инструкция должна быть всегда доступна каждому пользователю.
Установите принтер на ровном и стабильном месте так, чтобы он не смог упасть на пол.
Ни в коем случае не ставьте принтер вблизи легко воспламеняющихся газов и взрывчатых веществ.
Включайте принтер в розетку только с соответствующим напряжением.
Если Вы хотите отключить принтер от напряжения, сначала выключите принтер сам и затем выньте штекер из розетки.
Берегите принтер от нагревания, от попадания на него прямых солнечных лучей и пыли.
Не допускайте попадания жидкости на принтер.
Нельзя подвергать принтер тряске, ударам и вибрации.
Убедитесь, что принтер и компьютер выключены, только после этого соедините принтер с компьютером.
Печатающая головка нагревается во время работы принтера. Поэтому подождите какое-то время, прежде чем дотронуться до нее.
Пользуйтесь принтером так, как это написано в документации. Если у Вас возникают неясности, обращайтесь с вопросами к Вашим продавцам или в сервисный центр.
Устройство и розетка должны быть всегда легко доступна.

Important Safety Instructions |
User Guide |
|
|
Önemli Güvenlik Talimatları (Turkish)
Lütfen, yazıcıyı işletime geçirmeden önce bu güvenlik talimatlarını bütünüyle dikkatle okuyun.
Bakım ve tamir çalışmalarını kesinlikle ve hiçbir surette kendi başınıza yapmayın; her zaman kalifiyebir uzman servis-teknisyenine haber verin.
Yazıcıyı, üzerinden yere düşmesi mümkün olmayacak sabit ve düz bir zemine yerleştirin.
Yazıcıyı kesinlikle ve hiçbir surette kolayca yanabilecek gaz veya patlayıcı maddeler içeren nesnelerin yakınına koymayın.
Yazıcı akım kablosunu sadece doğru gerilime sahip bir prize takın.
Yazıcıyı şebeke ağından ayırmak istediğinizde, yazıcıyı kapatın ve ağ-fişini her zaman prizden çıkartın.
Yazıcıyı ne yüksek ısılı ne de doğrudan güneş ışığına ve toza mâruz kalan mekânlarda bulundurun.
Yazıcı hiçbir sıvı maddeyle temasta olmamalıdır.
Yazıcı hiçbir sarsıntıya, darbeye veya titreşime mâruz kalmamalıdır.
Veri kablosu bağlanmadan önce hem yazıcının hem de bilgisayarın kapalıolduklarından emin olmalısınız.
Yazıcının başı basma esnasında yüksek ısıya ulaşıyor. Bu yüzden lütfen dokunmadan önce kısa süre soğumasını bekleyin.
Yazıcının işletimi ve kullanımında bu dokümantasyondaki talimatların hiç dışına çıkmayın. Sorunlu görünen hususlarda lütfen imâlatçınıza veya müşteri hizmetleri servisinize başvurun.
Cihaz ve elektrik prizinin her zaman kolayca erişilebilir olması gerekir.

User Guide |
Table of contents |
Table of contents
Table of contents................................................................................ |
1 |
Symbols used................................................................................................... |
6 |
About this manual............................................................................... |
8 |
Printer at a glance.............................................................................. |
9 |
Printer in tractor mode.................................................................................... |
10 |
Paperway........................................................................................................ |
11 |
Installation........................................................................................ |
12 |
Unpacking the printer..................................................................................... |
12 |
Placing your printer........................................................................................ |
13 |
Connecting the printer.................................................................................... |
14 |
Switching on the printer.................................................................................. |
15 |
Inserting the ribbon cassette............................................................ |
16 |
Printer drivers................................................................................... |
21 |
Installing a printer driver in Windows.............................................................. |
21 |
Other operating systems................................................................................ |
22 |
Changing printer settings................................................................................ |
22 |
Form settings (Windows 2000/2003/XP/Vista/Windows 7/2008)................ |
23 |
Loading optional firmware.............................................................................. |
23 |
The control panel.............................................................................. |
24 |
The LC display............................................................................................... |
25 |
Online mode................................................................................................... |
26 |
Offline mode................................................................................................... |
26 |
Setup mode.................................................................................................... |
27 |
Messages in the LC display............................................................................ |
28 |
Key functions when turning on the printer....................................................... |
28 |
USB host interface..................................................................................... |
31 |
Firmware Download.............................................................................. |
31 |
Configuration File Upload...................................................................... |
31 |
Configuration File Download................................................................. |
31 |
Paper handling................................................................................. |
32 |
Loading paper................................................................................................ |
32 |
Paper transport............................................................................................... |
36 |
Moving the paper to the tear position............................................................. |
37 |
Removing paper............................................................................................. |
38 |
Options and accessories |
User Guide |
Settings............................................................................................. |
39 |
Setting the print head gap.............................................................................. |
39 |
Setting the tear position.................................................................................. |
40 |
Setting the first printing line (TOF).................................................................. |
41 |
Selecting character density and font............................................................... |
42 |
The Menu......................................................................................... |
43 |
Programming via the control panel................................................................. |
43 |
Enabling access to menu mode..................................................................... |
43 |
Calling up the menu....................................................................................... |
44 |
Menu configurations....................................................................................... |
45 |
Menu handling................................................................................................ |
47 |
Save settings............................................................................................. |
47 |
Selecting the LC display language............................................................. |
48 |
Terminating Setup mode............................................................................ |
49 |
Menu structure............................................................................................... |
50 |
Menu parameters........................................................................................... |
51 |
Printing out menu configurations (Print)..................................................... |
53 |
Loading menu configurations (Menu)......................................................... |
55 |
Reset to default values (Reset).................................................................. |
55 |
Quietmode (Quietm.)................................................................................. |
57 |
Selecting font (Font).................................................................................. |
58 |
Setting character density (CPI).................................................................. |
60 |
Setting line spacing (LPI)........................................................................... |
60 |
Skiping perforation (Skip)........................................................................... |
61 |
Selecting start signal for escape sequence (ESCChar)............................. |
61 |
Selecting emulation (Emulate)................................................................... |
62 |
Bidirectional printing (Bidir)........................................................................ |
62 |
Settings for interfaces (I/O)........................................................................ |
63 |
Serial interface (Serial).............................................................................. |
63 |
Data transmssion rate (Baud)................................................................ |
63 |
Data format (Format)............................................................................. |
64 |
Further Settings (Special)...................................................................... |
65 |
Error handling (ErrMode)....................................................................... |
65 |
Block end character (Blockend)............................................................. |
65 |
Signal feedback (Remote)..................................................................... |
66 |
Transparence (Handthr)........................................................................ |
66 |
Protocol (Protocol)................................................................................ |
66 |
Signal Processing (DTR)....................................................................... |
67 |
Selecting interface (Interf.)......................................................................... |
67 |
Interface buffer (Buffer).............................................................................. |
68 |
Ethernet interface (ETH-INT)..................................................................... |
68 |
Setting Gateway address (Gateway)..................................................... |
69 |

User Guide |
Table of contents |
|
Setting IP address (IPv4 Addr).............................................................. |
|
69 |
Setting Subnet mask (Subnet)............................................................... |
|
70 |
IP address administration (IP Get M)..................................................... |
|
70 |
Banner page (Banner)........................................................................... |
|
71 |
Ethernet speed (EthSpeed)................................................................... |
|
71 |
Selecting character set (CG-Tab)............................................................... |
|
72 |
IBM character set (CharSet)...................................................................... |
|
72 |
National character set (Country)................................................................ |
|
72 |
Slashed zero (Sl.Zero)............................................................................... |
|
73 |
Automatic carriage return (Auto-CR).......................................................... |
|
73 |
Automatic line feed (Auto-LF).................................................................... |
|
75 |
Menu lock (MenLock)................................................................................. |
|
75 |
Language (Language)................................................................................ |
|
76 |
Paper parameters (Paper)......................................................................... |
|
76 |
Form length (Forml)............................................................................... |
|
76 |
First printing position (FormAdj)............................................................ |
|
77 |
Printhead gap manually (Head)............................................................. |
|
78 |
View and tear position (AutoTear).............................................................. |
|
79 |
Line length (Width)..................................................................................... |
|
80 |
Barcode (Barcode)..................................................................................... |
|
80 |
Normal characters and barcode (Barmode)............................................... |
|
82 |
Vertical position after oversized barcode (BarTop)..................................... |
|
83 |
Vertical position after oversized character (LCPtop).................................. |
|
83 |
Form feed mode (Ffmode)......................................................................... |
|
84 |
Setting and activating options (PapOpt)..................................................... |
|
84 |
Activation of tractors (AutoTra).............................................................. |
|
85 |
Setting the left margin (LeftMrg)............................................................ |
|
85 |
Setting the right margin (RightMrg)....................................................... |
|
86 |
Local copy (screen print) from a Coax or Coax/IPDS (FFaftLC) |
............86 |
|
Enable/Disable paper handling features (Paphand).............................. |
|
87 |
Menu settings (example)................................................................................ |
|
88 |
Advanced menu................................................................................ |
|
89 |
Test functions................................................................................................. |
|
89 |
Printer self-test (Rolling ASCII).................................................................. |
|
91 |
Exiting Rolling ASCII test mode............................................................. |
|
92 |
Interface test (Hex-Dump).......................................................................... |
|
92 |
Printout in Hex-Dump............................................................................ |
|
92 |
Terminating Hex-Dump.......................................................................... |
|
93 |
Paper sensor display................................................................................. |
|
93 |
Advanced settings.......................................................................................... |
|
94 |
Automatic paper motion sensor (PMS)...................................................... |
|
97 |
Form length (Forml)................................................................................... |
|
98 |

Options and accessories |
User Guide |
Automatic gap adjustment (AGA)............................................................... |
98 |
Paper handling (Paphand)......................................................................... |
99 |
Increasing the printhead gap (Head up)................................................ |
99 |
Paper width (Pagewid)........................................................................ |
100 |
Left-hand area (Leftzon)...................................................................... |
100 |
Right-hand area (Rightzo)................................................................... |
101 |
Physical left margin (Physlm).............................................................. |
101 |
Bidirectional parallel interface (CX-bid).................................................... |
102 |
Line wrap (Wrap)..................................................................................... |
102 |
Beep at paper end (Sound)...................................................................... |
103 |
Activate PJL language (Jobcntl)............................................................... |
103 |
Settings for paper with dark back (Pap.back)........................................... |
104 |
Graphic print speed (GrSpeed)................................................................ |
104 |
Setting for printing copy paper (HvyForm)............................................... |
105 |
Automatic paper width detection (APW)................................................... |
105 |
Automatic detection of the top paper margin (AED)................................. |
106 |
Serial number (SerialN)........................................................................... |
108 |
Asset number (AssetN)............................................................................ |
108 |
Ignore characters (Ignore)....................................................................... |
109 |
Ignore character (IgnorChr)..................................................................... |
109 |
Troubleshooting.............................................................................. |
110 |
General print problems............................................................................. |
111 |
Problems with the print quality................................................................. |
113 |
Error messages via the display................................................................ |
114 |
Additional display messages.................................................................... |
117 |
Care and maintenance................................................................... |
118 |
Replacing the fuse........................................................................................ |
118 |
Cleaning the housing.................................................................................... |
120 |
Cleaning the interior..................................................................................... |
120 |
Cleaning the platen...................................................................................... |
121 |
Ribbon.......................................................................................................... |
121 |
Cleaning the upper friction............................................................................ |
122 |
Carriage shafts............................................................................................. |
122 |
Specifications................................................................................. |
123 |
Printer specifications................................................................................ |
123 |
Interface specifications............................................................................ |
126 |
Paper specifications................................................................................. |
127 |
Character sets................................................................................ |
128 |
MTPL standard character set....................................................................... |
129 |
MTPL, international substitution characters............................................. |
131 |

User Guide |
Table of contents |
OCR-A character set.................................................................................... |
132 |
OCR-B character set.................................................................................... |
133 |
Available character sets and fonts................................................................ |
134 |
Emulations...................................................................................... |
137 |
General........................................................................................................ |
137 |
Escape sequences....................................................................................... |
137 |
What are escape sequences?...................................................................... |
137 |
MTPL sequences..................................................................................... |
137 |
Control codes........................................................................................... |
137 |
The $$ procedure.................................................................................... |
138 |
Example.............................................................................................. |
138 |
How are escape sequences used?............................................................... |
138 |
MTPL....................................................................................................... |
139 |
Example in BASIC............................................................................... |
139 |
Example in Pascal............................................................................... |
139 |
Printout................................................................................................ |
139 |
List of available control codes...................................................................... |
140 |
Genicom ANSI Emulation........................................................................ |
150 |
PJL commands........................................................................................ |
152 |
Barcode........................................................................................................ |
153 |
List of available barcodes........................................................................ |
153 |
US Postnet barcode................................................................................. |
154 |
Royal Mail Customer barcode.................................................................. |
154 |
KIX barcode............................................................................................. |
155 |
USPS Intelligent Mail barcode................................................................. |
155 |
Large character printing........................................................................... |
156 |
List of additional control codes................................................................. |
157 |
Interfaces........................................................................................ |
158 |
USB 2.0 (Full-Speed, 12 MBit/s)................................................................... |
158 |
Ethernet interface......................................................................................... |
159 |
Hardware............................................................................................. |
159 |
Supported operating systems.............................................................. |
159 |
Supported protocols............................................................................ |
159 |
Designation of IP address................................................................... |
159 |
Configuration....................................................................................... |
159 |
Parallel interface (optional)........................................................................... |
160 |
Connector assignment............................................................................. |
160 |
Serial interface V.24/RS232C (optional)....................................................... |
161 |
Connector assignment............................................................................. |
161 |
Interface cable (serial interface)............................................................... |
162 |
Input signals........................................................................................ |
162 |

Options and accessories |
User Guide |
Output signals..................................................................................... |
162 |
Protocols.................................................................................................. |
163 |
Memory mode XON/XOFF.................................................................. |
163 |
Memory mode Robust XON/XOFF...................................................... |
163 |
Extended menu functions with the ENQ/STX and ETX/ACK protocols |
|
selected............................................................................................... |
163 |
ENQ/STX protocol............................................................................... |
164 |
ETX/ACK protocol............................................................................... |
164 |
Management....................................................................................... |
164 |
Setup................................................................................................... |
165 |
Physical printer port in Ethernet with TCP/IP........................................... |
165 |
Options and accessories................................................................ |
166 |
Options......................................................................................................... |
166 |
Tractor 2, front......................................................................................... |
166 |
Autocut facility.......................................................................................... |
166 |
Printer pedestal........................................................................................ |
166 |
Basket...................................................................................................... |
166 |
Interface modules.................................................................................... |
166 |
Optional firmware..................................................................................... |
166 |
Accessories.................................................................................................. |
167 |
Ribbon cassettes..................................................................................... |
167 |
Programming manuals............................................................................. |
167 |
Your printer has outstanding product features, such as a high print speed, an excellent print quality, a high workload and low running costs. Furthermore it withstands dusty, dirty and hostile environements.
For all these reasons it is a professional solution for many industrial sectors.
Symbols used
Important information is highlighted in this manual by two symbols.
CAUTION highlights information which must be observed in order to prevent injuries to the user and damage to the printer.
NOTE highlights general or additional information about a specific topic.

Options and accessories |
User Guide |
About this manual
The user guide contains a detailed description of the printer, its characteristic features and additional information.
Chapter 1 Printer at a glance lists all the parts of the printer.
Chapter 2 Installation contains start-up instructions and points to note.
Chapter 3 Inserting the ribbon cassette provides step-by-step instructions for changing the ribbon cassette.
Chapter 4 Printer drivers provides step-by-step instructions for installing the printer driver.
Chapter 5 The control panel explains how to control printer operations.
Chapter 6 Paper handling tells you how to load, transport and move the paper to the tear-off position.
Chapter 7 Settings tells you how to adjust the basic settings such as font, character density, print head distance, print line height and tearoff position.
Chapter 8 The Menu contains all the information necessary for controlling the printer via the control panel.
Chapter 9 Advanced menu describes the possible test settings and other technical adjustments of the printer.
Chapter 10 Troubleshooting provides instructions for rectifying faults which do not require the intervention of qualified personnel.
Chapter 11 Care and maintenance provides information on the upkeep of the printer.
Appendix A Specifications informs you about the technical specifications of your printer and the paper which should be used.
Appendix B Character sets lists the available MTPL character sets.
Appendix C Emulations deals with programming via the interface. The available programming sequences are listed.
Appendix D Interfaces explains the interfaces.
Appendix E Options and accessories contains information about options and accessories you can purchase for your printer.
8
User Guide |
Options and accessories |
|
|
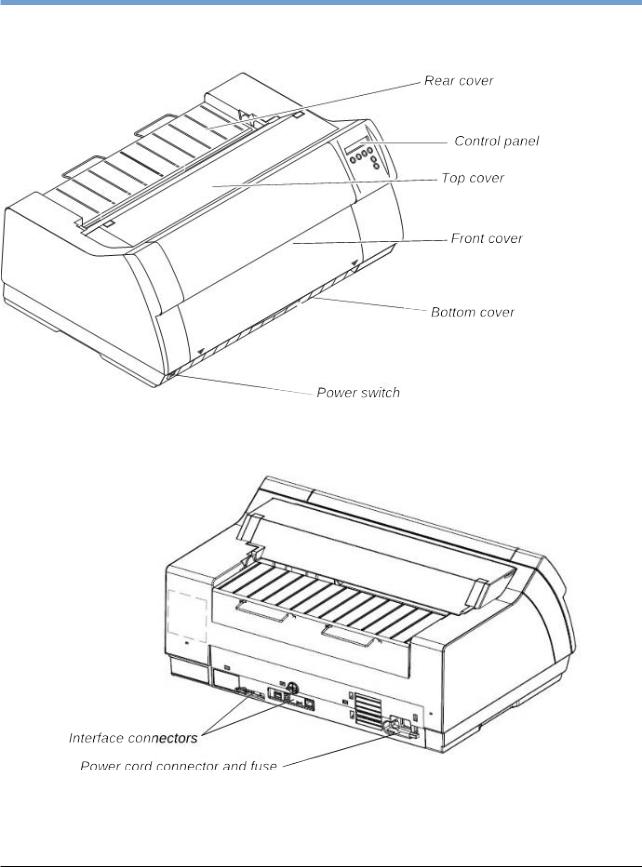
Printer at a glance
9

Options and accessories |
User Guide |
|
|
Printer in tractor mode
10

User Guide |
Options and accessories |
|
|
Paperway
Standard printer: Tractor 1 Options: Tractor 2
For additional paper options, please contact your dealer.
11

Options and accessories |
User Guide |
|
|
Installation
Unpacking the printer
Place your printer on a solid surface (see
Placing your printer).
Make sure that the “Up” symbols point in the correct direction.
Open the packaging, take out the accessory cassette and unpack it. Pull the printer out of the cardboard box towards you and remove the remaining packaging material.
Check the printer for any visible transport damage and completeness. Apart from this CD-ROM () the Quick start guide (), the power cable () and the ribbon () must be included.
If you find any transport damage or if any accessories are missing, please contact your dealer.
12
User Guide |
Options and accessories |
|
|
Placing your printer
Place the printer on a solid, flat, surface, ensuring that the printer is positioned in such a way that it can not topple, and that there is easy access to the control panel and paper input devices. Also ensure that there is sufficient space for the printed output.
If you expect that frequent forward and reverse feeds will occur, you should place the printer as shown in the figure, if possible.
The power supply cable may be damaged if the paper edges constantly chafe the insulating sheath. The user must always ensure that there is sufficient distance between the power supply cable and the paper.
When selecting the printer location, observe the following additional instructions:
Never place the printer in the vicinity of inflammable gas or explosive substances.
Do not expose the printer to direct sunlight. If you cannot avoid placing the printer near a window, protect it from the sunlight with a curtain.
When connecting the computer with the printer, make sure not to exceed the permitted cable length (see Interface specifications).
Ensure sufficient distance between the printer and any heating radiators.
Avoid exposing the printer to extreme temperature or air humidity fluctuations. Above all take care to avoid the influence of dust.
It is recommended to install the printer in a place which is acoustically isolated from the workplace because of the noise it may produce.
13
Options and accessories |
User Guide |
|
|
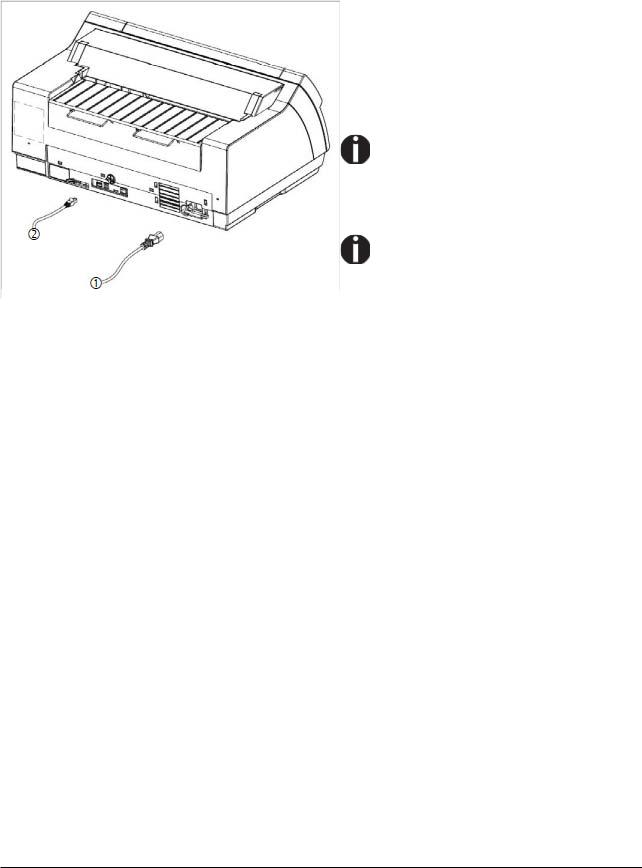
Connecting the printer
Connect the power cable (1) to the power inlet of the printer. Connect the power cable plug to a mains socket.
Make sure that the printer and the computer are switched off and connect the data cable (2) between the printer and the computer.
The printer by default is provided with a USB and an Ethernet interface. For further information about the interfaces, refer to the section
Interfaces.
Only straight connector can be used for power cord.
14
User Guide |
Options and accessories |
|
|
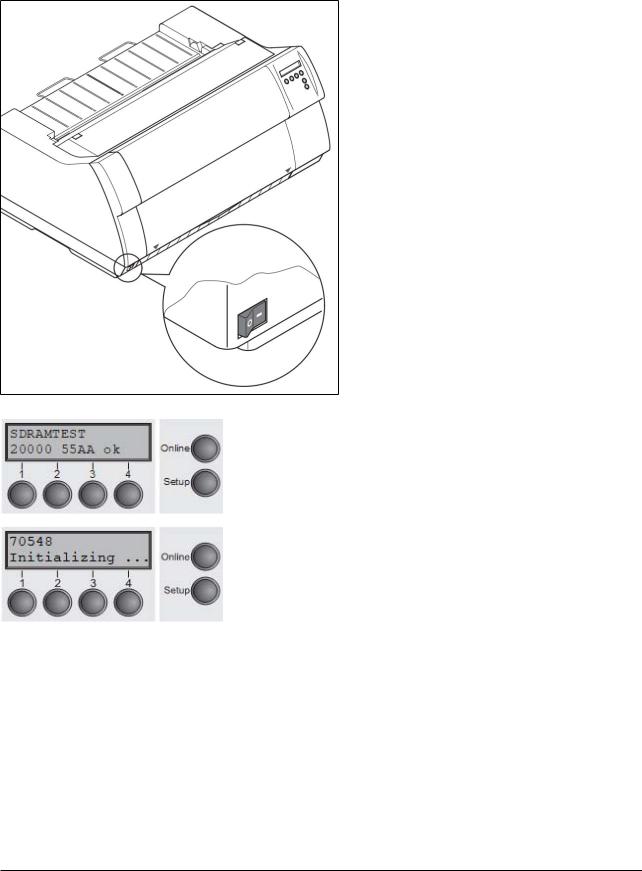
Switching on the printer
The power switch for switching on the printer is located at the bottom left at the front of the printer when viewed from the front.
After switching on, the printer passes through a memory test during the initialization phase. In the display appears temporary the message "SDRAMTEST XXXXX XX ok".
If the memory test is successful finished, the firmware number appears in the display.
After finishing the initialization the printer switches to online mode (see Online mode).
15

Options and accessories |
User Guide |
|
|
Inserting the ribbon cassette
During the process of initialization after powering on, the printer checks if a ribbon cassette is installed. It also checks during the execution of a print job the operativeness of the ribbon cassette. These functions mandatory require the use of the manufacturers original ribbon cassettes (see Accessories). If other ribbon cassettes were used, the message Check Ribbon appears in the display, it is impossible to print.
Before opening the cover, make sure that the printer is switched on so that it can execute automatic preparations for ribbon changing (widening the print head gap).
Open the printer top cover.
Cautiously slide the print head carriage to the left stop (viewed from the printer front).
16
User Guide |
Options and accessories |
|
|
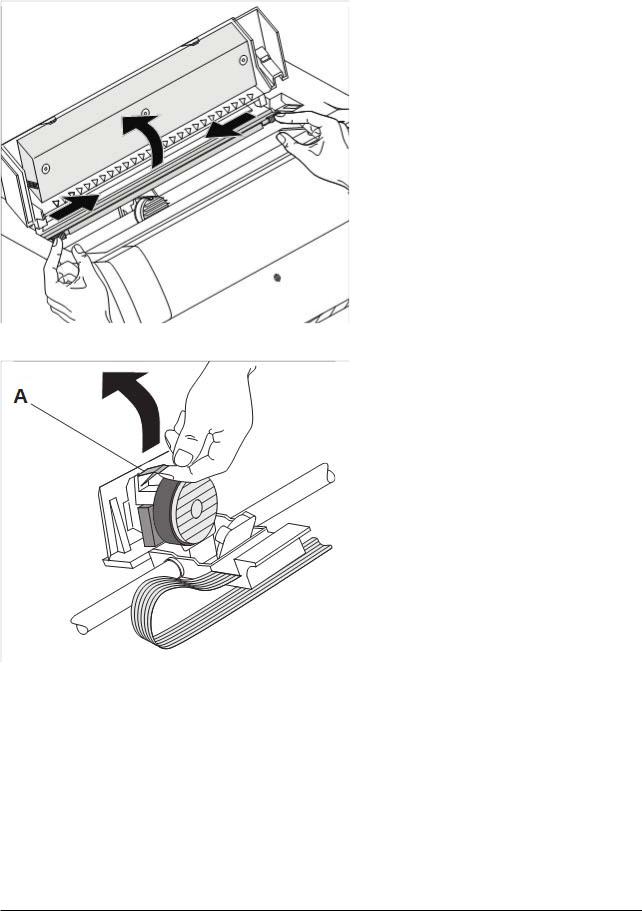
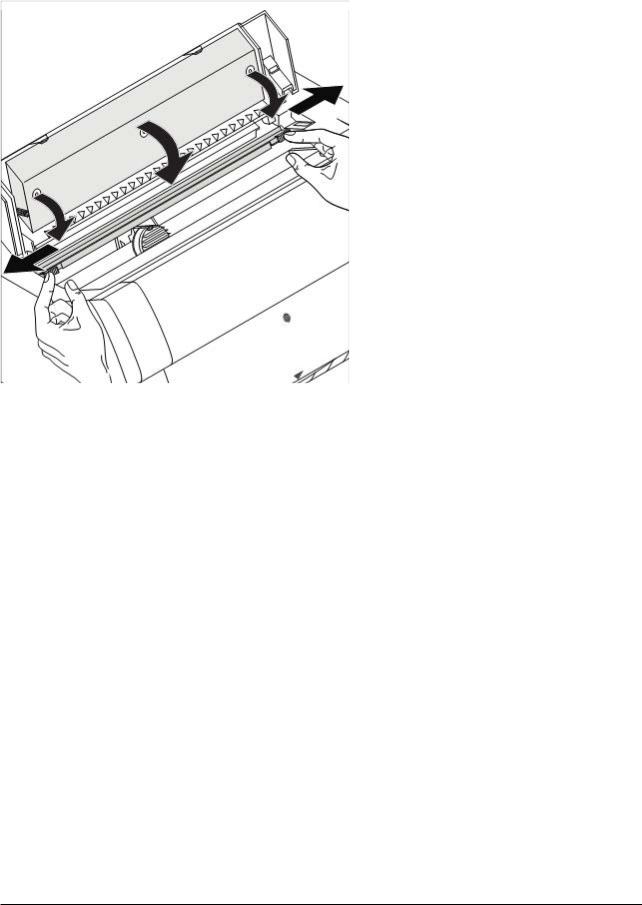
Move the coloured friction tabs to the left and right (direction of the arrows) as shown in the figure and raise the friction mechanism.
Raise the coloured insertion tongue A.
Pull out and remove the coloured strip
A.
17

Options and accessories |
User Guide |
|
|
|
|
|
Insert the coloured ribbon tension knob |
|
|
into the right-hand front location of the |
|
|
new ribbon cassette. Turn the knob in |
|
|
the direction of the arrow in order to |
|
|
take up slack of the ribbon. |
|
Slightly tilt the ribbon cassette forwards and thread in the ribbon between the coloured insertion tongue and the ribbon support (transparent plastic plate).
Align and insert the cassette into the guides on the left and right, then press down until it clicks into place.
18

User Guide |
Options and accessories |
|
|
Insert the coloured tension knob into one of the two locations.
Turn the tension knob in the direction of the arrow to take up slack in the ribbon until it is seated correctly at the bottom in the ribbon support.
Remove the knob.
Press down the coloured insertion tongue A.
19
Options and accessories |
User Guide |
|
|
Press the friction mechanism down until it clicks into place.
Close the top cover.
20
User Guide |
Options and accessories |
|
|
Printer drivers
You need to install a printer driver so that the printer can process the data from your application programs.
An original driver offers the best conditions for optimal printing results. All available printer drivers can be found on the CD-ROM enclosed with the printer, as well as on our internet site, from which you can also download updated versions as necessary.
We are offering the following drivers:
Windows V3 driver for Vista/7/8/8.1/10 and Server 2008-2016 (32/64bit)
V3 is the previous driver architecture from Windows supporting internal printer fonts.
Windows V4 driver for 8/8.1/10 and Server 2012-2016 (32/64bit)
V4 is the new, prospective driver architecture from Windows which will not support printer internal fonts - only Windows fonts will be supported!
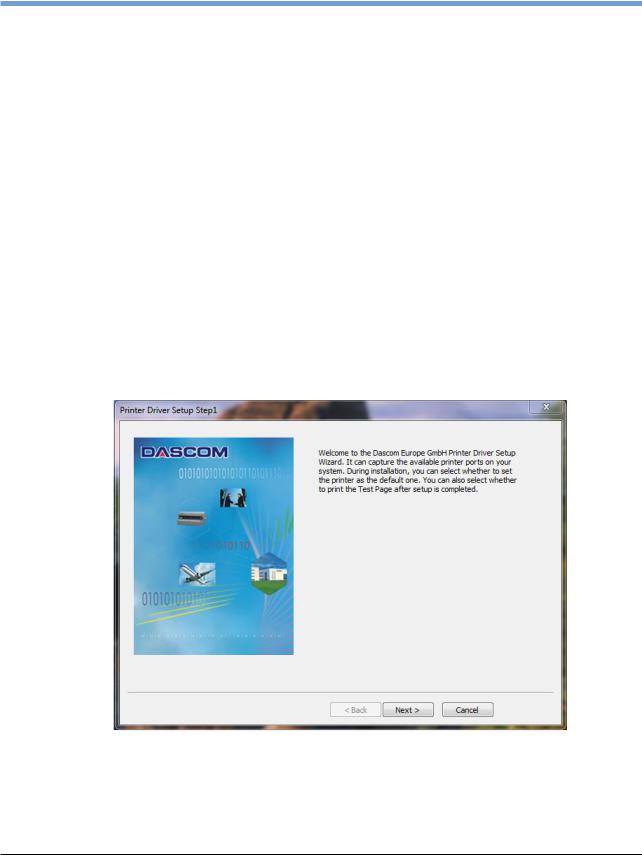
Installing a printer driver in Windows
To install the printer drivers easily please use the DriverSetup.exe wizard which will be part of the drivers:
21

Options and accessories |
User Guide |
|
|
For instructions on installing the printer as a network printer, please consult the documentation supplied with your network operating system and/or printer server, or contact the network administrator.
To install a network printer, you will need Administrator rights.
Other operating systems
The printer can also be used with other operating systems such as Linux or Unix. In this case, set the printer to one of the Epson emulations (LQ-2550/LQ-2170) or IBM emulations (Proprinter XL 24e/Proprinter XL 24e + AGM) for which default drivers are available in most operating systems.
Changing printer settings
You can make permanent changes to the printer settings using the control panel of the printer (see The Menu). Various printer settings can also be entered in the operating system of your PC, however.
1 Click on the Start button in the Windows taskbar.
2 Click on Printers and Faxes to open the printer folder.
3Move the mouse pointer to the appropriate printer symbol, press the right mouse key and click on Properties.
Details of the settings available in this window can be found in the Windows documentation or help pages.
Settings entered in the printer driver via Windows have priority over settings entered via the printer menu. It is therefore possible that the former may overwrite the latter.
22
Loading...