


Quick Start Guide |
Printer Network |
and Tutorial |
and WebPanel |
|
|
|
|
|
|
|
|
Introduction
It is assumed you have the following:
•A working knowledge of your network system and related utilities.
•Access to the supervisor or administrator account as a network administrator.
Supported Environments
The built-in network interface supports the following platforms and protocols:
•Microsoft® Windows® NT 4.0, 2000, XP, Server 2003
•Linux – Red Hat®, SuSE®
•Unix® – Sun Solaris®, HP-UX®, IBM AIX®
•TCP/IP, HTTP, LPR/LPD
Network Interface and Cabling
The printer requires:
•Ethernet 10Base-TX or 100Base-TX interface.
•Category 5e or 6 Ethernet cable with RJ-45 socket connectors.
Connecting the Printer
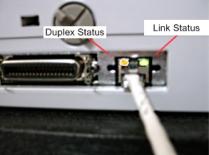
Connect the Ethernet cable to the network interface port RJ-45 connector on the rear center of the printer.
Network Interface Status
There are two status lights (LEDs) next to the RJ-45 connector on the rear panel.
•Right green light (Link Status) is solid: This shows the printer is connected to the network.
•Right green light is blinking: Shows network activity.
•Left yellow light (Duplex Status) is solid: Shows network interface is in full duplex mode.
Note:
Unless the link status light is green, the printer will not be able to connect to the network.
© DASCOM Europe GmbH Version 1.0 |
Page 2 of 25 |
Network IP Configuration
The network interface of the printer requires an IP address.
There are several ways to assign an IP address to the printer:
•DHCP (A Dynamic Host Configuration Protocol server assigned IP address.)
•Static (An IP address obtained from your network administrator added to the printer manually.)
•BOOTP (Bootstrap Protocol server assigned IP address.)
Assigning the IP Address
If the printer menu is locked, please see the User Guide.
1.Automatic DHCP IP address assignment:
•Press <Setup>, then <Menu>.
•Press <Next> until the I/O selection appears. Select <I/O>.
•Press <Next> until the ETH-INT selection appears. Select <ETH-INT>.
•Press <Next> until the IP Get M selection appears. Select <IP Get M> Select <DHCP>
•Verify that your printer was assigned an IP address by printing the “Current Settings” configuration page or in the operator panel menu.
Note:
At power-up, the printer network interface broadcasts a DHCP request for an IP address. If a DHCP server is present, the request will be processed, and an IP address will be returned to the printer network interface. Upon receipt of the IP address, the printer accepts and uses this new IP address (and subnet mask, and default gateway, if any).
Once an IP address has been assigned, the printer network interface will no longer broadcast DHCP requests. The printer will broadcast a DHCP request each time you turn on the printer.
The DHCP server may grant a temporary IP address, called a temporary lease or temporary reservation, which expires later, or may grant a permanent or unlimited time lease or reservation, which does not expire.
Devices such as the printer that are granted a temporary lease will be notified before the lease expires and asked if they would like to extend the lease. The printer network interface will continue extending its lease indefinitely (unless prohibited by your DHCP server configuration), and thus maintain a consistent IP address.
If the printer is not turned on or is not connected to the network when the DHCP server is sending requests to extend the lease, the lease will not be extended. The DHCP server will cancel the lease and may assign the IP address to another device. Therefore, it is highly recommended to explicitly specify the printer lease as permanent or unlimited in your DHCP server configuration.
© DASCOM Europe GmbH Version 1.0 |
Page 3 of 25 |
2.Static assignment using the operator panel:
•Press <Setup>, then <Menu>.
•Press <Next> until the I/O selection appears. Select <I/O>.
•Press <Next> until the ETH-INT selection appears. Select <ETH-INT>, then<IP Addr>
•Enter the value for Octet 1by pressing <OCTET 1>. Use the forward and backward arrows to increment/decrement the number. When finished with each entry press <Set> which will set the currently displayed value. To exit out without changing the value press <Exit>. Enter the Octet 2 value in the same way, pressing <OCTET 2>. To get to Octet 3 and Octet 4, select <Next> and then select <OCTET 3> and <OCTET 4>.
•Enter the default Gateway and Subnet mask in the same way. <Gateway> is available from the screen you are returned to. Press <Next> to select <Subnet>.
•Enter the IP address get method under the selection <IP Get M>. Select <Static>.
3.BOOTP IP address assignment:
•Press <Setup>, then <Menu>.
•Press <Next> until the I/O selection appears. Select <I/O>.
•Press <Next> until the ETH-INT selection appears. Select <ETH-INT>.
•Press <Next> until the IP Get M selection appears. Select <IP Get M> Select <BOOTP>
•Obtain the Ethernet MAC address by printing the “Current Settings” configuration page. Turn off printer.
•Configure your BOOTP server with desired IP address and MAC address.
•Turn on printer.
•Verify that the printer network interface received an IP address by printing the “Current Settings” configuration page or in the operator panel menu.
© DASCOM Europe GmbH Version 1.0 |
Page 4 of 25 |
WebPanel
Introduction
WebPanel is an intuitive browser interface that allows you to remotely manage your network attached printer. From WebPanel, you can do virtually everything you can do from the printer's control panel.
In addition, WebPanel provides full access to all of the TallyCom networking features. Before using WebPanel, you must configure your printer with an IP address, using one of the three methods discussed in the Assigning the IP Address section above.
Note:
The screenshots that are used in this document to demonstrate the functionality will vary depending on the printer model.
Web Browser
WebPanel is accessed from the printer through a web browser, either Netscape Navigator/Communicator version 4.0 through 8.1, or Microsoft Internet Explorer version 4.0 through 7.0. The browser needs to be configured with cache and history empty, and the browser set up to check for new pages every time, to insure that connections to WebPanel will produce the latest data.
WebPanel does not work through a proxy server. NOT use the Proxy Server for local IP addresses. bypass the proxy server if one is set up.
Therefore, the web browser must be setup to The following steps will set up the browser to
•Under Internet Explorer, select Tools->Internet Options->Connections->LAN Settings to get to the Proxy Server settings. Then check the "Bypass Proxy Server for Local Addresses" box, or add the specific print server IP address to the "Exceptions" list.
•In Netscape, select Edit->Preferences->Advanced->Proxies to get to the Proxy Server settings. Then add the local LAN domain, or the specific print server IP address, to the "Exceptions" list.
Disclaimer: Dascom WebPanel runs in conjunction with third party software, notably web browsers, which are designed to run independently of the Dascom software. Dascom cannot control the third party output or how it behaves from release to release. The above browser versions have been tested with WebPanel and while there is full functionality, there will undoubtedly be visual differences and anomalies between products and versions with which Dascom has no control.
Access to WebPanel
Once an IP address has been set up, you can access WebPanel by typing
the printer's IP address into your browser address box (for example: http://10.0.2.125).
© DASCOM Europe GmbH Version 1.0 |
Page 5 of 25 |

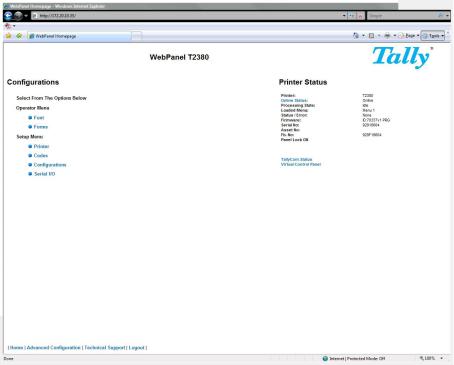
The current status of your printer is displayed on the right hand side of the screen. This is refreshed every 20 seconds, whenever you refresh the page or click Printer Status. The left side allows you to query the printer, configure it and access network options.
Printer Status
Selecting this option refreshes the status display. Displayed on this page are:
•Processing state
•Loaded menu
•Error state
•Firmware level
•Serial number
•Asset number
•Panel lock status
Options to change the online/offline state, network configuration and the virtual control panel for your printer are all accessed from this page.
© DASCOM Europe GmbH Version 1.0 |
Page 6 of 25 |
Printer Configuration
Selecting this option allows you to configure specific parameters in the printer. When one of these menu options is selected, a new page will load showing the options which can be viewed or modified.
© DASCOM Europe GmbH Version 1.0 |
Page 7 of 25 |
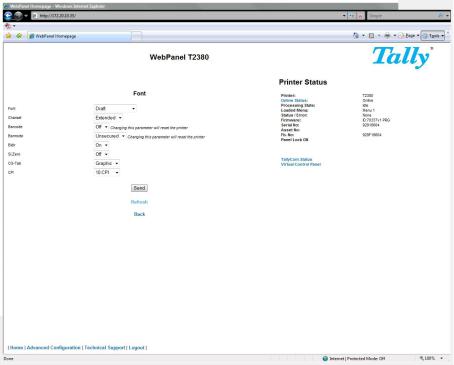
Example 1
Changing a dropdown menu option.
In this example, we are modifying the selected font to a different font.
Select “Font”. A new page appears.
Select the Font dropdown menu and choose the new font.
Select “Send”.
Note:
Changes are not applied until “Send” is selected.
To reset the changed value to the prior value, select “Refresh” instead of “Send”. To return to the prior page without applying the change, select “Back”.
Example 2
Changing an entered value menu option.
In this example, we are modifying the selected form length to a different form length. Select “Forms”. A new page appears:
© DASCOM Europe GmbH Version 1.0 |
Page 8 of 25 |
 Loading...