

Page 1

Getting started with PrintGuide
D10589-01
October 2009
DASCOM Europe GmbH
Heuweg 3
D-89079 Ulm
Germany
www.dascom.com
E-mail:
support.de@dascom.com or
support.gb@dascom.com
Page 2

Introduction
Getting Started with PrintGuide
TM
2
Table of contents
1
Introduction to PrintGuide............................................................................................................3
1.1 Overview.............................................................................................................................3
1.2 Online help.......................................................................................................................... 4
1.3 Start PrintGuide................................................................................................................... 4
1.4 Monitor View ....................................................................................................................... 4
1.4.1 Saving and loading a monitor list.........................................................................5
1.4.2 Monitor filters.......................................................................................................6
1.5 Info Viewer........................................................................................................................10
1.6 Discovery preferences......................................................................................................10
2 TallyCom III PrintServers............................................................................................................12
2.1 Configuring the PrintServer............................................................................................... 12
2.2 Editing and saving configuration....................................................................................... 13
2.3 Example of configuring a logical printer in the TallyCom III PrintServer...........................14
2.4 Network settings................................................................................................................19
2.5 Open in Web browser.......................................................................................................22
2.6 Updating configuration......................................................................................................23
2.7 Updating firmware............................................................................................................. 23
2.8 Backing up configuration................................................................................................... 23
2.9 Copying configuration to another PrintServer...................................................................24
Page 3
Introduction
Getting Started with PrintGuide
TM
3
1 Introduction to PrintGuide
PrintGuide discovers, monitors and configures TallyCom PrintServers.
PrintGuide is your common interface to the TallyCom PrintServers.
PrintGuide acts as:
• Configuration Tool – Once a PrintServer has been attached to the
network, you can use PrintGuide to discover and configure the
PrintServer.
• Status Monitor - When the PrintServer is in operation, you can use
PrintGuide to monitor the status of the PrintServer.
• Maintenance Tool - If the PrintServer needs updated firmware this
can be accomplished with PrintGuide.
Note:The TallyCom PrintServers can also be configured via a Web
browser. See section
2.5
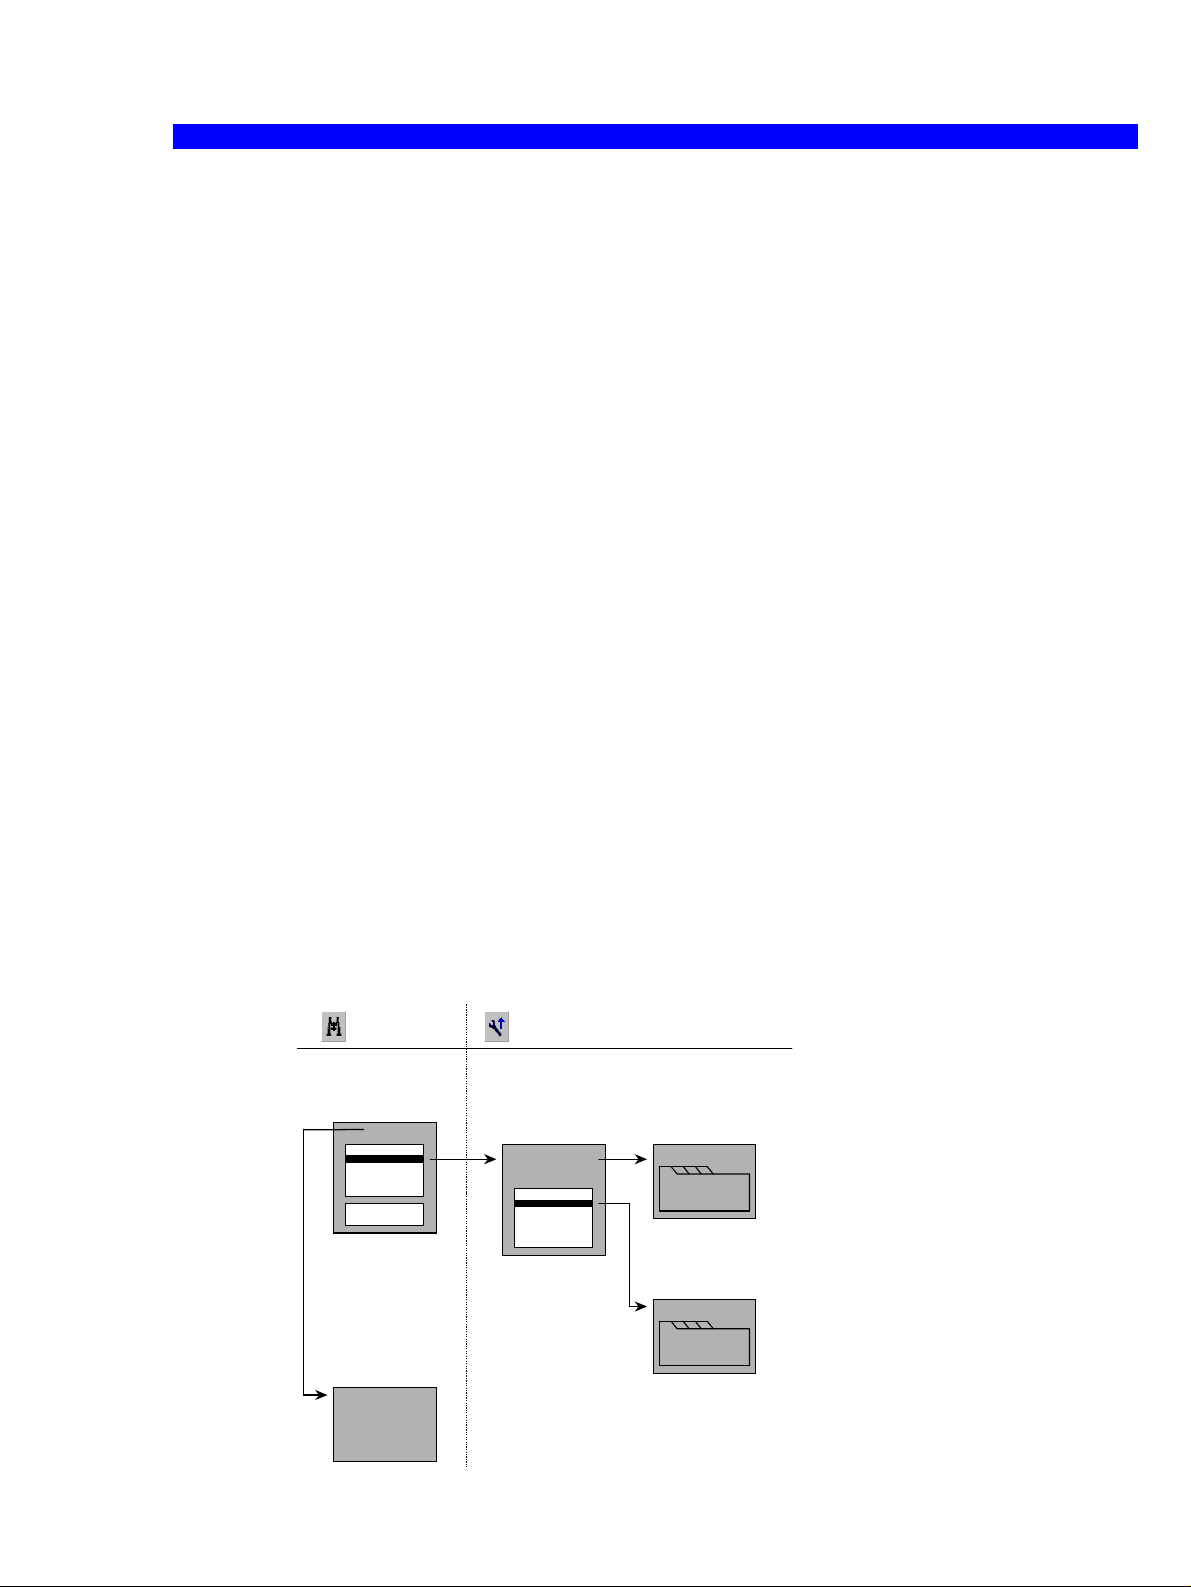
1.1 Overview
The initial window of PrintGuide is the Monitor View. The Monitor View lists the
currently discovered PrintServers and their status. By selecting a PrintServer
on the list, it is possible to see the status of its logical printers.
A double-click on a PrintServer in Monitor View will cause the PrintGuide to
upload the configuration of the selected PrintServer and open the Configuration
View. From here you can control network settings and you can enable, disable,
and configure logical printers.
MONITOR
• Discover PrintServers
and monitor their status.
Options | Preferences
The network protocols
•
used for discovery and
subnets to be browsed.
• Performance tuning
(refresh rates, timeouts,
and delays).
The logical printer
CONFIGURE
represents how the
PrintServer appears to
• E nable, disable and
co nfigure lo g ical p r in t e rs.
NETWORK
(*)
the printing application.
Each logical printer is
configured to accept
data from an input port
and direct it to a
specific output
LOGICAL
PRINTER
destination, typically a
physical printer.
There can be several
logical printers for each
physical printer.
Figure 1
.
Page 4

Introduction
Getting Started with PrintGuide
TM
4
1.2 Online help
This Getting Started will limit itself to an outline description. For details you are
referred to the extensive Help provided with the program, which can be
launched using the ‘F1’ key.
1.3 Start PrintGuide
Click the Start menu, point to Programs-> TallyCom -> PrintGuide and
click PrintGuide.
1.4 Monitor View
Figure 2
The initial screen, Monitor View, presents an overview of the discovered
PrintServers and the status of the selected PrintServer's logical printers.
Note: Lists in Monitor View can be sorted by clicking the column
headings. Click Configured to see the unconfigured (new)
PrintServers at the top of the list. Click Address to sort
PrintServers according to their address (MAC or IP).
Page 5

Introduction
Getting Started with PrintGuide
TM
5
The list of logical printers shows you their status, but if you want to
change settings for them, you have to put PrintGuide into Configuration
View (double-click a PrintServer).
1.4.1 Saving and loading a monitor list
You can save the entire list of discovered devices to file at any time by
selecting Save Monitor List from the Monitor menu.
Note: In the Preferences dialog (select Preferences from the Options
menu) you can choose to save the list automatically when
PrintGuide is closed. Refer to the on-line help for further details.
You can load the previously saved list of discovered devices from file at
any time by selecting Load Monitor List from the Monitor menu.
Note: In the Preferences dialog, you can choose to load the list
automatically when PrintGuide is started. Refer to the on-line help
for further details.
Page 6
Introduction
Getting Started with PrintGuide
TM
6
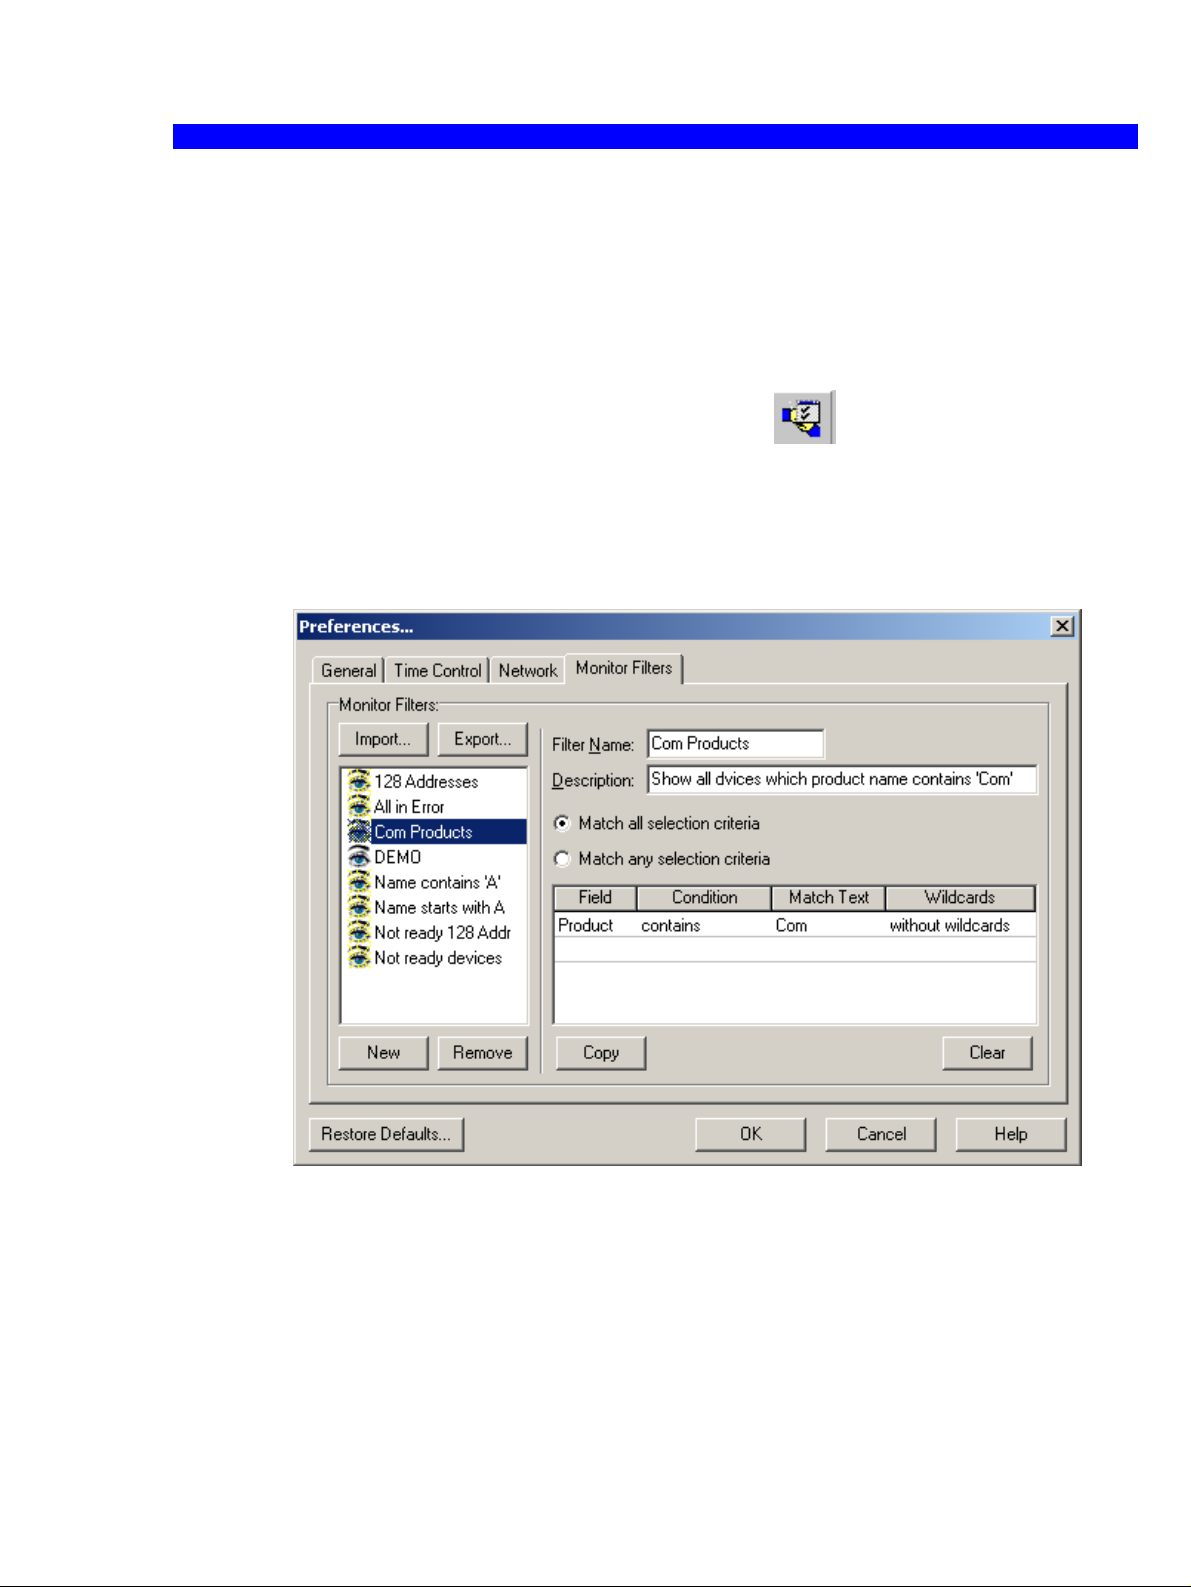
1.4.2 Monitor filters
With this feature, you can define a list of filters to limit the number of
PrintServers shown in the Monitor View. Filters can show device
addresses within a certain range, all devices with a common part of a
name, or all devices that are not ready etc. To define a filter, do the
following:
1. Press the Monitor Filter Preferences button
, or click
Preferences on the Options menu.
A dialog is displayed asking you whether you want to import a few
demonstration filters that illustrate how you can use filtering. If you
select Yes (they can be removed later), the Preferences dialog’s
Monitor Filters tab is displayed as shown in Figure 3:
Figure 3
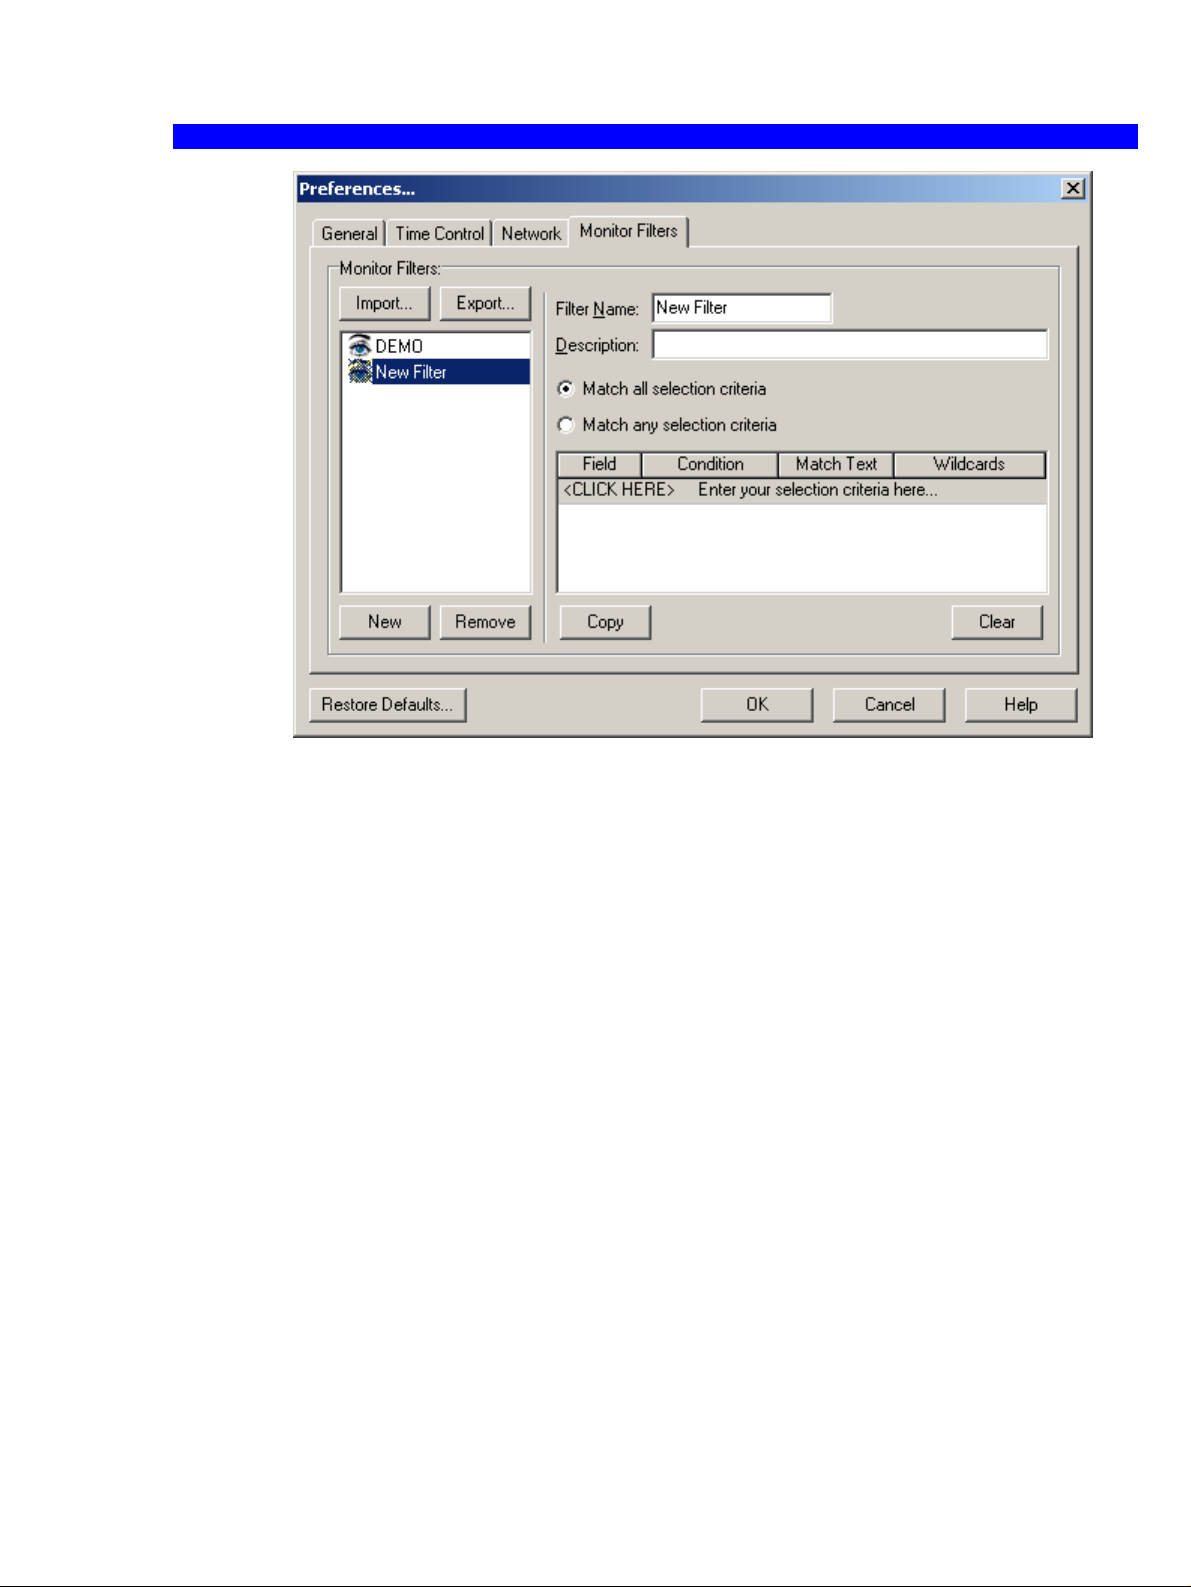
2. Press the New button.
The Monitor Filters tab changes to let you define a new filter; see
Figure 4.
3. Enter a Filter name and (if you want) a Description.
Page 7
Introduction
Getting Started with PrintGuide
TM
7
Figure 4
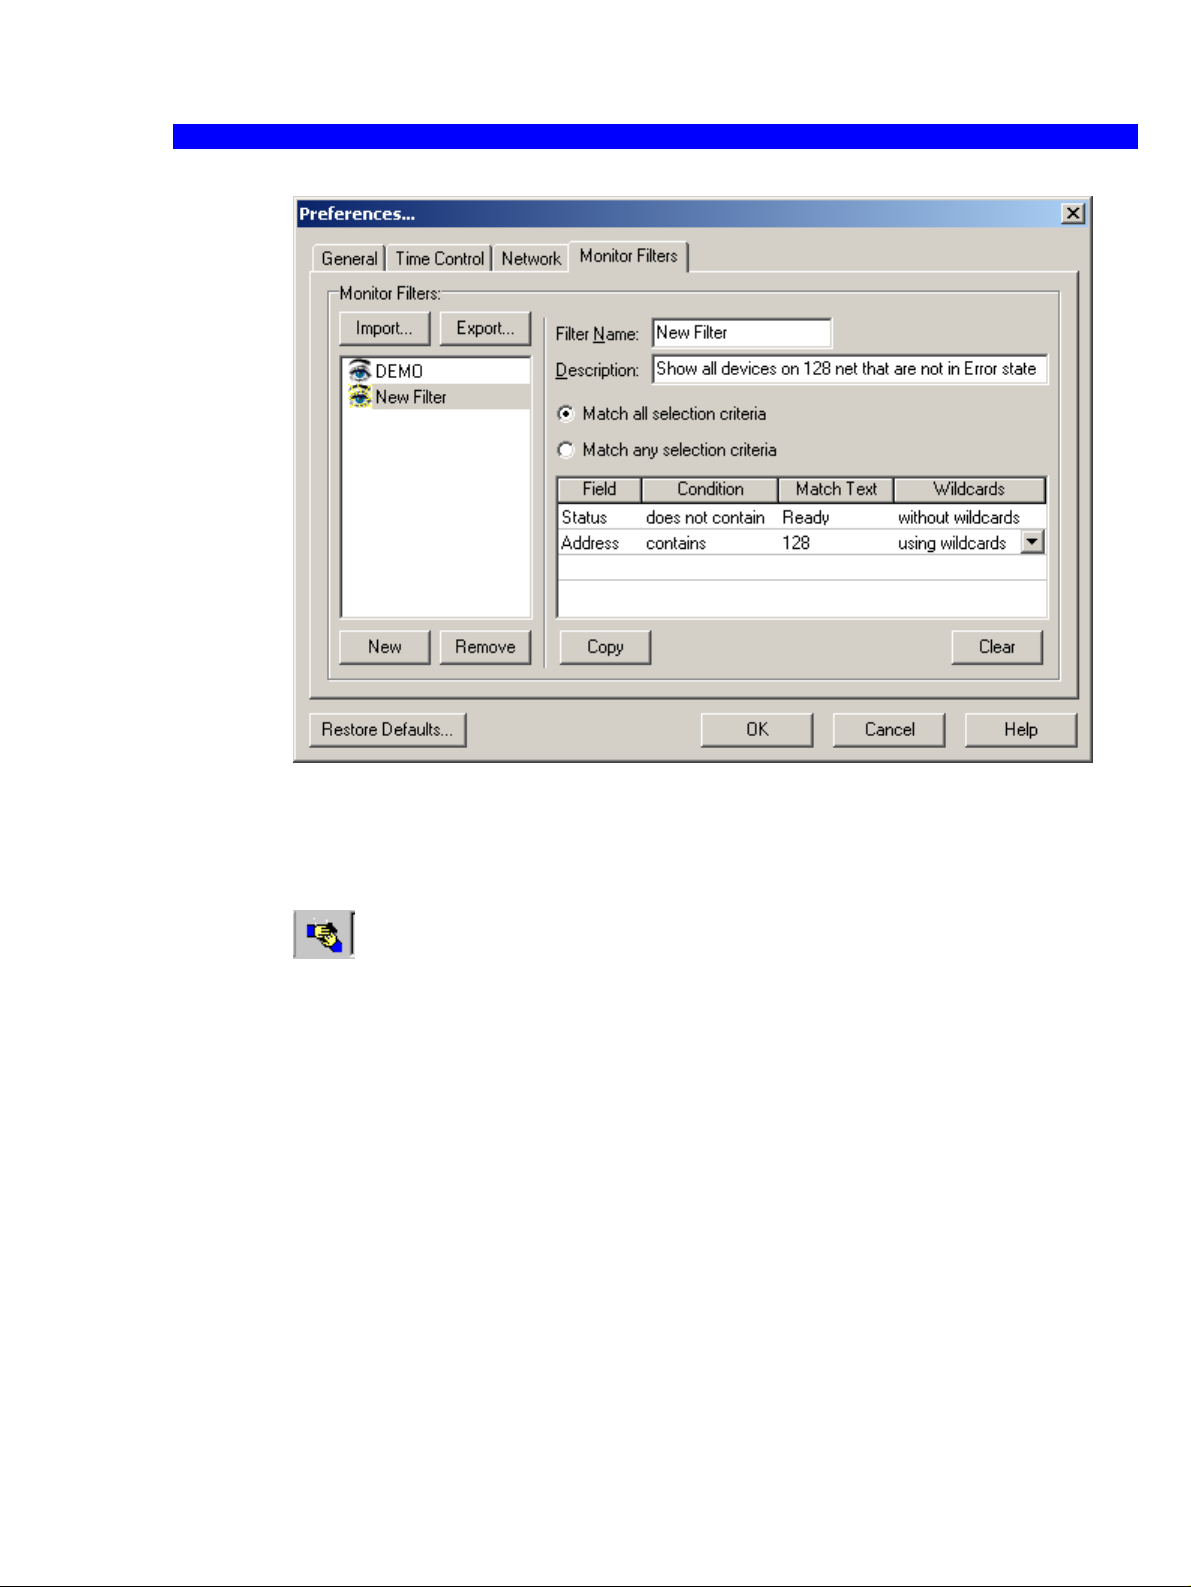
4. Now set up the conditions for the filter (click on the field beneath the
headings to see the options) and save it by pressing OK. You can
see how a filter is defined in Figure 5.
Page 8
Introduction
Getting Started with PrintGuide
TM
8
Figure 5
You can export the filters to a file and you can import them from a file.
You can also copy the filters from a network drive to your own PC.
To activate or deactivate the filters in Monitor view, press the filter button
.
When the filters are activated, the text above the list of detected devices
will say: Detected Devices: (Filtered) (see Figure 6).
Page 9

Introduction
Getting Started with PrintGuide
TM
9
Figure 6
Page 10

Introduction
Getting Started with PrintGuide
TM
10
1.5 Info Viewer
If you right-click the mouse on the highlighted PrintServer and select the
menu item Show Info Viewer, a window will be displayed giving you
useful information about the selected PrintServer. You can also select
Show Info Viewer on the menu Options.
Figure 7, PrintServer Info Viewer
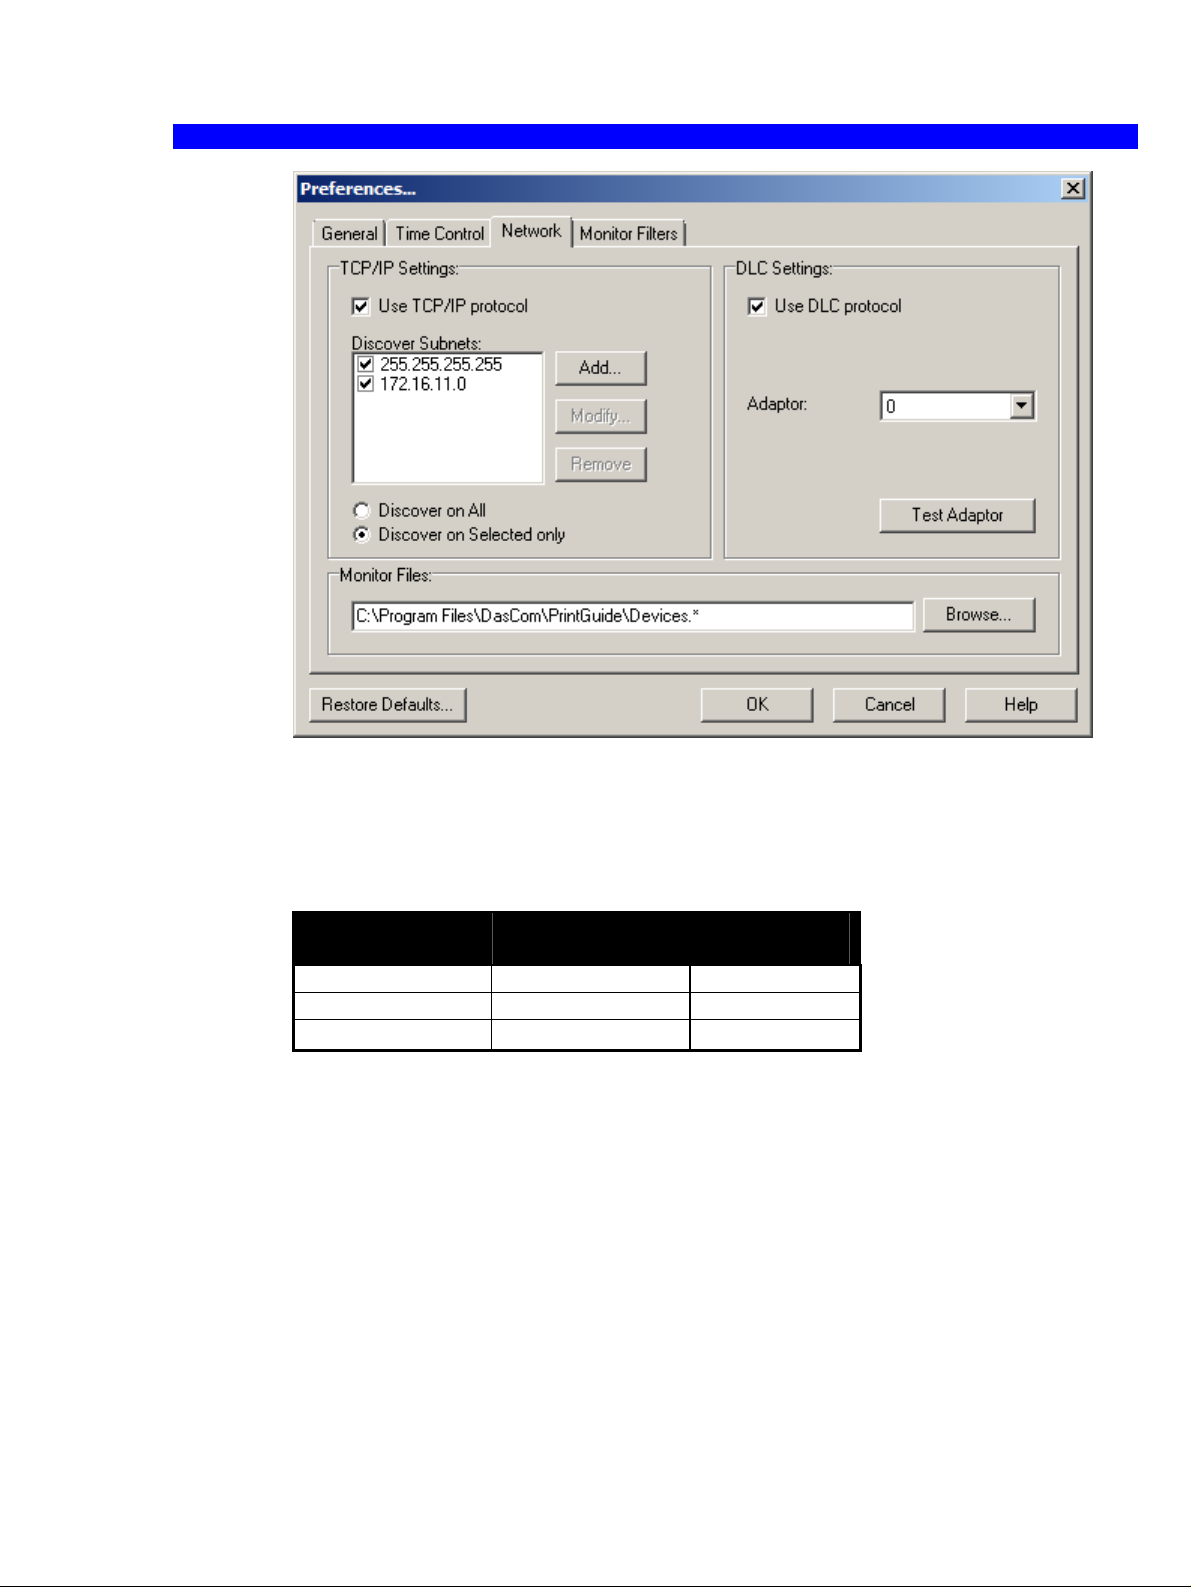
1.6 Discovery preferences
If PrintGuide is unable to discover a PrintServer and the PrintServer is
otherwise running (powered on), it may be because the discovery
preferences need to be changed.
1. On the Options menu, click Preferences.
2. Click the Network tab (See Figure 8).
3. Enable DLC and/or TCP/IP protocol.
4. Edit the corresponding protocol settings, as you require.
Page 11
Introduction
Getting Started with PrintGuide
TM
11
Figure 8
Table 1 shows the connection between the discovery protocol, the
PrintServer’s TCP/IP capabilities, and on what address (IP or MAC) the
PrintServer will be listed under Monitor View.
Discovery
Protocol
DLC
DLC and TCP/IP
TCP/IP
Table 1
TCP/IP
Disabled
TCP/IP
Enabled
MAC MAC
MAC MAC or IP (*)
none IP
(*) The first one that reaches PrintGuide will appear in Monitor View.
Page 12

™
Getting Started with PrintGuide
12
2 TallyCom III PrintServers
Once the hardware printer attachment has been installed according to its
”Installation & Operator’s Guide”, you should be able to discover it with
PrintGuide (In Monitor View, select Monitor, Discover).
The Hardware PrintServer appears in the Monitor View’s list of Detected
Devices with either IP address or universal MAC address (See label
attached to the bottom or rear panel of the hardware printer attachment).
The MAC address looks like this: 00036e00483a.
The DLC discovery protocol must be enabled, unless the PrintServer has
an IP address. Please note that the DLC protocol is not available on
Windows ME and XP. Please refer to the manual that came with your
PrintServer for more information on assigning the IP address.
Refer to “1.6 Discovery preferences” if the PrintServer remains
undetected.
2.1 Configuring the PrintServer
Now that the PrintServer is installed and discovered, only two conditions
remain to be fulfilled before the PrintServer can be used for printing:
• One or more logical printers must be enabled and configured.
(Refer to “Example of configuring a logical printer”)
• The logical printer's corresponding network protocol must be
enabled and configured (refer to 2.4, Network settings)
Table 2 shows some of the logical printers and the network protocol they
rely on.
Logical
Printer
LAN (Novell) using IPX/SPX IPX/SPX
LAN (TCP/IP) using LPD TCP/IP
LAN (TCP/IP) using Port 9100 TCP/IP
FTP Printer FTP
IPP 1.0 Printer using HTTP TCP/IP
LAN (Windows) using NetBEUI/NetBIOS NetBEUI
Table 2
Network
Protocol
Page 13

™
Getting Started with PrintGuide
13
2.2 Editing and saving configuration
To edit a PrintServer’s configuration, do one of the following:
• Double-click on it in the list in Monitor View
• Highlight it in the list and select Edit Configuration from the
PrintServer menu
• Highlight it in the list and click the Edit Configuration
• Right-click on it in the list and select Edit Configuration from the
menu
When you finish editing, you must save the configuration. You can either
save it in the PrintServer or you can save it in a file.
To save in the PrintServer, do one of the following:
• Select Save Configuration from the PrintServer menu
• Right-click on it in the list and select Save Configuration from the
menu
• Highlight it in the list and click the Save Configuration
To save to a file, do one of the following:
• Click on the
• Select Save / Save As from the File Menu
Note: When you save to a file, PrintGuide saves the original full
configuration, followed by the changes applied to the configuration.
button.
button.
button.
Page 14

™
Getting Started with PrintGuide
14
2.3 Example of configuring a logical printer in the TallyCom III PrintServer
1. Start the PrintGuide program (See “Start PrintGuide”).
2. Locate a PrintServer on the list of Detected Devices (Figure 9)
and double-click it. The PrintServer is identified by its Address and
Name.
Figure 9
3. Type a Print Server Name, Contact Person, and PrintServer
Location (Figure 10). This information is optional, but it will help
you identify the PrintServer in the future.
Note: The information in the remaining dialogs depend on the PrintServer
and the logical printer selected. Consult the online help for
additional information.
Page 15

Getting Started with PrintGuide
4. Locate a Logical Printer (Figure 10) that matches your
requirements and double-click it.
™
15
Figure 10
Page 16

Getting Started with PrintGuide
5. Adjust the settings to match your requirements (Figure 11). Select
the Enabled check box to enable the printer.
™
16
Figure 11
Page 17

Getting Started with PrintGuide
™
17
Figure 12
6. Then click the Physical Printer tab to get to the Printer Settings
(Figure 12).
7. Click the Strings tab to get the Strings Settings (Figure 13).
8. Click Output Driver (Figure 14).
Note: All dialogs shown will vary depending on the print server and the
type of logical printer configured.
Page 18

Getting Started with PrintGuide
™
18
Figure 13
Page 19

Getting Started with PrintGuide
™
19
Figure 14
2.4 Network settings
You can enable/ disable and configure settings for various network
protocols. In addition, you can configure the local MAC address, e-mail
notification settings.
1. In the Configuration menu, select Network Settings… (or just
click the Network button) See (Figure 10).
2. Select the Network Protocol you intend to use, and click the
corresponding tab to configure the network protocol (Figure 15).
Page 20

Getting Started with PrintGuide
™
20
Figure 15
Table 3 lists the network protocols/tabs and gives a short description of
their contents.
Page 21

Getting Started with PrintGuide
Tab Description
TCP/IP IP address, subnet mask, gateway, host name, and use
of BootP Server.
NetBEUI Microsoft Windows protocol settings, NetBIOS name and
WorkGroup.
SNMP Simple Network Management Protocol is enabled in
conjunction with TCP/IP.
IPX/SPX Novell NetWare protocol setting for NCP, EPS, and
supported frame type.
PU/LU IBM SNA protocol settings for IBM host configuration
(Block Number, ID Number, Remote MAC address,
Local SAP, and Remote SAP).
ida802.2 ida802.2 alias name.
MAC Use of local administered MAC addresses. Tab is always
present.
Notification SMTP Server address, sender (PrintServer) address,
receiver address, printer events which result in an e-mail
™
21
Table 3
Note: There are no settings for AppleTalk. Hence no AppleTalk Tab will
show when enabled.
Page 22

™
Getting Started with PrintGuide
22
2.5 Open in Web browser
You can open the Web browser directly from PrintGuide and use it to
configure the selected PrintServer.
1. Highlight the PrintServer in the list.
2. Right-click the PrintServer or click the PrintServer menu.
3. Select Open in Web Browser (see the example in Figure 16).
Figure 16, Open in Web browser
Page 23

™
Getting Started with PrintGuide
23
2.6 Updating configuration
You can update the selected PrintServer by sending an existing file to it.
To do this:
• In Monitor View, select Update Configuration from the PrintServer
menu.
When you select Update Configuration, a File Open dialog is displayed
prompting for the name of the file to be sent.
2.7 Updating firmware
You can update the selected PrintServer’s firmware by sending an
existing file to it. To do this:
• In Monitor View, select Update Firmware from the PrintServer
menu.
When you select Update Firmware, a File Open dialog is displayed
prompting for the name of the file to be sent.
2.8 Backing up configuration
You can make a backup of the selected PrintServer’s configuration in a
file. To do this:
• In Monitor View, select Backup Configuration from the PrintServer
menu.
When you select Backup Configuration, a Save As dialog is displayed
prompting for the name and location of the file to which the configuration
is to be saved.
Note: When you make a backup, the whole configuration is saved, unlike
with Save Configuration… which only saves a part of the
configuration. Files created using Backup Configuration… have
extension .upd.
Page 24

™
Getting Started with PrintGuide
24
2.9 Copying configuration to another PrintServer
You can copy the currently selected PrintServer’s configuration to
another PrintServer. To do this:
1. In Configuration View, select Copy Configuration to from the
Configuration menu.
2. In the dialog displayed, locate and double-click the PrintServer to
which you want to copy the configuration.
This feature is only recommended for advanced users.
Note: When you copy configuration to a PrintServer, its current
configuration is overwritten and lost.
 Loading...