

Page 1

Quick Start Guide
U1-multi-DascomTally.fm Seite 1 Samstag, 19. September 2009 2:14 14
Kurzanleitung
Guide de démarrage rapide
Guida di avvio rapida
n
Guía de instalación
T5040 Matrix Printer
Page 2
Important Information
U1-2-multi.fm Seite 2 Dienstag, 5. Dezember 2006 11:28 11
This equipment generates and uses ra dio freque ncy energy an d if not in stalled and used properly, that i s, i n acco r dan ce w ith the manufacturer's
instructions, may cause interference in radio and television reception. It
has been type tested and found to comply with the l imits for class B computing devices in accordance with the specificati on in subpart J of part 15
of FCC rules, which are designed to provide reasonable protection
against such interference in a residential installation. However, there is
no guarantee that interference will not occur in a partial installation. If this
equipment does cause interference t o radio or television reception, which
can be determined by turning the equipment off and on, the user is encouraged to try to correct the interference by o ne or more of the f ollowing
measures:
■ Reorient the receiving antenna,
■ Relocate the peripheral away from the receiver,
■ Move the peripheral away from the receiver
■ Plug the peripheral into a different ou tlet, so that the peri pheral and re -
ceiver are on different branch circuits
If necessary, the user should consult the de al er o r an experienced radio/
television technician for additional suggestions. The user may find the following booklet, prepared by the Federal Communications Commission,
helpful: “How to Identify and Resolve Radio-TV Interference Problems”.
This booklet is available from the U.S. Government Printing Office,
Washington DC 20402 Stock No. 004.000.00345.4.
WARNING: To comply with FCC regulations on electromagnetic inter-
ference for a class B computing device, the printer cable must be shielded. To assure compliance with FCC regulations for a computing device,
use a shielded interface cable with a metal shell connector. The use of
cables not properly shielded may result in violating FCC regulations.
This digital apparatus does not exceed the class B limits for radio noise
emissions from digital apparatus as se t out in the r adio interf erence regu lations of the Canadian department of communications.
This unit complies with DOC standard C108.8-M 1983
ATTENTION: Le présent appareil numérique n'ement pas de bruits radioélectriques déspassant les limites applicable s aux appareils num ériques
de la classe B prescrites dans le règlement sur le brouillage radio-électrique édicté par le minstère des communications du Canada.
The paper used is made of raw materials treated w it h a chlor i ne- fr ee
bleaching process.
Das verwendete Papier ist aus chlorfrei gebleichten Rohstoffen hergestellt.
Le papier utilisé est fabriqué à partir de matières premières blanchis
sans chlore.
La carta utilizzata è prodotta con materiali sbiancati senza cloro.
El papel utilizado ha sido fabricad o con un pro ceso de blan queo li bre
de cloro.
This device fulfils the European standards requirements by complying with the Directive of the Commission dated May 3, 1989 (89/336 /EEC) relati ng to electroma gnetic compatib ility and the Directive dated
February 19, 1973 (73/23/EEC) relating to low-voltage electrical equipment. Conformity wit h the above
Note: Conformity may be affected by:
■ using interface cables not complying with the specifications
■ non-observance of important instructions in the operator's manual
■ installing components not approved for this device by the manufacturer
■ unauthorized manipulation
gekennzeichnet.
Hinweis: Die Konformität kann beeinflußt werden durch:
■ Benutzung von nicht spezifizierten Schnittstellenkabeln
■ Nichtbeachtung wichtiger Hinweise der Bedienungsanleitung
■ Ersetzen von Bauteilen, die nicht vom Hersteller für dieses Gerät freigegeben wurden
■ Eingriffe durch Unbefugte
Remarque: La conformité peut être influencée par:
■ l'utilisation de câbles d'interface non spécifiés
■ le non-respect de consignes importantes du manuel d'utilisation
■ le remplacement de composants qui n'ont pas été homologués pour cet appareil par le constructeur
■ l'intervention de personnes non autorisées
Nota: La conformità può essere in fluenzata tramite:
■ Utilizzo di cavi interfaccia non specificati
■ Inosservanza di importanti indicazioni delle istruzioni per l'uso
■ Sostituzione di componenti per i quali non è stato dato il benestare dal produttore per questo apparecchio
■ Interventi tramite persone non autorizzate
equipo está dotado de la marca CE.
Indicación: La conformidad puede estar influida por:
■ la utilización de cables de interface no especificados
■ la inobservancia de indicaciones importantes con t en id as en el man ua l de serv i cio
■ la sustitución por componentes, que no han sido homologados por el fabricante para el equipo en cuestión
■ intervenciones de personas no autorizadas
Maschinenlärminformations-Verordnung 3. GPSGV: Der höchste Schalldruckpegel beträgt 70 dB(A) oder weniger
gemäss EN ISO 7779.
mentioned Directives is indicated by the CE symbol attached to the device.
Dieses Gerät erfüllt die Anforderungen der Eur op äi sche n No rm en durch Einhaltung der Richtlinie des
Rates vom 3. Mai 1989 (89/336/EWG) bezüglich der Elektromagn etischen Verträg lichkeit sowie di e Richtlinie vom 19. Februar 1973 (73/23/EWG) bezüglich Elektrischer Betriebsmittel mit Niederspannungen. Die
Konformität zu den oben angeführten Richtlinien ist durch das am Gerät angebrachte CE-Zeichen
Cet appareil remplit aux exigences des normes européennes en respectant la directive du Conseil du 3
mai 1989 (89/336/CE) relative à la compatibilité électromagnétique et la directive du 19février 1973 (73/
23/CE) en matière du matériel à basse tension. La conformité a ux directives mentionnées ci-dessus est
repérée par la marque de conformité de la Communauté Européenne (CE).
Questo apparecchio soddisfa le richieste delle norme europee rispettando la direttiva del consiglio del 3
Maggio 1989 (89/336/CEE) relativa alla compatibilità elettromagnetica nonché la direttiva del 19 Febbraio
1973 (73/23/CEE) relativa a mezzi di produzione elettrici a bassa tensione. La conformità alle direttive
sopra citate è contrassegnata con il simbolo CE applicato sull'apparecchio.
Este equipo corresponde a lo exigido en las nor mas europe as a base del cum plimiento de la directri z del
Consejo del 3 de mayo de 1989 (89/336/CEE) en lo que se refiere a la compatibilidad electromagnética
así como de la directriz del 19 de febrero de 1973 (73/23/CEE) en lo que se refiere a los materiale s
eléctricos con bajas tensiones. Para señalizar la conformidad con las directrices antes mencionadas, el
WARNING For continued protection against risk of fir e, repl ace only wit h sa me ty pe and rat ing of f use. On ly t raine d and q ualif ied pe rso nnel may open covers or
WARNUNG Aus Brandschutzgründen nur Sicherungen desselben Typs und derselben Auslegun g verwenden. Das En tfernen oder Öffn en von Abdeckungen und
ATTENTION Pour ne pas compromettre la protection contre les risques d'incendie, remplacer par un fusible de même type et de mêmes caractèristiques nomi-
ATTENZIONE Per evitare il pericolo di incendio, utilizzare esclusivamente fusibili dello st esso tipo e dell a stessa portata. So lo perso nale qualificat o puo'acced ere a
ADVERTENCIA Sólo utilizar fusibles del mismo tipo y con las mismas características para evitar cualquier riesgo de incendio. Las cubiert as y piezas sólo deberán ser
remove parts that are not explicitly shown and described in the User Guide as being accessible to the operator.
Teilen darf nur durch geschultes Fachpersonal vorgenommen werden. Ausgenommen hiervon sind nur solche Abdeckungen und Teile, deren Entfernen bzw. Öffnen in der Bedienungsanleitung ausdrücklich gekennzeichnet und beschrieben sind.
nales. Seul un personnel qualifié et formé est habilité à démonter les sous-ensembles de la machine qui ne sont pas formellement indiqués dans le
Manuel d'utilisation meme s'ils sont accessibles par l'opérateur.
parti che non siano esplicitamente descritte nelle Istruzioni per l'operatore come accessibill all'operatore.
quitadas o abiertas por personal especializado. Se exceptúan de esta regla sólo las cubiertas y piezas cuya retirada y apertura estén indicadas y
descritas expresamente en las Instrucciones de uso.
Page 3
Quick start guide Table of contents
Quick Start-en.book Seite I Dienstag, 5. Dezember 2006 10:48 10
Table of contents
QUICK START GUIDE
Introduction . . . . . . . . . . . . . . . . . . . . . . . . . . . . . . . 1
Symbols used. . . . . . . . . . . . . . . . . . . . . . . . . . . 1
Important safety instructions . . . . . . . . . . . . . . . 1
Using the Online CD-ROM. . . . . . . . . . . . . . . . . 2
Contents of the Online CD-ROM . . . . . . . . . . . . 2
Hardware requirements . . . . . . . . . . . . . . . . . . . 2
Troubleshooting . . . . . . . . . . . . . . . . . . . . . . . . . 2
Printer at a glance . . . . . . . . . . . . . . . . . . . . . . . . . . 3
Installation . . . . . . . . . . . . . . . . . . . . . . . . . . . . . . . . 5
Unpacking the printer. . . . . . . . . . . . . . . . . . . . . 5
Placing the printer . . . . . . . . . . . . . . . . . . . . . . . 6
Checking the printer voltage . . . . . . . . . . . . . . . 7
Connecting the printer . . . . . . . . . . . . . . . . . . . . 7
Switching on the printer . . . . . . . . . . . . . . . . . . . 8
Control panel . . . . . . . . . . . . . . . . . . . . . . . . . . . . . . 9
Operating the printer. . . . . . . . . . . . . . . . . . . . . . . 10
Inserting a document . . . . . . . . . . . . . . . . . . . . 10
Inserting a passbook . . . . . . . . . . . . . . . . . . . . 11
ENGLISH
Service and Maintenance . . . . . . . . . . . . . . . . . . . 14
Replacing the ribbon cassette . . . . . . . . . . . . . 14
Printing the Status Page . . . . . . . . . . . . . . . . . 19
Technical data . . . . . . . . . . . . . . . . . . . . . . . . . . . . 20
Printer specifications . . . . . . . . . . . . . . . . . . . . 20
Paper specifications. . . . . . . . . . . . . . . . . . . . . 21
Consumables and accessories . . . . . . . . . . . . 22
I
Page 4
Quick Start-en.book Seite II Dienstag, 5. Dezember 2006 10:48 10
Page 5
Quick start guide Introduction
Quick Start-en.book Seite 1 Dienstag, 5. Dezember 2006 10:48 10
Introduction This Quick start guide is intended as a quick introduction into working with the
printer and also to enable inexperienced users to operate the device properly. It describes the most important functions of the printer and contains the essential information for your everyday work with the printer. A more detailed description of the
printer, its characteristic features, and further information is contained in the User
guide on the Online CD-ROM, which is inserted at the back of this manual.
` Symbols used Important information is highlighted in this manual by two symbols.
ENGLISH
` Important safety
instructions
STOP
STOP
STOP
CAUTION highlights informati on wh ic h must be ob serv ed in or d er to pr ev ent in juries to the user and damage to the printer.
NOTE highlights general or additional information about a specific topic.
Read the following instructions thoroughly before starting up your printer in order
to prevent injuries and avoid damage to the device.
■ Keep this Quick start guide in a place which is easily accessible at all times.
■ Place the printer on a solid and even base so that it cannot fall down to the
ground.
■ Do not expose the printer to high temperatures or direct sunlight.
■ Keep all liquids away from the printer.
■ Protect the printer from shock, impact and vibration.
■ Be sure to connect the printer to a socket with the correct mains voltage.
■ Always disconnect the system from the mains before opening the device to per-
form maintenance work or remedy errors.
■ The power supply cable may be damaged if the paper edges constantly chafe the
insulating sheath. The user must always ensure that there is sufficient distance
between the power supply cable and the paper.
Never carry out maintenance or repair work yourself. Always contact a qualified
service technician.
Whenever you want to disconnect the printer from the power supply, pull the plug
out from the mains socket after having switched off the printer correctly.
Additional safety instructions are provided at the relevant places in the text.
1
Page 6

Introduction Quick start guide
Quick Start-en.book Seite 2 Dienstag, 5. Dezember 2006 10:48 10
` Using the Online CD-ROM First install the Adobe Acrobat Reader on your hard disk, unless the program has
already been installed. To install it, follow the steps described in the README file
in the READER directory.
To start the online documentation, call the Windows Explorer and double click on
the START.PDF file. Then follow the instructions and menus on the screen.
` Contents of the Online
CD-ROM
The Online CD-ROM contains:
– User guide: A detailed description of the printer and its impressive features;
– Drivers: Windows 95/98, Windows 2000, Windows XP;
– Additional documentation: Programmer’s application manuals, lists of the sup-
ported printer control codes and sequences.
If your CD-ROM is be defective or missing, please consult your dealer. The Online
Documentation is also available as a hardcopy (at a cost) or can be downloaded via
the Internet.
` Hardware requirements Minimum hardware requirements: PC 486 MHZ, quad-speed CD-ROM,
15" display screen, mouse.
` Troubleshooting The User’s Manual on the Online CD-ROM contains detailed Information on how
to rectify errors. It deals with general printing problems as well as problems with
the print quality and paper feed.
2
Page 7
Quick start guide Printer at a glance
Quick Start-en.book Seite 3 Dienstag, 5. Dezember 2006 10:48 10
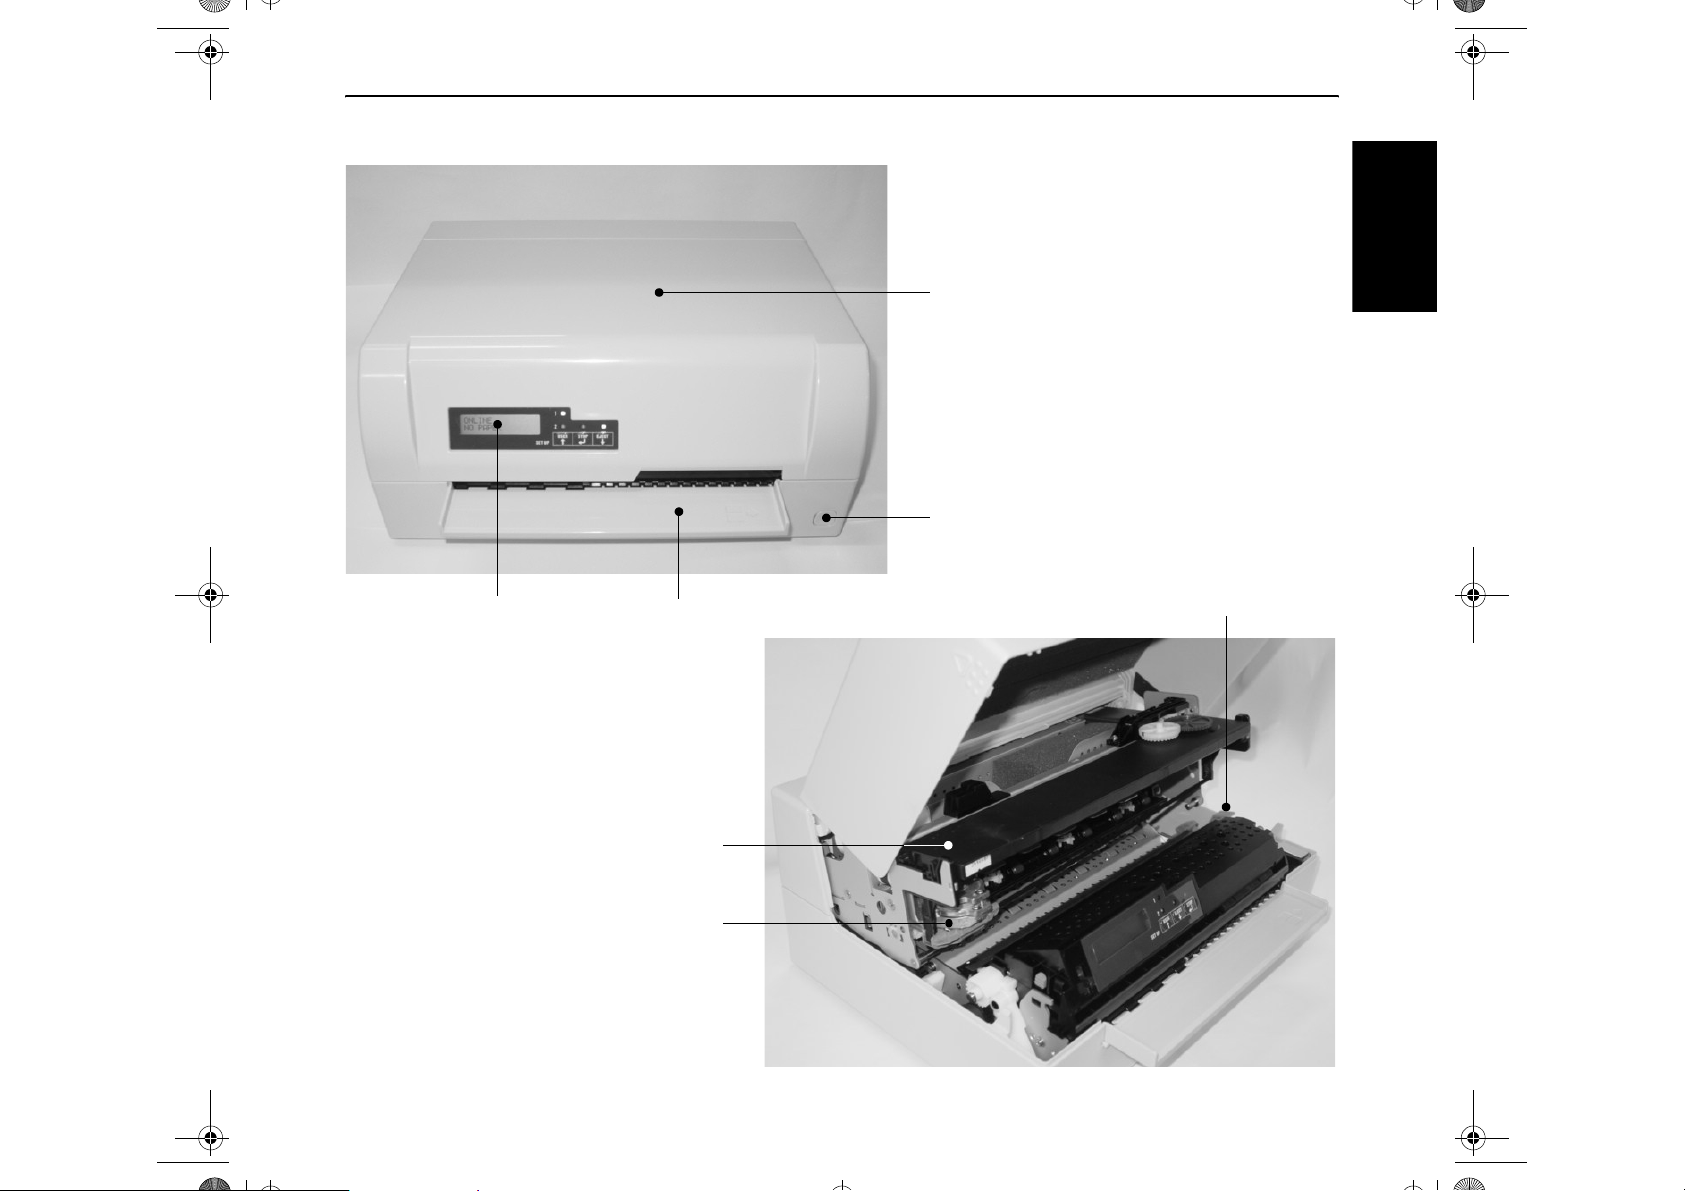
Printer at a glance
View from the front
Paper trayControl panel
View with cover opened
Ribbon cassette
Cover
ENGLISH
Power switch (On/Off)
Release lever
Print head
3
Page 8
Printer at a glance Quick start guide
Quick Start-en.book Seite 4 Dienstag, 5. Dezember 2006 10:48 10
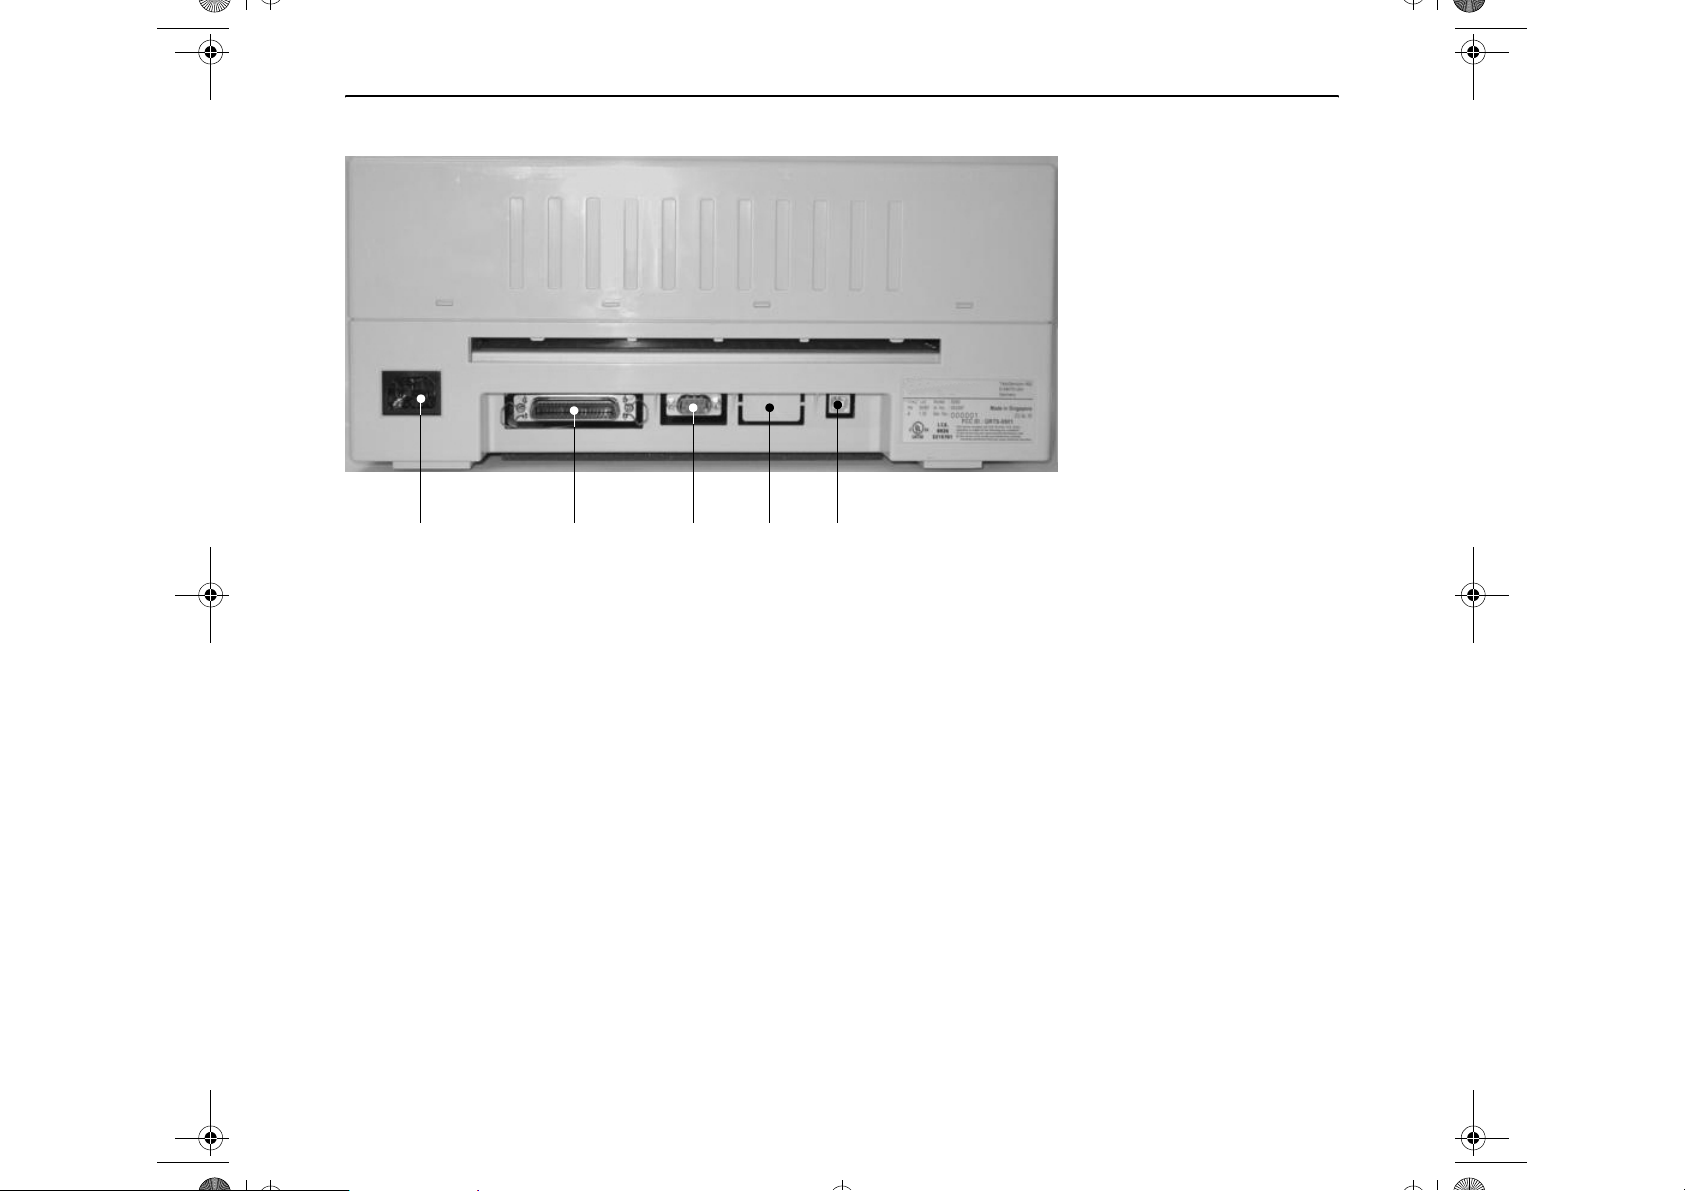
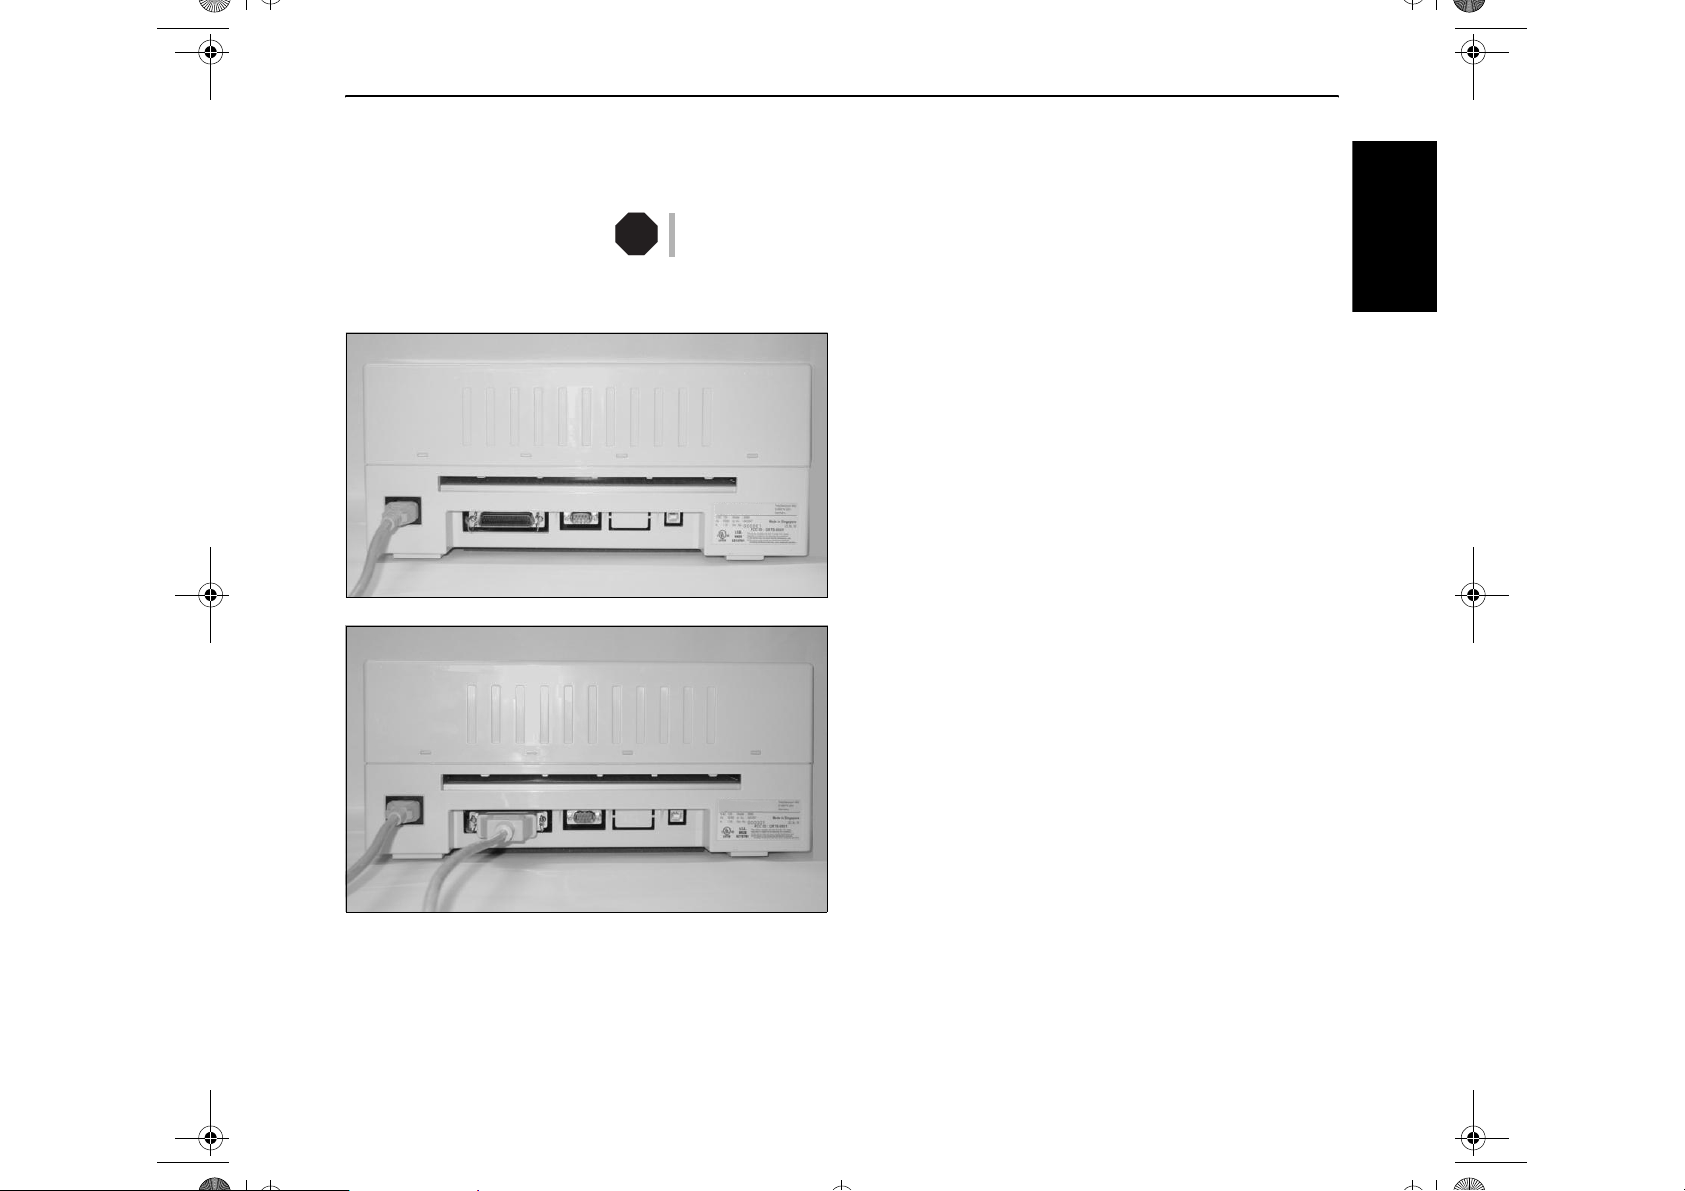
View from the rear
Power inlet Parallel
4
interface
1st Serial
interface
2nd Serial
interface
USB
interface
Page 9
Quick start guide Installation
Quick Start-en.book Seite 5 Dienstag, 5. Dezember 2006 10:48 10
Installation
` Unpacking the printer Place your packaged printer on a solid base.
Make sure that the “Up” symbols point in the correct direction.
Open the packaging, lift the printer out of the cardboard box and remove the re-
maining packaging material.
Check the printer for any visible transport damage and missing items. The follow-
ing items should be included:
■ This Quick start guide
■ The CD-ROM (at the back of this manual)
■ The power cable
■ The ribbon cartridge
If you find any transport damage or if any accessories are missing, please contact
your dealer.
ENGLISH
5
Page 10
Installation Quick start guide
Quick Start-en.book Seite 6 Dienstag, 5. Dezember 2006 10:48 10
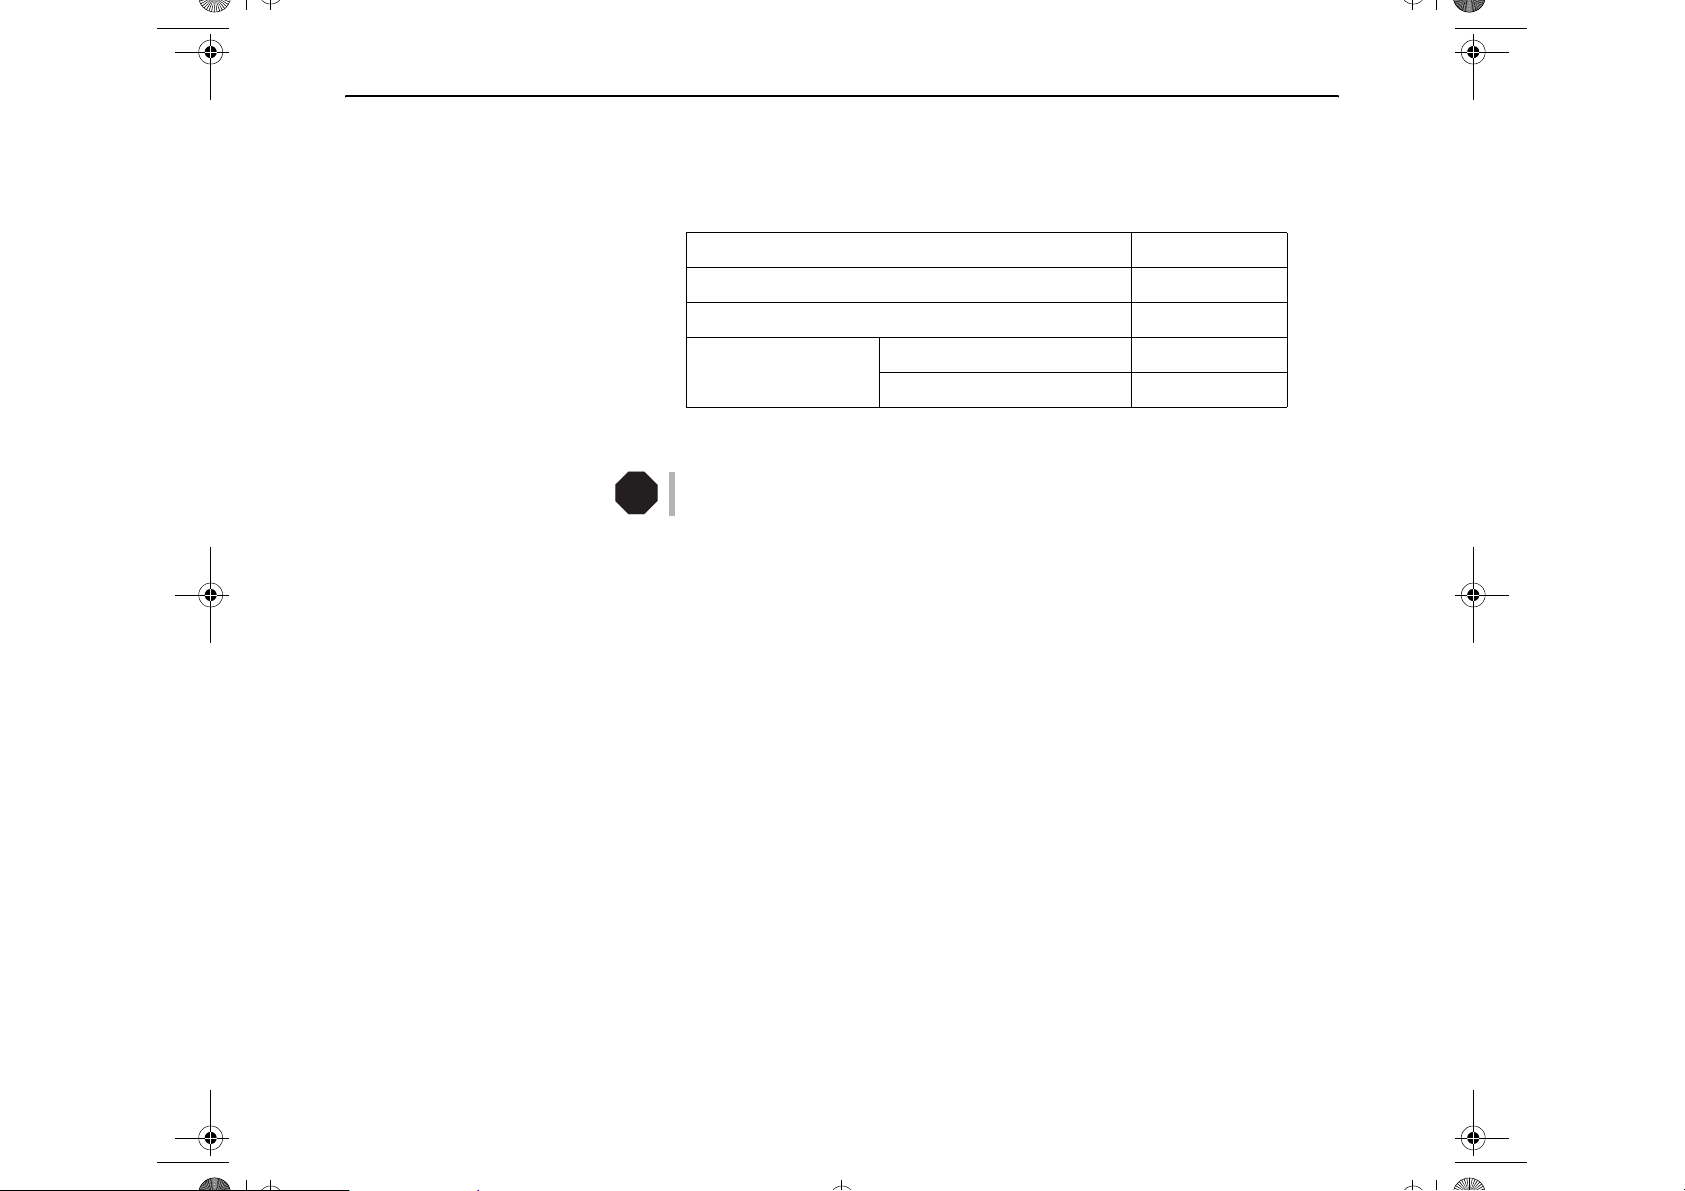
` Placing the printer Place the printer on a solid, flat, surface, ensuring that the printer is positioned in
such a way that it can not topple, and that there is easy access to the control panel
and paper input devices. Also ensure that there is enough space for sufficient ventilation and for the printed output:
Location Minimum space
Left and right side of the printer 1 cm
Top of the printer 2 cm
Rear of the printer to ensure sufficient ventilation 10 cm
to print on a DIN A4 sheet 12 cm
When selecting the printer location, observe the following additional instructions:
STOP
Never place the printer in the vicinity of inflammable gas or explosive substances.
■ Do not expose the printer to direct sunlight. If you cannot avoid placing the
printer near a window, protect it from the sunlight with a curtain.
■ When connecting a computer to the printer, make sure not to exceed the maxi-
mum cable length (see User guide on the Online CD-ROM, Technical Specifications).
■ Ensure sufficient distance between the printer and any heating devices/radia-
tors.
■ Avoid exposing the printer to extreme temperature or air humidity fluctuations.
Above all take care to avoid the influence of dust.
■ It is recommended to install the printer in a place which is acoustically isolated
from the workplace because of the noise it may produce.
6
Page 11
Quick start guide Installation
Quick Start-en.book Seite 7 Dienstag, 5. Dezember 2006 10:48 10
` Checking the printer
voltage
` Connecting the printer
STOP
Make sure that the device has been set to the correct voltage (e.g. 230 V in Europe,
120 V in the USA). To do this, check the type plate at the back of the printer. Contact your dealer if the setting is incorrect.
Never switch on the printer if the voltage setting is incorrect, since this may result
in severe damage.
ENGLISH
Connect the power cable to the power inlet of the printer.
Connect the power cable plug to a mains socket.
Make sure that the printer and the computer are switched off
and connect the data cable between the printer and the computer, in this example a 36-pin centronics parallel cable.
7
Page 12

Installation Quick start guide
Quick Start-en.book Seite 8 Dienstag, 5. Dezember 2006 10:48 10
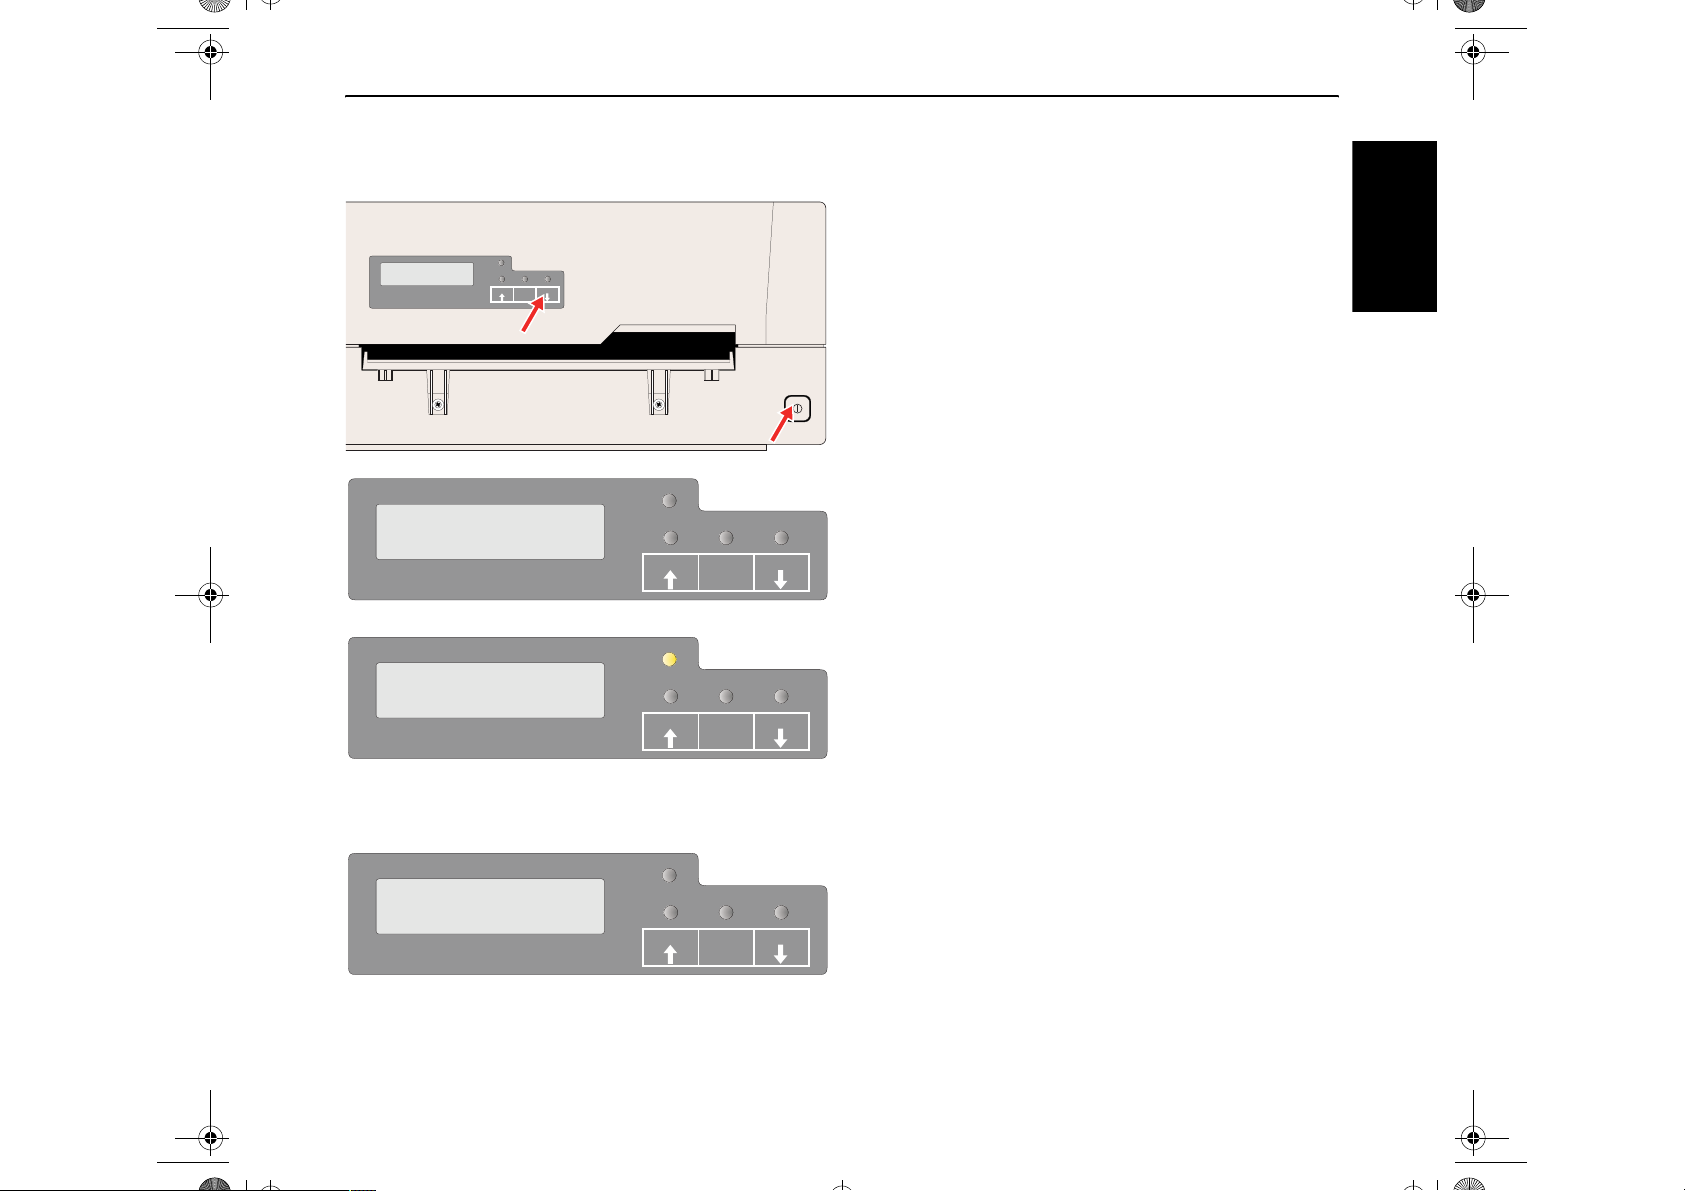
` Switching on the printer
Press the power which is located at the front bottom right of
the printer switch for switching on the printer.
The printer initializes.
ONLINE
NO PAPER
8
PAPER
SETUP
USER1
STOP
/EJECT
USER2
When the initialization is completed, the Ready indicator
lights up. The message ONLINE NO PAPER appears on
the LCD. The printer is in the online status and ready to
accept data from the system. You can now insert a document
or a passbook.
Page 13
Quick start guide Control panel
Quick Start-en.book Seite 9 Dienstag, 5. Dezember 2006 10:48 10
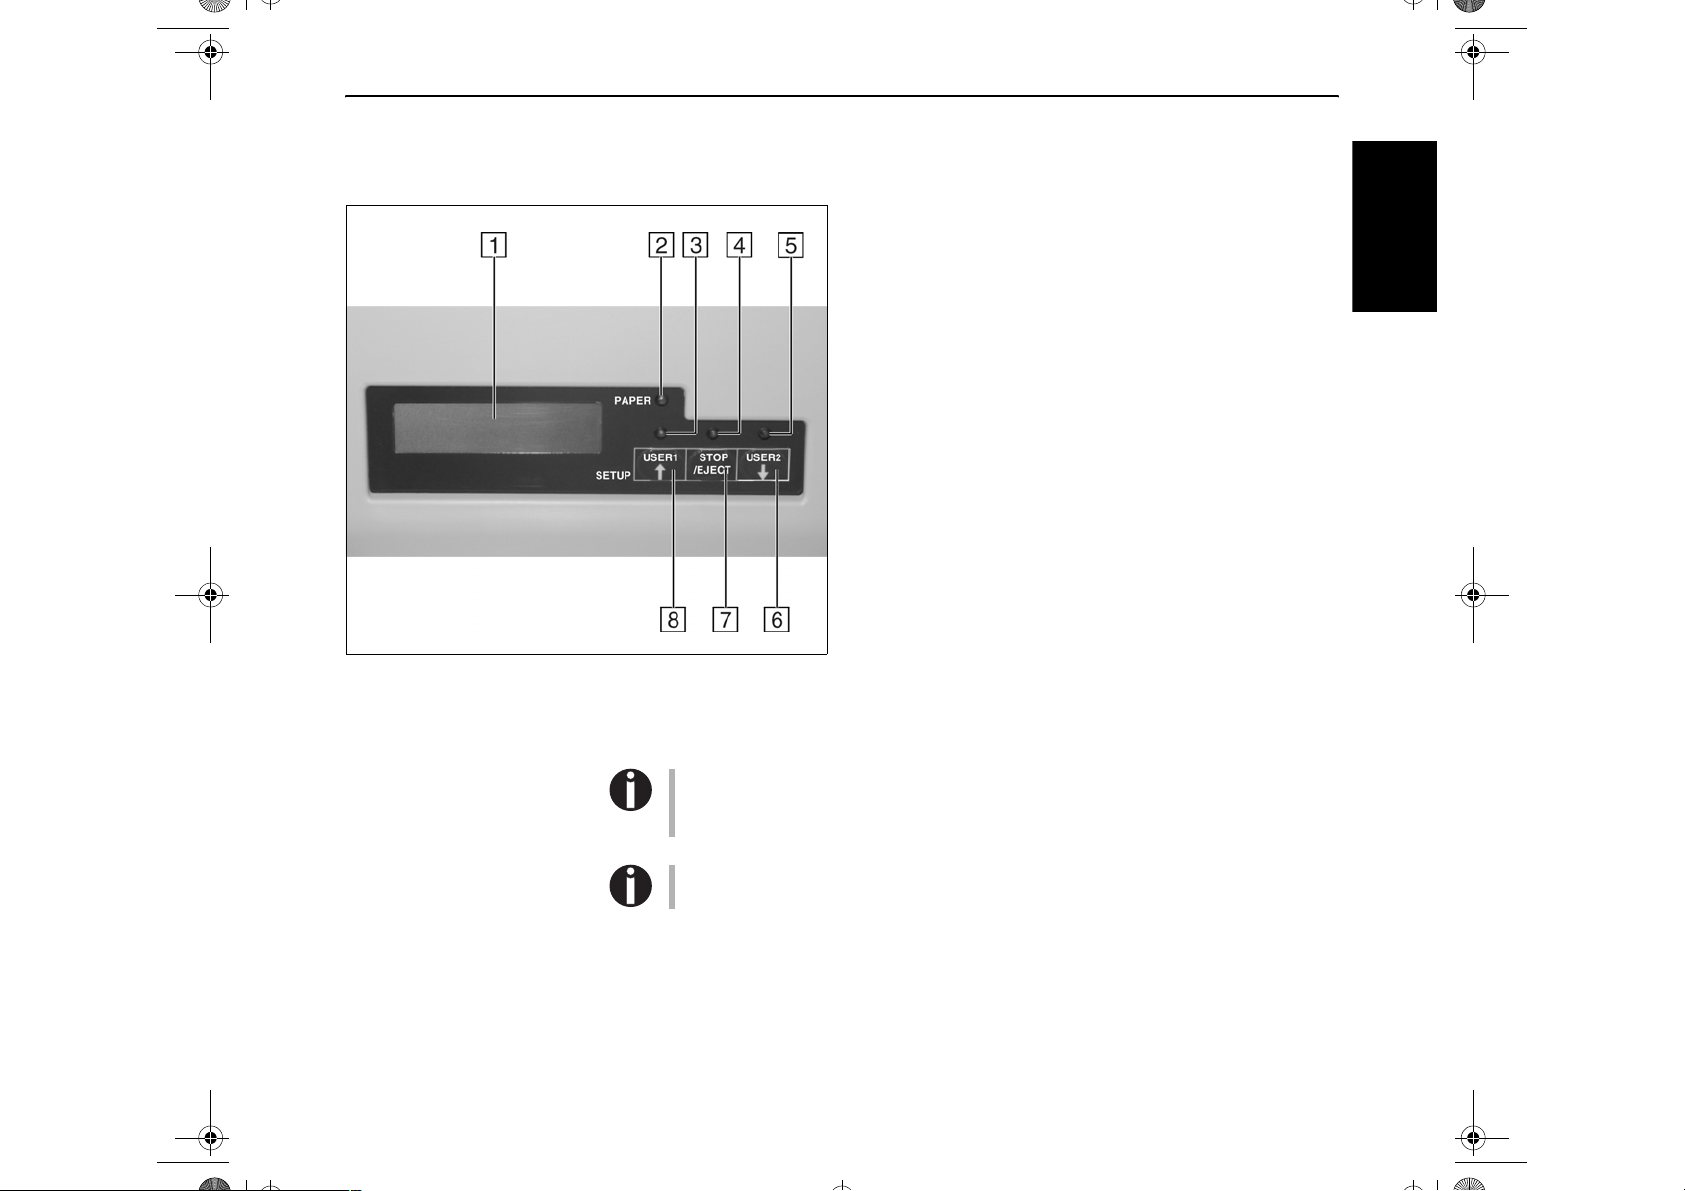
Control panel The control panel consists of three keys for controlling the printer functions, four
LEDs displaying the status of the printer and a LCD display with 2 x 16 digits.
1 LCD display: Displ a ys the int ernal printer statu s, operat-
ing instructions and error messages.
2 Paper LED: Display s if paper is inserted or not;
on = paper is inserted, off = no paper inserted.
3 User 1 LED: Lights up if the User 1 is active, blinks if the
printer is receiving data via the first interface (see below).
4 Ready LED: Displays if printer is offline or online;
on = online, off = offline.
5 User 2 LED: Lights up if the User 2 is active, blinks if the
printer is receiving data via the second interface (see
below).
6 USER 2 key: Activated by application only; the function-
ality of the key depends on the emulation and the application used (see also User 2 LED).
7 STOP/EJE CT key: Set s the prin ter to Online/Offline
mode (see also Ready LED); ejects inserted paper.
8 USER 1 key: Activated by application only; the function-
ality of the key depends on the emulation and the application used (see also User 1 LED).
Please be aware that some emulations and applications may use the LEDs and
keys in an entirely different way defined by the emulation and/or host software and
outside the definitions contained in this document.
ENGLISH
For a detailed overview of the individual functions of the control panel refer to the
User Guide on the Online CD-ROM.
9
Page 14
Operating the printer Quick start guide
Quick Start-en.book Seite 10 Dienstag, 5. Dezember 2006 10:48 10
Operating the printer
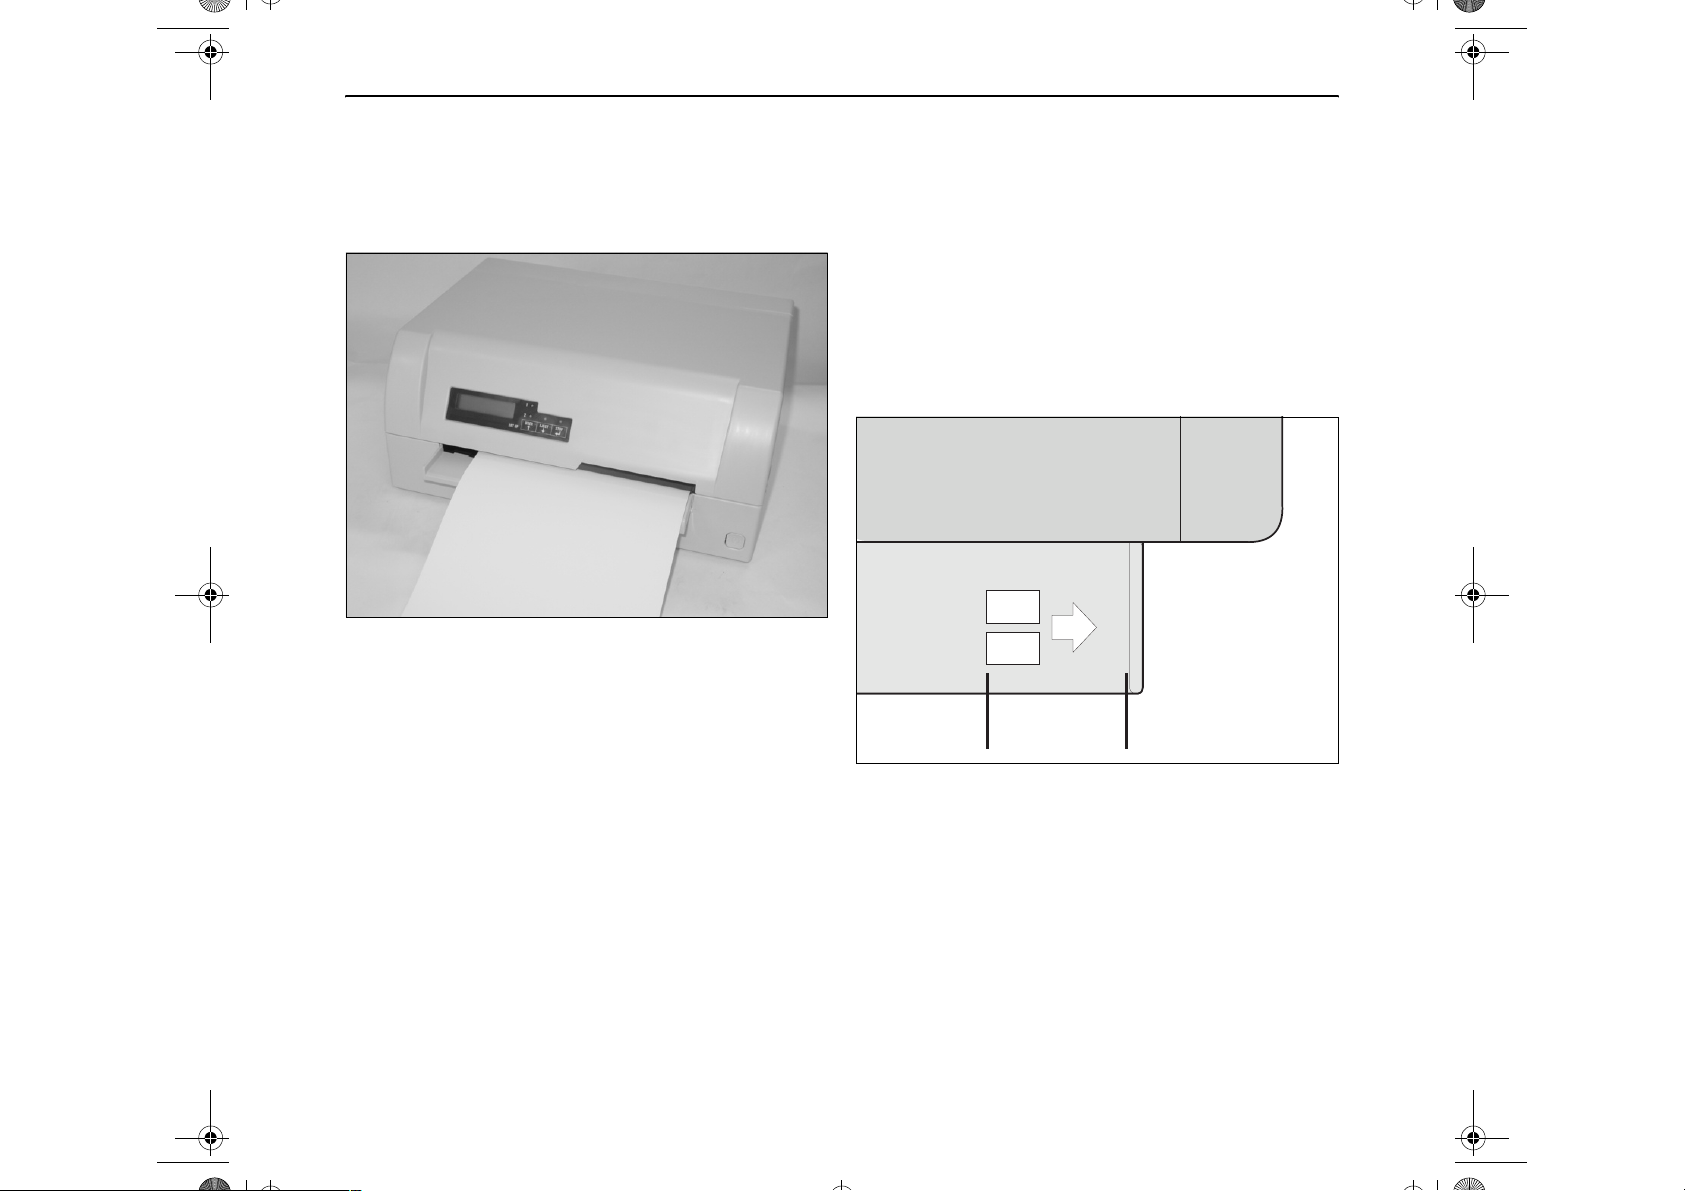
` Inserting a document Before inserting a document make sure t hat the printer is switched on and the the
message ONLINE NO PAPER is displayed in the LCD.
Insert the document in such a way that the right paper edge is
positioned inside the area between the left side of the symbol
and the right edge of the document support, so that the document alignment can grasp it securely. This is especially
important for documents that are narrower than a DIN A4
sheet.
10
Place right edge of
document inside
this area
Then push the document towards the stop into the document chute.
When the document is drawn in, the message ONLINE PAPER appears in the
LCD.
When printing is completed, the document is transported out of the printer and re-
leased for removal.
The message ONLINE NO PAPER appears on the LCD again.
Page 15
Quick start guide Operating the printer
Quick Start-en.book Seite 11 Dienstag, 5. Dezember 2006 10:48 10
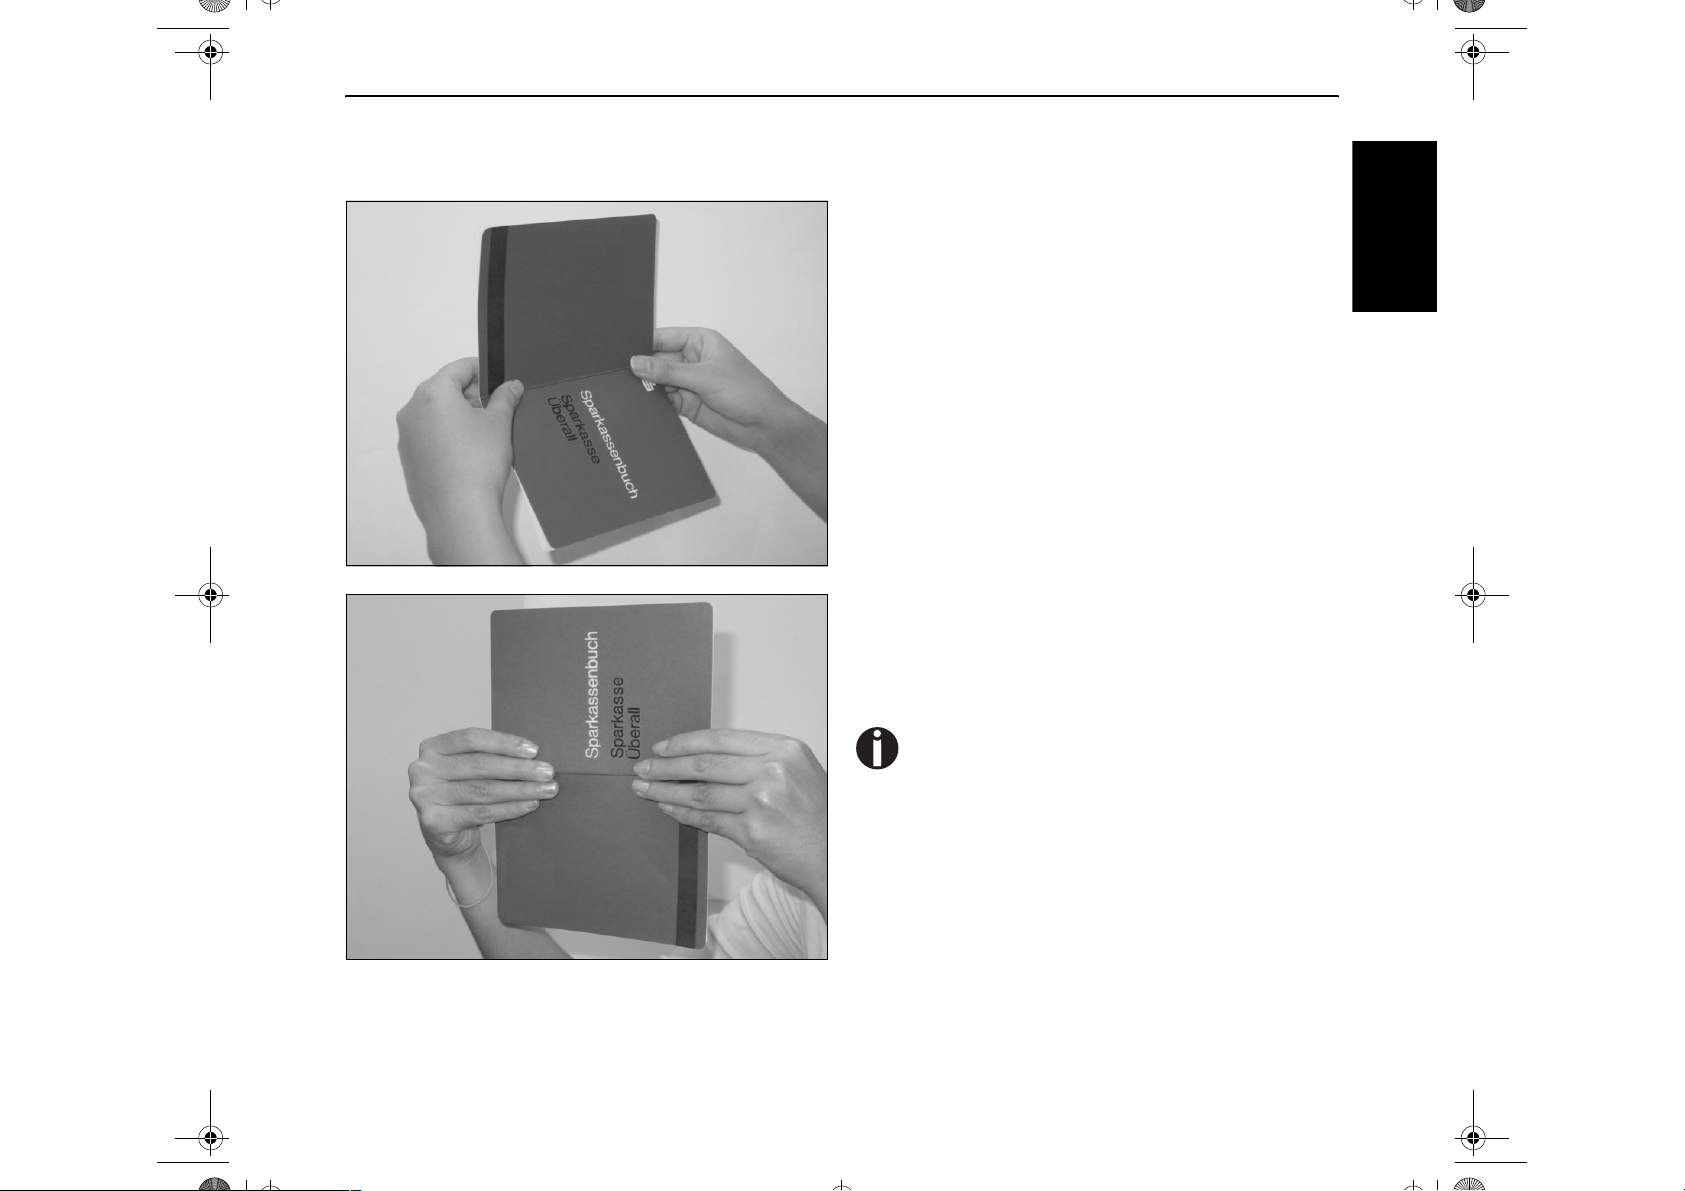
` Inserting a passbook Before processing a new vertical-fold or horizontal-fold passbook, you should
eliminate the stiffness of the fold by proceeding as follows.
Open the passbook on the page that you want to print. Bend
the fold backwards extremely hard.
Stroke along the fold of the passbook with both thumbs and
index fingers and slightly bend the passbook outwards.
ENGLISH
If you want to print a new passbook, repeat this procedure
several times.
If the passbook has a magnetic stripe, take care not to
crease it.
11
Page 16
Operating the printer Quick start guide
Quick Start-en.book Seite 12 Dienstag, 5. Dezember 2006 10:48 10
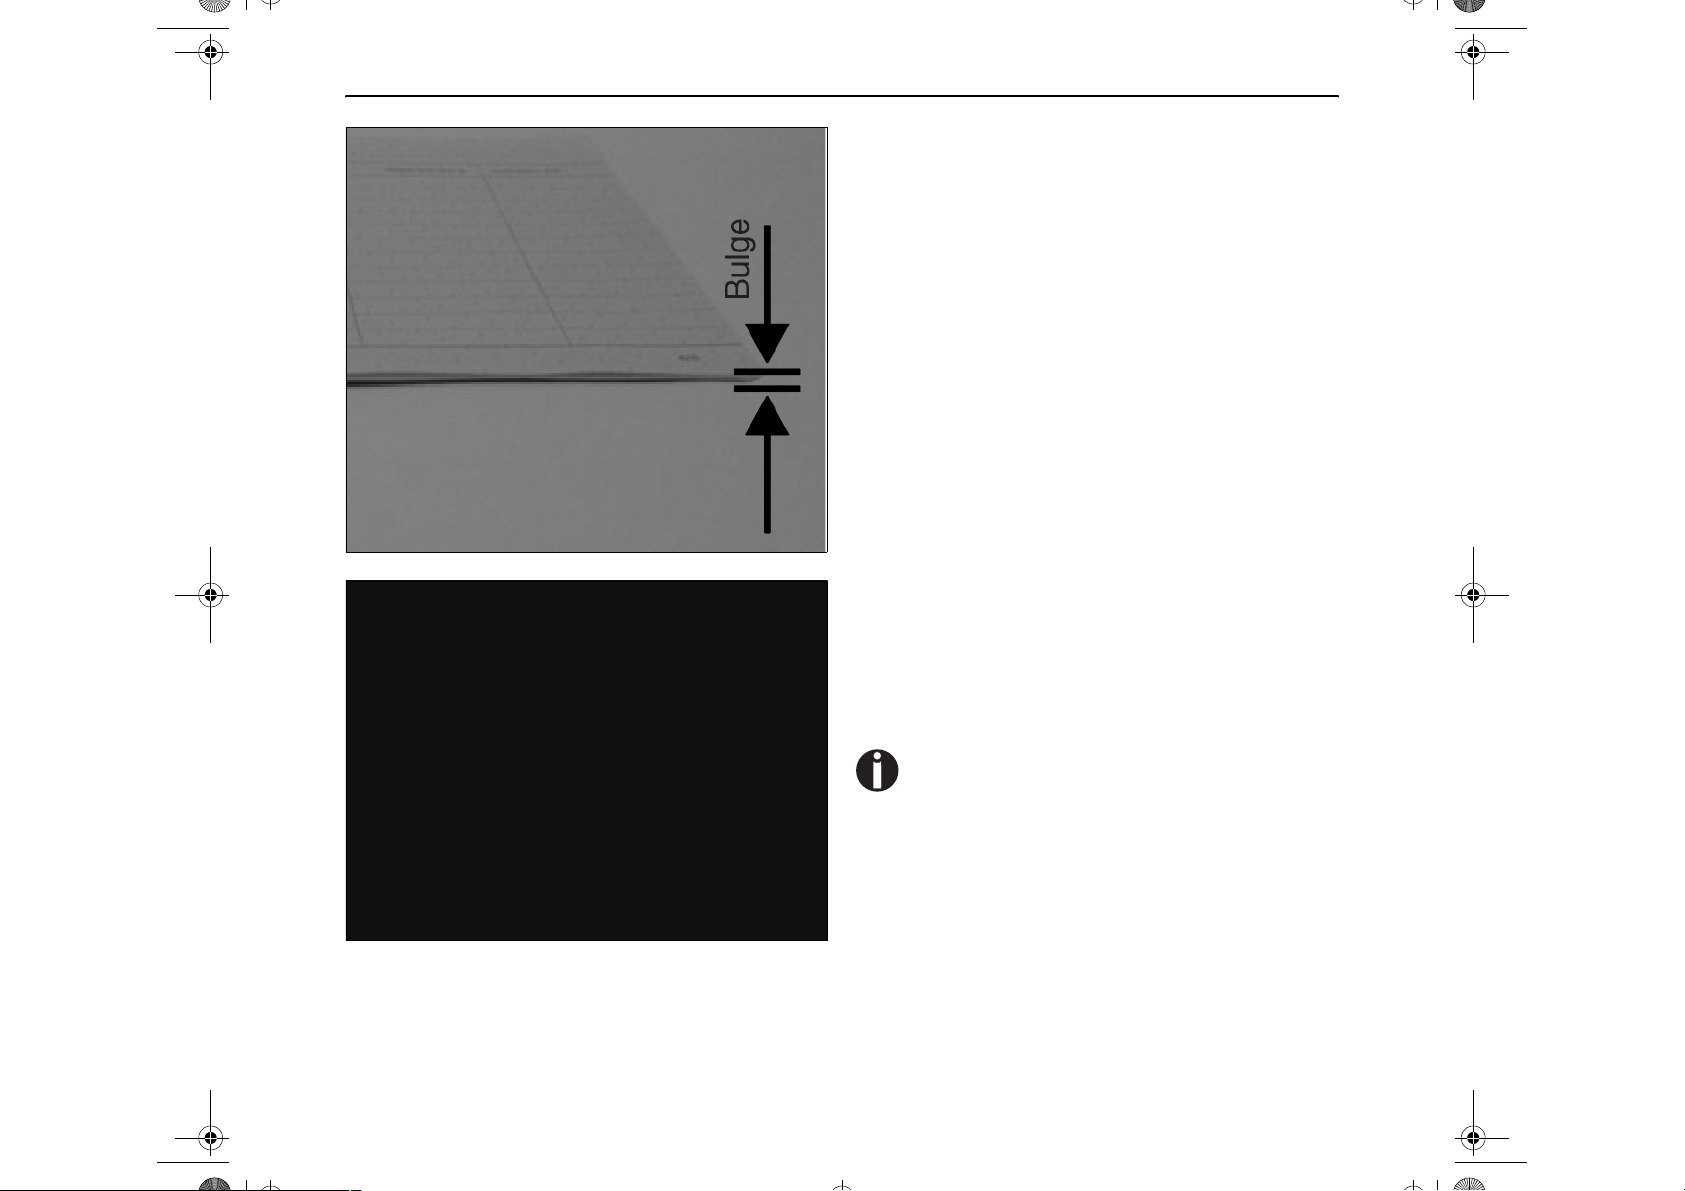
The bulge of the opened passbook should be as flat as possible to ensure trouble-free transportation into the print e r.
Place the passbook on the right-hand side of the document
support with the page to be printed facing up. The passbook
must be entered into the opening of the chute. Once in the
chute the printer mechanism will take the book. At this point
you may release the book, as the printer will align it against
it's right stop position and load it into the printer.
12
If the automatic document alignment cannot properly
grasp stiff or bent passbooks, you should place the
passbook manually at the stop at the right-hand side
of the document support and insert it.
Page 17
Quick start guide Operating the printer
Quick Start-en.book Seite 13 Dienstag, 5. Dezember 2006 10:48 10
ONLINE
PAPER
PAPER
SETUP
USER1
STOP
/EJECT
USER2
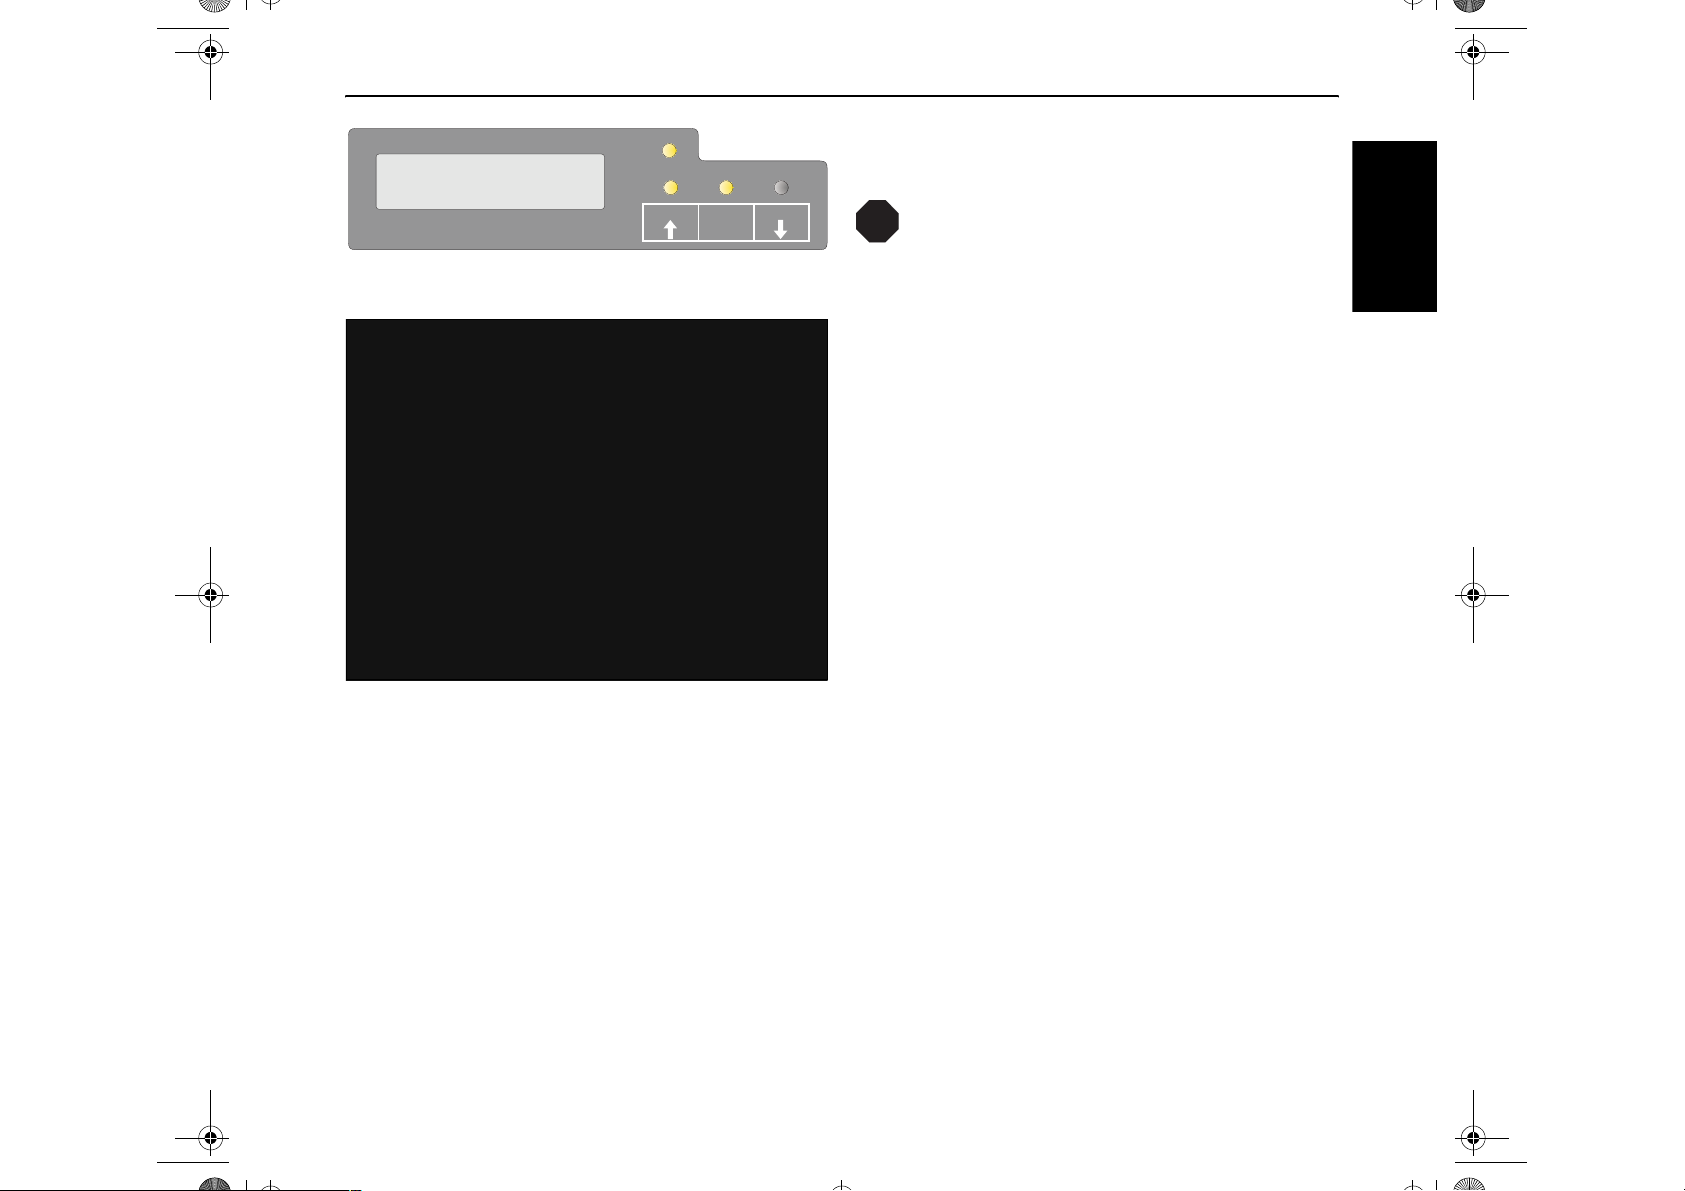
When the passbook is inserted, the message ONLINE
PAPER is displayed on the LCD.
Do not use passbooks that do not correspond to the
STOP
specifications listed in the section “Paper specifications”. Otherwise the passbooks and the print head
may be damaged.
When the passbook is printed, it is automatically transported
out of the printer and released for removal.
If the passbook has not successfully ejected from the printer,
press the STOP/EJECT key to to take the printer to STOP
(Offline) mode. Press the STOP key again to eject the passbook.
The message ONLINE NO PAPER appears on the LCD
again.
ENGLISH
13
Page 18
Service and Maintenance Quick start guide
Quick Start-en.book Seite 14 Dienstag, 5. Dezember 2006 10:48 10
Service and Maintenance
` Replacing the ribbon
cassette
STOP
Make sure that the printer is switched off before replacing the ribbon cassette.
The print head may be hot if the printer has been printing for a long time. Wait
until it cools down and you are no longer in danger of being burnt.
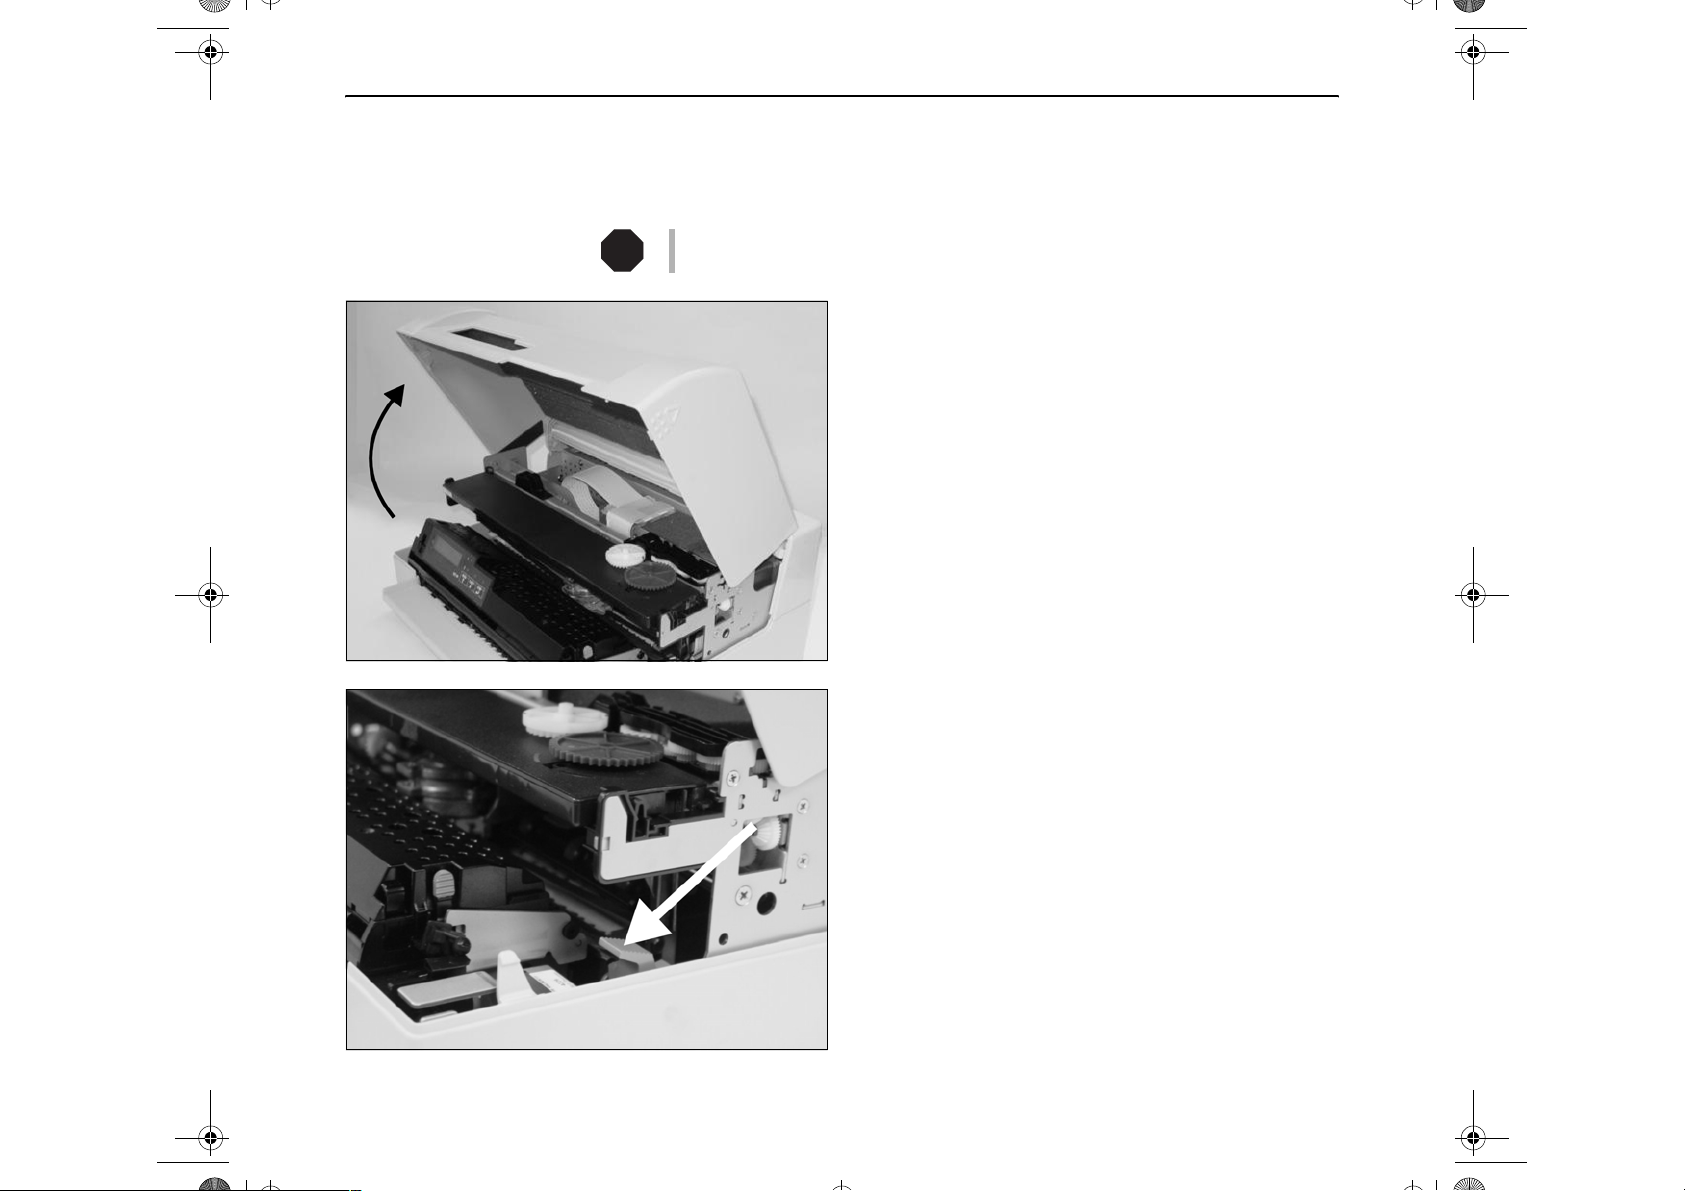
Open the cover by grasping it at the right and left-hand side
and swing it upward until it clicks into position.
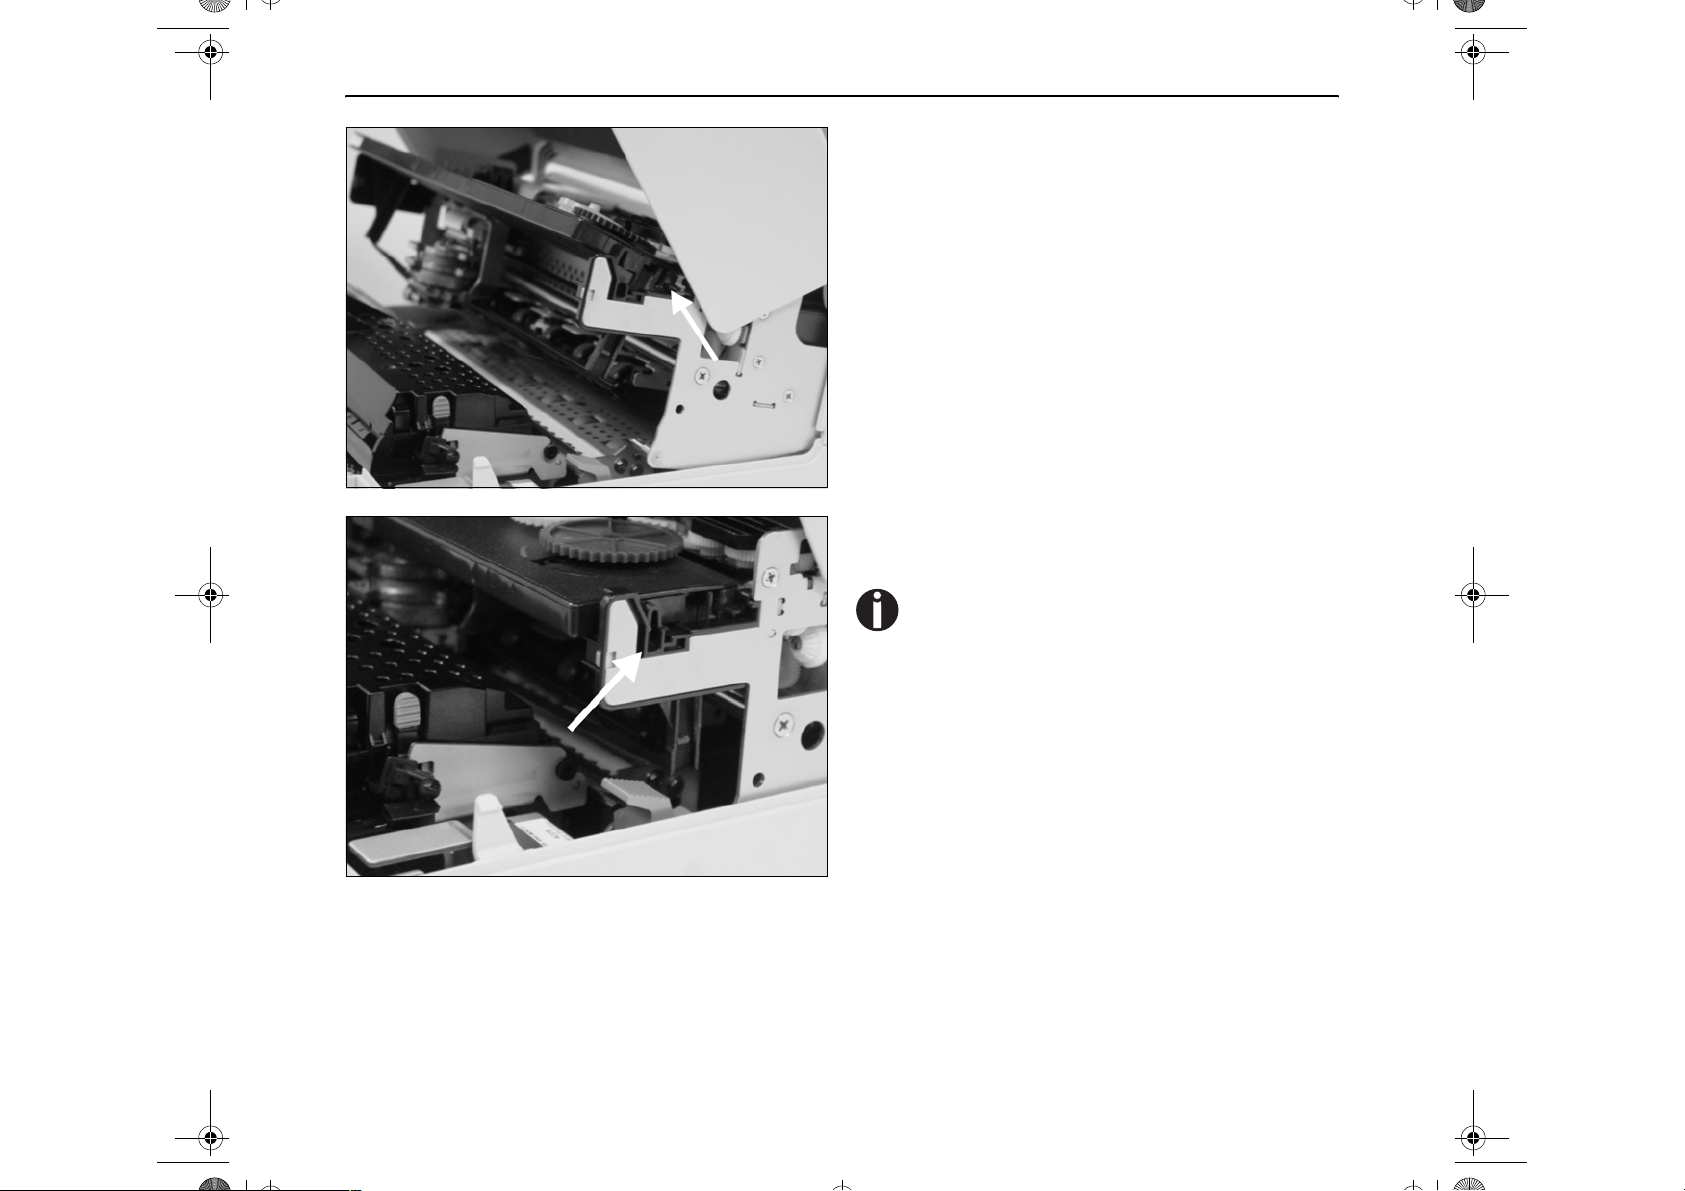
Press the green release lever for the printing mechanism.
This swings the printing mechanism backwards.
14
Page 19
Quick start guide Service and Maintenance
Quick Start-en.book Seite 15 Dienstag, 5. Dezember 2006 10:48 10
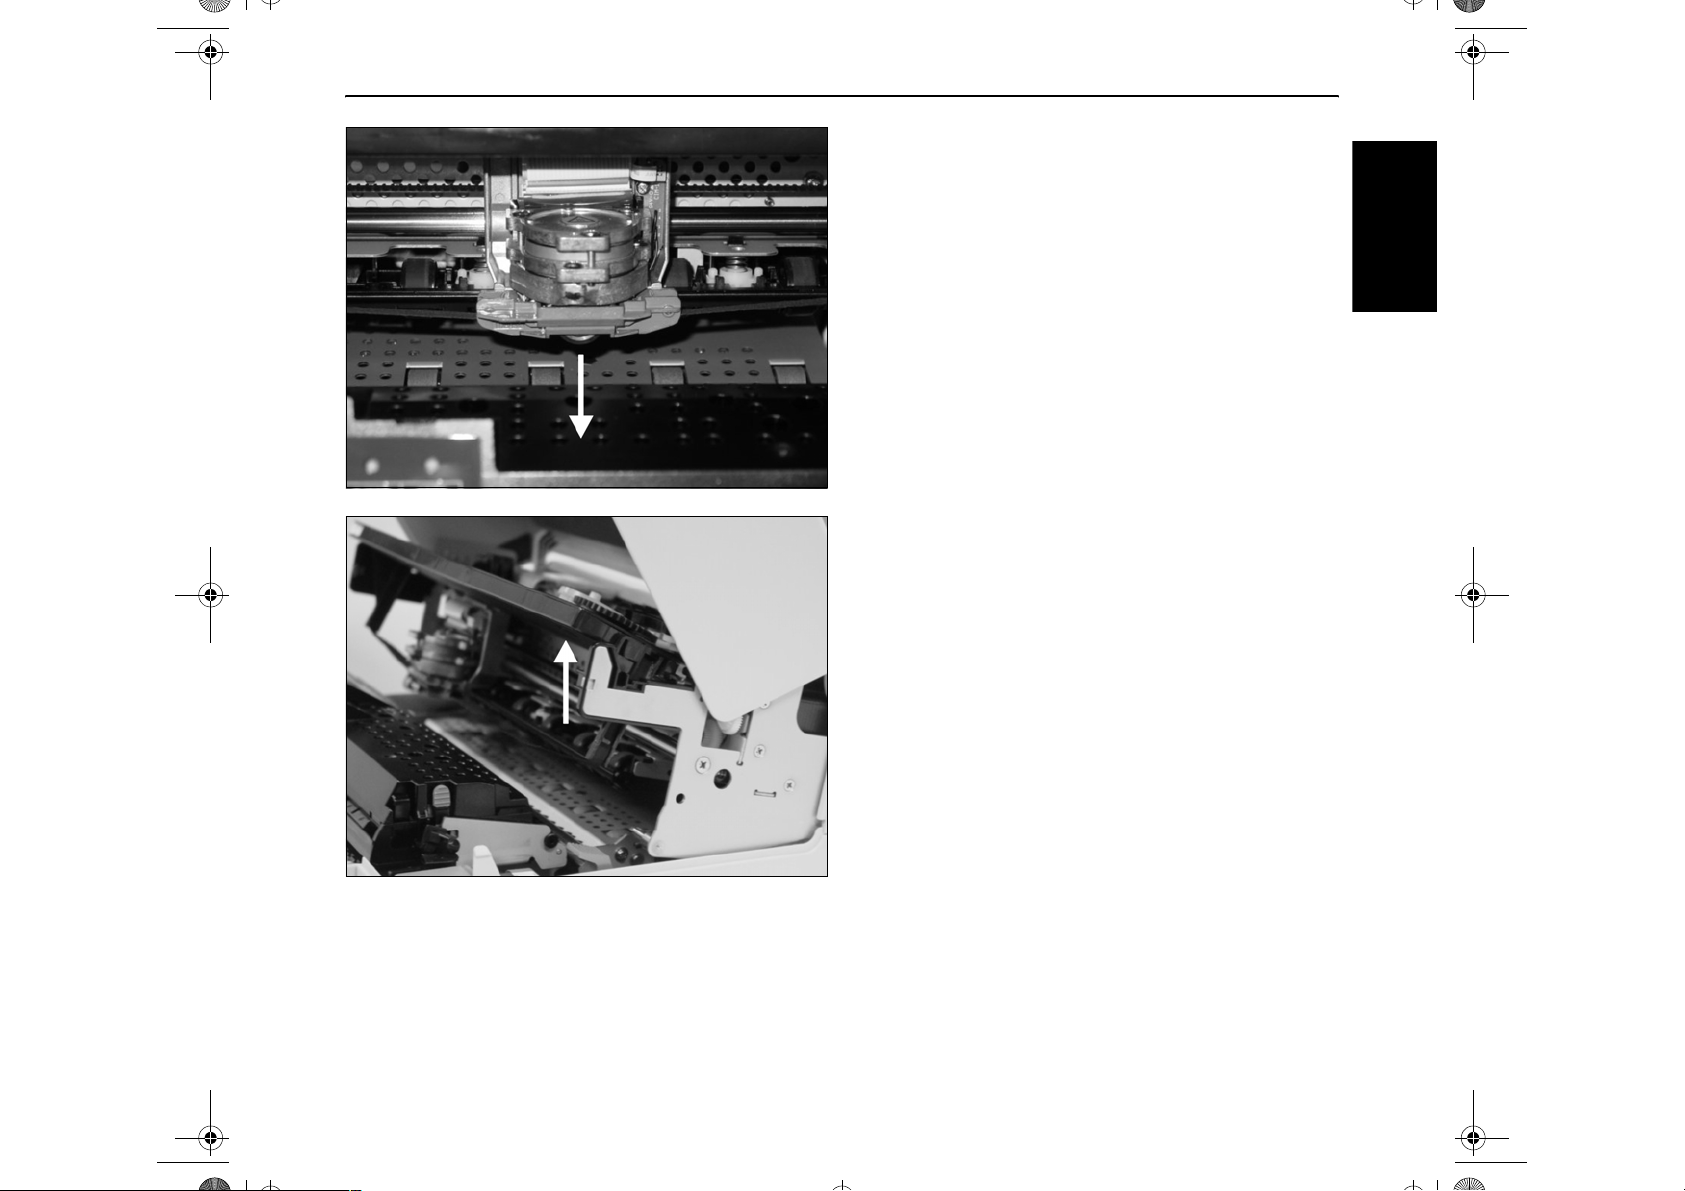
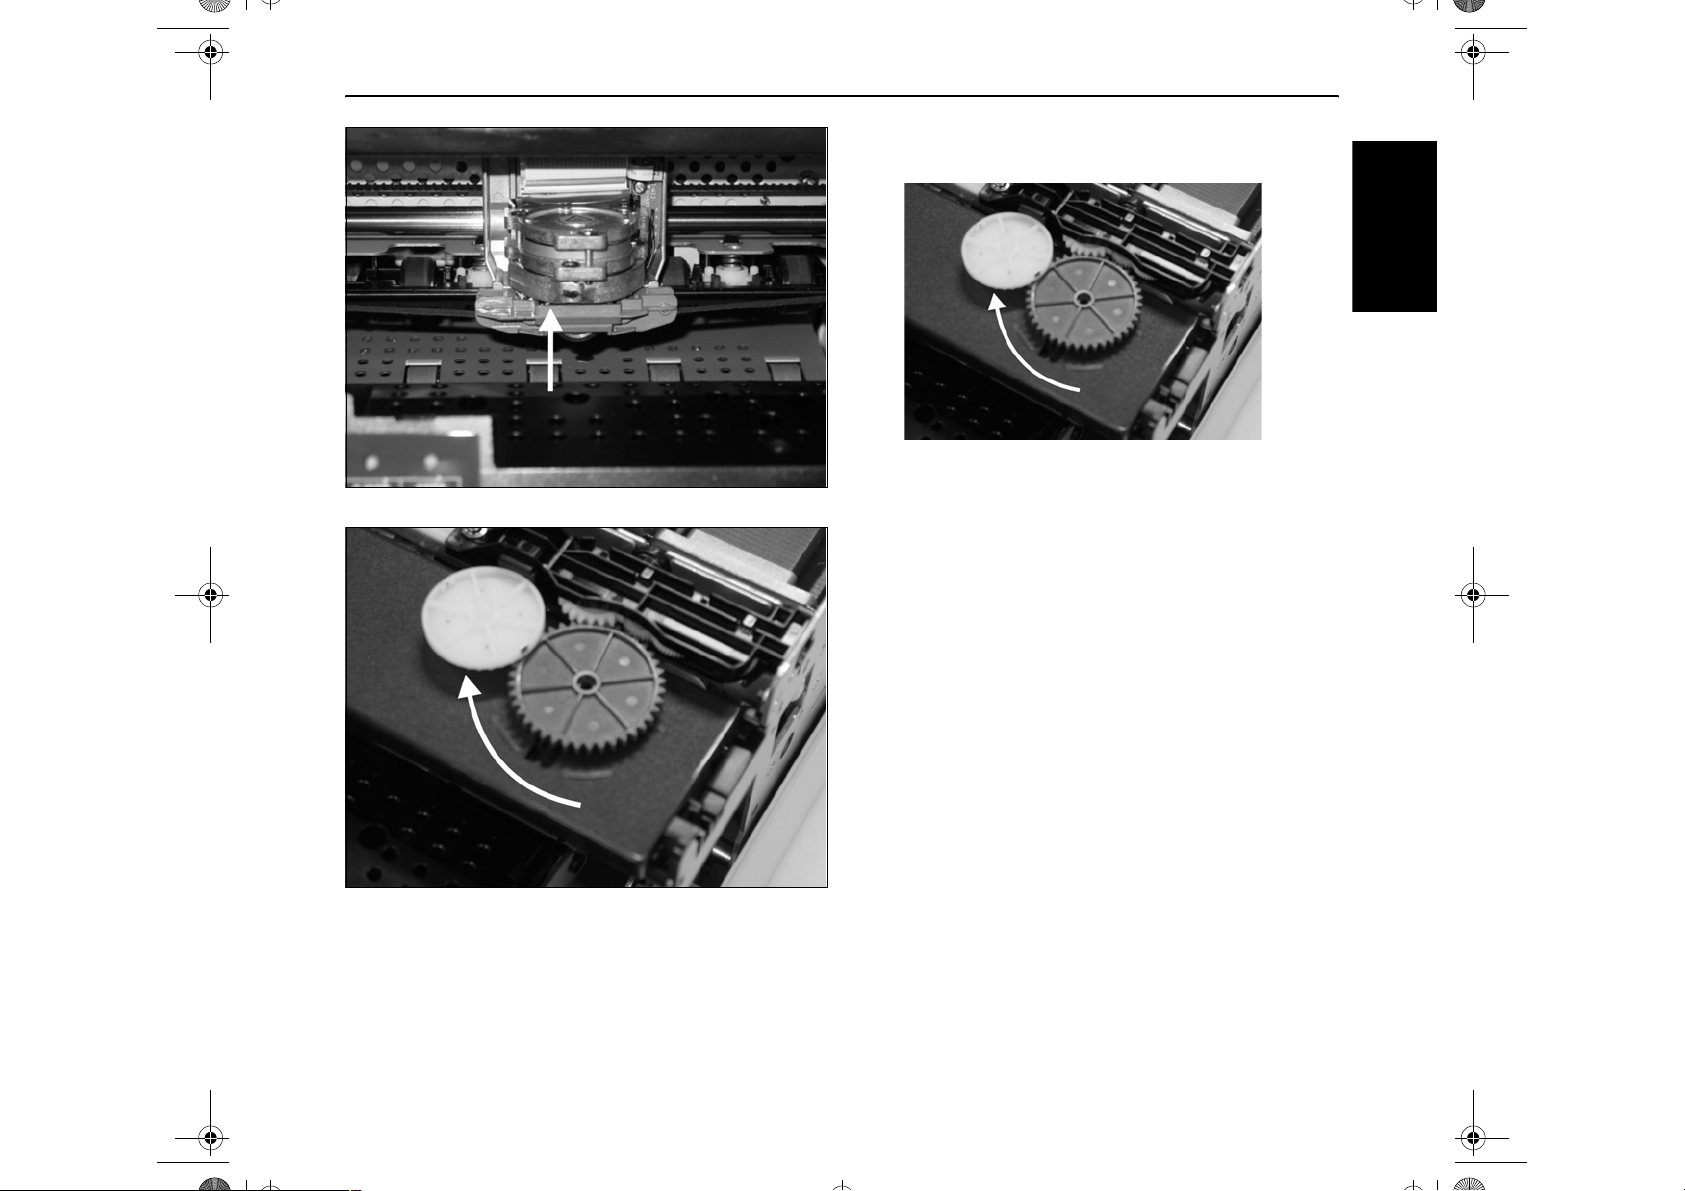
Remove the colored ribbon guide from the print head by pulling it downwards.
Raise the front end of the ribbon cassette on both sides.
Take the ribbon cassette out of the printer.
ENGLISH
15
Page 20
Service and Maintenance Quick start guide
Quick Start-en.book Seite 16 Dienstag, 5. Dezember 2006 10:48 10
Take the new ribbon cassette from the packaging and lift the
ribbon guide from the cassette.
Remove the transportation lock which fixes the ribbon guide
to the cassette.
Insert the new ribbon cassette by hooking it into the rear slots
of its mountings first.
Push the front of the cassette into its mounting so that it
clicks into position.
Please do not press the center of the ribbon cassette
as this will deform the ribbon cassette and will cause
operation problem.
16
Page 21
Quick start guide Service and Maintenance
Quick Start-en.book Seite 17 Dienstag, 5. Dezember 2006 10:48 10
Pull the ribbon guide under the print head. Tighten the ribbon
by turning the tension gear in the direction of the arrow.
Press the ribbon guide onto the print head from underneath
until you hear it click into place.
Check if the ribbon is transported correctly by turning the
tension gear in the direction of the arrow.
ENGLISH
17
Page 22
Service and Maintenance Quick start guide
Quick Start-en.book Seite 18 Dienstag, 5. Dezember 2006 10:48 10
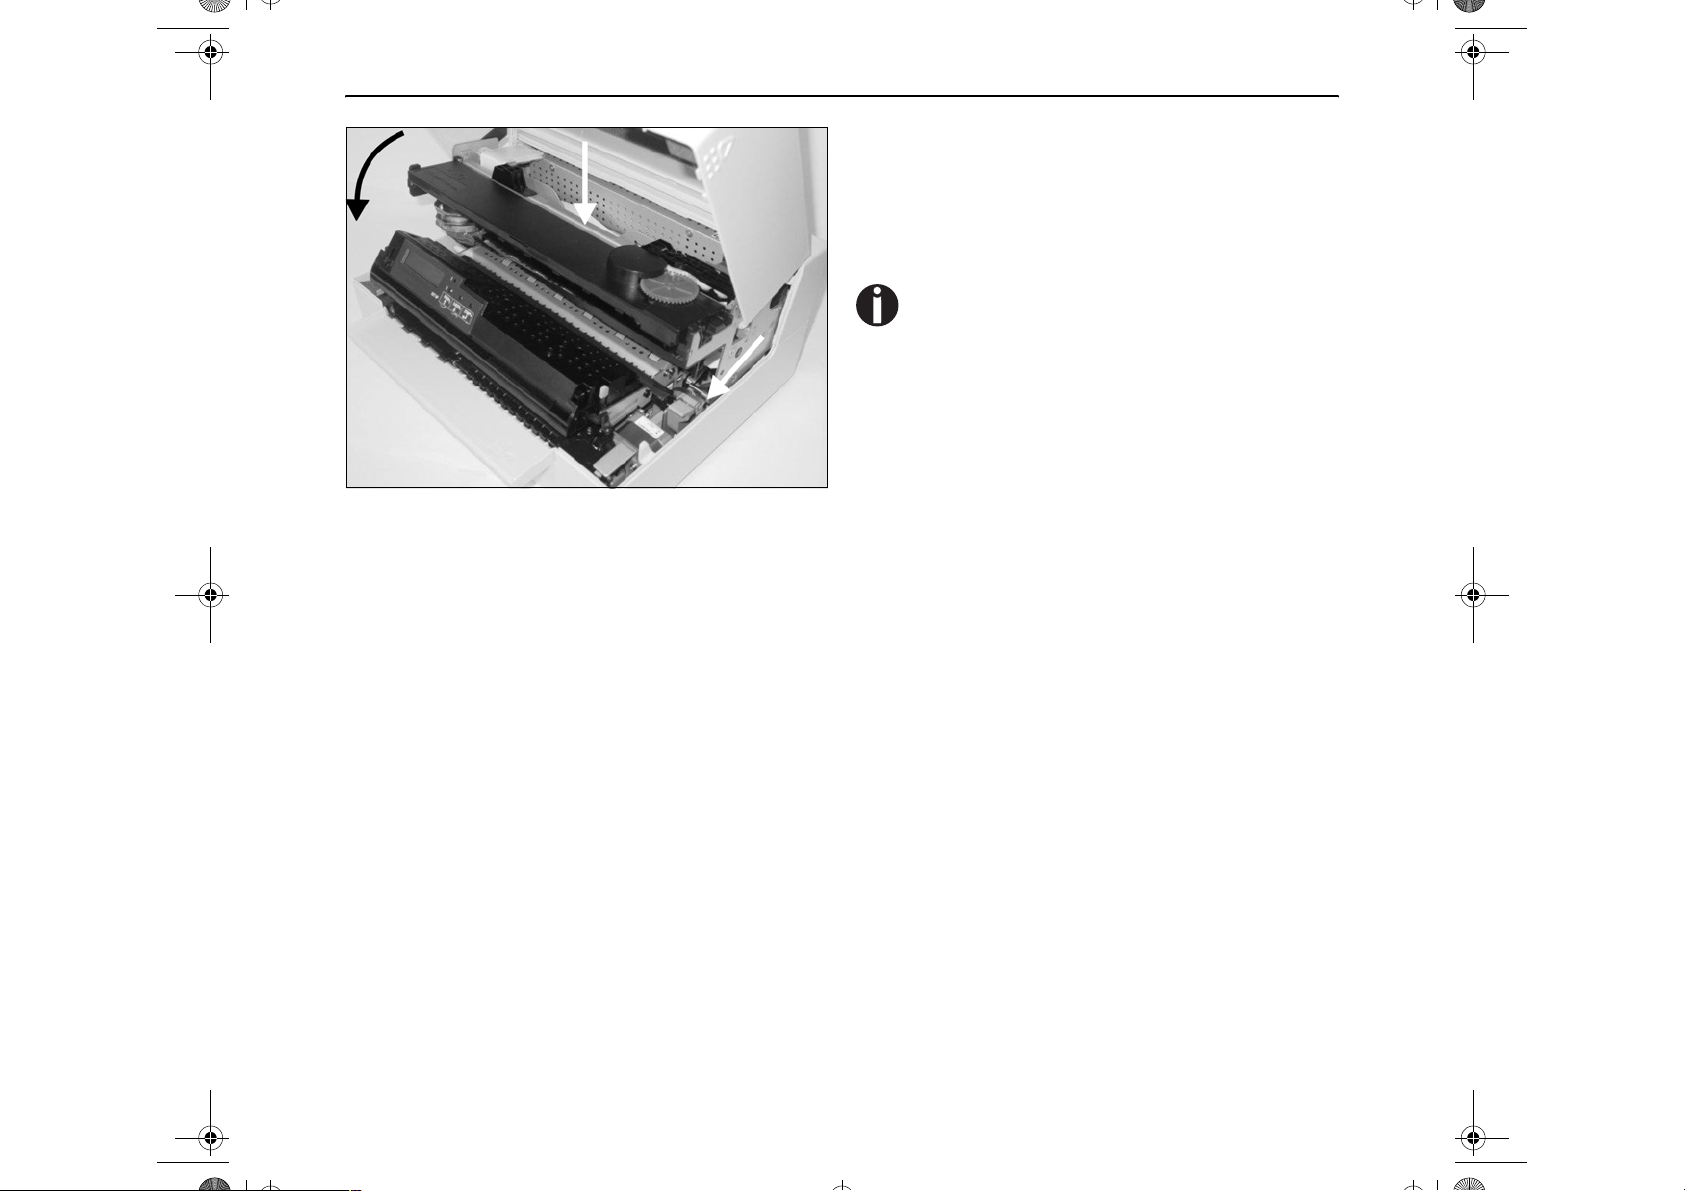
Close the main frame by pressing the colored section in the
middle of the frame as shown and ensure both left and right
hand sides of the frames are fully latched.
Close the cover. The printer is now ready to operate and to be
switched on again.
We recommend to check the printer's operation after
replacing the ribbon cassette by performing a printout of the parameter settings (see section “Printing
the Status Page” on page 19).
18
Page 23
Quick start guide Service and Maintenance
T3010-Quick Start-en.fm Seite 19 Dienstag, 5. Dezember 2006 10:54 10
` Printing the Status Page The printer has a function that allows you to printout the current parameter
settings.
Power the printer off.
PAPER
USER2
USER1
STOP
/EJECT
SETUP
Print StatusPage
Load Paper
Print StatusPage
Printing...
PAPER
SETUP
PAPER
SETUP
USER1
USER1
STOP
/EJECT
STOP
/EJECT
USER2
USER2
Press and hold the USER2 key while switching on the
printer.
The LCD displays Print StatusPage Load Paper. Release
the USER2 key.
Insert the paper in the printer. The LCD displays Print
StatusPage Printing... and the printout of the status page is
carried out.
The paper will be ejected once printing is complete.
While printing, you can use the STOP key to cancel the
printing. If STOP key is pressed, printing stops and paper
will be ejected.
ENGLISH
Print StatusPage
Completed
PAPER
SETUP
USER1
STOP
/EJECT
USER2
When the test printout is aborted or completed, LCD will display Print StatusPage Completed.
The Print setting mode will be ended automatically and a
Power ON reset will be performed.
19
Page 24
Technical data Quick start guide
Quick Start-en.book Seite 20 Dienstag, 5. Dezember 2006 10:48 10
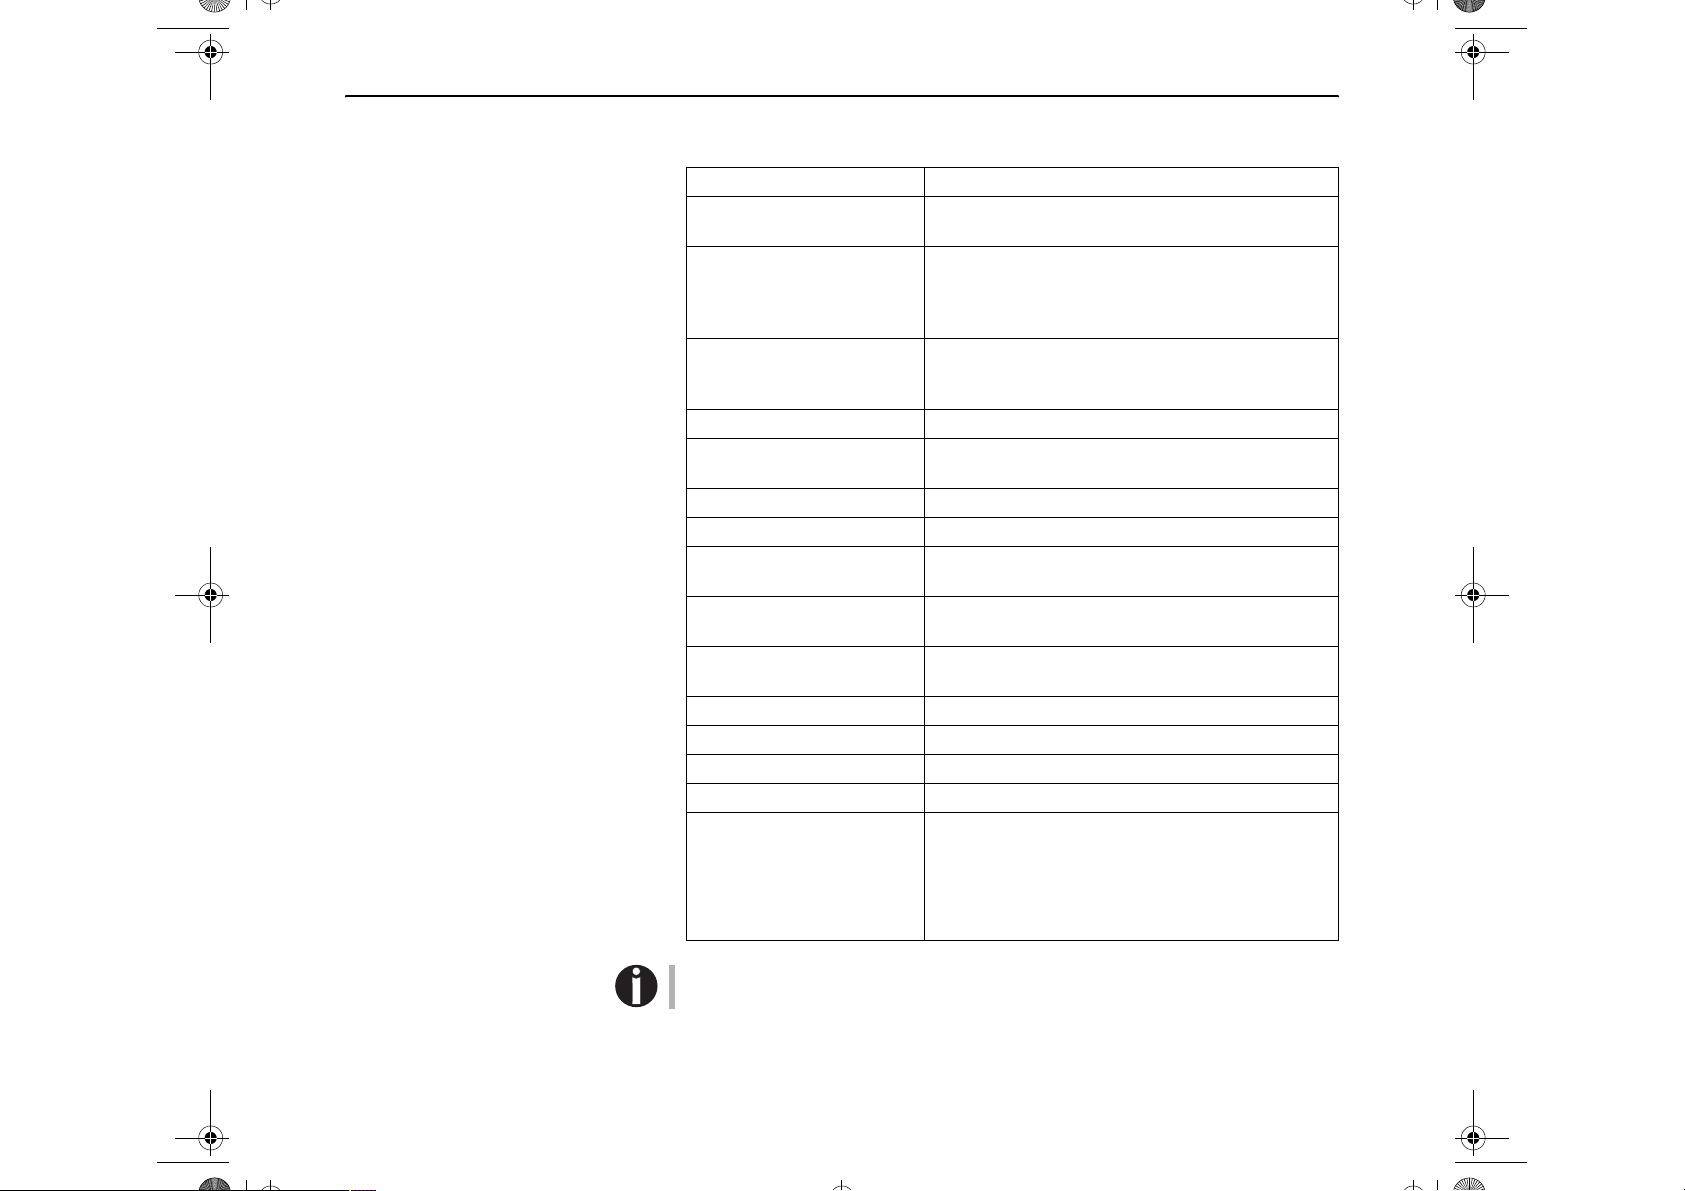
Technical data
` Printer specifications
Printing method 24-pin Dot matrix impact printer
Character pitch 10, 12, 15, 16.6, 17.1, 20, 24 characters/inch and
proportional type (emulation-dependent)
Line spacing Optional in microsteps
n/60 inches n = 0 to 127
n/180 inches n = 0 to 255
n/360 inches n = 0 to 255
Print width 194 characters/line at 10 cpi
112 characters/line at 12 cpi
141 characters/line at 15 cpi
Print speed LQ: 133 cps; DQ: 400 cps
Interface serial (RS232C), parallel (compatible Mode, ECP),
USB 2.0 (Full speed)
Nominal voltage 120V ± 10% (USA) or 230V ± 10% (Europe)
Line frequency 50/60Hz ± 3%
Network form For use in power dist ribution systems wi th neutral and
protective earth conductors (TN)
Rated current intake Operation (maximum): US: 1.30 A; EU: 0.59 A
Standby US: 0.11 A; EU: 0.072 A
Apparent power
consumption
Sound output level L
Sound pressure level
Dimensions Height: 168 mm, Width: 378 mm, Depth: 280 mm
Weight Standard = 9,10 kg, MSR-H = 9,95 kg
Approvals
WAd
LpAm
Operation (maximum): US: 89.7 VA; EU: 93.6 VA
Standby US: 88.8 VA; EU: 11.4 VA
7.1 dB in operation
55 dB in operation
DIN EN 60 950 / VDE 0805, TUV (EN 60950) / Certified
CE Mark, UL 60950 3rd Edition / C-UL (CSA C22.2 No
60950-00) new reversion, IEC 60950-1, EN 55022 :1998
(Class B), EN 55024 :1998, FCC PT 15B : 2000
(Class B), EN61000-3-2 :2000, EN61000-3-3 :1995,
Energy Star
20
For more information on printer specifications as well as interface specifications,
refer to the User guide on the Online CD-ROM.
Page 25
Quick start guide Technical data
Quick Start-en.book Seite 21 Dienstag, 5. Dezember 2006 10:48 10
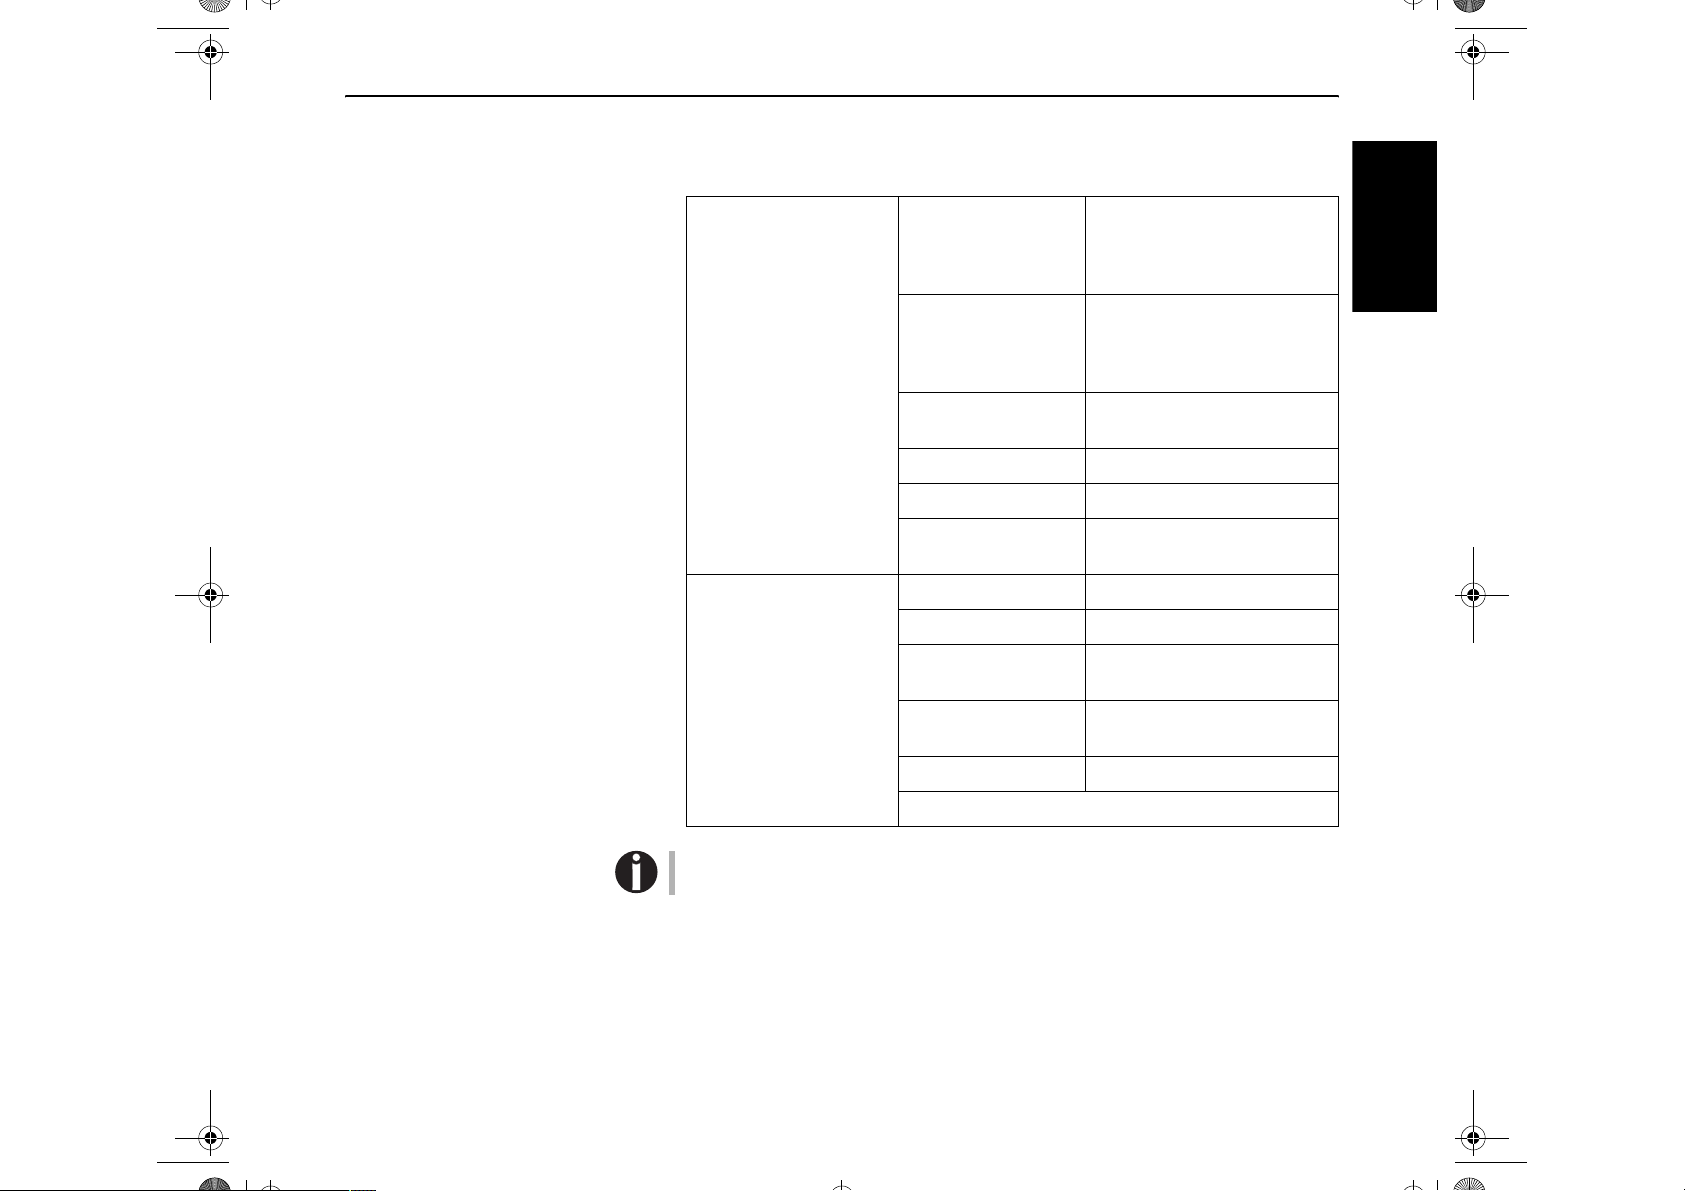
` Paper specifications Only use paper that corresponds to the paper specifications and test new sorts of
paper before use.
Paper specifications for
passbooks
Paper specifications for
single and multi-copy
sheets
Paper width open book 105 to 235 mm
(Horizontal passbook)
105 to 235 mm
(Vertical passbook)
Paper length open book 140 to 210 mm
(Horizontal passbook)
125 to 210 mm
(Vertical passbook)
Passbook thickness 2.0 mm Max.
(One cover + inner page)
Thickness difference 1.4 mm Max.
Paper weight 75 to 120 g/m
Book condition Recommend to be flattened
carefully before insertion.
Paper width 70 to 240 mm
Paper length 70 to 500 mm
Paper weight Single sheet: 60 to 160 g/m
Multi sheet: 80 to 260 g/m2
Paper thickness Single sheet: 0.08 to 0.5 mm
Multi sheet: 0.08 to 0.5 mm
Number of copies Original + 4 copies (copy mode)
2
2
ENGLISH
Recycled paper is permitted on principle.
For more information on general paper specifications, refer to the User guide on
the Online CD-ROM.
21
Page 26
Technical data Quick start guide
Quick Start-en.book Seite 22 Dienstag, 5. Dezember 2006 10:48 10
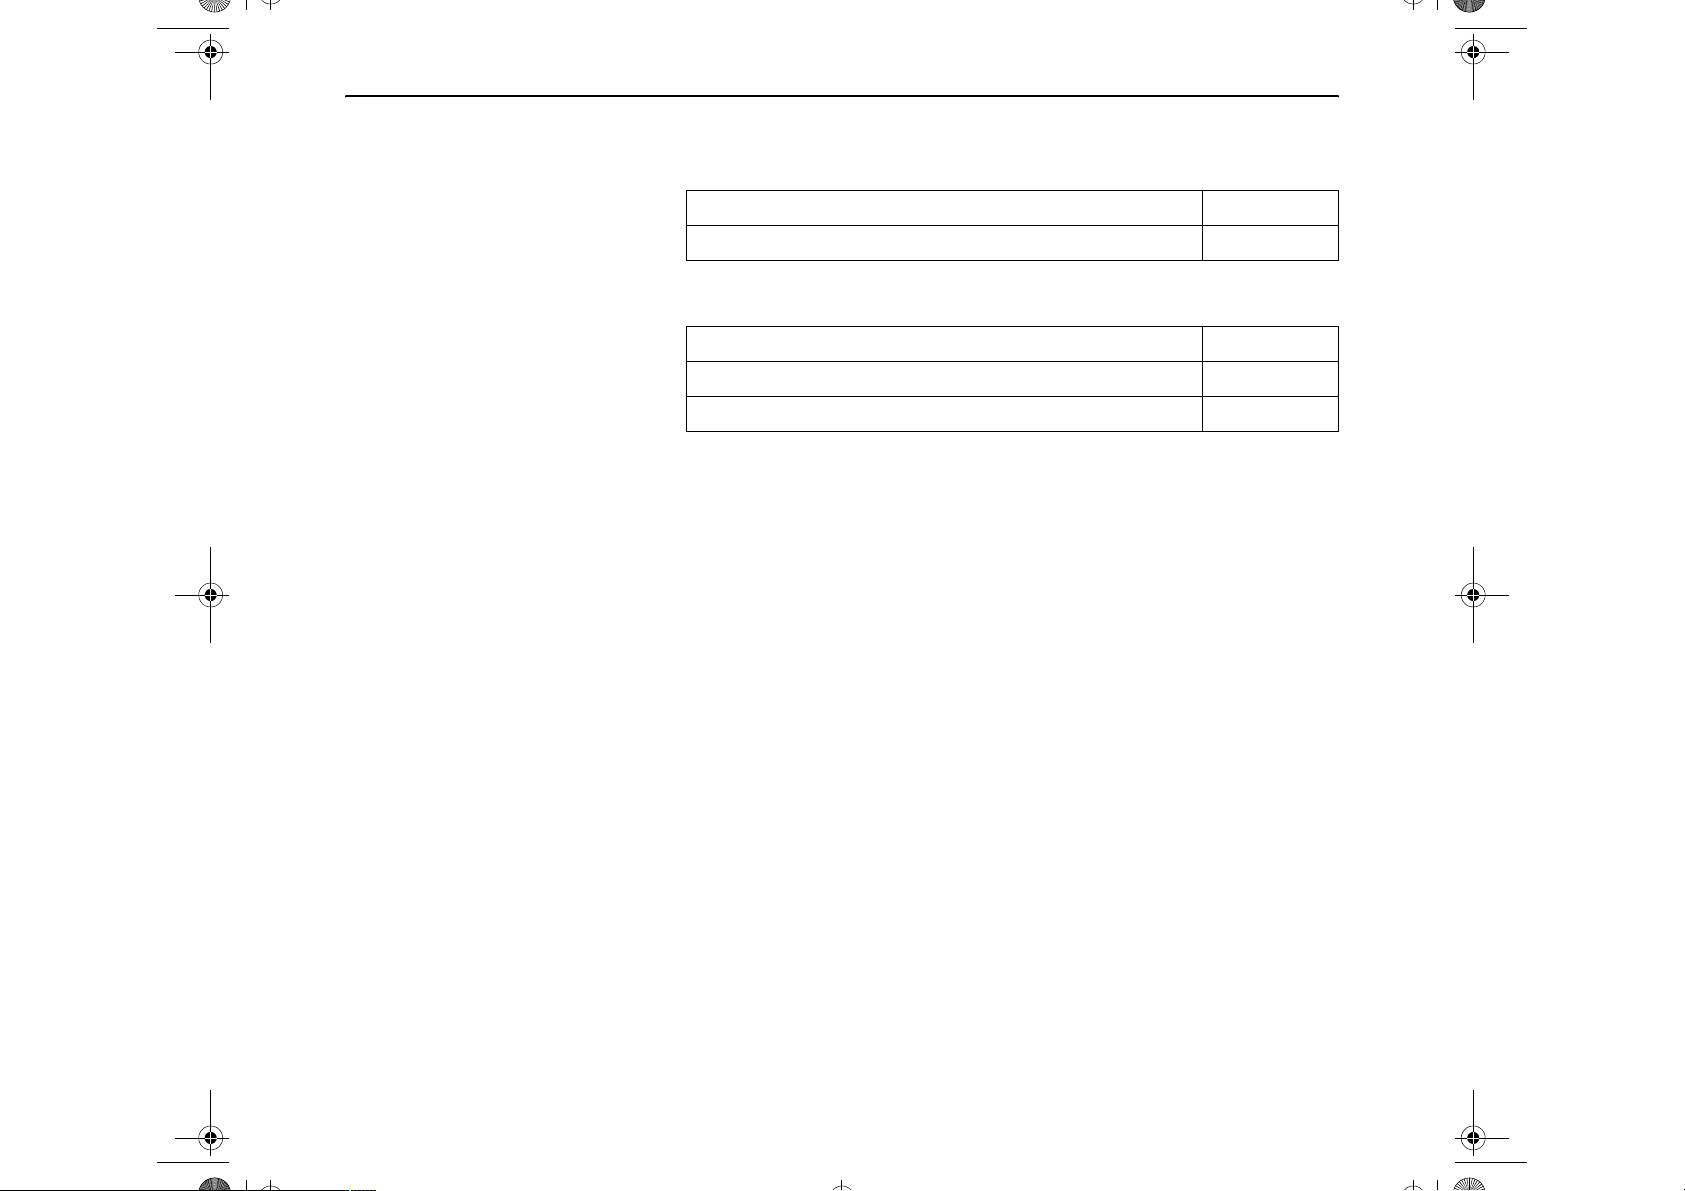
` Consumables and
accessories
Only use ribbon cassettes from the manufacturer as products from other manufacturers may damage the print head or the ribbon drive.
Consumables Order no.
Fabric ribbon in recyclable cassettes, color: black 043393
Only use print heads that are approved to prevent damage to your printer.
Accessories Order no.
Print head 24 needles 400805
Serial interface cable 5m, 9-pin Sub-D female 043018
22
Page 27
Kurzanleitung Inhaltsverzeichnis
Quick Start-de.book Seite I Dienstag, 5. Dezember 2006 10:43 10
Inhaltsverzeichnis
KURZANLEITUNG
Einführung . . . . . . . . . . . . . . . . . . . . . . . . . . . . . . . . 1
Zu den verwendeten Symbolen . . . . . . . . . . . . . 1
Wichtige Sicherheitshinweise. . . . . . . . . . . . . . . 1
Arbeiten mit der Online-CD-ROM . . . . . . . . . . . 2
Was ist auf der Online-CD-ROM . . . . . . . . . . . . 2
Hardwarevoraussetzungen . . . . . . . . . . . . . . . . 2
Fehlersuche . . . . . . . . . . . . . . . . . . . . . . . . . . . . 2
Auf einen Blick. . . . . . . . . . . . . . . . . . . . . . . . . . . . . 3
Installation . . . . . . . . . . . . . . . . . . . . . . . . . . . . . . . . 5
Drucker auspacken . . . . . . . . . . . . . . . . . . . . . . 5
Drucker aufstellen . . . . . . . . . . . . . . . . . . . . . . . 6
Druckerspannung überprüfen . . . . . . . . . . . . . . 7
Drucker anschließen . . . . . . . . . . . . . . . . . . . . . 7
Drucker einschalten . . . . . . . . . . . . . . . . . . . . . . 8
Bedienfeld . . . . . . . . . . . . . . . . . . . . . . . . . . . . . . . . 9
Mit dem Drucker arbeiten . . . . . . . . . . . . . . . . . . . 10
Ein Dokument einlegen . . . . . . . . . . . . . . . . . . 10
Pass/Sparbuch einlegen . . . . . . . . . . . . . . . . . 11
Wartung und Pflege. . . . . . . . . . . . . . . . . . . . . . . . 14
Farbbandkassette wechseln . . . . . . . . . . . . . . 14
Statusseite ausdrucken . . . . . . . . . . . . . . . . . . 19
Technische Daten . . . . . . . . . . . . . . . . . . . . . . . . . 20
Druckerspezifikationen. . . . . . . . . . . . . . . . . . . 20
Papierspezifikationen. . . . . . . . . . . . . . . . . . . . 21
Verbrauchsmaterial und Zubehör. . . . . . . . . . . 22
DEUTSCH
I
Page 28

Druckermodelle
Quick Start-enIVZ.fm Seite II Mittwoch, 2. Mai 2007 11:22 11
Modell Beschreibung
5040 Standardmodell
5040 MSR-H Modell 5040 mit zusätzlichem horizontalen Magnetstreifen-Leser (MSR-H)
5040 S2 Modell 5040 mit zusätzlicher zweiter seriellen Schnittstelle RS232C (S2)
5040 MSR-H S2 Kombination von Standardmodell, MSR-H- und S2-Modell
Page 29
Kurzanleitung Einführung
Quick Start-de.book Seite 1 Dienstag, 5. Dezember 2006 10:43 10
Einführung Die Kurzanleitung dient dem schnellen Einstieg in das Arbeiten mit dem Drucker
und soll auch dem ungeübten Benutzer den Umgang mit dem Gerät ermöglichen.
Sie beschreibt die wichtigsten Funktionen des Druckers und enthält unerläßliche
Informationen für die alltägliche Arbeit mit dem Gerät. Eine ausführliche Beschreibung des Druckers, seiner Leistungsmerkmale und weiterführende Informationen enthält das Benutzerhandbuch auf der Online-CD-ROM, die Sie auf der
vorletzten Seite dieser Kurzanleitung finden.
` Zu den verwendeten
Symbolen
` Wichtige
Sicherheitshinweise
STOP
Wichtige Informationen werden in der Kurzanleitung durch zwei Symbole hervorgehoben.
VORSICHT enthält Informationen, die beachtet werden müssen, um den Benutzer
vor Schaden zu bewahren und Schäden am Drucker zu verhindern.
HINWEIS enthält allgemeine oder zusätzliche Informationen zu einem bestimmten Thema.
Lesen Sie die folgenden Hinweise genau durch, bevor Sie den Drucker in Betrieb
nehmen. Dadurch schützen Sie sich und vermeiden Schäden an dem Gerät.
■ Bewahren Sie diese Kurzanleitung an einem jederzeit zugänglichen Ort auf.
■ Den Drucker auf stabilem und ebenem Untergrund so aufstellen, daß er nicht zu
Boden fallen kann.
■ Den Drucker weder hohen Temperaturen noch direktem Sonnenlicht aussetzen.
■ Keine Flüssigkeiten mit dem Drucker in Berührung bringen.
■ Den Drucker keinen Erschütterungen, Stößen oder Vibrationen aussetzen.
■ Den Drucker nur an eine Steck dose mit der richtigen Spannung anschließen.
■ Vor der Ausführung von Wartungsarbeiten und der Behebung von Störungen
vor dem Öffnen des Gerätes den Netzstecker ziehen.
■ Papierkanten können die Isolierung des Netzkabels beschädigen, wenn sie stän-
dig daran scheuern. Der Benutzer hat Sorge zu tragen, daß das Netzkabel und
bewegtes Papier unter allen Umständen genügend Abstand voneinander haben.
DEUTSCH
STOP
STOP
Führen Sie Wartungsarbeiten und Reparaturen keinesfalls selbst aus, sondern verständigen Sie immer einen qualifizierten Servicetechniker.
Wenn Sie den Drucker vom Netz trennen wollen, den Drucker korrekt ausschalten
und immer den Netzstecker an der Steckdose ziehen.
Weitere Sicherheitshinweise finden Sie an entsprechender Stelle im Text.
1
Page 30
Einführung Kurzanleitung
Quick Start-de.book Seite 2 Dienstag, 5. Dezember 2006 10:43 10
` Arbeiten mit der
Online-CD-ROM
` Was ist auf der
Online-CD-ROM
Installieren Sie zuerst den Adobe Acrobat Reader auf Festplatte, falls dieses Programm nicht schon vorhanden ist. Befolgen Sie zur Installation die in der ReadmeDatei im Verzeichnis READER aufgeführten Schritte.
Doppelklicken Sie zum Starten der Online-Dokumentation im Windows-Explorer
auf die Datei START.PDF. Folgen Sie dann der Bedienerführung.
Die Online-CD-ROM enthält:
– das Benutzerhandbuch: eine ausführliche Beschreibung des Druckers und sei-
ner Leistungsmerkmale;
– Treiber für Windows 95/98, Windows 2000, Windows XP;
– weitere Dokumentationen: Programmierhandbücher und Listen der unterstütz-
ten Druckerkommandos und Sequenzen.
Für den Fall, daß die CD-ROM fehlerhaft ist oder fehlt, wenden Sie sich bitte an
Ihren Händler. Die Online-Dokumentation ist auch in gedruckter Form (gegen Gebühr) oder im Internet erhältlich.
` Hardwarevoraussetzungen Hardwarevoraussetzungen mindestens PC AT 486, 4-fach CD-ROM, 15"-Bild-
schirm, Maus.
` Fehlersuche Das Kapitel „Fehlerbehebung“ des Benutzerhandbuchs auf der Online-CD-ROM
enthält ausführliche Informationen zur Behebung von Fehlern. Es behandelt allgemeine Druckprobleme ebenso wie Probleme mit der Druckqualität und dem Papierlauf.
2
Page 31

Kurzanleitung Auf einen Blick
Quick Start-de.book Seite 3 Dienstag, 5. Dezember 2006 10:43 10
Auf einen Blick
Ansicht von vorn
Abdeckung
Netzschalter (Ein/Aus)
DEUTSCH
PapierablageBedienfeld
Ansicht mit geöffneter
Abdeckung
Farbbandkassette
Druckkopf
Freigabehebel
3
Page 32

Auf einen Blick Kurzanleitung
Quick Start-de.book Seite 4 Dienstag, 5. Dezember 2006 10:43 10
Ansicht von hinten
Netzanschlußbuchse Parallele
Schnittstelle
Erste serielle
Schnittstelle
Zweite serielle
Schnittstelle
USB-
Schnittstelle
4
Page 33

Kurzanleitung Installation
Quick Start-de.book Seite 5 Dienstag, 5. Dezember 2006 10:43 10
Installation
` Drucker auspacken Den verpackten Drucker auf eine stabile Unterlage stellen.
Darauf achten, daß die Symbole für ,,Oben“ in die richtige Richtung zeigen.
Öffnen Sie die Verpackung, heben Sie den Drucker aus dem Karton heraus und
entfernen Sie die restliche Verpackung.
Überprüfen Sie den Drucker auf sichtbare Transportschäden und Vollständigkeit.
Folgendes Zubehör muß vorhanden sein:
■ Diese Kurzanleitung
■ Die CD-ROM (auf der vorletzten Seite dieses Handbuchs)
■ Das Netzkabel
■ Die Farbbandkassette
Informieren Sie im Fall von Transportschäden oder fehlendem Zubehör bitte Ihren
Händler.
DEUTSCH
5
Page 34

Installation Kurzanleitung
Quick Start-de.book Seite 6 Dienstag, 5. Dezember 2006 10:43 10
` Drucker aufstellen Den Drucker auf einer stabilen, ebenen und rutschfesten Oberfläche so aufstellen,
daß er nicht herunterfallen kann. Der Zugang zum Bedienfeld und den Papiereinzügen muß gewährleistet und genügend Platz für das ausgeworfene Papier vorhanden sein:
Ort Mindestabstand
Linke und rechte Seite des Druckers 1 cm
Druckeroberseite 2 cm
Druckerrückseite um ausreichende Bel üft ung z u gewährleisten 10 cm
um auf eine DIN A4-Seite zu drucken 12 cm
Beachten Sie bei der Wahl des Ortes, an dem Sie den Drucker aufstellen, außerdem
folgende Punkte:
STOP
Stellen Sie den Drucker keinesfalls in der Nähe von leicht entzündlichen Gasen
oder explosiven Stoffen auf.
■ Den Drucker keiner direkten Sonneneinstrahlung aussetzen. Läßt es sich nicht
vermeiden, daß das Gerät an einem Fenster steht, schützen Sie es mit einem
Vorhang vor Sonnenlicht.
■ Achten Sie beim Verbinden von Rechner und Drucker darauf, daß die zulässige
Kabellänge nicht überschritten wird (siehe Benutzerhandbuch auf der OnlineCD-ROM, Technische Spezifikationen).
■ Den Drucker in angemessenem Abstand von Heizkörpern aufstellen.
■ Darauf achten, daß der Drucker weder extremen Temperatur- noch Luftfeuch-
tigkeitsschwankungen ausgesetzt wird. Achten Sie vor allem auch darauf, daß
Staubeinwirkung vermieden wird.
■ Wegen der auftretenden Geräuschentwicklun g empfehlen wir Ihnen im Be-
darfsfall, den Drucker akustisch getrennt vom Arbeitsplatz aufzustellen.
6
Page 35

Kurzanleitung Installation
Quick Start-de.book Seite 7 Dienstag, 5. Dezember 2006 10:43 10
` Druckerspannung
überprüfen
` Drucker anschließen
STOP
Vergewissern Sie sich, daß das Gerät auf die richtige Spannung eingestellt ist (z.B.
230 V in Europa, 120 V in den USA). Siehe dazu das Typenschild auf der Rückseite des Druckers. Sollte diese Einstellung falsch sein, setzen Sie sich bitte mit Ihrem Händler in Verbindung.
Niemals den Drucker einschalten, wenn er nicht auf die richtige Spannung eingestellt ist, da dies zu schweren Schäden führen kann.
Verbinden Sie das Netzkabel wie mit der Anschlußbuchse
des Druckers.
Stecken Sie den Stecker des Netzkabels in eine Steckdose.
DEUTSCH
Stellen Sie sicher, daß Drucker und Computer ausgeschaltet
sind und verbinden Sie mit Ihrem Datenkabel Drucker und
Computer, in diesem Beispiel ein paralleles CentronicsSchnittstellenkabel mit 36 Pins.
7
Page 36

Installation Kurzanleitung
Quick Start-de.book Seite 8 Dienstag, 5. Dezember 2006 10:43 10
` Drucker einschalten
Drücken Sie den Netzschalter auf der rechten Vorderseite
des Druckers, um ihn einzuschalten.
Der Drucker initialisiert.
ONLINE
KEIN PAPIER
8
PAPER
SETUP
USER1
STOP
/EJECT
USER2
Ist der Initialisierungsvorgang abgeschlossen leuchtet die
Bereit-LED auf. In der Anzeige erscheint die Meldung
ONLINE KEIN PAPIER. Der Drucker befindet sich im
Online-Status und ist bereit für den Empfang von Daten aus
dem System. Sie können nun ein Dokument oder einen Pass/
ein Sparbuch einlegen.
Page 37

Kurzanleitung Bedienfeld
Quick Start-de.book Seite 9 Dienstag, 5. Dezember 2006 10:43 10
Bedienfeld Das Bedienfeld besteht aus drei Tasten zur Steuerung der Druckerfunktionen, vier
LEDs, die den Druckerstatus anzeigen und einer LCD-Anzeige mit 2 x 16 Zeichen.
1 LCD-Anzeige: Zeigt den internen Druckerstatus, Steuer-
befehle und Fehlermeldungen an.
2 Papier-LED: Zeigt an, ob Papier eingelegt ist oder nicht;
Ein = Papier ist eingelegt, Aus = kein Papier; blinkend =
zeigt an, daß Daten an den Drucker gesendet wurden.
3 Benutzer 1-LED: Blinkt, wenn der Drucker Daten über
die erste Schnittstelle erhält, leuchtet, wenn ein Auftrag
gedruckt wird (siehe unten).
4 Bereit-LED: Zeigt an, ob der Drucker Offline oder Online
ist; Ein = Online, Aus = Offline; blinkend = zeigt an, daß
ein Fehler aufgetreten ist, die Fehlerursache wird im Display angezeigt..
5 Benutzer 2-LED: Blinkt, wenn der Drucker Daten über
die erste Schnittstelle erhält, leuchtet, wenn ein Auftrag
gedruckt wird (siehe unten).
6 USER2-Taste: Kann nur durch eine Applikation aktiviert
werden; die Funktionalität dieser Taste hängt von der
Emulation und der Applikation an, die verwendet werden
(siehe auch Benutzer 2-LED).
7 STOP/EJECT-Taste: Schaltet den Drucker in den Online-
/Offline-Modus (siehe auch Bereit-LED); wirft eingelegtes Papier aus (siehe auch Papier-LED).
8 USER1-Taste: Kann nur durch eine Applikation aktiviert
werden; die Funktionalität dieser Taste hängt von der
Emulation und der Applikation an, die verwendet werden
(siehe auch Benutzer 1-LED).
Berücksichtigen Sie bitte, daß einige Emulationen und Applikationen die LEDs
und Tasten auf eine andere Weise verwenden, die durch die Beschreibungen in
diesem Dokument nicht abgedeckt wird.
DEUTSCH
Eine ausführliche Übersicht über die einzelnen Funktionen des Bedienfeldes finden Sie im Benutzerhandbuch auf der Online-CD-ROM.
9
Page 38

Mit dem Drucker arbeiten Kurzanleitung
Quick Start-de.book Seite 10 Dienstag, 5. Dezember 2006 10:43 10
Mit dem Drucker arbeiten
` Ein Dokument einlegen Stellen Sie vor dem Einlegen eines Dokuments sicher, daß der Drucker eingeschal-
tet ist und die Meldung ONLINE KEIN PAPIER im LCD angezeigt wird.
Legen Sie das Dokument so ein, daß die rechte Papierkante
sich innerhalb des Bereichs zwischen der linken Seite des
Symbols und der rechten Seite der Papierführung befindet,
so daß der automatische Papiereinzug es korrekt fassen kann.
Dies ist besonders für Dokumente wichtig, die schmaler sind
als ein DIN A4-Blatt.
10
Platzieren Sie die
rechte Papierkante
innerhalb dieses
Bereichs
Schieben Sie dann das Dokument bis zum Anschlag in den Papiereinzug.
Nachdem das Dokument eingezogen wurde, erscheint die Meldung ONLINE
PAPIER in der Anzeige.
Nach dem Abschluß des Druckvorgangs wird das Dokument aus dem Drucker
transportiert und freigegeben, so daß es entnommen werden kann.
Die Meldung ONLINE KEIN PAPIER erscheint wieder in der Anzeige.
Page 39

Kurzanleitung Mit dem Drucker arbeiten
Quick Start-de.book Seite 11 Dienstag, 5. Dezember 2006 10:43 10
` Pass/Sparbuch einlegen Vor der Verwendung eines neuen, längs oder quer gefalzten Sparbuchs sollten Sie
die Steifigkeit des Bindrückens beseitigen wie im Folgenden beschrieben.
Schlagen Sie das Sparbuch auf der Seite auf, die bedruckt
werden soll, und überbiegen Sie den Falz nach außen.
Streifen Sie mit beiden Daumen und Zeigefingern von der
Mitte aus über den Buchfalz und biegen Sie es leicht nach außen.
DEUTSCH
Handelt es sich um ein neues Sparbuch, sollte dieser Vorgang mehrere Male wiederholt werden.
Verfügt das Sparbuch einen Magnetstreifen, darf dieser nicht geknickt oder auf andere Weise beschädigt
werden.
11
Page 40

Mit dem Drucker arbeiten Kurzanleitung
Quick Start-de.book Seite 12 Dienstag, 5. Dezember 2006 10:43 10
Die Aufwölbung des aufgeschlagenen Sparbuchs muß so
flach wie möglich gehalten werden, um einen fehlerfreien
Einzug in den Drucker zu gewährleisten.
Aufwölbung
Legen Sie das Sparbuch mit der zu bedruckenden Seite nach
oben auf die rechte Seite der Papierablage. Das Sparbuch
muß in die Öffnung des Einzugs eingeführt werden. Befindet
es sich dort, greift der Druckermechanismus das Buch. Ist
dies geschehen, können Sie das Buch loslassen, weil der
Drucker es entlang seiner rechten Anschlagsposition ausrichtet und einzieht.
12
Werden steife oder stark gewölbte Sparbücher von
der automatischen Dokumentausrichtung nicht richtig erfasst, sollten Sie das Sparbuch manuell an den
Anschlag auf der rechten Seite der Papierablage anlegen und einführen.
Page 41

Kurzanleitung Mit dem Drucker arbeiten
Quick Start-de.book Seite 13 Dienstag, 5. Dezember 2006 10:43 10
ONLINE
PAPIER
PAPER
SETUP
USER1
STOP
/EJECT
USER2
Ist das Sparbuch eingezogen, erscheint die Meldung
ONLINE PAPIER in der LCD-Anzeige.
Verwenden Sie keine Sparbücher, die nicht den An-
STOP
forderungen entsprechen, die im Abschnitt "Papierspezifikationen" aufgeführt sind, da sonst das
Sparbuch und der Druckkopf beschädigt werden
könnten.
Nach Abschluß des Druckvorgangs wird das Sparbuch automatisch aus dem Drucker transportiert und zur Entnahme
freigegeben.
Wird das Sparbuch nicht automatisch aus dem Drucker transportiert, müssen Sie die STOP/EJECT-Taste drücken, um
den Drucker in den STOP-Modus (Offline-Modus) zu setzen. Drücken Sie die STOP/EJECT-Taste erneut, um das
Sparbuch auszugeben.
Die Meldung ONLINE KEIN PAPIER erscheint wieder in
der LCD-Anzeige.
DEUTSCH
13
Page 42

Wartung und Pflege Kurzanleitung
Quick Start-de.book Seite 14 Dienstag, 5. Dezember 2006 10:43 10
Wartung und Pflege
` Farbbandkassette
wechseln
STOP
Stellen Sie vor dem Wechsel der Farbbandkassette sicher, daß der Drucker ausgeschaltet ist.
Der Druckkopf kann heiß sein, wenn der Drucker eine längere Zeit gedruckt hat.
Warten Sie, bis er abgekühlt ist und keine Verbrennungsgefahr mehr besteht.
Öffnen Sie Abdeckung, indem Sie sie auf der rechten und
linken Seite fassen und nach oben schwenken, bis sie einrastet.
Drücken Sie den Freigabehebel für den Druckmechanismus.
Der Druckmechanismus wird dadurch nach hinten geschwenkt.
14
Page 43

Kurzanleitung Wartung und Pflege
Quick Start-de.book Seite 15 Dienstag, 5. Dezember 2006 10:43 10
Lösen Sie die farbige Farbbandführung vom Druckkopf, indem Sie diese nach unten drücken.
Heben Sie die Vorderseite der Farbbandkassette auf beiden
Seiten an. Nehmen Sie die Farbbandkassette aus dem
Drucker.
DEUTSCH
15
Page 44

Wartung und Pflege Kurzanleitung
Quick Start-de.book Seite 16 Dienstag, 5. Dezember 2006 10:43 10
Nehmen Sie die neue Farbbandkassette aus ihrer Verpakkung und heben Sie die Farbbandführung von der Kassette
ab.
Entfernen Sie die Transportsicherung, mit der die Farbbandführung an der Kassette befestigt ist.
Setzen Sie die neue Farbbandkassette ein, indem Sie sie zuerst in die hinteren Öffnungen der Halterung einlegen.
Drücken Sie die Farbbandkassette an der Vorderseite in ihre
Halterung, bis sie einrastet.
Drücken Sie nicht auf die Mitte der Farbbandkassette, da dies zur Verformung der Kassette führt und
Druckprobleme verursacht.
16
Page 45

Kurzanleitung Wartung und Pflege
Quick Start-de.book Seite 17 Dienstag, 5. Dezember 2006 10:43 10
Ziehen Sie die Farbbandführung unter den Druckkopf. Straffen Sie das Farbband durch Drehen des Spannrades in Pfeilrichtung.
Drücken Sie die Farbbandführung von unten auf den Druckkopf, bis sie einrastet.
Prüfen Sie durch Drehen des Spannrades in Pfeilrichtung, ob
das Farbband ordnungsgemäß transportiert wird.
DEUTSCH
17
Page 46

Wartung und Pflege Kurzanleitung
Quick Start-de.book Seite 18 Dienstag, 5. Dezember 2006 10:43 10
Schließen Sie die Druckmechanik, indem Sie in den farbigen
Bereich in der Mitte der Mechanik drücken wie dargestellt,
und stellen Sie sicher, daß sie auf der linken und rechten Seite vollständig eingerastet ist.
Schließen Sie die Abdeckung. Der Drucker ist nun druckbereit und kann wieder eingeschaltet werden.
Wir empfehlen, nach dem Austausch der Farbbandkassette die Funktionen des Druckers durch den Ausdruck der Parametereinstellung zu prüfen (siehe
Abschnitt “Statusseite ausdrucken” auf Seite 19).
18
Page 47

Kurzanleitung Wartung und Pflege
Quick Start-de.book Seite 19 Dienstag, 5. Dezember 2006 10:43 10
` Statusseite ausdrucken Der Drucker verfügt über eine Funktion, die es Ihnen erlaubt, die aktuellen Para-
metereinstellungen auszudrucken.
Schalten Sie den Drucker aus.
PAPER
USER2
USER1
STOP
/EJECT
SETUP
Druck Statusseite
Papier einlegen
Druck Statusseite
Druckt...
PAPER
SETUP
PAPER
SETUP
USER1
USER1
STOP
/EJECT
STOP
/EJECT
USER2
USER2
Halten Sie die USER2-Taste gedrückt, während Sie den
Drucker wieder einschalten.
DEUTSCH
In der LCD-Anzeige erscheint Druck Statusseite Papier
einlegen. Lassen Sie die USER2-Taste los.
Legen Sie Papier in den Drucker ein. In der LCD-Anzeige erscheint Druck Statusseite Druckt... und die Statusseite wird
ausgedruckt.
Nach Abschluß des Druckvorgangs wird das Papier ausgegeben.
Während des Druckvorgangs können Sie den Druck durch
Drücken der STOP/EJECT-Taste unterbrechen. Nach dem
Drücken der STOP/EJECT-Taste wird der Druck unterbrochen und das Papier ausgegeben.
Druck Statusseite
Abgeschlossen
PAPER
SETUP
USER1
STOP
/EJECT
USER2
Wird der Testausdruck abgebrochen oder ist er abgeschlossen, erscheint in der LCD-Anzeige die Meldung Druck
Statusseite Abgeschlossen.
Der Druckmodus wird automatisch beendet und ein DruckerReset ausgeführt.
19
Page 48

Technische Daten Kurzanleitung
Quick Start-de.book Seite 20 Dienstag, 5. Dezember 2006 10:43 10
Technische Daten
` Druckerspezifikationen
Druckprinzip Matrixdrucker mit 24 Nadel-Druckkopf
Zeichendichte 10, 12, 15, 16.6, 17.1, 20, 24 Zeichen/Zoll und Pro-
portionalschrift (Emulationsabhängig)
Zeilendichte Einstellbar in Mikroschritten
n/60 Zoll n = 0 bis 127
n/180 Zoll n = 0 bis 255
n/360 Zoll n = 0 bis 255
Druckbreite 194 Zeichen/Zeile bei 10 cpi
112 Zeichen/Zeile bei 12 cpi
141 Zeichen/Zeile bei 15 cpi
Druckgeschwindigkeit LQ: 133 cps; DQ: 400 cps
Schnittstellen seriell (RS232C), parallel (K ompatibilitätsmodus,
ECP), USB 2.0 (höchste Geschwindigkeit)
Nennspannung 120 V ± 10% (USA), 230 V ± 10% (Europa)
Netzfrequenz 50/60 Hz ± 3%
Netzform Für die Verwendung in Stromversorgungssystemen
mit neutralen und schutzgeerdeten Leitern (TN)
Nennstromaufnahme Betrieb (maximal): US: 1.30 A; EU: 0.59 A
Bereitschaft US: 0.11 A; EU: 0.072 A
Scheinleistungsaufnahme Betrieb (maximal): US: 89.7 VA; EU: 93.6 VA
Bereitschaft US: 88.8 VA; EU: 11.4 VA
Wirkleistung Betrieb (maximal): US: 70.0 W; EU: 73.0 W
Bereitschaft US: 76.9 W; EU: 78.9 W
Schalleistungspegel L
Schalldruckpegel L
Abmessungen Höhe: 168 mm, Breite: 378 mm, Tiefe: 280 mm
Gewicht Standard = 9,10 kg, MSR-H = 9,95 kg
Zulassungen
pAm
7.1 dB im Betrieb
WAd
55 dB im Betrieb
DIN EN 60 950 / VDE 0805, TUV (EN 60950) / Certified
CE Mark, UL 60950 3rd Edition / C-UL (CSA C22.2 No
60950-00) new reversion, IEC 60950-1, EN 55022 :1998
(Class B), EN 55024 :1998, FCC PT 15B : 2000 (Class
B), EN61000-3-2 :2000, EN61000-3-3 :1995, Energy
Star
20
Weitere Informationen zu Druckerspezifikationen sowie zu Spezifikationen der
Schnittstellen finden Sie im Benutzerhandbuch auf der Online-CD-ROM.
Page 49

Kurzanleitung Technische Daten
Quick Start-de.book Seite 21 Dienstag, 5. Dezember 2006 10:43 10
` Papierspezifikationen Benutzen Sie nur Papier, das den Papierspezifikationen entspricht, und testen Sie
neue Papierarten vor ihrem Gebrauch.
Papierspezifikationen
für Sparbücher
Papierspezifikationen
für Einfachformate
und Formularsätze
Papierbreite geöffnet 105 bis 235 mm
(horizontales Sparbuch)
105 bis 235 mm
(vertikales Sparbuch)
Papierlänge geöffnet 140 bis 210 mm
(horizontales Sparbuch)
125 bis 210 mm
(vertikales Sparbuch)
Buchdicke 2,0 mm max. (Umschlag +
Innenseiten)
Dickendifferenz 1,4 mm max.
Papierge wicht 75 bis 120 g/m
Buchbeschaffenheit Es wird empfohlen das Buch vor
dem Einführen sorgfältig zu
glätten.
Papierbreite 70 bis 240 mm
Papierlänge 70 bis 500 mm
Papierge wicht Einfachformat: 60 bis 160 g/m
Mehrfachformat: 80 bis 260 g/m2
Papierdic ke Einfachformat: 0,08 bis 0,5 mm
Mehrfachformat:0,08 bis 0,5 mm
Kopienzahl Original + 4 Kopien
(Kopiermodus)
Recyclingpapier kann grundsätzlich verwendet werden.
2
2
DEUTSCH
Weitere Informationen zu Papierspezifikationen finden Sie im Benutzerhandbuch
auf der Online-CD-ROM.
21
Page 50

Technische Daten Kurzanleitung
Quick Start-de.book Seite 22 Dienstag, 5. Dezember 2006 10:43 10
` Verbrauchsmaterial und
Zubehör
Verwenden Sie nur Farbbandkassetten des Herstellers; anderenfalls besteht die
Gefahr, dass der Druckkopf und der Farbbandantrieb beschädigt wird.
Verbrauchsmaterial Bestell-Nr.
Gewebeband in recycelbarer Kassette , schwarz 043393
Verwenden Sie nur zugelassene Druckköpfe, um Beschädigungen des Druckers zu
verhindern.
Zubehör Bestell-Nr.
Druckkopf 24 Nadeln 400805
22
Page 51

Guide de démarrage rapide Table des matières
Quick Start-de.book Seite I Dienstag, 5. Dezember 2006 11:01 11
Table des matières
Guide de démarrage rapide
Introduction . . . . . . . . . . . . . . . . . . . . . . . . . . . . . . . 1
Symboles utilisés . . . . . . . . . . . . . . . . . . . . . . . . 1
Consignes importantes de sécurité . . . . . . . . . . 1
Utilisation du CD-ROM Online . . . . . . . . . . . . . . 2
Que contient le CD-ROM Online . . . . . . . . . . . . 2
Configuration matérielle requise . . . . . . . . . . . . 2
Recherche des pannes . . . . . . . . . . . . . . . . . . . 2
Vue d’ensemble . . . . . . . . . . . . . . . . . . . . . . . . . . . . 3
Installation . . . . . . . . . . . . . . . . . . . . . . . . . . . . . . . . 5
Déballage de l’imprimante . . . . . . . . . . . . . . . . . 5
Mise en place de l’imprimante . . . . . . . . . . . . . . 6
Vérifier la tension de l’imprimante . . . . . . . . . . . 7
Connexion de l’imprimante. . . . . . . . . . . . . . . . . 7
Mise sous tension de l’imprimante. . . . . . . . . . . 8
Panneau de commande. . . . . . . . . . . . . . . . . . . . . . 9
Maniement de l'imprimante. . . . . . . . . . . . . . . . . . 10
Introduire un document . . . . . . . . . . . . . . . . . . 10
Introduire un livret d'épargne . . . . . . . . . . . . . . 11
Service et maintenance. . . . . . . . . . . . . . . . . . . . . 14
Remplacer la cartouche à ruban . . . . . . . . . . . 14
Imprimer la page du statut . . . . . . . . . . . . . . . . 19
Données techniques . . . . . . . . . . . . . . . . . . . . . . . 20
Spécifications de l’imprimante . . . . . . . . . . . . . 20
Spécifications du papier. . . . . . . . . . . . . . . . . . 21
Consommables et accessoires . . . . . . . . . . . . 22
FRANÇAIS
I
Page 52

Quick Start-de.book Seite II Dienstag, 5. Dezember 2006 11:01 11
Page 53

Guide de démarrage rapide Introduction
Quick Start-de.book Seite 1 Dienstag, 5. Dezember 2006 11:01 11
Introduction Ce manuel est une initiation rapide sur la manière d’utiliser l’imprimante et permet
également aux utilisateurs inexpérimentés de se servir de l’imprimante. Il décrit les
fonctions principales de l’imprimante et contient des informations indispensables
à connaître pour le travail quotidien avec l’imprimante. Vous trouverez une description détaillée de l’imprimante, de ses caractéristiques et des informations supplémentaires dans le guide d’utilisateur sur le CD-ROM Online, qui se trouve à
l’avant-dernière page de ce manuel.
` Symboles utilisés Deux symboles permettent de faire ressortir les informations importantes conte-
nues dans ce manuel.
STOP
ATTENTION signale les informations à observer pour éviter que l’utilisateur ne
se blesse ou que l’imprimante ne soit endommagée.
NOTE contient des informations générales ou supplémentaires sur un sujet précis.
` Consignes importantes de
sécurité
STOP
STOP
Lire attentivement les instructions suivantes avant de mettre l’imprimante en service pour éviter de vous blesser et d’endommager l’imprimante.
■ Veiller à ce que le présent manuel soit toujours parfaitement accessible.
■ Placer l’imprimante sur un support stable et plat de façon à ce qu’elle ne puisse
pas tomber.
■ Ne pas exposer l’imprimante à des températures élevées ou à la lumière directe
du soleil.
■ Ne pas mettre l’imprimante en contact avec des liquid es.
■ Ne pas exposer l’imprimante à des chocs, impacts ou vibrations.
■ Ne connecter l’imprimante à une prise que lorsque la tension est correcte.
■ Débranchez toujours le système du secteur avant d'ouvrir l'appareil pour exécu-
ter un travail de maintenance ou pour éliminer des erreurs.
■ Les arêtes du papier peuvent endommager l’isolation du câble secteur si vous le
frottez en permanence. L’utilisateur doit s’assurer que l’espacement entre le
câble secteur et le papier en mouvement est suffisant dans toute circonstance.
Ne jamais effectuer soi-même les travaux d’entretien et de réparations. Contacter
toujours un dépanneur qualifié.
Pour déconnecter l’imprimante de l’alimentation principale, mettre l’imprimante
hors tension correcte et toujours débrancher le connecteur secteur de la prise
murale.
Vous trouverez d’autres consignes de sécurité aux endroits appropriés dans le
texte.
FRANÇAIS
1
Page 54

Introduction Guide de démarrage rapide
Quick Start-de.book Seite 2 Dienstag, 5. Dezember 2006 11:01 11
` Utilisation du CD-ROM
Online
` Que contient le CD-ROM
Online
` Configuration matérielle
Installer d’abord l’Adobe Acrobat Reader sur le disque dur dans la mesure où ce
programme n’est pas déjà disponible. Pour l’installation, suivre les opérations détaillées dans le fichier Readme du répertoire READER.
Pour démarrer la documentation Online dans l’Explorateur, double-cliquez sur le
fichier START.PDF. Suivre ensuite le guide utilisateur.
Le CD-ROM Online contient
– le guide d’utilisateur: une description détaillée de l’imprimante et de ses
capacités;
– Pilotes pour Windows 95/98, Windows 2000, Windows XP;
– documentation supplémentaire : manuels d'utilisation pour programmeur, listes
des codes et séquences de commande de l'imprimante supportés.
Si le CD-ROM est défectueux ou manque, contacter votre revendeur. La documentation Online est également disponible sur papier (moyennant une participation) ou
sur Internet.
Matériel requis au minimum: PC AT 486, lecteur CD-ROM 4 x, écran 15", souris.
requise
` Recherche des pannes Le chapitre «Dépannage» du guide d’utilisateur sur le cédérom en ligne, contient
des informations détaillées sur l'élimination des erreurs. Il traite de problèmes
d'impression généraux, de problèmes avec la qualité de l'impression et avec le
parcours du papier.
2
Page 55

Guide de démarrage rapide Vue d’ensemble
Quick Start-de.book Seite 3 Dienstag, 5. Dezember 2006 11:01 11
Vue d’ensemble
Vue de face
Capot
Interrupteur secteur
commande
Support du documentPanneau de
Vue avec capot ouvert
Cartouche à ruban
Tête d’impression
Levier de libération
FRANÇAIS
3
Page 56

Vue d’ensemble Guide de démarrage rapide
Quick Start-de.book Seite 4 Dienstag, 5. Dezember 2006 11:01 11
Vue de dos
Prise secteur Interface
parallèle
1e interface
sérielle
e
2
interface
sérielle
Interface
USB
4
Page 57

Guide de démarrage rapide Installation
Quick Start-de.book Seite 5 Dienstag, 5. Dezember 2006 11:01 11
Installation
` Déballage de l’imprimante Placer l’imprimante emballée sur un support stable.
Veiller à ce que les symboles «Haut» soient orientés dans la bonne direction.
Ouvrez l'emballage, sortez l'imprimante du carton et retirez le matériel d'emballa-
ge restant.
Vérifier que l’imprimante est complète et en parfait état. Vous devez trouver les
articles suivants:
■ Ce guide de démarrage rapide
■ Le CD-ROM Online (à l’avant-dernière page de ce manuel)
■ Le câble secteur
■ Le ruban encreur
Si des accessoires manquent ou sont endommagés, contacter votre revendeur.
FRANÇAIS
5
Page 58

Installation Guide de démarrage rapide
Quick Start-de.book Seite 6 Dienstag, 5. Dezember 2006 11:01 11
` Mise en place de
l’imprimante
STOP
Placer l’imprimante sur un support stable, plan et antidérapant de façon à ce qu’elle ne puisse pas tomber. Veiller à ce que le panneau de commande et les magasins
d’alimentation en papier soient aisément accessibles et à ce qu’il y ait suffisamment de place pour l’éjection du papier:
Emplacement Espace
minimum
À gauche et à droite de l'imprimante 1 cm
Haut de l'imprimante 2 cm
Arrière de l'imprimante pour assurer une ventilation suffisante 10 cm
pour imprimer sur une feuille A4 12 cm
Pour le choix de l’emplacement de l’imprimante, observer ce qui suit:
Ne jamais placer l’imprimante à proximité de sources de gaz aisément inflammables ou de substances explosives.
■ Eviter d’exposer l’imprimante à la lumière directe du soleil. Si vous devez pla-
cer l’imprimante près d’une fenêtre, la protéger des rayons du soleil par un rideau.
■ Lorsque vous connectez l’ordinateur à l’imprimante, veiller à ce que la longueur
de câble autorisée ne soit pas dépassée (voir le guide d'utilisateur sur le CDROM Online, spécifications techniques).
■ Ne pas placer l’imprimante trop près des radiateurs.
■ Veiller à ce que l’imprimante ne soit pas soumise à de fortes variations de tem-
pérature ou d’humidité de l’air. Eviter la poussière.
■ En raison de l’émission sonore qui se produit, nous vous recommandons d’éloi-
gner l’imprimante du poste de travail.
6
Page 59

Guide de démarrage rapide Installation
Quick Start-de.book Seite 7 Dienstag, 5. Dezember 2006 11:01 11
` Vérifier la tension de
l’imprimante
STOP
` Connexion de l’imprimante
Assurez-vous que l’imprimante est réglée à la tension appropriée (p. ex. 230 V
pour l’Europe, 120 V pour les USA). Voir la plaque signalétique placée au dos de
l’imprimante. Si ce n’est pas le cas, contacter le vendeur.
Ne jamais mettre l’imprimante sous tension quand celle-ci n’est pas correcte car
ceci pourrait entraîner de graves endommagements.
Branchez le câble électrique à la prise d'admission électrique
de l'imprimante.
Branchez la fiche du câble électrique dans une prise de secteur.
FRANÇAIS
Assurez-vous que l'imprimante et l'ordinateur sont arrêtés et
branchez le câble de données entre l'imprimante et l'ordinateur, dans cet exemple, un câble parallèle Centronics à 36
ergots.
7
Page 60

Installation Guide de démarrage rapide
Quick Start-de.book Seite 8 Dienstag, 5. Dezember 2006 11:01 11
` Mise sous tension de l’imprimante
Appuyez sur l'interrupteur de courant situé en bas à droite sur
la face de l'imprimante pour allumer celle-ci.
L'imprimante procède à l'initialisaiton.
EN LIGNE
PAS DE PAPIER
8
PAPER
SETUP
USER1
STOP
/EJECT
USER2
Une fois l'initialisation terminée, le voyant Ready (Prête)
s'allume. Le message EN LIGNE PAS DE PAPIER
s'affiche sur l'écran à cristaux liquides. L'imprimante est dans
le statut en ligne et est prête à recevoir des données du système. Vous pouvez maintenant introduire un document ou un
livret d'épargne.
Page 61

Guide de démarrage rapide Panneau de commande
Quick Start-de.book Seite 9 Dienstag, 5. Dezember 2006 11:01 11
Panneau de
commande
Le panneau de commande se compose de trois touches pour piloter les fonctions
de l'imprimante, de quatre DEL affichant l'état de l'imprimante et d'un écran à cristaux liquides d'affichage avec 2 x 16 caractères.
1 Écran à cristaux liquides: affiche le statut interne de l'impri-
mante, les instructions de maniement et les messages d'erreur.
2 DEL Papier: indique si du papier a été introduit ou non; al-
lumée = papier introduit, éteinte = pas de papier introduit;
clignotant = indique que des données sont envoyées vers
l’imprimante.
3 DEL Utilisateur 1: clignote si l’impri mante est en train de
rece-voir des données via la première interface, est allumée
si un travail est imprimé (voir ci-dessous).
4 DEL Prête: indique si l'imprimante est hors ligne ou en ligne
(mode STOP); allumée = en ligne, éteinte = hors ligne. Clignote-ment = indique qu’une erreur est survenue. La cause
de l’erreur est indiquée sur l’écran à cristaux liquides.
5 DEL Utilisateur 2: clignote si l’impri mante est en train de
rece-voir des données via la deuxième interface, est allumée
si un travail est imprimé.
6 Touche USER 2: Activé par une application uniquement ; la
fonctionnalité de la touche dépend de l’émulation et de l’application utilisée (voir également la DEL Utilisateur 2).
7 Touche STOP/EJECT: commute l'imprimante dans le mode
en ligne/hors ligne (voir également la DEL Prête); éjecte le
papier introduit (voir également la DEL Papier).
8 Touche USER 1: Activé par une application uniquement ; la
fonctionnalité de la touche dépend de l’émulation et de l’application utilisée (voir également la DEL Utilisateur 1).
FRANÇAIS
Gardez à l’esprit que certaines émulations et applications peuvent utiliser des
LED et des touches d’une manière différente de celle définie par l'émulation et/ou
le logiciel hôte et en dehors des définitions contenues dans ce document.
Pour une vue d'ensemble détaillée des différentes fonctions du panneau de commande, reportez-vous au guide d'utilisateur sur le cédérom en ligne.
9
Page 62

Maniement de l'imprimante Guide de démarrage rapide
Quick Start-de.book Seite 10 Dienstag, 5. Dezember 2006 11:01 11
Maniement de l'imprimante
` Introduire un document Avant d'introduire un document, assurez-vous que l'imprimante est allumée et que
l'écran à cristaux liquides affiche EN LIGNE PAS DE PAPIER.
Introduisez le document de façon à ce que le bord droit du
papier soit positionné à l'intérieur de la zone entre le côté
gauche du symbole et le bord droit du support du document,
pour que le système d'alignement du document puisse saisir
celui-ci de manière sûre. Ceci est particulièrement important
pour les documents qui sont plus étroits qu'une feuille
DIN A4.
10
Placez le bord droit
du document à
l'intérieur de cette
zone.
Poussez ensuite le document vers la butée dans la glissière de
guidage pour documents.
Une fois que le document a été saisi et tiré vers l'intérieur, le
message EN LIGNE PAPIER s'affiche sur l'écran à cristaux
liquides.
Une fois l'impression terminée, le document est transporté et
sorti de l'imprimante puis libéré pour être retiré. Le message
EN LIGNE PAS DE PAPIER (en ligne, pas de papier)
s'affiche de nouveau sur l'écran à cristaux liquides.
Page 63

Guide de démarrage rapide Maniement de l'imprimante
Quick Start-de.book Seite 11 Dienstag, 5. Dezember 2006 11:01 11
` Introduire un livret
d'épargne
Avant de traiter un nouveau livret d'épargne avec pliure verticale ou pliure horizontale, cassez la raideur de la pliure comme suit.
Ouvrez le livret d'épargne à la page que vous voulez imprimer. Repliez la pliure très fortement vers l'arrière.
Passez en appuyant vos pouces et vos index le long de la
pliure du livret d'épargne et repliez légèrement le livret vers
l'extérieur.
Si vous voulez imprimer un livret d'épargne neuf, répétez
cette procédure plusieurs fois.
FRANÇAIS
Si le livret d'épargne est muni d'une bande
magnétique, veillez à ne pas la froisser.
11
Page 64

Maniement de l'imprimante Guide de démarrage rapide
Quick Start-de.book Seite 12 Dienstag, 5. Dezember 2006 11:01 11
Le bombement du livret ouvert doit être aussi plat que possible pour assurer un transport sans problèmes dans l’imprimante.
Bombement
Placez le livret d'épargne sur le côté droit du support pour documents, avec la page à imprimer faisant face en haut. Le livret doit être in-séré dans l’ouverture de la glissière. Une fois
qu’il est dans la glissière, le mécanisme de l’imprimante
prend le livret. À ce moment, vous pouvez relâcher le livret
car l’imprimante l’alignera de nouveau contre sa butée droite
pour le charger dans l’imprimante.
12
Si le dispositif d'alignement automatique du document ne peut pas saisir correctement des livrets
d'épargne raides ou incurvés, vous devez placer le livret manuellement contre la butée à droite du support
pour documents et introduire le livret.
Page 65

Guide de démarrage rapide Maniement de l'imprimante
Quick Start-de.book Seite 13 Dienstag, 5. Dezember 2006 11:01 11
EN LIGNE
PAPIER
PAPER
SETUP
USER1
STOP
/EJECT
USER2
Une fois le livret d'épargne introduit, l'écran à cristaux
liquides affiche le message EN LIGNE PAPIER.
N'utilisez pas de livrets d'épargne ne répondant pas
STOP
aux spécifications énoncées dans la section «Spécifications du papier». Dans le cas contraire, les livrets
d'épargne et la tête d'impression risquent d'être
endommagés.
Une fois le livret d'épargne imprimé, il est transporté et sorti
automatiquement de l'imprimante puis libéré pour être retiré.
Si le livret n’a pas été correctement éjecté de l’imprimante,
appuyez sur la touche STOP pour mettre l’imprimante dans
le mode STOP (hors ligne). Appuyez de nouveau sur la touche STOP/EJECT pour éjecter le livret.
Le message EN LIGNE PAS DE PAPIER s'affiche de
nouveau sur l'écran à cristaux liquides.
FRANÇAIS
13
Page 66

Service et maintenance Guide de démarrage rapide
Quick Start-de.book Seite 14 Dienstag, 5. Dezember 2006 11:01 11
Service et maintenance
` Remplacer la cartouche à
ruban
STOP
Assurez-vous que l'imprimante est éteinte avant de remplacer la cartouche à ruban.
La tête d'impression peut être très chaude si l'imprimante a imprimé pendant une
longue période. Attendez jusqu'à ce qu'elle refroidisse et que vous ne risquiez plus
de vous brûler.
Ouvrez le capot en le saisissant à droite et à gauche pour le
faire pivoter vers le haut jusqu'à ce qu'il prenne l'encoche en
position.
Appuyez sur le levier de libération vert pour le mécanisme
d'impression. Ceci fait pivoter le mécanisme d'impression
vers l'arrière.
14
Page 67

Guide de démarrage rapide Service et maintenance
Quick Start-de.book Seite 15 Dienstag, 5. Dezember 2006 11:01 11
Dégagez le guide en couleur du ruban de la tête d'impression
en le tirant vers le bas.
Soulevez la face de la cartouche à ruban des deux côtés.
Retirez la cartouche à ruban de l'imprimante.
FRANÇAIS
15
Page 68

Service et maintenance Guide de démarrage rapide
Quick Start-de.book Seite 16 Dienstag, 5. Dezember 2006 11:01 11
Retirez la nouvelle cartouche à ruban de son emballage et
relevez le guide du ruban de la cartouche.
Retirez le blocage de transport qui fixe le guide du ruban à la
cartouche.
Introduisez la nouvelle cartouche à ruban en l'accrochant
d'abord dans les fentes arrière de sa fixation.
Poussez la face de la cartouche dans sa fixation pour qu'elle
prenne l'encoche en position.
Veillez à ne pas appuyer sur le centre de la cartouche
à ruban, car vous déformeriez ainsi la cartouche à
ruban ce qui entraînerait un problème de fonctionnement.
16
Page 69

Guide de démarrage rapide Service et maintenance
Quick Start-de.book Seite 17 Dienstag, 5. Dezember 2006 11:01 11
Tirez le guide du ruban sous la tête d'impression. Serrez le ruban en tournant le mécanisme de tension dans le sens de la
flèche.
Appuyez le guide du ruban par le bas sur la tête d'impression,
jusqu'à ce que vous l'entendiez prendre l'encoche.
Vérifiez que le ruban est transporté correctement en tournant
le mécanisme de tension dans le sens de la flèche.
FRANÇAIS
17
Page 70

Service et maintenance Guide de démarrage rapide
Quick Start-de.book Seite 18 Dienstag, 5. Dezember 2006 11:01 11
Fermez le cadre principal en appuyant sur la section en couleur au milieu du cadre comme illustré, et assurez-vous que
les côtés gauche et droit des cadres sont entièrement verrouillés.
Fermez le capot. L'imprimante est maintenant prête à
fonctionner et peut être rallumée.
Nous conseillons de vérifier le fonctionnement de
l'imprimante après le remplacement de la cartouche
à ruban en exécutant une impression des réglages des
paramètres (voir la section «Imprimer la page du statut», page 19).
18
Page 71

Guide de démarrage rapide Service et maintenance
Quick Start-de.book Seite 19 Dienstag, 5. Dezember 2006 11:01 11
` Imprimer la page du statut L'imprimante possède une fonction vous permettant d'imprimer le réglage actuel
des paramètres.
Éteignez l'imprimante.
Appuyez sur la touche USER2 tout en maintenant la pression
pendant que vous allumez l'imprimante.
SETUP
PAPER
USER1
STOP
/EJECT
USER2
Impr.page statut
Charger Papier
Impr.page statut
Imprime...
Impr.page statut
Termine
PAPER
SETUP
PAPER
SETUP
PAPER
SETUP
USER1
USER1
USER1
STOP
/EJECT
STOP
/EJECT
STOP
/EJECT
USER2
USER2
USER2
L'écran à cristaux liquides indique Impr.page statut Charger Papier (Imprimer page du statut). Relâchez la touche
USER2.
FRANÇAIS
Introduisez le papier dans l'imprimante. L'écran à cristaux liquides affiche Impr.page statut Imprime... (Imprimer page
du statut, impression) et l'impression de la page du statut est
exécutée.
Le papier est éjecté quand l'impression est terminée.
Pendant l'impression, vous pouvez utiliser la Touche STOP/
EJECT pour terminée l'impression, le papier est éjecté.
Quand l'impression de test est abandonnée ou terminée,
l'écran à cristaux liquides affiche Impr.page statut
Terminé. Le mode du réglage de l'impression est alors terminé automatiquement et une remise à l'état initial pour mise
en marche est exécutée.
19
Page 72

Données techniques Guide de démarrage rapide
Quick Start-de.book Seite 20 Dienstag, 5. Dezember 2006 11:01 11
Données techniques
` Spécifications de
l’imprimante
Méthode d'impression Imprimante matricielle à impact, 24 ergots
Pas des caractères 10, 12, 15, 16.6 17.1, 20, 24 caractères/pouce et carac-
tère proportionnel (en fonction de l'émulation)
Espacement des lignes Optionnel en micropas
n/60 pouces n = 0 à 127
n/180 pouces n = 0 à 255
n/360 pouces n = 0 à 255
Largeur d'impression 194 caractères/ligne à 10 cpi
112 caractères/ligne à 12 cpi
141 caractères/ligne à 15 cpi
Vitesse d'impression LQ (qualité courrier): 133 cps;
DQ (qualité ébauche): 400 cps
Interface sérielle (RS232C), parallèle (mode compatible, ECP),
USB 2.0 (pleine vitesse)
Tension nominale 120 V ± 10% (USA), 230 V ± 10% (Europe)
Fréquence de ligne 50/60 Hz ± 3%
Forme de réseau Pour utilisation dans des systèmes de distribution électri-
que avec des conducteurs neutres et de protection à la
terre (TN).
Entrée de courant
nominal
Puissance absorbée
apparente
Puissance utile réelle En service (maximum): US: 7 0. 0 W ; EU: 7 3.0 W
Niveau de sortie
acoustique L
Niveau de pression
acoustique L
Dimensions Haut.: 168 mm, Larg.: 378 mm, Prof.: 280 mm
Poids Standard = 9,10 kg, MSR-H = 9,95 kg
Homologations
WAd
pAm
En service (maximum): US : 1 .3 0 A; EU: 0.59 A
En veille: US: 0.11 A; EU: 0.072 A
En service (maximum): US: 89.7 VA; EU: 93.6 VA
En veille: US: 8.8 VA; EU: 11.4 VA
En veille US: 6.9 W; EU: 8.9 W
7.1 dB en service
55 dB en service
DIN EN 60 950 / VDE 0805, TUV (EN 60950) / Certified CE
Mark, UL 60950 3rd Edition / C-UL (CSA C22.2 No 60950-
00) new reversion, IEC 60950-1, EN 55022 :1998 (Class B),
EN 55024 :1998, FCC PT 15B : 2000 (Class B), EN61000-32 :2000, EN61000-3-3 :1995, Energy Star
20
Page 73

Guide de démarrage rapide Données techniques
Quick Start-de.book Seite 21 Dienstag, 5. Dezember 2006 11:01 11
Pour d’autres informations concernant les spécifications de l’imprimante et des
interfaces, consulter le guide d'utilisateur sur le CD-ROM Online.
` Spécifications du papier Utilisez uniquement du papier correspondant aux spécifications du papier et testez
de nouveaux types de papier avant de les utiliser.
Spécifications du
papier pour les livrets
d'épargne
Spécifications du
papier pour les
feuilles individuelles
et les feuilles pour
exemplaires multiples
Largeur du papier, livret
ouvert
Longueur du papier, livret
ouvert
Épaisseur du livret 2,0 mm max. (Une couverture +
Différence d'épaisseur 1,4 mm max.
Grammage du papier 75 à 120 g/m
État du livret Il est recommandé de l'aplatir soi-
Largeur du papier 70 à 240 mm
Longueur du papier 70 à 500 mm
Grammage du papier Feuille individuelle: 60 à 160 g/m
Épaisseur du papier F eu ille i nd ividue ll e: 0 ,08 à 0, 5 mm
Nombre d'exemplaires Original + 4 copies (mode copie)
Le papier recyclé est admis en principe.
105 à 235 mm
(Livret d'épargne horizontal)
105 à 235 mm
(Livret d'épargne vertical)
140 à 210 mm
(Livret d'épargne horizontal)
125 à 210 mm
(Livret d'épargne vertical)
page intérieure)
2
gneusement avant de l'insérer.
Feuille multiple: 80 à 260 g/m2
Feuille multiple: 0,08 à 0,5 mm
FRANÇAIS
2
Pour d’autres informations concernant les spécifications du papier, consulter le
guide d'utilisateur sur le CD-ROM Online.
21
Page 74

Données techniques Guide de démarrage rapide
Quick Start-de.book Seite 22 Dienstag, 5. Dezember 2006 11:01 11
` Consommables et
accessoires
Utilisez uniquement des cartouches à ruban du fabricant car des produits d'autres
fabricants risquent d'endommager la tête d'impression ou le mécanisme de déplacement du ruban.
Consommables Référence
Ruban textile dans des cartouches recyclables, couleur: noir 043393
Utilisez uniquement des têtes d'impression homologuées pour prévenir des dommages sur votre imprimante.
Accessoires Référence
Tête d'impression 24 aiguilles 400805
22
Page 75

Guida di avvio rapida Indice
Quick Start-it.book Seite I Dienstag, 5. Dezember 2006 11:14 11
Indice
GUIDA DI AVVIO RAPIDA
Introduzione. . . . . . . . . . . . . . . . . . . . . . . . . . . . . . . 1
Simboli utilizzati . . . . . . . . . . . . . . . . . . . . . . . . . 1
Indicazioni di sicurezza importanti . . . . . . . . . . . 1
Utilizzo del CD-ROM online . . . . . . . . . . . . . . . . 2
Cosa c’è sul CD-ROM online . . . . . . . . . . . . . . . 2
Requisiti hardware . . . . . . . . . . . . . . . . . . . . . . . 2
Diagnostica . . . . . . . . . . . . . . . . . . . . . . . . . . . . 2
Configurazione della stampante . . . . . . . . . . . . . . 3
Installazione . . . . . . . . . . . . . . . . . . . . . . . . . . . . . . . 5
Estrazione della stampante dall’imballaggio . . . 5
Installazione della stampante. . . . . . . . . . . . . . . 6
Controllare la tensione della stampante. . . . . . . 7
Collegamento della stampante. . . . . . . . . . . . . . 7
Accensione della stampante . . . . . . . . . . . . . . . 8
Pannello di controllo . . . . . . . . . . . . . . . . . . . . . . . . 9
Funzionamento della stampante . . . . . . . . . . . . . 10
Inserimento di un documento. . . . . . . . . . . . . . 10
Inserimento di un libretto . . . . . . . . . . . . . . . . . 11
Assistenza e manutenzione . . . . . . . . . . . . . . . . . 14
Sostituzione della cartuccia del nastro. . . . . . . 14
Stampa della pagina di stato . . . . . . . . . . . . . . 19
Dati tecnici . . . . . . . . . . . . . . . . . . . . . . . . . . . . . . . 20
Specifiche della stampante . . . . . . . . . . . . . . . 20
Specifiche della carta. . . . . . . . . . . . . . . . . . . . 21
Materiali di consumo e accessori. . . . . . . . . . . 22
ITALIANO
I
Page 76

Quick Start-it.book Seite II Dienstag, 5. Dezember 2006 11:14 11
Page 77

Guida di avvio rapida Introduzione
Quick Start-it.book Seite 1 Dienstag, 5. Dezember 2006 11:14 11
Introduzione La presente Guida di avvio rapida consentono di cominciare subito a lavorare con
la stampante, anche a utenti inesperti. Vi sono descritte le principali funzioni della
stampante e vi sono riportate le informazioni indispensabili per il lavoro giornaliero con la stessa. Una descrizione dettagliata della stampante e delle sue caratteristiche, unitamente ad altre informazioni, è riportata nel manuale dell’utente sul
CD-ROM online, inserito nella tasca della penultima pagina delle presenti istruzioni per l’uso.
` Simboli utilizzati Le informazioni importanti sono contrassegnate nel manuale da due simboli.
` Indicazioni di sicurezza
importanti
STOP
STOP
ATTENZIONE contrassegna le informazioni che devono essere rispettate per evitare rischi per l’incolumità personale e danni alla stampante.
AVVERTENZA contrassegna informazioni generiche o aggiuntive in merito a un
determinato argomento.
Prima di mettere in funzione la stampante, leggere attentamente le seguenti indicazioni. In questo modo si possono evitare rischi per la propria incolumità personale e danni all’apparecchio.
■ Conservare la presente guida di avvio rapida in un luogo sempre accessibile.
■ Collocare la stampante su una superficie piana stabile, per evitare che cada a
terra.
■ Non esporre la stampante ad elevate temperature né alla luce solare diretta.
■ Evitare il contatto della stampante con liquidi.
■ Non esporre la stampante a colpi, scosse o vibrazioni.
■ Collegare la stampante a una presa di corrente con tensione adeguata.
■ Prima di aprire il dispositivo per eseguire interventi di manutenzione o elimina-
re errori, scollegare sempre il sistema dalla rete di alimentazione.
■ Gli angoli della carta possono danneggiare l’isolamento del cavo di rete se sfre-
gano continuamente sul cavo stesso. L’utente deve assicurarsi che il cavo di rete
e la carta in movimento abbiano in ogni caso sufficiente distanza uno dall’altra.
Non eseguire mai da sé gli interventi di manutenzione e riparazione, ma rivolgersi
sempre a un tecnico di assistenza qualificato.
ITALIANO
STOP
Per scollegare la stampante dalla rete di alimentazione, spegnere correttamente
la stampante e disinserire sempre il connettore di rete dalla presa.
Altre indicazioni di sicurezza sono riportate nei punti adeguati del testo.
1
Page 78

Introduzione Guida di avvio rapida
Quick Start-it.book Seite 2 Dienstag, 5. Dezember 2006 11:14 11
` Utilizzo del CD-ROM online Se Adobe Acrobat Reader non è già caricato, installare innanzitutto questo pro-
gramma sul disco fisso. Per l’installazione, attenersi alle indicazioni riportate nel
file Readme, nella directory READER.
Per lanciare la documentazione online in Explorer, cliccare due volte sul file
START.PDF. Attenersi quindi alle indicazioni di guida per l’utente.
` Cosa c’è sul CD-ROM
online
Il CD-ROM online contiene
– il manuale dell’utente: descrizione dettagliata della stampante e delle sue carat-
teristiche,
– driver per Windows 95/98, Windows 2000, Windows XP,
– documentazione supplementare: manuali applicativi del programmatore, elen-
chi dei codici di controllo della stampante supportati e delle relative sequenze.
Se il CD-ROM è difettoso o non è allegato alle istruzioni per l’uso, rivolgersi al
proprio rivenditore. La documentazione online è disponibile anche su carta (a pagamento) oppure può essere consultata tramite Internet.
` Requisiti hardware Requisiti hardware minimi: PC AT 486, CD-ROM 4x, schermo da 15", mouse.
` Diagnostica Il Capitolo “Eliminazione disfunzioni” del manuale dell'utente sul CD-ROM con-
tiene informazioni dettagliate per la risoluzione degli errori. Vengono trattati problemi generici di stampa, problemi relativi alla qualità di stampa e il percorso
della carta.
2
Page 79

Guida di avvio rapida Configurazione della stampante
Quick Start-it.book Seite 3 Dienstag, 5. Dezember 2006 11:14 11
Configurazione della stampante
Vista anteriore
Coperchio
Presa di alimentazione
Vassoio cartaPannello comandi
Vista con coperchio aperto
Cartuccia nastro
Testina di stampa
Leva di rilascio
ITALIANO
3
Page 80

Configurazione della stampante Guida di avvio rapida
Quick Start-it.book Seite 4 Dienstag, 5. Dezember 2006 11:14 11
Vista posteriore
Presa di
alimentazione
Interfaccia
parallela
1ª interfaccia
seriale
2ª interfaccia
seriale
Interfaccia
USB
4
Page 81

Guida di avvio rapida Installazione
Quick Start-it.book Seite 5 Dienstag, 5. Dezember 2006 11:14 11
Installazione
` Estrazione della stampante
dall’imballaggio
Collocare la stampante su una superficie stabile.
Fare attenzione che i simboli “Alto” siano rivolti nella direzione corretta.
Aprire la confezione. Estrarre la stampante dalla scatola e rimuovere il materiale
di imballaggio rimanente.
Verificare che la stampante non abbia riportato danni dovuti al trasporto e che la
documentazione sia completa. Devono essere presenti i seguenti articoli:
■ La presente guida di avvio rapida
■ Il CD-ROM (inserito nella tasca della penultima pagina)
■ Il cavo di rete
■ Il nastro
Se si riscontrano danni dovuti al trasporto o in caso di accessori mancanti, comunicarlo immediatamente al rivenditore.
ITALIANO
5
Page 82

Installazione Guida di avvio rapida
Quick Start-it.book Seite 6 Dienstag, 5. Dezember 2006 11:14 11
` Installazione della
stampante
STOP
Collocare la stampante su una superficie stabile, piana e non scivolosa, per evitare
che cada a terra. Predisporre un agevole accesso al pannello operatore e alle guide
carta, lasciando anche spazio adeguato per assicurare una sufficiente ventilazione:
Posizione Spazio minimo
Sinistra e destra della stampante 1 cm
Zona superiore della stampante 2 cm
Retro della stampante per assicurare una sufficiente
ventilazione
per stampare un foglio A4 12 cm
10 cm
Ai fini della scelta del luogo di installazione della stampante, rispettare le seguenti
indicazioni:
Non collocare la stampante in prossimità di gas facilmente infiammabili o di sostanze esplosive.
■ Non esporre la stampante alla luce solare diretta. Se la stampante deve essere
inevitabilmente installata in prossimità di una finestra, proteggerla dal sole con
una tenda.
■ Al collegamento del PC con la stampante, fare attenzione a non superare la
lunghezza massima ammissibile del cavo (vedere il manuale dell’utente sul CDROM online, Specifiche tecniche).
■ Tenere la stampante a una distanza adeguata da fonti di calore.
■ Fare attenzione a non esporre la stampante ad estreme escursioni di temperatura
e umidità. Evitare la formazione di condensa.
■ Per via del rumore prodotto, in caso di necessità si raccomanda di installare la
stampante in un luogo acusticamente isolato rispetto alla postazione di lavoro.
6
Page 83

Guida di avvio rapida Installazione
Quick Start-it.book Seite 7 Dienstag, 5. Dezember 2006 11:14 11
` Controllare la tensione
della stampante
` Collegamento della
stampante
STOP
Verificare che la stampante sia impostata sulla tensione adeguata (ad esempio
230 V in Europa, 120 V negli USA). A questo proposito, si veda la targhetta-tipo
posta sul retro della stampante. Se il valore di tensione non è corretto, contattare il
rivenditore.
Non accendere mai la stampante se non con la tensione corretta, poichè questo potrebbe causare seri danni.
Collegare il cavo di alimentazione alla presa di alimentazione nella stampante. Collegare il connettore del cavo di alimentazione a una presa di corrente.
Assicurarsi che la stampante e il computer siano spenti e collegare il cavo dati tra la stampante e il computer; in questo
esempio viene utilizzato un cavo parallelo centronics da
36 pin.
ITALIANO
7
Page 84

Installazione Guida di avvio rapida
Quick Start-it.book Seite 8 Dienstag, 5. Dezember 2006 11:14 11
` Accensione della
stampante
Premere il pulsante di alimentazione posizionato nell'angolo
inferiore destro nella parte anteriore della stampante per accendere l'apparecchio.
La stampante si inizializza.
ONLINE
MANCA CARTA
8
PAPER
SETUP
USER1
STOP
/EJECT
USER2
Al termine dell'inizializzazione, la spia Ready (Pronto) si illumina. Sull'LCD compare il messaggio ONLINE MANCA
CARTA. La stampante è in stato online ed è pronta a ricevere dati dal sistema. È possibile inserire un documento o un libretto.
Page 85

Guida di avvio rapida Pannello di controllo
Quick Start-it.book Seite 9 Dienstag, 5. Dezember 2006 11:14 11
Pannello di
controllo
Il pannello di controllo è costituito da tre tasti per comandare le funzioni della
stampante, quattro LED che visualizzano lo stato della stampante e un display
LCD con 2 x 16 cifre.
1 Display LCD: visualizza lo stato interno della stampante,
le istru-zioni operative e i messaggi di errore.
2 LED carta: visualizza se è presente carta; acceso = carta
presente, spento = carta non presente, lampeggiante = indica che è in corso l’invio di dati alla stampante.
3 LED utente 1: lampeggia se la stampante sta ricevendo
dati attraverso la prima interfaccia e si illumina alla stampa di un processo (vedere di seguito).
4 LED Pronto: indica se la stampante è online od offline
(modalità STOP); acceso = online, spento = offline; lampeggiante = segnala la presenza di un errore; la causa è visualizzata sull’LCD.
5 LED utente 2: lampeggia se la stampante sta ricevendo
dati attraverso la seconda interfaccia e si illumina alla
stampa di un processo (vedere di seguito).
6 Tasto USER2: Attivato solo dall’applicazione; la funzio-
ne del tasto dipende dall’emulazione e dall’applicazione
in uso (vedere anche LED utente 1 e LED utente 2).
7 Tasto STOP/EJECT: imposta la stampante in modalità
Online/ Offline (vedere anche LED Pronto); espelle la
carta inserita (vedere anche il LED carta).
8 Tasto USER1: Attivato solo dall’applicazione; la funzio-
ne del tasto dipende dall’emulazione e dall’applicazione
in uso (vedere anche il LED carta).
Si noti che alcune emulazioni e applicazioni usano i LED e i tasti in modo diverso,
in base a quanto definito dall'emulazione e/o dal software host e al di là delle definizioni presenti in questo documento.
Per una descrizione dettagliata delle singole funzioni del pannello di controllo,
vedere il Manuale dell'utente sul CD-ROM.
ITALIANO
9
Page 86

Funzionamento della stampante Guida di avvio rapida
Quick Start-it.book Seite 10 Dienstag, 5. Dezember 2006 11:14 11
Funzionamento della stampante
` Inserimento di un
documento
Prima di inserire un documento, assicurarsi che la stampante sia accesa e che
sull'LCD compaia il messaggio ONLINE MANCA CARTA.
Inserire il documento in modo che il bordo destro della carta
sia posizionato all'interno dell'area tra il lato sinistro del simbolo e il lato destro del suppor to documento, affinch é il sistema di allineamento del documento possa bloccarlo in
maniera salda. Quanto detto è particolarmente importante
per i documenti di dimensioni inferiori di DIN A4.
Posizionare il bordo
destro del documento
all'interno di questa
zona
10
Quindi, spingere il documento verso il dispositivo di arresto
nello scivolo.
Quando il documento viene prelevato, sull'LCD compare il
messaggio ONLINE CARTA.
Al termine della stampa, il documento viene trasportato fuori
dalla stampante e rilasciato per la rimozione.
Sull'LCD compare nuovamente il messaggio ONLINE
MANCA CARTA.
Page 87

Guida di avvio rapida Funzionamento della stampante
Quick Start-it.book Seite 11 Dienstag, 5. Dezember 2006 11:14 11
` Inserimento di un libretto Prima di elaborare un nuovo libretto con rilegatura orizzontale o verticale, si con-
siglia di eliminare la rigidità della rilegatura nel modo seguente.
Aprire il libretto sulla pagina che si desidera stampare. Piegare la rilegatura all'indietro con una certa forza.
Premere lungo la piega del libretto con entrambi i pollici e gli
indici e piegare leggermente il libretto verso l'esterno.
Se si desidera stampare un nuovo libretto, ripetere più volte
questa procedura.
Se il libretto è dotato di una striscia magnetica, assicurarsi di non sgualcirla.
ITALIANO
11
Page 88

Funzionamento della stampante Guida di avvio rapida
Quick Start-it.book Seite 12 Dienstag, 5. Dezember 2006 11:14 11
Il rigonfiamento del libretto aperto deve essere il più piatto
possibile per assicurarne il corretto trasporto nel sistema di
alimentazione carta.
Rigonfiamento
Posizionare il libretto sul lato destro del supporto documento
con la pagina su cui stampare rivolta verso l'alto. Inserire il
libretto nell’apertura dello scivolo. Una volta all’interno,
verrà afferrato dal meccanismo della stampante. A questo
punto, lasciare andare il libretto, poiché la stampante lo allineerà contro il finecorsa di destra e lo caricherà.
12
ONLINE
CARTA
PAPER
SETUP
USER1
STOP
/EJECT
USER2
Se il sistema di allineamento automatico del documento non riesce ad afferrare correttamente libretti
rigidi o piegati, provare a posizionare il libretto manualmente sul dispositivo di arresto sul lato destro
del supporto del documento e quindi a inserirlo.
Quando il libretto è inserito, sull'LCD compare il messaggio
ONLINE CARTA.
Non utilizzare libretti che non corrispondono alle
STOP
specifiche elencate nel paragrafo "Specifiche carta".
Altrimenti i libretti e la testina di stampa potrebbero
subire dei danni.
Page 89

Guida di avvio rapida Funzionamento della stampante
Quick Start-it.book Seite 13 Dienstag, 5. Dezember 2006 11:14 11
Quando il libretto viene stampato, viene auto-maticamente
trasportato fuori dalla stampante e rilasciato per essere rimosso.
Se il libretto non viene correttamente espulso dalla stampante, premere il tasto STOP/ EJECT per attivare la modalità
STOP (Offline). Premere di nuovo il tasto STOP/EJECT per
espellere il libretto.
Sul display LCD ricompare il messaggio ONLINE
MANCA CARTA.
ITALIANO
13
Page 90

Assistenza e manutenzione Guida di avvio rapida
Quick Start-it.book Seite 14 Dienstag, 5. Dezember 2006 11:14 11
Assistenza e manutenzione
` Sostituzione della cartuccia
del nastro
STOP
Prima di sostituire la cartuccia del nastro, accertarsi che la stampante sia spenta.
Se la stampante è rimasta in funzione per lungo tempo, la temperatura della testina di stampa può essere molto elevata. Per evitare il pericolo di ustioni, attendere
finché non si è raffreddata.
Aprire il coperchio afferrandolo dal lato destro e sinistro e
spostarlo verso l'alto finché non si blocca in posizione.
Premere la leva di rilascio verde del meccanismo di stampa.
In questo modo il meccanismo si sposta all'indietro.
14
Page 91

Guida di avvio rapida Assistenza e manutenzione
Quick Start-it.book Seite 15 Dienstag, 5. Dezember 2006 11:14 11
Rimuovere la guida nastro colorata dalla testina di stampa tirandola verso il basso.
Sollevare l'estremità anteriore della cartuccia su entrambi i
lati. Estrarre la cartuccia del nastro dalla stampante.
ITALIANO
15
Page 92

Assistenza e manutenzione Guida di avvio rapida
Quick Start-it.book Seite 16 Dienstag, 5. Dezember 2006 11:14 11
Prelevare la nuova cartuccia del nastro dall'imballaggio e
sollevare la guida dalla cartuccia.
Rimuovere il blocco di trasporto che fissa la guida del nastro
alla cartuccia.
Inserire la nuova cartuccia agganciandola negli alloggiamenti posteriori del dispositivo di montaggio.
Spingere la parte anteriore della cartuccia all'interno del dispositivo di montaggio finché non si blocca in posizione.
Non premere il centro della cartuccia perché in tal
caso la cartuccia può deformarsi e provocare problemi di funzionamento.
16
Page 93

Guida di avvio rapida Assistenza e manutenzione
Quick Start-it.book Seite 17 Dienstag, 5. Dezember 2006 11:14 11
Tirare la guida del nastro sotto la testina di stampa. Serrare il
nastro ruotando l'ingranaggio di tensionamento nella direzione della freccia.
Premere la guida sulla testina di stampa dal basso finché non
si sente un clic.
Controllare se il nastro viene trasportato correttamente ruotando l'ingranaggio di tensionamento nella direzione della
freccia.
ITALIANO
17
Page 94

Assistenza e manutenzione Guida di avvio rapida
Quick Start-it.book Seite 18 Dienstag, 5. Dezember 2006 11:14 11
Chiudere il telaio principale premendo la sezione colorata al
centro come indicato e controllare che entrambi i lati sinistra
e destra del telaio sia completamente bloccati.
Chiudere il coperchio. La stampante è ora pronta per funzionare e per essere riaccesa.
Si raccomanda di controllare il funzionamento della
stampante dopo aver sostituito la cartuccia del nastro
eseguendo una stampa delle impostazioni dei parametri (vedere il paragrafo “Stampa della pagina di
stato” a pag. 19).
18
Page 95

Guida di avvio rapida Assistenza e manutenzione
Quick Start-it.book Seite 19 Dienstag, 5. Dezember 2006 11:14 11
` Stampa della pagina di
stato
PAPER
USER2
USER1
STOP
/EJECT
SETUP
Stampa Pag.Stato
Carica Carta
SETUP
Stampa Pag.Stato
Stampa...
SETUP
PAPER
PAPER
La stampante prevede una funzione che consente di stampare le impostazioni correnti dei parametri.
Spegnere la stampante.
Premere e tenere premuto il tasto USER2 mentre si accende
la stampante.
Sul display LCD compare Stampa Pag.Stato Carica Carta.
Rilasciare il tasto USER2.
USER1
STOP
/EJECT
USER2
Inserire carta nella stampante. Il display LCD visualizza
Stampa Pag.Stato Stampa... e viene eseguita la stampa della pagina di stato.
USER1
STOP
/EJECT
USER2
Al termine della stampa, la carta viene espulsa.
Durante la stampa, è possibile utilizzare il tasto STOP per in-
terrompere la stampa; la carta viene espulsa e viene eseguito
un reset.
ITALIANO
Stampa Pag.Stato
Completato
PAPER
SETUP
USER1
STOP
/EJECT
USER2
Quando la stampa di prova viene interrotta o co mp letata,
l'LCD visualizza Stampa Pag.Stato Completato.
La modalità di impostazione stampa viene disattivata automaticamente e viene eseguito un reset di accensione.
19
Page 96

Dati tecnici Guida di avvio rapida
Quick Start-it.book Seite 20 Dienstag, 5. Dezember 2006 11:14 11
Dati tecnici
` Specifiche della stampante
Metodo di stampa Stampante a impatto a matrice di punti da 24 pin
Passo carattere 10; 12; 15; 16.6; 17.1; 20; 24 caratteri/pollice e tipo
proporzionale (dipendente da emulazione)
Interlinea Opzionale in micropassi
n/60 pollici n = da 0 a 127
n/180 pollici n = da 0 a 255
n/360 pollici n = da 0 a 255
Larghezza stampa 194 caratteri/linea a 10 cpi
112 caratteri/linea a 12 cpi
141 caratteri/linea a 15 cpi
Velocità stampa LQ: 133 cps; DQ: 400 cps
Interfaccia seriale (RS232C), parallela (modalità compatibile, ECP),
USB 2.0 (velocità completa)
Tensione nominale 120V ± 10% (USA), 230V ± 10% (Europa)
Frequenza linea 50/60Hz ± 3%
Forma rete Per l'impiego in sistema di distribuzione di alimentazione
con conduttore neutro e di messa a terra (T N)
Assorbimento di
corrente nominale
Consumo corrente
apparente
Reale consumo Funzionamento (massimo): US: 70,0 W; EU: 73,0 W
Livello potenza sonora
L
WAd
Livello pressione
acustica L
Dimensioni Altezza: 168 mm, Larghezza: 378 mm, Profondit à:280 mm
Peso Standard = 9,10 kg, MSR-H = 9,95 kg
Certificazioni
pAm
Funzionamento (massima): US: 1,30 A; EU: 0,59 A
Standby US: 0,11 A; EU: 0,072 A
Funzionamento (massima): US: 89,7 VA; EU: 93,6 VA
Standby US: 88,8 VA; EU: 11,4 VA
Standby US: 76,9 W; EU: 78,9 W
7,1 dB in funzionamento
55 dB in funzionamento
DIN EN 60 950 / VDE 0805, TUV (EN 60950) / Certified CE
Mark, UL 60950 3rd Edition / C-UL (CSA C22.2 No 60950-00)
new reversion, IEC 60950-1, EN 55022 :1998 (Class B), EN
55024 :1998, FCC PT 15B : 2000 (Class B), EN61000-3-2
:2000, EN61000-3-3 :1995, Energy Star
20
Per maggiori informazioni sulle specifiche della stampante e delle interfacce, si
rimanda al manuale dell’utente sul CD-ROM online.
Page 97

Guida di avvio rapida Dati tecnici
Quick Start-it.book Seite 21 Dienstag, 5. Dezember 2006 11:14 11
` Specifiche della carta Utilizzare esclusivamente carta corrispondente alle specifiche indicate e provare i
nuovi tipi di carta prima dell'uso.
Specifiche carta per
libretti
Specifiche carta per
fogli singoli e copie
multiple
Larghezza carta libretto
aperto
Lunghezza carta libretto
aperto
Spessore libretto 2.0 mm Max. (una copertina +
Differenza spessore 1.4 mm Max.
Peso carta 75 a 120 g/m
Condizione libro Si raccomanda di appiattire con
Larghezza carta 70 a 240 mm
Lunghezza carta 70 a 500 mm
Peso carta Foglio singolo: 60 a 160 g/m
Spessore libretto Foglio singolo: 0.08 a 0.5 mm
Numero di copie Originale + 4 copie (Copy mode)
La carta riciclata è di massima permessa.
105 a 235 mm (libretto
orizzontale)
105 a 235 mm (libretto verticale)
140 a 210 mm (libretto
orizzontale)
125 a 210 mm (libretto verticale)
pagina interna)
2
cura prima dell'inserimento.
Foglio multiplo: 80 a 260 g/m2
Foglio multiplo:0.08 a 0.5 mm
Per maggiori informazioni sulle specifiche della carta, si rimanda al manuale
dell’utente sul CD-ROM online.
2
ITALIANO
21
Page 98

Dati tecnici Guida di avvio rapida
Quick Start-it.book Seite 22 Dienstag, 5. Dezember 2006 11:14 11
` Materiali di consumo e
accessori
Utilizzare esclusivamente cartucce nastro del produttore poiché i prodotti di altre
marche possono danneggiare la testina di stampa e l'azionamento del nastro.
Materiali di consumo Numero d’ordine
Nastro in tessuto in cartucce riciclabili, colore: nero 043393
Utilizzare esclusivamente testine di stampa approvate per evitare di danneggiare
la stampante.
Accessori Numero d’ordine
Testina di stampa a 24 aghi 400805
22
Page 99

Guía de instalación Contenido
Quick Start-de.book Seite I Dienstag, 5. Dezember 2006 11:23 11
Contenido
GUÍA DE INSTALACIÓN
Introducción. . . . . . . . . . . . . . . . . . . . . . . . . . . . . . . 1
Símbolos convencionales . . . . . . . . . . . . . . . . . 1
Instrucciones de seguridad importantes . . . . . . 1
Utilizar la documentación en línea en el disco
CD-ROM . . . . . . . . . . . . . . . . . . . . . . . . . . . . . . 2
Qué incluye la documentación en línea en el disco
CD-ROM . . . . . . . . . . . . . . . . . . . . . . . . . . . . . . 2
Condiciones de hardware . . . . . . . . . . . . . . . . . 2
Detección de errores . . . . . . . . . . . . . . . . . . . . . 2
Vista de conjunto. . . . . . . . . . . . . . . . . . . . . . . . . . . 3
Instalación . . . . . . . . . . . . . . . . . . . . . . . . . . . . . . . . 5
Desembalar la impresora. . . . . . . . . . . . . . . . . . 5
Colocar la impresora . . . . . . . . . . . . . . . . . . . . . 6
Comprobar la tensión de la impresora. . . . . . . . 7
Conectar la impresora . . . . . . . . . . . . . . . . . . . . 7
Encender la impresora. . . . . . . . . . . . . . . . . . . . 8
Panel de control. . . . . . . . . . . . . . . . . . . . . . . . . . . . 9
Operación de la impresora . . . . . . . . . . . . . . . . . . 10
Introducción de un documento. . . . . . . . . . . . . 10
Introducción de una libreta de ahorros. . . . . . . 11
Servicio y Mantenimiento . . . . . . . . . . . . . . . . . . . 14
Sustitución del casete de cinta. . . . . . . . . . . . . 14
Impresión de la Página de Estado . . . . . . . . . . 19
Datos técnicos . . . . . . . . . . . . . . . . . . . . . . . . . . . . 20
Especificaciones de la impresora. . . . . . . . . . . 20
Especificaciones del papel. . . . . . . . . . . . . . . . 21
Material de consumo y accesorios. . . . . . . . . . 22
ESPAÑOL
I
Page 100

Quick Start-de.book Seite II Dienstag, 5. Dezember 2006 11:23 11
 Loading...