

Page 1

Umschlag.fm Seite 1 Donnerstag, 14. September 2000 2:00 02
Installation guide Automatic single sheet feeder, front
Installationsanleitung Automatische Einzelblattzuführung vorne
Guide d'installation Alimentation feuille à feuille automatique AV
Instruzioni per l'installazione Guida fogli singoli automatica anteriore
Instrucciones de instalación Alimentador automático de hojas sueltas frontal
Page 2

Umschlag.fm Seite 2 Donnerstag, 14. September 2000 2:00 02
Important Information
This equipment generates and uses radio frequency energy and if not installed and used properly, that is, in accordance with the manufacturer's
instructions, may cause interference in radio and television reception. It
has been type tested and found to comply with the limits for class B computing devices in accordance with the specification in subpart J of part 15
of FCC rules, which are designed to provide reasonable protection
against such interference in a residential installation. However, there is
no guarantee that interference will not occur in a partial installation. If this
equipment does cause interference to radio or television reception, which
can be determined by turning the equipment off and on, the user is encouraged to try to correct the interference by one or more of the following
measures:
■ Reorient the receiving antenna,
■ Relocate the peripheral away from the receiver,
■ Move the peripheral away from the receiver
■ Plug the peripheral into a different outlet, so that the peripheral and re-
ceiver are on different branch circuits
If necessary, the user should consult the dealer or an experienced radio/
television technician for additional suggestions. The user may find the following booklet, prepared by the Federal Communications Commission,
helpful: “How to Identify and Resolve Radio-TV Interference Problems”.
This booklet is available from the U.S. Government Printing Office,
Washington DC 20402 Stock No. 004.000.00345.4.
WARNING: To comply with FCC regulations on electromagnetic interference for a class B computing device, the printer cable must be shielded. To assure compliance with FCC regulations for a computing device,
use a shielded interface cable with a metal shell connector. The use of
cables not properly shielded may result in violating FCC regulations.
This digital apparatus does not exceed the class B limits for radio noise
emissions from digital apparatus as set out in the radio interference regulations of the Canadian department of communications.
This unit complies with DOC standard C108.8-M 1983
ATTENTION: Le présent appareil numérique n'ement pas de bruits radio-
électriques déspassant les limites applicables aux appareils numériques
de la classe B prescrites dans le règlement sur le brouillage radio-élec-
trique édicté par le minstère des communications du Canada.
The paper used is made of raw materials treated with a chlorine-free
bleaching process.
Das verwendete Papier ist aus chlorfrei gebleichten Rohstoffen hergestellt.
Le papier utilisé est fabriqué à partir de matières premières blanchis
sans chlore.
La carta utilizzata è prodotta con materiali sbiancati senza cloro.
El papel utilizado ha sido fabricado con un proceso de blanqueo libre
de cloro.
This device fulfils the European standards requirements by complying with the Directive of the Commission dated May 3, 1989 (89/336/EEC) relating to electromagnetic compatibility and the Directive dated
February 19, 1973 (73/23/EEC) relating to low-voltage electrical equipment. Conformity with the above
Note: Conformity may be affected by:
■ using interface cables not complying with the specifications
■ non-observance of important instructions in the operator’s manual
■ installing components not approved for this device by the manufacturer
■ unauthorized manipulation
gekennzeichnet.
Hinweis: Die Konformität kann beeinflußt werden durch:
■ Benutzung von nicht spezifizierten Schnittstellenkabeln
■ Nichtbeachtung wichtiger Hinweise der Bedienungsanleitung
■ Ersetzen von Bauteilen, die nicht vom Hersteller für dieses Gerät freigegeben wurden
■ Eingriffe durch Unbefugte
Remarque: La conformité peut être influencée par:
■ l'utilisation de câbles d'interface non spécifiés
■ le non-respect de consignes importantes du manuel d'utilisation
■ le remplacement de composants qui n'ont pas été homologués pour cet appareil par le constructeur
■ l'intervention de personnes non autorisées
Nota: La conformità può essere influenzata tramite:
■ Utilizzo di cavi interfaccia non specificati
■ Inosservanza di importanti indicazioni delle istruzioni per l'uso
■ Sostituzione di componenti per i quali non è stato dato il benestare dal produttore per questo apparecchio
■ Interventi tramite persone non autorizzate
equipo está dotado de la marca CE.
Indicación: La conformidad puede estar influida por:
■ la utilización de cables de interface no especificados
■ la inobservancia de indicaciones importantes contenidas en el manual de servicio
■ la sustitución por componentes, que no han sido homologados por el fabricante para el equipo en cuestión
■ intervenciones de personas no autorizadas
mentioned Directives is indicated by the CE symbol attached to the device.
Dieses Gerät erfüllt die Anforderungen der Europäischen Normen durch Einhaltung der Richtlinie des
Rates vom 3. Mai 1989 (89/336/EWG) bezüglich der Elektromagnetischen Verträglichkeit sowie die Richtlinie vom 19. Februar 1973 (73/23/EWG) bezüglich Elektrischer Betriebsmittel mit Niederspannungen. Die
Konformität zu den oben angeführten Richtlinien ist durch das am Gerät angebrachte CE-Zeichen
Cet appareil remplit aux exigences des normes européennes en respectant la directive du Conseil du 3
mai 1989 (89/336/CE) relative à la compatibilité électromagnétique et la directive du 19février 1973 (73/
23/CE) en matière du matériel à basse tension. La conformité aux directives mentionnées ci-dessus est
repérée par la marque de conformité de la Communauté Européenne (CE).
Questo apparecchio soddisfa le richieste delle norme europee rispettando la direttiva del consiglio del 3
Maggio 1989 (89/336/CEE) relativa alla compatibilità elettromagnetica nonché la direttiva del 19 Febbraio
1973 (73/23/CEE) relativa a mezzi di produzione elettrici a bassa tensione. La conformità alle direttive
sopra citate è contrassegnata con il simbolo CE applicato sull'apparecchio.
Este equipo corresponde a lo exigido en las normas europeas a base del cumplimiento de la directriz del
Consejo del 3 de mayo de 1989 (89/336/CEE) en lo que se refiere a la compatibilidad electromagnética
así como de la directriz del 19 de febrero de 1973 (73/23/CEE) en lo que se refiere a los materiales
eléctricos con bajas tensiones. Para señalizar la conformidad con las directrices antes mencionadas, el
WARNING For continued protection against risk of fire, replace only with same type and rating of fuse.Only trained and qualified personnel may open covers or
remove parts that are not explicitly shown and described in the User Guide as being accessible to the operator.
WARNUNG Aus Brandschutzgründen nur Sicherungen desselben Typs und derselben Auslegung verwenden.Das Entfernen oder Öffnen von Abdeckungen und
Teilen darf nur durch geschultes Fachpersonal vorgenommen werden. Ausgenommen hiervon sind nur solche Abdeckungen und Teile, deren Entfernen bzw. Öffnen in der Bedienungsanleitung ausdrücklich gekennzeichnet und beschrieben sind.
ATTENTION Pour ne pas compromettre la protection contre les risques d'incendie, remplacer par un fusible de même type et de mêmes caractèristiques nomi-
nales.Seul un personnel qualifié et formé est habilité à démonter les sous-ensembles de la machine qui ne sont pas formellement indiqués dans le
Manuel d'utilisation meme s'ils sont accessibles par l'opérateur.
ATTENZIONE Per evitare il pericolo di incendio, utilizzare esclusivamente fusibili dello stesso tipo e della stessa portata.Solo personale qualificato puo'accedere a
parti che non siano esplicitamente descritte nelle Istruzioni per l'operatore come accessibill all'operatore.
ADVERTENCIA Sólo utilizar fusibles del mismo tipo y con las mismas características para evitar cualquier riesgo de incendio.Las cubiertas y piezas sólo deberán ser
quitadas o abiertas por personal especializado. Se exceptúan de esta regla sólo las cubiertas y piezas cuya retirada y apertura estén indicadas y
descritas expresamente en las Instrucciones de uso.
Page 3
➀➁
➁
➀➀
➁
➂
④
Asf-f-en.fm Seite 1 Donnerstag, 14. September 2000 2:38 02
,QVWDOODWLRQJXLGH ,QVWDOOLQJWKHVKHHWIHHGHU
Automatic Sheet Feeder – Front
Your printer and its co nt ro l pan el ma y have a di fferent a ppea ra nce t ha n sh ow n
in this manual. However, the procedures described are the same.
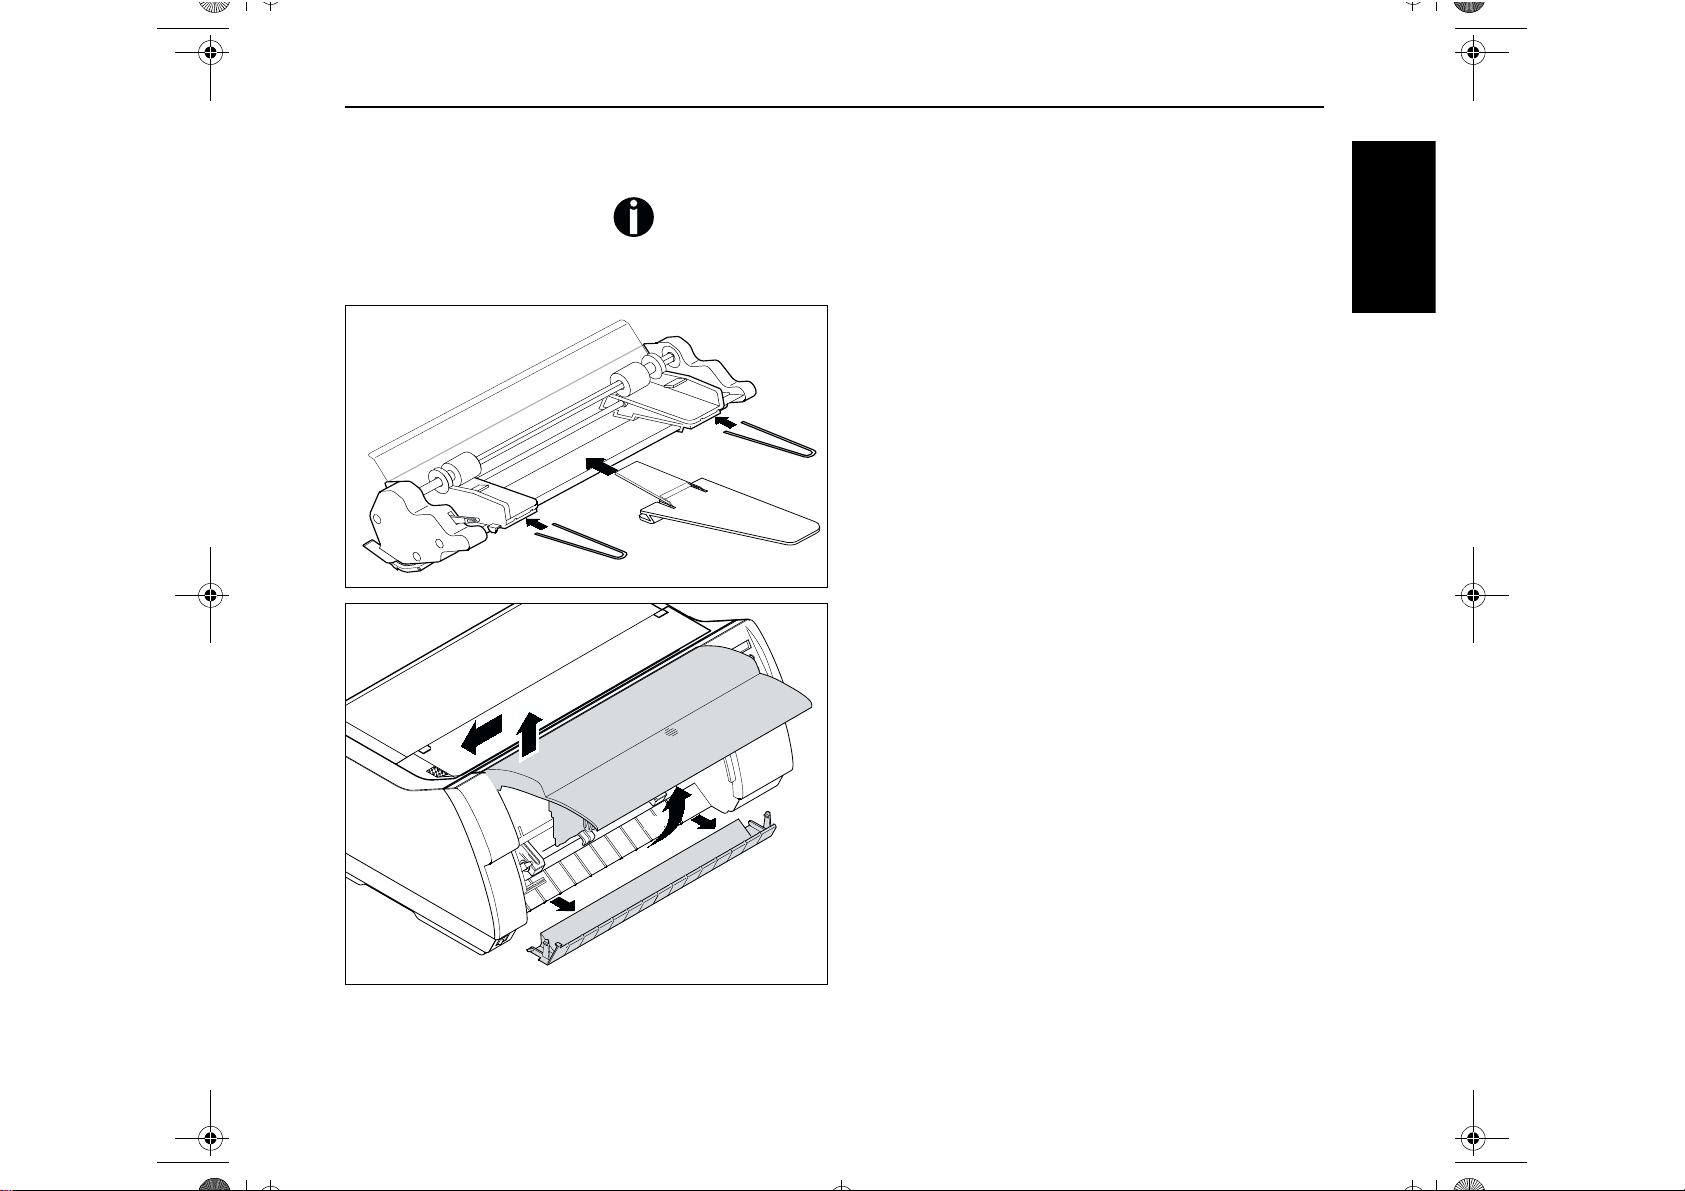
Installing the sheet feeder
Mount the paper support ➀ to the holder. Insert the two paper support brackets
paper guides.
Remove the front cover by raising it by about 90 degrees
➁ into the openings provided in the
➀, lifting it on the left side ➁and removing it from the sup-
port towards the left
with the sheet feeder in reverse sequence of steps.
Remove the bottom cover
➂. Install the front cover supplied
④.
(1*/,6+
1
Page 4

Offline Tractor1
Park Load
Online
Setup
2
1
3
4
Single Tractor
ASF-F
Online
Setup
2
1
3
4
Load paper from
ASF-F
Online
Setup
2
1
3
4
Asf-f-en.fm Seite 2 Donnerstag, 14. September 2000 2:38 02
3UHSDULQJWKHSULQWHU ,QVWDOODWLRQJXLGH
➁
Installation must be performed with the sheet feeder’s
toothed wheel on the right.
Insert the sheet feeder with the slides ➀ on the left and
right in parallel into the guides provided on the printer
until they click into place.
Reinstall the bottom cover.
➁
➀
Preparing the printer
Offline Tractor1
Park Load
3
2
1
Single Tractor
ASF-F
2
1
Load paper from
ASF-F
2
1
4
3
4
3
4
Online
Setup
Online
Setup
Online
Setup
➁
➀
Make sure that the printer is in offline mode; press the Online key, if necessary.
Press the Park (1) key. If fanfold paper is loaded in the printer, it is fed to the
tear position. The text
Tear paper off appears in the display. Then press
any key. If a single sheet is loaded in the printer, it is ejected.
Press the ASF-F (1) key.
If you do not make a selection within 5 seconds, the menu is closed.
The printer returns to offline mode. The display alternates between the basic
menu and the menu in the following figure:
Insert paper
(see page 3).
It is also possible t o s ele ct th e sh eet feeder from an ap pl ic ati on program
or in Setup mode. For more details, refer to the Operator’s Manual and
Reference Manual of your printer.
2
Page 5

➀
➁
➂
➀
➁
Asf-f-en.fm Seite 3 Donnerstag, 14. September 2000 2:38 02
,QVWDOODWLRQJXLGH /RDGLQJSDSHU
Loading paper
Align the left-hand paper guide ➀ with the mark on the
bottom cover
➁.
Fan through the paper s tack and reali gn the s heet edges before placing it into the paper tray.
Raise the fixing l ever
until it latches, then insert the paper.
Adjust the right-hand paper guide
per and move the paper support to the middle of the paper
stack. Press down the fixing lever
➂ on the left side of the sheet feeder
➀ to the width of the pa-
➁.
(1*/,6+
3
Page 6

Asf-f-en.fm Seite 4 Donnerstag, 14. September 2000 2:38 02
'LVPRXQWLQJWKHVKHHW IHHGHU ,QVWDOODWLRQJXLGH
Dismounting the
sheet feeder
Remove the bottom cover.
➁
➀
Push the tabs
metal bar upwards until the projections
pull out the sheet feeder.
➀ provided on the left and right ends of the
➁ unlatch, then
4
Page 7

➀➁
➁
➀➀
➁
➂
④
Asf-f-de.fm Seite 1 Donnerstag, 14. September 2000 2:35 02
,QVWDOODWLRQVDQOHLWXQJ (LQ]HOEODWW]XIKUXQJHLQEDXHQ
Automatische Einzelblattzuführung vorne
Das Aussehen Ihres Druckers und seines Bedienfeldes kann von der Darstellung
in dieser Installationsanleitung abweichen. Das beschr iebene Vorgehen bleibt
jedoch das Gleiche.
Einzelblattzuführung
einbauen
Die Papierstütze ➀ auf die Halterung stecken. Die beiden
➁ in die dafür vorgesehene Öffnung der link en und
Bügel
rechten Papierführung stecken.
'(87 6&+
Die vordere Abdeckung abnehmen. Dazu die Abdeckung
um etwa 90 Grad nach oben schwenken
➁und dann links aus der Lagerung entnehmen ➂.
heben
Die mit der Einzelblatt zuführung mit gelieferte vorde re Abdeckung in umgekehrter Reihenfolge einsetzen.
Die untere Abdeckung
④ entfernen.
➀, links hoch-
1
Page 8

Einzel Trak1
ASF-F
Online
Setup
2
1
3
4
Papier laden aus
ASF-F
Online
Setup
2
1
3
4
Asf-f-de.fm Seite 2 Donnerstag, 14. September 2000 2:35 02
'UXFNHUYRUEHUHLWHQ ,QVWDOODWLRQVDQOHLWXQJ
➁
Der Einbau muß so erfolgen, daß sich das Zahnrad an der
Einzelblattzuführung auf der rechten Seite befindet.
Die Einzelblattzuführung mit den Schienen ➀ auf der
linken und rechten Seite parallel in die Führungen am
Drucker
➁ einführen, bis sie einrasten.
Die untere Abdeckung wieder einsetzen.
➀
Drucker vorbereiten
Offline Traktor1
Park Load
3
21
Einzel Trak1
ASF-F
2
1
Papier laden aus
ASF-F
2
1
4
3
4
3
4
Online
Setup
Online
Setup
Online
Setup
➁
➀
Sicherstellen, daß der Drucker Offline ist, gegebenenfalls die Taste Online
drücken. Die Taste Park (1) drücken. Befindet sich Endlospapier im Drucker,
wird es in Abreißposition transportiert.
In der Anzeige erscheint Papier abreißen. Dann eine beliebige Taste drükken. Befindet sich ein Einzelblatt im Drucker, wird es ausgeworfen.
Die Taste ASF-F (1) drücken.
Erfolgt innerhalb von 5 Sekunden keine Auswahl, verläßt der Drucker
das Menü.
Der Drucker geht in den Offline-Modus zurück. Im Wechsel mit dem Grundmenü erscheint in der Anzeige:
Papier in die Einzelblattzuführung einlegen (siehe Seite 3).
Die Einzelblat t zuführung kann auch über ein Anwendungsprogramm
oder im Setup-Modus angewählt werden. Einzelheiten dazu finden Sie in
Bedienungsanleitung
der
und im
Referenzhandbuch
des Druckers.
2
Page 9

➀
➁
➂
➀
➁
Asf-f-de.fm Seite 3 Donnerstag, 14. September 2000 2:35 02
,QVWDOODWLRQVDQOHLWXQJ 3DSLHUHLQOHJHQ
Papier einlegen
Die linke Papierführung ➀ an der Markierung auf der unteren Abdeckung
Den Papierstapel vor dem Einlegen in den Papierschacht
gut auffächern und anschließend die Ränder bündig ausrichten.
➁ ausrichten.
Den Arretierhebel
zuführung bis zum Einrasten nach oben bewegen und das
Papier einlegen.
Die rechte Papierführung
einstellen und die Papierstütze der Einzelblattzuführung
mittig zum Papierstapel ausrichten. Den Arretierhebel
nach unten drücken.
➂ auf der linken Seite der Einzelblatt-
➀ entsprechend der Papierbr eite
➁
'(87 6&+
3
Page 10

Asf-f-de.fm Seite 4 Donnerstag, 14. September 2000 2:35 02
(LQ]HOEODWW]XIKUXQJDXVEDXHQ ,QVWDOODWLRQVDQOHLWXQJ
Einzelblattzuführung
ausbauen
Die untere Abdeckung entfernen.
➁
➀
Die links und rechts am Ende des Metallbügels angebrachten Druckflächen ➀ nach oben drücken, bis die Nasen ➁
ausrasten, und die Einzelzelblattzuführung herausziehen.
4
Page 11

➀➁
➁
➀➀
➁
➂
④
Asf-f-fr.fm Seite 1 Donnerstag, 14. September 2000 2:41 02
*XLGHGLQVWDOODWLRQ 3RVHGHODOLPHQWDWLRQIHXLOOHjIHXLOOH
Alimentation feuille à feuille AV automatique
Il se peut que votre imprimante et son panneau de commande ne correspo ndent
pas à la description qui en est faite dans ce Manuel d'utilisation. La procédure
décrite reste cependant la même.
Pose de l’alimentation
feuille à feuille
Fixez le support de papier ➀ sur l’appui. Introduisez les
deux étriers des guides-papier
guides-papier prévues à cet effet.
➁dans les ouvertures des
)5$1 d$,6
Déposer le capot avant. A cet effet pivoter le capot de
90 degrés env. vers le haut
ensuite l'enlever à gauche de son logement
l'alimentation feuille à feuille AV fournie en place en
procédant dans l'ordre inverse.
Déposer le capot inférieur
➀, le soulever à gauche ➁ et
➂. Mettre
④.
1
Page 12

Offline Tract 1
Park Load
Online
Setup
2
1
3
4
Insert Tract 1
ASF-F
Online
Setup
2
1
3
4
Appel papier du
ASF-F
Online
Setup
2
1
3
4
Asf-f-fr.fm Seite 2 Donnerstag, 14. September 2000 2:41 02
3UpSDUHUOLPSULPDQWH *XLGHGLQVWDOODWLRQ
➁
Effectuer la pose de telle façon que le pignon sur l'alimentation feuille à feuille soit disposé à droite.
Introduire les rails de l'alimentation feuille à feuille
➀ à
gauche et à droite parallèlement da ns les guida ges disposés
sur l'imprimante
➁ jusqu'à ce qu'ils s'encliquettent.
Reposer le capot inférieur.
➀
Préparer l'imprimante
Offline Tract 1
Park Load
3
2
1
Insert Tract 1
ASF-F
3
2
1
Appel papier du
ASF-F
3
2
1
Online
4
Setup
Online
4
Setup
Online
4
Setup
➁
➀
S'assurer que l'imprimante est en mode Offline, le cas échéant appuyer sur la
touche Online.
Appuyer sur la touche Park (1). Si du papier continu se trouve dans l'imprimante, il est transporté en position de séparation.
Couper le papier
s'affiche. Appuyer ensuite sur une touche de votre choix. Si une feuille simple se
trouve dans l'imprimante, elle est alors éjectée.
Appuyer sur la touche ASF-F (1).
Si aucune sélection n'est effectuée en l'espace de 5 secondes, l'imprimante quitte le menu.
L’imprimante revient en mode Offline. L’affichage alterne entre le menu de base
et le menu affiché ci-dessous:
Mise en place du papier dans l'alimentation feuille à feuille (voir page 3).
L'alimentation feuille à feuille peut également être sélectionnée au moyen
d'un programme d 'applicati on ou en mode Setup. Vous trouverez des informations plus détaillées dans le Manuel d’utilisation et dans le Manuel
de Référence de l’imprimante.
2
Page 13

➀
➁
➂
➀
➁
Asf-f-fr.fm Seite 3 Donnerstag, 14. September 2000 2:41 02
*XLGHGLQVWDOODWLRQ 0LVHHQSODFHGXSDSLHU
Mise en place du papier
Aligner le guide-papier gauc he ➀ au r epérage sur le capot
inférieur
Détacher les feuilles de la pile de papier les unes des autres
avant de les mettre en place dans le bac à papier et aligner
ensuite les bords à fleur.
➁.
Déplacer le levier d'arrêt
tation feuille à feuille vers le haut jusqu'à ce qu'il s'encliquette et mettre le papier en place.
Régler le guide-papier droit
centrer le support-papier de l'alimentation feuille à feuille
par rapport à la pile de papier. Pousser le levier d'arrêt
vers le bas.
➂ disposé à gauche sur l'alimen-
➀ selon la largeur du p apier et
➁
)5$1 d$,6
3
Page 14

Asf-f-fr.fm Seite 4 Donnerstag, 14. September 2000 2:41 02
'pSRVHGHODOLPHQWDWLRQIHXLOOHjIHXLOOH *XLGHGLQVWDOODWLRQ
Dépose de l'alimentation
feuille à feuille
Déposer le capot inférieur.
➁
➀
Pousser les surfaces de pression
droite sur l'extrémité de l'étrier en métal ves le haut jusqu'à
ce que les ergots
feuille à feuille.
➁ se décliquettent et retirer l'alimentation
➀ disposées à gauche et à
4
Page 15

➀➁
➁
➀➀
➁
➂
④
Asf-f-it.fm Seite 1 Donnerstag, 14. September 2000 2:44 02
,QVWUX]LRQLSHUO¶LQVWDOOD]LRQH ,QVWDOOD]LRQHGHOODJXLGDGLLQVHULPHQWRIRJOLVLQJROL
Guida di inserimento fogli singoli automatica anteriore
La configurazione della stampante e del pannello di controllo può presentare
differenze rispetto alla figura riportata nel le pr esenti istruzioni per l'uso standard. Le procedure descritte restano comunque le stesse.
Installazione della guida di
inserimento fogli singoli
Applicare il supporto carta ➀ sul sostegno. Inserire le due
squadrette delle guide carta
guide carta.
➁ nelle apposite cavità sulle
Rimuovere la copertura anteriore. Ruotare la copertura verso l‘alto di circa 90°
trarla da sinistra dal support o
la copertura anteriore fornita insieme alla guida d‘inserimento per fogli singoli.
Rimuovere la copertura inferiore
➀, sollevarla a sinistra ➁ e quindi es-
➂. Inserire in ordine inverso
④.
,7$/,$12
1
Page 16

Offline Trattor1
Park Load
Online
Setup
2
1
3
4
Foglio Trattor
ASF-F
Online
Setup
2
1
3
4
Carica carta del
ASF-F
Online
Setup
2
1
3
4
Asf-f-it.fm Seite 2 Donnerstag, 14. September 2000 2:44 02
3UHSDUDUHODVWDPSDQWH ,QVWUX]LRQLSHUO¶LQVWDOOD]LRQH
➁
Procedere con l’installazione in modo che la rotella sulla
guida d‘inserimento s i trovi sul lato destro.
Inserire la guida di inserimento per fogli s ingoli con i binari
➀ sul lato sinistro e destro paralleli nelle guide delle stam-
pante
➁, finché non scatta una posizione.
Riapplicare la copertura inferiore.
➀
Preparare la stampante
Offline Trattor1
Park Load
3
2
1
Foglio Trattor
ASF-F
3
2
1
Carica carta del
ASF-F
3
2
1
Online
4
Setup
Online
4
Setup
Online
4
Setup
➁
➀
Verificare che la stampante si trovi nel modo Offline e, se necessario, premere il
tasto Online.
Premere il tasto Park (1). Se nella stampante sono caricati moduli continui, questi vengono trasportati nella posizione di strappo. Sul display compare l'indicazione
Strappo carta. Premere un tasto a piacere. Se nella stampante sono
caricati fogli singoli, ne viene espulso uno.
Premere il tasto ASF-F (1).
Se entro 5 secondi non viene effettuata alcuna selezione, la stampante
esce dal menu.
La stampante si ricommuta nel mod o Offl ine. Al po st o del menu princi p ale, sul
display compare il seguente messaggio:
Inserire carta nella guida d‘inserimento per fogli singoli (vedere Pagina 3).
La guida d‘inserimento fogli singoli può anche essere selezionata tramite
il programma applicativo oppure in modalità setup. Per maggiori dettagli consultare il manuale utente e il manuale d’uso della stampante.
2
Page 17

➀
➁
➂
➀
➁
Asf-f-it.fm Seite 3 Donnerstag, 14. September 2000 2:44 02
,QVWUX]LRQLSHUO¶LQVWDOOD]LRQH ,QVHULPHQWRGHOODFDUWD
Inserimento della carta
Allineare la guida carta di sinistra ➀ con il contrassegno
sul rivestimento inferiore
“Sfogliare” accuratamente la carta prima di posizionarla
nel cassetto e quindi allineare bene i bordi.
➁.
Spostare verso l‘alto la leva di arresto
della guida di inserimento per fogli singoli fino a bloccarla.
Regolare la guida carta di destra
della carta e quindi allineare i supporti carta della guida di
riferimento al centro della pila di carta. Quindi spingere
verso il basso la leva di arresto
➂ sul lato sinistro
➀ in base alla larghezza
➁.
,7$/,$12
3
Page 18

Asf-f-it.fm Seite 4 Donnerstag, 14. September 2000 2:44 02
6PRQWDJJLRGHOODJXLGDGµLQVHULPHQWRSHUIRJOLVLQJROL ,QVWUX]LRQLSHUO¶LQVWDOOD]LRQH
Smontaggio della guida
d‘inserimento per fogli
singoli
Rimuovere il la copertura inferiore.
➁
➀
Spingere verso l‘alto le superfici di pressione applicate a
sinistra e a destra alla fine della staffa metallica
le linguette non scattano
serimento per fogli singoli.
➁; quindi estrarre la guida d‘in-
➀ , finché
4
Page 19

➀➁
➁
➀➀
➁
➂
④
Asf-f-sp.fm Seite 1 Donnerstag, 14. September 2000 2:46 02
,QVWUXFFLRQHVGHLQVWDODFLyQ ,QVWDODUHODOLPHQWDGRUGHKRMDVVXHOWDV
Alimentador automático de hojas sueltas – Frente
El diseño de su impresor a y s u pa nel de m a ndo pued e ser di fe r ente de l o q ue s e
muestra en las presentes instrucciones de servicio. Sin embargo, los procedimientos descritos serán los mismos.
Instalar el alimentador de
hojas sueltas
Insierte el soporte de papel ➀ en el soporte. Insierte los dos
arcos de las guías de papel
tal efecto.
➁ en las aberturas provistas a
Quite la tapa delantera. Para ello, gire la tapa en un 90 grados hacia arriba
soporte hacia la izquierda
suministrada con el alimentador de h ojas sueltas en secuencia inversa.
Quite la tapa inferior
➀, levántela a la izquierda ➁ y quítela del
➂. Monte la tapa delantera
④.
(63 $f2/
1
Page 20

Offline Tractor1
Park Load
Online
Setup
2
1
3
4
Sueltas Tractor
ASF-F
Online
Setup
2
1
3
4
Carga papel
ASF-F
Online
Setup
2
1
3
4
Asf-f-sp.fm Seite 2 Donnerstag, 14. September 2000 2:46 02
3UHSDUDUODLPSUHVRUD ,QVWUXFFLRQHVGHLQVWDODFLyQ
➁
La instalación debe efectuarse de manera que la ru eda dentada del alimentador de hojas sueltas se encuentre en el
lado derecho.
Introduzca el alimentador de hojas sueltas con las lengüetas
➀ a la izquierda y a la derecha en paralelo, en las guías en
la impresora
Reinstale la tapa inferior.
➁ hasta que se enganchen.
➀
Preparar la impresora
Offline Tractor1
Park Load
3
2
1
Sueltas Tractor
ASF-F
3
2
1
Carga papel
ASF-F
3
2
1
Online
4
Setup
Online
4
Setup
Online
4
Setup
➁
➀
Asegúrese de que la impresora esté en modo Offline. Si fuese necesario, presione
el pulsador Online.
Presione el pulsador Park (1). Si se encuen tra papel continuo en la impr esora, se
transporta a la posición de corte. Aparece
Tire papel en el visualizador.
Luego, pulse cualquier pulsador. Si se encuen tra una hoja suelta en la impresora,
se la expulsa.
Presione el pulsador ASF-F (1).
Si la selección no se realiza dentro de 5 segundos, la impresor a sa l e del
menú.
La impresora vuelve al modo Offline. Alternan el menú inicial y el mensaje
siguiente en el visualizador:
Cargue papel en el alimentador de hojas sueltas (véase página 3).
Se puede seleccionar el alimentador de hojas sueltas también a través d e
un programa de aplicación o en el modo de ajuste (Setup). Para más
detalles, consulte las Instrucciones de Servicio y el Manual de Referencia
de la impresora.
2
Page 21

➀
➁
➂
➀
➁
Asf-f-sp.fm Seite 3 Donnerstag, 14. September 2000 2:46 02
,QVWUXFFLRQHVGHLQVWDODFLyQ &DUJDUSDSHO
Cargar papel
Alinee la guía de papel izquierda ➀ con la marca en la tapa
➁.
inferior
Suelte las hojas de la pila de papel y realinee los cantos
antes de poner la pila en la bandeja.
Levante la palanca de fijación ➂ en el lado izquierdo del
alimentador de hojas sueltas hasta que se enganche, y
cargue el papel.
Ajuste la guía de papel derecha
alinee el soporte de papel del alimentador de hojas sueltas
con el cent ro de la pila de papel. Empuje la pal anca de
➁ hacia abajo.
fijación
➀ a la anchura del papel y
(63 $f2/
3
Page 22

Asf-f-sp.fm Seite 4 Donnerstag, 14. September 2000 2:46 02
'HVPRQWDUHODOLPHQWDGRUGHKRMDVVXHOWDV ,QVWUXFFLRQHVGHLQVWDODFLyQ
Desmontar el alimentador
de hojas sueltas
Quite la tapa inferior.
➁
➀
Empuje las placas
derecho de la barra metálica hacia arriba hasta que se
desenganchen los talones
hojas sueltas.
➀ provistas en los extremos izquierdo y
➁ y extraiga el alimentador de
4
Page 23

Umschlag.fm Seite 3 Donnerstag, 14. September 2000 2:32 02
“All rights reserved. Translations, reprinting or copying by any means of this manual complete or in part or in any different form requires our
explicit approval. We reserve the right to make changes to this manual without notice. All care has been taken to ensure accuracy of information
contained in this manual. However, we cannot accept responsibility for any errors or damages resulting from errors or inaccuracies of information
herein.”
„Alle Rechte vorbehalten. Übersetzungen, Nachdruck und sonstige Vervielfältigungen dieses Handbuchs, auch in Teilen und gleichgültig in welcher Form, bedürfen unserer ausdrücklichen schriftlichen Erlaubnis. Inhaltliche Änderungen dieses Handbuchs behalten wir uns ohne Ankündigung vor. Dieses Handbuch wurde mit Sorgfalt erstellt; wir können jedoch für etwaige Fehler und Mängel dieses Handbuchs sowie für daraus
sich ergebende Folgeschäden keine Haftung übernehmen.“
«Tous droits réservés. Toute reproduction ou traduction de ce manuel, qu'elle soit complète, partielle ou sous une forme différente est interdite
sans notre accord formel. Nous nous réservons le droit de modifier ce manuel sans préavis. Toutes les précautions ont été prises afin d'assurer
l'exactitude des informations contenues dans ce manuel. Cependant, nous déclinons toute responsabilité pour les fautes ou dégats provenant
d'erreurs ou d'inexactitudes qui seraient restées dans ce manuel.»
„Tutti i diritti sono riservati. Traduzione, ristampa o copia di contenuti in parte, totalmente o in qualsiasi differente forma richiede la nostra esplicita
approvazione. Noi ci si riserviamo il diritto di variare questo manuale senza preavviso. Tutte le precauzioni sono state prese per assicurare la
precisione delle informazioni contenute in questo manuale. Comunque, noi non possiamo accettare reponsabilità per errori o danni provocati da
errori o inesattezze contenuti nel manuale.“
“Todos los derechos reservados. Para traducciones, la reimpresión y otras reproducciones de este manual, incluso parciales y en cualquier
forma, será necesaria nuestra autorización expresa, por escrito. Nos reservamos el derecho de modificar el contenido de este manual sin previo
aviso. Este manual fue elaborado con cuidado, pero no podemos responsabilizarnos por eventuales errores e imperfecciones del presente
manual, ni por daños consiguientes que resulten de ellos.”
Page 24

Umschlag.fm Seite 4 Donnerstag, 14. September 2000 2:32 02
© September 2000 063 002a
 Loading...