

Page 1

Quick Start Guide
Kurzanleitung
Guide de démarrage rapide
Guida di avvio rapida
Guía de instalación
T2265+ T2280+ Matrix Printer
Page 2

Important Information
U1-2-en.fm Seite 2 Freitag, 9. Oktober 2009 10:15 10
This equipment generates and uses radio frequency energy and if not installed and used properly, that is, in accordance with the manufacturer's
instructions, may cause interference in radio and television reception. It
has been type tested and found to comply with the limits for class B computing devices in accordance with the specification in subpart J of part 15
of FCC rules, which are designed to provide reasonable protection
against such interference in a residential installation. However, there is
no guarantee that interference will not occur in a partial installation. If this
equipment does cause interference to radio or television reception, which
can be determined by turning the equipment off and on, the user is encouraged to try to correct the interference by one or more of the following
measures:
Reorient the receiving antenna,
Relocate the peripheral away from the receiver,
Move the peripheral away from the receiver
Plug the peripheral into a different outlet, so that the peripheral and re-
ceiver are on different branch circuits
If necessary, the user should consult the dealer or an experienced radio/
television technician for additional suggestions. The user may find the fol-
lowing booklet, prepared by the Federal Communications Commission,
helpful: “How to Identify and Resolve Radio-TV Interference Problems”.
This booklet is available from the U.S. Government Printing Office,
Washington DC 20402 Stock No. 004.000.00345.4.
WARNING: To comply with FCC regulations on electromagnetic interference for a class B computing device, the printer cable must be shielded. To assure compliance with FCC regulations for a computing device,
use a shielded interface cable with a metal shell connector. The use of
cables not properly shielded may result in violating FCC regulations.
This digital apparatus does not exceed the class B limits for radio noise
emissions from digital apparatus as set out in the radio interference regulations of the Canadian department of communications.
This unit complies with DOC standard C108.8-M 1983
ATTENTION: Le présent apparei l numérique n'ement pas de bruits radioélectriques déspassant les limites applicables aux appareils numériques
de la classe B prescrites dans le règlement sur le brouillage radio-électrique édicté par le minstère des communications du Canada.
The paper used is made of raw materials treated with a chlorine-free
bleaching process.
Das verwendete Papier ist aus chlorfrei gebleichten Rohstoffen hergestellt.
Le papier utilisé est fabriqué à partir de matières premières blanchis
sans chlore.
La carta utilizzata è prodotta con materiali sbiancati senza cloro.
El papel utilizado ha sido fabricado con un proceso de blanqueo libre
de cloro.
WARNING For continued protection against risk of fire, replace only with same type and rating of fuse. Only trained and qualified personnel may open covers or
WARNUNG Aus Brandschutzgründen nur Sicherungen desselben Typs und derselben Auslegung verwenden. Das Entfernen oder Öffnen von Abdeckungen und
remove parts that are not explicitly shown and described in the User Guide as being accessible to the operator.
Teilen darf nur durch geschultes Fachpersonal vorgenommen werden. Ausgenommen hiervon sind nur solche Abdeckungen und Teile, deren Ent-
Note: Conformity may be affected by:
using interface cables not complying with the specifications
non-observance of important instructions in the operator's manual
installing components not approved for this device by the manufacturer
unauthorized manipulation
gekennzeichnet.
Hinweis: Die Konformität kann beeinflußt werden durch:
Benutzung von nicht spezifizierten Schnittstellenkabeln
Nichtbeachtung wichtiger Hinweise der Bedienungsanleitung
Ersetzen von Bauteilen, die nicht vom Hersteller für dieses Gerät freigegeben wurden
Eingriffe durch Unbefugte
Remarque: La conformité peut être influencée par:
l'utilisation de câbles d'interface non spécifiés
le non-respect de consignes importantes du manuel d'utilisation
le remplacement de composants qui n'ont pas été homologués pour cet appareil par le constructeur
l'intervention de personnes non autorisées
Nota: La conformità può essere influenzata tramite:
Utilizzo di cavi interfaccia non specificati
Inosservanza di importanti indicazioni delle istruzioni per l'uso
Sostituzione di componenti per i quali non è stato dato il benestare dal produttore per questo apparecchio
Interventi tramite persone non autorizzate
equipo está dotado de la marca CE.
Indicación: La conformidad puede estar influida por:
la utilización de cables de interface no especificados
la inobservancia de indicaciones importantes contenidas en el manual de servicio
la sustitución por componentes, que no han sido homologados por el fabricante para el equipo en cuestión
intervenciones de personas no autorizadas
Maschinenlärminformations-Verordnung 3. GPSGV: Der höchste Schalldruckpegel beträgt 70 dB(A) oder weniger
gemäss EN ISO 7779.
This device fulfils the European standards requirements by complying with the Directive of the Commission dated May 3, 1989 (89/336/EEC) relating to electromagnetic compatibility and the Directive dated
February 19, 1973 (73/23/EEC) relating to low-voltage electrical equipment. Conformity with the above
mentioned Directives is indicated by the CE symbol attached to the device.
Dieses Gerät erfüllt die Anforderungen der Europäischen Normen durch Einhaltung der Richtlinie des
Rates vom 3. Mai 1989 (89/336/EWG) bezüglich der Elektromagnetischen Verträglichkeit sowie die Richtlinie vom 19. Februar 1973 (73/23/E WG) bezüglich Elektrischer Betriebsmittel mit Niederspannungen. Die
Konformität zu den oben angeführten Richtlinien ist durch das am Gerät angebrachte CE-Zeichen
Cet appareil remplit aux exigences des normes européennes en respectant la directive du Conseil du 3
mai 1989 (89/336/CE) relative à la compatibilité électromagnétique et la directive du 19février 1973 (73/
23/CE) en matière du matériel à basse tension. La conformité aux directives mentionnées ci-dessus est
repérée par la marque de conformité de la Communauté Européenne (CE).
Questo apparecchio soddisfa le richieste delle norme europee rispettando la direttiva del consiglio del 3
Maggio 1989 (89/336/CEE) relativa alla compatib ilità elettromagnetica nonché la direttiva del 19 Febbraio
1973 (73/23/CEE) relativa a mezzi di produzione elettrici a bassa tensione. La conformità alle direttive
sopra citate è contrassegnata con il simbolo CE applicato sull'apparecchio.
Este equipo corresponde a lo exigido en las normas europeas a base del cumplimiento de la directriz del
Consejo del 3 de mayo de 1989 (89/336/CEE) en lo que se refiere a la compatibilidad electromagnética
así como de la directriz del 19 de febrero de 1973 (73/23/CEE) en lo que se refiere a los materiales
eléctricos con bajas tensiones. Para señalizar la conformidad con las directrices antes mencionadas, el
fernen bzw. Öffnen in der Bedienungsanleitung ausdrücklich gekennzeichnet und beschrieben sind.
ATTENTION Pour ne pas compromettre la protection contre les risques d'incendie, remplacer par un fusible de même type et de mêmes caractèristiques nomi-
nales. Seul un personnel qualifié et formé est habilité à démonter les sous-ensembles de la machine qui ne sont pas formellement indiqués dans le
Manuel d'utilisation meme s'ils sont accessibles par l'opérateur.
ATTENZIONE Per evitare il pericolo di incendio, utilizzare esclusivamente fusibili dello stesso tipo e della stessa portata. Solo personale qualificato puo'accedere a
parti che non siano esplicitamente descritte nelle Istruzioni per l'operatore come accessibill all'operatore.
ADVERTENCIA Sólo utilizar fusibles del mismo tipo y con las mismas características para evitar cualquier riesgo de incendio. Las cubiertas y piezas sólo deberán ser
quitadas o abiertas por personal especializado. Se exceptúan de esta regla sólo las cubiertas y piezas cuya retirada y apertura estén indicadas y
descritas expresamente en las Instrucciones de uso.
Page 3

Quick start guide Table of contents
Table of contents
QUICK START GUIDE
Table of contents
Introduction 2
Symbols used 2
Important safety instructions 2
Using the Online-CD-ROM 3
Contents of the Online CD-ROM 3
Hardware requirements 3
Troubleshooting 3
Printer at a glance 4
Installation 5
Unpacking the printer 5
Placing your printer 6
Connecting the printer 7
Switching on the printer 7
Control panel 8
Online mode 8
Offline mode 8
Setup mode 8
Changing the ribbon cassette 9
Paper handling 15
Changing the paper type 15
Loading paper 16
Fanfold paper 16
Single sheets 19
Paper transport 20
Moving the paper to the tear position 21
Settings 22
Setting the tear position 22
Setting the first printing line (TOF) 23
Setting the print head gap 24
Selecting character density and font 25
Technical data 26
Printer specifications 26
Paper specifications 27
Accessories 27
ENGLISH
1
Page 4

Introduction Quick start guide
Introduction This quick start guide is intended as a quick introduction into working with the printer and also
Ah ha!
!
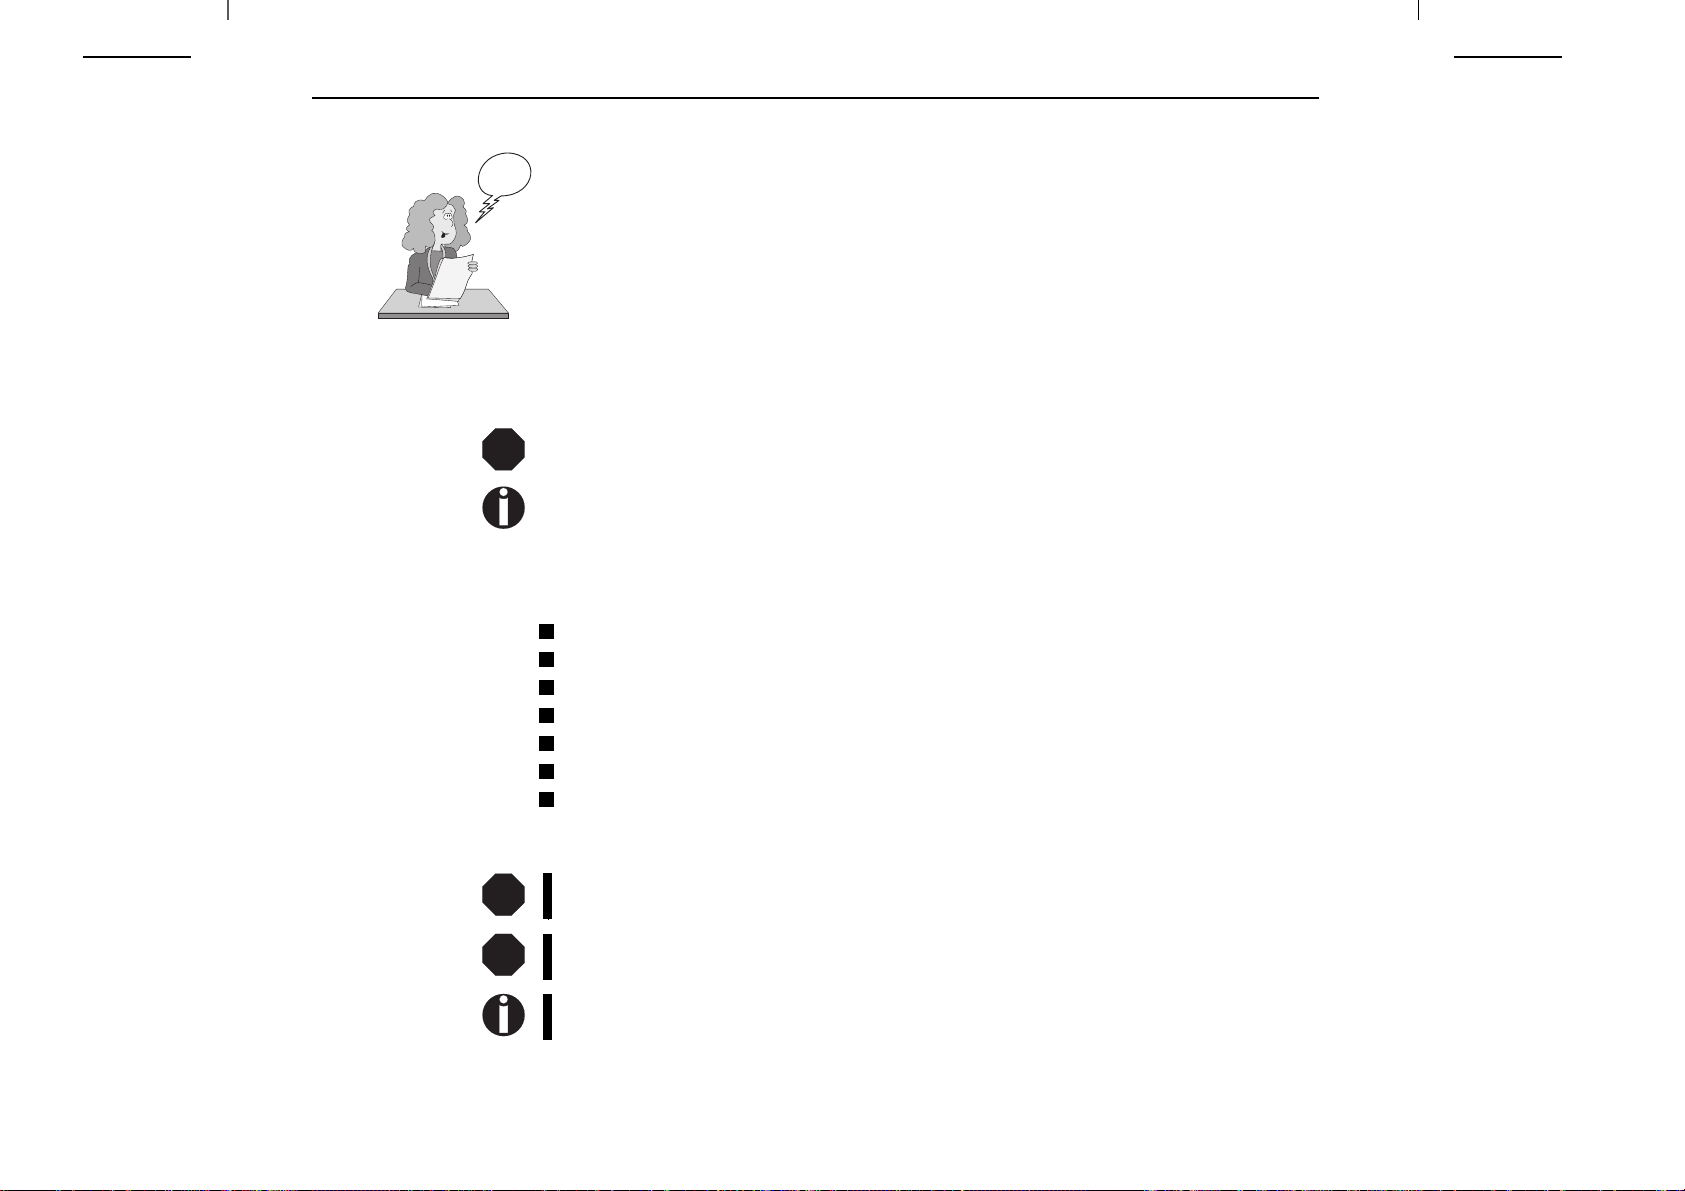
➤ Symbols used Important information is highlighted in this manual by two symbols.
to enable inexperienced users to operate the device properly. It describes the most important
functions of the printer and contains the essential information for your everyday work with the
printer. A more detailed description of the printer, its characteristic features, and further
information is contained in the User Guide on the Online CD-ROM, which is inserted at the
back of this manual.
STOP
➤ Important safety
instructions
STOP
STOP
CAUTION highlights information which must be observed in order to prevent injuries to the
user and damage to the printer.
NOTE highlights general or additional information about a specific topic.
Read the following instructions thoroughly before starting up your printer in order to prevent
injuries and avoid damage to the device.
Keep this Operator’s Manual in a place which is easily accessible at all times.
Place the printer on a solid base so that it cannot fall down to the ground.
Do not expose the printer to high temperatures or direct sunlight.
Keep all liquids away from the printer.
Protect the printer from shock, impact and vibration.
Be sure to connect the printer to a socket with the correct mains voltage.
The power supply cable may be damaged if the paper edges constantly chafe the insulating
sheath. The user must always ensure that there is sufficient distance between the power
supply cable and the paper.
Never carry out maintenance or repair work yourself. Always contact a qualified service
technician.
Whenever you want to disconnect the printer from the power supply, pull the plug out from
the mains socket.
Additional safety instructions are provided at the relevant places in the text.
2
Page 5

Quick start guide Introduction
➤ Using the
Online-CD-ROM
➤ Contents of the
Online CD-ROM
➤ Hardware
requirements
First install the Adobe Acrobat Reader on your hard disk, unless the program has already been
installed. To install it, follow the steps described in the README file in the READER directory.
To start the online documentation, call the Explorer and double click on the START.PDF file.
Then follow the instructions and menus on the screen.
The Online CD-ROM contains
–the User Guide: A detailed description of the printer and its impressive features
– Drivers: For
– Additional documentation: Programming instructions and descriptions of the available
options
If your CD-ROM is be defective or missing, please consult your dealer. The Online Documentation can also be downloaded via the Internet.
Minimum hardware requirements: PC 486 MHS, quad-speed CD-ROM, 15" display screen,
mouse.
Windows 2000, Windows XP/2003 Server, Windows 7, Windows Vista
➤ Troubleshooting The chapter Troubleshooting of the User Guide on the Online CD-ROM contains detailed
Information on how to rectify errors. It deals with general printing problems as well as problems
with the print quality, paper feed and ribbon cassette.
ENGLISH
3
Page 6

Printer at a glance Quick start guide
Printer at a glance
View from the front
Soundproofing cover
Top cover
Power switch
Bottom cover
Control panel
Front cover
Printer in tractor mode
Printer in single-sheet mode View from the rear
Paper support
Tractors
Rear cover
Interface connectors
Power cord connector
4
Single sheet feeder
Paper guide
Page 7

Quick start guide Installation
Installation
➤ Unpacking the printer
Place your printer on a solid base.
Make sure that the “Up” symbols point in the correct direction.
Open the packaging, take out the accessory cassette and unpack
it. Pull the printer out of the cardboard box towards you and
➃
➂
remove the remaining packaging material.
Check the printer for any visible transport damage and missing
items. In addition to this Operator’s Manual (➀) the CD-ROM
(➁, at the back of this manual), the power cable (➂) and the
ribbon (➃) must be included.
If you find any transport damage or if any accessories are
missing, please contact your dealer.
ENGLISH
➁
➀
5
Page 8

Installation Quick start guide
➤ Placing your printer Place the printer on a solid, flat, surface, ensuring that the printer is positioned in such a way
that it can not topple, and that there is easy access to the control panel and paper input devices.
Also ensure that there is sufficient space for the printed output.
If you expect that frequent forward and reverse feeds will occur,
you should place the printer as shown in the figure, if possible.
When selecting the printer location, observe the following additional instructions:
STOP
Never place the printer in the vicinity of inflammable gas or explosive substances.
Do not expose the printer to direct sunlight. If you cannot avoid placing the printer near a
window, protect it from the sunlight with a curtain.
When connecting a computer to the printer, make sure not to exceed the maximum cable
length (see User Guide on the Online CD-ROM, Technical Specifications).
Ensure sufficient distance between the printer and any heating devices/radiators.
Avoid exposing the printer to extreme temperature or air humidity fluctuations. Protect the
printer from dust.
It is recommended to install the printer in a place which is acoustically isolated from the
workplace because of the noise it may produce.
6
Page 9

Quick start guide Installation
➤ Connecting the printer
Make sure that the printer is set to the correct voltage (e.g. 230 V
120V
in Europe, 120 V in the U.S.A.). To do this, check the plate
above the power inlet at the rear of the printer.
If the setting is incorrect, set the coloured switch at the rear of
the printer to the correct position, using a pointed object (e.g.
screwdriver, ball pen or tweezers).
ENGLISH
➤ Switching on the printer
STOP
Make sure that the printer is switched off before
setting the correct voltage; otherwise severe damage may be caused.
Never switch on the printer if the voltage setting is
incorrect, since this may cause severe damage to the
printer.
Make sure that the printer and the computer are switched off,
and connect the printer to the computer with the data cable
(interface cable).
The printer by default is provided with a parallel and
an Ethernet interface. For further information about
the interfaces, refer to the User Guide on the Online
CD-ROM.
Connect the power cable to the power inlet of the printer.
Connect the power cable plug to a mains socket.
The power switch for switching on the printer is located at the
bottom left at the front of the printer when viewed from the
front.
7
Page 10

Control panel Quick start guide
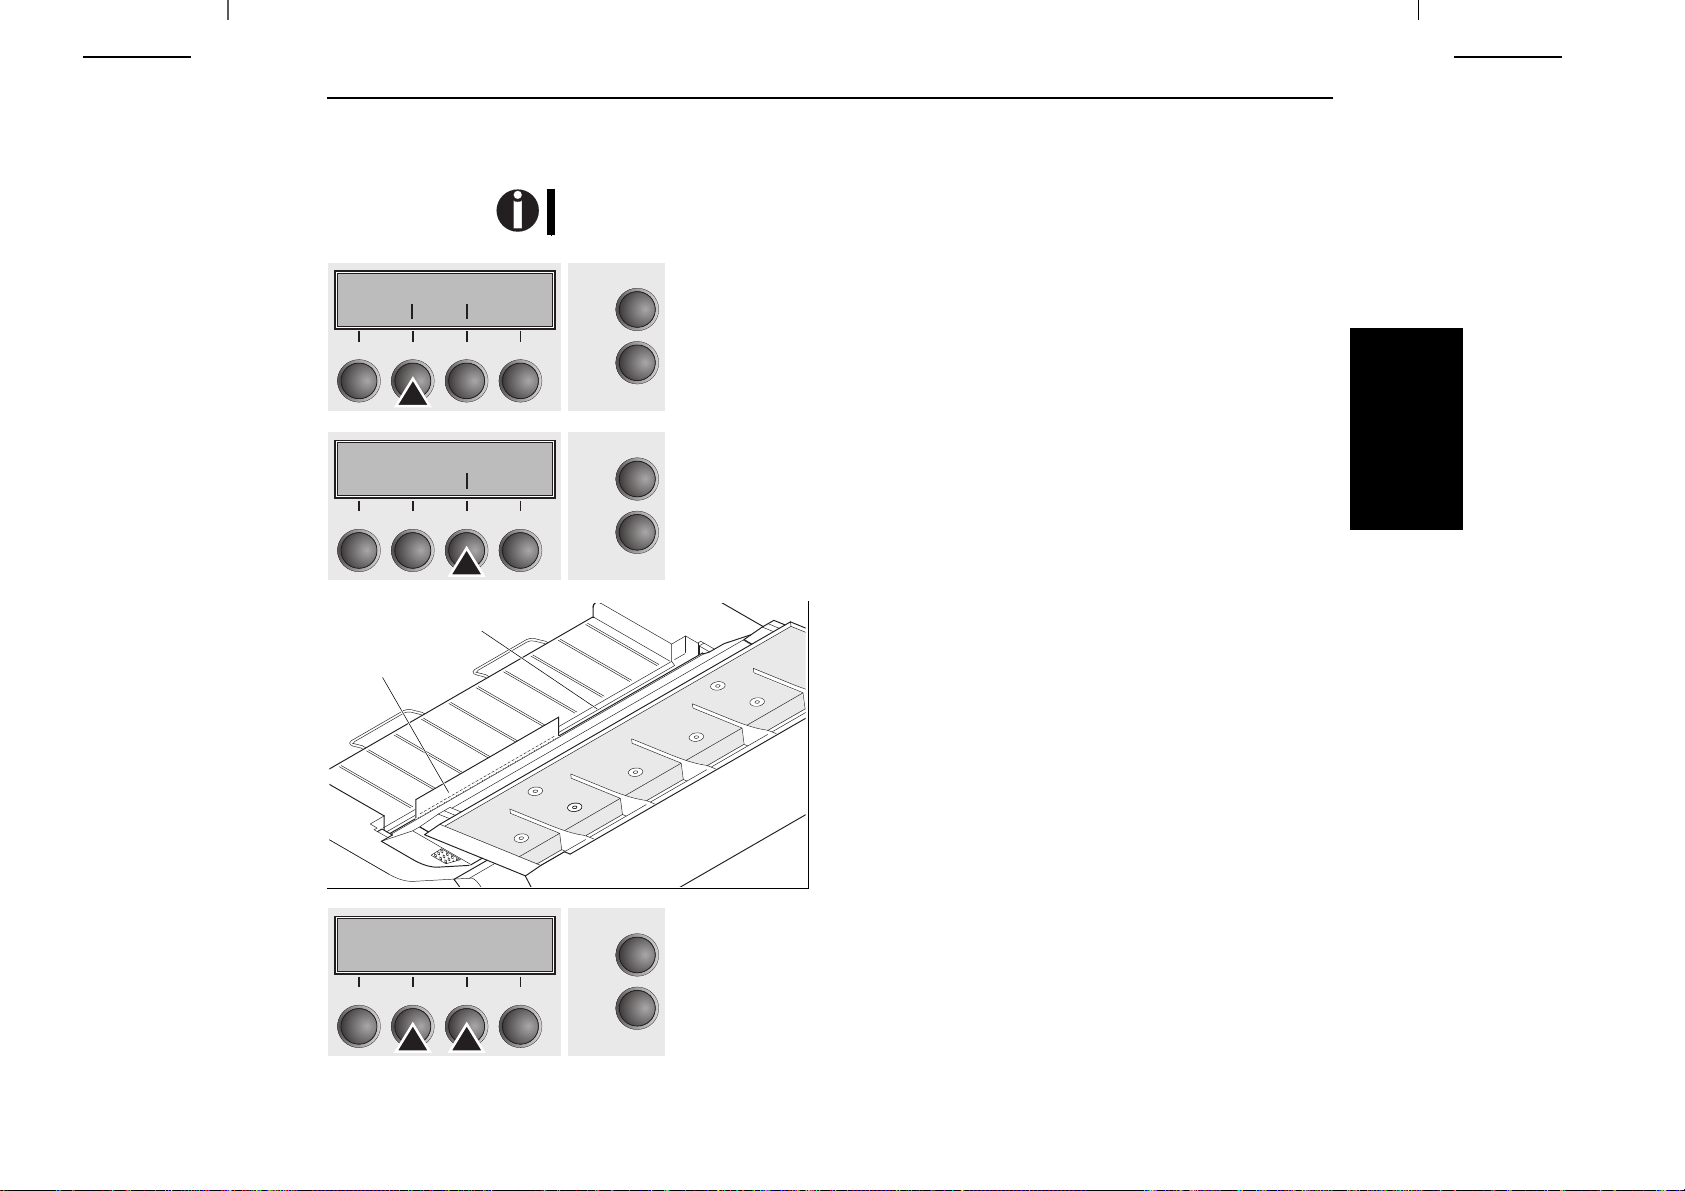
Control panel The control panel and the keys are used for controlling the printer operation.
The upper line of the display shows whether the printer is in Online or Offline mode and the
paper path selected (Tractor1 or Single).
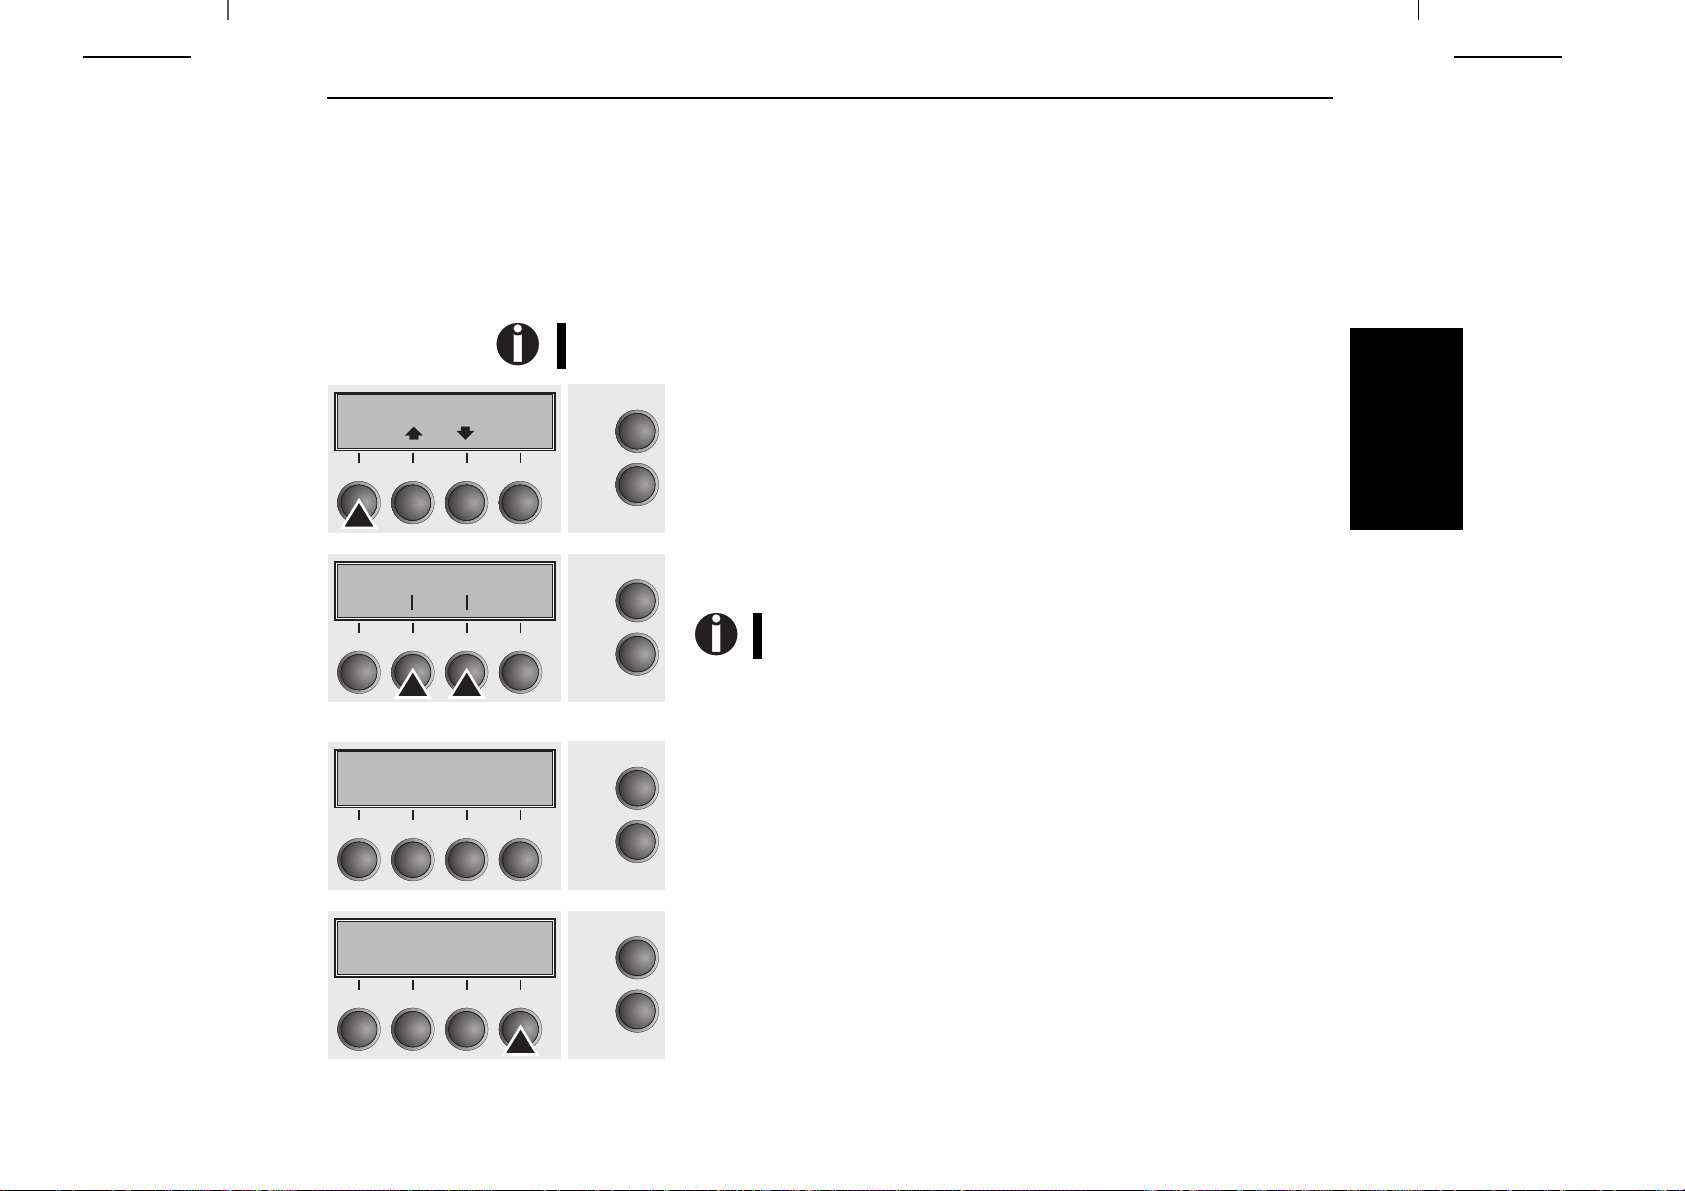
➤ Online mode After switching on, the printer is automatically set to online mode. Only in this mode can it receive
data from the computer.
Online Trac1
Tear
3
21
4
Online
Setup
Tear key (4): Activates the tear function when fanfold paper is loaded (see
page 21, Moving the paper to the tear position). If Load is displayed above
this key, no paper is loaded in the printer; press the key to feed paper to the
printing position.
Setup key: Sets the printer to setup mode.
Online key: Sets the printer to offline mode.
➤ Offline mode Only in this mode is it possible to perform step, line, or form feeds from the control panel (see page 20,
Paper transport); however, data cannot be received.
Offline Trac1
Park Load
21
3
Load
4
Online
Setup
Park key (1): Clears the paper path with paper loaded and activates paper
path quick selection (see page 15, Changing the paper type).
Key (2): Short keypress: Microstep forward.
Long keypress: Continuous paper feed.
Key (3): Short keypress: Microstep reverse.
Long keypress: Continuous paper reverse feed back to the park position.
Load key (4): If no paper is loaded, see above.
If paper is loaded: Short keypress: Line Feed (LF);
long keypress: Form Feed (FF).
Setup key: Sets the printer to setup mode.
Online key: Sets the printer to online mode.
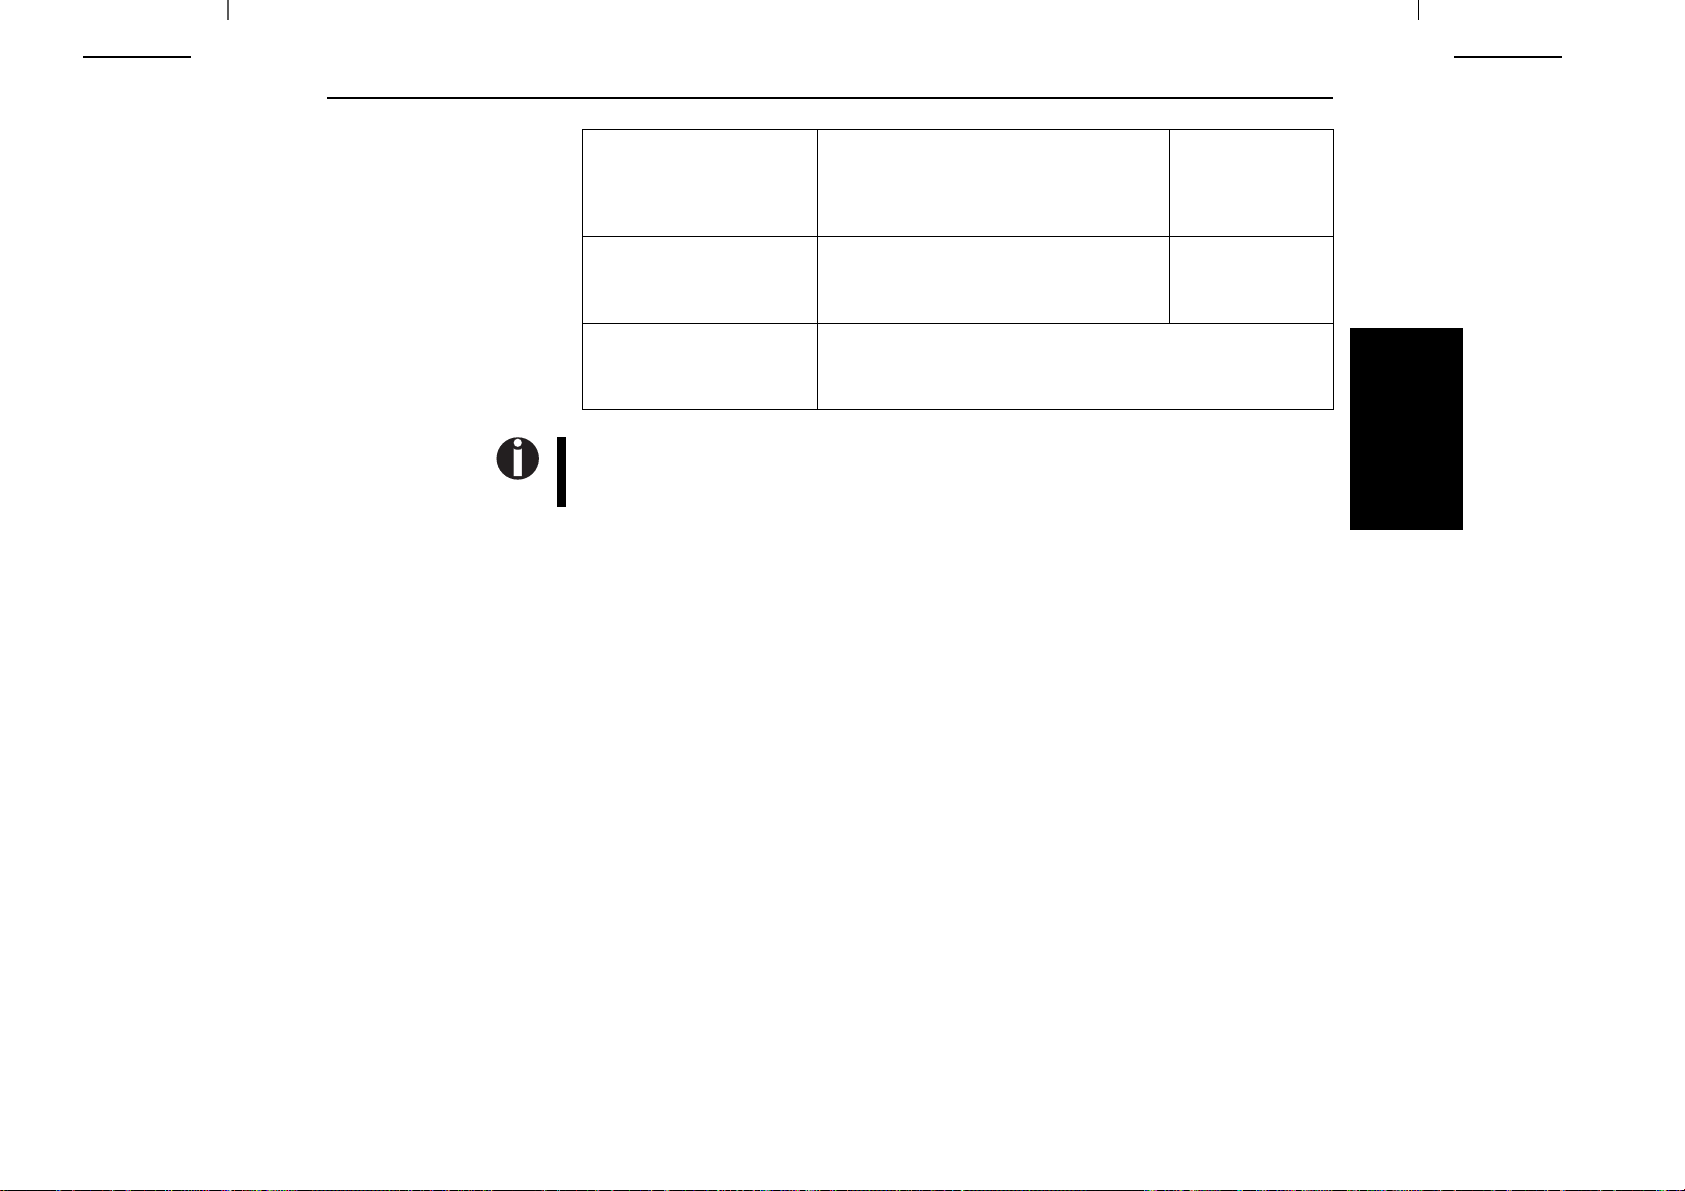
➤ Setup mode In this mode, the following settings are available:
Adjust Paperway
Menu Char
3
21
4
Online
Setup
Setup key: Sets the printer to setup mode, in which the following
settings can be selected:
Menu key (1): Other menu settings.
Adjust key (2): Tear position, first printing line and print head gap.
Paperway key (3): Paper path.
Char key (4): Font and number of characters per inch.
Access to the other menu settings (Menu) may be disabled by the manufacturer. For information on how to enable access and about the available settings, refer to the User Guide on the
Online CD-ROM. (chapter The Menu, section Enabling the menu).
8
Page 11

Quick start guide Changing the ribbon cassette
Changing the
ribbon cassette
Before opening the cover, make sure that the printer is switched on so that it can execute
automatic preparations for ribbon changing (widening the print head gap).
During the process of initialization after powering on, the printer checks if a ribbon cassette
is installed. It also checks during the execution of a print job the operativeness of the ribbon
cassette. These functions mandatory require the use of the manufacturers original ribbon cassettes (see section Accessories, page 28). If other ribbon cassettes were used, the message
"Check Ribbon" appears in the display, it is impossible to print.
Move the paper to the park position.
Open the printer top cover.
ENGLISH
9
Page 12

Changing the ribbon cassette Quick start guide
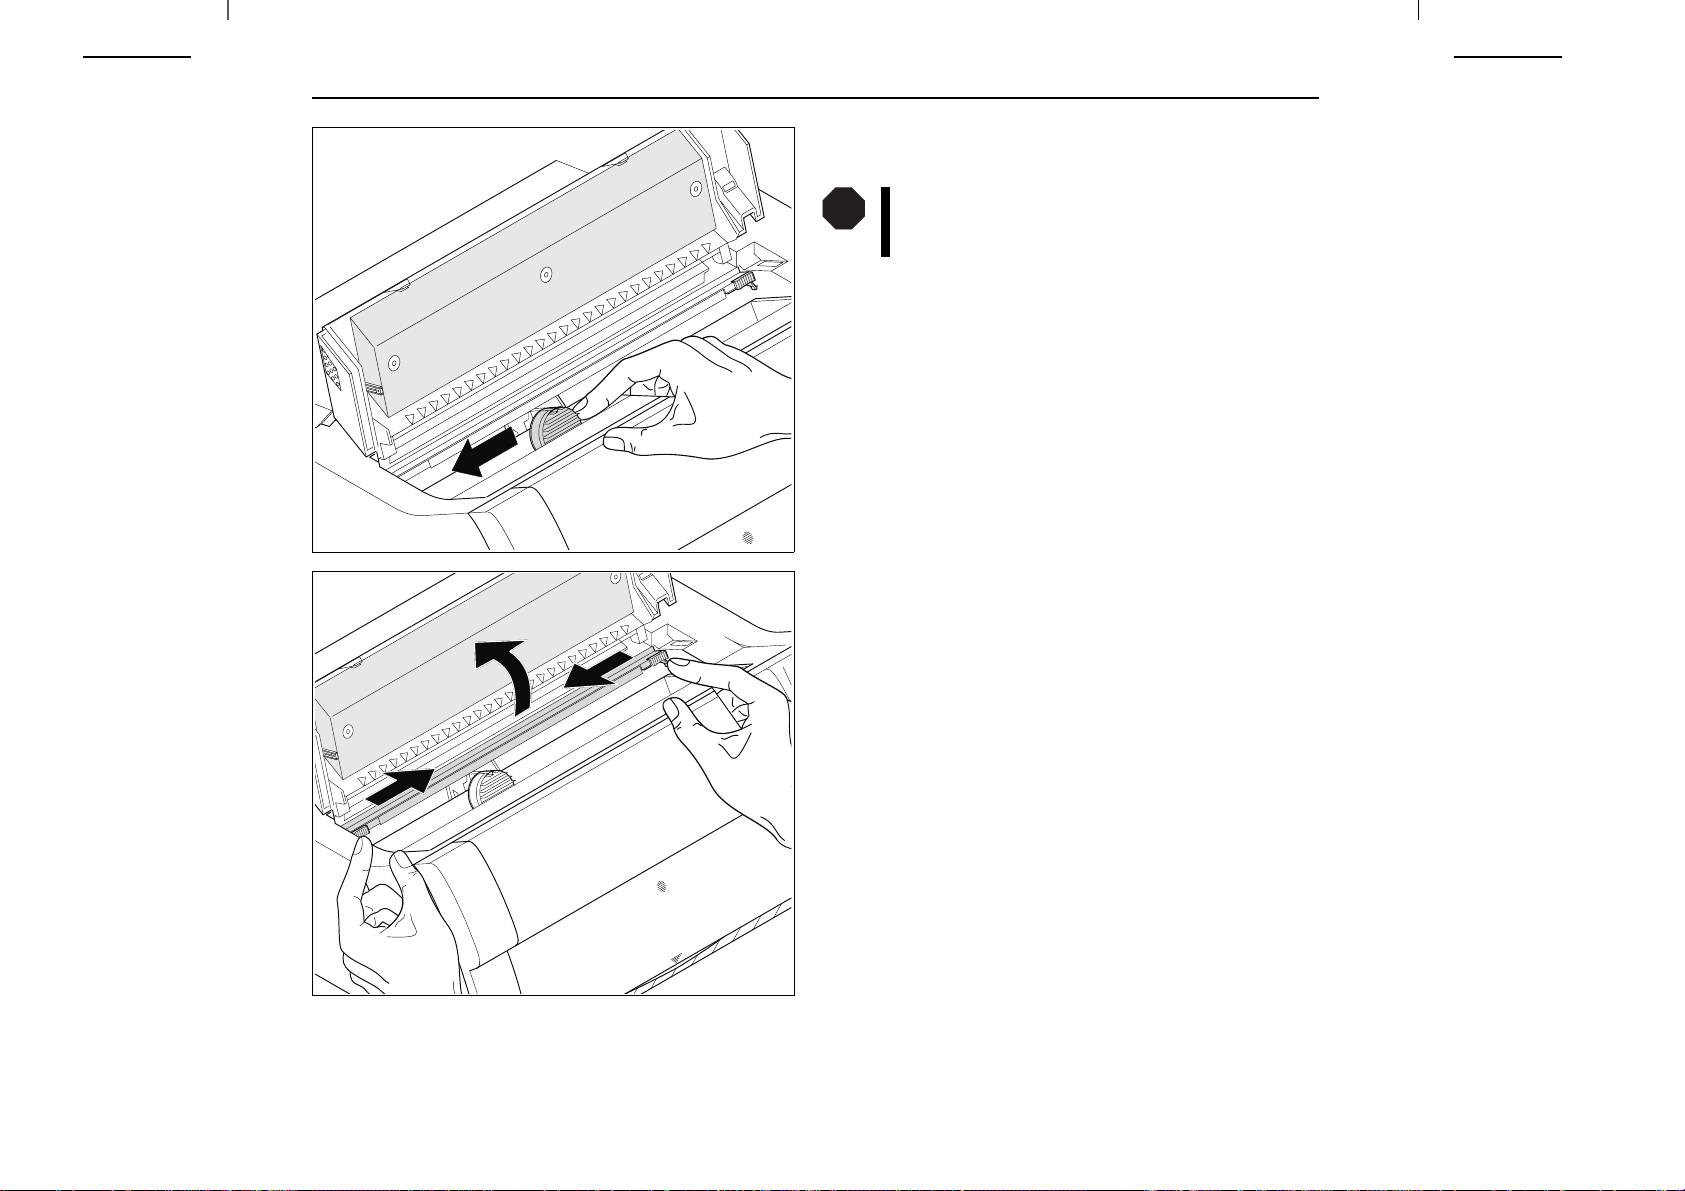
Carefully slide the print head carriage to the left stop (viewed
from the printer front).
STOP
The print head becomes hot during printing. For this
reason, let it cool down before touching it.
Move the coloured friction tab to the left (direction of the arrow)
as shown in the figure and raise the friction mechanism.
10
Page 13

Quick start guide Changing the ribbon cassette
Remove the used cassette.
Raise the coloured insertion tongue A.
A
ENGLISH
11
Page 14

Changing the ribbon cassette Quick start guide
Remove the coloured protections A and B.
Insert the coloured ribbon tension knob into the right-hand front
location of the new ribbon cassette. Turn the knob in the direction of the arrow in order to take up slack of the ribbon.
A
B
12
Slightly tilt the ribbon cassette forwards and thread in the ribbon
between the coloured insertion tongue and the ribbon support
(transparent plastic plate).
Align and insert the cassette into the guides on the left and right,
then press down until it clicks into place.
Page 15

Quick start guide Changing the ribbon cassette
Insert the coloured tension knob into one of the two locations.
Turn the tension knob to take up slack in the ribbon until it is
seated correctly at the bottom in the ribbon support.
Press down the coloured insertion tongue A.
ENGLISH
A
13
Page 16

Changing the ribbon cassette Quick start guide
Move the print head carriage backwards and forwards several
times. If the ribbon is correctly seated, there must be no perceptible resistance.
The ribbon should be transported during the travel
from left to right. If this is not the case, you should
check that the ribbon cassette is correctly inserted
on the right.
Press the friction mechanism down until it clicks into place.
Close the front section of the top cover.
14
Page 17

Quick start guide Paper handling
Paper handling This section describes how to set the paper type, load fanfold paper and single sheets, transport
paper and move the paper to the tear position.
➤ Changing the paper
type
Offline Trac1
Park Load
3
21
Single Trac1
21
Load paper from
Single
4
3
4
You can change the paper type either from an application program, by means of the paper path
quick selection feature or in the Setup menu. In this section, the quick selection feature is
described; for detailed information on how to make this setting via the Setup menu, refer to the
User Guide on the Online CD-ROM.
On some printer models, the single sheet paper source cannot be selected since these models
are not designed for manual single sheet feeding.
Make sure that the printer is in offline mode; press the Online key, if necessary.
Online
Setup
Press the Park (1) key. If fanfold paper is loaded in the printer, it is fed to the tear
position. The text tear paper off appears in the display. Then press any key. If a
single sheet is loaded in the printer, it is ejected.
Use one of the marked keys to select the desired paper path, for example,
Online
Single (2).
If you do not make a selection within 5 seconds, the menu is closed.
Setup
The printer returns to offline mode. The display alternates between the basic menu
and the menu in the following figure:
Insert a single sheet (for the procedure, see page 19, Loading single sheets).
Online
ENGLISH
3
21
4
Online Single
Load
3
21
4
Setup
Online
Setup
Press the Online key to set the printer to ready status. When the printer receives
data from the computer, the single sheet is automatically loaded. Press the Load
(4) key to load the single sheet before starting the printout.
15
Page 18

Paper handling Quick start guide
➤ Loading paper Your printer can process both fanfold paper and single sheets. For information on the supported
paper sizes, please refer to page 27 (Paper specifications).
You should only use those paper types which are approved for this printer. For more information, please refer to the User Guide on the Online CD-ROM.
The printer by default is adjusted in such a way, that it will automatically check the width of
the inserted paper before starting a print job. If the paper couldn’t be detected (for example
because it is positioned too far left), the message "PW sensor defect" appears in the display, it
is impossible to print.
If a printing line overrides the measured paper width, the characters out of range will not be
printed and the message "Paperwidth error" appears in the display. The printer switches to offline
mode. You can restart the printing process by pressing the Online key.
For further information on paper width measurment, please refer to the User Guide on the
Online CD-ROM.
Fanfold paper
Make sure that the printer is set for fanfold paper printing. If
necessary, change the paper type (see page 15, Changing the
paper type).
Raise the front cover.
16
Not available on some printer types.
Remove the bottom cover A.
Open the right and left tractor flaps.
A
Page 19

Quick start guide Paper handling
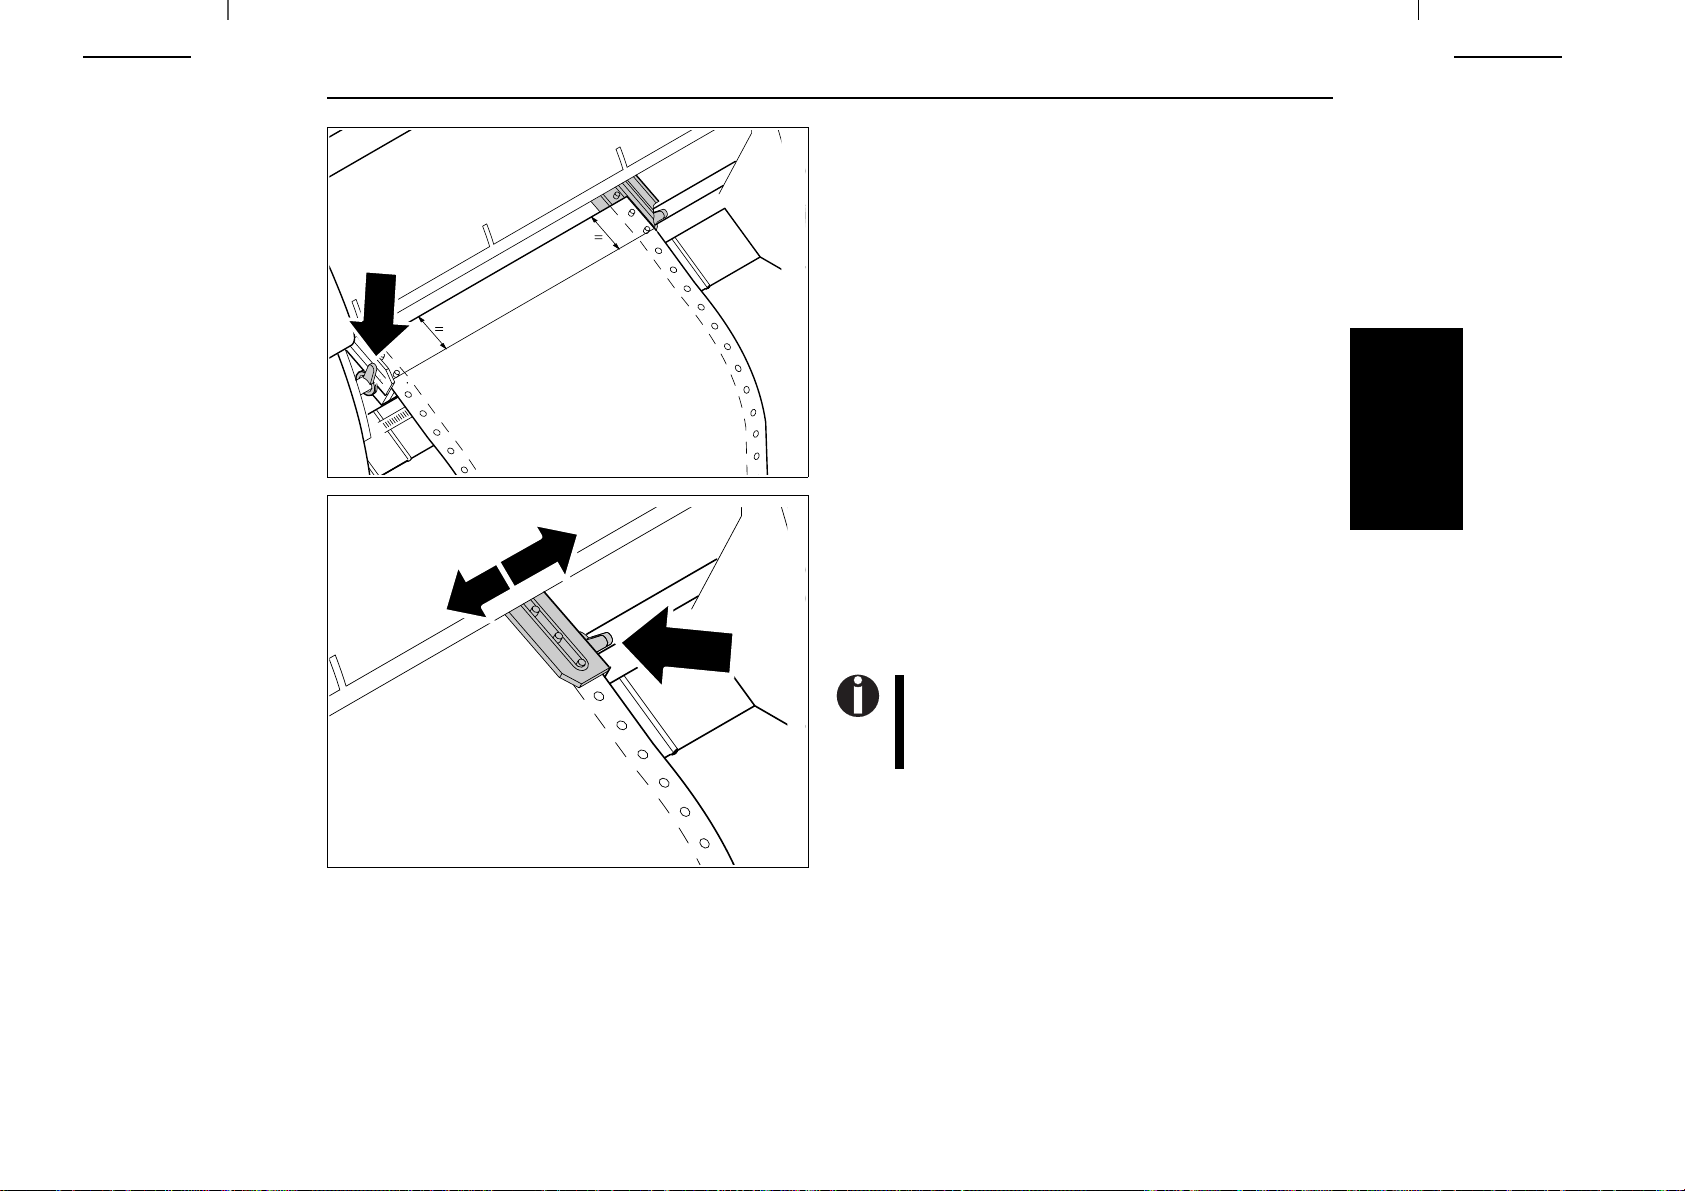
Release the coloured latch lever of the left-hand tractor and
align the tractor so that the first printing position on the paper
matches the X mark on the printer housing.
Lock the coloured lever again.
Place fanfold paper into the left-hand tractor.
Open the coloured latch lever of the right-hand tractor and align
it to the paper width.
Insert the fanfold paper into the right-hand tractor.
Make sure that it is inserted by the same length as on the
left-hand tractor in order to avoid any paper jam.
Close the tractor flap and lock the tractor by turning the tractor
lever to the rear.
ENGLISH
Do not tighten the paper excessively to avoid tearing
the perforation holes; do not allow excessive slack
or the paper will not remain flat enough to ensure
accurate feeding.
17
Page 20

Paper handling Quick start guide
Be sure to align the paper stack in parallel with the printer and
that the paper flow is unobstructed.
90
Online Trac1
Load
3
21
4
Online
Setup
Re-install the bottom cover.
Lower the front cover.
Switch the printer on. The active paper source (Traktor1) appears in the display.
The paper is automatically loaded when the printer is in online mode and receives
data from the computer.
Press the Load (4) key to load paper before starting the printout.
18
Page 21

Quick start guide Paper handling
Single sheets
Some printer models are designed for fanfold paper operation only and therefore do not feature a single sheet feeder. The front cover can therefore not be opened on these models.
Make sure that the printer is set to single sheet mode. If
necessary, change the paper type (see page 15, Changing the
paper type).
Press the latch at the middle of the front cover. The single sheet
input tray opens downwards.
Align the left paper guide with the mark on the left of the single
sheet input tray. Adjust the right paper guide to the width of the
paper used.
ENGLISH
19
Page 22

Paper handling Quick start guide
Insert the single sheet as far into the input tray as possible.
Press the Online key to set the printer to ready status.
The sheet is automatically loaded when the printer is in online
mode and receives data from the computer. Press the Load (4)
key to load paper before starting the printout.
➤ Paper transport Loaded paper (fanfold paper/single sheets) can be transported in the printer in several ways.
Offline Trac1
Park LF/FF
3
21
20
Make sure that the printer is in offline mode; press the Online key, if necessary.
Online
4
Setup
Key (2)
Short keypress: Paper is transported upwards step by step.
Long keypress: Continuous transport upwards.
Key (3)
Short keypress: Paper is transported downwards step by step.
Long keypress: Continuous transport downwards.
LF/FF key (4)
Short keypress: Line Feed (LF) is effected.
Long keypress: Form Feed (FF) is effected.
Page 23

Quick start guide Paper handling
➤ Moving the paper to
the tear position
Online Trac1
Tear
3
21
Tear position
Trac1
21
Online Tear
21
3
3
4
4
Exit
4
You can use the Tear key to move the paper to the tear position.
Swing the soundproofing cover towards the front.
Online
Setup
Make sure that the printer is in online mode. If necessary, press the Online key.
Press the Tear (4) key. The printer moves the perforation edge of the fanfold
paper to the tear edge of the top cover (see below).
The display alternates between…
Online
Setup
and…
After having torn off the paper, press the Exit (4) key. The printer returns the
Online
Setup
paper to the first printing position.
If a print job is active, the printer automatically returns the paper to the first
printing position.
ENGLISH
Tear edge
Abreißkante
21
Page 24

Settings Quick start guide
Settings This section describes how to set the tear position, the first printing line, the print head gap as
well as the font selection and the character density.
➤ Setting the tear
position
Adjust Paperway
Menu Char
3
21
TOF
Head Tear
3
21
TearAdj= 0/72" *
Set < > Exit
3
21
If the tear position of the paper is not aligned with the tear edge of the top cover of the printer,
you can adjust it.
Press the Setup key. The printer changes to setup mode.
Online
4
Setup
Press the Adjust (2) key.
Press the Tear (4) key. The printer performs a form feed.
Online
4
Setup
Press the < (2) or > (3) key to move the perforation to the desired position.
Online
4
Setup
Confirm the input by pressing the Set (1) key.
Confirm the input again by pressing the Setup key. The printer is reset to the initial
status.
22
The correction made – a maximum of approx. 2.5 cm (1") in each direction – will be retained
after switching the printer off.
Page 25

Computerdrucker
Quick start guide Settings
➤ Setting the first
printing line (TOF)
Adjust Paperway
Menu Char
3
21
TOF
Head Tear
3
21
B
A
You can use the TOF function for setting the position of the first printing line for each paper
source and each menu individually.
Before using the TOF function (if fanfold paper is used), you should first set the tear position
(see above).
Open the top cover.
Online
4
Setup
Press the Setup key. The printer changes to setup mode.
Press the Adjust (2) key.
ENGLISH
Press the TOF (3) key. The printer performs a form feed.
Online
4
Setup
The paper is fed to the position where the bottom edge of the
first printing line A is aligned with the tear edge of the top
cover B. The factory setting for the first printing position (TOF)
is 12/72".
Computerdrucker
FormAdj= 12/72"*
Set < > Exit
3
21
4
Online
Setup
Press the < (2) or > (3) key to move the first printing line to the desired position.
You can set values from 0 to 220/72" for fanfold paper or for single sheets.
23
Page 26

Settings Quick start guide
FormAdj= 17/72"
Set < > Exit
3
21
➤ Setting the print
head gap
Adjust Paperway
Menu Char
3
21
TOF
Head Tear
Confirm the input by pressing the Set (1) key.
Online
Press the Setup key. The printer returns to the initial status.
The setting made will be retained after switching off the printer.
4
Setup
For more details, please refer to the User Guide on the Online
CD-ROM.
The printer features automatic print head gap adjustment to the thickness of the paper used. In
setup mode, you can enter a correction value to modify the head gap that is normally determined
automatically. This correction is useful for modifying the appearance of the type face and the
impact force for multi-layer paper.
The AGA (automatic gap adjustment) function must be set to On. For more detailed information, refer to the User Guide on the Online CD-ROM.
Press the Setup key. The printer changes to setup mode.
Online
4
Setup
Press the Adjust (2) key.
Press the Head (1) key.
Online
3
21
Head= 0 *
Set < > Exit
3
21
24
4
Setup
Use the < (2) or > (3) key to set the range within which the automatic gap
Online
4
Setup
adjustment is to be corrected. You can select values in the range from -10 to +10.
Confirm the input by pressing the Set (1) key.
Press the Setup key. The printer returns to the initial status.
Negative values decrease the print head gap, positive values increase it.
The setting made will be retained after switching off the printer.
Page 27

Quick start guide Settings
➤ Selecting character
density and font
Adjust Paperway
Menu Char
3
21
Font CPI
21
10 CPI *
Set < > Exit
21
ROMAN NLQ
Set < > Exit
21
4
3
4
3
4
3
4
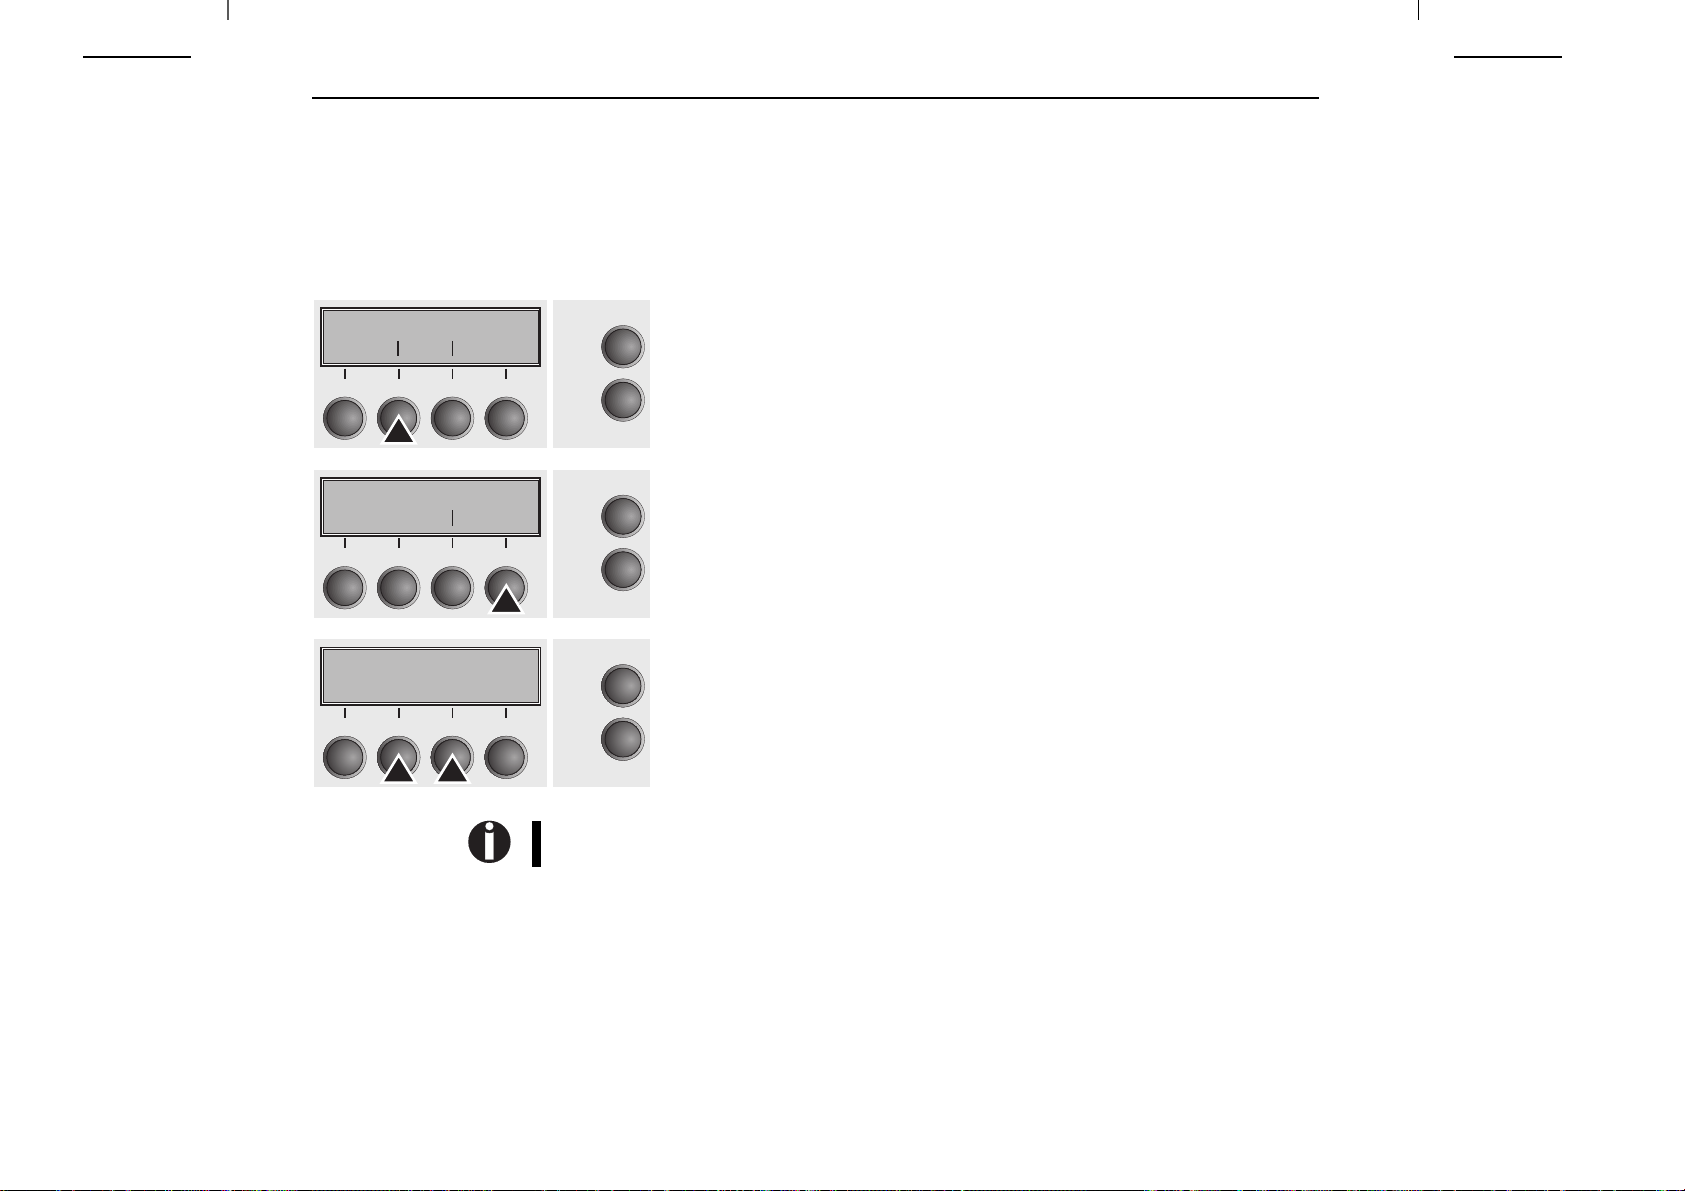
You can use the CPI (= Characters Per Inch) key in setup mode to select the number of characters
per inch to be printed. You can use the Font key to select resident fonts.
Press the Setup key, then the Char (4) key.
Online
Setup
Press the CPI (3) or Font (2) key (in our example, press CPI).
Online
Setup
Use the < (2) or > (3) key to set the desired character density. Confirm the se-
Online
Setup
lection by pressing the Set (1) key.
You can cancel the selection and leave the setting unchanged by pressing the
Exit (4) key.
If you pressed the Font (2) key, use the < (2) or > (3) key to select the desired
Online
Setup
font. Confirm the selection by pressing the Set key.
You can cancel the selection and leave the setting unchanged by pressing the
Exit (4) key.
ENGLISH
Adjust Paperway
Menu Char
3
21
4
Online
Setup
Press the Setup key. The printer returns to the initial status. It is also possible
to press the Online key. The printer then changes directly to online mode.
The selection made will not be retained after switching off the
printer. For more details on how to set the character density permanently, please refer to the User Guide on the Online CD-ROM.
25
Page 28

Technical data Quick start guide
Technical data
Printer
specifications
T2280+T2265+epyT
Printing method
Printing width 136 characters at 10 cpi
Print speed
Throughput (ECMA 132) 606 pages/h
Character densities 10 cpi, 12 cpi, 15 cpi, 17.1 cpi, 20 cpi
Max. resolution horizontal: 360 dpi; vertical: 360 dpi
Emulations Standard: MTPL, Epson LQ2550/LQ2170, IBM XL 24
Noise level
Dimensions
Weight
Power supply
Power consumption at 100% throughput 65 VA
Ambient conditions Temperature: 10° to 35°C; Air humidity: 16% to 73%
Print head No. of needles: 24; Needle diameter: 0.25 mm
Approvals
(Matrix 12 x 10)
HSQ
(Matrix 12 x 12)
DPQ
CPQ (Matrix 24 x 12)
(Matrix 24 x 18)
NLQ
(Matrix 24 x 36)
LQ
Serial with 24-needle print head
(bidirectional mode, 10 cpi)
650 cps
600 cps
300 cps
200 cps
100 cps
10.1 pages/min
≤
55 dB (A)
(LQ Mode Sans Serif)
624 x 430 x 276 mm (W x D x H)
20.7 kg
U.S.A./Canada 120 V ±
Europe 230 V ±
when idling: 20 VA
No. of copies:
1 original + 6 copies (max.)
ISO 60950, CE, GOST, VDE/GS+CB, cULus, FCC/B, CCC,
Energy Star
10%, 60 Hz
10%, 50/60 Hz ± 2%
(bidirectional mode, 10 cpi)
800 cps
667 cps
333 cps
222 cps
111 cps
626 pages/h
10.43 pages/min
≤
57 dB (A)
(LQ Mode Sans Serif)
± 2%
at 100% throughput 75 VA
when idling: 24 VA
No. of copies:
1 original + 5 copies (max.)
26
Page 29

Quick start guide Accessories
➤ Paper
specifications
Accessories
Fanfold paper Tractor1
Continuous single forms
Single set of forms
(requires individual testing)
Single sheet feeder
Single sheets
Single set of forms
(requires individual testing)
Sets of forms Sets of forms can only be processed if the top edge is bound.
Paper weight
No. of copies
Form thickness (max.)
Paper weight
No. of copies
Form thickness (max.)
ASF-R: Multi-part forms must be loaded with the bound top edge
down. They must be tested individually for their suitability.
60–120 g/m
1 + 6 (T2265+)
1 + 5 (
0.60 mm
80–120 g/m
1 + 5
0.60 mm
2
T2280+)
2
For more information on general paper specifications as well as paper specifications for the
optional tractor units and the automatic sheet feeder, refer to the User Guide on the Online
CD-ROM.
Ribbon cassettes Order no.
Black ribbon cassette 062 471
For more options, refer to the User Guide on the Online CD-ROM.
ENGLISH
27
Page 30

Page 31

Kurzanleitung Inhalt
Inhaltsverzeichnis
KURZANLEITUNG
Inhalt
Einführung 2
Zu den verwendeten Symbolen 2
Wichtige Sicherheitshinweise 2
Arbeiten mit der Online-CD-ROM 3
Was ist auf der Online-CD-ROM 3
Hardwarevoraussetzungen 3
Fehlersuche 3
Auf einen Blick 4
Installation 5
Drucker auspacken 5
Drucker aufstellen 6
Drucker anschließen 7
Drucker einschalten 7
Bedienfeld 8
Online-Modus 8
Offline-Modus 8
Setup-Modus 8
Farbbandkassette wechseln 9
Papierhandhabung 15
Papierart wechseln 15
Papier einlegen 16
Endlospapier 16
Einzelblätter 19
Papiertransport 20
Papier in Abreißposition fahren 21
Einstellungen 22
Abreißposition einstellen 22
Erste Druckzeile einstellen (TOF) 23
Druckkopfabstand einstellen 24
Zeichendichte und Schriftart wählen 25
Technische Daten 26
Druckerspezifikationen 26
Papierspezifikationen 27
Daten zur Langlebigkeit und Umweltverträglichkeit 28
Zubehör 28
DEUTSCH
1
Page 32

Einführung Kurzanleitung
Einführung Die Kurzanleitung dient dem schnellen Einstieg in das Arbeiten mit dem Drucker und soll auch
Ah ha!
!
dem ungeübten Benutzer den Umgang mit dem Gerät ermöglichen. Sie beschreibt die wichtigsten Funktionen des Druckers und enthält unerläßliche Informationen für die alltägliche Arbeit
mit dem Gerät. Eine ausführliche Beschreibung des Druckers, seiner Leistungsmerkmale und
weiterführende Informationen enthält das Benutzerhandbuch auf der Online-CD-ROM, die Sie
auf der vorletzten Seite dieser Bedienungsanleitung finden.
➤ Zu den verwendeten
Symbolen
STOP
➤ Wichtige Sicher-
heitshinweise
STOP
Wichtige Informationen werden in der Bedienungsanleitung durch zwei Symbole hervorgehoben.
VORSICHT enthält Informationen, die beachtet werden müssen, um den Benutzer vor Schaden
zu bewahren und Schäden am Drucker zu verhindern.
HINWEIS enthält allgemeine oder zusätzliche Informationen zu einem bestimmten Thema.
Lesen Sie die folgenden Hinweise genau durch, bevor Sie den Drucker in Betrieb nehmen.
Dadurch schützen Sie sich und vermeiden Schäden an dem Gerät.
Bewahren Sie diese Bedienungsanleitung an einem jederzeit zugänglichen Ort auf.
Den Drucker auf stabilem Untergrund so aufstellen, daß er nicht zu Boden fallen kann.
Den Drucker weder hohen Temperaturen noch direktem Sonnenlicht aussetzen.
Keine Flüssigkeiten mit dem Drucker in Berührung bringen.
Den Drucker keinen Erschütterungen, Stößen oder Vibrationen aussetzen.
Den Drucker nur an eine Steckdose mit der richtigen Spannung anschließen.
Papierkanten können die Isolierung des Netzkabels beschädigen, wenn sie ständig daran
scheuern. Der Benutzer hat Sorge zu tragen, daß das Netzkabel und bewegtes Papier unter allen Umständen genügend Abstand voneinander haben.
Führen Sie Wartungsarbeiten und Reparaturen keinesfalls selbst aus, sondern verständigen
Sie immer einen qualifizierten Servicetechniker.
STOP
2
Wenn Sie den Drucker vom Netz trennen wollen, immer den Netzstecker an der Steckdose
ziehen.
Weitere Sicherheitshinweise finden Sie an entsprechender Stelle im Text.
Page 33

Kurzanleitung Einführung
➤ Arbeiten mit der
Online-CD-ROM
➤ Was ist auf der
Online-CD-ROM
➤ Hardwarevoraus-
Installieren Sie zuerst den Adobe Acrobat Reader auf Festplatte, falls dieses Programm nicht
schon vorhanden ist. Befolgen Sie zur Installation die in der Readme-Datei im Verzeichnis
READER aufgeführten Schritte.
Doppelklicken Sie zum Starten der Online-Dokumentation im Explorer auf die Datei
START.PDF. Folgen Sie dann der Bedienerführung.
Die Online-CD-ROM enthält
–das Benutzerhandbuch: eine ausführliche Beschreibung des Druckers und seiner Leistungs-
merkmale
– Treiber für
– weitere Dokumentationen: Programmieranleitungen und Beschreibung der Optionen
Für den Fall, daß die CD-ROM fehlerhaft ist oder fehlt, wenden Sie sich bitte an Ihren Händler.
Die Online-Dokumentation ist auch im Internet erhältlich.
Hardwarevoraussetzungen mindestens: PC AT 486, 4-fach CD-ROM, 15"-Bildschirm, Maus.
Windows 2000, Windows XP/2003 Server, Windows 7, Windows Vista
setzungen
➤ Fehlersuche Das Kapitel Fehlerbehebung des Benutzerhandbuchs auf der Online-CD-ROM enthält ausführ-
liche Informationen zur Behebung von Fehlern. Es behandelt allgemeine Druckprobleme,
Probleme mit der Druckqualität, dem Papierlauf und der Farbbandkassette.
DEUTSCH
3
Page 34

Auf einen Blick Kurzanleitung
Auf einen Blick
Ansicht von vorn
Schalldämmelement
Obere Abdeckung
Netzschalter
Bedienfeld
Vordere Abdeckung
Untere Abdeckung
Drucker im Traktorbetrieb
Traktoren
Drucker im Einzelblattbetrieb Ansicht von hinten
Hintere Abdeckung
Papierstützen
Schnittstellenanschlüsse
Netzanschlußbuchse
4
Einzelblattzuführung
Randsteller
Page 35

Kurzanleitung Installation
Installation
➤ Drucker auspacken
Den verpackten Drucker auf eine stabile Unterlage stellen.
Darauf achten, daß die Symbole für ,,Oben“ in die richtige
Richtung zeigen.
Verpackung öffnen, Zubehörkassette entnehmen und aus-
➃
➂
packen. Drucker nach vorne aus dem Karton herausziehen, und
die restliche Verpackung entfernen.
Überprüfen Sie den Drucker auf sichtbare Transportschäden
und Vollständigkeit. Neben dieser Bedienungsanleitung (➀ )
muß die CD-ROM (➁ , befindet sich auf der vorletzten Seite
dieser Bedienungsanleitung), das Netzkabel (➂ ) und das Farbband (➃ ) vorhanden sein.
Informieren Sie im Fall von Transportschäden oder fehlendem
Zubehör bitte Ihren Händler.
DEUTSCH
➁
➀
5
Page 36

Installation Kurzanleitung
➤ Drucker aufstellen Den Drucker auf einer stabilen, ebenen und rutschfesten Oberfläche so aufstellen, daß er nicht
herunterfallen kann. Der Zugang zum Bedienfeld und den Papiereinzügen muß gewährleistet
und genügend Platz für das ausgeworfene Papier vorhanden sein.
Wird Endlospapier häufig vor- und zurücktransportiert, den
Drucker möglichst so aufstellen, wie im Bild gezeigt.
Beachten Sie bei der Wahl des Ortes, an dem Sie den Drucker aufstellen, außerdem folgende
Punkte:
STOP
Stellen Sie den Drucker keinesfalls in der Nähe von leicht entzündlichen Gasen oder
explosiven Stoffen auf.
Den Drucker keiner direkten Sonneneinstrahlung aussetzen. Läßt es sich nicht vermeiden,
daß das Gerät an einem Fenster steht, schützen Sie es mit einem Vorhang vor Sonnenlicht.
Achten Sie beim Verbinden von Rechner und Drucker darauf, daß die zulässige Kabellänge
nicht überschritten wird (siehe Benutzerhandbuch auf Online-CD-ROM, Technische Spezifi-
kationen).
Den Drucker in angemessenem Abstand von Heizkörpern aufstellen.
Darauf achten, daß der Drucker weder extremen Temperatur- noch Luftfeuchtigkeitsschwan-
kungen ausgesetzt wird. Staubeinwirkung vermeiden.
Wegen der auftretenden Geräuschentwicklung empfehlen wir Ihnen im Bedarfsfall, den
Drucker akustisch getrennt vom Arbeitsplatz aufzustellen.
6
Page 37

Kurzanleitung Installation
➤ Drucker anschließen
Vergewissern Sie sich, daß das Gerät auf die richtige Spannung
120V
eingestellt ist (z.B. 230 V in Europa, 120 V in den USA). Siehe
dazu das Typenschild über dem Netzanschluß auf der Rückseite
des Druckers.
Ist dies nicht der Fall, den farbigen Schalter an der Geräterückseite mit einem spitzen Gegenstand (z.B. Schraubenzieher,
Kugelschreiber oder Pinzette) entsprechend einstellen.
➤ Drucker einschalten
STOP
Vor der Einstellung der richtigen Spannung sicherstellen, daß der Drucker ausgeschaltet ist, da sonst
schwere Schäden auftreten können.
Niemals den Drucker einschalten, wenn er nicht auf
die richtige Spannung eingestellt ist, da dies zu
schweren Schäden führen kann.
Stellen Sie sicher, daß Drucker und Computer ausgeschaltet
sind und verbinden Sie mit Ihrem Datenkabel Drucker und
Computer.
Der Drucker verfügt standardmäßig über eine
parallele und eine Ethernet-Schnittstelle. Weitere
Informationen zu den Schnittstellen finden Sie im
Benutzerhandbuch auf der Online-CD ROM.
Verbinden Sie das Netzkabel wie im Bild gezeigt mit der
Anschlußbuchse des Druckers. Stecken Sie den Stecker des
Netzkabels in eine Steckdose.
Der Netzschalter, mit dem der Drucker eingeschaltet wird,
befindet sich von vorne aus betrachtet links unten auf der
Vorderseite des Druckers.
DEUTSCH
7
Page 38

Bedienfeld Kurzanleitung
Bedienfeld Über das Bedienfeld und seine Tasten steuern Sie die Arbeit mit dem Drucker.
Die obere Zeile der Anzeige gibt Aufschluß darüber, ob der Drucker sich im Online- oder im
Offline-Modus befindet und welcher Papierweg (Traktor1 oder Einzel) gewählt ist.
➤ Online-Modus Nach dem Einschalten geht der Drucker automatisch in den Online-Modus. Nur in diesem Modus
kann er Daten vom Computer empfangen.
Online Trak1
Tear
3
21
Online
4
Setup
➤ Offline-Modus Nur in diesem Modus können Schritt-, Zeilen oder Formularvorschübe über das Bedienfeld ausgeführt
werden (siehe Seite 20, Papiertransport), Daten können jedoch nicht empfangen werden.
Offline Trak1
Park Load
21
Load
3
Online
4
Setup
Taste Tear (4): Aktiviert die Abreißfunktion bei eingelegtem Endlospapier
(siehe Seite 21, Papier in Abreißposition fahren). Wenn über dieser Taste
Load steht, zeigt das an, daß kein Papier im Drucker ist, durch Tastendruck wird Papier in Druckposition transportiert.
Taste Setup: Schaltet Drucker in den Setup-Modus.
Taste Online: Schaltet Drucker Offline.
Taste Park (1): Macht Papierweg bei eingelegtem Papier frei und aktiviert
Papierweg-Schnellanwahl (siehe Seite 15, Papierart wechseln).
Taste (2): Kurzer Tastendruck: Mikroschritt nach vorn.
Langer Tastendruck: dauerhafter Papiervorschub.
Taste (3): Kurzer Tastendruck: Mikroschritt zurück.
Langer Tastendruck: dauerhafter Papierrückschub bis max. Parkposition.
Taste Load (4): Wenn kein Papier eingelegt ist siehe oben.
Wenn Papier eingelegt ist: Kurzer Tastendruck: Zeilenvorschub (LF);
langer Tastendruck: Seitenvorschub (FF).
Taste Setup: Schaltet Drucker in den Setup-Modus.
Taste Online: Schaltet Drucker Online.
➤ Setup-Modus In diesem Modus sind folgende Einstellungen möglich:
Adjust Pap.Weg
Menü Char
3
21
8
Online
4
Setup
Der Zugang zu den weiteren Menüeinstellungen (Menü) kann werkseitig gesperrt sein. Wie
diese Sperre aufgehoben werden kann und welche Einstellungen möglich sind, wird im Benutzerhandbuch auf der Online-CD-ROM (Kapitel Menü, Menüsperre beseitigen) erläutert.
Taste Setup: Setzt den Drucker in den Setup-Modus, in dem folgende Ein-
stellungen gewählt werden können:
Taste Menü (1): Weitere Menüeinstellungen.
Taste Adjust (2): Abreißposition, erste Druckzeile und Kopfabstand.
Taste Pap.Weg (3): Papierweg einstellen.
Taste Char (4): Schriftart und Anzahl der Zeichen pro Zoll.
Page 39

Kurzanleitung Farbbandkassette wechseln
Farbbandkassette
wechseln
Vor dem Öffnen der Abdeckung sicherstellen, daß der Drucker eingeschaltet ist, damit er
automatisch wichtige Vorbereitungen für den Farbbandwechsel (Druckkopfabstand vergrößern)
ausführen kann.
Der Drucker prüft während der Initialisierung nach dem Einschalten ob eine Farbbandkassette installiert ist. Er prüft außerdem während eines Druckvorgangs ständig die Funktionsfähigkeit der Farbbandkassette. Diese Funktionen erfordern zwingend den Einsatz von Original-Farbbandkassetten des Herstellers (siehe Zubehör, Seite 28). Werden andere Farbbandkassetten verwendet, erscheint in der Anzeige die Meldung "Check Ribbon", es kann nicht gedruckt werden.
Fahren Sie das Papier in Parkposition.
Die obere Abdeckung des Druckers aufklappen.
DEUTSCH
9
Page 40
Farbbandkassette wechseln Kurzanleitung
Den Druckkopfschlitten vorsichtig bis zum Anschlag nach links
(von der Druckervorderseite aus betrachtet) schieben.
STOP
Der Druckkopf wird während des Druckens heiß.
Vor dem Berühren deshalb gegebenenfalls einige
Zeit abkühlen lassen.
Die farbigen Schieber der Friktion wie im Bild gezeigt nach
links und rechts (in Pfeilrichtung) bewegen und die Friktion
nach oben klappen.
10
Page 41

Kurzanleitung Farbbandkassette wechseln
Die verbrauchte Kassette herausnehmen.
Die farbige Einlegehilfe A anheben.
A
DEUTSCH
11
Page 42

Farbbandkassette wechseln Kurzanleitung
A
Entfernen Sie die farbigen Sicherungen A und B.
Den farbigen Spannknopf in rechte vordere Aufnahme der neuen
Farbbandkassette setzen. Den Knopf in Pfeilrichtung drehen, um
das Farbband zu spannen.
B
Die Farbbandkassette etwas nach vorne neigen, das Farbband
zwischen farbiger Einlegehilfe und Farbbandträger (transparente Kunststoffscheibe) einfädeln.
Die Kassette parallel in ihre Führung einlegen und nach unten
drücken, bis sie einrastet.
12
Page 43

Kurzanleitung Farbbandkassette wechseln
Den farbigen Spannknopf in eine der beiden Aufnahmen einsetzen.
Durch Drehen des Spannknopfs in die jeweilige Pfeilrichtung
das Farbband solange spannen, bis es unten im Farbbandträger
aufliegt.
Die farbige Einlegehilfe A nach unten drücken.
DEUTSCH
A
13
Page 44

Farbbandkassette wechseln Kurzanleitung
Den Druckkopfschlitten mehrmals hin- und herbewegen. Sitzt
das Farbband richtig, darf kein Widerstand spürbar sein.
Bei der Bewegung von links nach rechts wird das
Farbband transportiert. Wenn dies nicht der Fall ist,
sollten Sie prüfen, ob das Farbband auf der rechten
Seite eingerastet ist.
Die Friktion nach unten drücken bis sie einrastet.
Die obere Abdeckung schließen.
14
Page 45
Kurzanleitung Papierhandhabung
Papierhandhabung In diesem Abschnitt wird beschrieben, wie Sie die Papierart einstellen, Endlospapier und
Einzelblätter einlegen, Papier transportieren und Papier in die Abreißposition fahren.
➤ Papierart wechseln Der Papierartwechsel kann entweder über ein Anwendungsprogramm, die Papierweg-Schnell-
umschaltung erfolgen oder im Menü Setup vorgenommen werden. An dieser Stelle wird die
Schnellumschaltung beschrieben; Informationen zum Vorgehen über das Menü Setup finden
Sie im Benutzerhandbuch auf der Online-CD-ROM.
Bei manchen Druckermodellen kann der Papierweg Einzel nicht gewählt werden, da sie
nicht für manuellen Einzelblattbetrieb konzipiert sind.
Offline Trak1
Park Load
3
21
4
Einzel Trak1
Trak2
3
21
4
Papier laden aus
Einzel
3
21
4
Online Einzel
Load
3
21
4
Online
Setup
Online
Setup
Online
Setup
Online
Setup
Sicherstellen, daß der Drucker Offline ist, gegebenenfalls Taste Online drücken.
Taste Park (1) drücken. Befindet sich Endlospapier im Drucker, wird es in
Abreißposition transportiert. In der Anzeige erscheint Papier abreißen. Dann
eine beliebige Taste drücken. Befindet sich ein Einzelblatt im Drucker, wird es
ausgeworfen.
Mit einer der markierten Tasten den gewünschten Papierweg wählen, in unserem
Beispiel Einzel (2).
Erfolgt innerhalb von 5 Sekunden keine Auswahl, verläßt der
Drucker das Menü.
Der Drucker geht in den Offline-Modus zurück. Im Wechsel mit dem Grundmenü
erscheint in der Anzeige:
Ein Einzelblatt einlegen (zum Vorgehen siehe Seite 19, Einzelblätter einlegen).
Taste Online drücken, um den Drucker betriebsbereit zu machen. Erhält der
Drucker Daten vom Computer, wird das Einzelblatt automatisch eingezogen.
Taste Load (4) drücken, um Einzelblatt vor Druckbeginn zu laden.
DEUTSCH
15
Page 46

Papierhandhabung Kurzanleitung
➤ Papier einlegen Ihr Drucker kann sowohl mit Endlospapier als auch mit Einzelblättern betrieben werden.
Informationen über zulässige Papierformate finden Sie auf Seite 27 (Papierspezifikationen).
Bitte verwenden Sie nur Papier, das für diesen Drucker geeignet ist. Nähere Informationen
finden Sie im Benutzerhandbuch auf der Online-CD-ROM.
Der Drucker ist werkseitig so eingestellt, daß er vor Druckbeginn jedesmal automatisch die
Breite von neu eingelegtem Papiers mißt. Kann das Papier nicht erkannt werden (z.B. weil es
sich zu weit links befindet), erscheint die Meldung "PW sensor defect" in der Anzeige, es kann
nicht gedruckt werden.
Überschreitet eine Druckzeile die gemessene Papierbreite werden die außerhalb der Papierbreite
liegenden Zeichen nicht gedruckt und in der Anzeige erscheint die Meldung "Paperwidth error".
Der Drucker geht in den Offline-Status. Sie können den Druck durch Drücken der Online-Taste
fortsetzen.
Weitere Informationen zur Papierbreitenmessung finden Sie im Benutzerhandbuch auf der
Online-CD-ROM.
Endlospapier
Sicherstellen, daß der Drucker auf Endlospapierbetrieb eingestellt ist. Gegebenenfalls die Papierart wechseln (siehe Seite 15,
Papierart wechseln).
Die vordere Abdeckung nach oben klappen.
16
Bei manchen Druckermodellen nicht vorhanden.
Die untere Abdeckung A abnehmen.
Die rechte und linke Traktorklappe öffnen.
A
Page 47
Kurzanleitung Papierhandhabung
Den farbigen Verriegelungshebel des linken Traktors öffnen
und den Traktor so ausrichten, daß die erste Druckposition auf
dem Papier mit der Markierung X auf dem Druckergehäuse
übereinstimmt.
Anschließend den farbigen Hebel wieder arretieren.
Endlospapier in den linken Traktor einlegen.
Den farbigen Verriegelungshebel des rechten Traktors lösen
und auf Papierbreite ausrichten.
Endlospapier in den rechten Traktor einlegen.
Darauf achten, daß es auf gleicher Höhe wie im linken Traktor
liegt, da sonst Papierstau auftritt.
Die Traktorklappe schließen und den Traktor durch Schwenken
des Traktorhebels nach hinten arretieren.
DEUTSCH
Papier weder zu straff spannen, da sonst Transportlöcher ausreißen können, noch zu locker führen, da
es sich in diesem Fall wölbt und Probleme bei der
Zuführung auftreten können.
17
Page 48

Papierhandhabung Kurzanleitung
Darauf achten, daß der Papierstapel parallel zum Drucker ausgerichtet ist, und daß der Papierfluß nicht behindert werden
kann.
90
Online Trak1
Load
3
21
4
Online
Setup
Die untere Abdeckung anbringen.
Die vordere Abdeckung nach unten klappen.
Den Drucker einschalten. Der aktive Einzugsschacht (Traktor1) erscheint in der
Anzeige. Papier wird automatisch eingezogen, wenn der Drucker im Betriebszustand Online ist und Daten vom Computer erhält.
Taste Load (4) drücken, um Papier vor Druckbeginn zu laden.
18
Page 49

Kurzanleitung Papierhandhabung
Einzelblätter
Manche Druckermodelle sind nur für den Endlospapierbetrieb konzipiert und verfügen deshalb über keine Einzelblattzuführung. Die Klappe kann daher nicht geöffnet werden.
Sicherstellen, daß der Drucker auf Einzelblattbetrieb eingestellt
ist. Gegebenenfalls die Papierart wechseln (siehe Seite 15,
Papierart wechseln).
Auf den Druckverschluß in der Mitte der vorderen Abdeckung
drücken. Die Einzelblattzuführung klappt nach unten auf.
Den linken Randsteller an der Markierung auf der linken Seite
der Einzelblattzufuhr ausrichten. Den rechten Randsteller entsprechend des verwendeten Papierformats einstellen.
DEUTSCH
19
Page 50

Papierhandhabung Kurzanleitung
Das Einzelblatt bis zum Anschlag in die Papierführung einführen.
Die Taste Online drücken, um den Drucker betriebsbereit zu
machen. Das Einzelblatt wird automatisch eingezogen, wenn
der Drucker Online ist und Daten vom Computer erhält.
Taste Load (4) drücken, um Papier vor Druckbeginn zu laden.
➤ Papiertransport Eingelegtes Papier (Endlospapier/Einzelblatt) kann auf unterschiedliche Weise im Drucker
transportiert werden.
Offline Trak1
Park LF/FF
3
21
20
Sicherstellen, daß sich der Drucker im Betriebszustand Offline befindet; gege-
Online
4
Setup
benenfalls Taste Online drücken.
Taste (2)
Kurzer Tastendruck: Papier wird schrittweise nach oben bewegt.
Langer Tastendruck: Dauertransport nach oben.
Taste (3)
Kurzer Tastendruck: Papier wird schrittweise nach unten bewegt.
Langer Tastendruck: Dauertransport nach unten.
Taste LF/FF (4)
Kurzer Tastendruck: Zeilenvorschub (LF) wird ausgelöst.
Langer Tastendruck: Seitenvorschub (FF) wird ausgelöst.
Page 51

Kurzanleitung Papierhandhabung
➤ Papier in Abreiß-
position fahren
Online Trak1
Tear
3
21
Abreiss position
Trak1
3
21
Online Tear
Exit
3
21
Endlospapier wird mit der Taste Tear in Abreißposition gefahren.
Das Schalldämmelement nach vorne klappen.
Online
4
Setup
Sicherstellen, daß der Drucker Online ist. Gegebenenfalls Taste Online drücken.
Taste Tear (4) drücken. Der Drucker fährt die Perforationskante des Endlospapiers an die Abreißkante (siehe unten).
Die Anzeige wechselt zwischen…
Online
4
Setup
und…
DEUTSCH
Nach Abreißen des Papiers Taste Exit (4) drücken. Der Drucker fährt das Papier
Online
4
Setup
zurück in die erste Druckposition.
Liegt ein Druckauftrag vor, fährt der Drucker das Papier automatisch in die erste
Druckposition.
Abreißkante
21
Page 52
Einstellungen Kurzanleitung
Einstellungen In diesem Abschnitt wird beschrieben, wie Sie die Abreißposition, die erste Druckzeile, den
Druckkopfabstand sowie die die Schriftart und die Zeichendichte einstellen.
➤ Abreißposition
einstellen
Adjust Pap.Weg
Menü Char
3
21
TOF
Kopf Tear
3
21
TearAdj= 0/72" *
Setze< > Exit
3
21
Stimmt die Abreißposition des Papiers nicht mit der Abreißkante des Druckers überein, kann sie
eingestellt werden.
Taste Setup drücken. Der Drucker wechselt in den Setup-Modus.
Online
4
Setup
Taste Adjust (2) drücken.
Taste Tear (4) drücken. Der Drucker führt einen Formularvorschub aus.
Online
4
Setup
Durch Drücken der Taste < (2) oder > (3) die Perforation in die gewünschte
Online
4
Setup
Position bewegen. Die Eingabe durch Drücken der Taste Setze (1) bestätigen.
Eingabe durch Drücken der Taste Setup bestätigen. Der Drucker geht in die
Grundstellung zurück.
22
Die vorgenommene Korrektur – maximal ca. 2,5 cm (1") in jede Richtung – bleibt auch nach
dem Ausschalten des Druckers erhalten.
Page 53
Computerdrucker
Kurzanleitung Einstellungen
➤ Erste Druckzeile
einstellen (TOF)
Adjust Pap.Weg
Menü Char
3
21
TOF
Kopf Tear
3
21
B
A
Mit der TOF-Funktion kann für jeden Papiereinzugsschacht und jedes Menü einzeln die Position
der obersten Druckzeile eingestellt werden..
Vor Ausführen der TOF-Funktion sollte – bei Verwendung von Endlospapier – vorher die Abreißposition eingestellt werden (siehe oben).
Die obere Abdeckung öffnen.
Online
4
Setup
Taste Setup drücken. Der Drucker wechselt in den Setup-Modus.
Taste Adjust (2) drücken.
Taste TOF (3) drücken. Der Drucker führt einen Formularvorschub aus.
Online
4
Setup
Das Papier wird so weit vortransportiert, bis die Unterkante der
ersten Druckzeile A auf Höhe der Oberkante der Papierabreißkante B liegt. Werkseitig ist die erste Druckposition auf
12/72" eingestellt.
DEUTSCH
Computerdrucker
FormAdj= 12/72"*
Setze< > Exit
3
21
4
Online
Setup
Durch Drücken der Taste < (2) oder > (3) die erste Druckzeile in die gewünschte
Position bewegen. Es können Werte von 0 bis 220/72" für Endlospapier und für
Einzelblätter eingestellt werden.
23
Page 54

Einstellungen Kurzanleitung
FormAdj= 17/72"
Setze< > Exit
3
21
4
➤ Druckkopfabstand
einstellen
Adjust Pap.Weg
Menü Char
3
21
TOF
Kopf Tear
4
Die Eingabe durch Drücken der Taste Setze (1) bestätigen.
Online
Taste Setup drücken. Der Drucker geht in die Grundstellung zurück.
Die vorgenommene Einstellung bleibt auch nach Ausschalten des
Setup
Druckers erhalten. Weitere Einzelheiten dazu finden Sie im Benutzerhandbuch auf der Online-CD-ROM.
Der Drucker ist mit einer Funktion ausgestattet, die den Druckkopfabstand automatisch auf die
verwendete Papierdicke einstellt. Im Setup-Modus kann ein Korrekturwert zum automatisch
ermittelten Kopfabstand eingegeben werden. Mit dieser Korrektur wird das Schriftbild und die
Durchschlagskraft bei mehrlagigem Papier verändert.
Die AGA-Funktion muß auf Ein gestellt sein. Einzelheiten dazu finden Sie im Benutzerhandbuch auf der Online-CD-ROM.
Taste Setup drücken. Der Drucker wechselt in den Setup-Modus.
Online
Setup
Taste Adjust (2) drücken.
Taste Kopf (1) drücken.
Online
3
21
Kopf= 0 *
Setze< > Exit
3
21
24
4
Setup
Mit Taste < (2) oder > (3) den Bereich einstellen, innerhalb dessen die automat-
Online
4
Setup
ische Kopfabstandseinstellung korrigiert wird. Es können Werte von -10 bis +10
gewählt werden.
Die Eingabe durch Drücken der Taste Setze (1) bestätigen.
Taste Setup drücken. Der Drucker geht in den Ausgangszustand zurück.
Minuswerte verringern den Druckkopfabstand, Pluswerte vergrößern ihn.
Die vorgenommene Einstellung bleibt auch nach dem Ausschalten des Druckers erhalten.
Page 55

Kurzanleitung Einstellungen
➤ Zeichendichte und
Schriftart wählen
Adjust Pap.Weg
Menü Char
3
21
Font CPI
21
10 CPI *
Setze< > Exit
21
4
3
4
3
4
Mit der Taste CPI (Character Per Inch = Zeichen pro Zoll) kann im Setup-Modus die Anzahl
der Zeichen eingestellt werden, die pro Zoll ausgedruckt werden. Mit der Taste Font können
interne Schriftarten ausgewählt werden.
Taste Setup und anschließend Taste Char (4) drücken.
Online
Setup
Taste CPI (3) oder Font (2) drücken, in unserem Beispiel CPI.
Online
Setup
Mit Taste < (2) oder > (3) die gewünschte Zeichendichte einstellen. Die Auswahl
Online
Setup
durch Drücken der Taste Setze (1) bestätigen.
Durch Drücken der Taste Exit (4) kann die Auswahl ohne Änderung verlassen
werden.
DEUTSCH
ROMAN NLQ
Setze< > Exit
3
21
4
Adjust Pap.Weg
Menü Char
3
21
4
Online
Setup
Online
Setup
Wurde die Taste Font (2) gedrückt, mit Taste < (2) oder > (3) die gewünschte
Schriftart auswählen. Die Auswahl durch Drücken der Taste Setze (1) bestätigen.
Durch Drücken der Taste Exit (4) kann die Auswahl ohne Änderung verlassen
werden.
Taste Setup drücken. Der Drucker geht in die Grundstellung zurück. Es ist auch
möglich, die Taste Online zu drücken. Der Drucker wechselt daraufhin direkt in
den Online-Modus.
Die getroffene Auswahl bleibt nach dem Ausschalten des Druckers
nicht erhalten. Einzelheiten über die dauerhafte Einstellung der
Zeichendichte finden Sie im Benutzerhandbuch auf der OnlineCD ROM.
25
Page 56

Technische Daten
Kurzanleitun
g
Technische
Druckerspezifikationen
Date
n
p
yT T2280+
Druckprinz
Druckbreite 136 Zeichen bei10cpi
Druckgeschw
HSQ
DPQ (Matrix 12 x 12
CPQ
NL
LQ
Durchsatz (ECMA 132) 606
Zeichendichte
Auflösung maxima
Emulationen
Geräuschpege
Abmessunge
ewi
G
Str
omversor
Leistungsverbrauch bei 100% Durchsatz 65 VA
Umgebungsbedingungen Temperatur: 10° bis 35°C; Luftfeuchtigkeit: 16% bis 73%
Druckkop
Zulassungen ISO 60950, CE, GOST, VDE/GS+CB, cULus, FCC/B, CCC,
ip
indigkei
(Matrix12x 10)
(Matrix
Q (Matrix24x 18)
cht
24 x 12
24 x 36)
(Matrix
n
l
l
n 624
gung
f Anzahl Nadeln: 24; Nadeldurchmesser: 0,25 mm
T2265+
seriell mit 24-Nadel
(bidirektionaler
t
)
)
s
650 cp
600cps
cps
300
s
200 cp
s
100 cp
Seiten/h
10,1 Seiten/min
x 430 x
anada
cpi,15cpi,
360
M
T
276 mm
r
10 cpi, 12
horizontal:
Standard:
≤
55 dB (A)
(LQ Mode Sans Serif)
20,7 kg
U
SA/K
Europa 230 V ± 10%,
im Leerlauf: 20 VA
Anzahl Kopien:
1 Original + 6 Kopien (max.)
Energy Sta
cpi)
17,1
LQ2550/L
T x
f
cpi, 20 cpi
H)
, 60 Hz ±
Druckkop
Modus, 10
dpi; vertikal: 360 dpi
PL, Epson
(B x
120 V±10%
(bidirektionaler
800 cp
s
s
667 cp
s
333 cp
222 cp
s
s
111 cp
626 Seiten/h
10,43 Seiten/min
Q2170, IBM
≤
57 dB (A)
(LQ Mode Sans Serif)
2%
50/60 Hz ± 2
bei 100% Durchsatz 75 VA
im Leerlauf: 24 VA
Anzahl Kopien:
1 Original + 5 Kopien (max.)
%
Modus, 10
XL 24
cpi)
26
Weitere Informationen zu Druckerspezifikationen sowie zu Spezifikati
finden Sie im
Benutzerhandbu
ch auf der O
nline-CD-ROM.
onen der Schnittstellen
Page 57
Kurzanleitung Technische Daten
➤ Papier-
spezifikationen
Endlospapier Traktor1
Einfachformat
Formularsatz (muß individuell getestet werden)
Einzelblattzufuhr
Einzelblatt
Formularsatz (muß individuell getestet werden)
Formularsätze Formularsätze können nur in kopfseitig kantenverleimter Ausfüh-
Papiergewicht
Zahl der Durchschläge
Formularsatzdicke (max.)
Papiergewicht
Zahl der Durchschläge
Formularsatzdicke (max.)
rung verarbeitet werden.
ASF-R: Mehrfachsätze müssen mit der Kopfverleimung nach unten
eingelegt werden. Sie sind auf Eignung zu testen.
60–120 g/m
1 + 6 (T2265+)
1 + 5 (
0,60 mm
80–120 g/m
1 + 5
0,60 mm
2
T2280+)
2
Weitere Informationen zu Papierspezifikationen sowie zu Papierspezifikationen der optionalen Traktoren und der automatischen Einzelblattzuführung finden Sie im Benutzerhandbuch
auf der Online-CD-ROM.
DEUTSCH
27
Page 58

Zubehör Kurzanleitung
Daten zur Langlebigkeit und Umweltverträglichkeit
Zubehör
Leistungsaufnahme
Ruhezustand
Aktivierungszeit
Betriebszustand ,,Aus“
Geräuschpegel
Schalldruckpegel
Schalleistungspegel
Druckpapier Dieses Gerät ist zur Verarbeitung von Recyclingpapier
Rücknahme von Drucker
und Verbrauchsmaterial
Garantie 2 Jahre (eine Erweiterung auf 3 bzw. 4 Jahre ist gemäß Service-
Reparatursicherheit
Verfügbarkeit der
Verbrauchsmaterialien
Bedienungsanleitung
F
sa
abbraF
kdn
s
T2265+
= 20 W P
P
Ruhe
t
= 0 Minuten t
Ruhe
= 0 W P
P
Aus
T2265+
= 55 dB(A) L
L
PA
= 72 dB(A) L
L
WAd
entsprechend DIN 19 309 geeignet.
Unsere Geräte mit Umweltzeichen und Verbrauchsmaterial
werden in unserem Recycling-Center,
Heuweg 3, D-89079 Ulm gebührenfrei
können dort persönlich oder auf dem Versandwege angeliefert
werden.
Preisliste möglich.)
5 Jahre (Verfügbarkeit von Ersatzteilen für notwendige
Reparaturen nach Produktionseinstellung)
5 Jahre (Verfügbarkeit nach Produktionseinstellung)
gedruckt auf chlorfrei gebleichtem Papier
T2280+
= 24 W
Ruhe
= 0 Minuten
Ruhe
= 0 W
Aus
T2280+
= 57 dB(A)
PA
= 72 dB(A)
WAd
DASCOM Europe GmbH,
angenommen und
m
l
nl
tseBnettessakdnabbra
e
u
1
60zrawhcs ette
74 2
em
r
28
Weitere Optionen finden Sie im Be
nutzerhandbuch auf der Online-CD-ROM.
Page 59

Guide de démarrage rapide Table des matières
Table des matières
Guide de démarrage rapide
Table des matières
Introduction 2
Symboles utilisés 2
Consignes importantes de sécurité 2
Utilisation du CD-ROM Online 3
Que contient le CD-ROM Online 3
Configuration matérielle requise 3
Recherche des pannes 3
Vue d’ensemble 4
Installation 5
Déballage de l’imprimante 5
Mise en place de l’imprimante 6
Connexion de l’imprimante 7
Mise sous tension de l’imprimante 7
Panneau de commande 8
Mode Online 8
Mode Offline 8
Mode Setup 9
Remplacement de la cartouche du ruban encreur 10
Manipulation du papier 16
Changement du type de papier 16
Chargement du papier 17
Papier continu 17
Papier feuille à feuille 20
Transport du papier 21
Déplacer le papier en position de séparation 22
Réglages 23
Réglage de la position de séparation 23
Réglage de la première ligne d’impression (TOF) 24
Réglage de l’écartement de la tête d’impression 25
Sélection de la densité des caractères et
de la police 26
Données techniques 27
Spécifications de l’imprimante 27
Spécifications du papier 28
Accessoires 28
FRANÇAIS
1
Page 60
Introduction Guide de démarrage rapide
Introduction Ce guide est une initiation rapide sur la manière d’utiliser l’imprimante et permet également aux
Ah ha!
!
➤ Symboles utilisés Deux symboles permettent de faire ressortir les informations importantes contenues dans ce
utilisateurs inexpérimentés de se servir de l’imprimante. Il décrit les fonctions principales de
l’imprimante et contient des informations indispensables à connaître pour le travail quotidien
avec l’imprimante. Vous trouverez une description détaillée de l’imprimante, de ses caractéristiques et des informations supplémentaires dans le guide d’utilisateur sur le CD-ROM Online,
qui se trouve à l’avant-dernière page de ce manuel d’utilisation.
manuel.
➤ Consignes
importantes de
sécurité
STOP
STOP
STOP
ATTENTION signale les informations à observer pour éviter que l’utilisateur ne se blesse ou
que l’imprimante ne soit endommagée.
NOTE contient des informations générales ou supplémentaires sur un sujet précis.
Lire attentivement les instructions suivantes avant de mettre l’imprimante en service pour éviter
de vous blesser et d’endommager l’imprimante.
Veiller à ce que le présent manuel soit toujours parfaitement accessible.
Placer l’imprimante sur un support stable de façon à ce qu’elle ne puisse pas tomber.
Ne pas exposer l’imprimante à des températures élevées ou à la lumière directe du soleil.
Ne pas mettre l’imprimante en contact avec des liquides.
Ne pas exposer l’imprimante à des chocs, impacts ou vibrations.
Ne connecter l’imprimante à une prise que lorsque la tension est correcte.
Les arêtes du papier peuvent endommager l’isolation du câble secteur si vous le frottez en permanence. L’utilisateur doit s’assurer que l’espacement entre le câble secteur et le papier en
mouvement est suffisant dans toute circonstance.
Ne jamais effectuer soi-même les travaux d’entretien et de réparations. Contacter toujours un
dépanneur qualifié.
Pour déconnecter l’imprimante de l’alimentation principale, toujours débrancher le connecteur secteur de la prise murale.
Vous trouverez d’autres consignes de sécurité aux endroits appropriés dans le texte.
2
Page 61

Guide de démarrage rapide Introduction
➤ Utilisation du
CD-ROM Online
➤ Que contient le
CD-ROM Online
➤ Configuration
matérielle requise
➤ Recherche
des pannes
Installer d’abord l’Adobe Acrobat Reader sur le disque dur dans la mesure où ce programme
n’est pas déjà disponible. Pour l’installation, suivre les opérations détaillées dans le fichier
Readme du répertoire READER.
Pour démarrer la documentation Online dans l’Explorateur, double-cliquez sur le fichier
START.PDF. Suivre ensuite le guide utilisateur.
Le CD-ROM Online contient
–le guide d’utilisateur: une description détaillée de l’imprimante et de ses capacités
– pilotes pour
– autres documentations: instructions de programmation et description des options
Si le CD-ROM est défectueux ou manque, contacter votre revendeur. La documentation Online
est également disponible sur Internet.
Matériel requis au minimum: PC AT 486, lecteur CD-ROM 4 x, écran 15", souris.
Le chapitre Dépannage du guide d’utilisateur sur le cédérom en ligne, contient des informations
détaillées sur l’élimination des erreurs. Il traite de problèmes d’impression généraux, de
problèmes avec la qualité de l’impression, avec le parcours du papier et avec la cartouche d’encre.
Windows 2000, Windows XP/2003 Server, Windows 7, Windows Vista
FRANÇAIS
3
Page 62
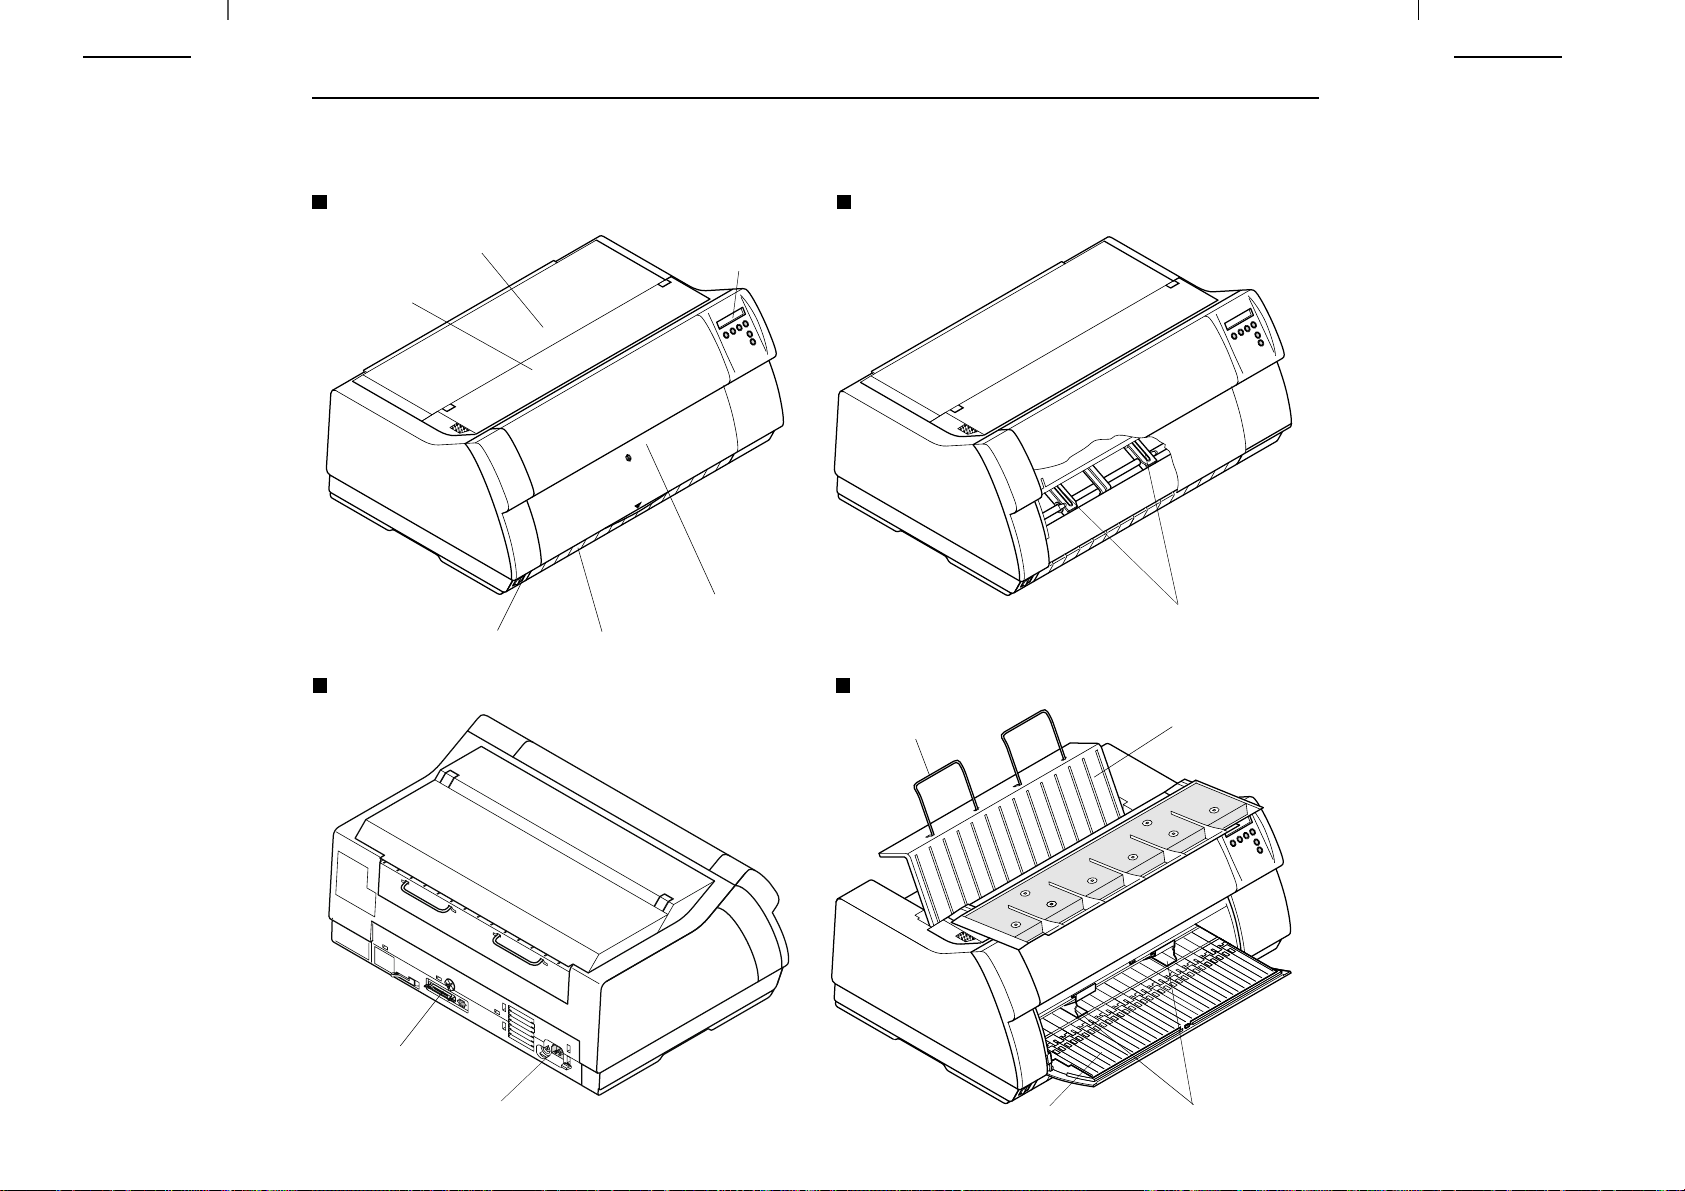
Vue d’ensemble Guide de démarrage rapide
Vue d’ensemble
Vue du devant Imprimante en mode continu
Elément insonorisant
Capot supérieur
Panneau de
commande
Interrupteur secteur
Connecteur
d’interface
Prise secteur
4
Capot avant
Capot inférieur
Imprimante en mode feuille à feuille Vue de l’arrière
Guide-papier
Alimentation feuille à feuille
Tracteurs
Capot arrière
Margeur
Page 63

Guide de démarrage rapide Installation
Installation
➤ Déballage de l’imprimante
Placer l’imprimante emballée sur un support stable.
Veiller à ce que les symboles «Haut» soient orientés dans la
bonne direction.
Ouvrir l’emballage et sortir et déballer la cartouche du ruban
➃
➂
encreur. Sortir vers vous l’imprimante du carton d’emballage et
enlever les restes de l’emballage.
Vérifier que l’imprimante est complète et en parfait état. Outre
le manuel d’utilisation (➀ ), le CD-ROM (➁ , à l’avant-dernière
page de ce manuel), le câble secteur (➂ ) et le ruban encreur (➃ )
doivent être présents.
Si des articles ou accessoires manquent ou sont endommagés,
contacter votre revendeur.
➁
FRANÇAIS
➀
5
Page 64

Installation Guide de démarrage rapide
➤ Mise en place de
l’imprimante
Placer l’imprimante sur un support stable, plan et antidérapant de façon à ce qu’elle ne puisse
pas tomber. Veiller à ce que le panneau de commande et les magasins d’alimentation du papier
soient aisément accessibles et à ce qu’il y ait suffisamment de place pour l’éjection du papier.
Si du papier continu est fréquemment avancé et reculé, installer
si possible l’imprimante comme illustré sur la figure.
Pour le choix de l’emplacement de l’imprimante, observer ce qui suit:
STOP
6
Ne jamais placer l’imprimante à proximité de sources de gaz aisément inflammables ou de
substances explosives.
Eviter d’exposer l’imprimante à la lumière directe du soleil. Si vous devez placer l’imprimante près d’une fenêtre, la protéger des rayons du soleil par un rideau.
Lorsque vous connectez l’imprimante à l’ordinateur, veiller à ce que la longueur de câble autorisée ne soit pas dépassée (voir le Guide d’utlisateur sur le CD-ROM Online, spécifications
techniques).
Ne pas placer l’imprimante trop près des radiateurs.
Veiller à ce que l’imprimante ne soit pas soumise à de fortes variations de température ou
d’humidité de l’air. Eviter la poussière.
En raison de l’émission sonore qui se produit, nous vous recommandons d’éloigner l’imprimante du poste de travail.
Page 65

Guide de démarrage rapide Installation
➤ Connexion de l’imprimante
S’assurer que l’imprimante est réglée à la tension appropriée
120V
(p. ex. 220–240 V en Europe, 120 V aux USA). Voir à ce sujet
la plaque signalitique placée au-dessus de la prise secteur au dos
de l’imprimante.
Si ce n’est pas le cas, régler en conséquence le commutateur de
couleur au dos de l’imprimante avec un objet pointu (p. ex.
tournevis, stylo-bille ou pincette).
STOP
Avant de régler la tension correcte, s’assurer que
l’imprimante est hors tension pour éviter de graves
endommagements.
Ne jamais mettre l’imprimante sous tension quand
elle n’est pas réglée sur la tension correcte, car ceci
peut entraîner de graves endommagements.
S’assurer que l’imprimante et l’ordinateur sont hors tension et
raccorder l’imprimante à l’ordinateur à l’aide de votre câble de
données.
L’imprimante est équipée de série d’un port parallèle et d’un port Ethernet. Vous trouverez de plus
amples informations sur les ports dans le guide
d’utilisateur sur le cédérom en ligne.
Raccorder le câble secteur à la prise femelle de l’imprimante,
comme illustré sur la figure. Raccorder le connecteur du câble
secteur à une prise.
FRANÇAIS
➤ Mise sous tension de l’imprimante
L’interrupteur secteur qui sert à la mise sous tension de l’imprimante se trouve sur la face avant de l’imprimante, en bas à
gauche vu de devant.
7
Page 66
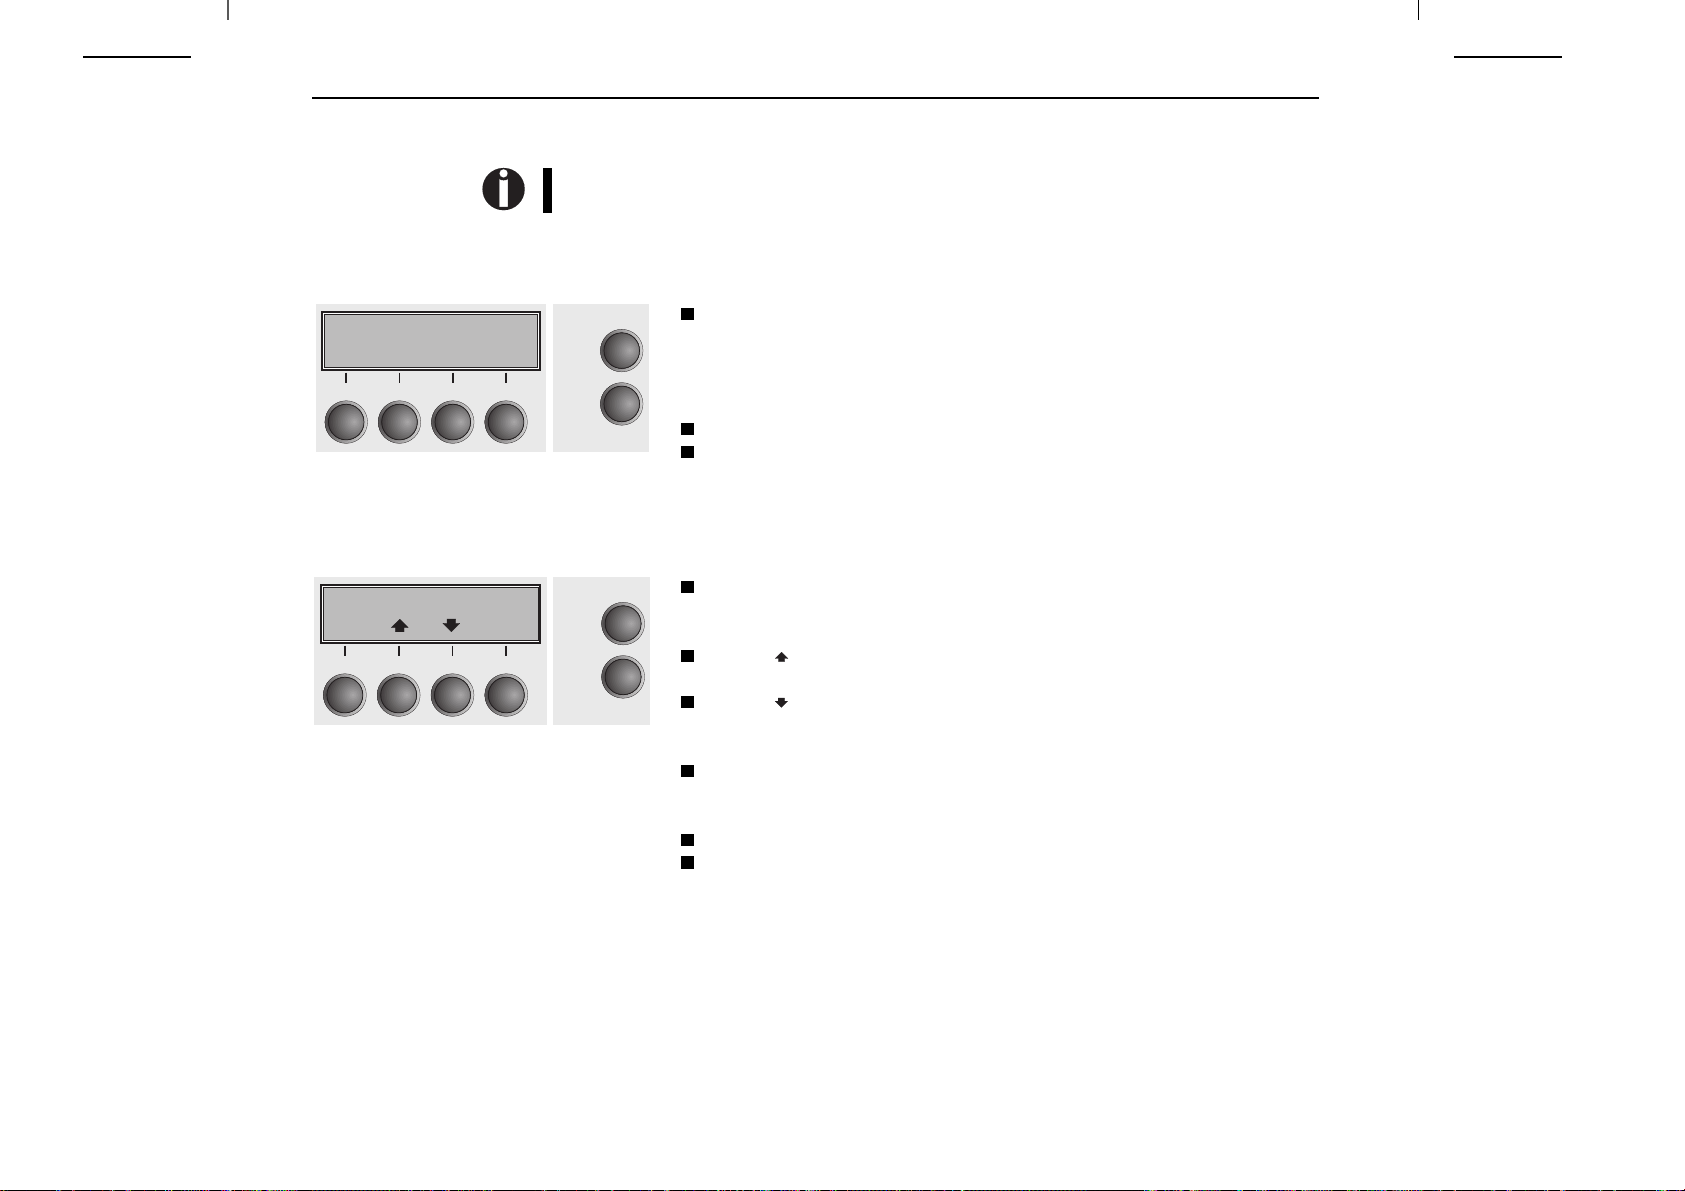
Panneau de commande Guide de démarrage rapide
Panneau de
commande
Le panneau de commande et les touches permettent de contrôler le fonctionnement de l’imprimante.
La première ligne de l’affichage indique si l’imprimante se trouve en mode Online ou Offline- et la fonction papier sélectionnée (Tracteur1 ou Insert).
➤ Mode Online Dès que l’imprimante est mise sous tension, elle passe automatiquement en mode Online. Elle
ne peut recevoir des données de l’ordinateur que dans ce mode.
Online Tract 1
Coupe
3
21
4
Online
Setup
Touche Coupe (4): active la fonction de séparation lorsque le papier continu
est chargé (voir page 22, Déplacer du papier en position de séparation). Si
Load s’affiche au-dessus de cette touche, c’est qu’il n’y a pas de papier dans
l’imprimante. Appuyer sur cette touche pour transporter le papier en position
d’impression.
Touche Setup: commute l’imprimante en mode Setup.
Touche Online: commute l’imprimante Offline.
➤ Mode Offline L’alimentation pas à pas, le changement de ligne ou de page ne peuvent être effectués via le
panneau de commande que dans ce mode (voir page 21, Transport du papier). Il n’est cependant
pas possible de recevoir des données.
Offline Tract 1
3
Load
4
Park Load
21
Online
Setup
Touche Park (1): libère la fonction papier quand du papier est chargé et
active la sélection rapide de la fonction papier (voir page 16, Changement
de type de papier).
Touche (2): appuyer brièvement sur la touche: micropas vers l’avant;
appuyer longuement sur la touche: avancement continu du papier.
Touche (3): appuyer brièvement sur la touche: micropas vers l’arrière;
appuyer longuement sur la touche: recul continu du papier jusqu’à la
position de parcage maxi.
Touche Load (4): s’il n’y a pas de papier, voir plus haut.
S’il y a du papier: appuyer brièvement sur la touche: changement de ligne
(LF); appuyer longuement sur la touche: changement de page (FF).
Touche Setup: commute l’imprimante en mode Setup.
Touche Online: commute l’imprimante Online.
8
Page 67

Guide de démarrage rapide Panneau de commande
➤ Mode Setup Dans ce mode, les réglages suivants sont disponibles:
Ajuster Chem-Pap
Menu Char
3
21
4
Touche Setup: Règle l’imprimante en mode Setup dans lequel les réglages
Online
Setup
suivants peuvent être sélectionnés:
Touche Menu (1): autres paramètres de menu.
Touche Ajuster (2): position de séparation, première ligne d’impression et
écartement de la tête d’impression.
Touche Chem-Pap (3): fonction papier.
Touche Char (4): police et nombre de caractères par pouce.
L’accès aux autres réglages de menu (Menu) peut être verrouillé en usine. Pour savoir comment accéder à ces paramètres et quels sont les paramètres disponibles, consulter le manuel
d’utilisation sur le CD-ROM Online (chapitre Menu, section Accès au menu bloqué).
FRANÇAIS
9
Page 68

Remplacement de la cartouche du ruban encreur Guide de démarrage rapide
Remplacement de
la cartouche du
ruban encreur
Avant d’ouvrir le capot, s’assurer que l’imprimante est hors tension de façon à pouvoir effectuer
les préparations automatiques pour le changement de ruban (agrandissement de l’écart de la tête
d’impression).
Pendant l’initialisation, l’imprimante vérifie, après la mise en service, si une cartouche à ruban est installée. Elle vérifie continuellement pendant l’opération d’impression, la capacité
de fonctionnement de la cartouche à ruban. Ces fonctions requièrent impérativement l’utilisation de cartouches à ruban d’origine du fabricant (voir Accessoires, page 28). Si d’autres
cartouches à ruban sont utilisées, l’affichage indique «Check Ribbon» (Vérifier ruban), l’impression est impossible.
Amenez le papier en position de parcage.
Ouvrir en rabattant le capot supérieur de l’imprimante.
10
Page 69

Guide de démarrage rapide Remplacement de la cartouche du ruban encreur
Pousser avec précaution le chariot de tête d’impression vers la
butée de gauche (vu de l’avant de l’imprimante).
STOP
La tête d’impression peut chauffer pendant l’impression. Il est donc conseillé de la laisser refroidir
quelque temps avant d’y toucher.
Déplacer le poussoir de friction de couleur comme illustré sur
la figure (dans le sens de la flèche) et relever le dispositif de
friction.
FRANÇAIS
11
Page 70

Remplacement de la cartouche du ruban encreur Guide de démarrage rapide
Déposer la cartouche usagée.
Lever l’aide à l’insertion A.
12
A
Page 71

Guide de démarrage rapide Remplacement de la cartouche du ruban encreur
A
Retirez les protecteurs de couleur A et B.
Placer la molette de tension de couleur dans le logement
devant à droite de la nouvelle cartouche de ruban encreur.
Tourner la molette dans le sens de la flèche pour tendre le
ruban encreur.
B
FRANÇAIS
Incliner légèrement vers l’avant la cartouche de ruban
encreur, insérer le ruban encreur entre l’aide à l’insertion de
couleur et le support de ruban encreur (plaque de plastique
transparente).
Introduire la cartouche parallèlement dans sa glissière et
l’enfoncer vers le bas jusqu’à ce qu’elle s’enclenche.
13
FRANÇAIS
Page 72

Remplacement de la cartouche du ruban encreur Guide de démarrage rapide
Introduire la molette de tension de couleur dans un des deux
logements.
En tournant la molette de tension dans le sens de la flèche
respectif, tendre le ruban encreur jusqu’à ce qu’il repose en bas
dans le support de ruban encreur.
Appuyer l’aide à l’insertion A vers le bas.
14
A
Page 73

Guide de démarrage rapide Remplacement de la cartouche du ruban encreur
Faire aller et venir plusieurs fois le chariot de tête d’impression.
Quand le ruban encreur est correctement installé, aucune résistance ne doit être perceptible.
Le ruban encreur est transporté au mouvement de
gauche à droite. Si ce n’est pas le cas, vérifiez que
le ruban encreur est bien encranté du côté droit.
Appuyer le dispositif de friction vers le bas jusqu’à ce qu’il
s’enclenche.
Fermer la partie avant du capot supérieur.
15
FRANÇAIS
Page 74
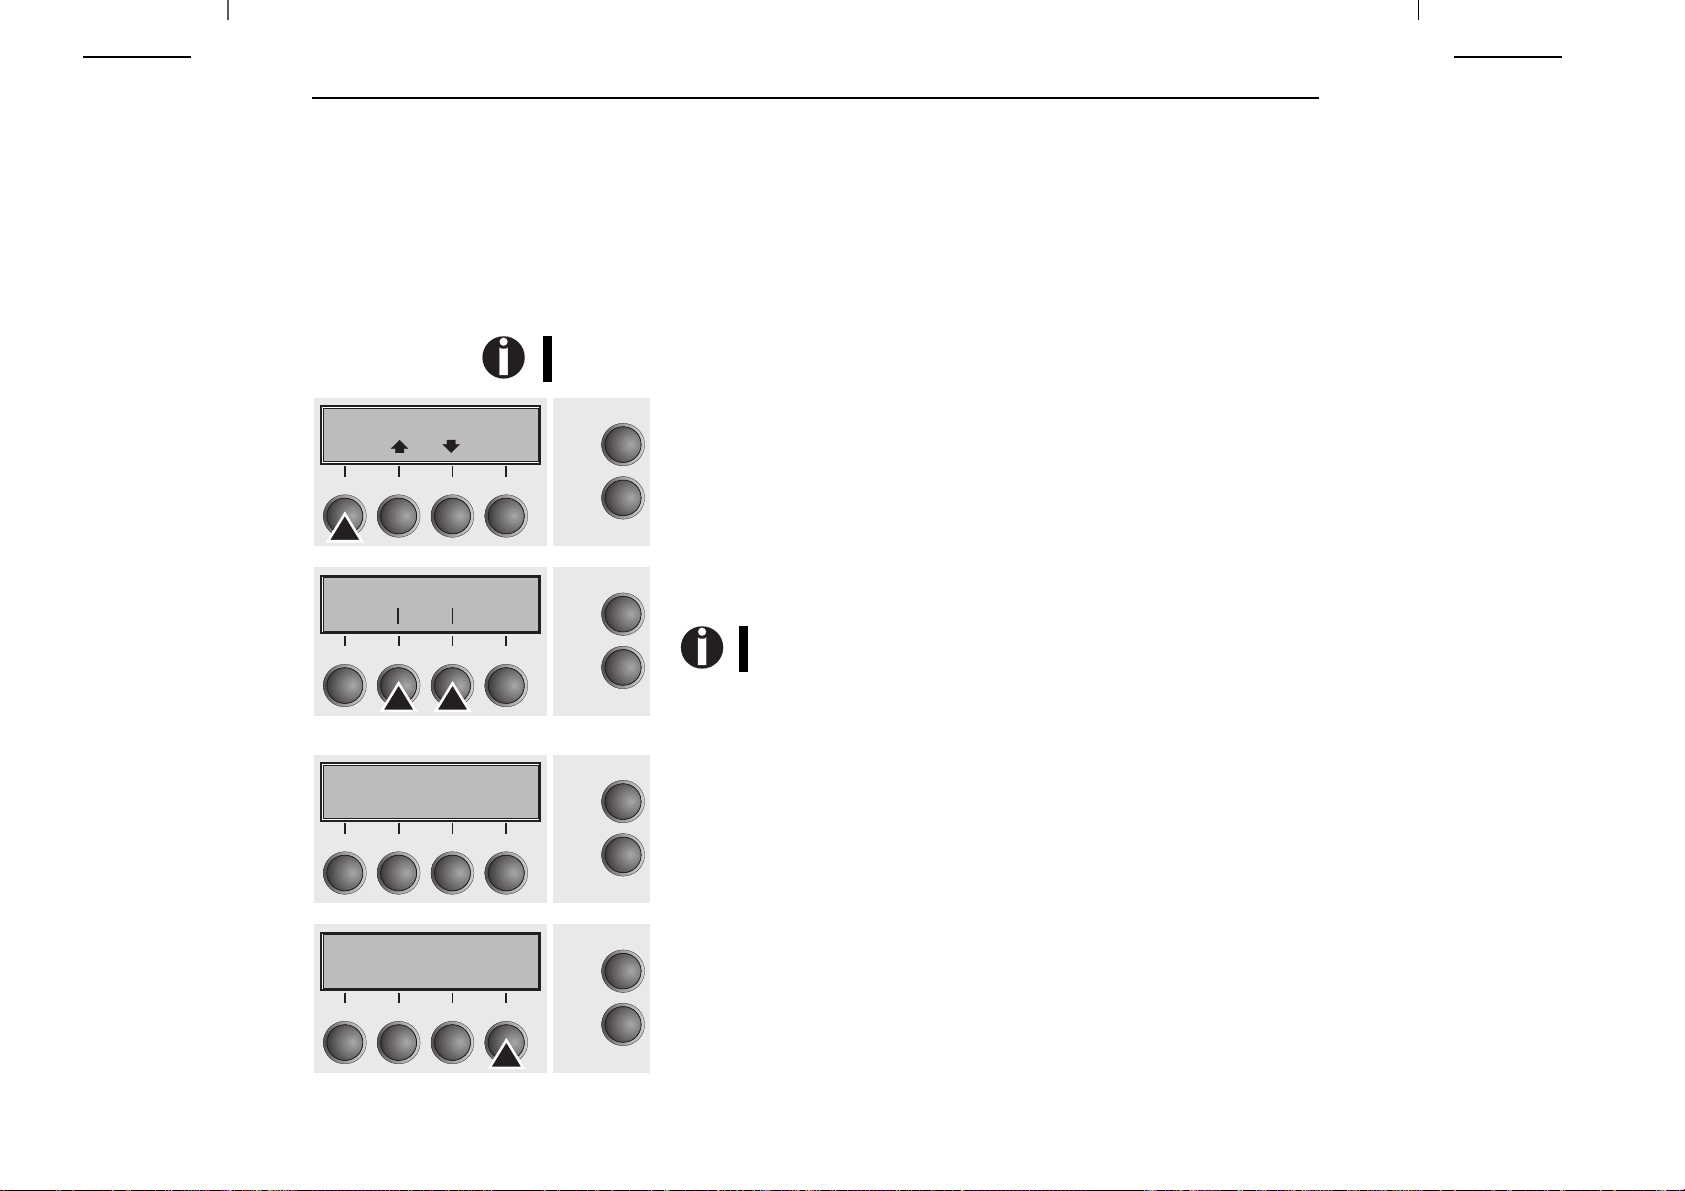
Manipulation du papier Guide de démarrage rapide
Manipulation du
papier
➤ Changement du
type de papier
Offline Tract 1
Park Load
3
21
Insert Tract 1
3
21
Ce chapitre explique comment régler le type de papier, mettre en place le papier continu et
l’alimentation feuille à feuille, transporter le papier et déplacer le papier en position de séparation.
Le changement du type de papier peut se faire soit grâce à un programme d’application, la
sélection rapide de la fonction papier, soit via le menu Setup. Cette partie décrit la sélection
rapide. Pour des détails concernant la procédure via le menu Setup, voir le guide d’utilisateur
sur le CD-ROM Online.
Sur certains modèles d’imprimante, il n’est pas possible de sélectionner le chemin de papier
«Feuille à feuille» car ils ne sont pas conçus pour le mode d’alimentation feuille à feuille manuel.
S’assurer que l’imprimante est en mode Offline, le cas échéant appuyer sur la
Online
4
Setup
touche Online.
Appuyer sur la touche Park (1). Si du papier continu se trouve dans l’imprimante,
il est transporté en position de séparation. Couper le papier s’affiche. Appuyer
ensuite sur une touche de votre choix. Si une feuille simple se trouve dans
l’imprimante, elle est alors éjectée.
Avec une des touches indiquées, Insert (2) dans l’exemple, sélectionner la
Online
fonction papier désirée.
Si aucune sélection n’est effectuée en l’espace de 5 secondes,
4
Setup
l’imprimante quitte le menu.
L’imprimante revient en mode Offline. L’affichage alterne entre le menu de base
et le menu affiché ci-dessous:
Appel papier du
Insert
3
21
Online Insert
3
21
16
4
Load
4
Online
Setup
Online
Setup
Insérer une feuille simple (voir la procédure à la page 20, Chargement du papier
feuille à feuille).
Appuyer sur la touche Online pour que l’imprimante soit prête à fonctionner. Si
l’imprimante reçoit des données de l’ordinateur, la feuille simple est chargée
automatiquement. Appuyer sur la touche Load (4) pour charger la feuille simple
avant l’impression.
Page 75

Guide de démarrage rapide Manipulation du papier
➤ Chargement
du papier
Papier continu
Votre imprimante peut aussi bien imprimer sur du papier continu que sur du papier feuille à
feuille. Pour des informations concernant les formats de papier autorisés, consulter la page 28
(Spécifications du papier).
N’utiliser que du papier approprié pour cette imprimante. Pour d’autres informations,
consulter le guide d’utilisateur sur le CD-ROM Online.
L’imprimante est réglée à l’usine de telle manière qu’elle mesure à chaque fois automatiquement,
avant l’impression, la largeur de papier nouvellement installé. Si le papier ne peut pas être
identifié (p.ex. parce qu’il est trop à gauche), le message «PW sensor defect» (Défaut capteur
de largeur de papier) s’inscrit dans l’affichage, l’impression est impossible.
Si une ligne à imprimer dépasse la largeur mesurée du papier, les caractères se trouvant en dehors
de la largeur du papier ne sont pas imprimés et l’affichage indique «Paperwidth error» (Erreur
largeur de papier). L’imprimante passe dans le mode hors ligne. Vous pouvez poursuivre
l’impression en appuyant sur la touche Online (en ligne).
Vous trouverez de plus amples informations sur la mesure de la largeur du papier, dans le
guide d’utilisateur sur le cédérom en ligne.
S’assurer que l’imprimante est réglée sur le mode continu. Si
nécessaire, changer le type de papier (voir page 16, Changement
du type de papier).
Relever le capot avant.
FRANÇAIS
Non disponible sur certains modèles d’imprimante.
Enlever le capot inférieur A.
Ouvrir les volets de tracteur à gauche et à droite.
A
17
Page 76

Manipulation du papier Guide de démarrage rapide
Ouvrir le levier de verrouillage de couleur du tracteur de gauche
et aligner le tracteur de façon à ce que la position du début
d’impression sur le papier coïncide avec le repère X sur le carter
de l’imprimante.
Rebloquer ensuite le levier de couleur.
Charger du papier continu dans le tracteur de gauche.
Desserrer le levier de verrouillage du tracteur de droite et
l’ajuster sur la largeur du papier.
Charger du papier continu dans le tracteur de droite.
Veiller à ce qu’il soit à la même hauteur que dans le tracteur de
gauche pour éviter un bourrage du papier.
Refermer le volet du tracteur et bloquer le tracteur en basculant
le levier vers l’arrière.
18
Le papier ne doit pas être trop tendu pour ne pas se
déchirer pendant le transport, mais ni trop lâche
pour éviter alors les problèmes à l’alimentation.
Page 77

Guide de démarrage rapide Manipulation du papier
Veiller à ce que la pile de papier soit alignée parallèlement à
l’imprimante et que le flux de papier ne soit pas entravé.
90
Online Tract 1
Load
3
21
4
Online
Setup
Replacer le capot inférieur.
Rabattre le capot avant vers le bas.
Mettre l’imprimante sous tension. Le bac de chargement actif (tracteur) s’affiche.
Le papier est chargé automatiquement si l’imprimante est Online et si elle reçoit
des données de l’ordinateur.
Appuyer sur la touche Load (4) pour charger du papier avant l’impression.
FRANÇAIS
19
Page 78

Manipulation du papier Guide de démarrage rapide
Papier feuille à feuille
Certains modèles d’imprimante ne sont conçus que pour le mode de papier continu et ne sont
donc pas équipés d’une alimentation feuille à feuille. C’est pourquoi le couvercle avant ne
peut pas être ouvert sur ces modèles.
S’assurer que l’imprimante est réglée sur le mode feuille à
feuille. Si nécessaire, changer le type de papier (voir page 16,
Changement du type de papier).
Appuyer sur le verrouillage au milieu du capot avant. Le guide
feuille à feuille s’ouvre vers le bas.
20
Aligner le margeur de gauche sur le repère de gauche du guide
feuille à feuille. Régler le margeur de droite en fonction du
format de papier utilisé.
Page 79
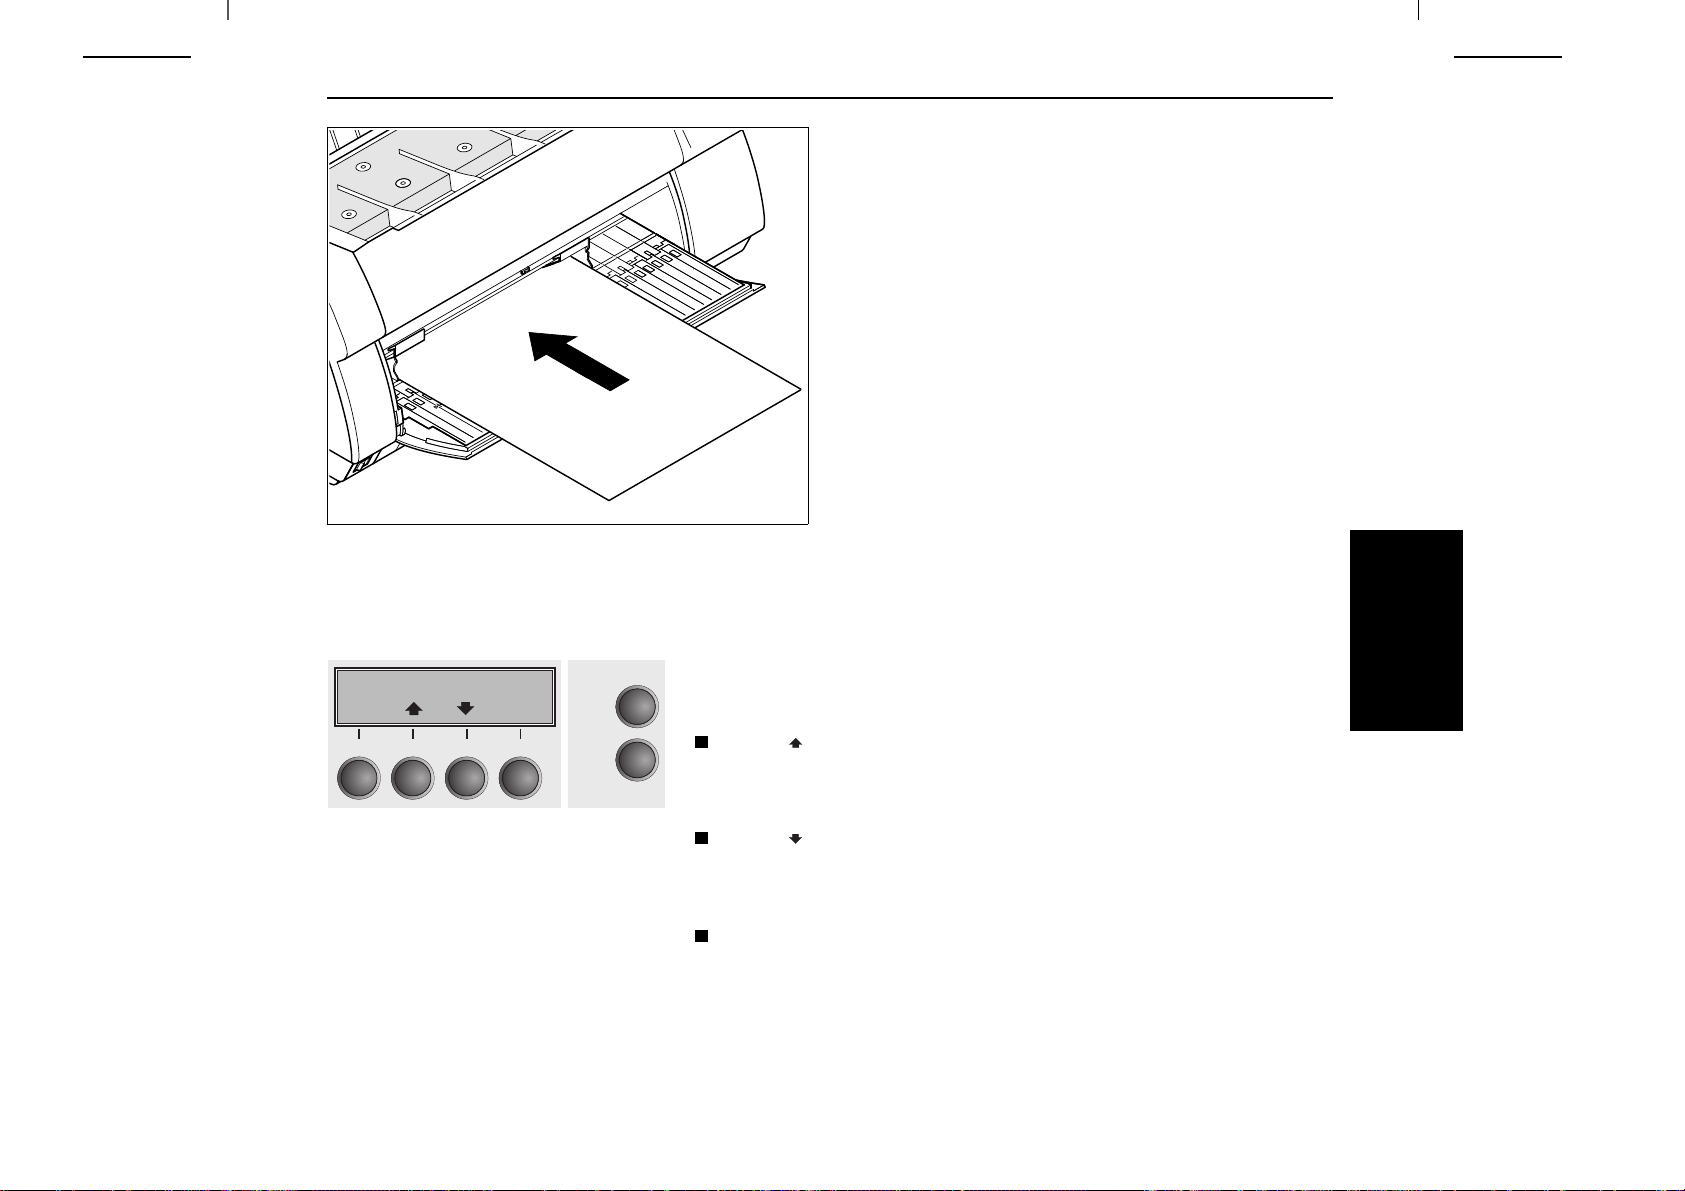
Guide de démarrage rapide Manipulation du papier
Insérer la feuille simple dans le guide-papier jusqu’à la butée.
Appuyer sur la touche Online pour que l’imprimante soit prête
à fonctionner.
La feuille simple est chargée automatiquement quand l’imprimante est Online et reçoit des données de l’ordinateur. Appuyer
sur la touche Load (4) pour charger le papier avant l’impression.
➤ Transport du papier Le papier chargé (continu/feuille à feuille) peut être transporté de différentes façons dans
l’imprimante.
Offline Tract 1
Park LF/FF
3
21
4
Online
Setup
S’assurer que l’imprimante se trouve en mode Offline; si nécessaire, appuyer
sur la touche Online.
Touche (2)
Appuyer brièvement sur la touche: le papier est transporté progressivement
vers le haut.
Appuyer longuement sur la touche: transport continu vers le haut.
Touche (3)
Appuyer brièvement sur la touche: le papier est transporté progressivement
vers le bas.
Appuyer longuement sur la touche: transport continu vers le bas.
Touche LF/FF (4)
Appuyer brièvement sur la touche: le changement de ligne (LF) est activé.
Appuyer longuement sur la touche: le changement de page (FF) est activé.
FRANÇAIS
21
Page 80

Manipulation du papier Guide de démarrage rapide
➤ Déplacer le papier
en position de
séparation
Online Tract 1
Coupe
3
21
Position coupe
Tract 1
21
Online Coupe
21
3
3
4
4
Quit
4
Le papier continu est transporté en position de séparation en appuyant sur la touche Coupe.
Rabattre l’élément insonorisant vers l’avant.
Online
Setup
S’assurer que l’imprimante est en mode Online ; si nécessaire, appuyer sur la
touche Online.
Appuyer sur la touche Coupe (4). L’imprimante déplace l’arête de perforation
du papier continu sur l’arête de séparation (voir ci-dessous).
L’affichage alterne entre...
Online
Setup
et ...
Après coupe du papier, appuyer sur la touche Quit (4). L’imprimante ramène
Online
Setup
le papier en position de début d’impression.
Si un travail d’impression est actif, l’imprimante ramène automatiquement le
papier en position de début d’impression.
22
Arête de séparation
Abreißkante
Page 81
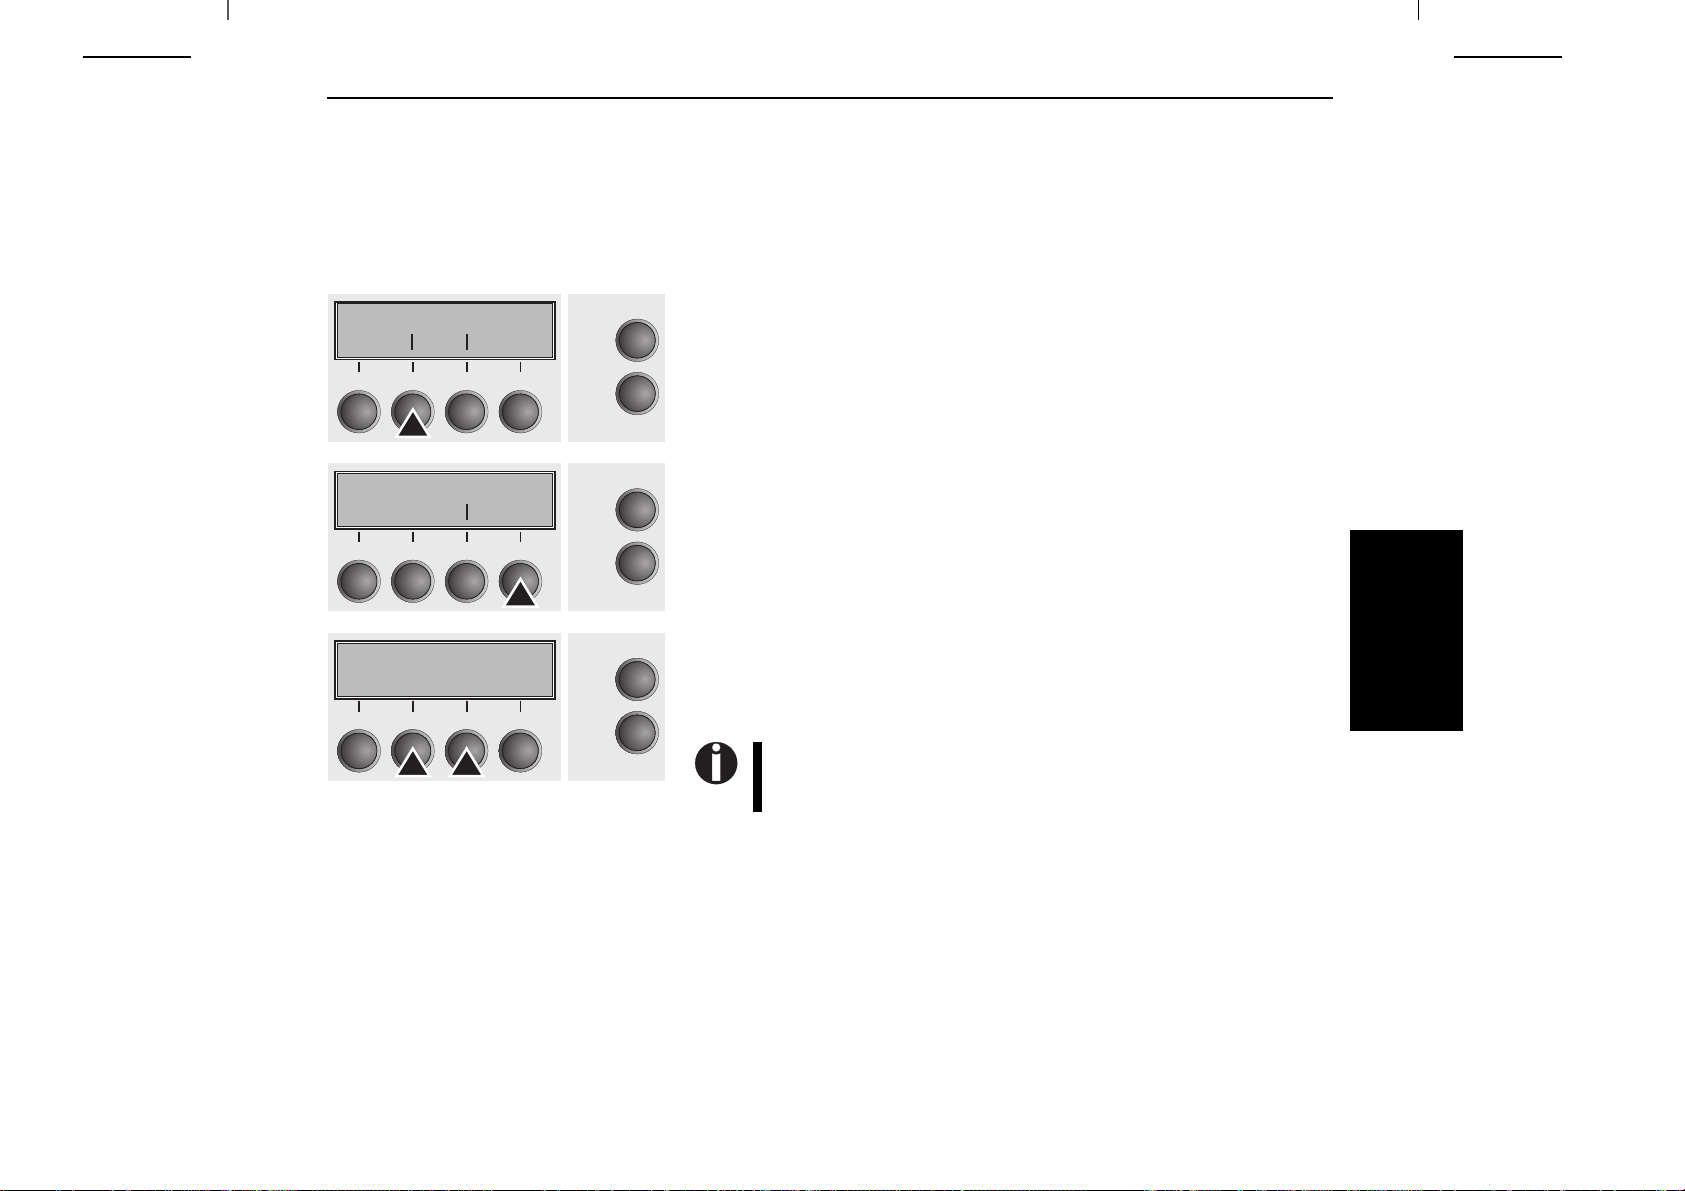
Guide de démarrage rapide Réglages
Réglages Cette partie décrit le réglage de la position de séparation, de la première ligne d’impression, de
l’écartement de la tête d’impression, ainsi que de la police et de la densité des caractères.
➤ Réglage de la
position de
séparation
Ajuster Chem-Pap
Menu Char
3
21
TOF
Tête Coupe
3
21
Ajust.C= 0/72" *
Valid < > Quit
3
21
Si la position de séparation ne correspond pas à l’arête de séparation de l’imprimante, elle peut
être réglée.
Appuyer sur touche Setup. L’imprimante passe en mode Setup.
Online
4
Setup
Appuyer sur la touche Ajuster (2).
Appuyer sur la touche Coupe (4). L’imprimante exécute un avancement des
Online
4
Setup
formulaires.
Appuyer sur la touche < (2) ou > (3) pour déplacer la perforation dans la position
Online
4
Setup
souhaitée. Valider le réglage en appuyant sur la touche Valid (1).
Valider la sélection en appuyant sur la touche Setup. L’imprimante revient en
position initiale.
FRANÇAIS
La correction effectuée – au maximum env. 2,5 cm (1") dans chaque
direction – reste conservée même après mise hors tension de l’imprimante.
23
Page 82

Computerdrucker
Réglages Guide de démarrage rapide
➤ Réglage de la
première ligne
d’impression (TOF)
Ajuster Chem-Pap
Menu Char
3
21
TOF
Tête Coupe
3
21
B
A
La fonction TOF permet de régler la position de la première ligne d’impression pour chaque bac
de chargement du papier et chaque menu individuellement.
Régler d’abord la position de séparation (voir plus haut) – en cas d’utilisation de papier
continu – avant d’exécuter la fonction TOF.
Ouvrir le capot supérieur.
Online
4
Setup
Appuyer sur la touche Setup. L’imprimante passe en mode Setup.
Appuyer sur la touche Ajuster (2).
Appuyer sur la touche TOF (3). L’imprimante exécute un avancement des for-
Online
4
Setup
mulaires.
Le papier est transporté jusqu’à ce que l’arête inférieure de la
première ligne A se trouve à la hauteur de l’arête de séparation B. La position de la première ligne d’impression est réglée
en usine sur 12/72".
Computerdrucker
Ligne-1= 12/72"*
Valid < > Quit
3
21
24
Appuyer sur la touche < (2) ou > (3) pour déplacer la première ligne d’impression
Online
4
Setup
dans la position souhaitée. Vous pouvez régler des valeurs comprises entre 0 et
220/72" pour le papier continu et pour les feuilles simples.
Page 83

Guide de démarrage rapide Réglages
Ligne-1= 17/72"*
Valid < > Quit
3
21
➤ Réglage de
l’écartement de la
tête d’impression
Ajuster Chem-Pap
Menu Char
3
21
TOF
Tête Coupe
Valider la sélection en appuyant sur la touche Valid (1).
Online
Appuyer sur la touche Setup. L’imprimante revient en position initiale.
Le réglage effectué reste conservé même après mise hors tension de
4
Setup
l’imprimante. Vous trouverez d’autres détails dans le guide d’utilisateur sur le CD-ROM Online.
L’imprimante est équipée d’une fonction qui permet d’ajuster automatiquement l’écartement de
la tête d’impression sur l’épaisseur du papier utilisé. En mode Setup, vous pouvez entrer une
valeur de correction pour modifier l’écartement de la tête d’impression défini automatiquement.
Cette correction permet de modifier l’aspect de l’écriture et la force de claquage sur du papier
multicouche.
La fonction AGA doit être réglée sur «marche». Pour plus de détails, consulter le guide d’utilisateur sur le CD-ROM Online.
Appuyer sur la touche Setup. L’imprimante passe en mode Setup.
Online
4
Setup
Appuyer sur la touche Ajuster (2).
FRANÇAIS
Appuyer sur la touche Tête (1).
Online
3
21
4
Tête= 0 *
Valid < > Quit
3
21
4
Setup
Appuyer sur la touche < (2) ou > (3) pour régler la plage dans laquelle l’écarte-
Online
Setup
ment de la tête d’impression doit être corrigé. Vous pouvez sélectionner des
valeurs entre -10 et +10.
Valider la sélection en appuyant sur la touche Valid (1).
Appuyer sur la touche Setup. L’imprimante revient en position initiale.
Les valeurs négatives diminuent l’écartement de la tête d’impression, les valeurs positives
l’augmentent.
Le réglage effectué reste conservé même quand l’imprimante est mise hors service.
25
Page 84

Réglages Guide de démarrage rapide
➤ Sélection de la den-
sité des caractères
et de la police
Ajuster Chem-Pap
Menu Char
3
21
Police CPI
21
10 CPI *
Valid < > Quit
21
4
3
4
3
4
Avec la touche CPI (Character Per Inch = Caractères par pouce), vous pouvez régler en mode
Setup le nombre de caractères imprimés par pouce. Avec la touche Police, vous pouvez
sélectionner la police souhaitée.
Appuyer sur la touche Setup, puis sur la touche Char (4).
Online
Setup
Appuyer sur la touche CPI (3) ou Police (2), dans notre exemple CPI.
Online
Setup
Appuyer sur la touche < (2) ou > (3) pour régler la densité de caractères
Online
Setup
souhaitée. Valider la sélection en appuyant sur la touche Valid (1).
L’appui sur la touche Quit (4) permet de quitter la sélection sans modification.
ROMAN NLQ
Valid < > Quit
3
21
Ajuster Chem-Pap
Menu Char
3
21
26
Si la touche Police (2) est actionnée, sélectionner la police souhaitée avec la
Online
4
Setup
touche < (2) ou > (3). Valider la sélection en appuyant sur la touche Valid.
L’appui sur la touche Quit (4) permet de quitter la sélection sans modification.
Appuyer sur la touche Setup. L’imprimante revient en position initiale. Il est
Online
4
Setup
également possible d’appuyer sur la touche Online. L’imprimante passe alors
directement en mode Online.
La sélection effectuée ne reste pas conservée après mise hors
tension de l’imprimante. Vous trouverez des détails sur le réglage
permanent de la densité des caractères dans le guide d’utilisateur
sur le CD-ROM Online.
Page 85

Guide de démarrage rapide
Données techniques
Réglage
s
Spécificat
ion
l’imprimante
s de
e
py
T
Principe d’impression
Largeur d’impression
Vitesse d’impression
HSQ(M
DPQ(M
CPQ(M
NLQ(Matrix 24 x 18
LQ (Matrix 24x36
Débit (ECMA 132) 606
Densité descaractères
Résolution maximale
Emulations Standard: MTPL, Epson LQ2550/LQ2170, IBM XL 24
Niveau sonor
Dimension
Poids 20,7 kg
A
limentation
Puissance consommée A
Température ambiant
Tête d’impression Nombre d’aiguilles: 24; diamètre d’aiguille: 0,25 mm
Homologations ISO
atrix 12 x 10
atrix12x12)
atrix
24 x 12)
e
s 624 x 430 x 276 mm (L x P x H)
T2265+
avec tête
Série
caractèresenm
136
bidirectionnel,
(Mode
s
650 cp
)
600cps
300cps
s
200 cp
)
)
e
cp
s
100
pages/h
10,1 pages/
10
cpi, 12 cpi, 15
Horizontale: 360 dpi; verticale: 360 dpi
≤ 55 dB (A)
(LQ Mode San
USA/Canada 120 V±10%, 60 Hz±2%
Europe
un débit
A vide:
Température: 10° ...
No
mbre de copies:
1
original + 6
60950, CE,
Energy Star
m
pression 24
d’i
ode10cpi
cpi)
10
m
n
cpi, 17,1 cpi, 20 cpi
erif)
s S
± 10%,
230 V
de 100%65VA
copies
GOST,
20 VA
35°C; hu
(max.
VDE/GS+CB, cULus,
)
T2280+
aiguille
s
bidirectionnel,
(Mode
800cps
667cps
333cps
222cps
111cps
pages/h
626
10,43 pages/mn
≤ 57 dB (A)
(LQMode Sans Serif)
Hz±2
50/60
A
A v
midité de
No
1
%
un débit
:
ide
l’air: 16%
mbre de copies:
original + 5
de 100%75V
... 73
copies
FCC/B,
10
24 V
%
(max.)
CCC,
cpi)
A
A
FRANÇAIS
Pour d’autres spécifications concernant les spécifica
consulter le guide
d’utili
sat
eur sur le CD-ROM Online.
tions del’i
mpr
imante et les interfaces,
27
Page 86

Accessoires Guide de démarrage rapide
➤ Spécifications
du papier
Accessoires
Papier continu tracteur1
Formulaire simple
Liasse de formulaires
(doit être testée
individuellement)
Alimentation feuille à
feuille
Feuille simple
Liasse de formulaires
(doit être testée
individuellement)
Liasses de formulaires Seules les liasses de formulaires dont les bords d’en-tête sont collés
Grammage
Nombre de copies
Epaisseur de formulaire (maxi)
Grammage
Nombre de copies
Epaisseur de formulaire (maxi)
peuvent être utilisées.
ASF-R: Les liasses multiples doivent être introduites avec le collage
en bas en premier. Un essai préalable est indispensable.
60–120 g/m
1 + 6 (T2265+)
1 + 5 (
0,60 mm
80–120 g/m
1 + 5
0,60 mm
2
T2280+)
2
Pour d’autres informations concernant les spécifications du papier et les spécifications du
papier des tracteurs en option et de l’alimentation feuille à feuille automatique, consulter le
guide d’utilisateur sur le CD-ROM Online.
Cartouches de ruban encreur Référence
Cartouche de ruban encreur noire 062 471
Pour d’autres options, consulter le guide d’utilisateur sur le CD-ROM Online.
28
Page 87

Per cominciare subito Indice
Indice
Guida di avvio rapida
Indice
Introduzione 2
Simboli utilizzati 2
Indicazioni di sicurezza importanti 2
Utilizzo del CD-ROM online 3
Cosa c’è sul CD-ROM online 3
Requisiti hardware 3
Diagnostica 3
Installazione 5
Rimozione dell’imballaggio 5
Installazione della stampante 6
Collegamento della stampante 7
Accensione della stampante 7
Pannello comandi 8
Modo Online 8
Modo Offline 8
Modo Setup 9
Sostituzione della cartuccia colore 10
Modalità di gestione della carta 16
Cambio del tipo di carta 16
Caricamento della carta 17
Moduli continui 17
Fogli singoli 20
Trasporto carta 21
Posizionamento della carta nella posizione di
strappo 22
Impostazioni 23
Impostazione della posizione di strappo 23
Impostazione della riga di inizio stampa
(Top Of Form, TOF) 24
Regolazione della distanza della testina di stampa 25
Selezione della densità dei caratteri e del font 26
Dati tecnici 27
Specifiche della stampante 27
Specifiche della carta 28
Accessori 28
ITALIANO
1
Page 88

Introduzione Per cominciare subito
Introduzione Le presenti istruzioni per l’uso consentono di cominciare subito a lavorare con la stampante,
Ah ha!
!
➤ Simboli utilizzati Le informazioni importanti sono contrassegnate nel manuale da due simboli.
anche a utenti inesperti. Vi sono descritte le principali funzioni della stampante e vi sono riportate
le informazioni indispensabili per il lavoro giornaliero con la stessa. Una descrizione dettagliata
della stampante e delle sue caratteristiche, unitamente ad altre informazioni, è riportata nel
manuale dell’utente sul CD-ROM online, inserito nella tasca della penultima pagina delle
presenti istruzioni per l’uso.
➤ Indicazioni di
sicurezza
importanti
STOP
STOP
STOP
ATTENZIONE contrassegna le informazioni che devono essere rispettate per evitare rischi per
l’incolumità personale e danni alla stampante.
AVVERTENZA contrassegna informazioni generiche o aggiuntive in merito a un determinato
argomento.
Prima di mettere in funzione la stampante, leggere attentamente le seguenti indicazioni. In questo
modo si possono evitare rischi per la propria incolumità personale e danni all’apparecchio.
Conservare le presenti istruzioni per l’uso in un luogo sempre accessibile.
Collocare la stampante su una superficie stabile, per evitare che cada a terra.
Non esporre la stampante ad elevate temperature né alla luce solare diretta.
Evitare il contatto della stampante con liquidi.
Non esporre la stampante a colpi, scosse o vibrazioni.
Collegare la stampante a una presa di corrente con tensione adeguata.
Gli angoli della carta possono danneggiare l’isolamento del cavo di rete se sfregano continuamente sul cavo stesso. L’utente deve assicurarsi che il cavo di rete e la carta in movimento abbiano in ogni caso sufficiente distanza uno dall’altra.
Non eseguire mai da sé gli interventi di manutenzione e riparazione, ma rivolgersi sempre a
un tecnico di assistenza qualificato.
Per scollegare la stampante dalla rete di alimentazione, disinserire il connettore di rete dalla
presa.
Altre indicazioni di sicurezza sono riportate nei punti adeguati del testo.
2
Page 89

Per cominciare subito Introduzione
➤ Utilizzo del
CD-ROM online
➤ Cosa c’è sul
CD-ROM online
Se Adobe Acrobat Reader non è già caricato, installare innanzitutto questo programma sul disco
fisso. Per l’installazione, attenersi alle indicazioni riportate nel file Readme, nella directory
READER.
Per lanciare la documentazione online in Explorer, cliccare due volte sul file START.PDF.
Attenersi quindi alle indicazioni di guida per l’utente.
Il CD-ROM online contiene
– il manuale dell’utente: descrizione dettagliata della stampante e delle sue caratteristiche
– Driver per
– altra documentazione: Istruzioni di programmazione e descrizione delle opzioni
Se il CD-ROM è difettoso o non è allegato alle istruzioni per l’uso, rivolgersi al proprio
rivenditore. La documentazione online può essere consultata tramite Internet.
Windows 2000, Windows XP/2003 Server, Windows 7, Windows Vista
➤ Requisiti hardware Requisiti hardware minimi: PC AT 486, CD-ROM 4x, schermo da 15", mouse.
➤ Diagnostica Il Capitolo Eliminazione disfunzioni del manuale dell’utente sul CD-ROM contiene informa-
zioni dettagliate per la risoluzione degli errori. Vengono trattati problemi generici di stampa,
problemi relativi alla qualità di stampa e il percorso della carta.
ITALIANO
3
Page 90

Introduzione Per cominciare subito
Configurazione della stampante
Vista dal davanti
Calotta insonorizzante
Coperchio
superiore
Interruttore di rete
Vista posteriore
Pannello comandi
Coperchio anteriore
Untere Abdeckung
Configurazione della stampante per l’uso dei
trascinamoduli
Trascinamoduli
Configurazione della stampante per l’uso di
fogli singoli
Supporti carta
Coperchio
posteriore
Connettori di
interfaccia
Presa di collegamento alla rete
4
Guida fogli singoli
Riscontro bordo
Page 91

Per cominciare subito Installazione
Installazione
➤ Rimozione dell’imballaggio
Collocare la stampante ancora imballata su una superficie stabile.
Fare attenzione a disporre i simboli “sopra” nella direzione
corretta.
➃
➂
Aprire l’imballaggio, estrarre il kit degli accessori e disimballarlo. Estrarre la stampante dal cartone, dal davanti, e rimuovere gli altri elementi dell’imballaggio.
Verificare che la stampante non mostri danni visibili dovuti al
trasporto e che non manchi nessun componente della dotazione.
Oltre alle presenti istruzioni per l’uso (➀), nell’imballaggio
devono esservi il CD-ROM (➁, inserito nella tasca della
penultima pagina), il cavo di rete (➂) e la cartuccia colore (➃).
Se si riscontrano danni dovuti al trasporto o se mancano degli
accessori, rivolgersi al proprio rivenditore.
➁
➀
ITALIANO
5
Page 92
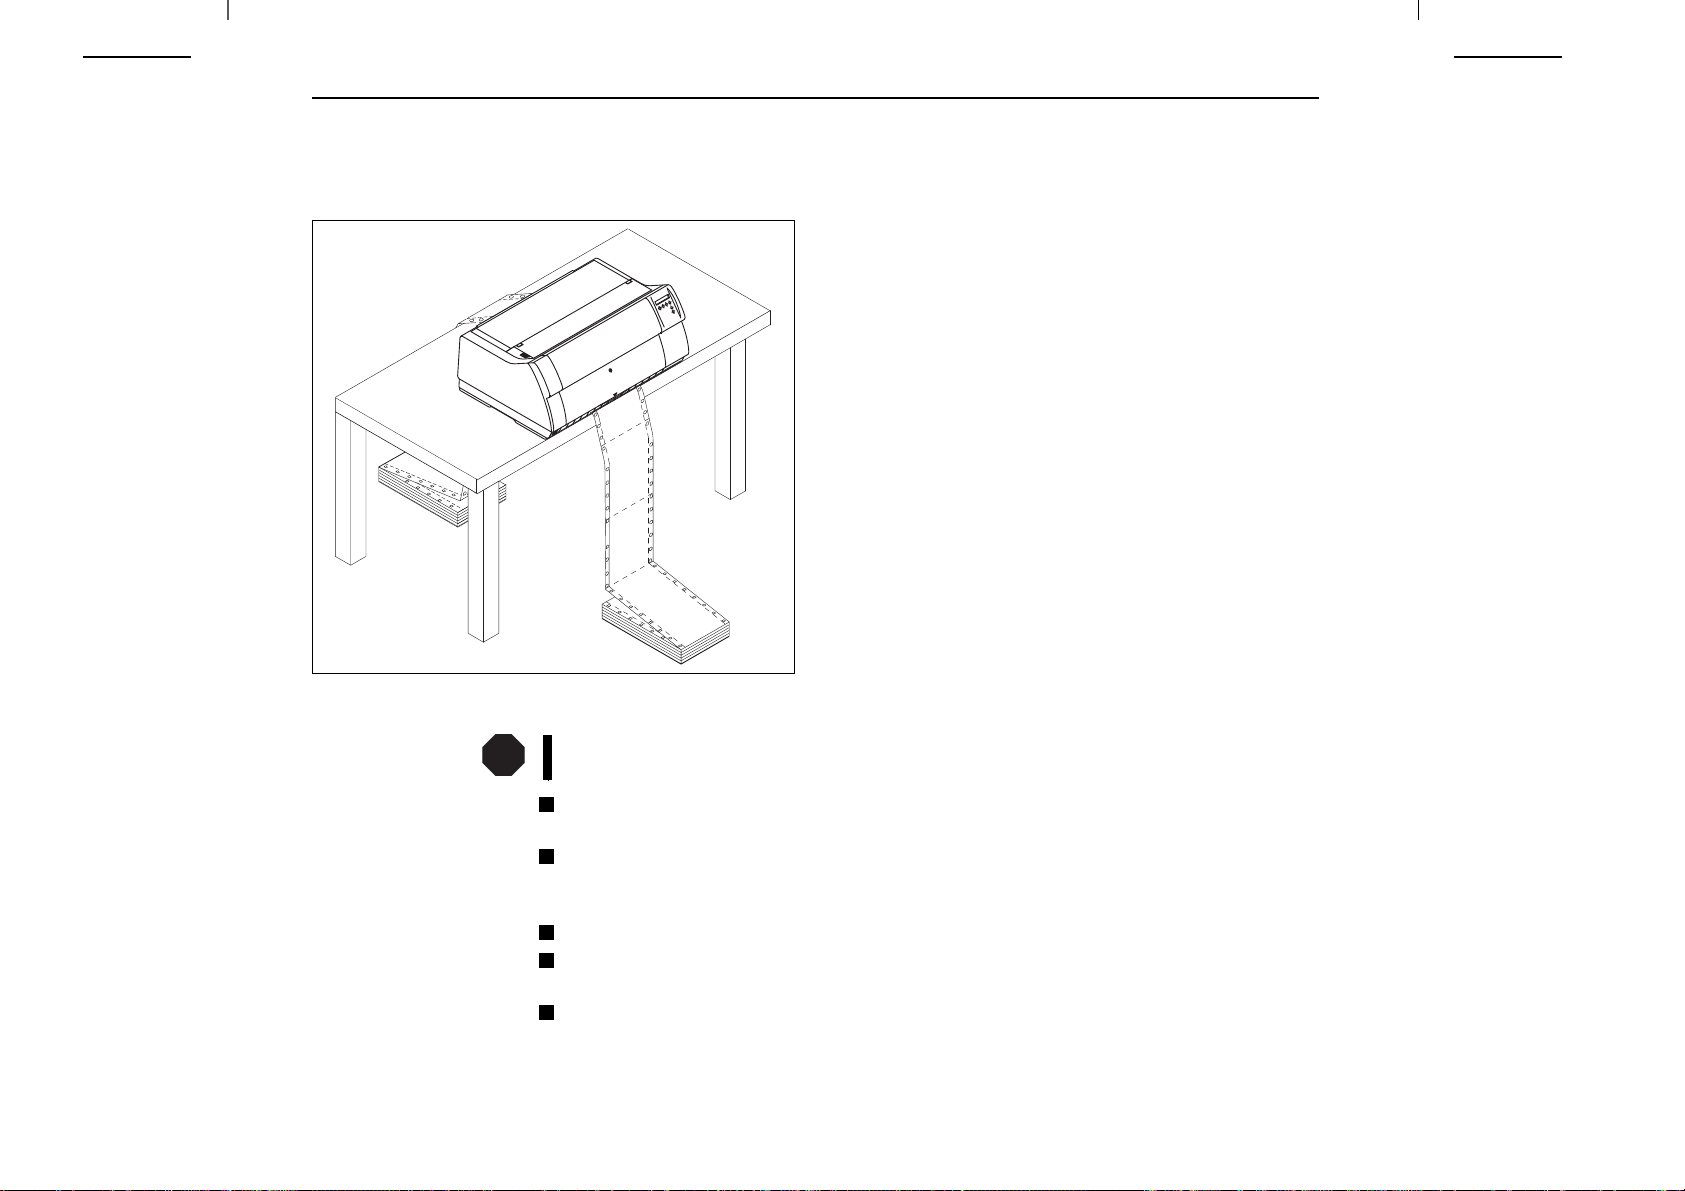
Installazione Per cominciare subito
➤ Installazione
della stampante
Collocare la stampante su una superficie stabile, piana e non scivolosa, per evitare che cada a
terra. Predisporre un agevole accesso al pannello operatore e alle guide carta, lasciando anche
spazio adeguato per l’uscita della carta.
Se si utilizzano frequenti comandi di avanzamento e ritorno
della carta a moduli continui, collocare la stampante il più
possibile come mostrato nella figura.
Ai fini della scelta del luogo di installazione della stampante, rispettare le seguenti indicazioni:
STOP
6
Non collocare la stampante in prossimità di gas facilmente infiammabili o di sostanze
esplosive.
Non esporre la stampante alla luce solare diretta. Se la stampante deve essere inevitabilmente
installata in prossimità di una finestra, proteggerla dal sole con una tenda.
Al collegamento del PC con la stampante, fare attenzione a non superare la lunghezza massima ammissibile del cavo (vedere il manuale dell’utente sul CD-ROM online, Specifiche
tecniche).
Tenere la stampante a una distanza adeguata da fonti di calore.
Fare attenzione a non esporre la stampante ad estreme escursioni di temperatura e umidità.
Evitare la formazione di condensa.
Per via del rumore prodotto, in caso di necessità si raccomanda di installare la stampante in
un luogo acusticamente isolato rispetto alla postazione di lavoro.
Page 93
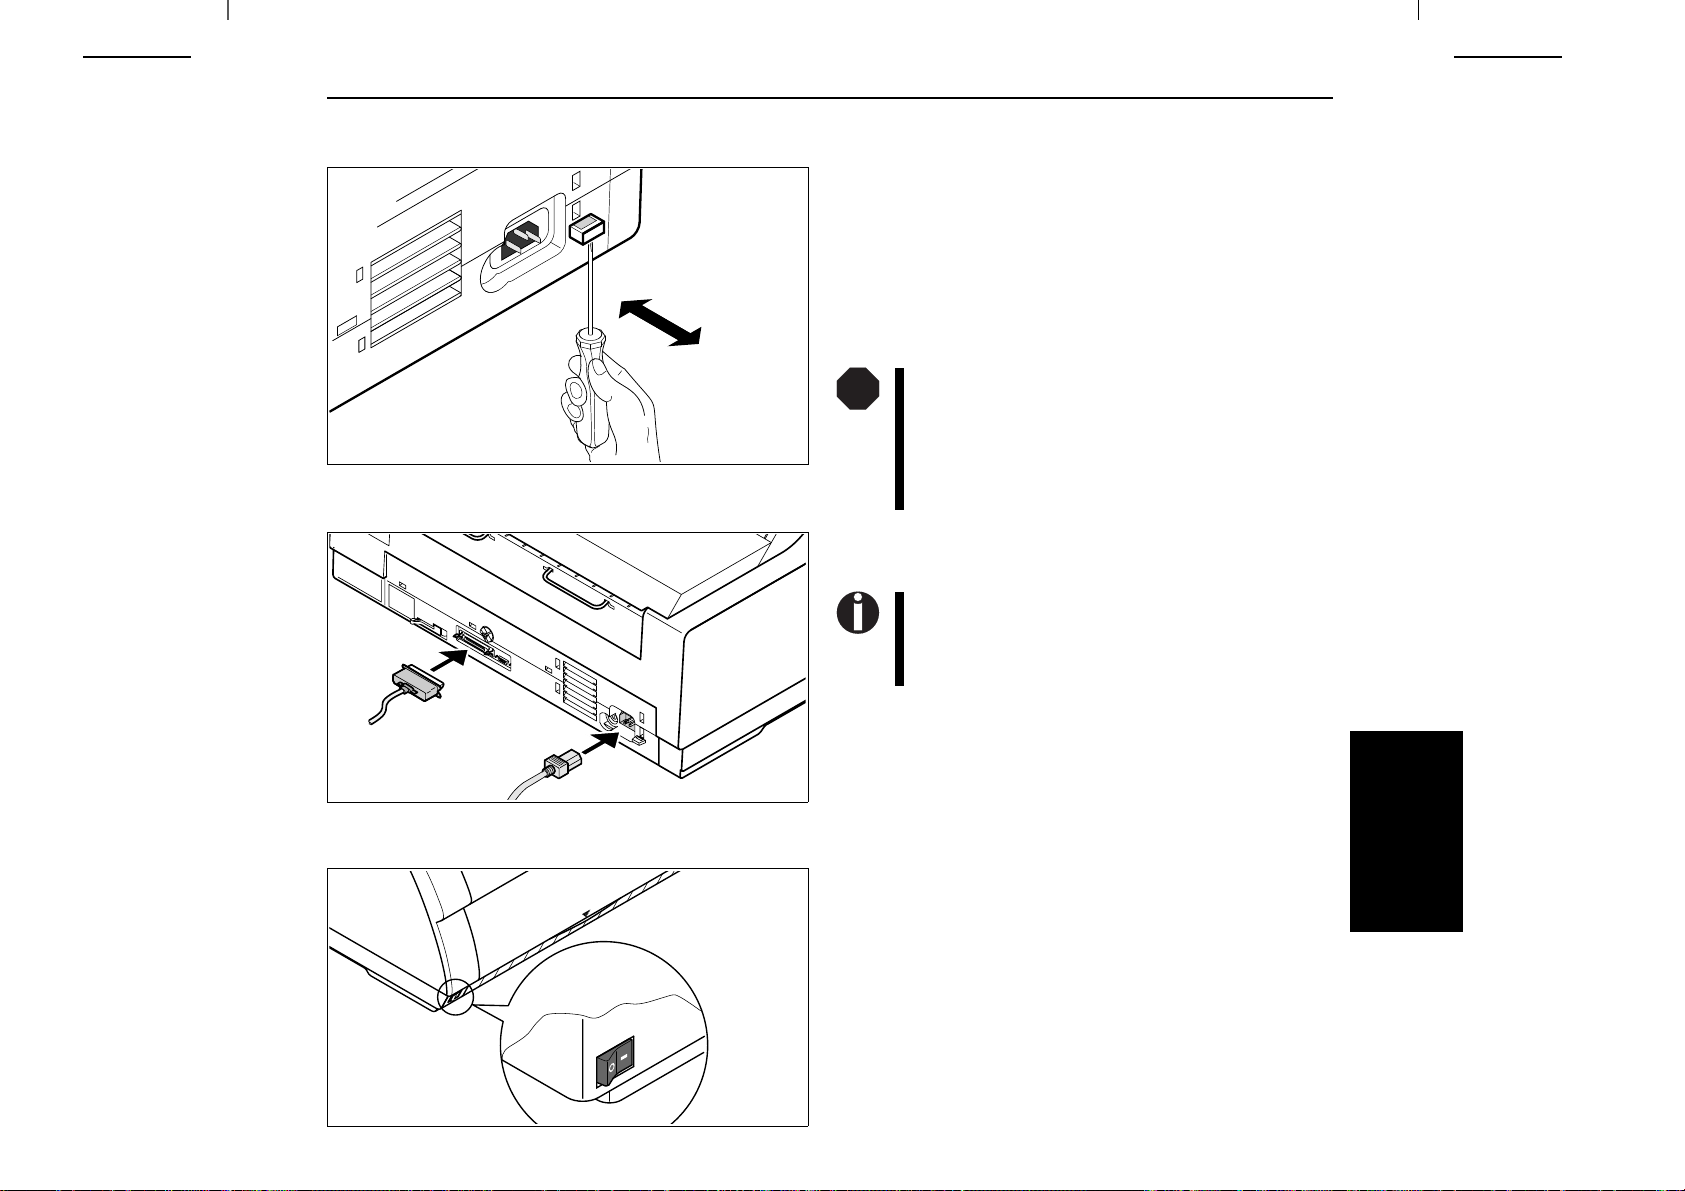
Per cominciare subito Installazione
➤ Collegamento della stampante
Verificare che la stampante sia impostata sul valore di tensione
120V
corretto (ad esempio 220–240 V in Europa, 120 V negli Stati
Uniti). A questo proposito, vedere la targhetta presente in
corrispondenza della presa di rete sul retro della stampante.
Se la stampante non è impostata sul valore di tensione corretto,
impostare in maniera adeguata l’interruttore colorato posto sul
retro dell’apparecchio servendosi di un oggetto appuntito (ad
esempio un cacciavite, una penna a sfera o delle pinzette).
STOP
Prima di impostare la tensione, verificare che la
stampante sia spenta, altrimenti possono verificarsi
seri danni.
Non accendere mai la stampante se il valore di
tensione impostato non è corretto; rischio di seri
danni.
Verificare che la stampante e il computer siano spenti e collegarli con l’apposito cavo di trasmissione dati.
La stampante è dotata come standard di una porta
parallela e di una port Ethernet. Ulteriori informazioni a riguardo sono indicate sul manuale dell’utente sul CD-ROM.
➤ Accensione della stampante
Collegare il cavo di rete, come mostrato nella figura, al connettore della stampante. Inserire quindi il connettore del cavo di
rete in una presa di alimentazione.
L’interruttore di rete che consente di accendere la stampante è
posto in basso, sul pannello anteriore della stampante, vista dal
davanti.
ITALIANO
7
Page 94

Pannello comandi Per cominciare subito
Pannello comandi Il pannello comandi e i relativi tasti consentono di controllare il funzionamento della stampante.
La prima riga del display indica se la stampante si trova nel modo Online o Offline e qual è
il percorso carta selezionato (Trattor1, o Foglio).
➤ Modo Online All’accensione, la stampante si commuta automaticamente nel modo Online. Solo in questa
modalità può ricevere i dati dal computer.
Online Trattor1
Stp.
3
21
4
Online
Setup
Tasto Stp. (4): Attiva la funzione di strappo se sono caricati i moduli continui
(vedere pag. 22, Posizionamento della carta nella posizione di strappo). Se
sopra questo tasto compare l’indicazione Load, significa che nella stampante
manca la carta; premendo il tasto, si trasporta la carta nella posizione di stampa.
Tasto Setup: Commuta la stampante nel modo Setup.
Tasto Online: Commuta la stampante nel modo Offline.
➤ Modo Offline Soltanto in questa modalità è possibile comandare l’avanzamento passo-passo, riga per riga o della
modulistica attraverso il pannello comandi (vedere pag. 21, Trasporto carta), non è possibile la
ricezione dei dati.
Offline Trattor1
3
Load
4
Park Load
21
Online
Setup
Tasto Park (1): Libera il percorso carta quando la carta è inserita e attiva la
selezione rapida del percorso carta (vedere pag. 16, Cambio del tipo di carta).
Tasto (2): breve pressione del tasto: micropasso in avanti.
pressione prolungata del tasto: avanzamento continuo della carta.
Tasto (3): breve pressione del tasto: micropasso all’indietro pressione
prolungata del tasto: ritorno continuo della carta fino alla posizione di parcheggio.
Tasto Load (4): Se la carta non è caricata, vedere le indicazioni precedenti
Se la carta è già caricata: breve pressione del tasto: Avanzamento riga per riga
(LF); pressione prolungata del tasto: Avanzamento di una pagina (FF).
Tasto Setup: Commuta la stampante nel modo Setup.
Tasto Online: Commuta la stampante nel modo Online.
8
Page 95
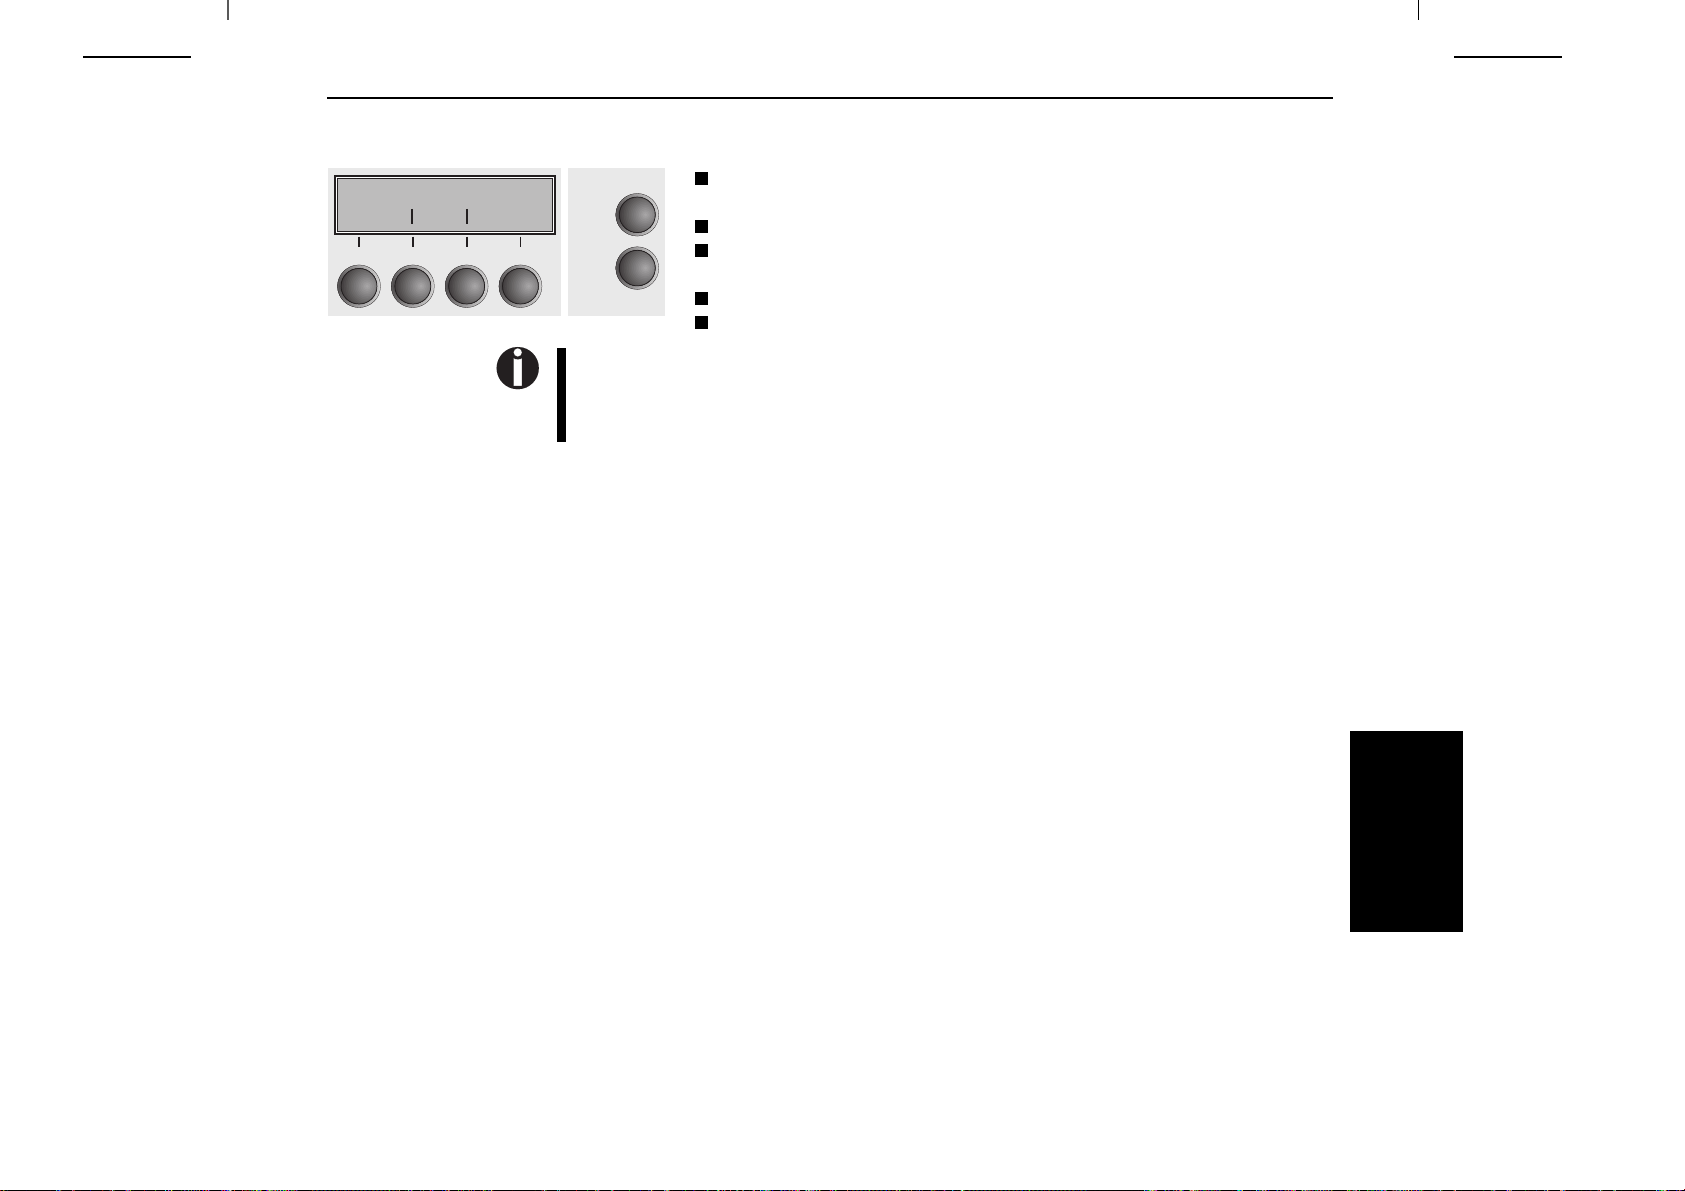
Per cominciare subito Pannello comandi
➤ Modo Setup In questa modalità si possono effettuare le seguenti impostazioni:
Regolaz Dir.Cart
Menu Char
3
21
4
Tasto Setup: Commuta la stampante nel modo Setup, in cui si possono
Online
Setup
effettuare le seguenti impostazioni:
Tasto Menu (1): Ulteriori impostazioni di menu.
Tasto Adjust (2): Posizione di strappo, prima riga di stampa e distanza
testina di stampa.
Tasto Dir.Cart (3): Percorso carta.
Tasto Char (4): Font e numero di caratteri per pollice.
A seconda del modello della stampante, l’accesso alle altre impostazioni di menu (Menu)
può essere bloccato dalla fabbrica. Le modalità di rimozione di questa funzione di blocco e
le impostazioni possibili sono riportate nel manuale dell’utente sul CD-ROM online (Capitolo Il menu, Richiamare un menu nascosto).
ITALIANO
9
Page 96

Sostituzione della cartuccia colore Per cominciare subito
Sostituzione della
cartuccia colore
Prima di aprire il coperchio, verificare che la stampante sia accesa e che possa quindi eseguire
le funzioni di predisposizione automatica per il cambio della cartuccia nastro (aumento della
distanza della testina di stampa).
La stampante durante l’inizializzazione all’avvio controlla se è installata una cartuccia
nastro a colori. Inoltre, durante il processo di stampa controlla empre il corretto funzionamento della cartuccia stessa. Queste funzioni richiedono necessariamente l’impiego di cartucce originali fornite dal produttore (vedere Accessori, a pagina 28). Se si utilizzano altri
tipi di cartucce compare sul display il messaggio "Check Ribbon" e non è possibile effettuare
la stampa.
Portare la carta nella posizione di parcheggio.
Aprire il coperchio superiore della stampante.
10
Page 97

Per cominciare subito Sostituzione della cartuccia colore
Far scorrere con delicatezza il cursore della testina di stampa
all’estremità sinistra (guardando la stampante dal davanti).
STOP
Durante il processo di stampa, la testina di stampa
tende a surriscaldarsi notevolmente. Prima di
toccare la testina di stampa, attendere quindi
qualche istante.
Spostare il cursore colorato della frizione verso sinistra, come
mostrato nella figura (direzione della freccia) e sollevare la
frizione.
11
ITALIANO
Page 98

Sostituzione della cartuccia colore Per cominciare subito
Estrarre la cartuccia consumata.
Sollevare la guida di inserimento colorata A.
A
12
Page 99

Per cominciare subito Sostituzione della cartuccia colore
A
Rimuovere i fermi di sicurezza colorati A e B.
Inserire il pomello tendinastro colorato nel foro anteriore destro
della cartuccia colore. Ruotare il pomello nella direzione della
freccia per tendere il nastro.
B
Inclinare la cartuccia lievemente in avanti in modo da inserire il
nastro tra la guida di inserimento colorata e il supporto (finestrella in plastica trasparente).
Inserire la cartuccia parallelamente nella rispettiva guida e spingerla verso il basso in modo da fissarla.
ITALIANO
13
Page 100

Sostituzione della cartuccia colore Per cominciare subito
Inserire il pomello tendinastro colorato in uno dei due fori.
Ruotando il pomello nella direzione della freccia, tendere il
nastro, finché non viene a contatto sotto con il supporto.
Spingere la guida di inserimento A verso il basso.
14
A
 Loading...