

Page 1

OWNER’S USE AND CARE GUIDE
GUIDE D’UTILISATION ET D'ENTRETIEN
GUÍA DE UTILIZACIÓN Y CUIDADO PARA EL PROPIETARIO
PARTIAL FROST FREE REFRIGERATOR
LE GEL PARTIEL RÉFRIGÉRATEUR GRATUITEMENT
REFRIGERADOR LIBRE DE ESCARCHA PARCIAL
MODEL • MODÈLE • MODELO
DPF073C1WDB
DANBY PRODUCTS LIMITED, ONTARIO, CANADA N1H 6Z9
DANBY PRODUCTS INC., FINDLAY, OHIO, USA 45840
2015.05.22
Page 2

1-800-263-2629
(1-800-26-DANBY)
DO NOT RETURN THIS UNIT TO THE RETAILER
WITHOUT FURTHER INSTRUCTIONS
Dear valued customer, we hope your Danby product purchase fulfills all
your requirements. Your satisfaction is our priority!
Please contact us at our toll free consumer service number for any inquiries
you may have about your new unit.
NE PAS RETOURNER CET APPAREIL CHEZ LE
DÉTAILLANT SANS CONSIGNES SUPPLÉMENTAIRES
Cher(ère) client(e) important(e), nous espérons que votre produit Danby
répond à tous vos besoins. Votre satisfaction est notre priorité!
Veuillez nous contacter au numéro gratuit de service après-vente, si
vous avez des questions quelconques à propos de votre nouvel appareil.
NO DEVUELVA ESTA UNIDAD A LA TIENDA SIN
INSTRUCCIONES ADICIONALES
Estimado cliente, esperamos que el producto Danby que ha comprado
satisfaga completamente sus necesidades. Su satisfacción
es nuestra prioridad!
Por favor, contáctenos gratuitamente a nuestro número de Servicio al
Cliente para cualquier pregunta que tenga sobre su nuevo electrodoméstico.
Danby 28.08.2014
Page 3
CONTENTS
TABLE DES MATIÈRES
ÍNDICE
PARTIAL FROST FREE REFRIGERATOR
Owner’s Use and Care Guide .............................................1-11
• Welcome
• Important Safety Information
• Features
• Installation Instructions
• Operation Instructions
• Care and Maintenance
• Troubleshooting
• Warranty
LE GEL PARTIEL RÉFRIGÉRATEUR GRATUITEMENT
Guide d’utilisation et d’entretien du propriétaire............12-22
• Bienvenue
• Consignes de sécurité importantes
• Caractéristiques
• Consignes d’installation
• Consignes d’utilisation
• Soins et entretien
• Dépannage
• Garantie
REFRIGERADOR LIBRE DE ESCARCHA PARCIAL
Guía de utilización y cuidado para el propietario............23-33
• Bienvenido
• Información importante sobre seguridad
• Características
• Instrucciones de instalación
• Instrucciones de funcionamiento
• Cuidado y mantenimiento
• Solución sugerida
• Garantía
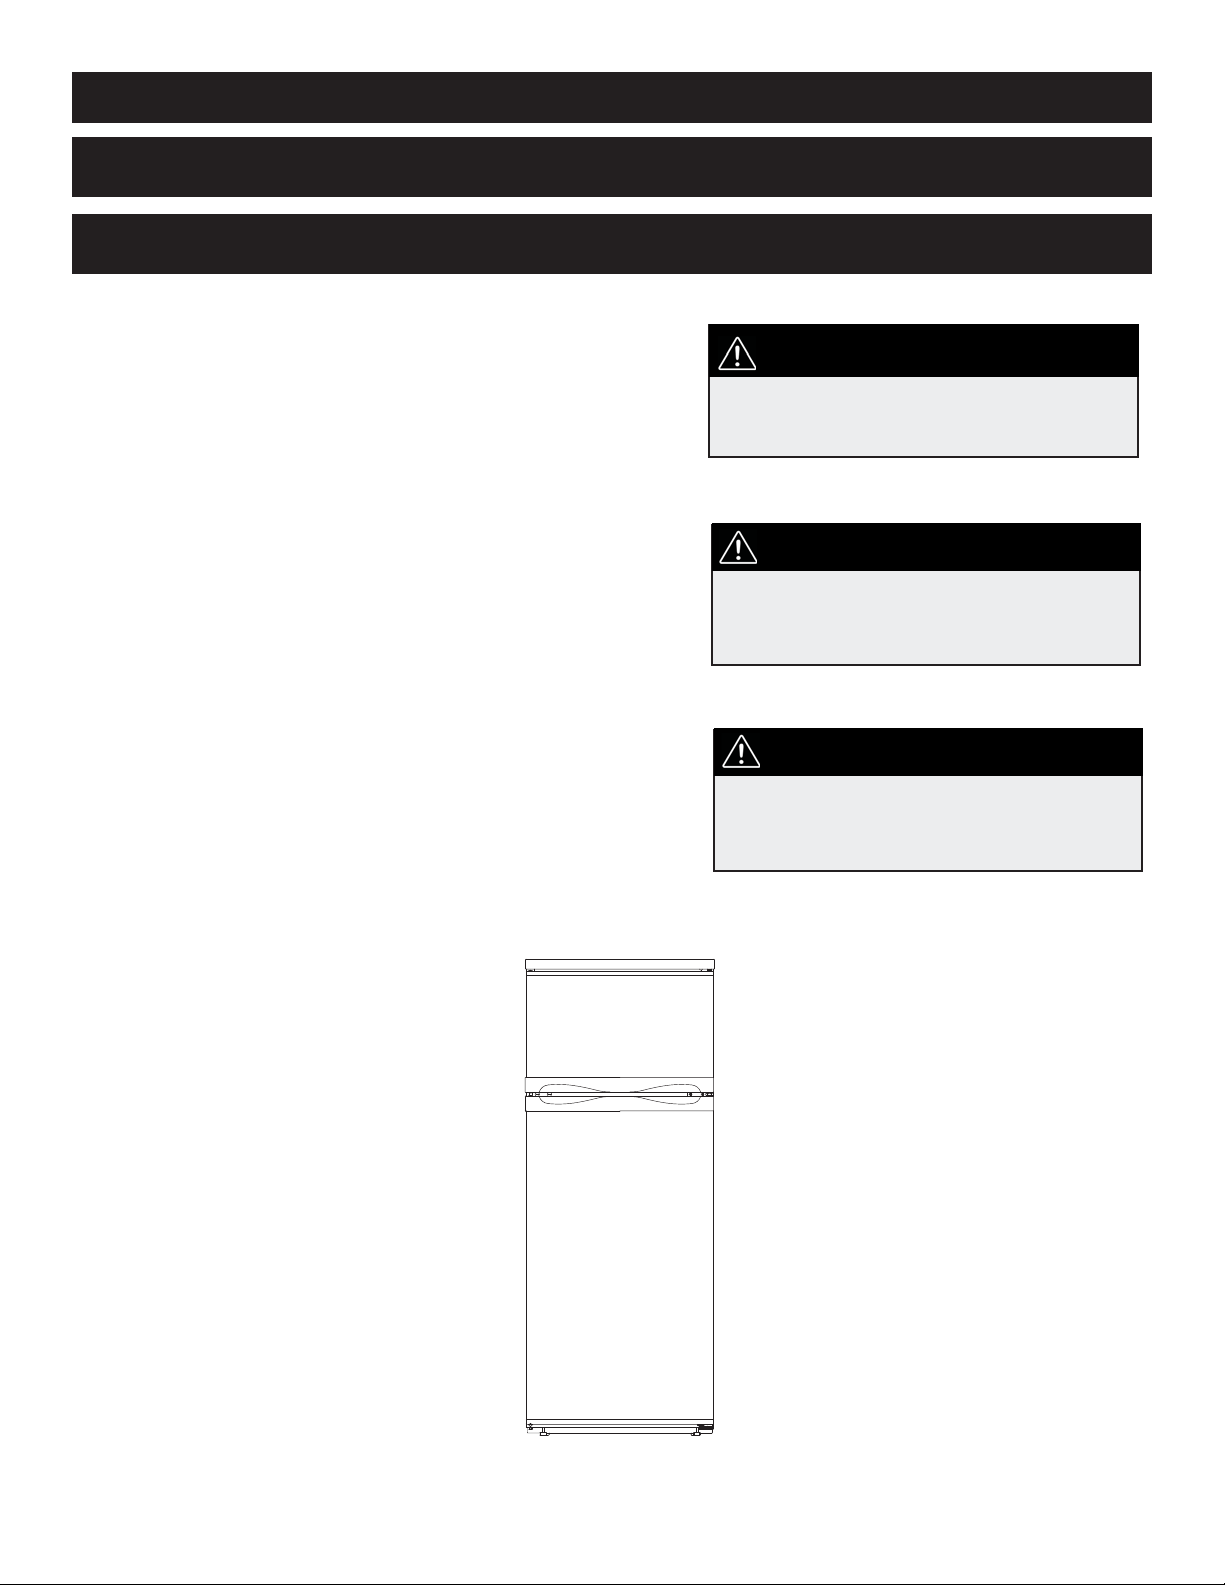
CAUTION:
Read and follow all safety rules and operating
instructions before fi rst use of this product.
PRÉCAUTION :
Veuillez lire attentivement les consignes de
sécurité et les instructions d’utilisation avant
l’utilisation initiale de ce produit.
PRECAUCIÓN:
Lea y observe todas las relgas de seguridad y
las instrucciones de operación antes de usar
este producto por la primera vez.
Model • Modèle • Modelo
DPF073C1WDB
Page 4
Thank you for choosing Danby
We know you’re excited. We are too! However, the more familiar you are with your new appliance, the better experience you will
have. We therefore strongly suggest that you read this Owner’s Manual before plugging in your new appliance. It contains
important operational information that will help you make full use of the technical features available in your Danby appliance. The
manual also contains information designed to enhance operating reliability and safety, as well as tips to maintaining your new
appliance so that it brings you happiness for years to come.
Please visit www.danby.com to access self-service tools, FAQs and more. Should you need additional assistance, please call
1-800-26-DANBY (1-800-263-2629).
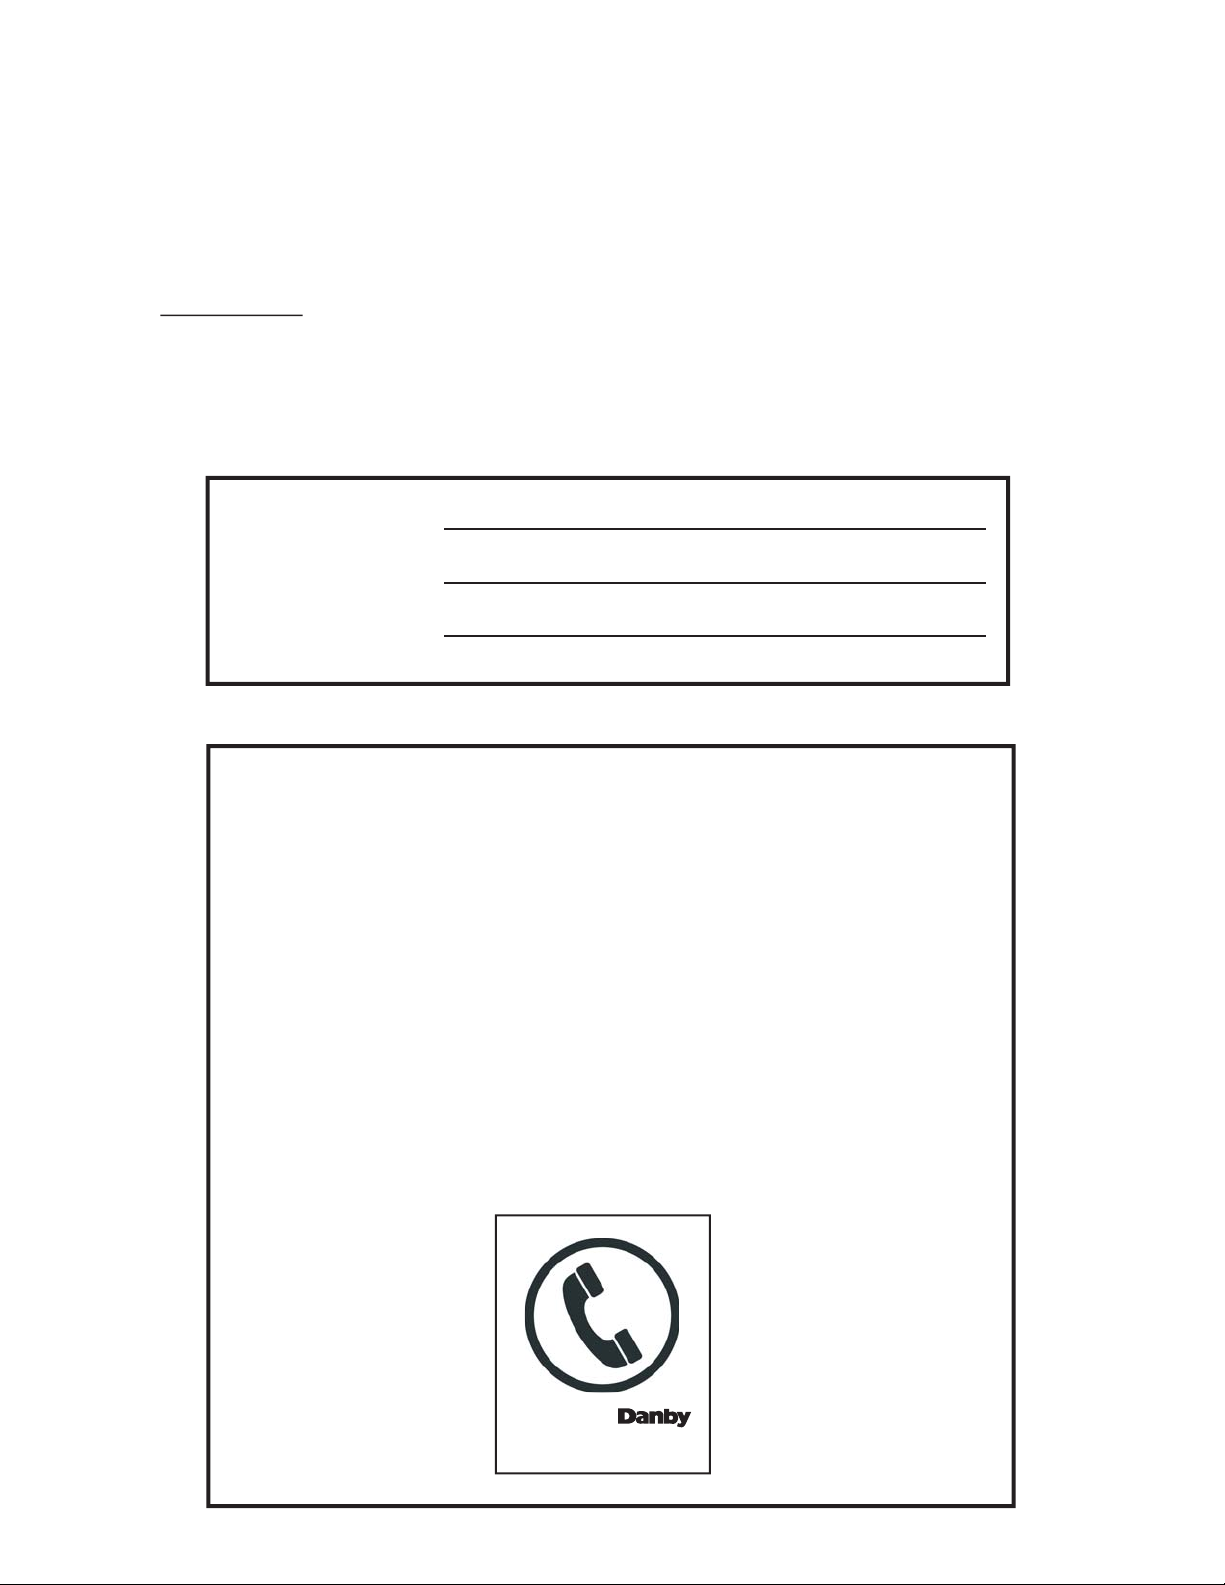
Note: You will need the below information to obtain service under warranty.
To receive service, you must provide the original receipt.
Model Number:
Serial Number:
Date of Purchase:
NEED HELP?
Before you call for service, here are a few things you can do to help us serve you
better:
Read this Owner’s Manual:
It contains instructions to help you use and maintain your appliance properly.
If you received a damaged appliance:
Immediately contact the retailer (or builder) that sold you the appliance.
Save time and money:
Check the Troubleshooting section at the end of the guide before calling. This section
helps you solve common problems that may occur.
If you do need service, you can relax, knowing help is only a phone call away.
Tel: 1-800-26-
(1-800-263-2629)
1
Page 5

Important Safety Information
READ AND FOLLOW ALL SAFETY INSTRUCTIONS
Please ensure that component parts shall be replaced with like components and that servicing shall be done by
factory authorized service personnel, so as to minimize the risk of possible ignition due to incorrect parts or
improper service.
This appliance must be grounded. In the event of an electrical short circuit, grounding reduces the risk of
electrical shock by providing an escape wire for the electrical current.
ELECTRICAL REQUIREMENTS
WARNING
ELECTRICAL RATING: The serial rating plate indicates the
voltage and frequency the unit is designed for.
Due to possible variations in line voltage (caused by overloading of circuits), it is advisable to install a separate fuse circuit from the meter panel. This will help to eliminate current fl uctuation which might cause motor trouble.
IMPORTANT WARNING
An empty refrigerator is a very dangerous attraction to children. Remove either the gasket or lid from
unused appliances, or take some other action that will guarantee it harmless.
DANGER: Risk of child entrapment. Before you throw away your old refrigerator:
• Take off doors.
• Leave the shelves in place so that children may not easily climb in.
DON’T WAIT! DO IT NOW!
WARNING! EXPLOSION HAZARD!
Risk of fi re or explosion due to puncturing of refrigerant tubing. Do not use sharp objects to aid in
defrost. Please handle with care. Keep fl ammable materials and vapors such as gasoline away from
the refrigerator. Use nonfl ammable cleaner.
Disposal of this unit should be in accordance with federal and local regulations.
GROUNDING INSTRUCTIONS
This appliance is equipped with a cord having a grounding wire with a grounding plug. The plug must be plugged into an
outlet that is properly installed and grounded.
WARNING - Improper use of the grounding plug can result in a risk of electric shock. Consult a qualifi ed electrician or
service agent if the grounding instructions are not completely understood, or if doubt exists as to whether the appliance is
properly grounded.
DO NOT USE AN EXTENSION CORD
Use an exclusive 115V wall outlet. Do not connect your refrigerator to extension cords or together with another appliance
in the same wall outlet. Do not splice the cord.
SAVE THESE INSTRUCTIONS!
2
Page 6

Important Safety Information
READ AND FOLLOW ALL SAFETY INSTRUCTIONS
ENERGY SAVING TIPS
• Try not to open the door too often, especially when the weather is hot and humid. Once you open the door, close it as
soon as possible.
• Every now and then check if the appliance is suffi ciently ventilated (adequate air circulation behind the appliance).
• Set the thermostat from cooler to warmer settings whenever possible (depending on how loaded the appliance is,
ambient temperatures etc.).
• Before loading the appliance with packages of hot food, make sure that they are cooled to ambient temperature.
• Ice and frost layers increase energy consumption, so defrost the appliance as soon as the frost layer is 1/4 inch / 3-5
mm thick.
• If the gasket is damaged or the door seal is poor, energy consumption is substantially higher. To restore effi ciency,
replace the gasket.
• Always follow instructions stated in this manual.
DISPOSING OF YOUR OLD APPLIANCE
The refrigerator system of the appliance is fi lled with refrigerant and insulating substances which should be separately
treated and processed. Call your nearest authorized service agent or specialized servicing centre. If you are unable to
locate one, contact your local authorities or your distributor. Be careful not to damage the tubes on the rear wall of the
appliance.
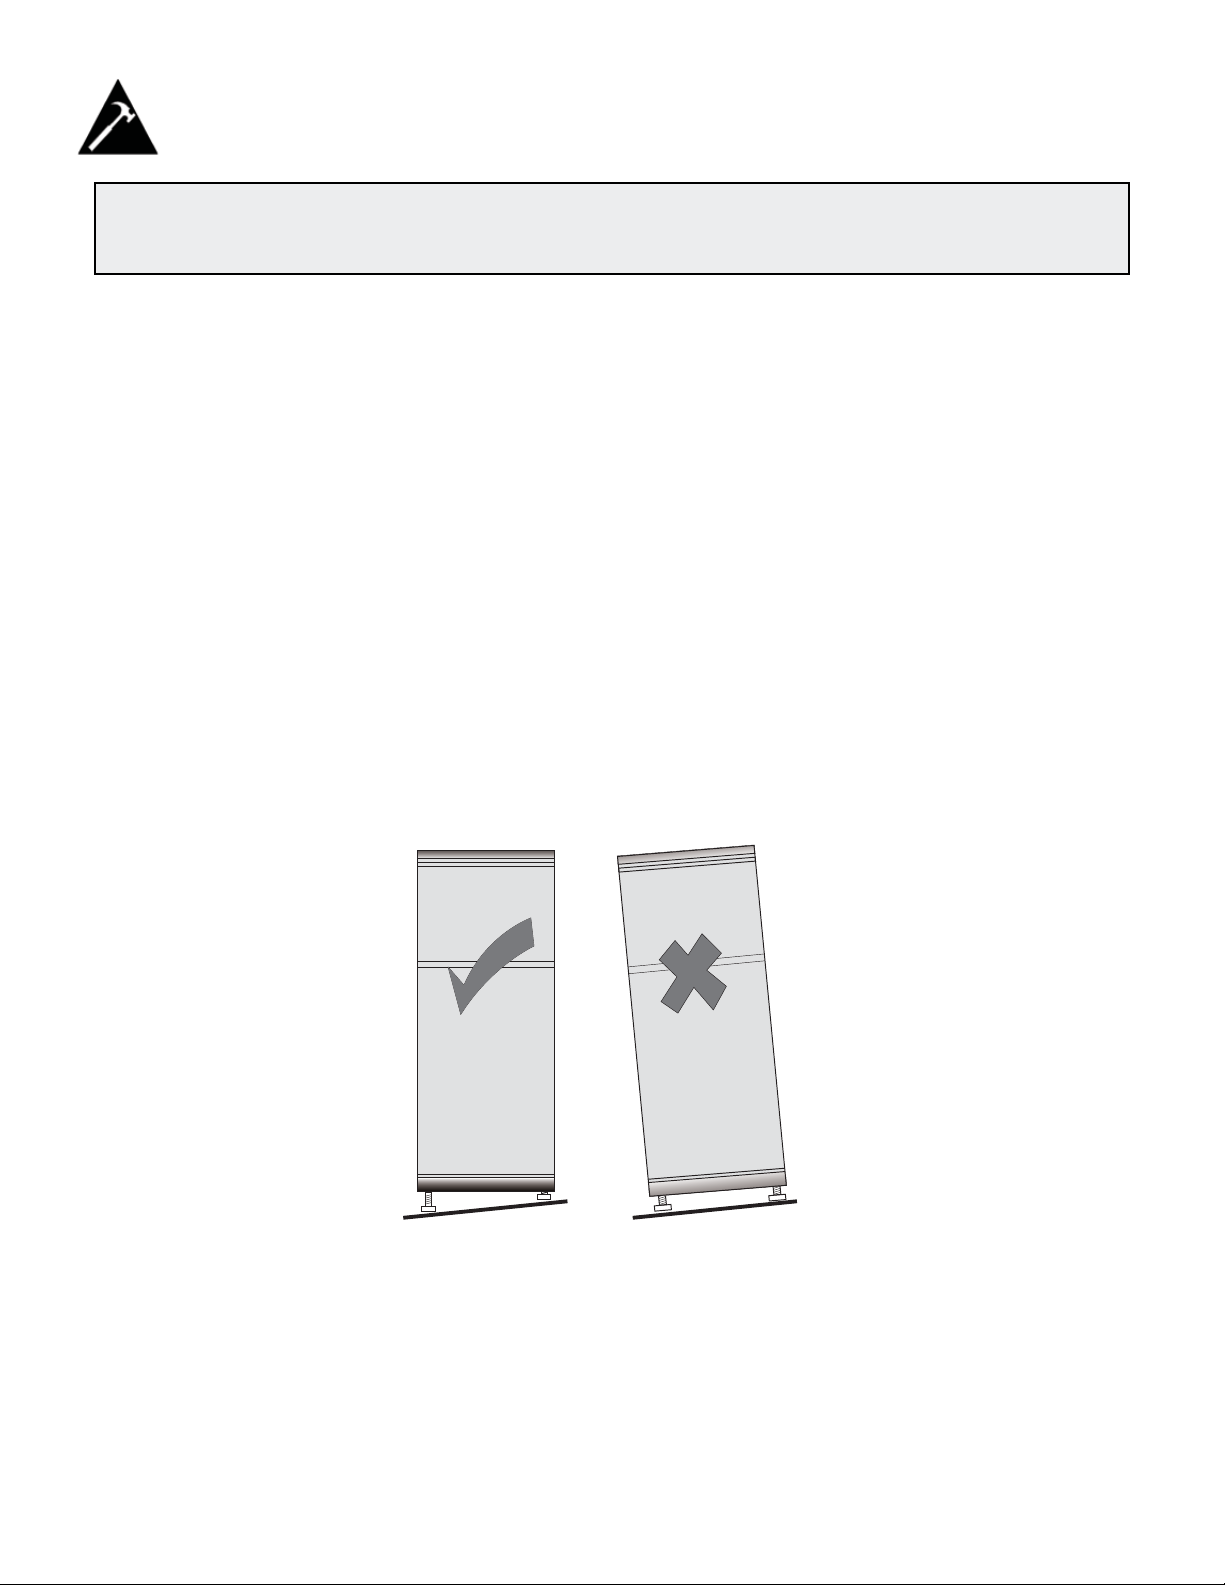
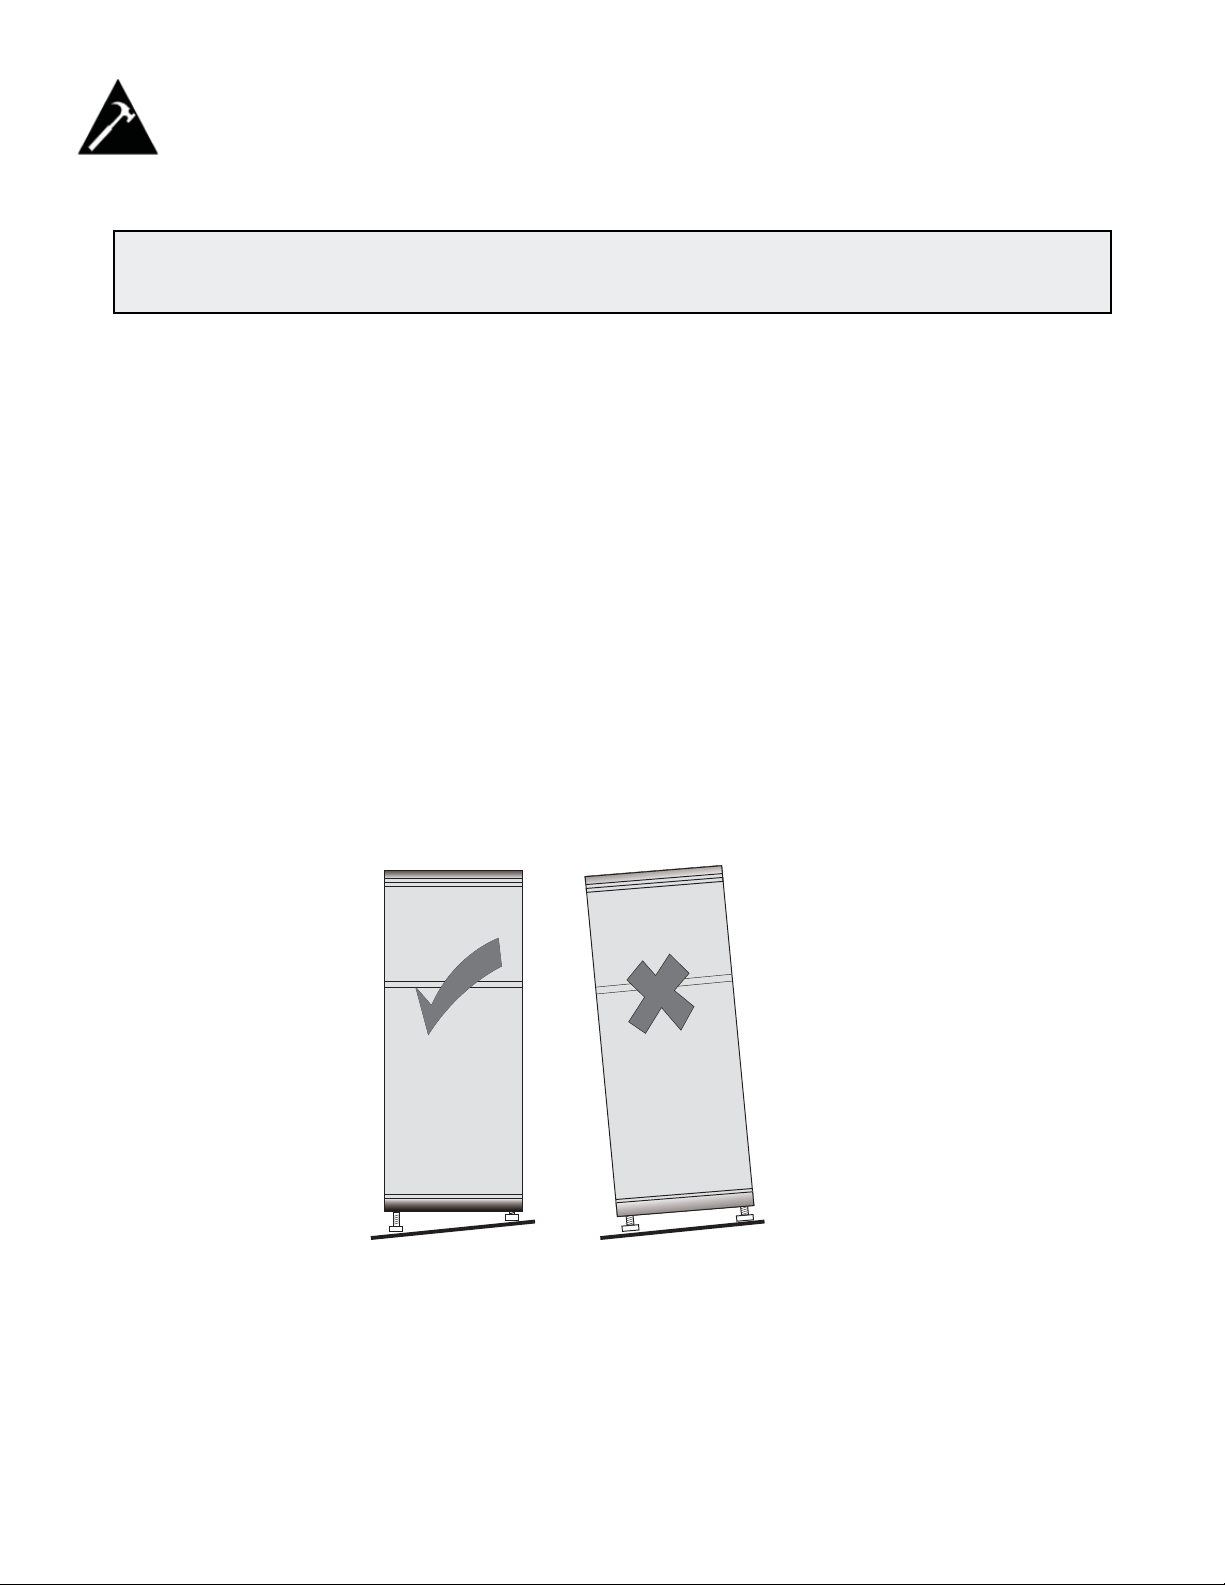
BEFORE STARTING
• To avoid vibration, the unit must be set level. This is accomplished by adjusting the front leveling leg, located under
the refrigerator.
• Before connecting this appliance to electrical power supply, leave it to stand for approximately 24 hours, which will
reduce the possibility of malfunction in the cooling system due to transport handling.
• This unit is not designed for outside installation, including installation anywhere that is not temperature controlled
(including garages, porches, carports, etc.).
• If the unit is unplugged, has lost power, or is turned off, you must wait 3 to 5 minutes before restarting the unit. If you
attempt to restart before this time delay, the refrigerator-freezer will not start.
SAVE THESE INSTRUCTIONS!
3
Page 7
Installation Instructions
Remove exterior and interior packaging, wipe the outside thoroughly with a soft dry cloth and the inside with a lukewarm, wet cloth. Avoid placing the unit in a narrow recess or near any heat source, direct sunlight or moisture. Let air
circulate freely around the unit. Keep the rear of the refrigerator 5 inches away from the wall.
LOCATION
1. Select a place with a strong, level fl oor.
2. Allow 5 inches of space between the back of the refrigerator and any adjacent wall.
3. Avoid direct sunlight and heat. Direct sunlight could damage the unit. Heat sources nearby will cause higher electricity consumption.
4. Avoid moist places. Too much moisture in the air will cause frost to form very quickly on the evaporator, and your
refrigerator will have to be defrosted more frequently.
To avoid vibration, the unit must be set level. This is accomplished by adjusting the front leveling leg, located under the
refrigerator.
INSTALLATION
Place the appliance fi rmly on a solid base. This appliance has adjustable feet on the front side; use them to level the
appliance.
NOTE: This appliance is intended for FREE-STANDING INSTALLATION ONLY, and is NOT intended to be built-in.
This appliance is approved for INDOOR USE ONLY and is NOT intended for outdoor operation.
4
Page 8
Operating Instructions
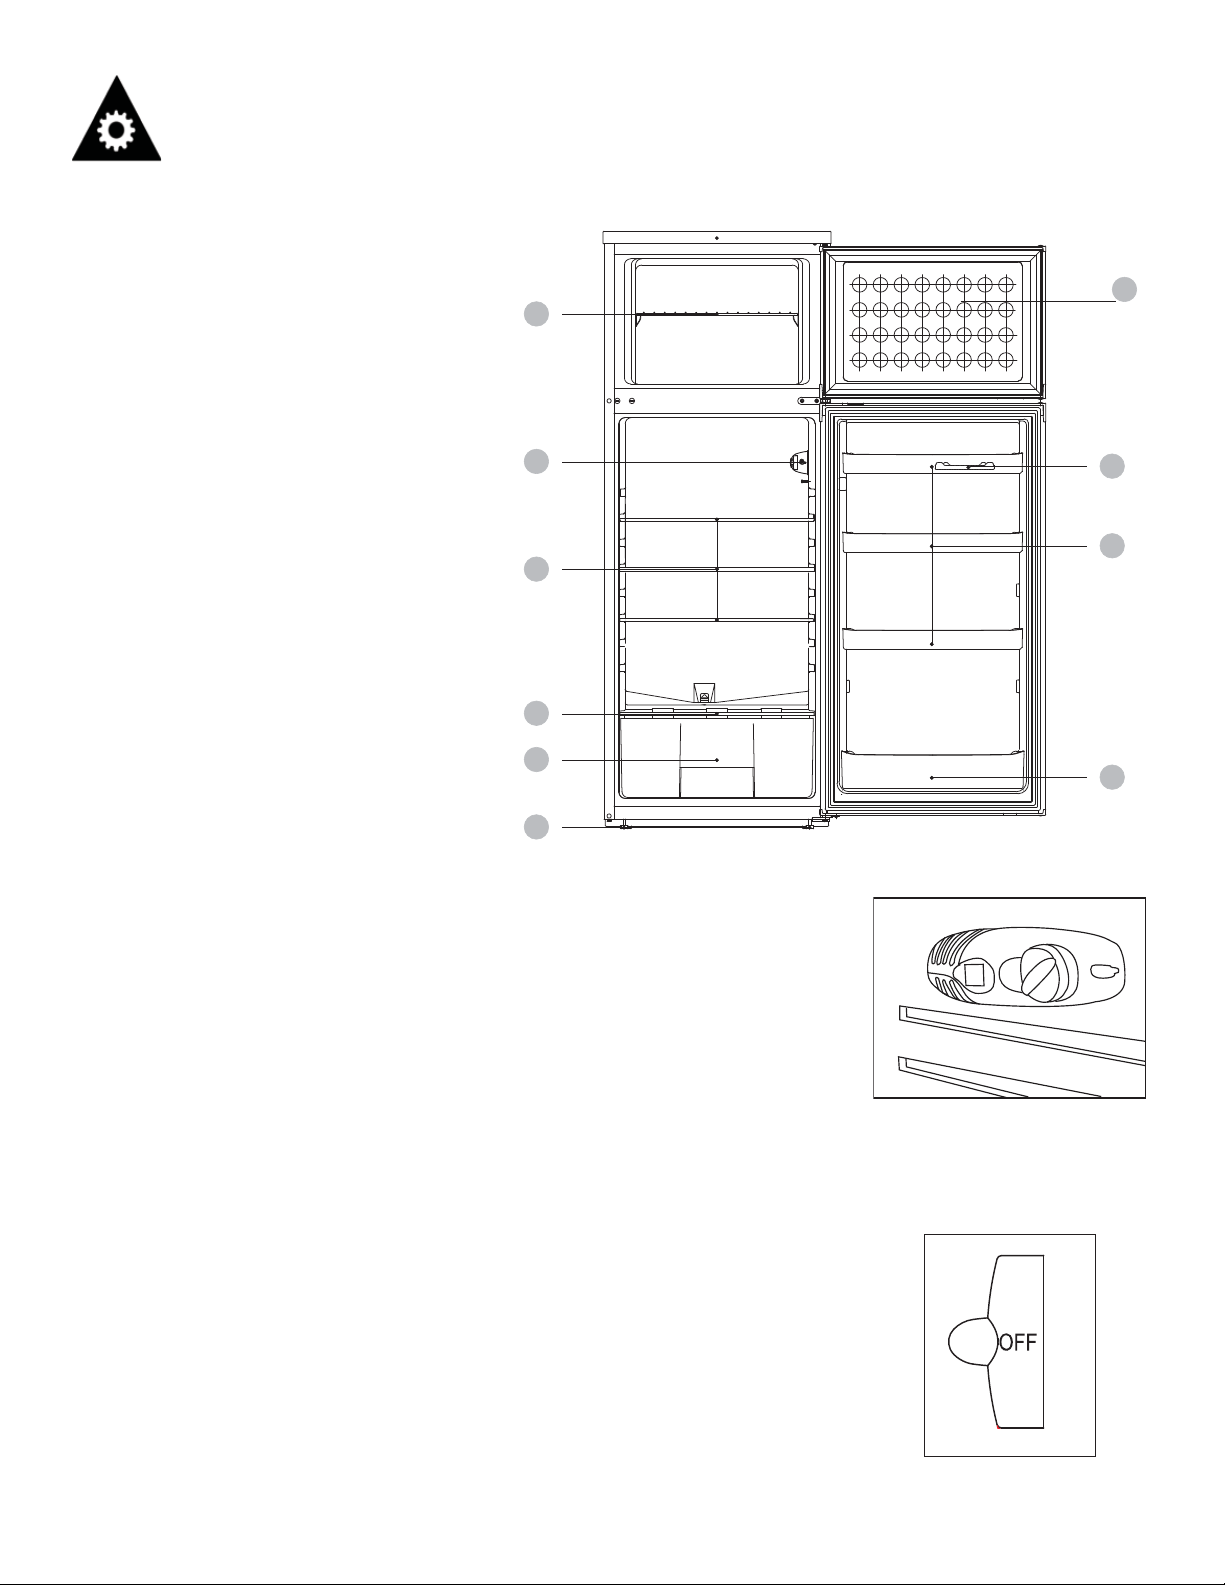
FEATURES
1. Freezer Shelf
2. Freezer Door
3. Thermostat Control
4. Refrigerator Shelves
5. Crisper Cover
6. Crisper
7. Leveling Legs
8. Egg Tray
9. Refrigerator Door Bin
10. Lower Door Bin
2
1
3
4
8
9
5
6
7
BULB REPLACEMENT
• Unplug the AC power cord from the wall.
• Remove the screw that holds the light bulb cover.
• Squeeze the tabs at the top and bottom of the light bulb cover simultaneously.
• Remove the light bulb cover.
• Make sure the light bulb is cool before removing.
• Unscrew the bulb
• Replace with a 10 watt bulb that is the same shape and size.
• Replace the light bulb cover.
TEMPERATURE SELECTION
• The fi rst time you turn the unit on, set the temperature control to “7,” the coolest
setting.
• The range of temperature controls are from position “OFF,” or NO COOLING to “7,”
the coldest. After 24 hours, adjust the temperature control to the setting that best
suits your needs. The setting of “4” should be suffi cient for home or offi ce refriger-
ator use.
Note:
• If the unit is unplugged, has lost power, or has been turned off, you must wait 3 to
5 minutes before restarting the unit. If you attempt to restart before this time delay,
the refrigerator will not start.
• Turning the refrigerator temperature control to the “OFF” position stops the cooling
cycle but does not shut off the power to the unit.
10
1
7
5
Page 9

Operating Instructions
DEFROSTING YOUR APPLIANCE
For most effi cient operation and minimum energy consumption, defrost the freezer compartment when the frost on the
appliance walls is excessive or 1/4 inch / 3-5 mm thick (see instructions below). There is no need to defrost the refrigerator compartment, because ice build up on the inner back wall is defrosted automatically. Ice may deposit on the inner
back wall during the compressor operation; later on, when the compressor is not operating the ice will defrost and the
water drops collect and drain through the outlet in the inner back wall into the drain pan situated above the compressor,
from where it evaporates.
Caution: Do not use boiling water because it may damage the plastic parts. In addition, never use a sharp or metallic
instrument to remove frost as it may damage the cooling coils and will void the warranty. We recommend using a plastic
scraper if necessary.
• Reset the thermostat to the “0” or “Off” position and disconnect the power supply.
• Remove the frozen food from the appliance and place it in a cooler to protect the food.
• Leave the door open for a while so that you can easily remove the frost.
• Use a plastic scraper but be careful not to damage the inner surfaces of the freezer.
• Wipe up the scraped off frost and ice before it is completely defrosted.
FREEZING FRESH FOODS
• Proper use of the appliance, adequately packed food, correct temperature and taking into account hygienic precautions will substantially infl uence the quality of freezing the food or storing of the frozen foods.
• This compartment is designed for the short-term storage of frozen food.
• The storage life of frozen foods varies and the recommended storage time should not be exceeded.
• Pre-packaged commercially frozen food should be stored in accordance with the frozen foods manufacturer’s instructions for a three star frozen food storage compartment or home freezer.
• Place frozen food into the freezer as quickly as possible after purchase. If there are instructions on the package,
carefully follow these instructions regarding storage times.
• Carefully select food you intend to freeze, it should be of adequate quality and suitable for freezing.
• Use correct packaging and wrap it tight.
• The packaging should be airtight and shouldn’t leak since this could cause substantial dehydration of foods.
• Foils and bags should be soft enough to tightly wrap around the foods.
• When preparing foods to be frozen, take sanitary precautions.
• Mark packages with the following data: kind and amount of food and the date of loading.
• It is extremely important that the food is frozen as quickly as possible.
• If the loading amount is too large, the quality of freezing is reduced which affects the quality of frozen foods.
FOOD STORAGE SUGGESTIONS
Fresh Food Compartment
• Never cover food compartment shelves with aluminum foil or any other shelf covering material which may prevent air
circulation.
• Always remove porous store wrapping paper from meats, poultry and fi sh. Meats should be wrapped individually and
placed in a dish for storage. Wrap fi sh and poultry in foil or heavy waxed paper. Most fi sh should be used the same
day of purchase. Packaged meats such as ham, bacon, dried beef, or frankfurter, store best in their original packages.
• Allow warm foods to cool to room temperature before placing them in the refrigerator.
• Always cover open dishes of food, especially leftovers. Use leftovers within 2 or 3 days.
6
Page 10

Operating Instructions
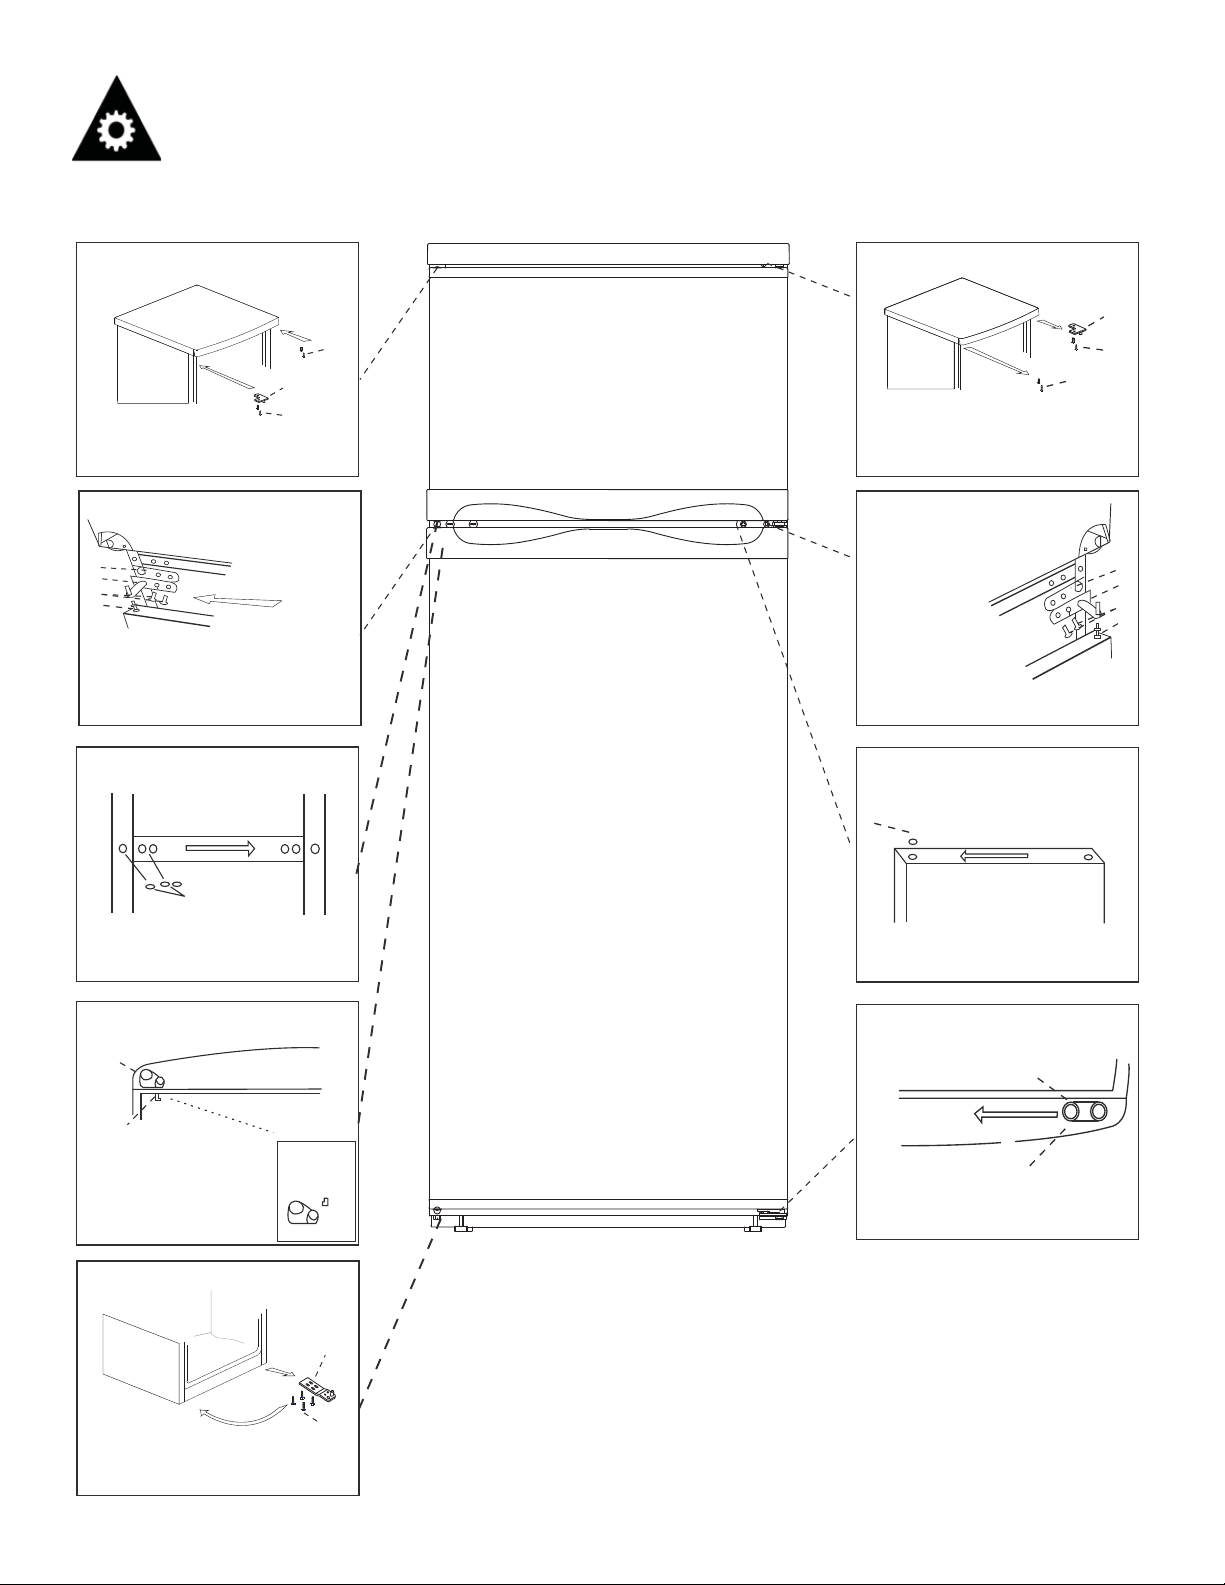
DOOR REVERSAL INSTRUCTIONS
CAUTION
To avoid personal injury to yourself and/or property, we recommend someone assist you during the door reversal process.
Your refrigerator is built with a reversible door. You have the choice of either opening it from the left or the right side. In
order to reverse the opening direction of your door, please follow these simple instructions:
Door and Hinge Removal
1. Unplug refrigerator or disconnect power.
2. Keep both doors closed until you are ready to lift them free from the cabinet.
NOTE: Provide additional support for the doors while the hinges are being moved. Do not depend on the door magnets to
hold the doors in place while you are working.
3. Remove the parts for the top hinge as shown in Top Hinge graphic. Lift the freezer door from the cabinet.
4. Remove the parts for the center hinge as shown in the Center Hinge graphic. Lift the refrigerator door free from the
cabinet.
5. Remove the parts for the bottom hinge as shown in the Bottom Hinge graphic.
Door Reversal Cabinet
1. Remove the cover of upper hinge hole from left side and move them to opposite side.
2. Remove hole plugs from left side and move them to opposite side.
Doors
1. Remove door hinge hole plug from the top of freezer and refrigerator door.
2. Remove the door stop from refrigerator door and move to the other side.
3. Take out the left door stop of freezer door and screw from the accessory bag and fi x it on the handle.
Note: The left door and the right door stop of the freezer door are different. They can’t replace each other.
Door and Hinge Replacement
1. Replace the parts for the bottom hinge as shown. Tighten screws. Replace the refrigerator door.
NOTE: Provide additional support for the doors while the hinges are being moved. Do not depend on the door magnets to
hold the doors in place while you are working.
2. Assemble the parts for the center hinge as shown and tighten all screws. Replace the freezer door.
3. Assemble the parts for the top hinge as shown. Do not tighten screws completely.
4. Line up the doors so that the bottom of the freezer door aligns evenly with the top of the refrigerator door. Tighten all
screws.
Final Steps
1. Check all holes to make sure that hole plugs and screws are in place.
2. Plug in refrigerator or reconnect power.
3. Reset the controls (see “temperature control” section).
4. Return all removable door parts to doors and food to product.
7
Page 11
Operating Instructions
DOOR REVERSAL INSTRUCTIONS
Figure 9
1.
Screws
2.Top Hinge
3.Top Hinge Screws
Figure 8
1
2
3
4
1.Center Hinge Spacer
2.Center Hinge
3.Screws
4.Bushing
Figure 7
Figure 1
2
1
2
1.
3
1.Center Hinge Spacer
2.Center Hinge
3.Screws
4.Bushing
1
Screws
2.Top Hinge
3.Top Hinge Screws
Figure 2
Figure 3
1
3
1
2
3
4
1
1.Hole Plugs
Figure 6
1
2
1.Left Door Stop
2.Door Stop Screw
Figure 5
1.Bottom Hinge
2.Bottom Hinge Screws
Accessory
Bag
1
2
1.Door Hinge Hole Plug
Figure 4
1
2
1.Door Stop
2.Door Stop Screw
8
Page 12

Care and Maintenance
CLEANING THE APPLIANCE
• Turn the temperature control to the “OFF” position, unplug the unit and remove the food and interior accessories.
• Wash the inside with a warm water and baking soda solution. The solution should be about 2 tablespoons of baking
soda to a quart of water.
• Wash the baskets / crisper and interior accessories with a mild detergent solution.
• The outside of the unit should be cleaned with mild detergent and warm water.
Caution: Failure to unplug the appliance could result in electrical shock or personal injury.
VEGETABLE CRISPER
The tray at the bottom of the refrigerator is covered to retain moisture. The crisper compartment will enable you to store
vegetables and fruits which would otherwise dry out rapidly.
POWER FAILURE
Most power failures are corrected within a few hours and should not affect the temperature of your refrigerator-freezer if
you minimize the number of times the door is opened. If the power is going to be off for a longer period of time, you need
to take the proper steps to protect your food.
VACATION TIME
Short vacations: Leave the unit operating during vacations of less than three weeks.
Long vacations: If the appliance will not be used for several months, remove all food and unplug the power cord. Clean
and dry the interior thoroughly. To prevent odor and mold growth, leave the door open slightly, blocking it open if necessary.
IF YOU MOVE
Remove or securely fasten down all loose items inside the unit. To avoid damaging the leveling legs (some models), turn
them all the way in to the base.
SOME IMPORTANT RULES FOR THE CORRECT USE OF
THE REFRIGERATOR
• Never place hot foods in the refrigerator.
• Never place spoiled foods in the refrigerator.
• Don’t overload the refrigerator.
• Don’t open the door unless necessary.
• Should the refrigerator be stored without use for long
periods, it is suggested, after a careful cleaning, to leave
the door ajar to allow the air to circulate inside the unit in
order to avoid possible formations of condensation, mold or
odors.
9
Page 13

Troubleshooting
Occasionally, a minor problem may arise, and a service call may not be necessary- use this troubleshooting guide for
a possible solution. If the unit continues to operate improperly, call an authorized service depot or Danby’s Toll Free
Number for assistance.
Tel: 1-800-26- (1-800-263-2629)
PROBLEM POSSIBLE CAUSE SOLUTION
Does not work • No power to unit
• Power cord is unplugged
• Wrong voltage is being used
Refrigerator runs continuously • Temperature setting is too
cold
• Door is not closed
• Hot food inserted
• Door opened too long or too
often
• Close proximity to heat
source or direct sunlight
Internal temperature not cold
enough
Internal temperature too cold • Temperature control set too
Freezer not cold enough • Temperature control too warm
Light will not work • No power to unit
• No power to unit
• Power cord is unplugged
• Temperature control set too
high (too warm)
• Door is not closed
• Hot food inserted
• Door opened too long or too
often
• Air fl ow obstruction
• Wrong voltage is being used
• Close proximity to heat
source or direct sunlight
cold
• Door not closed
• Hot food inserted
• Doors open too long/often
• Wrong voltage being used
• Power cord is unplugged
• Bulb is loose/needs replacing
• Door switch is stuck
• Check connection of power
cord to power source
• Plug in the unit
• Use proper voltage
• Set temperature to a warmer
setting
• Close door securely
• Be sure food is at room temperature before inserting
• Minimize door openings/duration
• Do not place unit close to
heat sources or direct sunlight
• Check connection of power
cord to power source
• Plug in unit
• Check setting and increase
(make cooler) as needed
• Close door securely
• Be sure that food is at room
temperature
• Minimize door openings/duration
• Allow room for air to circulate
around the unit
• Use proper voltage
• Do not place unit close to
heat sources or direct sunlight
• Adjust settings as needed
• Adjust settings as needed
• Close door securely
• Cool food before inserting
• Minimize door openings/duration
• Use proper voltage
• Check connection of power
cord to power source
• Plug in unit
• Tighten or replace bulb
• Check the switch for obstructions, clean if necessary
10
Page 14
LIMITED IN-HOME APPLIANCE WARRANTY
LIMITED IN-HOME APPLIANCE WARRANTY
This quality product is warranted to be free from manufacturer’s defects in material and workmanship, provided that the unit is used under the normal operating
This quality product is warranted to be free from manufacturer’s defects in material and workmanship, provided that the unit is
conditions intended by the manufacturer.
used under the normal operating conditions intended by the manufacturer.
This warranty is available only to the person to whom the unit was originally sold by Danby Products Limited (Canada) or Danby Products Inc. (U.S.A.) (hereafter
This warranty is available only to the person to whom the unit was originally sold by Danby Products Limited (Canada) or
“Danby”) or by an authorized distributor of Danby, and is non-transferable.
Danby Products Inc. (U.S.A.) (hereafter “Danby”) or by an authorized distributor of Danby, and is non-transferable.
TERMS OF WARRANTY
Plastic parts, are warranted for thirty (30) days only from purchase date, with no extensions provided.
Plastic parts, are warranted for thirty (30) days only from purchase date, with no extensions provided.
First year
First Year
To obtain
service
To obtain
Service
Boundaries of
Boundaries of
in-home service
In Home Service
During the first twelve (12) months, any functional parts of this product found to be defective, will be
repaired or replaced, at warrantor’s option, at no charge to the ORIGINAL purchaser.
During the rst twelve (12) months, any functional parts of this product found to be defective, will be repaired or replaced, at warrantor’s
option, at no charge to the ORIGINAL purchaser.
Danby reserves the right to limit the boundaries of “In Home Service” to the proximity of an Authorized
Service Depot. Any appliance requiring service outside the limited boundaries of “In Home Service” ,it
Danby reserves the right to limit the boundaries of “In Home Service” to the proximity of an Authorized Service Depot. Any app liance
will be the consumer’s responsibility to transport the appliance (at their own expense) to the original
requiring service outside the limited boundaries of “In Home Service” , it will be the consumer’s responsibility to transport the appliance (at
retailer (point of purchase) or a service depot for repair. See “Boundaries of In Home Service” below.
their own expense) to the original retailer (point of purchase) or a service depot for repair. See “Boundaries of In Home Serv ice” below.
Contact your dealer from whom your unit was purchased, or contact your nearest authorized Danby
Contact your dealer from whom your unit was purchased, or contact your nearest authorized Danby service depot, where service
service depot, where service must be performed by a qualified service technician. If service is performed
must be performed by a qualied service technician.
on the units by anyone other than an authorized service depot, or the unit is used for commercial
If service is performed on the units by anyone other than an authorized service depot, or the unit is used for commercial appli cation, all
application, all obligations of Danby under this warranty shall be void.
obligations of Danby under this warranty shall be void.
If the appliance is installed in a location that is 100 kilometres (62 miles) or more from the nearest
If the appliance is installed in a location that is 100 kilometers (62 miles) or more from the nearest service center your unit must be
service centre your unit must be delivered to the nearest authorized Danby Service Depot, as service
delivered to the nearest authorized Danby Service Depot, as service must only be performed by a technician qualied and certif ied for
must only be performed by a technician qualified and certified for warranty service by Danby. Transpor-
warranty service by Danby. Transportation charges to and from the service location are not protected by this warranty and are t he
tation charges to and from the service location are not protected by this warranty and are the responsi-
responsibility of the purchaser.
bility of the purchaser.
TERMS OF WARRANTY
Nothing within this warranty shall imply that Danby will be responsible or liable for any spoilage or damage to food or other c ontents of this appliance, whether due
Nothing within this warranty shall imply that Danby will be responsible or liable for any spoilage or damage to food or other
to any defect of the appliance, or its use, whether proper or improper.
contents of this appliance, whether due to any defect of the appliance, or its use, whether proper or improper.
EXCLUSIONS
EXCLUSIONS
Save as herein provided, by Danby, there are no other warranties, conditions, representations or guarantees, express or
Save as herein provided, Danby, there are no other warranties, conditions, representations or guarantees, express or implied, m ade or intended by Danby or its
implied, made or intended by Danby or its authorized distributors and all other warranties, conditions, representations or
authorized distributors and all other warranties, conditions, representations or guarantees, including any warranties, conditio ns, representations or guarantees
guarantees, including any warranties, conditions, representations or guarantees under any Sale of Goods Act or like legislation
under any Sale of Goods Act or like legislation or statue is hereby expressly excluded. Save as herein provided, Danby shall no t be responsible for any damages
or statute is hereby expressly excluded. Save as herein provided, Danby shall not be responsible for any damages to persons
to persons or property, including the unit itself, howsoever caused or any consequential damages arising from the malfunction o f the unit and by the purchase of
or property, including the unit itself, howsoever caused or any consequential damages arising from the malfunction of the unit
the unit, the purchaser does hereby agree to indemnify and hold harmless Danby from any claim for damages to persons or propert y caused by the unit.
and by the purchase of the unit, the purchaser does hereby agree to indemnify and hold harmless Danby from any claim for
damages to persons or property caused by the unit.
No warranty or insurance herein contained or set out shall apply when damage or repair is caused by any of the following:
1) Power failure.
No warranty or insurance herein contained or set out shall apply when damage or repair is caused by any of the following:
1) Power failure.
2) Damage in transit or when moving the appliance.
2) Damage in transit or when moving the appliance.
3) Improper power supply such as low voltage, defective house wiring or inadequate fuses.
3) Improper power supply such as low voltage, defective house wiring or inadequate fuses.
4) Accident, alteration, abuse or misuse of the appliance such as inadequate air circulation in the room or abnormal operating con ditions
4) Accident, alteration, abuse or misuse of the appliance such as inadequate air circulation in the room or abnormal operating
conditions (extremely high or low room temperature).
5) Use for commercial or industrial purposes (i.e., If the appliance is not installed in a domestic residence).
6) Fire, water damage, theft, war, riot, hostility, acts of God such as hurricanes, floods etc.
7) Service calls resulting in customer education.
8) Improper Installation (i.e., building-in of a free standing appliance or using an appliance outdoors that is not approved for
outdoor application). Proof of purchase date will be required for warranty claims; so, please retain bills of sale. In the event
Proof of purchase date will be required for warranty claims; so, please retain bills of sale. In the event warranty service is required, present this document to our
warranty service is required, present this document to our AUTHORIZED SERVICE DEPOT.
AUTHORIZED SERVICE DEPOT.
(extremely high or low room temperature).
5) Use for commercial or industrial purposes (ie. If the appliance is not installed in a domestic residence).
6) Fire, water damage, theft, war, riot, hostility, acts of God such as hurricanes, oods etc.
7) Service calls resulting in customer education.
8) Improper Installation (ie. Building-in of a free standing appliance or using an appliance outdoors that is not approved for out door application).
GENERAL PROVISIONS
GENERAL PROVISIONS
Danby Products Limited
Danby Products Limited
PO Box 1778, Guelph, Ontario, Canada N1H 6Z9
PO Box 1778, Guelph, Ontario, Canada N1H 6Z9
Telephone: (519) 837-0920 FAX: (519) 837-0449
Telephone: (519) 837-0920 FAX: (519) 837-0449
Warranty Service
Warranty Service
In-home
In-home
1-800-263-2629
1-800-263-2629
07/14
04/09
Danby Products Inc.
PO Box 669, Findlay, Ohio, U.S.A. 45840
Telephone: (419) 425-8627 FAX: (419) 425-8629
PO Box 669, Findlay, Ohio, U.S.A. 45840
Telephone: (419) 425-8627 FAX: (419) 425-8629
Danby Products Inc.
Page 15

Merci d’avoir choisi Danby
Nous savons que vous êtes excité. Nous sommes aussi! Cependant, le plus que vous vous familiarisez avec votre
nouvel appareil, le mieux va être votre expérience. Nous suggérons donc de lire ces instructions avant connecter votre
nouvel appareil. Ce manuel contient des informations opérationnel important qui vous aidera à faire un usage pleine de les
caractéristiques techniques disponibles dans votre appareil Danby. Le manuel contient également des informations conçu
pour améliorer la fiabilité et la sécurité de votre appareil ainsi que des conseils pour le maintien, pour vous assurez des annees
de bonheur.
Se il vous plaît visitez www.danby.com pour accéder les outils libre-service, FAQ et plus encore. Si jamais vous avez besoin
d'aide supplémentaire, s’il vous plaît appelez 1-800-26-Danby (1-800-263-2629). S’il vous plaît ayez votre facture d’achat, le
numéro de modèle, et le numéro de série près durant l'appel.
Remarque : Ces renseignements seront nécessaires si votre appareil a besoin d’entretien ou pour les demandes de
renseignements généraux. Pour bénéficier d’une opération de maintenance ou de dépannage, le reçu
original sera exigé.
Numéro de modèle :
Numéro de serie :
Date d’achat :
BESOIN D’ASSISTANCE ?
Veuillez trouver quelques conseils avant de faire appel à nos services, cela
nous aidera à mieux vous servir :
Lisez ce guide :
Il comprend des instructions pour l’utilisation et l’entretien adapté de votre
appareil.
Si votre nouvel appareil est endommagé :
Contactez immédiatement le revendeur (ou le fabricant).
Gagnez du temps et de l’argent :
Avant de faire appel à nos services, consultez à nouveau la section
« Dépannage ». Cette section vous aidera à résoudre des problèmes courants.
Si une réparation est nécessaire, ne vous inquiétez pas, la solution est au
bout du fil.
Tel: 1-800-26-
(1-800-263-2629)
12
Page 16

Consignes de sécurité importantes
PRENDRE CONNAISSANCE DE TOUTES LES INFORMATIONS
RELATIVES À LA SÉCURITÉ AVANT D’UTILISER LE PRODUIT
Veuillez vous assurer que les pièces de rechange sont remplacées par des pièces similaires, et que l’entretien
soit effectué par un technicien agréé par l’usine, afi n réduire le risque d’incendie à cause de mauvaises pièces
ou d’entretien mal fait.
Cet appareil doit être mis à la terre. En cas de courtcircuit, la mise à la terre réduit les risques de décharge
électrique en fournissant un échappatoire au courant électrique. L’appareil est muni d’un cordon électrique
comprenant un fi l de mise à la terre et une fi che de terre.
CONDITIONS ÉLECTRIQUES
ATTENTION
ÉNERGIÉ ÉLECTRIQUE : Le voltage et la fréquence requis pour
ce réfrigérateur sont indiqués sur la plaque d’identifi cation.
Dû aux variations possibles sur la ligne de voltage (causé par une surcharge des circuits) il est recommandé d’installer
un circuit séparé avec fusibles à partir du panneau compteur. Ceci aidera à éliminer les fl uctuations du courant qui peu-
vent endommager le moteur.
AVERTISSEMENT IMPORTANT!
Un réfrigérateur vide peut représenter un attrait dangereux aux enfants. Retirer le joint d’étanchéité, les loquets,
les couvercles ou portes des appareils ménagers inutilisés, ou prenez d’autres mesures qui assureront que
l’appareil ne posera aucun danger.
DANGER : Risque de piéger un enfant. Avant de mettre votre vieux congélateur ou réfrigérateur au rebut :
• Enlever les portes.
• Laisser les tablettes en place afi n que les enfants ne puissent pas facilement y entrer.
N’ATTENDEZ PAS! FAITES-LE IMMÉDIATEMENT!
AVERTISSEMENT! DANGER D’EXPLOSION!
Risque d’incendie ou d’explosion causé par la perforation de tuyaux frigorigènes. Ne jamais utiliser un objet
pointu pour assister au dégel. Manipuler avec soin. Garder les matériaux et vapeurs infl ammables comme de
l’essence loin du réfrigérateur. Utiliser un nettoyant ininfl ammable.
La mise au rebut de cet item doit être faite selon les lois locales et fédérales.
MISE À LA TERRE
L’appareil est muni d’un cordon électrique comprenant un fi l de mise à la terre et une fi che de terre. Branchez la fi che
dans une prise de courant correctement installée et mise à la terre.
AVERTISSEMENT - Une fi che de mise à la terre mal branchée peut entraîner un risque d’incendie, de choc électrique
ou de blessures aux personnes qui utilisent l’appareil. Si vous n’êtes pas certain que l’appareil est correctement mis à la
terre, consultez un préposé du service qualifi é.
N’UTILISER JAMAIS DE FIL DE RALLONGE
Brancher le réfrigérateur à son propre curcuit de 115V. N’utilisez pas de rallonge électrique pour brancher votre réfrigérateur. Ne branchez pas le réfrigérateur à une prise femelle multiple qui sera également utilisée pour d’autres appareils
électriques. N’épissez pas le cordon électrique.
CONSERVEZ CES INSTRUCTIONS!
13
Page 17

Consignes de sécurité importantes
PRENDRE CONNAISSANCE DE TOUTES LES INFORMATIONS
RELATIVES À LA SÉCURITÉ AVANT D’UTILISER LE PRODUIT
CONSEILS RELATIFS AUX ÉCONOMIES D’ÉNERGIE
• Essayez de ne pas ouvrir la porte trop fréquemment, surtout lorsque les conditions météorologiques sont chaudes et
humides. Une fois la porte ouverte, fermez-la dès que possible.
• Vérifi ez de temps en temps si l’appareil est suffi samment ventilé (si l’air circule bien derrière l’appareil).
• Réglez le thermostat dès que possible pour que les paramètres passent d’une valeur élevée à moins élevée (en
fonction du volume de l’appareil occupé pas les aliments, de la température de la pièce, etc.).
• Avant de mettre au réfrigérateur des emballages contenant des aliments frais, assurez-vous qu’ils sont refroidis à la
température de la pièce.
• La présence de couches de glace et de givre augment la consommation d’énergie; dégivrez l’appareil dès que
l’épaisseur de la couche de givre atteint 3 à 5 mm / 1/4 po.
• Lorsque le joint d’étanchéité est endommagé ou que la porte ne ferme pas hermétiquement, la consommation
d’énergie est considérablement plus élevée. Afi n de rétablir l’effi cacité replacez le joint d’étanchéité.
• Il convient de toujours prendre en compte les directives fi gurant dans le guide d’utilisation.
ÉLIMINATION DES APPAREILS USÉS
Le système frigorifi que de l’appareil contient un fl uide frigorigène et des substances isolantes qui doivent être trans-
formés et traités séparément. Appelez votre réparateur autorisé ou centre de réparations spécialisé le plus proche. Si
vous êtes dans l’impossibilité d’en trouver un, contactez les autorités ou le distributeur de votre localité. Prenez soin de
ne pas endommager les tubes situés sur la paroi arrière de l’appareil.
AVANT DE COMMENCER
• Pour éviter la vibration, l’appareil doit être absolument horizontal. Les deux premieres pieds de nivellement au dessous du réfrigérateur peuvent être ajustés.
• Laisser reposer le réfrigérateur pendant 24 heures avant de le brancher à l’alimentation électrique. Ceci réduit la
posibilité de problèmes du système de refroidissement causés par la manutention durant le transport.
• Cet appareil n’a pas été conçu pour une installation extérieur, incluant l’installation dans un endroit qui n’a pa une
temperature contrôlée (y compris les garages, les vérandas, les abris de voitures, etc.).
• Lorsque l’appareil est débranché, que le courant est coupé ou qu’il est arrêté, il faut attendre de 3 à 5 minutes avant
de le remettre en marche. En cas de tentative de remise en marche avant que ce laps de temps se soit écoulé, le
réfrigérateur-congélateur ne se remettra pas en marche.
CONSERVEZ CES INSTRUCTIONS!
14
Page 18
Instructions d’installation
EMPLACEMENT
Enlevez les emballages extérieurs et intérieurs. Essuyez complètement l’extérieur avec un linge doux sec et
l’intérieur avec un linge humide tiède. Il ne faut jamais situer l’appareil dans un recoin étroit, proche d’une source
d’air chaud. L’air doit circuler à l’entour de l’appareil. Eloigner le réfrigérateur au moins 5 pouces du mur.
1. Choisir un place qui a un plancher fort et à niveau.
2. Éloigner l’appareil de 5 pouces des murs arrière et de côté.
3. Éviter les rayons de soleil et la chaleur directs qui peuvent affecter la surface en acrylique. Les sources de chaleur
rapprochées augmentent la consommation d’énergie.
4. Éviter les endroits très humides. L’humidité élevée dans l’air occasionne la formation rapide de gèle sur l’évaporateur
et le réfrigérateur. Le réfrigérateur devra être dégivré fréquemment.
Pour éviter les vibrations, l’unité doit être de niveau ensemble. Ceci est réalisé en ajustant le pied de nivellement avant,
située sous le réfrigérateur.
INSTALLATION
Placez l’appareil de manière à ce qu’il repose de manière ferme sur une base solide. L’appareil possèdent des pieds
réglables à l’avant; utilisez-les pour mettre les appareils à niveau.
REMARQUE : Cet appareil est pour L’INSTALLATION AUTONOME SEULEMENT, et n’est pas pour l’installation
intégrée. Cet appareil est approuvé pour L’USAGE D’INTÉRIEUR SEULEMENT et n’est pas approuvé pour l’usage
extérieur.
15
Page 19

Consignes d’utilisation
CARACTÉRISTIQUES
1. Clayette du congélateur
2. Porte du congélateur
3. Cadran du thermostat
4. Clayettes du réfrigérateur
5. Couvercle en verre
6. Bac à légumes
7. Pieds de nivellement
8. Plateau à œufs
9. Casier de rangement dans la porte
du réfrigérateur
10. Casier de rangement inférieur
2
1
3
4
8
9
5
6
7
CHANGEMENT DE L’AMPOULE
• Débranchez le cordon d’alimentation du mur.
• Retirez la vis qui maintient le couvercle de l’ampoule.
• Pressez simultanément les onglets en haut et en bas de la couverture de l’ampoule.
• Retirez le couvercle de l’ampoule.
• Avant de la retirer, assurez-vous que l’ampoule a refroidi.
• Dévissez l’ampoule.
• Remplacez-la par une ampoule de 10 watts qui est de la même forme et de la même
taille.
• Replacez le couvercle sur l’ampoule.
SÉLECTION DE LA TEMPÉRATURE
• La première fois que vous allumez l’appareil, réglez le contrôle de la température à
« 7 », la température la plus froide.
• Le contrôle de température va de la position « OFF » c.-à-d. PAS DE REFROIDISSEMENT à la position « 7 », la température la plus froide. Après 24 à 48 heures,
ajustez le thermostat à la température qui correspond le mieux à vos besoins. La
position « 4 » est celle qui convient pour l’utilisation du réfrigérateur à la maison ou
au bureau.
Remarque :
• Lorsque l’appareil est débranché, que le courant est coupé ou qu’il est arrêté, il
faut attendre de 3 à 5 minutes avant de le remettre en marche. En cas de tentative
de remise en marche avant que ce laps de temps se soit écoulé, le réfrigérateur
ne se remettra pas en marche.
• Tourner le thermostat sur la position « OFF » arrête le cycle de refroidissement,
mais ne coupe pas l’alimentation électrique de l’unité.
16
10
1
7
Page 20

Consignes d’utilisation
DÉGIVRER VOTRE APPAREIL
Pour un fonctionnement effi cace et une consommation d’énergie minimale, dégivrez le congélateur lorsque le givre
sur les murs de l’appareil atteint plus de 3-5 mm ou 1/4 de pouce d’épaisseur (voir les instructions ci-dessous). Nul
besoin de dégivrer la partie réfrigérateur, car les dépôts de glace se formant sur la paroi arrière intérieure sont dégivrés
de manière automatique. Il se peut que de la glace se dépose sur la paroi intérieure arrière lorsque le compresseur est
en marche. Par contre, si le compresseur n’est pas en état de marche, la glace sera dégivrée et les gouttes d’eau seront
recueillies. Elles sont évacuées par la sortie de la paroi arrière intérieure et se déversent dans le bac situé au-dessus du
compresseur, d’où elles s’évaporent.
Mise en garde : N’utilisez pas d’eau bouillante car elle pourrait abîmer les pièces en plastique. Aussi, n’utilisez jamais
d’instrument pointu ou métallique pour enlever le givre car vous pourriez endommager les serpentins de refroidissement
et par conséquent annuler la garantie. Nous vous recommandons d’utiliser un grattoir en plastique.
• Remettez le thermostat à la position « 0 » ou « OFF » et débranchez l’appareil.
• Retirez les aliments congelés de l’appareil et placez-les dans une glacière pour les garder au frais.
• Laissez la porte ouverte assez longtemps pour ramollir le givre pour pouvoir le retirer facilement à l’aide d’un grattoir.
• Utilisez un grattoir en plastique, mais attention à ne pas endommager les surfaces intérieures du congélateur.
• Avant qu’ils ne soient complètement décongelés, essuyez le givre et la glace.
CONGÉLATION DES DENRÉES FRAÎCHES
• Utiliser convenablement l’appareil, emballer les aliments adéquatement, ajuster la température correctement et tenir
compte de précautions d’hygiène adéquates infl uencera de façon substantielle la qualité des aliments congelés.
• La durée de conservation des aliments congelés varie, par conséquent on ne doit dépasser la période d’entreposage
maximale recommandée.
• Les aliments congelés pré-emballés commercialement doivent être entreposés conformément aux instructions du
fabricant de produits congelés.
• Placez les aliments congelés au congélateur le plus rapidement possible après l’achat. Lorsque l’emballage comporte des indications, observez-les de manière stricte en ce qui touche les périodes de conservation.
• Choisir soigneusement la nourriture que vous avez l’intention de congeler, elle doit être de bonne qualité et être
adaptée à la congélation.
• Utilisez l’emballage qui convient et enveloppez les aliments hermétiquement.
• L’emballage doit être hermétique et ne devrait pas avoir de fuites car cela pourrait causer la déshydratation des
aliments.
• Les feuilles d’emballage et les sacs doivent être relativement souples pour bien envelopper la nourriture.
• Lorsque vous préparez des aliments pour les mettre au congélateur, prenez toutes les précautions sanitaires.
• Inscrivez les données suivantes sur tous les emballages : type et quantité de nourriture, et date d’entreposage.
• Il est extrêmement important que la nourriture soit congelée le plus vite possible.
• Si le congelateur est trop rempli, l’effi cacité de la congélation est réduite, ce qui affecte la qualité des aliments con-
gelés.
RANGEMENTS DES ALIMENTS
Compartiments pour aliments frais
• Ne jamais recouvrir les clayettes du compartiment de papier d’aluminium ou autres matériaux ca ceci peut empêcher
la circulation d’air.
• Enlever toujours les emballages perméables du marchand qui recouvrent la viande, volaille et le poisson. Les viandes doivent être emballées individuellement, et déposées dans un récipient pour le rangement. Emballer la volaille
ou le poisson dans du papier aluminium ou du papier ciré épais. Faites cuire la plupart de sorte de poissons le jour
de l’achat. Les viandes emballées par le marchand, telles que le jambon, le bacon, le boeuf sec, ou les saucisses
fumées se rangent très bien dans leur emballage.
• Laisser refroidir les aliments à la température de la pièce avant de les ranger dans le réfrigérateur.
• Toujours recouvrir les aliments, surtout les restants. Utiliser les restants avant 2 à 3 jours.
17
Page 21

Consignes d’utilisation
INSTRUCTIONS DE PORTE RÉVERSIBLE
ATTENTION
Afi n d’éviter de vous blesser ou de causer des dégâts matériels, nous vous recomman-
dons de solliciter l’aide d’autrui lors des manœuvres liées à l’inversion de la porte.
Votre réfrigérateur est muni d’une porte réversible. Vous pouvez donc l’ouvrir par la gauche ou par la droite. Pour inverser
l’ouverture de la porte, il vous suffi t de suivre les consignes suivantes :
Désinstallation de la porte et des charnières
1. Débranchez le réfrigérateur ou coupez l’alimentation électrique.
2. Laissez les deux portes fermées jusqu’à ce que vous soyez prêt à les soulever pour les séparer du meuble.
REMARQUE : Assurez un soutien supplémentaire des portes pendant la désinstallation des charnières. Ne vous fi ez pas
aux aimants des portes pour tenir celles-ci en place pendant que vous travaillez.
3. Retirez les pièces de la charnière supérieure comme le montre l’illustration de la charnière supérieure. Soulevez la
porte du congélateur pour la séparer du meuble.
4. Retirez les pièces de la charnière centrale comme le montre l’illustration de la charnière centrale. Soulevez la porte du
réfrigérateur pour la séparer du meuble.
5. Retirez les pièces de la charnière inférieure comme le montre l’illustration de la charnière inférieure.
Inversion de la porte
1. Retirez les capuchons des trous de la charnière supérieure du côté gauche et mettez-les sur le côté opposé.
2. Retirez les bouchons des trous du côté gauche et mettez-les sur le côté opposé.
Portes
1. Retirez le bouchon du trou de la charnière du haut de la porte du congélateur et du réfrigérateur.
2. Retirez l’arrêt de porte de la porte du réfrigérateur et mettez-le sur le côté opposé.
3. Retirez l’arrêt de porte gauche de la porte du congélateur et la vis du sac d’accessoires, puis fi xez l’arrêt sur la poignée
.
Remarque :
L’arrêt de porte gauche et l’arrêt de porte droit de la porte du congélateur sont différents. Ils ne sont pas interchangeables.
Remplacement de la porte et de la charnière
1. Remettez les pièces de la charnière inférieure en place comme le montre l’illustration. Resserrez les vis. Remettez la
porte du réfrigérateur en place.
REMARQUE :
Assurez un soutien supplémentaire des portes pendant la désinstallation des charnières. Ne vous fi ez pas aux aimants
des portes pour tenir celles-ci en place pendant que vous travaillez.
2. Assemblez les pièces de la charnière centrale comme le montre l’illustration et resserrez toutes les vis. Remettez la
porte du congélateur en place.
3. Assemblez les pièces de la charnière supérieure comme le montre l’illustration. Ne serrez pas les vis à fond.
4. Positionnez les portes de sorte que la partie inférieure de la porte du congélateur soit dans le prolongement exact de la
partie supérieure de la porte du réfrigérateur. Resserrez toutes les vis.
Dernières étapes
1. Inspectez chaque trou pour vous assurer que les bouchons et les vis sont en place.
2. Branchez le réfrigérateur ou rétablissez le courant.
3. Remettez les réglages au niveau désiré (voir la section intitulée « Réglage du thermostat »).
4. Réinstallez les pièces amovibles à l’intérieur des portes, et remettez la nourriture dans le réfrigérateur.
18
Page 22

Consignes d’utilisation
INSTRUCTIONS DE PORTE RÉVERSIBLE
Figure 9
1
2
1.
Vis
2. Charnière supérieure
3. e de la charnière supérieure
Figure 8
1
2
3
4
1. Entretoise de la charnière centrale
2.Charnière centrale
3. Vis
4. Manchon
Figure 7
3
Figure 1
1
1.
Vis
2. Charnière supérieure
3. Vis de la charnière supérieure
Figure 2
1. Entretoise de la
charnière centrale
2. Charnière
centrale
3. Vis
4. Manchon
Figure 3
1
2
3
1
2
3
4
1
1. Butée de porte
Figure 6
1
2
1. Butée de porte
gauche
2. Vis de butée de porte
Figure 5
1. Charnière inférieure
2.Vis de la charnière inférieure
Sac d’accessories
1
2
1. Bouchon cache-trou pour la
charnière de la porte
Figure 4
1
2
1. Butée de porte
2. Vis de butée de porte
19
Page 23

Soins et entretien
NETTOYAGE DE L’APPAREIL
• Tournez le thermostat à « OFF », débranchez l’appareil et retirez les accessoires intérieurs.
• Lavez l’intérieur au bicarbonate de soude dilué dans de l’eau chaude. La solution doit contenir 2 cuillerées à soupe
de bicarbonate de soude pour un litre d’eau.
• Lavez les accessoires intérieurs avec une solution de détergent non abrasif.
• L’extérieur de l’appareil doit être nettoyé à l’aide d’un détergent doux dilué dans de l’eau chaude.
Mise en garde : Ne pas débrancher le réfrigérateur-congélateur pourrait vous exposer à un risque de choc électrique ou
de blessure corporelle.
BAC À LÉGUMES ET À FRUITS
Le plateau situé à bas du réfrigérateur est couvert pour conserver l’humidité. Le bac à légumes et à fruits vous permet de
conserver les légumes et les fruits qui se dessecheraient rapidement autrement.
PANNE D’ÉLECTRICITÉ
La plupart des pannes de courant ne durent que quelques heures et ne devraient pas modifi er la température de votre
réfrigérateur-congélateur si vous réduisez au minimum le nombre de fois où la porte est ouverte. Si le courant reste
coupé pendant une longue période, il faut prendre des mesures pour protéger les aliments dans l’appareil.
PÉRIODE DE VACANCES
Des vacances de courte durée : Laissez l’appareil fonctionner normalement pendant des vacances de moins de trois
semaines.
Des vacances de longue durée : Si l’appareil ne sera pas utilisé pendant plusieurs mois, videz-le de tous ses aliments
et débranchez la fi che d’alimentation. Nettoyez et asséchez minutieusement l’intérieur. Pour éviter les odeurs et le dével-
oppement de moisissures, laissez la porte entrouverte : la coincer au besoin.
DÉMENAGEMENT
Enlever ou immobiliser toutes les pièces amovibles (c’-à-d les clayettes) à l’intérieur du réfrigérateur. Serrer les vis à
nivellement à la base afi n de ne pas les endommager (sur certains modèles).
IMPORTANTES CONSIGNES DE SÉCURITÉ POUR L’UTILISATION DU CONGÉLATEUR
• Ne jamais ranger d’aliments chauds dans le congélateur.
• Ne jamais placer des aliments pourris dans le réfrigérateur.
• Ne jamais surcharger l’appareil.
• Ouvrir le couvercle seulement si nécessaire.
• Pour un rangement prolongé de l’appareil, il est suggéré de laver l’appareil, de laisser la
porte ouverte afi n de fournir une circulation d’air à l’intérieur du meuble et d’éviter le dévelop-
pement de condensation, de moisi et d’odeurs.
20
Page 24

Dépannage
De temps en temps, un problème est mineur et un appel de service peut ne pas être nécessaire. Utilisez ce guide de
dépannage pour trouver une solution possible. Si l’unité continue de fonctionner incorrectement, appelez un dépôt de
service autorisé ou le numéro sans frais de Danby pour obtenir de l’assistance.
Tel: 1-800-26- (1-800-263-2629)
PROBLEME CAUSE PROBABLE SOLUTION
Ne fonctionne pas • Pas de tension à l’unité
• Le cordon d’alimentation est
débranché
• Le mauvais voltage est utilisé
Le réfrigérateur fonctionne
sans arrêt
La température interne n’est
pas assez froide
Température interne trop
froide
Congélateur pas assez froid • La commande est à une posi-
Lampe ne fonctionne pas • L’appareil n’est pas alimenté
• La température est réglage trop
haut
• La porte n’est pas fermée
• De la nourriture chaude a été
insérée
• La porte est ouverte trop souvent / longtemps
• Proximité d’une source de chaleur ou source de soleil
• Pas de tension à l’unité
• Le cordon d’alimentation est
débranché
• Le contrôle de la température
est trop bas
• La porte n’est pas fermée
• La nourriture est chaude
• La porte est ouverte trop souvent / longtemps
• Obstruction de la circulation de
l’air
• Le mauvais voltage est utilisé
• Proximité d’une source de chaleur ou exposition directe aux
rayons du soleil
• La commande du thermostat
est à une position trop haute
tion trop basse
• La porte n’est pas fermée
• De aliments chauds y ont été
rangés
• La source d’alimentation n’est
pas appropriée
• Le cordon d’alimentation n’est
pas branché
• Vérifi ez la connexion du cordon
d’alimentation
• Branchez l’appareil
• Utilisez le voltage approprié
• Régler la température plus élevée
• Fermez la porte
• Assurez-vous que la nourriture
est frais avant de la placer dans
l’appareil
• Minimisez l’ouverture de la porte
• Ne placez pas l’appareil près
d’une ou exposition directe aux
rayons de la chaleur et du soleil
• Vérifi ez la connexion du cordon
d’alimentation
• Branchez l’appareil
• Vérifi ez le réglage et augment-
ez-le au besoin
• Fermez la porte
• Assurez-vous que la nourriture
est frais avant de la placer dans
l’appareil
• Minimisez l’ouverture de la porte
• Laissez l’air circuler dans la pièce
autour de l’appareil
• Utilisez le voltage approprié
• Ne placez pas l’appareil près
d’une ou exposition directe aux
rayons de la chaleur et du soleil
• Vérifi ez la position de la com-
mande et réglez de nouveau
• Vérifi ez la position de la com-
mande et réglez de nouveau
• Fermez bien la porte
• Assurez-vous que les aliments
son refroidis avant de les ranger
• Utilisez la tension appropriée
• Vérifi ez que l’appareil est branché
à la source d’alimentation
• Branchez la fi che
21
Page 25

LIMITED IN-HOME APPLIANCE WARRANTY
This quality product is warranted to be free from manufacturer’s defects in material and workmanship, provided that the unit is used under the normal operating
conditions intended by the manufacturer.
Cet appareil de qualité est garanti exempt de tout vice de matière première et de fabrication, s’il est utilisé dans les conditions
This warranty is available only to the person to whom the unit was originally sold by Danby Products Limited (Canada) or Danby Products Inc. (U.S.A.) (hereafter
normales recommandées par le fabricant.
“Danby”) or by an authorized distributor of Danby, and is non-transferable.
Cette garantie n’est offerte qu’à l’acheteur initial de l’appareil vendu par Danby Products Limited (Canada) ou Danby Products
Inc. (E.- U.A.) (ci-après « Danby ») ou par l’un des ses distributeurs agréés et elle ne peut être transférée.
Plastic parts, are warranted for thirty (30) days only from purchase date, with no extensions provided.
Les pièces en plastique sont garanties pendant trente (30) jours seulement à partir de la date de l’achat, sans aucune prolongation prévue.
First Year
Premiers 12 mois
To obtain
Pour bénéficier
Service
du service
Limites de
Boundaries of
l’entretien à
In Home Service
domicile
APPAREIL ÉLECTROMÉNAGER À DOMICILE
During the rst twelve (12) months, any functional parts of this product found to be defective, will be repaired or replaced, at warrantor’s
Pendant les premiers douze (12) mois, toutes les pièces fonctionnelles de ce produit qui s’avèrent
option, at no charge to the ORIGINAL purchaser.
défectueuses seront réparées ou remplacées, selon le choix du garant, sans frais à l’acheteur INITIAL.
Danby reserves the right to limit the boundaries of “In Home Service” to the proximity of an Authorized Service Depot. Any app liance
Le client sera responsable pour le transport et tous les frais d’expédition de tout appareil exigeant le
requiring service outside the limited boundaries of “In Home Service” , it will be the consumer’s responsibility to transport the appliance (at
service au dépot de service autorisé le plus proche. S’adresser au détaillant qui a vendu l’appareil, ou à
their own expense) to the original retailer (point of purchase) or a service depot for repair. See “Boundaries of In Home Serv ice” below.
la station technique agréée de service la plus proche, où les réparations doivent être effectuées par un
Contact your dealer from whom your unit was purchased, or contact your nearest authorized Danby service depot, where service
technicien qualifié. Si les réparations sont effectuées par quiconque autre que la station de service
must be performed by a qualied service technician.
agréée où à des fins commerciales, toutes les obligations de Danby en vertu de cette garantie seront
If service is performed on the units by anyone other than an authorized service depot, or the unit is used for commercial appli cation, all
annulées.
obligations of Danby under this warranty shall be void.
Si l'appareil est installé à plus de 100 kilomètres (62 milles) du centre de service le plus proche, il doit
If the appliance is installed in a location that is 100 kilometers (62 miles) or more from the nearest service center your unit must be
être livré à l'atelier de réparation autorisé par Danby le plus proche, car l'entretien doit uniquement être
delivered to the nearest authorized Danby Service Depot, as service must only be performed by a technician qualied and certif ied for
réalisé par un technicien qualifié et certifié pour effectuer un entretien couvert par la garantie de Danby.
warranty service by Danby. Transportation charges to and from the service location are not protected by this warranty and are t he
Les frais de transport entre votre domicile et le lieu de l'entretien ne sont pas couverts par la présente
responsibility of the purchaser.
garantie et doivent être acquittés par l'acheteur.
GARANTIE LIMITÉE SUR
TERMS OF WARRANTY
CONDITIONS
Aucune partie de la garantie ne prévoit implicitement que le fabricant sera tenu responsable des dommages subis par les
Nothing within this warranty shall imply that Danby will be responsible or liable for any spoilage or damage to food or other c ontents of this appliance, whether due
aliments ou d’autres types de contenu, qu’ils soient causés par la défectuosité de l’appareil ou par son usage adéquat ou
to any defect of the appliance, or its use, whether proper or improper.
inadéquat.
EXCLUSIONS
Save as herein provided, Danby, there are no other warranties, conditions, representations or guarantees, express or implied, m ade or intended by Danby or its
En vertu de la présente, il n’existe aucune autre garantie, condition ou représentation, qu’elle soit exprimée ou tacite, de façon
authorized distributors and all other warranties, conditions, representations or guarantees, including any warranties, conditio ns, representations or guarantees
manifeste ou intentionnelle, par Danby ou ses distributeurs agréés. De même, sont exclues toutes les autres garanties,
under any Sale of Goods Act or like legislation or statue is hereby expressly excluded. Save as herein provided, Danby shall no t be responsible for any damages
conditions ou représentations, y compris les garanties, conditions ou représentations en vertu de toute loi régissant la vente
to persons or property, including the unit itself, howsoever caused or any consequential damages arising from the malfunction o f the unit and by the purchase of
de produits ou de toute autre législation ou règlement semblables. En vertu de la présente, Danby ne peut être tenue respon-
the unit, the purchaser does hereby agree to indemnify and hold harmless Danby from any claim for damages to persons or propert y caused by the unit.
sable en cas de blessures corporelles ou des dégâts matériels, y compris à l’appareil, quelle qu’en soit les causes. Danby ne
peut pas être tenue responsable des dommages indirects dus au fonctionnement défectueux de l’appareil. En achetant
l’appareil, l’acheteur accepte de mettre à couvert et de dégager Danby de toute responsabilité en cas de réclamation pour
No warranty or insurance herein contained or set out shall apply when damage or repair is caused by any of the following:
toute blessure corporelle ou tout dégât matériel causé par cet appareil.
EXCLUSIONS
GENERAL PROVISIONS
1) Power failure.
CONDITIONS GÉNÉRALES
2) Damage in transit or when moving the appliance.
La garantie ou assurance ci-dessus ne s’applique pas si les dégâts ou réparations sont dus aux cas suivants :
3) Improper power supply such as low voltage, defective house wiring or inadequate fuses.
1) Panne de courant.
4) Accident, alteration, abuse or misuse of the appliance such as inadequate air circulation in the room or abnormal operating con ditions
2) Dommage subis pendant le transport ou le déplacement de l’appareil.
3) Alimentation électrique incorrecte (tension faible, câblage défectueux, fusibles incorrects).
4) Accident, modification, emploi abusif ou incorrect de l’appareil tel qu'une circulation d'air inadéquate dans la pièce ou des
conditions de fonctionnement anormales (température extrêmement élevée ou basse).
5) Utilisation dans un but commercial ou industriel (à savoir, si l'appareil n'est pas installé dans un domicile résidentiel).
6) Incendie, dommages causés par l’eau, vol, guerre, émeute, hostilités, cas de force majeure (ouragan, inondation, etc.).
7) Visites d’un technicien pour expliquer le fonctionnement de l’appareil au propriétaire.
Proof of purchase date will be required for warranty claims; so, please retain bills of sale. In the event warranty service is required, present this document to our
8) Installation inappropriée (par exemple, encastrement d'un appareil autoportant, ou utilisation extérieure d'un appareil non
AUTHORIZED SERVICE DEPOT.
conçu à cet effet). Une preuve d’achat doit être présentée pour toute demande de réparation sous garantie. Prière de garder
le reçu. Pour faire honorer la garantie, présenter ce document à la station technique agréée ou s’adresser à :
(extremely high or low room temperature).
5) Use for commercial or industrial purposes (ie. If the appliance is not installed in a domestic residence).
6) Fire, water damage, theft, war, riot, hostility, acts of God such as hurricanes, oods etc.
7) Service calls resulting in customer education.
8) Improper Installation (ie. Building-in of a free standing appliance or using an appliance outdoors that is not approved for out door application).
Warranty Service
Service sous garantie
In-home
Service au domicile
Danby Products Limited
Danby Products Limited
PO Box 1778, Guelph, Ontario, Canada N1H 6Z9
PO Box 1778, Guelph, Ontario, Canada N1H 6Z9
Téléphone : (519) 837-0920 Télécopieur: (519) 837-0449
Telephone: (519) 837-0920 FAX: (519) 837-0449
1-800-263-2629
1-800-263-2629
03/14
04/09
Danby Products Inc.
PO Box 669, Findlay, Ohio, U.S.A. 45840
Téléphone: (419) 425-8627 Télécopieur: (419) 425-8629
PO Box 669, Findlay, Ohio, U.S.A. 45840
Telephone: (419) 425-8627 FAX: (419) 425-8629
Danby Products Inc.
Page 26
Gracias por elegir Danby
Sabemos que está emocionado. Nosotros lo estamos también! Sin embargo, cuanto más se familiarice con su nuevo aparto,
mejor será su experiencia. Por lo tanto le sugerimos de manera especial que lea este manual de instrucciones antes de
conectar su nuevo aparato. Este manual contiene importante información operacional que le ayudará a hacer un uso completo
de las características técnicas disponibles en su aparato Danby. El manual también contiene información diseñada para
mejorar la fiabilidad y seguridad operacional de su aparato, así como consejos para el mantenimiento del mismo, lo que le
traerá felicidad en los años venideros.
Por favor, visite www.danby.com para acceder a herramientas de autoservicio, preguntas frecuentes y más. En caso de
necesitar asistencia adicional, por favor llame al 1-800-26-DANBY (1-800-263-2629). Por favor tenga disponible su recibo
de compra y número de modelo cuando llame.
Nota: Esta información será necesaria si su unidad requiere servicio o para hacer consultas generales.
Para recibir servicio técnico debe sonstrar el recibo original.
Número de modelo:
Número de serie:
Fecha de la compra:
NECESITA AYUDA
Antes de solicitar servicio, hay algunas cosas que puede hacer para ayudarnos a
servirle mejor:
Lea este manual:
Contiene instrucciones que lo ayudarán a mantener correctamente su unidad.
Si usted recibe un artefacto dañado:
Llame inmediatamente al distribuidor (o constructor) que se lo vendió.
Ahorre tiempo y dinero:
Lea la sección de Diagnóstico de problemas antes de llamar. Esta sección le
ayudará a resolver problemas comunes que pudieran ocurrir.
Si necesita asistencia, no se preocupe y llámenos.
Tel: 1-800-26-
(1-800-263-2629)
23
Page 27

Instrucciones de seguridad importantes
LEA TODA LA INFORMACIÓN SOBRE SEGURIDAD ANTES DE
UTILIZAR EL EQUIPO
Asegúrese de que las piezas del componente se reemplacen con componentes similares y que la reparación
sea realizada por personal de servicio autorizado por la fábrica, para minimizar el riesgo de incendio debido a
piezas incorrectas o reparación inadecuada.
Este artefacto debe ser conectado a tierra. En caso de un corto circuito eléctrico, la conexión a tierra reduce el
riesgo de una descarga eléctrica proporcionando un cable de retorno para la corriente eléctrica.
REQUISITOS ELÉCTRICOS
ADVERTENCIA
POTENCIAS ELÉCTRICAS: La placa de serie indica el voltaje y
frecuencia que se debe utilizar para el refrigerador.
Debido a posibles variaciones en los voltaje de lines (ocasionadas por sobrecargas de curcuitos), se recomienda instalar
un circuito con fusibles separado del panel medidor. Esto ayudará a eliminar las fl ucuaciones de corriente que pueden
causar problemas con el motor.
¡ADVERTENCIA IMPORTANTE!
Un refrigerador vacio es una atracción muy peligrosa para los niños. Saque todas las juntas, pestillos,
tapas o la puerta de todo electrodoméstico que no esté en uso, o tome alguna medida para asegurar
que no presente peligro.
¡PELIGRO! Peligro de atrapas los niños en la unidad. Antes de desechar su antiguo refrigerador o congela dor:
• Quite las puertas.
• Deje las tablas en sus lugares exactos a fi n de que los niños no pusieran subir fácilmente a la unidad.
¡NO ESPERE, HAGALO AHORA MISMO!
¡ADVERTENCIA! ¡PELIGRO DE EXPLOSIÓN!
Hay riesgo de incendio o explosión si el tubo de refrigerante es perforado. No use objetos cortantes para
ayudar en descongelamiento. Tratar con cuidado. Mantenga lejos del congelador los vapores y materiales
infl amables, como la gasolina. Use un limpiador no infl amable.
Siga las normas federales y locales para desechar la unidad.
LA CONECIÓN A TIERRA
Este artefacto viene con un cable de alimentación que tiene un conductor y pata del enchufe de tierra. Este cable debe
enchufarse en un tomacorriente debidamente instalado y con conexión a tierra.
ADVERTENCIA - El uso inadecuado del enchufe de conexión a tierra puede resultar en un riesgo de choque eléctrico.
Consulte con un electricista o persona de reparaciones competente si no comprende buen las instrucciones de conexión
a tierra o si existe alguna duda sobre si el aparato está conectado a tierra correctament.
NO USE CABLES DE EXTENSIÓN
Use una toma de corriente exclusiva de 115V. No conecte su congelador a cables de extensión o junto a otro aparato en
la misma toma de corriente. No empalme el cable.
¡GUARDE ESTAS INSTRUCCIONES!
24
Page 28

Instrucciones de seguridad importantes
LEA TODA LA INFORMACIÓN SOBRE SEGURIDAD ANTES DE
UTILIZAR EL EQUIPO
CONSEJOS PARA AHORRAR ENERGÍA
• Trate de no abrir la puerta con mucha frecuencia, especialmente en días cálidos y húmedos. Una vez que haya abierto la puerta, ciérrela lo más rápido posible.
• Cada cierto tiempo, verifi que el aparato tenga la ventilación sufi ciente (una circulación de aire adecuada detrás del
aparato).
• Ajuste el termostato de la graduación más alta a la má baja en cuanto sea posible (dependiendo de cuánta carga
tenga el aparato, la temperatura ambiente, etc.).
• Antes de cargar el aparato con paquetes de alimentos frescos, asegúrese de que éstos estén a temperatura ambiente.
• El hielo y las capas de escarcha aumentan el consumo de energía; por consiguiente, descongelar el aparato en
cuanto la capa de escarcha tenga un espesor de entre 1/4 pulg. / 3 mm y 5 mm.
• Si la junta está dañada o la puerta no cierra herméticamente, el consumo de energía aumentará signifi cativamente.
Para restablecer la efi ciencia energética, cambie la junta.
• Siempre tenga en cuenta las instrucciones en la guía de utilización.
CÓMO DESECHAR LOS APARATOS USADOS
El sistema de refrigeración del aparato contiene líquido refrigerante y sustancias aislantes que deben tratarse y procesarse por separado. Llame al representante de servicio técnico o al centro de servicio especializado autorizado más
cercano. Si no puede encontrar uno, comuníquese con las autoridades locales o con el distribuidor. Tenga cuidado de no
dañar los tubos ubicados en la pared trasera del aparato.
ANTES DE EMPEZAR
• Para evitar vibración, el refrigerador debe estar bien nivelado. Este se logra ajustando los dos pies graduales delanteros, ubicados bajo el refrigerador.
• Antes de conectar el artefacto eléctrico a la fuente de energia eléctrica, déjelo reposar durante de horas. Esto reducirá la posibilidad de a los funcionamientos en el sistema de enfi ado debido a la manipulación para su transporte.
• Esta unidad no está diseñada para instalación exterior, incluyendo la instalación en cualquier lugar que no es de temperatura controlada (incluyendo garajes, porticos, cocheras, etc.).
• Si la unidad se desenchufa, perdió potencia o se apagó, debe esperar entre 3 y 5 minutos para volver a encenderla.
Si intenta hacerlo antes del tiempo señalado, el refrigerador-congelador no se encenderá.
¡GUARDE ESTAS INSTRUCCIONES!
25
Page 29

Instrucciones de instalación
ELECCIÓN DE LA MEJOR UBICACIÓN
Saque los embalajes exteriores e interiores, limpie el exterior bien con un paño suave seco y el interior con
un paño húmedo y tibio. Evite colocar la caja en un hueco estrecho o cerca de una fuente de calor, luz de sol
directa, o lugar húmedo. Deje que el aire circule libremente alrededor de la caja. Mantenga la parte posterior del
refrigerador a 5 pulgadas de la pared.
1. Seleccione un lugar con un piso fi rme y nivelado.
2. Deje un espacio de 5 pulgadas entre el refrigerador y cualquier pared adyacente.
3. Evite luz directa del sol o calor. La luz directa del sol puede afectar la capa de acrílico. Las fuentes de calor en su
proximidad causarán un consumo mayor de electricidad.
4. Evite lugares muy húmedos. Demasiada humedad en el aire hará que se acumule escarcha rápidamente en el evaporador y deberá descongelar su refrigerador con mucha frecuencia.
Vierta éviter les vibraciones, l’unité doit être de niveau conjunto. Ceci est réalisé en ajustant le pied de nivellement avant,
située sous le réfrigérateur.
INSTALACIÓN
Coloque el aparato fi rmemente sobre una base sólida. Esto aparato tiene patas ajustables en la parte frontal; úselas para
nivelarlos.
NOTAS : Este aparato es pensado para la INSTALACIÓN AUTONOMO, y no es pensado para la instalación integrada. Su refrigerador es aprobada para EL USO DE INTERIOR SOLAMENTE y no es aprobada para el uso al aire
libre.
26
Page 30

Instrucciones operadoras
CARACTERÍSTICAS
1. Estante del congelador
2. Puerta del congelador
3. Control de temperatura
4. Estantes del refrigerador
5. Cubierta de vidrio
6. Cajón para frutas y verduras
7. Patas niveladoras
8. Bandeja de huevos
9. Contenedor de la puerta del refrigerador
10. Contenedor inferior
2
1
3
4
8
9
5
6
7
CAMBIO DE LA BOMBILLA
• Desenchufe el cable de alimentación de CA de la pared.
• Remueva el tornillo que sujeta la cubierta del foco.
• Apriete las lengüetas en la parte superior e inferior de la cubierta de la bombilla de
luz en forma simultánea.
• Saque la cubierta de la bombilla de luz.
• Asegúrese de que la bombilla de luz esté fría antes de sacara.
• Desenrosque la bombilla.
• Cámbiela por una bombilla de 10 vatios, que sea de la misma forma y tamaño.
• Vuelva a colocar la cubierta de la bombilla de luz.
SELECCIÓN DE TEMPERATURA
• Cuando encienda la unidad por primera vez, fi je el control de temperatura en la
posición “7”, la confi guración más fría.
• El rango de controles de temperatura va desde la posición “0” o SIN REFRIGERACIÓN hasta “7”, la temperatura más fría. Después de 24 a 48 horas, ajuste
el control de temperatura según la confi guración más acorde a sus necesidades.
La confi guración “4” debería ser satisfactoria para un refrigerador doméstico o de
ofi cina.
Nota:
• Si la unidad se desenchufa, perdió potencia o se apagó, debe esperar entre 3 y 5
minutos para volver a encenderla. Si intenta hacerlo antes del tiempo señalado, el
refrigerador no se encenderá.
• Al girar el control de temperatura del refrigerador a la posición “0”, se interrumpirá
el ciclo de refrigeración, pero no se apagará la unidad.
27
10
1
7
Page 31

Instrucciones operadoras
CÓMO DESCONGELAR EL ELECTRODOMÉSTICO
Para lograr el funcionamiento más efi ciente y el mínimo consumo de energía, descongele el compartimento del conge-
lador cuando la escarcha en las paredes del electrodoméstico tenga más de 1/4 pulgada / 3-5 mm de espesor (consulte
las instrucciones de abajo). No es necesario descongelar el compartimento del refrigerador, porque el hielo que se deposita en la pared interior trasera se descongela automáticamente. El hielo puede depositarse en la pared interior trasera
durante el functionamiento del compresor. Sin embargo, cuando el compresor no funcione, el hielo se descongelará y
el agua caída se acumulará. Se escurrirá por la salida ubicada en la pared interior trasera hacia la bandeja de drenaje
ubicada sobre el compresor, donde se evaporará.
Advertencia: No use agua hirviendo porque puede dañar las partes de plástico. Por otra parte, nunca use un instrumento fi loso o metálico para sacar la escarcha ya que puede dañar el serpentín de enfriamiento y anular la garantía.
Recomendamos usar un raspador de plástico.
• Restablezca el termostato a la posición « 0 » o « OFF » y desconecte el suministro eléctrico.
• Saque los alimentos congelados del electrodoméstico y colóquelos en una nevera para protegerlos.
• Deje la puerta abierta el tiempo sufi ciente para ablandar la escarcha y poder sacarla raspando.
• Use un raspador de plástico, pero tenga cuidado de no dañar las superfi cies interiores del congelador.
• Limpie la escarcha y el hielo raspados antes de que se descongelen por completo.
CÓMO CONGELAR ALIMENTOS FRESCOS
• Usar correctamente el electrodoméstico, envolver bien los alimentos, fi jar la temperatura correcta y obervar la higiene
adecuada infl uirá sustancialmente en la calidad de los alimentos congelados.
• El período de almacenamiento de los alimentos congelados varía y no debe superarse el tiempo recomendado.
• Los alimentos congelados que se venden empaquetados deben almacenarse de acuerdo con las instrucciones del
fabricante de esos alimentos.
• Coloque los alimentos congelados en el congelador lo más pronto posible después de haberlos comprado. Si el
paquete trae instrucciones, lea con atención aquellas relacionadas con los tiempos de almacenamiento.
• Seleccione cuidadosamente los alimentos que desee congelar; deben tener la calidad adecuada y ser apropiados
para congelar.
• Use el envase correcto y envuelva herméticamente los alimentos.
• El envase debe ser hermético y sin fugas porque esto podría provocar una pérdida sustancial de la deshidratación de
los alimentos.
• Los envoltorios de aluminio y las bolsas deben ser sufi cientemente lo suaves como para envolver herméticamente los
alimentos.
• Cuando prepare los alimentos para congelar, tenga en cuenta las precauciones sanitarias.
• Marque todos los paquetes con los siguientes datos: tipo y cantidad de alimento, y fecha de almacenamiento.
• Es sumamente importante que los alimentos se congelen lo antes posible.
• Si la contidad de alimentos cargada es demasiada, la efi ciencia del congelamiento se reducirá, lo que afecta la cali-
dad de los alimentos congelados.
SUGERENCIAS PARA GUARDAR ALIMENTOS
El compartimiento para alimentos frescos
• Nunca cubra las parillas del compartimiento para alimentos con papel de alumnio o cualquier otro material para cubrir parrillas que puedan obstruir la circulación del aire.
• Siempre saque la envoltura porosa proveniente de la tienda, de toda la carne, pollo o pescado. La carne se debe envolver en forma individual. Envuelva el pescado y el pollo en papel aluminio o papel encerado grueso. La mayoria de
los pescados se debe sur usar el mismo dia enque se compran. Las carnes empaquetadas como el jamon, tocino,
carne seca o sal chichas, se almacenan mejor en sus paquetes originales.
• Permita que los alimentos calientes se enfrien a temp peratura ambiente antes de colocarlos en el refrigerador.
• Siempre cubra los platos con alimentos, especialmente los restos. Use los restos en 2 o 3 días.
28
Page 32

Instrucciones operadoras
INSTRUCCIONES PARA LA INVERSIÓN DE LA PUERTA
ADVERTENCIA
Para evitarse lesiones personales y daños a la propiedad, recomendamos que otra persona lo
ayude durante el proceso de cambiar de sentido en que abre la puerta.
Su refrigerador tiene una puerta reversible. Tiene la posibilidad de abrirla desde la derecha o desde la izquierda. Para
revertir la dirección de apertura de la puerta, siga estas sencillas instrucciones:
Extracción de la puerta y la bisagra
1. Desenchufe el refrigerador o corte el suministro eléctrico.
2. Mantenga ambas puertas cerradas hasta que esté listo para retirarlas del marco.
NOTA: Coloque un soporte adicional a las puertas mientras se mueven las bisagras. No deje que los imanes de la puerta
soporten toda la carga de las puertas mientras usted está trabajando.
3. Retire las piezas de la bisagra superior, como se muestra en la ilustración de la bisagra superior. Levante la puerta del
congelador y retírela de su marco.
4. Retire las piezas de la bisagra del centro, como se muestra en la ilustración de la bisagra del centro. Levante la puerta
del refrigerador y retírela de su marco.
5. Retire las piezas de la bisagra inferior, como se muestra en la ilustración de la bisagra inferior.
Gabinete de inversión de puertas
1. Retire la tapa del orifi cio de la bisagra superior del lado izquierdo y colóquela en el lado opuesto.
2. Retire los tapones de los orifi cios del lado izquierdo y colóquelos en el lado opuesto.
Puertas
1. Retire el tapón del orifi cio de la bisagra de la parte superior de la puerta del congelador y del refrigerador.
2. Retire el tope de puerta de la puerta del refrigerador y colóquelo en el lado opuesto.
3. De la bolsa de accesorios, tome el tope de puerta izquierdo de la puerta del congelador y el tornillo, y colóquelo en la
manija.
Nota: El tope de puerta izquierdo y de puerta derecho de la puerta del congelador son diferentes. No se pueden inter-
cambiar.
Reemplazo de la puerta y la bisagra
1. Vuelva a colocar las piezas de la bisagra inferior, como se ilustra. Apriete los
tornillos. Vuelva a colocar la puerta del refrigerador.
NOTA: Coloque un soporte adicional a las puertas mientras se mueven las bisagras. No deje que los imanes de la puerta
soporten toda la carga de las puertas mientras usted está trabajando.
2. Arme las piezas de la bisagra del centro, como se ilustra y apriete todos los tornillos. Vuelva a colocar la puerta del
congelador.
3. Arme las piezas de la bisagra superior, como se ilustra. No apriete los tornillos completamente.
4. Alinee las puertas de manera que la parte inferior de la puerta del congelador quede pareja con la parte superior de la
puerta del refrigerador. Apriete todos los tornillos.
Pasos fi nales
1. Revise todos los orifi cios para asegurarse de que los tapones y tornillos estén colocados.
2. Conecte el refrigerador o vuelva a conectar el suministro eléctrico.
3. Restablezca los controles (vea la sección “Control de temperatura”).
4. Vuelva a colocar todas las piezas desmontables de la puerta y los alimentos en su refrigerador.
29
Page 33

Instrucciones operadoras
INSTRUCCIONES PARA LA INVERSIÓN DE LA PUERTA
Figura 9
1
2
1.
Tornillos
2. Bisagra superior
3. Tornillos de bisgara superior
Figura 8
1
2
3
4
1. Separador de bisagra central
2. Bisagra central
3. Tornillos
4.Manguito
Figura 7
3
Figura 1
1.
Tornillos
2. Bisagra superior
3. Tornillo de bisagra superior
Figura 2
1. Separador de bisagra
central
2. Bisagra central
3. Tornillos
4. Manguito
Figura 3
1
1
2
3
1
2
3
4
1
1. Tapón de orificio
Figura 6
1
2
1. Tope de puerta de
lado izquierdo
2. Tornillo de tope de
puerta
Figura 5
1. Bisagra inferior
2. Tornillos de bisagra inferior
Bolsa de
accesorios
1
2
1. Tapón de origicio de bisagra
de puerta
Figura 4
1
2
1. Tope de puerta
2. Tornillo para tope de puerta
30
Page 34

Cuidado y mantenimiento
LIMPIEZA DEL ARTEFACTO
• Gire el control de temperatura a la posición « OFF », desenchufe la unidad y saque los accesorios del interior.
• Limpie el interior con una solución de agua tibia y bicarbonato de sodio. La solución debe contener cerca de 2
cucharadas de bicarbonato de sodio y un cuarto de galón de agua.
• Limpie los accesorios del interior con un detergente suave diluido.
• El exterior de la unidad debe limpiarse con un detergente suave y agua tibia.
Advertencia: El no desenchufar el refrigerador-congelador podría ocasionar descarga eléctrica o lesiones.
CAJÓN DE VERDURAS
La bandeja del piso del refrigerador esta cubierta para retener la humedad. El compartimiento de verduras le permitirá
almacenar verduras y frutas que, en otras condiciones, se secarian con rapidez.
CORTE DE CORRIENTE
La mayoría de las fallas eléctricas se solucionan en pocas horas y no deben afectar la temperatura de su refrigerador-congelador si reduce la cantidad de veces que abre su puerta. Si la interrupción se prolonga por un período más
largo, deberá tomar las medidas pertinentes para conservar sus alimentos.
VACACIONES
Vacaciones cortas: Deje la unidad funcionando durante vacaciones de menos de tres semanas.
Vacaciones largas: Si no usará el electrodoméstico durante varios meses, saque todos los alimentos y desenchufe el
cable de alimentación. Limpie y seque bien el interior del equipo. Para evitar el mal olor y la proliferación de moho, deje
la puerta ligeramente abierta. Si es necesario, bloquéela para mantenerla abierta.
SI UD SE MUDA
Saque o asegure todas los artículos dentro (ej. parrillas) del refrigerador. Para evitar que los tornillos de nivel se averíen,
gírelos completamente hacia la base (en algunos modelos).
ALGUNAS REGLAS IMPORTANTES PARA EL USO CORRECTO DEL REFRIGERADOR
• Nunca coloque alimentos calientes en el refrigerador.
• Nunca coloque en la unidad alimentos que se hayan echado a perder.
• No sobrecargue el gabinete.
• No abra la puerta a menos que sea necesario.
• Si el refrigerador guarda sin uso por períodos largos de tiempo, se sugiere que, luego de
una limpieza cuidadosa, se deje la puerta entrabierta para permitir que el aire circule dentro
de el gabinete y evitar una posible formación de condensación, moho u olores.
31
Page 35

Solucion Sugerida
A menudo, los problemas son sencillos y no es necesario hacer una llamada de reparación, use esta guía de resolución
de problemas para encontrar una posible solución. Si la unidad sigue funcionando mal, llame a los números
gratuitos de un centro Danby de servicio autorizado.
Tel: 1-800-26- (1-800-263-2629)
PROBLEMA POSSIBLE CAUSA SOLUCIÓN SUGERIDA
No funciona • No llega alimentación a la uni-
dad
• Cable de alimentación desenchufado
• Voltaje incorrecto
El refrigerador funciona constantemente
La temperatura interna no es
muy fría
Temperatura interior es muy
friá
Congelador no hela sufi ciente • Control en mínimo o cerca
Foco no enciende • No hay voltaje en el contacto
• Temperatura fi jada demasiado
alta
• La puerta no está cerrada
• Se colocó comida caliente
• Se abrió la puerta demasiadas
veces o durante mucho tiempo
• Muy cerca de una fuente de calor o bajo la luz directa del sol
• No llega alimentación a la unidad
• Cable de alimentación desenchufado
• Control de temperatura muy
bajo
• La puerta no está cerrada
• Alimentos calientes
• Se abrió la puerta demasiadas
veces o durrante mucho tiempo
• Obstrucción del fl ujo de aire
• Voltaje incorrecto
• Muy cerca de una fuente de calor o bajo la luz directa del sol
• Control en frió máximo o cerca • Verifi que la posición y ajuste su
• Puerta mal cerrada
• Alimentos muy calientes en
interior
• Voltaje fuera de especifi cationes
• Clavija desconectada
• Foco fl ojo o fundido; el interrup-
tor de puerta pegado
• Revise la conexión del cable de
almentación al enchufe
• Enchufe la unidad
• Use el voltaje correcto
• Ajustar la temperatura más alta
• Cierre bien la puerta
• Verifi que que los alimentos
estén a temperatura ambiente
antes de guardarlos
• Abra menos veces la puerta
• No coloque la unidad cera de
fuentes de calor o bajo la luz
directa del sol
• Revise la conexión del cable de
alimentación al enchufe
• Enchufe la unidad
• Verifi que el ajuste y auméntelo
como sea necesario
• Cierre bien la puerta
• Verifi que que loas alimentos
estén a temperatura ambiente
• Abra menos veces la puerta
• Deje lugar para que circule aire
alrededor de la unidad
• Use el voltaje correcto
• No coloque la unidad cerca de
fuentes de calor o bajo la luz
directa del sol
gusto
• Ajuste la posición a su gusto
• Cierra bien la puerta
• Asegurese de meter los alimentos no muy calientes
• Verifi que que haya corriente
adecuada
• Verifi que que la clavija. esté
conectada
• Conecte la clavija
• Ajuste el foco, o reemplácelo.
Verifi que que el interruptor no
este pegado
32
Page 36

GARANTÍA LIMITADA PARA
LIMITED IN-HOME APPLIANCE WARRANTY
ELECTRODOMÉSTICO
This quality product is warranted to be free from manufacturer’s defects in material and workmanship, provided that the unit is used under the normal operating
conditions intended by the manufacturer.
Este producto de calidad está garantizado contra defectos de fabricación, incluyendo partes y mano de obra, siempre y cuando
la unidad se utilice bajo las condiciones normales de funcionamiento para las que fue diseñado.
This warranty is available only to the person to whom the unit was originally sold by Danby Products Limited (Canada) or Danby Products Inc. (U.S.A.) (hereafter
Esta garantía está solamente disponible para la persona que haya comprado originalmente esta unidad directamente de
“Danby”) or by an authorized distributor of Danby, and is non-transferable.
Danby Products Limited (Canada) o Danby Products Inc. (U.S.A.) (en adelante “Danby”) o uno de sus distribuidores autorizados, y no es transferible.
Plastic parts, are warranted for thirty (30) days only from purchase date, with no extensions provided.
Las piezas plásticas, se autorizan por treinta (30) días solamente a partir de la fecha de la compra, sin las extensiones
proporcionadas.
First Year
Primeros 12 meses
To obtain
Service
Para obtener
servicio
Boundaries of
In Home Service
Límites del servicio
técnico a domicilio
Nothing within this warranty shall imply that Danby will be responsible or liable for any spoilage or damage to food or other c ontents of this appliance, whether due
to any defect of the appliance, or its use, whether proper or improper.
Nada dentro de esta garantía implica que Danby será responsable por cualquier daño que hayan sufrido los alimentos u otros
contenidos de este aparato, ya sea debido a un defecto del aparato, o su uso, adecuado o inadecuado.
During the rst twelve (12) months, any functional parts of this product found to be defective, will be repaired or replaced, at warrantor’s
option, at no charge to the ORIGINAL purchaser.
Durante los primeros 12 meses, cualquier parte en buen estado de este producto que resulte defectuosa, incluyendo cualquier sistema sellado, será reparado o reemplazado, a opción del fabricante, sin
cargo para el comprador ORIGINAL.
Danby reserves the right to limit the boundaries of “In Home Service” to the proximity of an Authorized Service Depot. Any app liance
requiring service outside the limited boundaries of “In Home Service” , it will be the consumer’s responsibility to transport the appliance (at
Danby se reserva el derecho de limitar la cobertura de "Servicio en Domicilio" sujeto a la proximidad de
their own expense) to the original retailer (point of purchase) or a service depot for repair. See “Boundaries of In Home Serv ice” below.
un Taller de Servicio Autorizado. Para todo artefacto que requiera servicio fuera del área limitada de
Contact your dealer from whom your unit was purchased, or contact your nearest authorized Danby service depot, where service
"Servicio en Domicilio", el cliente será responsable por transportar dicho artefacto hasta el Taller de
must be performed by a qualied service technician.
Servicio Autorizado mas cercano. Consulte "Límites del servicio técnico a domicilio", a continuación.
If service is performed on the units by anyone other than an authorized service depot, or the unit is used for commercial appli cation, all
Comuníquese con el distribuidor donde haya comprado la unidad, o llame al Taller de Servicio Autor-
obligations of Danby under this warranty shall be void.
izado más cercano, donde debe ser reparada por un técnico calificado. Si esta unidad es reparada en
otro lugar que no sea un Taller de Servicio Autorizado, o si la unidad se utiliza para aplicaciones
If the appliance is installed in a location that is 100 kilometers (62 miles) or more from the nearest service center your unit must be
comerciales, Danby no se hará responsable de ninguna forma y la garantía será anulada.
delivered to the nearest authorized Danby Service Depot, as service must only be performed by a technician qualied and certif ied for
Si el electrodoméstico está instalado en un lugar que se encuentra a 100 kilómetros (62 millas) o más
warranty service by Danby. Transportation charges to and from the service location are not protected by this warranty and are t he
del centro de servicios más cercano, se debe llevar la unidad al Centro de servicios Danby autorizado
responsibility of the purchaser.
más cercano, ya que dicho servicio sólo puede realizarlo un técnico calificado y certificado por Danby
para prestar servicios de garantía. Los cargos por transporte desde y hacia el lugar en que se
efectúe el servicio técnico no están cubiertos por esta garantía y son de responsabilidad del comprador.
CONDICIONES DE LA GARANTÍA
Save as herein provided, Danby, there are no other warranties, conditions, representations or guarantees, express or implied, m ade or intended by Danby or its
authorized distributors and all other warranties, conditions, representations or guarantees, including any warranties, conditio ns, representations or guarantees
Salvo lo aquí indicado por Danby, no existen otras garantías, condiciones o representaciones, explícitas o implícitas, concre-
under any Sale of Goods Act or like legislation or statue is hereby expressly excluded. Save as herein provided, Danby shall no t be responsible for any damages
tas o intencionales por parte de Danby o sus distribuidores autorizados y todas las demás garantías, condiciones o represen-
to persons or property, including the unit itself, howsoever caused or any consequential damages arising from the malfunction o f the unit and by the purchase of
taciones, incluyendo cualquier garantía, condiciones o representaciones bajo cualquier Acta de Venta de Productos o
the unit, the purchaser does hereby agree to indemnify and hold harmless Danby from any claim for damages to persons or propert y caused by the unit.
legislación o estatuto similar, quedan de esta forma expresamente excluidas. Salvo lo aquí indicado, Danby no serán responsables por ningún daño a personas o bienes, incluyendo la propia unidad, sin importar su causa, o de ningún daño indirecto
causado por el desperfecto de la unidad, y al comprar esta unidad, el comprador acepta por la presente, indemnizar y
proteger a Danby contra cualquier reclamo por daños a personas o bienes causados por la unidad.
No warranty or insurance herein contained or set out shall apply when damage or repair is caused by any of the following:
1) Power failure.
2) Damage in transit or when moving the appliance.
No se considerará ninguna de estas garantías o seguros cuando el daño o la necesidad de reparación sea el producto de los
3) Improper power supply such as low voltage, defective house wiring or inadequate fuses.
siguientes casos:
1) Falla del suministro eléctrico.
4) Accident, alteration, abuse or misuse of the appliance such as inadequate air circulation in the room or abnormal operating con ditions
2) Daños en tránsito o durante el transporte de la unidad.
3) Alimentación incorrecta, como bajo voltaje, instalación eléctrica defectuosa o fusibles inadecuados.
4) Accidente, modificación, abuso o uso incorrecto del artefacto, tal como insuficiente ventilación del ambiente o condiciones
de operación anormales (temperatura ambiente extremadamente alta o baja).
5) Utilización comercial o industrial (v.g., si el electrodoméstico no está instalado en una vivienda particular).
6) Incendio, daños por agua, robo, guerra, disturbios, hostilidades, actos de fuerza mayor como huracanes, inundaciones, etc.
7) Pedidos de servicio debido a desinformación del usuario.
Proof of purchase date will be required for warranty claims; so, please retain bills of sale. In the event warranty service is required, present this document to our
8) Instalación inadecuada (v.g., instalación empotrada de un electrodoméstico diseñado como unidad independiente o uso de
AUTHORIZED SERVICE DEPOT.
un electrodoméstico al aire libre que no esté aprobado para dicho fin).
(extremely high or low room temperature).
5) Use for commercial or industrial purposes (ie. If the appliance is not installed in a domestic residence).
6) Fire, water damage, theft, war, riot, hostility, acts of God such as hurricanes, oods etc.
7) Service calls resulting in customer education.
8) Improper Installation (ie. Building-in of a free standing appliance or using an appliance outdoors that is not approved for out door application).
TERMS OF WARRANTY
EXCLUSIONS
EXCLUSIONES
GENERAL PROVISIONS
CONDICIONES GENERALES
Para acceder a la garantía se solicitará un comprobante de compra; por lo tanto, guarde su recibo. En caso de necesitar
servicio de garantía, presente ese documento al TALLER DE SERVICIO AUTORIZADO.
Warranty Service
In-home
Servicio de Garantía
Danby Products Limited
Danby Products Limited
PO Box 1778, Guelph, Ontario, Canada N1H 6Z9
PO Box 1778, Guelph, Ontario, Canada N1H 6Z9
Telephone: (519) 837-0920 FAX: (519) 837-0449
Telephone: (519) 837-0920 FAX: (519) 837-0449
Servicio en Domicilio
1-800-263-2629
1-800-263-2629
04/09
07/13
Danby Products Inc.
PO Box 669, Findlay, Ohio, U.S.A. 45840
Telephone: (419) 425-8627 FAX: (419) 425-8629
Telephone: (419) 425-8627 FAX: (419) 425-8629
PO Box 669, Findlay, Ohio, U.S.A. 45840
Danby Products Inc.
Page 37

NOTES / REMARQUES / NOTAS :
__________________________________________________________________________________________
__________________________________________________________________________________________
__________________________________________________________________________________________
__________________________________________________________________________________________
__________________________________________________________________________________________
__________________________________________________________________________________________
__________________________________________________________________________________________
__________________________________________________________________________________________
__________________________________________________________________________________________
__________________________________________________________________________________________
__________________________________________________________________________________________
__________________________________________________________________________________________
__________________________________________________________________________________________
__________________________________________________________________________________________
__________________________________________________________________________________________
__________________________________________________________________________________________
__________________________________________________________________________________________
__________________________________________________________________________________________
__________________________________________________________________________________________
__________________________________________________________________________________________
__________________________________________________________________________________________
__________________________________________________________________________________________
Page 38

NOTES / REMARQUES / NOTAS :
__________________________________________________________________________________________
__________________________________________________________________________________________
__________________________________________________________________________________________
__________________________________________________________________________________________
__________________________________________________________________________________________
__________________________________________________________________________________________
__________________________________________________________________________________________
__________________________________________________________________________________________
__________________________________________________________________________________________
__________________________________________________________________________________________
__________________________________________________________________________________________
__________________________________________________________________________________________
__________________________________________________________________________________________
__________________________________________________________________________________________
__________________________________________________________________________________________
__________________________________________________________________________________________
__________________________________________________________________________________________
__________________________________________________________________________________________
__________________________________________________________________________________________
__________________________________________________________________________________________
__________________________________________________________________________________________
__________________________________________________________________________________________
Page 39

NOTES / REMARQUES / NOTAS :
__________________________________________________________________________________________
__________________________________________________________________________________________
__________________________________________________________________________________________
__________________________________________________________________________________________
__________________________________________________________________________________________
__________________________________________________________________________________________
__________________________________________________________________________________________
__________________________________________________________________________________________
__________________________________________________________________________________________
__________________________________________________________________________________________
__________________________________________________________________________________________
__________________________________________________________________________________________
__________________________________________________________________________________________
__________________________________________________________________________________________
__________________________________________________________________________________________
__________________________________________________________________________________________
__________________________________________________________________________________________
__________________________________________________________________________________________
__________________________________________________________________________________________
__________________________________________________________________________________________
__________________________________________________________________________________________
__________________________________________________________________________________________
Page 40

PARTIAL FROST FREE REFRIGERATOR
All repair parts are available for purchase or special
order when you visit your nearest service depot. To
request service and/or the location of the service depot
nearest you, call the TOLL FREE number.
When requesting service or ordering parts, always provide the following information:
• Product Type
• Model Number
• Part Number
• Part Description
REFRIGERADOR LIBRE DE ESCARCHA PARCIAL
Todas las piezas de reparación disponibles para la compra o la orden especial cuando usted visita su depósito
más cercano del servicio. Para pedir servicio y/o la localización del depósito del servicio lo más cerca posible
usted, llama Danby gratis.
LE GEL PARTIEL RÉFRIGÉRATEUR
GRATUITEMENT
Toutes les pièces de rechange ou commandes spéciales sont disponibles à votre centre de service régional
autorisé. Pour obtenir le service et/ou la localité de
votre centre de service régional, signalez le NUMÉRO
D’APPEL SANS FRAIS.
Ayez les renseignements suivants à la portée de la main
lors de la commande de pièce ou service:
• Type de produit
• Numéro de modèle
• Numéro de pièce
• Description de la pièce
Al pedir servicio o pidiendo piezas, proporcione siempre
la información siguiente:
• Tipo de producto
• Número de modelo
• Número de pieza
• Descripción de la parte
MODEL • MODÈLE • MODELO
DPF073C1WDB
1-800-26-
(1-800-263-2629)
Printed in China
Imprimé en Chine
Impreso en China
Danby Products Limited, Guelph, ON, Canada N1H 6Z9
Danby Products Inc., Findlay, Ohio, USA 45840
 Loading...