

PARCEL GUARD
Owner’s Manual...............................1 - 8
INSTALLATION MANUAL
MANUEL D'INSTALLATION
MANUAL DE INSTALACIÓN
GARDE DE COLIS
Manuel du propriétaire...................9 - 16
BUZÓN DE PAQUETERÍA
Manual del propietario.................17 - 24
MODEL • MODÈLE • MODELO
DPG37U
DPG37B
DANBY PRODUCTS LIMITED, ONTARIO, CANADA N1H 6Z9
DANBY PRODUCTS INC., FINDLAY, OHIO, USA 45840
2018.12.19

Welcome
Welcome to the Danby family. We are proud of our quality products and we believe in
dependable service. We suggest that you read this owner’s manual before plugging in your new
appliance as it contains important operation information, safety information, troubleshooting and
maintenance tips to ensure the reliability and longevity of your appliance.
Visit www.Danby.com to access self service tools, FAQs and much more. For additional assistance
call 1-800-263-2629.
Note the information below; you will need this information to obtain service under warranty.
You must provide the original purchase receipt to validate your warranty and receive service.
Model Number: _________________________________________________
Serial Number: _________________________________________________
Date of Purchase: _______________________________________________
Need Help?
Before you call for service, here are a few things you can do to help us serve you better.
Read this owner’s manual:
It contains instructions to help you use and maintain your appliance properly.
If you receive a damaged appliance:
Immediately contact the retailer or builder that sold you the appliance.
Save time and money:
Check the troubleshooting section at the end of this manual before calling. This section
will help you solve common problems that may occur.
1-800-26- Danby
(1-800-263-2629)
1

Important Safety Information
READ AND FOLLOW ALL SAFETY INSTRUCTIONS
SAFETY REQUIREMENTS
• Ensure that servicing is done by factory authorized service personnel to minimize product damage or
safety issues.
• Consult the repair manual or owner’s guide before attempting to service this product. All safety
precautions must be followed.
• Dispose of this appliance properly in accordance with federal or local regulations.
• Follow handling instructions carefully.
DANGER: The power cord can be a potential tripping hazard. The power cord should be located in a area
that does not cross walking paths or traffi cked areas.
CAUTION: Children should be supervised to ensure that they do not play with the appliance.
DANGER: Risk of child entrapment. Before throwing away an old appliance, ensure that the lower door is
removed or secured closed so that no small child may climb inside.
DISPOSAL
Disposal of this appliance should be in accordance with federal and local regulations.
SAVE THESE INSTRUCTIONS!
2

INSTALLATION INSTRUCTIONS
FEATURES
1. Camera and wifi signal receiver
2. Signal fl ag
3. Upper door handle
4. Upper door
5. Lower door
6. Door lock
2
1
3
4
5
6
ACCESSORIES
A. Concrete bolts with expanding sleeves (x2)
B. Wood screws (x2)
C. Washers (x4)
D. Power adapter
REQUIRED TOOLS
The following tools are required to complete the
installation:
• Safety goggles
• Pencil or pen
• Wrench
• Power drill with 1/4” concrete bit
LOCATION
The installation location should include the
following:
• A level location that is strong enough to support
the Parcel Guard when it includes ballast and
packages.
• Access to a 120V power outlet. Make sure that
the power cord will not cross walking paths or
high traffi c areas.
• Access to a strong wireless signal. Use your cell
phone to check the wireless signal in the chosen
location. Your phone should get at least three
bars of signal.
• Unobstructed camera view. Ensure the fi eld
of view in front of the Parcel Guard is not
obstructed by foliage or structures so that the
camera can capture clear video.
3
INSTALLATION INSTRUCTIONS
INSTALLATION
There are two methods that can be used to install the Parcel Guard depending on what installation location
is available. Decide which option is best for your chosen location and follow the steps below.
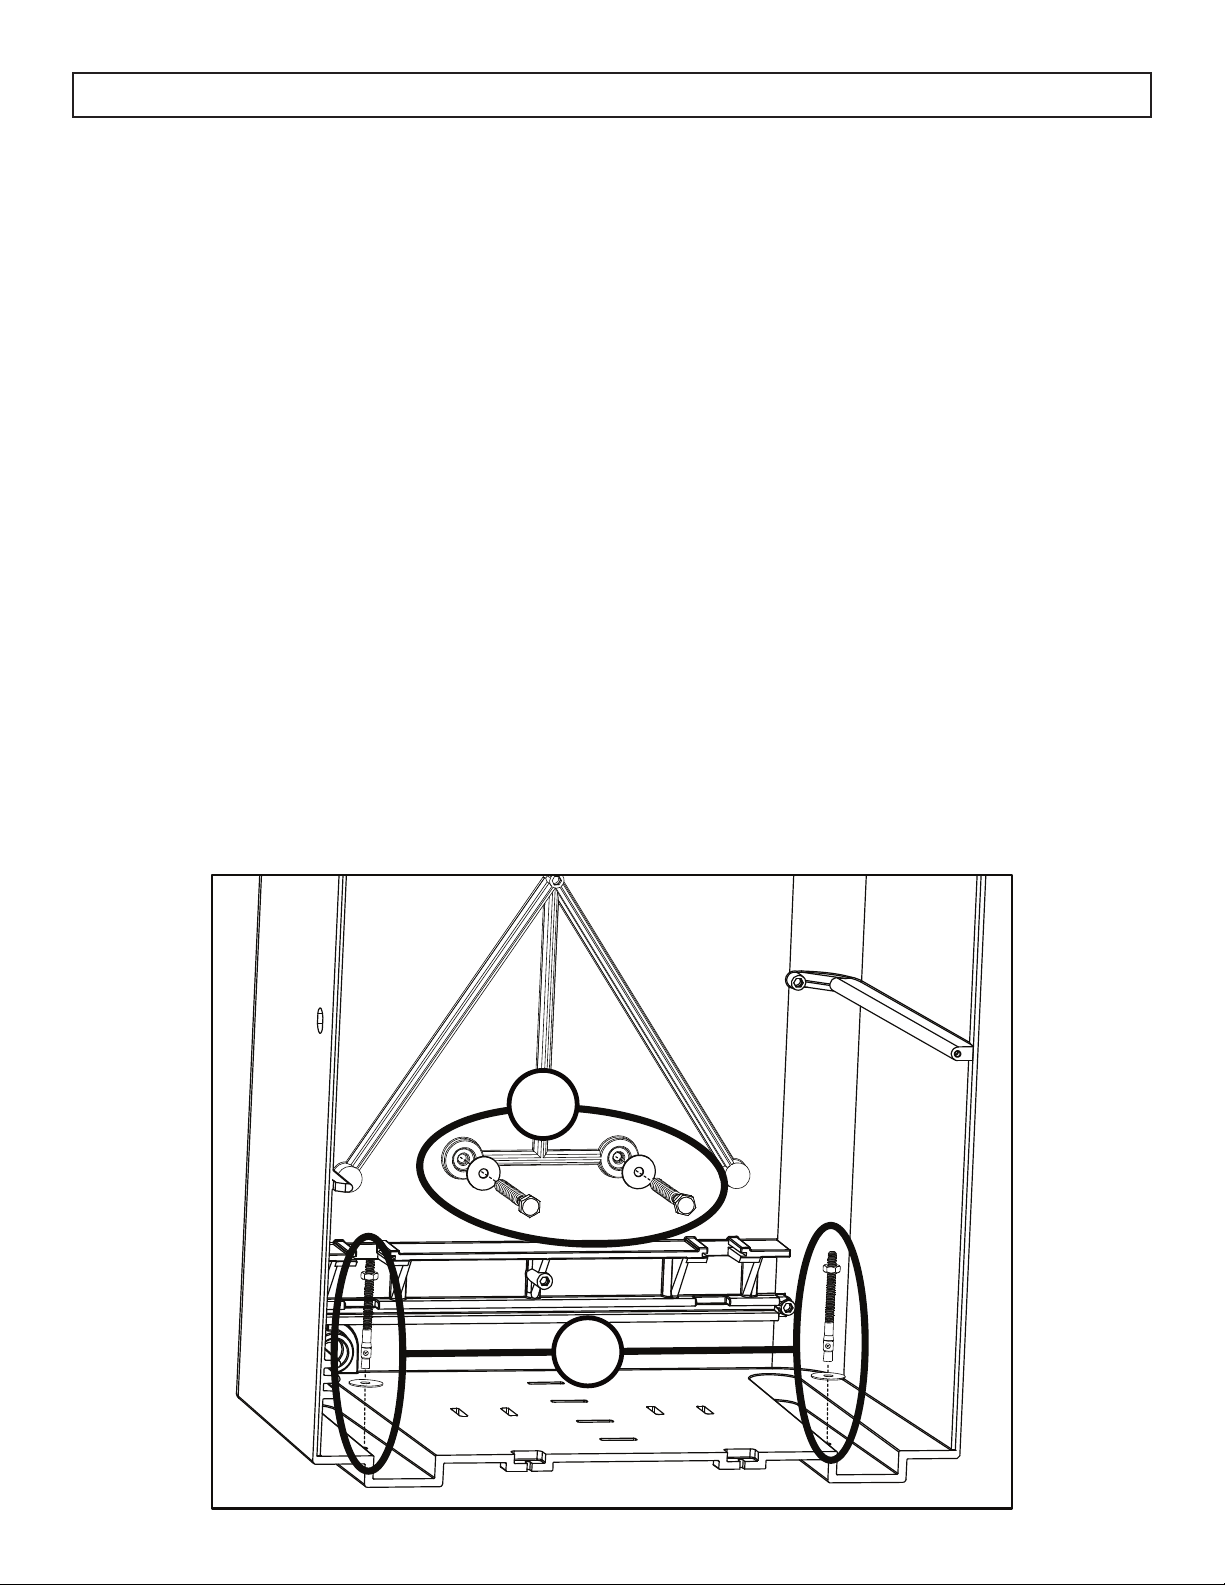
A. Secured through the rear
1. Use a power drill and a 1/4” drill bit to create
holes in the marked locations on the back wall
of the Parcel Guard.
2. Place the Parcel Guard against the wall or
structure that it will be secured to.
3. Use a pen or pencil to mark the hole locations
through the drilled holes.
4. Move the Parcel Guard out of the way and then
use a power drill and a 1/4” drill bit to create
guide holes for the bolts or screws, at least 2.5”
deep for wood screws and at least 3.75” deep
for concrete bolts.
5. Replace the Parcel Guard and insert the wood
screws or concrete bolts with washers into the
holes. Use a wrench to tighten the wood screw.
Tighten the nut on the concrete bolts and the
sleeves will expand to secure the bolt.
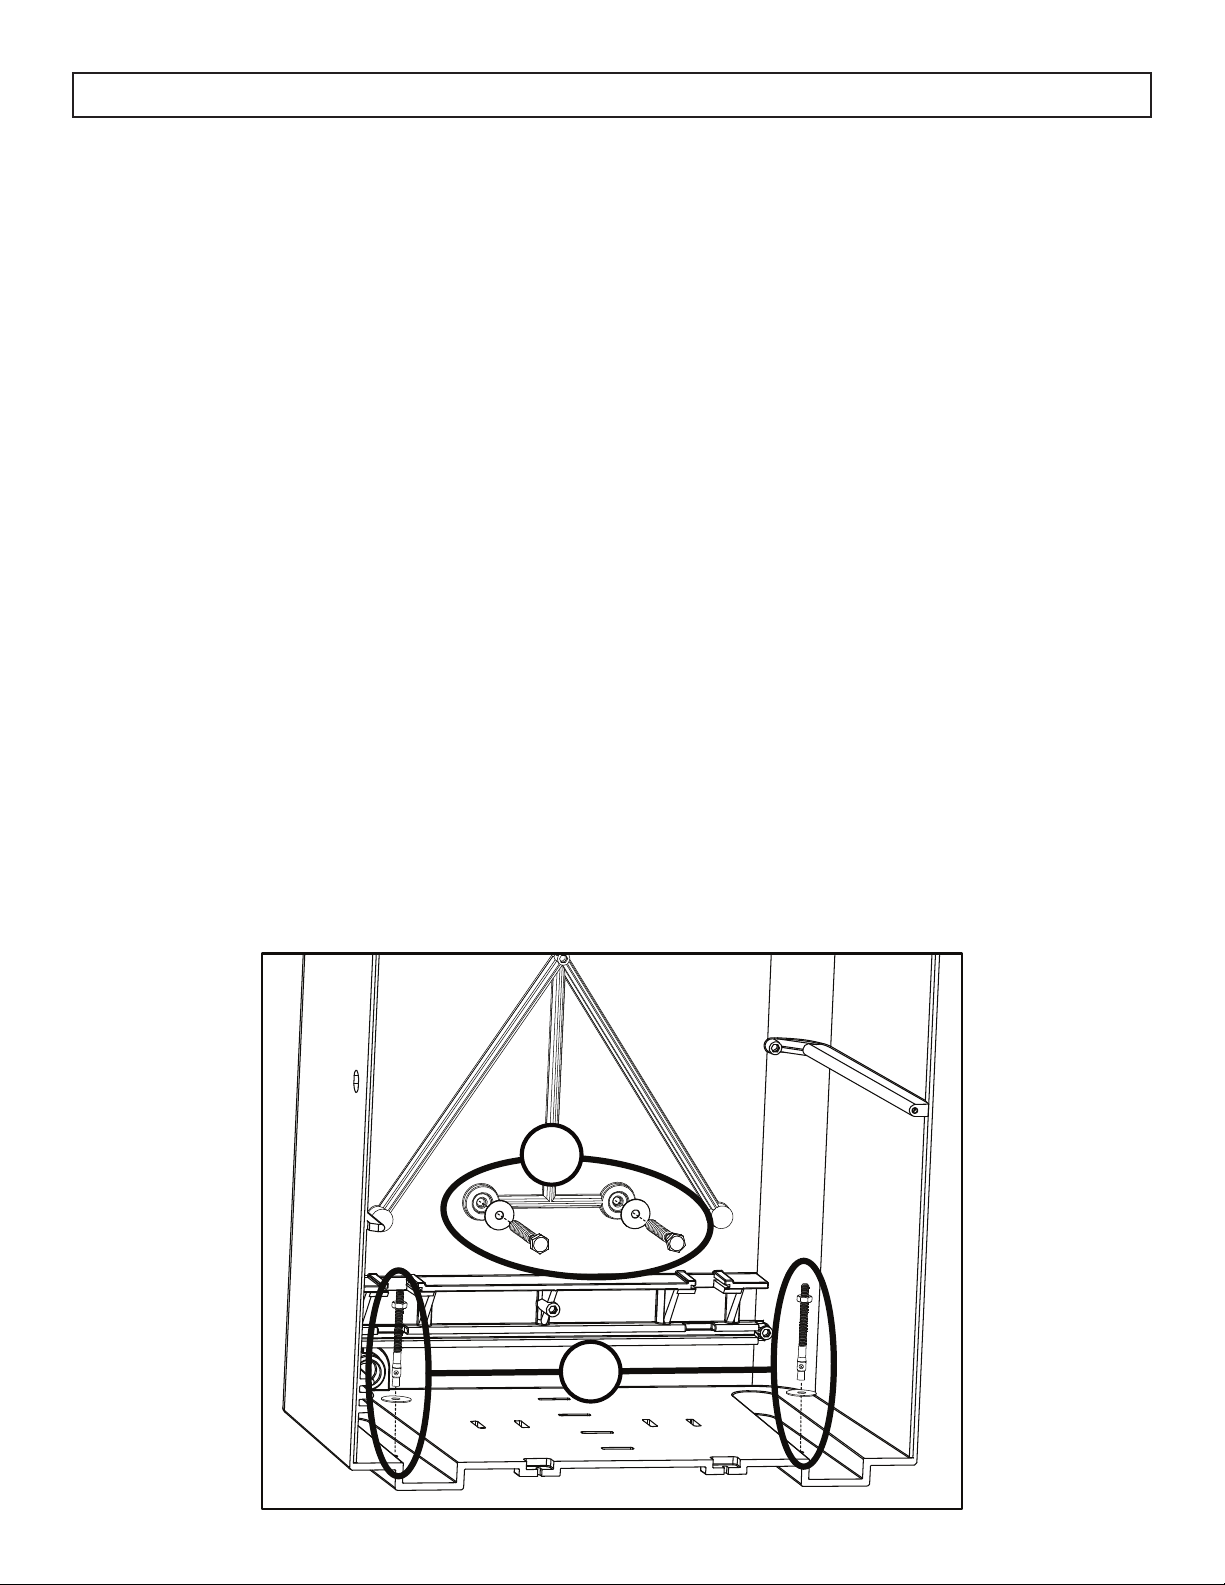
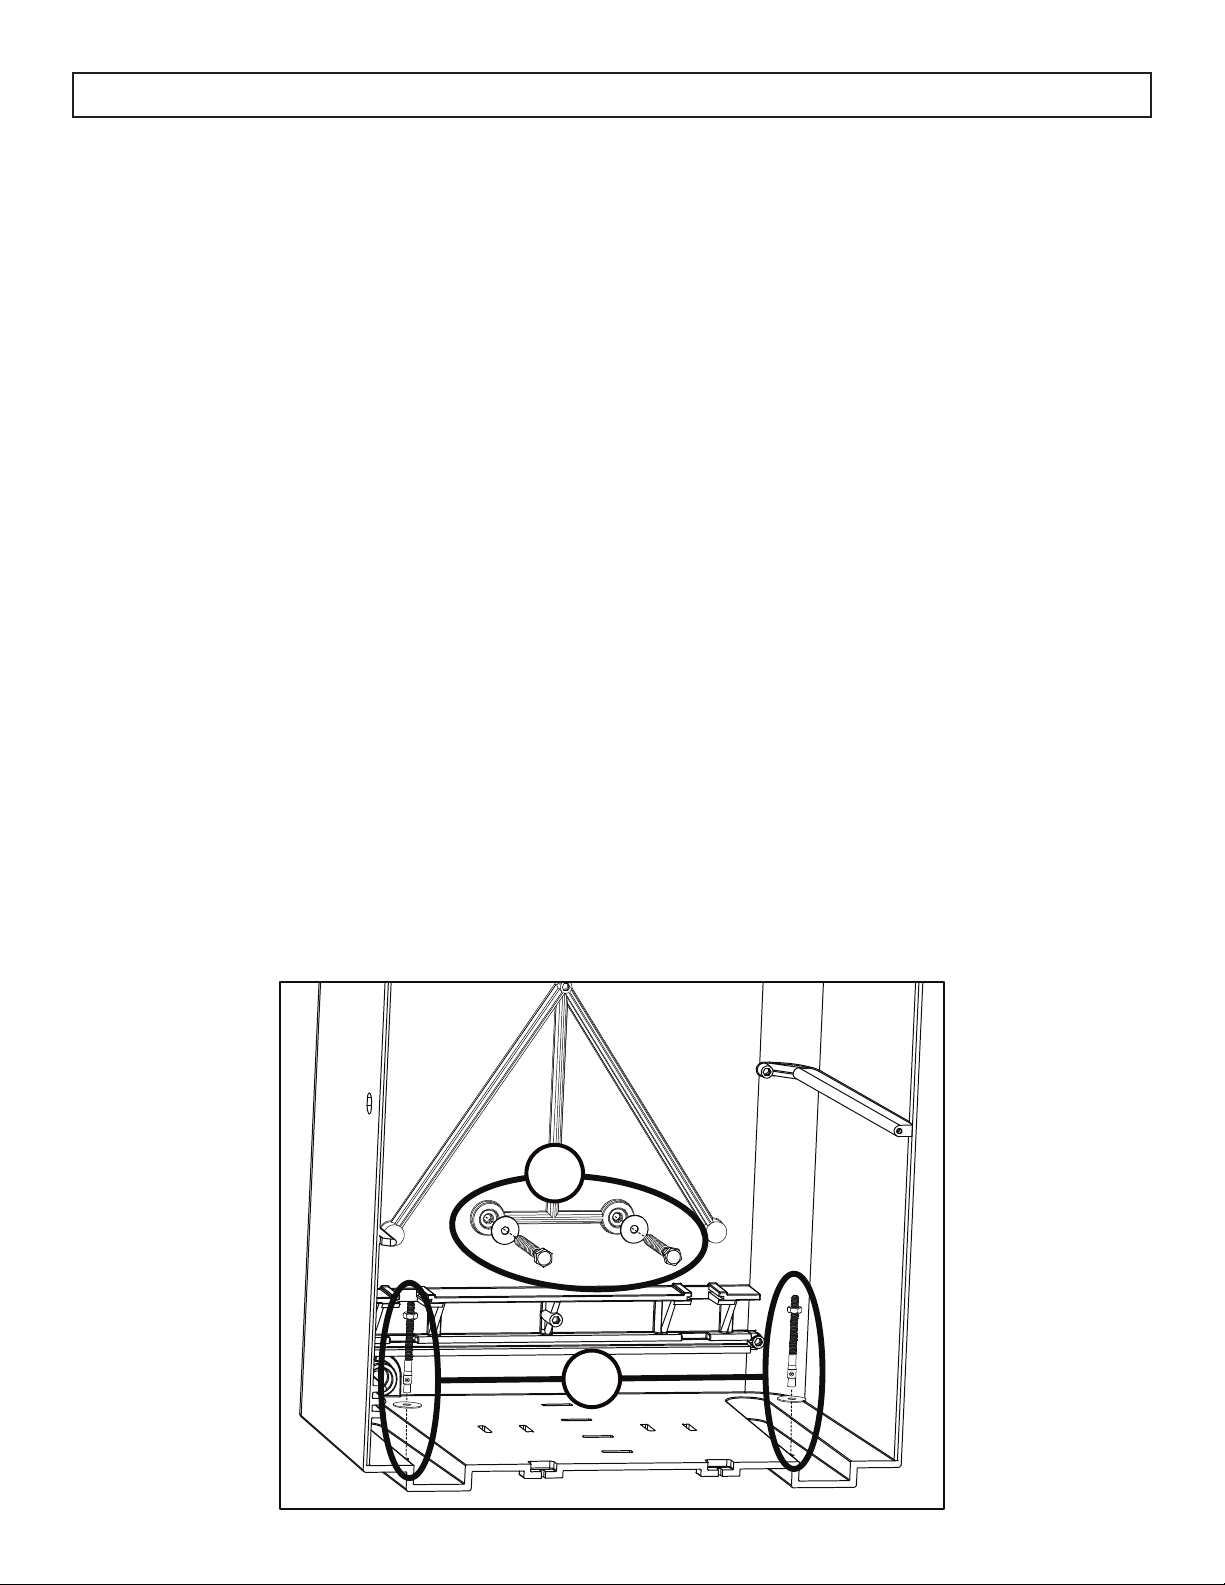
B. Secured through the bottom
1. Remove the platform at the bottom of the Parcel
Guard. Two holes are pre-drilled in the bottom
of the box.
2. Place the Parcel Guard on the fl oor or structure
that it will be secured to.
3. Use a pen or pencil to mark the hole locations
through the pre-drilled holes.
4. Move the Parcel Guard out of the way and then
use a power drill and a 1/4” drill bit to create
guide holes for the bolts or screws, at least 2.5”
deep for wood screws and at least 3.75” deep
for concrete bolts.
5. Replace the Parcel Guard and insert the wood
screws or concrete bolts with washers into the
holes. Use a wrench to tighten the wood screw.
Tighten the nut on the concrete bolts and the
sleeves will expand to secure the bolt.
A
B
4

OPERATING INSTRUCTIONS
RECEIVING MAIL
Mail can be delivered into the top door, which will
then drop down into the secure lower compartment.
Place the Parcel Guard at or near the doorstep that
deliveries are usually sent to.
When placing an order online, indicate in the
special notes fi eld that the delivery should be placed
into your Parcel Guard.
Deliveries can be placed into the top door or into
the bottom door using the app or the manual
override to unlock the bottom door.
RETRIEVING MAIL
To retrieve mail that has been delivered, use either
the app or the manual override to unlock the bottom
door and remove the delivery.
WIRELESS CONNECTION
This appliance can be controlled with a wireless
application on your wireless device.
Visit https://www.danby.com/support/#apps
to download the application and learn about its
operation.
BALLAST WEIGHT
A weight can be added to the bottom of the
parcel guard to provide stability and security if the
supplied mounting fastener are not used.
A sandbag can be used for ballast weight. It should
be fi lled with a maximum of 10 kgs (22 lbs) of fi ne
sand. Alternatively a brick or similar item can also
be used.
Remove the interior fl oor of the Parcel Guard and
place the ballast weight inside the empty space in
the fl ooring. Ensure that no wires get unplugged
during this process.
OUTGOING MAIL
Use the provided outgoing mail strap to attach any
outgoing mail to the inside of the top door.
Place the signal fl ag in the upright position to tell
the mail carrier that there is outgoing mail in the top
compartment.
RETURNING PURCHASES
Use the app to create a unique barcode that can be
sent by text or email to the mail carrier.
Place the package to be returned in the bottom
compartment.
The mail carrier will use the barcode to open the
lower compartment and retrieve the outgoing
package.
Replace the interior fl oor.
5

CARE & MAINTENANCE
CLEANING
Ensure the Parcel Guard is unplugged before
cleaning.
The Parcel Guard can be cleaned with a soft cloth
and a solution of a tablespoon of baking soda to
one quart of water or some mild detergent.
Note: Do not use cleaners containing ammonia or
alcohol on the appliance. Ammonia or alcohol can
damage the appearance of the appliance. Never
use any commercial or abrasive cleaners or sharp
objects on any part of the appliance.
BATTERY REPLACEMENT
The battery may need to be replaced every 3 - 5
years, depending on usage and environment.
Ensure the Parcel Guard is unplugged before
changing the battery.
1. Turn off the electronics with the parcel guard
app.
2. Open the lower door using the mechanical
override key.
3. Remove the platform fl oor.
4. Unhook the battery and remove.
5. Replace with a new battery. Connect the positive
wire to the positive terminal on the battery.
Connect the negative wire to the negative
terminal on the battery.
6. Replace the platform fl oor and turn the
electronics back on with the app to return the
Parcel Guard to normal functioning.
6

TROUBLESHOOTING
Danby Consumer Care: 1-800-263-2629 or consumerservice@danby.com
Hours of operation:
Monday to Thursday 8:30 am - 6:00 pm Eastern Standard Time
Friday 8:30 am - 4:00 pm Eastern Standard Time
Information in this manual is subject to change without notice.
PROBLEM POSSIBLE CAUSE
No power • A fuse may be blown or the circuit breaker tripped
• Plug not fully inserted into the wall outlet
• The battery needs to be replaced
Poor video quality or response time • Check the wireless signal strength
• Ensure that the internet upload speed available is >1Mbps
Lower door will not open when
pressing unlock in the app
Lower door says open in the app
when it is closed
Upper door will not open • Ensure the lower compartment is empty and that there are
• If the temperature is very cold, the lock may have frozen
• The lock may need to be oiled
• Ensure the lock on the lower door is fully engaged
• Unlock the door, open and close the door to ensure it is fully
closed, then try to lock it again
no packages blocking the closing mechanism
7

LIMITED “IN HOME” WARRANTY
LIMITED IN-HOME APPLIANCE WARRANTY
This quality product is warranted to be free from manufacturer’s defects in material and workmanship, provided that the unit is used under the normal operating
This quality product is warranted to be free from manufacturer’s defects in material and workmanship, provided that the unit is used
conditions intended by the manufacturer.
under the normal operating conditions intended by the manufacturer.
This warranty is available only to the person to whom the unit was originally sold by Danby Products Limited (Canada) or Danby Products Inc. (U.S.A.) (hereafter
This warranty is available only to the person to whom the unit was originally sold by Danby Products Limited (Canada) or Danby
“Danby”) or by an authorized distributor of Danby, and is non-transferable.
Products Inc. (U.S.A.) (hereafter “Danby”) or by an authorized distributor of Danby, and is non-transferable.
TERMS OF WARRANTY
Plastic parts are warranted for thirty (30) days from the date of purchase, with no extensions provided.
Plastic parts, are warranted for thirty (30) days only from purchase date, with no extensions provided.
First 24 months
First Year
To obtain service
To obtain
Service
Boundaries of
in-home service
During the first twenty four (24) months, any functional parts of this product found to be defective, will be repaired
or replaced, at warrantor’s option, at no charge to the original purchaser.
During the rst twelve (12) months, any functional parts of this product found to be defective, will be repaired or replaced, at warrantor’s
option, at no charge to the ORIGINAL purchaser.
Contact the dealer where the unit was purchased, or contact the nearest authorized Danby service depot, where
service must be performed by a qualified service technician. If service is performed on the unit by anyone other
Danby reserves the right to limit the boundaries of “In Home Service” to the proximity of an Authorized Service Depot. Any app liance
than an authorized service depot, all obligations of Danby under this warranty shall be void.
requiring service outside the limited boundaries of “In Home Service” , it will be the consumer’s responsibility to transport the appliance (at
their own expense) to the original retailer (point of purchase) or a service depot for repair. See “Boundaries of In Home Serv ice” below.
Danby reserves the right to limit the boundaries of “In Home Service” to the proximity of an authorized service
Contact your dealer from whom your unit was purchased, or contact your nearest authorized Danby service depot, where service
depot. Any appliance requiring service outside the limited boundaries of “In Home Service”, will be the consumer’s
must be performed by a qualied service technician.
responsibility to transport at their own expense to the original point of purchase or a service depot for repair. If the
If service is performed on the units by anyone other than an authorized service depot, or the unit is used for commercial appli cation, all
appliance is installed in a location that is 100 kilometers (62 miles) or more from the nearest service center, it must
obligations of Danby under this warranty shall be void.
be delivered to the nearest authorized Danby Service Depot by the purchaser.
TERMS OF WARRANTY
Boundaries of
In Home Service
If the appliance is installed in a location that is 100 kilometers (62 miles) or more from the nearest service center your unit must be
Transportation charges to and from the service location are not protected by this warranty and are the
delivered to the nearest authorized Danby Service Depot, as service must only be performed by a technician qualied and certif ied for
responsibility of the purchaser.
warranty service by Danby. Transportation charges to and from the service location are not protected by this warranty and are t he
Nothing within this warranty shall imply that Danby will be responsible or liable for any spoilage or damage to food or other
contents of this appliance, whether due to any defect of the appliance, or its use, whether proper or improper.
responsibility of the purchaser.
Nothing within this warranty shall imply that Danby will be responsible or liable for any spoilage or damage to food or other c ontents of this appliance, whether due
to any defect of the appliance, or its use, whether proper or improper.
Save as herein provided, by Danby, there are no other warranties, conditions, representations or guarantees, express or implied, made
or intended by Danby or its authorized distributors and all other warranties, conditions, representations or guarantees, including any
warranties, conditions, representations or guarantees under any Sale of Goods Act or like legislation or statute is hereby expressly
Save as herein provided, Danby, there are no other warranties, conditions, representations or guarantees, express or implied, m ade or intended by Danby or its
excluded. Save as herein provided, Danby shall not be responsible for any damages to persons or property, including the unit itself,
authorized distributors and all other warranties, conditions, representations or guarantees, including any warranties, conditio ns, representations or guarantees
howsoever caused or any consequential damages arising from the malfunction of the unit and by the purchase of the unit, the
under any Sale of Goods Act or like legislation or statue is hereby expressly excluded. Save as herein provided, Danby shall no t be responsible for any damages
purchaser does hereby agree to indemnify and hold harmless Danby from any claim for damages to persons or property caused by
to persons or property, including the unit itself, howsoever caused or any consequential damages arising from the malfunction o f the unit and by the purchase of
the unit.
the unit, the purchaser does hereby agree to indemnify and hold harmless Danby from any claim for damages to persons or propert y caused by the unit.
No warranty or insurance herein contained or set out shall apply when damage or repair is caused by any of the following:
No warranty or insurance herein contained or set out shall apply when damage or repair is caused by any of the following:
1) Power failure.
2) Damage in transit or when moving the appliance.
1) Power failure.
3) Improper power supply such as low voltage, defective house wiring or inadequate fuses.
2) Damage in transit or when moving the appliance.
4) Accident, alteration, abuse or misuse of the appliance such as inadequate air circulation in the room or abnormal operating
3) Improper power supply such as low voltage, defective house wiring or inadequate fuses.
conditions (ie. extremely high or low room temperature).
4) Accident, alteration, abuse or misuse of the appliance such as inadequate air circulation in the room or abnormal operating con ditions
5) Use for commercial or industrial purposes (ie. If the appliance is not installed in a domestic residence).
6) Fire, water damage, theft, war, riot, hostility, acts of God such as hurricanes, floods etc.
7) Service calls resulting in customer education.
8) Improper Installation (ie. Building-in of a free standing appliance or using an appliance outdoors that is not approved for outdoor
application, including but not limited to: garages, patios, porches or anywhere that is not properly insulated or climate controlled).
Proof of purchase date will be required for warranty claims; retain bills of sale. In the event that warranty service is required, present
Proof of purchase date will be required for warranty claims; so, please retain bills of sale. In the event warranty service is required, present this document to our
the proof of purchase to our authorized service depot.
AUTHORIZED SERVICE DEPOT.
(extremely high or low room temperature).
5) Use for commercial or industrial purposes (ie. If the appliance is not installed in a domestic residence).
6) Fire, water damage, theft, war, riot, hostility, acts of God such as hurricanes, oods etc.
7) Service calls resulting in customer education.
8) Improper Installation (ie. Building-in of a free standing appliance or using an appliance outdoors that is not approved for out door application).
EXCLUSIONS
EXCLUSIONS
GENERAL PROVISIONS
GENERAL PROVISIONS
Danby Products Limited
Danby Products Limited
PO Box 1778, Guelph, Ontario, Canada N1H 6Z9
PO Box 1778, Guelph, Ontario, Canada N1H 6Z9
Telephone: (519) 837-0920 FAX: (519) 837-0449
Telephone: (519) 837-0920 FAX: (519) 837-0449
Warranty Service
Warranty Service
In-home
In Home
1-800-263-2629
1-800-263-2629
04/17
04/09
Danby Products Inc.
PO Box 669, Findlay, Ohio, U.S.A. 45840
Telephone: (419) 425-8627 FAX: (419) 425-8629
PO Box 669, Findlay, Ohio, U.S.A. 45840
Telephone: (419) 425-8627 FAX: (419) 425-8629
Danby Products Inc.

Bienvenue
Bienvenue à la famille Danby. Nous sommes fi ers de la qualité de nos produits et nous croyons au
service fi able. Nous vous suggérons de lire ce manual d’utilisation avant de brancher votre nouvel
appareil, car il contient des informations inportantes sur l’utilisation, la sécurité, le dépannage et
la maintenance, afi n d’assurer la fi abilité et la longévité de votre appareil.
Visitez www.Danby.com pour accéder aux outils d’autoservice, aux FAQ et bien plus encore. Pour
obtenir de l’aide supplémentaire, composez le 1-800-263-2629.
Notez les informations ci-dessous; Vous aurez besoin de cette information pour obtenir un
service sous garantie.
Vous devez fournir le reçu d’achat original pour valider votre garantie et recevoir le service.
Numéro de modèle : _____________________________________________
Numéro de serie : _______________________________________________
Date d’achat : __________________________________________________
Besoin d’assistance?
Avant d’appeler pour le service, voici quelques choses que vous pouvez faire pour nous
aider à mieux vous servir.
Lire ce manuel du propriétaire :
Il contient des instructions pour vous aider à utiliser et à entretenir votre appareil
correctement.
Si vous recevez un appareil endommagé :
Contactez immédiatement le revendeur ou l’entrepreneur qui vous a vendu l’appareil.
Gagnez du temps et de l’argent :
Avant d’appeler pour le service, consultez la section de dépannage à la fi n de ce
manuel. Cette section vous aidera à résoudre les problèmes courants pouvant survenir.
1-800-26- Danby
(1-800-263-2629)
9

Consignes de sécurité importantes
LIRE ET SUIVRE TOUTES LES INSTRUCTIONS DE SÉCURITÉ
EXIGENCES DE SECURITE
• Assurez-vous que les réparations sont effectuées par du personnel autorisé par l’usine afi n de minimiser
les dommages au produit ou les problèmes de sécurité.
• Consultez le manuel de réparation ou le guide du propriétaire avant de tenter de réparer ce produit.
Toutes les précautions de sécurité doivent être suivies.
• Éliminez cet appareil conformément aux réglementations fédérales ou locales.
• Suivez attentivement les instructions de manipulation.
DANGER: le cordon d’alimentation peut présenter un risque de chute. Le cordon d’alimentation doit être
placé dans une zone ne croisant pas les chemins piétonniers ni les zones de trafi c.
ATTENTION: Les enfants doivent être surveillés pour s’assurer qu’ils ne jouent pas avec l’appareil.
DANGER: Risque de piégeage de l’enfant. Avant de jeter un vieil appareil, assurez-vous que la porte
inférieure est enlevée ou bien fermée de manière à ce qu’aucun enfant ne puisse monter à l’intérieur.
DISPOSITION
La mise au rebut de cet appareil doit être conforme aux réglementations fédérales et locales.
GARDEZ CES INSTRUCTIONS!
10

INSTRUCTIONS D’INSTALLATION
CARACTÉRISTIQUES
1. Caméra et récepteur de signal wifi
2
1
2. Drapeau de signalisation
3. Poignée de porte supérieure
4. Porte supérieure
5. Porte basse
6. Verrou
ACCESSOIRES
3
4
5
6
EMPLACEMENT
A. Vis à béton à manchons expansibles (x2)
B. Vis à bois (x2)
C. Rondelles (x4)
D. Adaptateur secteur
OUTILS REQUIS
Les outils suivants sont requis pour terminer
l’installation:
• Lunettes de sécurité
• Crayon ou stylo
• Clé
• Perceuse électrique avec mèche à béton 1/4”
L’emplacement d’installation doit inclure les éléments
suivants:
• Un emplacement de niveau suffi samment
puissant pour prendre en charge la boîte à colis
lorsqu’elle comprend du ballast et des colis.
• Accès à une prise de courant de 120V. Assurezvous que le cordon d’alimentation ne croise pas
les chemins piétonniers ou les zones de trafi c.
• Accès à un fort signal wifi . Utilisez votre
téléphone portable pour vérifi er le signal wifi
à l’emplacement choisi. Votre téléphone doit
recevoir au moins trois barres de signal.
• Vue dégagée de la caméra. Assurez-vous
que le champ de vision situé devant la boîte à
colis n’est pas obstrué par le feuillage ou les
structures afi n que la caméra puisse capturer
une vidéo nette.
11
INSTRUCTIONS D’INSTALLATION
INSTALLATION
Vous pouvez utiliser deux méthodes pour installer la boîte à parcelle en fonction de l’emplacement
d’installation disponible. Décidez quelle option convient le mieux à l’emplacement que vous avez choisi et
suivez les étapes ci-dessous.
A. Sécurisé à l’arrière
1. Utilisez une perceuse et un foret de 1/4” pour
créer des trous aux emplacements marqués sur
le mur arrière de la boîte à colis.
2. Placez la boîte à colis contre le mur ou la
structure sur laquelle elle sera fi xée.
3. Utilisez un stylo ou un crayon pour marquer les
emplacements des trous dans les trous percés.
4. Éloignez la boîte à colis, puis utilisez une
perceuse électrique et un foret de 1/4” pour
créer des trous de guidage pour les boulons ou
vis, d’une profondeur minimale de 2,5” pour
les vis à bois et d’au moins 3,75 ”pour les vis à
béton.
5. Remettez la boîte à colis en place et insérez les
vis à bois ou les boulons à béton avec rondelles
dans les trous. Utilisez une clé pour serrer la vis
à bois. Serrer l’écrou sur les boulons en béton
et les manchons vont se dilater pour fi xer le
boulon.
B. Sécurisé par le bas
1. Retirez la plate-forme au bas de la boîte à colis.
Deux trous sont pré-percés dans le fond de la
boîte.
2. Placez la boîte à colis sur le sol ou la structure
sur laquelle elle sera sécurisée.
3. Utilisez un stylo ou un crayon pour marquer
les emplacements des trous dans les trous déjà
percés.
4. Éloignez la boîte à colis, puis utilisez une
perceuse électrique et un foret de 1/4 ”pour
créer des trous de guidage pour les boulons ou
vis, d’une profondeur minimale de 2,5” pour
les vis à bois et d’au moins 3,75 ”pour les vis à
béton.
5. Remettez la boîte à colis en place et insérez les
vis à bois ou les boulons à béton avec rondelles
dans les trous. Utilisez une clé pour serrer la vis
à bois. Serrer l’écrou sur les boulons en béton
et les manchons vont se dilater pour fi xer le
boulon.
A
B
12

INSTRUCTIONS D’UTILISATION
RÉCEPTION DE COURRIER
Le courrier peut être acheminé par la porte
supérieure, qui tombera ensuite dans le
compartiment inférieur sécurisé.
Placez le garde-colis à proximité des portes où les
livraisons sont habituellement envoyées.
Lorsque vous passez une commande en ligne,
indiquez dans le champ Notes spéciales que la
livraison doit être placée dans votre Parcel Guard.
Les livraisons peuvent être placées dans la porte
supérieure ou dans la porte inférieure à l’aide de
l’application ou de la commande manuelle pour
déverrouiller la porte inférieure.
RECUPERATION MAIL
Pour récupérer le courrier qui a été livré, utilisez
l’application ou la commande manuelle pour
déverrouiller la porte inférieure et supprimer la
livraison.
CONNEXION SANS FIL
Cet appareil peut être contrôlé avec une application
sans fi l sur votre appareil sans fi l.
Rendez-vous sur https://www.danby.com/
support/#apps pour télécharger l’application et
découvrir son fonctionnement.
POIDS DE BALLAST
Un poids peut être ajouté au bas du protège-colis
pour assurer stabilité et sécurité si la fi xation de
montage fournie n’est pas utilisée.
Un sac de sable peut être utilisé pour le poids du
ballast. Il doit être rempli avec un maximum de 10
kg (22 lb) de sable fi n. Vous pouvez également
utiliser une brique ou un article similaire.
Enlevez le plancher intérieur de la boîte à colis et
placez le poids du ballast à l’intérieur de l’espace
vide du plancher. Assurez-vous qu’aucun fi l ne soit
débranché pendant ce processus.
COURRIER SORTANT
Utilisez la dragonne de courrier sortant fournie pour
joindre tout courrier sortant à l’intérieur de la porte
supérieure.
Placez le drapeau de signalisation en position
verticale pour indiquer au courrier qu’il ya du
courrier sortant dans le compartiment supérieur.
RETOUR DES ACHATS
Utilisez l’application pour créer un code à barres
unique pouvant être envoyé par courrier ou par
courrier électronique au courrier.
Placez le colis à retourner dans le compartiment du
bas.
Le facteur utilisera le code à barres pour ouvrir le
compartiment inférieur et récupérer le colis sortant.
Remplacez le sol intérieur.
13

SOINS ET ENTRETIEN
NETTOYAGE
Assurez-vous que la boîte à colis est débranchée
avant le nettoyage.
La boîte à colis peut être nettoyée avec un chiffon
doux et une solution d’une cuillère à soupe de
bicarbonate de soude pour un litre d’eau ou un
détergent doux.
Remarque: N’utilisez pas de nettoyants contenant
de l’ammoniac ou de l’alcool sur l’appareil.
L’ammoniac ou l’alcool peut endommager
l’apparence de l’appareil. N’utilisez jamais de
nettoyants commerciaux ou abrasifs ni d’objets
tranchants sur aucune partie de l’appareil.
REMPLACEMENT DE LA BATTERIE
Il peut être nécessaire de remplacer la batterie
tous les 3 à 5 ans, en fonction de l’utilisation et de
l’environnement.
Assurez-vous que la boîte à colis est débranchée
avant de remplacer la batterie.
1. Éteignez les appareils électroniques avec
l’application Parcel Guard.
2. Ouvrez la porte inférieure à l’aide de la clé
mécanique.
3. Retirez le sol de la plate-forme.
4. Décrocher la batterie et la retirer.
5. Remplacez par une nouvelle pile. Connectez
le fi l positif à la borne positive de la batterie.
Connectez le fi l négatif à la borne négative de la
batterie.
6. Remplacez le plancher de la plate-forme et
rallumez l’électronique avec l’application pour
rétablir le fonctionnement normal de la boîte à
colis.
14

DÉPANNAGE
Danby soins du consommateur : 1-800-263-2629 ou consumerservice@danby.com
Heures d’ouverture :
Du lundi au jeudi, de 8 h 30 à 18 h, heure de l’Est
Vendredi, de 8 h 30 à 16 h, heure de l’Est
Les informations contenues dans ce manuel sont sujettes à modifi cation sans préavis.
PROBLÈME CAUSE POSSIBLE
L’appareil n’est pas alimenté • Un fusible de votre panneau de distribution peut être grillé
ou le disjoncteur déclenché
• La fi che n’est pas complètement insérée dans prise murale
• La batterie doit être remplacée
Mauvaise qualité vidéo ou temps de
réponse
La porte inférieure ne s’ouvre
pas lorsque vous appuyez sur
déverrouiller dans l’application
Porte inférieure dit ouvert dans
l’application quand il est fermé
La porte supérieure ne s’ouvre pas • Assurez-vous que le compartiment inférieur est vide et
• Vérifi ez la force du signal sans fi l
• Assurez-vous que la vitesse de téléchargement Internet
disponible est >1Mbps
• Si la température est très froide, la serrure peut avoir gelé
• La serrure peut avoir besoin d’être huilée
• Assurez-vous que le verrou de la porte inférieure est
complètement engagé
• Déverrouillez la porte, ouvrez et fermez la porte pour vous
assurer qu’elle est complètement fermée, puis essayez de la
verrouiller à nouveau
qu’aucun colis ne bloque le mécanisme de fermeture
15

GARANTIE LIMITÉE « À DOMICILE »
LIMITED IN-HOME APPLIANCE WARRANTY
Cet appareil de qualité est garanti exempt de tout vice de matière première et de fabrication, s’il est utilisé dans les conditions
This quality product is warranted to be free from manufacturer’s defects in material and workmanship, provided that the unit is used under the normal operating
normales recommandées par le fabricant.
conditions intended by the manufacturer.
Cette garantie n’est offerte qu’à l’acheteur initial de l’appareil vendu par Danby Products Limited (Canada) ou Danby Products Inc.
This warranty is available only to the person to whom the unit was originally sold by Danby Products Limited (Canada) or Danby Products Inc. (U.S.A.) (hereafter
(É.-U.) (ci-après « Danby ») ou par l’un de ses distributeurs agréés et elle ne peut être transférée.
“Danby”) or by an authorized distributor of Danby, and is non-transferable.
CONDITIONS
Les pièces en plastique sont garanties pendant trente (30) jours seulement à partir de la date de l’achat, sans aucune prolongation
prévue.
Plastic parts, are warranted for thirty (30) days only from purchase date, with no extensions provided.
Premiers 24 mois
First Year
Pendant les premiers vingt quatre (24) mois, toutes les pièces fonctionnelles de ce produit qui s’avèrent
défectueuses seront réparées ou remplacées, selon le choix du garant, sans frais à l’acheteur initial.
During the rst twelve (12) months, any functional parts of this product found to be defective, will be repaired or replaced, at warrantor’s
TERMS OF WARRANTY
option, at no charge to the ORIGINAL purchaser.
Pour bénéficier
du service
To obtain
Service
Limites de l’entretien
à domicile
Boundaries of
In Home Service
S’adresser au détaillant qui a vendu l’appareil, ou à la station technique agréée de service la plus proche, où
les réparations doivent être effectuées par un technicien qualifié. Si les réparations sont effectuées par
Danby reserves the right to limit the boundaries of “In Home Service” to the proximity of an Authorized Service Depot. Any app liance
quiconque autre que la station de service agréée où à des fins commerciales, toutes les obligations de Danby
requiring service outside the limited boundaries of “In Home Service” , it will be the consumer’s responsibility to transport the appliance (at
en vertu de cette garantie seront annulées.
their own expense) to the original retailer (point of purchase) or a service depot for repair. See “Boundaries of In Home Serv ice” below.
Contact your dealer from whom your unit was purchased, or contact your nearest authorized Danby service depot, where service
Danby se réserve le droit de limiter les limites de « Service au domicile » à proximité d'un dépôt de service
must be performed by a qualied service technician.
agréé. Pour tout appareil nécessitant le service hors des limites de "Service à domicile" il sera la responsabilité
If service is performed on the units by anyone other than an authorized service depot, or the unit is used for commercial appli cation, all
du consommateur de transporter à ses frais au point d'achat d’origine ou un dépôt de service pour la réparation.
obligations of Danby under this warranty shall be void.
Si l'appareil est installé à plus de 100 kilomètres (62 milles) du centre de service le plus proche, il doit être livré
à l'atelier de réparation autorisé par Danby le plus proche, car l'entretien doit uniquement être réalisé par un
If the appliance is installed in a location that is 100 kilometers (62 miles) or more from the nearest service center your unit must be
technicien qualifié et certifié pour effectuer un entretien couvert par la garantie de Danby.
delivered to the nearest authorized Danby Service Depot, as service must only be performed by a technician qualied and certif ied for
warranty service by Danby. Transportation charges to and from the service location are not protected by this warranty and are t he
Les frais de transport entre votre domicile et le lieu de l'entretien ne sont pas couverts par la présente garantie
responsibility of the purchaser.
et doivent être acquittés par l'acheteur.
Aucune partie de la garantie ne prévoit implicitement que le fabricant sera tenu responsable des dommages subis par les aliments ou
Nothing within this warranty shall imply that Danby will be responsible or liable for any spoilage or damage to food or other c ontents of this appliance, whether due
d’autres types de contenu, qu’ils soient causés par la défectuosité de l’appareil ou par son usage adéquat ou inadéquat.
to any defect of the appliance, or its use, whether proper or improper.
EXCLUSIONS
En vertu de la présente, il n’existe aucune autre garantie, condition ou représentation, qu’elle soit exprimée ou tacite, de façon
Save as herein provided, Danby, there are no other warranties, conditions, representations or guarantees, express or implied, m ade or intended by Danby or its
manifeste ou intentionnelle, par Danby ou ses distributeurs agréés. De même, sont exclues toutes les autres garanties, conditions ou
authorized distributors and all other warranties, conditions, representations or guarantees, including any warranties, conditio ns, representations or guarantees
représentations, y compris les garanties, conditions ou représentations en vertu de toute loi régissant la vente de produits ou de toute
under any Sale of Goods Act or like legislation or statue is hereby expressly excluded. Save as herein provided, Danby shall no t be responsible for any damages
autre législation ou règlement semblable. En vertu de la présente, Danby ne peut être tenue responsable en cas de blessures
to persons or property, including the unit itself, howsoever caused or any consequential damages arising from the malfunction o f the unit and by the purchase of
corporelles ou de dégâts matériels, y compris à l’appareil, quelle qu’en soit les causes. Danby ne peut pas être tenue responsable
the unit, the purchaser does hereby agree to indemnify and hold harmless Danby from any claim for damages to persons or propert y caused by the unit.
des dommages indirects dus au fonctionnement défectueux de l’appareil. En achetant l’appareil, l’acheteur accepte de tenir sans
reproche et de dégager Danby de toute responsabilité en cas de réclamation pour toute blessure corporelle ou tout dégât matériel
causé par cet appareil.
No warranty or insurance herein contained or set out shall apply when damage or repair is caused by any of the following:
La garantie ou assurance ci-dessus ne s’applique pas si les dégâts ou réparations sont dus aux cas suivants :
1) Power failure.
1) Panne de courant.
2) Damage in transit or when moving the appliance.
2) Dommages subis pendant le transport ou le déplacement de l’appareil.
3) Improper power supply such as low voltage, defective house wiring or inadequate fuses.
3) Alimentation électrique incorrecte (tension faible, câblage défectueux, fusibles incorrects).
4) Accident, alteration, abuse or misuse of the appliance such as inadequate air circulation in the room or abnormal operating con ditions
4) Accident, modification, emploi abusif ou incorrect de l’appareil tel qu'une circulation d'air inadéquate dans la pièce ou des
conditions de fonctionnement anormales (température extrêmement élevée ou basse).
5) Utilisation dans un but commercial ou industriel (à savoir, si l'appareil n'est pas installé dans un domicile résidentiel).
6) Incendie, dommages causés par l’eau, le vol, la guerre, une émeute, des hostilités, ou en cas de force majeure (ouragan,
inondation, etc.).
7) Visites d’un technicien pour expliquer le fonctionnement de l’appareil au propriétaire.
8) Installation inappropriée (par exemple, encastrement d'un appareil autoportant, ou utilisation extérieure d'un appareil non conçu à
Proof of purchase date will be required for warranty claims; so, please retain bills of sale. In the event warranty service is required, present this document to our
cet effet, y compris, mais sans s'y limiter : les garages, les patios, les porches ou ailleurs, qui ne sont pas correctement isolés ou
AUTHORIZED SERVICE DEPOT.
climatisés).
(extremely high or low room temperature).
5) Use for commercial or industrial purposes (ie. If the appliance is not installed in a domestic residence).
6) Fire, water damage, theft, war, riot, hostility, acts of God such as hurricanes, oods etc.
7) Service calls resulting in customer education.
8) Improper Installation (ie. Building-in of a free standing appliance or using an appliance outdoors that is not approved for out door application).
EXCLUSIONS
GENERAL PROVISIONS
CONDITIONS GÉNÉRALES
La preuve de la date d'achat sera requise pour les réclamations de garantie; conserver la facture de vente. Dans le cas où un service
de garantie est requis, présentez la preuve d'achat à notre dépôt de service agréé.
Warranty Service
In-home
Service sous garantie
Danby Products Limited
Danby Products Limited
PO Box 1778, Guelph, Ontario, Canada N1H 6Z9
PO Box 1778, Guelph, Ontario, Canada N1H 6Z9
Telephone: (519) 837-0920 FAX: (519) 837-0449
Téléphone : (519) 837-0920 Télécopieur : (519) 837-0449
Service au domicile
1-800-263-2629
1-800-263-2629
02/18
04/09
Danby Products Inc.
PO Box 669, Findlay, Ohio, U.S.A. 45840
PO Box 669, Findlay, Ohio, U.S.A. 45840
Téléphone : (419) 425-8627 Télécopieur : (419) 425-8629
Telephone: (419) 425-8627 FAX: (419) 425-8629
Danby Products Inc.

Bienvenido
Bienvenido a la familia Danby. Estamos orgullosos de nuestros productos de calidad y creemos en
un servicio confi able. Sugerimos que lea este manual del propietario antes de conectar el nuevo
aparato ya que contiene información importante sobre la operación, información de seguridad,
solución de problemas y consejos de mantenimiento para garantizar la fi abilidad y longevidad de
su electrodoméstico.
Visite www.Danby.com para acceder a herramientas de autoservicio, preguntas frecuentes y
mucho más. Para asistencia adicional, llame al 1-800-263-2629.
Tenga en cuenta la información siguiente; Necesitará esta información para obtener un servicio
bajo garantía.
Debe proporcionar el recibo de compra original para validar su garantía y recibir servicio.
Número de modelo: _____________________________________________
Número de serie: _______________________________________________
Fecha de compra: _______________________________________________
Necesitas ayuda?
Antes de llamar al servicio, aquí hay algunas cosas que puede hacer para ayudarnos a
servirle mejor.
Lea este manual del propietario:
Contiene instrucciones para ayudarle a usar y mantener su aparato correctamente.
Si recibe un aparato dañado:
Inmediatamente póngase en contacto con el minorista o el constructor que le vendió el
aparato.
Ahorre tiempo y dinero:
Consulte la sección de solución de problemas al fi nal de este manual antes de llamar. Esta
sección le ayudará a resolver problemas comunes que pueden ocurrir.
1-800-26- Danby
(1-800-263-2629)
17

Importantes Instrucciones de Seguridad
LEA Y SIGA TODAS LAS INSTRUCCIONES DE SEGURIDAD
REQUERIMIENTOS DE SEGURIDAD
• Asegúrese de que el servicio sea realizado por personal de servicio autorizado de fábrica para
minimizar los daños del producto o los problemas de seguridad.
• Consulte el manual de reparación o la guía del propietario antes de intentar reparar este producto.
Deben seguirse todas las precauciones de seguridad.
• Deseche este aparato adecuadamente de acuerdo con las regulaciones federales o locales.
• Siga cuidadosamente las instrucciones de manejo.
PELIGRO: El cable de alimentación puede ser un peligro potencial de tropiezo. El cable de alimentación
debe estar ubicado en un área que no cruce caminos peatonales o áreas trafi cadas.
PRECAUCIÓN: Los niños deben ser supervisados para asegurarse de que no jueguen con el aparato.
PELIGRO: Riesgo de atrapamiento infantil. Antes de tirar un aparato viejo, asegúrese de quitar o asegurar
la puerta inferior para que ningún niño pequeño pueda entrar.
DISPOSICIÓN
La eliminación de este aparato debe realizarse de acuerdo con las regulaciones federales y locales.
¡GUARDE ESTAS INSTRUCCIONES!
18

INSTRUCCIONES DE INSTALACIÓN
CARACTERISTICAS
1. Cámara y receptor de señal wifi .
2
1
2. Bandera de señal
3. Manija de la puerta superior
4. Puerta superior
5. Puerta inferior
6. Cerradura de la puerta
ACCESORIOS
3
4
5
6
UBICACIÓN
A. Pernos de hormigón con manguitos de
expansión (x2)
B. Tornillos para madera (x2)
C. Arandelas (x4)
D. Adaptador de corriente
HERRAMIENTAS REQUERIDAS
Se requieren las siguientes herramientas para
completar la instalación:
• Gafas protectoras
• Lapiz o lapiz
• Llave inglesa
• Taladro eléctrico con broca de hormigón de
1/4“
La ubicación de instalación debe incluir lo siguiente:
• Una ubicación de nivel que sea lo
sufi cientemente fuerte como para admitir la caja
de parcelas cuando incluye lastre y paquetes.
• Acceso a una toma de corriente de 120V.
Asegúrese de que el cable de alimentación no
se cruce con senderos o áreas de tráfi co.
• Acceso a una señal wifi fuerte. Use su teléfono
celular para verifi car la señal wifi en la
ubicación elegida. Su teléfono debe obtener al
menos tres barras de señal.
• Vista de cámara sin obstrucciones. Asegúrese
de que el campo de visión en frente de la caja
de la parcela no esté obstruido por el follaje
o las estructuras para que la cámara pueda
capturar video claro.
19
INSTRUCCIONES DE INSTALACIÓN
INSTALACIÓN
Hay dos métodos que se pueden usar para instalar la caja de parcelas dependiendo de la ubicación
de instalación disponible. Decida qué opción es la mejor para su ubicación elegida y siga los pasos a
continuación.
A. Asegurado a través de la parte trasera
1. Use un taladro eléctrico y una broca 1/4” para
crear orifi cios en las ubicaciones marcadas en
la pared posterior de la caja de paquetes.
2. Coloque la caja de paquetería contra la pared o
estructura a la que se asegurará.
3. Use una pluma o un lápiz para marcar las
ubicaciones de los orifi cios a través de los
orifi cios perforados.
4. Mueva la caja de paquetes fuera del camino
y luego use un taladro eléctrico y una broca
de 1/4“ para crear orifi cios de guía para
los pernos o tornillos, al menos 2.5” de
profundidad para tornillos de madera y al
menos 3.75 “de profundidad para los pernos
de concreto.
5. Reemplace la caja de paquetes e inserte los
tornillos para madera o los pernos de concreto
con arandelas en los orifi cios. Use una llave
para apretar el tornillo de madera. Apriete la
tuerca en los pernos de concreto y los manguitos
se expandirán para asegurar el perno.
B. Asegurado a través de la parte inferior
1. Retire la plataforma en la parte inferior de la
caja de paquetes. Dos orifi cios están perforados
en la parte inferior de la caja.
2. Coloque la caja de paquetería en el piso o la
estructura a la que se asegurará.
3. Use un bolígrafo o un lápiz para marcar las
ubicaciones de los orifi cios a través de los
orifi cios perforados previamente.
4. Mueva la caja de paquetes fuera del camino
y luego use un taladro eléctrico y una broca
de 1/4 “para crear orifi cios de guía para
los pernos o tornillos, al menos 2.5” de
profundidad para tornillos de madera y al
menos 3.75 “de profundidad para los pernos
de concreto.
5. Reemplace la caja de paquetes e inserte los
tornillos para madera o los pernos de concreto
con arandelas en los orifi cios. Use una llave
para apretar el tornillo de madera. Apriete la
tuerca en los pernos de concreto y los manguitos
se expandirán para asegurar el perno.
A
B
20

INSTRUCCIONES DE OPERACIÓN
RECIBIENDO CORREO
El correo puede ser entregado en la puerta superior,
que luego caerá en el compartimiento inferior
seguro.
Coloque la Guardia de paquetes en o cerca de
la puerta a la que generalmente se envían las
entregas.
Al realizar un pedido en línea, indique en el campo
de notas especiales que la entrega debe realizarse
en su Parcel Guard.
Las entregas se pueden colocar en la puerta
superior o en la puerta inferior mediante la
aplicación o la anulación manual para desbloquear
la puerta inferior.
RECUPERANDO EL CORREO
Para recuperar el correo que se ha entregado,
use la aplicación o la anulación manual para
desbloquear la puerta inferior y eliminar la entrega.
CONEXIÓN INALÁMBRICA
Este dispositivo se puede controlar con una
aplicación inalámbrica en su dispositivo
inalámbrico.
Visite https://www.danby.com/support/#apps
para descargar la aplicación y obtener información
sobre su funcionamiento.
PESO DE BALASTO
Se puede agregar un peso a la parte inferior
de la protección del paquete para proporcionar
estabilidad y seguridad si no se utiliza el sujetador
de montaje suministrado.
Una bolsa de arena se puede utilizar para el peso
de lastre. Debe llenarse con un máximo de 10 kg
(22 lb) de arena fi na. Alternativamente, también se
puede utilizar un elemento de ladrillo o similar.
Retire el piso interior de la caja de paquetes y
coloque el peso del lastre dentro del espacio vacío
en el piso. Asegúrese de que ningún cable se
desenchufe durante este proceso.
CORRESPONDENCIA SALIENTE
Use la correa de correo saliente provista para
adjuntar cualquier correo saliente al interior de la
puerta superior.
Coloque la bandera de señal en posición vertical
para decirle al cartero que hay correo saliente en el
compartimiento superior.
DEVOLUCIÓN DE LAS COMPRAS
Use la aplicación para crear un código de barras
único que se pueda enviar por mensaje de texto o
correo electrónico al proveedor de correo.
Coloque el paquete a devolver en el compartimiento
inferior.
El cartero usará el código de barras para abrir
el compartimiento inferior y recuperar el paquete
saliente.
Reemplace el piso interior.
21

CUIDADO Y MANTENIMIENTO
LIMPIEZA
Asegúrese de que la caja de paquetes esté
desenchufada antes de limpiarla.
La caja de paquetes se puede limpiar con un
paño suave y una solución de una cucharada de
bicarbonato de sodio en un litro de agua o un poco
de detergente suave.
Nota: No use limpiadores que contengan amoníaco
o alcohol en el aparato. El amoníaco o el alcohol
pueden dañar la apariencia del aparato. Nunca
use limpiadores comerciales o abrasivos u objetos
afi lados en ninguna parte del aparato.
CAMBIO DE BATERÍA
Es posible que la batería deba reemplazarse cada
3 a 5 años, según el uso y el entorno.
Asegúrese de que la caja de paquetes esté
desenchufada antes de cambiar la batería.
1. Apague la electrónica con la aplicación parcel
guard.
2. Abra la puerta inferior con la llave de anulación
mecánica.
3. Retire el piso de la plataforma.
4. Desenganche la batería y retírela.
5. Reemplace con una batería nueva. Conecte el
cable positivo al terminal positivo de la batería.
Conecte el cable negativo al terminal negativo
de la batería.
6. Reemplace el piso de la plataforma y vuelva
a encender la electrónica con la aplicación
para que la caja de paquetes vuelva al
funcionamiento normal.
22

SOLUCIÓN SUGERIDA
Danby cuidado del consumidor: 1-800-263-2629 o consumerservice@danby.com
Horas de operación:
Lunes a Jueves 8:30 am - 6:00 pm Hora estándar del este
Viernes 8:30 am - 4:00 pm Hora estándar del este
La información de este manual está sujeta a cambios sin previo aviso.
PROBLEMA POSSIBLE CAUSA
No funciona • Un fusible en su casa puede soplarse o el interruptor de
circuito disparado
• El enchufe no está completamente insertado en la toma de
corriente
• La batería necesita ser reemplazada
Mala calidad de video o tiempo de
respuesta
La puerta inferior no se abrirá
al presionar desbloquear en la
aplicación
La puerta inferior dice abierta en la
aplicación cuando está cerrada
La puerta superior no se abre • Asegúrese de que el compartimiento inferior esté vacío y
• Compruebe la potencia de la señal inalámbrica
• Asegúrese de que la velocidad de carga de Internet
disponible sea >1Mbps
• Si la temperatura es muy fría, la cerradura puede haberse
congelado.
• La cerradura puede necesitar ser engrasada
• Asegúrese de que la cerradura de la puerta inferior esté
completamente enganchada
• Abra la puerta, ábrala y ciérrela para asegurarse de que
esté completamente cerrada, luego intente bloquearla
nuevamente
que no haya paquetes bloqueando el mecanismo de cierre
23

GARANTÍA LIMITADA “A DOMICILIO”
LIMITED IN-HOME APPLIANCE WARRANTY
Este producto de calidad está garantizado contra defectos de fabricación, incluyendo partes y mano de obra, siempre y
This quality product is warranted to be free from manufacturer’s defects in material and workmanship, provided that the unit is used under the normal operating
cuando la unidad se utilice bajo las condiciones normales de funcionamiento para las que fue diseñado.
conditions intended by the manufacturer.
Esta garantía está solamente disponible para la persona que haya comprado originalmente esta unidad directamente de Danby
This warranty is available only to the person to whom the unit was originally sold by Danby Products Limited (Canada) or Danby Products Inc. (U.S.A.) (hereafter
Products Limited (Canada) o Danby Products Inc. (U.S.A.) (en adelante “Danby”) o uno de sus distribuidores
“Danby”) or by an authorized distributor of Danby, and is non-transferable.
autorizados, y no es transferible.
CONDICIONES DE LA GARANTÍA
Las piezas plásticas, se autorizan por treinta (30) días solamente a partir de la fecha de la compra, sin las extensiones
proporcionadas.
Plastic parts, are warranted for thirty (30) days only from purchase date, with no extensions provided.
Primeros 24 meses
First Year
Para obtener
servicio
To obtain
Service
Límites del servicio
técnico a domicilio
Boundaries of
In Home Service
Durante los primeros veinticuatro (24) meses, cualquier parte en buen estado de este producto que resulte
During the rst twelve (12) months, any functional parts of this product found to be defective, will be repaired or replaced, at warrantor’s
defectuosa, incluyendo cualquier sistema sellado, será reparado o reemplazado, a opción del fabricante, sin
option, at no charge to the ORIGINAL purchaser.
cargo para el comprador original.
Comuníquese con el distribuidor donde haya comprado la unidad, o llame al Taller de Servicio Autorizado más
cercano, donde debe ser reparada por un técnico calificado. Si esta unidad es reparada en otro lugar que no
Danby reserves the right to limit the boundaries of “In Home Service” to the proximity of an Authorized Service Depot. Any app liance
sea un Taller de Servicio Autorizado, o si la unidad se utiliza para aplicaciones comerciales, Danby no se hará
requiring service outside the limited boundaries of “In Home Service” , it will be the consumer’s responsibility to transport the appliance (at
responsable de ninguna forma y la garantía será anulada.
their own expense) to the original retailer (point of purchase) or a service depot for repair. See “Boundaries of In Home Serv ice” below.
Contact your dealer from whom your unit was purchased, or contact your nearest authorized Danby service depot, where service
Danby se reserva el derecho de limitar la cobertura de "Servicio en Domicilio" sujeto a la proximidad de un
must be performed by a qualied service technician.
Taller de Servicio Autorizado. Para todo artefacto que requiera servicio fuera del área limitada de "Servicio en
If service is performed on the units by anyone other than an authorized service depot, or the unit is used for commercial appli cation, all
Domicilio", el cliente será responsable por transportar dicho artefacto hasta el Taller de Servicio Autorizado
obligations of Danby under this warranty shall be void.
mas cercano. Si el electrodoméstico está instalado en un lugar que se encuentra a 100 kilómetros (62 millas)
o más del centro de servicios más cercano, se debe llevar la unidad al Centro de servicios Danby autorizado
If the appliance is installed in a location that is 100 kilometers (62 miles) or more from the nearest service center your unit must be
más cercano, ya que dicho servicio sólo puede realizarlo un técnico calificado y certificado por Danby para
delivered to the nearest authorized Danby Service Depot, as service must only be performed by a technician qualied and certif ied for
prestar servicios de garantía.
warranty service by Danby. Transportation charges to and from the service location are not protected by this warranty and are t he
responsibility of the purchaser.
Los cargos por transporte desde y hacia el lugar en que se efectúe el servicio técnico no están cubiertos por
esta garantía y son de responsabilidad del comprador.
TERMS OF WARRANTY
Nothing within this warranty shall imply that Danby will be responsible or liable for any spoilage or damage to food or other c ontents of this appliance, whether due
Nada dentro de esta garantía implica que Danby será responsable por cualquier daño que hayan sufrido los alimentos u otros
to any defect of the appliance, or its use, whether proper or improper.
contenidos de este aparato, ya sea debido a un defecto del aparato, o su uso, adecuado o inadecuado.
EXCLUSIONS
Save as herein provided, Danby, there are no other warranties, conditions, representations or guarantees, express or implied, m ade or intended by Danby or its
Salvo lo aquí indicado por Danby, no existen otras garantías, condiciones o representaciones, explícitas o implícitas, concretas o
authorized distributors and all other warranties, conditions, representations or guarantees, including any warranties, conditio ns, representations or guarantees
intencionales por parte de Danby o sus distribuidores autorizados y todas las demás garantías, condiciones o representaciones,
under any Sale of Goods Act or like legislation or statue is hereby expressly excluded. Save as herein provided, Danby shall no t be responsible for any damages
incluyendo cualquier garantía, condiciones o representaciones bajo cualquier Acta de Venta de Productos o legislación o estatuto
to persons or property, including the unit itself, howsoever caused or any consequential damages arising from the malfunction o f the unit and by the purchase of
similar, quedan de esta forma expresamente excluidas. Salvo lo aquí indicado, Danby no serán responsables por ningún daño a
the unit, the purchaser does hereby agree to indemnify and hold harmless Danby from any claim for damages to persons or propert y caused by the unit.
personas o bienes, incluyendo la propia unidad, sin importar su causa, o de ningún daño indirecto causado por el desperfecto de la
unidad, y al comprar esta unidad, el comprador acepta por la presente, indemnizar y proteger a Danby contra cualquier reclamo
por daños a personas o bienes causados por la unidad.
EXCLUSIONES
GENERAL PROVISIONS
No warranty or insurance herein contained or set out shall apply when damage or repair is caused by any of the following:
1) Power failure.
No se considerará ninguna de estas garantías o seguros cuando el daño o la necesidad de reparación sea el producto de los
2) Damage in transit or when moving the appliance.
siguientes casos:
3) Improper power supply such as low voltage, defective house wiring or inadequate fuses.
1) Falla del suministro eléctrico.
2) Daños en tránsito o durante el transporte de la unidad.
4) Accident, alteration, abuse or misuse of the appliance such as inadequate air circulation in the room or abnormal operating con ditions
3) Alimentación incorrecta, como bajo voltaje, instalación eléctrica defectuosa o fusibles inadecuados.
4) Accidente, modificación, abuso o uso incorrecto del artefacto, tal como insuficiente ventilación del ambiente o condiciones de
operación anormales (temperatura ambiente extremadamente alta o baja).
5) Utilización comercial o industrial (v.g., si el electrodoméstico no está instalado en una vivienda particular).
6) Incendio, daños por agua, robo, guerra, disturbios, hostilidades, actos de fuerza mayor como huracanes, inundaciones, etc.
7) Pedidos de servicio debido a desinformación del usuario.
8) Instalación inadecuada (v.g., instalación empotrada de un electrodoméstico diseñado como unidad independiente o uso de un
Proof of purchase date will be required for warranty claims; so, please retain bills of sale. In the event warranty service is required, present this document to our
electrodoméstico al aire libre que no esté aprobado para dicho fin, incluyendo pero no limitado a: garajes, patios, porches o en
AUTHORIZED SERVICE DEPOT.
cualquier lugar que no esté bien aislado o controlado por el clima).
(extremely high or low room temperature).
5) Use for commercial or industrial purposes (ie. If the appliance is not installed in a domestic residence).
6) Fire, water damage, theft, war, riot, hostility, acts of God such as hurricanes, oods etc.
7) Service calls resulting in customer education.
8) Improper Installation (ie. Building-in of a free standing appliance or using an appliance outdoors that is not approved for out door application).
CONDICIONES GENERALES
Se requerirá una prueba de la fecha de compra para reclamaciones de garantía; Retener las facturas de venta. En el caso de que se
requiera servicio de garantía, presente el comprobante de compra a nuestro depósito de servicio autorizado.
Warranty Service
In-home
Servicio de Garantía
Danby Products Limited
PO Box 1778, Guelph, Ontario, Canada N1H 6Z9
Danby Products Limited
Telephone: (519) 837-0920 FAX: (519) 837-0449
PO Box 1778, Guelph, Ontario, Canada N1H 6Z9
Telephone: (519) 837-0920 FAX: (519) 837-0449
Servicio en Domicilio
1-800-263-2629
1-800-263-2629
04/17
04/09
PO Box 669, Findlay, Ohio, U.S.A. 45840
Telephone: (419) 425-8627 FAX: (419) 425-8629
Telephone: (419) 425-8627 FAX: (419) 425-8629
PO Box 669, Findlay, Ohio, U.S.A. 45840
Danby Products Inc.
Danby Products Inc.

MODEL • MODÈLE • MODELO
DPG37U
DPG37B
Printed in China
Imprimé en Chine
Impreso en China
Danby Products Limited, Guelph, ON, Canada N1H 6Z9
Danby Products Inc., Findlay, Ohio, USA 45840
 Loading...