Daewoo DV-K486N User Manual

Video Cassette Recorder
User’s Guide
DV-K486N/K286N
As an ENERGYSTAR R Partner, DAEWOO has determined that this product meets the ENERGYSTAR R guidelines for energy efficiency.

Safety information
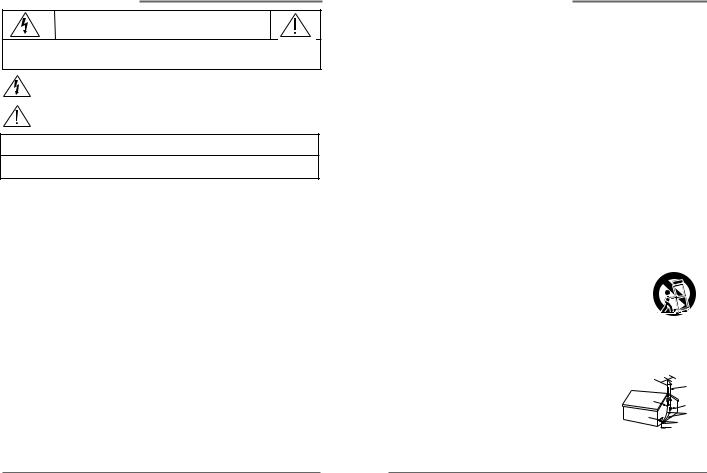
CAUTION
RISK OF ELECTRIC SHOCK
DO NOT OPEN
CAUTION: TO REDUCE THE RISK OF ELECTRIC SHOCK, DO NOT REMOVE COVER (OR BACK). NO USER-SERVICEABLE PARTS INSIDE.
REFER SERVICING TO QUALIFIED SERVICE PERSONNEL.
The lightning flash with arrowhead symbol, within an equilateral triangle, is intended to alert the user to the presence of uninsulated “dangerous voltage” within the product’s enclosure that may be of sufficient magnitude to constitute a risk of electric shock to persons.
The exclamation point within an equilateral triangle is intended to alert the user to the presence of important operating and maintenance (servicing) instructions in the literature accompanying the appliance.
WARNING : TO REDUCE THE RISK OF FIRE OR ELECTRIC SHOCK, DO NOT EXPOSE THIS APPLIANCE TO RAIN OR MOISTURE.
CAUTION: TO PREVENT ELECTRIC SHOCK, MATCH WIDE BLADE OF PLUG TO WIDE SLOT, FULLY INSERT.
IMPORTANT SAFEGUARDS
In addition to the careful attention devoted to quality standards in the manufacture of your video product, safety is a major factor in the design of every instrument. However, safety is your responsibility too. This sheet lists important information that will help to assure your enjoyment and proper use of the video product and accessory equipment. Please read them carefully before
operating and using your video product.
Installation
1 Read and Follow InstructionsAll the safety and operating instructions should be read before the video product is operated. Follow all operating instructions.
2 Retain InstructionsThe safety and operating instructions should be retained for future reference.
3 Heed Warnings-Comply with all warnings on the video product and in the operating instructions.
4 PolarizationThis video product is equipped with a polarized alternating -current line plug (a plug having one blade wider than the other). This plug will fit into the power outlet only one way.
This is a safety feature. If you are unable to insert the plug fully into the outlet, try reversing the plug. If the plug still fails to fit, contact your electrician to replace your obsolete outlet. To prevent electric shock, do not use this polarized plug with an extension cord, receptacle, or other outlet unless the blades can be fully inserted without blade exposure. If you need an extension cord, use a polarized cord.
5 Power Sources-This video product should be operated only from the type of power source indicated on the marking label. If you are not sure of the type of power supply to your home, consult your video dealer or local power company. For video products intended to operate from battery power, or other sources, refer to the operating instructions.
6 OverloadingDo not overload wall outlets of extension cords as this can result in a risk of fire or electric shock. Overloaded AC outlets, extension cords, frayed power cords, damaged or cracked wire insulation, and broken plugs are dangerous. They may result in a shock or fire
i. |
Daewoo Video Cassette Recorder User’s Guide |
Safety information, continued
harzard. Periodically examine the cord, and if its appearance indicates damage or deteriorated insulation, have it replaced by your service technician.
7 Power-Cord Protection- Power-supply cords should be routed so that they are not likely to be walked on or pinched by items placed upon or against them, paying particular attention to cords at plugs, convenience receptacles, and the point where they exit from the video product.
8 VentilationSlots and openings in the case are provided for ventilation to ensure reliable operation of the video product and to protect it from overheating. These openings must not be blocked or covered. The openings should never be blocked by placing the video product on a bed, sofa, rug, or other similar surface. This video product should never be placed near or over a radiator or heat register. This video product should not be placed in a built-in installation such as a bookcase or rack unless proper ventilation is provided or the video product manufacturer’s instruction’s have been followed.
9 AttachmentsDo not use attachments unless recommended by the video product manufacturer as they may cause hazards.
10 Water and MoistureDo not use this video product near waterfor example, near a bath tub, wash bowl, kitchen sink or laundry tub, in a wet basement, or near a swimming pool and the like.
Caution : Maintain electrical safety. Powerline operated equipment or accessories connected to this unit should bear the UL listing mark or CSA certification mark on the accessory itself and should not be modified so as to defeat the safety features. This will help avoid any potential hazard from electrical shock or fire. If in doubt, contact qualified service personnel.
11 AccessoriesDo not place this video product on an unstable cart, stand, tripod, bracket, or table. The video product may fall, causing serious injury to a child or adult as well as serious damage to the video product. Use this video product only with a cart, stand , tripod, bracket, or table recommended by the manufacturer or sold with the video product. Any mounting of the product should follow the manufacturer’s instructions and use a mounting accessory recommended by the manufacturer.
11A A video product and cart combination should be moved with care. Quick stops, excessiveforce, and uneven surfaces may cause the video product and cart combination to overturn.
Note to CATV system installer
This reminder is provided to call the CATV system installer’s attention to Section 820-40 of the NEC which provides guidelines for proper grounding and, in particular, specifies that the cable ground shall be connected to the grounding system of the building, as close to the point of cable entry as practical.
12 Outdoor Antenna GroundingIf an outside antenna or cable system is connected to the video product, be sure the antenna or cable system is grounded so as
to provide some protection against voltage surges and built-up
static charges. Section 810 of the National Electrical Code, ANSI/NFPA No. 70-1984 (Section 54 of Canadian Electrical Code, Part 1) provides information with respect to proper grounding of the mast and supporting structure, grounding of the lead-in wire to an antenna-discharge unit, connection to grounding electrodes, and requirements for the grounding electrode.
See example as shown.
Daewoo Video Cassette Recorder User’s Guide

Safety information, continued
13 Power LinesAn outside antenna system should not be located in the vicinity of overhead power lines, other electric light or power circuits, or where it can fall into such power lines or circuits. When installing an outside antenna system, extreme care should be taken to keep from touching or approaching such power lines or circuits as contact with them might be fatal. Installing an outdoor antenna can be hazardous and should be left to a professional
antenna installer.
Use
14 CleaningUnplug this video product from the wall outlet before cleaning. Do not use liquid cleaners or aerosol cleaners. Use a damp cloth for cleaning.
15 Object and Liquid Entry-Never push objects of any kind into this video product through openings as they may touch dangerous voltage points or “short-out” parts that could result in a fire or electric shock. Never spill liquid of any kind on the video product.
16 Lightning-For added protection for this video product during a lightning storm, or when it is left unattended and unused for long periods of time, unplug it from the wall outlet and disconnect the antenna or cable system. This will prevent damage to the video product due to
lightning and power line surges.
Service
17 Servicing-Do not attempt to service this video product yourself as opening or removing covers may expose you to dangerous voltage or other hazards. Refer all servicing to qualified service personnel.
18 Conditions Requiring Service-Unplug this video product from the wall outlet and refer servicing to qualified service personnel under the following conditions.
A.When the power-supply cord or plug is damaged.
B.If liquid has been spilled, or objects have fallen into the video product.
C.If the video product has been exposed to rain or water.
D.If the video product does not operate normally by following the operating instructions. Adjust only those controls that are covered by the operating instructions. Improper adjustment of other controls may result in damage and will often require extensive work by a qualified technician to restore the video product to its normal operation.
E.If the video product has been dropped or the cabinet has been damaged.
F.When the video product exhibits a distinct change in performance-this indicates a need for service.
19 Replacement Parts-When replacement parts are required, have the service technician verify that the replacements he uses have the same safety characteristics as the original parts. Use of replacements specified by the video product manufacturer can prevent fire, electric shock, or other hazards.
20 Safety CheckUpon completion of any service or repairs to this video product, ask the service technician to perform safety checks recommended by the manufacturer to determine that the video product is in safe operating condition.
21 Wall or Ceilling MountingThe product should be mounted to a wall or ceilling only as recommended by the manufacturer.
22 Heat-The product should be situated away from heat sources such as radiators, heat registers, stoves, or other products (including amplifiers) that produce heat.
iii. |
Daewoo Video Cassette Recorder User’s Guide |

Contents |
|
Overview of the equipment ............................................................................................................................... |
1 |
Front panel |
1 |
Front panel display |
2 |
Back panel |
3 |
Remote control |
4 |
Connecting your VCR .......................................................................................................................................... |
7 |
Connecting an antenna to the VCR |
7 |
Connecting your VCR to your TV |
8 |
Connecting a cable system |
10 |
Setting up your VCR ......................................................................................................................................... |
12 |
Turning the VCR on |
12 |
Changing the on-screen menu language |
12 |
Setting the clock |
13 |
Selecting cable or antenna viewing |
14 |
Programming the channel memory |
14 |
Using video cassettes ....................................................................................................................................... |
17 |
Protecting video cassettes from accidental erasure |
17 |
Inserting video cassettes |
17 |
Removing video cassettes |
17 |
Watching recorded programs.......................................................................................................................... |
18 |
Playing a video cassette |
18 |
Searching forward while viewing a video cassette |
18 |
Searching backward while viewing a video cassette |
18 |
Pausing a video cassette during playback |
18 |
Playing a video cassette at different speeds |
18 |
Stopping video cassette playback |
19 |
Fast forwarding the video cassette |
19 |
Rewinding the video cassette |
19 |
Adjusting the picture |
19 |
Recording programs .......................................................................................................................................... |
20 |
Preparing to record a program |
20 |
Manual recording |
20 |
Timer recording |
21 |
Reviewing timer programs |
23 |
Cancelling timer programs |
23 |
One touch timer recording |
24 |
Using advanced features.................................................................................................................................. |
25 |
Searching a cassette tape for programs (indexing) |
25 |
Searching with the tape counter (go-to search) |
25 |
Play the tape automatically |
26 |
Switch the VCR to TV or VCR mode automatically |
27 |
Energy Saver |
27 |
Child Lock |
28 |
CM Skip |
28 |
Display |
28 |
Daylight -Saving Time |
28 |
Duplicating video cassette tapes with another VCR |
29 |
Glossary .............................................................................................................................................................. |
31 |
Troubleshooting ................................................................................................................................................. |
32 |
Specifications...................................................................................................................................................... |
34 |
Warranty.............................................................................................................................................................. |
35 |
Daewoo Video Cassette Recorder User’s Guide

Overview of the equipment
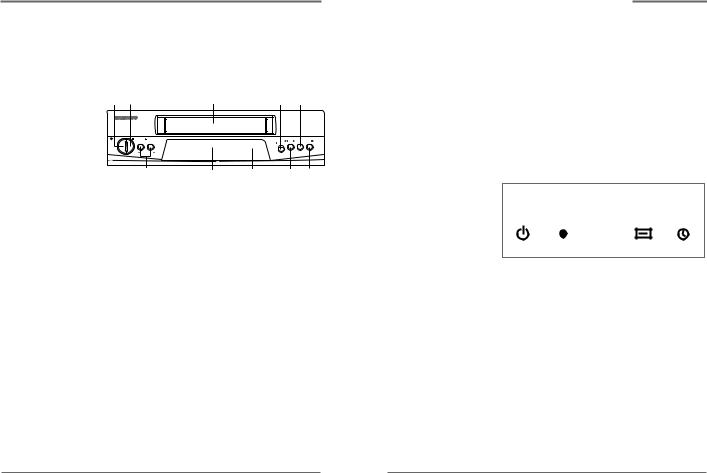
This section summarizes the buttons, controls, and terminals that you will use with your VCR.
Front panel |
|
|
|
|
|
1 |
2 |
3 |
|
4 |
5 |
POWER |
STOP/EJECT |
|
|
REW PLAY/PAUSE FF |
|
|
POWER RECORD |
VCR |
TIMER |
||
|
REC |
|
|||
|
CH/TRACKING |
|
|
|
|
|
10 |
9 |
8 |
7 |
6 |
1POWER
Press to turn the VCR on or off.
2STOP/EJECT
Press to stop the VCR and to eject a video cassette.
3Cassette compartment
Insert a video cassette into this slot.
4REC
Press to record the program currently airing on the channel. Press multiple times to display one-touch- recording (OTR)time options.
5PLAY/PAUSE
Press to play a video cassette or press during video cassette playback to temporarily stop playback
6FF
Press to fast forward a video cassette.
7REW
Press to rewind a video cassette.
Overview of the equipment, continued
8Remote sensor
This receiver receives a signal from your remote control. Do not block it.
9Display panel
Displays information to assist you in operating the VCR successfully.
10▼CH/TRACKING▲
Press the up and down buttons to change the channel or to adjust the tracking during playback.
Front panel display
POWER RECORD |
VCR |
TIMER |
1POWER
Indicates that the VCR Power is on.
2RECORD
Indicates that the VCR records a program.
3VCR
Indicates that the VCR is in VCR mode when lit. When not lit, the VCR is in TV mode.
4 TIMER
Indicates that a timer recording has been programmed.
1 |
Daewoo Video Cassette Recorder User’s Guide |
Daewoo Video Cassette Recorder User’s Guide |
2 |

Overview of the equipment, continued
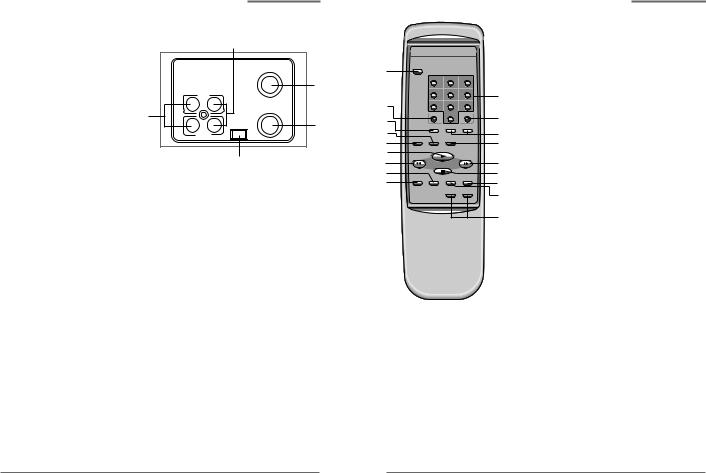
Back panel
2 |
|
|
ANT. IN |
VIDEO AUDIO |
3 |
IN |
|
1 |
RF OUT |
|
|
3 CH. 4 |
5 |
OUT |
|
4
1 VIDEO IN/OUT
Attach the VCR’s video input/output at these terminals.
2 AUDIO IN/OUT
Attach the VCR’s audio input/output at these terminals.
3 Antenna terminal
Attach an antenna or cable system at this terminal.
4 CH. 3-4
Set this switch to the appropriate channel (channel 3 or channel 4) for VCR output at your location.
5 RF OUT
Use this terminal to connect to a VHF/UHF antenna or to your television RF input.
Overview of the equipment, continued
REMOTE CONTROLLER
1 |
POWER |
|
|
|
|
1 |
2 |
3 |
|
|
|
|||
|
|
4 |
5 |
6 |
2 |
|
7 |
8 |
9 |
|
INPUT |
|
100 |
|
3 |
|
0 |
||
|
TV/VCR |
– CH/TRK + |
||
4 |
REC/OTR |
SPEED |
P/S |
|
5 |
|
|||
|
PLAY |
|
||
6 |
|
|
||
REW |
|
|
FF |
|
7 |
|
STOP |
|
|
8 |
MENU |
CLEAR |
DISPLAY |
CM SKIP |
9 |
|
|
|
|
–SLOW/SHUTTLE+
•Objects between the remote control and VCR will block the path of the remote control beam.
•Dark walls, direct sunshine or very bright light will reduce the remote sensor’s sensitivity.
•The remote control will not work correctly if you press several buttons at the same time.
|
Remote control |
||
|
1 |
POWER |
|
|
|
Press to turn your VCR on or off. |
|
|
2 |
INPUT |
|
|
|
Press to select between the VCR tuner or the |
|
10 |
|
Audio/Video Input jacks. (auxiliary). |
|
3 |
TV/VCR |
||
|
|||
11 |
|
Press to select the TV or VCR tuner. |
|
4 |
SPEED |
||
12 |
|||
|
Press to select tape recording speed (SP, or |
||
13 |
|
||
|
EP) |
||
|
|
||
14 |
5 |
REC/OTR |
|
15 |
|
Press once to record; press multiple times to |
|
16 |
|
||
|
display one-touch-recording (OTR) options. |
||
17 |
|
||
6 |
PLAYBACK |
||
|
|||
18 |
7 |
Press to play a video cassette. |
|
|
REW |
||
|
|
Press to rewind a video cassette. |
|
|
8 |
CLEAR |
|
|
|
Press to delete previous selections. |
|
|
9 |
MENU |
|
|
|
Press to display the main menu. |
|
|
10 |
0-9 |
|
|
|
Press to select channels or to make certain |
|
|
|
selections when using the menu system. |
|
|
11 |
100 |
|
|
|
Press in combination with the 0-9 buttons to |
|
|
|
select channels greater than 100. |
|
3 |
Daewoo Video Cassette Recorder User’s Guide |
Daewoo Video Cassette Recorder User’s Guide |
4 |

Overview of the equipment, continued
12 –CH/TRK+
Press to change the channel (channels stored in memory only) or to adjust the tracking.
13P/S
Press to pause video tape playback for temporarily still picture. Each press of the button advances the picture one frame.
14FF
Press during stop mode to quickly advance video tape.
15STOP
Press to stop tape movement.
16CM SKIP
Press during playback mode to skip commercials or program segments.
17DISPLAY
Press to display the tape counter, clock and status mode on the TV screen.
18SLOW/SHUTTLE +/- keys(DV-K486N ONLY)
Allows you to control speeds variously during playback.
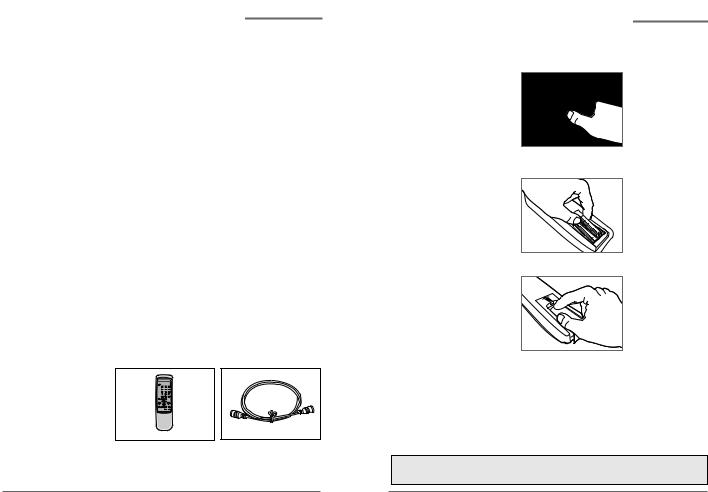
Accessories
Carefully remove the VCR from the carton. Check to see that the VCR has not been damaged. The following accessories are included.
Overview of the equipment, continued
•Do not mix different types of batteries, or mix an old and a new battery.
•Remove and replace weak batteries. Weak batteries can leak and damage your controller. Dispose of batteries properly; never throw them into a fire.
Installing the remote control batteries
1Open the battery compartment on the back of the remote control.
2Install two AA size batteries as shown. Make sure the “+” and “–” terminals are oriented correctly.
3 Replace the cover.
Using the remote control
Hold the remote control within an angle range of about 30° from either side of the remote sensor. The remote control range is about 23 feet (7m) from the VCR.
Point the front of the remote control directly at the front of the VCR.
Please call : 1-800-DAEWOO8(1-800-323-9668) to place the order for your replacement remote.
5 |
Daewoo Video Cassette Recorder User’s Guide |
Daewoo Video Cassette Recorder User’s Guide |
6 |
 Loading...