

Page 1

CyberLink
Power2Go
User’s Guide
Page 2

Copyright and Disclaimer
All rights reserved. No part of this publication may be reproduced, stored in a retrieval
system, or transmitted in any form or by any means electronic, mechanical, photocopying,
recording, or otherwise without the prior written permission of CyberLink Corporation.
To the extent allowed by law, Power2Go IS PROVIDED "AS IS", WITHOUT WARRANTY
OF ANY KIND, EITHER EXPRESS OR IMPLIED, INCLUDING WITHOUT LIMITATION
ANY WARRANTY FOR INFORMATION, SERVICES, OR PRODUCTS PROVIDED
THROUGH OR IN CONNECTION WITH POWER2GO AND ANY IMPLIED
WARRANTIES OF MERCHANTABILITY, FITNESS FOR A PARTICULAR PURPOSE,
EXPECTATION OF PRIVACY, OR NON-INFRINGEMENT.
BY USING THIS SOFTWARE, YOU AGREE THAT CYBERLINK WILL NOT BE LIABLE
FOR ANY DIRECT, INDIRECT, OR CONSEQUENTIAL LOSS ARISING FROM THE USE
OF THIS SOFTWARE OR MATERIALS CONTAINED EITHER IN THIS PACKAGE.
The terms and conditions here under shall be governed and construed in accordance with
the laws of Taiwan.
Power2Go is a registered trademark along with other company and product names
mentioned in this publication, used for identification purposes and remain the exclusive
property of their respective owners.
International Headquarters
Mailing Address CyberLink Corporation
15F, #100, Min Chuan Road, Hsin Tian City
Taip e i Cou n ty, Ta i wan, R .O.C.
Web Site www.gocyberlink.com
Telephone 886-2-8667-1298
Fax 886-2-8667-1300
Page 3

Contents
1
Introduction.............................................. 1
Welcome ...................................................................................2
The Power2Go Program .........................................................3
Power2Go Express Mode .................................................3
Power2Go Mode ................................................................5
System Requirements .............................................................8
Burning.................................................... 9
2
Before Burning a Disc ...........................................................10
Information Tab ...............................................................10
Data Tab ............................................................................11
Common Tab ....................................................................12
Burner Tab ........................................................................13
Burning Discs .........................................................................14
Multisession Discs ...........................................................14
Burn a Data Disc ..............................................................15
Burn a Music Disc ............................................................18
Burn a Movie Disc ...........................................................21
Copying Discs ........................................................................23
3
Disc Utilities ........................................... 25
Using Disc Utilities ............................................................... 26
Burning a Disc Image ...........................................................27
Saving a Disc Image .............................................................. 28
Erasing a Disc .........................................................................29
Ripping Audio .......................................................................30
i
Page 4

CyberLink Power2Go
Appendix ............................................... 31
Index ..................................................... 37
Technical Support .................................................................32
Web Support ....................................................................32
Fax Support ......................................................................32
Telephone Support ..........................................................33
CD vs. DVD ............................................................................34
CD Types ..........................................................................35
DVD Types .......................................................................36
ii
Page 5

Chapter 1:
Introduction
This chapter introduces the CyberLink Power2Go program, starting
with a description of the program’s functions, followed by an
explanation of Power2Go’s two burning modes, Power2Go mode
and Power2Go Express mode. The chapter ends with a list of
recommended system minimum requirements.
This chapter contains the following sections:
• Welcome on p.2
• The Power2Go Program on p.3
• System Requirements on p.8
1
Page 6

CyberLink Power2Go
Welcome
Welcome to the CyberLink family of digital video tools! CyberLink
Power2Go is a disc-burning program, which is a handy utility for
burning discs containing movies made using CyberLink’s moviemaking software, or when you want to make music discs, data discs,
and even bootable discs.
Power2Go’s main features include the following:
• burns data, music, and movie discs
• supports CD-R/RW, DVD-R/RW, DVD+R/RW, and DVD-
RAM disc types
• supports Audio CD, .MP3, .WMA, .WAV music formats
• erases discs that contain unwanted content
• copies entire discs
• Power2Go Express mode supports drag-and-drop to desktop
icons for burning in the fewest number of steps
• supports CD text for additional textual information (such as a
description of the artist or song) with audio tracks
2
Page 7

Chapter 1: Introduction
The Power2Go Program
The CyberLink Power2Go program can run in either of two modes:
Power2Go Express mode or Power2Go mode. Power2Go Express
mode is the simpler of the two modes, allowing you to burn discs in
two steps. Power2Go mode, on the other hand, offers you access to
more options and disc utilities.
Power2Go Express Mode
Power2Go Express mode uses the following icons, placed on your
desktop:
Drag data files to this icon to burn a data disc. (See Burn a
Data Disc in Power2Go Express Mode on p.15.)
Drag music files to this icon to burn a music disc. (See
Burn a Music Disc in Power2Go Express Mode on p.18.)
Drag video files to this icon to burn a movie disc. (See
Burn a Movie Disc in Power2Go Express Mode on p.21.)
Double-click this icon to copy a disc. (See Copying Discs
on p.23.)
Note: You can click and drag the entire column of icons to a
different location on your desktop, or right-click on a single icon
to move it individually.
Dragging files in appropriate formats to these icons prepares
Power2Go to burn a disc. (You can double-click the icon to open a
window for further modification of your burning configuration. See
Burn a Data Disc in Power2Go Express Mode on p.15, Burn a Music
Disc in Power2Go Express Mode on p.18, Burn a Movie Disc in
Power2Go Express Mode on p.21, or Copying Discs on p.23.)
3
Page 8
CyberLink Power2Go
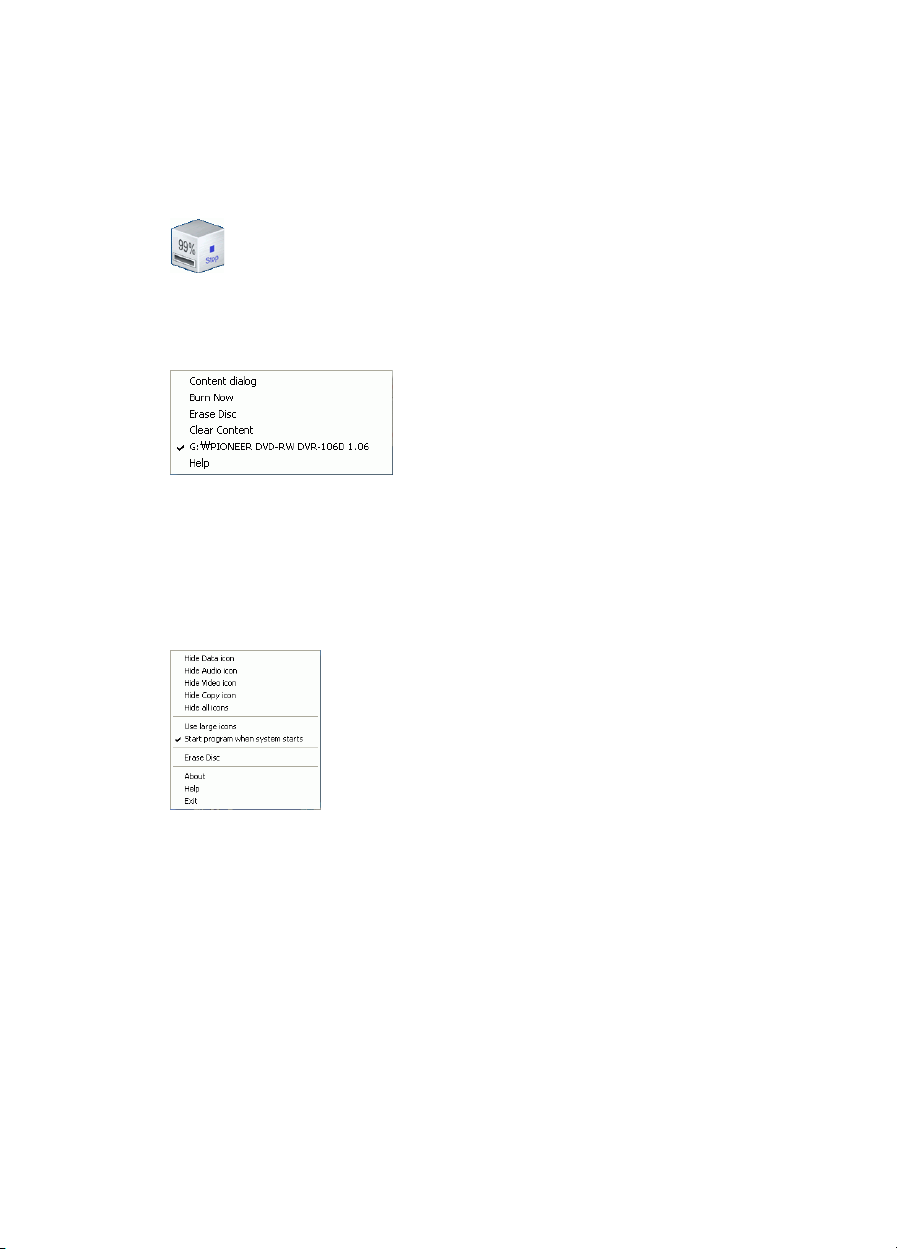
If you do not need to add any more files or modify your burning
configuration, click the Rec button after dragging files onto the icon.
Burning begins immediately, and the process is displayed on the icon.
(Click Stop to cancel the burning process.)
Right-clicking an icon on the desktop opens a command menu to
control burning tasks.
Click a menu item to perform the corresponding task.
Right-clicking the icon on the system tray opens a command menu to
control Power2Go Express mode icons, to erase a disc, and to control
the Power2Go program.
Use one of the Hide options to remove an icon from display on the
desktop. (The option then becomes Show, allowing you to display the
icon again.) You can also choose to display large and small icons on
the desktop.
Check the Start program when system starts option to run Power2Go
whenever you power on your computer.
Click Erase Disc to erase a rewritable disc.
Click About to display Power2Go version information, click Help to
open the help file, and click Exit to close the Power2Go program.
4
Page 9

Chapter 1: Introduction
Power2Go Mode
Power2Go mode opens in a program interface. By default, the Select a
Burning Task window opens each time you run the program in
Power2Go mode. Power2Go mode also displays a program window
with a row of buttons that allow you to perform each of Power2Go’s
different tasks.
To begin a burning task in the Select a Burning Task window, click an
icon, then click OK to begin your task.
You can disable the Select a Burning Task window by unchecking the
Display this window whenever Power2Go opens option.
5
Page 10

CyberLink Power2Go
The icons available in the Select a Burning Task window are
described below:
Burns data files to disc.
Burns audio files to disc.
Opens the CyberLink PowerProducer (or
EZProducer) program to create a movie disc.
Copies disc content onto a blank disc.
>
>
>
>
Burns a disc image to disc.
Saves a disc image to your hard drive.
Erases a rewritable disc.
Copies audio tracks from an Audio CD to your
hard drive.
6
Page 11

Chapter 1: Introduction
When you close (or disable) the Select a Burning Task window, the
Power2Go program displays a row of buttons at the top, which allow
you to access certain important functions.
The available buttons are described below:
Starts a new burning task.
Opens an existing project.
Saves an existing project. Click the down-arrow to
save a project under a different name.
Refreshes the displayed disc/drive information.
Displays disc and drive configuration information.
Erases a disc.
Copies a disc.
Burns a disc.
Opens the help file.
Displays Power2Go version information.
7
Page 12

CyberLink Power2Go
System Requirements
The system requirements listed below are recommended as
minimums for burning. You may find that your system, while
meeting these recommended minimums, requires expanded capacity
during specific burning tasks.
Minimum System Requirements
OS
Screen
Resolution
Memory
CPU
HDD Space
Video Capture to
Disc
• Windows XP/2000/ME/98SE
• (Windows XP/2000 recommended)
• 800x600 pixels
• 128MB SDRAM for music and data burning
• 256MB (512MB recommended) for video
burning
• VCD (MPEG-1) and DVD (MPEG-2)
production: Intel Pentium III 800 MHz, or
AMD Athlon 700 MHz
• DV Tape to MPEG-1 real-time capture: Intel
Pentium III 800 MHz or AMD Athlon 800
MHz
• DV Tape to MPEG-2 real-time capture: Intel
Pentium 4 2.2 GHz or AMD Athlon XP 2200+
• DV Tape to MPEG-1/MPEG-2 non real-time
capture: Intel Pentium III 800 MHz or AMD
Athlon 700 MHz
•1GB for making VCDs
• 5GB for making DVDs
• Analog video capture: USB or PCI capture
devices compliant to WDM standards
• DV Camcorder video capture: IEEE 1394 I/O
devices compliant with OHCI standards
• DSC photo import: USB interface
8
Page 13

Chapter 2:
Burning
CyberLink Power2Go offers a number of burning functions, including
burning data discs, music discs, movie discs, and bootable discs, as
well as copying the entire contents of a disc. You can burn to CD or
DVD in a variety of formats. Before burning a disc, you can set your
burning configuration to ensure proper burning.
This chapter contains the following sections:
• Before Burning a Disc on p.10
• Burning Discs on p.14
• Copying Discs on p.23
9
Page 14

CyberLink Power2Go
Before Burning a Disc
Before you begin burning discs, you may want to set your burning
configuration to match your burning drive and the discs you want to
burn. The Configuration/Information button opens a window that
displays disc and drive configuration information.
To open the Configuration/Information window, click in the
main program window. The Configuration/Information window
opens, displaying four tabs that contain different configuration
information. (Only the Information tab appears if you have closed the
Select a Burning Task window without starting a burning task.) Each
of these tabs is described below.
Information Tab
The Information tab displays information about the selected disc
drive, the disc in the drive, as well as the current project. Click the +
box next to an item to view more detailed information.
10
• If you change discs or select a different drive, click Refresh to
ensure that the most updated information is displayed.
Page 15

Data Tab
The Data tab displays options for making a data disc.
• Make this disc bootable: You can create a bootable CD/
DVD, which you can use to boot your computer from your
CD/DVD drive if your operating system ever fails. Burning a
bootable CD/DVD requires a bootable file (either on your
hard drive or on a bootable floppy disc). Check Use a
bootable image file, then click Browse to locate the file you
want to use, or check Use a bootable floppy disc.
• Make auto-run disc: When this option is enabled, a computer
runs the selected auto-run file when the disc is inserted. Click
Browse, then locate the auto-run file you want to use. When
this option is disabled, the computer takes no action when
the disc is inserted.
• Change disc icon: You can change the icon that appears
when this disc is viewed in Windows Explorer. Click Browse,
then locate the icon (.ICO) file you want to use.
Chapter 2: Burning
11
Page 16

CyberLink Power2Go
Common Tab
The Common tab displays options available when burning any kind
of disc (i.e.: data, music, or movie).
• Disc name: Enter a name for the disc. The disc name appears
on a disc player when the disc is played.
• Use original date and time: This option uses the original date
and time of the files that will be burned to the disc.
• Use current date and time: This option uses the current date
and time on your computer.
• Use this date and time: This option uses a date and time of
your choosing.
12
Page 17

Burner Tab
The Burner tab displays information about your disc burner and
options for controlling its functioning.
• Burner: Displays the disc burner installed on your system.
• Write speed: Select a write speed from the drop-down list.
• Number of copies: Enter the number of copies of the disc you
want to burn.
• Enable buffer underrun protection: Enabling this option
ensures that data is written to disc without interruption. (An
interruption in data can result in an unusable disc.)
• Write simulation: Perform a write simulation to verify that
your burner can burn to the disc at the selected speed
without error.
Chapter 2: Burning
Note: If you have enabled buffer underrun protection or have
previously burned discs using the current configuration, you do
not need to run a simulation.
• Close disc: Checking this option write-protects the disc. No
further data can be appended to the disc after the current
burning session.
• Verify recorded data: Check this option to compare recorded
data to the source data to ensure accurate burning.
13
Page 18

CyberLink Power2Go
Burning Discs
The fastest way to burn any kind of disc is to drag and drop files from
Windows Explorer onto the appropriate icon on the desktop. This
method of burning is called Power2Go Express mode. This method is
presented first in each of the following sections, as you may be able to
accomplish your burning task without even opening the Power2Go
program.
If you need to select more detailed options, or if you are already
working in the Power2Go program, you can perform the same
burning tasks within the program itself. This method of burning is
called Power2Go mode, and is described after the Power2Go Express
procedure, being the slightly longer and more complex process.
Multisession Discs
Multisession discs allow you to append additional data after the
original burning session. Power2Go always creates a multisession
disc whenever you burn a CD-R, CD-RW, DVD-R, or DVD+R disc.
Therefore, you can continue to add content to a multisession disc
until the disc is full or closed, at which point you can no longer
append any further data.
14
Page 19

Chapter 2: Burning
Burn a Data Disc
The Data Disc option allows you to burn data files to a CD-R/RW,
DVD-R/RW, DVD+R/RW, or DVD-RAM disc. Data files can include
images and any other document files. You can also create a bootable
CD/DVD, which you can use to boot your computer from your CD/
DVD drive if your operating system ever fails.
Burn a Data Disc in Power2Go Express Mode
To burn a data disc in Power2Go Express mode, do this:
1. Open Windows Explorer, then locate the files you want to burn.
2. Drag the files to the Data icon.
• To modify your burning configuration, double-click the Data
icon. The Data Disc window opens, in which you can add or
remove data files if you wish.
3. Click Rec on the Data icon. (In the Data Disc window, click
.) Power2Go burns the disc. When the task is completed,
a screen message appears, informing you of the status.
15
Page 20

CyberLink Power2Go
Burn a Data Disc in Power2Go Mode
To burn a data disc in Power2Go mode, do this:
1. Open Power2Go. In the Select Burning Task window, click the
Data Disc icon, then select the type of disc (CD or DVD) you
want to create. The Data Disc window opens.
2. Highlight the files or folders you want to burn, then drag to the
destination disc or click Add.
• To remove a file, highlight it, then click .
• To remove all files, click .
• To create a new folder in the directory, click . A folder is
created under the current directory.
3. When you have added all of the content that you want to burn,
click . The Configuration/Information window opens to the
Burner tab, to allow you to set your burning configuration. (For
more information, see Burner Tab on p.13.)
4. Make any necessary modifications to your burning
configuration, then click Burn. Power2Go burns the disc. When
the task is completed, a screen message appears, informing you
of the status.
16
Page 21

Chapter 2: Burning
Burn a Bootable Data Disc from an Image File
To burn a bootable data disc from an image file, do this:
1. Open Power2Go. In the Select Burning Task window, click the
Data Disc icon, then select CD or DVD.
2. Click . The Configuration/Information window opens to
the Data tab.
3. Check the Make this disc bootable option.
4. Check the Use a bootable image file option. Click Browse, then
locate the bootable disc partition. Click OK.
5. Click Burn. Power2Go burns the disc. When the task is
completed, a screen message appears, informing you of the
status.
Burn a Bootable Data Disc from a Floppy Disc
To burn a bootable data disc from a bootable floppy disc, do this:
1. Open Power2Go. In the Select Burning Task window, click the
Data Disc icon, then select CD or DVD.
2. Click . The Configuration/Information window opens to
the Data tab.
3. Check the Make this disc bootable option.
4. Check the Use a bootable floppy disc option.
5. Click Burn. A prompt appears, asking you to insert your
bootable floppy disc.
6. Insert the floppy disc, then click OK. Power2Go copies the disc.
When the copy task is complete, the disc drive opens and a
prompt appears, asking you to insert your target disc.
7. Insert your target disc into your burning drive, then click OK.
8. Power2Go burns the disc. When the task is completed, a screen
message appears, informing you of the status.
17
Page 22

CyberLink Power2Go
Burn a Music Disc
The Music Disc option allows you to burn audio files to a CD or
DVD. Depending on the audio file format you burn to, you may
require a special player or player software to be able to listen to your
disc.
Burn a Music Disc in Power2Go Express Mode
To burn a music disc in Power2Go Express mode, do this:
1. Open Windows Explorer, then locate the files you want to burn.
2. Drag the files to the Music icon.
Note: Music discs burned in Power2Go Express mode are burned
in Audio CD format.
•
To modify your burning configuration, double-click the
Music icon. The Audio CD window opens, in which you can
add or remove music files if you wish.
3. Click Rec on the Music icon. (In the Audio CD window, click
.) Power2Go burns the disc. When the task is completed,
a screen message appears, informing you of the status.
18
Page 23

Burn an Audio CD Music Disc in Power2Go Mode
To burn an Audio CD music disc in Power2Go mode, do this:
1. Open Power2Go. In the Select Burning Task window, click the
Music Disc icon. Select CD, then check the Audio CD format.
The Audio Disc window opens.
Chapter 2: Burning
2. Locate your music files in the directory on the left. Highlight the
files you want to burn on the right, then drag to the track listing
at the bottom of the window or click .
• To remove a file, highlight it, then click .
• To remove all files, click .
• To move a track up or down in the track listing, highlight it,
then click or .
• To listen to a track before burning, highlight it, then click .
Click to stop. Drag the slider to set the audio volume level.
3. When you have added all of the content that you want to burn,
click . The Configuration/Information window opens to the
Burner tab. (See Burner Tab on p.13.)
4. Modify your burning configuration (if necessary), then click
Burn. Power2Go burns the disc. When the task is completed, a
screen message appears, informing you of the status.
19
Page 24

CyberLink Power2Go
Burn an MP3/WMA Music Disc in Power2Go Mode
To burn an MP3/WMA music disc in Power2Go mode, do this:
1. Open Power2Go. In the Select Burning Task window, click the
Music Disc icon. Select CD or DVD, then check the MP3 or
WMA format. The MP3/WMA Disc window opens.
2. Locate your music files in the directory on the left. Highlight the
files and folders you want to burn on the right, then drag to the
directory tree at the bottom of the window or click .
• To remove a file, highlight it, then click .
• To remove all files, click .
• To create a new folder in the directory, click . A folder is
created under the current directory.
• To listen to a track before burning, highlight it, then click .
Click to stop. Drag the slider to set the audio volume level.
3. When you have added all of the content that you want to burn,
click . The Configuration/Information window opens to the
Burner tab. (See Burner Tab on p.13.)
4. Modify your burning configuration (if necessary), then click
Burn. Power2Go burns the disc. When the task is completed, a
screen message appears, informing you of the status.
20
Page 25

Chapter 2: Burning
Burn a Movie Disc
The Movie Disc option allows you to burn movie files to CD/DVD.
Burning a movie disc in Power2Go opens the CyberLink
PowerProducer program, which gives you more expanded moviemaking options.
Note: Depending on the version of Power2Go that you purchase,
you may have either the PowerProducer or EZProducer program.
For help using either program, please see the help file included in
that program.
Burn a Movie Disc in Power2Go Express Mode
To burn a movie disc in Power2Go Express mode, do this:
1. Open Windows Explorer, then locate the files you want to burn.
2. Drag the files to the Movie icon.
• To modify your burning configuration, double-click the
Movie icon. The Video/Photo Disc window opens, in which
you can add or remove video or photo files if you wish.
3. Click Rec on the Movie icon. (In the Video/Photo Disc window,
click .) The CyberLink PowerProducer (or EZProducer)
program opens.
21
Page 26

CyberLink Power2Go
Burn a Movie Disc in Power2Go Mode
Selecting the Movie Disc option opens the CyberLink PowerProducer
(or EZProducer) program, which offers you a wide range of
capturing, editing, and burning functions.
Note: Depending on the version of Power2Go that you purchase,
you may have either the PowerProducer or EZProducer program.
For help using either program, please see the help file included in
that program.
22
Page 27

Chapter 2: Burning
Copying Discs
The Copy Disc option allows you to make an exact copy of a disc of
any format. However, you must copy the disc contents onto a blank
disc of the same format. (You cannot, for example, copy content from
a CD onto a DVD.)
Note: Some discs may not be copied if they are copy-protected
or contain errors.
The procedures for copying a disc from inside the Power2Go
program or in Power2Go Express mode are very similar. Only the
first step for opening the Copy Disc window is slightly different.
To copy a disc, do this:
1. Open Power2Go. In the Select Burning Task window, click the
Copy Disc icon , then click OK. (In Power2Go Express mode,
simply double-click the Copy Disc icon.) The Copy Disc
window opens.
2. Select your source and target drives.
Note: If you are copying “on the fly” (i.e.: using a different source
and burning drive), insert your source disc into your source drive
and your target disc into your burning drive. Click OK to copy your
disc in one step, skipping the second prompt.
23
Page 28

CyberLink Power2Go
3. Select a recording speed and enter the number of disc copies you
want to burn. If you want to perform a write simulation before
you burn the disc, check Perform write simulation.
4. Click Copy. The disc drive opens and a prompt appears, asking
you to insert your source disc.
5. Insert your source disc into your drive, then click OK. Power2Go
copies the disc. When the copy task is complete, the disc drive
opens and a prompt appears, asking you to insert your target
disc.
6. Insert your target disc into your burning drive, then click OK.
Power2Go burns the copied data onto the disc. When the task is
completed, a screen message appears, informing you of the
status.
24
Page 29

Chapter 3:
Disc Utilities
In addition to simple disc burning functions, CyberLink Power2Go
offers a number of other utilities for managing your discs and your
disc image files, as well as for ripping audio tracks from CD onto your
hard disk. These utilities are available in the Select a Burning Task
window in Power2Go mode.
This chapter contains the following sections:
• Using Disc Utilities on p.26
• Burning a Disc Image on p.27
• Saving a Disc Image on p.28
• Erasing a Disc on p.29
• Ripping Audio on p.30
25
Page 30

CyberLink Power2Go
Using Disc Utilities
Power2Go contains a number of utilities for managing disc
content. To display Power2Go’s disc utility icons, open
Power2Go, then click Disc Utilities. Icons for the available
disc utilities appear in the central panel of the window.
The disc utilities are as follows:
Burns a disc from a disc image. (See Burning a Disc
Image on p.27.)
Saves a disc image for future burning. (See Saving a Disc
Image on p.28.)
Erases content from a rewritable disc. (See Erasing a Disc
on p.29.)
26
Copies audio tracks from an Audio CD to your hard disk.
(See Ripping Audio on p.30.)
Page 31

Chapter 3: Disc Utilities
Burning a Disc Image
A disc image is a duplicate of the content and file structure
that is destined to be burned to disc. Using Power2Go, you
can burn a disc image to CD or DVD. Burning a disc image to
disc allows you to restore a saved disc image to disc as well
as burn disc images created by the CyberLink Image drive.
To burn a disc image, do this:
1. Start CyberLink Power2Go.
2. In the Select a Burning Task window, click Disc Utilities, then
select Burn Disc Image.
3. Click Browse... and locate the folder that contains the disc
image.
4. Insert your disc and select your drive in the drop-down list.
• You can select a different write speed or enter the number of
copies you want to burn, if desired. If you want to perform a
write simulation before you burn the disc, check Perform
write simulation.
5. Click Burn to start. Power2Go displays the real-time progress of
the task. When the task is completed, a screen message appears,
informing you of the status.
27
Page 32

CyberLink Power2Go
Saving a Disc Image
Save a disc image onto your hard drive. This function is
useful for backing up your disc onto your hard drive for
future burning tasks.
To save a disc image, do this:
1. Start CyberLink Power2Go.
2. In the Select a Burning Task window, click Disc Utilities, then
select Save Disc Image.
3. Insert your disc. If necessary, select your source drive in the
From drop-down box.
4. Enter the destination folder and disc image file name in the To
entry box, or click Browse..., select a folder, and enter the disc
image file name.
5. Click Save to save the disc image. Power2Go displays the realtime progress of the task. When the task is completed, a screen
message appears, informing you of the status.
28
Page 33

Chapter 3: Disc Utilities
Erasing a Disc
If you are using a rewritable disc, you can erase content that
has been previously recorded onto it. This allows you to
reuse the same discs over and over without the need to
continually buy new discs. Most manufacturers suggest that
current rewritable discs can be written to about 1,000 times.
To erase a disc, do this:
1. Start CyberLink Power2Go.
2. In the Select a Burning Task window, click Disc Utilities, then
select Erase Disc.
3. Insert your disc and select your burner.
4. Select an erasing method.
• The Quick erase option erases the disc index contained on
the disc.
• The Full erase option erases all of the content the disc
contains.
5. Click Erase to start. Power2Go displays the real-time progress of
the task. When the task is completed, a screen message appears,
informing you of the status.
29
Page 34

CyberLink Power2Go
Ripping Audio
The Rip Audio function copies audio tracks from an Audio
CD to your hard drive in .MP3, .WAV, or .WMA format.
Keeping copies of your CDs on your hard drive allows you to
play songs from numerous CDs without changing discs in
your computer's disc drive and also saves wear and tear on
your physical CD collection.
To rip audio files to your hard drive, do this:
1. Start CyberLink Power2Go.
2. In the Select a Burning Task window, click Disc Utilities, then
select Rip Audio.
3. Insert your disc and select your drive.
• If you change discs or select a different drive, click Refresh to
ensure that the most updated information is displayed.
4. Select the track(s) you want to rip to your hard drive.
5. Locate the folder you want to rip the audio tracks to.
• You can select a different audio format or quality, if desired.
6. Click Go to start. Power2Go displays the real-time progress of
the task. When the task is completed, a screen message appears,
informing you of the status.
30
Page 35

Appendix
This chapter contains technical support information as well as a
reference section to help answer questions you may have about the
different disc technologies available in CyberLink Power2Go.
This chapter contains the following sections:
• Technical Support on p.32
• CD vs. DVD on p.34
31
Page 36

CyberLink Power2Go
Technical Support
Before asking CyberLink for technical support, please refer to this
user's guide or online help for information. It contains all the
information you generally need to use the program. You may also
find answers quickly by contacting your local distributor/dealer.
If your problem is not resolved using the above methods, please feel
free to contact CyberLink for technical support.
Web Support
Solutions to your problems are available 24 hours a day and at no cost
on our Web sites:
support.gocyberlink.com
www.gocyberlink.com
In addition to frequently asked questions, we also provide
troubleshooting techniques, the latest in product news, and other
relevant information.
Fax Support
Use our fax support number to get technical support quickly without
spending time on the phone:
(886) 2-8667-1300
Note: Technical support is only offered to registered users, so
please make sure to include your CD-key (located on your CD
case) when faxing.
32
Page 37

Telephone Support
You are welcome to call the CyberLink's Technical Support Hotline at
the phone number listed below during hours of availability:
CyberLink Technical Support Information
Appendix
Support Phone
(886) 2-8667-1298
Number
Support Hours
9:00 a.m. -5:00 p.m. Taiwan time (GMT +8:00)
Monday to Friday, excluding holidays
Note: Technical support is only offered to registered users. Please
be sure to have your CD-key (located on your CD case) on hand
when calling.
When calling for support, please have your computer ready and
provide us with the following information:
• your registered CD-key
• the product version
• the version of Windows installed on your system
• the hardware devices on your system and their specifications
• the wording of any warning messages that were displayed
(You may want to write this down or make a screen capture.)
• a detailed description of the problem and under what
circumstances it occurred
33
Page 38

CyberLink Power2Go
CD vs. DVD
CDs and DVDs look the same and do pretty much the same thing:
store data. Both can be used to record data, music, or video files.
However, CDs and DVDs are incompatible, bringing different
advantages and disadvantages. Therefore, the decision of which to
use is left up to you. You can avoid any confusion over which disc
type to use by asking yourself two simple questions:
• What disc type is supported by my disc burner?
• What disc type is supported by my disc player?
Knowing the answers to these questions goes a long way towards
deciding on a disc type: after all, you want to be able to play your disc
after burning it, and of course, your burner must support the disc
type you want to create.
In broad terms, discs are divided into CD (which, being the earlier
technology, is more widely supported) and DVD (which holds seven
times the amount of content, but requires a special drive). Following
is a brief description of the different disc types supported by
CyberLink Power2Go.
34
Page 39

CD Types
CDs contain up to 74/80 minutes of high quality video or 650/700
MB of data.
Appendix
CD-R
CD-RW
CD-R is a once-writable format. CD-RW burners and
most new DVD burners can write in CD-R, and most
DVD players can also read this format. The CD-R
format is commonly used for distribution of
computer data and digital audio.
CD-RW is a rewritable CD format. CD-RW burners
and most new DVD burners can write in CD-RW,
and most DVD players can also read this format.
The CD-RW format is best suited for storage of
computer data and digital audio.
35
Page 40

CyberLink Power2Go
DVD Types
DVD is a high capacity disc that holds anywhere from 8-18 GB of
data, or from roughly 2-8 hours of video (depending on the type of
DVD). Using the High Quality setting, you can expect to be able to
record 1-2 hours of video.)
DVDs can be played on DVD players and computers equipped with
DVD drives. For more detailed information on DVD-R/RW formats,
see www.dvdrhelp.com/dvd or other web sources. For more detailed
information on DVD+R/RW formats, see www.dvdrw.com or other
web sources.
DVD-R
DVD-RW
DVD+R
DVD+RW
DVD-R is a once-writable DVD format. It is a
competitor product to DVD+R, and is therefore not
compatible with that format. Some new DVD burners
can write in both DVD-R and DVD+R, and most
DVD players can read both formats.
DVD-RW is a DVD format that can be written to
about 1,000 times. It is a competitor product to
DVD+RW, and is therefore not compatible with that
format. Some new DVD burners can write in both
DVD-RW and DVD+RW, and most DVD players can
read both formats.
DVD+R is a once-writable DVD format. It is a
competitor product to DVD-R, and is therefore not
compatible with that format. Some new DVD burners
can write in both DVD-R and DVD+R, and most
DVD players can read both formats.
DVD+RW is a rewritable DVD format that can be
written to about 1,000 times. It is a competitor
product to DVD-RW, and is therefore not compatible
with that format. Some new DVD burners can write
in both DVD-RW and DVD+RW, and most DVD
players can read both formats.
36
DVD-RAM
DVD-RAM is a DVD format that can be written/
rewritten to about 100,000 times. While DVD-RAM’s
boasts technological advances, it is incompatible with
many DVD burners and players.
Page 41

C
Index
A
Audio CD, burning 19
audio tracks, ripping to hard disk 30
auto-run option 11
B
before burning
configuring burning options 10
writing a simulation 13
bootable
CD, burning 17
CD, options 11
floppy disc 11, 17
image file 17
buffer underrun protection 13
Burn Disc button 7
Burn Disc Image icon 6
burning
Audio CD 19
bootable data disc 17
configuration 10
data discs 15
disc images 27
movie disc 21
MP3 disc 20
multisession discs 15
music disc 18
simulation 13
WMA disc 20
CD
bootable 11
closing 13
key, location of 33
multisession 15
ripping music from 30
types 35
verifying after burning 13
vs. DVD 34
write-protecting 13
change disc icon 11
close disc 13
Configuration/Information
button 7
options 10
Copy Disc
button 7
Power2Go Express icon 3
Power2Go mode icon 6
procedure 23
D
Data Disc
burning in Power2Go Express
mode 15
burning in Power2Go mode 16
configuration options 11
Power2Go Express icon 3
Power2Go mode icon 6
date and time options 12
disc
copying 23
name 12
disc image
burning 27
saving 28
disc utilities
Burn Disc Image 27
Erase Disc 29
Rip Audio 30
Save Disc Image 28
37
Page 42

CyberLink Power2Go
using 26
DVD
types 36
vs. CD 34
E
enable buffer underrun protection 13
Erase Disc
button 7
icon 6
procedure 29
EZProducer program 21, 22
F
fax support 32
features in Power2Go 2
floppy disc, bootable 11, 17
full erase 29
burning 21
Power2Go Express mode 3
Power2Go mode icon 6
MP3 CD, burning 20
multisession discs 15
music
ripping to hard drive 30
supported formats 2
Music Disc
Audio CD, burning in Power2Go
mode 19
burning in Power2Go Express mode
18
MP3, burning in Power2Go mode 20
Power2Go Express icon 3
Power2Go mode icon 6
WMA, burning in Power2Go mode 20
N
New Project button 7
number of copies 13
H
Help button 7
L
listen to a track before burning 20
M
Make a disc bootable 11
minimum system requirements 8
modes
Power2Go 5
Power2Go Express 3
Movie Disc
38
O
Open Existing Project button 7
P
phone number, tech support 33
Power2Go Express 3
burning data discs 15
burning movie discs 21
burning music discs 18
Copy Disc icon 3
copying discs 23
Data Disc icon 3
Movie Disc icon 3
Music Disc icon 3
Power2Go mode 5
burning Audio CD discs 19
Page 43

Index
burning bootable data discs 17
burning data discs 16
burning movie discs 21, 22
burning MP3 discs 20
burning music discs 20
burning WMA discs 20
copying discs 23
Power2Go Version button 7
PowerProducer program 21, 22
Q
quick erase 29
R
Refresh button 7
Rip Audio
icon 6
procedure 30
V
verify recorded data option 13
W
Web sites for technical support 32
WMA CD, burning 20
write
simulation 13
speed 13
write-protect a CD 13
S
Save button 7
Save Disc Image icon 6
simulation, writing 13
system requirements 8
T
technical support 32
tracks, listening to before burning 20
U
utilities, using 26
39
Page 44

CyberLink Power2Go
40
 Loading...