


917353771

.Assembly
®Operation
. Msintenance
. RepairParts
I:RRFTSIVinNo
33 CHAIN SAW
OR
CHAIN SAW
MODEL NO,S.
917.353730
917.353731
IMPORTANT:
I
AND INSTRUCTIONS
_ CAREFULLY
|
I
MODEL NOS.
917.353770
917.353771
Sears, Roebuck and Co_, Chicago, Illo 60684, U,S.A_
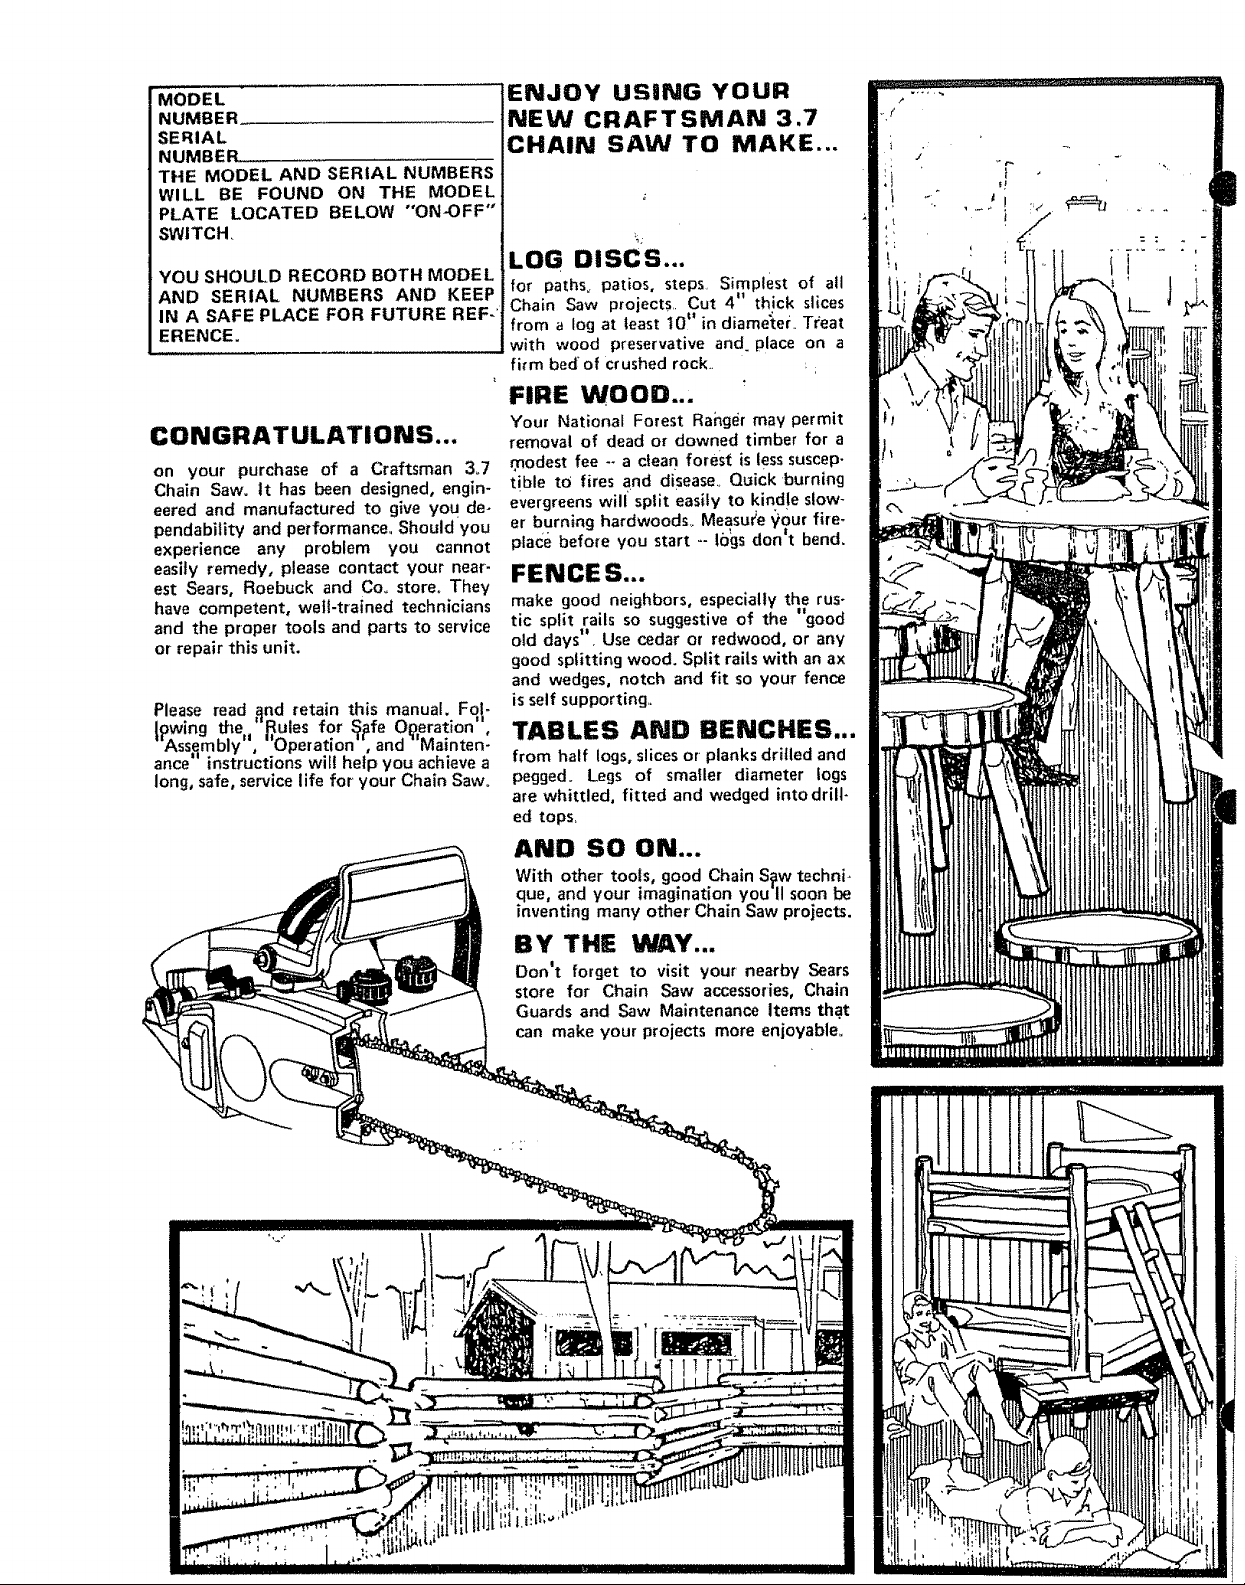
MODEL ;
NUMBER_
SERIAL
NUMBEL
THE MODEL AND SERIAL NUMBERS
WILL BE FOUND ON THE MODEL
PLATE LOCATED BELOW "ON-OFF"
SWITCH
YOU SHOULD RECORD BOTH MODEL
AND SERIAL NUMBERS AND KEEP
IN A SAFE PLACE FOR FUTURE REF-'
ERENCE.
CONGRATULATIONS...
on your purchase of a Craftsman 3°7
Chain Saw. tt has been designed, engin-
eered and manufactured to give you de-
pendability and pe_'formanceoShould you
experience any problem you cannot
easily remedy, please contact your near-
eat Sears, Roebuck and Coo store_ They
have competent, welt-trained technicians
and the proper tools and parts to service
or repair this unit.
Please read and retain this manual Fol-
[pwlng the ]_ules for _pfe Ot2eratzon ,
"'Assqmbly", "Operation", and-Mainten-
ance" instructions will help you achieve a
long, safe, service life for your Chain Saw°
ENJOY USING YOUR
NEW CRAFTSMAN 3.7
CHAIN SAW TO MAKE...
4;
LOG DISCS...
for paths, pat os steps. Simplest of all
Chmn Saw prolects.. Cut 4 thtck slices
from a log at least 10!' in diame_ter. Treat
with wood preservative and place on a
fi_m bed"of crushed rock.. :
FIRE WOOD...
Your National Forest Ra_qgermay permit
removal of dead or downed timber for a
_odest fee -- a clear) forest is lesssuscep-
t!ble tO fires and disease_Quick burning
evergreens will split easily to kindle slow-
er burning hardwoods_ Measure "_i0urfire-
place before you start -- logs don_t bend.
FENCES...
make good neighbors, especially the rus-
tic split rails so suggestiveof the "good
old days". Use cedar or redwood, or any
good splitting wood. Split rails with an ax
and wedges, notch and fit so your fence
is self supporting.,
TABLES AND BENCHES...
from half logs, slices or planks drilled and
pegged. Legs of smaller diameter logs
are whittled, fitted and wedged into drill-
ed tops.
With other tools, good Chain S_w techni-
que, and your imagination you'll soon be
inventing many other Chain Saw projects.
BY THE 1NAY...
Don't forget to visit your' nearby Sears
store for Chain Saw accessories, Chain
Guards and Saw Maintenance Items that
can make your projects more enjoyable°

TABLE OF CONTENTS
WARRANTY ................. 1
RULES FOR SAFE OPERATION ...... 1
ASSEMBLY INSTRUCTIONS ........... 2
OPERATION INSTRUCTIONS ........... 5
MAINTENANCE INSTRUCTIONS ...... 9
CHAIN SHARPENING INSTRUCTIONS ., 9
TROUBLE SHOOTING ............ 16
REPAIR PARTS ............. 18
LOOK FOR THIS SYMBOl. TO POINT
OUT IMPORTANT SAFETY PRECAU-
TIONS. IT MEANS -- ATTENTION!
BECOME ALERT! YOUR SAFETY IS
INVOLVED,
FULL 90-DAY WARRANTY
For 90 days from the date of purchase, Sears will repair any de-
fect in material or workmanship in this gasoline chain saw at no
charge
If the chain saw is used for commercial or rental purpo_s, the
warranty applies for only thirty days from the date of purchar_.
Warranty service is available by contacting the nearest Sears store
or Service Center throughout the United States_
This warranty gives you specific legal rights, and you may also
have other rights which vary from state to state.
Sears, Roebuck and Co,1
Sears Tower
BSC 41-3
Chicago, !il 60684
SPECIAL NOTE
In some states, such as California, laws covering chain saws (having internal combustion engines}, when used in areas covered by
forests, brush or grass (excluding residential lawns and landscaped areas}, necessitate fitting the saw's muffler with an additional
heat shield to reduce muffler surface temperatures, Sears offers such a shield as an optional accessory kit° Muffler Heat Shield Kit
Catalog No. 32-36178 can be purchased at your Sears Service Center. Check with your state conservation or forestry department
about their regulations before operating this Sears Chain Saw on any forest-covered, brush-covered or grass-covered areas, Oregon
and Washington have similar requirements with respect to forest-covered lands°
RULES FOR SAFE OPERATION
1o KNOW YOUR ShtW,
Use your Owner s Manual to become familiar with your
Saw and proper cutting methods before you begin cutting,
2, LIMIT YOUR SAW'S USE TO TRAINED ADULTS.
Never allow children to operate your Saw or adults lacking
proper instruction,,
3, PLAN AHEAD.
Keep onlookers and pets a safe distance away when starting
or operating your Saw,,
USE EYE, EAR, HEAD, HAND, AND FOOT PROTEC-
TION and never wear loose clothing or jewerly.,
Take time to carefully study your sawing operation, plan-
ning cuts required and clearing retreat paths° Be alert to
conditions which might alter your plans asyou are cutting,
4o TAKE PRECAUTIONS AGAINST FIRE,
Take fire fighting equipment with you when operating the
Saw in dry areas_
Handle fuel with care:
a. Use approved gasoline and oil containers and store them
away from heat or open flame, out of the reach of chil-
dren,
bo Turn the engine off and let your Saw cool before remov-
ing the fuel tank cap and refueling your Saw,
d. Do not smoke while operating or refueling your Saw.
d. Refuel your Saw outdoors in a clear area.
e, Wipe your Saw clean of any spilled oil or fuel and move
away from the fueling area before starting your Saw,
Never run the Saw without the muffler or muffler screen.
5. RESPECT YOUR SAW.
Do not start or run Saw indoors to avoid Carbon Monoxide
poisoning from exhaust gases.
When starting Saw, pick an area clear of loose gravel or
flammable debris, hold Saw firmly to the ground without
letting the Guide Bar touch anything, and start your Saw
without assistance,
Take a position uphill of expected fall or roll of logs, then
practice cutting on fallen logs before felling trees° Take
special care when cutting wood that is under stress.
Don_t operate your Saw when you're tired° Fight careless-
ness and avoid distractions,
Cut wood only,
When sawing, maintain a firm grip with both hands, thumbs
opposing fingers and a secure footing. Do not saw on lad-
ders, platforms or in any other position which might en-
danger your balance and thus cause loss of positive Saw
control.
-1-
6_
Keep hands, body and clothing away from the moving
chain°
Stop Saw Engine and wear heavy gloves when handling
Saw Muffler area or Chain.
LOOK OUT FOR KICKBACK, When the moving chain or
the tip of the guide bar is stubbed or pinched in a cut, the
bar and chain can be thrown up and back or down and
back with considerable force° THIS IS KICKBACK!
Avoid touching limbs or other objects with the tip of the
Guide Bar while the chain is moving.
Stand slightly to the side rather than directly behind Guide
Bar°
Do not reach above shoulder height or outward beyond
your point of positive Saw control as you cut.
Avoid striking cement or metal, etc. buried in the wood.
Obtain full chain speed before cutting or resuming pre*
vious cut. Start cutting with fro_t of _3aw Frame against
log or tree. Never use your Saw for boring.0
Plan c_tting to avoid situations which might cause Guide
Bar to be pinched in a cut. If, however, your Saw does be-
come pinched in a cut, STOP THE ENGINE BEFORE RE-
MOVING IT.
7. MAINTAIN SAW IN GOOD WORKING ORDER,
Keep your entire Saw clean of sawdust, chaff, oil or fuel
and keep handles clean and dry.
Keep oil and fuel caps, bolts and screwstight.
Make all adjustments (except carburetor) with engine stop-
ped and spark plug disconnected.
Adjust carburetor so that chain stops when throttle trigger
is released.
Keep chain sharp and properly tensioned.
Stop your Saw, inspect and repair if necessaryafter chain
strikes a foreign object.
All service other than that included in this Manual should
be performed by a competent technician.
8, TRANSPORT AND STORE SAFELY.
Stop your Saw engine before setting it down or carrying it
to another location.
Carry stopped Saw with Guide Bar behind (preferably
covered) and muffler away from your body°
Cool your Saw completely and cover Guide Bar before
transporting in any vehicle,
Drain oil and fuel tank and run Saw engine to use remain _
ing fuel, then cool completely before storing in any en-
closure,
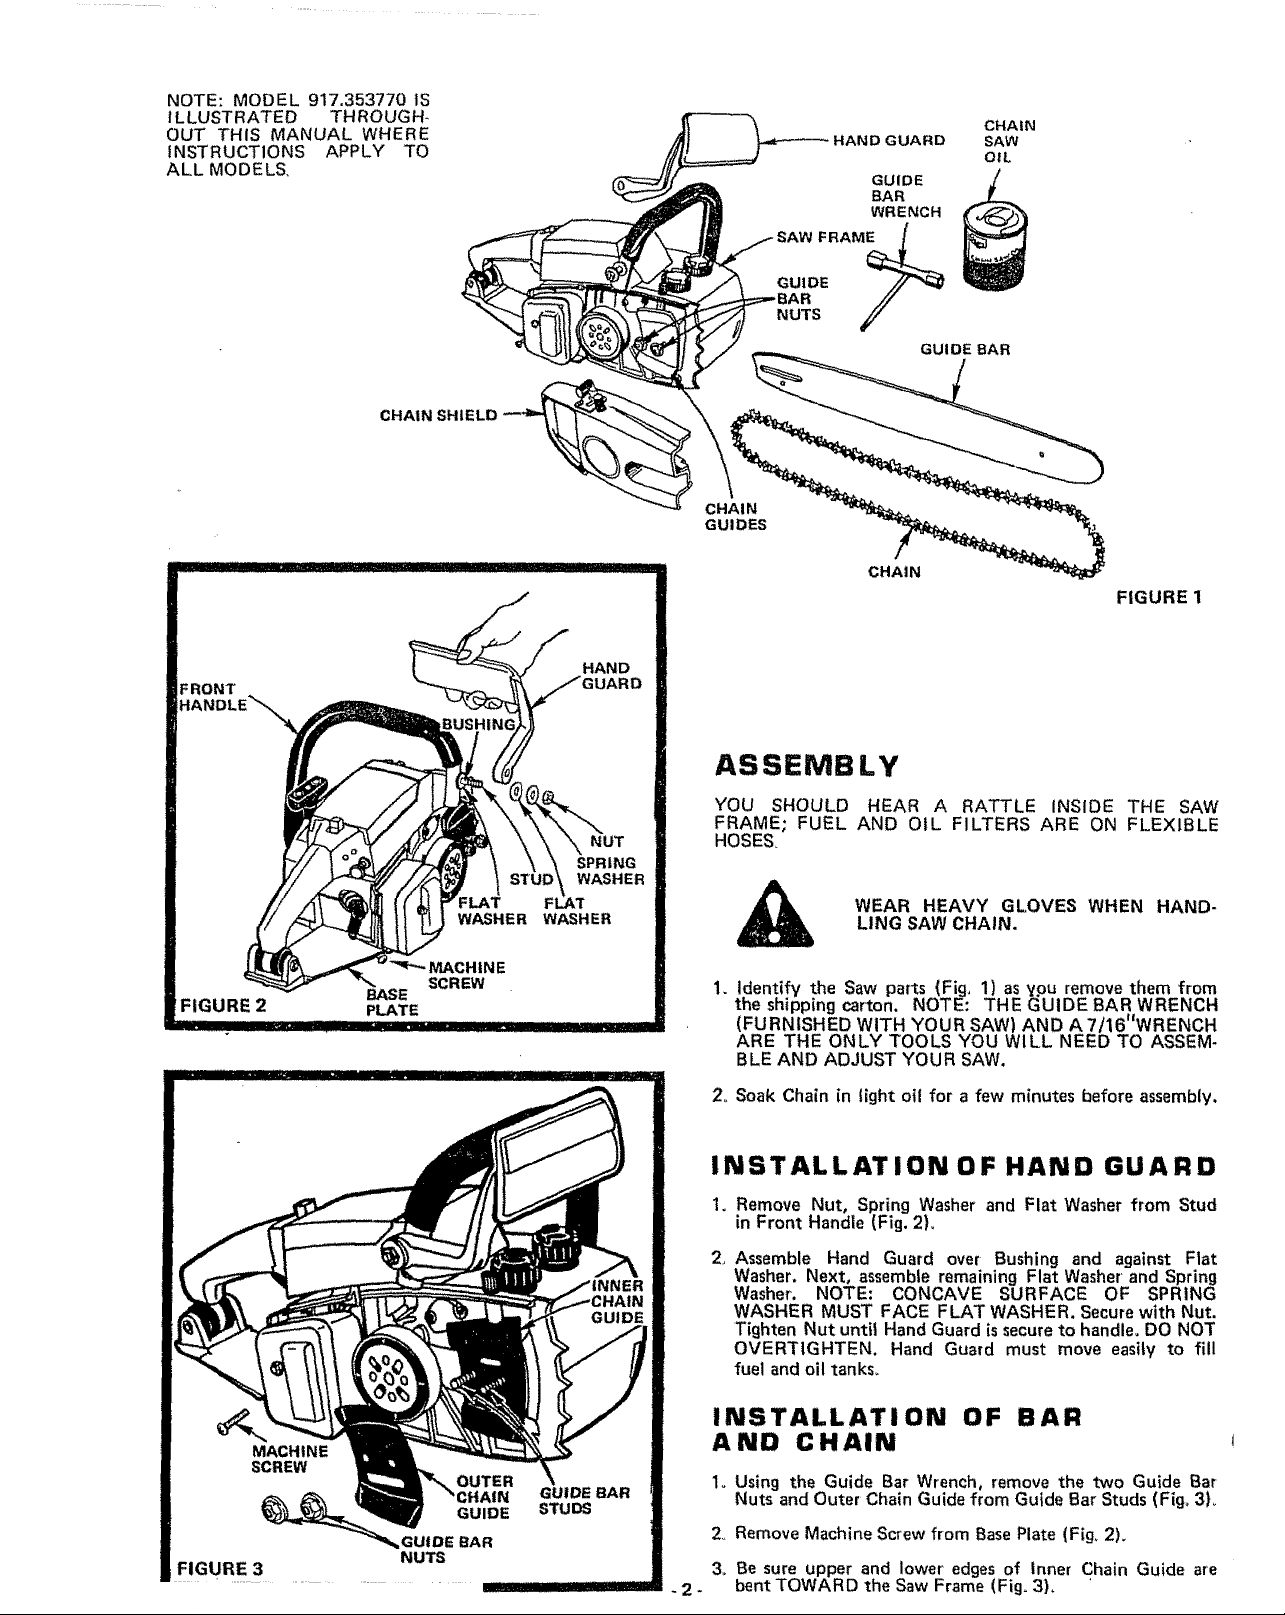
NOTE: MODEL 917.353770 tS
ILLUSTRATED THROUGH-
OUT THIS MANUAL WHERE
INSTRUCTIONS APPLY TO
ALL MODELS,
HAND GUARD
CHAIN
SAW
OIL
GUIDE
BAR
WRENCH
FRAM_
GUIDE /F'_
BAR //
NUTS
GUIDE BAR
CHAIN
GUIDES
FIGURE 2
FLAT
WASHER
"_" MACHtN E
SCREW
BASE
PLATE
HAND
NUT
SPRING
WASHER
WASHER
CHAIN
FIGURE 1
ASSEMBLY
YOU SHOULD HEAR A
FRAME; FUEL AND OiL
HOSES_
RATTLE INSIDE THE SAW
FILTERS ARE ON FLEXIBLE
WEAR HEAVY GLOVES WHEN HAND-
LING SAW CHAIN,
.
Identif_¢ the Saw parts (Fig, 1) as ypu remove them from
the shipping carton, NOTE: THE GUIDE BAR WRENCH
(FURNISHED WITH YOUR SAW) AND A 7/16"WRENCH
ARE THE ONLY TOOLS YOU WILL NEED TO ASSEM-
BLE AND ADJUST YOUR SAW.
2o Soak Chain in light oil for a few minutes before assembly,
-2-
INSTALLATION OF HAND GUARD
1. Remove Nut, Spring Washer and Flat Washer from Stud
in Front Handle (Fig. 2L
2_
Assemble Hand Guard over Bushing and against Flat
Washer, Next, assemble remaining Flat Washer and Spring
Washer. NOTE: CONCAVE SURFACE OF SPRING
WASHER MUST FACE FLAT WASHER. Secure with Nut.
Tighten Nut until Hand Guard is secure to handle, DO NOT
OVERTIGHTEN. Hand Guard must move easily to fill
fuel and oil tanks_
INSTALLATION OF BAR
A ND C H AIN
1o Using the Guide Bar Wrench, remove the two Guide Bar
Nuts and Outer Chain Guide from Guide Bar Studs (Fig_ 3L
2. Remove Machine Screw from Base Plate (Fig. 2).
3. Be sure upper and lower" edges of inner Chain Guide are
bent TOWARD the Saw Frame (Fig. 3). '
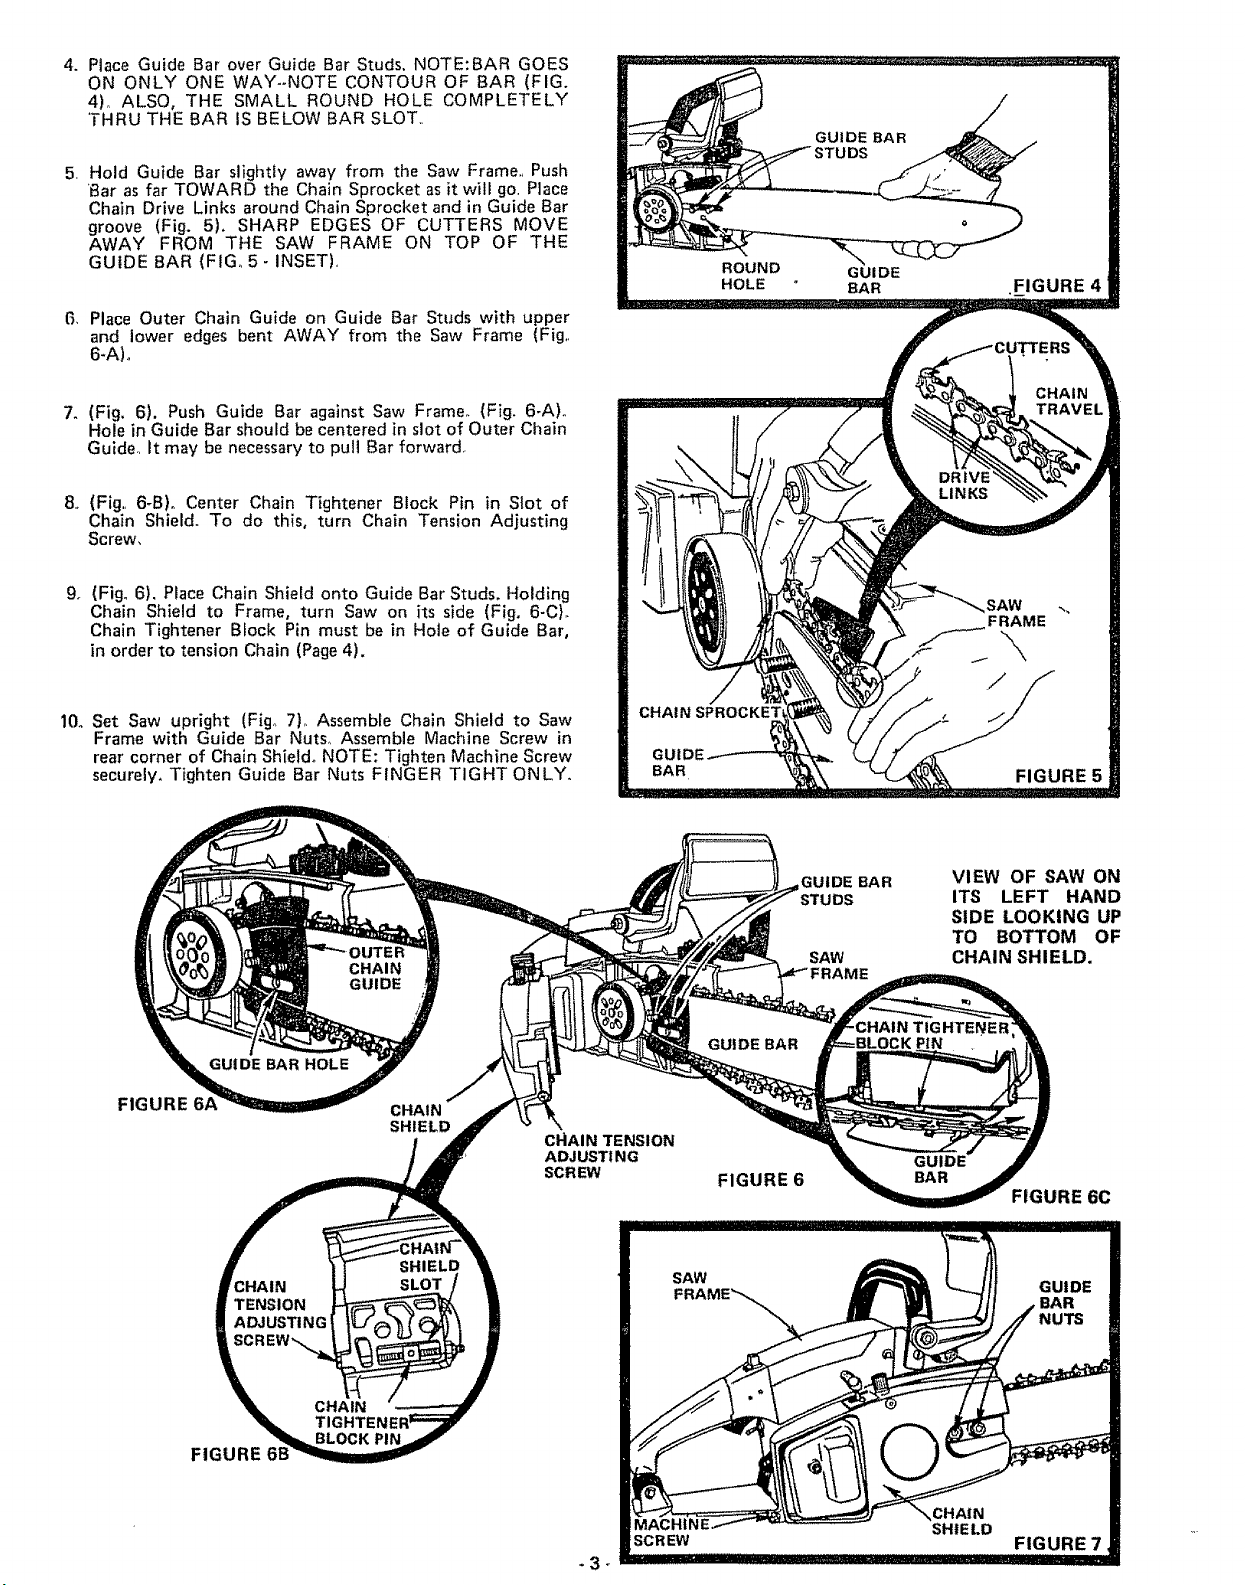
4. Place Guide Bar over Guide Bar Studs, NOTE:BAR GOES
ON ONLY ONE WAY--NOTE CONTOUR OF BAR (FIG.
4)° ALSO, THE SMALL ROUND HOLE COMPLETELY
THRU THE BAR IS BELOW BAR SLOT.
5, Hold Guide Bar slightly away from the Saw Frame., Push
_Baras far TOWARD the Chain Sprocket as it will go. Place
Chain Drive Links around Chain Sprocket and in Guide Bar
groove (Fig. 5), SHARP EDGES OF CUTTERS MOVE
AWAY FROM THE SAW FRAME ON TOP OF THE
GUIDE BAR (FIGo 5- INSET),
B, Place Outer Chain Guide on Guide Bar Studs with upper
and lower edges bent AWAY from the Saw Frame (Fig,,
6-A) o
7. (Fig. 6). Push Guide Bar against Saw Frame. (Fig. 6-A)o
Hole in Guide Bar should be centered in slot of Outer Chain
Guide It may be necessary to pull Bar forward.
8o (Fig., 6-B)o Center Chain Tightener Block Pin in Slot of
Chain Shield. To do this, turn Chain Tension Adjusting
Screw,
go (Fig° 6), Place Chain Shield onto Guide Bar Studs, Holding
Chain Shield to Frame, turn Saw on its side (Fig. 6-C)_
Chain Tightener Block Pin must be in Hole of Guide Bar,
in order to tension Chain (Page 4).
10. Set Saw upright (Fig° 7), Assemble Chain Shield to Saw
Frame with Guide Bar Nuts_ Assemble Machine Screw in
rear corner of Chain Shiel& NOTE: Tighten Machine Screw
securely, Tighten Guide Bar Nuts FINGER TIGHT ONLY.
GUIDE BAR
ROUND GUIDE
HOLE BAR
CHAIN SPROCKETI
GUIDE
BAR
.FIGURE 4
CHAIN
TRAVEl
DRIVE'
LINKS
FIGURE 5
FIGURE
CHAIN
GUIDE
GUIDE BAR HOLE
CHAIN
SHIELD
CHAIN TENSION
ADJ USTI N G
SCREW
GUIDE BAR
SAW
GUIDE BAR
FIGURE 6
VIEW OF SAW ON
ITS LEFT HAND
SIDE LOOKING UP
TO BOTTOM OF
CHAIN SHIELD.
'tGHTENEB
PIN
GUIDE
BAR
FIGURE 6C
CHAIN
TENSION
ADJUSTING
CHAIN
TIGHTE
BLOCK PIN
SHIEL[
SLOT
-3-
LOOSEr
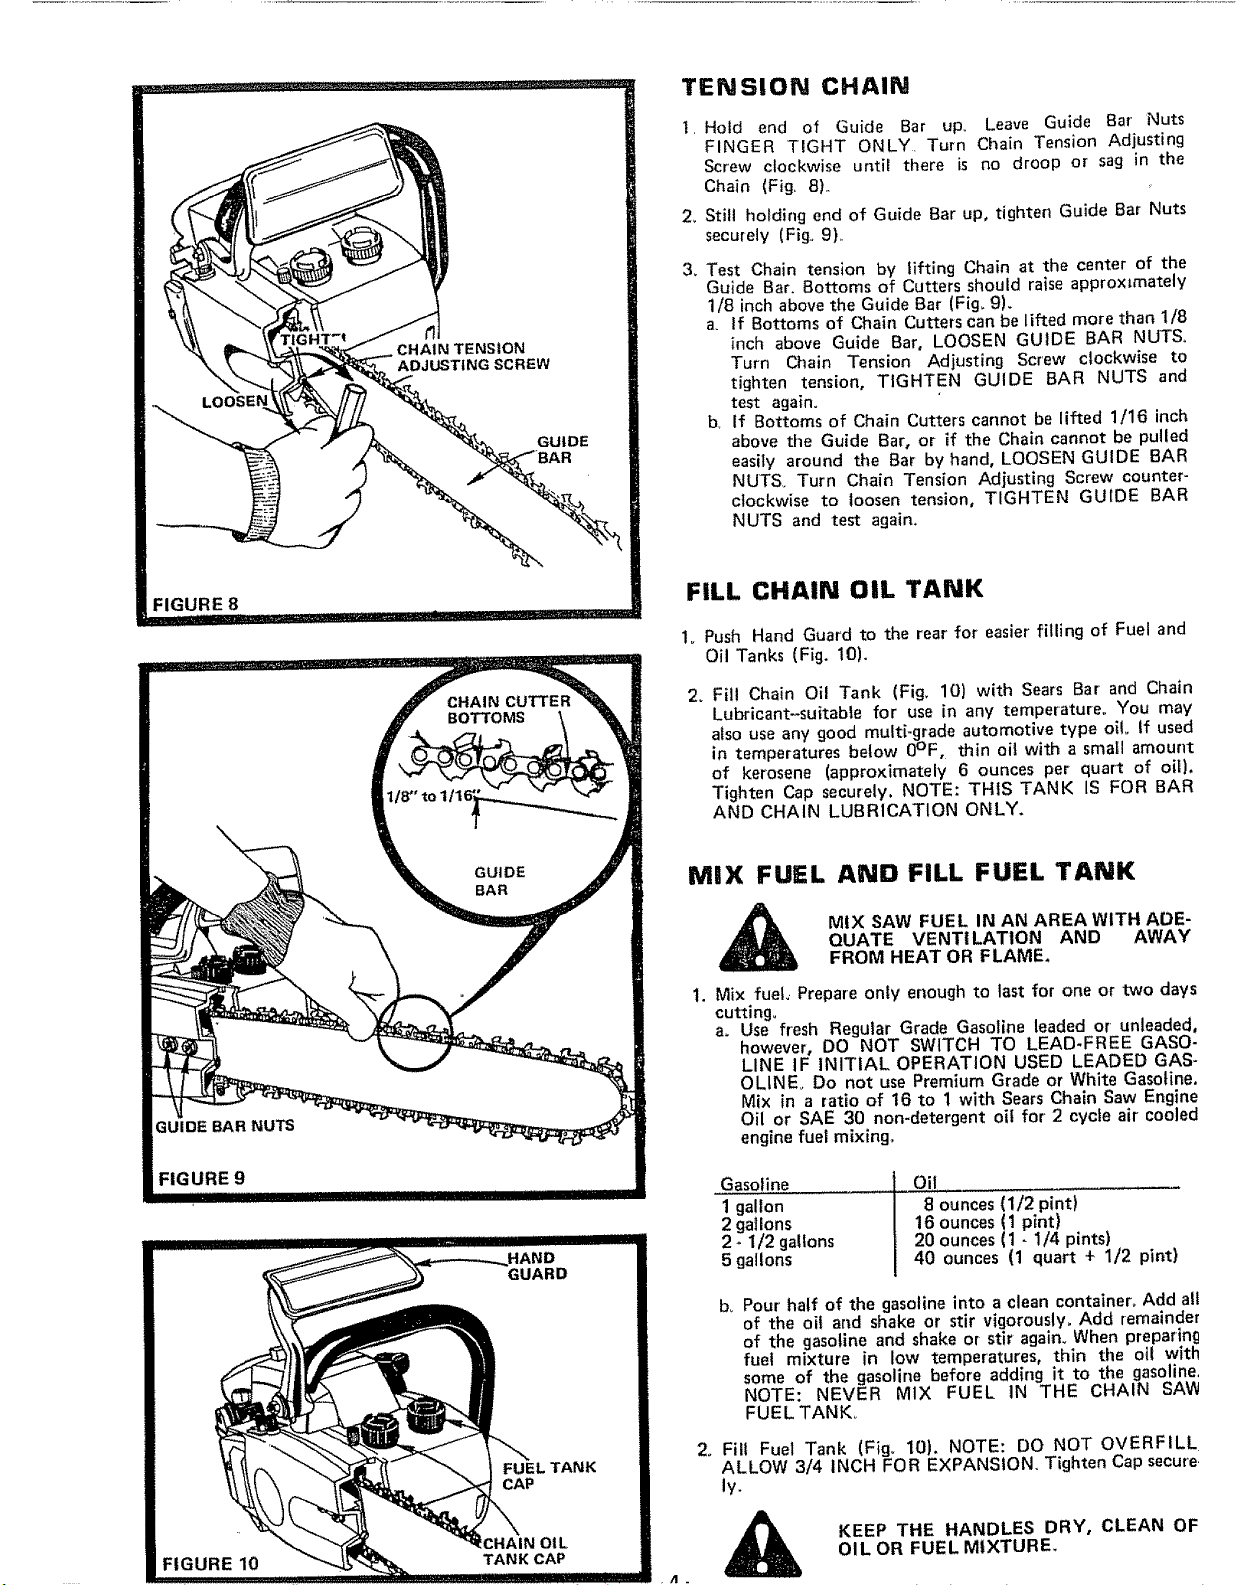
FIGURE 8
CHAIN TENSION
EW
GUIDE
TENSION CHAIN
2_
3_
Hold end of Guide Bar upo Leave Guide Bar Nuts
FINGER TIGHT ONLY. Turn Chain Tension Adjusting
Screw clockwise until there is no droop or sag in the
Chain (Fig. 8),,
Still holding end of Guide Bar up, tighter} Guide Bar Nuts
securely (Fig,, 9).
Test Chain tension by lifting Chain at the center of the
Guide Bar. Bottoms of Cutters should raise approx=mately
1/8 inch above the Guide Bar (Fig, 9).
a. If Bottoms of Chain Cutters can be lifted more than 1/8
inch above Guide Bar, LOOSEN GUIDE BAR NUTS.
Turn Chain Tension Adjusting Screw clockwise to
tighten tension, TIGHTEN GUIDE BAR NUTS and
test again.
b, if Bottoms of Chain Cutters cannot be lifted 1/16 inch
above the Guide Bar, or if the Chain cannot be pulled
easily around the Bar by hand, LOOSEN GUIDE BAR
NUTS_ Turn Chain Tension Adjusting Screw counter-
clockwise to loosen tension, TIGHTEN GUIDE BAR
NUTS and test again,
FILL CHAIN OIL TANK
1. Push Hand Guard to the rear for easier filling of Fuel and
Oil Tanks (Fig. 10).
2_ Fill Chain Oil Tank (Fig, 10) with Sears Bar' and Chain
Lubricant--suitable for use in any temperature_ You may
also use any good multi-grade automotive type oil. if used
in temperatures below 0°F, thin oil with a small amount
of kerosene (approximately 6 ounces per quark of oil).
Tighten Cap securely. NOTE: THIS TANK IS FOR BAR
AND CHAIN LUBRICATION ONLY.
MIX FUEL AND FILL FUEL TANK
MIX SAW FUEL IN AN AREA WITH ADE-
QUATE VENTILATION AND AWAY
FROM HEAT OR FLAME,
t. Mix fuel.. Prepare only enough to last for one or two days
cutting_
a. Use fresh Regular Grade Gasoline leaded or unleaded,
however, DO NOT SWITCH TO LEAD-FREE GASO-
LINE IF INITIAL OPERATION USED LEADED GAS-
OLINEo Do not use Premium Grade or White Gasoline,
Mix in a ratio of 16 to 1 with Sears Chain Saw Engine
Oil or SAE 30 non-detergent oif for 2 cycle air cooled
engine fuel mixing,,
Gasoline
1 gallon
2gallons
2 - 1/2 gallons
5 gallons
Oil
8 ounces (1/'2 pint)
16 ounces (1 pint)
20 ounces (1 - 1/4 pints)
40 ounces (1 quart + 1/2 pint)
b,, Pour half of the gasoline into a clean container_ Add all
of the oil and shake or stir vigorously, Add remainder
of the gasoline and shake or stir again_ When preparing
rue| mixture in low temperatures, thin the oil with
some of the gasoline before adding it to the gasoline.
NOTE: NEVER MIX FUEL IN THE CHAIN SAW
FUELTANK_
2o Fill Fuel Tank (Fig_ 10). NOTE: DO NOT OVERFILL.
ALLOW 3/4 INCH FOR EXPANSION. Tighten Cap secure
ly.
KEEP THE HANDLES DRY, CLEAN OF
CAP OIL OR FUEL M|XTURE.
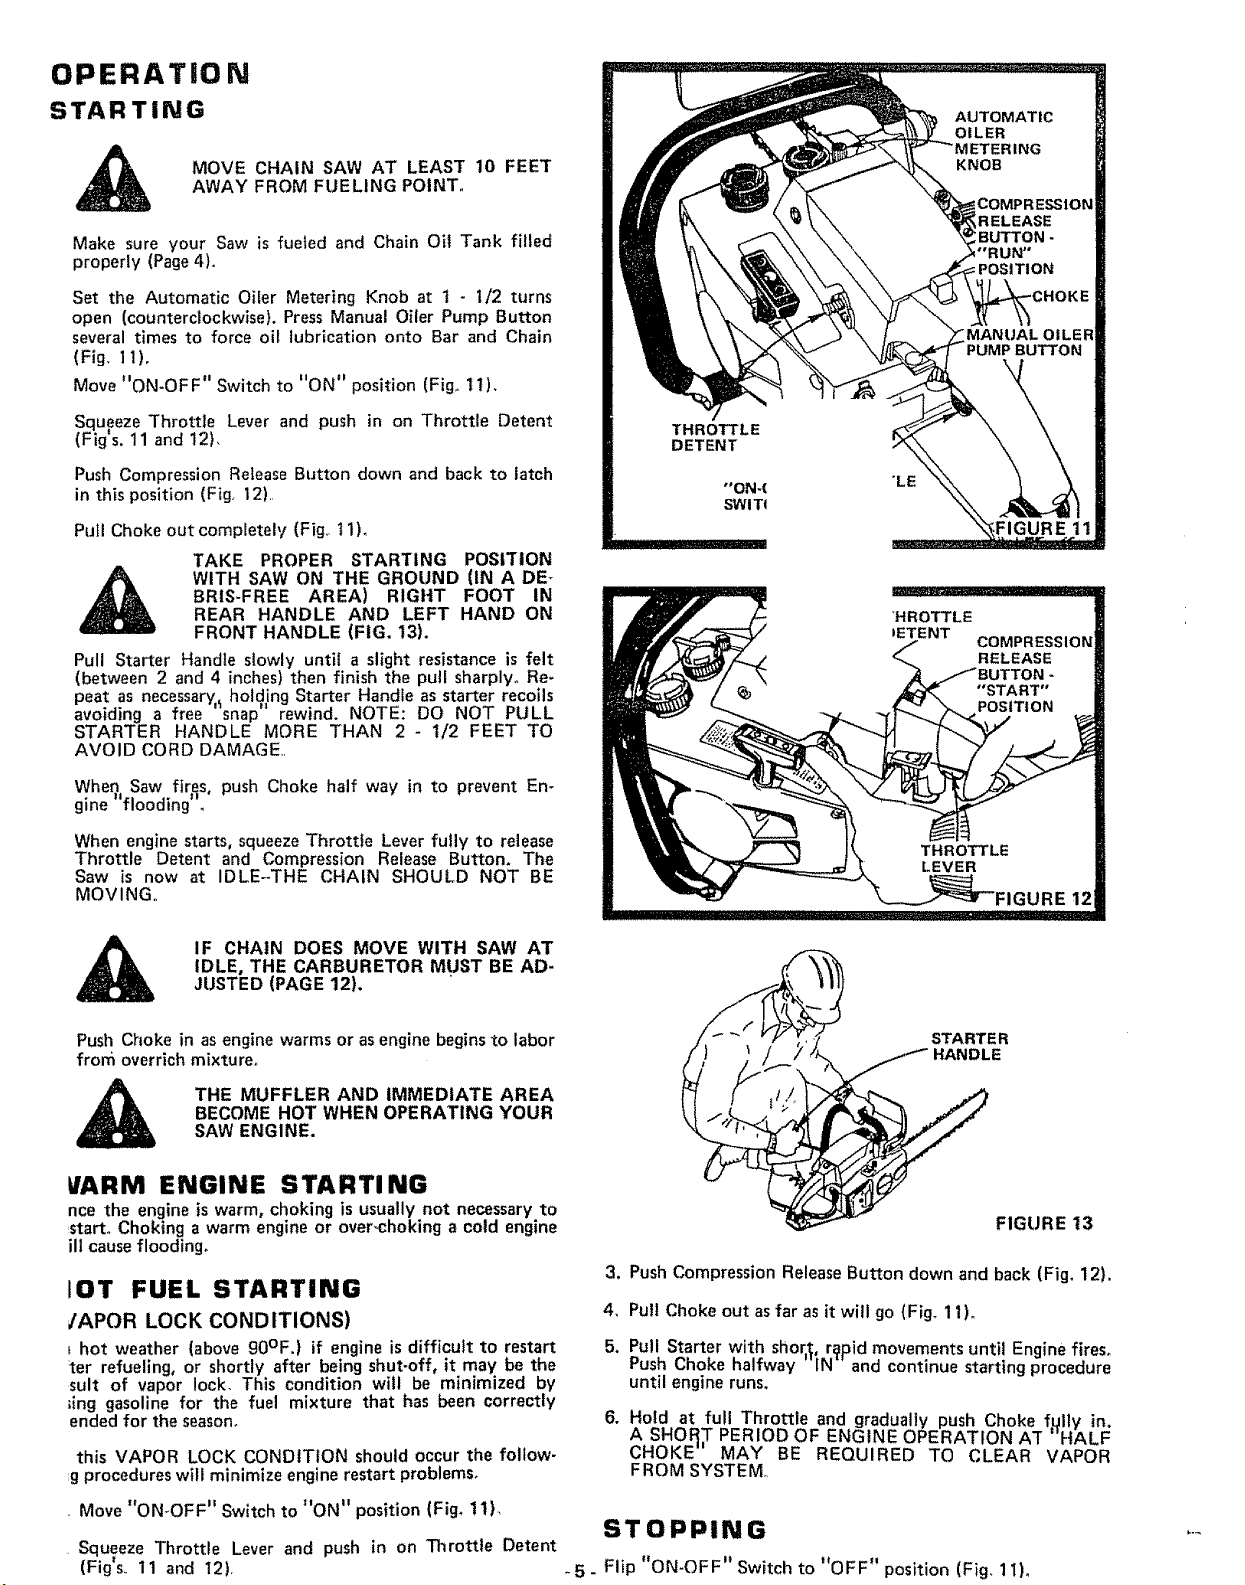
OPERATION
STARTING
MOVE CHAIN SAW AT LEAST 10 FEET
AWAY FROM FUELING POINT.,
Make sure your Saw is fueled and Chain Oil Tank filled
properly (Page4).
Set the Automatic Oiler Metering Knob at 1 - 1/2 turns
open (counterclockwise). Press Manual Oiler Pump Button
several times to force oil lubrication onto Bar and Chain
(Fig. 11),
Move "ON-OFF" Switch to "ON" position (Fig° tt),
Squeeze Throttle Lever and push in on Throttle Detent
(Fig's. 11 and 12),
Push Compression Release Button down and back to latch
in this position (Fig, 12),,
Pull Choke out completely (Fig_, 11),
TAKE PROPER STARTING POSITION
WITH SAW ON THE GROUND (IN A DE_
BRIS-FREE AREA) RIGHT FOOT IN
REAR HANDLE AND LEFT HAND ON
FRONT HANDLE (FIG. 13).
Pull Starter Handle slowly until a slight resistance is felt
(between 2 and 4 inches) then finish the pull sharply, Re-
peat as necessary_ holding Starter Handle as starter recoils
avoiding a free snap rewind. NOTE: DO NOT PULL
STARTER HANDLE MORE THAN 2 - 1/2 FEET TO
AVOID CORD DAMAGE,,
When Saw fires, push Choke half way in to prevent En-
. llf .* II
g ne OOolng
When engine starts, squeeze Throttle Lever fully to release
Throttle Detent and Compression Release Button. The
Saw is now at IDLE-THE CHAIN SHOULD NOT BE
MOVING°
FIGURE 11
IF CHAIN DOES MOVE WITH SAW AT
IDLE, THE CARBURETOR MUST BE AD-
JUSTED (PAGE 12).
Push Choke in as engine warms or asengine begins to labor
from overrich mixture,
THE MUFFLER AND IMMEDIATE AREA
BECOME HOT WHEN OPERATING YOUR
SAW ENGINE.
_/ARM ENGINE STARTING
nce the engine is warm, choking is usually not necessary to
start. Choking a warm engine or over-choking a cold engine
ill cause flooding.
lOT FUEL STARTING
IAPOR LOCK CONDITIONS)
hot weather (above 90°F.) if engine is difficult to restart
ter refueling, or shortly after being shut-off, it may be the
suit of vapor lock. This condition will be minimized by
;ing gasoline for the fuel mixture that has been correctly
ended for the season°
this VAPOR LOCK CONDITION should occur the follow-
g procedures will minimize engine restart problems,
. Move "ON-OFF" Switch to "ON" position (Fig, 11)_
Squeeze Throttle Lever and push in on Throttle Detent
, If
(Figs., 11 and 12),
)//_/ STARTER
E
FIGURE 13
3. Push Compression Release Button down and back (Fig, 12).
4, Pull Choke out as far as it will go (Fig. 11).
5. Pull Starter with shor_, r_pid movements until Engine fires,
Push Choke halfway IN and continue starting procedure
until engine runs.
6. Hold at full Throttle and gradually push Choke f_lly in.
A SHO_,T PERIOD OF ENGINE OPERATION AT HALF
CHOKE MAY BE REQUIRED TO CLEAR VAPOR
FROM SYSTEM°
STOPPING
-5 - Flip _ON-OFF" Switch to _'OFF" position (Fig, t t),
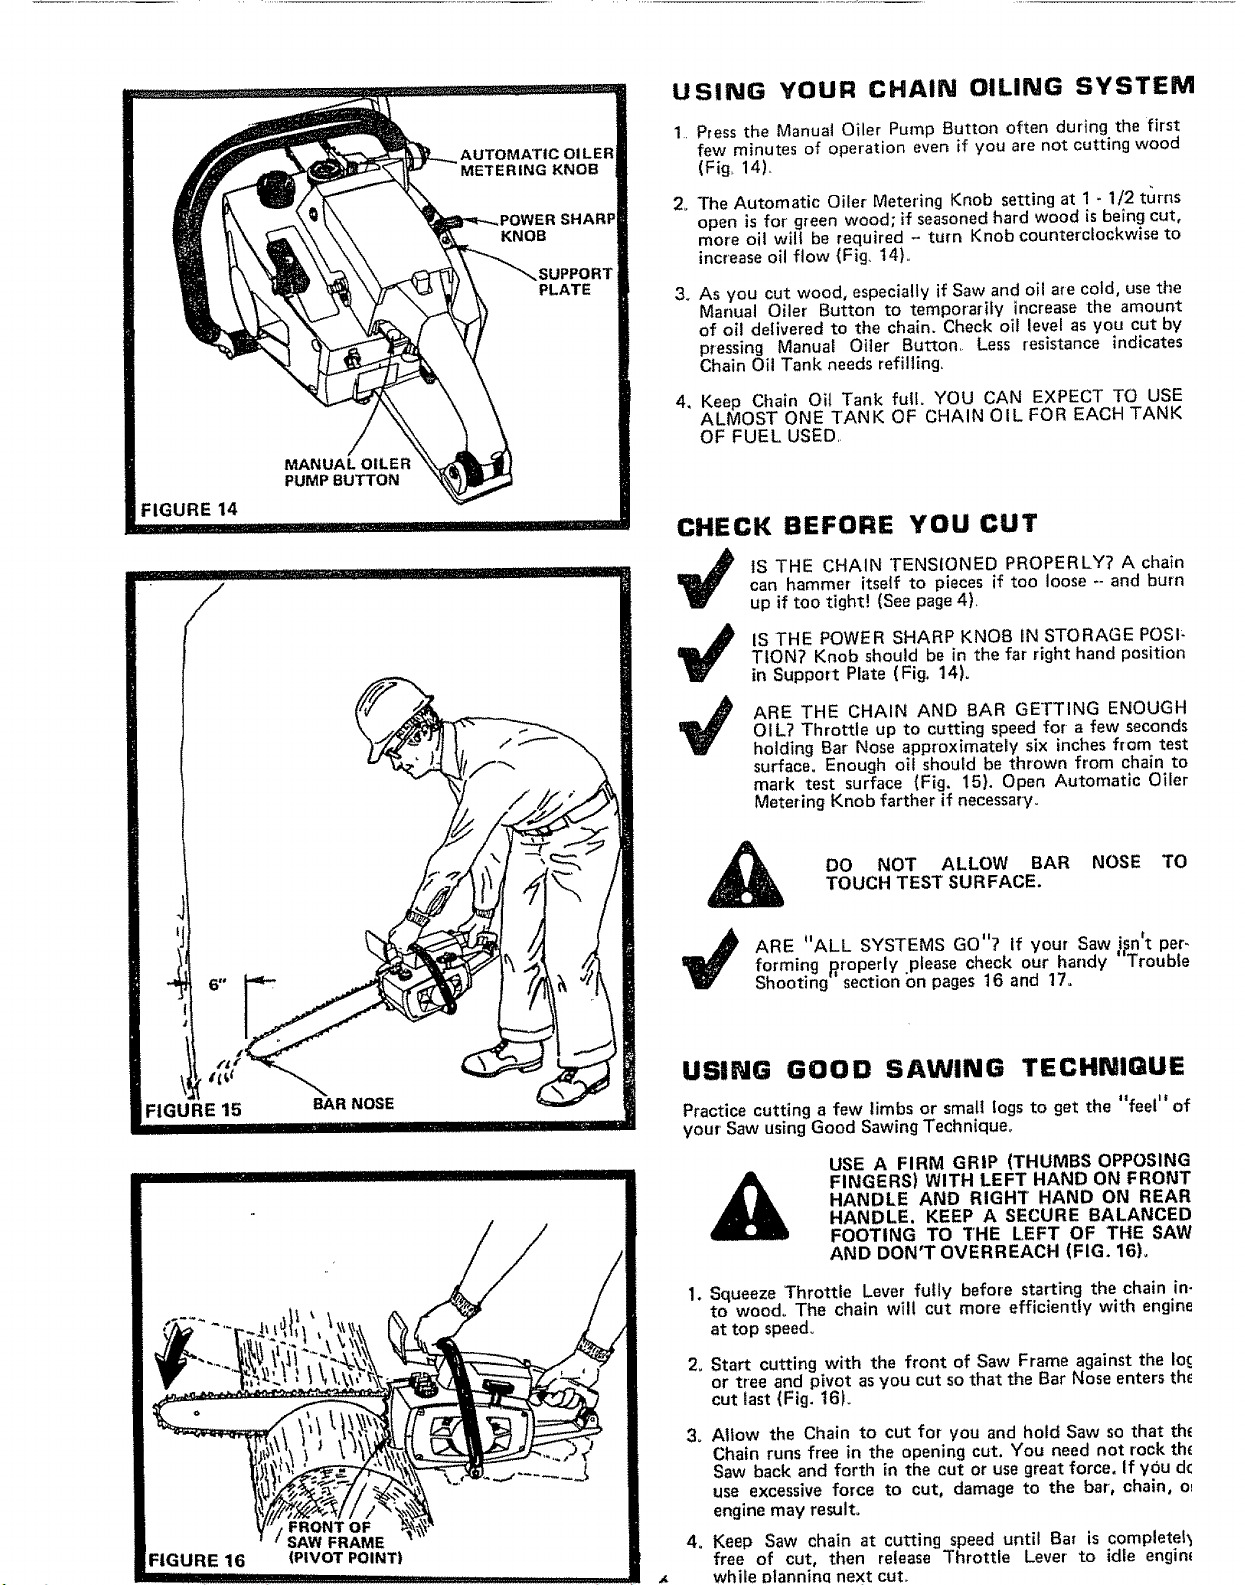
USING YOUR CHAIN OILING SYSTEM
1, Press the Manual Oiler Pump Button often during the first
few minutes of operation even if you are not cutting wood
(Fig, 14).
2+ The Automatic Oiler Metering Knob setting at 1 -1/2 turns
open is for green wood; if seasoned hard wood is being cut,
more oil will be required -* turn Knob counterclockwise to
increase oil flow (Fig, 14)+
3+ As you cut wood, especially if Saw and oil are cold, use the
Manual Oiler' Button to temporarily increase the amount
of oil delivered to the chain. Check oil level as you cut by
pressing Manual Oiler Button, Less resistance indicates
Chain Oil Tank needs refilling.
4, Keep Chain Oil Tank fulI+ YOU CAN EXPECT TO USE
ALMOST ONE TANK OF CHAIN OIL FOR EACH TANK
OF FUEL USED,
CHECK BEFORE
¢
¢
YOU CUT
lS THE CHAIN TENSIONED PROPERLY? A chain
can hammer itself to pieces if too loose -- and burn
up if too tight! (See page 4),
IS THE POWER SHARP KNOB iN STORAGE POSI_
TION? Knob should be in the far right hand position
in Support Plate (Fig. 14)+
ARE THE CHAIN AND BAR GETTING ENOUGH
OIL? Throttle up to cutting speed for a few seconds
holding Bar Nose approximately six inches from test
surface+ Enough oil should be thrown from chain to
mark test surface (Fig. 15}. Open Automatic Oiter
Metering Knob farther if necessary.
DO NOT ALLOW BAR NOSE TO
TOUCH TEST SURFACE.
q_ ARE "ALL SYSTEMS GO"? if your Saw i_n't per-forming Rroperly .please check our handy Trouble
Shooting- section on pages 16 and 17+
USING GOOD SAWING TECHNIQUE
Practice cutting a few limbs or small fogs to get the "feel '_of
your' Saw using Good Sawing Technique,
USE A FIRM GRIP (THUMBS OPPOSING
FINGERS) WITH LEFT HAND ON FRONT
HANDLE AND RIGHT HAND ON REAR
HANDLE. KEEP A SECURE BALANCED
FOOTING TO THE LEFT OF THE SAW
AND DON'T OVERREACH (FIG. 16),
1. Squeeze Throttle Lever fully before starting the chain in-
to wood+ The chain will cut more efficiently with engine
at top speed+
2+ Start cutting with the front of Saw Frame against the Ioc,
or tree and pivot asyou cut so that the Bar Nose enters th_
cut last (Fig. t6)+
3, Allow the Chain to cut for you and hold Saw so that the
Chain runs free in the opening cut. You need not rock th_
Saw back and forth in the cut or use great force, If y0u dc
use excessive force to cut, damage to the bar+,chain, o_
engine may result+
4. Keep Saw chain at cutting speed until Bar is completel_
free of cut, ttmn release Throttle Lever to idle engim
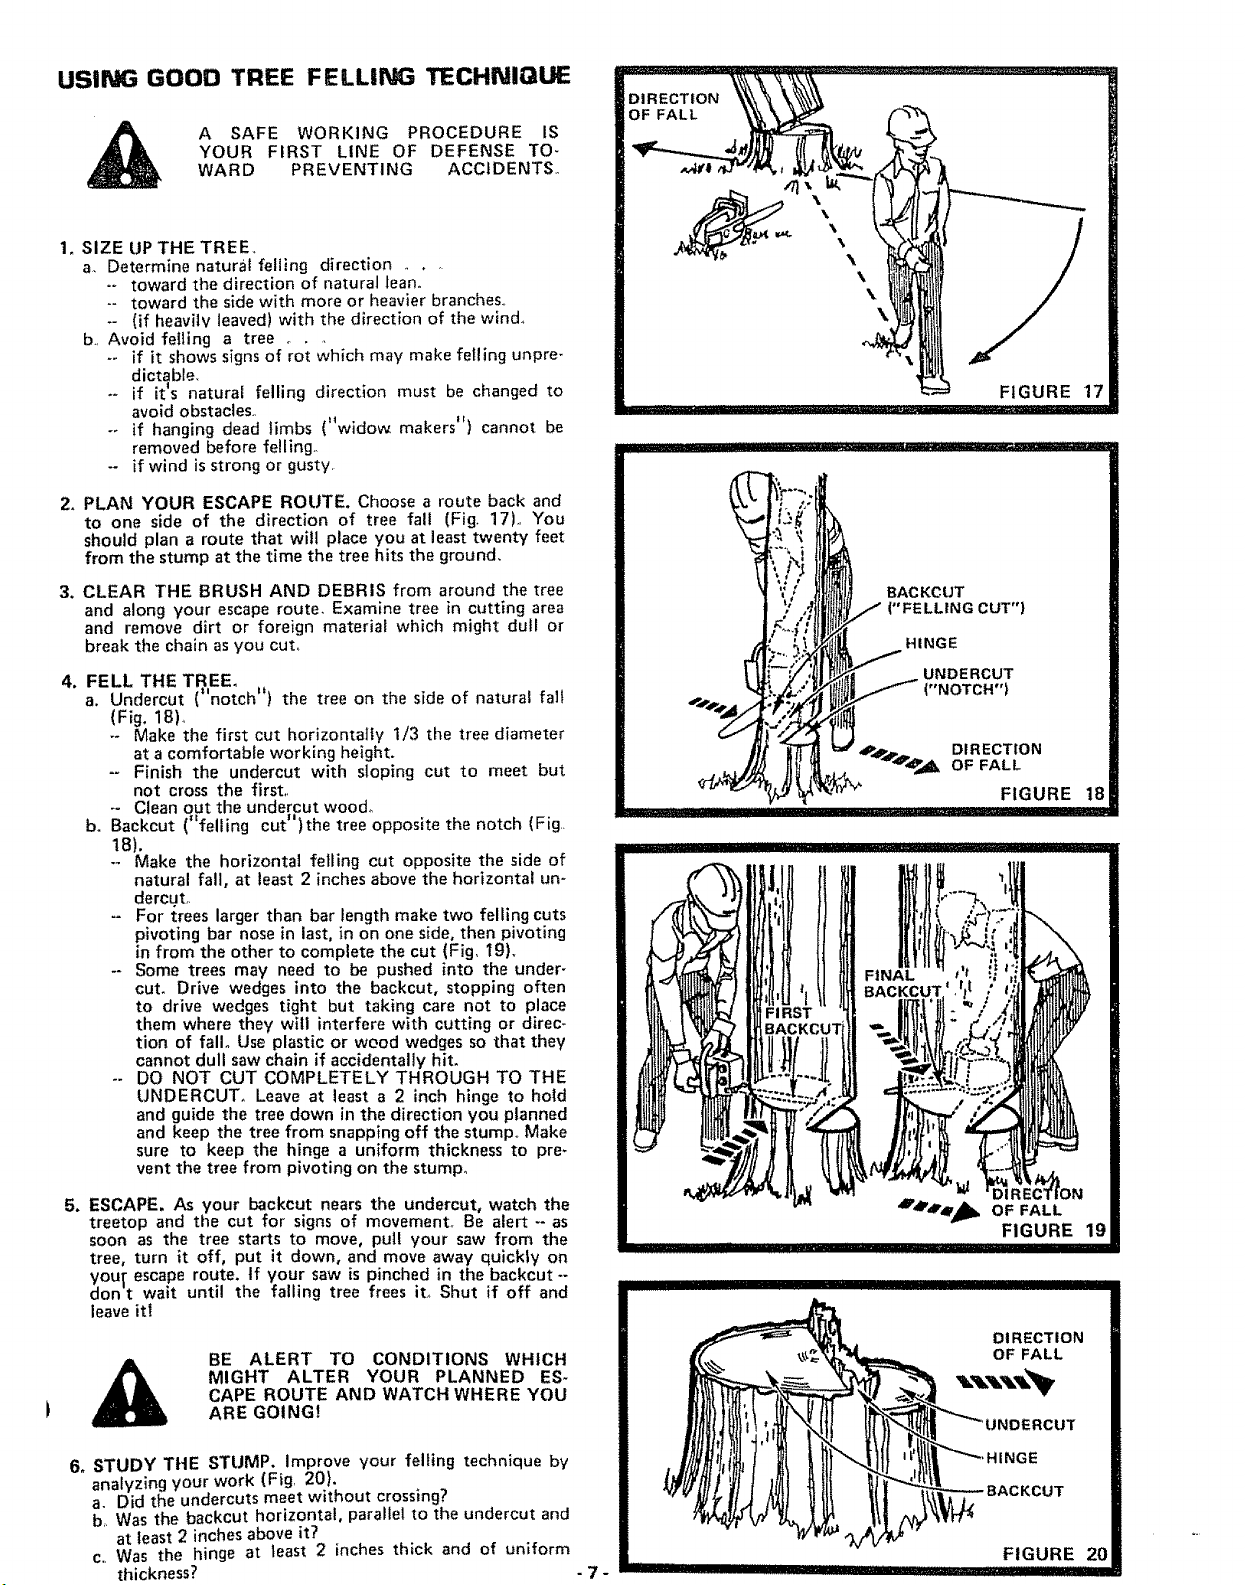
USING GOOD TREE FELLING TECHNIQUE
A SAFE WORKING PROCEDURE IS
YOUR FIRST LINE OF DEFENSE TO-
WARD PREVENTING ACCIDENTS
1. SIZE UP THE TREE.
a. Determine natural felling direction ....
-- toward the direction of natural lean.
-- toward the side with more or heavier branches.,
-- (if heavily leaved) with the direction of the wind.t
b., Avoid felling a tree ....
-- if it shows signs of rot which may make felling unpre-
dictable.
-- if it's natural felling direction must be changed to
avoid obstacles.,
-- if hanging dead limbs (_widov_ makers =_)cannot be
removed before felling.,
-- if wind is strong or gusty.
2. PLAN YOUR ESCAPE ROUTE, Choose a route back and
to one side of the direction of tree fall (Fig, 17),, You
should plan a route that will place you at least twenty feet
from the stump at the time the tree hits the ground,
3. CLEAR THE BRUSH AND DEBRIS from around the tree
and along your escape route, Examine tree in cutting area
and remove dirt or foreign material which might dull or
break the chain as you cut_
4. FELL THE T_EE. ,
a. Undercut ( notch ) the tree on the side of natural fall
(Fig. 18),
-- Make the first cut horizontally I/3 the tree diameter
at a comfortable working height.
-- Finish the undercut with sloping cut to meet but
not cross the first,,
-- Clean out the undercut wood.
fl , Ii
b. Backcut ( felling cut )the tree opposite the notch (Fig..
18).
- Make the horizontal felling cut opposite the side of
natural fall. at least 2 inches above the horizontal un-
dercut,,
-- For trees larger than bar length make two felling cuts
pivoting bar nose in last, in on one side. then pivoting
in from the other to complete the cut (Fig. 19).
-- Some trees may need to be pushed into the under-
cut. Drive wedges into the backcut, stopping often
to drive wedges tight but taking care not to place
them where they will interfere with cutting or direc-
tion of fallo Use plastic or wood wedges so that they
cannot dull saw chain if accidentally hit.
-- DO NOT CUT COMPLETELY THROUGH TO THE
UNDERCUT. Leave at least a 2 inch hinge to hold
and guide the tree down in the direction you planned
and keep the tree from snapping off the stump., Make
sure to keep the hinge a uniform thickness to pre-
vent the tree from pivoting on the stump°
5. ESCAPE. As your backcut nears the undercut, watch the
treetop and the cut for signs of movement., Be alert -- as
soon as the tree starts to move, pul! your saw from the
tree, turn it off, put it down, and move away quickly on
you[ escape route. If your saw is pinched in the backcut--
don t wait until the falling tree frees it., Shut if off and
leave itl
BE ALERT TO CONDITIONS WHICH
MIGHT ALTER YOUR PLANNED ES-
CAPE ROUTE AND WATCH WHERE YOU
ARE GOINGI
6. STUDY THE STUMP. Improve your felling technique by
analyzing your work (Fig. 20).
a. Did the undercuts meet without crossing?
b;. Was the backcut horizontal, parallel to the undercut and
at least 2 inches above it?
c,, Was the hinge at least 2 inches thick and of uniform
thickness? -7-
BACKCUT
("FELLING CUT"}
HINGE
UNDERCUT
("NOTCH")
IIIIIIIIIIIIIIIII
Ot RECTION
OF FALL
FIGURE 20
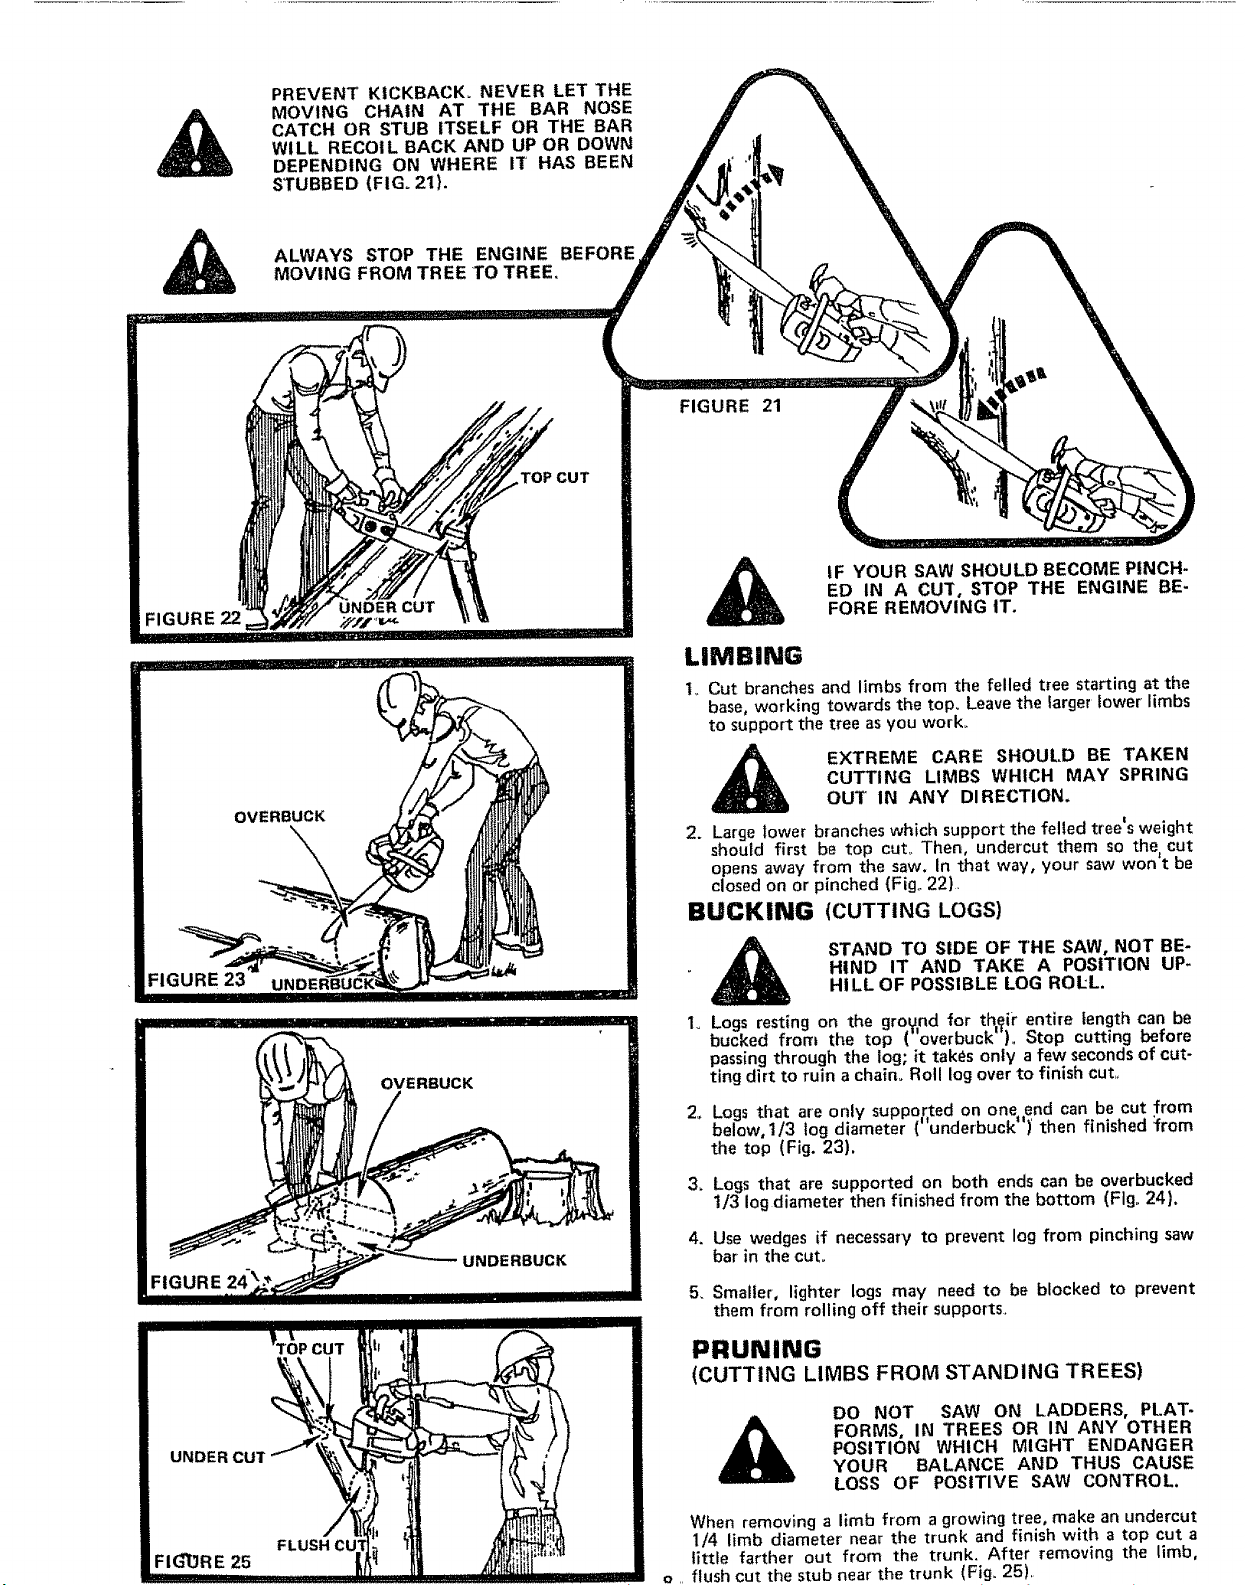
PREVENT KICKBACK. NEVER LET THE
MOVING CHAIN AT THE BAR NOSE
CATCH OR STUB ITSELF OR THE BAR
WILL RECOIL BACK AND UP OR DOWN
DEPENDING ON WHERE IT HAS BEEN
STUBBED (FIG. 21).
ALWAYS STOP THE ENGINE BEFORE
MOVING FROM TREE TO TREE.
FIGURE 22
,TOPCUT
FIGURE 21
IF YOUR SAW SHOULD BECOME PINCH-
ED IN A CUT, STOP THE ENGINE BE-
FORE REMOVING IT.
LIMBING
I,, Cut branches and limbs from the felled tree starting at the
base, working towards the top, Leave the larger lower limbs
to support the tree as you work°
EXTREME CARE SHOUL.D BE TAKEN
CUTTING LIMBS WHICH MAY SPRING
OUT IN ANY DIRECTION,
2. Large lower branches which support the felled tree's weight
should first be top cut° Then, undercut them so the cut
opens away from the saw, n that way, your saw won't be
closed on or pinched (Fig,. 22}.
BUCKING (CUTTING LOGS)
2_
.
4.
STAND TO SIDE OF THE SAW, NOT BE-
HIND IT AND TAKE A POSITION UP-
HILL OF POSSIBLE LOG ROLL.
Logs resting on the ground for their entire length can be
I II |#
bucked from the top ( overbuck ),, Stop cutting before
passing through the log; it takes only a few secondsof cut-
ting dirt to ruin a chain. Roll log over to finish cut,,
Logs that are only suppo,r,ted on one.end can be cut from
below, 1/3 log diameter ('under'buck")' then finished '_rom
the top (Fig. 23),
Logs that are supported on both ends can be overbucked
1/3 log diameter then finished from the bottom (FIgo24).
Use wedges if necessary to prevent log from pinching saw
bar in the cut.
5. Smaller, lighter logs may need to be blocked to prevent
them from rolling off their supports.
PRUNING
(CUTTING LIMBS FROM STANDING TREES)
DO NOT SAW ON LADDERS, PLAT-
FORMS, IN TREES OR IN ANY OTHER
POSITION WHICH MIGHT ENDANGER
YOUR BALANCE AND THUS CAUSE
LOSS OF POSITIVE SAW CONTROL.
When removing a limb from a growing tree, make an undercut
1/4 limb diameter near the trunk and finish with a top cut a
little farther out from the trunk. After removing the limb,
fhJ_h _l_t fh_ _t=lh noor th_ tr_lnk {_';rt _}_
 Loading...