


¨
COLD SHOT
Operator’s Manual with
Installation and Service
Release Date: June 1, 2006
Publication Number: 621058201OPR
Revision Date: July 24, 2006
Revision: C
Visit the IMI Cornelius web site at www.cornelius.com for all your Literature needs.

SERVICE MANUAL
The products, technical information, and instructions contained in this manual are subject to change without notice. These instructions are not intended to cover all details or variations of the equipment, nor to provide for every possible contingency in the installation, operation or maintenance of this equipment. This manual assumes that the person(s) working on the equipment have been trained and are skilled in working with electrical, plumbing, pneumatic, and mechanical equipment. It is assumed that appropriate safety precautions are taken and that all local safety and construction requirements are being met, in addition to the information contained in this manual.
To inquire about current revisions of this and other documentation or for assistance with any Cornelius product contact:
www.cornelius.com 1-800-468-4231
Trademarks and copyrights:
Aurora, Cornelius, FlavorFusion, Hydro Boost, Optifill, Pinnacle, and Vanguard are registered trademarks of IMI Cornelius Inc.
This document contains proprietary information and it may not be reproduced in any way without permission from Cornelius.
Printed in U.S.A.
Copyright © 2006, All Rights Reserved, IMI Cornelius, Inc.

TABLE OF CONTENTS
Start up Instructions . . . . . . . . . . . . . . . . . . . . . . . . . . . . . . . . . . . . . . . . . . . . . . . . . . . 1 Operating Instructions . . . . . . . . . . . . . . . . . . . . . . . . . . . . . . . . . . . . . . . . . . . . . . . . . 1
Maintenance . . . . . . . . . . . . . . . . . . . . . . . . . . . . . . . . . . . . . . . . . . . . . . . . . . . . . . . . . 2
Daily (or as required) . . . . . . . . . . . . . . . . . . . . . . . . . . . . . . . . . . . . . . . . . . . . . . . . . 2 Monthly (or as required) . . . . . . . . . . . . . . . . . . . . . . . . . . . . . . . . . . . . . . . . . . . . . . 2 Brand Changeover . . . . . . . . . . . . . . . . . . . . . . . . . . . . . . . . . . . . . . . . . . . . . . . . . . 2 Cleaning Instructions . . . . . . . . . . . . . . . . . . . . . . . . . . . . . . . . . . . . . . . . . . . . . . . . . 2 Dispenser Maintenance . . . . . . . . . . . . . . . . . . . . . . . . . . . . . . . . . . . . . . . . . . . . . . 2
Cleaning Exterior Surfaces . . . . . . . . . . . . . . . . . . . . . . . . . . . . . . . . . . . . . . . . . 2 Cleaning Tanks . . . . . . . . . . . . . . . . . . . . . . . . . . . . . . . . . . . . . . . . . . . . . . . . . . 2
Troubleshooting . . . . . . . . . . . . . . . . . . . . . . . . . . . . . . . . . . . . . . . . . . . . . . . . . . . . . . 3
Service Parts . . . . . . . . . . . . . . . . . . . . . . . . . . . . . . . . . . . . . . . . . . . . . . . . . . . . . . . . . 3
Wiring Diagram . . . . . . . . . . . . . . . . . . . . . . . . . . . . . . . . . . . . . . . . . . . . . . . . . . . . . . . 4
Parts Changeout . . . . . . . . . . . . . . . . . . . . . . . . . . . . . . . . . . . . . . . . . . . . . . . . . . . . . . 5
Side Panel Removal . . . . . . . . . . . . . . . . . . . . . . . . . . . . . . . . . . . . . . . . . . . . . . . . . 5
Thermostat Replacement . . . . . . . . . . . . . . . . . . . . . . . . . . . . . . . . . . . . . . . . . . . . . 6
Lever Replacement . . . . . . . . . . . . . . . . . . . . . . . . . . . . . . . . . . . . . . . . . . . . . . . . . . 6
Valve Change Over . . . . . . . . . . . . . . . . . . . . . . . . . . . . . . . . . . . . . . . . . . . . . . . . . . 7
Servicing Top Light . . . . . . . . . . . . . . . . . . . . . . . . . . . . . . . . . . . . . . . . . . . . . . . . . . 8


Cold Shot OwnerÕs Manual
DRINK RESPONSIBLY
If you do choose to drink, please do so responsibly. Alcohol use by persons under the age of 21 is illegal and is not condoned by IMI Cornelius.
START UP INSTRUCTIONS
1.Place unit on a sturdy countertop near a safe GFCI electrical outlet. Ensure all four feet on bottom of unit are firmly sitting on a level surface.
IMPORTANT: Allow 4 inches of clearance on each side and rear of the unit for proper ventilation of the refrigeration system. If proper clearance is not maintained the compressor will not be able to keep the product cold.
CAUTION: To avoid damage to the compressor it must be in an upright position at lease 4 hours before plugging the unit in.
2.Clean tank with soap solution. Then flush out the tank with warm tap water.
Whenever emptying the tanks completely the unit needs to be tilted forward at a 45-degree angle to ensure all liquid is removed.
3.Pour product into the unit reservoir tanks. It will take about 1.5 liter of product to fill each tank for the first time. Invert the last bottle vertically and let it sit upside down on the tank inlet.
4.Plug unit into GFCI outlet for use. Let the unitÕs refrigeration system cool down the reservoirs for approximately 2-3 hours. After the appropriate cool down time has lapsed, the compressor will continue to cycle on and off to keep product cool. The product will then dispense between 5¡F and 15¡F.
OPERATING INSTRUCTIONS
To operate depress lever of respective brand beverage and continuous dispense will occur. As the level in the tank decreases, the internal tank is automatically filled by evacuation of the bottle on top. When a bottle on top of the unit is completely empty, it must be replaced immediately with a full bottle of the same product, or performance will degrade. To maintain proper cooling, capacity, and prevent freezing it is recommended to replace empty bottles immediately with full bottles. Use the visual slots in bottle holders as a guide to determine volume remaining inside the top bottle.
The unit is supplied with single-handed operation faucets. This allows the bar-staff serving the cold shots the capability of using one hand to hold the glass while simultaneously activating the lever to allow beverage to flow. If the valve lever is raised forward and vertical it then allows free-flow of the product from the respective faucet. This mode is used for filling large glasses, pitchers, cleaning or emptying the tanks.
Do not tighten down on nut on valve, as this will affect the tank to valve seal.
If the dispenser fails to dispense product see troubleshooting guide.
© 2006, IMI Cornelius Inc. |
- 1 - |
Publication Number: 621058201OPR |

Cold Shot OwnerÕs Manual
MAINTENANCE
DAILY (OR AS REQUIRED)
Clean faucets externally with clean wet towel.
Wipe down unit with damp cloth and rinse out drip tray with soap solution.
MONTHLY (OR AS REQUIRED)
Make sure when cleaning the tanks that unit is unplugged.
Clean tank with soap solution.
Vacuum condenser coils in back of unit.
BRAND CHANGEOVER
Clean and sanitize tank with proper cleaning procedure.
Follow the ÒCleaning TanksÓ procedure and step 2 of the ÒStart upÓ procedure for each flavor being changed.
CLEANING INSTRUCTIONS
Soap solution Ð Use a mixture of mild detergent and warm (100 F) potable water.
Sanitizing solution Ð Use ½ ounce of household bleach in 1 gallon of potable water. Preparing the sanitizing solution to this ratio will create a solution of 200 PPM.
DISPENSER MAINTENANCE
Cleaning Exterior Surfaces
IMPORTANT: Perform the following daily.
1.Remove cup rest from drip tray.
2.Wash the drip tray with soap solution. Then rinse with clean water.
3.Wash cup rest with soap solution and rinse in clean water. Install the cup rest into the drip tray.
4.Clean all exterior surfaces with soap solution and rinse in clean water.
5.Vacuum dust from grill on back of unit.
Cleaning Tanks
1.Unplug unit.
2.Remove product from tanks.
3.Rinse out tanks with soap solution.
4.Rinse out tanks with potable water.
5.Open the faucet and tilt entire unit forward at a 45-degree angle to completely drain each tank; otherwise the residual water and soap solution will remain inside the tanks.
Publication Number: 621058201OPR |
- 2 - |
© 2006, IMI Cornelius Inc. |

Cold Shot OwnerÕs Manual
TROUBLESHOOTING
IMPORTANT: Only qualified personnel should service internal components or electrical wiring.
Should your unit fail to operate properly, check that there is power to the unit. If the unit does not dispense, check the following chart under the appropriate symptoms to aid in locating the defect.
Trouble |
|
Probable Cause |
|
|
|
TRIPPED CIRCUIT BREAKER. |
A. |
Short circuit in wiring. |
|
B. |
Circuit breaker overloaded. |
|
|
|
PRODUCT DOES NOT DISPENSE. |
A. |
Out of product. |
|
B. |
Clog in valve body. |
|
C. |
Lever not attached. |
|
|
|
PRODUCT WARM. |
A. |
Thermostat setting |
|
|
incorrect. |
|
B. |
Unit not plugged in. |
|
C. |
Circuit breaker tripped. |
|
D. |
Defective refrigerator deck. |
|
E. |
Unit capacity exceeded. |
|
|
|
LIGHTS DO NOT TURN ON |
A. |
No power |
|
B. |
Switch turned off. |
|
C. |
Lights burnt out. |
|
|
|
SERVICE PARTS
To order service parts contact IMI BEVCORe at 1-866-275-6392 between the hours of 7:30 am and 5:00 pm (Central time) Monday - Friday (excluding holidays).
|
Cladding Panel RH Side |
|
|
620052965 |
|
|
|
|
|
|
|
|
Cladding Panel LH Side |
|
|
620052966 |
|
|
|
|
|
|
|
|
Drip Tray |
|
|
620046271 |
|
|
|
|
|
|
|
|
Cup Rest sheet metal |
|
|
620708546 |
|
|
|
|
|
|
|
|
Thermostat |
|
|
620314421 |
|
|
|
|
|
|
|
|
Plug Silicone Thermowell |
|
|
620519024 |
|
|
|
|
|
|
|
|
Valve Assembly (includes Lever) |
|
|
620608787 |
|
|
|
|
|
|
|
|
Lever |
|
|
620709345 |
|
|
|
|
|
|
|
|
O-Ring |
|
|
310784000 |
|
|
|
|
|
|
|
|
Window Clear Side |
|
|
620052944 |
|
|
|
|
|
|
|
|
Guard Top Light (qty.2 per unit) |
|
|
620047511 |
|
|
|
|
|
|
|
|
Screw long 10-32 x 7/8 Phillips (functional) |
|
620720802 |
|
|
|
|
|
|
|
|
|
Screw short TF 8-16 x 1/4 Phillips (decorative) |
|
620720596 |
|
|
|
|
|
|
|
|
|
Decal pack of two large side (rectangular shape) |
|
620920157 |
|
|
|
|
|
|
|
|
|
Decal pack of six small front brands (wedge shape) |
|
620920156 |
|
|
|
|
|
|
|
|
|
Label ÒCOLD SHOTÓ side (qty. 2 per unit) |
|
620921118 |
|
|
|
|
|
|
|
|
|
Label caution front (triangular shape) |
|
|
620921119 |
|
|
|
|
|
|
|
|
Label ÒDrink ResponsiblyÓ front drip tray |
|
620921120 |
|
|
|
|
|
|
|
|
|
Lens clear Top Light |
|
|
620518226 |
|
|
|
|
|
|
|
|
Lens red Top Light |
|
|
620518227 |
|
|
|
|
|
|
|
© 2006, IMI Cornelius Inc. |
- 3 - |
Publication Number: 621058201OPR |
|||
621058201OPR Number: Publication
- 4 -
.Inc Cornelius IMI 2006, ©
|
|
|
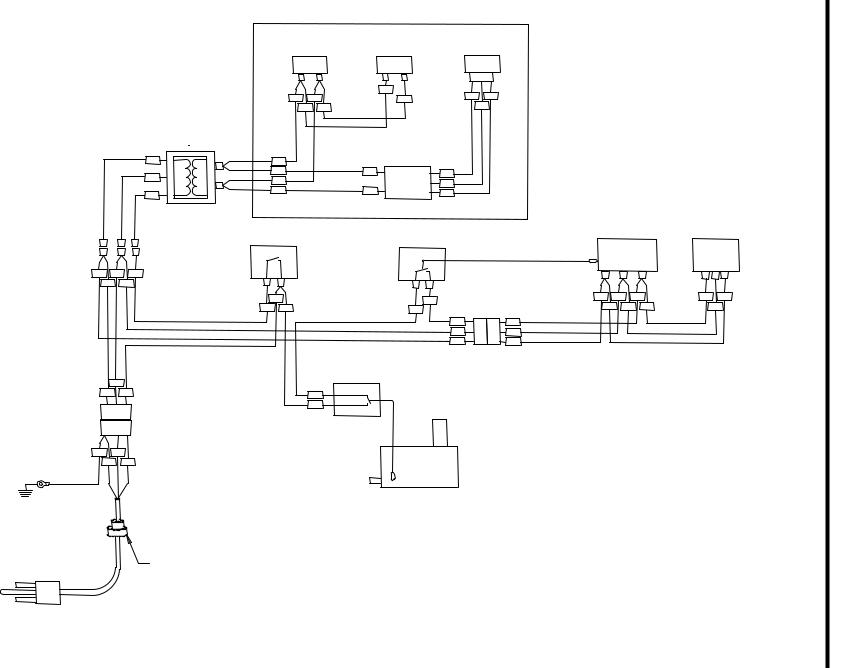
LOW VOLTAGE |
|
|
YELLOW LED |
RED LED |
TOP LIGHT |
|
|
|
|
WHT |
|
|
WHT |
BLK |
BLK |
RED BLK |
|
|
|||
|
WHT |
BLK |
|
WHT |
|
|
|
||
TRANSFORMER |
|
|
|
|
GRN |
WHT |
|
CONTROLLER |
|
|
|
|
||
BLK |
WHT |
|
WHT |
RED |
|
|
|
||
BLK |
|
|
WHT |
|
|
|
|
||
|
|
|
|
|
BLK |
BLK |
|
BLK |
BLK |
|
|
|
||
|
|
|
|
|
120 VOLTS IN |
|
|
SHRINK WRAPPED |
|
|
|
|
|
|
10 VOLTS OUT |
LIGHT SWITCH |
|
PRESSURE SWITCH |
|
|
|
|||
GRN |
WHT |
BLK/WHT |
GRN WHT
|
BLK |
YEL |
BLK/WHT |
BLK |
YEL |
YEL |
YEL |
WHT |
WHT |
GRN |
GRN |
|
|
THERMOSTAT |
|
WHT |
|
GRN |
BLK |
YEL |
|
|
|
|
|
BLK |
GRN |
WHT |
|
GRN |
BLK |
|
CHASSY |
|
PRODUCT |
|
RESERVOIR |
|
GROUND |
|
|
|
|
STRAIN
RELEIF
POWER IN
STANDARD GROUNDED
PLUG
120 VOLT 60 HZ
COMPRESSOR |
CONDENSER |
FAN |
GRN |
WHT |
|
YEL |
BLK |
GRN |
|
GRN |
WHT |
BLK |
|
WHT |
Manual OwnerÕs Shot Cold
DIAGRAM WIRING

Cold Shot OwnerÕs Manual
PARTS CHANGEOUT
SIDE PANEL REMOVAL
1.Remove the screws on the side panel.
2.Slide the panel back and then pull it out to remove.
Remove Screws
© 2006, IMI Cornelius Inc. |
- 5 - |
Publication Number: 621058201OPR |
Cold Shot OwnerÕs Manual
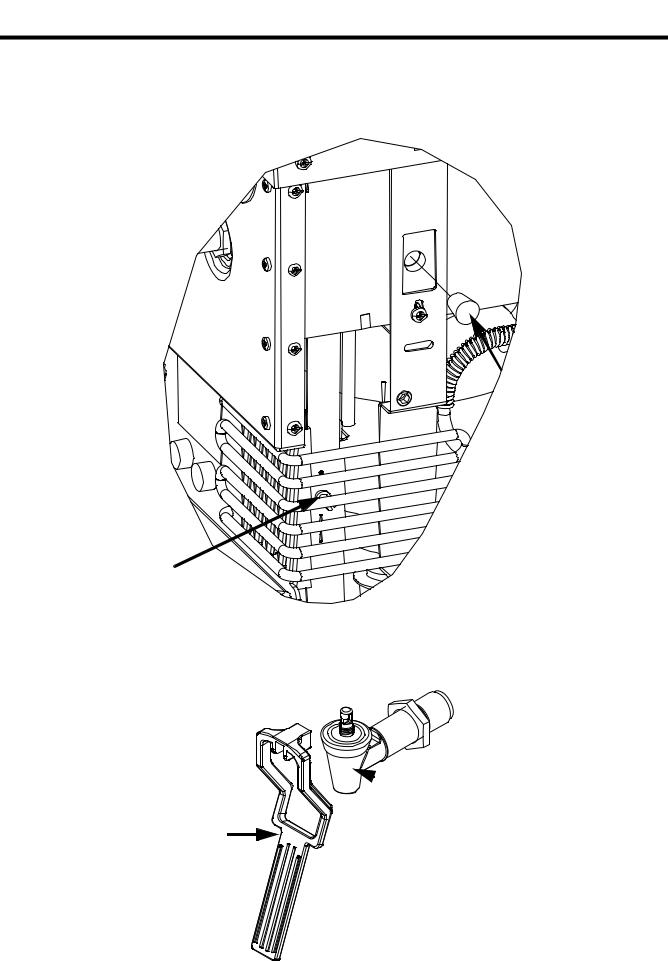
THERMOSTAT REPLACEMENT
1.Remove silicone plug.
2.Remove nut and then remove the thermostat.
Silicone Plug
Nut and Thermostat
LEVER REPLACEMENT
1.Push a blunt object up into the faucet opening.
2.Pull the lever forward to remove.
 Faucet
Lever
Publication Number: 621058201OPR |
- 6 - |
© 2006, IMI Cornelius Inc. |
Cold Shot OwnerÕs Manual
VALVE CHANGE OVER
1.Unscrew the entire valve body.
2.Replace the o-ring and screw the valve back in place.
3.Tighten the nut onto the o-ring.
O-Ring
Nut
Valve Body
© 2006, IMI Cornelius Inc. |
- 7 - |
Publication Number: 621058201OPR |
Cold Shot OwnerÕs Manual
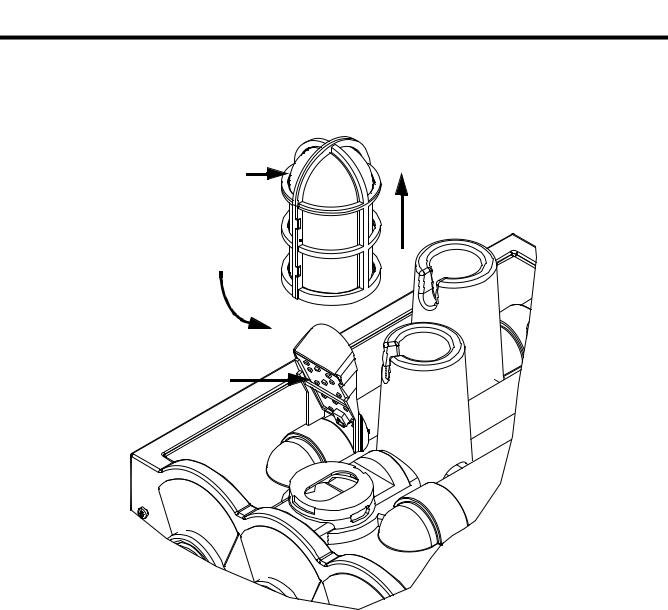
SERVICING TOP LIGHT
1.Slightly twist and pull up on the top light.
2.Unplug the harness and replace the LED board.
Top Light
LED Board
Publication Number: 621058201OPR |
- 8 - |
© 2006, IMI Cornelius Inc. |
 Loading...