


Owner’s manual & Installation manual
Mode d’emploi et manuel d’installation
Bedienungs- & Installationsanleitung
Manuale d’Istruzioni e d’Installazione
Gebruiksaanwijzing en installatie-aanwijzingen
Manual de instrucciones y de instalación
Bruksanvisning- och installations
Manual do proprietário e manual de instalação
VRX9 38 R
7.0" MONITOR, CD & RDS-EON FM/MW/LW RADIO WITH
NAVIGATION / CeNET CONTROL
•
MONITEUR 7,0", LECTEUR CD ET RADIO FM/PO/GO RDSEON AVEC NAVIGATION/COMMANDE CeNET
•
7-ZOLL-MONITOR, CD & RDS-EON UKW/MW/LW RADIO MIT
NAVIGATION/ CeNET-STEUERUNG
•
RADIO RDS-EON FM/MW/LW CON MONITOR DA 7 POLLICI
E LETTORE CD CON CONTROLLO NAVIGAZIONE/CeNET
•
7.0" MONITOR, CD & RDS-EON FM/MW/LW RADIO MET
NAVIGATIE / CeNET BEDIENING
•
MONITOR DE 7,0", REPRODUCTOR DE DISCOS
COMPACTOS Y RADIO DE RDS–EON FM/MW/LW CON
CONTROL DE NAVEGACIÓN/CeNET
•
7,0-TUMS BILDSKÄRM, CD-SPELARE OCH RDS-EON FM/
MV/LV-RADIO MED NAVIGATIONS/CeNET-KONTROLLER
•
COMBINAÇÃO DE LEITOR DE CDs E RÁDIO RDS-EON FM/MW/
LW COM MONITOR DE 7,0" E NAVEGAÇÃO/CONTROLO CeNET
VRX938R

CAUTIONS:
This appliance contains a laser system and is
classified as a “CLASS 1 LASER PRODUCT”.
T o use this model pr operly, read this Owner’s
Manual carefully and keep this manual for y our
future reference. In case of any trouble with
this player, please contact your nearest “AUTHORIZED service station”. To prevent direct
exposure to the laser beam, do not try to open
the enclosure.
!CAUTION
USE OF CONTROLS OR ADJUSTMENTS OR
PERFORMANCE OF PROCEDURES OTHER
THAN THOSE SPECIFIED IN THE OWNER’S
MANUAL MAY RESULT IN HAZARDOUS
RADIATION EXPOSURE.
ADVARSEL.
Denne mærking er anbragt udvendigt på
apparatet og indikerer, at apparatet arbejder
med laserstråler af klasse 1, hvilket betyder,
at der anvendes laserstråler af svageste
klasse, og at man ikke på apparatets
yderside kan blive udsat for utilladelig
kraftig stråling.
APPARATET BØR KUN ÅBNES AF FAGFOLK
MED SÆRLIGT KENDSKAB TIL APPARATER
MED LASERSTRÅLER!
Indvendigt i apparatet er anbragt den her
gengivne advarselsmækning, som advarer
imod at foretage sådanne indgreb i
apparatet, at man kan komme til at udsaætte
sig for laserstråling.
OBS!
Apparaten innehåller laserkomponenten
som avger laserstrålning överstigande
gränsen för laserklass 1.
VAROITUS
Suojakoteloa si saa avata. Laite sisältää
laserdiodin, joka lähettää näkymätöntä
silmille vaarallista lasersäteilyä.
2 VRX938R

English
4.DISPLAY
The Color LCD Display and the Information Panel on the main unit sho w the following displa ys, pro viding
information about the mode and functions operated.
Owner’s manual
Information Panel
Thank you for purchasing the Clarion VRX938R.
∗ This owner’s manual is for the VRX938R.
∗ Please read this owner’s manual in its entirety before operating this equipment.
∗ After reading this manual, be sure to keep it in a handy place (e.g., glove compartment).
∗ Check the contents of the enclosed warranty card and keep it carefully with this manual.
∗ This manual includes the operating procedures of the CD changer, MD changer, DVD changer, TV
tuner, digital sound processor (DSP) and DVD video deck connected via the CeNET cable. The CD
changer, MD changer , DVD changer, TV tuner, DSP and DVD video deck have their o wn manuals , but
no explanations for operating them are described.
English
1.PRECAUTIONS
Owner’s manual
For your safety, the driver should not watch the TV or operate the controls while driving.
Please note that watching and operating the TV while driving are prohibited by law in some
countries. Also, while driving, keep the volume to a level at which external sounds can be
heard.
WARNING
English
Owner’s manual
: AF (Alternative frequency) indication
: TP (Traffic programme) indication
: INFO (Information) indication
: DAB indication
: REG (Regional programme) indication
: PTY (Programme type) indication
: TA (Traffic announcement) indication
Preset channel indication
Disc number indication
∗The disc numbers corresponding to the
discs in the CD or MD or DVD changer light.
: Volume indication
Operation status indication
∗The frequency, PTY, play time, CT (clock),
etc. are displayed.
: Search indication
: Mute indication
: Z-enhancer indication
: Stereo indication
: Loudness indication
: Disc indication
: Repeat indication
: Random indication
Contents
1. PRECAUTIONS ........................................................................................................... 4
2. CONTROLS .................................................................................................................. 5
3. NOMENCLATURE ........................................................................................................ 6
4. DISPLAY .......................................................................................................................8
5. OUTLINE OF BUTTON AND TOUCHKEY OPERATION
WHEN THE DISPLAY IS OPEN.................................................................................. 10
6. REMOTE CONTROL .................................................................................................. 12
7. DCP............................................................................................................................. 14
8. CAUTIONS ON HANDLING ....................................................................................... 15
9. OPERATIONS ............................................................................................................. 17
Basic Operations ......................................................................................................... 17
Radio Operations ........................................................................................................ 21
RDS Operations .......................................................................................................... 23
CD Operations............................................................................................................. 26
CD/MD Changer Operations ....................................................................................... 28
DVD Changer Operations............................................................................................ 31
TV Operations ............................................................................................................. 34
Digital Radio/DAB Operations ..................................................................................... 37
NAVI Operations.......................................................................................................... 41
Connecting other company’s image equipment .......................................................... 42
Other Functions........................................................................................................... 42
DSP Operations .......................................................................................................... 45
DVD Video Operations ................................................................................................ 50
Visual Operations ........................................................................................................ 51
10. IN CASE OF DIFFICULTY .......................................................................................... 52
11. ERROR DISPLAYS..................................................................................................... 54
12. SPECIFICATIONS ...................................................................................................... 55
Installation and Wire connection manual................................................................ 57
1. This unit is applicable for on-road 4 wheel vehicle purpose only. Use for tractor, fork truck,
bulldozer, off road vehicle, 2 or 3 wheel motor
bicycle, marine boat or other special purpose
vehicle is not appropriate.
2. When the inside of the car is very cold and the
player is used soon after switching on the
heater, moisture may f orm on the disc (CD/MD)
or the optical parts of the player and proper
playback ma y not be possible. If moisture forms
on the disc (CD/MD), wipe it off with a soft cloth.
If moisture forms on the optical parts of the
player , do not use the player f or about one hour.
The condensation will disappear naturally allowing normal operation.
3. Driving on extremely bumpy roads which cause
severe vibration may cause the sound to skip.
4. This unit uses a precision mechanism. Even in
the event that trouble arises, never open the
case, disassemble the unit, or lubricate the rotating parts.
Caution on Handling
On CDs
• Exercise a good precaution when loading a CD
disc with the panel open.
• Never turn off the power and remo ve the unit from
the car with a CD loaded.
5. TV broadcast reception
When receiving the TV broadcasts, the strength
of the signals changes since the car is moving,
so in some cases it may not be possible to receive clear pictures.
• TV signals are strongly linear, so reception is
affected by buildings, mountains and other obstacles.
• Such external factors such as electric train
lines, a high voltage lines, and signal devices
may disturb the picture or cause noise.
∗If the reception is poor, switch to a station with
good reception.
INFORMATION FOR USERS:.
CHANGES OR MODIFICATIONS TO THIS
PRODUCT NOT APPROVED BY THE MANUFA CTURER WILL V OID THE W ARRANTY .
On navigation
• If the NAVI mode is turned to NVG, the FUNC
button becomes invalid and the audio modes
cannot be switched.
Be sure to unfold and read the next page. / Veuillez déplier et vous référer à la page suivante.
Bitte ausbreiten und die nächste Seite lesen. / Assicurarsi di aprire e leggere la pagina successiva.
Volgende pagina uitvouwen en doorlezen a.u.b. / Cerciórese de desplegar y de leer la página siguiente.
VRX938R 38 VRX938R
Glöm inte att vika ut och läsa nästa sida. / Não deixe de aprir e ler a próxima página.
VRX938R 4

English
CONTROLS / COMMANDES / REGLER / CONTROLLI
2.
REGELAARS / CONTROLES / KONTROLLER / CONTROLOS
Main unit / Unité principale / Hauptgerät / Unità principale
Français
Hoofdtoestel / Unidad principal / Huvudenhet / Unidade principale
With the Display closed / Avec l`afficheur fermé / Mit geschlossenem Display / Con display chiuso /
Met het display gesloten / Con el visualisador cerrado / Med bildskärmen stängd / Com o écran fechado
[
]
Deutsch
Italiano
[
RELEASE
[s]
VOL
]
[
SEARCH
[Q]
VRX 938R
[
]
]
DIRECT
[
BAND
]
[
TILT
] [
FUNC
[
OPEN
[
DISP
[
TA
[
SENSOR
]
]
]
]
With the Display open / Avec l`afficheur ouvert / Mit geöffnetem Display / Con display aperto
Met het display geopend / Con el visualisador abierto / Med bildskärmen öppen / Com o écran aberto
Nederlands
Español
Svenska
[
]
NVG/AV
VRX938R
[
A-M
[
ADJ
] ([
OUT
] ([IN])
Português
[
]
MENU
Note: Be sure to unfold this page and refer to the front diagrams as you read each chapter.
Remarque: Veuillez déplier cette page et vous référer aux schémas quand vous lisez chaque chapitre.
Hinweis: Bitte diese Seite ausfalten und beim Lesen der einzelnen Kapitel die Frontdiagramme beachten.
Nota: Assicurarsi di aprire questa pagina e fare riferimento a questi diagrammi quando si legge ciascun capitolo.
Opmerking:
Nota: Cuando lea los capítulos, despliegue esta página y consulte los diagramas.
Observera: Vik ut denna sida för att kunna se figurerna över bilstereons framsida medan du läser de olika kapitlen.
Nota: Lembre-se de abrir esta página e consultar os diagramas frontais durante a leiture de cada capítulo.
Vouw deze pagina uit en zie tevens de afbeeldingen van het voorpaneel tijdens het doorlezen van de volgende hoofdstukken.
[
VIEW
]
[
SHORT
[
]
RPT+
]
[
ROUTE
]
[
ICON
]
English
3.NOMENCLATURE
Names of Buttons
Owner’s manual
Note:
• Be sure to read this chapter referring to the front diagrams of chapter “2. CONTROLS” on page 5 (unfold).
When the display open
[A•M] button
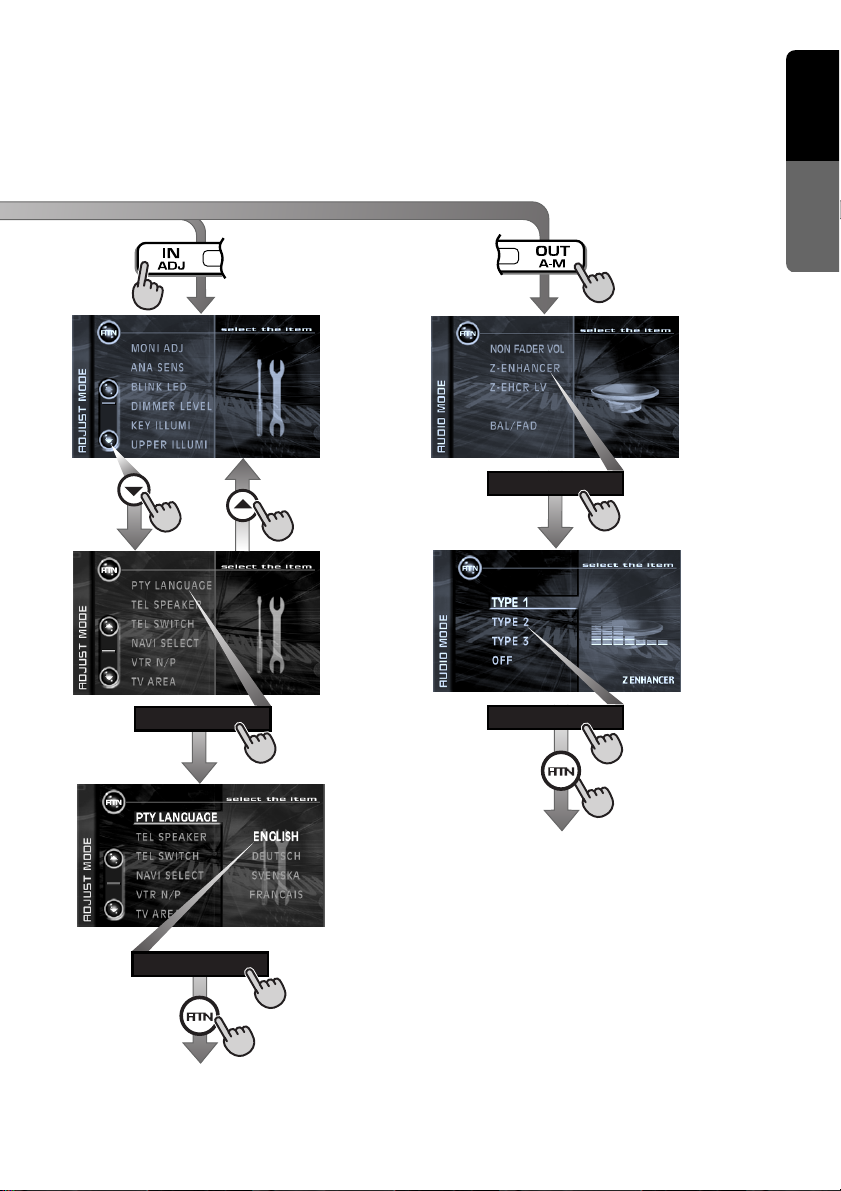
• Shows the A UDIO MODE menu for tone adjustment, etc. Press and hold this button for 1 second or longer to switch the loudness on or off
(LOUD ON/OFF).
[ADJ] button
• Shows the ADJUST MODE menu to change the
settings.
English
Owner’s manual
● The following buttons are used with the navigation system connected.
When the display closed
]
[VOL] button
• Use this button to increase/decrease the volume.
[TILT] button
• Use this button to adjust the angle of the liquid
crystal panel in 5 steps.
• Every time this button is pressed and held for
about 2 seconds or longer, the liquid crystal
panel moves forward/backward in 3 steps.
[OPEN] button
• Use this button to open/close the liquid crystal
panel.
• Press and hold this button for about 2 seconds
or longer so that the liquid crystal panel is positioned horizontally when the liquid crystal panel
is open. Press the button again to return the
panel to the original position. Even if the b utton
is not pressed, the panel returns to the original
position after about 10 seconds.
[DISP] button
• Use this button to switch the indications such
as play status on the information panel when
the liquid crystal panel is closed.
• Use this button to call the LCD background
screen setup menu when the liquid crystal panel
])
is open.
• Press and hold this button f or 1 second or longer
to turn off the monitor when the liquid crystal
panel is open.
• Use this button to switch the displa y sizes while
in the screen where the TV, VISUAL, or DVD
video/DVD changer mode is suspended.
[TA] button
• Use this button to enter the T A (Traffic Announcement) standby mode.
[SENSOR]
• Remote control infrared sensor
[FUNC] button
• Press this button to turn on the power. Press
and hold this button for 1 second or longer to
turn off the power.
• Press this button to switch the modes such as
radio.
[BAND] button
• Press this button to switch the receiving bands
for radio/D AB/TV mode, etc. Press and hold this
button for 1 second or longer to switch the SEEK/
MANUAL tuning modes.
• Use this button to move to the first track on a
disc in the CD mode.
• Use this button to switch to the next disc in the
CD/MD/DVD changer mode.
[DIRECT] button
• Use this button to select a preset channel in the
radio/DAB/TV mode.
• Use this button to select a disc in the CD/MD/
DVD changer mode.
[SEARCH] button
• Use this button to tune to a station in the radio/
DAB/TV mode.
• Use this button to select a track in the CD/DVD
video mode and CD/MD/DVD changer mode.
[Q] button
• Use this button to eject a CD.
[s] button
• Use this button to mute the sound.
• Press and hold this button for 1 second or longer
to enter the play pause mode in the CD/DVD
video mode and CD/MD changer mode. Press
and hold the button for 1 second or longer again
to resume playback.
[RELEASE] button
• Use this button to remove the DCP from the main
unit.
[IN] button
• Enlarges the map screen.
[OUT] button.
• Reduces the map screen.
[ICON] button
• Used to find place names or facility names hidden in the same map.
[ROUTE] button
• Use this button while in the route guidance mode
to recalculate the route when a detour is made
due to traffic jam.
[RPT+] button
• Use this button to call one of the frequently-used
functions.
6 VRX938R
[SHORT] button
• Use this button to call a menu for resetting or
canceling of the destination, etc. depending on
the situation.
[VIEW] button
• Use this button on the menu screen or map
screen being scrolled to show the present position on the map.
[MENU] button
• Use this button to show the main menu.
[NVG/AV] button
• Use this button to switch between the navigation screen and audio/visual screen.
VRX938R 75 VRX938R

Color LCD Display
•Radio/RDS/DAB/TV mode
:
PROGRAM
•CD/CD changer mode
USER TITLE
:
•CD TEXT mode
DISC TITLE
:
:
TRACK TITLE
ARTIST
:
•MD changer mode
DISC TITLE
:
:
TRACK TITLE
BBC OXFD (Station name)
SHINE (User title)
SHINE (Disc title)
Time has come (Track title)
Time has come (Artist)
SHINE (Disc title)
Time has come (Track title)
•Radio mode: FM1 87.50MHz Pch 1(Band/Frequency/Preset No.)
•RDS mode : FM1 CLASSICS Pch 1(Band/PTY name being received
•DAB mode : M1 CLASSICS Pch 1(Band/PTY name being received
•CD mode : TRACK 02 04 : 07(Track No./Playback time)
•CD/MD changer mode
•TV mode : TV1 28CH Pch 1(Band/Channel/Preset No.)
•VISUAL mode
•DVD mode : CHAPTER 01
•DVD changer mode
/Preset No.)
/Preset No.)
: DISC 02 TRACK 02 00 : 45(
: VISUAL 1 (Band)
: DVD video (Disc No./Title No./Chapter No./Playback time)
: MP3 (Disc No./Folder No./Track No./Playback time)
: CD/Video CD (Disc No./Track No./Playback time)
Disc No./Track No./Playback time
English
Owner’s manual
)
CT (Clock time)
MANU : Seek/Manual indication
ST : Stereo indication
LD : Loudness indication
ZEHCR : Z-enhancer indication
Mode name
MOTION/SPRITE pattern display
PTY interrupt setting
genre name
DAB : DAB indication
INFO : INFO (Information) indication
AF : AF (Alternative frequency) indication
REG : REG (Regional programme) indication
TA : TA (Traffic announcement) indication
TP : TP (Traffic programme) indication
PTY : PTY (Programme type) indication
VRX938R 9

English
DISPLAY
∗1
∗2
∗3
∗5
∗4
∗5
FUNCTION
CD PLAYER
Owner’s manual
OUTLINE OF BUTTON AND TOUCHKEY
5.
OPERATION WHEN THE DISPLAY IS OPEN
∗1: An example screen indication in the radio
mode
∗2: Press an operation button to switch the screen.
The operation button is [FUNC] button in the
description of operation per mode.
∗3: Touch the screen and the menu correspond-
ing to the play mode is displayed.
∗4: Touch an operation key to switch the screen.
The operation key is [FUNCTION] key in the
description of operation per mode.
∗5: Touch the [RTN] key to return to the previous
screen.
∗6: Touch the [w] key to return to the previous
menu.
∗7: Touch the [z] key to go to the next menu.
10 VRX938R
English
Owner’s manual
∗6 ∗7
PTY LANGUAGE
ENGLISH
Z-ENHANCER
TYPE 2
VRX938R 11
English
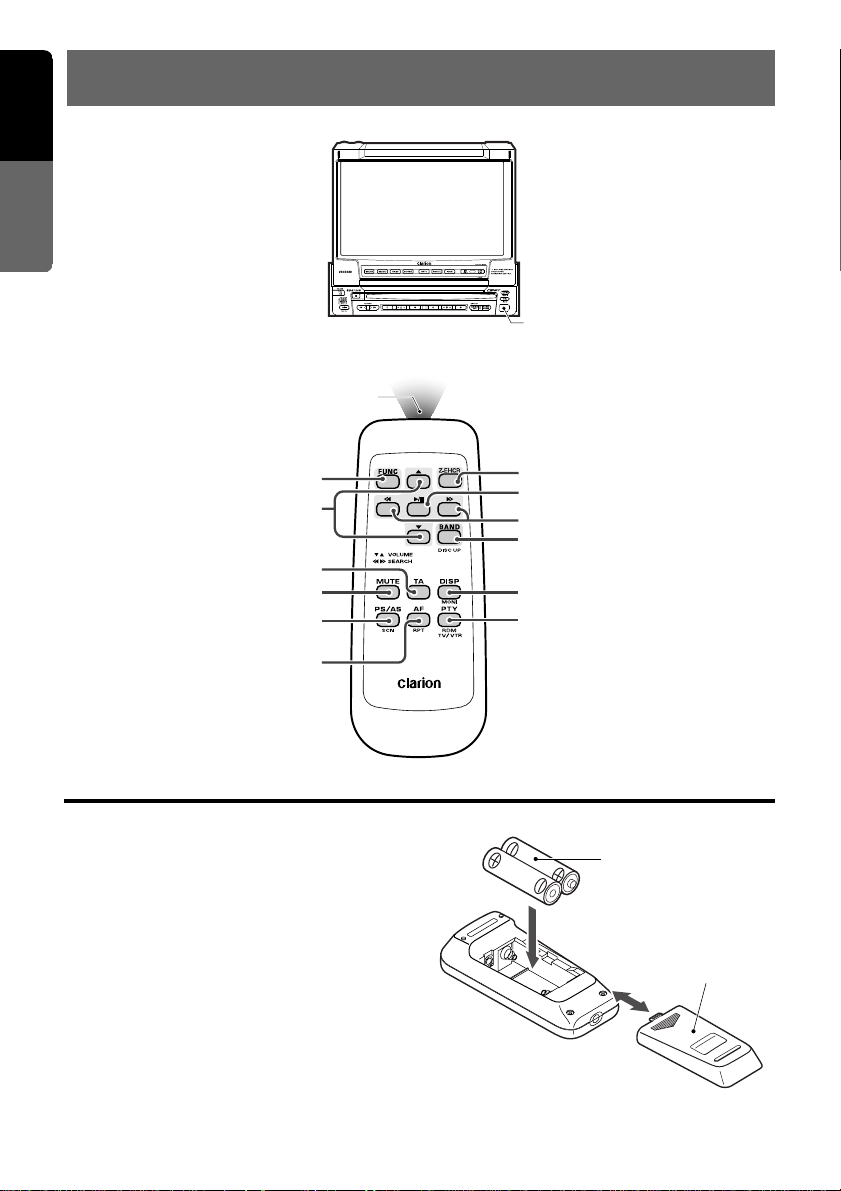
6.REMOTE CONTROL
When the panel is open
Owner’s manual
Remote control unit
Operating range: 30˚ in all directions
Signal transmitter
1
3
7
6
9
0
Inserting the Batteries
1. Turn the remote control unit over, then slide
the rear cover in the direction of the arrow.
2. Insert the AA (SUM-3, IECR-6/1.5V) batteries
that came with the remote control unit facing
in the directions shown in the figure, then close
the rear cover.
Notes:
Using batteries improperly can cause them to explode.
Take note of the following points:
• When replacing batteries, replace both batteries
with new ones.
• Do not short-circuit, disassemble or heat batteries.
• Do not dispose of batteries into fire or flames.
• Dispose of spent batteries properly.
Receiver for remote control unit
@
5
4
2
8
!
AA (SUM-3, IECR-6/1.5V)
Batteries
Rear cover
Rear side
12 VRX938R

Functions of Remote Control Unit Buttons
English
Mode
Button
1 FUNC
2 BAND
DISC UP
TOP
3 VOLUME
4 SEARCH
5 PLAY/PAUSE
6 MUTE
7 TA
8 DISP
WIDE
9 PS/AS
SCN
0 AF
RPT
! PTY
RDM
TV/VTR
@ Z-EHCR
CD changer
Radio (RDS) CD
Switches among radio, DAB, CD, DVD, CD changer, MD changer, DVD changer, TV
and VISUAL.
Switches reception
band.
Increases and decreases volume (in all modes).
Moves preset
channels up and
down.
No function.
Turns mute on and off.
Plays the first track.
Top play.
Moves tracks up
and down.
When pressed and
held for 1 second:
Fast-forward/
fast-backward.
Switches between
playback and
pause.
MD changer
DVD changer
Moves the next disc
in increasing order.
Moves tracks up
and down.
When pressed and
held for 1 second:
Fast-forward/
fast-backward.
Switches between
playback and
pause.
TA on and off.
When the display open, Display mode select. When the display
open and when pressed and held for 1 second: Turns on and off
the monitor. (When the unit is in the DVD changer mode and the
vehicle is moving, operates in the same way on the CD/MD
changer. When the vehicle is stopped, changes the screen size.
When pressed and held: Turns on and off the monitor.)
When the display close, Switches among main-display, sub-display, clock-display.
Preset scan.
When pressed and
held for 2 seconds:
Auto store.
AF function on and
off.
When pressed and
held for 1 second:
REG function on
and off
PTY standby mode
on and off.
Switches Z-ENHANCER 1, 2, 3, OFF
Scan play.
Repeat play.
Random play.
Scan play.
When pressed and
held for 1 second:
Disc scan play.
Repeat play.
When pressed and
held for 1 second:
Disc repeat play.
Random play.
When pressed and
held for 1 second:
Disc random play.
TV
Switches reception
band.
Moves preset
channels up and
down.
No function.
No function.
Switches the TV
mode.
Preset scan.
When pressed and
held for 2 seconds:
Auto store.
No function.
Switches between
TV and VTR.
Owner’s manual
Notes:
• Some of the corresponding buttons on the main unit and remote control unit have different functions.
• Please use the dedicated remote control unit provided with a DVD player in the DVD or DVD changer in the
DVD changer mode.
• In DVD changer mode, the sub display function can not be used.
VRX938R 13
English
SEARCH
VOL
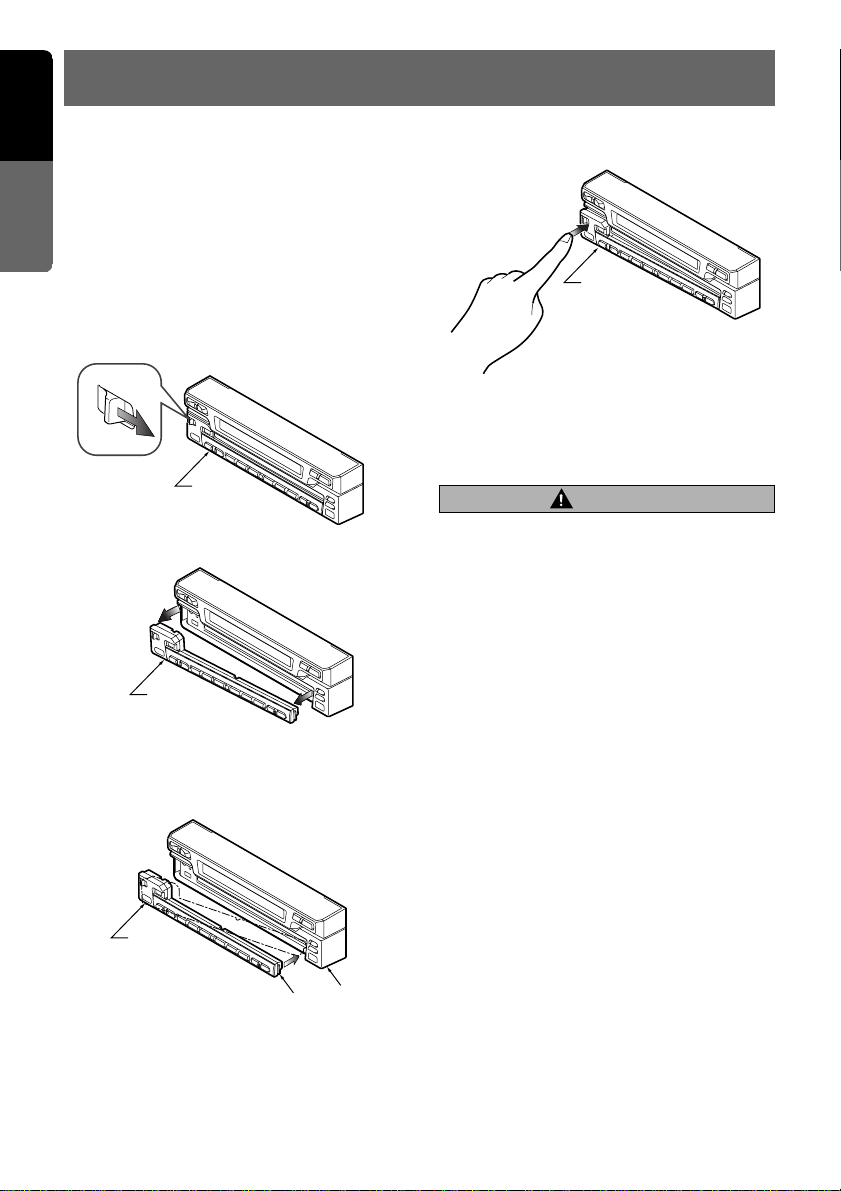
7.DCP
The control panel can be detached to prevent theft.
When detaching the control panel, store it in the
Owner’s manual
DCP (DET A CHABLE CONTROL PANEL) case to
prevent scratches.
We recommend taking the DCP with you when
leaving the car.
Removing the DCP
1. Turn the power off.
2. Slide the [RELEASE] lever rightward to release
the DCP/Operation Panel.
RELEASE
DCP
3. Pull the DCP toward you and remove it.
S
E
A
R
C
H
DCP
Attaching the DCP
1. Inser t the DCP so that the A section on the
right side of the DCP catches on the hook B
on the unit.
2. Press the left side of the DCP carefully to fit it
in place.
DCP
3. Press the [FUNC] button to turn on the power.
∗ The unit will not accept any key inputs for 1 second
after the DCP has been reattached.
CAUTION
• The DCP can easily be damaged by shocks. Af-
ter removing it, be careful not to drop it or subject it to strong shocks.
• If the Operation Panel is kept open, the DCP may
drop due to vibration of the car. This results in
damage to the DCP. So close the Operation
Panel or remove the DCP to store into the case.
• The DCP is an extremely important part. Be care-
ful not to damage it by pressing on it with fingernails, screwdrivers, etc.
Note:
• If the DCP is dirty, wipe off the dirt with a soft, dry
cloth only.
14 VRX938R
DCP
VOL
B
A

8.CAUTIONS ON HANDLING
English
LCD panel/Generalities
For a longer service life, be sure to read the following cautions.
• Be sure to store the LCD panel inside the main
unit when parking the car outdoors for long period of time. The LCD panel will operate properly in a temperature range of 0 to 60˚C.
• Don’t allow any liquids on the set from drinks,
umbrellas etc. Doing so ma y damage the internal circuitry.
• Do not disassemble or modify the set in any way.
Doing so may result in damage.
• Do not draw the LCD panel out and use it as a
tray. Also, subjecting the LCD panel to shocks
may result in breakage, deformation or other
damage.
• Do not let cigarettes burn the display. Doing so
may damage or deform the cabinet.
• If a problem should occur, hav e the set inspected
at your store of purchase.
• Do not insert objects or poke in the space between the LCD panel and the main unit when
the panel is tilted.
• Do not place anything on the display when the
panel is tilted.
• The remote controller may not work if the remote control sensor is exposed to direct sunlight.
• In extremely cold weather, the displa y movement
may slow down and the display ma y darken, but
this is not a malfunction. The display will work
normally when the temperature increases.
• Small black and shiny spots inside the LCD
panel are normal for LCD products.
• The LCD panel may stop temporarily when it
opens or closes, when the engine stops or when
it is cold.
• The touchkeys on the display operate when
slightly touched. Do not press the touchkey
screen with much force.
• Do not push the case surrounding the touchkey
panel with much force. This ma y cause malfunctioning of the touchkeys.
Cleaning
Owner’s manual
• Cleaning the cabinet
Use a soft, dry cloth and gently wipe off the dirt.
For tough dirt, apply some neutral detergent diluted in water to a soft cloth, wipe off the dirt
gently, then wipe again with a dry cloth.
Do not use benzene, thinner, car cleaner, etc.,
as these substances may damage the cabinet
or cause the paint to peel. Also, leaving rubber
or plastic products in contact with the cabinet
for long periods of time may cause stains.
• Cleaning the LCD panel
The LCD panel tends to collect dust, so wipe it
off occasionally with a soft cloth. The surf ace is
easily scratched, so do not rub it with hard objects.
VRX938R 15

English
Handling Compact Discs
Use only compact discs bearing the mark.
Do not play heart-shaped, octagonal, or other specially shaped compact discs.
Owner’s manual
Some CDs recorded in CD-R mode may not be usable.
Even when recorded in CD-RW mode, some CDs not be usable.
Handling
• New discs may have some roughness around
the edges. If such discs are used, the player
may not work or the sound may skip . Use a ballpoint pen or the like to remove any roughness
from the edge of the disc.
Ball-point pen
Storage
• Do not expose compact discs to direct sunlight
or any heat source.
• Do not expose compact discs to excess humidity or dust.
• Do not expose compact discs to direct heat from
heaters.
Roughness
• Never stick labels on the surface of the compact disc or mark the surface with a pencil or
pen.
• Never play a compact disc with an y cellophane
tape or other glue on it or with peeling off marks.
If you try to play such a compact disc, you ma y
not be able to get it back out of the CD play er or
it may damage the CD player.
• Do not use compact discs that have large
scratches, are misshapen, cracked, etc. Use of
such discs may cause misoperation or damage.
• T o remove a compact disc from its storage case ,
press down on the center of the case and lift
the disc out, holding it carefully by the edges.
• Do not use commercially available CD protection sheets or discs equipped with stabilizers,
etc. These may damage the disc or cause breakdown of the internal mechanism.
Cleaning
• T o remove fingermarks and dust, use a soft cloth
and wipe in a straight line from the center of the
compact disc to the circumference.
• Do not use any solvents, such as commercially
available cleaners, anti-static spray, or thinner
to clean compact discs.
• After using special compact disc cleaner, let the
compact disc dry off well before playing it.
16 VRX938R

9.OPERATIONS
Note: Be sure to read this chapter referring to the front diagrams of
Basic Operations
CAUTION
When the unit is turned on, starting and stopping
the engine with its volume raised to the maximum
level may harm your hearings. Be careful about
adjusting the volume.
Note:
• Use this unit after starting the engine.
ACC or engine
ON position
Turning on and off the power
Note:
• Be careful about using this unit for a long time without running the engine. If you dr ain the car’s battery
too far, y ou ma y not be able to start the engine and
this can reduce the service life of the battery.
1. Press the [FUNC] button.
2. The illumination and display on the unit light
up. The unit automatically remembers its last
operation mode and will automatically switch
to display that mode.
3. Press and hold the [FUNC] button for 1 sec-
ond or longer to turn off the power for the unit.
Note:
• About the “SYSTEM CHECK”
The confirmation of connected equipment must be
performed for this unit only when the wiring connection is complete and power is turned on to the
unit first. When the power is supplied, “SYSTEM”
and “PUSH PWR” appear alternately in the display .
Press the [FUNC] button, the system check starts
inside the unit. When “COMPLETE” appears, press
once again the [FUNC] button.
Selecting a mode
1. Press the [FUNC] button to change the mode
of operation.
2. Each time you press the [FUNC] button, the
mode of operation changes in the following
order:
Radio mode ➜ DAB mode ➜ CD mode ➜
DVD video mode ➜ CD changer mode ➜ MD
changer mode ➜ DVD changer mode ➜ TV
mode ➜ VISUAL mode ➜ Radio mode...
∗ External equipment not connected with CeNET
is not selected.
chapter “2. CONTROLS” on page 5 (unfold).
English
Owner’s manual
Adjusting the volume
Operate the [VOL] button in the direction of the +
(up) or – (down) to adjust the volume;
+ : Increases the volume.
– : Decreases the volume.
∗ The volume level indicated in the displa y is in a range
from 0 (minimum) to 33 (maximum).
CAUTION
While driving, keep the volume at a le vel at which
external sounds can be heard.
Switching the display
When the panel is closed:
Press the [DISP] button to select the desired display.
Each time you press the [DISP] button, the display switches in the following order:
MAIN Display
SUB Display
Clock Time (CT) Display
MAIN Display
Notes:
• Once selected, the preferred display becomes the
default display. When a function adjustment such
as volume is made, the display momentarily
switches to that function’s displa y , then returns back
to the preferred display several seconds after the
adjustment.
• If a title has been input, it is shown in the SUB display. If no title has been input, “---------” appears in
the display. To input a title, refer to the subsection
“Entering titles” in “Other Functions” section.
• For CD, MD and TV, some special characters of the
title, the PS name of the RDS, and the DAB service
label will not be displayed on the Information P anel
of the DCP. In this case, those characters will only
be left blank.
• When CT data is not received, “CT--:--” appears in
the display.
VRX938R 17

English
Basic Operations
Showing a mode display
When the panel is open:
T ouch the men u screen s witching touchke y when
Owner’s manual
the main screen is being displayed to show the
menu screen.
Touch the Title List Select key (--- SELECT) on
the menu screen to show the Title List display.
In the Title List display, the titles of items stored in
the [DIRECT] buttons 1 to 6 are listed.
∗ In the RDS tuner mode, a PS name is displayed.
∗ In the DAB mode, a service label is displayed.
Opening and turning the display
WARNING
• To prevent the battery from going dead,
operate this unit with the engine running,
if possible.
• When the liquid crystal panel is operating, be careful not to get your hand or finger caught between the panel and main
unit or the instrument panel of the car.
Standing up the liquid crystal panel
1. When the power is turned off, press the [FUNC]
button to turn on the power.
2. Press the [OPEN] button and the liquid crystal
panel comes out and stand up automatically.
Adjusting the angel, etc. of the
liquid crystal panel
The angle of the liquid crystal panel or protruding
amount of the panel from the mounting surface
can be adjusted depending on the mounting angle
of the unit or light coming into the car.
To adjust the angle
Every time the [TILT] button is pressed, the liquid
crystal panel tilts forward or backward at up to
about 20 degrees. The adjusted angel is stored in
memory.
20˚
20˚
Note:
• Do not move the liquid crystal panel by hand.
To adjust the slide position
Press and hold the [TILT] button and release when
a beep is heard.
The liquid crystal panel slides forward or backward. The adjusted slide position is stored in
memory.
∗ While the liquid crystal panel is opening or clos-
ing, the LED blinks.
Note:
• If the liquid crystal panel stops in the middle of its
operation, press the [OPEN] button to house the
panel and press the button again to stand it up. The
unit enters the same display mode as the display
was turned off the last time.
18 VRX938R
Housing the liquid crystal panel
Press the [OPEN] button and the liquid crystal
panel is housed automatically.
Note:
• When leaving this unit unused for a long period of
time or leaving your car , be sure to house the liquid
crystal panel into the main unit.

Basic Operations
English
Turning the liquid crystal panel
horizontal (Air conditioner
operation mode)
When the way the liquid crystal panel is mounted
hinders the operation of the air conditioner, the
position of the panel can be turned horizontal temporarily.
1. Press and hold the [OPEN] button when the
liquid crystal panel is upright, and release the
button when a beep is heard.
2. The liquid crystal panel turns horizontal.
∗ Press the [OPEN] button again when the liquid
crystal panel is in the horizontal position, and
the panel returns to the original position.
∗ Even if the button is not operated for about 10
seconds, the panel returns to the original position with a warning sound.
Turning on and off the monitor
Pressing and holding the [DISP] button for 1 second or longer turns the monitor off. To return to
the monitor on, press the [DISP] button once
again.
∗ When a button is pressed or during security moni-
toring, the monitor-off mode is canceled.
Mute
Each time you press the [s] button, mute is
turned on and off.
“MUTE” appears when mute is turned on.
When the panel is closed:
Each time you press the [Z-EHCR] button of the
remote control unit, the tone effect changes in the
following order:
“Z-EHCR 1” ➜ “Z-EHCR 2” ➜ “Z-EHCR 3” ➜
“Z-EHCR OFF” ➜ “Z-EHCR 1”...
Note:
• When the panel is closed, operations can only be
made through the remote control unit.
When the panel is open:
1. Press the [A-M] button to change into the AU-
DIO-MODE display.
2. Touch the [Z-ENHANCER] key when the AU-
DIO-MODE screen is being displayed to show
the Z-ENHANCER type selection screen.
3. When the Z-ENHANCER type selection screen
is displayed, touch the ke y for the desirable type
to select it.
•“TYPE 1” (Z-Enhancer 1)
•“TYPE 2” (Z-Enhancer 2)
•“TYPE 3” (Z-Enhancer 3)
•“OFF” (Z-Enhancer off)
4. When the setting is finished, touch the [RTN]
key to return to the AUDIO-MODE screen.
Touch the [RTN] key on the AUDIO-MODE
screen to return to the STANDARD display.
∗ To return from the Z-ENHANCER type selec-
tion display to the ST AND ARD display, press the
[A-M] button once again.
Owner’s manual
Setting the Z-enhancer
This unit comes with 3 types of sound tone effect
stored in memory . Select the one you prefer.
∗ The factory default setting is “Z-EHCR OFF”.
When a Z-enhancer comes on (1-3), “Z-EHCR”
appears in the display.
•“Z-EHCR 1” (Z-Enhancer 1):
Setting emphasizing bass.
•“Z-EHCR 2” (Z-Enhancer 2):
Setting emphasizing treble.
•“Z-EHCR 3” (Z-Enhancer 3):
Setting emphasizing bass and
treble.
•“Z-EHCR OFF” (Z-Enhancer off):
Neither bass nor treble are
emphasized by the Z-enhancer.
Note:
• Incapable of operation when connecting DSP
(DPH913) and DVD player (DVS970Z).
VRX938R 19

English
Basic Operations
Adjusting the Z-enhancer
Note:
• This function is enabled only when the panel is open.
Owner’s manual
1. Press the [A-M] button to change into the AU-
DIO-MODE display.
2. Touch the [Z-EHCR LV] key when the AUDIO-
MODE screen is being displayed to show the
Z-ENHANCER level adjustment screen.
3. Touch the [w] or [z] key to adjust to the de-
sirable level.
∗ When type 1 is selected, you can adjust the bass
in the range of ±2.
∗ When type 2 is selected, you can adjust the
treble in the range of ±2.
∗ When type 3 is selected, you can adjust the bass
and treble in the range of ±2.
4. When adjustment is finished, touch the [RTN]
key on the Z-ENHANCER level adjustment
screen to return to the AUDIO-MODE screen.
Touch the [RTN] key on the AUDIO-MODE
screen to return to the STANDARD display.
∗ To return from the Z-Enhancer level mode dis-
play to the STANDARD display , press the [A-M]
button once again.
Adjusting the bass and treble
Notes:
• This function is enabled only when the panel is open.
• This function can be adjusted only when the Z-en-
hancer is OFF.
1. Press the [A-M] button to change into the AU-
DIO-MODE display .
2. Touch the [BAS/TREB] key when the AUDIO-
MODE screen is being displayed to show the
BASS/TREBLE LEVEL adjustment screen.
3. Touch the [w] or [z] ke y to adjust to the de-
sirable BASS/TREBLE level (adjustment r ange:
from -6 to 6).
4. When adjustment is finished, touch the [RTN]
key on the BASS/TREBLE LEVEL adjustment
screen to return to the AUDIO-MODE screen.
Touch the [RTN] key on the AUDIO-MODE
screen to return to the STANDARD display.
∗ T o return from the BASS/TREBLE LEVEL mode
display to the STANDARD display , press the [A-
M] button once again.
Adjusting the balance and fader
Note:
• This function is enabled only when the panel is open.
1. Press the [A-M] button to change into the AU-
DIO-MODE display .
2. Touch the [BAL/FAD] key when the AUDIO-
MODE screen is being displayed to show the
BALANCE/FADER adjustment screen.
3. Touch the [Î] or [Å] ke y to adjust to the desir-
able balance.
Adjusting range of the balance: left 13 to right
13
4. Touch the [w] or [z] key to adjust to the de-
sirable fader.
Adjusting range of the fader: front 12 / rear 12
5. When adjustment is finished, touch the [RTN]
key on the BALANCE/FADER adjustment
screen to return to the AUDIO-MODE screen.
Touch the [RTN] key on the AUDIO-MODE
screen to return to the STANDARD display.
∗ T o return from the BALANCE/F ADER mode dis-
play to the STANDARD display , press the [A-M]
button once again.
Turning on/off the loudness
The loudness effect emphasizes the bass and
treble to create a natural sound tone. When you
are listening to music at a low volume, it is recommended to use the loudness effect.
∗ This function is enabled only when the panel is open.
1. Press the [A-M] button for 1 second or longer
to select Loudness ON. The “LD” indicator
lights in the display.
2. Press the [A-M] button for 1 second or longer
to select Loudness OFF. The “LD” indicator
goes off.
Note:
• When using a sold separately digital sound proces-
sor (DPH913) or DVD pla yer (DVS970Z), a f eature
called auto loudness is selected. This function is
different from the loudness effect. For further details on the auto loudness feature, refer to the subsection “Output adjustment of auto loudness,
subwoofer and playback band”.
CT (Clock Time) function
Note:
• This function is only available on the sub–LCD dis-
play with the panel close.
The CT function receives CT data sent from an
RDS station and displays the time. Press the
20 VRX938R
 Loading...