

Page 1
Owner's manual
Mode d'emploi
Manual de instrucciones
CD RECEIVER
•
RÉCEPTEUR CD
DB346MP
•
RECEPTOR CD
Contents
1. FEATURES............................................................................................................................ 2
2. CONTROLS ........................................................................................................................ 3
SOURCE UNIT ...................................................................................................................... 3
DISPLAY................................................................................................................................ 3
3. BUTTON TERMINOLOGY .................................................................................................... 4
Names of the Buttons and their Functions ............................................................................ 4
4. PRECAUTIONS .................................................................................................................... 5
Flip Down Panel .................................................................................................................... 6
Handling Compact Discs ....................................................................................................... 6
5. DCP (Detachable Control Panel) ........................................................................................ 7
6. REMOTE CONTROL ............................................................................................................. 8
Functions of Remote Control Unit Buttons ............................................................................ 9
7. OPERATIONS ..................................................................................................................... 10
Basic Operations ................................................................................................................. 10
Radio Mode Operations ....................................................................................................... 12
CD Mode Operations ........................................................................................................... 13
8. TROUBLESHOOTING ........................................................................................................ 14
9. ERROR DISPLAYS ............................................................................................................. 14
10. SPECIFICATIONS ............................................................................................................... 15
1. FEATURES
High Visibility & Contrast Blue Negative Display (13 x 8 Digits) with Screen Saver
CD-R/RW Playability
High Power 51W X 4 Built in Amplifier
2 ch RCA Output
Remote Control and DCP Case Included
Detachable Flip-Down Faceplate
Z-Enhancer and Magna Bass EX for Sound Adjustment
“Easy to Use” Rotary Volume Knob
2 DB255
Veuillez déployer et vous référer à la page suivante.
Be sure to unfold and read the next page.
Cerciórese de desplegar y de leer la página siguiente.
Page 2

English
2.
English
CONTROLS / COMMANDES / CONTROLES
3. BUTTON TERMINOLOGY
Note :
Be sure to unfold this page and refer to the front diagrams as you read each chapter.
Remarque:
Nota:
Veuillez déployer cette page et vous référer aux schémas quand vous lisez chaque chapitre.
Cuando lea los capÍtulos, despliegue esta página y consulte los diagramas.
Français
SOURCE UNIT / APPAREIL PILOTE / UNIDAD FUENTE
Español
With the FLIP DOWN PANEL opened / Ouvrez le PANNEAU RABATTABLE
/ Apertura del PANEL ABATIBLE
Note:
• Be sure to read this chapter referring to the front diagrams of chapter “2. CONTROLS” on page 3.
Names of the Buttons and their Functions
[
]
button
OPEN
• Deeply push in [OPEN] button to unlock the flip
down panel.
[ ]
button
• Plays or pauses a CD while in the CD mode.
• Performs preset scan while in the radio mode.
When the button is pressed and held, auto store
is performed.
[
SENSOR] button
• Receiver for remote control unit.
• Operating range: 30° in all directions.
[D] button
• Switch the display indication (Main display, clock
display).
[SCN] button
• Performs scan play for 10 seconds for each track
while in the CD mode.
[
RPT] button
• Plays repeatedly while in the CD mode.
[
RDM] button
• Performs random play while in the CD mode.
[
DIRECT] button
• Stores a station into memory or recall it directly
while in the radio mode.
[
ROTARY] knob
• Adjust the volume by turning the knob clockwise
or counterclockwise.
• Use the knob to perform various settings.
[
SRC] button
• Press the button to turn on the power.
Press and hold the button for 1 second or longer
to turn off the power.
• Switches the operation mode among radio and
CD mode.
[
A-M] button
• Press and hold the button for 1 second or longer
to switch the MAGNA BASS EX on/off.
• Use the button to switch to the audio mode (bass,
treble, balance, fader)
[Z]
button
• Use the button to select one of the three types
of sound characteristics already stored in
memory. (Z-Enhancer
[a], [d]
• Selects a station while in the radio mode or
selects a track when listening to a CD.
• Press and hold the button for 1 second or longer
to switches the fast-forward/fast-backward.
[Q]
• Ejects a CD when it is loaded into the unit.
button
button
)
DISPLAY / AFFICHEUR / VISUALIZADOR
DB255
3
[
ISR] button
• Recalls ISR radio station in memory.
• Press and hold for 2 seconds or longer: Stores
current station into ISR memory (radio mode
only).
[
BND] button
• Switches the band, or seek tuning or manual
tuning while in the radio mode.
• Plays a first track while in the CD mode.
DB255
4
[
CD SLOT
• CD insertion slot.
]
Page 3
4.PRECAUTIONS
English
1. When the inside of the car is very cold and the
player is used soon after switching on the
heater, moisture may form on the disc or the
optical parts of the player and proper playback
may not be possible. If moisture forms on the
disc, wipe it off with a soft cloth. If moisture
forms on the optical parts of the player, do not
use the player for about one hour and the condensation will disappear naturally to allow normal operation.
This equipment has been tested and found to
comply with the limits for a Class B digital device,
pursuant to Part 15 of the FCC Rules.
These limits are designed to provide reasonable
protection against harmful interference in a residential installation.
This equipment generates, uses, and can radiate
radio frequency energy and, if not installed and
used in accordance with the instructions, may
cause harmful interference to radio communications. However, there is no guarantee that interference will not occur in a particular installation.
If this equipment does cause harmful interference
to radio or television reception, which can be determined by turning the equipment off and on, the
user is encouraged to consult the dealer or an
experienced radio/TV technician for help.
2. Driving on extremely bumpy roads which cause
severe vibration may cause the sound to skip.
3. This unit uses a precision mechanism.
Even in the event that trouble arises, never
open the case, disassemble the unit, or
lubricate the rotating parts.
!
CAUTION
USE OF CONTROLS, ADJUSTMENTS, OR
PERFORMANCE OF PROCEDURES OTHER
THAN THOSE SPECIFIED HEREIN, MAY
RESULT IN HAZARDOUS RADIATION EXPOSURE.
THE COMPACT DISC PLAYER SHOULD
NOT BE ADJUSTED OR REPAIRED BY
ANYONE EXCEPT PROPERLY QUALIFIED
SERVICE PERSONNEL.
INFORMATION FOR USERS:.
CHANGES OR MODIFICATIONS TO THIS
PRODUCT NOT APPROVED BY THE MANUFACTURER WILL VOID THE WARRANTY
AND WILL VIOLATE FCC APPROVAL.
Bottom View of Source Unit
DB255
5
Page 4

Flip Down Panel
English
This unit uses a flip-down structure that makes possible large-size displays.
CAUTION
!
When opening and closing the FLIP DOWN PANEL, be careful not to catch your fingers. They
could be injured.
1. Always use this unit with the FLIP DOWN
PANEL closed.
2. Do not force operations or use this device abnormally when opening or closing the FLIP
DOWN PANEL.
3. Do not use the FLIP DOWN PANEL as a tray
to place objects on when it is open.
4. When closing the FLIP DOWN PANEL, do not
press the [OPEN] button.
5. Strong impacts to the operating or display section can cause damage or deformation.
6. If the FLIP DOWN PANEL does not open fully,
gently open it with your hand.
Handling Compact Discs
Use only compact discs bearing the mark.
Do not play heart-shaped, octagonal, or other
specially shaped compact dics.
Some CDs recorded in CD-R/CD-RW mode may
not be usable.
Handling
• Compared to ordinary music CDs, CD-R and
CD-RW discs are both easily affected by high
temperature and humidity and some of CD-R
and CD-RW discs may not be played. Therefore, do not leave them for a long time in the
car.
• New discs may have some roughness around
the edges. If such discs are used, the player
may not work or the sound may skip. Use a
ball-point pen or the like to remove any roughness from the edge of the disc.
Ball-point pen
Roughness
• Never stick labels on the surface of the compact disc or mark the surface with a pencil or
pen.
• Never play a compact disc with any cellophane tape or other glue on it or with peeling
off marks. If you try to play such a compact
disc, you may not be able to get it back out of
the CD player or it may damage the CD
player.
• Do not use compact discs that have large
scratches, are misshapen, cracked, etc. Use
of such discs may cause misoperation or damage.
• To remove a compact disc from its storage
case, press down on the center of the case
and lift the disc out, holding it carefully by the
edges.
• Do not use commercially available CD protection sheets or discs equipped with stabilizers, etc. These may damage the disc or
cause breakdown of the internal mechanism.
Storage
• Do not expose compact discs to direct sunlight or any heat source.
• Do not expose compact discs to excess humidity or dust.
• Do not expose compact discs to direct heat
from heaters.
Cleaning
• To remove fingermarks and dust, use a soft
cloth and wipe in a straight line from the center of the compact disc to the circumference.
• Do not use any solvents, such as commercially available cleaners, anti-static spray, or
thinner to clean compact discs.
• After using special compact disc cleaner, let
the compact disc dry off well before playing
it.
DB255
6
Page 5
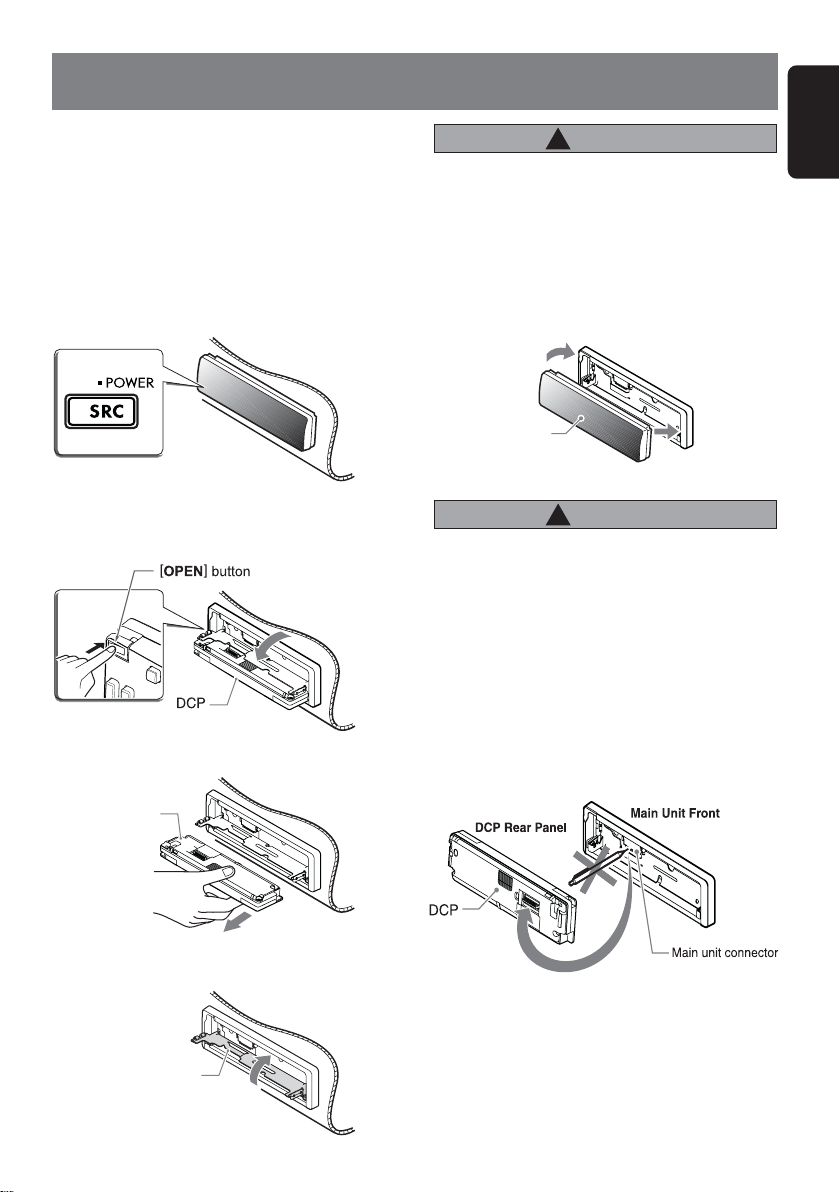
5.DCP (Detachable Control Panel
)
English
The control panel can be detached to prevent
theft. When detaching the control panel, store it
in the DCP (Detachable Control Panel) case to
prevent scratches.
We recommend taking the DCP with you when
leaving the car.
Removing the DCP
1. Press the [SRC] button for 1 second or longer
to switch off the power.
2. Press in the [OPEN] button.
∗ If the flip down panel does not open fully, gently
open it with your hand.
3. Pull the DCP toward you and remove it.
CAUTION
!
Be sure to close the HOLD FLAP for safety
when removing the DCP.
Attaching the DCP
1. Insert the right side of the DCP into the main
unit.
2. Insert the left side of the DCP into the main
unit.
2.
DCP
CAUTION
!
• The DCP can easily be damaged by shocks.
After removing it, be careful not to drop it or
subject it to strong shocks.
• If the FLIP DOWN PANEL is kept open, the
DCP may drop due to vibration of the car.
This results in damage to the DCP. So close
the FLIP DOWN PANEL or remove the DCP
to store into the case.
• The connector connecting the main unit and
the DCP is an extremely important part. Be
careful not to damage it by pressing on it
with fingernails, pens, screwdrivers, etc.
1.
DCP
4. Close the HOLD FLAP.
HOLD FLAP
Note:
• If the DCP is dirty, wipe off the dirt with a soft, dry
cloth only.
DB255
7
Page 6

English
6.REMOTE CONTROL
Inserting the Battery
1. Turn over the remote control unit and slide the
cover in the direction indicated by the arrow in
the illustration.
2. Insert the battery (CR2025) into the insertion
guides, with the printed side (+) facing upwards.
3. Press the battery in the direction indicated by
the arrow so that it slides into the compartment.
4. Replace the cover and slide in until it clicks into
place.
DB255
8
Notes:
Misuse may result in rupture of the battery, producing
leakage of fluid and resulting in personal injury or
damage to surrounding materials. Always follow these
safety precautions:
• Use only the designated battery .
• When replacing the battery, insert properly, with +/
- polarities oriented correctly.
• Do not subject battery to heat, or dispose of in fire
or water. Do not attempt to disassemble the battery.
• Dispose of used batteries properly.
Page 7

Functions of Remote Control Unit Buttons
English
Button
[
SRC
[
BND
[ ]
[ ]
[ ]
[
MUTE
[
ISR
[
DISP
[
SCN
[
RPT
[
RDM
Mode
[ ]
,
[ ]
,
Radio
]
Turns power on and off. When press and held for 1 second: Turns power off.
Switches between radio and CD.
]
Switches reception band.
Increases and decreases volume (in all modes).
Moves preset channels up
and down.
Turns mute on and off
]
Turns mute on and off.
]
Recalls ISR radio station in memory.
Press and hold for 2 seconds or longer: Stores current station into ISR (radio mode only).
]
Switches among main display, clock display.
]
Preset scan.
When pressed and held for
1 second: Auto store.
]
No function
]
No function
Plays the first track.
Top play.
Moves tracks up and down.
When pressed and held for 1 second:
Fast-forward/fast-backward.
Switches between playback and pause.
Switches between playback and pause.
Scan play.
Repeat play.
Random play.
CD
∗ Some of the corresponding buttons on the main unit and remote control unit have different functions.
DB255
9
Page 8

English
7.OPERATIONS
Basic Operations
Note:Be sure to read this chapter referring to the front diagrams of
chapter “2. CONTROLS” on page 3.
CAUTION
!
Be sure to lower the volume before switching
off the unit power or the ignition key. The unit
remembers its last volume setting. If you
switch the power off with the volume up, when
you switch the power back on, the sudden loud
volume may hurt your hearing and damage the
unit.
Turning on/off the power
Note:
• Be careful about using this unit for a long time without running the engine. If you drain the car’s battery too far, you may not be able to start the engine
and this can reduce the service life of the battery.
1. Press the [SRC] button.
2. The illumination and display on the unit light
up. The unit automatically remembers its last
operation mode and will automatically switch
to display that mode.
3. Press and hold the [SRC] button for 1 second
or longer to turn off the power for the unit.
Selecting a mode
1. Press the [SRC] button to change the opera-
tion mode.
2. Each time you press the [SRC] button, the op-
eration mode changes in the following order:
Radio mode
Note:
• If the CD mode is selected when no disc is inserted,
the display shows “NO DISC”.
ÆÆ
Æ CD mode
ÆÆ
ÆÆ
Æ Radio mode...
ÆÆ
Adjusting the volume
Turning the [ROTARY] knob clockwise increases
the volume; turning it counterclockwise decreases
the volume.
∗ The volume level is from 0 (minimum) to 33 (maxi-
mum).
Setting the Z-Enhancer
This unit are provided with 3 types of sound tone effects stored in memory. Select the one you prefer.
∗ The factory default setting is Z-EHCR OFF.
Each time you press the [Z] button, the tone effect changes in the following order:
Z-ENHANCER 1
HANCER 3
1...
• Z-ENHANCER 1 : bass emphasized
• Z-ENHANCER 2 : treble emphasized
• Z-ENHANCER 3 : bass and treble emphasized
• Z-EHCR OFF : no sound effect
ÆÆ
Æ Z-ENHANCER 2
ÆÆ
ÆÆ
Æ Z-EHCR OFF
ÆÆ
ÆÆ
Æ Z-ENHANCER
ÆÆ
ÆÆ
Æ Z-EN-
ÆÆ
Audio mode adjustments
Press the [A-M] button to select the adjustment
mode. The mode switches as follows each time
the [A-M] button is pressed:
ÆÆ
BASS
Æ TREB
ÆÆ
∗ The display returns to the previous mode 7 sec-
onds after the adjustment.
ÆÆ
Æ BAL
ÆÆ
ÆÆ
Æ FAD
ÆÆ
ÆÆ
Æ Previous mode
ÆÆ
Adjusting the bass
1. Press the [A-M] button and select “BASS”.
2. Turning the [ROTARY] knob clockwise emphasizes the bass; turning it counterclockwise attenuates the bass.
∗ The factory default setting is “0”. (Adjustment
range: –7 to +7
)
Adjusting the treble
1. Press the [A-M] button and select “TREB”.
2. Turning the [ROTARY] knob clockwise emphasizes the treble; turning it counterclockwise
attenuates the treble.
∗ The factory default setting is “0”. (Adjustment
range: -7 to +7)
10
DB255
Page 9

Basic Operations
English
Adjusting the balance
1. Press the [A-M] button and select “BAL”.
2. Turning the [ROTARY] knob clockwise emphasizes the sound from the right speaker; turning it counterclockwise emphasizes the sound
from the left speaker.
∗ The factory default setting is “0”. (Adjustment
range: L13 to R13)
Adjusting the fader
1. Press the [A-M] button and select “FAD”.
2. Turning the [ROTARY] knob clockwise emphasizes the sound from the front speakers; turning it counterclockwise emphasizes the sound
from the rear speakers.
∗ The factory default setting is “0”. (Adjustment
range: F12 to R12)
Note:
• Bass and Treble can only be adjusted when the “Z-
enhancer” is off.
Turning on/off MAGNA BASS EX
The MAGNA BASS EX does not adjust the low
sound area like the normal sound adjustment function, but emphasizes the deep bass sound area
to provide you with a dynamic sound.
∗ The factory default setting is off.
Press and hold the [A-M] button for 1 second or
longer to turn the MAGNA BASS EX and “M-B EX”
in the display lights on or off.
Switching display
Press and hold the [BND] button, and then press
the [DISP] button to select the desired display.
The display switches in the following order:
Main Display
∗ If the display is changed by other button operation
when the clock is displayed, the clock display returns automatically after the operation.
ÆÆ
Æ Clock Display
ÆÆ
ÆÆ
Æ Main Display …
ÆÆ
Illumination dimmer function
When the illumination line of this unit is connected
with the car-side illumination signal line, the display illumination of this unit dims in connection
with turning on the car-side illumination.
ADJ mode adjustment
1. Press [D] button more than 1 second at POWER
ON mode to enter ADJ mode, the previous selected ADJ items will be called out.
2. Press [D] button again at ADJ mode will cancel
ADJ mode and return to previous display.
3. Press [SRC] button will also release ADJ mode.
4. ADJ mode will also be released when current
source mode is changed. (Mode changes of
LOADING, EJECT, interruption and interruption release)
5. Press
6. The ADJ Mode Title will be display for 2 sec-
[ ]/[ ]
items,
CLOCK(E) SCRN SVR
onds before showing the ADJ Mode setting.
button to switch the ADJ mode
Adjusting clock setting
1. Press the [D] button and press
to select "CLOCK (E)".
2. Press [ ] button to start clock adjustment,
the HOUR is selected and blinking by default.
3.Press
4. Turn the [ROTARY] knob clockwise to in-
5. Press
Note:
• If you remove the vehicle's battery for a check or
[ ]/[ ]
MINUTE selection.
creases hour/minute or counterclockwise to
decrease hour/minute.
[ ]
the clock will blink for 2 seconds and return to
"CLOCK(E)".
repair, the clock will be reset, so you must set it
again.
button to toggle HOUR and
button to confirm the clock setting,
[ ]/[ ]
button
Adjusting screensaver setting
1. Press the [D] button and press
button to select "SCRN SVR".
2. "SS ON" or "SS OFF" will be display after 2
seconds.
3. Turn the [ROTARY] knob clockwise to turn on
the screensaver or counterclockwise to turn off
the screensaver.
4. If Screensaver setting is set to on, Screensaver
will be activated after 30 seconds of no key operation.
[ ]/[ ]
DB255
11
Page 10

Radio Mode Operations
English
FM reception
For enhanced FM performance the
tuner includes signal actuated stereo control and
multipath noise reduction circuits.
Listening to the radio
1. Press the [SRC] button and select the radio
mode. then the radio will be on.
2. To select a preset band, press the [BND] button, then select one of the preset bands such
as
FM1, FM2, FM3 or AM. Every time the [BND
button is pressed, the display will change as:
ÆÆ
ÆÆ
ÆÆ
F1
ÆF2
ÆF3
ÆÆ
ÆÆ
3. Press the
desired station.
[ ]
ÆAM
ÆÆ
or
ÆÆ
ÆF1...
ÆÆ
[ ]
button to tune in the
Manual tuning
1. Press
2. Press and hold the [BND]
3. Press the
the [BND]
band FM1, FM2, FM3 or AM.
or longer, then the "
which means that a manual selection function
is on.
in a station.
button to select the desired
button for 1 second
MANU" is lit in the display,
[ ]
[ ]
or
button to manually tune
Seek tuning
1. Press
2. If the "MANU" is lit in the display, press and
3. Press the
the [BND]
band FM1, FM2, FM3 or AM.
hold the [BND] button for 1 second or longer.
When the "MANU"
ing is now available.
seek in a station.
button to select the desired
display is off, the seek tun-
[ ]
[ ]
or
button to automatically
Preset memory function
Preset memory f unction can store up to 24 s t ations: six stations for each of FM1, FM2, FM3 and
AM.
DB255
12
Manual memory function
1. Press the [BND] button, to select a band you
want to store in the memory.
[ ]
2. Press the
desired station.
3. Press and hold one of the [DIRECT] button for
2 seconds or longer to store the current station into preset memory.
Auto store function
]
(
Automatic Station Store
1. Press [BND]
FM1, FM2, FM3 or AM.
2. Press and hold the [ ] button for 1 second
or longer. The stations at which the reception
is the strongest will be automatically stored in
the memory.
Notes:
• When the auto store is performed, the station pre-
viously store in the memory at that position is overwritten.
• When the number of stations stored is less than
six, the previous content of the memory for each
direct button will be retained.
[ ]
or
button to tune into a
)
button to select the desired band
Preset scanning
(
Preset Station Scan
When the
be indicated with preset memory numbers and the
stations are tuned in for 7 seconds each in the
order in which they were stored. Press the
button again to cancel the preset scanning mode.
[ ]
button is pressed, the "SCN" will
Instant station recall (
With this function, a specific radio station can be
recalled from any mode.
ISR memory
1. Press the [SRC] button, then select the radio
mode.
2. Select the radio station which you want to store
in the memory.
3. Press and hold the [ISR] button for 2 seconds
or longer.
Recalling ISR
Press the [ISR] button and the display will show
"ISR". Then the radio station previously memorized will be selected. Press the [ISR] button again
to disengage the unit from the Recalling ISR function.
)
ISR
)
[ ]
Page 11

CD Mode Operations
Loading a CD
1. Press the [OPEN] button to access the CD
SLOT behind the FLIP DOWN PANEL.
2. Insert a CD into the center of the CD SLOT
with the label side facing up. The CD plays
automatically after loading.
Notes:
• Never insert foreign objects into the CD SLOT.
• If the CD is not inserted easily, there maybe an-
other CD in the mechanism or the unit may require
service.
• Discs not bearing the mark and CD-ROMs
cannot be played by this unit.
• Some CDs recorded in CD-R/CD-RW mode may
not be usable.
Loading 8cm compact discs:
• No adapter is required to play an 8cm CD.
• Insert the 8cm CD into the centre of the insertion slot.
3. Close the FLIP DOWN PANEL.
CAUTION
!
Be careful not to catch your hand or fingers
while closing the FLIP DOWN PANEL.
Notes:
• If the FLIP DOWN PANEL does not open fully, gen-
tly open with your hand.
• After loading a CD, always close the FLIP DOWN
PANEL.
Listening to the disc already inserted
Press the [SRC] button to select the CD mode,
the CD will start playing.
Stopping (Pausing) playback
While the CD playing pressing the
will stop the CD and “PAUSE” indicate.
Press the
back.
[ ]
button again to resume play-
Ejecting a CD
1. Press the [OPEN] button to open the FLIP
DOWN PANEL.
2. Press the
the ejected position.
3. Close the FLIP DOWN PANEL.
∗ If a CD (12cm) is left in the ejected position for
∗ 8cm CDs are not auto reloaded. Be sure to re-
Notes:
• If you force a CD into before auto reloading, this
can damage the CD.
[ ]
to eject the CD. Take it out from
15 seconds, the CD is automatically reloaded
(
Auto reload).
move them when ejected.
[ ]
button
Top function
Press the [BND] button, then the CD will start playing from the first song (track number 1).
Selecting tracks (Songs)
[ ]
Press the
: Playback will start from the next track.
: Playback will start from the beginning of
the track currently playing. When this button is pressed again, the CD will play from
the previous track.
or
[ ]
button.
Fast-forward and fast-backward
[ ]
Press and hold the
: To fast-forward
: To fast-backward
∗ For Audio CD mode pressing the
button for 1 second or longer will move forward
or backward 5 times faster than normal play, and
pressing it for 3 seconds or longer will do the operation 30 times faster.
Scan play (
At Audio CD press the [SCN] button, the “SCN” is
lit, then the CD will play the first 10 seconds of
each track of the whole disc. Press the [SCN
button again to disengage the unit from scan play.
∗ A scan play will start from the track following the
one currently playing.
Intro Music Scan
or
[ ]
button.
[ ]
)
or
[ ]
Repeat play
At Audio CD press the [RPT] button, the “RPT” is
lit, then the track currently playing will be played
repeatedly. Press the [RPT] button again to disengage the unit from repeat play.
Random play
At Audio CD press the [RDM] button, the “RDM”
is lit, then the entire tracks on the disc will be
played at random. Press the [RDM] button again
to disengage the unit from random play.
English
]
DB255
13
Page 12

English
8.TROUBLESHOOTING
Problem Cause Solution
Power does not turn on.
(
No sound is produced
Compact disc cannot be
loaded.
Sound skips or is noisy.
Sound is bad directly after
power is turned on.
Nothing happens when
button are pressed.
Display is not accurate.
Fuse is blown.
)
Incorrect wiring.
Another compact disc is
already loaded.
Compact disc is dirty.
Compact disc is heavily
scratched or warped.
Water droplets may form on
the internal lens when the car
is parked in a humid place.
The microprocessor has
malfunctioned due to noise,
etc.
DCP or main unit connectors
are dirty.
Replace with a fuse of the same amperage. If
the fuse blows again, consult your store of
purchase.
Consult your store of purchase.
Eject the compact disc before loading the new
one.
Clean the compact disc with a soft cloth.
Replace with a compact disc with no scratches.
Let dry for about 1 hour with the power on.
Turn off the power, then press the [OPEN
button and remove the DCP.
Wipe the dirt off with a soft cloth moistened with
cleaning alcohol.
]
9.ERROR DISPLAYS
To protect the system, this unit has been equipped with self diagnostic functions. If a fault
arises, a warning is issued by various error displays. Follow the corrective measures and
remove the fault.
Error Display Corrective Measure
ERROR 2
ERROR 3
ERROR 6
DB255
14
This error display indicates that a fault has arisen in the
mechanism of the source unit (for example, the disc cannot be
ejected).
ÆÆ
Æ Check the source unit.
ÆÆ
This error display indicates that the pickup focus is off because
of a scratched disc or some other factor during source unit play.
ÆÆ
Æ Check the compact disc.
ÆÆ
This indicates that the CD’s TOC (table of contents) cannot be
read, for example because the selected disc is upside-down.
Page 13

10.SPECIFICATIONS
English
FM tuner
Frequency Range: 87.9 MHz to 107.9 MHz
Usable Sensitivity: 11 dBf
50 dB Quieting Sensitivity: 17 dBf
Alternate Channel Selectivity: 75 dB
Stereo Separation (1 kHz): 35 dB
Frequency Response (±3 dB): 30 Hz to 15 kHz
AM tuner
Frequency Range:
AM 530 kHz to 1710 kHz
Usable Sensitivity: 25 µV
CD player
System: Compact disc audio system
Usable Discs: Compact disc
Frequency Response: 10 Hz to 20 kHz (±1 dB
Signal-to-Noise Ratio: 100 dB (1 kHz) IHF-A
Dynamic Range: 95 dB (1 kHz
Harmonic Distortion: 0.01%
)
Audio
Maximum Power Output: 204 W (51 W X 4 ch
Continuous Average Power Output:
17 W X 4, into 4 Ω, 20 Hz to 20 kHz, 1%THD
Bass Control Action (100 Hz): ±14 dB
Treble Control Action (10 kHz): ±14 dB
Line Output (with A/C 1 kHz, 10 kΩ): 1.8 V
General
Power Supply Voltage:
14.4 V DC (10.8 V to 15.6 V allowable), negative ground
Current Consumption: Less than 15 A
Speaker Impedance: 4 Ω (4 Ω to 8 Ω allowable
Weight: 2.42 lb. (1.1 kg
Dimensions:
178 mm Width X 50 mm Height X 152 mm
Depth
152 mm
)
Notes:
• Specifications comply with JEITA Standards.
• Specifications and design are subject to change
without notice for further improvement.
• Please make sure when connecting external power
)
amplifier, that you properly, to the car chassis,
ground the amplifier.
• If this is not done, severe damage to the source
unit may happen.
)
)
50 mm178 mm
58 mm188 mm
DB255
15
Page 14

Clarion Co., Ltd.
All Rights Reserved. Copyright © 2004: Clarion Co., Ltd.
Printed in Malaysia / Imprimé en Malaisie / Impreso en Malasia
PE-2739B
280-8151-00
 Loading...