

Page 1

Contents
1. CONTROLS .................................................................................................................................... 2
2. PRECAUTIONS .............................................................................................................................. 3
Handling Compact Discs ................................................................................................................. 3
LCD Screen ..................................................................................................................................... 3
3. DCP ................................................................................................................................................. 4
4. NOMENCLATURE .......................................................................................................................... 5
Names of the Buttons and their Functions ...................................................................................... 5
5. OPERATIONS ................................................................................................................................. 6
Basic Operations ............................................................................................................................. 6
Radio Operations ............................................................................................................................. 7
RDS Operations .............................................................................................................................. 7
CD Operations ................................................................................................................................. 9
6. SPECIFICATIONS ......................................................................................................................... 10
7. IN CASE OF DIFFICULTY ............................................................................................................ 10
8. ERROR DISPLAYS ........................................................................................................................11
2. PRECAUTIONS
English
1. This unit is applicable for on-road 4 wheel
vehicle purpose only. Use for tractor, fork
truck, bulldozer, off road vehicle, 2 or 3
wheel motor bicycle, marine boat or other
special purpose vehicle is not appropriate.
2. When the inside of the car is very cold and
the player is used soon after switching on the
heater moisture may form on the disc or the
optical parts of the player and proper
playback may not be possible. If moisture
forms on the disc, wipe it off with a soft cloth.
If moisture forms on the optical parts of the
player, do not use the player for about one
hour. The condensation will disappear
naturally allowing normal operation.
3. Driving on extremely bumpy roads which
cause severe vibration may cause the sound
to skip.
INFORMATION FOR USERS:.
CHANGES OR MODIFICATIONS TO THIS
PRODUCT NOT APPROVED BY THE
MANUFACTURER WILL VOID THE
WARRANTY.
Handling Compact Discs
Use only compact discs bearing the
mark.
Do not play heart-shaped, octagonal, or other
specially shaped compact discs.
Handling
• Compared to ordinary music CDs, CD-R and
CD-RW discs are both easily affected by high
temperature and humidity and some of CD-R
and CD-RW discs may not be played.
Therefore, do not leave them for a long time in
the car.
• Never stick labels on the surface of the
compact disc or mark the surface with a pencil
or pen.
LCD Screen
In extreme cold, the screen movement may
slow down and the screen may darken, but this
is normal. The screen will recover when it
returns to normal temperature.
DB158R/BD159R 3
280-8131-00
Page 2
English
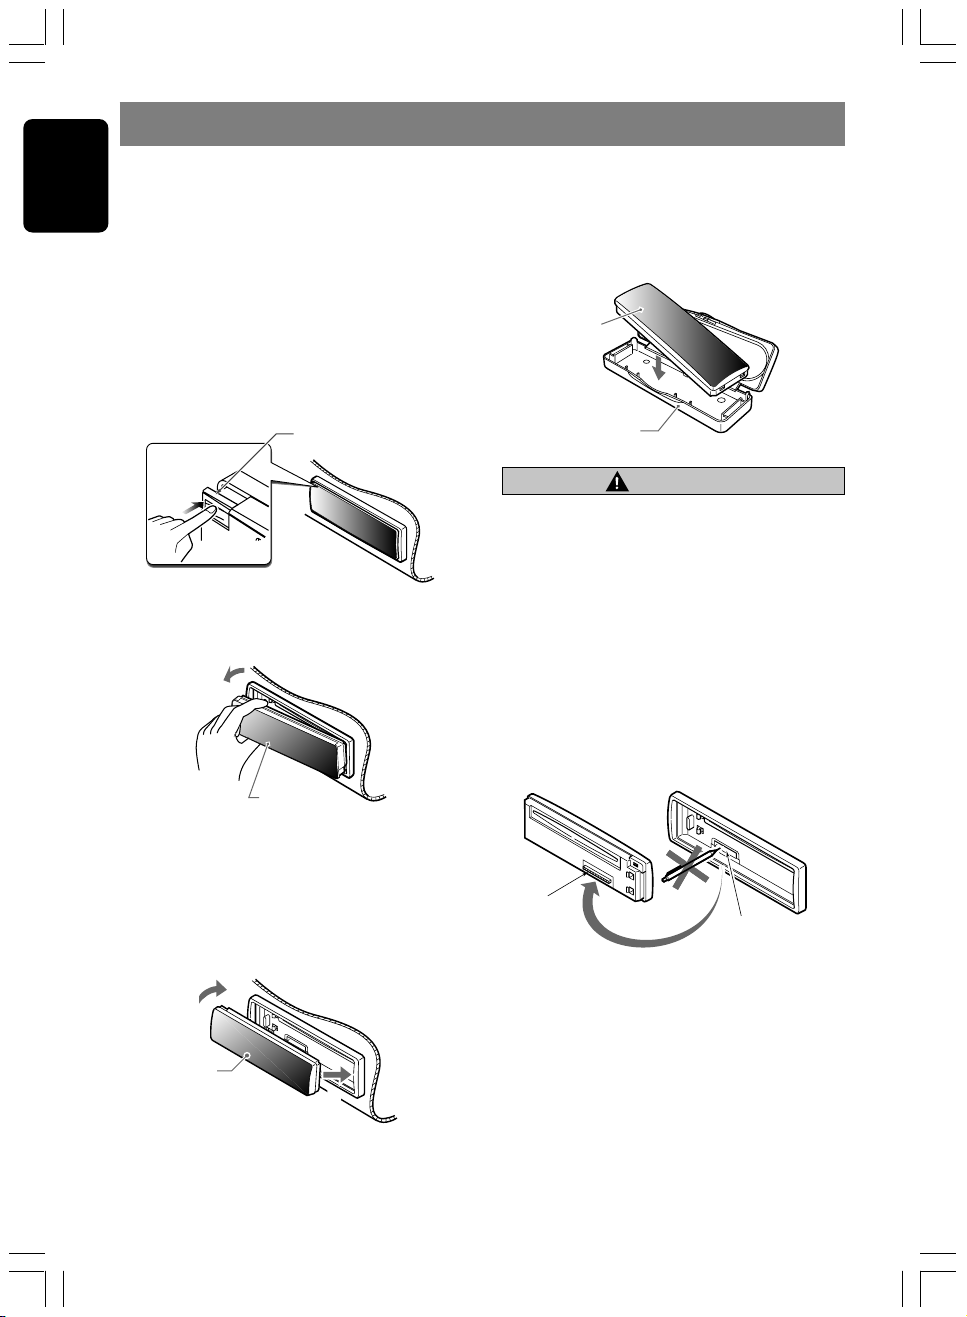
3. DCP
The control panel can be detached to prevent
theft. When detaching the control panel, store it
in the DCP (DETACHABLE CONTROL PANEL)
case to prevent scratches.
We recommend taking the DCP with you when
leaving the car.
Removing the DCP
1. Press the [SRC] button for 1 second or
longer to switch off the power.
2. Press in the [RELEASE] button.
[RELEASE] button
∗ The DCP is unlocked
3. Remove the DCP.
Storing the DCP in the DCP Case
Hold the DCP, in the orientation as shown in the
figure below, and put it into the supplied DCP
case. (Ensure the DCP is in the correct
orientation.)
DCP
DCP case
CAUTION
• The DCP can easily be damaged by
shocks. After removing it, be careful not to
drop it or subject it to strong shocks.
• When the Release button is pressed and
the DCP is unlocked, the car’s vibrations
may cause it to fall. To prevent damage to
the DCP, always store it in its case after
detaching it. (See figure below.)
• The connector connecting the main unit
and the DCP is an extremely important
part. Be careful not to damage it by
pressing on it with fingernails, pens,
screwdrivers, etc.
DCP
Attaching the DCP
1. Insert the right side of the DCP into the main
unit.
2. Insert the left side of the DCP into the main
unit.
2.
DCP
1.
4 DB158R/BD159R
DCP Rear Panel Main Unit Front
DCP
connector
Note:
• If the DCP is dirty, wipe off the dirt with a soft, dry
cloth only.
Main unit connector
280-8131-00
Page 3

4. NOMENCLATURE
Note:
• Be sure to read this chapter referring to the front diagrams of chapter “1. CONTROLS” on page 2.
Names of the Buttons and their Functions
English
[RELEASE] button
• Press the [RELEASE] button to unlock the
DCP.
[ROTARY] knob
• Adjust the volume by turning the knob
clockwise or counterclockwise.
• Use the knob to perform various settings.
[CD SLOT]
• CD insertion slot.
[PTY] button
• Use the button to set the PTY (Programme
Type) standby mode or PTY items.
[Q] button
• Ejects a CD when it is loaded into the unit.
[DIRECT] button
• Stores a station into memory or recall it
directly while in the radio mode.
[RPT] button
• Plays repeatedly while in the CD mode.
[RDM] button
• Performs random play while in the CD mode.
[SCN] button
• Performs scan play for 10 seconds for each
track while in the CD mode.
[SS] button
• Press the [SS] button while keeping the [BND]
button pressed, to turn the screen saver
function on or off.
[ ] button
• Plays or pauses a CD while in the CD mode.
[TA] button
• Use the button to set the TA (Traffic
Announcement) standby mode.
[AF] button
• Press the button to turn on or off the AF
(Alternative Frequency) function.
• When the button is pressed and held,
Regional function can select ON or OFF.
[BND] button
• Switches the band, or seek tuning or manual
tuning while in the radio mode.
• Plays a first track while in the CD mode.
[SRC] button
• Press the button to turn on the power.
Press and hold the button for 1 second or
longer to turn off the power.
• Switches the operation mode among the radio
mode, etc.
[A-M] button
• Press and hold the button for 1 second or
longer to switch the MAGNA BASS EXTEND
on/off.
• Use the button to switch to the audio mode
(bass/treble, balance/fader).
[Z] button
• Use the button to select one of the three types
of sound characteristics already stored in
memory. (Z-Enhancer)
[a], [d] button
• Selects a station while in the radio mode or
selects a track when listening to a CD.
• Press and hold the button for 1 second or
longer to switches the fast-forward/fastbackward.
[P/A] button
• Performs preset scan while in the radio mode.
When the button is pressed and held, auto
store is performed.
[DISP] button
• Press the [DISP] button while keeping the
[BND] button pressed, to switch the display
indication (Main display, clock display).
DB158R/BD159R 5
280-8131-00
Page 4
English
5. OPERATIONS
Basic Operations
CAUTION
Be sure to lower the volume before switching
off the unit power or the ignition key. The unit
remembers its last volume setting.
Turning on/off the power
1. Press the [SRC] button to turn on the power.
2. Press and hold the [SRC] button for 1 second
or longer to turn off the power for the unit.
Selecting a mode
1. Press the [SRC] button to change the
operation mode.
Radio mode ➜ CD mode ➜ Radio mode...
Adjusting the volume
1. Turning the [ROTARY] knob clockwise
increases the volume; turning it
counterclockwise decreases the volume.
∗ The volume level is from 0 (minimum) to
33 (maximum).
Audio Mode Adjustments
1. Press the [A-M] button to select the
adjustment mode. The mode switches as
follows each time the [A-M] button is pressed:
BASS ➜ TREB ➜ BAL ➜ FAD ➜ Previous
mode
∗ When the Z-Enhancer function is turned
on, BASS (bass) and TRE (treble) cannot
be selected.
2. Turning the [ROTARY] knob to adjust the
selected audio mode.
• BASS (bass): Adjustment range; –7 to +7
• TREB (treble): Adjustment range; –7 to +7
•
BAL (balance): Adjustment range; L13 to R 13
• FA D (fader): Adjustment range; F12 to R12
3. When the adjustment is complete, press the
[A-M] button several times until the function
mode is reached.
∗ The display returns to the previous mode 7
seconds after the adjustment.
Switching display
1. Press and hold the [BND] button, and then
press the [DISP] button to select the desired
display.
The display switches in the following order:
Main display ➜ Clock (CT) display ➜ Main …
∗ If the display is changed by other button
operation when the clock (CT) is displayed,
the clock display returns automatically after
the operation.
Setting the Z-Enhancer
This unit are provided with 3 types of sound
tone effects stored in memory. Select the one
you prefer.
1. Each time you press the [Z] button, the tone
effect changes in the following order:
“Z-ENHANCER 1” (bass emphasized) ➜
“Z-ENHANCER 2” (treble emphasized) ➜
“Z-ENHANCER 3” (bass and treble
emphasized) ➜ “Z-EHCR OFF” (no sound
effect) ➜ “Z-ENHANCER 1”...
Turning on/off MAGNA BASS
EXTEND
1. Press and hold the [A-M] button for 1 second
or longer to turn the MAGNA BASS EXTEND
and “M-B EX” in the display lights on or off.
CT (Clock Time) function
1. Press and hold the [BND] button, and then
press the [DISP] button, the display switches
to CT (Clock Time) from RDS data.
Triggered audio mute for cellular
telephones
This unit requires special wiring to mute the
audio signal automatically when a cellular
telephone rings in the car.
1. Press and hold the [BND] button, and then
press the [ ] to select the “TEL MUTE” or
“TEL OFF”.
TEL MUTE : mutes the audio sound.
TEL OFF : does not mute the audio sound.
Illumination dimmer function
When the illumination line of this unit is connected
with the car-side illumination signal line, the
display illumination of this unit dims in connection
with turning on the car-side illumination.
Turning the screen saver function
on or off
1. Press the [SS] button while keeping the
[BND] button pressed, to turn the screen
saver function on or off.
6 DB158R/BD159R
280-8131-00
Page 5

Radio Operations
Listening to the radio
1. Press the [SRC] button and select the radio mode.
The frequency or PS appears in the display.
∗ PS: Programme service name
2. Press the [BND] button and select the radio
band. Each time the button is pressed, the radio
reception band changes in the following order:
F1 (FM1) ➜ F2 (FM2) ➜ F3 (FM3) ➜
AM (MW/LW) ➜ F1 (FM1)...
3. Press the [a] or [d] button to tune in the
desired station.
∗ There are 3 types of tuning mode available,
seek tuning, manual tuning and preset tuning.
Seek tuning
There are 2 types of seek tuning: DX SEEK and
LOCAL SEEK.
● DX SEEK “DX”
Press the [a] or [d] button to automatically
seek a station.
● LOCAL SEEK “LO”
If you press and hold the [a] or [d] button for
1 second or longer, local seek tuning is carried
out. Broadcast stations with good reception
sensitivity are selected.
Manual tuning
There are 2 ways available: Quick tuning and
step tuning.
1. Press the [BND] button and select the
desired band (FM or AM (MW/LW)).
∗ If “MANU” is not lit in the display, press
and hold the [BND] button for 1 second or
longer. “MANU” is lit in the display and
manual tuning is now available.
2. Tune into a station.
● Quick tuning:
Press and hold the [a] or [d] button for 1
second or longer to tune in a station.
● Step tuning:
Press the [a] or [d] button to manually tune
in a station.
Recalling a preset station
A total of 24 preset positions (6-FM1, 6-FM2, 6FM3, 6-AM) exists to store individual radio
stations in memory.
1. Press the [BND] button and select the
desired band (FM or AM (MW/LW)).
2. Press the corresponding [DIRECT] button to
recall the stored station.
∗ Press and hold one of the [DIRECT]
buttons for 2 seconds or longer to store
that station into preset memory.
English
Manual memory
1. Select the desired station with seek tuning,
manual tuning or preset tuning.
2. Press and hold one of the [DIRECT] buttons
for 2 seconds or longer to store the current
station into preset memory.
Auto store
1. Press the [BND] button and select the
desired band (FM or AM (MW/LW)).
2. Press and hold the [P/A] button for 2
seconds or longer. The stations with good
reception are stored automatically to the
preset channels.
∗ If auto store is performed in the FM bands,
the stations are stored in FM3 even if FM1
or FM2 was chosen for storing stations.
Preset scan
1. Press the [P/A] button.
2. When a desired station is tuned in, press the
[P/A] button again to continue receiving that
station.
Note:
• Be careful not to press and hold the [P/A] button
for 2 seconds or longer, otherwise the auto store
function is engaged and the unit starts storing
stations.
RDS Operations
RDS (Radio Data System)
This unit has a built-in RDS decoder system that
supports broadcast stations transmitting RDS
data.
When using the RDS function, always set the
radio to FM mode.
AF (Alternative Frequency) function
The AF function switches to a different
frequency on the same network in order to
maintain optimum reception.
∗ The factory default setting is “ON”.
● Switching ON/OFF the AF function
1. Press the [AF] button to turn on/off the AF
function.
∗ If the reception of the current broadcast
station deteriorates, “SEARCH” appears in
the display and the radio searches for the
same programme on another frequency.
DB158R/BD159R 7
280-8131-00
Page 6

RDS Operations
English
REG (Regional programme) function
When the REG function is ON, the optimum
regional station can be received. When this
function is OFF, if the regional station area
switches as you drive, a regional station for that
region is received.
Notes:
• This function is disabled when a national station
such as BBC R2 is being received.
• The REG function ON/OFF setting is valid when
the AF function is ON.
● Switching the REG function ON/OFF
1. Press and hold the [AF] button for 1 second
or longer to turn on/off the REG function.
Manually tuning a regional station
in the same network
1. This function is valid when the AF function is
ON and the REG function is OFF.
Note:
• This function can be used when a regional
broadcast of the same network is received.
2. Press any one of the [DIRECT] buttons to
call out the regional station.
3. If the reception condition of the called out
station is bad, press the [DIRECT] button of
the same number. The unit receives a local
station on the same network.
TA (Traffic Announcement) function
● Setting the TA standby mode
If you press the [TA] button when only “TP” is lit
in the display, “TP” and “TA” light in the display
and the unit is set into the TA standby mode
until a traffic announcement is broadcast. When
a traffic announcement broadcast starts, “TRA
INFO” appears in the display. If you press the
[TA] button while a traffic announcement
broadcast is being received, the traffic
announcement broadcast reception is cancelled
and the unit goes into the TA standby mode.
● Cancelling the TA standby mode
With “TP” and “TA” lit in the display, press the
[TA] button. The “TA” in the display goes off and
the TA standby mode is cancelled.
∗ If “TP” is not lit, pressing the [TA] button
searches for a TP station.
● Searching for a TP station
When “TP” is not lit, if you press the [TA] button,
“TA” in the display lights and the unit
automatically receives a TP station.
Auto store function for TP stations
With “TA” lit in the display, press and hold the
[P/A] button for 2 seconds or longer. The TP
stations with the good reception sensitivity are
stored into preset memory.
∗ Even if you select F1 (FM1) or F2 (FM2), a TP
station is stored into memory for F3 (FM3).
PTY (Programme Type) function
This function enables you to listen to a
broadcast of the selected programme type when
it starts even if the unit is on a function mode
other than radio.
∗ Some countries do not yet have PTY
broadcast.
● Setting the PTY standby mode
When you press the [PTY] button, the PTY
standby mode is turned on. The PTY item name
appears in the display.
● Cancelling the PTY standby mode
When you press and hold the [PTY] button for 1
second or longer, the PTY standby mode is
cancelled.
● Cancelling a PTY interrupt broadcast
Press the [PTY] button during the PTY interrupt
broadcast, the PTY interrupt is cancelled and
the unit returns to PTY standby mode.
Selecting PTY
1. When you press the [PTY] button, the unit
goes into PTY select mode.
2. Press any one of the [DIRECT] buttons.
Alternatively, turn the [ROTARY] knob
clockwise or counterclockwise to select the
desired PTY.
3. The PTY select mode is cancelled
automatically 7 seconds after a PTY is
selected.
PTY seek
1. When you press the [PTY] button, the PTY
select mode is turned on.
2. Select PTY.
3. Press the [a] or [d] button. If you press
the [d] button, the unit seeks a PTY
broadcast moving up the frequencies; if you
press the [a] button, it seeks moving down
the frequencies.
∗ If no station with the selected PTY
broadcast can be received, the unit returns
to the PTY select mode.
8 DB158R/BD159R
280-8131-00
Page 7

RDS Operations
PTY preset memory
1. When you press the [PTY] button, the PTY
select mode is turned on.
2. Turn the [ROTARY] knob clockwise or
counterclockwise to select the desired PTY.
The 29 types of PTY below can be selected.
NEWS, AFFAIRS (Today’s events), INFO
(Information), SPORT, EDUCATE
(Education), DRAMA, CULTURE,
SCIENCE, VARIED (Variety), POP M (Pop
music), ROCK M (Rock music), EASY M
(Easy music), LIGHT M (Light music),
CLASSICS, OTHER M (Other music),
WEATHER, FINANCE, CHILDREN (For
children), SOCIAL, RELIGION, PHONE IN,
TRAVEL, LEISURE, JAZZ, COUNTRY,
NATION M (Nation music), OLDIES, FOLK M
(Folk music), DOCUMENT (Documentaries)
3. If you press and hold any one of the
[DIRECT] buttons for 2 seconds or longer,
the selected PTY is stored into that preset
channel memory.
Emergency broadcast
If an emergency broadcast is received, all the
function mode operations are stopped.
“ALARM” appears in the display and the
emergency broadcast can be heard.
● Cancelling an emergency broadcast
If you press the [AF] button, emergency
broadcast reception is cancelled.
Volume setting of TA, emergency
broadcast (ALARM) and PTY
1. During a TA, ALARM or PTY interrupt, turn
the [ROTARY] knob clockwise or
counterclockwise to set the volume to the
desired level (0 to 33).
CD Operations
Loading a CD
Insert a CD into the centre of the CD SLOT with
the labeled side facing up. “LOADING” appears
in the display, the CD enters into the slot, and the
play starts.
Notes:
• Do not put your hand, fingers, or foreign objects
into the CD SLOT.
• If a CD has already been loaded, another CD
cannot be inserted. Do not insert another one
forcefully.
• Discs not bearing the mark cannot be
played with the unit. CD-ROMs cannot be played.
CD Operations
Listening to a CD already inserted
Press the [SRC] button to select the CD mode.
Play starts automatically.
Pausing play
1. Press the [ ] button to pause play.
2. To resume CD play, press the [ ] button
again.
Ejecting a CD
1. Press the [Q] to eject the CD. Take it out
from the ejected position.
Note:
• If a CD is left in the ejected position for 15 seconds,
the CD is automatically reloaded (Auto reload).
Track-up / track-down
1. Press the [a] or [d] button to select the
desired track.
Fast-forward/fast-backward
1. Press and hold the [a] or [d] button for 1
second or longer to quickly more fastward or
backward through the disc.
Top function
1. Press the [BND] button to play the first track
(track No. 1) on the disc.
Scan play
The scan play locates and plays the first 10
seconds of each track on a disc automatically.
1. Press the [SCN] button to start scan play.
“SCN” lights in the display.
2. To cancel the scan play, press the [SCN]
button again. “SCN” goes off from the display
and the current track continues to play.
Repeat play
The repeat play continuously plays the current
track.
1. Press the [RPT] button. “RPT” lights in the
display and the current track is repeated.
2. To cancel the repeat play, press the [RPT]
button again. “RPT” goes off from the display
and normal play resumes.
Random play
The random play selects and plays individual
tracks on a disc in no particular order.
1. Press the [RDM] button. “RDM” lights in the
display, an individual track is selected
randomly and play begins.
2. To cancel the random play, press the [RDM]
button again. “RDM” goes off and normal
play resumes.
DB158R/BD159R 9
English
280-8131-00
Page 8

English
6. SPECIFICATIONS
Radio section
Tuning System: PLL synthesizer tuner
Receiving Frequencies:
FM : 87.5 to 108 MHz (0.05 MHz steps)
MW : 531 to 1602 kHz (9 kHz steps)
LW : 153 to 279 kHz (3 kHz steps)
CD player section
System: Compact disc digital audio system
Frequency Response: 10 Hz to 20 kHz (± 1 dB)
Signal to Noise Ratio: 100 dB (1 kHz) IHF-A
Dynamic Range: 93 dB (1 kHz)
Distortion: 0.03%
Note:
• Specifications and design are subject to change without notice for further improvement.
General
Output Power: 4 ✕ 25 W (DIN 45324, +B=14.4V)
Power Supply Voltage:
14.4 V DC (10.8 to 15.6 V allowable),
negative ground
Power Consumption: Less than 15 A
Speaker Impedance: 4 Ω (4 to 8 Ω allowable)
Auto Antenna Rated Current: 500 mA or less
Weight:
Main unit: 1.2 kg
Dimensions:
Main unit : 178 (W) ✕ 50 (H) ✕ 155 (D) mm
7. IN CASE OF DIFFICULTY
Problem Cause Solution
Power does not turn on.
(No sound is produced.)
Compact disc cannot be
loaded.
Sound skips or is noisy.
Sound is bad directly after
power is turned on.
Nothing happens when
buttons are pressed.
Display is not accurate.
Fuse is blown.
Incorrect wiring.
Another compact disc is
already loaded.
Compact disc is dirty.
Compact disc is heaviiy
scratched or warped.
Water droplets may form on
the internal lens when the car
is parked in a humid place.
Microprocessor has
malfunctioned due to noise,
etc.
Replace with a fuse of the same amperage. If
the fuse blows again, consult your store of
purchase.
Consult your store of purchase.
Eject the compact disc before loading the new
one.
Clean the compact disc with a soft cloth.
Replace with a compact disc with no scratches.
Let dry for about 1 hour with the power on.
Turn off the power, then press the Release
button and remove the DCP.
Press the reset button for about 2 seconds with
a thin rod.
10 DB158R/BD159R
DCP or main unit connectors
are dirty.
Reset button
Wipe the dirt off with a soft cloth moistened with
cleaning alcohol.
280-8131-00
Page 9

8. ERROR DISPLAYS
If an error occurs, one of the following displays is displayed.
Take the measures described below to eliminate the problem.
English
Measure
ERROR 2
ERROR 3
CauseError Display
A CD is caught inside the CD deck and is
not ejected.
A CD cannot be played due to scratches,
etc.
This is a failure of CD deck’s mechanism and
consult your store of purchase.
Replace with a non-scratched,
non-warped-disc.
If an error display other than the ones described above appears, press the reset button. If the problem
persists, turn off the power and consult your store of purchase.
DB158R/BD159R 11
280-8131-00
 Loading...